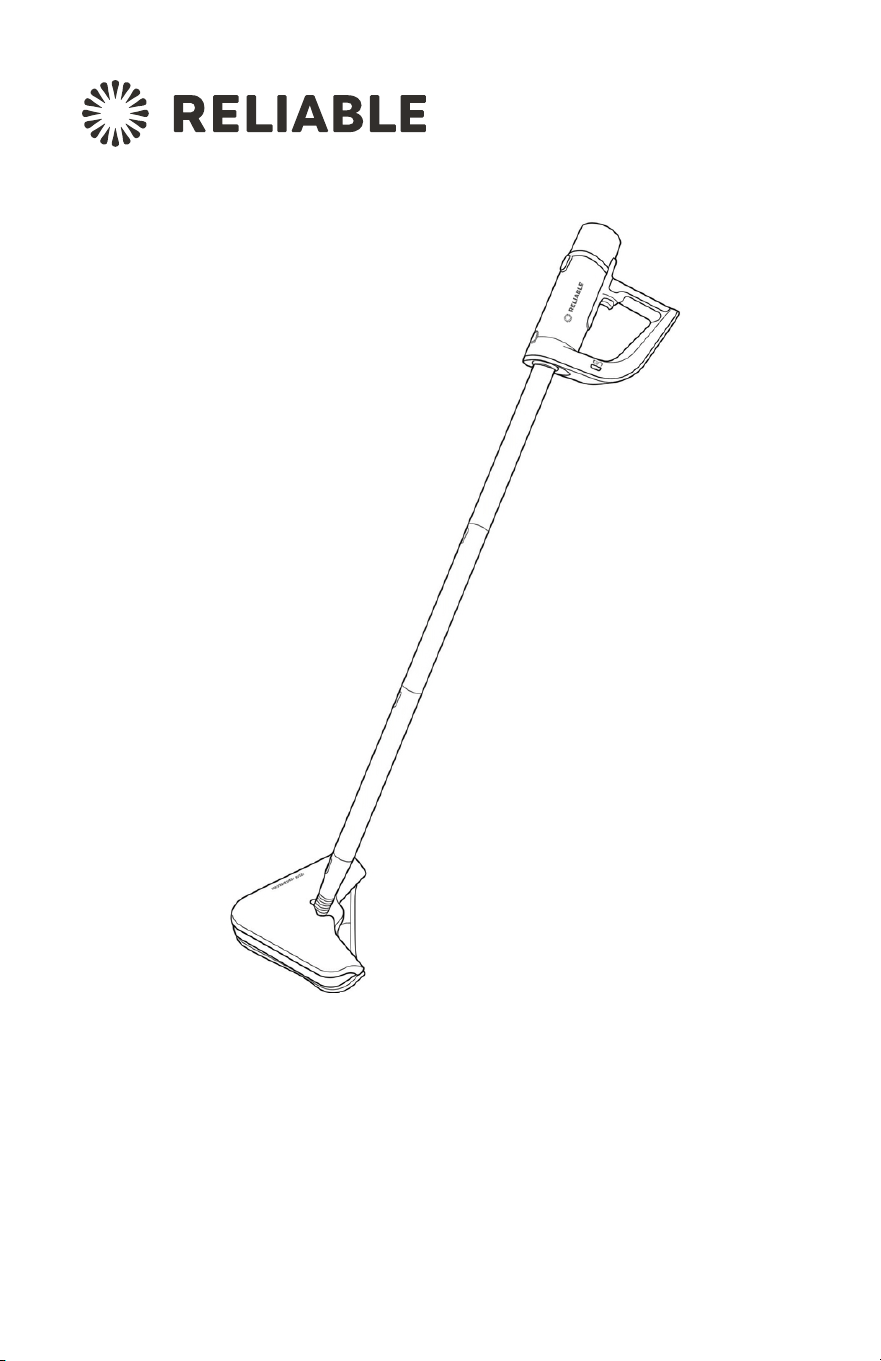
Steamboy Plus 350CS
2-in-1 Steam Cleaner and
Steam Mop

2
Steamboy Plus 350CS
2-in-1 Steam Cleaner and Steam Mop
Instruction Manual
English
Do Not Return To Store
Contact Us First
For immediate help with your purchase, please give us a
call so that we can resolve your issue.
We can be reached toll-free at 1-800-268-1649 or
email support@reliablecorporation.com
STOP

3
Reliable. Getting it Right. For You.
At Reliable, we do what we love, and we take pride in doing it right.
You want what’s best for the people, places and things that matter
in your life—from where you live to what you wear. So do we. That’s
why we approach every product with a laser-focus on you. In our
commitment to quality, functionality, design and customer service,
we are continuously innovating to find solutions to better fit your
needs. Everything we make looks and feels just right, because it is.
We get it right. For you.
For your safety and to fully enjoy the advantages of this product,
please take a few minutes to read all the important safeguards and
care instructions. Keep this manual handy and review the product
warranty for your reference.
Thank you for your purchase. Please share your Reliable product
experience by posting an online review on the website from which
you purchased. We greatly appreciate it.

4
Thank you for choosing our steam cleaning system.
To make sure you get the most out of your Steamboy Plus 350CS, we’ve got a range of
helpful resources ready for you.
Access support resources by visiting:
https://reliablecorporation.com/pages/steamboy-support-centre
Or simply scan the QR code to access:
• Frequently Asked Questions to quickly resolve common issues
• Troubleshooting tips to help you diagnose and fix problems
• Instructional videos that walk you through setup, operation, and maintenance
We’re committed to ensuring your experience is smooth and hassle-free. If you need
additional assistance, our customer support team is ready to help.
Thank you for choosing Reliable.
- The Reliable Team

5
Important Safety Instructions
Read all instructions before using the Steamboy Plus 350CS.
Warning: Danger of scalding
When using an electric appliance, basic precautions should always be followed. To
reduce the risk of fire, electric shock, or injury, follow these instructions:
• This product is designed for domestic use only.
• Do not use outdoors.
• Do not leave the Steamboy Plus 350CS unattended while it is turned on. Unplug
the electrical cord when not in use and before servicing.
• Do not allow the unit to be used as a toy. Close attention is necessary when it is
used near children, pets, or plants.
• The Steamboy Plus 350CS is not intended for use by young children or infirm
persons without supervision.
• Young children should be supervised to ensure that they do not play with the
Steamboy Plus 350CS.
• Never direct steam towards people, animals or plants, or equipment containing
electrical components.
• Do not immerse the Steamboy Plus 350CS in water or other liquids.
• Do not use with damaged cord or plug. If the Steamboy Plus 350CS is not
working as it should, has been dropped, damaged, left outdoors, or immersed in
water, contact the distributor before continuing use. If the power supply cord is
damaged, it must be replaced by the manufacturer.
• Do not pull or carry the unit by the cord, use the cord as a handle, close a door
on the cord, or pull the cord around sharp edges. Keep the cord away from
heated surfaces.
• Do not use extension cords or outlets with inadequate current-carrying capacity.
• Unplug after use. Do not unplug by pulling on the cord. To unplug, grasp the plug,
not the cord.
• Do not handle plug or any part of the Steamboy Plus 350CS with wet hands or
operate the unit without shoes.
• Do not insert any objects into openings. Do not use the unit with any opening
blocked.
• Do not use the steam mop without the floor pad in place.
• Do not use on stairs.

6
SAVE THESE INSTRUCTIONS
!
• Store your Steamboy Plus 350CS indoors in a cool, dry area.
• Keep your work area well lit.
• Never put cleaning detergents into the Steamboy Plus 350CS. This will make the
operation unsafe and damage the unit.
• Use only as described in this manual. Use only the manufacturer’s recommended
accessories.
7
Steamboy Plus 350CS Key Features
1
2
3
4
5
6
7
8
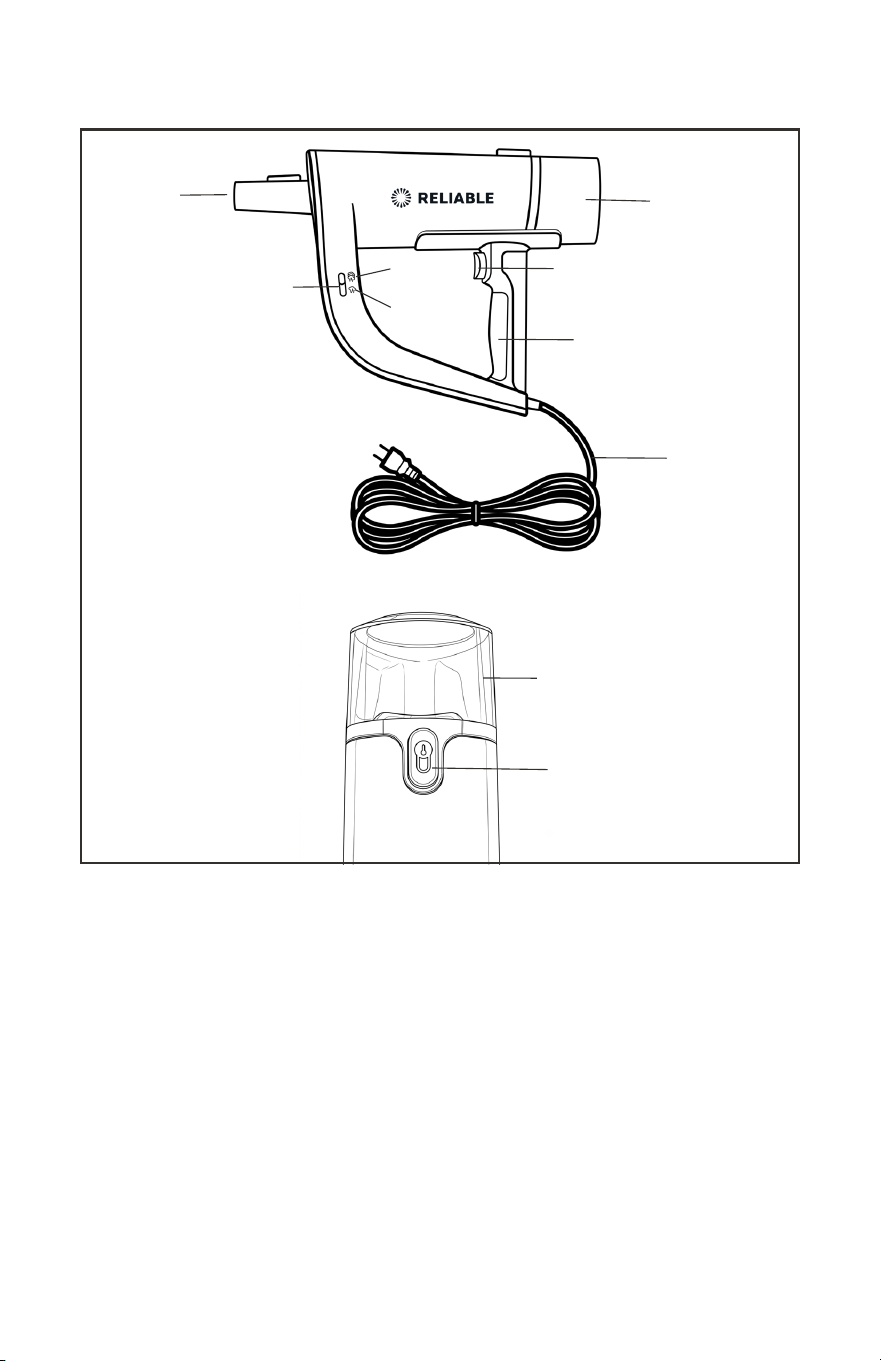
1. Water Tank
2. Steam Activation
3. Handle
4. 6M Cord
5. Steam Output Level Slider
6. Steam Level I (minimum steam output)
7. Steam Level II (maximum steam output)
8. Attachment Connector
9. Water Tank Release Button
9
1
8
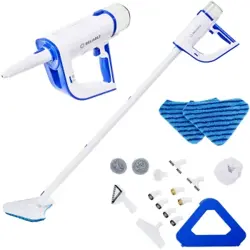
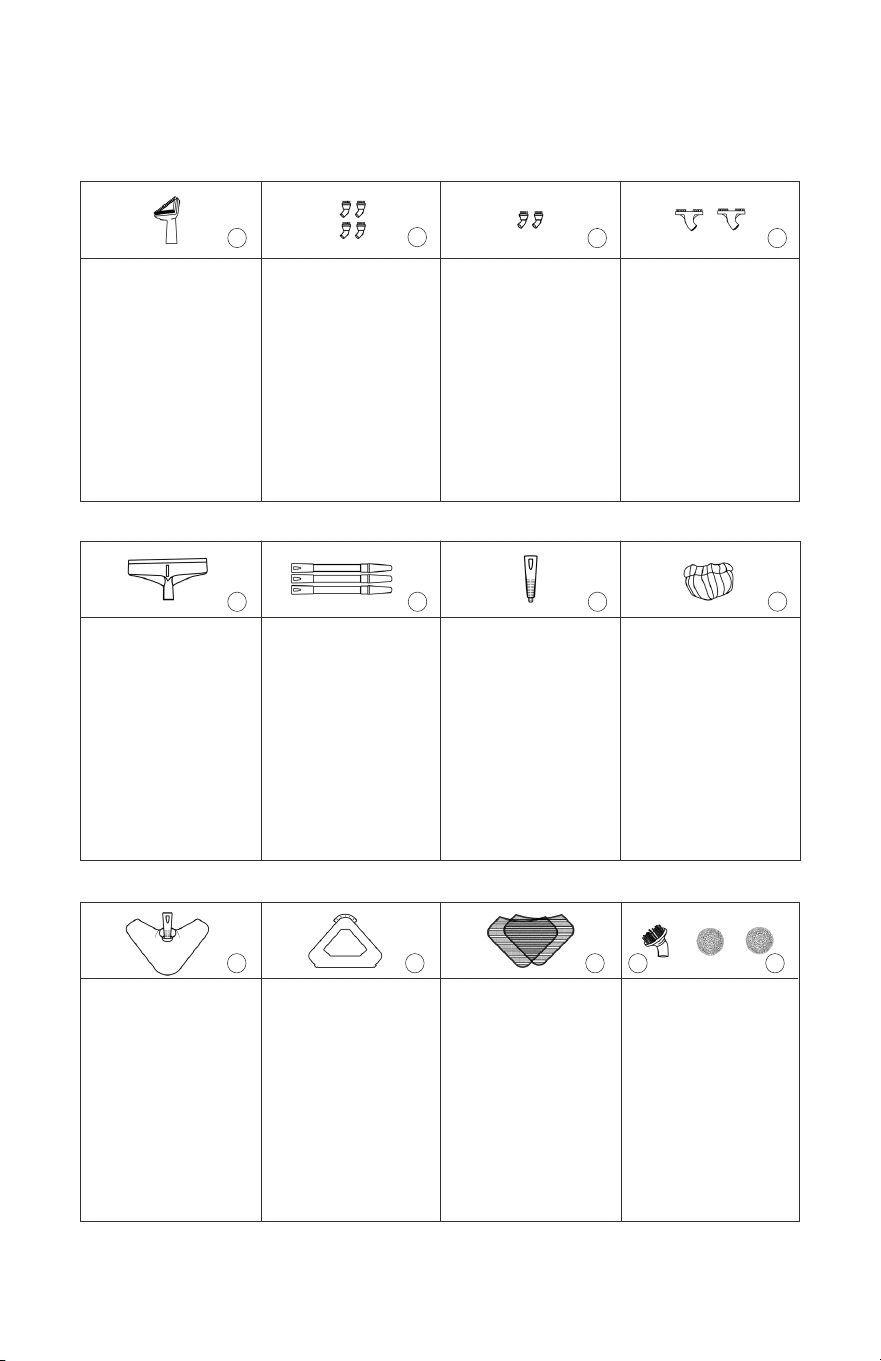
22-Piece Accessory Kit
Large Triangle Brush (A)
350CSATRIBRUSH
The large triangle brush
with durable nylon bristles
provide eective scrubbing
for larger surfaces and can
be paired with Microfiber
Bonnet (H) for enhanced
cleaning, especially on
upholstery.
Nylon Brush (B)
350CSA30N
The nylon brush is
designed for delicate
surfaces and helps
remove caked-on dirt
without causing damage.
Brass Brush (C)
350CSA30B
The brass brush helps
remove stubborn grime
from durable surfaces.
Test on a small,
inconspicuous area
before use.
Grout Tool (D)
350CSAGROUT
The grout tool targets
narrow gaps, grout lines,
and other areas where
dirt and grime tend to
build up.
Squeegee (E)
350CSASQUEGEE
The squeegee is ideal for
cleaning windows, mirrors,
and other smooth surfaces,
leaving them clear and
streak-free.
35 cm Extension Rod (F)
350CSAEXT
The extension rods convert
the steam cleaner into a
steam mop, allowing extra
reach for cleaning high or
hard-to-access areas and
reducing bending and
stretching.
Pressure Nozzle (G)
350CSANOZZLE
The pressure nozzle
delivers concentrated
steam to loosen stubborn
dirt, grease, and grime
in tight or heavily soiled
areas.
Microfiber Bonnet (H)
350CSABONNET
The microfiber bonnet is
designed to fit over the
Large Triangle Brush (A)
for removing dust, dirt,
and light grime from floors,
upholstery, and other
delicate surfaces.
Fabric Glide (J)
350CSAGLIDE
The fabric glide gently
refreshes carpets, curtains,
and upholstery while helping
release wrinkles and odours.
Floor Pad (K)
350CSAPAD
The floor pad absorbs
dirt and moisture during
hard floor cleaning when
paired with the Floor
Attachment (I).
Scrub Pad Adapter (L) &
Spiral Scrub Pad (M)
350CSASSSCRUBTOOL
350CSASSSCRUBBER
The scrub pad adapter
and spiral scrub pad add
extra scrubbing power
to tackle stubborn dirt,
grease, and residue on
durable surfaces.
x1
x4
x2 x2
x1 x3 x1
x1 x2 x1 x2
x1
Floor Attachment (I)
350CSAMOPHEAD
The floor attachment
evenly distributes steam
to clean and refresh
sealed hard floors across
larger surfaces.
x1
9
Important: This appliance must be grounded. Use only the proper type
outlet when plugging in the appliance, do not attempt to override the
ground wire feature.
!
Filling the Water Tank
Before you begin cleaning:
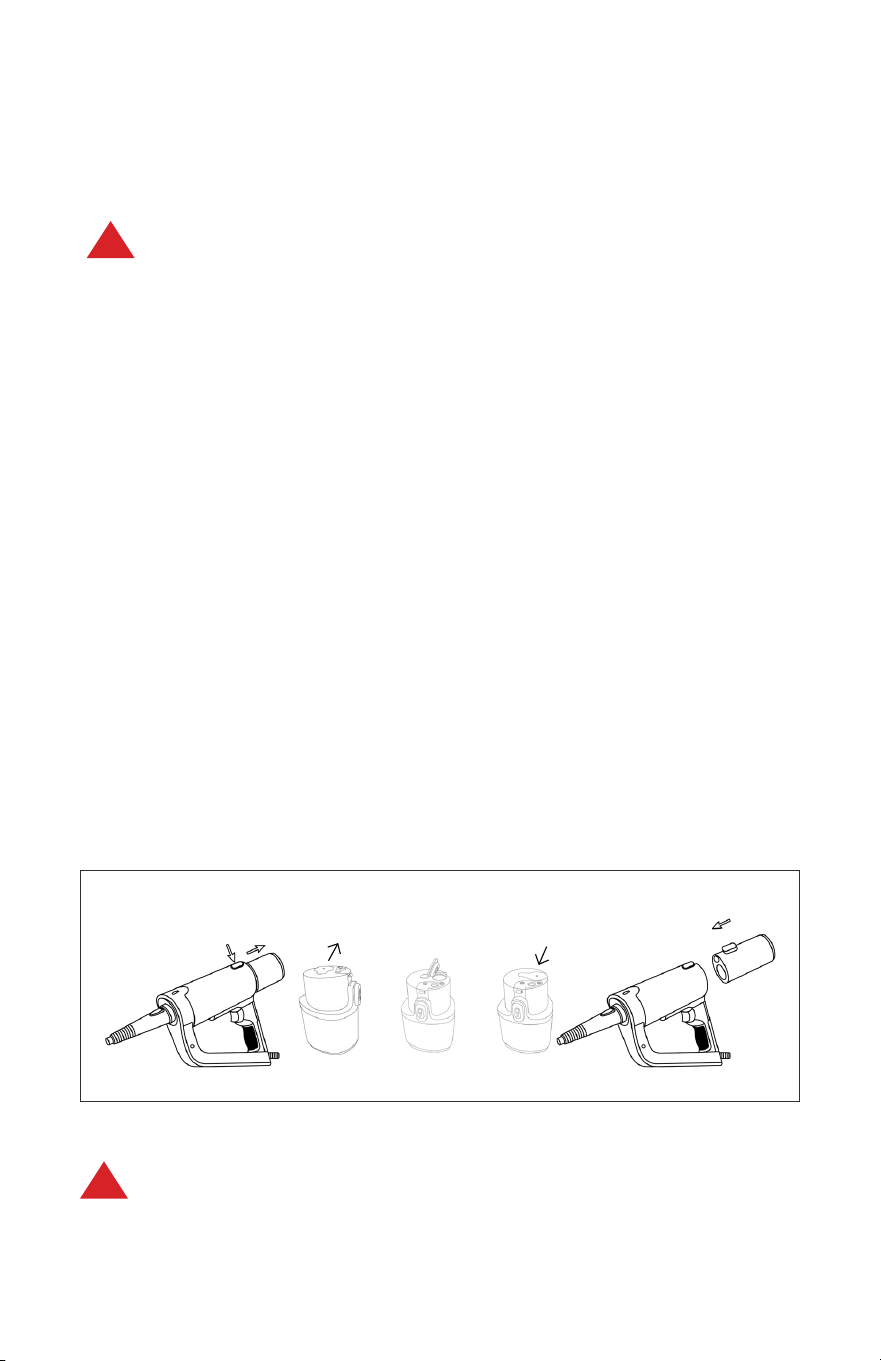
1. Remove the Water Tank (1) from the main body of the steam cleaner.
2. Press the Water Tank Release (9) button and pull the tank backward (Fig. 1).
3. Lift and slide the water tank lid to access the filling opening (Fig. 2).
4. Fill the Water Tank (1) with water (Fig. 3). Do not exceed the maximum capacity
of 350 ml.
5. Close the water tank cover securely (Fig. 4).
6. Reinsert the water tank into the steam cleaner until it clicks into place (Fig. 5).
Important: Always unplug the cleaner when adding water or changing any accessory.
The following information is provided for service by a qualified electrician only:
Rated voltage: 120V, 60 HZ, 1200W
Fig. 1 Fig. 2 Fig. 3 Fig. 4 Fig. 5
To preserve the life of your boiler, we recommend distilled water. Tap water is
okay, but more cleaning is required. Refer to the “Tank Cleaning & Descaling
Instructions” section for more information.
!
10
Accessory Installation
Before you begin cleaning:
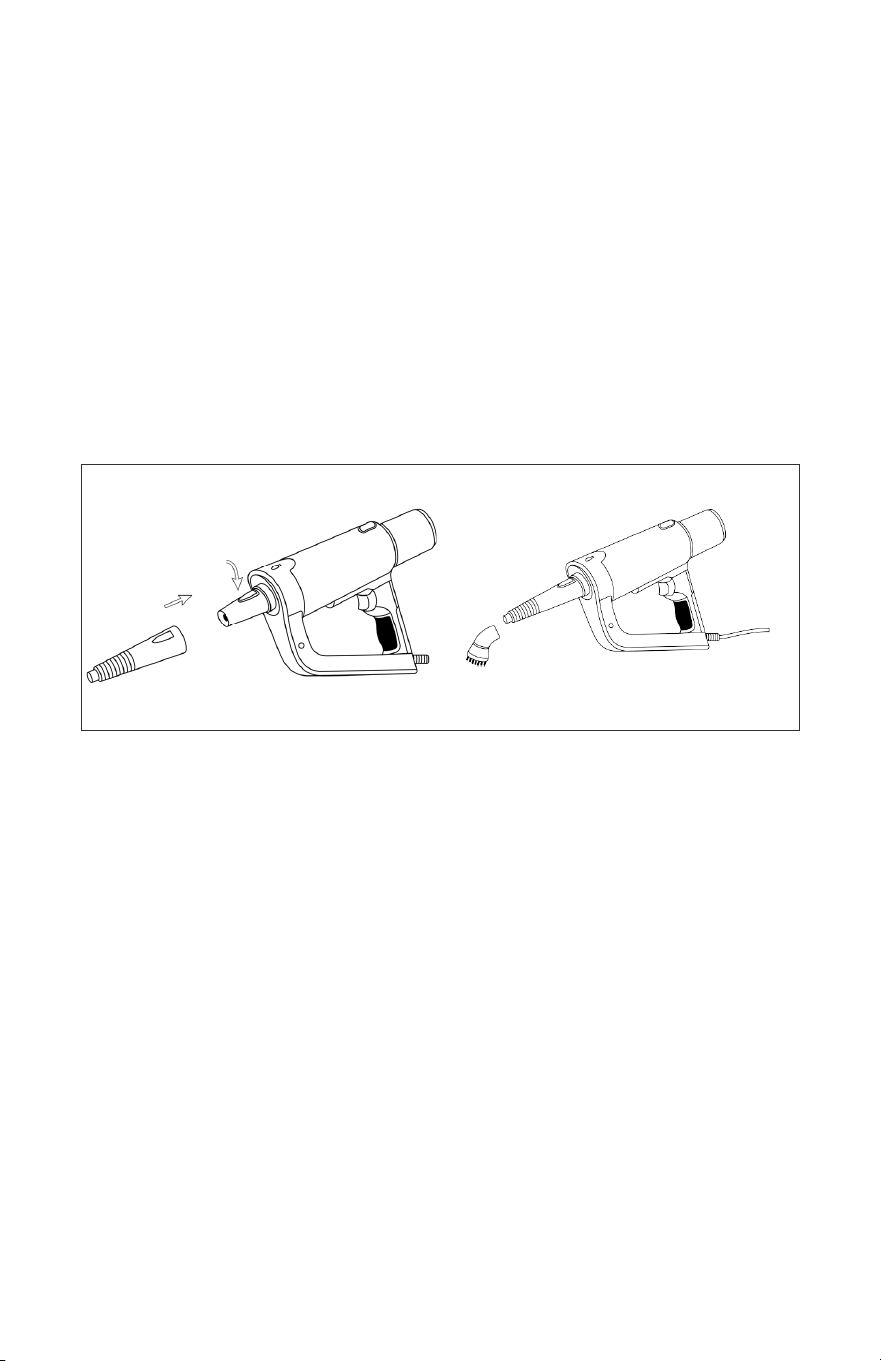
1. Pressure Nozzle Installation:
• Align the Pressure Nozzle (G) with the Attachment Connector (8), then rotate it
until the nozzle clicks into place (Fig. 1).
2. Accessory Brush Installation:
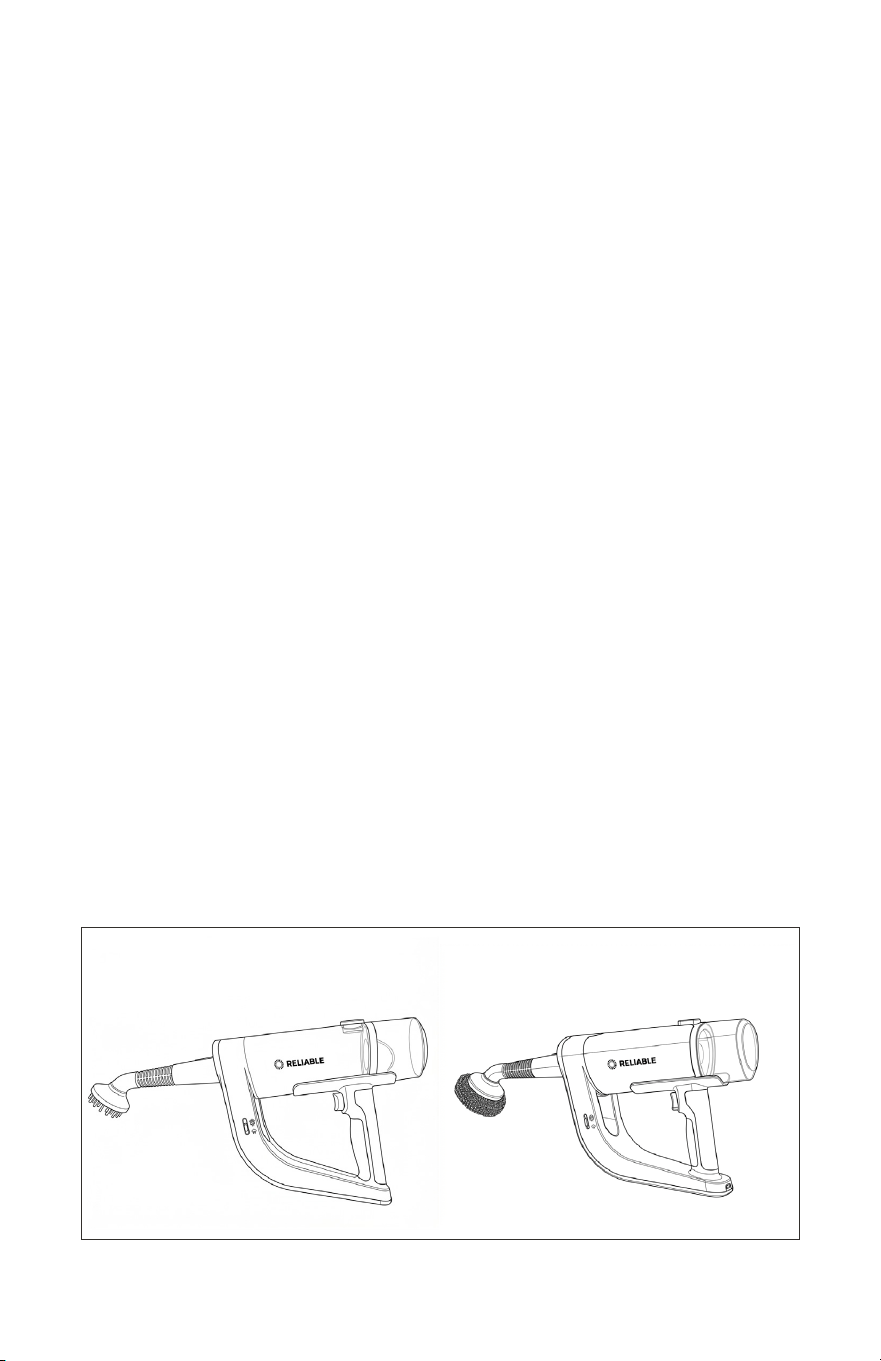
• Attach the brush accessory on the nozzle. Note that the direction of the elbow of
the small brush is as shown in the figure, facing downward (Fig. 2).
3. Extension Rod Installation:
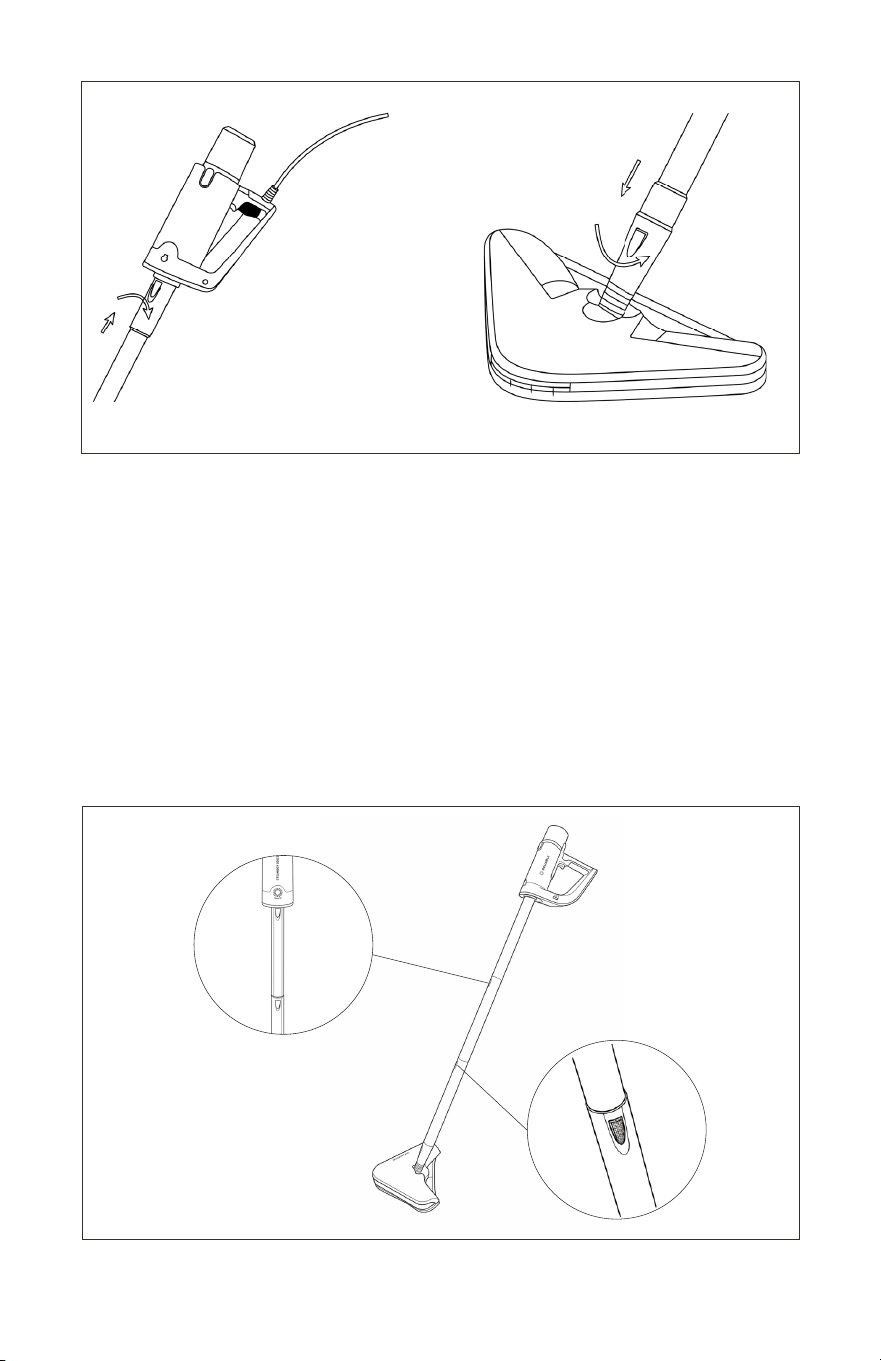
• The accessory kit contains three 35 cm Extension Rods (F). Attach one or more
rods depending on the required cleaning distance.
For high or hard-to-reach areas, or when mopping floors:
• Select the number of extension rods needed.
• Align the first extension rod with the Attachment Connector (8) and push it into
place (Fig. 3).
• To add additional extension rods, align each rod with the previous one, then push
until it clicks into place (Fig 5).
Fig. 1 Fig. 2
click
11
4. Mop Head Installation:
• Assemble the required Extension Rods (F) as described in “Extension Rod
Installation" section.
• Align the bottom Extension Rod (F) with the Floor Attachment (I) and push until it
clicks into place (Fig. 4).
• Align the top Extension Rod (F) with the Attachment Connector (8) and push
until it clicks into place (Fig. 3).
• The steam mop is ready for use (Fig. 5).
Fig. 3 Fig. 4
Fig. 5
click
12
Spiral Scrub Pad
Pair the cleaning power of steam with durable non-scratch spiral scrub pads to cut
through grease, grime, rust, and stubborn buildup on metal surfaces, cookware, grills,
tools, and more.
Warnings
• Test on a small inconspicuous area before use.
• Do not use on delicate polished finishes or surfaces prone to scratching.
• Avoid excessive force when cleaning sensitive surfaces.
• Replace scrub pad if torn, damaged or excessively worn.
• Rinse and dry scrub pad after use to help maintain performance.
• Keep out of reach of children.
How to Use
• Align and insert the hexagonal end of the Scrub Pad Adapter (L) into the
Pressure Nozzle (G) (Fig. 6).
• Slide the Spiral Scrub Pad (M) over the Scrub Pad Adapter (L) until it is securely
fitted (Fig. 7).
Fig. 6 Fig. 7

13
Features
Non-Scratch Cleaning
• Non-scratch material helps clean without damaging delicate surfaces
• Safe for non-stick cookware, glass, ceramic and stainless steel surfaces
• Flexible mesh texture provides eective scrubbing while remaining gentle on
finishes
• Suitable for everyday household cleaning
Kitchen Cleaning Applications
• Helps remove grease and grime
• Ideal for sinks, stovetops, oven interiors, range hoods and countertops
• Eective on refrigerators, microwaves and other kitchen surfaces
Bathroom & Household Surfaces
• Suitable for bathroom sinks, tubs, faucets and tile surfaces
• Helps remove soap scum, water spots and surface buildup
• Can be used on household fixtures and hard surfaces throughout the home
Durability & Design
• Tightly woven mesh design resists fraying and falling apart
• Flexible material conforms to corners and uneven surfaces
• Reusable construction designed for repeated cleaning tasks
• Lightweight and easy to rinse clean after use

14
Before You Begin Steam Cleaning
• Ensure there is sucient water in the water tank before use. If the water level is too
low or the tank is empty, the pump may not be able to draw water properly. Refer
to the “Filling the Water Tank” section for instructions. Do not operate the machine
at any time without water in the tank.
• Always sweep or vacuum the floor prior to use to remove any loose dirt or debris.
• When replacing any accessories, make sure the machine is powered o and no
steam is ejected. The machine needs to cool for 15 minutes to prevent risk of
burn.
• Do not use the Floor Attachment (I) without a Floor Pad (K) attached.
• Do not use the Fabric Glide (J) when cleaning hard floors.
• Do not aim steam at people, pets, plants or any other electrical appliances
during use to avoid burns or damage to the machine.
• Before using the steam cleaner, allow the unit to fully heat up. During first-time
use, or after refilling the water tank, the pump may produce a brief pumping or
pulsing sound. This is normal and should diminish after a few seconds.

15
Using the Steam Cleaner
1. Plug machine into a properly grounded outlet.
2. Wait 30 seconds for the unit to heat up. The power light flashes red while heating
and becomes solid red when the unit is ready for use.
3. Select a desired steam level based on your cleaning needs.
• Push Steam Output Level Slider (5) to Steam Level II (7) for cleaning durable
surfaces, tough stains and stuck-on or sticky messes.
• Push Steam Output Level Slider (5) to Steam Level I (6) for cleaning more
delicate surfaces and lighter, everyday messes.
4. Press Steam Activation (2) button once to release steam. Do not hold.
5. When finished cleaning, press Steam Activation (2) button to turn the steam o.
Unplug the machine from the outlet.
Important Operating Note
The Steamboy Plus 350CS uses an internal pump to deliver pressurized steam. During
operation, you may notice a slight pulsing sensation, vibration, or pumping sound. This
is normal and indicates that the pump is supplying water to the heating system.
If the pumping noise or vibration becomes noticeably louder than normal, check
that the water tank contains sucient water. Continued excessive noise may indicate
that maintenance or descaling is required. If the issue persists after refilling the tank
and performing recommended maintenance, discontinue use and contact customer
support.
!

16
Using the Steam Mop
Your steam mop is intended for cleaning sealed hard floors, including ceramic tile,
laminate, marble, stone, and hardwood. For best results and to help prevent floor
damage, always refer to your flooring manufacturer’s care instructions and test on a
small, inconspicuous area before use.
1. Attach Floor Pad (K) to the Floor Attachment (I).
2. Assemble the steam mop as described in “Extension Rod Installation” and “Mop
Head Installation" sections.
3. Plug machine into a properly grounded outlet.
4. Wait 30 seconds for the unit to heat up. The power light flashes red while heating
and becomes solid red when the unit is ready for use.
6. Select a desired steam level based on your cleaning needs.
• Push Steam Output Level Slider (5) to Steam Level II (7) for cleaning durable
surfaces, tough stains and stuck-on or sticky messes.
• Push Steam Output Level Slider (5) to Steam Level I (6) for cleaning more
delicate surfaces and lighter, everyday messes.
7. Press Steam Activation (2) button once to release steam. Do not hold.
8. Move the mop slowly back and forth, focusing on high-trac areas.
9. When finished cleaning, press Steam Activation (2) button to turn the steam o.
Unplug the machine from the outlet.
It’s best to use the steam intermittently so that the pad does not become
over-saturated with water.
!
When cleaning carpets, couches, or other fabric surfaces, attach the Fabric
Glide (J) to the Floor Pad (K) and Floor Attachment (I) before use. This helps
protect textiles and ensures optimal cleaning performance.
!

17
Cleaning and Maintenance
Important: Always ensure the cleaner has fully cooled down before performing any
maintenance tasks.
Empty the Water Tank
1. Unplug the Steamboy Plus 350CS from the main power and ensure the unit has
cooled.
2. Remove the Water Tank (1) by pressing the Water Tank Release (9) button and
pull the tank backward.
3. Lift and slide the water tank lid to access the filling opening. Empty any excess
water from the tank.
4. Reinsert the water tank into the steam cleaner until it clicks into place.
Removing and Cleaning the Floor Pad
1. Unplug the Steamboy Plus 350CS from the main power and ensure the unit has
cooled.
2. If necessary, remove the Fabric Glide (J), then peel the Floor Pad (K) from the
Floor Attachment (I).
3. Wash the Floor Pad (K) in a washing machine with a mild detergent at max
temperature 40°C.
Important: Do not use bleach or fabric softener when washing the floor pad.
Tank Cleaning & Descaling Instructions
We recommend rinsing the tank after every use if you have hard water. To rinse the
tank, fill it with water and shake it thoroughly to loosen and remove any limescale
deposits from the bottom.

18
Reliable Products Warranty
Reliable Corporation (“Reliable”) oers a 1-year warranty for its products (a “Reliable Product”) from the
original purchase date, as long as the product is properly used and maintained.
What’s Covered
• Reliable will repair or replace any defective parts caused by poor workmanship or materials.
• If the product can’t be repaired or replaced with the same model, it will be replaced with a current
model of equal or greater value.
• Repaired or replaced parts will be either new or refurbished to work like new.
• If Reliable cannot repair or replace the product, they will refund its current value.
What’s Not Covered
This warranty does not cover:
• Damage caused by improper installation, accidents, abuse, misuse, natural disasters, electrical
issues, or wear and tear from normal use.
• Products that have been altered, disassembled, or modified without authorization.
• Products not purchased directly from Reliable or an authorized dealer.
• Indirect, consequential, or incidental damages, including third-party claims.
Warranty Claim Process
To file a warranty claim:
• Contact customer service at 1-800-268-1649 or support@reliablecorporation.com.
• Provide your original receipt, which must show you’re the original purchaser and that the product
was bought from Reliable or an authorized dealer.
• You will receive a Return Authorization (RA#). Ship the defective product (with proof of purchase
and RA#) prepaid and insured to:
• Reliable Corporation, 5-100 Wingold Avenue, Toronto, ON M6B 4K7
• Note: Freight collect shipments will be refused. Loss or damage during shipping is your
responsibility.
Additional Information:
This warranty applies to products used for personal, and not commercial or rental, service. Reliable is
not liable for incidental or consequential damages of any nature associated with the use of this product.
Reliable’s liability will not exceed the purchase price of the product.
For questions, contact:
Reliable Corporation
100 Wingold Avenue, Unit 5
Toronto, Ontario
Canada M6B 4K7
www.reliablecorporation.com

19
1 800 268 1649
www.reliablecorporation.com
12082026

20