ENGLISH 1
INSTRUCTION MANUAL
We hope you’re enjoying your Origin Intelligent Home
Observatory! From the start, Origin was designed to
grow and evolve, adapting as technology advances and
supporting you on your journey as an astroimager. Your
system originally came with the Origin-178C Camera,
which uses Sony’s Starvis CMOS sensor. The Origin-
678C Camera is its replacement, featuring Sony’s latest
Starvis 2 CMOS technology. It offers smaller pixels
without sacrificing sensitivity, allowing you to resolve finer
details in astronomical objects.
This instruction sheet will guide you through installing the
Origin-678C Camera on your Origin system and show
you how to capture new dark and flat frames to ensure
optimal performance after the upgrade.
Installing the Camera
Installing the Origin-678C Camera is straightforward but
does require careful attention to detail. Work in a well-
lit area and leave the optical tube on the mount with the
tube pointed upward during installation. Avoid touching
the Schmidt corrector plate to prevent smudges or
fingerprints, which can be challenging to clean.
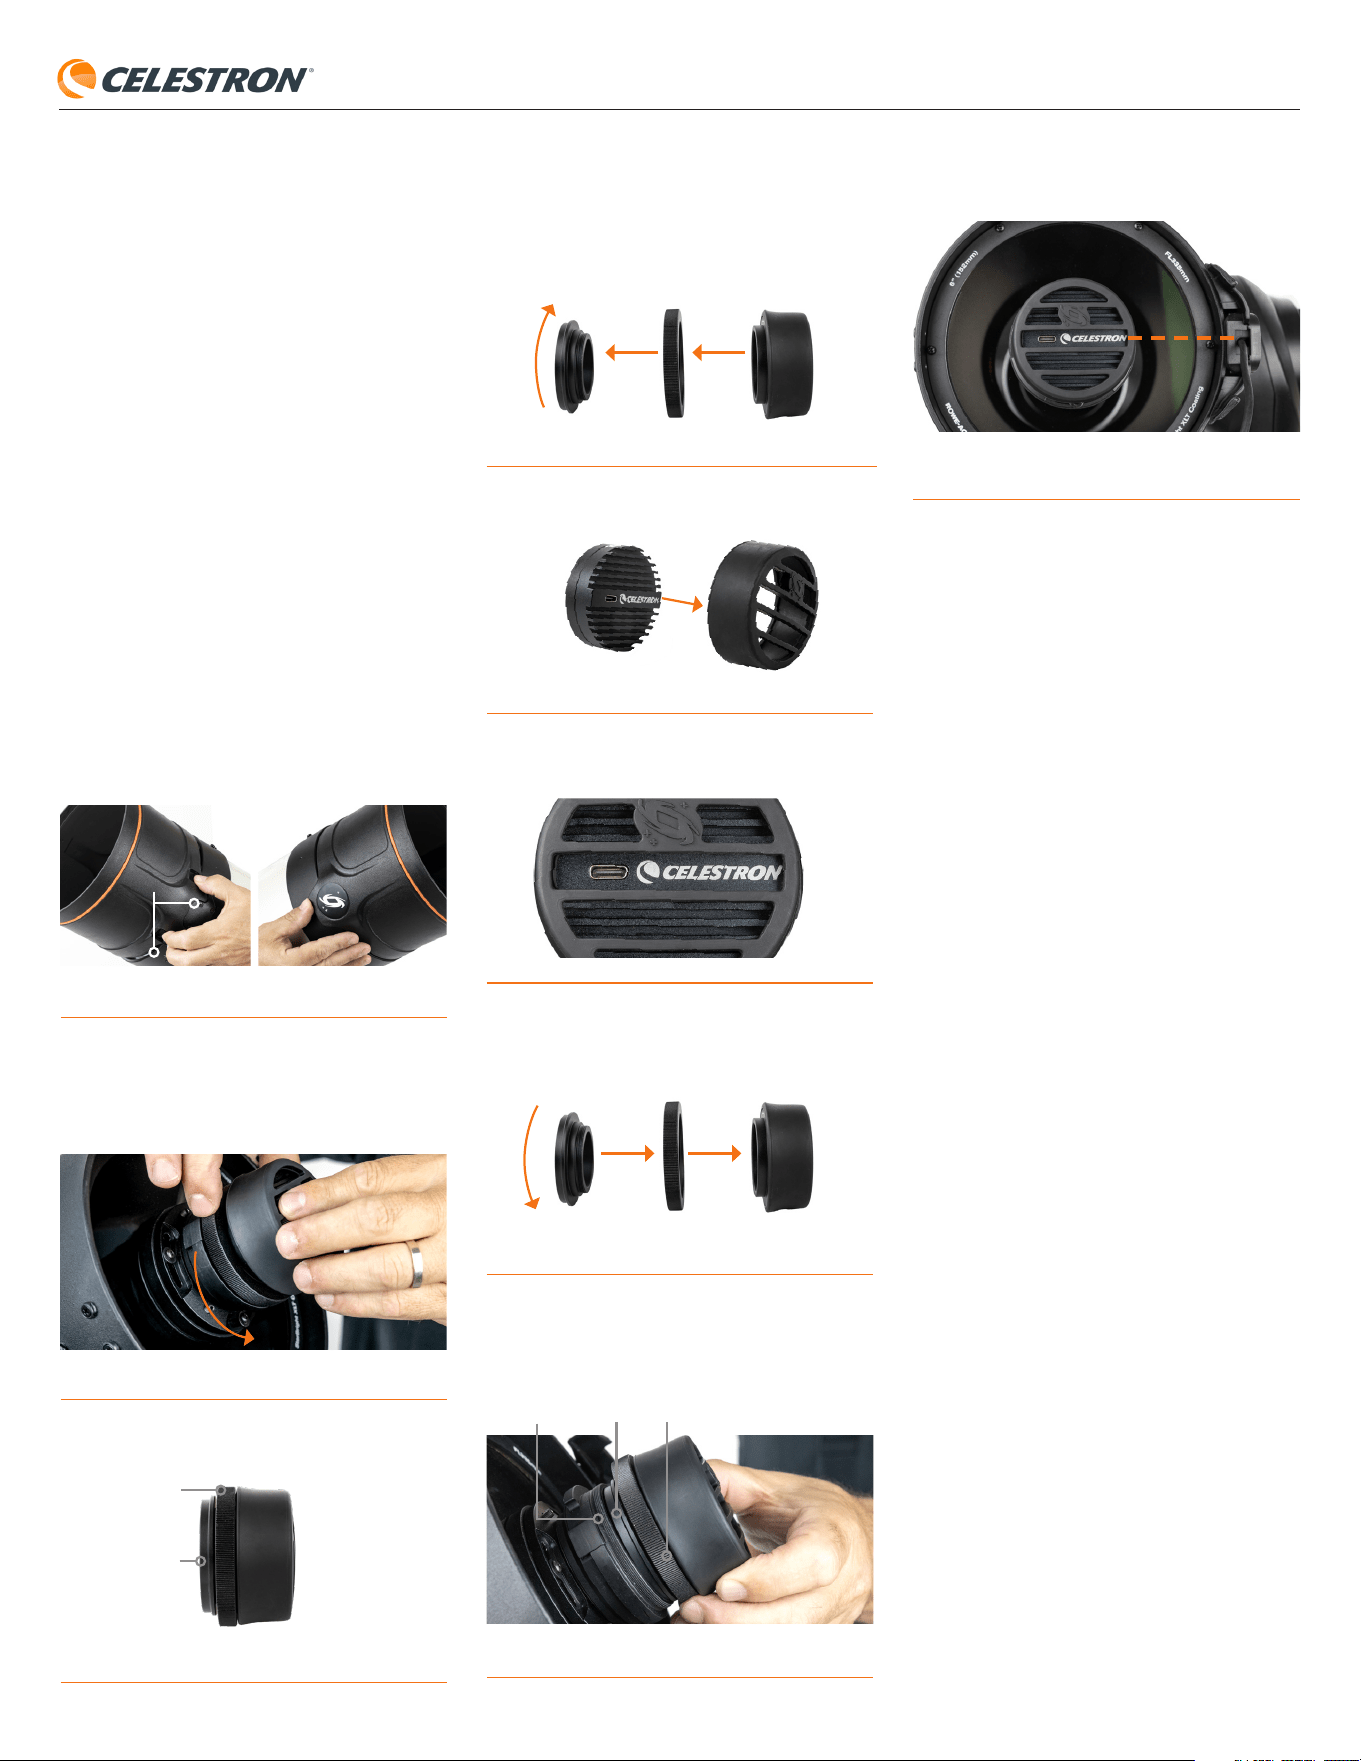
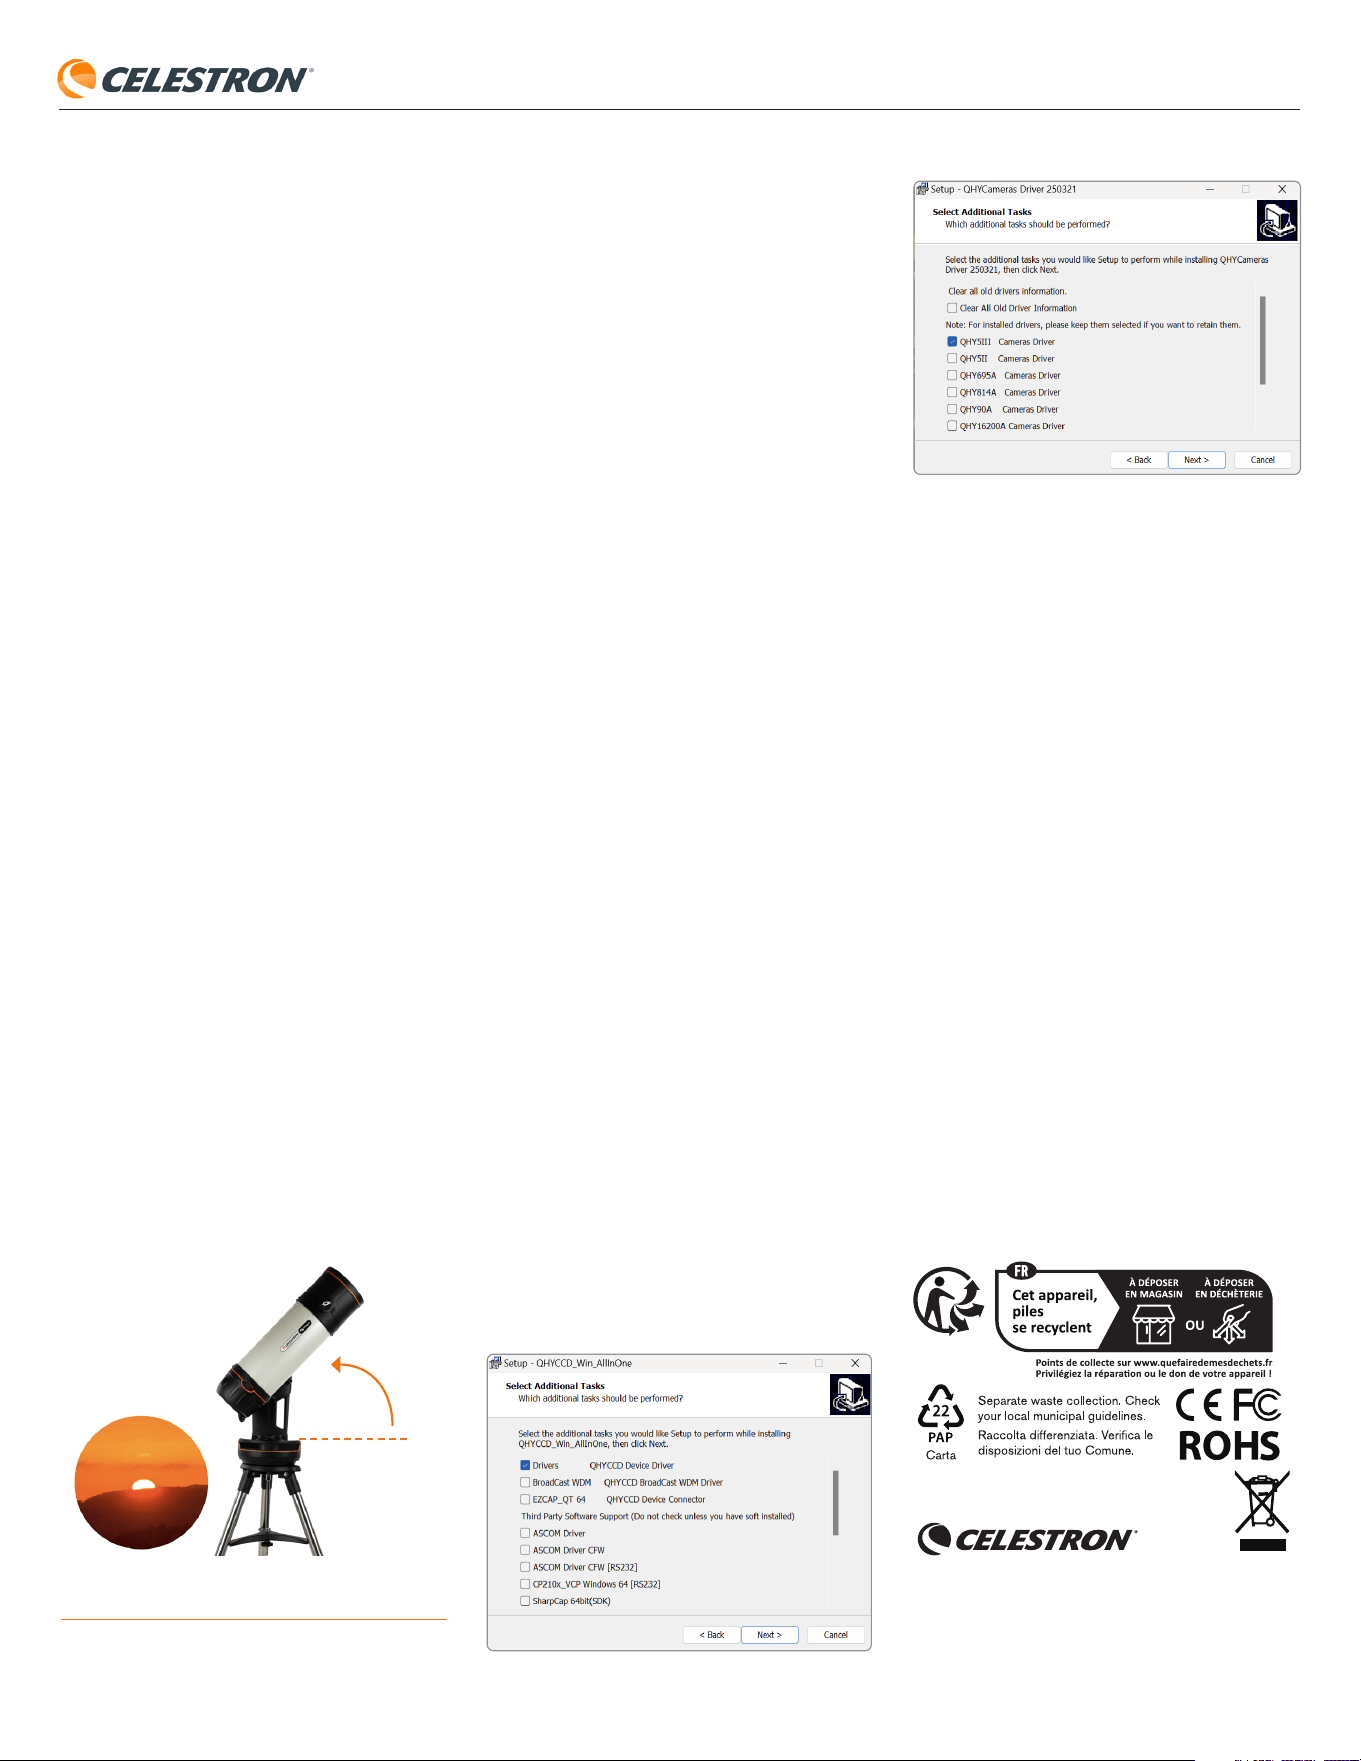
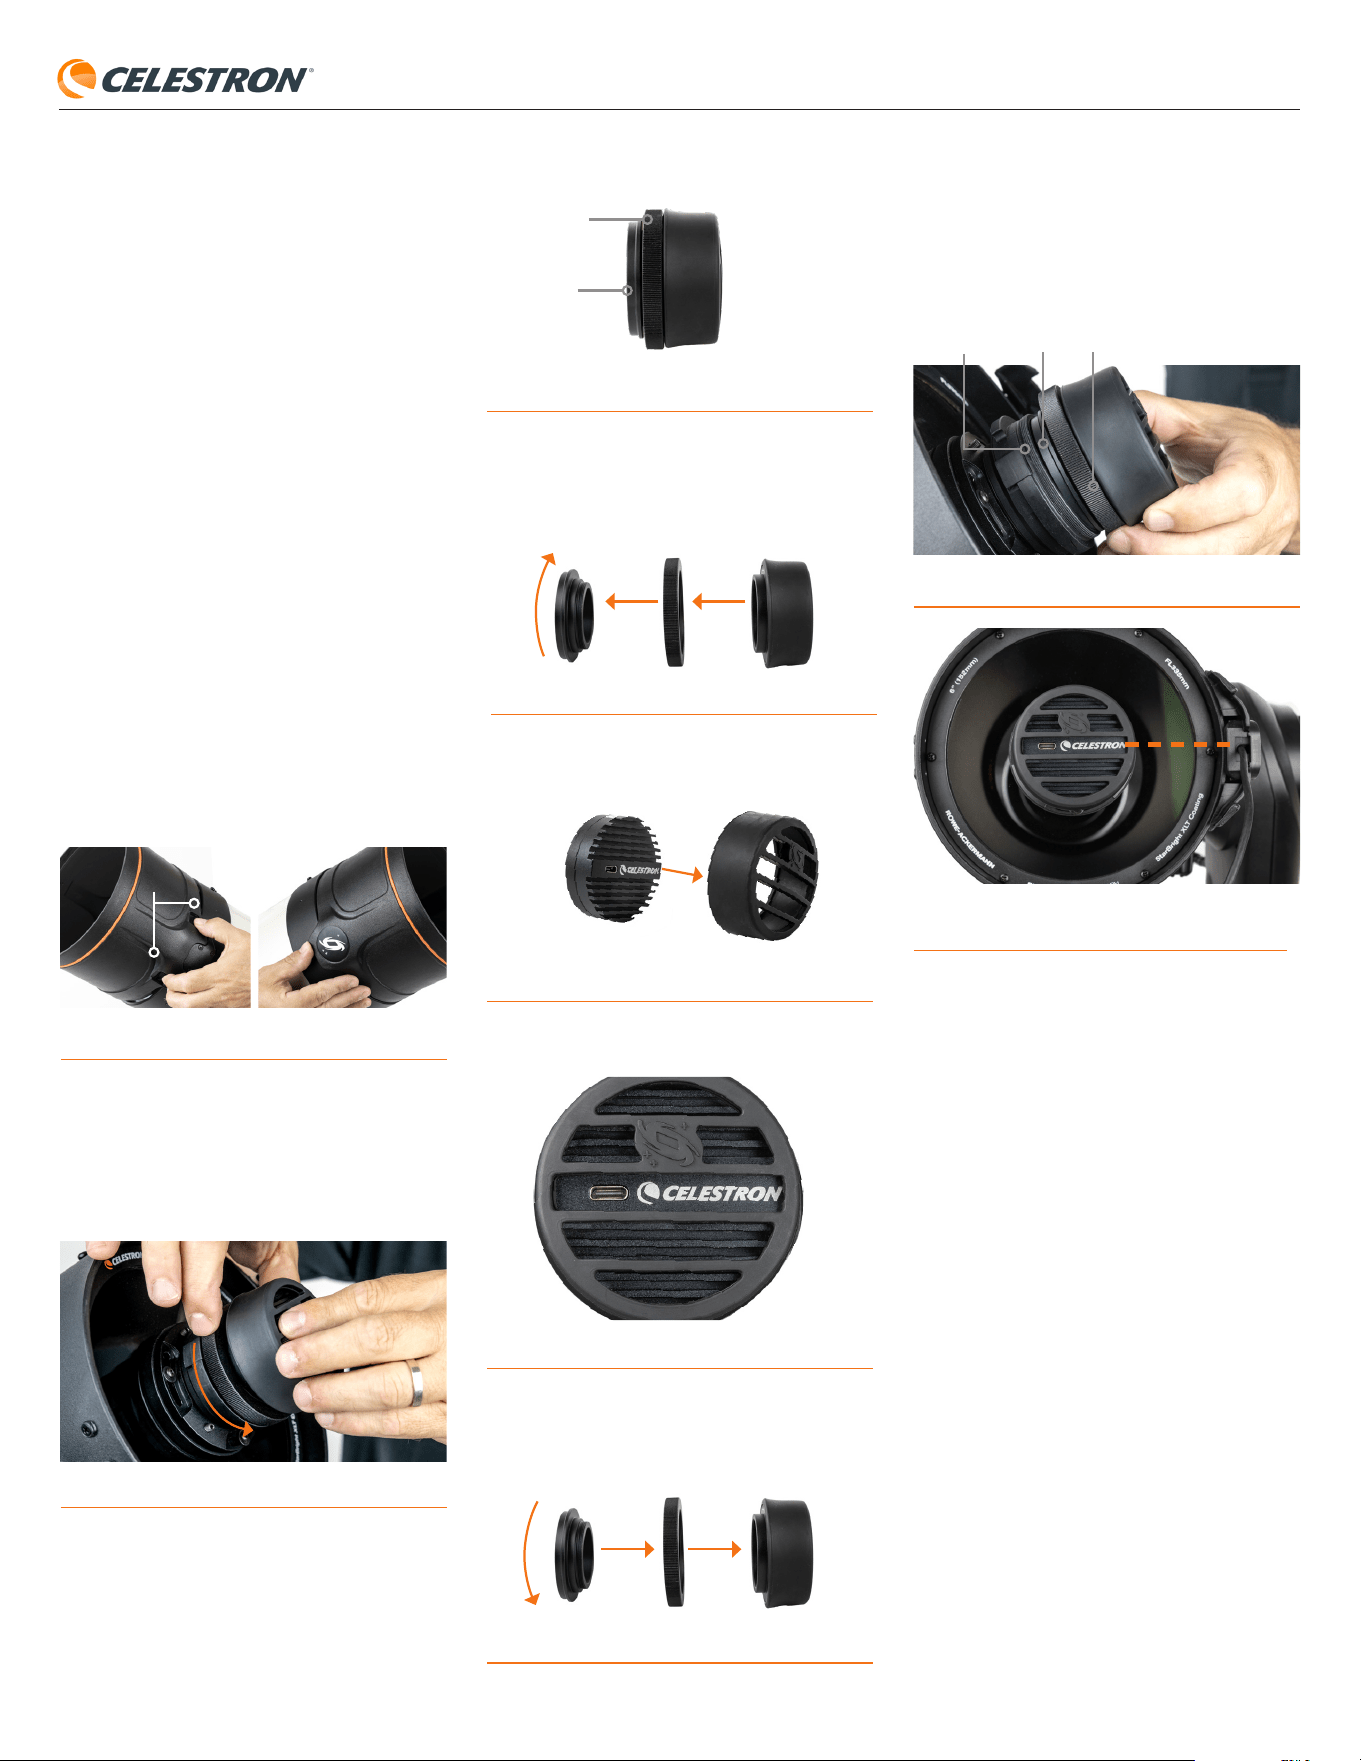
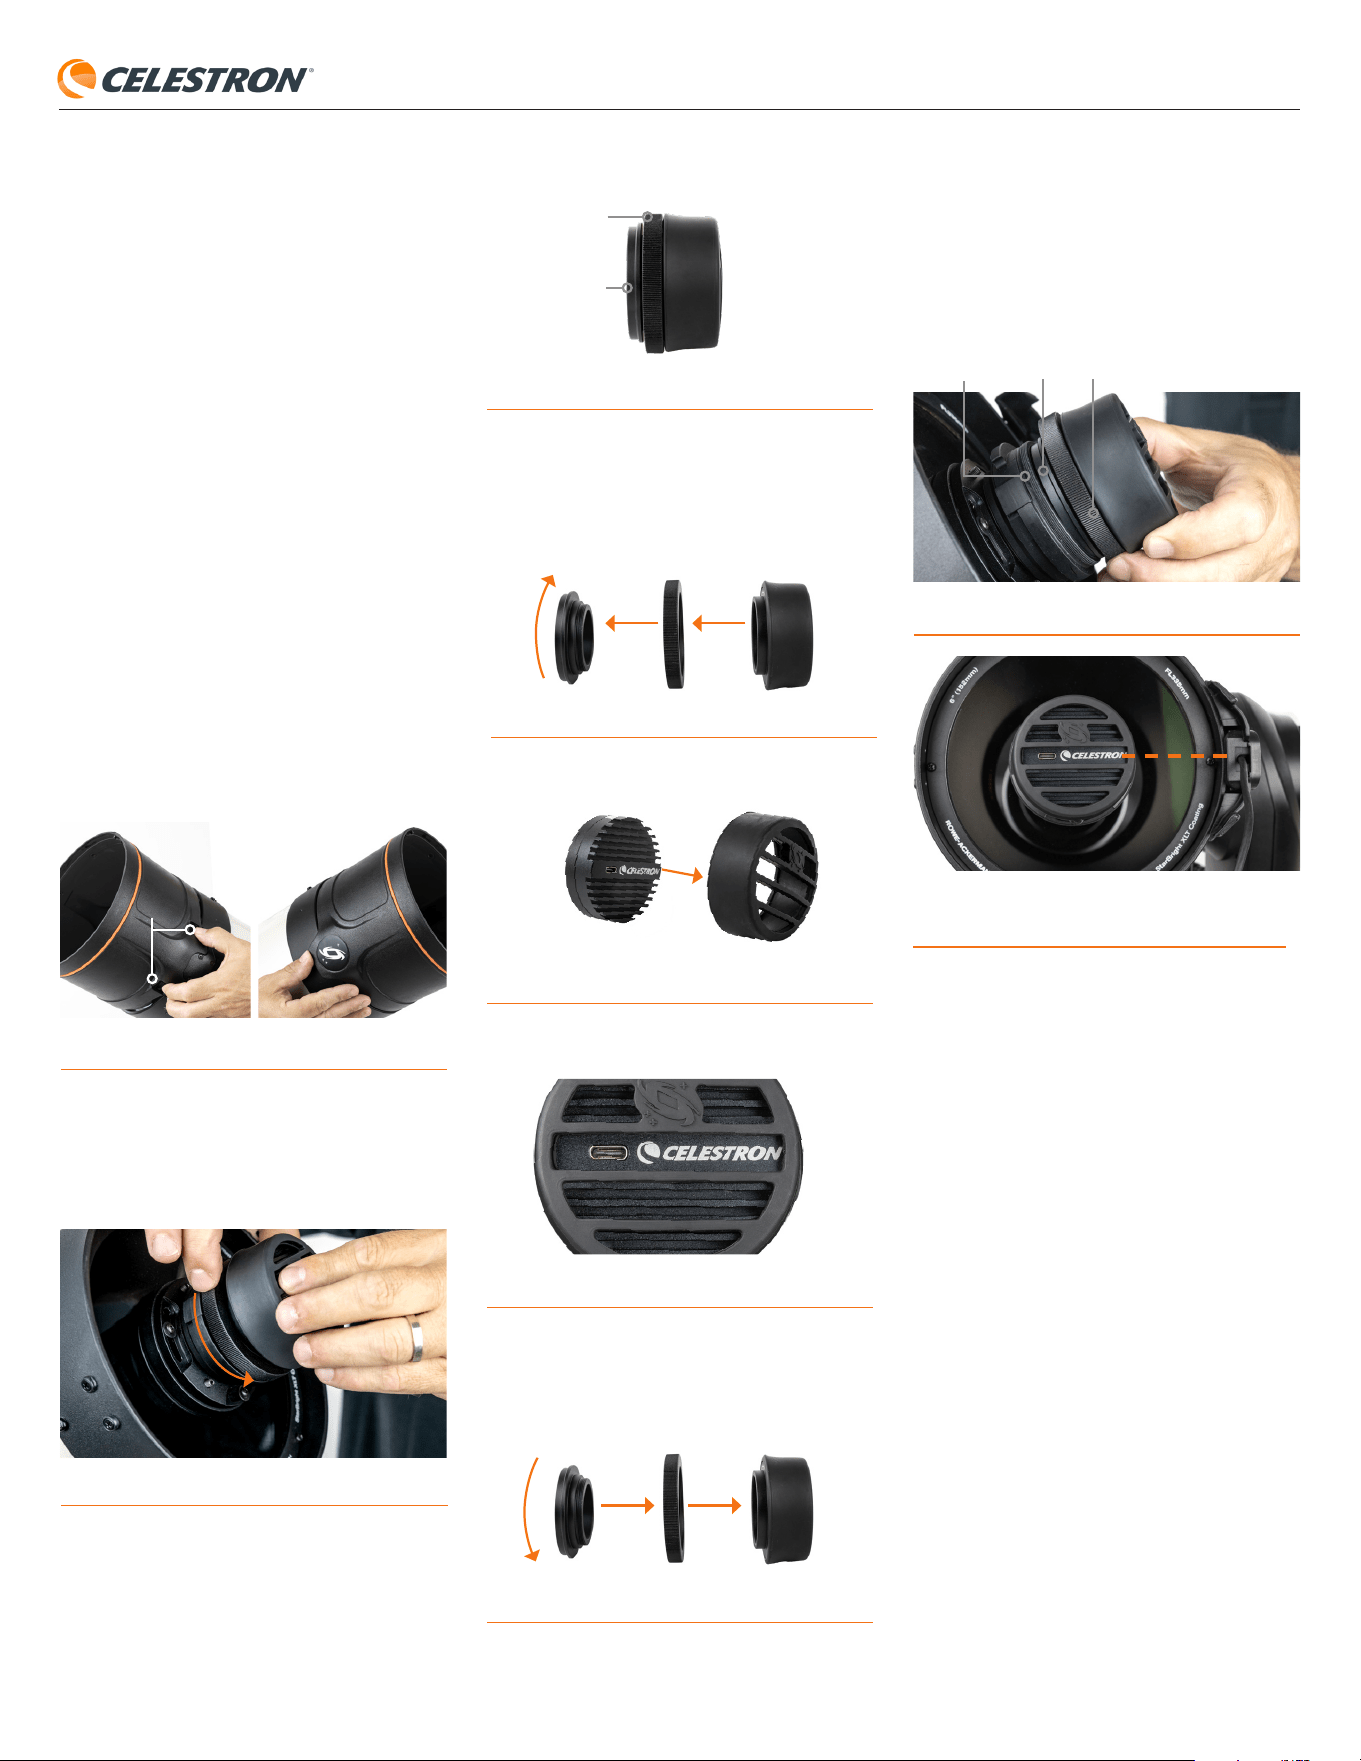
1. First, remove the lens shade from the front of the
Origin optical tube by pressing down on the two
tabs on the exterior of the lens shade with one hand
while pushing upward under the Origin logo, which is
located 180° away from the tabs (Fig. 1).
Fig. 1: Remove the lens shade by pressing down on the two tabs while pushing
upwards under the Origin logo.
2. Unplug the USB cable from the camera that is already
installed on Origin. Do not let the cable touch the
Schmidt corrector once it is disconnected.
3. Grasp the rubber cover on the camera with one hand,
then unthread the camera retaining ring with your
other hand (Fig. 2).
Fig. 2: To remove the Origin-178C camera from Origin, first unthread the
retaining ring.
4. Once the retaining ring is fully unthreaded, remove the
camera, camera adapter, and retaining ring (Fig. 3).
Retaining RIng
Fig. 3: Removing camera from Origin with retaining ring and camera adapter
connected.
Camera Adapter
5. Unthread the camera adapter from the camera, then
remove the camera adapter and retaining ring (Fig. 4).
Fig. 4: Remove the camera adapter and retaining ring from the camera by
unthreading the camera adapter.
Retaining Ring CameraCamera Adapter
6. Remove the rubber cover from the camera (Fig. 5).
Fig. 5: Remove the rubber cover from the camera. You can simply pull it off.
7. Place the rubber cover on the Origin-678C camera.
Orient the rubber cover on the camera as shown in
Fig. 6.
Fig. 6: Install the rubber cover on the Origin-678C so it appears as shown.
8. Insert the camera adapter through the retaining ring
and thread it into the bottom of the Origin-678C until
tight (Fig. 7).
Fig.7: The camera adapter goes through the retaining ring and threads into the
bottom of the camera.
Retaining RIng CameraCamera Adapter
9. Now it’s time to place the Origin-678C onto Origin.
Seat the camera adapter onto the exposed filter
drawer (Fig. 8), then tighten the retaining ring. Before
fully tightening the ring, we recommend rotating the
camera body to match the orientation shown in Fig. 9.
Fig. 8: Seat the camera adapter onto the exposed filter drawer, then tighten
the retaining ring.
Camera Adapter Retaining RIngFilter Drawer
Fig. 9: We recommend orienting the camera as shown, with the sensor
parallel to the Celestron logo on the front of the camera. This positions the sensor
perpendicular to Origin’s altitude axis.
In this configuration, the sensor is aligned with the
Celestron logo on the front of the camera housing and
perpendicular to Origin’s altitude axis.
You can orient the camera sensor however You can
orient the camera sensor however you wish. Just
remember that if you rotate the camera later, you’ll need
to capture a new flat frame for best results.
NOTE: Do not overtighten the retaining ring! It should
be snug and secure, but not so tight that it’s difficult to
loosen later.
10. Plug the USB cable into the USB-C port on the
camera.
11. Replace Origin’s lens shade.
The camera is now installed on your Origin. To ensure
optimal performance, you must capture new dark and flat
frames before your next nighttime session.
Capturing New Dark Frames
Dark frames are important because they help eliminate
sensor noise in images. Since you have installed a new
sensor, you must capture new dark frames. Here’s how
to do it:
1. Place the dust cap on Origin.
2. Place Origin in a dark location. If it is not completely
dark, consider covering Origin with a blanket.
3. Turn on Origin and connect with your smartphone or
tablet as usual.
4. In the Origin app, navigate to Menu>Settings>
Advanced, and tap “Recapture Complete Set of
DarkFrames.” Origin will now capture a full set of dark
frames with up to 30 seconds of sub-exposure time.
The process takes about 20 minutes.
5. If you are using an EQ Wedge and know you will be
capturing sub-exposures longer than 30 seconds,
you should capture additional dark frames manually.
In the app, enter the Dark Frame ISO and Dark Frame
Exposure that match the manual camera settings you
intend to use. Then press “Recapture Dark Frames.”
This process takes another few minutes.
6. If you intend to use Origin immediately after capturing
new dark frames, remember to remove the dust cap!
You now have a new complete set of dark frames for the
Origin-678C Camera. The dark frames for the Origin-
178C are still saved on Origin, so if you switch back to the
Origin-178C camera later, you won’t need to take dark
frames again. Origin will recognize the camera and select
the proper dark frames automatically.
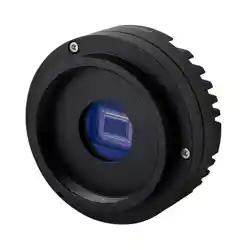
Origin-678C Camera Model #95531
Tabs
ENGLISH 2
INSTRUCTION MANUAL
Capturing A New Flat Frame
Flat frames help ensure even response to light across
the entire sensor. You should capture a new flat frame
whenever you replace or rotate the camera.
We highly recommend purchasing the GIOTTO Origin
Flat-Frame Generator by PrimaLuceLab for easily
capturing flat frames. Custom-designed for Origin, it
allows you to capture flat frames anytime from the same
smartphone or tablet you use to control Origin.
In this section, we’ll cover two methods for capturing a
new flat frame with the Origin-678C Camera: using a
third-party flat-field generator or EL panel, and using the
sky at dusk—a technique commonly called capturing a
“sky flat.”
A) Using a Flat-Field Generator or EL Panel
1. Turn on the flat-field generator (FFG) or EL panel.
2. Adjust the brightness of the FFG or EL panel
to roughly the midpoint of its brightness range.
NOTE: The exact brightness isn’t critical. Origin will
automatically adjust the exposure time during flat
frame capture to compensate.
3. Remove Origin’s dust cap.
4. Power on Origin and connect to it using your
smartphone or tablet.
a. If you’re outside at night, you can let Origin
complete its initialization or tap Cancel Initialization
in the app and initialize later.
5. Attach your FFG or EL panel to Origin’s dew shield
following the instructions provided with the panel.
6. In the Origin app, navigate to
Menu>Settings>Advanced, and tap “Recapture Flat
Frames.” Origin will capture a new flat frame, which
only takes a few moments.
7. When capture is complete, remove the FFG or EL
panel. Now you’re ready to begin imaging with your
new flat frame.
B) Using the Sky at Dusk (i.e., “Sky Flat”)
1. Wait 20-30 minutes after sunset.
2. Power on Origin. Initialization will fail since stars are
not yet visible—this is expected. You can also choose
Cancel Initialization in the app.
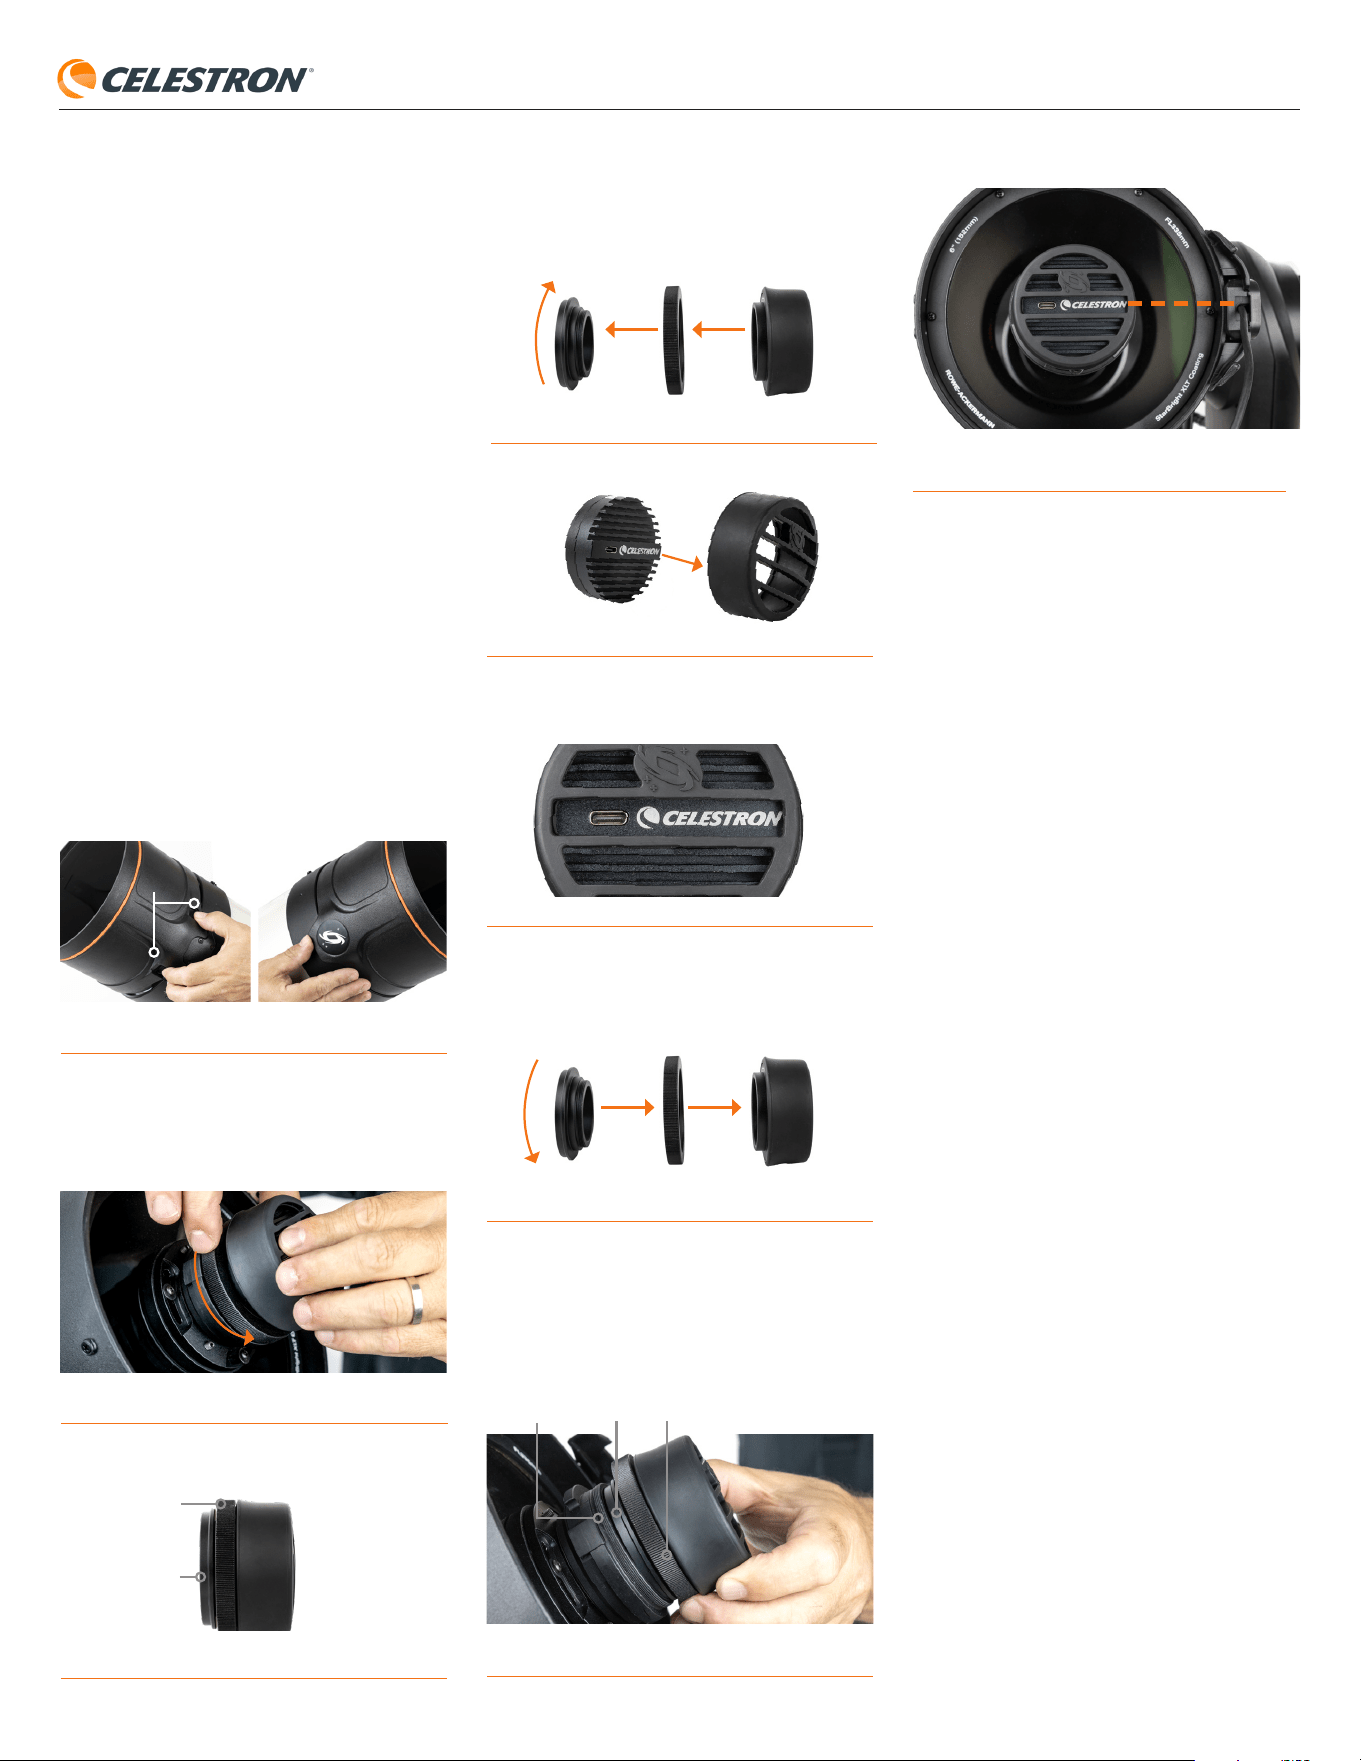
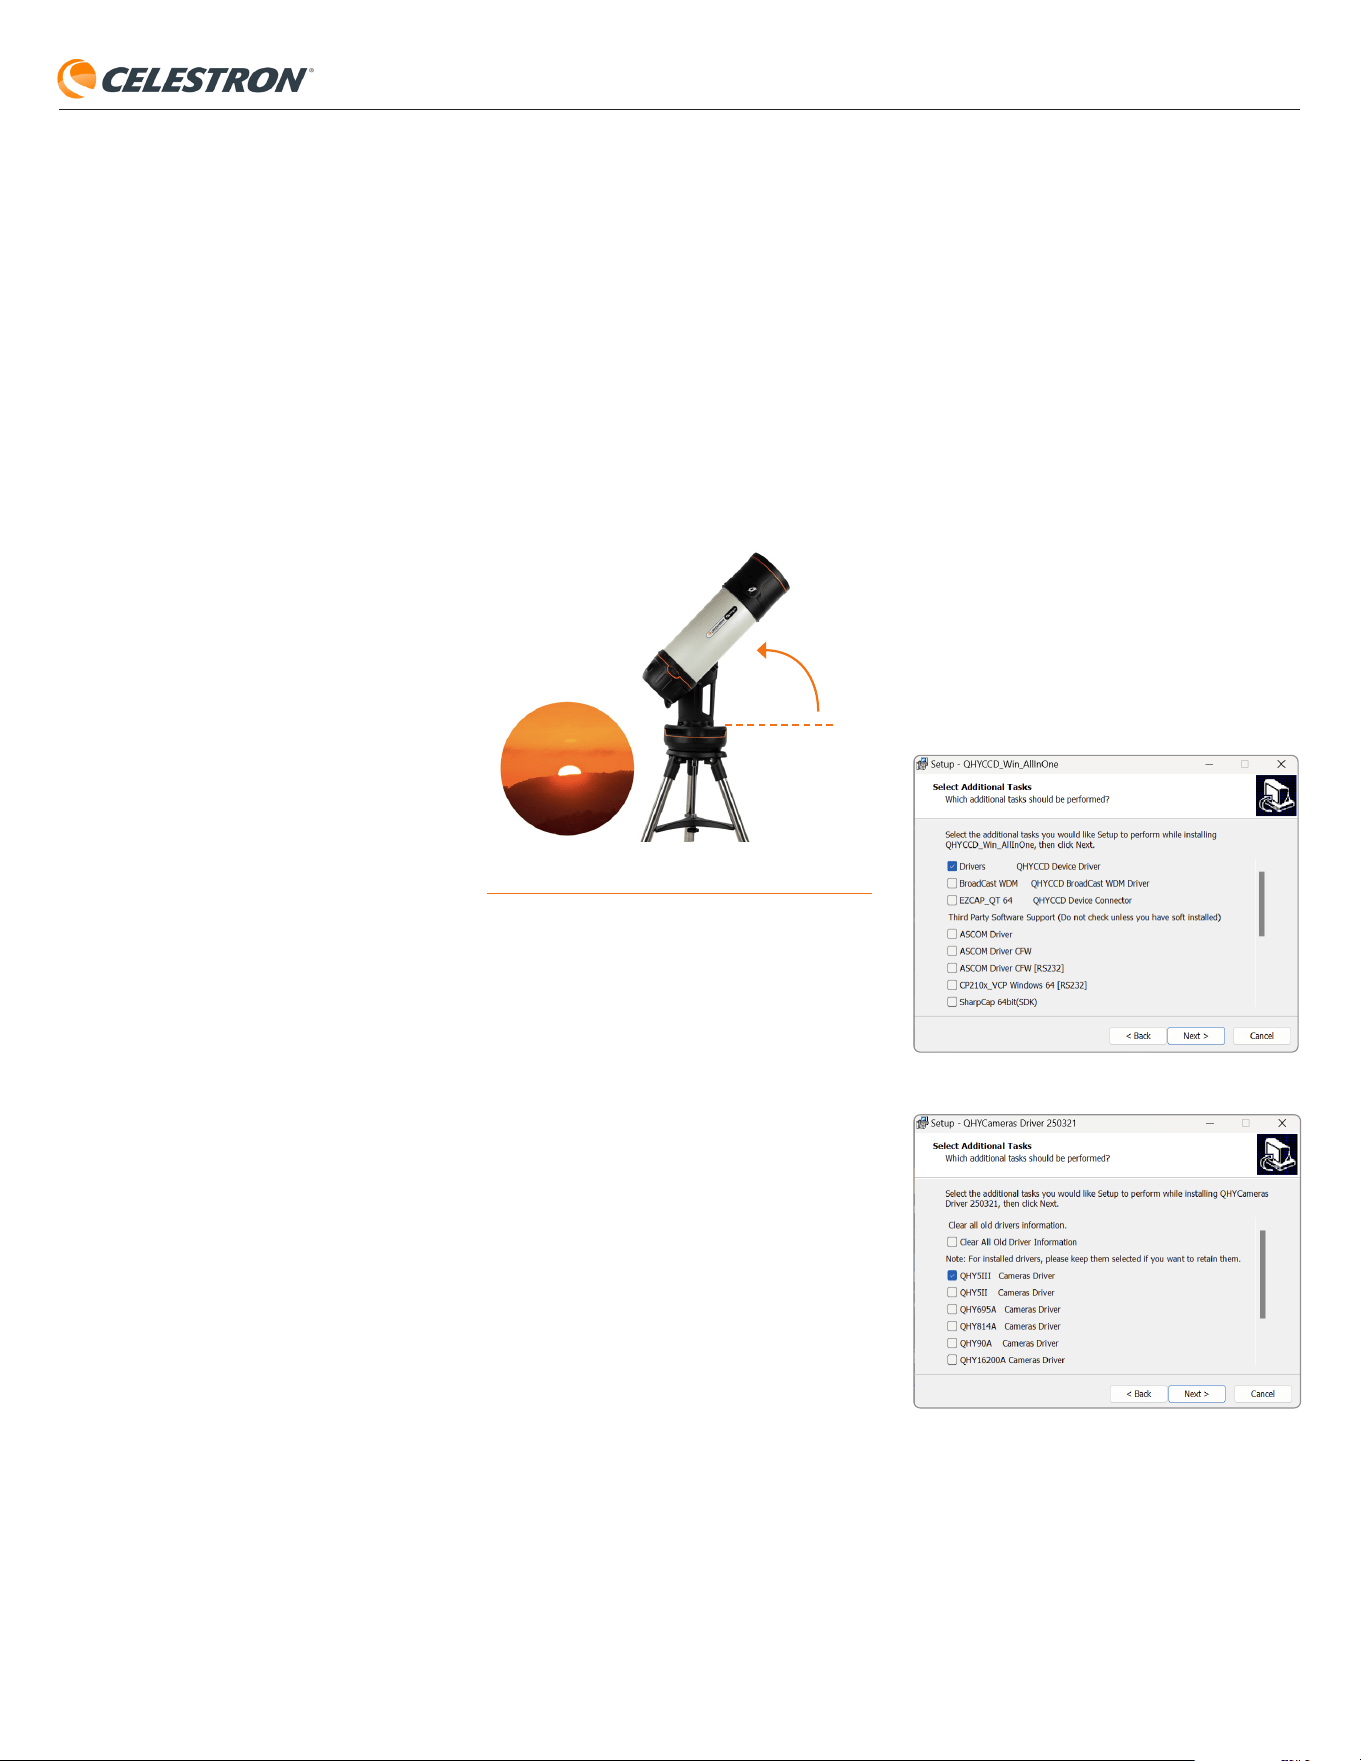
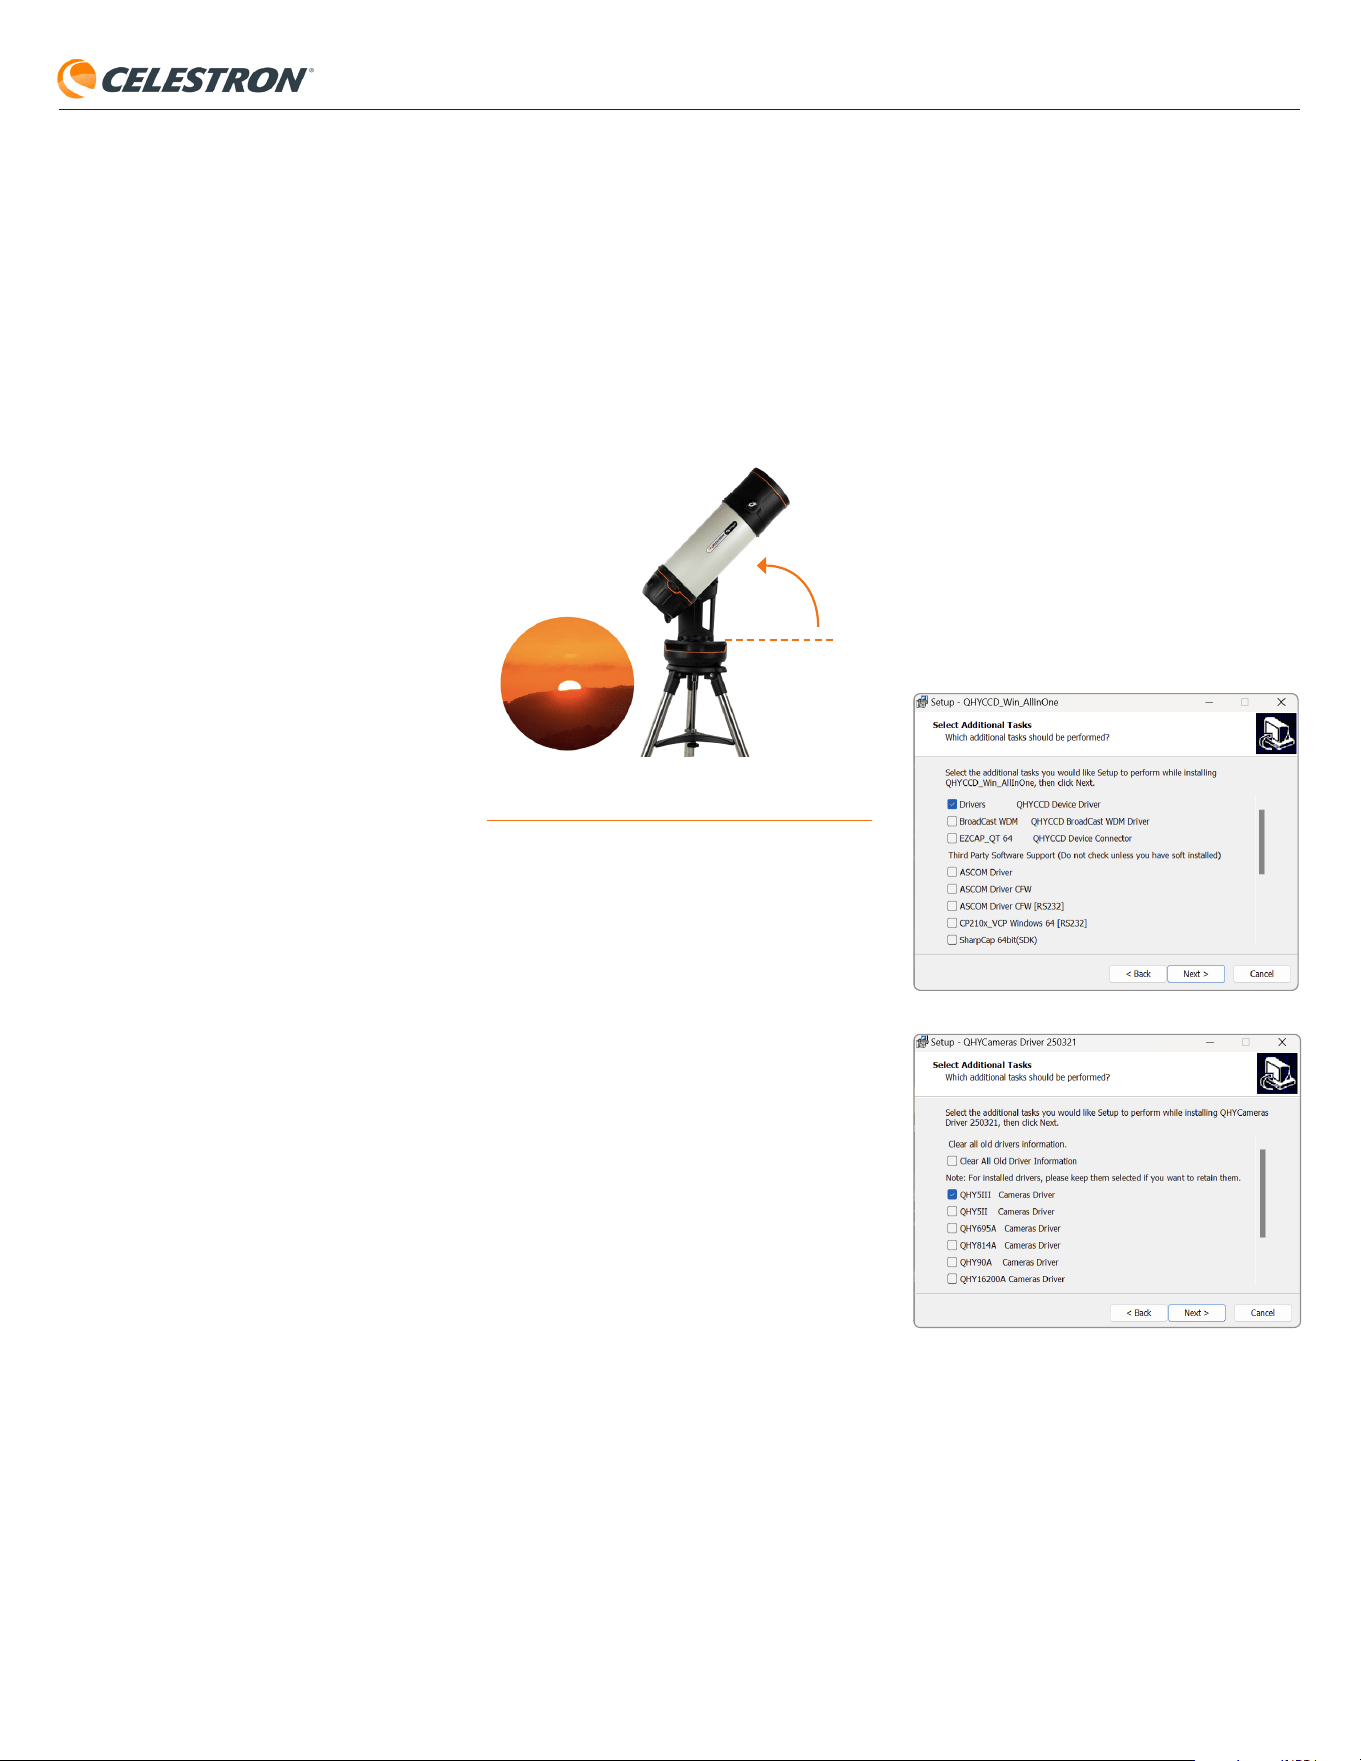
3. Manually point Origin to an altitude of approximately
60° - 75° and roughly opposite where the Sun set (Fig.
10). Look for a swath of clear, uniform blue sky with no
clouds. You can loosen the mount’s clutches and point
the telescope by hand or use the manual slew controls
in the app under Menu>Show Scope Controls.
Altitude of
Origin 60-75°
Sunset
Fig. 10: To capture a “sky flat,” position Origin as shown about 20-30 minutes
after sunset.
4. Navigate to Menu>Settings>Advanced and select
“Recapture Flat Frames.” Origin will capture a new flat
frame, which only takes a few moments.
5. When capture is complete, you can begin imaging
using your new flat frame.
What to Expect
1. Increased resolution
Although both sensors are the same physical size, the
IMX678C uses smaller 2.0 μm² pixels than the 2.4 μm²
pixels in the IMX178C. This results in a finer resolution of
1.2 arcseconds per pixel (down from 1.5 arcseconds per
pixel), allowing you to resolve more detail and “zoom in”
slightly on celestial objects. This is especially beneficial
since most night sky targets are relatively small.
2. Larger file sizes
Because the IMX678C packs more effective pixels (8.4
MP vs. 6.4 MP), image files will be somewhat larger. As
a result, you may notice slightly slower automatic image
processing in the app, depending on the performance of
your smartphone or tablet.
3. Increased sensitivity
Despite having smaller pixels, the IMX678C is
slightly more sensitive overall than the IMX178C. The
improvement is subtle; images won’t appear dramatically
brighter.
4. Different ISO response
ISO values are not directly comparable between the two
sensors. The IMX678C’s default ISO is 1000, while the
IMX178C’s is 200.
5. Different aspect ratio
The IMX678C uses a 16:9 aspect ratio, compared to
the 3:2 ratio of the IMX178C. This means your field of
view will appear more rectangular, which some users
may prefer for framing certain objects. The 16:9 aspect
ratio better corresponds to the landscape display on
smartphones and tablets.
Using the Original Origin-
178C Camera for Other
Applications
Now that you’ve upgraded Origin with the new camera,
the original Origin-178C Camera can still be put to good
use. For example, if you have another telescope, the 178C
can serve as a capable imaging camera.
It features standard M42 threads (“T-threads”) for easy
mounting and is compatible with SharpCap, a widely
used astronomical imaging application for Windows,
available as a free download online.
To use the Origin-178C Camera with SharpCap, you’ll
first need to install the appropriate Windows driver,
available here: https://www.qhyccd.com/download/
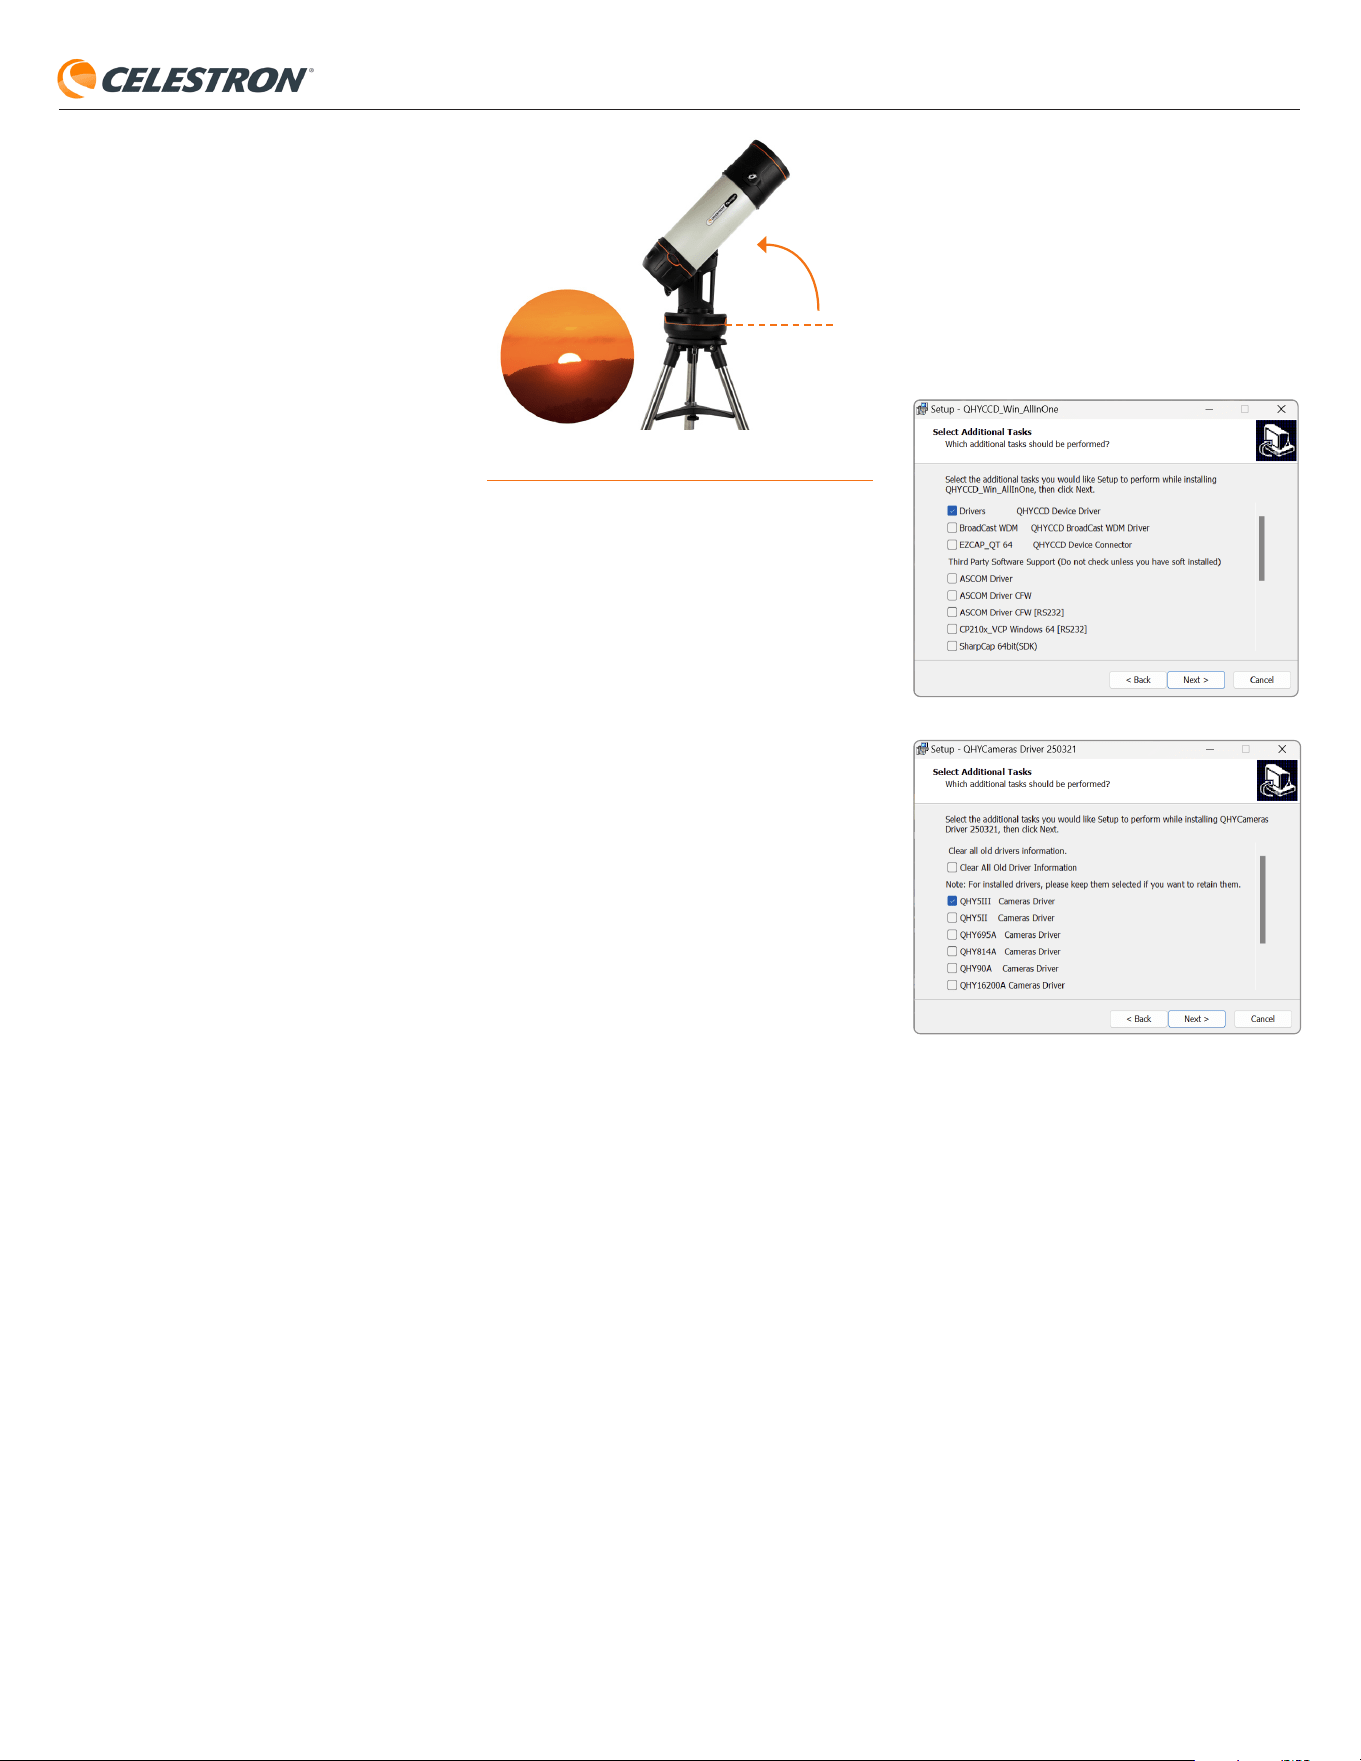
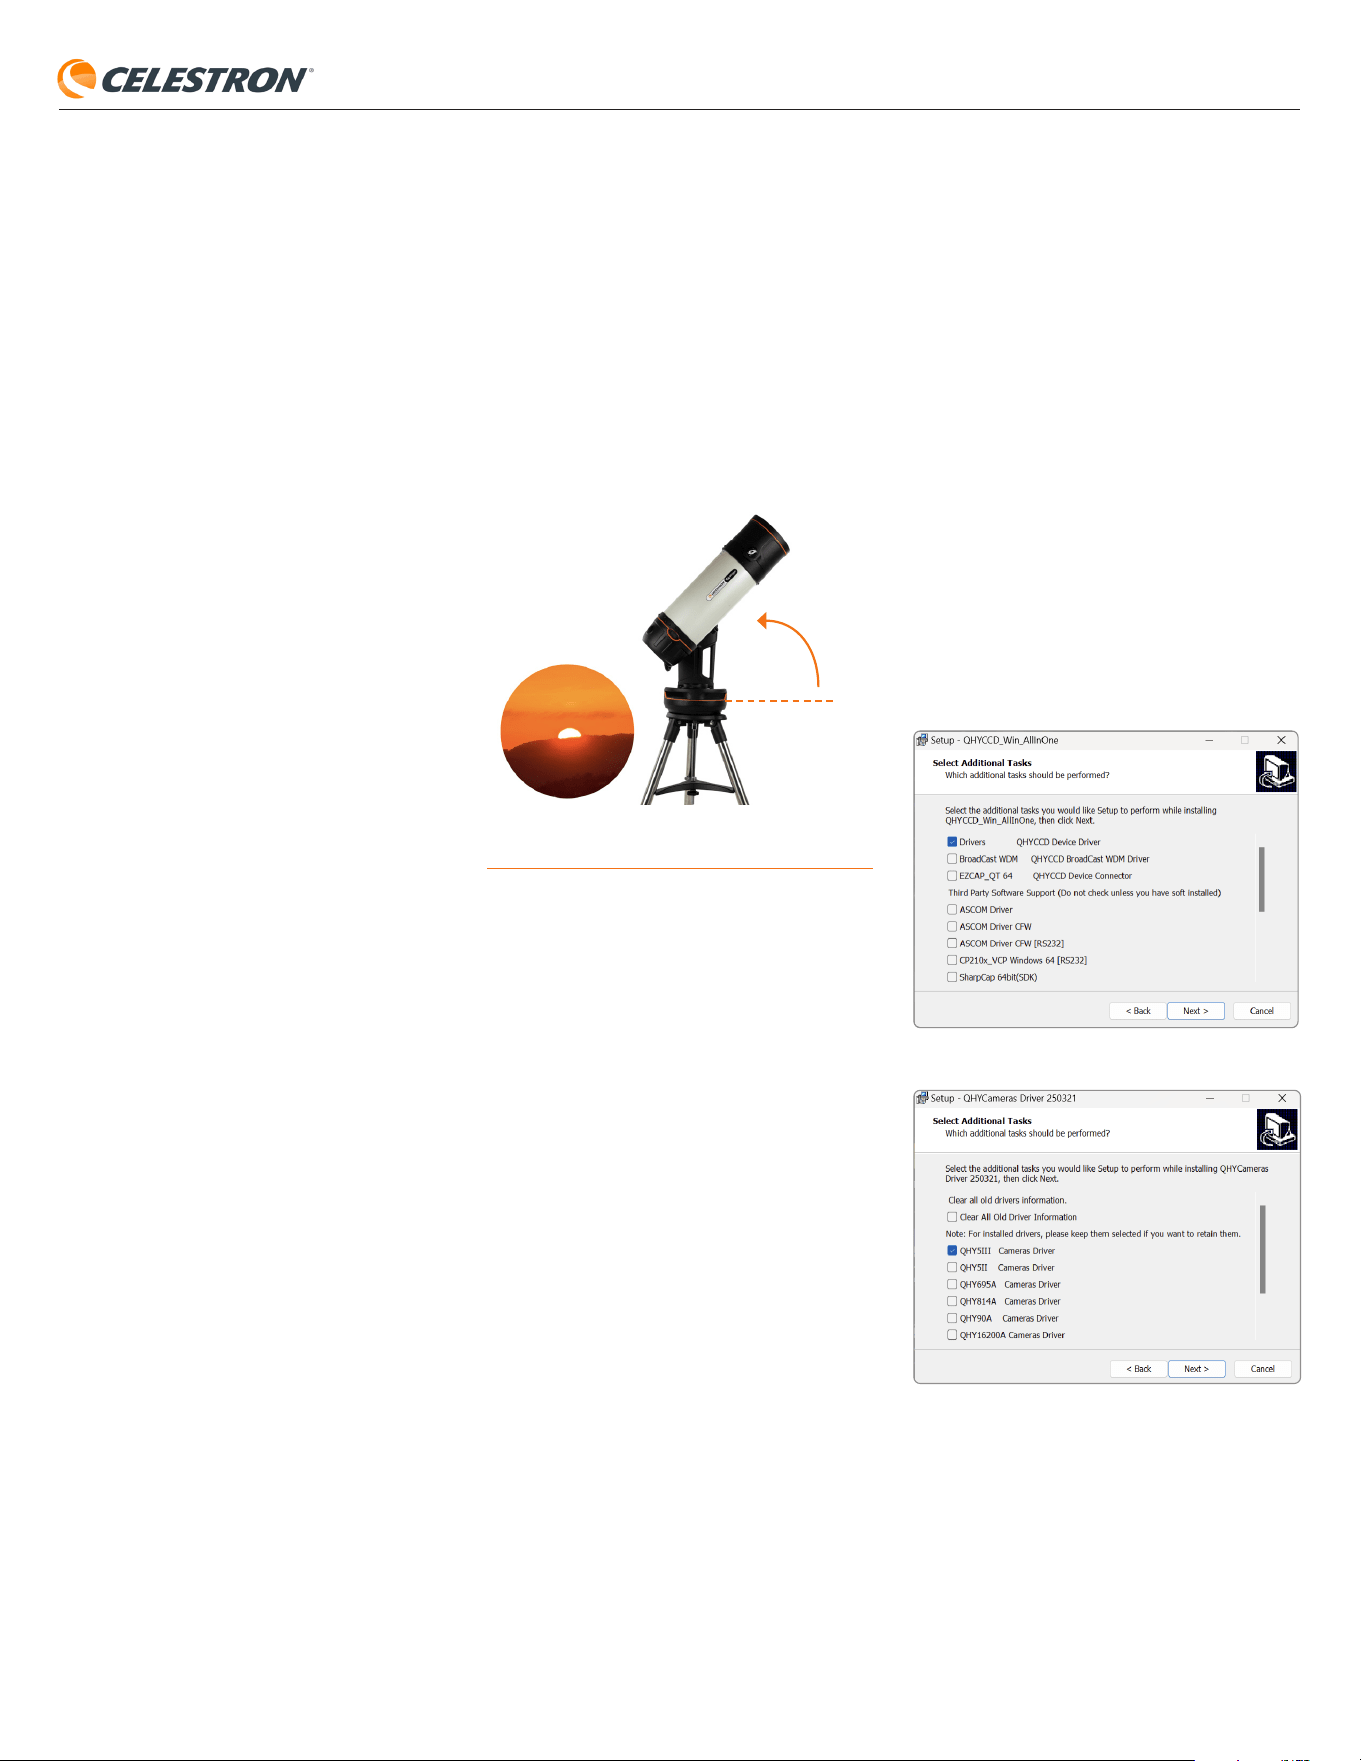
Run the installer, then make sure the “Drivers” box is
selected when you get to this screen:
As installation proceeds, select the QHY5III Driver:
Once both SharpCap and the driver are installed,
connect the Origin-178C Camera to your computer using
a high-quality USB 3 cable. After connecting, launch
SharpCap. From the Cameras menu at the top of the
screen, you should see an option labeled “Origin 178.”
Select it, and the camera’s live image should appear in
SharpCap’s Live View.
For detailed guidance on using SharpCap, refer to the
SharpCap User Manual, available within the software
under Help>View Help.
Specifications
CMOS Image sensor: Sony IMX678-AAQR1, color,
back-illuminated
Sensor size: 8.9mm diagonal
Pixel size: 2.0μm x 2.0μm
Number of effective pixels: 8.4M (3856 x 2180)
IR-Cut coatings: Applied to camera optical window,
transmission from 400-740 nm
Camera mounting threads: M42 x 0.75
USB Port: USB-C
Housing: Aluminum black anodized
Backfocus: 12.5mm
Weight: 3.2 oz
Dimensions: 59.0mm Ø x 25.7mm
NEED ASSISTANCE? Contact Celestron Technical Support
celestron.com/pages/technical-support
Product design and specifications are subject to change without
prior notification. This product is designed and intended for use
by those 14 years of age and older
FCC NOTICE: This device complies with Part 15 of the FCC
Rules. Operation is subject to the following two conditions: (1)
This device may not cause harmful interference, and (2) this device
must accept any interference received, including interference that
may cause undesired operation.
©2025 Celestron. Celestron and Symbol are trademarks of
Celestron, LLC. • All rights reserved. • Celestron.com
US: Celestron, 2835 Columbia Street, Torrance, CA 90503 USA
UK: Celestron Global Ltd., Unit 2 Transigo, Gables Way,
Thatcham RG19 4JZ, United Kingdom
Printed in China. 07/25
MANUEL D’INSTRUCTIONS
FRANÇAIS 3
Nous espérons que vous appréciez votre observatoire
domestique intelligent Origin ! Dès le départ, Origin
a été conçu pour évoluer, s'adaptant aux avancées
technologiques et vous accompagnant dans votre
parcours d'astrophotographe. Votre système était
originellement équipé de la caméra Origin-178C,
équipée du capteur CMOS Starvis de Sony. La caméra
Origin-678C remplace celle-ci et intègre la dernière
technologie CMOS Starvis 2 de Sony. Elle est capable
de générer des pixels plus petits sans sacrifier la
sensibilité, vous permettant de capturer des détails plus
fins sur les objets astronomiques.
Ce mode d'emploi vous guidera dans l'installation de la
caméra Origin-678C sur votre système Origin et vous
expliquera comment capturer de nouvelles images
sombres et claires pour garantir des performances
optimales après la mise à niveau.
Installation de la caméra
L'installation de la caméra Origin-678C est simple, mais
nécessite une attention particulière aux détails. Travaillez
dans un endroit bien éclairé et laissez le tube optique
monté sur le support, pointé vers le haut, pendant
l'installation. Évitez de toucher la plaque correctrice
Schmidt pour éviter les taches ou les empreintes
digitales, qui peuvent être difficiles à nettoyer.
1. Tout d'abord, retirez le pare-soleil de l'avant du
tube optique Origin en appuyant d'une main sur les
deux languettes extérieures du pare-soleil tout en
poussant vers le haut sous le logo Origin, situé à
180° des languettes (Fig. 1).
Fig. 1: Retirez le pare-soleil en appuyant sur les deux languettes tout en
poussant vers le haut, sous le logo Origin.
2. Débranchez le câble USB de la caméra déjà
installée sur Origin. Une fois débranchée, veillez à ce
que le câble ne touche pas le correcteur Schmidt.
3. Saisissez le cache en caoutchouc de la caméra
d'une main, puis dévissez la bague de retenue de
l'autre (Fig. 2).
Fig. 2: Pour retirer la caméra Origin-178C de l'Origin, dévissez d'abord la bague
de retenue.
4. Une fois la bague de retenue entièrement dévissée,
retirez la caméra, l'adaptateur et la bague de retenue
(Fig. 3).
Bague de retenue
Fig. 3: Retrait de la caméra de l'Origin avec la bague de retenue et l'adaptateur
connectés.
Adaptateur pour
caméra
5. Dévissez l'adaptateur de la caméra, puis retirez-le et
la bague de retenue (Fig. 4).
Fig. 4: Retirez l'adaptateur et la bague de retenue de la caméra en dévissant
l'adaptateur.
Anneau de tenue CaméraAdaptateur pour
caméra
6. Retirez le cache en caoutchouc de la caméra (Fig. 5).
Fig. 5: Retirez le cache en caoutchouc de la caméra. Il suffit de le retirer.
7. Placez le cache en caoutchouc sur la caméra Origin-
678C. Orientez le cache en caoutchouc de l'appareil
photo comme illustré à la Fig. 6.
Fig. 6: Installez le cache en caoutchouc sur l'Origin-678C comme illustré.
8. Insérez l'adaptateur dans la bague de retenue et
vissez-le au fond de l'Origin-678C jusqu'à ce qu'il
soit bien serré (Fig. 7).
(Fig.7) L'adaptateur pour appareil photo passe par la bague de retenue et se
visse sous l'appareil.
Bague de retenue CaméraAdaptateur pour caméra
9. Il est maintenant temps de placer l'Origin-678C
sur l'Origin. Placez l'adaptateur sur le tiroir à filtre
exposé (Fig. 8), puis serrez la bague de retenue.
Avant de serrer complètement la bague, nous
vous recommandons de faire pivoter le boîtier de
l'appareil photo pour qu'il corresponde à l'orientation
illustrée à la Fig. 9.
Fig. 8: Placez l'adaptateur pour appareil photo sur le tiroir à filtre exposé, puis
serrez la bague de retenue.
Adaptateur pour
caméra
Bague de retenueTiroir à filtre
Fig. 9: Nous vous recommandons d'orienter l'appareil photo comme illustré,
avec le capteur parallèle au logo Celestron à l'avant. Le capteur est ainsi
perpendiculaire à l'axe d'altitude de l'Origin.
Dans cette configuration, le capteur est aligné avec le
logo Celestron à l'avant du boîtier et perpendiculaire à
l'axe d'altitude d'Origin.
Vous pouvez orienter le capteur comme vous le
souhaitez. N'oubliez pas que si vous faites pivoter
l'appareil photo ultérieurement, vous devrez capturer
une nouvelle image claire pour obtenir de meilleurs
résultats.
REMARQUE: Ne serrez pas trop l'anneau de retenue!
L'image doit être bien ajustée, mais pas trop serrée
pour éviter de la desserrer ultérieurement.
10. Branchez le câble USB sur le port USB-C de
l'appareil photo.
11. Remettez le cache-objectif d'Origin en place.
La caméra est maintenant installée sur votre Origin.
Pour des performances optimales, vous devez capturer
de nouvelles images sombres et claires avant votre
prochaine séance nocturne.
Capturer de nouvelles images
sombres
Les images sombres sont importantes car elles
permettent d'éliminer le bruit du capteur dans les
images. Puisque vous avez installé un nouveau capteur,
vous devez capturer de nouvelles images sombres. Voici
comment procéder:
1. Remettez le capuchon anti-poussière sur Origin.
2. Placez Origin dans un endroit sombre. S'il ne fait pas
complètement sombre, pensez à couvrir Origin avec
une couverture.
3. Allumez Origin et connectez-vous à votre
smartphone ou tablette comme d'habitude.
4. Dans l'application Origin, accédez à Menu
> Paramètres > Avancé, puis appuyez sur «
Recapturer l'ensemble complet d'images sombres
». Origin capturera alors un ensemble complet
d'images sombres avec un temps de sous-exposition
allant jusqu'à 30 secondes. Le processus prend
environ 20 minutes.
5. Si vous utilisez un égaliseur sur cale et que vous
savez que vous capturerez des sous-expositions
de plus de 30 secondes, vous devez capturer
manuellement des images sombres supplémentaires.
Dans l'application, saisissez l'ISO et l'exposition
correspondant aux paramètres manuels de l'appareil
photo que vous souhaitez utiliser pour l'image
sombre. Appuyez ensuite sur « Recapturer les
images sombres ». Ce processus prend quelques
minutes supplémentaires.
6. Si vous utilisez Origin immédiatement après avoir
capturé de nouvelles images sombres, n'oubliez pas
de retirer le cache-poussière !
Caméra Origin-678C Modèle #95531
Onglet:
MANUEL D’INSTRUCTIONS
FRANÇAIS 4
Vous disposez désormais d'un nouvel ensemble
complet d'images sombres pour l'appareil photo Origin-
678C. Les images sombres de l'Origin-178C sont
toujours enregistrées sur Origin. Ainsi, si vous revenez
à l'Origin-178C ultérieurement, vous n'aurez pas besoin
de les reprendre. Origin reconnaîtra l'appareil photo et
sélectionnera automatiquement les images sombres
appropriées.
Capture d'une nouvelle image
claire
Les images claires garantissent une réponse uniforme
à la lumière sur l'ensemble du capteur. Il est conseillé
de capturer une nouvelle image claire à chaque fois que
vous remplacez ou faites pivoter la caméra.
Nous vous recommandons vivement d'acheter le
générateur de cadres plats GIOTTO Origin de
PrimaLuceLab pour capturer facilement des images
claires. Conçu spécialement pour Origin, il vous permet
de capturer des images claires à tout moment depuis
le smartphone ou la tablette que vous utilisez pour
contrôler Origin.
Dans cette section, nous aborderons deux méthodes
pour capturer une nouvelle image claire avec la caméra
Origin-678C: utiliser un générateur de champ plat tiers
ou un panneau EL, et utiliser le ciel au crépuscule,
une technique communément appelée « capture d'une
image du ciel à plat ».
A) Utiliser un générateur de champ plat ou un
panneau EL
1. Allumez le générateur de champ plat (FFG) ou le
panneau EL.
2. Réglez la luminosité du FFG ou du panneau EL
à peu près au milieu de sa plage de luminosité.
REMARQUE: La luminosité exacte n'est pas
essentielle. Origin ajustera automatiquement le
temps d'exposition pendant la capture de l'image
claire pour compenser.
3. Retirez le cache anti-poussière de l'Origin.
4. Allumez Origin et connectez-vous à l'appareil depuis
votre smartphone ou votre tablette.
a. Si vous êtes dehors la nuit, vous pouvez laisser
Origin terminer son initialisation ou appuyer sur
Annuler l'initialisation dans l'application et initialiser
plus tard.
5. Fixez votre panneau FFG ou EL au pare-buée d'Origin
en suivant les instructions fournies avec le panneau.
6. Dans l'application Origin, accédez à Menu
> Paramètres > Avancé, puis appuyez sur «
Recapturer les images claires ». Origin capturera
une nouvelle image claire, ce qui ne prend que
quelques instants
7. Une fois la capture terminée, retirez le panneau FFG
ou EL. Vous êtes maintenant prêt à commencer à
photographier avec votre nouvelle image claire.
B) Utilisation du ciel au crépuscule (c.-à-d. « Ciel
à plat »)
1. Attendez 20 à 30 minutes après le coucher du soleil.
2. Allumez Origin. L'initialisation échouera car les étoiles
ne sont pas encore visibles ; c'est normal. Vous
pouvez également choisir Annuler l'initialisation dans
l'application.
3. Pointez manuellement Origin à une altitude d'environ
60° à 75°, à peu près à l'opposé du coucher du
soleil (Fig. 10). Recherchez une section de ciel
bleu clair et uniforme, sans nuages. Vous pouvez
desserrer les freins de la monture et pointer le
télescope manuellement, ou utiliser les commandes
de déplacement manuelles dans l'application, sous
Menu > Afficher les commandes du télescope.
Altitude
d'Origin:
60-75°
Coucher de
soleil
Fig. 10: Pour capturer un ciel à plat, positionnez l'Origin comme indiqué,
environ 20 à 30 minutes après le coucher du soleil.
4. Ouvrez Menu > Paramètres > Avancé et sélectionnez
« Recapturer les images claires ». Origin capturera
une nouvelle image claire, ce qui ne prend que
quelques instants.
5. Une fois la capture terminée, vous pouvez commencer
à prendre des images avec votre nouvelle image
claire.
Quelles améliorations seront
apportées
1. Résolution accrue
Bien que les deux capteurs aient la même taille,
l'IMX678C utilise des pixels plus petits de 2,0 μm²
que ceux de 2,4 μm² de l'IMX178C. Il en résulte une
résolution plus fine de 1,2 seconde d'arc par pixel (au
lieu de 1,5 seconde d'arc par pixel), ce qui vous permet
d'obtenir plus de détails et de zoomer légèrement
sur les objets célestes. Cela est particulièrement
avantageux car la plupart des cibles du ciel nocturne
sont relativement petites.
2. Plus grande taille de fichier
Comme l'IMX678C génère plus de pixels (8,4 MP contre
6,4 MP), les fichiers image seront légèrement plus
volumineux. Par conséquent, vous constaterez peut-être
un léger ralentissement du traitement automatique des
images dans l'application, selon les performances de
votre smartphone ou tablette.
3. Sensibilité augmentée
Malgré des pixels plus petits, l'IMX678C est globalement
légèrement plus sensible que l'IMX178C. L'amélioration
est subtile; les images n'apparaîtront pas visiblement
plus lumineuses.
4. Réponse ISO différente
Les valeurs ISO ne sont pas directement comparables
entre les deux capteurs. La sensibilité ISO par défaut de
l'IMX678C est de 1000, tandis que celle de l'IMX178C
est de 200.
5. Format d'image différent
L'IMX678C utilise un format d'image 16:9, contre 3:2
pour l'IMX178C. Votre champ de vision apparaîtra
donc plus rectangulaire, ce que certains utilisateurs
préféreront pour cadrer certains objets. Le format
d'image 16:9 correspond mieux à l'affichage paysage
sur les smartphones et les tablettes.
Utilisation de la caméra Origin-
178C d'origine pour d'autres
applications
Maintenant que vous avez mis à niveau votre Origin
avec la nouvelle caméra, la caméra Origin-178C
d'origine peut toujours être utilisée. Par exemple, si vous
possédez un autre télescope, le 178C peut servir de
caméra d'imagerie performante.
Elle est équipée de filetages M42 standard (« filetages
en T ») pour un montage facile et est compatible avec
SharpCap, une application d'imagerie astronomique
largement utilisée pour Windows, disponible en
téléchargement gratuit en ligne.
Pour utiliser la caméra Origin-178C avec SharpCap,
vous devez d'abord installer le pilote Windows
approprié, disponible ici: https://www.qhyccd.com/
download/
Lancez le programme d'installation, puis assurez-vous
que la case « Pilotes » est cochée lorsque vous accédez
à cet écran.
Pendant l'installation, sélectionnez le pilote QHY5III.
Une fois SharpCap et le pilote installés, connectez la
caméra Origin-178C à votre ordinateur à l'aide d'un
câble USB 3.0 haute qualité. Une fois la connexion
établie, lancez SharpCap. Dans le menu « Caméras » en
haut de l'écran, vous devriez voir l'option « Origin 178 ».
Sélectionnez-la et l'image en direct de la caméra devrait
apparaître dans la vue en direct de SharpCap.
Pour des instructions détaillées sur l'utilisation
de SharpCap, consultez le manuel d'utilisation de
SharpCap, disponible dans le logiciel sous Aide >
Afficher l'aide.
Spécifications
Capteur d’image CMOS: Sony IMX678-AAQR1,
couleur, rétroéclairé
Taille du capteur: Diagonale de 8,9mm
Pas de pixel: 2,0 μm x 2,0 μm
Nombre de pixels efficaces: 8.4M (3856 x 2180)
Revêtements IR-Cut: Appliqué sur la fenêtre optique
de la caméra, transmission de 400 à 740 nm
Pas de vis de montage de caméra: M42 x 0,75
Ports USB: USB-C
Boîtier: Aluminium anodisé noir
Rétrofocus: 12,5mm
Poids: 3,2 oz
Dimensions: 59,0 mm Ø x 25,7 mm
MANUEL D’INSTRUCTIONS
FRANÇAIS 5
BESOIN D'ASSISTANCE? Contactez le support technique de
Celestron
celestron.com/pages/technical-support
Le design et les spécifications du produit sont sujettes à
modification sans préavis. Ce produit est conçu et prévu pour
être utilisé par des personnes âgées de 14 ans et plus
Déclaration de la FCC: Cet appareil respecte la section 15 des
règles de la FCC. Son utilisation est sujette aux deux conditions
suivantes: (1) Cet appareil ne doit pas causer d'interférences
nuisibles et (2) cet appareil doit accepter toutes les interférences
reçues, y compris celles pouvant entraîner un fonctionnement
indésirable.
©2025 Celestron. Celestron et le Symbol sont des
marques déposées de Celestron, LLC. • Tous droits réservés •
Celestron.com
US: Celestron, 2835 Columbia Street, Torrance, CA 90503 USA
UK: Celestron Global Ltd., Unit 2 Transigo, Gables Way,
Thatcham RG19 4JZ, Royaume-Uni
Imprimé en Chine 25/07
BEDIENUNGSANLEITUNG
DEUTSCH 6
Wir hoffen, Sie genießen Ihr Origin Intelligent Home
Observatory! Von Anfang an wurde Origin so konzipiert,
dass es wächst und sich weiterentwickelt, sich an den
technologischen Fortschritt anpasst und Sie auf Ihrer
Reise als Astro-Imager unterstützt. Ihr System wurde
ursprünglich mit der Origin-178C Kamera geliefert, die
Sonys Starvis CMOS-Sensor verwendet. Die Origin-
678C Kamera ist ihr Ersatz und verfügt über Sonys
neueste Starvis 2 CMOS-Technologie. Sie bietet
kleinere Pixel, ohne die Empfindlichkeit zu opfern,
sodass Sie feinere Details in astronomischen Objekten
auflösen können.
Dieses Anleitungsblatt führt Sie durch die Installation
der Origin-678C Kamera auf Ihrem Origin-System und
zeigt Ihnen, wie Sie neue Dunkel- und Flat-Frames
aufnehmen, um nach dem Upgrade eine optimale
Leistung zu gewährleisten.
Installation der Kamera
Die Installation der Origin-678C Kamera ist unkompliziert,
erfordert jedoch sorgfältige Detailgenauigkeit. Arbeiten
Sie in einem gut beleuchteten Bereich und lassen Sie
den Tubus während der Installation auf der Halterung,
wobei das Rohr nach oben zeigt. Vermeiden Sie es, die
Schmidt-Korrektorplatte zu berühren, um Flecken oder
Fingerabdrücke zu vermeiden, die schwer zu reinigen
sein können.
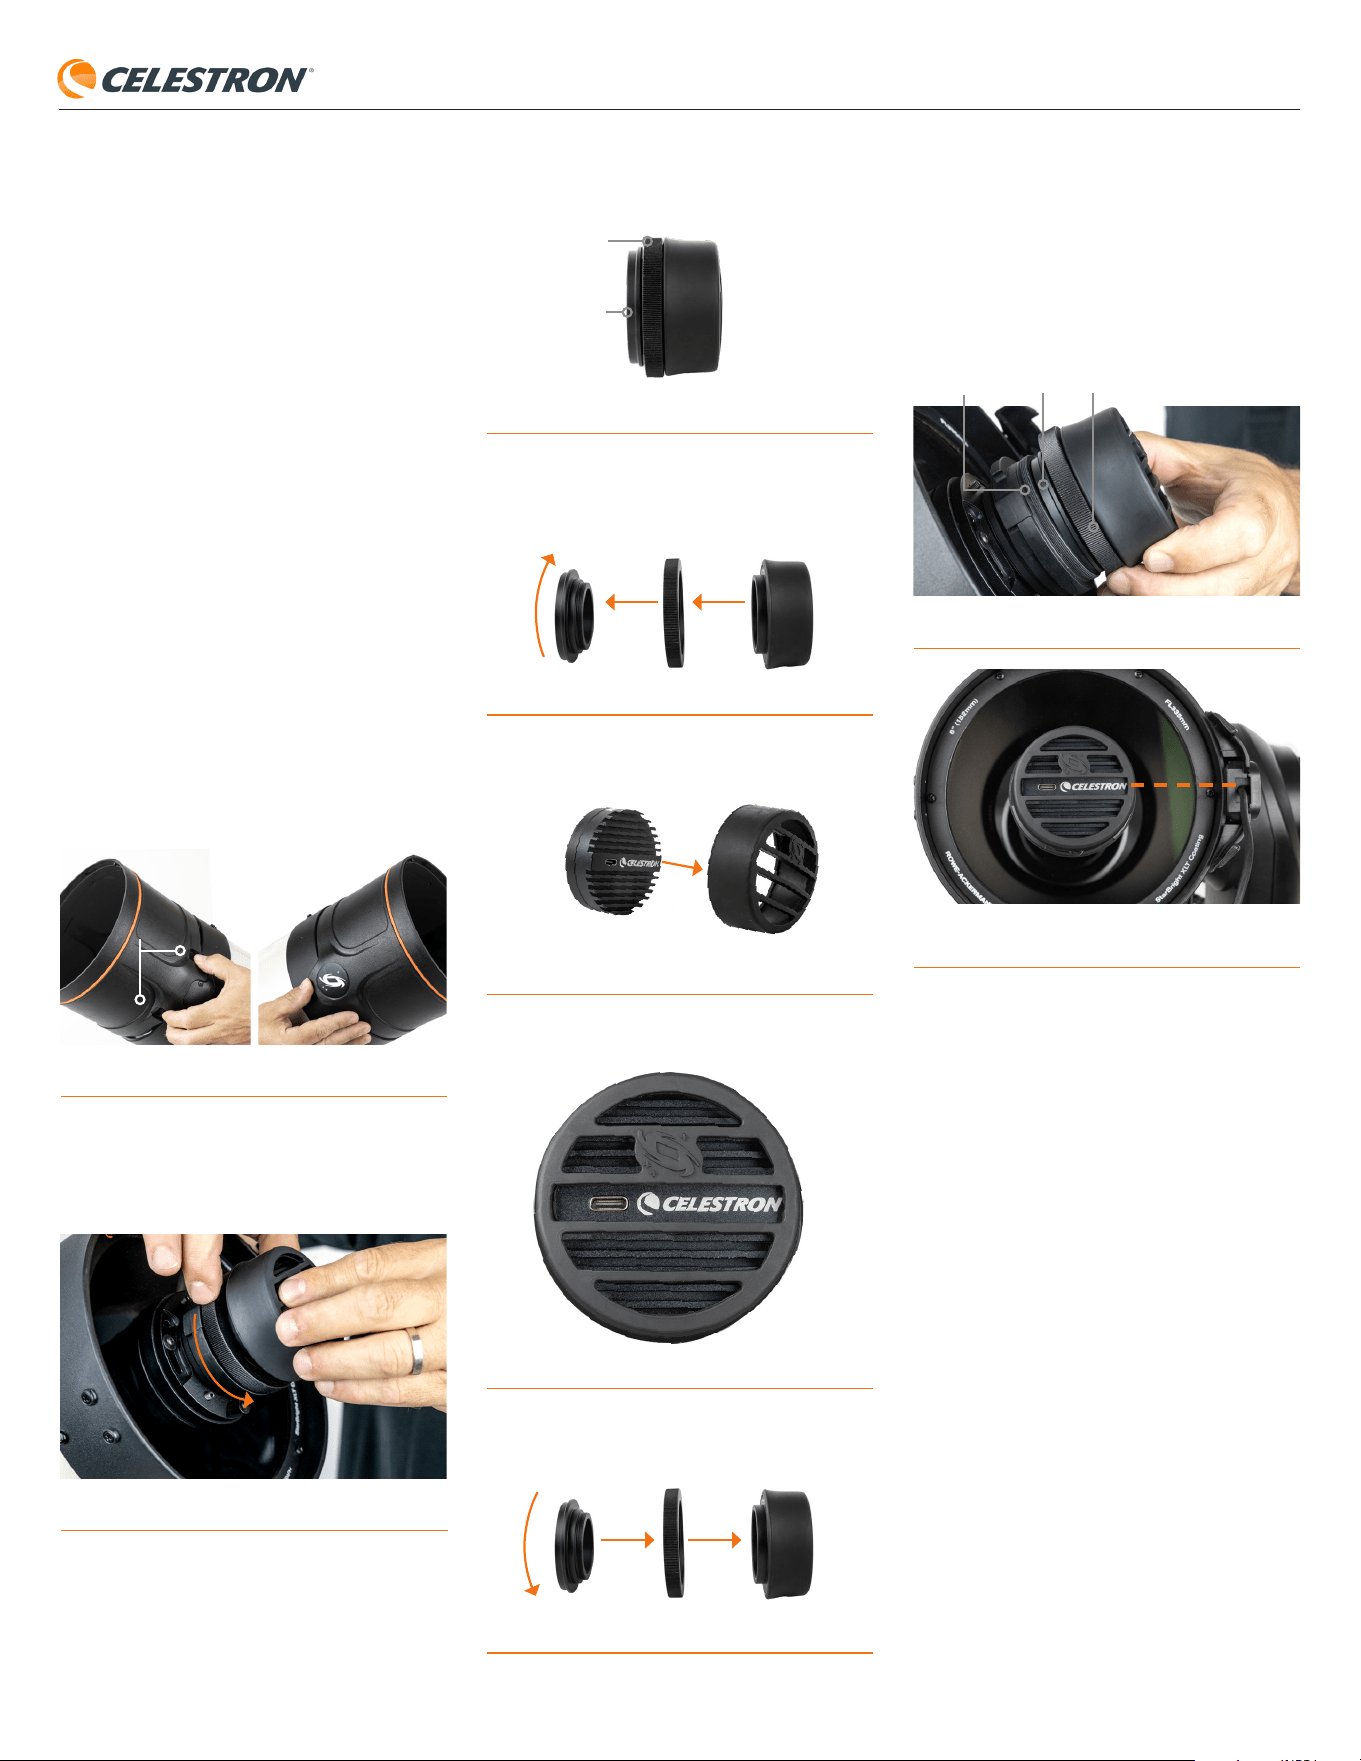
1. Entfernen Sie zuerst die Gegenlichtblende von der
Vorderseite des Origin-Tubus, indem Sie mit einer
Hand auf die beiden Laschen an der Außenseite
der Gegenlichtblende drücken, während Sie mit
der anderen Hand unter dem Origin-Logo, das sich
180° von den Laschen entfernt befindet, nach oben
drücken (Abb. 1).
Abb. 1: Entfernen Sie die Gegenlichtblende, indem Sie auf die beiden Laschen
drücken und gleichzeitig unter dem Origin-Logo nach oben schieben.
2. Ziehen Sie das USB-Kabel von der bereits auf
Origin installierten Kamera ab. Lassen Sie das Kabel
nach dem Trennen nicht die Schmidt-Korrektorplatte
berühren.
3. Fassen Sie die Gummiabdeckung der Kamera
mit einer Hand und schrauben Sie dann den
Kamerasicherungsring mit Ihrer anderen Hand ab
(Abb. 2).
Abb. 2: Um die Origin-178C Kamera von Origin zu entfernen, schrauben Sie
zuerst den Sicherungsring ab.
4. Sobald der Haltering vollständig abgeschraubt ist,
entfernen Sie die Kamera, den Kameraadapter und
den Sicherungsring (Abb. 3).
Sicherungsring
Abb. 3: Entfernen der Kamera von Origin mit verbundenem Sicherungsring
und Kameraadapter.
Kameraadapter
5. Schrauben Sie den Kameraadapter von der Kamera
ab, entfernen Sie dann den Kameraadapter und den
Haltering (Abb. 4).
Abb. 4: Entfernen Sie den Kameraadapter und den Sicherungsring von der
Kamera, indem Sie den Kameraadapter abschrauben.
Sicherungsring KameraKameraadapter
6. Entfernen Sie die Gummiabdeckung von der Kamera
(Abb. 5).
Abb. 5: Entfernen Sie die Gummiabdeckung von der Kamera. Sie können sie
einfach abziehen.
7. Setzen Sie die Gummiabdeckung auf die Origin-
678C Kamera. Richten Sie die Gummiabdeckung
auf der Kamera wie in (Abb. 6) gezeigt aus.
Abb. 6: Installieren Sie die Gummiabdeckung auf der Origin-678C Kamera,
sodass sie wie abgebildet aussieht.
8. Führen Sie den Kameraadapter durch den Haltering
und schrauben Sie ihn fest in die Unterseite der
Origin-678C (Abb. 7).
Abb. 7: Der Kameraadapter geht durch den Sicherungsring und wird in die
Unterseite der Kamera geschraubt.
Sicherungsring KameraKameraadapter
9. Jetzt ist es Zeit, die Origin-678C auf Origin zu
platzieren. Setzen Sie den Kameraadapter auf
den freiliegenden Filterschublade (Abb. 8) und
ziehen Sie dann den Sicherungsring fest. Bevor
Sie den Ring vollständig festziehen, empfehlen wir,
den Kamera zu drehen, um die in Abb. 9 gezeigte
Ausrichtung zu erreichen.
Abb. 8: Setzen Sie den Kameraadapter auf die freiliegende Filterschublade und
ziehen dann den Sicherungsring fest.
Kameraadapter SicherungsringFilterschublade
Abb. 9: Wir empfehlen, die Kamera wie abgebildet auszurichten, wobei der
Sensor parallel zum Celestron-Logo auf der Vorderseite der Kamera ist. Dies
positioniert den Sensor senkrecht zur Höhenachse von Origin.
In dieser Konfiguration ist der Sensor auf
das Celestron-Logo auf der Vorderseite des
Kameragehäuses ausgerichtet und senkrecht zur
Höhenachse von Origin.
Sie können den Kamerasensor beliebig ausrichten.
Denken Sie jedoch daran, dass Sie, wenn Sie
die Kamera später drehen, ein neues Flat-Frame
aufnehmen müssen, um optimale Ergebnisse zu
erzielen.
HINWEIS: Ziehen Sie den Sicherungsring nicht zu fest
an! Er sollte fest und sicher sitzen, aber nicht so fest,
dass er sich später nur schwer lösen lässt.
10. Stecken Sie das USB-Kabel in den USB-C-
Anschluss der Kamera.
11. Bringen Sie die Gegenlichtblende von Origin
wieder an.
Die Kamera ist nun auf Ihrem Origin installiert. Um eine
optimale Leistung zu gewährleisten, müssen Sie vor
Ihrer nächsten Nachtsitzung neue Dunkelbilder und
Flatframes aufnehmen.
Neue Darkframes aufnehmen
Darkframes sind wichtig, da sie das Sensorrauschen in
Bildern eliminieren. Da Sie einen neuen Sensor installiert
haben, müssen Sie neue Darkframes aufnehmen. So
geht's:
1. Setzen Sie die Staubkappe auf das Origin.
2. Stellen Sie Origin an einem dunklen Ort. Wenn es
nicht völlig dunkel ist, ziehen Sie in Betracht, Origin
mit einer Decke abzudecken.
Origin-678C Kamera Modell-Nr. 95531
Registerkarte
BEDIENUNGSANLEITUNG
DEUTSCH 7
3. Schalten Sie Origin ein und verbinden es wie
gewohnt mit Ihrem Smartphone oder Tablet.
4. Navigieren Sie in der Origin-App zu Menü >
Einstellungen > Erweitert und tippen Sie auf
„Gesamten Satz Dunkelbilder neu aufnehmen“.
Origin wird nun einen vollständigen Satz
Dunkelbilder mit einer Unterbelichtungszeit von bis
zu 30 Sekunden aufnehmen. Der Vorgang dauert
etwa 20 Sekunden.
5. Wenn Sie einen Äquatorialkeil verwenden und
wissen, dass Sie Unterbelichtungen von mehr
als 30 Sekunden aufnehmen werden, sollten Sie
zusätzliche Dunkelbilder manuell aufnehmen. Geben
Sie in der App das ISO des Darkframes und die
Belichtung des Darkframes ein, die den von Ihnen
beabsichtigten manuellen Kameraeinstellungen
entsprechen. Drücken Sie dann „Darkframes
neu aufnehmen“. Dieser Vorgang dauert weitere
Minuten.
6. Wenn Sie Origin unmittelbar nach dem Aufnehmen
neuer Dunkelbilder verwenden möchten, denken Sie
daran, die Staubkappe zu entfernen!
Sie haben jetzt einen neuen vollständigen Satz
Dunkelbilder für die Origin-678C Kamera. Die
Darkframes für die Origin-178C sind weiterhin auf Origin
gespeichert. Wenn Sie also später wieder zur Origin-
178C Kamera wechseln, müssen Sie keine Darkframes
erneut aufnehmen. Origin erkennt die Kamera und wählt
automatisch die passenden Dunkelbilder aus.
Neue Flatframes aufnehmen
Flatframes sorgen für eine gleichmäßige Lichtreaktion
über den gesamten Sensor. Sie sollten immer ein
neues Flat-Frame aufnehmen, wenn Sie die Kamera
austauschen oder drehen.
Wir empfehlen dringend den Kauf des GIOTTO
Origin Flatframe Generators von PrimaLuceLab, um
Flatframes einfach aufnehmen zu können. Er wurde
speziell für Origin entwickelt und ermöglicht es Ihnen,
Flatframes jederzeit mit demselben Smartphone oder
Tablet aufzunehmen, das Sie zur Steuerung von Origin
verwenden.
In diesem Abschnitt werden zwei Methoden zum
Aufnehmen eines neuen Flat-Frames mit der Origin-
678C Kamera behandelt: die Verwendung eines
Flat-Field-Generators oder einer EL-Platte eines
Drittanbieters und die Verwendung des Himmels in der
Dämmerung – eine Technik, die gemeinhin als „Sky Flat“
bezeichnet wird.
A) Verwendung eines Flatfield-Generators oder
einer Korrektur-Platte
1. Schalten Sie den Flatfield-Generator (FFG) oder die
Korrektur-Platte ein.
2. Passen Sie die Helligkeit des FFG oder der Korrektur-
Platte ungefähr auf die Mitte ihres Helligkeitsbereichs an.
HINWEIS: Die genaue Helligkeit ist nicht
entscheidend. Origin passt die Belichtungszeit
während der Flat-Frame-Aufnahme automatisch an,
um dies auszugleichen.
3. Entfernen Sie die Staubkappe von Origin.
4. Schalten Sie Origin ein und verbinden Sie es mit
Ihrem Smartphone oder Tablet.
a. Wenn Sie nachts draußen sind, können Sie Origin
die Initialisierung abschließen lassen oder in der
App auf Initialisierung abbrechen tippen und
später initialisieren.
5. Befestigen Sie Ihren FFG oder Ihre Korrektur-Platte
am Tauschutz von Origin und befolgen Sie dabei die
mit dem Panel mitgelieferten Anweisungen.
6. Navigieren Sie in der Origin-App zu Menü >
Einstellungen > Erweitert und tippen Sie auf „Flat-
Frames neu aufnehmen“. Origin nimmt ein neues
Flatframe auf, das nur wenige Augenblicke dauert.
7. Wenn die Aufnahme abgeschlossen ist, entfernen
Sie den FFG oder die Korrektur-Platte. Jetzt sind
Sie bereit, mit Ihrem neuen Flat-Frame Bilder
aufzunehmen.
B) Verwendung des Himmels in der Dämmerung
(d. h. „Sky Flat“)
1. Warten Sie 20-30 Minuten nach Sonnenuntergang.
2. Schalten Sie Origin ein. Die Initialisierung schlägt
fehl, da Sterne noch nicht sichtbar sind – dies ist zu
erwarten. Sie können in der App auch „Initialisierung
abbrechen“ wählen.
3. Richten Sie Origin manuell auf eine Höhe von etwa
60° - 75° aus und ungefähr entgegen der Richtung,
in der die Sonne untergegangen ist (Abb. 10).
Suchen Sie nach einem klaren, gleichmäßigen
blauen Himmelsabschnitt ohne Wolken. Sie können
die Kupplungen der Montierung lösen und das
Teleskop von Hand ausrichten oder die manuellen
Schwenksteuerungen in der App unter Menü > Show
Scope Controls verwenden.
Höhe des
Origin 60-75°
Sonnenuntergang
Abb. 10: Um einen „Sky Flat“ aufzunehmen, positionieren Sie Origin wie
abgebildet etwa 20-30 Minuten nach Sonnenuntergang.
4. Navigieren Sie zu Menü > Einstellungen > Erweitert
und wählen Sie „Flatframes neu aufnehmen“. Origin
nimmt ein neues Flatframe auf, das nur wenige
Augenblicke dauert.
5. Wenn die Aufnahme abgeschlossen ist, können
Sie mit der Bildgebung mit Ihrem neuen Flatframe
beginnen.
Was Sie erwarten können
1. Erhöhte Auflösung
Obwohl beide Sensoren die gleiche physikalische
Größe haben, verwendet der IMX678C kleinere 2,0 μm²
Pixel als die 2,4 μm² Pixel im IMX178C. Dies führt zu
einer feineren Auflösung von 1,2 Bogensekunden pro
Pixel (vorher 1,5 Bogensekunden pro Pixel), wodurch Sie
mehr Details auflösen und astronomische Objekte leicht
„heranzoomen“ können. Dies ist besonders vorteilhaft,
da die meisten Himmelsziele relativ klein sind.
2. Größere Dateigrößen
Da der IMX678C mehr effektive Pixel (8,4 MP vs. 6,4 MP)
hat, sind die Bilddateien etwas größer. Infolgedessen
kann die automatische Bildverarbeitung in der App je
nach Leistung Ihres Smartphones oder Tablets etwas
langsamer sein.
3. Erhöhte Empfindlichkeit
Trotz kleinerer Pixel ist der IMX678C insgesamt etwas
empfindlicher als der IMX178C. Die Verbesserung ist
subtil. Bilder werden nicht dramatisch heller erscheinen.
4. Andere ISO-Antwort
ISO-Werte sind zwischen den beiden Sensoren nicht
direkt vergleichbar. Der Standard-ISO-Wert des
IMX678C ist 1000, während der des IMX178C 200
beträgt.
5. Anderes Seitenverhältnis
Der IMX678C verwendet ein Seitenverhältnis von 16:9,
verglichen mit dem 3:2-Verhältnis des IMX178C. Dies
bedeutet, dass Ihr Sichtfeld rechteckiger erscheint,
was einige Benutzer für die Bildkomposition bestimmter
Objekte bevorzugen könnten. Das 16:9-Seitenverhältnis
entspricht besser der Querformatanzeige auf
Smartphones und Tablets.
Verwendung der Original
Origin-178C Kamera für
andere Anwendungen
Nachdem Sie Origin mit der neuen Kamera aufgerüstet
haben, kann die ursprüngliche Origin-178C
Kamera immer noch gut genutzt werden. Wenn Sie
beispielsweise ein anderes Teleskop besitzen, kann die
178C als leistungsfähige Bildgebungskamera dienen.
Sie verfügt über Standard-M42-Gewinde („T-Gewinde“)
für eine einfache Montage und ist kompatibel mit
SharpCap, einer weit verbreiteten astronomischen
Bildgebungsanwendung für Windows, die als
kostenloser Online-Download erhältlich ist.
Um die Origin-178C Kamera mit SharpCap zu
verwenden, müssen Sie zunächst den entsprechenden
Windows-Treiber installieren, der hier verfügbar ist:
https://www.qhyccd.com/download/
Führen Sie das Installationsprogramm aus und stellen
Sie sicher, dass das Kästchen „Drivers“ (Treiber)
ausgewählt ist, wenn Sie diesen Bildschirm erreichen:
Während der Installation wählen Sie den QHY5III-
Treiber aus:
Sobald sowohl SharpCap als auch der Treiber installiert
sind, verbinden Sie die Origin-178C Kamera mit
Ihrem Computer über ein hochwertiges USB 3-Kabel.
Starten Sie nach dem Anschließen SharpCap. Im Menü
„Cameras“ (Kameras) oben auf dem Bildschirm sollte
eine Option namens „Origin 178“ angezeigt werden.
Wählen Sie diese aus und das Live-Bild der Kamera
sollte in SharpCaps Live View erscheinen.
Für detaillierte Anleitungen zur Verwendung von
SharpCap lesen Sie das SharpCap-Benutzerhandbuch,
das in der Software unter Hilfe > Hilfe anzeigen
verfügbar ist.
BEDIENUNGSANLEITUNG
DEUTSCH 8
Technische Daten
CMOS-Bildsensor: Sony IMX678-AAQR1, Farbe,
rückseitig belichtet
Sensorgröße: 8,9 mm Diagonale
Pixelgröße: 2,0 μm x 2,0 μm
Anzahl der effektiven Pixel: 8,4M (3856 x 2180)
Beschichtungen mit Infrarotfilter: Auf dem
optischen Fenster der Kamera, Transmission von 400 -
740 nm
Kameramontagegewinde: M42 x 0,75
USB-Anschluss: USB-C
Gehäuse: Aluminium, schwarz eloxiert
Backfokus: 12,5 mm
Gewicht: 3,2 oz.
Abmessungen: 59,0 mm Ø x 27,7 mm
BENÖTIGEN SIE UNTERSTÜTZUNG? Wenden Sie sich an
die technische Unterstützung von Celestron unter
celestron.com/pages/technical-support
Produktdesign und technische Daten können ohne vorherige
Ankündigung geändert werden. Dieses Produkt ist für Personen
ab 14 Jahren konzipiert und vorgesehen.
FCC-HINWEIS: Dieses Gerät entspricht Teil 15 der FCC-
Bestimmungen. Der Betrieb unterliegt den folgenden beiden
Bedingungen: (1) Dieses Gerät darf keine schädlichen
Störungen erzeugen und (2) dieses Gerät muss Störungen von
außen akzeptieren, dazu gehören solche Störungen, die einen
unerwünschten Betrieb verursachen.
©2025 Celestron. Celestron und Symbol sind Marken von
Celestron, LLC. • Alle Rechte vorbehalten. • Celestron.com
USA: Celestron, 2835 Columbia Street, Torrance, CA 90503
USA
UK: Celestron Global Ltd., Einheit 2 Transigo, Gables Way,
Thatcham RG19 4JZ, Vereinigtes Königreich
Gedruckt in China. 07/25
MANUALE DI ISTRUZIONI
ITALIANO 9
Ci auguriamo che il tuo Origin Intelligent Home
Observatory ti stia piacendo! Fin dall'inizio, Origin è
stata progettata per crescere ed evolversi, adattandosi
ai progressi della tecnologia e supportandoti nel
tuo percorso come astrofotografo. Il tuo sistema era
originariamente dotato della fotocamera Origin-178C,
che utilizza il sensore CMOS Starvis di Sony. La
fotocamera Origin-678C la sostituisce, dotata della più
recente tecnologia CMOS Starvis 2 di Sony. Offre pixel
più piccoli senza sacrificare la sensibilità, consentendoti
di risolvere dettagli più fini negli oggetti astronomici.
Questo foglio di istruzioni ti guiderà nell'installazione
della telecamera Origin-678C sul tuo sistema Origin e
ti mostrerà come acquisire nuovi dark e flat frame per
garantire prestazioni ottimali dopo l'aggiornamento.
Installazione della
fotocamera
L'installazione della fotocamera Origin-678C è
semplice, ma richiede molta attenzione ai dettagli.
Lavorare in un'area ben illuminata e lasciare il tubo ottico
sulla montatura con il tubo rivolto verso l'alto durante
l'installazione. Evitare di toccare la piastra correttrice
Schmidt per evitare macchie o impronte digitali, che
possono essere difficili da pulire.
1. Innanzitutto, rimuovere il paraluce dalla parte
anteriore del tubo ottico Origin premendo con una
mano le due linguette all'esterno del paraluce e
spingendo verso l'alto sotto il logo Origin situato a
180° dalle linguette (Fig. 1).
Fig. 1: Rimuovi il paraluce premendo verso il basso le due linguette e spingendo
verso l'alto sotto il logo Origin.
Linguette
2. Scollega il cavo USB dalla fotocamera già installata
su Origin. Una volta scollegato, evitare che il cavo
tocchi il correttore Schmidt.
3. Afferrare la copertura in gomma della fotocamera
con una mano, quindi svitare l'anello di fissaggio con
l'altra mano (Fig. 2).
Fig. 2: Per rimuovere la fotocamera Origin-178C da Origin, svitare prima l'anello
di fissaggio.
4. Una volta svitato completamente l'anello di fissaggio,
rimuovere la fotocamera, l'adattatore e l'anello di
fissaggio (Fig. 3).
Anello di fissaggio
Fig. 3: Rimozione della fotocamera da Origin con l'anello di fissaggio e
l'adattatore collegati.
Adattatore
fotocamera
5. Svitare l'adattatore dalla fotocamera, quindi
rimuovere l'adattatore e l'anello di fissaggio (Fig. 4).
Fig. 4: Rimuovere l'adattatore e l'anello di fissaggio dalla fotocamera svitando
l'adattatore.
Anello di fissaggio
Fotocamera
Adattatore fotocamera
6. Rimuovere la copertura in gomma dalla fotocamera
(Fig. 5).
Fig. 5: Rimuovere il coperchio in gomma dalla fotocamera. È sufficiente
tirarlo via.
7. Posizionare la copertura in gomma sulla fotocamera
Origin-678C. Orientare la copertura in gomma sulla
fotocamera come mostrato in Fig. 6.
Fig. 6: Installare il coperchio in gomma sulla Origin-678C in modo che appaia
come mostrato in figura.
8. Inserire l'adattatore per fotocamera attraverso
l'anello di fissaggio e avvitarlo nella parte inferiore
dell'Origin-678C fino a stringerlo (Fig. 7).
Fig. 7: L'adattatore per fotocamera passa attraverso l'anello di fissaggio e si
avvita nella parte inferiore della fotocamera.
Anello di fissaggio FotocameraAdattatore fotocamera
9. Ora è il momento di posizionare l'Origin-678C
sull'Origin. Posizionare l'adattatore per fotocamera
sul cassetto portafiltri esposto (Fig. 8), quindi
stringere l'anello di fissaggio. Prima di stringere
completamente l'anello, si consiglia di ruotare il
corpo macchina per adattarlo all'orientamento
mostrato in Fig. 9.
Fig. 8: Posizionare l'adattatore per fotocamera sul cassetto portafiltri esposto,
quindi serrare l'anello di fissaggio.
Adattatore
fotocamera
Anello di fissaggioCassetto filtro
Fig. 9: Consigliamo di orientare la fotocamera come mostrato, con il sensore
parallelo al logo Celestron sulla parte anteriore della fotocamera. In questo modo, il
sensore viene posizionato perpendicolarmente all'asse di altitudine di Origin.
In questa configurazione, il sensore è allineato con il
logo Celestron sulla parte anteriore dell'alloggiamento
della fotocamera e perpendicolare all'asse di altitudine
di Origin.
Puoi orientare il sensore della fotocamera come
preferisci. Ricorda solo che se ruoti la fotocamera in un
secondo momento, dovrai acquisire un nuovo flat frame
per ottenere risultati ottimali.
NOTA: Non stringere eccessivamente l'anello di
fissaggio! Deve essere aderente e sicuro, ma non così
stretto da risultare difficile da allentare in seguito.
10. Collega il cavo USB alla porta USB-C della
fotocamera.
11. Riposiziona il paraluce di Origin.
La fotocamera è ora installata su Origin. Per garantire
prestazioni ottimali, devi acquisire nuovi dark e flat frame
prima della successiva sessione notturna.
Acquisizione di nuovi dark
frame
I dark frame sono importanti perché aiutano a eliminare il
rumore del sensore nelle immagini. Poiché hai installato
un nuovo sensore, devi acquisire nuovi dark frame. Ecco
come fare:
1. Applica il tappo antipolvere su Origin.
2. Posiziona Origin in un luogo buio. Se non è completa-
mente buio, valuta la possibilità di coprire Origin con
una coperta.
Fotocamera Origin-678C Modello n. 95531
MANUALE DI ISTRUZIONI
ITALIANO 10
3. Accendi Origin e connettiti al tuo smartphone o
tablet come di consueto.
4. Nell'app Origin, vai a Menu>Impostazioni>Avanzate
e tocca "Ricattura set completo di dark frame".
Origin acquisirà ora un set completo di dark frame
con un massimo di 30 secondi di sottoesposizione.
Il processo richiede circa 20 minuti.
5. Se utilizzi un EQ Wedge e sai che acquisirai
sottoesposizioni superiori a 30 secondi, dovresti
acquisire manualmente ulteriori dark frame. Nell'app,
inserisci i valori Dark Frame ISO ed Dark Frame
Exposure che corrispondono alle impostazioni
manuali della fotocamera che intendi utilizzare.
Quindi premi "Ricattura Dark Frame". Questo
processo richiede altri pochi minuti.
6. Se intendi utilizzare Origin subito dopo aver
acquisito nuovi dark frame, ricordati di rimuovere il
tappo antipolvere!
Ora hai un nuovo set completo di dark frame per la
fotocamera Origin-678C. I dark frame per la fotocamera
Origin-178C sono ancora salvati su Origin, quindi se in
seguito tornerai alla fotocamera Origin-178C, non dovrai
acquisire nuovamente i dark frame. Origin riconoscerà
la fotocamera e selezionerà automaticamente i dark
frame appropriati.
Acquisizione di un nuovo flat
frame
I flat frame aiutano a garantire una risposta uniforme alla
luce su tutto il sensore. Dovresti acquisire un nuovo flat
frame ogni volta che sostituisci o ruoti la fotocamera.
Consigliamo vivamente l'acquisto del generatore Flat-
Frame GIOTTO Origin di PrimaLuceLab per catturare
facilmente flat frame. Progettato appositamente per
Origin, consente di catturare flat frame in qualsiasi
momento dallo stesso smartphone o tablet che si
utilizza per controllare Origin.
In questa sezione, illustreremo due metodi per catturare
un nuovo flat frame con la fotocamera Origin-678C:
utilizzando un generatore di flat-field o un pannello EL
di terze parti e utilizzando il cielo al crepuscolo, una
tecnica comunemente chiamata cattura di uno "sky flat".
A) Utilizzo di un generatore di campo piatto o di
un pannello EL
1. Accendi il generatore di campo piatto (FFG) o il
pannello EL.
2. Regola la luminosità del pannello FFG o EL
approssimativamente al punto medio del suo
intervallo di luminosità.
NOTA: La luminosità esatta non è fondamentale.
Origin regolerà automaticamente il tempo di
esposizione durante l'acquisizione di flat frame per
compensare.
3. Rimuovi il cappuccio antipolvere di Origin.
4. Accendi Origin e connettiti tramite smartphone o
tablet.
a. Se ti trovi all'aperto di notte, puoi lasciare che
Origin completi l'inizializzazione oppure toccare
"Annulla inizializzazione" nell'app e inizializzare in
seguito.
5. Attacca il pannello FFG o EL al paraluce di Origin
seguendo le istruzioni fornite con il pannello.
6. Nell'app Origin, vai su Menu>Impostazioni>Avanzate
e tocca "Ricattura flat frame". Origin catturerà un
nuovo flat frame, operazione che richiederà solo
pochi istanti.
7. Una volta completata l'acquisizione, rimuovere il
pannello FFG o EL. Ora sei pronto per iniziare a
creare immagini con il tuo nuovo flat frame.
B) Utilizzo del cielo al tramonto (ovvero "Sky
Flat")
1. Attendi 20-30 minuti dopo il tramonto.
2. Accendi Origin. L'inizializzazione non andrà a buon fine
poiché le stelle non sono ancora visibili: è normale.
Puoi anche selezionare "Annulla inizializzazione"
nell'app.
3. Punta manualmente Origin a un'altitudine di circa 60°
- 75° e approssimativamente in direzione opposta
al punto in cui tramonta il Sole (Fig. 10). Cerca una
striscia di cielo azzurro limpido e uniforme, senza
nuvole. Puoi allentare le frizioni della montatura e
puntare il telescopio manualmente oppure utilizzare
i controlli di rotazione manuale nell'app, in Menu >
Mostra controlli telescopio.
Altitudine di
Origin 60-75°
Tramonto
Fig. 10: Per catturare un "cielo piatto", posizionare Origin come mostrato circa
20-30 minuti dopo il tramonto.
4. Vai a Menu > Impostazioni > Avanzate e seleziona
"Ricattura flat frame". Origin catturerà un nuovo flat
frame, operazione che richiederà solo pochi istanti.
5. Una volta completata l'acquisizione, è possibile
iniziare a creare immagini utilizzando il nuovo flat
frame.
Cosa aspettarsi
1. Risoluzione aumentata
Sebbene entrambi i sensori abbiano le stesse
dimensioni fisiche, l'IMX678C utilizza pixel da 2,0 μm²
più piccoli rispetto ai pixel da 2,4 μm² dell'IMX178C.
Questo si traduce in una risoluzione più precisa di 1,2
secondi d'arco per pixel (in calo rispetto a 1,5 secondi
d'arco per pixel), consentendo di risolvere maggiori
dettagli e di "zoomizzare" leggermente sugli oggetti
celesti. Questo è particolarmente vantaggioso poiché
la maggior parte dei bersagli del cielo notturno sono
relativamente piccoli.
2. File di dimensioni maggiori
Poiché l'IMX678C integra un numero maggiore di pixel
effettivi (8,4 MP contro 6,4 MP), i file immagine saranno
leggermente più grandi. Di conseguenza, potresti notare
un'elaborazione automatica delle immagini leggermente
più lenta nell'app, a seconda delle prestazioni del tuo
smartphone o tablet.
3. Maggiore sensibilità
Nonostante i pixel più piccoli, l'IMX678C è
complessivamente leggermente più sensibile
dell'IMX178C. Il miglioramento è minimo; le immagini
non appariranno molto più luminose.
4. Diversa risposta ISO
I valori ISO non sono direttamente confrontabili tra i due
sensori. L'ISO predefinito dell'IMX678C è 1000, mentre
quello dell'IMX178C è 200.
5. Diverso rapporto d'aspetto
L'IMX678C utilizza un rapporto d'aspetto 16:9, rispetto
al rapporto 3:2 dell'IMX178C. Ciò significa che il campo
visivo apparirà più rettangolare, caratteristica che alcuni
utenti potrebbero preferire per inquadrare determinati
oggetti. Il rapporto d'aspetto 16:9 corrisponde meglio
alla visualizzazione orizzontale su smartphone e tablet.
Utilizzo della fotocamera
Origin-178C originale per
altre applicazioni
Ora che hai aggiornato Origin con la nuova fotocamera,
la fotocamera Origin-178C originale può ancora essere
utilizzata al meglio. Ad esempio, se possiedi un altro
telescopio, la 178C può fungere da fotocamera per
immagini.
È dotata di filettature standard M42 ("filettature a T") per
un facile montaggio ed è compatibile con SharpCap,
un'applicazione di imaging astronomico per Windows
ampiamente utilizzata, disponibile come download
gratuito online.
Per utilizzare la fotocamera Origin-178C con SharpCap,
è necessario prima installare il driver Windows
appropriato, disponibile qui: https://www.qhyccd.com/
download/
Eseguire il programma di installazione, quindi assicurarsi
che la casella "Driver" sia selezionata quando si arriva a
questa schermata:
Durante l'installazione, selezionare il driver QHY5III:
Una volta installati SharpCap e il driver, collegare la
fotocamera Origin-178C al computer utilizzando un
cavo USB 3.0 di alta qualità. Dopo la connessione,
avvia SharpCap. Dal menu "Fotocamere" nella parte
superiore dello schermo, dovresti vedere un'opzione
denominata "Origin 178". Selezionala e l'immagine live
della fotocamera dovrebbe apparire nella vista live di
SharpCap.
Per istruzioni dettagliate sull'utilizzo di SharpCap,
consulta il Manuale utente di SharpCap, disponibile
all'interno del software in Guida>Visualizza Guida.
MANUALE DI ISTRUZIONI
ITALIANO 11
Specifiche
Sensore di immagine CMOS: Sony IMX678-AAQR1,
a colori, retroilluminato
Dimensioni del sensore: Diagonale 8,9mm
Dimensione pixel: 2.0μm x 2.0μm
Numero di pixel effettivi: 8.4M (3856 x 2180)
Rivestimenti IR-Cut: Applicati alla finestra ottica della
fotocamera, trasmissione da 400 a 740 nm
Filettature di montaggio della fotocamera: M42 x
0,75
Porta USB: USB-C
Alloggiamento: Alluminio anodizzato nero
Messa a fuoco automatica: 12,5 mm
Peso: 3,2 oz
Dimensioni: 59,0mm Ø x 25,7mm
BISOGNO DI AIUTO? Contattare l'Assistenza Tecnica
Celestron
celestron.com/pages/technical-support
Il design del prodotto e le specifiche sono soggetti a modifiche
senza previa notifica. Questo prodotto è progettato per essere
utilizzato da persone di età pari o superiore ai 14 anni
NOTA FCC: Il presente dispositivo è conforme alla Parte 15 delle
Norme FCC. L'utilizzo è soggetto alle seguenti due condizioni: (1)
Il presente dispositivo non deve causare interferenze dannose, e
(2) il presente dispositivo deve accettare qualsiasi interferenza
ricevuta, comprese interferenze che potrebbero causare un
funzionamento indesiderato.
©2025 Celestron. Celestron e Simbolo sono marchi commerciali
di Celestron, LLC. • Tutti i diritti riservati. • Celestron.com
Stati Uniti: Celestron, 2835 Columbia Street, Torrance, CA
90503 Stati Uniti
Regno Unito: Celestron Global Ltd., Unit 2 Transigo, Gables Way,
Thatcham RG19 4JZ Regno Unito
Stampato in Cina. 07/25
MANUAL DE INSTRUCCIONES
ESPAÑOL 12
Esperamos que disfrute con su observatorio doméstico
inteligente Origin. Desde sus inicios, Origin ha sido
diseñado para crecer y evolucionar, adaptándose
a medida que avanza la tecnología y ayudándole
en su viaje como astrofotógrafo. Su sistema incluía
originalmente la cámara Origin-178C, que usa el sensor
CMOS Starvis de Sony. La cámara Origin-678C la
sustituye, con la última tecnología CMOS Starvis 2 de
Sony. Ofrece píxeles de menor tamaño sin comprometer
la sensibilidad, permitiéndole resolver detalles más
precisos en objetos astronómicos.
Esta ficha de instrucciones le orientará en la instalación
de la cámara Origin-678C en su sistema Origin y le
mostrará como capturar nuevos fotogramas oscuros y
planos para garantizar un rendimiento optimo después
de la actualización.
Instalación de la cámara
Instalar la cámara Origin-678C no es complicado,
pero precisa prestar atención a los detalles. Trabaje
en un lugar bien iluminado y deje el tubo óptico en el
soporte, con el tubo apuntando hacia arriba durante la
instalación. Evite tocar la placa del corrector Schmidt
para evitar manchas o huellas dactilares, que pueden
ser difíciles de limpiar.
1. Primero, retire el parasol de la lente de la parte
anterior del tubo óptico de Origin presionando las
dos pestañas del exterior del parasol con una mano
mientras empuja hacia arriba bajo el logotipo Origin
situado a 180° de distancia de las pestañas (Fig. 1).
Fig. 1: Retire el parasol de la lente presionando las dos pestañas hacia abajo y
empujando hacia arriba bajo el logotipo Origin.
2. Desconecte el cable USB de la cámara ya instalada
en Origin. No deje que el cable toque el corrector
Schmidt cuando esté desconectado.
3. Agarre la cubierta de caucho de la cámara con una
mano, desenrosque la arandela de retención de la
cámara con la otra mano (Fig. 2).
Fig. 2: Para retirar la cámara Origin-178C de Origin, desenrosque primero la
arandela de retención.
4. Cuando la arandela de retención esté totalmente
desenroscada, retire la cámara, el adaptador de la
cámara y la arandela de retención (Fig. 3).
Arandela de
retención
Fig. 3: Retirar la cámara de Origin con la arandela de retención y el adaptador
de cámara conectados.
Adaptador de
cámara
5. Desenrosque el adaptador de cámara de la cámara
y retire el adaptador de cámara y la arandela de
retención (Fig. 4).
Fig. 4: Retire el adaptador de cámara y la arandela de retención de la cámara
desenroscando el adaptador de la cámara.
Arandela de
retención
CámaraAdaptador de cámara
6. Retire la cubierta de caucho de la cámara (Fig. 5).
Fig. 5: Retire la cubierta de caucho de la cámara. Solamente tiene que tirar
de ella.
7. Coloque la cubierta de caucho en la cámara Origin-
678C. Oriente la cubierta de caucho de la cámara
como se indica en la Fig. 6.
Fig. 6: Instale la cubierta de caucho en Origin-678C de modo que quede como
se indica.
8. Inserte el adaptador de la cámara por la arandela de
retención y enrósquelo en la parte inferior de Origin-
678C hasta que quede apretado (Fig. 7).
Fig.7: El adaptador de cámara pasa por la arandela de retención y se enrosca a
la parte inferior de la cámara.
Arandela de
retención
CámaraAdaptador de cámara
9. Ahora es el momento de colocar la Origin-678C
en Origin. Coloque el adaptador de la cámara
sobre el cajón de filtro expuesto (Fig. 8) y apriete
la arandela de retención. Antes de apretar por
completo la arandela, recomendamos girar el cuerpo
de la cámara para que coincida con la orientación
indicada en Fig. 9.
Fig. 8: Coloque el adaptador de la cámara sobre el cajón de filtro expuesto y
apriete la arandela de retención.
Adaptador de
cámara
Arandela de retención
Cajón de filtro
Fig. 9: Recomendamos orientar la cámara como se indica, con el sensor
paralelo al logotipo Celestron de la parte anterior de la cámara. Esto posiciona el
sensor perpendicular respecto al eje de altitud de Origin.
En esta configuración, el sensor está alineado con el
logotipo de Celestron en la parte anterior de la carcasa
de la cámara y perpendicular al eje de altitud de Origin.
Puede orientar el sensor de la cámara como desee.
Recuerde que si gira más adelante la cámara, deberá
capturar un primer fotograma plano más adelante para
obtener los mejores resultados.
NOTA: ¡No apriete la arandela de retención en
exceso! Debería quedar ajustada y segura, pero no tan
apretada que sea difícil de afljar más tarde.
10. Conecte el cable USB al puerto USB-C de la
cámara.
11. Vuelva a colocar el pararol de la lente de Origin.
La cámara está ahora instalada en su Origin. Para
garantizar un rendimiento óptimo, debe capturar
fotogramas oscuros y planos nuevos antes de su
primera sesión nocturna.
Capturar nuevos fotogramas
oscuros
Los fotogramas oscuros son importantes, dado que
ayudan a eliminar las interferencias del sensor en las
imágenes. Como ha instalado un sensor nuevo, debe
capturar nuevos fotogramas oscuros. Aquí le indicamos
cómo hacerlo:
1. Coloque la tapa para polvo en Origin.
2. Coloque Origin en un lugar oscuro. Si no es total-
mente oscuro, puede considerar cubrir Origin con
una manta.
Cámara Origin-678C Modelo #95531
Pestañas
MANUAL DE INSTRUCCIONES
ESPAÑOL 13
3. Encienda Origin y conecte con su teléfono o tableta
del modo habitual.
4. En la aplicación Origin, acceda a Menú>
Configuración>Avanzado, y toque "Volver a
capturar grupo completo de fotogramas oscuros".
Origin capturará ahora un grupo completo de
fotogramas oscuros con hasta 30 segundos de
tiempo de subexposición. Este proceso tarda
aproximadamente 20 minutos.
5. Si usa una cuña EQ y sabe que va a capturar
subexposiciones superiores a 30 segundos, debería
capturar fotogramas adicionales manualmente. En la
aplicación, introduzca las ISO de fotograma oscuro
y Exposición de fotograma oscuro que coincidan
con la configuración de cámara manual que va
a usar. Pulse a continuación "Volver a capturar
fotogramas oscuros". Este proceso tarda unos
minutos más.
6. Si quiere usar Origin inmediatamente después de
capturar fotogramas oscuros nuevos, recuerde
sacar la tapa para polvo.
Ahora tiene un grupo completo de fotogramas oscuros
para la cámara Origin-678C. Los fotogramas oscuros
para Origin-178C se guardan en Origin, por lo que
si vuelve a la cámara Origin-178C más adelante no
necesitará volver a capturar fotogramas oscuros. Origin
reconocerá la cámara y seleccionará los fotogramas
oscuros correctos automáticamente.
Capturar nuevo fotograma
plano
Los fotogramas planos garantizan una respuesta
homogénea a la luz en todo el sensor. Debería capturar
un nuevo fotograma plano siempre que sustituya o gire
la cámara.
Recomendamos encarecidamente adquirir el Generador
de fotograma plano Origin GIOTTO por PrimaLuceLab
para capturar fácilmente fotogramas planos. Diseñado
a medida para Origin, le permite capturar fotogramas
planos en cualquier momento desde el mismo teléfono
o tableta usada para controlar Origin.
En esta sección cubriremos dos métodos para capturar
un nuevo fotograma plano con la cámara Origin-678C:
usar un generador de campo plano de terceros o panel
EL, y usar el firmamento al anochecer - una técnica
llamada normalemten capturar un "plano celeste".
A) Usar un generador de campo plano o panel EL
1. Encienda el generador de campo plano (FFG) o panel
EL.
2. Ajuste el brillo del FFG o panel EL a aproximadamente
el punto medio de su gama de brillo.
NOTA: El brillo preciso no es crucial. Origin ajustará
automáticamente el tiempo de exposición durante la
captura de fotograma plano para compensar.
3. Retire la tapa para polvo de Origin.
4. Encienda Origin y conecte con él usando el teléfono
o tableta.
a. Si está fuera de noche, puede dejar que Origin
finalice esta inicialización o tocar Cancelar
inicialización en la aplicación, e inicializar más
tarde.
5. Instale su FFG o panel EL al escudo de condensación
de Origin siguiendo las instrucciones incluidas con
el panel.
6. En la aplicación Origin, vaya a Menú >
Configuración > Avanzado y seleccione "Volver
a capturar fotogramas planos". Origin capturará
un nuevo fotograma plano, lo que solo tarda unos
instantes.
7. Cuando finalice la captura retire el FFG o panel EL.
Ahora puede comenzar a fotografiar con su nuevo
fotograma plano.
B) Usar el firmamento al anochecer (es decir,
“Plano celeste”)
1. Espere 20-30 minutos tras el ocaso.
2. Encienda Origin. La inicialización fallará porque aún
no hay estrellas visibles - está previsto. También
puede elegir Cancelar inicialización en la aplicación.
3. Apunte manualmente Origin a una altitud de
aproximadamente 60° - 75° y aproximadamente
opuesta a la puesta del Sol (Fig. 10). Busque una
zona de firmamento despejada y homogénea sin
nubes. Puede aflojar las fijaciones del soporte
y apuntar el telescopio manualmente o usar los
controles de desplazamiento manual en la aplicación,
en Menú>Mostrar controles del telescopio.
Altitud de
Origin 60-75°
Anochecer
Fig. 10: Para capturar un "plano celeste", posicione Origin como se indica
aproximadamente 20-30 minutos después de la puesta del Sol.
4. Vaya a Menú>Configuración>Avanzado y seleccione
"Volver a capturar fotogramas planos". Origin
capturará un nuevo fotograma plano, lo que solo
tarda unos instantes.
5. Cuando finalice la captura, puede comenzar a
capturar imágenes usando su nuevo fotograma plano.
Qué esperar
1. Mayor resolución
Aunque ambos sensores tienen el mismo tamaño físico,
el IMX678C usa píxeles de 2,0 μm², más pequeños que
los píxeles de 2,4 μm² en IMX178C. El resultado es una
resolución más precisa de 1,2 arcosegundos por píxel
(respecto a 1,5 arcosegundos por píxel), permitiéndole
resolver más detalle y "aumentar" ligeramente en
objetos celestes. Es especialmente ventajoso, dado
que la mayoría de objetivos del firmamento nocturno son
relativamente pequeños.
2. Tamaños de archivo más grandes
Como IMX678C incluye píxeles más efectivos (8,4 MP
respecto a 6,4 MP), los archivos de imagen serán algo
mayores. Como resultado puede notar un procesamiento
de imagen automático algo más lento en la aplicación,
según el rendimiento de su teléfono o tableta.
3. Sensibilidad aumentada
Pese a tener píxeles de menor tamaño, IMX678C es
ligeramente más sensible en general que IMX178C. La
mejora es sutil; las imágenes no serán dramáticamente
más brillantes.
4. Distinta respuesta de ISO
Los valores ISO no son directamente comparables
entre ambos sensores. Las ISO predeterminadas de
IMX678C son 1000, mientras que las de IMX178C son
200.
5. Distinta relación de aspecto
IMX678C usa una relación de aspecto 16:9, comparada
con la relación de aspecto 3:2 de IMX178C. Esto
implica que su campo visual parecerá más rectangular,
lo que puede ser preferido por algunos usuarios para
encuadrar ciertos objetos. La relación de aspecto 16:9
se corresponde mejor con la presentación apaisada de
teléfonos y tabletas.
Usar la cámara original
Origin-178C para otras
aplicaciones
Ahora que ha actualizado Origin con la nueva cámara,
la cámara original Origin-178C aún puede utilizarse
provechosamente. Por ejemplo, si tiene otro telescopio
la 178C puede servir como una cámara de captura muy
capaz.
Incluye estriado M42 estándar ("estriado en T") para
montarla fácilmente y es compatible con SharpCap, una
aplicación de captura astronómica ampliamente usada
para Windows disponible como decarga gratuita en
línea.
Para usar la cámara Origin-178C con SharpCap, deberá
instalar primero el controlador Windows correcto,
disponible aquí: https://www.qhyccd.com/download/
Ejecute el instalador y asegúrese de que la casilla
"Controladores" esté seleccionada cuando llegue a
esta pantalla:
A medida que progrese la instalación, seleccione el
controlador QHY5III:
Cuando se instalen el controlador y SharpCap,
conecte la cámara Origin-178C a su ordenador con
un cable USB 3 de alta calidad. Tras conectar, ejecute
SharpCap. Desde el menú Cámara en la parte superior
de la pantalla, debería ver una opción etiquetada "Origin
178". Selecciónela y la imagen en directo de la cámara
debería aparecer en la vista en directo de SharpCap.
Para una guía detallada del uso de SharpCap, consulte
el manual del usuario de SharpCap, disponible en el
software en Ayuda>Ver ayuda.
MANUAL DE INSTRUCCIONES
ESPAÑOL 14
Especificaciones
Sensor de imagen CMOS: Sony IMX678-AAQR1,
color, retroiluminado
Tamaño de sensor: 8,9mm diagonal
Tamaño de píxel: 2,0μm x 2,0μm
Número de píxeles efectivos: 8,4M (3856 x 2180)
Recubrimiento de corte IR: Aplicado a la ventana
óptica de la cámara, transmisión entre 400-740 nm
Rosca de montaje de cámara: M42 x 0,75
Puerto de USB: USB-C
Carcasa: Aluminio anodizado negro
Retrofoco: 12,5 mm
Peso: 3,2 oz
Dimensiones: 59,0mm Ø x 25,7mm
¿NECESITA AYUDA? Contacte con el soporte técnico de
Celestron
celestron.com/pages/technical-support
El diseño y las especificaciones del producto están sujetos a
cambios sin notificación previa. Este producto ha sido diseñado
y está pensado para ser usado por personas de 14 años o más
de edad.
NOTIFICACIÓN FCC: Este dispositivo cumple con el apartado
15 de las normas FCC. Su uso está sujeto a las dos condiciones
siguientes: (1) este dispositivo no puede causar interferencias
nocivas, y (2) este dispositivo debe admitir cualquier interferencia
recibida, incluidas las interferencias que puedan causar un
funcionamiento indeseado.
©2025 Celestron. Celestron y su símbolo son marcas
comerciales de Celestron, LLC. • Todos los derechos reservados.
• Celestron.com
EE.UU.: Celestron, 2835 Columbia Street, Torrance, CA 90503
EE.UU.
GB: Celestron Global Ltd., Unit 2 Transigo, Gables Way,
Thatcham RG19 4JZ, Reino Unido
Impreso en China. 07/25