INSTRUCTION MANUAL
#12099

CELESTRON ORIGIN INSTRUCTION MANUAL
Congratulations on purchasing Celestron Origin,
and welcome to a new world of adventure.
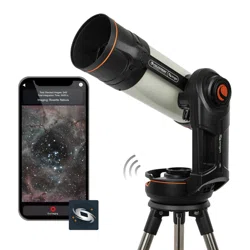
Celestron Origin stands at the forefront of a new era in amateur astronomy, blending stargazing and astrophotography
into a single, user-friendly experience. Your intelligent, all-in-one home observatory takes the complexity out of using a
telescope and transforms your backyard into a gateway to the cosmos. Packed with cutting-edge technology, Celestron
Origin captures the beauty of celestial objects and brings them to life on your phone or tablet.
This manual contains a lot of information, but Origin is simple to use. We recommend reading through at least the first
few sections to get oriented before using Origin at night. Then, as you use Origin and become more familiar with its basic
operation, you can read on to learn about its advanced features.
TABLE OF CONTENTS
1. Getting Started .............................................1
2. Your First Night Out with Origin ................................8
3. Status LEDs and Origin Status .................................9
4. Manual Camera Settings .....................................12
5. Use of Optional Filters .......................................14
6. Image Gallery ..............................................16
7. Scheduled Imaging ..........................................18
8. OneSky ...................................................20
9. Using Origin for Terrestrial Observing ..........................21
10. Multiple Users ..............................................23
11. Other Menu Options ........................................24
12. Accessing Raw Files for Manual Image Processing ...............27
13. Other Advanced Functionality .................................29
14. Updating Software ..........................................32
15. Transporting and Storing .....................................33
16. Care and Maintenance .......................................34
17. Specifications ..............................................35
Appendix A: Troubleshooting .....................................36
Appendix B: Tips ...............................................40
Appendix C: USB Key Actions ....................................41
INSTRUCTION MANUAL
CELESTRON ORIGIN | 1
Origin’s power source is its internal rechargeable battery.
Fully charge the battery using the included AC adapter before
you use Origin for the fi rst time. The AC adapter has four
different plugs for various international standards. Choose the
appropriate plug for your region and install it on the adapter.
Then, plug the AC adapter into a wall socket and the other
end into the power jack at the bottom of the Origin mount
(Figure 1).
1. Getting Started
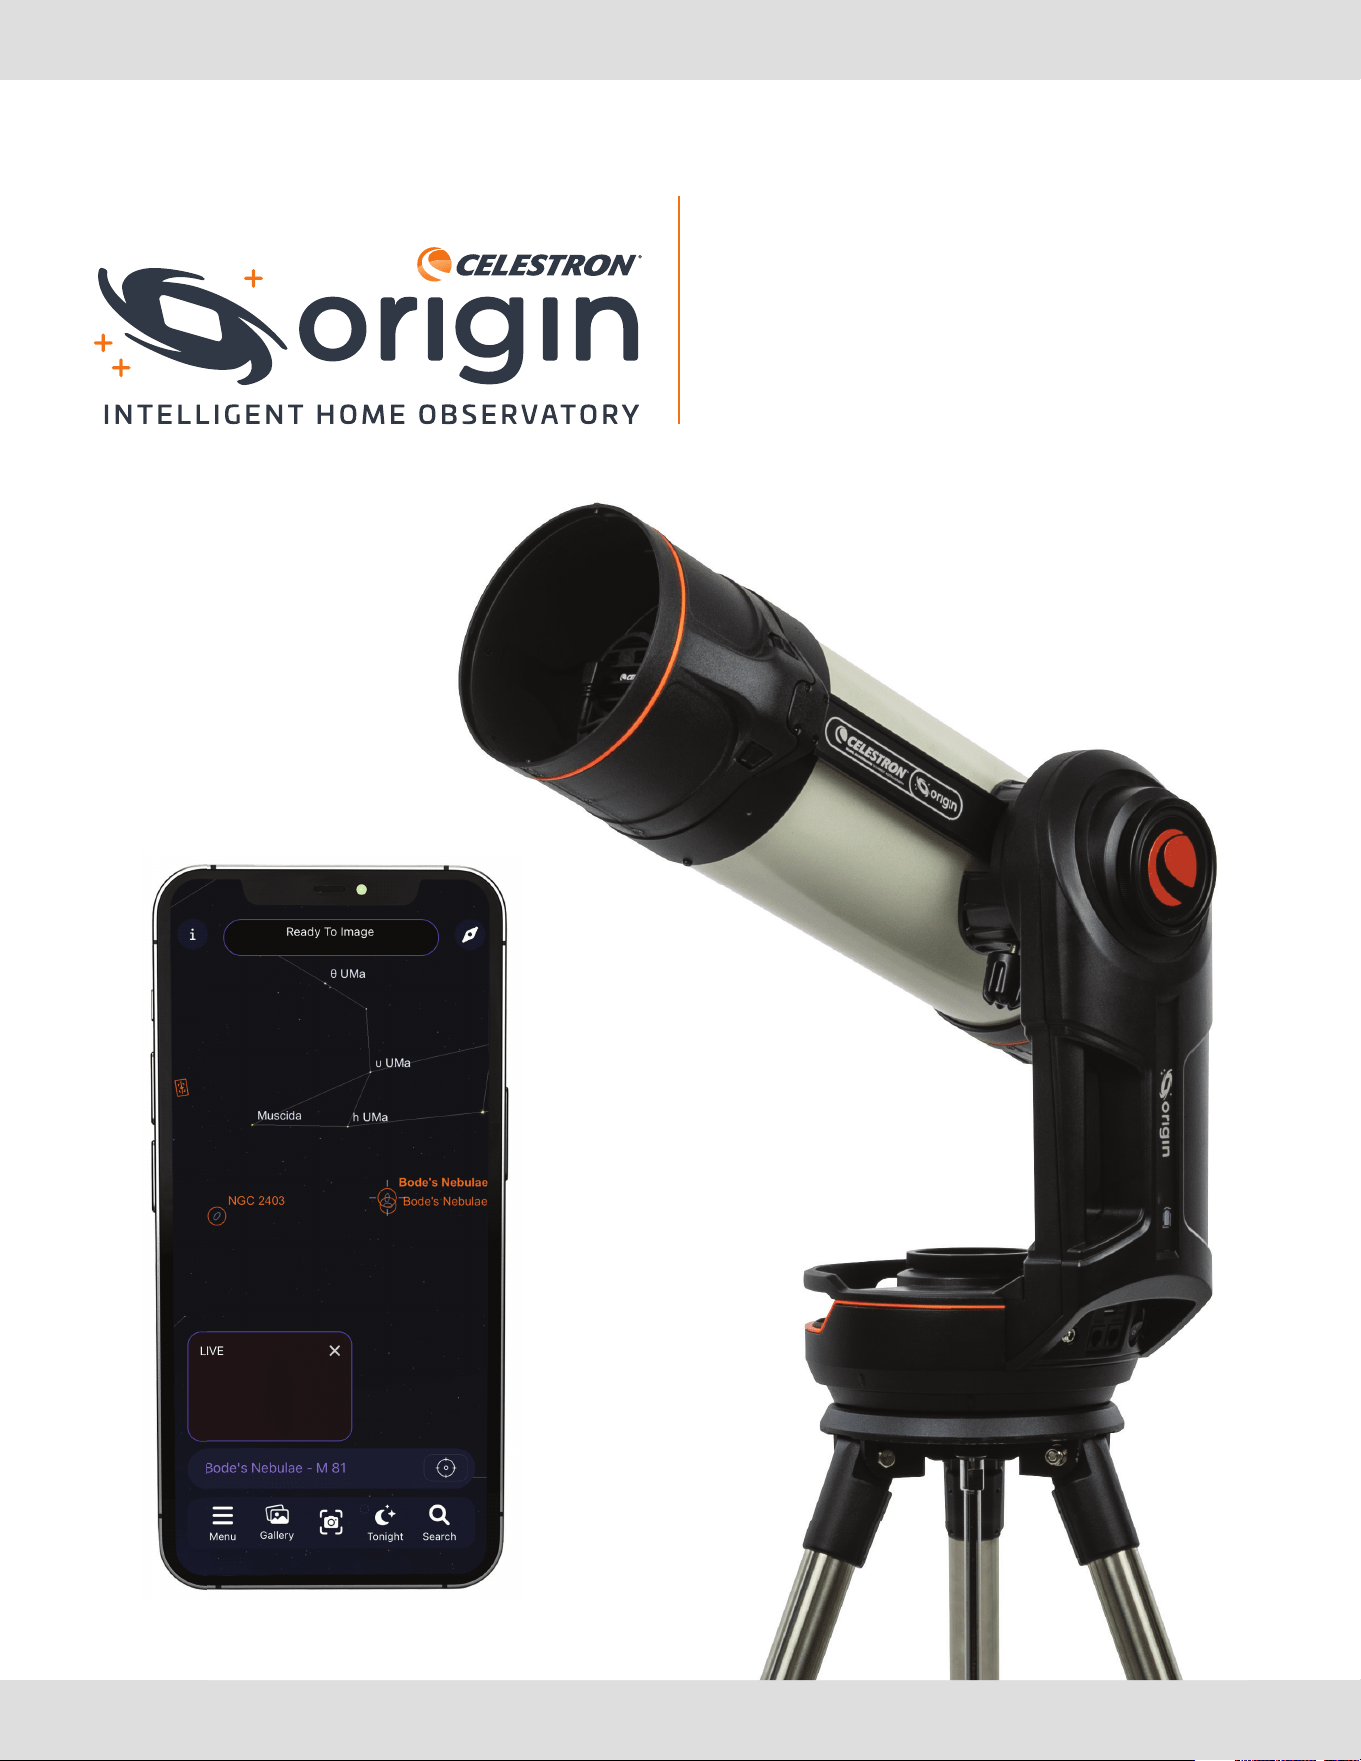
Don’t forget to download the Celestron
Origin Powered by SkySafari™ App from the
Apple App Store or Google Play.
Minimum device requirements:
• Android OS 12 or greater
• iOS 16 or greater
(iPhone 8 and up)
When you’re ready to observe, take Origin outside and
place it in the area of your observing site with the fewest
obstructions. If your observing site contains railings or fences,
extend Origin’s tripod legs to avoid them. (Remove the mount
and optical tube before extending the tripod legs.) Use the
integrated bubble level at the top of the tripod to ensure it is
reasonably level (within 5° of true level).
Turn on Origin with the power switch on the mount. Wait
about a minute for Origin to boot up. When Origin is ready to
connect, the red LED status ring on the rear cell will change
from pulsing to spinning counterclockwise. Open the Origin
app on your device. The fi rst time you open the app, the Quick
Start Guide will appear. Please read through the Quick Start
Guide carefully. You can swipe to go back and forth between
the screens.
When you fi rst open the Origin app, it will ask for
several permissions:
Photo Library – Origin needs access to your Photo Library
to store your completed images. We recommend allowing full
access.
Location Services – Origin needs access to your location to
align itself to the night sky. We recommend allowing access
while using the app.
Local Network – Origin needs access to your local network
to connect Origin to your home network. Please select allow.
Please refer to the included Quick Setup Guide
for initial setup instructions.
We recommend that you keep all the packaging provided
with your Origin. If you need to ship Origin to another
location, or if it ever needs to be shipped to Celestron
for service, the original packaging will come in handy.
Figure 1: The included AC Adapter plugs into Origin’s 12V DC
power jack.
12V DC POWER JACK

2 | CELESTRON ORIGIN
INSTRUCTION MANUAL
Direct Connect Mode
Initially, you must connect to Origin’s internal WiFi network
using “Direct Connect” mode. The app should automatically
fi nd Origin’s WiFi network and ask you to connect in a pop-
up window. The network will be named “Origin-XXX,” where
XXX is a combination of letters and digits. Once connected,
initialization will automatically begin.
NOTE: If you attempt to connect to Origin’s WiFi network
outside the app, the app will ask you for a network password.
The default password is “12345555” but you can change it
under Menu>Settings.
When operating Origin in Direct Connect mode, you must
remain within 30 feet of the unit. If there are no available
external WiFi networks at your observing site, you must
operate Origin in Direct Connect mode only. When using
Origin at home or where trusted local networks are available,
we recommend connecting through your network in “Network
Connect” mode. This will potentially provide you with a larger
operating range, allowing you to move more than 30 feet away
from Origin as you use it.
If desired, you can force Origin to always create a Direct
Connect network by enabling the Force Direct Connect
setting in Menu>Settings>WiFi Settings.
Network Connect Mode
You can follow the steps in the Quick Start Guide to set up
Network Connect mode. Alternatively, you can confi gure it
from Menu>Settings>WiFi Settings. To start, fi rst connect
to Origin in Direct Connect mode. You should see the
network you want to connect to under “WIFI NETWORKS
VISIBLE TO SCOPE” near the bottom of the screen. Select
the network you would like to join, and a pop-up window
will appear, prompting you to enter the network’s password.
Once you enter the password, you should see the network
under “CONFIGURED WIFI NETWORKS.” Origin will then
restart (this takes about 30 seconds) and reconnect to the
app through this network.
The next time you connect to Origin, it will scan the environment
for any network you have confi gured previously. Origin will
begin to initialize immediately if it successfully connects to
a confi gured visible network. If Origin does not successfully
connect to any confi gured networks, it will create a Direct
Connect network.
Connecting to Origin
Direct Connect Mode Network Connect Mode
INSTRUCTION MANUAL
CELESTRON ORIGIN | 3
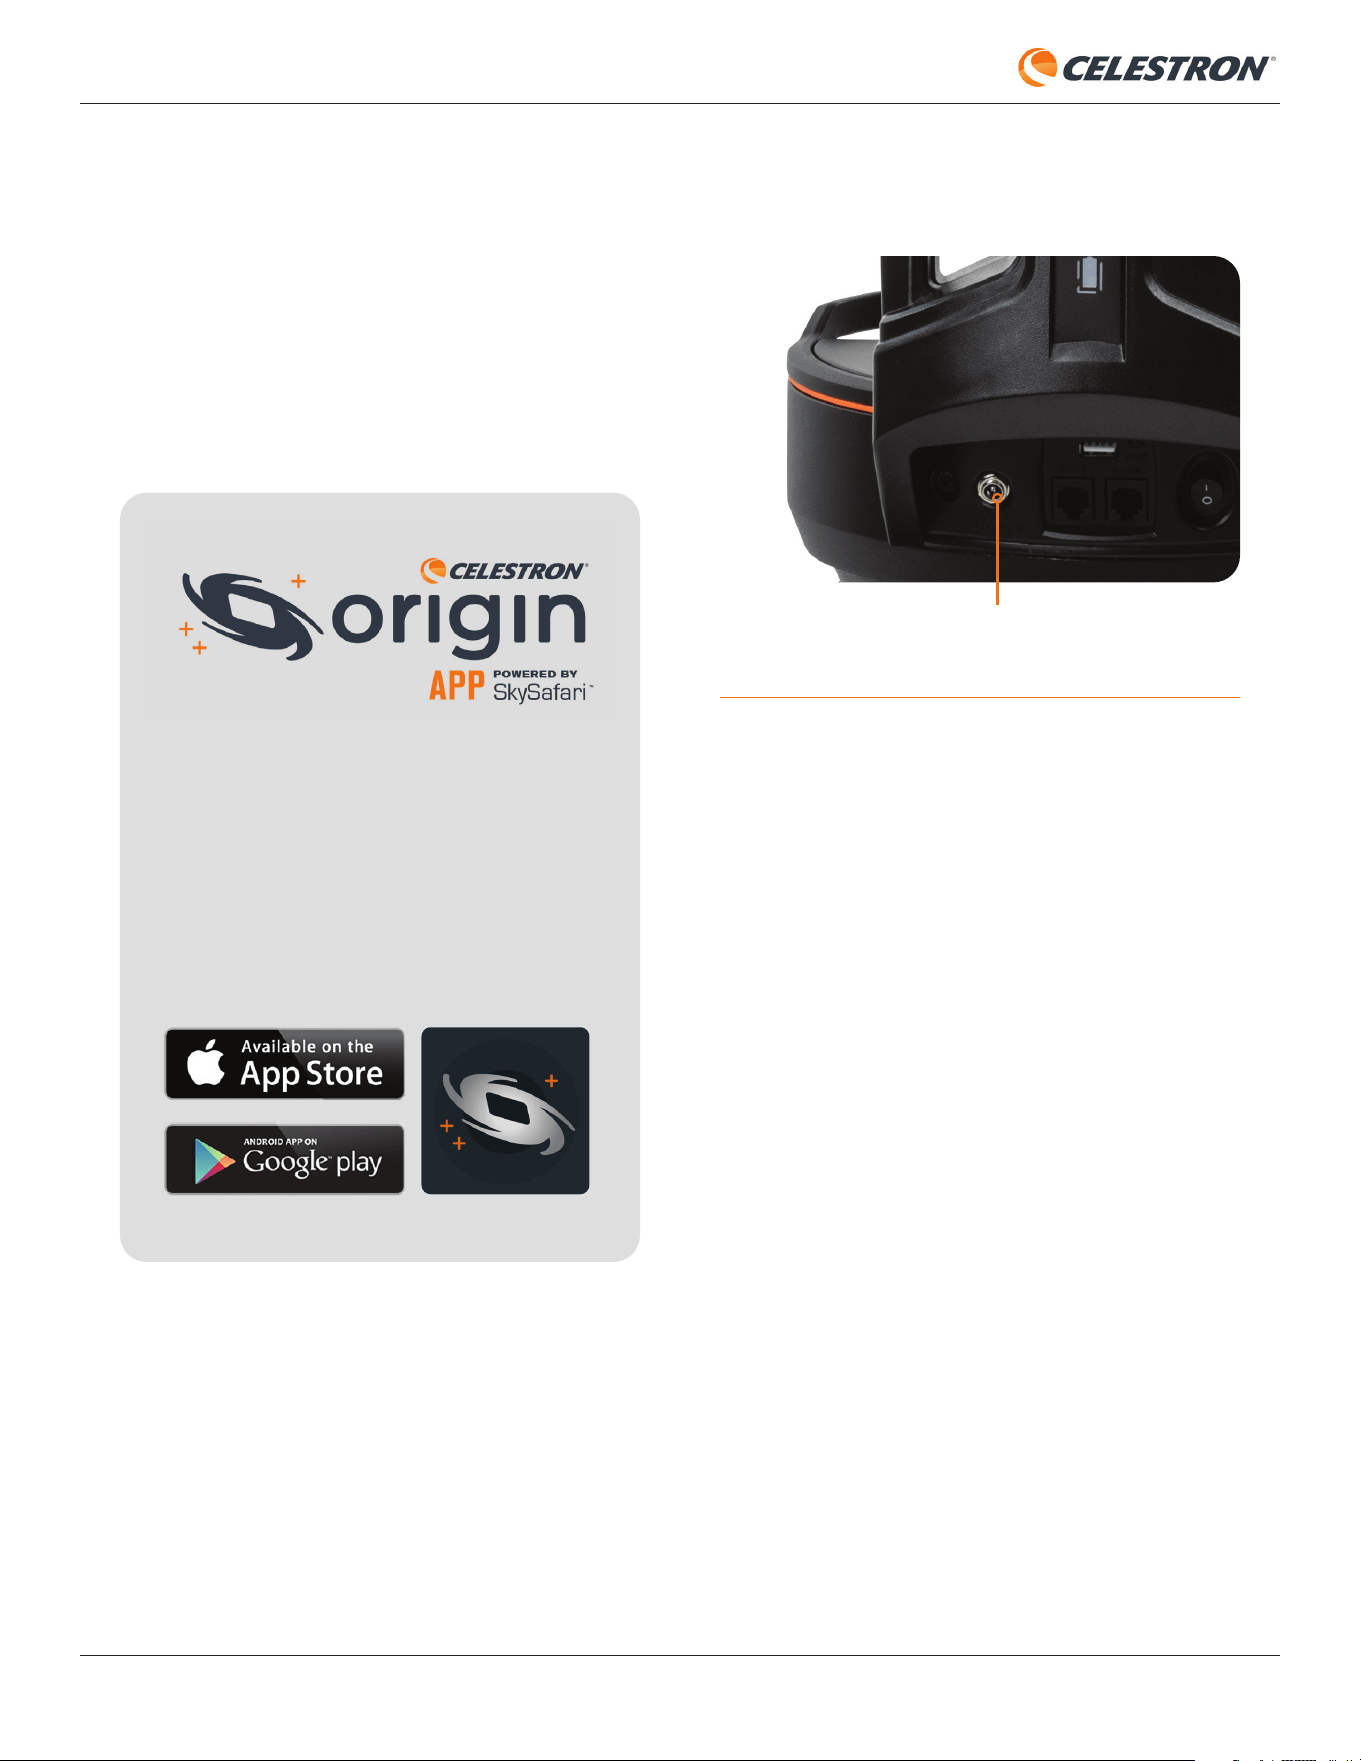
Troubleshooting
The WiFi logo in the upper left corner can help you connect
(Figure 2). If Origin doesn’t automatically connect to your
smart device, press the WiFi logo and select “Connect.”
Alternatively, you can choose “WiFi Settings,” and the app
will take you to the Menu>Settings>WiFi Settings screen,
where you have additional connection options, including the
Run Network Quick Setup Quick Start option, which loads the
Quick Setup Guide screens.
Initialization
Once Origin connects via Direct or Network Connect mode,
initialization begins automatically. Origin will point itself up,
then focus itself. Then, it will move around and align itself with
the night sky.
During initialization, you can follow along with the
Picture-in-Picture within the Planetarium View or Camera
View. You’ll see the stars focusing as Origin focuses, and stars
streak by as Origin slews across the sky. Once initialization is
complete, Origin will report “Ready to Image.”
Of course, if you connect to Origin during the day, it will fail
initialization, as it needs to see stars to focus and determine
where it is pointing. Origin will only initialize successfully when
the sky is suffi ciently dark.
If you wish to cancel initialization, press the “Cancel
Initialization” bar at the top of the screen. Remember that
Origin will not work at night until initialization with the sky is
complete.
After initialization, the next step is to select an object
to image.
Figure 2: The WiFi logo in the upper left corner of the Planetarium View can
help you get connected.
4 | CELESTRON ORIGIN
INSTRUCTION MANUAL
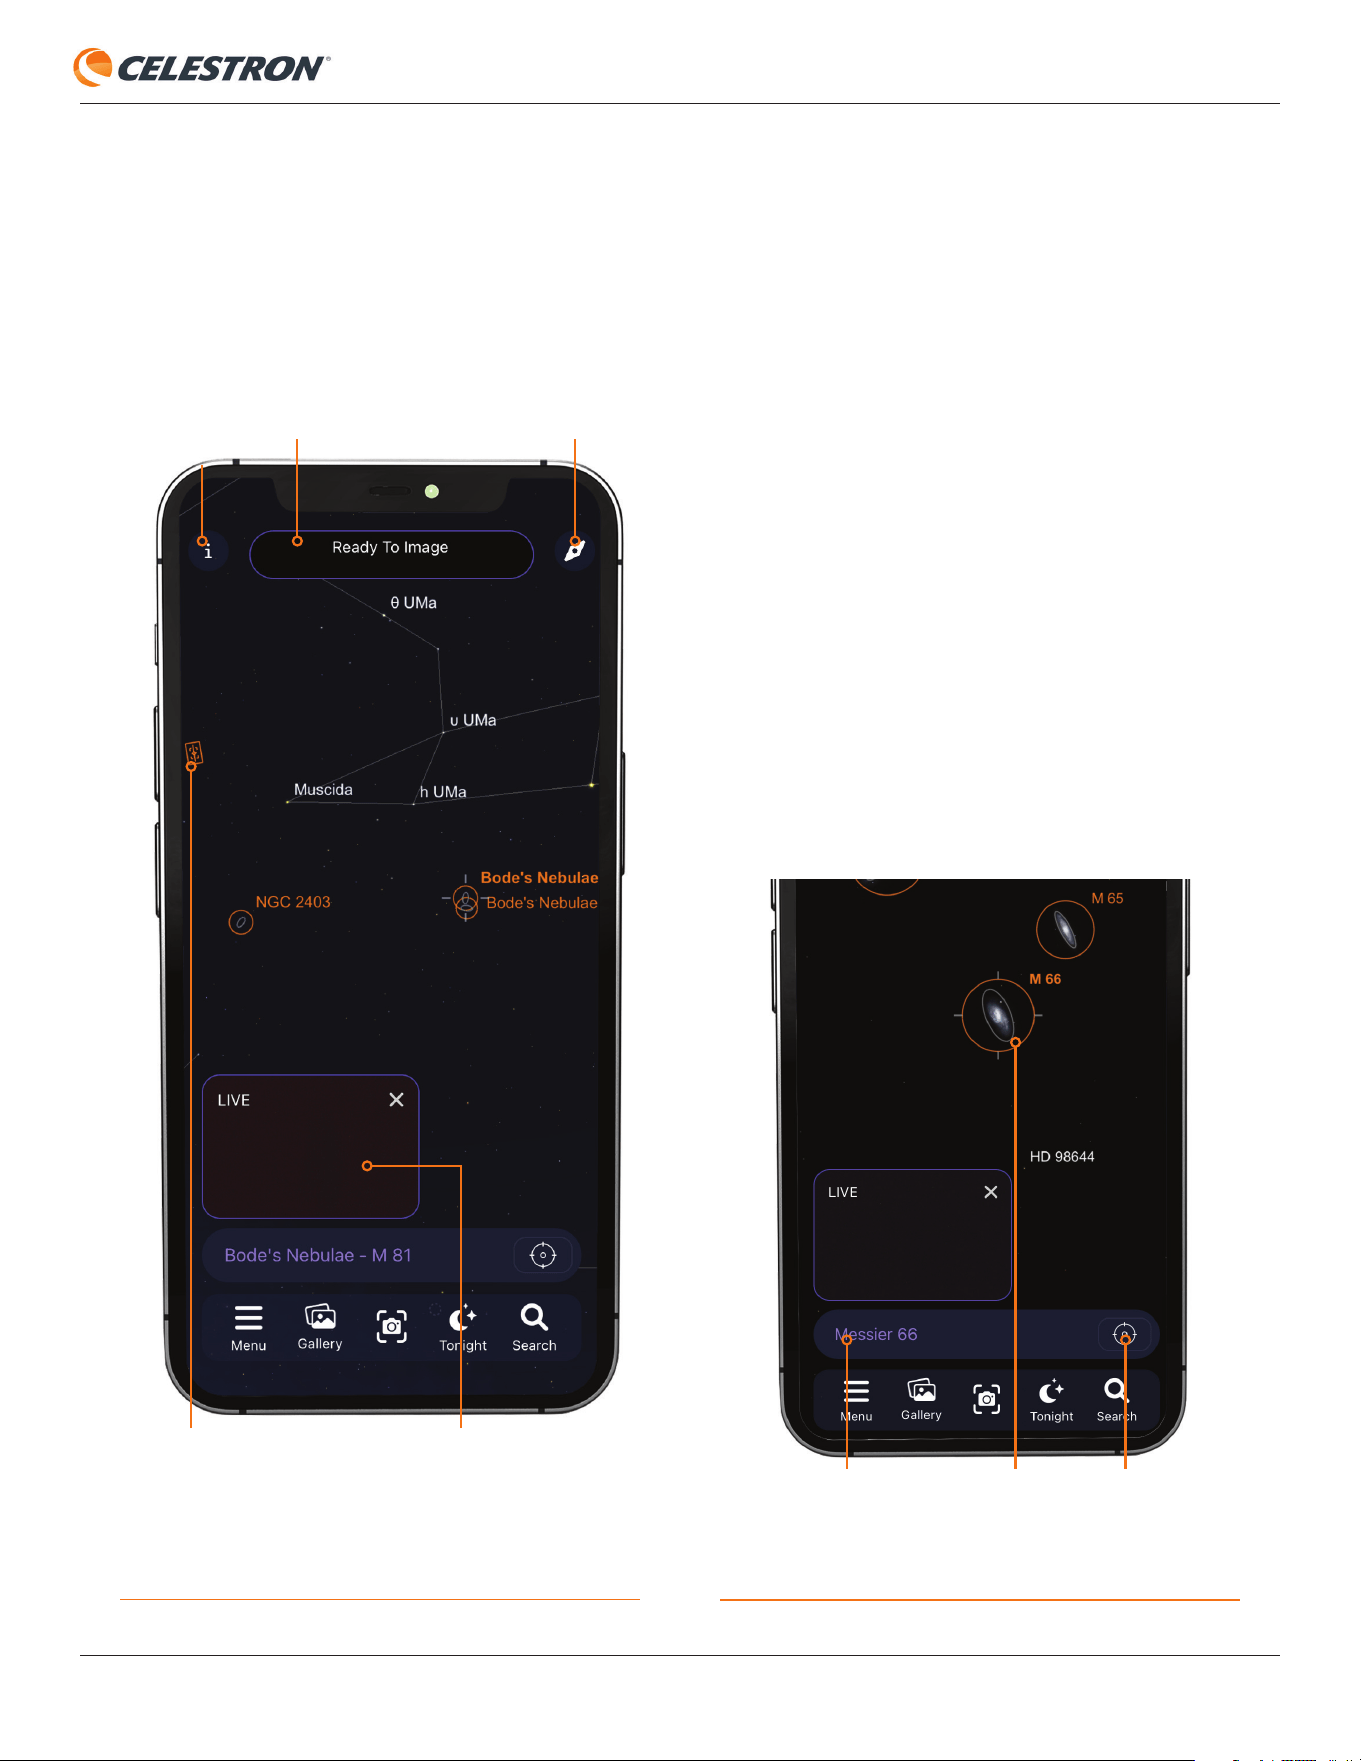
GETTING ORIENTED
FIG 3: The Planetarium View is the “home screen” where you can select
objects to view and access Origin’s features. You can see the Camera View in
the Picture-In-Picture.
STATUS BARORIGIN STATUS
INFO PAGE
ORIGIN CROSSHAIRS - WHERE ORIGIN
IS CURRENTLY POINTED IN SKY
COMPASS ICON
PICTURE-IN-PICTURE (PIP)
Planetarium View
The main screen or home screen is called the “Planetarium
View.” This screen has the interactive planetarium sky chart
(Figure 3) and access to all of Origin’s functions.
Planetarium Functionality
You can move around the sky within the app’s Planetarium
View by swiping. To zoom in or out, you can “pinch” the screen.
You can also move around the sky in Compass mode by
tapping the compass icon in the upper right corner. Compass
mode uses your smartphone’s accelerometer and gyro to
match the view onscreen to the sky overhead. You can now
hold your smartphone up to the sky, and the planetarium
will match the night sky behind it. It’s a great way to move
around the Planetarium View outside, as it helps you learn
the positions of objects from your observing location. To exit
Compass mode, simply tap onscreen.
Selecting an Object
As you move around the Planetarium View, you’ll see
objects highlighted with orange circles. These are the best
objects to target. To select an object, tap it onscreen. Once
selected, the object will show selection crosshatches around
it, and its name will appear in the Object Info bar (Figure 4).
FIG 4: The Object Info bar indicates the currently selected object. Tapping it
displays additional options.
OBJECT INFO BAR CROSSHAIRS ICONSELECTION
CROSSHATCHES
INSTRUCTION MANUAL
CELESTRON ORIGIN | 5
You don’t have to select only the highlighted objects; you can
choose any object within the Planetarium View. You can select
stars or any of the object icons that appear. Zoom in, and you’ll
see fainter objects.
To point Origin to the selected object, tap the crosshairs icon
next to the Object Info bar, and Origin will slew to the object.
You can also press the Object Info bar and select “Center
Object.” To access the object information screens, press the
Object Info bar and select “Object Info” from the options
provided.
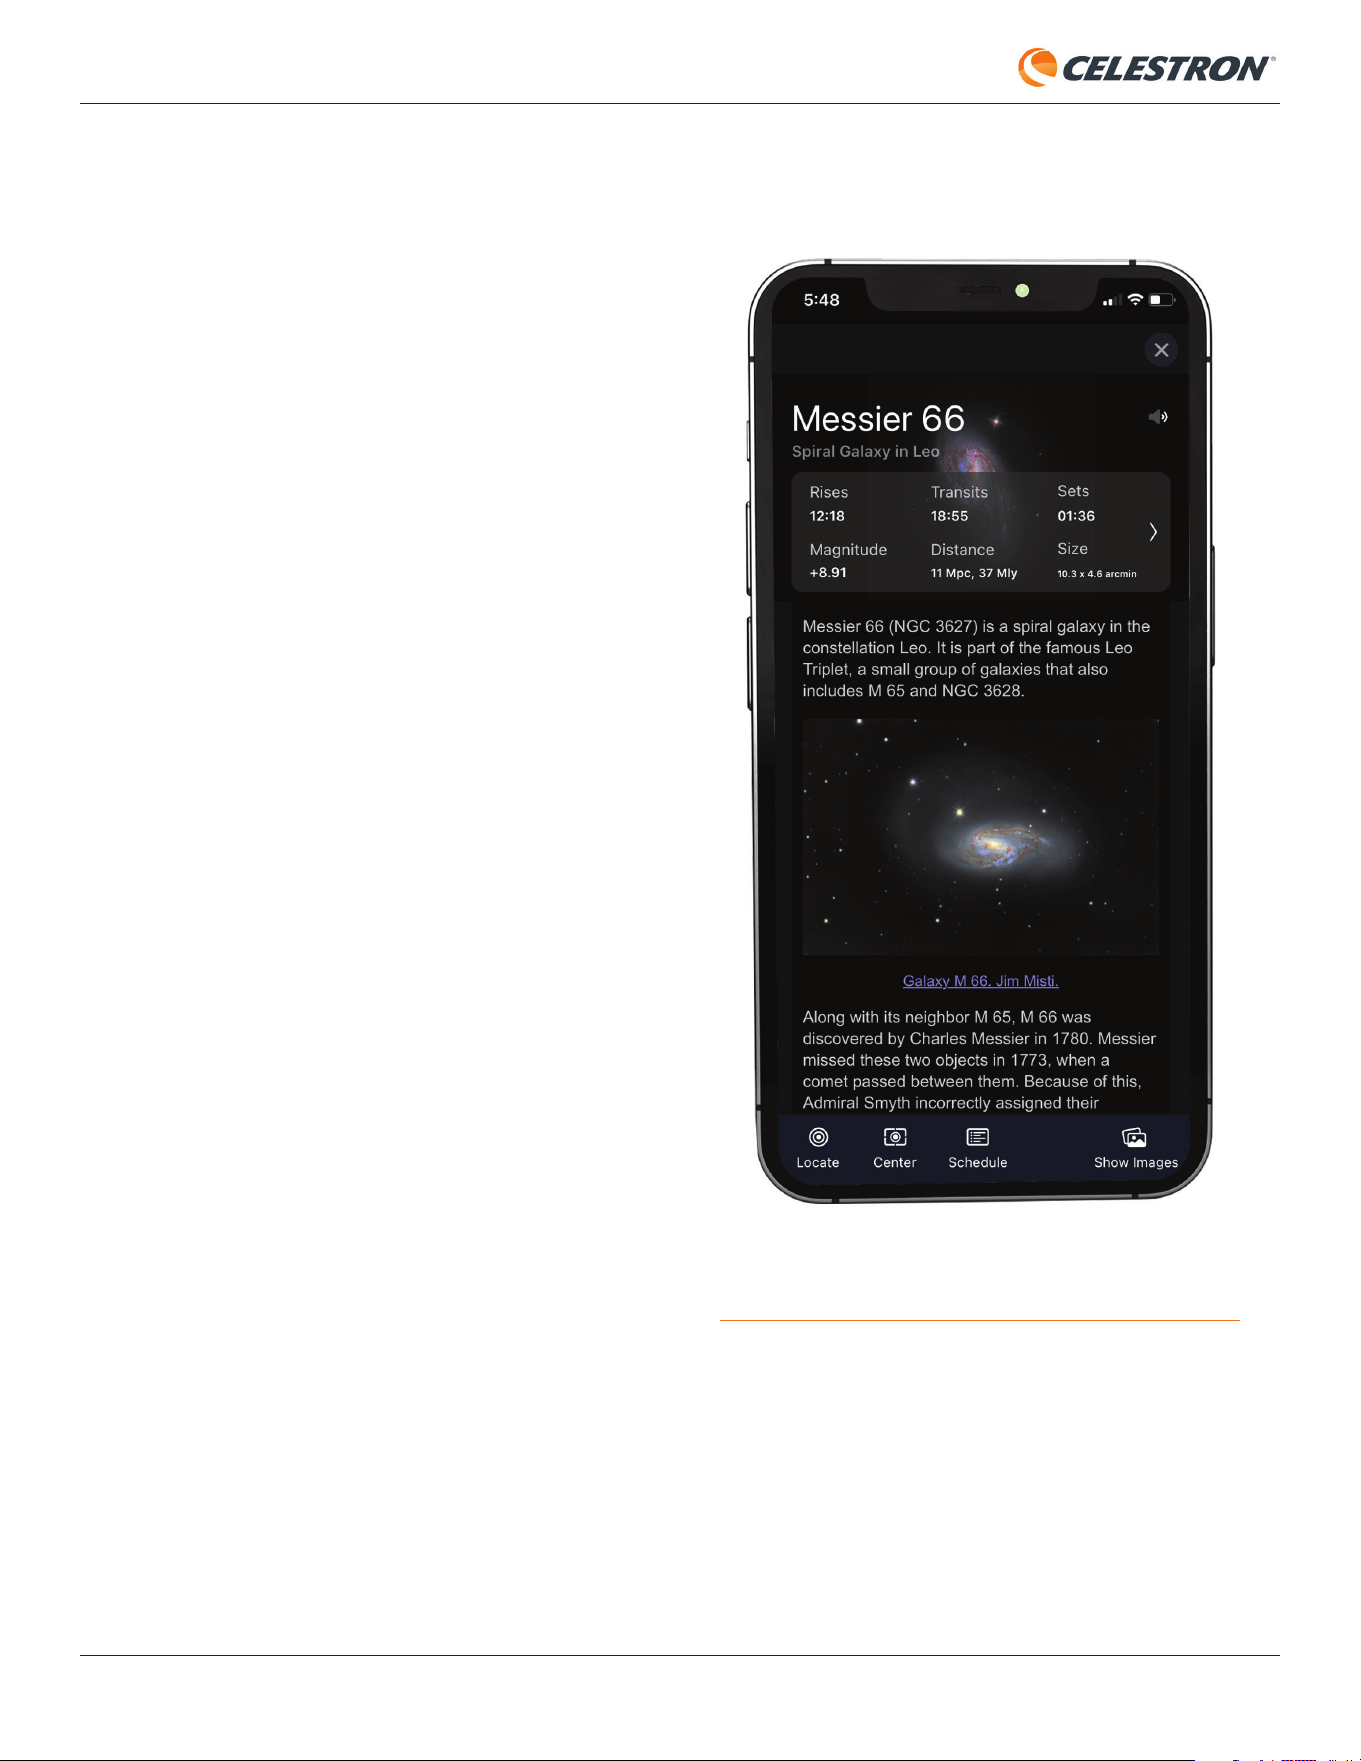
A handy way to fi nd objects to observe is by tapping the
Tonight icon at the bottom of the Planetarium View. Selecting
this will display a list of all the best objects currently visible
from your location. Choose an object from the list to see its
Object Info screen (Figure 5). From there, you can press the
Locate icon at the bottom to fi nd the object in the Planetarium
View. You can also press the Center icon, and Origin will
automatically slew to the object in the sky.
Another way to fi nd objects is via the Search icon. You can
enter an object’s name or designation in the search bar
or select one of the object folders and choose from the
list. Once you select an object, you’ll see its Object Info
screen. From there, you can Locate or Center the object as
described above.
Picture-in-Picture (PIP)
In the lower-left corner of the Planetarium View, you’ll see
the “Picture-in-Picture” (PIP), which displays a live feed
from Origin’s camera. You can reposition the PIP within the
Planetarium view by dragging it. Press the “X” in the upper
right corner of the PIP to hide the PIP in the lower left corner.
Tap the right chevron that subsequently appears to unhide the
PIP. You’ll see the full Camera View if you tap anywhere on the
PIP screen. The PIP and Camera View display the same view,
but the Camera View fi lls the entire screen.
FIG. 5: The Object Info screen gives information about the selected object.
Swipe right to access all the screens. The Locate and Center options are at the
bottom of the screen.
6 | CELESTRON ORIGIN
INSTRUCTION MANUAL
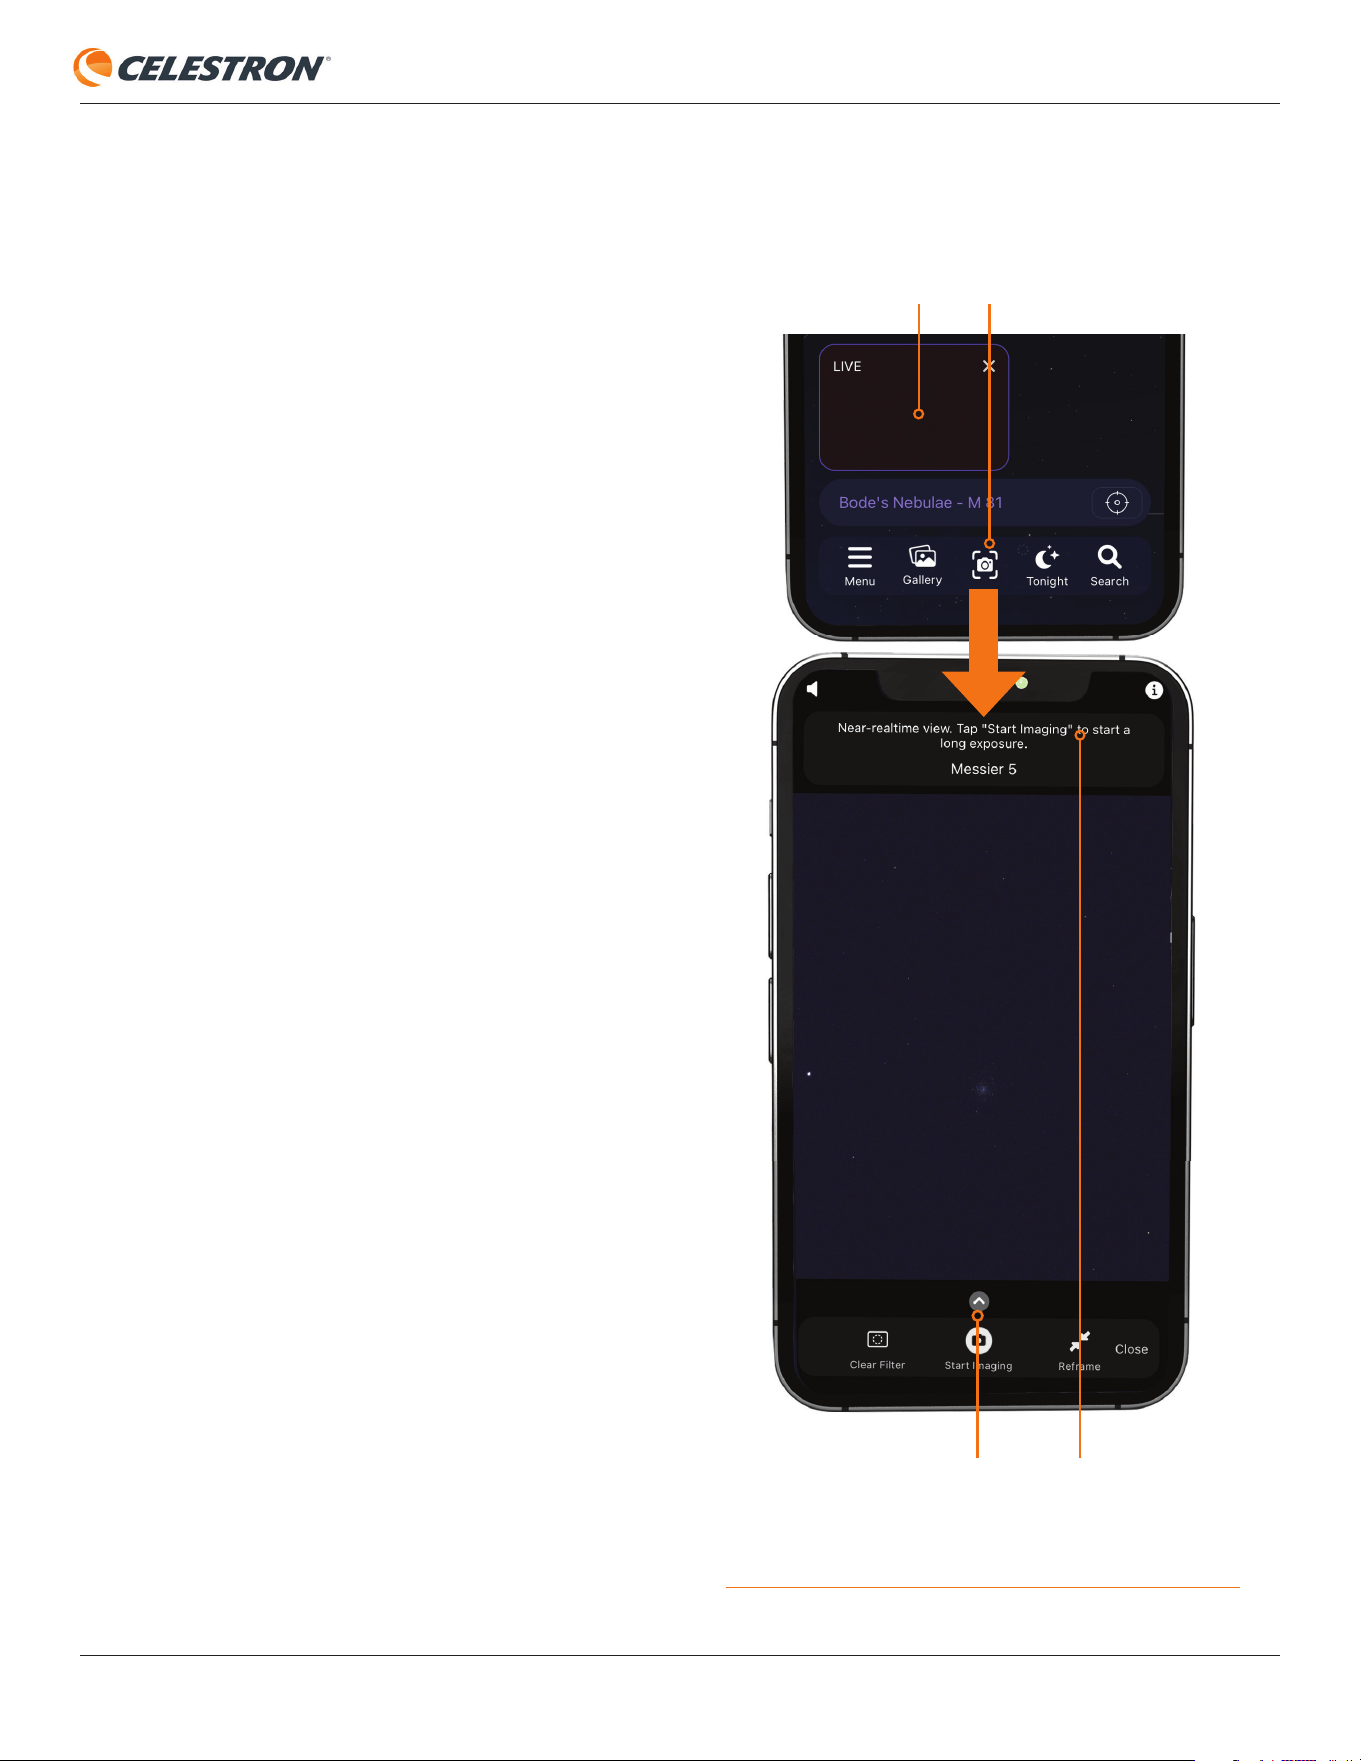
Camera View
Besides the Planetarium View, the other main screen is the
Camera View (Figure 6), which you can access by tapping the
camera icon or the PIP screen.
The Camera View shows you a live feed from Origin’s camera.
It’s also where you initiate imaging sessions (by pressing the
Start Imaging button) and where you can adjust the camera
settings (by pressing the up chevron).
In Camera View, Origin shows you what it sees during
initialization. When Origin is focusing, you can see the stars
coming in and out of focus in the live video. When Origin
slews around the sky, you’ll see the stars streak by!
Once Origin is pointing at an object you would like to image,
enter the Camera View and press the “Start Imaging” button
at the bottom of the screen. Origin will then begin capturing
10-second exposures and automatically stack and post-
process the images using its built-in artifi cial intelligence (AI)
algorithms.
The fi rst 10-second exposure will show a lot of detail, but more
detail emerges as Origin captures more 10-second exposures
and adds them to “the stack.” After a few exposures, improved
noise reduction will kick in. When you’re ready to stop imaging,
press “End Imaging” at the bottom of the screen. Origin will
download, process, and display the fi nal stacked master.
Then, it will automatically save that image to the Image Gallery
and your device’s camera roll.
Near the top of the Camera View, you’ll see the name of the
object currently selected. Above that is the Status Bar, which
communicates what Origin is doing. During imaging, the
Status Bar will indicate the total number of stacked images
and the total integration time. It will also indicate when the
app is downloading and processing an image from Origin and
will even let you know the current bandwidth speed. Below
the object name, you’ll fi nd the Progress Bar. This will fi ll as
the current sub-exposure is captured and reset when the next
sub-exposure begins.
At the bottom of the Camera View, next to the Start Imaging
button, you’ll see the Reframe and Filter buttons.
You can use the Reframe button to fi ne-tune your composition
before imaging by recentering the view on any spot in the
frame. Press the Reframe button, and a crosshair will appear
on the image. “Drag” the image until the crosshairs coincide
with where you want to recenter the frame. Then press “Center
Here,” and the telescope will reposition so the selected spot
lies in the center of the frame.
FIG 6: The Camera View is where you observe objects being imaged. It’s also
where you can access the manual camera controls by tapping the up chevron.
UP CHEVRON
PICTURE IN PICTURE CAMERA ICON
STATUS BAR
You’ll only use the Filter button when you have placed optional
fi lters into Origin’s integrated fi lter drawer. We’ll discuss this
button in this manual’s “Filters” section.
INSTRUCTION MANUAL
CELESTRON ORIGIN | 7
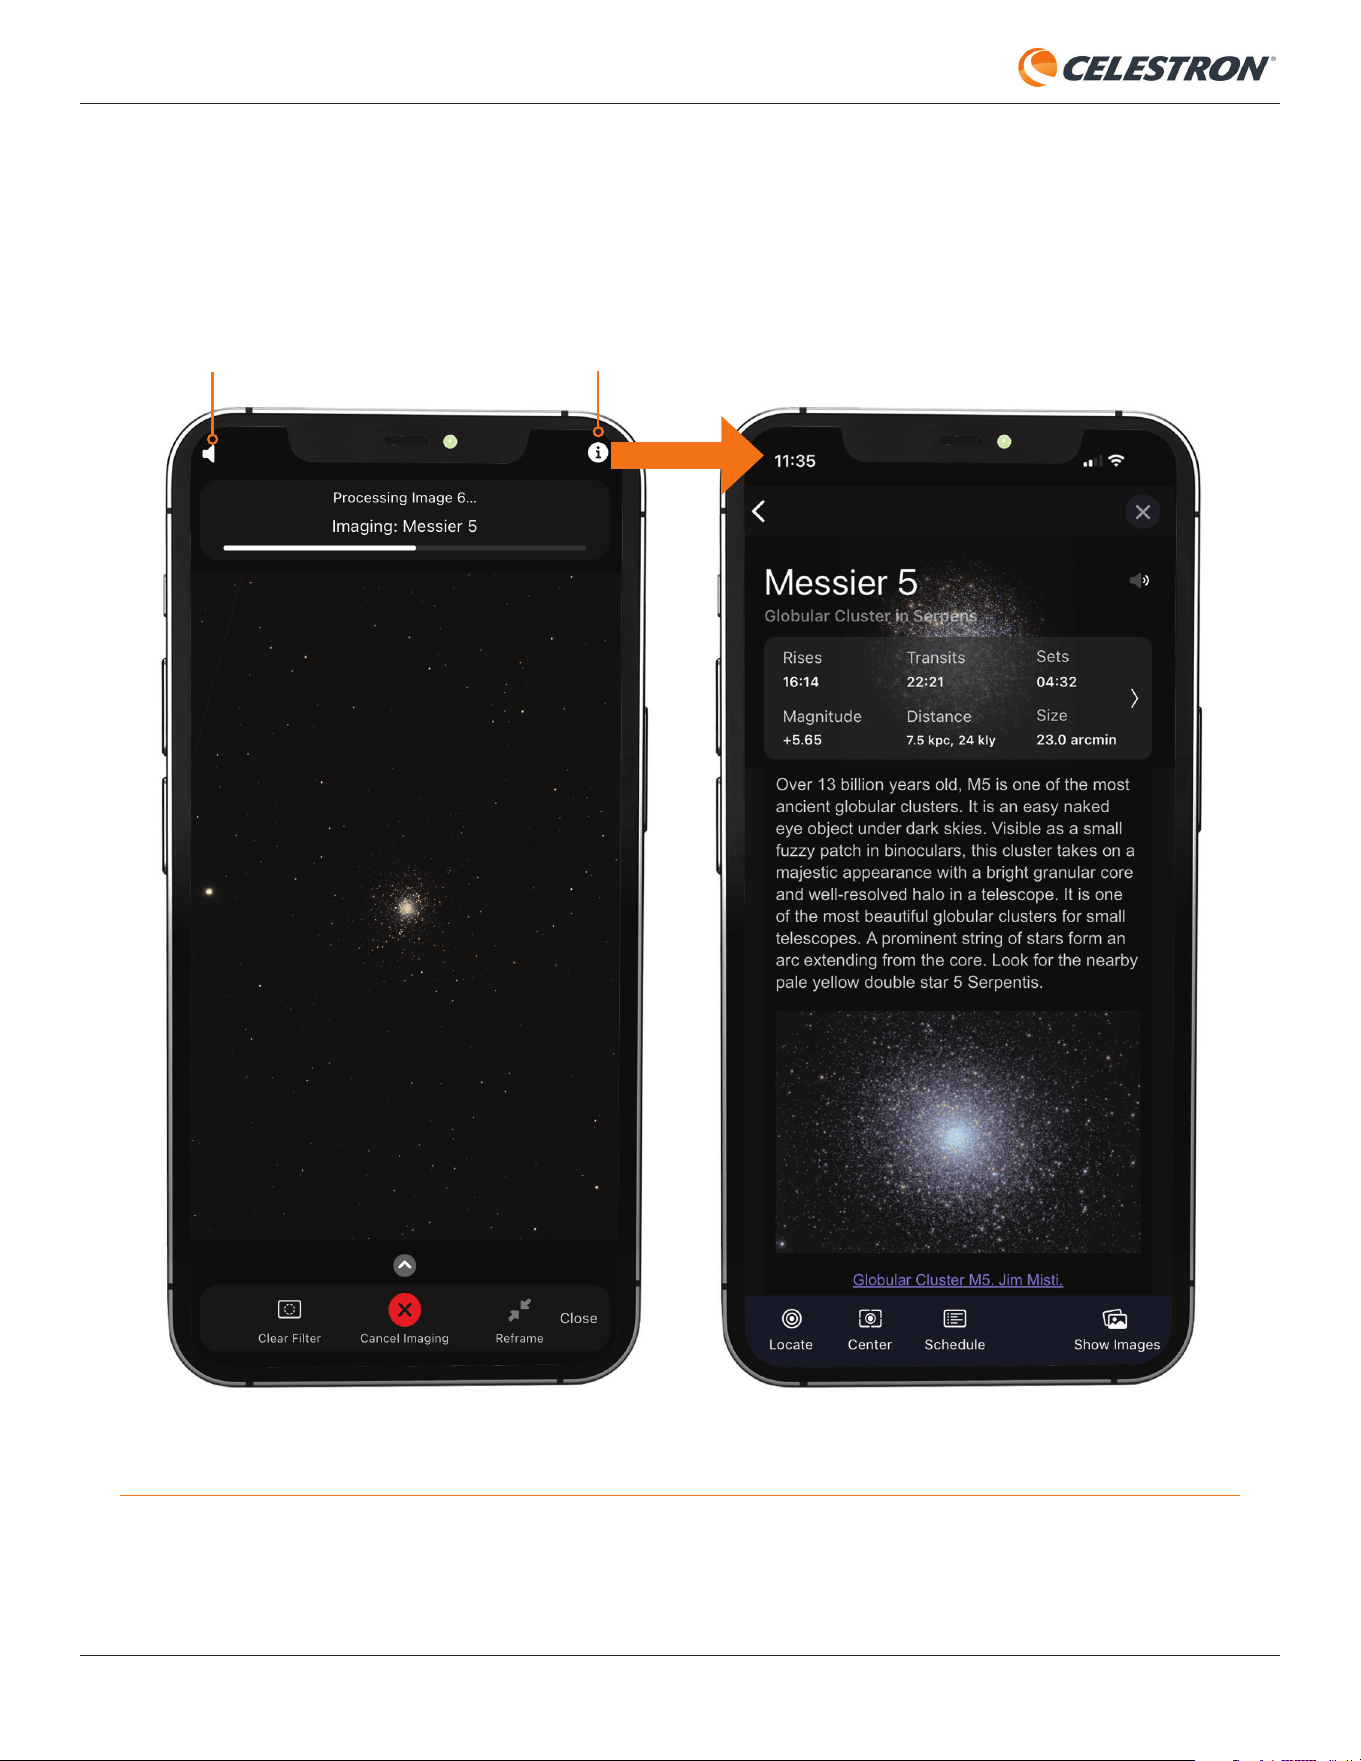
Object Info View
As you are imaging, you can peruse information about the object by pressing the Info button in the upper right corner of the Camera
View (Figure 7). This takes you to the Object Info page for the selected object. You can also listen to audio presentations for over 200
of the most popular celestial objects by pressing the speaker icon in the upper left corner of the Camera View.
INFO BUTTONAUDIO PRESENTATION
Fig. 7: During imaging, you can read information about your chosen object or listen to an audio presentation by using the icons in the upper left and upper right corners.

8 | CELESTRON ORIGIN
INSTRUCTION MANUAL
1. Download the Celestron Origin app from the Apple App
Store (iOS) or Google Play (Android).
2. Place Origin outside, where it has a clear view of the sky.
3. Turn on Origin.
4. Open the app.
5. Directly connect to Origin’s WiFi network.
6. If Origin is within range of your home WiFi network, set up
Origin to connect through your home network.
a. The next time you launch the app, it will automatically
check the home network to see if it can fi nd Origin. You
won’t need to set up a connection through your home
network again.
7. Once connected, Origin will autofocus and orient itself to
the night sky (i.e., initialization). This process takes about
90 seconds.
8. Select an object to view from the Planetarium View by
tapping one of the highlighted objects onscreen.
9. Slew Origin to the selected object by pressing the
crosshairs icon to the right in the Object Info bar at the
bottom of the screen (refer to Figure 4).
10. Switch to Camera View by pressing the Camera icon at
the bottom of the screen.
11. Press the Start Imaging button in the bottom center of
the screen (refer to Figure 6). The fi rst image will appear
onscreen in about 10 seconds.
12. Continue observing the image as it gets brighter and more
“burned in” onscreen.
a. You can peruse object info and audio presentations
using the info and speaker icons at the top corners of
the screen.
13. When you are done observing/imaging, press End Imaging.
Origin will download, process, and save the fi nal image to
the gallery and your device’s camera roll.
14. Switch back to the Planetarium View by closing the
Camera View. Then select another object to observe and
image.
15. When you fi nish observing for the night, power off Origin
and bring it inside.
a. After switching the power off, Origin takes about 7
seconds to complete its “safe shutdown” routine.
2. Your First Night Out with Origin
Here are the steps to follow for basic operation:
Low Bandwidth Warning
If the bandwidth between your mobile device and Origin becomes less than 0.2 MB/sec, the Low Bandwidth warning
will appear, and you may notice that images take longer to download. If this happens when directly connected to
Origin, we recommend moving your device closer to Origin (i.e., within 10 feet). If you receive a Low Bandwidth
warning while connected to Origin through a home network, you may need to move Origin and/or your smartphone
closer to your WiFi router, reboot your router and reconnect, purchase a WiFi extender, or upgrade your WiFi router.
Consult Appendix A in this manual for more information. Remember, you can always use Direct Connect mode if you
have issues with your home network.
INSTRUCTION MANUAL
CELESTRON ORIGIN | 9
3. Status LEDs and Origin Status
Origin has LEDs to provide “status-at-a-glance” functionality
outside of the app, which allows you to check Origin by looking
at its lighting pattern. The status LEDs help you understand
what Origin is doing and assist with troubleshooting.
Status LED Ring
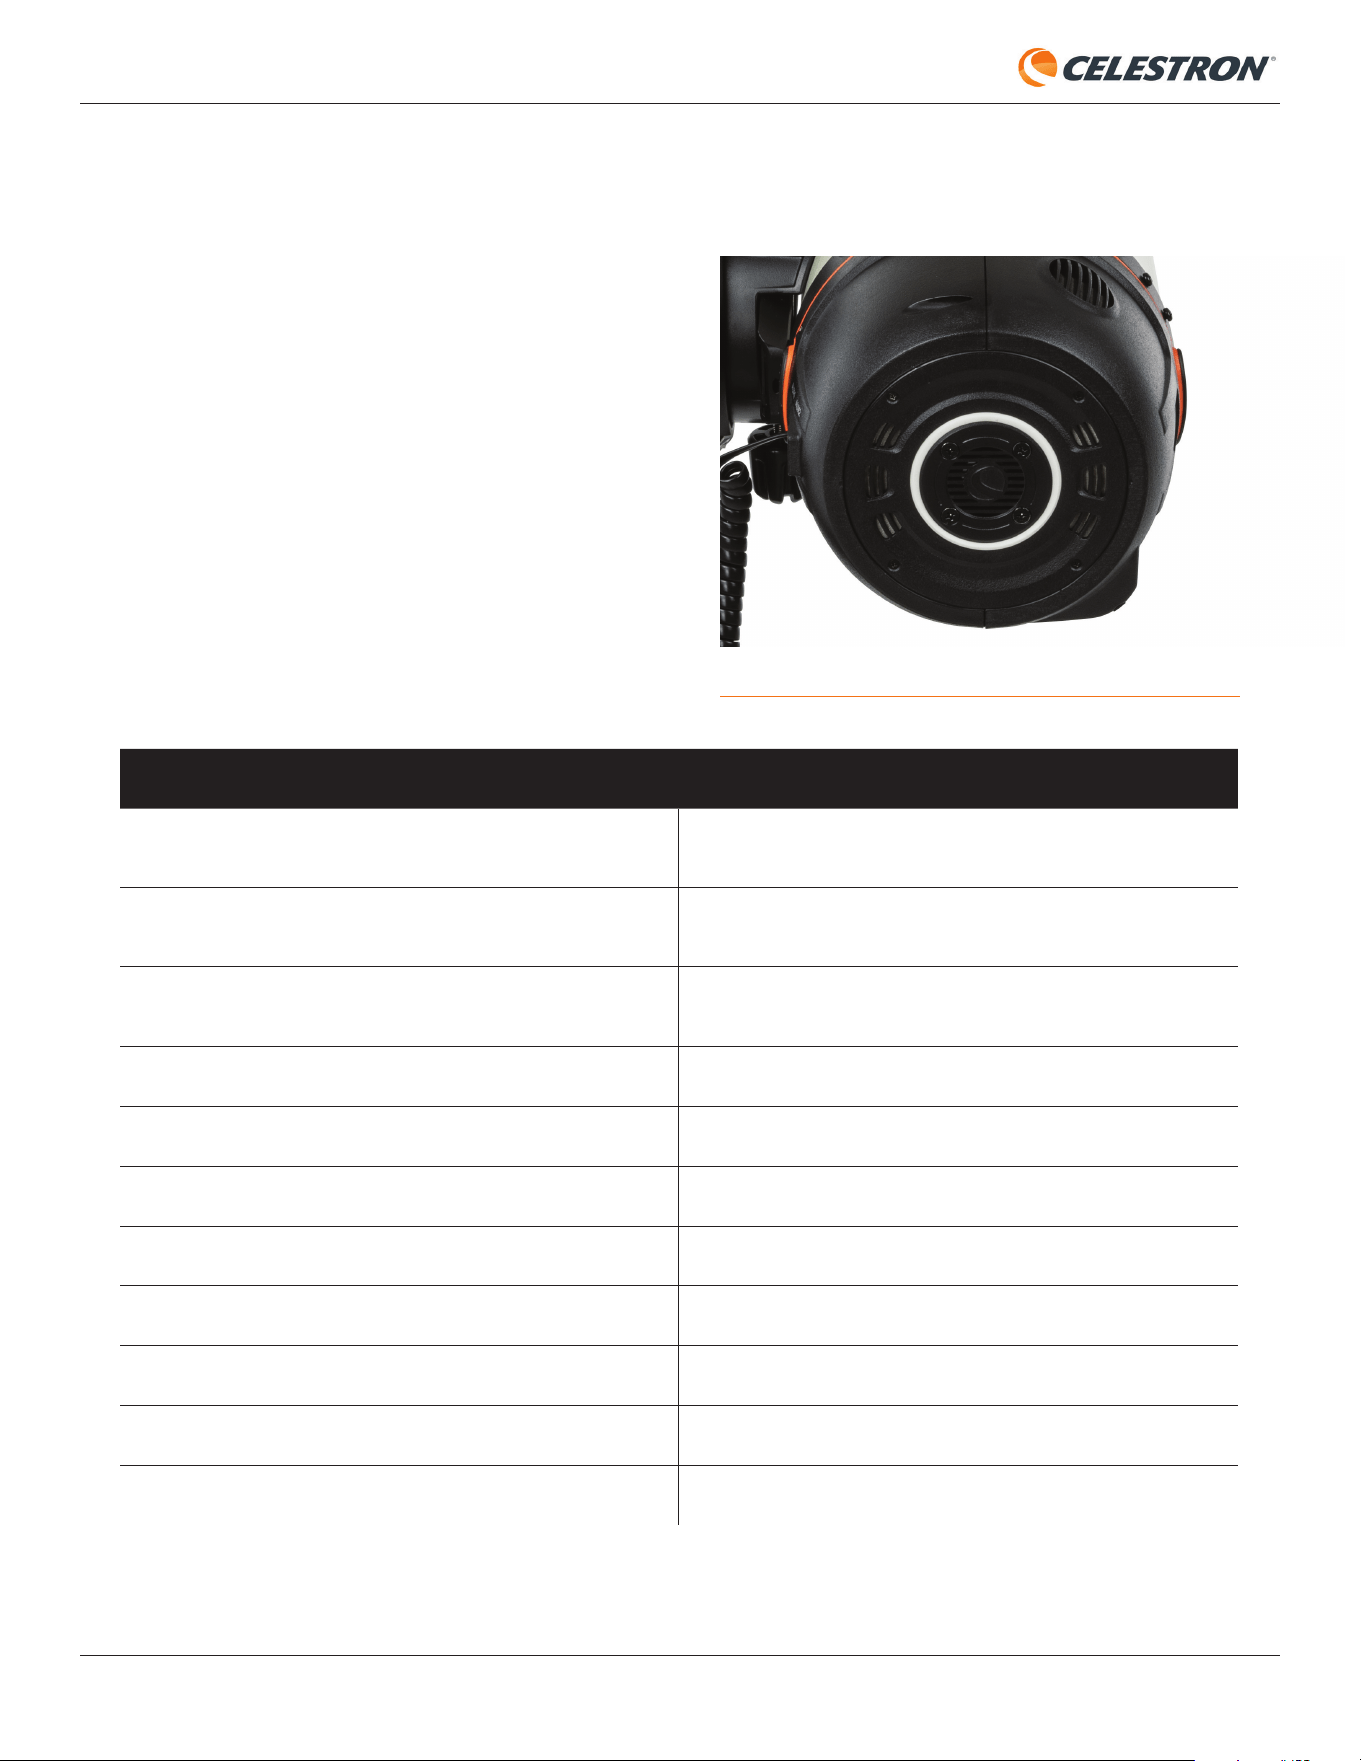
You’ll find the Status LED Ring on the back of Origin’s rear
cell (Figure 8). The ring has eight individual segments and
provides “status-at-a-glance” functionality. The status LED
ring can also indicate if there is a problem.
Pattern Meaning
Counterclockwise swirl
Origin has established its own network and is waiting for the
mobile app to connect.
Clockwise swirl
Origin has connected to your local WiFi network and is waiting
for the mobile app to connect.
Solid ring
Origin has established a connection with the mobile app and
is awaiting commands.
LED #3 and #7 (left and right) are alternating
Origin is busy with a long task (e.g., focusing).
Fill in a clockwise direction
An exposure is in progress.
All LEDs - repeating stepwise increase in brightness
Origin is booting up.
All LEDs - repeating stepwise decrease in brightness
Origin is shutting down.
Pendulum - swinging back and forth
Origin is reconfiguring the WiFi network.
One LED Blinking (top LED)
A firmware update is in progress.
One LED Blinking (closest to the dovetail bar)
There is a hardware malfunction.
Slow fill from bottom to top
The hardware is not calibrated.
Fig. 8: The LED ring on Origin’s rear cell provides status-at-a-glance.
You can find animations of some of the LED ring patterns at https://software.celestron.com/Origin/led-patterns.html
10 | CELESTRON ORIGIN
INSTRUCTION MANUAL
It is normal for the battery to display the fast-blinking “battery fault” pattern for a few seconds immediately after you plug it into external
power via the mount’s 12V power jack. You may also see the battery fault warning if the battery is too warm or cold to charge.
Pattern Meaning
Repeating stepwise increase in brightness
Battery charging
Steady On
Discharging (or fully charged if plugged in)
Slow Blinking Discharging and battery is low or critically low
Fast Blinking
Battery fault
Repeating stepwise decrease in brightness
Origin is completing its shutdown sequence and will shut
down in seven seconds.
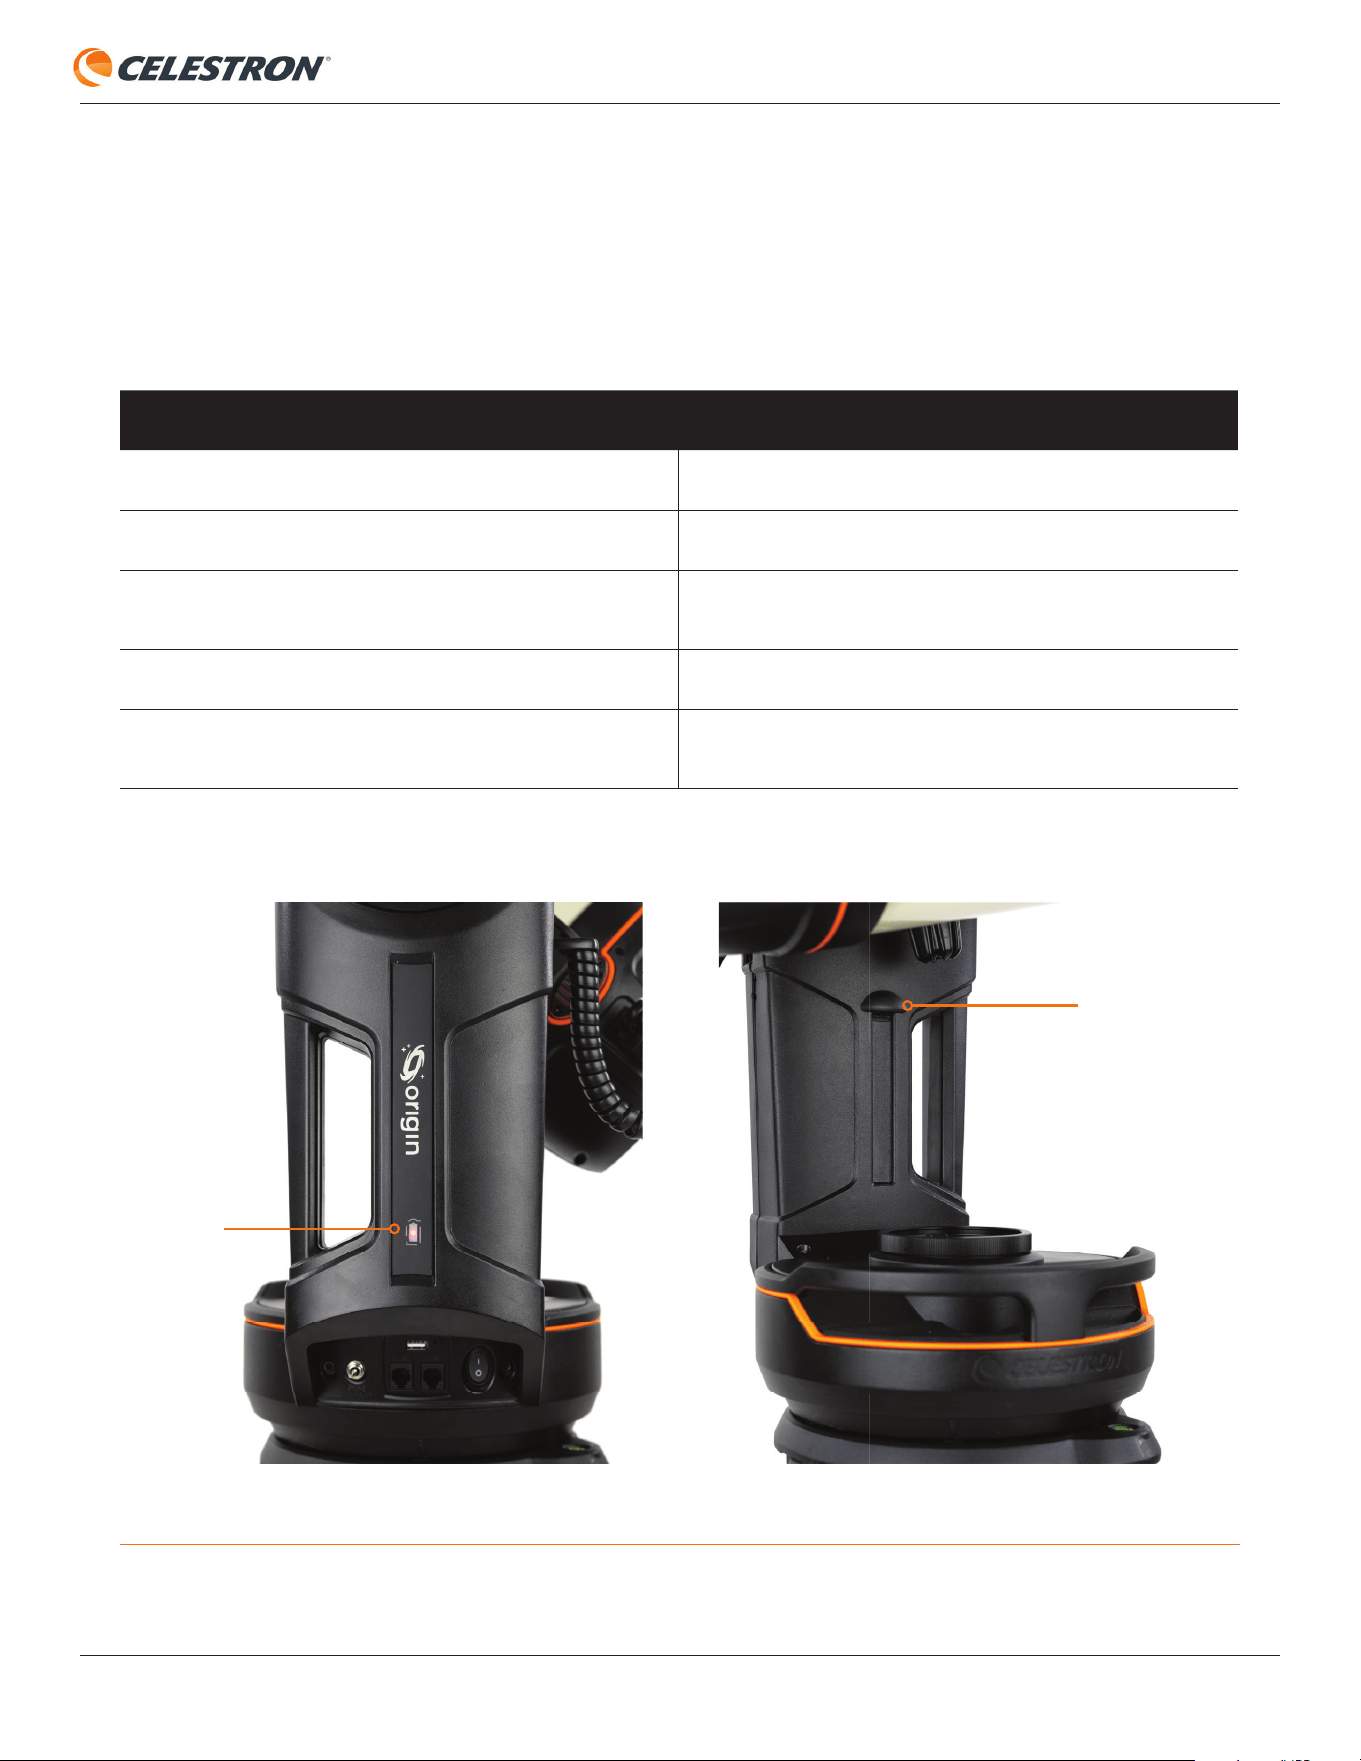
Mount LEDs
There are two LEDs on the Origin mount—one faces outward behind the battery icon on the side of the mount, and the other faces
inward and conveniently illuminates the center of the mount itself (Figure 9). Only the LED behind the battery icon has status patterns.
The tray light is always on or off, depending on how you have confi gured it under Menu>Settings>Advanced in the app.
The battery icon LED on the mount indicates the power status:
Fig. 9: There are two LEDs on the Origin mount. The battery icon LED indicates power status.
TRAY LIGHT
BATTERY
ICON LIGHT

INSTRUCTION MANUAL
CELESTRON ORIGIN | 11
Fig. 10: You can access the Origin Status page from the Info icon in the upper left corner of the Planetarium View.
INFO ICON
Origin Status Page
Once you connect to Origin with your device, you can access the Origin Status page by pressing the info icon in the upper left corner
of the Planetarium View. The Origin Status page (Figure 10) gives information about Origin’s current operating status and can help
you monitor performance.
12 | CELESTRON ORIGIN
INSTRUCTION MANUAL
4. Manual camera settings
Once you are comfortable with Origin’s basic operation, you can try using manual camera settings instead of automatic ones. You can
customize the duration of the sub-exposures and the ISO (i.e., gain) setting.
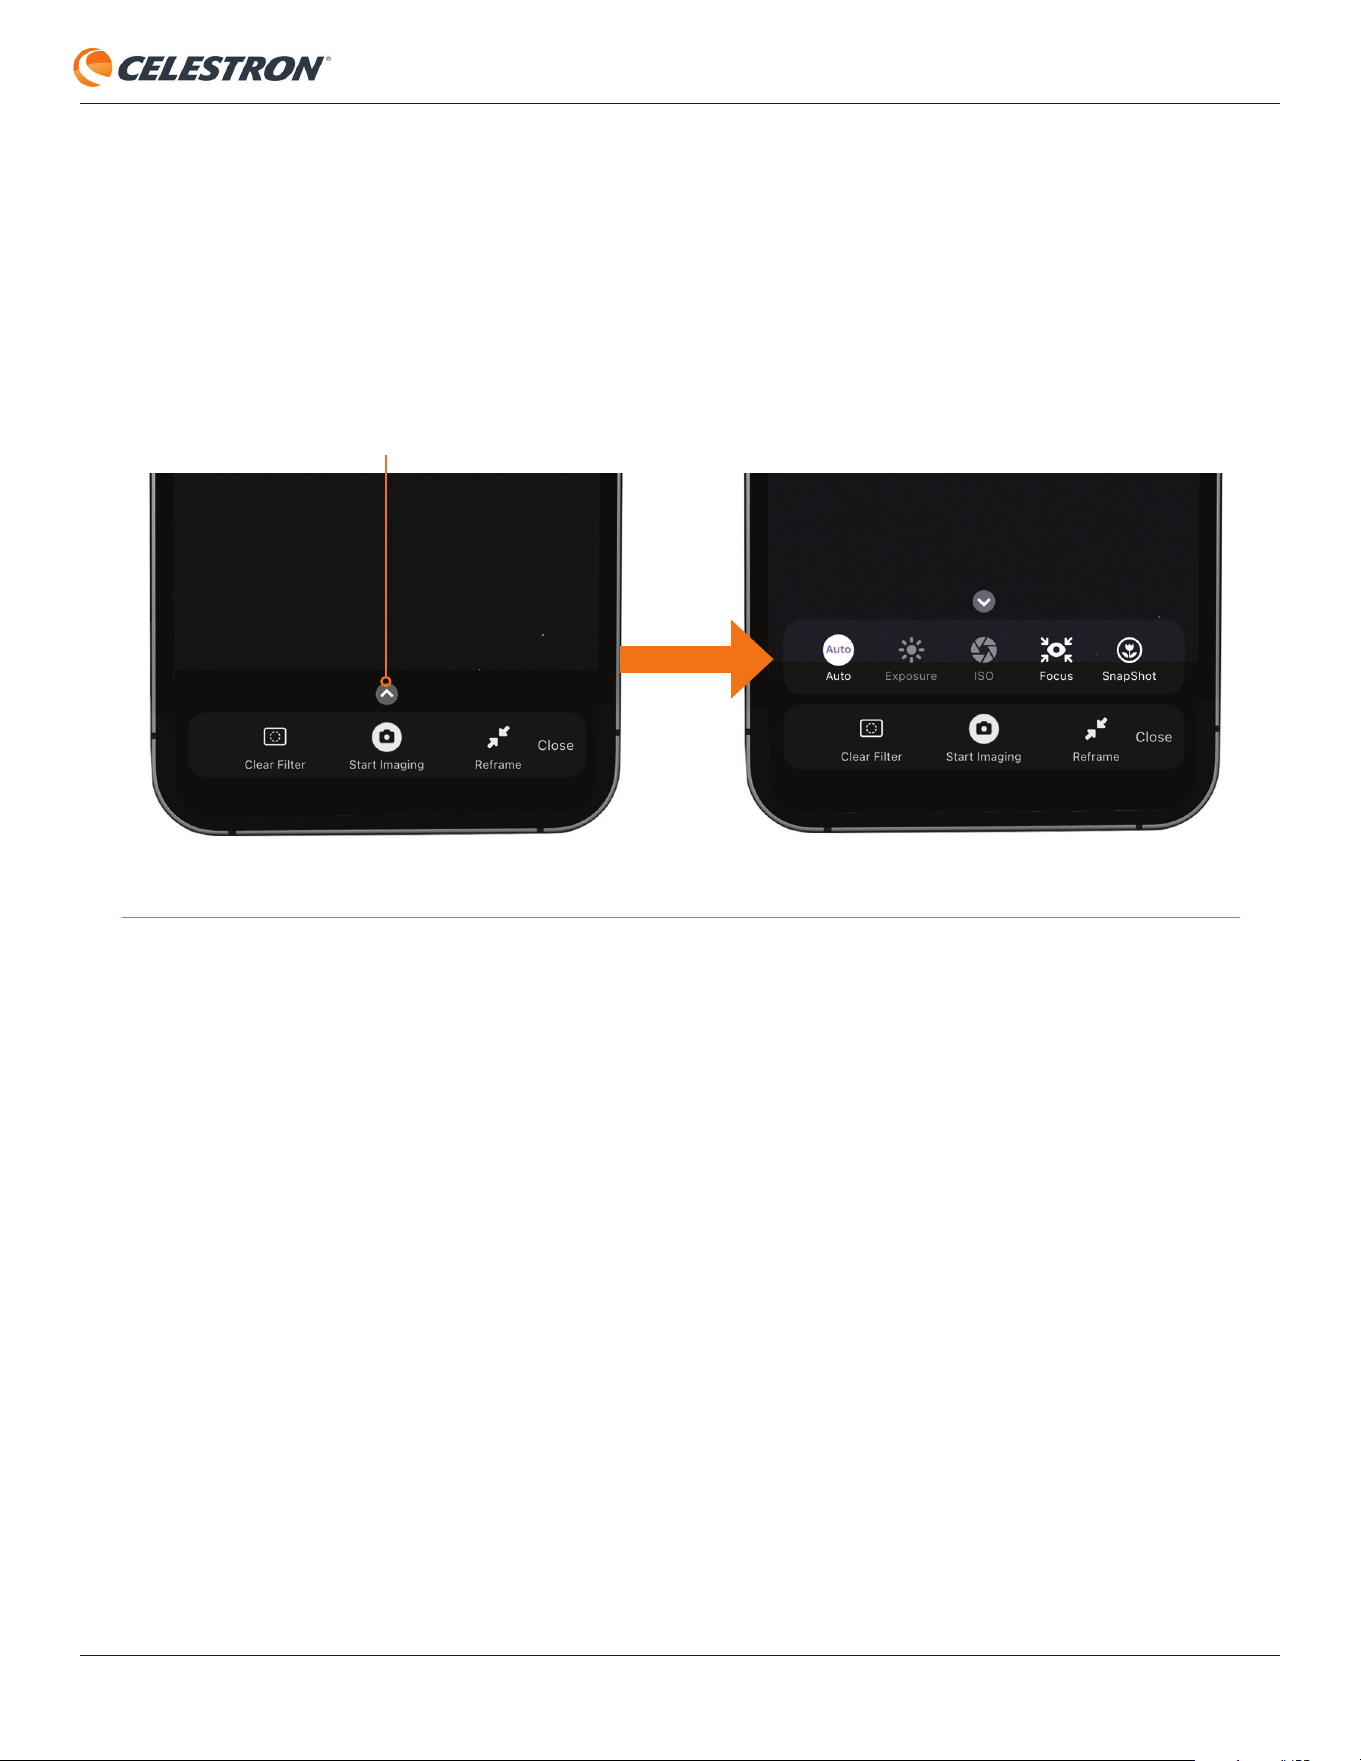
To access the manual camera settings, press the up chevron above the Start Imaging button in the Camera View (Figure 11). Press
the Auto button on the far left to toggle from Auto to Manual camera settings.
Sub-exposure Duration
To manually set the sub-exposure duration, press the “Exposure” button. To set the number, tap it, and a number keyboard will appear.
You can also use the “+” and “-” buttons to increment the number. To change the unit of time, tap it. We recommend using seconds
for normal operation at night.
- For exposures under one second, use SnapShot mode (explained later in this manual).
- The maximum sub-exposure time is about 30 seconds due to fi eld rotation from the altazimuth tracking mount, which is normal. If
the object is close to the zenith, you will likely need to use even shorter exposures.
ISO (Gain)
To manually set the ISO, tap the ISO button and select ISO 100, 200 (default), or 2000. Use ISO 200 most of the time. You can try
ISO 2000 if you are imaging from very dark skies or using a narrowband imaging fi lter. Otherwise, the gain will be too high for the
Origin to recognize star patterns, which will cause Origin to fail. If this occurs, Origin will automatically drop down from ISO 2000 to
ISO 200 and display a warning message. You can try ISO 100 for bright targets, like stars or clusters, to minimize noise by sacrifi cing
some signal strength.
Fig. 11: Access the manual camera settings from the Camera View by pressing the up chevron.
UP CHEVRON
INSTRUCTION MANUAL
CELESTRON ORIGIN | 13
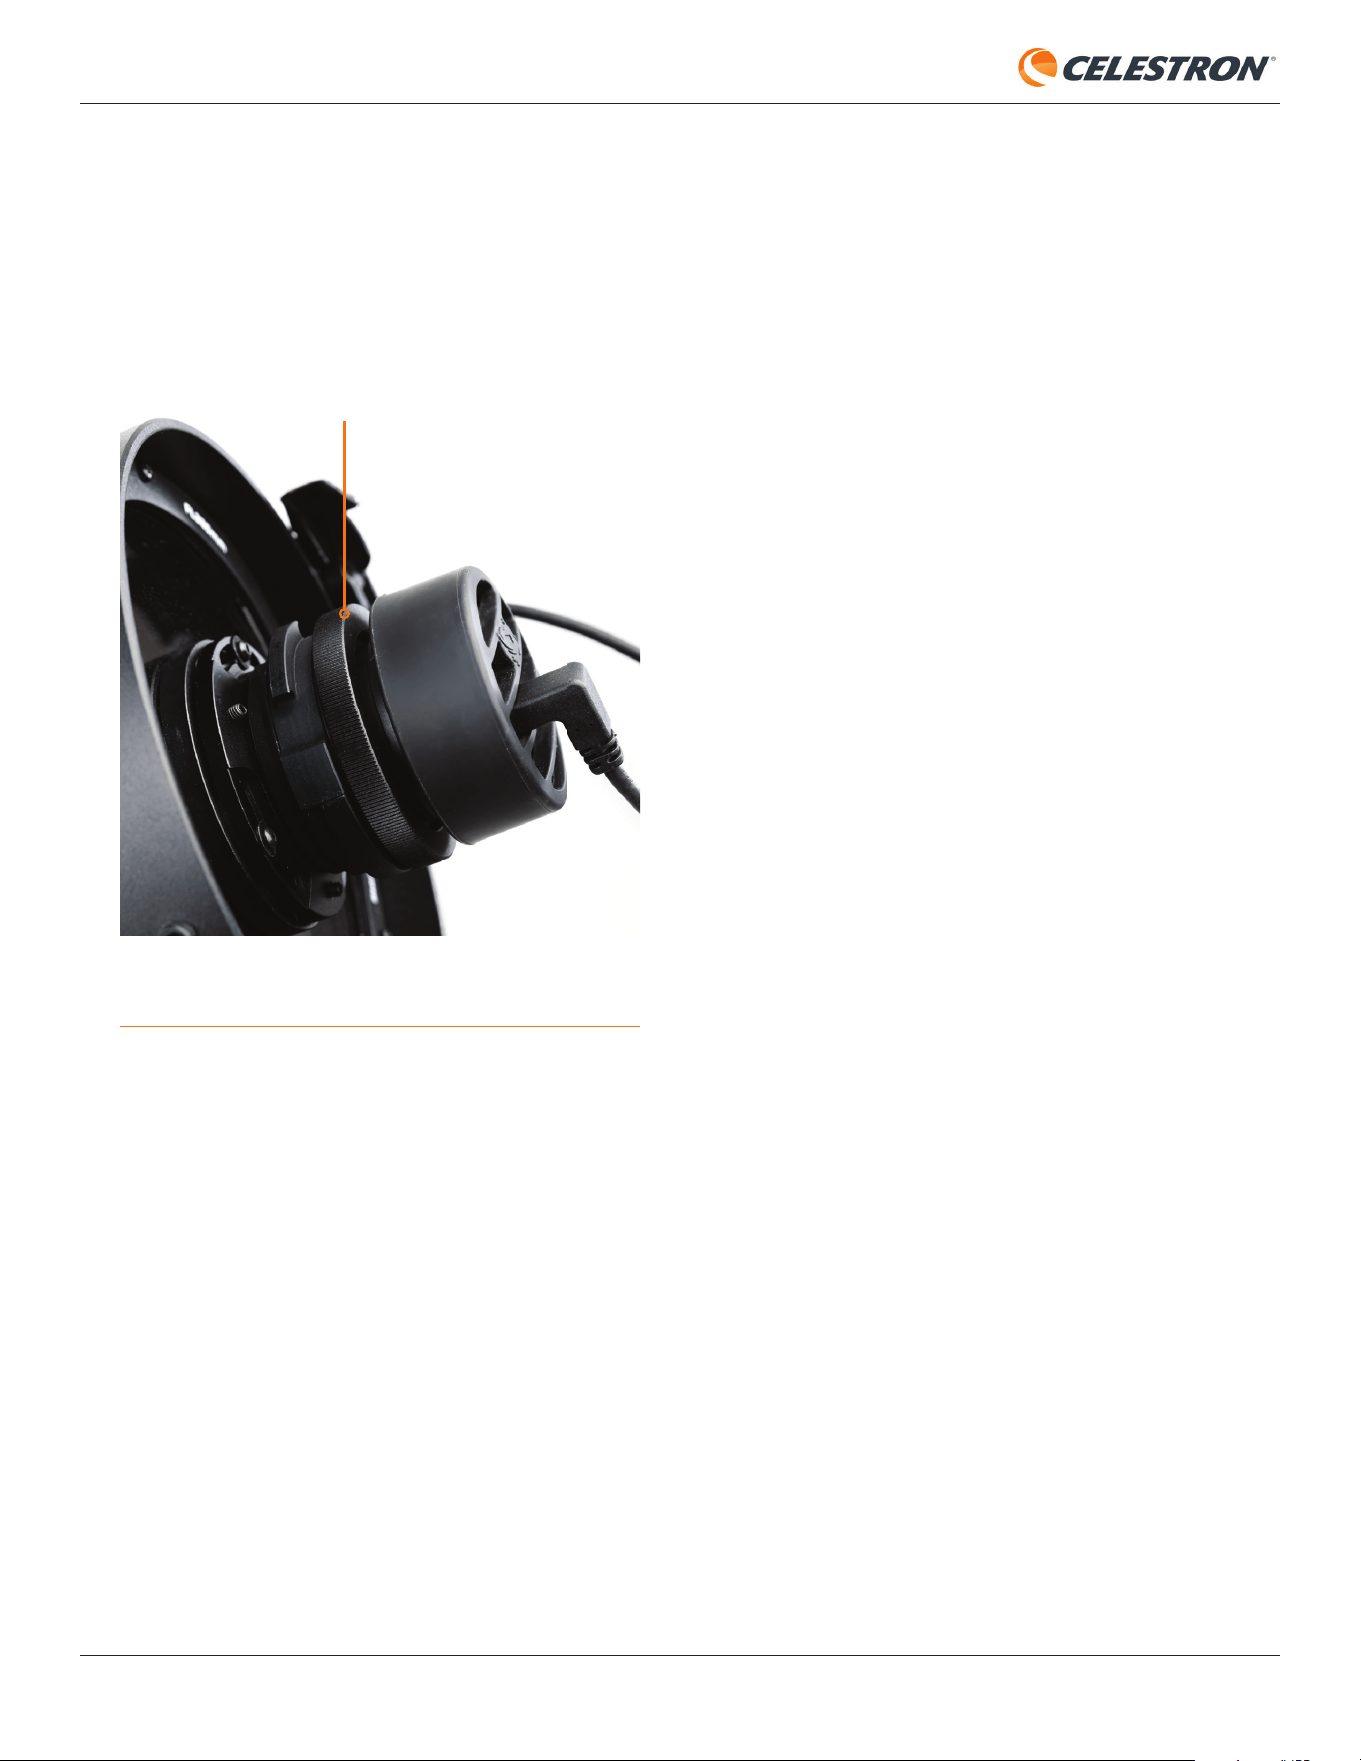
Focus
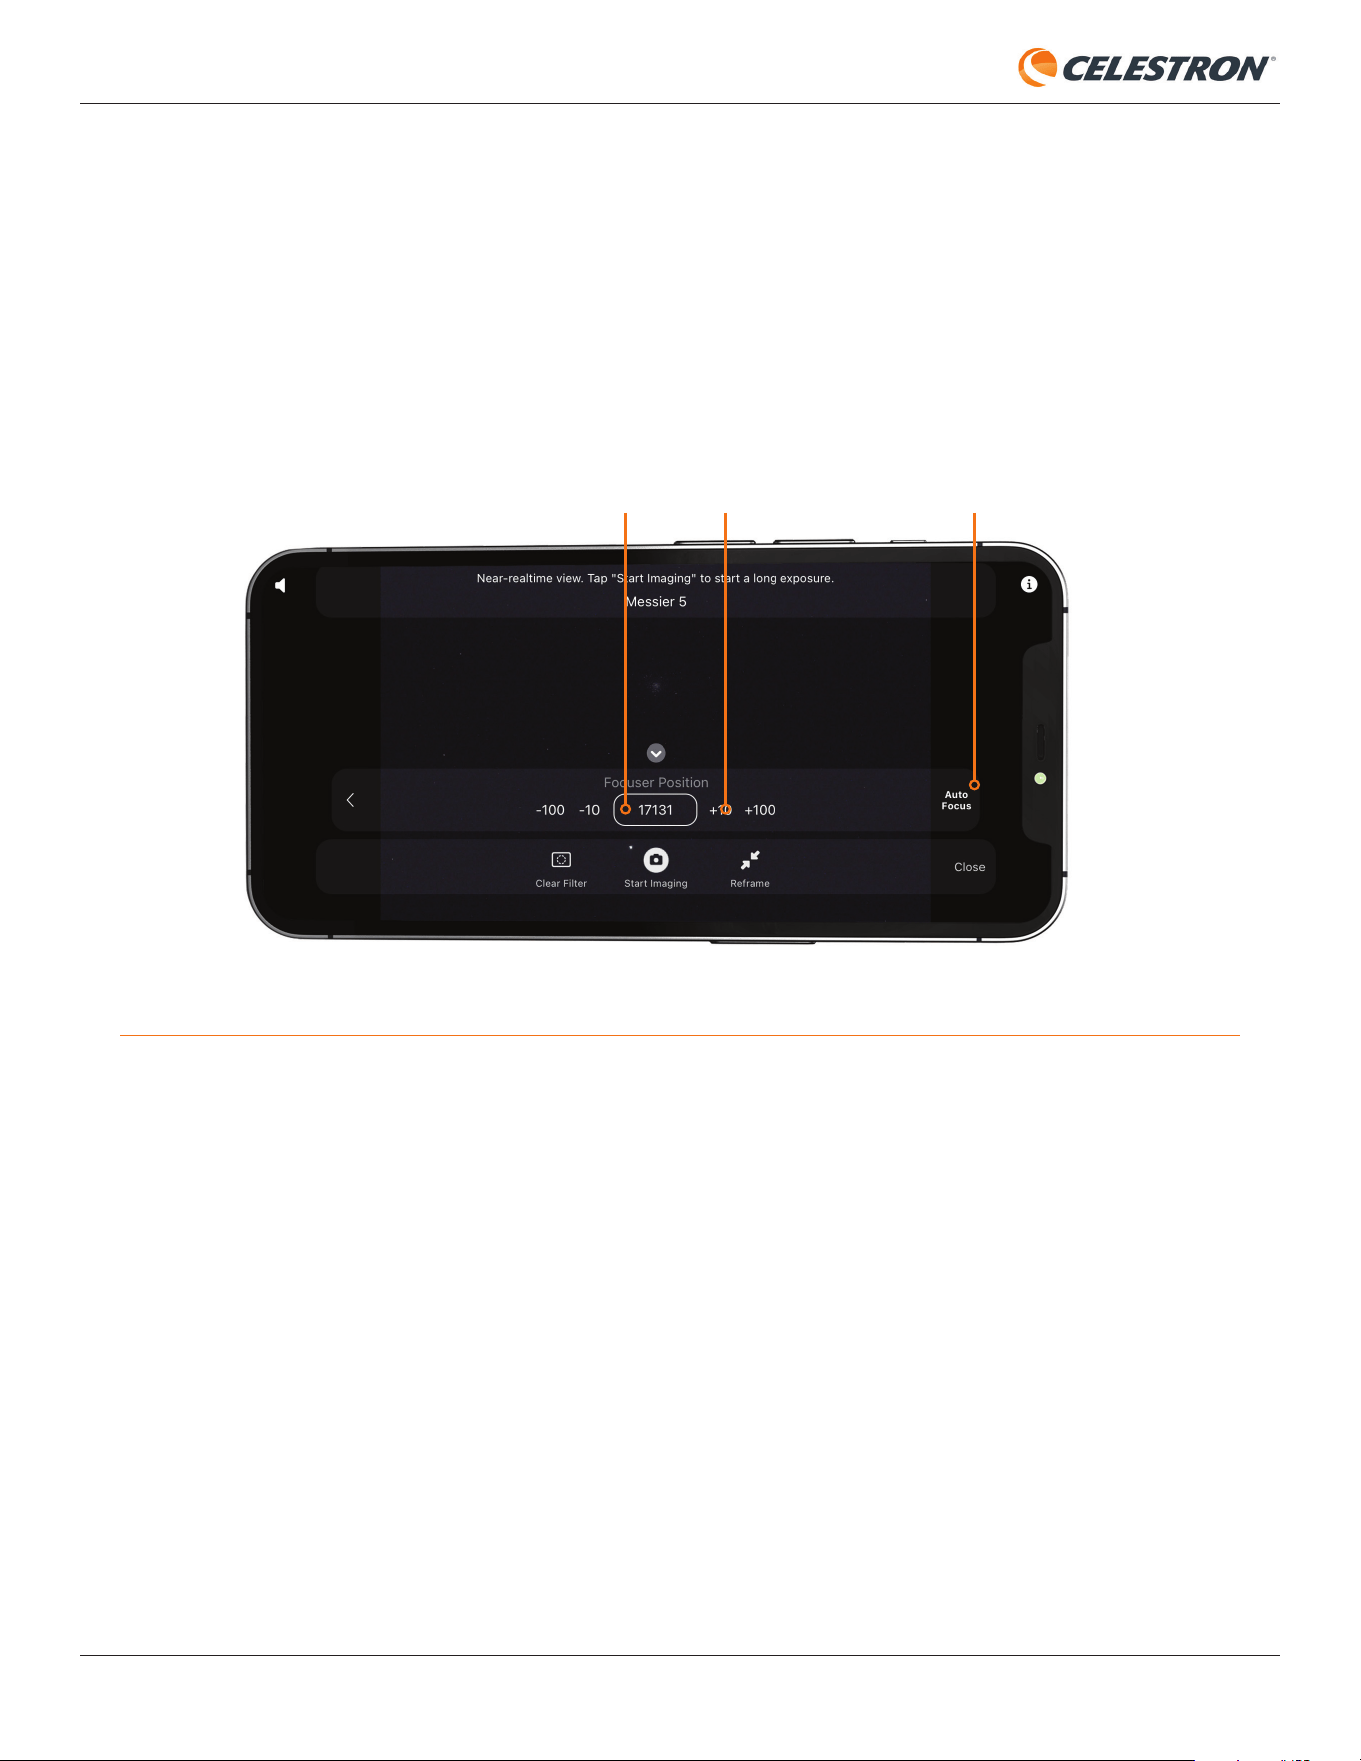
You can either autofocus or manually focus your Origin. To autofocus, press “AutoFocus” on the far right (Figure 12). In most cases, the
AutoFocus button is all you will need. Remember that Origin will autofocus as a regular part of its initialization routine, so you should
not need to rerun it under most circumstances.
To manually focus, use the -100/-10/+10/+100 controls to move the focuser in and out until stars come into sharp focus. You can see
the relative position of the focuser under “Focuser Position.” Each complete turn of the focuser knob equates to 1000 counts.
Fig. 12: Use the focus icon to access autofocus and manual focus controls. The Focuser Position can also provide useful information.
SnapShot
In SnapShot mode, stacking is disabled. Origin will take a single snapshot and save it to your device’s camera roll. SnapShot mode is
ideal for sub-exposures under one second and is the correct mode for terrestrial imaging or imaging the Moon and planets. The toggle
to turn SnapShot mode on and off is in the manual camera settings. Please refer to Section 9 of this manual for more information.
FOCUSER POSITION MANUAL FOCUS CONTROLS AUTOFOCUS BUTTON
14 | CELESTRON ORIGIN
INSTRUCTION MANUAL
Fig. 15: Grasp the drawer’s handle with your fingers and pull outwards to
release it from its magnets.
Fig. 14 The filter drawer is located between the camera and the front optics.
5. Use of Optional Filters
A great feature of Origin is its built-in filter drawer, which allows you to use astronomical imaging filters in the standard 1.25” or 2”
formats. The most useful filter is likely the optional Nebula Filter for Origin offered by Celestron, but you can experiment with other
filters, too.
Using the Optional Nebula
Filter for Origin
Installing the Nebula Filter for Origin is easy. First, in the app,
press the “Clear Filter” button to the left of the “Start Imaging”
button in the Camera View (refer to Figure 6). The app will
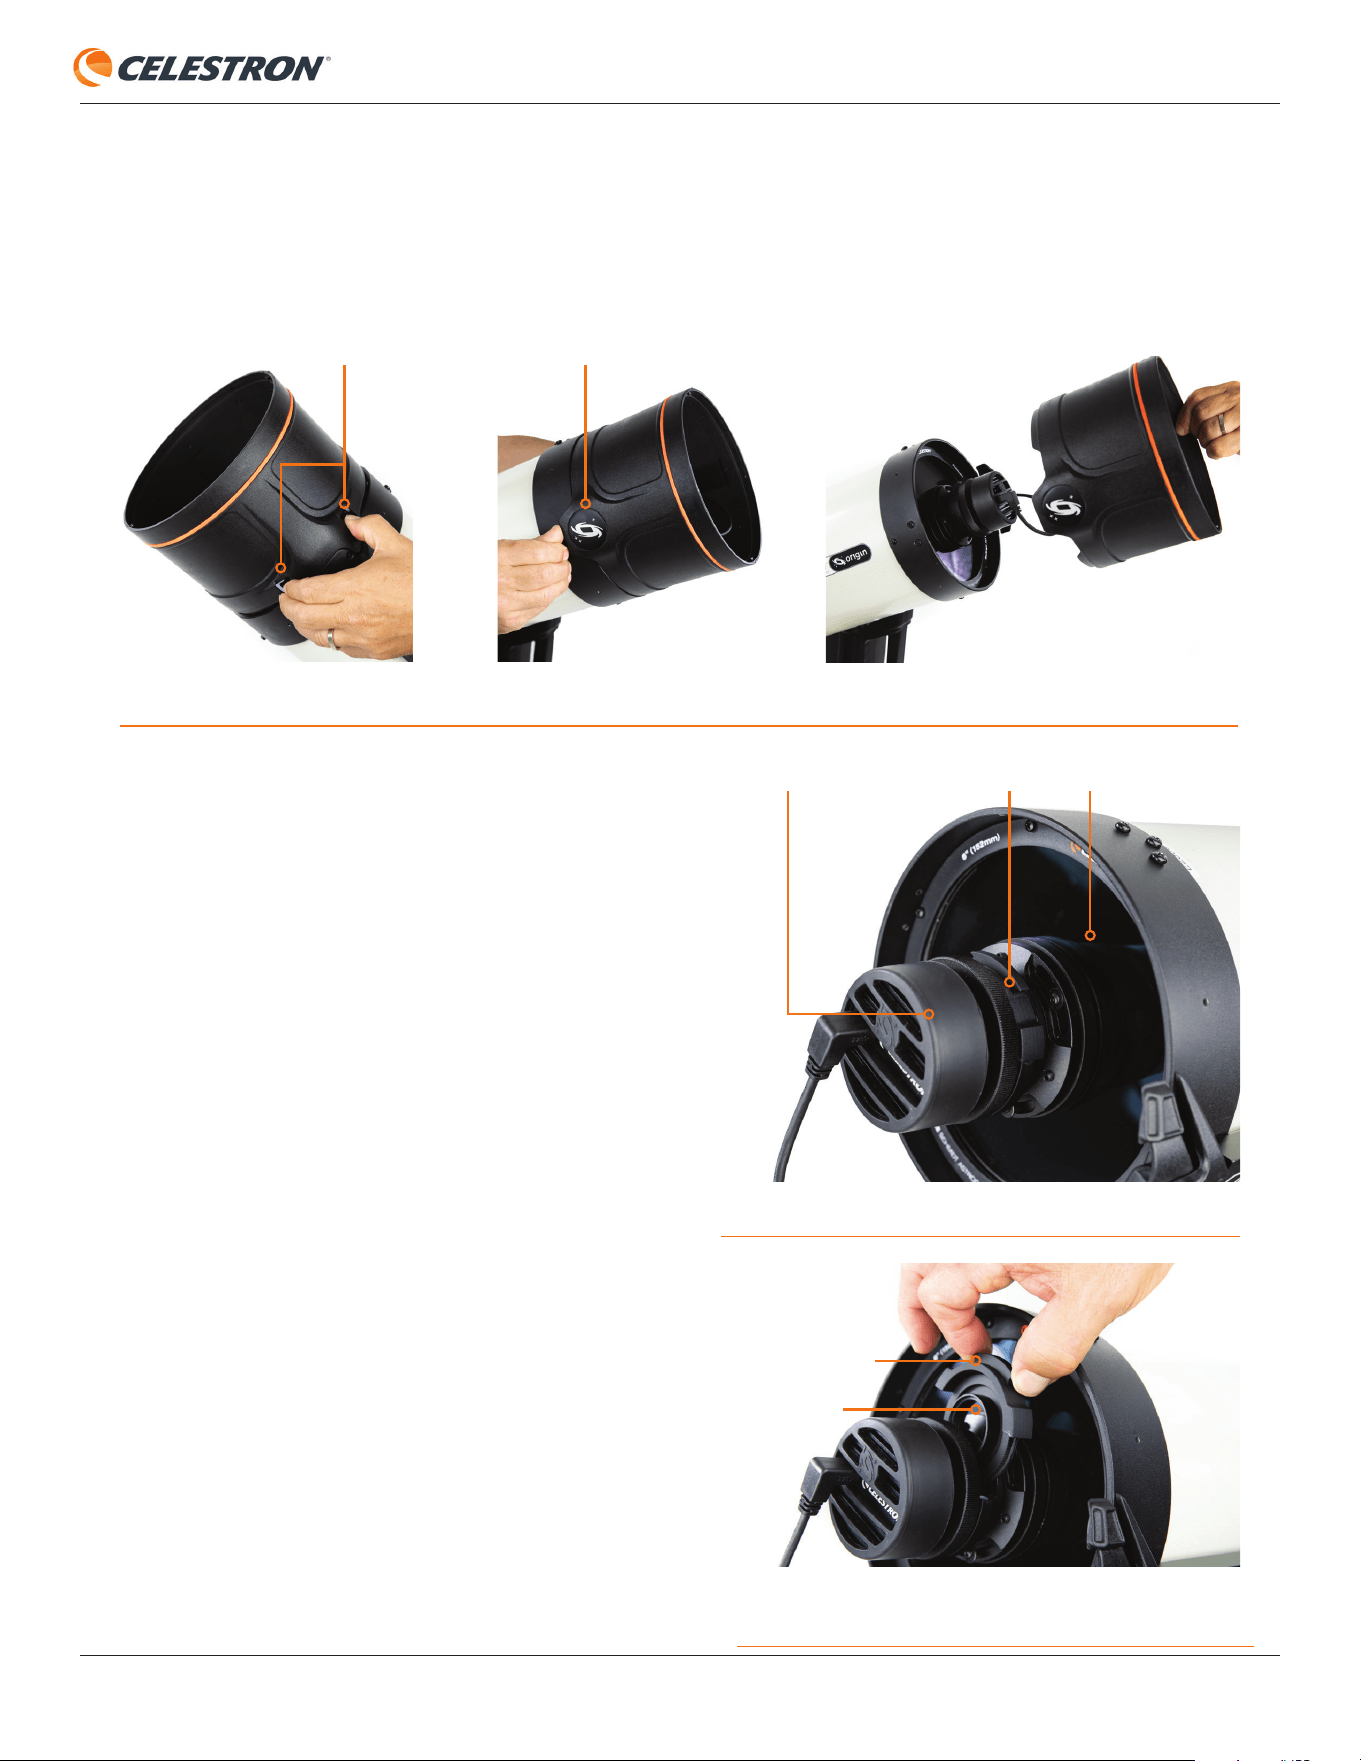
prompt you to install the Nebula Filter in Origin. First, remove
the lens shade from the front of the Origin optical tube by
pressing down on the two tabs on the exterior of the lens
shade with one hand while pushing upward under the Origin
logo located 180° away from the tabs (Figure 13). Removing
the lens shade will expose the Origin camera. The filter drawer
lies between the camera and the front optics, held in place by
magnets (Figure 14).
NOTE: The filter drawer has two pieces of tape to prevent it
from dislodging during shipment. Before removing the filter
drawer for the first time, remove the tape. If you ever ship the
Origin optical tube, re-tape the filter drawer. You won’t need
to re-tape for regular transport, as the drawer’s magnets are
strong enough to secure it in place.
Grasp the drawer’s handle with your fingers and pull outwards
to release the filter drawer from its securing magnets (Figure
15). You’ll see the clear filter already installed in the filter
drawer.
The clear filter is essential to maintain the Origin’s optical
properties when using filters. Without the clear filter, adding
another piece of flat glass (like the Nebula Filter) to the
CAMERA
TABS
DRAWER HANDLE
CLEAR FILTER
ORIGIN LOGO
FILTER DRAWER FRONT OPTICS
Fig. 13: Remove the lens shade by pressing down on the two tabs with one hand while pushing upward under the Origin logo.
INSTRUCTION MANUAL
CELESTRON ORIGIN | 15
optical system without removing a piece of glass (like the
clear filter) would affect the system’s performance at f/2.2.
So, a filter should always be installed in the drawer, either the
included clear filter, the optional Nebula Filter, or some other
astronomical imaging filter you wish to use.
To change the filter, unthread the clear filter from the drawer,
and thread in the Nebula Filter. Make sure to put the clear filter
in a safe place! Reinstall the filter drawer into Origin, orienting
it as shown in Figure 15. When the magnets connect to the
drawer, you’ll feel it “click” into place. Finally, reinstall the lens
shade onto Origin.
Now, go back to the app and indicate that you have changed
filters in the pop-up window. The app will ask if you want to re-
autofocus, which you should do. Now, you are ready to image
with the Nebula Filter. The app will also update the default
settings, using 15-second sub-exposures at ISO 200 for the
best performance with the filter. Remember, you can always
change the camera settings manually.
When you are done using the Nebula Filter, either at the end of
the night or if you want to resume imaging broadband objects,
reinstall the clear filter. Before doing this, press the Nebula
Filter button in the lower left corner of the Camera View. The
app will direct you to reinstall the clear filter. Then press OK.
After reinstalling the filter and pressing OK, you’ll be asked if
you would like to autofocus again. Choose this option. After
autofocusing is complete, you’re ready to resume imaging.
If you disconnect from Origin with the Nebula Filter installed,
Origin will automatically ask you if the Nebula Filter is still
installed when you reconnect.
Using Other Filters
You can use any appropriate third-party astroimaging filters
in 1.25” or 2” format with your Origin. The maximum shoulder
height for the filter to fit in the drawer is 8mm, which should
accommodate most filters.
To install third-party 1.25” filters, follow the same instructions
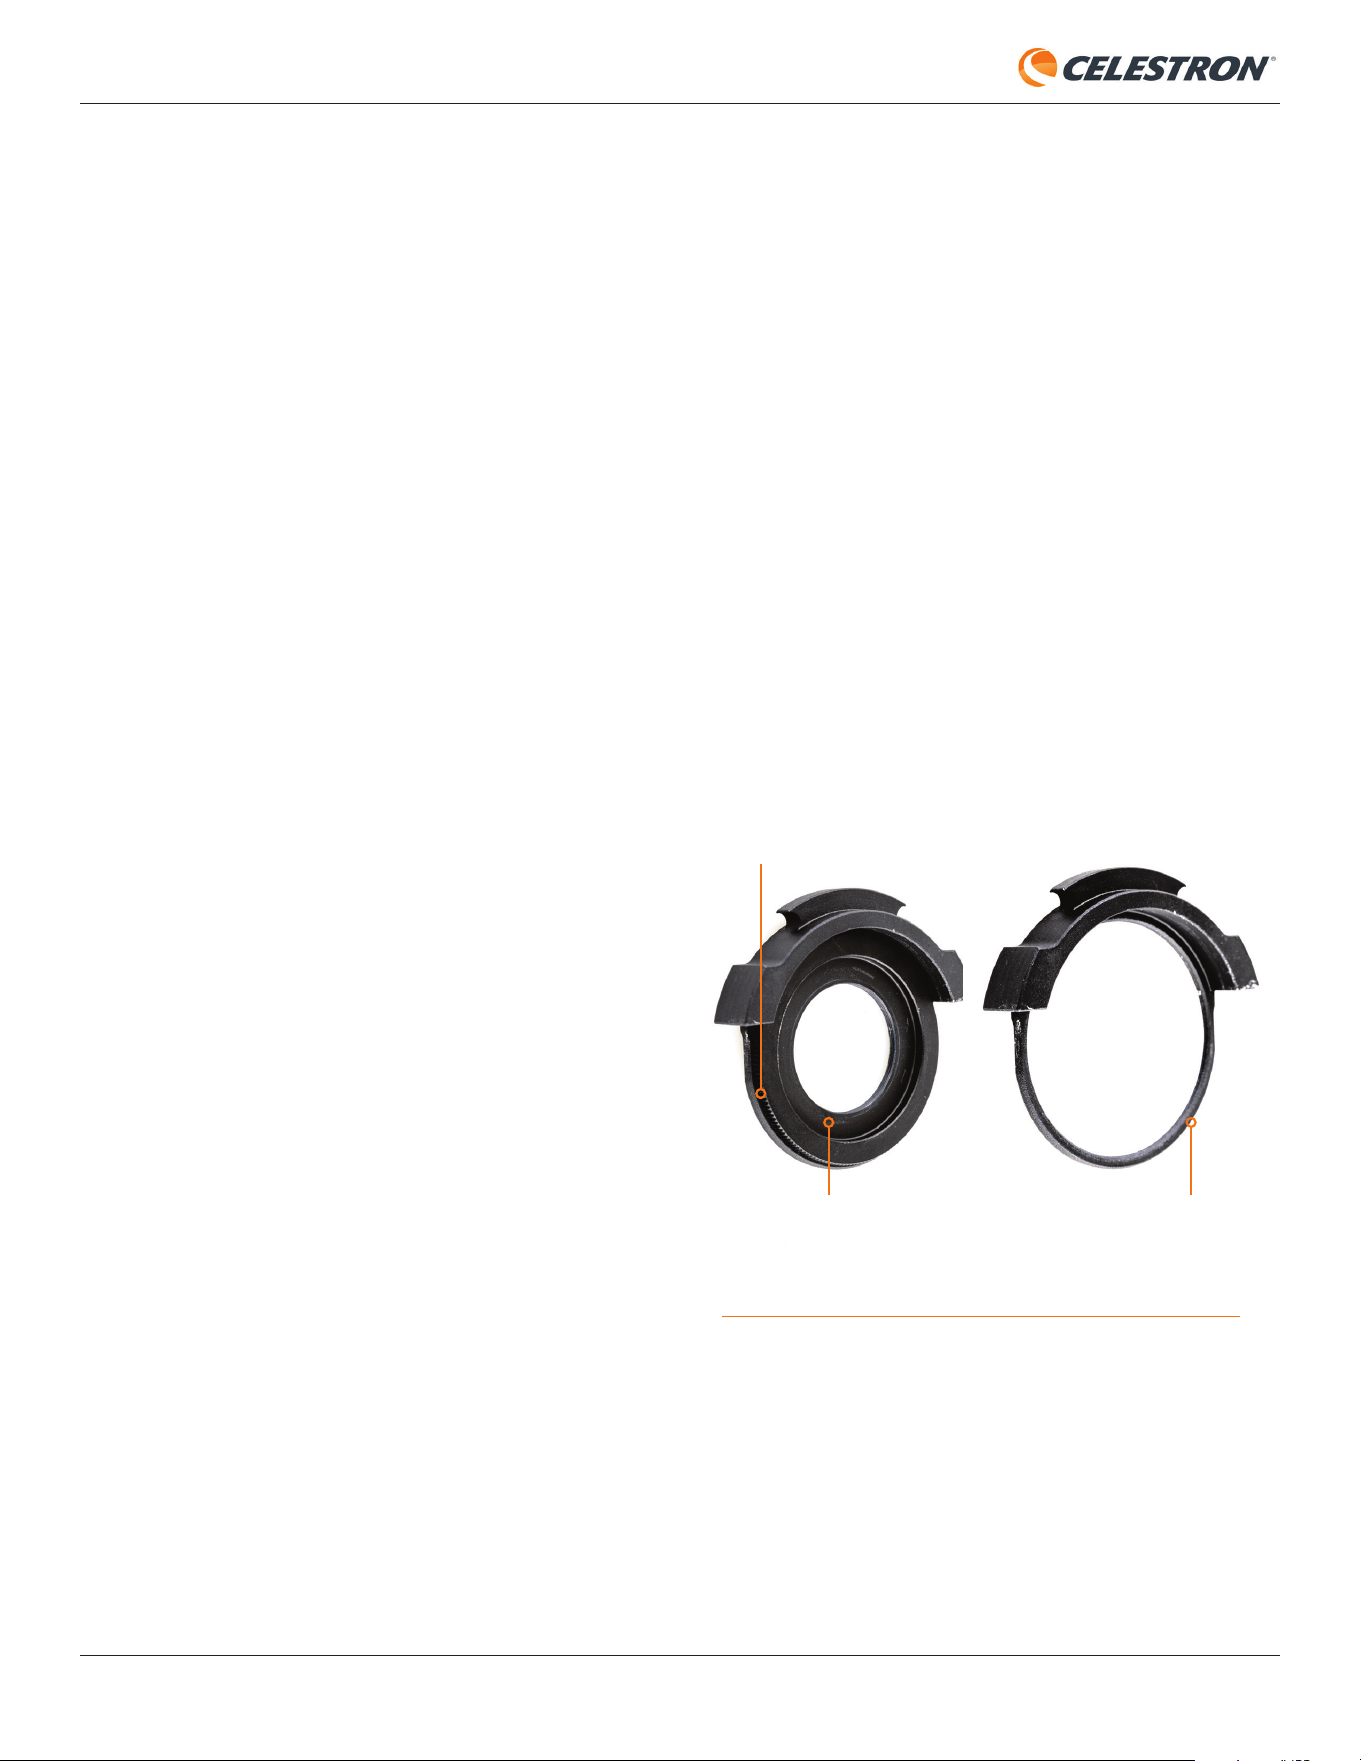
for the Nebula Filter for Origin. For 2” filters, in addition to
removing the clear filter, you also need to remove the 1.25”
filter adapter ring, which is the part that the 1.25” filters thread
into (Figure 16). Grasp the knurled edge of the ring with your
fingers and rotate it counterclockwise. Once you remove the
ring, you’ll see the 2” filter threads.
When using other filters, we recommend pressing the clear
filter button, which will instruct you to remove the clear filter,
and then install the “Nebula Filter,” which, in this case, can
be any filter you choose. The app will ask if you want to re-
autofocus, which you should do. Now, you are ready to image
with your filter. The app will update the default settings using
15-second sub-exposures at ISO 200. Remember, you can
always change the camera settings manually.
If your filter’s glass is much thicker than 2.0mm, it may put the
focus point out of range of the autofocusing routine. A pop-
up will appear. Use the manual focus controls to get stars
reasonably in focus, then try pressing the AutoFocus button
again.
Also, depending on the filter, AI image processing may not
provide the best results; you may want to process the raw
images manually. You can turn off some (or all) AI image
processing under Menu>Settings>Advanced.
Fig: 16: Remove the drawer’s 1.25” filter adapter ring to expose the 2” filter
threads.
1.25” FILTER ADAPTER RING
KNURLED EDGE
2” FILTER THREADS
16 | CELESTRON ORIGIN
INSTRUCTION MANUAL
6. Image Gallery
After you complete an image, Origin stores it in the app’s
Image Gallery and your device’s camera roll. You can access
the Image Gallery anytime by tapping the Gallery button at the
bottom left of the Planetarium View (Figure 3).
IMPORTANT NOTE: If you manually delete an image from your
device’s camera roll, it will also be deleted in the Origin app’s
gallery.
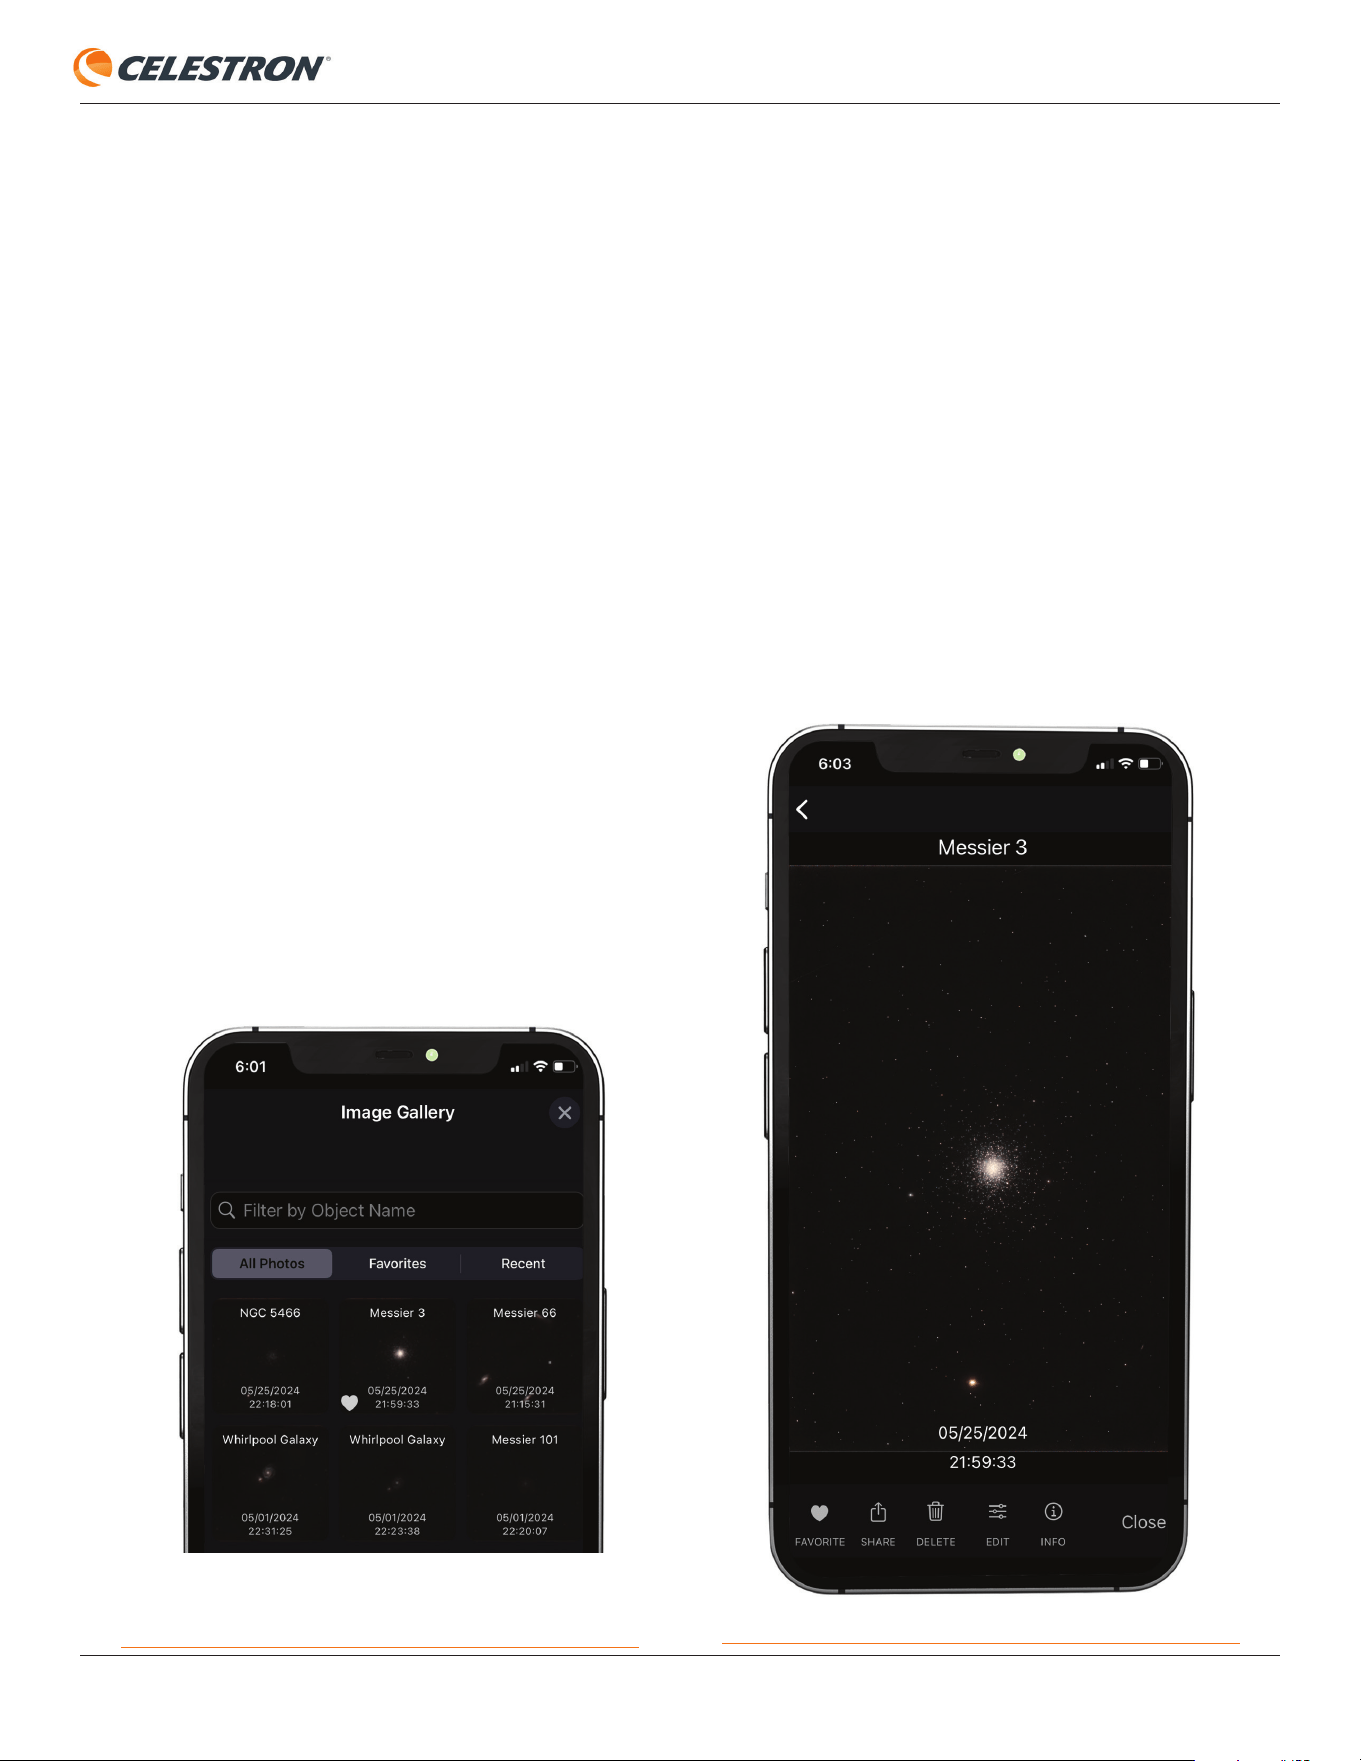
When you open the gallery, the screen will look like Figure 17.
There are three sections at the top of the gallery:
“All Photos” displays all images taken with the Origin, sorted
in chronological order.
“Favorites” displays only the images you’ve selected as
favorites.
“Recent” displays only the images you’ve captured during
the past day.
You can also search the gallery by object name for your
desired image.
Fig: 18: From the Image Gallery, you can select an image to edit or share.
Fig: 17: The Image Gallery is where you can view and share all the images
you’ve captured with Origin.
When you select an image, you’ll see a screen similar to the
one you saw when you originally downloaded and processed
the image (Figure 18). From here, you have several options:
“Favorite” allows you to mark images as favorites for easy
access in the gallery from the “Favorites” section.
“Share” allows you to send images to friends, family, and/or
social media.
“Delete” permanently removes the image from the gallery
AND your camera roll.
“Edit” allows you to make some manual post-processing
adjustments.
“Info” gives you detailed information about the image’s
parameters.
INSTRUCTION MANUAL
CELESTRON ORIGIN | 17
Fig: 19: After pressing Share for an image in the gallery, you’ll see additional
options. Press the Share icon when the image is ready to share.
Sharing Images
Sharing images requires a connection to the internet. If your
device is connected to Origin via Network Connect mode, you
should be able to connect to the internet. If you are in Direct
Connect mode, you won’t be able to share images unless you
have cell service.
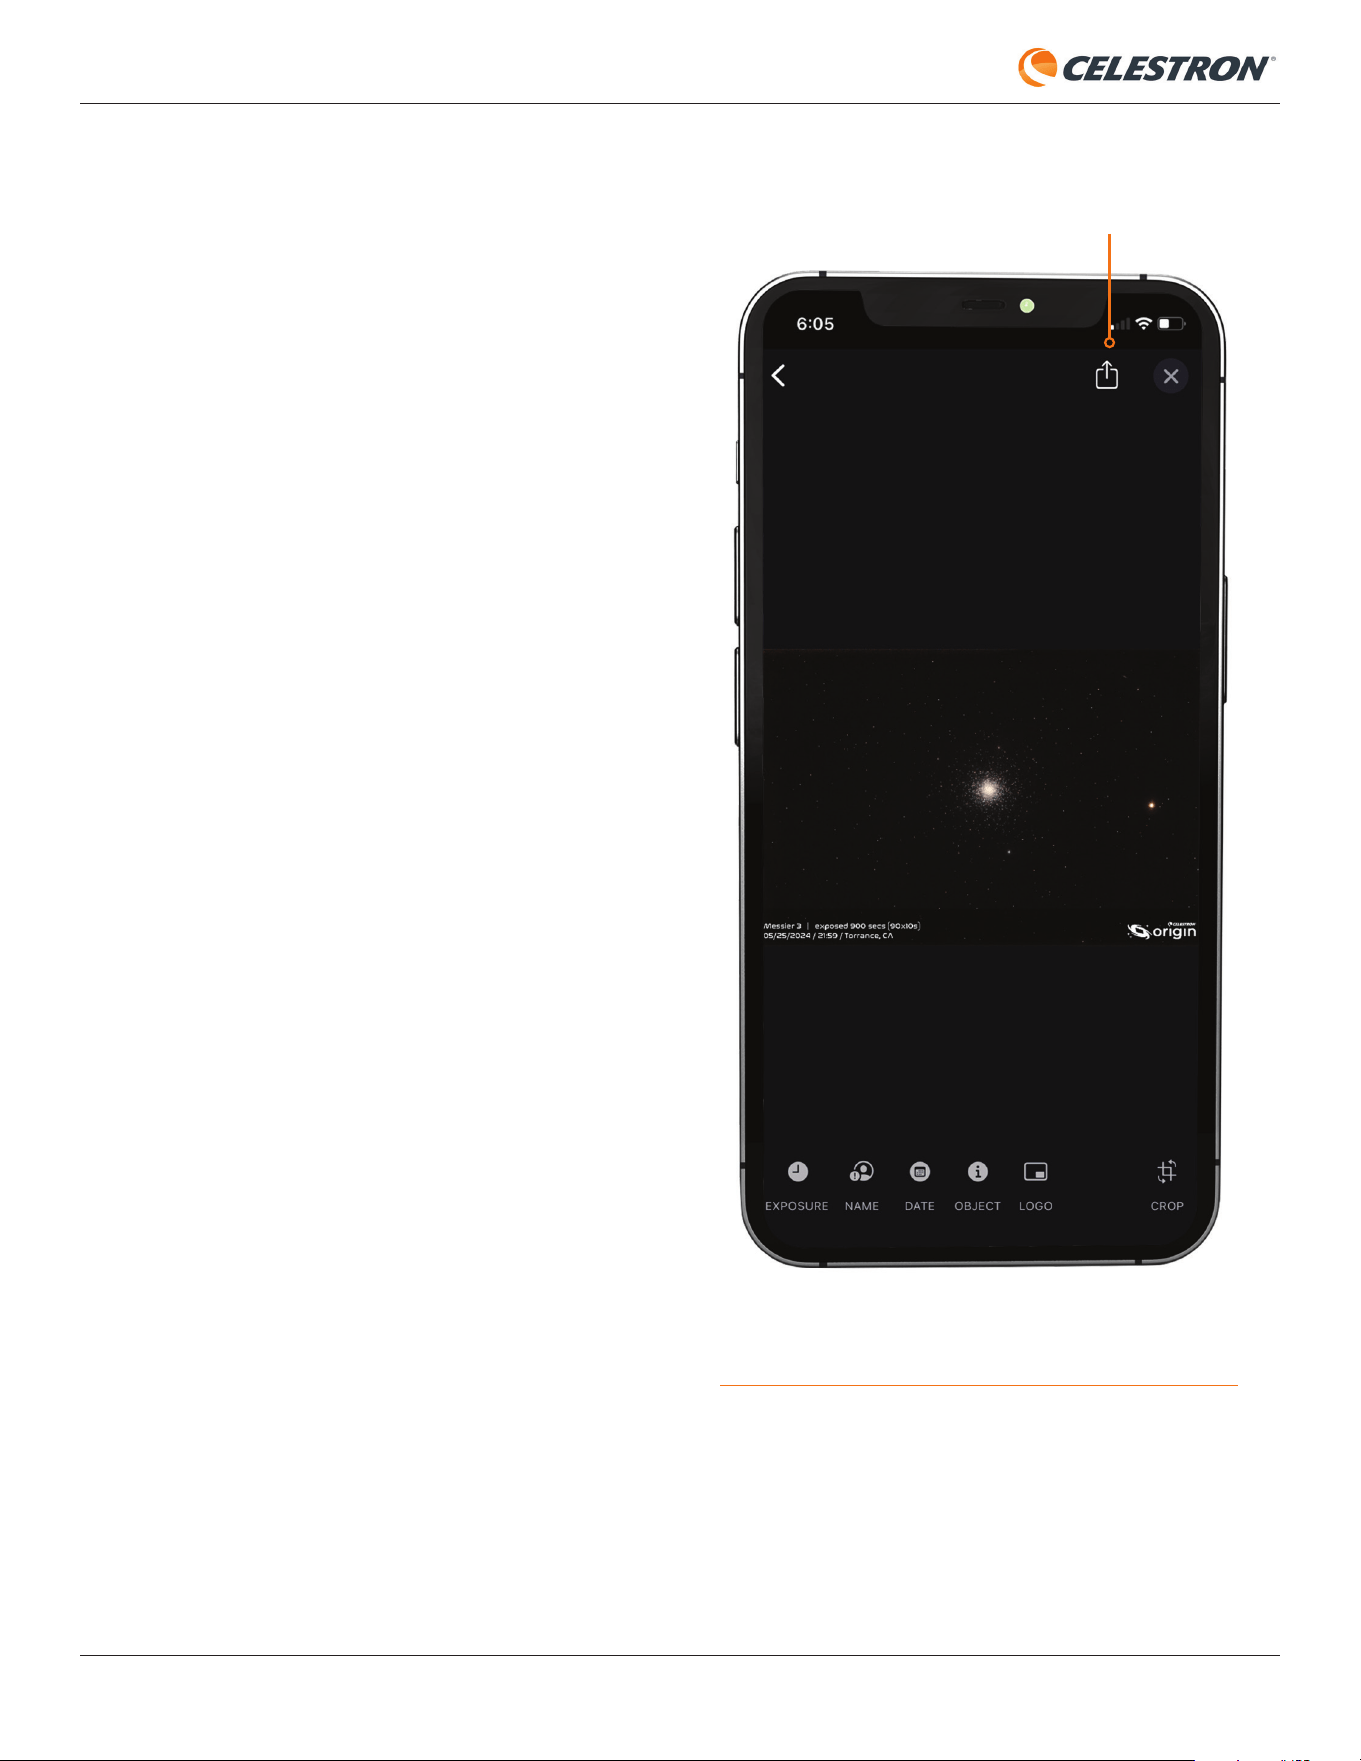
After tapping the Share button, you’ll see a screen that looks
like Figure 19. The buttons at the bottom of the screen allow
you to customize the image further before you share:
“Exposure” displays the total exposure time in the lower left
corner.
“Name” displays your name in the lower left corner.
“Date” displays the time, date, and location where the image
was captured in the lower left corner.
NOTE: The location may not be exact. The app displays the
nearest location in its database.
“Object” displays the object’s name in the lower left corner.
“Logo” displays the Origin logo in the bottom right corner.
“Crop” allows you to crop the image before sharing. This is
especially useful for smaller objects that only take up a small
section of the larger frame.
As you make changes, you’ll see them in the preview image.
When you’re ready to share the image, press the Share
icon in the top right corner. You’ll see several ways to share,
depending on the other apps you have installed. You can even
share directly to social media!
Note about Image Resolution
and File Formats
For Android devices, shared images will be high-resolution
in PNG. For iOS devices, however, the shared images are
compressed JPG fi les. This is because the saved images on
iOS devices default to the HEIC format, allowing photos to
have smaller fi le sizes while retaining a higher image quality. To
obtain high-resolution images from your iOS devices, consult
Apple online resources.
SHARE ICON
18 | CELESTRON ORIGIN
INSTRUCTION MANUAL
7. Scheduled Imaging
One of Origin’s most interesting functions is its ability to
perform scheduled imaging sessions whether you are actively
observing or not. You can set up a list of objects, disconnect
your device, and let Origin automatically image the objects
on your list. When you come back later and reconnect, you’ll
be able to download the images. You even have the option to
power off Origin automatically after the schedule completes!
You can create “Tonight’s Imaging Schedule,” run the list,
go to bed, wake up, power on Origin, and download your
images. It’s that easy! Or you can take a real-time automatic
sky tour by creating a list of objects and sitting back as Origin
automatically images the list and displays the results.
It all starts with Tonight’s Imaging Schedule. There are a
couple of ways to add objects to your schedule:
For objects selected in the Planetarium View
, press
the Object Info bar, then select “Add to Tonight’s Imaging
Schedule” from the pop-up menu.
From the Object Info pages, tap the Schedule icon at the
bottom of the screen.
Once you’ve added all your desired objects to Tonight’s
Imaging Schedule, go to Menu>Tonight’s Imaging
Schedule. You’ll see the objects you have added to the list. To
remove an object in iOS, swipe left on it, then press the Delete
button that appears. For Android, press the Edit button in the
upper left corner, select the object you want to remove from
the list, and press the Delete icon.
There are two additional options located at the top of the
screen. “Power Down Scope On Completion” instructs Origin
to automatically power itself off after completing the list. This
is ideal for scheduling imaging sessions before you go to bed.
NOTE: Be sure weather and safety conditions allow Origin to
be left outside all night!
“AutoFocus After Each Object” instructs Origin to
automatically focus after it moves to a new object in the
list and before imaging starts. This can be useful if you are
imaging many objects across the sky over an extended time,
as it ensures excellent focus throughout the imaging run.
To run Tonight’s Schedule, simply press “RUN SCHEDULE
NOW.” Origin will begin by moving to the fi rst object in the list.
Once the schedule is underway, you can close the app (and
go to bed!) or watch the Camera View as Origin images the
objects on the list. If you want to interrupt the schedule and
skip to the next object, press “Skip to Next Object” towards
the bottom of the Camera View. To cancel the schedule, press
the Cancel Schedule button at the bottom of the Camera View.
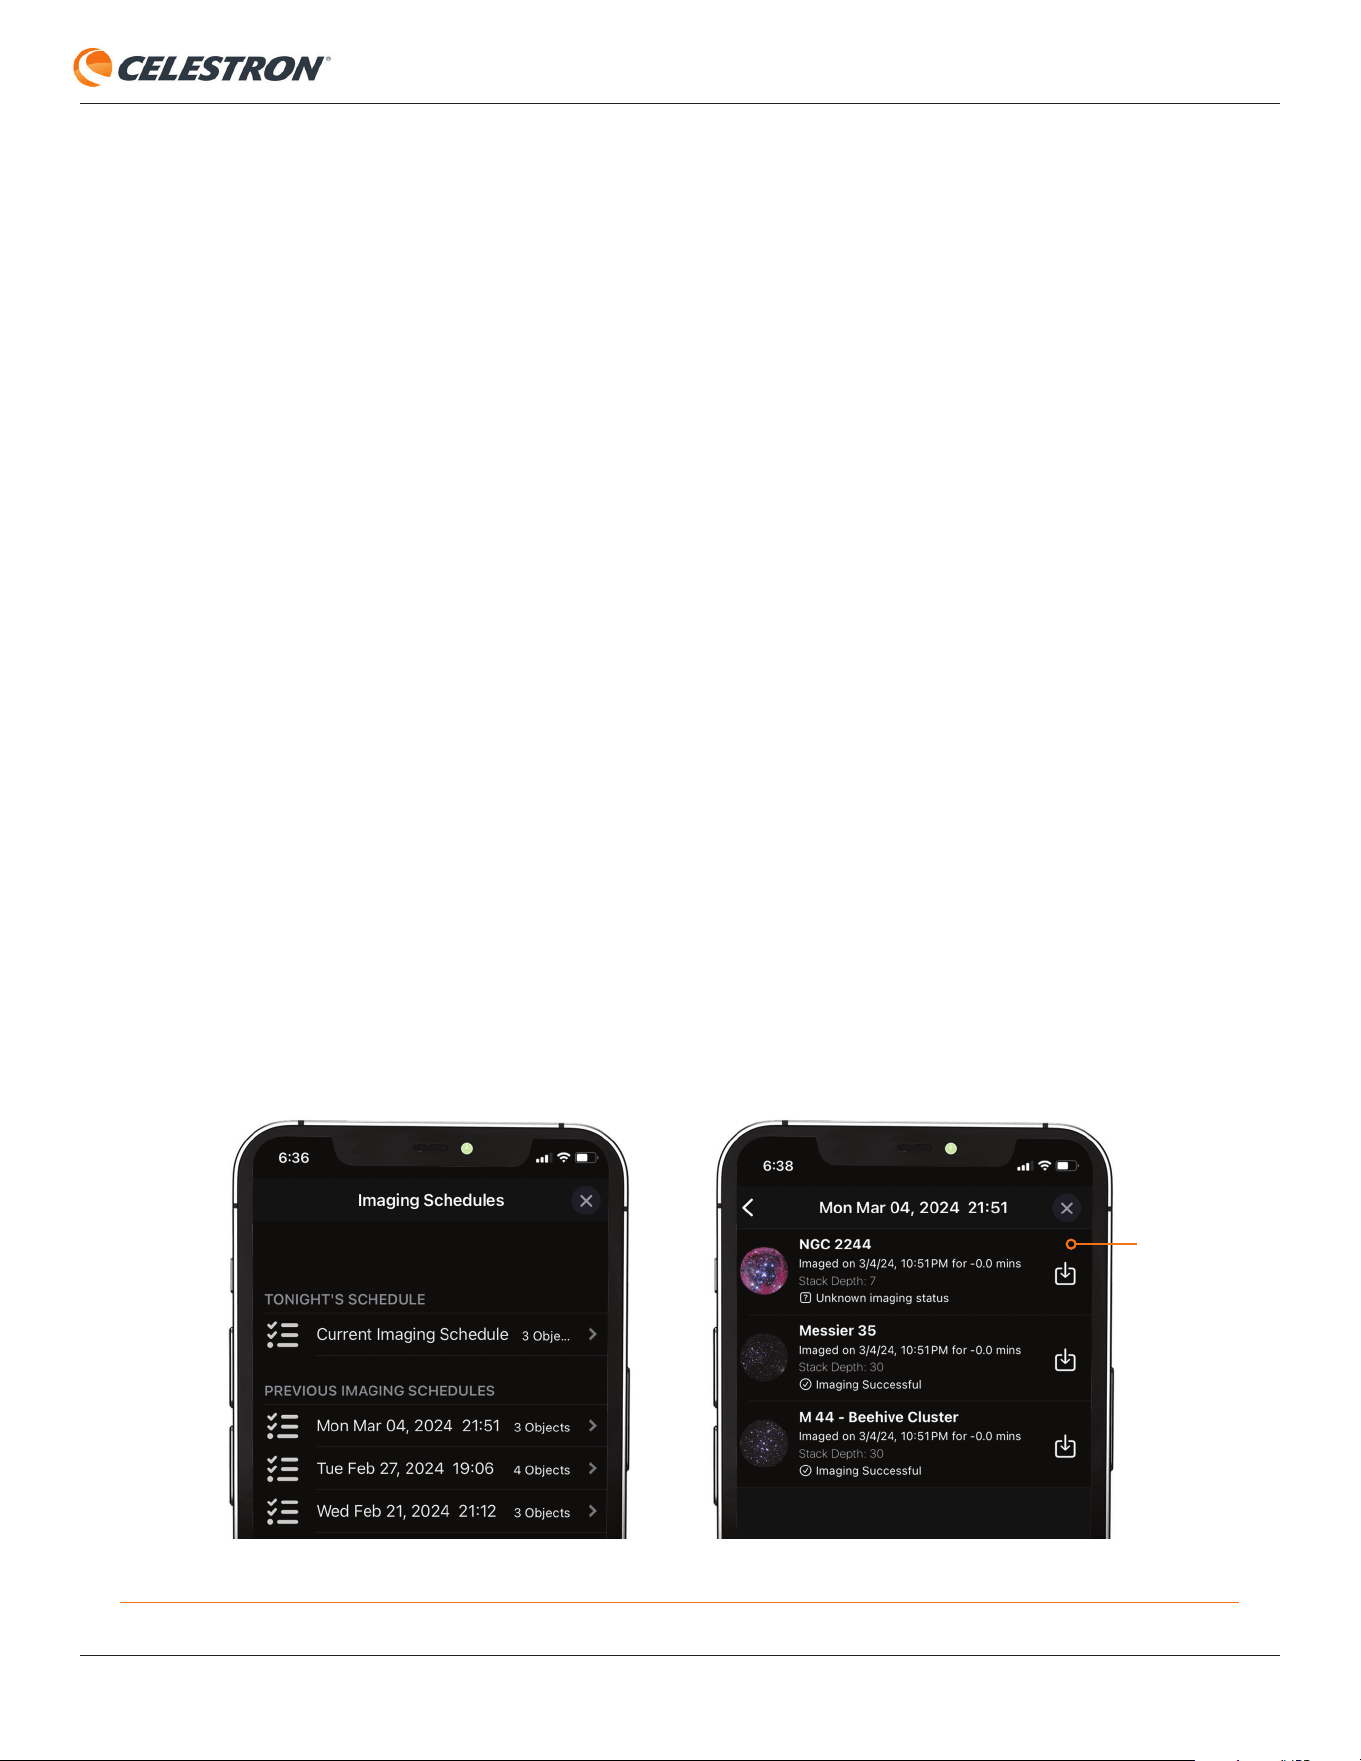
To retrieve the images after Tonight’s Schedule is complete, go
to Menu>Imaging Schedules. Under PREVIOUS IMAGING
SCHEDULES, you should see the date and time of the
schedule you just ran. Select that schedule, and you should
see download icons next to the objects in the schedule that
were successfully imaged (Figure 20). Press the download
icon, and the image will download into the gallery and your
device’s camera roll.
DOWNLOAD
ICON
Fig: 20: Find the schedule you ran under PREVIOUS IMAGING SCHEDULES. Once selected, you’ll see download icons for objects previously imaged.
INSTRUCTION MANUAL
CELESTRON ORIGIN | 19
NOTE: If you are connected to Origin while running the
schedule, the app may download the fi nal stacked masters
automatically. If this occurs, you won’t see a download icon
next to the object in the schedule. Instead, you’ll see a right
chevron, which takes you to the fi nal stacked master image.
You can usually use the automatic and default settings while
running Tonight’s Imaging Schedule. The automatic/default
settings are as follows:
Image Duration
• 1 minute for stars
• 5 minutes for open star clusters
• 10 minutes for globular star clusters and planetary nebulae
• 20 minutes for galaxies and diffuse nebulae
Camera Settings
• 10-second sub-exposures
• ISO 200
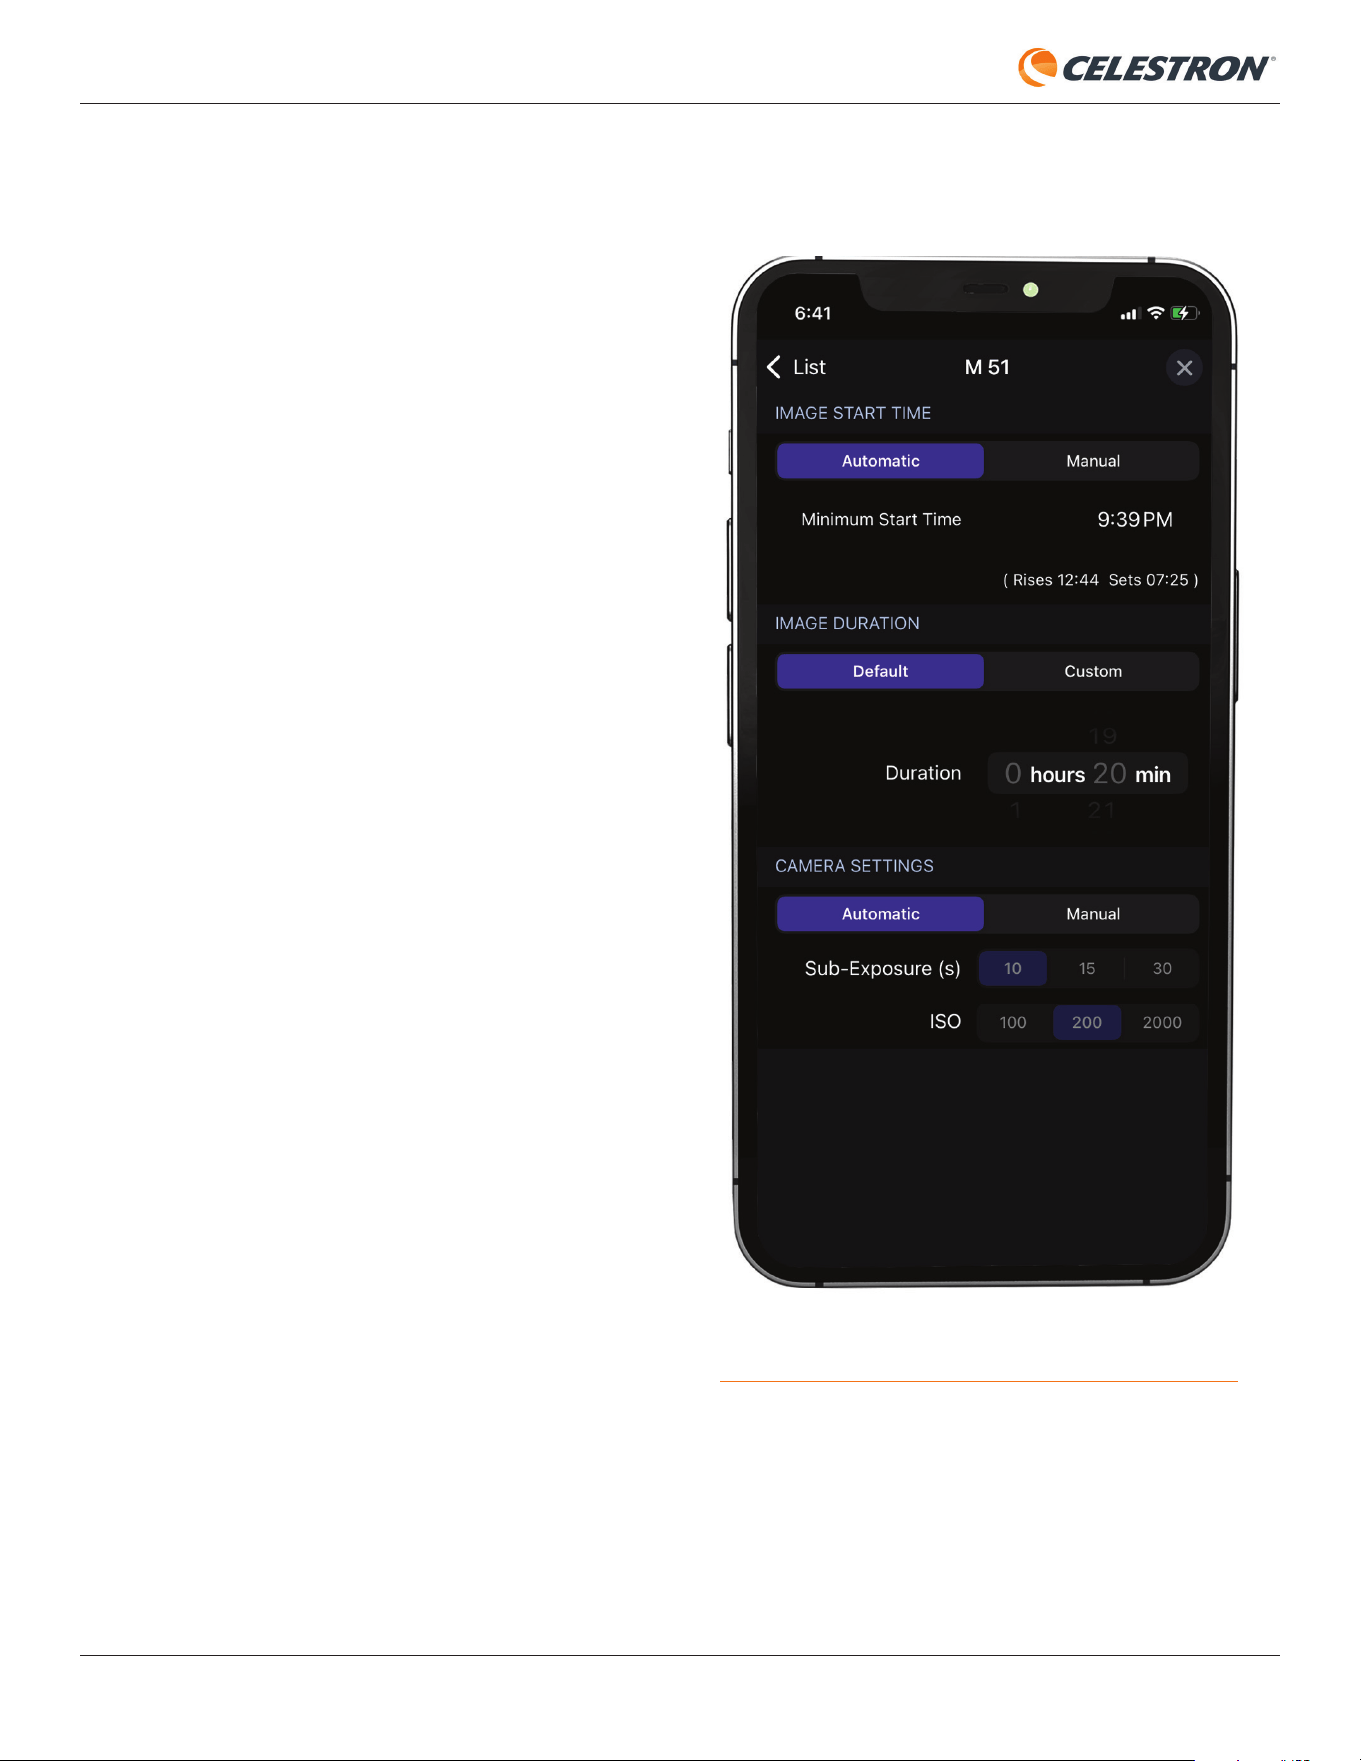
You can also manually change the imaging settings for each
object in the schedule from the Tonight’s Schedule screen.
Tap on an object in the list, and you’ll be able to adjust settings
(Figure 21):
Image Start Time
• Allows you to set the Minimum Start Time for each object.
Image Duration
• Allows you to set the total exposure time for each object.
Camera Settings
• Allows you to change sub-exposure duration: 10, 15, or 30
seconds.
• Allows you to change the ISO: 100, 200, or 2000.
NOTE: For objects near the zenith, don’t use 30 second sub-
exposures due to altazimuth fi eld rotation.
NOTE: If you are under light-polluted skies and not using the
Nebula Filter for Origin, don’t use ISO 2000. The background
may become too bright for Origin to see stars and plate-solve.
To delete old schedules under PREVIOUS IMAGING
SCHEDULES, swipe left in iOS. For Android, press the Edit
button in the upper left corner, select the schedule you want
to delete, then press the Delete icon.
Fig: 21: You can manually adjust settings for each object in the schedule by
tapping on it.
20 | CELESTRON ORIGIN
INSTRUCTION MANUAL
8. OneSky
Origin can connect to Simulation Curriculum’s OneSky
database. Here, you can see which astronomical objects
other people are observing with Origin (and other apps from
Simulation Curriculum) and how many observers are currently
studying each object. This can help you select the best objects
to observe and lets you know that others are observing at the
same time you are!
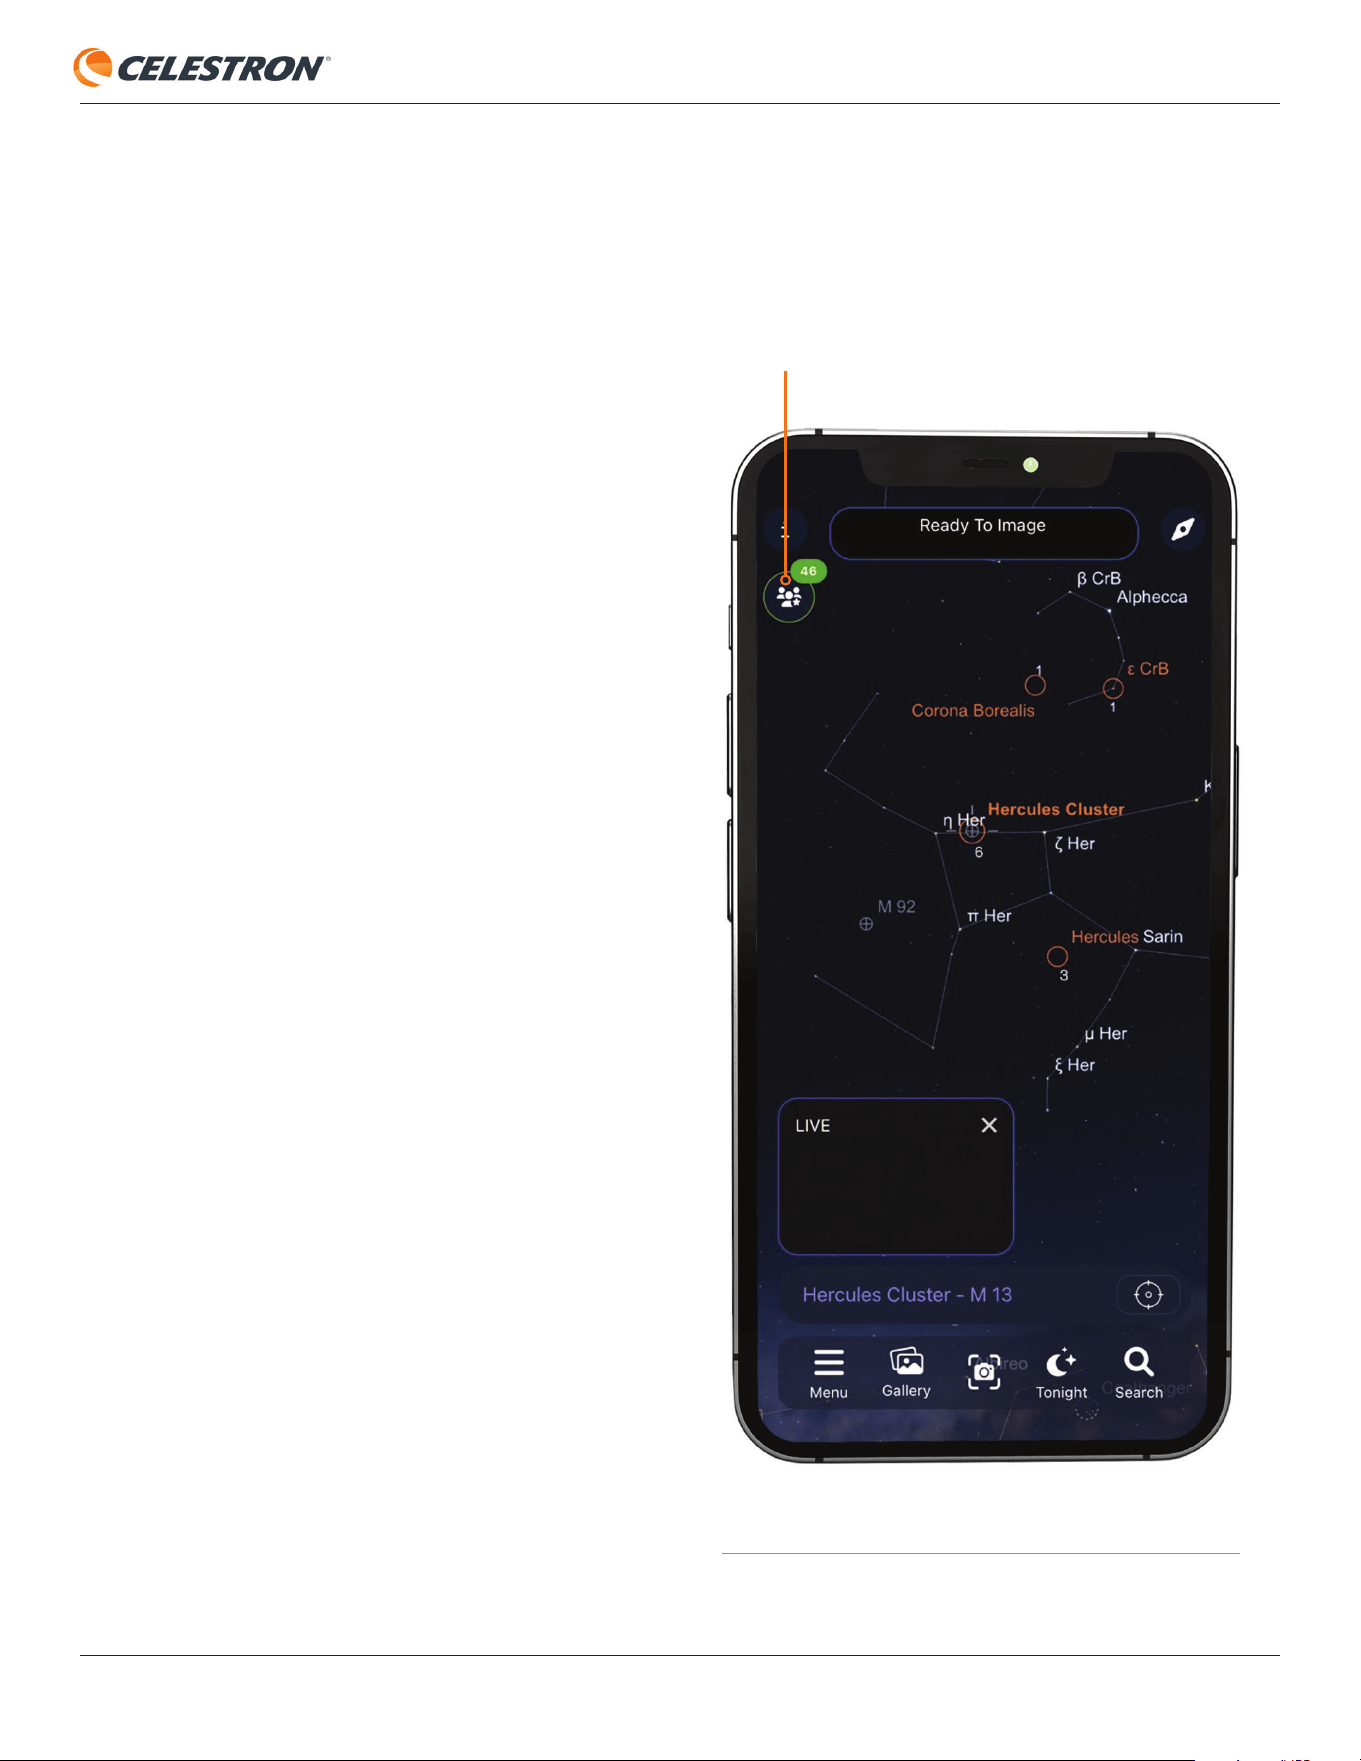
To enter OneSky, select Menu>OneSky. When you connect
to OneSky, you’ll see objects highlighted and a number
below each. The highlighted objects are the ones others are
observing, and the number denotes the current number of
observers for that object. Tap the OneSky icon in the upper
left corner for more options (Figure 22).
Fig: 22: After entering OneSky, press the OneSky icon for more options.
ONESKY ICON
INSTRUCTION MANUAL
CELESTRON ORIGIN | 21
9. Using Origin for Terrestrial Observing
Of course, Origin delivers dazzling images of objects in
the night sky. But did you know it can also capture images
of terrestrial (i.e., land-based) objects? During the day, you
can use your Origin like a spotting scope to observe vistas,
wildlife, or far-away objects. At night, Origin provides “night-
vision-like” performance by delivering a large amount of light
to its sensitive sensor in a fraction of a second. You’ll be able
to look around in near-darkness and see things clearly.
To use Origin for terrestrial viewing, you don’t need to initialize.
In fact, Origin cannot initialize during the day since it needs
to be able to see stars to orient itself. To enter Terrestrial
mode, power on Origin and connect to it with the app. Then
press “Cancel Initialization.” (Otherwise, Origin will soon fail
initialization anyway.)
SnapShot Mode
For terrestrial targets, you’ll use Origin in SnapShot mode.
Image stacking is turned off, and when you press the “Start
Imaging” button, Origin will capture a single image and send
it to your camera roll. SnapShot mode is also the best way to
capture images of the Moon and planets.
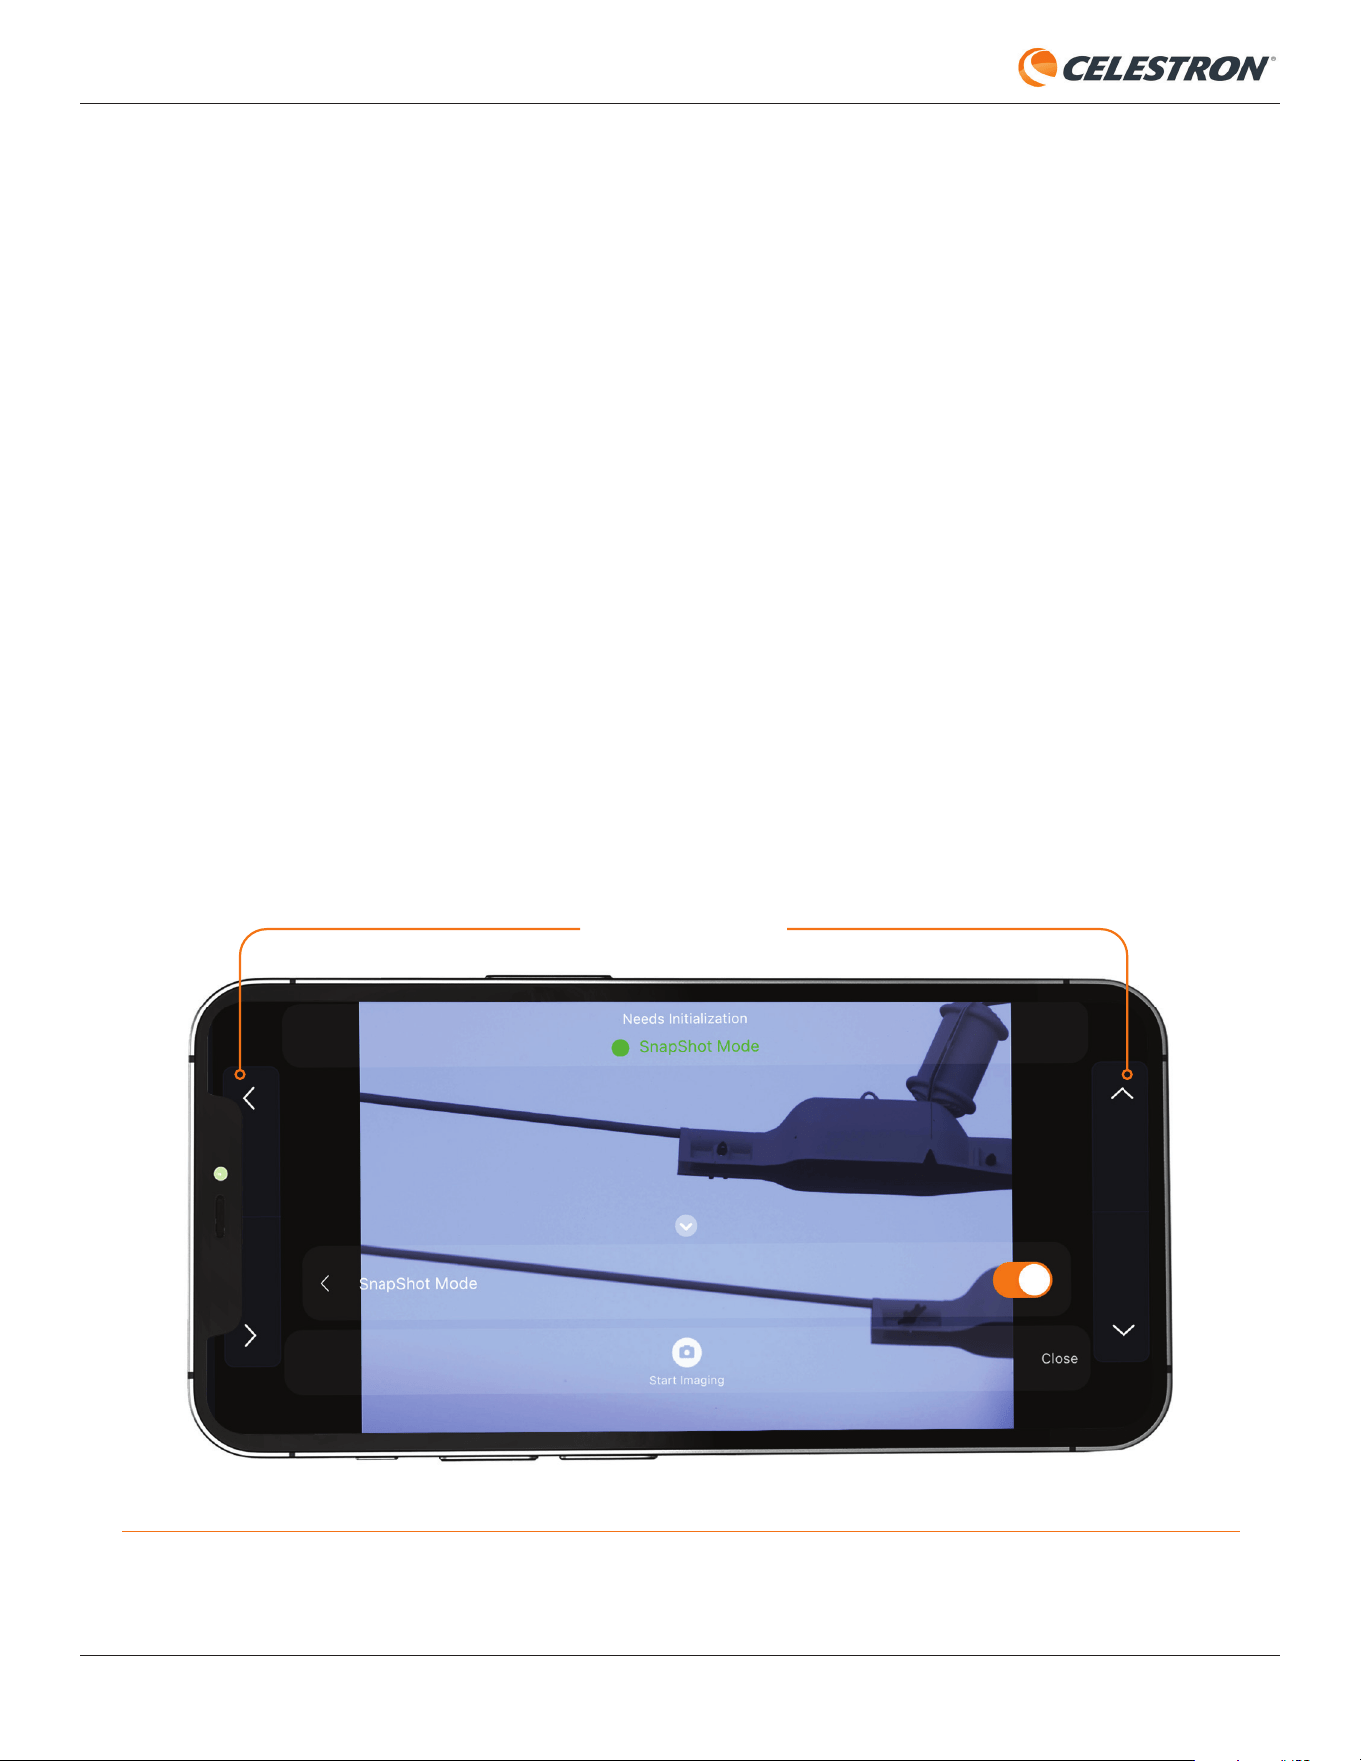
To launch SnapShot mode, go to the Camera View, press
the “up chevron” to access the manual camera controls, then
press the “SnapShot” icon that appears. (refer to Figure 11)
This will reveal the SnapShot mode slider. Tap the slider to
turn it on. You’ll notice that the telescope manual slew controls
appear, and “SnapShot Mode” is indicated in the Status Bar
(Figure 23).
Use the manual slew controls to move Origin until it is pointed
at the desired target. The slew controls move Origin in the
direction indicated by the arrows. The up arrow moves Origin
up, the down arrow moves Origin down, the right arrow moves
Origin to the right, and the left arrow moves Origin to the left.
When you are holding your device in landscape mode (i.e.,
horizontally), the arrows will match the apparent direction
of the image you see. When you are holding your device in
portrait mode (i.e., vertically), the fi eld of view appears rotated
90° clockwise, so the direction arrows do not correspond to
the apparent motion direction of the image. For this reason,
we recommend using your device in landscape mode during
terrestrial imaging.
Fig: 23: When in SnapShot mode, you’ll have access to the manual telescope slew controls in the Camera View. These work best with your device in landscape mode.
MANUAL SLEW CONTROLS

22 | CELESTRON ORIGIN
INSTRUCTION MANUAL
To focus during the day, tap the Focus button in the manual
camera controls. From here, you can either autofocus or
manually focus. For autofocus, simply press AutoFocus. Origin
can take 30 seconds or more to go through its focus range to
find the best focus. If you use the manual focus adjustments,
you’ll see the current focuser position in the box in the center:
• -1000 turns the focuser = one full turn counterclockwise
• -100 turns the focuser = 1/10th of a turn counterclockwise
• +100 turns the focuser = 1/10th of a turn clockwise
• +1000 turns the focuser = one full turn clockwise
During the day, you can usually use auto camera settings in
SnapShot mode. If you’re imaging terrestrially at night with
low light levels, use manual camera settings to prevent your
images from looking too dim. You should also use manual
camera settings when capturing the Moon and planets like
Jupiter and Saturn.
It is easy to adjust camera settings manually in SnapShot
mode, as the Live View image you see onscreen will reflect the
ISO and exposures you manually set. Press the up chevron
above the “Start Imaging” button and press the Auto button
to toggle to Manual camera settings. Then, you can use the
ISO and Exposure buttons to change the ISO and Exposure
manually. Once the image looks good onscreen, press the
“Start Imaging” button to capture a snapshot and save it to
your gallery and camera roll.
If you are setting manual exposure times during the day, you’ll
need to use exposures much less than one second to prevent
the sensor from becoming saturated (i.e., screen appears all
white). Tap the unit of time in the manual exposure settings to
change it.
NOTE: When using Origin during the day, never point it at
the Sun or slew it across the Sun. Doing so can damage its
sensor. Solar imaging requires a full-aperture solar filter (not
currently available from Celestron).

INSTRUCTION MANUAL
CELESTRON ORIGIN | 23
10. Multiple Users
With a traditional telescope, only one person can look through
the eyepiece at a time. With Origin, there are several ways to
have multiple people observe at once.
The easiest and simplest way is to have others observe on
your device with you. We highly recommend using a tablet for
this application to provide a bigger observing screen.
A variation on this is to “cast” the image on your device
onto a big-screen TV. This requires additional external
equipment,depending on your device:
• For iOS devices, you’ll need an AirPlay-compatible smart
TV or external device, such as AppleTV or specific 4K Roku
devices.
• For Android devices, you’ll need a Google Chromecast-
compatible smart TV or external device, such as the
Chromecast, Fire TV, or Roku.
Alternatively, multiple people can observe Origin’s images on
their devices simultaneously. To do this, each user will need
to download the Origin app. Then, everyone can connect
to Origin and view the image from the Camera View. Each
person can save the final image on their own device! Anyone
connected with the app can control Origin, so you’ll need to
coordinate with your friends and family. Origin works best with
one user controlling the telescope while the others watch from
the Camera View.
You may receive a Low Bandwidth Warning message if
too many people connect to Origin at once. To improve
performance, we recommend turning on “Bin Live Images”
under Menu>Settings>Advanced. This combines pixels
so that they act as a single larger pixel. This reduces image
resolution, but the effect should not be noticeable when
viewing on a device. Binning does not affect the resolution of
the final stacked master that downloads after pressing “End
Imaging,” just the “live” images displayed during imaging in
the Camera View. Network Connect mode generally provides
more bandwidth than Direct Connect mode, but it depends
on the quality of your home network router. If you can use
Network Connect mode with multiple users, we recommend
trying that first.
24 | CELESTRON ORIGIN
INSTRUCTION MANUAL
11. Other Menu Options
In this section, we’ll review all the options under the menu icon
in the Planetarium View.
Night Vision
• This will turn the screen red to preserve your night vision.
OneSky
• Refer to Section 8 of this manual.
Imaging Schedules
• This is where you can download images from previously
run Tonight’s Imaging Schedules. Refer to Section 7 of this
manual for more details.
Tonight’s Schedule
• This is the main interface for performing scheduled imaging.
Refer to Section 7 of this manual for more details.
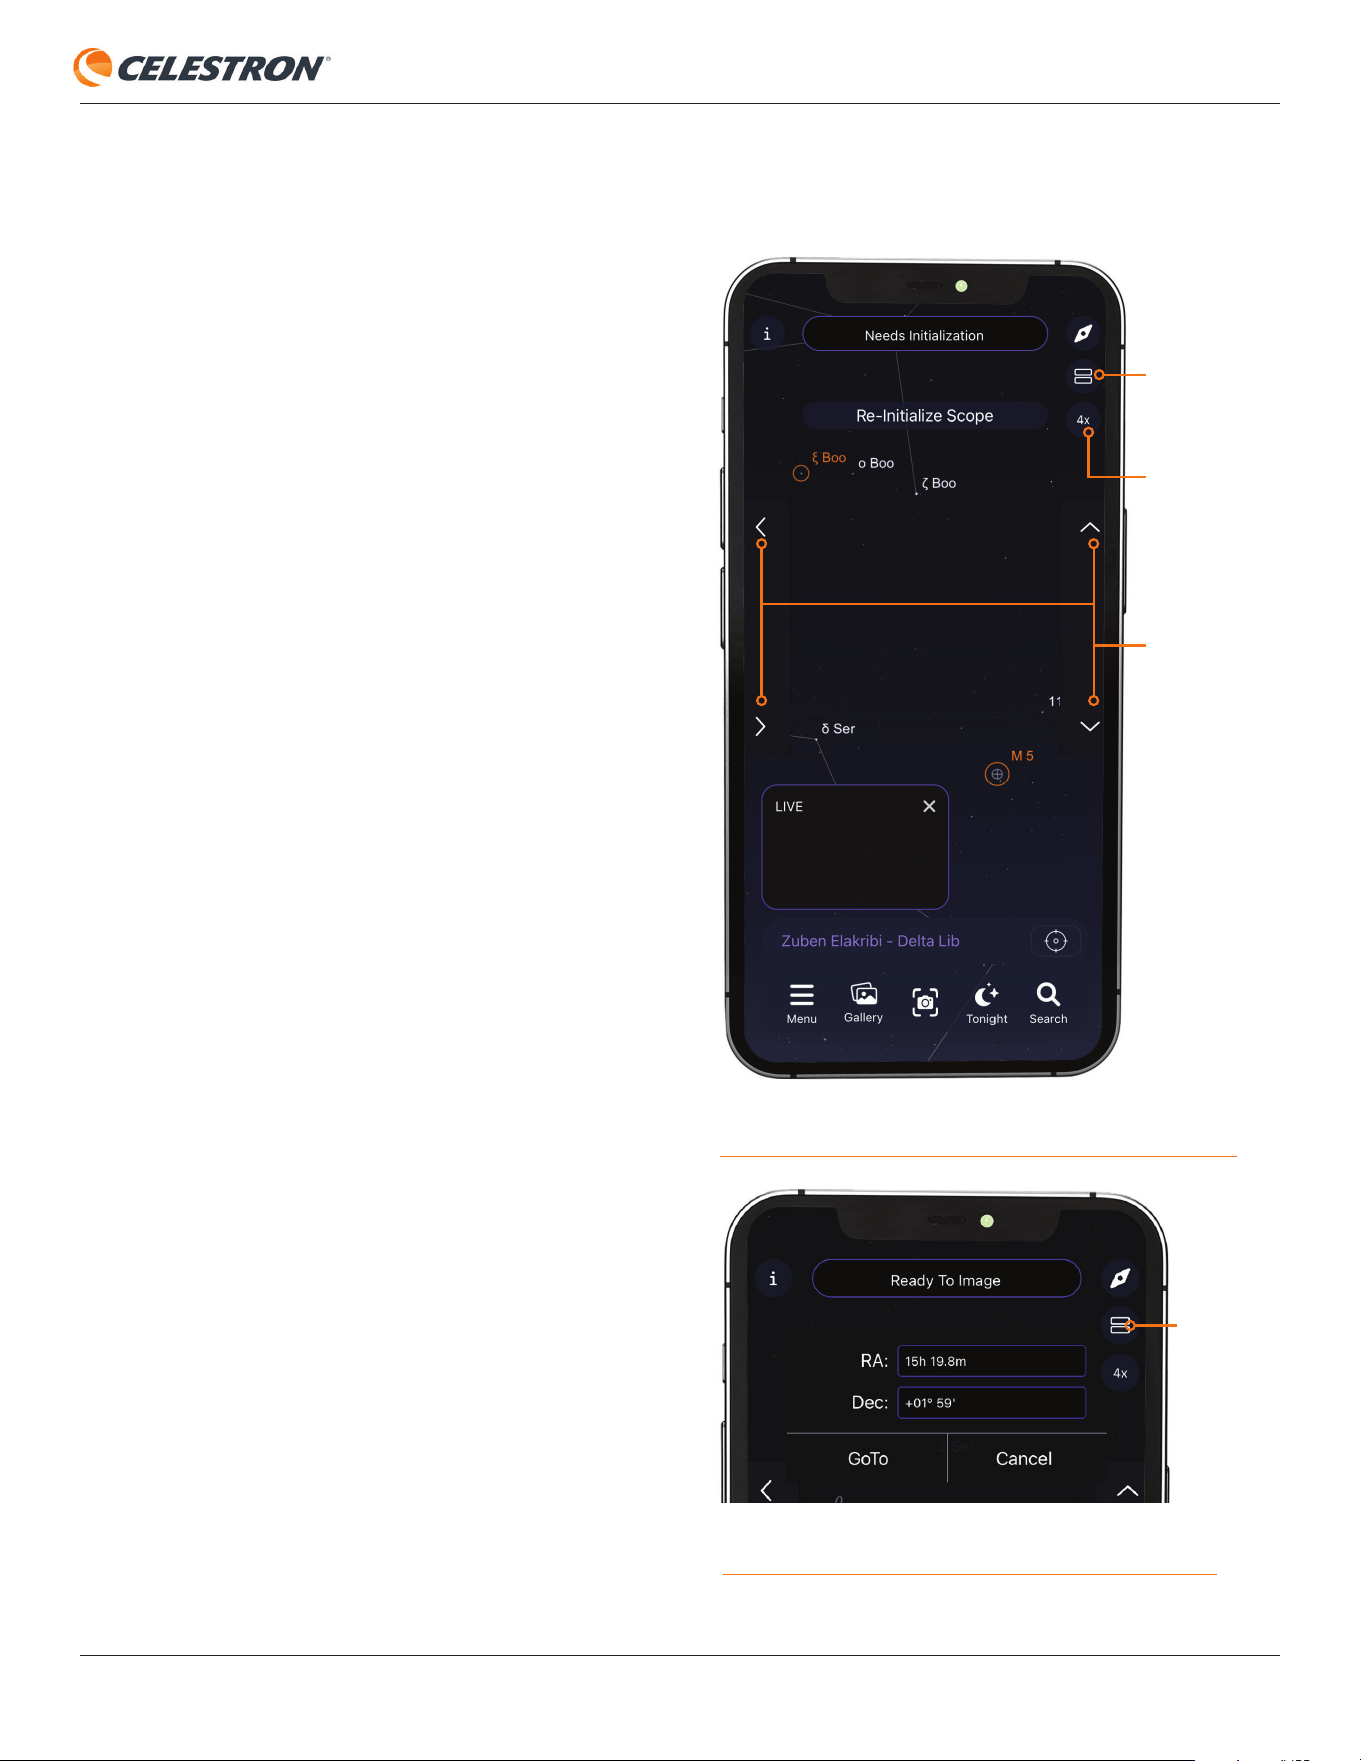
Show Scope Controls
• Selecting this option displays the manual telescope slew
controls in the Planetarium View. You can use the up/down/
left/right direction buttons to move Origin manually or change
the slew rate by tapping the rate button (Figure 24).
• Selecting this option also allows you to enter coordinates
manually. Tap the “two boxes” icon that appears just under
the Compass icon, and the coordinate entry interface will
appear (Figure 25). Enter the RA and Dec coordinates, then
press “GoTo” to slew Origin to the desired coordinates.
FIG 25: When Show Scope Controls is selected, pressing the two boxes icon
gets you to the manual coordinate interface.
RATE
BUTTON
TWO BOXES
ICON
MANUAL
SLEW
CONTROLS
FIG 24: Show Scope Controls gives you manual slew controls in the
Planetarium View. Use the Rate button to change the slew rate.
TWO
BOXES
ICON
INSTRUCTION MANUAL
CELESTRON ORIGIN | 25
Recenter Telescope
• Selecting this option recenters the Planetarium View on the
location Origin is currently pointing to.
Settings
• Tapping here brings up the Settings page, which presents
additional options:
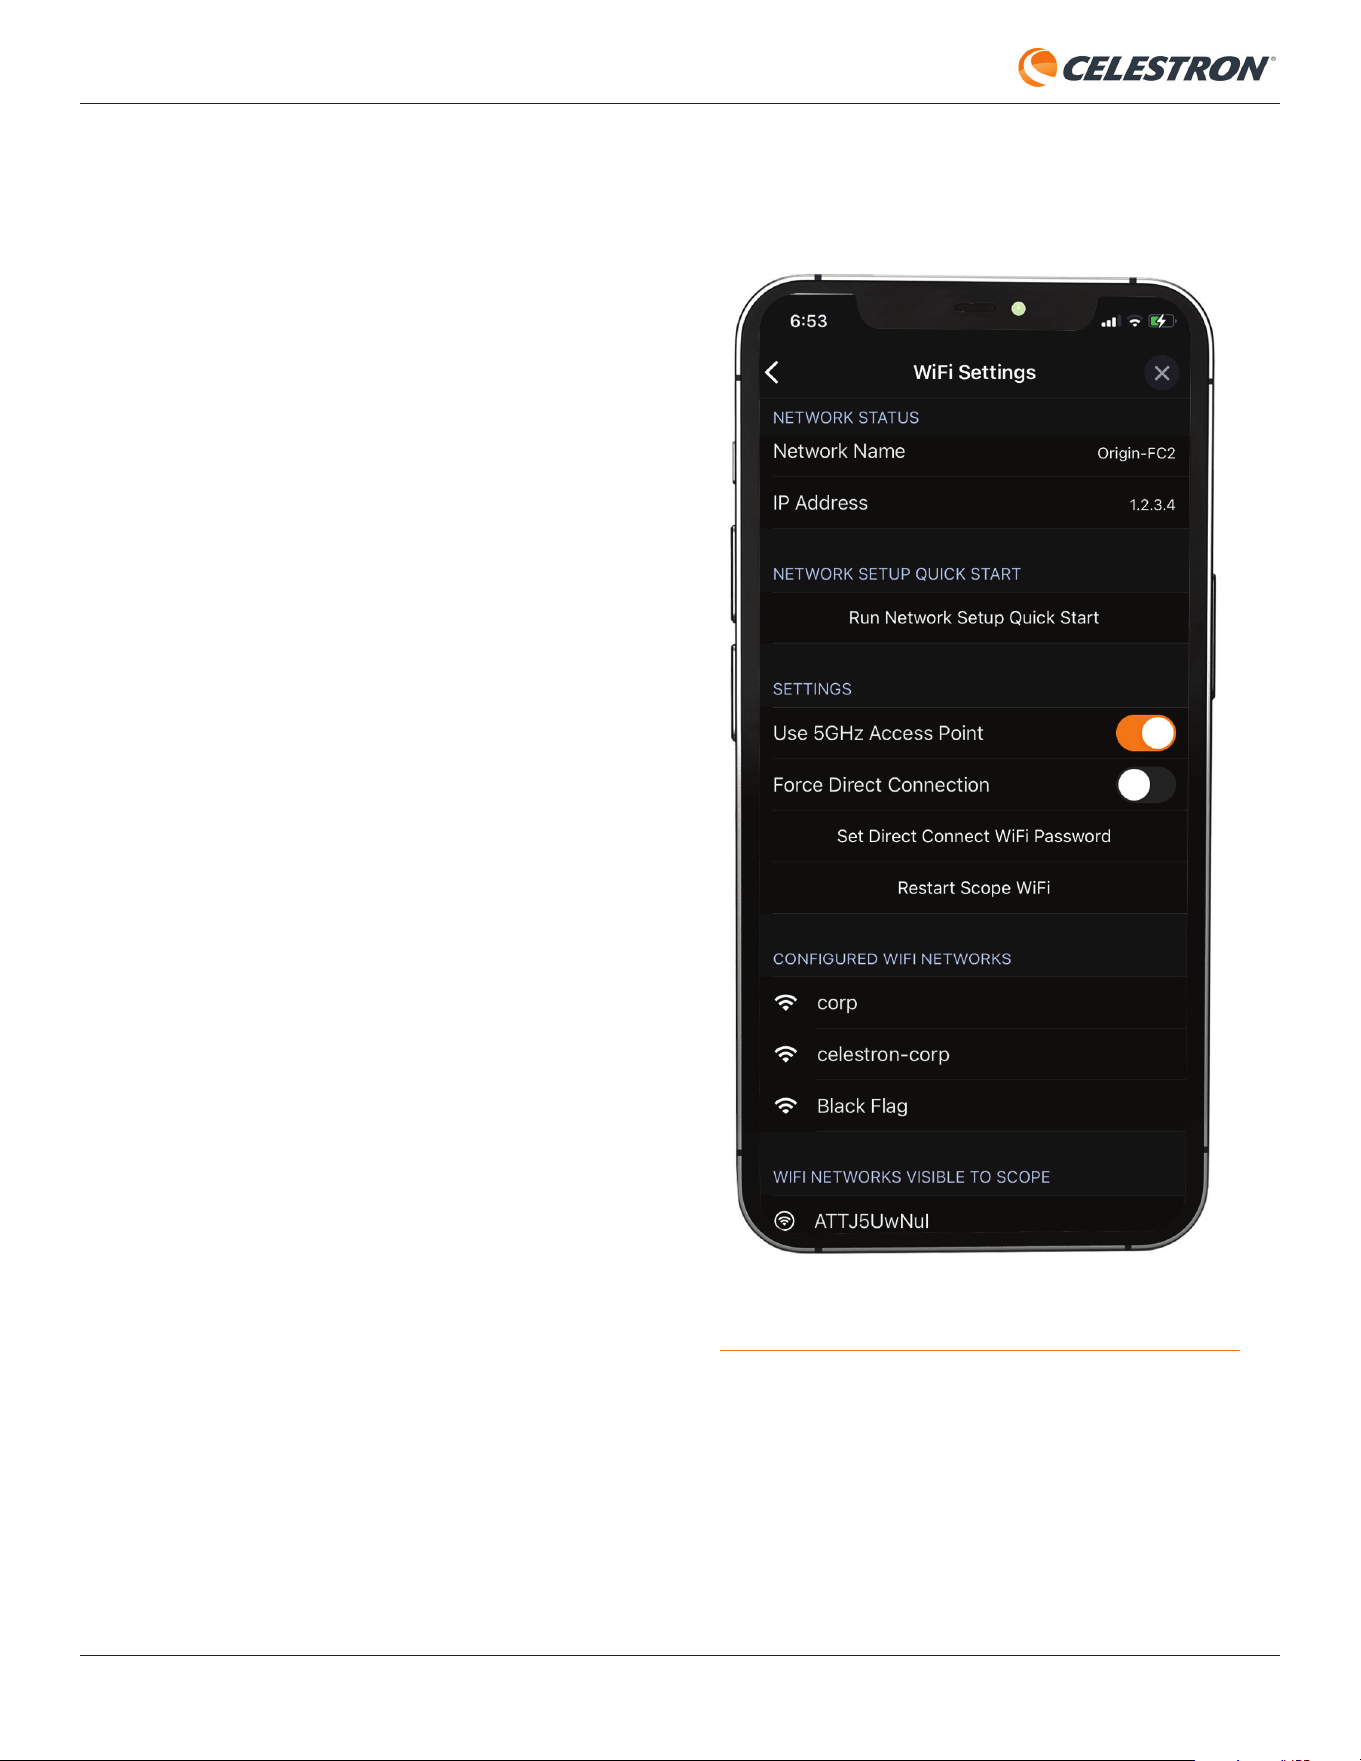
• Wifi Settings – Manage and view Origin’s WiFi
connection details (Figure 26).
• Network Status – Displays the Network Name and IP
Address for the current WiFi connection.
• Network Setup Quick Start - Runs the initial “Quick
Start” guide to set up WiFi connection.
• Use 5GHz Access Point – This is on by default. We
generally recommend using Origin in 5GHz. If you want
to switch to 2.4GHz operation, turn this switch off. You
may need to use 2.4GHz operation with some older
routers in Network Connect mode. In this case, Origin
will automatically switch to 2.4 GHz.
• Force Direct Connect – If you are connected to
Origin through your home network and wish to revert to
Direct Connect mode, turn the Force Direct Connection
slider on.
• Set Direct Connect WiFi Password – This is where you
can change the password for Origin’s Direct Connect
WiFi network from the default 1234555.
NOTE: You will
only need this password if you try to connect to Origin’s
WiFi outside the app (i.e., from your device’s WiFi page.
You won’t need the password if you connect from within
the app.
• Restart Scope WiFi – This restarts Origin’s WiFi
connection. While WiFi is restarting, you won’t be able to
connect to Origin.
• Confi gured WiFi Networks – Selecting this option
displays the external WiFi networks you previously set up
to work with Origin.
• WiFi Networks Visible To Scope – Selecting this option
displays all the external WiFi networks currently visible to
Origin. Tap one of the visible networks to begin confi guring
that network to connect to Origin in Network Connect
mode.
FIG 26: Manage and view Origin’s WiFi connection from the Menu>Settings>
WiFi Settings page.

26 | CELESTRON ORIGIN
INSTRUCTION MANUAL
Version & Updates
• Refer to Section 14 of this manual.
Advanced
• Refer to Section 13 of this manual.
Manage Remote Files
• Refer to Section 12 of this manual.
Account Information
• This is where you can set the screen name that displays
when you have the “Name” customization enabled on your
shared images.
Privacy
• This displays Origin’s privacy policy. You can opt out of
sharing observing information with OneSky here.
Revert to Default Settings
• Tapping here reverts all the display options to the app’s
default settings.
Display Options
• This section provides extensive customization options for the
Planetarium View.
Notifications
• This section lets you receive or opt out of Origin’s notifications
about upcoming astronomical events.
Storage
• The images you capture with Origin are stored on your
device like the ones you capture with your device’s built-
in camera. However, some image metadata is also backed
up (anonymously) on our servers. If you choose to use this
storage option, the metadata on our servers can help us
retrieve your images should your device be lost or stolen.
This storage is free, but you can opt-out on this screen if you
do not want to use it.
Time & Location
Date & Time – Displays the Origin app’s current date and
time. This should match the date and time on your device.
Location – Displays the Origin app’s current location data.
This should match your current observing location. If the
location you see here is incorrect, use the options at the
bottom of the screen to reset it.
INSTRUCTION MANUAL
CELESTRON ORIGIN | 27
12. Accessing Raw Files for Manual Image Processing
As you use Origin and learn about astronomical imaging,
you may want to try processing your raw images manually
instead of using Origin’s AI image processing. While some
fi nd imaging processing challenging and tedious, others enjoy
using their creative and technical skills to create a fi nal image
they can call their own.
By default, Origin does not save raw image fi les to avoid fi lling
up Origin’s memory if you do not plan on manually processing
your images. If you wish to save your raw image fi les for manual
processing, you fi rst need to enable “Save Raw Images”
under Menu>Settings>Advanced. The raw image fi les are
saved in the FITS, the preferred format for astronomical image
processing.
To obtain the raw images, insert a USB thumb drive into one
of the USB ports in Origin’s rear cell (Figure 27). The only
fi lesystems currently supported for fi le transfer are exFAT and
FAT32. If you plug in a thumb drive with some other fi lesystem,
such as NTFS (the Windows fi lesystem) or HFS+ (the Mac
fi lesystem), the fi le transfer won’t work.
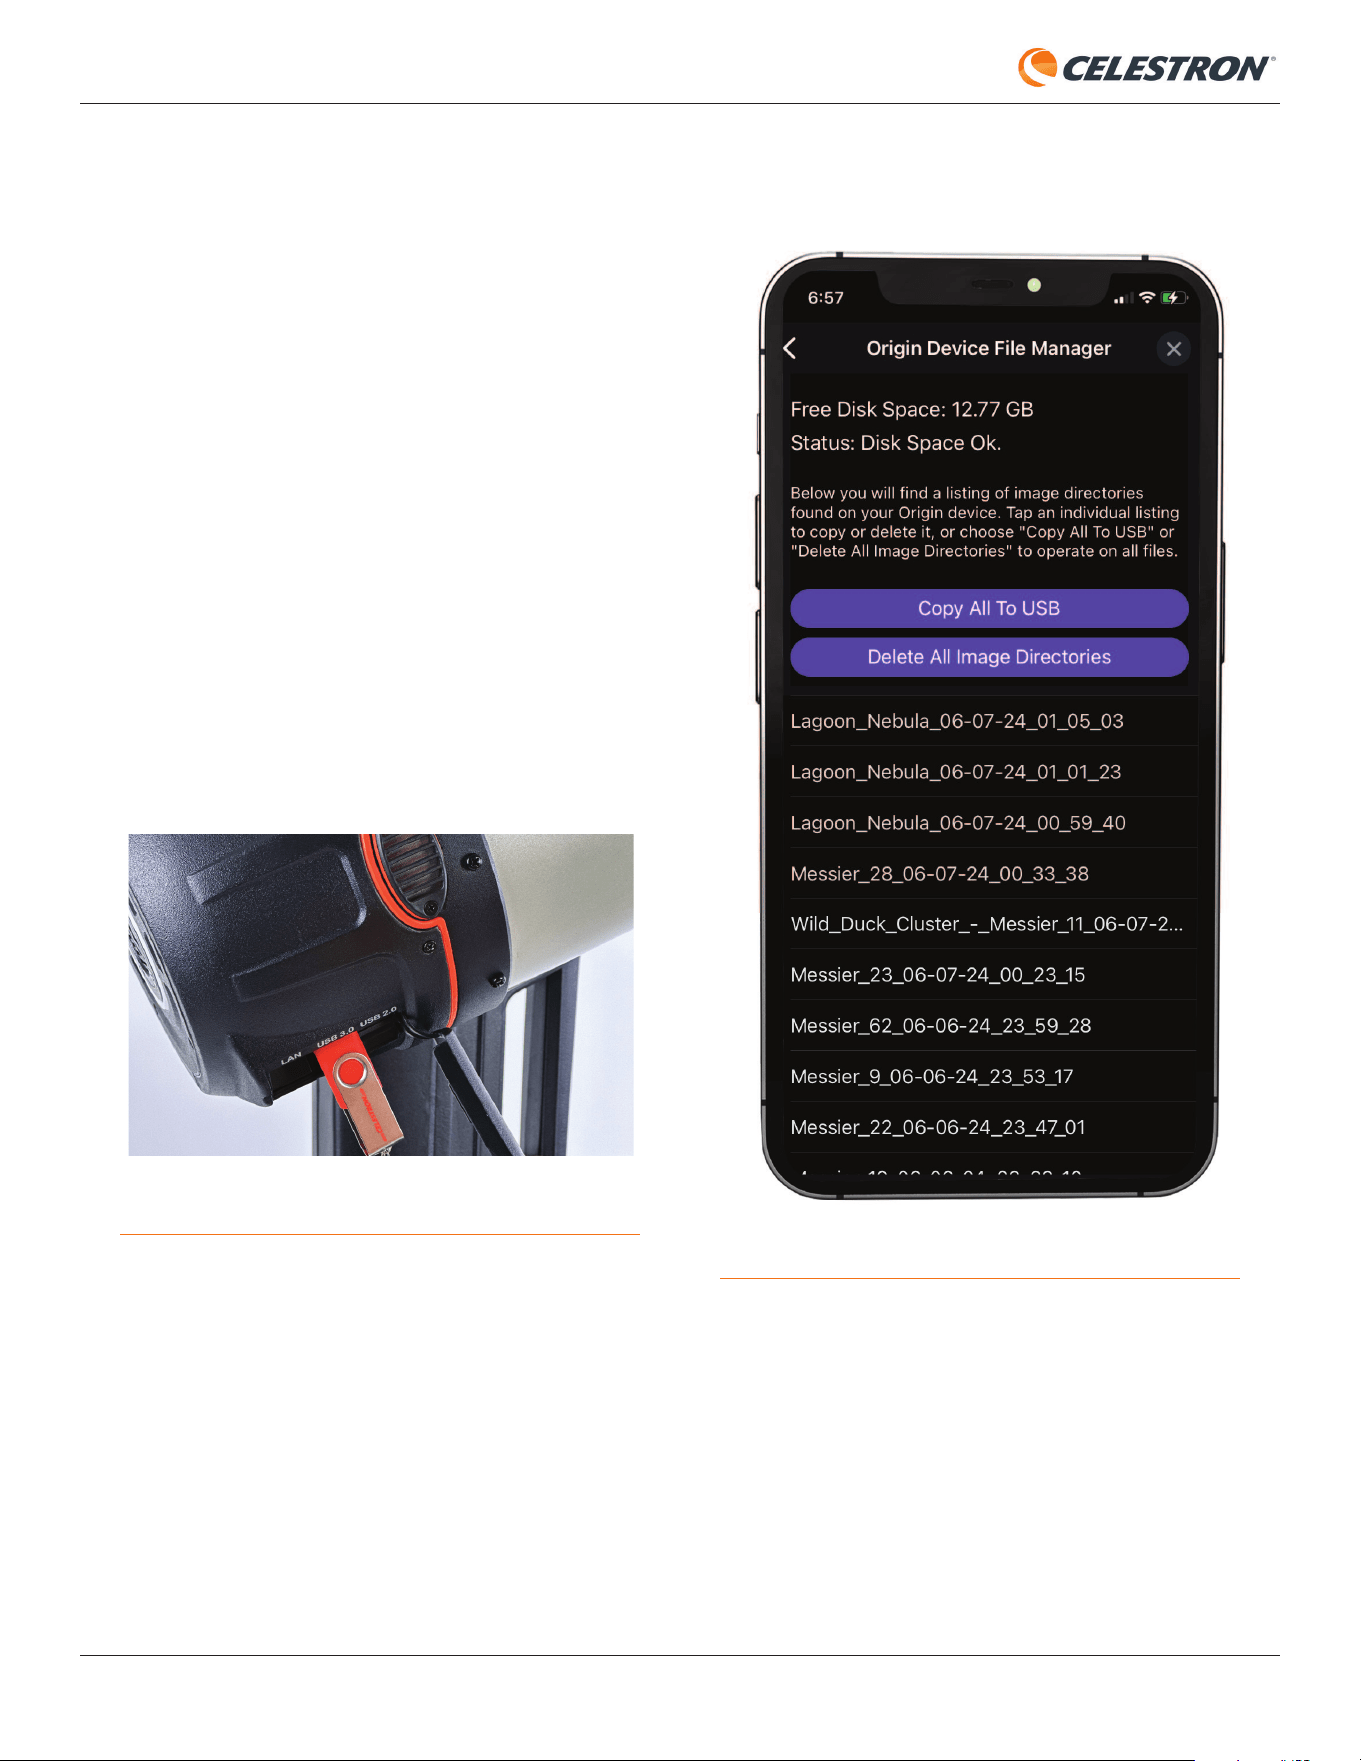
The app has a built-in File Manager (Figure 28) to help
you access Origin’s raw image fi les. You can fi nd it under
Menu>Settings>Manage Remote Files. When you navigate
to the File Manager, you’ll see two self-explanatory options:
Copy All to USB - Copies all the raw image fi les on Origin’s
internal memory onto the thumb drive.
Delete All Image Directories - Deletes all the raw image
fi les on Origin.
FIG 27: Insert a USB thumb drive into the USB port on Origin’s tube to transfer
the raw image fi les.
FIG 28: Access Origin’s raw image folders from the File Manager.

28 | CELESTRON ORIGIN
INSTRUCTION MANUAL
Below these two options, you’ll see a list of folders named for
the objects you have imaged with Origin. The name for each
folder starts with the object name and then the date imaged,
so it should be easy to find the folder you are looking for. Tap
a folder, and you’ll see additional options:
Delete Image Directory - Deletes the selected folder from
Origin.
Download Stacked Master - Downloads the final stacked
master and saves it to the app’s Image Gallery and your
device’s camera roll.
Copy Folder to USB - Copies the unprocessed final stacked
master (i.e., calibrated and stacked but not post-processed),
the raw image files, and a copy of the flat, dark, and bias frames
Origin used during image capture to your USB thumb drive.
This option only works if “Save Raw Images” was enabled
during imaging. If it was not enabled, only the unprocessed
final stacked master is saved. You can always obtain an
unprocessed final stacked master by using this command.
If you have enabled the “Save Raw Images” option under
Menu>Settings>Advanced, there will come a time when
you come close to filling up Origin’s internal memory (50+
GB). When this occurs, Origin will notify you with a warning
message and a warning icon in the upper left corner
.
At this point, transfer any files you wish to keep onto a thumb
drive, and then delete at least some of the folders. The fastest
method is to use “Copy All To USB” to save all the raw image
folders onto a thumb drive and then use “Delete All Image
Directories” to erase the internal memory. If you do not heed
the warning and fill up Origin’s memory, you may encounter
major functionality issues. It is important that you remove
folders as soon as you see the notification.

INSTRUCTION MANUAL
CELESTRON ORIGIN | 29
13. Other Advanced Functionality
In this section, we’ll review some of Origin’s more
advanced functionality. You can find these features under
Menu>Settings>Advanced. You shouldn’t need to adjust any
of these options for basic, everyday use.
Mount
Altitude Slew Limit
This option allows you to set a minimum altitude limit on Origin’s
slewing range. If local obstructions block your horizon, you can
enable slew limits to ensure Origin doesn’t slew to an object
behind an obstruction. You’ll receive a warning message if you
select an object below the altitude slew limit. Altitude Slew
Limit also affects which highlighted objects are displayed in
the Planetarium View and automatic start times for objects in
Tonight’s Imaging Schedule. Keep this in mind when setting
the Altitude Slew Limit.
Reinitialize Telescope Now
Selecting this option forces Origin to reinitialize.
Lighting
This slider allows you to adjust the brightness of Origin’s
onboard lights from 100% (full brightness) to 0% (off). You
can adjust:
• The LED ring on Origin’s rear cell
• The LEDs on Origin’s fork arm, including the battery icon light
and the tray light (i.e., the light that illuminates the azimuth
axis clutch area).
Fans
This option lets you turn Origin’s fan and the CPU fan on or off.
We recommend that you always leave the fans on. Your Origin
uses low-vibration fans that do not affect imaging during use.
AutoFocus
Selecting this option displays settings for automatic focusing.
On Temperature Change
Turn this on to force Origin to refocus after it detects changes
in ambient temperature via its environmental sensor. Use the
“Change After” slider to set the degree of temperature change
that initiates refocusing.
After GoTo Any Object
Turn this on to force Origin to refocus after slewing to an
object.
Dew Heater
The dew heater prevents dew from forming on the exterior
of the Schmidt corrector lens. You can choose between
automatic or manual operation.
Automatic Operation
In this mode, you can adjust the dew heater’s “aggressiveness”
from 1 (lowest) to 10 (highest), with 5 being the default.
This indicates how active the smart dew controller is when
preventing dew. A higher aggression setting will use more
power but will provide the highest level of dew prevention
during changing environmental conditions. Use a lower
aggression setting for warmer, drier, or windier observing
sites. Conversely, use a higher aggression setting for cooler
and more humid observing sites.
Manual Operation
In this mode, you set the dew heater’s power from 0-100%,
forgoing “smart” dew prevention via the environmental sensor.
Adjust the power level upwards to prevent dew from forming
in cooler and more humid conditions.
Recalibrate Environmental Sensor
Tap “Recalibrate Environment Sensor” under Environment.
This heats the sensor to evaporate any accumulated moisture,
which helps provide the most accurate sensor readings.
The sensor takes about 10 minutes to heat up and cool
back down. We recommend recalibrating the environmental
sensor periodically, especially if Origin has not been used in a
while and was stored in humid conditions. Doing so will help
maximize the dew heater’s power efficiency.
Camera and Imaging
Show Live Images in Sky
Turning this on will display the field of view you are currently
imaging in the Planetarium View instead of the default graphic.
AI Post Process
Toggling this option turns AI image processing on and off. For
most use cases, leave this on. If you turn off AI Post Process,
Origin will not process displayed images within the app. Images
will generally appear dim and lack detail because they are
unprocessed.
30 | CELESTRON ORIGIN
INSTRUCTION MANUAL
Save Raw Images
Turning this on saves the raw images on Origin so you can
access them later. Refer to Section 12 of this manual for more
information. This option is off by default to not unnecessarily
fi ll up Origin’s internal memory if you don’t plan to access the
raw image fi les later.
Image Stacking Replay
Turning this option on creates a short video of the sub-
exposures being stacked for an imaged object. If you have
enabled this feature, you’ll see a replay icon at the bottom of
the image in the Gallery view after you press End Imaging.
Press the replay icon to play the video.
Replay only works for the last object you imaged. You can
share the video to save it elsewhere. Otherwise, Origin will
overwrite the replay video for the next object you image. Image
Stacking Replay is not available for images obtained from
Scheduled Imaging.
Auto-Crop Images
This function auto-crops the edges of the image that are
affected by altazimuth mount fi eld rotation before displaying
the image. Auto-Crop Images is enabled by default. If you
choose to turn it off, you’ll fi nd that AI post-processing handles
many fi eld rotation artifacts quite well.
AI Image Processing Controls
Here, you can enable or disable different parts of Origin’s AI
image processing.
• AI Deconvolution – This option applies deconvolution to
the fi nal stacked master only, not the “live” images in the
Camera View. You’ll fi nd AI Deconvolution tightens up the
appearance of stars and helps to reveal fi ne object detail.
• AI Gradient Removal – This option removes gradients
across the fi eld of view.
• Denoise Live Images – This option applies denoise to all
images as they are stacked.
• Denoise Final Image – This option applies denoise only to
the fi nal stacked master.
• Denoising – Here, you can choose from low, medium, or
high denoise. Medium is selected by default.
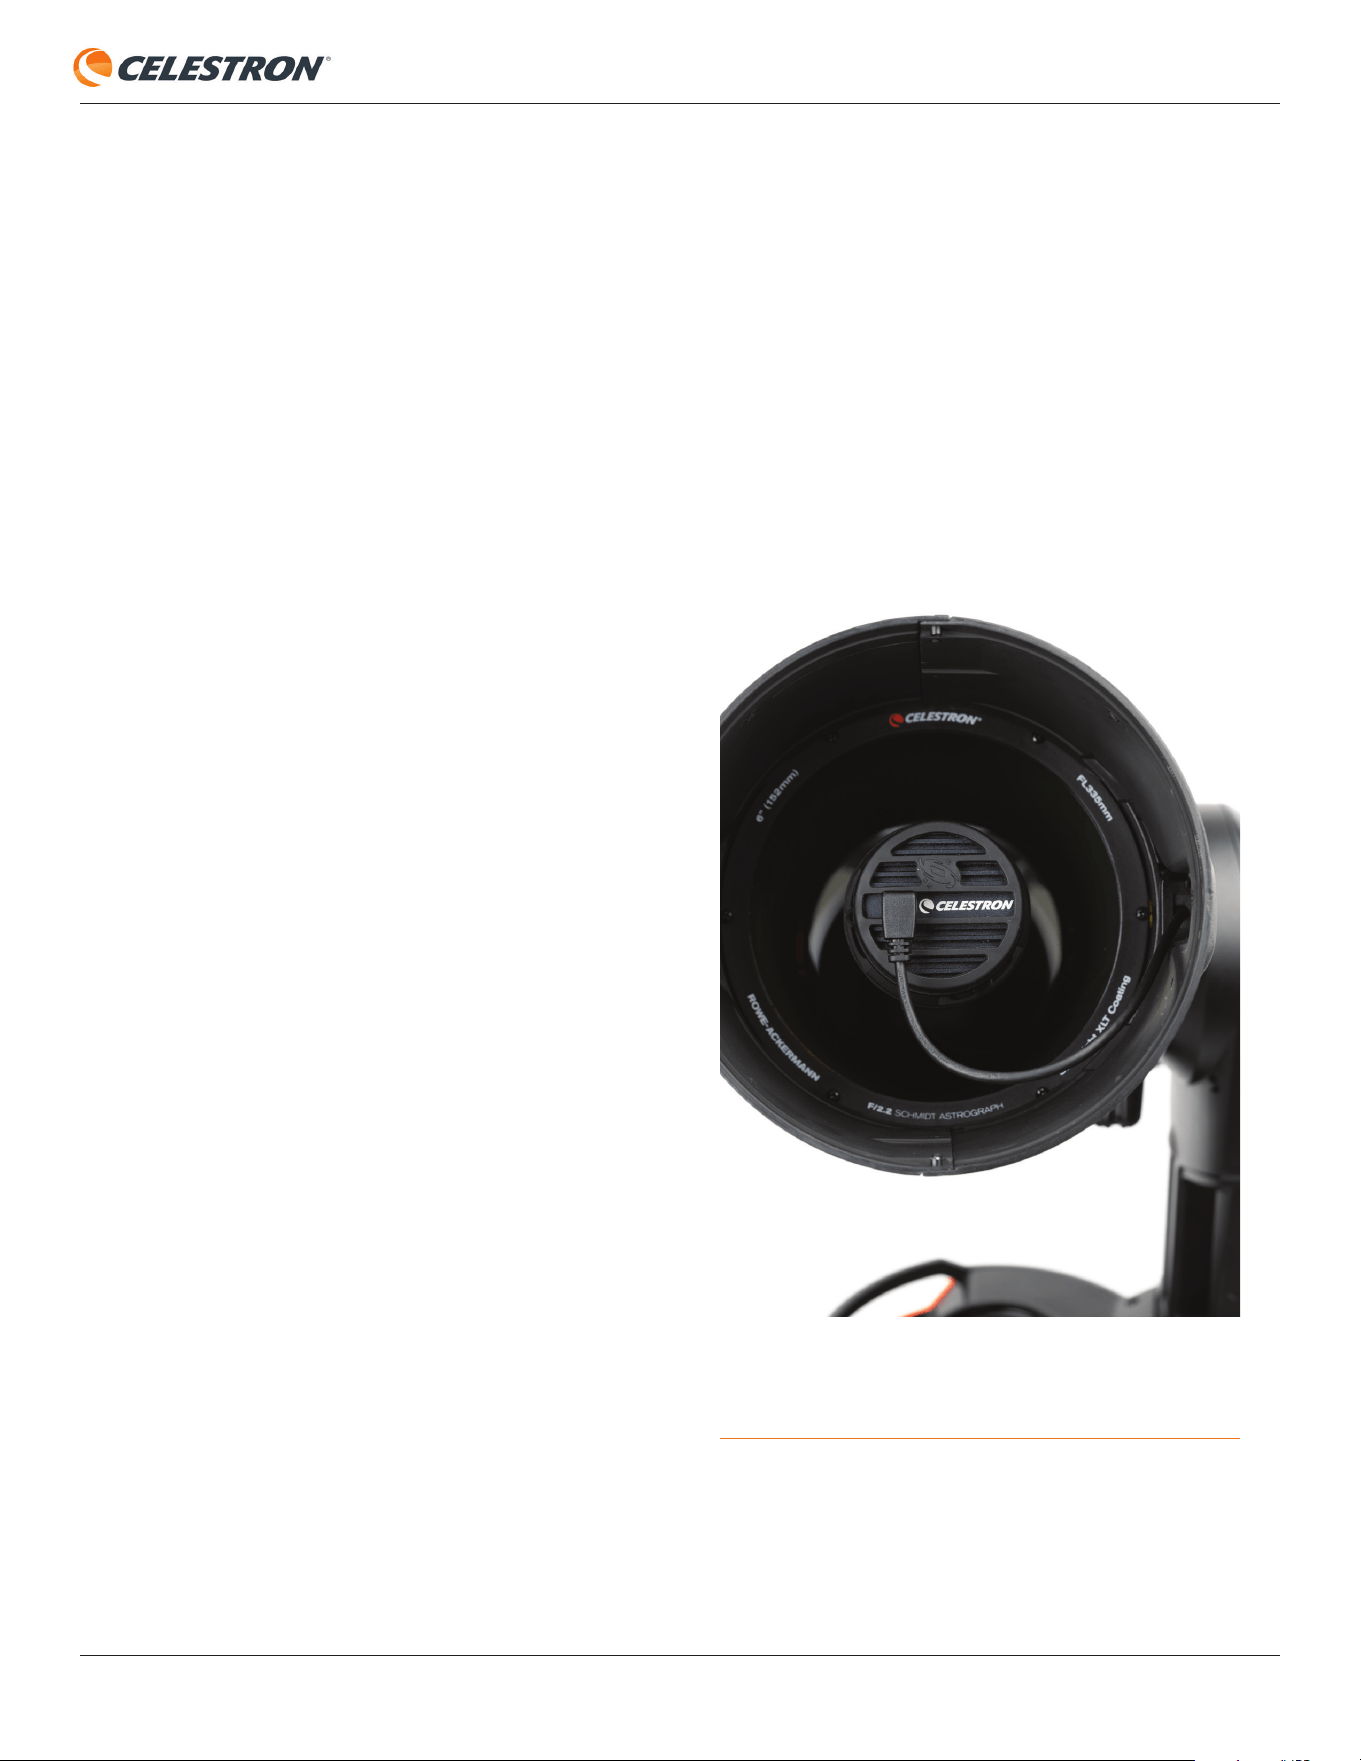
Flat Frames
Here, you can take a new fl at frame for Origin image calibration
by pressing “Recapture Flat Frames.” This requires an optional
third-party EL panel. Flat frames ensure even illumination
across the sensor. The factory fl at was taken with the camera
in the orientation shown in Figure 29.
• An important note about rotating the camera: If you rotate
the camera, you will need to take a new fl at frame for best
results, which requires an optional third-party EL panel. This
is why we don’t recommend rotating the camera.
FIG 29: The fl at frame taken at the factory and pre-loaded onto Origin was
captured with the camera in the orientation shown. If you rotate the camera
from this orientation, you’ll need to produce a new fl at frame.
INSTRUCTION MANUAL
CELESTRON ORIGIN | 31
FIG 30: If you wish to rotate the camera orientation, fi rst loosen the camera
lock ring.
CAMERA LOCK RING
Dark Frames
Here, you can take new dark frames for Origin. Generally, you
won’t need to capture new dark frames; you can use the ones
captured at the factory. To take a new dark frame, fi rst place the
lens cap on Origin. Set the Dark Frame ISO and Dark Frame
Exposure to match what you will use for imaging (usually ISO
200 Exp 10s), then press “Recapture Dark Frames.”
Logs
This is where you can download logs for troubleshooting
purposes.
Core Software Channel
Here, you can change the channel that receives core software
updates. This is set to “stable” by default. We don’t recommend
switching to “beta” unless you have been instructed to do so
by Celestron Tech Support. The beta core software is always
in development and will likely cause unexpected issues to
arise.
• To rotate the camera, loosen the lock ring behind the camera
(Figure 30), rotate the camera to the desired orientation, and
retighten the lock ring.
Refer to Section 14 for more information about updating
software.

32 | CELESTRON ORIGIN
INSTRUCTION MANUAL
14. Updating Software
There are two types of software updates for Origin: app
updates and updates to the Origin’s internal computer (“core”
updates). App updates are handled automatically through the
Apple App Store (iOS) and Google Play (Android). Update
these as you would any other apps on your smartphone or
tablet.
You must connect in Network Connect mode to update
Origin’s core. If there is a core update available when your
device has an internet connection, you’ll receive a message
that a new update is available. Core updates are handled
through the app under Menu>Settings>Version & Updates.
Connect to Origin in Network Connect mode and select
“Download and Install.” The app will download the core update
and install it into Origin.
In some cases, you may need to power cycle Origin after a
core update if the app doesn’t automatically reconnect.
INSTRUCTION MANUAL
CELESTRON ORIGIN | 33
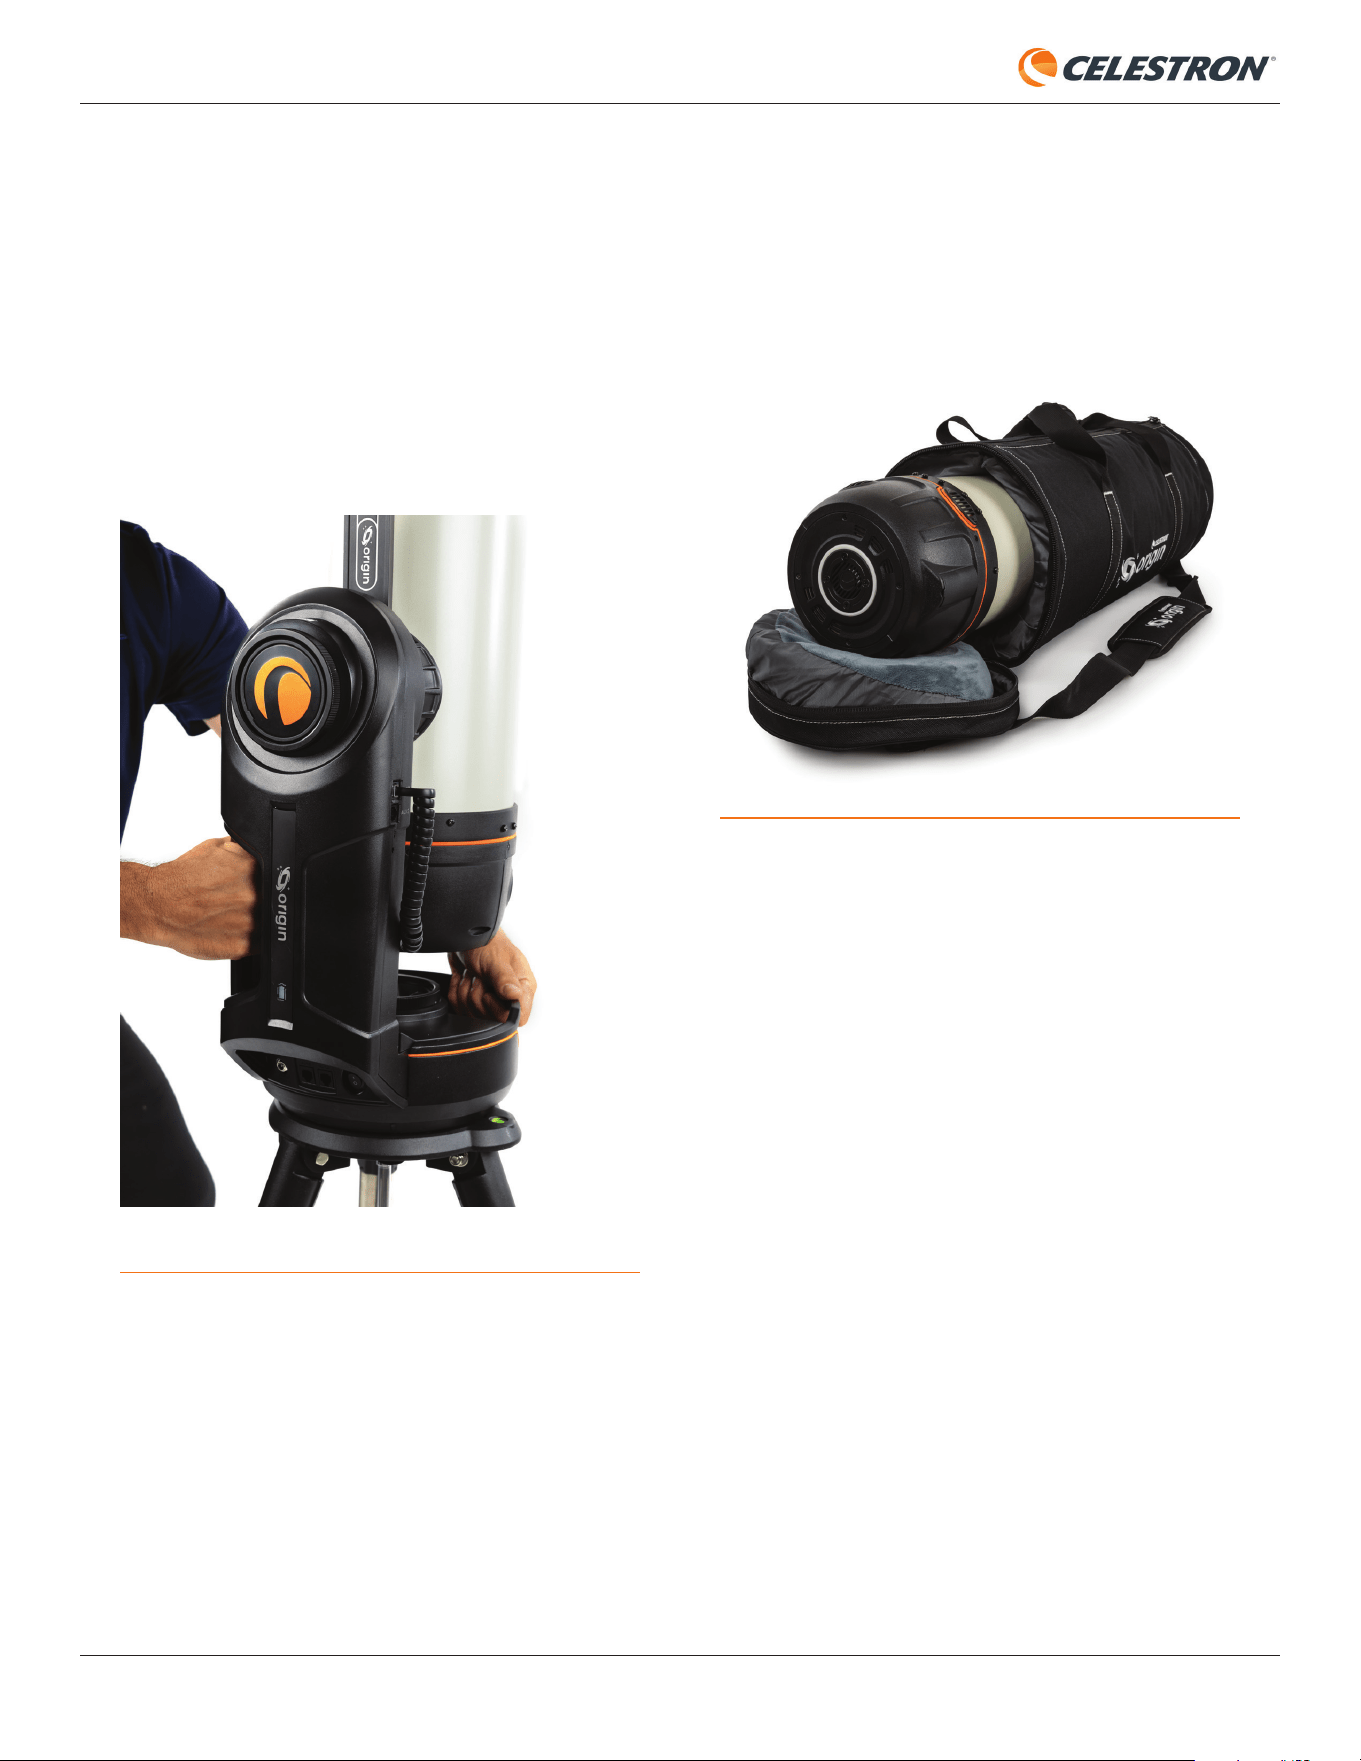
15. Transporting and Storing
Transporting
Transporting Origin from one location to another is easy. If
you are just taking Origin a short distance outside, like from
your garage to your backyard, then you may be able to carry
the entire setup assembled. It weighs about 42 pounds. You
can use the handles on the fork arm and mount to lift Origin
(Figure 31).
If the assembled setup is too heavy, or if you must move it
somewhere further away, we recommend disassembling
Origin into its three components: optical tube, mount, and
tripod. Each component weighs between 10 and 17 pounds,
so they should be easy for most people to carry. Refer to
the Quick Setup Guide supplied with Origin for details on
disassembly and reassembly.
If you need to transport Origin via car to an observing location,
you should break the system down into its three components.
We strongly recommend the optional Padded Bag for
Origin (Figure 32) for the optical tube assembly, as it is the
component you should protect most from impacts. We also
offer optional padded bags for the tripod and mount. Place
all the components in your car so they can’t move around or
bump into each other when driving.
FIG 31: Use the handles on the fork arm and mount to lift Origin.
If you ever need to ship Origin to another location:
• Use the original packaging.
• Secure the filter drawer with tape to prevent it from dislodging
from its magnets if the box takes a significant impact.
• Use the front foam piece that goes into the lens shade
and covers the camera to protect the camera and Schmidt
corrector from large impacts.
Storing
Store Origin indoors in a dry place. A garage is ideal; it will
keep the system near the ambient outdoor temperature, so the
optics won’t take as long to acclimate. Keep the dust cover
on the front of Origin when not in use to prevent dust and
particles from accumulating on the optics.
If the telescope is wet from dew, dry the exterior of the
telescope tube, mount, and tripod with a towel before storage.
While a small amount of water on the exterior won’t harm
the telescope, storing it wet in the long term could cause
corrosion and water damage. If the exterior surface of the
Schmidt corrector lens has moisture on it, wait until it dries/
evaporates before installing the dust cover.
FIG 32: Padded Telescope Bag for Celestron Origin
34 | CELESTRON ORIGIN
INSTRUCTION MANUAL
16. Care and Maintenance
Cleaning the optics
Dust, debris, and fingerprints on the optics will usually have
little effect on the images you capture with Origin. However,
if the external surface of the Schmidt corrector lens becomes
excessively dirty, you should clean it. Remove dust with a
blower bulb or an optical cleaning brush. Then, use an optical
cleaning solution and lens cleaning tissue to remove any
remaining debris or stains. Apply the solution to the tissue and
then apply the tissue to the lens. Use low-pressure strokes;
do not rub in circles. When cleaning the corrector, strokes
should go from the center to the outer edge. Use a new tissue
for each stroke so as not to spread any oils or debris. Keep
the dust cover on Origin when it is not in use to minimize the
need for cleaning.
Only the Celestron Repair Department should clean your
Origin’s internal optical surfaces. If your Origin needs internal
cleaning, please call Celestron for a return authorization
number and price quote.
Optical Alignment
Origin’s optics are factory-aligned and should not normally
need adjustment. However, if needed, you can adjust the lens
group’s tilt to collimate the optical system. To do this, you’ll
need a 2mm hex key. If you have two of them, it will make
things easier. The primary mirror and corrector are permanently
aligned at the factory and cannot be adjusted.
To adjust the tilt of the lens group:
1. Turn Origin on and let it initialize on the night sky as usual.
2. Point Origin at a bright star. Make sure the star is centered
in the field of view.
3. Use the manual focus controls to defocus the star by about
500-1000 counts.
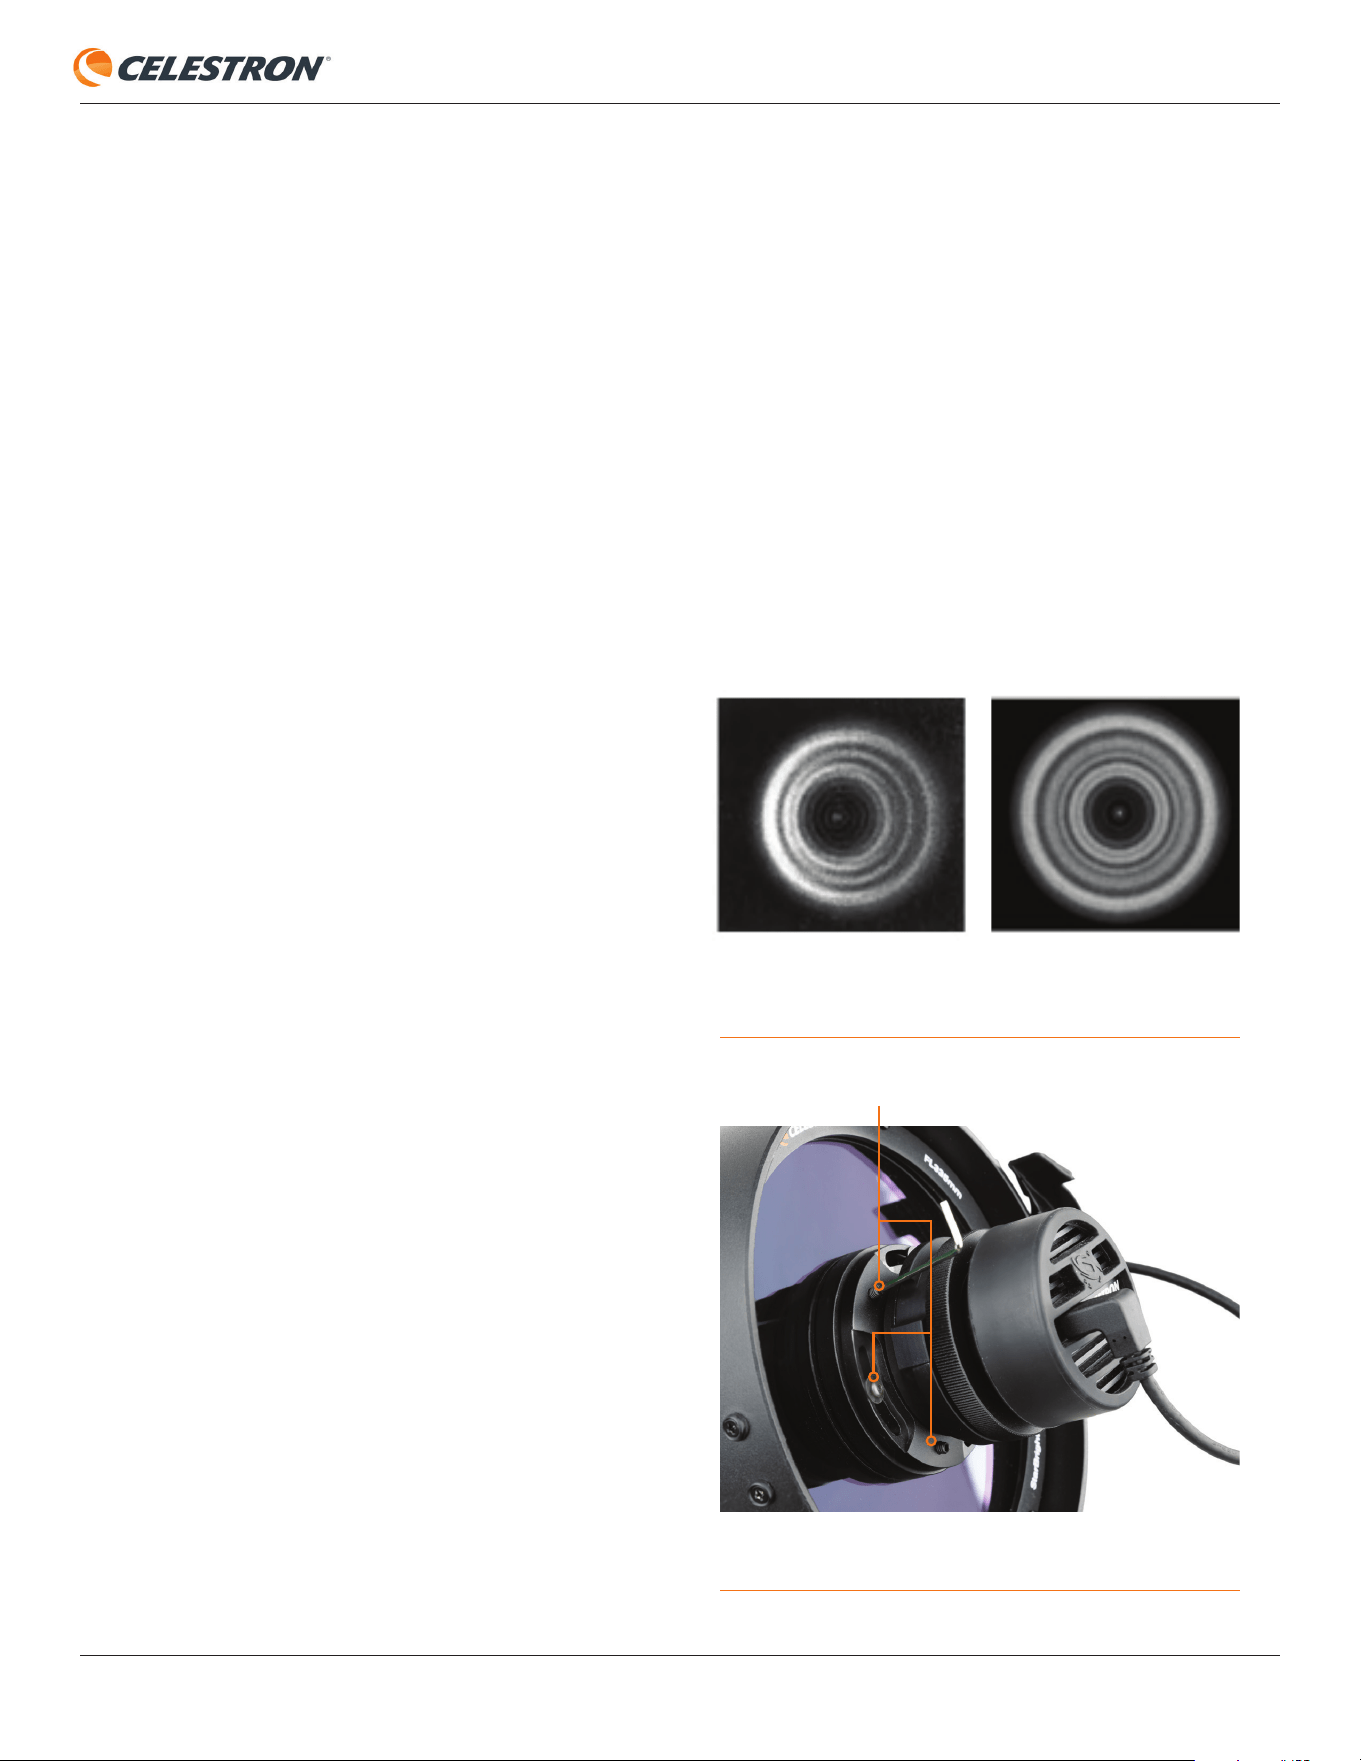
4. Inspect the defocused star diffraction pattern. When
collimated, the pattern should look like a concentric donut.
If the pattern is concentric, no adjustment is necessary. If
the “donut hole” is not centered within the pattern, some
adjustment is needed (Figure 33).
5. There are two sets of three collimation screws. The
setscrews act as push screws, while the button head
screws act as pull screws (Figure 34). The screw sets
work together as a push-pull tilt adjustment. Using the hex
keys, adjust the collimation by slightly loosening two of the
push screws and tightening the pull screw located between
them. Alternatively, you can loosen two of the pull screws
and tighten one of the push screws between them to tilt
the lens group in the opposite direction. Always loosen
two of the push or pull screws first, then tighten the screw
between them. TIP: If the defocused star pattern is thin on
one side, adjust the collimation screws so the star moves
towards the thin side.
6. After adjusting, recenter the star in the field of view and
reinspect the defocused star diffraction pattern.
7. Continue adjusting until the defocused star image is
concentric, as shown in Figure 33.
GOOD COLLIMATION
NEEDS ADJUSTMENT
FIG 33: If the optics need alignment, the “hole” will not be centered in the
defocused star image.
FIG 34: Adjust the tilt of the lens group (and camera) with the collimation
screws.
COLLIMATION SCREWS
INSTRUCTION MANUAL
CELESTRON ORIGIN | 35
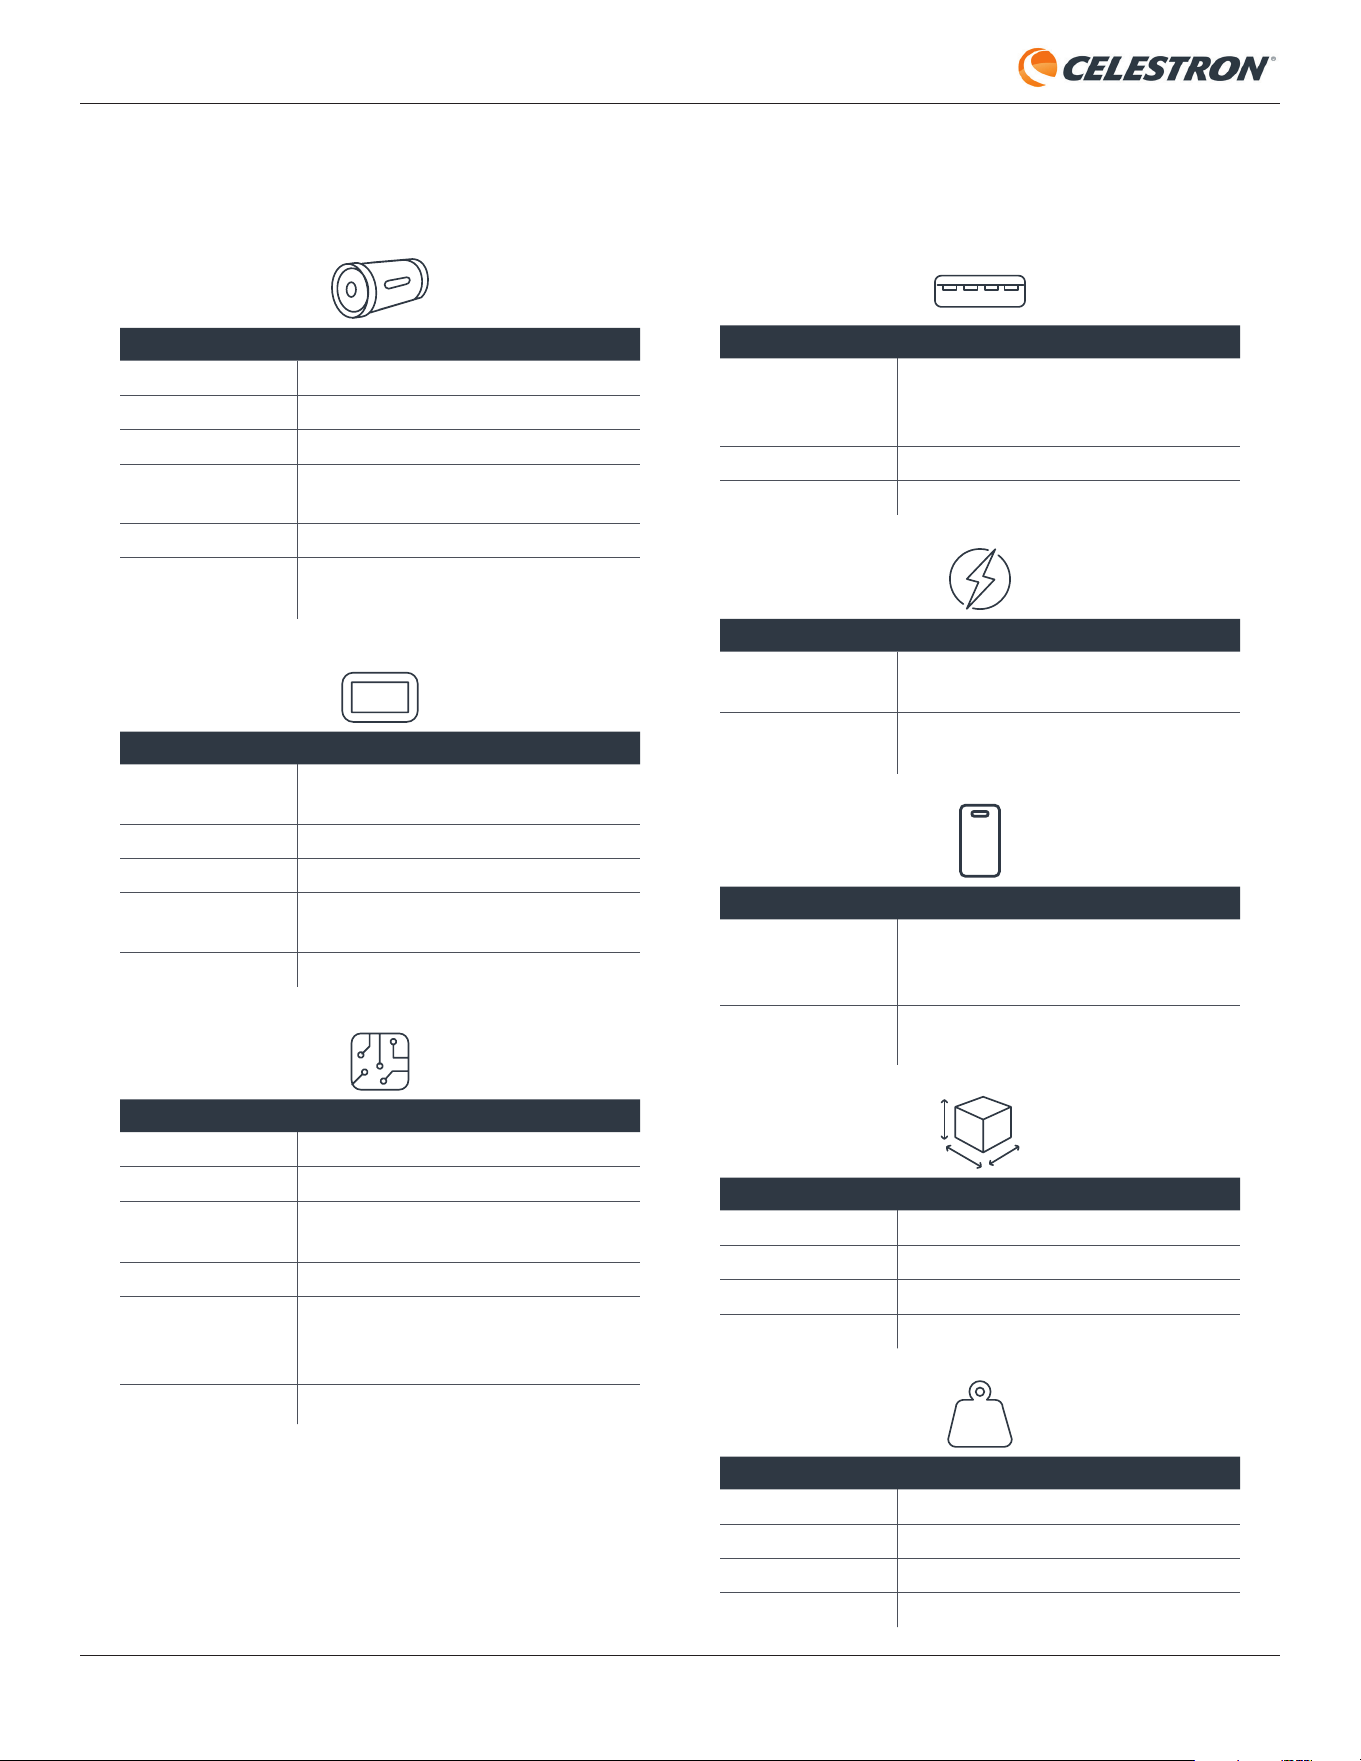
17. Specifications
OPTICS
OPTICAL DESIGN
Rowe-Ackermann Schmidt Astrograph (RASA)
APERTURE
152mm
FOCAL LENGTH
335mm
EFFECTIVE FOCAL
RATIO
f/2.2
OPTICAL COATINGS
StarBright XLT coatings throughout
FILTER DRAWER
Integrated, accepts 1.25" or 2" astroimaging
filters
IMAGING SENSOR
CMOS IMAGE
SENSOR
Sony IMX178LQJ, color, back-illuminated
SENSOR SIZE
8.92mm diagonal
PIXEL SIZE
2.4μm x 2.4μm
NUMBER OF
EFFECTIVE PIXELS
6.44M (3096 x 2080)
FIELD OF VIEW
1.27° x 0.85°
INTEGRATED ELECTRONICS
ONBOARD COMPUTER
Raspberry Pi 4 Model B
MOUNT
Computerized GoTo altazimuth mount
DEW PREVENTION
Fully automated heating element integrated into
front lens, removable dew shield/lens shade
FOCUS MOTOR
Autofocus or manual control
COOLING FANS
One (1) fan for optics, one (1) fan for
electronics, both pull air through vents with
wire mesh
LED STATUS RING
Indicates status "at-a-glance"
PORTS
USB-A
Two (2) on optical tube for accessing raw image
files for external processing, one (1) on mount
for mobile device charging only
ETHERNET
One (1) on optical tube
AUXILIARY PORTS
Two (2) on optical tube, four (4) on mount
POWER
BATTERY
Integrated LiFePO4, 97.9 Wh, capable of 6+
hours of use
POWER INPUT
12V DC adapter for charging internal battery or
running on external AC power
USER INTERAFACE
CELESTRON ORIGIN
POWERED BY
SKYSAFARI
TM
APP
Runs on compatible iOS or Android smartphones
and tablets
SYSTEM
REQUIREMENTS
iOS 16 or higher, Android 12 or higher
DIMENSIONS
OPTICAL TUBE
24" x 7" diameter
MOUNT
18" x 12" x 10"
TRIPOD (COLLAPSED)
13" x 12" x 32"
ASSEMBLED SYSTEM
24" L x 26" W x 48" H
WEIGHT
OPTICAL TUBE
10.6 lb
MOUNT
17.0 lb
TRIPOD
14.0 lb
TOTAL SYSTEM
41.6 lb

36 | CELESTRON ORIGIN
INSTRUCTION MANUAL
Appendix A: Troubleshooting
If you are having problems with Origin, consult this appendix
for possible solutions.
Direct Connect Password
• Normally, you can directly connect to Origin’s WiFi network
through the app. No password is required. You can also
directly connect to Origin’s WiFi network outside the app
through your device’s WiFi settings page. The first time you
attempt to connect to Origin’s WiFi network outside the
app, you’ll be asked for a password. The default password
is 12345555
• Once connected, you can change the password in the app
in Menu>Settings> WiFi settings.
• You can reset the Direct Connect password with a USB key
action. Refer to Appendix C for more details.
App Settings
When you first open the Origin app, it will ask for several
permissions:
Photo Library
Origin needs access to your Photo Library to store your
completed images. We recommend allowing full access.
Location Services
Origin needs access to your location to align itself to the night
sky. We recommend allowing access while using the app.
Local Network
Origin needs access to your local network to connect Origin
to your home network. Please select allow.
• If you are having trouble connecting to Origin, check your
device’s settings to ensure access to Location, Photos,
and Local Network is enabled.
• For iOS devices, go to Settings, then find Origin in your
list of installed apps. Select Origin, and you’ll see the
permissions (i.e., “Allow Origin to Access”).
Connecting to Origin
Through Home Network
When switching from Direct Connect mode to Network
Connect mode using a home router, you may encounter issues
that are unrelated to Origin’s functionality.
Origin Cannot Connect to Home Network -
Wrong Password Entered
If, after selecting your home network from “Visible WiFi
Networks” and entering your home network password, Origin
cannot connect to the router, you’ll see Origin’s status LED
ring display a “rocking back-and-forth” pattern instead of
rotating clockwise. This usually means you entered the home
network password incorrectly.
Tap the WiFi icon in the upper left corner of the Planetarium
View, then select “Connect.” Origin will eventually drop back
into Direct Connect mode (i.e., status LED ring rotating
counterclockwise). Once reconnected directly to Origin, go
to Menu>Settings>WiFi Setttings, select the home network
from “Configured WIFi Networks” and choose “Remove
Configuration.” Then, select the home network again under
“Visible WiFi Networks” and reenter the network password
correctly.
Origin and Device Connect to Home Network
but Cannot Connect to Each Other
With some routers, you may be able to connect your device to
the home network and Origin to the home network, but cannot
get the device to connect with Origin. You’ll see Origin’s status
LED ring rotating clockwise, indicating it is connected to the
home network, and you’ll be able to connect to the internet with
your device. In this case, check your router’s security settings
to make sure it will allow networking of multiple devices.
To recover from this, you’ll need to reconnect to Origin
in Direct Connect mode. This can be a bit tricky, as Origin
will be connected to the router and won’t be able to receive
commands from your device. If needed, you can turn off
your home network temporarily so Origin won’t detect and
automatically connect to it; Origin will drop back into Direct
Connect mode automatically. Another way to do this is to
move Origin far enough away from your router so that it does
not detect it. Another way is to use the Resetting WiFi USB
Key Action. To do this, you’ll need a USB thumbdrive. Refer to
Appendix C for more information.
The information in this manual is accurate as of July 1, 2024. For more helpful tips and up-to-the-minute information, visit celestron.com/origin and navigate to the FAQ tab.
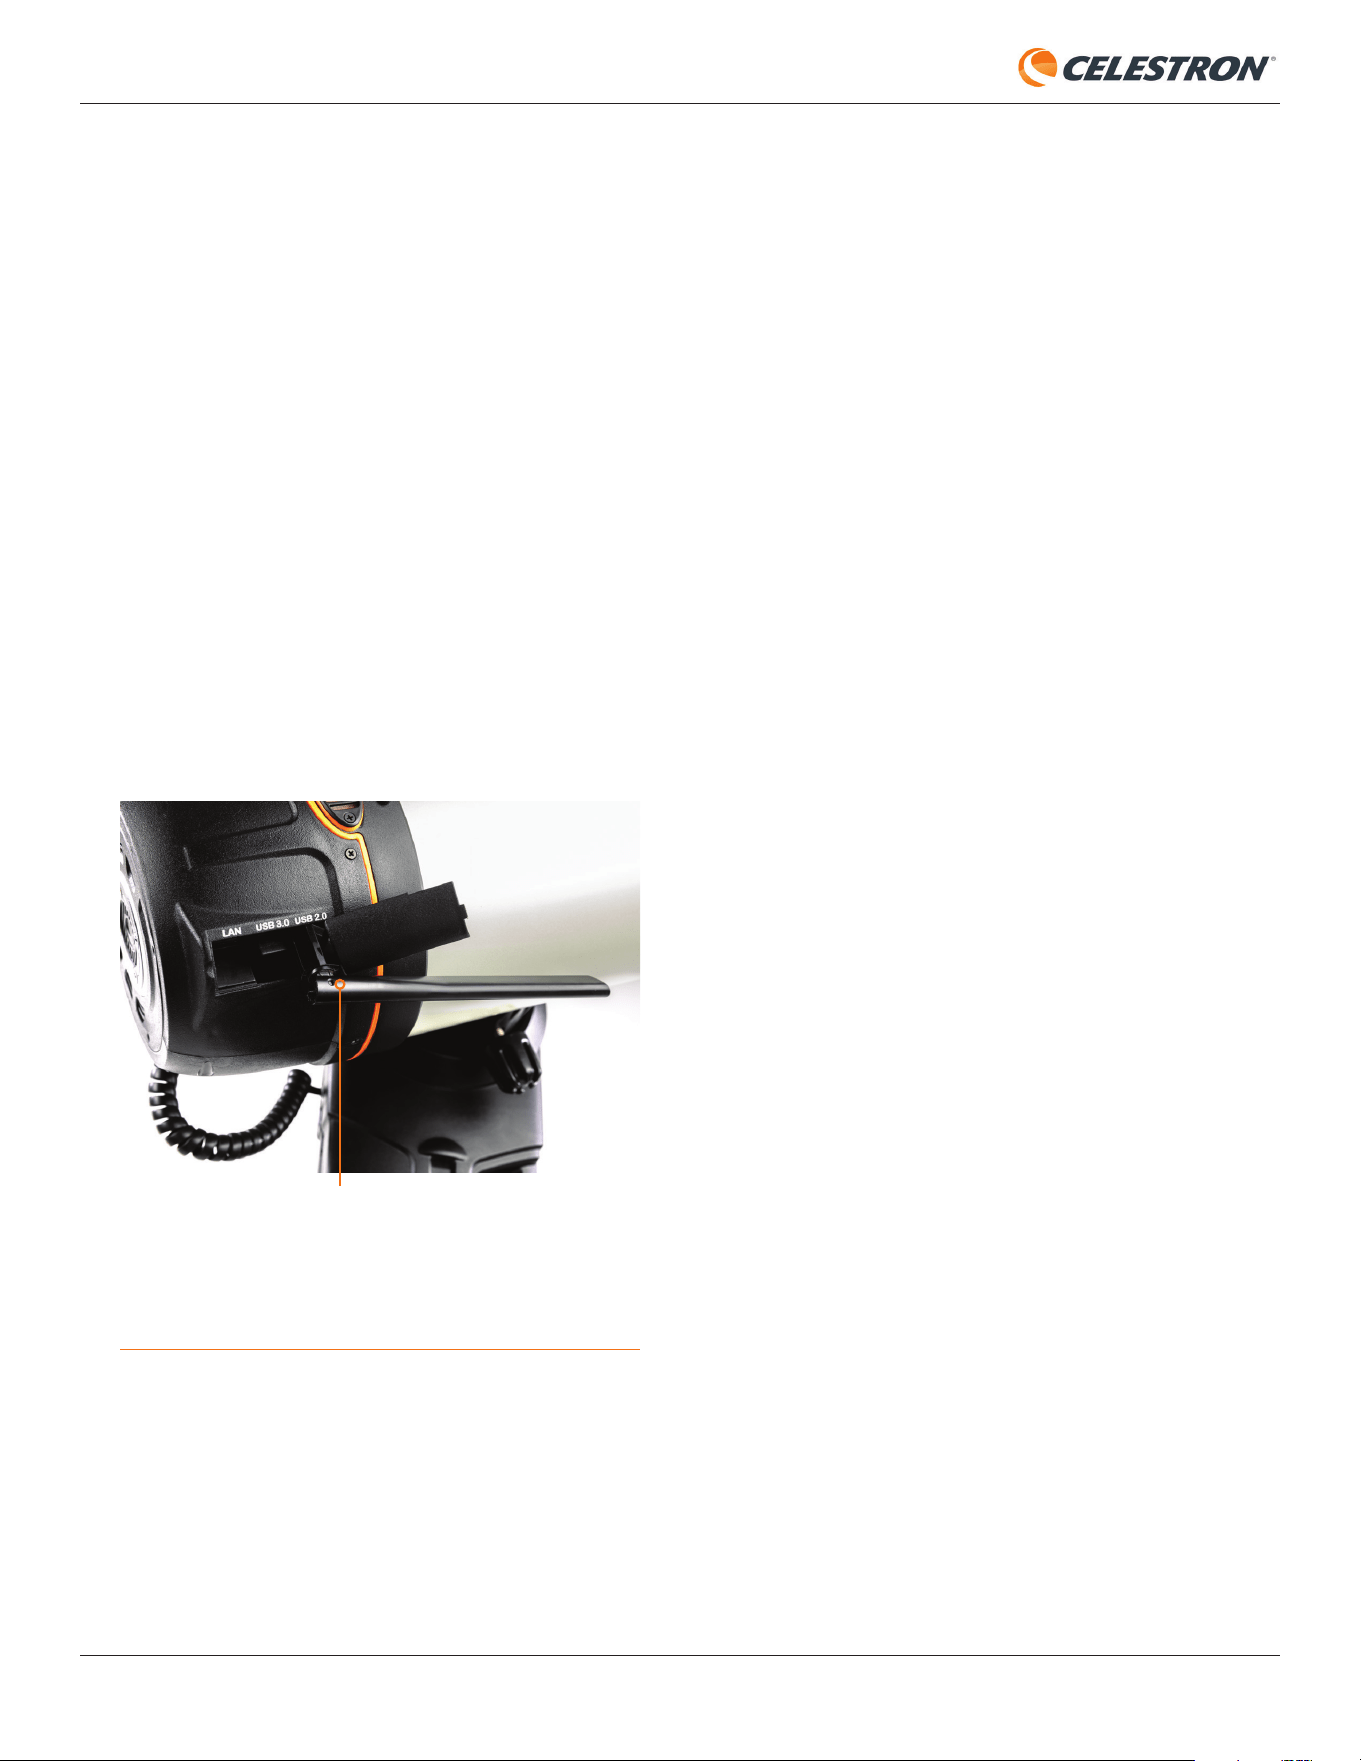
INSTRUCTION MANUAL
CELESTRON ORIGIN | 37
Low Bandwidth
In Direct Connect mode
• Move your device closer to Origin or vice-versa.
• If Origin is outside and you are inside, place the device where
there is minimal interference between the device and Origin.
• For example, if there is a thick wall between the device
and Origin, try placing the device closer to a window.
• If Origin is outside and you are inside, we highly
recommend trying Network Connect mode.
• Using a WiFi antenna
• Origin is compatible with a third-party USB WiFi antenna,
the TP-Link Archer T2U Plus AC600 High Gain Wireless
Dual Band USB Adapter. If you would like to use the
antenna, first turn Origin off. Then, connect the antenna
to the USB 2.0 port in Origin’s rear cell (Figure 35).
In Network Connect mode
• WiFi Routers
• When operating in Network Connect mode, where Origin
is connected through your home network, performance
highly depends on your home network’s WiFi router. If
you consistently get low bandwidth in Network Connect
mode, consider upgrading or reconfiguring your WiFi
router.
• The WiFi router’s location relative to Origin can also
impact performance. If you are getting low bandwidths in
Network Connect mode and your WiFi router is a good
one, consider moving your router closer to where you
observe with Origin (or vice-versa).
• WiFi Extenders
• If your Origin will usually be located far away from your
router, consider purchasing a WiFi extender. You can
place this somewhere in your home closer to Origin. It
will help increase your router’s bandwidth and range.
Tripod leveling
• Origin’s tripod should be within about 5° of level for the best
tracking and pointing accuracy. Use the bubble level on the
top of the tripod to confirm. If the tripod is over 5° out of level,
it will not properly initialize.
Date/Time/Location
Check the date/time/location by pressing the information
button
• If Origin has problems initializing, check Date & Time and
Location under Menu>Settings to confirm the data is correct.
Nebula Filter activated,
but Clear Filter installed
• Initialization may fail if the app indicates that you have the
Clear Filter installed but another filter (or no filter) is installed.
Conversely, initialization may fail if the app indicates you have
a Nebula Filter installed but you have the Clear Filter (or no
filter) installed.
• In either of these instances, simply press the filter button
to change its state to match your installed filter. Then, try
initializing again.
• If no filter is installed, Origin’s optical performance will be
slightly degraded, as the fast F/2.2 optics were designed to
be used with a 2.0mm thick filter of flat glass. So, if you are
not using an optional filter, ensure that the Clear Filter that
came with your Origin is always installed.
Wind
• Strong winds can influence Origin’s performance, especially
FIG 35: You can install an optional third-party WiFi antenna into the USB 2.0
port in Origin’s rear cell.
TP-LINK ARCHER T2U PLUS AC600 HIGH GAIN
WIRELESS DUAL BAND USB ADAPTER

38 | CELESTRON ORIGIN
INSTRUCTION MANUAL
with regard to tracking over time. If you note that your stars
are somewhat streaked or that imaging fails, you may need to
shield Origin from the wind or move it to a better-protected,
less windy area.
• If you are in an area of strong winds, use manual camera
settings to try shorter sub-exposures (which may also allow
using ISO 2000).
Consistently getting streaky
stars or objects not being
centered
• If you see streaky stars during imaging or if objects are
consistently off-center in the field of view, Origin’s mount
model is probably inaccurate or corrupted.
• In this unlikely scenario, try power cycling Origin and
reinitializing. This will usually clear the problem.
Performance near zenith
• Because Origin uses an altazimuth mount (and not an
equatorial mount), imaging near the zenith becomes difficult
due to field rotation. A warning message will appear when
imaging within 5° of the zenith.
• If imaging fails near the zenith due to field rotation, use
manual camera settings to set a shorter sub-exposure time.
Grid artifacts when zooming
far into Camera View while
imaging
• If you zoom into your device’s screen during imaging, you
may notice some “grid artifacts.” These artifacts result from
the compression of the “live” image you see onscreen.
• The final stacked master is not compressed in this way, so
your final stacked master (i.e., the image Origin saves to the
Image Gallery after you press End Imaging) will not show
these grid artifacts.
Hot Pixels or Other Image
Artifacts
If you notice some “hot pixels” or other image artifacts,
we recommend using “Recapture Dark Frames” in
Menu>Settings>Advanced. The dark frames stored on Origin
were taken at the factory, and may not perfectly match your
current observing conditions (i.e. temperature). Taking the
dark frame in the same conditions you are imaging will better
eliminate any residual hot pixels or artifacts.
NOTE: Be sure to install the dust cover on Origin before
recapturing dark frames.
Camera cable connections
• An internal USB cable connects Origin’s camera to its
onboard computer. If you are no longer receiving images
from the camera, check the cable connections on both ends
of this cable. One end connects to the USB-C port on the
camera. The other end connects to one of Origin’s USB
ports (Figure 36).
Power stays on even
when the power switch is
turned off
• After turning off the switch, the mount may remain on for up
to 7 seconds while it waits for Origin’s electronics to shut
down.
• In some rare instances, you may find that Origin stays on
indefinitely, even when the power switch is put into the
off position. If this occurs, press the Reset button on the
fork arm (Figure 37). You’ll need a paper clip or another
instrument with a fine tip. Once you press the Reset button,
Origin will turn off. The next time you turn Origin on via the
power switch, it should work normally.
Power stays off even when
the power switch is turned on
• If this occurs, the battery may be completely dead, or it may
have shut down for other reasons to protect itself. To reset
the battery, briefly plug in the AC adapter.
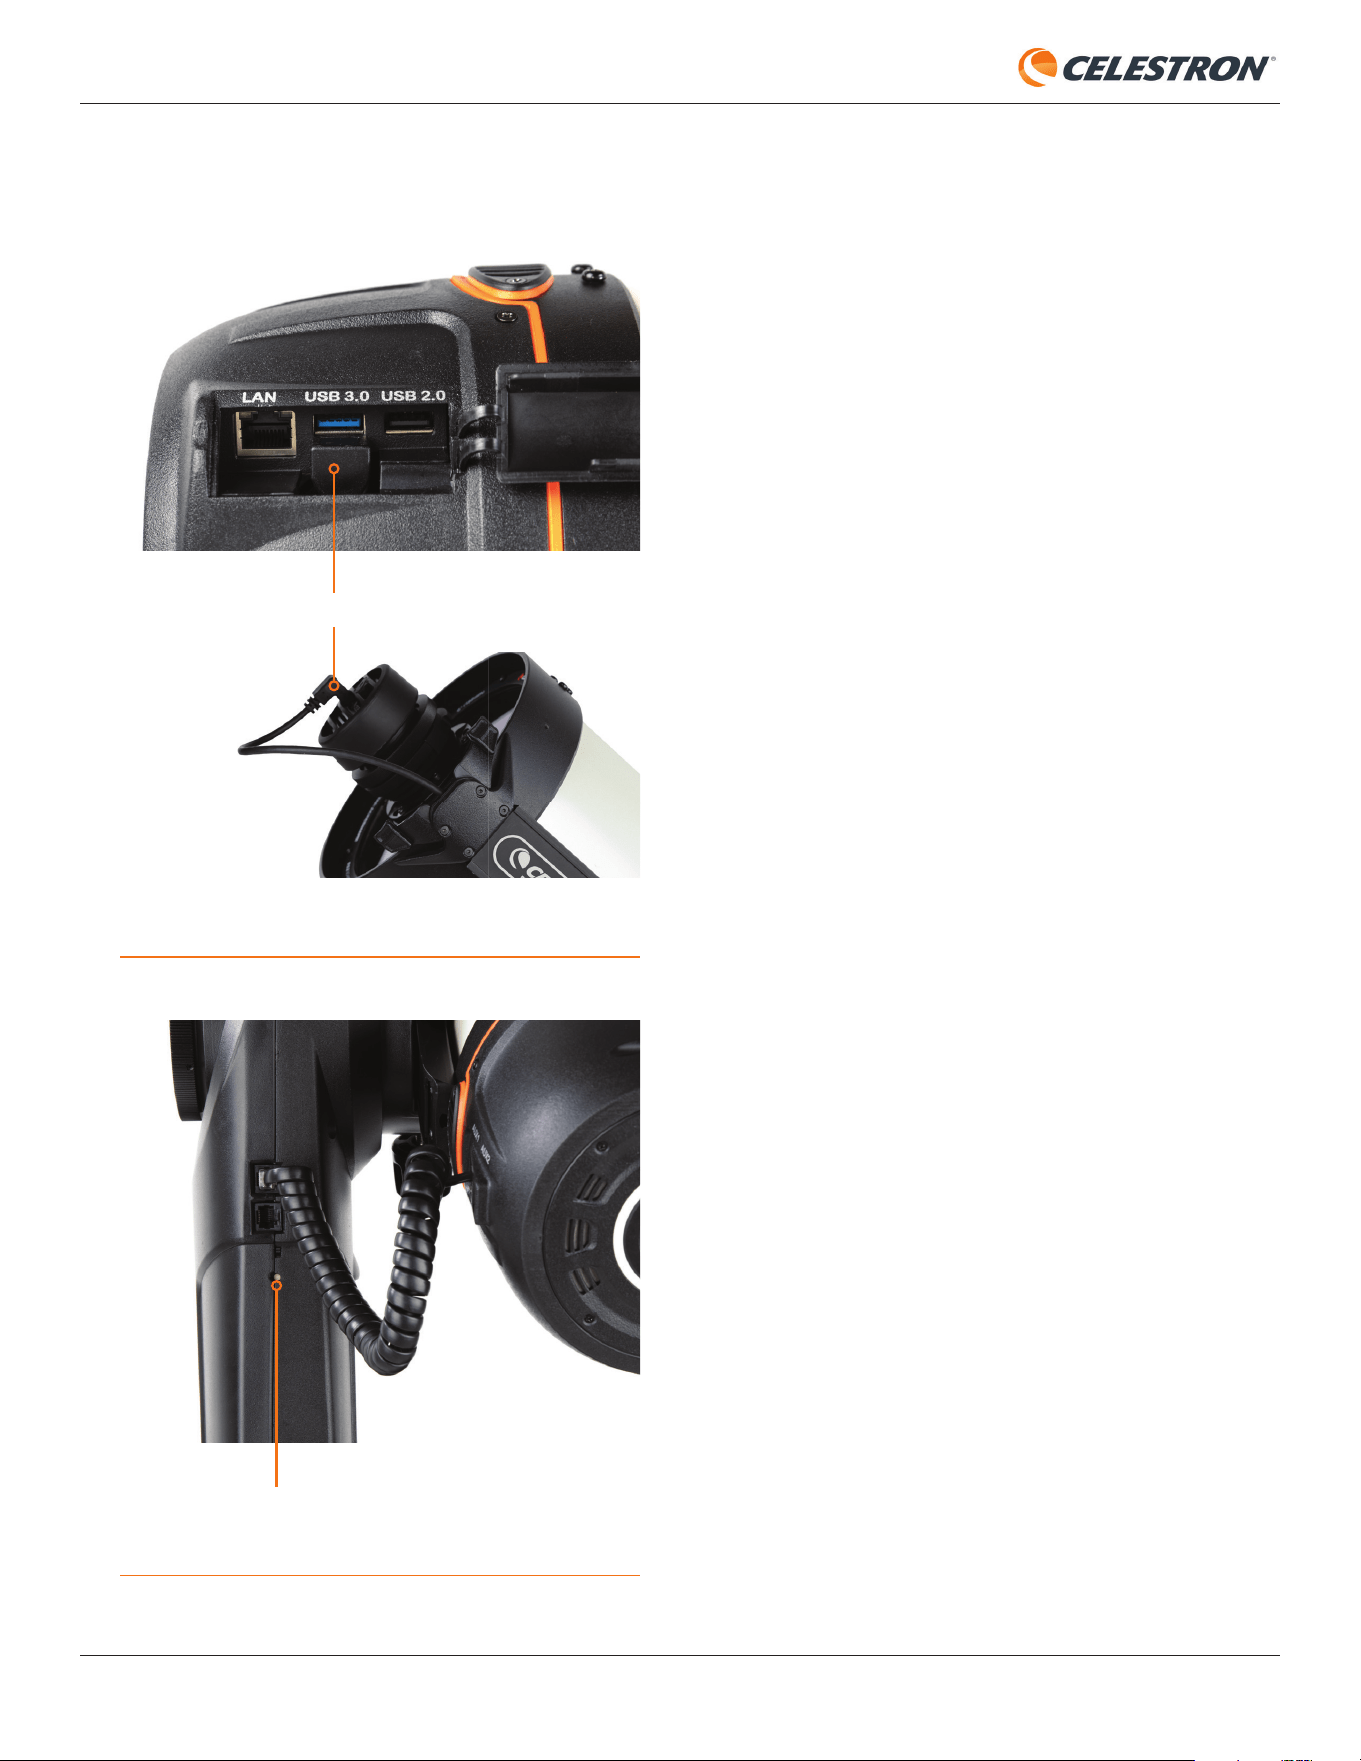
INSTRUCTION MANUAL
CELESTRON ORIGIN | 39
FIG 36: One end of the camera cable plugs into the camera. The other end
plugs into one of Origin’s USB ports.
FIG 37: In rare instances, you may need to depress this recessed button
to turn Origin off
CAMERA CABLE
RESET BUTTON
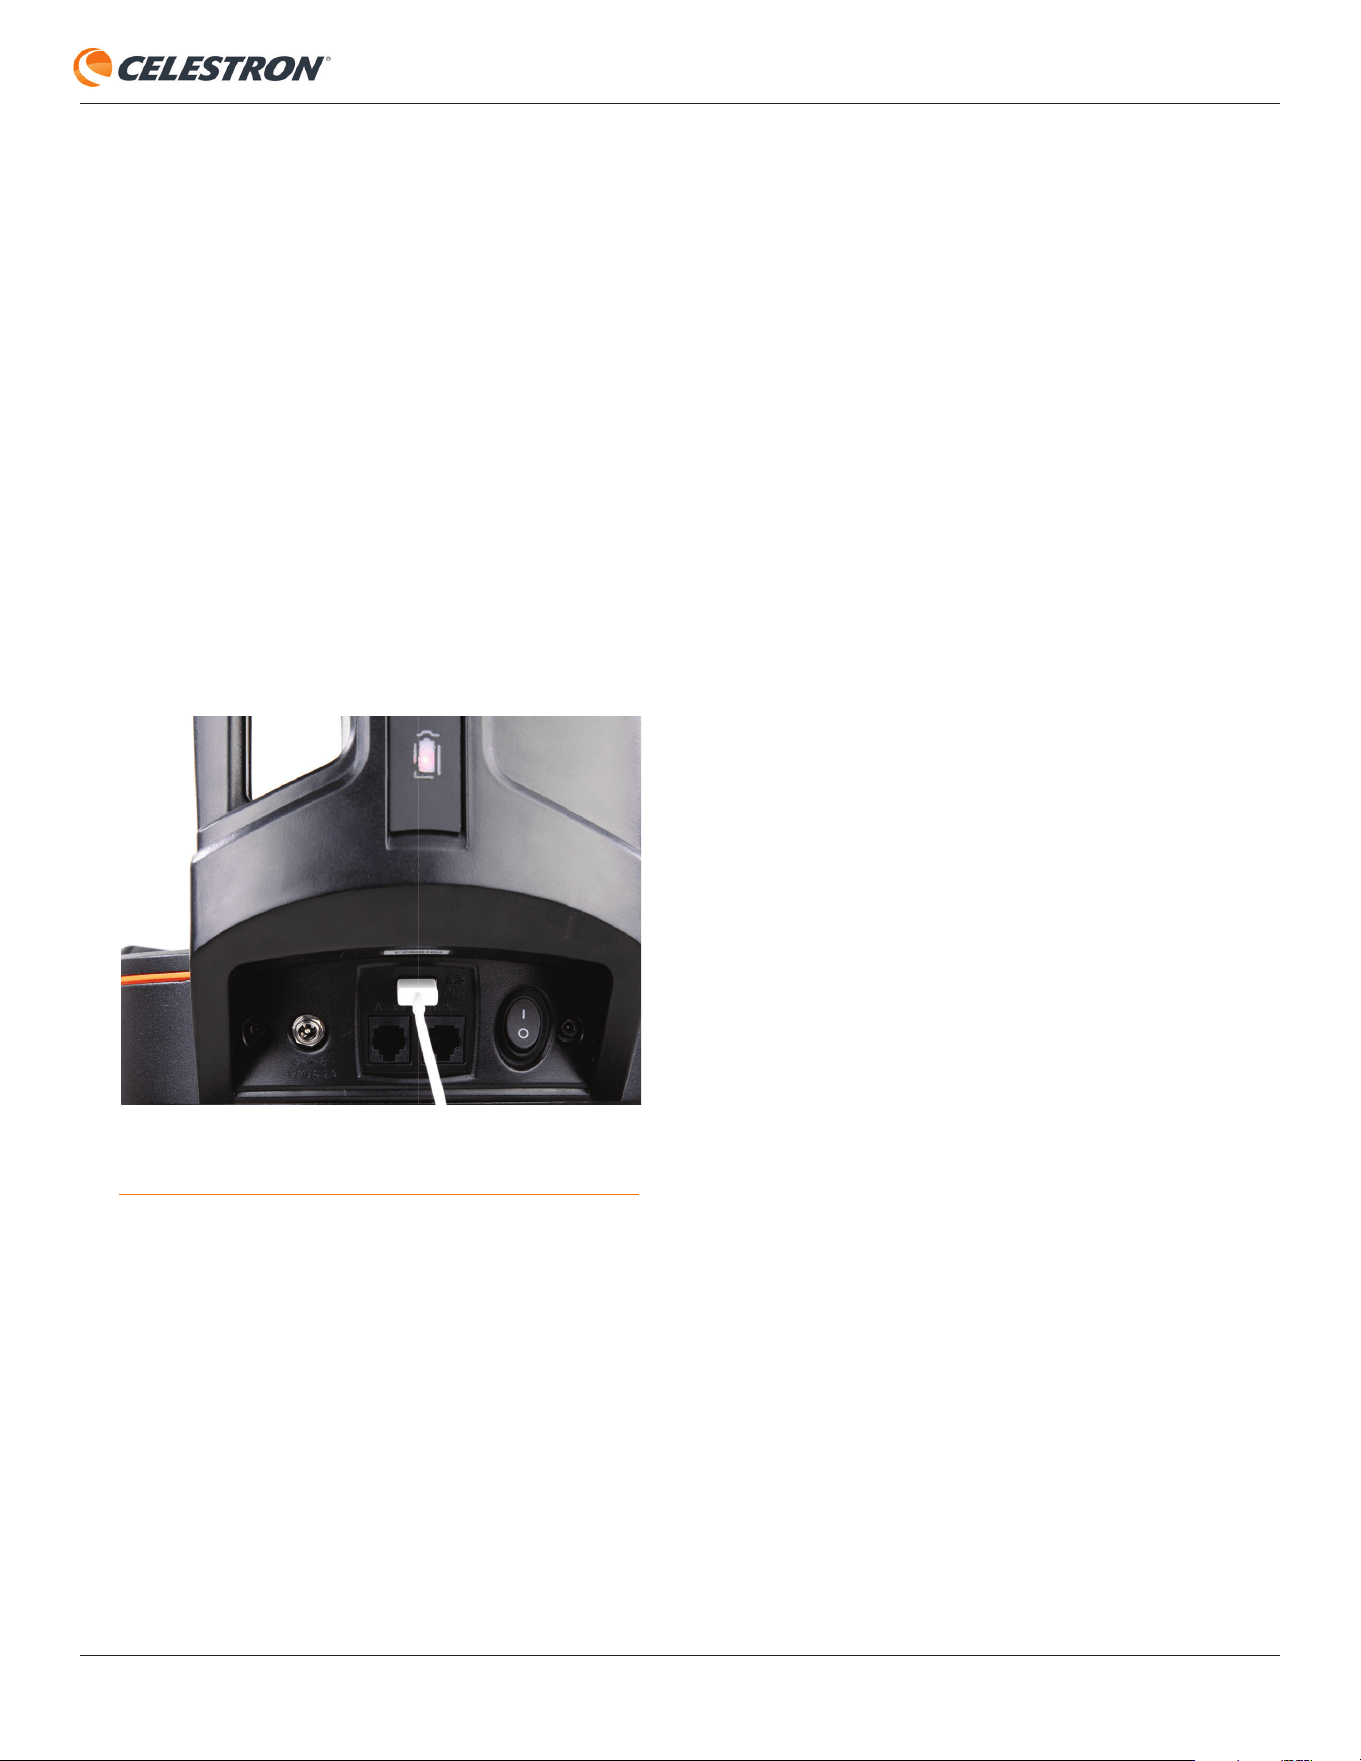
40 | CELESTRON ORIGIN
INSTRUCTION MANUAL
Appendix B: Tips
In this appendix, we’ll review tips to help you get the best
results with Origin.
Charge your device
• While you use Origin, your device (i.e. phone or tablet) will
continually process images, which can deplete the battery
over time. You may fi nd that your smartphone battery runs
down faster than Origin’s internal battery. Therefore, before
using Origin, we recommend fully charging your device.
• You can use the USB charge port on the Origin mount
(Figure 38) to charge your device as you use it.
NOTE: Only use the USB charge port on the mount to charge
your device. Do not use the USB ports on the tube for
charging.
Use a smartphone or tablet with a modern
display and processor
• Your overall experience, including the speed of image
processing and image quality, depends on the device you
pair with Origin. Choose a smartphone or tablet with an
excellent display and fast processor for best results.
Choose the correct settings for your device’s
sleep mode
• While you use the Origin app, your device’s operating
system may go into “sleep mode” after some inactivity to
preserve the device’s battery power. If this happens, the app
FIG 38: You can use the USB charging port on the Origin mount to charge
your device in the fi eld.
will lose connection with Origin. The app will automatically
reconnect to Origin when you reactivate the app. To prevent
Origin from disconnecting due to sleep mode, turn off sleep
mode or set a very long duration before it initiates. Consult
your device’s manual or manufacturer’s website for specifi c
instructions.
Adjust the tube balance
• Origin’s Quick Setup Guide shows you how to balance
the optical tube on the mount. However, you may slightly
improve Origin’s tracking performance by mounting the
tube somewhat off-balance. When Origin’s tube is slightly
off-balance, gravity ensures the altitude axis gears stay
well-engaged. The worm gears on both axes of motion are
spring-loaded to provide good contact regardless. However,
the additional gravitational force on the altitude axis when
slightly off-balance may help in some circumstances.
Select the correct object for the best imaging
results
• For the best AI image processing results, ensure the object
you selected is the object you intend to image. If you want
to change the framing, use the Reframe functionality. Do not
choose a nearby star and issue a GoTo command to center
on that. Origin will think you intend to image the star and may
adjust AI parameters as a result.
• The Western Veil Nebula is a good example. The bright
star 52 Cygni is near its center. Do not choose 52 Cyngi
and GoTo it to image the Western Veil. Instead, choose
the Western Veil, GoTo it, and then use the Reframe
functionality to place 52 Cygni at the center of the
image, if you wish.
Switch from 5 GHz WiFi to 2.4 GHz
WiFi if necessary
- When in Direct Connect mode, Origin’s WiFi operates at 5
GHz by default. In most cases, 5GHz provides the greatest
bandwidth and stability. However, you may fi nd that operating
at 2.4 GHz WiFi is best for your WiFi environment in Direct
Connect mode. To switch from 5 GHz WiFi (default) to 2.4
GHz WiFi, use the toggle in Menu>Settings>WiFi Settings.
After you change the setting, power cycle Origin.
- When in Network Connect mode, Origin automatically
switches between 2.4 GHz and 5 GHz operation to match
your router. If your home router has both 2.4 GHz and 5 GHz
channels, we generally recommend connecting through the
5 GHz channel for best results.

INSTRUCTION MANUAL
CELESTRON ORIGIN | 41
Appendix C: USB Key Actions
In this appendix, we’ll explain how to use a USB thumb drive
to reset Origin’s WiFi settings or reset all settings. You won’t
usually need to perform these procedures, but they can be
helpful in some situations.
USB Drive Requirements
You will need a USB drive that supports one of these
file system formats:
• exFAT
• FAT32
• HFS+
• NTFS
• ext4
Resetting WiFi
When you perform this reset, the Direct Connect password
will revert to the default and all known networks will be cleared.
This could be useful if you have changed the Direct Connect
password and forgotten it. It can also get Origin back into
Direct Connect mode if it becomes stuck in Network Connect
mode. (This could happen if you connect Origin to your
router’s network but then are unable to connect your device to
Origin through the network due to network security settings.)
1. On a USB thumb drive, create a file named
“OriginResetWifi.txt”
2. Turn off the Origin unit and insert the thumb drive.
3. Turn on the Origin unit. In a few moments, Origin will create
an access point. You can now use the app to connect
via Direct Connect with the default password. Once
reconnected, remove the thumb drive from Origin.
Reset All Settings
When you perform this reset, you clear all your customized
settings while retaining astrophotography data. For instance,
the dew heater’s aggressiveness and the WiFi settings
will be reset. You may want to perform this reset during
troubleshooting.
1. On a USB thumb drive, create a file named
“OriginResetSettings.txt”
2. Turn off the Origin unit and insert the thumb drive.
3. Turn on the Origin unit. All settings will be reset.
0724
FCC NOTE: This equipment has been tested and found to comply with the limits for a
Class B digital device, pursuant to part 15 of the FCC Rules. These limits are designed to
provide reasonable protection against harmful interference in a residential installation.
This equipment generates, uses, and can radiate radio frequency energy and, if not
installed and used in accordance with the instructions, may cause harmful interference
to radio communications. However, there is no guarantee that interference will not
occur in a particular installation. If this equipment does cause harmful interference to
radio or television reception, which can be determined by turning the equipment off
and on, the user is encouraged to try to correct the interference by one or more of the
following measures:
• Reorient or relocate the receiving antenna.
• Increase the separation between the equipment and receiver.
• Connect the equipment into an outlet on a circuit different from that to which the
receiver is connected.
• Consult the dealer or an experienced radio/TV technician for help.
Product design and specifi cations are subject to change without prior notifi cation.
This product is designed and intended for use by those 14 years of age and older.
©2024 Celestron. Celestron and Symbol are trademarks of Celestron, LLC.
All rights reserved. Celestron.com.
2835 Columbia Street • Torrance, CA 90503 U.S.A.
UK: Unit 2 Transigo, Gables Way, Thatcham RG19 4JZ, United Kingdom
celestron.com/pages/technical-support
celestron.com/pages/warranty
Origin uses Open Source Software. A document with licenses and notices for all the open
source software used to build Origin OS is available on the device. Connect to the device
using Wi-Fi, then visit http://origin.local/licenses for more information.
As of this writing, this manual contains the
most up-to-date information we have on
Origin. But as we gather feedback from
customers and work internally to add
new features, we continue to maintain a
Frequently Asked Questions page on our
website with up-to-the-minute answers and
tips as they become available. Scan the QR
code below or navigate to the FAQ tab at
celestron.com/origin to browse the full FAQ.