#22160-DS
QUICK SETUP GUIDE
1
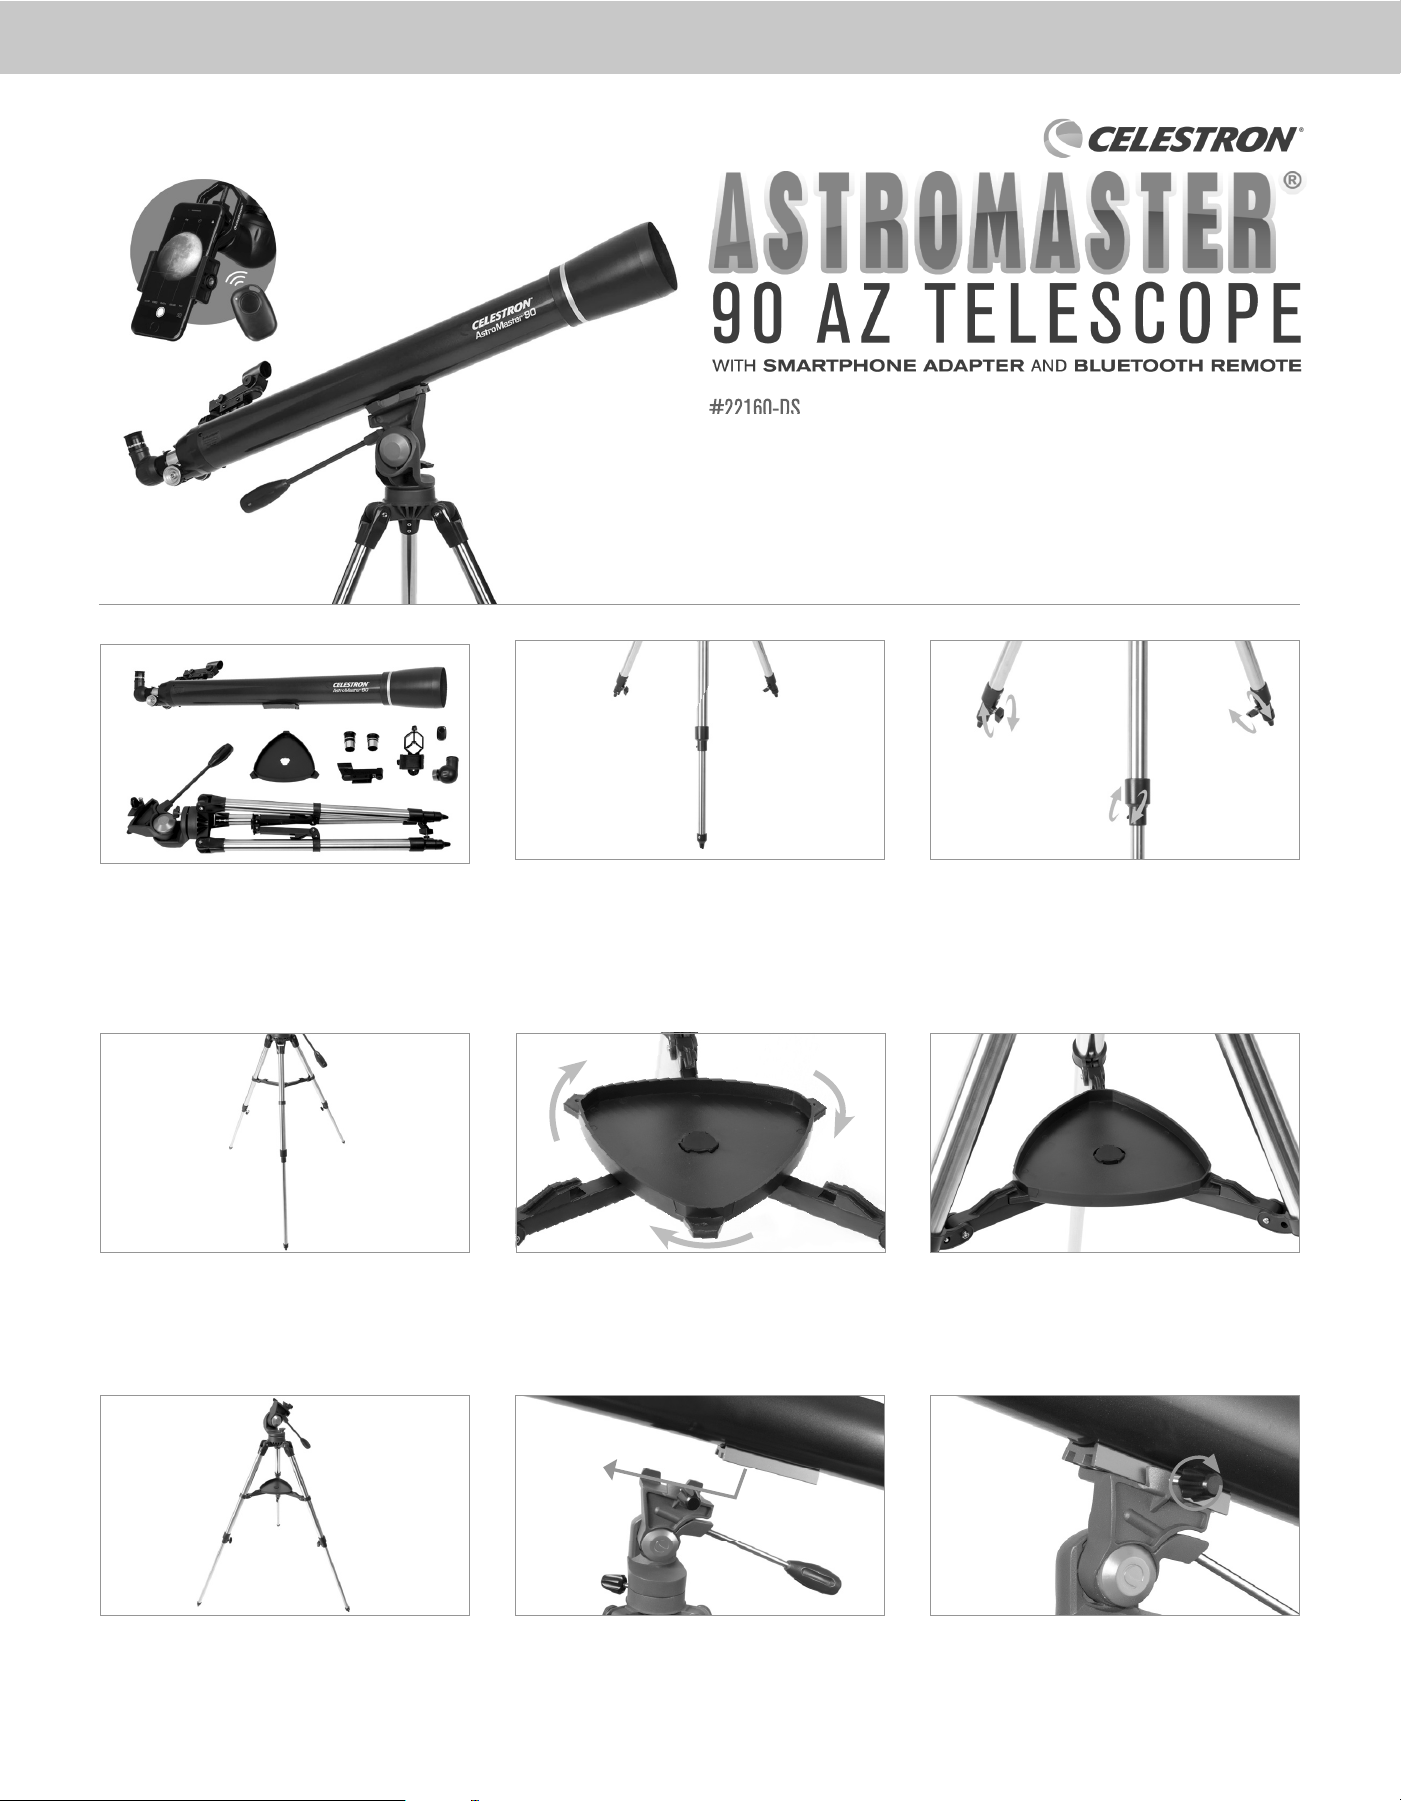
Unpack your telescope and verify that all parts are present.
Your AstroMaster 90AZ includes: a telescope tube, a tripod
and mount head, two eyepieces, a StarPointer™ red dot
finderscope, an erect image diagonal, a smartphone adapter,
and a Bluetooth shutter remote.
All three legs should be the same length to provide a level
platform for the telescope.
Here is how the fully assembled tripod and mount
should appear.
To set up the tripod, spread the legs outward until they
are fully extended. Extend each of the three tripod legs
down 6 to 12”.
To attach the accessory tray, line up the notches and turn
clockwise until the tray tabs lock into place with the tripod
brackets.
Next, slide the telescope tube into the mount. Be sure to
back out the fastening screws to allow enough clearance for
the dovetail.
Use the three tightening screws located at the bottom of each
leg to secure the extended legs in place.
Properly assembled, the accessory tray should appear as
pictured above.
Center the dovetail in the mount and tighten the fastening
screw. For added security, tighten the angled lock-down screw
next to the fastening screw.
1 2 31
8 9
4
65
#22160-DS
7
#22160-DS
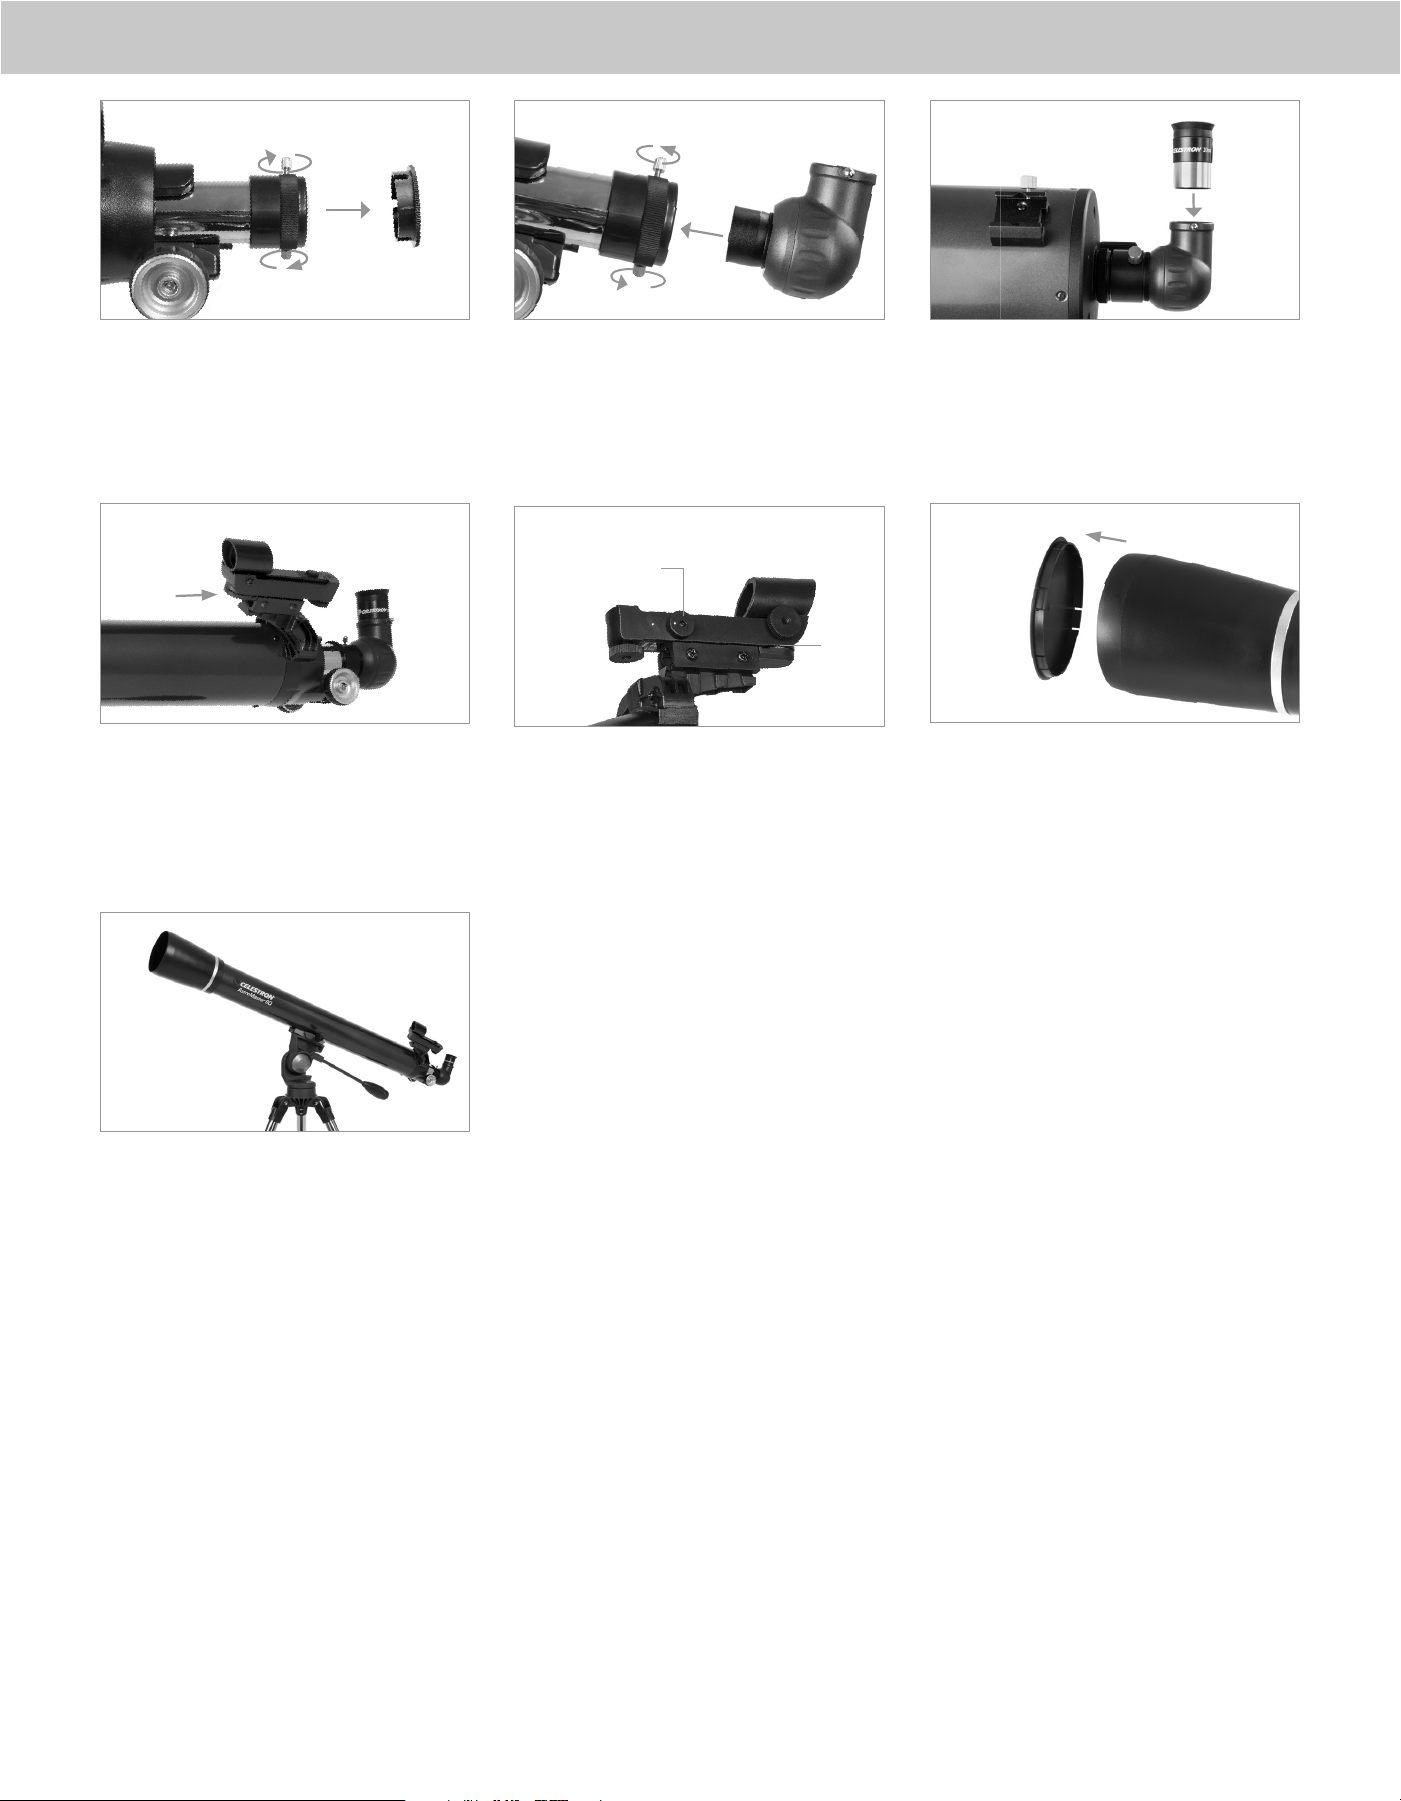
2
Loosen the thumbscrews on the focuser and remove the cap.
Make sure the two thumbscrews do not protrude into the
opening.
To install the finderscope, loosen the two Philips–head screws
on its side. Slide the clamp over the dovetail bracket. Tighten
the Phillips-head screws.
You are now ready to use your AstroMaster telescope.
Insert the diagonal into the focuser and tighten the
thumbscrews.
Remove the small plastic tab under the battery cover by
pulling it straight out. For longer battery life, be sure to turn
off the finderscope when it is not in use.
Loosen the setscrew on the diagonal. Insert the chrome
barrel of the 20mm eyepiece into the diagonal and tighten
the setscrew.
Remove the lens cap from the front of the telescope before
you begin observing.
10
11
13 1414 15
16
12
On/Off
Switch
Battery
Cover
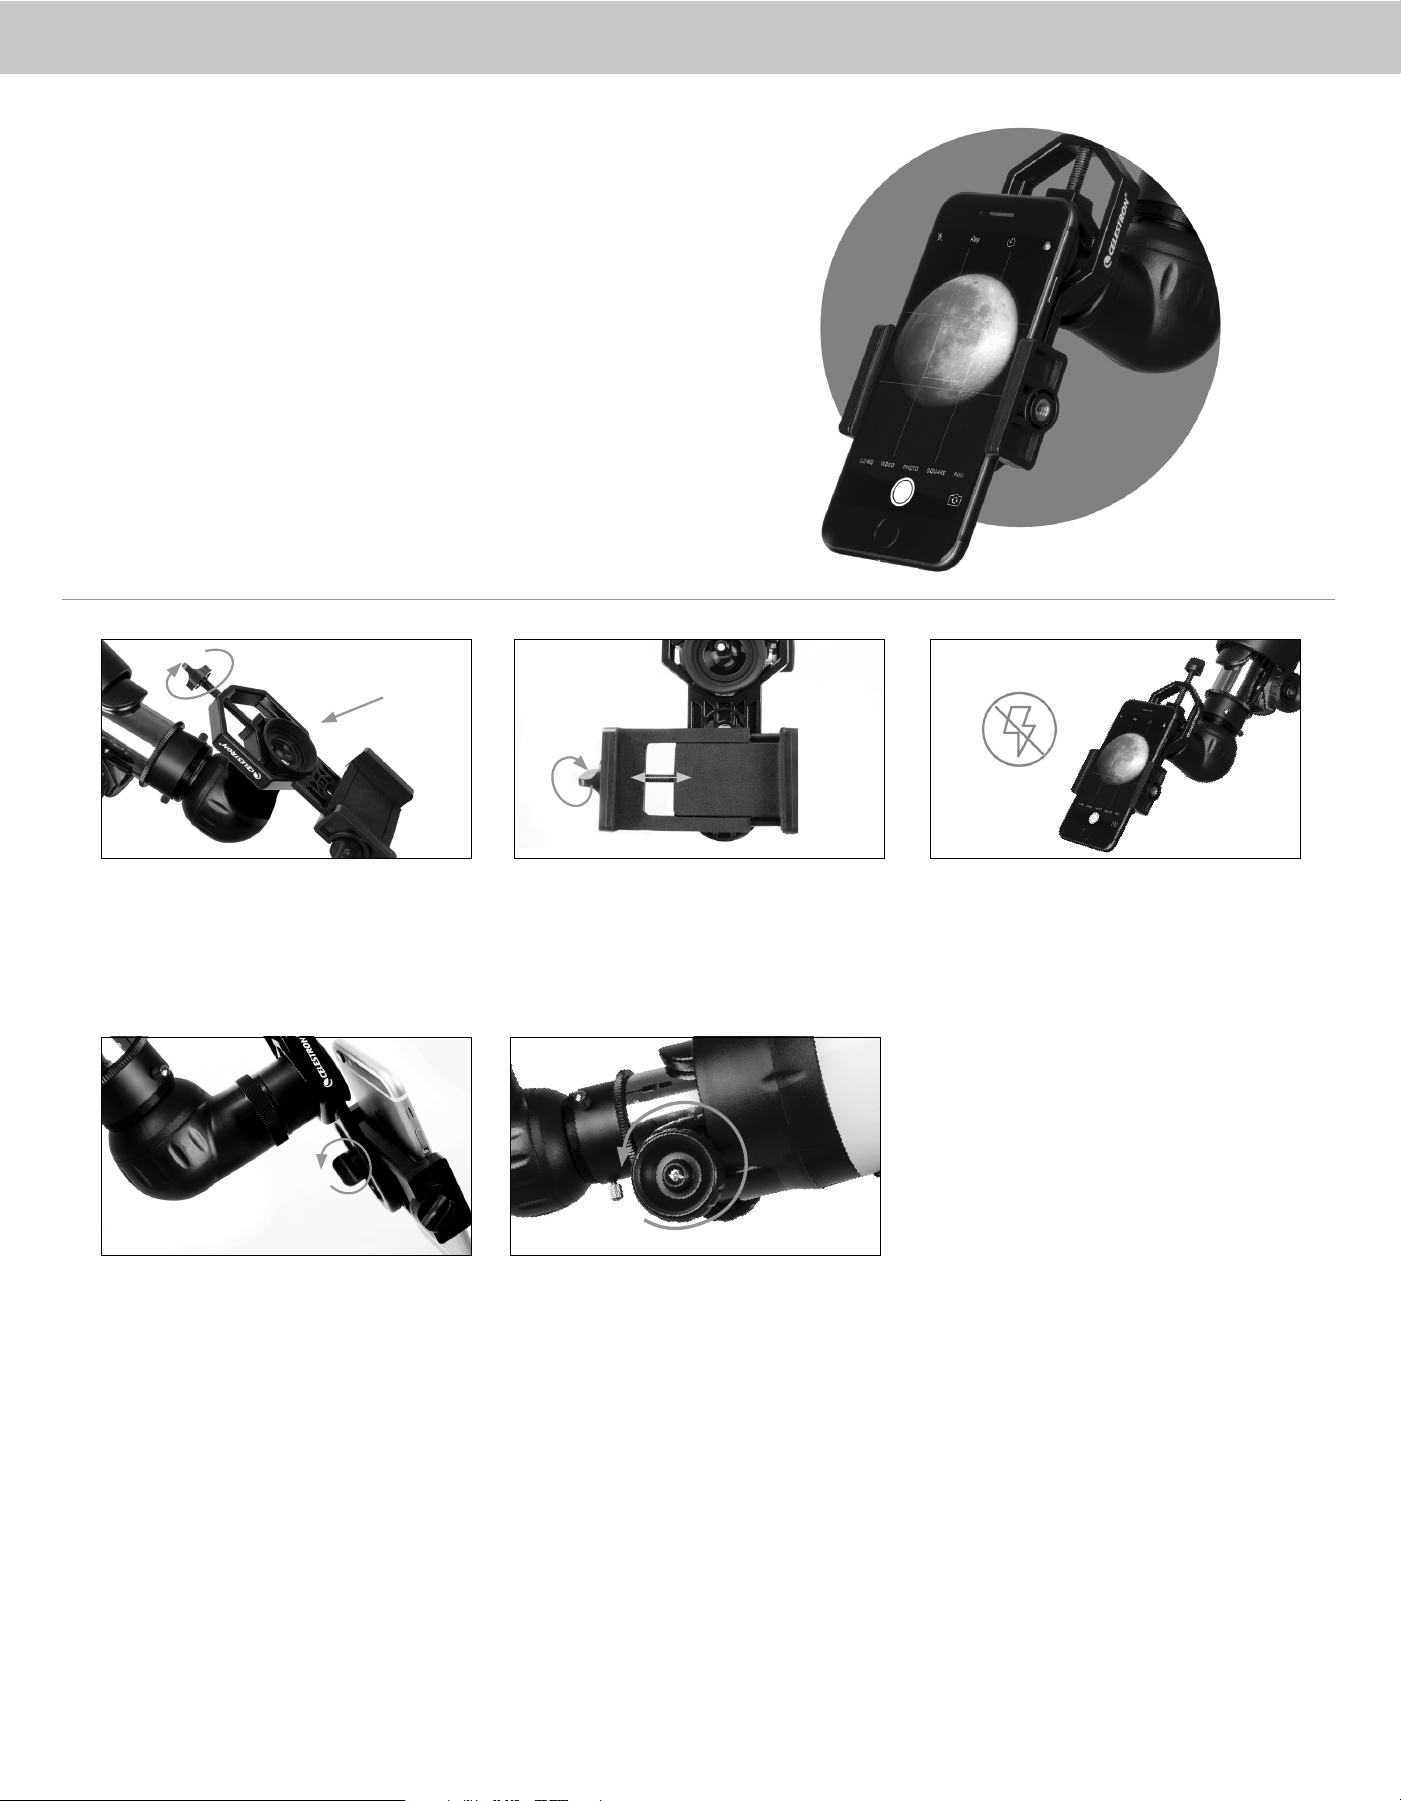
3
Use the phone clamp knob to open the phone holder so
your phone fits inside. Tighten it to secure your phone
in place.
Turn on the phone and open your camera app. Make sure
the flash is turned off.
Loosen the knob on the bottom of the adapter that secures
the phone clamp to the eyepiece clamp. Slide the phone
clamp up and down and rotate it left and right until your
camera is looking through the eyepiece of the telescope.
Tighten the knob on the bottom of the adapter to secure
it in place.
Use the telescope’s focuser to adjust focus of your camera.
Snap the image using your app or the Bluetooth remote
described in the next section.
Open the eyepiece clamp and place it around the body of the
eyepiece. Tighten the clamp until it’s secure.
USING THE
SMARTPHONE
ADAPTER
1
3
2
4 5
4
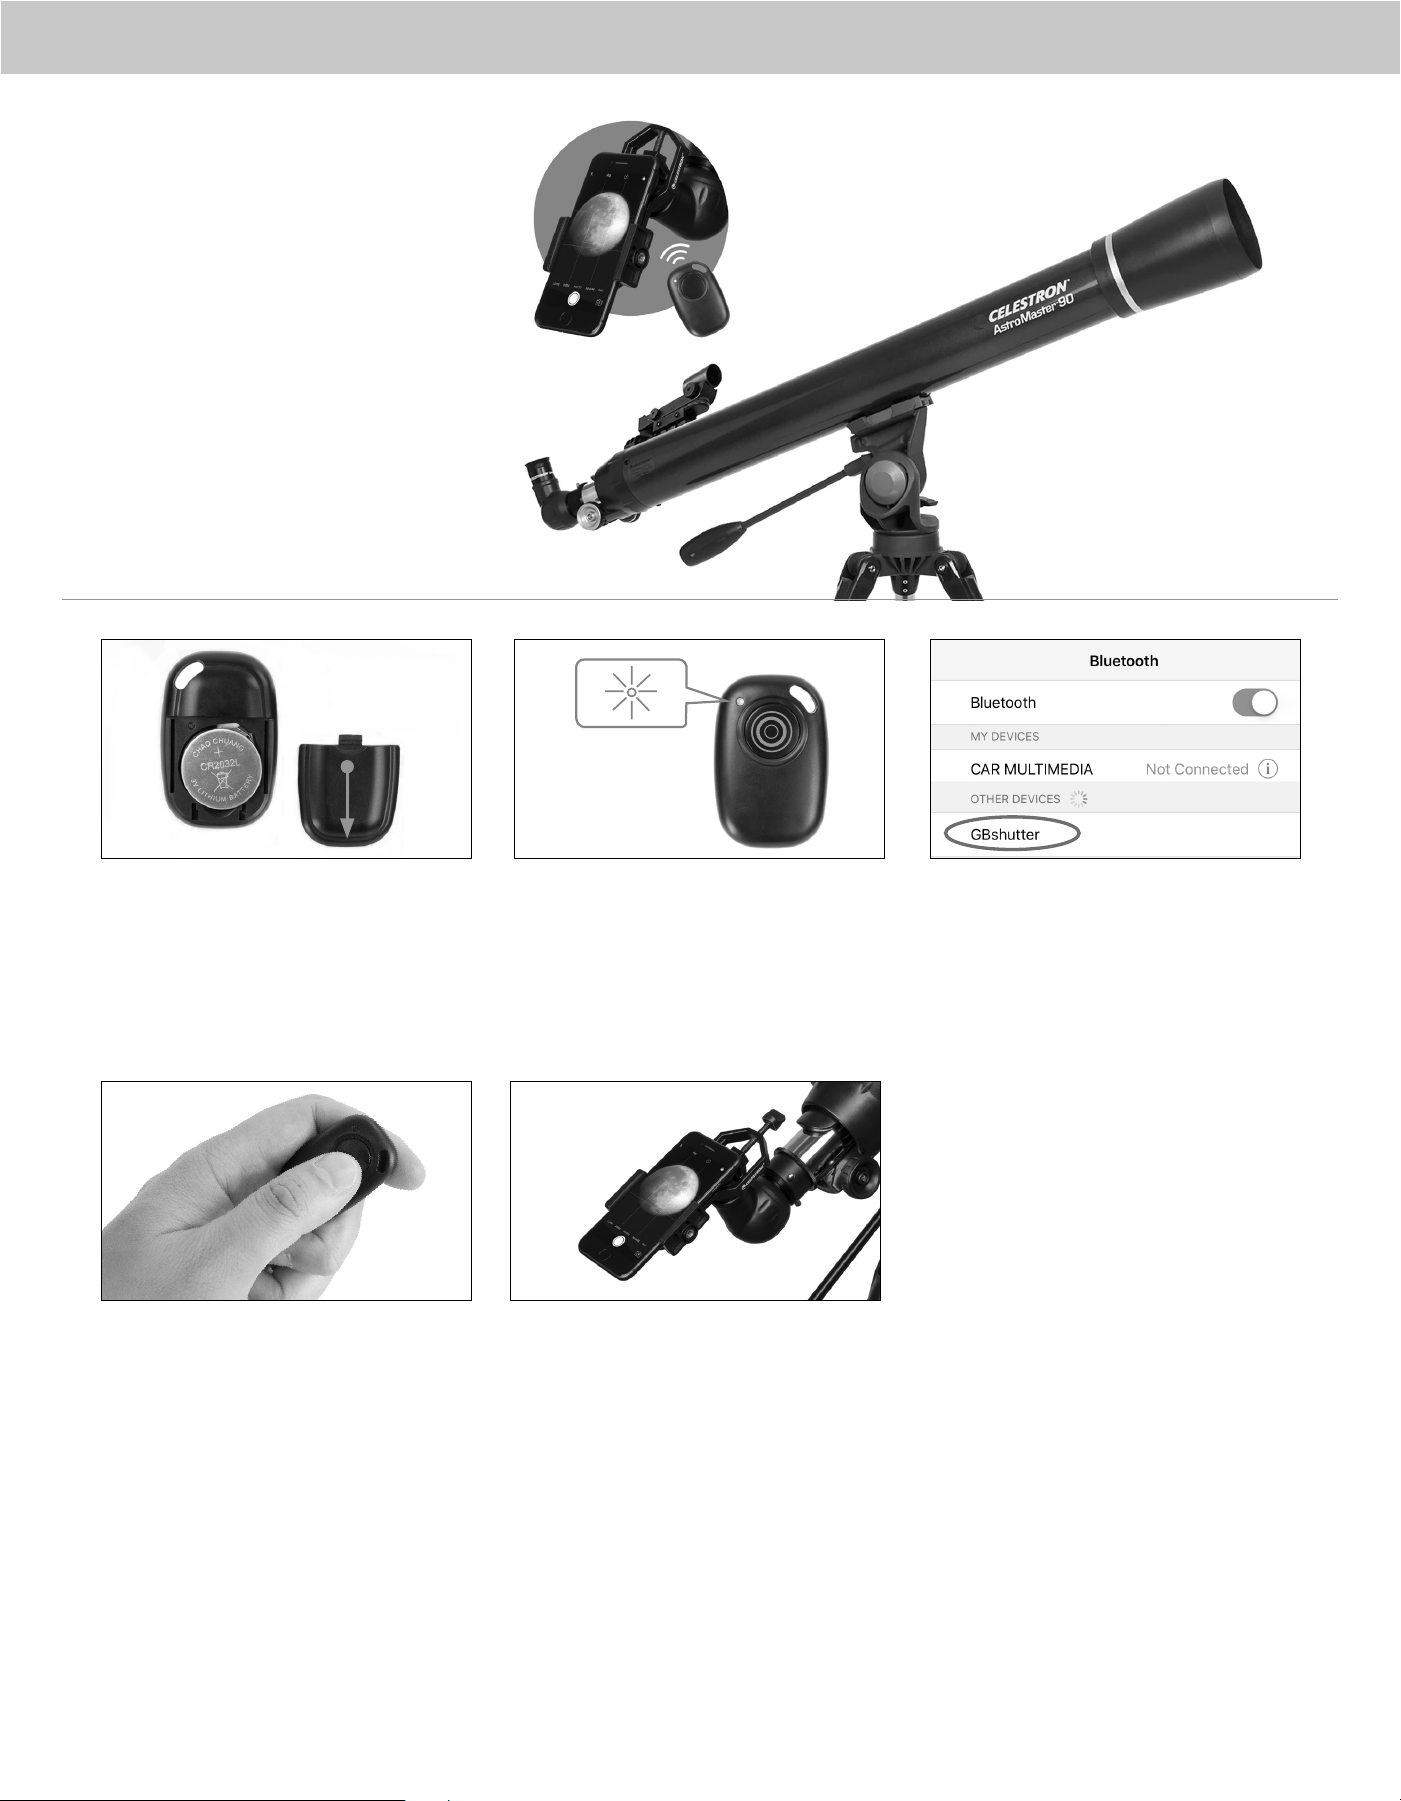
Press and hold the button on the remote for 5 seconds. A blue
light will turn on. After a few seconds, the blue light will start
to blink. The remote is now in pairing mode.
Using the Bluetooth settings on your phone, pair the
device called “GBshutter” or “22035.”
Open your camera app. Press the button on the remote to
trigger the shutter on your phone.
If your camera is in video mode, you can press the button
once to start recording and again to stop the recording.
4 5
To insert or replace the battery, place your thumb in the center
of the back cover. Pressing inward and sliding downward,
remove the battery door. Insert the CR2032 battery with the
positive (+) side facing upward. Replace the cover.
1
2
3
USING THE
BLUETOOTH
REMOTE
5
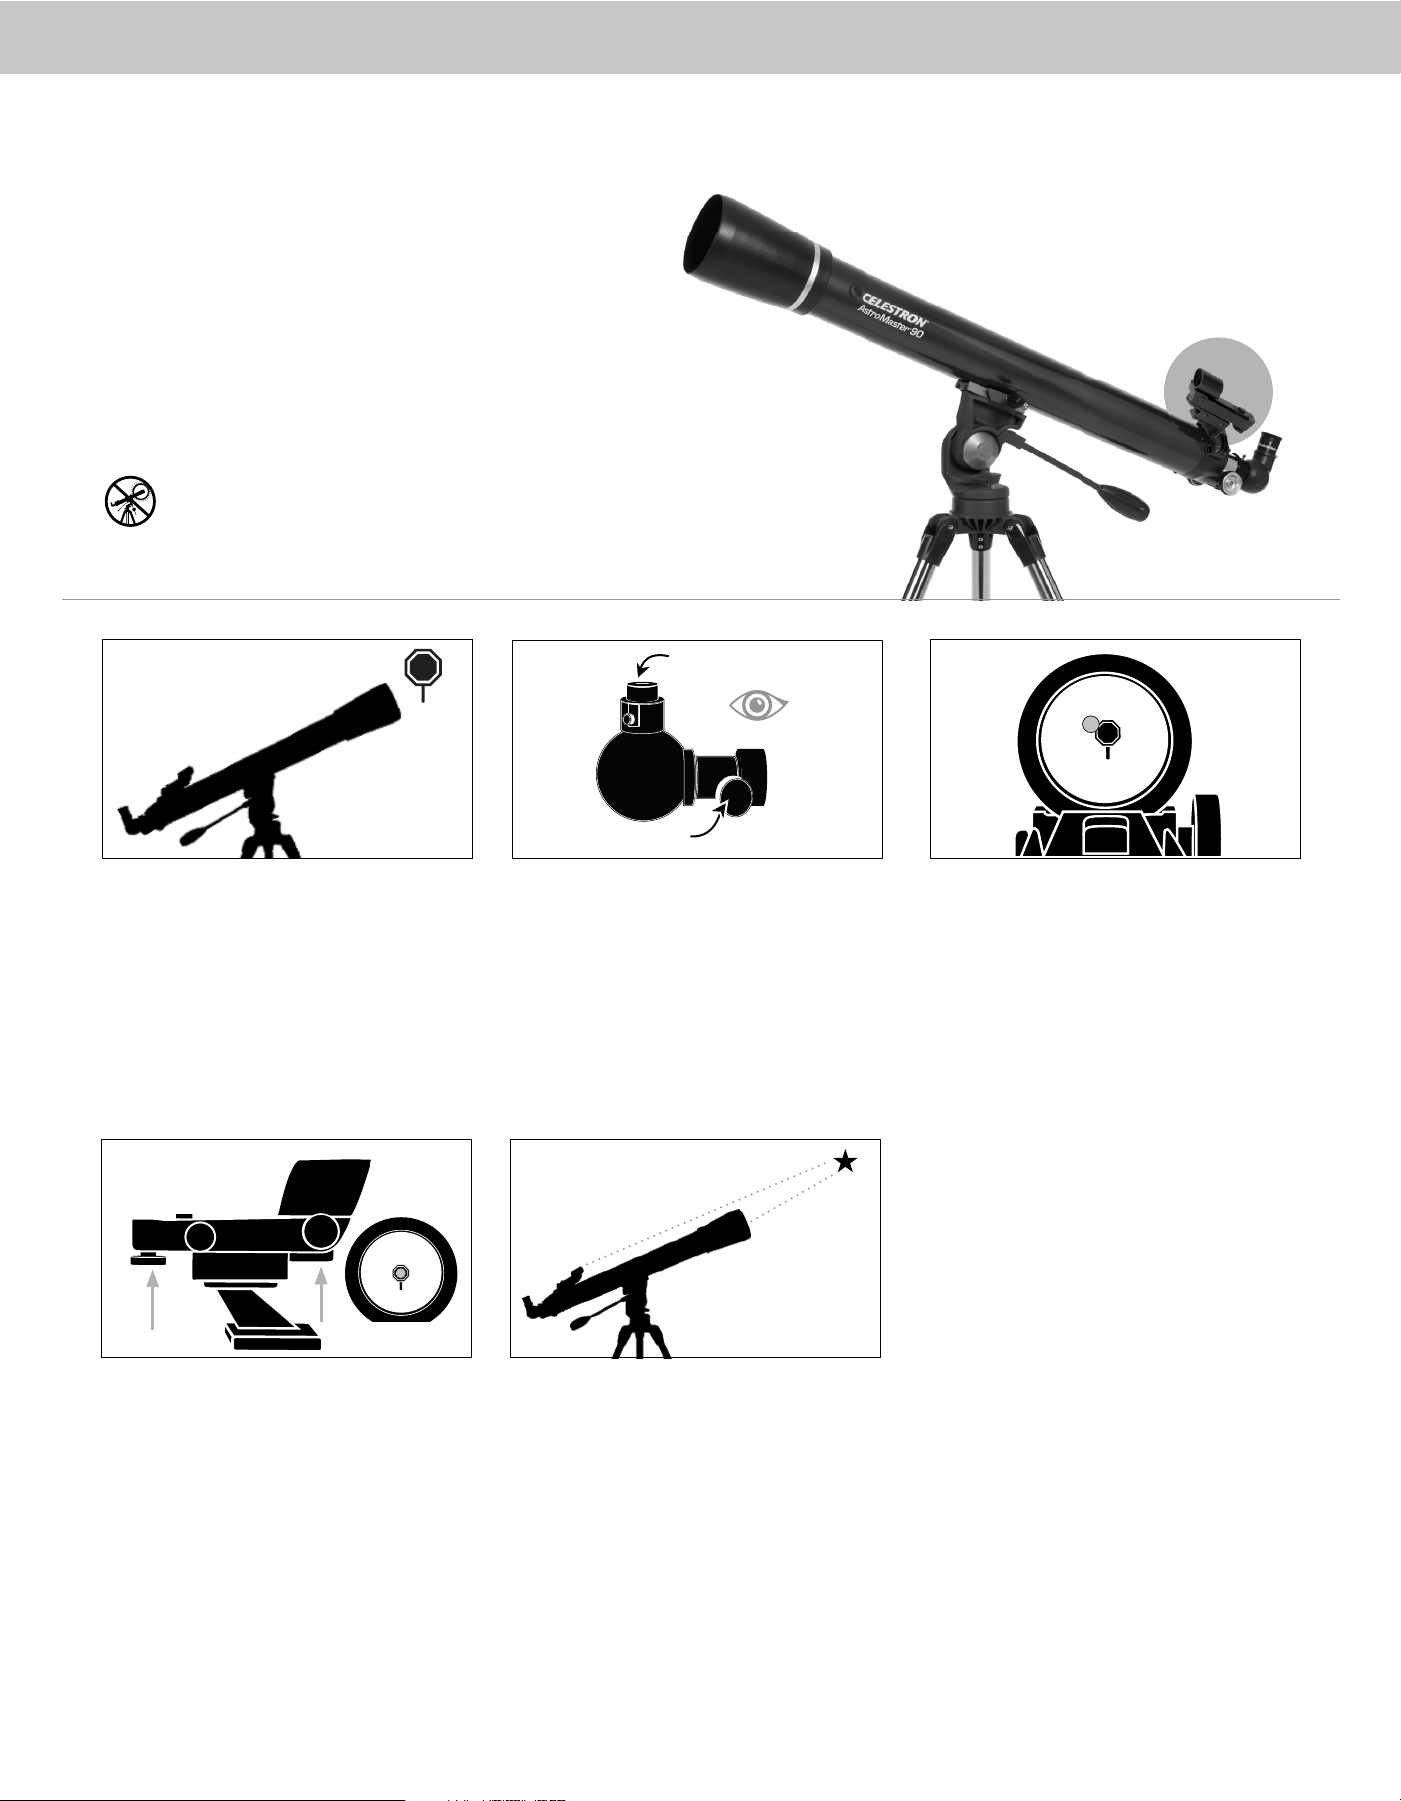
CENTER THE TARGET
IN THE EYEPIECE
Look through the telescope using your lower powered
eyepiece. Move the telescope until the object you chose lies
in the center of the view. If the image is blurry, gently turn
the focus knobs until it comes into sharp focus.
LOOK THROUGH FINDERSCOPE
Once the object is centered in your 20mm eyepiece, look
through the finderscope and locate the red dot.
3
ADJUST THE FINDERSCOPE
Without moving the telescope, use the two
adjustment knobs to move the finder around until the red
dot appears over the same object you are observing in the
telescope’s 20mm eyepiece.
YOUR FINDERSCOPE IS
NOW ALIGNED!
It should not require realignment unless it is bumped
or dropped.
4
The finder is one of the most important parts of your telescope. It helps you
locate objects and center them in the eyepiece. The first time you assemble your
telescope, you need to align the finder to the telescope’s main optics. It’s best to
do this during the day*.
* SOLAR WARNING! Never attempt to view the Sun through any telescope
without a proper solar filter
!
CHOOSE A TARGET
Take the telescope outside during the day and find an easily
recognizable object, like a streetlight, license plate or sign.
The object should be as far away as possible, but at least a
quarter mile away.
1
5
ALIGNING THE
FINDERSCOPE
2
Low Power Eyepiece
Focus Knobs
6
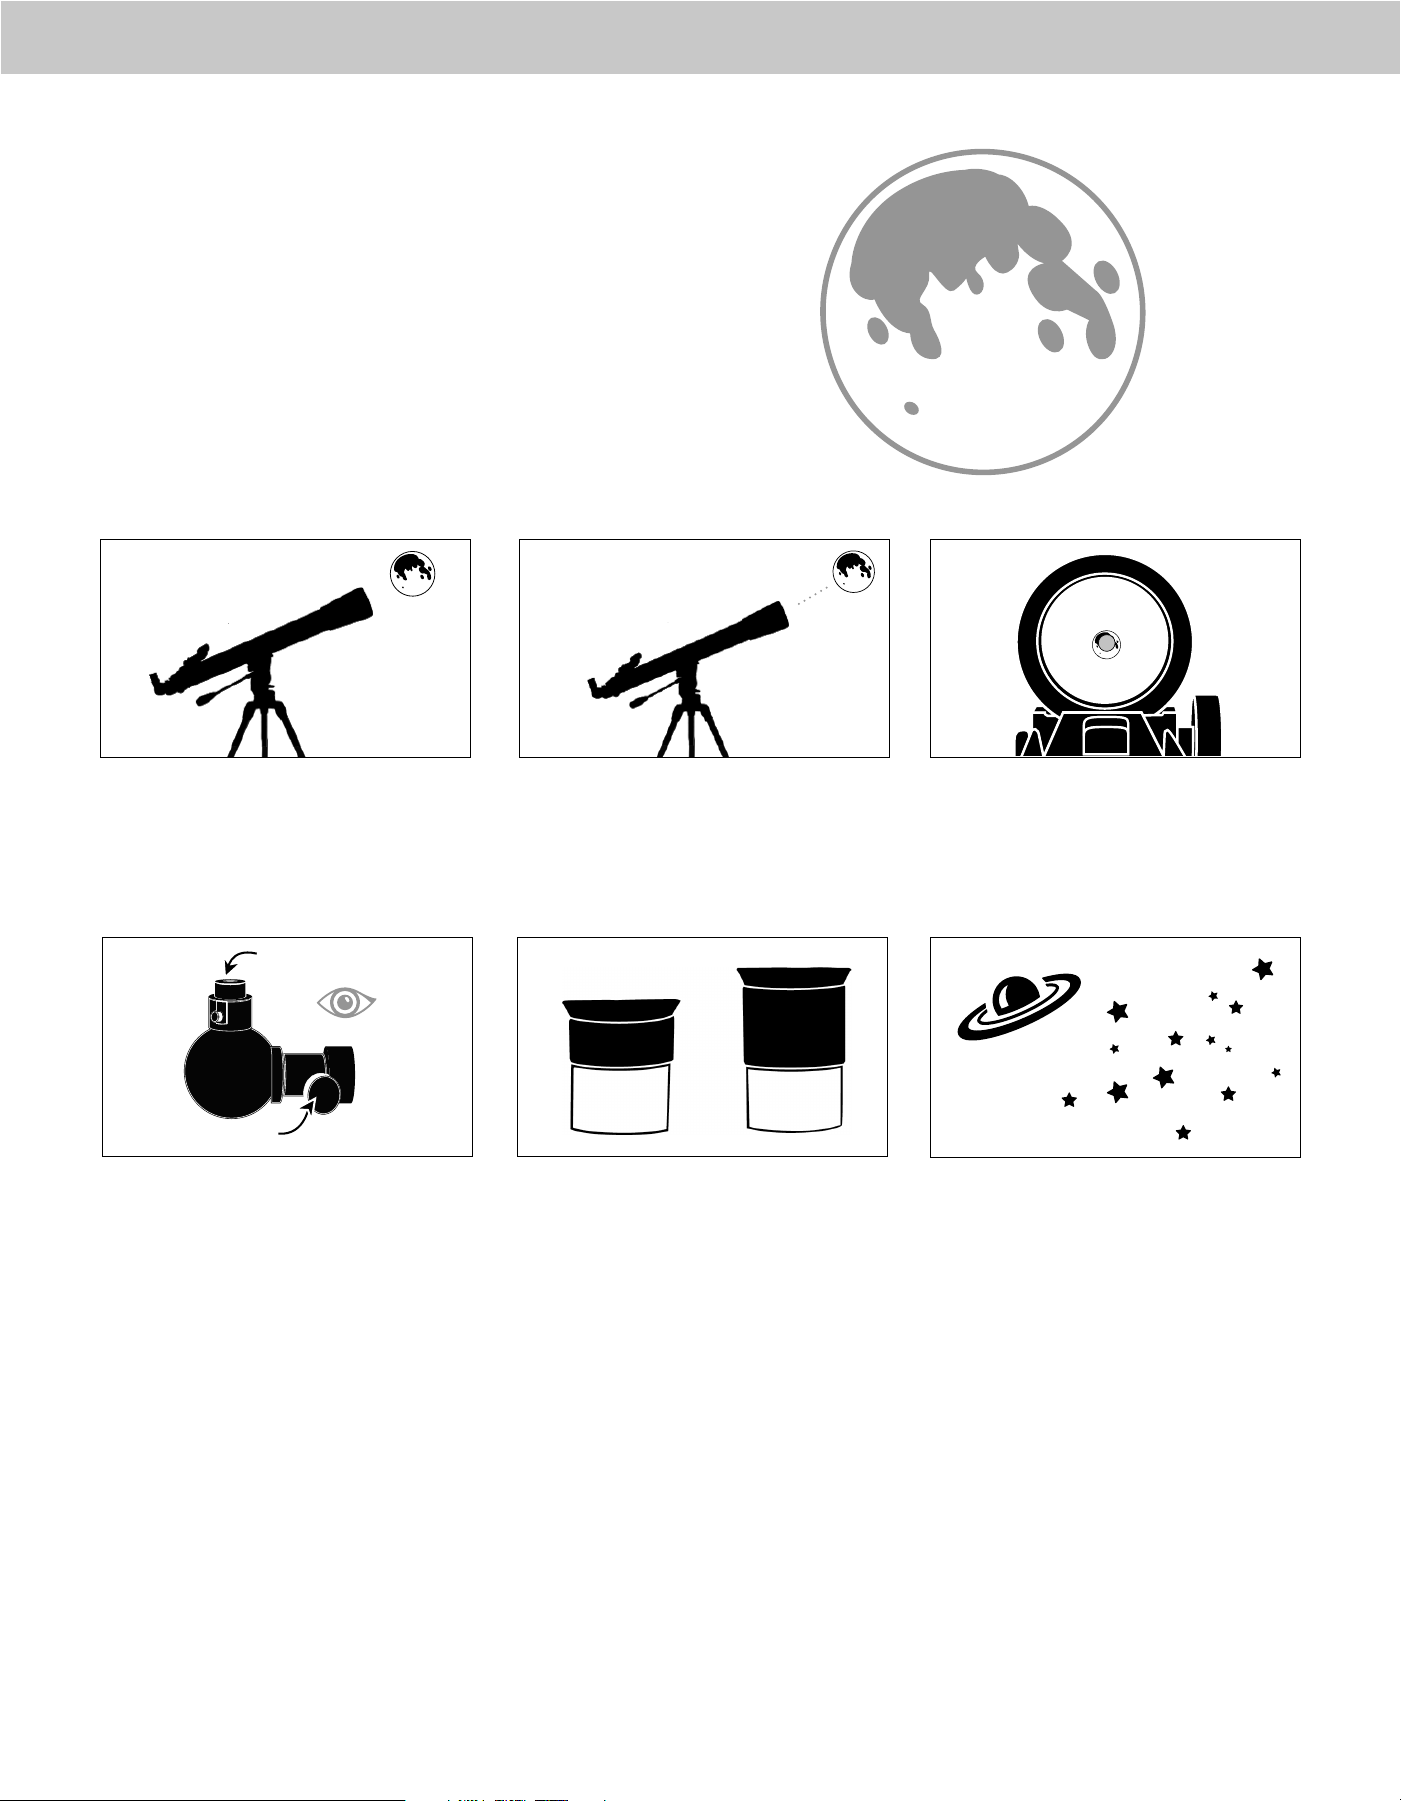
With the Moon visible in the sky, set up your telescope
with the 20mm eyepiece installed.
Look through the telescope’s 20mm eyepiece.
Gently turn the focus knobs to adjust the sharpness
of the image.
You can view many other celestial objects, such as
planets, star clusters and nebulae using this same
technique once you know where to find them in the
night sky.
The best and easiest target for you to try to view first is the Moon. Try
observing the Moon at different points in its phase cycle. The best time
to view the Moon is from two days after a New Moon up to a few days
before a Full Moon. During this period, you will be able to see the most
detail in the craters and lunar mountain ranges.
To get a closer view of the Moon, loosen the setscrews
on the focuser and remove the 20mm eyepiece.
Replace it with your 10mm eyepiece and tighten
the setscrews to secure the new eyepiece in place.
The 10mm eyepiece will give you significantly more
magnification, making the Moon appear much larger.
NOTE: You may need to adjust the focus
knobs when you change eyepieces to
make sure you are getting the sharpest
image possible.
Move the telescope so that it is roughly pointing
toward the Moon.
Turn on and look through the finderscope and locate
the red dot. Continue moving the telescope until the
red dot appears over the Moon.
1
6
3
CONGRATULATIONS!
YOU HAVE NOW OBSERVED YOUR
FIRST CELESTIAL OBJECT!
2
55
10mm
20mm
YOUR FIRST NIGHT OUT:
THE MOON
4
Low Power Eyepiece
Focus Knobs
SOLAR WARNING: Never attempt to view the Sun through any telescope without a proper solar filter.
NEED ASSISTANCE? Contact Celestron Technical Support celestron.com/pages/technical-support
For more information on this product or to download the instruction manual, please visit the respective product page on celestron.com
SAFETY INSTRUCTIONS
• Risk of explosion if battery is replaced by an incorrect type.
• The included battery is not rechargeable.
• Please use the battery in its original purpose to avoid causing the battery to short circuit. When the conductive material is connected directly to the
battery positive and negative will cause a short circuit.
• Do not use a damaged battery.
• Keeping the battery in an extremely cold or very hot location can result in shortened battery life.
• When replacing the battery, please refer to the instruction manual and pay attention to the positive and negative direction of battery.
• Do not put the battery in the fire. Dispose of the battery according to local regulations.
FCC IDENTIFIER: 2A2FG-X9
This device complies with Part 15 of the FCC Rules. Operation is subject to the following two conditions: (1) This device may not cause harmful
interference, and (2) this device must accept any interference received, including interference that may cause undesired operation.
CAUTION: Changes or modifications not expressly approved by the party responsible for compliance could void the user’s authority to operate the equipment.
NOTE: This equipment has been tested and found to comply with the limits for a Class B digital device, pursuant to part 15 of the FCC Rules. These limits are designed to provide reasonable
protection against harmful interference in a residential installation.
This equipment generates, uses and can radiate radio frequency energy and, if not installed and used in accordance with the instructions, may cause
harmful interference to radio communications. However, there is no guarantee that interference will not occur in a particular installation.
If this equipment does cause harmful interference to radio or television reception, which can be determined by turning the equipment off and on, the user is
encouraged to try to correct the interference by one or more of the following measures:
• Reorient or relocate the receiving antenna.
• Increase the separation between the equipment and receiver.
• Connect the equipment into an outlet on a circuit different from that to which the receiver is connected.
• Consult the dealer or an experienced radio/TV technician for help.
Product design and specifications are subject to change without prior notification. This product is designed and intended for use by those
14 years of age and older.
Windows: Android:
- Version 4.0 and higher
Apple:
- iOS 4.3 and higher
Mac:
- Windows 7 or higher
- 500 MHz or higher processor
- 128 MB RAM
- 850 MB of hard disk space
- 32 MB OpenGL capable graphics card
- Minimum recommended monitor resolution
of 1024 x 768 pixels.
- Universal Binary (PPC/Intel compatible)
- OS X 10.4 or higher (10.5 or higher for Elementary)
- G3 450 MHz or higher processor
- 128 MB RAM
- 850 MB of hard disk space
- 32 MB OpenGL capable graphics card
- Minimum recommended monitor resolution of 1024 x 768 pixels.
BONUS ASTRONOMY DESKTOP SOFTWARE & MOBILE APP: MINIMUM SYSTEM RQUIREMENTS
Download Celestron’s Starry Night Software and learn about the night sky, celestial objects,
and how to plan your next observing session. Celestron Starry Night Software is the premier
astronomy software package on the market, providing resources and knowledge to view our
Solar System and beyond.
The telescope experts at Celestron have partnered with the renowned app developers
at Sky Safari to provide the best planetarium app and telescope control solution.
©2022 Celestron, Celestron and Symbol are trademarks of Celestron, LLC
All Rights Reserved • celestron.com • Torrance CA 90503 USA
Printed in China
02-22