
SES 9350CH
EN
FULLY AUTOMATIC
ESPRESSO / CAPPUCCINO MACHINE
Translation of the original manual
SES 9350CH
A
1
2
3
4
5
9
10
11
12
16
13
14
6
7
8
15
B
Select beverage
Ready
10 11 12 13
1 2 3 4 5 6 7 8
9 14 15
C
D1 D2
E1 E2
E3 E4
E5 E6 E7

– 1 –
03/2024
2024, .
EN
Fully Automatic Espresso / Cappuccino Machine
Important Safety Instructions
READ CAREFULLY AND STORE FOR FUTURE USE.
• This appliance is not to be used by children. Keep this
appliance and its power cable out of reach of children.
• The appliance may be used by persons with reduced
physical, sensory or mental abilities or lack of experience
and knowledge, provided they are supervised or have
been instructed on the safe use of the appliance and
understand the potential hazards.
• Children must not play with the appliance.
• Cleaning and maintenance must not be carried out by
children.
• If the power cable is damaged, have it replaced in
aprofessional service centre in order to prevent
adangerous situation. It is forbidden to use the appliance
with the power cable damaged.
• Always clean the parts of the appliance that come into
contact with food with clean warm water and alittle neutral
dishwashing liquid, rinse them with clean water and wipe
dry.
WARNING: Incorrect use may lead to injury.
• Always disconnect the appliance from the power supply
when leaving it unattended and before assembly,
disassembly or cleaning.

– 2 –
03/2024
2024, .
• This appliance is intended for household use. It is not
intended for use in areas such as:
– kitchenettes in shops, offices and other workplaces;
– agricultural farms;
– hotels, motels and other residential establishments;
– bed and breakfast establishments.
WARNING: Avoid spilling on the plug.
• The outer surface of the appliance heats up during use
and may be hot for some time after use.
• Be very careful.
• The appliance must not be placed in acabinet when in
use.
WARNING: The filling hole must not be opened during use.
• Do not do submerge the power cable, plug or appliance in
water or any other liquid.
• Before connecting the appliance to apower socket, make sure that its nominal voltage indicated on the rating plate matches the electrical voltage of
the socket.
• Connect the appliance only to aproperly earthed socket. For safety reasons, we do not recommend using adaptor plugs or extension cords.
• Do not place the appliance on windowsills, sink drain trays or unstable surfaces. Always place the appliance on astable, flat and dry surface.
• Do not place the appliance on an electric or gas stove or near an open flame.
• Never use the appliance in the immediate vicinity of abath, shower or swimming pool.
• Use the appliance only for the purpose for which it has been designed.
• Use the appliance according to the instructions in this user manual. Otherwise injury, damage to the appliance or dangerous situation might occur.
• Use the appliance only with the original accessories supplied with it.
• During operation, aclear space of at least 15 cm must be left around and above the appliance to ensure sufficient air circulation.
• Only use the top surface of the appliance to heat up cups. Do not use it to store items.
• Fill the water tank with clean, cold water. Do not pour hot water or other liquids into it or place any objects inside it.
• Before turning on the appliance, make sure that:
– the drip tray together with the grid is installed in position;
– the water tank is filled with asufficient amount of water and is properly installed in position.
• The water level must not exceed the maximum mark.
• Take extra care when operating the appliance to avoid scalding with hot water or steam.
• The hot water function may only be used continuously for amaximum of one emptying of the entire water tank.
• When using the appliance, check the water level in the water tank regularly. If the water level falls below the minimum mark, refill the water tank.
Before adding water, first turn the appliance off and disconnect it from the power socket.
• Use the built-in coffee grinder only for grinding coffee beans. Do not use it for any other purposes.
• Ensure that no hair or other items enter the grinder area during the grinding process. The coffee bean hopper lid should always be properly closed
unless you are refilling coffee beans or adjusting the grinding coarseness.
• The appliance is equipped with abuilt-in thermal fuse that shuts it off when the pump is idling to prevent damage. If such asituation occurs, unplug
the power cable and allow the appliance to cool down for at least 30 minutes. Then you can use it again.
• Do not move the appliance with acup of coffee placed on the drip tray grid or with cups placed on the surface designed to heat them up.
• Ensure that the power cable does not come into contact with hot surfaces.
• Unplug the appliance from the power socket by pulling the plug, not the power cable. Otherwise, damage to the power cable or the socket may
occur.

– 3 –
03/2024
2024, .
• Do not submerge the appliance, power cable or plug in water or any other liquid.
• Make sure that the power cable and plug do not come into contact with water or other fluids.
• To avoid the risk of electric shock, do not repair or modify the appliance yourself. All repairs should be carried out by an authorised service centre.
Tampering with the appliance may result in the loss of your legal rights regarding faulty performance or warranty for quality.
– 4 –
03/2024
2024, .
• Thank you for purchasing our SENCOR product; we hope it will serve
to your satisfaction.
• Before using this appliance, please familiarise yourself with the user
manual, even if you are already familiar with using similar types of
appliances. Use the appliance only as described in this user manual.
Keep the manual for future reference.
• It is recommended to keep the original packaging, packing material,
receipt and confirmation of the extent of the seller'sliability or warranty
certificate at least for the duration of the legal right of defective
performance or quality guarantee. When transporting the appliance,
we recommend packaging it again in the original box provided by the
manufacturer.
. . . . . . . . . . . . . . . . . . . . . . . . . . . . . . . . . . . . . . . . . . . . . . . . . . . . . . . . . . . . . . . . . . . .
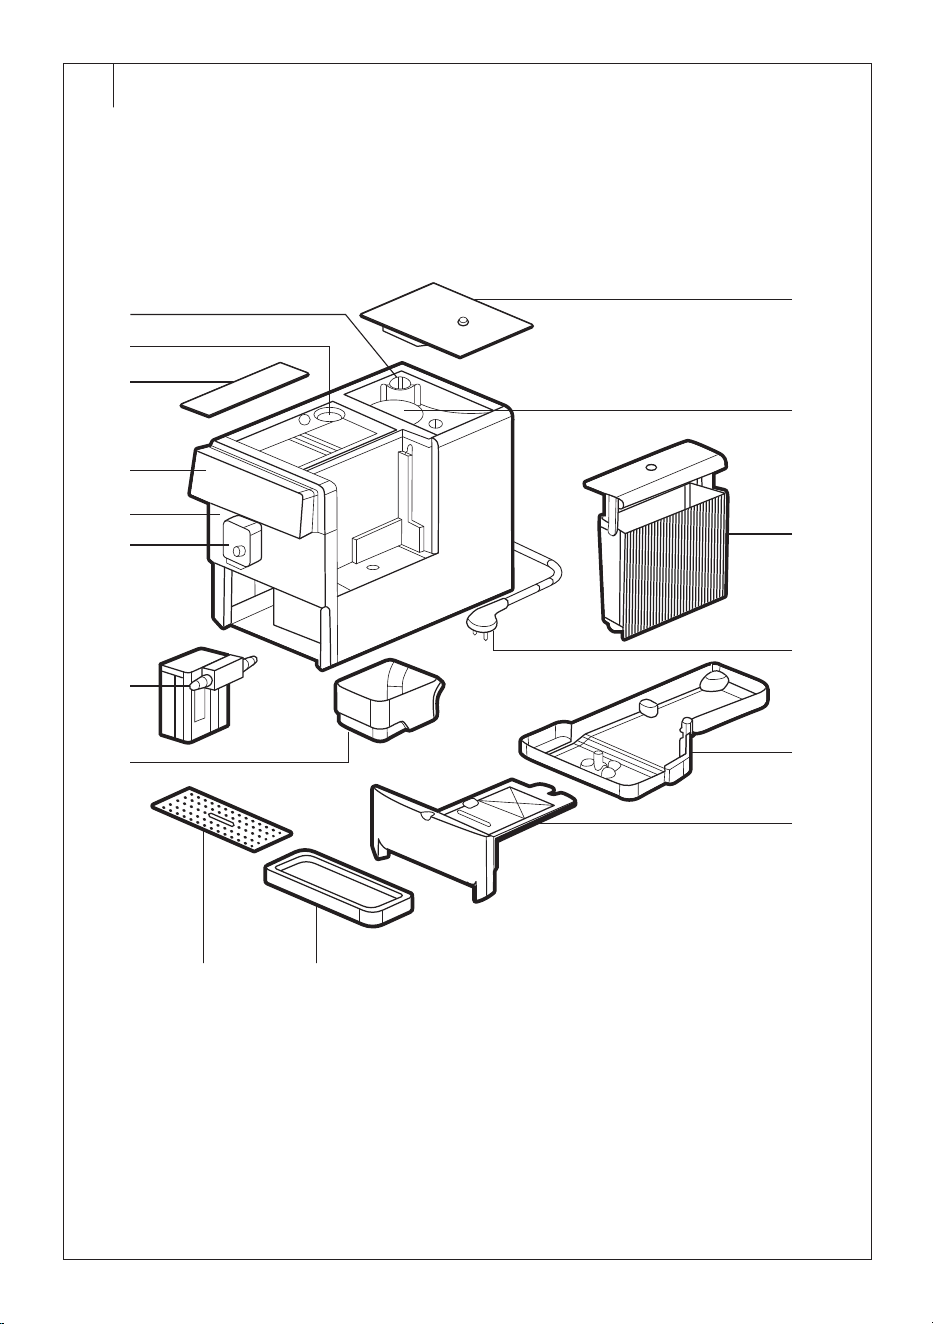
DESCRIPTION OF THE APPLIANCE
A1 Grinding coarseness regulator
A2 Ground coffee hopper
A3 Ground coffee hopper lid
A4 Control panel
A5 Milk container insertion
opening with lid
A6 Coffee spout head (adjustable
heigh)
A7 Milk container
A8 Coffee grounds container
A9 Coffee bean hopper lid
A10 Coffee bean hopper
Inside the hopper is agrinder
with adjustable grinding
coarseness
A11 Water tank, capacity 1.4 l
A12 Power cable
A13 Drip tray
A14 Drip tray cover
A15 Drip tray
A16 Grid
Not depicted: Measuring cup for
ground coffee, main power switch
(located at the back)
. . . . . . . . . . . . . . . . . . . . . . . . . . . . . . . . . . . . . . . . . . . . . . . . . . . . . . . . . . . . . . . . . . . .
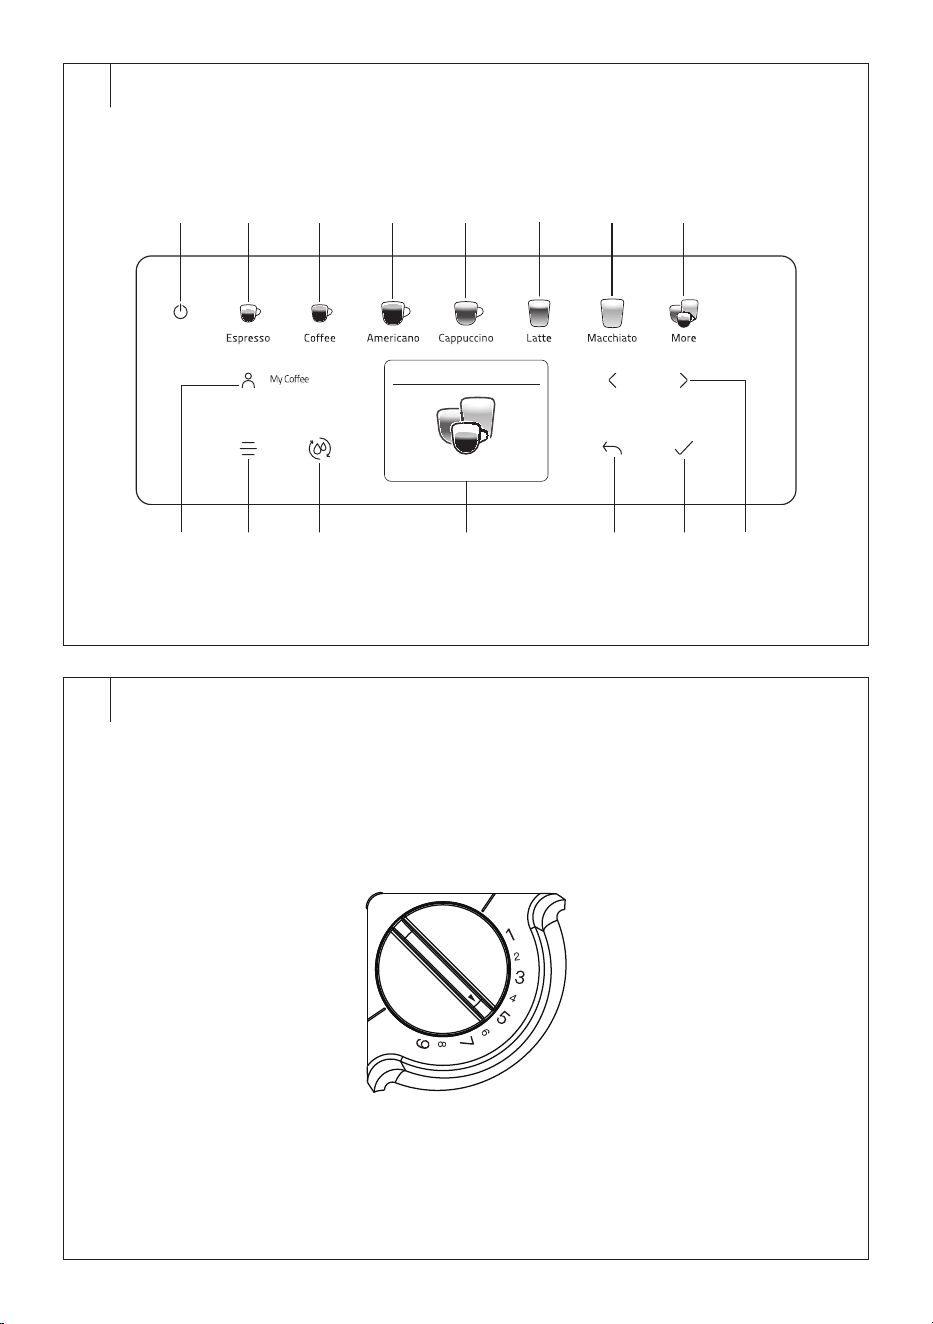
DESCRIPTION OF THE CONTROL PANEL
B1
button: power on/off
B2 Espresso button: start brewing
Espresso
B3 Coffee button: start brewing
coffee
B4 Americano button: start
brewing Americano
B5 Cappuccino button: start
brewing Cappuccino
B6 Latte button: start brewing
Caffé Latté
B7 Macchiato button: start
brewing Latté Macchiato
B8 More button
B9 My coffee button: save
custom coffee settings
B10 button: enter advanced
settings
B11 button: machine rinsing
B12 Display
B13 button: step back
B14 button: confirm selection
B15 / buttons: navigate
through the coffee machine
menus backward / forward
. . . . . . . . . . . . . . . . . . . . . . . . . . . . . . . . . . . . . . . . . . . . . . . . . . . . . . . . . . . . . . . . . . . .
BEFORE FIRST USE
• Before first use, remove the appliance and its accessories form the
packaging and discard all promotional labels and tags. Check that
neither the appliance nor any of its components is damaged.
• Install the appliance on aflat, dry and clean surface.
• Remove the water tank, rinse it with clean water and asmall amount
of neutral kitchen detergent. Then rinse it properly with clean water,
dry it and put it back in place.
• Secure the outer drip tray properly to the appliance.
• Wipe the outer surface of the appliance with aslightly damp cloth and
then wipe dry properly.
• Fully unwind the power cable and connect it to the corresponding
socket at the back of the appliance.
Filling the Water Tank
1. Hold the water tank by its lid. It also serves as acarrying handle. Lift
it up and remove it from the coffee machine side.
2. Fill the water tank with clean water up to the maximum mark and
insert it back into the appliance. Make sure that the water tank is
properly installed in its place.
Note:
The water you pour into the water tank should ideally be at
room temperature (approximately 25 °C). Water that is too
cold can adversely affect the final taste of the coffee drink.
Warning:
The maximum capacity of the water tank is 1.3 l. Do
not overfill it.
Never fill the water tank with warm or hot water,
sparkling water or other liquids such as milk. This
could damage the appliance.
Never fill the water tank by pouring water into in while
it is inserted inside the appliance. There is arisk of
spilling the appliance or overfilling the water tank.
Note:
Awater filter can be installed in the water tank. It is
not included in the package. Follow the water filter
manufacturer'sinstructions, especially regarding usage
and replacement. Follow the installation and activation
instructions provided in this manual in the sections
“Installing andActivating the Water Filter (optional)”
and“Replacing the Water Filter”.
• Do not leave water in the water tank for more than one day. For
preparing quality fresh coffee, it is necessary to always use fresh
water. Otherwise, the taste of the resulting drink may be adversely
affected.
Filling the Coffee Bean Hopper
1. Remove the coffee bean hopper lid.
2. Pour roasted coffee beans into the hopper and close the lid. Do not
leave the lid of the hopper open, otherwise the coffee beans will lose
their aroma more quickly.
Warning:
Themaximum capacity of the hopper is 200 g
of coffee beans. Do not overfill it. Never fill the
hopper with ground or instant coffee, caramelised
or otherwise specially treated coffee beans, cocoa
beans or other items that may damage the appliance.
Grinding Coarseness Regulator
Use the grinding coarseness regulator to adjust the appropriate
coarseness of the ground coffee. Grinding coarseness adjustment is
possible only when the grinder is in operation. The new coarseness
setting will take effect after the second or third coffee preparation following
the grinding coarseness change.
1. You can adjust the coarseness of the grinding in 9 levels by using
the grinding coarseness regulator, which is located inside the bean
hopper (Figure C).
2. Turn the regulator towards number 9 to set acoarser grind, or turn
towards number 1 to set afiner grind. Number 9represents the
coarsest grinding level while number 1represents the finest grinding
level.
3. Only adjust the grinding coarseness when the grinder is running.
Otherwise, damage to the appliance may occur.
4. If the brewed coffee flows out very slowly, it means that the beans
are ground too finely and acoarser grind should be set. If the brewed
coffee flows out too quickly, it means that the grains are ground too
coarsely and afiner grind should be set.
Note:
Darker roasted coffee beans require acoarser grind, while
lighter roasted beans require afiner grind.
EN
Fully Automatic Espresso / Cappuccino Machine
User Manual
– 5 –
03/2024
2024, .
Milk Container
Use the milk container when preparing Latte macchiato or Cappuccino.
The coffee machine can also be used without the milk container installed.
However, coffee drinks withmilk will not be available. This is anormal
occurrence and does not affect the proper functioning of the coffee
machine.
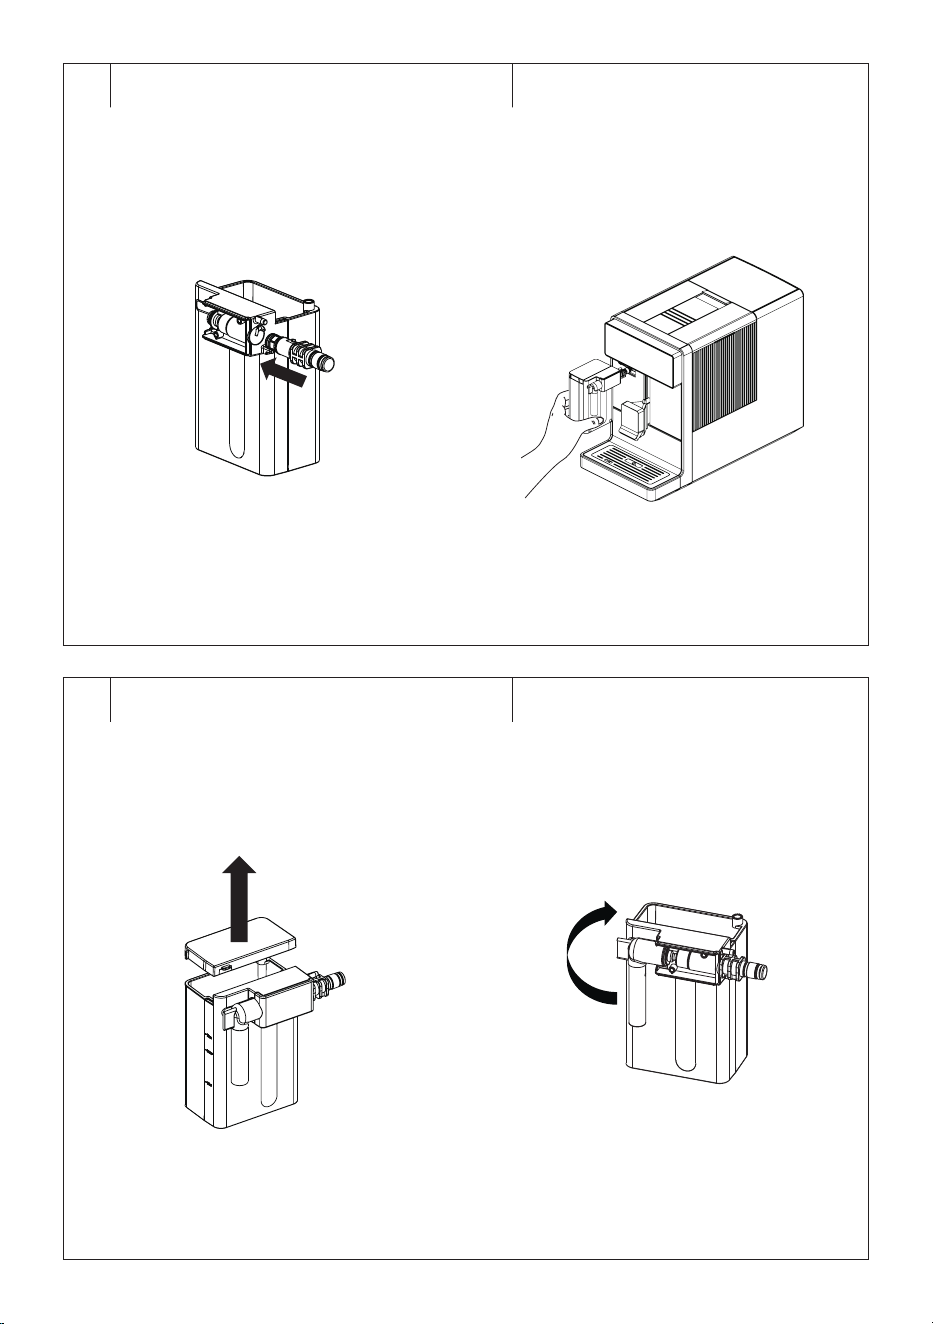
Before using the container, it must be assembled andinserted into the
coffee machine. Follow these steps:
1. Remove the milk container from the package andremove the lid to
access the steam nozzle located inside. Rinse the milk container in
clean water and wipe dry.
2. Unwrap the steam nozzles and insert them into the hole in the
container so that the protrusion on the steam nozzle fits into the
notch in the container, and at the same time, rotate the nozzle
clockwise until you feel resistance (see Fig. D1).
3. Remove the container lid andfill it with fresh, cold milk. Then put the
lid back.
4. Open the cover of the milk container insertion opening (see Fig. A,
number 5).
5. With the end of the steam nozzle pointing forward, insert the milk
container into the opening (see Fig. D2) and press gently.
6. Do not exceed the maximum level mark. The maximum capacity of
the milk container is 250 ml.
. . . . . . . . . . . . . . . . . . . . . . . . . . . . . . . . . . . . . . . . . . . . . . . . . . . . . . . . . . . . . . . . . . . .
USING THE COFFEE MACHINE
• Place the coffee machine on aflat, dry and clean surface at
asufficient distance from the power socket. Ensure there is enough
space around it for manipulation, at least 15 cm around the entire
coffee machine.
• Make sure that the water tank is refilled with fresh water and that the
coffee bean hopper has an adequate amount of coffee beans and that
the appliance is properly assembled.
• Plug the power cable connector into the socket in the coffee machine
and connect the power cable plug to the power socket.
• The control panel is equipped with touch buttons. Use the pads of your
fingers to press the buttons, not the tips. It is important to maintain
constant contact with the button when pressing it. Do not press the
buttons with force. Press the button where its symbol is located.
Note:
When refilling water and coffee beans, always follow the
instructions provided in sections “Filling the Water Tank”
and “Filling the Coffee Bean Hopper”.
Coffee Machine On/Off
• Press and hold the button for 3 seconds to turn the coffee machine
on. The button indicator will blink.
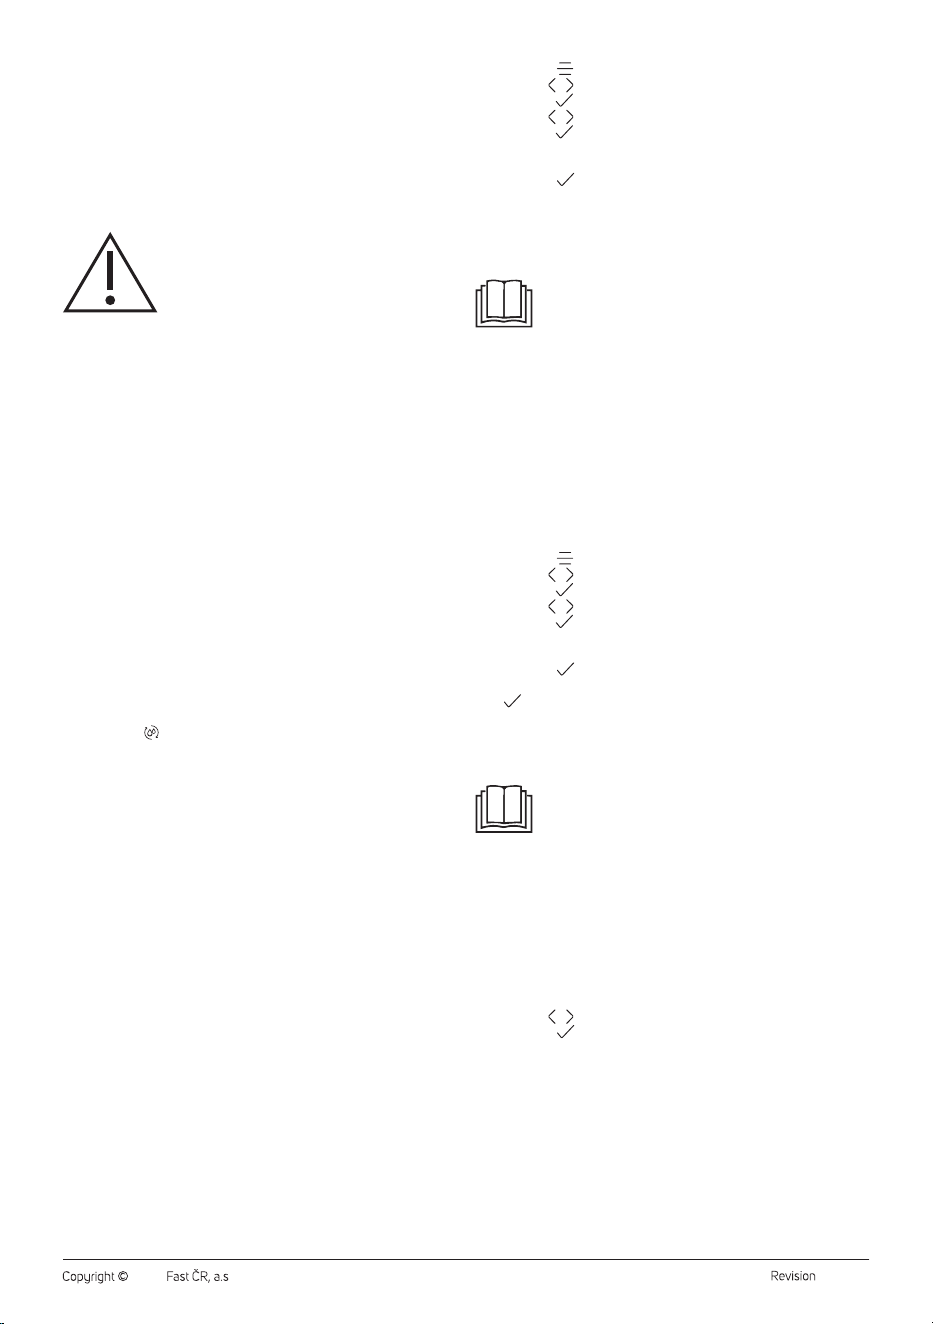
The first time you switch on the machine, it guides you through the basic
settings:
1. Use the
/ buttons select the desired language from themenu.
2. Press the button to confirm.
3. After confirming the language, you will be prompted to adjust the
water hardness.
Water Hardness Setting
When turning on the coffee machine for the first time or after performing
afactory reset, you will need to set the water hardness.
You can determine the water hardness either from your drinking water
supplier or by using awater hardness test kit, which involves dipping
atest strip into the water. Water hardness test kit is not included in the
package.
We recommend setting the water hardness correctly according to the
hardness of the water you will be using in the coffee machine. This will
ensure proper operation of the coffee machine, descaling intervals and
extend its lifespan.
Water hardness is set to 4 by default.
1. Press the
button to enter the user settings.
2. Use the / buttons to select “Water hardness” and press the
button to confirm and enter the menu.
3. Use the / buttons to set the water hardness from 1 (soft water) to
4 (hard water).
4. Press the button to confirm.
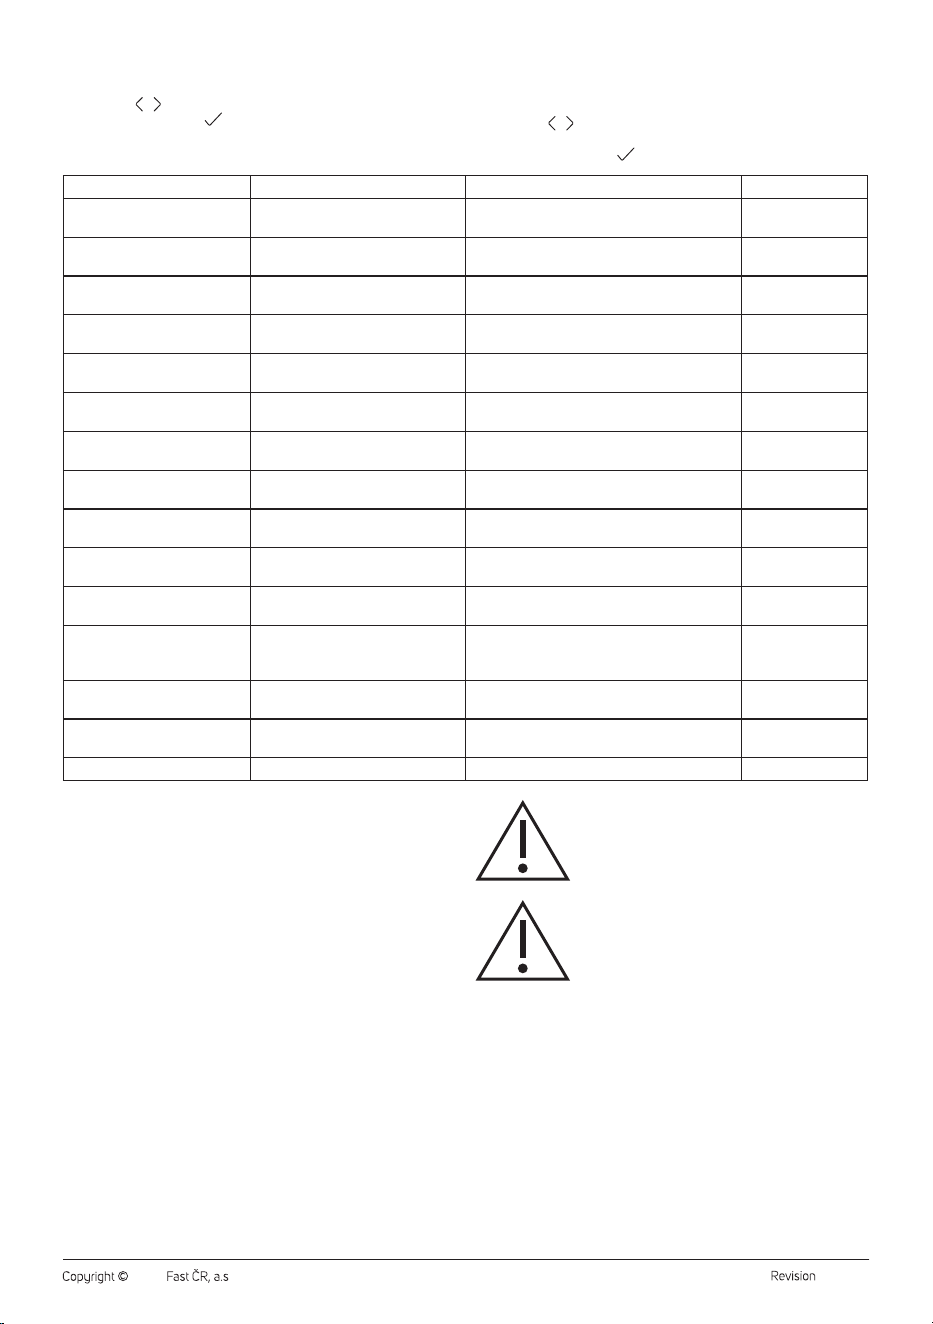
Table for Setting Up Water Hardness
Indicator Position Level Water Hardness
1 1 1–7 dH
2 2 8–15 dH
3 3 16–23 dH
4 4 24–30 dH
4. After setting the water hardness, you will be prompted to insert
the water filter. Confirm the water filter insertion by clicking
, or
use the back arrow to select “No” (you did not insert awater filter).
Follow the information on the display. After inserting the filter, click
on “Next”.
• The coffee machine starts heating up, and the preparation process
begins, during which water is pumped into the internal circuit, the
grinder is checked, and the coffee spout is rinsed, with asmall amount
of water flowing into the cup. During this time, the pump will briefly
operate. This is anormal occurrence.
• At the same time, the internal circuit is rinsed and asmall amount of
water flows through the head. Water drains into the drip tray then.
Alternatively, you can place amug with acapacity of at least 100 ml
under the head.
• Once all buttons light up, the machine is ready for use.
• After use, press and hold the
button for 3 seconds to turn the coffee
machine off. When turning off the coffee machine, the internal circuit
will also be rinsed if acoffee drink was being prepared before turning
off the coffee machine.
Note:
The coffee machine is equipped with an automatic
shut-off function. The automatic shut-off occurs after the
set idle time has elapsed – see the “Automatic Shut-off
of the Coffee Machine” section below. This is anormal
occurrence.
Preparation of Coffee Using Espresso, Americano and Coffee Buttons
1. Place acup, mug or glass under the brew head. Adjust the height of
the brew head by moving it up or down depending on the size of the
cup, mug or glass.
2. Press the Espresso, Americano or Coffee button. The indicator light
of the selected button will light up.
3. The coffee machine will automatically start the grinding, dosing,
tamping and dispensing process.
4. The volume of the drink can be changed during the dispensing
process using the “
/ “ buttons.
Preparation of Americano coffee consists of preparing 1 cup of Espresso
and hot water. Do not remove the cup from under the brew head until the
hot water dispensing is finished.
You can cancel the coffee preparation by pressing the button of the drink
being prepared.
If you wish to adjust the parameters of your coffee (e.g., change the
temperature, intensity, volume of coffee dispensed, etc.), follow the
instructions in the “Beverage Preset” section.
Preparation of Coffee Using Latte and Cappuccino Buttons
1. Pour the milk into the milk container and place the container in the
coffee machine.
Note:
To achieve rich and creamy froth, we recommend using
properly chilled milk (around 5°C) with aminimum fat
content of 3%.
2. Place acup, mug or glass under the brew head. Adjust the height of
the brew head by moving it up or down depending on the size of the
cup, mug or glass.
3. Turn the steam nozzle so that it points into the cup.
4. Press the Cappuccino, Latte or Macchiato button. The indicator light
of the selected button will light up.
5. The coffee machine will automatically start the preparation process
of Latté Macchiato, Cappuccino or Caffé Latté.
6. After the preparation is complete, we recommend performing amilk
frothing system cleaning by pressing the button.
– 6 –
03/2024
2024, .
You can cancel the coffee preparation by pressing the button of the drink
being prepared.
If you wish to adjust the parameters of your coffee (e.g., change the
temperature, coffee intensity, milk volume, volume of coffee dispensed,
etc.), follow the instructions in the “Beverage Preset” section.
Note:
If there is insufficient milk in the milk container or if you
need to refill it, remove the lid and pour fresh, cold milk
into the container without having to remove the container
from the coffee machine. However, when pouring milk, be
careful not to overfill the container or spill the milk.
Unused milk can be stored temporarily in the container,
which should be placed in the refrigerator. However, we
recommend consuming such milk as soon as possible.
“More“ Button
After pressing the More button, the menu of additional coffee drinks, hot
water dispensing, etc. will be displayed.
1. Place acup, mug or glass under the brew head. Adjust the height of
the brew head by moving it up or down depending on the size of the
cup, mug or glass.
2. Press the More button.
3. Use the / buttons to select the drink: Flat white, Ristretto, Black
coffee, Travel mug, Lungo, Double Espresso, Double coffee, Hot
water or Milk foam.
4. Press the button to confirm and the coffee machine will
automatically start the preparation process.
Brewing Coffee from Ground Coffee
The coffee machine allows the preparation of coffee from pre-ground
coffee. The recommended amount of ground coffee for the preparation of
one cup is 5 to 12 g.
1. Remove the ground coffee hopper lid (Fig. A, number 3) andadd
the desired amount of coffee into the coffee machine hopper (Fig. A,
number 2).
2. Press the More button.
3. Use the
/ buttons to select “Ground Coffee”.
4. Press the button to confirm.
5. Use the / buttons to select the desired coffee drink andpress the
button to confirm.
6. The coffee machine will automatically start the preparation process
of the selected coffee.
If you wish to adjust your coffee parameters (e.g. change the temperature
or volume of the coffee dispensed), please follow the instructions in the
“Beverage Preset” section.
We recommend using the measuring cup included in the package
(the volume of coffee levelled to the edge of the cup is 6 g). The
recommended ground coffee volume for one cup is 5 to 12g.
"My coffee" Option
The "My coffee" option allows you to adjust the parameters of up to 4
drinks according to personal preferences.
To create andsave, follow these steps:
1. Press the My coffee button.
2. Use the
/ buttons to select one of thefour presets.
3. Select the desired beverage.
4. Use the / buttons to gradually adjust the volume of coffee
dispensed, the intensity of the coffee.
To start the preparation, follow these steps::
1. Press the My coffee button.
2. Use the / buttons to select one of the four profiles. Press the
desired beverage and the preparation of the selected beverage starts
automatically.
Note:
Even if you adjust any parameter of te beverage, the
beverage settings will return to their original settings after
preparation. If you wish to adjust the settings, go to “Beverage
Preset”.
Child Lock
• When the coffee machine is ready for use, simultaneously press the
/ buttons.
This will activate the child lock function. Pressing the
/ buttons
again will deactivate the function.
• When the child lock is active, all control buttons exceptfor the
button are inactive. Additionally, when turning the coffee machine on
or off, it will not be rinsed to prevent children from scalding.
. . . . . . . . . . . . . . . . . . . . . . . . . . . . . . . . . . . . . . . . . . . . . . . . . . . . . . . . . . . . . . . . . . . .
ADVANCED SETTINGS
The user settings offer four sections:
A) Maintenance
B) Settings
C) Beverage Preset
D) Information
A) Maintenance
User settings (amount of ground coffee, volume of coffee dispensed,
volume of frothed milk and coffee / hot water temperature) will affect the
preparation of all beverages. This is auniversal setting for the entire coffee
machine.
• Press the
button to enter the user settings.
• Use the
/ buttons to navigate backward / forward in the settings.
The selected settings will light up.
• Press the
button to confirm andenter the menu, or to confirm
asetting.
• Press the
button to return onestep back. Press the button
repeatedly to exit theuser settings.
B) Settings
Auto Switch Off (Automatic Switch-Off of the Coffee Machine)
Set the idle time after which the coffee machine will turn off. Automatic
switch-off is used to save electricity.
1. Inthe user settings, select the Auto switch off option.
2. Use the
/ buttons to select the idle period: 15 minutes, 30
minutes, 1 hour, 2 hours up to 8 hours.
3. To confirm, press the button.
Eco Mode (ECO Programme)
The appliance can be set to energy-saving mode which achieves greater
energy savings. The coffee machine will not heat up once rinsing is
complete and is ready for use. Before preparing any beverage, the coffee
maker will first preheat when the recorded temperature is insufficient.
After the preheating is complete, the beverage preparation will start.
1.
In the user settings, select the Eco mode (ECO programme)
option
.
2. Use the / buttons to select Ye s or No.
3. To confirm, press the
button.
Factory Reset
If you need to restore the factory settings and erase all your customised
settings, perform afactory reset.
Inthe user settings, select the Factory reset
option.
1. Use the / buttons to select Ye s or No.
2. To confirm, press the button.
3. The number of prepared cups, maintenance information and data or
water hardness will not be affected by restoring the factory settings.
Empty Water Circuit
Use the empty water circuit function if you will not be using the coffee
machine for an extended period to prevent water spoilage in the circuit
and the formation of unwanted microorganisms and odours.
1. Place acup under the coffee spout. Direct the steam nozzle into the
cup.
2. In the user settings, select the Empty water circuit option.
3. Use the
/ buttons to select Ye s or No.
4. To confirm, press the button.
5. When anotification aboutremoving the water tank appears on the
display, remove the tank from the coffee machine. The internal
circuit will then be automatically emptied.
Note:
During the emptying of the internal circuit, the sound of the
pump will be heard. This is anormal occurrence.
Language
1. Inthe user settings, select the Language option.
2. Use the
/ buttons to select the preferred interface language.
3. To confirm, press the
button.
– 7 –
03/2024
2024, .
Keyboard Sound
1. In the user settings, select the Keyboard sound option.
2. Use the
/ buttons to select Ye s or No.
3. To confirm, press the button.
If the keyboard sound notification is enabled, each button press will be
accompanied by ashort beep.
C) Beverage Preset
Beverage Setting
1. Inthe user settings, select the Beverage setting option.
2. Use the
/ buttons to select abeverage andadjust its parameters
(volume, temperature or intensity).
3. To confirm, press the
button.
Beverage Volume of Dispensed Coffee Temperature Intensity
Ristretto 15–200 ml
Low/Medium/High
(Low/Medium/High)
5 levels
Espresso 15–200 ml
Low/Medium/High
(Low/Medium/High)
5 levels
Coffee 15–200 ml
Low/Medium/High
(Low/Medium/High)
5 levels
Lungo 15–200 ml
Low/Medium/High
(Low/Medium/High)
5 levels
2x Espresso 15–200 ml
Low/Medium/High
(Low/Medium/High)
5 levels
2x Coffee 15–200 ml
Low/Medium/High
(Low/Medium/High)
5 levels
Americano
Coffee: 15–200 ml
Water: 15–240 ml
Low/Medium/High
(Low/Medium/High)
5 levels
Black coffee
Coffee: 15–200 ml
Water: 15–240 ml
Low/Medium/High
(Low/Medium/High)
5 levels
Cappuccino
Milk dispensing time: 5–50 s
Coffee: 15–200 ml
Low/Medium/High
(Low/Medium/High)
5 levels
Caffé Latte
Milk dispensing time: 5–50 s
Coffee: 15-200 ml
Low/Medium/High
(Low/Medium/High)
5 levels
Flat white
Milk dispensing time: 5–50 s
Coffee: 15–200 ml
Low/Medium/High
(Low/Medium/High)
5 levels
Latté Macchiato
Milk dispensing time: 5–50 s
Coffee: 15–200 ml
Wait time: 1–30 s
Low/Medium/High
(Low/Medium/High)
5 levels
Travel mug
Two cycles of coffee dispensing
15–200 ml / each cycle
Low/Medium/High
(Low/Medium/High)
5 levels
Hot water 15–240 ml
Low/Medium/High
(Low/Medium/High)
–
Milk foam Milk dispensing time: 5–50 s – –
D) Information
Information
1. Inthe user settings, select the Information option.
2. The settings interface andinformation about the coffee machine will
be displayed.
Beverage Counter
1. In the user settings, select the Beverage counter option.
2. Data on the prepared number of cups of individual beverages will be
displayed.
Maintenance
1. In the user settings, select the Maintenance option.
2. The individual maintenance items of the coffee machine are
displayed: cleaning the milk frothing system / cleaning the brewing
system / descaling / rinsing the water filter.
Software Version
1. In the user settings, select the Software version menu.
2. Data about the current software will be displayed.
. . . . . . . . . . . . . . . . . . . . . . . . . . . . . . . . . . . . . . . . . . . . . . . . . . . . . . . . . . . . . . . . . . . .
CLEANING AND MAINTENANCE
Before cleaning, unplug the power cable from the socket and allow the
appliance to cool down.
Warning:
Do not use abrasive cleaning agents, solvents, or any
substances to clean any parts of the appliance that
could damage the surface of the appliance. None of
the components of this appliance is dishwasher safe.
Warning:
To prevent the risk of electric shock, do not immerse
the appliance, power cable, or plug into water or any
other liquid.
Replacing the Water Filter
When anotification indicating the need for filter replacement appears
on the display, the water filter must be replaced. This is usually after its
recommended usage period has elapsed.
When replacing the water filter, proceed as described inthe "Installing
andActivating the Water Filter (optional)"section; however, before
inserting anew water filter, remove the old one.
. . . . . . . . . . . . . . . . . . . . . . . . . . . . . . . . . . . . . . . . . . . . . . . . . . . . . . . . . . . . . . . . . . . .
DAILY CLEANING AND MAINTENANCE
Regular cleaning and maintenance are crucial for the proper functioning
and longevity of the appliance.
Before cleaning, turn off the appliance, unplug it and allow it to cool down.
– 8 –
03/2024
2024, .
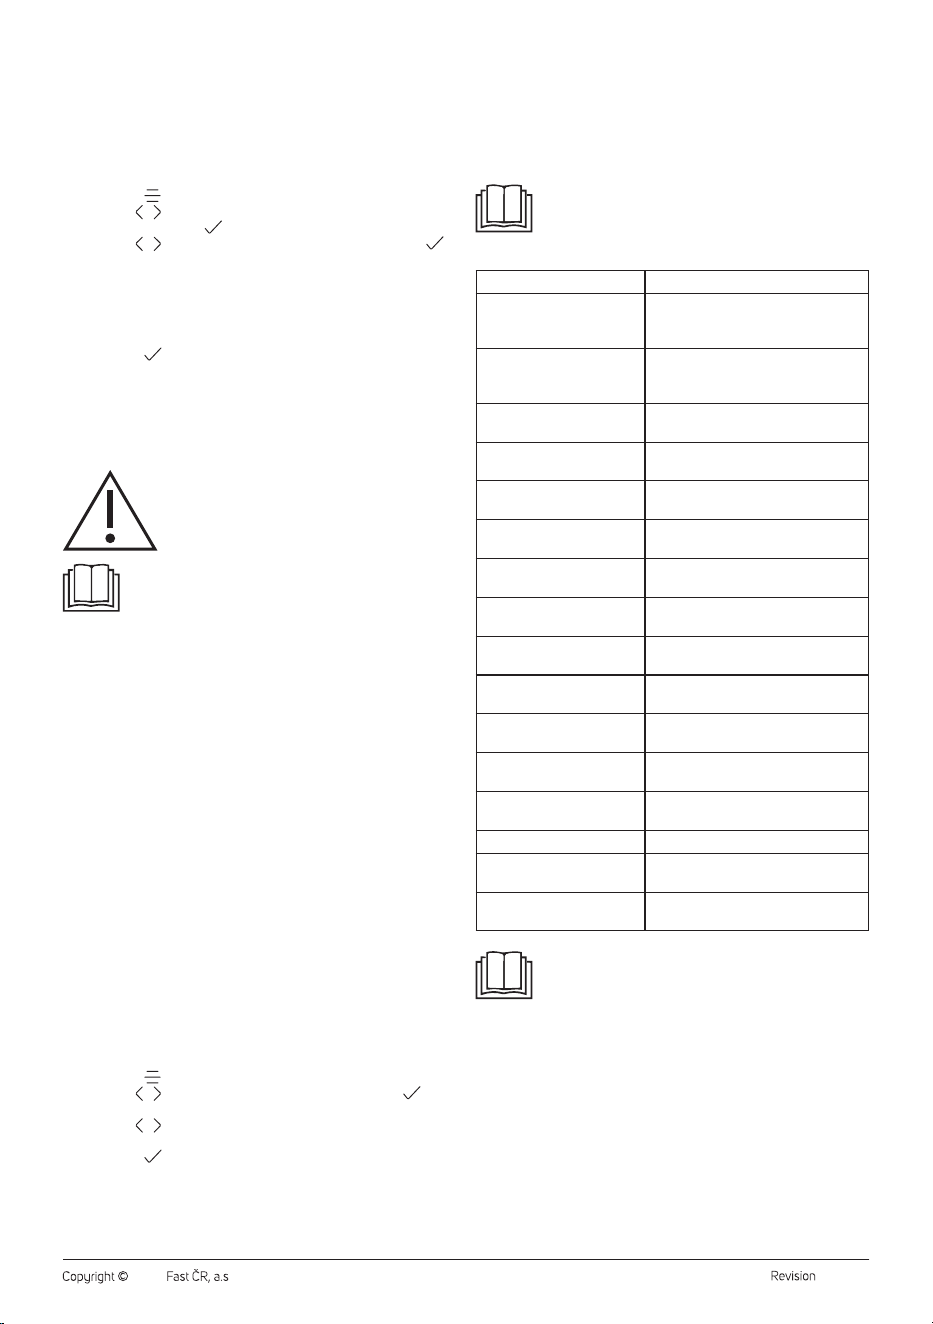
1. Press the
button to enter the user settings.
2. Use the
/ buttons to select the Maintenance menu. To confirm,
press the button.
3. Use the / buttons to select Milk system cleaning. To confirm,
press the
button.
4. Remove the milk container andfill it with detergent and water.
5. Attach the milk container to the coffee machine.
6. Press the
button to start cleaning process.
7. When prompted, remove the milk container andfill it with water.
Reattach it to the coffee machine andfollow the instructions on the
display.
8. Allow the coffee machine to complete the cleaning process until the
completion notification appears on the display.
Note:
Follow the same procedure if you need to perform manual
cleaning before the notification appears on the display.
. . . . . . . . . . . . . . . . . . . . . . . . . . . . . . . . . . . . . . . . . . . . . . . . . . . . . . . . . . . . . . . . . . . .
CLEANING THE BREWING SYSTEM
By using the coffee machine, oil residues fromcoffee beans and ground
coffee may accumulate in the brewing system and internal piping,
which may clog these parts over time andcause the coffee machine
to malfunction. To prevent clogging andpossible choking the brewing
system and the internal piping, the machine is equipped with an internal
counter, and after every 230 cups of coffee prepared, acleaning alert
will appear on the display. The total cleaning time is approximately 20
minutes and the total volume of water dispensed is approximately 550
ml.
Toclean the brewing system, use degreasing tablets for Espresso-type
machines, which are commonly commercially available.
1. Press the
button to enter the user settings.
2. Use the
/ buttons to select the Maintenance menu. To confirm,
press the
button.
3. Use the
/ buttons to select Coffee system cleaning. To confirm,
press the
button.
4. Make sure the drip tray and the coffee grounds container are empty.
Empty them if necessary.
5. Press the button to start the cleaning process.
6. Place the degreasing tablet in the ground coffee hopper. Press the
button.
7. Empty the drip tray and the coffee grounds container andplace
them back into the coffee machine.
8. Allow the coffee machine to complete the cleaning process until the
completion notification appears on the display.
Note:
Follow the same procedure if you need to perform manual
cleaning before the notification appears on the display.
Quick Rinsing of the Brewing Unit
The integrated brewing unit can be quickly rinsed to remove coffee
residues andoil from thecoffee beans deposited in the unit. Dependingon
the frequency of the coffee machine use, we recommend rinsing the
brewing unit manually at least once amonth. If you use the coffee maker
regularly to agreater extent, or conversely, if you have not used the coffee
maker for alonger period, perform the rinsing of the brewing unit more
frequently.
1. Place alarge cup or abowl under the brew head.
2. Press the More button.
3. Use the
/ buttons to select Ground coffee.
4. Press the button to confirm.
5. Press the Coffee button and the coffee machine will start brewing
the coffee drink, but without ground coffee inside.
6. Only water will flow into the cup/bowl. Allow the coffee machine to
complete the brewing.
7. Repeat step 5 as required to rinse the brewing unit thoroughly.
8. Pour out the water from the cup/bowl.
. . . . . . . . . . . . . . . . . . . . . . . . . . . . . . . . . . . . . . . . . . . . . . . . . . . . . . . . . . . . . . . . . . . .
DESCALING
Mineral deposits from water can accumulate in the internal circuit of the
coffee machine with regular use. It is anatural process. Therefore, regular
descaling is necessary. Mineral deposits can adversely affect the taste of
Drip Tray and Coffee Grounds Container
• Carefully pull the drip tray out of the body of the machine. Remove the
grid and the coffee grounds tray. Carefully place the drip tray over the
sink and remove the cover.
• Pour the contents of the drip tray into the sink.
• Empty the coffee grounds container into the municipal waste or
compost.
• Wash the drip tray, its cover, the grid and the coffee grounds tray with
clean water and then dry them properly.
Warning:
Be careful not to scald yourself when handling the
tray. It may contain hot water.
• Place the cover on the drip tray, insert the grid into the open space in
the cover and place the coffee grounds container on top of the cover.
• Put the folded drip tray back into the coffee machine.
Drip Tray Full Indicator
The drip tray is equipped with afloat that serves as an indicator of the drip
tray'sfullness. When the water level reaches the maximum amount, the
float is ejected through the opening in the grid. In this case, the drip tray
must be emptied to prevent water from spilling out of the tray.
Warning for Full Coffee Grounds Container
If anotification indicating the need to empty the container appears during
operation, the coffee grounds container is full and needs to be emptied.
Water Tank
Remove the water tank, rinse it with clean water and asmall amount of
neutral kitchen detergent. Then rinse it properly with clean water, dry it
and put it back in place.
Coffee Spout
Wipe the coffee spout with asoft, slightly dampened sponge and then
wipe with adry cloth.
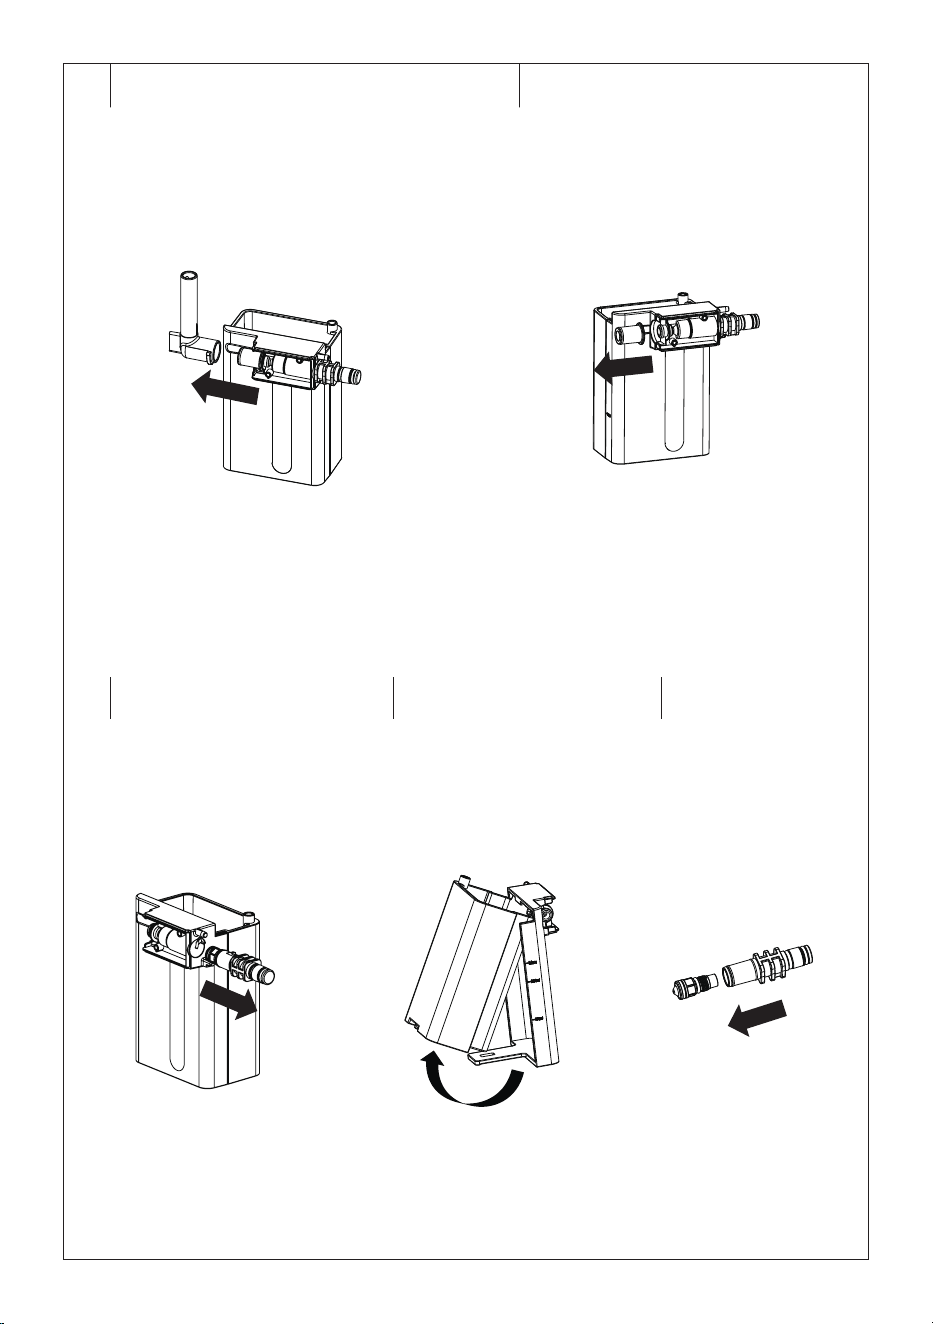
Milk Container andSteam Nozzle
To prevent milk build-up in the steam nozzle and the formation of
undesirable odours, it is important to clean them after each use.
1. Place abowl under the brew head.
2. Direct the steam nozzle into the bowl.
3. Press the
button. The cleaning of the milk frothing system will
start andhot water withsteam will be dispensed through the milk
dispensing nozzle.
4. Allow the coffee machine to complete the cleaning process.
5. Remove the milk container from the machine.
6. Remove the milk container lid and cover (Fig. E1).
7. Turn milk dispensing nozzle upward (Fig. E2) and remove it (Fig.
E3).
8. Pull out the rubber coupling (Fig. E4).
9. Remove the steam nozzle by twisting it counterclockwise while
pulling it out (Fig. E5).
10. Release the latch at the bottom of the container and remove it from
the holder (Fig. E6).
11. Unscrew the steam nozzle (Figure E7).
12. Wash all parts in warm water with alittle dishwashing detergent.
Rinse in clean water and wipe dry.
13. Clean the small hole at the end of the steam nozzle with athin
object (e.g. aneedle). It is important for the hole to be clean to avoid
damage to the entire milk frothing system.
14. Assemble the milk container and steam nozzle in the reverse order
of disassembly and place them back into the coffee machine.
Outer Surface of the Coffee Machine
To clean the outer surface of the appliance, use aclean, slightly damp
cloth. Afterwards, wipe it dry thoroughly.
. . . . . . . . . . . . . . . . . . . . . . . . . . . . . . . . . . . . . . . . . . . . . . . . . . . . . . . . . . . . . . . . . . . .
CLEANING THE MILK FROTHING SYSTEM
To prevent the milk container from clogging with milk residues and to
ensure the cleanliness of the milk container, the milk frothing system
needs to be cleaned with aspecial cleaning agent.
The total cleaning time is approximately 3 minutes and the total volume
of water dispensed is approximately 430 ml.
– 9 –
03/2024
2024, .
the coffee being brewed. Therefore, once the descaling alert is displayed,
it is necessary to perform the descaling process.
The total time of descaling is approximately 30 minutes and the total
volume of water dispensed is approximately 900 ml.
Use adescaling agent suitable for Espresso-type machines and follow
the instructions provided in the accompanying documentation of the
descaling agent. Do not use vinegar, citric acid or other agents to descale
the coffee machine.
1. Press the
button to enter the user settings.
2. Use the
/ buttons to select the Maintenance data option.
To confirm, press the button.
3. Use the / buttons to select Descaling. To confirm, press the
button.
4. Remove the water filter.
5. Make sure the drip tray and the coffee grounds container are empty.
Empty them if necessary.
6. Remove the water tank and fill it with the descaling agent and water.
Place the tank back into the coffee machine.
7. Press the
button to start the descaling process.
8. When prompted, empty the drip tray and the coffee grounds
container, remove the water container, rinse it andfill it with clean
water. Place it back into the coffee machine.
9. Follow the instructions on the display.
10. Allow the coffee machine to complete the descaling process until the
display shows thecompletion notification.
Warning:
Hot water is flowing out of the coffee machine. When
handling the drip tray, be careful to avoid scalding.
Note:
Follow the same procedure if you need to perform manual
cleaning before the notification appears on the display.
Storage
If the appliance will not be used for an extended period, unplug it from
the power socket, let it cool down, and clean it following the instructions
provided above.
Before storing, ensure that the appliance and all accessories are
thoroughly clean and dry.
Store the appliance in adry, clean, and well-ventilated place away from
extreme temperatures and out of the reach of children or pets.
Installing andActivating the Water Filter (optional)
The water filter contains activated charcoal, which helps remove sediment
from water, reduces water hardness, and reduces the formation of mineral
deposits and limescale in the internal piping if the coffee machine, water
heater, and brew head. Therefore, we recommend using awater filter for
coffee machines, especially if you have medium hard to very hard water.
Use water filters for Espresso machines, which are
commonlycommercially available (with afitting system for BRITA
AquaAroma Crema filters).
Important: The coffee machine can also be used without the water filter.
The installation andactivation of the water filter must be carried out
manually, as the coffee machine is not equipped with asensor to detect
the installed filter. Follow these steps to install andactivate the water filter:
1. Take the water filter out of the packaging.
2. Immerse the water filter in cold andclean water for at least 30
minutes with the opening facing up. If necessary, expel the
remaining air by gently shaking it in the water. Then remove it and
shake it gently. Follow the filter manufacturer'sinstructions.
3. Turn on the coffee machine.
4. Press the
button to enter the advanced settings.
5. Use the / buttons to select Maintenance and press the
button to enter the menu.
6. Use the / buttons to select Ye s andinstall the filter according to
the instructions on the display.
7. Press the
button to confirm andstart filter rinsing.
8. After rinsing is complete, the filter setup completion notification will
appear on the display.
Change the water filter each time the water filter replacement notification
appears onthe display. This occurs when the filter usage period has
elapsed.
If the notification does not appear within three months of installing and
activating the water filter, it is recommended to replace it.
When replacing the water filter, follow the instructions inthe “Replacing
the Water Filter” part in the “Cleaning andMaintenance” section.
Note:
The use of the water filter in the coffee machine can be
deactivated in the user settings by selecting No.
Notifications on the Display andTheir Meaning
Display Notification Meaning
Empty the drip tray and
coffee grounds container
The drip tray and coffee grounds
container are full and need to be
emptied.
Insert drip tray and coffee
grounds container
The drip tray and coffee grounds
container are not inserted or not
inserted correctly.
Insert the milk container The milk container is not connected to
the coffee machine.
System without water There is no water in the tank and it is
not pumped into the internal system.
Refill the water tank The water tank is empty, the water
needs to be refilled.
Refill coffee beans The bean hopper is empty or there is
insufficient coffee in the hopper.
Lack of ground coffee There is little ground coffee in the
hopper.
Insert the water tank The water tank is not inserted or is
incorrectly inserted.
Insert the drip tray. The drip tray is not inserted or is
incorrectly inserted.
Insert the milk container The milk container is not inserted or is
incorrectly inserted.
Fill the water tank The water tank is empty, the water
needs to be refilled.
Remove the drip tray The drip tray is full and needs to be
emptied.
Remove the milk container It is necessary to remove the milk
container.
Remove the water tank The water tank must be removed.
Milk container removed,
rinse
Rinse the milk container.
Make sure there is enough
milk in the container
Check that there is enough milk in the
container.
Note:
The table above shows the basic messages on the display
and their meaning. Read and follow the instructions that
appear on the display.
. . . . . . . . . . . . . . . . . . . . . . . . . . . . . . . . . . . . . . . . . . . . . . . . . . . . . . . . . . . . . . . . . . . .
– 10 –
03/2024
2024, .
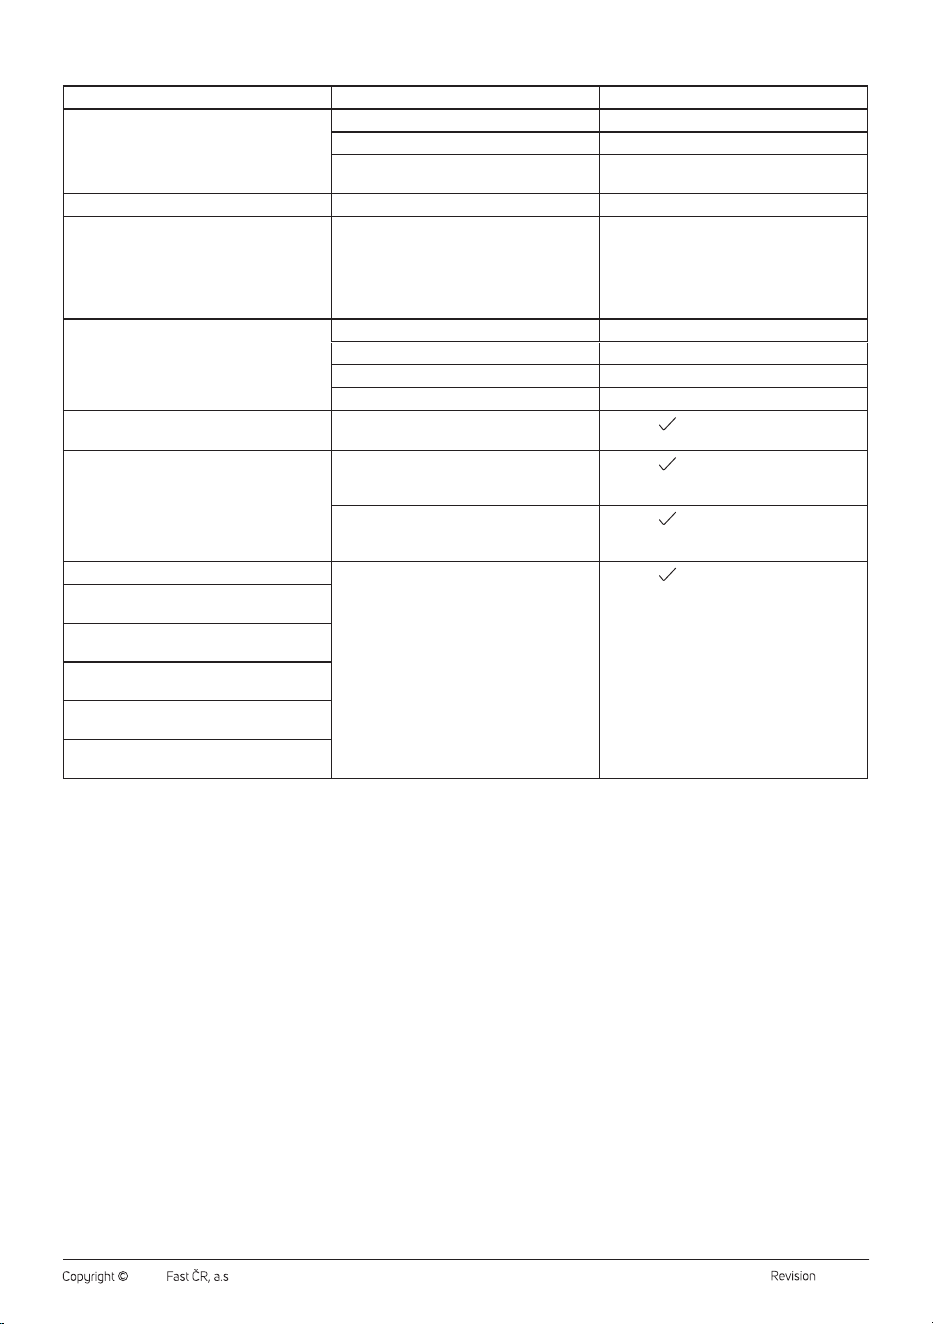
TROUBLESHOOTING
Problem Cause Solution
The milk squirts out of the container as it foams. There is insufficient milk in the container. Refill the milk.
The steam nozzle is clogged. Clean the steam nozzle.
The milk container is not inserted correctly in
the coffee machine.
Remove the container and reinsert it into the
coffee machine.
The amount of frothed milk is very little or none. The internal circuit is scaled. Perform the descaling process.
The coffee grounds container cannot be
removed together with the drip tray; or it is not
possible to insert the drip tray with the coffee
grounds container into the coffee machine.
The brewing unit inside the coffee machine and
the coffee grounds container touch and block
each other.
Manually remove the coffee grounds container
and then insert aseparate drip tray. Turn on
the coffee machine and wait for it to heat up.
Remove the drip tray and insert the coffee
grounds container on it. Place it back into the
coffee machine.
The coffee does not flow or only drips. The ground coffee is too fine. Adjust the grind coarseness.
The brewing system is clogged. Perform the brewing system cleaning.
The coffee spout is clogged. Clean the coffee spout.
The internal circuit is scaled. Perform the descaling process.
“System empty” message is shown on the
display.
The coffee machine does not dispense water.
Press the
button again and the coffee
machine will start pumping water automatically.
“Brewer error” message is shown on the
display.
When brewing fromground coffee: the coffee
machine detected aquantity of coffee less
than 12 g.
Press the
button and increase the quantity
when brewing from the ground coffee next time.
Malfunction in the internal system.
Press the
button andturn off the coffee
machine. If the problem persists after restarting,
contact an authorised service centre.
“NTC error” message is shown on the display. Malfunction in the internal system.
Press the
button andturn off the coffee
machine. If the problem persists after restarting,
contact an authorised service centre.
“Multi-way valve error” massage is shown on
the display.
“Thermoblock error“ message is shown on
the display.
“Pump or flowmeter error” message is shown
on the display.
“Grinding error” message is shown on the
display.
“High temp in thermoblock” or “Low temp in
thermoblock” message is shown on the display.
If the problem is not listed in the table or if the problem persists, turn off the coffee machine, disconnect it from the power source, and contact an
authorised service centre.
. . . . . . . . . . . . . . . . . . . . . . . . . . . . . . . . . . . . . . . . . . . . . . . . . . . . . . . . . . . . . . . . . . . . . . . . . . . . . . . . . . . . . . . . . . . . . . . . . . . . . . . . . . . . . . . . . . . . . . . . . . . . . . . . . . . . . . . . . . . .
– 11 –
03/2024
2024, .
TECHNICAL SPECIFICATIONS
Rated voltage range ..............................................................................220−240 V~
Rated frequency ...........................................................................................50/60 Hz
Rated input .........................................................................................................1,400 W
Noise level ......................................................................................................<65 dB(A)
The declared noise emission level of this appliance is <65dB(A),
representing the A-weighted sound power level relative to the reference
sound power level of 1pW.
We reserve the right to change the text and technical specifications.
. . . . . . . . . . . . . . . . . . . . . . . . . . . . . . . . . . . . . . . . . . . . . . . . . . . . . . . . . . . . . . . . . . . .
INSTRUCTIONS AND INFORMATION ON DISPOSAL OF USED
PACKAGING MATERIAL
Dispose of used packaging material in the designated waste disposal area
determined by the municipality.
DISPOSAL OF USED ELECTRICAL AND ELECTRONIC EQUIPMENT
This symbol on the products or accompanying documents
indicates that used electrical and electronic products
should not be disposed of with regular municipal waste.
For proper disposal and recycling of these products, deliver
them to designated collection points. Alternatively, in some
European Union states or other European countries the
products can be returned to the local retailer when buying
an equivalent new product. By properly disposing of this
product, you help preserve valuable natural resources and contribute to
preventing potential negative impacts on the environment and human
health resulting from improper waste disposal. For further details, contact
your local authorities or the nearest collection point. Fines may be
imposed for improper disposal of this type of waste in accordance with
national regulations.
For Business Entities in European Union States
If you want to dispose of electric or electronic devices, ask your retailer or
supplier for the necessary information.
Disposal in Other Countries Outside the European Union
This symbol is valid in the European Union. To dispose of this product
elsewhere, request necessary information on the correct disposal method
from local authorities or your retailer.
This product complies with all the essential requirements of
the applicable EU directives.