Page 1User Manual
Safety Precautions
Product Features
Installation Instructions
Operating Instructions
Care and Cleaning
Troubleshooting Tips
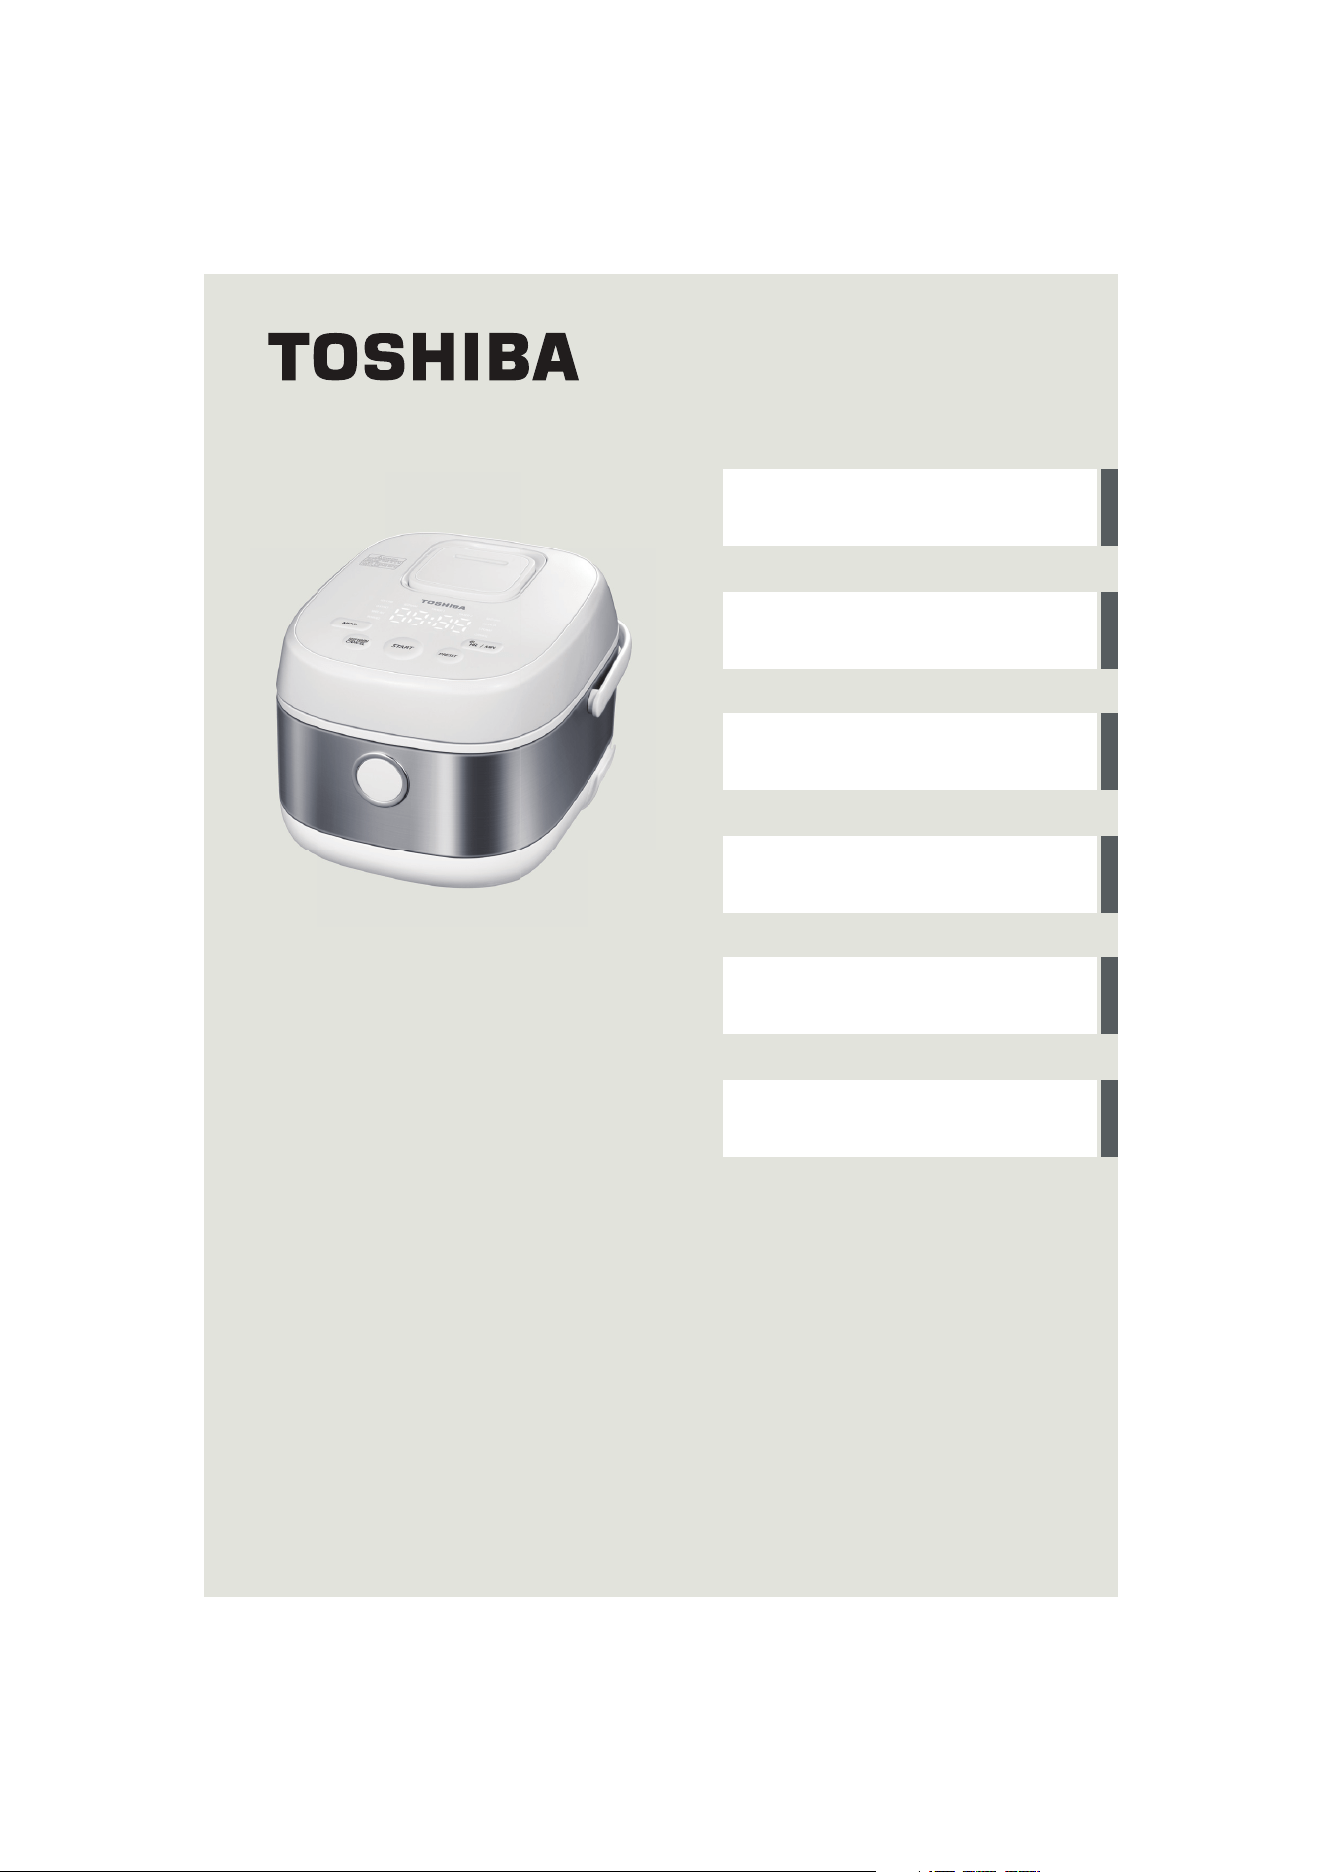
USER MANUAL
Electric Rice Cooker
TRSH01
Warning notices: Before using this product,
please read this manual carefully and keep
it for future reference.
The design and specifications are subject
to change without prior notice for product
improvement. Consult with your dealer or
the manufacturer for details.
https://www.toshiba-lifestyle.com/us/

Page 2
SAFETY PRECAUTIONS
To prevent injury to the user or other people and property damage, the following
instructions must be followed. Incorrect operation due to ignoring of instructions
may cause harm or damage. The level of risk is shown by the following indications.
WARNING: This symbol indicates the possibility of death or serious injury.
CAUTION: This symbol indicates the possibility of injury or damage to property.
When using electrical appliances, basic safety precautions should always be followed
including the following:
WARNING
• Read all instructions before use.
• Do not touch hot surfaces. Use potholders or oven mitts when handling the
cooking bowl or lid.
• To avoid electrical shock do not immerse cord, plugs, or the rice cooker housing
in water or other liquid.
• This appliance is not intended for use by persons (including children) with
reduced physical, sensory or mental capabilities, or lack of experience and
knowledge, unless they have been given supervision or instruction concerning
the use of the appliance by a person responsible for their safety.
• Close supervision is necessary when any appliance is used by or near children.
• Keep appliance and cord away from children.
• Unplug from electrical outlet when not in use and before cleaning.
• Allow appliance to cool before putting on or taking off parts.
• Do not operate any appliance with a damaged cord or plug or after the
appliance malfunctions or has been damaged in any manner. Return appliance
to the nearest Authorized Service Center for examination, repair, or adjustment.
• Do not disassemble, repair or modify the rice cooker. For any repair, consult a
Toshiba authorized Service Center.
• Do not operate the rice cooker if any part of the unit is damaged.
• Do not use outdoors. Intended for indoor household use only.
• Do not let cord hang over edge of countertop, or touch hot surfaces, including
the top of the rice cooker. Never use outlet below countertop, and never use
with an extension cord.
• Do not place on or near a hot gas or electric burner, or in a heated oven.
• Do not place near heat-sensitive curtains.
IMPORTANT SAFETY INSTRUCTIONS
Safety
Precautions

Safety
Precautions
WARNING
• The total amount of food and water should NOT exceed the MAX level marked
on the cooking pot. Some foods such as rice, expand during cooking and
should not fill the cooking pot over halfway.
• Spilled food can cause serious burns. Extreme caution must be used when
moving an appliance containing hot liquids or hot oil.
• Do not use appliance for other than intended use.
• Always attach cord to appliance first, and then plug cord into a wall outlet.
• A short power cord is used to reduce the risk resulting from the cord being
grabbed by children, or becoming entangled in or tripping over a longer cord.
• To disconnect, set all controls to "Off," then remove plug from wall outlet.
• The use of accessory attachments not recommended by Toshiba may cause
injuries.
CAUTION
To reduce the risk of Electric Shock, cook only in removable container.
THIS PRODUCT IS DESIGNED FOR HOUSEHOLD USE ONLY.
KEEP APPLIANCE AWAY FROM CHILDREN.
SAVE THESE INSTRUCTIONS
Page 3

Read This Manual
Inside you'll find many helpful hints on how to use and maintain your rice cooker properly.
Just a little preventive care on your part can save you a great deal of time and money over
the life of your rice cooker. You'll find many answers to common problems in the
troubleshooting tips - you should be able to fix most of them quickly before calling service.
These instructions may not cover every possible condition of use, so common sense and
attention to safety is required when operating and maintaining this product.
0
1
2
3
4
5
6
Safety Precautions .................................................................................................2
Product Features ....................................................................................................5
Installation Instructions .......................................................................................6
Unpacking ............................................................................................................6
Electrical Requirements...................................................................................6
Location Requirements ...................................................................................7
Operating Instructions .........................................................................................7
Controls .................................................................................................................8
Using the Rice Cooker ......................................................................................9
Care And Cleaning ...............................................................................................16
Troubleshooting Tips..........................................................................................20
Warranty..................................................................................................................24
Page 4

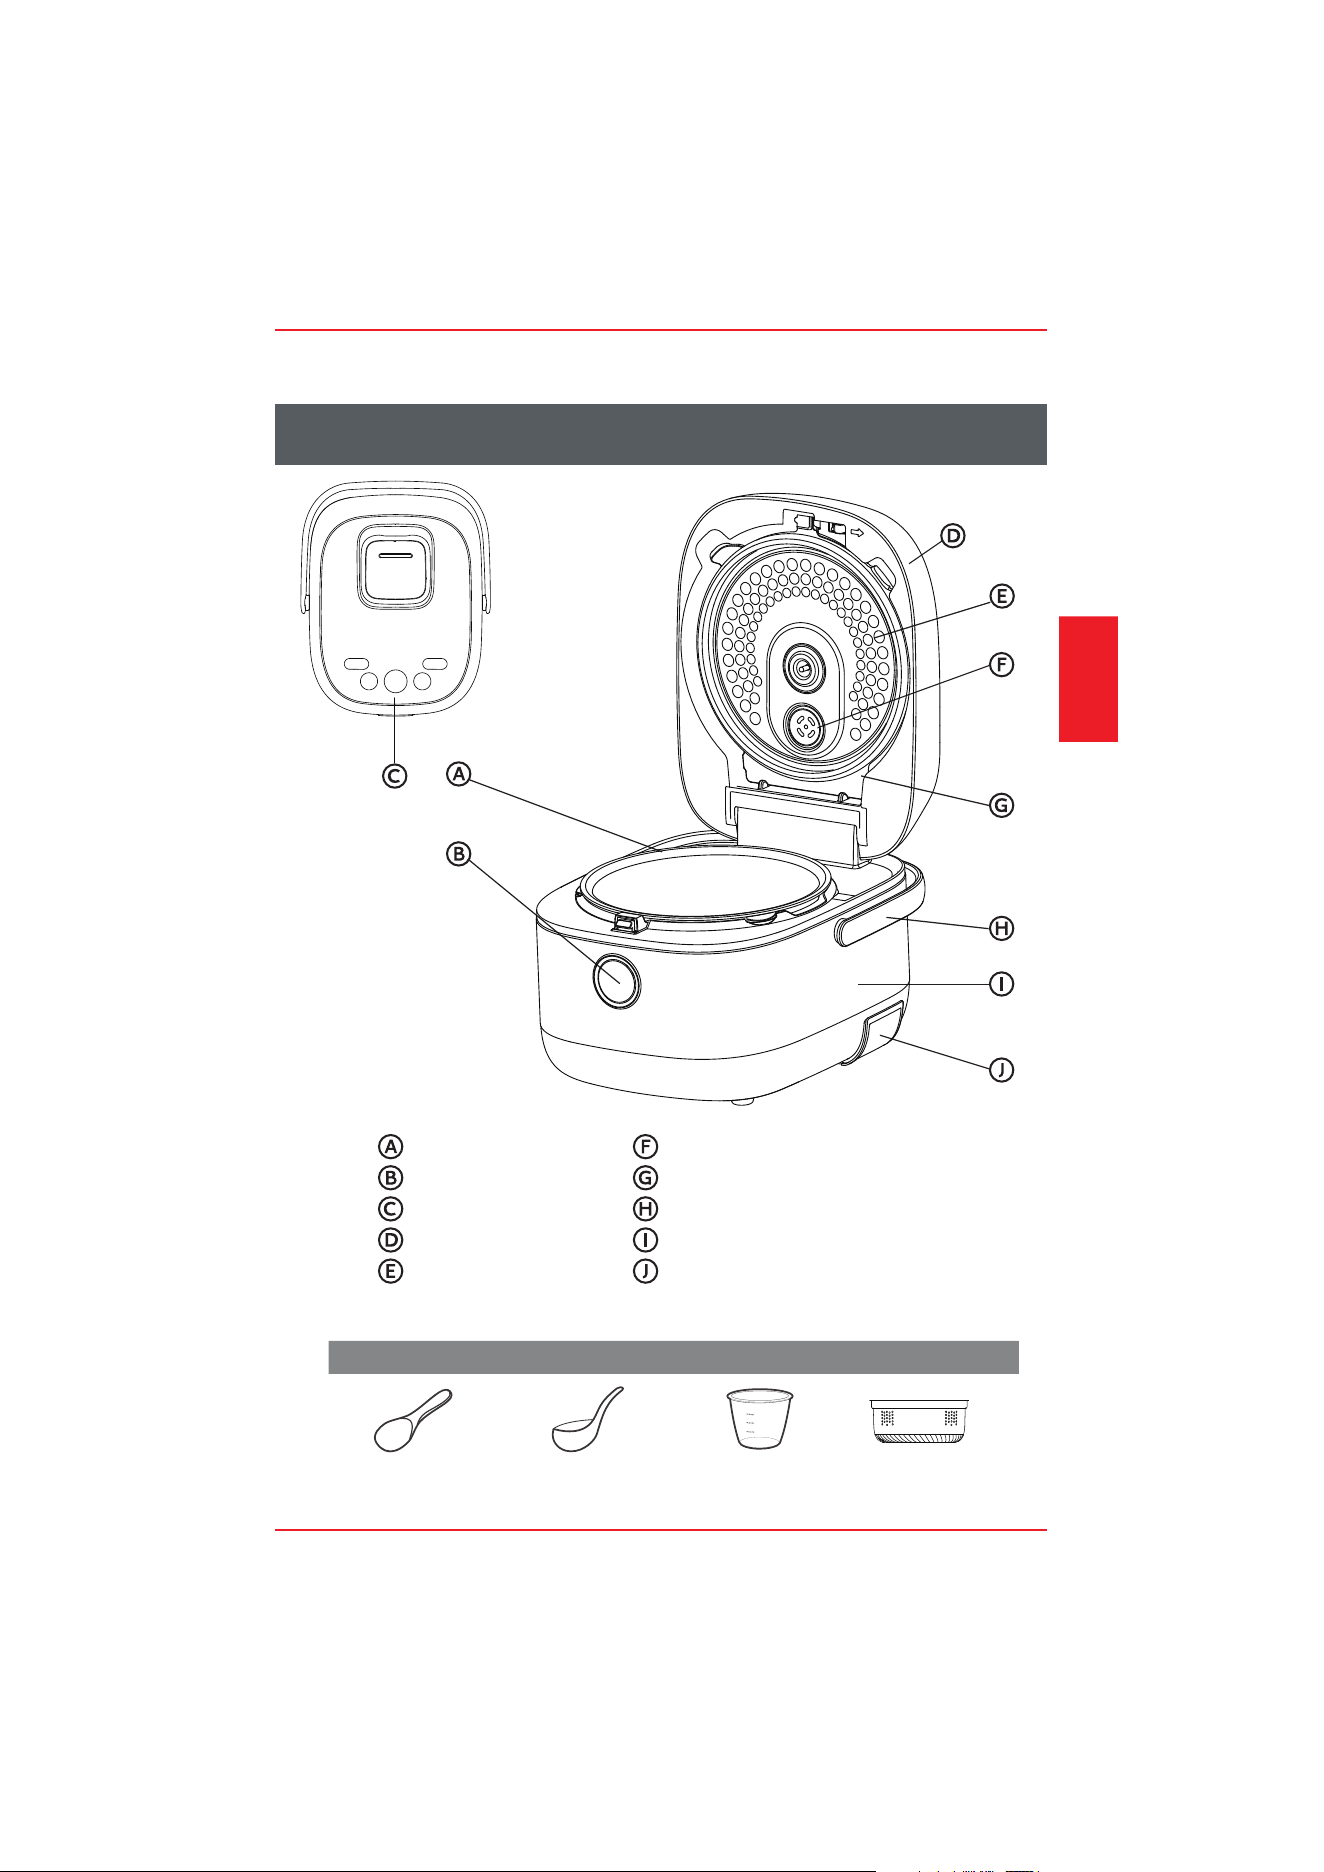
PRODUCT FEATURES
Cooking Pot
Lid Latch
Control Panel
Lid
Inner Lid
Steam Port
Lid Gasket (not removable)
Carrying Handle
Lower Housing
Power Cord
Accessories
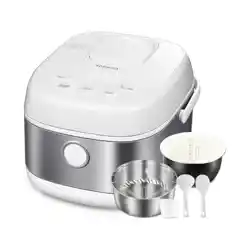
Serving Spatula Soup Ladle Rice Measure Steamer Basket
Product
Features
Page 5
INSTALLATION INSTRUCTIONS
Unpacking
Remove all packing materials.
Wash the cooking pot, inner lid, steam port and other accessories, and then dry thoroughly
before using.
Electrical Requirements
WARNING
Electrical Shock Hazard
• Do not use an adapter.
• Do not use an extension cord.
Failure to do so can result in death, fire or electrical shock.
A 120 V, grounded electrical supply is required. It is recommended that a separate circuit
serving only the rice cooker is used. Sharing the power supply with other appliances will
result in overheating.
Power Supply Cord
NOTE
This Rice Cooker has a 2-prong plug. To reduce the risk of electrical shock, the plug will fit
into an outlet only one way. If the plug does not fit in the outlet, contact a qualified
electrician. Do not modify the plug.
A short power supply cord is used to reduce the risks of becoming entangled in, or tripping
over a longer cord, or of the cord being grabbed by children.
If the power supply cord is too short, have a qualified electrician or technician install
an outlet near the appliance. Do NOT use an extension cord.
Installation
Instructions
Page 6
This rice cooker is designed for household use only; the cooker should not be used for
commercial use.
Use indoors on a stable, level, non-heat sensitive surface such as a countertop in a location
where the lid can be fully opened; do NOT use outdoors.
Do not place the rice cooker on an area of the countertop that is exposed to direct sunlight,
or where it might be splashed with cooking oil.
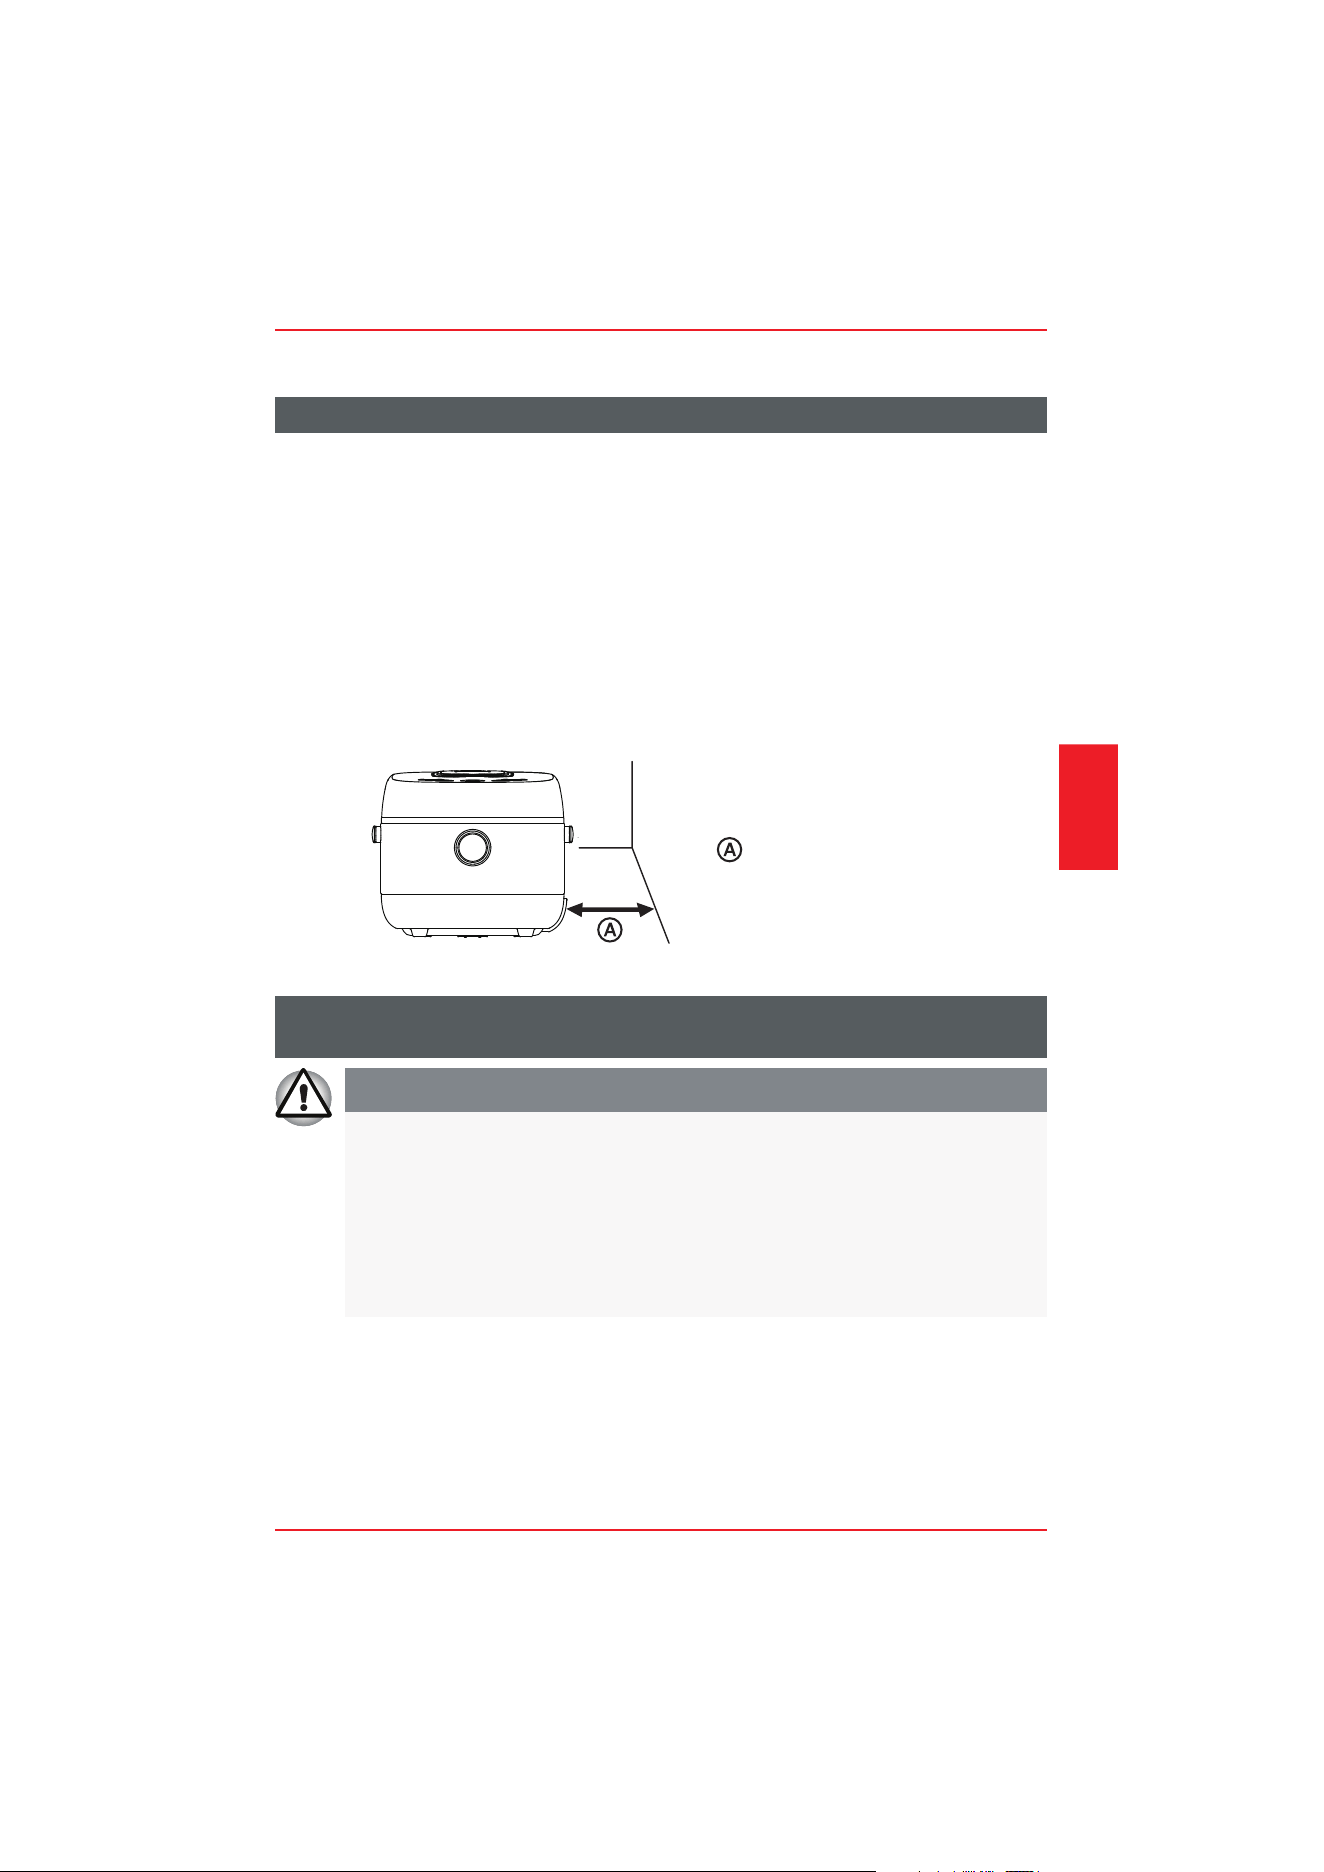
RECOMMENDED CLEARANCE
Steam and heat emitted from the rice cooker may damage or discolor nearby walls or
cabinets. It is recommended that the rice cooker be placed a minimum distance of 12"
(30.5 cm) from walls or cabinets.
Location Requirements
At least 12" (30.5 cm)
Fire/Burn Hazard
Unplug immediately and do not use rice cooker if:
• The power supply cord becomes abnormally hot during use.
• Smoke is emitted from the rice cooker or a burning odor is detected.
• The rice cooker is cracked or there are loose or rattling parts.
• The cooking pot, outer lid or inner lid is broken or deformed.
Failure to do so may result in fire, electric shock or injury.
OPERATING INSTRUCTIONS
WARNING
Installation
Instructions
Page 7
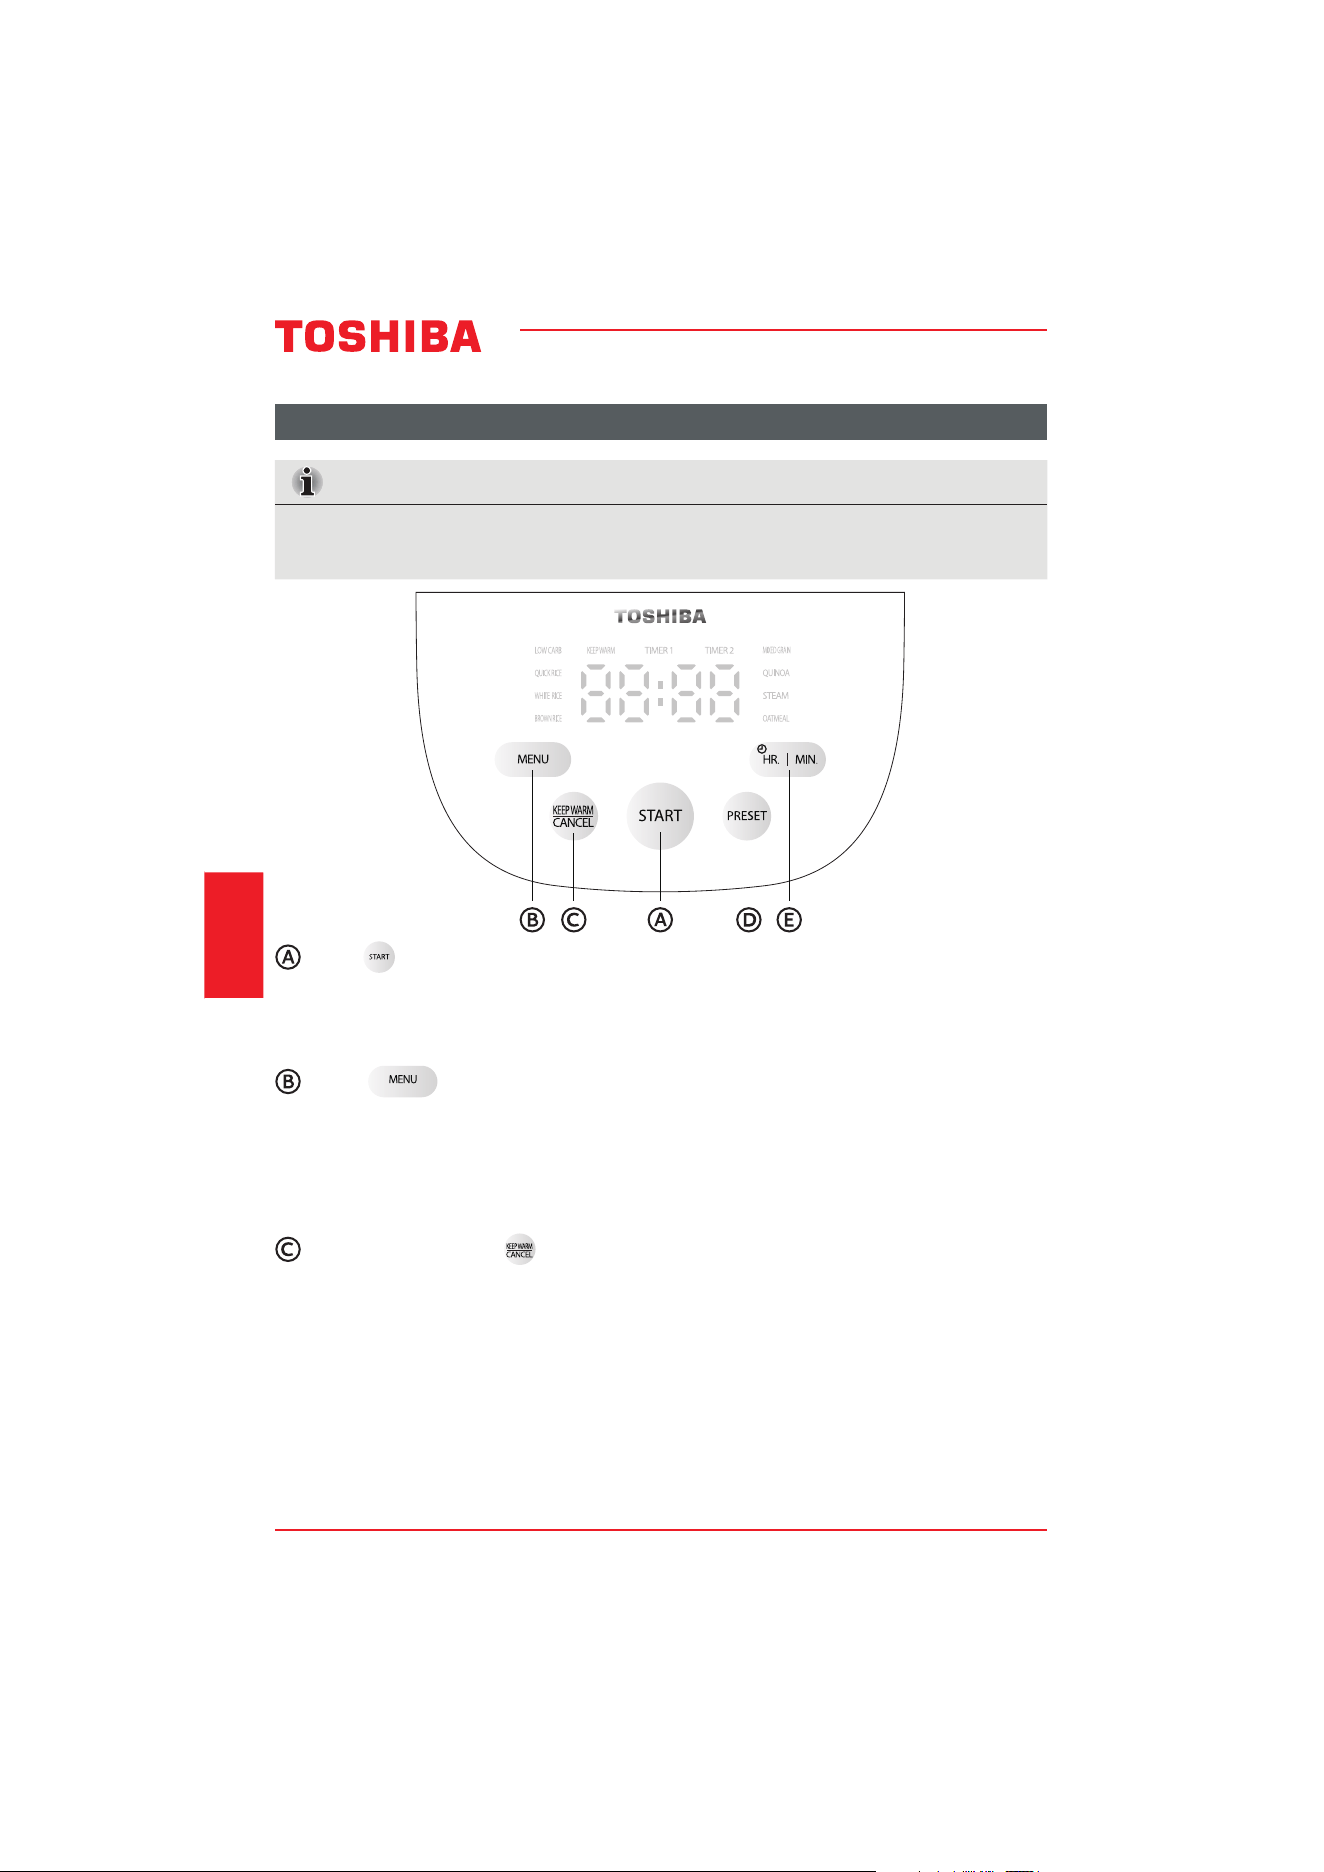
Plug in the power supply, then the rice cooker is in standby mode, and the digital screen
displays the current time. After selecting the required correspondence function, press the
"START" button to start the corresponding function program.
In standby mode, press the "MENU" button to select various functions. Each time the "MENU"
button is pressed, the selected function will also change in order. The function cycle is as follows:
LOW CARB/QUICK RICE/WHITE RICE/BROWN RICE/MIXED GRAIN/QUINOA/STEAM/ OATMEAL. In
the function selection state, the program returns to standby mode when no pressing operation
for over 2 minutes.
1. In standby mode, press the "KEEP WARM/CANCEL" button to start the Keep Warm program.
The digital screen displays "KEEP WARM" and Keep Warm time. The Keep Warm time is
displayed from 0:00 to 24:00. After 24 hours in Keep Warm mode has passed, the rice cooker
will return to the standby mode.
2. In working mode, press the "KEEP WARM/CANCEL" button to exit the working state and
return back to the standby mode.
3. After cooking is completed, the Keep Warm mode starts up. The Keep Warm time is
displayed from 0:00 to 24:00. After 24 hours in Keep Warm mode has passed, the rice cooker
will return to the standby mode. It is recommended to eat the food within 5 hours after
cooking so that its taste will not deteriorate.
Controls
IMPORTANT
To select a cooking program, the rice cooker must first be plugged into a 2 pong
electrical outlet (ON).
Start
Menu
KEEP WARM/CANCEL
Operating
Instructions
Page 8
Operating
Instructions
In standby mode, press "MENU" button, select various functions, and then press "PRESET"
button to enter the Preset mode.
Time setting button. When entering the "STEAM" function, Preset mode and clock setting
mode, press "HR." for hours adjustment and "MIN." for minutes adjustment.
PRESET
HR. I MIN.
SET CURRENT TIME
Setting the current time:
1. In standby mode, press the "HR." button for 3 seconds to enter the clock setting mode.
The digital screen flashes to display the current time.
2. Press "HR." and "MIN." to set the hours and minutes. The time is 24-hour clock. Press the
"HR." button once for 1 hour adding and press the "MIN." button once for 1 minute
adding. Long press to increase automatically.
3. After pressing the "START" button or 10~15 seconds no operation, the time setting is
completed, the standby mode is entered, and the digital screen displays the set time.
INTRODUCTION
The Toshiba® Rice and Grain Cooker benefits from the use of Fuzzy Logic, a technology that
senses moisture levels to accurately cook food. Cooking time and temperature are defined
by the appliance. Our highly intelligent Rice and Grain Multicooker automatically adjusts the
heat and timing for perfect results every time.
IMPORTANT
• Do NOT place anything on or over the rice cooker lid, during use.
• Do NOT touch the steam vent during cooking.
• Do NOT place the interior cooking pot on a cooktop burner; the high temperature
will warp the pot. The cooking pot is designed to be used only in the rice cooker.
• Do not use a pot or container other than the cooking pot (provided) in the rice
cooker.
• Do not insert any foreign objects into the air vent or gaps at the bottom of the rice
cooker.
• Do not season rice while it is being kept warm in the cooking pot. Seasonings left in
contact with the interior of the cooking pot may damage the non-stick coating.
• Do not use metal cooking utensils. Metal utensils may scratch or damage the
non-stick coating.
Operating
Instructions
Using the Rice Cooker
Page 9
Operating
Instructions
MEASURING RICE
IMPORTANT
The total amount of rice and water should NOT exceed the 5.5 cup MAX level marked
inside the cooking pot.
NOTE
The Rice Measure is significantly smaller than the standard U.S. cup measure.
• To achieve the correct ratio of rice to water, use ONLY the Rice Measure (cup provided).
• Level the rice in the Rice Measure cup so that it is even with the top.
• For softer or firmer rice adjust the ratio of water to rice accordingly.
• If the rice requires rinsing before cooking, measure the rice before you rinse it, Follow the
rinsing directions for that specific type of rice.
RINSING RICE
Some types of rice are rinse-free and other types require rinsing before use to remove excess
starch which may make the rice sticky. Also, cooking rice with starchy water may result in the
rice burning or being improperly cooked.
If the water should turn white or cloudy, when added to rinse-free rice, drain and replace the
water before cooking. Many recipes recommend rinsing quickly so the rice does not absorb
water prior to cooking.
To Rinse Rice Quickly:
1. Place a colander inside a larger bowl.
2. Place the rice in the colander and rinse under cool running water.
Rinsing rice in hot water may prevent the rice from cooking properly.
3. Using your hand stir the rice around 3 to 4 times to separate the grains.
4. Continue to rinse until the water in the bowl is clear.
ADDING OTHER INGREDIENTS
If you wish to add other ingredients or seasonings to the rice, do so after adding the water.
The rice will not cook properly and be too firm if ingredients are added before the water.
Operating
Instructions
Page 10
NOTE
Electrical Shock Hazard
• Do not use an adapter.
• Do not use an extension cord.
Failure to do so can result in death, fire or electrical shock.
COOKING RICE
WARNING
Cooking time will vary depending on the type of rice or grain being cooked.
1. Before using for the first time, wash the cooking pot, inner lid, steam port, other
accessories and attachments, and then dry each thoroughly.
2. Measure rice, and then rinse rice, if needed.
3. Add measured rice to the cooking pot.
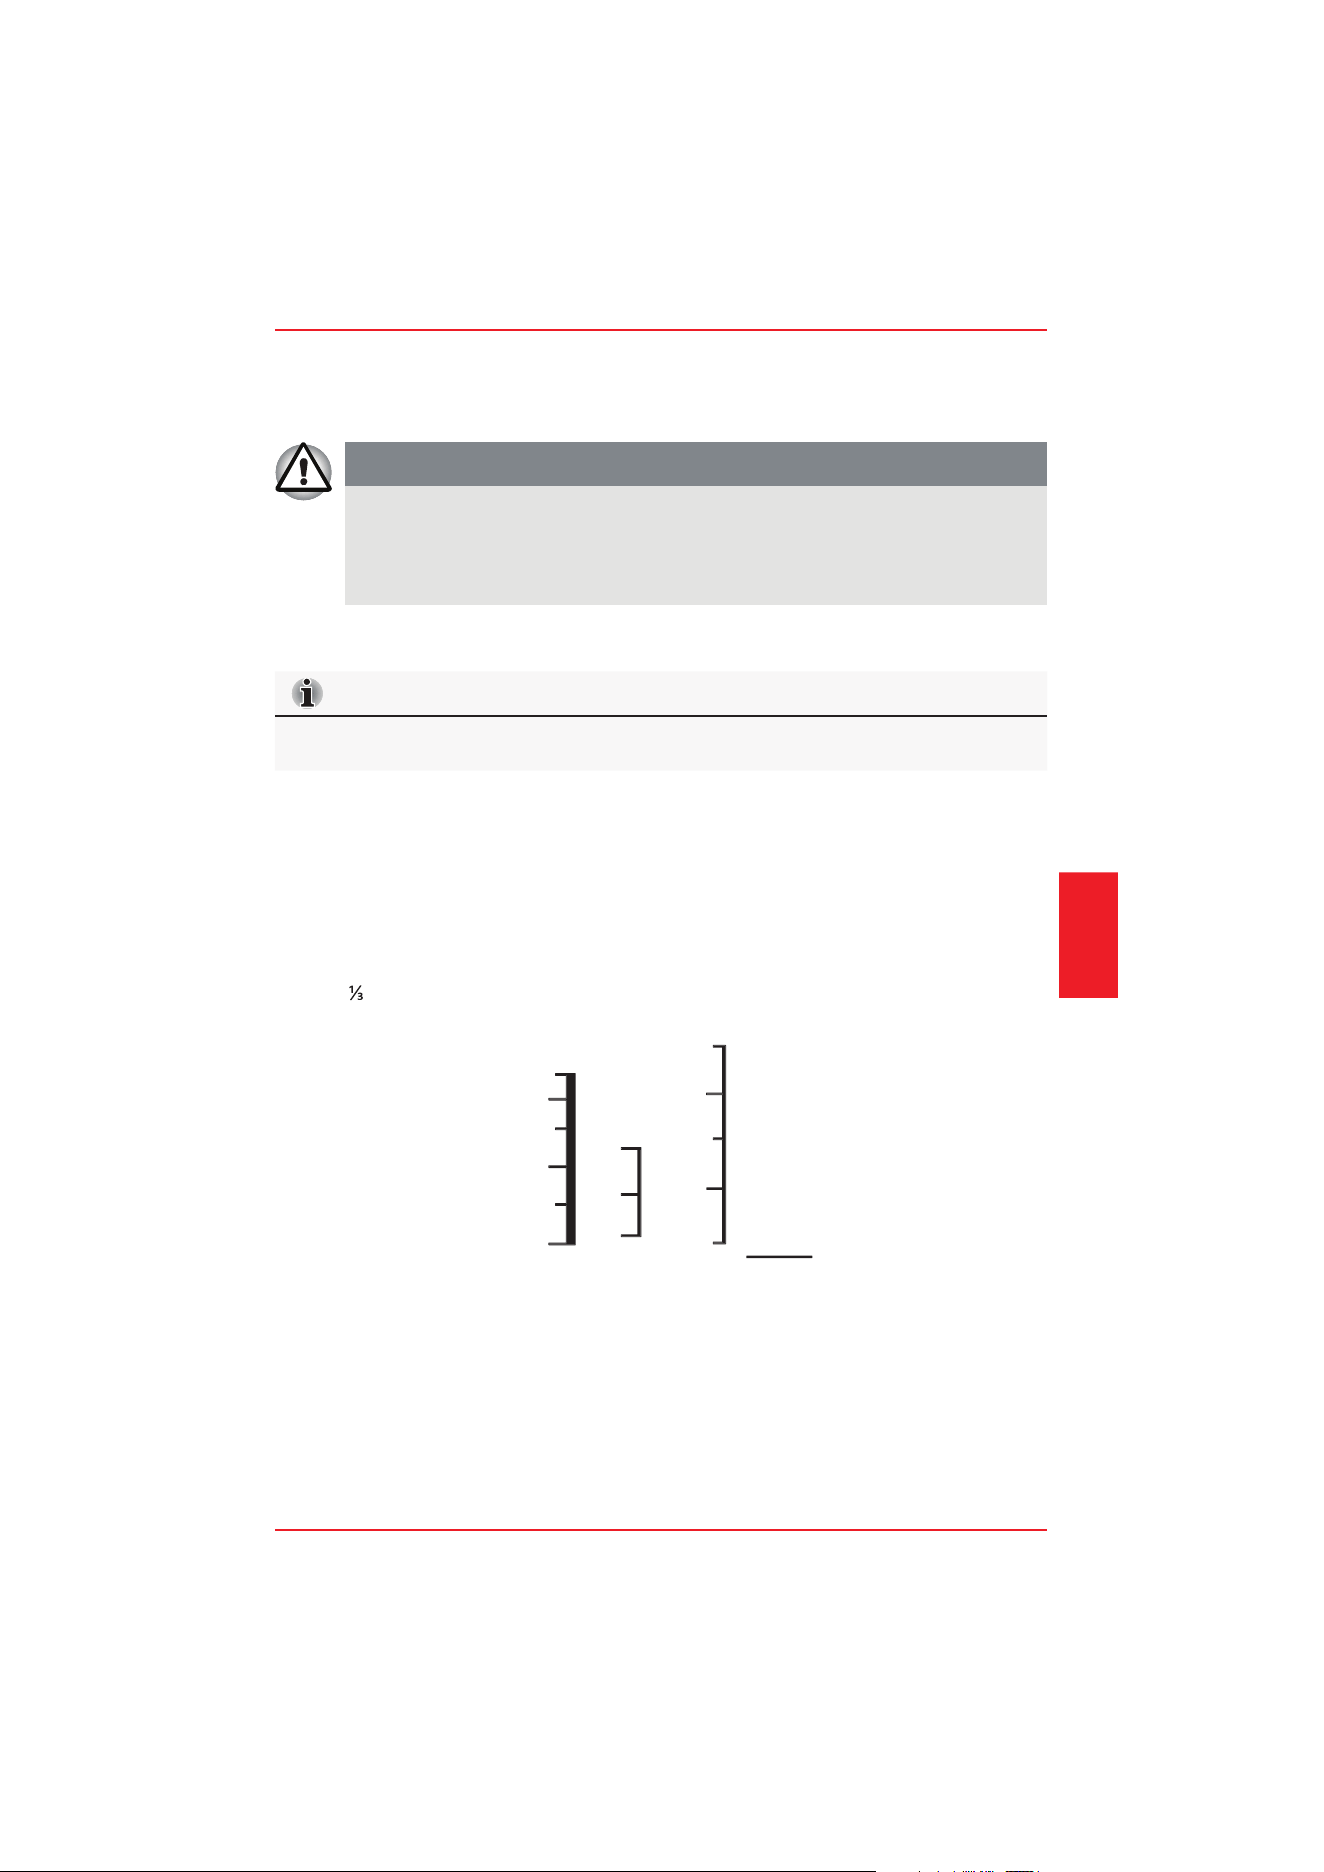
4. Add water until it reaches the corresponding numbered Water Line marked on the
interior of the cooking pot. For example, when cooking 3 measures of white rice, add
water to third line from the bottom of the pot.
To suit your personal preference, the amount of liquid can be adjusted slightly (no more
than of the distance between the lines).
WHITE
RICE
BROWN
RICE
MAX
(Cup)
5
4
3
2
1
3
2
1
2.5
0.5
(L)
2
1
MAX
CAPACITY
STEAM
5. Stir the rice into the water, so that each grain is immersed in the water.
6. Place the cooking pot into the rice cooker.
Operating
Instructions
(Cup)
5.5
MAX
Page 11
12. After cooking is completed, it will automatically change to Keep Warm mode, and
"KEEP WARM" light turns on
NOTE
NOTE
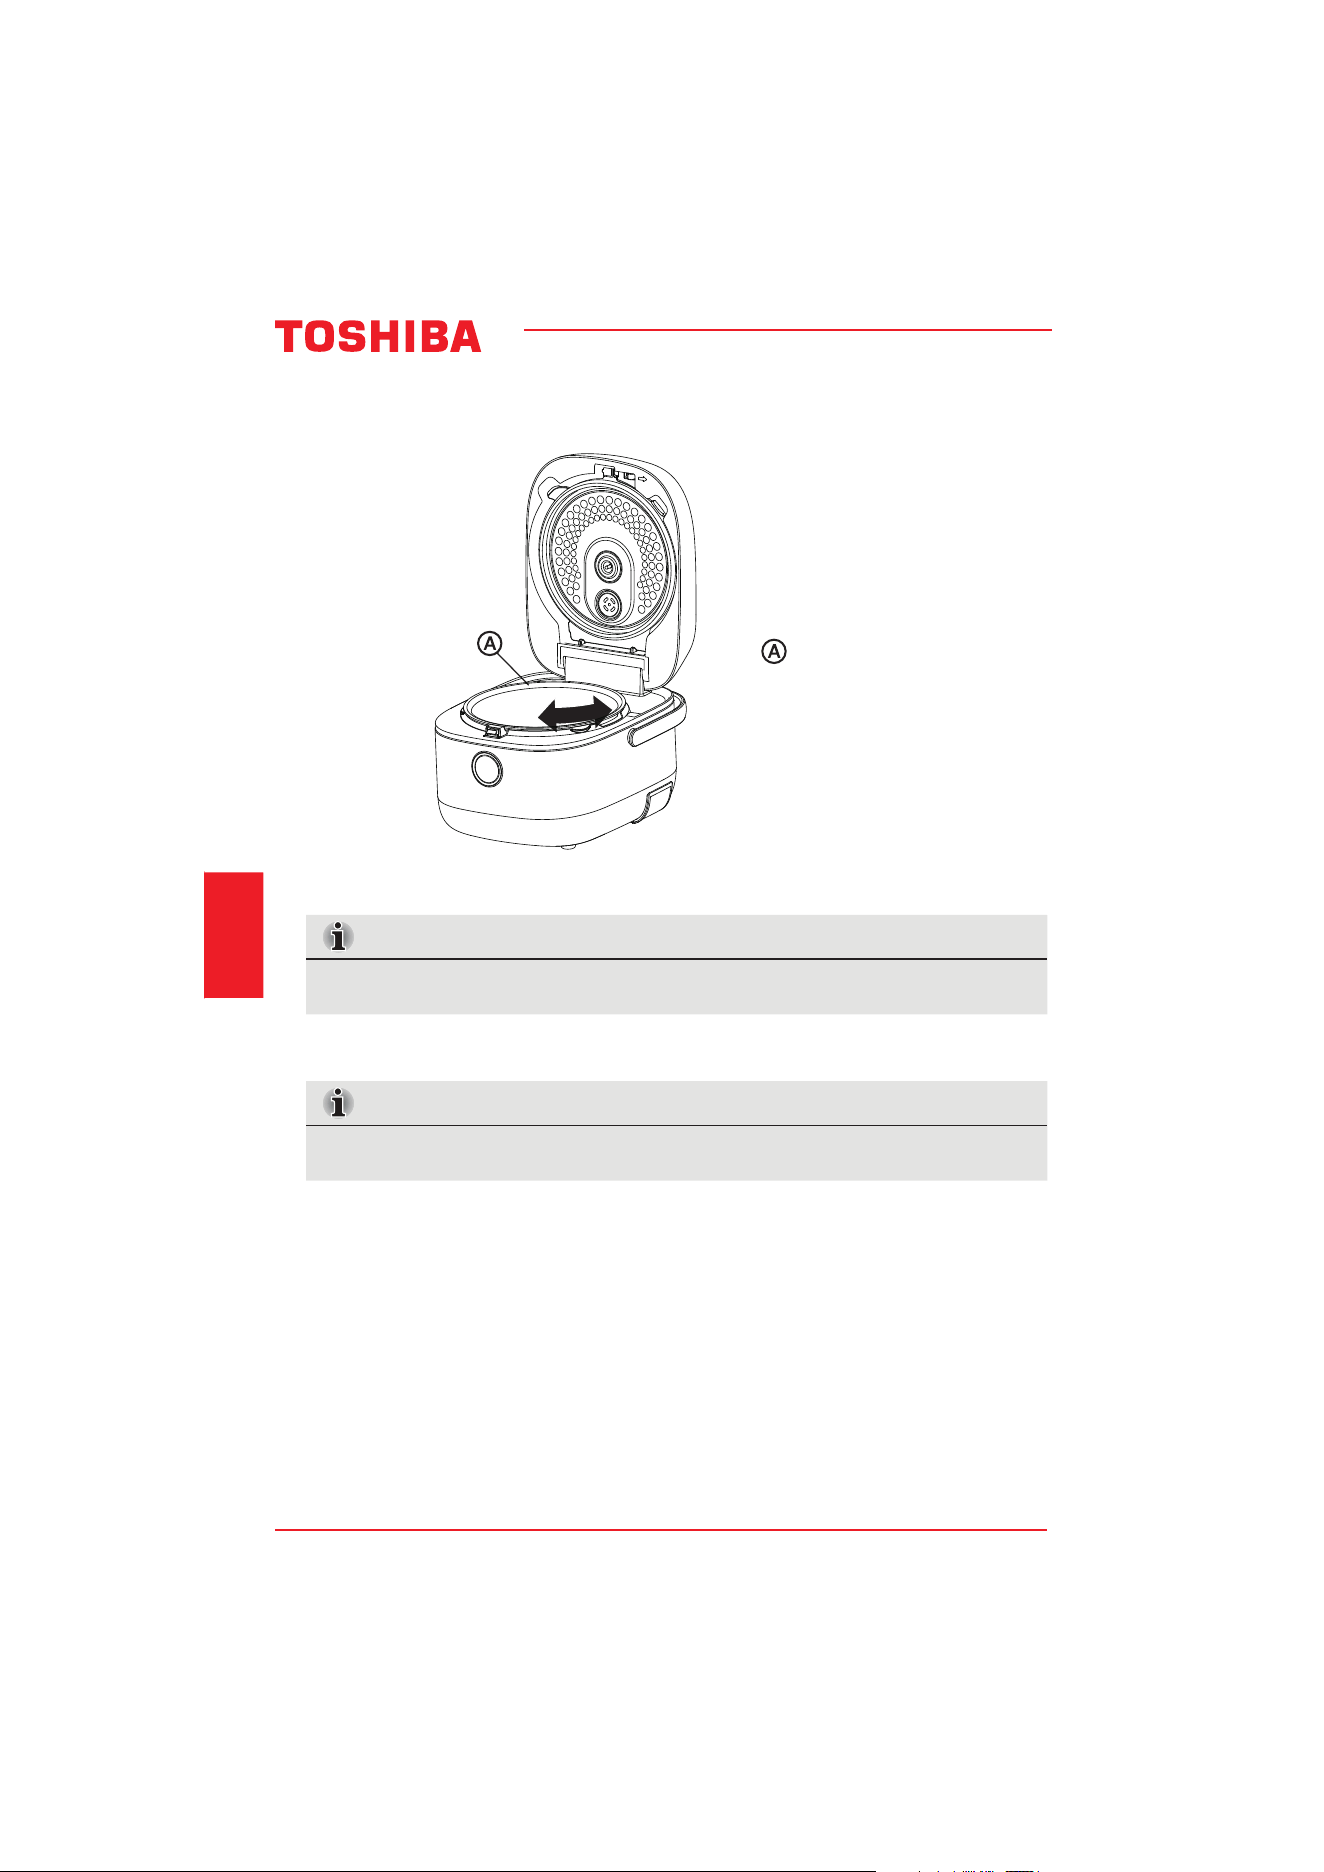
7. Rotate the pot two to three times to ensure a solid contact between the bottom of the
cooking pot and the heating plate.
Cooking Pot
8. Close the lid, and then press downward until it clicks into place.
9. Plug the power supply cord into a grounded 2 prong electrical outlet.
The rice cooker is powered ON, but in standby mode (no heat).
10. Select desired cooking program. See "Controls" for explanation of options.
11. Press START.
During first use, there may be a plastic odor which will dissipate after using.
Operating
Instructions
Page 12

Operating
Instructions
COOKING PROGRAMS
Average cooking time is approximate; it will automatically increase or decrease depending
on the amount being cooked. Keep Warm mode begins automatically at the end of each
cooking program. The timer displays from 0 to 24 hours. After 24 hours in Keep Warm mode
has passed, the rice cooker will return to the ON (standby) mode.
LOW CARB
1. In standby mode, press the "MENU" button, select the "LOW CARB" function, and the
"LOW CARB" light flashes.
2. Press the "START" button to start the "LOW CARB" program, the "LOW CARB" light remains
on, and the digital screen displays the time countdown.
3. After cooking is completed, it will automatically change to the Keep Warm mode.
4. Recommended cooking volume range: 1-2 cups of rice.
5. When selecting LOW CARB function, use the metal steamer to put the rice into the inner
pot to wash the rice. After washing the rice, add the corresponding amount of water
according to the water level line on the metal steamer.
QUICK RICE
1 In standby mode, press the "MENU" button, select the "QUICK RICE" function, and the
"QUICK RICE” light flashes.
2. Press the "START" button to start the "QUICK RICE" program, the "QUICK RICE" light
remains on, and the digital screen displays the time countdown.
3. After cooking is completed, it will automatically change to the Keep Warm mode.
4. Recommended cooking volume range: 1-5.5 cups of rice.
5. Add the corresponding amount of water according to the "WHITE RICE" water level line
on the inner pan.
WHITE RICE
1. In standby mode, press the "MENU" button, select the "WHITE RICE" function, and the
"WHITE RICE” light flashes.
2. Press the "START" button to start the "WHITE RICE" program, the "WHITE RICE" light
remains on, and the digital screen displays the time countdown.
3. After cooking is completed, it will automatically change to the Keep Warm mode.
4. Recommended cooking volume range: 1-5.5 cups of rice.
5. Add the corresponding amount of water according to the "WHITE RICE" water level line
on the inner pan.
BROWN RICE
1 In standby mode, press the "MENU" button, select the "BROWN RICE" function, and the
"BROWN RICE" light flashes.
2. Press the "START" button to start the "BROWN RICE" program, the "BROWN RICE" light
remains on, and the digital screen displays the time countdown.
3. After cooking is completed, it will automatically change to the Keep Warm mode.
4. Recommended cooking volume range: 1-3 cups of rice.
5. Add the corresponding amount of water according to the "BROWN RICE" water level line
on the inner pan.
Operating
Instructions
Page 13
MIXED GRAIN
1. In standby mode, press the "MENU" button, select the "MIXED GRAIN" function, and the
"MIXED GRAIN" light flashes.
2. Press the "START" button to start the "MIXED GRAIN" program, the "MIXED GRAIN" light
remains on, and the digital screen displays the time countdown.
3. After cooking is completed, it will automatically change to the Keep Warm mode.
4. Recommended cooking volume range: 1-3 cups of rice.
5. Add the corresponding amount of water according to the " WHITE RICE " water level line
on the inner pan.
QUINOA
1. In standby mode, press the "MENU" button, select the "QUINOA" function, and the
"QUINOA" light flashes.
2. Press the "START" button to start the "QUINOA" program, the "QUINOA" light remains on,
and the digital screen displays the time countdown.
3. After cooking is completed, it will automatically change to the Keep Warm mode.
4. Recommended cooking volume range: 1-5.5 cups.
5. Add the corresponding amount of water according to the "WHITE RICE" water level line on
the inner pan.
STEAM
1. In standby mode, press the "MENU" button, select the "STEAM" function, and the "STEAM"
light flashes.
2. The default cooking time for the "STEAM" function is 30 minutes. You can press the "HR."
button to change it to 1 hour, or press the "MIN." button to adjust the cooking time by
minute. Press it once adding a minute at a time, and long press it to automatically increase it.
3. After setting the cooking time, press the "START" button to start the "STEAM" program,
and the digital screen displays the countdown time when boiling.
4. After cooking is completed, it will automatically change to the Keep Warm mode.
5. Add the corresponding amount of water according to the "STEAM" water level line on the
inner pan.
OATMEAL
1. In standby mode, press the "MENU" button, select the "OATMEAL" function, and the
“OATMEAL” light flashes.
2. Press the "START" button to start the "OATMEAL" program, the "OATMEAL" remains on,
and the digital screen displays the time countdown.
3. After cooking is completed, it will automatically change to the Keep Warm mode.
4. Recommended cooking volume range: 1-2 cups.
5. Add the corresponding amount of water as recommended for oatmeal.
NOTE
Operating
Instructions
Mixed grains need to be soaked in water above 176℉for 2hours before cooking.
Page 14

Operating
Instructions
Presetting operation method
1. In standby mode, press the "MENU" button to select the function to be preset.
2. Press "PRESET" to enter the Preset mode, and the digital screen displays "TIMER1" and
the current preset cooking completion time. Or press the "PRESET" button again, the
digital screen displays “TIMER2” and the current preset cooking completion time.
Press “TIMER1” and “TIMER2” continuously, they will display in a cycle. “TIMER1” and
“TIMER2” have the same function. The rice cooker will store each preset cooking
completion time. The last preset cooking completion times are remembered and
recalled whenever you go back into the preset function and select “TIMER1” or
“TIMER2”.
3. Press “HR” and “MIN.” to set the time to when you want the rice cooker to finish
cooking.
The maximum preset time is 24 hours. Press the "HR." button once for 1 hour adding
and press the "MIN." button once for 10 minutes adding. Long press to increase
automatically.
4. Press the “START” button to start the preset function. The screen displays the
completion time. When the rice cooker needs to start cooking, the display will change
to display the cook time remaining. The display will then begin to countdown. The
rice cooker will finish cooking at the original completion time.
5. After cooking is completed, it will automatically change to the Keep Warm mode. The
Keep Warm time can be as long as 24 hours, and the standby state is returned back
after 24 hours. The shorter the Keep Warm time, the better the taste.
6. In the Preset setting state, the program returns to standby mode when no pressing
operation for over 2 minutes.
7. Quinoa and oat porridge meal functions cannot be preset.
8. EXAMPLE OF HOW TO USE THE DELAY FUNCTION:
You want to eat dinner at 6 PM tonight. You will press “MENU” button until you see
the type of rice you want to cook. Then you press “PRESET” button and enter the time
you want the rice cooker to finish cooking. Press “HR” button until the display shows
“18:00”. Then you press “START” button. The rice cooker will display “18:00”. The
display will change when the rice cooker needs to start cooking. The display will then
countdown and the rice cooker will finish cooking at 6 PM.
TIPS FOR GREAT RESULTS
• Measure rice and water accurately.
• For added flavor you may substitute meat stock or broth for the water and chopped
fresh herbs can be stirred into the rice at the end of cooking before allowing to rest.
• Some varieties of rice should be rinsed before cooking. Enriched rice, commonly found
in the U. S., is not rinsed to preserve the added nutrients. If rinsing rice before cooking,
measure rice before rinsing and drain as much water as possible.
• After adding the rice and water to the cooking pot, spread it evenly over the bottom.
• Do not open the lid during cooking.
• Most types of rice will be slightly undercooked at the end of the cooking program. Allow
the cooked rice to “rest” in the cooking pot for 5 to 10 minutes to absorb the last bit of
moisture.
Before using the Preset function, the current time should be set correctly
In order to avoid food deterioration, it is recommended that the preset time should not
exceed 12 hours.
DELAY COOKING
IMPORTANT
Operating
Instructions
The Delay Timer can preset two different cooking completion times, Timer1 and Timer2.
Page 15
CARE AND CLEANING
WARNING
Burn Hazard
• Wait until the rice cooker has cooled before cleaning.
Failure to do so may result in burns
Unplug the rice cooker from the electrical outlet, allow it to cool, and then clean and dry the
cooker and all its parts after each use to avoid odors and poor performance.
GENERAL CARE
IMPORTANT
The rice cooker is not dishwasher safe. Use only soft cloths with a mild dish soap
solution to clean the rice cooker. Do not wash either the rice cooker or its interior
cooking pot in the dishwasher.
CLEANING THE COOKER EXTERIOR
IMPORTANT
Do NOT immerse the rice cooker in water.
Using a soft, damp cloth, clean the outer surfaces of the rice cooker.
Using a soft, dry cloth thoroughly dry the outer surfaces.
Steam Valve
IMPORTANT
• Clean the steam valve frequently to ensure proper venting.
• The rice cooker should be cool to the touch before cleaning the steam valve.
Care and
Cleaning
Page 16
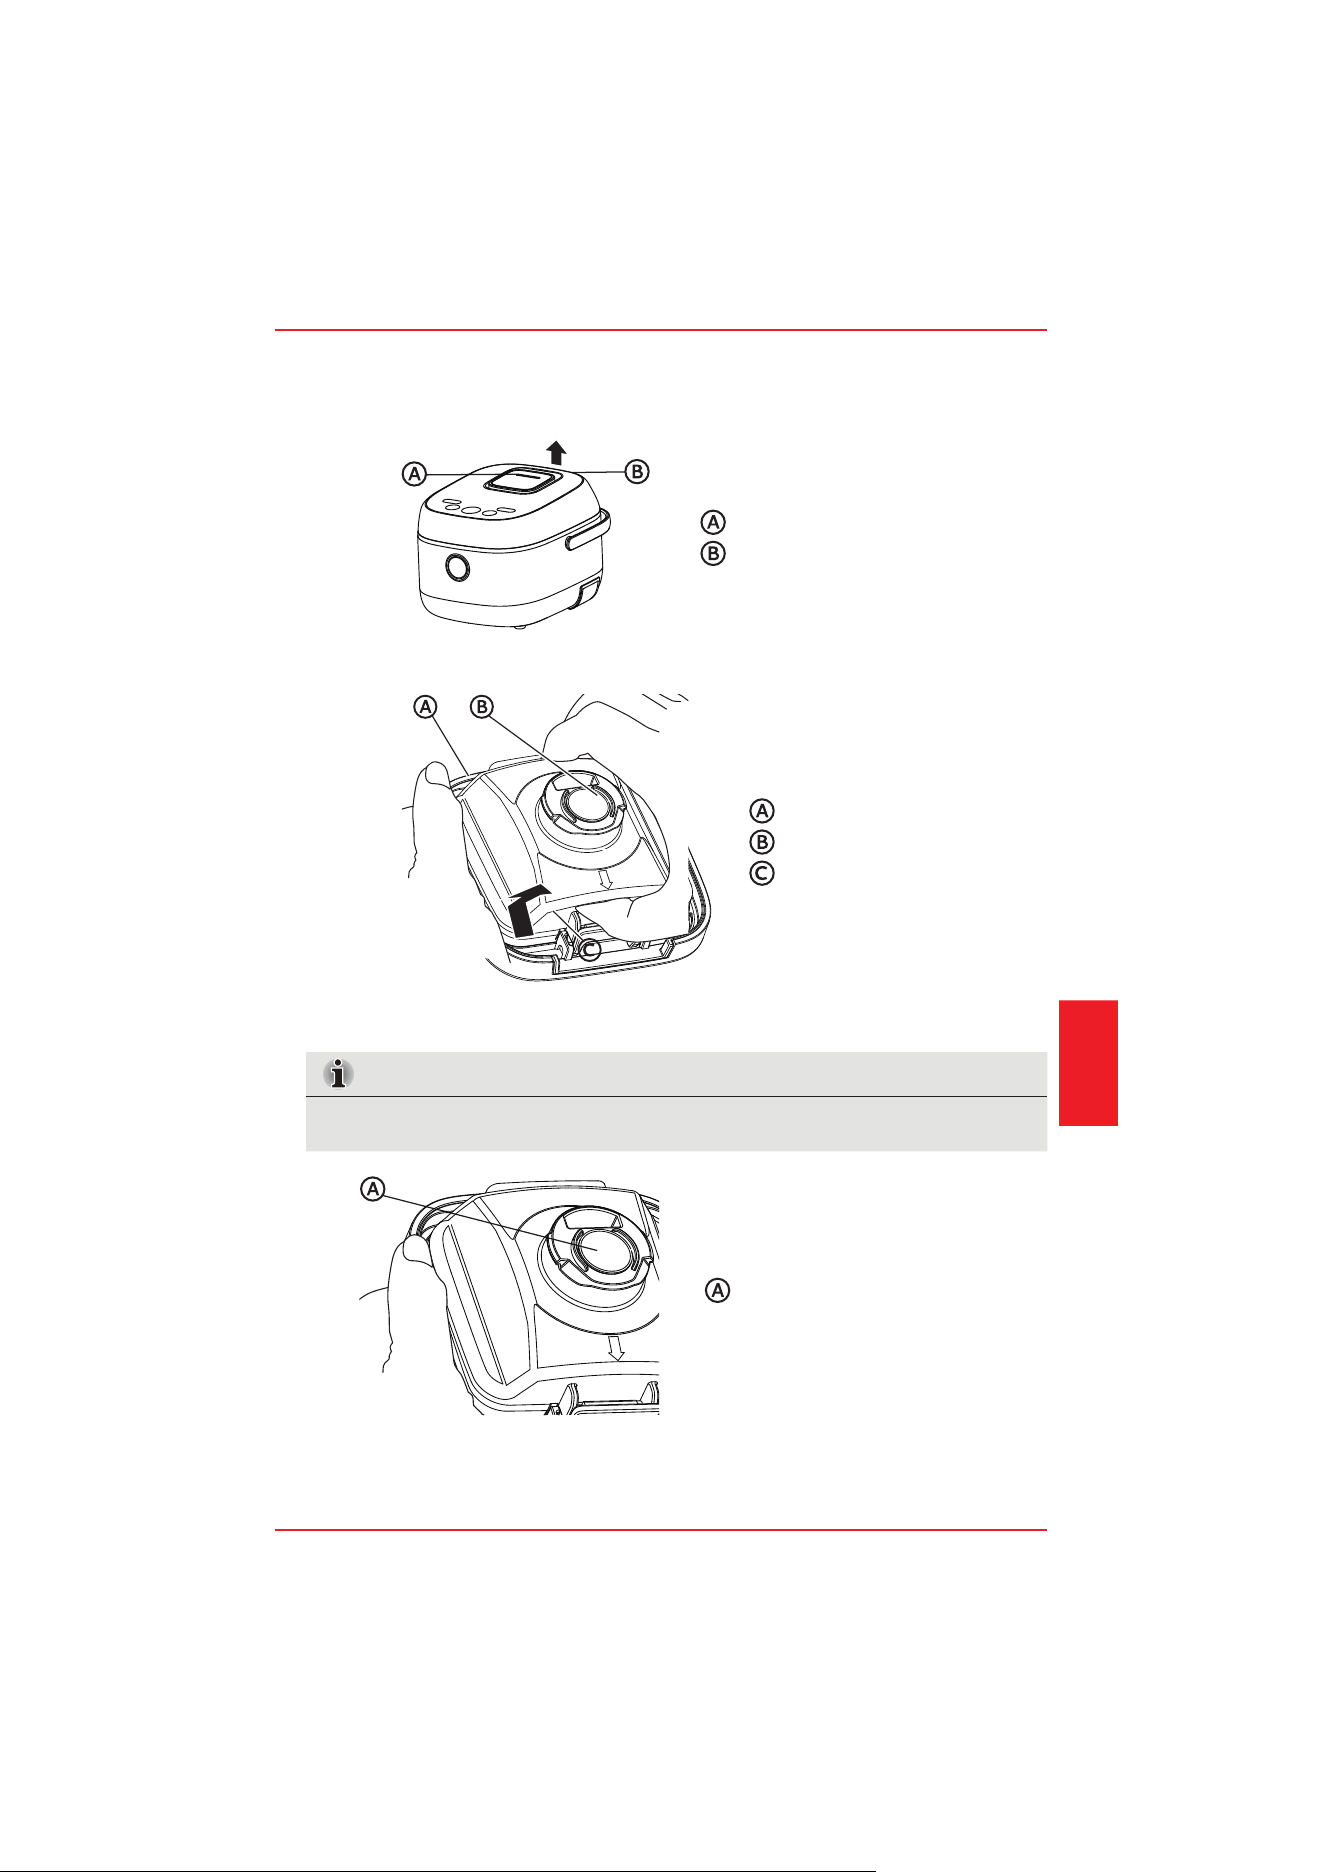
1. Grasp the tab on the Steam Valve Cover, and then lift up to remove the steam valve cover.
Steam Vent Gasket
Valve Seat
Steam Valve
Latch
Steam Valve Cover
Tab
2. Push in where indicated to release the latch and open the valve seat and steam valve
cover.
3. Wash the steam valve with soap and water after every use.
4. Using a soft doth, dry thoroughly.
NOTE
Reinsert the steam vent gasket if it comes off when washing or drying the valve seat.
Page 17User Manual
Care and
Cleaning
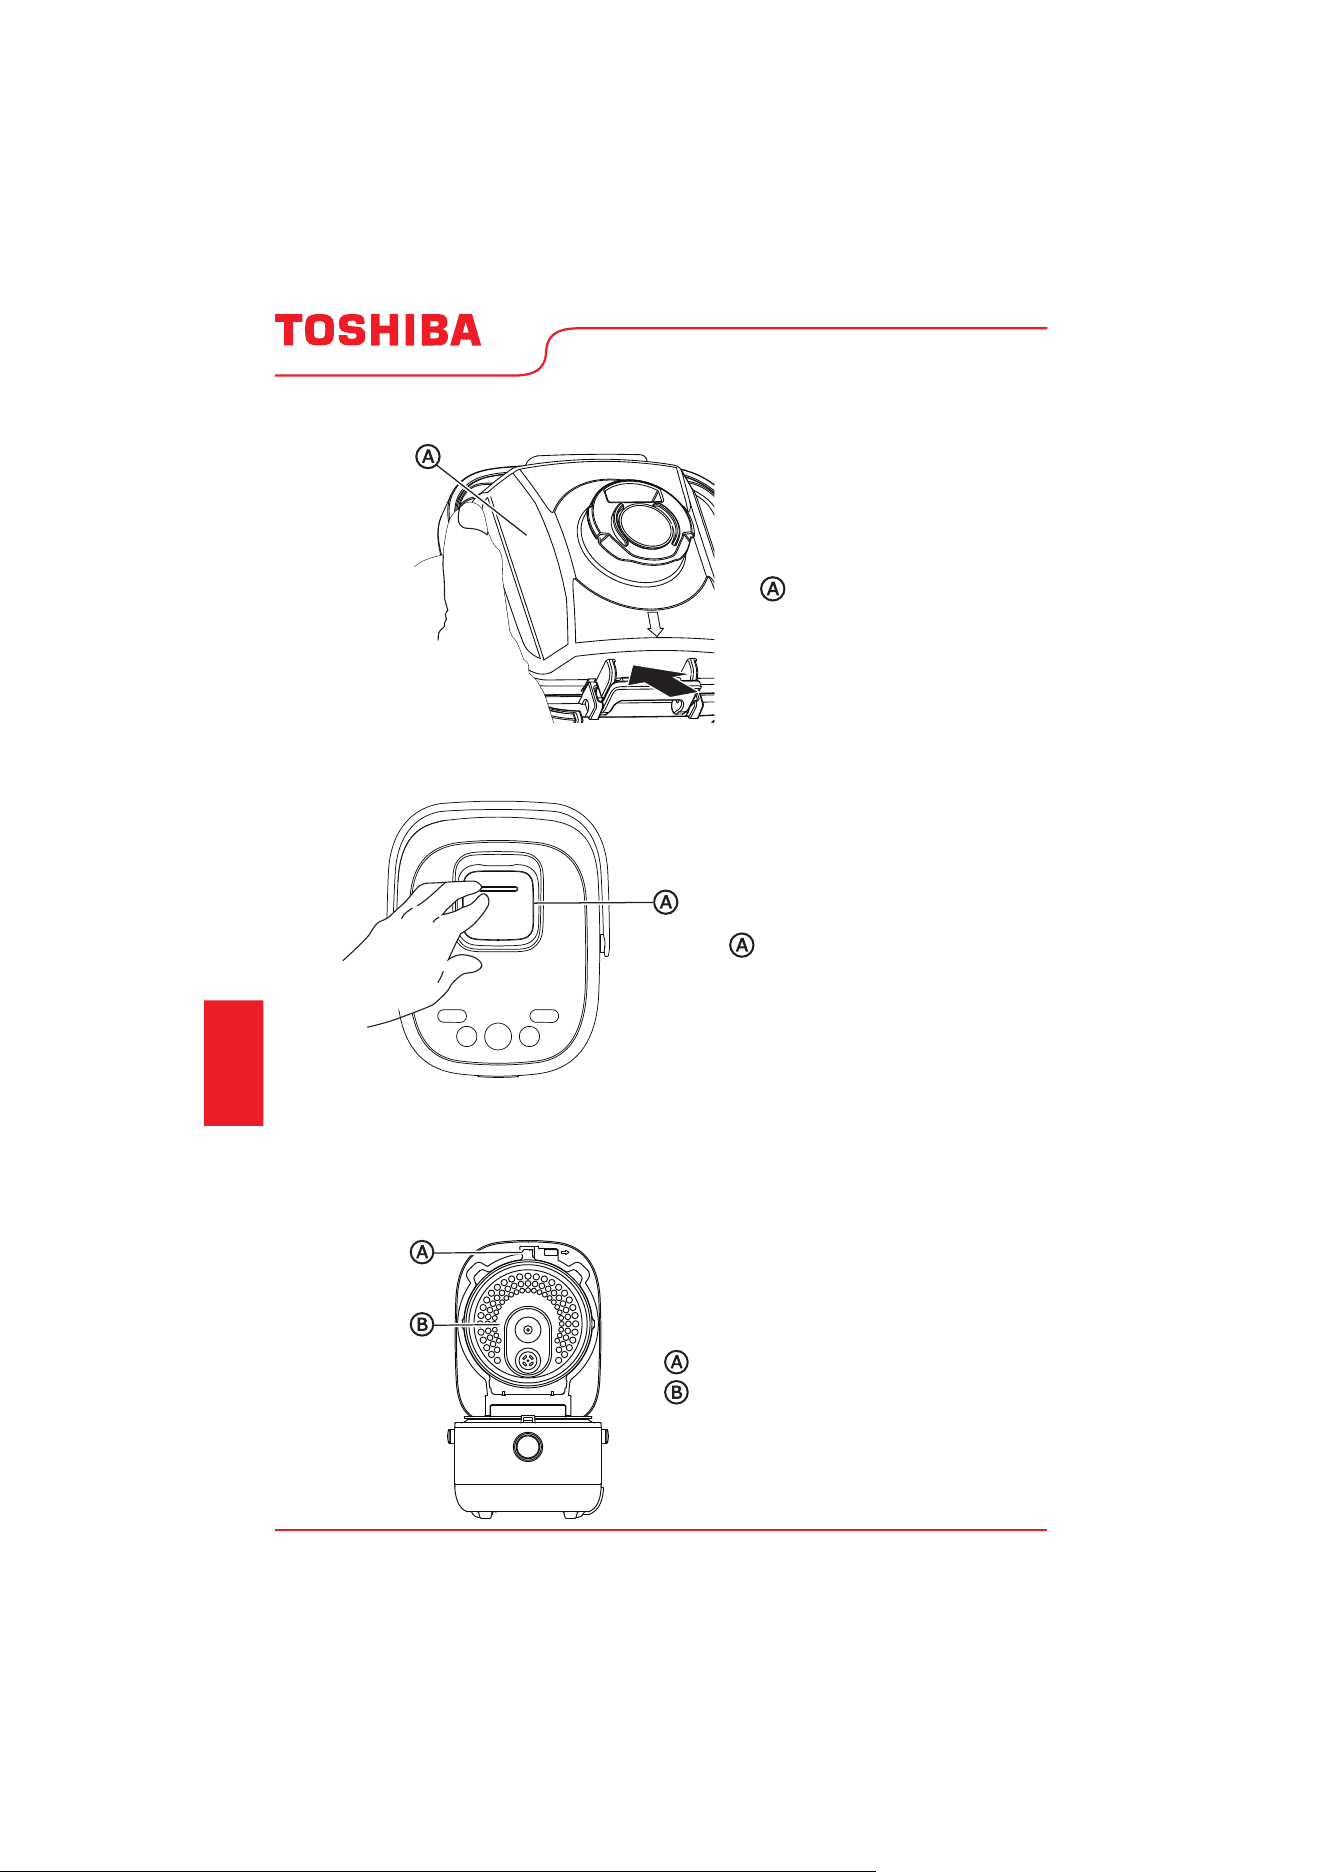
Valve Seat
Steam Valve Cover
5. Close the valve seat cover. A "click" will sound to indicate the cover is closed completely.
6. Align the valve seat with the opening in the cooker lid, and then press downward to
reinstall the steam valve cover.
CLEANING THE COOKER INTERIOR PARTS
Press down on the metal lid latch to open the rice cooker cover.
Page 18 User Manual
Care and
Cleaning
Tab
Inner Lid
Inner Lid
1. With the cover of the rice cooker open, press upward on the tab to release, and then pull
out to remove the inner lid.
2. Wash and dry the inner lid.
3. Replace the inner lid by setting the lower edge into the bottom groove, and then
pressing the upper edge under the tab until you feel it snap into place.
Condensation
Condensation from steam will collect in the well around the cooking pot and under the
steam valve cover.
1. Using a soft cloth, thoroughly dry the areas where condensation collects.
Heating Plate
1. Using a steel wool pad, remove any residue burned onto the metal heating plate.
2. Using a soft, damp cloth, wipe the heating plate, and then dry thoroughly.
Cooking Pot
• The inside of the cooking pot has a non-stick coating that can lose its non-stick
properties if it becomes scratched or damaged.
• Do not use abrasive cleansers, vinegar, bleaching agents, steel wool or other harsh
scrubbing brushes to clean the cooking pot.
• Do not use metal cooking utensils.
• Wash the cooking pot immediately after removing rice that has been seasoned.
Seasonings may damage the non-stick coating of the cooking pot if left in contact
for any length of time.
1. Wash the cooking pot, using a soft cloth and a nonabrasive cleanser or a mild solution of
dish soap and warm water.
2. Using a soft cloth, dry both the interior and exterior of the cooking pot.
Page 19User Manual
Care and
Cleaning
IMPORTANT
NOTE
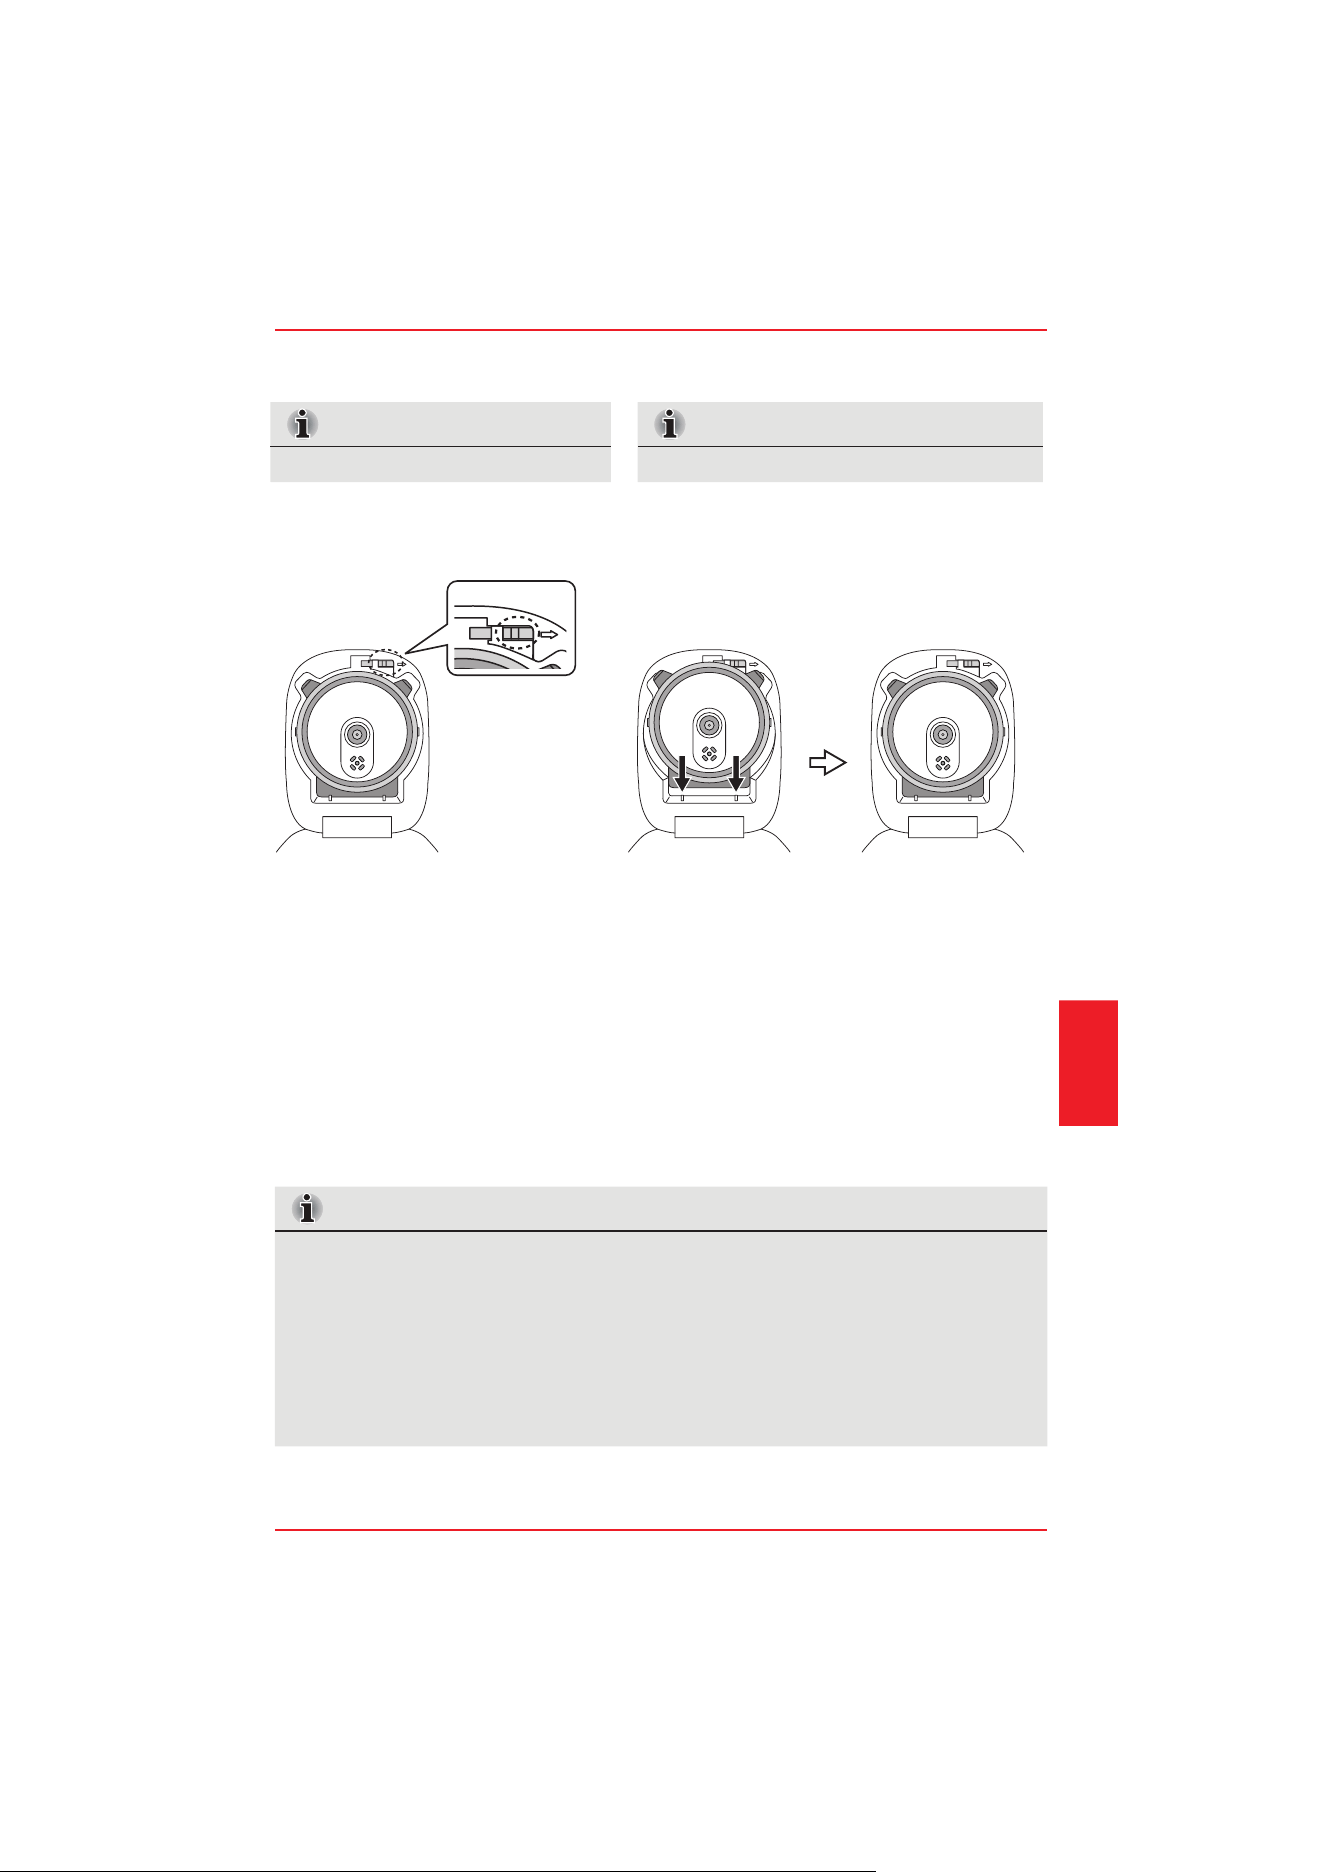
Inner Lid Removal Method
NOTE
Inner Lid Installation Method
Move the slider to the right and take
out the inner lid.
Insert the lower part of the lid into the
protrusion on the lower part of the inner cover,
and then clamp the upper part of the lid into
the slider.
Note: If it is difficult for the lid to snap into the
slider, move the slider to the right and press
the lid again.
Troubleshooting
TROUBLESHOOTING TIPS
Before calling for service, review the following tips. It may save you time and money.
This list includes common occurrences that are not the result of poor workmanship or
defective materials.
Any other servicing should be performed by an authorized service representative.
WARNING
Electrical Shock Hazard
• Do not use an adapter.
• Do not use an extension cord.
Failure to do so can result in death, fire or electrical shock.
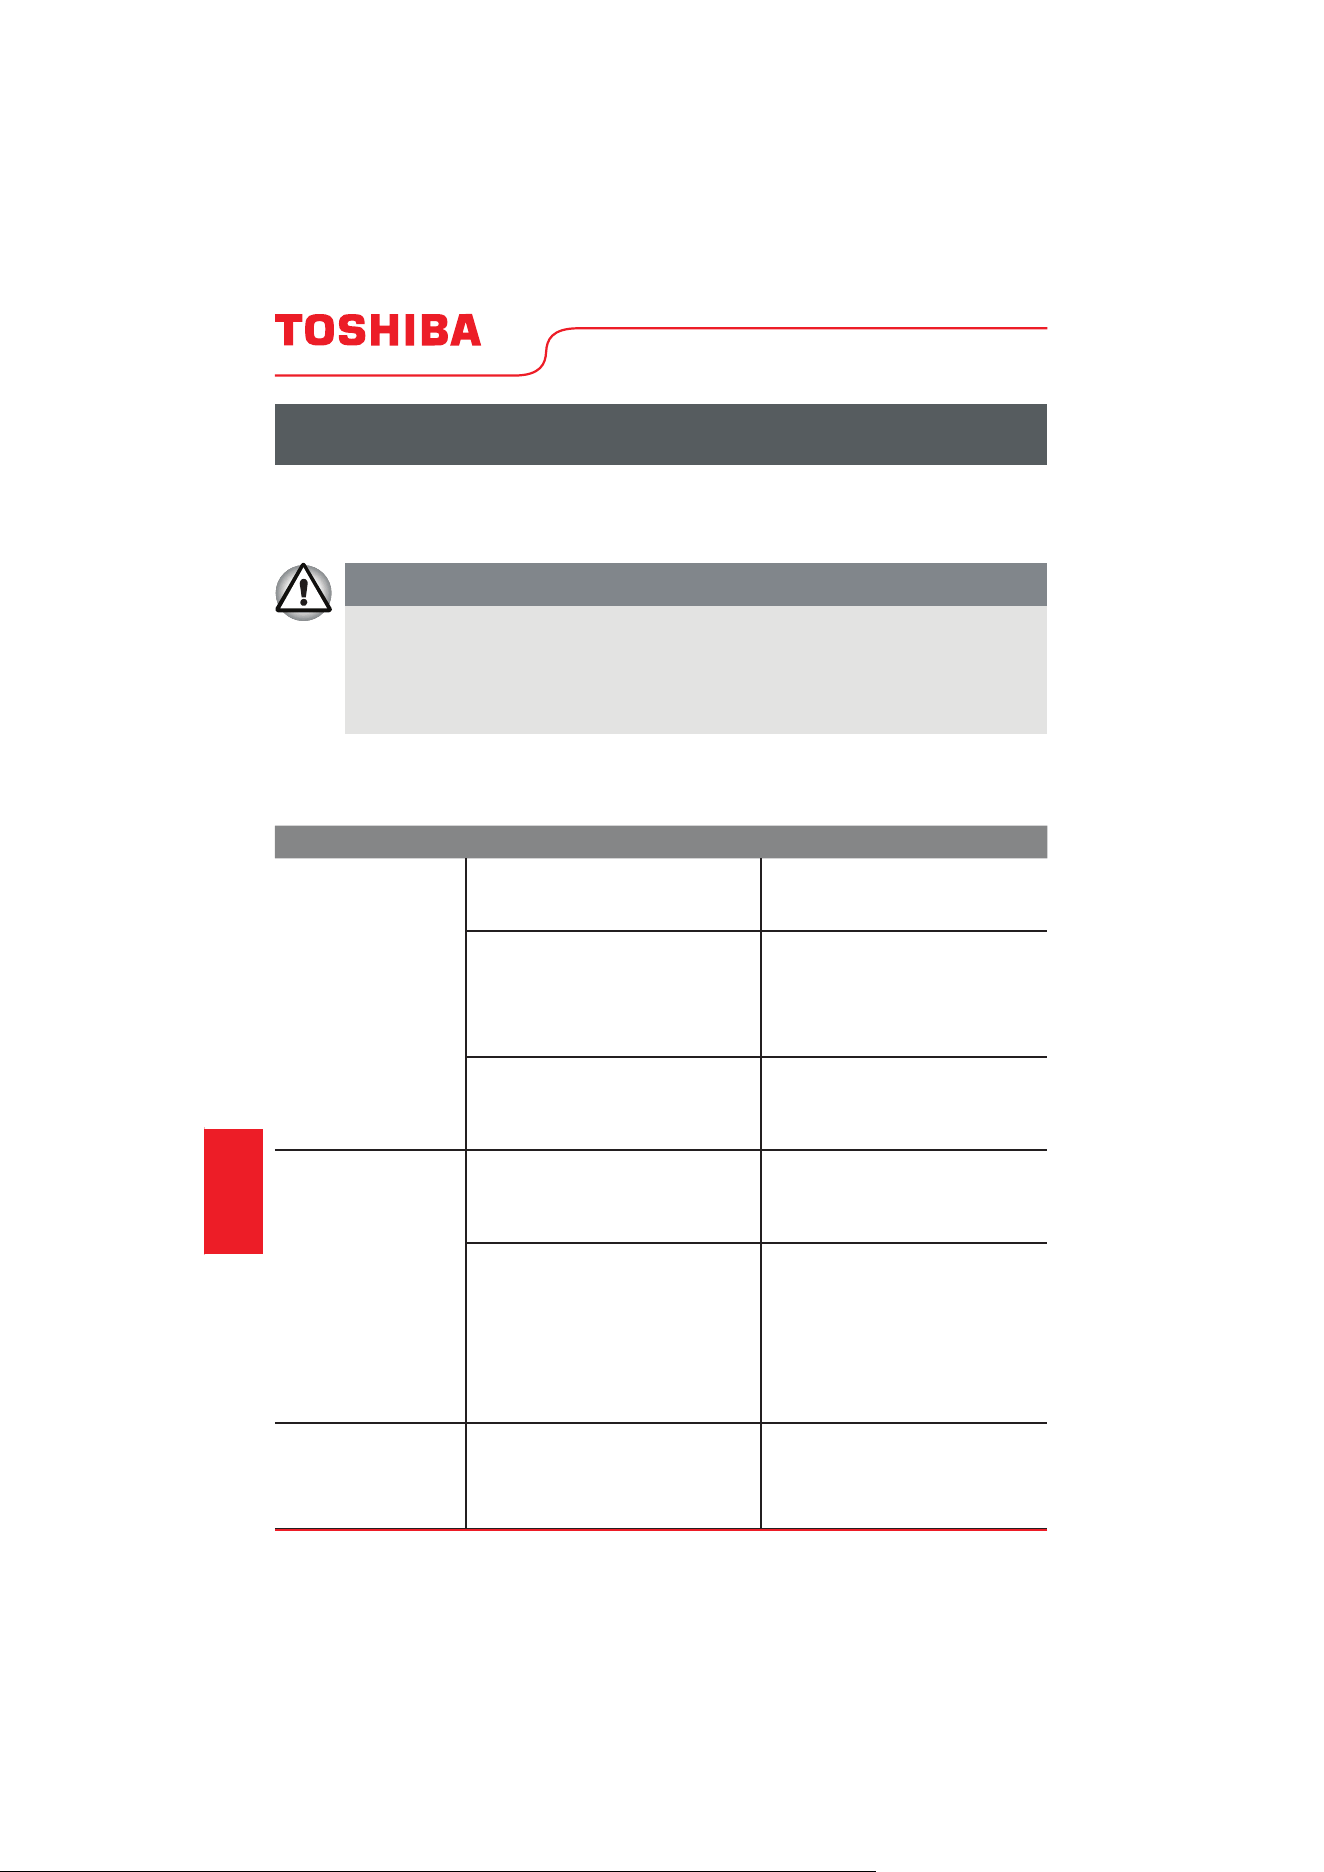
PROBLEM SOLUTION POSSIBLE CAUSE
Rice cooker does
not operate
Rice is mushy,
sticky or clumping
Rice is hard or dry
The power supply cord is not
completely plugged into a
working outlet.
Plug the power supply cord into
the electrical outlet.
There has been a power failure.
During a power failure, the
time-of-day, not the countdown
time, will appear in the display
during a cooking program.
Another appliance was plugged
into the same electrical outlet,
which tripped the circuit breaker
or blown a household fuse.
Rice was cooked with too much
water
Rice was rinsed or soaked before
cooking
Pre-rinsing can cause the rice to
crack and become mushy and
sticky during cooking.
Soaking before cooking softens
the texture of rice.
Rice was not cooked with
enough water or it was cooked
with mineral water.
Reset the circuit breaker or
replace the fuse once power is
restored.
Reset the circuit breaker or
replace the fuse. Plug power
supply cord into a separate
,
dedicated circuit.
Use less water when cooking
rice. Once cooked, fluff rice
immediately using a fork to
separate the grains.
If rinsing is required, rinse the
rice quickly and drain as much
water as possible. Do not allow
rice to soak in liquid prior to
cooking.
Use more water when cooking
rice.
Soak the rice for a short time
before cooking.
Page 20 User Manual
Troubleshooting

Troubleshooting
Rice is scorched
NOTE: Rice turning
a light brown color
is not a result of rice
cooker failure.
Rice does not taste
good
Unpleasant odor
NOTE: A plastic
odor is normal the
first few times the
cooker is used.
Rice is dry and has
turned color
Dirt or a foreign substance is
stuck to the temperature sensor.
Other ingredients and/or
seasonings were added to the
rice before cooking.
Rice was soaked for too long.
The cooking pot and inner cover
are warm or hot when cooking
begins.
Dirt or a foreign substance is
stuck to the temperature sensor,
inner lid, or steam vent.
The inner lid or steam vent was
not attached to the rice cooker.
Used wrong ratio of ingredients
to water or wrong cooking
program for
Keep Warm mode was used too
long.
Rice left in the cooking pot after
Keep Warm mode has turned off.
The rice was not rinsed
thoroughly.
The cooking pot, inner lid and/or
steam vent is dirty.
The plastic scoop was left in the
cooking pot.
Rice has been reheated
repeatedly.
Steam vent is not attached
correctly.
Remove foreign substance and
clean well.
Cook only rice with the proper
ratio of water.
Soak rice for a shorter period
of time.
All
ow rice cooker to cool
completely before cooking a
new batch.
Remove foreign substance and
clean well.
After cleaning replace both the
inner lid and steam vent into
the rice cooker. See “Care and
Cleaning.”
Accurately measure the correct
ratio of ingredients to water.
Do not allow rice to remain in
Keep Warm mode indefinitely.
Serve rice soon after the
10-minute resting period.
Remove cooked rice from
cooker.
Rinse rice until the water runs
clear.
Clean and dry parts thoroughly.
See “Cleaning.”
Remove plastic scoop and all
accessories from the rice cooker
before using.
Rice should be reheated only
once to maintain the quality.
Sprinkle rice with water to help
keep it from drying out during
reheating.
After washing, attach the steam
vent correctly to the rice cooker.
See “Cleaning.”
Page 21User Manual
Troubleshooting
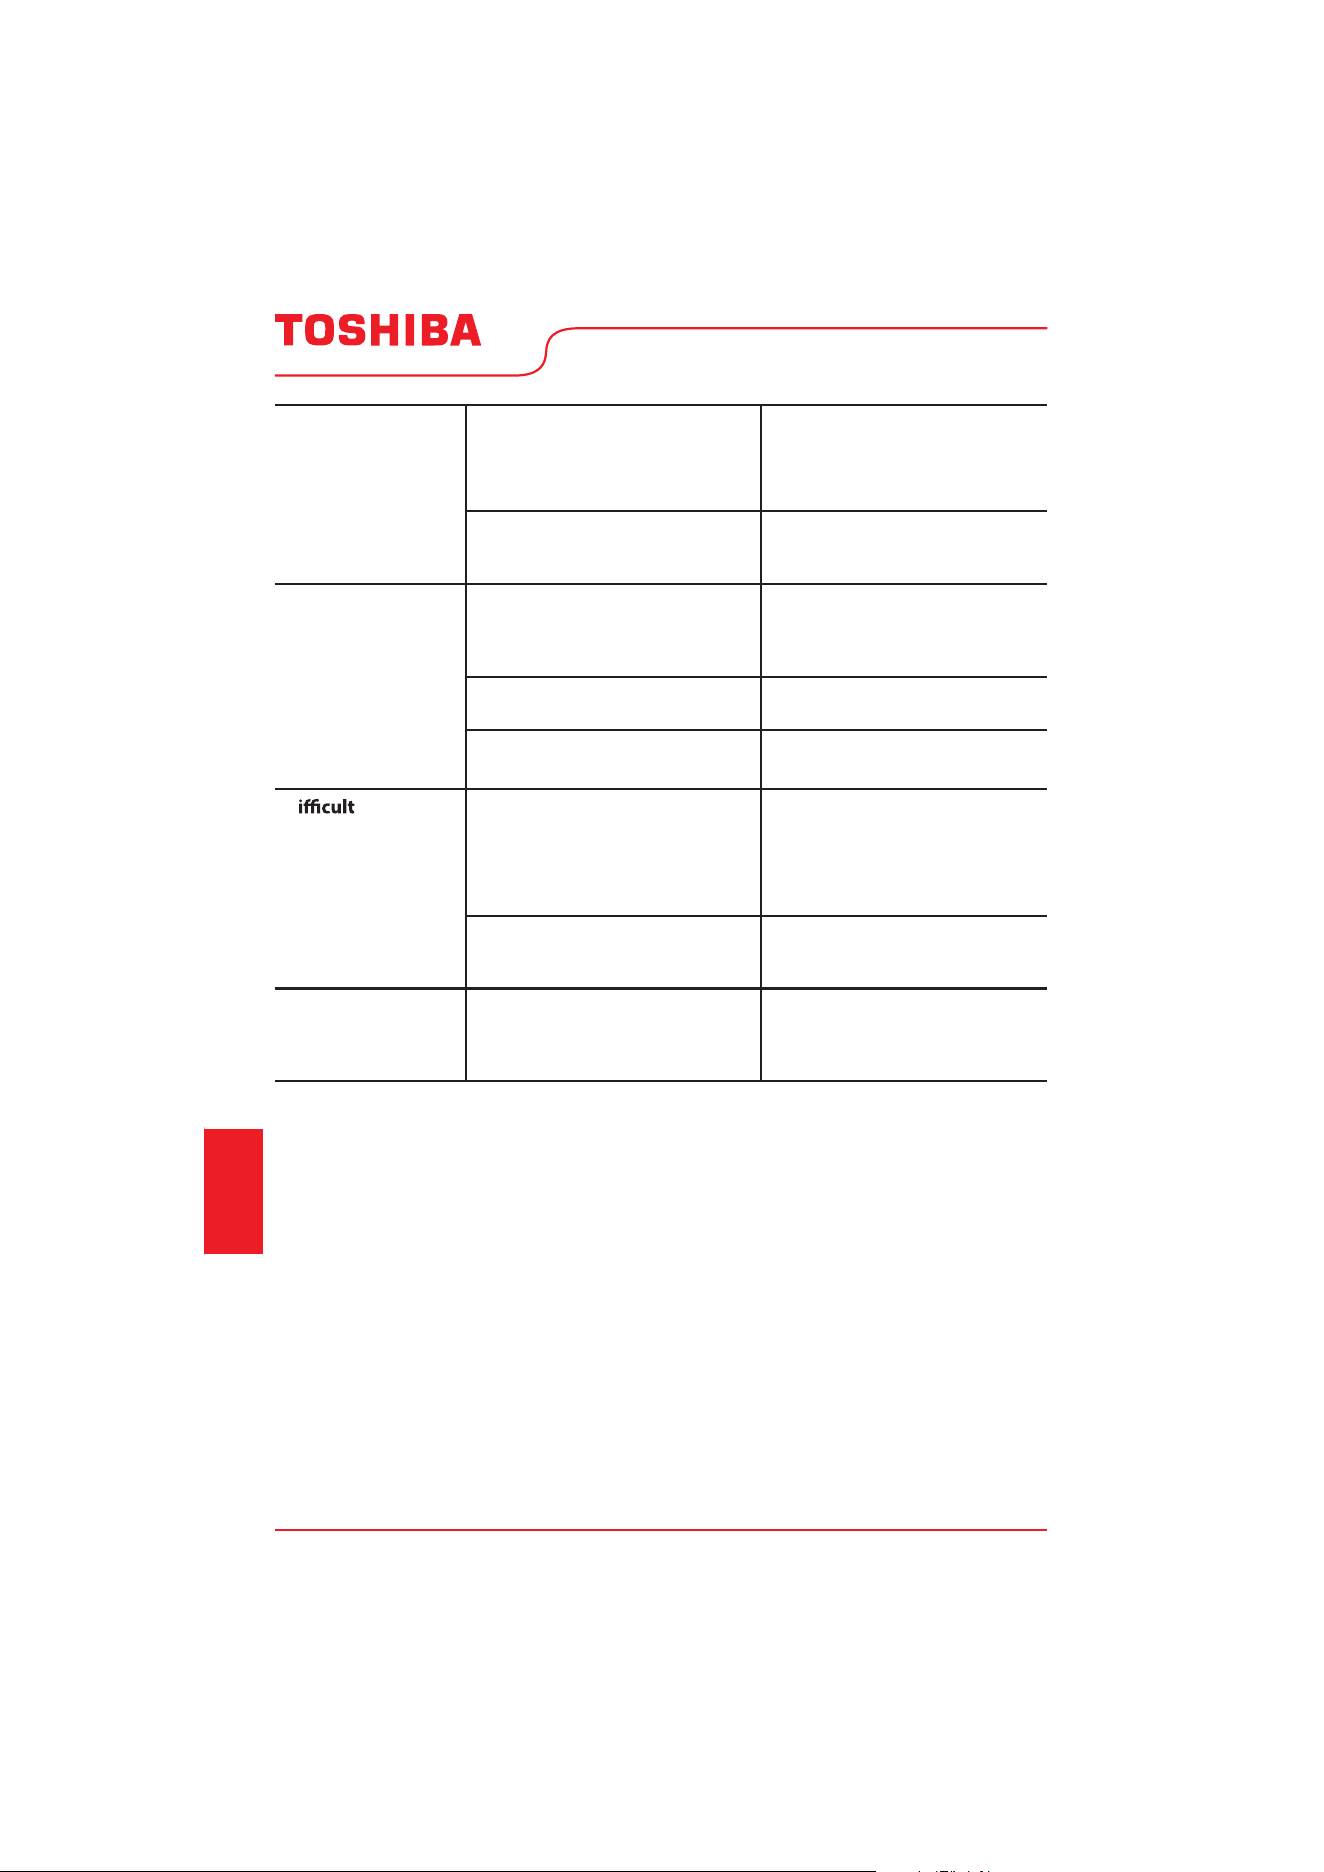
Troubleshooting
Steam escaping
from the rice
cooker
Rice cooker
boiling over and
spattering
NOTE: It is normal
for moisture to
appear on the inner
lid or cooking pot
and drip when the
lid is opened.
D
to close
the cooker lid
Film on interior of
cooking pot
The inner lid is not attached
properly.
The inner lid and/or cooking pot
is deformed.
Foreign substances are stuck to
the inner lid, cooking pot rim or
the frame of the rice cooker.
The inner lid and/or steam vent
are not attached properly.
The steam vent and/or
temperature sensor is dirty.
Porridge program was
unintentionally used to cook rice.
The inner lid is not attached
properly.
NOTE: The outer lid will not
close unless the inner lid is
attached correctly.
Foreign substances in the lid
latch well are preventing the
outer lid from latching.
The starch in the rice will melt
during cooking and dry onto the
interior of the cooking pot.
Check the condition of the inner
lid and gasket. Confirm that the
inner lid is correctly seated in
the cooker cover.
Clean both the cooking pot and
rice cooker after each use.
After cleaning replace both the
inner lid and steam vent into
the rice cooker. See “Care and
Cleaning.”
Clean the steam vent and
temperature sensor.
Select the cooking program for
the ingredients you are cooking.
Replace the inner lid in
to the
top cover of the rice cooker.
See “Care and Cleaning.”
Remove debris from the lid
latch w
ell.
During washing, use a
non-abrasive plastic scouring
pad or utensil to gently remove
the firm.
Page 22 User Manual
Troubleshooting
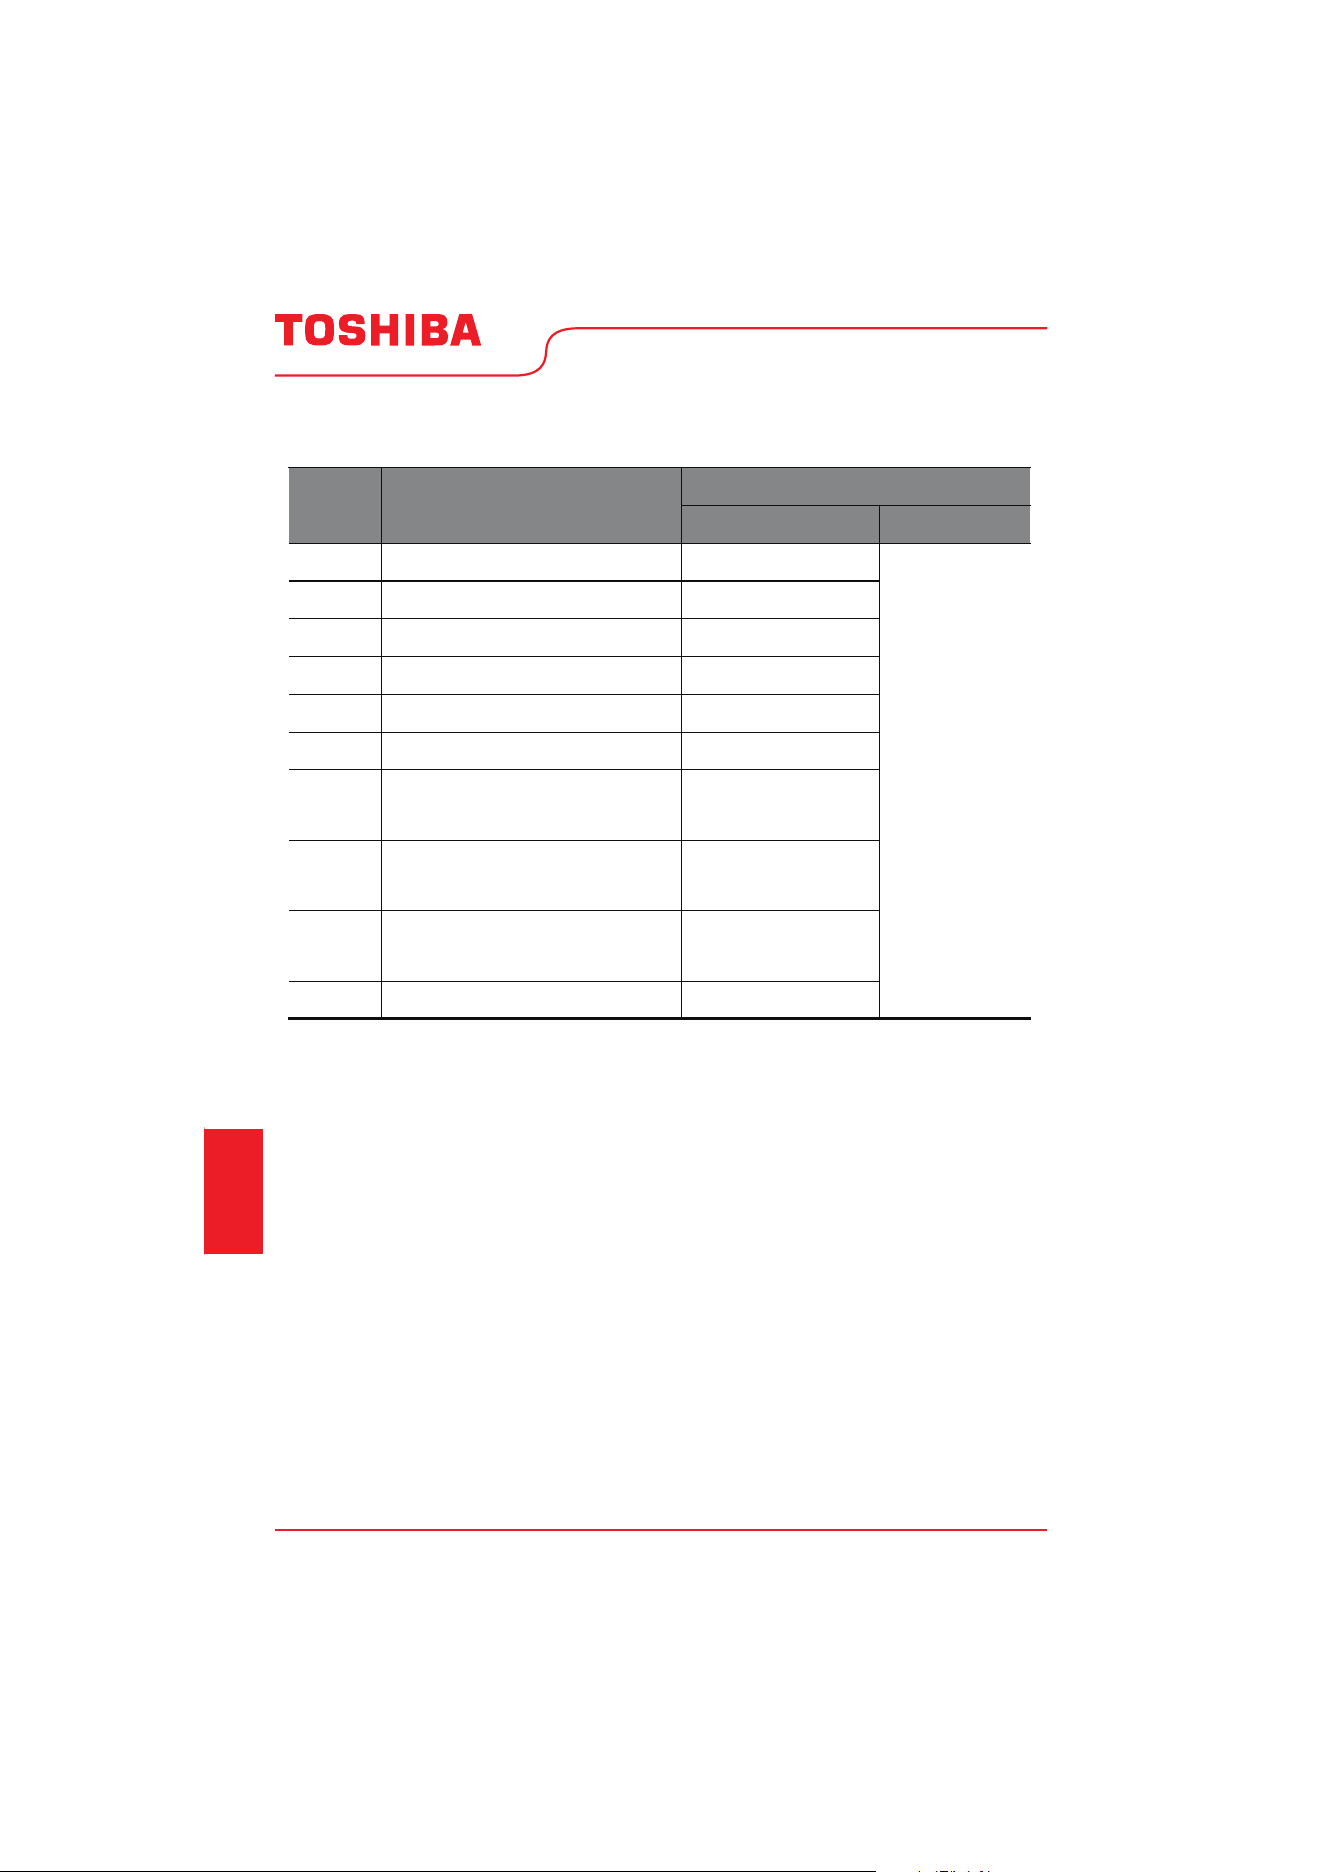
Troubleshooting
Sequence
Operating sequence
LED display status
Remaining LEDs
Open circuit of bottom sensor
Off
“88: 88" digital section
E1 (Light on)
E2 (Light on)
E5 (Light on)
E6 (Light on)
E3 (Light on)
E4 (Light on)
C2 (Light on)
EU (Flash)
EU (Light on)
C4 (Light on)
Short circuit of bottom sensor
Open circuit of upper housing sensor
Short circuit of upper housing sensor
IGBT sensor open circuit
IGBT sensor short circuit
IGBT sensor high
temperature alarm
Control board sending
communication error
Control board receiving
communication error
No pot prompt
ERROR DISPLAY
Troubleshooting
1
0
1
2
3
4
5
6
7
8
9
Page 23User Manual

Warranty
LIMITED ONE-YEAR WARRANTY
U.S. AND CANADA ONLY
Warranty Period:
This warranty is available to consumers only. You are a consumer if you own a Toshiba® Rice
and Grain Multicooker that was purchased at retail for personal, family or household use.
Except as otherwise required under applicable law, this warranty is not available to retailers
or other commercial purchasers or owners.
We warrant that your Toshiba® Rice and Grain Multicooker will be free of defects in materials
or workmanship under normal home use for 1 year from the date of original purchase.
If your Toshiba® Rice and Grain Multicooker should prove to be defective within the warranty
period, we will repair it, or if we think necessary, replace it. To obtain warranty service, simply
call our toll-free number 1-855-204-5313 for additional information from our Consumer
Service Representatives or send the defective product to Consumer Service at Toshiba,
5 Sylvan Way, Parsippany, NJ07054.
NOTE:
For added protection and secure handling of any Toshiba product that is being returned, we
recommend you use a traceable, insured delivery service. Toshiba cannot be held responsible
for in-transit damage or for packages that are not delivered to us. Lost and/or damaged
products are not co
vered under warranty. Please be sure to include your return address,
daytime phone number, description of the product defect, product model number (located
on bottom of product), original date of purchase, and any other information pertinent to the
product’s return.
CALIFORNIA RESIDENTS ONLY
California law provides that for In-Warranty Service California residents have the option of
returning a nonconforming product (A) to the stor
e where it was purchased or (B) to another
retail store that sells Toshiba products of the same type. The retail store shall then, at its
discretion, either repair the product, refer the consumer to an independent repair facility,
replace the product, or refund the purchase price less the amount directly attributable
to the consumer’s prior usage of the product. If the above two options do not result in
the appropriate relief to the consumer, the consumer may then take the product to an
independent repair facility if service or repair can be economically accomplished. Toshiba
and not the consumer will be responsible for the reasonable cost of such service, repair,
replacement, or refund for nonconforming products under warranty.
California residents may also, according to their preference, return nonconforming products
directly to Toshiba for repair, or if necessary, replacement, by calling our Consumer Service
Center toll-free at 1-855-204-5313 . Toshiba will be responsible for the cost of the repair,
replacement, and shipping and handling for such products under warranty.
Warranty
User ManualPage 24
However, product registration does not eliminate the need for the consumer to maintain the
original proof of purchase in order to obtain the warranty benefits. In the event that you do
not have proof of purchase date, the purchase date for purposes of this warranty will be the
date of manufacture.

Warranty
BEFORE RETURNING YOUR TOSHIBA PRODUCT
If you are experiencing problems with your Toshiba product, we suggest that you call our
Toshiba Service Center at 1-855-204-5313 before returning the product for service. If
servicing is needed, a Representative can confirm whether the product is under warranty and
direct you to the nearest service location. Your Toshiba® Rice and Grain Multicooker has been
manufactured to the strictest specifications and has been designed for use only in 120-volt
outlets and only with authorized accessories and replacement parts. This warranty expressly
excludes any defects or damages caused by attempted use of this unit with a converter,
as well as by use with accessories, replacement parts or repair service other than those
authorized by Toshiba. This warranty does not damage caused by accident, misuse, shipment
or other than ordinary household use. This warranty excludes all incidental or consequential
damages. Some states do not allow the exclusion or limitation of these damages, so these
exclusions may not apply to you. This warranty gives you specific legal rights, and you may
also have other rights, which vary from state to state.
Important:
If the nonconforming product is to be serviced by someone other than Toshiba’s Authorized
Service Center, please remind the servicer to call our Consumer Service Center at
1-855-204-5313 to ensure that the problem is properly diagnosed, the product is serviced
with the correct parts, and the product is still under warranty.
War
ranty
Page 25User Manual