Wire channel
Wire channel
Cover
glass panel
Note:
3
3.1
3.2
2
Registration or Log in
Download “Smart Life”Application
Enter the Register/Login interface;tap “Register” to
create an account by entering your phone number
to get verification code and “Set password”.Choose
“Log in” if you already have a Smart Life account.
Configure the APP to the switch
Preparation: Ensure the switch has been connected
with electricity;ensure your phone has been connected
to Wi-Fi and is able to connect to the Internet.
The switch only supports 2.4G network.If you have
connected 5G network,please disconnect 5G network
firstly and connect 2.4G network.
1.Make sure your phone is connected to Wi-Fi and
Bluetooth.
2.Open Smart Life/Tuya App and Click“+”,then the
prompt page will automatically show on the screen.
Click “Go to add”.
3.Select the device you want to add and click “Add”
4.Enter Wi-Fi Password and click “Confirm”,waiting for
completing the connection.
5.Add the device successfully, you can edit the name of
the device to enter the device page by click “Done”
Wi-Fi link method:
Pair and clear up the WiFi code(New Updated)
How to reset/re-pair Wi-Fi code
Press the switch button for 6 times,and hold on the 6th
time,then release until you hear Di-Di-Di(3 times),and the
blue indicator on the switch will flash fast after 3
seconds.Reset/re-pair is successful.
Product Description
Prepare to install wiring
A. Live wire connects “ L ” terminal
B. Neutral wire connects “ N ” terminal
C. Lamp wire connects “ L1,L2,L3,L4 ” terminal
1 Gang connects “L1” terminal
2 Gang connects “L1,L2” terminal
3 Gang connects “L1,L2,L3” terminal
4 Gang connects “L1,L2,L3,L4” terminal
1 Gang L1 and N line.
2 Gang L1 and N line.
3 Gang L1 and N line.
4 Gang L1 and N line.
Step 6
Download Smart Life App
Please scan the QR code or download
Smart Life on App store.
Installation
Add Devices
Put the switch into switch box in the wall
Mount the two side screws
Install the glass panel (install from up above)
Finish installation
Step 7
1
Remove the panel with screwdriver
(Please don’t install with electricity power on)
Step 5
See the
picture below
Pair and clear up the RF code
1. How to pair the RF code
1.1 (can be turned on and off): Confirm your switch is
off before operations.Press the switch button for about 8
seconds until you hear Di-Di(2 times).Then the matching
of RF code is successful. The key of the remote control-
ler can control the switching of the state of the switch on
and off corresponding to the position of the switch.
1.2 (Open only): Confirm your switch is off before
operations.Press the switch button for about 5 seconds
until you hear Di(1 time).After that,release the button,
press the corresponding button on the remote control to
turn on.Then the matching of RF codes is successful. The
key of the remote controller can control the corresponding
position of the switch to be open.
1.3 (Close only): Confirm your switch is on before
operations.Press the switch button for about 5 seconds
until you hear Di(1time).After that,release the button, press
the corresponding button on the remote control to turn
on.Then the matching of RF codes is successful.The key
of the remote controller can control the corresponding
position of the switch to be closed.
2. How to clear up the RF code
Confirm your switch is off before operations. Press the
switch button for a long time until you hear Di-Di-Di-Di(4
times), and then release the button.The RF code is now
cleared up.
How to achieve multi-control association
Note:Please confirm you have successfully finished the WiFi
link method above for adding this switch to your Smart Life
App before the association.
1.WiFi add another smart switch to the same Smart
Life/Tuya App.(If there is a smart switch having been added
before to the app,just go to next step.)Note:There is no
need to wire the new added switch to the light,only L and
N are required for wiring.
2.Then you will see two devices in the app and click the
main switch(as One gang switch as below) by entering into
the next operation.
3.3
Remote radio frequency (RF)link method:
EU US
(1) (2)
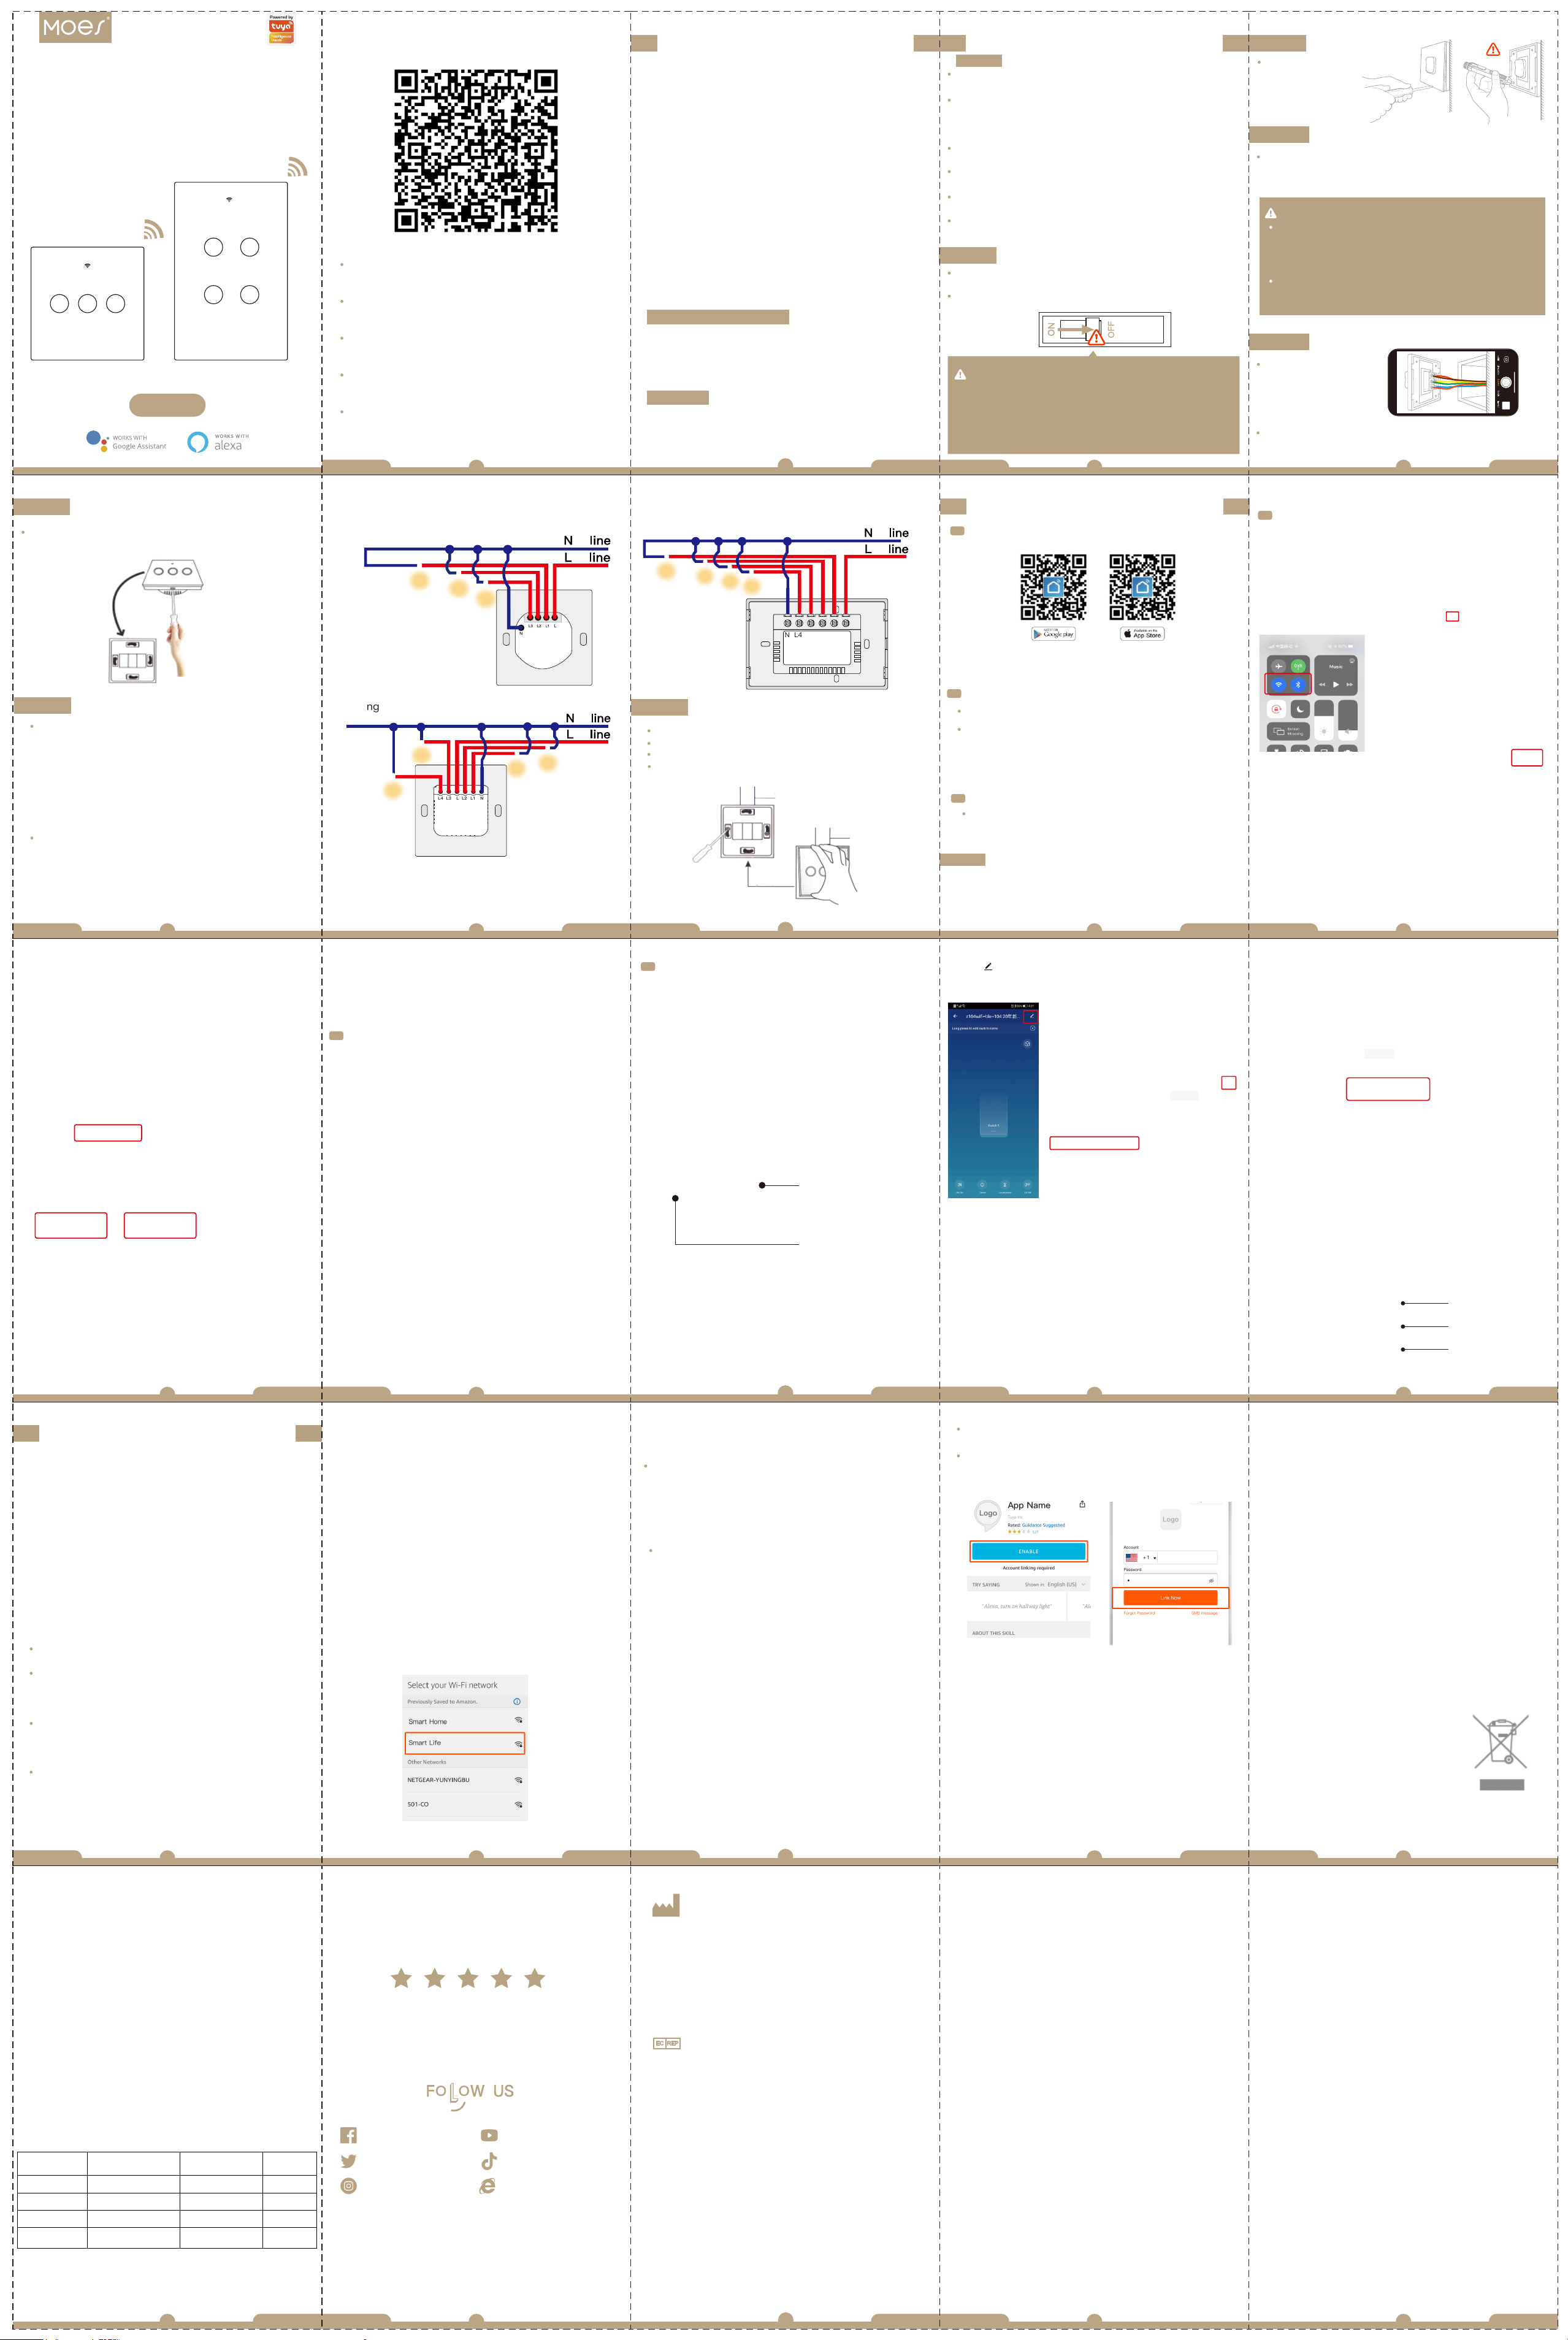
This new designed glass panel wireless touch smart
switch is designed with WiFi+RF to replace traditional
switches with a variety of ways to control.Now one new
smart feature as multi-control association to other smart
switches is added into the Smart Life/Tuya App,together
with the backlight on/off and relay status.And its scratch
resistance glass panel is suitable for different decoration
styles with its best value.
Note: Button sound on and off: no button operations
before operations begin within 6 seconds.Then press
switch button for 4 times and long press for the fourth
time until the switch beep sounds as Di-Di for 2 times
for successful operation.
Bitte scannen Sie den QR-Code hier für eine
Anleitung in deutscher Sprache
Por favor escanear el código QR aquí para
instrucciones en español
Veuillez scanner le QR code ici pour des instructions
en français
Пожалуйста, отсканируйте QR-код здесь, чтобы
получить инструкции на русском языке.
Leia o código QR aqui para obter instruções em
português
Risk of Electric Shock:Electricity can cause personal
injury and property damage if handled improperly.If you
are not sure about any part of these instructions,please
seek professional assistance from a qualified electrician.
Model: WS-EU-RF / WS-US-RF
Voltage: 90-250V AC, 50/60Hz
Max. Current: 10A/Gang; Total 10A
Wireless Protocol: Wi-Fi 2.4GHz+RF433MHz
Technical Parameters:
Warnings:
Turn off the power at the circuit breaker and test that
power is off before wiring.
Safety Information
Instruction Manual
Smart Switch
Wi-Fi+RF433 Neutral+Live
N
Enjoy Our Smart Life
1. Complete product networking configuration in the
App
Enter Smart Life Skill in
Alexa APP
Complete the device's networking configuration
according to the prompts in the App.
Note: In the App, change the name of the device to an
easily identifiable name such as Alexa; names are
usually in English, such as “bed light”.
Step 3
Remove the switch and pull it away from the wall.
Identify Line/Load Wire(Note:The color of your wire
may be different from the color shown on the manual.)
We recommend you remove the faceplate from the
old switch and use an electrical tester to test all wires
connected to the switch to ensure there is no voltage
in the circuit.
You may need to turn off more than one circuit
breaker.
Verify power is off
Step 4
Take pictures of the
wiring
Follow the wiring diagram to connect the switch wires
to the wires in the wall box with the wire conductors.
3. Key step —— Link Skill
Tap on "Skills" in the Alexa App menu.
Then search for "App Name". Tap "Enable" to enable
the Skill.
Enter the App account and password, then tap "Link
Now" to link your App account to enable the Skill. Now
you can start your smart home journey.
2. Configure the Amazon Echo device
(If you have already configured Amazon Echo, you can
skip this step. The following instructions are based on
the iOS client.)
Make sure you Amazon Echo device is powered on
and connected to a Wi-Fi network.
Open the Alexa App on your phone. After successful
login, tap on the menu in the upper left corner of the
Home page, select “Settings” and tap “Set Up A New
Device” to set up the Amazon Echo.
Choose your Amazon Echo device type and language
for connecting. Press and hold the small dot on the
device until the light turns yellow. Then tap “Continue”
to connect to the hotspot.
After connecting to the Amazon Echo hotspot, return
to the page. At this point, the connection is successful.
Tap “Continue” to proceed to the next step. Choose a
Wi-Fi network to connect to. Amazon Echo will take a
few minutes to try to connect to the network.
After the network connection is successful, tap
“Continue”. An introduction video will appear. After the
video ends, tap “Continue” to jump to the Alexa Home
page. You have now completed the Amazon Echo's
configuration process.
4. Common commands
Control the device via voice commands, now you can
control your smart device with Echo. You can control
your device (such as your bedroom light) with the
following commands:
Alexa, turn on/off bedroom light. (Turn on/off the
light)
Alexa, set bedroom light to 50 percent. (Set the light
to any brightness)
Alexa, brighten/dim bedroom light. (Increase/weaken
the brightness of the light)
Alexa, set bedroom light to green. (Adjust the color of
the light)
English
1
2
3
4
English
English
English
English
1.During the free warranty period, if the product breaks
down during normal use, we will offer free maintenance
for the product.
2.Natural disasters/man-made equipment failures,
disassembly and repair without the permission of our
company, no warranty card, products beyond the free
warranty period, etc., are not within the scope of free
warranty
3.Any commitment (oral or written) made by the third
party (including the dealer/service provider) to the user
beyond the warranty scope shall be executed by the third
party
4.Please keep this warranty card to ensure your rights
5.Our company may update or change the products
without notice. Please refer to the official website for the
updates.
SERVICE
RECYCLING INFORMATION
Product Information
Product Name________________________________________
Product Type_________________________________________
Purchase date________________________________________
Warranty Period_______________________________________
Dealer Information_____________________________________
Customer's Name_____________________________________
Customer Phone______________________________________
Customer Address_____________________________________
______________________________________________________
All products marked with the symbol for separate collection
of waste electrical and electronic equipment (WEEE
Directive 2012/19 / EU) must be disposed of separately
from unsorted municipal waste. To protect
your health and the environment, this
equipment must be disposed of at designated
collection points for electrical and electronic
equipment designated by the government
or local authorities. Correct disposal and
recycling will help prevent potential negative
consequences for the environment and human health. To
find out where these collection points are and how they
work, contact the installer or your local authority.
Maintenance Records
Failure date Cause Of Issue Fault Content Principal
WARRANTY CARD
Thank you for your support and purchase at
we Moes,we are always here for your complete
satisfaction,just feel free to share your great
shopping experience with us.
If you have any other need,please do not
hesitate to contact us first,we will try to meet
your demand.
moes
@moessmart
@moes_smart
@moes_smart
@moes_smart
www.moes.net
WENZHOU NOVA NEW ENERGY
CO.,LTD
Address: Power Science and Technology
Innovation Center, NO.238, Wei 11 Road,
Yueqing Economic Development Zone,
Yueqing, Zhejiang, China
Tel:+86-577-57186815
Email:[email protected]
AMZLAB GmbH
Laubenhof 23, 45326 Essen
Made In China
AJ21
L4 L3 L2 L1 LN
1-3 Gang
4 Gang
NL1L3 L2L4 L
Main Switch
New Added Switch
3.Click in the upper right corner and choose“Multi-
Control Association, and then click “+” in the right corner
4.Choose the switch that you want to associate to and
then choose the switch button that you want to control
the same light.
Smart Switch
5.Then go back to previous page,you will see two items in
the page,one is your main switch,the other is the one you
associate just now.
Note:Please confirm the associated switch is enabled.
Smart Switch
Light Switch
Switch 2
6.Now you are able to control your light with two
switches.Do not associate another button in the same
switch for multi-control.
7.If you want to add another third or more smart switches
to control your light,just repeat the steps above.And you
will see the result as below when you associate another
new switch.
Associated 1
Associated 2
Main Switch
Switch 2
Switch 1
Make sure that the power at the circuit breaker is off
before wiring.
Neutral Wire is required.Confirm the wall box contains a
Neutral Wire(typically white).If the wall box don’t have a
Neutral Wire,please try another location at your home or
call a professional electrician to install the switch.
The wire colors indicated in this manual are the usual
colors and may differ in some houses.
Ensure the wire conductors are securely fastened to each
wire.
Ensure the Wi-Fi signal is steady and normally working
before wiring.
If you don’t have any wiring experience,please call a
professional electrician.
Turn off the circuit breaker and use the electrical
tester to test the power.
Ensure the circuit breaker is off before wiring.
Remove the old switch
Note:
Step 1
Step 2
Please disconnect the power supply before installing or
removing the device for avoiding irreversible damage
on the device from the electric current or some
unpredictable problems such as lamp flashing.
Attention:
6
7
8
9
English
English
English English
English
5
11
12
13
14
English
English English
English English
10
16
17
18
19
English English English
English English
15
21
22
23
24
English
English English
English English
20