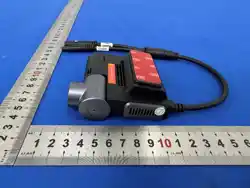

YG5201 Car Sense Vision
User Manual

Table of Contents
1. Product Overview ............................................................................................................. 1
2. Installation Guide .............................................................................................................. 2
3. Recorder function ............................................................................................................. 4
4. OnaGo APP ....................................................................................................................... 6
5. Video Storage Guidelines .................................................................................................. 8
6. Voice Diagnosis ................................................................................................................. 9
7. Troubleshooting .............................................................................................................. 10
8. Important Notes ............................................................................................................. 14
1
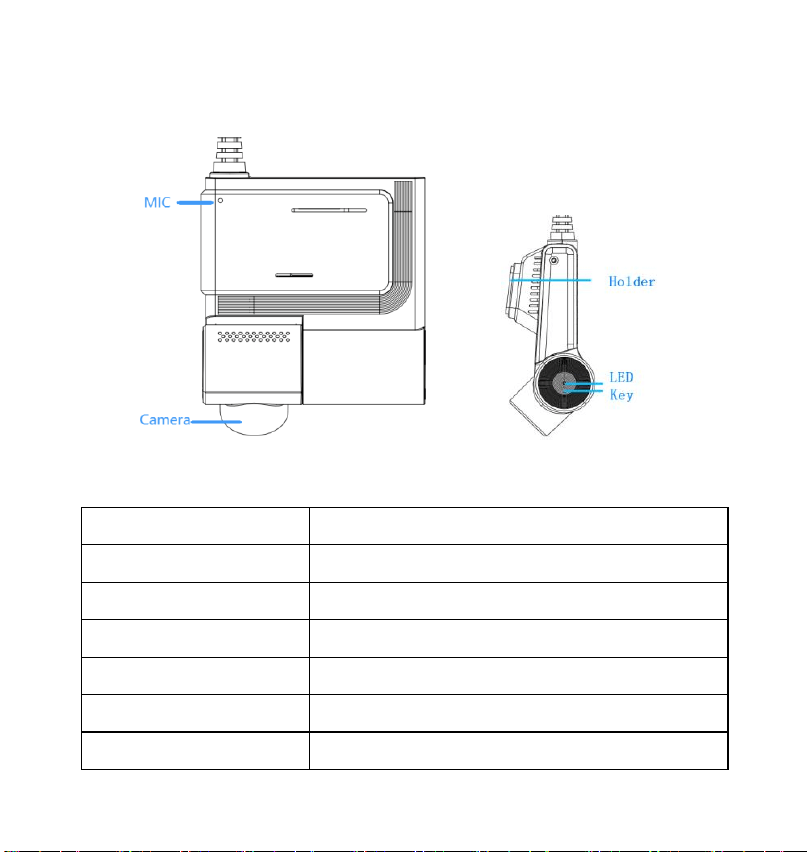
1. Product Overview
LED Indicator Instructions
Product status
LED light status
Normal Operation
Green LED remains constantly on
No Video
Red LED flashes
No Network
Blue LED flashes
No GPS Location
Green LED flashes
Various Abnormal States
Each abnormal state is displayed sequentially
Power Off
Device turns off
2
Physical Buttons
① Snap: Short press once to take a photo; short press twice to record a video.
② SOS: Press and hold for 2 seconds
③ Affirm: Formatting the memory
④ Reset: Press and hold for 7 seconds
Packaging List
1. Dash Cam 2. Power Cord
3. TF Card (Accessories) 4. User Manual
5. Rear Camera (Accessories)
2. Installation Guide
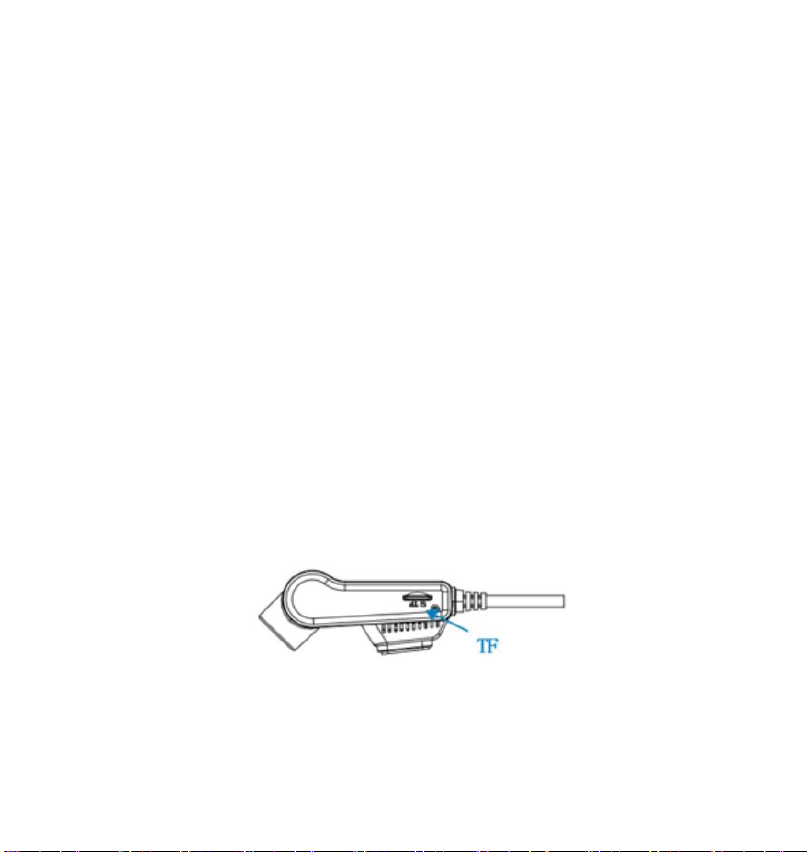
Installing the TF Card
Insert the TF card into the device according to the diagram provided.
3
Installing the Dash Camera
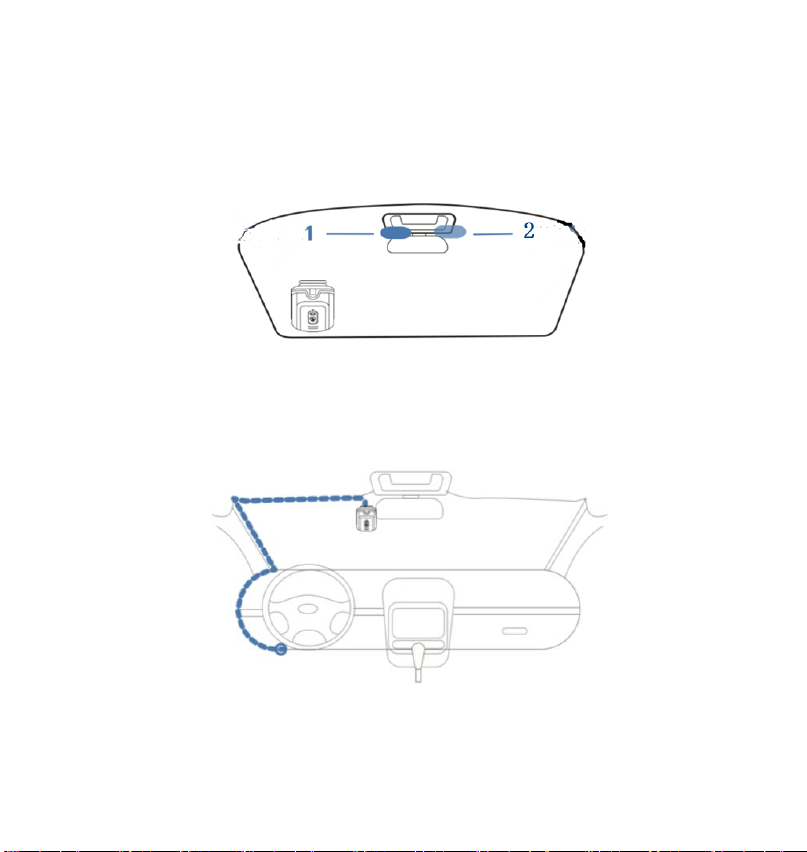
1. Mount the device to the windshield: Before installation, clean the windshield
thoroughly, then peel off the 3M adhesive tape on the dash camera mount and press it
against the glass for 2 minutes.
2. Power supply via cables
● Example: Power supply installation through the fuse box for convenient and hidden
wiring. Refer to the diagram for guidance.
Through the safe box can facilitate the driving recorder to take power, can make it work
safely, but also make the recorder line more hidden, the car cloth safe box location: most

4
models of the safe box location in the left side of the driving position or near the steering
wheel. Refer to the car instructions for details.
3. Adjusting Camera Angle
Open the mobile app "OnaGo" and access live streaming to adjust the camera angle,
ensuring it faces directly forward.
3. Recorder function
1. Video
After powering on, the system automatically begins recording. It supports dual-camera
video loop recording, with front camera ultra-clear 2K and rear camera 1080P. Utilizing
advanced image processing technology, it effectively captures dynamic scenes during
high-speed movement, preventing fraud and accurately restoring the truth of events.
How to Record Emergency Videos?
The recorder will automatically generate an emergency video upon detecting a collision,
which will be stored in the storage card gallery and uploaded to cloud storage, while also
being pushed to the OnaGo app for backup. You can view it in the cloud storage of the
OnaGo app. Additionally, holding the button for 2 seconds can trigger SOS to manually lock
the video.
2. 4G Live Streaming or Wi-Fi Local Mode
Utilizes 4G for high-speed internet access.
The mobile phone can connect to the device’s Wi-Fi hotspot and use the OnaGo app in
local mode to check device information or set configurations.

5
How to Connect to the Dash Cam's Wi-Fi?
Turn on the Dash Cam, select "LLM_xxxxxx" from the phone's Wi-Fi list to connect (default
password: 12345678).
3. GPS
Built-in GPS antenna for stable and fast satellite signal acquisition, ensuring accurate
positioning.
4. Parking Monitoring
1) Automatically activates parking monitoring upon vehicle shutdown.
2) Sends alarm notifications to your phone in case of external force impact.
3) Real-time monitoring and capture of pictures and videos via the mobile phone app .
4) Automatically shuts down the recorder to protect the car battery when voltage drops
below 11.6V or if the car remains idle for 7 days.
5. Time-lapse Recording
1) Turn on parking monitoring, then activate time-lapse recording; the device will
automatically switch to time-lapse mode when the vehicle turns off.
2) The recorder will record in time-lapse at a speed of 3 frames per second or 5 frames
per second, depending on the settings.
3) You can also monitor real-time location and capture images and video via the OnaGo
app while in time-lapse mode.
4) To protect your car battery, the default recording duration for time-lapse is 8 hours;
after which it will automatically switch to parking monitoring mode. You can set the
time-lapse duration to 16 hours or 24 hours in the settings.
6
4. OnaGo APP
Install “OnaGo” APP
Downloading the App
Follow the prompts to enter the App Store or Google Play and search for OnaGo to
download.
Binding the Device
1) Open "Onago", click on "Register", select the country, register and log in using your

7
email, or log in via a third-party account.
2) Click on the 'Add Device' button in the upper right corner to enter the 'Add Device'
page and add the dash cam.
Functions Introduction
1) Real time live streaming: Users can view real-time live videos and operate different
functions.
2) Wi-Fi Preview: When connected to the device Wi-Fi, enter the connection interface to
preview the recorder's view in real time.
3) Intercom: Supports intercom between APP and device
4) Video recording: supports recording real-time preview and saving it to the album
5) Photography: Supports taking photos of real-time preview and saving them to the
album
6) Album: Supports downloading, sharing, deleting, and playing videos and images locally
7) Dual camera: supports simultaneous preview of both front and rear cameras
8) Message: Supports viewing event messages generated by the recorder.
9) TF card: Supports viewing historical videos recorded by the recorder to the TF card.
10)Journey: Supports viewing the historical journey of the recorder.
11)Set up:Click on the 'Settings icon' to enter the dashcam settings page.
12)Help and Feedback;Feedback and suggestions on device and app information.

8
5. Video Storage Guidelines
1) Use standard TF cards with capacities of 64GB-128GB and Class 10 or higher
read/write speeds.
2) Periodically export important videos to other devices to prevent accidental erasure.
3) Replace memory cards if damaged or aged.
4) Use genuine memory cards to avoid video loss or damage.
The memory card is abnormal:
When the memory card is abnormal and cannot record, the indicator light of the recorder
is red, and the following is the abnormal state:
Abnormal condition
Memory card write speed is slow;
Memory card exception unrecognized;
There are illegal files in the memory card, that is, non-logger recorded files;
The memory card format is incorrect, the memory card needs to be formatted when it
is used on the recorder side for the first time;
Error writing card during recording;
The video recording card is removed.

9
6. Voice Diagnosis
Voice Diagnosis
Function
Start Diagnosis
Diagnostic Instruction
Clear Fault Codes
Diagnostic Instruction
Stop Diagnosis
Diagnostic Instruction
Diagnosing…, Progress ... Percent
Diagnostic Progress Update
Clearing Codes…, Progress ... Percent
Diagnostic Progress Update
Diagnosis Complete, No Fault Codes
Diagnostic Result Notification
Diagnosis Complete..., Fault Codes Found,
Please Clear Codes
Diagnostic Result Notification
Diagnosis Failed
Diagnostic Result Notification
Failed to Clear Codes
Diagnostic Result Notification
Codes Cleared, Please Diagnose Again
Diagnostic Result Notification

10
7. Troubleshooting
Scenario
Symptoms
Cause/solution
Installation
procedure
3M static glue is not strong
Please wipe the glass, stick 3M glue on
the glass, and squeeze out the air
between the 3M glue and the glass.
The fuselage is unstable. It
shakes
Please check whether the bracket and
the tachograph card are good.
Image not clear
The front windshield has a reflective
effect, please adjust the camera Angle
according to the mounting position of
the recorder.
The effect of day and night
video is very different
The light transmittance of the
commonly used heat insulation film of
the front windshield varies from 68%
to 80%, which will affect the recording
effect of the video during the day and
night.
Recorder recurrent outage
Due to the different model design,
please adjust the rotation Angle of the
vehicle power adapter properly, and
try to avoid the position of the
structure loose.

11
Power-on
condition
Recorder cannot start
1) Check whether the power cable is
improperly connected.
2) Check whether the car is started and
the car power adapter indicator
light is on. If it is not on, reinsert the
car power adapter.
3) Long press reset for 8 seconds to
restart the recorder.
Boot restart, black screen,
the button does not work
1) Please confirm whether the power
supply is normal; After shutting
down, restart later.
2) Long press the restart button for 8
seconds to forcibly restart the
recorder, restart the machine and
replace the TF memory card (It is
recommended to replace it with a
Class10 TF memory card with 64GB
or more).
Running
condition
The system cannot run
properly or is stuck
If the machine cannot work normally
due to improper use, you can press the
Reset key to restart the machine to
work normally.
No automatic recording on
startup
1) Please check that the memory card
is installed correctly;

12
2) Reinsert TF memory card after
power off;
3) Please check whether TF memory
card needs to be formatted or
replaced.
Abnormal recording
termination
1) Formatted TF card
2) Change TF card. (It is recommended
to change to a Class10 TF card with
more than 64GB)
Video picture is blurred
1) Verify that the lens protector is not
removed;
2) Check whether the front windshield
or recorder lens is clean.
The video has no sound.
1) Check whether sound recording is
disabled;
2) When recording, the recording
function can be enabled or disabled
by pressing a key or voice.
System time error
1) Insert the SIM card, and the system
will automatically correct the time
after networking;
2) After the recorder is positioned, the
system time is also automatically
corrected.

13
A corrupted video appears
during recording
Please use a genuine, Class10 or more
memory card.
Wi-Fi
Connection
Issues
Phone unable to connect to
Dash Cam
1) Make sure your phone WIFI is
turned on correctly
2) Forcibly close the mobile APP and
restart the APP
Connection takes too long
1) If there are too many WIFI signals in
the surrounding environment, it
may be caused by inter-signal
interference, it is recommended to
use in an environment with less
interference.
2) The phone may be in a system busy
state, it is recommended to close
other applications or restart the
phone.
Forgot Wi-Fi password
Default password for the Dash Cam's
Wi-Fi: 12345678.

14
8. Important Notes
• This product is a driving assistance tool and does not ensure the user's driving safety.
The company is not responsible for any driving accidents, information loss, or damages
resulting from product failure or improper operation.
• Please use the accessories provided by the original manufacturer to install this product
correctly to avoid unforeseen damage. Failure to follow the correct usage procedures or
connect incompatible accessories may result in automatic warranty expiration and pose
potential safety risks to you and others, for which the company holds no liability.
• Professional installation is recommended. The company is not liable for any damages
caused by improper personal operation, such as car battery circuit short-circuiting, car
battery damage, or interior damage. Removing or modifying the product shell will void
the warranty.
• Ensure proper installation of the product without obstructing the driver's line of sight or
the safety airbag, as this may cause malfunction and personal injury.
• Keep the product away from strong magnetic fields, as they may damage the device.
• While this product can record and save images of vehicle accidents, it cannot guarantee
the recording of all accident images. Minor collision incidents may not activate the
collision sensor, thus the images may not be recorded in a dedicated folder.
• Do not use this product in environments exceeding 70°C or below -30°C.
• Please use this product within the limits permitted by law.
• To the maximum extent permitted by applicable law, neither the company nor the
manufacturer shall be liable for any special, incidental, or indirect losses, regardless of
the cause.

15
The following circumstances are not covered by the free warranty:
• Products beyond the warranty period.
• Products without three-package vouchers and valid invoices, except those proving the
recorder's validity within the three-package period.
• Product failure due to accidents, negligence, disasters, intentional damage, improper
operation, or mis operation.
• Improper usage environments or conditions, such as using non-supporting power
supplies, ambient temperature, humidity, lightning strikes, leading to product failure.
• Products repaired by maintenance units not authorized by the manufacturer.

16
FCC Statement
This device complies with part 15 of the FCC Rules. Operation is subject to the following
two conditions: (1) This device may not cause harmful interference, and
(2) This device must accept any interference received, including interference that may
cause undesired operation.
Any Changes or modifications not expressly approved by the party responsible for
compliance could void the user's authority to operate the equipment.
Note: This equipment has been tested and found to comply with the limits for a Class B
digital device, pursuant to part 15 of the FCC Rules. These limits are designed to provide
reasonable protection against harmful interference in a residential installation. This
equipment generates uses and can radiate radio frequency energy and, if not installed and
used in accordance with the instructions, may cause harmful interference to radio
communications. However, there is no guarantee that interference will not occur in a
particular installation. If this equipment does cause harmful interference to radio or
television reception, which can be determined by turning the equipment off and on, the
user is encouraged to try to correct the interference by one or more of the following
measures:
-Reorient or relocate the receiving antenna.
-Increase the separation between the equipment and receiver.
-Connect the equipment into an outlet on a circuit different from that to which
the receiver is connected.
-Consult the dealer or an experienced radio/TV technician for help.
RF warning:
This equipment complies with FCC radiation exposure limits set forth for an uncontrolled
environment. This equipment should be installed and operated with minimum distance
20cm between the radiator & your body.