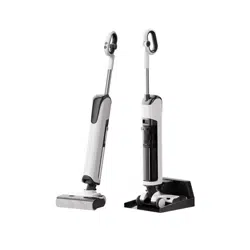

Instruction Manual
D100 Cordless Wet D Vacuum Cleaner
Please read this Manual carefully before use and keep it properly.

Warning
Safe disposal methods of waste batteries
一
I
Precautions
Before using this device, please read all the contents of this manual carefully, install
the device according to the operating steps in this manual, and keep the manual
properly. Any operation inconsistent with the instructions in this manual may result
in product damage or serious personal injury. This device is only suitable for
operation in domestic environment and is not suitable for industrial or outdoor use.
• The device is not suitable for individuals with physical, sensory or intellectual
impairments, or individuals lacking experience and common sense (including
children), unless they are supervised or guided by a guardian ensure safe use of
the device;
• Do not touch the plug or any live part of the device with wet hands to avoid the
risk of electric shock;
• If the charger or plug is damaged, please stop using it and call our professional
service personnel to replace it to avoid accidents;
• Please keep long hair, loose clothing, ngers and other parts of the body away
from the airow channels and moving parts of this device;
• Do not insert metal shavings, pins, wires and other objects into the gaps of the
device to prevent electric shock and accidental injury;
• Except for qualied technical personnel, others are not allowed to disassemble,
repair or modify;
• If you do not use this device for a long time, please unplug it to avoid electric
leakage, re, malfunction, etc.;
• If any abnormality is found during use of the device, please cut o the power
immediately and call our after-sales oce;
• After using this device, please clean the wastewater tank in time to keep the
ventilation path unobstructed and avoid blockage, or it will cause the suction to
decrease and the motor to heat up, thus aecting the service life of the device;
• After using the device, please store it in a dry place. Humid places will aect the
insulation and service life of electrical appliances;
• The body above the device logo, and the base contain electrical components
cannot be soaked in water or rinsed;
• Please check the smoothness of the oor brush elbow regularly. If there is any
debris blocked, please use a multi-functional brush to clean it in time to avoid
blockage, or it will cause a decrease in suction and aect the service life of the
device;
• Before replacing the roller brush, make sure the device is turned o;
• When using this device, you need to add the cleaning agent provided or specied
by our company. Please add it according to the specied proportion to prevent
excessive foam, which may penetrate into the motor and reduce its lifespan;
• All technologies and data reected in this manual were obtained by our company
or a designated third-party testing agency, and our company reserves the nal
right of interpretation.
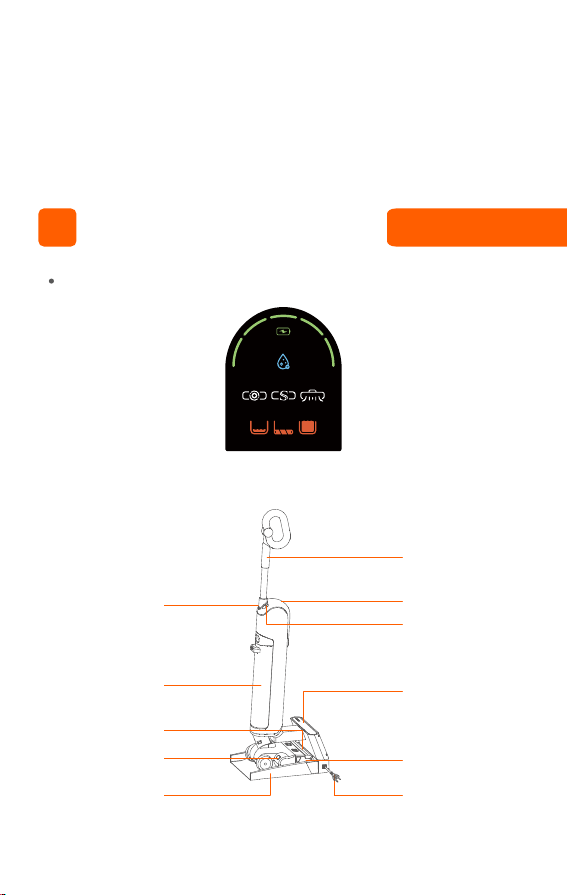
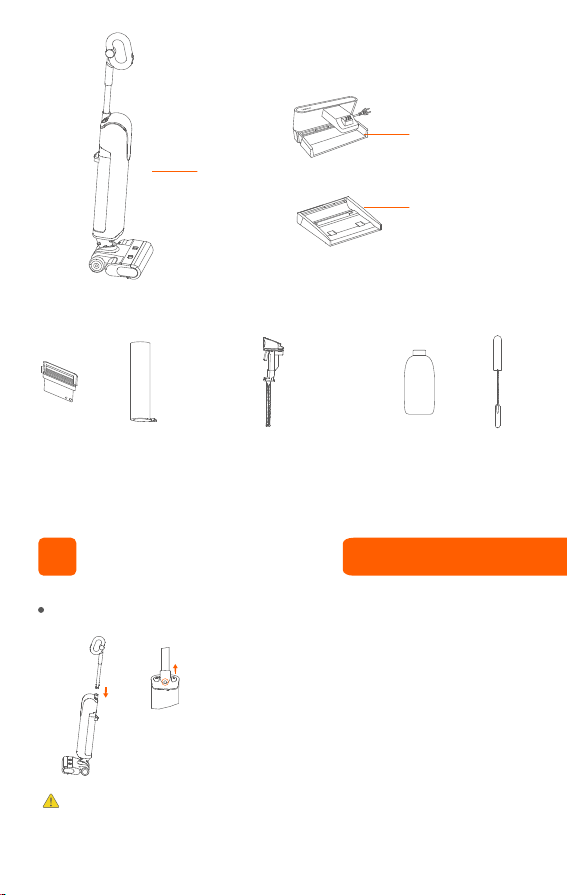
Part name
Handle
Display
II
• The battery installed in the appliance contains materials that are harmful to the
environment. When discarding the appliance, the battery must be removed from
the appliance;
• Before taking out the battery, the appliance must be powered off;
• Please dispose of waste batteries safely and properly, and do not throw them into
fire, water or soil;
• If the waste battery leaks and contacts your skin or clothing, please wash it with
clean water to avoid skin discomfort and seek medical treatment immediately.
① LED screen and mode
Voice broadcast
volume control
button
Clean water/waste-
water tank
Roller brush window
Electrolyzed water
window
Tray
Self-cleaning
button/water volume
control button
Base
Roller brush
Power cable
Product Introduction
Sterilization
Batte
Sma Turbo D
Note:
Please do not remove the sticker of the handle hole.
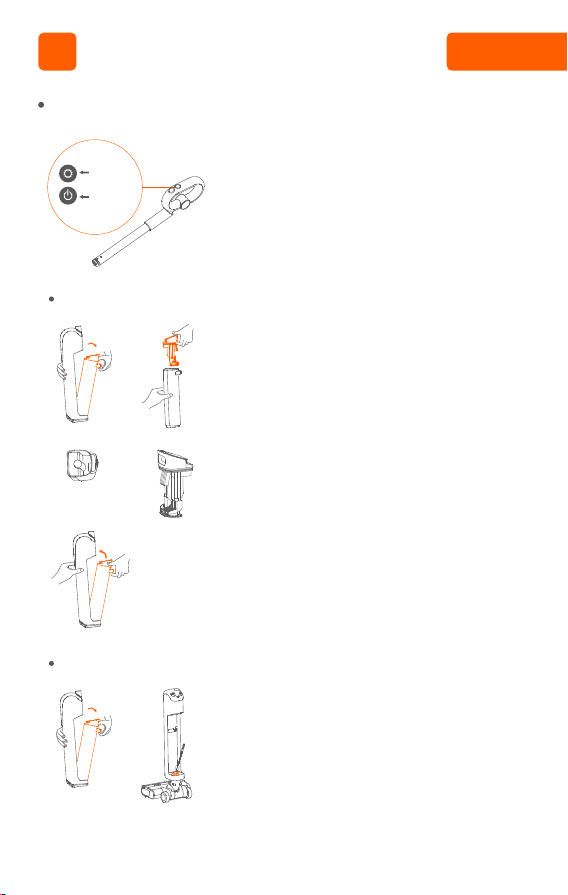
Handle installation instructions
②①
III
• Insert the end of the handle into the port of the
main unit in the vertical direction until there is a
“click” sound, make sure the handle is tight and
not loose, and complete the installation;
• To disassemble, please insert a hard object into
the hole as shown in the figure, press the pin and
pull the handle upward at the same time.
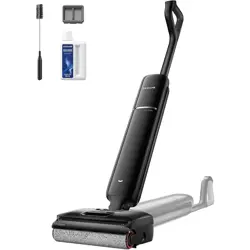
② Scrubber
③ Other components
Main unit
HEPA Roller brush
assembly
Cleaning
solution
Cleaning
tool
Wastewater tank component
upper cover + solid-liquid
separation + deodorizing stick
Smart base
Clean tray
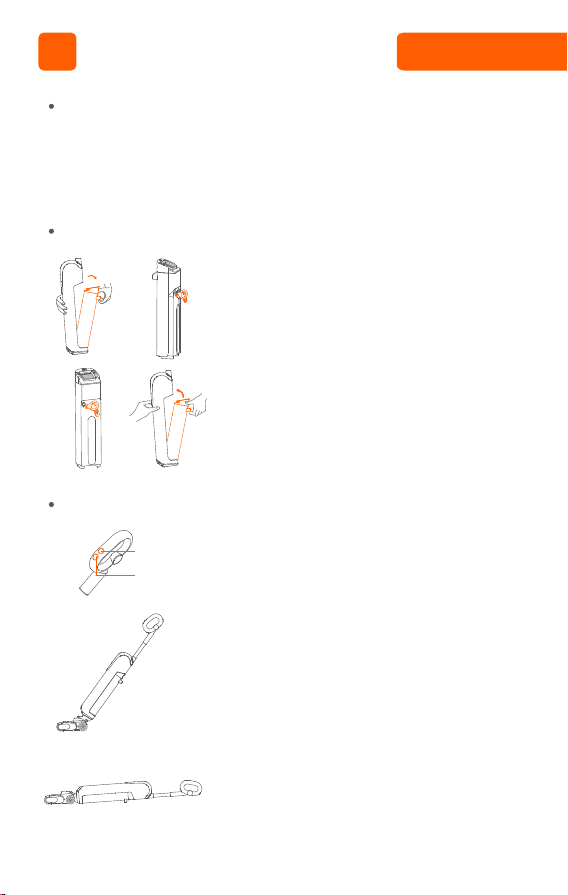
Disassembly and Assembly

②①
②①
②
③
①
②
①
• To remove the wastewater tank assembly, hold the
scrubber body with one hand, press the release
button of the wastewater tank assembly with the
other hand, and pull it out as shown in the figure to
take out the wastewater tank assembly;
• To install the wastewater tank assembly, please put
the bottom of the wastewater tank assembly into
the opening of the scrubber body, and then push
the wastewater tank assembly gently until there is
a “click” sound, which indicates that the installation
is successful.
• To remove the transparent window of the roller
brush, place one hand on the transparent window
of the roller brush, press and hold the transparent
window release button in the direction shown in
the figure, lift the window upward and take it out;
• To install the window, press the window vertically
down into the groove above the floor brush with
both hands until there is a “click” sound, which
indicates that the installation is successful.
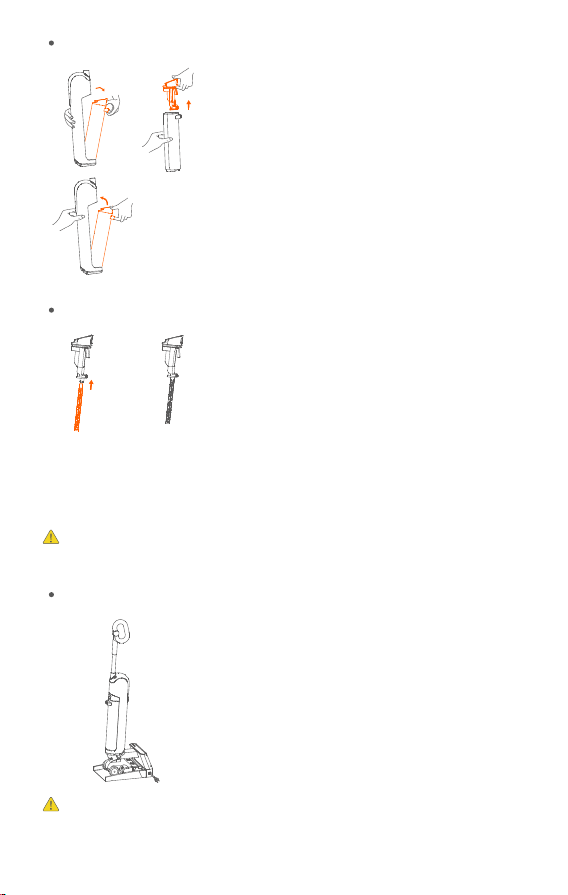
• To remove the roller brush, first remove the
transparent window of the roller brush;
• Slightly lift the floor brush as shown in the figure,
press the roller brush unlock button until there is a
“click” sound, and the roller brush handle bounces
up, indicating that the roller brush handle is
successfully unlocked;
• As shown in the figure, grab the handle of the roller
brush and pull out the roller brush in the direction
of the arrow.
• To remove the tray, grab the handles on the left
and right sides and lift the tray upward in the
direction of the arrow as shown;
• To install the tray, rst wrap the bottom of the tray
around the charging column, slide it down onto the
base in the direction of the arrow, and then lay the
tray at.
Disassembly and assembly instructions for wastewater tank assembly
Disassembly and assembly instructions of roller brush assembly
Base tray installation instructions
Disassembly and assembly instructions for roller brush transparent window
Add clean water to the clean water/wastewater tank assembly
Start working
Preparation work
②
②
④③
③
①
①
Mode button
On/O button
IV
• Before use, please check whether your floor scrubber has power. If the power is
insufficient, please charge it in time (refer to the charging guide for details) and
use after it is fully charged;
• The default mode is smart mode when it is turned on. You can choose to switch to
the appropriate mode according to the actual situation.
• Press the wastewater tank unlock button to
remove the clean water/wastewater tank;
• Open the water filling plug and inject clean water
(below 60°C) ;
• Tightly cover the water filling plug to ensure it is
tight and not loose;
• Install the clean water/wastewater tank assembly
back to the body until there is a “click” sound,
indicating that the installation is successful.
• The default mode is smart mode when the
scrubber is turned on. You can press the Mode
button to switch to boost mode, press the Mode
button again to enter the dry suction mode, and
press the Mode button in dry suction mode to
enter the smart mode;
• This device comes with an upright switch when it
is turned on. Please tilt it to use it after turning it
on;
• When scrubbing under tables, coee tables or
beds, it can be used lying at .
Instructions for Use
Pouring wastewater from wastewater tank assembly
Charging
Warning:
②
③
①
• Press the unlock button of the wastewater tank
and remove the wastewater tank;
• Hold the wastewater tank with one hand and pull
out the drain basket assembly upward with the
other hand;
• After draining the wastewater, install the drain
basket assembly back to the body.
• After using the device, push it into the smart
base;
• First push the device into the smart base, and
insert the plug of the smart base into the socket.
During the charging process, please keep the
device upright and close to the foot of the wall
to avoid tripping and other injuries. When
charging is not needed, pull out the plug and
put it away.
If the device is not used for a long time, please use the smart base
equipped to charge the battery for 3 hours (no need to fully charge) every
②①
Replacement of deodorant rod
• When it is necessary to replace the deodorizing
stick, first wipe it clean. Grasp the deodorizing
stick tightly with your hand and pull down
firmly to remove it. When reinstalling, grasp the
deodorizing stick tightly with your hand and
push up firmly until you hear a "click" sound,
indicating that it is properly installed.
• The deodorizing stick is a replaceable
component. If it happens to come off during
regular use, it can be reinstalled following the
above method.
Note: The deodorizing stick has a certain lifespan, and it is recommended to
replace it every 3-5 months.
When
using
During
clean-
ing and
self-
clean-
ing
Waste-
water
tank
prompt
In
work-
ing
state
Waste-
water
tank
prompt
Roller
brush
prompt
Charge
Water
shortage
prompt
Water
shortage
prompt
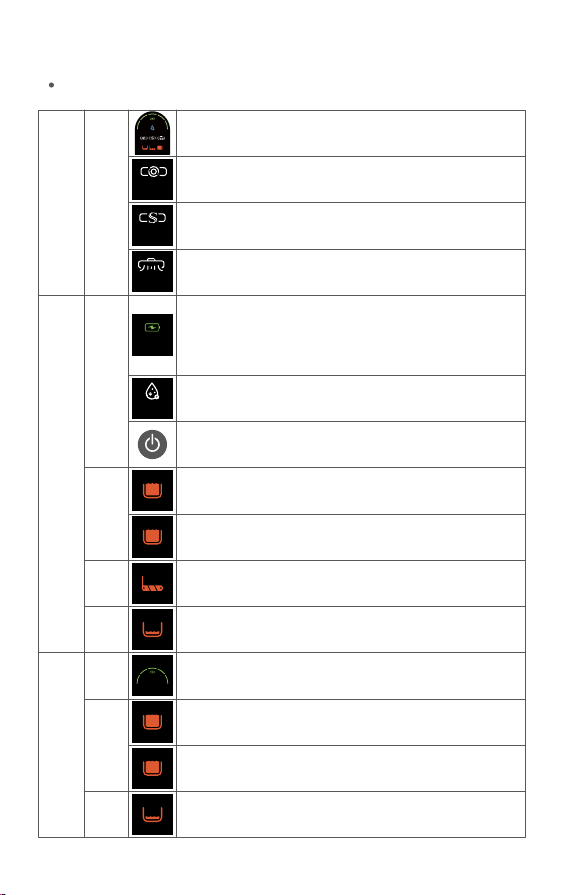
When the voice prompts "Low battery, please charge", the
battery indicator light ashes red.
When the battery indicator light ashes red, please continue
charging. When the battery indicator light changes from red to
green, it can start self-cleaning.
Sterilization mode light, remembers the status when it was last
turned o
Press the On/O button when the device is on, it will turn o, and
all the lights on the display will go out
When the wastewater tank is full, the wastewater tank prompt
light ashes, and the screen turns o after 3 minutes of no
operation
When the wastewater tank HEPA is missing, the wastewater tank
prompt light ashes, and the screen turns o after 3 minutes of
no operation
When the roller brush is blocked, the roller brush indicator light
ashes, and the screen turns o after 3 minutes of no operation
During normal use, when the clean water tank is short of water,
the water shortage indicator light ashes, and the screen turns
o after 3 minutes of no operation
Displays the battery percentage, each grid is about 20% of the
battery
When the wastewater tank is full, the wastewater tank prompt
light ashes, and the screen turns o after 8 minutes of no
operation
When the wastewater tank HEPA is missing, the wastewater tank
prompt light ashes, and the screen turns o after 8 minutes of
no operation
During the self-cleaning process, when the clean water tank is
short of water, the water shortage indicator light ashes, and the
screen turns o after 8 minutes of no operation
Battery
Battery
Sterilization
Indicator lights
3 months to avoid battery damage.
When
using
In
work-
ing
state
Screen display: power display, cleaning mode, sterilization
mode, fault prompt
The default mode is smart mode when the device is turned on,
and the smart mode light is on
In smart mode, press the Mode button to switch to Turbo mode,
and the Turbo mode light turns on
In Turbo mode, press the Mode button to switch to dry suction
mode, and the dry suction mode light turns on
Smart
Turbo
Dry
Sterilization
Batte
Sma Turbo D
Clean the body
V
• Before cleaning, please make sure the device is
turned o;
• Please scrub the device body with water or
neutral detergent. Be sure to wring out the
cleaning cloth before scrubbing. Do not let water
ow into the inside of the device.
Mode
button
On/O
button
Maintenance
Clean the wastewater sensor
Clear the wastewater tank
④③
⑤
①
①
②
②
• When the wastewater tank assembly is full of
wastewater or the device is shut down and
stopped for use, please remove the wastewater
tank assembly;
• Clear the wastewater in the wastewater tank and
use clean water and cleaning tools to clean the
wastewater tank;
• Clean the drain basket assembly and HEPA;
• After the drain basket assembly cover and HEPA is
dry, please assemble them and put them back
into the main unit.
• When the sensor is clogged or the device is shut
down and stopped for use, remove the
wastewater tank assembly;
• Please use the provided cleaning tool and clean
water to clean the wastewater pipes and HEPA;
• After cleaning is completed, put it back into the
wastewater tank.

Self-cleaning
②
• Please put the device back to the smart base after
using it;
• Press the self-cleaning button, and the device will
start self-cleaning; after the roller brush cleaning
is completed, the device enters drying mode.
• The drying mode time is ≤60min. If you remove
the device during drying, the drying stops and
you can use the device normally;
• After self-cleaning is completed, please clean the
wastewater tank.
①
Self-cleaning
button
Clean the water suction port
Note:
Note:
Smart base cleaning
• After removing the transparent window of the
roller brush, press the roller brush unlock button
and follow the direction of the arrow to pull out
the roller brush;
• Rinse the suction port with clean water;
• After cleaning is completed, reinstall the roller
brush and roller brush window into the device.
• Grasp the handles on the left and right sides
with your hands and lift up to remove the tray;
• Rinse with clean water and wipe the tray clean;
• First wrap the bottom of the tray around the
charging column, slide it down into the base in
the direction of the arrow in the gure below,
and then lay the tray at.
Please clean the debris on the roller brush regularly, remove the roller
brush, and use cleaning tool to clean the garbage on the roller brush to
avoid will aecting the cleaning eect.
The body above the device logo, and the base contain electrical components
cannot be soaked in water or rinsed.
The body below the device logo, oor brush, and base station tray can be
rinsed directly, but cannot be soaked.
Roller brush
transparent
window
Roller
brush
unlock
button
Roller brush
③
①
②

一
VII
Compliant national standards:
GB 4706.1-2005; GB 4706.7-2014; GB 4343.1-2018; GB 17625.1-2022
The technical specications are subject to change without prior notice.
Please check the following points before entrusting it to repair.
Failure
The device is not
working
The battery is low
The nozzle or pipe is clogged
HEPA is dirty
The clean water tank is short of
water
The water outlet sealing ring falls o
Water pump malfunction
Pipe blockage
The charging plug is not plugged in
properly
The device is not completely placed
in the charging base
Poor contact between charging
head and charging base
Wastewater tank is full
HEPA is not installed
Charge the battery before using
Check whether the nozzle or pipe is
blocked and clean it
Cleaning HEPA components
Add water
Send it to service center for repair
Send it to service center for repair
Send it to service center for repair
Check if the plug is connected properly
Check whether the device is placed
correctly
Check whether the charging head of the
device and the charging base are
connected properly
Drain the wastewater in the wastewater
tank
Install HEPA and wastewater tank
Suction weakens
No water comes
out from the
water spout
Product cannot
be charged
Wastewater tank
indicator light is
on
Possible causes Solution
Troubleshooting
22.2V
26.5V
230W
26.5V 0.6A
220-240V 50/60Hz
180W
VI
Product name
Product name
Rated voltage
Rated power
Charging voltage
Rated power
Rated input
Rated output
Model
Cordless Wet Dry
Vacuum Cleaner
Smart base
D100
Specications
Battery pack is abnormal
The battery is too low
The wastewater detection electrode
needle is dirty
Electrolyzed water sterilization is not
turned on
If there are other faults, special tools are required, so you must go to the designated service center for
repair and replacement.
Finish at least 3 complete cycles of charge
and discharge
Charge the battery before using
Clean the electrode needle of the
wastewater tank and wipe it clean
Press and hold the Mode button to switch
to electrolyzed water sterilization
Sudden changes
in power when
the product is
being discharged
No alarm when
wastewater tank
is full
The electrolyzed
water sterilizing
lamp does not
light up
Self-cleaning
unavailable
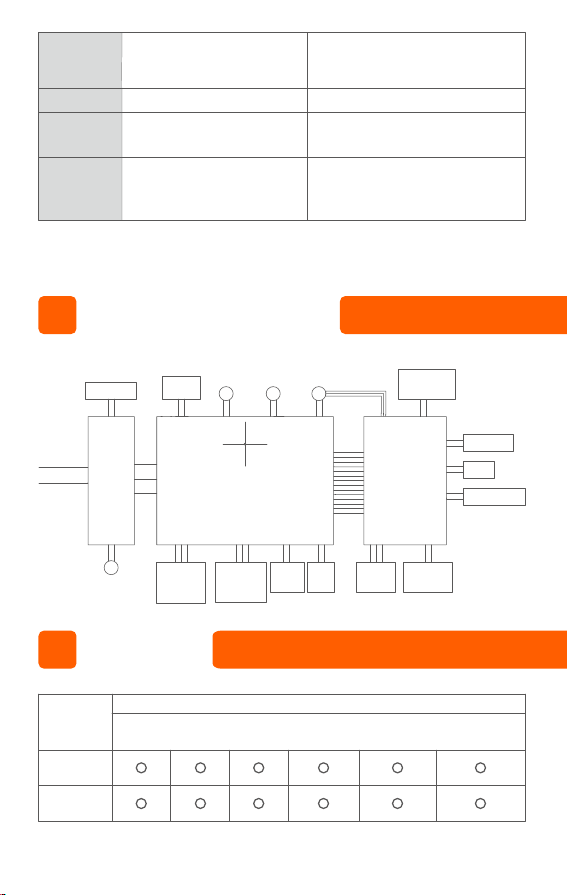
MM
220-240VAC
50/60HZ
M
12V fan
M
IX
VIII
Part name
Plastic
components
Hardware
components
Lead (Pb)
Mercury
(Hg)
Chromium
(Cd)
Hexavalent
chromium
(Cr(V)
Polybrominated
biphenyl
(PBB)
Polybrominated
diphenyl ethers
(PBDE)
Hazardous substances
Floor
brush
motor
Water
pump
motor
Suction
motor
Switch button
Mode button
Clean water
tank water
shortage
detection
Wastewater
contamination
detection
module
Lying at
detection
Upright
switch
HEPA
missing
detection
Wastewater
tank full
detection
Voice button
Speaker
Self-cleaning
button
Battery protection board
6 serial and 1 parallel
Heating PTC
Charging base
Display
Electrolyzed
water
Electric Schematic Diagram
Name and Content of Hazardous Substances

This form is prepared in accordance with the provisions of SJ/11364:
O: Indicates that the content of hazardous substances in all homogeneous
materials of this part is below the limit requirements specied in GB/T26572.
X: Indicates that the content of the hazardous substance in at least one
homogeneous material of this part exceeds the limit requirements specied in
GB/T26572.
Note: Among the components marked with “X” above, some of the hazardous
substances that exceed the standard are due to the current limited technical level
of the industry and the temporary inability to achieve substitution or reduction.
Motor
components
Water pump
components
PCB
components
Battery