9
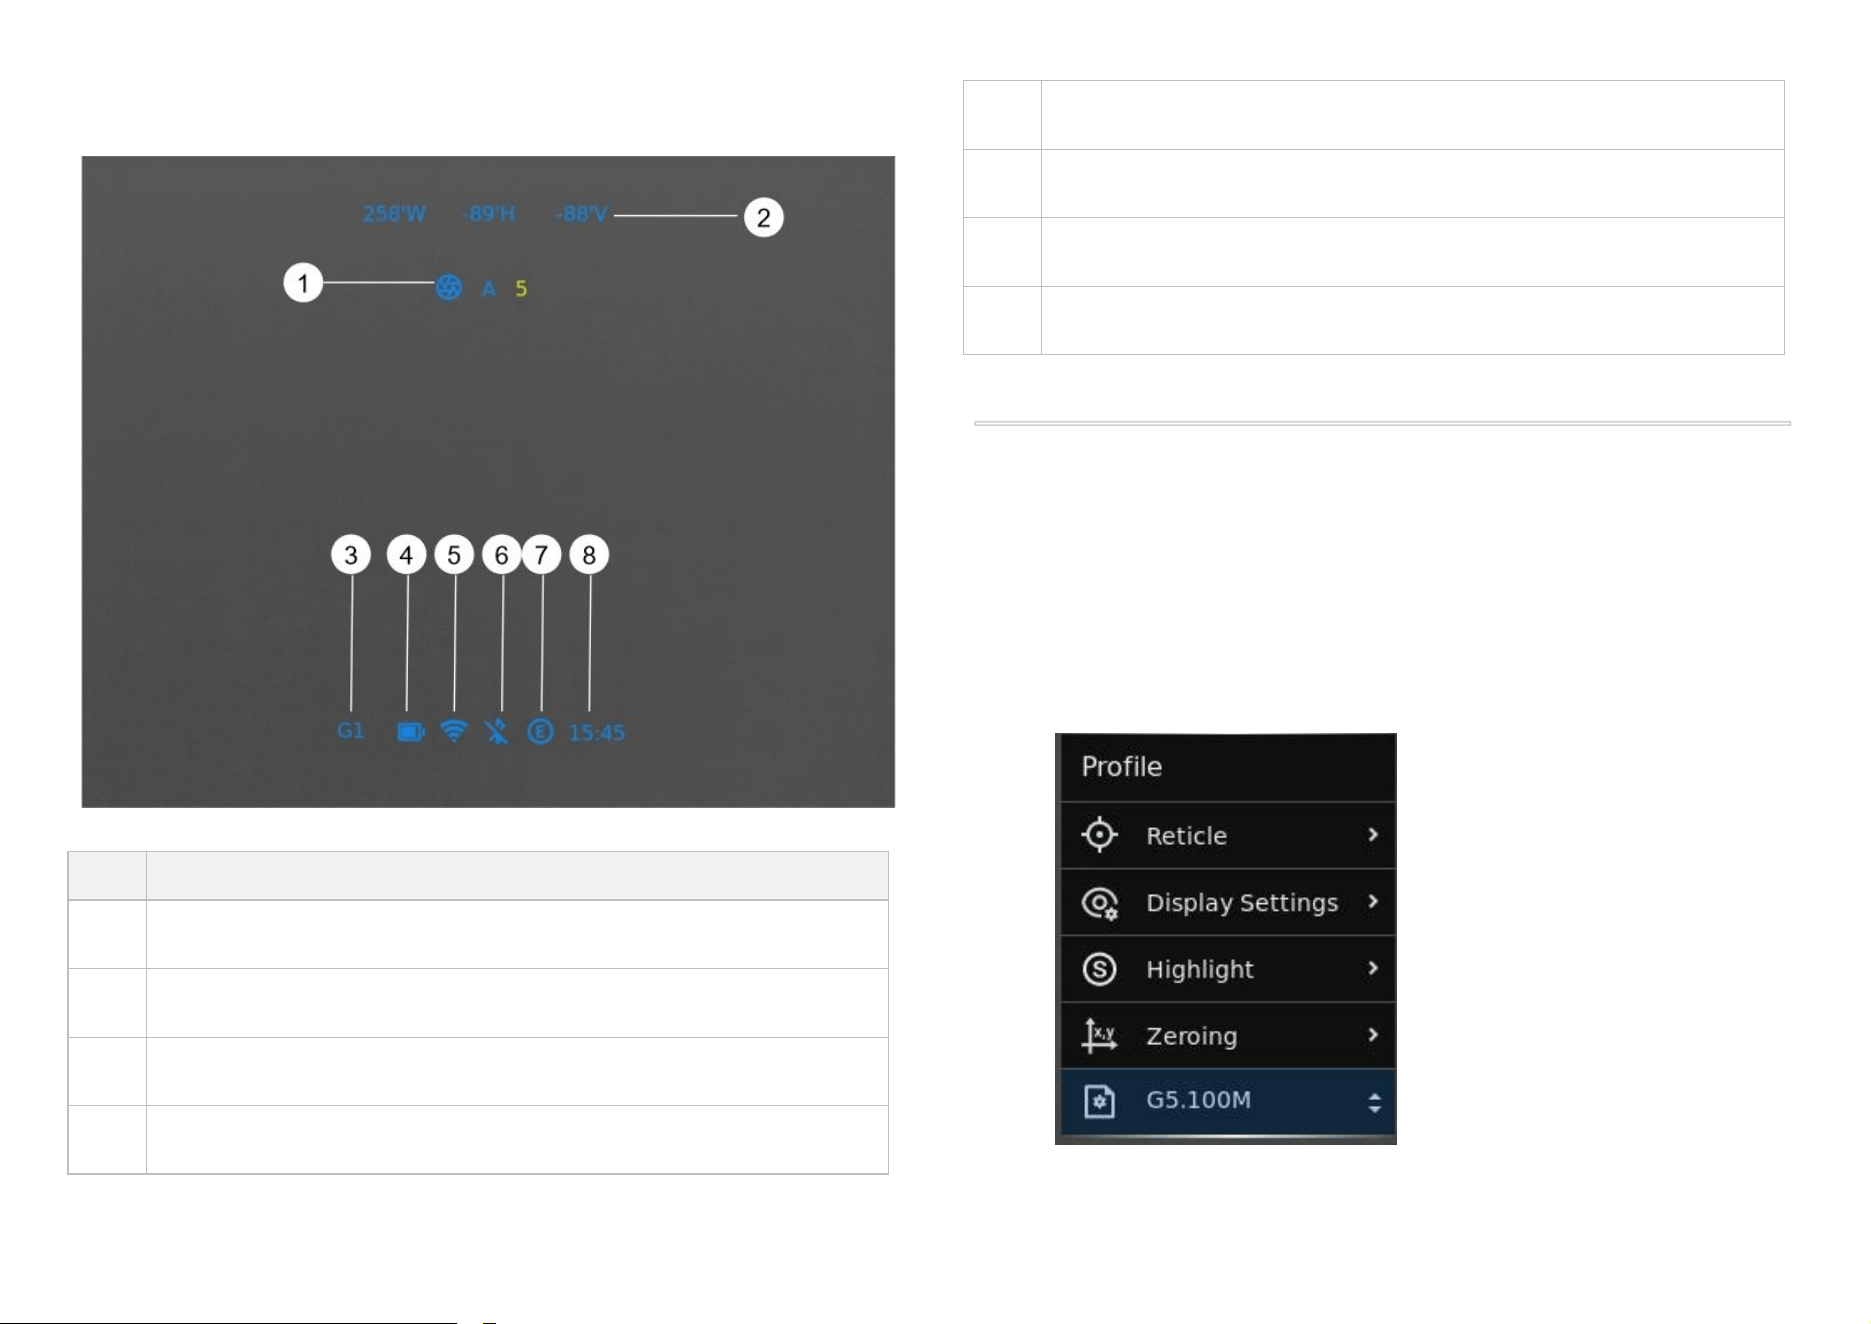
10. Status Bar Overview
NO.
Description
1
NUC Shutter
2
Electronic compass
3
Profile
4
Battery
5
Wi-Fi
6
Bluetooth
7
Scene mode
8
Time
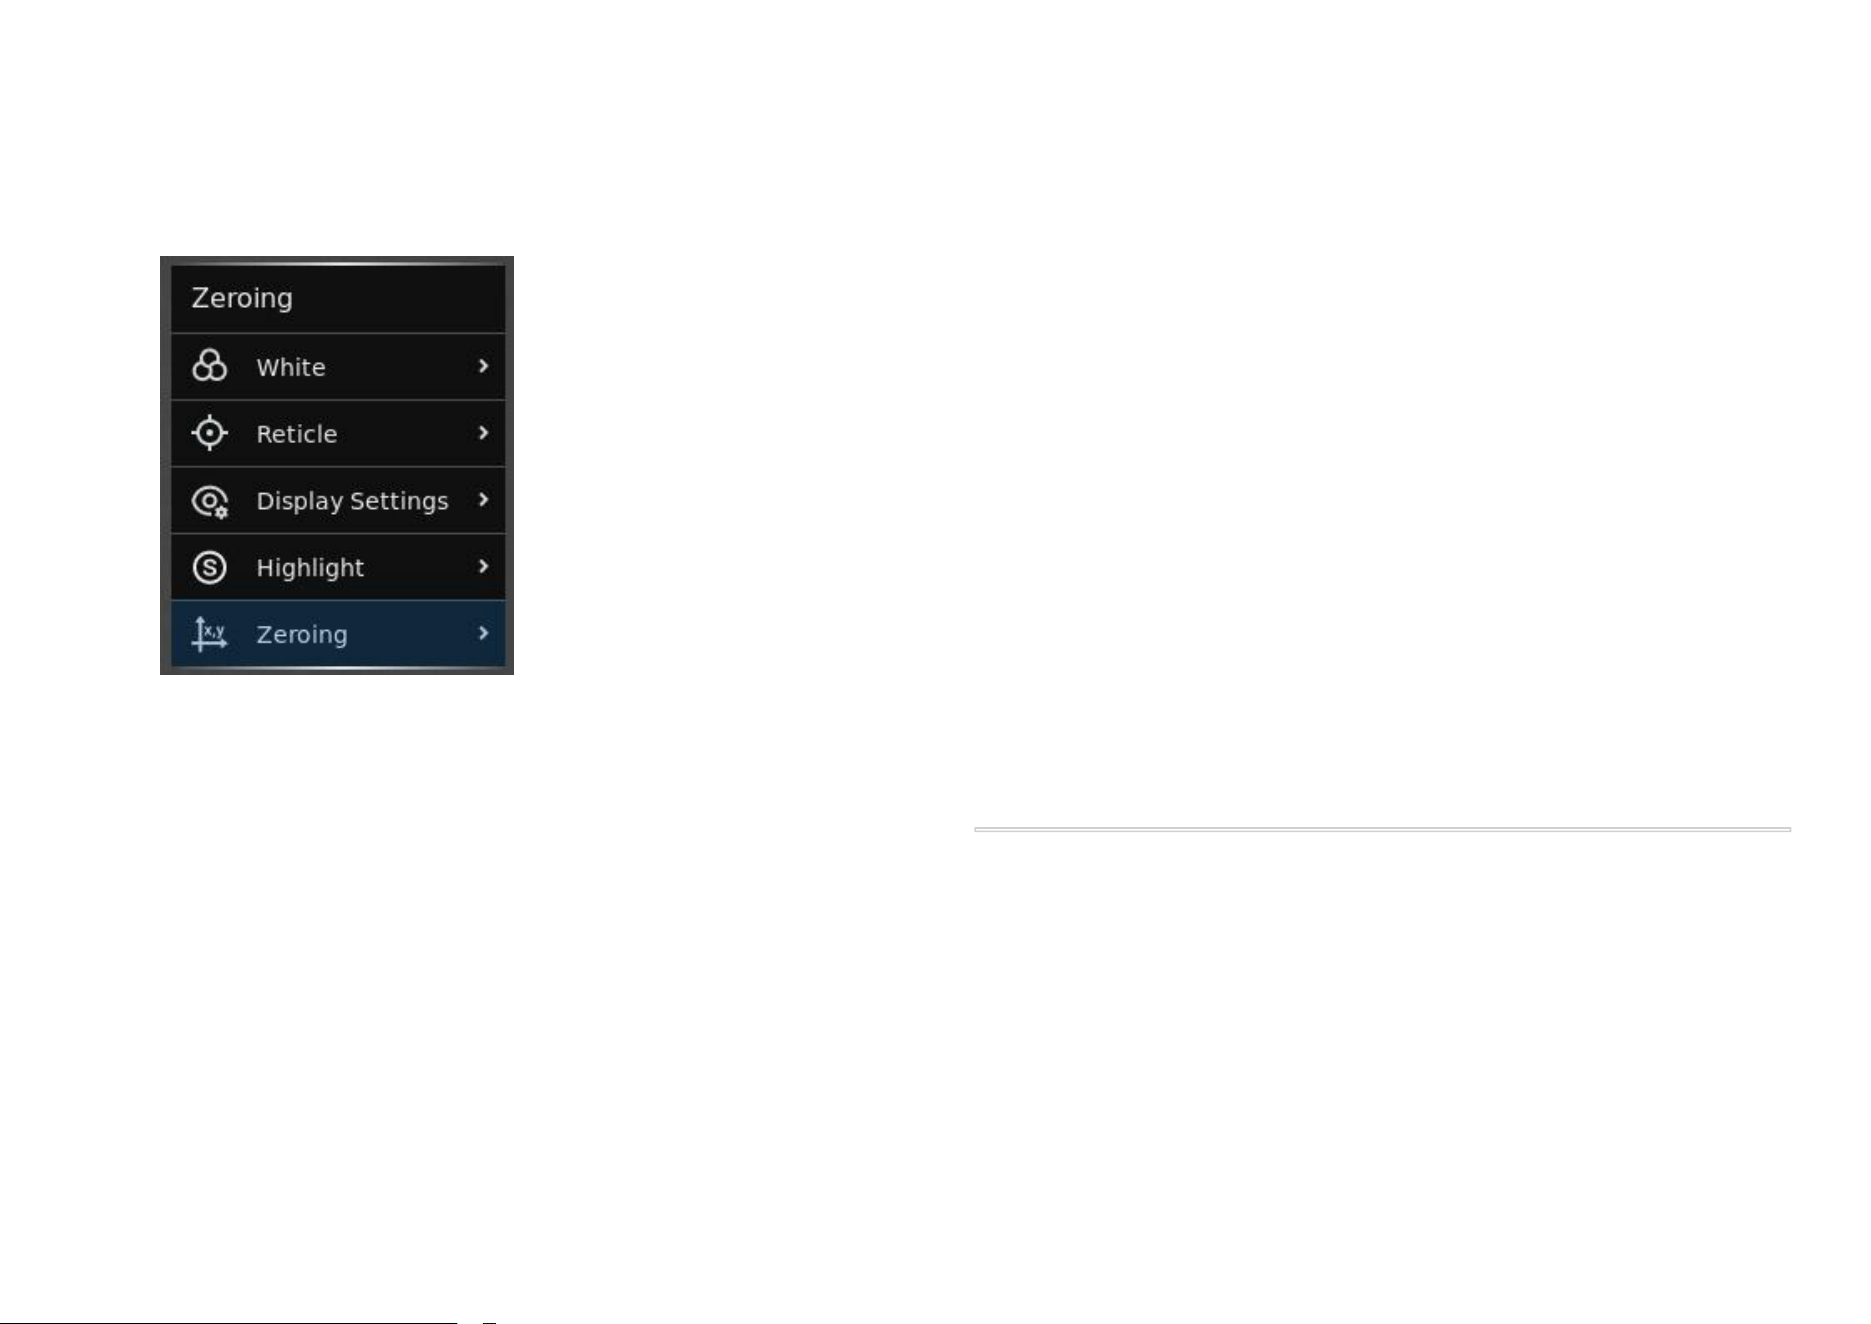
11. Zeroing
ZEN C series feature to use the “Freeze” zeroing method. The detailed
steps are as follows:
● In the main menu screen, choose a profile.
10
● Select the zeroing function to enter the zeroing screen and the
coordinate position of the reticle (X axis, Y axis) is displayed in the
center of the screen.
● Set Up a Stable Shooting Position: Find a stable shooting position,
such as a shooting bench or sandbags, to rest their rifle on.
Consistency is key for accuracy.
● Fire a Shot: Fire a single shot at their chosen target. Aim for the
center.
● If the bullet hole and the aiming point (the center point of the
reticle) do not match with each other, keep the aiming position still.
Do not move their reticle.
● Make sure the center of their reticle is on the aiming point. Then
Press ‘freeze’ to make the screen frozen.
● Press the menu button to toggle between the x and y axes, then
use the up and down buttons to align the crosshair with the bullet
hole from their shot.
● Press and hold the menu button again to exit the main menu and
save the setting.
● Shoot Again: Fire another shot at the same target after adjusting.
● Confirm Zero: Once they consistently hit the target at their desired
distance, their thermal scope is zeroed. Confirm this by shooting a
few more rounds to ensure consistency.
12. Calibration
NUC (Non-Uniformity Correction):
● Auto: Triggered regularly by device.
● Manual: Long press Zoom button.
● External: Close lens cap, long press Zoom button.
11
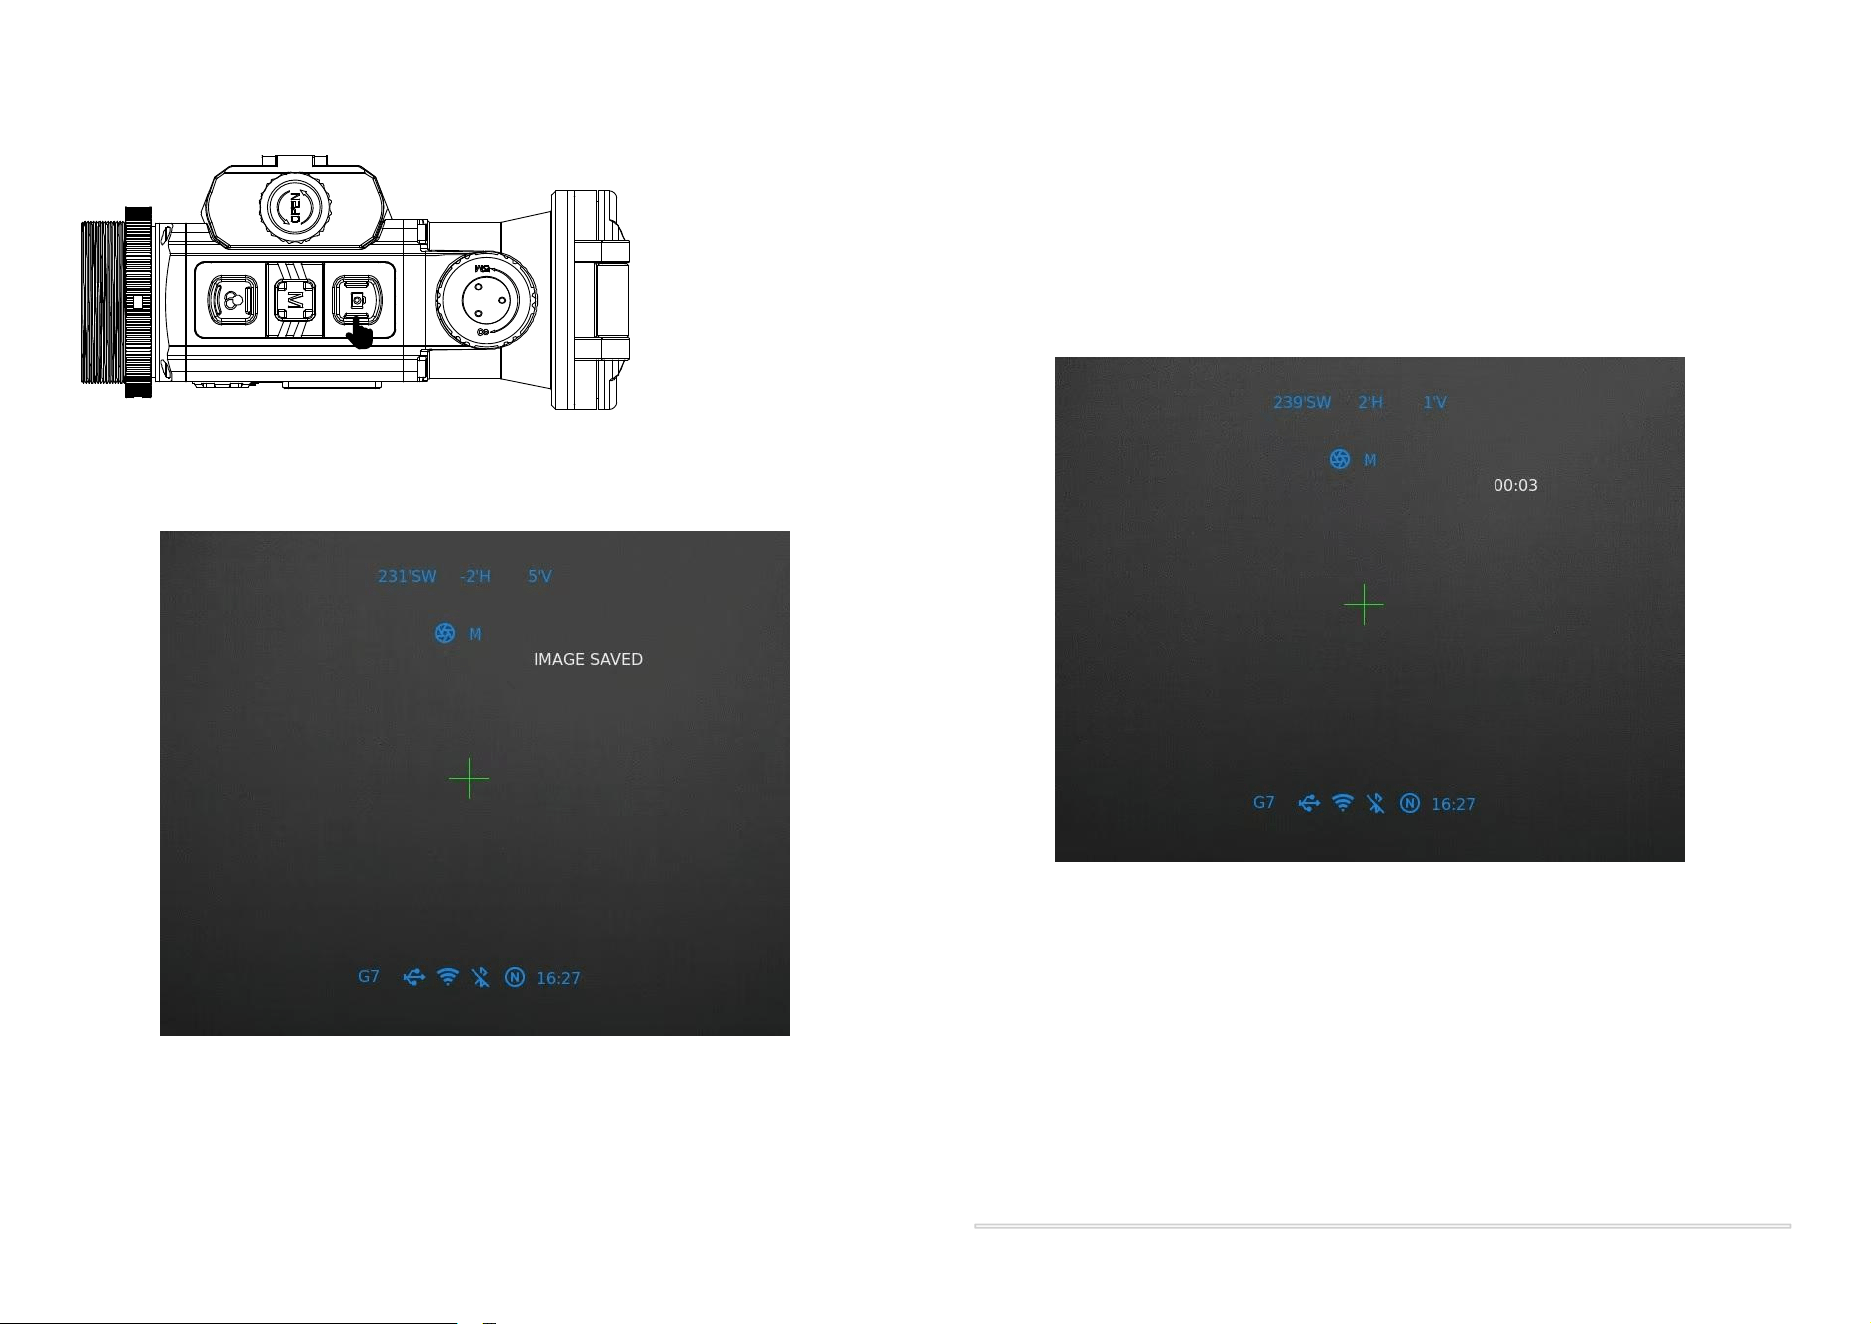
13. Photographing & Video Recording
Take Photo:
● Short press the shutter button → brief freeze with photo icon.
Note:
Make sure the device is properly zeroed before activating the virtual reticle
function.
Record Video:
● Long press Capture button → recording icon and timer.
● Press again to stop.
RAV Mode:
● Automatically records 10 to 30 seconds before and 10 to 30
seconds after a recoil event.
All media saved in internal 32GB/64GB memory.
12
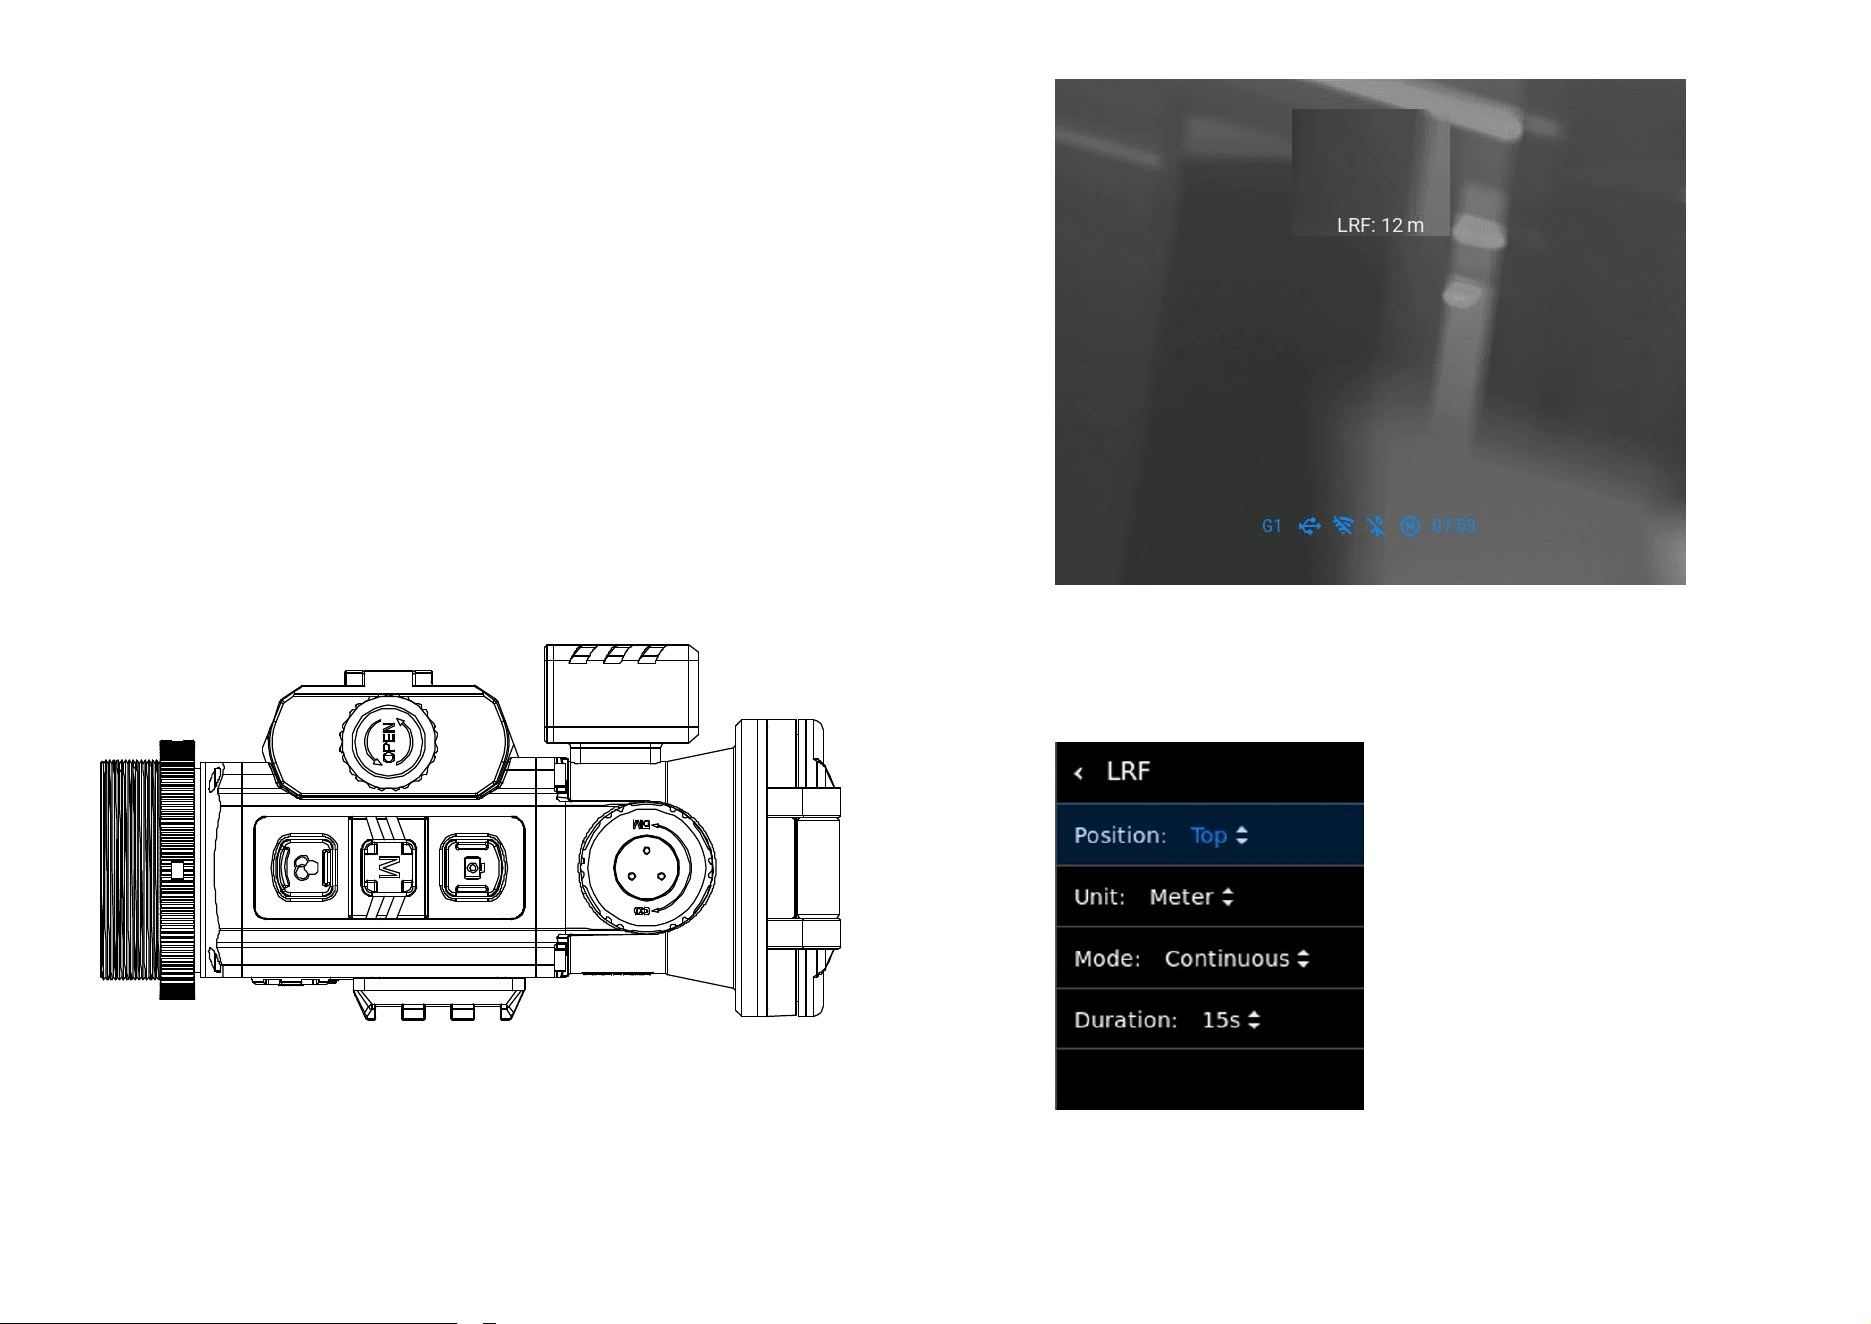
14. Measure Distance(C50R)
C50R is equipped with an integrated LRF module, which can be used to
measure the distance to a target. When measuring distance, please hold
the device steady and avoid shaking to ensure measurement accuracy.
This feature provides two distance measurement modes: Continuous and
Single. The operation differs depending on the selected mode. You can
switch modes via Main Menu > Advanced Settings > LRF.
Warning: Laser radiation emitted by this device can cause eye injuries, skin
burns, or ignite flammable materials. Ensure no person or flammable
material is positioned in front of the laser lens before activating the laser
ranging function.
The device’s battery is below 5%, LRF will be automatically disabled.
1 2 3 4 5
6 7 9 108
1
2
Continuous: Short press the Palettes button to start measuring. The
device will perform continuous measurements for a preset duration
and then stop automatically. You can also stop it early by short
pressing the Palettes button again.
Single: Short press the Palettes button to perform a single distance
measurement each time.
Position:Top、Mid
Unit:Meter、Yard
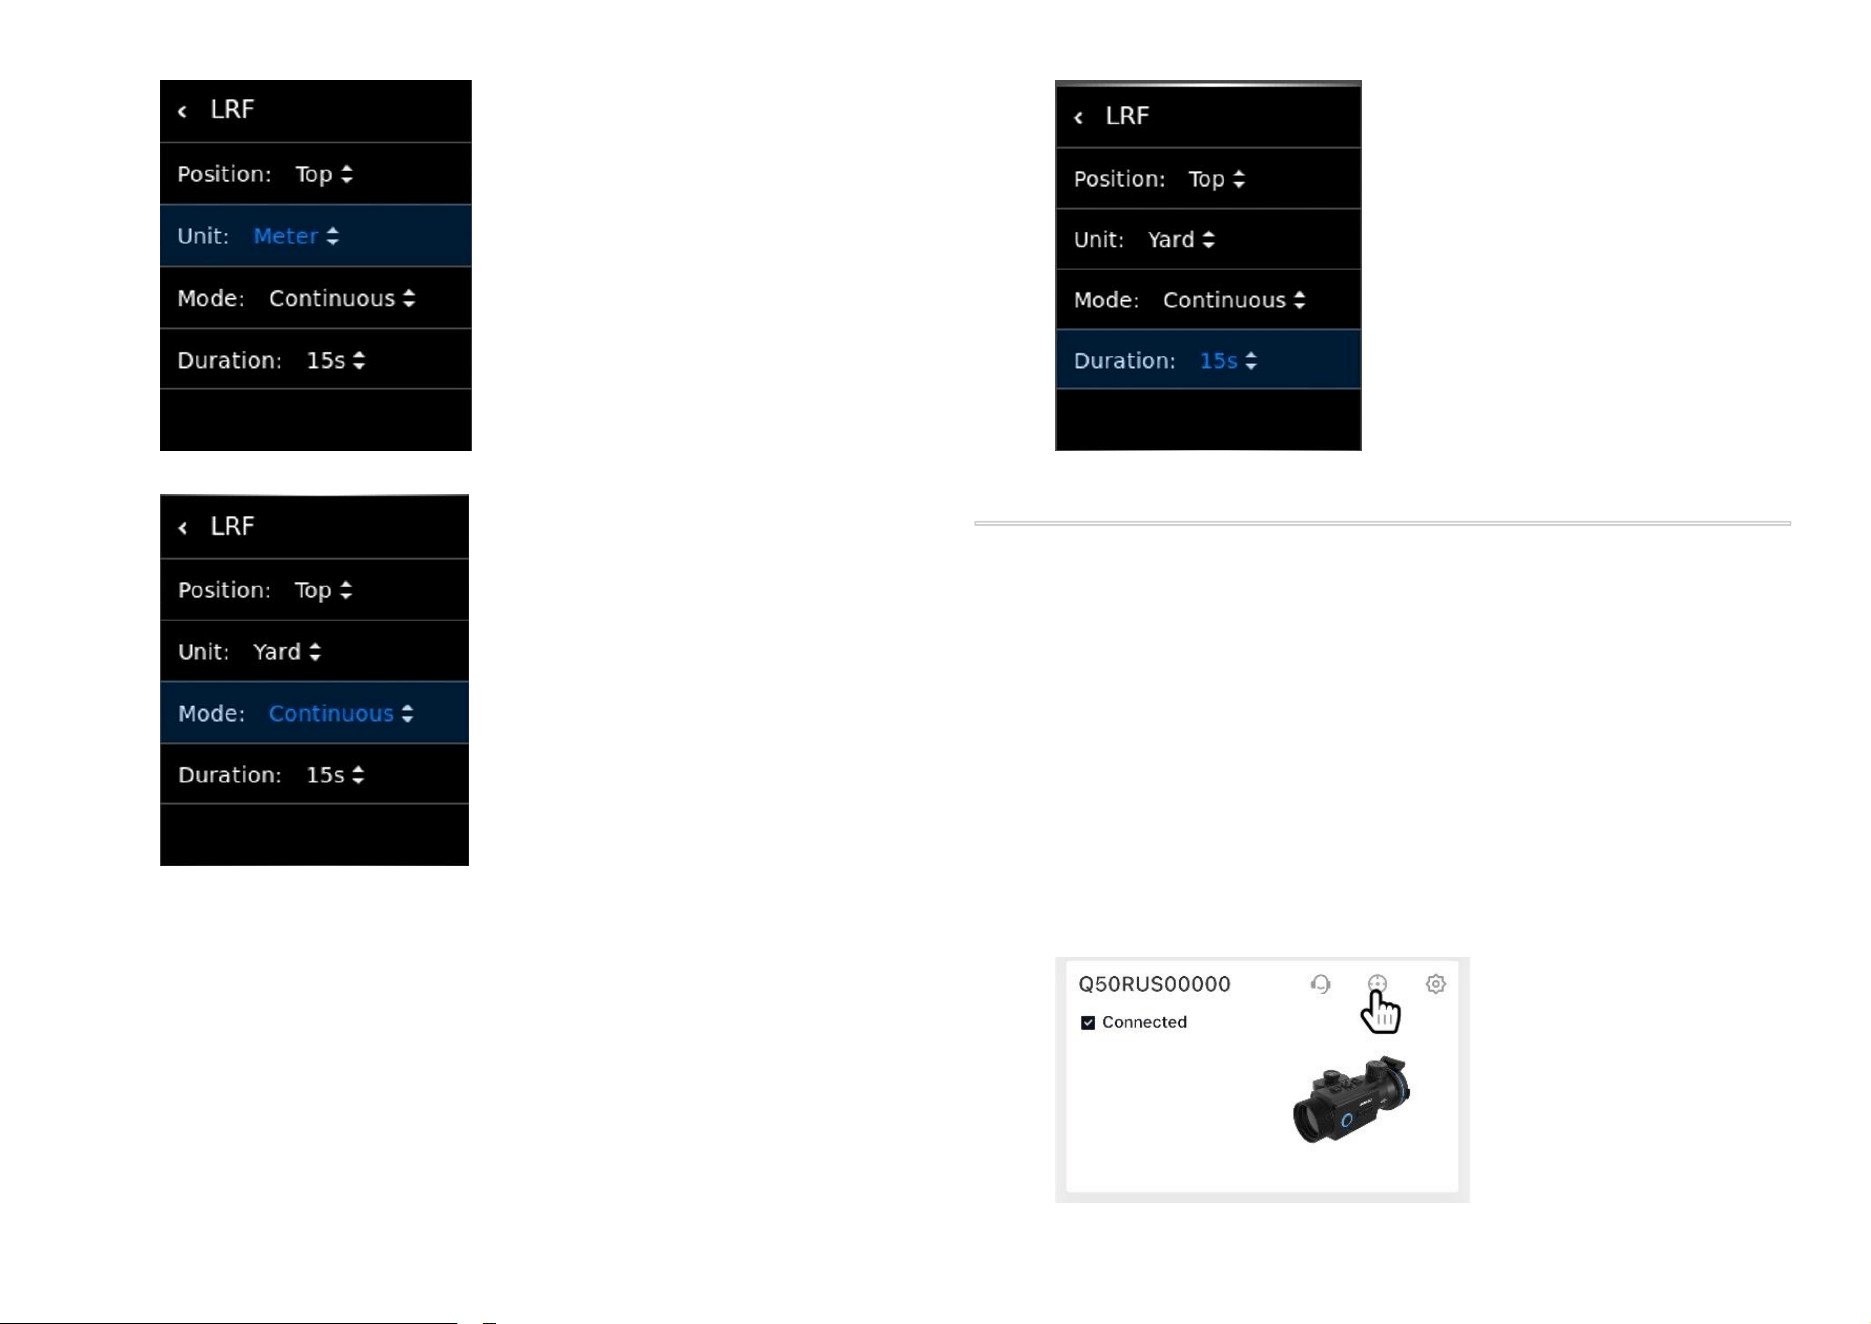
13
Mode:Continuous、Single
Duration:15、30、45、60 sec
15. Ballistic Calculation(C50R)
Before using this function, please note the following two points:
1. Ensure the rangefinding function is working properly. For detailed
instructions on using the rangefinder, refer to the previous section.
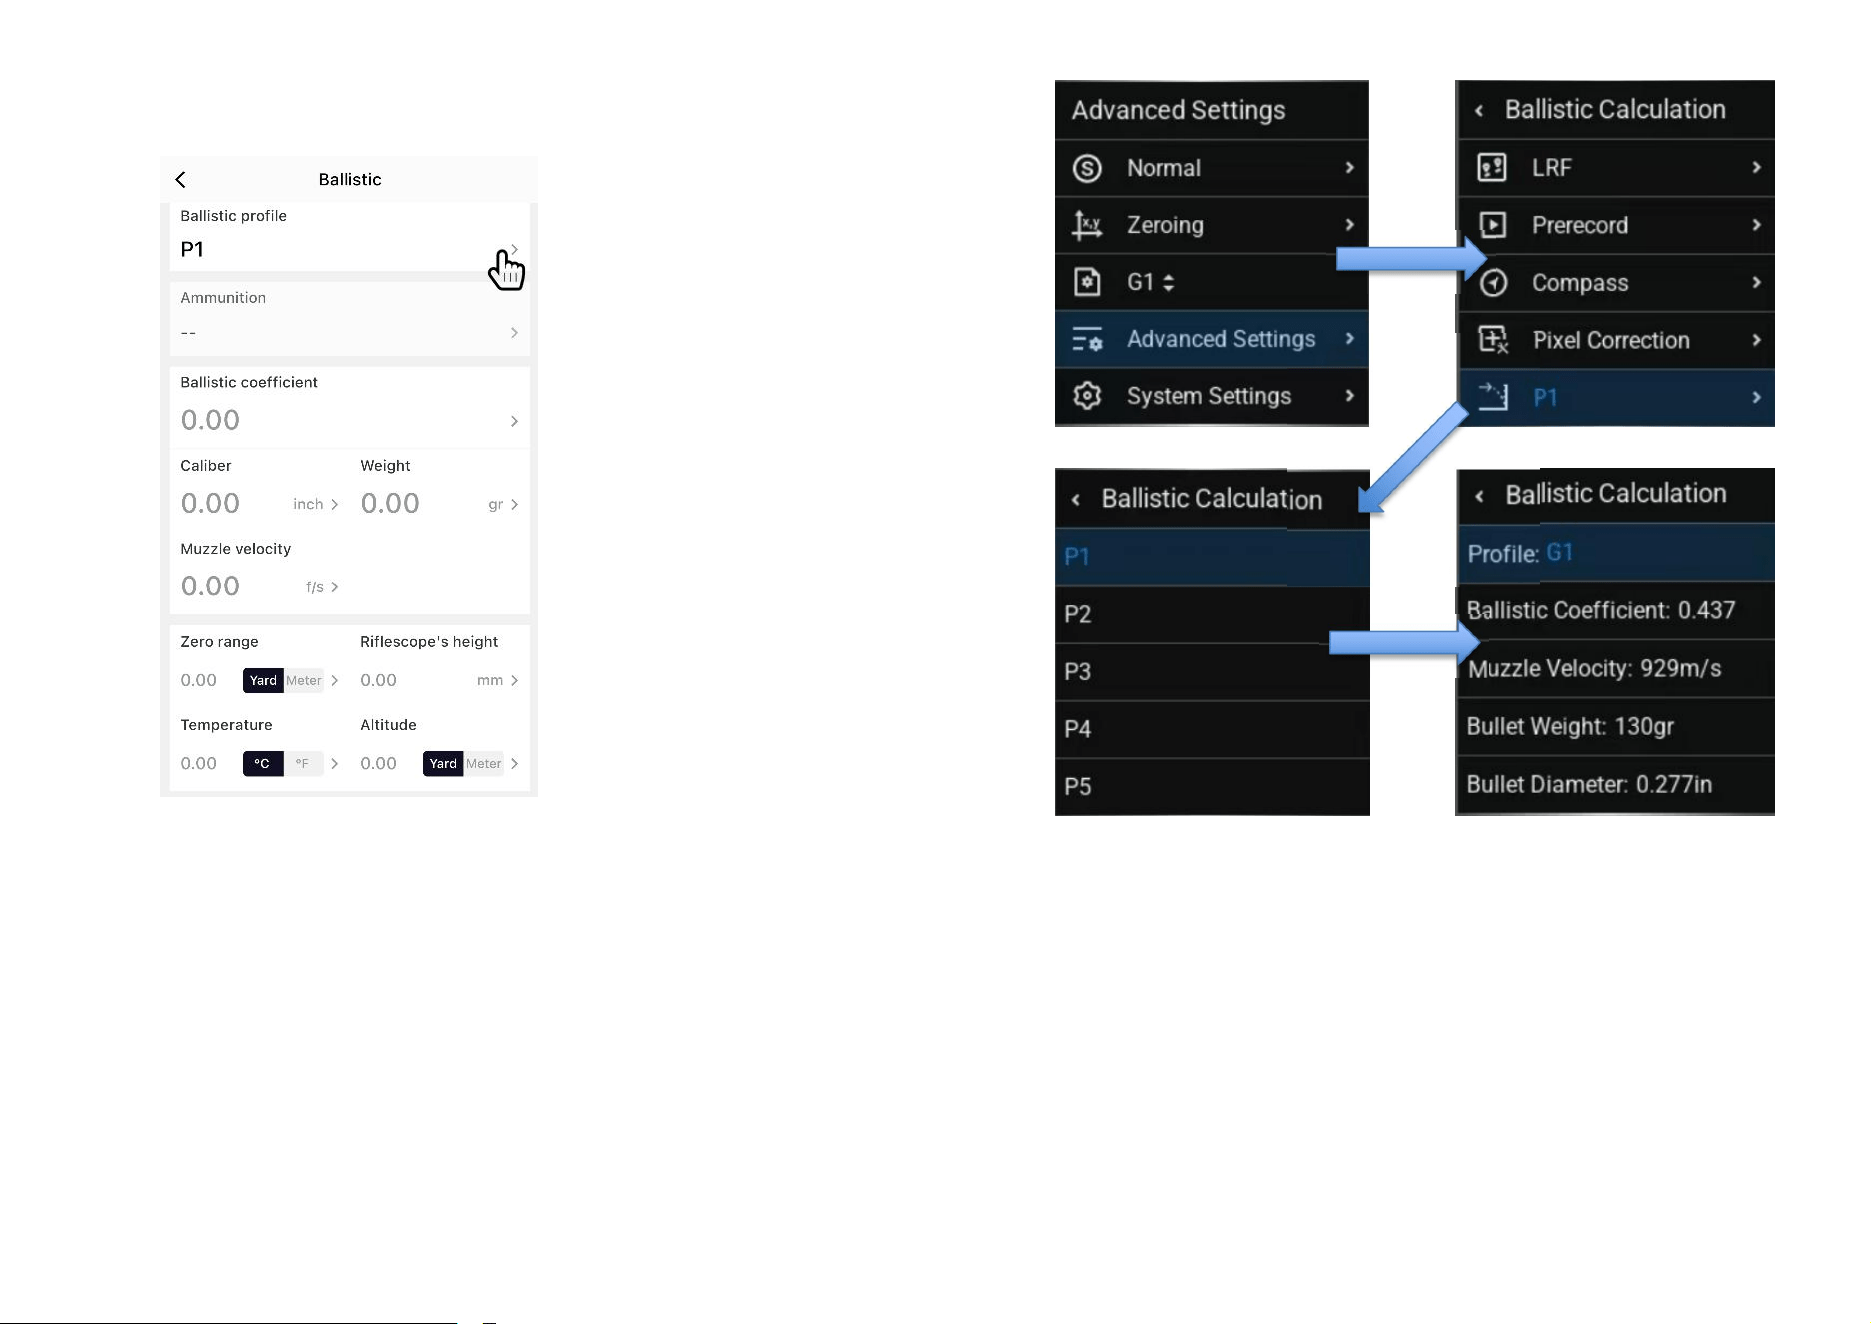
2. Ballistic parameters must be set in the ZEN LINK App. The specific steps
are as follows:
Connect the C50R in the ZEN LINK App. Once connected, tap the
Ballistic Calculation function icon.
14
On this page, select the corresponding Ballistic Profile, enter the
parameters, and tap Save after completing the setup.
After saving, the data will be automatically transmitted to and
stored in the C50R. If you need to modify the parameters in the
Ballistic Profile later, you must reconnect to the ZEN LINK App and
repeat the above steps.
Open the device’s main menu to view or switch Ballistic Profiles in
the Ballistic Calculation menu.
Once the above setup is complete, you can start using the Ballistic
Calculation function. Follow the steps below:
Aim at a distant target. The function will not work at close range.
Short press the Palettes button to start rangefinding. After a short
moment, the screen will display the calculated ballistic data.
Adjust the muzzle elevation according to the displayed data to
accurately hit the target.
15
Adjust the muzzle elevation according to the displayed data to hit
the target accurately. For example, if the screen shows "3 MIL", use
the reticle on the day scope as a reference and raise the muzzle by
3 MIL.
Short press the Palettes button again to turn off the rangefinding
and ballistic calculation functions.
16. Quick Menu
Press Menu briefly to enter:
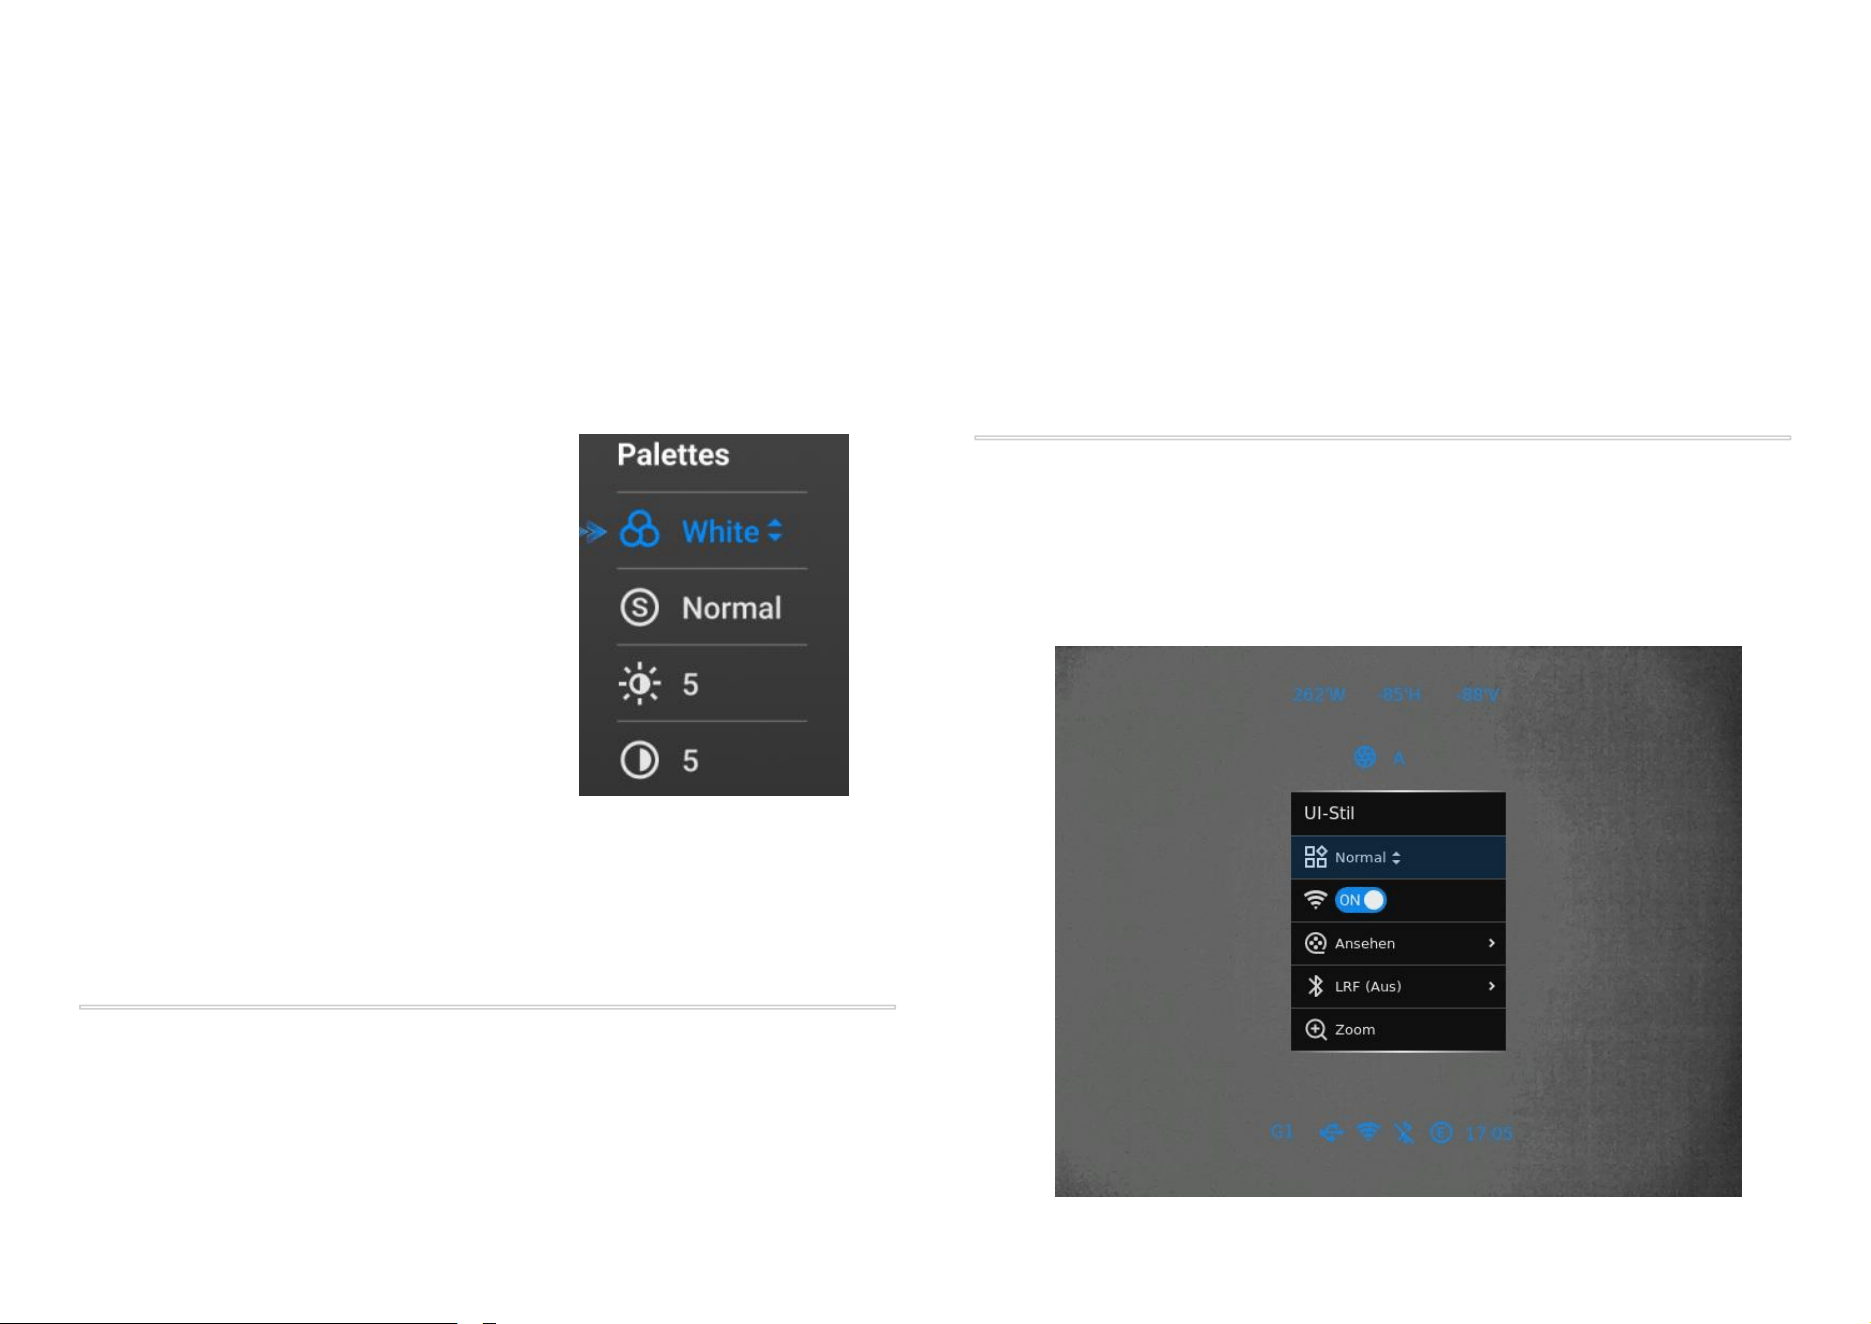
● Palettes.
● Scene Mode.
● Screen Brightness (1–15).
● Contrast (1–5).
Use Palettes/Capture to navigate, Menu to modify, long press Menu to
save and exit.
17. Main Menu
The Main Menu provides full control of all advanced settings. Access it by
long pressing the Menu button on the home screen. Navigate with the
Palettes/Capture buttons, short press the Menu button to edit or enter a
submenu, and long press the Menu button to save and return to the
previous level.
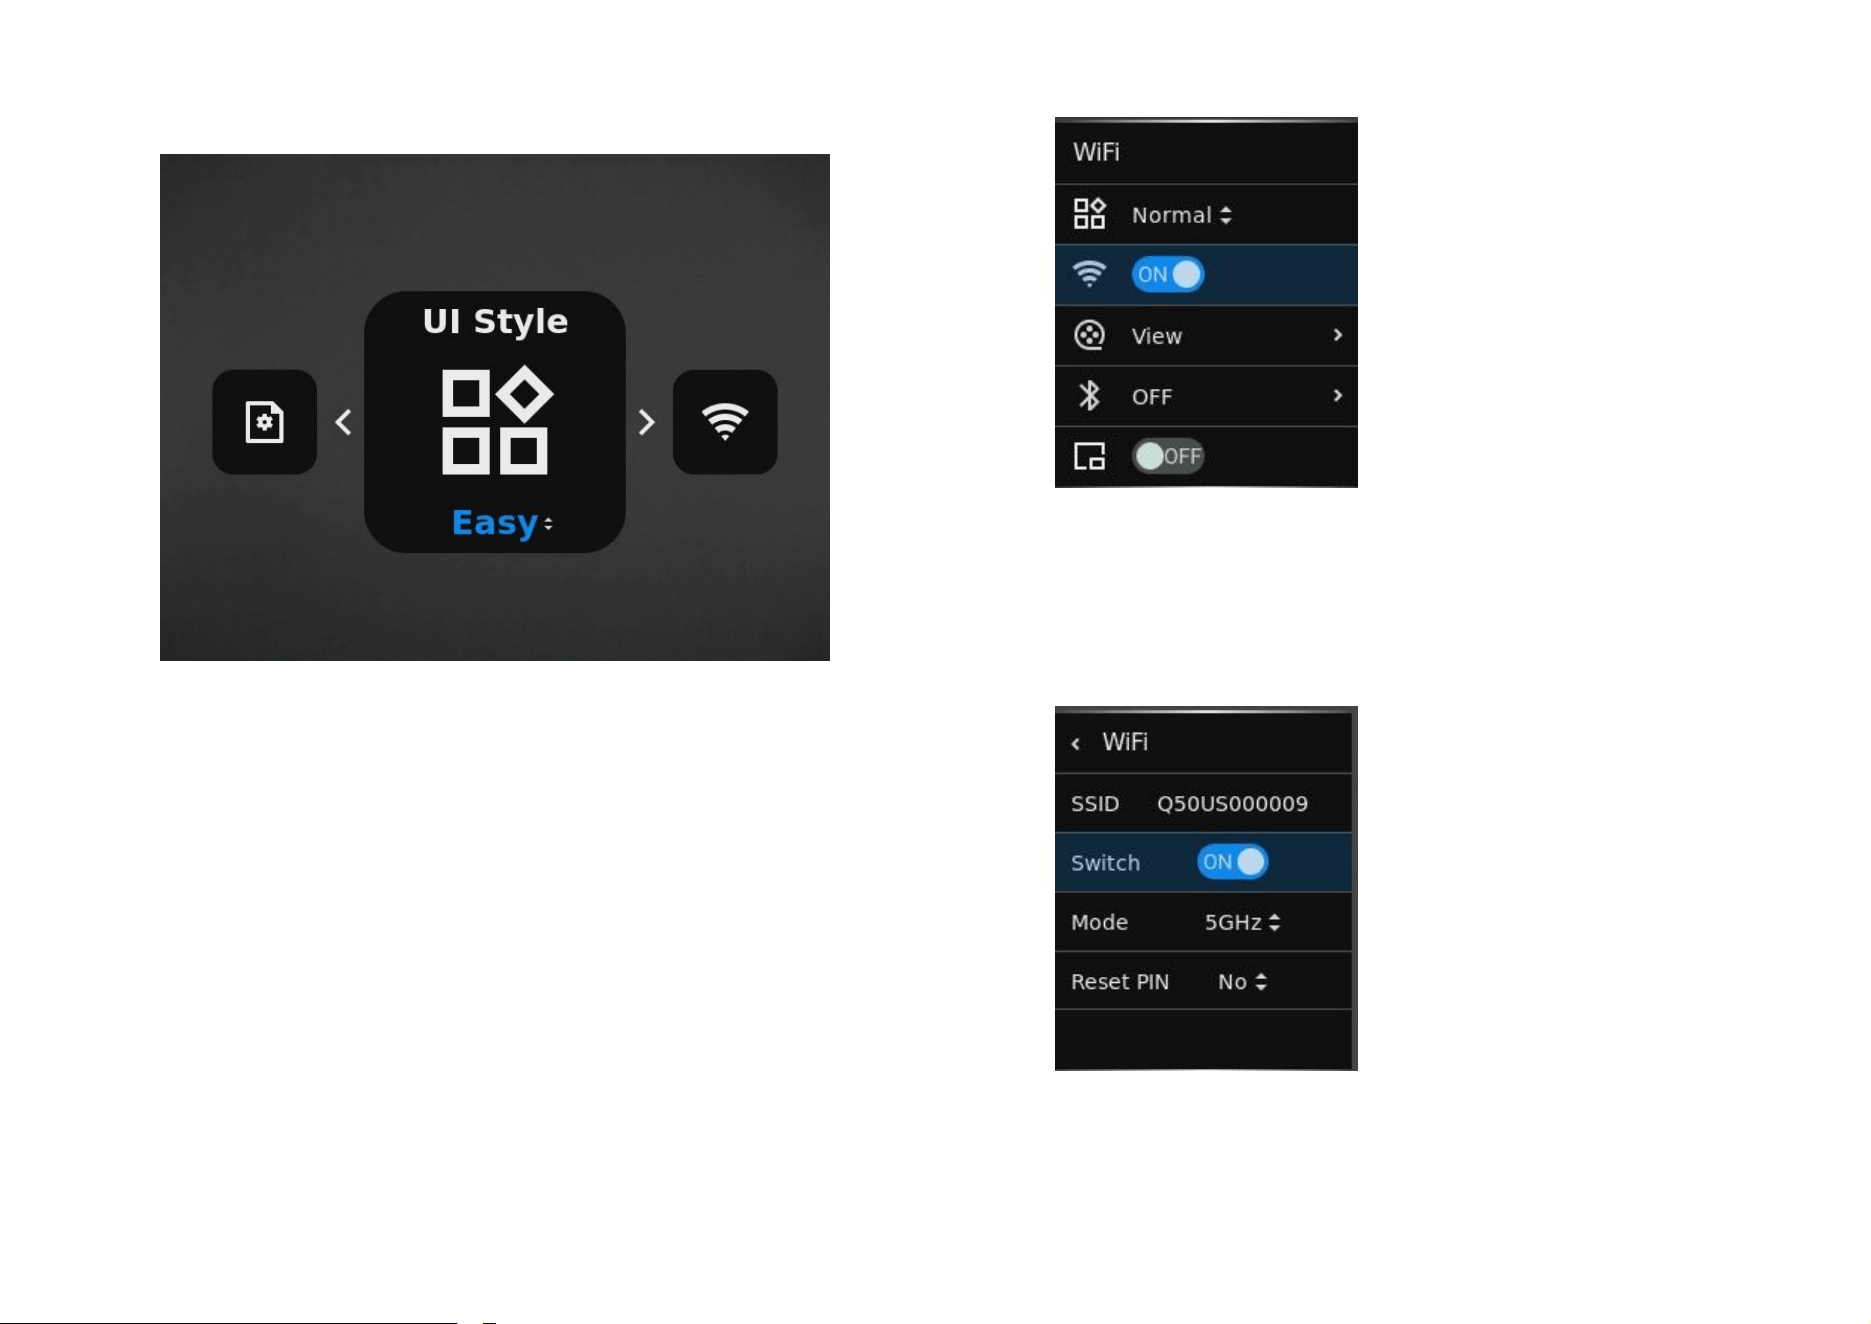
UI Style
Switch between two menu display styles: Normal and Easy.
● Normal: Displays menu items with standard-sized text and icons.
Multiple menu items are visible at once.
16
● Easy: Enlarges text and icons for improved readability. Only one
menu item is shown at a time, creating a simplified user interface.
Wi-Fi
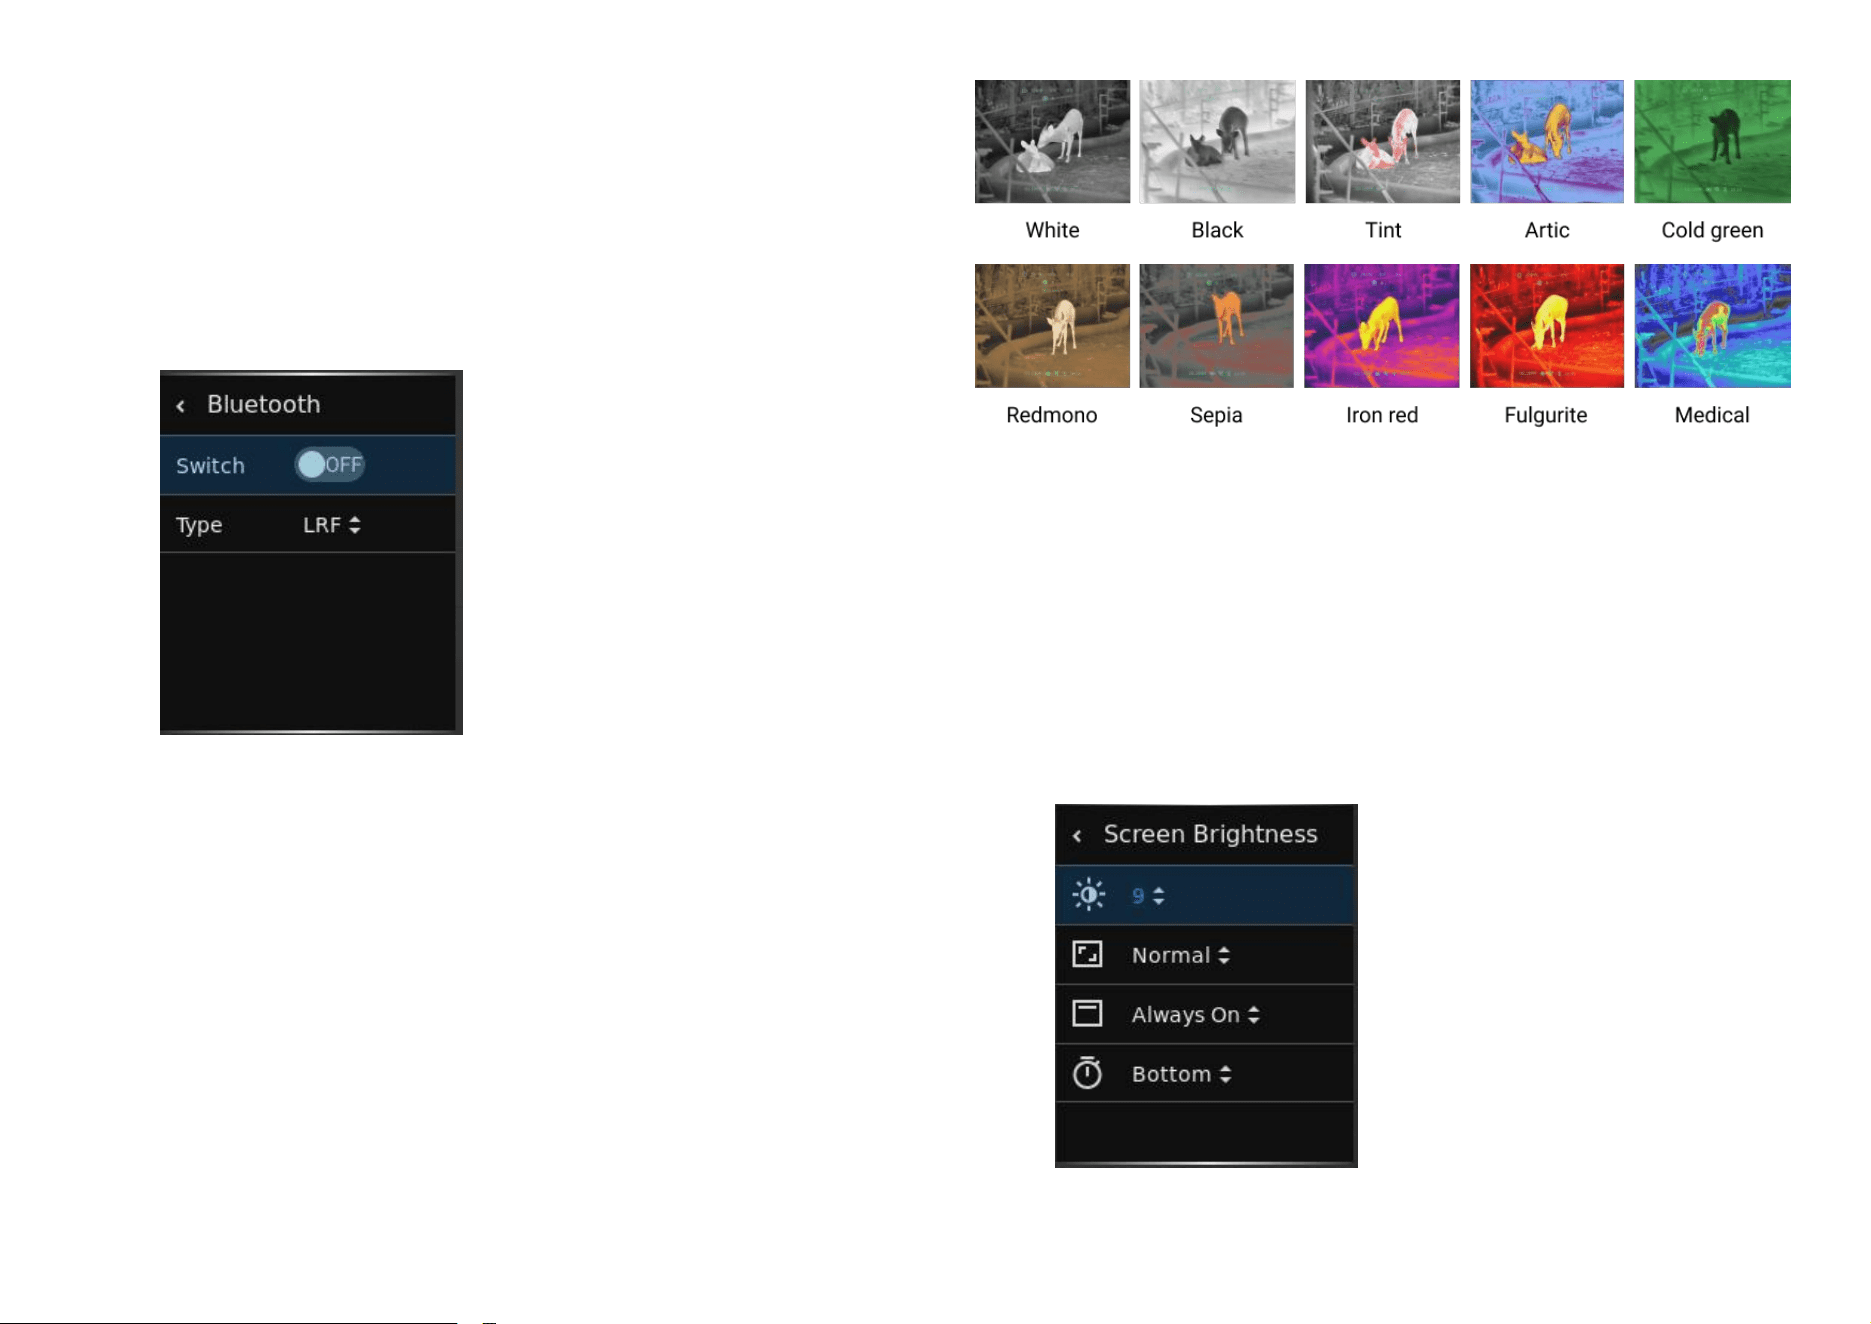
This option enables or disables Wi-Fi, allowing the device to connect to
mobile apps (e.g., ZEN LINK) for remote control, image preview, and
firmware updates. When enabled, the device will broadcast its SSID for
connection.
Toggle wireless connection for app control and file transfers.
● On / Off.
NOTE: Displays SSID on activation. You can check the Wi-Fi name
(SSID) in Advanced Settings > Wi-Fi. The default password is
12345678. If forgotten, go to Advanced Settings > Wi-Fi > Reset PIN
to reset the password.
17
Bluetooth
Bluetooth allows pairing with external accessories such as laser
rangefinders or remote controls. Once paired, the device will recognize
and show the connection status.
Pair with compatible external devices (e.g. rangefinder).
● On / Off.
Palettes
Thermal palettes control how the device translates heat differences into
visual colors. Users can switch between various false-color schemes for
better target visibility under different environmental conditions.
Change thermal display color schemes.
● White Hot / Black Hot / Red Mono / Rainbow / Arctic / Iron Red /
Green White / Tint / Sepia / Fulgurite / Cold Green / White
Highlight.
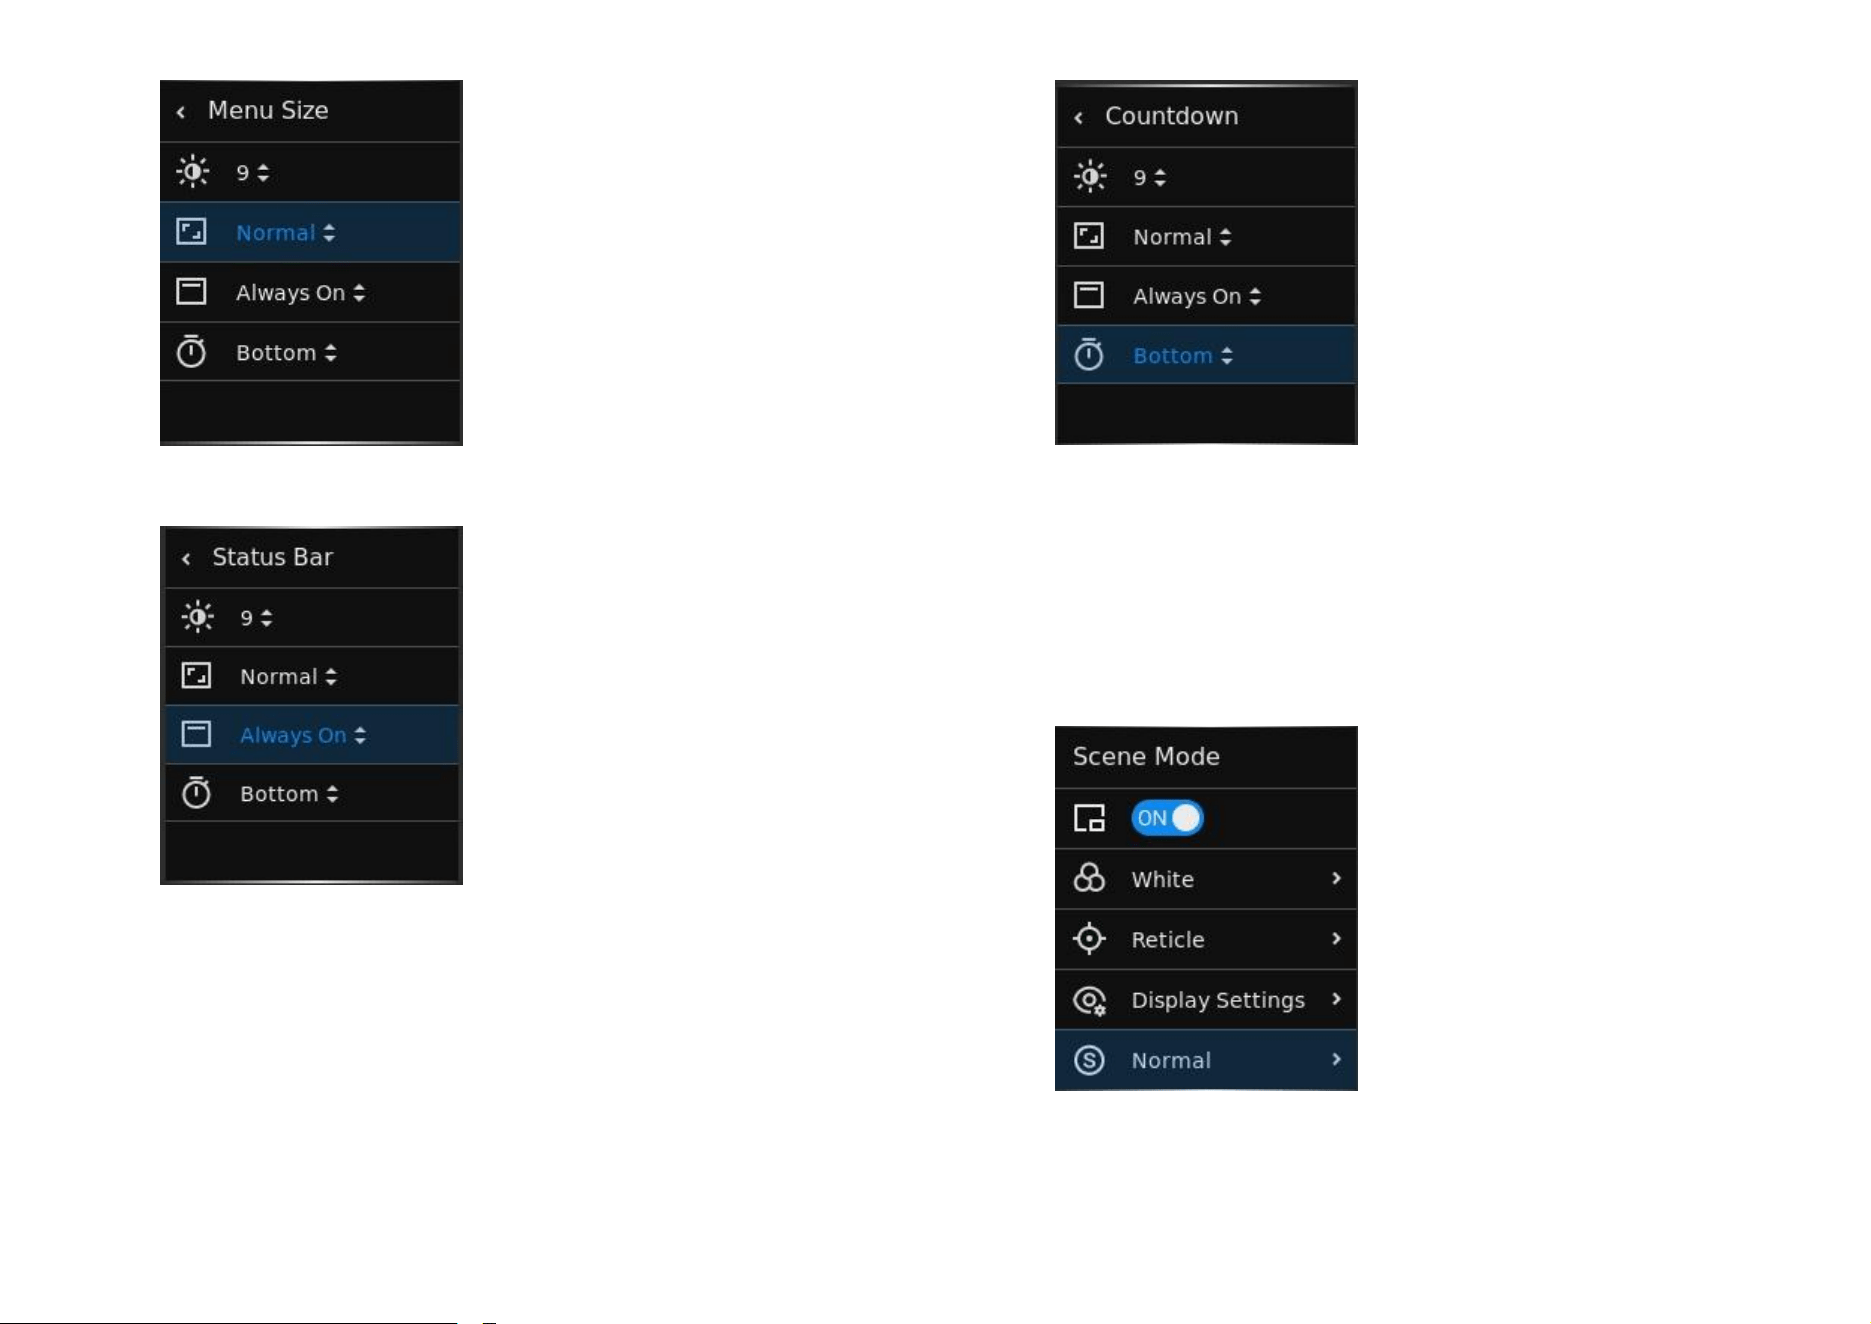
Display Settings
Adjust screen brightness, menu scale, status bar visibility, and location to
ensure optimal display readability across lighting environments.
Personalize display preferences.
● Brightness (1–15).
● Menu Size: Normal / Small.
18
● Status Bar: Auto hide / Always On.
● Countdown Location: Top/ Mid.
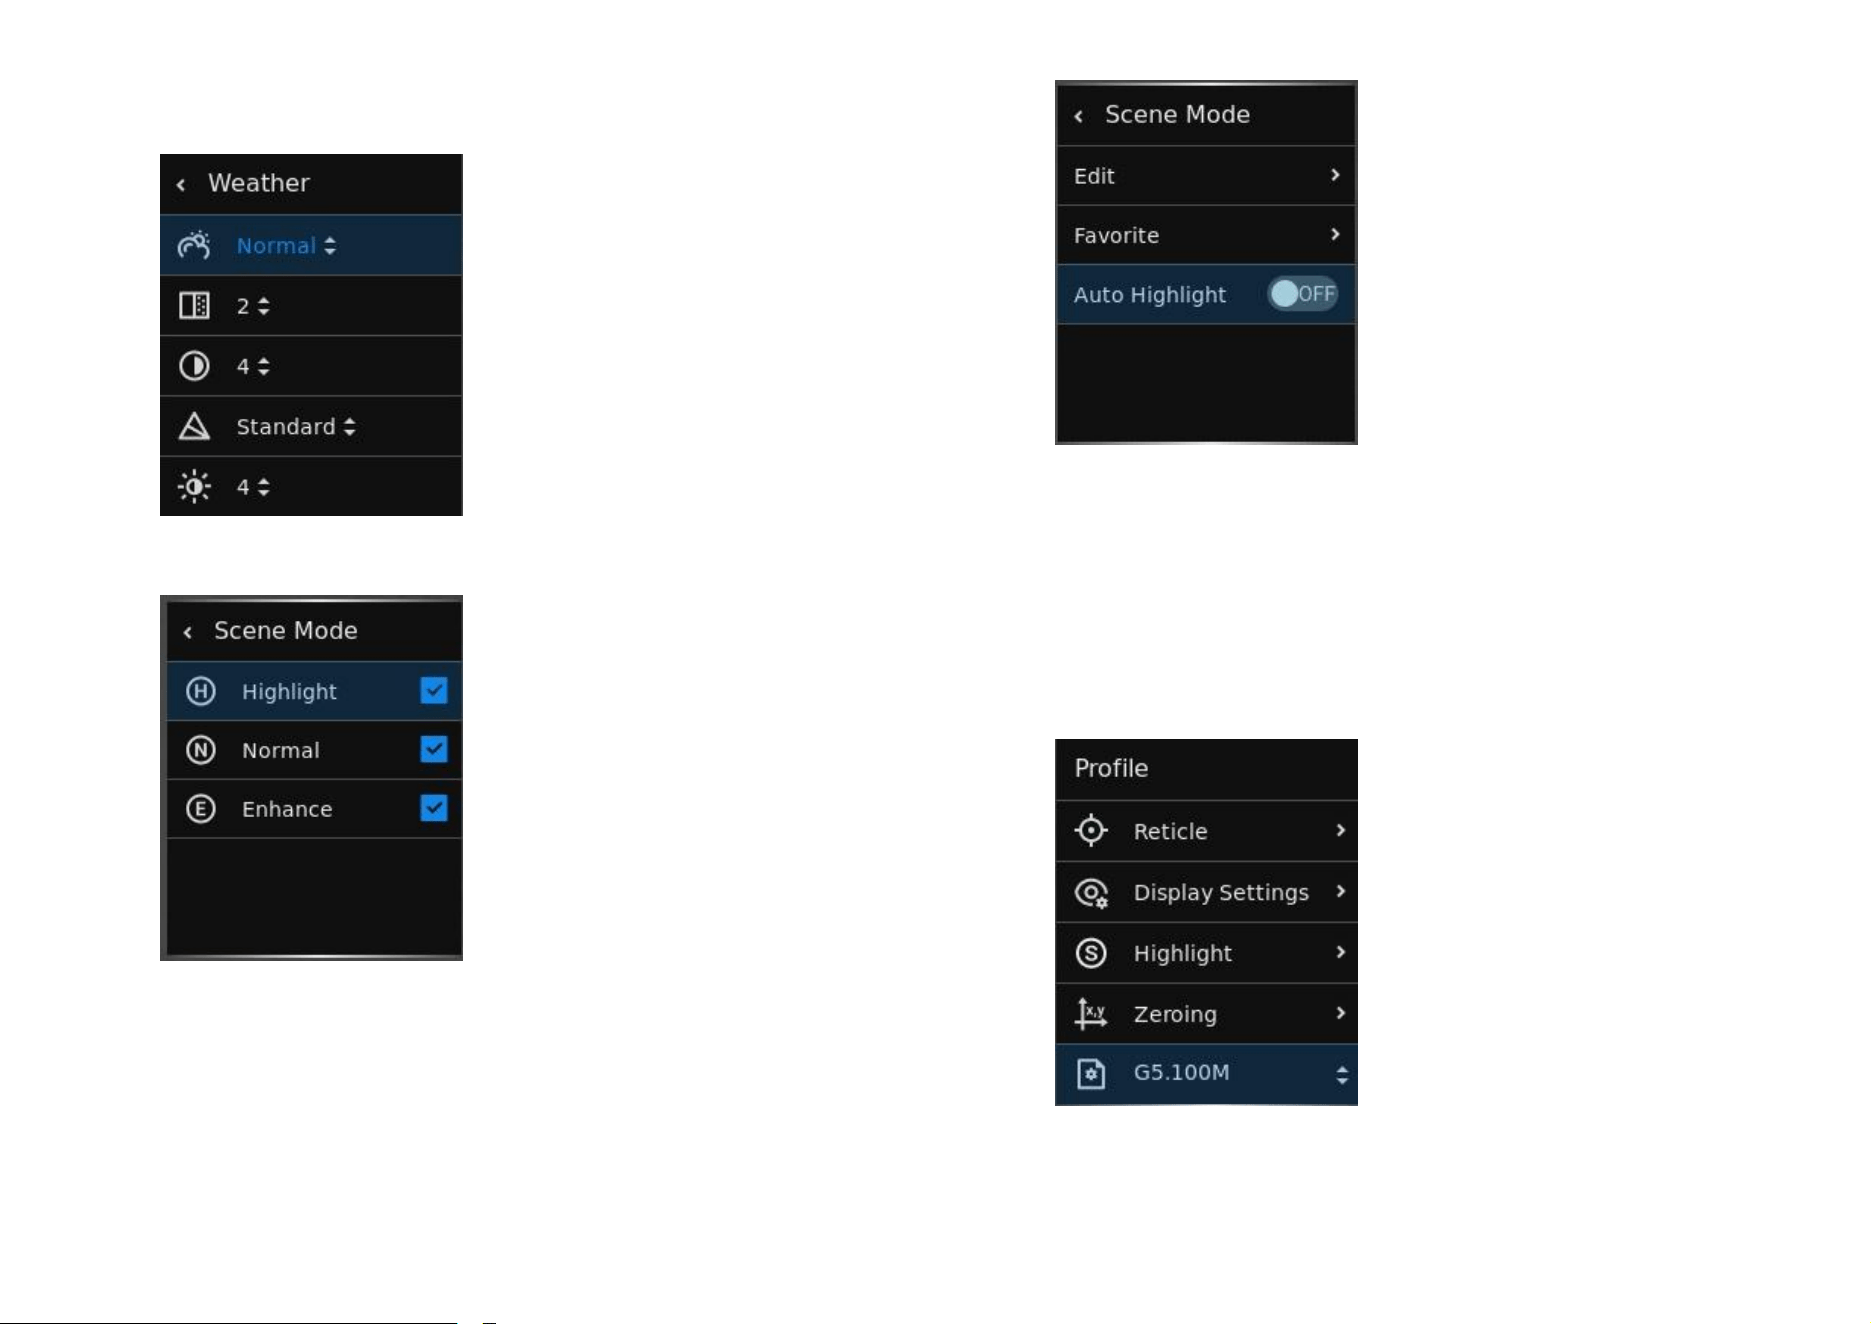
Scene Mode
There are three scene modes that can be switched via the Quick menu.
Users can customize the Display Settings for each mode, such as weather,
denoise, and contrast, enabling fast and effective transitions between
different environments for optimal viewing.
● Three Scene Modes: Normal / Highlight / Enhance.
19
● Editable parameters: Weather, Denoise, Contrast, Sharpness,
Brightness.
● Favorite: The selected scene mode can be switched via the Quick
menu.
● Auto Highlight: On / Off.
When this feature is enabled, the device automatically switches to
Highlight mode after shooting, making it easier to detect and locate
targets while eliminating the hassle of manually switching scene
modes.
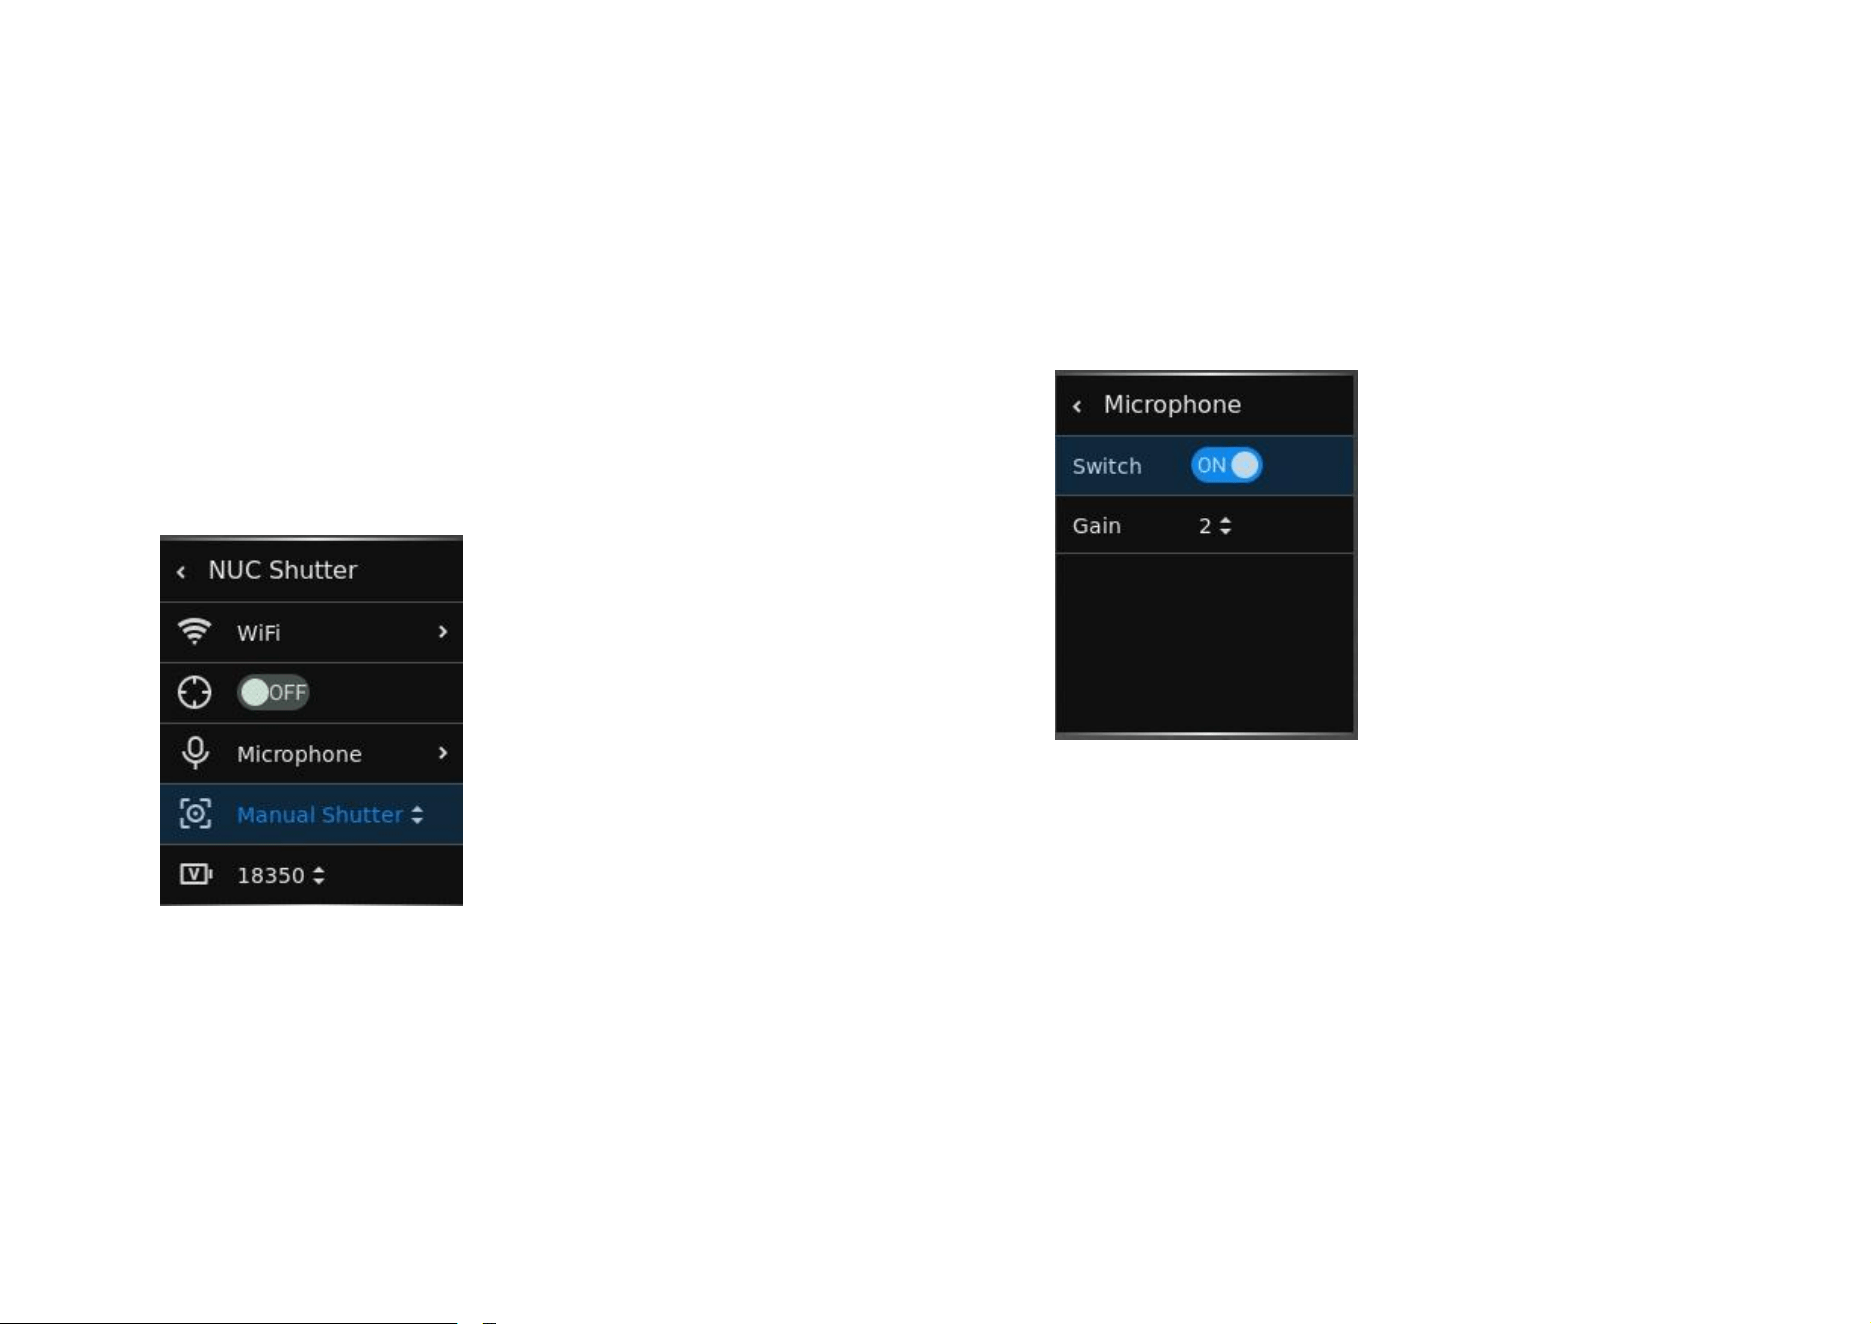
Profile
Quickly switch between different zeroing profiles. Once the device is
connected to the ZEN LINK App, you can rename profiles within the app to
make them easier to remember.
● Profiles G1–G10 can be renamed in the app for easier identification.
20
Media
Browse and view stored photos and videos.
● Thumbnail grid, with album categorized by month.
NUC Shutter
Control thermal sensor calibration.
When switched to Auto mode, the status bar displays an icon with the
letter A; in Manual mode, it shows M; in External mode, it shows E.
● Auto / Manual / External.
● Auto: The device automatically triggers image calibration at regular
intervals without user action.
● Manual: User initiates calibration manually by long pressing the
Zoom button.
● External: Close the lens cap and long press the Zoom button to
calibrate.
MIC
Enable or disable ambient audio recording.
● On / Off.
● Gain: -5~5.
Adjust microphone gain level
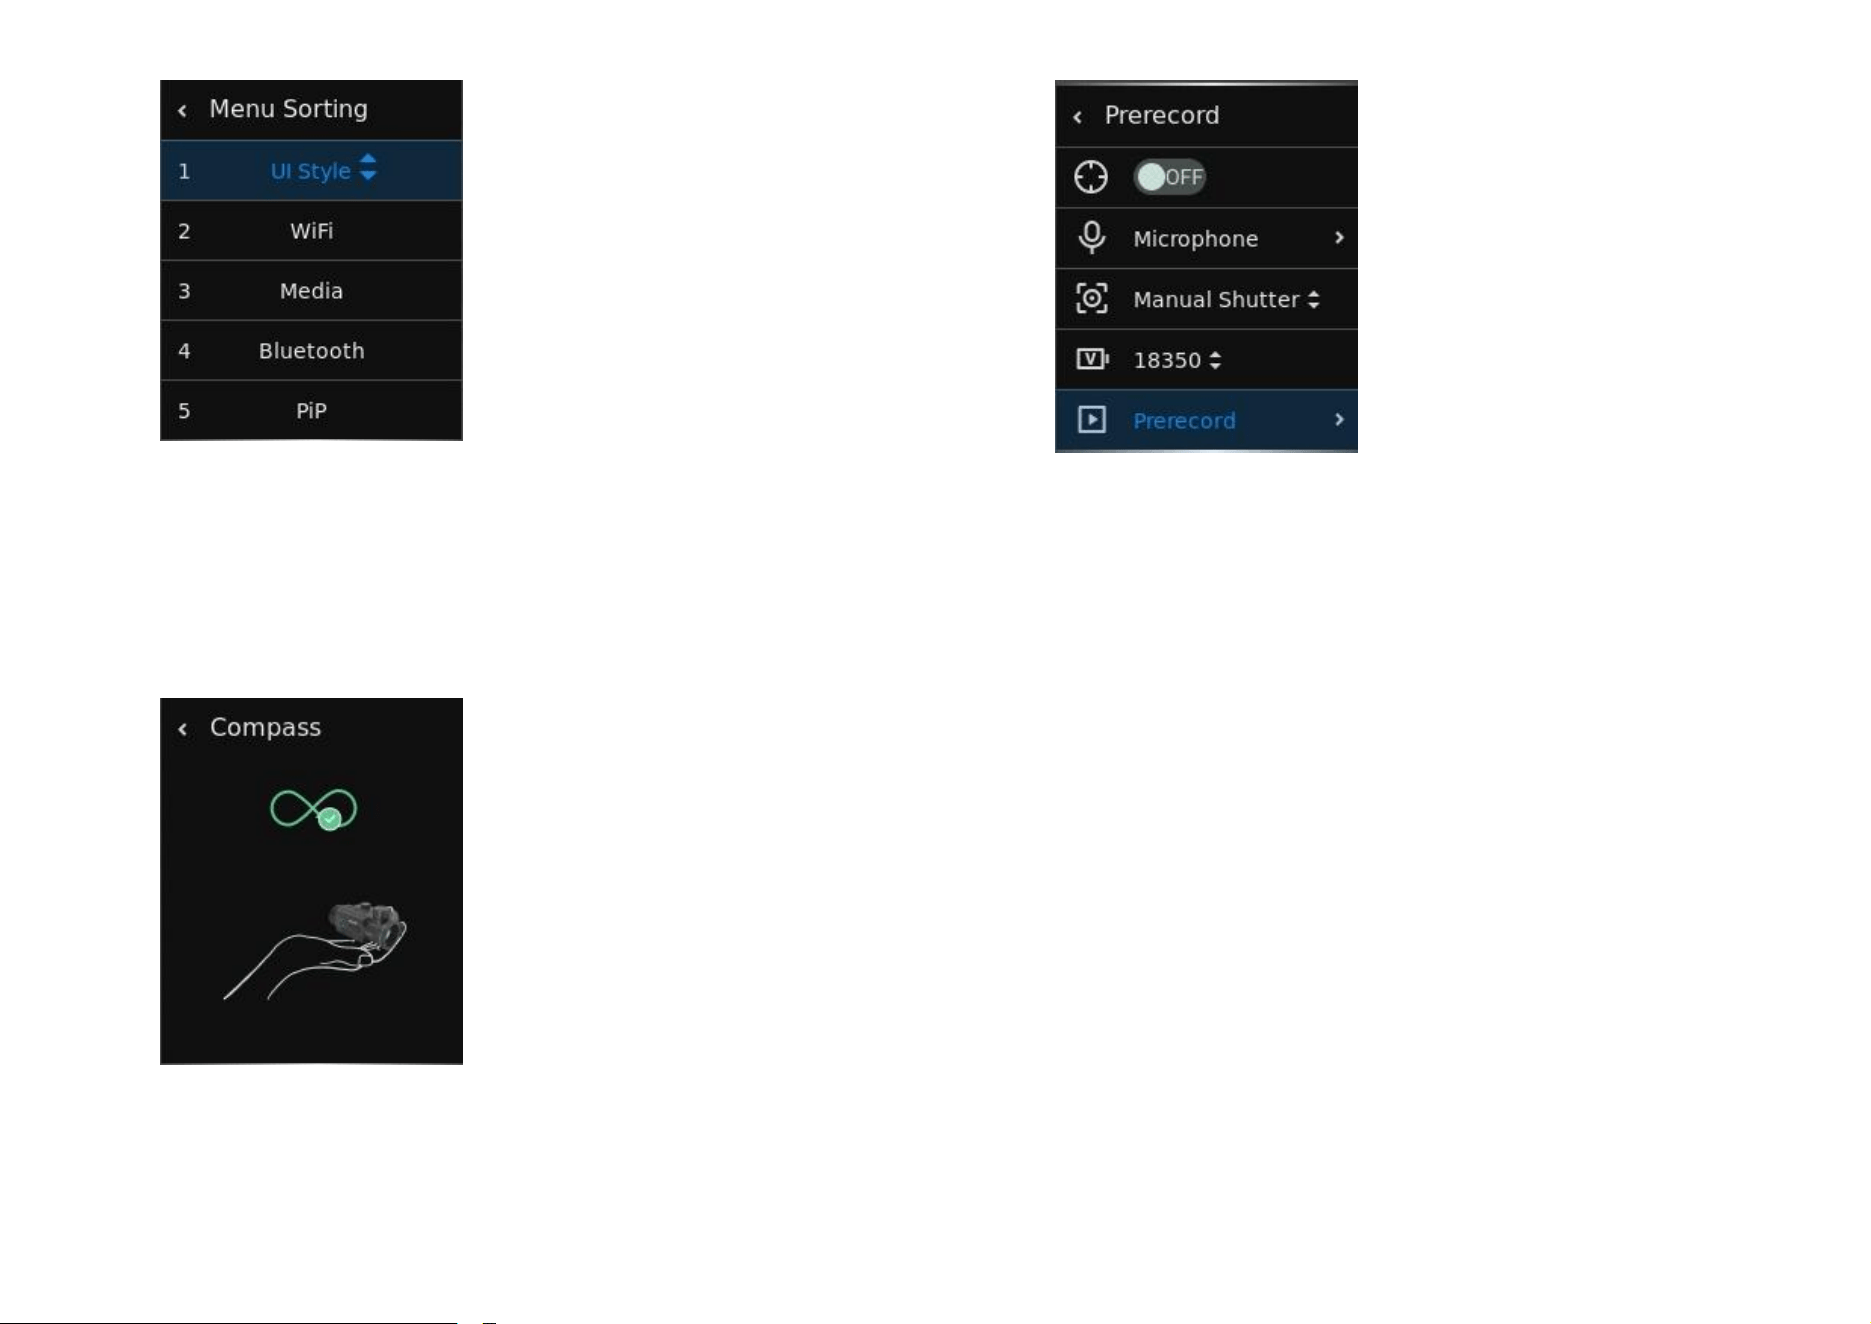
Menu Sorting
Reorder items in Main Menu.
● Press the Menu button to switch menu items, and use the
Up/Down buttons to move positions.
21
Compass Calibration
Guide to recalibrate electronic compass.
● Requires manual motion in specific directions until green icon
appears.
Prerecord
Automatically captures video before and after recoil.
● Sensitivity: Low / Medium / High.
Adjust the sensitivity of this feature.
● Duration: 10s/15s/20s/25s/30s (before & after).
Set the time to start recording the video. For example, if set to 15
seconds (before shot), the video will start recording 15 seconds
before the shot.
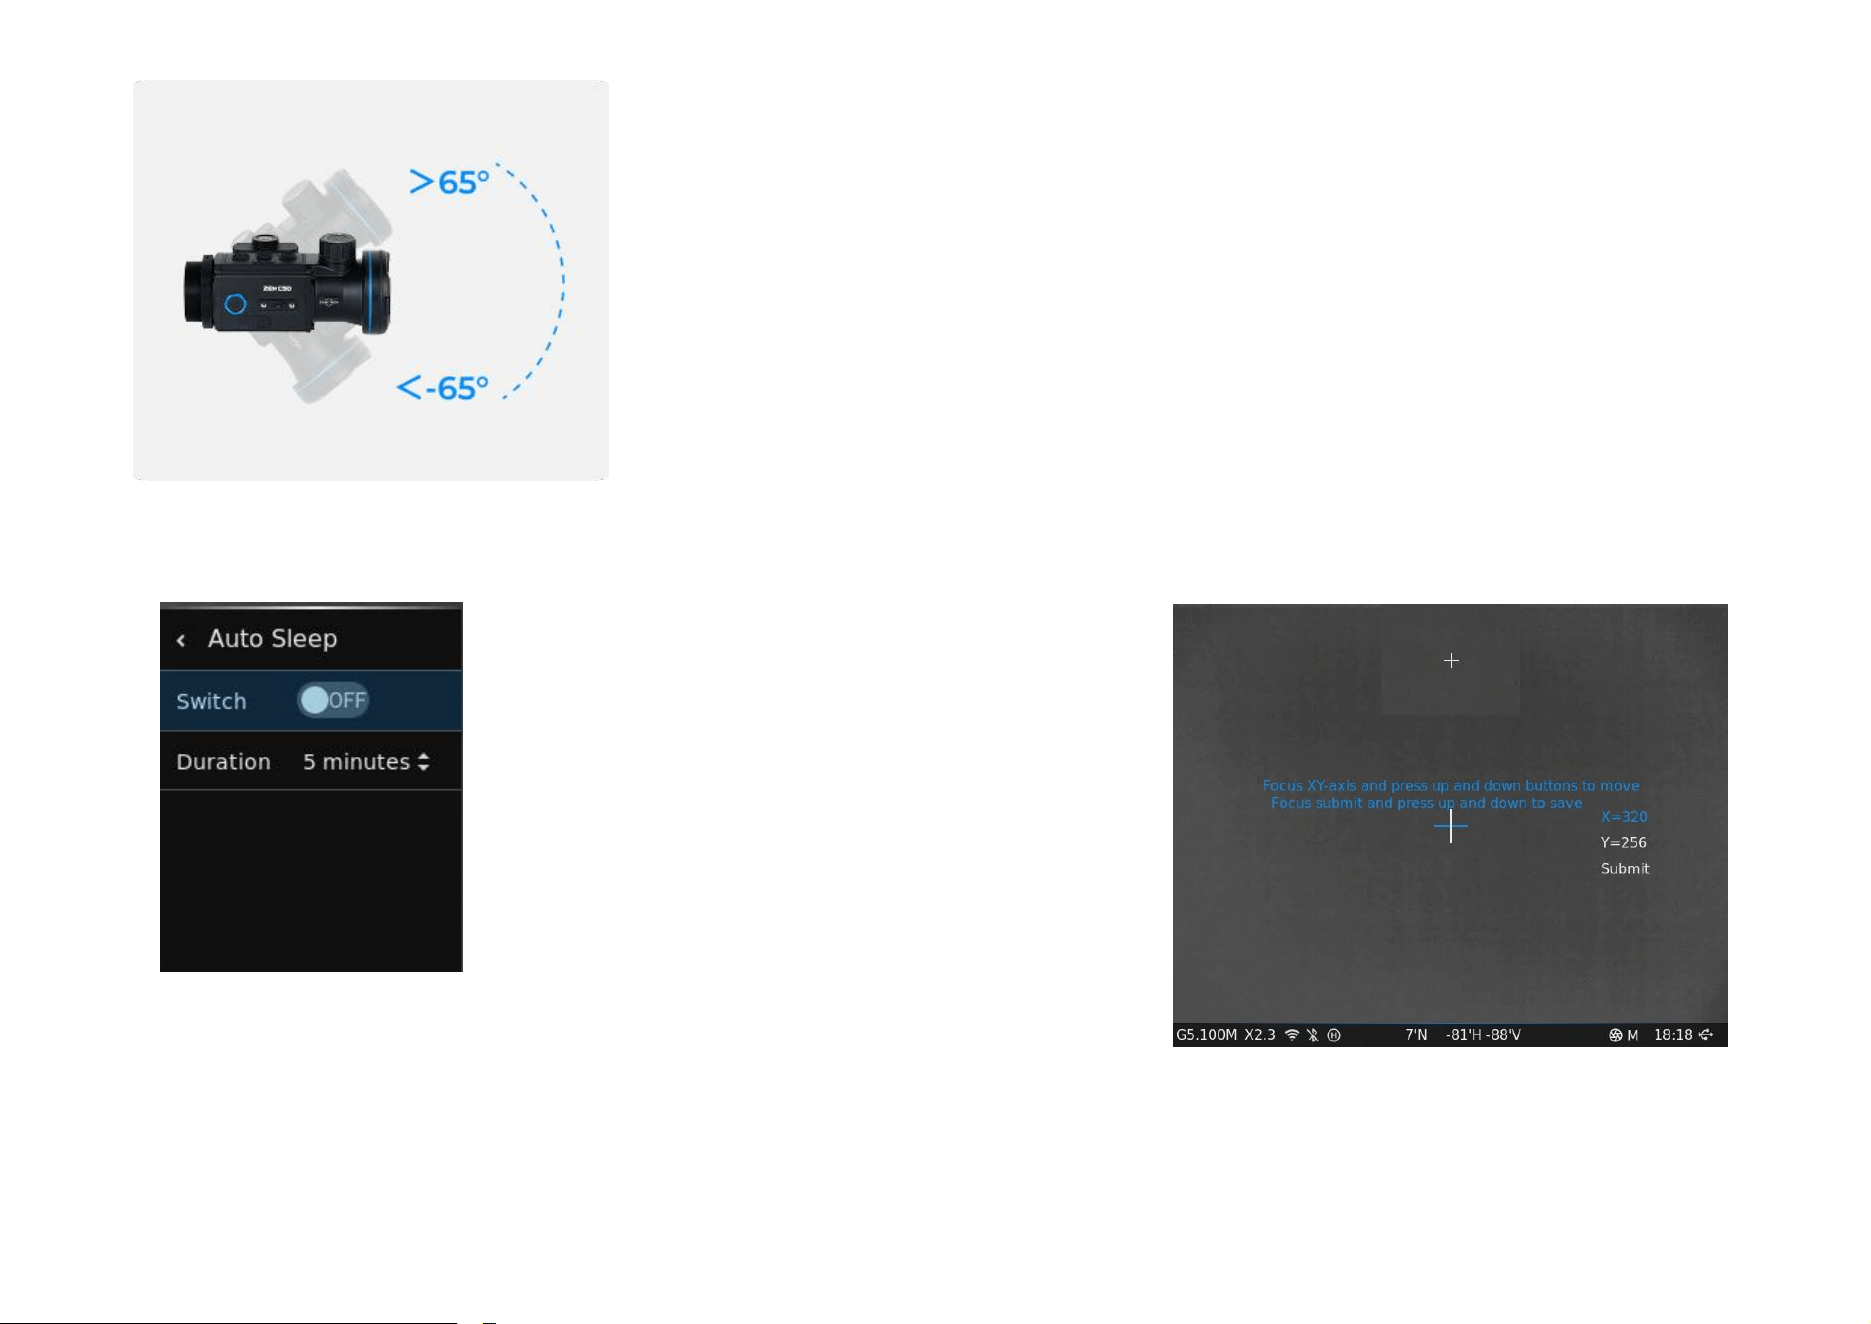
Auto Sleep
When the device's pitch angle exceeds 65 degrees or the roll angle exceeds
45 degrees, it will enter standby mode after the preset period of inactivity.
22
● Delay: 3 / 5 / 10 min.
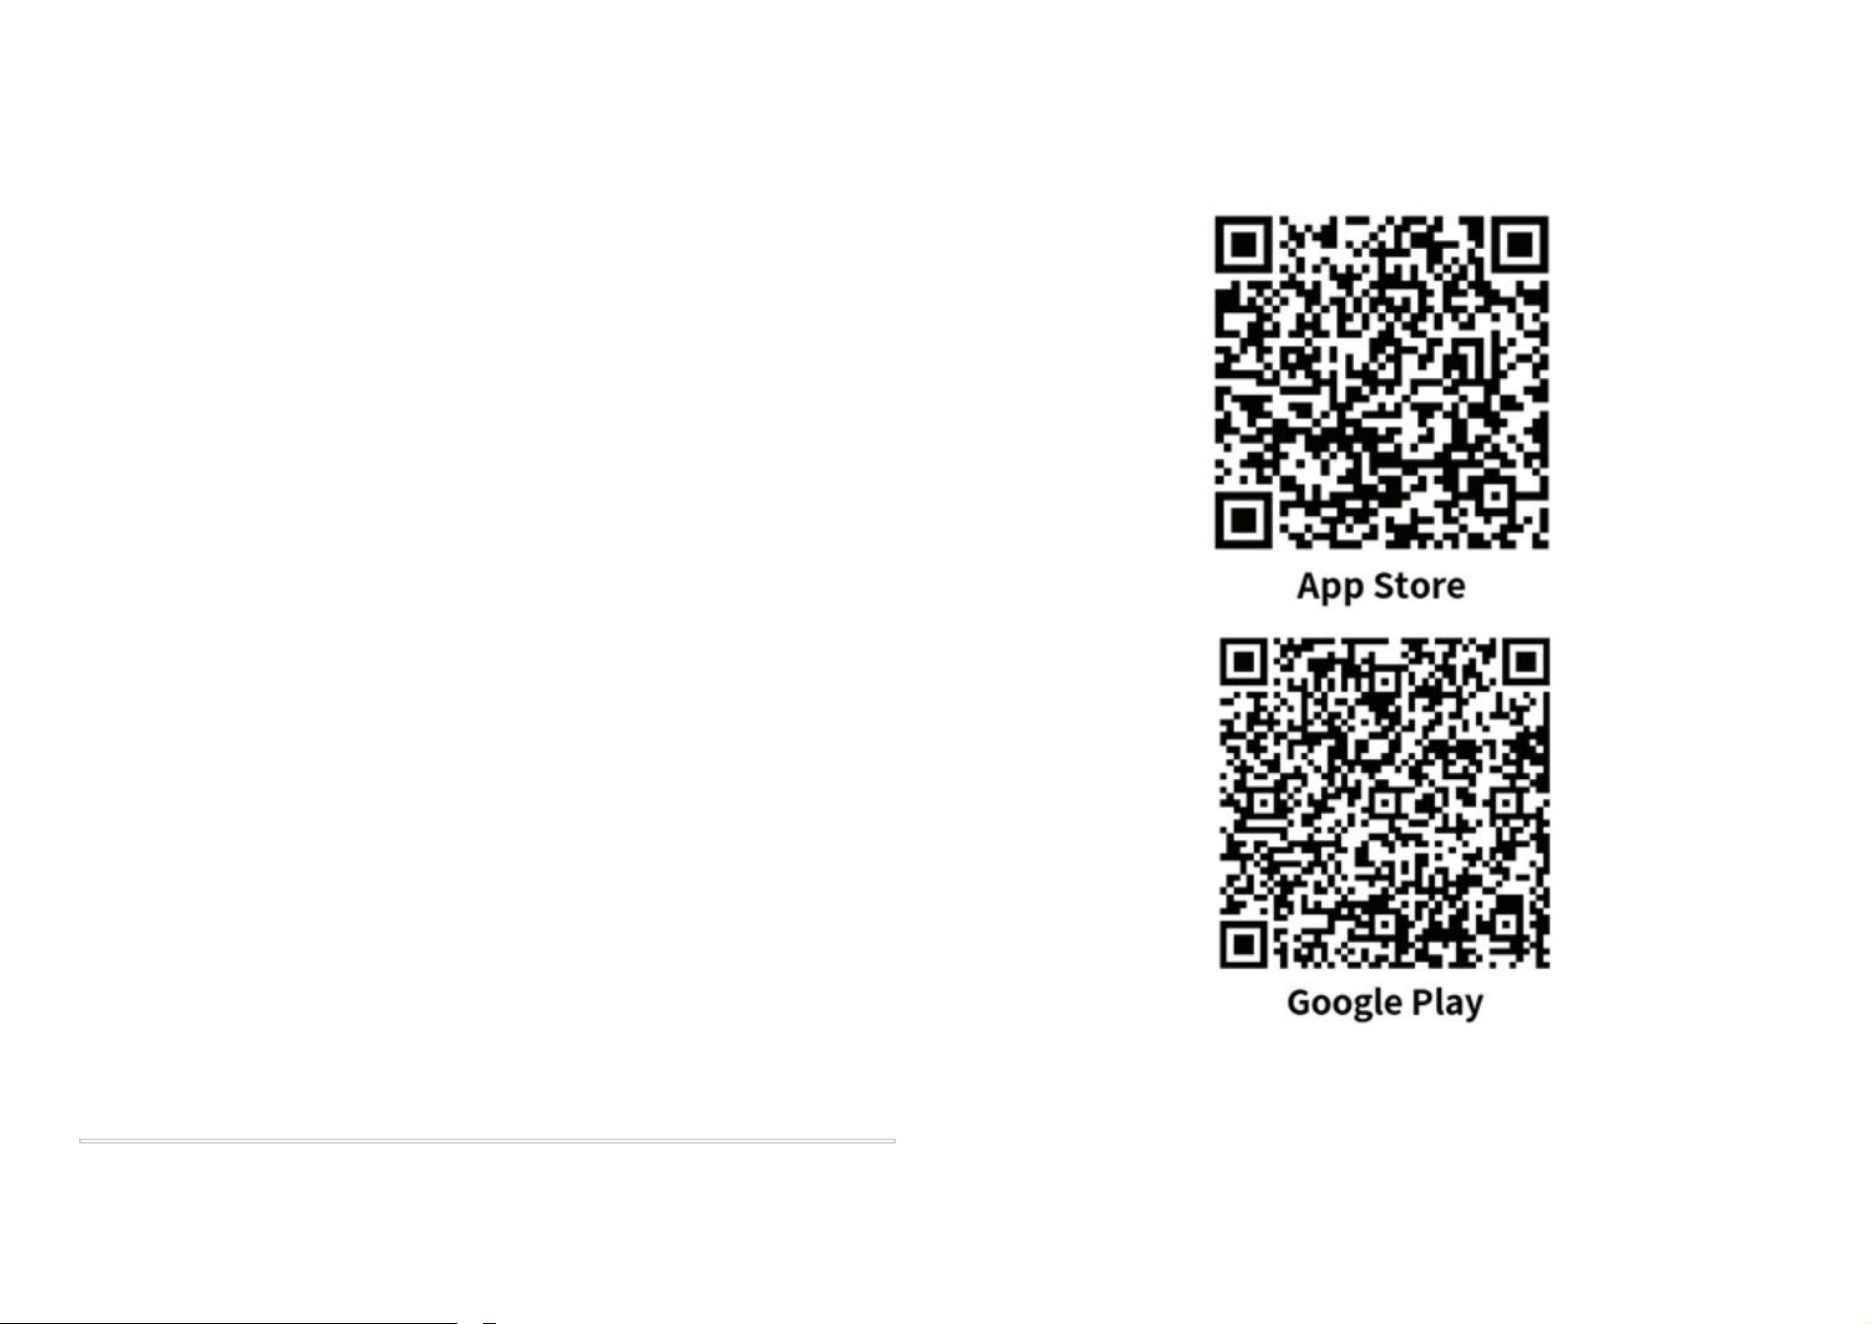
Pixel Correction
Fix defective (hot/stuck) pixels manually.
● Press and hold the menu button to enter the main menu.
● Select the Pixel Correction function to enter the Pixel Correction
screen and the coordinate position of the reticle (X axis, Y axis) will
be displayed in the center of the screen.
● Find the bad pixels in the screen.
● Press the menu button to toggle the x and y axes and press the up
and down buttons to adjust the position of the x and y axes. Press
the menu button to calibrate the bad pixels.
● Repeat the above operations to continue selecting bad pixels.
● When the calibration is done, press and hold the menu button to
exit the pixel
correction.
Time/Date
Manually set time and date.
23
● Year, month, day, hour, minute, and second can be set individually.
● Used to display time in the status bar.
● Required for accurate file naming.
Language
Choose device interface language.
● English / Deutsch / Italiano / Čeština / Magyar / Español / Français
Reset Settings
Restore factory defaults (non-destructive).
● Confirmation required.
Erase Media
Delete all saved photos and videos from internal storage.
● Confirmation required.
About
View firmware version, serial number, and hardware ID.
18. Connecting to ZEN LINK App
App Installation:
● Download ZEN LINK from App Store (iOS) or Google Play (Android).
Connecting:
24
1. Turn on device Wi-Fi (Main Menu > Wi-Fi > On).
2. Note SSID displayed in Main Menu > Advanced Settings > Wi-Fi.
3. On your phone, go to WLAN settings and connect to the same SSID.
Default password: 12345678.
4. Open ZEN LINK App → Tap connected device → View real-time
image or access media.
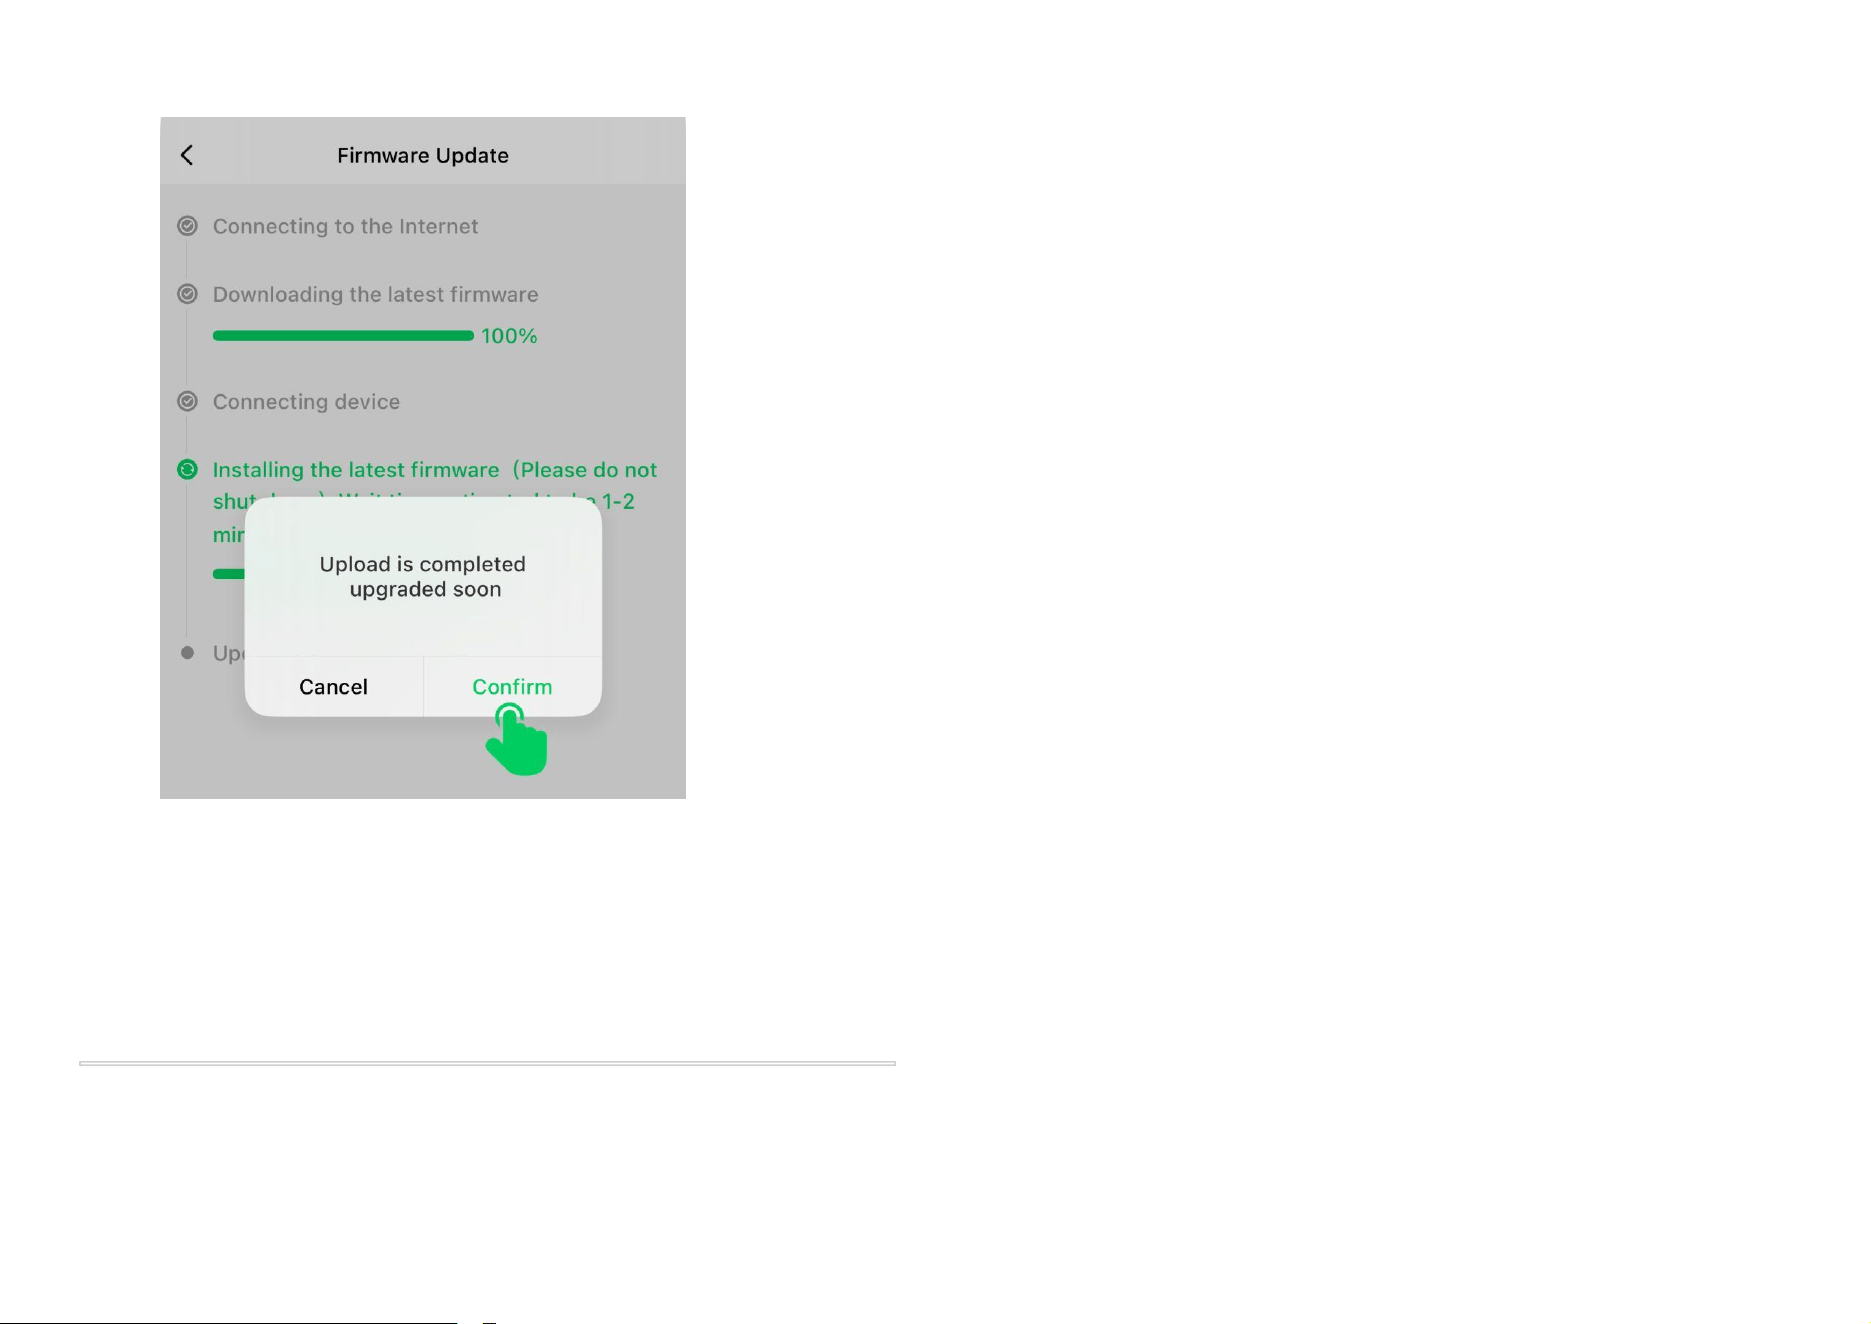
19. Firmware Upgrade
1. Connect mobile device to the unit via Wi-Fi.
2. Open ZEN LINK App → Tap Settings ⚙.
3. Select Firmware update → Tap Download Now.
25
4. Follow prompts to complete installation.
5. Device will automatically restart and apply updates.
Important: Do not disconnect during upgrade. Ensure battery >50% or
connect external power.
20. File Transfer to PC
When connected via USB-C cable:
1. Power on the device.
2. Connect to a PC via cable.
3. Device will appear as a USB drive. Double-click to open and view
files.
4. Open folders by date to view:
The device stores captured photos and videos in its USB
drive.
Users can copy them to their computer.
Photos (.jpg).
Videos (.mp4).
The naming conventions for photos and videos are:
● zentron_image_YYYY_MM_DD_HH_mm_ss.jpg.
● zentron_video_YYYY_MM_DD_HH_mm_ss_auto.mp4.
● zentron_video_YYYY_MM_DD_HH_mm_ss_manual.mp4.
● auto.mp4 is the video automatically recorded by the Prerecord
function.
● manual.mp4 is the manually recorded video.
26
● YYYY_MM_DD_HH_mm_ss represents year, month, day, hour,
minute, and second.
21. Maintenance & Cleaning
● Lens: Use provided microfiber cloth. Do not use alcohol or coarse
material.
● Body: Wipe with soft damp cloth. Avoid solvents.
● Storage: Keep dry, store in provided bag.
● Charging Port: Avoid dust buildup.
● Battery: Charge every 3 months during long-term storage. Avoid
full depletion.
22. Troubleshooting (FAQ)
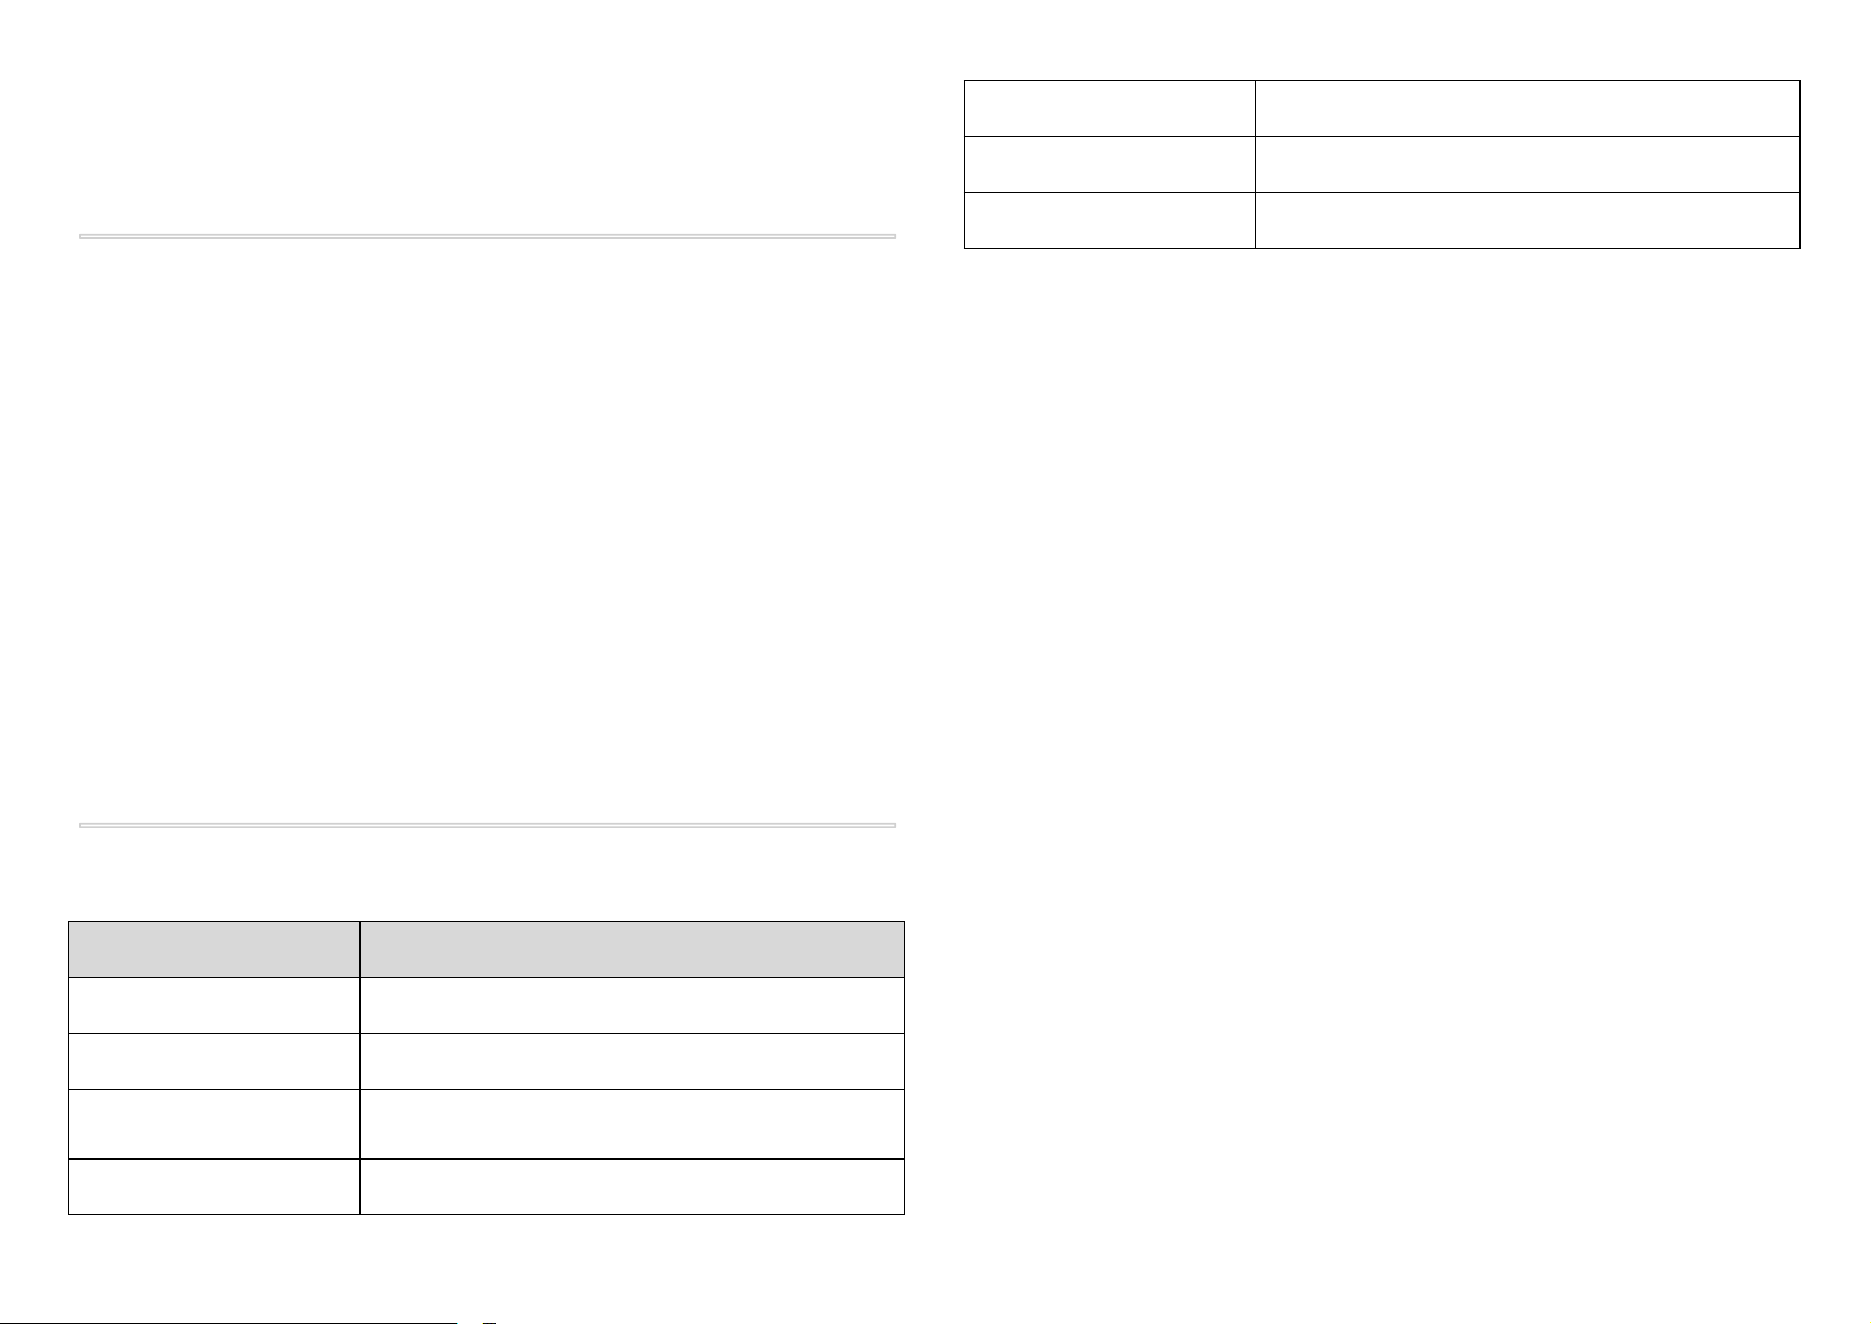
Issue
Possible Cause / Solution
Device won’t turn on
Check battery orientation / charge level
Wi-Fi not visible
Ensure Wi-Fi is enabled in main menu
App fails to connect
Forget Wi-Fi, reconnect / Restart device
Image is blurry
Adjust lens focus / Eyepiece diopter
Reticle is misaligned
Perform zeroing again / Reset profile
Video not recording
Ensure sufficient storage space
Battery drains fast
Enable Auto Sleep, disable Wi-Fi and Bluetooth
23. Legal & Compliance
FCC ID: 2BGU2-ZENC50
FCC ID: 2BGU2-ZENC35
FCC ID: 2BVLG-ZEN-C50R
FCC Caution:
This device complies with part 15 of the FCC Rules. Operation is subject to
the following two conditions: (1) this device may not cause harmful
interference, and (2) this device must accept any interference received,
including interference that may cause undesired operation.
Any changes or modifications not expressly approved by the party
responsible for compliance could void the user's authority to operate the
equipment.
NOTE: This equipment has been tested and found to comply with the limits
for a Class B digital device, pursuant to Part 15 of the FCC Rules. These
limits are designed to provide reasonable protection against harmful
interference in a residential installation. This equipment generates, uses
and can radiate radio frequency energy and, if not installed and used in
accordance with the instructions, may cause harmful interference to radio
communications. However, there is no guarantee that interference will not
occur in a particular installation.
If this equipment does cause harmful interference to radio or television
reception,which can be determined by turning the equipment off and on,
27
the user is encouraged to try to correct the interference by one or more of
the following measures:
-- Reorient or relocate the receiving antenna.
-- Increase the separation between the equipment and receiver.
-- Connect the equipment into an outlet on a circuit different
from that to which the receiver is connected.
-- Consult the dealer or an experienced radio/TV technician for help.
RF Exposure Information
To maintain compliance with FCC’s RF Exposure guidelines, This equipment should be
installed and operated with minimum distance 20cm between the radiator and your
body: Use only the supplied antenna.
24. Caution
Use of controls or adjustments or performance of procedures other than
those specified herein may result in hazardous radiation exposure.
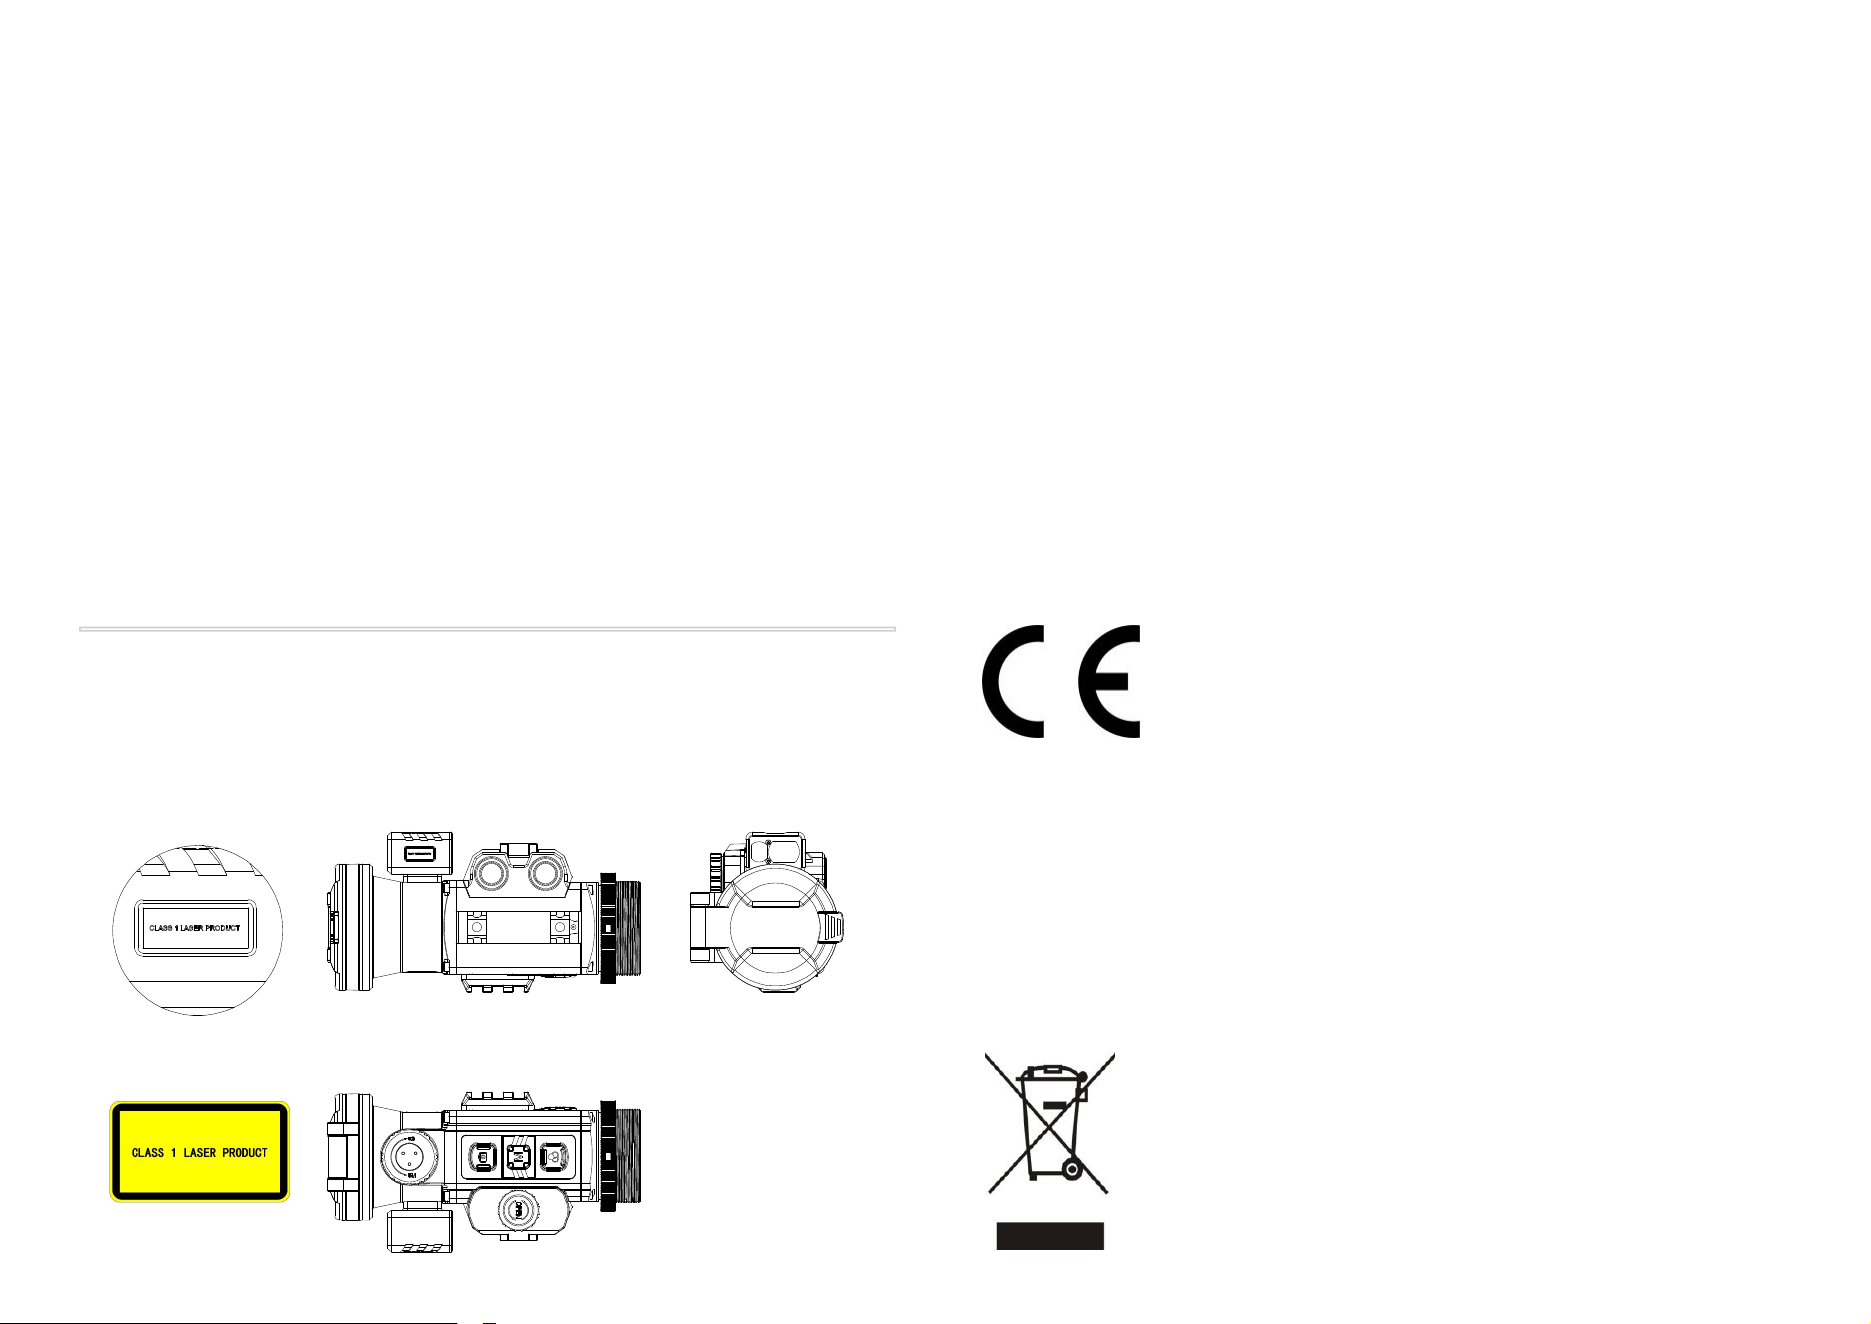
1. Laser safety levels are classified according to IEC 60825-1: 2014.
2. The laser module information is as follows :
Wavelength: 905nm
Maximum single pulse energy: 0
Laser safety level:Class 1
Pulse width
:
0
Repetition frequency:1-5hz
Note
:
Semiconductor laser, without Maximum single pulse energy and Pulse width
parameters.
25.
Regulatory Information
EU Conformity Statement
This product and - if applicable - the supplied accessories
too are marked with "CE" and comply therefore with the
applicable harmonized European standards listed under the
2011/65/EU and its amendment directive 2015/863/EU.
Frequency Bands and Power (for CE)
The frequency bands and transmitting power (radiated
and/or conducted) nominal limits applicable to the
following radio equipment are as follows:
Wi-Fi 2.4 GHz (2.4 GHz to 2.4835 GHz), 20 dBm
Directive 2012/19/EU (WEEE Directive): Products marked
with this symbol cannot be disposed of as unsorted
municipal waste in the European Union. For proper
recycling, return this product to your local supplier upon the
purchase of equivalent new equipment, or dispose of it at
28
designated collection points. For more information see:
www.recyclethis.info
26. Contact & Support
For technical support, warranty service, or general inquiries:
● Website: zentronoutdoor.com
Users can also submit feedback and contact our European agents through
our ZEN LINK app.
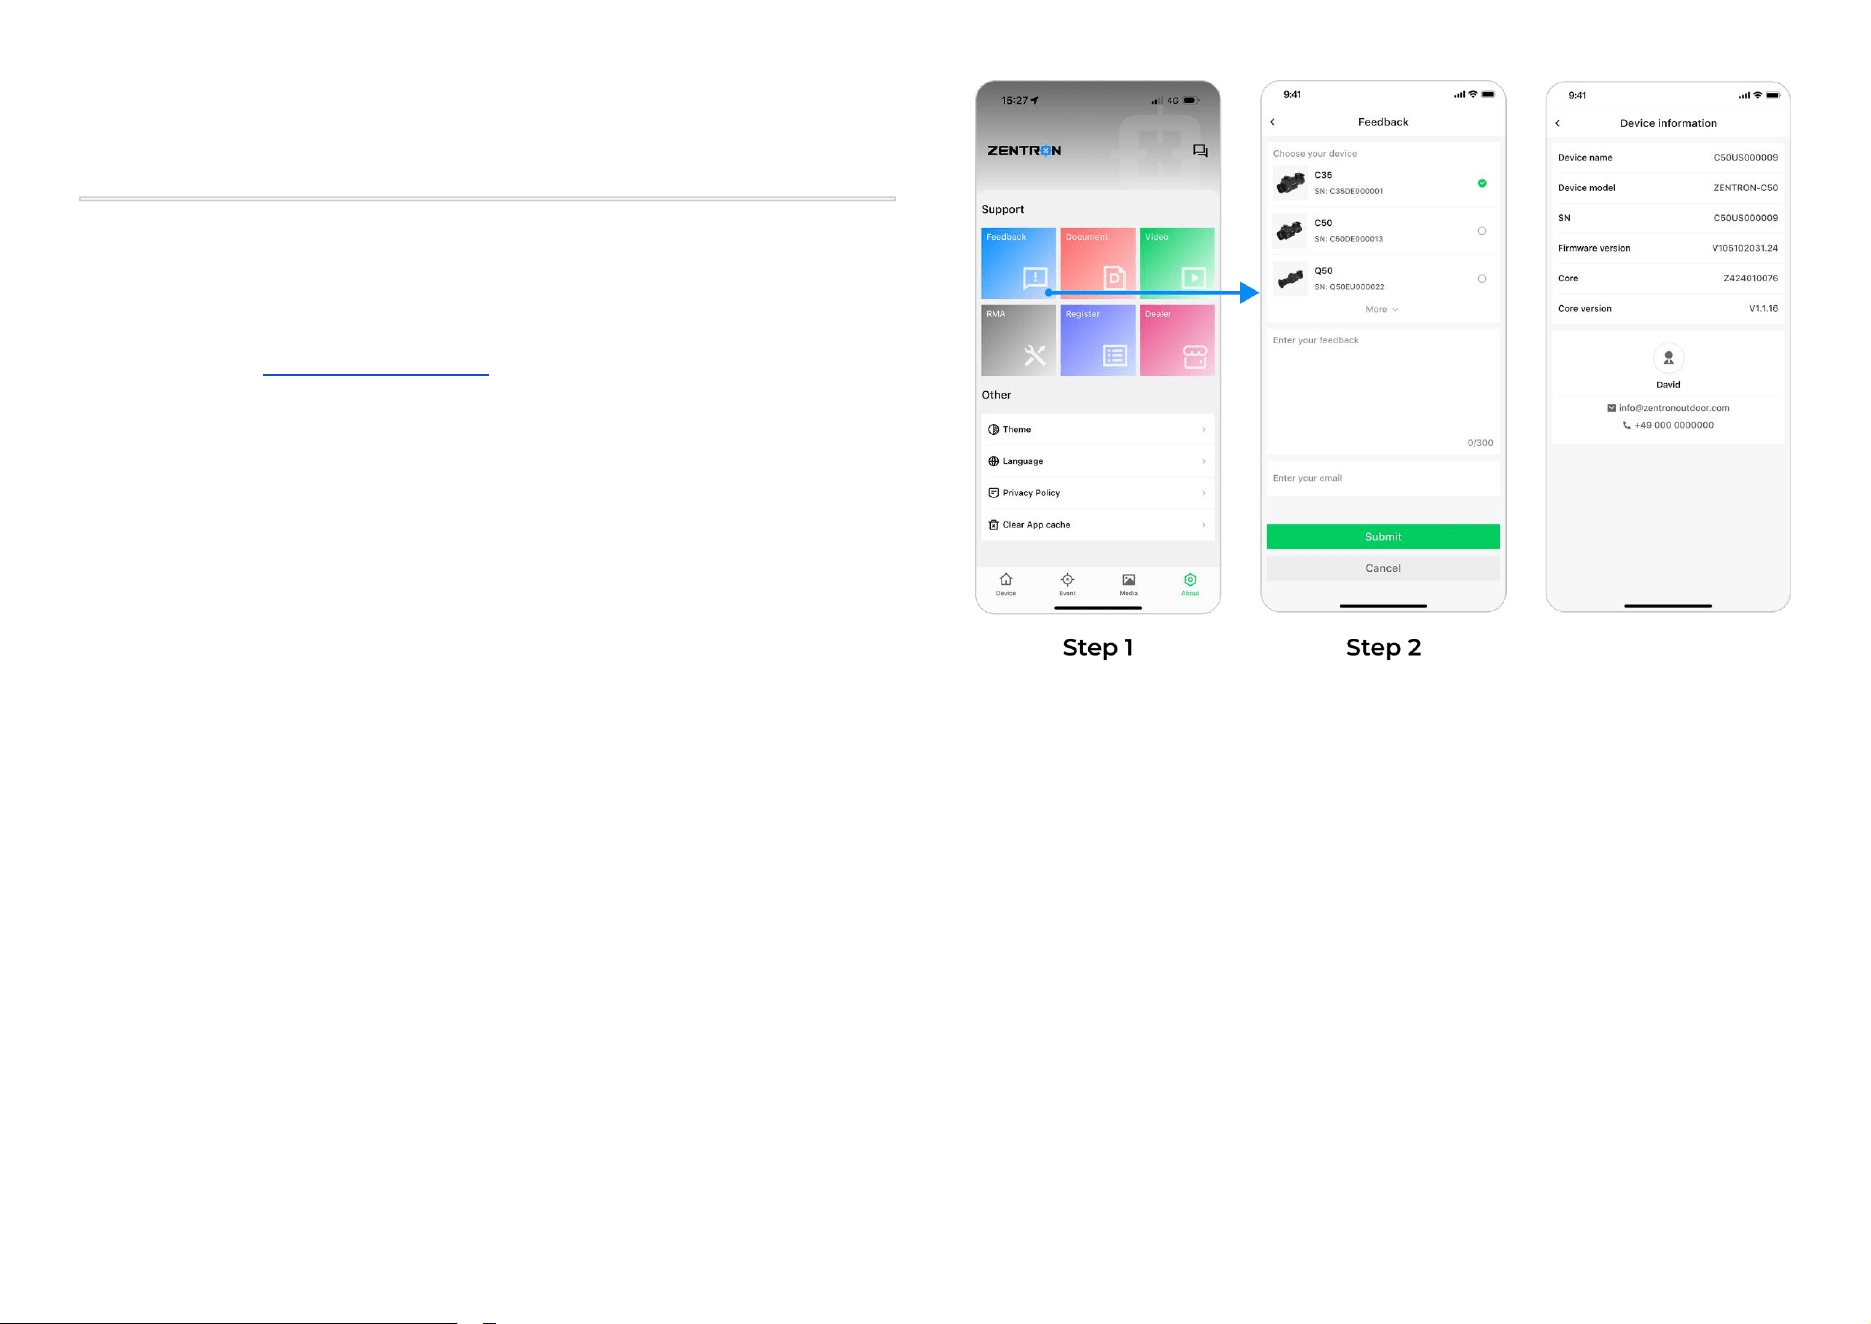
Step 1:
Connect your device to the ZEN LINK app, then navigate to the "About"
page. Find the submenu "Feedback" under Support.
Step 2:
Tap on "Feedback" to report any issues you encountered or to share your
valuable experience using our products. Our team is here to help and will
respond promptly.
At Zentron, we value your experience. You’re welcome to share any
feedback regarding product usage, technical issues, or suggestions for
improvement. Our professional technical support team is committed to
responding within 24 hours.
29