RGB LED Whip
•
•
www.truemods.com
US Toll Free: 1-855-533-6654
International: 1-909-212-0993
Fax: (909) 575-6722
E-mail: [email protected]
True Mods © 2012-2021 All Rights Reserved
Do not install this product or route any wires in the deployment area of your air bag. Equipment
mounted or located in the air bag deployment area will damage or reduce the eectiveness of the
air bag, or become a projectile that could cause serious personal injury or death. Refer to your
vehicle owner’s manual for the air bag deployment area. The User/Installer assumes full
responsibility to determine proper mounting location, based on providing ultimate safety to all
passengers inside the vehicle.
This product contains either strobe light(s), halogen light(s), high-intensity LEDs or a
combination of these lights. Do not stare directly into these lights. Momentary blindness and/or
eye damage could result.
IMPORTANT: READ CAREFULLY BEFORE ASSEMBLY AND USE.
•
•
•
•
Proper installation of this product requires the installer to have a good understanding of
automotive electronics, systems, and procedures.
If mounting this product requires drilling holes, the installer MUST be sure that no vehicle
components or other vital parts could be damaged by the drilling process. Check both sides of
the mounting surface before drilling begins. Also de-burr any holes and remove any metal shards
or remnants. Install grommets into all wire passage holes.
If this manual states that this product may be mounted with suction cups, magnets, tape or
Velcro®, clean the mounting surface and dry thoroughly prior to apply adhesive for maximum
adhesion.
Do not attempt to activate or control this device in a hazardous driving situation.
Manual ID: PIM-00000186-V002
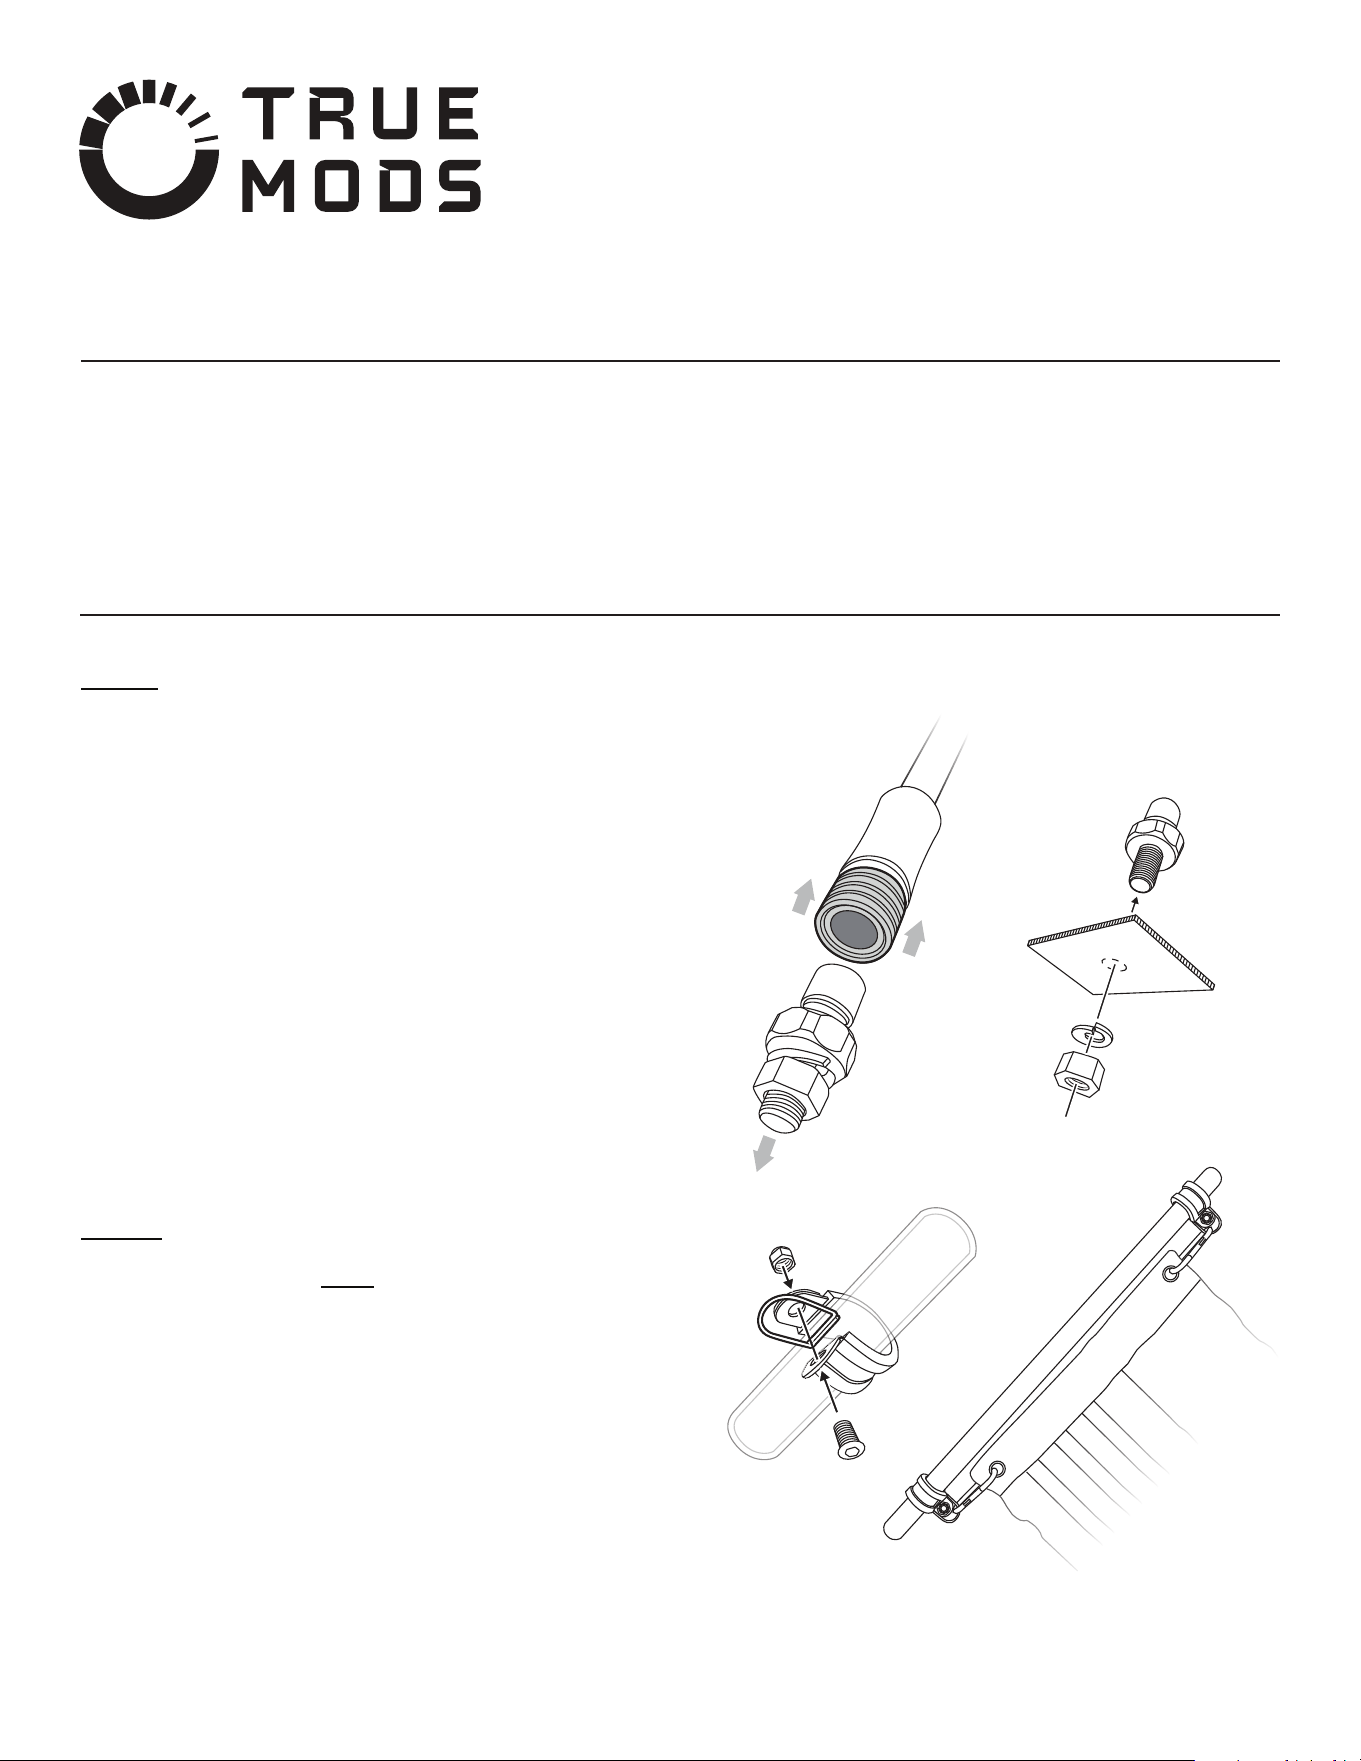
Mounting:
Disassemble the two parts of the quick disconnect mounting base by sliding the
quick disconnect band "UP" to release the locking mechanism. Refer to
Mounting Diagram 1
Proceed on untightening and removing the Mounting Bolt, Nut, Split Washer,
and Washer from the quick disconnect Mounting Base.
Select a desired mounting location.
Place the Mounting Base over the desired mounting surface.
Mark the area where the mounting hole is to be drilled. Conrm that no vehicle
parts could be damaged by the drilling process.
Using a drill bit of appropriate size, drill a mounting hole for the Mounting Bolt.
Thoroughly de-burr all hole(s).
Secure the Mounting Base onto the mounting surface using the included
Mounting Bolt, Nut, and Split Washer. Refer to Mounting Diagram 2
Attach the included Flag to the LED Whip using the hardware included.
We recommend keeping the ag taut using the included carabiner hook. This will
result in less rattling of the hardware and promote optimal attering of the ag
as the automobile is set in motion. Refer to Mounting Diagram 3
1.
2.
3.
4.
5.
6.
7.
8.
9.
CAUTION! Permanent mounting of this product will require drilling. It is
absolutely necessary to make sure that no other vehicle components could be
damaged by this process. Check both sides of the mounting surface before
starting. If damage is likely, select a dierent mounting location.
RED - To 12V DC Power Source
BLACK - To Chassis Ground
Input Voltage: 3A MAX @ 12V DC per light
Wiring:
Specications:
WARNING! All customer supplied wires that connect to the positive
terminal of the battery must be sized to supply at least 125% of the
maximum operating current and FUSED at the battery to carry that load.
Mounting Diagram:
Mounting Diagram 1
Mounting Diagram 3
Mounting Diagram 2
MOUNTING
SURFACE
LED Whip
True Mods © 2012-2021 All Rights Reserved
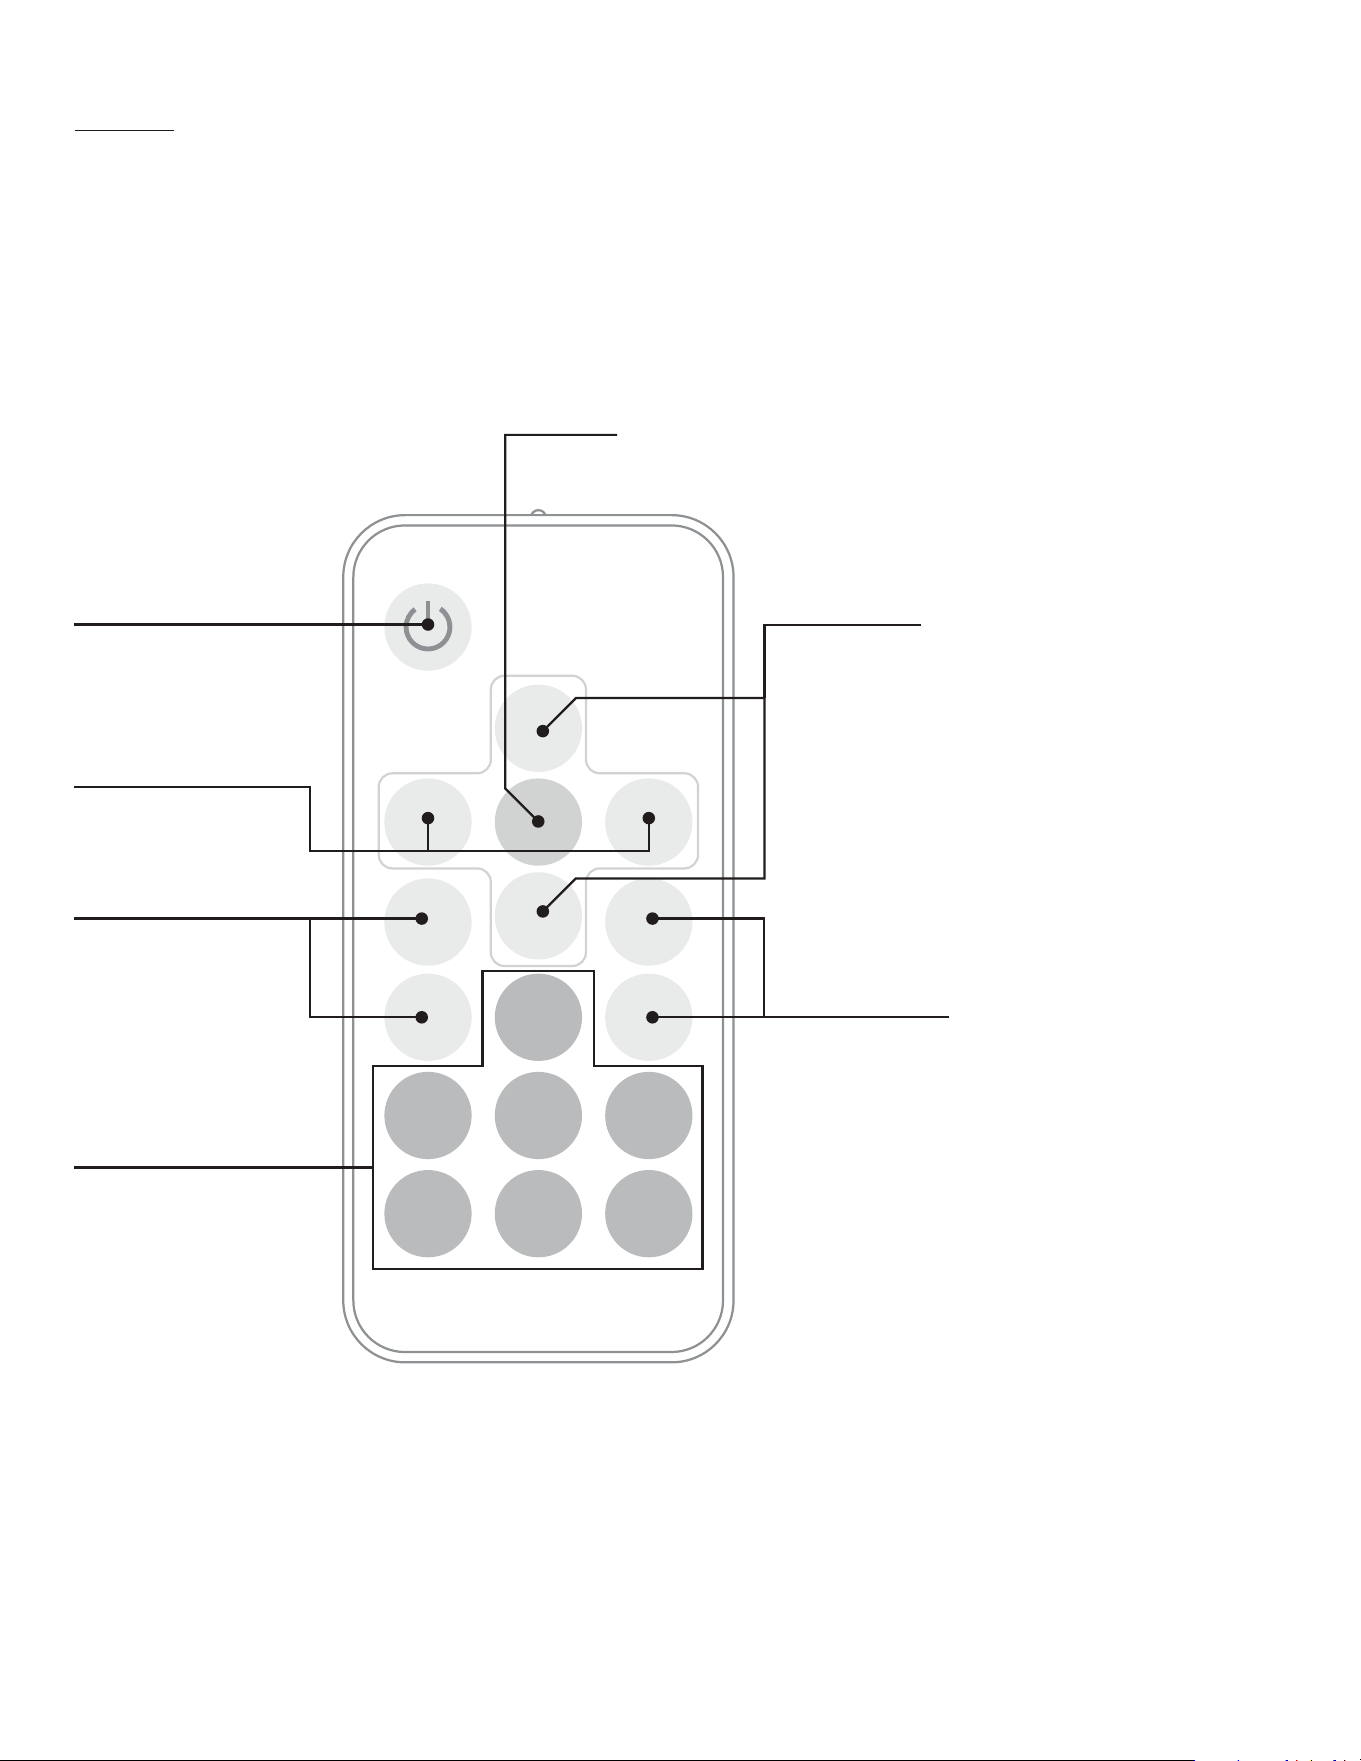
Remote Control:
IMPORTANT! Isolate/Pair Whip(s) to Remote Control
The remote controller is universal by default, which means one can control multiple whips via a single remote control. In the case in which the user experiences the
whips being controlled by other users nearby or in the case which the whips experiences radio frequency interference causing it to be unresponsive to the remote
controller, one can isolate/pair any given number of whips to a single remote controller. Below are the steps on how this can be done.
Connect the whips to be isolated/paired to a remote controller to power and ground.
Press and hold the DEMO button for 5 seconds to pair the remote to the whip(s).
Press and hold the MODE button for 5 seconds to unpair the remote to the whip(s).
If successful, the whip(s) would ash for a brief second.
Proceed with testing the function of the whip(s) via the newly programmed remote controller.
1.
2.
3.
4.
5.
DEMO
SPEED
+
MODE
+
MODE
-
SPEED
-
COLOR
+
COLOR
-
BRIGHT
+
BRIGHT
-
ON/OFF Button
Speed Selector
To turn the LED whip on or o
Whip has memory recall and
will always resume the last
known color/mode it was at
when turned o
Color Selector
To quick select a color of choice
Red, Green, Blue, Yellow, Teal,
Magenta, and White
Demo Mode
Advance the LED whip to mode: RGB with Pause
To increase or decrease the
ash rate or the rate of color
change
Mode Selector
•
•
•
•
Color Selector
To cycle through the
dierent colors
Intensity Selector
To increase or decrease the intensity of the LED lights
1. Flash with Fade - Red
2. Flash with Fade - Green
3. Flash with Fade - Blue
4. Flash with Fade - Magenta
5. Flash with Fade - Yellow
6. Flash with Fade - Teal
7. Flash with Fade - White
8. RGB with Pause
9. RGB Continuous
10. 7 Color Continuous
11. Flash with Pause - Red
12. Flash with Pause - Green
13. Flash with Pause - Blue
14. Flash with Pause - Yellow
15. Flash with Pause - Magenta
16. Flash with Pause - Teal
17. Flash with Pause - White
18. 6 Color Morph (No White)
19. 7 Color Morph with White
20. RGB with Fade
21. 7 Color with Fade
To cycle through the dierent modes