BK-N1 Bluetooth Headset
User’s Guide
Table of contents
Safety Precautions ----------------------------------3
Package contents -----------------------------------5
Installation Guide Speakers –------------------------6
Installation Guide Microphone -----------------------7
Installation Guide Mounting Clamp ------------------8
Installation Guide Cable Holder ---- ------------------8
Installation Guide Connecting Headset Unit ----------9
Getting Started -------------------------------------9
Power on/Power off/Charging ------------ -----------10
Volume Adjustment -------------------------- ------11
Device Pairing ----------------------------- --------12
Call Settings ---------------------------------------13
Music Playback -----------------------------------13
Intercom Pairing ------------------------------ ------14
Intercom Operation --------------------------------16
Troubleshooting -----------------------------------17
Product Warranty and Disclaimer -------------------18
Safety Precautions:
-Please read the following safety remarks to correctly use the product
and to avoid possible severe injury, death, and/ or asset loss.
Use of product
-Please read the following notices to avoid injury to the body or
damage to the product.
Warning:
-To use the product at a high volume for a long period of time may
damage your ears and hearing.
- If there is an unusual smell, high heat, or other abnormal phenomena
during the use and/or the charging of the product, stops using the
product immediately, otherwise, there could be damage, an explosion,
or fire. If any of the above occurs, contact the dealer. It’s dangerous to
use the product without caution while riding a motorbike. The effect
could be injury, death, or damage. Please understand the safety-
related issues of the product while riding to lower the risk of danger.
-In any radio communication prohibited area, such as hospitals or on a
plane, please shut down the product to avoid the possible danger or
accident caused by radio signals.
-Make sure the product is stable and correctly fixed onto the helmet.
The product falling apart from the helmet during riding will cause
damage to the product as well as unexpected accidents.
-Do not use the product in an explosive area. In this kind of
environment, follow the rules, signs, and instructions.
-While using the product during the operation of transportation, follow
the safety regulations of the operator. The transportation means
motorbikes, scooters, bicycles, vehicles or trains.
-While using the product, you must be in good condition and not under
the influence of alcohol & drugs, nor should you be lacking sleep.
FEDERAL COMMUNICATIONS COMMISSION
INTERFERENCE STATEMENT
This equipment has been tested and found to comply with the limits
for a Class B digital device, pursuant to part 15 of the FCC Rules.
These limits are designed to provide reasonable protection against
harmful interference in a residential installation. This equipment
generates, uses and can radiate radio frequency energy and, if not
installed and used in accordance with the instructions, may cause
harmful interference to radio communications. However, there is no
guarantee that interference will not occur in a particular installation.
If this equipment does cause harmful interference to radio or
television reception, which can be determined by turning the
equipment off and on, the user is encouraged to try to correct the
interference by one or more of the following measures:
-Reorient or relocate the receiving antenna.
-Increase the separation between the equipment and receiver.
-Connect the equipment into an outlet on a circuit different from
that to which the receiver is connected.
-Consult the dealer or an experienced radio/ TV technician for help.
CAUTION:
Any changes or modifications not expressly approved by the grantee
of this device could void the user's authority to operate the
equipment.
This device complies with Part 15 of the FCC Rules. Operation is
subject to the following two conditions: (1) this device may not cause
harmful interference, and (2) this device must accept any
interference received, including interference that may cause
undesired operation.
RF Exposure warning
This device meets the government’s requirements for exposure to
radio waves. This device is designed and manufactured not to
exceed the emission limits for exposure to radio frequency (RF)
energy set by the Federal Communications Commission of the U.S.
Government.
The exposure standard employs a unit of measurement known as the
Specific Absorption Rate, or SAR. The SAR limit set by the FCC is 1.6
W/kg. Tests for SAR are conducted using standard operating
positions accepted by the FCC with the EUT transmitting at the
specified power level in different channels.
The FCC has granted an Equipment Authorization for this device
with all reported SAR levels evaluated as in compliance with the
FCC RF exposure guidelines. SAR information on this device is on file
with the FCC and can be found under the Display Grant section of
https://apps.fcc.gov/oetcf/eas/reports/GenericSearch.cfm after
searching on FCC ID: WTU-28658913-N.
Note:
-The product is to be used with a helmet. Follow the user manual to
install the product.
-Keep sharp-pointed items away from the product to avoid damage.
-Keep children or pets away from the product to avoid damage.
-Any unauthorized disassembly, maintenance, or modifications to the
products will cause the warranty to be void.
Battery
-A battery is included in the product. Read the user’s manual carefully to
understand all the safety information. Improper use of the product might
cause the possible battery to overheat, explode, combust or damage to
those nearby.
Warning:
-Do not continuously charge after the battery is fully charged as this
might cause the battery to overheat, explode or combust.
-Keep the product away from fire as this might cause battery to
overheat, explode or combust.
-Do not use an already damaged power adapter to charge the product
to avoid possible explosion and accidents.
-The certified low-power radio frequency device is not allowed to change
operating frequency whether it is done by firms or users. Enlarging the
transmission power or changing the features or functionality of the
original design is also not allowed. The low power radio frequency devices
can not affect aircraft flying safety and legal radio communication. If
there is a case of interference, stop using the device and do not use it
again until the interference is removed. The legal radio communication
mentioned above means the operation under the government
telecommunication regulations. The certified low power radio frequency
device must withstand the interference from the radio equipment of legal
communication and other radio radiation devices of industry, science,
and medical.
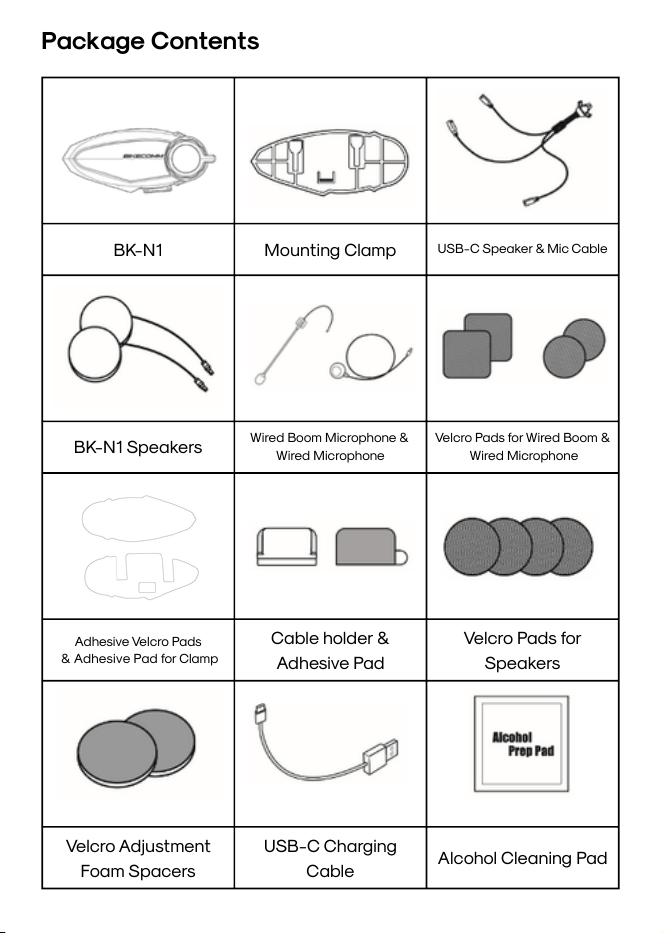
BK-N1
Mounting Clamp
USB-C Speaker & Mic Cable
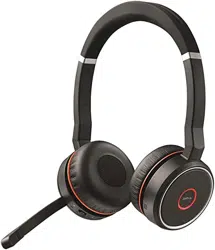
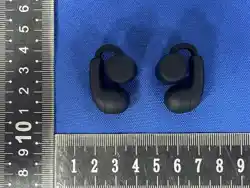
BK-N1 Speakers
Wired Boom Microphone &
Wired Microphone
Velcro Pads for Wired Boom &
Wired Microphone
Adhesive Velcro Pads
& Adhesive Pad for Clamp
Cable holder &
Adhesive Pad
Velcro Pads for
Speakers
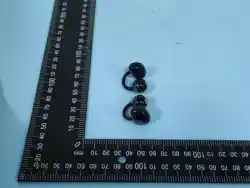
Velcro Adjustment
Foam Spacers
USB-C Charging
Cable
Alcohol Cleaning Pad
Package Contents
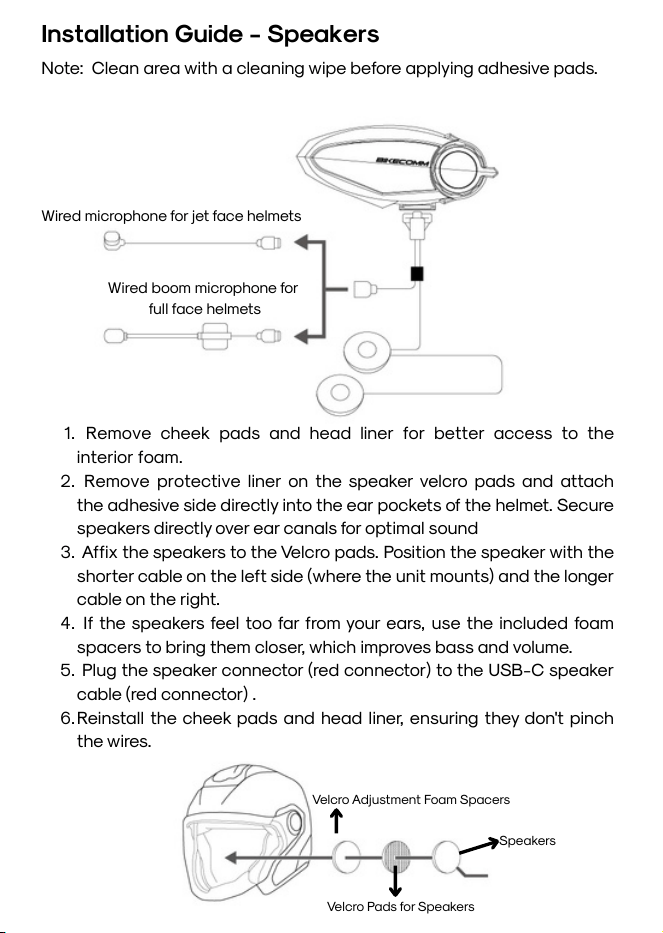
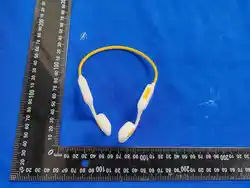
Wired boom microphone for
full face helmets
Wired microphone for jet face helmets
Note: Clean area with a cleaning wipe before applying adhesive pads.
1. Remove cheek pads and head liner for better access to the
interior foam.
2. Remove protective liner on the speaker velcro pads and attach
the adhesive side directly into the ear pockets of the helmet. Secure
speakers directly over ear canals for optimal sound
3. Affix the speakers to the Velcro pads. Position the speaker with the
shorter cable on the left side (where the unit mounts) and the longer
cable on the right.
4. If the speakers feel too far from your ears, use the included foam
spacers to bring them closer, which improves bass and volume.
5. Plug the speaker connector (red connector) to the USB-C speaker
cable (red connector) .
6.Reinstall the cheek pads and head liner, ensuring they don't pinch
the wires.
Installation Guide - Speakers
Velcro Adjustment Foam Spacers
Velcro Pads for Speakers
Speakers
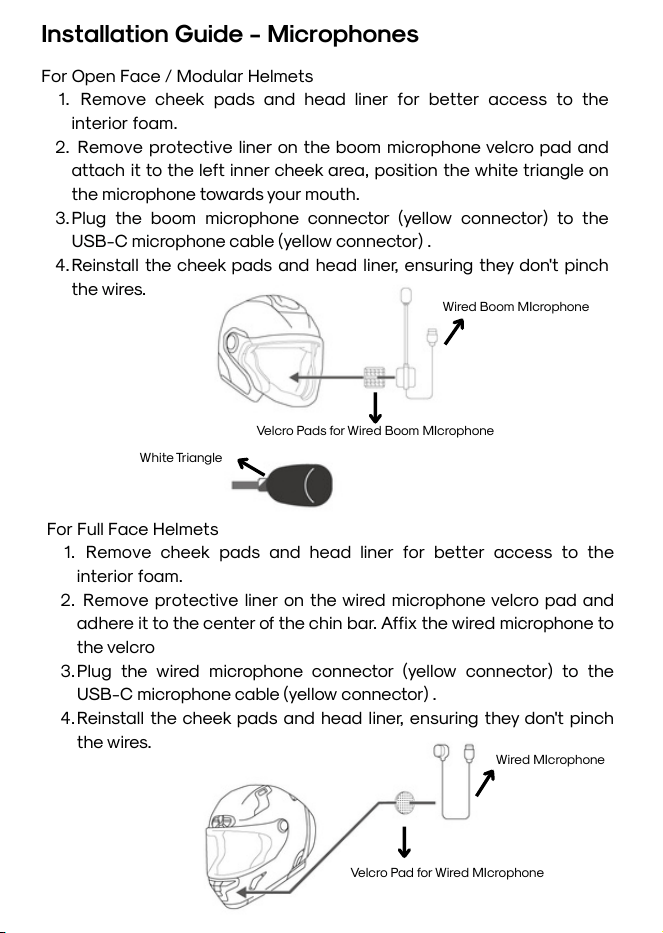
Installation Guide - Microphones
For Open Face / Modular Helmets
1. Remove cheek pads and head liner for better access to the
interior foam.
2. Remove protective liner on the boom microphone velcro pad and
attach it to the left inner cheek area, position the white triangle on
the microphone towards your mouth.
3.Plug the boom microphone connector (yellow connector) to the
USB-C microphone cable (yellow connector) .
4.Reinstall the cheek pads and head liner, ensuring they don't pinch
the wires.
For Full Face Helmets
1. Remove cheek pads and head liner for better access to the
interior foam.
2. Remove protective liner on the wired microphone velcro pad and
adhere it to the center of the chin bar. Affix the wired microphone to
the velcro
3.Plug the wired microphone connector (yellow connector) to the
USB-C microphone cable (yellow connector) .
4.Reinstall the cheek pads and head liner, ensuring they don't pinch
the wires.
Velcro Pads for Wired Boom MIcrophone
Wired Boom MIcrophone
White Triangle
Velcro Pad for Wired MIcrophone
Wired MIcrophone

Note: Clean area with a cleaning wipe before applying adhesive pads.
Installation Guide - Mounting Clamp
Mounting Clamp
1. Affix adhesive pads on the backside of the mounting clamp and
affix to the left side of the helmet as shown below. Leave for 12 hours
for optimal adhering.
2. To attach headset unit, align the hooks on the rear side with the
cavities found on the mounting clamp, slide down to secure headset
unit.
3.To remove headset unit, push headset unit upwards.
Installation Guide - Cable Holder
Note: Clean area with a cleaning wipe before applying adhesive pads.
1. Affix double sided adhesive pads on the backside of the cable
holder then attach the cable holder to the left side of the helmet as
shown below. Leave for 12 hours for optimal adhering.
2. When the USB-C cable is not connected to the headset, always
secure the cable to the cable holder to prevent damage to the USB-C
cable.
Clasp
Cable Holder Adhesive Pad
Cable Holder
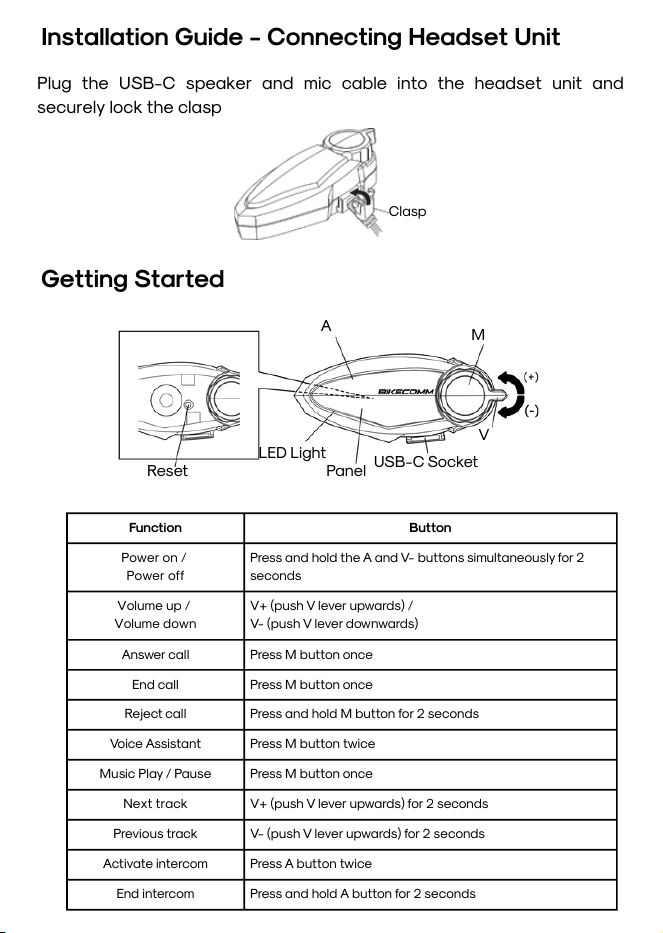
Installation Guide - Connecting Headset Unit
Plug the USB-C speaker and mic cable into the headset unit and
securely lock the clasp
Clasp
Getting Started
Reset
LED Light
A
Panel
M
V
USB-C Socket
Function
Button
Power on /
Power off
Press and hold the A and V- buttons simultaneously for 2
seconds
Volume up /
Volume down
V+ (push V lever upwards) /
V- (push V lever downwards)
Answer call
Press M button once
End call
Press M button once
Reject call
Press and hold M button for 2 seconds
Voice Assistant
Press M button twice
Music Play / Pause
Press M button once
Next track
V+ (push V lever upwards) for 2 seconds
Previous track
V- (push V lever upwards) for 2 seconds
Activate intercom
Press A button twice
End intercom
Press and hold A button for 2 seconds
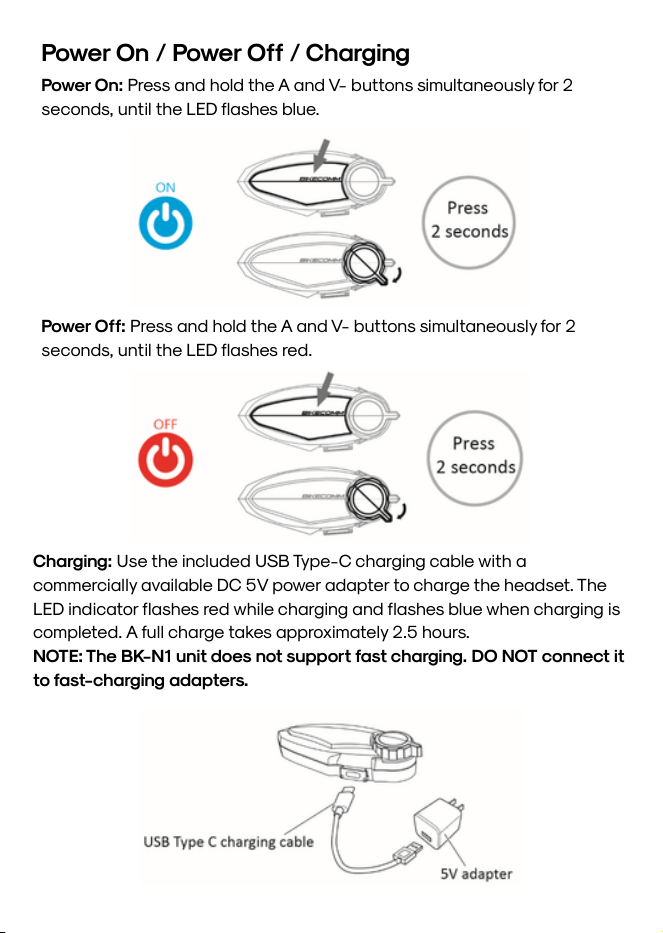
Power On / Power Off / Charging
Power On: Press and hold the A and V- buttons simultaneously for 2
seconds, until the LED flashes blue.
Power Off: Press and hold the A and V- buttons simultaneously for 2
seconds, until the LED flashes red.
Charging: Use the included USB Type-C charging cable with a
commercially available DC 5V power adapter to charge the headset. The
LED indicator flashes red while charging and flashes blue when charging is
completed. A full charge takes approximately 2.5 hours.
NOTE: The BK-N1 unit does not support fast charging. DO NOT connect it
to fast-charging adapters.

Volume Adjustment
Voice Prompt Volume: While the headset is in pairing mode and the
beeping sound is playing, use the V+ and V− controls to adjust the voice
prompt volume. During adjustment, a voice notification will be played to
indicate the volume level. After completing the adjustment, cancel pairing
mode or power off the headset to save and exit the setting. Voice prompt
volume can also be adjusted in the BIKECOMM app.
Audio Volume: Use the V+ and V− controls to adjust audio volume. A
beeping sound is played when adjusting the volume. A double beeping
sound is played when the maximum or minimum volume level is reached.
Audio volume adjustment is independent for each audio source. The
volume level can only be adjusted while the headset is operating with the
corresponding audio source. The volume setting is saved and retained
after the headset is powered off. Audio volume can also be adjusted in the
BIKECOMM app.
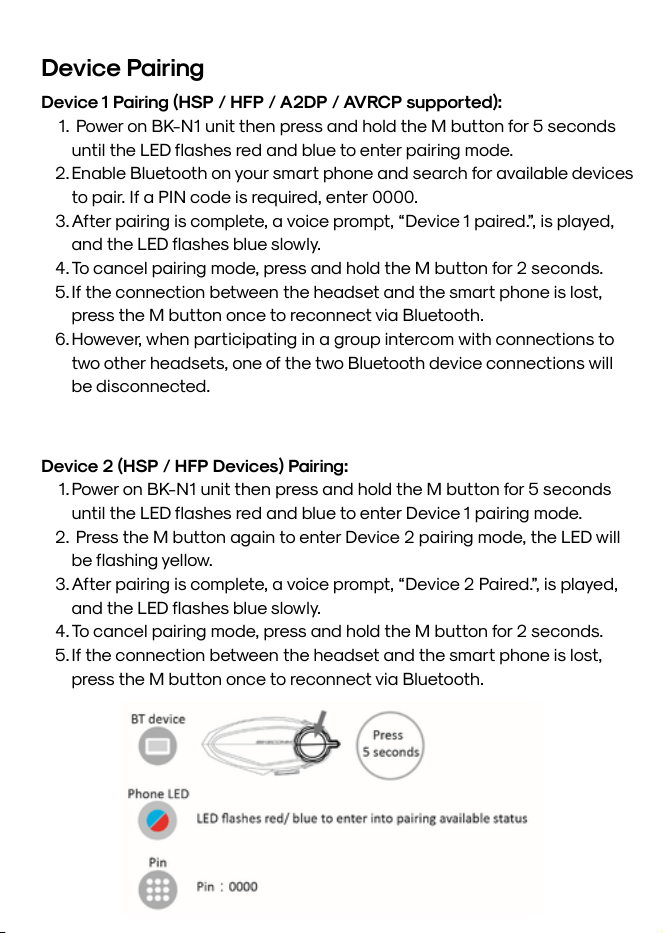
Device 1 Pairing (HSP / HFP / A2DP / AVRCP supported):
1. Power on BK-N1 unit then press and hold the M button for 5 seconds
until the LED flashes red and blue to enter pairing mode.
2.Enable Bluetooth on your smart phone and search for available devices
to pair. If a PIN code is required, enter 0000.
3.After pairing is complete, a voice prompt, “Device 1 paired.”, is played,
and the LED flashes blue slowly.
4.To cancel pairing mode, press and hold the M button for 2 seconds.
5.If the connection between the headset and the smart phone is lost,
press the M button once to reconnect via Bluetooth.
6.However, when participating in a group intercom with connections to
two other headsets, one of the two Bluetooth device connections will
be disconnected.
Device Pairing
Device 2 (HSP / HFP Devices) Pairing:
1.Power on BK-N1 unit then press and hold the M button for 5 seconds
until the LED flashes red and blue to enter Device 1 pairing mode.
2. Press the M button again to enter Device 2 pairing mode, the LED will
be flashing yellow.
3.After pairing is complete, a voice prompt, “Device 2 Paired.”, is played,
and the LED flashes blue slowly.
4.To cancel pairing mode, press and hold the M button for 2 seconds.
5.If the connection between the headset and the smart phone is lost,
press the M button once to reconnect via Bluetooth.
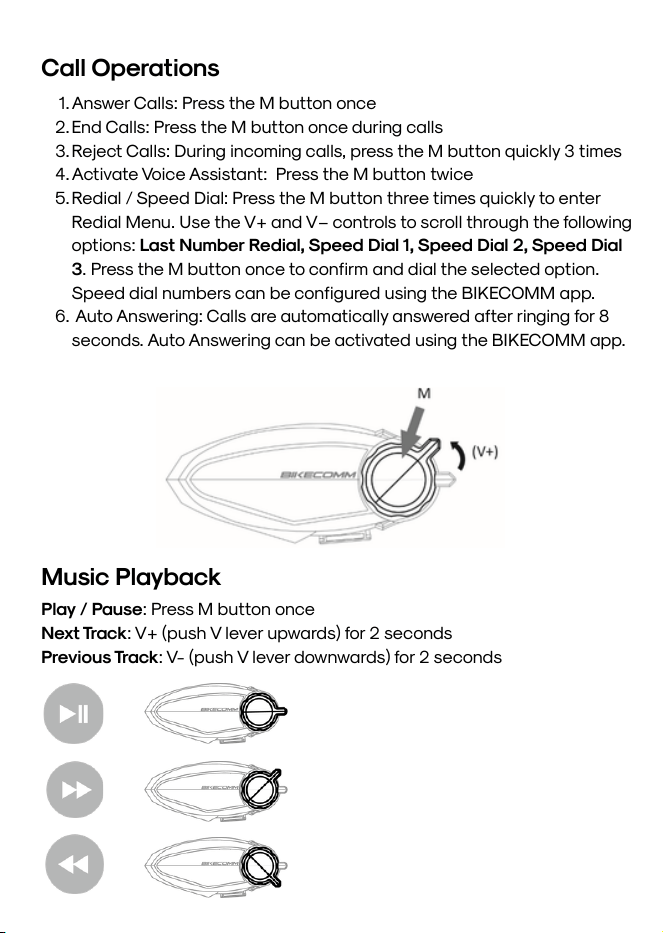
1.Answer Calls: Press the M button once
2.End Calls: Press the M button once during calls
3.Reject Calls: During incoming calls, press the M button quickly 3 times
4.Activate Voice Assistant: Press the M button twice
5.Redial / Speed Dial: Press the M button three times quickly to enter
Redial Menu. Use the V+ and V− controls to scroll through the following
options: Last Number Redial, Speed Dial 1, Speed Dial 2, Speed Dial
3. Press the M button once to confirm and dial the selected option.
Speed dial numbers can be configured using the BIKECOMM app.
6. Auto Answering: Calls are automatically answered after ringing for 8
seconds. Auto Answering can be activated using the BIKECOMM app.
Call Operations
Music Playback
Play / Pause: Press M button once
Next Track: V+ (push V lever upwards) for 2 seconds
Previous Track: V- (push V lever downwards) for 2 seconds

A maximum of eight (8) headsets can be paired together for intercom
communication. Regardless of the number of headsets being paired, the
pairing procedure remains the same.
Intercom pairing and operation can be managed through the BIKECOMM
app.
InstaLink:
1. When any member of a paired group activates the intercom, group
intercom communication begins immediately.
2. If one headset leaves the group, the remaining headsets continue
intercom communication without interruption.
3. When the headset rejoins the group, it will automatically resume
intercom communication.
4. After the headset is powered off and then powered on again, the
pairing information is retained, and re-pairing is not required. However,
if the group intercom members change, the pairing procedure must be
performed again.
During pairing:
One headset acts as the active pairing device.
All other headsets act as passive pairing devices.
Intercom Pairing
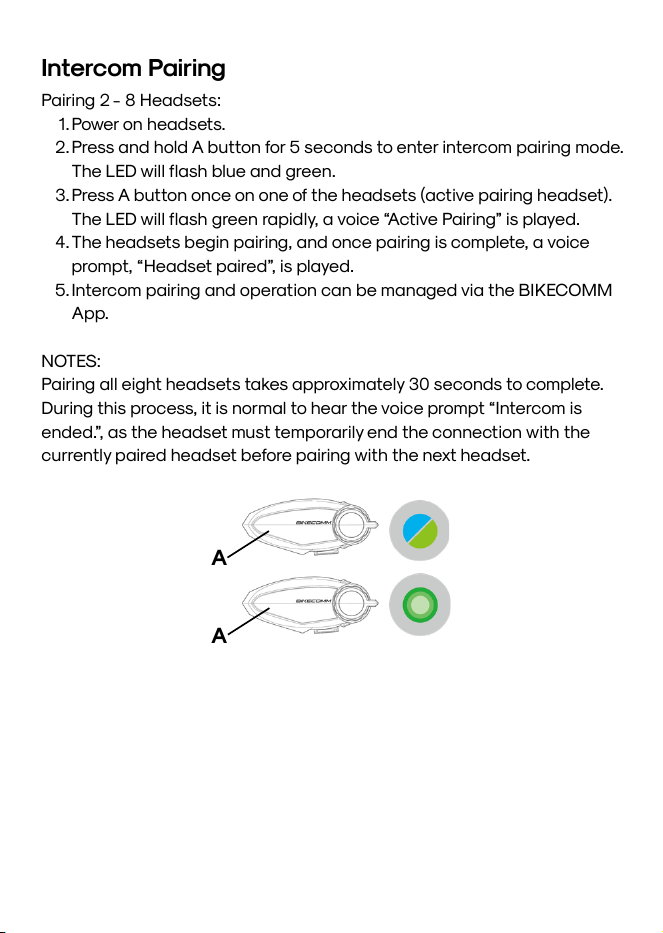
Intercom Pairing
Pairing 2 - 8 Headsets:
1.Power on headsets.
2.Press and hold A button for 5 seconds to enter intercom pairing mode.
The LED will flash blue and green.
3.Press A button once on one of the headsets (active pairing headset).
The LED will flash green rapidly, a voice “Active Pairing” is played.
4.The headsets begin pairing, and once pairing is complete, a voice
prompt, “Headset paired”, is played.
5.Intercom pairing and operation can be managed via the BIKECOMM
App.
NOTES:
Pairing all eight headsets takes approximately 30 seconds to complete.
During this process, it is normal to hear the voice prompt “Intercom is
ended.”, as the headset must temporarily end the connection with the
currently paired headset before pairing with the next headset.
A
A
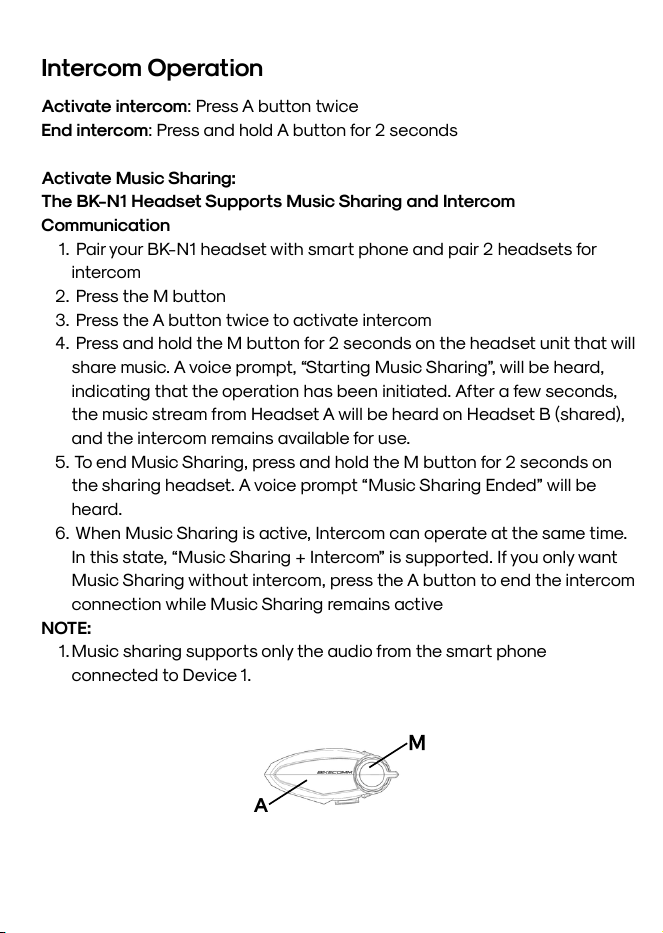
Activate intercom: Press A button twice
End intercom: Press and hold A button for 2 seconds
Activate Music Sharing:
The BK-N1 Headset Supports Music Sharing and Intercom
Communication
1. Pair your BK-N1 headset with smart phone and pair 2 headsets for
intercom
2. Press the M button
3. Press the A button twice to activate intercom
4. Press and hold the M button for 2 seconds on the headset unit that will
share music. A voice prompt, “Starting Music Sharing”, will be heard,
indicating that the operation has been initiated. After a few seconds,
the music stream from Headset A will be heard on Headset B (shared),
and the intercom remains available for use.
5. To end Music Sharing, press and hold the M button for 2 seconds on
the sharing headset. A voice prompt “Music Sharing Ended” will be
heard.
6. When Music Sharing is active, Intercom can operate at the same time.
In this state, “Music Sharing + Intercom” is supported. If you only want
Music Sharing without intercom, press the A button to end the intercom
connection while Music Sharing remains active
NOTE:
1.Music sharing supports only the audio from the smart phone
connected to Device 1.
Intercom Operation
A
M
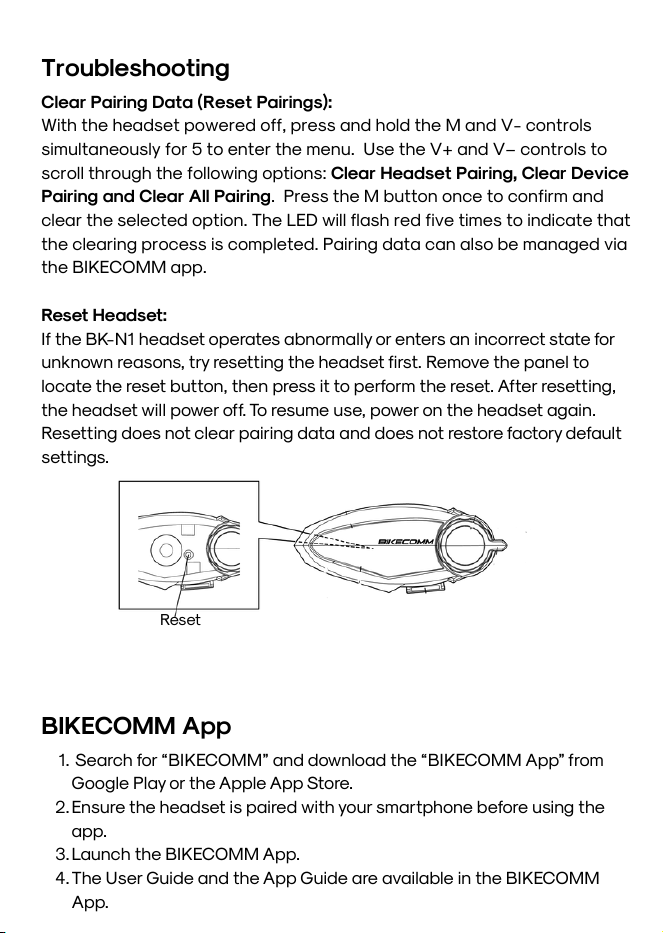
Troubleshooting
Reset
Clear Pairing Data (Reset Pairings):
With the headset powered off, press and hold the M and V- controls
simultaneously for 5 to enter the menu. Use the V+ and V− controls to
scroll through the following options: Clear Headset Pairing, Clear Device
Pairing and Clear All Pairing. Press the M button once to confirm and
clear the selected option. The LED will flash red five times to indicate that
the clearing process is completed. Pairing data can also be managed via
the BIKECOMM app.
Reset Headset:
If the BK-N1 headset operates abnormally or enters an incorrect state for
unknown reasons, try resetting the headset first. Remove the panel to
locate the reset button, then press it to perform the reset. After resetting,
the headset will power off. To resume use, power on the headset again.
Resetting does not clear pairing data and does not restore factory default
settings.
BIKECOMM App
1. Search for “BIKECOMM” and download the “BIKECOMM App” from
Google Play or the Apple App Store.
2.Ensure the headset is paired with your smartphone before using the
app.
3.Launch the BIKECOMM App.
4.The User Guide and the App Guide are available in the BIKECOMM
App.
Product Warranty & Disclaimer
Limited Warranty
Open Road Solutions, Inc. (BIKECOMM) guarantees the product quality
based on the technical specification stated in the product manual, and
data regarding product warranty. Here, product warranty extends to the
product only. BIKECOMM will not be liable for any loss, damage of human
life, or loss of property which may result from using the product beyond
defective parts or flaws that occur due to problems in manufacture.
Warranty Period
BIKECOMM guarantees free-of-charge replacements of defective parts
of the product or flaws that may have occurred due to problems in
manufacture for a period of 1 year from the date of initial purchase.
Termination
Quality warranty of the product becomes effective on the date of initial
purchase. In addition, the quality warranty of the product expires when
the warranty period expires. However, in the following cases, the
warranty will be terminated prematurely.
In the event the product has been sold or transferred to a third party.
In the event the manufacturer's name, serial number, product label, or
other markings have been modified or removed.
In the event any unauthorized person has tried to disassemble, repair,
or modify the product.
Notice & Waiver
By buying and using this product, you relinquish considerable legal rights
including any claim for compensation for damages. Therefore, be certain
to read and understand the following terms and conditions before using
the product. Use of this product will constitute consent to this
agreement, and forfeiture of rights to all claims. If you do not consent to
all the terms and conditions of this agreement, return the product for a
refund. (Refer to the section "Return for Full Refund".)
Product Warranty & Disclaimer
1.You agree that you, your descendants, legal proxies, successors, or
transferees will not raise permanent volitional request for any suit,
claim, implementation, redemption or similar action from BIKECOMM
with regard to any occasion such as difficulty, pain, suffering,
inconvenience, loss, injury, or death which may occur to you or a third
party during the use of this product.
2.You must completely understand and accept all risks (including those
occurring due to any careless behavior of yours or others) which may
occur during the use of this product.
3.You are responsible for ensuring that your medical condition permits
usage of the product and that you are in sufficient physical condition
for using any device which can be used with it. In addition, you must
ensure that the product does not limit your abilities and that you are
able to use it safely.
4.You must be an adult who can take responsibilities for using the
product.
5. You must read and understand the following warnings and alerts:
BIKECOMM; together with employees, managers, partners,
subsidiaries, representatives, agents, supporting firms and suppliers,
sole sellers of BIKECOMM (collectively referred to as "the company")
recommend that, before using the product and similar devices of any
brands including its derivative models, you collect any relevant
information in advance and be entirely prepared in terms of weather,
traffic situation, and road conditions.
When you use the product while you operating any vehicle or
equipment such as motorcycles, scooters, mopeds, ATVs, or quad-
bikes (hereinafter called as "transportation means"), you must take
complete caution regardless of the location of such operation.
Use of the product on the road may cause such risks as fracture,
serious disability, or death.
Risk factors, which may occur when you use the product, may be due
to errors of the manufacturer, its agents, or third parties which are
involved in the manufacturing.
Product Warranty & Disclaimer
Risk factors, which may occur when you use the product, may be
unforeseeable. Therefore, you must take full responsibility for any
damage or loss caused by all risk factors which may occur when
using the product.
When you use the product, use good judgment; never use it under the
influence of alcohol. 6. You must read and completely understand all
terms and conditions of legal rights and warnings that are involved in
using the product. In addition, usage of the product constitutes
acceptance of all terms and conditions regarding waiver of rights.
Warranty Exclusions
Reasons for Limited Liabilities
If you do not return the product after purchasing it, you relinquish all
rights to liabilities, loss, claims, and claims for reimbursement of expenses
(including attorney's fees). Therefore, BIKECOMM will not be liable for
physical injury, death, or any loss or damage of transportation means,
possessions, or assets which belong to you or third parties that may have
occurred while you use the product. Further, BIKECOMM will not be liable
for any substantial damage not related to the, condition, environment, or
malfunction of the product. All risks related with the operation of the
product depend entirely on the user regardless of its use by the initial
purchaser of a third party. Use of this product may violate local or
national laws. In addition, be aware once again that correct and safe use
of the product is entirely your responsibility.
Limitation of Liability
TO THE FULL EXTENT ALLOWED BY LAW, BIKECOMM EXCLUDES FOR
ITSELF AND ITS SUPPLIERS ANY LIABILITY, WHETHER BASED IN
CONTRACT OR TORT (INCLUDING NEGLIGENCE), FOR INCIDENTAL,
CONSEQUENTIAL, INDIRECT, SPECIAL, OR PUNITIVE DAMAGES OF ANY
KIND, OR FOR LOSS OF REVENUE OR PROFITS, LOSS OF BUSINESS,
LOSS OF INFORMATION OR DATA, OR OTHER FINANCIAL LOSS ARISING
OUT OF OR IN CONNECTION WITH THE SALE, INSTALLATION,
MAINTENANCE, USE, PERFORMANCE, FAILURE, OR INTERRUPTION OF
ITS PRODUCTS,
Product Warranty & Disclaimer
EVEN IF BIKECOMM OR ITS AUTHORIZED RESELLER HAS BEEN ADVISED
OF THE POSSIBILITY OF SUCH DAMAGES, AND LIMITS ITS LIABILITY TO
REPAIR, REPLACEMENT, OR REFUND OF THE PURCHASE PRICE PAID, AT
BIKECOMM’S OPTION. THIS DISCLAIMER OF LIABILITY FOR DAMAGES
WILL NOT BE AFFECTED IF ANY REMEDY PROVIDED HEREIN SHALL FAIL
OF ITS ESSENTIAL PURPOSE. IN ANY CASE, THE TOTAL COMPENSATION
LIABILITIES OF BIKECOMM OR ITS SALES AGENTS SHALL NOT EXCEED
THE PRICE PAID FOR THE PRODUCT BY THE PURCHASER.
Liabilities Disclaimer
In addition to damages which may occur due to the use of the product,
BIKECOMM will not be liable for damages of the product which occur due
to the following events. In the event the product is misused or used for
purposes other than its intended purposes. In the event the product is
damaged because the user does not follow the content of the product
manual. In the event the product is damaged because it has been left
unattended or has undergone any other accident. In the event the
product is damaged because the user has used any parts or software
which are not provided by the manufacturer. In the event the product is
damaged because the user has disassembled, repaired, or modified it in
such way as is not explained in the product manual. In the event the
product is damaged by a third party. In the event the product is damaged
due to Acts of God (including fire, flood, earthquake, storm, hurricane or
other natural disaster). In the event the surface of the product is
damaged by use.
Warranty Service
To obtain product warranty service, send the defective product, at your
expense, to the manufacturer or the seller along with proof of purchase
(a receipt that shows the purchase date, a product registration
certificate of the Website, and other relevant information). Take
necessary measures to protect the product. In order to get a refund or
replacement, you must include the whole package as it was purchased.
Product Warranty & Disclaimer
Free-of-charge Service
BIKECOMM will provide free-of-charge repair or replacement service for
the product when product defects occur within the scope of the product
warranty during the warranty period.
Charged Service
BIKECOMM will provide charged repair or replacement service for the
product when the product warranty period has been expired or when the
product damage is beyond the scope of the product warranty. For
further information on charged service, you may contact the seller.
Return for Full Refund
Should you not agree to the terms and conditions explained above, you
may return the product for a full refund. To get a refund, within 14 days
from the purchase date you must return the product to the seller in such
a condition as it was purchased. Unless you return the product within 14
days from the purchase date, you will have read and agreed to all the
terms and conditions explained above, and BIKECOMM will not be liable
for any claim for damages related with the product.
Copyright 2026 Open Road Solutions, Inc.
All rights reserved.
Open Road Solutions, Inc. reserves the right to make any changes and
improvements to its product without providing prior notice.
BIKECOMM™ is a trademark of Open Road Solutions, Inc. or its
subsidiaries in Taiwan and other countries.
The Bluetooth® word mark and logos are owned by the Bluetooth SIG,
Inc. and any use of such marks by BIKECOMM is under license.
Open Road Solutions, Inc.
No. 88-13, Shuili Road, Hsinchu City, 30059, Taiwan
services@openroad.com.tw
BK-N1_USER MANUAL_EN_V1.04
May 5, 2026