
User’s Manual
Automotive Diagnostic Smoke Leak Detector
L5000 / L5000 PRO
Preface
1.Thank you for purchasing this product. Please read this user manual carefully before using the
product for the first time.
2.Always keep this manual handy, as it contains important information about using the product.
Note: The ANCEL Diagnostic Smoke Leak Detector product line consists of a series of product
models that vary from one model to another. Not all descriptions in this manual are applicable
to all product models. Please refer to the specific product configuration to determine the
applicability of the introduction.
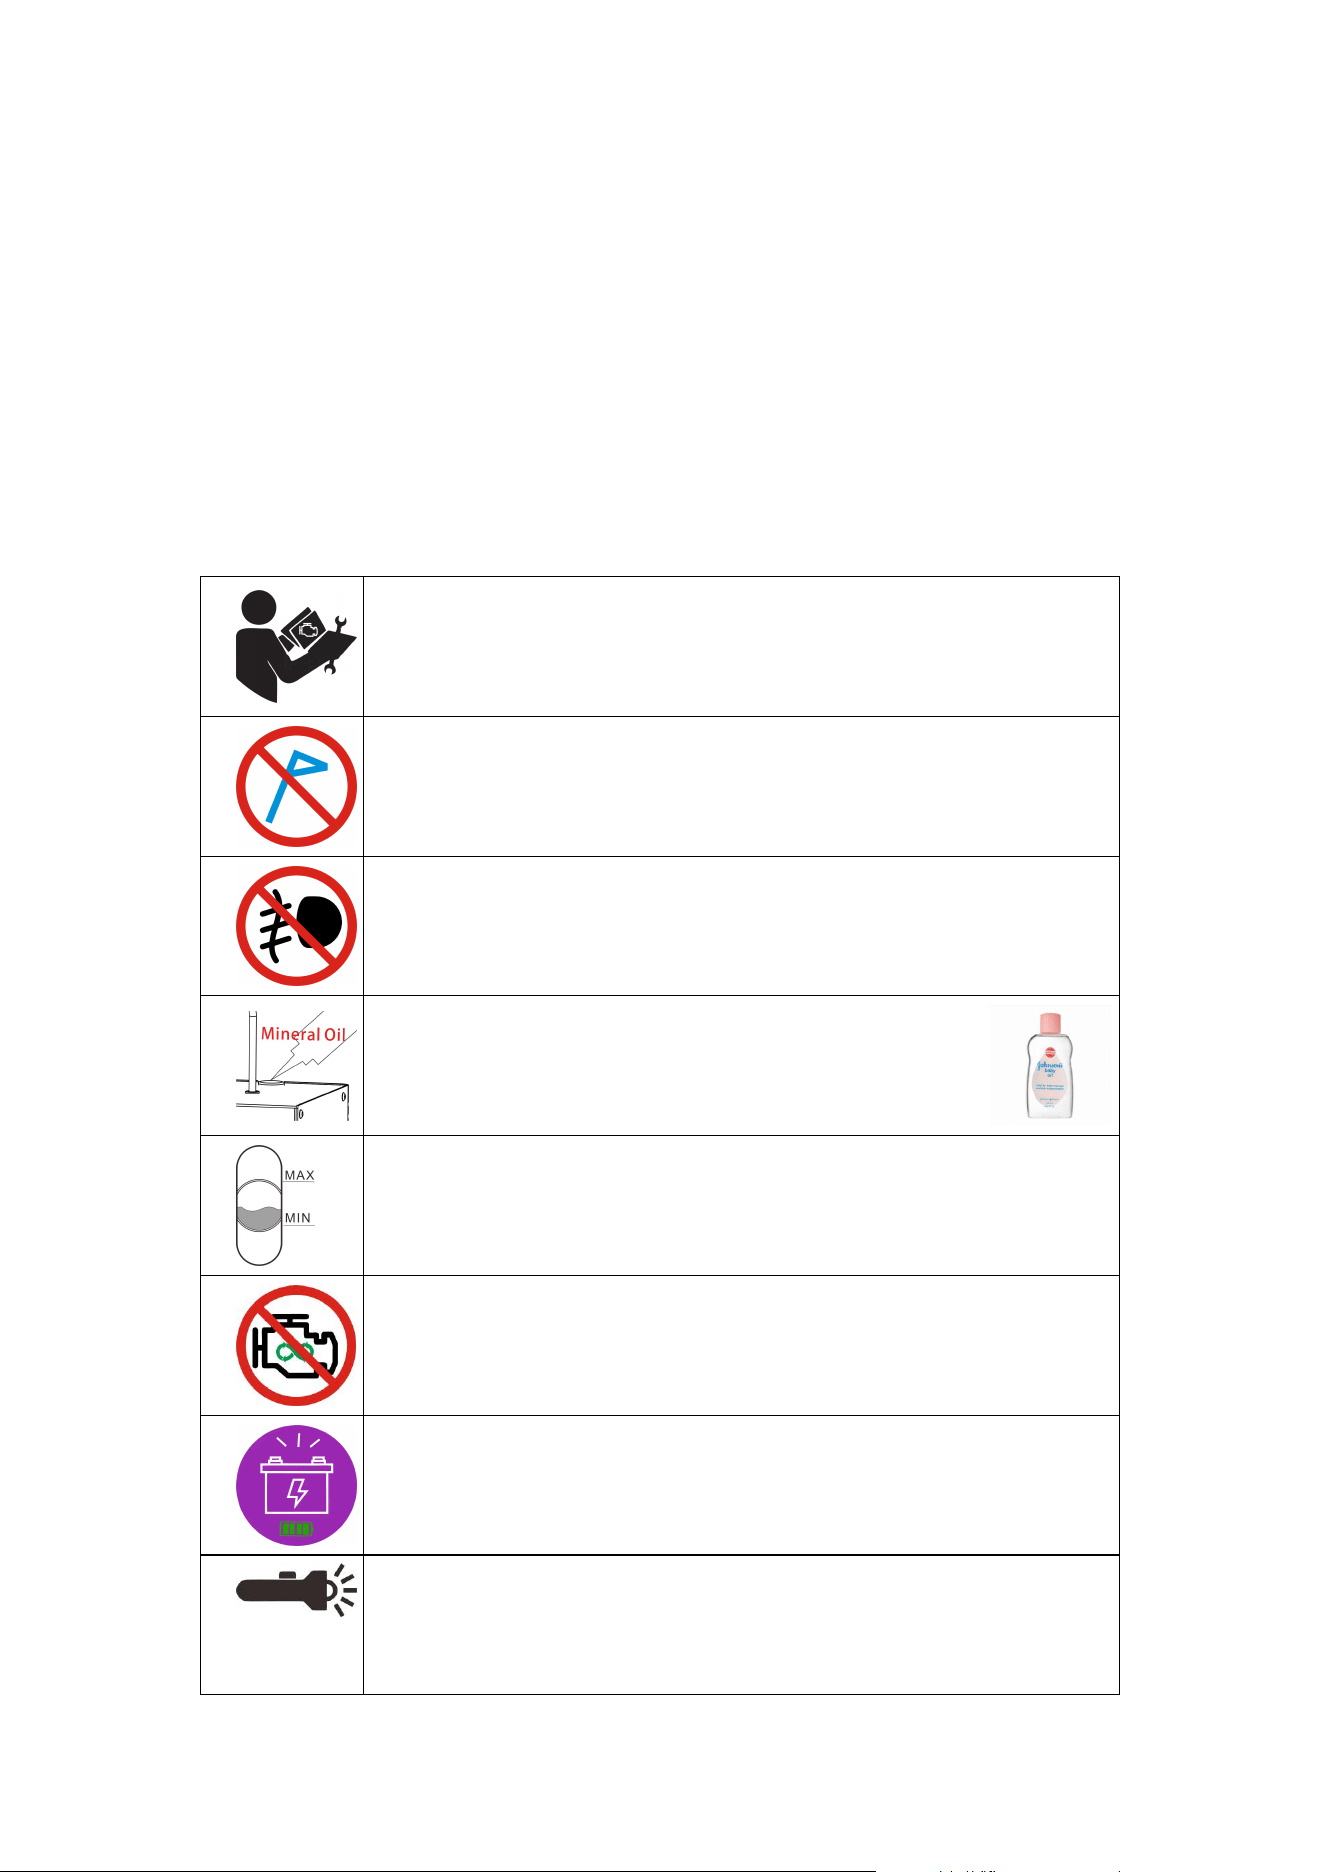
Warning
The operator must have a basic understanding of the vehicle's structure and
engine. A vehicle service book is required.
To ensure better test results, it is required that there be no wind in the
operating area.
Do NOT use the product on smoke-sensitive components. Eg. smoke residue
might reduce the sharpness of headlights if applied to headlight housing.
Only low-density, mineral oil-based fluid is allowed for use
as smoke oil. Johnson & Johnson's Baby Oil (pink label) is
compatible. Use a funnel to avoid pouring oil onto other parts
of the unit.
Check the oil level before use, if the oil level is lower than the middle of the
gauge, the unit will need a refill. However, do not overfill the unit beyond the
gauge.
The product is only allowed to be used while the ignition is off.
Be sure to use a 12 V vehicle battery. The battery should be fully charged,
and its voltage should not be lower than 12 V.
Use a bright light torch or halogen light to help find leaks.
Wear goggles if available.
Scope of use
The smoke leak detector, with its WYSIWYG efficiency, is widely applicable to the leak testing of
various pipeline systems and for quickly pinpointing leak positions. This product can effectively
find the leakage position by simulating most suitable operating pressure conditions of the vehicle
pipeline and introducing smoke into the vehicle pipeline system through appropriate adapters. It
can be used to test the EVAP system, air intake system, exhaust system, inter-cooling system, oil
circuit, water lines, and other pipeline systems that users can imagine.
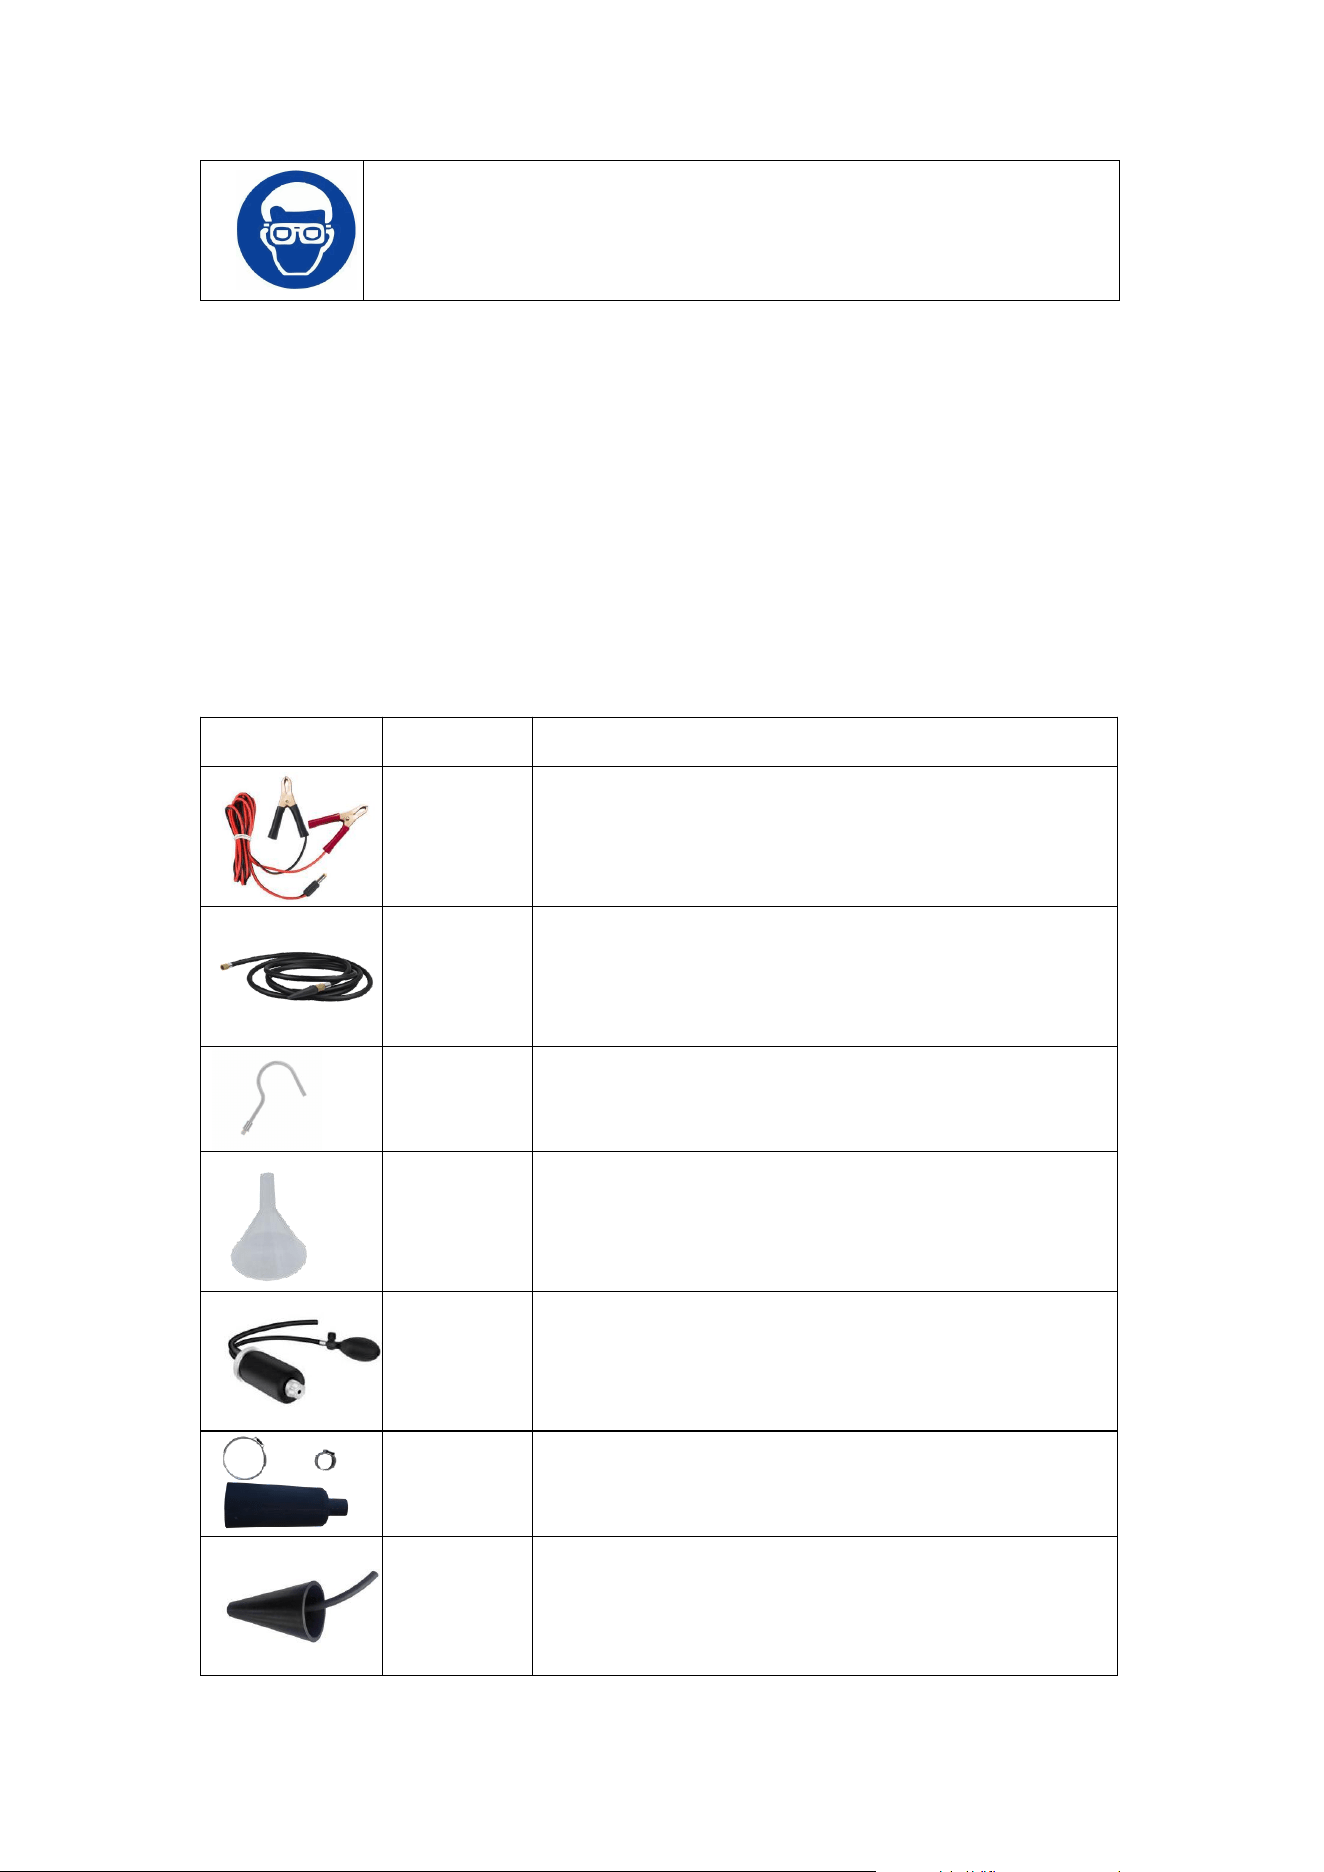
Accessories
Picture
Article
Description
Power Cord
For connecting the power supply to the unit. Fitting size
5.5 x 2.5 mm.
Delivery
Hose
Air/smoke delivery hose to introduce air/smoke from main
unit to the system directly or via adapters.
Hook
For hanging up the main unit.
Funnel
Refilling assistant tool to prevent the smoke oil from
flowing into the casing during filling, which would cause
unexpected failure.
Intake
Bladder
Applicable for 25~140 mm opening, especially when the
opening is not round shaped.
Note: avoid contact to oil and high temperature.
Service
Replacement
Replacement rubber and clamps for intake bladder.
Adapter
Cone
Applicable for 30~80 mm round shaped opening.
Eg. intake.

Adapter
Cone Set
Applicable for 25~55 mm round shaped opening. Eg. fuel
tank, cooling system, engine oil filler port, exhaust etc.
Block-off
Cone Set
Applicable for block round shaped opening at high
pressure test.
EVAP
Adapter
For fitting to the EVAP service port, mostly available on
vehicle made in North America.
EVAP
Removal Tool
EVAP service port valve removal tool, note the thread is
anti-clockwise.
Block-cap set
Mostly used when work on leak test on vehicle engine
while it is unmounted from the vehicle, or low pressure
applications.
Specification
Power Supply
DC 12 V (Automotive Battery) < 8 Amp
Output Pressure
Fixed low (0.5 psi) / high (20 psi) pressure mode,
and 0.5 to 20 psi linear customizable output pressure mode
Flow Rate
< 8 LPM
Length of Power Cord
2.5 Meters
Length of Smoke Hose
2.5 Meters
L5000
L5000 PRO
Leak Test with Air
Support
Support
Leak Test with Smoke
Support
Support
Decay Test at specific pressure
N/A
Support
Vacuum Leak Test
N/A
Support
Pressure resolution
0.001 of selected unit
0.001 of selected unit
Flow rate resolution
0.01 LPM
0.01 LPM
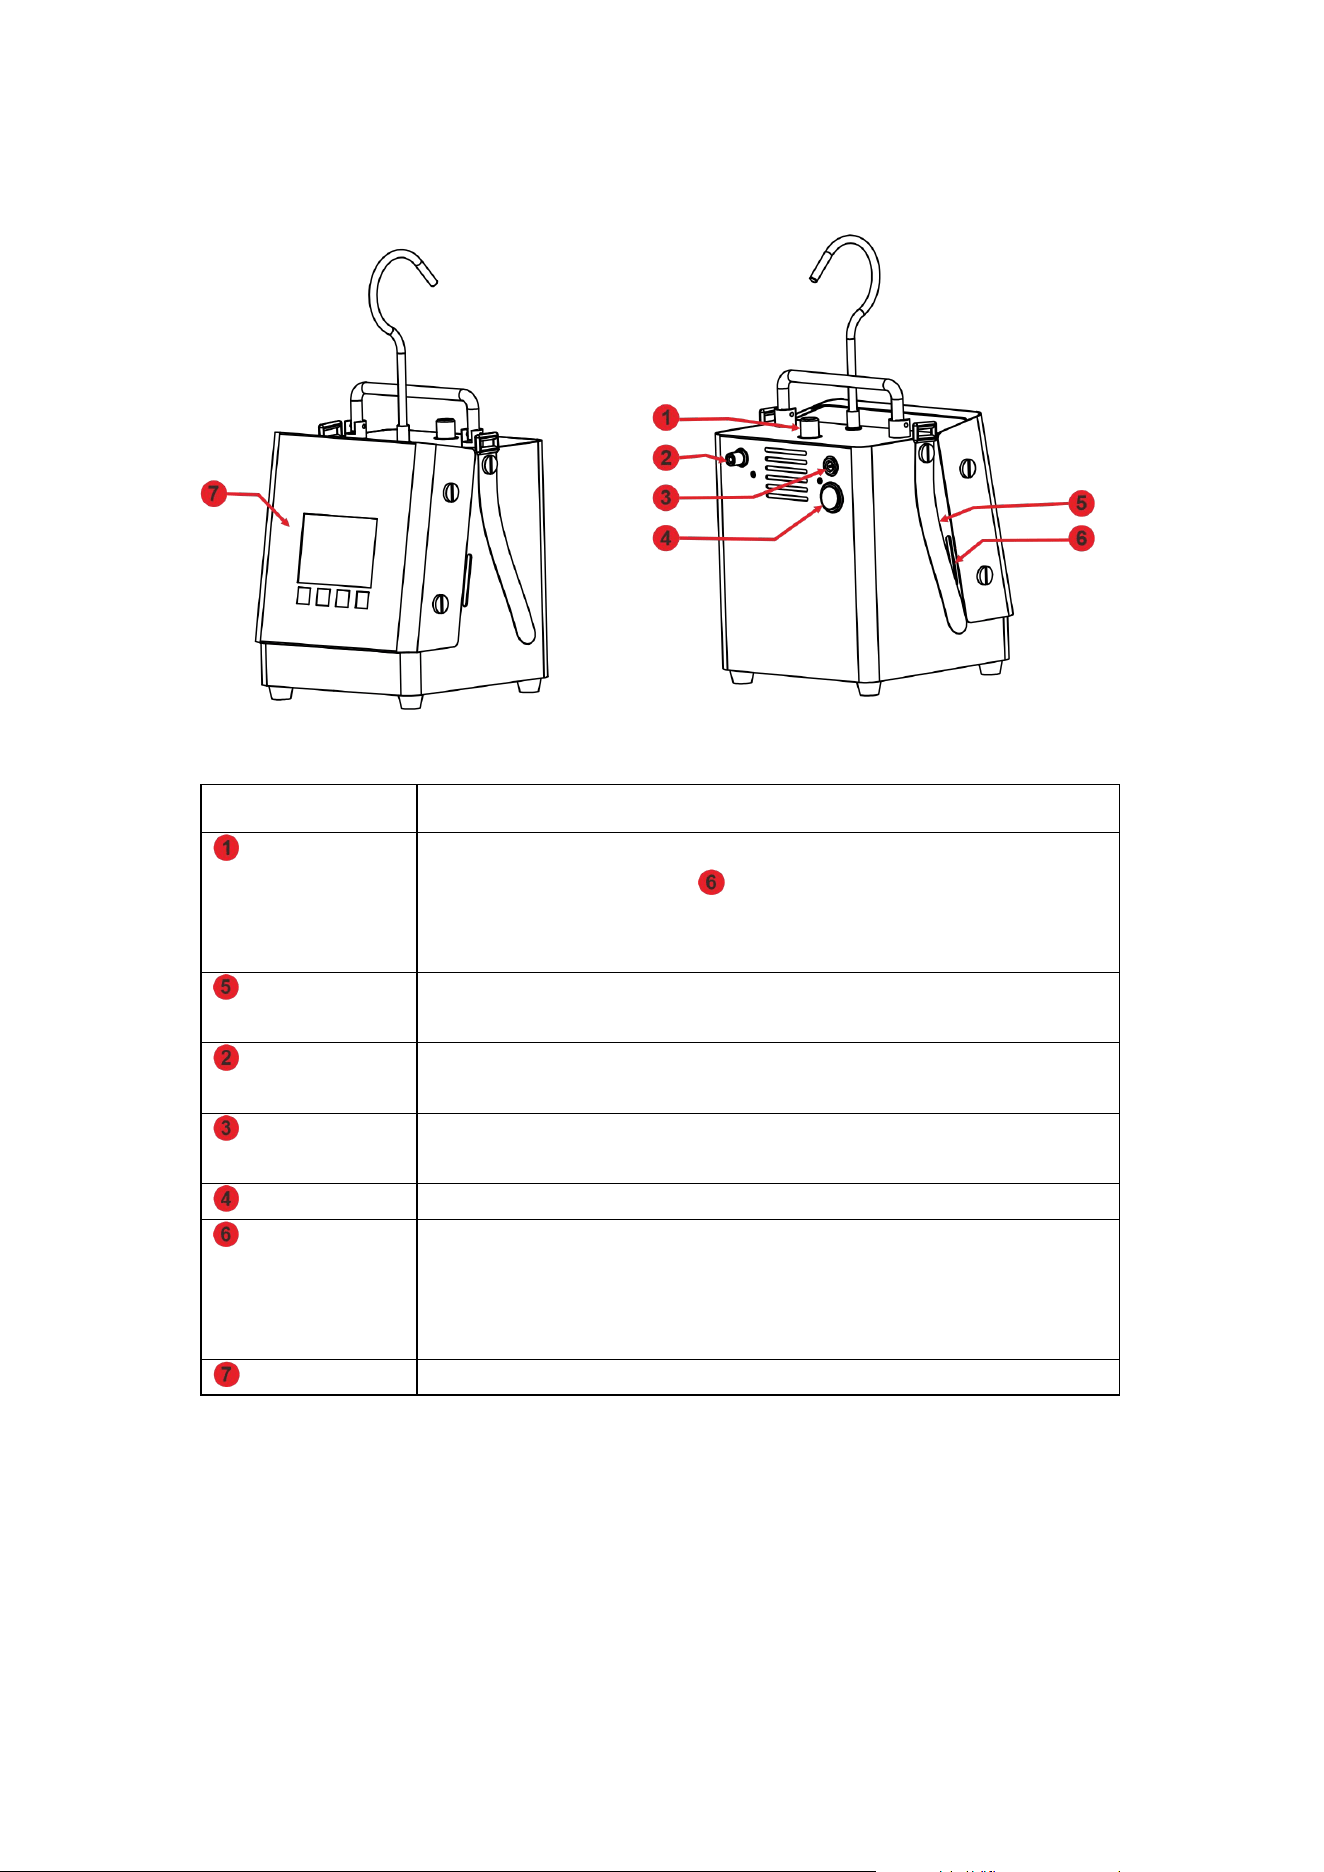
Product Structure
The following list is designed to familiarize you with the function of the operational components
of the machine.
Article
Description
Oil Refill Port
For oil refill while its needed. The capacity of the heating chamber is
max 30 ml, note the oil level while refill. DO NOT OVERFILL.
The funnel is a nice helper to prevent oil from poured to the surface of
the unit.
Velcro Strap
Available on both sides of the unit, for collection of the smoke delivery
hose, and power cord before storage.
Smoke Outlet
Port
While set up the unit, the Smoke Delivery Hose need to be mounted
onto the Smoke Outlet.
Power Socket
While set up the unit, the power cords need to plug into the power
socket.
Power Switch
Mechanical Switch.
Oil Level Gauge
While set up the unit, smoke oil need to be filled into the unit, do not
exceed the MAX line.
Check and confirm proper oil level periodically. If the oil level is lower
than the MIN line, the unit would need a refill.
Operation panel
All the operation/setting is done at the operation panel.
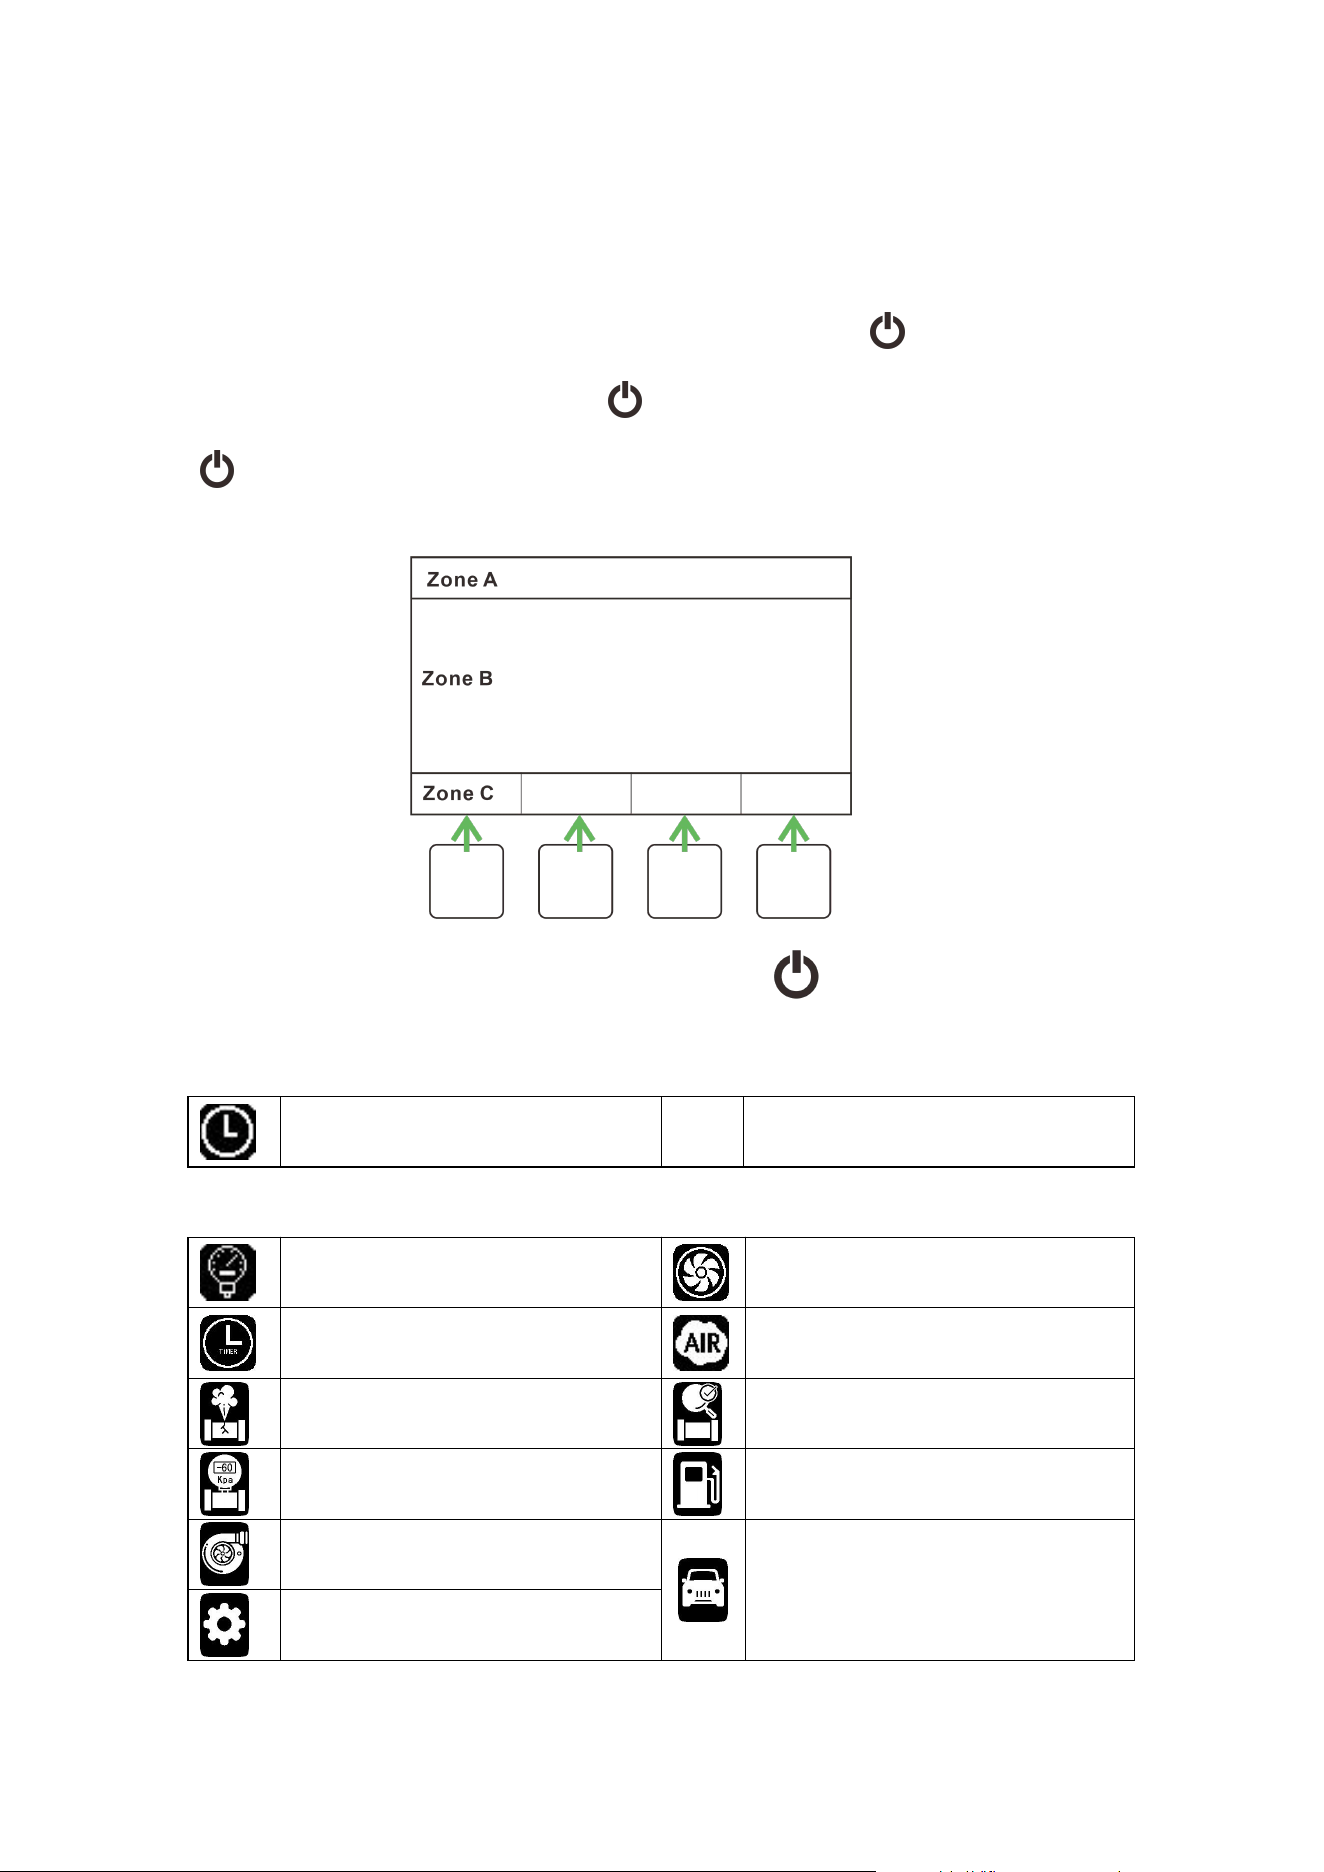
Operation Panel
Always use the mechanical switch to avoid damage from shock voltage/current which might
occur while attach/detach battery clamp from the vehicle battery.
After switch ON the machine from the back of the unit, long press the button to power up
the unit. At the main screen while there is available on the Navigation bar, long press the
would shut the unit off.
The operation panel consists of a LCD screen and 4 buttons below.
In which,
Zone A: The working path which indicate on what function interface the machine is currently in.
5 minutes countdown
Zone B: The display area of content.
System pressure
Flow rate
Countdown
Air volume delivered
Pressure Leakage Test (Air/Smoke)
Pressure Decay Test
Vacuum Leak Test
Low Pressure Test (Air/Smoke),
targeted test pressure 0.5 psi
High Pressure Test (Air/Smoke),
targeted test pressure 20 psi
Customized Pressure Leak Test
(Air/Smoke),
Test pressure could be adjust from
0.5 psi to 20 psi
System Setting
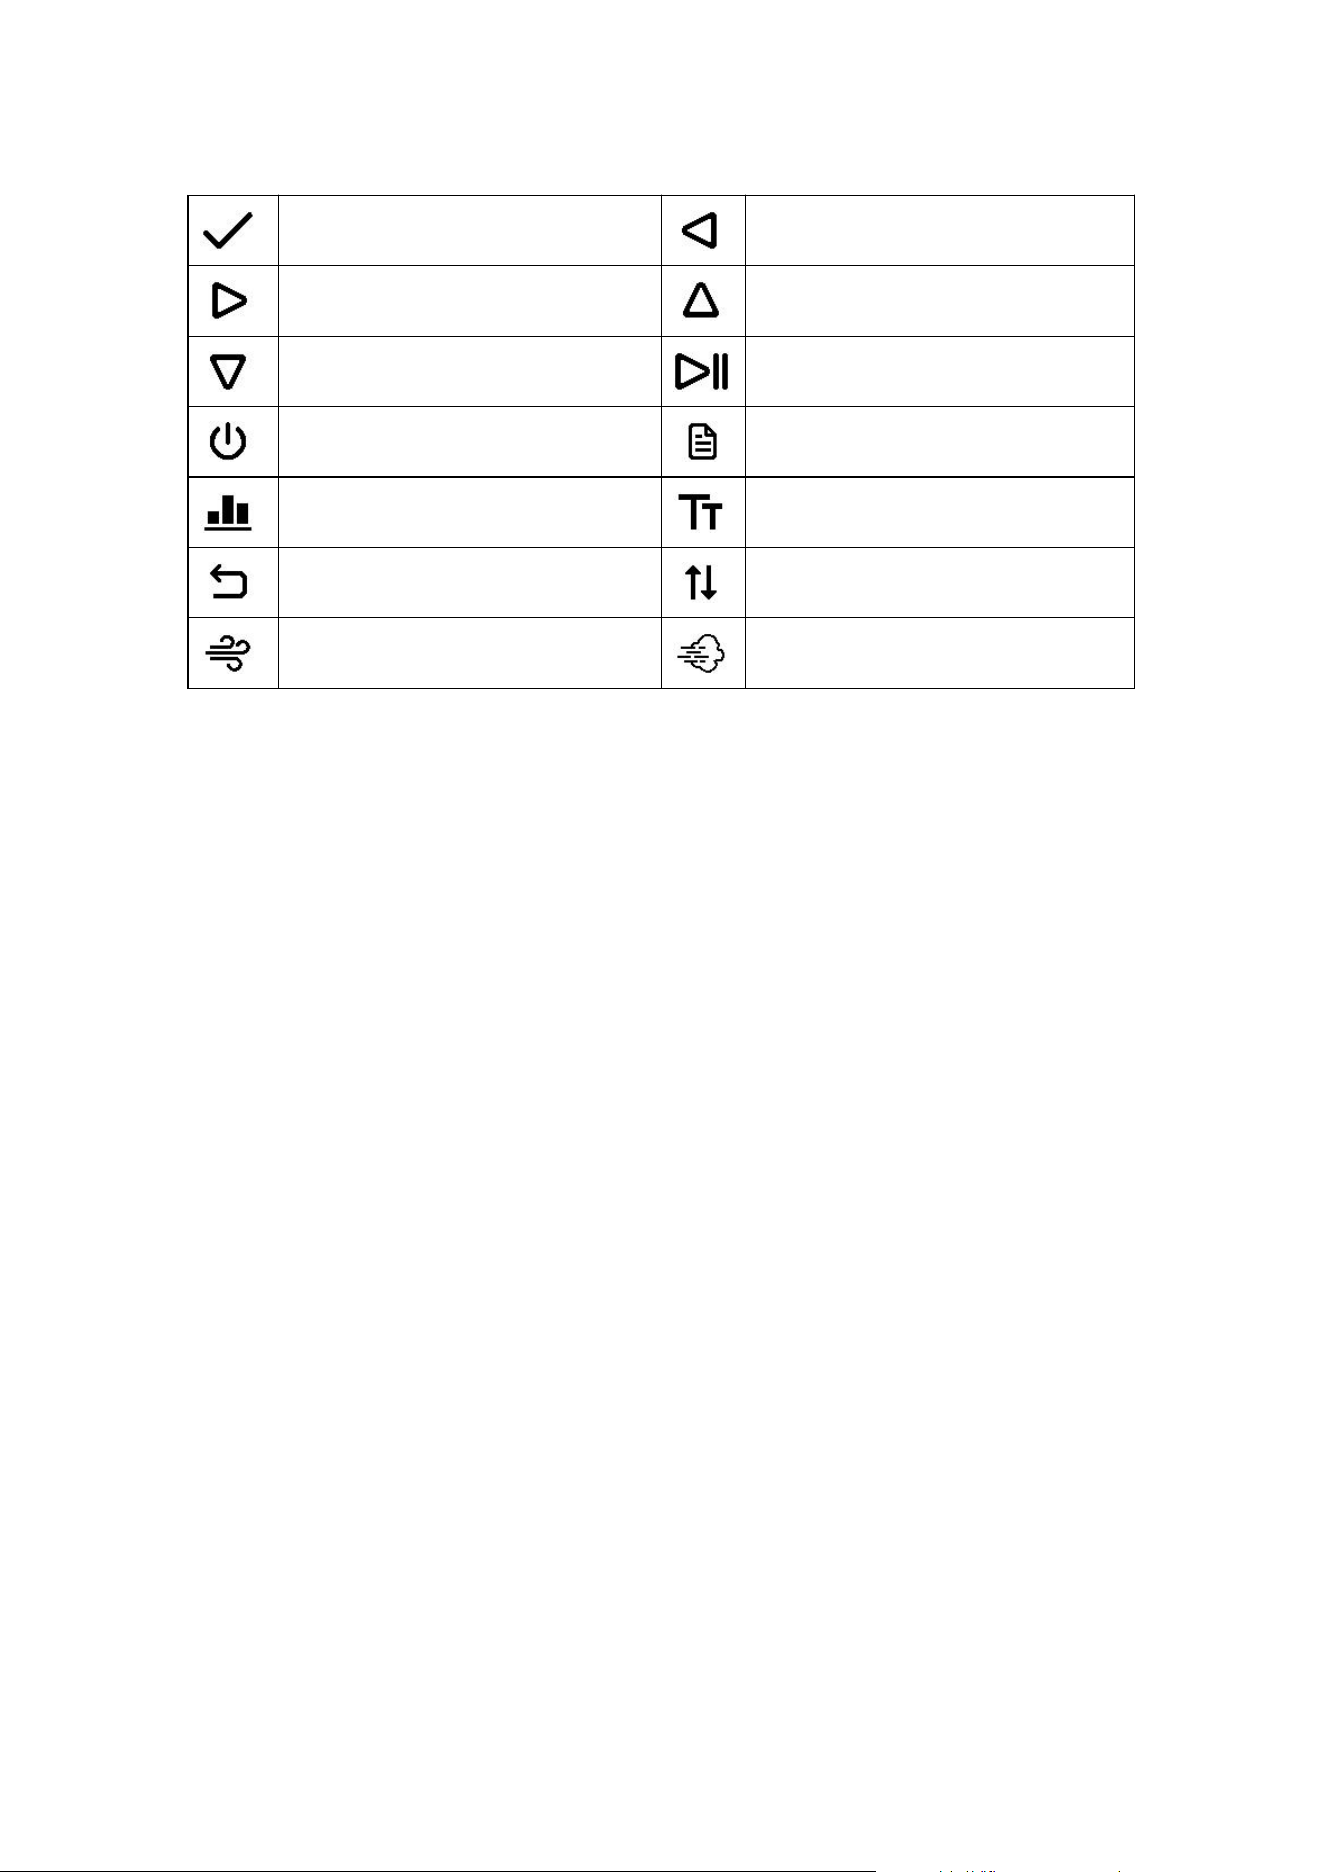
Zone C: Function of the buttons underneath,explanation as follows,
Confirm
Move the focus left
Move the focus right
Increase
Decrease
Stop
Power Off
Set/Edit the current parameters
Display in detail(graph)
Display in numbers
Navigate back
Switch between items
Air only
Smoke ON
Self-Diagnose
In the Settings page, there is an entry named 'Self Test' in which a self-diagnosis routine of the
machine itself will be carried out. It is recommended to carry out a self-diagnosis when a
malfunction occurs.
Generic Operation
1.Place the unit at a stable & flat surface, fill (mineral Oil based) smoke oil into the unit from
the refill port on the top.
Note: The oil level shall not exceed the level gauge and the smoke oil has to be mineral oil.
2.Mount the hook on to the unit if you'd like to hang it under the hood.
3.Plug the power cord into the power socket.
4.Screw on the smoke hose to the unit.
5.Connect 12 V vehicle power.
6.Switch on the power at the back of the unit.
7.Long press the power button on the operation panel, then the LCD would be lit.
8.Select the corresponding item in the menu, and edit test parameters according to your need,
then start the air/smoke producing.
9.Air mode is always a necessity if quick knowledge of leak status is required, in case you just
want to know if it leaks or not, instead of find/fix it.
10.While introduce smoke into the system which need to be tested, It is recommended to leave
a exit at the far end of the system which to be tested, and seal it when obvious smoke coming out
from the exit. This would make the test more efficient and accurate.
11.The system is ready for leak check. Use a bright light torch or working lamp to assist.
12.After test, switch off the unit with the mechanical switch from the back of the unit.
13.Collect the Smoke Hose and the Power Cord with the Velcro Straps for storage.
14.Hang the unit or make it stand in UPRIGHT position only. Do NOT lay it down.

Knowledge for Fuel Vapor Recovery System (EVAP)
1.According to available data, the EVAP system is the most neglected of all the emission
systems in an automobile. A leak as small as 0.02-inch diameter can allow over 30 times the
allowable hydrocarbons into the atmosphere then is currently acceptable through the exhaust.
Additionally, EVAP system leaks can be a major cause of check engine lights occurring. In the past,
EVAP related problems have been difficult to locate and repair. These can now be quickly
diagnosed and repaired, becoming a profitable ticket for service facilities.
2.There are several acceptable methods of inspecting the EVAP system. Basically we need to
close any vent solenoids, fill the system with smoke, and look for the smoke escaping at the leak.
Since these systems vary in different vehicles and have evolved over the years, we will attempt to
describe operating guidelines that should be helpful in inspecting these EVAP systems.
3.Beginning with the 1996 model year, U.S. Vehicles have been produced with an EVAP Service
Port to access this system. The port is usually located under the hood, but may be located else
were on the vehicle. To access this port for testing, remove the cap, then remove the Schrader
Valve from inside the Service Port, using the supplied EVAP Removal Tool. Important Note: The
Schrader Valve has left-hand threads, turn clockwise to remove! Connect the supplied Service
Port Adaptor to the Service Port.
4.The Onboard Diagnostics on vehicles 1996 and beyond will determine if a leak exists, the
following trouble codes may be indicated to report the leak:
P0442 for a .040 leak standard
P0456 for a .020 leak standard.
5.Using a scan tool, close the vent solenoids so that the EVAP system is closed to the
atmosphere.
6.Set up the machine.
7.Remove the fuel cap and begin to fill the system through the Service Port Adaptor until dense
smoke is seen exiting the fuel neck. This procedure ensures that the system is full of smoke.
Replace the fuel cap and continue pumping smoke into the system.
8.Inspect under the hood for leaks using a bright halogen lamp. Raise the vehicle on a hoist and
inspect the underside of the vehicle, tracing the route of the EVAP system. Note: It may be
necessary to hang the Smoke Machine under the car so that it is visible to the operator.
9.As the system fills with smoke, and the pressure in the system equalizes, keep an eye on the
Flow meter and the Pressure Gauge. If there is no leakage in the system the Pressure Gauge will
go to its maximum pressure and the Flow meter will drop to zero.
10.For trouble code P0456, the meter should stabilize at 0.1 LPM or less with the Smoke
Machine.
11.For trouble code P0442, the meter should stabilize at 0.5 LPM or less with the Smoke
Machine.
Note: These readings are approximate and are for reference only.
12.Once the leak has been located and repaired, it is a good idea to repeat the above
procedure using air only. It is not necessary to turn on the smoke to test for leakage using the
flow meter.
13.Replace Schrader Valve and cover. (Note: Valve is Left-hand thread.)

14.Following are some generic OBD EVAP related codes:
P0443 Purge Control Valve Circuit
P0444 Purge Control Valve Circuit Open
P0445 Purge Control Valve Circuit Shorted
P0446 Vent Control Circuit
P0447 Vent Control Circuit Open
P0448 Vent Control Circuit Shorted
P0449 Vent Valve/Solenoid Circuit
P0450 Pressure Sensor
P0451 Pressure Sensor Range/Performance
P0452 Pressure Sensor Low Input
P0453 Pressure Sensor High Input
P0454 Pressure Sensor Intermittent
P0455 System Leak Detected (gross leak)
P0456 System Leak Detected (very small leak)
P0457 System Leak Detected (fuel cap loose/off)
P0465 EVAP Purge Flow Sensor Circuit
P0466 EVAP Purge Flow Sensor Circuit Range/Performance
P0467 EVAP Purge Flow Sensor Circuit Low Input
P0468 EVAP Purge Flow Sensor Circuit High Input
P0469 EVAP Purge Flow Sensor Circuit Intermittent
Troubleshooting
The unit would prompt error message on the LCD screen while there is malfunction occurs.
'Low input voltage', if supply voltage lower than 11 V, or supply power less than 70 W.
'High input voltage', if supply voltage higher than 15.5 V.
'Motherboard high temperature', if the PCB temperature over 70 ℃.
'High temperature', if heating chamber overheat, or the temperature sensor fails. Leave
the unit to cool down for 15/20 minutes, overheat problem could be fixed.
'Pipeline failure', the pressure sensors or the electromagnetic valve not work as
expected.
'Smoke system malfunction', if the heating element is faulty.
And there’s some issues which may not be detected by the unit itself,
Error
Possible Reason
Solution
LCD not ON
Mistaken positive to
negative
Connect to power source correctly.
Poor contact of power
line
Check with meter if the power line is
broken, confirm and replace the power
lines.
Pump’s not on
Poor contact of
pump's power line
Check the wiring from PCB to the
pump

Pump’s on but no air
output
Electromagnetic valve
malfunction
Check if the wiring from PCB to
the electromagnetic valve went
loose.
Electromagnetic valve is faulty, can
not be opened.
Pump failure
Replace a new pump
No smoke output
Pump failure
Make reference to 'Pump is not on'
Smoke oil out or
overfilled
Check oil level; turn unit upside down
while the oil filler port is open, and
refill to the correct level.
Voltage Low
Check battery voltage if its over 12 V.
Heater damaged
Heater damaged if current
consumption less than 3 Amp, replace
the heater.
Weak smoke, obvious oil
drops from the output
Smoke oil not
compatible
Change proper smoke oil. Only mineral
oil could be used as smoke oil.
Voltage Low
Check battery voltage if its over 12 V.
Slow oil drops from the
output
Normal smoke
condensation
Periodically take off the smoke hose
and blow it with air gun.
Sudden stop of smoke
output
Overheat protection
activated
Cool down the unit before use again.
Overheat occurs fast
Oil level is too low
The unit need a refill.
Smoke oil not
compatible
Change proper smoke oil. Only mineral
oil could be used as smoke oil.
It’s recommend to run a self-test, which is in the setting pages, to confirm the problem, before
you seek for supplier's assist.
Warranty
1. The main unit entitled free warranty since the date of purchasing up to 12 months.
2. The accessories are consumables and no warranty would apply.
3. Any damage to the machine caused by misuse, or improper operation, is not covered by
warranty.