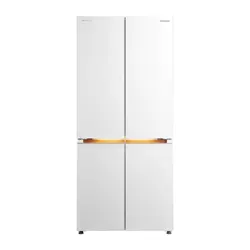
GR-RF698WI-PGA(67)

1. ..................................................................... 1
2.
...........................................................
3.
.......................................................
4.
...................................................
5.
...................................................................
6.
...........................................................
•
•
•
•
1
1.1
•
1.
2.
•
•
•
•
1.
2
•
•
•
•
•
•
•
•
•
•
-
-
•
•
3
•
IEC
•
EN 8
•
•
•
•
•
48 5
1
-
2
3
-
4
-
-
-
-
-
-
4
•
1 2 3
•
•
LED
5
1.2
1.3
•
•
•
•
6
•
•
•
•
•
1.4
•
•
•
•
7
•
•
•
1.5
•
•
•
•
8
1.6
•
•
•
•
•
•
1.7
•
•
9
2.
2.1
•
45
°
•
•
•
10
833 837
600 600
1910 1918
2000mm
200mm
200 mm
11
2.2
a.
b.
c.
12
2.3
2.4
2.5
LED
2.6
•
• 2
3
4
•
2.7
•
•
•
•
•
1280mm
833mm
125°
892mm
600mm
833mm
833mm
978mm
540mm
3.
3.1
•
3 5
•
•
•
柔光燈幕
玻璃層架
•
•
•
3.2
注水蓋
注水蓋
3.3
A
B
C
D
E
F
-30℃冰極
連線
無線網絡連線
網絡連線
5
1
1
6
6
1
1
4
3
3.4
4.
4.1
•
•
•
•
•
•
•
•
•
Gas
Detergent
Bananaoil
Alcohol
•
•
•
•
4.2
•
4.3
4.4
乾
酸鹼性
4.5
4.6
•
4.7
•
•
5.
•
6.
... ...
SN +10
°
C +32
°
C
N +16
°
C
+32
°
C
ST +16
°
C
+38
°
C
T +16
°
C
+43
°
C
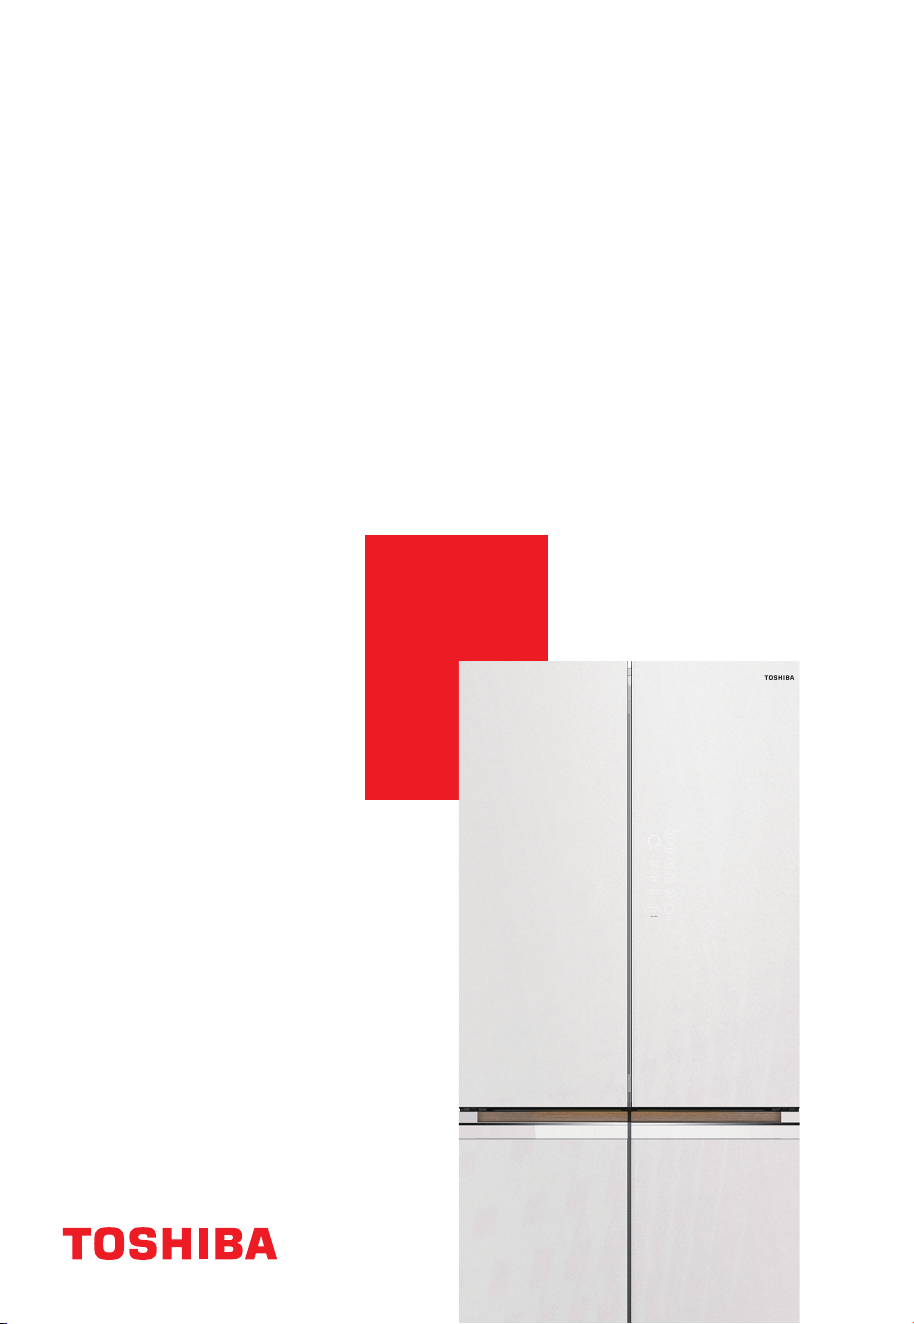
GR-RF698WI-PGA(67)
USER
MANUAL
REFRIGERATOR FREEZER
For Home Use Only

CONTENTS
1. Safety warnings
..............................................................................................................
1
2. Pro 8..................................................... rotaregirfer eht fo esu rep
3. Structure and functions .............................................................14
4. Maintenance and care of the refrigerator ................................22
5. 52........................................................................ gnitoohs elbuorT
6. Disposal of your appliance ........................................................26
Thank you very much for purchasing this Toshiba product.
Read this user manual and become completely familiar
with the product before use to operate it safely and correctly.
Keep this user manual in a handy place for future reference.
Make sure that you received your warranty.
WARNING: Do not damage or let the back of the refrigerator squeeze the power
plug and cable. Damage to the power plug or cable when strapping, bending,
placing heavy objects on it, or being squeezed by the back of the refrigerator
WARNING: Please abandon the refrigerator according to local regulators for it
owing gas and refrigerant.
WARNING: When positioning the appliance, ensure the supply cord is not
trapped or damaged.
WARNING: Do not locate multiple portable socket-outlets or portable power
supplies at the rear of the appliance.
liquids other than potable water such as juices.
DANGER: Risk of child entrapment. Before you throw away your old
refrigerator or freezer:
-Take of the doors.
-Leave the shelves in place so that children may not easily climb inside.
The refrigerator must be disconnected from the source of electrical supply
before attempting the installation of accessory.
Refrigerant and cyclopentane foaming material used for the refrigerator are
e. Therefore, when the refrigerator is scraped, it shall be kept away
from an re source and be recovered by a special recovering company with
corr ation other than be disposed by combustion, so as to
prevent damage to the environment or any other harm.
For IEC standard: This appliance is not intended for use by persons(including
children) with reduced physical, sensory or mental capabilities, or lack of
experience and knowledge, unless they have been given supervision or
instruction concerning use of the appliance by a person responsible for their
safety.
For E
standard: This appliance can be used by children aged from 8 years and
above and persons with reduce physical sensory or mental capabilities
or lack of experience and knowledge if they have been given supervision or
instruction concerning use of the appliance in a safe way and understand the
hazards involved. Children shall not play with the appliance. Cleaning and
user maintenance shall not be made by children without supervision.
Please do not use the appliance on tr
If noise, odor and smoking happens, please unplug the power plug
immediately, and contact the distributor or local service agent.
Please do not put your hands under or behind the appliance to prevent from
being hurt.
Please leave the packing materials and other parts out of the reach of
children to prevent from risk of su
ocation.
2
To avoid contamination of food, please respect the following instructions:
- Opening the door for long periods can cause a sig
nt increase of the
temperature in the compartments of the appliance.
- Clean regularly surfaces that can come in contact with food and accessible
drainage systems.
- Clean water tanks if they have not been used f
ater system
connected to a water supply if water has not been drawn for 5 days. ( note 1 )
- Store raw mea
containers in the refrigerator, so that it is
not in contact with or drip onto other food.
- Two-star frozen-food compartments are suitable for storing pre-frozen food,
storing or making ice-cream and making ice cubes. ( note 2 )
- One-, two- and three star compartments are not suitable for the freezing of
fresh food. (note 3)
- For appliances without a 4-star compartment: this refrigerating appliance is
not suitable for freezing foodstuffs. (note 4)
- If the refrigerating appliance is left empty for long periods, switch off,
defrost, clean, dry, and leave the door open to prevent mould developing
within the appliance.
Note 1,2,3,4 : Please c
rm whether it is applicable according to your
product compartment type.
Any replacement or maintenance of the LED lamps is intended to be made by
F).
3
4
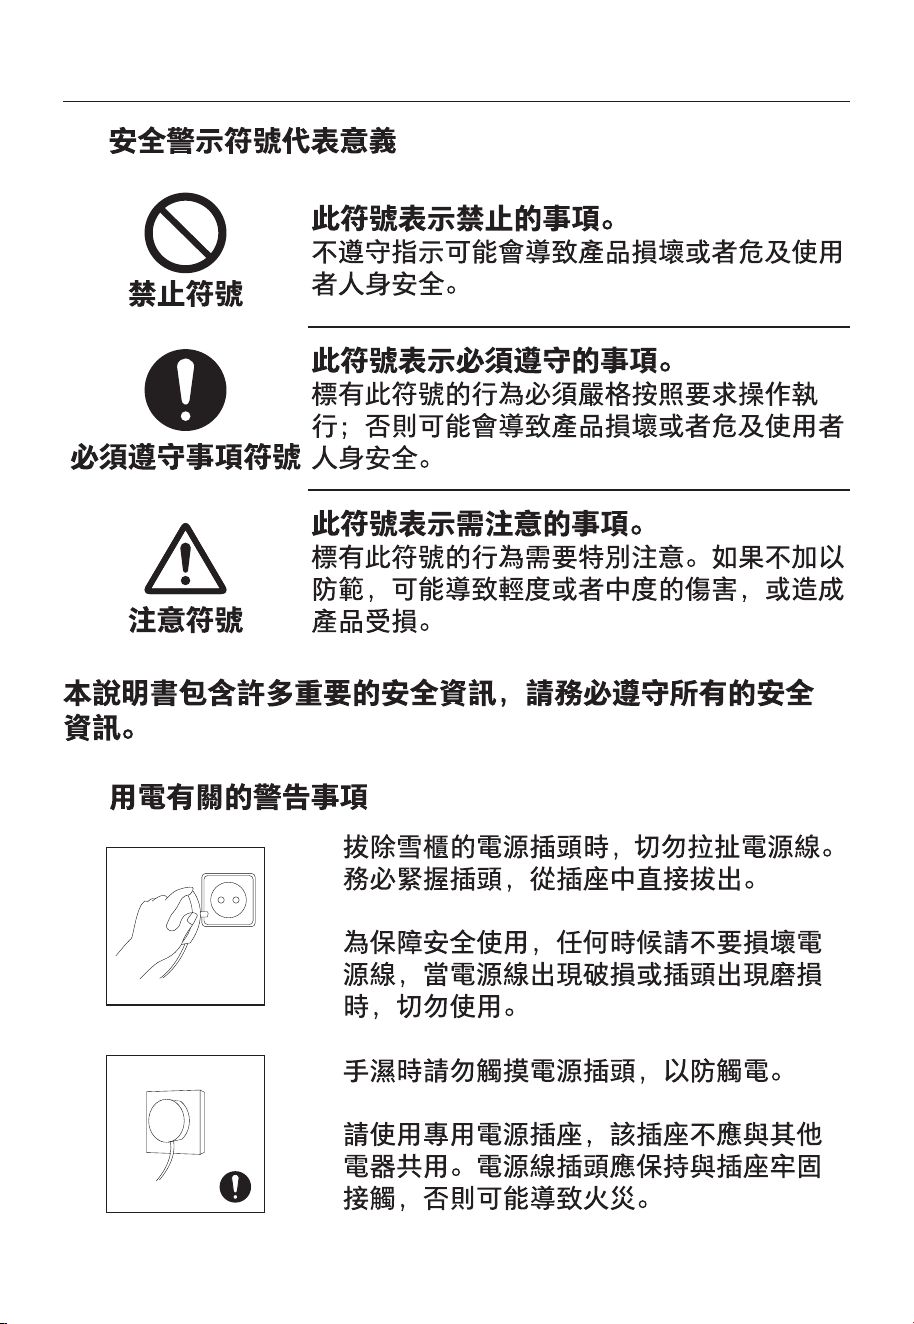
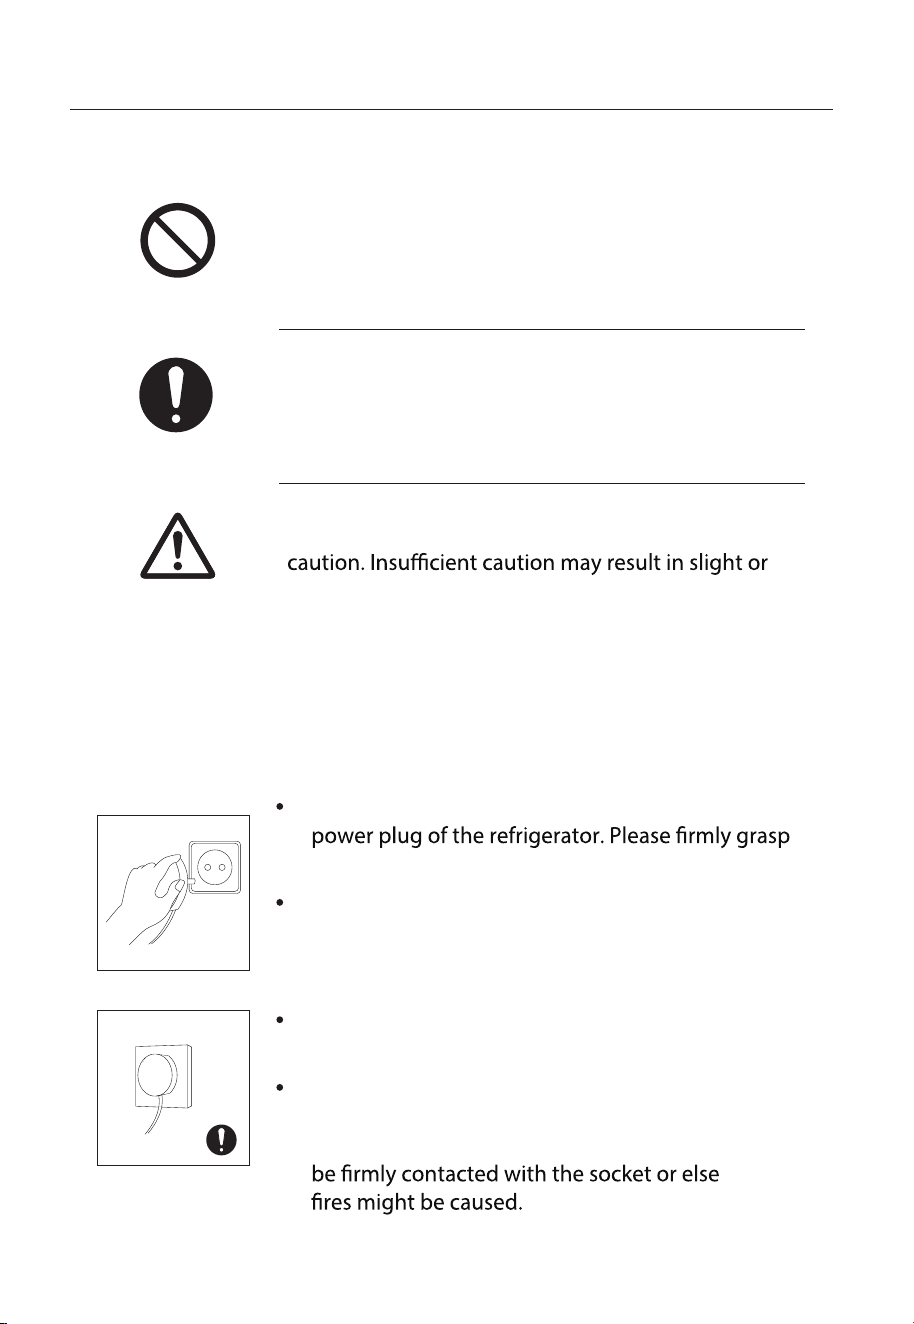
1.2 Meaning of safety warning symbols
This is a prohibition symbol.
This is a mandatory symbol.
This is a cautioning symbol.
This manual contains lots of important safety information which shall
be observed by the users.
Any incompliance with instructions marked with
this symbol may result in damage to the product
or endanger the personal safety of the user.
It is required to operate in strict observance of
instructions marked with this symbol; or otherwise
damage to the product or personal injury may be
caused.
Instructions marked with this symbol require special
moderate injury, or damage to the product.
Do not pull the power cord when pulling the
the plug and pull out it from the socket directly.
To ensure safe use, do not damage the power
cord or use the power cord when it is damaged or
worn.
Please do not touch the power plug with wet
hand to prevent from electric shock.
Please use a dedicated power socket and the
power socket shall not be shared with other
electrical appliances. The power plug should
Mandatory
Prohibition symbol
Cautioning symbol
1.3 Electricity related warnings
symbol
5
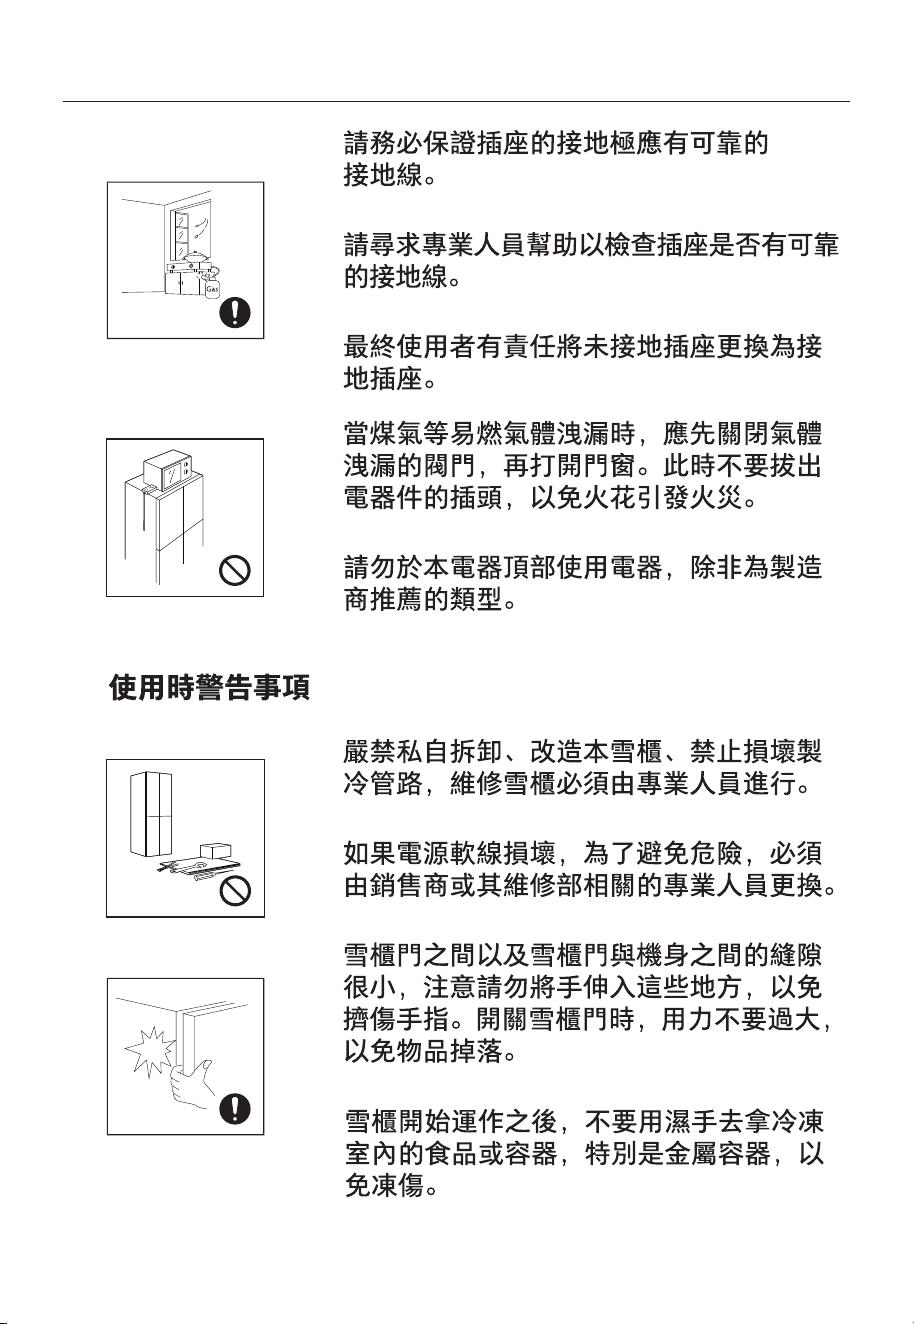
Gas
Please ensure that the grounding electrode of the
power socket is equipped with a reliable grounding
line.
Please ask for help from persons with professional
reliable grounding line or not.
It is the end-consumers' responsibility to change
the ungrounded socket into grounded socket.
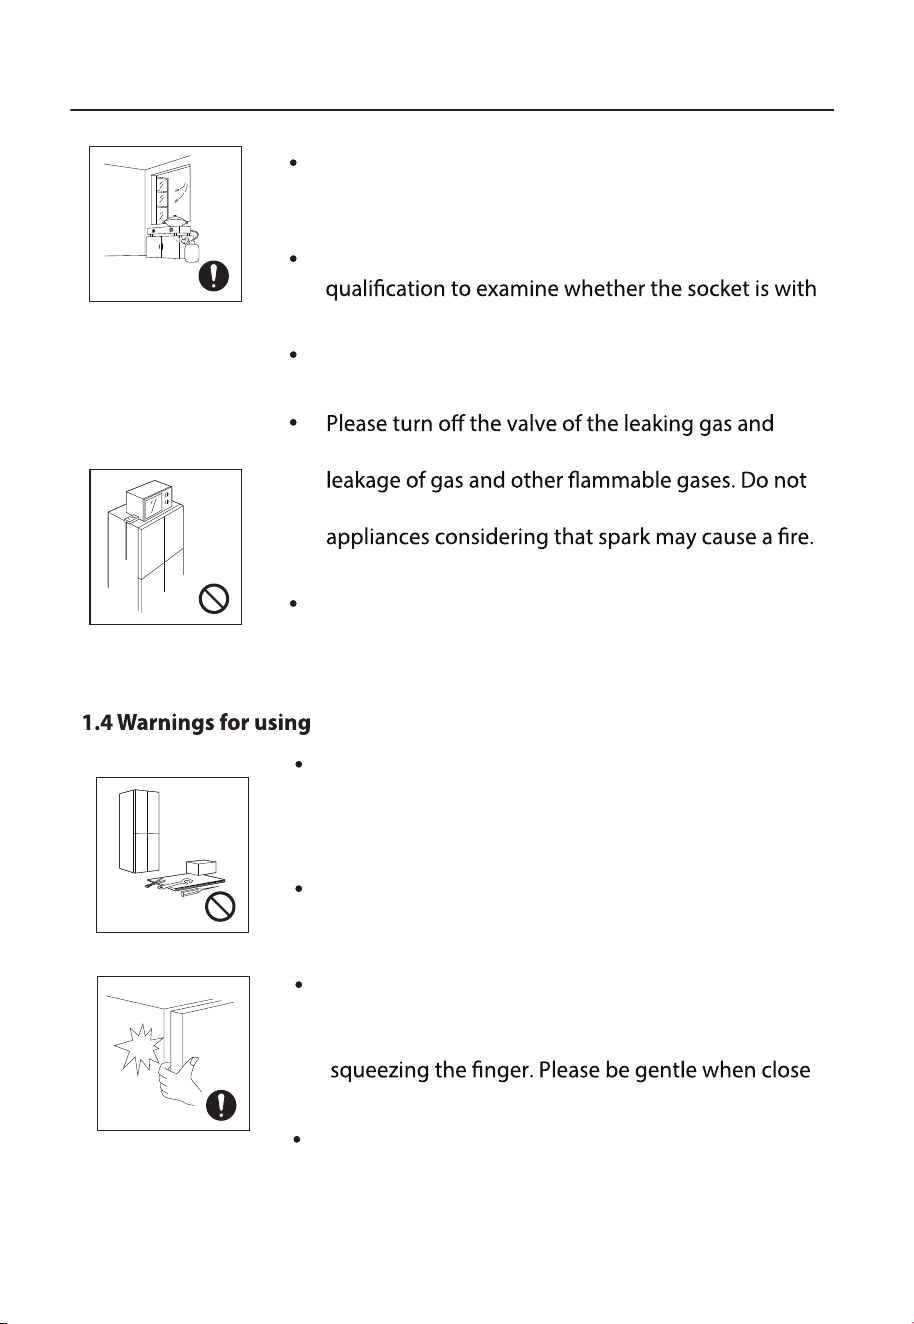
then open the doors and windows in case of
unplug the refrigerator and other electrical
Do not use electrical appliances on the top of the
appliance, unless they are of the type recommended
by the manufacturer.
Do not arbitrarily disassemble or reconstruct the
refrigerator, nor damage the refrigerant circuit;
maintenance of the appliance must be conducted
by a specialist.
Damaged power cord must be replaced by the
manufacturer, its maintenance department or
related professionals in order to avoid danger.
The gaps between refrigerator doors and between
doors and refrigerator body are small, be noted not
to put your hand in these areas to prevent from
the refrigerator door to avoid falling articles.
Do not pick foods or containers with wet hands in
the freezing chamber when the refrigerator is
running, especially metal containers in order to
avoid frostbite.
6
Please pull out the power plug when the electricity
fails or clean the appliance, and connecting it to
power supply after at least 5 minutes, which
prevents damage to the compressor by continuous
startup.
Drugs
Biological
products
Blood
Flammable
Highly
corrosive
Explosive
Beer
Freezing chamber
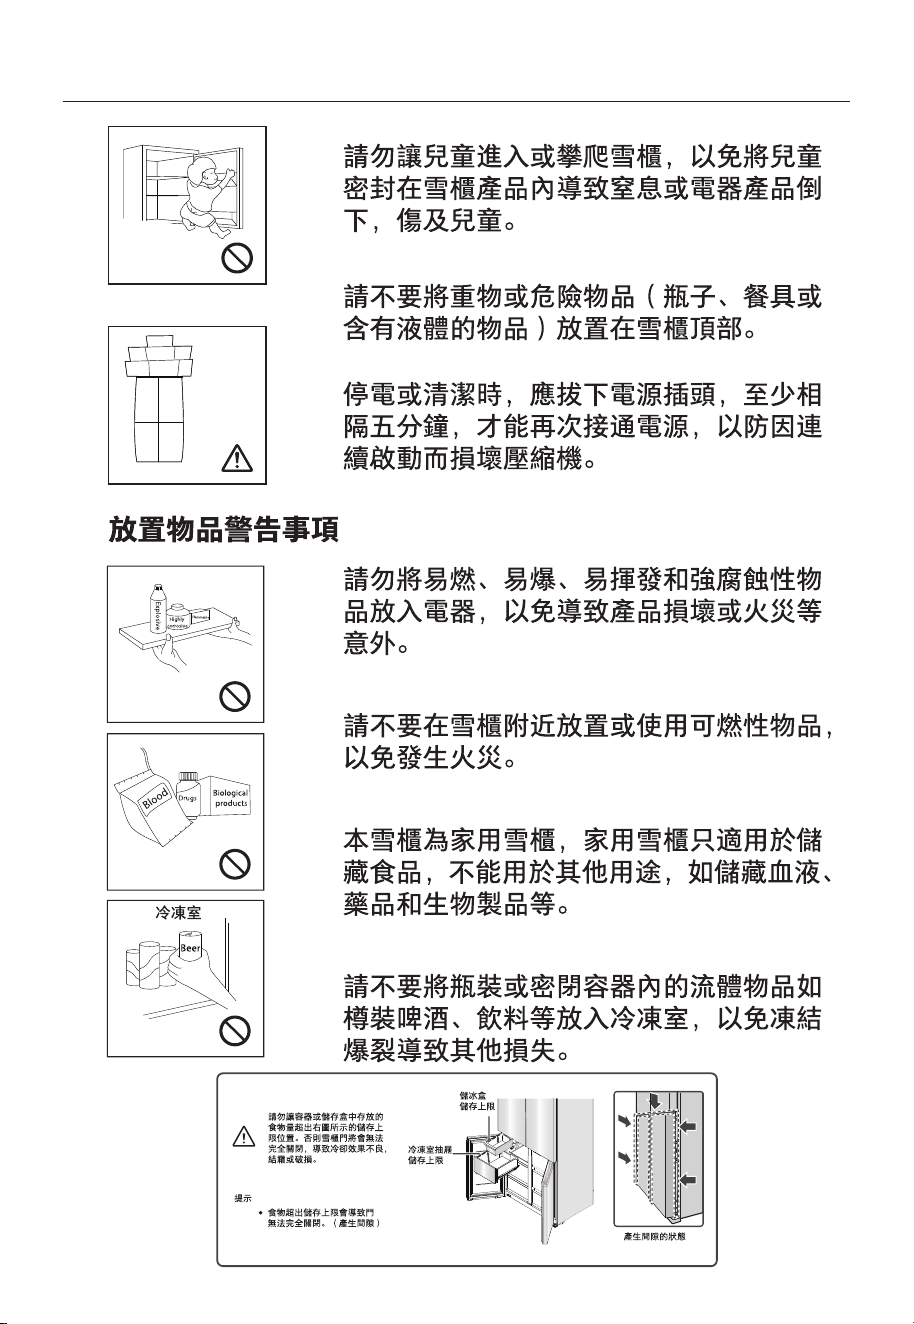
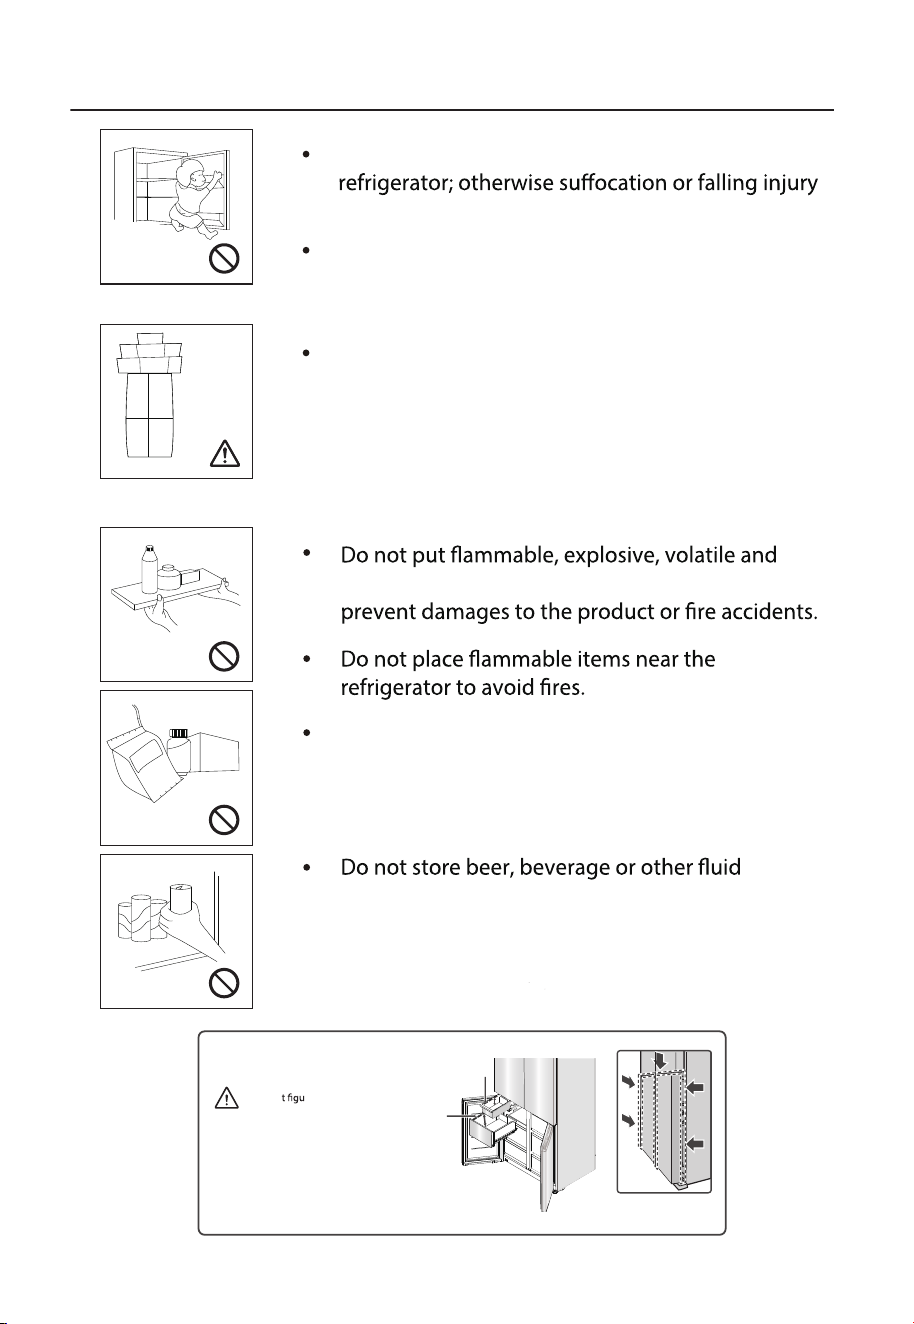
Do not allow any child to get into or climb the
of the child may be caused.
Please do not put heavy or dangerous objects on
top of the appliance (bottles, tableware, or
something containing liquid)
highly corrosive items in the refrigerator to
The refrigerator is intended for household use,
such as storage of foods; it shall not be used for
other purposes, such as storage of blood, drugs
or biological products, etc.
1.5 Warnings for placement
contained in bottles or enclosed containers in the
freezing chamber of the refrigerator ; or otherwise
the bottles or enclosed containers may crack due
to freezing to cause damages.
Please do not allow the amount
of food stored in the container
or storage box to exceed the
upper storage limit shown in
the righ
re. Otherwise, the
refrigerator door will not be able
to close completely, resulting in
poor cooling effect, frosting or
damage.
Tips
• Food exceeding the upper
storage limit will result in the
door not being able to be fully
closed. (Create gap)
Gap state
Upper storage
limit of ice
storage box
Upper
storage limit
of freezing
compartment
drawer
7
Refrigerating appliances might not operate consistently (possibility of
defrosting of contents or temperature becoming too warm in the frozen
food compartment) when sited for an extended period of time below
the cold end of the range of temperatures for which the refrigerating
appliance is designed.
compartments or cabinets or in low-temperature compartments or
cabinets, and that some products such as water ices should not be
consumed too cold;
The need to not exceed the storage time(s) recommended by the food
manufacturers for any kind of food and particularly for commercially
quick-frozen food in food-freezer and frozen-food storage
compartments or cabinets;
The precautions necessary to prevent an undue rise in the temperature
of the frozen food while defrosting the refrigerating appliance, such as
wrapping the frozen food in several layers of newspaper.
The fact that a rise in temperature of the frozen food during manual
defrosting, maintenance or cleaning could shorten the storage life.
be kept out of the reach of children and not in the vicinity of the
refrigerating appliance, in order to prevent children from being locked
inside.
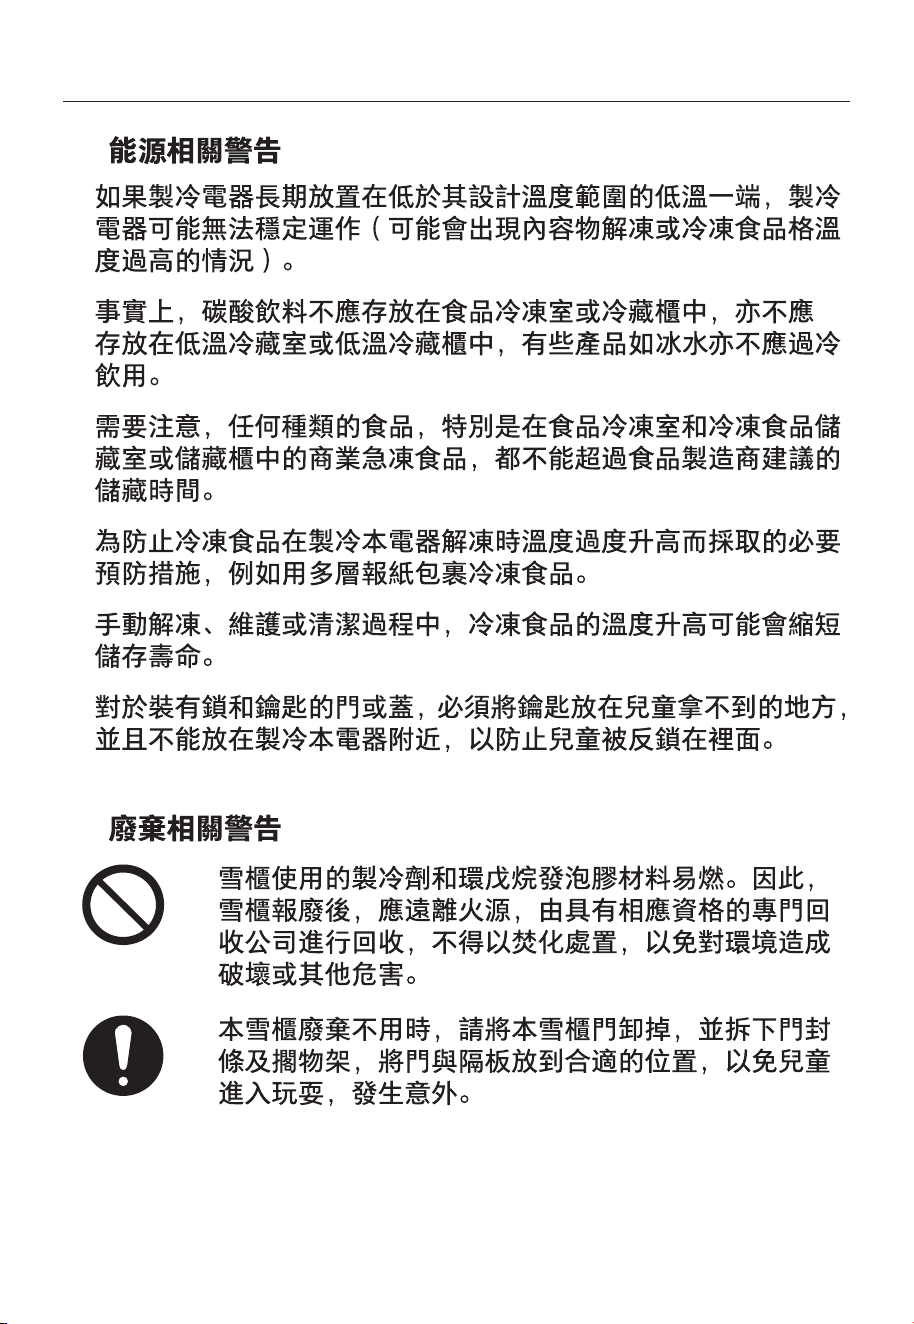
Refrigerant and cyclopentane foaming material used for
refrigerator is scrapped, it shall be kept away from any
be disposed by combustion, so as to prevent damage
to the environment or any other harm.
When the refrigerator is scrapped, disassemble the
doors, and remove gasket of door and shelves; put the
doors and shelves in a proper place, so as to prevent
trapping of any child.
1.6 Warnings for energy
1.7 Warnings for disposal
8
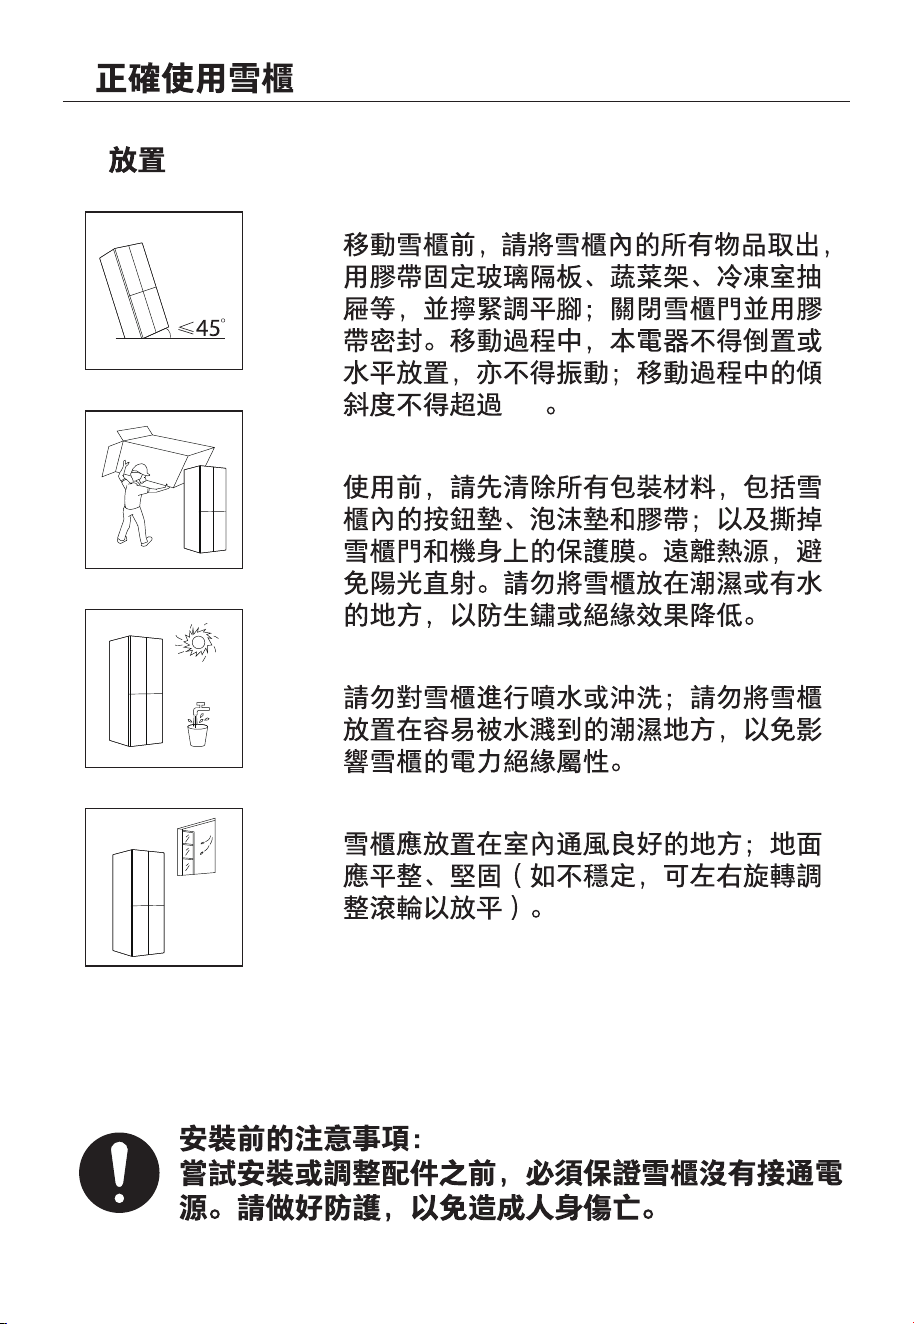
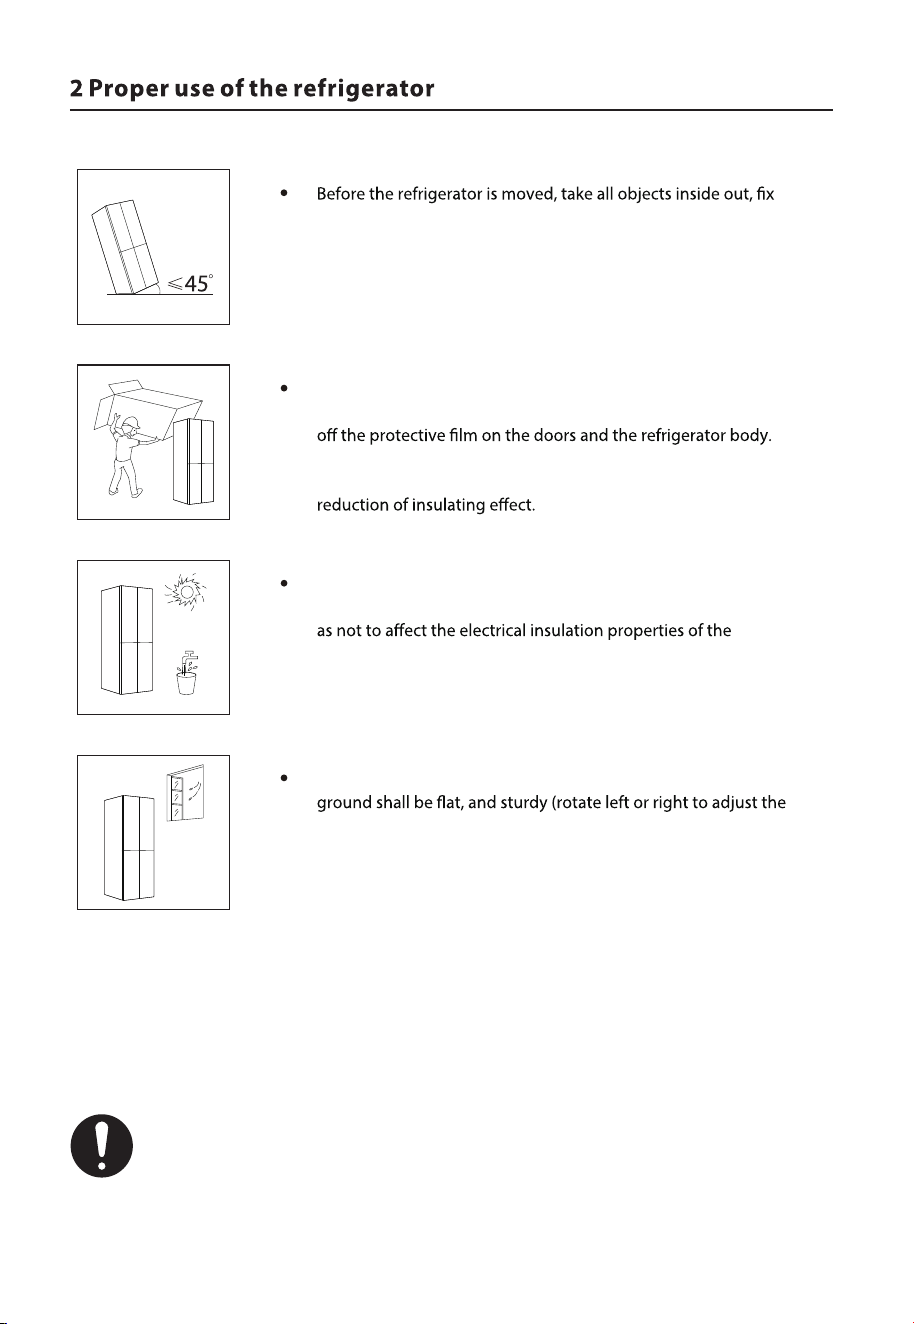
the glass partitions, vegetable holder, freezing chamber
drawers and etc. with tape, and tighten the leveling feet; close
the doors and seal them with tape. During moving, the
appliance shall not be laid upside down or horizontally, or be
vibrated; the inclination during movement shall be no more
than 45°.
Before use, remove all packing materials, including button
cushions, foam pads and tapes inside of the refrigerator; tear
Keep away from heat and avoid direct sunlight. Do not place
the freezer in moist or watery places to prevent rust or
Do not spray or wash the refrigerator; do not put the
refrigerator in moist places easy to be splashed with water so
refrigerator.
The refrigerator is placed in a well-ventilated indoor place; the
wheel for leveling if unstable).
2.1 Placement
Precautions before installation:
Before installation or adjusting of accessories, it shall be ensured
that the refrigerator is disconnected from power. Precautions shall
be taken to prevent fall of the handle from causing any personal
injury.
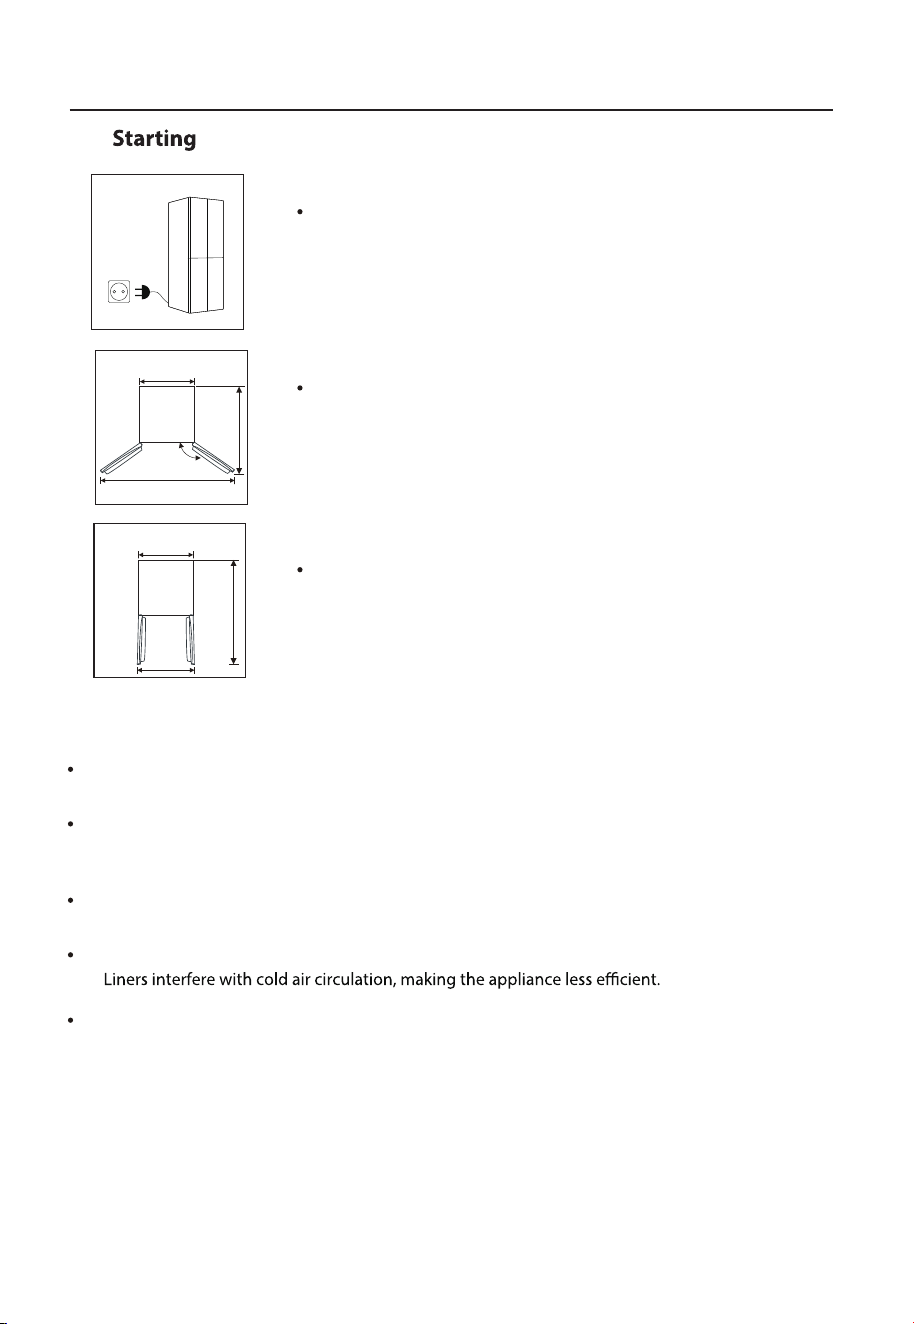
9
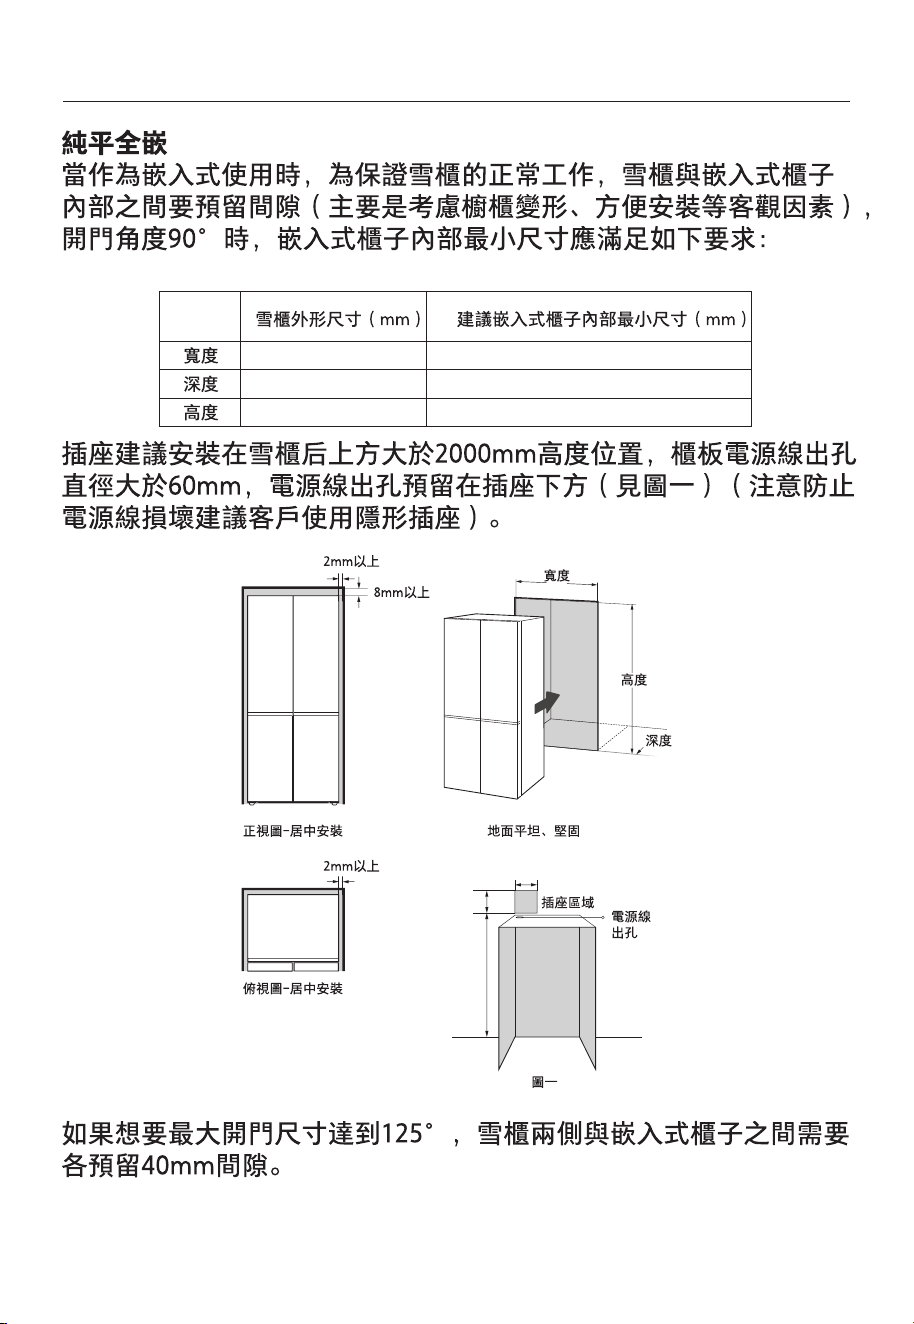
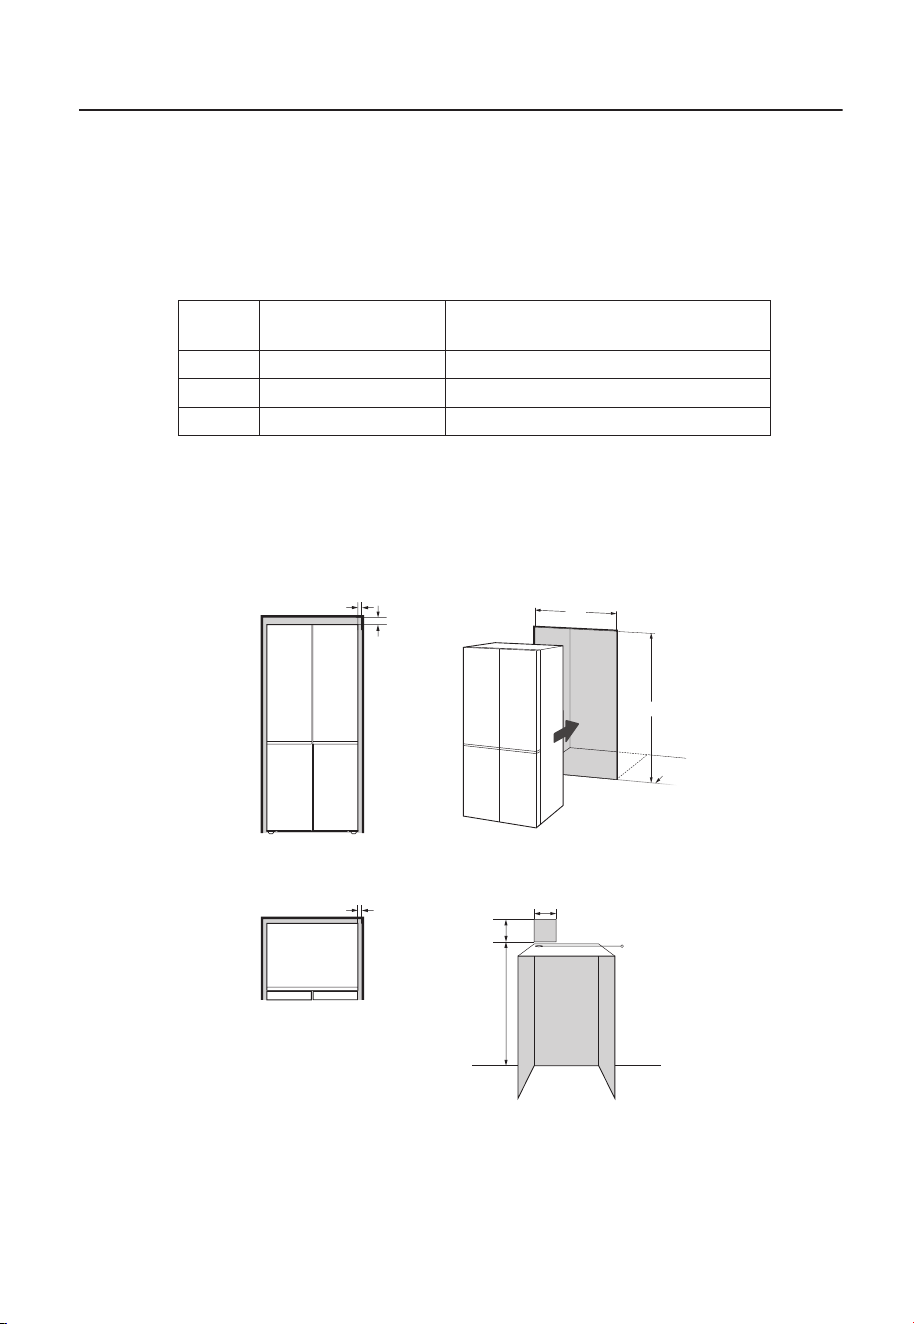
Slot-in
In order to ensure the proper functioning of the refrigerator when used in an embedded manner, a gap
should be left between the refrigerator and the interior of the embedded cabinet (primarily considering
cabinet deformation and ease of installation). When the door opening angle is 90°, the minimum
dimensions of the interior of the embedded cabinet should meet the following requirements:
Overall dimensions of
refrigerator (mm)
Recommended minimum dimensions of
the interior of the embedded cabinet (mm)
Width
833 837
Depth
600 600
Height
1910 1918
It is recommended to install the socket at a height greater than 2000 mm above the rear of the refrigerator.
The diameter of the cable hole on the cabinet board shall be greater than 60 mm, and the cable hole shall
be reserved below the socket (see Figure I) (pay attention to preventing damage to the power cable. It is
recommended that customers use invisible sockets).
• If you want the maximum door opening of 125°, a 40 mm gap is required between both sides of the
refrigerator and the embedded cabinet.
2mm
2000mm
200mm
Above 2 mm
Above 2 mm
200 mm
Above 8 mm
Front View - Centered
Installation
Top View - Centered
Installation
Flat and solid ground
Figure I
Width
Height
Depth
Cable
hole
Power
outlet area
2 2 Leveling feet.
10
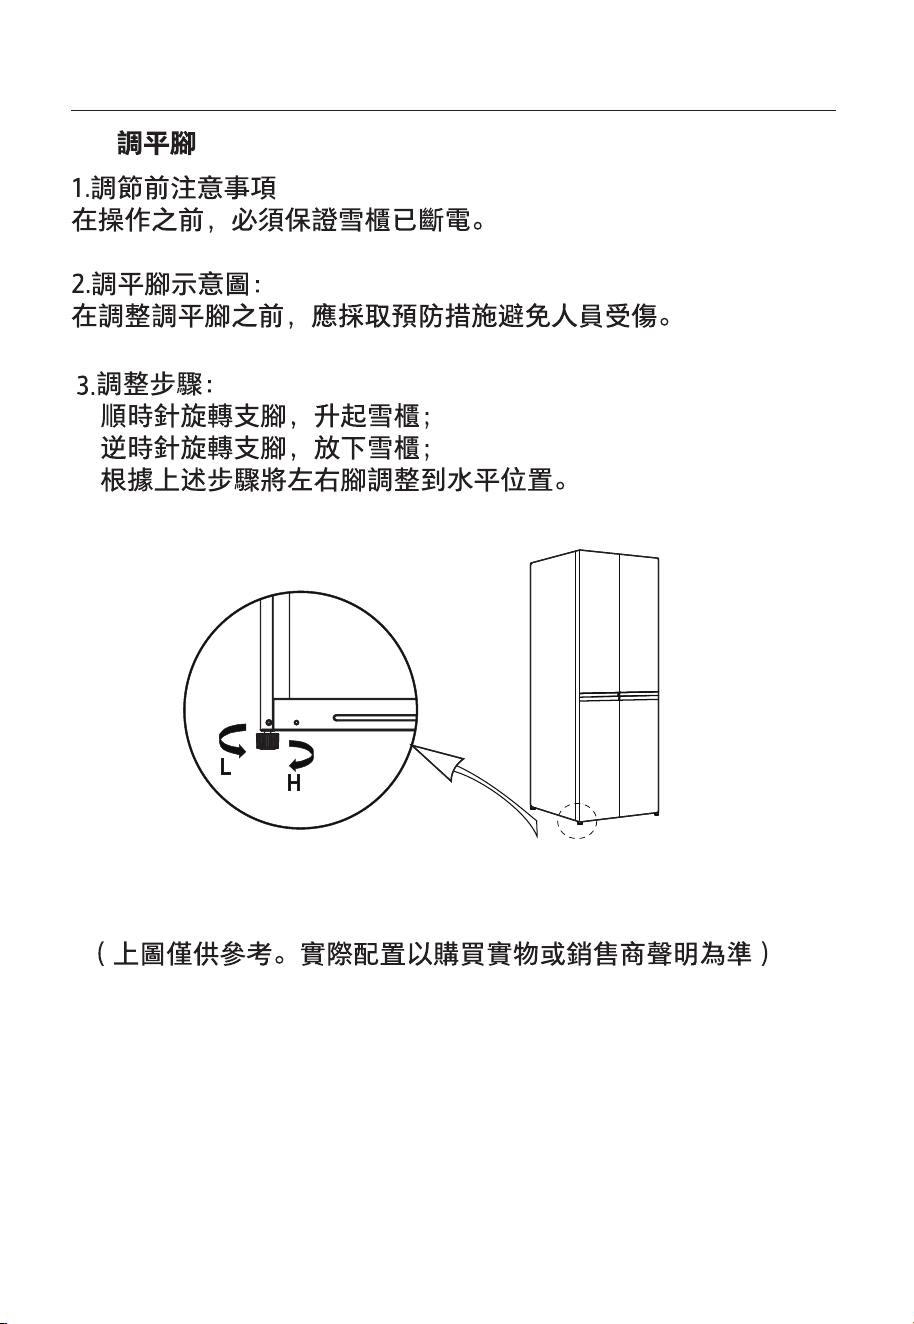
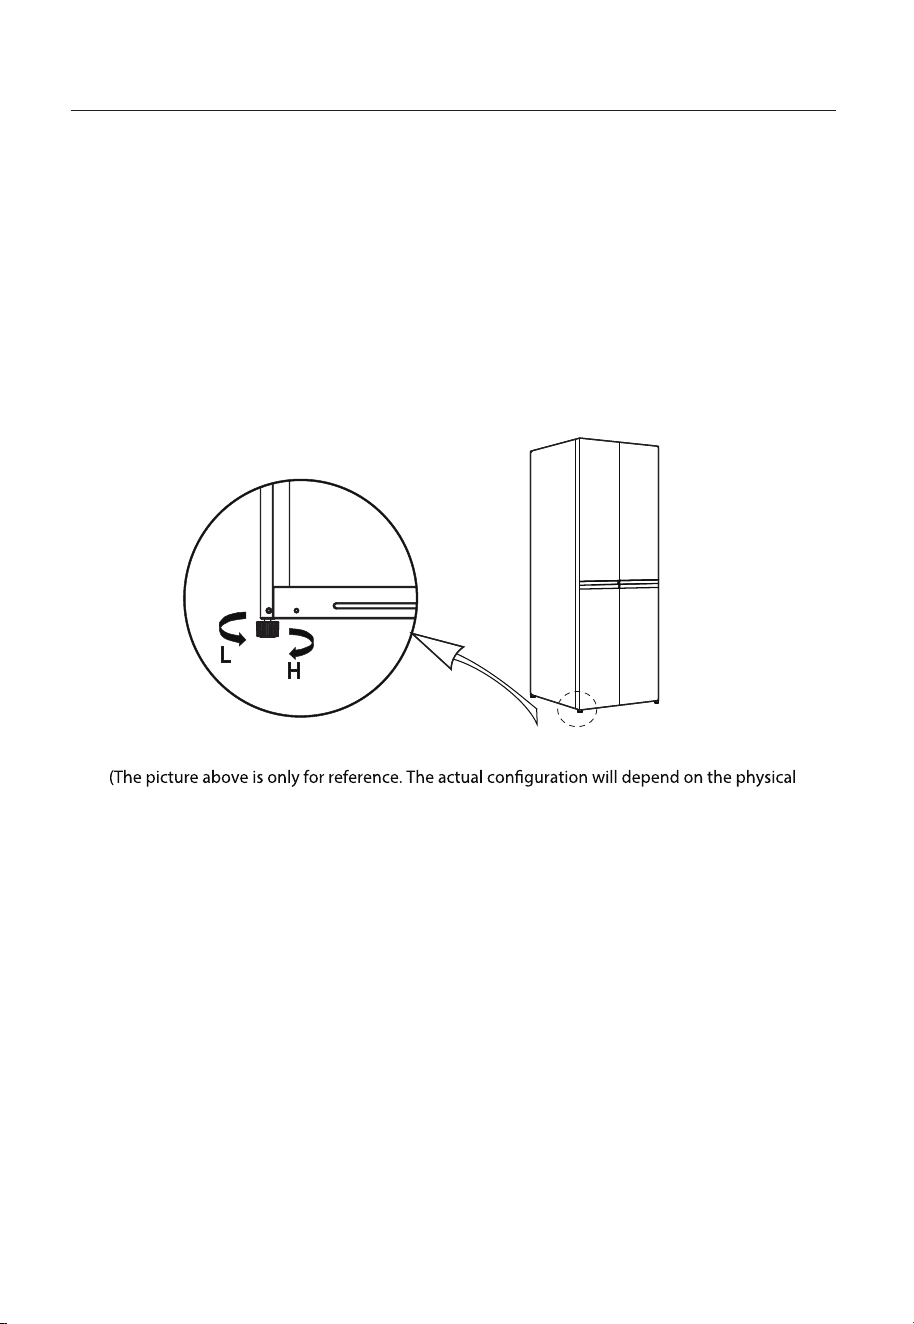
1. Precautions before operation:
Before operating the accessories, ensure that the refrigerator is disconnected from the power
source.
Before adjusting the leveling feet, precautions shall be taken to prevent any personal injury.
2. Schematic diagram of the levelling feet:
3. Adjusting procedures:
a. Turn the feet clockwise to raise the refrigerator;
b. Turn the feet counterclockwise to lower the refrigerator;
c. Adjust the right and left feet based on the procedures above to a horizontal level.
product or statement by the distributor)
11
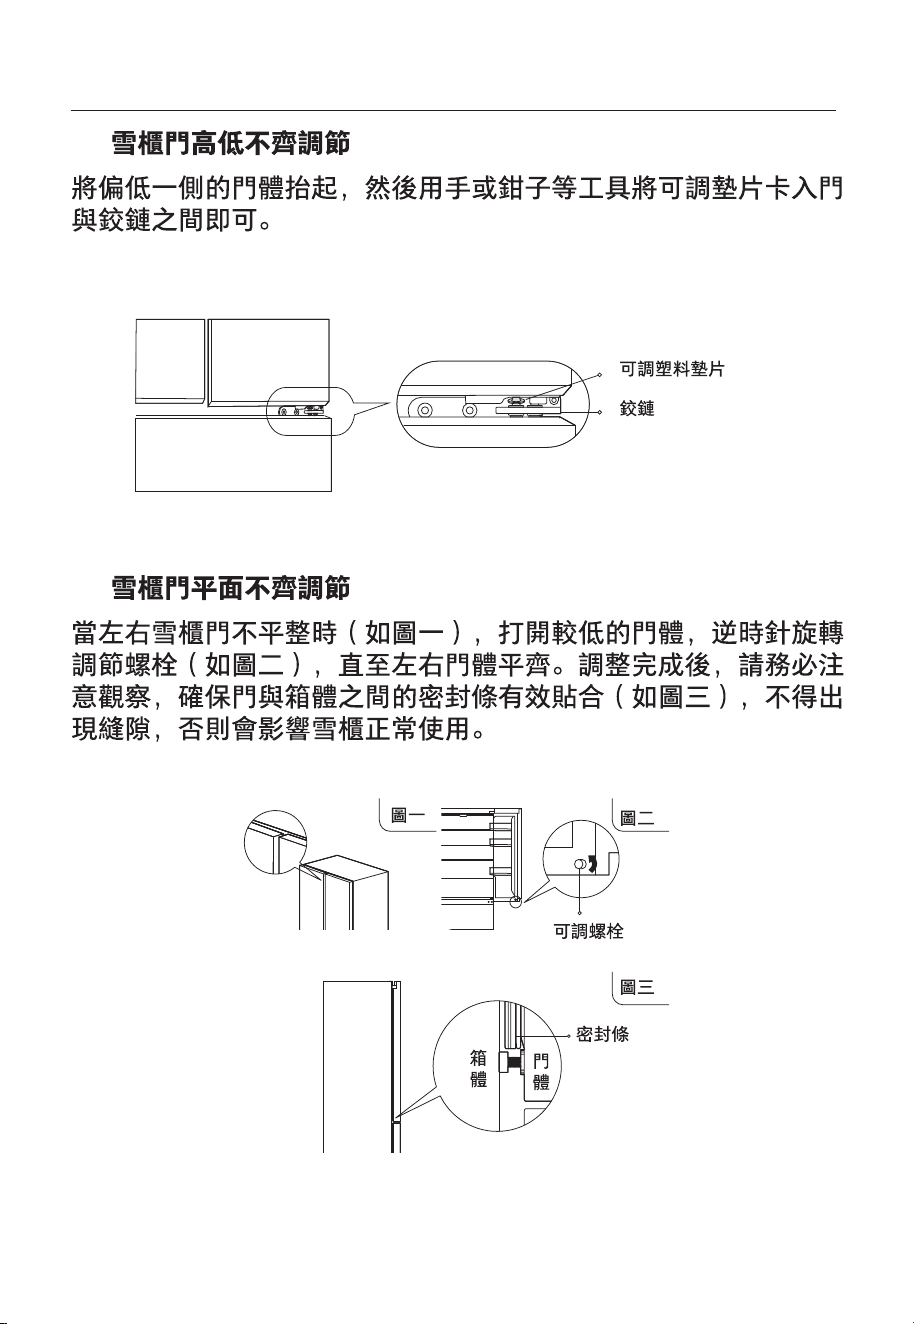
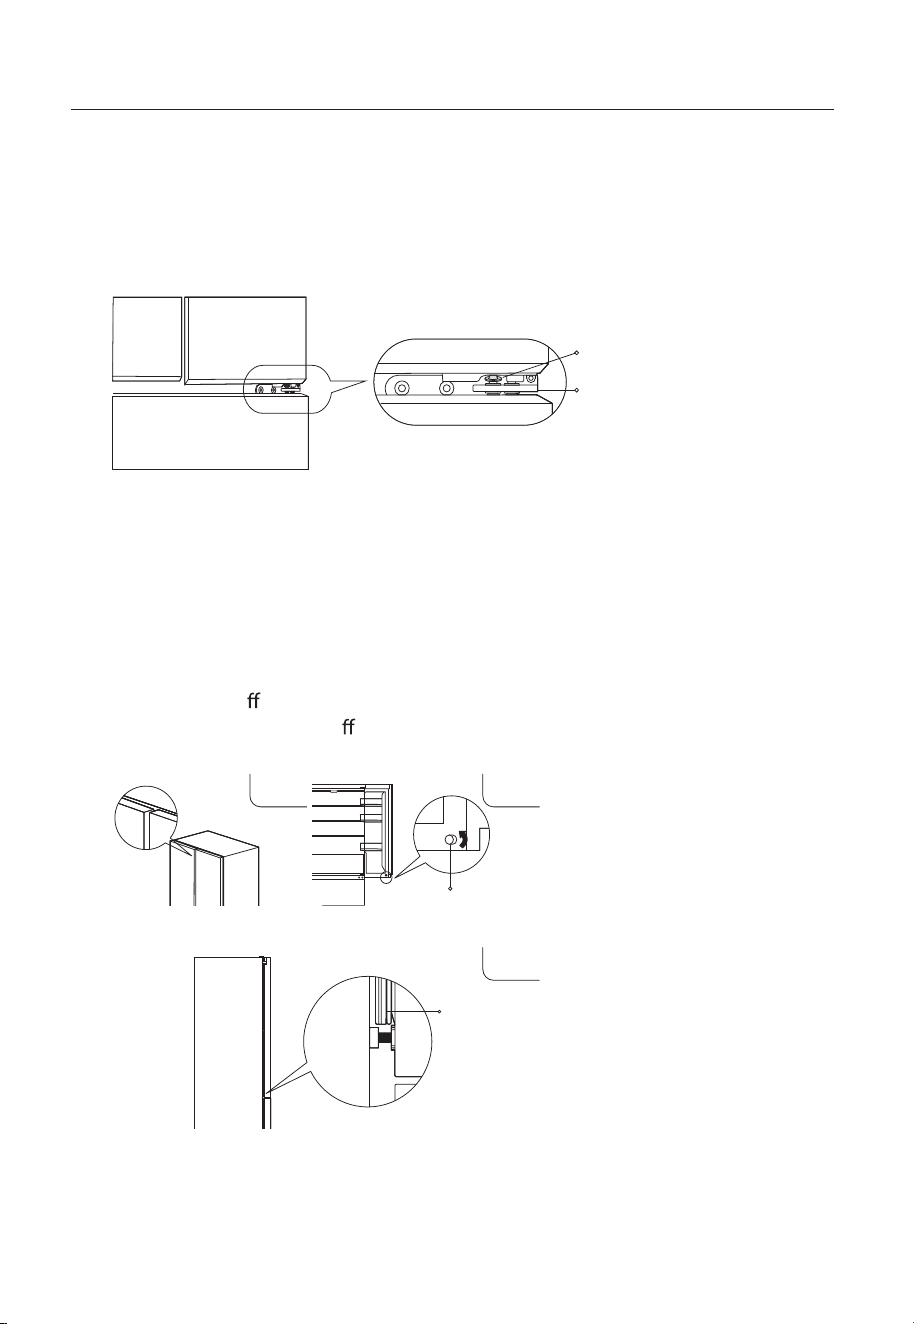
2.3 Side by Side Leveling
Lift the lower door body. Use your hand or a tool, e.g. a pincer, to place the adjustable
shim between the door and the hinge.
Adjustable plastic shim
Hinge
2.4 Door Front Alignment
When the left and right doors have uneven surfaces (as shown in Illustration 1),
open the lower door body, turn the adjusting bolt counterclockwise (as shown in
Illustration 2) until the left and right door bodies are even. When the adjustment is
done, please observe carefully. Make sure the gasket between the doors and the case
of the fridge seals e
ectively (as shown in Illustration 3). No crack is allowed, or the
function of the fridge will be a
ected.
Illustration 1
Illustration 2
Illustration 3
Door
body
Case
Adjustable bolt
Gasket
12
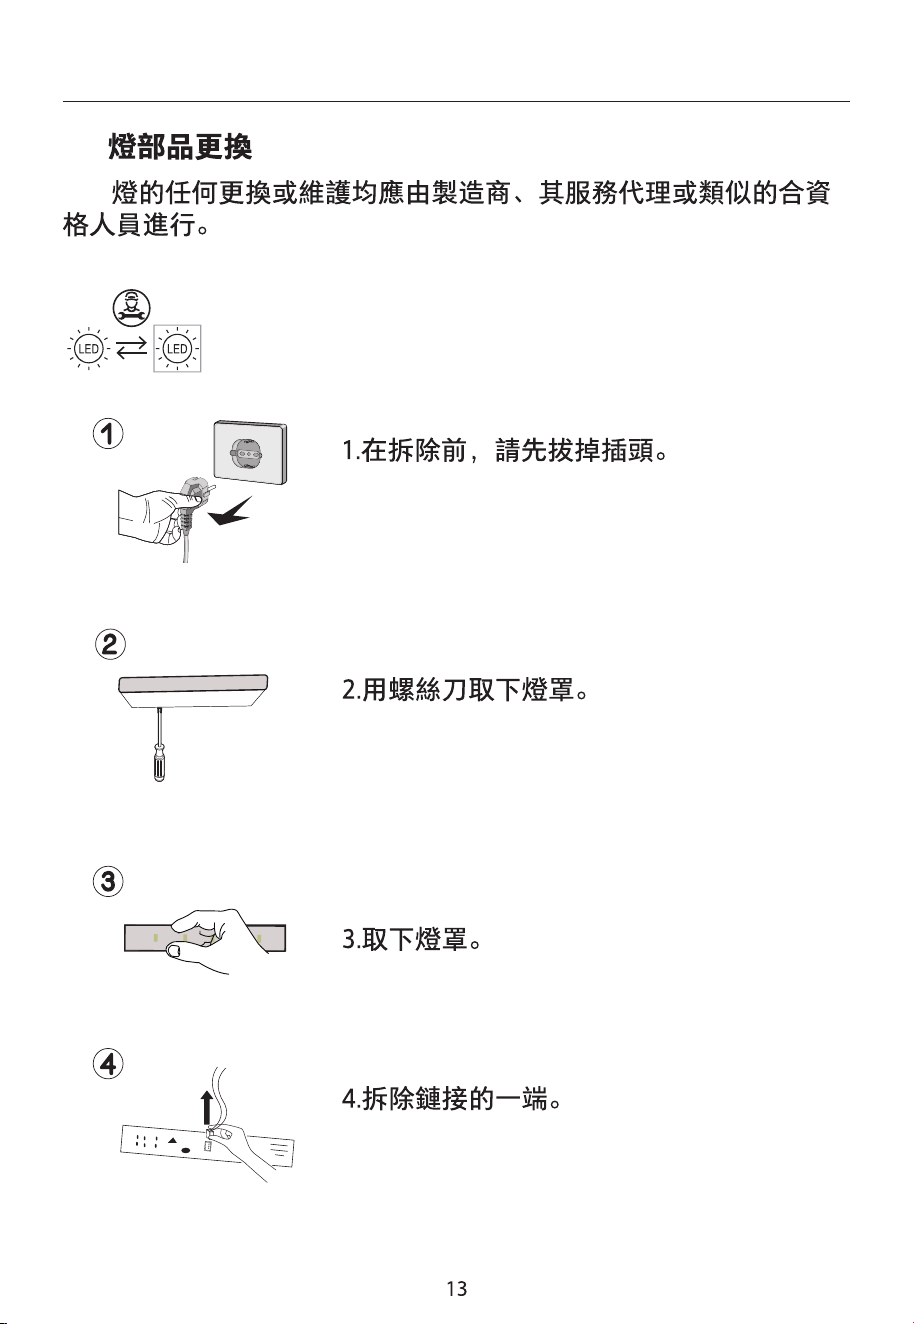
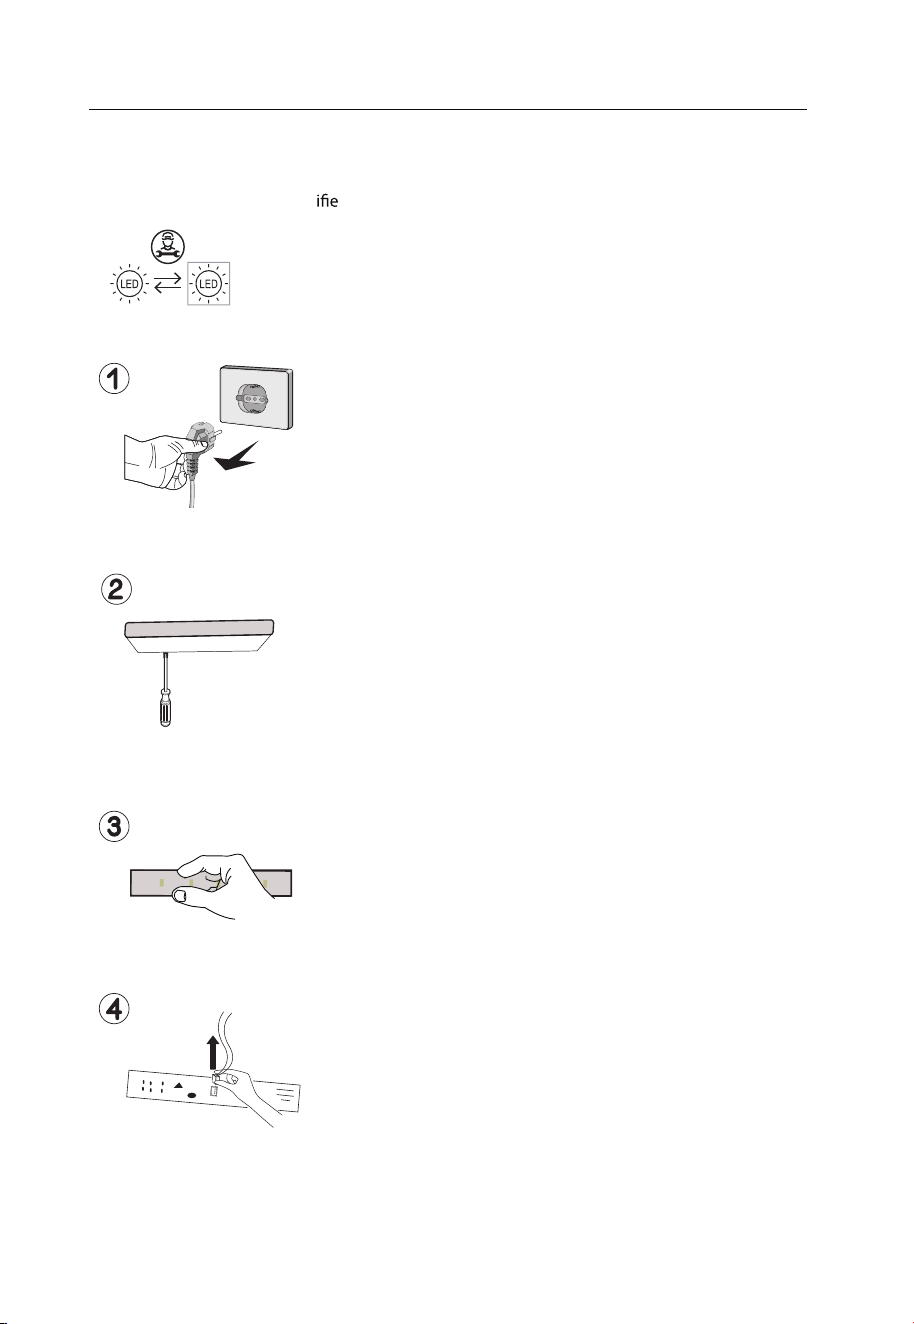
2.5 Changing the Light
Any replacement or maintenance of the LED lamps is intended to be made by the manufacturer,
its service agent or similar qual
d person.
1. Please unplug the unit from the power source before
performing the replacement.
2. Remove the lampshade with a screwdriver.
3. Take down the lamp panel.
4. Remove the connection terminal.
13
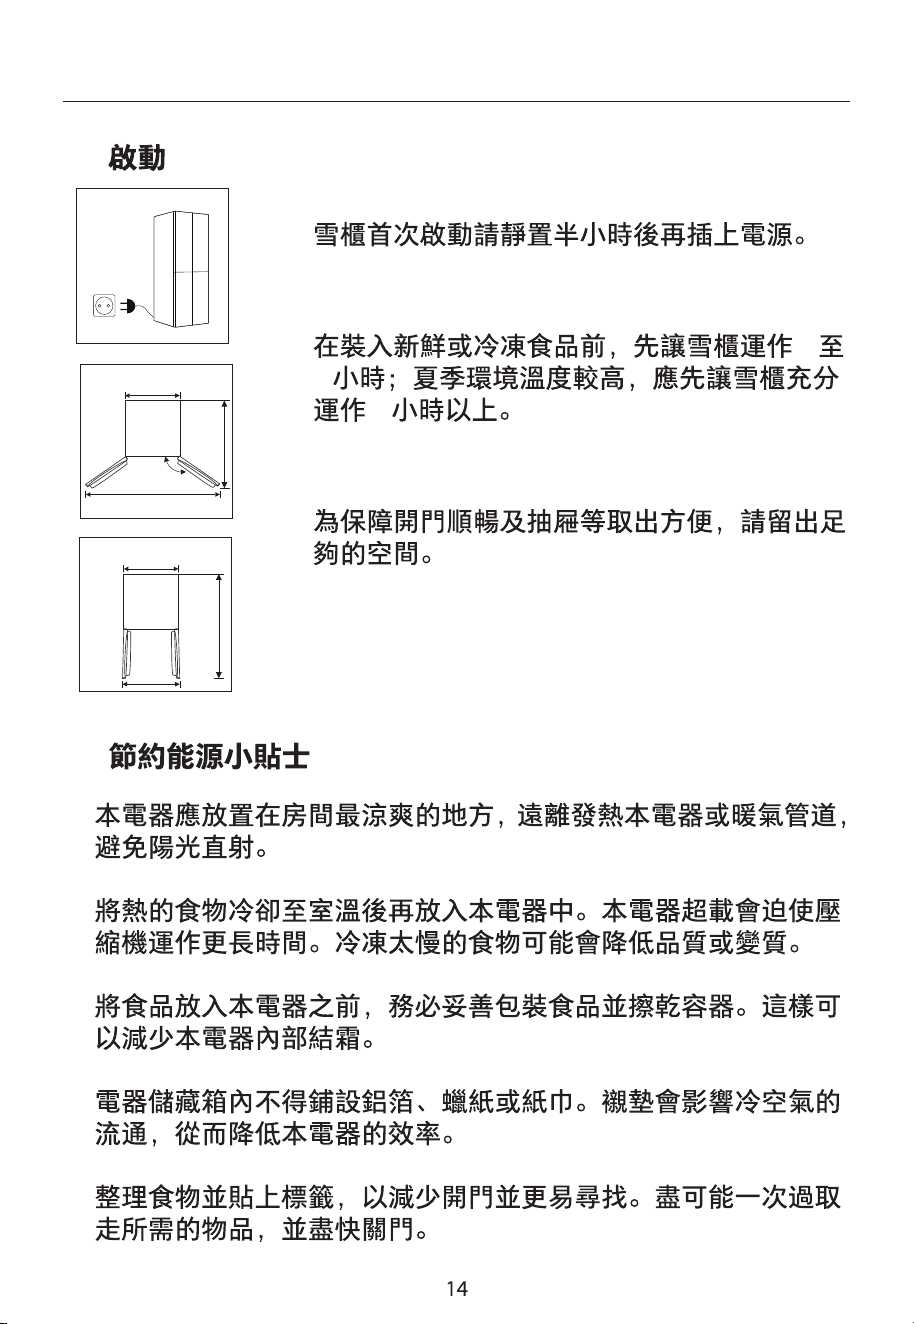
Before putting any fresh or frozen foods, the refrigerator shall have
run for 2-3 hours, or for above 4 hours in summer when the ambient
temperature is high.
Before initial start, keep the refrigerator still for half an hour before
connecting it to power supply.
Spare enough space for convenient opening of the doors and
drawers or statement by the distributor.
The appliance should be located in the coolest area of the room, away from heat producing
appliances or heating ducts, and out of the direct sunlight.
Let hot foods cool to room temperature before placing in the appliance. Overloading the
appliance forces the compressor to run longer. Foods that freeze too slowly may lose quality,
or spoil.
Be sure to wrap foods properly, and wipe containers dry before placing them in the appliance.
This cuts down on frost build-up inside the appliance.
Appliance storage bin should not be lined with aluminum foil, wax paper, or paper toweling.
Organize and label food to reduce door openings and extended searches. Remove as many
items as needed at one time, and close the door as soon as possible.
2.7 Energy saving tips
1280mm
833mm
125°
892mm
600mm
833mm
833mm
978mm
540mm
2.6
14
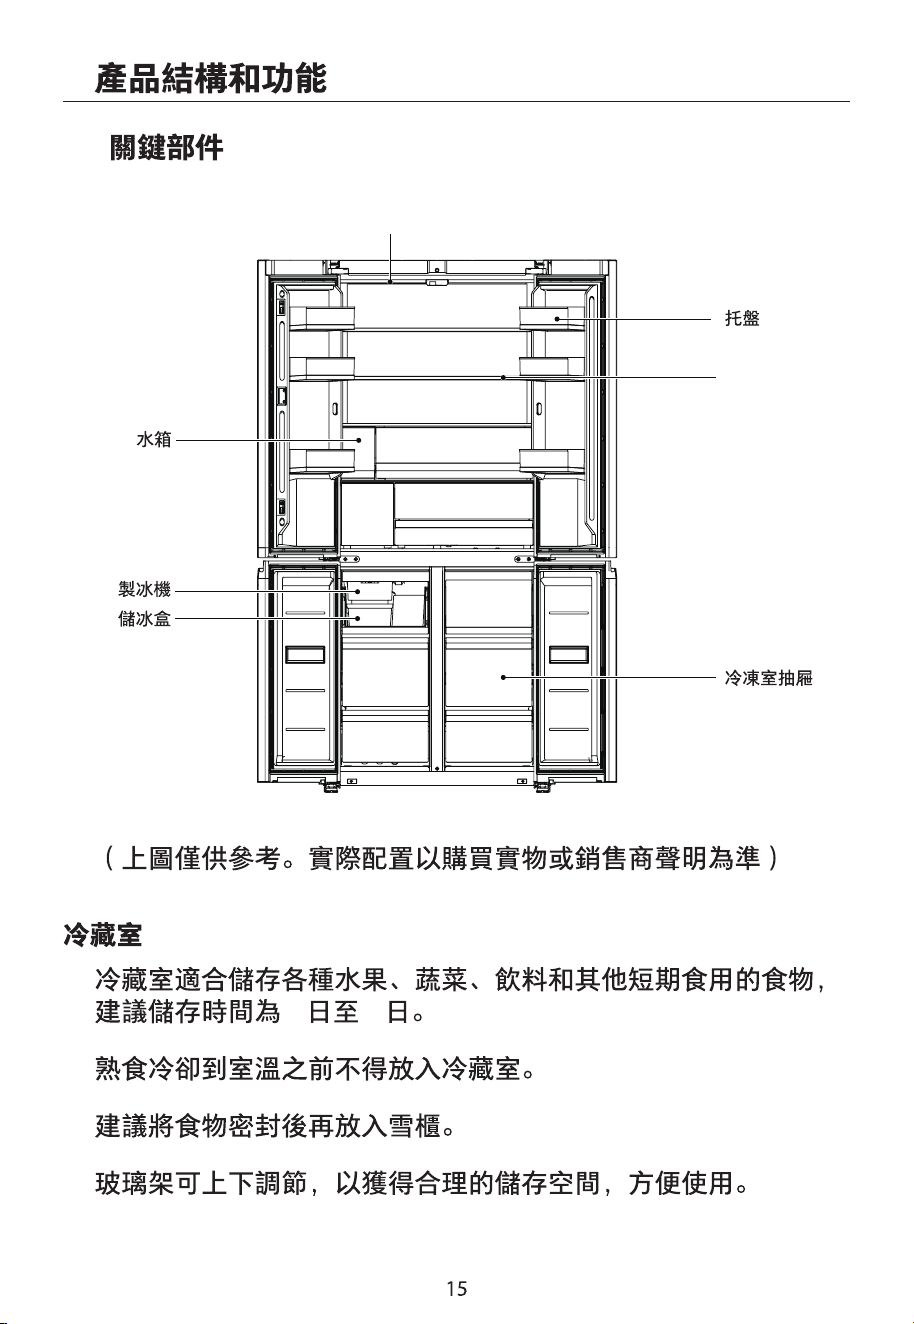
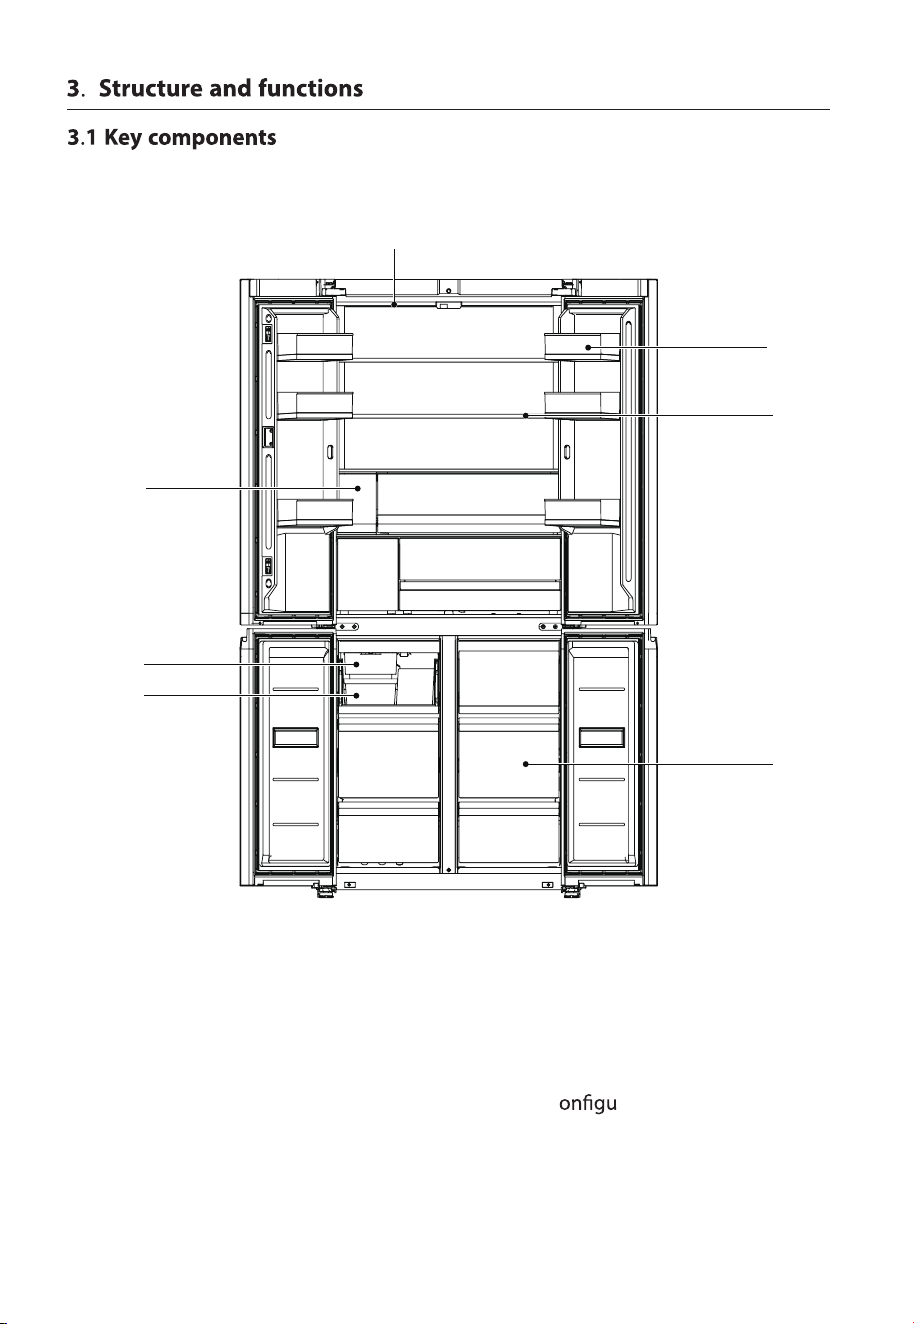
The above pictures are for reference only. The actual c ration is subject to the
purchased item or the declaration from the dealer.
Soft light panel
Door tray
Glass shelf
Ice maker
Ice storage bin
Water tank
Freezer Drawer
15
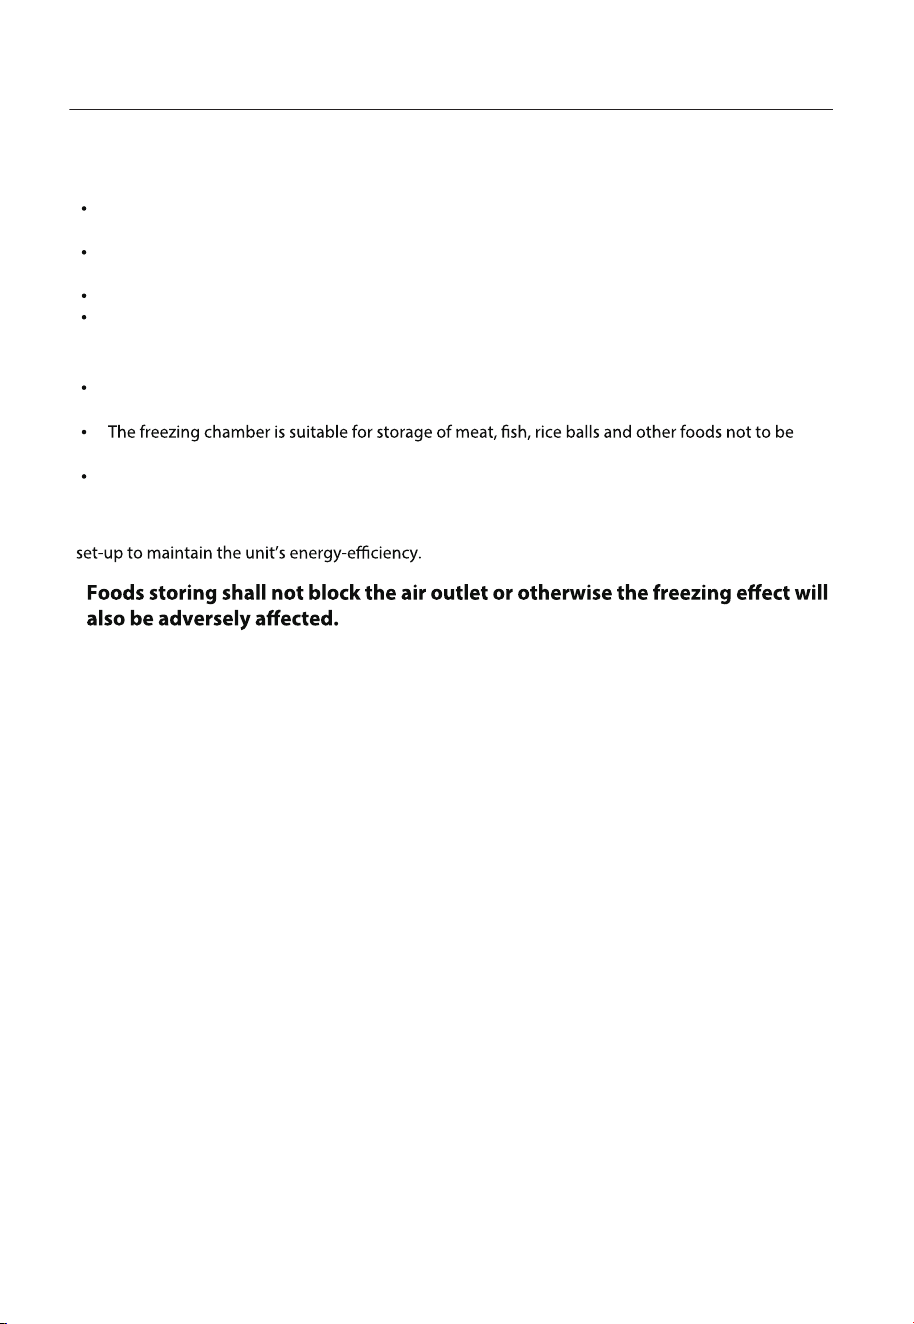
The Refrigerating chamber is suitable for storage of a variety of fruits, vegetables, beverages and
other food consumed in the short term, suggested storage time 3days to 5 days.
Cooking foods shall not be put in the refrigerating chamber until cooled to room
temperature.
Foods are recommended to be sealed up before putting into the refrigerator.
The glass shelves can be adjusted up or down for a reasonable amount of storage space and easy
use.
The low temperature freezing chamber may keep food fresh for a long time and it is mainly used
to store frozen foods and making ice.
consumed in short term.
Chunks of meat are preferably to be divided into small pieces for easy access. Please be noted food
shall be consumed within the shelf time.
Drawers, food boxes, shelves, etc., placed according to the position in the picture above, is the most ideal
Refrigerating chamber
Freezing chamber
16
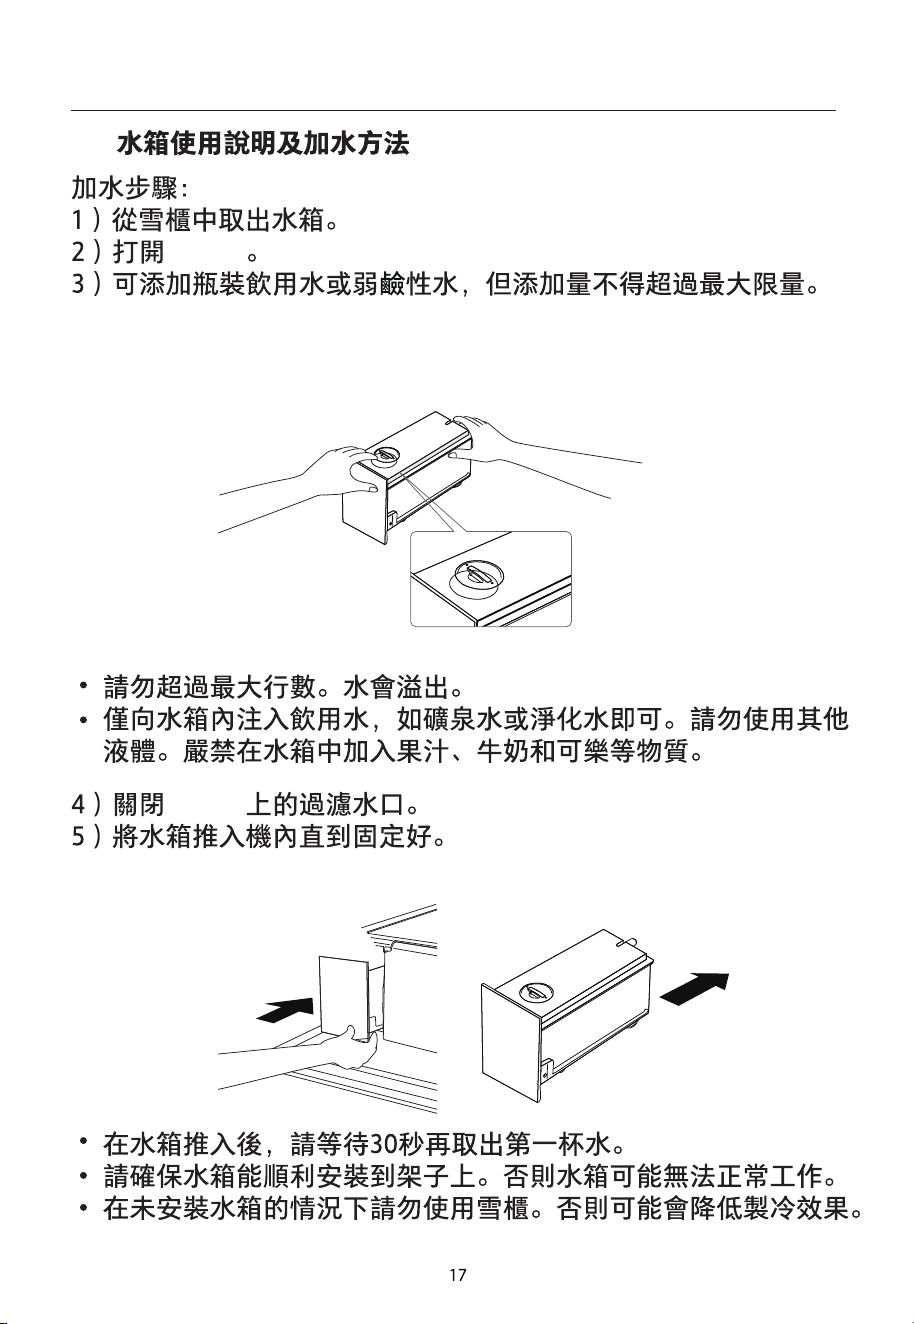
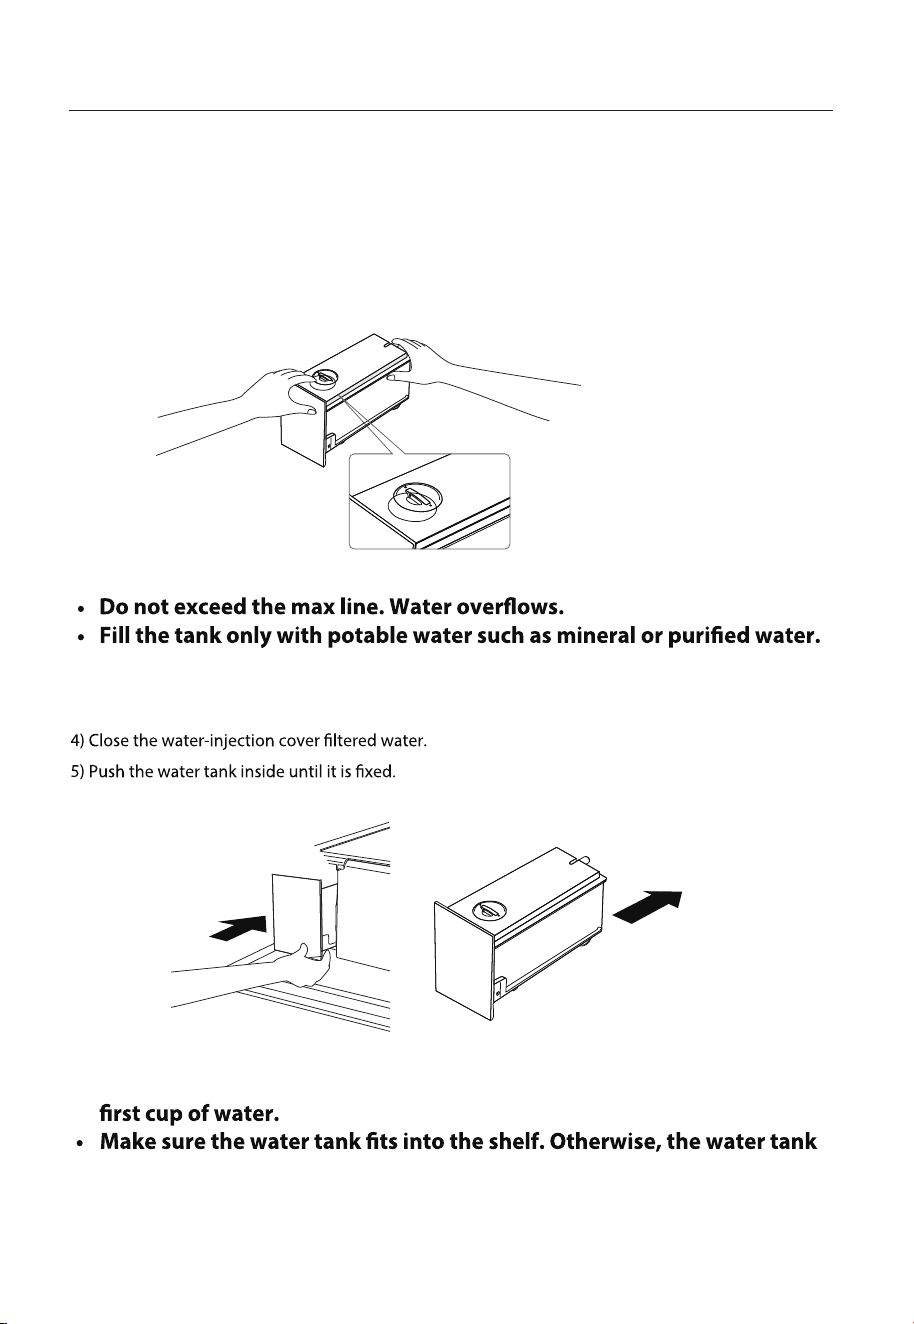
3.2 Instructions for water tank usage and adding of water.
Steps of adding water:
1) Pull out the water tank from the refrigerator.
2) Open the water-injection cover.
3)Add bottled drinking water or alkaline water, without exceeding the Max level.
Do not use other liquid. It is not allowed to add juice, milk and cola in
the water tank.
• After the water tank is pushed in, please wait for 30s before taking the
may not operate properly.
• Do not use the refrigerator without inserting the water tank. This may
decrease the cooling performance.
17
3.3 Functions
A
B
C
D
E
F
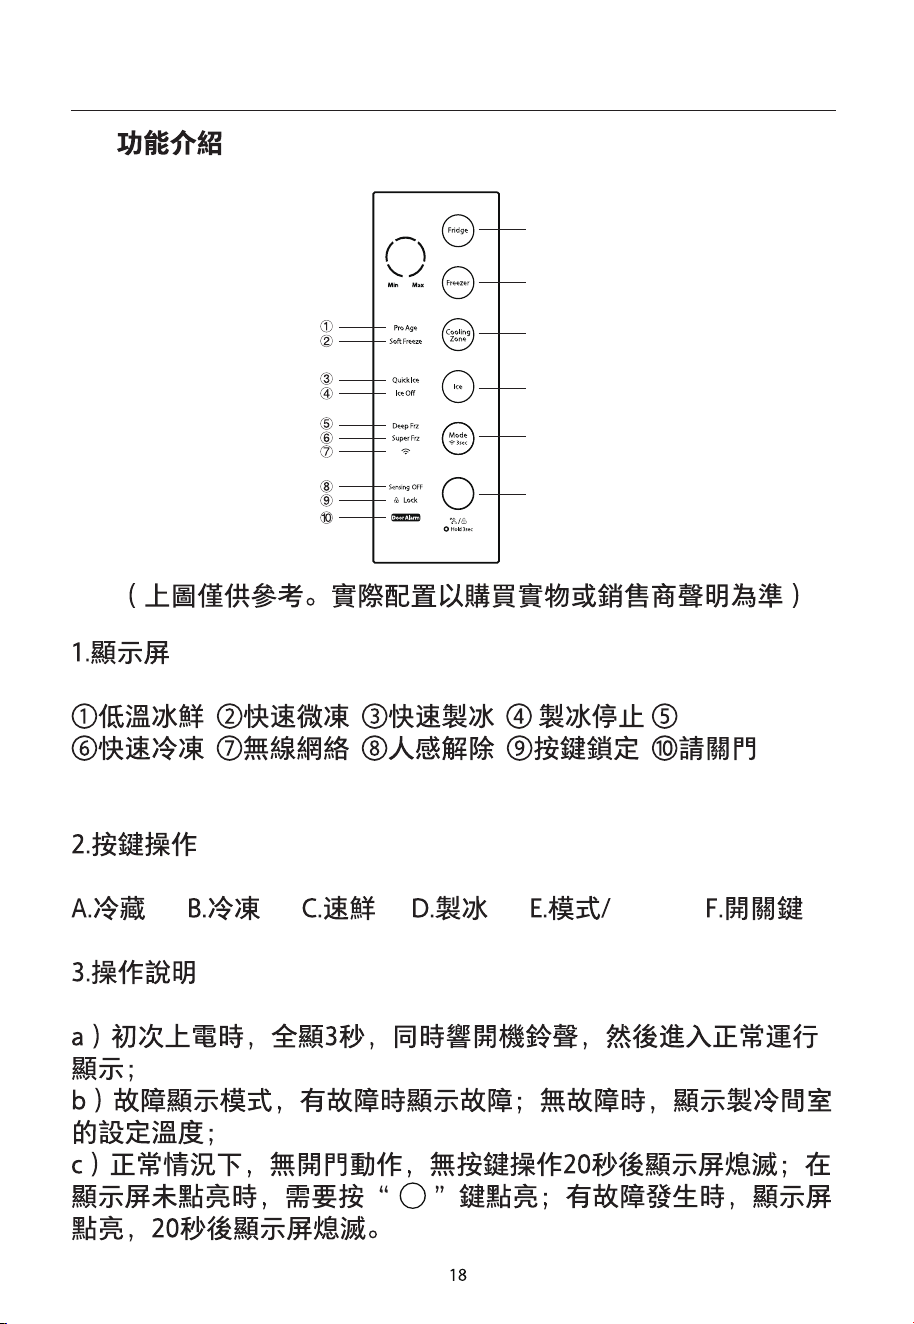
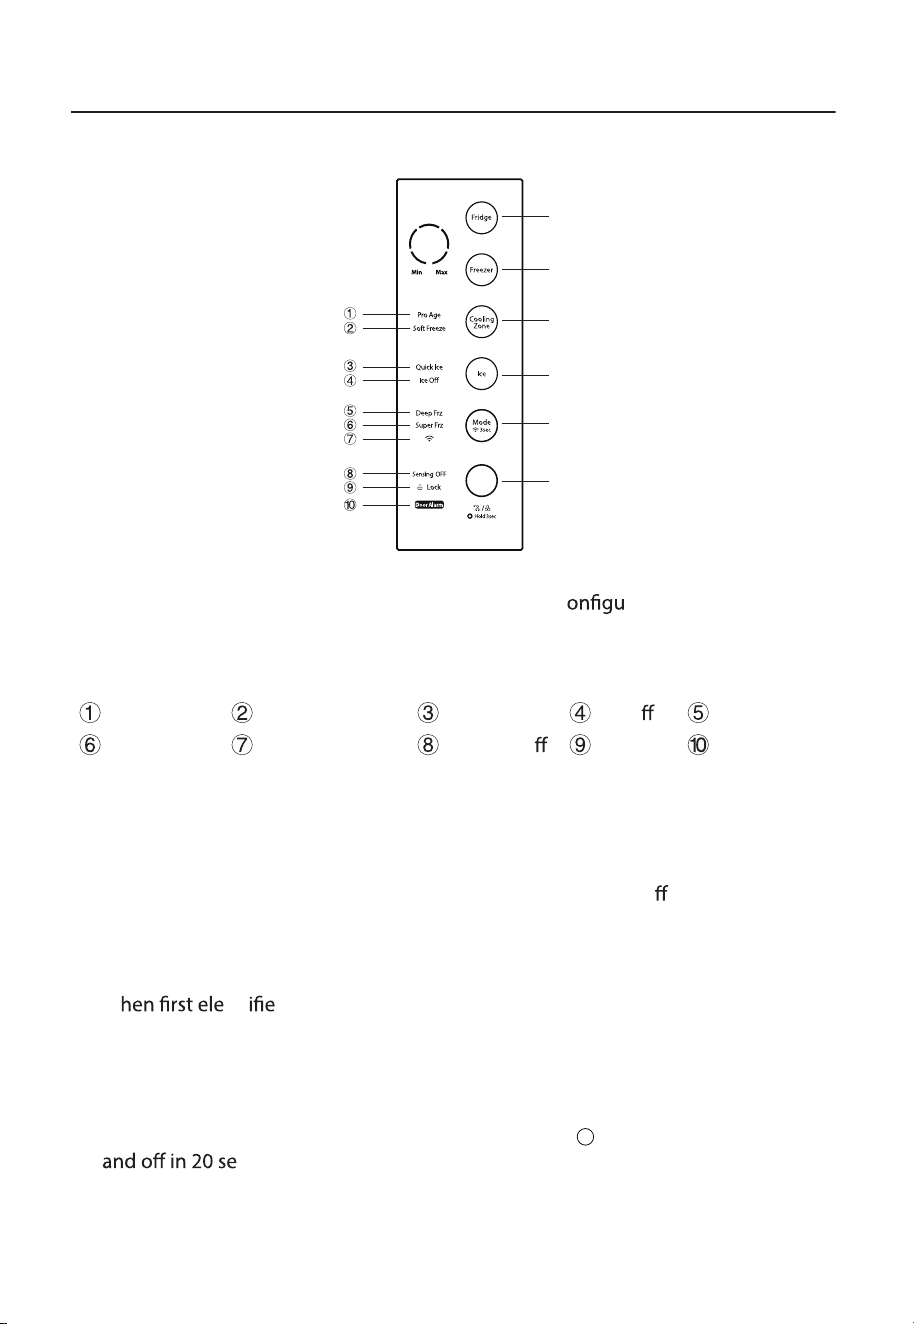
The above pictures are for reference only. The actual c ration is subject to the
purchased item or the declaration from the dealer.
1. Display screen
Pro Age Soft Freeze Quick Ice Ice O Deep Frz
Super Frz Wireless Network Sensing O Lock Door Alarm
2. Key operation
A Fridge B Freezer C Cooling Zone
D Ice Making E Mode/Wlan F On/O
3. Operating Instructions
a) W
ctr d, the screen fully displays for 3 seconds. Meanwhile, the start-
up ringtone sounds, and the normal function display begins.
b) When there's a malfunction, it is being displayed in the malfunction display mode.
temperature of the fridge is displayed when there's no malfunction.
c) Normally, when there's no door opening or key operation for 20 seconds, the light
of the screen turns off. To turn it on, please press the "
" key. The screen lights up
conds when there's a malfunction.
The set
18
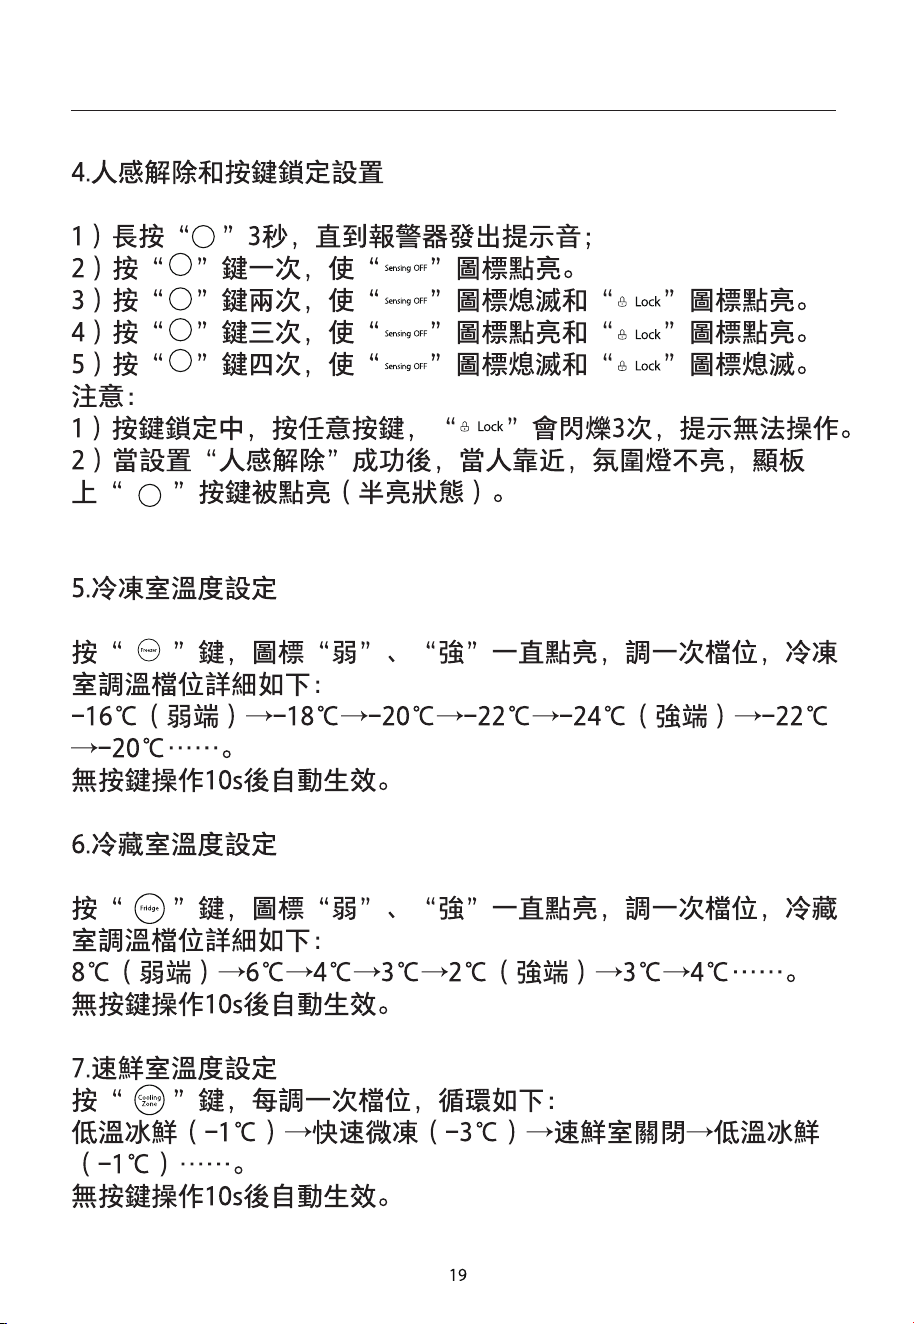
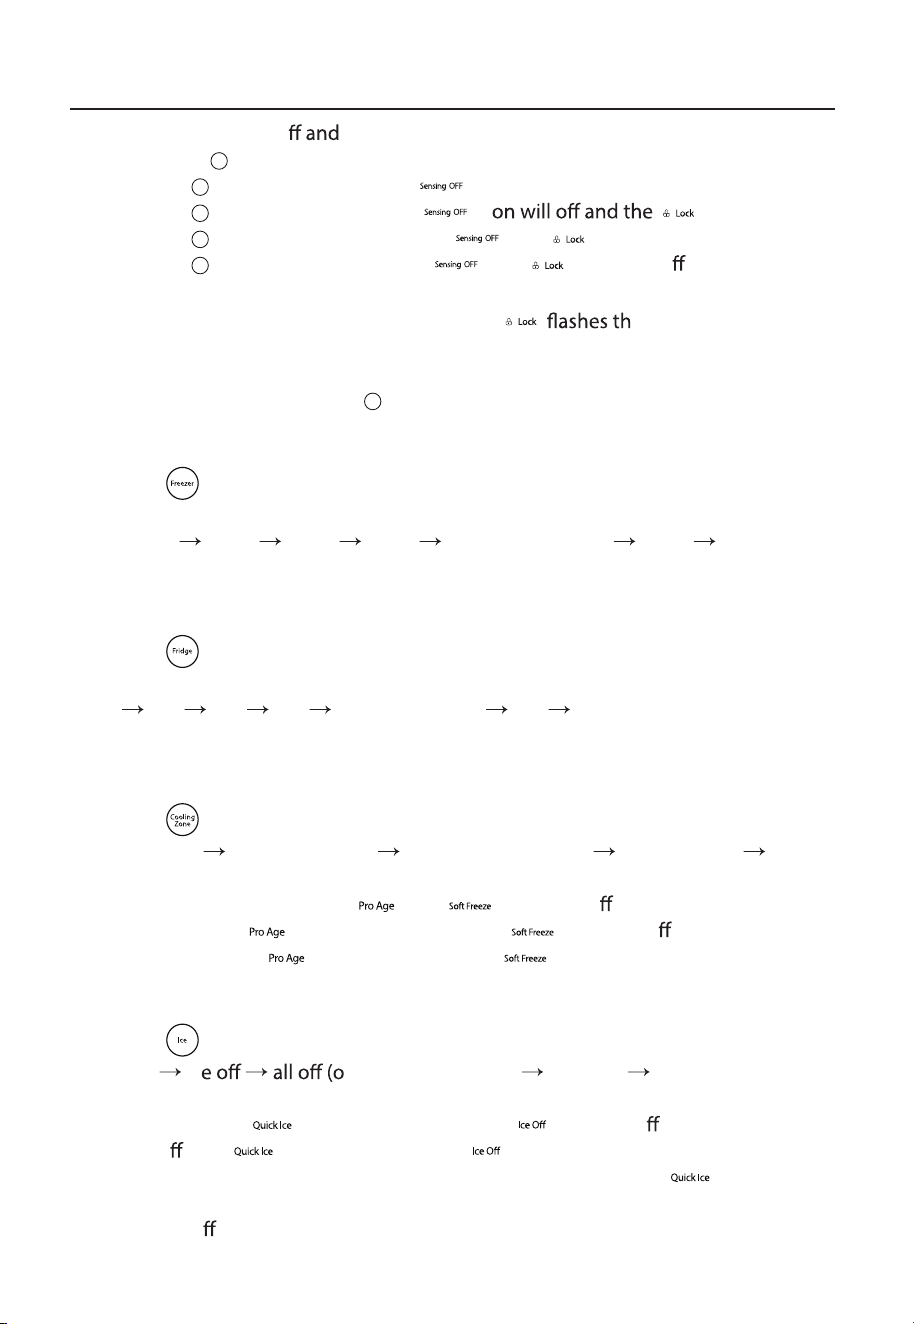
4. Setting of Sensing O Lock
1) Hold down “
” for 3 seconds until the buzzer sounds.
2) Press the “
” key once to make the “ ” icon light up.
3) Press the “
” key twice to make the “ “ ic “ “ icon bright.
4) Press the “
” key thrice to brighten the ” ” and “ ” icons.
5) Press the “
” key four times until the “ “ and “ “ icons will o .
Note:
1) In the “Lock” mode, when any key is pressed, “
” rice, meaning no
operation can be done.
2) When “Sensing Off” is set successfully, the ambience light remains dark at the
approach of people, and the “
“ key on the display panel lights up (half bright).
5. Setting of the temperature of the freezer
Press the “
” key. The “weak” and “strong” icons remain bright, and the temperature
can be adjusted. The adjustable temperature levels of the freezer are as follows: -16°C
(weak end)
-18°C -20°C -22°C -24°C (strong end) -22°C -20°C...
Without key operation, the adjustment will take effect automatically in 10 seconds.
6. Setting of the temperature of the fridge
Press the “
”. The “weak” and “strong” icons remain bright, and the temperature can
be adjusted. The adjustable temperature levels of the fridge are as follows: 8°C (weak
end)
6°C 4°C 3°C 2°C (strong end) 3°C 4°C...
Without key operation, the adjustment will take effect automatically in 10 seconds.
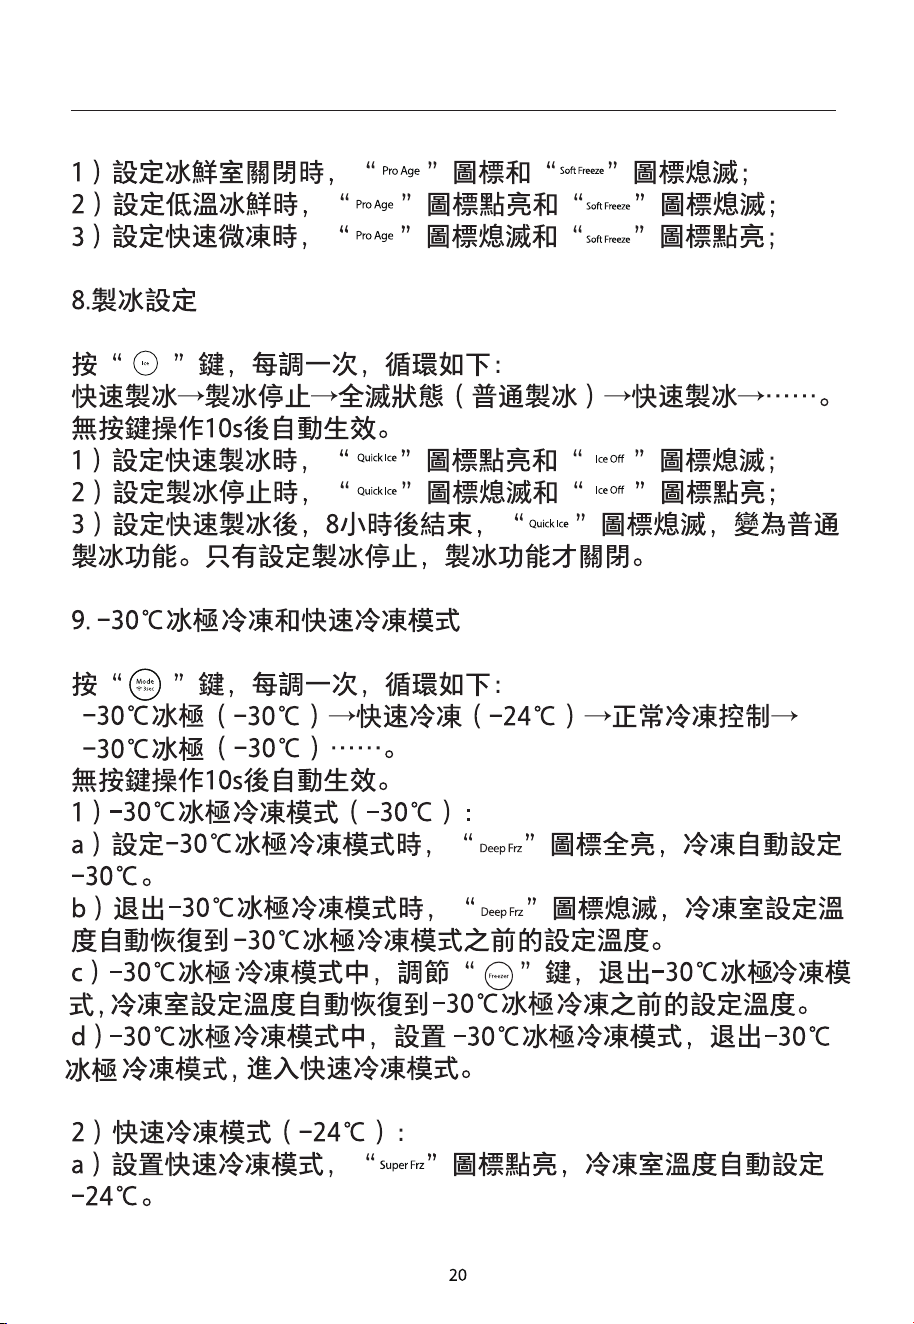
7. Setting of the cooling zone
Press the “
” key. At each adjustment of the temperature, the circle goes like this:
pro age (-1°C)
softfreeze (-3°C) cooling zone closing proage (-1°C) ...
Without key operation, the adjustment will take effect automatically in 10 seconds.
1) In “cooling zone closing,” the “
” and “ ” icons will o ;
2) In “pro age,” the “
” icon brightens, and the “ ” icon will o ;
3) In “soft freeze,” the “
” icon will off, and the “ ” icon lights up.
8. Ice Making Setting
Press the “
” key. At each adjustment, the circle goes like this:
quick ice
ic rdinary ice making) quickice ...
Without key operation, the adjustment will take effect automatically in 10 seconds.
1) In “quck ice,” the “
” icon brightens, and the “ ” icon will o ;
2) In “ice o
,” the “
” icon will off, and the “ ” icon brightens;
3) After being set, the “quick ice” mode ends in 8 hours, where the “
” icon darkens
and the ordinary ice making function begins. The ice making function stops only
when “ice o
” is set.
19
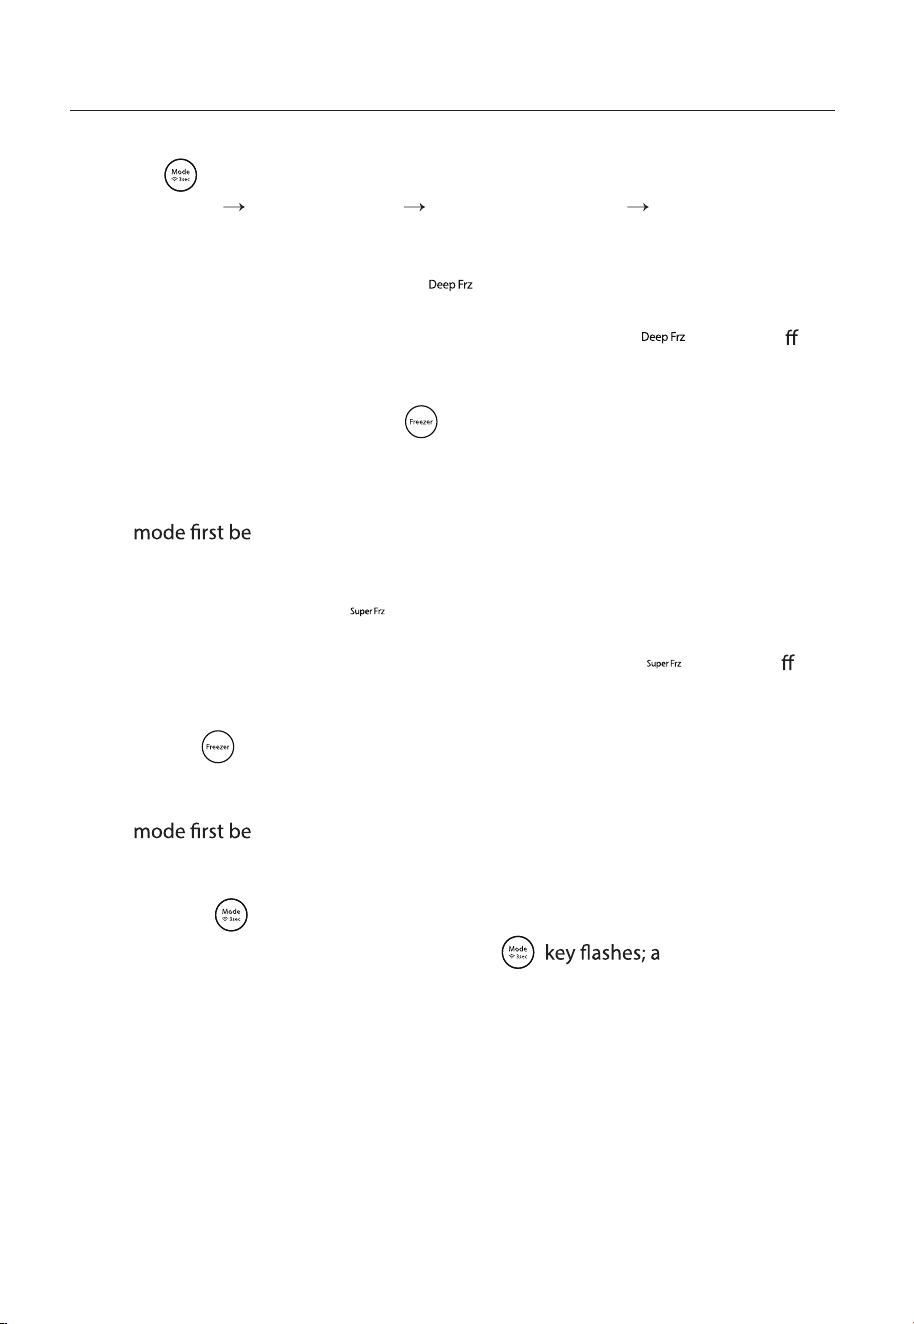
9. Deep Frz and Super Frz
Press the “
” key. At each adjustment, the circle goes like this:
Deep Frz (-30°C)
Super Frz (-24°C) normal freeze control Deep Frz (-30°C)...
Without key operation, the adjustment will take effect automatically in 10 seconds.
1) Deep Frz Mode(-30°C):
a) When the “deep frz” mode is set, the “
” icon fully brightens. The temperature of
the freezer is automatically set for-30°C;
b) When the machine withdraws from the “deep frz” mode, the “
” icon will o .
The temperature of the freezer automatically returns to the set temperature before
the “deep frz” mode.
c) In the “deep frz” mode, adjust the “
” key to withdraw from the mode. The
temperature of the freezer automatically comes back to the set temperature
before the “deep frz” mode.
d) When setting the “super frz” mode in the “deep frz” mode, withdraw from the “deep
frz”
fore entering the “super frz” mode.
2) Super Frz Mode (-24°C):
a) In the “super frz” mode, the “
” icon brightens, and the temperature of the
freezer is automatically set for-24°C;
b) When the machine withdraws from the “super frz” mode, the “
” icon will o . The
temperature of the freezer automatically returns to the set temperature before the
“super frz” mode.
c) Adjust the “
” key to withdraw from the “super frz” mode. The temperature of the
freezer automatically returns to the set temperature before the “super frz” mode.
d) When setting the “deep frz” mode in the “super frz” mode, withdraw from the “super
frz”
fore entering the “deep frz” mode.
10. Network modes
Hold down the“
” key 3s to choose the network. The user can forcefully set the
WiFi module of the fridge for the AP mode. The “
” fter entering the
AP mode upon successful module setting, the machine withdraws from the AP mode
automatically. The temperature displayed in the temperature display zone becomes
normal; in the AP mode, if the module setting remains unsuccessful for 10s, forcefully
withdraw from the AP mode so the temperature can be displayed normally.
20
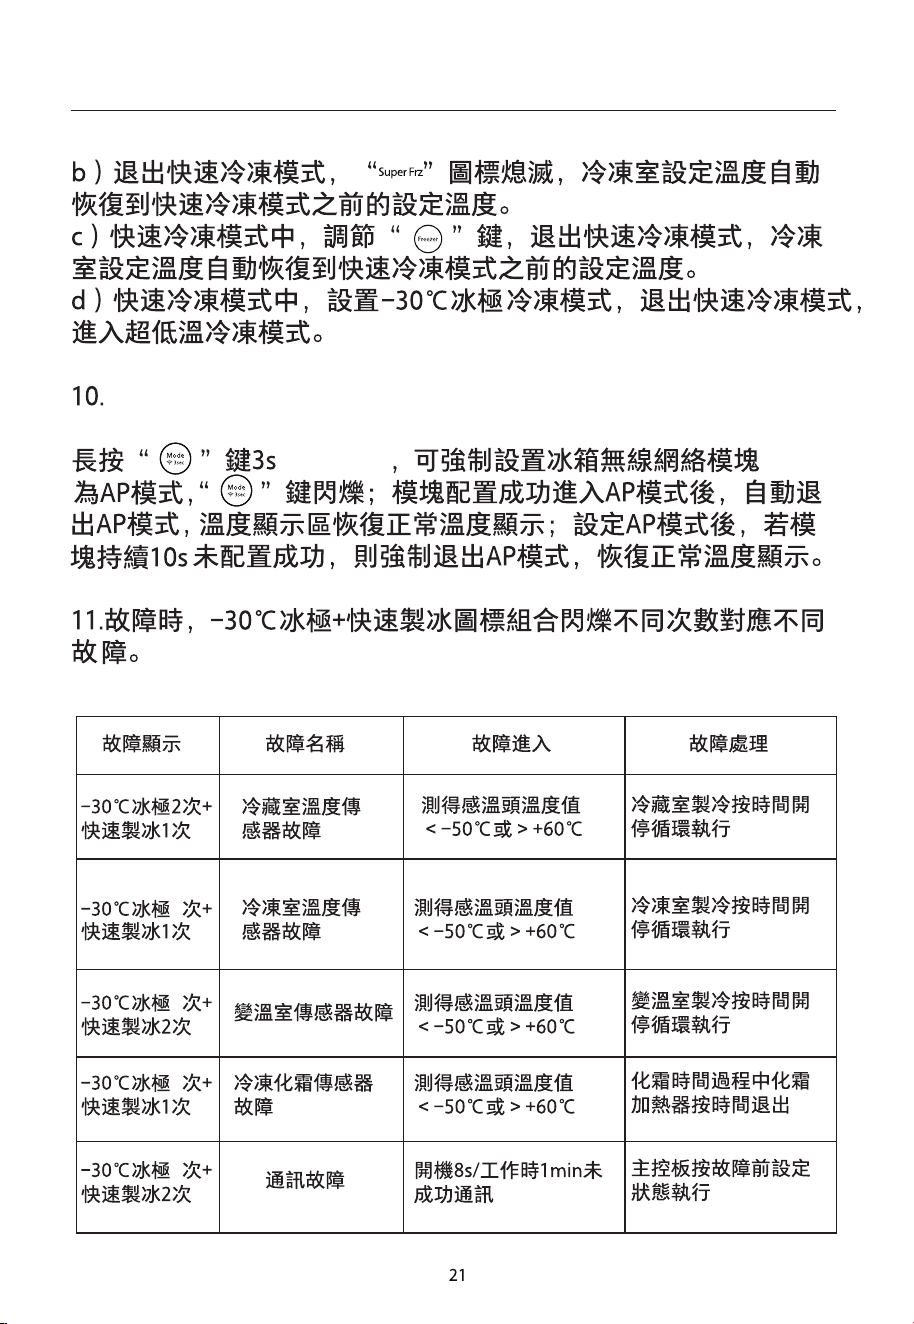
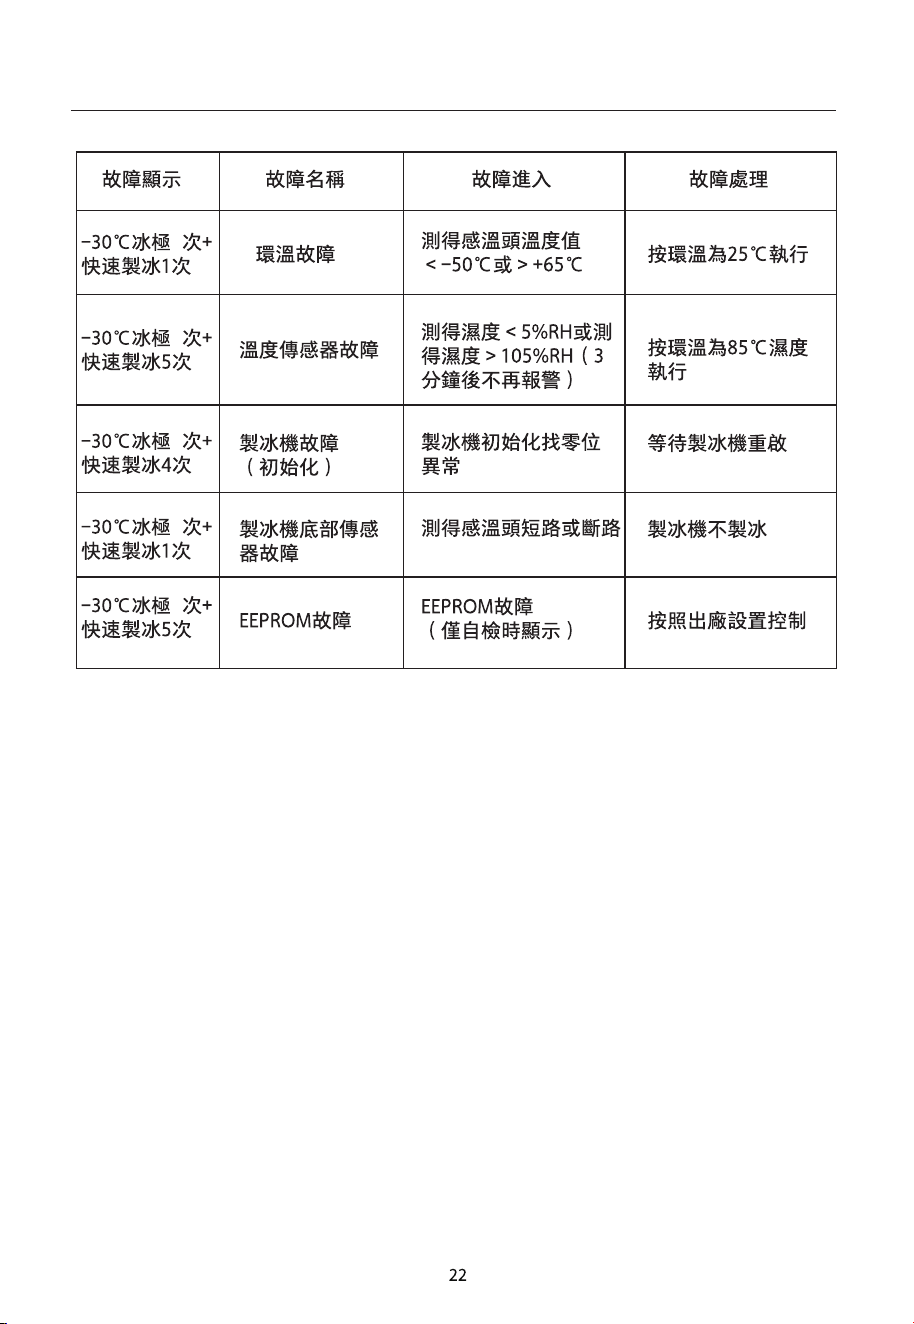
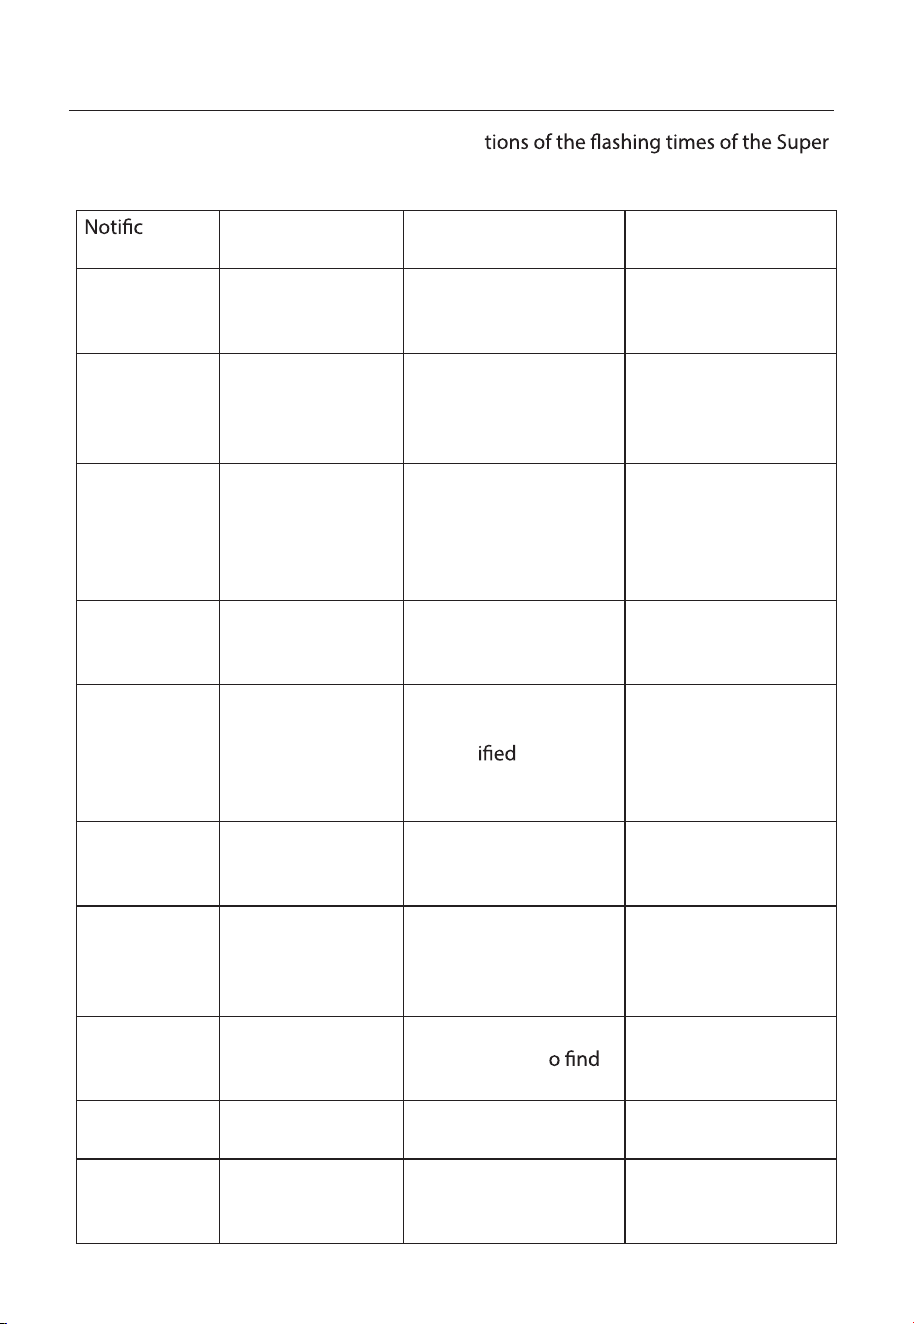
11. When an error happens, different combina
Frz icon+the Quick Ice icon represent different errors.
ation of
errors
Fault name Fault entry Fault treatment
2 Super Frz +
1 Quick Ice
Fault of the fridge’s
temperature
sensor
Detected temperature
of the sensor<-50°C, or
it>+60°C.
Start and stop the
cooling of the fridge
alternately.
Super Frz 5 +
Quick Ice 1
Fault of the
freezer’s
temperature
sensor
Detected temperature
of the sensor<-50°C, or
it>+60°C.
Start and stop the
freezing of the freezer
alternately.
Super Frz 1 +
Quick Ice 2
Fault of the
interchangeable
temperature
chamber’s sensor
Detected temperature
of the sensor<-50°C, or
it>+60°C.
Start and stop
the cooling of the
interchangeable
temperature chamber
alternately.
Super Frz 1 +
Quick Ice 1
Fault of the
freezer’s defrosting
sensor
Detected temperature
of the sensor<-50°C, or
it>+60°C.
Stop the heater
on time during
defrosting.
Super Frz 6 +
Quick Ice 2
Communication
fault
Failing to communicate
8s after the refrigerator
is electr
or after the
refrigerator has worked
for one minute
Operate the master
control board
according to its
setting before the
fault happens.
Super Frz 6 +
Quick Ice 1
Fault of the
environmental
temperature
Detected temperature
of the sensor<-50°C, or
it >+65°C.
Environmental
temperature=25°C
Super Frz 1 +
Quick Ice 5
Fault of the
humidity sensor
Detected
humidity<5%RH or
it>105%RH (no alarm
after 3 min)
Environmental
temperature=85% of
humidity
Super Frz 1 +
Quick Ice 4
Fault of the
ice maker
(initialization)
Abnormal initialization
of ice maker t
zero position
Waiting for the ice
maker to restart
Super Frz 4 +
Quick Ice 1
Ice maker bottom
sensor failure
Open or short circuit of
the temperature sensor
Ice maker not making
ice
Super Frz 3 +
Quick Ice 5
EEPROM faults
EEPROM faults (only
displayed during self-
inspection)
Control according to
factory settings.
21
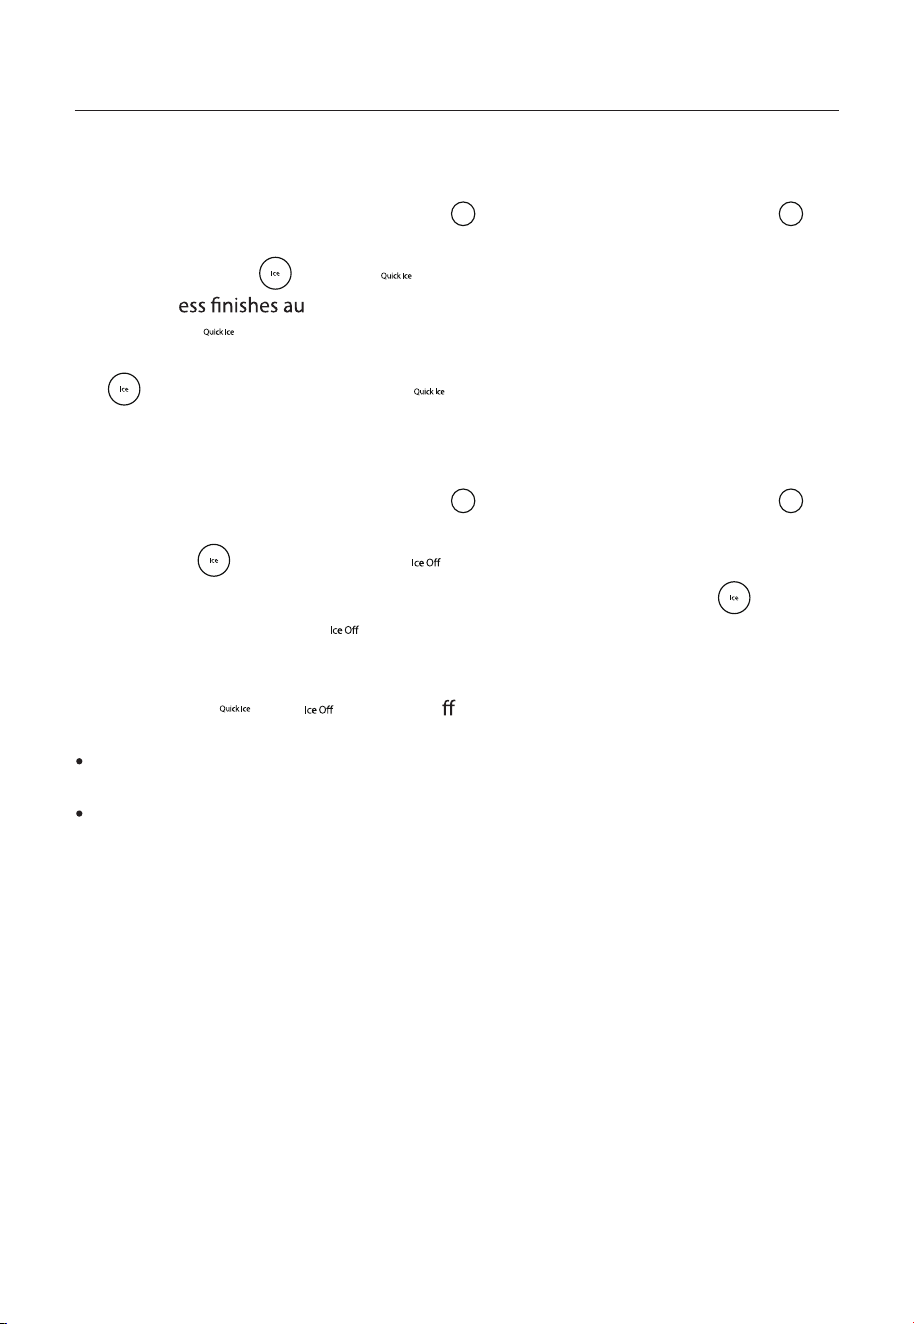
3.4 Setting of Ice Making
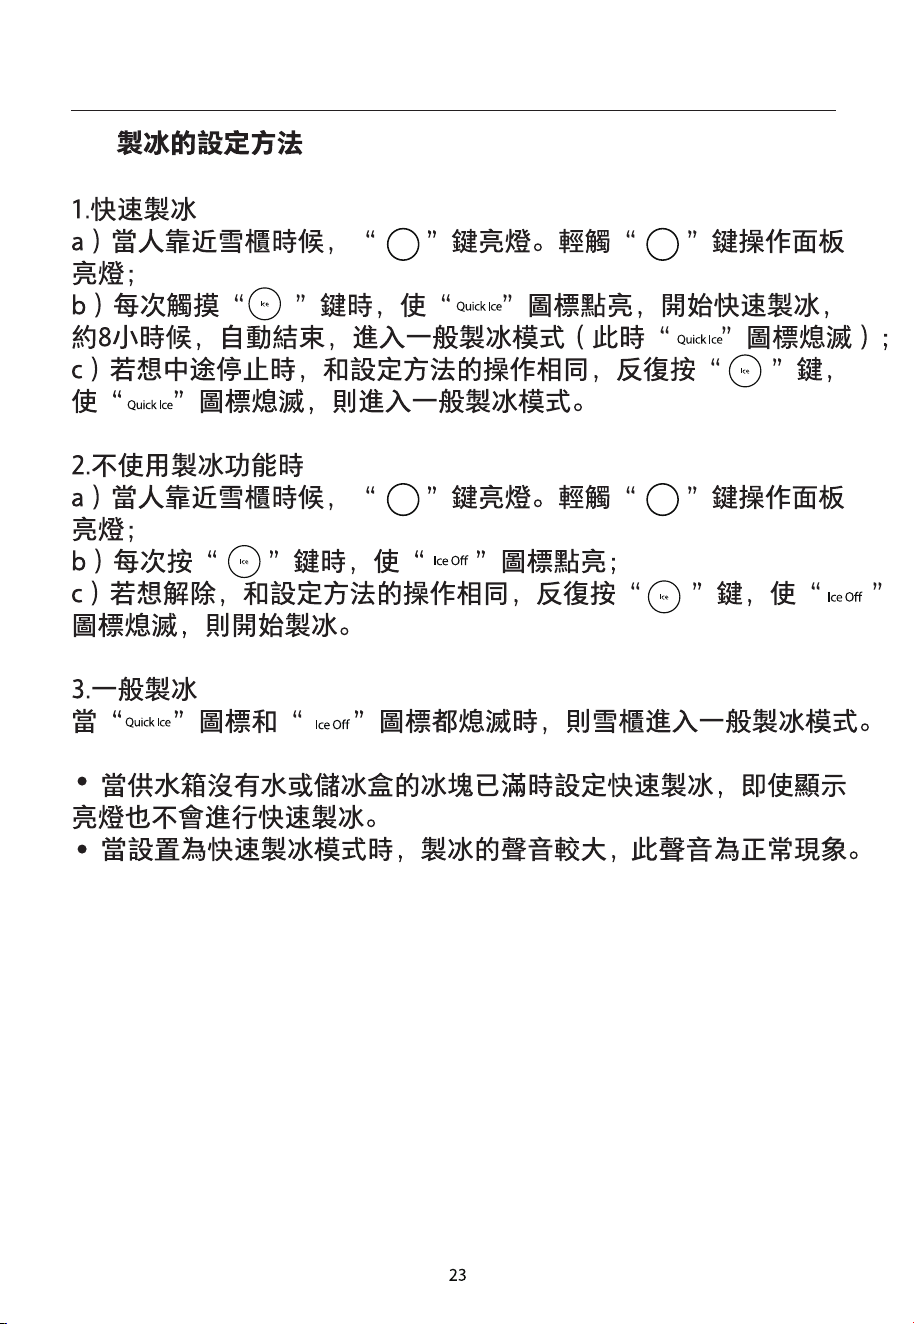
1. Quick ice making
a) When people approach the fridge, the “
” key brightens. Lightly touch the “ ”
key, and the operating panel brightens.
b) At a touch of the “
” key, the “ ” icon lights up, and quick ice making begins.
The proc
tomatically in about8hours, and enters ordinary ice making
mode (the “
” icon will off).
c) The method of stopping halfway is the same as the setting operation: press the
“
”key repeatedly to darken the “ “ icon and enter the ordinary ice making
mode.
2. When not using ice making
a) When people approach the fridge, the “
” key brightens. Lightly touch the “ ”
key, and the operating panel brightens.
b) When the “
” key is pressed, the “ ” icon lights up.
c) The disabling method is the same as the setting operation: press the “
” key
repeatedly to darken the “
” icon and start the ice making procedure.
3. Ordinary ice making
When both the “
” and “ ” icons will o , the fridge enters the ordinary ice making
mode.
Quick ice making fails even if the indicator is on when there's no water in the water
supply box, or the ice box is full.
In the “quick ice” mode, the ice making sound is loud, which is normal.
refrigerator
22
Gas
Detergent
Bananaoil
Alcohol
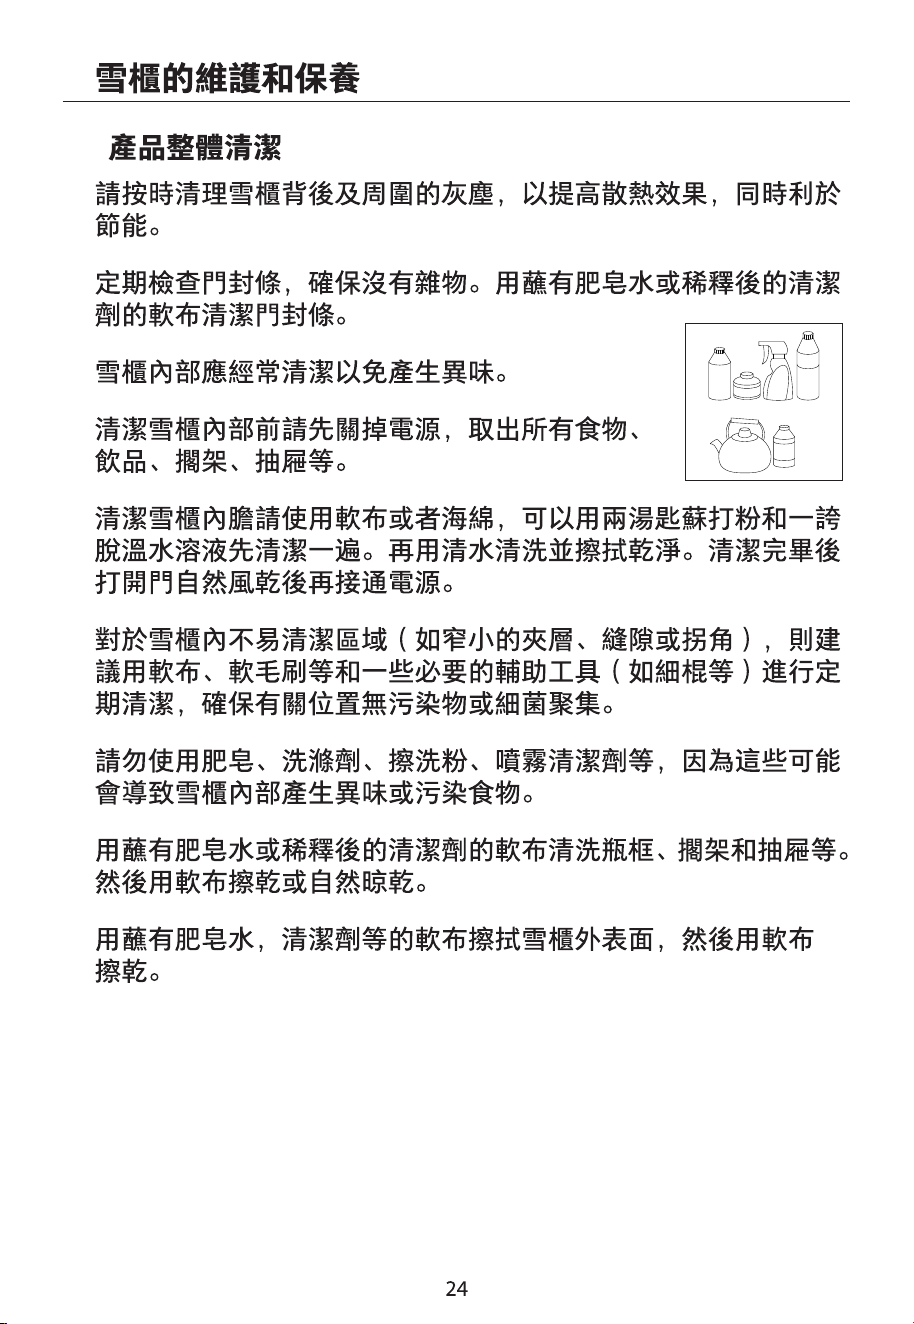
Dusts behind the refrigerator and on the ground shall be timely cleaned to improve the
Check the door gasket regularly to make sure there are no debris. Clean the door gasket with
a soft cloth dampened with soapy water or diluted detergent.
The interior of the refrigerator should be cleaned regularly to
avoid odor.
foods, drinks, shelves, drawers, etc.
Use a soft cloth or sponge to clean the inside of the
refrigerator, with two tablespoons of baking soda and a quart
of warm water. Then rinse with water and wipe clean. After
cleaning, open the door and let it dry naturally before turning
on the power.
narrow sandwiches, gaps or corners), it is recommended to wipe them regularly with a soft
rag, soft brush, etc. and when necessary, combined with some auxiliary tools (such as thin
sticks) to ensure no contaminants or bacterial accumulation in these areas.
Do not use soap, detergent, scrub powder, spray cleaner, etc. as these may cause odors in
the interior of the refrigerator or contaminated food.
Clean the bottle frame, shelves and drawers with a soft cloth dampened with soapy water or
diluted detergent. Dry with a soft cloth or dry naturally.
Wipe the outer surface of the refrigerator with a soft cloth dampened with soapy water,
detergent, etc., and then wipe dry.
Do not use hard brushes, clean steel balls, wire brushes, abrasives (such as toothpastes),
organic solvents (such as alcohol, acetone, banana oil, etc.), boiling water, acid or alkaline
items, which may damage the fridge surface and interior. Boiling water and organic solvents
such as benzene may deform or damage plastic parts.
Do not rinse directly with water or other liquids during cleaning to avoid short circuits or
4.1 Overall cleaning
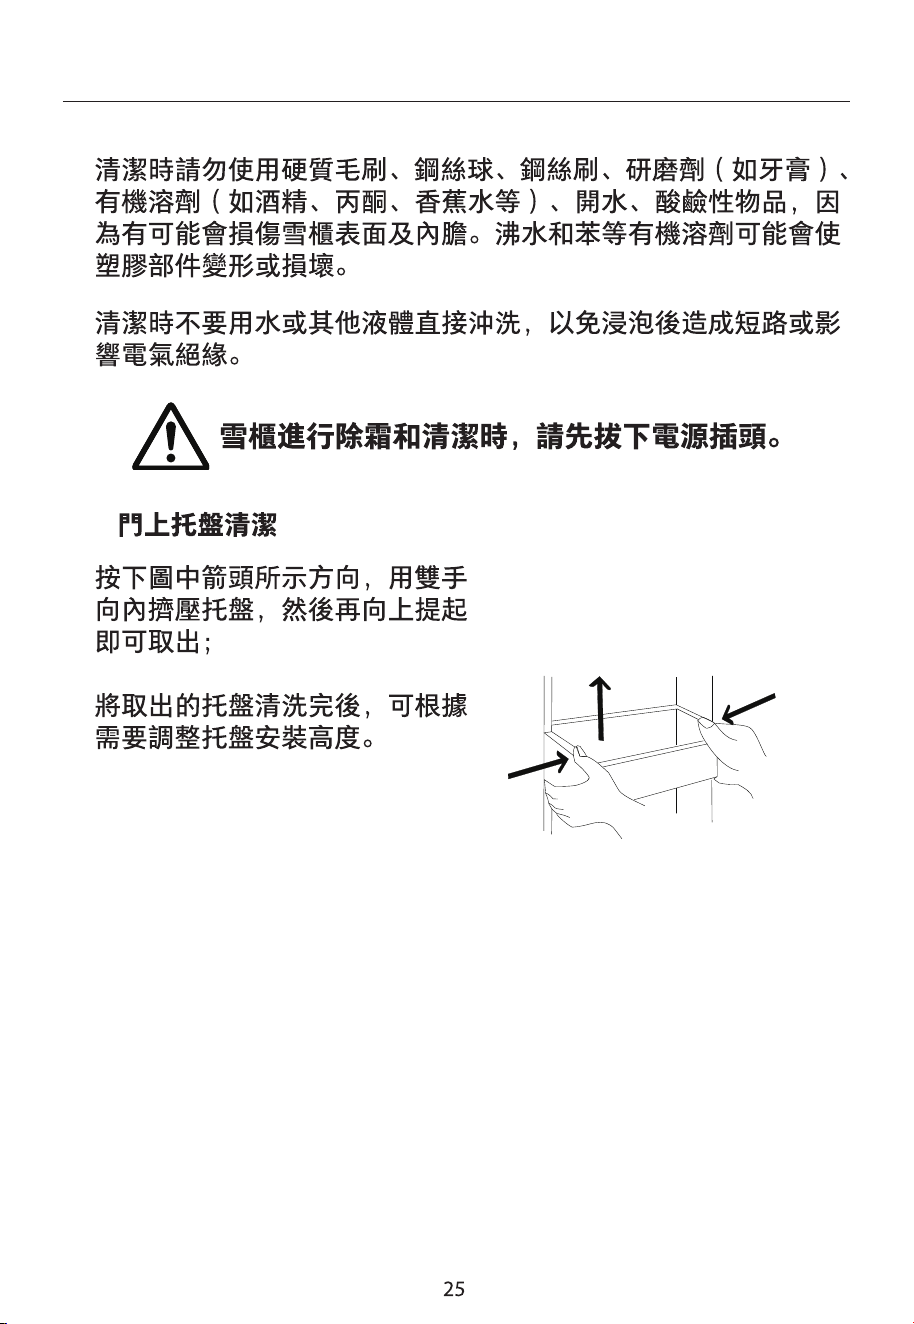
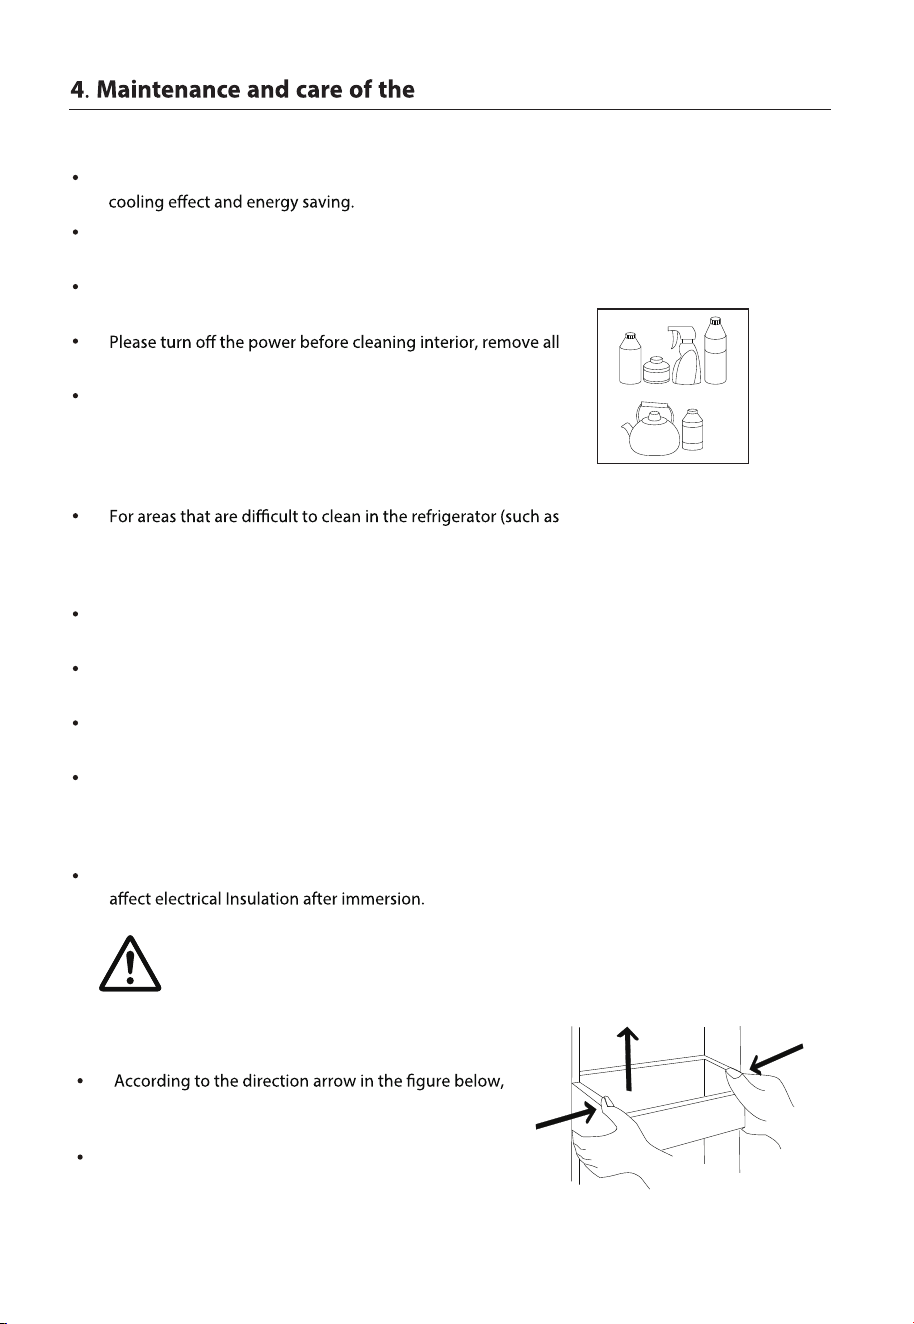
use both hands to squeeze the tray, and push it
upward, then you can take it out.
After washing the tray having been taken out, you can
adjust its installing height in accordance with your
requirement.
4.2 Cleaning of door tray
Please unplug the refrigerator for defrost and cleaning.
23
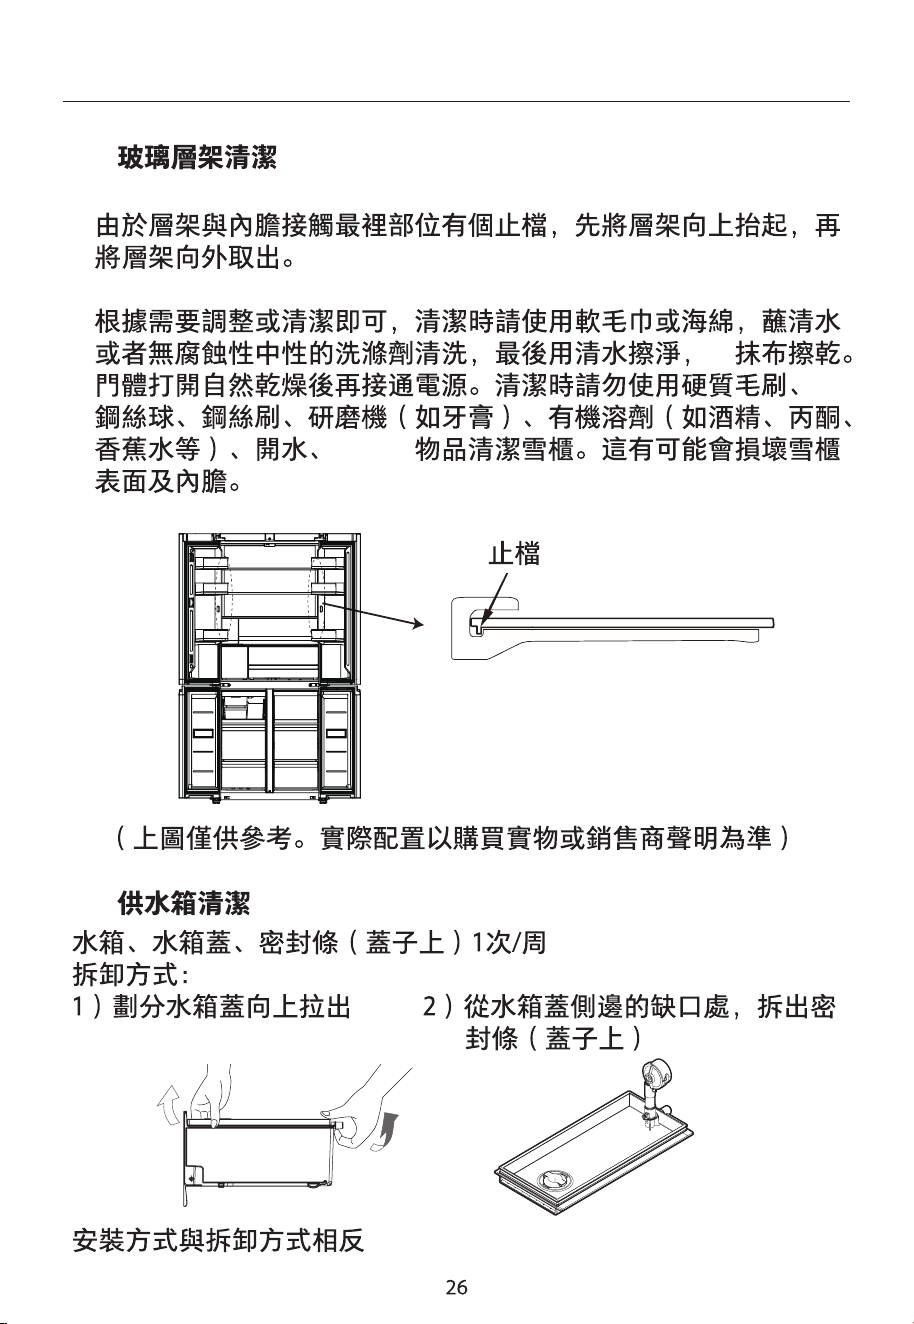
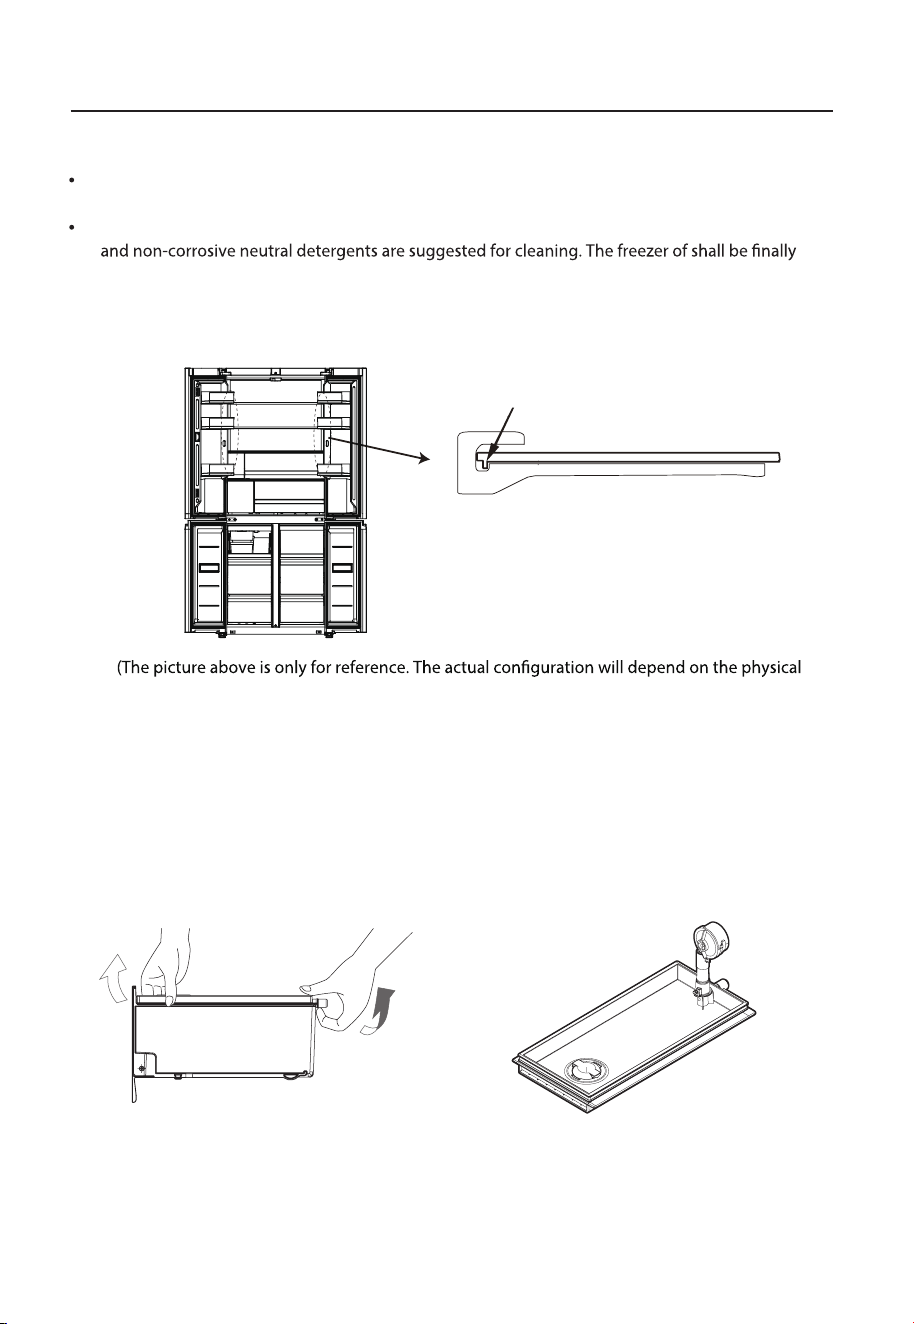
As the innermost part of the refrigerator liner where contacting the shelves has a backstop, you
shall raise the shelves upward, then you can be able to take it out.
Adjust or clean the shelves according to your requirement. Soft towels or sponge dipped in water
cleaned with clean water and dry cloth. Open the door for natural drying before the power is
turned on. Do not use hard brushes, clean steel balls, wire brushes, abrasives, such as toothpastes,
organic solvents (such as alcohol, acetone, banana oil, etc.), boiling water, acid or alkaline items
clean refrigerator considering that this may damage the fridge surface and interior.
4.3 Cleaning of Glass shelf
backsto
raise the glass shelf upwardsk
then pull it out
product or statement by the distributor)
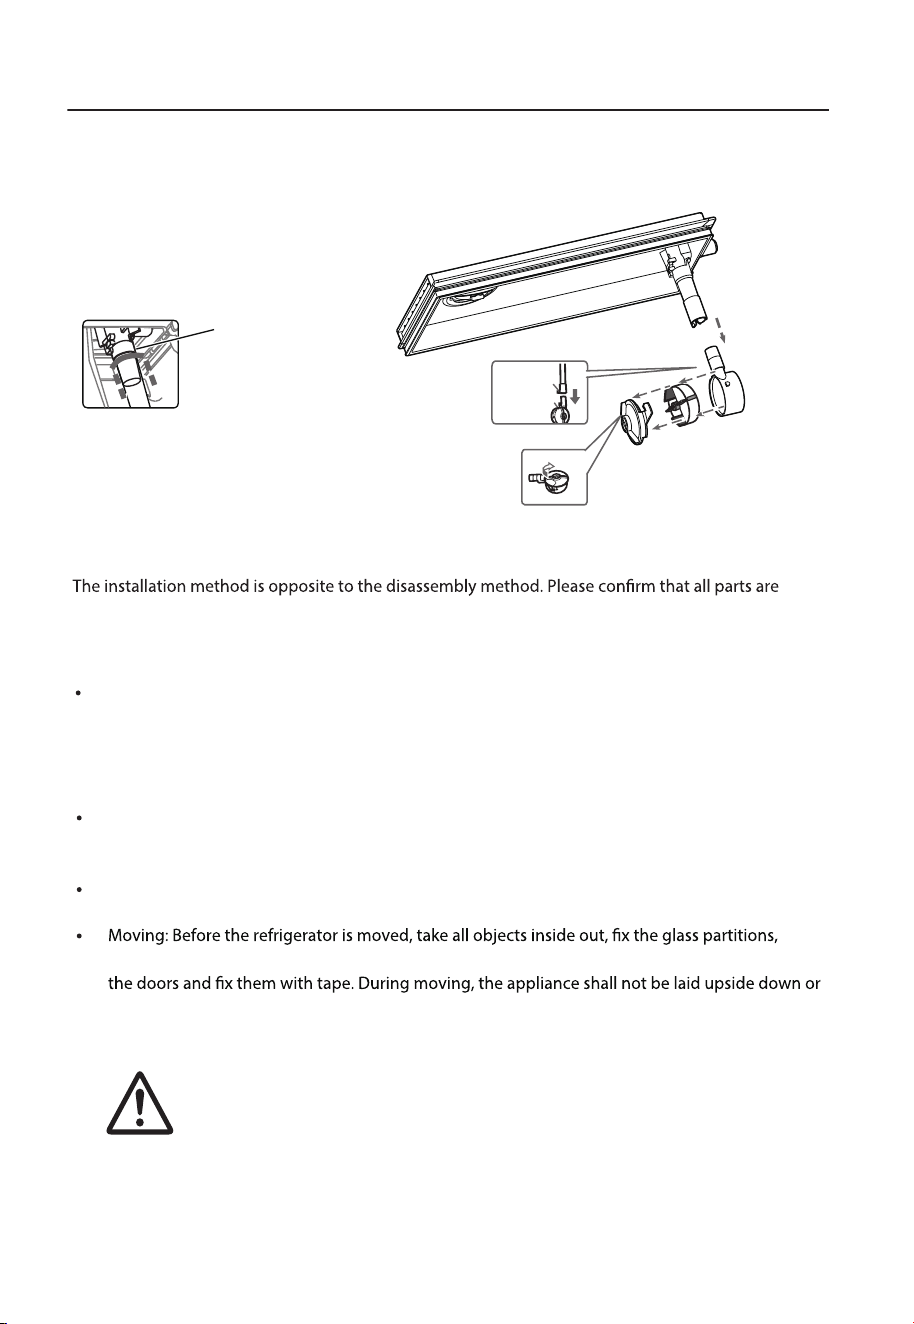
4.4 Cleaning of the Water Supply Box
Water supply box, lid of the water supply
box, gasket (on the lid) once/week
Disassembly method:
1) Pull the lid up 2) Remove the gasket (on the lid) through
the cracks on the sides of the lid.
The assembly method is opposite to the
disassembly method.
24
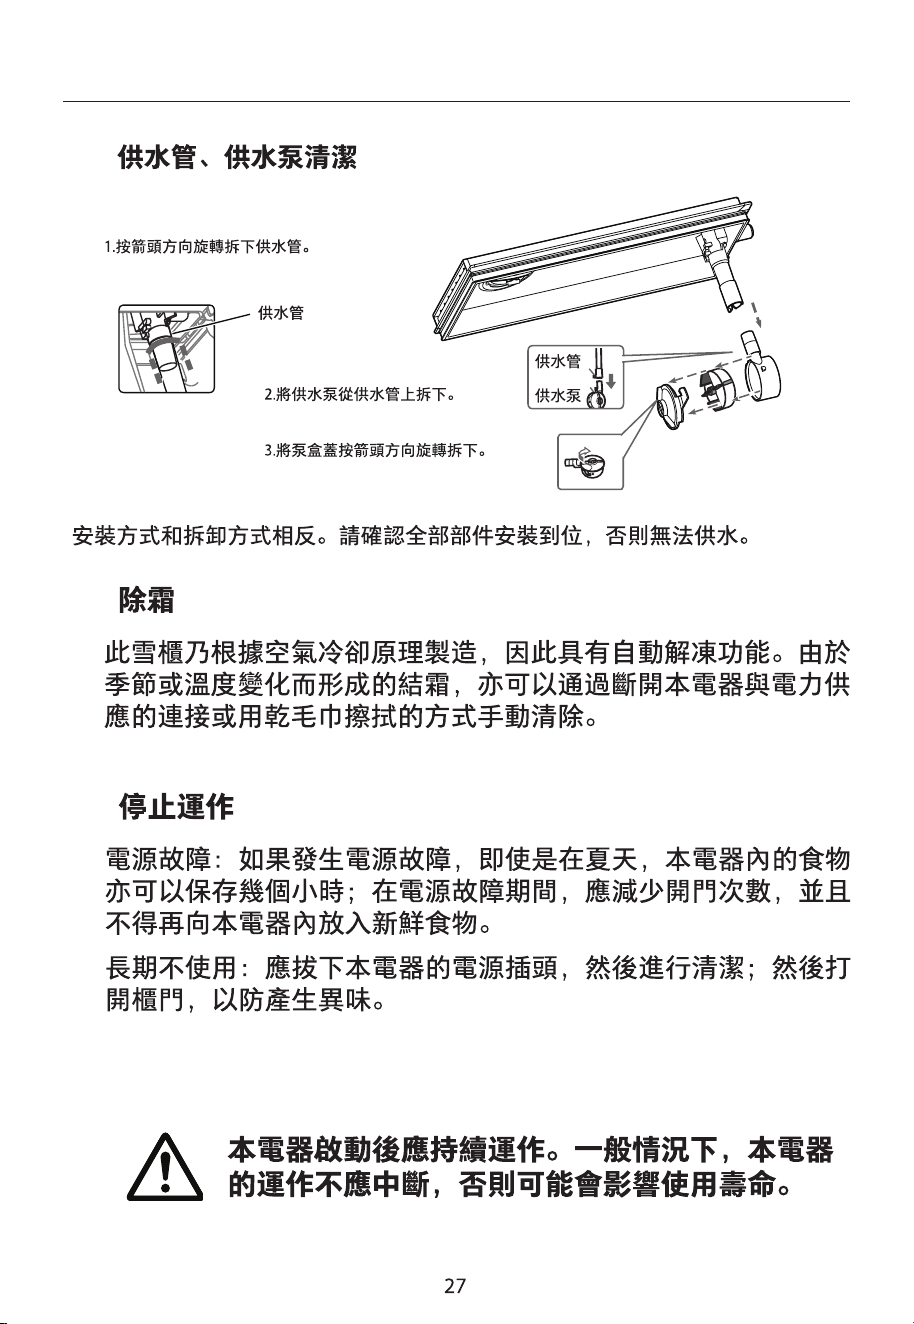
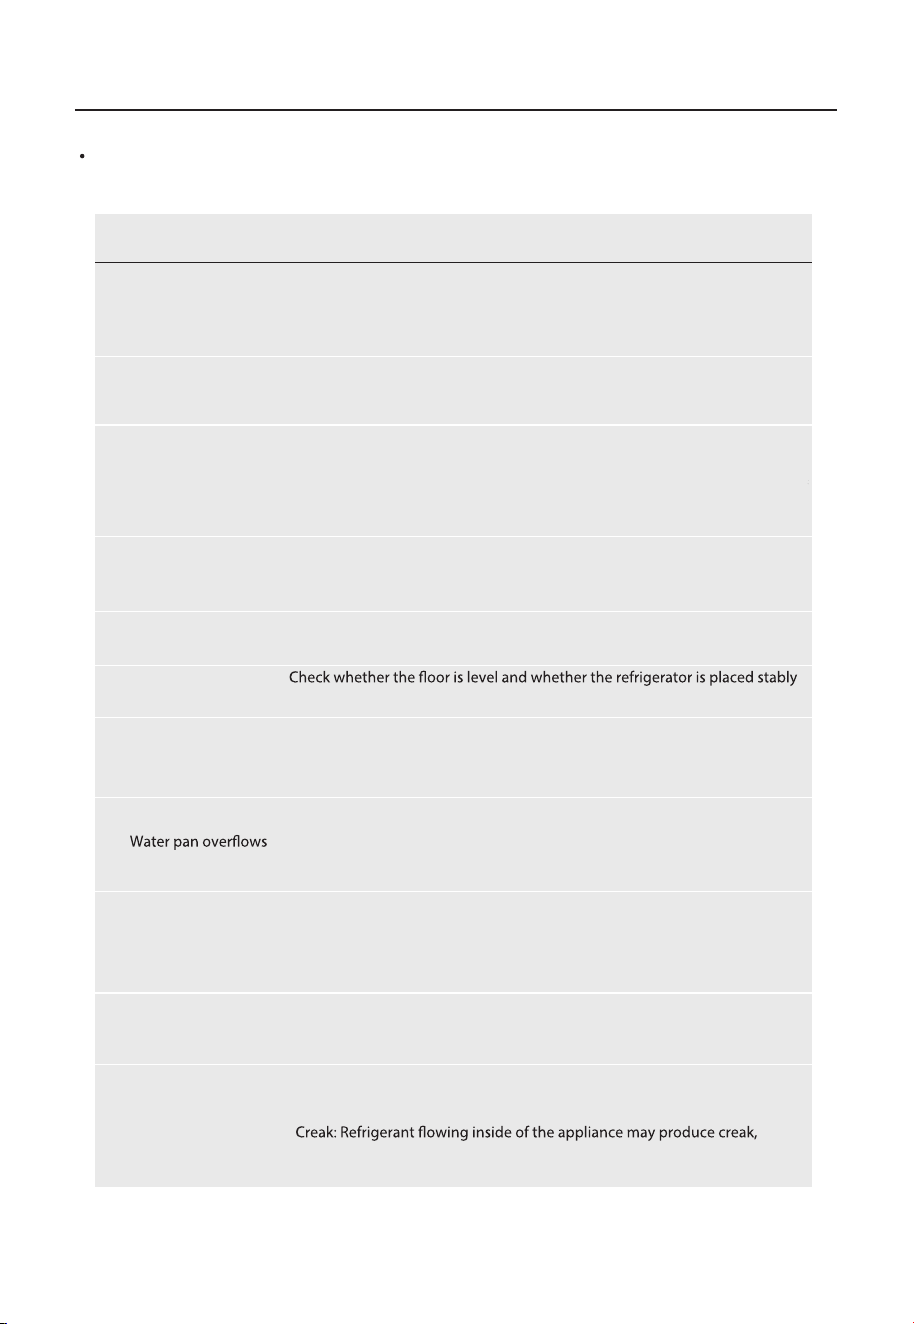
4.5 Cleaning of the Water Supply Pipe and the Water Supply Pump
1. Remove the water supply pipe
by rotating it in the direction
of the arrow.
Water supply
pipe
Water supply
pipe
Water supply
pump
2. Disconnect the water
supply pump from the
water supply pipe.
3. Remove the lid of the
water supply pump by
rotating it in the direction
of the arrow.
installed in place, otherwise the water cannot be supplied.
4.6 Defrosting
4.7 Out of operation
The refrigerator is made based on the air-cooling principle and thus has automatic defrosting
function. Frost formed due to change of season or temperature may also be manually removed by
disconnection of the appliance from power supply or by wiping with a dry towel.
Power failure: In case of power failure, even if it is in summer, foods inside the appliance can be
kept for several hours; during the power failure, the times of door opening shall be reduced, and
no more fresh food shall be put into the appliance.
Long-time nonuse: The appliance shall be unplugged and then cleaned; then the doors are left
open to prevent odor.
vegetable holder, freezing chamber drawers and etc. with tape, and tighten the leveling feet; close
horizontally, or be vibrated; the inclination during movement shall be no more than 45°.
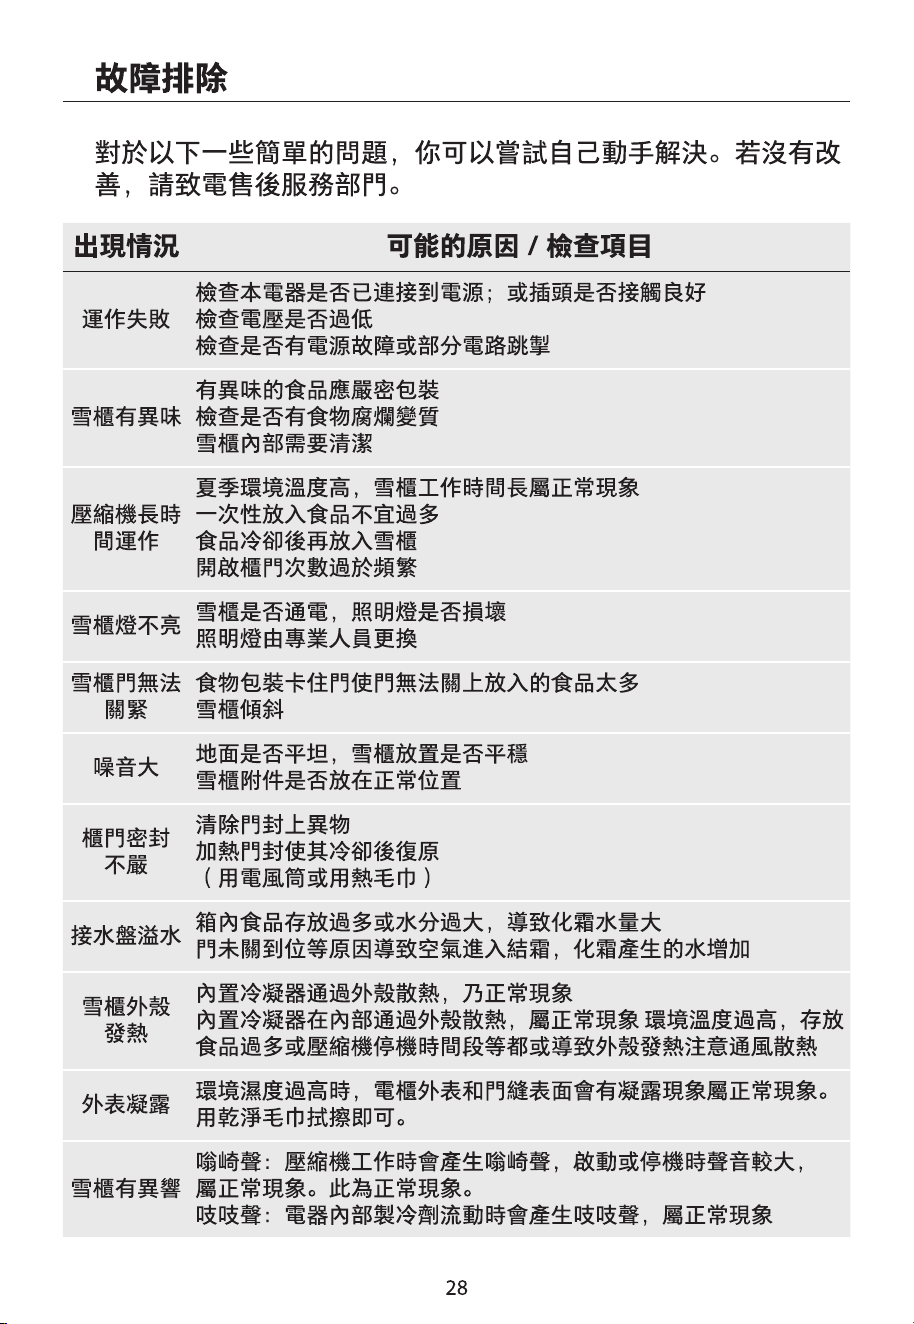
The appliance shall run continuously once it is started.
Generally, the operation of the appliance shall not be
interrupted; otherwise the service life may be impaired.
25
You may try to solve the following simple problems on your own. If they cannot be solved, please
contact the after-sales department.
Occurrence
Failed operation
Odor
Light fails to get lit
Loud noise
Hot housing
Surface condensation
Abnormal noise
Buzz: The compressor may produce buzzes during operation, and the
buzzes are loud particularly upon start or stop. This is normal.
which is normal
Condensation on the exterior surface and door seals of the refrigerator
is normal when the ambient humidity is too high. Just wipe the condensate
with a clean towel
Heat dissipation of the built-in condenser via the housing, which is normal
When housing becomes hot due to high ambient temperature,
storage of too much food or shutdown of the compressor is shut down,
provide sound ventilation to facilitate heat dissipation
There is too much food in the chamber or food stored contains
too much water,resulting in heavy defrosting
The doors are not closed properly, resulting in frosting due to entry
of air and increased water due to defrosting
Remove foreign matters on the door seal
Heat the door seal and then cool it for restoration
(or blow it with an electrical drier or use a hot towel for heating)
Door seal fails to
be tight
Check whether accessories are placed at proper locations
The door is stuck by food packages Too much food is placed
The refrigerator is tilted
Doors cannot be
properly closed
Check whether the refrigerator is connected to power supply and
whether the illuminating light is damaged
Have the light replaced by a specialist
Long-time operation
of the compressor
Odorous foods shall be tightly wrapped
Check whether there is any rotten food
Clean the inside of the refrigerator
Long operation of the refrigerator is normal in summer
when the ambient temperature is high
It is not suggestible having too much food in the appliance at the
same time
The doors are opened too frequently
Check whether the appliance is connected to power or
whether the plug is in well contact
Check whether the voltage is too low
Check whether there is a power failure or partial circuits have tripped
Possible cause/inspection items
Food shall get cool before being put into the appliance
5. Trouble shooting
26
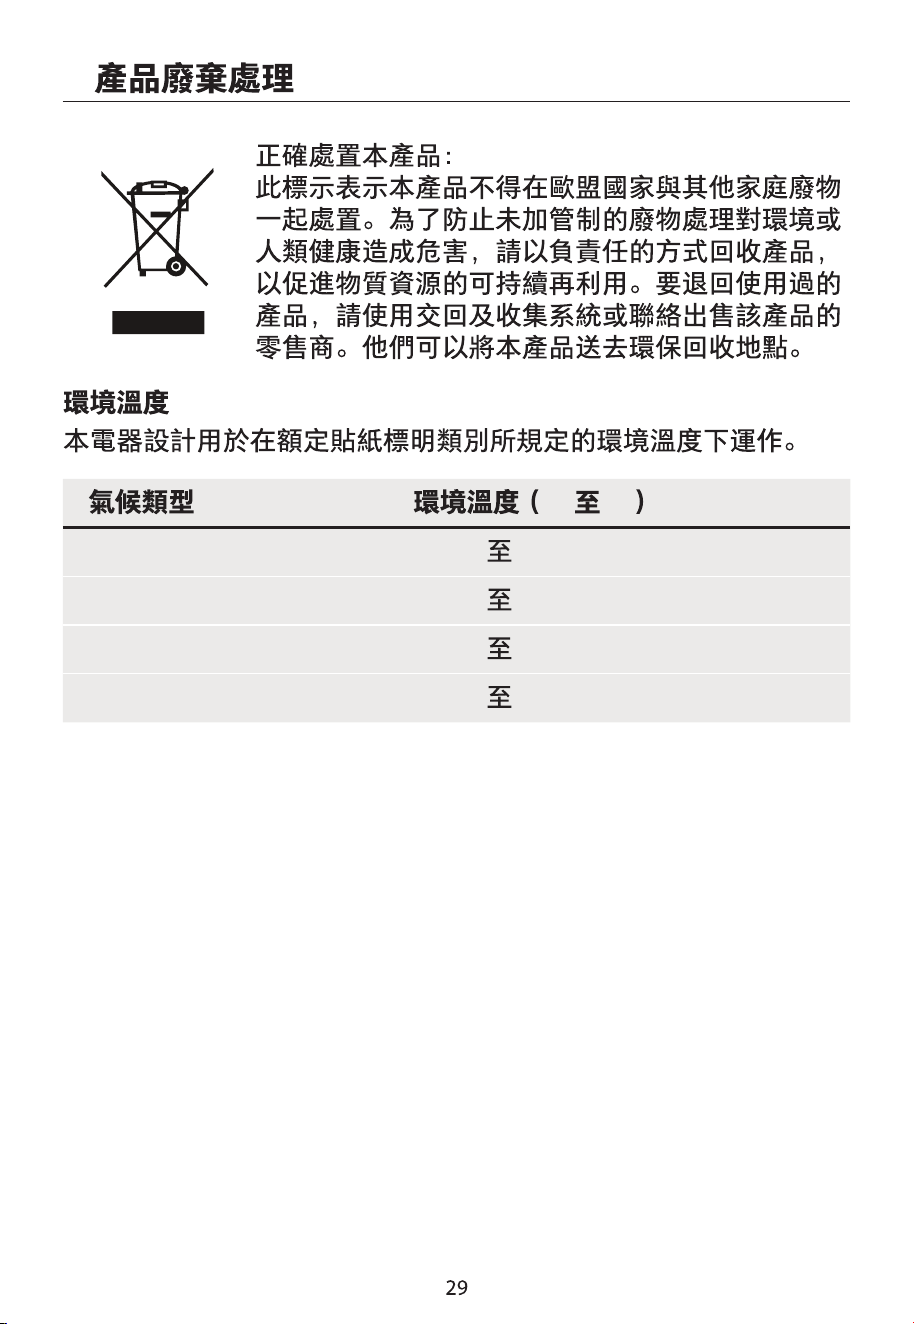
Climate category Ambient temperature (from...to...)
SN +10°C to +32°C
N +16°C to +32°C
ST +16°C to +38°C
T +16°C to +43°C
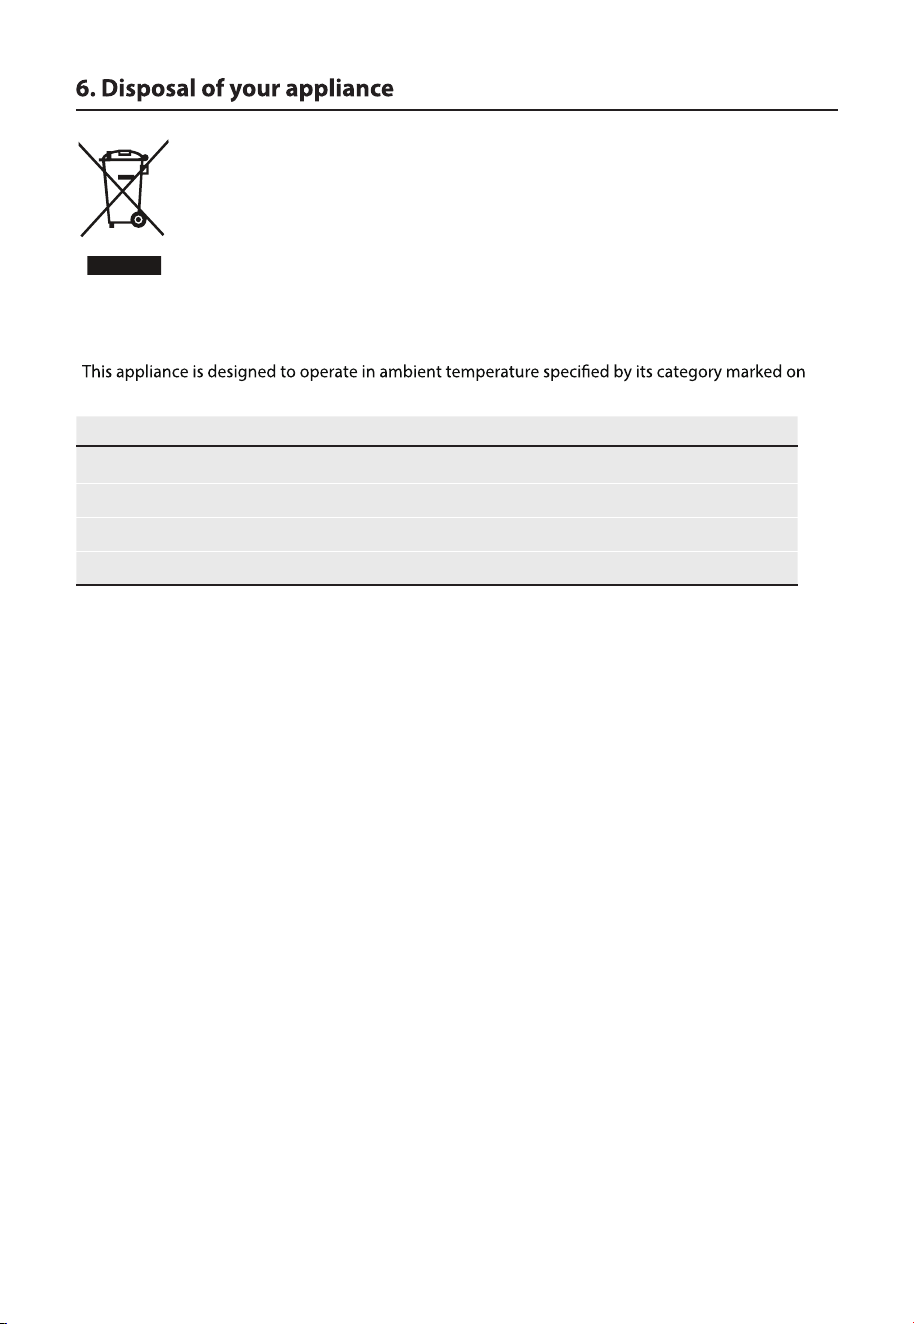
Correct Disposal of this product:
This marking indicates that this product should not be disposed with other
household wastes throughout the EU. To prevent possible harm to the environment
or human health from uncontrolled waste disposal, recycle it responsibly to promote
the sustainable reuse of material resources. To return your used device, please use
the return and collection systems or contact the retailer where the product was
purchased. They can take this product for environmental safe recycling.
AMBIENT TEMPERATURE
the rating plate.

Service hotline: 2635 9222
Specifications are subject to change without prior notice.
The patterns on this manual are all diagrams, and the parts
and structures take the actual product as the standard.



