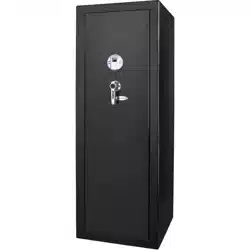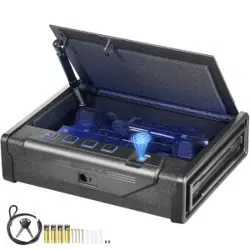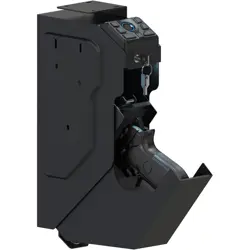

Biometric Dropdown Safe Elite
Instruction Manual (PS0230)
VERPROOFSafe secures your peace
of mind

VERPROOF
®
THE BEST SAFE FOR
ULTIMATE SAFETY AND PROTECTION
Thank you so much for your purchase.
We hope you’re happy with the item and our service.
Should there be any problems with the item,
please do not hesitate to contact us.
support@verproof.com
After-sales
Service
@VerproofSafe
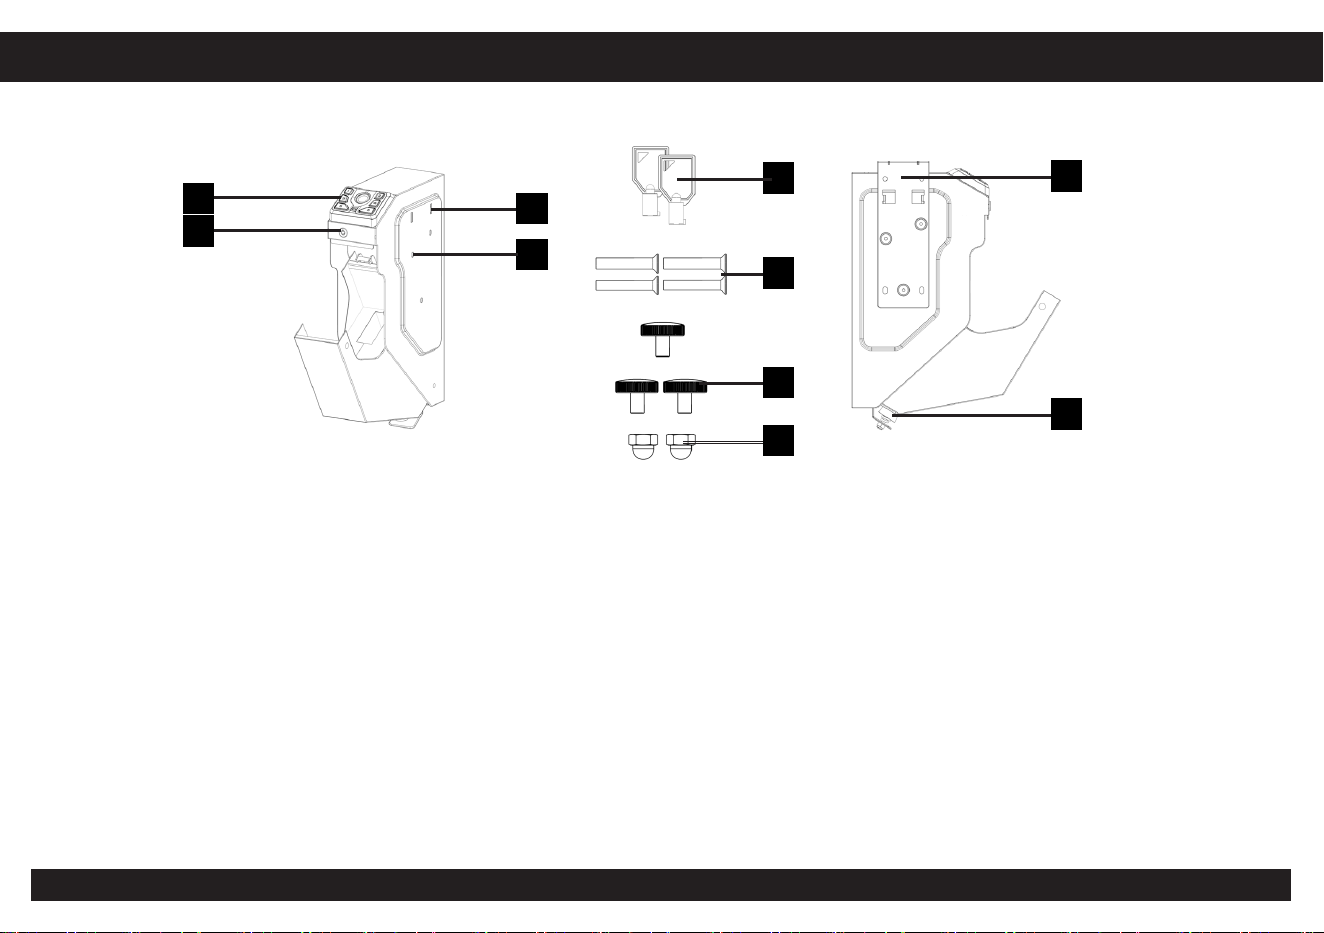
BOX CONTENTS
I. Mounting Bracket
II. Panel (Button & Biometric Scanner)
III. Override Keyhole
IV. Mounting Holes
V. Thumb Mounting Holes
VI. Rubber Bumper
VII. Override Keys (×2)
VIII. Wood Screws (×4)
IX. Thumb Screws (×3)
X . M4 Nuts (×2)
01/Verproof Biometric Safe Elite
Ⅰ
Ⅱ
Ⅲ
Ⅳ
Ⅴ
Ⅵ
Ⅶ
Ⅷ
Ⅸ
Ⅹ

WARNINGS
As a firearms owner, you are responsible for ensuring that children and other unauthorized individuals cannot access your guns at
home. Please follow the following safety measures before using this unit.
DO NOT LOSE THE OVERRIDE KEYS OR STORE THEM IN THE SAFE.
DO NOT expose the safe to extreme low/high temperatures as it may aect battery life.
DO NOT store loaded guns in this unit. Firearms can be dangerous and must be handled with respect.
REGULARLY confirm whether the door is fully locked and check the battery level.
NEITHER SELLER NOR MANUFACTURER SHALL BE LIABLE FOR UNAUTHORIZED ACCESS, ANY INJURY, LOSS OR DAMAGE
TO PERSONAL PROPERTY DIRECT OR CONSEQUENTIAL, ARISING OUT OF THE USE OF, OR THE INABILITY TO USE THE
VERPROOF
®
SAFES. THE USER SHALL DETERMINE THE SUITABILITY OF THE VERPROOF
®
SAFES BEFORE THE INTENDED
USE AND USER ASSUMES ALL RISK AND LIABILITY WHATSOEVER IN CONNECTION THEREWITH, VERPROOF
®
SAFES ARE
NOT INTENDED TO PROTECT AGAINST ENVIRONMENTAL HAZARDS INCLUDING FIRE AND WATER.
Be sure to follow all local and state firearm laws.
DO NOT operate a firearm without proper training and experience.
DISCLAIMERS
02/Verproof Biometric Safe Elite
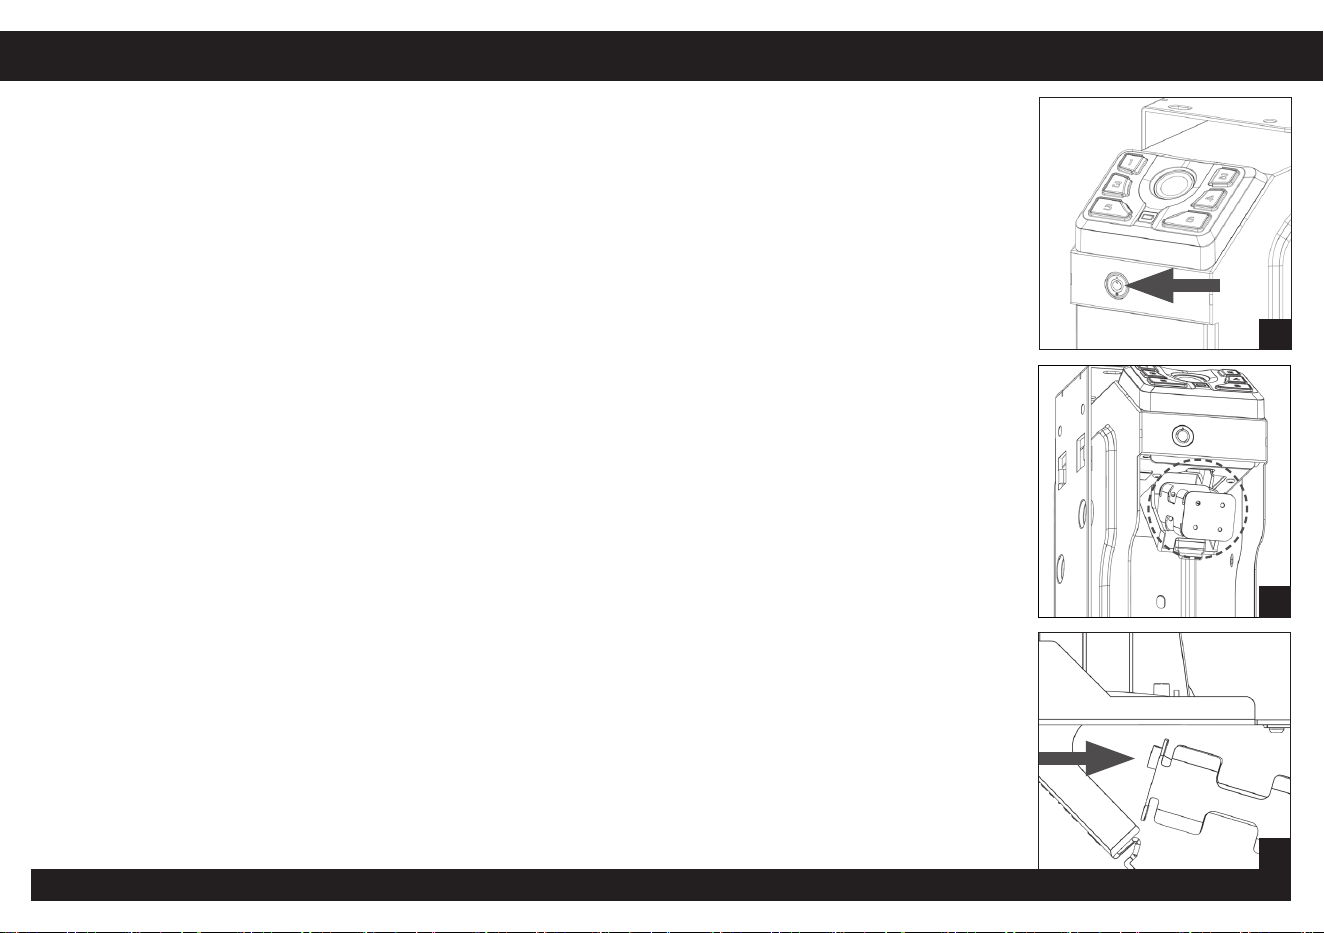
BATTERY INSTALLATION
1 Place the safe upright. Insert an override key into the keyhole and turn clockwise to open the door
(Figure A).
2 Locate the battery compartment cover behind the keypad inside the safe (Figure B).
3 Open the cover, remove the battery box, and insert four AA alkaline batteries. Ensure correct polar-
ity (two positive electrodes face upward; see Figure C).
4 Reinsert the box and close the cover.
5 Repeat the steps above for battery replacement.
Battery Guidelines
1 Use high-quality alkaline batteries; do not mix old and new or dierent battery types.
2 Avoid extreme temperatures.
3 When power is low, the keypad indicator turns yellow—replace the batteries promptly.
4 Remove exhausted batteries and dispose of them properly.
ATTENTION:
VERPROOF
®
Safe auto-locks when the door is fully closed. Do not leave the override key inside the
safe.
All voice prompts can be turned o by enabling silent mode.
03/Verproof Biometric Safe Elite
A
B
C

MASTER CODE PROGRAMMING
04/Verproof Biometric Safe Elite
After receiving the safe, you need to set your own password as soon as possible to prevent unauthorized access to your safe.
TIPS: Code Requirements
• 3-12 digits.
• Press buttons one at a time (no simultaneous presses).
• Recording must be completed within 20 seconds.
• Programming a new code overwrites the previous code.
• There will be voice guidance in programming, which can be turned o by enabling the silent mode (Page 7).
1 Enter the default code 1-2-3-4 to open the safe.
2 Press and hold the Learn button (1 second), and the indicator will turn green with one beep (Figure D).
3 Enter your NEW master code, then press the Learn button again for 1 second to confirm, the indica-
tor will flash green three times with beeps, indicating a successful setup.
4 If the indicator flashes red three times with beeps, the setup has failed. Start again from Step 2.
Note:
• The “Learn” button is on the left side of the LED light, please be careful not to confuse it with the “Mute”
button.
• Holding it down for 3 seconds will reset all of the fingerprints to default.
Please keep your master code in a safe place.
D
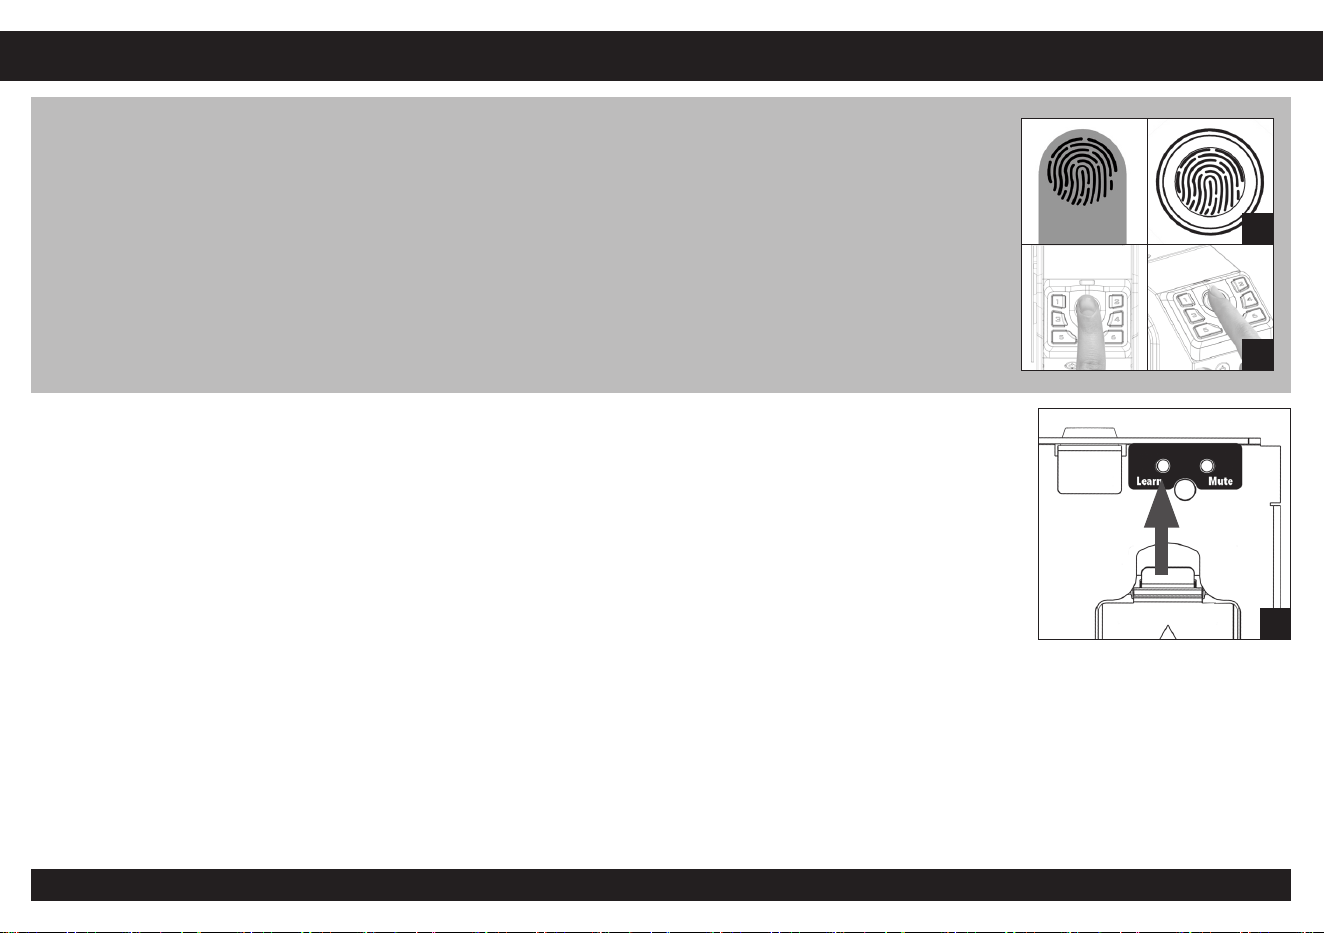
FINGERPRINT REGISTRATION
05/Verproof Biometric Safe Elite
ATTENTION:
• Up to 100 fingerprints can be stored.
• Keep your finger clean when registering fingerprints.
• Keep the core of the fingerprint flat (Figure E+F) over the center of the scanner.
• Adjust your finger slightly between scans for increased accuracy.
• If your fingerprints are diicult to identify, register the same finger 4-5 times for increased accuracy.
• There will be voice guidance in programming, which can be turned o by enabling
the silent mode (Page 7).
1 Enter the previously set master code to open the safe.
2 Locate and press the Learn button (1 second), the indicator will turn green with one beep (Figure G).
3 Place your finger on the biometric scanner and tap it 4 times. Each tap will end with a green flash
and one beep. The last tap will end with a green flashing three times and beeps, indicating a success-
ful setup.
4 If the indicator flashes red three times with beeps, the setup failed. Start again from Step 2.
Note:
• The “Learn” button is on the left side of the LED light, please be careful not to confuse it with the “Mute”
button.
• Holding it down for 3 seconds will reset all of the fingerprints to default.
E
F
G

DELETING THE REGISTERED FINGERPRINTS
06/Verproof Biometric Safe Elite
OPEN SAFE BY FINGERPRINT
Place a previously registered finger onto the scanner to open the safe.
Note:
• Keep your finger clean when identifying fingerprints.
• When a correct fingerprint is read, the green light will turn on with one beep and the door should open.
• If an incorrect fingerprint is read, the red light will flash with beeps.
• After 5 incorrect entries, the red light will flash with beeps and “Too many input errors, safe locked”, the safe will be
disabled for 1 minute.
OPEN SAFE BY MASTER CODE
Enter the previously programmed 3-12 digital code to open the safe.
1
Press and hold the Learn button for 3 seconds; the indicator will flash green three times with beeps and “All fingerprints have been deleted”.
2 Now all registered fingerprints are erased.
Note:
• Press any button to wake the keypad; the first press also counts as the first digit.
• Enter your 3–12 digit code. If correct, the door opens.
• If an incorrect code is entered, the red light will flash with beeps three times.
• After 5 incorrect entries, the red light will flash with beeps, and “Too many input errors, safe locked”, the safe will be
disabled for 1 minute.
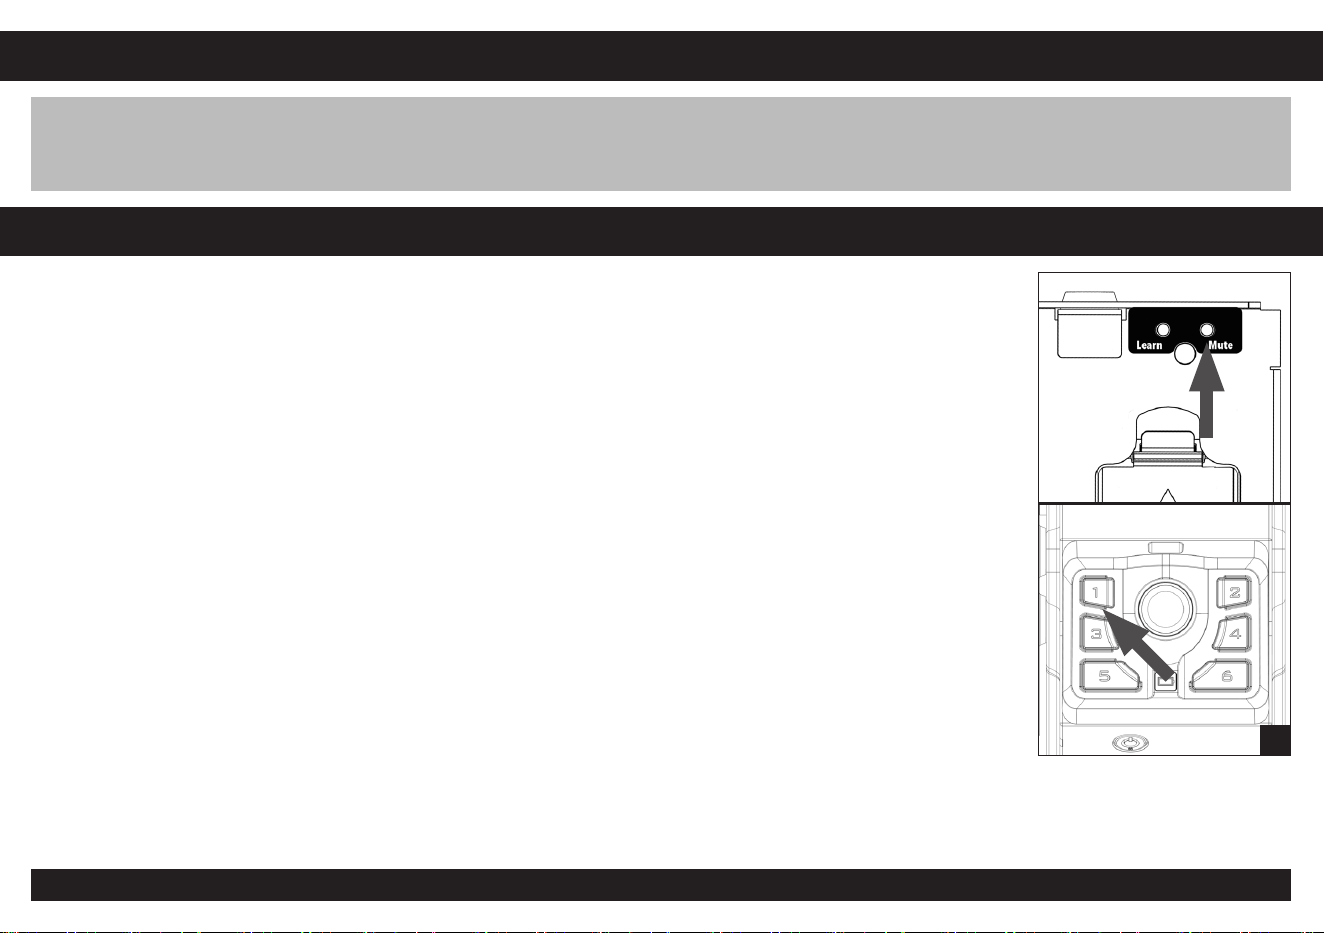
To mute the sound of the safe, press and hold the Mute button or the "1" button for 3 seconds until
the indicator flashes three times (Figure H).
Note:
• Silent mode is disabled during programming process and lock-down mode.
• In silent mode, all voice prompts will be muted.
LOCK-DOWN SYSTEM
After five incorrect entries (fingerprint scans and code entries), the safe will activate lock-down mode, the red light will
flash with beeps, and the safe will be disabled for 1 minute. It will automatically resume normal operation afterward.
To reset immediately, reset lock-down mode by using a registered fingerprint or removing the battery.
SILENT MODE SETTING
07/Verproof Biometric Safe Elite
H
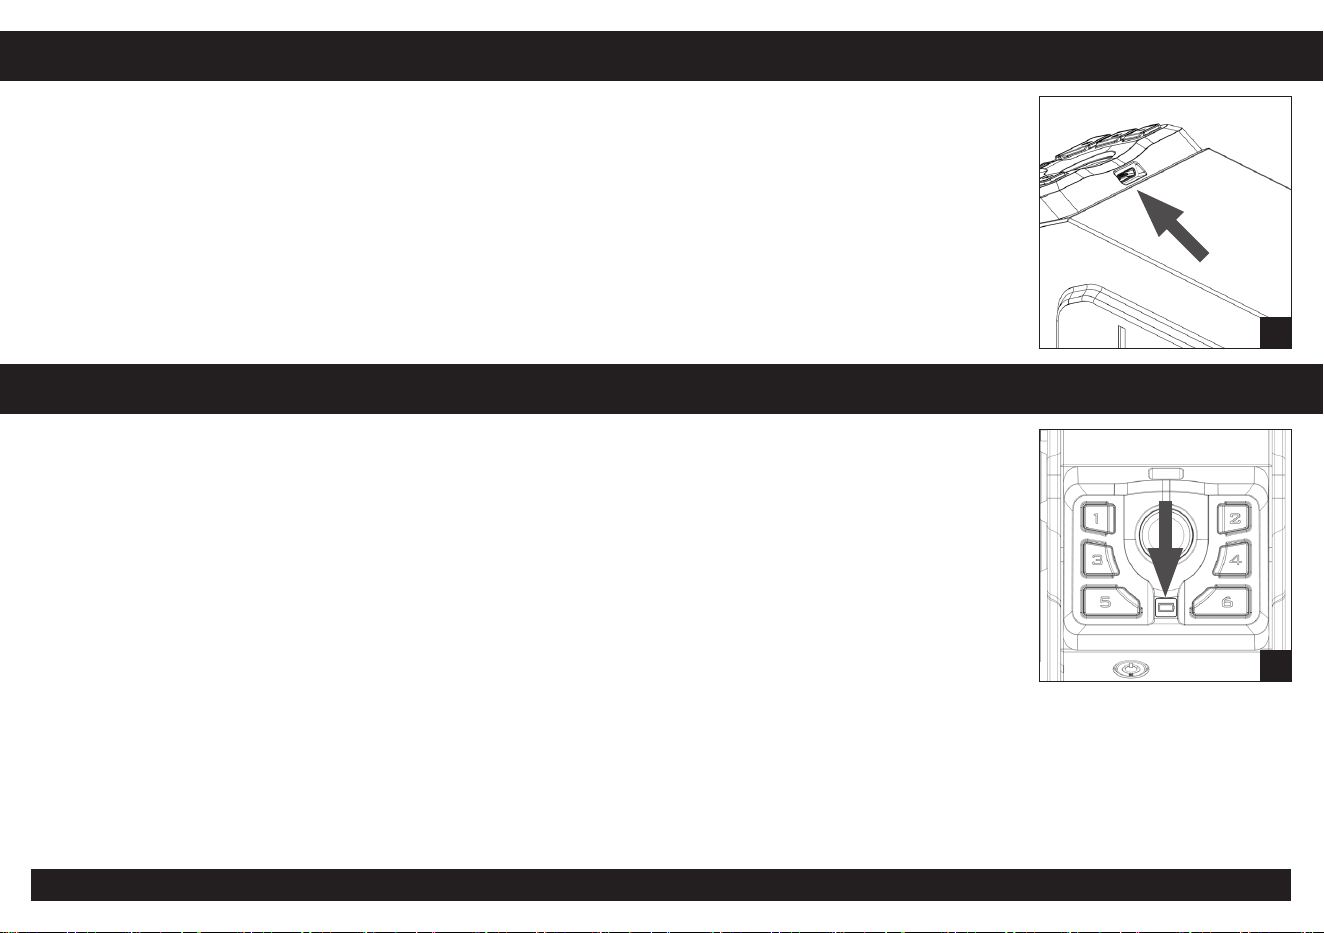
08/Verproof Biometric Safe Elite
When battery power is low, the keypad indicator turns yellow after you wake up the keypad (Figure G).
Replace the batteries immediately.
Note:
• This item contains a memory chip, and the master code and biometric data will never be lost due to
loss of power.
• Low battery warning is disabled during Low-Vis mode.
LOW BATTERY WARNING
J
An emergency power port is located on the top of the keypad (Figure I). Use a USB Type-C cable with
an AC power adapter to power the safe if the batteries are depleted.
Note: Leaving your safe plugged in continually will not harm the safe or battery. After disconnecting
external power, always check battery status and replace batteries if low.
EMERGENCY OUTLET
I
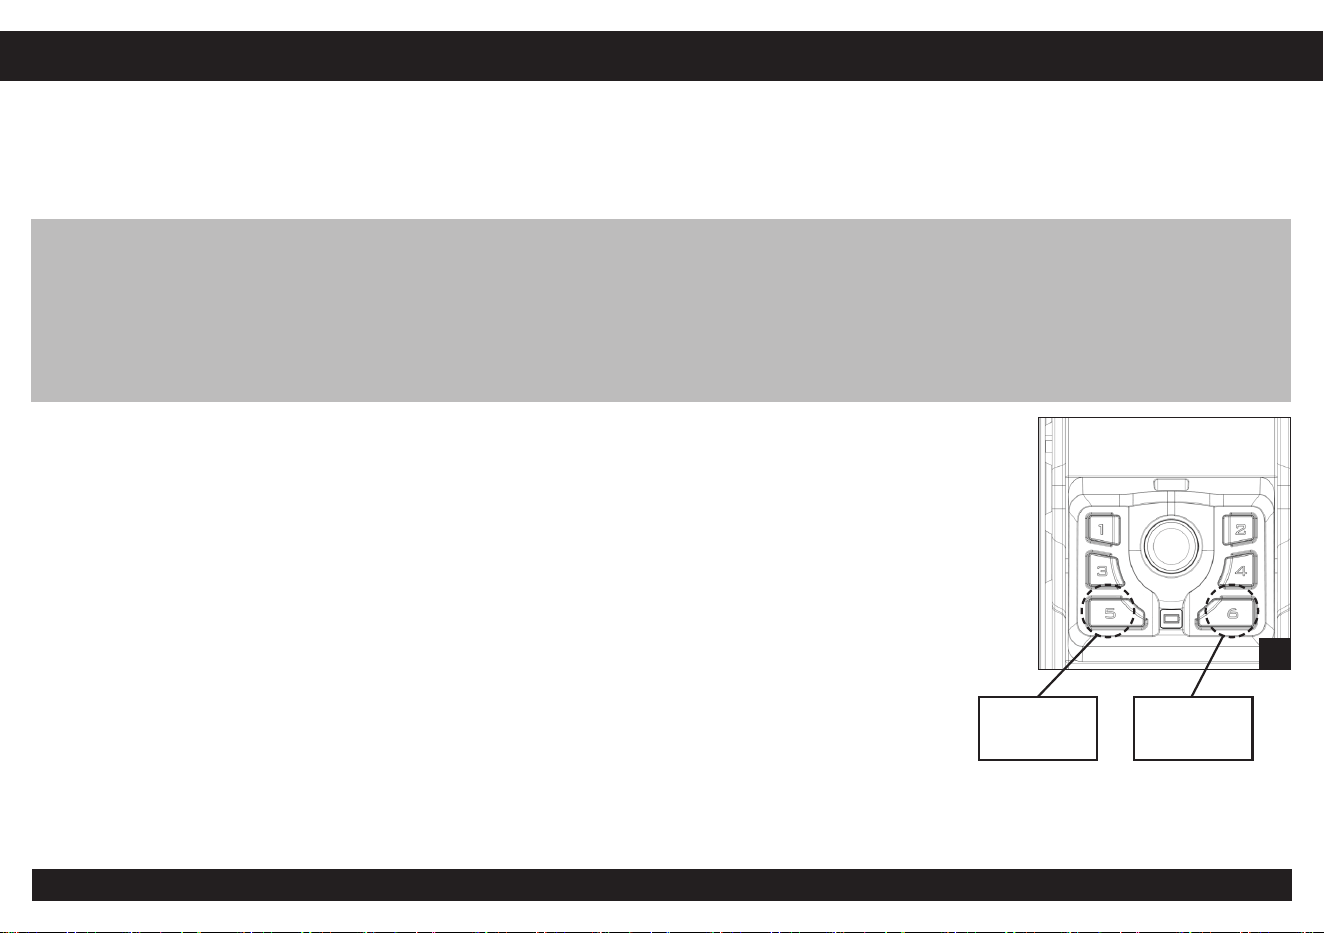
LOW-VIS MODE (STEALTH FUNCTION)
DISABLES INTERIOR LIGHT TO PREVENT NIGHTTIME VISIBILITY.
QUICK ACCESS VIA PHYSICAL BUTTONS OR BIOMETRICS, EXTENDED BATTERY LIFE, AND UNCOMPROMISED SECURITY.
STEALTH, READINESS, AND SAFETY UNIFIED.
K
TIPS:
• Please turn o Low-Vis mode during registration to obtain light indication.
• Register multiple angles of fingerprints in advance to boost biometric reliability in darkness.
• For prolonged stealth use, connect to backup power to eliminate battery-change exposure risks.
• Enable Low-Vis + Silent Mode for full-night concealment—must practice emergency access drills in advance.
09/Verproof Biometric Safe Elite
To disable the internal light, hold the “3” button for 3 seconds until the indicator light flashes green
three times with three beeps (Figure K).
To disable the backlight of the keypad and fingerprint, hold the “4” Button for 3 seconds until all lights
are turned o (Figure K).
Note: Low battery warning is disabled during Low-Vis mode.
Disable the
Internal light
Disable the
backlight

WI-FI SETUP
10/Verproof Biometric Safe Elite
The SmartLife app is an incredible management tool. Android users can download it from Google Play and iOS
can download from the Apple Store.
Scan the QR code on the right with your smartphone camera to access the video tutorial for Wi-Fi functions and
features or visit https://www.youtube.com/@Verproofsafe/playlists and select your model.
Pairing the Safe with the SmartLife App
1 On your smartphone, turn on Wi-Fi and Bluetooth. Open the SmartLife app, tap the “+” icon in the top-right corner, and tap “Add
Device”.
2 On the safe, press the “2” button, then press the Learn button.
The safe will announce “pairing” and the keypad will flash, indicating it has entered pairing mode.
3 On the "Searching for nearby devices" screen, your safe will appear. Tap it.
4 On the "Enter Wi-Fi Information" screen, select the Wi-Fi network that is the same as the one your smartphone is connected
to, enter the password, and tap Next. Wait for the safe to connect.
Upon successful connection, the safe will announce “connected”.
Pairing Time Limit: 2 minutes.
If the time expires, the red indicator light will flash 3 times with beeps and the safe will automatically exit pairing mode.
Note: For a successful connection, install the safe close to your Wi-Fi router. During pairing, keep your smartphone as near as pos-
sible to the safe.
VERPROOF WIFI SAFES WILL ONLY CONNECT TO 2.4 GHZ NETWORKS. ACCESS POINTS ARE NOT RECOMMENDED.
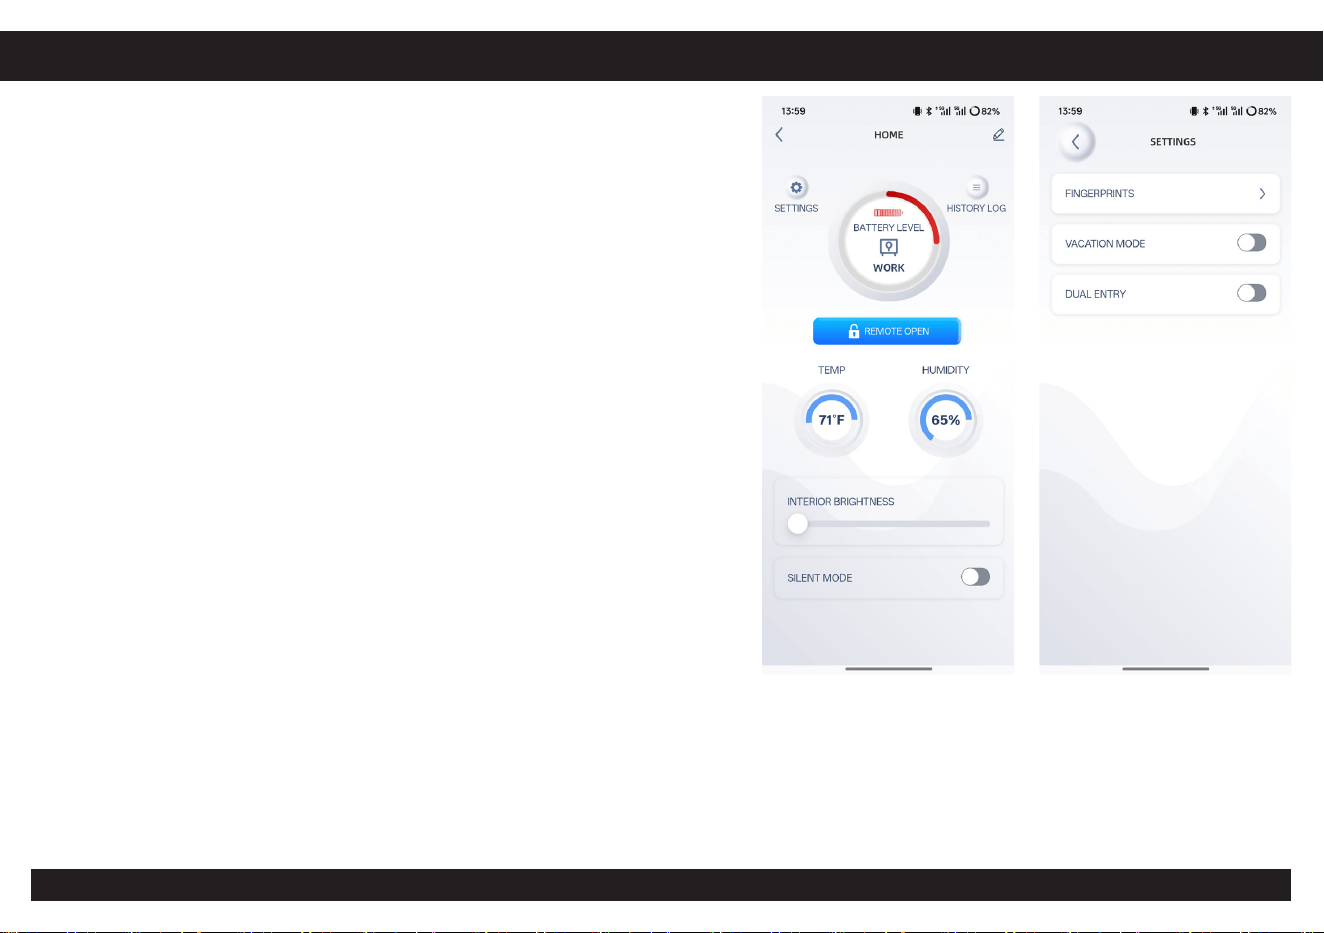
DASHBOARD FEATURES
11/Verproof Biometric Safe Elite
Upon successful connection, the app will display the dashboard for your safe.
The following features are available:
1 Settings (Fingerprints / Vacation Mode / Dual Entry)
Fingerprints: Edit fingerprint names. Delete individual fingerprints or all
fingerprints at once.
Vacation Mode: Toggle Vacation Mode. When enabled, fingerprints and
passwords are disabled; the safe can only be opened with the physical key.
Dual Entry: Toggle Dual Entry mode. When enabled, opening the safe re-
quires both entering the correct password and scanning a registered fingerprint
for dual verification.
2 History Log: Displays the safe’s opening records. These records cannot be
deleted unless the safe is unbound from the app.
Notes:
1 When no external power is connected and the safe is in wake-up mode, op-
erating the app will keep the safe awake. If no operations are performed for 20
seconds, the safe will enter sleep mode and can no longer be controlled via the
app. To wake the safe and restore control, press any key on the safe’s keypad.
When external power is connected, the fingerprint light will continuously pulse
blue (breathing eect), indicating wake-up mode. The app can control the safe at
any time.
2 If the safe is too far from the Wi-Fi router, app operations may respond slowly.
Please be patient or reposition the safe closer to the router.
Tips: Every time the safe wakes up, it needs about 5 seconds
to connect to the server. During this short period, you may
notice a slight lag in the dashboard feedback.
We recommend keeping it plugged into the external power
supply — this way, the safe and server will stay constantly
connected.
DASHBOARD FEATURES
12/Verproof Biometric Safe Elite
3 Battery Level: Shows the current battery level. When displayed in red, replace the batteries as soon as possible.
Note: When using external power, the safe may still display a low-voltage warning. This is normal, so please do not worry about it.
4 TEMP: Displays the internal temperature.
To switch between Celsius and Fahrenheit: On the Smart Life app home screen, tap Me in the bottom menu, then tap the hexagonal nut icon in
the top-right corner to open Settings. Tap Temperature Unit to change the unit.
5 HUMIDITY: Displays the internal humidity.
6 Interior Brightness: Adjusts the brightness of the safe’s interior light.
7 Silent Mode: Toggles silent mode for the safe.
8 Remote Open: Normally hidden. Press and hold the “6” button on the safe for 3 seconds to initiate a remote open request. A button will ap-
pear on the dashboard. Tap the button to open the safe.
If no action is taken within 1 minute, the red indicator light will flash 3 times and the request will exit.
RESETTING THE SAFE
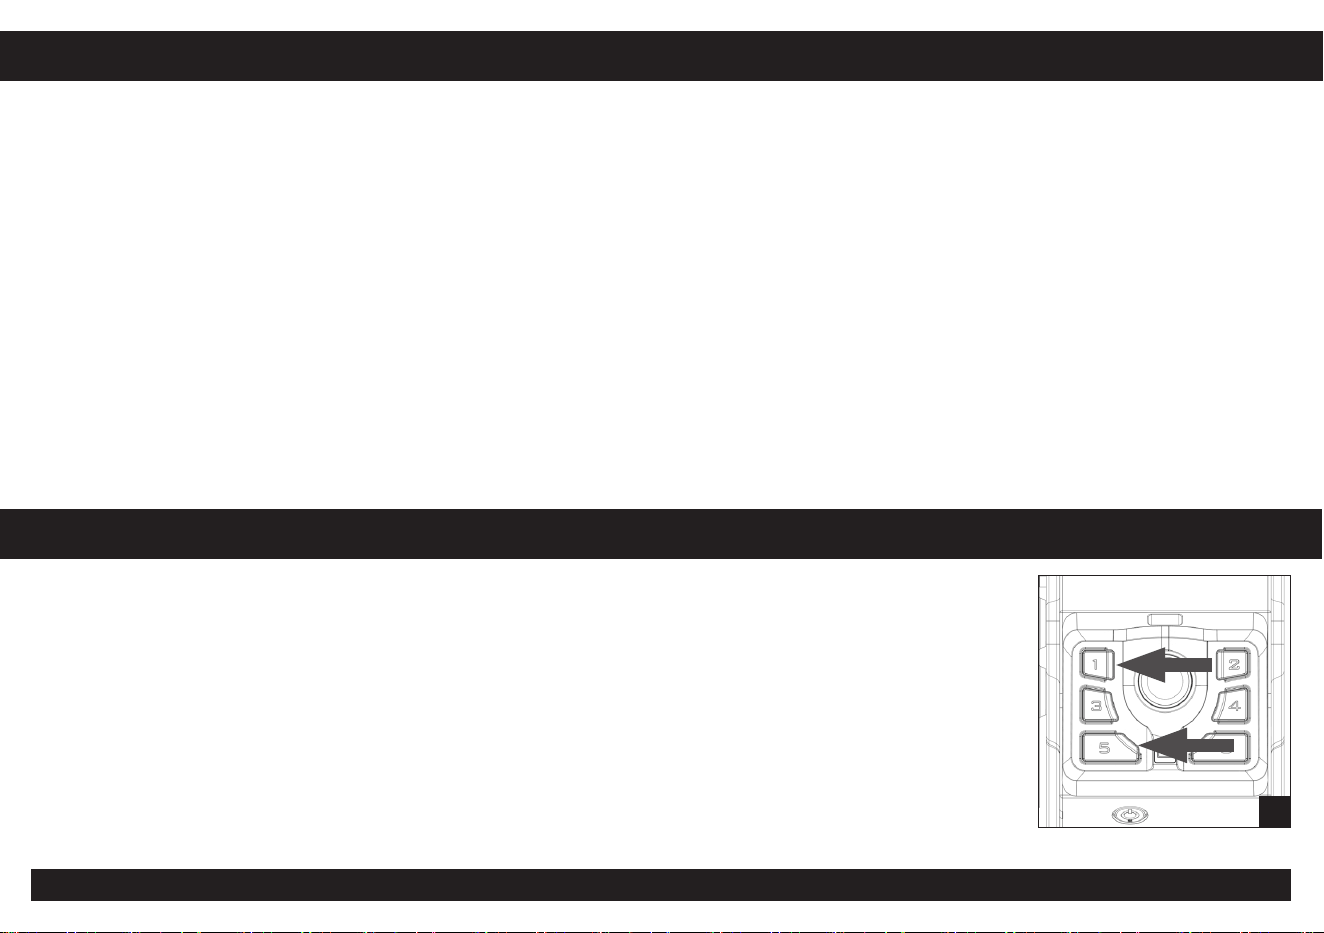
To reset the safe, simultaneously press and hold the “1”, “5”, and Learn button for 3 seconds (Figure L).
The safe will be restored to factory default settings. All settings will be cleared, and the connection with the
Smart Life app will be disconnected.
L
Tools Required:
Phillips-Head Screw Driver
Optional Tools:
Power Drill, Phillips-Head Bit
Supplied parts:
Safe body x1, Override keys x 2, Rubber Bumper x1, Mounting Bracket x1
Wood Screw x 4, Thumbscrew x 3, Nut (M4) x 2
Direction: The safe can be mounted from the left, right, or back using the provided bracket.
Note: If you need to mount the bracket on the back of the safe, please first remove the door by
unscrewing the two screws under the safe. After completing step 5, reinstall the door.
MOUNTING INSTRUCTIONS
13/Verproof Biometric Safe Elite
Note:
Mounting screws provided are for solid wood surface only. If mounting to any other
surfaces, like drywall, cement, etc. The appropriate hardware can be purchased
through a local hardware store.
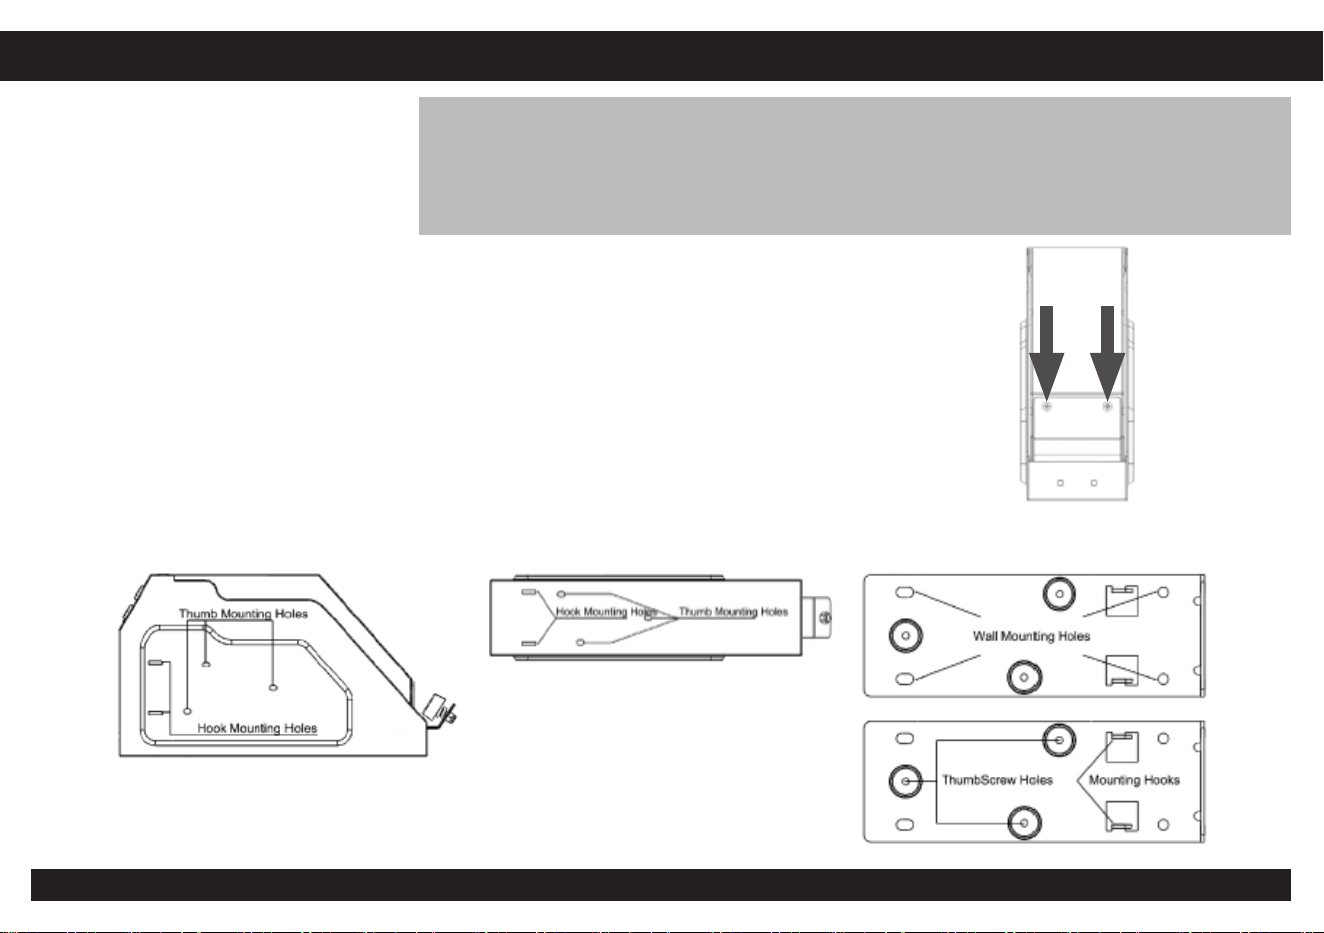
Left/Right Side View: Back Side View: Bracket Images:
1 Secure the “Mounting Bracket” to the desired location using the “Wall Mounting Holes”
on the bracket and the provided wood screws.
2 Open the safe by the supplied keys. This will allow the hand to reach into the safe.
3 Insert the “Mounting Hooks” into the “Hook Mounting Holes” located on the left, right,
or back of the safe. Now that the safe is mounted to the bracket, it can be secured to the
bracket by using the supplied “Thumbscrews”.
4 Locate the three “Thumb Mounting Holes” beneath the “Mounting Hooks” inside the
safe.
5 Insert the “Thumbscrew” into the “Thumb Mounting Hole” and turn clockwise until tight.
The safe is now securely mounted.
6 Try to open and close the safe three times to ensure the drawer is working properly.
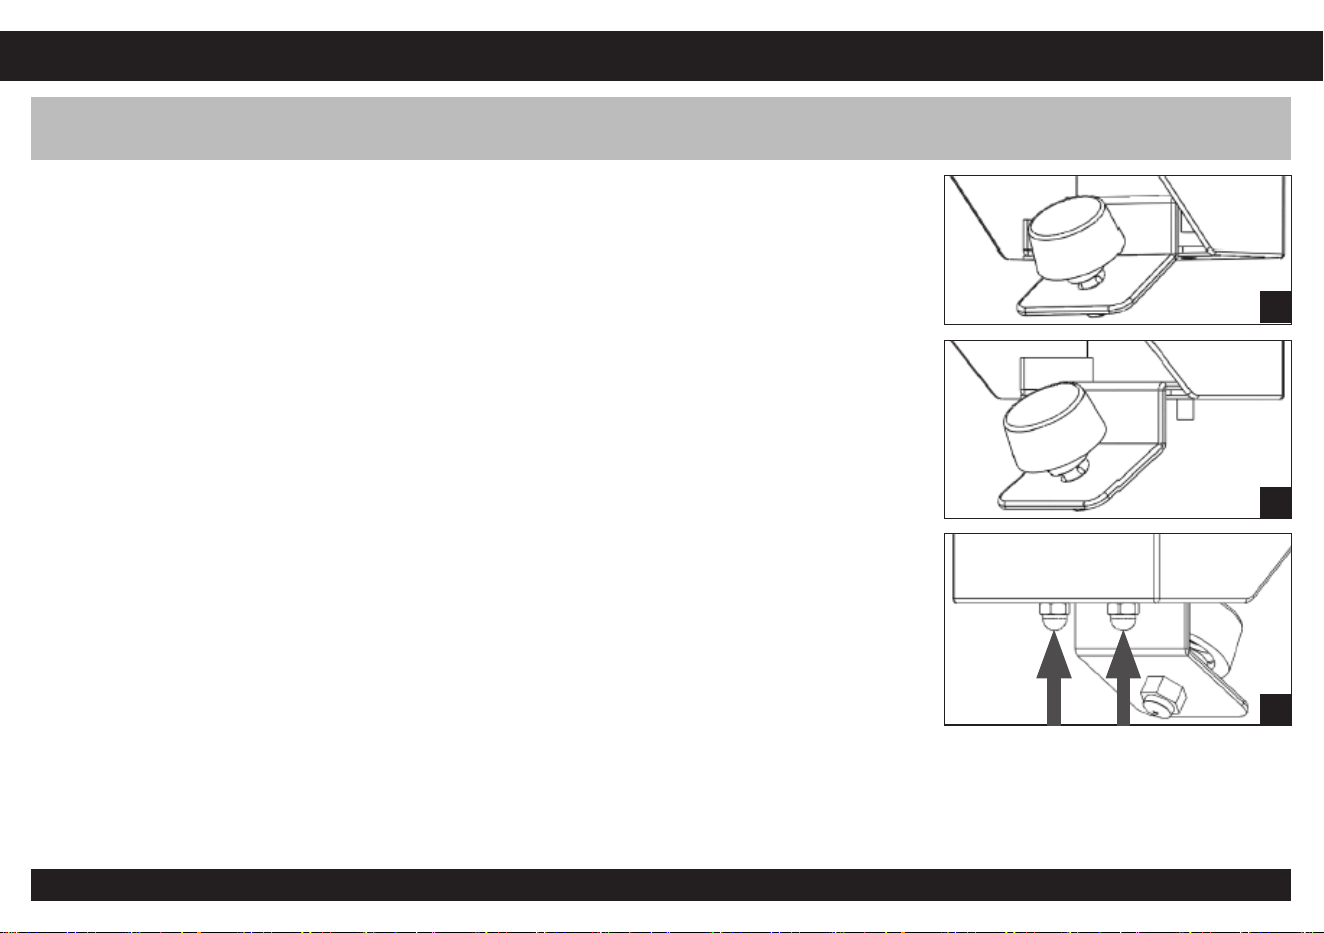
7 Insert the rivets on the “Bumper” into the holes in the bottom of the safe and then secure
them with two supplied “Nuts (M4)”.
Wood Screw x 4, Thumbscrew x 3, Nut (M4) x 2
MOUNTING INSTRUCTIONS
14/Verproof Biometric Safe Elite
IMPORTANT: When mounting this safe, make sure the drawer has enough space to drop open. The drawer requires
gravity to fully release; always install in a vertical orientation.
M
N
O

Q: Fingerprint scanner works sometimes and not others.
A: 1 Please refer to the method to increase the success rate of fingerprints on page 5 of our manual.
2 Replace with new AA alkaline batteries.
Q: Unable to register the master code and fingerprint.
A: Ensure you are pressing the “Learn” button, which is located on the left side of the LED light, and the recording interval needs to be within
15s.
Q: The keypad is not responding.
A: Please replace with new AA alkaline batteries and reset the master code. If this issue persists, please contact us for assistance via sup-
Q: The door cannot be closed or opened.
A: Please try again after using the emergency outlet to power the safe or replacing with the new alkaline batteries.
Q: Fingerprint scanner, keypad and lights are not responding.
A: 1 Please ensure Low-Vis mode is turned o.
2 Please replace with new AA alkaline batteries and ensure that the positive and negative electrodes are not reversed.
Q: How to turn o all voice prompts.
A: Turn on silent mode; all voice prompts will be muted.
Q: When using the dashboard in the app, the safe does not respond to the commands.
A: 1 Please check whether your safe has entered sleep mode. If so, please press any button on the safe to wake it up, wait a few seconds, and
then operate it again through the app.
2 Please check whether your safe is currently set to low-visibility mode. If so, please turn this mode o. If the issue remains unresolved,
please contact us for assistance via support@verproof.com.
TROUBLESHOOTING
STOP! Do not return to retailer. If you have any questions about your Verproof
®
Safe or need help configuring the system, please
contact [email protected]
15/Verproof Biometric Safe Elite
OPERATION VIDEOS/CUSTOMER SUPPORT
16/Verproof Biometric Safe Elite
1 Go to our YouTube website via https://www.youtube.com/@Verproofsafe/playlists or
scan the left side QR code.
2 Select the product model you purchased.
3 If you have a problem with your VERPROOF
®
Safe that is not answered in this manual,
we encourage you to email us: support@verproof.com or scan the right side QR code.
Our dedicated support team is available to assist with inquiries, troubleshoot issues, and provide personalized support, all with
a commitment to your satisfaction.

This device complies with Part 15 of the FCC Rules. Operation is subject to the following two conditions:
(1) This device may not cause harmful interference, and (2) this device must accept any interference received, including inter-
ference that may cause undesired operation.
NOTE 1: This equipment has been tested and found to comply with the limits for a Class B digital device, pursuant to part 15 of
the FCC Rules. These limits are designed to provide reasonable protection against harmful interference in a residential installa-
tion. This equipment generates, uses and can radiate radio frequency energy and, if not installed and used in accordance with
the instructions, may cause harmful interference to radio communications. However, there is no guarantee that interference will
not occur in a particular installation. If this equipment does cause harmful interference to radio or television reception, which
can be determined by turning the equipment o and on, the user is encouraged to try to correct the interference by one or
more of the following measures:
- Reorient or relocate the receiving antenna.
- Increase the separation between the equipment and receiver.
-Connect the equipment into an outlet on a circuit dierent from that to which the receiver is connected.
-Consult the dealer or an experienced radio/TV technician for help.
NOTE 2: Any changes or modifications to this unit not expressly approved by the party responsible for compliance could void
the user's authority to operate the equipment.
The device has been evaluated to meet general RF exposure requirement. The device can be used in portable exposure condi-
tion without restriction.
FCC Warning
17/Verproof Biometric Safe Elite