QUICK START GUIDE QUICK START GUIDE
Smart Candle 5-inch Video Baby Monitor – DM568
Smart Candle 5-inch Video Baby Monitor Twin – DM568-2
Smart Candle 5-inch Video Baby Monitor – DM568
Smart Candle 5-inch Video Baby Monitor Twin – DM568-2
Parent Unit Parent UnitUSB-C/ USB-A
power cable
USB-C/ USB-A
power cable
Quick Start
Guide
Quick Start
Guide
Baby Unit
(Camera)
Baby Unit
(Camera)
USB Power
Adaptor
USB Power
Adaptor
x2 x2x2 x2
3.
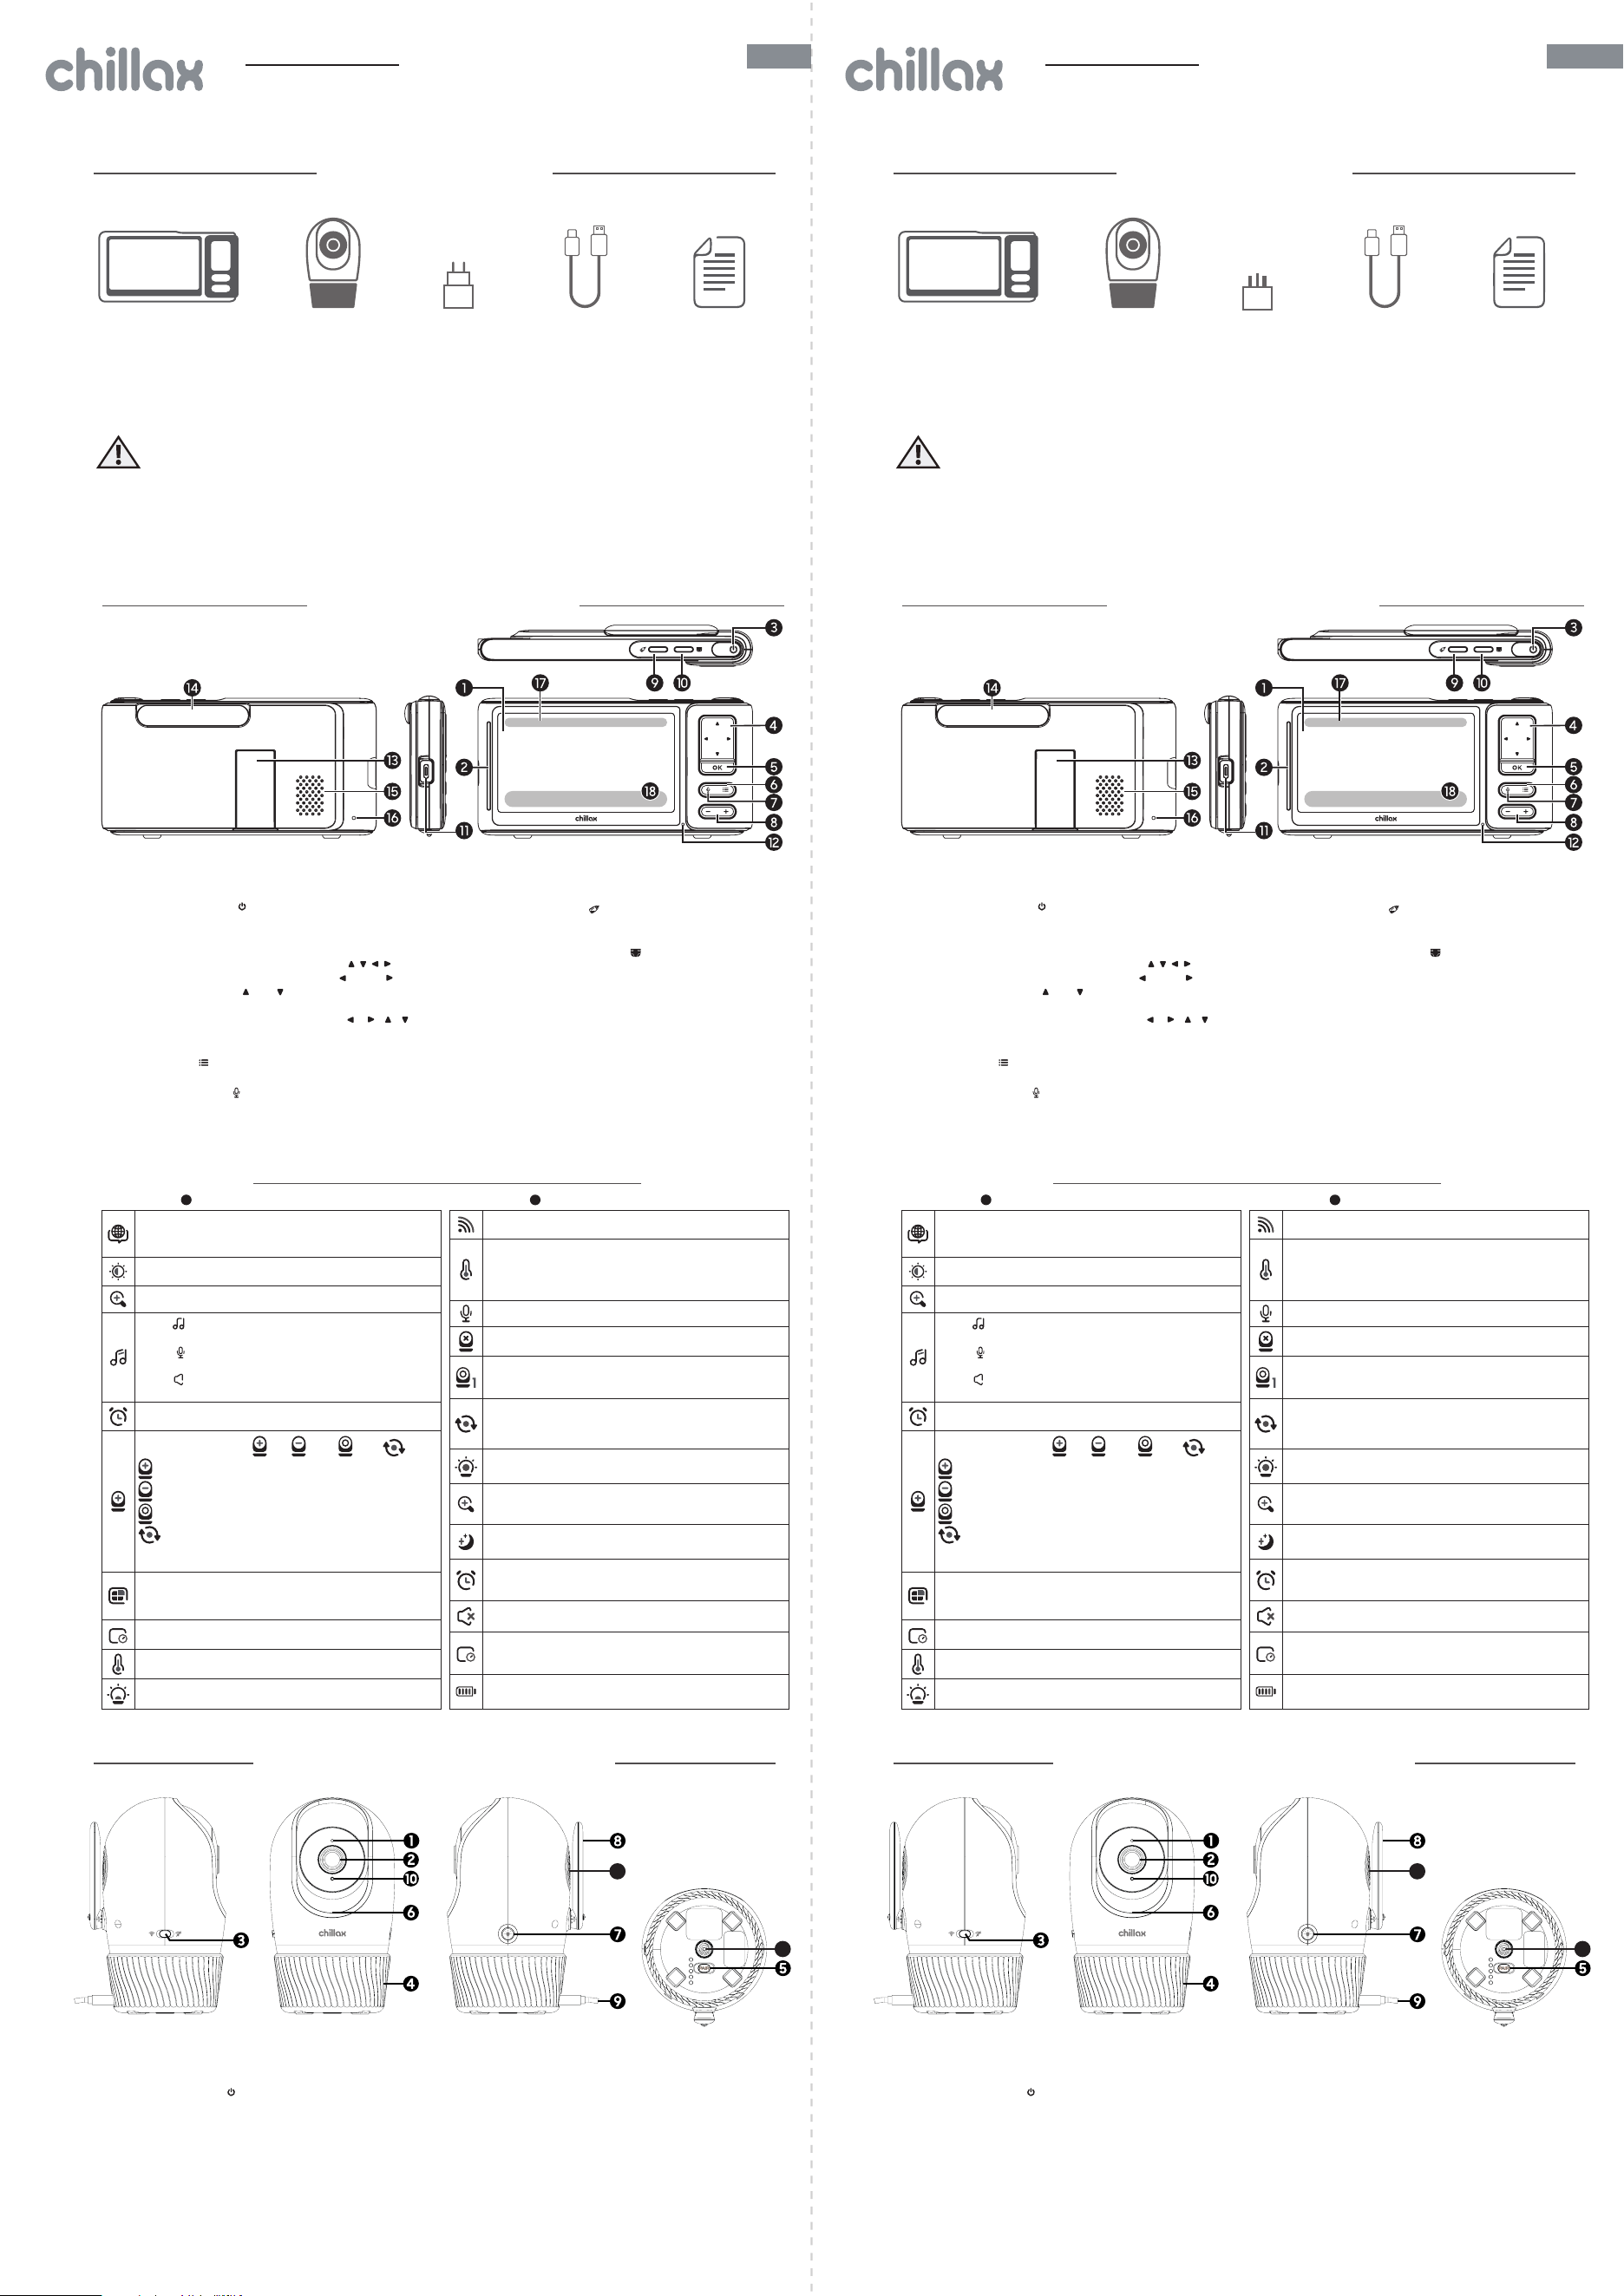
Overview of Baby Unit (Camera)
3.
Overview of Baby Unit (Camera)
1.
Contents Inside Box
1.
Contents Inside Box
Menu icons
18
Language selection icon :
US English, UK English, Français, Deutsch, Español,
Português, Italiano, Nederlands
LCD Brightness Level Control (8 Levels).
Zoom Level Control (1X, 1.5X, 2X).
Select to playback preloaded lullaby.
Press OK to playback or stop the selected lullaby.
Select to playback personal recording (record via
Chillax App).
Select and press - or + button to adjust the volume of
the lullaby in the baby room.
Timer Setting (30mins to 6hrs with step of 30-min, OFF).
Camera Control (add , del , view , tour ).
to add a camera
to delete a camera
to choose which cam you want to view
to cycle through camera views automatically. It
works when more than one camera is paired to the
parent unit.
View multiple cameras on screen.
Function available when you have more than 1 Baby Unit
(Camera).
Set Screen Off Timer (Off, 5 mins, 15 mins, 30 mins, 60 mins).
Baby room temperature :
Choose °C or °F.
Night light: choose the colour of the camera nightlight.
Menu icons
18
Language selection icon :
US English, UK English, Français, Deutsch, Español,
Português, Italiano, Nederlands
LCD Brightness Level Control (8 Levels).
Zoom Level Control (1X, 1.5X, 2X).
Select to playback preloaded lullaby.
Press OK to playback or stop the selected lullaby.
Select to playback personal recording (record via
Chillax App).
Select and press - or + button to adjust the volume of
the lullaby in the baby room.
Timer Setting (30mins to 6hrs with step of 30-min, OFF).
Camera Control (add , del , view , tour ).
to add a camera
to delete a camera
to choose which cam you want to view
to cycle through camera views automatically. It
works when more than one camera is paired to the
parent unit.
View multiple cameras on screen.
Function available when you have more than 1 Baby Unit
(Camera).
Set Screen Off Timer (Off, 5 mins, 15 mins, 30 mins, 60 mins).
Baby room temperature :
Choose °C or °F.
Night light: choose the colour of the camera nightlight.
1. Display (LCD screen)
2. Visuals sound level indicator indicating the sound
level at the baby unit
3. Parent Unit ON/OFF
Short press to switch on when unit is off.
Long press to switch off when unit is on.
Short press to turn LCD screen Off when unit is on.
4. Camera control / Navigation buttons
In standby mode, control the Pan ( LEFT /
RIGHT) and the Tilt (
UP / DOWN) movements of
the camera head.
In menu mode, press once to move /
/ /
through the menu options.
5. OK button
6. MENU button
Press to open / close the Menu options.
7. 2-Way Talk button
Press and hold to speak to your baby.
1. Display (LCD screen)
2. Visuals sound level indicator indicating the sound
level at the baby unit
3. Parent Unit ON/OFF
Short press to switch on when unit is off.
Long press to switch off when unit is on.
Short press to turn LCD screen Off when unit is on.
4. Camera control / Navigation buttons
In standby mode, control the Pan ( LEFT /
RIGHT) and the Tilt (
UP / DOWN) movements of
the camera head.
In menu mode, press once to move /
/ /
through the menu options.
5. OK button
6. MENU button
Press to open / close the Menu options.
7. 2-Way Talk button
Press and hold to speak to your baby.
1. Microphone
2. Camera Lens
3. Wi-Fi On/Off Switch
Slide to switch On/Off the Wi-Fi connection.
4. Mood Light
5. PAIR Button
Press and hold to pair with the Chillax app or
the parent unit (see chapter 5 for the parent
unit registration)
6. Micro-SD Card Slot (below the camera head)
Support micro-SD card up to 128GB memory.
1. Microphone
2. Camera Lens
3. Wi-Fi On/Off Switch
Slide to switch On/Off the Wi-Fi connection.
4. Mood Light
5. PAIR Button
Press and hold to pair with the Chillax app or
the parent unit (see chapter 5 for the parent
unit registration)
6. Micro-SD Card Slot (below the camera head)
Support micro-SD card up to 128GB memory.
2.
Overview of Parent Unit
2.
Overview of Parent Unit
WARNING:
Strangulation hazard. Children have STRANGLED on cords. Keep this cord out of the reach of children (more
than 3ft (1m) away). Never use extension cords with AC Adaptor. Only use the AC Adaptor provided.
WARNING:
Strangulation hazard. Children have STRANGLED on cords. Keep this cord out of the reach of children (more
than 3ft (1m) away). Never use extension cords with AC Adaptor. Only use the AC Adaptor provided.
2.1
Parent unit menu and status icon on display
2.1
Parent unit menu and status icon on display
8. Volume -/+
Adjust the speaker volume level by pressing
- or + buttons.
9. Feeding log button
Press and hold to record one feeding event
on the App.
10. Nappy change log button
Press and hold to record one diaper change
event on the App.
11. USB-C power socket
12. Microphone
Speak to the mic when 2-way talk.
13. Kick stand
14. Antenna
15. Speaker
16. RESET
17. Status icons bar
(refer to chapter 2.1)
18. Menu icons bar
(refer to chapter 2.1)
8. Volume -/+
Adjust the speaker volume level by pressing
- or + buttons.
9. Feeding log button
Press and hold to record one feeding event
on the App.
10. Nappy change log button
Press and hold to record one diaper change
event on the App.
11. USB-C power socket
12. Microphone
Speak to the mic when 2-way talk.
13. Kick stand
14. Antenna
15. Speaker
16. RESET
17. Status icons bar
(refer to chapter 2.1)
18. Menu icons bar
(refer to chapter 2.1)
7. Mood Light ON/OFF Button
8. Antenna
9. USB-C Power Socket
10. Power and Connection Indicator LED
- Steady Red: Offline
- Steady Blue: Connected
- Blink between Red and Blue alternatively: Pairing
11. 1/4” mounting screw
12. Speaker
7. Mood Light ON/OFF Button
8. Antenna
9. USB-C Power Socket
10. Power and Connection Indicator LED
- Steady Red: Offline
- Steady Blue: Connected
- Blink between Red and Blue alternatively: Pairing
11. 1/4” mounting screw
12. Speaker
Note: In multi-camera packs, you will find one or more additional Baby Units with power adapters. Note: In multi-camera packs, you will find one or more additional Baby Units with power adapters.
EU EN UK EN
11
12 12
11
Status icons
17
Signal level between parent and baby units (5 Levels).
Baby room temperature indication.
Readings in RED if >26°C (max limit) or <14°C (min limit).
Displays LL °C if < 10 °C.
Displays HH °C if > 36 °C.
Talk Mode On.
No Baby Unit detected.
Camera with number (up to 4) indicating the current
viewing camera.
Camera Tour function that cycles through camera views
automatically. It works when more than one camera is
paired to the parent unit.
Mood light on when the function is activated
Zoom Level Indicator (1X, 1.5X, 2X). It appears on the status
bar when zoom in is activated.
Night Vision Mode is activated (Video also changes to
Black/White).
Indicates the timer is set, and when flashing, that timer
time has been reached or missed.
Parent unit speaker is muted.
Indicates the screen off timer is set (not applicable when
the unit is AC powered).
Battery Level indicator (4 Levels).
Status icons
17
Signal level between parent and baby units (5 Levels).
Baby room temperature indication.
Readings in RED if >26°C (max limit) or <14°C (min limit).
Displays LL °C if < 10 °C.
Displays HH °C if > 36 °C.
Talk Mode On.
No Baby Unit detected.
Camera with number (up to 4) indicating the current
viewing camera.
Camera Tour function that cycles through camera views
automatically. It works when more than one camera is
paired to the parent unit.
Mood light on when the function is activated
Zoom Level Indicator (1X, 1.5X, 2X). It appears on the status
bar when zoom in is activated.
Night Vision Mode is activated (Video also changes to
Black/White).
Indicates the timer is set, and when flashing, that timer
time has been reached or missed.
Parent unit speaker is muted.
Indicates the screen off timer is set (not applicable when
the unit is AC powered).
Battery Level indicator (4 Levels).
www.chillaxcare.com www.chillaxcare.com
Note: The micro-SD card records all the video captured by the camera when a formatted card is inserted
into the slot. The system stores the video clips in files every 30 seconds. To view the video clips, unload the
micro-SD card from the camera and use a PC that supports micro-SD card playback.
Note: The micro-SD card records all the video captured by the camera when a formatted card is inserted
into the slot. The system stores the video clips in files every 30 seconds. To view the video clips, unload the
micro-SD card from the camera and use a PC that supports micro-SD card playback.
Chillax, Chillaxcare and the Logos, are trademarks of Chillax Care Limited. 5GenCare and the Logo are trademarks
of 5GenCare Limited. Apple logo is trademarks of Apple Inc., registered in the U.S. and other countries. App Store is
a service mark of Apple Inc. Google Play, Android are trademarks of Google Inc.
Wi-Fi is a trademark of the Wi-Fi Alliance. All the other trademarks are the property of their respective owners.
© 2025 Chillax Care Limited. All rights reserved.
Chillax, Chillaxcare and the Logos, are trademarks of Chillax Care Limited. 5GenCare and the Logo are trademarks
of 5GenCare Limited. Apple logo is trademarks of Apple Inc., registered in the U.S. and other countries. App Store is
a service mark of Apple Inc. Google Play, Android are trademarks of Google Inc.
Wi-Fi is a trademark of the Wi-Fi Alliance. All the other trademarks are the property of their respective owners.
© 2025 Chillax Care Limited. All rights reserved.
7.
Warranty
This product is guaranteed in accordance with the laws in force in the country where you purchased it.
For detailed information on how to activate and implement the warranty in your country, or for guidance on the procedure to
follow in order to benefit from the warranty, please contact us by email at: eu-uksupport@chillaxcare.com
8.
Regulatory Compliance
Declaration of conformity
Hereby, Chillax Care Limited declares that this product is in compliance with the essential requirements and other relevant provi-
sions of Directive 2014/53/EU.
Compliance with EMF
This product complies with all applicable standards and regulations regarding exposure to electromagnetic fields..
9.
Disposal of the Device (environment)
This symbol means that your inoperative electronic appliance must be collected separately and not mixed with the
household waste. Local authority has implemented a specific collection and recycling system for which producers are
responsible.
Help us protect the environment in which we live!
10.
Technical Specifications
CAMERA UNIT
Radio Frequency Proprietary 2400 MHz to 2483.5 MHz
Wi-Fi
®
802.11 b/g/n, 2.4GHz
Image Sensor Colour CMOS 3MP pixels
IR LED 8 pcs
Operating Temperature 5⁰C - 40⁰C
Power Adapter Input: 100-240V AC, 50/60Hz, 350mA;
Output: 5.0V DC, 1500mA
WARNING
Use only with provided power supply.
7.
Warranty
This product is guaranteed in accordance with the laws in force in the country where you purchased it.
For detailed information on how to activate and implement the warranty in your country, or for guidance on the procedure to
follow in order to benefit from the warranty, please contact us by email at: eu-uksupport@chillaxcare.com
8.
Regulatory Compliance
Declaration of conformity
Hereby, Chillax Care Limited declares that this product is in compliance with the essential requirements and other relevant provi-
sions of Directive 2014/53/EU.
Compliance with EMF
This product complies with all applicable standards and regulations regarding exposure to electromagnetic fields..
9.
Disposal of the Device (environment)
This symbol means that your inoperative electronic appliance must be collected separately and not mixed with the
household waste. Local authority has implemented a specific collection and recycling system for which producers are
responsible.
Help us protect the environment in which we live!
10.
Technical Specifications
CAMERA UNIT
Radio Frequency Proprietary 2400 MHz to 2483.5 MHz
Wi-Fi
®
802.11 b/g/n, 2.4GHz
Image Sensor Colour CMOS 3MP pixels
IR LED 8 pcs
Operating Temperature 5⁰C - 40⁰C
Power Adapter Input: 100-240V AC, 50/60Hz, 350mA;
Output: 5.0V DC, 1500mA
WARNING
Use only with provided power supply.
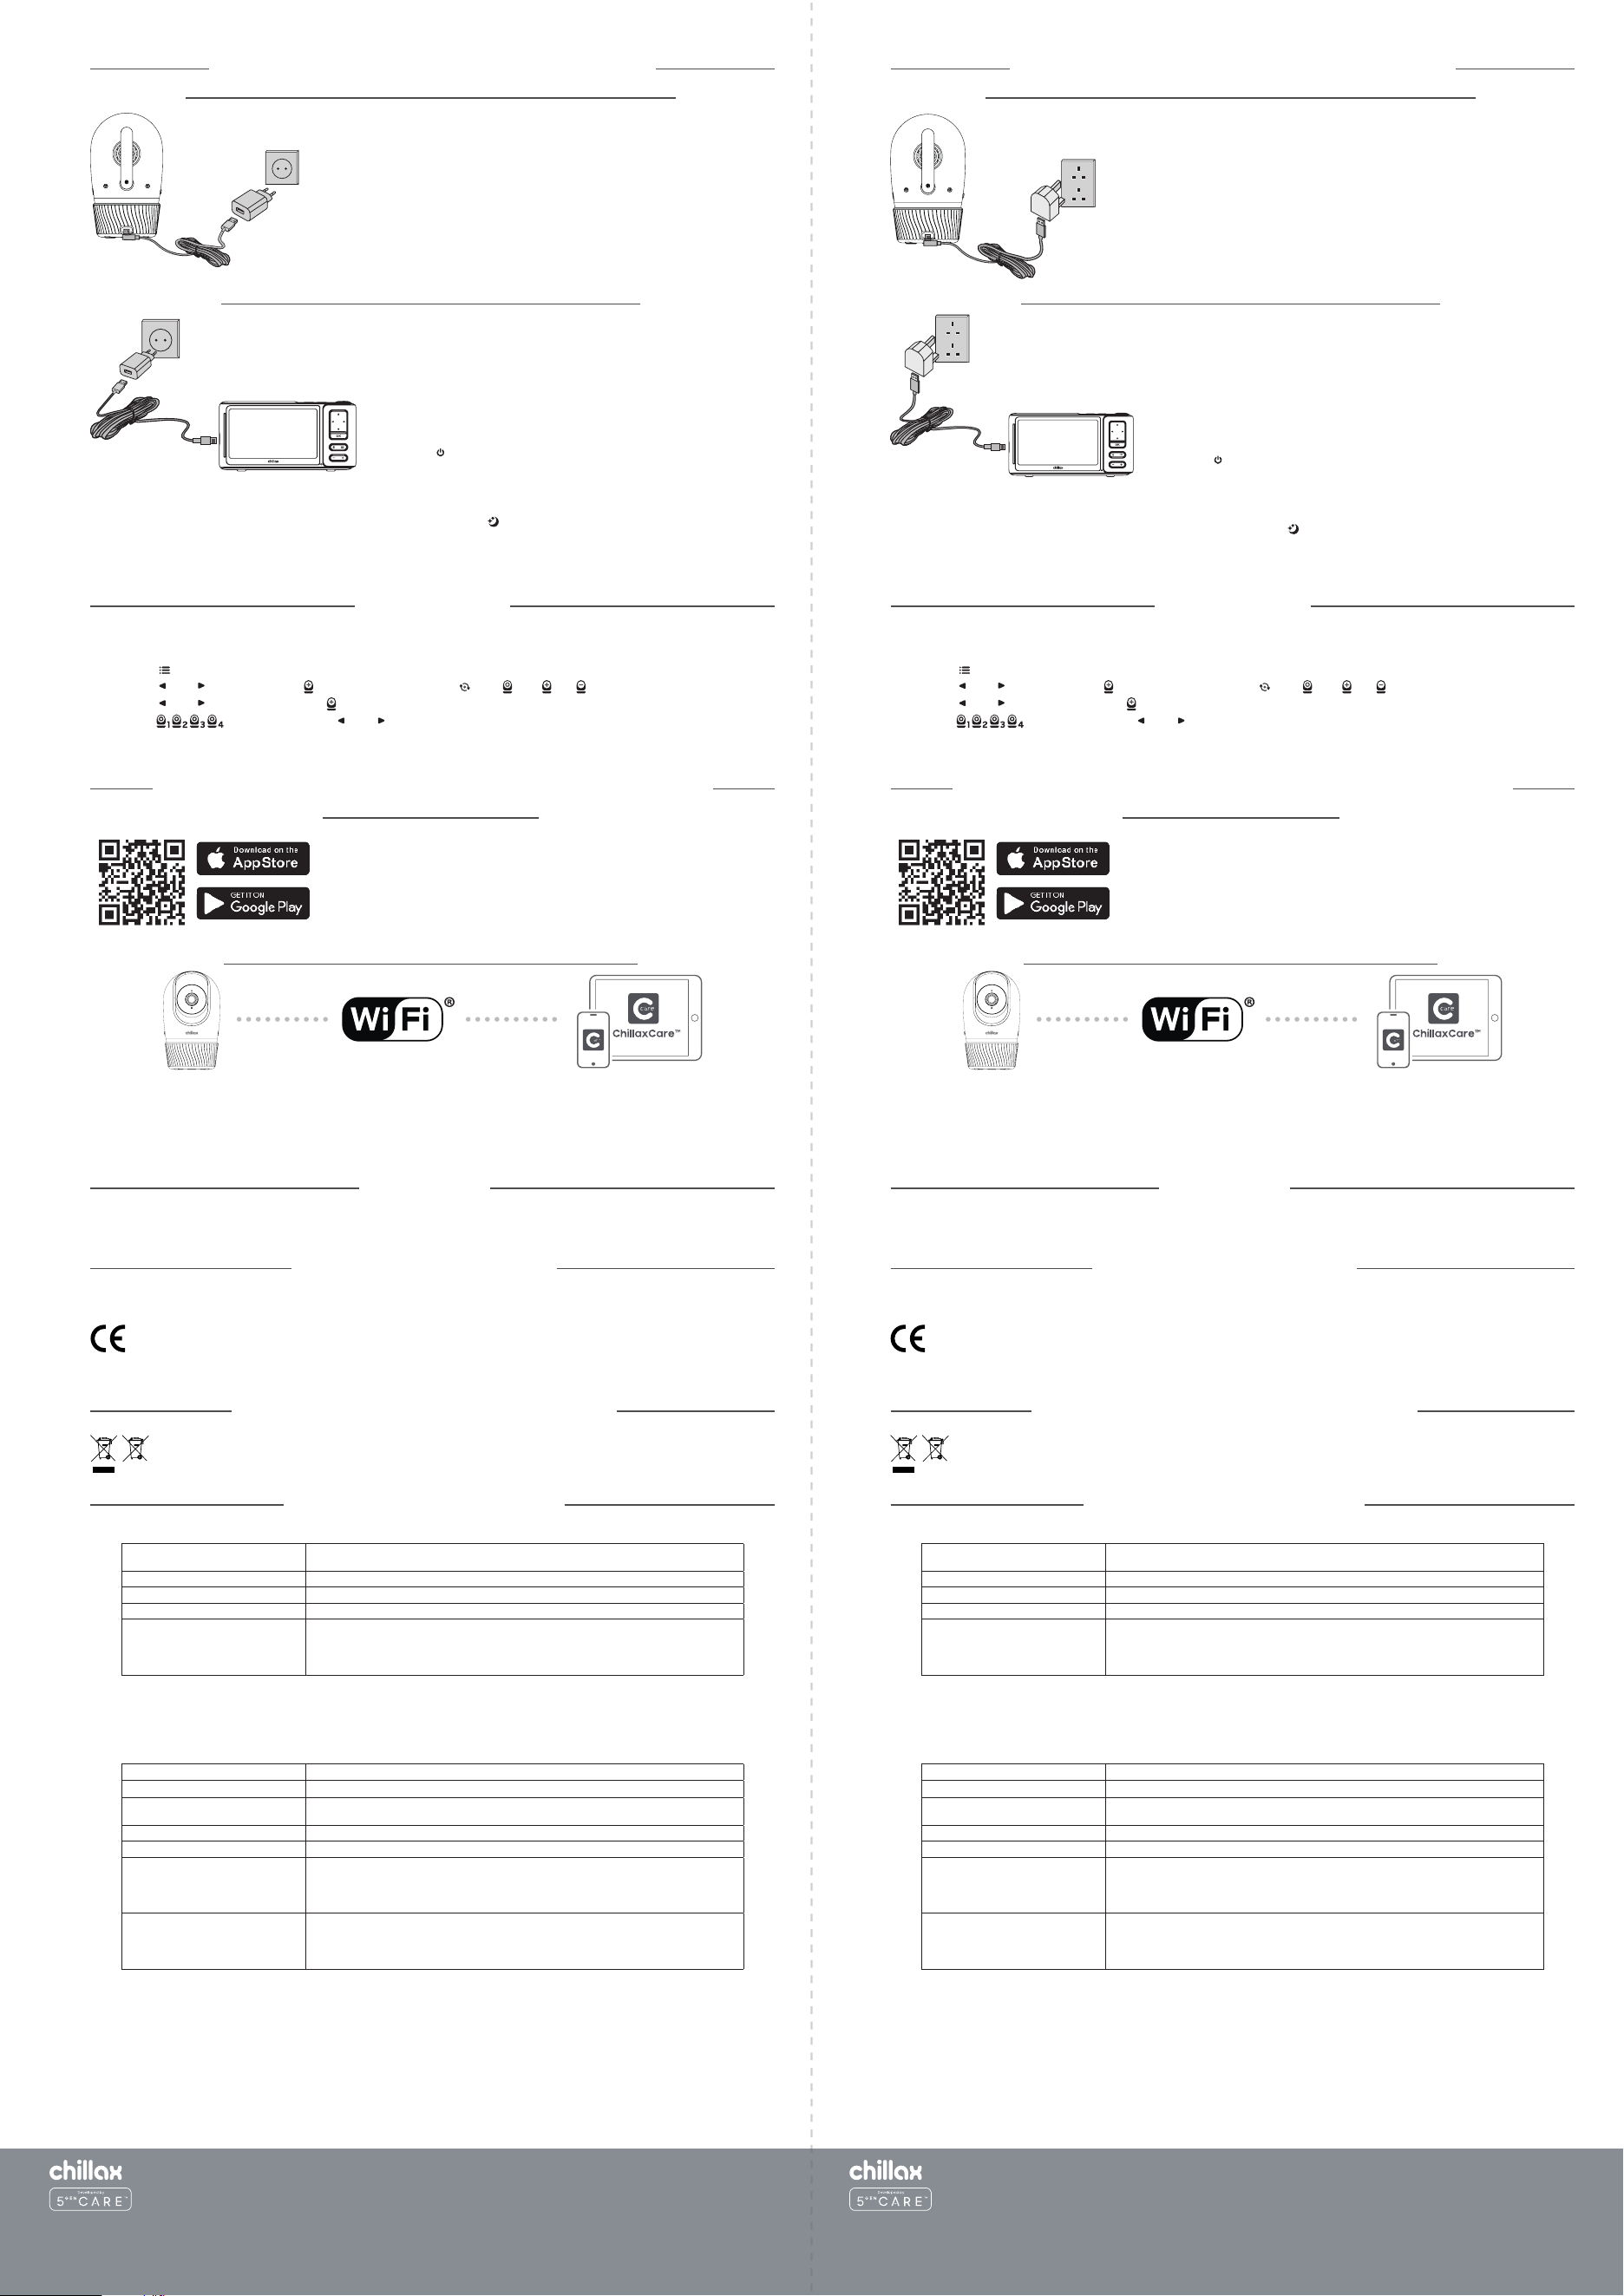
5.
Registration
The Baby Monitor is pre-registered to your Parent Unit. You do not need to register it again unless the Baby Unit loses its link with the
Parent Unit.
To re-register your Baby Unit, or register a new Baby Unit, follow the procedures below:-
• Press the button and the menu bar will pop up.
• Press the LEFT / RIGHT buttons until is highlighted, and the scan , view , add , del menus will pop up.
• Press the LEFT / RIGHT buttons to select and press the
OK
button to confirm.
• Camera will pop up. Press the LEFT / RIGHT buttons to select an open camera number and press the OK button
to start searching for a camera unit.
• Press and hold the
PAIR
button on the underside of the Camera Unit until the Parent Unit finds it, beeps and "PAIRING SUCCESS" is
annonced by the camera. The video from the new added camera will then appear on the parent unit.
6.
Setting up the Camera Unit for Wi-Fi
®
Internet Viewing
6.1
Install ChillaxCare App
• Scan the QR code with your smart device and download ChillaxCare App from the
App Store for iOS devices or from the Google Play™ Store for Android™ devices.
• Install ChillaxCare App on your device.
6.2
View on Compatible Smartphones and Tablets
• Open the ChillaxCare App on your compatible smartphone or tablet.
• Follow the in-app instructions to create your Chillax account and connect to your device.
Please take note of the following minimum system requirements:
Smartphones/Tablets: iOS 12.0, Android™ 8.0
5.
Registration
The Baby Monitor is pre-registered to your Parent Unit. You do not need to register it again unless the Baby Unit loses its link with the
Parent Unit.
To re-register your Baby Unit, or register a new Baby Unit, follow the procedures below:-
• Press the button and the menu bar will pop up.
• Press the LEFT / RIGHT buttons until is highlighted, and the scan , view , add , del menus will pop up.
• Press the LEFT / RIGHT buttons to select and press the
OK
button to confirm.
• Camera will pop up. Press the LEFT / RIGHT buttons to select an open camera number and press the OK button
to start searching for a camera unit.
• Press and hold the
PAIR
button on the underside of the Camera Unit until the Parent Unit finds it, beeps and "PAIRING SUCCESS" is
annonced by the camera. The video from the new added camera will then appear on the parent unit.
6.
Setting up the Camera Unit for Wi-Fi
®
Internet Viewing
6.1
Install ChillaxCare App
• Scan the QR code with your smart device and download ChillaxCare App from the
App Store for iOS devices or from the Google Play™ Store for Android™ devices.
• Install ChillaxCare App on your device.
6.2
View on Compatible Smartphones and Tablets
• Open the ChillaxCare App on your compatible smartphone or tablet.
• Follow the in-app instructions to create your Chillax account and connect to your device.
Please take note of the following minimum system requirements:
Smartphones/Tablets: iOS 12.0, Android™ 8.0
ATLINKS Europe
28 Boulevard Belle Rive
92500 Rueil Malmaison - France
RCS Nanterre 508 823 747
DM568 EU EN (rev.1)
Printed in China
ATLINKS Europe
28 Boulevard Belle Rive
92500 Rueil Malmaison - France
RCS Nanterre 508 823 747
DM568 UK EN (rev.1)
Printed in China
PARENT UNIT
Radio Frequency 2400 MHz to 2483.5 MHz
Display 5” diagonal IPS LCD (1280 x 720 resolution)
Operating range with the camera
unit
Up to 340m open field range and 50m indoor range*
Battery Life Up to 10 hours**
Operating Temperature 5⁰C - 40⁰C
Power Adapter Input: 100-240V AC, 50/60Hz, 350mA;
Output: 5.0V DC, 1500mA
WARNING
Use only with provided power supply.
Battery (built-in) 3.8V, 3000mAh Lithium-ion, re-chargeable battery pack
WARNING
Do not attempt to replace the battery, Contact customer Service if it needs
replacement.
Specifications are subject to change without prior notice
* Values may vary according to environment.
** Depending on initial charge.
PARENT UNIT
Radio Frequency 2400 MHz to 2483.5 MHz
Display 5” diagonal IPS LCD (1280 x 720 resolution)
Operating range with the camera
unit
Up to 340m open field range and 50m indoor range*
Battery Life Up to 10 hours**
Operating Temperature 5⁰C - 40⁰C
Power Adapter Input: 100-240V AC, 50/60Hz, 350mA;
Output: 5.0V DC, 1500mA
WARNING
Use only with provided power supply.
Battery (built-in) 3.8V, 3000mAh Lithium-ion, re-chargeable battery pack
WARNING
Do not attempt to replace the battery, Contact customer Service if it needs
replacement.
Specifications are subject to change without prior notice
* Values may vary according to environment.
** Depending on initial charge.
4. Setting up your Digital Video Baby Monitor
4.1
Connecting the Power Supply of the Baby Unit (Camera)
• Insert the USB-A (bigger end) plug of the USB cable into the USB charger then insert the
USB-C (smaller end) into the USB-C socket at the back of the Mood Light unit.
• Connect the USB charger to electrical outlet.
• The Baby Unit turns on, the Mood Light lights in amber color.
NOTE
Only use the supplied USB charger (DC5V/1.5A).
4.2
Connecting the Power Supply of the Parent Unit
A rechargeable battery (Lithium-ion battery 3.8V 3000mAh) inside the Parent
Unit allows you to move it without losing the link and picture from the Baby Unit.
The parent unit battery provides up to 10 hours standby. We recommend
charging for at least 16 hours before first use, and when the Parent Unit
indicates the battery is low.
• Insert the USB-A (bigger end) plug of the USB cable into the USB charger
then insert the USB-C (smaller end) into the USB-C socket at the side of the
Parent Unit.
• Connect the USB-charger to the electrical outlet. Use only the enclosed USB
charger (5VDC/1.5A).
• Press the button to turn the Parent unit on, the Parent unit and Baby unit
are automatically linked and ready to use.
NOTE
When the Baby and Parent Units are both turned on and within range, the Parent Unit should show a color image from the Baby Unit
camera, but if the room is dark, the image will be in black and white, with an icon showing, the camera infra-red illumination is
on..
4. Setting up your Digital Video Baby Monitor
4.1
Connecting the Power Supply of the Baby Unit (Camera)
• Insert the USB-A (bigger end) plug of the USB cable into the USB charger then insert the
USB-C (smaller end) into the USB-C socket at the back of the Mood Light unit.
• Connect the USB charger to electrical outlet.
• The Baby Unit turns on, the Mood Light lights in amber color.
NOTE
Only use the supplied USB charger (DC5V/1.5A).
4.2
Connecting the Power Supply of the Parent Unit
A rechargeable battery (Lithium-ion battery 3.8V 3000mAh) inside the Parent Unit
allows you to move it without losing the link and picture from the Baby Unit. The
parent unit battery provides up to 10 hours standby. We recommend charging for
at least 16 hours before first use, and when the Parent Unit indicates the battery is
low.
• Insert the USB-A (bigger end) plug of the USB cable into the USB charger then
insert the USB-C (smaller end) into the USB-C socket at the side of the Parent
Unit.
• Connect the USB-charger to the electrical outlet. Use only the enclosed USB
charger (5VDC/1.5A).
• Press the button to turn the Parent unit on, the Parent unit and Baby unit are
automatically linked and ready to use.
NOTE
When the Baby and Parent Units are both turned on and within range, the Parent Unit should show a color image from the Baby Unit
camera, but if the room is dark, the image will be in black and white, with an icon showing, the camera infra-red illumination is
on..

Page 1 of 2
Smart Candle 5-inch Video Baby Monitor – DM568
Any Changes or modifications not expressly approved by the party responsible for
compliance could void the user's authority to operate the equipment.
This device complies with part 15 of the FCC Rules. Operation is subject to the following
two conditions: (1) This device may not cause harmful interference, and (2) this device
must accept any interference received, including interference that may cause undesired
operation.
Note: This equipment has been tested and found to comply with the limits for a Class B
digital device, pursuant to part 15 of the FCC Rules. These limits are designed to provide
reasonable protection against harmful interference in a residential installation. This equipment
generates, uses and can radiate radio frequency energy and, if not installed and used in
accordance with the instructions, may cause harmful interference to radio communications.
However, there is no guarantee that interference will not occur in a particular installation. If
this equipment does cause harmful interference to radio or television reception, which can be
determined by turning the equipment off and on, the user is encouraged to try to correct the
interference by one or more of the following measures:
—Reorient or relocate the receiving antenna.
—Increase the separation between the equipment and receiver.
—Connect the equipment into an outlet on a circuit different from that to which the receiver is
connected.
—Consult the dealer or an experienced radio/TV technician for help.
This device complies with Innovation, Science, and Economic Development Canad licence-
exempt RSS standard(s). Operation is subject to the following two conditions:
(1) this device may not cause interference, and
(2) this device must accept any interference, including interference that may cause undesired
operation of the device.
Le présent appareil est conforme aux CNR d' Innovation, Sciences et Développement
économique Canada applicables aux appareils radio exempts de licence. L'exploitation est
autorisée aux deux conditions suivantes:
(1) l'appareil nedoit pas produire de brouillage, et
(2) l'utilisateur de l'appareil doit accepter tout brouillage radioélectrique subi, même si le
brouillage est susceptible d'en compromettre le fonctionnement.
For BU
This equipment complies with FCC/ISED radiation exposure limits set forth for an
uncontrolled environment. This equipment should be installed and operated with
minimum distance 20cm between the radiator& your body.

Page 2 of 2
L'appareil est conforme aux limites d'exposition aux rayonnements spécifiées par la FCC/ISED
pour les environnements non contrôlés. La distance entre le radiateur et le corps doit être d'au
moins 20 cm lors de l'installation et du fonctionnement de l'appareil.
For PU
The device has been tested and comply with FCC/ISED SAR limits.
L'Unité a été testée et répond aux limites FCC/ISED SAR.