1
Hearth & Home Technologies • DVLINEAR36 Installation Manual • 2569-980 Rev. E • 11/20
Installation Manual
Installation and Appliance Setup
CAUTION! Risk of Fire! DO NOT store instruction manuals inside replace cavity.
High temperatures could cause a re.
INSTALLER: Leave this manual with the appliance, not inside the appliance.
CONSUMER: Retain this manual for future reference. Do not store inside the appliance.
NOTICE: DO NOT discard this manual!
• DO NOT store or use gasoline or other am-
mable vapors and liquids in the vicinity of this
or any other appliance.
• What to do if you smell gas
- DO NOT try to light any appliance.
- DO NOT touch any electrical switch. DO
NOT use any phone in your building.
- Leave the building immediately.
- Immediately call your gas supplier from
a neighbor’s phone. Follow the gas sup-
plier’s instructions.
- If you cannot reach your gas supplier, call
the re department.
• Installation and service must be performed
by a qualied installer, service agency, or the
gas supplier.
WARNING:
FIRE OR EXPLOSION HAZARD
Failure to follow safety warnings exactly
could result in serious injury, death, or
property damage.
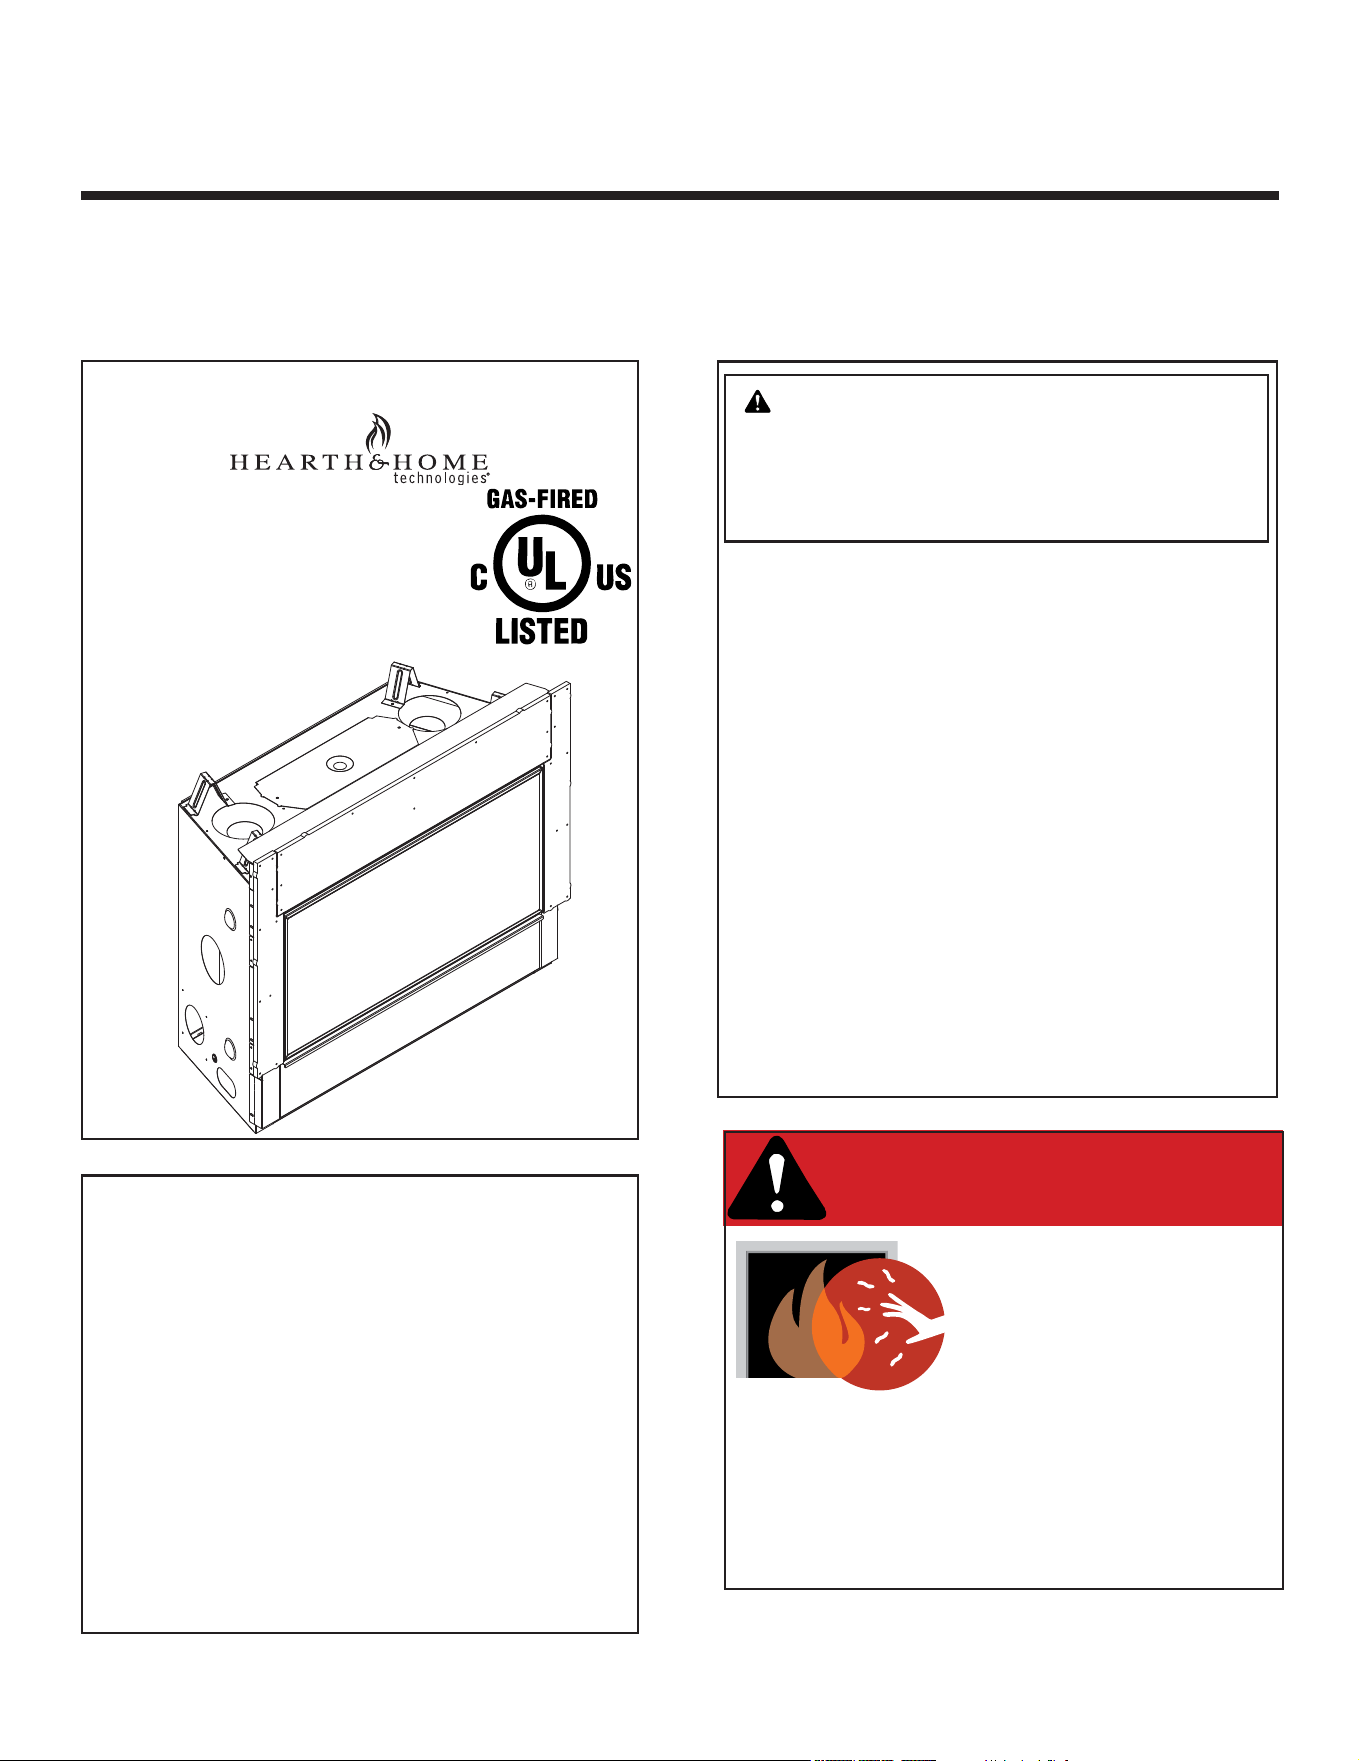
Model:
DVLINEAR36
This appliance may be installed as an OEM
installation in manufactured home (USA
only) or mobile home and must be installed
in accordance with the manufacturer’s
instructions and the Manufactured Home
Construction and Safety Standard, Title 24
CFR, Part 3280 in the United States, or the
Standard for Installation in Mobile Homes,
CAN/CSA Z240 MH Series, in Canada.
This appliance is only for use with the type(s)
of gas indicated on the rating plate. This
appliance is not convertible for use with other
gases, unless a certied kit is used.
Decorative barrier front provided with this appliance.
See Section 3.A.
DANGER
HOT GLASS WILL
CAUSE BURNS.
DO NOT TOUCH GLASS
UNTIL COOLED.
NEVER ALLOW CHILDREN
TO TOUCH GLASS.
A barrier designed to reduce the risk of
burns from the hot viewing glass is provided
with this appliance and must be installed for
the protection of children and other at-risk
individuals.

Hearth & Home Technologies • DVLINEAR36 Installation Manual • 2569-980 Rev. E • 11/20
2
Safety Alert Key:
• DANGER! Indicates a hazardous situation which, if not avoided will result in death or serious injury.
• WARNING! Indicates a hazardous situation which, if not avoided could result in death or serious injury.
• CAUTION! Indicates a hazardous situation which, if not avoided, could result in minor or moderate injury.
• NOTICE: Used to address practices not related to personal injury.
Note: The term “recommend” or “recommended” does not indicate a requirement. It is a best practice suggested by
Hearth & Home Technologies
®
.
Table of Contents
Installation Standard Work Checklist ....................3
1 Product Specic and Important Safety Information
A. Appliance Certication ............................4
B. Glass Specications ..............................4
C. BTU Specications ...............................4
D. High Altitude Installations ..........................4
E. Non-Combustible Materials Specication. . . . . . . . . . . . . . 5
F. Combustible Materials Specication .................5
G. Electrical Codes .................................5
H. California ......................................5
I. Requirements for the Commonwealth of Massachusetts . . 6
2 Getting Started
A. Design and Installation Considerations ...............7
B. Good Faith Wall Surface ..........................7
C. Tools and Supplies Needed ........................8
D. Inspect Appliance and Components ..................8
3 Framing and Clearances
A. Appliance/Decorative Barrier Front Dimension Diagrams . 9
B. Appliance Location and Clearances to Combustibles ... 11
C. Constructing the Appliance Chase ..................17
4 Termination Location and Vent Information
A. Approved Pipe .................................18
B. Vent Termination Minimum Clearances ..............18
C. Vent Terminal Clearances ........................20
D. Use of Elbows .................................21
E. Use of Flex Vent (SLP-FLEX Series 6-5/8 Inch) .......23
F. Vent Diagrams .................................24
5 Vent Clearances and Vent Framing
A. Vent Clearances to Combustibles .................. 36
B. Wall Penetration Framing/Firestops .................36
C. Ceiling Firestop/Floor Penetration Framing ...........37
D. Install Attic Insulation Shield .......................37
6 Appliance Preparation
A. Vent Collar Preparation .......................... 38
B. Prepare For Heat Management ....................38
C. Securing and Leveling the Appliance ................39
D. Non-Combustible Material Installation ...............40
7 Venting
A . Assemble Vent Sections (SLP Only) ................ 41
B. Assemble Slip Sections ..........................42
C. Secure the Vent Sections .........................42
D. Disassemble Vent Sections ....................... 43
E. Vertical Termination Requirements ..................44
F. Horizontal Termination Requirements ...............45
8 Electrical Information
A. General Information .............................46
B. Wiring Requirements ............................47
9 Gas Information
A. Fuel Conversion ................................49
B. Gas Pressure ..................................49
C. Gas Connection ................................51
D. High Altitude Installations .........................51
E. Air Shutter Setting ..............................52
10 Finishing
A. Facing Material .................................53
B. Non-Combustible Board and Drywall Installation .......54
C. Installing a Television ............................55
D. Mantel and Wall Projections .......................56
11 Appliance Setup
A. Remove the Shipping Materials .................... 58
B. Clean the Appliance .............................58
C. Install Media ..................................58
D. Fixed Glass Assembly Removal and Replacement .....59
E. Install Decorative Barrier Front. . . . . . . . . . . . . . . . . . . . . 60
12 Reference Materials
A. Vent Components Diagrams ......................62
B. Accessories ...................................69
= Contains updated information.
3
Hearth & Home Technologies • DVLINEAR36 Installation Manual • 2569-980 Rev. E • 11/20
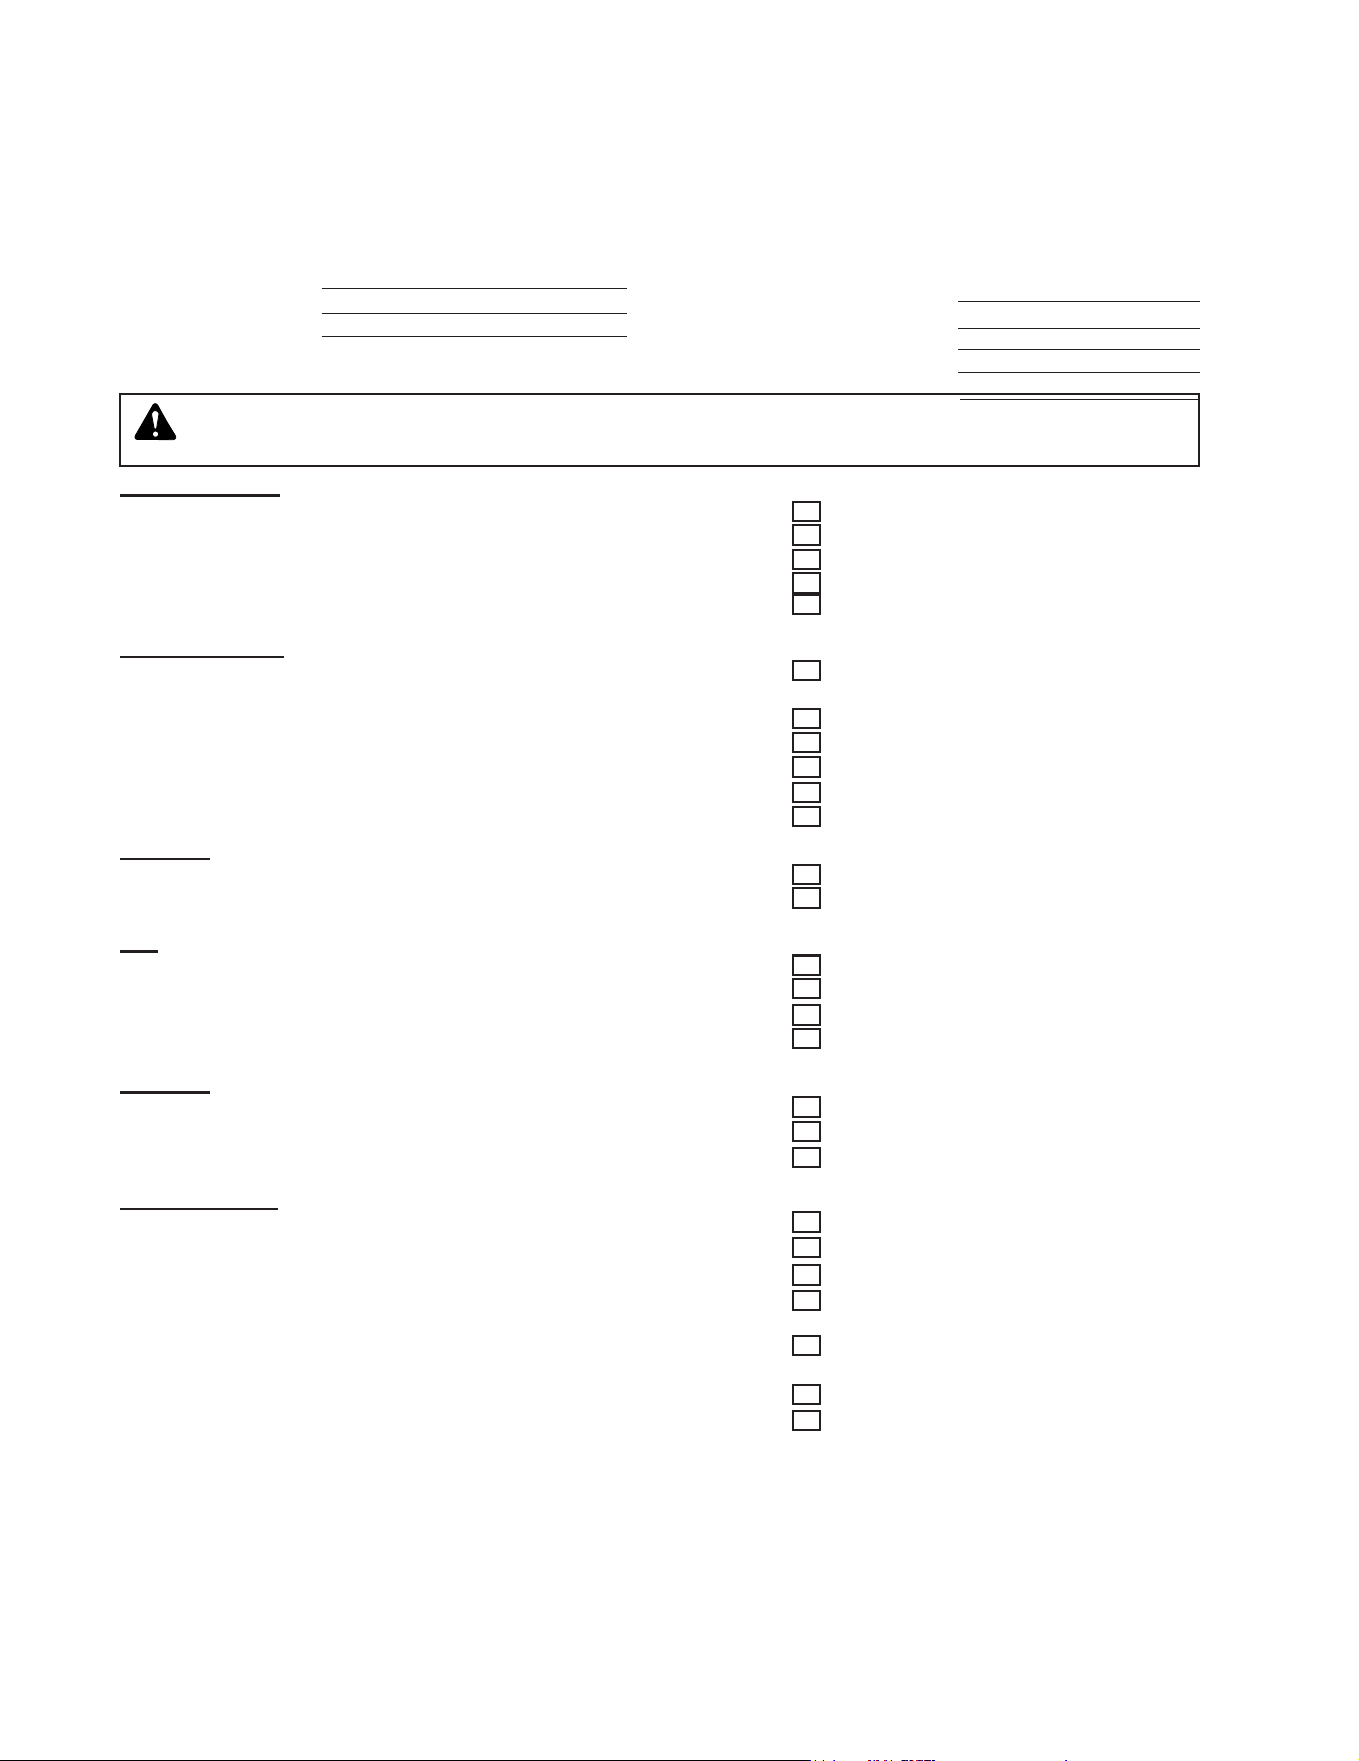
Installation Standard Work Checklist
Customer:
Lot/Address:
Model (circle one): DVLINEAR36
Date Installed:
Location of Fireplace:
Installer:
Dealer/Distributor Phone #
Serial #:
Comments: Further description of the issues, who is responsible (Installer/ Builder/ Other Trades, etc) and corrective
action needed _____________________________________________________________________________________
_________________________________________________________________________________________________
_________________________________________________________________________________________________
Comments Communicated to party responsible ____________________ by ______________________on ___________
(Builder / Gen. Contractor/) (Installer) (Date)
Appliance Install YES IF NO, WHY?
Veried that the chase is insulated and sealed. (Pg. 17) ___________________________
Required non-combustible board is installed. (Pg. 40) ___________________________
Veried clearances to combustibles. (Pg. 11-16) ___________________________
Fireplace is leveled and secured. (Pg. 39) ___________________________
Optional Heat Management System and/or Power Vent installed correctly. ___________________________
Venting/Chimney Sections 4, 5 and 7
Venting conguration complies to vent diagrams. ___________________________
Venting installed, locked and secured in place with proper clearance.
(May need to order separately.) ___________________________
Firestops installed. (Section 5) ___________________________
Attic insulation shield installed. (Pg 37) ___________________________
Exterior wall/Roof ashing installed and sealed. ___________________________
Terminations installed and sealed. ___________________________
Electrical Section 8 (Pg 46-48)
Unswitched power (110-120 VAC) provided to the appliance. ___________________________
Switch wires properly installed. ___________________________
Gas Section 9 (Pg 49-52)
Proper appliance for fuel type. ___________________________
Was a conversion performed? ___________________________
Leak check performed and inlet pressure veried. ___________________________
Veried proper air shutter setting for installation type. ___________________________
Finishing Section 10 (Pg 53-57)
Combustible materials not installed in non-combustible areas. ___________________________
Veried all clearances meet installation manual requirements. ___________________________
Mantels and wall projections comply with installation manual requirements. ___________________________
Appliance Setup Section 11 (Pg 58-61)
All packaging and protective materials removed (inside & outside of appliance). ___________________________
Refractories, logs, media and embers installed correctly. ___________________________
Glass assembly installed and secured. ___________________________
Accessories installed properly. ___________________________
Mesh, decorative barrier front properly installed.
(May need to order separately.) __________________________
Manual bag and all of its contents are removed from inside/under
the appliance and given to party responsible for use and operation. ___________________________
Started appliance and veried no gas leaks exist. ___________________________
2569-982 Rev. B 7/20
= Contains updated information.
Hearth & Home Technologies recommends the following:
• Photographing the installation and copying this checklist for your le.
• That this checklist remain visible at all times on the appliance until the installation is complete.
This standard work checklist is to be used by the installer in conjunction with, not instead of, the instructions contained in this
installation manual.
ATTENTION INSTALLER:
Follow this Standard Work Checklist
WARNING! Risk of Fire or Explosion! Failure to install appliance according to these instructions could lead
to a re or explosion. Install ONLY components and accessories approved by Hearth & Home Technologies.
Unapproved components and accessories could cause replace to overheat.
Hearth & Home Technologies • DVLINEAR36 Installation Manual • 2569-980 Rev. E • 11/20
4
This product is listed to ANSI standards for “Vented
Gas Fireplace Heaters” and applicable sections of “Gas
Burning Heating Appliances for Manufactured Homes
and Recreational Vehicles”, and “Gas Fired Appliances
for Use at High Altitudes”. Also Certied for Installation in
a Bedroom or a Bedsitting Room.
A. Appliance Certication
NOT INTENDED FOR USE AS A PRIMARY HEAT SOURCE.
This appliance is tested and approved as either supplemen-
tal room heat or as a decorative appliance. It should not be
factored as primary heat in residential heating calculations.
NOTICE: This installation must conform with local codes.
In the absence of local codes you must comply with the
National Fuel Gas Code, ANSI Z223.1-latest edition in
the U.S.A. and the CAN/CGA B149 Installation Codes in
Canada.
1 1
Product Specic and Important Safety Information
D. High Altitude Installations
NOTICE: If the heating value of the gas has been reduced,
these rules do not apply. Check with your local gas utility
or authorities having jurisdiction.
When installing above 2000 feet elevation:
• In the USA: Reduce input rate 4% for each 1000 feet
above 2000 feet.
• In CANADA: Input ratings are certied without a
reduction of input rate for elevations up to 4500 feet
(1370 m) above sea level. Please consult provincial and/
or local authorities having jurisdiction for installations at
elevations above 4500 feet (1370 m).
Check with your local gas utility to determine proper
orice size.
B. Glass Specications
Hearth & Home Technologies appliances manufactured
with tempered glass may be installed in hazardous lo-
cations such as bathtub enclosures as dened by the
Consumer Product Safety Commission (CPSC). The
tempered glass has been tested and certied to the re-
quirements of ANSI Z97.1 and CPSC 16 CFR 1202
(Safety Glazing Certication Council SGCC# 1595 and
1597. Architectural Testing, Inc. Reports 02-31919.01
and 02-31917.01).
This statement is in compliance with CPSC 16 CFR Sec-
tion 1201.5 “Certication and labeling requirements”
which refers to 15 U.S. Code (USC) 2063 stating “…Such
certicate shall accompany the product or shall otherwise
be furnished to any distributor or retailer to whom the
product is delivered.”
Some local building codes require the use of tempered
glass with permanent marking in such locations. Glass
meeting this requirement is available from the factory.
Please contact your dealer or distributor to order.
C. BTU Specications
MODELS: DVLINEAR36
LABORATORY: Underwriters Laboratories, Inc. (UL)
TYPE: Direct Vent Heater
STANDARD: CSA / ANSI Z21.88:19 • CSA 2.33:19
Models
(U.S. or Canada)
Maximum
Input BTU/h
Minimum
Input BTU/h
Orice
Size (DMS)
DVLINEAR36
(NG)
(0-2000 ft)
16,500 16,500 #47
DVLINEAR36
(PROPANE)
(0-2000 ft)
16,500 16,500 1.25 mm
5
Hearth & Home Technologies • DVLINEAR36 Installation Manual • 2569-980 Rev. E • 11/20
E. Non-Combustible Materials Specication
Material which will not ignite and burn. Such materials are
those consisting entirely of steel, iron, brick, tile, concrete,
slate, glass or plasters, or any combination thereof.
Materials that are reported as passing ASTM E 136,
Standard Test Method for Behavior of Materials in
a Vertical Tube Furnace at 750 ºC shall be considered
non-combustible materials.
F. Combustible Materials Specication
Materials made of or surfaced with wood, compressed pa-
per, plant bers, plastics, or other material that can ignite
and burn, whether ame proofed or not, or plastered or
unplastered shall be considered combustible materials.
G. Electrical Codes
NOTICE: This appliance must be electrically wired
and grounded in accordance with local codes or, in the
absence of local codes, with National Electric Code
ANSI/NFPA 70-latest edition or the Canadian Electric
Code CSA C22.1.
• A 110-120 VAC circuit for this product must be pro-
tected with ground-fault circuit interrupter protection,
in compliance with the applicable electrical codes,
when it is installed in locations such as in bathrooms
or near sinks.
H. California
WARNING: This product and the fuels used to
operate this product (liquid propane or natural
gas), and the products of combustion of such fuels, can
expose you to chemicals including benzene, which is
known to the State of California to cause cancer and
reproductive harm. For more information go to: www.
P65Warnings.ca.gov.

Hearth & Home Technologies • DVLINEAR36 Installation Manual • 2569-980 Rev. E • 11/20
6
I. Requirements for the Commonwealth of
Massachusetts
For all side wall horizontally vented gas fueled equipment
installed in every dwelling, building or structure used in
whole or in part for residential purposes, including those
owned or operated by the Commonwealth and where the
side wall exhaust vent termination is less than seven (7)
feet above nished grade in the area of the venting, in-
cluding but not limited to decks and porches, the following
requirements shall be satised:
Installation of Carbon Monoxide Detectors
At the time of installation of the side wall horizontal vented
gas fueled equipment, the installing plumber or gas tter
shall observe that a hard wired carbon monoxide detector
with an alarm and battery back-up is installed on the oor
level where the gas equipment is to be installed. In addi-
tion, the installing plumber or gas tter shall observe that
a battery operated or hard wired carbon monoxide detec-
tor with an alarm is installed on each additional level of
the dwelling, building or structure served by the side wall
horizontal vented gas fueled equipment. It shall be the
responsibility of the property owner to secure the services
of qualied licensed professionals for the installation of
hard wired carbon monoxide detectors.
In the event that the side wall horizontally vented gas fu-
eled equipment is installed in a crawl space or an attic,
the hard wired carbon monoxide detector with alarm and
battery back-up may be installed on the next adjacent
oor level.
In the event that the requirements of this subdivision can
not be met at the time of completion of installation, the
owner shall have a period of thirty (30) days to comply
with the above requirements; provided, however, that dur-
ing said thirty (30) day period, a battery operated carbon
monoxide detector with an alarm shall be installed.
Approved Carbon Monoxide Detectors
Each carbon monoxide detector as required in accor-
dance with the above provisions shall comply with NFPA
720 and be ANSI/UL 2034 listed and IAS certied.
Signage
A metal or plastic identication plate shall be permanent-
ly mounted to the exterior of the building at a minimum
height of eight (8) feet above grade directly in line with the
exhaust vent terminal for the horizontally vented gas fu-
eled heating appliance or equipment. The sign shall read,
in print size no less than one-half (1/2) in. in size, “GAS
VENT DIRECTLY BELOW. KEEP CLEAR OF ALL OB-
STRUCTIONS”.
Inspection
The state or local gas inspector of the side wall horizon-
tally vented gas fueled equipment shall not approve the
installation unless, upon inspection, the inspector ob-
serves carbon monoxide detectors and signage installed
in accordance with the provisions of 248 CMR 5.08(2)(a)1
through 4.
Exemptions
The following equipment is exempt from 248 CMR 5.08(2)
(a)1 through 4:
• The equipment listed in Chapter 10 entitled “Equipment
Not Required To Be Vented” in the most current edition
of NFPA 54 as adopted by the Board; and
• Product Approved side wall horizontally vented gas fu-
eled equipment installed in a room or structure separate
from the dwelling, building or structure used in whole or
in part for residential purposes.
MANUFACTURER REQUIREMENTS
Gas Equipment Venting System Provided
When the manufacturer of Product Approved side wall
horizontally vented gas equipment provides a venting
system design or venting system components with the
equipment, the instructions provided by the manufacturer
for installation of the equipment and the venting system
shall include:
• Detailed instructions for the installation of the venting
system design or the venting system components; and
• A complete parts list for the venting system design or
venting system.
Gas Equipment Venting System NOT Provided
When the manufacturer of a Product Approved side wall
horizontally vented gas fueled equipment does not pro-
vide the parts for venting the ue gases, but identies
“special venting systems”, the following requirements
shall be satised by the manufacturer:
• The referenced “special venting system” instructions
shall be included with the appliance or equipment in-
stallation instructions; and
• The “special venting systems” shall be Product Ap-
proved by the Board, and the instructions for that sys-
tem shall include a parts list and detailed installation
instructions.
A copy of all installation instructions for all Product Ap-
proved side wall horizontally vented gas fueled equip-
ment, all venting instructions, all parts lists for venting
instructions, and/or all venting design instructions shall
remain with the appliance or equipment at the completion
of the installation.
See Gas Connection section for additional Common-
wealth of Massachusetts requirements.
Note: The following requirements reference various
Massachusetts and national codes not contained in this
document.
7
Hearth & Home Technologies • DVLINEAR36 Installation Manual • 2569-980 Rev. E • 11/20
2 2
Getting Started
A. Design and Installation Considerations
WARNING! Risk of Fire or Explosion! Read all instruc-
tions before starting the installation.
Hearth & Home Technologies direct vent gas appliances
are designed to operate with all combustion air siphoned
from outside of the building and all exhaust gases ex-
pelled to the outside. No additional outside air source is
required.
Installation MUST comply with local, regional, state and
national codes and regulations. Consult insurance carrier,
local building inspector, re ocials or authorities having
jurisdiction over restrictions, installation inspection and
permits.
Before installing, determine the following:
• Where the appliance is to be installed.
• The vent system conguration to be used. If Passive
Heat will be installed, consider location of discharge
opening in relation to venting and other construction
materials.
• Gas supply piping requirements.
• Provisions for optional heat management system.
• Electrical wiring requirements.
• Framing and nishing details.
• Whether optional accessories—devices such as a wall
switch or remote control—are desired.
Improper installation, adjustment, alteration, service or
maintenance can cause injury or property damage. For
assistance or additional information, consult a qualied
service technician, service agency or your dealer.
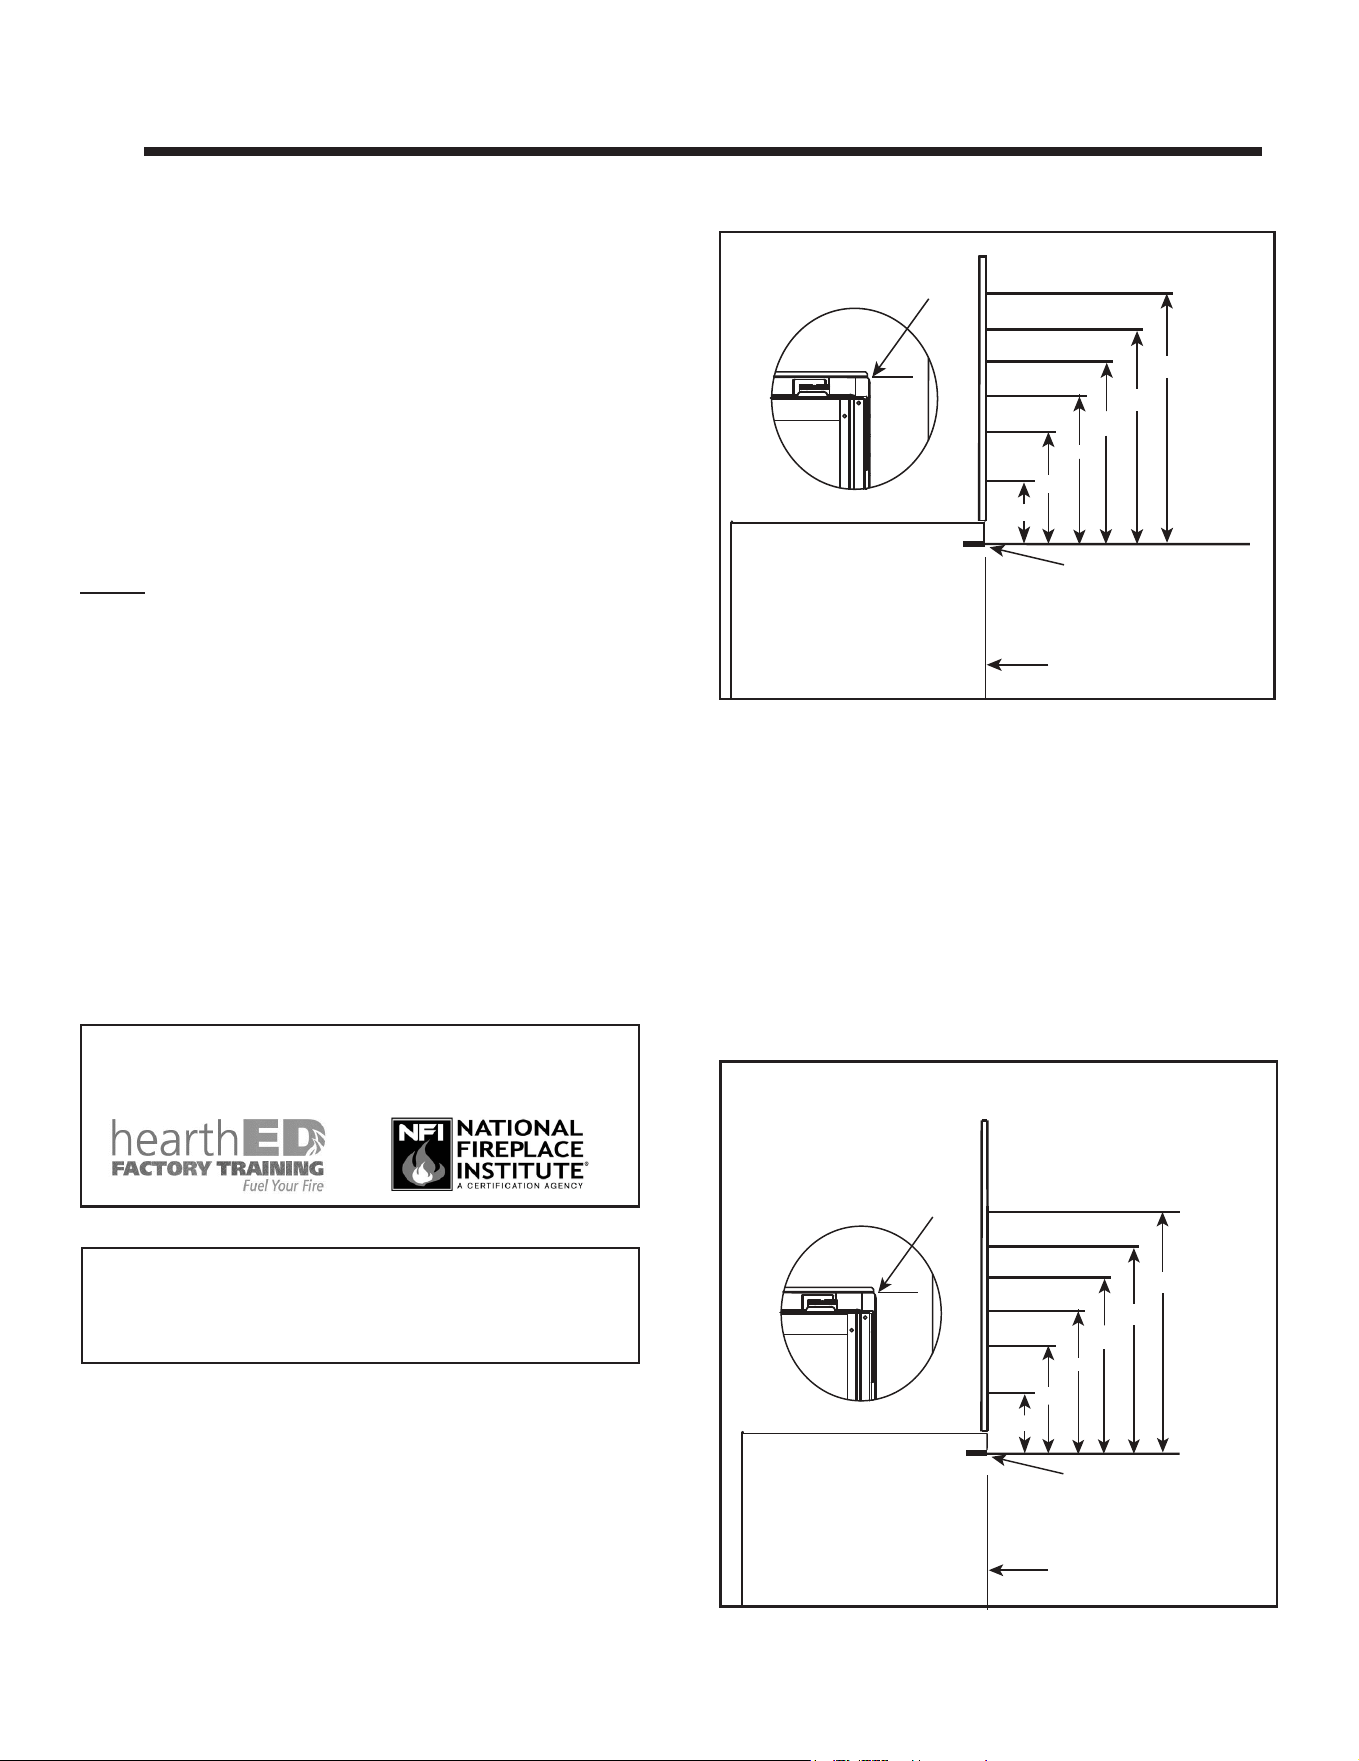
Figure 2.1 Good Faith Wall Surface Temperatures Above
Appliance
B. Good Faith Wall Surface
NOTICE: Surface temperatures listed above are taken with
a temperature measuring probe as prescribed by the test
standard used for appliance certication. Temperatures
on walls or mantels taken with an infrared thermometer
may yield increased temperatures of up to 30 °F (17 °C) or
more depending on the thermometer settings and material
characteristics being measured. Use appropriate nishing
materials that are able to withstand these conditions. For
additional nishing guidelines, see Section 10.
Installation and service of this appliance should be performed by
qualied personnel. Hearth & Home Technologies recommends
HHT Factory Trained or NFI certied professionals.
MEASUREMENTS FROM
TOP EDGE OF THE OPENING
6 in.
18 in.
24 in.
30 in.
36 in.
TO CEILING
12 in.
181°F
APPLIANCE FRONT
FIREPLACE
OPENING
146°F
134°F
124°F
116°F
107°F
Figure 2.2 Good Faith Wall Surface Temperatures Above
Appliance with Passive Heat Kit Installed
MEASUREMENTS FROM
TOP EDGE OF THE OPENING
6 in.
18 in.
24 in.
30 in.
36 in.
TO CEILING
12 in.
100°F
APPLIANCE FRONT
FIREPLACE
OPENING
89°F
88°F
86°F
85°F
85°F
OPTIONAL PASSIVE HEAT KIT INSTALLED

Hearth & Home Technologies • DVLINEAR36 Installation Manual • 2569-980 Rev. E • 11/20
8
C. Tools and Supplies Needed
Before beginning the installation be sure that the following
tools and building supplies are available.
Hand Tools Tape measure
Level Framing material
Manometer Framing square
Voltmeter Electric drill and bits (1/4 in.)
Plumb line Safety glasses/Gloves
Wrenches Reciprocating saw
1/4 in. nut driver
Non-corrosive leak check solution
1/2 - 3/4 in. length, #6 or #8 Self-drilling screws
Caulking material (300 ºF minimum continuous exposure
rating)
D. Inspect Appliance and Components
WARNING! Risk of Fire or Explosion! Damaged parts
could impair safe operation. DO NOT install damaged, in-
complete or substitute components. Keep appliance dry.
WARNING! Risk of Fire, Explosion or Electric Shock!
DO NOT use this appliance if any part has been under
water. Call a qualied service technician to inspect the
appliance and to replace any part of the control system
and/or gas control which has been under water.
• Carefully remove the appliance and components from
the packaging.
• The vent system components and decorative barrier
fronts may be shipped in separate packages.
• If packaged separately, the log set and appliance grate
must be installed.
• Report to your dealer any parts damaged in shipment.
Hearth & Home Technologies disclaims any responsibility for,
and the warranty will be voided by, the following actions:
• Installation and use of any damaged appliance or vent
system component.
• Modication of the appliance or vent system.
• Installation other than as instructed by Hearth & Home
Technologies.
• Improper positioning of the logs/media (as applicable) or
the glass assembly.
• Installation and/or use of any component part not approved
by Hearth & Home Technologies.
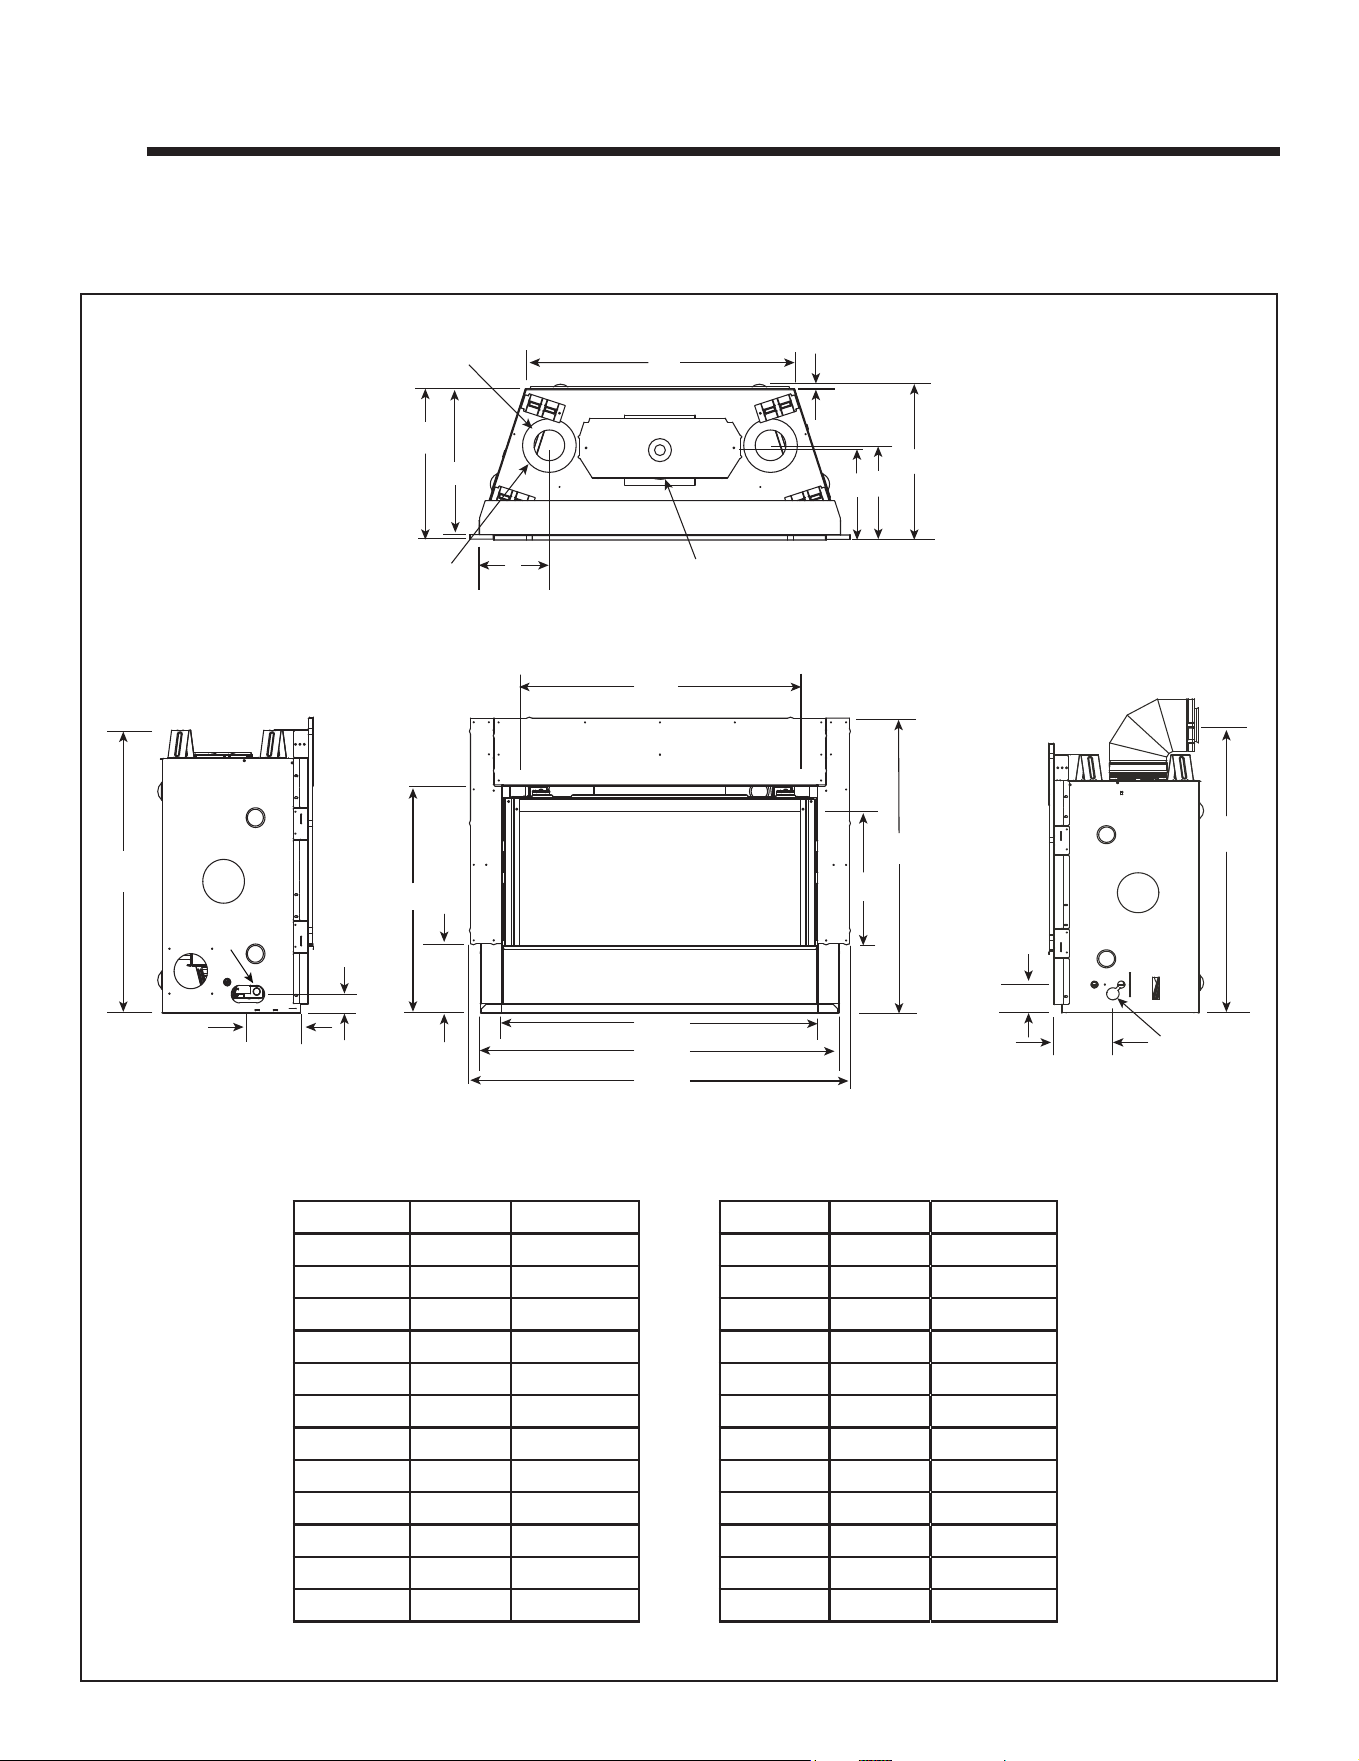
9
Hearth & Home Technologies • DVLINEAR36 Installation Manual • 2569-980 Rev. E • 11/20
3 3
Framing and Clearances
A. Appliance/Decorative Barrier Front Dimension Diagrams
Dimensions are actual appliance dimensions. Use for reference only. For framing dimensions and clearances refer to Section 5.
Figure 3.1 Appliance Dimensions - DVLINEAR36
Location Inches Millimeters
M 16-3/4 426
N 6-5/8 168
O 32-3/8 822
P 2-3/16 56
Q 6 152
R 17-1/4 438
S 25-7/8 657
T 43-1/2 1105
U 6-1/8 156
V 7-1/2 191
W 10-3/8 264
X 7-3/4 197
Location Inches Millimeters
A 41 1041
B 36 914
C 32-1/4 819
D 15-1/4 387
E 33-11/16 856
F 3-1/2 89
G 7 178
H 34-1/2 876
I 9-13/16 249
J 17-3/4 451
K 1/2 13
L 30-3/4 781
O
GAS LINE
ACCESS
Q
P
C
X
S
T
B
A
LEFT VIEW
FRONT VIEW RIGHT VIEW
E
D
F
G
ELECTRICAL
ACCESS
H
M
R
N Ø
J
K
I
TOP VIEW
L
HEAT MANAGEMENT
SYSTEMS ACCESS
U
Ø
W
V
Hearth & Home Technologies • DVLINEAR36 Installation Manual • 2569-980 Rev. E • 11/20
10
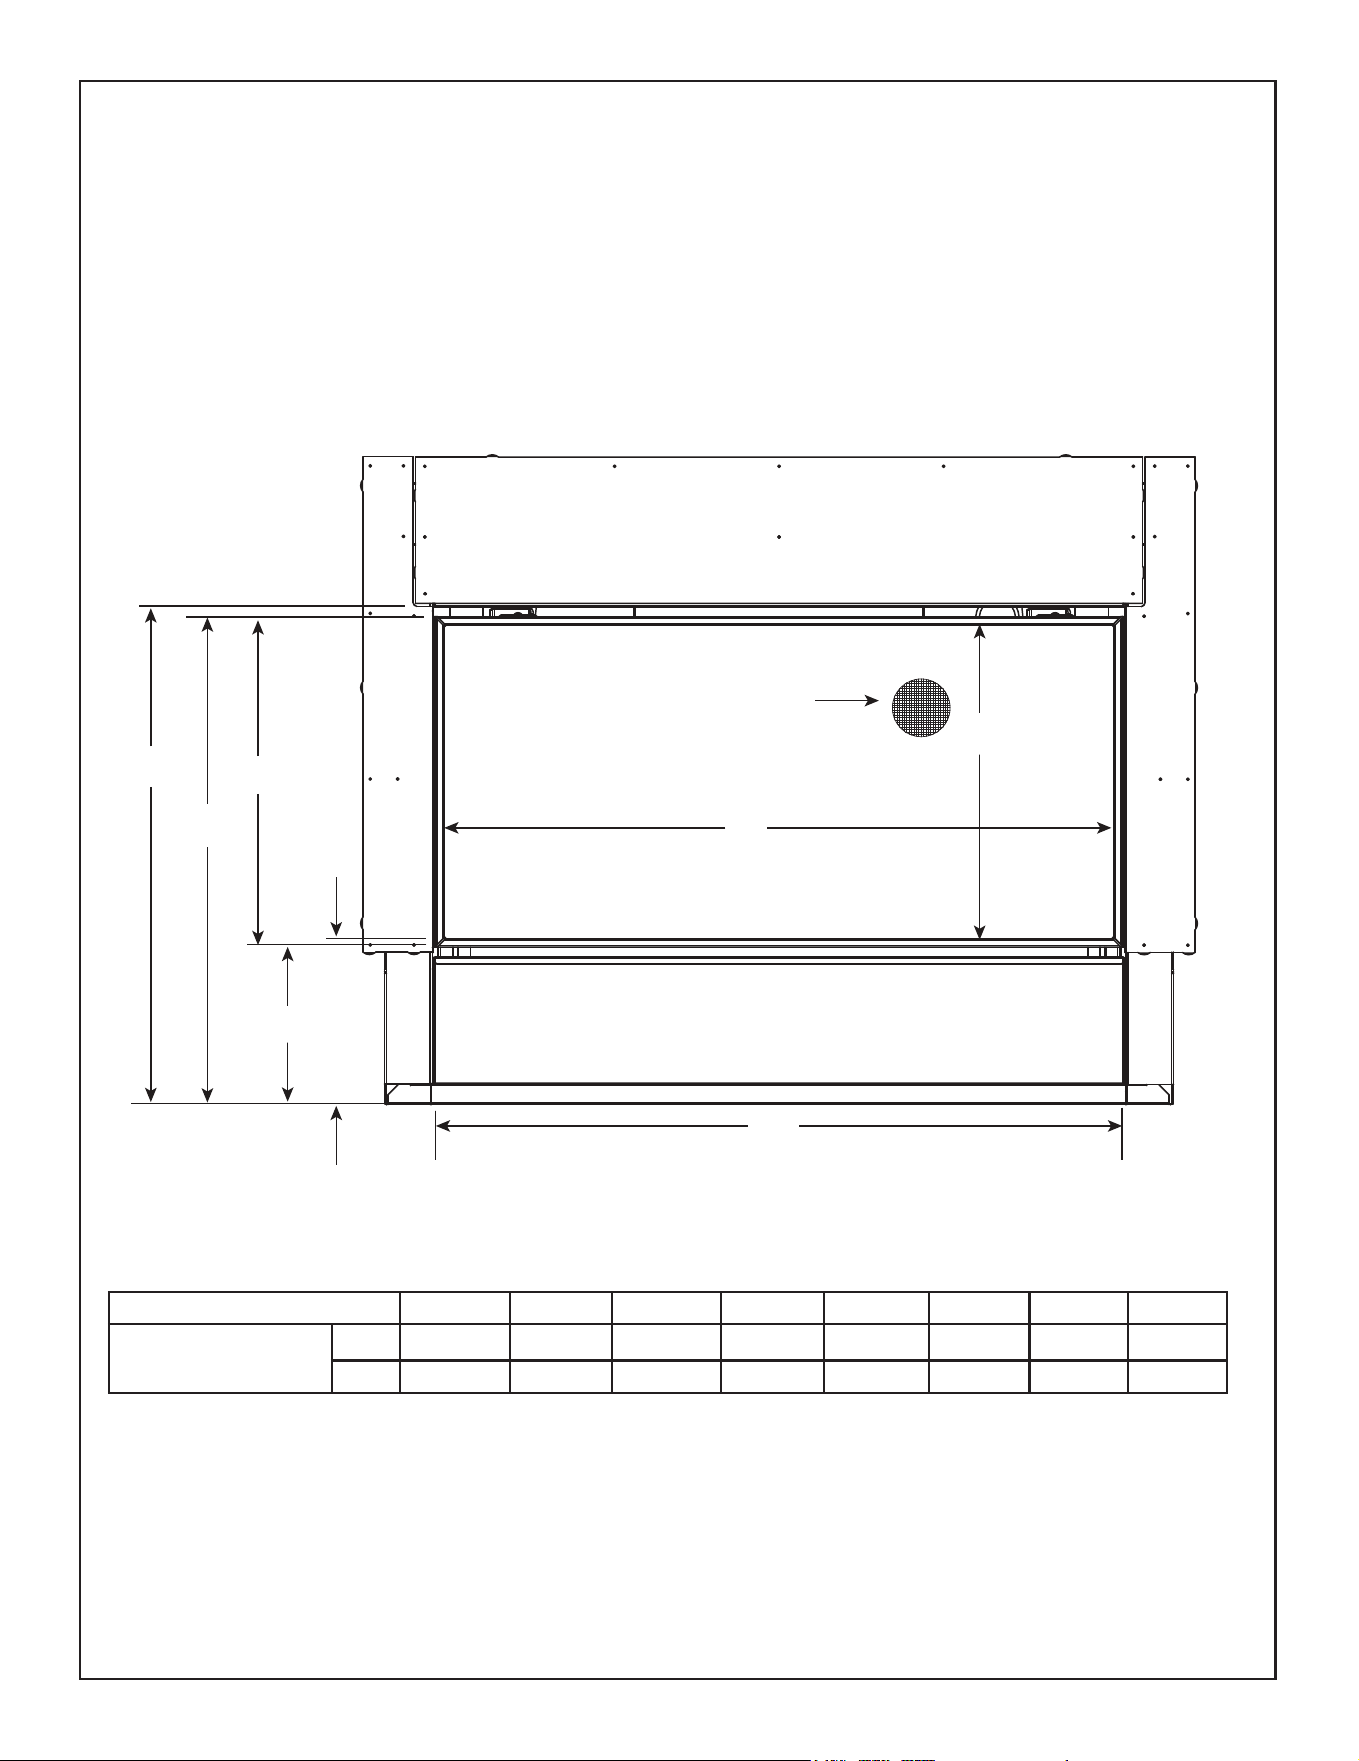
SRV2569-069 DECORATIVE BARRIER FRONT
A B C D E F G H
SRV2569-069
in. 34-1/4 15-5/8 36 8-3/16 8-7/8 17-1/8 25-5/8 25-3/16
mm 870 397 914 208 225 435 651 640
Barrier Mesh: Integral to
Decorative Barrier Front
G
E
D
H
B
A
C
F
Dimensions are actual decorative barrier front dimensions. Use for reference only.
Figure 3.2 Decorative Barrier Front Dimensions
IMPORTANT! This replace requires an installed decorative barrier front to prevent direct contact with the
hot viewing glass. DO NOT operate the replace with the barrier removed.
If decorative barrier front is not present, contact dealer.
Note: See Section 10 for hearth, mantel and nishing requirements.
11
Hearth & Home Technologies • DVLINEAR36 Installation Manual • 2569-980 Rev. E • 11/20
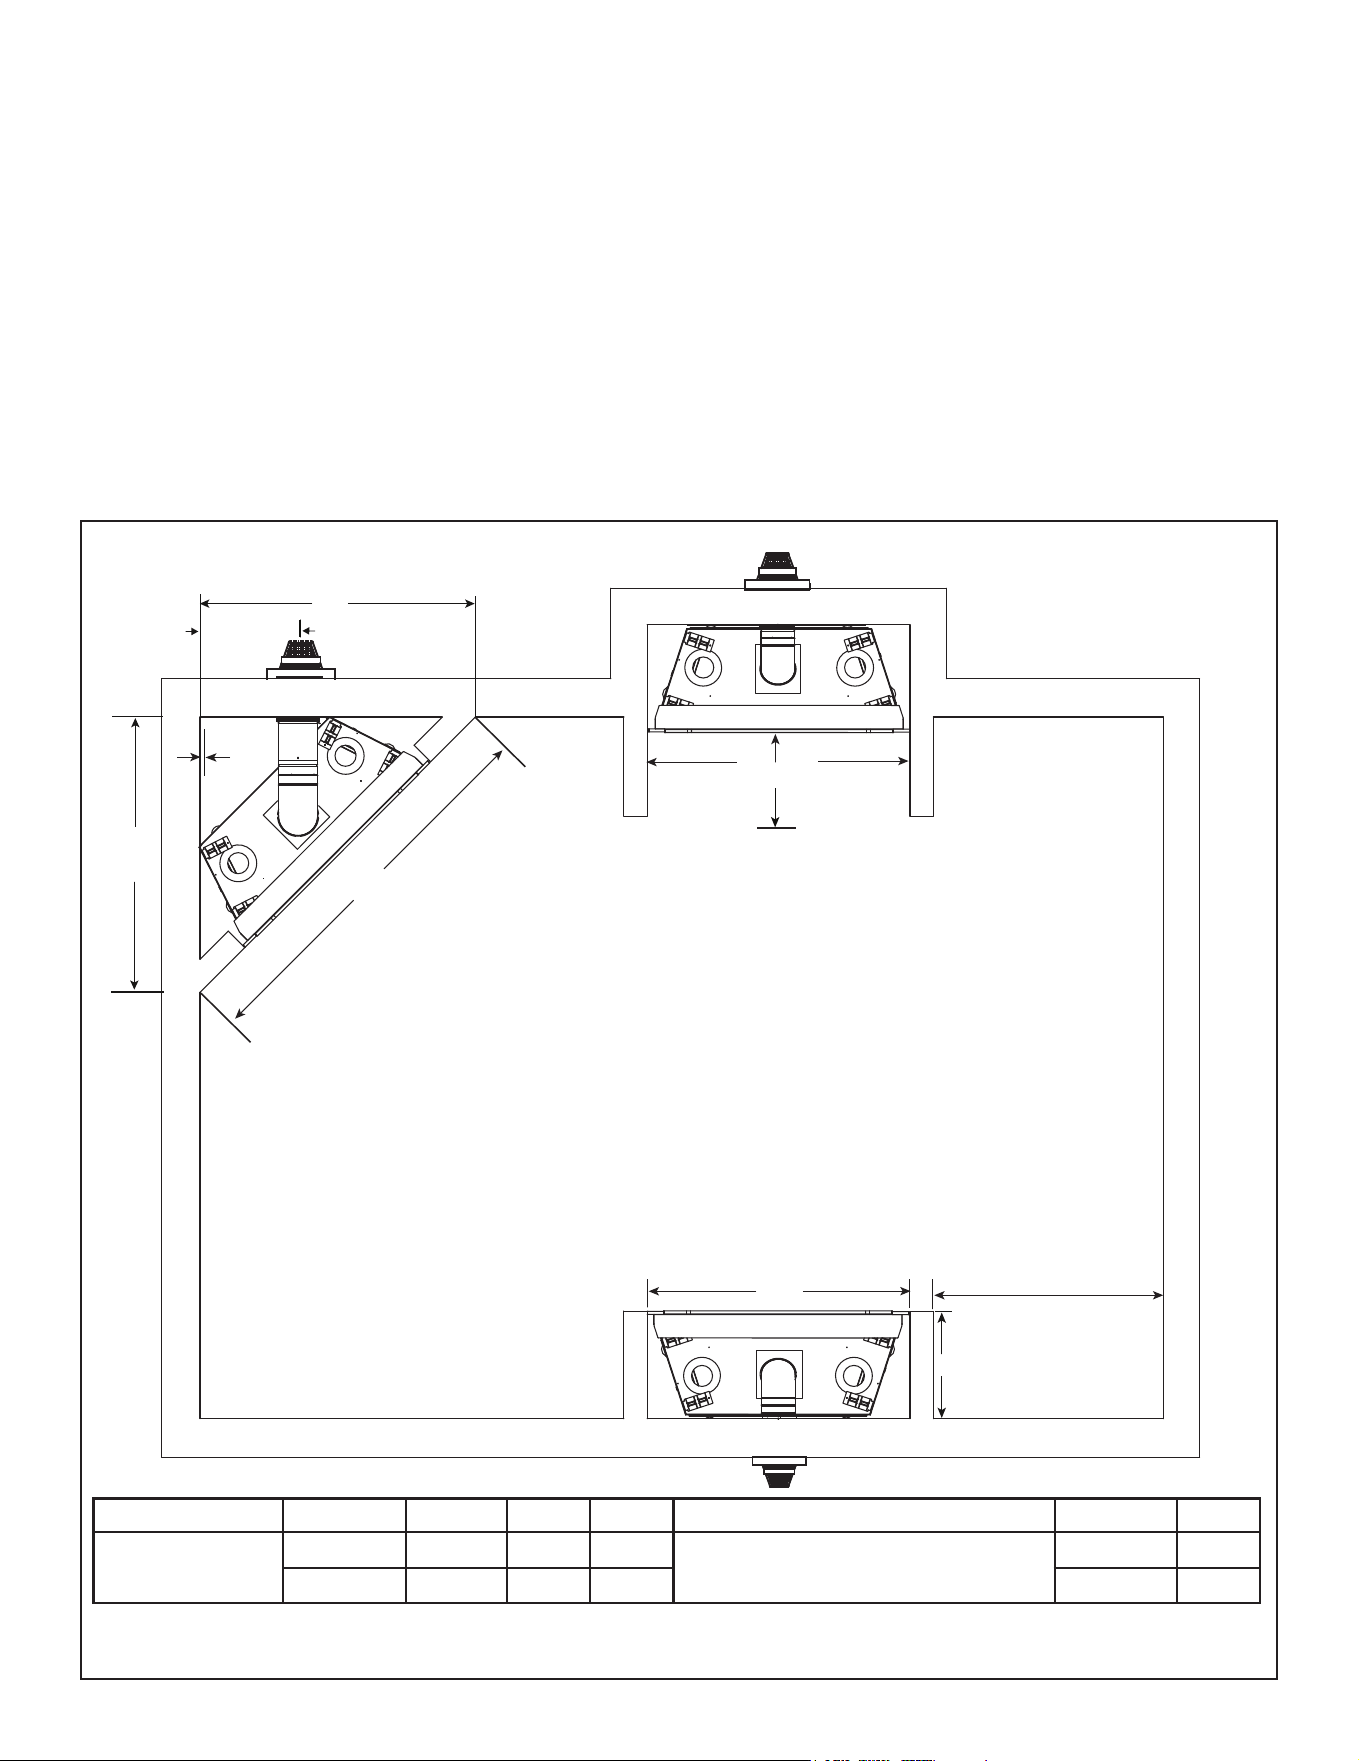
B. Appliance Location and Clearances to
Combustibles
When selecting a location for the appliance it is important
to consider the required clearances to walls and allow suf-
cient clearance for heat management systems venting.
See Figure 3.3.
WARNING! Risk of Fire or Burns! Provide adequate
clearance around air openings and for service access.
Due to high temperatures, the appliance should be lo-
cated out of trac and away from furniture and draperies.
NOTICE: Illustrations reect typical installations and are
FOR DESIGN PURPOSES ONLY. Illustrations/diagrams
are not drawn to scale. Actual installation may vary due to
individual design preference.
Figure 3.3 Appliance Locations
A B C D E F
DVLINEAR36
Inches 47-1/2 42 66
See Section 10
Mantel and Wall Projections.
15-3/4 17-1/4
Millimeters 1207 1067 1676 400 438
A
E
A
C
TOP VENT
ONE 90
0
ELBOW
ALCOVE
INSTALLATION
D*
TOP VENT
ONE 90° ELBOW
B
F
Refer to Section 10 for mantel and wall
projection information.
Consider the mantel or cabinet system to be
installed and comply with the necessary
requirements for elevated hearth. Refer to
instructions included with cabinet system.
18 in. (457 mm) required
when Passive Heat Side
Discharge Kit is installed.
1/2 IN.
Hearth & Home Technologies • DVLINEAR36 Installation Manual • 2569-980 Rev. E • 11/20
12
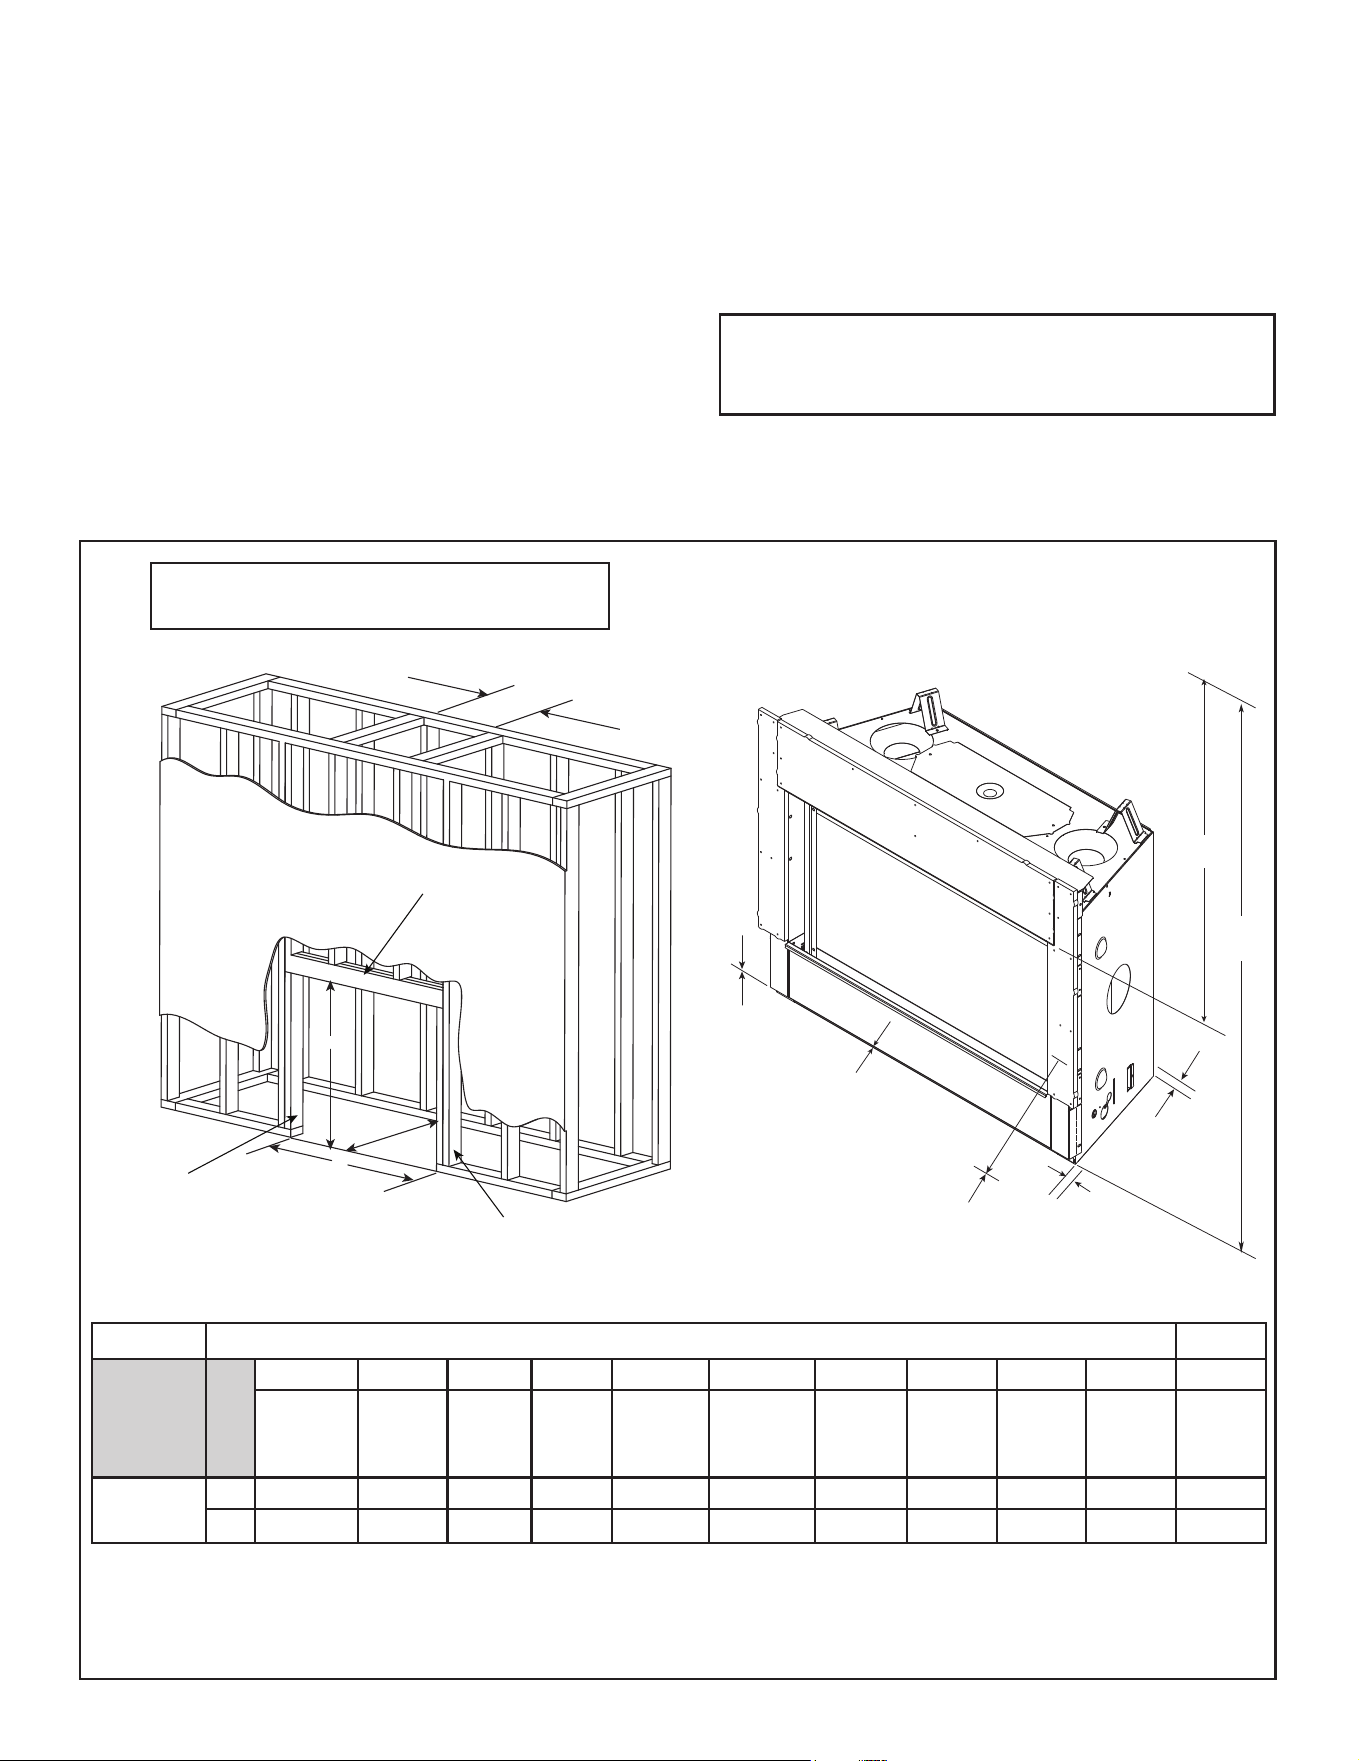
* Adjust framing dimensions for interior chase sheathing (such as sheetrock)
A
B
C
D
HEADER: TWO 2 X 4’S OR 2 X 6’S
INSTALLED ON END
KING STUD
JACK (TRIMMER) STUD
MINIMUM FRAMING DIMENSIONS*
A B C D E F G H I J K
Rough
Opening
(Vent Pipe)
Rough
Opening
(Height)
Rough
Opening
(Depth)
Rough
Opening
(Width)
Clearance
to Room
Ceiling
Combustible
Floor
Minimum
Hearth
Required
Behind
Appliance
Sides of
Appliance
Front of
Appliance
Clearance
to Ceiling
DVLINEAR36
in. 8-5/8 32-3/4 17-3/4 42 31 0 0 1/2 1/2 36 56-7/8
mm 219 832 451 1067 787 0 0 13 13 914 1445
Figure 3.4 Clearances to Combustibles
F
G
I
H
E
MEASURE FROM TOP
OF APPLIANCE OPENING
J
K
Framing
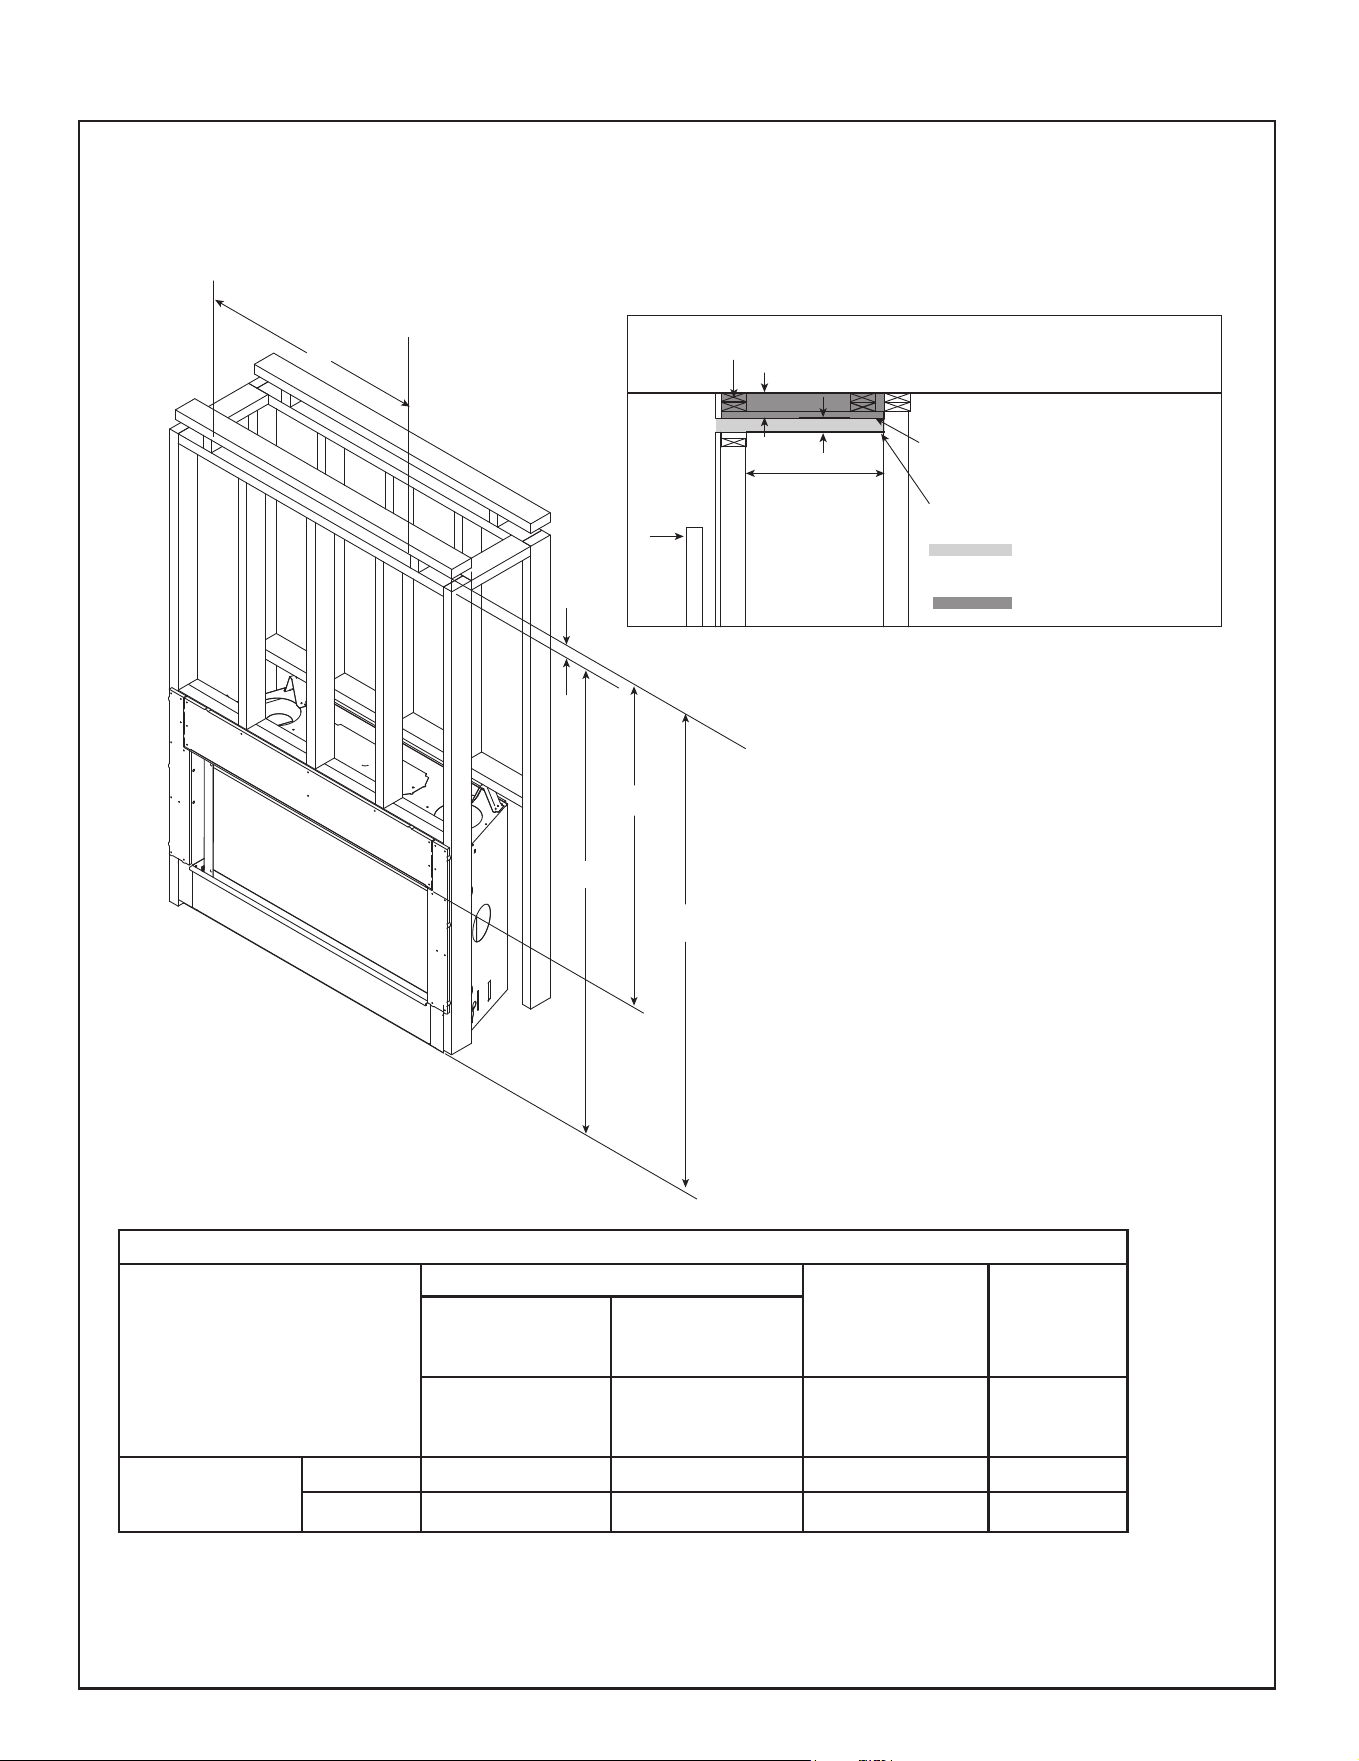
This appliance is designed to be recessed into combus-
tible framing with non-combustible material pre-installed
on top and side. Drywall or combustible materials (mini-
mum 1/2 inch thick) are designed to contact the non-
combustible material/appliance as called out in Section
10 Finishing.
This appliance has been thoroughly tested to minimize
drywall cracking and/or the protrusion of screws “screw
pops" when framed as shown below.
Framing should be done in a manner similar to framing a
window or door: Double-2x4/2x6 as a header for horizon-
tal strength and utilizing Jack or Trimmer stud fastened to
the King studs for vertical strength. See Figure 3.4.
Note: Refer to Section 10 for important information
related to facing, drywall specications and decorative
barrier front information.
Note: Header MUST be installed on end
as shown in the diagram.
If elevating the appliance, the base of the appliance
should also be constructed in a similar manner to prevent
settling.
Refer to Figures 3.5, 3.6 and 3.7 for information regarding
framing when the Passive Heat Kit is installed. Install the
Passive Heat Kit per the instructions provided with the kit.
NOTE: E & K dimensions will change if
Passive Heat option is installed. Reference the
instructions included with the Passive Heat Kit.
13
Hearth & Home Technologies • DVLINEAR36 Installation Manual • 2569-980 Rev. E • 11/20
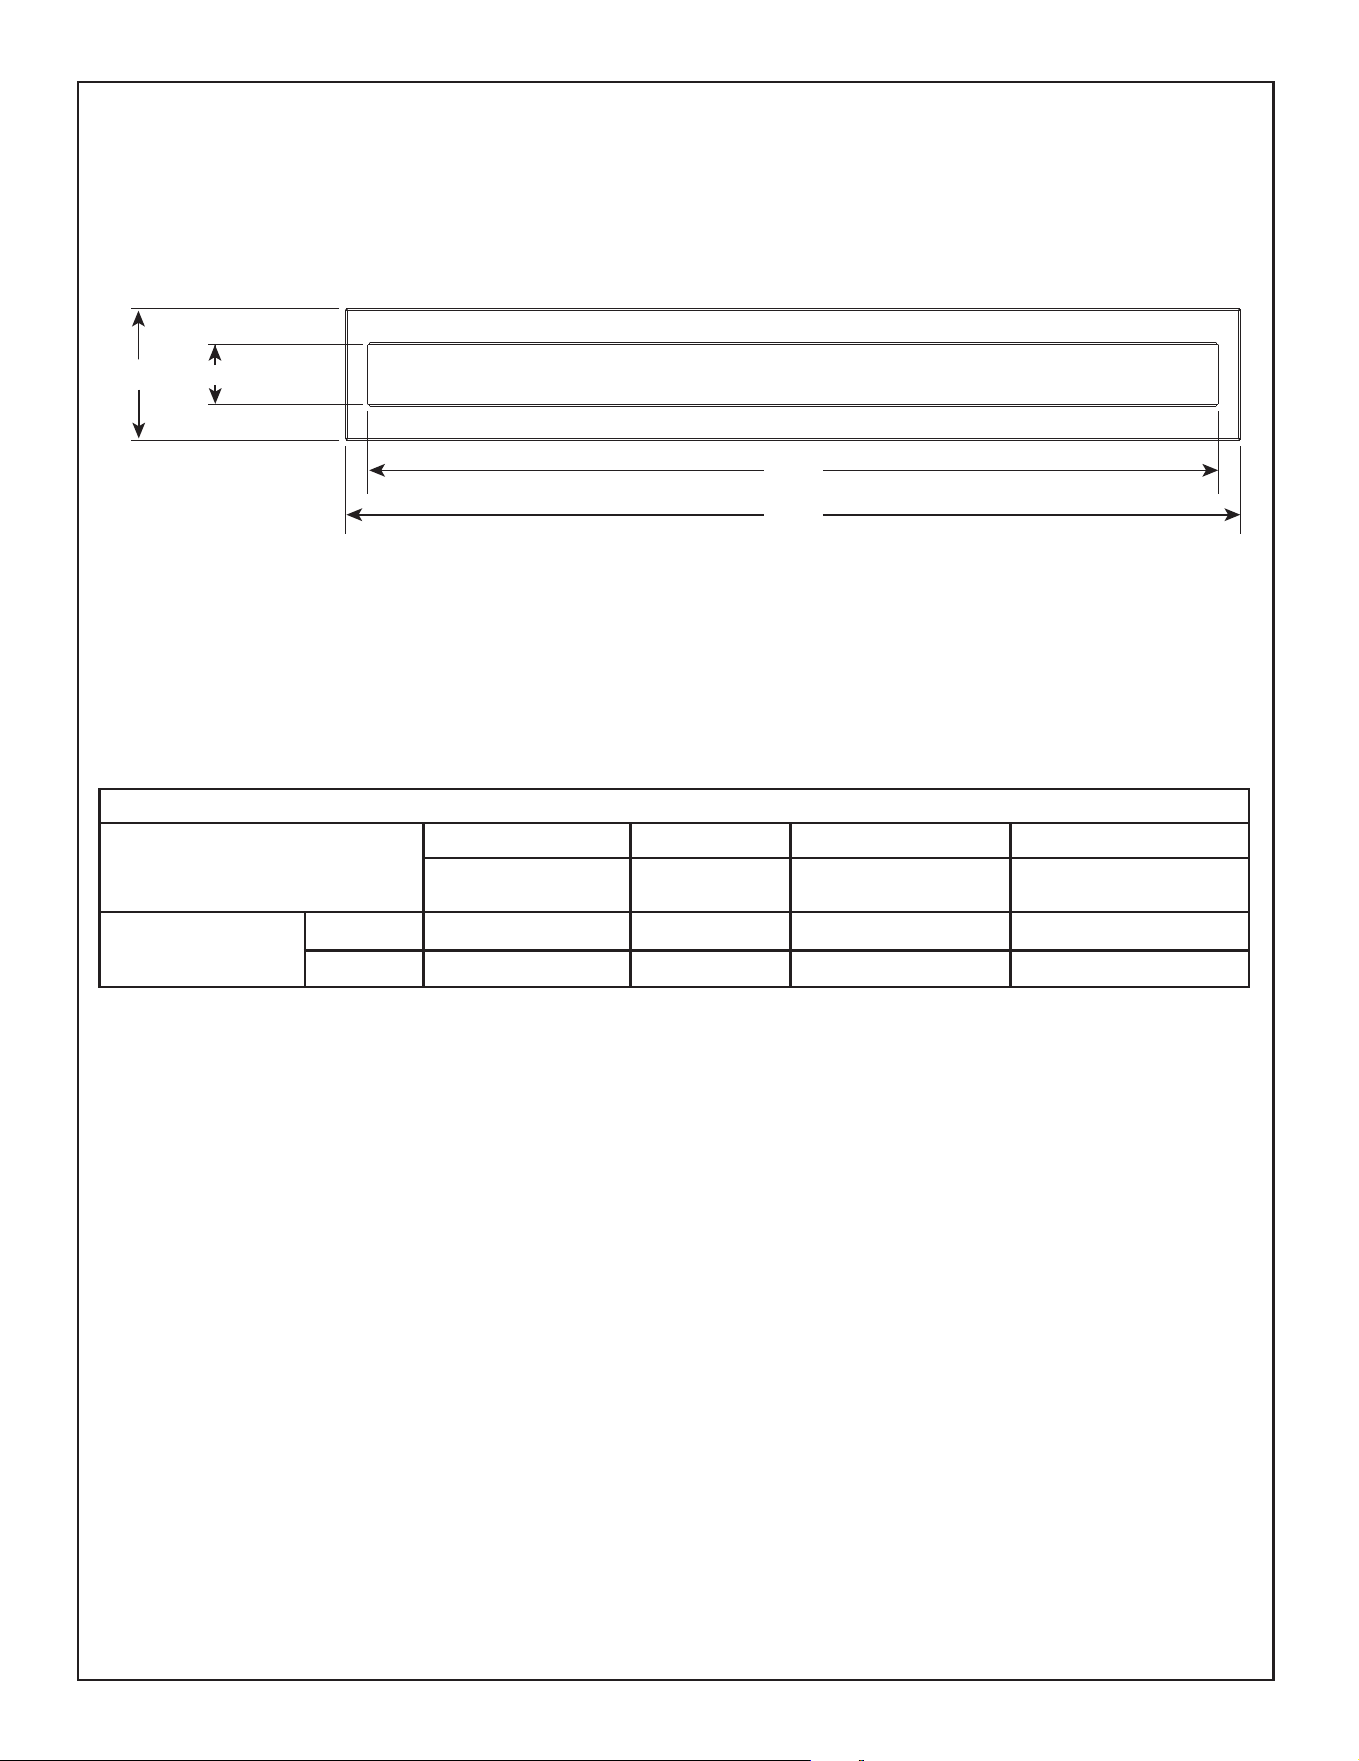
Figure 3.5 Passive Heat Front Discharge Framing Dimensions With and Without a Trim Kit
Framing Dimensions- Passive Heat Font Discharge (PH-FRT-LINEAR)
WARNING! Risk of Fire! Mesh screen required on bottom of discharge opening (Dimension A)
when discharge opening is greater than 3 inches. Secure mesh to top of framing.
Front Discharge: Air conveyed into the room through one front discharge slot.
FRONT DISCHARGE MINIMUM FRAMING DIMENSIONS
A
B C
TRIM KIT*
INSTALLED
(PHTRIM-LINEAR)
NO TRIM KIT**
Required Height of
Discharge Opening
Height of
Discharge
Opening
Clearance to
Discharge
Opening
Width of
Discharge
Opening
DVLINEAR36
Inches 3-1/2 2 48 36-1/2
millimeters 89 51 1219 927
* Measurement for Trim Kit = 3-1/2 in. + Additional Finishing Material Thickness. Figure 3.6 shows vent cover dimensions.
** Measurement without Trim Kit = 2 in. + Additional Finishing Material Thickness. If discharge opening is greater than 3
inches, a mesh screen is required.
ROOM CEILING
1-1/2 IN. (2 X 4 FRAMING)
2 IN. MIN.
TV
1/2 IN. X 1/2 IN.
WIRE MESH**
CHASE CEILING REQUIRED
WITHIN 3 IN. OF TOP OF OPENING
WIRE MESH**
= PASSIVE HEAT
DISCHARGE OPENING
0-3 IN.
= CHASE CEILING ZONE
A
D
C
B
APPLIANCE MAY BE INSTALLED
OFF OF FLOOR
E
Hearth & Home Technologies • DVLINEAR36 Installation Manual • 2569-980 Rev. E • 11/20
14
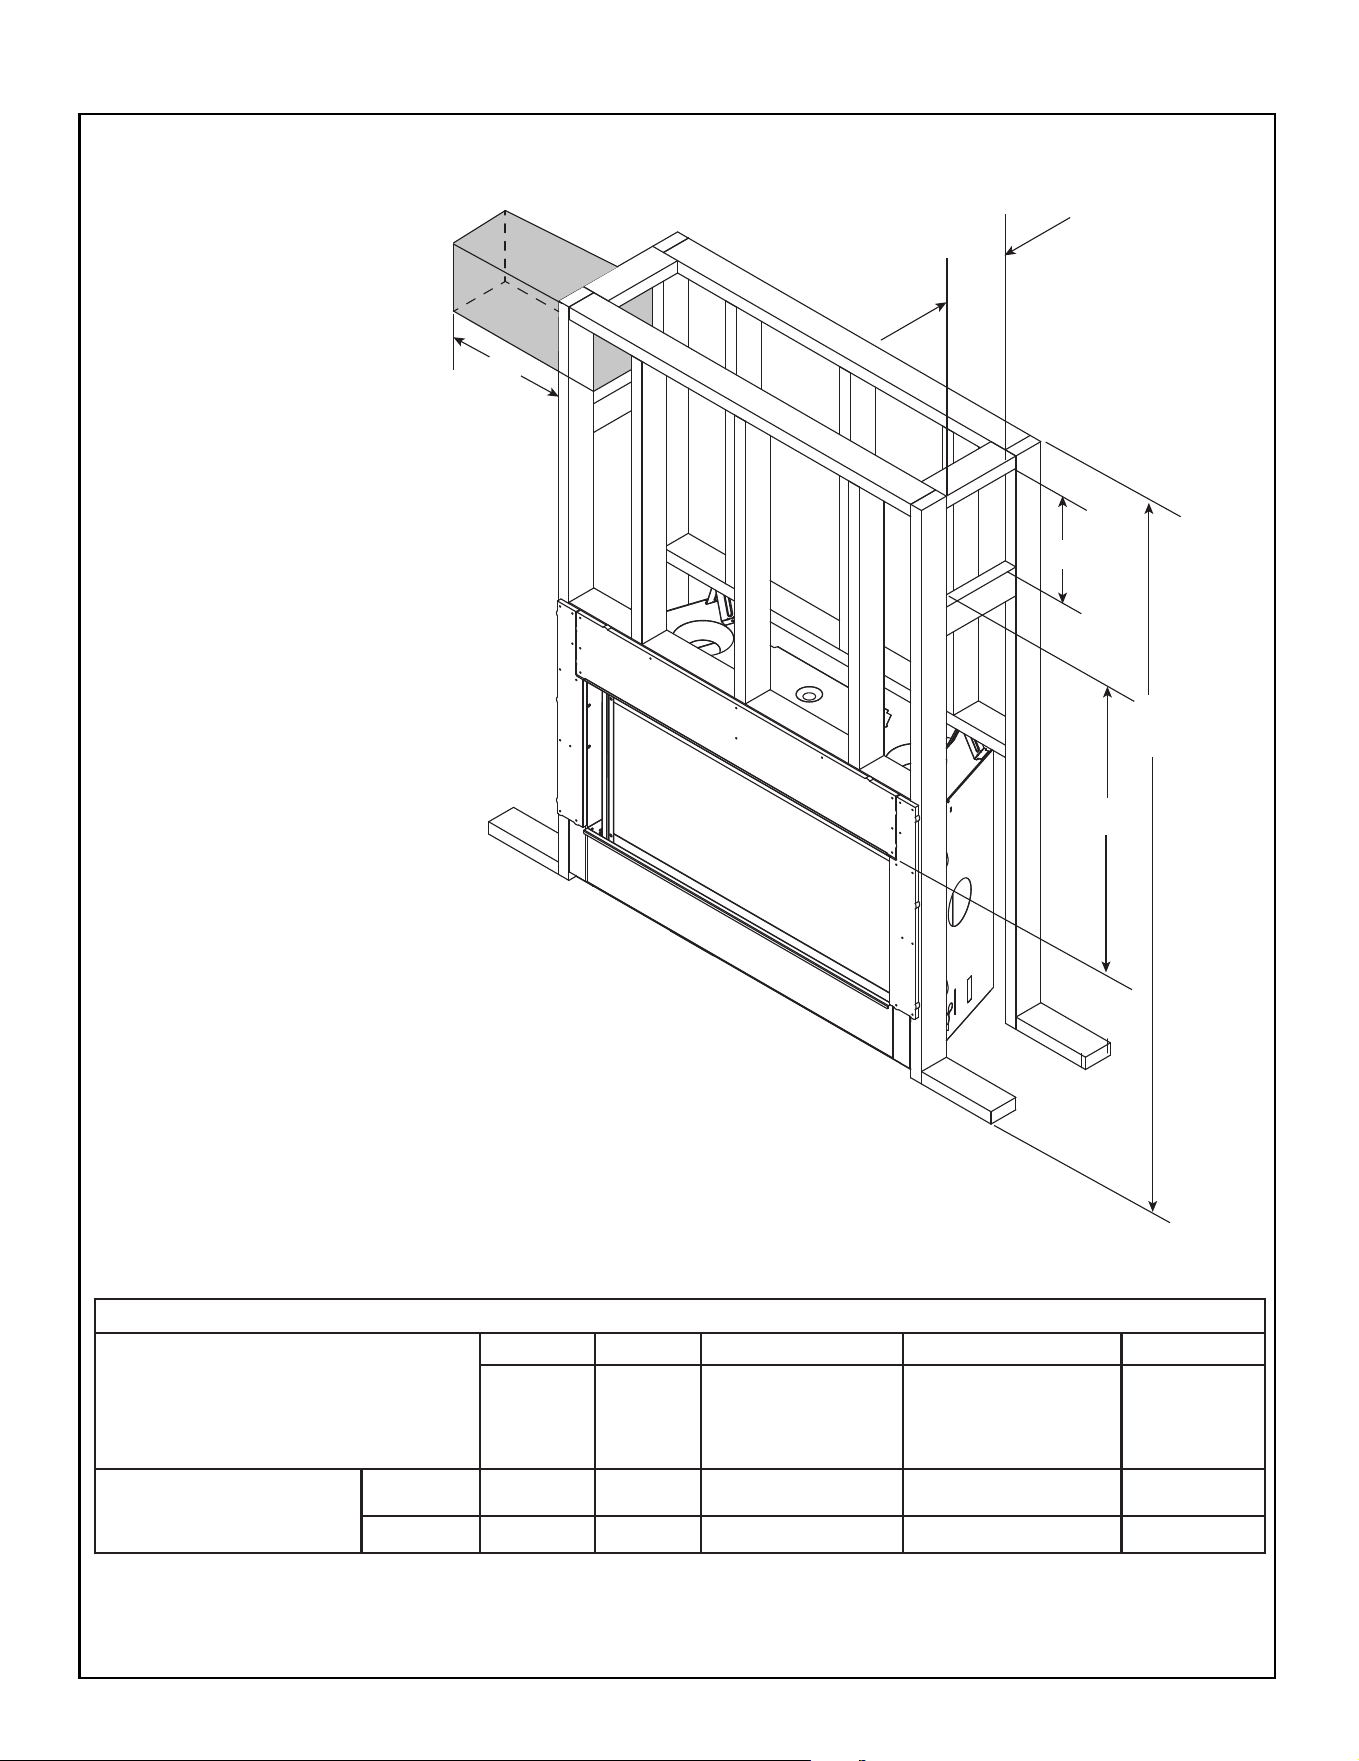
Figure 3.6 Passive Heat Front Discharge - Vent Cover Dimensions
C
D
B
A
FRONT DISCHARGE FRAMING DIMENSIONS
A
B C D
Inside Height Inside Width Outside Height Outside Width
PHTRIM-36LINEAR
Inches 2-9/16 36-1/2 5-5/8 38-3/8
millimeters 65 927 143 975
Passive Heat Front Discharge (PH-FRT-LINEAR) Trim Kit
Vent Cover Dimensions
15
Hearth & Home Technologies • DVLINEAR36 Installation Manual • 2569-980 Rev. E • 11/20
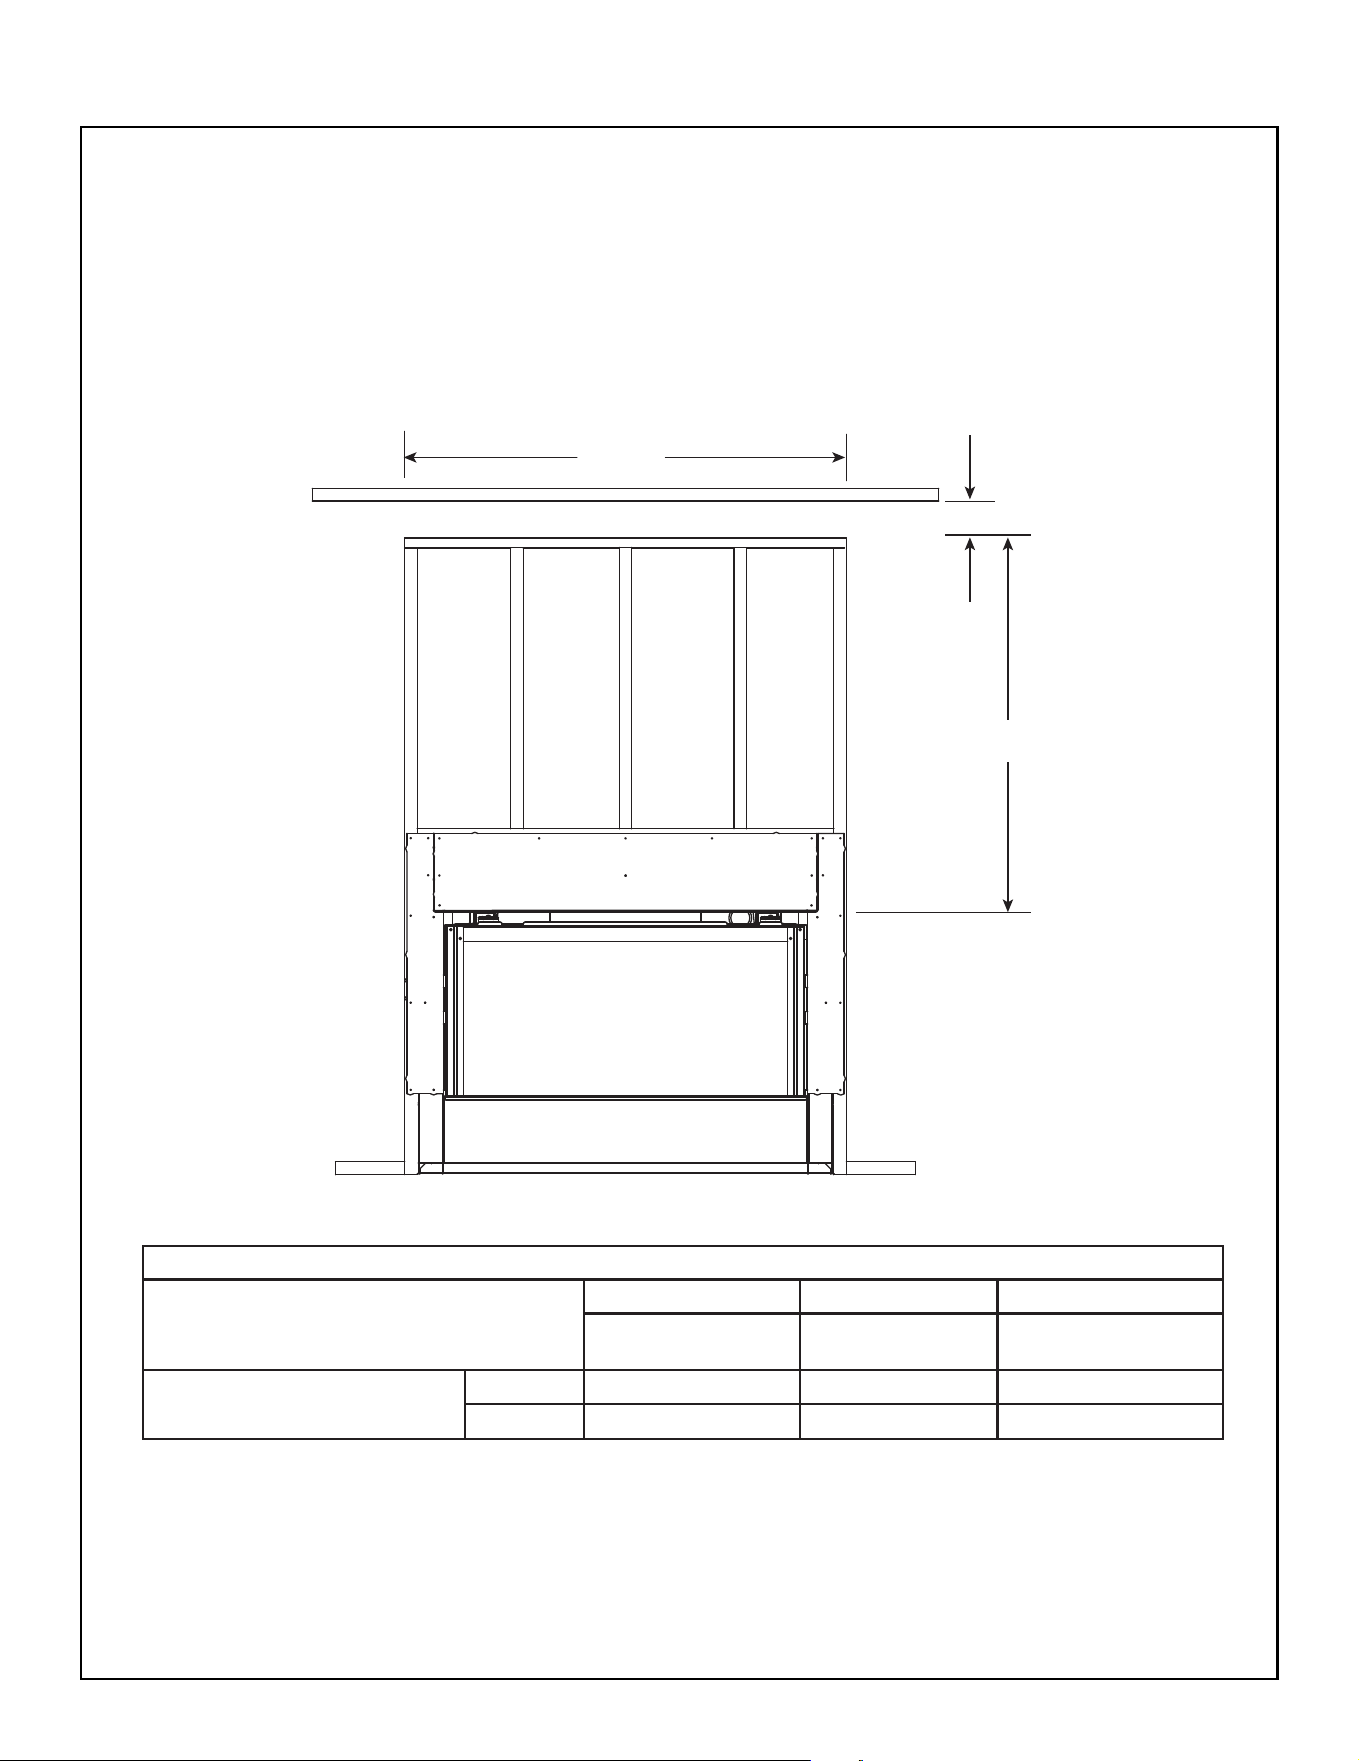
Figure 3.7 Passive Heat Side Discharge Framing Dimensions
SIDE DISCHARGE FRAMING DIMENSIONS
A B C D E
Height of
Discharge
Opening
Width of
discharge
Opening
Minimum
Clearance to
Discharge Opening
Minimum Clearance
Bottom of Appliance
to Ceiling
Minimum
Clearance to
Combustible
Materials
DVLINEAR36
Inches 12-1/4 8-3/4 39 82 18
millimeters 311 222 991 2083 457
Framing Dimensions - Passive Heat Side Discharge (PH-SIDE-LINEAR)
WARNING! Risk of Fire! DO NOT place
combustible objects or combustible materials
in non-combustible zone. Appliance and
combustible materials will overheat.
E
B
A
D
C
Side Discharge: Air conveyed into the room through two discharge registers,
one on each side of appliance.
Hearth & Home Technologies • DVLINEAR36 Installation Manual • 2569-980 Rev. E • 11/20
16
C
A
B
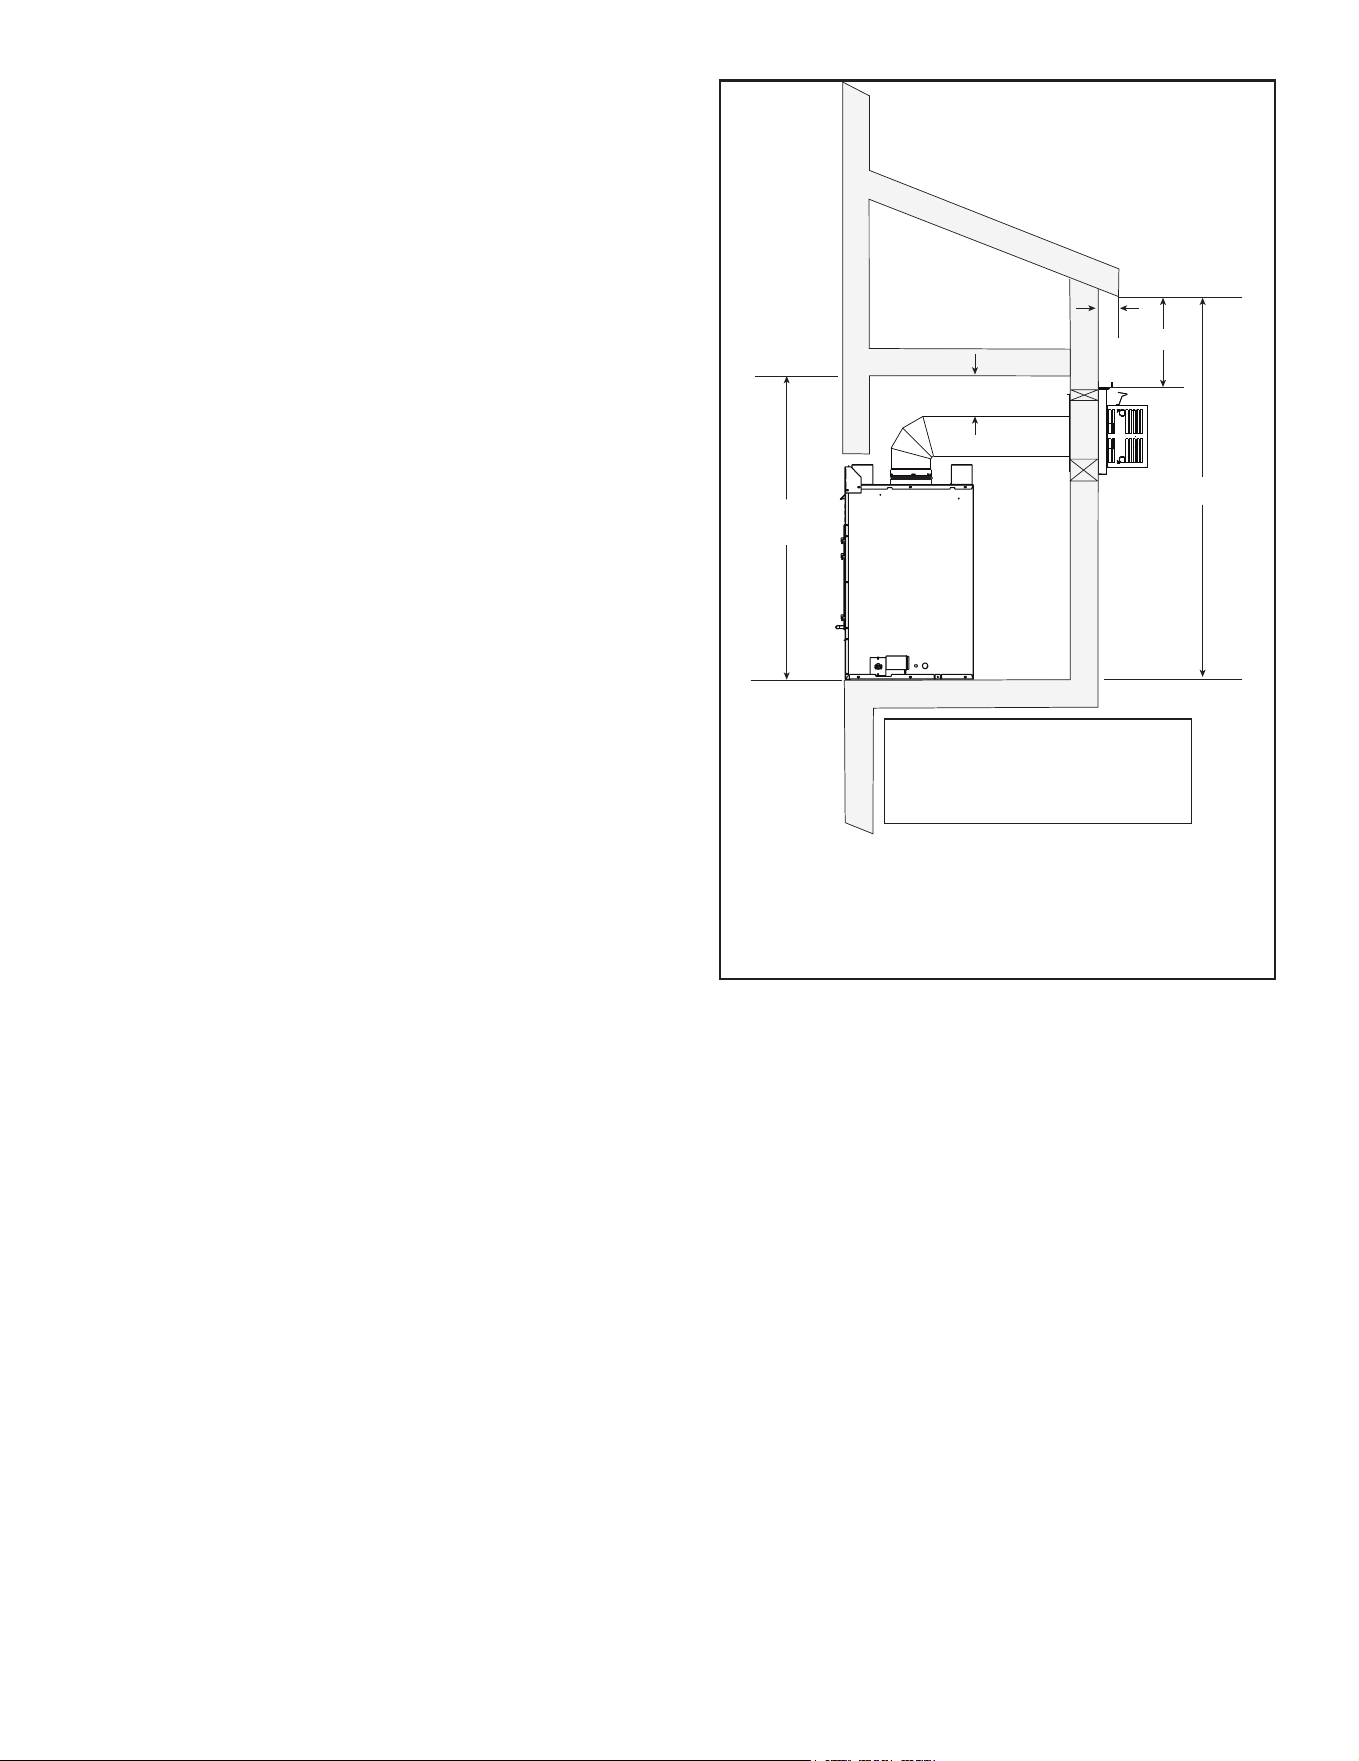
Figure 3.8 Passive Heat Minimum Framing Dimensions Open Top Discharge
* Mesh screen required for front discharge or open top discharge passive heat installations with discharge
opening of 3 inches or greater.
Framing Dimensions - Passive Heat Open Top Discharge (PH-FRT-LINEAR)
WARNING! Risk of Fire! Mesh screen required on bottom of discharge opening when discharge
opening is greater than 3 inches. Secure mesh to top of framing.
Open Top Discharge: Both sides and the top are open allowing air to be conveyed into the room.
OPEN TOP DISCHARGE MINIMUM FRAMING DIMENSIONS
A*
B C
Height of
Discharge Opening
Clearance to
Discharge Opening
Width of
Discharge Opening
DVLINEAR36
Inches 2 48 36-1/2
millimeters 51 1219 927
17
Hearth & Home Technologies • DVLINEAR36 Installation Manual • 2569-980 Rev. E • 11/20
NOTICE: Install appliance on hard metal or wood surfaces
extending full width and depth. DO NOT install directly on
carpeting, vinyl, or any combustible material other than
wood.
WARNING! Risk of Fire! Maintain specied air space
clearances to appliance and vent pipe:
• Insulation and other materials must be secured to prevent
accidental contact.
• The chase must be properly blocked to prevent blown
insulation or other combustibles from entering and
making contact with replace or chimney.
• Failure to maintain airspace may cause overheating and
a re.
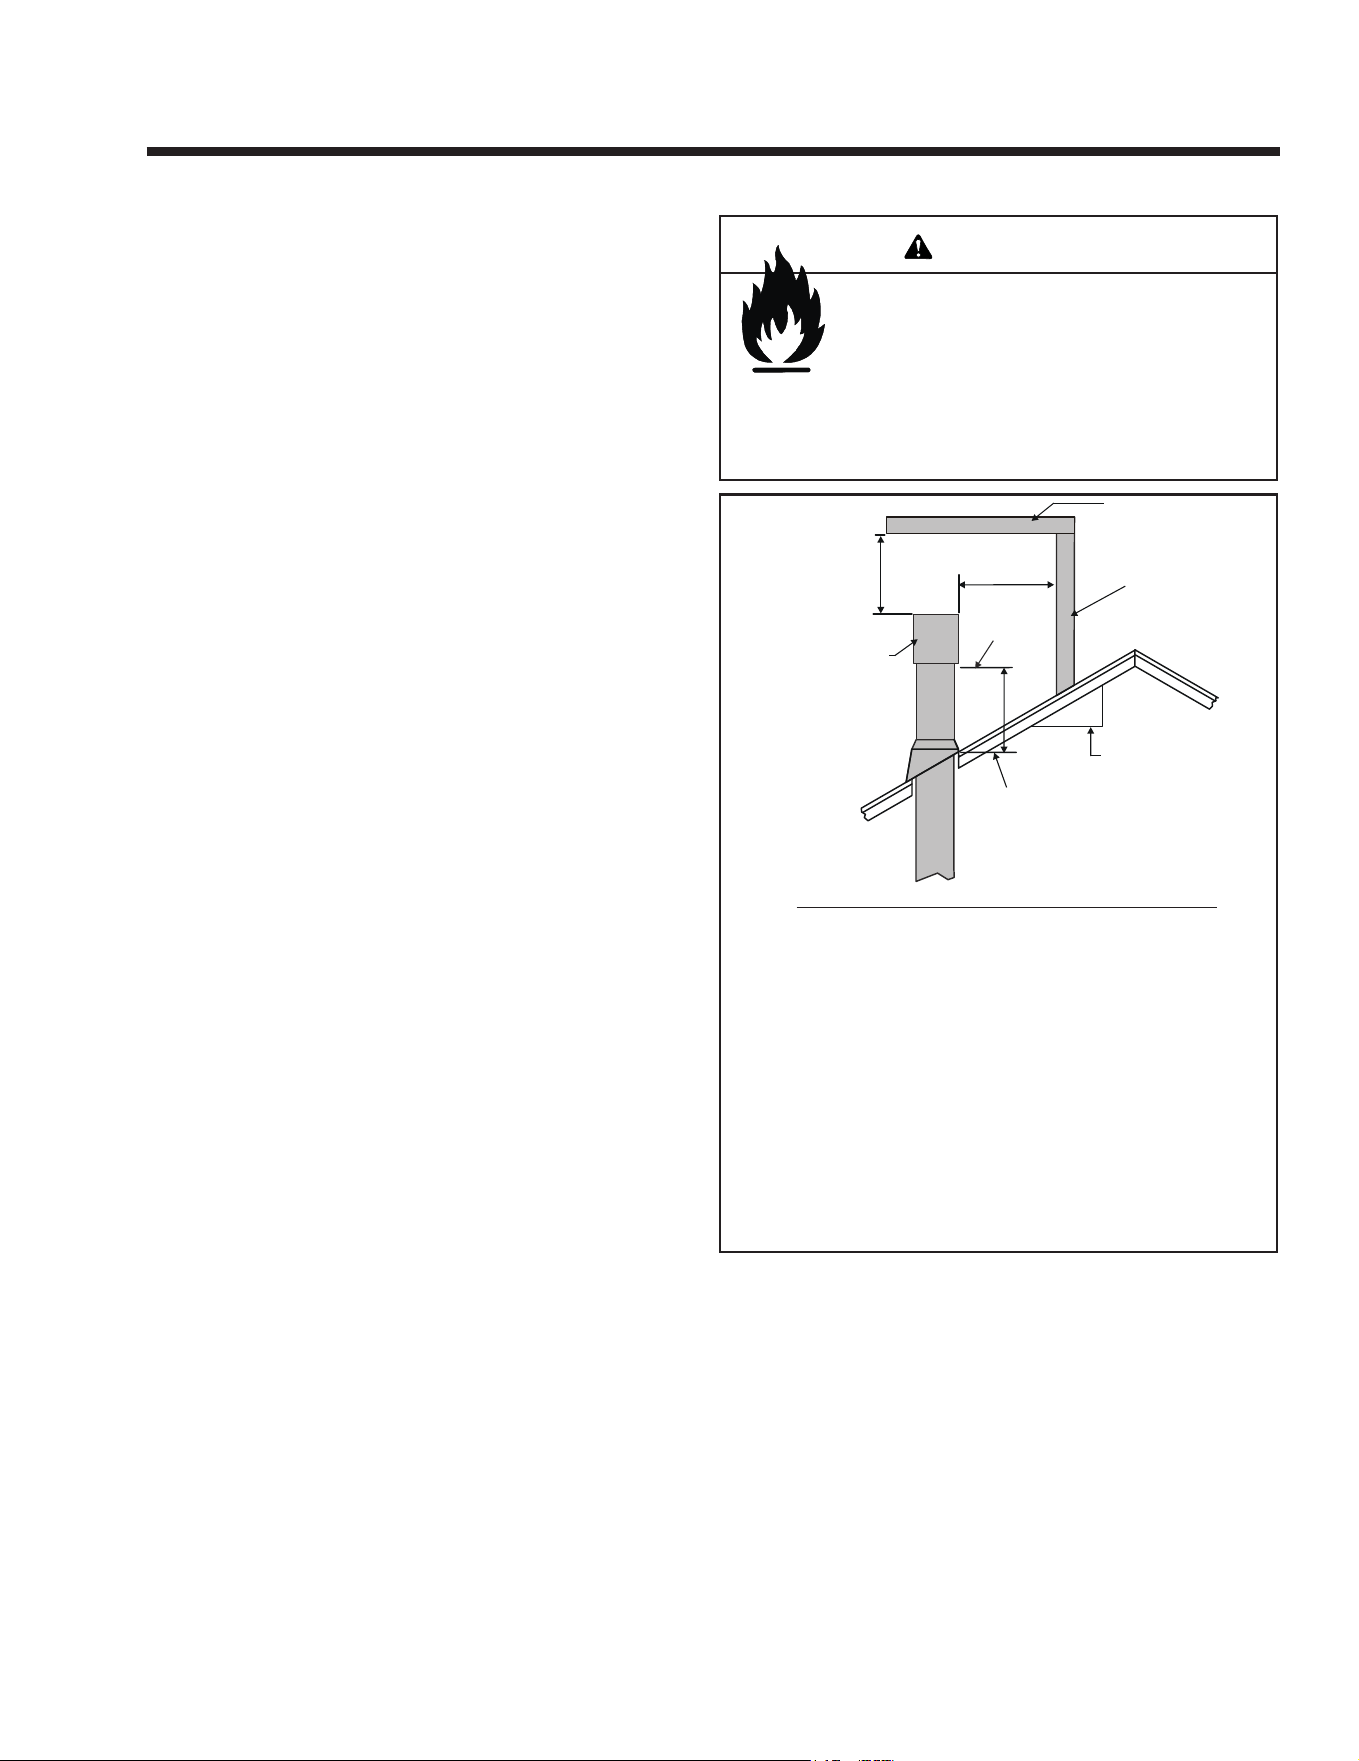
Figure 3.9 Exterior Chase - Minimum Height Requirements
*
3 IN. MIN.
41 IN. MIN.
*
57-1/2 IN. UNVENTILATED SOFFITS
57-1/2 IN. VENTILATED SOFFITS
69-1/2 IN. VINYL SOFFITS
NOTE: THESE DIMENSIONS ARE DERIVED
USING DIMENSION C FROM FIGURE 4.4.
AA
NOTE: If overhang (Dim. A) is less than 2 inches, clearance from
top of termination cap to bottom of overhang (Dim. B) may
be 0 inches.
Dimension A is measured from the edge of the overhang to
the surface the termination cap is mounted to.
B
C. Constructing the Appliance Chase
A chase is a vertical box-like structure built to enclose the
gas appliance and/or its vent system. In cooler climates
the vent should be enclosed inside the chase.
NOTICE: Treatment of ceiling restops and wall shield
restops and construction of the chase may vary with the
type of building. These instructions are not substitutes
for the requirements of local building codes. Therefore,
you MUST check local building codes to determine the
requirements to these steps.
NOTICE: Where required by code, install only sprinkler
heads with a sprinkler activation temperature classied
as Extra High.
• Sprinklers inside of chase: Keep sprinkler head away
from vent and chimney.
• Heat Management applications: Maintain 36 inches of
clearance to openings from which heat is discharged
such as convection slots, passive heat registers, heat
zone registers, etc. Refer to Section 6.B for Heat
Management options allowed for this appliance.
Chases should be constructed and insulated in the same
manner as the thermal envelope of the home based on
the code requirements for that climate zone to prevent air
leakage and draft problems. The chase is an extension of
the building thermal envelope.
To further prevent drafts and air leakage, the wall shield
and ceiling restops should be sealed with caulk with
a minimum of 300 ºF continuous exposure rating to
seal gaps. Gas line holes and other openings should
be sealed with caulk with a minimum of 300 ºF continu-
ous exposure rating or stued with unfaced insulation. If the
appliance is being installed on a cement surface, a layer of
plywood may be placed underneath to prevent conducting
cold up into the room.
Minimum height requirements for an exterior chase on a top-
vented appliance are shown in Figure 3.9. Reference Figure
4.5 for additional clearances.
Hearth & Home Technologies • DVLINEAR36 Installation Manual • 2569-980 Rev. E • 11/20
18
4 4
Termination Location and Vent Information
A. Approved Pipe
WARNING! Risk of Fire, Delayed Ignition or Asphyxi-
ation. This appliance requires a separate vent. DO NOT
vent to a pipe serving any other appliance.
This appliance is only approved for use with the Hearth &
Home Technologies SLP venting system. Refer to Sec-
tion 12.A for vent component information and dimensions.
Only use listed decorative termination caps/shrouds with
Hearth & Home Technologies approved venting systems.
DO NOT mix pipe, ttings or joining methods from dier-
ent manufacturers.
The pipe is tested to be run inside an enclosed wall.
There is no requirement for inspection openings at each
joint within the wall.
Approved Pipe - Rigid
This appliance is approved for use with Hearth & Home
Technologies SLP venting systems. Refer to Section
12.A for vent component information and dimensions.
DO NOT mix pipe, ttings or joining methods from dier-
ent manufacturers.
The pipe is tested to be run inside an enclosed wall.
There is no requirement for inspection openings at each
joint within the wall.
WARNING! Risk of Fire or Asphyxiation. This appli-
ance requires a separate vent. DO NOT vent to a pipe
serving a separate solid fuel burning appliance.
Approved Pipe - Flex
This appliance is approved for use with Hearth & Home
Technologies SLP-FLEX (6-5/8 inch) and SLP-FLEX7 (7
inch) venting systems.
DO NOT mix pipe, ttings or joining methods from
dierent manufacturers. SLP-FLEX and SLP-FLEX7
venting cannot be interchanged.
SLP-FLEX (6-5/8 Inch): Venting may be used in any
venting conguration shown in the venting tables pro-
vided that the horizontal vent length is reduced by 25%.
SLP-FLEX7 (7 Inch-Canada Only): Venting requires
adapter collars to transition from the 6-5/8 IN. appliance
starting collar and to the 6-5/8 IN. termination cap. Refer
to installation instructions included with the SLP-FLEX7
collar adapter (SLP-FLEX7-A). SLP-FLEX7 Series vent-
ing is approved for use in Canada only.
The pipe is tested to be run inside an enclosed wall.
There is no requirement for inspection openings at each
joint within the wall.
WARNING! Risk of Fire or Asphyxiation. This appli-
ance requires a separate vent. DO NOT vent to a pipe
serving a separate solid fuel burning appliance.
B. Vent Termination Minimum Clearances
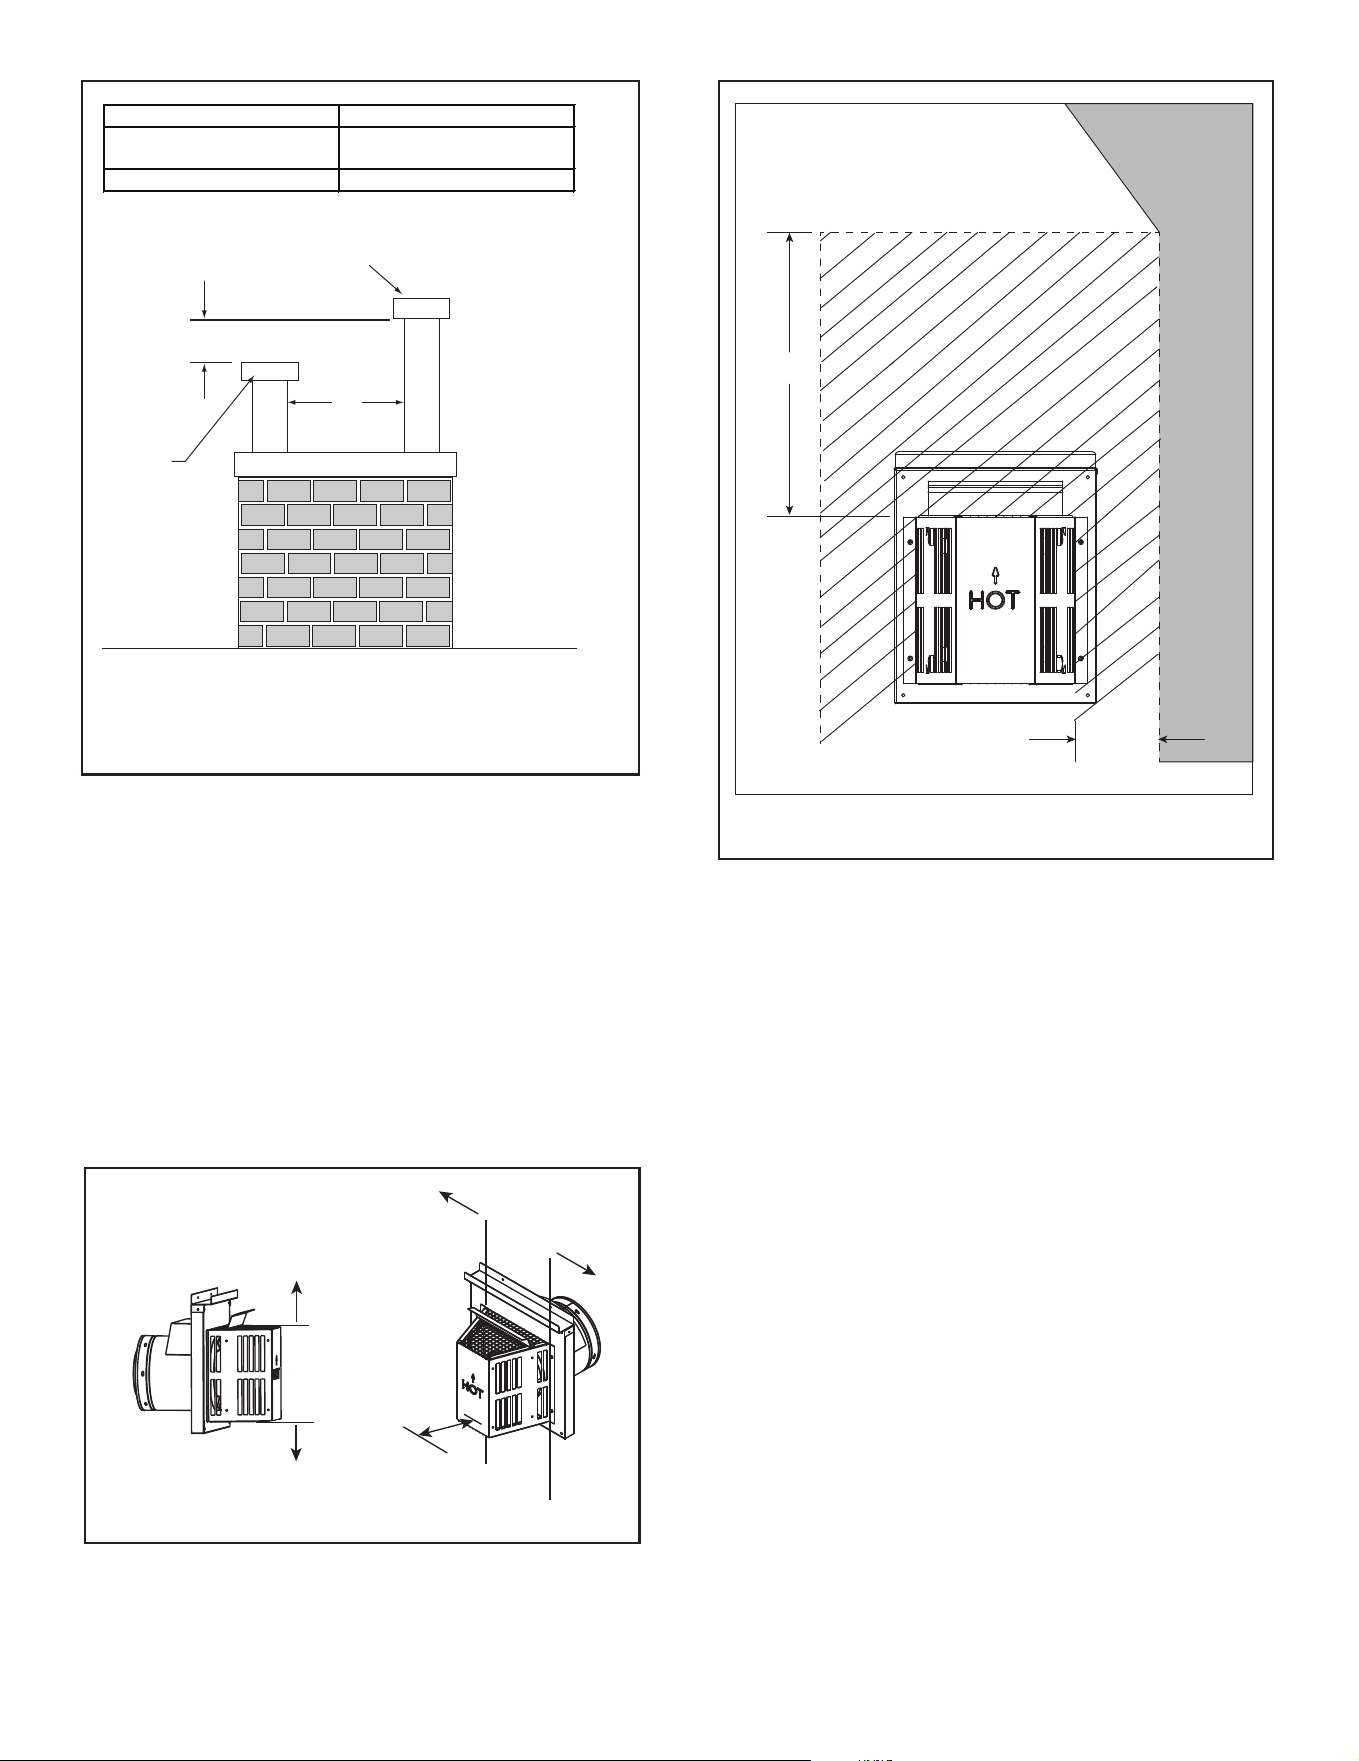
Roof Pitch H (Min.) Ft
Flat to 6/12...........................................................1.0*
Over 6/12 to 7/12 .................................................1.25*
Over 7/12 to 8/12 .................................................1.5*
Over 8/12 to 9/12 .................................................2.0*
Over 9/12 to 10/12 ...............................................2.5*
Over 10/12 to 11/12 .............................................3.25
Over 11/12 to 12/12 .............................................4.0
Over 12/12 to 14/12 .............................................5.0
Over 14/12 to 16/12 .............................................6.0
Over 16/12 to 18/12 .............................................7.0
Over 18/12 to 20/12 .............................................7.5
Over 20/12 to 21/12 .............................................8.0
Figure 4.1 Minimum Height From Roof to Lowest Discharge
Opening
HORIZONTAL
OVERHANG
VERTICAL
WALL
GAS DIRECT VENT
TERMINATION CAP
12
X
ROOF PITCH
IS X/ 12
LOWEST
DISCHARGE
OPENING
2 FT.
MIN.
20 INCHES MIN.
H (MIN.) - MINIMUM HEIGHT FROM ROOF
TO LOWEST DISCHARGE OPENING
Fire Risk.
Maintain vent clearance to combustibles as
specied.
• DO NOT pack air space with insulation or other
materials.
Failure to keep insulation or other materials away
from vent pipe could cause overheating and re.
WARNING
* H minimum may vary depending on regional snowfall.
Refer to local codes.
19
Hearth & Home Technologies • DVLINEAR36 Installation Manual • 2569-980 Rev. E • 11/20
Wood or Fuel Oil
Termination Cap
B
**Gas
Termination
Cap
A *
* If using decorative cap cover(s), this distance may need to be increased.
Refer to the installation instructions supplied with the decorative cap cover.
A B
6 in. (minimum) up to 20 in.
152 mm/508 mm
18 in. minimum
457 mm
20 in. and over 0 in. minimum
** If two gas terminations are present, they may be level (B = 0 inches)
provided A is a minimum of 6 inches.
Figure 4.2 Staggered Termination Caps
CAUTION! Risk of Burns! Termination caps are HOT,
consider proximity to doors, trac areas or where people
may pass or gather (sidewalk, deck, patio, etc.). Listed
cap shields available. Contact your dealer.
• Local codes or regulations may require different
clearances.
• Hearth & Home Technologies assumes no responsibility
for the improper performance of the appliance when the
venting system does not meet these requirements.
• Vinyl protection kits are suggested for use with vinyl siding.
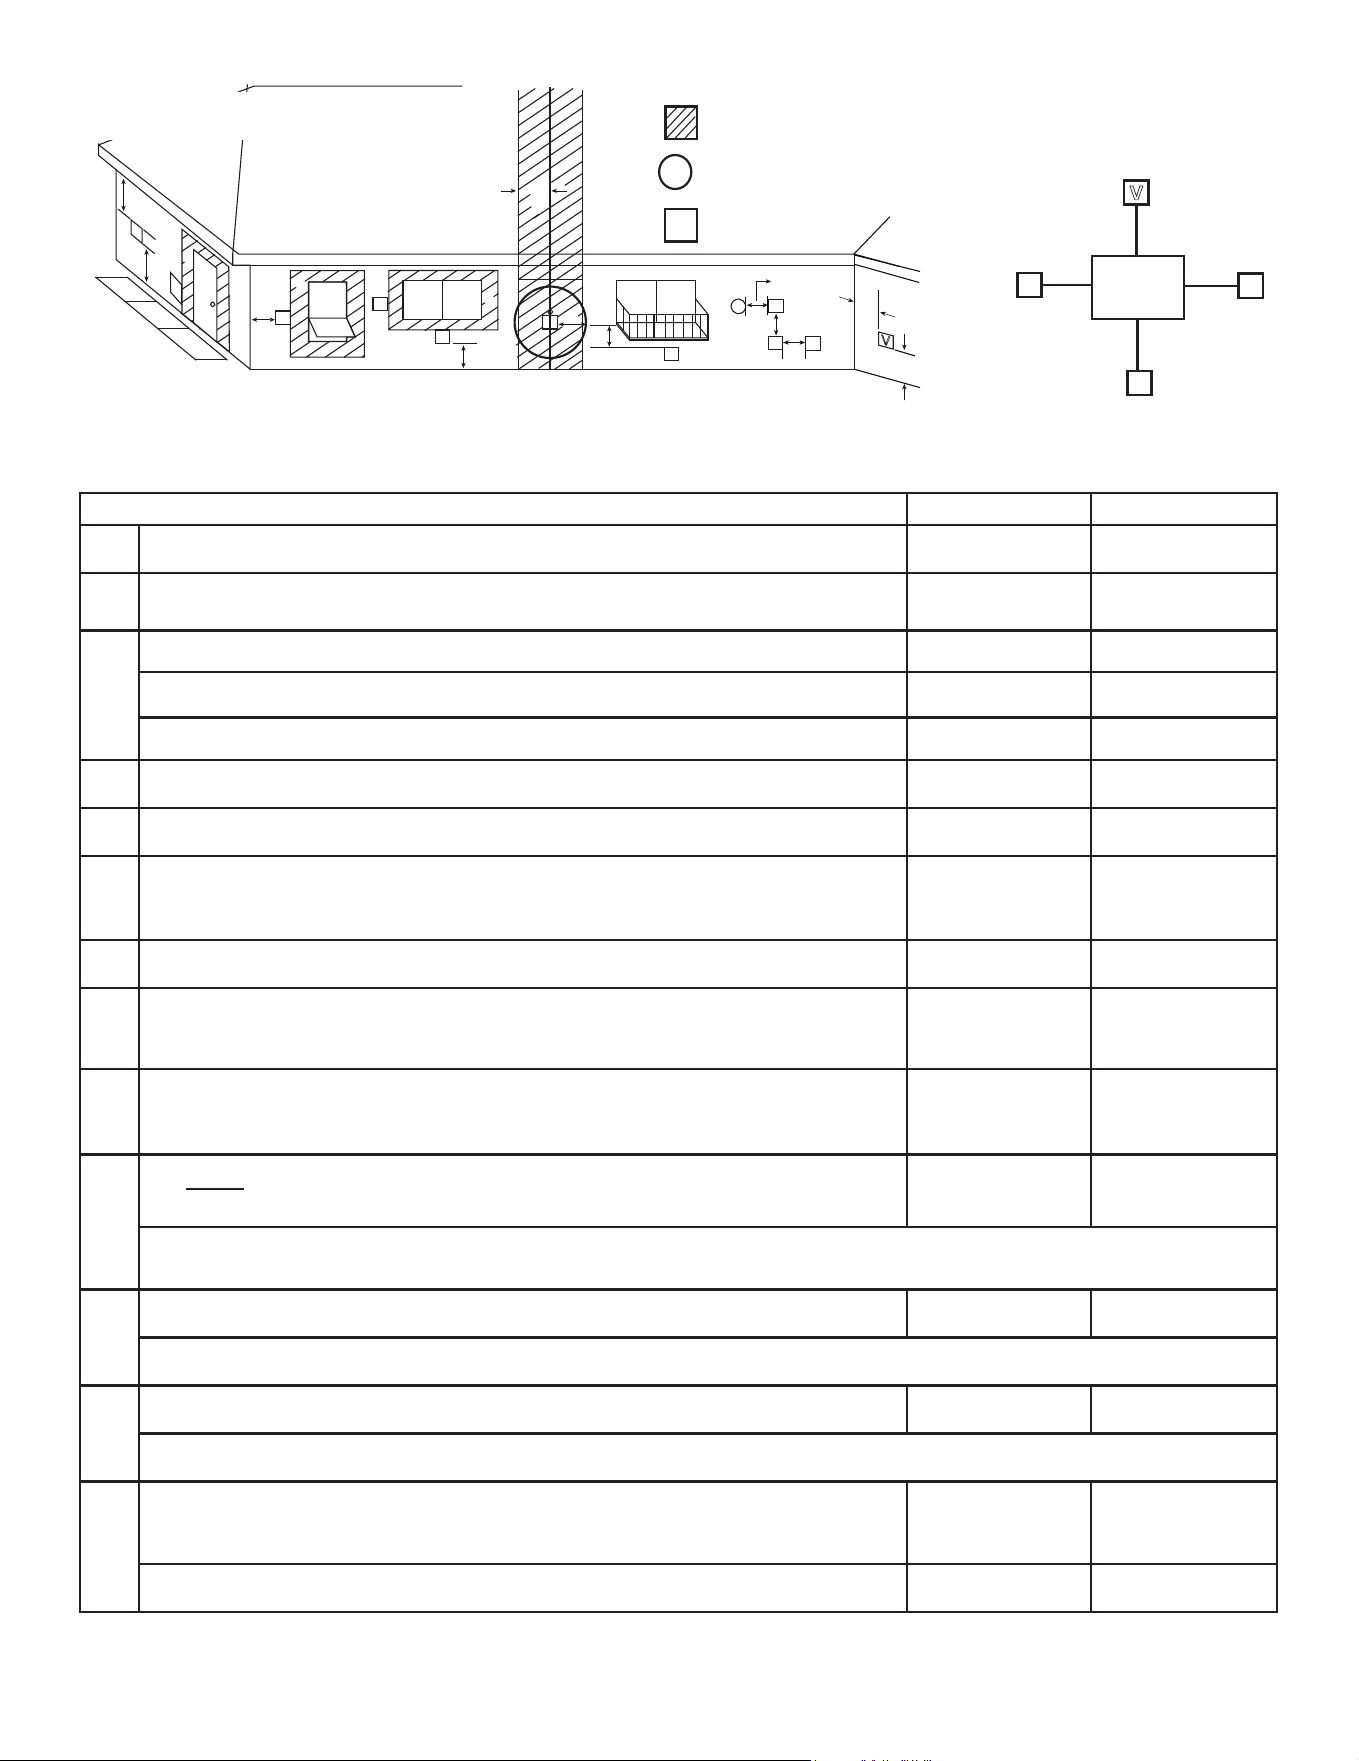
• Measure horizontal and vertical termination cap clearances
as noted in Figure 4.3.
Figure 4.3
CLEARANCE
= 6 IN.
H
V
V
H=Measure Horizontal Distances from H
V=Measure Vertical Distances from V
H
Figure 4.4 Measure Horizontal and Vertical Termination
Clearance to Trapezoid Portion of Cap
OVERHANG
X
Y
WALL
For X and Y dimensions, see Figure 4.5.
Hearth & Home Technologies • DVLINEAR36 Installation Manual • 2569-980 Rev. E • 11/20
20
C
J
B
D
B
F
B
A
E
V
V
V
V
V
V
M
H or i
V
G
X
V
H
A
V
V
H
Figure 4.5 Minimum Clearances for Termination
X
= AIR SUPPLY INLET
V
= VENT TERMINAL
= AREA WHERE TERMINAL IS NOT PERMITTED
Electrical
Service
V
K
V
K
V
L
C
V
C. Vent Terminal Clearances
U.S.A. CANADA
A Clearance above grade,veranda, porch, deck, or balcony 12 in. (305 mm) 12 in. (305 mm)
B Clearance to window or door that may be opened, or to permanently closed window
9 in. min. (229
mm min.)
12 in. min.
(305 mm min.)
C
clearance below unventilated sot 18 in. (457 mm) 18 in. (457 mm)
clearance below ventilated sot 18 in. (457 mm) 18 in. (457 mm)
clearance below any vinyl sots and electrical service 30 in. (762 mm) 30 in. (762 mm)
D clearance to outside corner 6 in. (152 mm) 6 in. (152 mm)
E clearance to inside corner 6 in. (152 mm) 6 in. (152 mm)
F
not to be installed above a gas meter/regulator assembly within 3 feet horizontally from
the center-line of the regulator
3 ft (914 mm) 3 ft (914 mm)
G clearance to gas service regulator vent outlet 3 ft (914 mm) 3 ft (914 mm)
H
clearance to non-mechanical air supply inlet to building or the combustion air inlet to
any other appliance termination (mechanical or non-mechanical)
9 in. (229 mm) 12 in. (305 mm)
I
clearance to a mechanical (powered) air supply inlet
***(All mechanical air intakes within 10 feet of a horizontal termination cap must be
a minimum of 3 feet below termination.)
3 ft (914 mm)*** 6 ft (1.8 m)
J
On public property: clearance above paved sidewalk or a paved driveway.
7 ft (2.1 m) 7 ft (2.1 m)**
**(A vent shall not terminate directly above a sidewalk or paved driveway which is located between two single family dwellings
and serves both dwellings.)
K
clearance from sides of electrical service 6 in. (152 mm) 6 in. (152 mm)
Location of the vent termination must not interfere with access to the electrical service.
L
clearance above electrical service 12 in. (305 mm) 12 in. (305 mm)
Location of the vent termination must not interfere with access to the electrical service.
M
clearance under veranda, porch, deck, balcony or overhang
*(Permitted only if veranda, porch, deck, or balcony is fully open on a minimum of
two sides beneath the oor.)
18 in. (457 mm) 12 in. (305 mm)*
vinyl or composite overhang 42 in. (1067 mm) 42 in. (1067 mm)
U.S.A. Installations: In accordance with the current ANSI Z223.1/NFPA 54, National Fuel Gas Code.
Canadian Installations: In accordance with the current CSA B149.1, Natural Gas and Propane Installation Code.
21
Hearth & Home Technologies • DVLINEAR36 Installation Manual • 2569-980 Rev. E • 11/20
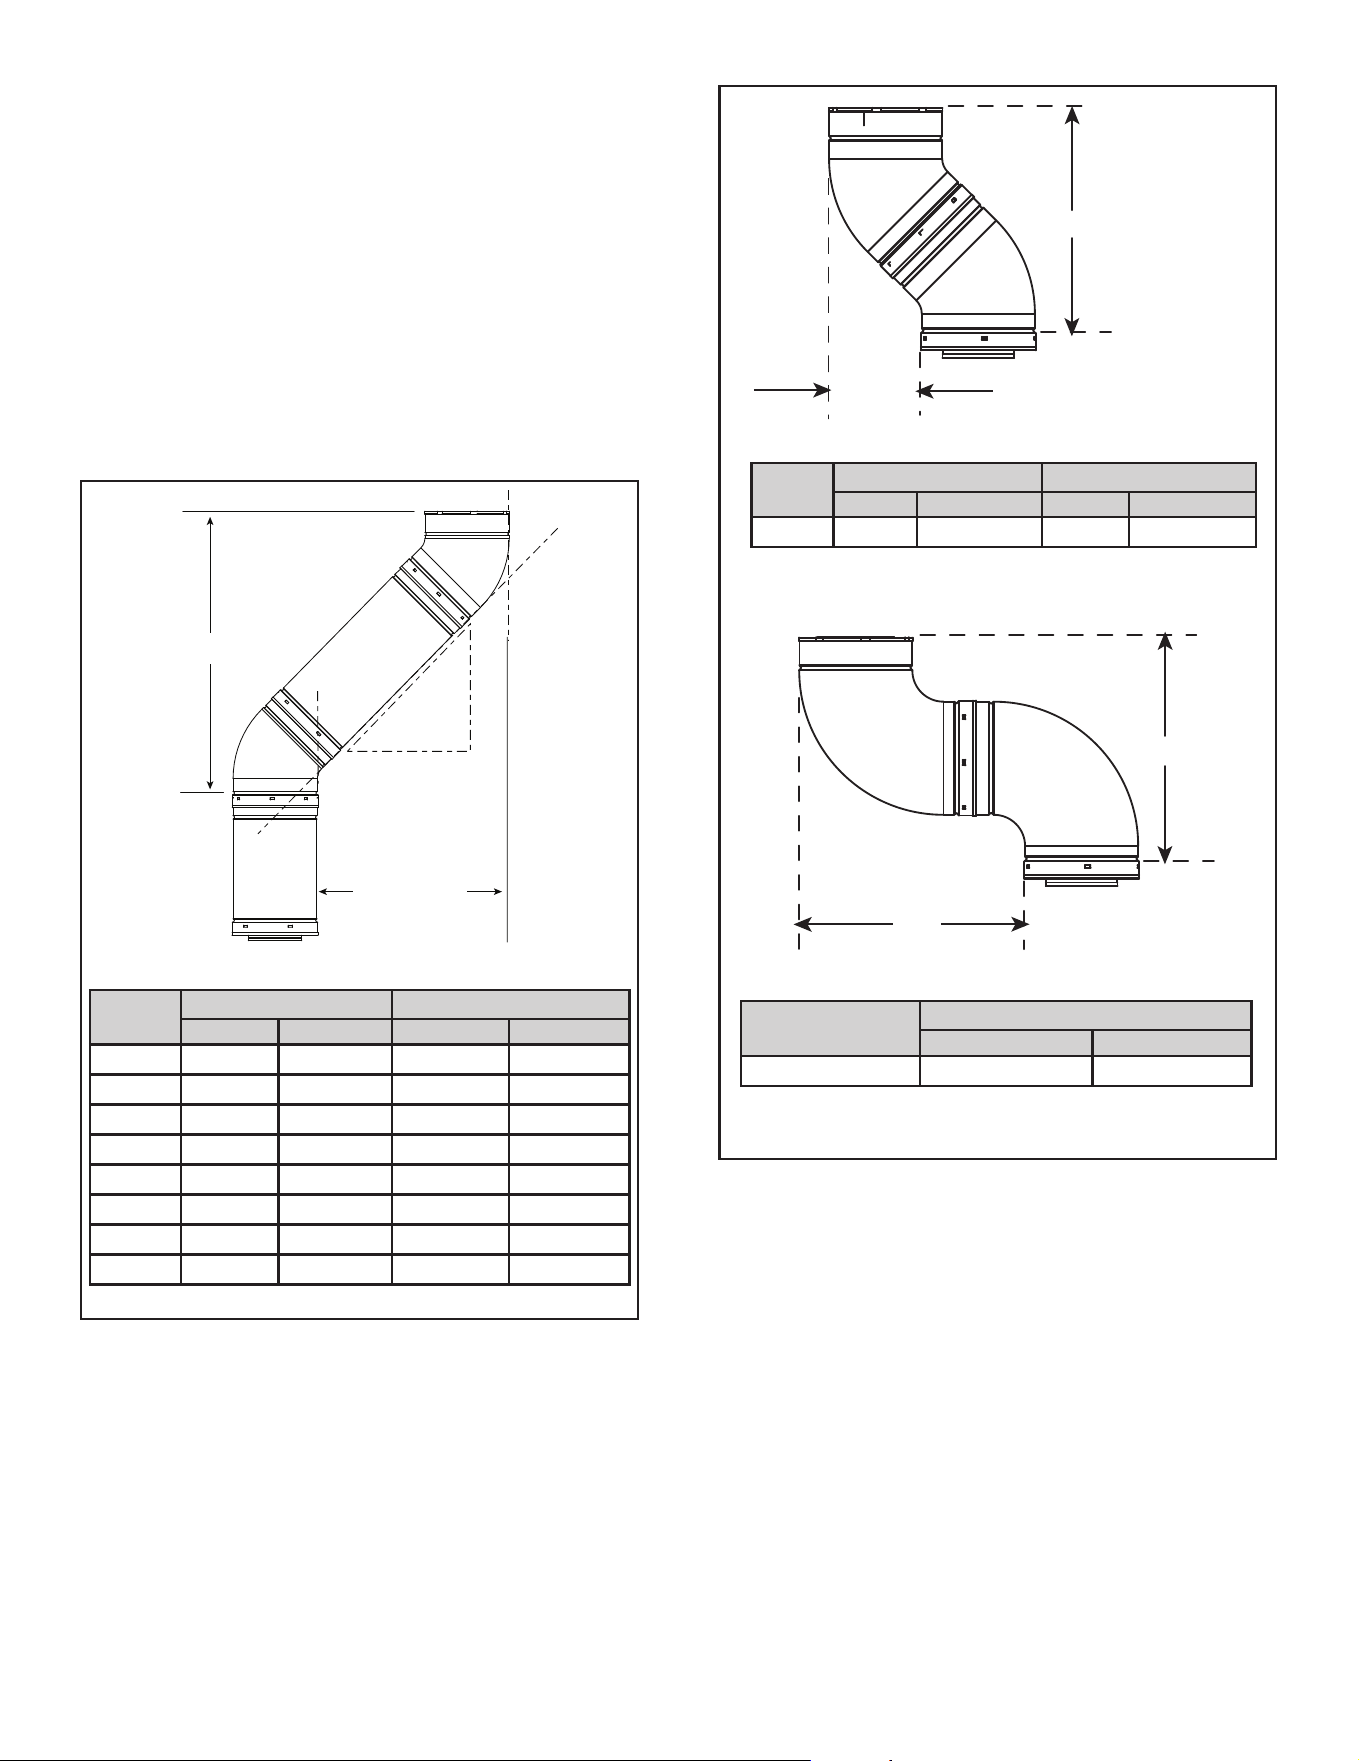
D. Use of Elbows
Diagonal runs have both vertical and horizontal vent as-
pects when calculating the eects. Use the rise for the
vertical aspect and the run for the horizontal aspect. See
Figure 4.6.
Two 45º elbows may be used in place of one 90º elbow.
On 45º runs, one foot of diagonal is equal to 8-1/2 inch
(216 mm) horizontal run and 8-1/2 inch (216 mm) vertical
run. A length of straight pipe is allowed between two 45º
elbows. See Figure 4.6.
Figure 4.7 shows the vertical and horizontal osets for
SLP elbows.
Figure 4.6
HORIZONTAL
VERTICAL
RUN
RISE
EFFECTIVE
LENGTH
Y
X
X
X
Vent Type
X
Inches Millimeters
SLP 11-1/4 286
Figure 4.7 Vertical and Horizontal Oset for SLP Elbows
SLP
Pipe
Eective Length Rise/Run
Inches Millimeters Inches Millimeters
SLP4 4 102 2-3/4 70
SLP6 6 152 4-1/4 108
SLP12 12 305 8-1/2 216
SLP24 24 610 17 432
SLP36 36 914 25-1/2 648
SLP48 48 1219 34 864
SLP6A 3 to 6 76 to 152
2-1/8-4-1/4 54-108
SLP12A 3 to 12 76 to 305
2-1/8-8-1/2 54-216
Vent
Type
X Y
Inches Millimeters Inches Millimeters
SLP 5-1/4 133 11-3/8 289
Hearth & Home Technologies • DVLINEAR36 Installation Manual • 2569-980 Rev. E • 11/20
22
Measuring Standards:
Vertical and horizontal measurements listed in the vent
diagrams and clearances for termination were made
using the following standards:
• Pipe measurements are shown using the eective length
of pipe. See Section 12.A (Figure 12.1) for information
on eective length of pipe components.
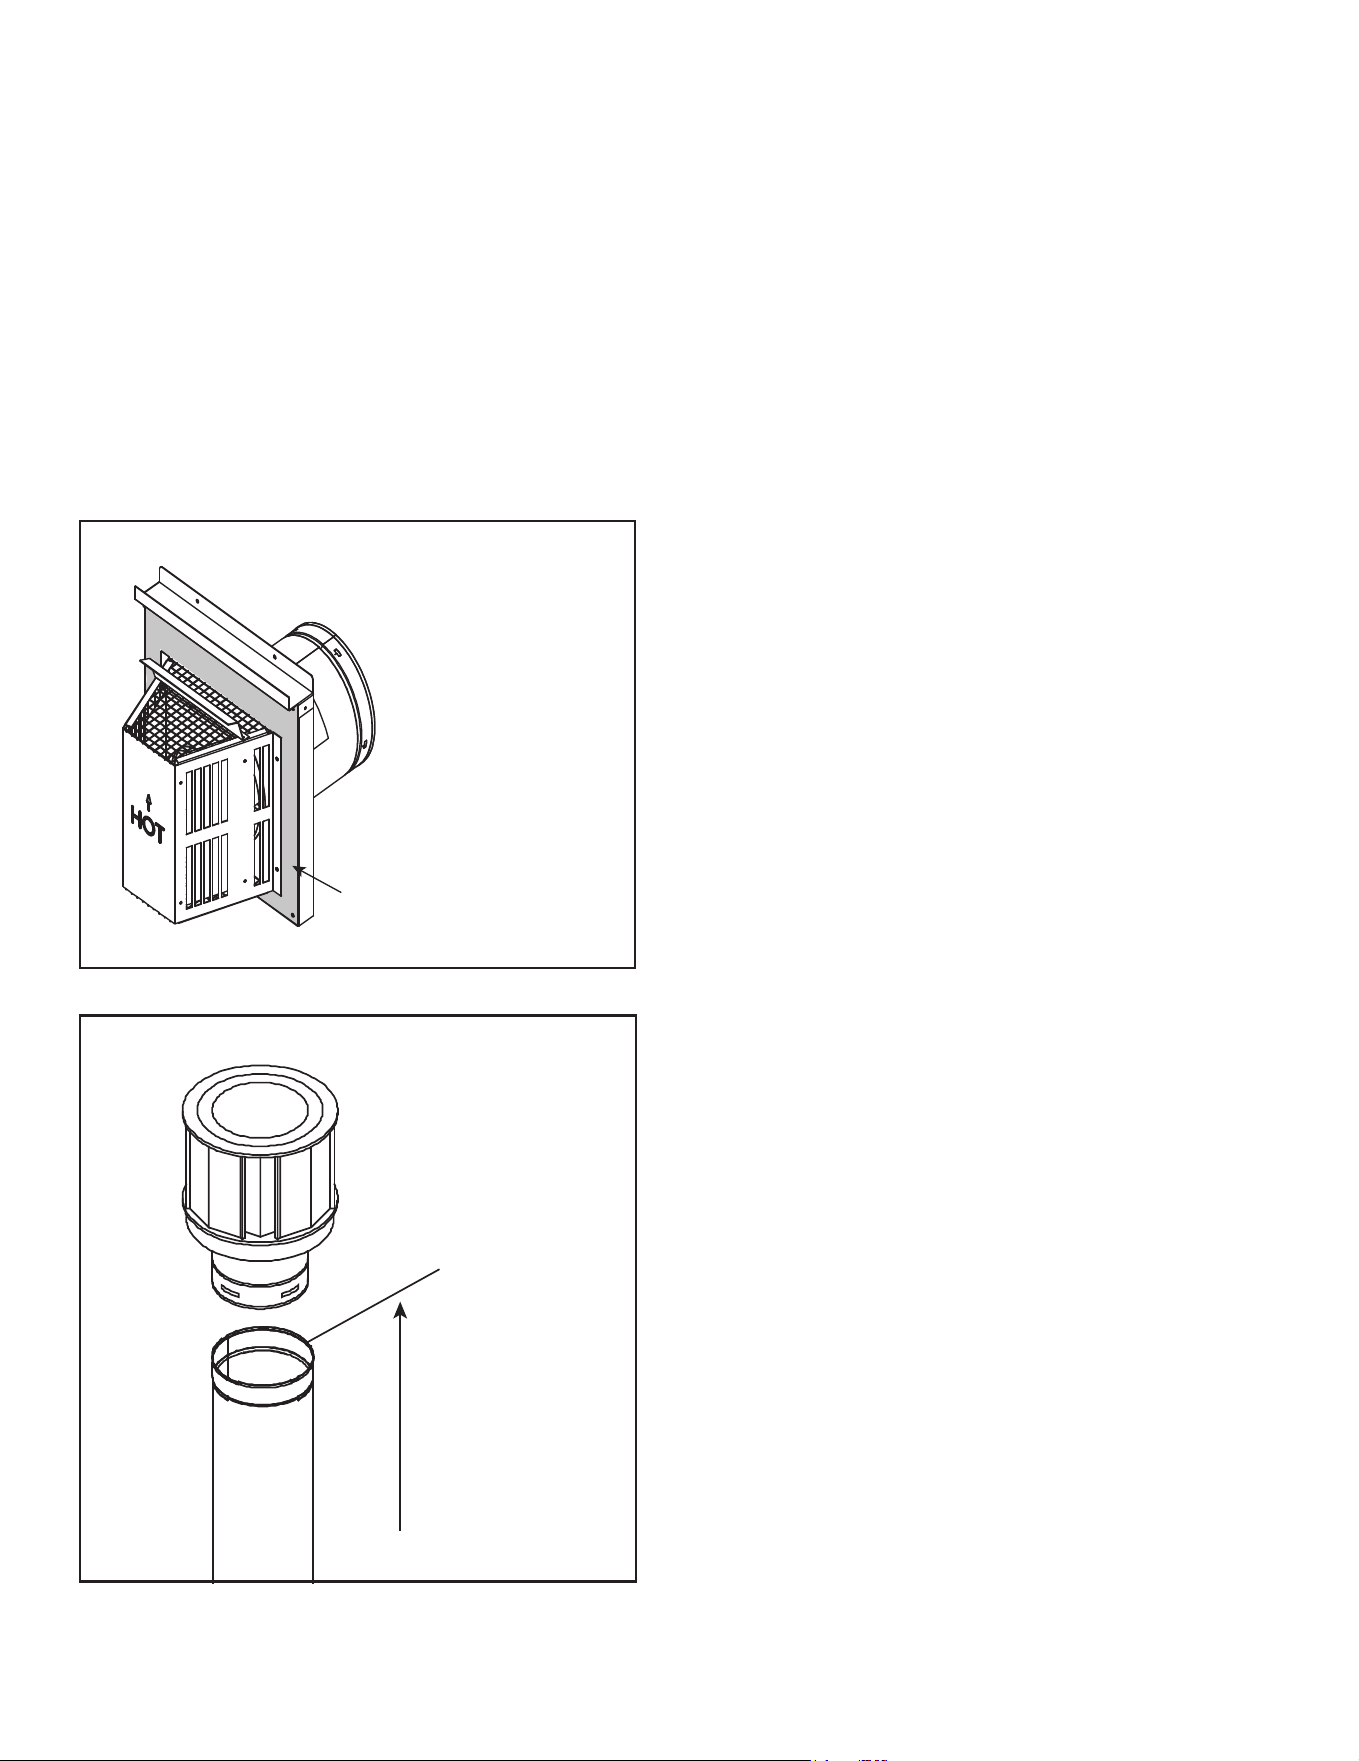
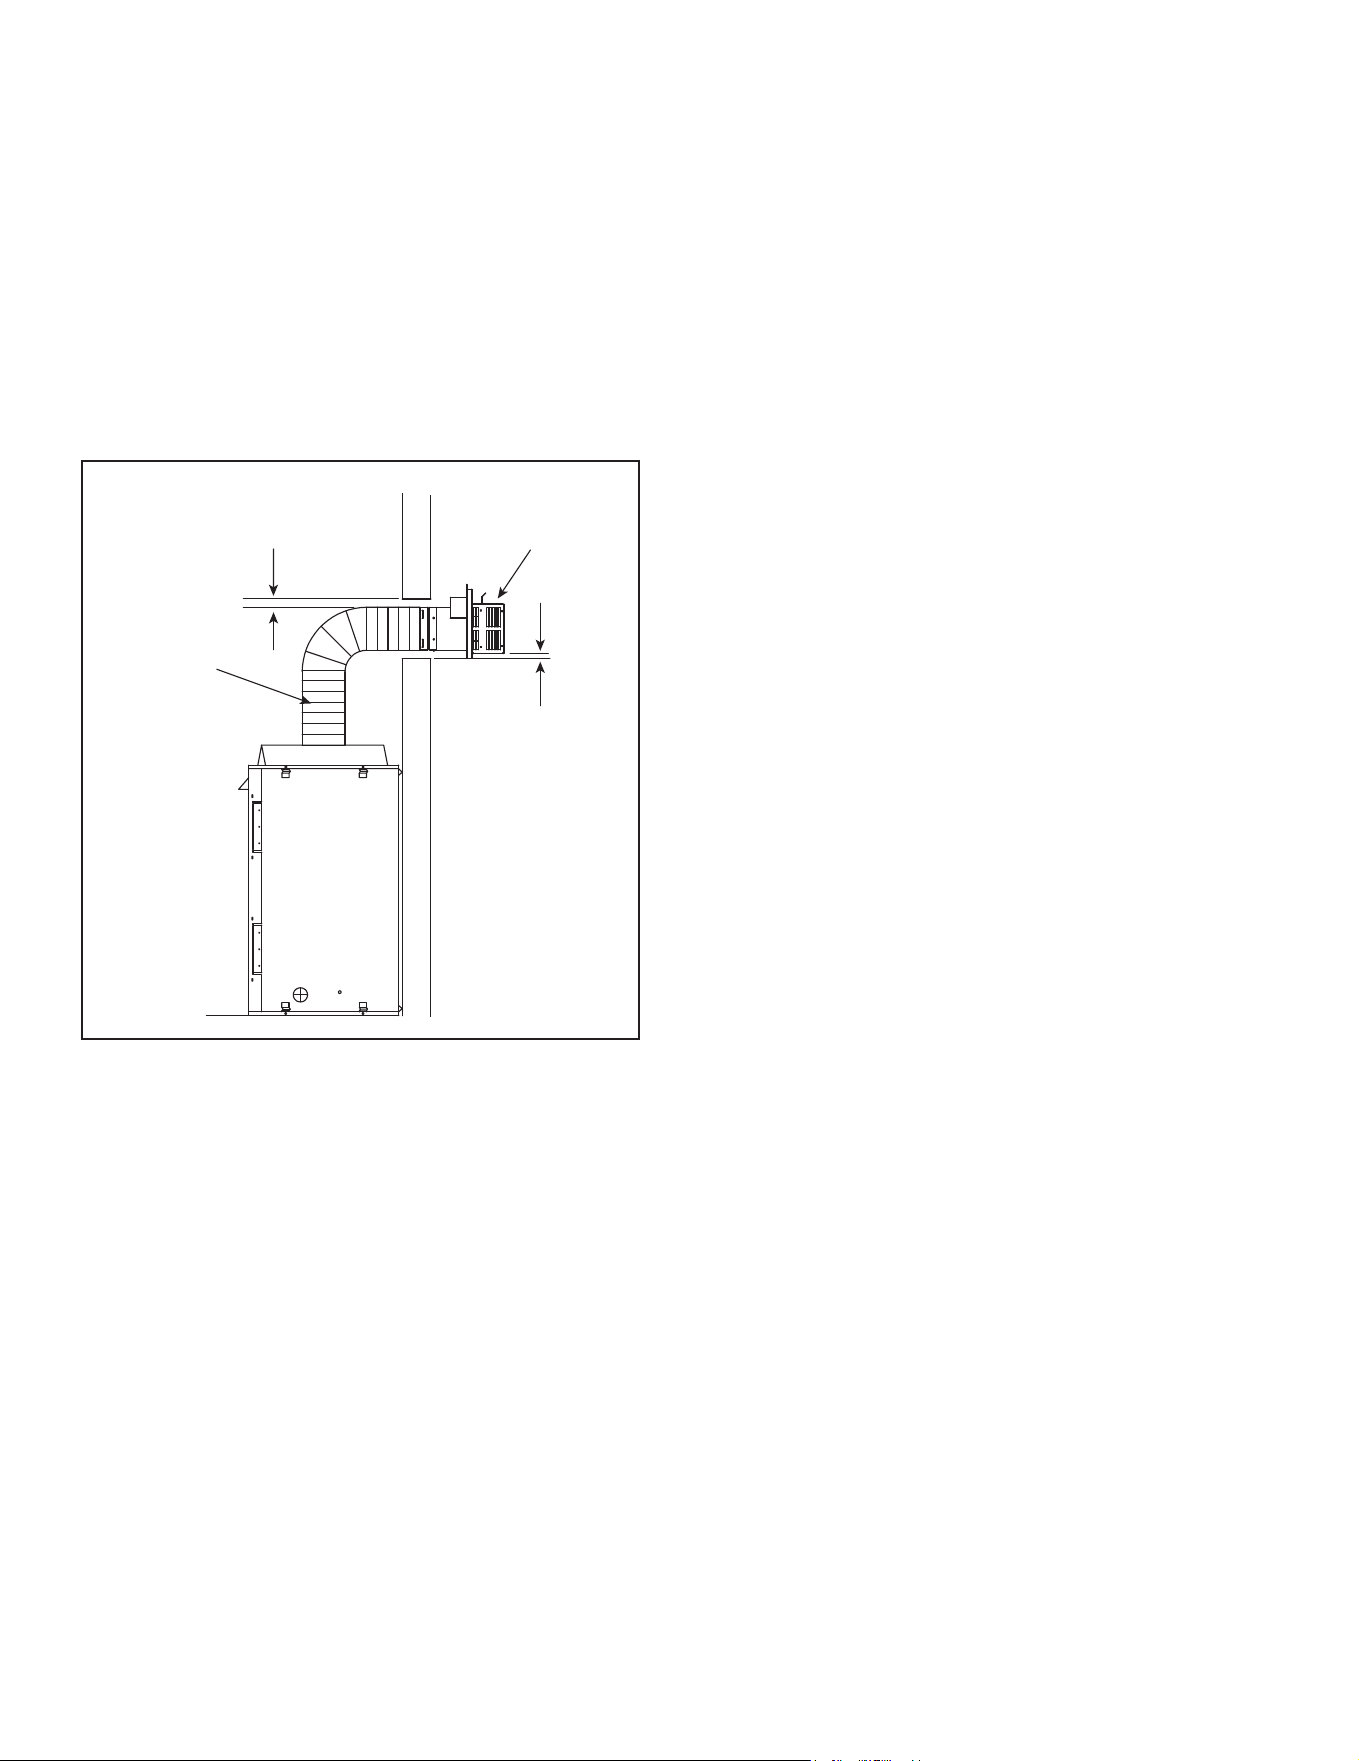
• Horizontal terminations are measured to the outside
mounting surface (flange of termination cap). See
Figure 4.8.
• Vertical terminations are measured to top of last section
of pipe. See Figure 4.9.
• Horizontal pipe installed level with no rise.
MEASURE TO SHADED SURFACE
(OUTSIDE MOUNTING SURFACE)
Figure 4.8 Measure to Outside Mounting Surface
Figure 4.9 Measure to Top of Last Section of Pipe
23
Hearth & Home Technologies • DVLINEAR36 Installation Manual • 2569-980 Rev. E • 11/20
E. Use of Flex Vent (SLP-FLEX Series 6-5/8
Inch)
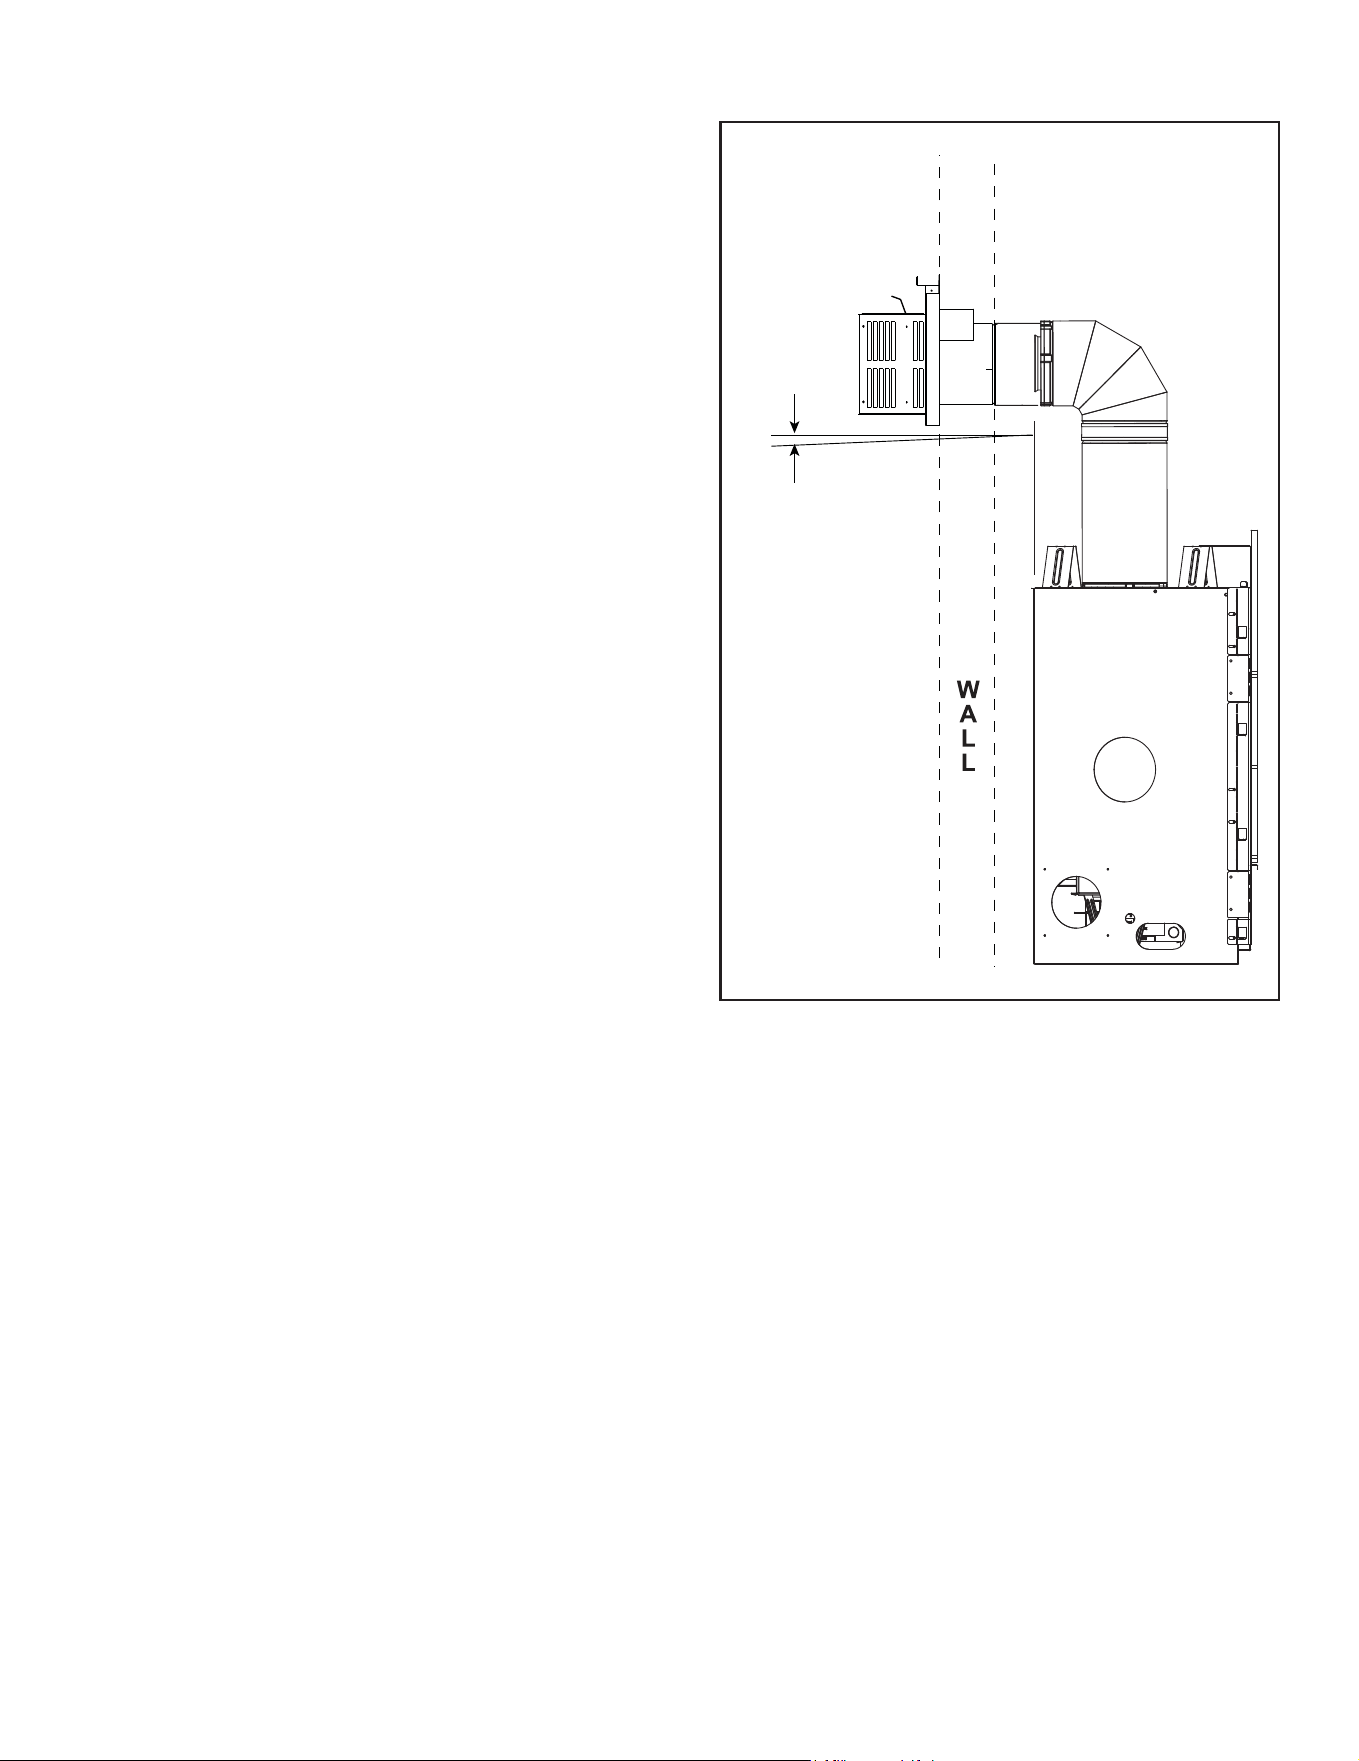
The ex vent must be supported with the spacing between
support intervals not exceeding 4 feet, with no more than
1/2 inch sag between supports.
A support is required at each change in venting direc-
tion, and in any location where it is necessary to maintain
the necessary clearance to combustibles. A simple “up
and out” installation (Figure 4.10) requires only enough
support to maintain the necessary clearance to combusti-
bles. However, the vent attachment point and the restop
location are considered to be supports.
Figure 4.10 Flex Vent Pipe - Generic Fireplace Shown
3 in. CLEARANCE
TERMINATION
CAP
FLEX-VENT
1 in.
CLEARANCE
Hearth & Home Technologies • DVLINEAR36 Installation Manual • 2569-980 Rev. E • 11/20
24
General Rules:
• SUBTRACT 3 ft from the total H measurement for each
90º elbow installed horizontally.
• SUBTRACT 1-1/2 ft from the total H measurement for
each 45º elbow installed horizontally.
• A maximum of four 90º elbows (or eight 45º elbows) may
be used in any vent conguration. Some elbows may be
installed horizontally. See Figure 4.15.
• Elbows may be placed back to back anywhere in the
system.
• Any 90º elbow may be replaced with two back to back
45º elbows.
• When penetrating a combustible wall, a wall shield
restop must be installed.
• When penetrating a combustible ceiling, a ceiling restop
must be installed.
• Horizontal runs of vent do not require vertical rise;
horizontal runs may be level.
• Horizontal termination cap should have a 1/4 inch
downward slant to allow any moisture in cap to be
released. See Figure 4.11.
F. Vent Diagrams
Figure 4.11 Vent Cap
1/4 in. max.
(6 mm)
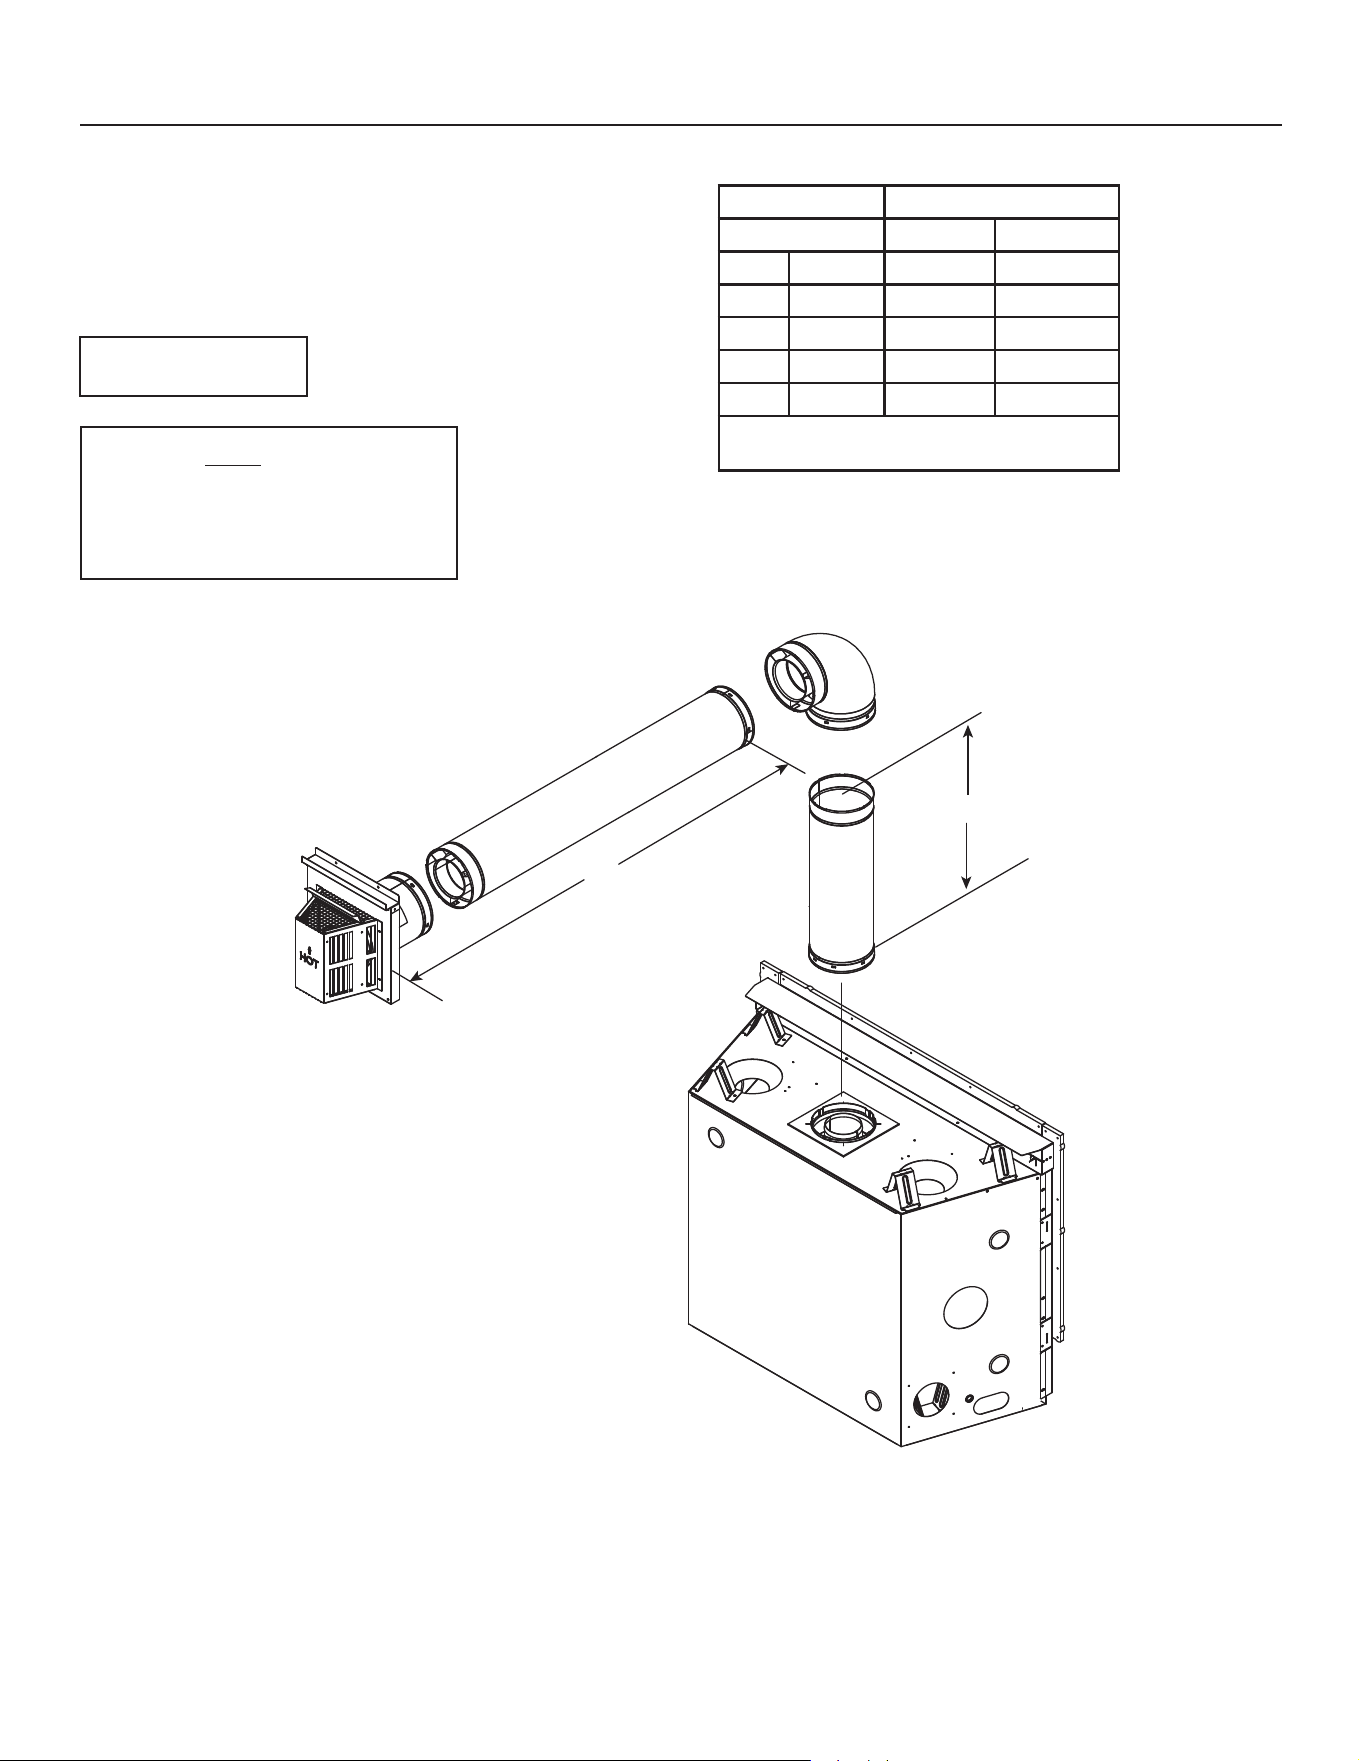
25
Hearth & Home Technologies • DVLINEAR36 Installation Manual • 2569-980 Rev. E • 11/20
Figure 4.12
One Elbow
Top Vent - Horizontal Termination
Note: Use SLP Series
components only.
Note: There MUST be a 25% reduction
in total H when using SLP-FLEX Series
(6-5/8 inch) vent except when using
the simple up and out installation. See
Figure 4.10.
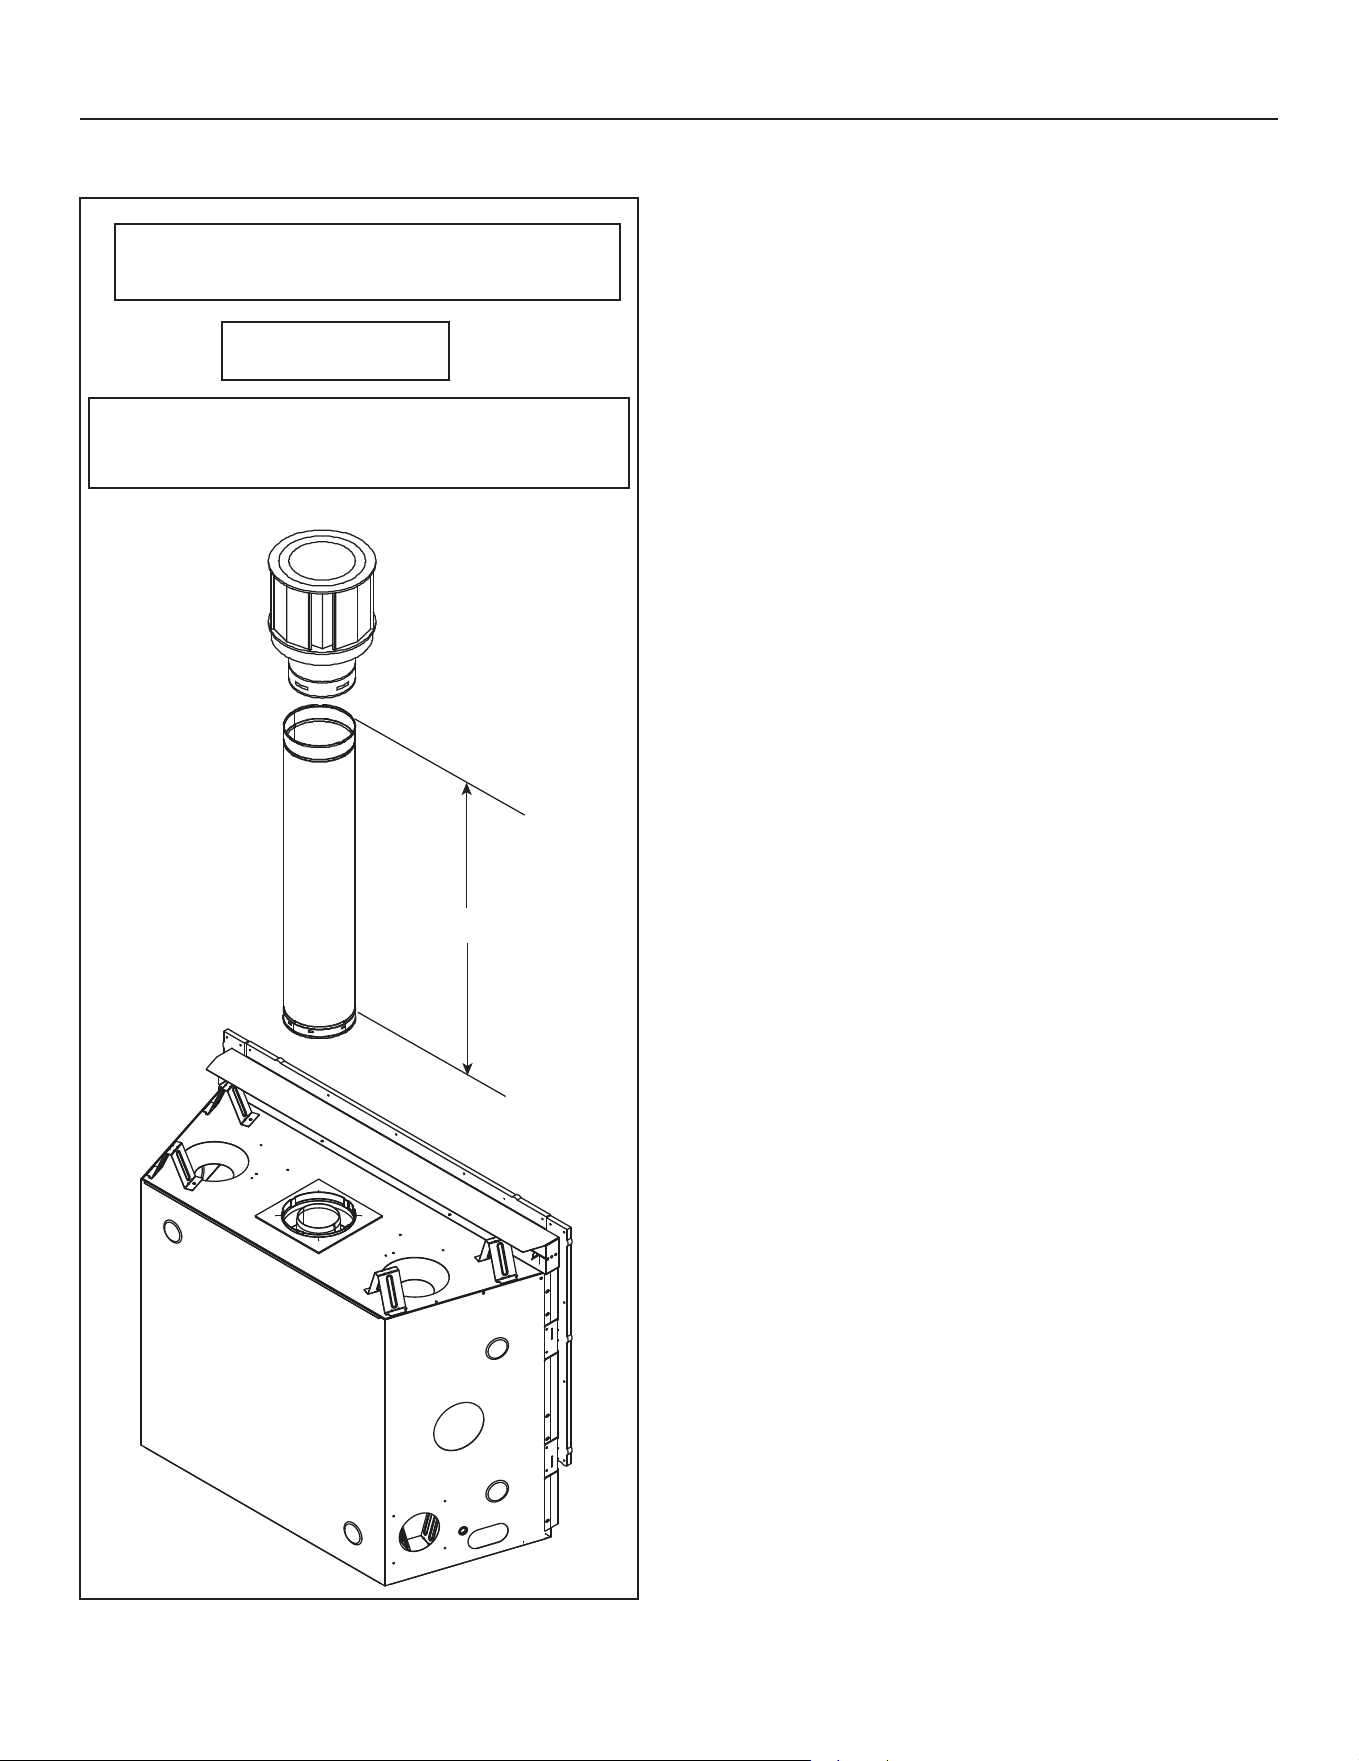
H
1
V
1
V Minimum H
1
Maximum
90° Elbow 1 ft. 305 mm
1 ft. 305 mm 2 ft. 610 mm
2 ft. 610 mm 3 ft. 914 mm
3 ft. 914 mm 5 ft. 1.5 m
4 ft. 1.2 m 7 ft. 2.1 m
5 ft. 1.5 m 14 ft. 4.3 m
H MAX. =14 ft. (4.3 m)
V + H MAX. = 40 ft. (12.2 m)
CAUTION: The SLP-HRC-SS termination caps are
not approved for use with these models. May lead to
elevated glass temperature that may cause tempered
glass breakage.
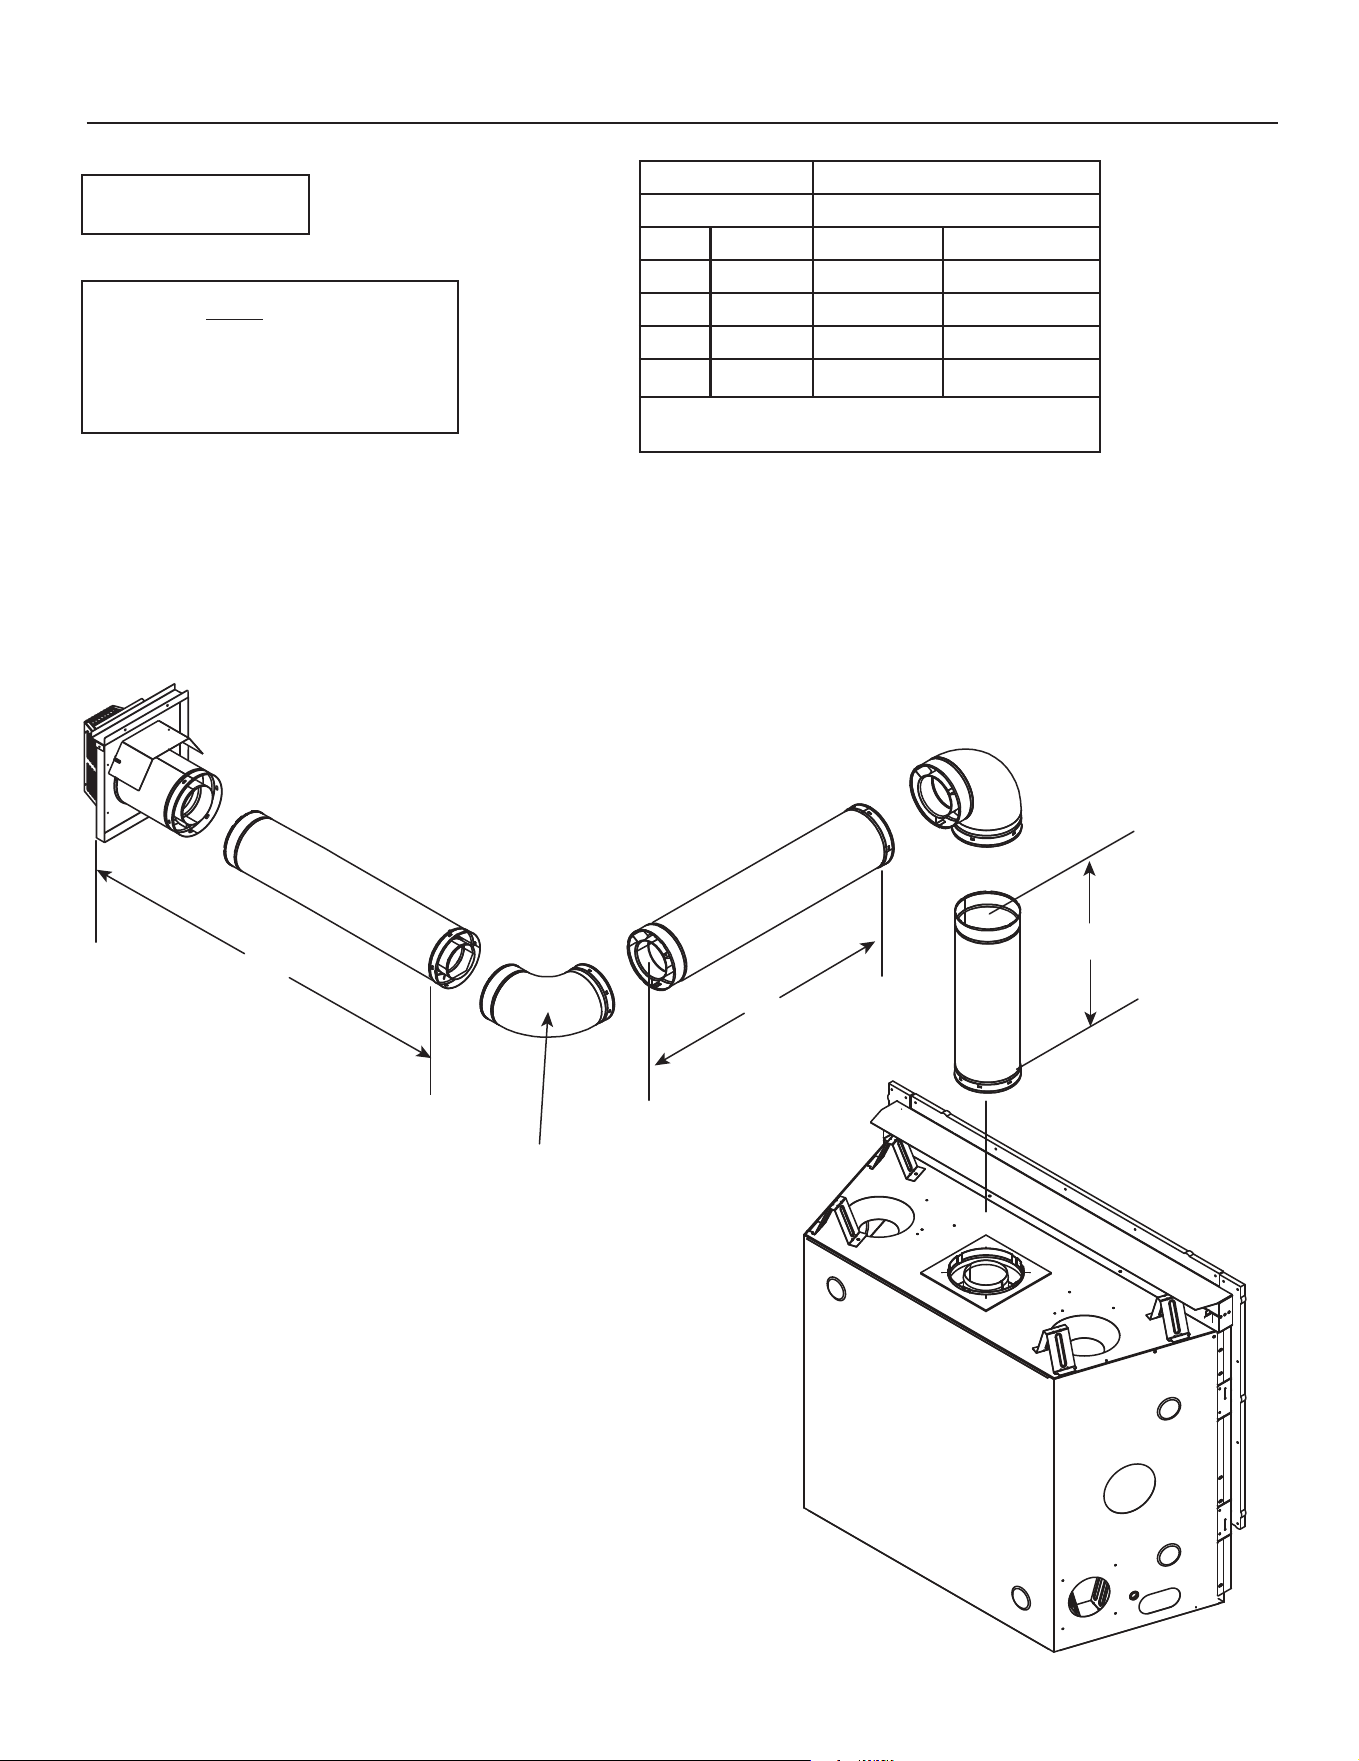
Hearth & Home Technologies • DVLINEAR36 Installation Manual • 2569-980 Rev. E • 11/20
26
Figure 4.13
Two Elbows
Top Vent - Horizontal Termination - (continued)
Note: Use SLP Series
components only.
INSTALLED
HORIZONTALLY
H
1
H
2
V
1
V Minimum H
1
+ H
2
Maximum
90° Elbow Not Allowed
1 ft. 305 mm 1 ft. 305 mm
2 ft. 610 mm 2 ft. 610 mm
3 ft. 914 mm 4 ft. 1.2 m
4 ft. 1.2 m 6 ft. 1.8 m
5 ft. 1.5 m 15 ft. 4.6 m
H
1
+ H
2
MAX. =15 ft. (4.6 m)
V
1
+ H
1
+ H
2
MAX. = 40 ft. (12.2 m)
CAUTION: The SLP-HRC-SS termination caps are
not approved for use with these models. May lead to
elevated glass temperature that may cause tempered
glass breakage.
Note: There MUST be a 25% reduction
in total H when using SLP-FLEX Series
(6-5/8 inch) vent except when using
the simple up and out installation. See
Figure 4.10.
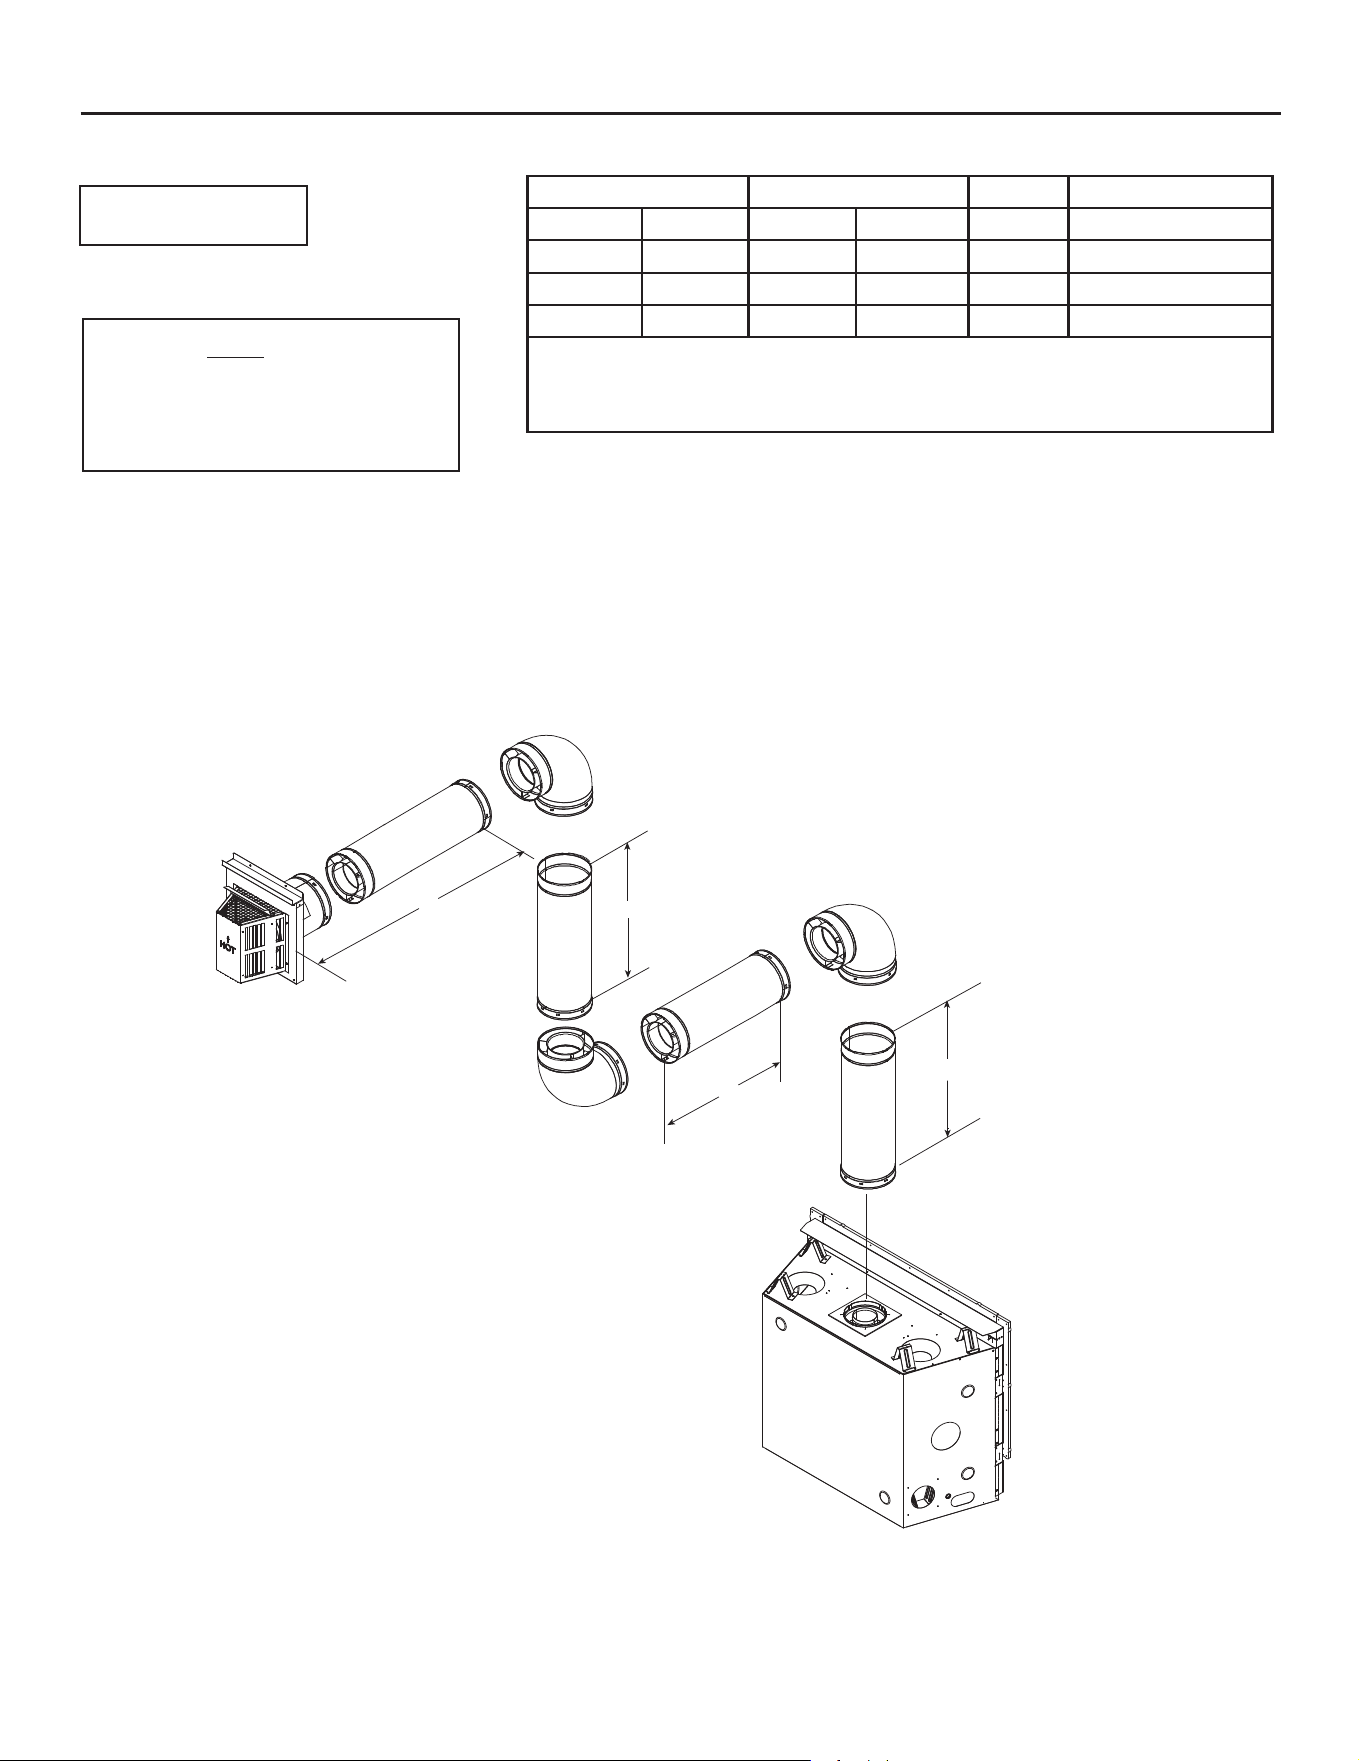
27
Hearth & Home Technologies • DVLINEAR36 Installation Manual • 2569-980 Rev. E • 11/20
H
2
H
1
V
2
V
1
Figure 4.14
Top Vent - Horizontal Termination - (continued)
Three Elbows
CAUTION: The SLP-HRC-SS termination caps are
not approved for use with these models. May lead to
elevated glass temperature that may cause tempered
glass breakage.
Note: There MUST be a 25% reduction
in total H when using SLP-FLEX Series
(6-5/8 inch) vent except when using
the simple up and out installation. See
Figure 4.10.
V
1
Minimum H
1
+ H
2
Maximum V
2
V
1
+ V
2
Minimum
1 ft. 305 mm 6 ft. 1.8 m * *
2 ft. 610 mm 10 ft. 3.0 m * *
3 ft. 914 mm 12 ft. 3.7 m * *
4 ft. 1.2 m 14 ft. 4.3 m * *
H
1
+ H
2
MAX. =14 ft. (4.3 m)
V
1
+ V
2
+ H
1
+ H
2
MAX. = 40 ft. (12.2 m)
*No specic restrictions on this value EXCEPT V
1
+ V
2
+ H
1
+ H
2
cannot
exceed 40 ft. (12.2 m)
Note: Use SLP Series
components only.
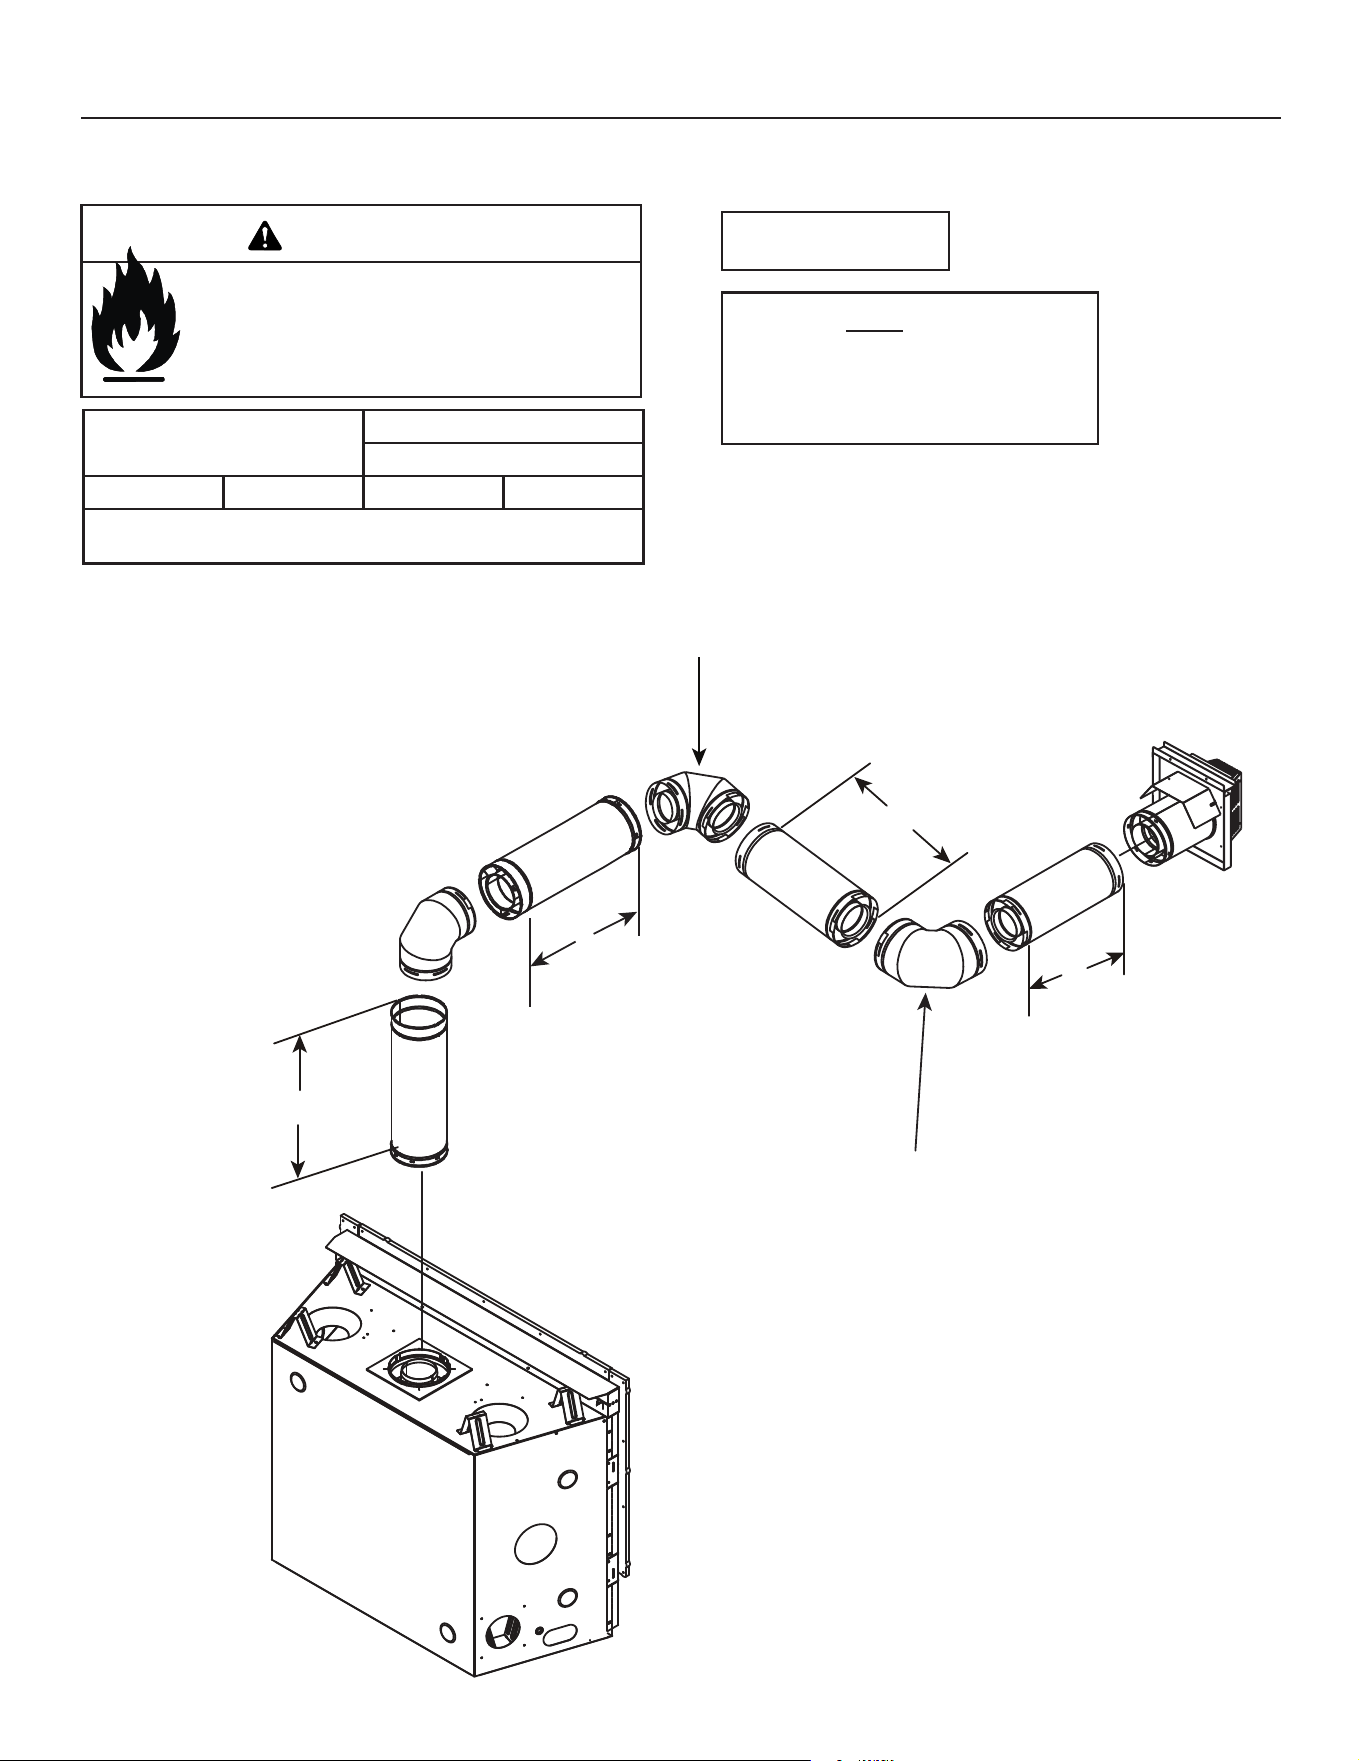
Hearth & Home Technologies • DVLINEAR36 Installation Manual • 2569-980 Rev. E • 11/20
28
Note: Use SLP Series
components only.
V
1
H
1
H
3
H
2
INSTALLED
HORIZONTALLY
INSTALLED
HORIZONTALLY
V Minimum
H
1
+ H
2
+ H
3
MAXIMUM
(NG ONLY)
4 ft. 1.2 m 15 ft. 4.6 m
H
1
+ H
2
+ H
3
MAX. = 15 ft. (4.6 m)
V
1
MAX. = 7 ft (2.1 m)
Risk of Fire!
This vent conguration can ONLY be used for
DVLINEAR36 Natural Gas appliances.
WARNING
CAUTION: The SLP-HRC-SS termination caps are
not approved for use with these models. May lead to
elevated glass temperature that may cause tempered
glass breakage.
Figure 4.15
Three Elbows
Note: There MUST be a 25% reduction
in total H when using SLP-FLEX Series
(6-5/8 inch) vent except when using
the simple up and out installation. See
Figure 4.10.
Top Vent - Horizontal Termination - (continued)
29
Hearth & Home Technologies • DVLINEAR36 Installation Manual • 2569-980 Rev. E • 11/20
Top Vent - Vertical Termination
No Elbow
Figure 4.16
V
1
= 60 ft. Max. (18.3 m)
Note: Use SLP Series
components only.
Note: If installing a vertical vent/termination o the top
of the appliance, the optional exhaust restrictor may be
needed.
V
1
Hearth & Home Technologies • DVLINEAR36 Installation Manual • 2569-980 Rev. E • 11/20
30
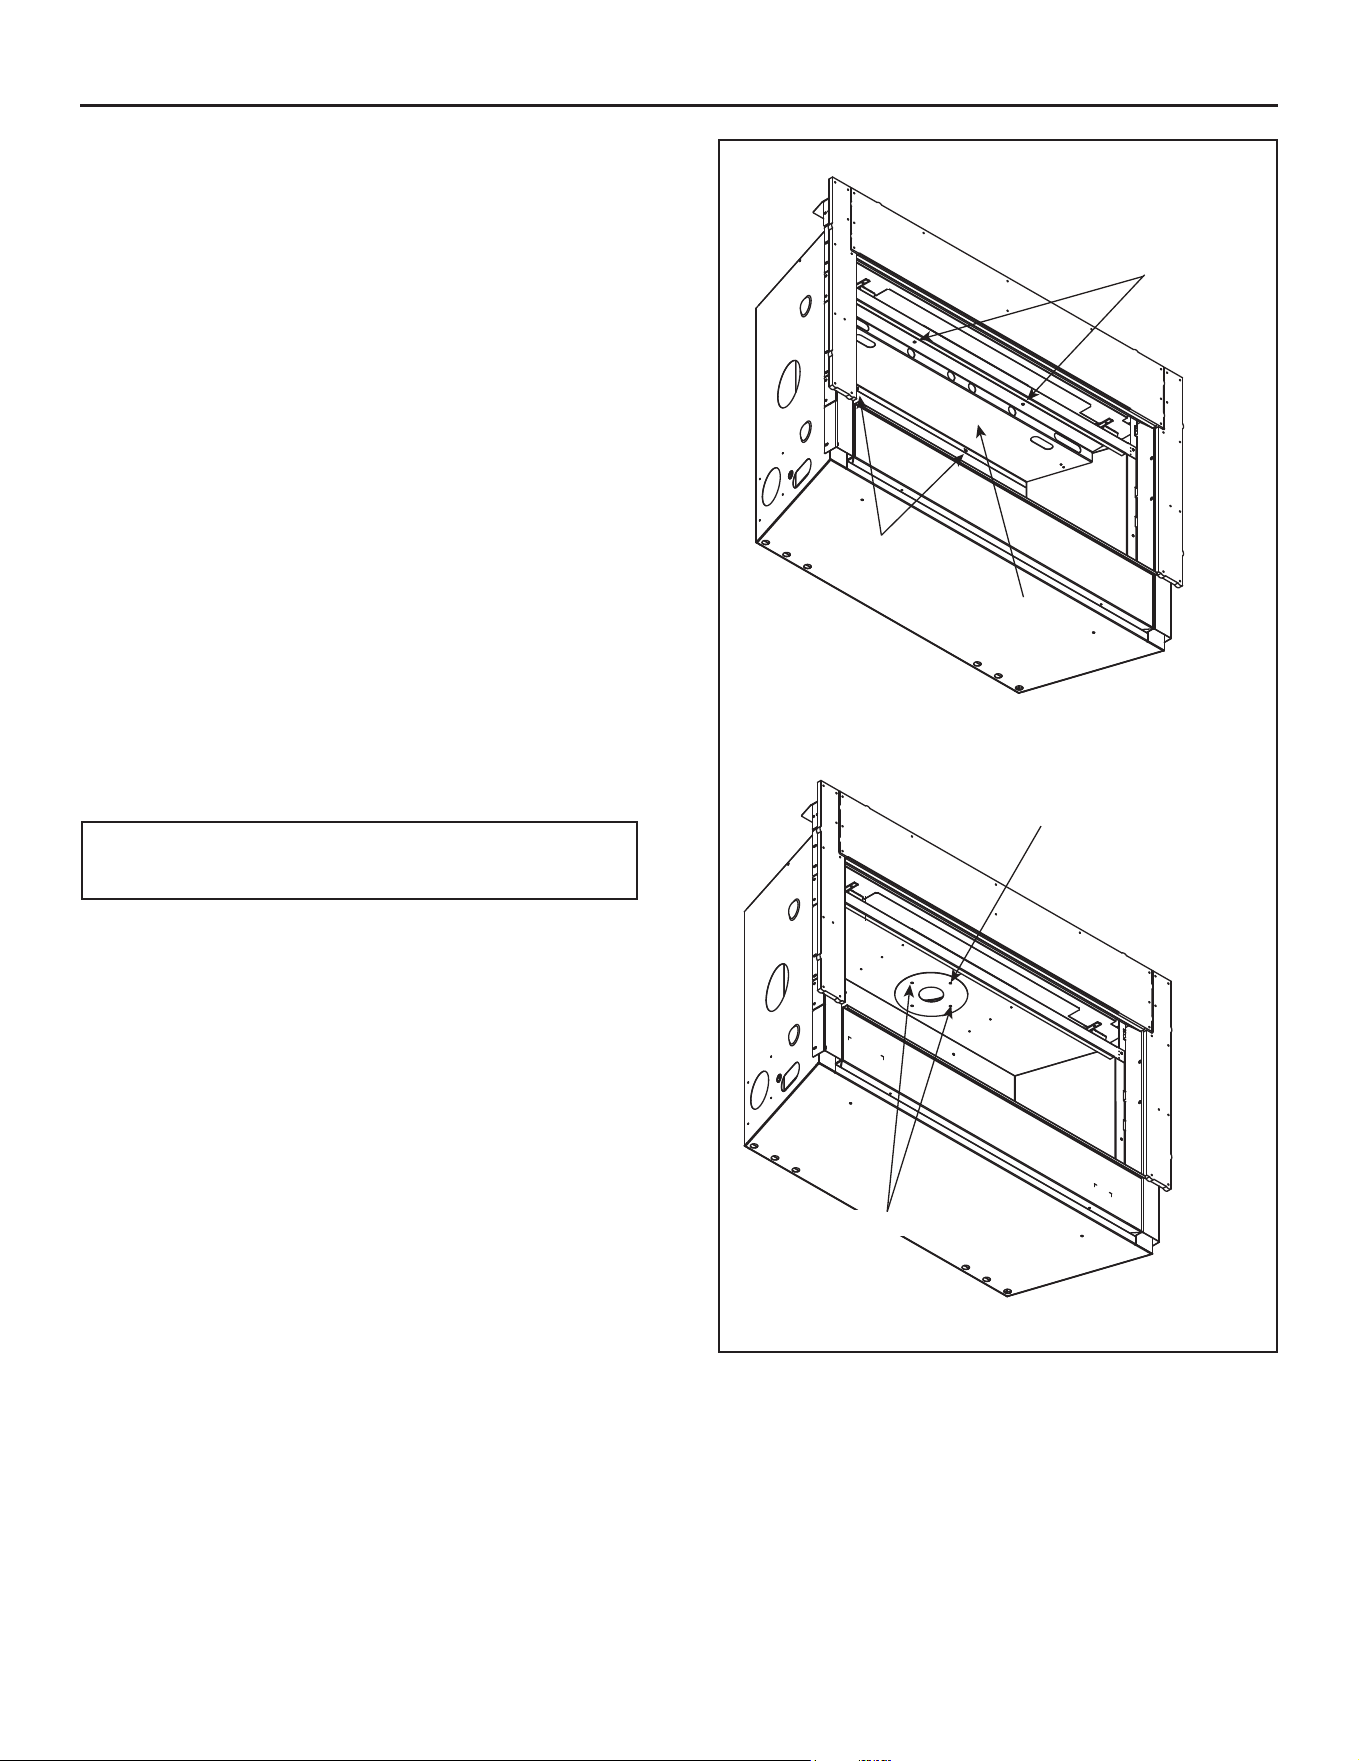
Figure 4.17 Installing Restrictor
Exhaust Restrictor Instructions
Exhaust restrictors are recommended for these verti-
cally terminated products which have excessive draft.
Exhaust restrictors will compensate for high draft, and
restore visual ame height. If the vent conguration has
a total vertical of 15-60 feet, an exhaust restrictor may
be needed. The exhaust restrictor can be located in the
appliance manual bag.
Exhaust Restrictor Installation
1. Remove inner heat shield by removing two wing nuts
from top front of heat shield and two screws that se-
cure the heat shield to back wall of replace. Retain
heat shield and fasteners.
2. Center the exhaust restrictor in the open end of the
exhaust outlet and secure through the slots on the
exhaust restrictor with the two 1/4 in. self-tapping
screws provided in the appliance manual bag. See
Figure 4.17.
3. Reinstall shield by securing it with the two wing nuts
and two screws previously removed in Step 1.
SCREWS
WING NUTS
HEAT SHIELD
EXHAUST RESTRICTOR
INSTALLED SCREWS
Top Vent - Vertical Termination - (continued)
Note: Recommended air shutter settings are located in
Section 9.E.
31
Hearth & Home Technologies • DVLINEAR36 Installation Manual • 2569-980 Rev. E • 11/20
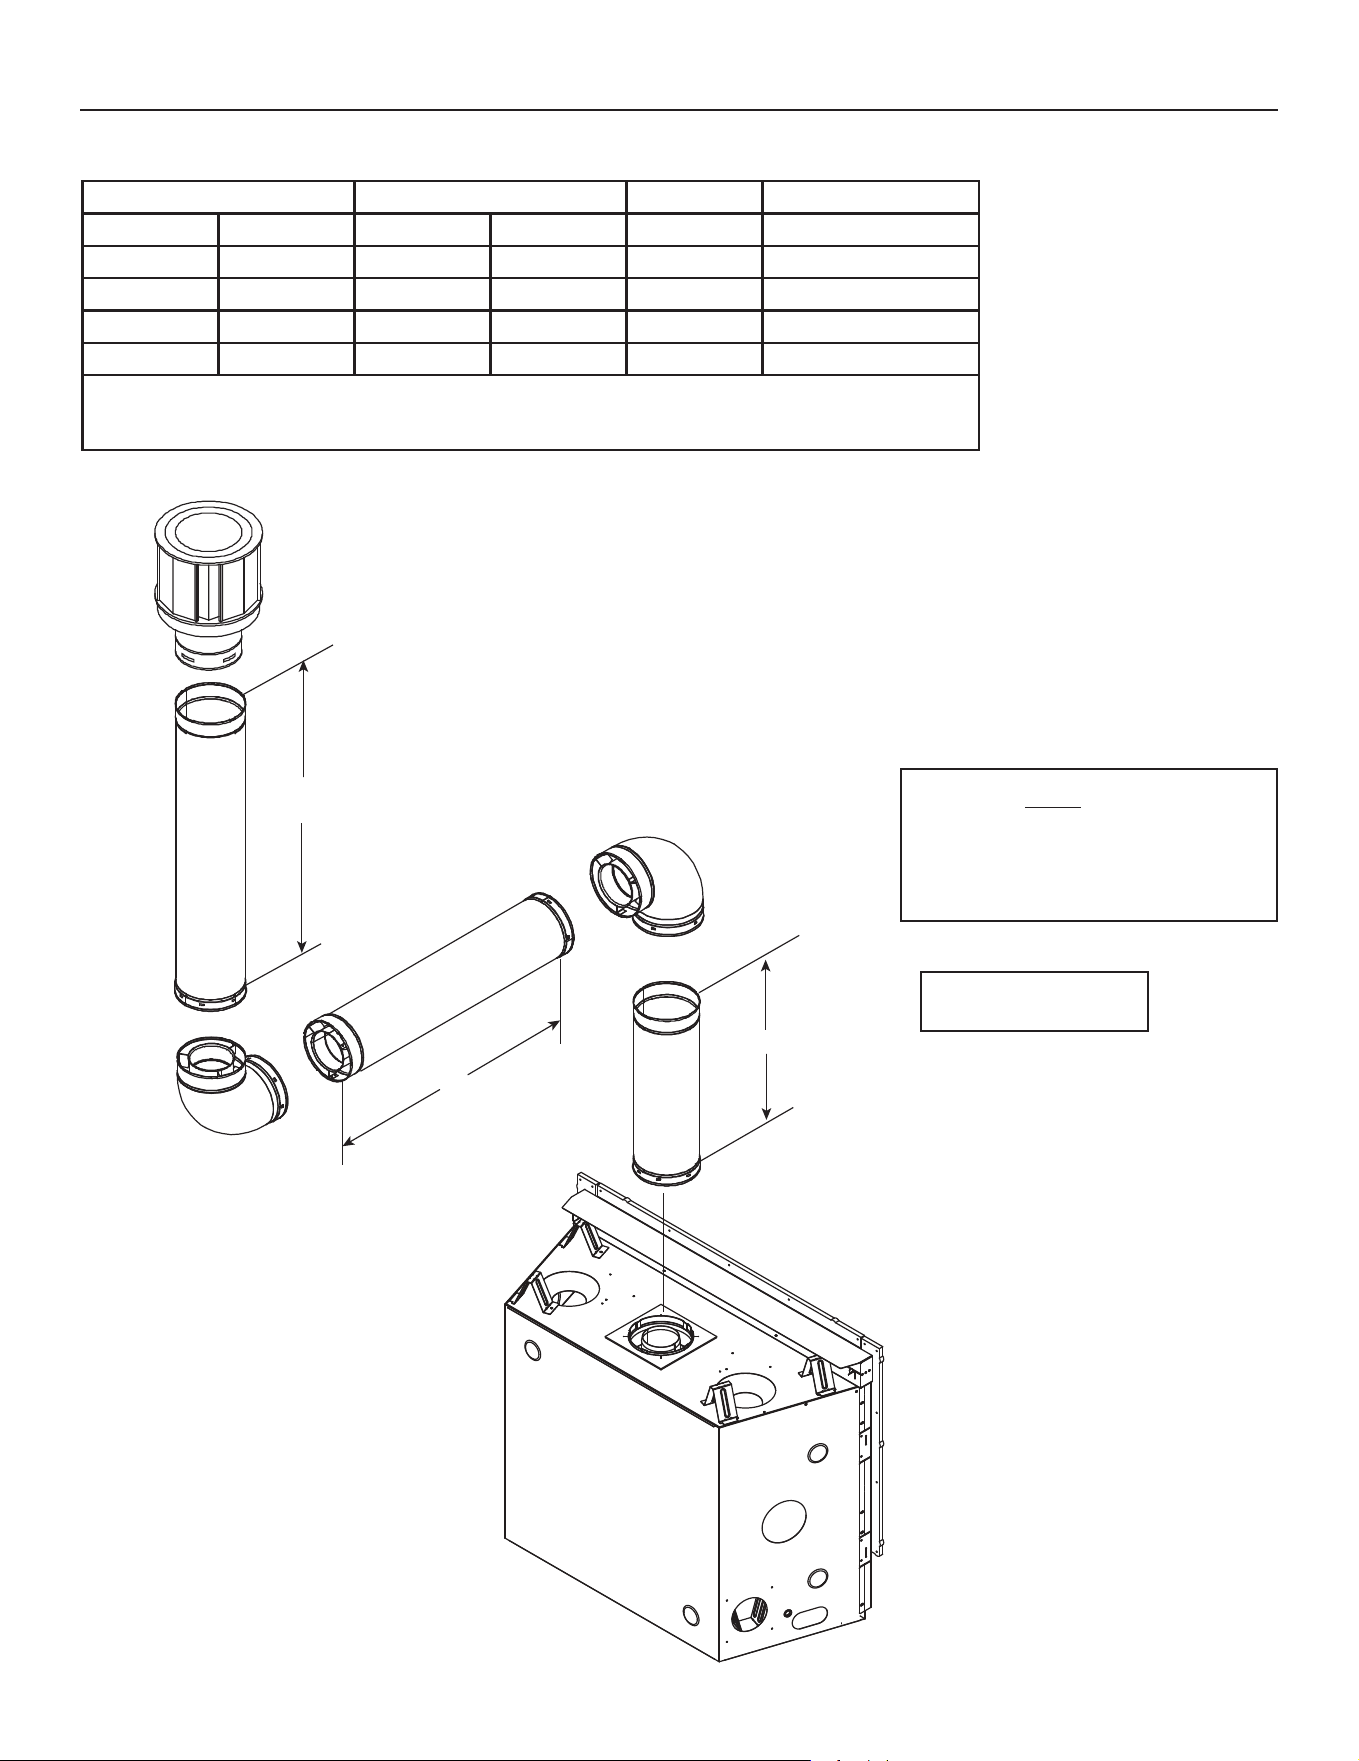
Figure 4.18
Two 90º Elbows
Note: Use SLP Series
components only.
Top Vent - Vertical Termination - (continued)
H
1
V
1
V
2
Note: There MUST be a 25% reduction
in total H when using SLP-FLEX Series
(6-5/8 inch) vent except when using
the simple up and out installation. See
Figure 4.10.
V
1
Minimum H Maximum V
2
V
1
+ V
2
Minimum
1 ft. 305 mm 2 ft. 610 mm * *
2 ft. 610 mm 3 ft. 914 mm * *
3 ft. 914 mm 5 ft. 1.5 m * *
4 ft. 1.2 m 7 ft. 2.1 m * *
5 ft. 1.5 m 15 ft. 4.6 m * *
H MAX. =15 ft. (4.6 m)
V
1
+ V
2
+ H MAX. = 40 ft. (12.2 m)
* No specic restrictions on this value EXCEPT V
1
+ V
2
+ H cannot exceed 40 ft. (12.2 m)
Hearth & Home Technologies • DVLINEAR36 Installation Manual • 2569-980 Rev. E • 11/20
32
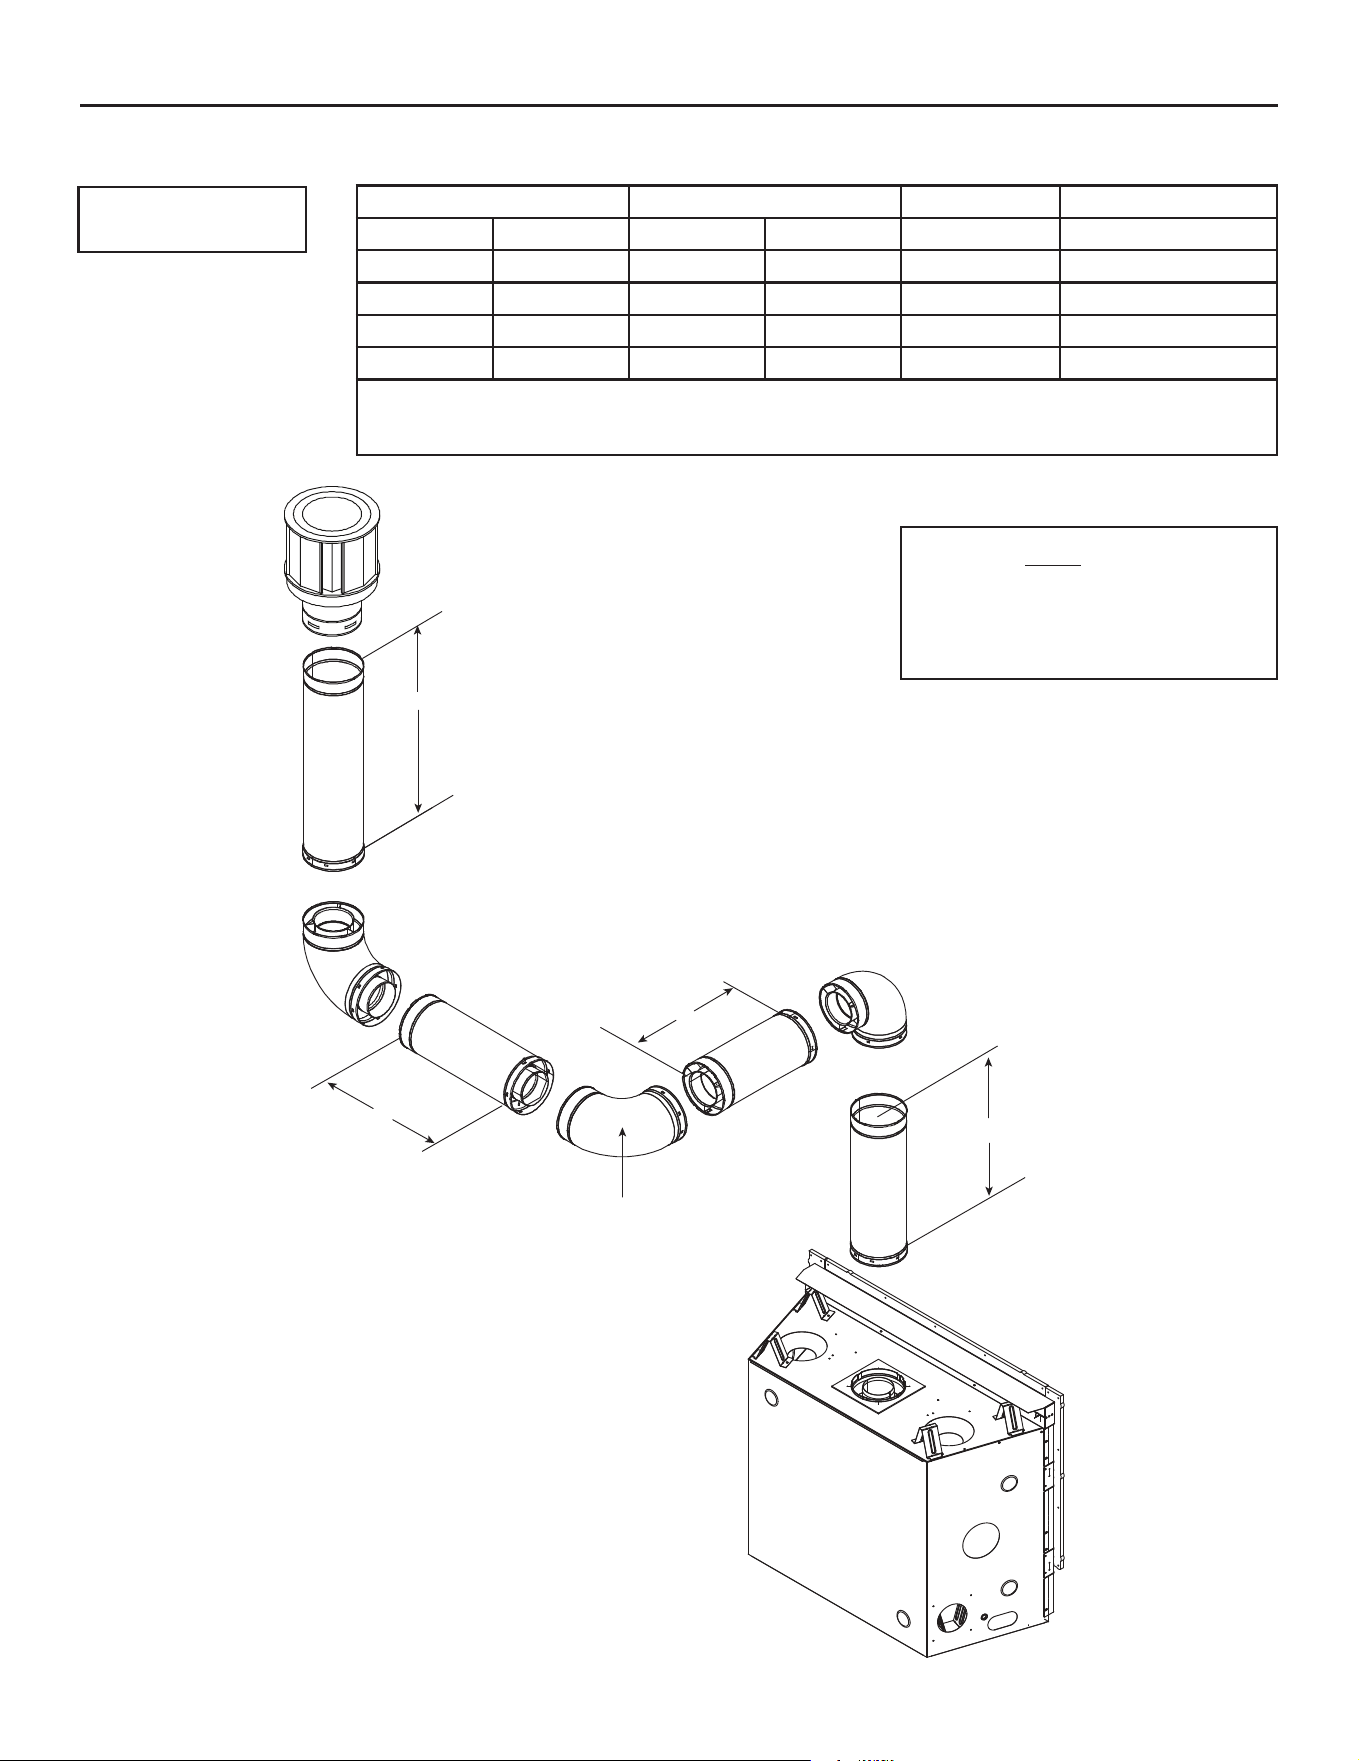
Figure 4.19
Three 90º Elbows
Top Vent - Vertical Termination - (continued)
INSTALLED
HORIZONTALLY
H
1
H
2
V
1
V
2
Note: Use SLP Series
components only.
Note: There MUST be a 25% reduction
in total H when using SLP-FLEX Series
(6-5/8 inch) vent except when using
the simple up and out installation. See
Figure 4.10.
V
1
Minimum H
1
+ H
2
Maximum V
2
V
1
+ V
2
Minimum
1 ft. 305 mm 1 ft. 305 mm * *
2 ft. 610 mm 2 ft. 610 mm * *
3 ft. 914 mm 4 ft. 1.2 m * *
4 ft. 1.2 m 6 ft. 1.8 m * *
5 ft. 1.5 m 14 ft. 4.3 m * *
H MAX. =14 ft. (4.3 m)
V
1
+ V
2
+ H
1
+ H
2
MAX. = 40 ft. (12.2 m)
* No specic restrictions on this value EXCEPT V
1
+ V
2
+ H
1
+ H
2
cannot exceed 40 ft. (12.2 m)
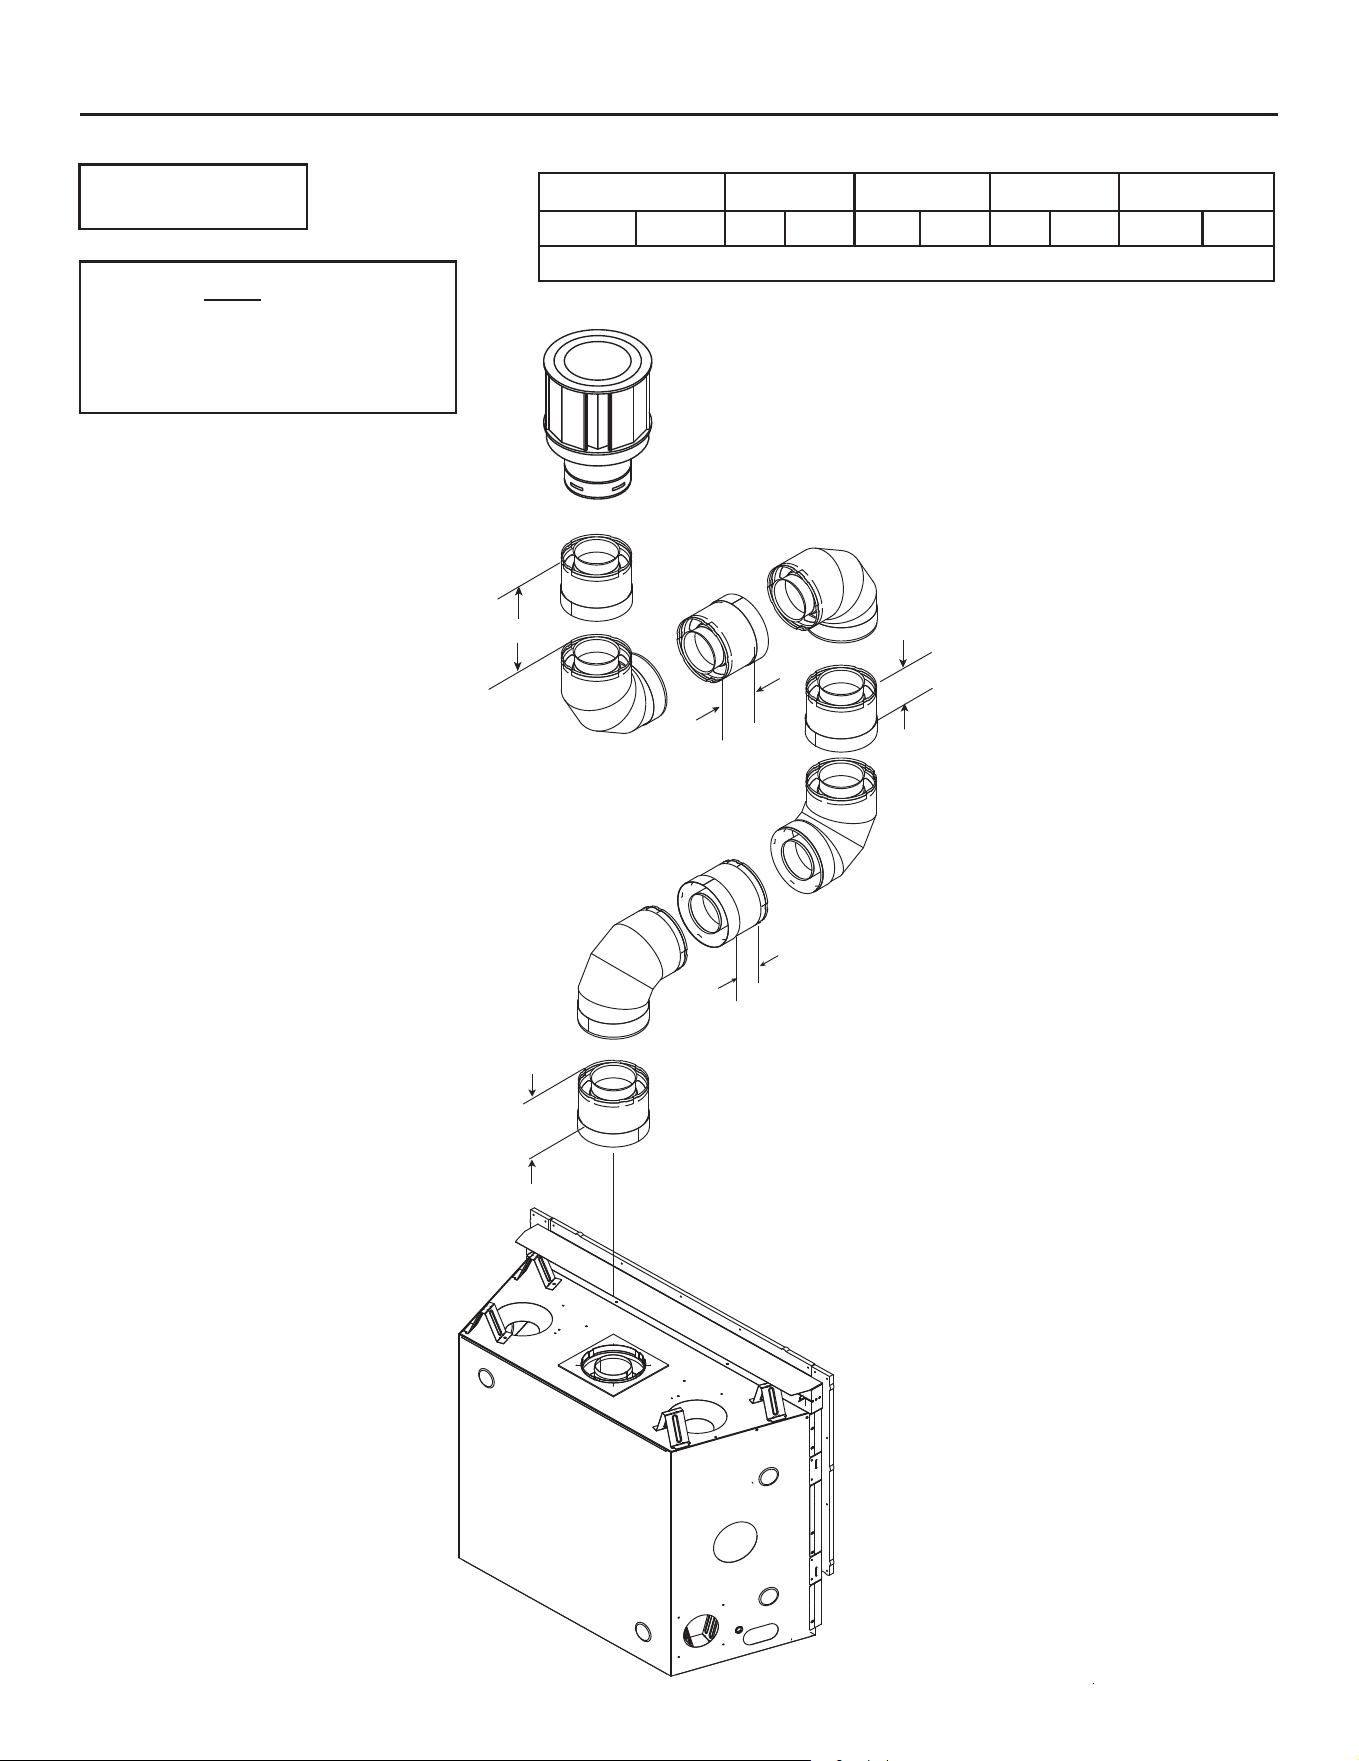
33
Hearth & Home Technologies • DVLINEAR36 Installation Manual • 2569-980 Rev. E • 11/20
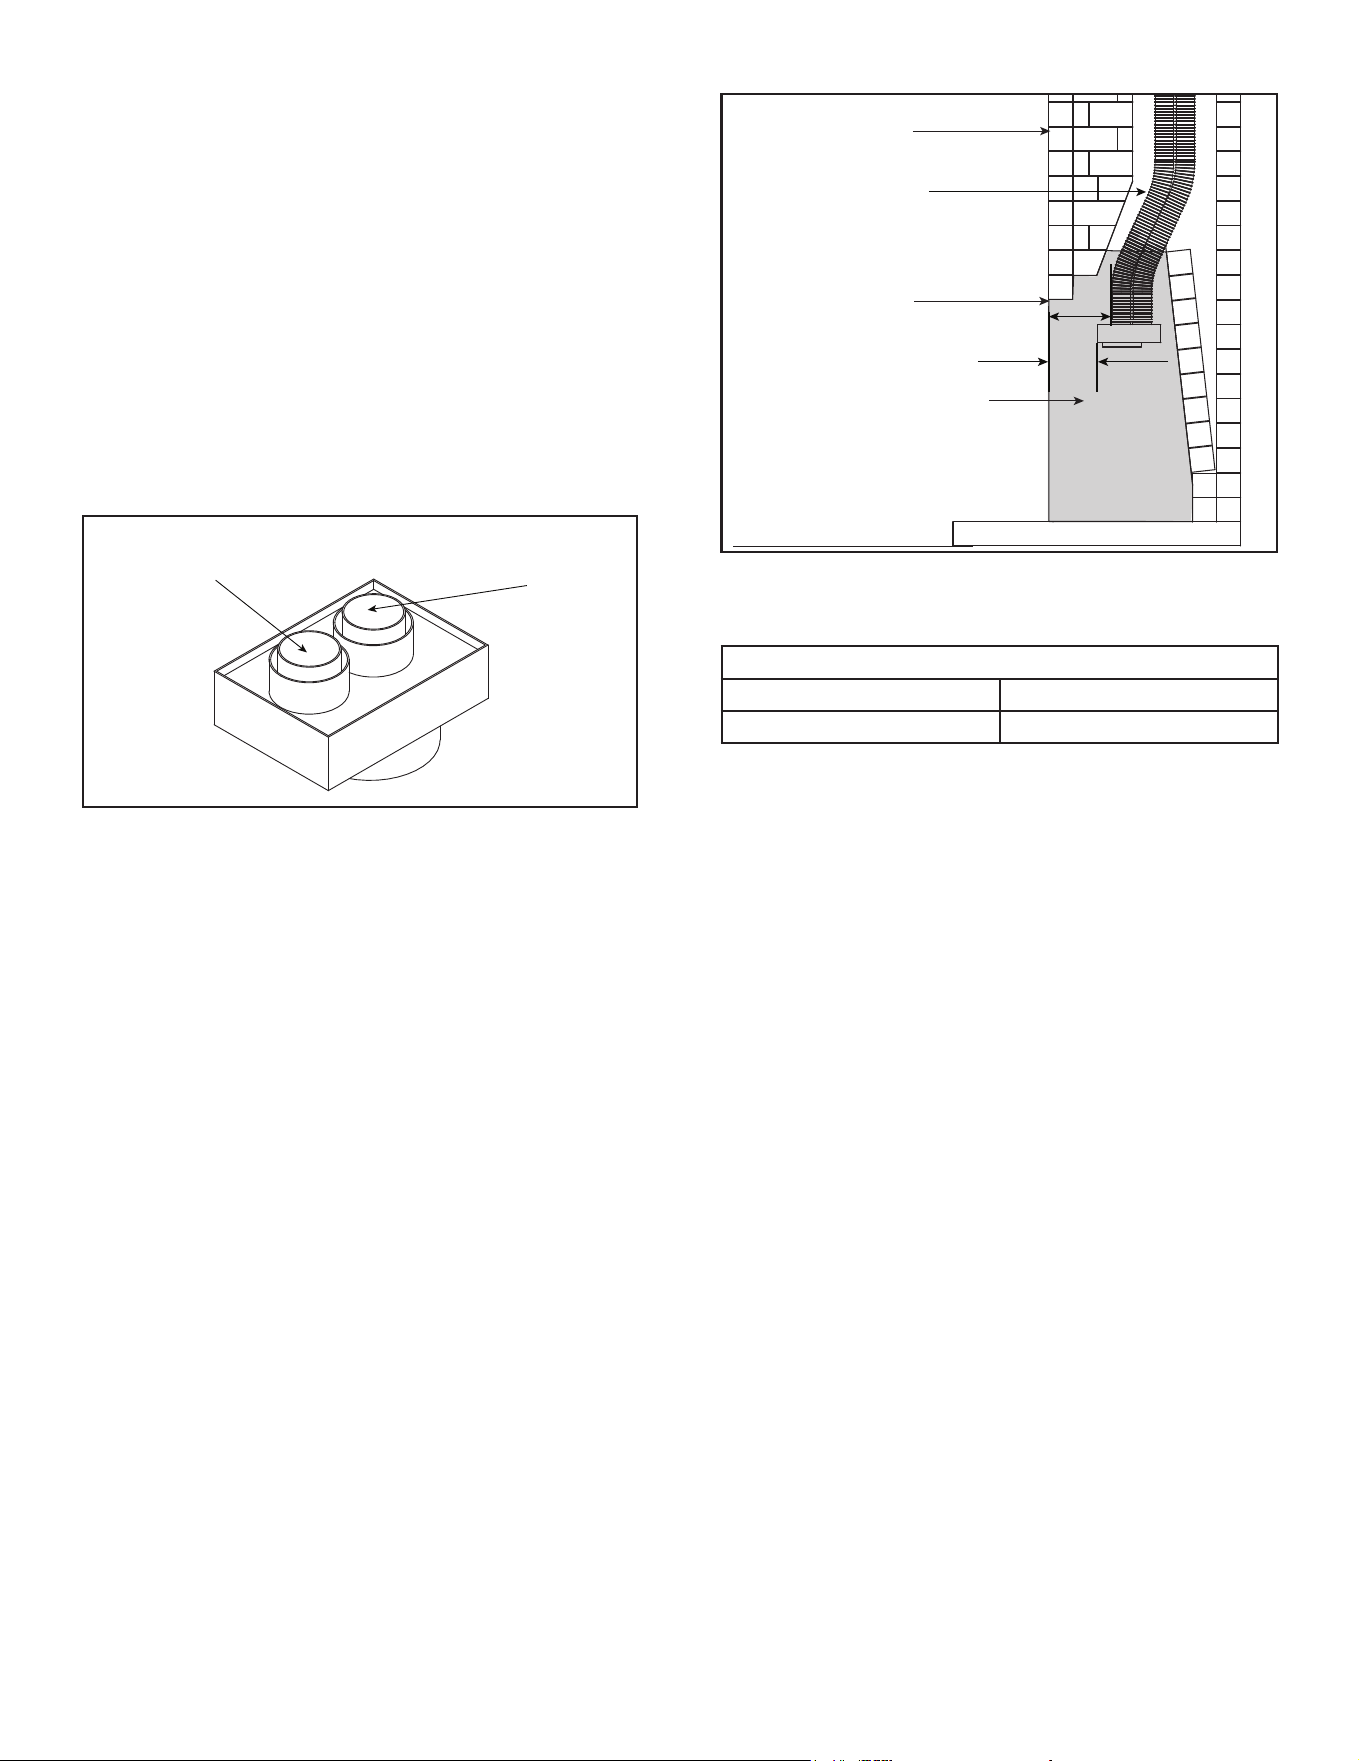
Note: Use SLP Series
components only.
V
1
MIN. H
1
MAX. V
2
MIN. H
2
MAX. V
3
MIN.
2-1/2 ft. 762 mm 4 ft. 1.2 m 4 ft. 1.2 m 4 ft. 1.2 m 3-1/2 ft. 1.0 m
V
1
+ V
2
+ V
3 +
H
1
+ H
2
Maximum= 40 ft. (12.2 m)
V
1
H
1
V
2
V
3
H
2
Figure 4.20
Four 90º Elbows
Top Vent - Vertical Termination - (continued)
Note: There MUST be a 25% reduction
in total H when using SLP-FLEX Series
(6-5/8 inch) vent except when using
the simple up and out installation. See
Figure 4.10.
Hearth & Home Technologies • DVLINEAR36 Installation Manual • 2569-980 Rev. E • 11/20
34
EXHAUST VENT PIPE
INLET AIR VENT PIPE
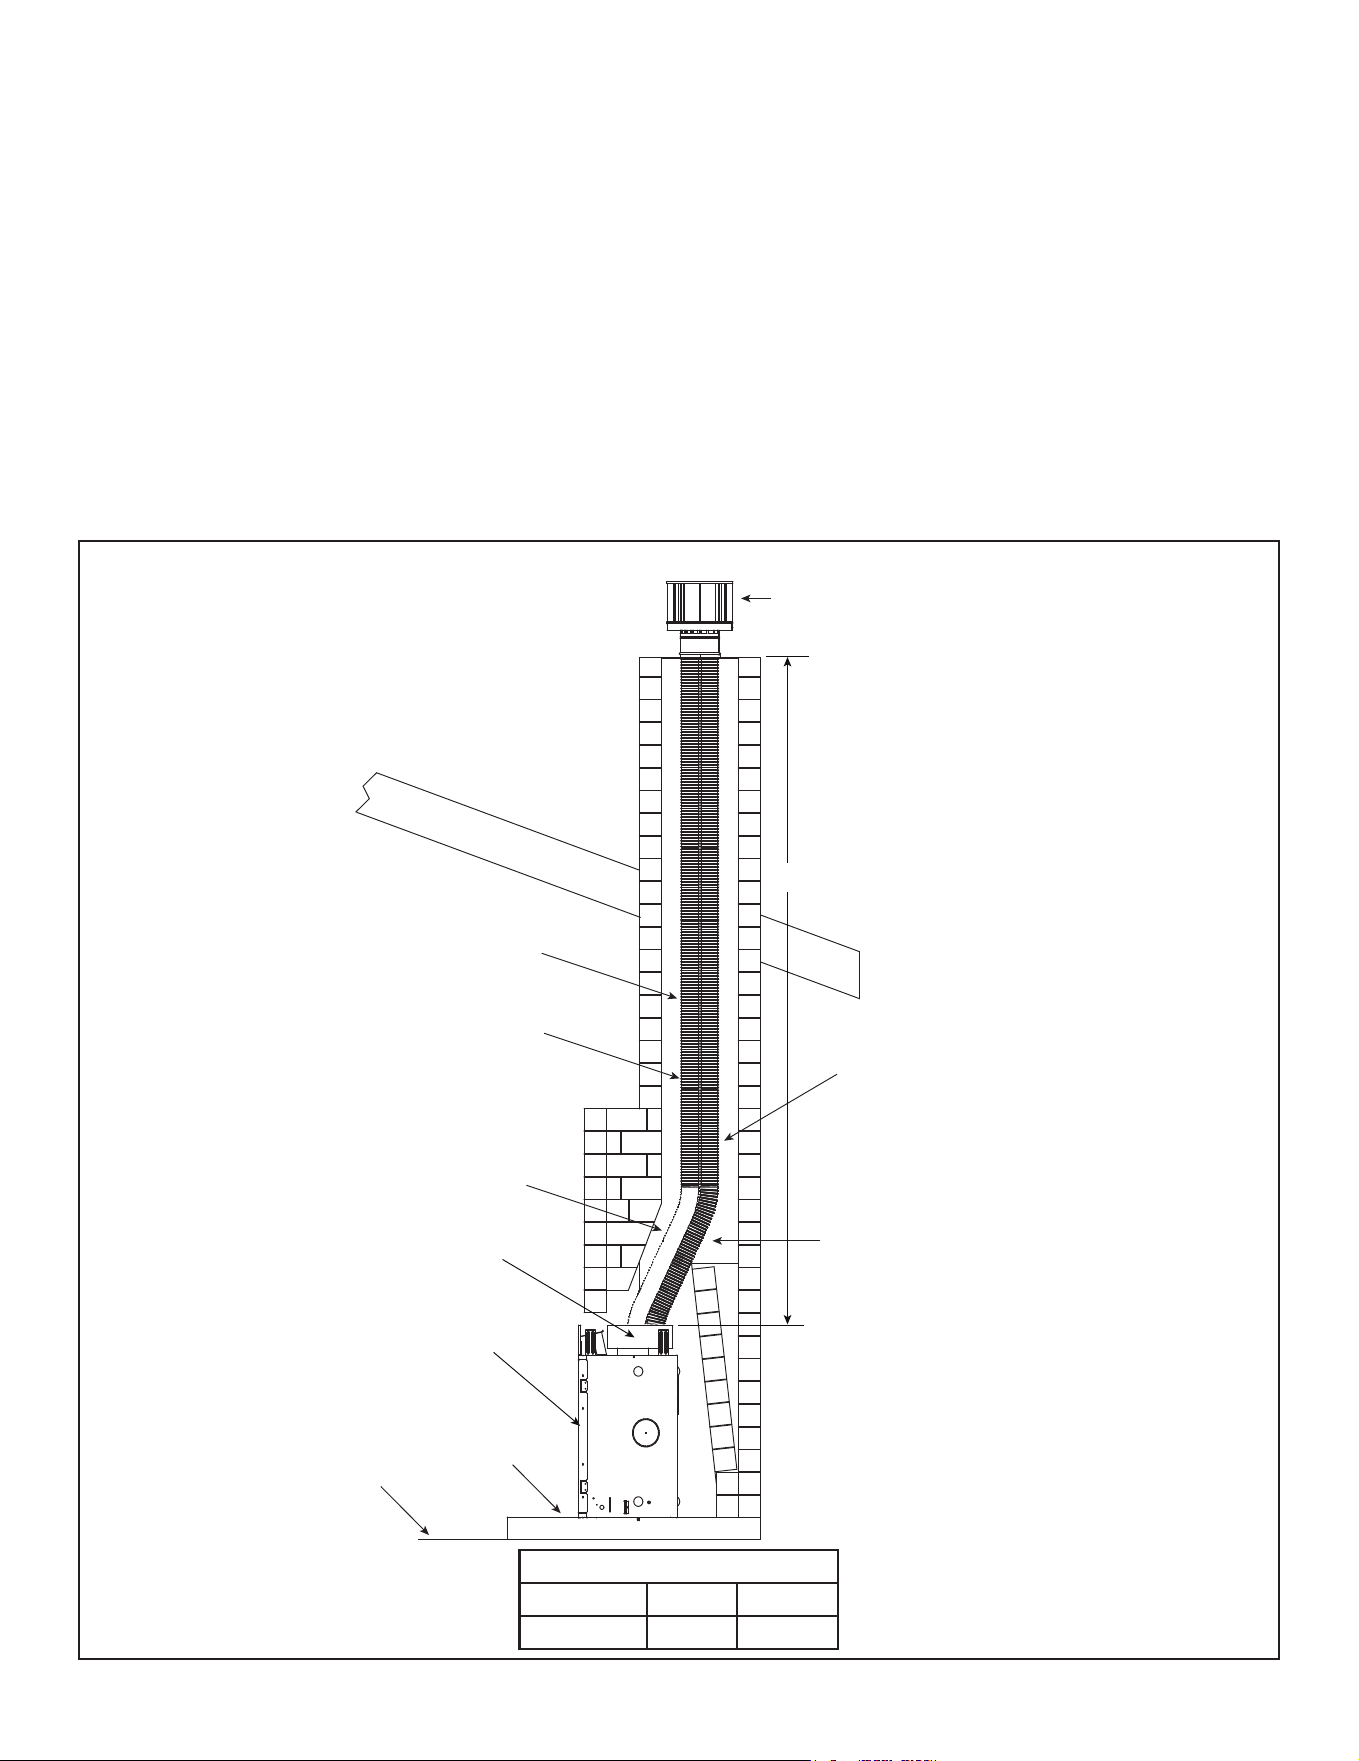
Figure 4.21 Coaxial/Colinear Appliance Connector
OUTSIDE FACE OF
FIREPLACE
TOP OF FIREPLACE
OPENING
SHADED AREA DEFINED AS
“INSIDE EXISTING MASONRY
FIREPLACE”
3 IN. MIN.
5 IN. MIN.
EXHAUST VENT PIPE
Figure 4.22 Existing Fireplace DV-46DVA-GCL
Clearance Requirements
Clearances to Combustibles:
Refer to Section 3 and Section 10 for clearances to the
appliance, mantel, mantel legs and wall projection.
Refer to Section 5 for pipe clearances to combustibles.
Termination Cap
For installation of termination cap see minimum vent
heights for various pitched roofs. See Section 4.A.
Flue Damper
Fully lock the solid fuel replace’s ue damper in the open
position, OR completely remove it.
Venting Components
The LINK-DV30B is approved for use with the coaxial/co-
linear venting application. The LINK-DV30B kit includes:
• Two 30 foot sections of exible vent pipe (3 inches Ø).
One section is used to draw combustion air and the other
section is used to expel exhaust gases.
• One vertical termination cap.
Prior to installing the gas appliance:
• Have the chimney and adjacent structure inspected
and cleaned by qualied professionals. Hearth & Home
Technologies recommends that NFI or CSIA certied
professionals, or technicians under the direction of certi-
ed professionals, conduct a minimum of a NFPA 211
Level 2 inspection of the chimney.
• Replace component parts of the chimney and replace
as specied by the professionals.
• Ensure all joints are properly engaged and the chimney
is properly secured.
Coaxial to Colinear Venting
WARNING! Risk of Fire! Coaxial to colinear venting con-
guration may only be used in existing non-combustible
chimney. Installation in any other venting application
could cause re.
The coaxial to colinear adapter (DV-46DVA-GCL) is ap-
proved for installations into solid fuel masonry or factory
built replaces that have been installed in accordance with
the National, Provincial, State and local building codes.
The coaxial to colinear vent components are shown in
Section 12.A. The DV-46DVA-GCL must be recessed
into existing masonry replace. See Table 1 and Figure
4.21.
Table 1
CLEARANCE TO COMBUSTIBLES REQUIREMENTS
DV-46DVA-GCL 3 IN.
Exhaust Vent Pipe 5 IN.
CAUTION! DO NOT use any ue restrictor when vent-
ing with the DV-46DVA-GCL adapter and LINK-DV30B
kit. This could result in poor ame appearance, sooting,
pilot malfunction, or overheating.
35
Hearth & Home Technologies • DVLINEAR36 Installation Manual • 2569-980 Rev. E • 11/20
Top Vent
• Remove top seal cap and insulation if equipped.
See Section 6, “Appliance Preparation.” Attach the
DV-46DVA-GCL adapter to the appliance starting collar
with 3-1/2 in. self-tapping screws. See Figure 4.23.
WARNING! Risk of Fire, Explosion or Asphyxiation!
Do NOT connect this gas appliance to a chimney ue
serving a separate solid fuel or gas burning appliance.
• Could impair safe operation of this appliance or other
appliances connected to the ue.
• Vent this appliance directly outside.
• Use separate vent system for this appliance.
Connecting the LINK-DV30B to the DV-46DVA-GCL
Adapter
• Insert the two sections of exible vent pipe down the
existing chimney.
• Use three self-tapping screws to attach one section
of exible vent pipe to the inlet collar on top of the
DV-46DVA-GCL adapter and three self-tapping screws
to attach one section of exible vent pipe to the exhaust
collar on top of the DV-46DVA-GCL adapter.
• To minimize cold air drafts, seal around the ex vents
at the damper inside the chimney with non-combustible
unfaced berglass or rock wool insulation.
The DV-46DVA-GCL adapter must be recessed into existing
masonry replace. This measurement is taken from the top
of the replace opening. See Table 1 and Figure 4.22.
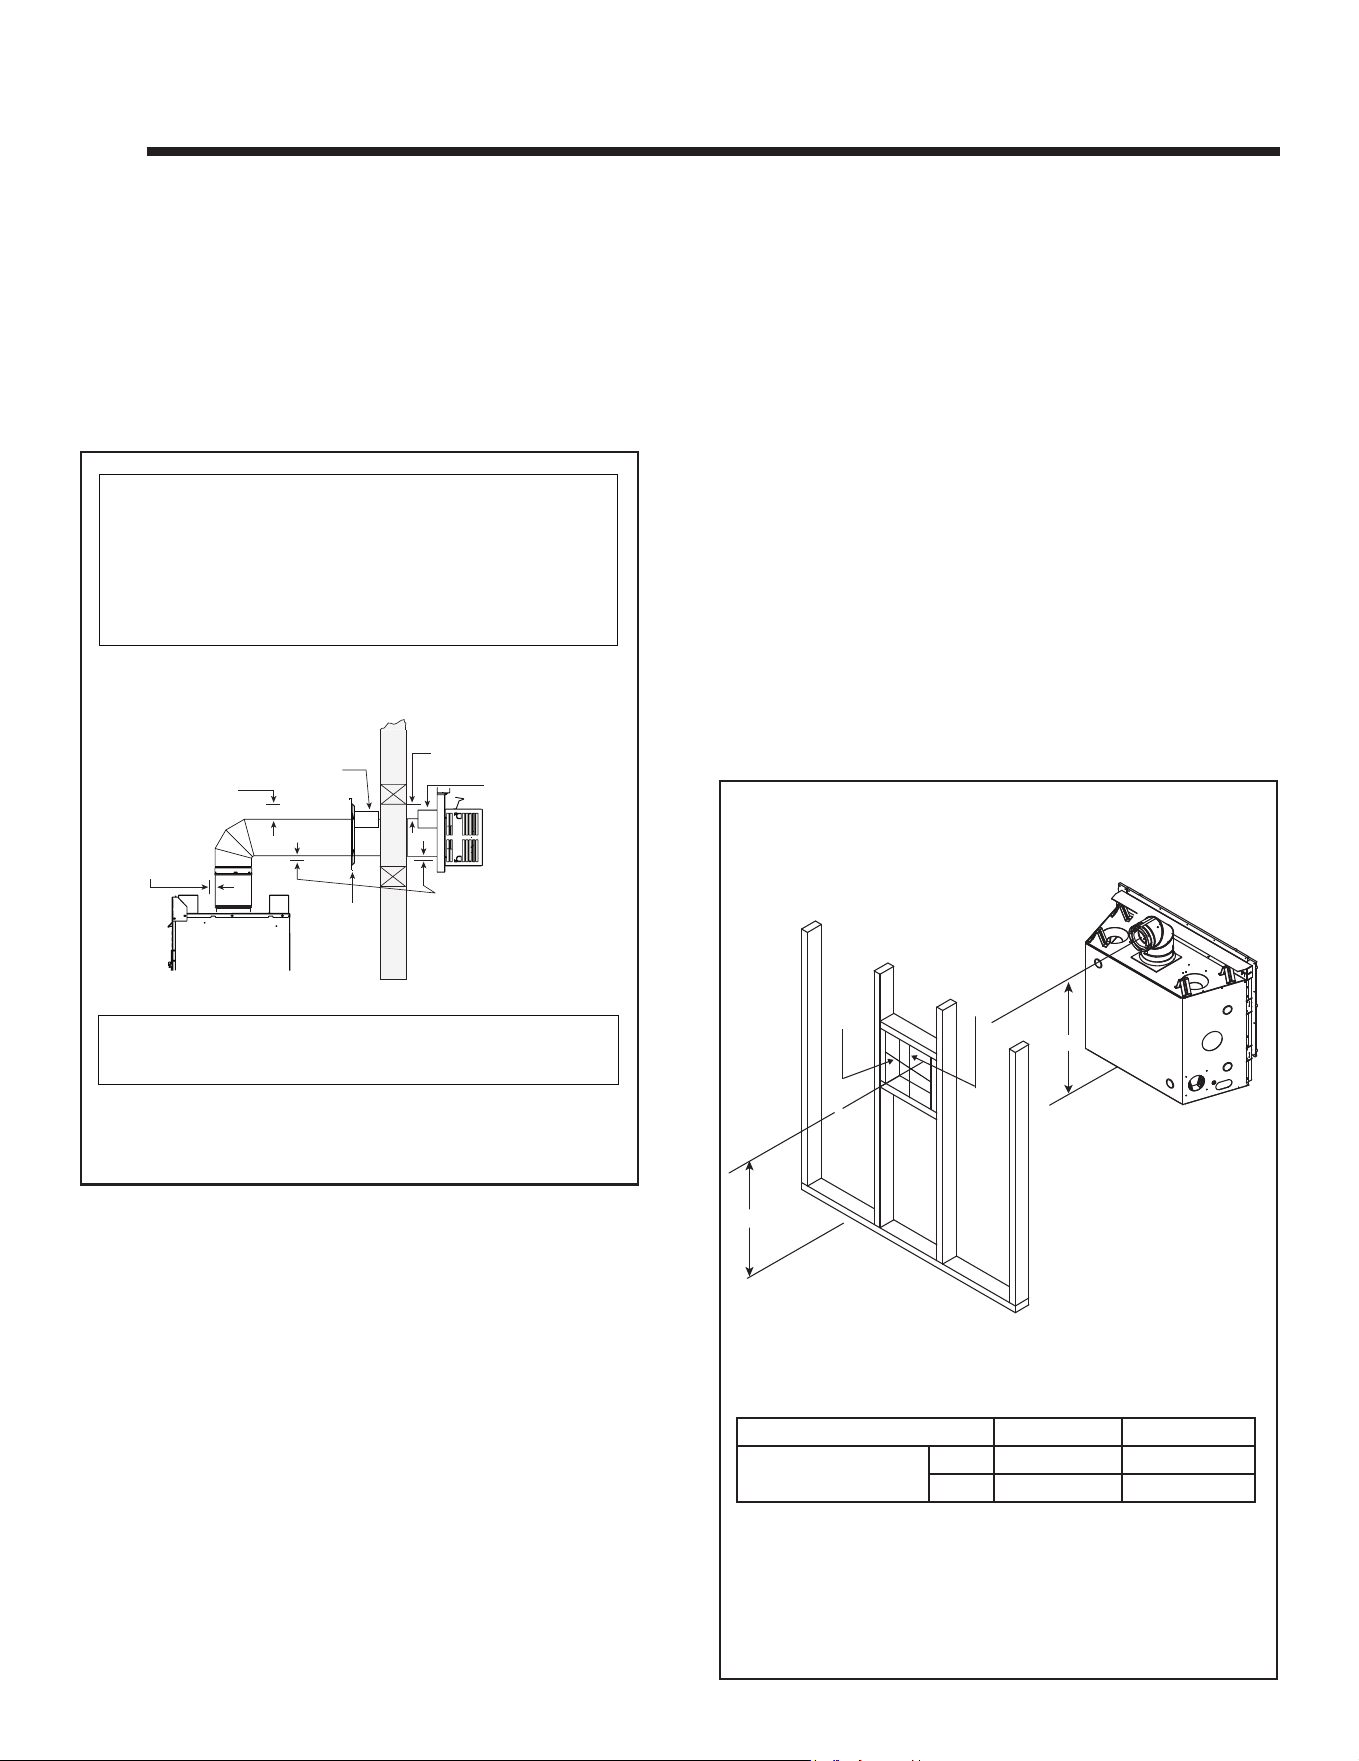
Figure 4.23
EXISTING CHIMNEY
HEARTH
FLOOR
EXISTING CHIMNEY
EXHAUST AIR
VENT PIPE
INLET AIR
VENT PIPE
To minimize cold air
drafts, seal with
non-combustible
insulation.
TERMINATION CAP
DIRECT VENT FIREPLACE
V
COAXIAL/COLINEAR
APPLIANCE CONNECTOR
V
Minimum 10 ft 3.05 m
Maximum 40 ft 12.2 m
NOTICE: To achieve optimum
performance of appliance, minimize or
avoid bends in exhaust vent pipe.
CAUTION! DO NOT use any ue restric-
tor when venting with the DV-46DVA-GCL
adapter and LINK-DV30B kit. This could
result in poor ame appearance, sooting,
pilot malfunction, or overheating.
Connecting the DV-46DVA-GCL Adapter to Appliance
Hearth & Home Technologies • DVLINEAR36 Installation Manual • 2569-980 Rev. E • 11/20
36
A. Vent Clearances to Combustibles
WARNING! Risk of Fire! Maintain air space clearance
to vent. DO NOT pack insulation or other combustibles:
• Between ceiling restops
• Between wall shield restops
• Around vent system
Failure to keep insulation or other material away from
vent pipe could cause overheating and re.
5 5
Vent Clearances and Vent Framing
Figure 5.2 Wall Penetration
Figure 5.1 Horizontal Venting Clearances To Combustible
Materials
* When using SLP pipe, minimum clearances from the vent pipe to combustible materi-
als at inside wall firestops are: Top: 2-1/2 in. (64 mm)
Bottom: 1/2 in. (13 mm)
Sides: 1 in. (25 mm)
Note: Heat shields MUST overlap by a minimum of 1-1/2 in. (38 mm).
• DVP heat shield - designed to be used on a wall 4 in. to 7-1/4 in. (102 mm to 184
mm) thick.
• If wall thickness is less than 4 in. the existing heat shields must be field trimmed. If
wall thickness is greater than 7-1/4 in. a DVP-HSM-B will be required.
• SLP heat shield - designed to be used on a wall 4-3/8 in. to 7-5/8 in. (111 mm to
194 mm thick).
• If wall thickness is less than 4-3/8 the existing heat shields must be field trimmed.
If wall thickness is greater than 7-5/8 in. a DVP-HSM-B will be required.
(DVP-SLP Pipe Shown)
3 in. (76 mm)
top clearance *
1 in. (25 mm)
clearance
bottom & sides
Heat
Shield
Wall
Shield
Firestop
Heat
Shield
WALL
3 in. (76 mm)
top clearance
1 in. (25 mm)
clearance around
vertical sections
B. Wall Penetration Framing/Firestops
Combustible Wall Penetration
Whenever a combustible wall is penetrated, you must
frame a hole for the wall shield restop(s). The wall shield
restop maintains minimum clearances and prevents cold
air inltration.
• The opening must be framed on all four sides using the
same size framing materials as those used in the wall
construction.
• SLP pipe - A wall shield restop must be placed on each
side of an interior wall. A minimum 1-1/2 in. (38 mm)
overlap of attached heat shields must be maintained.
• See Section 7.F for information for regarding the instal-
lation of a horizontal termination cap.
Non-Combustible Wall Penetration
If the hole being penetrated is surrounded by non-com-
bustible materials such as concrete, a hole with diameter
one inch greater than the pipe is acceptable.
Whenever a non-combustible wall is penetrated, the wall
shield restop is only required on one side and no heat
shield is necessary.
DO NOT PACK VENT FRAMING HOLE WITH INSULATION
OR OTHER MATERIAL.
Note: Center of the horizontal vent pipe to the vertical measuring
surface of a trap cap is 5 inches (127 mm)
* Shows center of vent framing hole for top venting. The center of the
hole is 1 in. (25 mm) above the center of the horizontal vent pipe.
A* B
DVLINEAR36
in. 35-1/2 34-1/2
mm 902 876
A
10 in.
10 in.
B
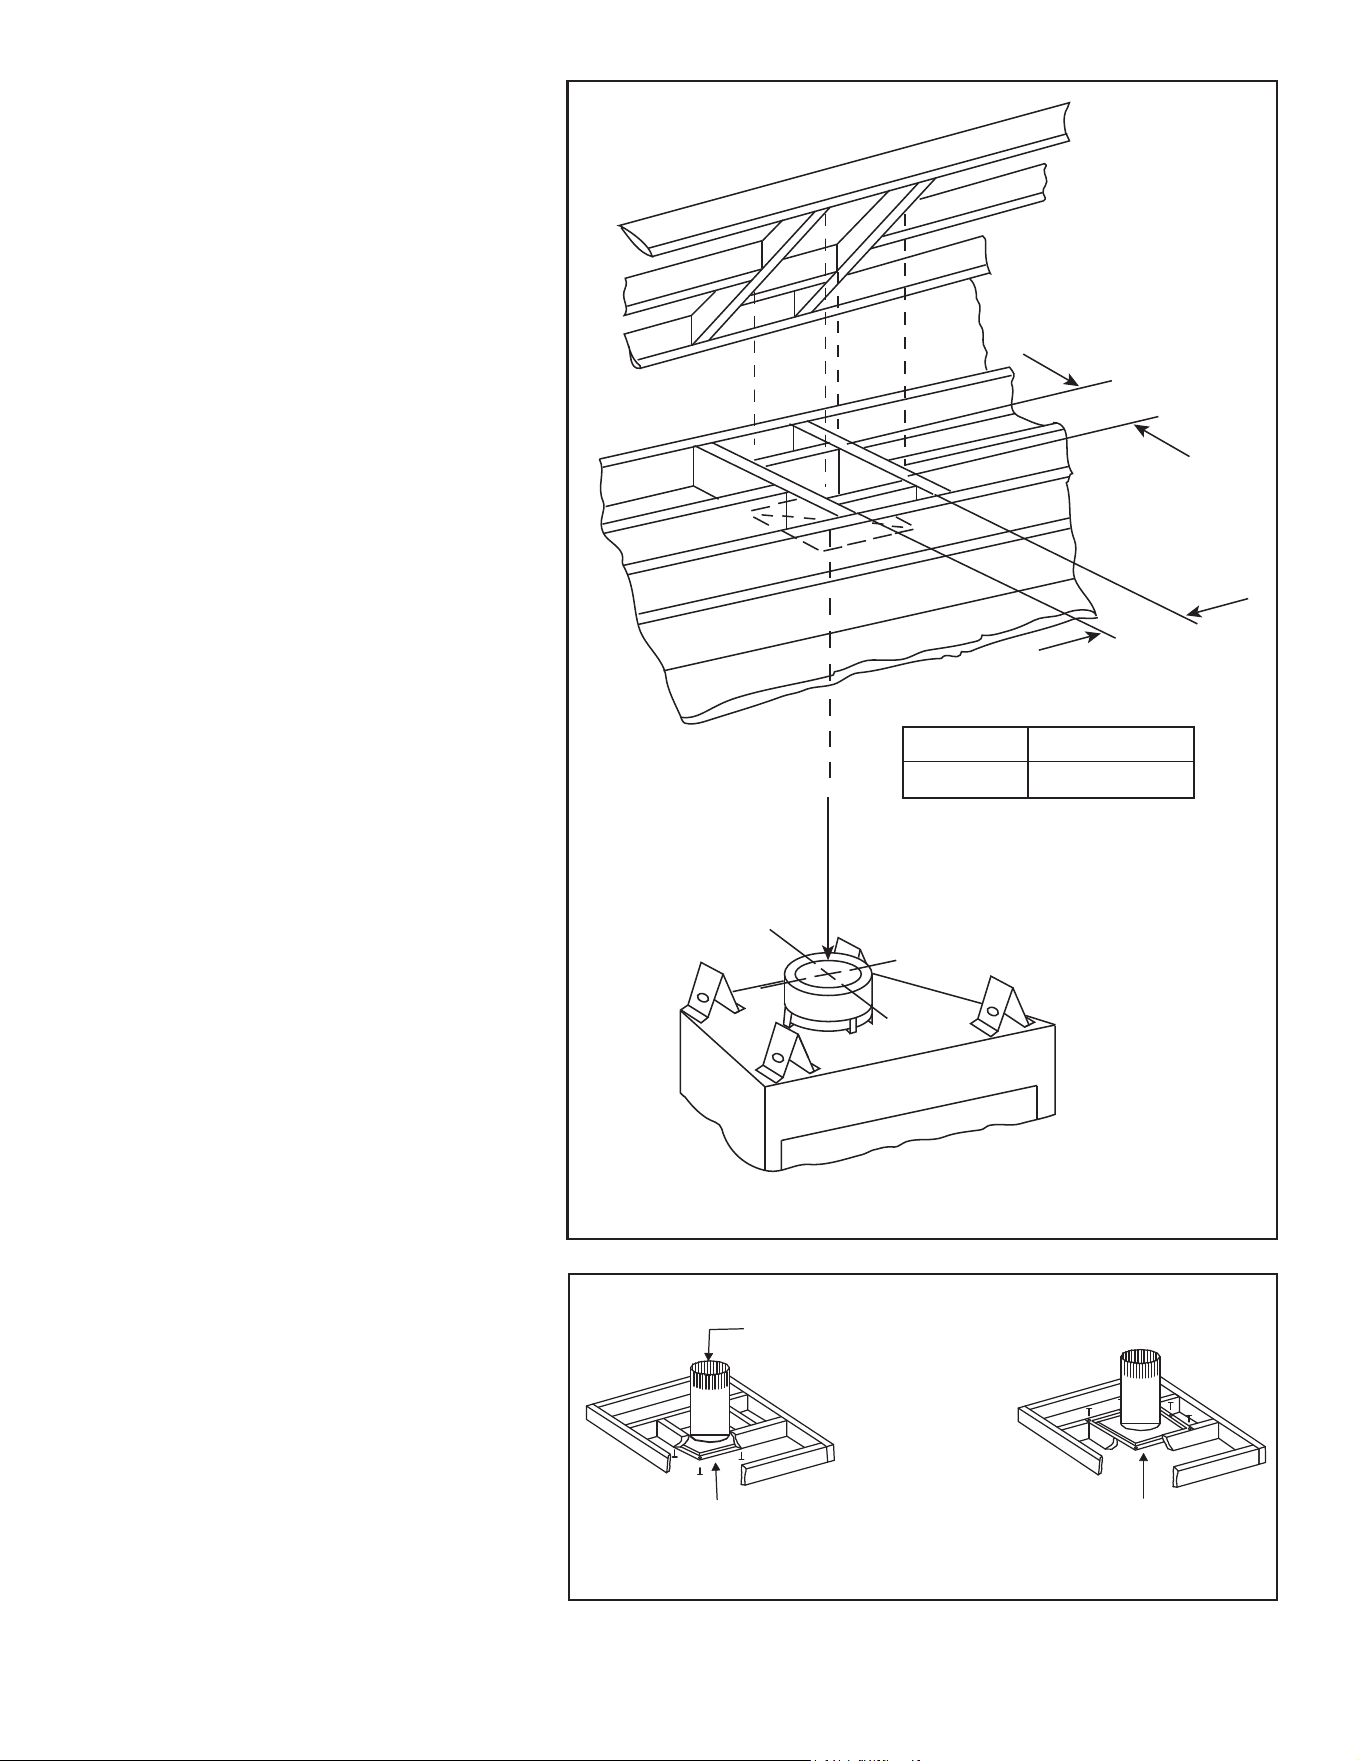
37
Hearth & Home Technologies • DVLINEAR36 Installation Manual • 2569-980 Rev. E • 11/20
D. Install Attic Insulation Shield
WARNING! Fire Risk. The use of an attic
shield is required to prevent loose materials
or insulation from contacting the vent causing
overheating and a re.
The International Fuel Gas Code requires an
attic shield constructed of 26 gauge minimum
steel that extends at least 2 in. (51 mm) above
insulation.
• Attic insulation shields must meet specied
clearances to combustible materials and be
secured in place.
• An attic insulation shield kit is available from
Hearth & Home Technologies. Contact your
dealer to order. Install attic insulation shield
according to instructions included with kit.
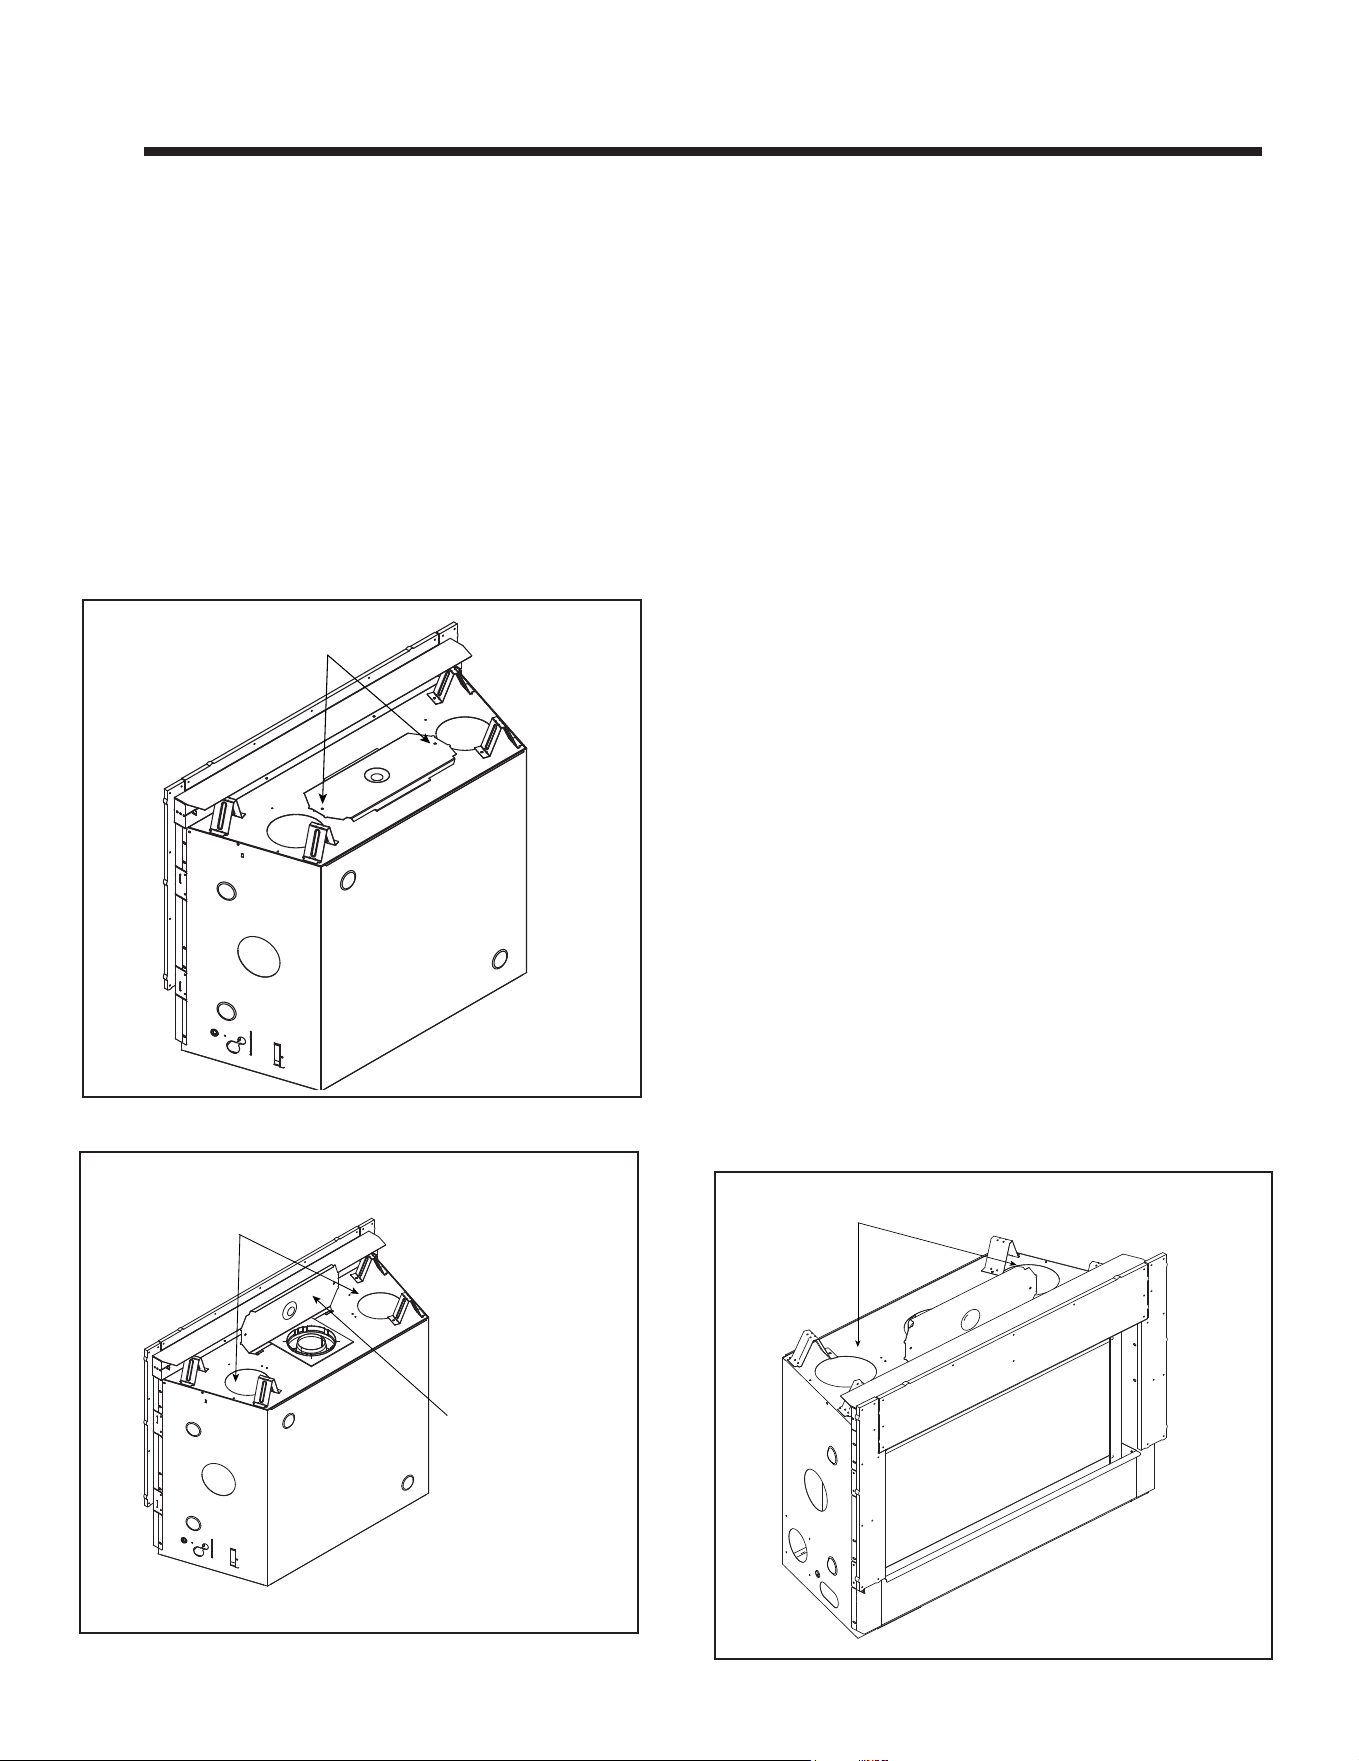
C. Ceiling Firestop/Floor Penetra-
tion Framing
WARNING! Risk of Fire! DO NOT pack insu-
lation around the vent. Maintain clearances to
vent to prevent overheating.
A ceiling restop MUST be used between
oors and attics.
• SLP pipe only - Frame opening 9 in. x 9
in. (229 mm x 229 mm) whenever the vent
penetrates a ceiling/oor (see Figure 5.3).
• Frame the area with the same sized lumber
as used in ceiling/oor joist.
• The ceiling restop may be installed above or
below the ceiling joists when installed with an
attic insulation shield. It must be under joists
between oors that are not insulated. Refer
to Figure 5.4.
• Secure in place with nails or screws.
Figure 5.3 Installing Ceiling Firestop
Figure 5.4 Installing the Attic Shield
INSTALL ATTIC INSULATION SHIELDS
BEFORE OR AFTER INSTALLATION OF VENT SYSTEM
CEILING FIRESTOP
INSTALLED BELOW CEILING
CEILING FIRESTOP
INSTALLED ABOVE CEILING
ATTIC ABOVE
A
PIPE
SLP
A
A
9 in. (229 mm)
Hearth & Home Technologies • DVLINEAR36 Installation Manual • 2569-980 Rev. E • 11/20
38
CAUTION! Risk of Cuts, Abrasions or Flying Debris.
Wear protective gloves and safety glasses during instal-
lation. Sheet metal edges are sharp.
A. Vent Collar Preparation
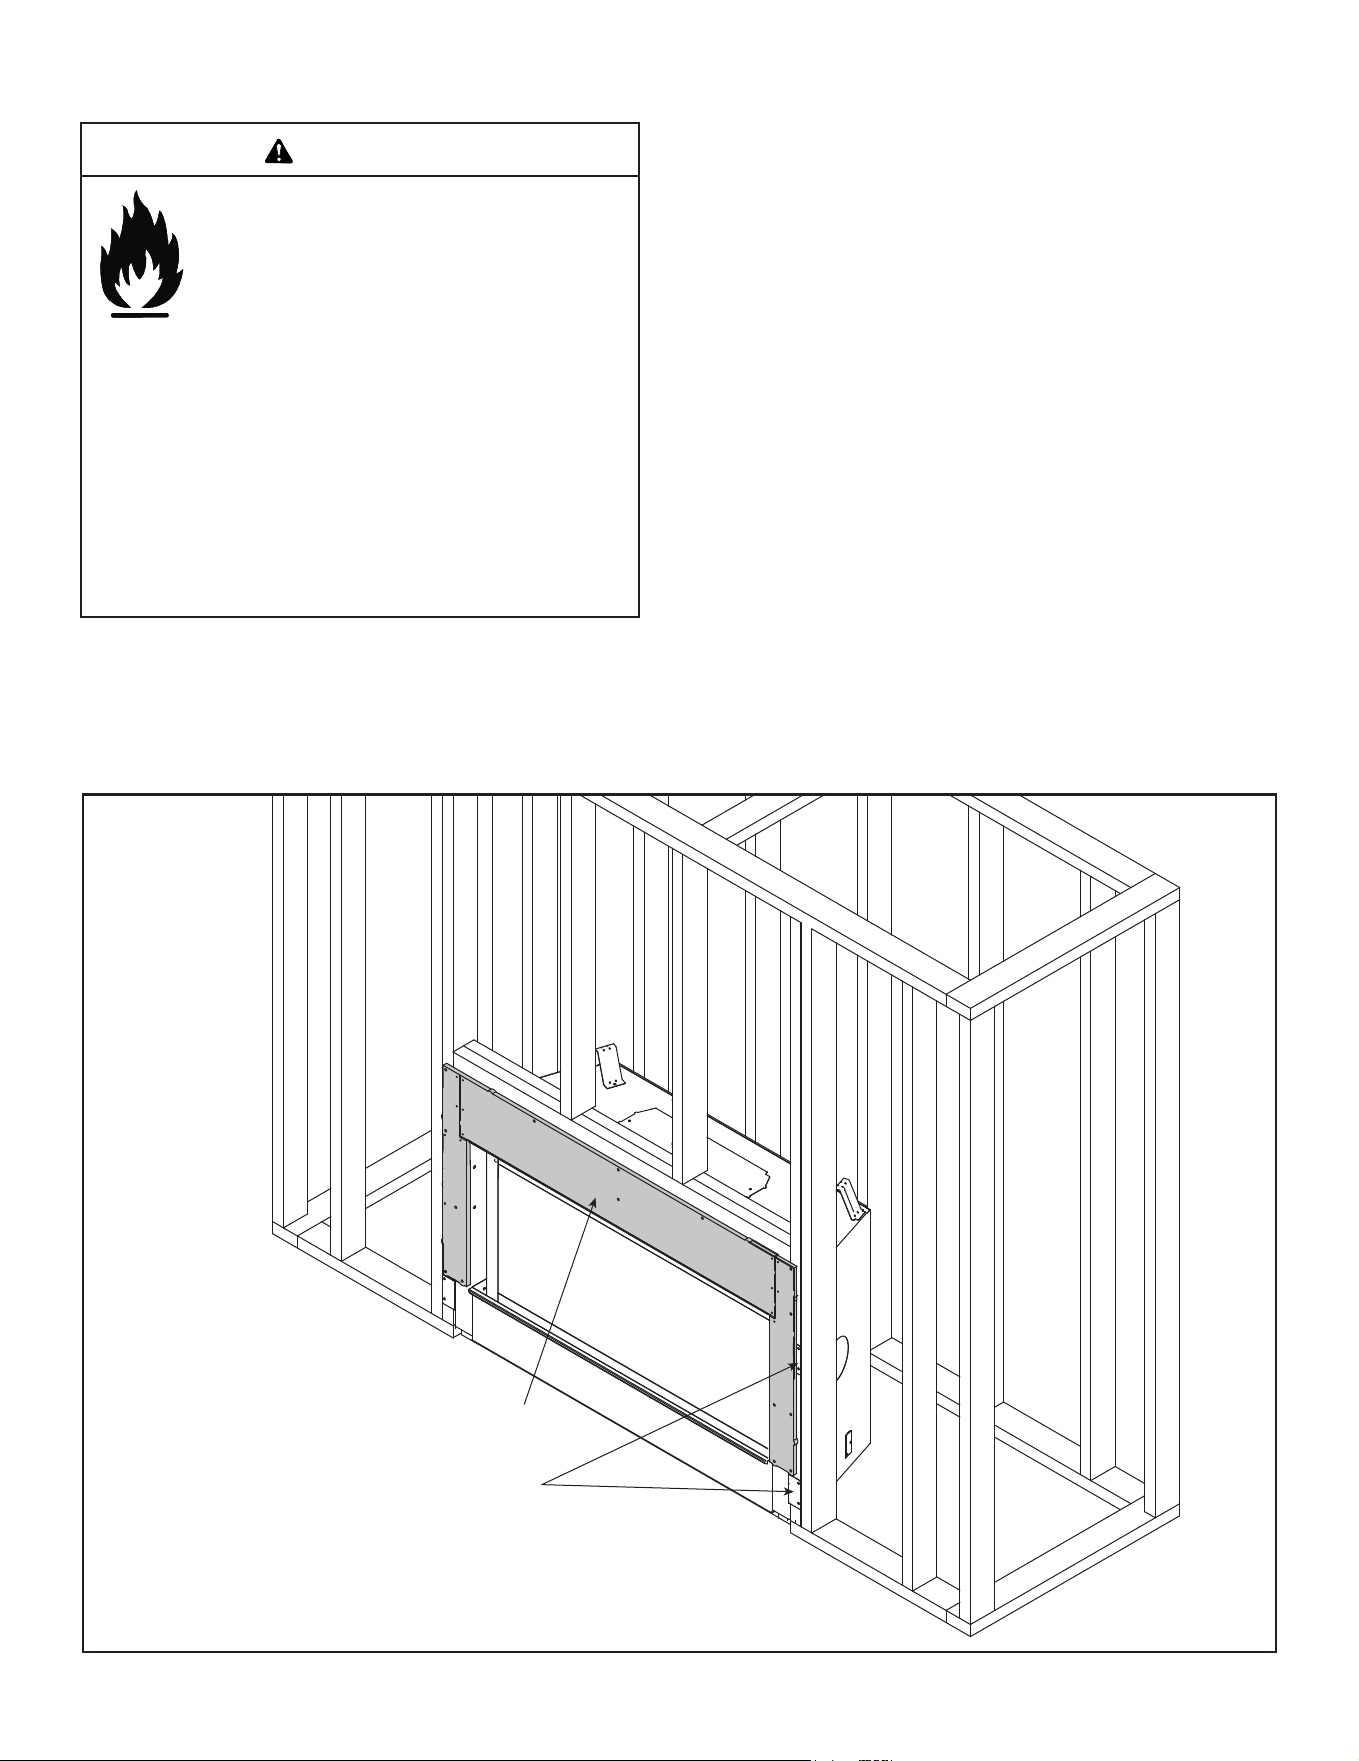
Top Vent
WARNING! Risk of Fire! Do not remove heat shield.
Elevated header temperatures may cause a re.
1. Remove two screws and discard. See Figure 6.1.
2. Fold up top heat shield to 90 degrees as shown in
Figure 6.2.
REMOVE SCREWS
Figure 6.1 Heat Shield Shipping Position
Figure 6.2 Top Heat Shield in Position
TOP HEAT SHIELD
IN POSITION
HEAT MANAGEMENT
KNOCKOUT LOCATIONS
6 6
Appliance Preparation
B. Prepare For Heat Management
Introduction
An optional heat management system allows the heat from
the appliance to be redirected as desired.
An optional heat management system must be installed by
a qualied service technician at the time of the appliance
installation. Follow the instructions shipped with the kit for
installation and operation.
NOTICE: Additional clearances are required for heat
management systems installations. Provisions must be
made in advance to ensure t within the framing.
• Determine the heat management system(s) that will be
installed.
• Locate the two heat management knockouts on the top of
the appliance. See Figure 6.2. Remove the knockouts
from the appliance with a tin snips.
• Center the duct collar or passive heat adapter around
the exposed hole and attach it to the appliance.
Note: Do this BEFORE nal positioning of the appliance.
• Determine the location for the air register/fan housing
assembly.
Heat Managment Option:
• Passive Heat (PH-FRT-LINEAR, PH-SIDE-LINEAR):
The heat is vented into the room in which the appliance
is installed through a discharge opening(s).
WARNING! Risk of Fire! DO NOT block passive heat
registers! Overheating of appliance and combustible
materials will occur.
Figure 6.3 Heat Management Knockout Locations
WARNING! Risk of Fire! DO NOT remove a knockout
unless a heat management system will be installed in its
place. Appliance and combustible materials will overheat.
REMOVE HEAT MANAGEMENT KNOCKOUTS
39
Hearth & Home Technologies • DVLINEAR36 Installation Manual • 2569-980 Rev. E • 11/20
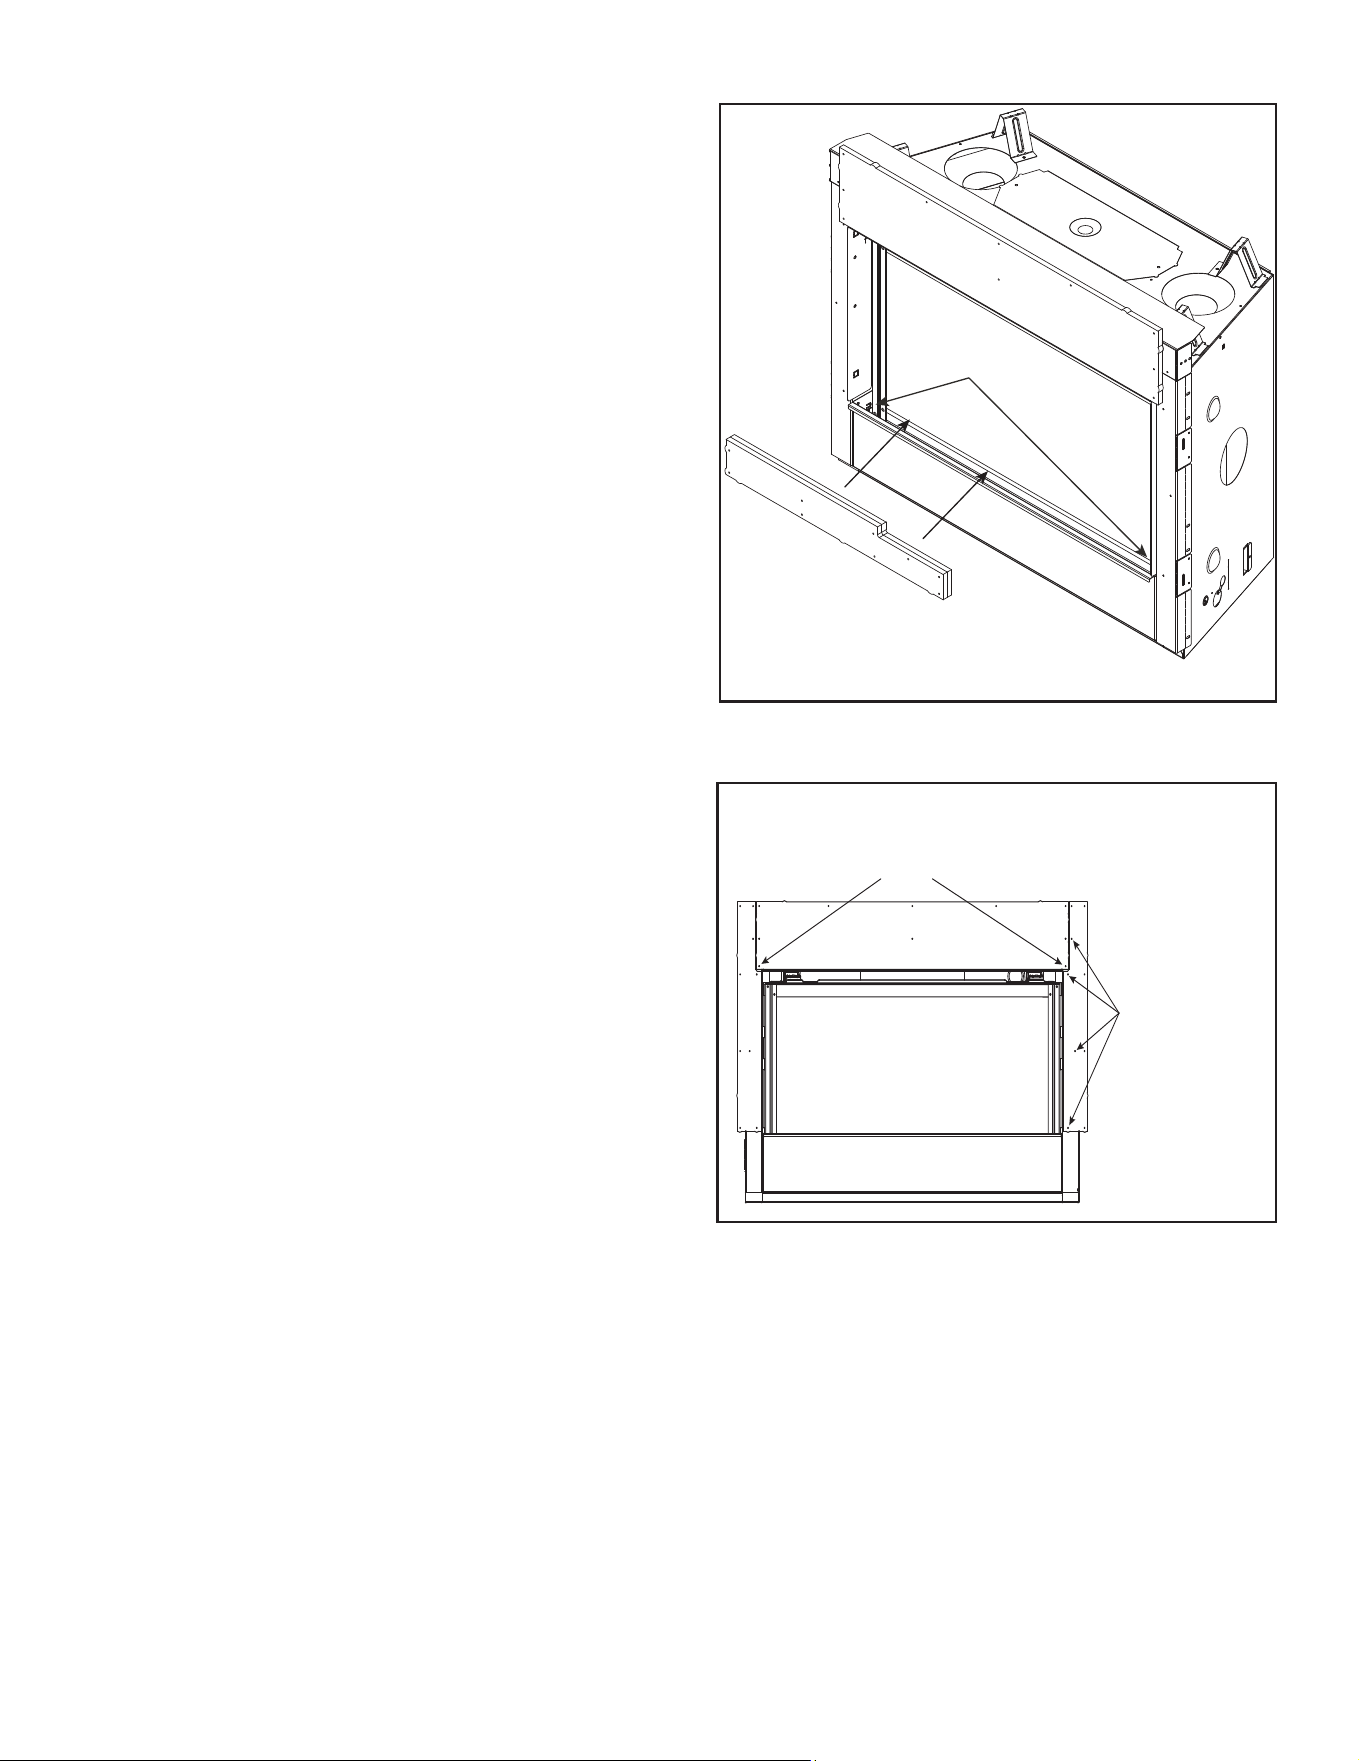
C. Securing and Leveling the Appliance
Figure 6.4 shows how to properly position and secure the
appliance. Nailing tabs are provided to secure the appli-
ance to the framing members.
• Bend out nailing tabs on each side.
• Place the appliance into position.
• Keep nailing tabs ush with the framing.
• Level the appliance from side to side and front to back.
• Shim the appliance as necessary. It is acceptable to use
wood shims underneath the appliance.
• Secure the appliance to the framing by using nails or
screws through the nailing tabs. Use a minimum of one
fastener per nailing tab.
• Optional: Secure the appliance to the oor by inserting
two screws through the pilot holes at the bottom of the
appliance.
Risk of Fire!
Prevent contact with:
• Sagging or loose insulation
• Insulation backing or plastic
• Framing and other combustible
materials
WARNING
DO NOT remove standos or notch the framing
around the appliance standos.
Failure to maintain air space clearance could
cause overheating and re.
Block openings into the chase to prevent entry
of blown-in insulation. Make sure insulation and
other materials are secured.
Figure 6.4 Proper Positioning, Leveling And Securing Of Appliance
The DVLINEAR36 model ships with factory-installed non-
combustible board. This board must be used. Do NOT
remove. See Figure 6.4.
NAILING TABS
BOTH SIDES
FACTORY-INSTALLED
NON-COMBUSTIBLE BOARD
DO NOT REMOVE
Hearth & Home Technologies • DVLINEAR36 Installation Manual • 2569-980 Rev. E • 11/20
40
D. Non-Combustible Material Installation
WARNING! Risk of Fire! DO NOT remove factory-
installed non-combustible material.
Figure 6.6 Installation of the Side Non-Combustible Components
INSTALL TWO OF THE
PROVIDED SCREWS INTO
THESE PILOT HOLES
INSTALL FOUR
OF THE PROVIDED
SCREWS INTO
THESE PILOT HOLES
NOTE: BOTH LEFT &
RIGHT SIDES
Figure 6.5 Shipping Position - Non-Combustible Sides
COVER PANEL
SCREW LOCATIONS
This model ships with the required top, left and right non-
combustible board. The top non-combustible board has
been pre-installed at the factory with three screws. The left
and right side non-combustible boards are shipped inside
the appliance. See Figure 6.5.
1. Remove the left and right non-combustible components
from the shipping position and set aside.
2. Pivot the lower cover panel down by lifting the lower
cover panel “up” and rotating the top downward.
3. Locate the manual bag assembly and remove the small
package containing the 1-1/2 inch Phillips screws.
Note: Care should be taken when installing screws into
the non-combustible board. DO NOT overtighten screws.
Screws should be set “ush” to the surface of the non-
combustible board.
4. Further secure the top non-combustible board by
installing screws into the pilot holes located in the upper
left and right corners of the top non-combustible board
as shown in Figure 6.6.
5. Install the left and right non-combustible components
with four of the provided Phillips screws. See Figure 6.6.
After all non-combustible material has been installed,
remove the small package of sheet metal screws from
the manual bag. Reinstall lower cover panel and ensure
it is “hooked” onto the appliance. Use the two screws
from the package to fasten the top sides of the cover
panel to appliance. The holes on the cover panel should
align with the holes in the sides of the appliance. See
Figure 6.5.
6. Install drywall screws (not provided) around the
perimeter of the installed non-combustible components
to secure it to the framing material. Refer to Section 10
for more information.
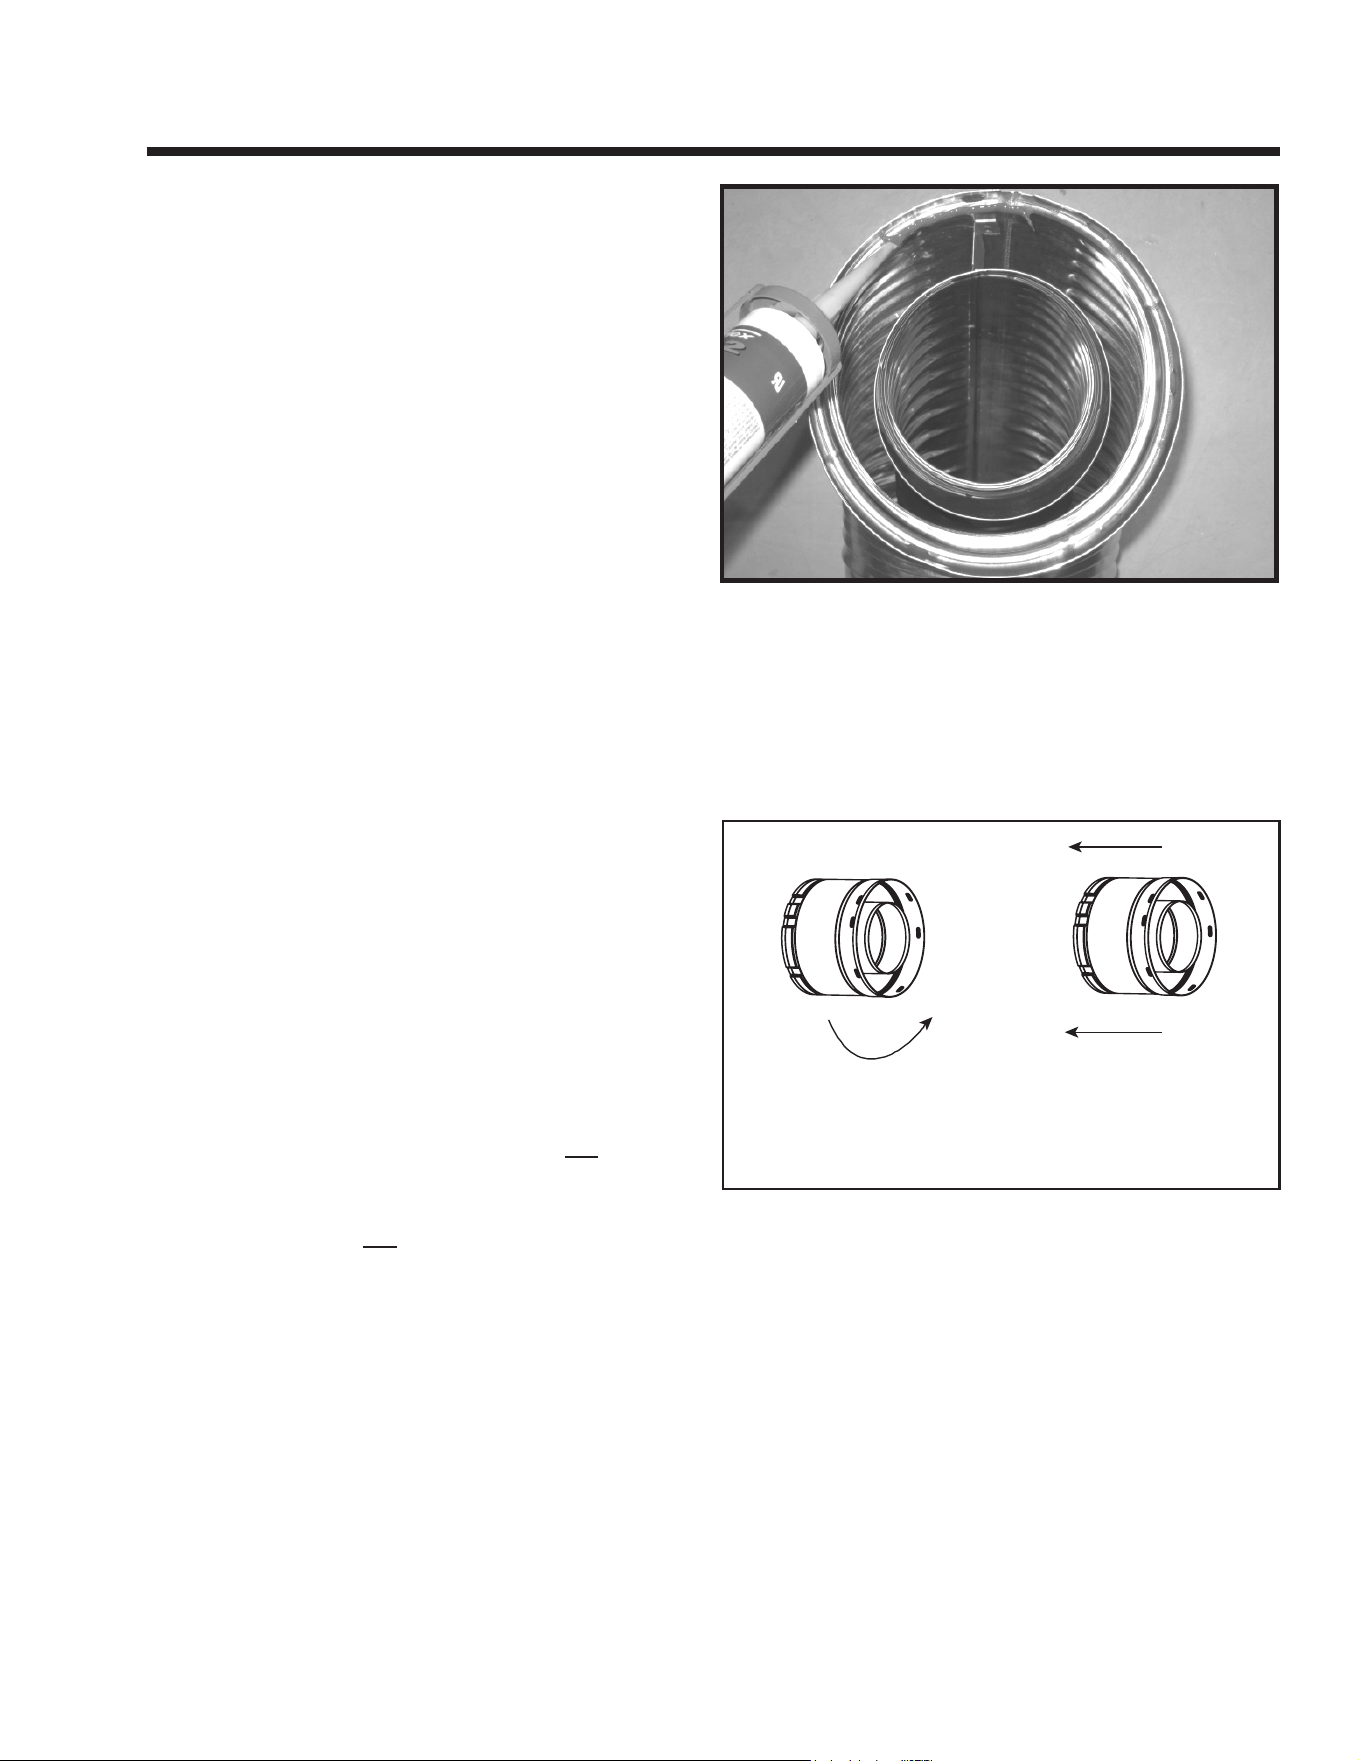
41
Hearth & Home Technologies • DVLINEAR36 Installation Manual • 2569-980 Rev. E • 11/20
7 7
Venting
To attach the rst vent component to the starting collars
of the appliance:
• Lock the vent components into place by sliding the pipe
section onto the collar.
• Align the seam of the pipe and seam of collar to allow
engagement. Rotate the vent component to lock into
place. Use this procedure for all vent components. See
Figure 7.1.
• Slide the gasket over the rst vent section and place it
ush to the appliance. This will prevent cold air inltration.
Caulk with a minimum of 300 ºF continuous exposure
rating may be used to hold the part in place.
• Continue adding vent components, locking each
succeeding component into place.
• Ensure that each succeeding vent component is securely
tted and locked into the preceding component.
It is acceptable to use screws no longer than 1/2 in. (13
mm) to hold outer pipe sections together. If predrilling holes,
DO NOT penetrate inner pipe.
Requirement for Commercial, Multi-family (Multi-level ex-
ceeding two stories), or High-Rise Applications
All outer pipe joints must be sealed using one of the meth-
ods below, including the slip section that connects directly
to the horizontal termination cap.
• Apply a bead of silicone sealant (300 ºF minimum con-
tinuous exposure rating) inside the female outer pipe
joint prior to joining sections. See Figure 7.1 OR
Apply a bead of silicone sealant (300 ºF minimum con-
tinuous exposure rating) to the outside of connecting
joint after joining sections OR
Apply aluminum foil tape (300 ºF minimum continuous
exposure rating) to the outside of connecting joint after
joining sections. On horizontal pipe runs, it is recom-
mended that the tape seam is positioned on the bottom
side of the vent pipe.
• Only outer pipes need to be sealed. All unit collar, pipe,
slip section, elbow and cap outer ues shall be sealed
in this manner, unless otherwise stated.
Figure 7.2 Adding Venting Components
WARNING! Risk of Fire or Explosion! DO NOT break
silicone seals on slip sections. Use care when remov-
ing termination cap from slip pipe. If slip section seals
are broken during removal of the termination cap, vent
could leak.
Note: Align seams to engage pipe,
then rotate counterclockwise to lock
WARNING! Risk of Fire or Explosion! Vent sections
MUST be installed correctly. Improperly installed vent
sections could leak or cause appliance to overheat.
A . Assemble Vent Sections (SLP Only)
Figure 7.1 High Temperature Silicone Sealant
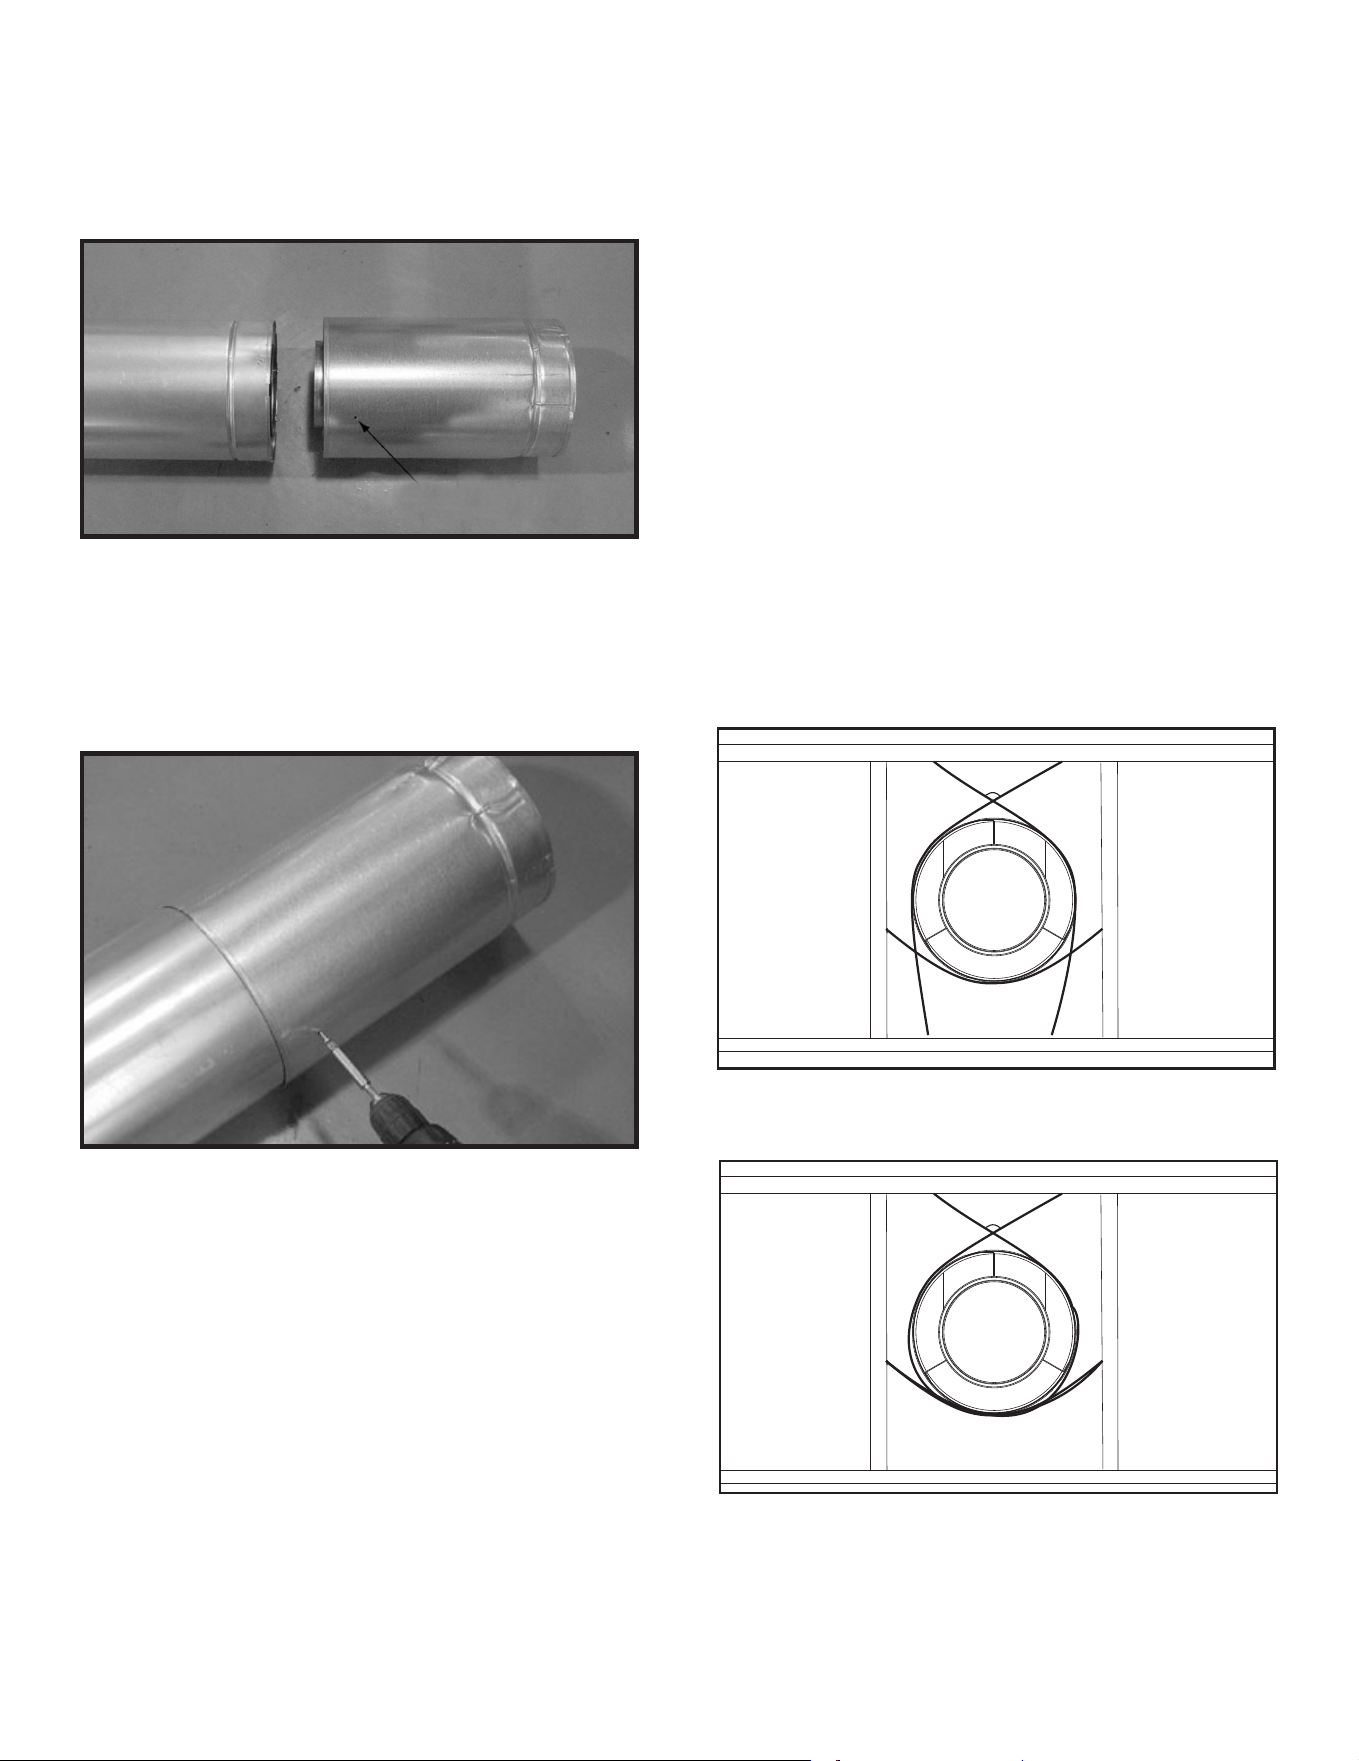
Hearth & Home Technologies • DVLINEAR36 Installation Manual • 2569-980 Rev. E • 11/20
42
B. Assemble Slip Sections
• Slide the inner ue of the slip section into the inner ue
of the pipe section and the outer ue of the slip section
over the outer ue of the pipe section. See Figure 7.3.
• Slide together to the desired length.
Figure 7.3 Slip Section Pilot Holes
Figure 7.4 Screws into Slip Section
Pilot holePilot hole
• Continue adding pipe as necessary following instructions
in “Assembling Pipe Sections.”
NOTICE: If slip section is too long, the inner and outer
ues of the slip section can be cut to the desired length.
• Maintain a 1-1/2 in. (38 mm) overlap between the slip
section and the pipe section.
• Secure the pipe and slip section with two screws no
longer than 1/2 in. (13 mm), using the pilot holes in the
slip section. See Figure 7.4.
120º
Figure 7.5 Securing Vertical Pipe Sections
C. Secure the Vent Sections
WARNING! Risk of Fire, Explosion or Asphyxiation!
Improper support could allow vent to sag and separate.
Use vent run supports and connect vent sections per in-
stallation instructions. DO NOT allow vent to sag below
connection point to appliance.
• Vertical runs originating o the top of the appliance, with
no osets, must be supported every 8 feet (2.44 m) after
the maximum allowed 25 feet (7.62 m) of unsupported
rise.
• Vertical runs originating o the rear of the appliance, or
after any elbow, must be supported every 8 feet (2.44
m).
• Horizontal runs must be supported every 5 feet (1.52 m).
• Vent supports or plumbers strap (spaced 120º apart)
may be used to support vent sections. See Figures 7.5
and 7.6.
• Wall shield restops may be used to provide horizontal
support to vent sections.
• SLP ceiling restops have tabs that may be used to
provide vertical support.
120º
Figure 7.6 Securing Horizontal Pipe Sections
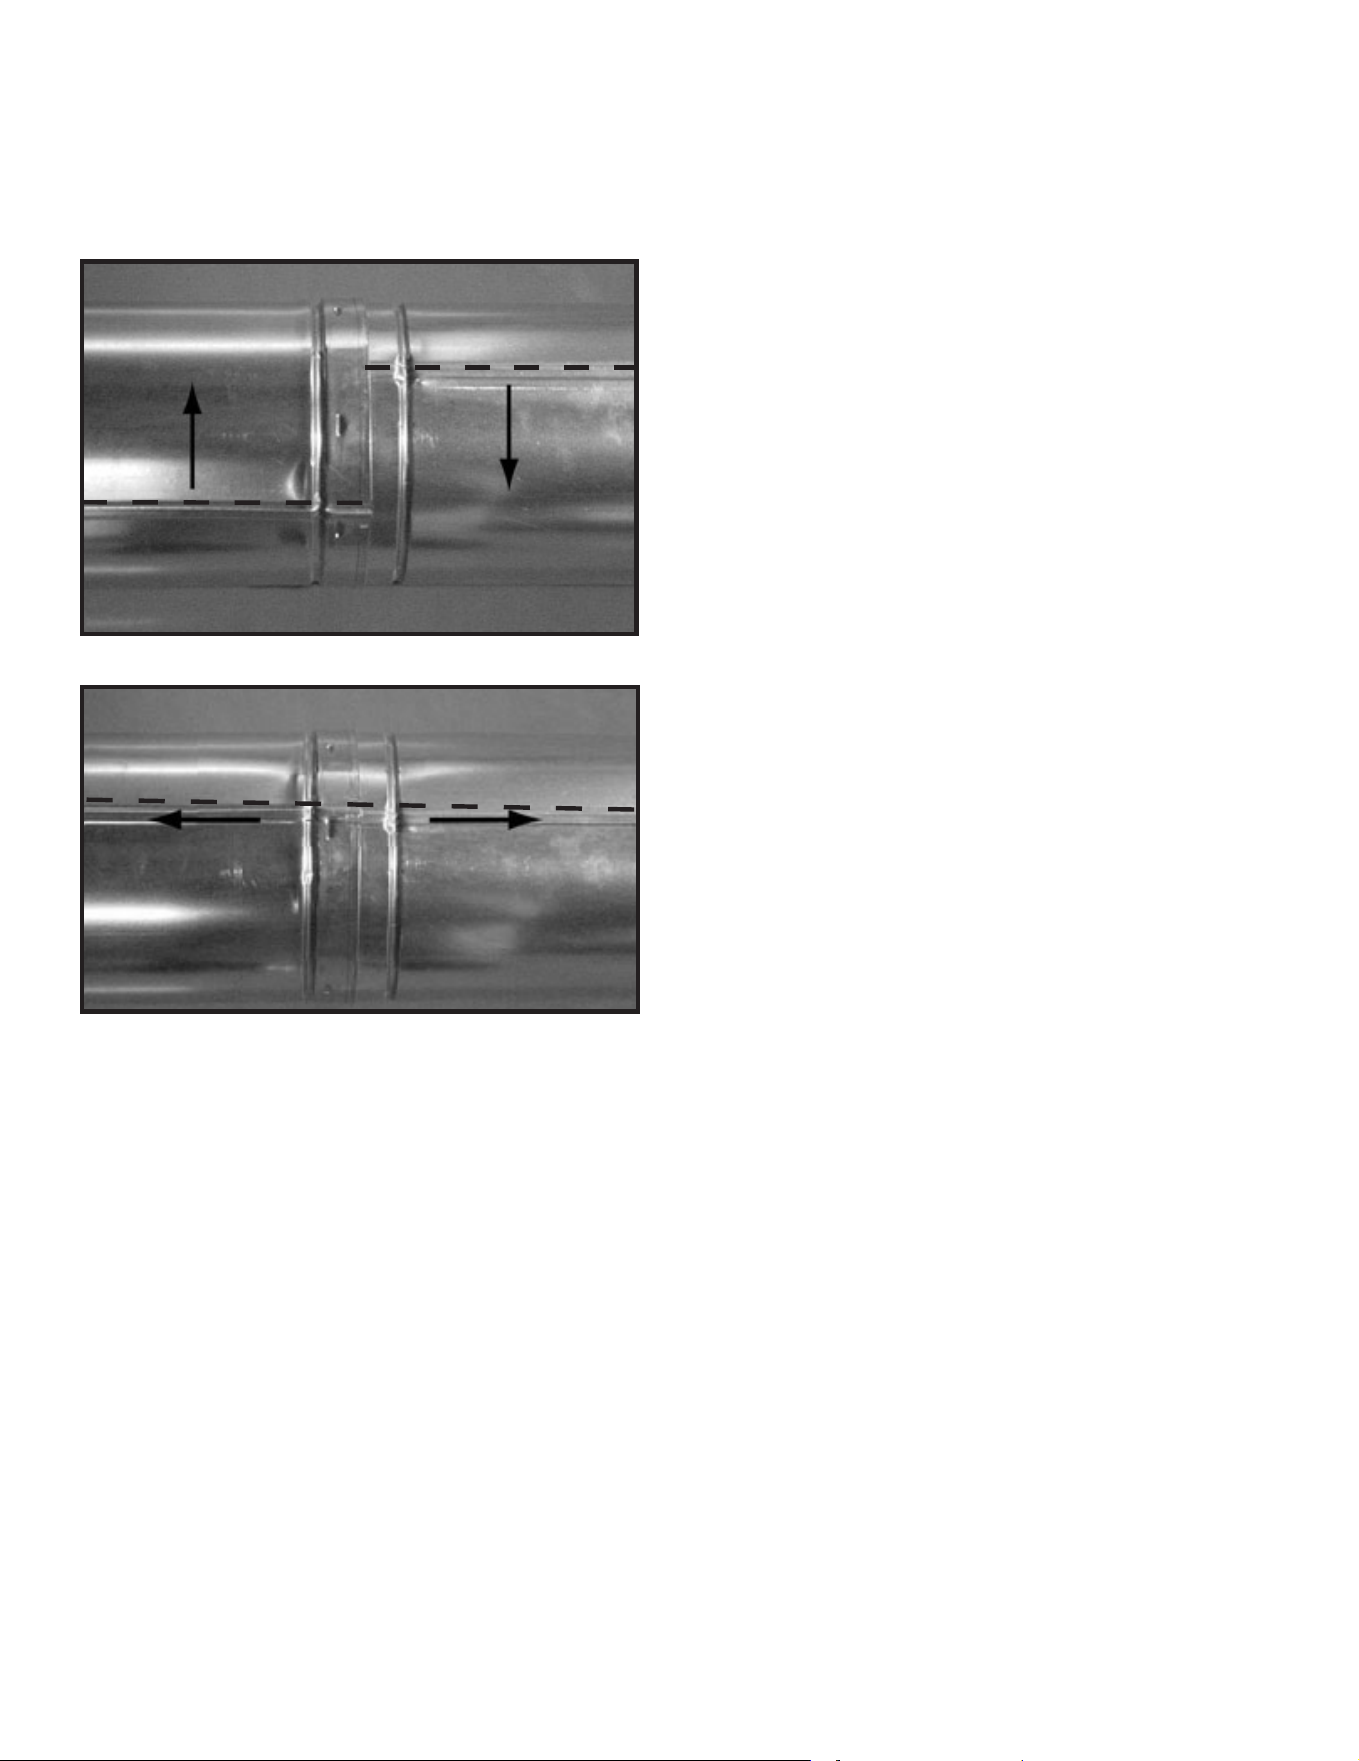
43
Hearth & Home Technologies • DVLINEAR36 Installation Manual • 2569-980 Rev. E • 11/20
D. Disassemble Vent Sections
• Rotate either section (see Figure 7.7) so the seams on
both pipe sections are aligned as shown in Figure 7.8.
• Pull carefully to separate the pieces of pipe.
Figure 7.8 Align and Disassemble Vent Sections
Figure 7.7 Rotate Seams for Disassembly
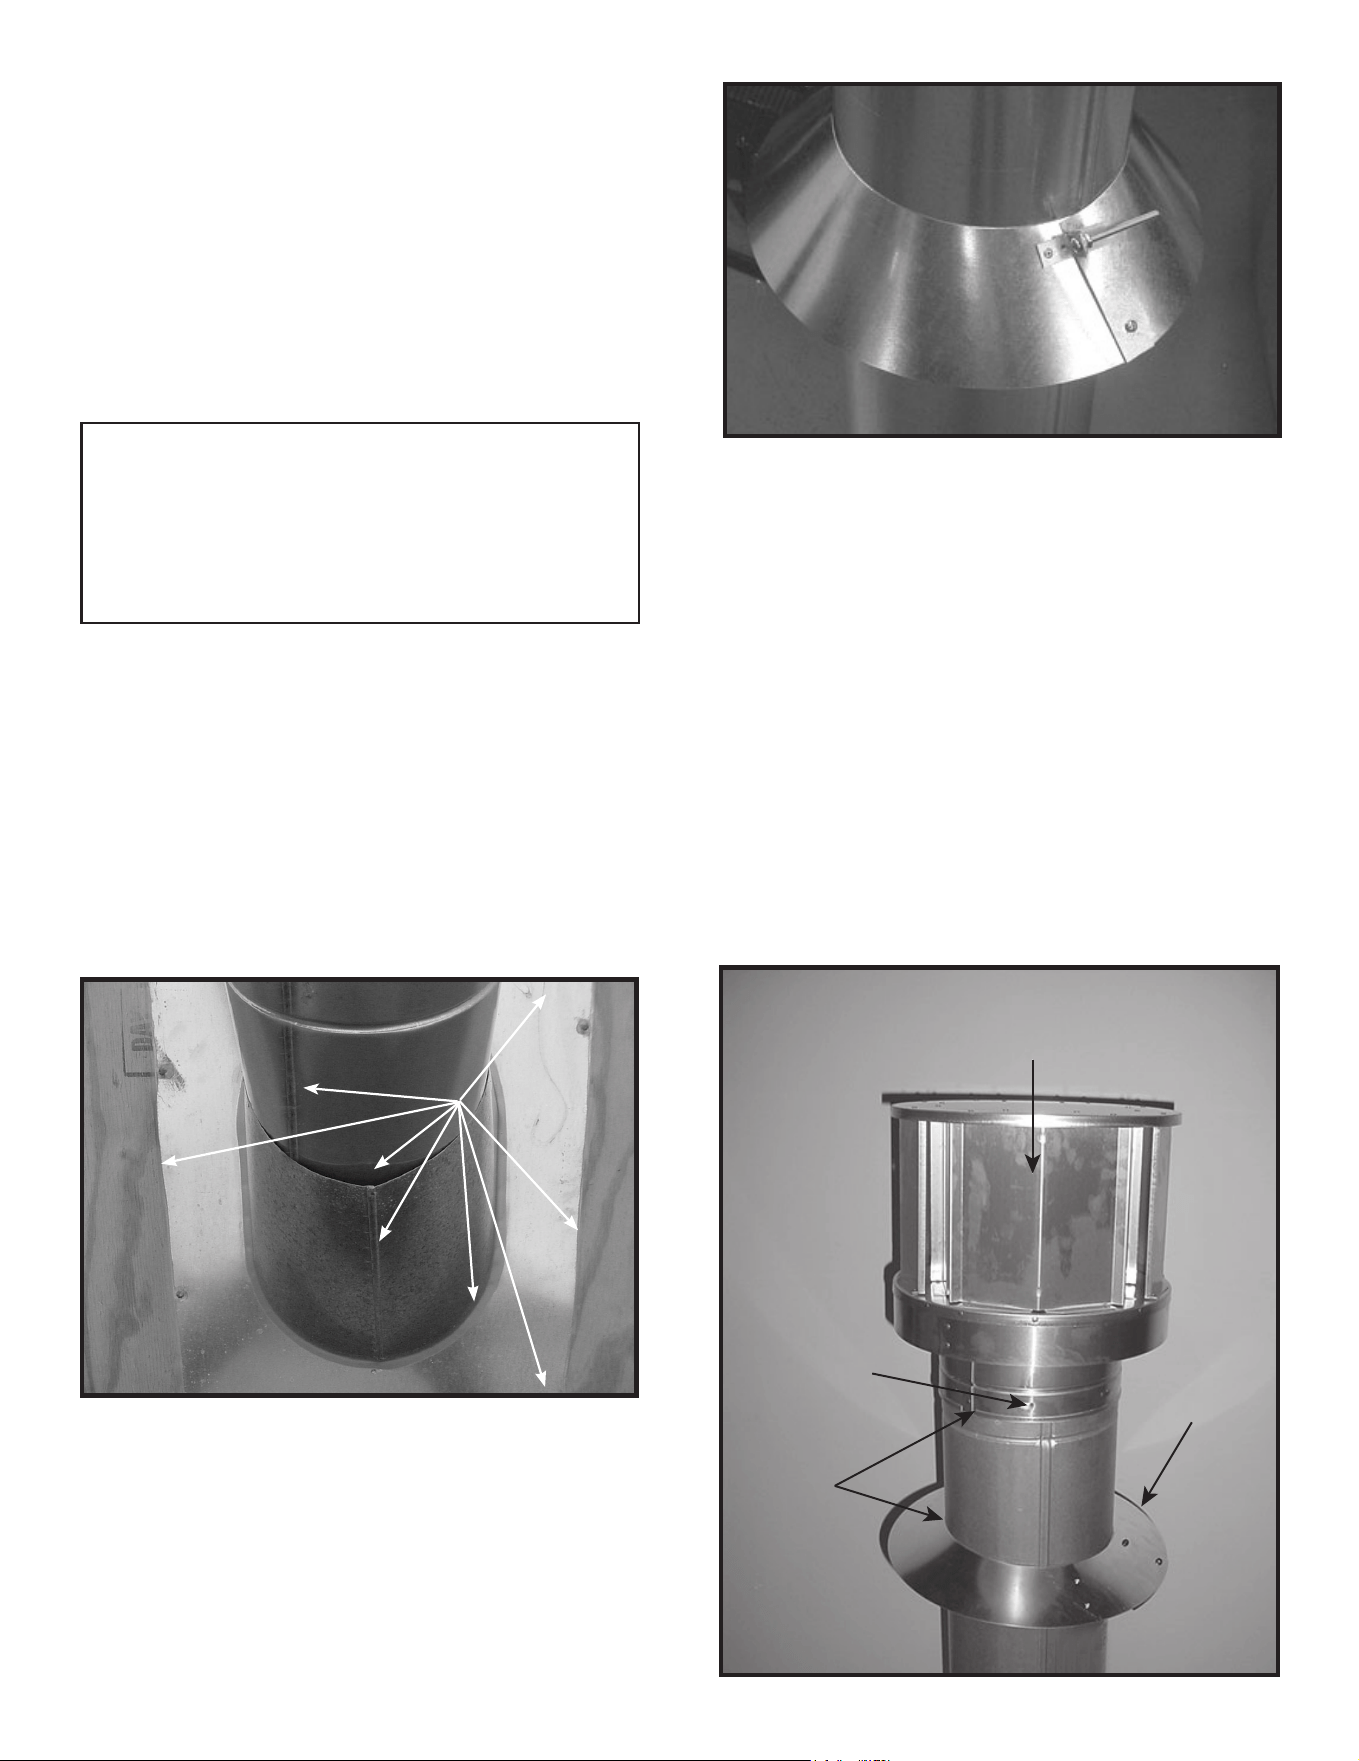
Hearth & Home Technologies • DVLINEAR36 Installation Manual • 2569-980 Rev. E • 11/20
44
E. Vertical Termination Requirements
Install and Seal Metal Roof Flashing
• See minimum vent heights for various pitched roofs
(Section 4, Figure 4.1) to determine the length of pipe
to extend through the roof.
• Slide the roof ashing over the pipe sections extending
through the roof as shown in Figure 7.9.
• Use an elastomeric or silicone sealant with a minimum of
150 ºF temperature rating to seal the metal roof ashing.
Figure 7.10 Insert Bolt into BracketsFigure 7.10 Insert Bolt into Brackets
NOTICE: Failure to properly seal the roof ashing and pipe
seams could permit entry of water.
• Seal the gap between the roof ashing and the outside
diameter of the pipe.
• Seal the perimeter of the ashing where it contacts the
roof surface. See Figure 7.9.
• Seal the exposed pipe section seams that are located
above the roof.
SEAL
Figure 7.9 Figure 7.9
Assemble and Install Storm Collar
CAUTION! Risk of Cuts, Abrasions or Flying Debris.
Wear protective gloves and safety glasses during instal-
lation. Sheet metal edges are sharp.
• Slide the storm collar onto the exposed pipe section
and align brackets.
• Insert a bolt (provided) through the brackets and install
nut. Do not completely tighten.
• Slide the assembled storm collar down the pipe section
until it rests on the roof ashing. See Figure 7.10.
• Tighten nut and make sure the collar is tight against the
pipe section.
• Seal around the top of the storm collar. See Figure 7.11.
TERMINATION CAP
(1 OF 3)
SCREWS
SEAL
STORM
COLLAR
Install Vertical Termination Cap
• Attach the vertical termination cap by sliding the inner
collar of the cap into the inner ue of the pipe section
while placing the outer collar of the cap over the outer
ue of the pipe section.
• Secure the cap by driving three self-tapping screws
(supplied) through the pilot holes in the outer collar of
the cap into the outer ue of the pipe. See Figure 7.11.
Figure 7.11 Figure 7.11
Note: When installing a silicone or EPDM pipe ashing boot
on a metal roof, it is recommended to put a bead of 100%
silicone sealant where the boot contacts the vent pipe to
prevent the entry of water. Follow the manufacturer’s recom-
mendations when installing the boot. Climate regions with
frequent temperatures below - 50 °F (-45.6 °C) should use a
silicone ashing boot.
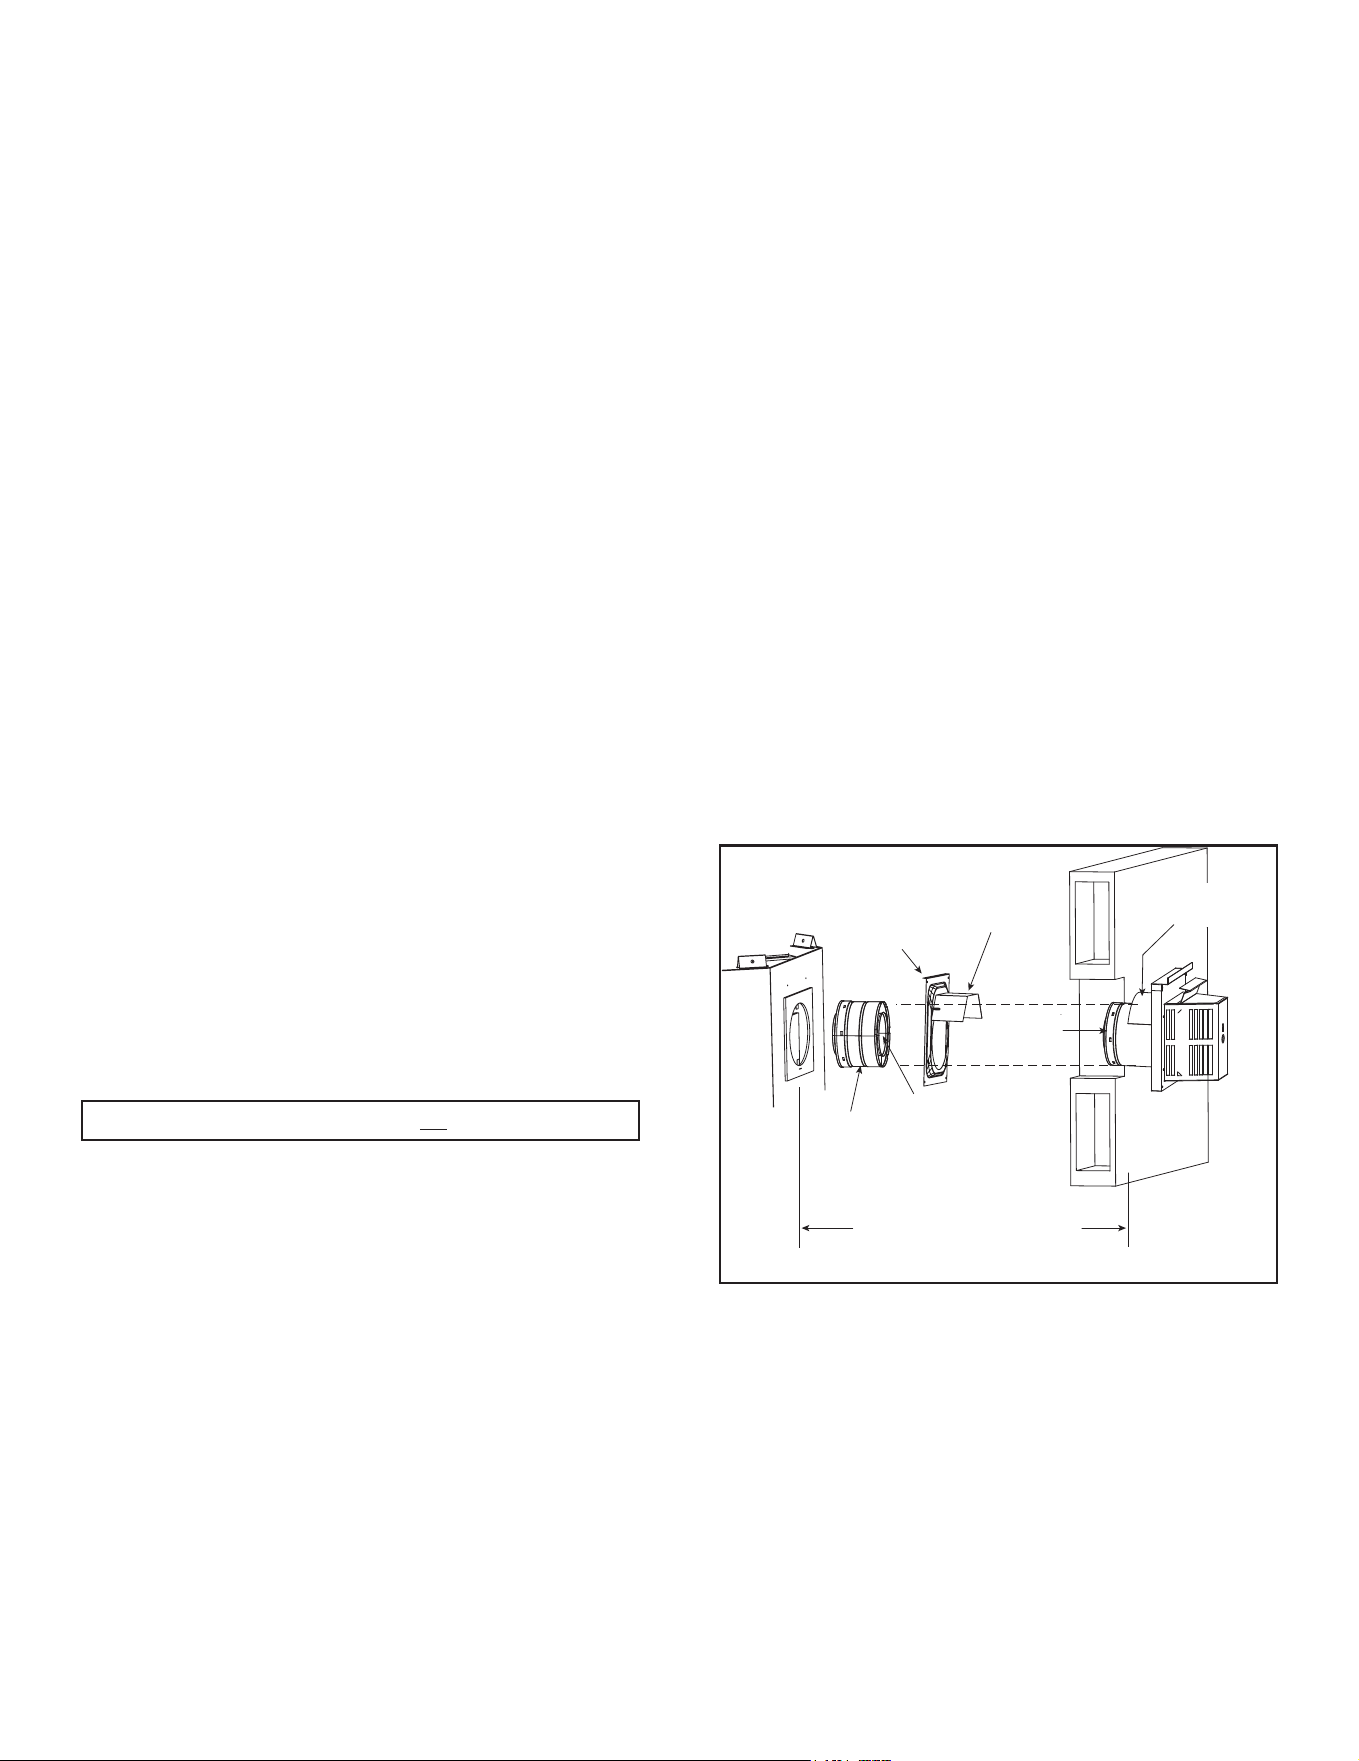
45
Hearth & Home Technologies • DVLINEAR36 Installation Manual • 2569-980 Rev. E • 11/20
Important Notice: Heat shields may not be eld constructed.
F. Horizontal Termination Requirements
Heat Shield Requirements for Horizontal
Termination
WARNING! Risk of Fire! To prevent overheating and re,
heat shields must extend through the entire wall thick-
ness.
• DO NOT remove the heat shields attached to the
wall shield restop and the horizontal termination cap
(shown in Figure 7.12).
• Heat shields must overlap 1-1/2 in. (38 mm) mini-
mum.
There are two sections of the heat shield. One section
is factory-attached to the wall shield restop. The other
section is factory-attached to the cap. See Figure 7.12.
If the wall thickness does not allow the required 1-1/2 in.
(38 mm) heat shield overlap when installed, an extended
heat shield must be used.
• If the wall thickness is less than 4 in./102 mm (DVP)
or 4-3/8 in./ 111 mm (SLP), the heat shields on the cap
and wall shield restop must be trimmed. A minimum
1-1/2 in. (38 mm) overlap MUST be maintained.
• Use an extended heat shield if the nished wall thickness
is greater than 7-1/4 in. (184 mm).
• The extended heat shield may need to be cut to length
maintaining sucient length for a 1-1/2 in. (38 mm)
overlap between heat shields.
• Attach the extended heat shield to either of the existing
heat shields using the screws supplied with the extended
heat shield. Refer to vent components diagrams in the
back of this manual.
• Rest the small leg on the extended heat shield on top
of the pipe section to properly space it from the pipe
section.
Figure 7.12 Venting Through the Wall
Note: When using termination caps with factory-supplied
heat shield attached, no additional wall shield restop is
required on the exterior side of a combustible wall.
Install Horizontal Termination Cap (SLP Pipe)
WARNING! Risk of Fire! The telescoping ue section of
the termination cap MUST be used when connecting vent.
• 1-1/2 (38 mm) minimum overlap of ue telescoping
section is required.
Failure to maintain overlap could cause overheating and
re.
• Vent termination must not be recessed in the wall. Siding
may be brought to the edge of the cap base.
• Flash and seal as appropriate for siding material at
outside edges of cap.
• When installing a horizontal termination cap, follow
the cap location guidelines as prescribed by current
ANSI Z223.1 and CAN/CGA-B149 installation codes
and refer to Section 4 of this manual.
CAUTION! Risk of Burns! Local codes may require in-
stallation of a cap shield to prevent anything or anyone
from touching the hot cap.
INTERIOR
HEAT SHIELD OR
EXTENDED
HEAT SHIELD
WALL SHIELD
FIRESTOP
HEAT SHIELD
1-1/2 IN. (38 MM) MIN.
OVERLAP
SHEATHING
VENT DEPTH FROM BACK OF APPLIANCE TO
OUTSIDE SURFACE OF EXTERIOR WALL
(SEE CHART BELOW)
SLIP SECTION
CAN BE EXTENDED
INNER VENT
OUTER VENT
EXTERIOR
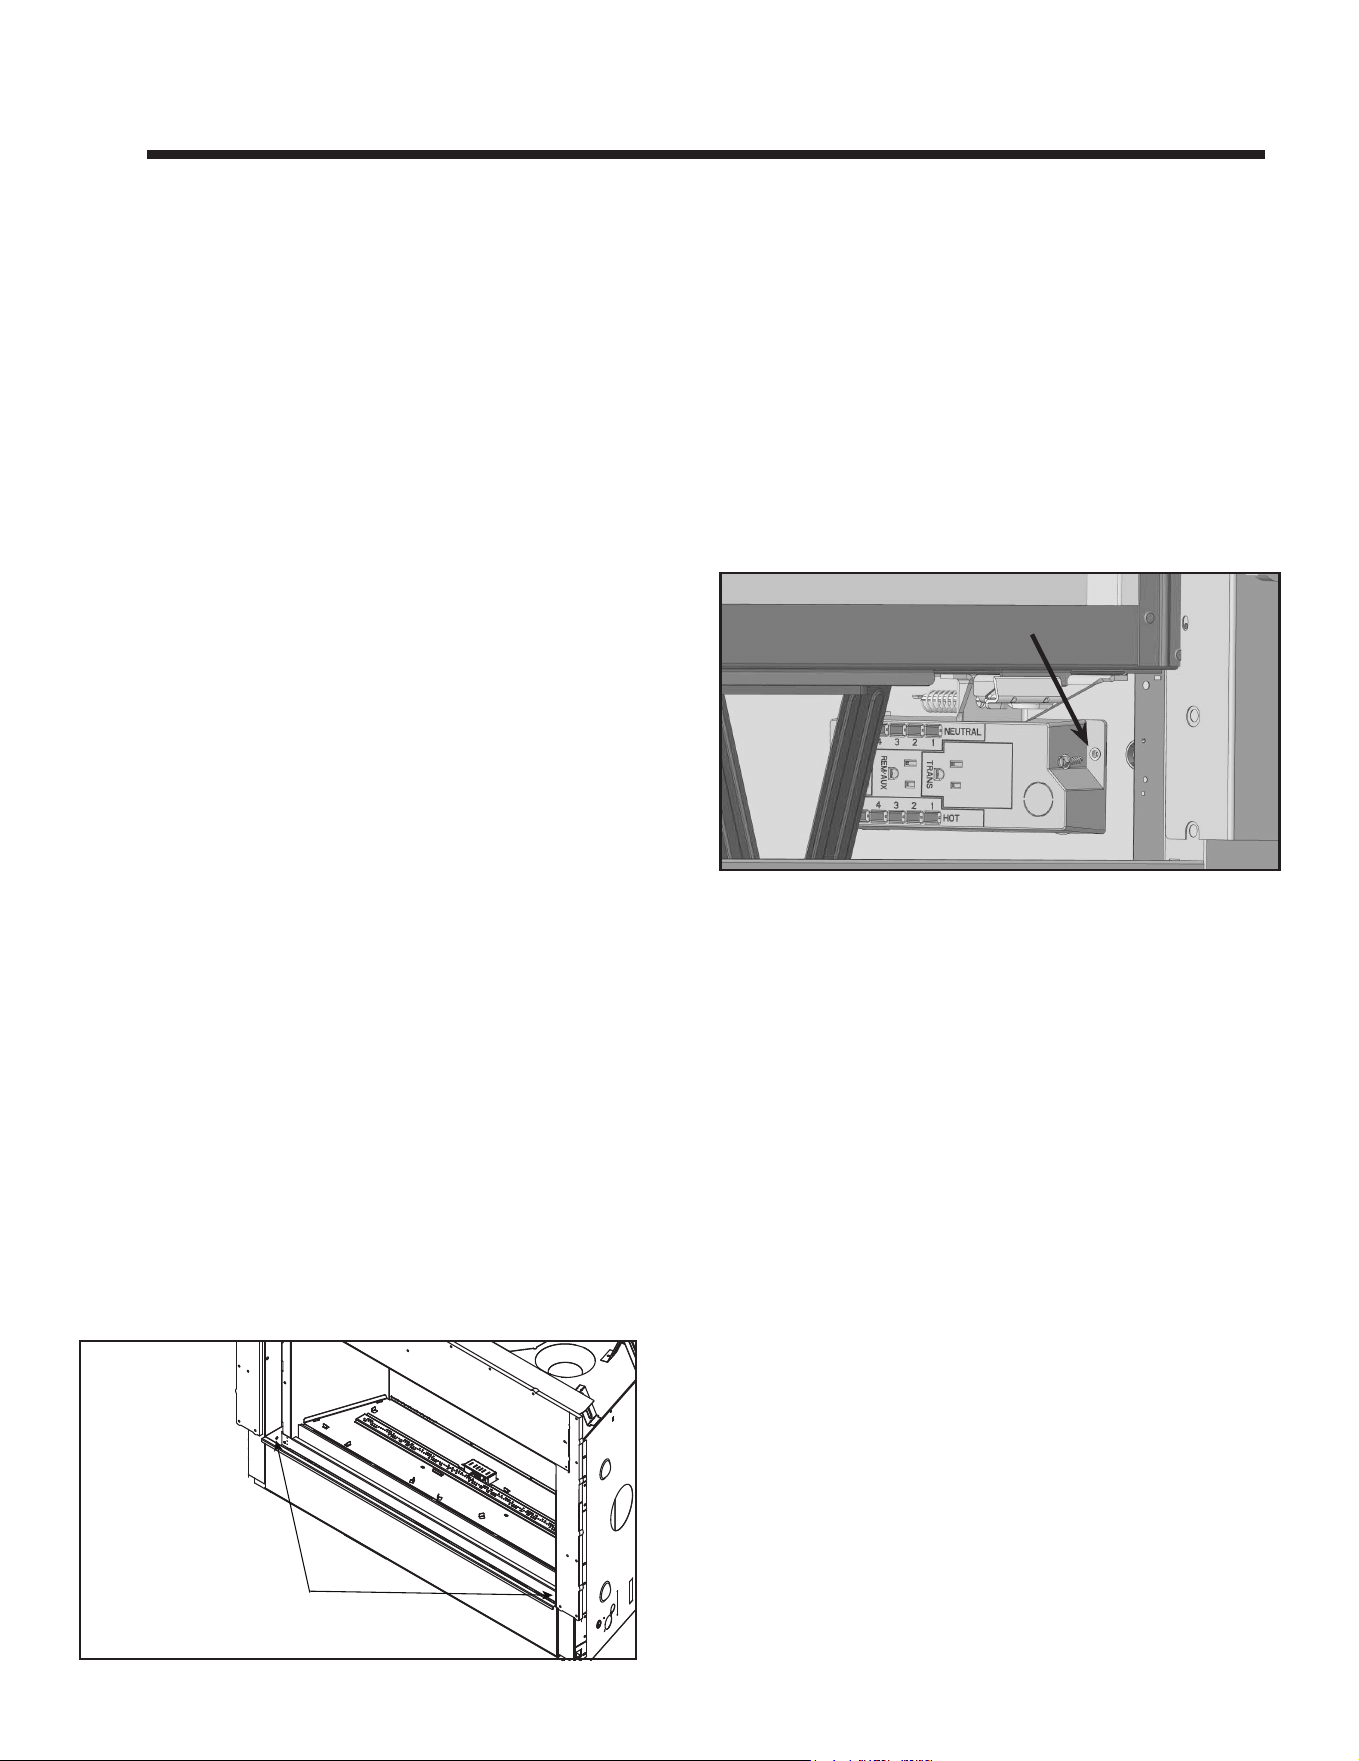
Hearth & Home Technologies • DVLINEAR36 Installation Manual • 2569-980 Rev. E • 11/20
46
A. General Information
WARNING! Risk of Shock! DO NOT wire 110-120 VAC
to the ignition module or to the appliance wall switch.
Incorrect wiring will damage controls.
NOTICE: This appliance must be electrically wired
and grounded in accordance with local codes or, in the
absence of local codes, with National Electric Code
ANSI/NFPA 70-latest edition or the Canadian Electric
Code CSA C22.1.
• Wire the appliance circuit using a minimum 14-2 AWG
with ground to unswitched 110-120 VAC. This is required
for proper operation of the appliance (IntelliFire
®
ignition).
• A 110-120 VAC circuit for this product must be protected
with ground-fault circuit interrupter protection, in
compliance with the applicable electrical codes, when
it is installed in locations such as in bathrooms or near
sinks.
• Low voltage and 110-120 VAC voltage cannot be shared
within the same wall box.
• In some instances, the spark ignition of the replace may
cause intermittent, non-damaging, interference during
the lighting sequence with a TV plugged into the same
circuit. It is recommended that the replace and TV use
dierent circuits to mitigate the interference potential.
If interference is occurring on the same circuit, the use
of surge protectors may help alleviate the interference.
8 8
Electrical Information
Valve/Control Access
Prior to installation of nishing material, the valve/con-
trol cavity is accessible by lifting the lower access panel
slightly to “unhook” it from the appliance and then rotating
the top of the lower access panel downward.
Once the installation of the nishing material is complet-
ed, the top sides of the access panel are to be fastened
with sheet metal screws from the manual bag. See Fig-
ure 8.1
Once nishing material has been installed, access to the
valve/control cavity is limited to access through the re-
box, see Section 9.B.
Figure 8.1 Remove Lower Access Panel
Junction Box Installation
If the box is being wired from the INSIDE of the appliance:
The junction box is secured to the replace outer wrap.
Remove one screw. See Figure 8.2.
• Pull the electrical wires from outside the appliance through
the opening into the valve compartment and secure wires
with a Romex connector. See Figure 8.3.
• Make all necessary wire connections to the junction box/
receptacle and reattach the junction box/receptacle to
the outer shell.
Figure 8.2 Junction Box Detail
REMOVE ONE SCREW
BOTTOM PANEL SCREW LOCATIONS
LOWER ACCESS PANEL
NOTE: Appliance shown
without glass installed.
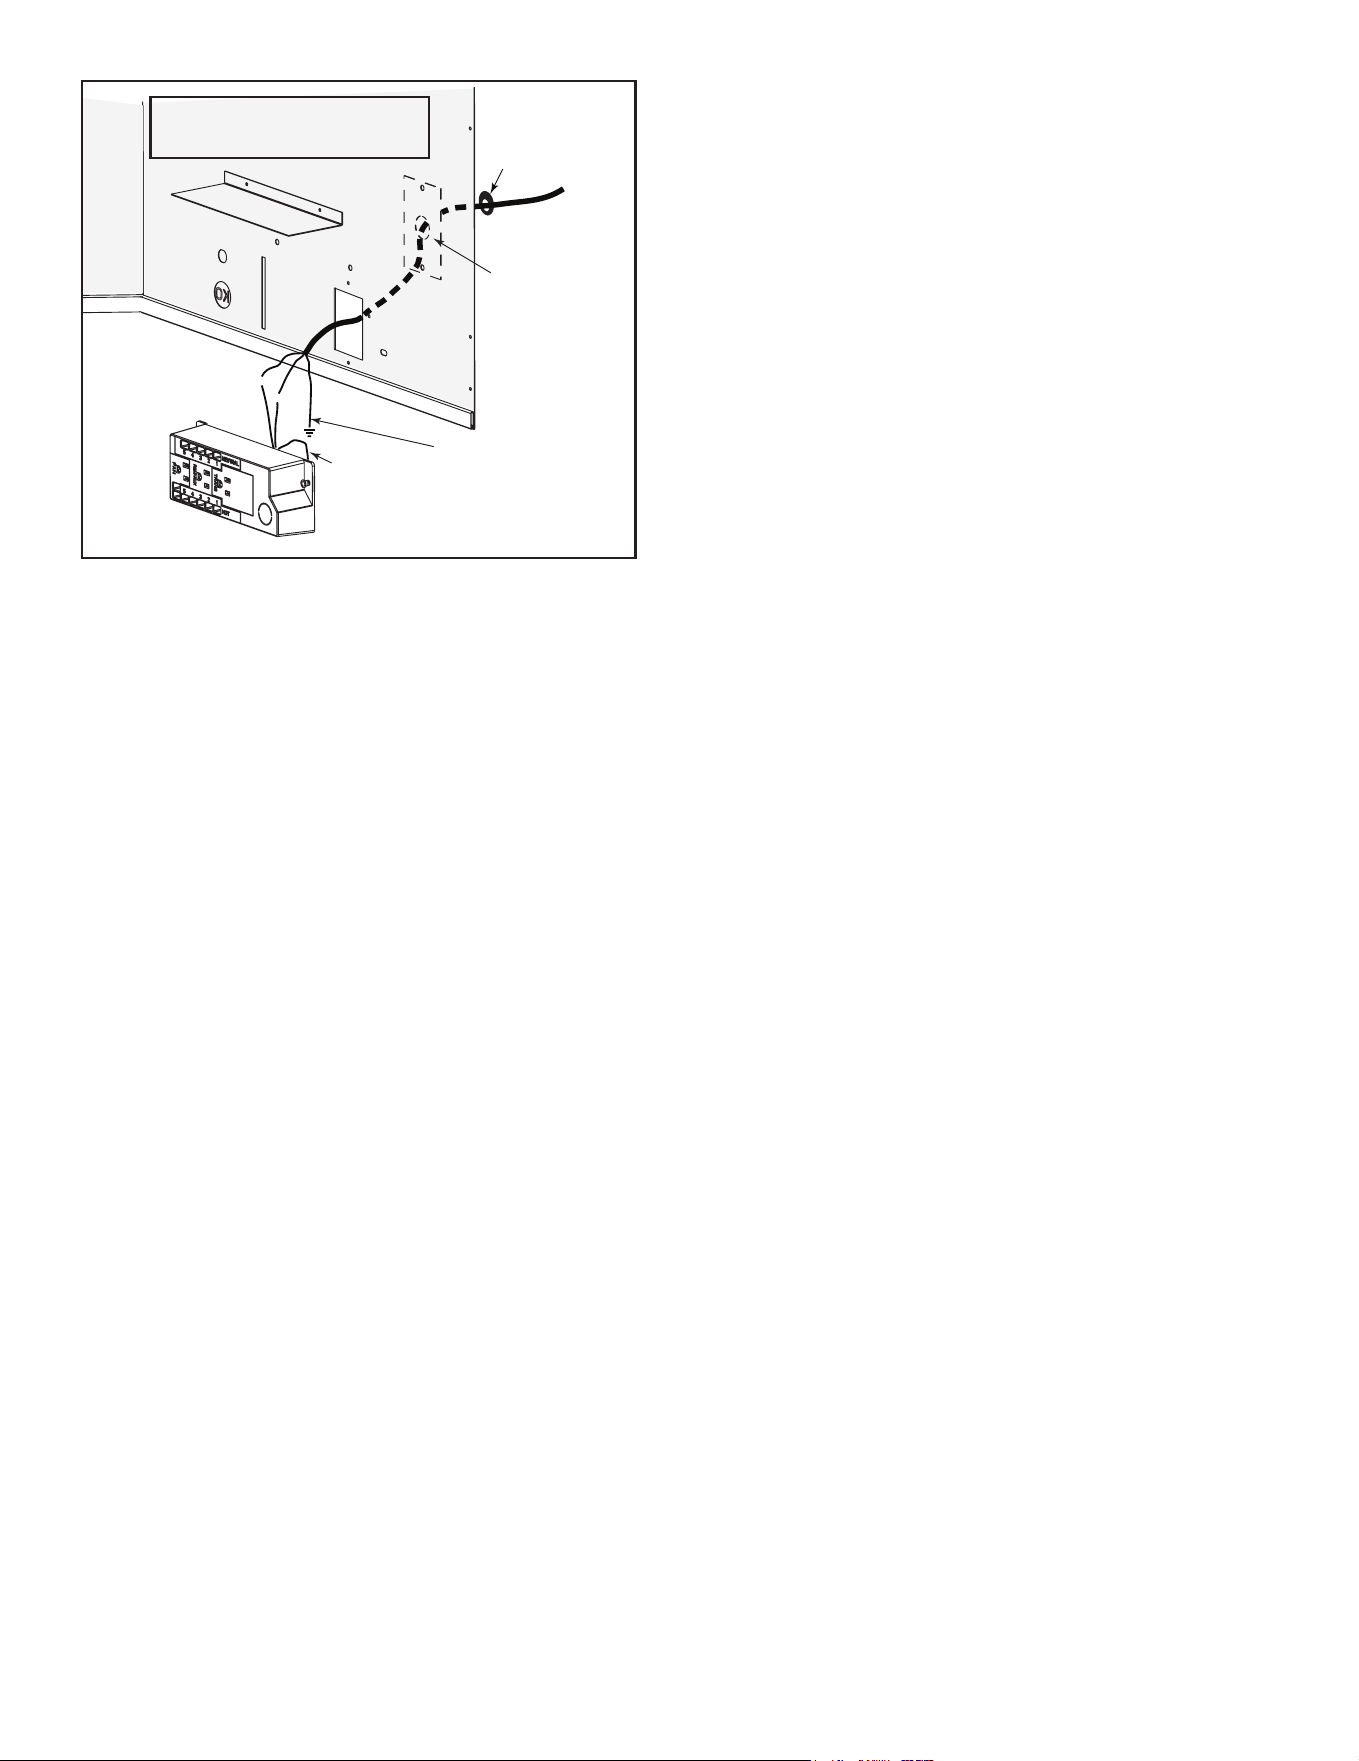
47
Hearth & Home Technologies • DVLINEAR36 Installation Manual • 2569-980 Rev. E • 11/20
Accessories Requirements
• This appliance may be used with a wall switch, wall
mounted thermostat and/or a remote control.
Wiring for optional Hearth & Home Technologies approved
accessories should be done now to avoid reconstruction.
Follow instructions that come with those accessories.
Electrical Service and Repair
WARNING! Risk of Shock! Label all wires prior to dis-
connection when servicing controls. Wiring errors could
cause improper and dangerous operation. Verify proper
operation after servicing.
WARNING! Risk of Shock! Replace damaged wire with
type 105º C rated wire. Wire must have high temperature
insulation.
WHT
WHT
BLK
BLK
GRN wire
inside box
Copper
ground attached
to GRN screw with
GRN wire
14-2 AWG
Cover Plate
outside firebox
Romex
Connector
NOTICE: DO NOT wire
110-120 VAC to wall switch.
Figure 8.3 Junction Box Detail (Generic Model Shown)
• Wire the appliance junction box to 110-120 VAC for
proper operation of the appliance.
WARNING! Risk of Shock or Explosion! DO NOT wire
IPI controlled appliance junction box to a switched circuit.
Incorrect wiring will override IPI safety lockout.
• Refer to Figure 8.4, IntelliFire Pilot Ignition (IPI) Wiring
Diagram.
• This appliance is equipped with an IntelliFire control valve
which operates on a 3 volt system.
• Plug the 3-volt AC transformer into the appliance junction
box to supply power to the unit OR install two D cell
batteries (not included) into the battery pack before use.
NOTICE: Batteries should not be placed in the battery
pack while using the transformer. Remove batteries before
using the transformer, and unplug the transformer before
installing the batteries. Batteries tend to corrode over time.
B. Wiring Requirements
IntelliFire
®
Ignition System Wiring
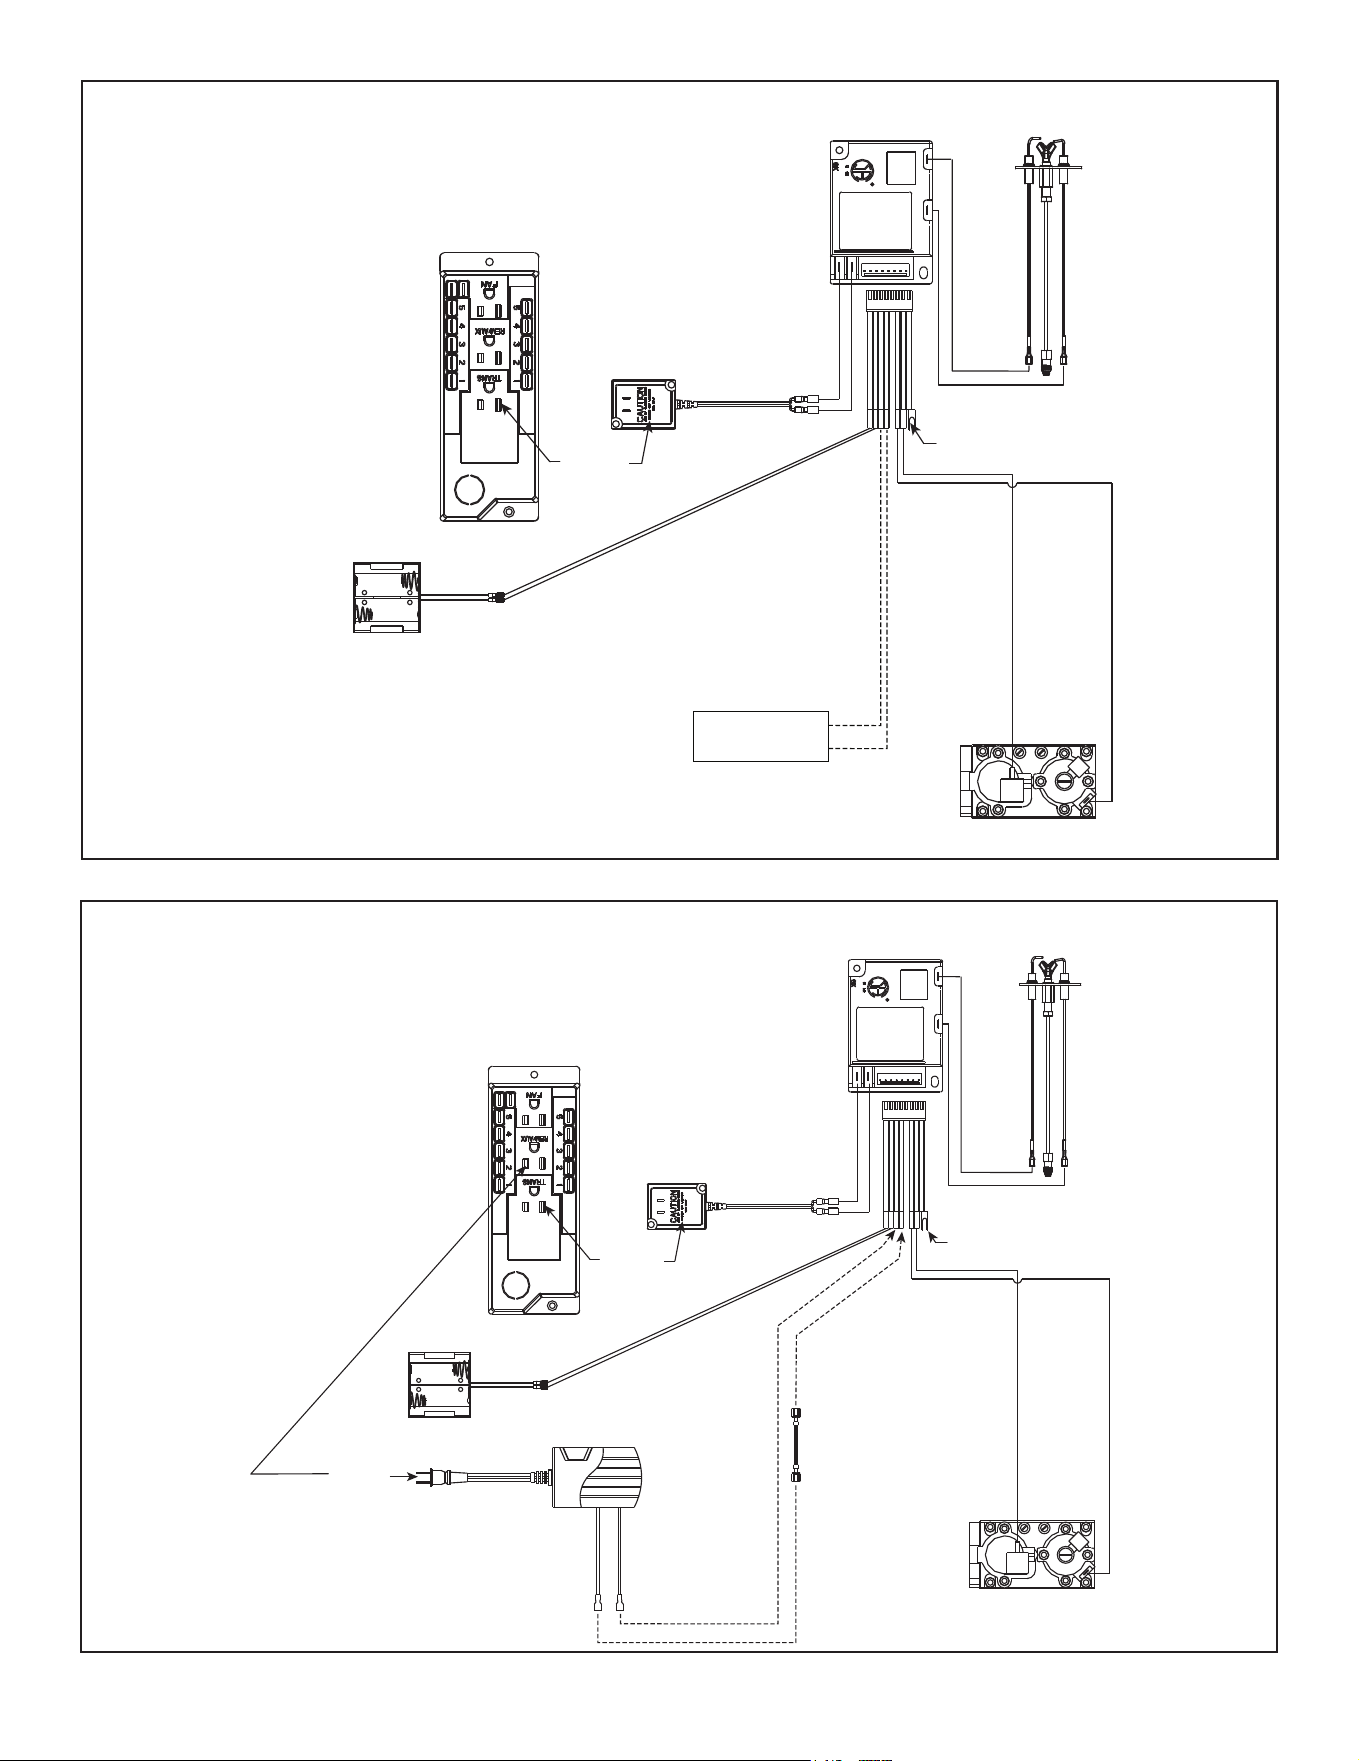
Hearth & Home Technologies • DVLINEAR36 Installation Manual • 2569-980 Rev. E • 11/20
48
Figure 8.4 IntelliFire Wiring Diagram - Standard
Figure 8.5 IntelliFire Wiring Diagram with Remote
TRANSFORMER
WALL SWITCH
OR THERMOSTAT
3 VAC
PLUG IN
BLACK
RED
BATTERY PACK
ORANGE
TO BROWN
TO BROWN
GREEN
VALVE
GROUND TO
FIREPLACE
CHASSIS
WHITE
ORANGE
IGNITION
MODULE 3 VAC
INTERMITTENT
PILOT IGNITOR
HOT
NEUTRAL
I
S
JUNCTION BOX
(110-120 VAC)
TRANSFORMER
3 VAC
PLUG IN
PLUG IN
BLACK
RED
BATTERY PACK
REMOTE
WIRES
(TO BROWN)
ORANGE
GREEN
VALVE
GROUND TO
FIREPLACE
CHASSIS
HOT
NEUTRAL
WHITE
ORANGE
IGNITION
MODULE 3 VAC
INTERMITTENT
PILOT IGNITOR
I
S
JUNCTION BOX
(110-120 VAC)
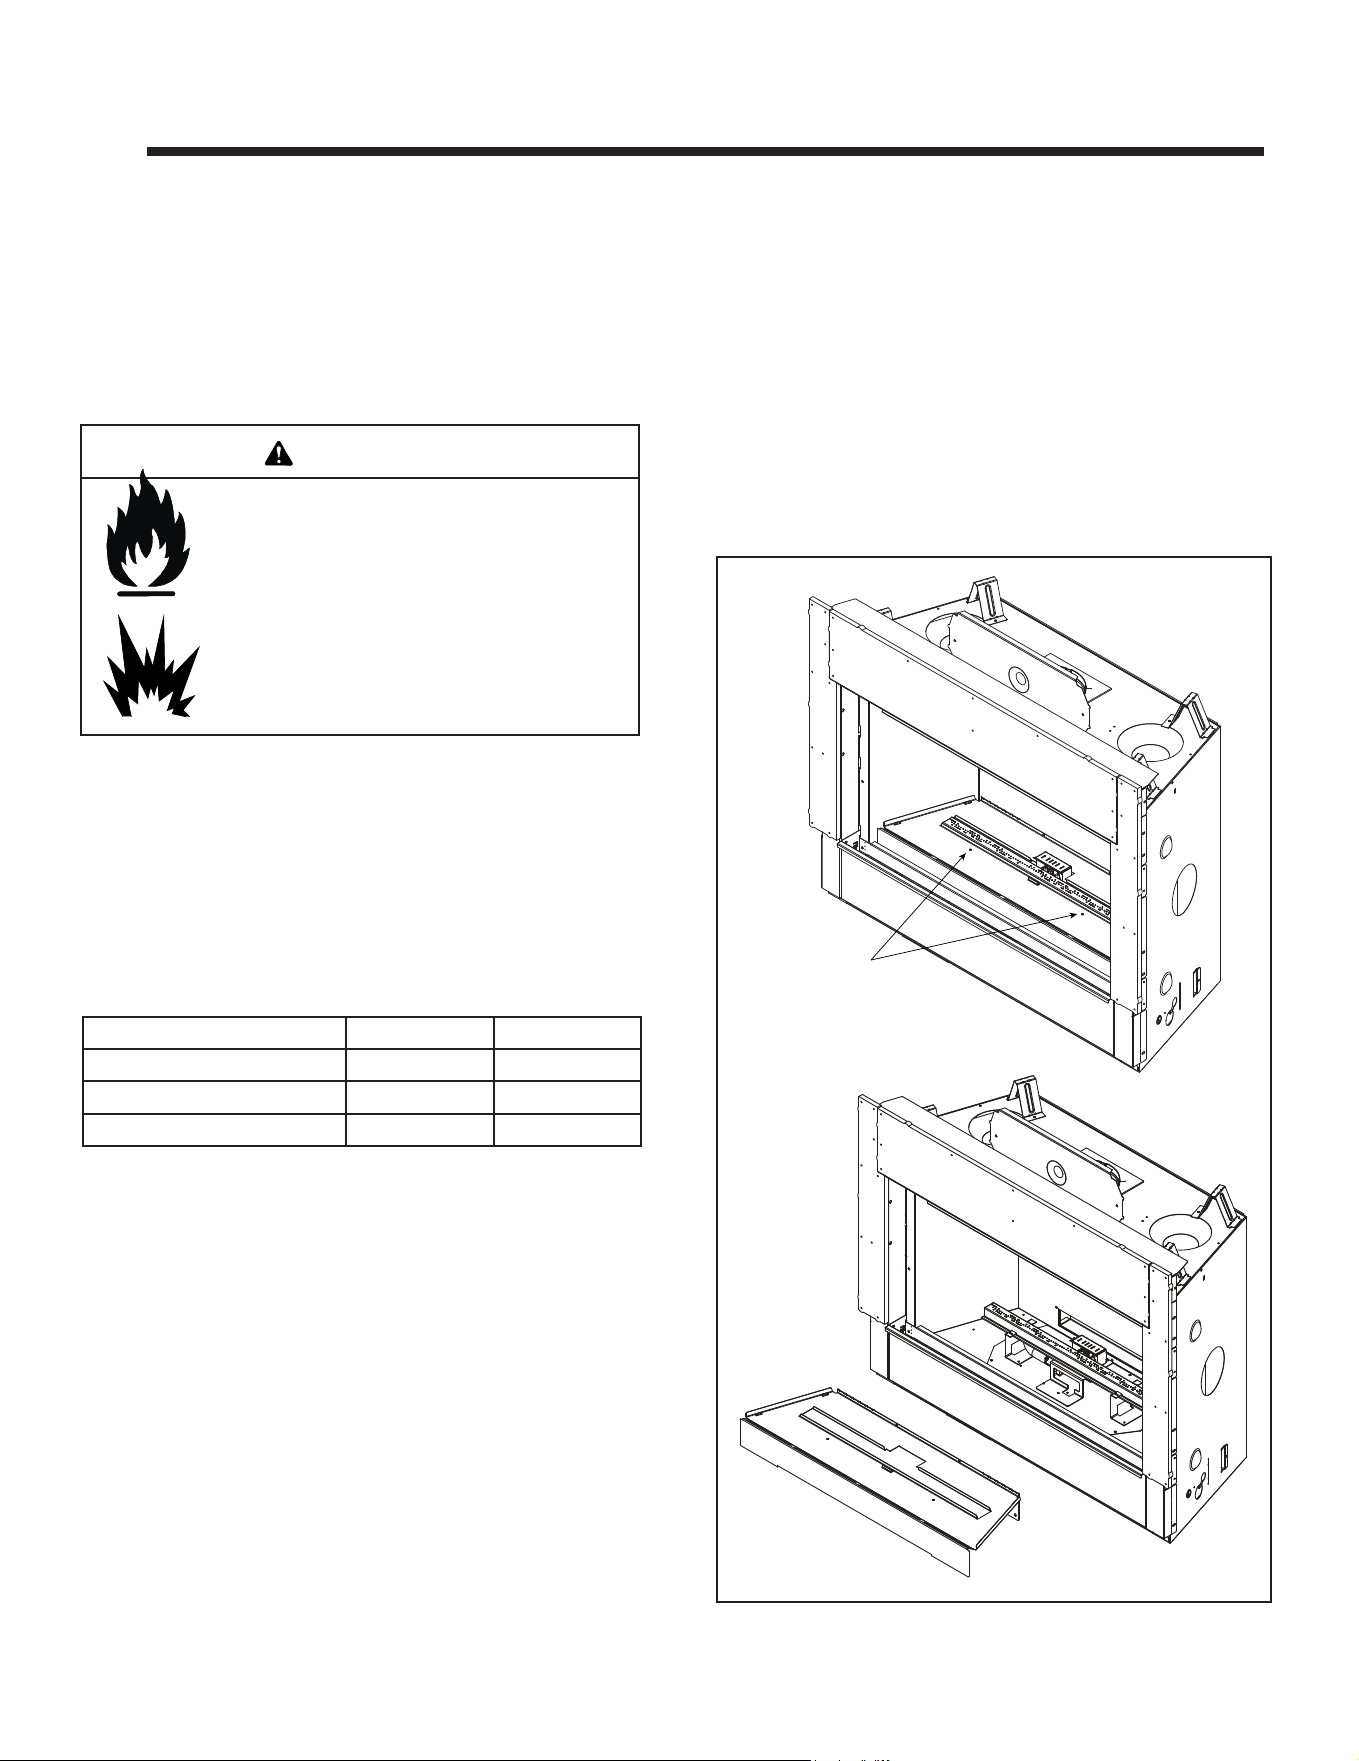
49
Hearth & Home Technologies • DVLINEAR36 Installation Manual • 2569-980 Rev. E • 11/20
A. Fuel Conversion
• Make sure the appliance is compatible with available gas
types.
• Conversions must be made by a qualified service
technician using Hearth & Home Technologies specied
and approved parts.
B. Gas Pressure
• Verify inlet pressures. Verify minimum pressures when
other household gas appliances are operating.
• Install regulator upstream of valve if line pressure is
greater than 1/2 psig.
9 9
Gas Information
Gas Pressure Natural Gas Propane
Minimum inlet pressure 5.0 in. w.c. 11.0 in. w.c.
Maximum inlet pressure 10.0 in. w.c. 13.0 in. w.c.
Manifold pressure 3.5 in. w.c. 10.0 in. w.c.
Note: Have the gas supply line installed in accordance with
local codes, if any. If not, follow ANSI Z223.1. Installation
should be done by a qualied installer approved and/or
licensed as required by the locality. (In the Commonwealth
of Massachusetts installation must be performed by a
licensed plumber or gas tter).
Note: A listed (and Commonwealth of Massachusetts ap-
proved) 1/2 in. (13 mm) T-handle manual shut-o valve
and exible gas connector are connected to the 1/2 in. (13
mm) control valve inlet.
• If substituting for these components, please consult
local codes for compliance.
Fire Risk.
Risk of Fire! Risk of Explosion!
Incorrect pressure will damage valve.
• Isolate gas supply piping BEFORE pressure
testing gas line at test pressures above 1/2
psig.
• Close the manual shuto valve BEFORE
pressure testing gas line at test pressures
equal to or less than 1/2 psig.
WARNING
• Optimum appliance performance requires proper input
pressures.
• Gas line sizing requirements will be determined in ANSI
Z223.1 National Fuel Gas Code in the USA and CAN/
CGA B149 in Canada.
• Pressure requirements when in operation are:
REMOVE 2 SCREWS
Figure 9.1 Basepan Removal
Access Through the Valve Assembly
(For Service/Conversion)
1. Locate and remove the two screws that secure the
basepan to the appliance. See Figure 9.1. Remove
basepan. Retain screws.
Access Through the Control Cavity
(For Service/Conversion)
The lower access cover panel pivots down if nishing
material has not been previously installed. See Section
8.A for removal instructions.
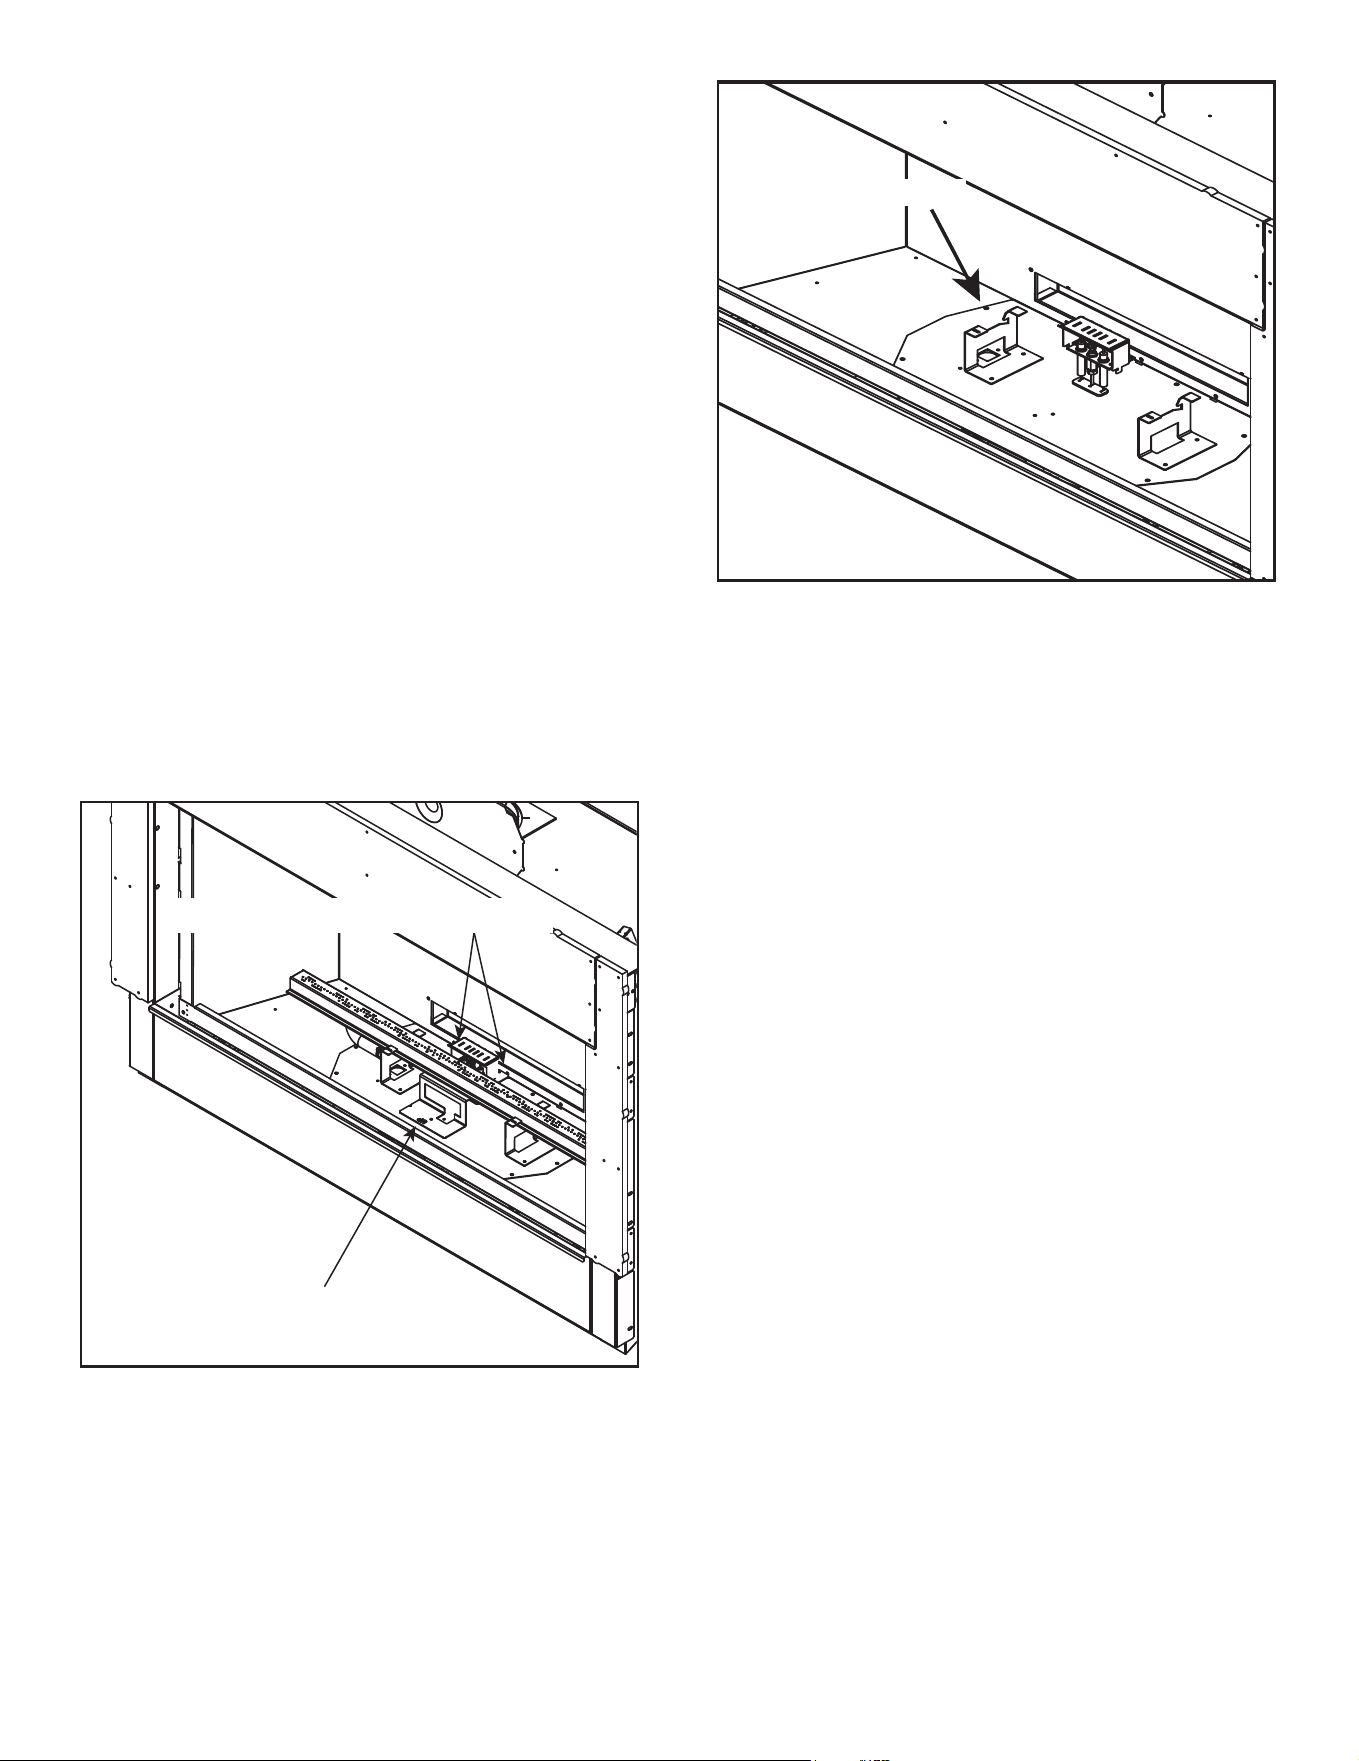
Hearth & Home Technologies • DVLINEAR36 Installation Manual • 2569-980 Rev. E • 11/20
50
Figure 9.3 Remove Valve Plate
Figure 9.2 Burner Removal
Valve Pressure Taps
The pressure taps are accessible by removing the lower
panel prior to nishing material installation. There is
limited access to the pressure taps after nishing material
installation. Remove glass assembly and utilize an
appropriate sized screwdriver.
Note: Install the gas supply line in accordance with local
codes, if any. If not, follow ANSI Z223.1. Installation
should be done by a qualied installer approved and/or
licensed as required by the locality. (In the Commonwealth
of Massachusetts installation must be performed by a
licensed plumber or gas tter).
Note: A listed (and Commonwealth of Massachusetts ap-
proved) 1/2 in. (13 mm) T-handle manual shut-o valve
and exible gas connector are connected to the 1/2 in. (13
mm) control valve inlet.
• If substituting for these components, please consult
local codes for compliance.
2. Remove the two screws that secure the pilot shield to
the burner bracket and remove the two screws that
secure the pilot assembly to the burner bracket.
3. Remove the screw that secures the burner bracket
to the valve plate. See Figure 9.2. Gently push the
pilot assembly backwards to allow for the burner to be
removed.
4. Slide burner assembly to the left to disengage the
burner tube from the orice. Remove the burner from
the appliance.
5. Remove the nine screws around the perimeter of the
valve plate that secure valve plate to the appliance.
See Figure 9.3.
6. Lift up on the plate assembly. Ensure the gas ball
valve is turned o. Disconnect the ball valve assembly
from the gas valve by loosening the compression tting
located on the left side of the gas valve.
7. Prior to removing valve assembly for service,
disconnect the pilot wires from the ignition module.
8. Upon completion of service, reverse steps 1-7. If the
valve plate gasket is damaged, replace the gasket
prior to reinstallation of valve plate assembly.
REMOVE 9 SCREWS
REMOVE BURNER SCREW
REMOVE PILOT SCREWS
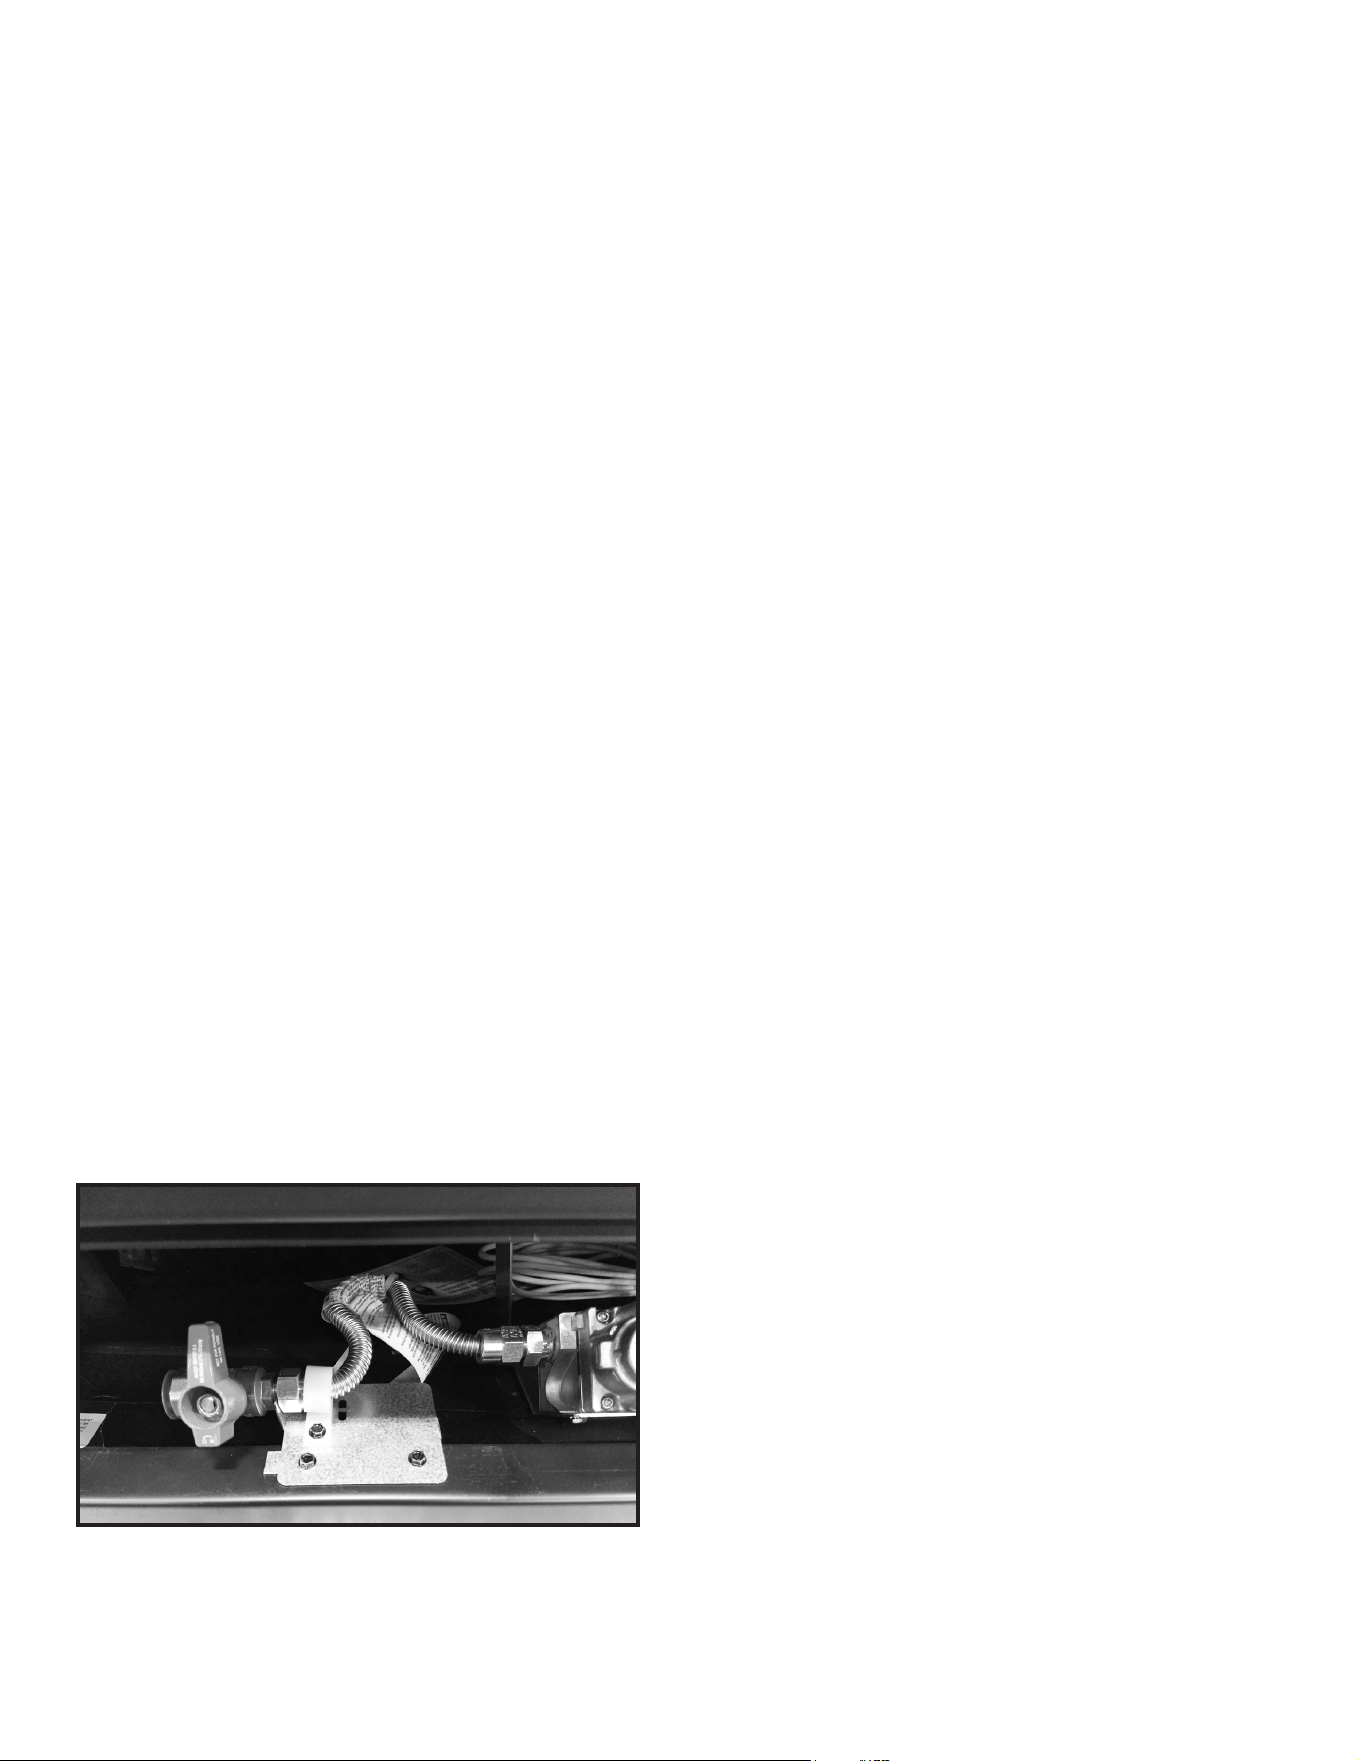
51
Hearth & Home Technologies • DVLINEAR36 Installation Manual • 2569-980 Rev. E • 11/20
C. Gas Connection
• Refer to Section 3 for location of gas line access in
appliance.
• Gas line may be run through knockout(s) provided.
• The gap between supply piping and gas access hole
may be sealed with caulk or aluminum foil tape with a
minimum of 300 ºF continuous exposure rating or stued
with non-combustible, unfaced insulation to prevent cold
air inltration.
• Ensure that gas line does not come in contact with outer
wrap of the appliance. Follow local codes.
• Pipe incoming gas line into valve compartment.
D. High Altitude Installations
NOTICE: If the heating value of the gas has been reduced,
these rules do not apply. Check with your local gas utility
or authorities having jurisdiction.
When installing above 2000 feet elevation:
• In the USA: Reduce input rate 4% for each 1000 feet
above 2000 feet.
• In CANADA: Input ratings are certied without a
reduction of input rate for elevations up to 4500 feet
(1370 m)above sea level. Please consult provincial and/
or local authorities having jurisdiction for installations at
elevations above 4500 feet (1370 m).
Check with your local gas utility to determine proper
orice size.
Figure 9.4 Incoming Gas Line Location
• Connect incoming gas line to the 1/2 in. (13 mm) NPT
connection on manual shuto valve.
WARNING! Risk of Fire or Explosion! Support control
when attaching pipe to prevent bending gas line.
WARNING! Risk of Fire or Explosion! Gas build-up
during line purge could ignite.
• A small amount of air will be in the gas supply lines.
• Ensure adequate ventilation.
• Ensure there are no ignition sources such as sparks or
open ames.
Light the appliance. It will take a short time for air to purge
from lines. When purging is complete the appliance will
light and operate normally.
WARNING! Risk of Fire, Explosion or Asphyxiation!
Check all ttings and connections with a non-corrosive
commercially available leak-check solution. DO NOT use
open ame. Fittings and connections could have loos-
ened during shipping and handling.
Note: It is important to plumb the incoming gas line to
the location specied inside the appliance. This specic
location allows for future serviceability of the appliance.
See Figure 9.4
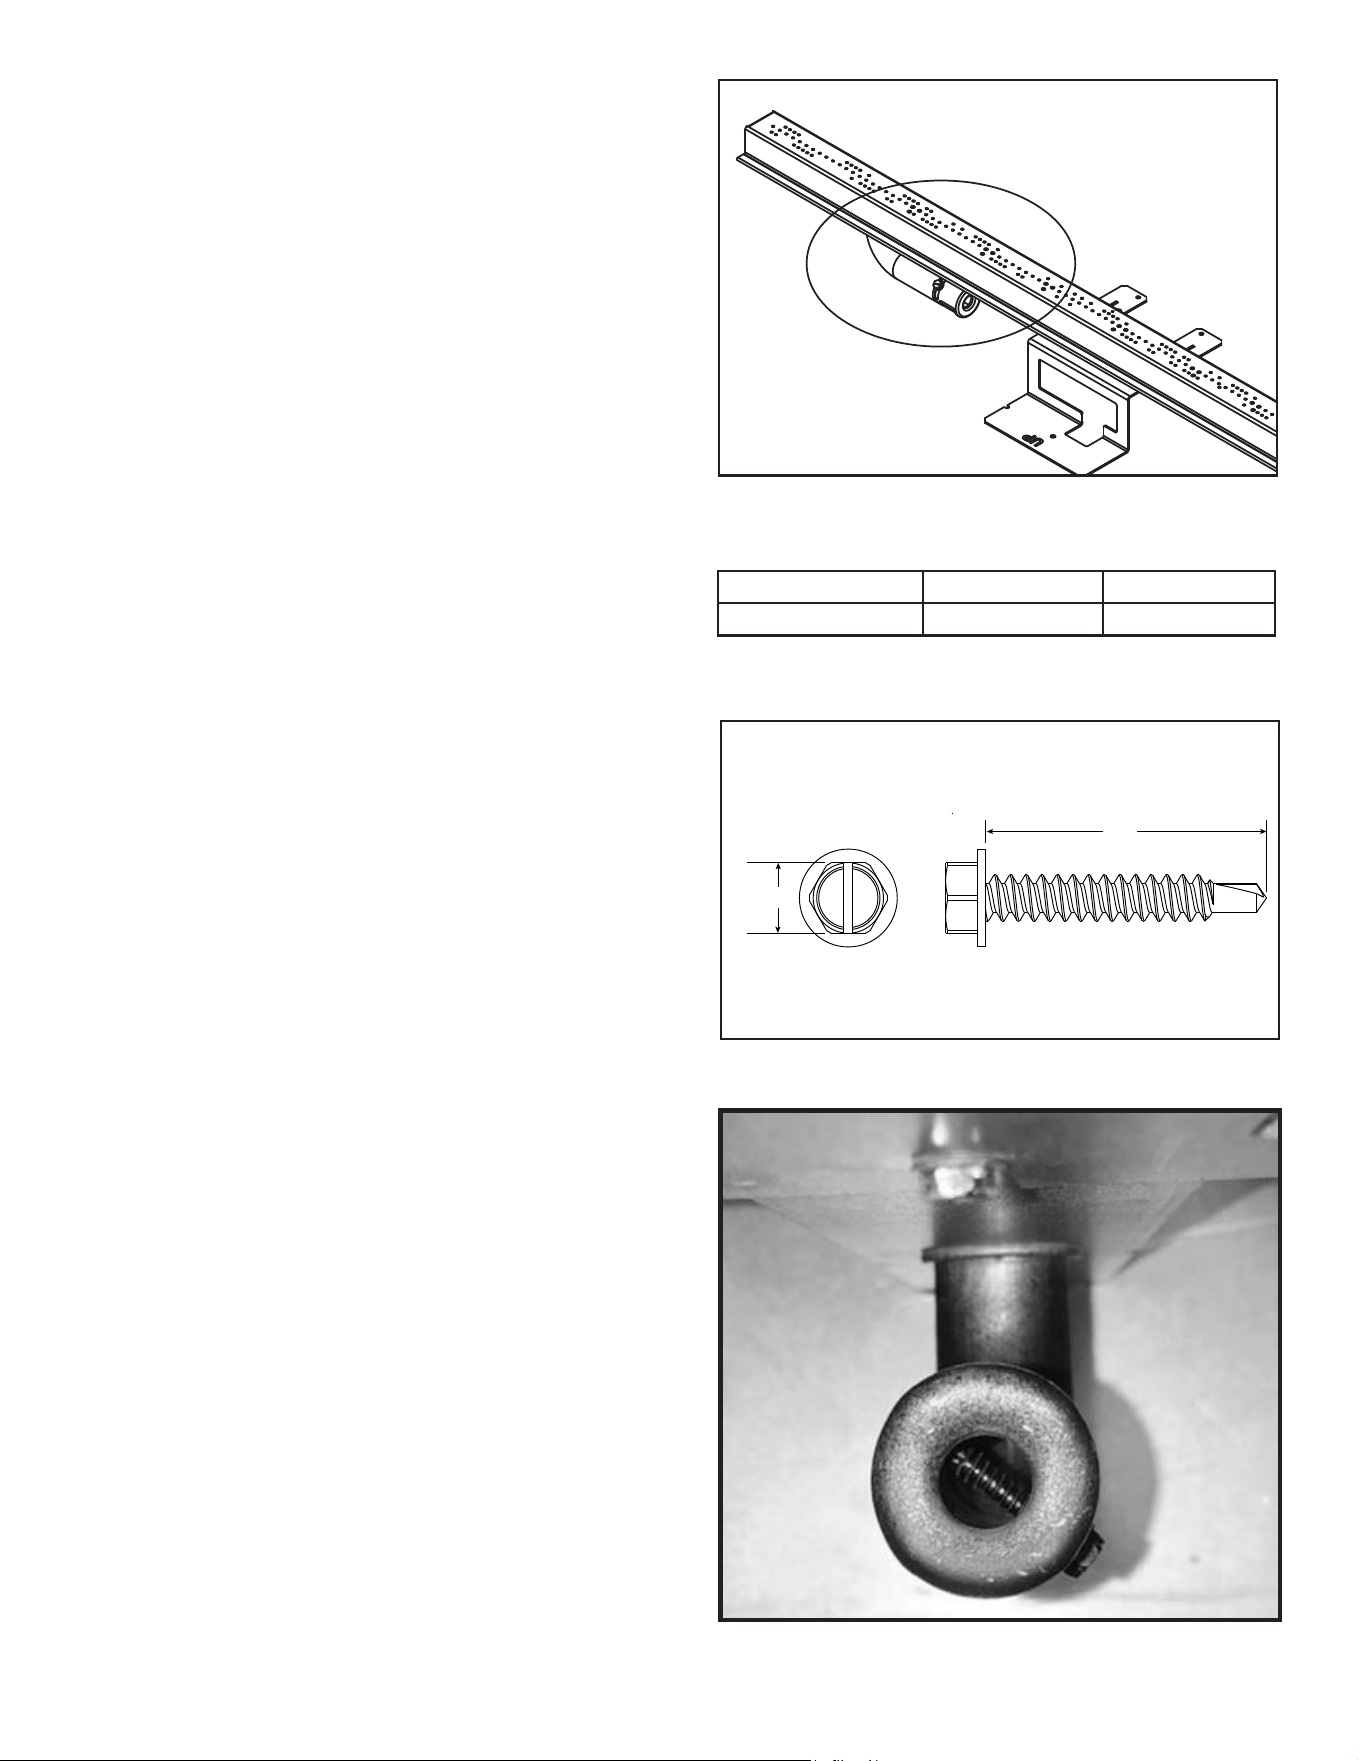
Hearth & Home Technologies • DVLINEAR36 Installation Manual • 2569-980 Rev. E • 11/20
52
Shutter Setting Verication / Flame Appearance
• After 15 minutes, the ames will be a yellow/blue mix.
The front ames may be blue at this time.
• After 30 minutes, the ames should be yellow with
some blue ames near the burner ports.
• After 1 hour, the ame will be at its maximum maturity.
NOTICE: Flames should not appear orange or stretch
to the top of the rebox. If ames are dark orange with
dark, smoky tips, provide more primary air to the burner
by opening the air shutter accordingly.
Figure 9.5 Air Shutter Location
Air Shutter Settings
NG Propane
DVLINEAR36 1/16 in. 1/16 in.
E. Air Shutter Setting
WARNING! Risk of Explosion or Delayed Ignition!
Improperly adjusted air shutter could cause soot buildup.
NOTICE: If sooting occurs, provide more air by opening
the air shutter.
Air shutter settings should be adjusted by a qualied ser-
vice technician at the time of installation. The air shut-
ter is set at the factory for a typical horizontal termination
through a 2 X 6 wall:
90 degree elbow o top with 9 inches horizontal.
Adjust air shutter for dierent vent runs. See Figure 9.5.
• Loosen the 1/4 inch screw.
• Twist the air shutter to adjust.
• Air shutter may be opened for longer horizontal vent runs.
• Tighten the 1/4 inch screw.
Flame Appearance on Extended Vertical Runs
Flame appearance can be improved on installations with
extended vertical runs by installing a mixing screw into
the adjustable shutter on burner neck.
1. With the shutter installed, replace the 1/4 inch screw
with the mixing screw supplied in manual bag and
tighten most of the way. See Figure 9.6.
2. Twist adjustable shutter to the fully closed position and
nish tightening the screw. See Figure 9.7.
Figure 9.6 One Inch Mixing Screw
Figure 9.7 Mixing Screw Installed
1 IN.
1/4 IN.
53
Hearth & Home Technologies • DVLINEAR36 Installation Manual • 2569-980 Rev. E • 11/20
10 10
Finishing
A. Facing Material
NOTICE: Surface temperatures around the appliance will
become warm while the appliance is in operation. Ensure
finishing materials used for all surfaces (floor, walls,
mantels, etc.) will withstand temperatures up to 190°F.
Risk of Fire!
DO NOT apply combustible materials beyond the min-
imum clearances. Comply with all minimum clearanc-
es to combustibles as specied in this manual. Ma-
terials overlapping into non-combustible zones could
ignite and will interfere with air ow through decorative
barrier fronts.
• Metal front of appliance may be covered with non-
combustible materials only.
• Facing and/or nishing materials must not interfere
with air ow through decorative barrier fronts, removal
of decorative barrier fronts or access for service.
• Facing and/or finishing materials must never
overhang into the glass opening.
• Observe all clearances when applying combustible
materials.
• Seal gaps between the nished wall and appliance
top and sides using a 300 ºF minimum sealant. Refer
to Figure 10.1 and Figure 10.2.
WARNING
WARNING! Risk of Fire! Comply with all minimum clear-
ances to combustibles as specied. Framing closer than the
minimums listed must be constructed entirely of noncom-
bustible materials (i.e., steel studs, concrete board, etc.)
The appliance is designed to accept 1/2 in. wall sheathing
materials such as drywall, plywood, wood composites, or
non-combustible materials.
The factory-supplied non-combustible board must be
used in all installations. It must be directly attached to
structural framing adjacent to the appliance. Screw fas-
teners should be installed in the pilot holes provided in
the outer perimeter of the non-combustible board. See
Figure 10.1 and Figure 10.2.
The factory-supplied board is designed such that its edg-
es will be at the approximate center of the adjacent fram-
ing, assuming it is 1-1/2 in. nominal thickness. This will
allow the wallboard joints to occur on the center of the
framing where the panels can be fastened properly. If the
framing thickness is less than 1-1/2 in. nominal, such as
with formed steel systems, then it may be necessary to
adjust the adjacent framing dimensions so that the non-
combustible board and wallboard joints are centered on
the framing.
Non-Combustible Materials Specication
Material which will not ignite and burn. Such materials are
those consisting entirely of steel, iron, brick, tile, concrete,
slate, glass or plasters, or any combination thereof.
Materials that are reported as passing ASTM E 136,
Standard Test Method for Behavior of Materials in a
Vertical Tube Furnace at 750 ºC.
Finishing Instructions
It is important to follow the framing and nishing instruc-
tions to ensure proper placement of replace into the sur-
rounding framing/nishing materials.
Wall sheathing materials 1/2 in. thick are specied in
this installation manual to properly align with the factory-
installed non-combustible material.
WARNING! Risk of Fire! DO NOT remove the factory-
installed non-combustible board or cover it with combus-
tible material, such as:
• Drywall (gypsum board)
• Plywood
• Materials that do not meet the ASTM E 136 Non-
combustibility standard (below).
Removal of factory-installed, non-combustible board and/
or use of materials not meeting the ASTM E 136 standard
may cause re.
• Facing and/or nishing materials must not interfere with
air ow through decorative barrier fronts.
• Facing and/or nishing materials must never overhang
into the glass opening.
• Observe all clearances when applying combustible
materials.
WARNING! Risk of Fire! DO NOT apply combustible
materials beyond the minimum clearances. Comply with
all minimum clearances to combustibles as specied in
this manual. Overlapping materials could ignite and will
interfere with proper operation of decorative barrier fronts.
WARNING! Risk of Fire! DO NOT install drywall or oth-
er combustible materials over the factory-installed non-
combustible board. Overlapping materials could ignite.
Decorative facing material thickness is measured from
the face of the factory-installed non-combustible board.
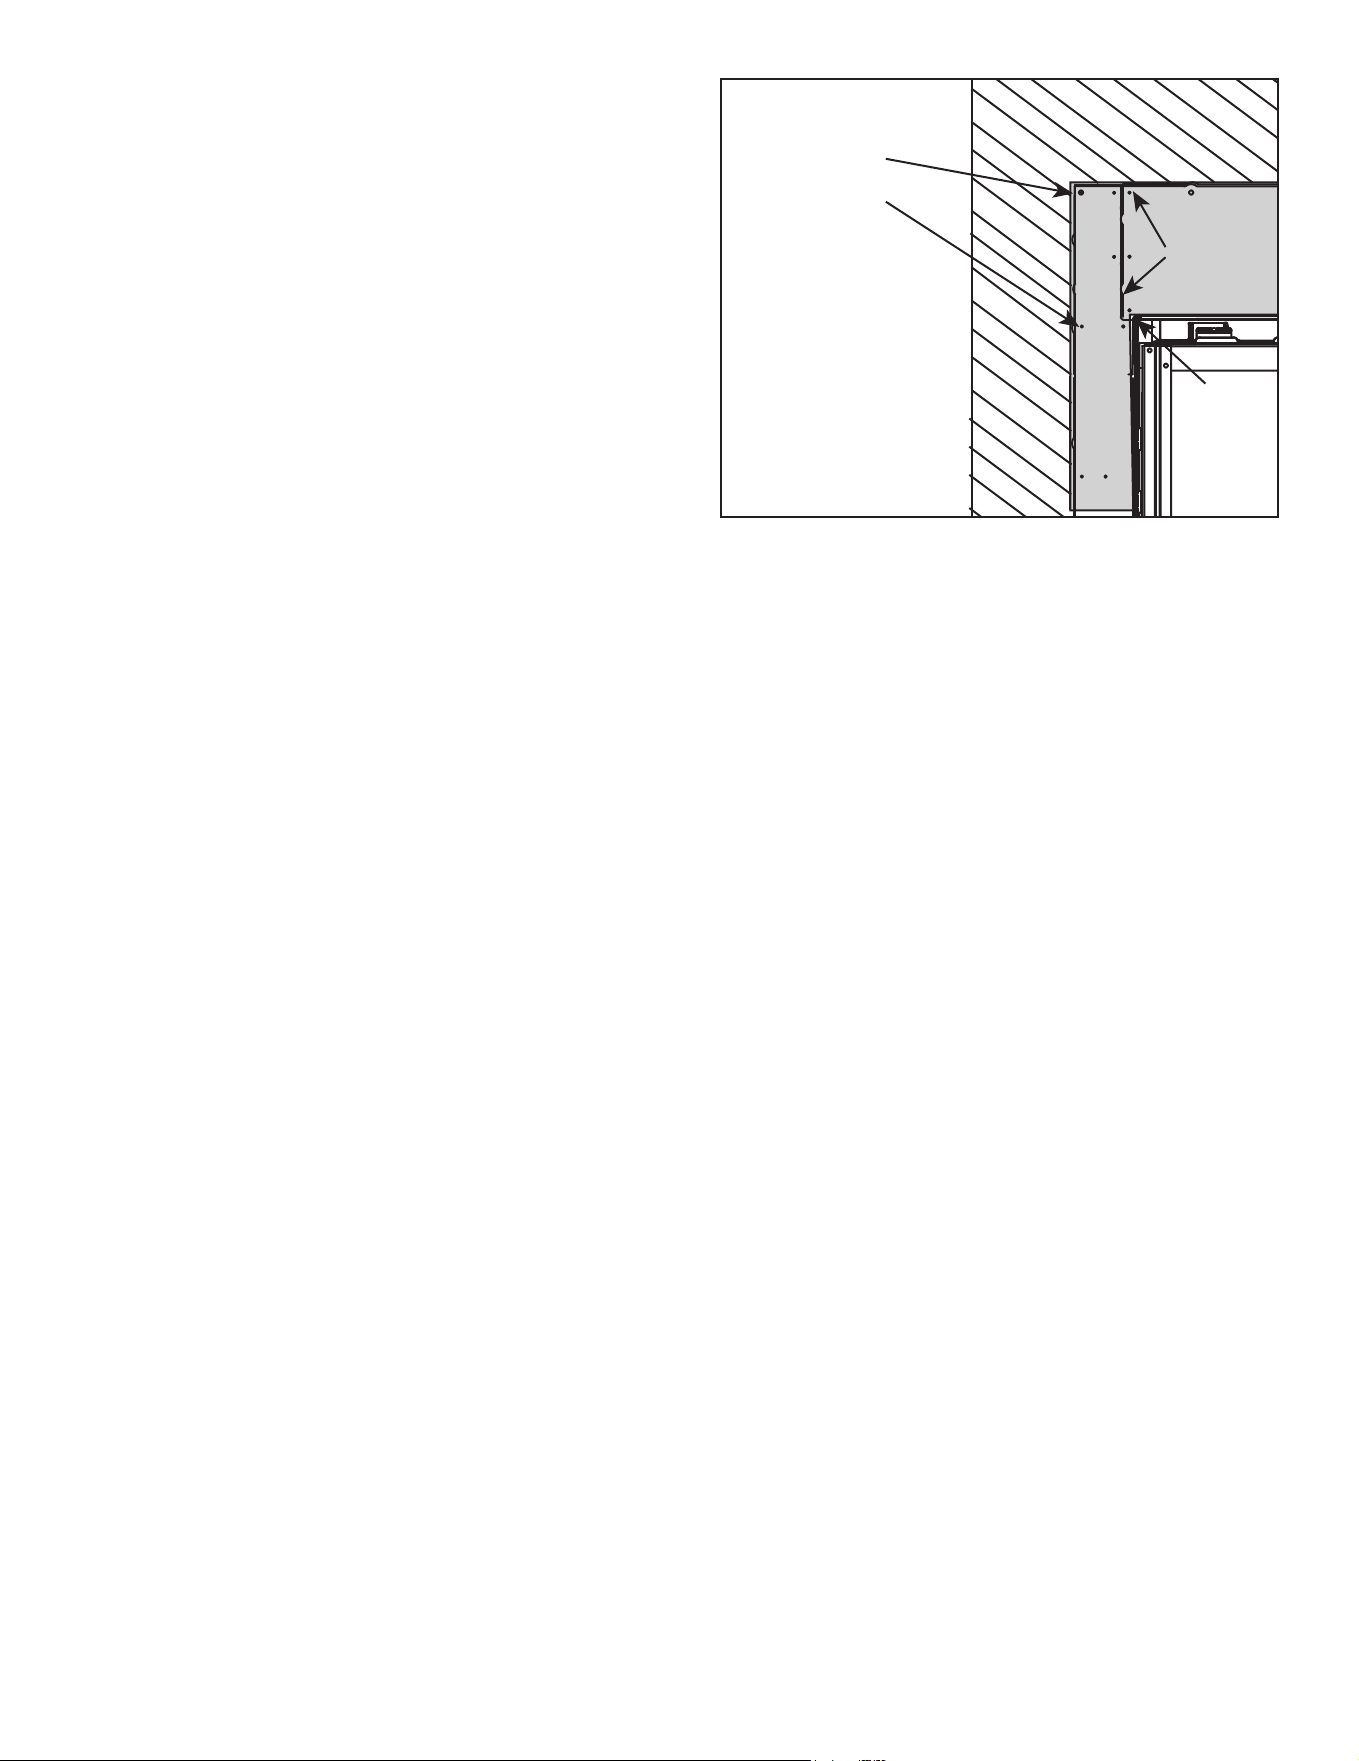
Hearth & Home Technologies • DVLINEAR36 Installation Manual • 2569-980 Rev. E • 11/20
54
B. Non-Combustible Board and Drywall In-
stallation
Introduction
If the desired nished replace installation does not utilize
non-combustible nishing materials (such as tile, marble,
stone, etc.), special attention must be paid to the instal-
lation of drywall/gypsum wallboard to minimize potential
development of cracking and paint discoloration. Hearth
and Home Technologies has tested the following methods
and materials and therefore recommends the following
steps for the best drywall performance.
Attaching Non-Combustible Board to Framing
1. To ensure the lower cover panel has been correctly
installed, verify that two screws (total) have been
installed in the lower left and right sides of the re-
place opening. See Figure 8.1. These screws, when
installed, will ensure the lower panel is correctly in-
stalled. If the lower cover panel is not correctly in-
stalled, the decorative barrier front may not t into the
replace opening correctly. Refer to section 6.D for
more information regarding the included non-combus-
tible board.
2. The appliance ships with the required non-combus-
tible board. The large top piece of non-combustible
board is pre-installed at the factory. The narrow left
and right non-combustible pieces are shipped within
the appliance. Install the non-combustible side pieces
with the screws provided in the manual bag assembly.
There are pilot holes located on the left and right side
columns. Care should be taken not to tighten these
screws into the non-combustible board excessively.
Set screws ush to the face of the non-combustible
board. See Figure 10.2 and Section 6.D.
3. The outer perimeter of the factory-installed non-com-
bustible board has pre-drilled pilot holes. See Figure
10.1. Secure the non-combustible board to adja-
cent framing with drywall screws that are a minimum
of 1-1/4 inch in length. Care should be taken not to
tighten these screws into the non-combustible board
excessively. Set screws ush to the face of the non-
combustible board. See Figure 10.2 and Section 6.D.
4. When installing drywall around the appliance, install
a rectangular hole for the replace/non-combustible
board in a single sheet of drywall. This will minimize
the joints that require nishing adjacent to the replace
opening. Ensure that the 1/8 inch gap is maintained
between the factory installed non-combustible board
and the surrounding drywall. See Figure 10.1. Secure
the drywall to the framing with screws a minimum of
one inch in length every six inches across the top of
the replace and every ten inches on the sides of the
replace.
5. To ensure good adhesion of drywall compounds and
tape, thoroughly clean the non-combustible board and
surrounding drywall to remove dust. The non-com-
bustible board may be primed with a high-quality PVA
primer.
PRE-DRILLED
PILOT HOLES
APPLIANCE
OPENING
FILL GAPS
Figure 10.1 Install Non-Combustible Board
Filling and Finishing Seams
1. Step 1: Fill all gaps and joints between the non-
combustible board pieces and the drywall with a
general purpose chemically setting joint compound
such as Durabond® 45 Joint Compound manufactured
by USG (Sheetrock® brand), recommended by Hearth
& Home Technologies. Use a drywall knife to rmly
press the joint compound into all gaps. See Figure
10.1. Allow these joints to dry.
2. Step 2: All joints are to be taped with berglass mesh
tape 1 7/8” minimum width, and embedded with
Setting-Type joint compound, such as with Durabond®
Joint Compound manufactured by USG (Sheetrock®
brand), or equivalent. Allow these joints to dry.
3. Step 3: Depending on the technique used in steps
1 and 2, two to three nishing coats are required to
provide a smooth and durable nish. Hearth and
Home Technologies recommends a lightweight or all-
purpose compound. Allow each coat to properly cure.
Allow the nishing coat(s) to cure for 24 hours before
operating appliance.
Painting
If desired nishing includes a painted wall, a high-quality
100% acrylic latex paint with a high-quality latex primer
base coat are recommended around the appliance to limit
discoloration. Oil-based or standard acrylic paints may
be more prone to discoloration due to heat exposure.
Drywall Joint-Crack Prevention and Repair
Drywall joints around the replace will be aected by ex-
posure to elevated temperatures, along with other envi-
ronmental, structural factors due to new construction, and
methods used to install and nish the drywall. If a crack
does emerge adjacent to the replace, it can be perma-
nently repaired by lling it with a paintable latex caulk,
followed by repainting.
Some movement of the screws used to secure the non-
combustible board to the appliance/surround framing is
expected. If a blemish begins to show over a screw head,
sand the surface to remove the blemish and repaint.
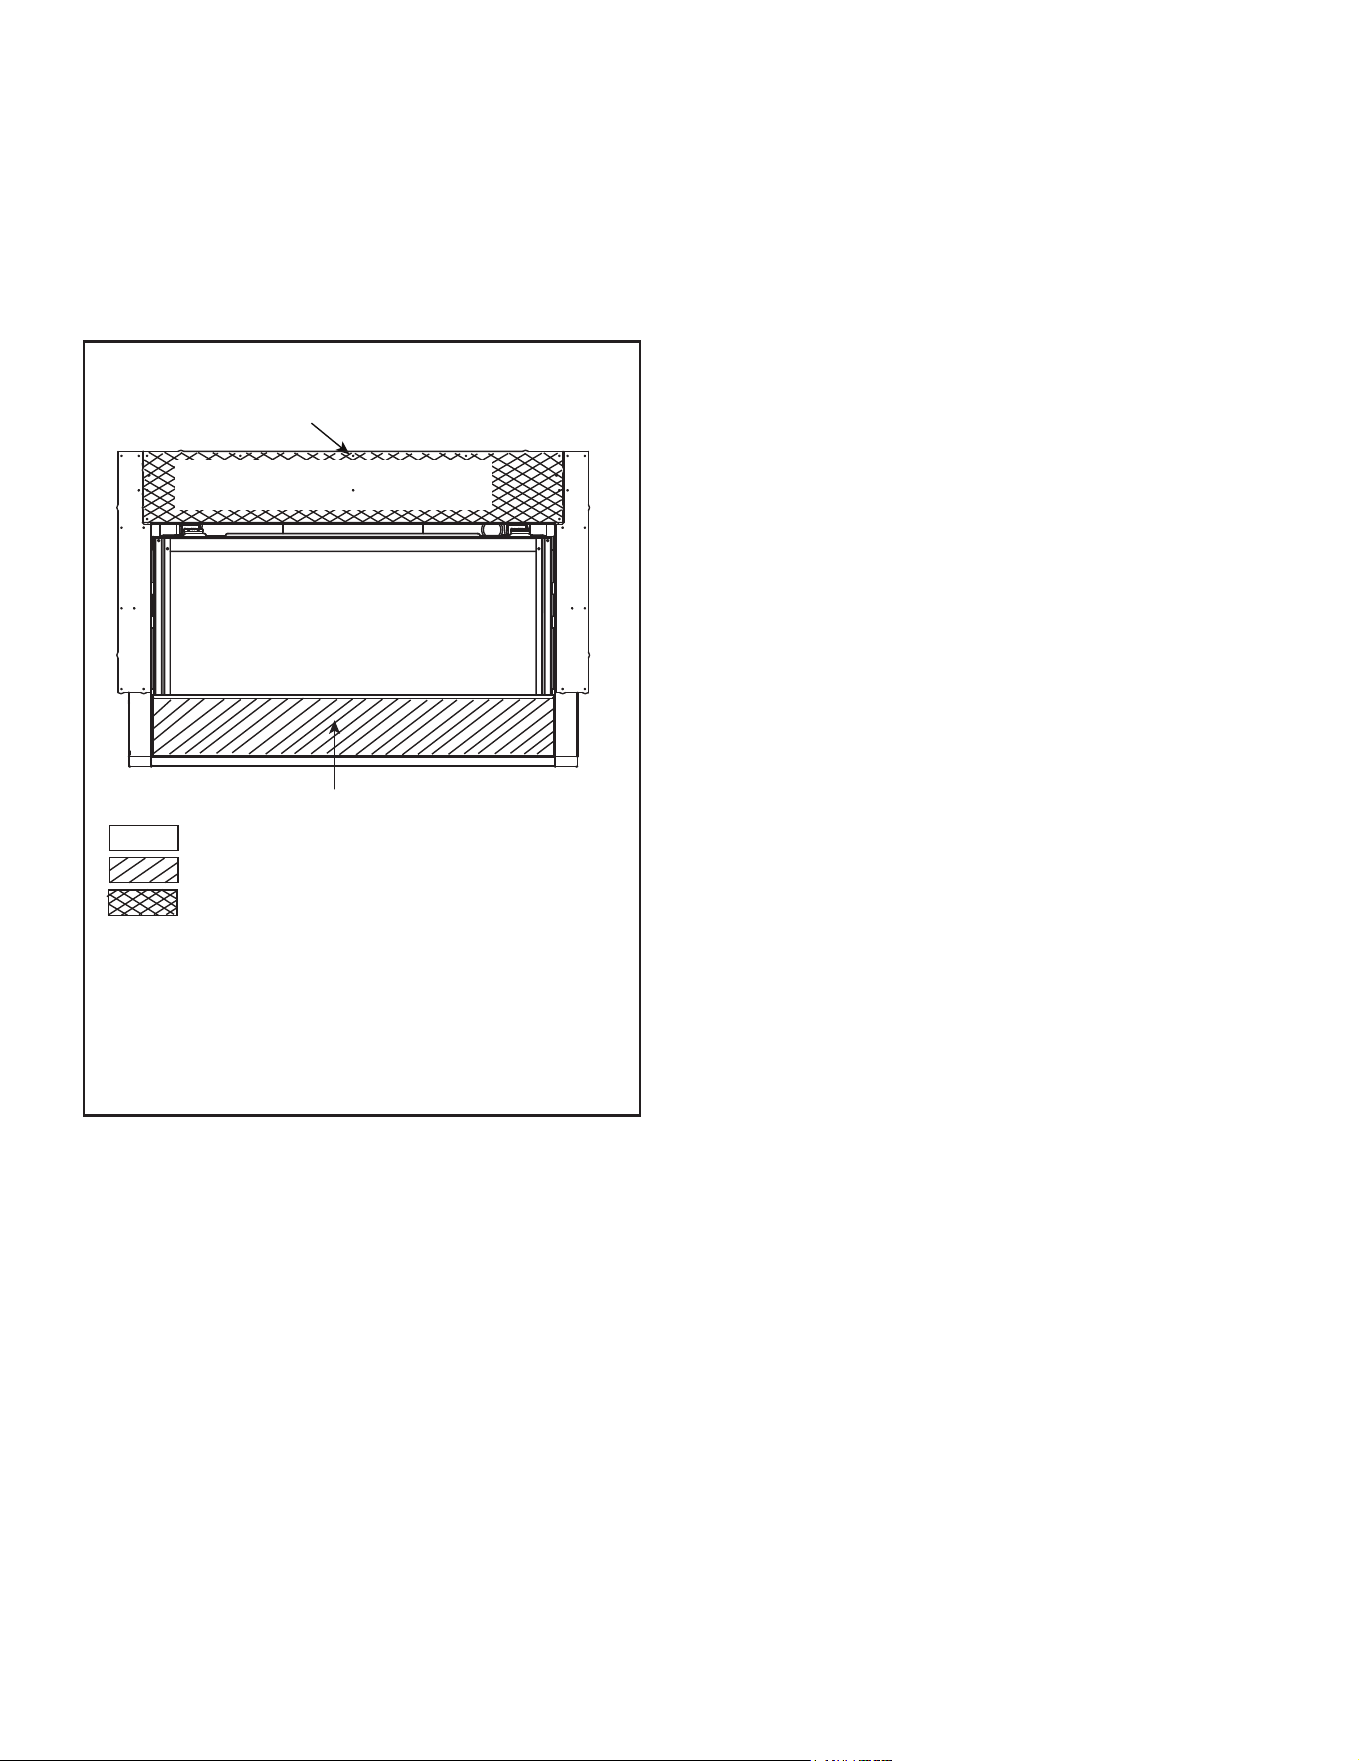
55
Hearth & Home Technologies • DVLINEAR36 Installation Manual • 2569-980 Rev. E • 11/20
WARNING! Risk of Fire! Maintain specied air space
clearances to combustibles. Failure to comply with
these instructions may cause a re or cause the appli-
ance to overheat.
CAUTION! Risk of Glass Damage and Cuts! DO NOT
drill or install any type of screw or fastener into the lower
cover panel. Sharp screw or fastener tips may penetrate
and break the glass or cause cuts.
Note: It is acceptable to use a silicone sealant with
a minimum of 300 ºF continuous exposure rating to
adhere drywall to lower cover panel.
It is acceptable to pre-drill holes and use self-tapping
screws in the installed non-combustible board to attach
non-combustible backer board for tile, marble, etc. Refer
to Figure 10.2 for acceptable screw or metal lath location
and screw length requirements.
Do not drill or install screws which may penetrate the
lower cover panel as this will restrict required access
to the glass, battery-backup, and control module. See
Figure 10.2.
Note: If the desired look is painted drywall, it is
recommended that no additional screws are installed into
the factory-provided non-combustible board. Only install
the screws provided into the pilot holes located in the
factory-provided non-combustible board.
Figure 10.2 Finishing Details
WARNING! Risk of Fire! Maintain specied air space
clearances to combustibles. Inadequate air space could
cause overheating and re.
FACTORY-INSTALLED
NON-COMBUSTIBLE BOARD
LOWER COVER PANEL
= NO SCREWS ALLOWED
= 1 INCH. MAX. SELF-TAPPING SCREWS ALLOWED
= 5 INCH - 7 INCH SELF-TAPPING SCREWS ALLOWED
PILOT HOLES (11 LOCATIONS) TO ATTACH
NON-COMBUSTIBLE BOARD TO FRAMING
NOTICE: The location of the Passive Heat discharge
opening could allow for venting and other construction
materials to be visible. It is acceptable to paint the vent pipe
and other construction materials using a high temperature
paint with a minimum of 300 °F continuous exposure rating.
Hearth & Home Technologies recommends using black
touch up paint (part number TUP-GBK-12) available from
your Hearth & Home Technologies dealer.
If installing a television (TV) above the appliance, see
Section 3 of the appliance Owner’s Manual.
C. Installing a Television
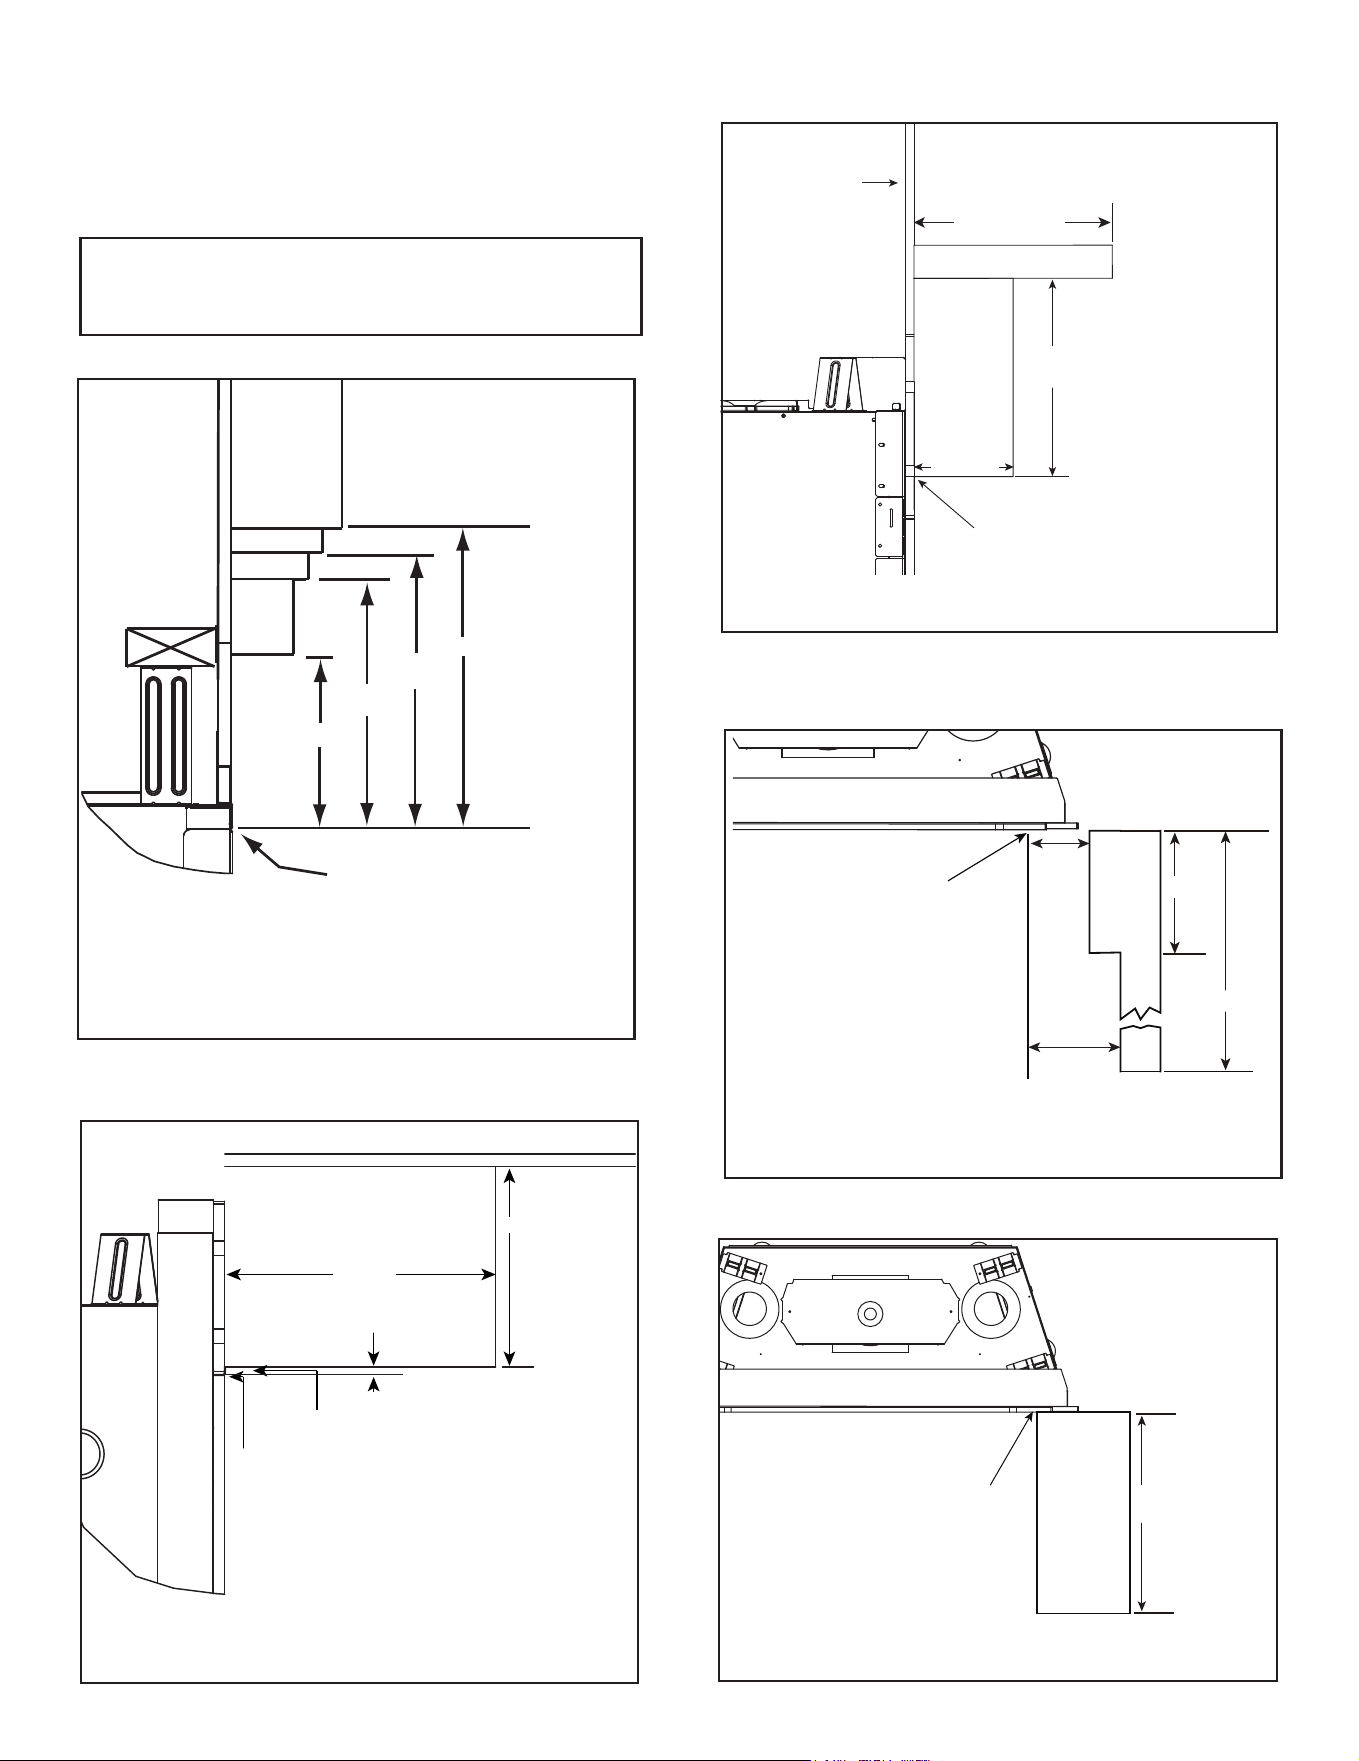
Hearth & Home Technologies • DVLINEAR36 Installation Manual • 2569-980 Rev. E • 11/20
56
MEASUREMENTS FROM
TOP EDGE OF THE OPENING
TO CEILING
See Dimension S on Appliance
Dimension Diagram (Figure 3.1).
16 INCHES
3/8 IN. NON-COMBUSTIBLE FINISHING RETURN
DO NOT COVER
NON-COMBUSTIBLE FINISHING RETURN
CEILING
MEASUREMENTS FROM
TOP EDGE OF THE OPENING
10
11
TO CEILING
See Dimension S on Appliance
Dimension Diagram (Figure 3.1).
9
12
3
16
12
9
12 IN.MAX.
1/2 IN.
THICK WALL
SHEATHING
14 IN. MIN. BOTTOM OF MANTEL
TO TOP OF APPLIANCE OPENING
NON-COMBUSTIBLE
MANTEL
6 IN. MAX.
NON-
COMBUSTIBLE
MANTEL
APPLIANCE OPENING
Combustible Mantels - Without Passive Heat
Figure 10.3 Minimum Vertical and Maximum Horizontal
Dimensions of Combustibles
Non-Combustible Mantels - Without Passive Heat
Figure 10.5 Minimum Vertical and Maximum Horizontal
Dimensions of Non-Combustibles
D. Mantel and Wall Projections
WARNING! Risk of Fire! Comply with all minimum clear-
ances as specied. Framing closer than the minimums list-
ed must be constructed entirely of non-combustible materi-
als (i.e., steel studs, concrete board, etc.).
Note: Measurement is taken from top/side of the
opening, NOT the top/side of the replace.
Note: All measurements in
inches.
Figure 10.4 Minimum Vertical and Maximum Horizontal
Dimensions of Combustibles and Non-
Combustibles
Combustible and Non-Combustible Mantels - Passive
Heat Kit Installed
6 IN.
MIN.
APPLIANCE OPENING
See Dimension B on Appliance
Dimension Diagram (Figure 3.1).
UNLIMITED
7 IN.
MIN.
WALL MAX.
3 FT.
Combustible and Non-Combustible Mantel Legs
or Wall Projections - Without Passive Heat
Figure 10.6 Combustible and Non-Combustible Mantel Leg
or Wall Projections
(Acceptable on both sides of opening)
Combustible and Non-Combustible Mantel Legs
or Wall Projections - With Passive Heat
Figure 10.7 Combustible and Non-Combustible Mantel Leg
or Wall Projections
(Acceptable on both sides of opening)
16 IN. MAX
APPLIANCE OPENING
See Dimension B on Appliance
Dimension Diagram (Figure 3.1).
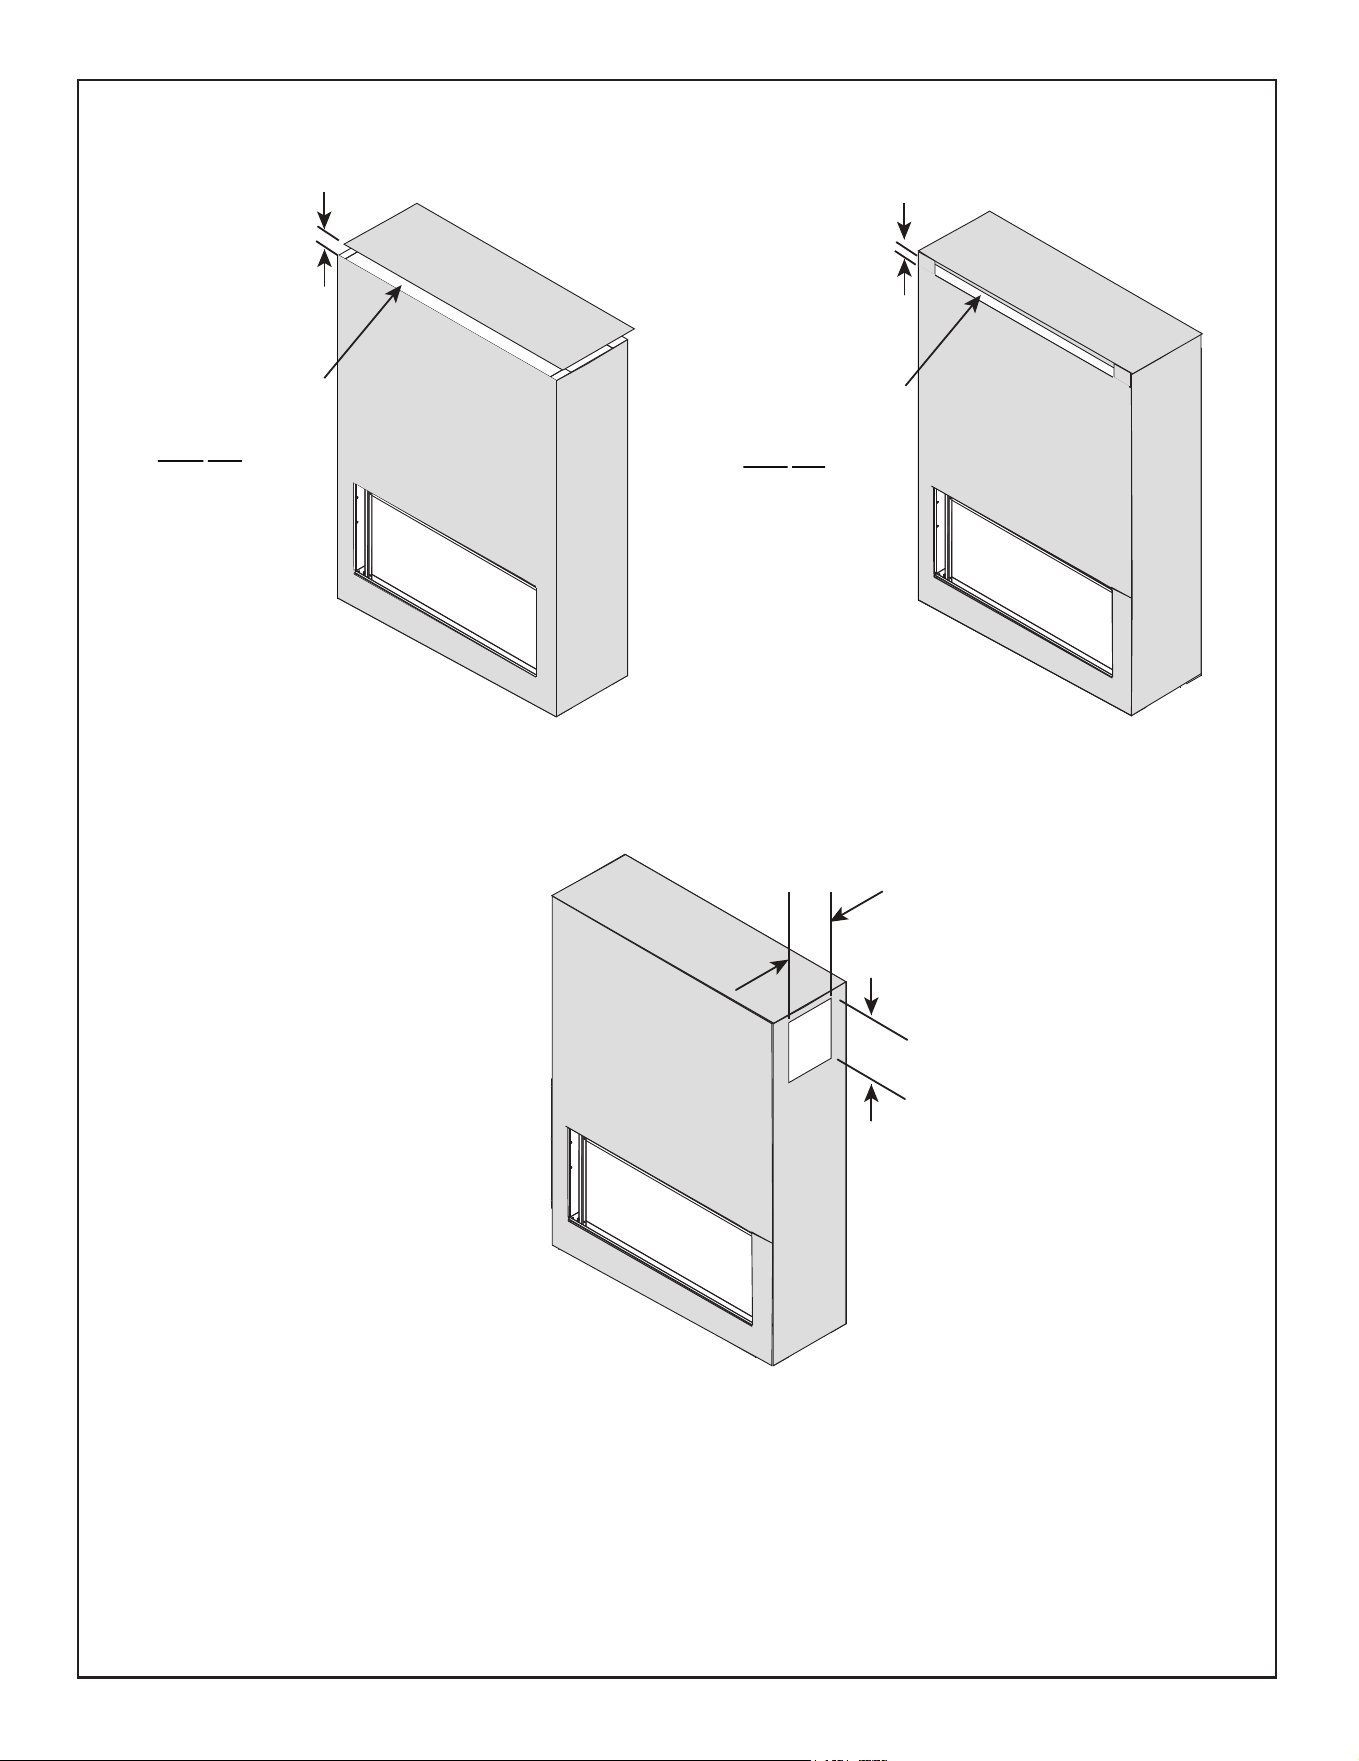
57
Hearth & Home Technologies • DVLINEAR36 Installation Manual • 2569-980 Rev. E • 11/20
Figure 10.6 Combustible and Non-Combustible Mantel Leg
or Wall Projections
(Acceptable on both sides of opening)
2 IN. MIN.
DO NOT INSTALL
FINISHING MATERIAL
ON THIS SURFACE.
2 IN. MIN. OPENING
MUST NOT BE
BLOCKED
CEILING
CEILING
2 IN. MIN.
DO NOT INSTALL
FINISHING MATERIAL
ON THIS SURFACE.
2 IN. MIN. OPENING
MUST NOT BE
BLOCKED
CEILING
12-1/4 IN.
8-3/4 IN.
SIDE DISCHARGE
(DISCHARGE SLOTS ON BOTH SIDES OF APPLIANCE)
FRONT DISCHARGE
OPEN TOP DISCHARGE
Figure 10.8 Finishing Material installed with Passive Heat Optional Heat Management System
Finishing Material Installed with Passive Heat Optional Heat Management System
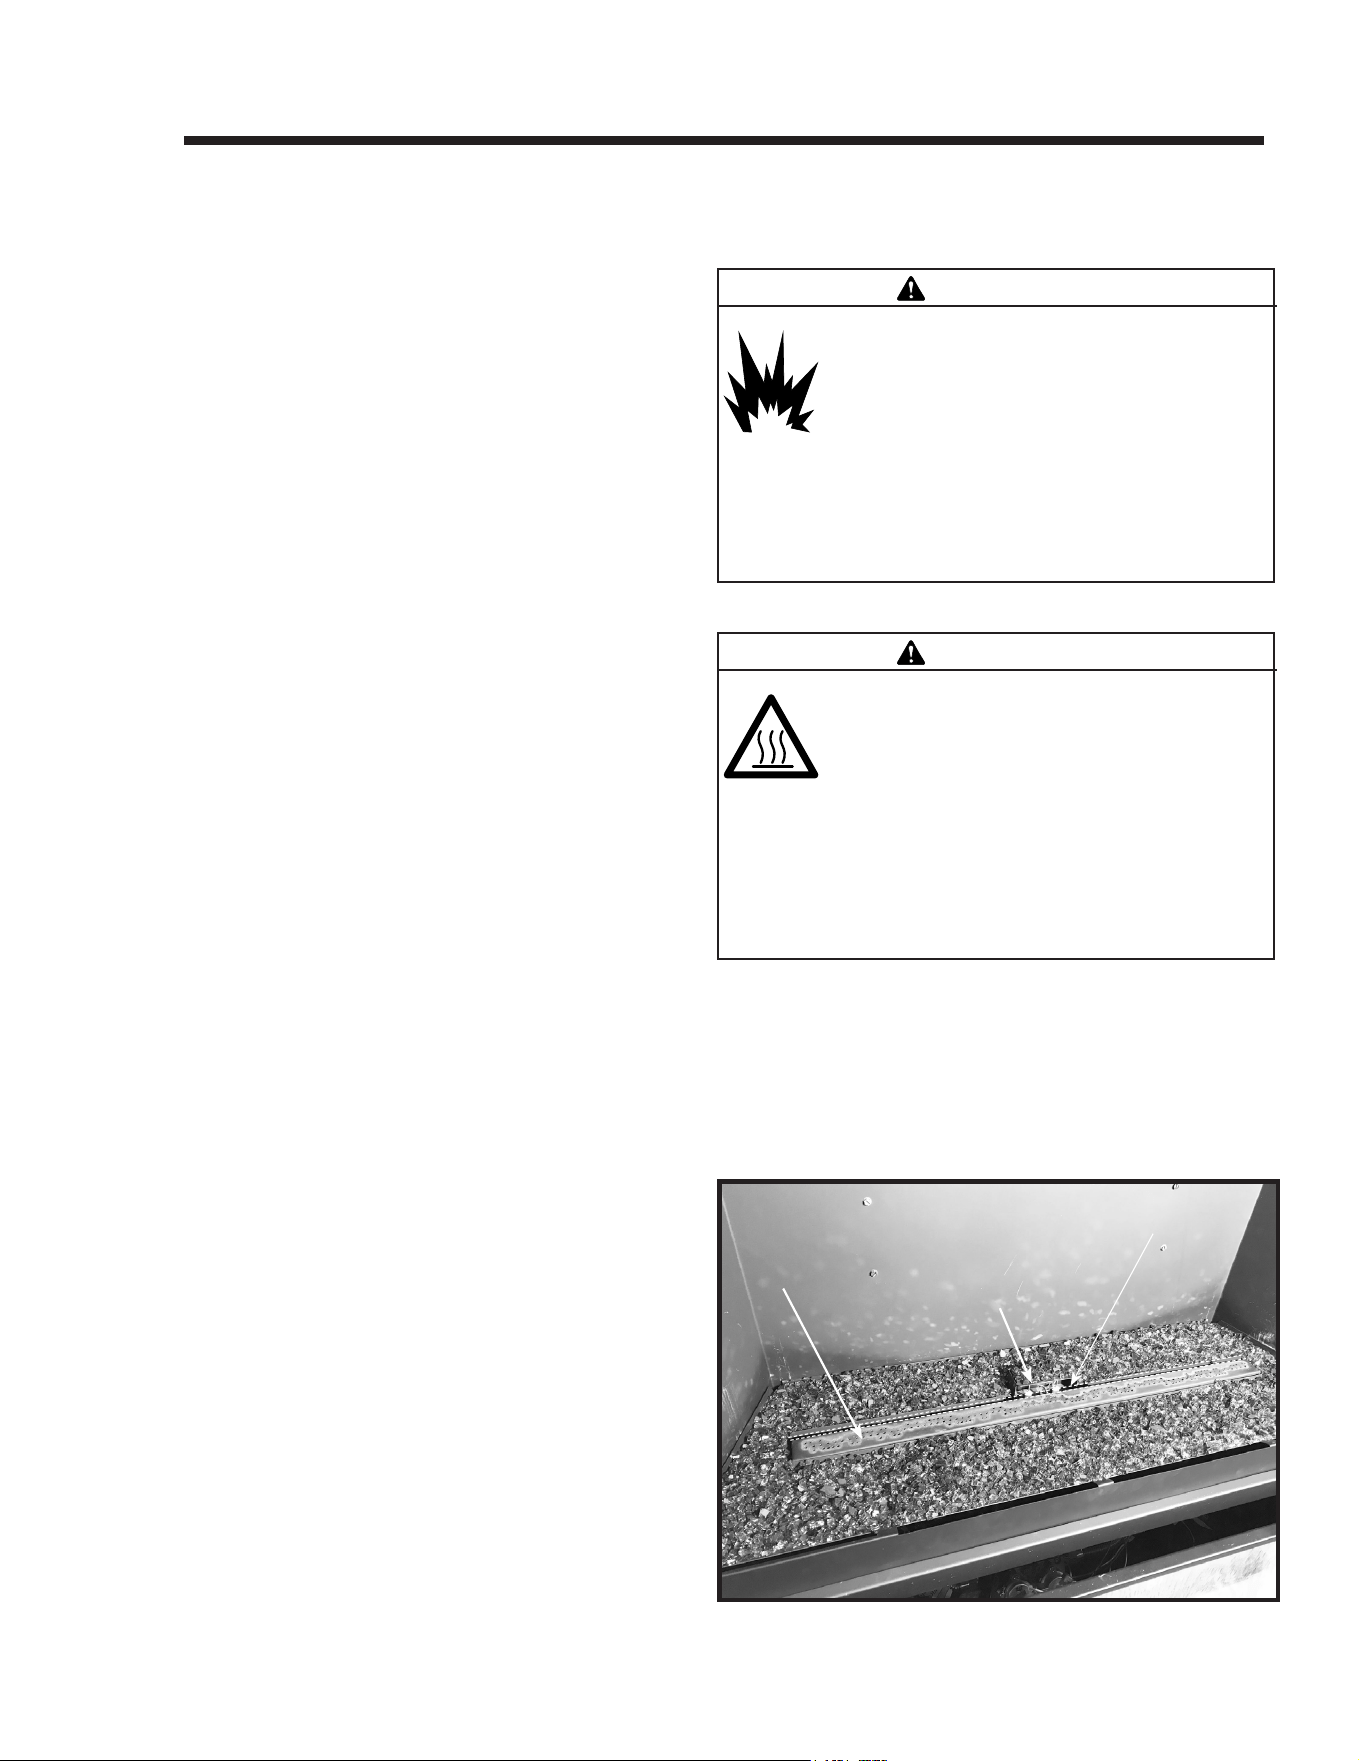
Hearth & Home Technologies • DVLINEAR36 Installation Manual • 2569-980 Rev. E • 11/20
58
11 11
Appliance Setup
A. Remove the Shipping Materials
Remove shipping materials from inside or underneath the
rebox.
• The splatter guard is a piece of corrugated material
used to protect the appliance during the installation
process before nishing work on the whole hearth is
complete. Splatter guards may be factory installed
or accompany the decorative barrier front of the ap-
pliance, depending on the replace model. Splatter
guards must be removed before appliance is red.
• The left and right side non-combustible boards are
packaged inside the appliance. Install as instructed
in Section 6.
WARNING! Risk of Fire! Close the ball valve before in-
stalling the splatter guard to prevent accidental lighting.
Remove the splatter guard before lighting the appliance.
B. Clean the Appliance
Clean/vacuum any sawdust that may have accumulated
inside the rebox or underneath in the control cavity.
C. Install Media
Decorative glass media is included with the DVLINEAR36.
Placing the Media
Install glass media around the burner ensuring that no
media is placed on the burner or in the gap located be-
hind the burner. See Figure 11.1. Install media on top of
pilot shield.
WARNING
Delayed Ignition Risk
• Place media according to instructions.
• Do NOT place media in area in front of pilot
• Do NOT place media in a position that they may
fall into area in front of pilot.
• Do NOT use any media other than the Hearth
& Home Technologies-supplied options for this
replace model.
Fireplace will not function properly.
Delayed ignition may occur.
WARNING
Risk of Asphyxiation or Fumes.
• Place media according to instructions.
• Do NOT place media in area between glass and
rebox.
• Do NOT place media in a position that they may
fall into area between glass and rebox.
• Do NOT use any media other than the media
supplied with this replace.
Fireplace will not function properly.
Gas leak may occur.
Figure 11.1 Media Placement
PILOT SHIELDPILOT SHIELD
NO MEDIA ON BURNERNO MEDIA ON BURNER
NO MEDIA IN GAPNO MEDIA IN GAP
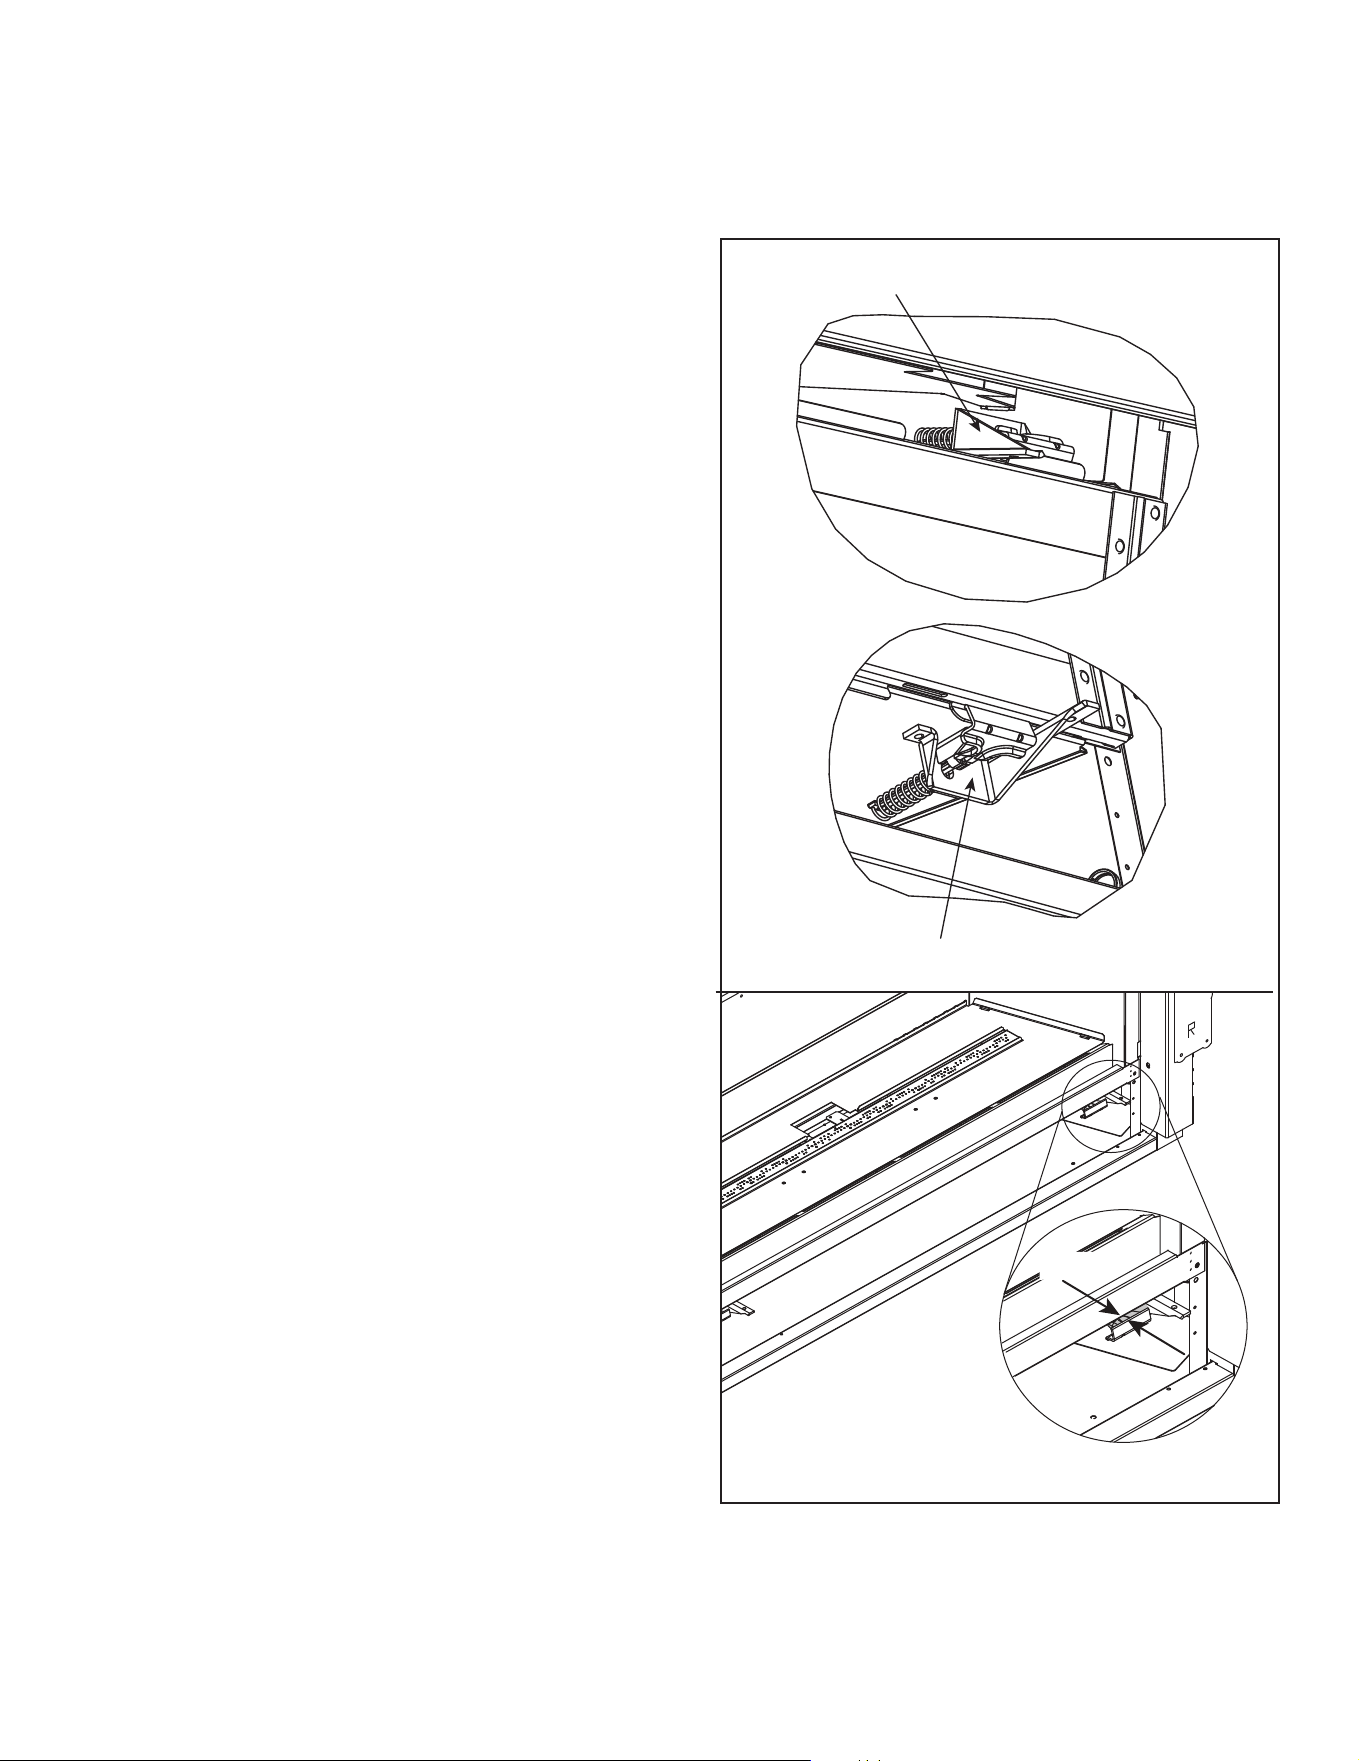
59
Hearth & Home Technologies • DVLINEAR36 Installation Manual • 2569-980 Rev. E • 11/20
Removing Fixed Glass Assembly
1. Remove the decorative barrier front.
2. The glass assembly has two upper spring latches
and two lower spring latches. See Figure 11.2. Lo-
cate the two spring latches that are on the upper left
and right of the replace.
3. Pull upper spring latch on one side forward to release
glass assembly while supporting glass assembly with
opposite hand. Repeat for the other upper spring
latch always taking care to support the glass assem-
bly with one hand.
4. Grasp glass on the upper right and left sides and
remove glass assembly by lifting “up” and “out”.
Note: Observe the presence of a space or gap between
the glass latch and the front of the appliance where the
bottom of the glass assembly is positioned. This gap is
designed for positive placement when replacing the glass
assembly. See Figure 11.2.
Replacing Fixed Glass Assembly
The bottom glass latches have been designed to create
a small gap between the glass clip and the face of the
appliance. See Figure 11.2.
1. Install the bottom of the glass assembly so that the
two tabs on the bottom of the glass latch engage the
gap. By tilting the top of the glass towards the face of
the appliance, tension will be applied to the bottom
two glass latches. Use one hand to support the glass
at all times.
2. Fasten the two upper glass latches, one at a time, by
pulling out and downward into position on the glass
assembly. Use one hand to support the glass at all
times.
3. Verify that the top two glass latches are engaged by vi-
sually verifying that glass latches have engaged both
left and right tabs on the glass frame.
4. Verify the bottom two glass latches have engaged the
glass frame tabs by grasping the bottom of the glass
frame assembly and pulling the glass frame assembly
“away” from the face of the appliance and “release”
the glass frame. The spring action of the clips will
“pull” the glass frame assembly towards the face of
the appliance if bottom clips are properly engaged. If
the glass frame assembly does not pull back towards
the face of the appliance, repeat steps 1-4.
D. Fixed Glass Assembly Removal and Re-
placement
WARNING! Risk of Asphyxiation! Handle xed glass
assembly with care. Inspect the gasket to ensure it is
undamaged and inspect the glass for cracks, chips or
scratches.
• DO NOT strike, slam or scratch glass.
• DO NOT operate replace with glass removed, cracked,
broken or scratched.
• Replace as a complete assembly.
Figure 11.2 Fixed Glass Assembly
UPPER SPRING LATCH
LOWER SPRING LATCH
GAP
WARNING! Risk of Explosion! Risk of Asphyxiation!
Glass latches MUST be properly engaged. Inspect glass
seal before installing decorative barrier front. Gas could
leak!
5. Reinstall decorative barrier front.
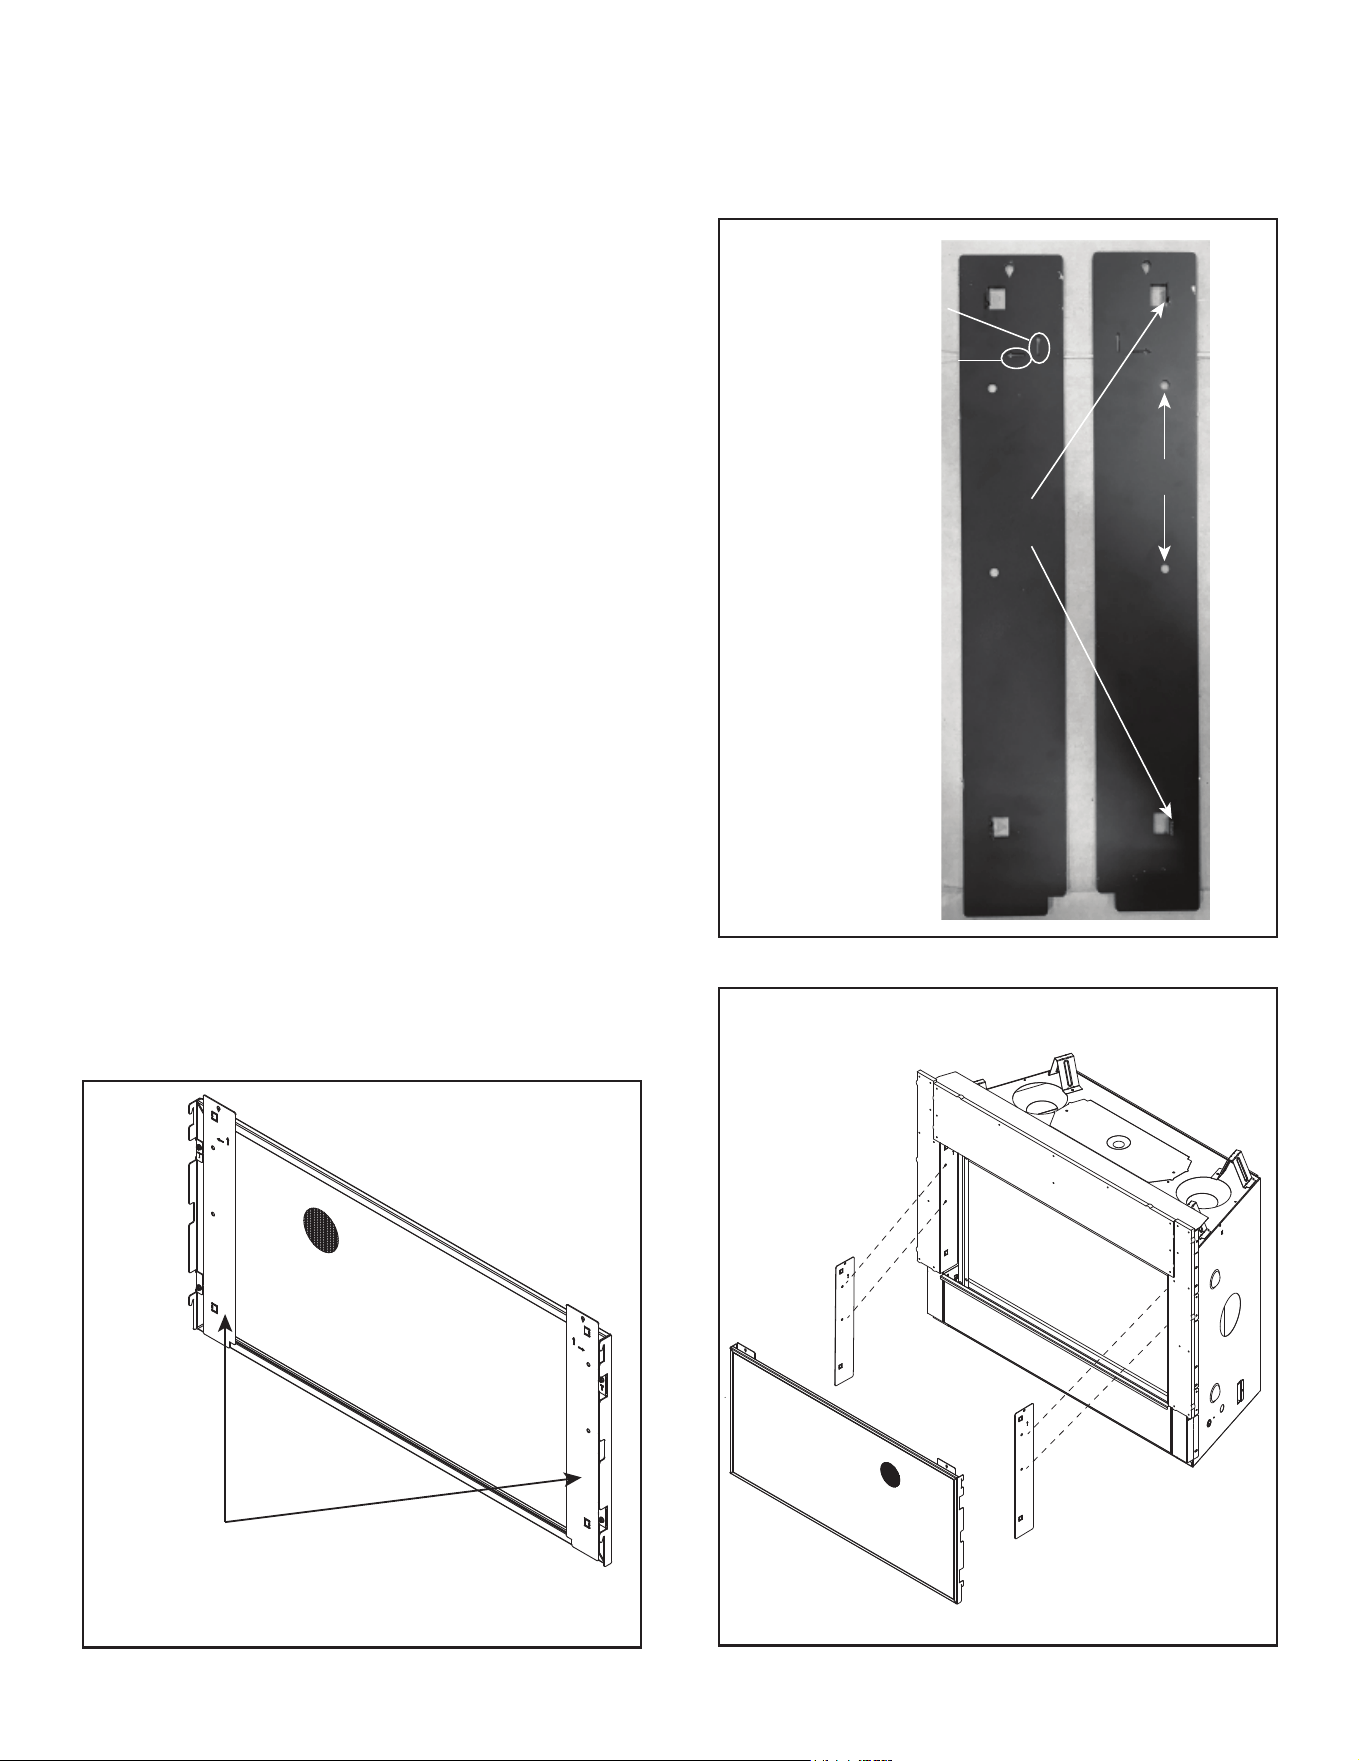
Hearth & Home Technologies • DVLINEAR36 Installation Manual • 2569-980 Rev. E • 11/20
60
E. Install Decorative Barrier Front
WARNING! Risk of Fire! Install ONLY decorative barrier
fronts approved by Hearth & Home Technologies. Unap-
proved decorative barrier fronts could cause replace to
overheat.
WARNING! Risk of Fire! A decorative barrier front is re-
quired for this model. DO NOT operate the replace with
the barrier front removed.
IMPORTANT! This fireplace requires an installed
decorative barrier front to prevent direct contact with
the hot viewing glass.
The decorative barrier front included with this model is the
only one certied for use with this appliance. No other
decorative barrier fronts may be used.
Contact your dealer or Hearth & Home Technologies if
the barrier is not present or help is needed to properly
install one
1. Remove the decorative barrier front from the appli-
ance.
2. Remove cardboard wrap and protective bag from
decorative barrier front.
3. Bend the front hanging brackets to separate from the
assembly. See Figure 11.3 and Figure 11.4.
4. Locate the mounting tabs on the two hanging brack-
ets. The mounting tabs are shipped unbent. Use a
pliers to bend the tabs to 90 degrees as shown in
Figure 11.4.
5. Install the left hanging bracket by positioning the
arrows upward and outward. Install a hex screw in
each mounting hole. See Figure 11.5. Repeat for
right auxiliary hanging bracket.
Figure 11.5 Install Hanging Brackets
(LEFT BRACKET)
FACE OF NON-COMBUSTIBLE BOARD
(RIGHT BRACKET)
Figure 11.3 Decorative Barrier Front Assembly Shown as Shipped
FRONT HANGING BRACKETS
ATTACHED TO DECORATIVE
BARRIER FRONT FOR SHIPMENT
ARROW MUST POINT OUT
(AWAY FROM FIREBOX)
WHEN INSTALLED
ARROW MUST POINT UP
WHEN INSTALLED
MOUNTING
HOLES
MOUNTING TABS
BENT TO 90 DEGREES
(TOP & BOTTOM)
LEFT
RIGHT
Figure 11.4 Preparation of Mounting Brackets
6. Install the decorative barrier front assembly by hanging
it from the four tabs located on the auxiliary brackets.
There are two tabs on the left side and two tabs on the
right side. See Figure 11.6.
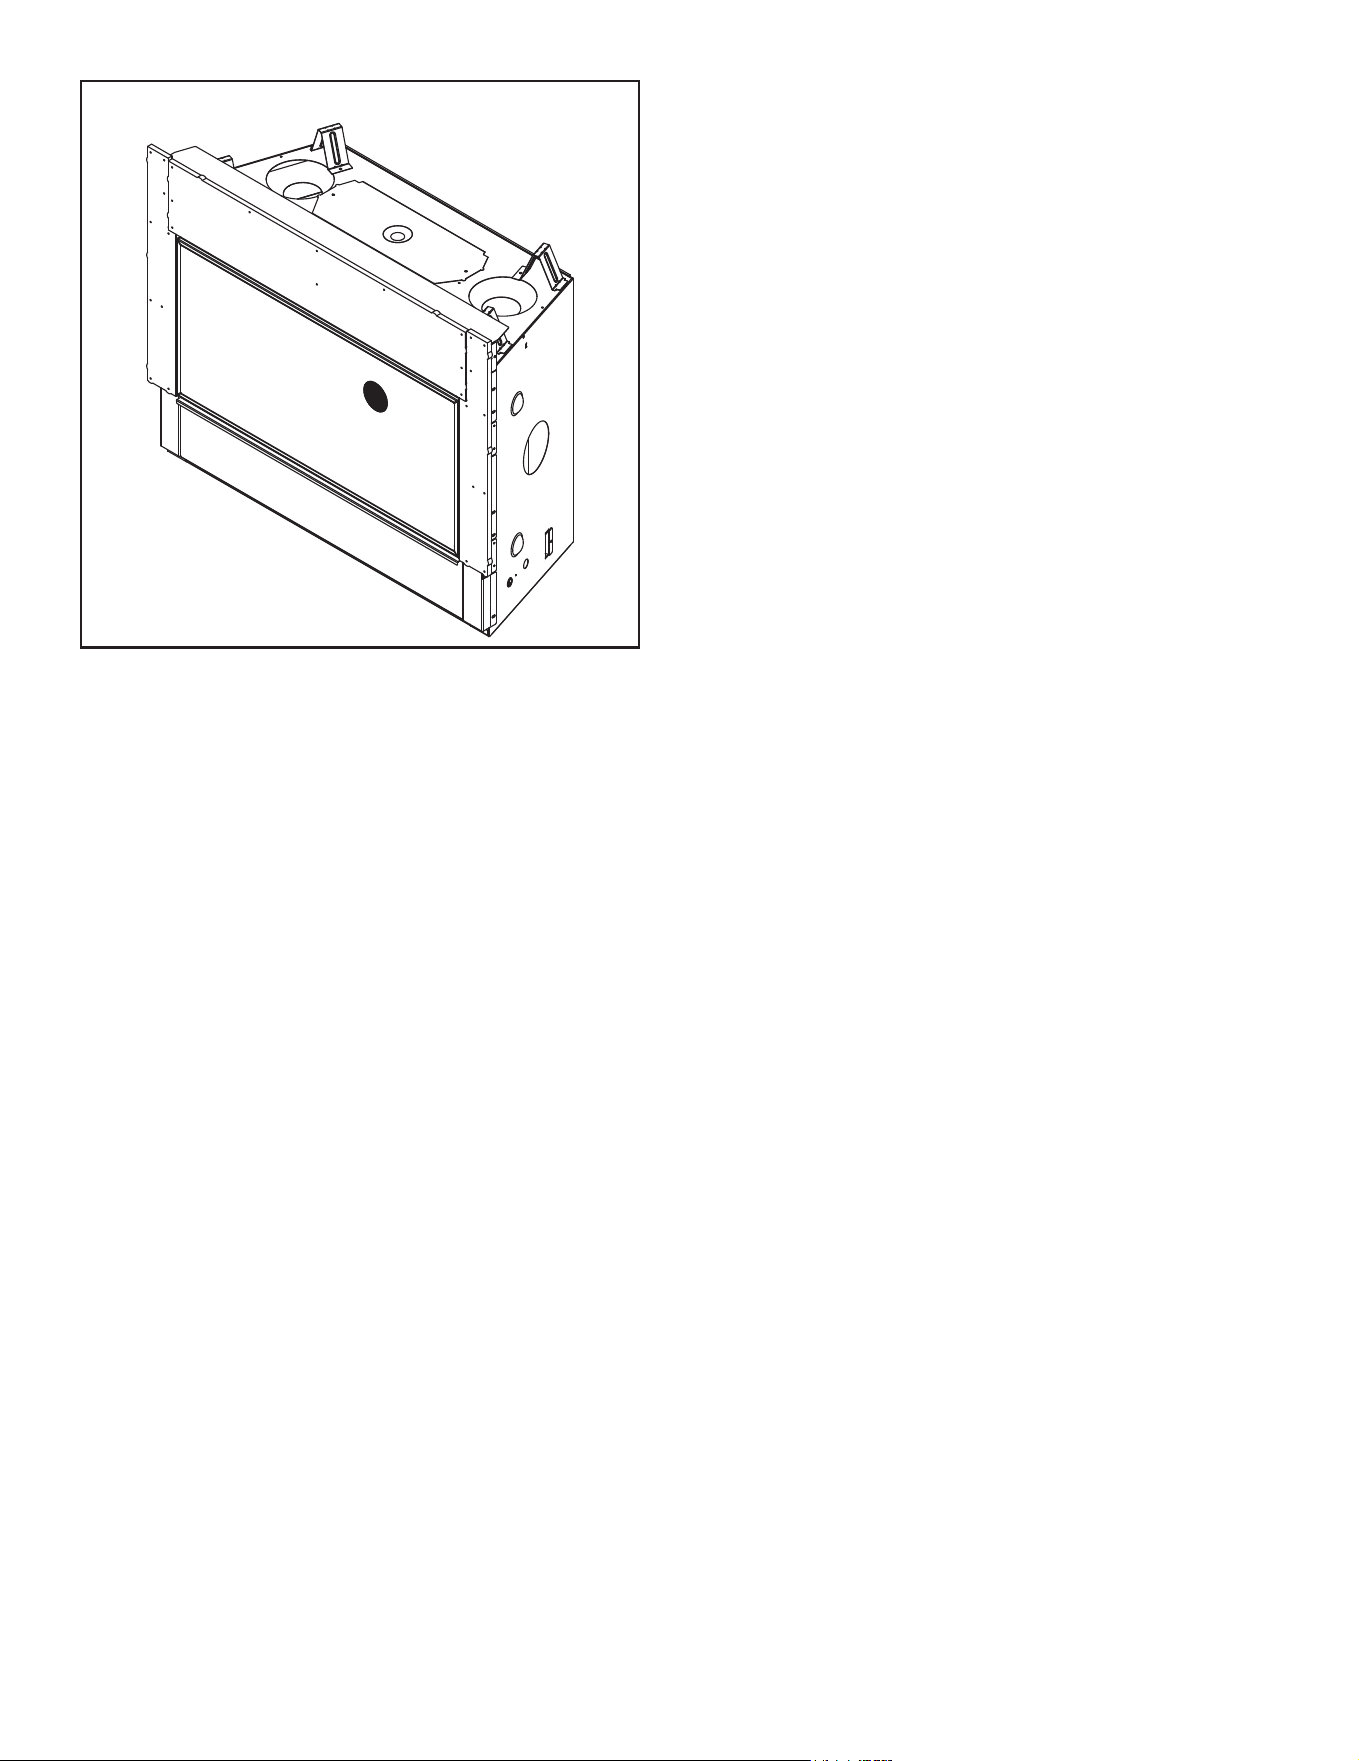
61
Hearth & Home Technologies • DVLINEAR36 Installation Manual • 2569-980 Rev. E • 11/20
Figure 11.6 Decorative Barrier Front Installed
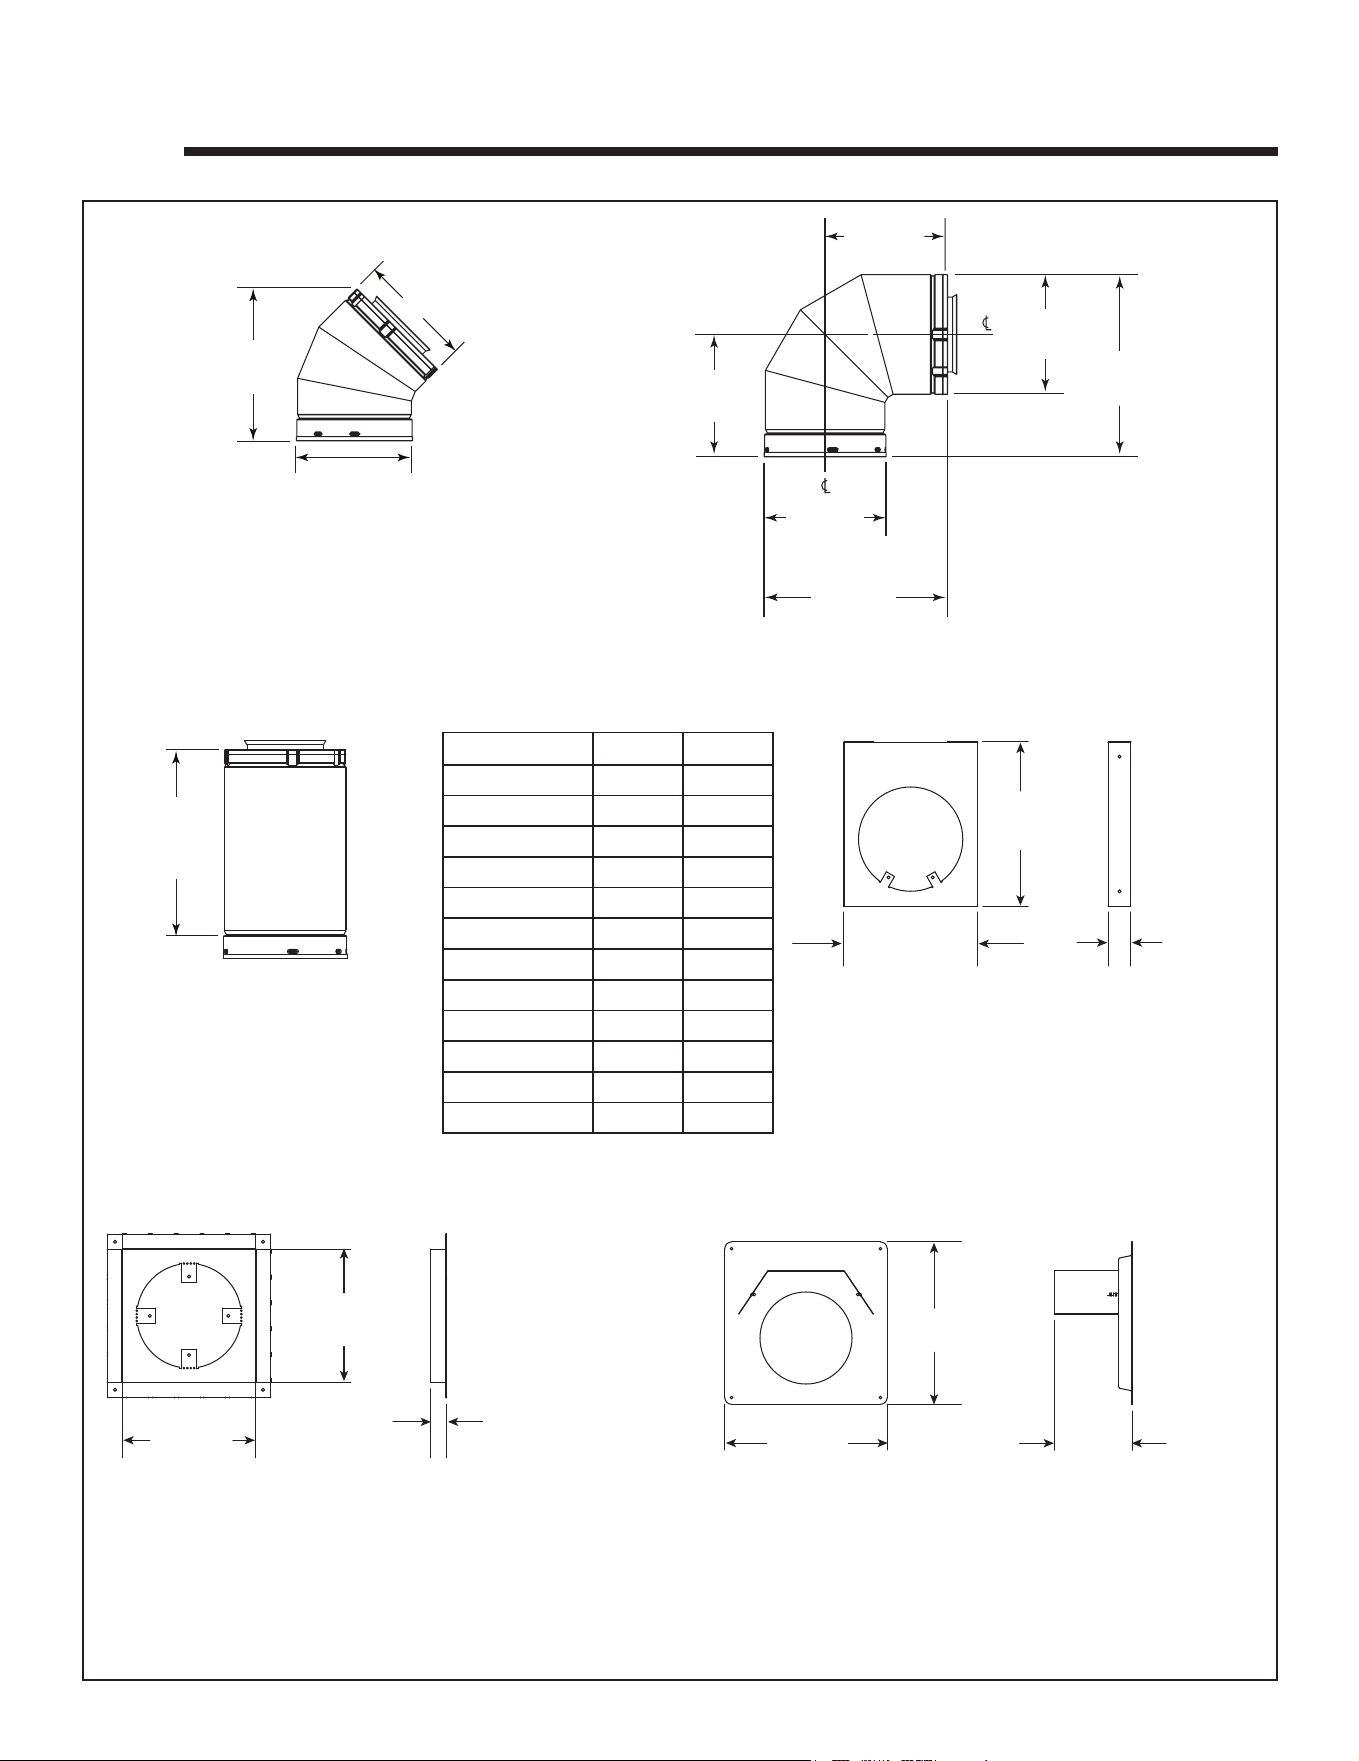
Hearth & Home Technologies • DVLINEAR36 Installation Manual • 2569-980 Rev. E • 11/20
62
12 12
Reference Materials
A. Vent Components Diagrams
Figure 12.1 SLP Series Vent Components
8-3/4 in.
222 mm
6-1/2 in.
165 mm
6-5/8 in.
168 mm
6 in.
152 mm
6-1/2 in.
165 mm
6-5/8 in.
168 mm
9-7/8 in.
251 mm
6-1/2 in.
165 mm
9-1/4 in.
235 mm
SLP45
45° Elbow
SLP90
90° Elbow
Effective
Height/
Length
SLP PIPE
SLP-HVS
Horizontal Pipe
Support
SLP-FS
Ceiling Firestop
SLP-WS
Wall Shield Firestop
10-7/8 in.
276 mm
8-7/8 in.
225 mm
1-1/2 in.
38 mm
8-11/16 in.
220 mm
8-11/16 in.
220 mm
1-1/2 in.
38 mm
12 in.
305 mm
12 in.
305 mm
5-1/2 in.
146 mm
Eective Height/Length
Pipe inches mm
SLP4 4 102
SLP6 6 152
SLP12 12 305
SLP24 24 610
SLP36 36 914
SLP48 48 1219
SLP6A 2 - 6 51 - 152
SLP12A 2 - 12 51 - 305
SLP-FLEX-2 24 610
SLP-FLEX-3 36 914
SLP-FLEX-5 60 1524
SLP-FLEX-10 120 3048
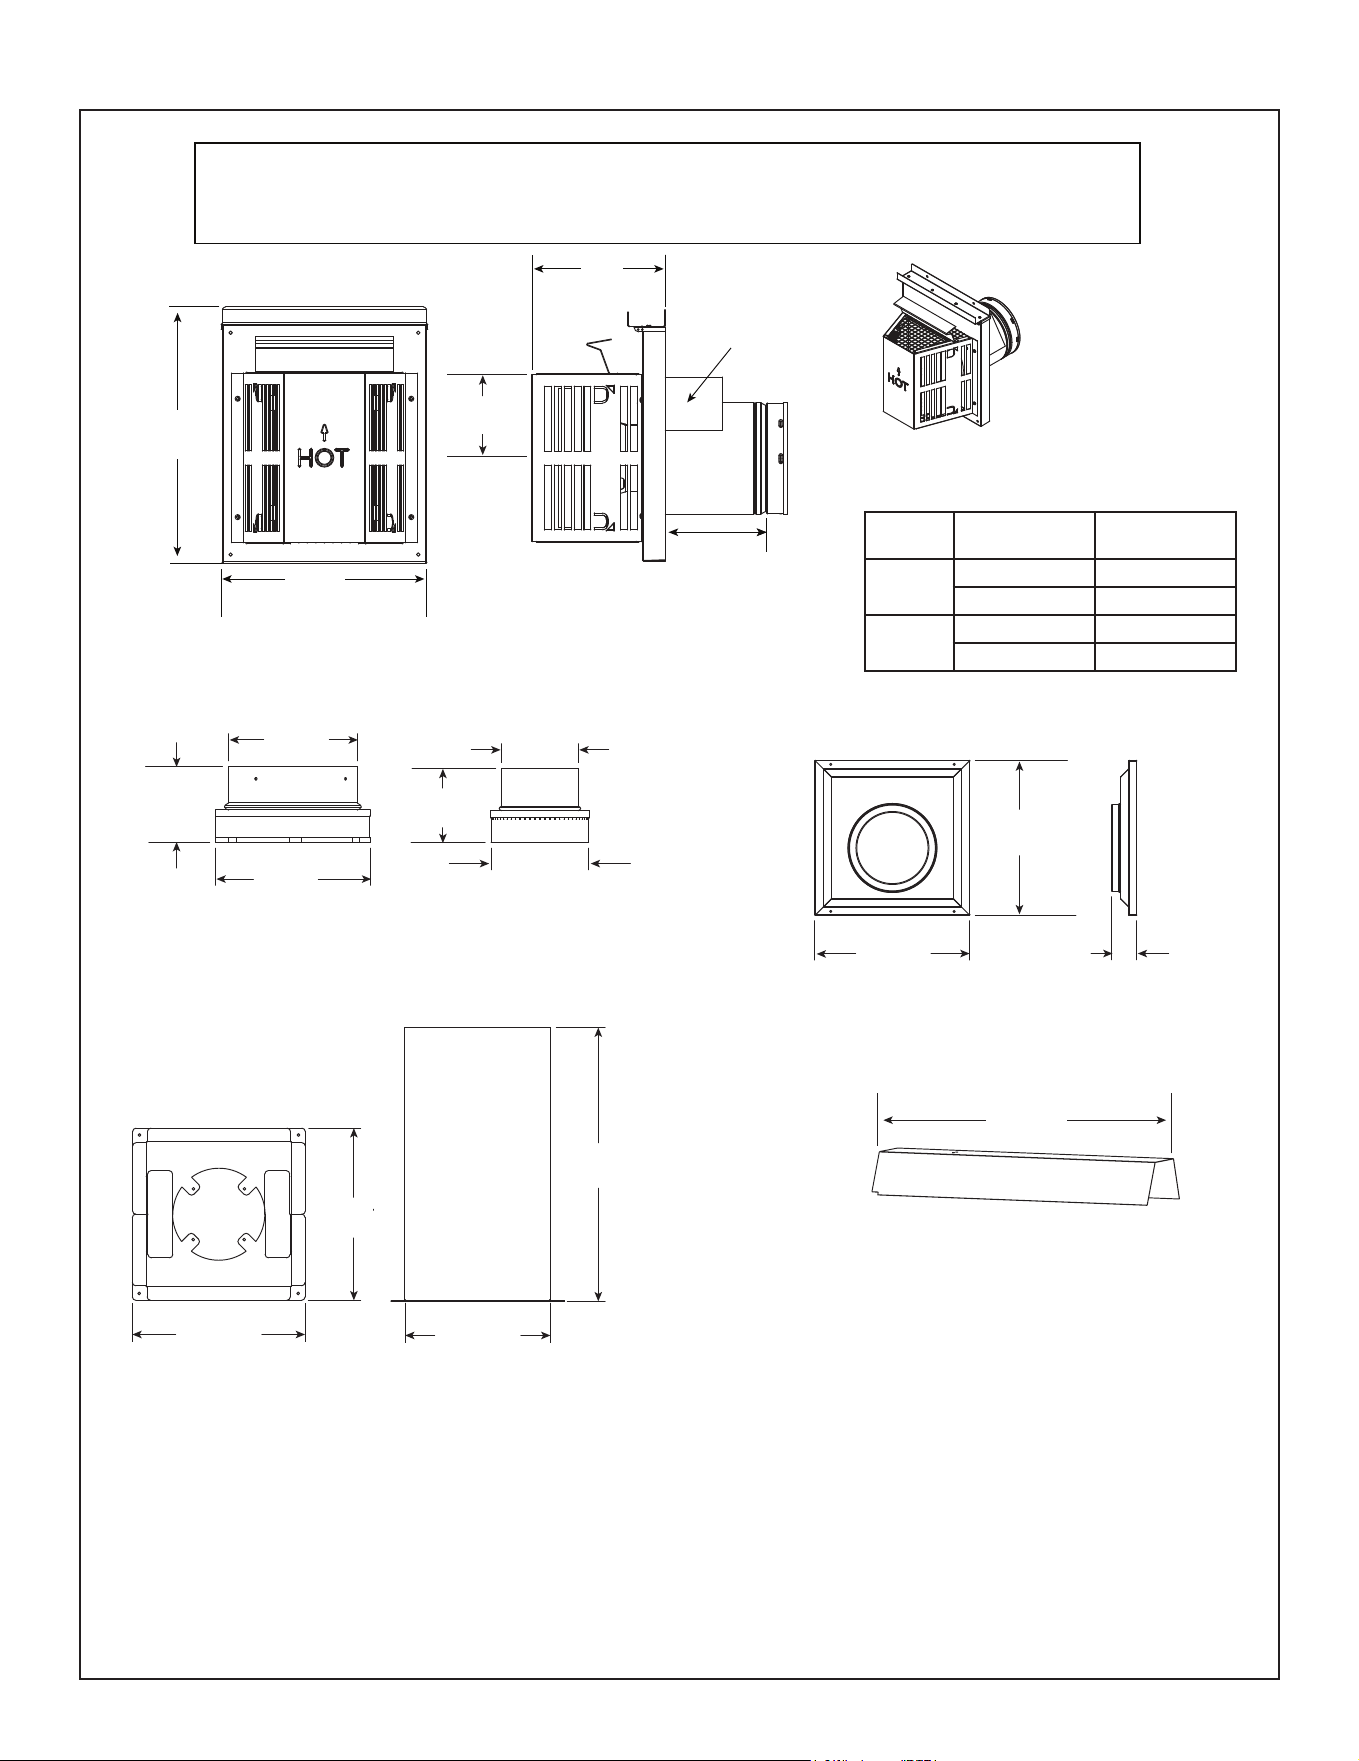
63
Hearth & Home Technologies • DVLINEAR36 Installation Manual • 2569-980 Rev. E • 11/20
A. Vent Components Diagrams (continued)
Figure 12.2 SLP Series Vent Components
SL-2DVP
Adapter
26 in.
660 mm
DVP-HSM-B
Extended Heat Shield
SLP-TRAP
Horizontal Termination Cap
15-1/8 in.
(384 mm)
Note: Heat shields MUST overlap by a minimum of 1-1/2 in. (38 mm). The heat shield is designed to be
used on a wall 4 in. to 7-1/4 in. (102 mm to 184 mm) thick. If wall thickness is less than 4 in. (102 mm)
the existing heat shields must be field trimmed. If wall thickness is greater than 7-1/4 in. (184 mm) a
DVP-HSM-B will be required.
Heat
Shield
Term Cap
Minimum
Effective Length
Maximum
Effective Length
Trap1
3-1/8 in. 4-3/4 in.
79 mm 121 mm
Trap2
5-1/4 in. 9-1/4 in.
133 mm 235 mm
8 in.
(203 mm)
12 in.
(305 mm)
Max
Effective
Length
SLP-WT-BK
Wall Thimble-Black
14-7/16 in.
367 mm
14-7/16 in.
367 mm
2-5/16 in.
59 mm
3-15/16 in.
(101 mm)
6-11/16 in.
(169 mm)
8 in.
(203 mm)
3-15/16 in.
(101 mm)
3-13/16 in.
(97 mm)
5-1/16 in.
(128 mm)
12-5/8 IN.
(321 mm)
12-5/8 IN.
(321 mm)
20 IN.
(508 mm)
10-5/8 IN.
(270 mm)
SLP-RDS
ROOF DECK INSULATION SHIELD
*5 in.
(127 mm)
* Center of the horizontal vent pipe to
the vertical measuring surface.
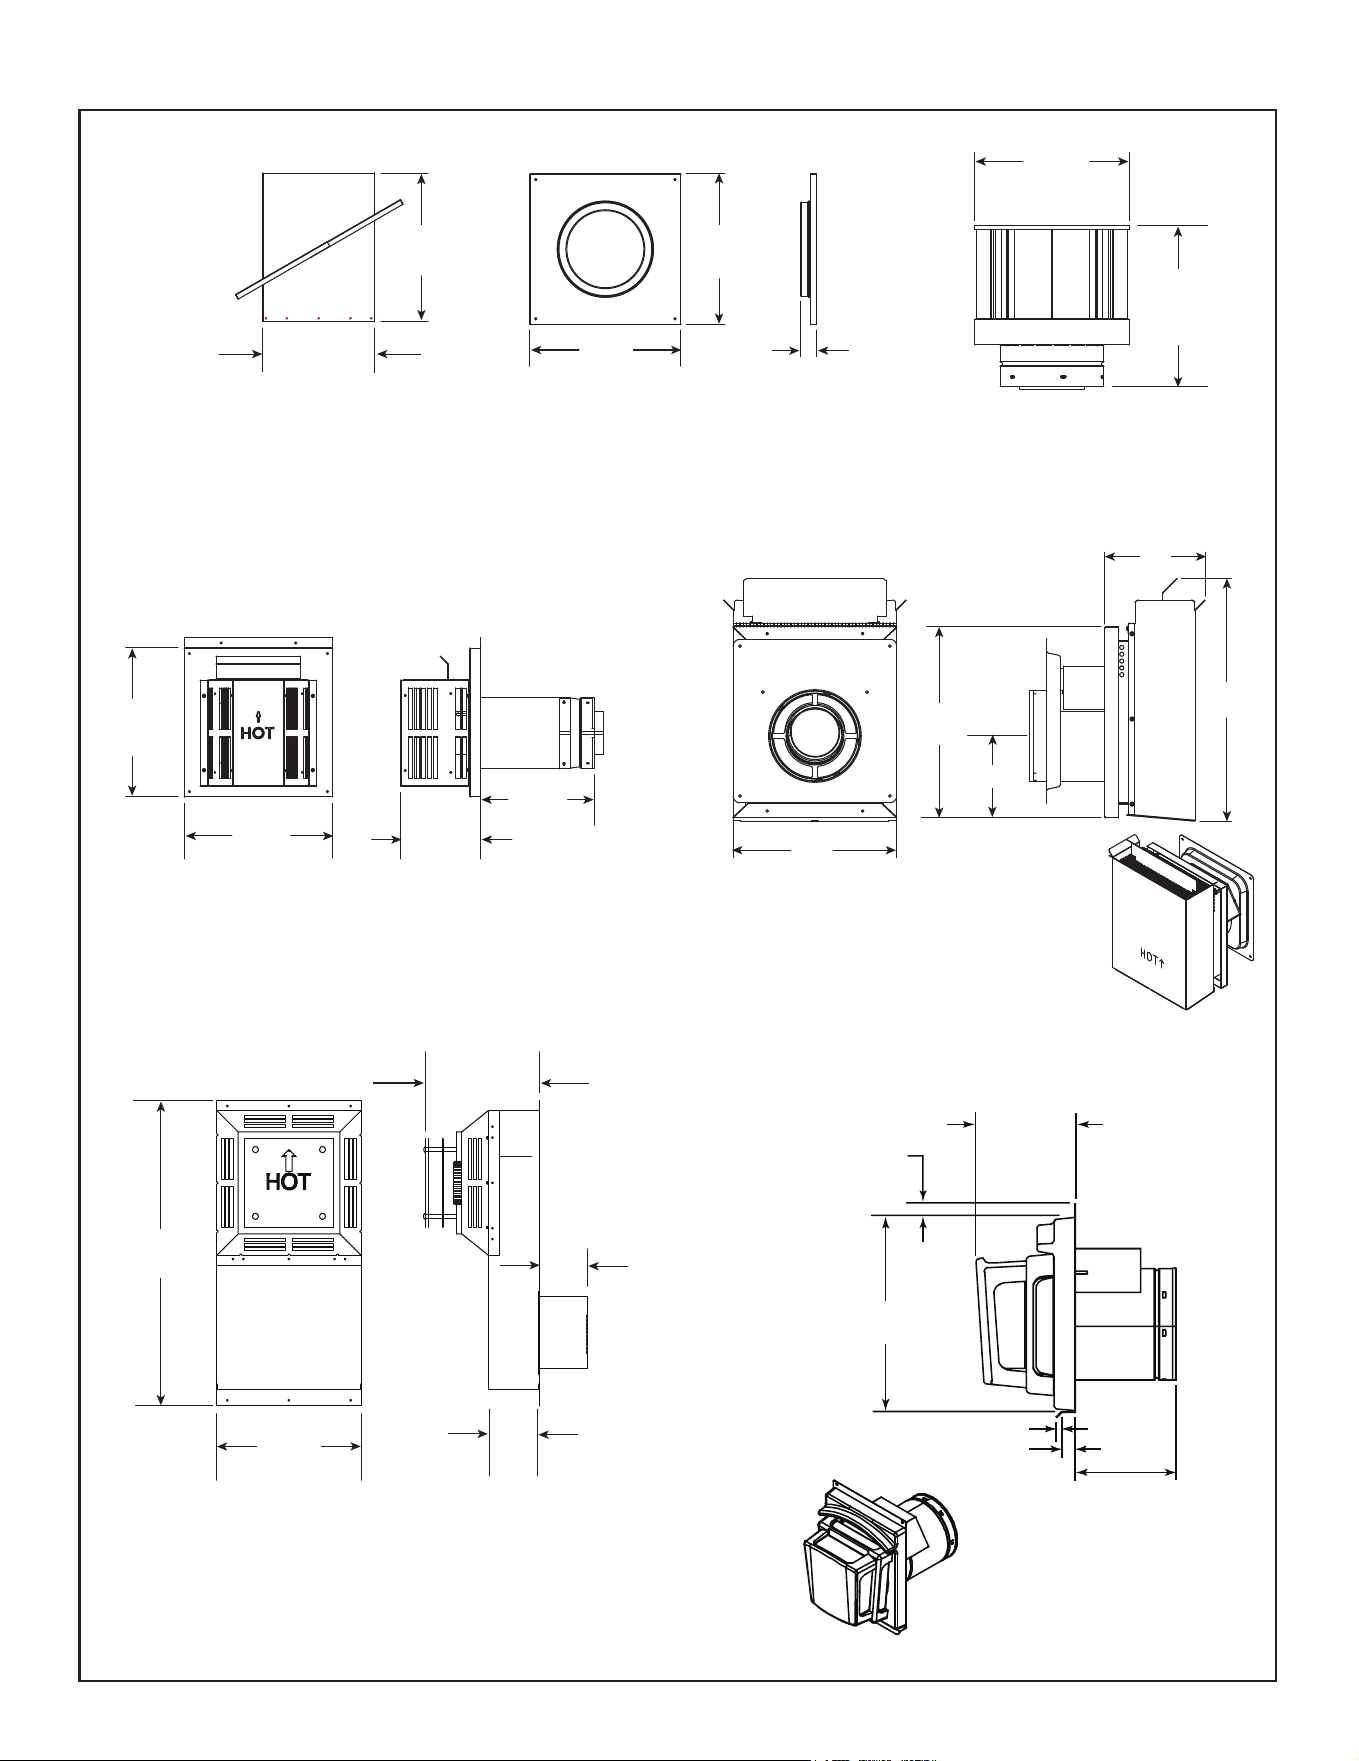
Hearth & Home Technologies • DVLINEAR36 Installation Manual • 2569-980 Rev. E • 11/20
64
1 in.
(25 mm)
14 in.
(356 mm)
3/8 in. (10 mm)
1 in. (25 mm)
7-1/4 in.
(184 mm)
7-3/4 to 10-3/8 in.
(197 to 264 mm)
13 in.
330 mm
13 in.
330 mm
1-5/16 in.
34 mm
10-9/16 in.
269 mm
14 in.
356 mm
12-1/2 in.
318 mm
12 in.
305 mm
SLP-FLEX-TRAP
Horizontal
Termination Kit
14 in.
356 mm
14-1/16 in.
357 mm
7-1/2 in.
192 mm
10-3/4 in.
273 mm
SLP-CCS-BK
Cathedral Ceiling
Support Box-Black
SLP-DCF-BK
Ceiling Firestop
Black
SLK-SNKD
Snorkel
Termination Cap
SLP-TVHW
Vertical
Termination Cap
DVP-FBHT
Horizontal
Termination Cap
13-1/2 in.
343 mm
28-1/2 in.
724 mm
10-11/16 in.
271mm
17-7/8 IN.
454 mm
7-3/8 IN.
187 mm
14 IN.
356 mm
12 IN.
305 mm
SLP-TB1
Basement Vent Cap
4-3/4 in.
121 mm
4-1/8 in.
105 mm
6 IN.
152 mm
A. Vent Components Diagrams (continued)
Figure 12.3 SLP Series Vent Components
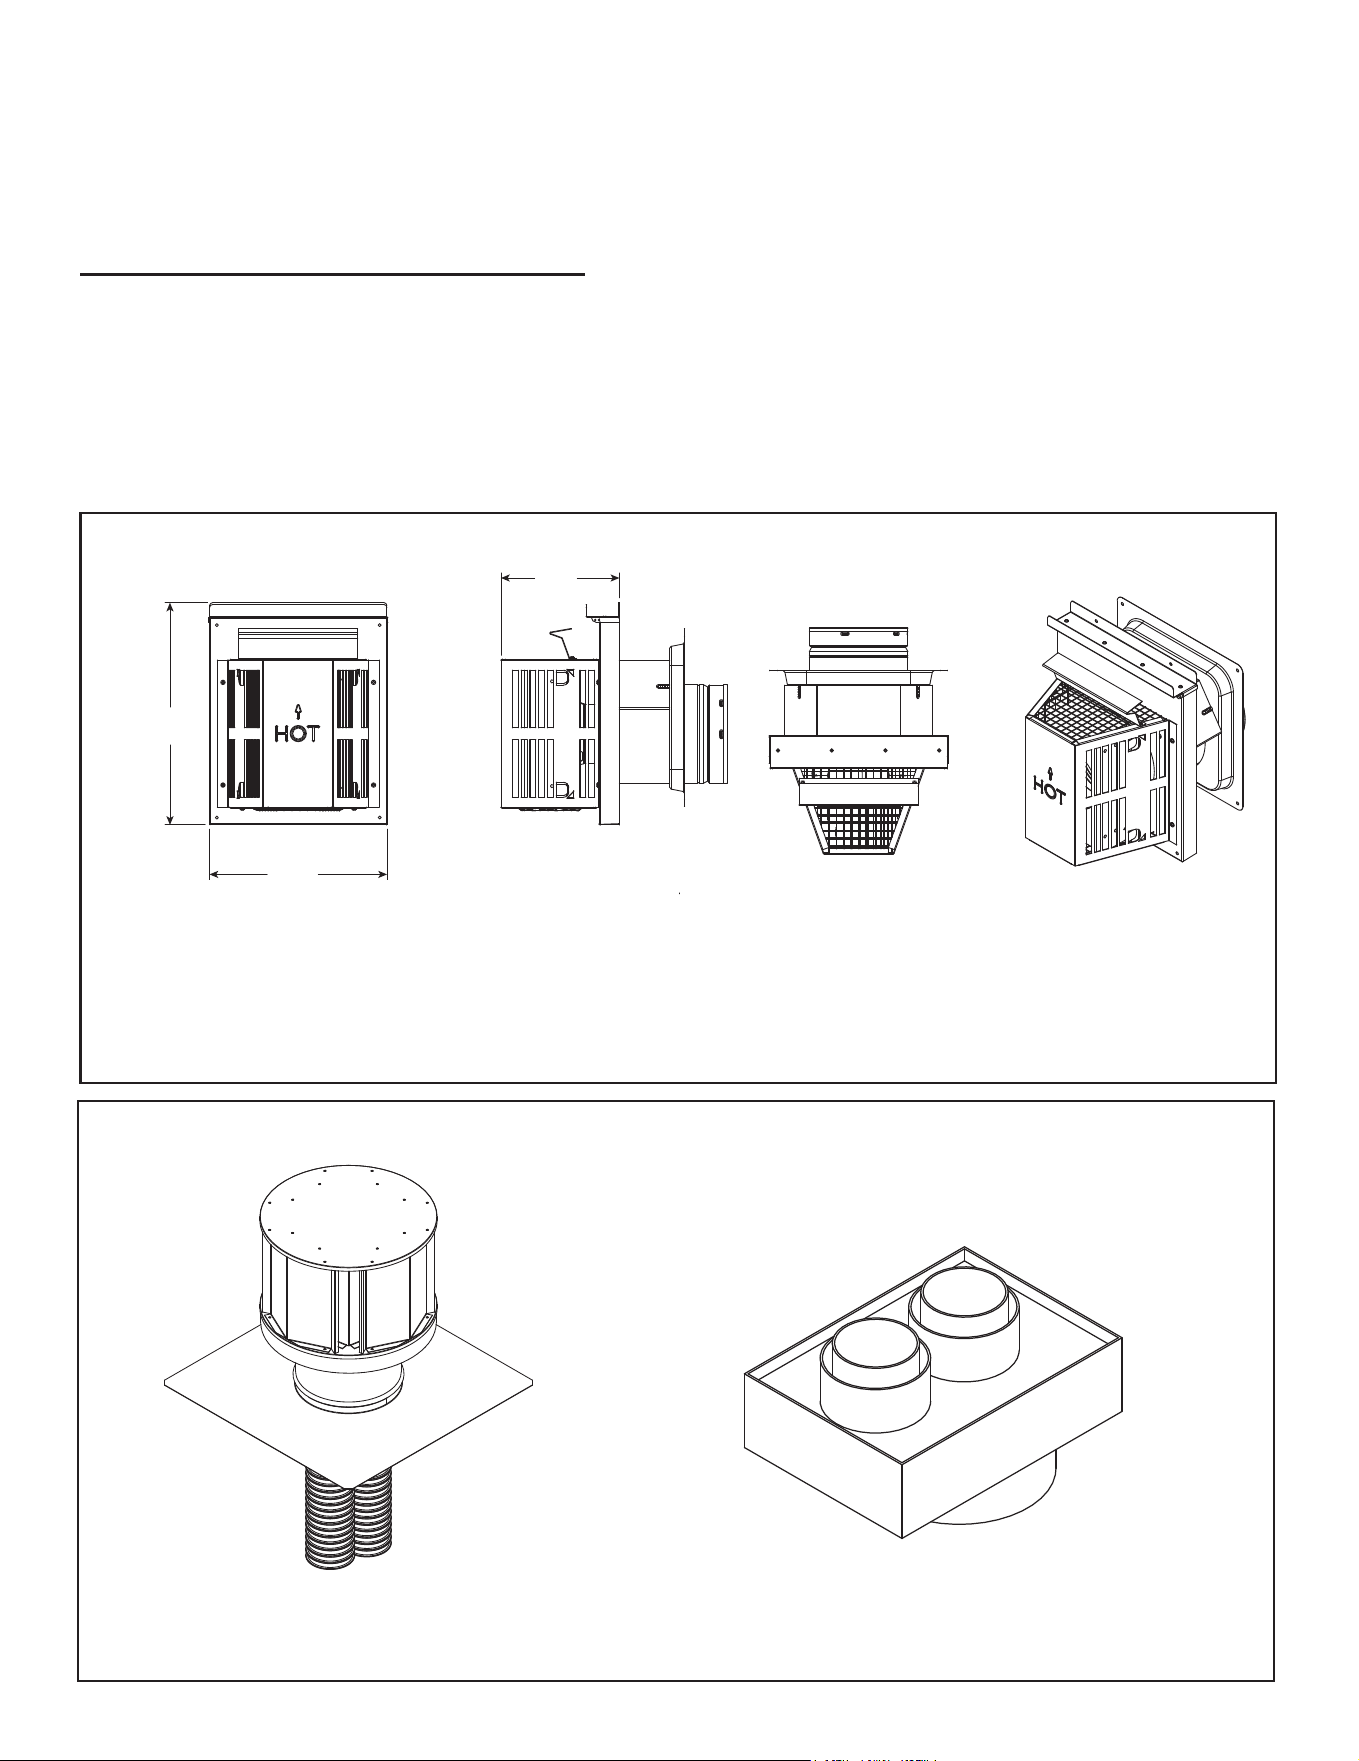
65
Hearth & Home Technologies • DVLINEAR36 Installation Manual • 2569-980 Rev. E • 11/20
LINK-DV30B
Flex Liner Kit
DV-46DVA-GCL
Coaxial/Colinear Appliance Connector
COAXIAL to COLINEAR VENTING
Figure 12.5 Coaxial to Colinear Vent Components
SLP-HHW2
Horizontal High Wind Termination Cap
15 IN.
(381 mm)
12 IN.
(305 mm)
8 IN.
(203 mm)
Figure 12.4 SLP series Vent Components
A. Vent Components Diagrams (continued)
DECORATIVE TERMINATIONS/SHROUDS
Only use listed decorative termination caps/shrouds with Hearth & Home Technologies approved venting systems.
This applies to both DVP and SLP venting systems.
Decorative Terminations Caps/Shrouds
DTO134 LDS33
DTO146 LDS46
DTS134 LDS-BV
DTS146
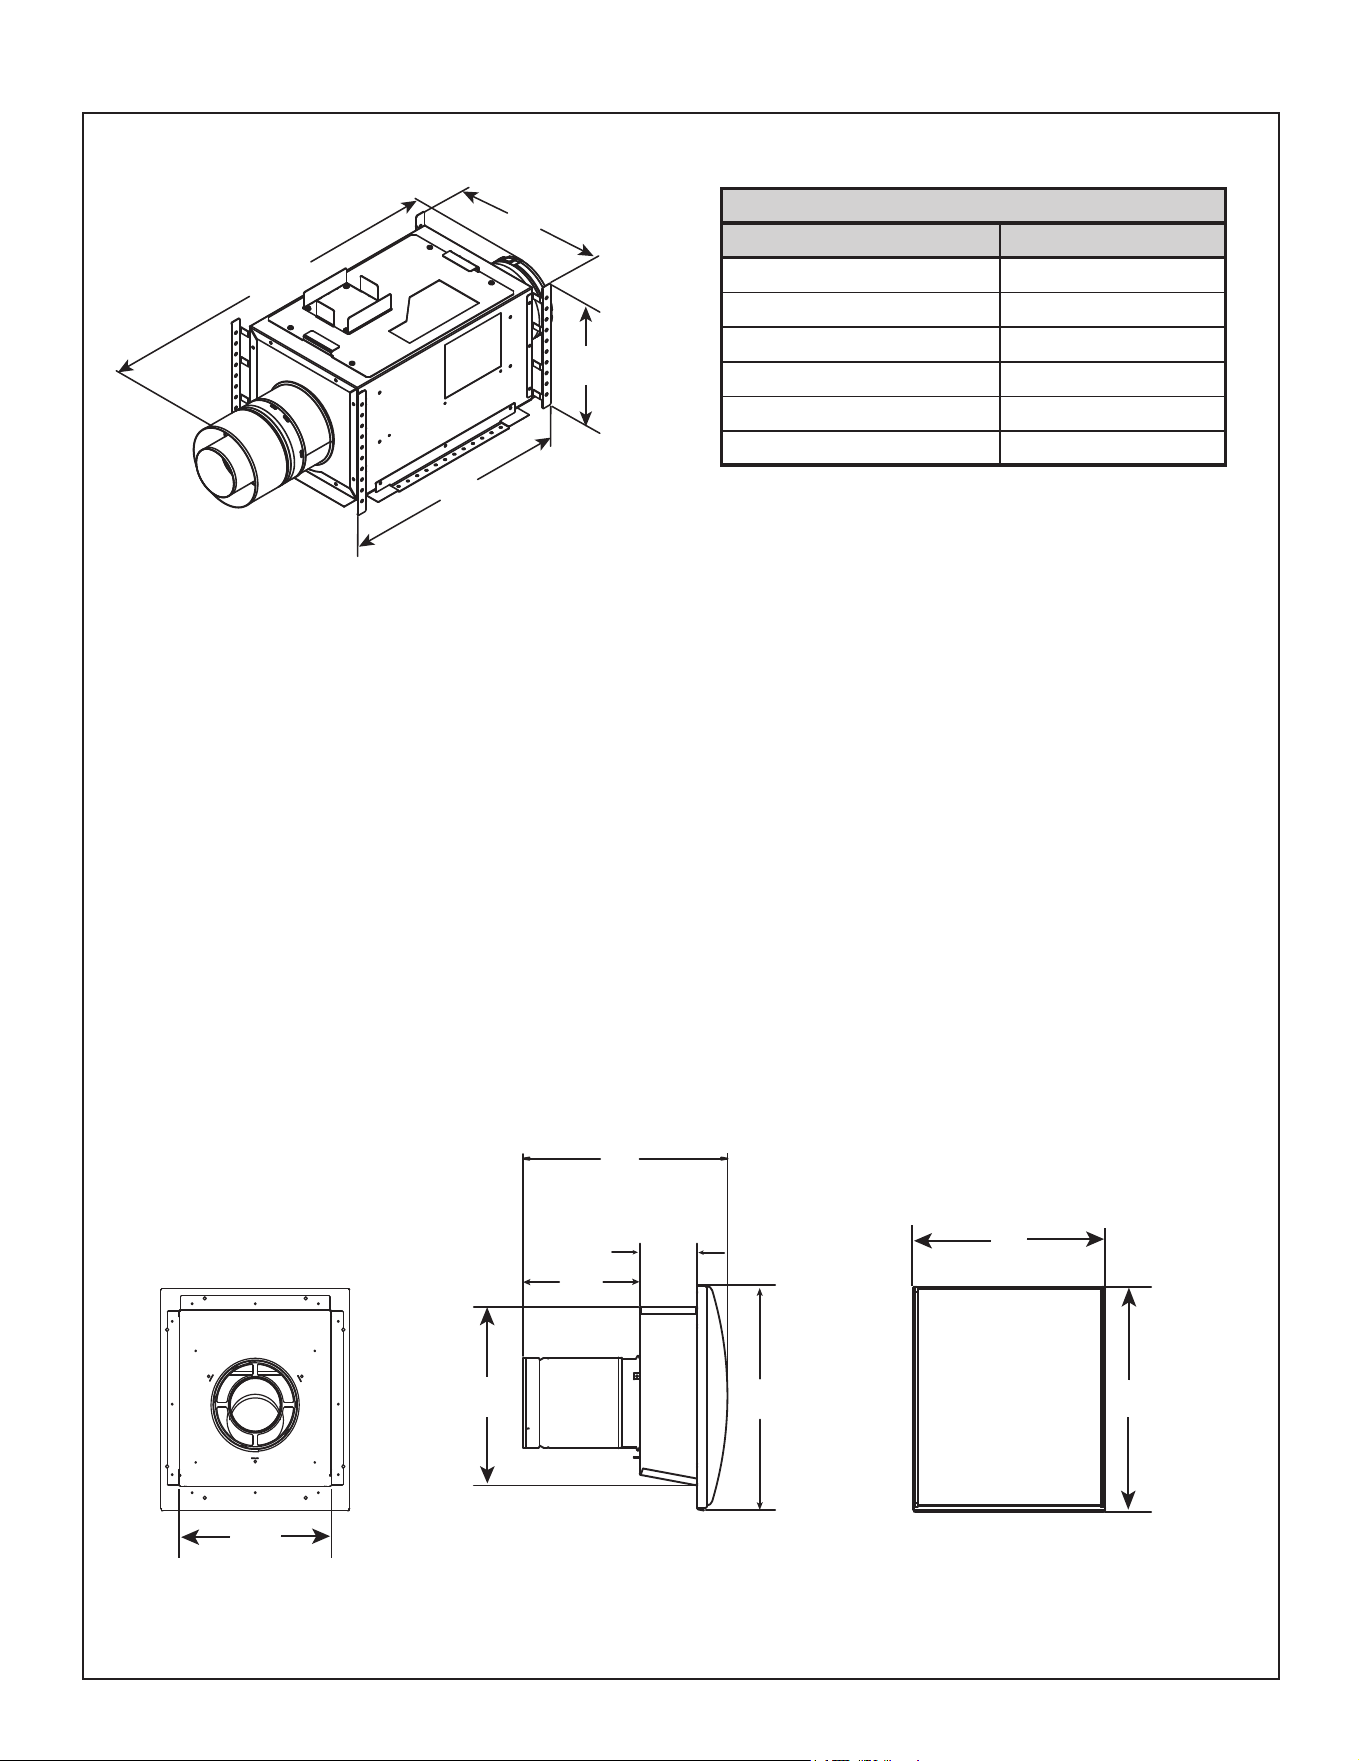
Hearth & Home Technologies • DVLINEAR36 Installation Manual • 2569-980 Rev. E • 11/20
66
Figure 12.6 PVI-SLP-B Vent Components
Optional Wire Harness
DESCRIPTION PART NUMBER
10 FT PV Wire Harness PVI-WH10
20 FT PV Wire Harness PVI-WH20
40 FT PV Wire Harness PVI-WH40
60 FT PV Wire Harness PVI-WH60
80 FT PV Wire Harness PVI-WH80
100 FT PV Wire Harness PVI-WH100
PVI-SLP-B
Power Vent Inline
SLP-LPC
SLP Low Prole Cap
(Approved for use with PVI-SLP-B only)
Note: Wire harnesses required to power the PVI-SLP-B connect to the appliance and are ordered separately from
PVI-SLP-B. Contact your dealer to order.
16 IN.
406 mm
15 IN.
(381 mm)
16-11/16 IN.
(424 mm)
9-3/16 IN.
(233 mm)
4-1/2 IN.
114 mm
16-11/16 IN.
424 mm
13-5/8 IN.
(346 mm)
12-1/2 IN.
(318 mm)
12-1/2 IN.
318 mm
20-3/4 IN.
527 mm
13-5/8 IN.
346 mm
EFFECTIVE LENGTH
32 IN. (813 mm) MIN.
35 IN. (889 mm) MAX.
A. Vent Components Diagrams (continued)
Note: The PVI-SLP-B requires a PV-IPI-CK be installed on this appliance. The PV-IPI-CK is ordered separately from
the PVI-SLP-B. Contact your dealer to order.
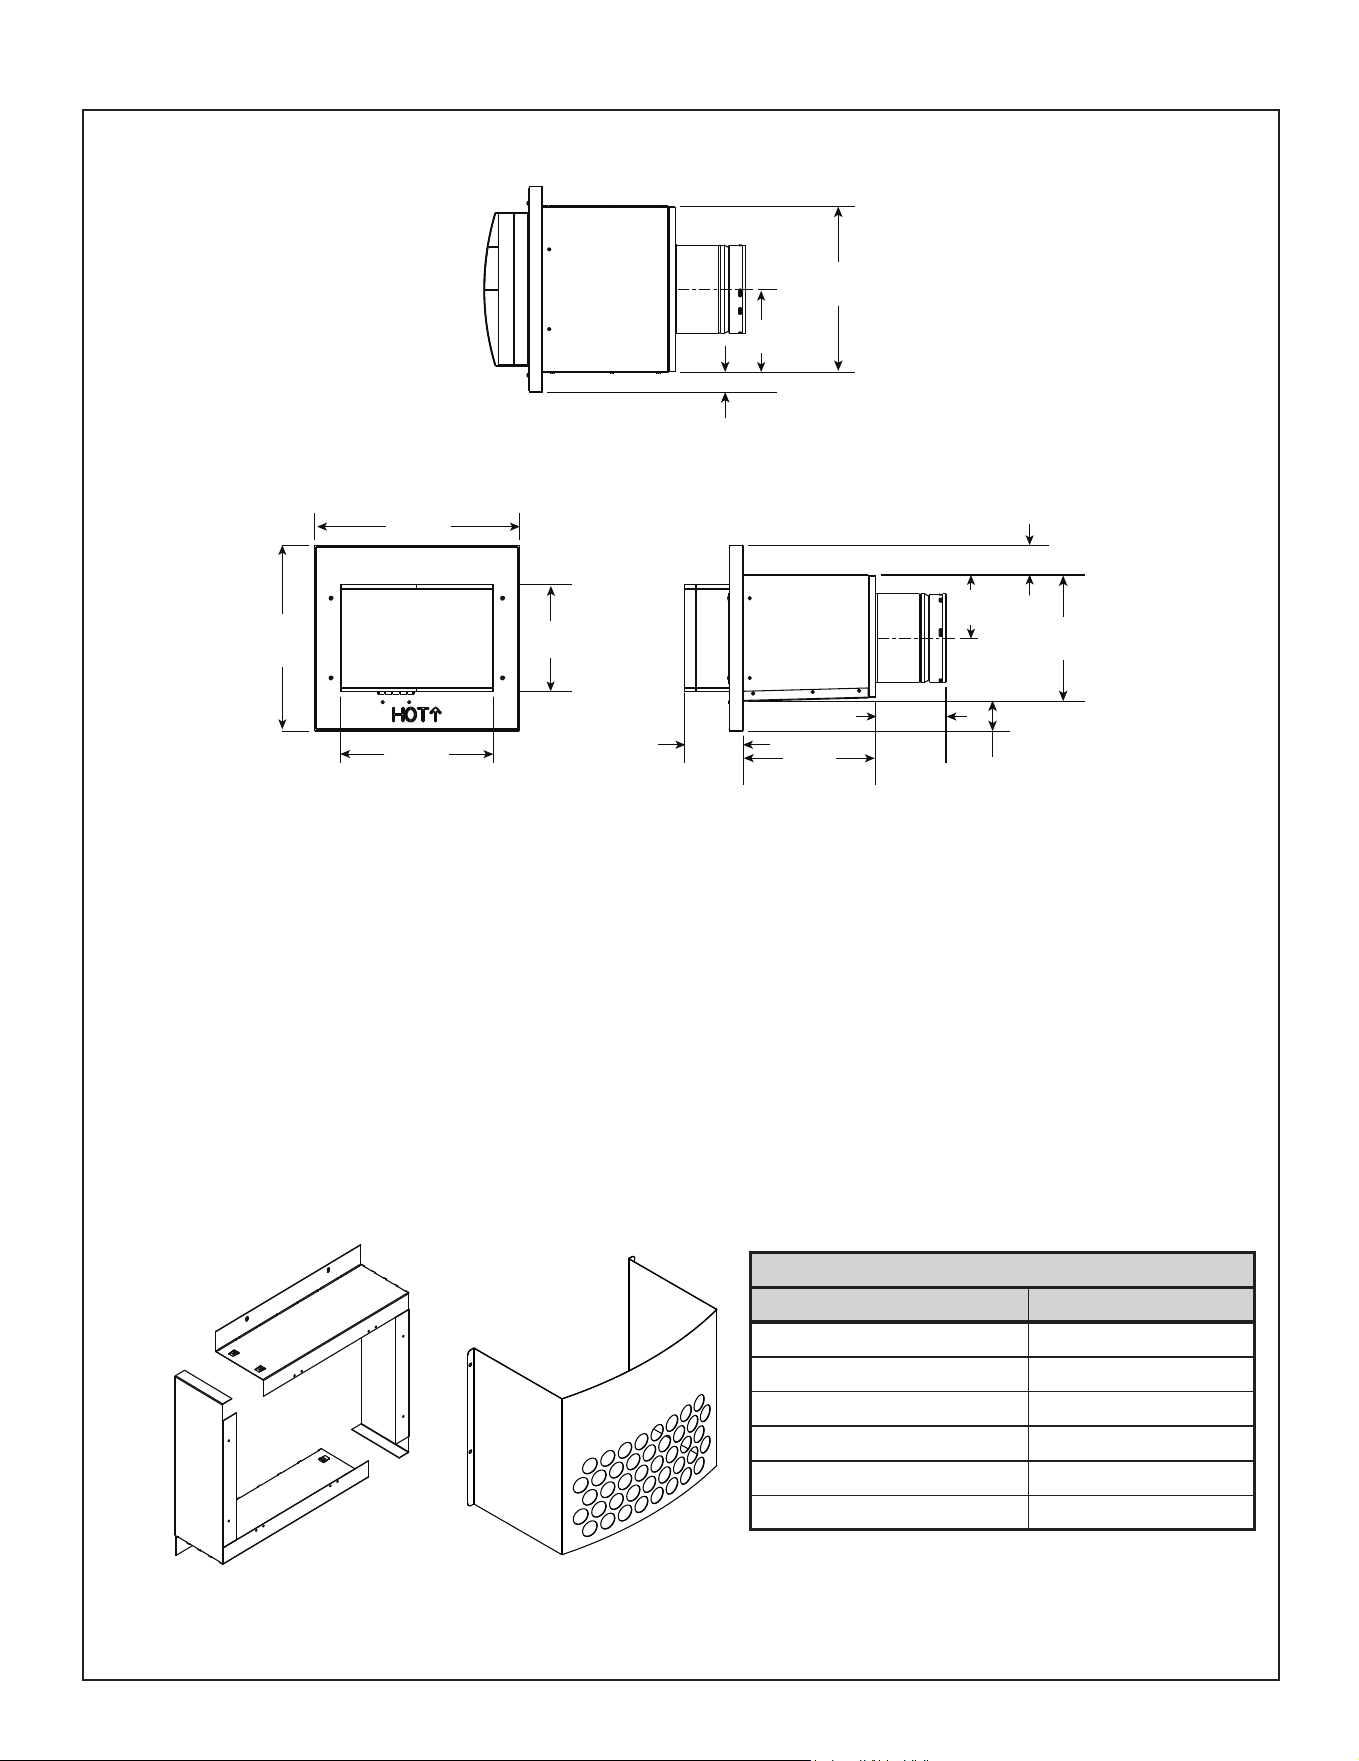
67
Hearth & Home Technologies • DVLINEAR36 Installation Manual • 2569-980 Rev. E • 11/20
A. Vent Components Diagrams (continued)
Required Wire Harness
DESCRIPTION PART NUMBER
10 FT PV Wire Harness PVI-WH10
20 FT PV Wire Harness PVI-WH20
40 FT PV Wire Harness PVI-WH40
60 FT PV Wire Harness PVI-WH60
80 FT PV Wire Harness PVI-WH80
100 FT PV Wire Harness PVI-WH100
Note: Wire harnesses required to power the PVLP-SLP connect to the appliance and are ordered separately from
PVLP-SLP. Contact your dealer to order.
Figure 12.7 PVLP-SLP Vent Components
PVLP-HS
Heat Shield
14 IN.
356 mm
15-1/2 IN.
394 mm
11-1/2 IN.
292 mm
8 IN.
203 mm
4-3/8 IN.
112 mm
10 IN.
254 mm
5-1/4 IN.
135 mm
2-1/4 IN.
57 mm
9-1/2 IN.
241 mm
4-3/4 IN.
121 mm
2-1/4 IN.
57 mm
1-1/2 IN.
38 mm
6-1/4 IN.
159 mm
Front View
Top View
Side View
Note: A PVLP-HS heat shield is available and sold separately. Use if the PVLP-SLP is installed in a high trac area.
PVLP-BEK
Brick Kit
PVLP-SLP
Power Vent Low Prole
Note: The PVLP-SLP requires a PV-IPI-CK be installed on this appliance. The PV-IPI-CK is ordered separately from
the PVLP-SLP. Contact your dealer to order.
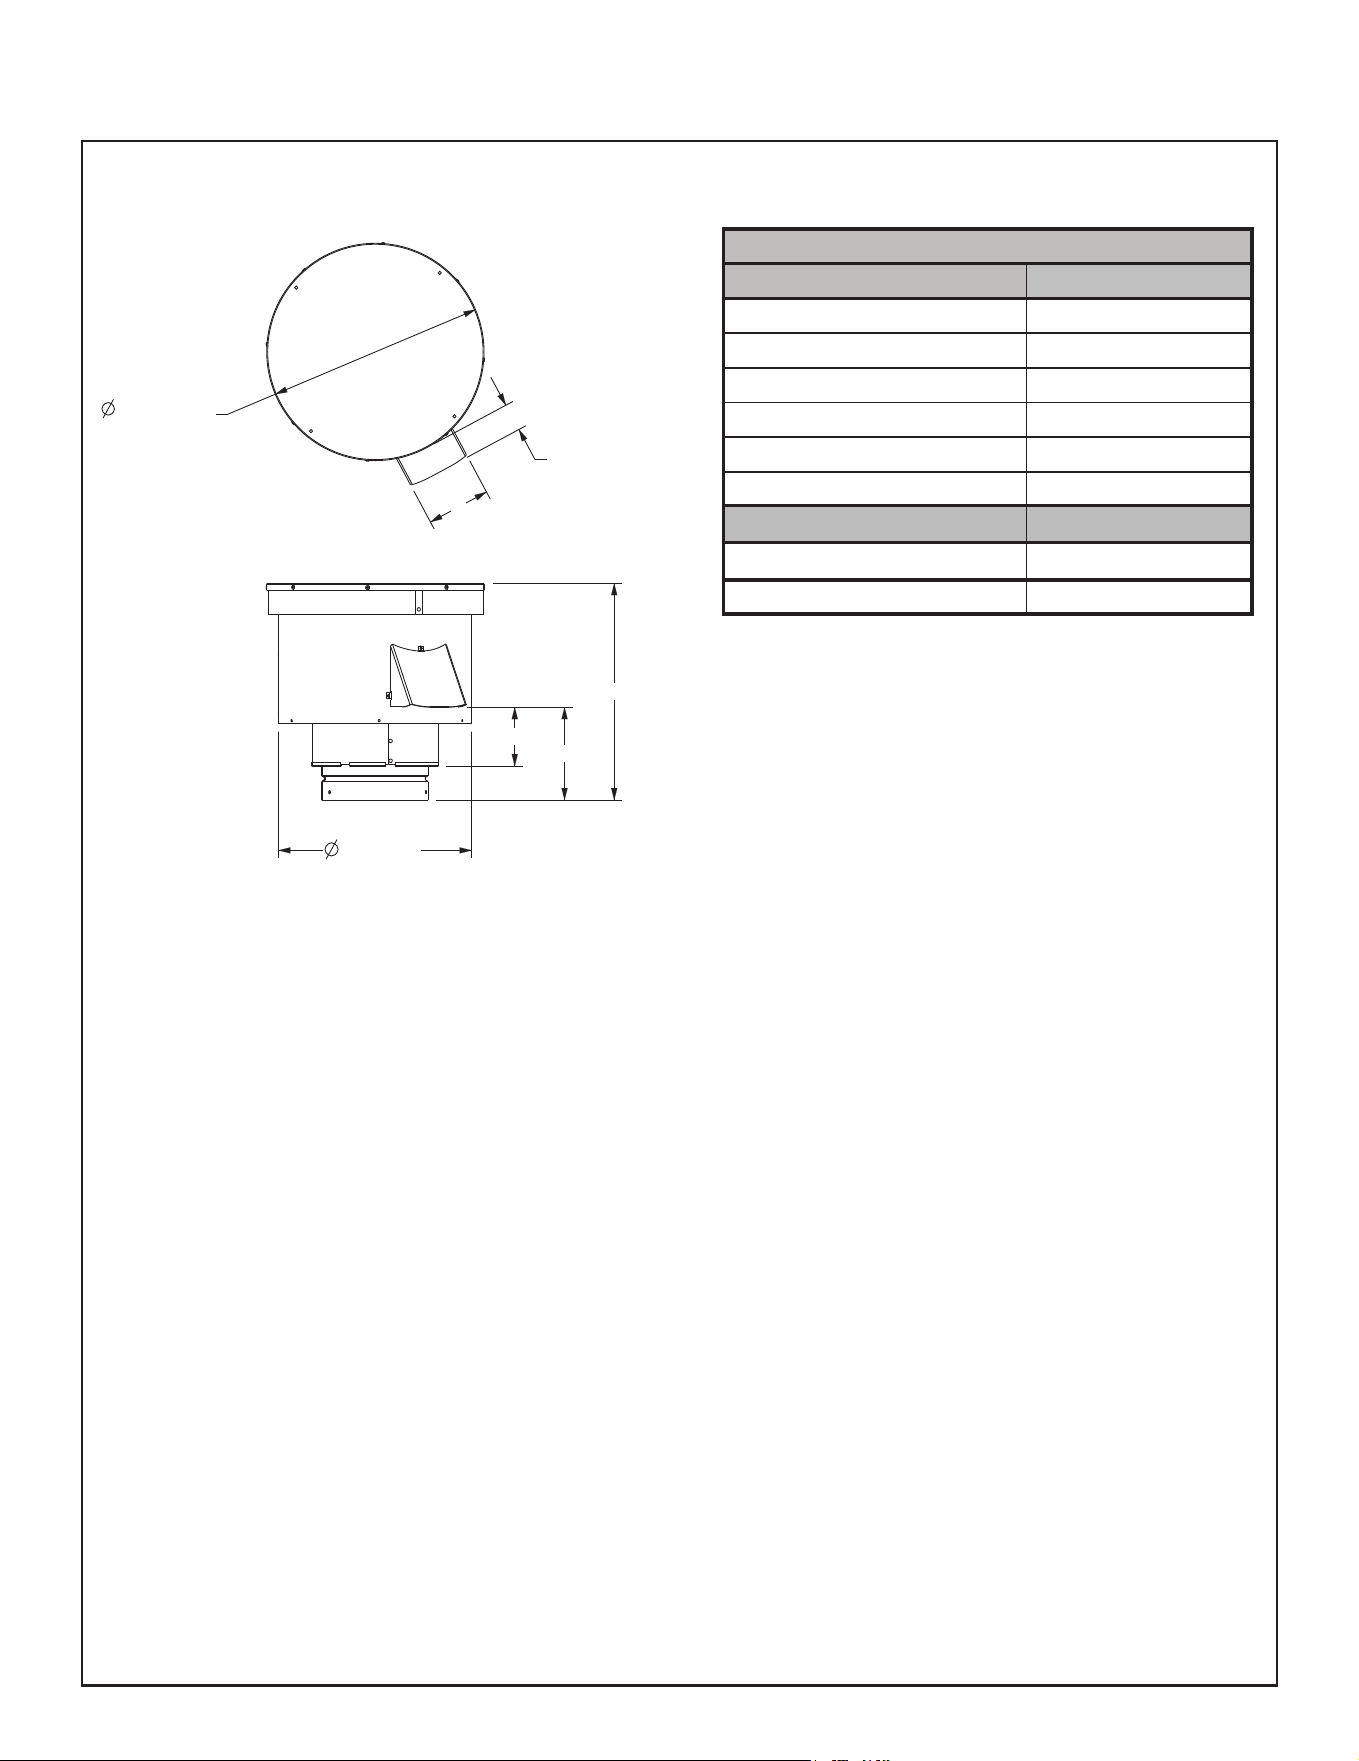
Hearth & Home Technologies • DVLINEAR36 Installation Manual • 2569-980 Rev. E • 11/20
68
Figure 12.8 PVV-SLP Vent Components
13-5/8 IN.
13-11/16 IN.
1-3/4 IN.
4 IN.
5-7/8 IN.
3-11/16 IN.
12-1/8 IN.
TOP VIEW
SIDE VIEW
Required Wire Harness and PVV-SLEEVE
Lengths Available Part Number
10 ft. PV Wire Harness PVI-WH10
20 ft. PV Wire Harness PVI-WH20
40 ft. PV Wire Harness PVI-WH40
60 ft. PV Wire Harness PVI-WH60
80 ft. PV Wire Harness PVI-WH80
100 ft. PV Wire Harness PVI-WH100
Description Part Number
12 in. Wire Harness Sleeve PVV-SLEEVE-12
48 in. Wire Harness Sleeve PVV-SLEEVE-48
PVV-SLP
Vertical Power Vent
Note: A wire harness is required to power the PVV-SLP and connect it to the appliance. It is ordered separately from
the PVV-SLP. Contact your dealer to order.
Note: The PVV-SLEEVE-12 and/or PVV-SLEEVE-48 is required to be installed with the PVV-SLP. It is ordered
separately from the PVV-SLP. Contact your dealer to order.
A. Vent Components Diagrams (continued)
Note: The PVV-SLP requires a PV-IPI-CK be installed on this appliance. The PV-IPI-CK is ordered separately from
the PVV-SLP. Contact your dealer to order.

69
Hearth & Home Technologies • DVLINEAR36 Installation Manual • 2569-980 Rev. E • 11/20
B. Accessories
Remote Controls, Wall Controls and Wall
Switches
Follow the instructions supplied with the control installed
to operate your replace:
For safety:
• Install a switch lock or a wall/remote control with child
protection lockout feature.
• Keep remote controls out of reach of children.
See your dealer if you have questions.
Printed in U.S.A. - Copyright 2020
Hearth & Home Technologies
7571 215
th
Street West, Lakeville, MN 55044
www.hearthnhome.com
Please contact your Hearth & Home Technologies dealer with any questions or concerns.
For the location of your nearest Hearth & Home Technologies dealer,
please visit www.hearthnhome.com.
WARNING! Risk of Fire and Electric Shock! Use ONLY
Hearth & Home Technologies-approved optional acces-
sories with this appliance. Using non-listed accessories
could result in a safety hazard and will void the warranty.
Install approved accessories per instructions included
with accessories. Contact your dealer for a list of ap-
proved accessories.
It is recommended that optional accessories are installed
prior to installation of nishing material. If nishing mate-
rial is already installed, the optional accessories must be
installed by removing the basepan, burner and valve as-
sembly. Use only Hearth & Home Technologies-approved
optional accessories with this appliance.
Optional Heat Management Systems
After a qualied service technician has installed the Pas-
sive Heat Kit, follow the instructions supplied with the kit
for operation. Contact your dealer if you have questions.
Note: Optional heat management systems kit must be
installed while the top of the appliance is accessible.