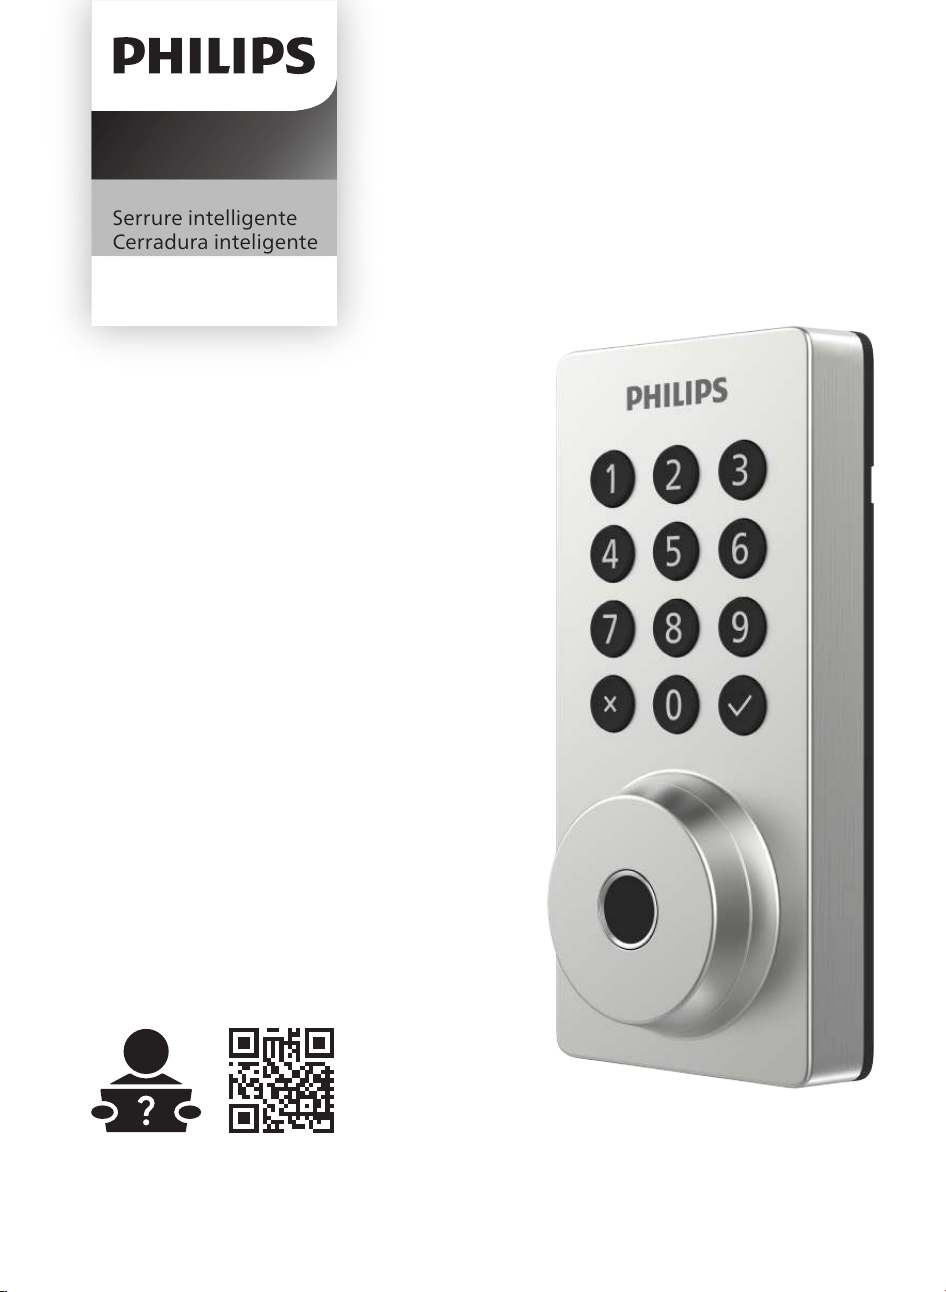
Smart deadbolt
Serrure intelligente
Cerradura inteligente
Home Access
4200 series
Séries 4200
Serie 4200
EN User Manual 02
FR Mode d'Emploi 27
ES Manual del usuario 52
www.philips.com/support

1 Warnings & Safety
02
02
2 How to Install
03
3 How to Setup 13
Parts List
Assembly View
Install the Lock
Remove the Batteries
Download the Philips Home Access App
Create a User Account
Add the Device
5 Troubleshooting
22
4 How to Use 14
Feature De�nitions
Factory Reset & Default Settings
Credential Type and Maximum Capacity
Program the Lock
Lock & Unlock
Safety
Caution
Returns & Disposal
6 Warranty 24
25
8 ISED Statement 25
7 FCC Statement
Contents
EN
Introduction
◆ Before using this product, please read and understand all instructions. Damage caused
by failure to follow the instructions is not covered by the warranty.
◆ Only use components the manufacturer provided and suggested accessories.
◆ Only use AA alkaline batteries.
◆ Do not forcibly disassemble the product to trigger an alarm or damage the product.
◆ Do not scrape the �ngerprint sensor with sharp objects as this may cause permanent
damage.
◆ Do not remove the batteries during lock setup and operation.
◆ Change the default master PIN code immediately via the Philips Home Access app after
completing the installation.
Caution
◆ Do not place the batteries near �re sources.
◆ Do not connect the 2 poles of the batteries to metals to avoid a short circuit and
potential explosion.
◆ Any replacement component should be performed by Philips, a Philips-authorized
service center, or a professional technician.
◆ Do not use parts or accessories manufactured by others, except batteries.
◆ Do not expose products to places that have water leakage or splashing.
Returns & Disposal
◆ Locks can be returned at an authorized Philips service center. Appropriate compensation
will be provided if the returned product meets Philips's conditions.
◆ Please follow local regulations and do not throw the used products or batteries into
normal household waste.
1 Warnings & Safety
Safety
Congratulations on your purchase and welcome to Philips Smart Security family!
To fully bene�t from the support that Philips Home Access offers, register your product at
www.philips.com/myphilips
Introduction
Keep track of your product warranty coverage
Qualify for cash-back, gifts and special offers
Get easy access to product support
Register your product
EN-2

2 How to Install
Parts List
*8 AA alkaline batteries are required and need to be purchased separately.
Parts List
User Manual
Mechanical Keys
Drilling Template
User
Manual
Quick Start
Guide
Quick Start Guide
Strike Plate
Screws (2)
Latch Bolt
Screws (2)
Strike Plate
Exterior Assembly Latch Bolt Mounting Plate
Battery Cover Interior Assembly Mounting Plate
Screws (2)
Interior Assembly
4
Screws (5) (2 Spare)
EN-3
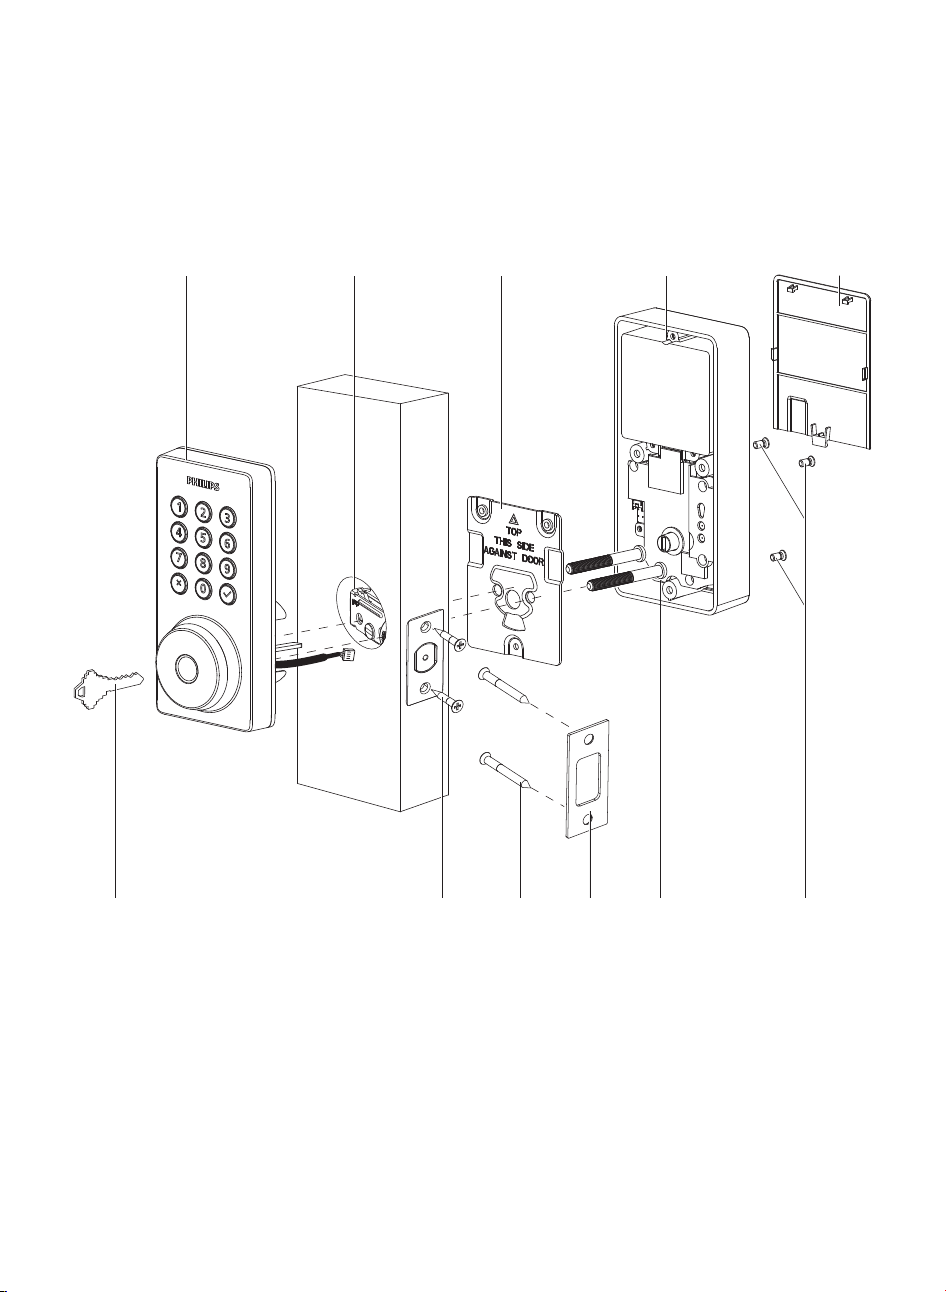
Assembly View
Interior Assembly Screws (3)
1.
2.
3.
4.
5.
Exterior Assembly
Latch Bolt
Mounting Plate
Interior Assembly
6.
Battery Cover
7. Mounting Plate Screws (2)
8.
10.
9.
11.
Strike Plate Screws (2)
Strike Plate
Mechanical Keys (2)
Latch Bolt Screws (2)
21 3
7910 811
54
6
EN-4
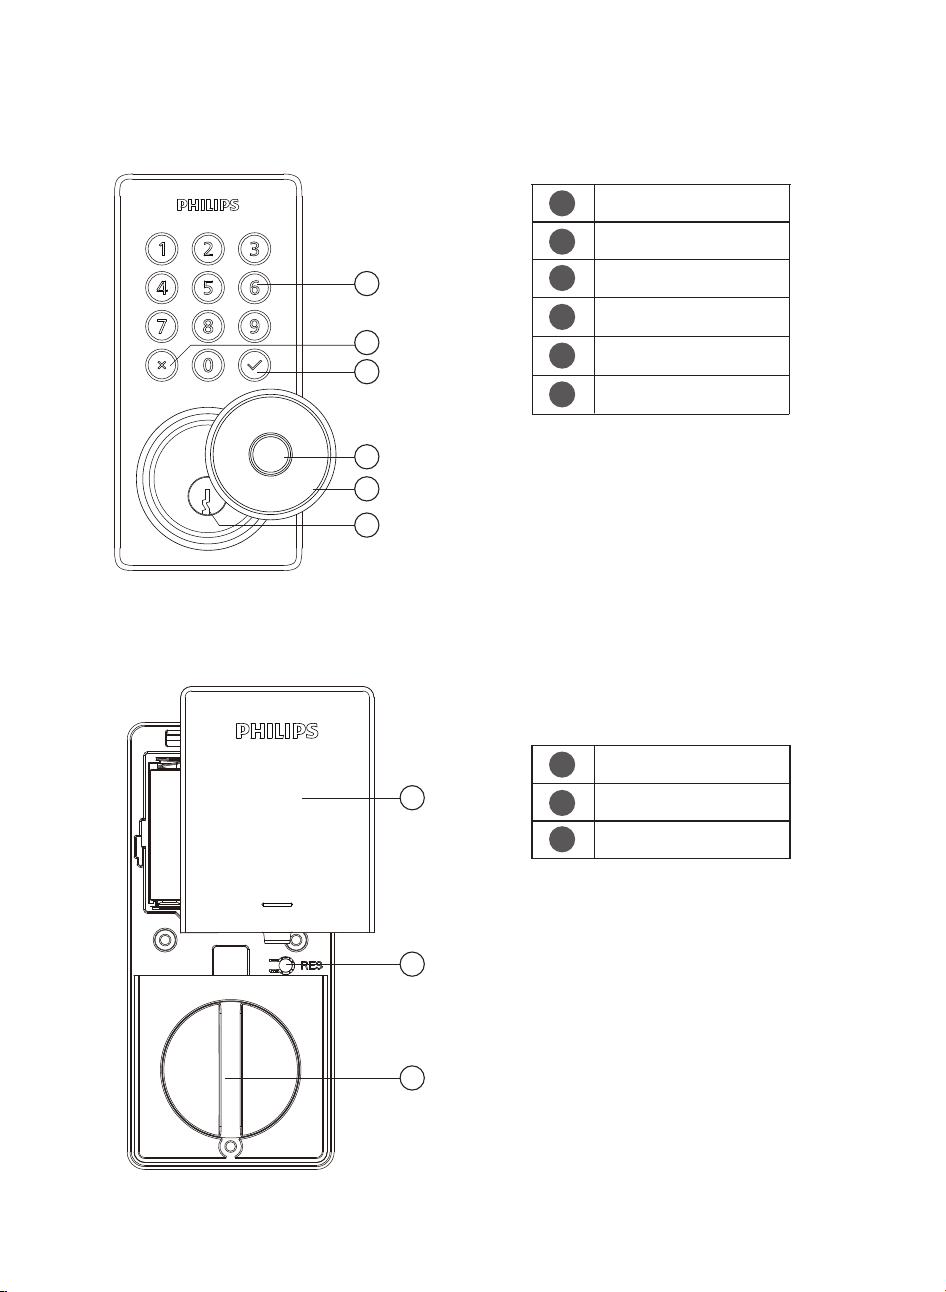
Exterior Assembly
Interior Assembly
Keypad
Cancel Key
Con�rm Key with Backlit
Indicator
Reset Button
Thumb Turn
1
2
3
4
Fingerprint Sensor
5
Keyhole Cover
6
Keyhole
Battery Cover
1
2
3
1
3
2
5
6
4
1
2
3
EN-5
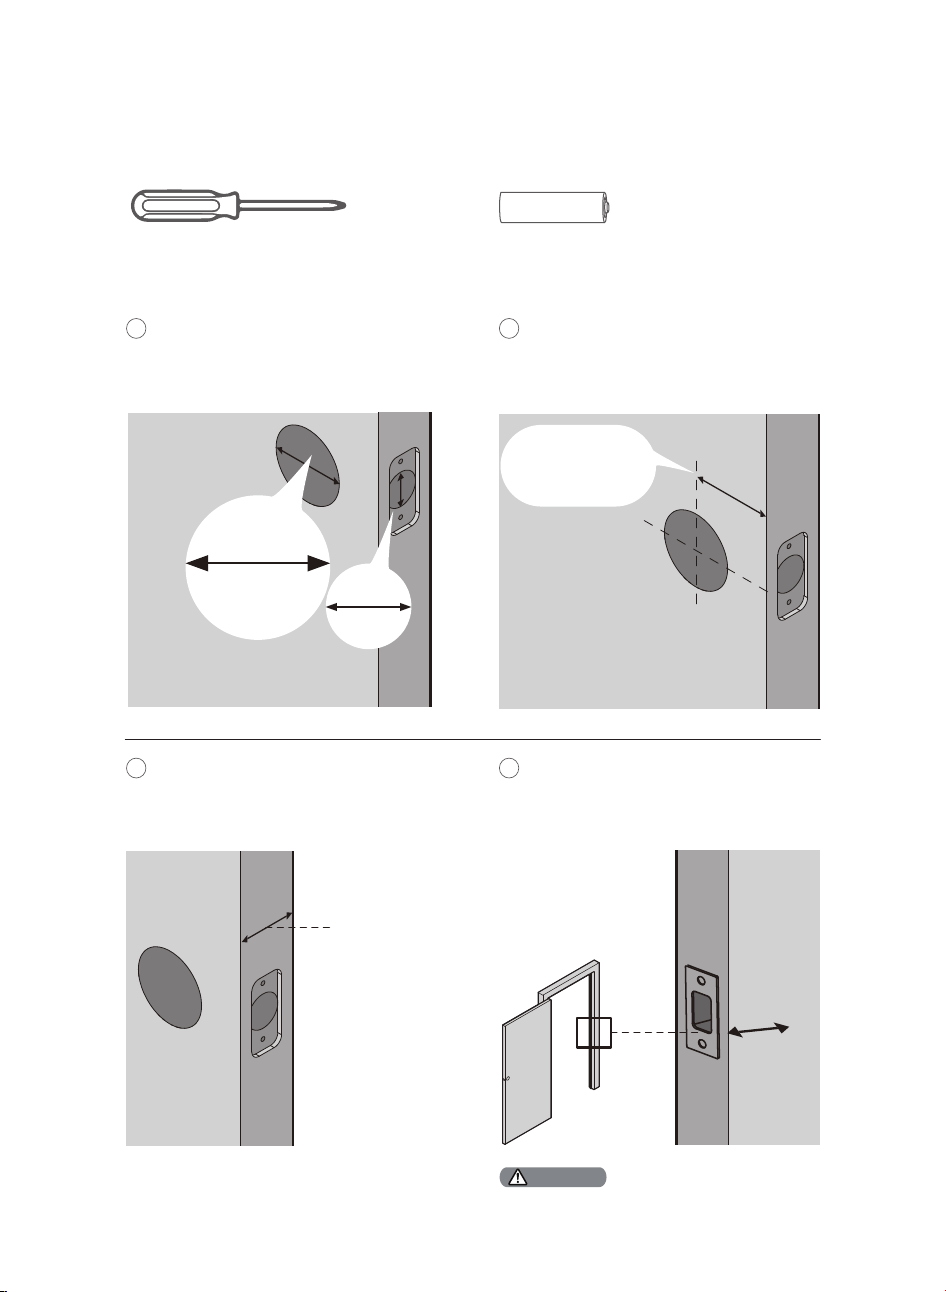
Measure to con�rm that the hole in the
door is 1-1/2’’ or 2-1/8" (38mm or 54mm).
Measure to con�rm that the hole in the
door edge is 1" (25mm).
Install the Lock
1
Measure to con�rm that the backset is
either 2-3/8" or 2-3/4" (60mm or 70mm).
2
1’’
25 mm
Prepare the Door and Check the Dimensions
Required Tools
2-3/8’’ or 2-3/4’’
(60mm or 70mm)
Backset
Measure to con�rm that the door is
1-3/8" to 2" (35mm to 50mm) thick.
3
Make sure the hole in the door frame is
drilled a minimum of 1’’ (25mm) deep to
leave enough space for the deadbolt to
extend into the door frame when the
door is locked.
4
1-3/8’’ to 2’’
(35mm to 50mm)
1’’
25mm
Make sure the door frame is aligned with the door
and there are no obstructions in the door frame.
Attention
1-1/2" or 2-1/8"
(38mm or 54mm)
#2 Phillips Screwdriver 8 AA alkaline batteries (purchased separately)
EN-6
Determine the backset and adjust the Latch Bolt.
5
Hold the Latch Bolt in front of the door hole, with the
Latch Bolt face �ush against the door edge. Is the
slotted hole centered in the door hole?
No adjustment is required.
Proceed to the next step.
YES
The slotted hole is
NOT centered.
Rotate and pull the
Latch Bolt as
shown to extend it.
NO
2-3/4"
(70mm)
2-3/8"
(60mm)
pull
Install the Latch Bolt.
6
Latch Bolt Screws
Chiseled
For a 1-1/2" (38 mm) bore hole, use a 1" (25 mm) Drill Bit to extend the latch hole
at least 13/64" (5 mm) deep.
No need to extend the latch hole for a 2-1/8" (54 mm) bore hole.
After extending the latch hole, insert the Latch Bolt again to ensure it �ts correctly.
NO
1”
25 mm
At Least 13/64"
(5 mm) Deep
1" Drill Bit for Wood
1
2
up
EN-7
Install the Latch Bolt and rotate it with a screwdriver to con�rm smooth rotation.
If it cannot rotate smoothly because the door hole is too small.
Remove the Latch Bolt and chisel out a small channel at the top of the hole to give the cam of
the Latch Bolt room to rotate.
7
Chisel
Cam
Make sure the hole in door frame is drilled a minimum
of 1"(25mm) deep.
Install the Strike Plate on the door frame.
8
Attention
Strike Plate
Screws
EN-8
Install the Exterior Assembly
Before installing the Exterior and Interior Assembly,
make sure the Latch Bolt is fully retracted (in the
unlocked position).
Attention
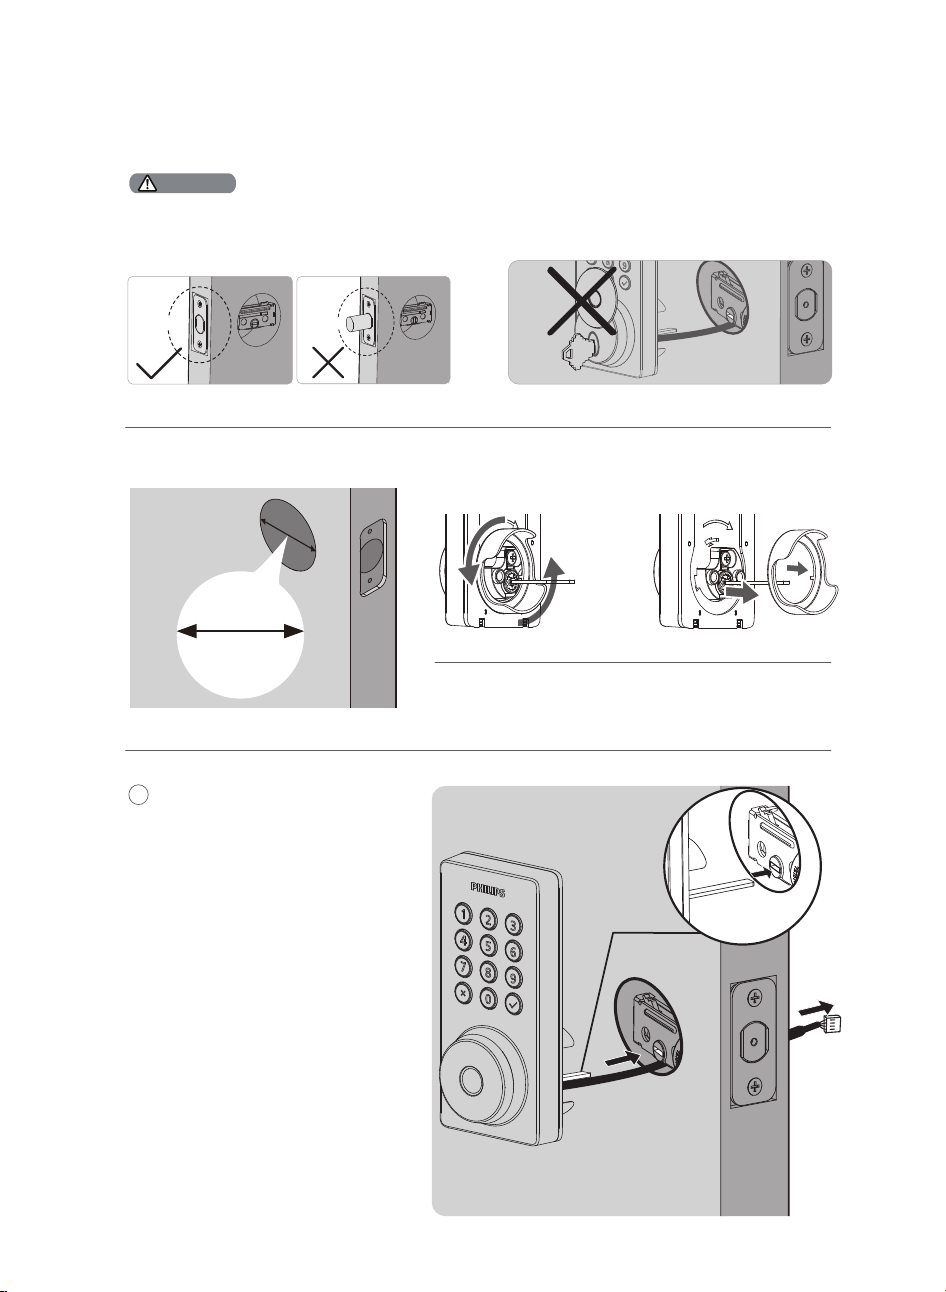
Measure the diameter of the hole in the door.
1-1/2" or 2-1/8"
(38 or 54mm)
Proceed to next step
2-1/8" (54mm)
Remove the spacer
1-1/2" (38mm)
Do not insert the key when you are installing.
Unlocked
Locked
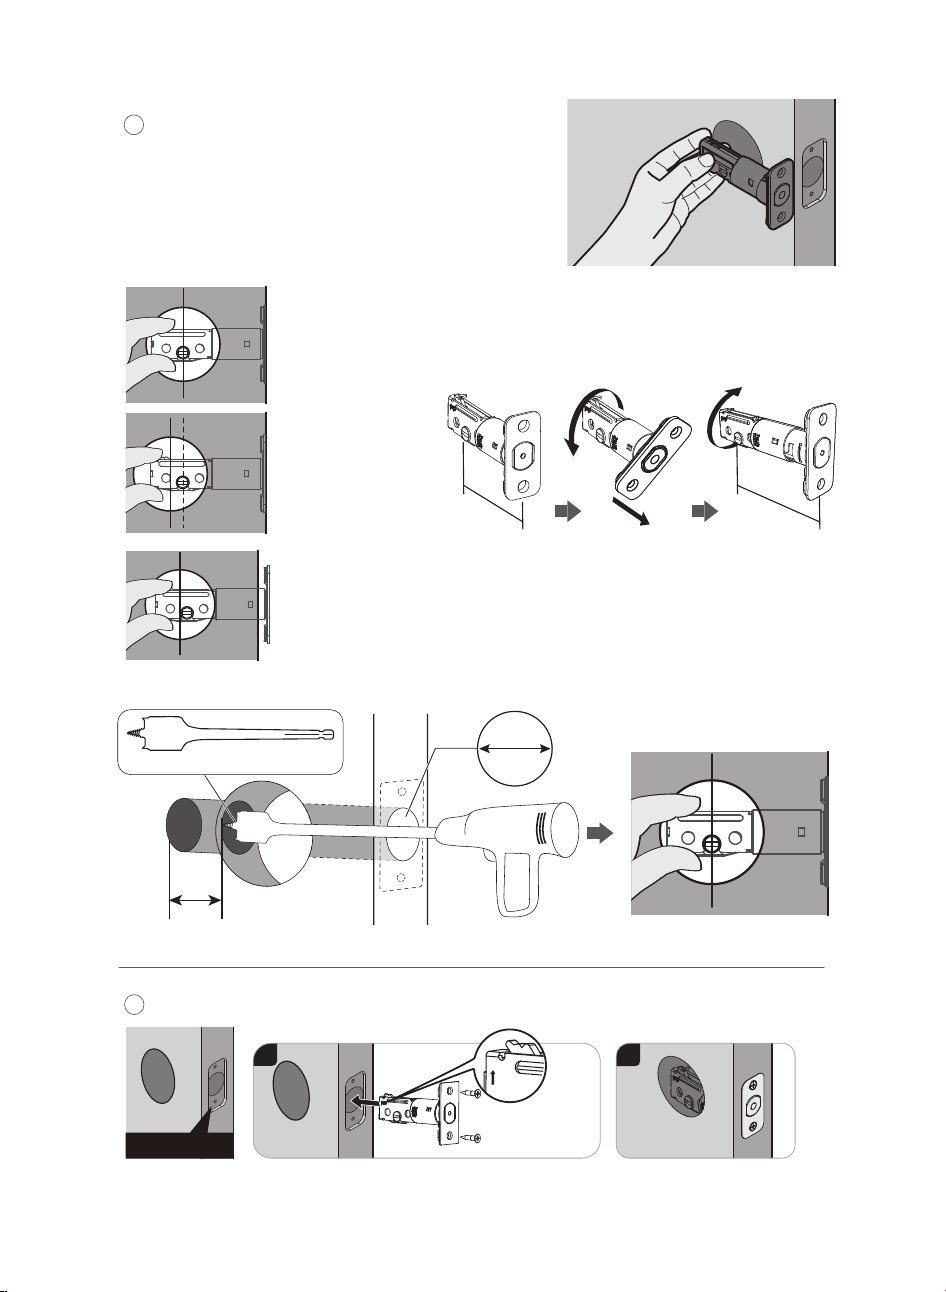
9
With the Latch Bolt fully retracted
(in the unlocked position), route the
cable beneath the Latch Bolt, and
insert the tailpiece through the slot
in the Latch Bolt.
Tailpiece
EN-9
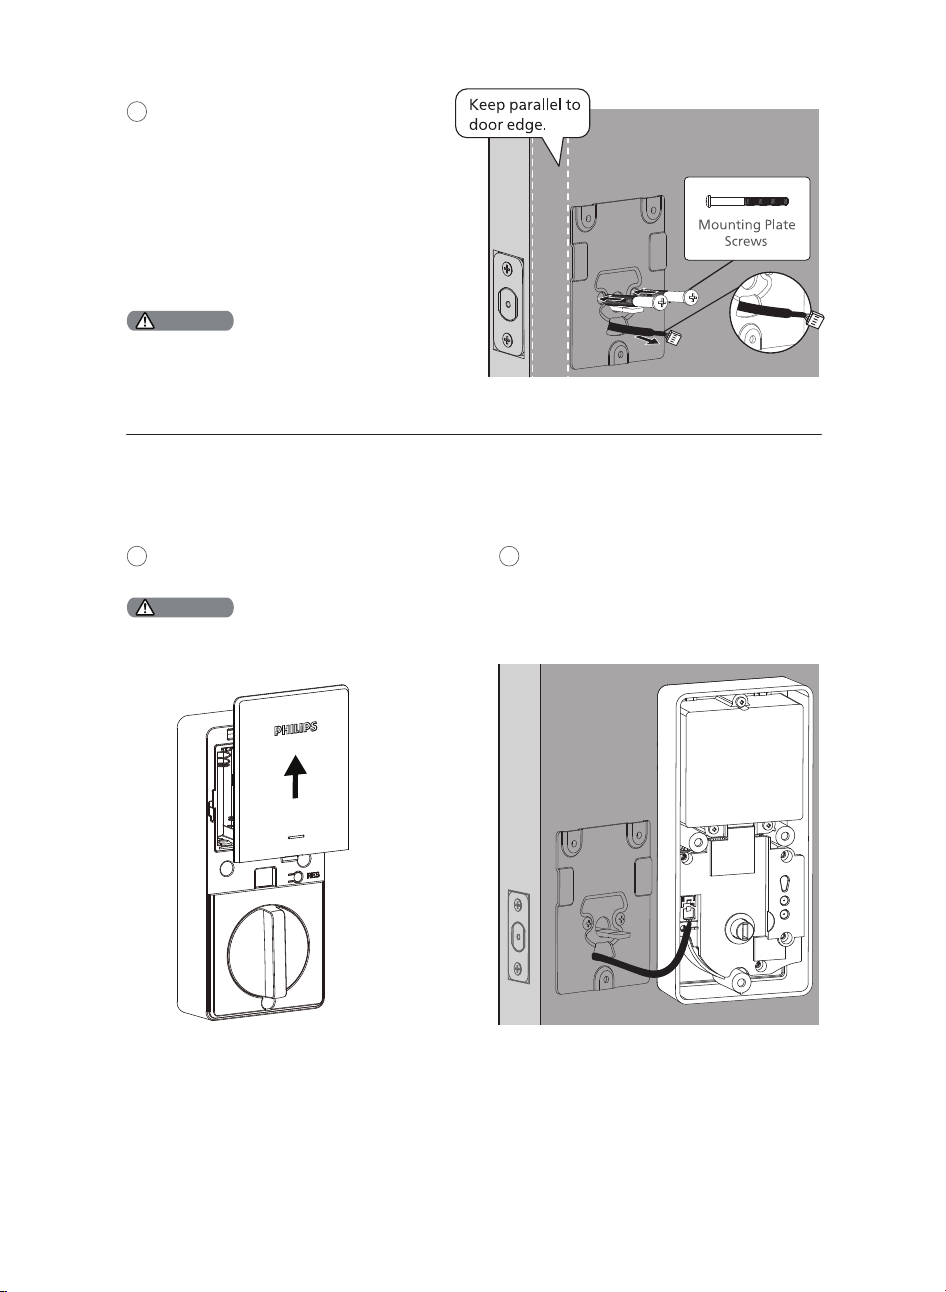
Do not load batteries before �nishing the lock installation.
Attention
Route the cable through the hole in the mounting
plate.
12
Install the Interior Assembly
Attention
Secure the Mounting Plate with the
Mounting Plate Screws. Do not
overtighten screws.
10
Push the Battery Cover up in the direction
as illustrated.
11
Insert the cable connector of the Exterior
Assembly to the socket on the Interior
Assembly. Push the connector in �rmly
until it is completely attached.
Insert the cable connector of the Exterior
Assembly to the socket on the Interior
Assembly. Push the connector in �rmly
until it is completely attached.
EN-10
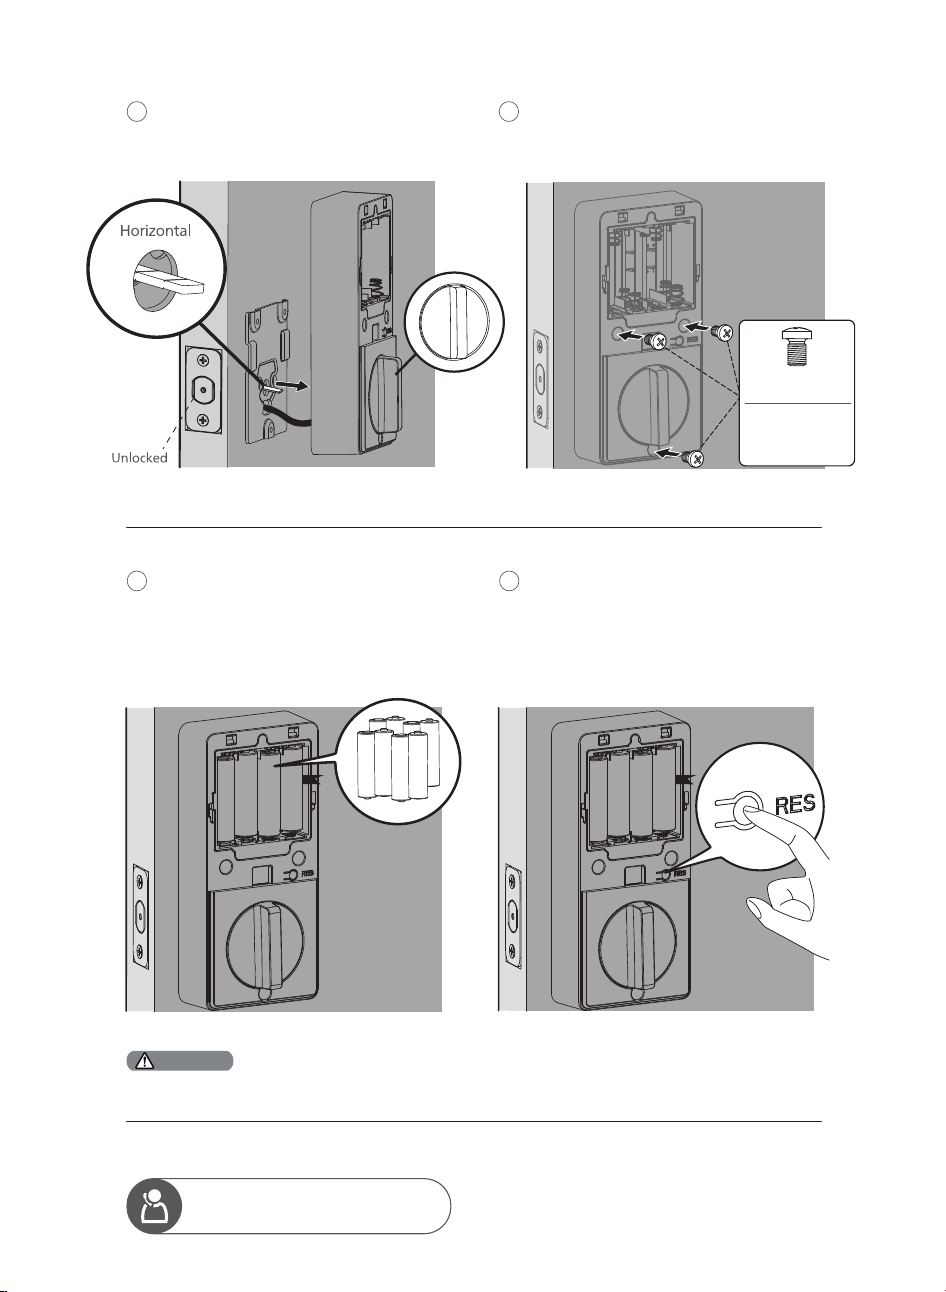
Keep the Thumb Turn in the vertical position
and the tailpiece horizontal, then install the
Interior Assembly.
13
Attach the interior assembly to the mounting
plate and secure it with 3 interior assembly
screws.
14
Install the AA alkaline batteries according
to the direction guide inside the battery
holder.
8 AA alkaline batteries are required and
need to be purchased separately.
15
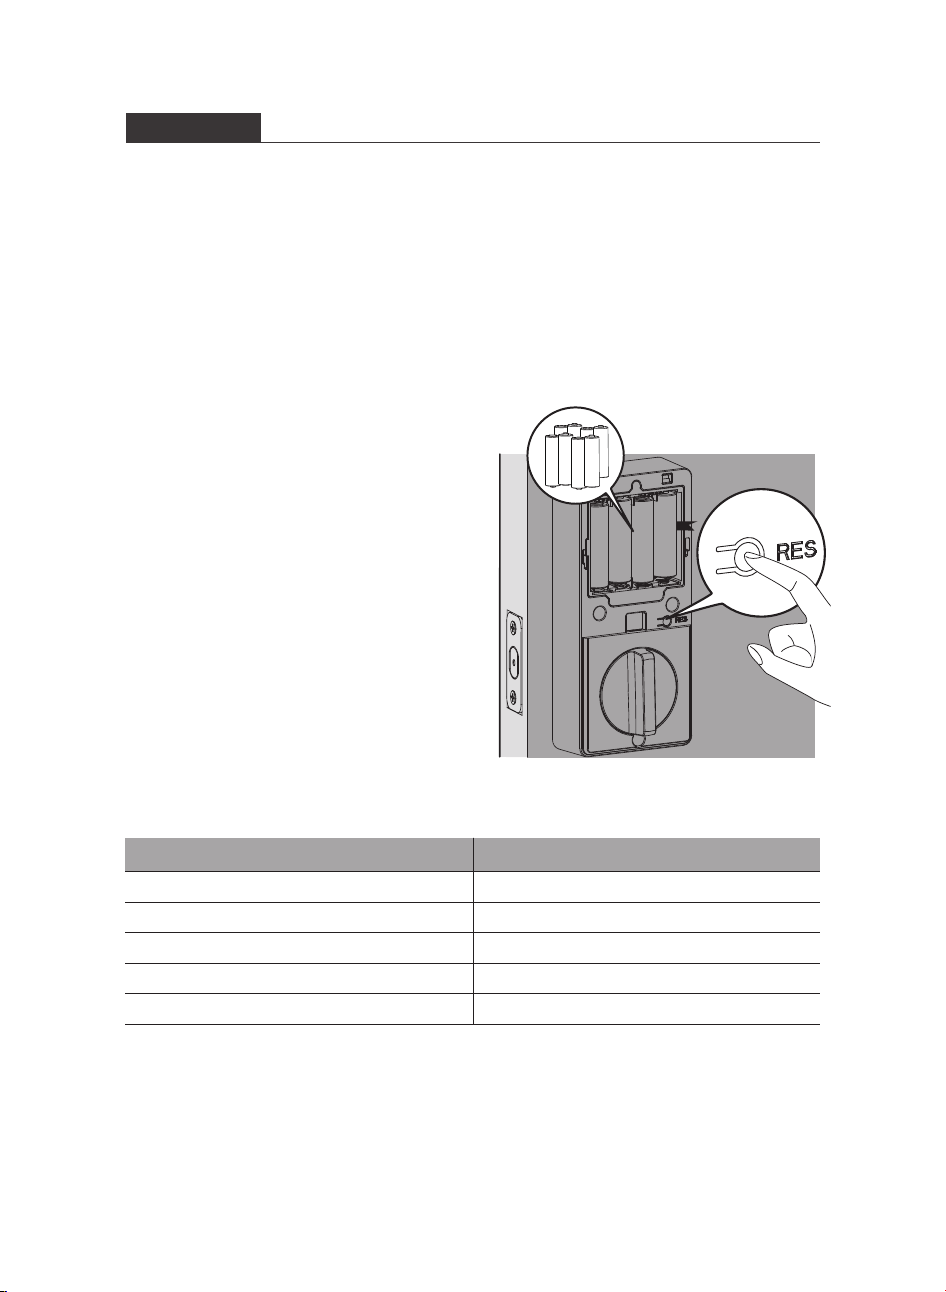
Keep the door open and unlocked.
Press and hold the Reset Button for 5
seconds.
Keep holding the Reset Button until you
hear a long beep and the latch bolt
extends automatically.
16
Need help?
U.S.A. & Canada: +1(833)599-9111
Ensure the cable is not pinched or the lock will not function properly.
Attention
Interior Assembly
Screws
Note:
Do not use
other screws.
EN-11
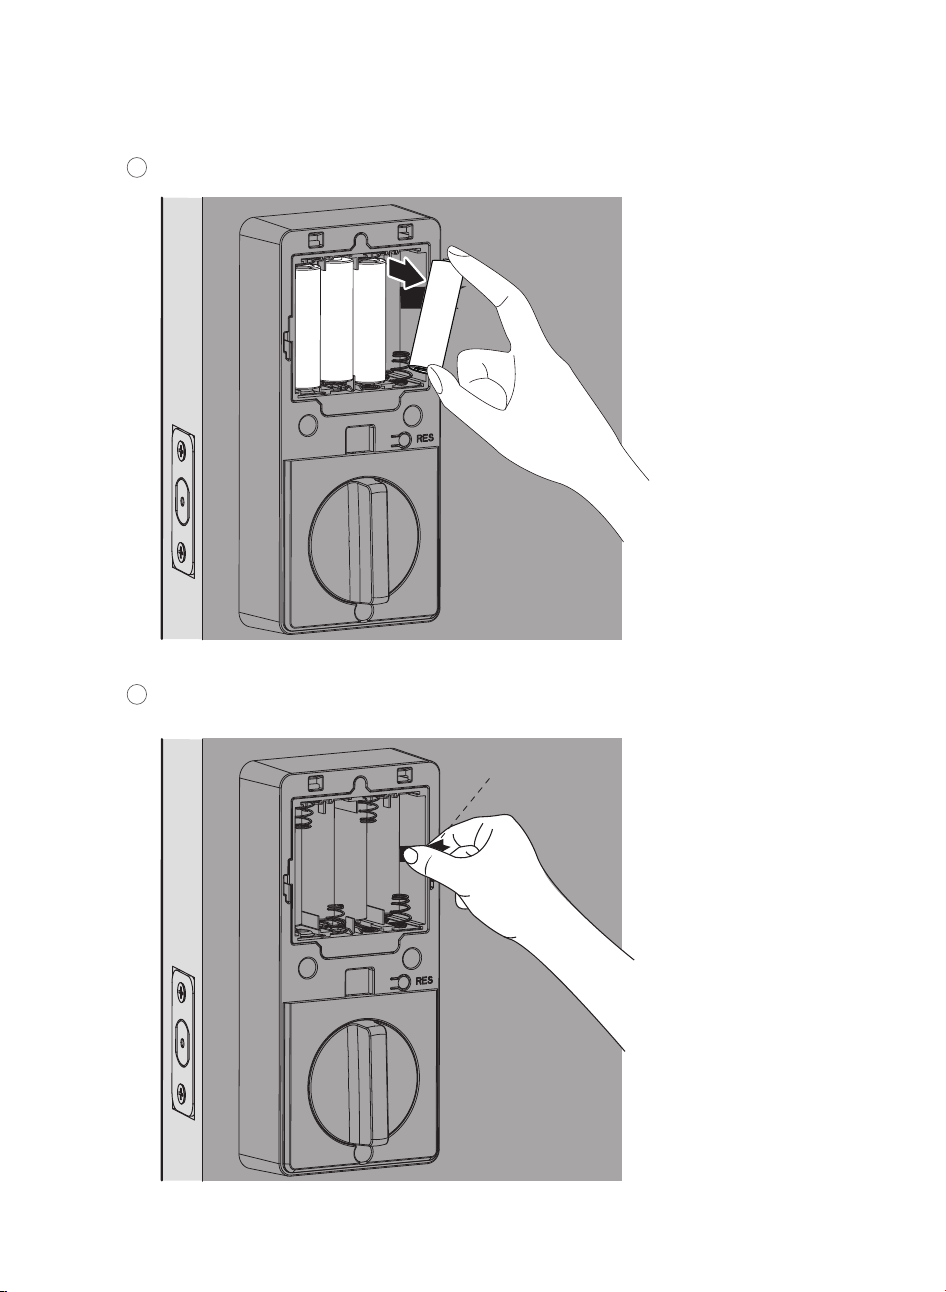
Remove the 4 outer batteries from right to left.
1
2
Remove the Batteries
Pull the ribbon to remove the 4 inner batteries from right to left.
Ribbon
EN-12
3 How to Setup
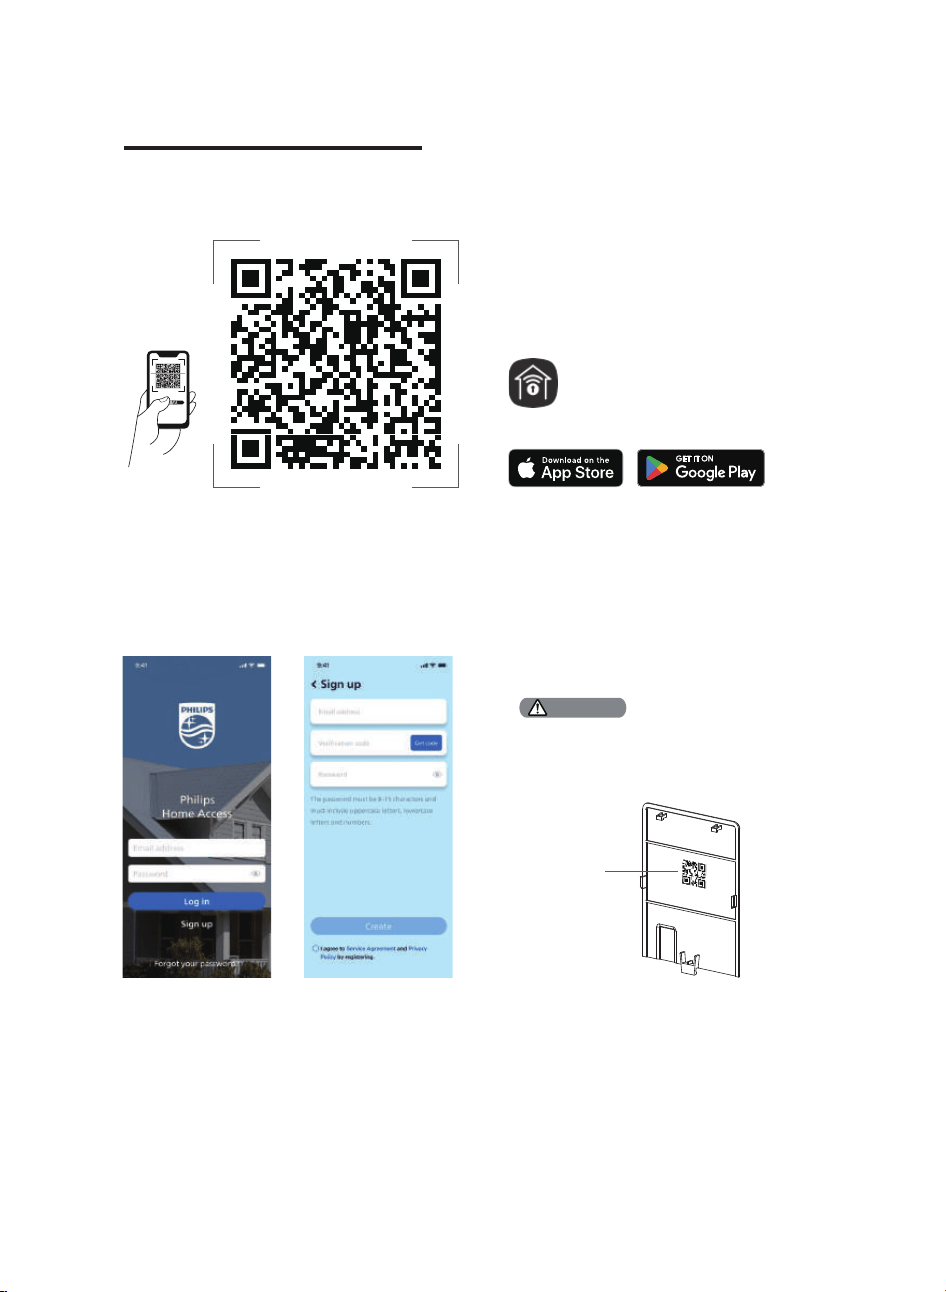
Download the Philips Home Access App
Create a User Account
Register and log in to the Philips Home
Access app.
QR code
Home Access
Add the Device
Bring your phone close to the lock, enable
Location and Bluetooth permissions, then scan
the QR code on the back of the battery cover to
add the device.
Scan the QR Code to download the Philips Home Access app.
QR Code
If the Wi-Fi connection fails, please follow these tips:
· Check if the Wi-Fi connection is stable.
· Ensure the network is 2.4GHz, as the lock only supports 2.4GHz. If your router is dual-band
(2.4GHz/5GHz), turn off the 5GHz band.
· Keep the router and lock within 65ft (20m). Avoid walls and interference sources like microwaves.
· Too many devices connected to Wi-Fi may affect the lock's connection.
· Ensure the lock's �rmware and app are up-to-date. If an update is available, please upgrade promptly.
If the device is not found, please ensure that the app
permissions for Location and Bluetooth are enabled
for pairing.
Attention
EN-13

4 How to Use
Feature De�nitions
Required for programming and adjusting settings. The Master PIN Code can be used to unlock the
deadbolt in Away Mode and Privacy Mode. The default Master PIN Code (12345678) must be
changed immediately via the Philips Home Access app after completing the installation. The
owner/manager should keep this information con�dential.
Master PIN Code
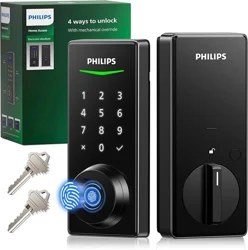
Unlock with your �ngerprint, PIN codes, keys, or a simple touch via the Philips Home Access app.
Fingerprints and PIN codes can be added through the app settings (�ngerprint enrollment should
be done on the lock).
4 Ways to Unlock
Follow the in-app instructions in the Phillips Home Access app to share access with your family or
friends. The access can only be shared and accepted via the Phillips Home Access app.
Simple Sharing
Create multi-mode PIN codes remotely via the Philips Home Access app for different needs like
inviting guests or ordering a service technician.
Multi-mode PIN codes
Offers a detailed record of all lock interactions and activities like lock/unlock events and user access.
Lock Activities Record
The device will automatically lock after it has been unlocked. This feature is disabled by default. It
can be set between 10 and 180 seconds via the Philips Home Access app.
Auto-Lock
The sounds can be muted when pressing the keypad. However, you will still hear low battery
warnings and system alerts. Enable it in the Philips Home Access app.
Silent Mode
Lock the door by simply pressing and holding any key on the keypad for 2s.
Lock the door by simply pressing " " 1 time without entering any code.
Lock the door by Fingerprint when the device is unlocked.
One-Touch Locking
Feature settings can be adjusted if needed through the Philips Home Access app.
Attention
EN-14
Limited lifetime for mechanical and 2 years for electronical warranty
This procedure erases all user and network settings
and unpairs the lock from users' accounts.
All paired accessories will also be removed. Restoring
the lock will also activate the lock-handing process.
Keep the door open and unlocked.
Press and hold the Reset Button for 5 seconds.
Keep holding the Reset Button until you hear a long
beep and the latch bolt extends automatically.
Function
Master PIN Code
Auto-Lock
Silent Mode
Shut Down Time
Away Mode
Default Setting
12345678
Disabled
Disabled
3 minutes
Disabled
Factory Reset & Default Settings
This is a safety feature when you leave your house for a vacation or long trip. Away Mode restricts
all User PIN Codes and Fingerprints until the Master PIN Code is entered on the keypad. When the
lock is unlocked by the Thumb Turn, it will sound an alarm for 1 minute and send a noti�cation via
the Philips Home Access app.
Enable it in the Philips Home Access app.
By entering the Master PIN Code on the keypad or setting it on the Philips Home Access app, you
can disable the alarm and the Away Mode.
Away Mode
EN-15

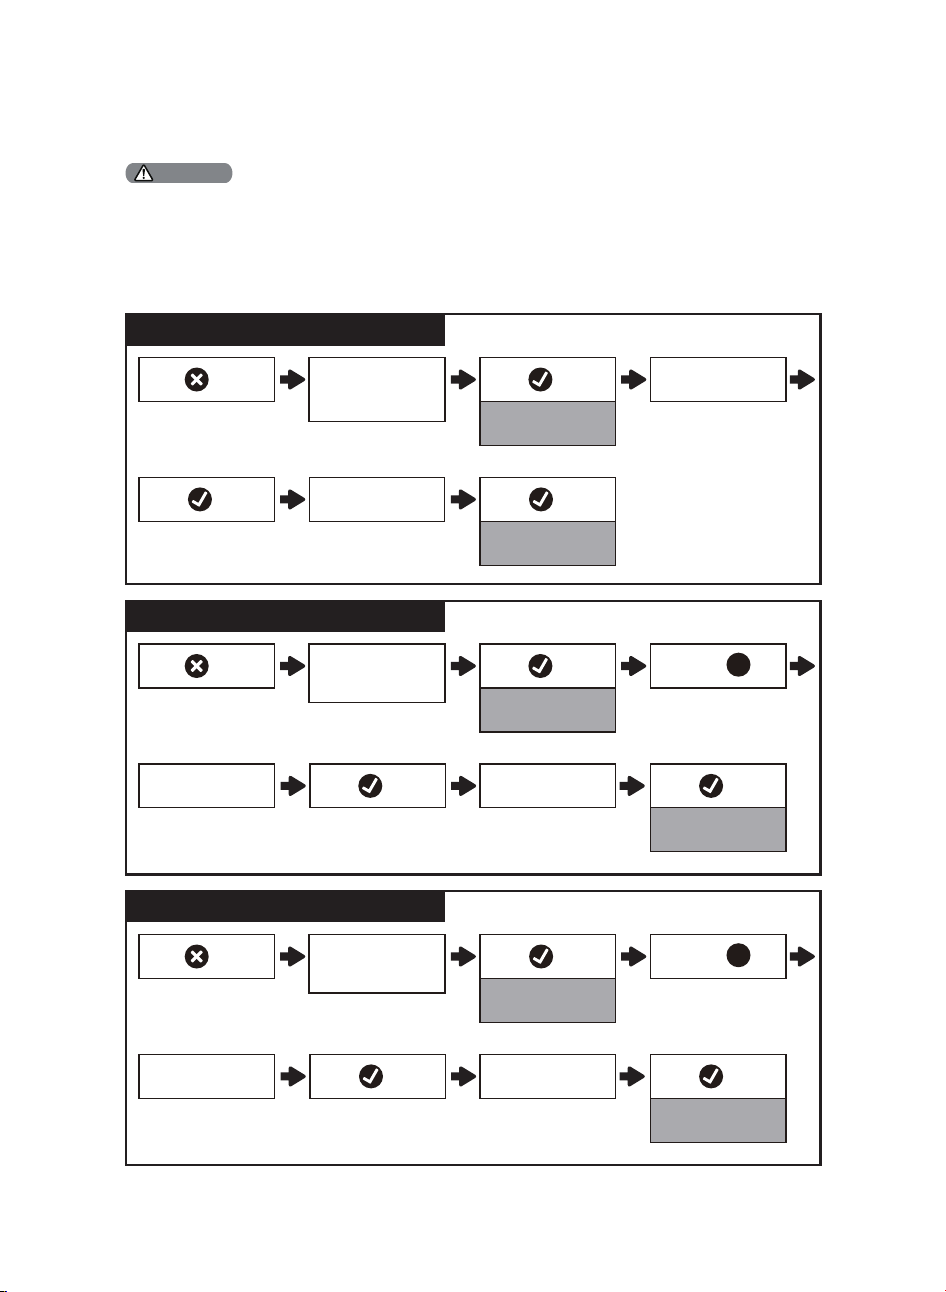
1. Master PIN Code (4 to 10 digits): The default Master PIN Code is 12345678. Change the default Master.
PIN Code before programming other codes.
2. User PIN Code (4 to 10 digits): A total of 100 User PIN Codes can be programmed and stored in the lock.
3. User Fingerprint: 20 �ngerprints can be programmed and stored in the lock.
Credential Type and Maximum Capacity
EN-16
Attention
The default Master PIN Code is 12345678. Change the default Master PIN Code before programming the lock. The
indicator light will �ash red when the code entered is not saved successfully.
If no key is pressed for more than 10 seconds, the lock will exit programming mode.
All settings can be easily managed through the Philips Home Access app, with
con�guration recommended there.
1 timePress
Green light is on
1 timePress
Green light is on
2 timesPress
Enter Master
PIN Code
Enter Master
PIN Code
1 timePress
Green light is on
1 timePress
Green light is on
Enter new
Master PIN Code
Re-enter new
Master PIN Code
1 timePress
Change the Master PIN Code
Press
1
2 timesPress 1 timePress
Green light is on
Enter new
User PIN Code
Re-enter new
User PIN Code
1 timePress
Add a User PIN Code
Press
2
Program the Lock
Change the Default Master PIN Code
2 timesPress
(default is 12345678)
Enter Master
PIN Code
Enter new
Master PIN Code
1 timePress
Re-enter new
Master PIN Code
1 timePress
Green light is on
EN-17
To improve recognition, register your �nger from different angles during the 8-time scanning.
Attention
Enter Master
PIN Code
Enter Master
PIN Code
Enter Master
PIN Code
Delete the User PIN Code
2 timesPress
1 timePress
Green light is on
Enter the unwanted
User PIN Code
1 timePress
Green light is on
Press
3
Add a User Fingerprint
2 timesPress
1 timePress
Green light is on
Scan �ngerprint 8 times
Each successful scan along with a green light
Green light is on
Press
4
Delete the User Fingerprint
2 timesPress
1 timePress
Green light is on
Scan the unwanted �ngerprint 1 time
Green light is on
Press
5
EN-18
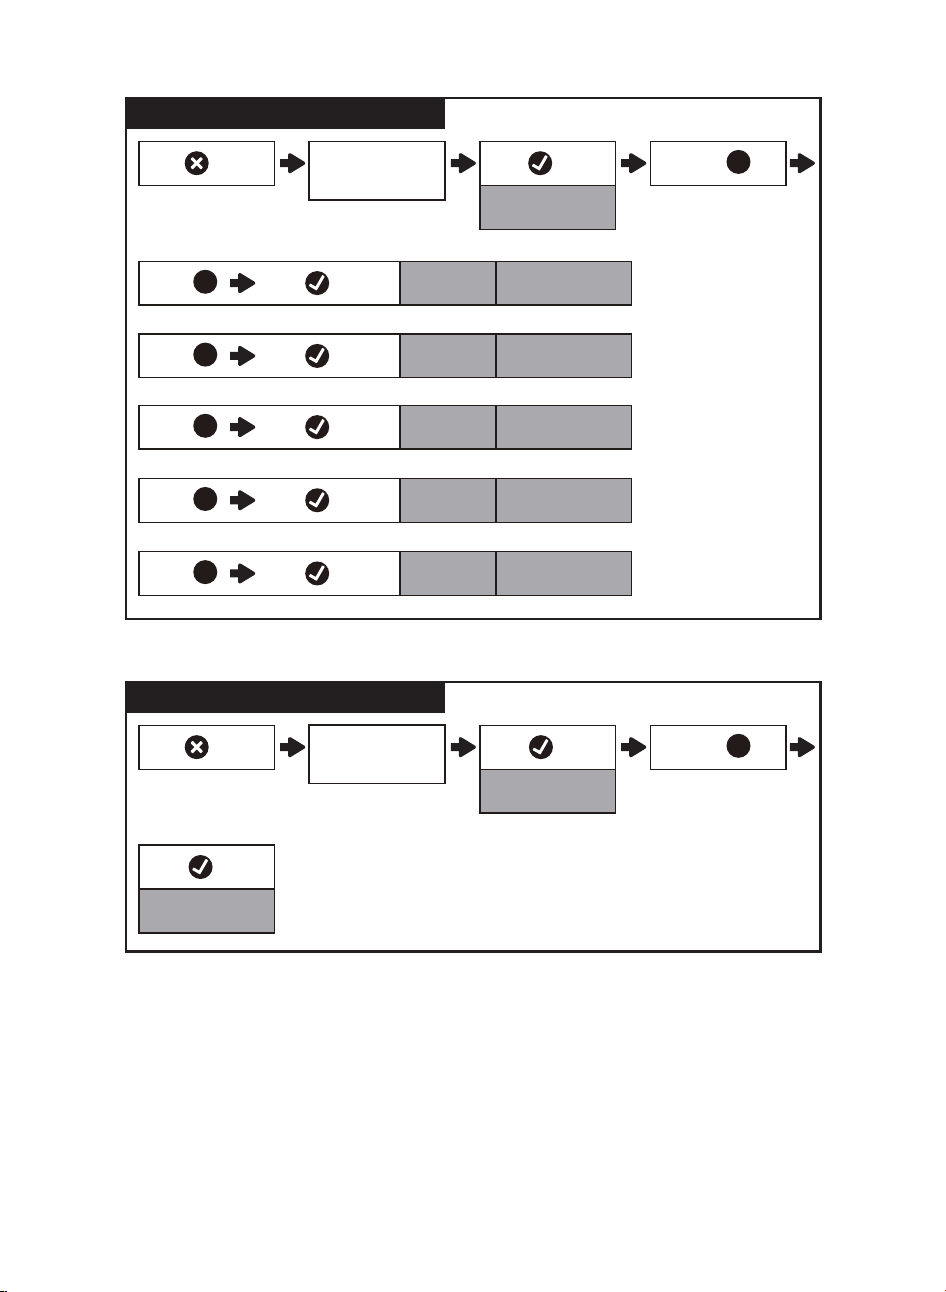
Enter Master
PIN Code
2 timesPress 1 timePress
Green light is on
Timed Auto-Lock Setting
Press
7
1 timePress
Green light is on
OR
OR
Green light is on
Green light is on
Press
1
1 timePress
Press
2
1 timePress
Press
3
Auto-Lock
OFF
for 30s
for 60s
OR
Green light is on
1 timePress
Press
4
for 120s
OR
Green light is on
1 timePress
Press
5
for 180s
Enter Master
PIN Code
Away Mode
2 timesPress
1 timePress
1 timePress
Green light is on
Green light is on
Press
8
EN-19
Lock & Unlock
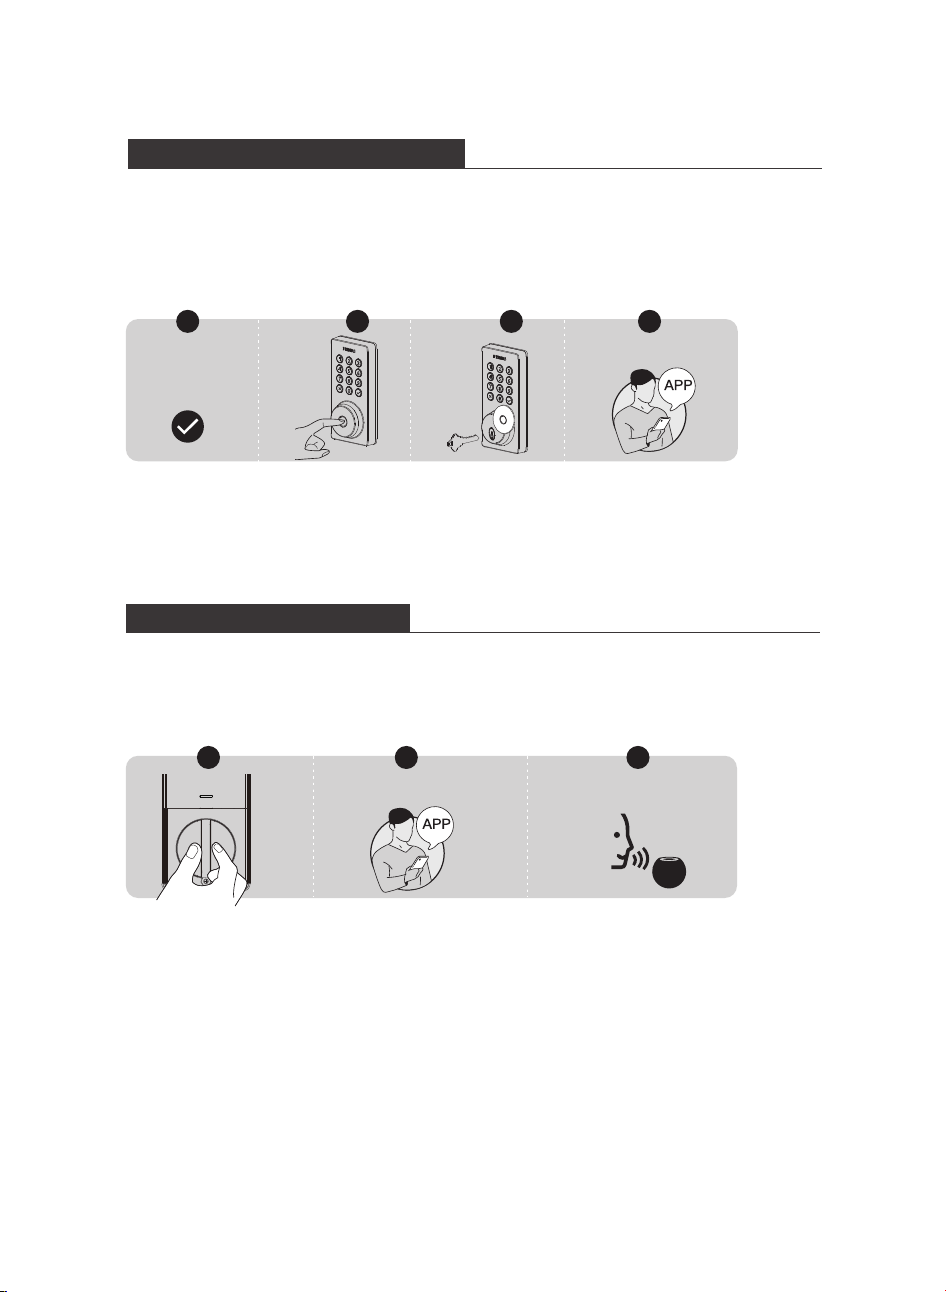
Unlocking the Door from Outside
1. Unlock by PIN codes.
2. Unlock by Fingerprint.
3. Unlock by Mechanical Key.
4. Unlock by the Philips Home Access app.
PIN Code
+
1 32 4
Home Access app
1. Rotate the Thumb Turn to the unlocked position.
2. Unlock by the Philips Home Access app.
3. Unlock by the Voice Assistant.
Unlocking the Door from Inside
1 2 3
Home Access app
Voice Assistant
EN-20
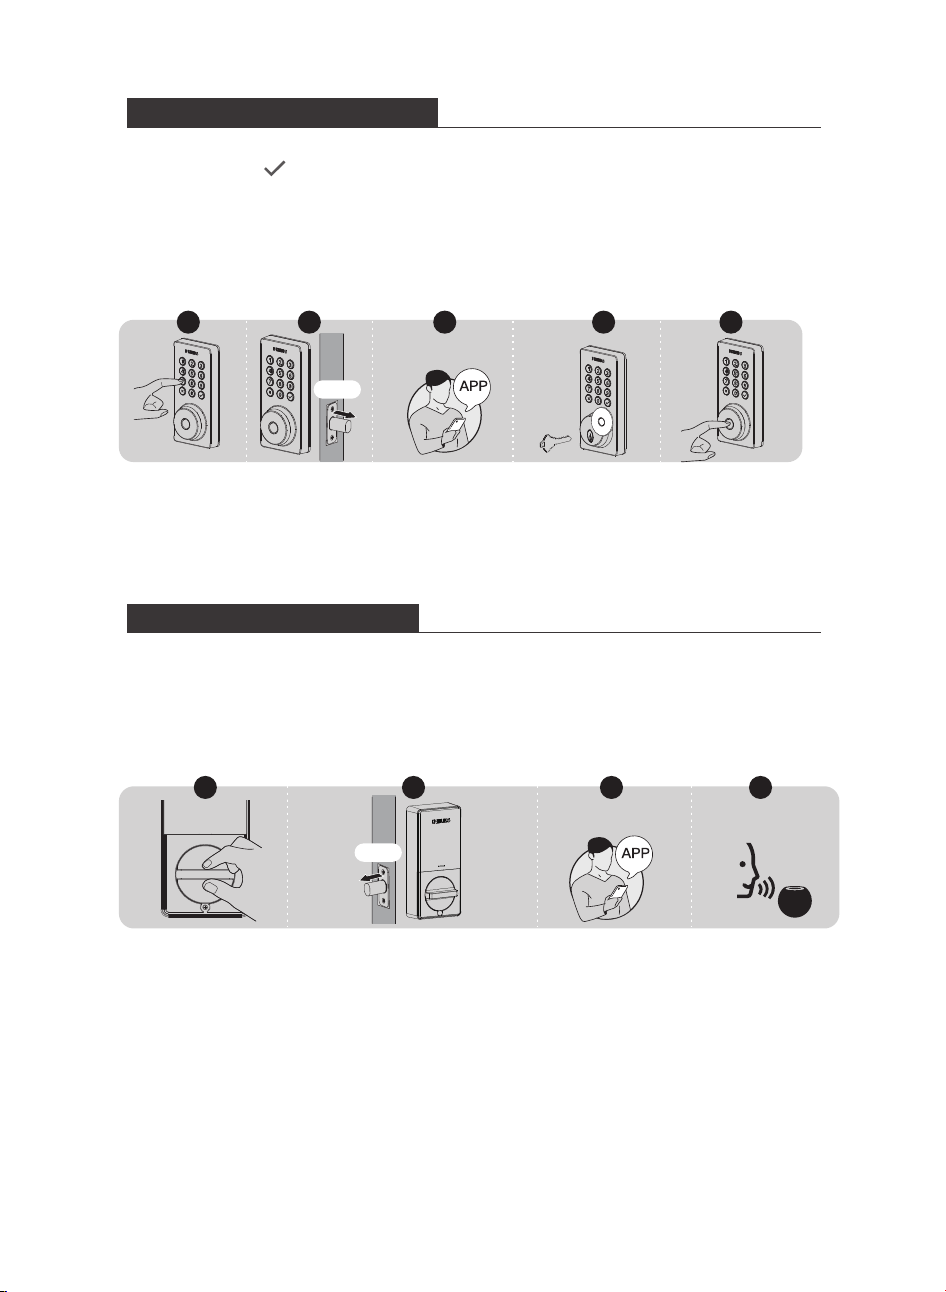
1. Rotate the Thumb Turn to the locked position to lock the device in Manual Mode.
2. In Auto-Lock Mode, the device is locked automatically.
3. Lock by the Philips Home Access app.
4. Lock by the Voice Assistant.
Locking the Door from Inside
1 3 4
Home Access app
Voice Assistant
1. Press and hold any button on the keypad for at least 2 seconds to lock the door in Manual Mode Or
lock by pressing " " 1 time without entering any code.
2. In Auto-Lock mode, the device is locked automatically.
3. Lock by the Philips Home Access app.
4. Lock by Mechanical Key.
5. Lock by Fingerprint.
Locking the Door from Outside
1 2 43
Home Access app
5
Auto
EN-21
2
Auto
5 Troubleshooting
Issue Solution
The lock turns in the
wrong direction.
Press and hold the Reset Button for at least 5 seconds until you
hear a beep to activate the lock-handing process.
If resetting fails to solve it, the lock is probably not installed
correctly. Please re-install the lock and reset it again.
After installation, the
Latch Bolt makes sounds
but does not work.
Ensure you have followed the installation instructions. Re-install
and reset the lock by paying attention to the following tips:
Before installing the Exterior and Interior Assembly, make sure the
Latch Bolt is fully retracted (in the unlocked position).
Do not insert the key when you are installing.
Ensure you have inserted the cable connector of the Exterior
Assembly to the socket on the Interior Assembly correctly.
Keep the Exterior and Interior Assembly aligned and parallel to
the door edge, and the Latch Bolt parallel to the door edge.
Press and hold the Reset Button for at least 5 seconds until you
hear a beep.
Use 8 new AA dry batteries, do not use rechargeable batteries, or
new batteries mixed with old batteries.
Cannot pull out the key
from the Keyhole.
Disassemble the lock, then rotate to pull out the key and re-install
the lock.
Do not insert the key when you are installing.
The lock does not smoothly
lock or unlock while using
the Thumb Turn.
Con�rm the Mounting Screws are properly installed.
The Latch Bolt does
not operate correctly
after installation.
Make sure the backset on the Latch Bolt is set to the proper
length. Refer to page 8.
Make sure before installation the Latch Bolt is retracted. Refer to
page 9.
Restore to the factory default setting and enter the default Master
PIN Code to set up the lock. Refer to page 15.
Make sure the Latch Bolt is installed correctly. Refer to page 8-9.The lock rotates only if
the Key is inserted.
The door handing is not
activated after the
batteries are installed.
Press the Reset Button for at least 5 seconds until you hear the
tone prompting you to restore the default settings.
EN-22
Issue Solution
The lock only locks but
does not unlock, or the
Latch Bolt goes in and
out uncontrollably.
If the door locks and unlocks smoothly in the open position, then
there is a problem with the door frame.
Make sure the hole in the door frame is drilled a minimum of
1"(25mm) deep to leave enough space for the deadbolt to extend
into the door frame when the door is locked.
If the issue still happens in the open position, then there is a
problem with the lock handing or installation.
Press and hold the Reset Button for at least 5 seconds until you
hear a beep to reset the lock.
If resetting fails to solve it, the lock is probably not installed
correctly. Please re-install the lock and reset it again.
If the solutions still cannot solve the problem, contact us.
Failed to lock. Keep the Exterior and Interior Assembly aligned and parallel to
the door edge.
Keep the Latch Bolt parallel to the door edge.
Failed to scan the QR
Code on the device.
Scan the QR Code in a well-lit environment, use the built-in
�ashlight on your phone, or try to scan in an environment with
sufficient lighting.
Ensure enough distance between your smartphone and the QR
Code, and ensure the QR Code is at the center of your phone screen.
Direct lighting or sunlight can cause re�ections that will interfere
with the scanning process.
The Master PIN Code
cannot be changed.
Change the Master PIN Code via the Philips Home Access app.
Restore factory settings and reprogram all user PIN codes. Refer to
page 15.
Failed to set up the lock. Make sure the lock is installed correctly.
Insert fresh batteries and make sure that the cable is not pinched.
After installation, reset the lock to factory settings to complete the
lock setting process.
I forgot my Master PIN
Code.
Change the Master PIN Code via the Philips Home Access app.
Perform a factory reset to clear all PIN codes. Once the reset is
completed, all PIN codes will be deleted and the Master PIN Code
will be reset to the default Master PIN Code of 12345678.
Failed to add the device
via Bluetooth.
Make sure your smart lock has enough power, and your phone is
close to it.
Check your phone’s Bluetooth settings and ensure it’s turned on.
If you have an Android device, enable the Location Service.
EN-23

Still have questions or need help? Please feel free to contact us:
U.S.A. & Canada: +1(833)599-9111
6 Warranty
This limited warranty applies to Philips Home Access products. It covers defects in materials and
workmanship under normal use and conditions, as determined by Conex or its authorized dealer.
For more information on the warranty applicable to this product, please visit http://www.usa.philips.com,
or contact the reseller from whom you purchased the product.
2 Years Warranty
Issue Solution
Auto-Lock is not working. If the battery indicator �ashes continuously, the batteries are low.
Please replace them with 8 new AA alkaline batteries.
Activate the Auto-Lock function. Enable it in the Philips Home
Access app.
Receiving low battery
alerts.
Remove the batteries and insert 8 new AA alkaline batteries.
The keypad is not
responding.
Make sure batteries are inserted correctly.
If the battery indicator �ashes continuously, the batteries are low.
Please replace them with 8 new AA alkaline batteries.
Make sure that the cable is properly connected and has not been
damaged during installation.
Cannot add �ngerprints,
or the �ngerprint does
not work.
Make sure the �ngerprint is registered and recognizable.
Change the default Master PIN Code (12345678) before adding
�ngerprints.
Keep the �nger to be registered dry and clean.
Keep the Fingerprint Sensor dry and clean.
Add multiple �ngerprints with the same �nger.
Try to add �ngerprints of other �ngers.
To improve recognition, register your �nger from different angles
and press harder during the 8-time scanning.
The Philips Home Access
app displays that the
door is open when the
door is closed.
Re-calibrate your lock with the door position sensor in the Philips
Home Access app.
If re-calibration does not solve this problem, check to see if
another magnet has been brought into the range of the lock. If
so, remove it.
EN-24

7 FCC Statement
This equipment has been tested and found to comply with the limits for a Class B digital device, pursuant to
part 15 of the FCC Rules. These limits are designed to provide reasonable protection against harmful
interference in a residential installation. This equipment generates, uses and can radiate radio frequency
energy and, if not installed and used in accordance with the instructions, may cause harmful interference to
radio communications. However, there is no guarantee that interference will not occur in a particular
installation. If this equipment does cause harmful interference to radio or television reception, which can be
determined by turning the equipment off and on, the user is encouraged to try to correct the interference by
one or more of the following measures:
• Reorient or relocate the receiving antenna.
• Increase the separation between the equipment and receiver.
• Connect the equipment into an outlet on a circuit different from that to which the receiver is connected.
• Consult the dealer or an experienced radio/TV technician for help.
Caution: Any changes or modifications to this device not explicitly approved by manufacturer could void your
authority to operate this equipment.
This device complies with part 15 of the FCC Rules. Operation is subject to the following two conditions: (1) This
device may not cause harmful interference, and (2) this device must accept any interference received, including
interference that may cause undesired operation.
RF Exposure Information
This equipment complies with FCC radiation exposure limits set forth for an uncontrolled environment. This
equipment should be installed and operated with minimum distance 20cm between the radiator and your
body.
8 ISED Statement
English: This device contains licence-exempt transmitter(s)/receiver(s) that comply with Innovation, Science and
Economic Development Canada’s licence-exempt RSS(s). Operation is subject to the following two conditions:
(1) This device may not cause interference.
(2) This device must accept any interference, including interference that may cause undesired operation of the
device.
The digital apparatus complies with Canadian CAN ICES‐3 (B)/NMB‐3(B).
French: Cet appareil contient des émetteurs / récepteurs exemptés de licence conformes aux RSS d'Innovation,
Sciences et Développement économique Canada.
L'exploitation est autorisée aux deux conditions suivantes:
(1) Cet appareil ne doit pas produire de brouillages.
(2) Cet appareil doit accepter tout brouillage, même si le brouillage est susceptible d’en compromettre le
fonctionnement.
L’appareil numérique est conforme à la norme canadienne CAN ICES-3(B)/NMB-3(B).
This device meets the exemption from the routine evaluation limits in section 2.5 of RSS 102 and compliance
with RSS 102 RF exposure, users can obtain Canadian information on RF exposure and compliance.
Cet appareil est conforme avec l'exemption d'évaluation de routine des limitations de la section 2.5 du
CNR-102 et le CNR-102 sur l'exposition aux RF et les utilisateurs peuvent obtenir l’information canadienne sur
l'exposition aux RF et la conformité.
This equipment complies with Canada radiation exposure limits set forth for an uncontrolled environment.
Cet équipement est conforme aux limites de radiation du Canada établies pour un environnement non
contrôlé.
This equipment should be installed and operated with minimum distance 20cm between the radiator & your
body.
Cet équipement doit être installé et utilisé à une distance minimale de 20 cm entre le radiateur et votre corps.
EN-25