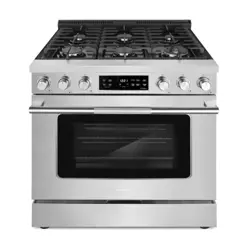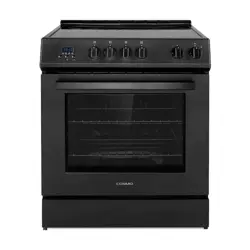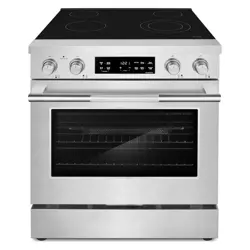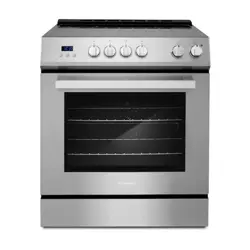
RANGE
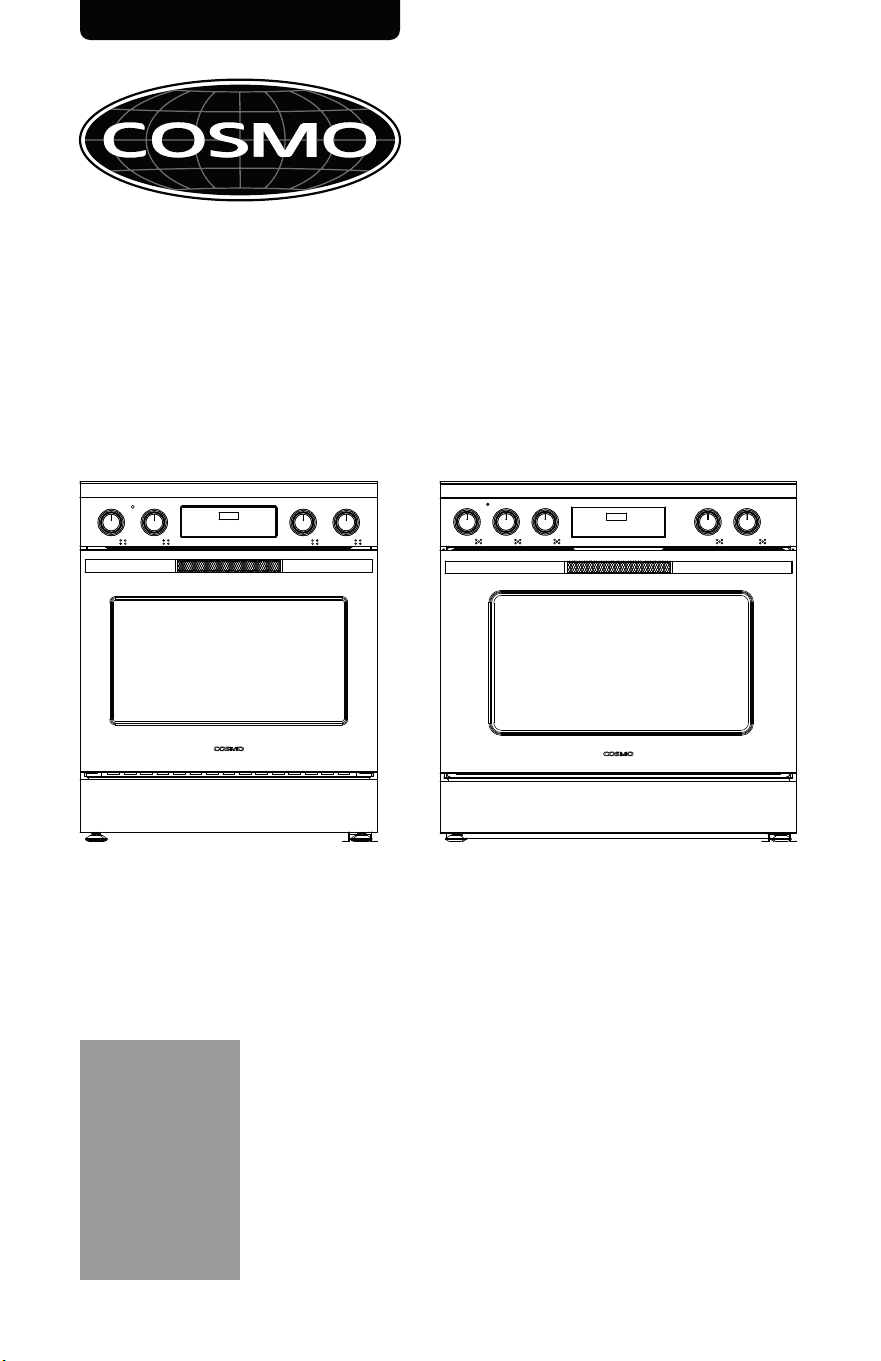
COS-RIS304SS
USER MANUAL
READ AND SAVE THESE INSTRUCTIONS.
FOR RESIDENTIAL USE ONLY.
PLEASE LEAVE THESE INSTRUCTIONS WITH THIS UNIT FOR
THE OWNER.
PLEASE RETAIN THESE INSTRUCTIONS FOR FUTURE
REFERENCE.
IMPORTANT:
INSTALLER:
OWNER:
SLIDE-IN INDUCTION RANGE
COS-RIS365SS
Rev.26.08
2
THANK YOU FOR YOUR PURCHASE
Thank you for your purchase. We know that you have many brands and
products to choose from and we are honored to know that you have decided
to take one of our products into your home and hope that you enjoy it.
COSMO Appliances are designed according to the strictest safety and
performance standard for the North American market. We follow the most
advanced manufacturing philosophy. Each appliance leaves the factory after
thorough quality inspection and testing. Our distributors and our service
partners are ready to answer any questions you may have regarding how to
install, use and care for your products. We hope that this manual will help you
learn to use the product in the safest and most effective manner.
Before using this product, please read through this manual carefully. Keep
this user manual in a safe place for future reference. Please ensure that other
persons using this product are familiar with these instructions as well.
If you have any questions or concerns, please contact the dealer from whom you
purchased the product, or contact our Customer Support at:
1-888-784-3108
Reach us online at:
www.cosmoappliances.com

3
TABLE OF CONTENTS
Range Safety ...................................................................................................... 5
Anti-Tip Device ....................................................................................................... 7
Important Safety Instructions .............................................................................. 8
Overview ............................................................................................................ 14
Range Layout ......................................................................................................... 14
Accessories Included............................................................................................. 16
Operation ........................................................................................................... 17
Control Panel ......................................................................................................... 17
Features .................................................................................................................. 19
Clock ................................................................................................................ 19
Timer ............................................................................................................... 20
Oven Light ...................................................................................................... 21
Oven Control Lock ......................................................................................... 21
Oven Settings ................................................................................................ 22
Cook Time ...................................................................................................... 23
Delay Start ..................................................................................................... 25
Cooktop ................................................................................................................. 27
Before Using the Cooktop .......................................................................... 27
Cooking Areas ............................................................................................... 31
Element Display ............................................................................................ 32
Induction Cookware .................................................................................... 33
Cookware Placement .................................................................................. 35
Pan Sensing ................................................................................................... 36
Minimum and Maximum Pan Size ............................................................ 36
Using the Cooktop Elements ...................................................................... 39
Turning On Cooktop Element ............................................................ 39
Synchronizing Left Cooktop Elements ............................................. 40
Using Power Boost Level ...................................................................... 41
Hot Surface Indicator ........................................................................... 41
Automatic Safety Shutoff ................................................................... 42
Power Management .................................................................................... 43

4
Oven ....................................................................................................................... 44
Before Using the Oven ................................................................................ 44
Before Using the Oven for the First Time ................................................. 45
Oven Vent ...................................................................................................... 46
Oven Door ..................................................................................................... 46
Using Oven Racks ......................................................................................... 47
Preheating ..................................................................................................... 48
Minimum & Maximum Default Settings ................................................... 49
Bake ................................................................................................................ 50
Convection Bake ........................................................................................... 51
Air Fry ............................................................................................................. 53
Broil ................................................................................................................. 54
Keep Warm ................................................................................................... 56
Tips and Techniques .................................................................................... 57
Maintenance ..................................................................................................... 60
General Cleaning ................................................................................................ 60
Steam Clean .......................................................................................................... 67
Troubleshooting ............................................................................................... 70
Before Calling for Service ................................................................................... 70
Error Codes ............................................................................................................ 76
Limited Warranty ............................................................................................. 77
5
RANGE SAFETY
Read All Instructions Before Using the Appliance
Your safety and the safety of others are very important.
We have provided many important safety messages in this manual and on
your appliance. Always read and obey all safety messages.
WARNING
CAUTION
This is the safety alert symbol.
This symbol alerts you to potential hazards that
can kill or hurt you and others.
All safety messages will follow the safety alert
symbol and either the word "WARNING" or
"CAUTION." These words mean:
You can be killed or seriously injured if you don't
follow instructions.
A potentially hazardous situation which, if not
avoided, could result in minor or moderate injury.
All safety messages will tell you what the potential hazard is, tell you how
to reduce the chance of injury, and tell you what can happen if the
instructions are not followed.
California Proposition 65 Warning
WARNING: Cancer and Reproductive Harm - www.P65Warnings.ca.gov.
6
WARNING
• This appliance is intended for normal residential use. It is not approved
for commercial use, outdoor installation, or any other application not
specifically allowed by this manual.
• This appliance requires connection to a 3-prong or 4-prong, 240VAC
single-phase (split-phase), 60Hz grounded electrical source dedicated
to the appliance. When installed, appliance must be electrically
grounded in accordance with local codes or, in the absence of local
codes, with the National Electrical Code, NFPA 70 or the Canadian
Electric Code, CSA C22.1-02.
• Proper installation is the responsibility of the installer. Any adjustment
and service should be performed only by qualified oven installers or
service technicians. The manufacturer is not responsible for any injury or
damage that may result from incorrect or defective installation by
unauthorized personnel.
• Product failure due to improper installation is not covered under
warranty.
• Do not use a steam cleaner to clean the appliance.
• This appliance is not intended to be operated with separate remote
control system.
7
ANTI-TIP DEVICE
WARNING
Tip Over Hazard
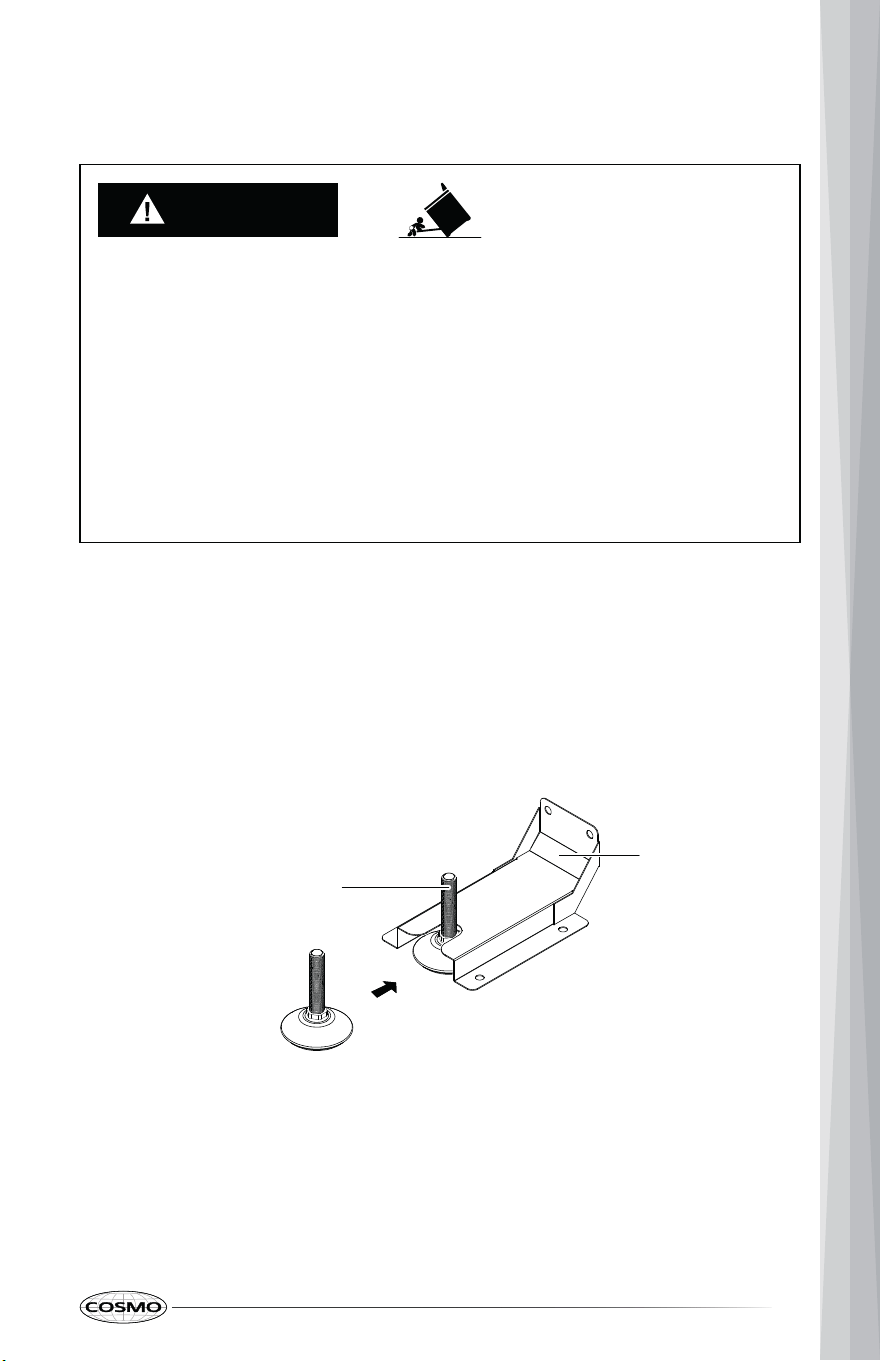
Making sure the anti-tip bracket is installed:
• Slide range forward.
• Look for the anti-tip bracket securely attached to floor or wall.
• Slide range back and make sure rear range foot is under anti-tip bracket.
• A child or adult can tip the range and be killed.
• Install anti-tip bracket to floor or wall per installation instructions.
• Slide range back so rear range foot is engaged in the slot of the anti-tip
bracket.
• Re-engage anti-tip bracket if range is moved.
• Do not operate range without anti-tip bracket installed and engaged.
• Failure to follow these instructions can result in death or serious burns to
children and adults.
Rear range foot
Anti-tip bracket
8
IMPORTANT SAFETY INSTRUCTIONS
WARNING: To reduce the risk of fire, electrical shock, injury to persons, or
damage when using the range, follow basic precautions, including the
following:
• WARNING: TO REDUCE THE RISK OF TIPPING OF THE RANGE, THE
RANGE MUST BE SECURED BY PROPERLY INSTALLED ANTI-TIP DEVICES.
TO CHECK IF THE DEVICES ARE INSTALLED PROPERLY, SLIDE RANGE
COMPLETELY FORWARD, LOOK FOR ANTI-TIP BRACKET SECURELY
ATTACHED TO THE FLOOR OR WALL, AND SLIDE RANGE BACK SO THE
REAR RANGE FOOT IS UNDER ANTI-TIP BRACKET.
• CAUTION: Do not store items of interest to children in cabinets above a
range or on the back guard of a range – children climbing on the range
to reach items could be seriously injured.
• Do Not Leave Children Alone – Children should not be left alone or
unattended in area where range is in use. They should never be allowed
to sit or stand on any part of the appliance.
• Never use your appliance for warming or heating the room.
• Use this appliance only for its intended purpose as described in this
manual.
• Proper Installation – The appliance, when installed, must be electrically
grounded in accordance with local codes, or in the absence of local
codes, with the National Electrical Code, ANSI/NFPA 70 or the
Canadian Electrical Code, CSA C22.1-02. In Canada, the appliance must
be electrically grounded in accordance with Canadian Electrical Code.
Be sure your appliance is properly installed and grounded by a
qualified technician.
• User Servicing – Do not repair or replace any part of the range unless
specifically recommended in the manual. All other servicing should be
referred to a qualified technician.
• Before performing any service, unplug the range or disconnect the
power supply at the household distribution panel by removing the fuse
or switching off the circuit breaker.
• Do Not Use Water on Grease Fires – Smother fire or flame or use dry
chemical or foam-type extinguisher.
READ AND SAVE THESE INSTRUCTIONS
9
IMPORTANT SAFETY INSTRUCTIONS
• If there is a fire in the oven during baking, smother the fire by closing
the oven door and turning the oven off or by using a multi-purpose dry
chemical or foam-type fire extinguisher.
• Do not use any type of foil or liner to cover the oven bottom or
anywhere in the oven, except as described in this manual. Oven liners
can trap heat or melt, resulting in damage to the product and risk of
shock, smoke or fire.
• Use Only Dry Potholders – Moist or damp potholders on hot surfaces
may result in burns from steam. Do not let potholder touch hot heating
elements. Do not use a towel or other bulky cloth.
• DO NOT TOUCH SURFACE UNITS OR AREAS NEAR UNITS – Surface units
may be hot even though they are dark in color. Areas near surface units
may become hot enough to cause burns. During and after use, do not
touch, or let clothing or other flammable materials contact surface units
or areas near units until they have had sufficient time to cool. Among
these areas are the coil elements, the cooktop, and surfaces facing the
cooktop.
• DO NOT TOUCH HEATING ELEMENTS OR INTERIOR SURFACES OF OVEN
– Heating elements may be hot even though they are dark in color.
Interior surfaces of an oven become hot enough to cause burns. During
and after use, do not touch, or let clothing or other flammable materials
contact heating elements or interior surfaces of oven until they have
had sufficient time to cool. Other surfaces of the appliance may
become hot enough to cause burns – among these surfaces are oven
vent openings and surfaces near these openings, oven doors, and
windows of oven doors.
• Do Not Cook on Broken Cooktop – If cooktop should break, cleaning
solutions and spillovers may penetrate the broken cooktop and create a
risk of electric shock. Contact a qualified technician immediately.
• Avoid scratching the glass cooktop. The cooktop can be scratched with
items such as knives, sharp instruments, rings or other jewelry, and rivets
on clothing. Doing so may lead to glass breakage.
• Never Leave Surface Units Unattended at Medium or High Heat
Settings - Cooking oils and animal fats are flammable, boilover may
cause smoking, and greasy spillovers may ignite.
READ AND SAVE THESE INSTRUCTIONS
10
IMPORTANT SAFETY INSTRUCTIONS
• Do Not Heat Unopened Food Containers – Build-up of pressure may
cause container to burst and result in injury.
• Wear Proper Apparel – Loose-fitting or hanging garments should never
be worn while using the appliance.
• Use Proper Pan Size – This appliance is equipped with one or more
surface units of different size. Select utensils having flat bottoms large
enough to cover the surface unit heating element. The use of
undersized utensils will expose a portion of the heating element to
direct contact and may result in ignition of clothing. Proper relationship
of utensil to heating element will also improve efficiency.
• Glazed Cooking Utensils – Only certain types of glass, glass/ceramic,
ceramic, earthenware, or other glazed utensils are suitable for range-
top service without breaking due to the sudden change in temperature.
• Utensil Handles Should Be Turned Inward and Not Extend Over
Adjacent Surface Units – To reduce the risk of burns, ignition of
flammable materials, and spillage due to unintentional contact with the
utensil, the handle of a utensil should be positioned so that it is turned
inward, and does not extend over adjacent surface units.
• If power is lost to range while a surface unit is ON, the surface unit will
not turn back on as soon as power is restored.
• Do not place or store items that can melt or catch fire on the glass
c
ooktop, even when it is not being used. If the cooktop is inadvertently
turned on, they may ignite. Heat from the cooktop or oven vent after it
is turned off may cause them to ignite also.
• Use Care When Opening Door – Let hot air or steam escape before
removing or replacing food.
• Never broil with door open. Open-door broiling is not permitted due to
overheating of control knobs.
• Care must be taken to prevent aluminum foil and meat probes from
contacting heating elements.
• Placement of Oven Racks – Always place oven racks in desired location
while oven is cool. If rack must be moved while oven is hot, do not let
potholder contact hot heating element in oven.
READ AND SAVE THESE INSTRUCTIONS
11
IMPORTANT SAFETY INSTRUCTIONS
• Injuries may result from misuse of appliance doors or drawers such as
stepping, leaning, or sitting on the doors or drawers.
• Storage in or on Appliance – Flammable materials should not be stored
in an oven or near surface units.
• The oven is not intended for storage.
• Maintenance – Keep range area clear and free from combustible
materials, gasoline, and other flammable vapors and liquids.
• Do not let cooking grease or other flammable materials accumulate in
or near the range. Grease in the oven or on the cooktop may ignite.
• Keep Oven Vent Ducts Unobstructed.
• Clean Cooktop With Caution – If a wet sponge or cloth is used to wipe
spills on a hot cooking area, be careful to avoid steam burn. Some
cleaners can produce noxious fumes if applied to a hot surface.
• Use care when touching the cooktop. The glass surface of the cooktop
will retain heat after the controls have been turned off.
• Do Not Soak Removable Heating Elements – Heating elements should
never be immersed in water.
• Do Not Clean Door Gasket – The door gasket is essential for a good
seal. Care should be taken not to rub, damage, or move the gasket.
• Do Not Use Oven Cleaners – No commercial oven cleaner or oven liner
protective coating of any kind should be used in or around any part of
the oven.
• Clean Only Parts Listed in Manual.
• Do not use replacement parts that have not been recommended by the
manufacturer (e.g. parts made at home using a 3D printer).
• Proper Disposal of Your Appliance – Dispose of or recycle your
appliance in accordance with Federal and Local Regulations. Contact
your local authorities for the environmentally safe disposal or recycling
of your appliance.
READ AND SAVE THESE INSTRUCTIONS
12
IMPORTANT SAFETY INSTRUCTIONS
For units with ventilating hood
• Clean Ventilating Hoods Frequently – Grease should not be allowed to
accumulate on hood or filter.
• When flaming foods under the vent hood, turn the fan on.
For self-cleaning ranges
• Before Self-Cleaning the Oven – Remove broiler pan and other utensils.
Wipe off all excessive spillage before initiating the cleaning cycle.
• Wait for the oven to cool before removing contents and cleaning the
oven.
• In the event of ignition inside the oven during self-clean, turn off the
oven and wait for the fire to extinguish. DO NOT FORCE THE DOOR
OPEN. Introduction of fresh air at Self Clean temperatures may lead to
a burst of flame from the oven.
• If the self-cleaning mode malfunctions, keep door closed, turn off the
appliance, disconnect the circuit at the circuit breaker box, and contact
a qualified service provider for repairs.
• The health of some birds is extremely sensitive to the fumes given off.
Exposure to fumes may result in the death of certain birds. Always move
birds to another closed and well-ventilated room.
READ AND SAVE THESE INSTRUCTIONS
13
IMPORTANT SAFETY INSTRUCTIONS
Radio Frequency Interference
• This unit has been tested and found to comply with the limits for a class
B digital device, pursuant to Part 18 of the FCC rules. These limits are
designed to provide reasonable protection against harmful interference
in a residential installation. This unit generates, uses and can radiate
radio frequency energy and, if not installed and used in accordance
with the instructions, may cause harmful interference to radio
communications. However, there is no guarantee that interference will
not occur in a particular installation. If this unit does cause harmful
interference to radio or television reception, which can be determined
by turning the unit off and on, the user is encouraged to try to correct
the interference by one or more of the following measures:
- Reorient or relocate the receiving antennae.
- Increase the distance between the unit and receiver.
- Connect the unit into an outlet or a circuit different from that to
which the receiver is connected.
- Use this appliance only for its intended purpose as described in this
User Manual.
- Be sure your appliance is properly installed and grounded by a
qualified installer in accordance with the provided installation
instructions.
- Do not attempt to repair or replace any part of your range unless
range unless it is specifically recommended in this manual. All other
servicing should be transferred to a qualified technician.
CAUTION
• Persons with a pacemaker or similar medical device should exercis e
caution when using or standing near an induction unit while it is i n
operation. The electromagnetic field may affect the working of th e
pacemaker or similar medical device. It is advisable to consult your
doctor or the pacemaker manufacturer about your particular situation.
READ AND SAVE THESE INSTRUCTIONS
14
OVERVIEW
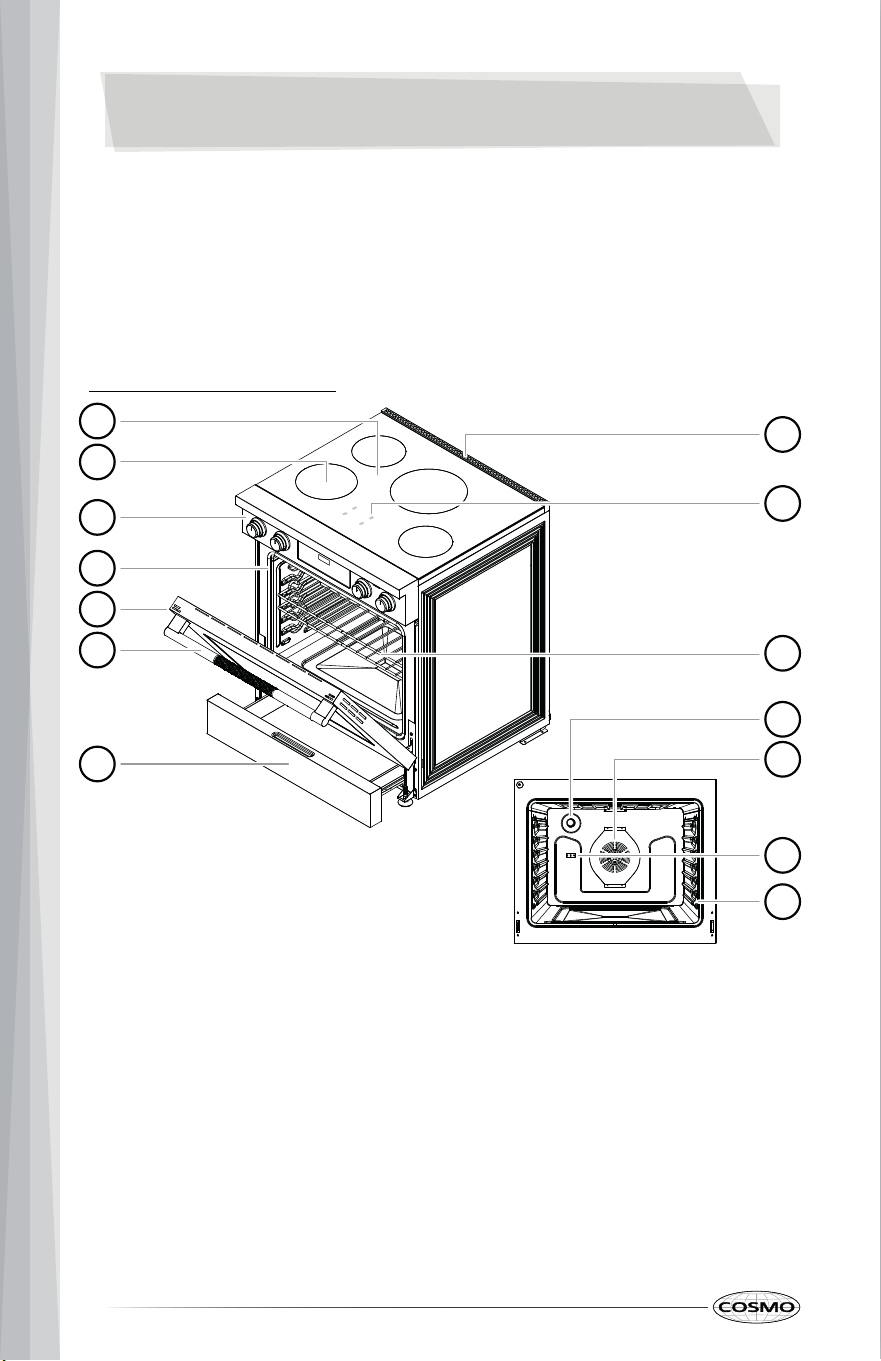
RANGE LAYOUT
The range you have purchased may have some or all of the items listed. The
locations and appearances of the features shown here may not match those
of your model.
01. Glass-ceramic cooktop
02. Surface element
03. Control panel
04. Door gasket
05. Oven door
06. Oven door handle
07. Storage drawer
08. Oven vent
09. Element display
10. Oven rack
11. Oven light
12. Convection fan
13. Temperature sensor
14. Rack position
30" Model: COS-RIS304SS
01
02
03
04
05
06
07
08
10
13
11
12
14
09
15
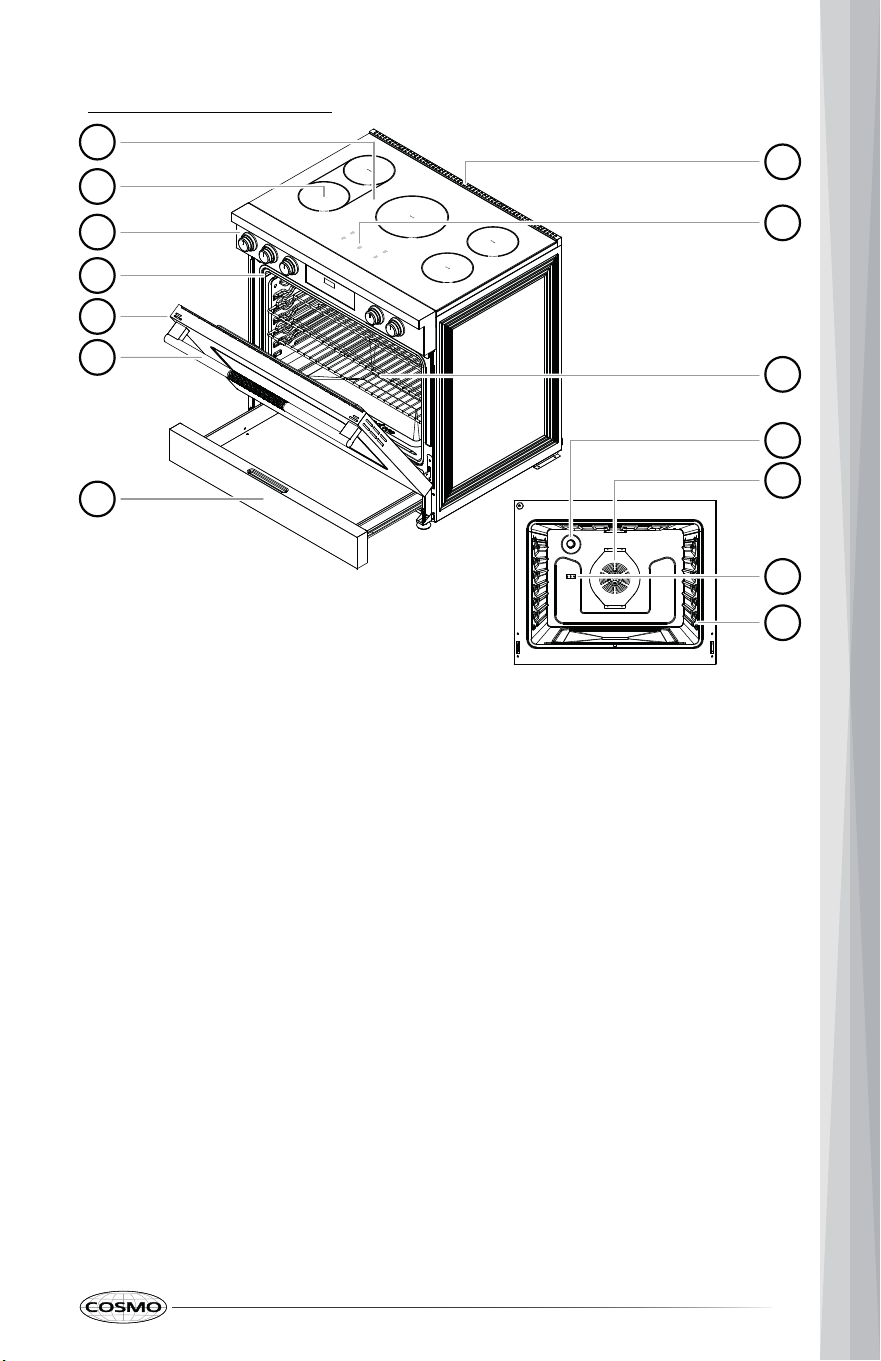
36" Model: COS-RIS365SS
01. Glass-ceramic cooktop
02. Surface element
03. Control panel
04. Door gasket
05. Oven door
06. Oven door handle
07. Storage drawer
08. Oven vent
09. Element display
10. Oven rack
11. Oven light
12. Convection fan
13. Temperature sensor
14. Rack position
01
02
03
04
05
06
07
08
10
13
11
12
14
09
16
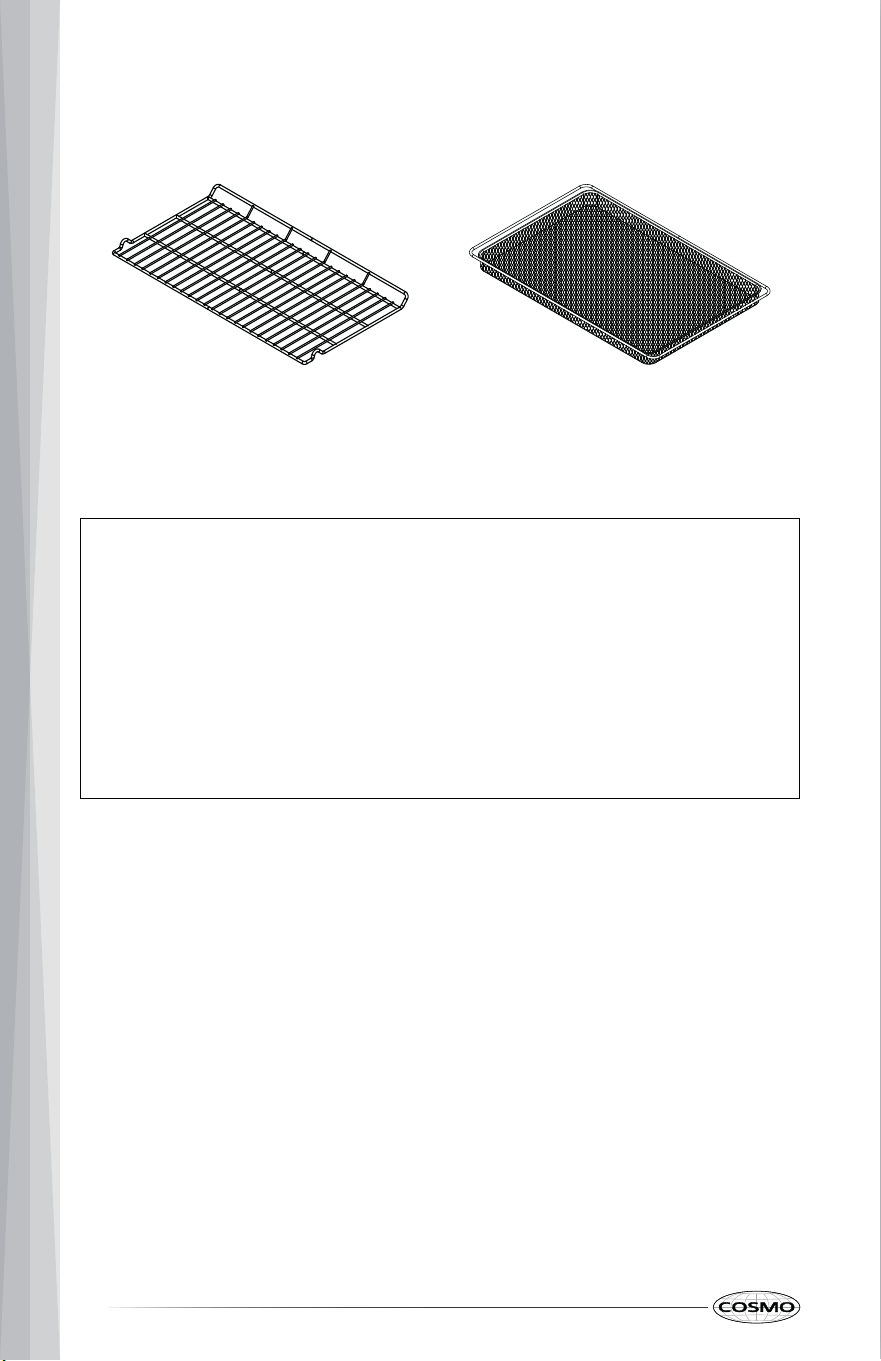
ACCESSORIES INCLUDED
Oven racks (2)
Note:
• Reference the contact information at the end of this manual and
contact customer service if any accessories are missing.
• To purchase replacement parts or any other accessories, please visit
www.cosmoappliances.com or reference the contact information at the
end of this manual.
• The images in this guide may be different from the actual components
and accessories, which are subject to change by the manufacturer
without prior notice for product improvement purposes.
Air fry tray
17
OPERATION
30" Model: COS-RIS304SS
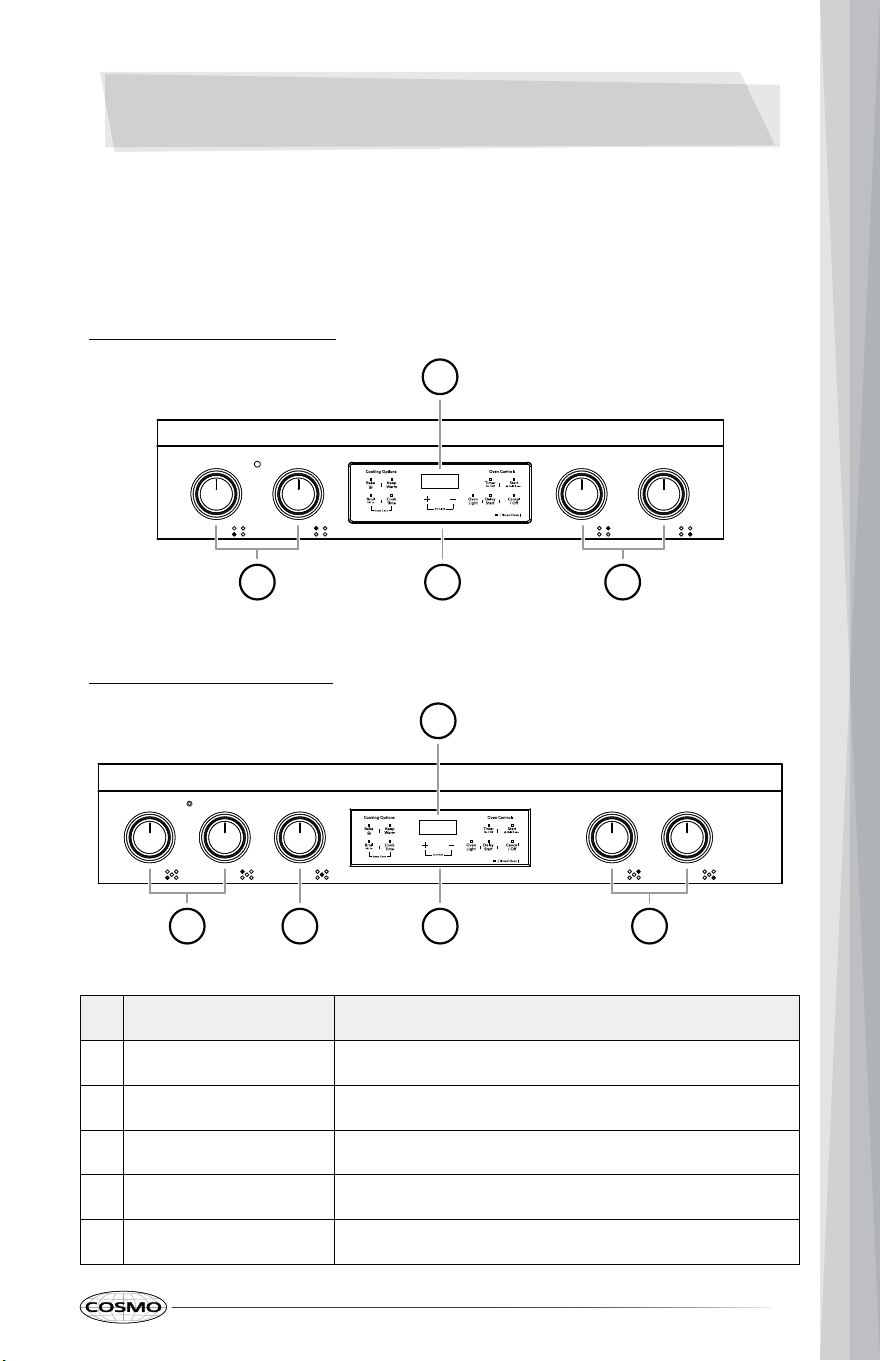
CONTROL PANEL
The appearance of the knobs may vary from what is shown below.
36" Model: COS-RIS365SS
# Name Description
01 Display
02
To show the time and provide oven status.
Cooktop elements
03
To turn the left cooktop elements on and off.
Cooktop element
04
To turn the middle cooktop element on and off.
Oven/Timer controls
05
To turn the oven functions or timer on and off.
Cooktop elements To turn the right cooktop elements on and off.
04
01
02 05
03 04
01
02 05
18
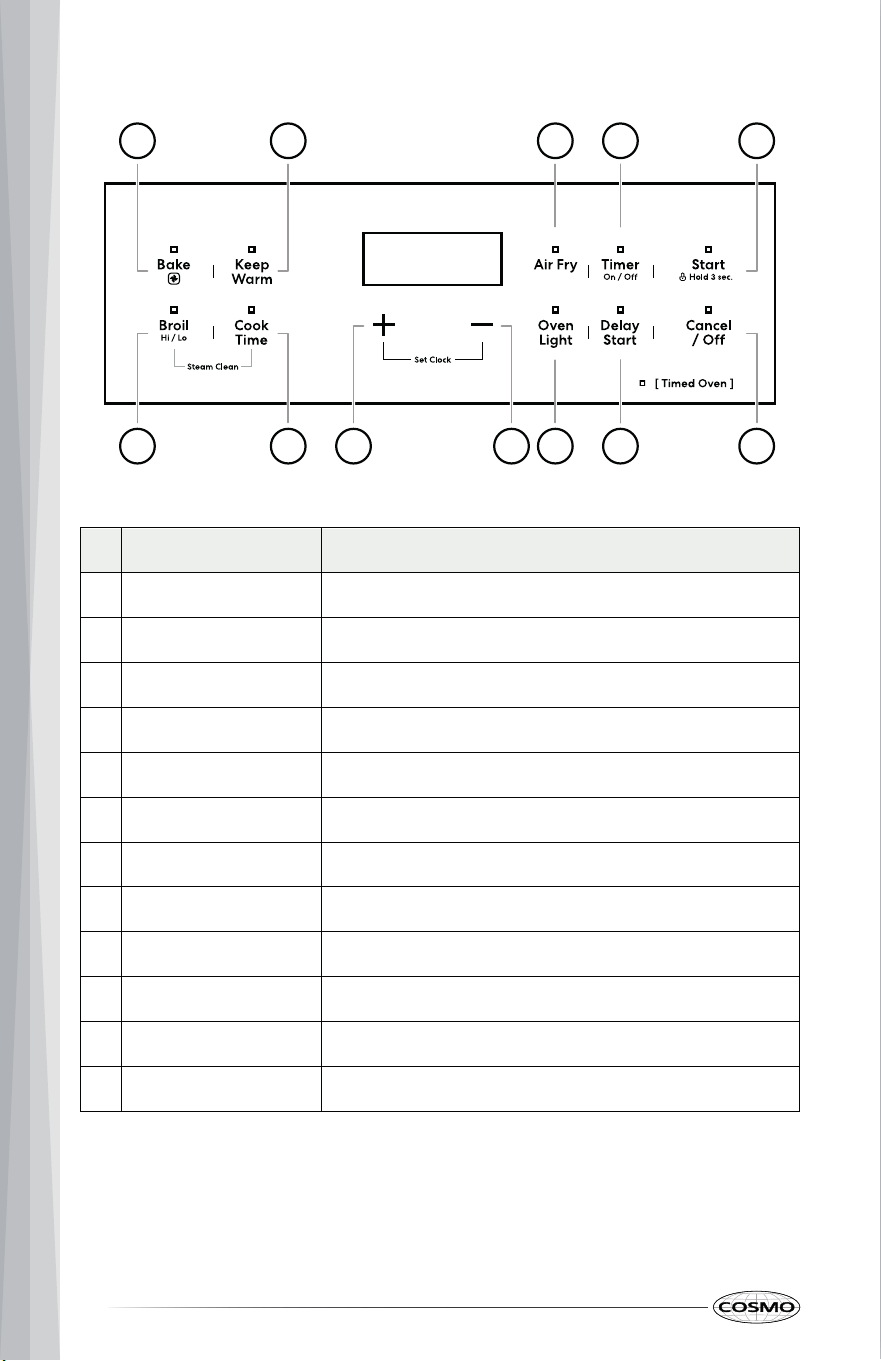
OVEN CONTROLS
# Name Description
06 Bake
07 Keep Warm
To select the Bake or Convection Bake function.
08
To select the Keep Warm function.
Broil
09
To select the Hi Broil or Lo Broil function.
Cook Time
10 +
To set the length of the cook time.
11 -
To increase temperature and all times.
12
To decrease temperature and all times.
Air Fry
13
To select the Air Fry function.
Timer
14
To set or cancel the timer.
Oven Light
15
To turn the oven light on and off.
Delay Start
16
To set the length of the delay time.
Start
17
To start all functions of the oven.
Cancel/Off To stop oven functions or cancel settings.
0908 1110 14 15 17
07
06
16
12 13
19
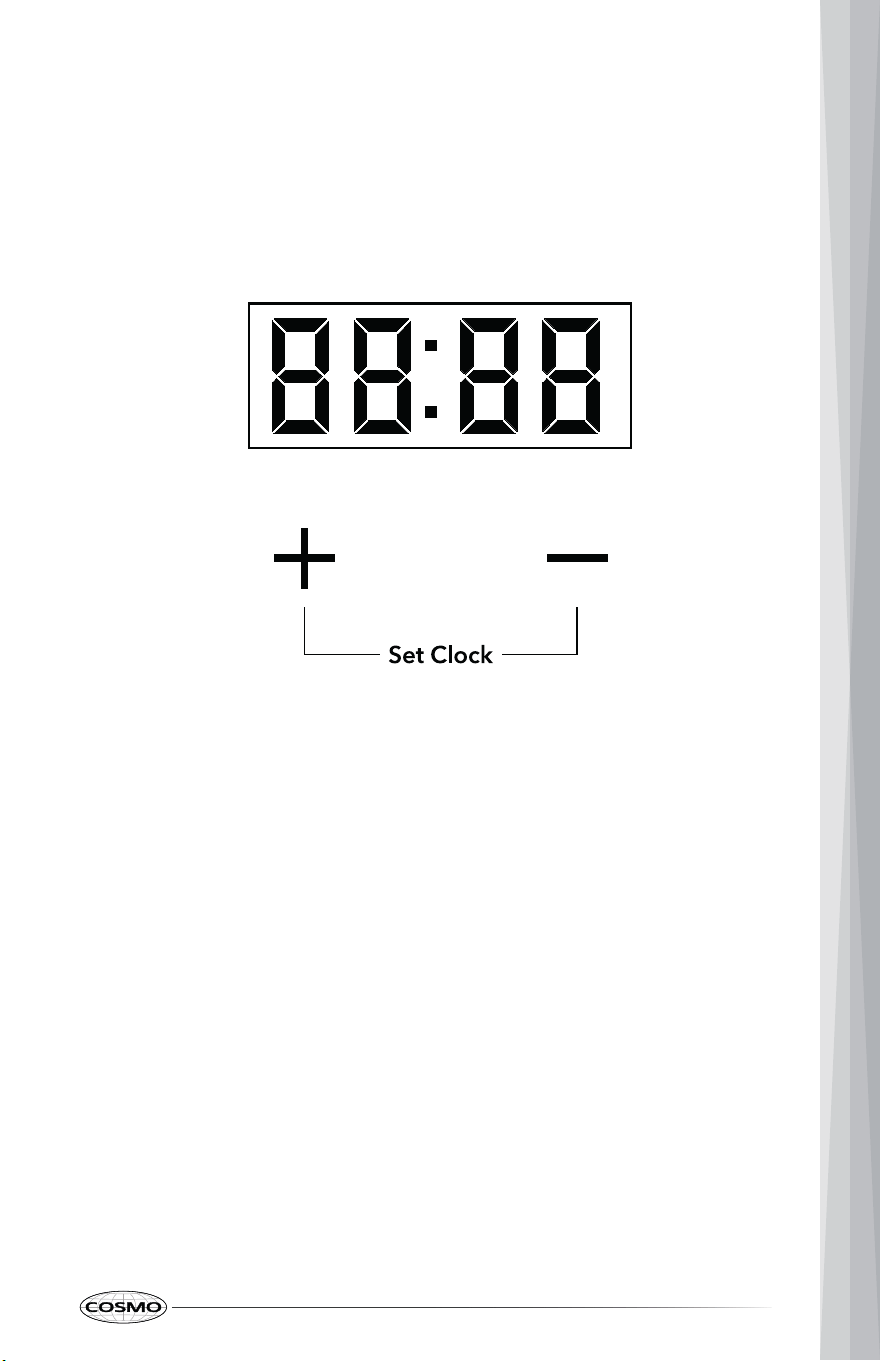
Setting the Clock
FEATURES
CLOCK
The digital clock displays the time of day when the oven is not in use. The
control is set to use a 12-hour clock.
Changing the Hour Mode
1. Press + and - at the same time.
The current clock flashes in the display.
2. Press/hold + or - to adjust the clock.
3. Press Start to confirm and start the clock.
1. Press and hold + and - at the same time for 3 seconds to toggle and
select 12-hour or 24-hour clock.
The display will show the selected hour mode 12H or 24H for 3 seconds.

20
TIMER
The timer serves as an extra timer in the kitchen that beeps when the set time
has run out. It does not start or stop cooking. The timer feature can be used
during any of the other oven control functions.
Setting the Timer (Up to 24 Hours)
1. Press Timer On/Off once.
"0:00" appears and flashes in the display.
2. Press/hold + or - to set the length of time.
3. Press Timer On/Off to start the timer.
The remaining time countdown appears in the display for a few seconds
before the clock returns.
Note:
• Timer indicator light above Timer On/Off flashes, indicating a
timer is counting down.
• Pressing Timer On/Off will recall the remaining time in the display
for a few seconds.
• For remaining time less than a minute, the display shows MM:SS
(minutes:seconds); for remaining time over a minute, the display
shows HH:MM (hours:minutes).
4. When the set time runs out, "00:00" flashes in the display and the
indicator tone sounds for about 20 seconds. Press Cancel/Off to cancel
the tone early.
Changing the Timer
1. Press Timer On/Off once.
The remaining time will flash in the display for a few seconds.
2. While the remaining time is flashing, press/hold + or - to set the new
length of time.

21
3. Press Timer On/Off to start the timer.
Canceling the Timer
1. Press and hold Timer On/Off for 3 seconds or until the timer indicator
light turns off.
Note:
• Pressing Cancel/Off will not cancel the current timer, but will cancel
any oven cooking modes in progress.
OVEN LIGHT
The interior oven light automatically turns on and off when the door is opened
and closed.
1. Press Oven Light to manually turn the oven light on or off.
OVEN CONTROL LOCK
The Oven Control Lock feature locks most of the oven controls. The Timer,
Oven Light, Start, and Cancel/Off are the only usable pads when the lock is
activated.
1. To activate or deactivate the oven control lock, press and hold Start for 3
seconds.
21

22
OVEN SETTINGS
The oven settings can be accessed while the oven is idle and the display is
showing the time of day. The settings remain in the control’s memory after a
power failure or until changed.
Available oven settings:
• Adjusting the Oven Thermostat - calibrate the oven temperature
• Selecting Fahrenheit or Celsius - switch the temperature scale
Adjusting the Oven Thermostat
This oven may cook differently than the one it replaced. Use the oven for a
few weeks to become more familiar with it before adjusting the thermostat
settings.
Do not use thermometers, such as those found in grocery stores, to check the
temperature setting of your oven. These thermometers may vary 20°F – 40°F.
Note:
• The thermostat adjustment will affect Bake, Convection Bake, Broil
(Hi/Lo), Keep Warm, and Air Fry. This adjustment will not affect Steam
Clean.
• The adjustment will be retained in memory after a power failure.
• The oven temperature can be increased (+) or decreased (-) as much as
35°F (19°C).
1. Press and hold Bake and Broil at the same time for 3 seconds while the
oven is idle.
2. Press/hold + or - to set the desired temperature adjustment.
Examples:
• 15 raises the oven temperature by 15 degrees
• -15 lowers the oven temperature by 15 degrees
3. Press Start to accept the change.
23
Selecting Fahrenheit or Celsius
The oven is set to display the Fahrenheit temperature scale. Follow these
instructions to set the display to either the Celsius or Fahrenheit scales.
1. Press and hold Bake for 3 seconds to toggle and select F (Fahrenheit) or C
(Celsius).
The display will show the selected temperature scale F or C for 3 seconds.
COOK TIME
Set the oven to cook for a specific length of time and turn off automatically at
the end of the cooking time.
Setting a Timed Cook
For example, to Bake at 375°F for 30 minutes.
1. Adjust oven rack levels as needed.
2. Press Bake to select Bake mode
3. Press/hold + or - to set the bake temperature to 375°F.
4. Press Cook Time.
CAUTION
Food Poisoning Hazard
• Do not let food sit in oven more than one hour before or after cooking.
• Foods that can easily spoil such as milk, eggs, fish, meat or poultry,
should be chilled in the refrigerator first. Even when chilled, they should
not stand in the oven for more than 1 hour before cooking begins, and
should be removed promptly when finished cooking. Consuming spoiled
food can result in food poisoning or sickness.
24
Note:
• Cook Time can only be used with the Bake, Convection Bake, and
Air Fry modes.
5. Press/hold + or - to set the cooking time to 0:30.
6. Press Start.
The oven starts to preheat and PRE appears in the display. Keep the oven
door closed, and wait for the oven to preheat to the set temperature.
Note:
• The Timed Oven indicator lights up on the control panel, indicating
an automatic oven is set.
• When the preheat has completed, the set temperature appears in
the display and the indicator tone sounds for a few seconds. The
cooking time countdown starts.
7. Place the food in the oven.
The oven will continue to cook for the set amount of time and then turn
off automatically.
8. When the cooking time has elapsed, END shows in the display. The cook
end indicator tone sounds until Cancel/Off or any pad is pressed. Remove
the food from the oven.
Changing the Cook Time during Cooking
For example, to change the cook time to 1 hour during cooking.
1. Press Cook Time.
2. Press/hold + or - to change the cooking time to 1:00.
3. Press Start to accept the change.
25
Changing the Temperature during Cooking
For example, to change the bake temperature to 300°F.
1. Press Bake.
2. Press/hold + or - to change the bake temperature to 300°F.
3. Press Start to accept the change.
DELAY START
Set the oven to turn on automatically after a specific length of time. With both
Delay Start and Cook Time set, the oven automatically turns on after a
specific length of time and turns off after a selected length of cooking time.
Setting a Delayed Timed Cook
For example, to Bake at 375°F for 30 minutes and delay the start of baking by
45 minutes.
1. Adjust oven rack levels as needed.
2. Press Bake to select Bake mode.
CAUTION
Food Poisoning Hazard
• Do not let food sit in oven more than one hour before or after cooking.
• Foods that can easily spoil such as milk, eggs, fish, meat or poultry,
should be chilled in the refrigerator first. Even when chilled, they should
not stand in the oven for more than 1 hour before cooking begins, and
should be removed promptly when finished cooking. Consuming spoiled
food can result in food poisoning or sickness.
26
3. Press/hold + or - to set the bake temperature to 375°F.
4. Press Cook Time.
Note:
• Cook Time can only be used with the Bake, Convection Bake, and
Air Fry modes.
5. Press/hold + or - to set the cooking time to 0:30.
6. Press Delay Start.
7. Press/hold + or - to set the delaying time to 0:45.
8. Press Start to confirm.
Note:
• The Timed Oven indicator lights up on the control panel, indicating
an automatic oven is set.
• When the delaying time has elapsed, the oven automatically turns
on and starts to preheat. After preheating, the oven will continue to
cook for the set amount of time and then turn off automatically.
9. When the cooking time has elapsed, END shows in the display. The cook
end indicator tone sounds until Cancel/Off or any pad is pressed. Remove
the food from the oven.
27
COOKTOP
BEFORE USING THE COOKTOP
Read all instructions before using.
WARNING
• Do not cook on a broken cooktop. If the cooktop is broken, cleaning
solutions and spillovers may penetrate the broken cooktop and create a
risk of electric shock. Contact a qualified technician immediately.
• Never leave surface units unattended at medium or high settings.
Boilovers may cause smoking and greasy spillovers may ignite.
• Turn cookware handles inward and not extend over adjacent surface
units to reduce the risk of burns, ignition of flammable materials, and
spillage due to unintentional contact with the cookware.
• Always place the pan in the center of the surface unit you are cooking
on. Proper contact of cookware to surface unit also will improve
efficiency.
• Turn off all controls when done cooking.
• Clean cooktop with caution. If a wet sponge or cloth is used to wipe
spills on a hot cooking area, be careful to avoid steam burn. Some
cleaners can produce noxious fumes if applied to a hot surface.
CAUTION
• Do not use the glass cooktop surface as a cutting board.
• Do not turn surface units on before placing cookware.
• Place induction-capable cookware on the cooking elements before
turning on the induction cooktop.
• Do not store heavy items above the cooktop surface that could fall and
damage it.
• Do not place or store flammable or heat sensitive items on the induction
cooktop, even when the cooktop is not in use.
• Do not place sealed containers on the cooktop.
28
CAUTION
• Never cook directly on the glass. Always use cookware.
• Do not place metallic objects such as knives, forks, spoons, and lids o n
the induction cooktop surface; they can get hot.
• Choose proper induction element size. For smaller pots and pans, us e
the smaller induction elements. For larger pots and pans, use the larg er
induction elements. Select pans that have flat bottoms large enough t o
cover the induction elements.
• Do not slide metal or glass across the cooktop surface. Cookware wit h
rough or uneven bottoms can mark or scratch the cooktop surface.
• Use this appliance only for normal household use. It is not designed fo r
commercial or industrial use.
• Never use the appliance to heat the room.
• Use caution when plugging electrical appliances into power outlet s
near the cooktop. Keep power cords from any contact with the cookto p
or cookware.
• Overheated fat and oil can catch fire quickly. Never leave surfac e
elements unattended when frying foods.
• Do not use the induction cooktop to heat aluminum foil, product s
wrapped in aluminum foil, or frozen foods packaged in alumin um
cookware.
• Users with pacemakers and active heart implants must keep their upp er
body at a minimum distance of 1 ft (30 cm) from active inductio n
cooking elements. If in doubt, consult the implant manufacturer or your
doctor.
• Immediately clean spills on the cooking area to prevent a toug h
cleaning chore later.
• Do not use a steel-wool pad or scrub pad or abrasive cleaning pads .
They can scratch the surface.
• After use, switch off the induction cooking element using its control. D o
not rely on the pan sensor.
• The surface element may appear to have cooled after it has bee n
turned off. The surface may still be too hot to touch.
29
CAUTION
PAN PREHEAT RECOMMENDATIONS
Induction cooking may decrease the amount of time required to preheat
cookware compared to cooking on a radiant element cooktop or gas surface
burner.
Pay close attention to all food items while cooking on the cooktop or in the
oven, and until all cooking processes are complete.
• Remember that induction surface cooking initially heats the cookware
very quickly if the cookware does not contain food.
NOISES DURING COOKTOP OPERATION
Induction Sound
Cookware Vibration Sound
• The electronic processes involved with induction cooking create some
unfamiliar background noises such as a slight buzzing sound. These
noises are a normal part of the induction cooking process.
Cooling Fan Sound
Note:
• Some cookware will buzz, depending on its construction or base material.
The buzz may be more noticeable if the pan or its contents are cold or if
the bottom of the pan is not flat. As the pan heats up, the noise will
decrease. The noise will also decrease if the power level setting is
reduced.
• The fan may operate while the induction cooktop is in use to reduce the
temperature of the product. The cooling fan may also operate after the
cooktop is turned off.
• When using the induction cooktop, operational noises are more
noticeable while cooking in Power Boost mode. But very loud noises are
not normal when induction cooking.
30
HOT COOKWARE AND RESIDUAL HEAT
CAUTION
BENEFITS OF INDUCTION SURFACE COOKING
Speed and Efficiency
• Unlike radiant surface elements, induction cooking elements do no t
glow red when hot. You can be burned if the glass surface is hot fro m
the residual heat transferred from the cookware. Do not touch ho t
cookware or pans. Use oven mitts or potholders to protect hands fro m
burns.
A Cooler Cooktop
• Induction cooking elements heat faster and use less energy. Inductio n
power levels quickly boil liquids and are efficient when simmering.
Easy Cleanups
• Whether induction cooking elements are turned on or off, they remai n
cooler than radiant elements. Virtually no heat is wasted because t he
heat begins with the presence of cookware.
Pan Size Detection
• Cooler cooking elements make for easier cleaning. Spills resist sticking o r
burning so they wipe up easily.
Greater Responsiveness
• A sensor automatically detects and adapts the induction cooking elem ent
to the pan size in use for more consistent, even cooking.
• Induction cooking elements are more responsive than their electric or gas
counterparts because only the pan heats. Induction elements heat more
easily and are just as responsive when reducing temperatures to a
simmer.
31
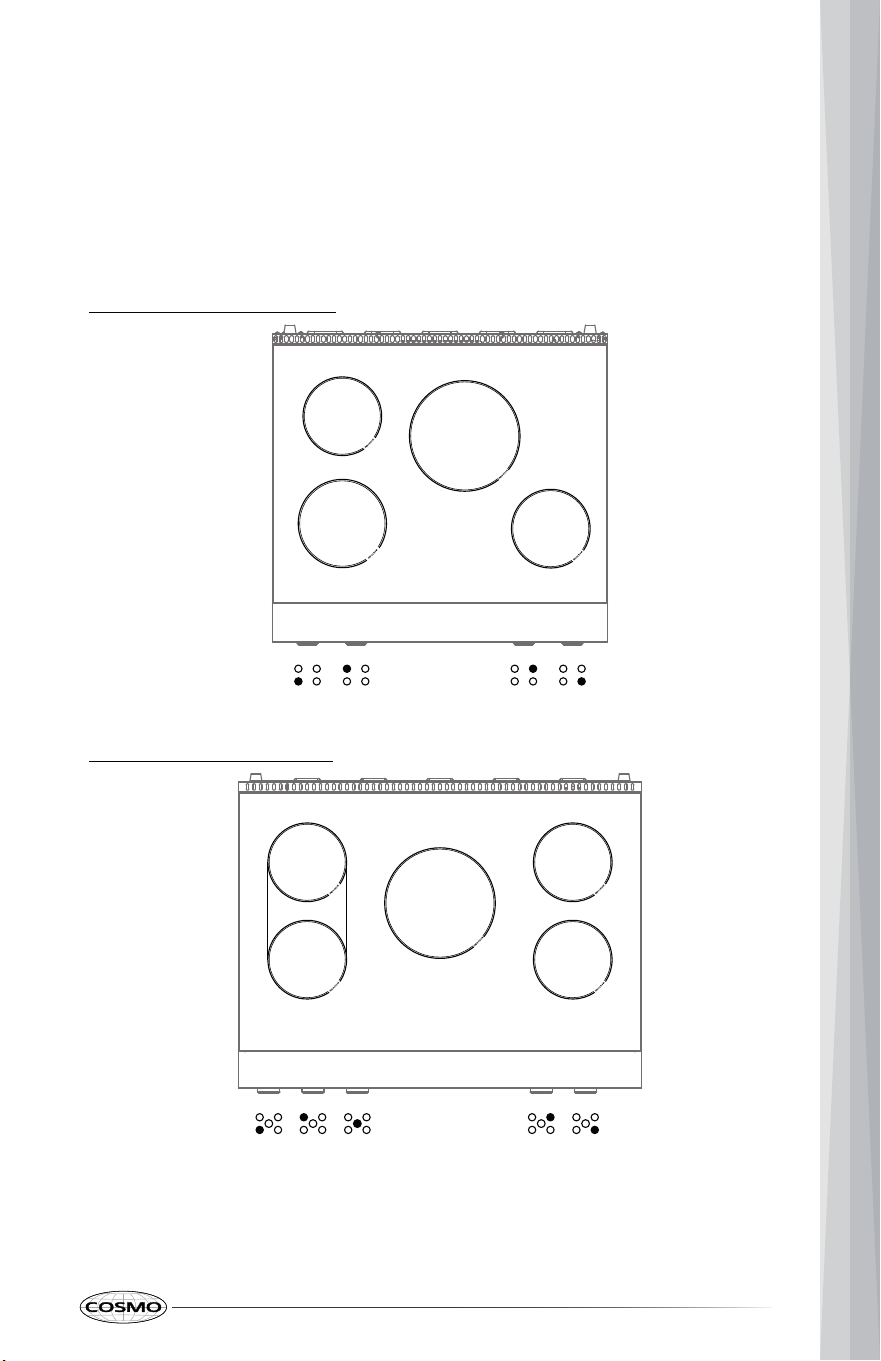
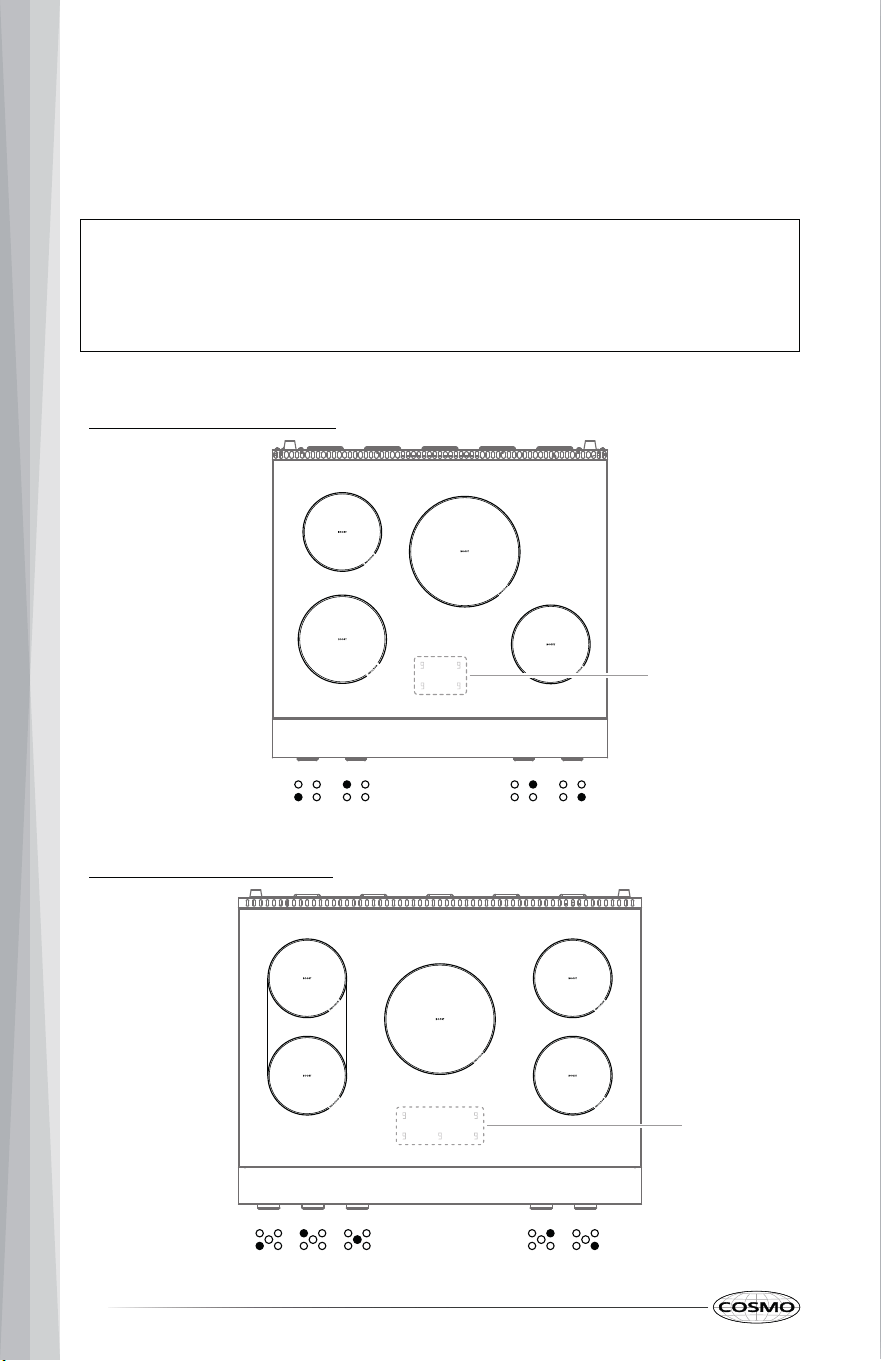
COOKING AREAS
The cooking areas on your range are identified by permanent circles on the
glass cooktop surface.
The wattage ratings below are maximum outputs. The second rating is the
maximum output for Power Boost mode.
30" Model: COS-RIS304SS
36" Model: COS-RIS365SS
1,600 W
/ 2,000 W
1,600 W
/ 2,000 W
2,500 W
/ 3,700 W
2,100 W
/ 2,700 W
1,200 W
/ 1,500 W
1,600 W
/ 2,100 W
1,200 W
/ 1,500 W
2,500 W
/ 3,700 W
1,600 W
/ 2,100 W
32
Note:
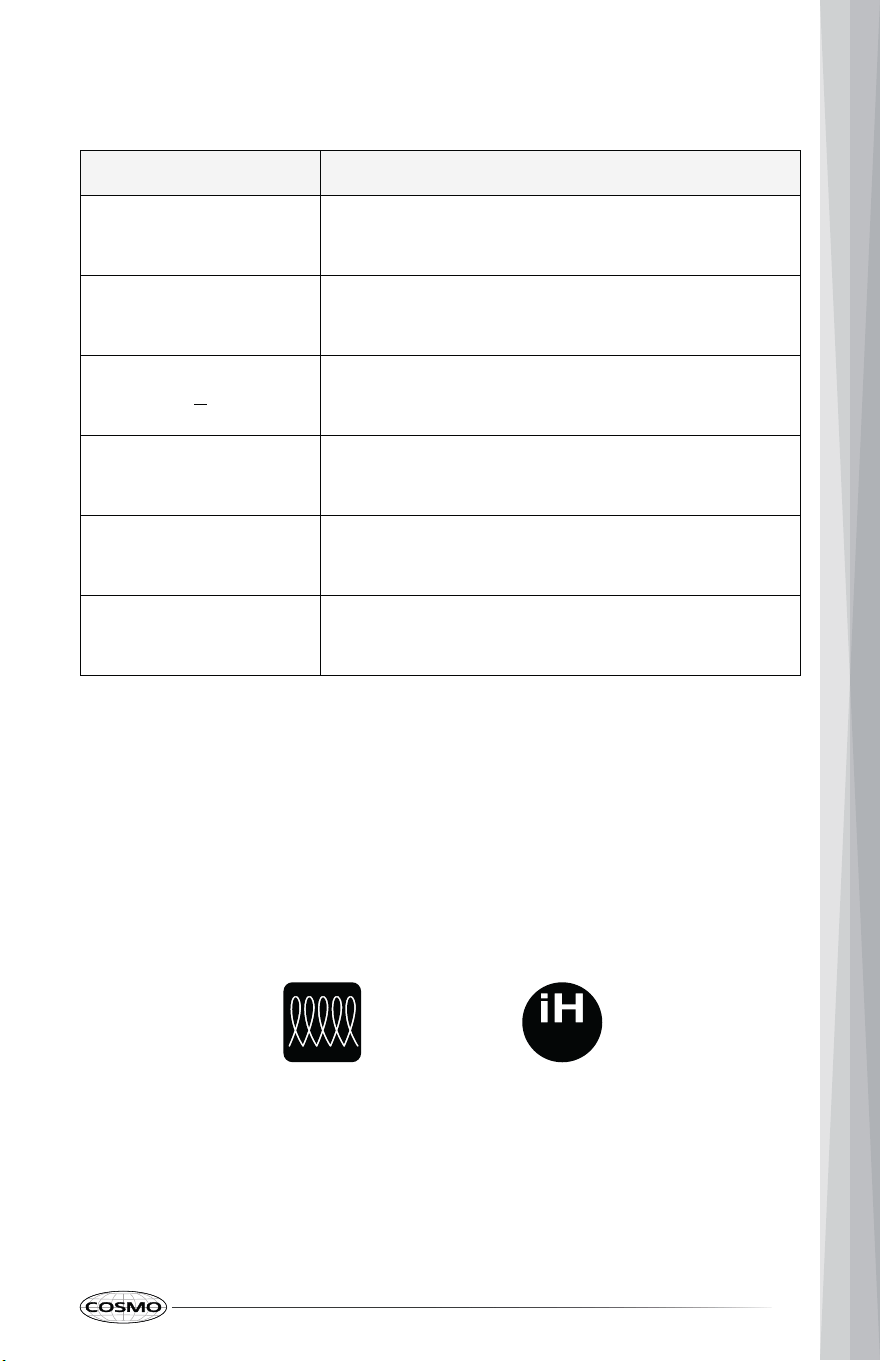
ELEMENT DISPLAY
The range provides a display for each cooking element on the cooktop. Use
the display to monitor the power levels of the elements.
30" Model: COS-RIS304SS
• Do not place hot cookware over the element displays on the cooktop.
Placing hot cookware on the element displays can damage the
electronic underneath.
36" Model: COS-RIS365SS
Element
displays
Element
displays
33
In addition to power levels, several indicators may also show in the display.
Symbols of Induction Compatible Cookware
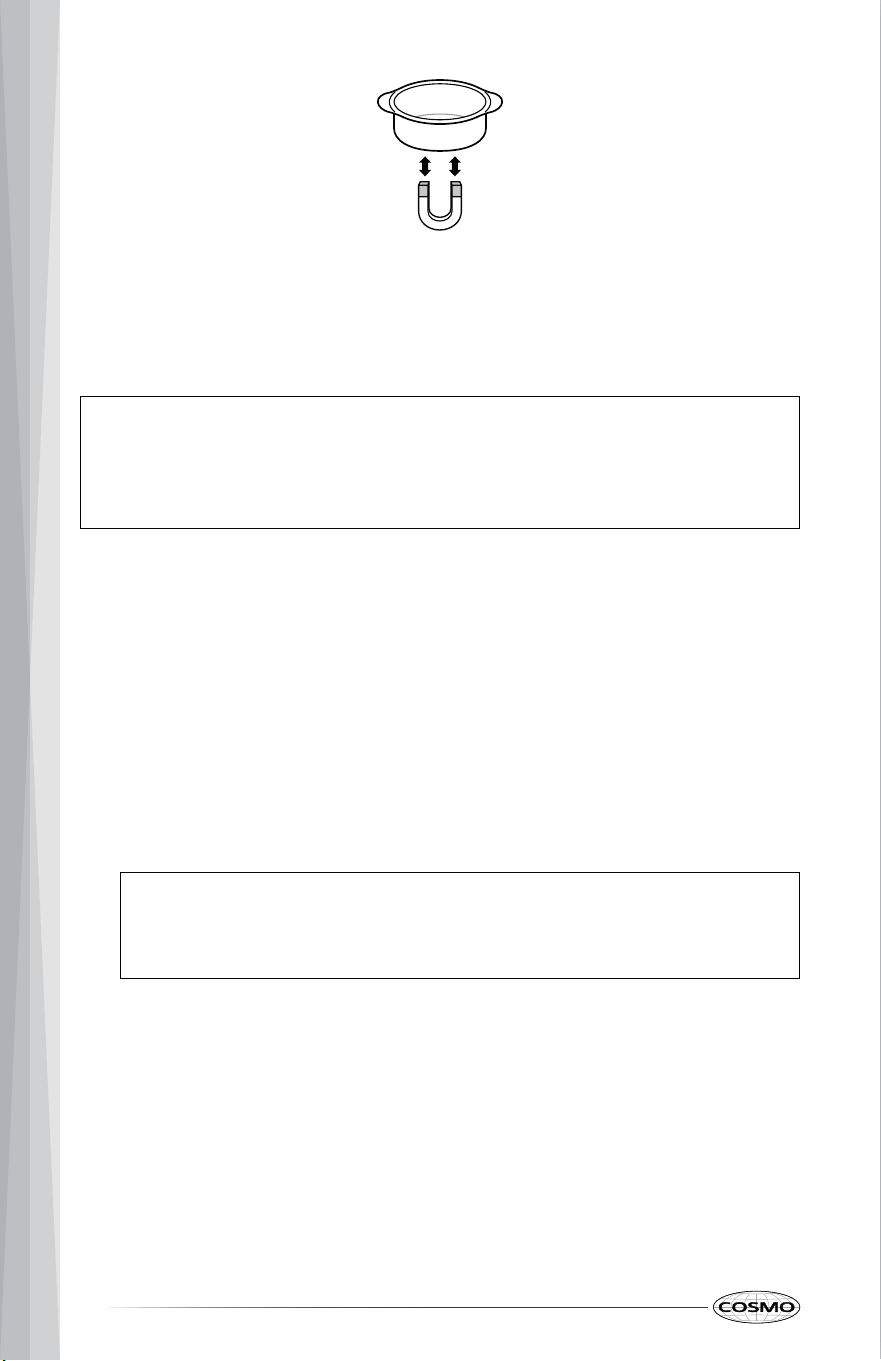
INDUCTION COOKWARE
When purchasing pans for use on the induction cooktop, look for cookware
identified by the manufacturer as "induction ready" or "induction capable", or
that is marked by the manufacturer as specifically designed for induction
cooking.
The base material of the cookware must be magnetic for the cooking
elements to activate. Use a magnet to check if the cookware base material is
suitable. If the magnet sticks to the bottom of the cookware, the cookware
can be used for induction cooking.
Indicator Description
-
≡
The element knob is not in the OFF position.
U
The surface element is synced.
F
Detecting proper cookware before deactivating
element. See "Pan Sensing" section.
H
Surface element error. See "Error Code" section.
Element surface is still hot. See "Hot Surface
Indicator" section.
Flashing E, or flashing E
and a number
This is an error code. See "Error Code" section.
34
Note:
For the best possible surface cooking results, use only high-quality, heavy
gauge steel cookware on the induction cooking elements. Follow
manufacturer's recommendations when using induction cookware.
• Before using the induction cooking elements, carefully read and follow
these cookware recommendations and the instructions in the "Pan
Sensing" section.
Note:
INDUCTION COOKWARE TYPES
The three most common induction cookware types available are stainless
steel, cast iron, and porcelain-enamel-coated metals.
• Stainless Steel is generally excellent for induction cooking. It is durable,
easy to clean, and resists staining.
• Not all stainless steel cookware is magnetic; stainless steel is not
always suitable for induction cooking.
• Cast Iron cooks evenly and is also good for induction cooking. Do not
slide cast iron cookware on the cooktop; cast iron cookware with a rough
surface will scratch the ceramic cooktop.
• Porcelain-enamel-coated metals have variable heating characteristics
depending on the quality of the base metal. Make sure the porcelain-
enamel coating is smooth to avoid scratching the ceramic cooktop.
35
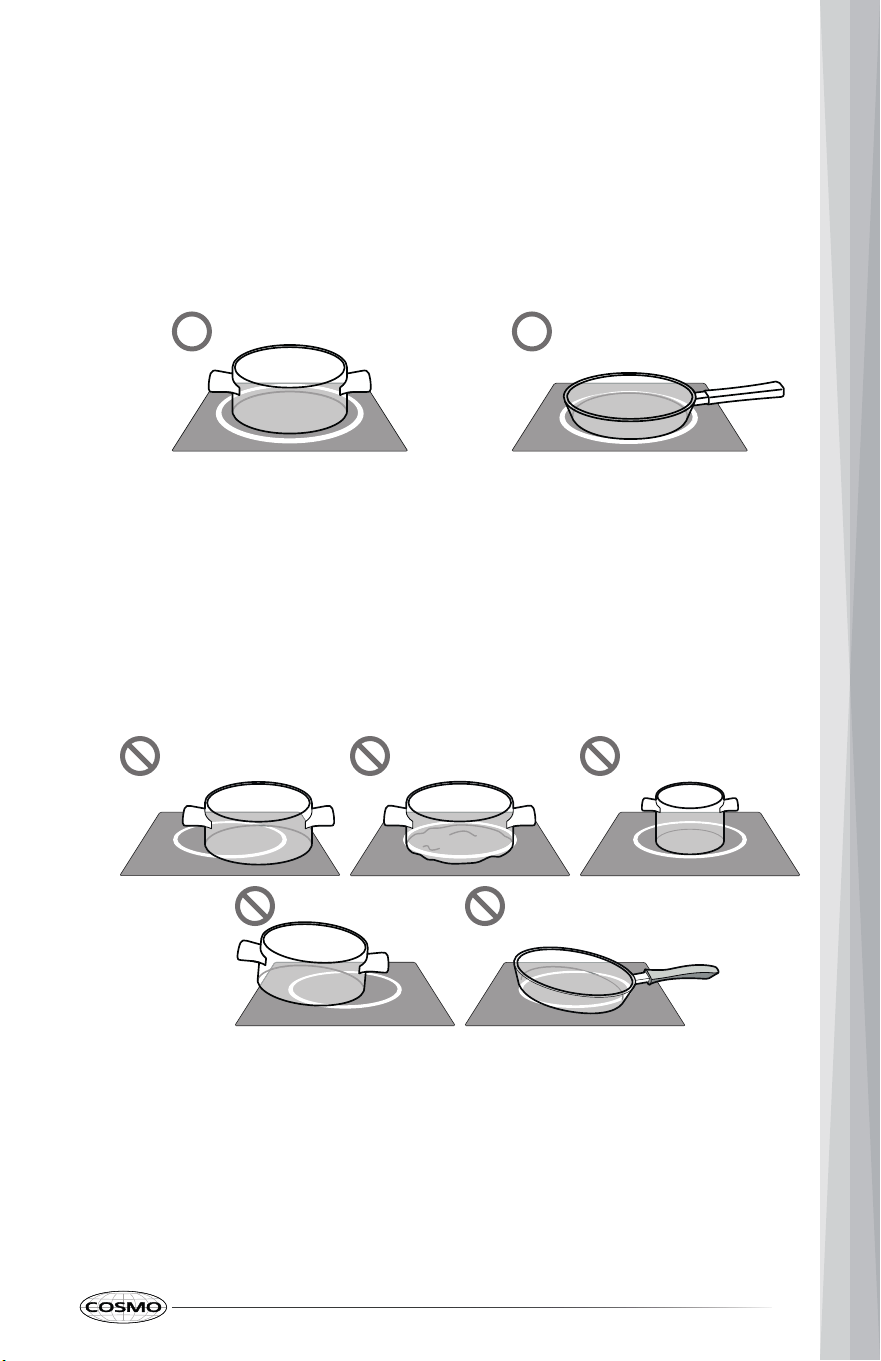
COOKWARE PLACEMENT
Use the proper cookware and place it correctly on the cooktop. One or more
of the cooking elements will not heat if any of the incorrect conditions shown
is detected by the sensors located below the ceramic cooktop surface. Correct
the problem before attempting to use the cooktop.
Correct Use
Incorrect Use
• Cookware is centered correctly on surface of cooking element.
• Pan has flat bottom and straight sides.
• Pan size meets or exceeds the recommended minimum size for the
cooking element.
• Pan rests completely on the cooktop surface.
• Pan is properly balanced.
• Cookware is not centered on surface of cooking element.
• Pan has curved or warped bottom or sides.
• Pan does not meet the minimum size required for the cooking element
used.
• Pan bottom rests on cooktop trim or does not rest completely on the
cooktop surface.
• Pan is unbalanced by heavy handle.

36
PAN SENSING
The cooking-element sensors located below the cooktop surface require
certain cookware conditions to be met before the induction cooking elements
can operate.
The element display may show a pan sensing status or error symbol.
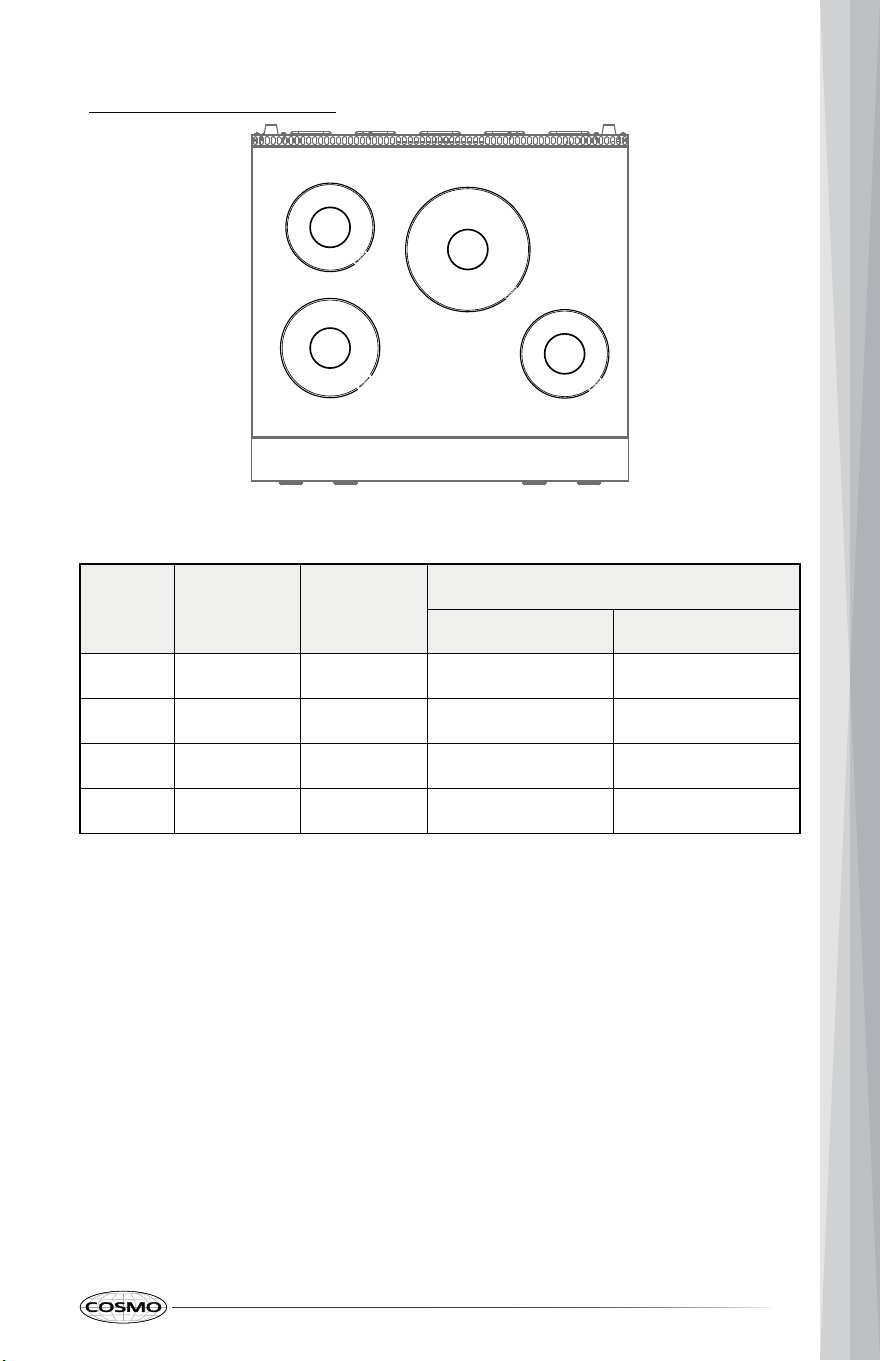
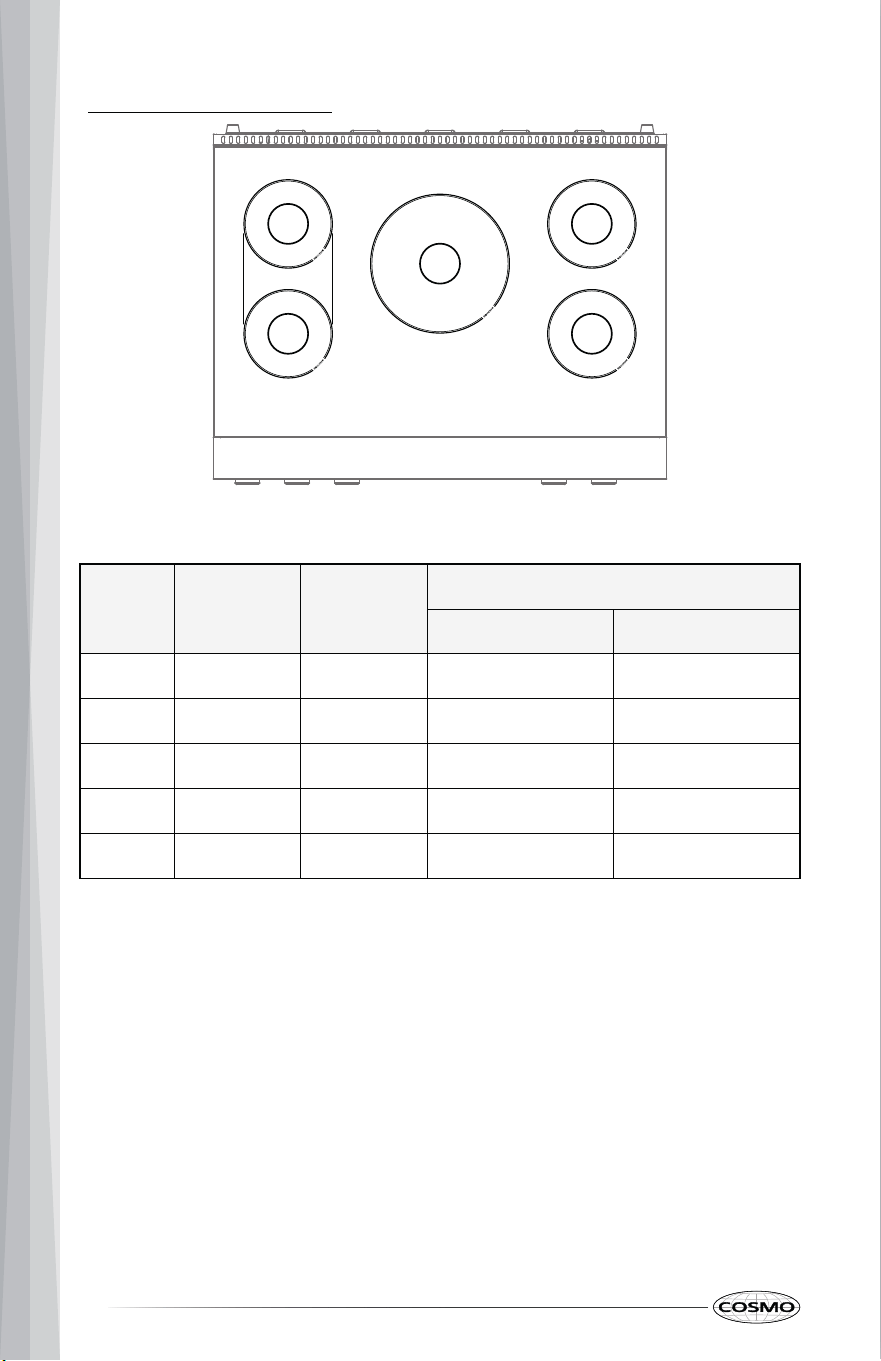
MINIMUM AND MAXIMUM PAN SIZE
Each cooking element on the induction cooktop requires an appropriate pan
size to be used effectively. The bottom size of the pan must be between the
maximum and minimum diameter for proper cooking to occur.
Note:
• If a cooking element is activated and no proper cookware is detected, the
affected element display will show "U". If the cookware does not meet the
correct conditions, the cooking element will not operate.
• If the problem is not corrected within 30 seconds, the affected cooking
element will automatically deactivate and the element display will show
"-", indicating the element knob is not in the OFF position.
• The pan must make full contact with the glass surface without the
bottom of the pan touching the metal cooktop trim.
• If the correct induction cookware centered on any of the active cooking
elements is too small, the affected element display will show "U" and the
pan does not heat.
37
30" Model: COS-RIS304SS
Cooking
Element
Element
Location
Element
Size
Diameter of Pan Bottom
Min. Max.
1 Front Left 7.5 inch 7.0 inch (178 mm) 8.5 inch (216 mm)
2 Rear Left 7 inch 6.5 inch (165 mm) 8.1 inch (205 mm)
3 Rear Right 9.8 inch 8.5 inch (216 mm) 10.8 inch (274 mm)
4 Front Right 7 inch 6.5 inch (165 mm) 8.1 inch (205 mm)
1
2
3
4
38
36" Model: COS-RIS365SS
Cooking
Element
Element
Location
Element
Size
Diameter of Pan Bottom
Min. Max.
1 Front Left 7 inch 6.5 inch (165 mm) 8.1 inch (205 mm)
2 Rear Left 7 inch 6.5 inch (165 mm) 8.1 inch (205 mm)
3 Middle 11 inch 9.5 inch (241 mm) 11.8 inch (300 mm)
4 Front Right 7 inch 6.5 inch (165 mm) 8.1 inch (205 mm)
5 Rear Right 7 inch 6.5 inch (165 mm) 8.1 inch (205 mm)
1
2
3
4
5
39
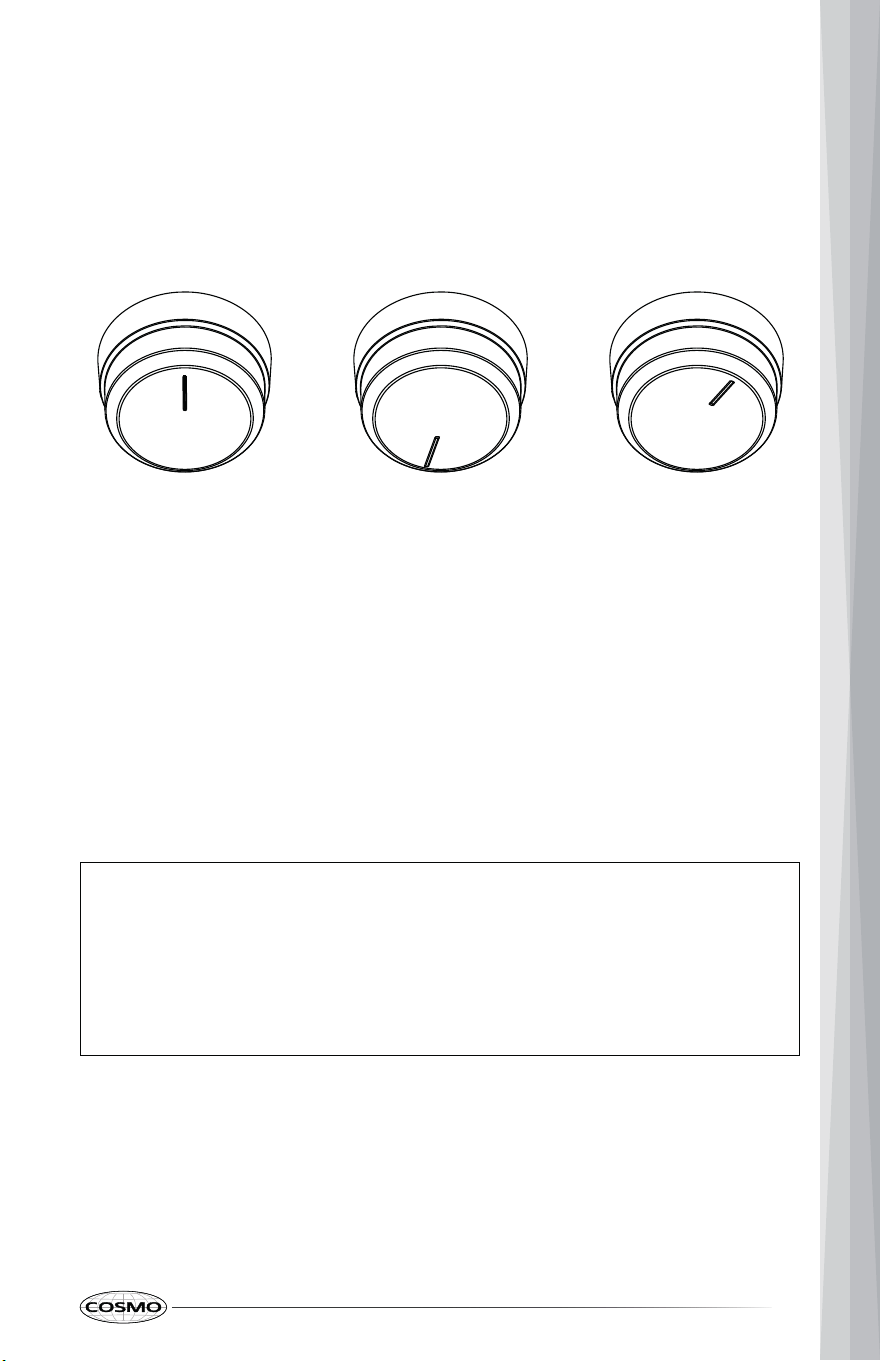
OFF position 5 (medium) position
USING THE COOKTOP ELEMENTS
TURNING ON COOKING ELEMENT
Center appropriate cookware on surface of cooking element before turning
on the element.
Power Boost
position
Note:
1. Push the control knob in.
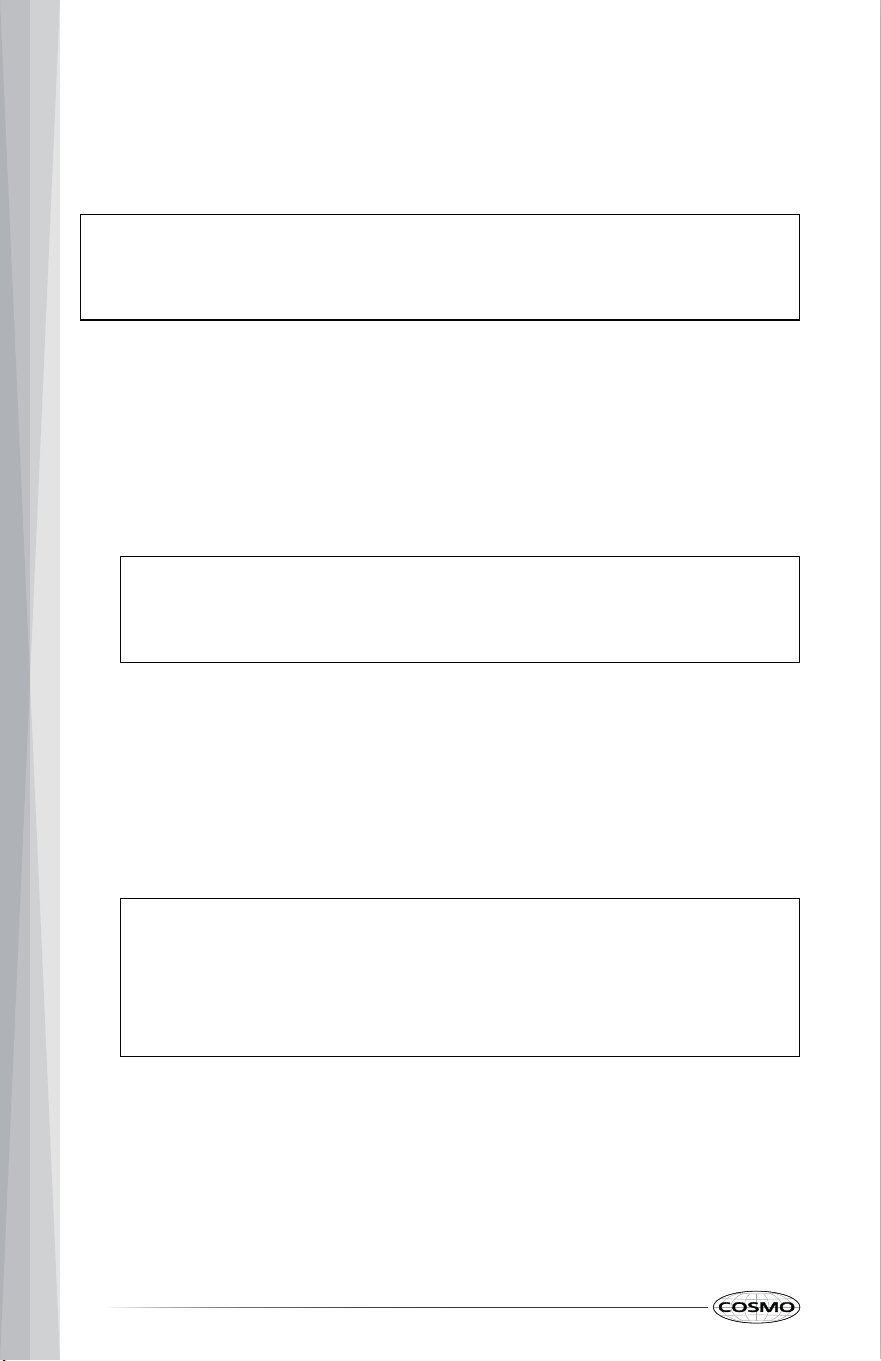
2. Turn the knob to select the desired setting. The element display shows its
current setting.
3. To turn off a cooking element, turn the knob to the OFF position.
• It is normal for the cooktop elements in low and medium settings to
cycle on and off during cooking.
• To avoid damage to the product, the cooktop elements in high settings
may also cycle on and off during cooking if element surface
temperature is approaching the safety limit.
1
P
O
F
F
O
F
F
P
6
4
5
40
SYNCHRONIZING LEFT COOKING ELEMENTS
Sync elements is only intended for cookware that spans both left cooking
elements.
Note:
• Power Boost mode cannot be activated when the cooking elements are
synced.
1. Push the left element control knobs in.
2. Turn both knobs simultaneously to select P and hold for 3 seconds. The
front-left element display shows "0", and rear-left element display shows
"≡".
Note:
• The rear-left element knob is deactivated when the left cooking
elements are synced.
3. Turn the front-left element knob to select the desired setting.
4. To turn off sync, turn both left element knobs simultaneously to select P
and hold for 3 seconds. Both the front-left and the rear-left element
displays show "-".
Note:
• If the synced element knobs are turned to the OFF position without
turning off sync, the rear-left element knob will continue to be
deactivated and the left elements will be synced when the front-
left element is turned on again.
5. Turn the knobs to the OFF position.

41
USING POWER BOOST LEVEL
When the cooking element is set to the Power Boost mode, the element
display shows "P". Power Boost mode stays in operation for up to 10 minutes.
After 10 minutes, the cooking element automatically returns to the Hi setting.
Note:
HOT SURFACE INDICATOR
The element display shows "H" after the cooking element is turned off to
indicate that the element surface is still hot due to contact with hot cookware.
When the hot surface indicator "H" disappears, the glass surface may still feel
slightly hot to touch.
Note:
• Power Boost mode cannot be activated when the cooking elements are
synced.
1. Push the control knob in.
2. Turn the knob to select P and hold for 3 seconds. The element display
shows "P". Power Boost mode will operate for up to 10 minutes.
3. To turn off Power Boost mode early, turn the knob to select a different
setting or to the OFF position when cooking is complete.
• The element display shows "H" when the element surface temperature is
approximately 131°F (55°C) or higher.
• "H" remains in the element display after the cooking element is turned
off and until the element surface has cooled to approximately 113°F
(45°C).
42
AUTOMATIC SAFETY SHUTOFF
The various power settings of the induction cooking elements have an
operating time limit, after which the control will automatically turn off the
cooking elements to avoid unintentional extensive use. The cooking elements
can be restarted after the time limit expires.
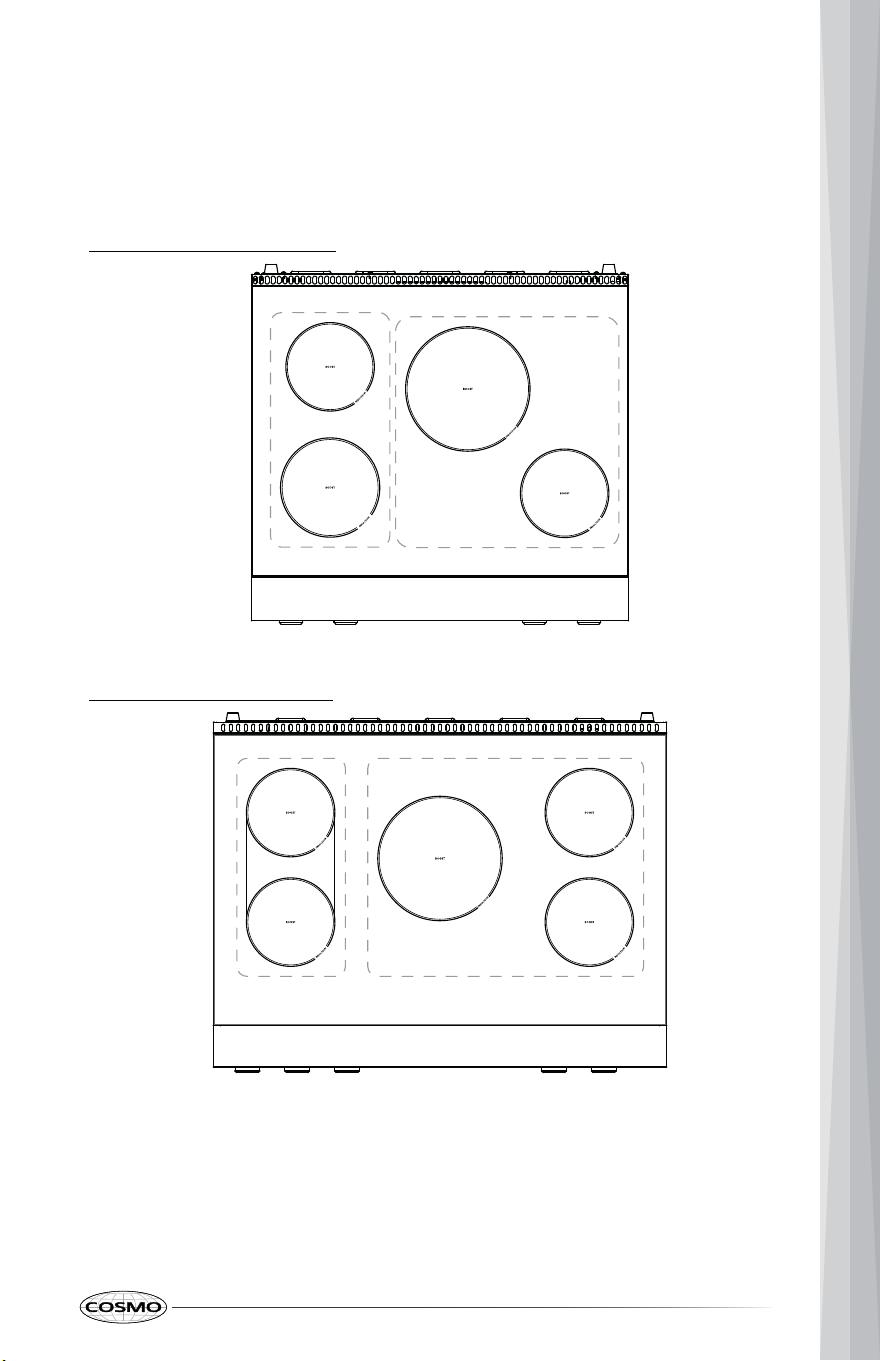
Cooking Element Settings Operating Time Limit
1 – 3 8 hours
4 – 6 6 hours
7 – 9 2 hours
IN CASE OF POWER FAILURE
The electric cooktop and oven cannot be used during a power outage.
If power is lost while a cooktop element is on and the knob is not turned to the
OFF position, the cooktop element will not turn back on as soon as power is
restored and the element display will show "-". Turn the knob to the OFF
position to clear the element display and restart the cooking.
43
30" Model: COS-RIS304SS
36" Model: COS-RIS365SS
POWER MANAGEMENT
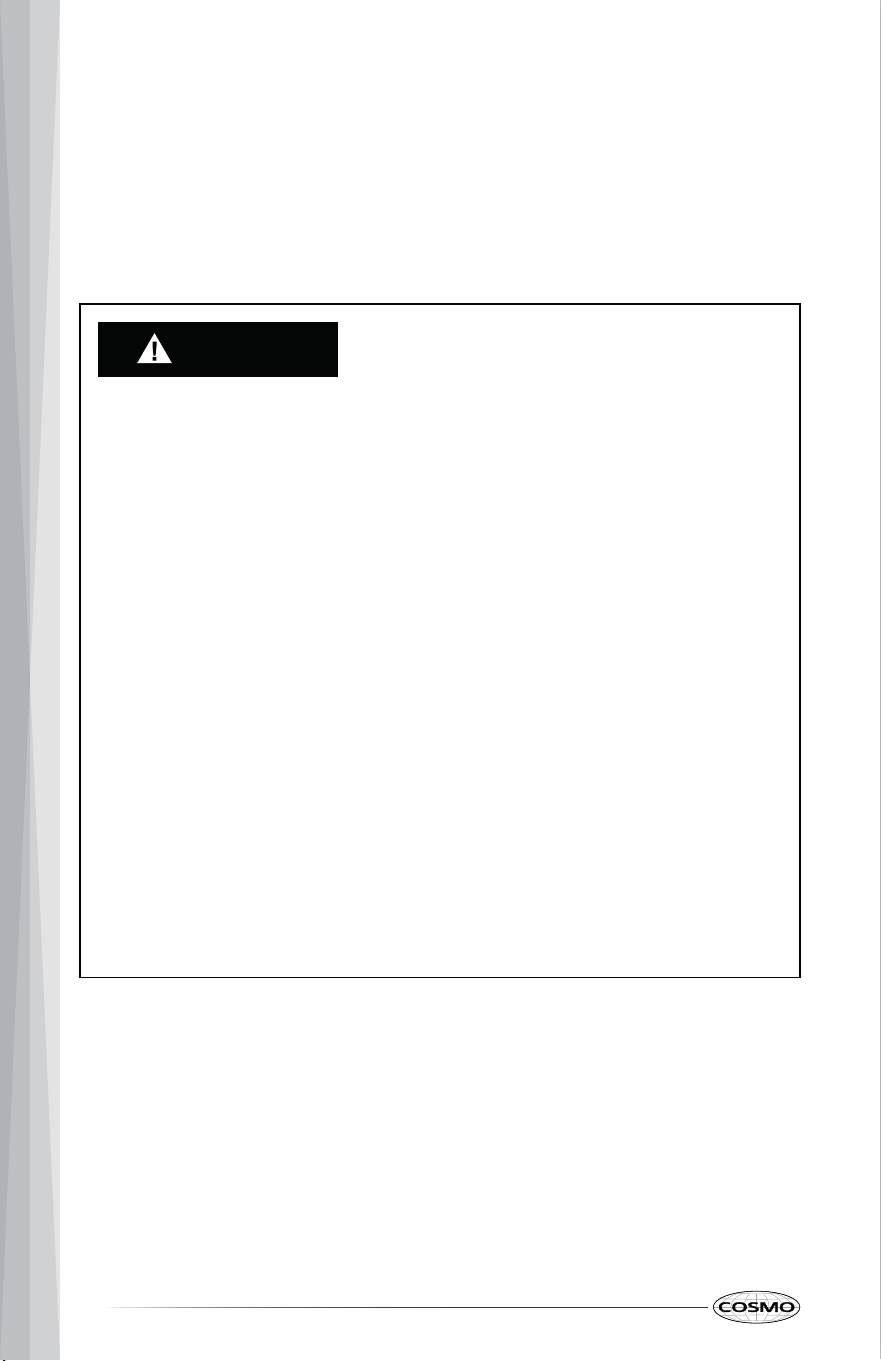
The cooking zones, which consist of paired cooking elements, are restricted to
drawing a certain maximum amount of power.
If you turn on the Power Boost mode for one element while its paired element
is in use, the Power Management function may automatically reduce the
power of both elements. For consistent performance when using multiple
elements, use elements in separate cooking zones.
Zone 1 Zone 2
Zone 1 Zone 2
44
OVEN
BEFORE USING THE OVEN
Read the instructions for each feature and cooking mode in this manual
carefully before using the oven.
CAUTION
• Do not use any type of foil or oven liner to cover the oven bottom. These
items can trap heat or melt, resulting in damage to the product and risk
of shock, smoke or fire. Damage from improper use of these items is not
covered by the product warranty.
• Foil may be used to catch spills by placing a sheet on a lower rack,
several inches below the food. Do not use more foil than necessary and
never entirely cover an oven rack with aluminum foil. Keep foil at least
1-1/2" (3.8 cm) from oven walls to prevent poor heat circulation.
• Do not cover the slotted grid of the 2-piece broiler pan with aluminum
foil. This will catch the grease and could cause fire.
• Do not use plastic wrap or wax paper in the oven.
• Do not place food, water, ice, or any dish or tray directly on the oven
floor, as this will irreversibly damage the enamel surface.
• Do not block, touch or place items around the oven vent during cooking.
• Do not block the oven vent when cooking to allow for proper air flow.
Do not touch vent openings or nearby surfaces during any cooking
operation.
• As the oven heats up, the heated air in the oven may cause
condensation to appear on the oven door glass. These water drops are
harmless and will evaporate as the oven continues to heat up.
45
CAUTION
Food Poisoning Hazard
• Do not let food sit in oven more than one hour before or after cooking.
• Foods that can easily spoil such as milk, eggs, fish, meat or poultry,
should be chilled in the refrigerator first. Even when chilled, they should
not stand in the oven for more than 1 hour before cooking begins, and
should be removed promptly when finished cooking. Consuming spoiled
food can result in food poisoning or sickness.
Note:
• Because the oven temperature cycles, an oven thermometer placed in
the oven cavity may not show the same temperature that is set on the
oven.
• It is normal for the convection fan to run while preheating during a
regular bake cycle.
• The convection fan motor may run periodically during a regular bake
cycle.
• The fan turns off if the door is left open during baking. The fan turns
back on automatically once the door is closed.
• Avoid opening the oven door more than necessary during use. This
helps the oven maintain temperature, prevents unnecessary heat loss,
and saves on energy use.
BEFORE USING THE OVEN FOR THE FIRST TIME
Clean the oven thoroughly before using it for the first time. Then, remove the
accessories, set the oven to bake, and then run the oven at 400°F (204°C) for 1
hour. There will be a distinctive odor. This is normal. Ensure your kitchen is well
ventilated during this conditioning period.
46
Note:
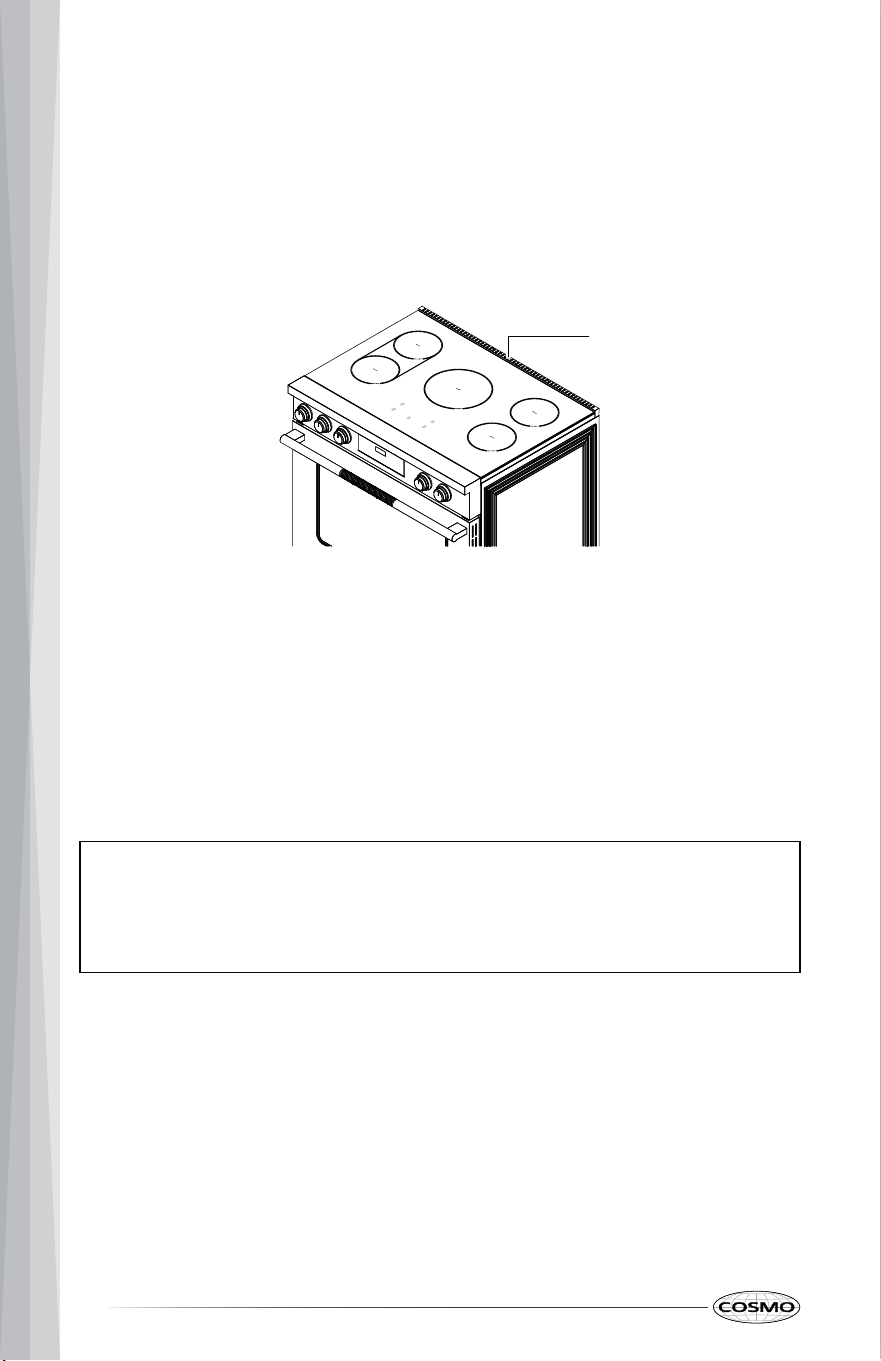
OVEN VENT
Areas near the vent may become hot during operation and may cause burns.
Do not block the vent opening. Avoid placing plastics near the vent as heat
may distort or melt the plastic.
It is normal for steam to be visible when cooking foods with high moisture
content.
OVEN DOOR
Oven heating elements and, if in operation, convection fan will temporarily
shut off any time door is opened, and will resume when door is closed within 3
minutes.
To avoid oven door glass breakage:
• Do not leave the door open any longer than necessary. If the door is left
open too long for over 3 minutes, the cooking mode will be
automatically cancelled.
• Do not close the oven door if the racks are not fully inserted into the oven
cavity or if bakeware extends past the front edge of an oven rack.
• Do not set objects on the glass surface of the oven door.
• Do not hit glass surfaces with bakeware or other objects.
• Do not wipe down glass surfaces until the oven has completely cooled.
Oven vent
47
CAUTION
USING OVEN RACKS
IMPORTANT: To avoid permanent damage to the porcelain finish, do not
place food or bakeware directly on the oven door or bottom.
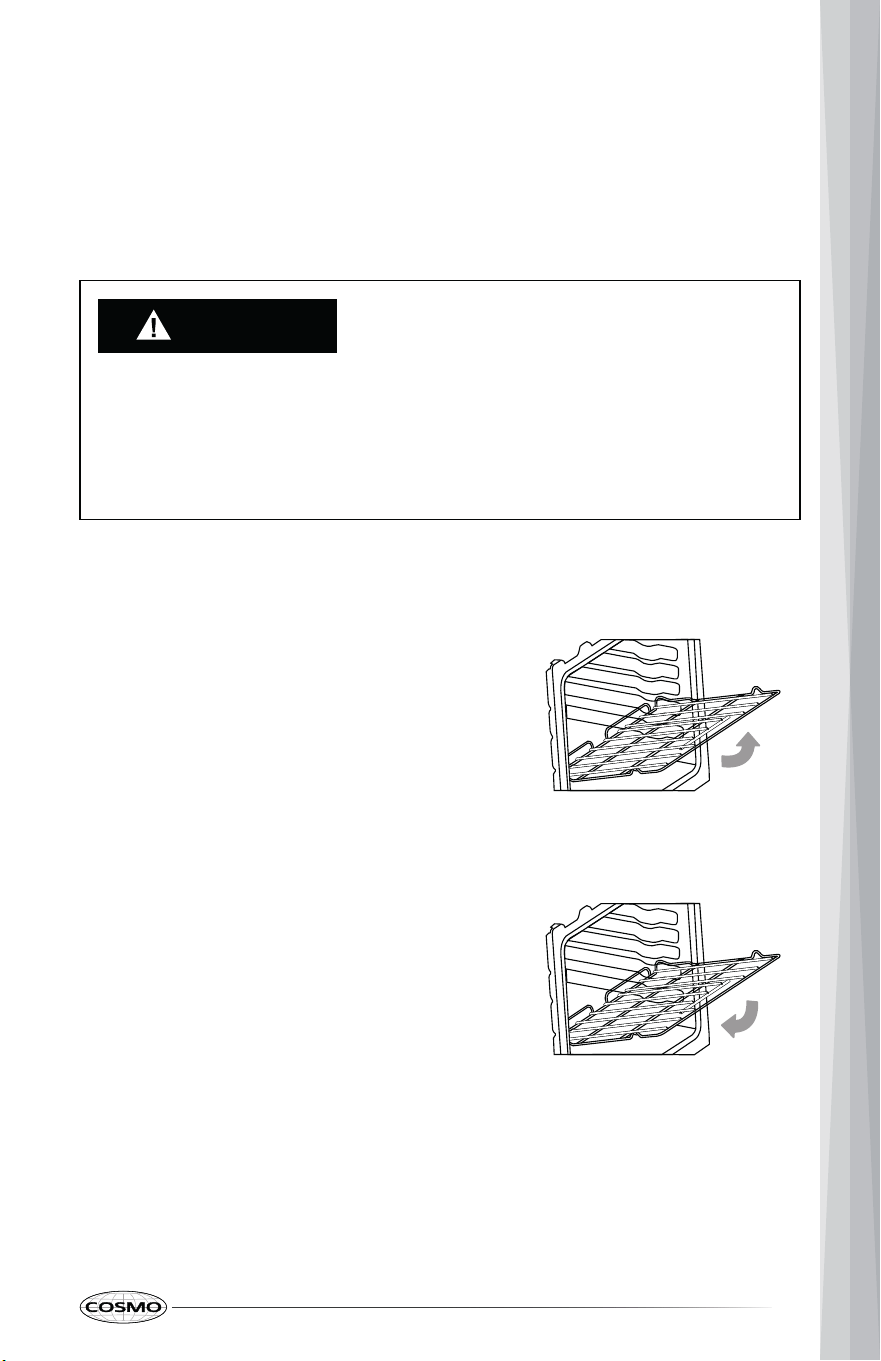
The racks have a turned-up back edge that prevents them from being pulled
out of the oven cavity.
Removing Racks
Replacing Racks
1. Pull the rack straight out until i t
stops.
2. Lift up the front of the rack an d
pull it out.
• Replace oven racks before turning the oven on to prevent burns.
• Do not cover the racks with aluminum foil, or any other material, o r
place anything on the bottom of the oven. Doing so will result in poo r
baking and may damage the oven bottom.
• Only arrange oven racks when the oven is cool.
1. Place the end of the rack on t he
support.
2. Tilt the front end up and push t he
rack in.
48
PREHEATING
When beginning a Bake, Convection Bake, or Air Fry cycle, the oven will begin
preheating after Start is pressed. Higher temperatures will take longer to
preheat.
The preheat cycle rapidly increases the oven temperature. The actual oven
temperature will go above your set temperature to offset the heat lost when
your oven door is opened to insert food. This ensures that when you place
your food in the oven, the oven will begin at the proper temperature.
Insert your food when the preheat tone sounds. Do not open the door during
preheat before the tone sounds.
• For Bake, Convection Bake, and Air Fry that utilizes preheat, the control
will automatically enter preheat mode and show PRE after Start is
pressed to turn on the oven.
– Once the set temperature is reached, an indicator tone will sound to
alert the user that preheat is complete.
• For Broil and Keep Warm modes that do not utilizes preheat, the control
will show Hi or Lo for Broil and 175°F (79°C) for Keep Warm after Start is
pressed to turn on the oven.
Note:
• The convection fan may operate during preheating to improve oven
performance.
49
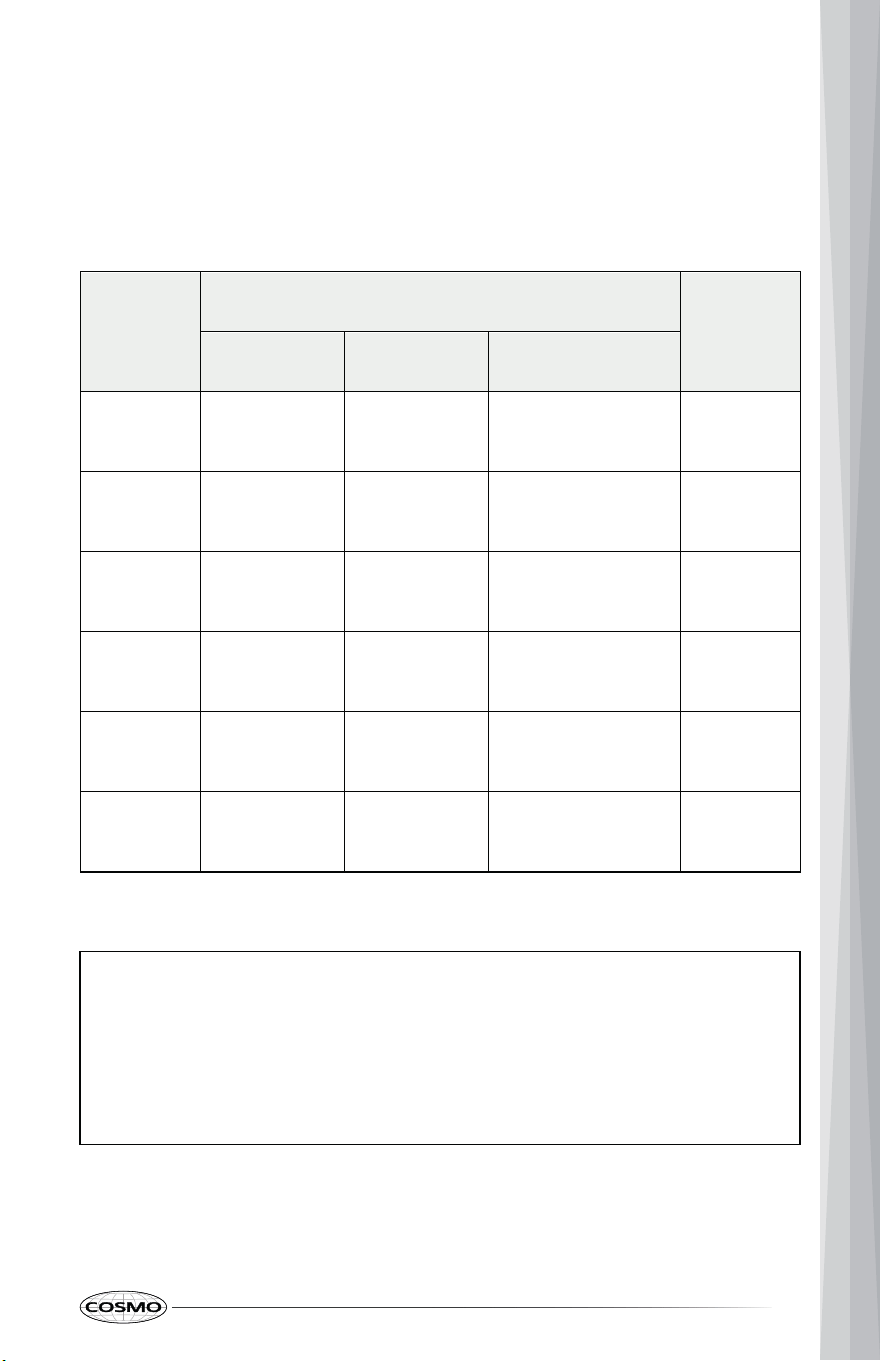
MINIMUM & MAXIMUM DEFAULT SETTINGS
Bake, Conv Bake, and Air Fry modes have a 10-hour time limit, after which the
control will automatically end the cooking mode. Broil and Keep Warm modes
have a 3-hour time limit. If desired, these modes can be restarted after the
time limit expires.
Mode
Temperature
Maximum
Cook Time
(hh:mm)
Minimum Maximum Default / Target
Bake 175°F (79°C) 550°F (287°C) 350°F (177°C) 10:00
Conv Bake 175°F (79°C) 550°F (287°C) 350°F (177°C) 10:00
Air Fry 350°F (177°C) 550°F (287°C) 425°F (219°C) 10:00
Broil - -
Hi: 550°F (287°C)
Lo: 400°F (204°C)
03:00
Keep
Warm
- - 175°F (79°C) 03:00
Steam
Clean
- - 150°F (65°C) 00:25
Note:
• Elements will cycle on and off as needed to provide consistent
temperature but may run slightly hot or cool at any point in time due to
this cycling.
• Because the oven temperature cycles, an oven thermometer placed in
the oven cavity may not show the same set temperature on the oven.

50
BAKE
The Bake mode uses heat from the lower heating element to prepare foods
such as pastries, breads and casseroles. This mode works best with food
placed on a single rack. Always preheat the oven first and place food
centrally near the middle racks.
Setting the Bake Mode
For example, to Bake at 375°F.
1. Adjust oven rack levels as needed.
2. Press Bake once to select Bake mode.
3. Press/hold + or - to set the bake temperature to 375°F.
4. Press Start.
--:-- appears in the display, prompting for cooking time to be entered.
5. (Optional) Press/hold + or - to set the desired cooking time.
6. Press Start.
The oven starts to preheat, and PRE appears in the display. Keep the oven
door closed, and wait for the oven to preheat to the set temperature.
Note:
• If the oven door is opened at the time Start is pressed, the oven will
turn on when the oven door is closed.
• When the preheat has completed, the set temperature appears in
the display and the indicator tone sounds. If a cooking time is set,
the countdown will start.
7. Place the food in the oven.

51
Note:
• Do not leave the door open any longer than necessary when
placing food. If the door is left open too long for over 3 minutes, the
cooking mode will be automatically cancelled.
8. Press Cancel/Off when cooking is finished, and remove the food from the
oven.
Note:
• Baking time and temperature will vary depending on the
characteristics, size, and shape of the baking pan used.
• Check for food doneness at the minimum recipe time.
• Use metal bakeware (with or without a nonstick finish), heatproof glass-
ceramic, ceramic or other bakeware recommended for oven use.
• Dark metal pans or nonstick coatings will cook food faster with more
browning. Insulated bakeware will slightly lengthen the cooking time for
most foods.
CONVECTION BAKE
The Convection Bake mode uses heat from the lower heating element and air
movement from the convection fan to enhance cooking efficiency and
evenness across multiple racks. Always preheat the oven first. Baking times
may be slightly longer for multiple racks than what would be expected for a
single rack.
Setting the Convection Bake Mode
For example, to Convection Bake at 375°F.
1. Adjust oven rack levels as needed.
2. Press Bake twice to select Convection Bake mode.
The indicator light above Bake flashes.
52
3. Press/hold + or - to set the convection bake temperature to 375°F.
4. Press Start.
--:-- appears in the display, prompting for cooking time to be entered.
5. (Optional) Press/hold + or - to set the desired cooking time.
6. Press Start.
The oven starts to preheat, and PRE appears in the display. Keep the oven
door closed, and wait for the oven to preheat to the set temperature.
Note:
• If the oven door is opened at the time Start is pressed, the oven will
turn on when the oven door is closed.
• When the preheat has completed, the set temperature appears in
the display and the indicator tone sounds. If a cooking time is set,
the countdown will start.
7. Place the food in the oven.
Note:
• Do not leave the door open any longer than necessary when
placing food. If the door is left open too long for over 3 minutes, the
cooking mode will be automatically cancelled.
8. Press Cancel/Off when cooking is finished, and remove the food from the
oven.
Note:
• The oven fan runs while convection baking.
• Use Convection Bake for faster and more even multiple-rack cooking of
pastries, cookies, muffins, biscuits, and breads of all kinds.

53
Note:
• Bake cookies and biscuits on pans with no sides or very low sides to
allow heated air to circulate around the food. Food baked on pans with
a dark finish will cook faster.
• Place the oven racks in positions suggested in the "Tips and Techniques"
section.
AIR FRY
The Air Fry mode uses heat from the upper and lower heating elements and
hot air movement from the convection fan to circulate hot air inside the oven.
This mode is specially designed for oil-free frying, and to produce foods with a
crispier exterior than traditional oven cooking. The Air Fry mode is intended
for single rack cooking only. Always preheat the oven first and place food
centrally near the middle racks.
Setting the Air Fry Mode
For example, to Air Fry at 400°F.
1. Adjust oven rack levels as needed.
2. Press Air Fry to select Air Fry mode.
3. Press/hold + or - to set the air fry temperature to 400°F.
4. Press Start.
--:-- appears in the display, prompting for cooking time to be entered.
5. (Optional) Press/hold + or - to set the desired cooking time.
6. Press Start.
The oven starts to preheat, and PRE appears in the display. Keep the oven
door closed, and wait for the oven to preheat to the set temperature.
54
Note:
• If the oven door is opened at the time Start is pressed, the oven will
turn on when the oven door is closed.
• When the preheat has completed, the set temperature appears in
the display and the indicator tone sounds for a few seconds. If a
cooking time is set, the countdown will start.
7. Place the food in the oven.
Note:
• Do not leave the door open any longer than necessary when
placing food. If the door is left open too long for over 3 minutes, the
cooking mode will be automatically cancelled.
8. Press Cancel/Off when cooking is finished, and remove the food from the
oven.
Note:
• The oven fan runs while air frying.
• Use either the provided air fry tray or a dark baking tray with no sides or
short sides that does not cover the entire rack. This allows for better air
circulation.
BROIL
The Broil mode uses intense heat from the upper heating element to sear
foods. This mode works best for tender cuts of meat, fish, and thinly cut
vegetables, and is ideal for toasting, melting cheese, browning and searing
surface. Food should be placed near the upper racks, and should not be
cooked for too long on each side of the food.
Setting the Broil Mode
1. Adjust oven rack levels as needed.
55
2. Press Broil once to select Hi Broil or twice to select Lo Broil.
3. Press Start.
The oven starts to preheat, and HI or LO remains in the display. Keep the
oven door closed.
Note:
• If the oven door is opened at the time Start is pressed, the oven will
turn on when the oven door is closed.
4. Place the food in the oven after preheating for 5 - 10 minutes.
Note:
• Do not leave the door open any longer than necessary when
placing food. If the door is left open too long for over 3 minutes, the
cooking mode will be automatically cancelled.
5. Press Cancel/Off when cooking is finished, and remove the food from the
oven.
Note:
• This range is designed for closed-door broiling. If the door is opened
during broiling, the broil element turns off temporarily. The broil
element turns back on automatically once the door is closed.
• The broil heating element is very powerful. Follow recipe directions and
monitor food closely to reduce risk of burning food.
• Always use a broiler pan and grid for excess fat and grease drainage.
This will help to reduce splatter, smoke, and flare-ups.
• Do not use a broiler pan without a grid. Oil can cause a grease fire.
• Do not cover the grid and broiler pan with aluminum foil. Doing so will
cause a fire.
56
KEEP WARM
The Keep Warm mode uses heat from the lower heating element to maintain
oven temperature at around 175°F (79°C). It will keep cooked food warm for
serving up to 3 hours after cooking has finished. Cover foods that need to
remain moist and do not cover foods that should be crisp. Preheating is not
required.
Setting the Keep Warm Mode
1. Adjust oven rack levels as needed.
2. Place the hot food in the oven.
3. Press Keep Warm to select Keep Warm mode.
4. Press Start.
The oven starts to preheat, and 175F (79°C) remains in the display. Keep
the oven door closed.
Note:
• If the oven door is opened when Start is pressed, the oven will turn
on when the oven door is closed.
5. Press Cancel/Off when warming is finished, and remove the food from
the oven.
Note:
• Always start with hot food. Do not use to Warm mode to heat cold food.
• It is recommended that food not be kept warm for more than 2 hours.
• The warm mode is intended to keep food warm. Do not use it to cool
food down.
• Avoid opening the oven door more than necessary during use. If the
door is left open too long for over 3 minutes, the cooking mode will be
automatically cancelled.

57
TIPS AND TECHNIQUES
Bake
Baking is cooking with heated air. The lower element in the oven is used to
heat the air but no fan is used to circulate the heat.
Follow the recipe or convenience food directions for baking temperature, time
and rack position. Baking time will vary with the temperature of ingredients
and the size, shape and finish of the baking utensil.
• For best results, bake food on a single rack with at least 1" - 1½" (2.5 - 3
cm) space between utensils and oven walls.
• Check for doneness at the minimum time.
• Use metal bakeware (with or without a non-stick finish), heatproof glass,
glass-ceramic, pottery or other utensils suitable for the oven.
• When using heatproof glass, reduce temperature by 25°F (15°C) from
recommended temperature.
• Use baking sheets with or without sides or jelly roll pans.
• Dark metal pans or nonstick coatings will cook faster with more browning.
Insulated bakeware will slightly lengthen the cooking time for most foods.
• Do not use aluminum foil or disposable aluminum trays to line any part of
the oven. Foil is an excellent heat insulator and heat will be trapped
beneath it. This will alter the cooking performance and can damage the
finish of the oven.
• Avoid using the opened door as a shelf to place pans.
• See Troubleshooting for tips on solving Oven Problems.
Convection Bake
Convection Bake uses heat from the lower heating element and air movement
from the convection fan to enhance cooking efficiency and evenness across
multiple racks. Reduce recipe baking temperatures by 25°F (15°C).
• For best results, foods should be cooked uncovered, in low-sided pans to
take advantage of the forced air circulation. Use shiny aluminum pans for
best results unless otherwise specified.
• Heatproof glass or ceramic can be used. Reduce temperature by another
25°F (15°C) when using heatproof glass dishes for a total reduction of
50°F (30°C).
58
Foods recommended for convection bake mode:
• Appetizers, Biscuits, Cakes,
Coffee Beans
• Cookies (2 to 4 racks), Yeast
Breads
• Cream Puffs, Popovers
• Casseroles, One-Dish Entrées
• Oven Meals (rack positions 2, 3,
and 4)
• Air Leavened Foods (Soufflés,
Meringue, Meringue-Topped
Desserts, Angel Food Cakes,
Chiffon Cakes)
• Dark metal pans may be used. Note that food may brown faster when
using dark metal bake ware.
• The number of racks used is determined by the height of the food to be
cooked.
• Baked items, for the most part, cook extremely well in convection. Don’t
try to convert recipes such as custards, quiches, pumpkin pie, or
cheesecakes, which do not benefit from the convection-heating process.
Use the regular Bake mode for these foods.
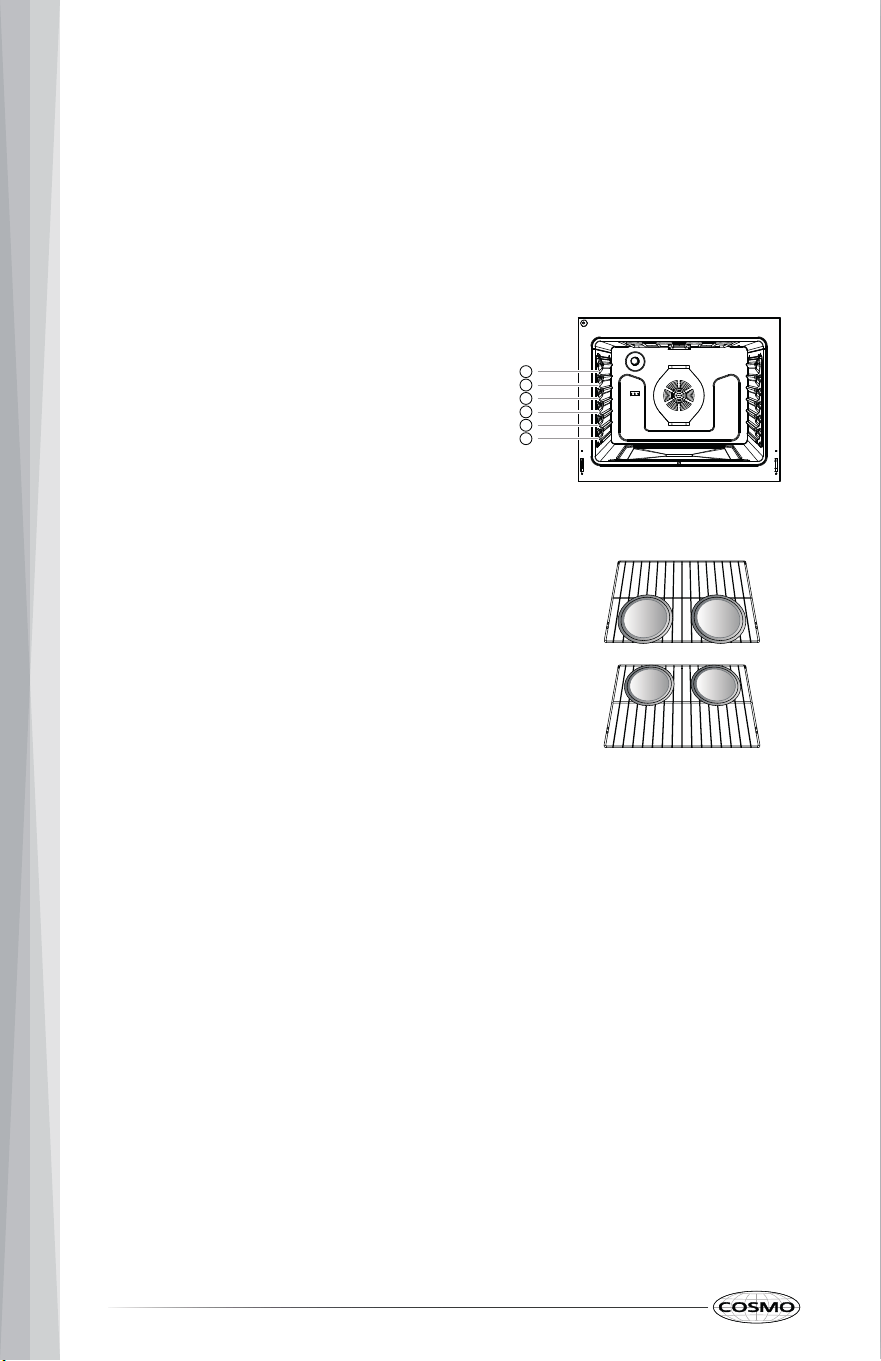
• Multiple rack cooking for oven meals is
done on rack positions 1, 2, 3, 4, 5, and
6. All six racks can be used for cookies,
biscuits and appetizers.
– 2 Rack baking: use positions 2 and
4 or 3 and 5.
– 3 rack baking: use positions 2, 3,
and 4 or 1, 3, and 5 or 2, 4, and 6.
– When baking four cake layers at
the same time, stagger pans so
that one pan is not directly above
another. For best results, place
cakes on front of upper rack and
back of lower rack (See graphic at
right). Allow 1" - 1 ½" (2.5 - 4 cm) air
space around pans.
• Converting your own recipe can be easy. Choose a recipe that will work
well in convection.
• Reduce the temperature and cooking time if necessary. It may take some
trial and error to achieve a perfect result. Keep track of your technique for
the next time you want to prepare the recipe using convection.
• See Troubleshooting for tips to Solving Baking and Roasting Problems.
Front
Placement
Rear
Placement
6
5
4
3
2
1

59
Air Fry
The Air Fry mode uses heat from the upper and lower heating elements and
air movement from the fans to circulate hot air inside the oven to produce
foods with a crispier exterior than traditional oven cooking.
• For best results, use the provided air fry tray and position oven rack so
that food is placed centrally near the middle racks.
• If you don't have the air fry tray, place food on a wire rack inside a foil-
lined broiler pan or on a dark baking pan with low sides or no sides for
better air flow over foods.
• Spread the food out evenly in a single layer. Check food often and shake
it or turn it over for crisper results.
• If desired, spray the baking tray or air fry tray with a pan spray. Use an oil
that can be heated to a high temperature before smoking, such as
avocado, grapeseed, peanut or sunflower oil.
• Place a foil-lined baking tray on the bottom rack to catch the oil falling
from the food. For high fat foods like chicken wings, add a few sheets of
parchment paper to absorb the fat.
• Foods high in fat will smoke when using the Air Fry mode. Turn on your
exhaust hood at a high fan setting before you start Air Fry and leave it on
for 15 minutes after you're done. Open a window or sliding glass door, if
possible, to make sure the kitchen is well-ventilated.
• Prepared frozen foods may cook faster with the Air Fry mode than stated
on the package. Reduce the cooking time by about 20 percent, check
food early, and adjust cooking time as needed.
Broil
The Broil mode uses intense heat from the upper heating element to sear
foods. The size, weight, thickness, starting temperature, and your preference
of doneness will affect broiling times.
• For best results when broiling, use a pan designed for broiling.
• Avoid fatty marinades and sugary glazes. Both of these will increase the
amount of smoke you experience. If you would like to use a glaze, apply it
at the very end of cooking.
60
MAINTENANCE
GENERAL CLEANING
IMPORTANT: Before cleaning, make sure all controls are off and the oven and
cooktop are cool. Always follow label instructions on cleaning products. Soap,
water and a soft cloth or sponge are suggested first unless otherwise noted.
Do not use abrasive cleaning products.
Note:
• Do not clean the oven door gasket. The material of the gasket cannot
withstand abrasion. It is essential for the gasket to remain intact. If you
notice it becoming worn or frayed, replace it.
• Re-engage the anti-tip bracket if range is moved.
GLASS-CERAMIC COOKTOP
• Before using the cooktop for the first time, clean it with a ceramic cooktop
cleaner. This helps protect the top and makes cleanup easier.
• Regular use of ceramic cooktop cleaner will help keep the cooktop
looking new.
• If any sugar or food containing sugar spills, or plastic or foil melts on the
cooktop, remove the material IMMEDIATELY with a metal razor scraper
while the cooking surface is still hot to avoid the risk of damage to the
glass-ceramic surface. When used correctly, the scraper will not damage
the cooktop surface.
• To protect hands from burns, always wear oven mitts or use pot holders
while using a scraper on the hot cooking surface.
• If water or food containing water spills, remove the spill IMMEDIATELY
with a dry paper towel.
• Do not use scrub pads or abrasive cleaning pads. They may damage your
cooktop surface.

61
Cleaning Method:
• Use ceramic cooktop cleaner on the glass cooktop. Other creams may not
be as effective or may scratch, damage or stain the cooktop surface.
• Apply a few drops of cleaner directly to the cooktop.
• Use a paper towel to clean the entire cooktop surface.
• Rinse with clear water and use a dry cloth or paper towel to remove all
cleaning residue.
Note:
• Any damage or failure of the product resulting from the items
below may not be covered under the Limited Warranty.
- Sugary spillovers (such as preserves, ketchup, tomato sauce,
jellies, fudge, candy, syrups, or chocolate) or melted plastics
can cause pitting on the surface of your cooktop.
- If food or water containing calcium (such as baking powder,
wine, milk, spinach, or broccoli) is spilled on the cooktop, it can
permanently stain or discolor the surface.
BURNED-ON RESIDUE
• Allow the cooktop to cool.
• For additional protection, after all residue has been removed, polish the
entire surface with ceramic cooktop cleaner and a paper towel.
Cleaning Methods:
• Spread a few drops of ceramic cooktop cleaner on the entire burned
residue area. Using a non-scratch cleaning pad for ceramic cooktops, rub
the residue area, applying pressure as needed. Leave the cleaner on for
10 minutes before rinsing it off.
• Rinse with clear water and wipe the cooktop surface with a clean, dry
paper towel. If any residue remains, repeat the steps listed above as
needed.
Note:
• Damage to your glass surface may occur if you use scrub pads
other than those recommended.
62
HEAVY BURNED-ON RESIDUE
• Allow the cooktop to cool.
• For additional protection, after all residue has been removed, polish the
entire surface with ceramic cooktop cleaner and a paper towel.
Cleaning Methods:
• While the cooktop is still warm, use a single-edge razor blade scraper at
approximately a 30° to 45° angle against the glass surface and scrape
the soil. It will be necessary to apply pressure to the razor scraper in order
to remove the residue.
• When the cooking surface is completely cooled, spread a few drops of
ceramic cooktop cleaner on the entire burned residue area. Using a non-
scratch cleaning pad for ceramic cooktops, rub the residue area, applying
pressure as needed. Leave the cleaner on for 10 minutes before rinsing it
off.
• Rinse with clear water and wipe the cooktop surface with a clean, dry
paper towel.
Note:
• Do not use a dull or nicked blade.
COOKTOP SEAL
• Do not use a knife or any sharp object to clean the seal around the
outside of the glass-ceramic cooktop.
• Take care to avoid damaging the seal when cleaning the cooktop with a
metal razor scraper.
Cleaning Methods:
• To remove burned-on soil from the seal around the outside of the glass-
ceramic cooktop, cover the area with a warm, wet cloth to soften the soil.
• After a few minutes, wipe the area clean with a mild, nonabrasive
cleaner.
63
METAL MARKS AND SCRATCHES
• Always use heavier gauge, high-quality cookware on the cooking
elements and do not slide it on the ceramic cooktop surface. Even high-
quality cookware can scratch the cooktop surface.
• Any cookware that has a rough or dirty bottom can mark and scratch the
cooktop surface. Always start with clean cookware.
• Do not use cookware if there is foreign matter on the cooktop surface.
Always clean the cooktop surface before cooking.
Cleaning Methods:
• Be careful not to slide pots and pans across your cooktop. It will leave
metal markings on the cooktop surface. These marks are removable using
the ceramic cooktop cleaner with a non-scratch cleaning pad for ceramic
cooktops.
• If pots with a thin overlay of aluminum or copper are allowed to boil dry,
the overlay may leave black discoloration on the cooktop. This should be
removed immediately before heating again or the discoloration may be
permanent.
Note:
• Any damage or failure of the product resulting from the items
above may not be covered under the Limited Warranty.
EXTERIOR STAINLESS STEEL SURFACES
• To avoid scratches, do not use steel wool pads.
• Use warm sudsy water or a stainless steel cleaner or polish. Follow the
cleaner instructions for cleaning the stainless steel surface.
• Rub in direction of grain to avoid damaging.
Cleaning Methods:
• Place a small amount of stainless steel appliance cleaner or polish on a
damp cloth or paper towel.
• Clean a small area, rubbing with the grain of the stainless steel if
applicable.
• Dry and buff with a clean, dry paper towel or soft cloth.
64
Note:
• To avoid damage to stainless steel surfaces, do not use soap-filled
scouring pads, abrasive cleaners, cooktop polishing cream, steel-
wool pads, gritty washcloths or some paper towels. Damage may
occur, even with one-time or limited use.
COOKTOP CONTROL KNOBS
• Do not use abrasive cleansers, strong liquid cleaners, plastic scouring
pads or oven cleaners on the manifold panel. Doing so will damage the
finish.
• Do not try to bend the knobs by pulling them up or down, and do not
hang a towel or other objects on them. This can damage the gas valve
shaft.
• The control knobs may be removed for easy cleaning.
• To clean the knobs, make sure that they are in the OFF position and pull
them straight off the stems.
• To replace the knobs, make sure the knob has the OFF position centered
at the top, and slide the knob directly onto the stem.
Cleaning Method:
• Use a damp cloth and mild soapy water or a 50/50 solution of vinegar
and water.
• Rinse with clean water and polish dry with a soft cloth.
Note:
• To avoid damage, do not use steel wool, abrasive cleansers or oven
cleaner. Do not soak knobs.

65
CONTROL PANEL
• It’s a good idea to wipe the control panel after each use.
• To avoid damage to the control panel, do not use abrasive cleaners,
steel-wool pads, gritty washcloths, or abrasive paper towels.
• To prevent activating the control panel during cleaning, activate the
control lock or disconnect power to the appliance.
Cleaning Method:
• Glass cleaner and soft cloth or sponge: Apply glass cleaner to soft cloth or
sponge, not directly on panel.
• Clean up splatters with a damp cloth using a glass cleaner.
OVEN DOOR
• Do not immerse the door in water.
• You may use a glass cleaner on the outside glass of the oven door. Do n ot
spray water or glass cleaner on the door vents.
• Apply glass cleaner to soft cloth or sponge, not directly on panel.
• Do not use oven cleaners, cleaning powders, or harsh abrasive cleani ng
materials on the outside of the oven door.
• Do not clean the oven door gasket. The oven door gasket is made of
material that is essential for a good seal. Care should be taken not to rub,
damage, or remove this gasket.
Cleaning Method:
• Use soapy water to thoroughly clean the oven door. Rinse well.
OVEN RACKS
• All racks can be washed with warm, soapy water.
Cleaning Method:
• Clean with warm, soapy water, or with a mild, abrasive cleaner.
• Rinse with clean water and dry.
66
OVEN CAVITY
• Do not use oven cleaners, abrasive cleaners, strong liquid cleansers, steel
wool, scouring pads, or cleaning powders on the interior of the oven.
• When cleaning surfaces, make sure that they are at room temperature.
• Food spills should be cleaned when oven cools. At high temperatures,
foods react with porcelain. Staining, etching, pitting or faint white spots
can result.
Cleaning Method:
• Clean with a mild soap and water or vinegar and water solution.
• Rinse with clean water and dry with a soft cloth.
• Use Steam Clean function regularly to clean light soil.
Note:
• Do not clean the oven door gasket.
STORAGE DRAWER
• Check that storage drawer is cool and empty before cleaning.
Cleaning Method:
• Clean with a damp towel and mild detergent.
Note:
• Do not use scrub pads or abrasive cleaning pads.
• Most cleaning can be done with the drawer in place; however, the
drawer may be removed if further cleaning is needed. See
"Removing/Assembling Storage Drawer" section in the Installation
Instructions manual.

67
STEAM CLEAN
The Steam Clean feature helps lift soils without harsh chemicals, and it runs
using only water in low temperatures to help loosen light soils before hand
cleaning. Clean the oven regularly using the Steam Clean feature to prevent
heavy, burnt-on soil from building up in the oven.
BEFORE STARTING STEAM CLEAN
• Allow the oven to cool to room temperature before using the Steam
Clean cycle. If your oven cavity is above 150°F (65°C), HOT will appear in
the display, and the Steam Clean cycle will not be activated until the oven
cavity cools down.
• The range should be level to ensure that the bottom surface of the oven
cavity is entirely covered by water at the beginning of the Steam Clean
cycle.
• For best results, use distilled or filtered water. Tap water may leave
mineral deposits on the oven bottom.
• Soil baked on through several cooking cycles will be more difficult to
remove with the Steam Clean cycle.
• Do not open the oven door during the Steam Clean cycle. Water will not
get hot enough if the door is opened during the cycle.
SETTING STEAM CLEAN
Start with oven at room temperature.
1. Remove oven racks and accessories from the oven. Scrape off and
remove any burnt-on debris with a plastic scraper.
2. Fill a spray bottle (10 oz or 300 ml) with water and use the spray bottle to
thoroughly spray the inside surfaces of the oven. Use at least 1/5 (2 oz or
60 ml) of the water in the bottle to completely saturate the soil on both
the walls and in the corners of the oven.
Note:
• Do not spray water directly on the door. Doing so will result in
water dripping to the floor.
68
3. Spray or pour the remaining water (8 oz or 240 ml) onto the bottom
center of the oven cavity. The indentation on the oven bottom should be
fully covered to submerge all soils. Add water if necessary.
4. Close the oven door.
5. Press and hold Broil and Cook Time at the same time to select Steam
Clean mode.
Note:
• If your oven cavity is above 150°F (65°C), HOT will appear in the
display, and the Steam Clean cycle will not be activated until the
oven cavity cools down.
6. Press Start.
The Steam Clean cycle will run for 25 minutes by default. Keep the oven
door closed.
Note:
• If the oven door is opened at the time Start is pressed, the oven will
turn on when the oven door is closed.
• Press Cancel/Off to cancel Steam Clean at any time.
7. After the cleaning cycle and during hand cleaning, enough water should
remain on the oven bottom to completely submerge all soils. Add water if
necessary.
Note:
• Place a towel on the floor in front of the oven to capture any water
that may spill out during hand-cleaning.
8. Clean the oven cavity immediately after the Steam Clean cycle by
scrubbing with a wet, non-scratch scouring sponge or pad. (The scouring
side will not scratch the finish.)
69
Note:
• If some light soils remain, repeat the above steps, making sure to
thoroughly soak the soiled areas.
9. Once the oven cavity is cleaned, wipe any excess water with a clean dry
towel. Replace racks and any other accessories.
Note:
• The cavity gasket may be wet when the Steam Clean cycle finishes.
This is normal. Do not clean the gasket.
• If mineral deposits remain on the oven bottom after cleaning, use a
cloth or sponge soaked in vinegar to remove them.
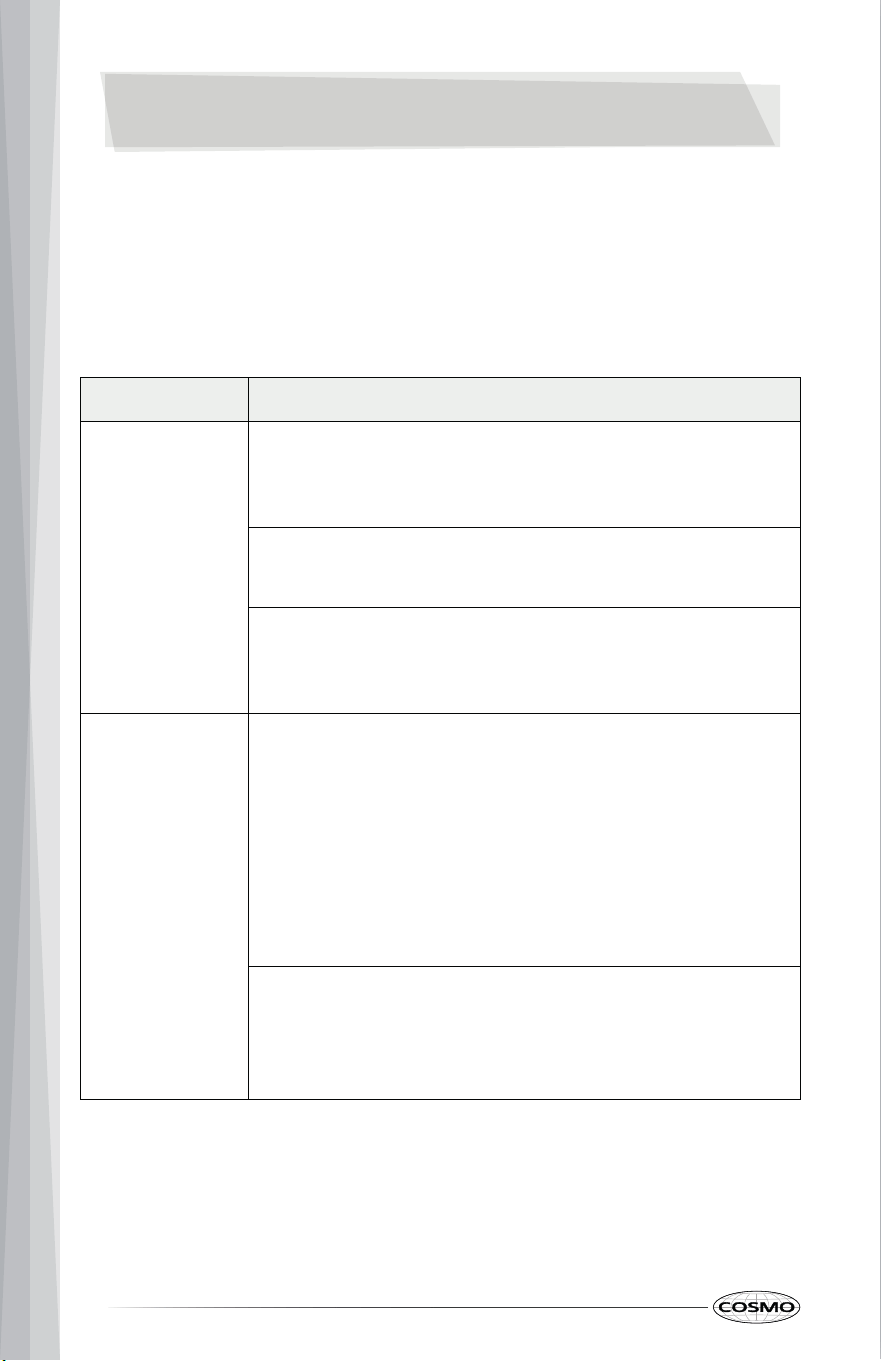
70
TROUBLESHOOTING
BEFORE CALLING FOR SERVICE
Review this section before calling for service; doing so will save you both time
and money.
RANGE PROBLEMS
Problem Possible Causes & Solutions
Appliance does
not operate.
Cord is not plugged in correctly.
• Make sure cord is plugged correctly into outlet. Check
circuit breakers.
Service wiring is not complete.
• Contact your electrician for assistance.
Power outage.
• Check house lights to be sure. Call your local electric
company for service.
Range is not
level.
Poor installation.
• Place oven rack in center of oven. Place a level on the
oven rack. Adjust leveling legs at base of range until
the oven rack is level.
• Be sure floor is level and strong and stable enough to
adequately support range.
• If floor is sagging or sloping, contact a carpenter to
correct the situation.
Kitchen cabinet alignment may make range appear
unlevel.
• Be sure cabinets are square and have sufficient room
for range clearance.
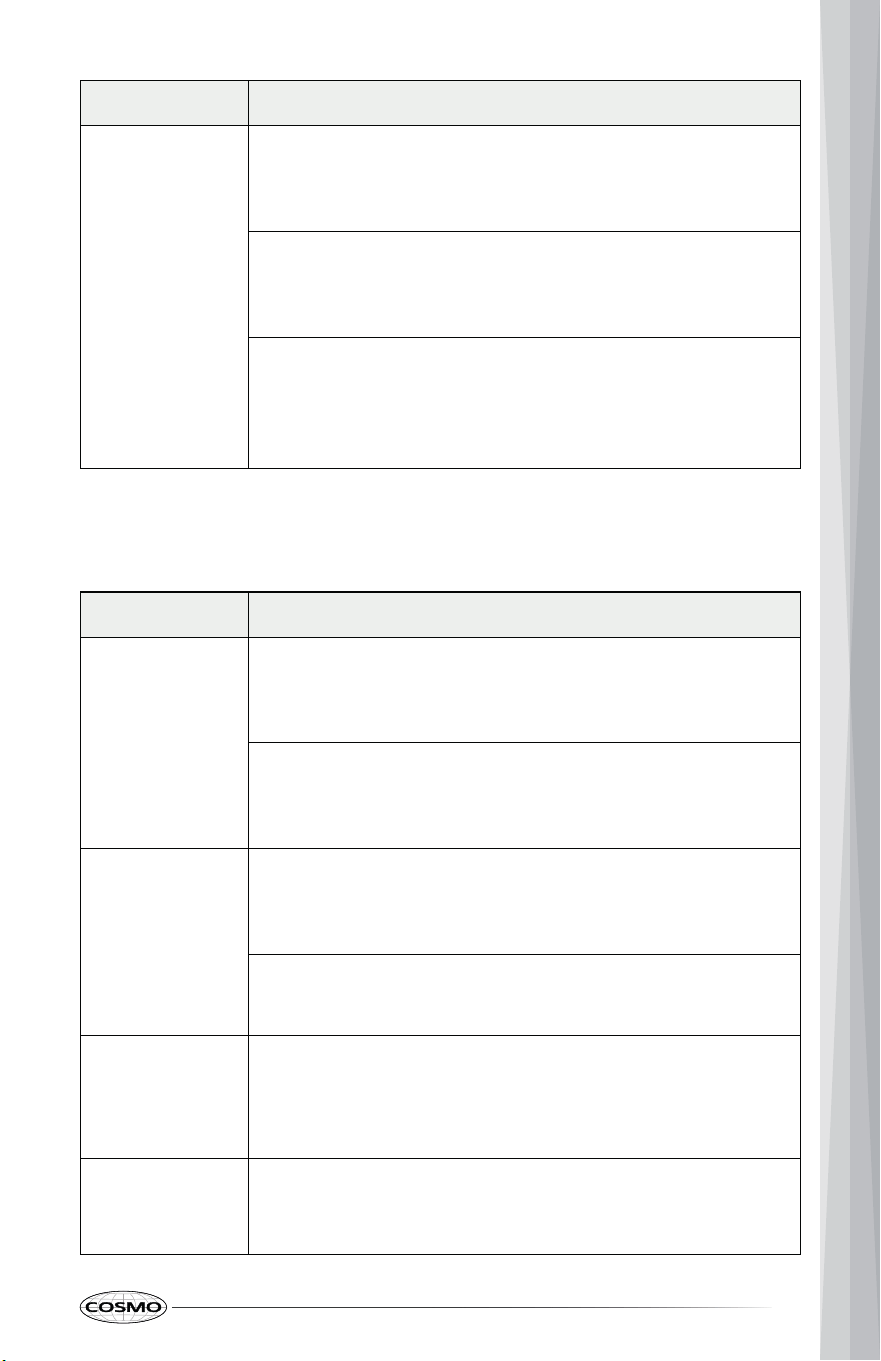
71
Problem Possible Causes & Solutions
Cannot move
appliance
easily.
Appliance must
be accessible
for service.
Cabinets not square or are built in too tightly.
• Contact builder or installer to make appliance
accessible.
Carpet interferes with range.
• Provide sufficient space so range can be lifted over
carpet.
Anti-tip device engaged.
• Uninstall the anti-tip device to move the range.
Reengage the anti-tip device after pulling the range
out for cleaning, service, or any other reason.
COOKTOP PROBLEMS
Problem Possible Causes & Solutions
Surface units
do not work
properly.
A fuse in your home may be blown or the circuit breaker
tripped.
• Replace the fuse or reset the circuit breaker.
Cooktop controls improperly set.
• Check to see the correct control is set for the surface
unit you are using.
Surface units
will not
maintain a
rolling boil or
cooking is not
fast enough.
Improper cookware being used.
• Use pans which are flat and match the diameter of
the surface unit selected.
In some areas, the power (voltage) may be low.
• Cover pan with a lid until desired heat is obtained.
Frequent
cycling on and
off of surface
units.
The element cycle on and off to maintain the heat setting.
• This is normal.
Areas of
discoloration
on the cooktop.
Food spillovers not cleaned before next use.
• See "Cleaning" in the "Maintenance" section.
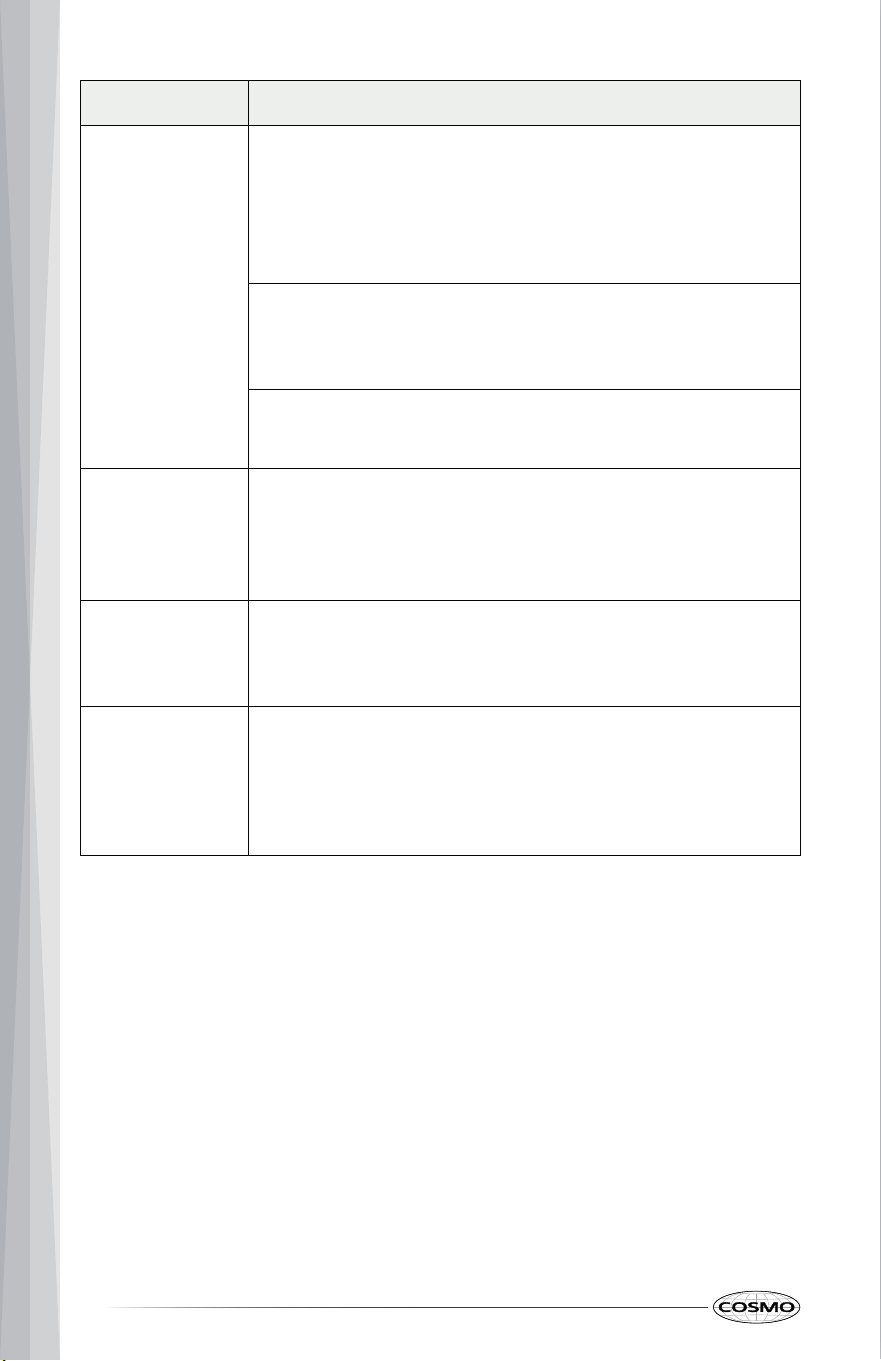
72
Problem Possible Causes & Solutions
Scratches or
abrasions on
cooktop
surface.
Coarse particles such as salt or sand between cooktop
and utensils can cause scratches.
• Be sure the cooktop surface and bottoms of utensils
are clean before using. Small scratches do not affect
cooking and will become less visible with time.
Cleaning materials not recommended for glass-ceramic
cooktop have been used.
• See "Cleaning" in the "Maintenance" section.
Cookware with rough bottom has been used.
• Use smooth, flat-bottomed cookware.
Metal marks. Scraping of metal utensils on cooktop surface.
• Do not slide metal utensils on cooktop surface. Use a
glass-ceramic cooktop cleaning crème to remove the
marks. See "Cleaning" in the "Maintenance" section.
Brown streaks
or specks.
Boilovers are cooked onto surface.
• Use a blade scraper to remove soil. See "Cleaning" in
the "Maintenance" section.
Cooktop
surface
displays a
letter or a
symbol.
Surface units are synchronized, pan sensor is detecting
proper cookware, surface is hot, or system error detected.
• See "Element Display" in the "Cooktop" section.
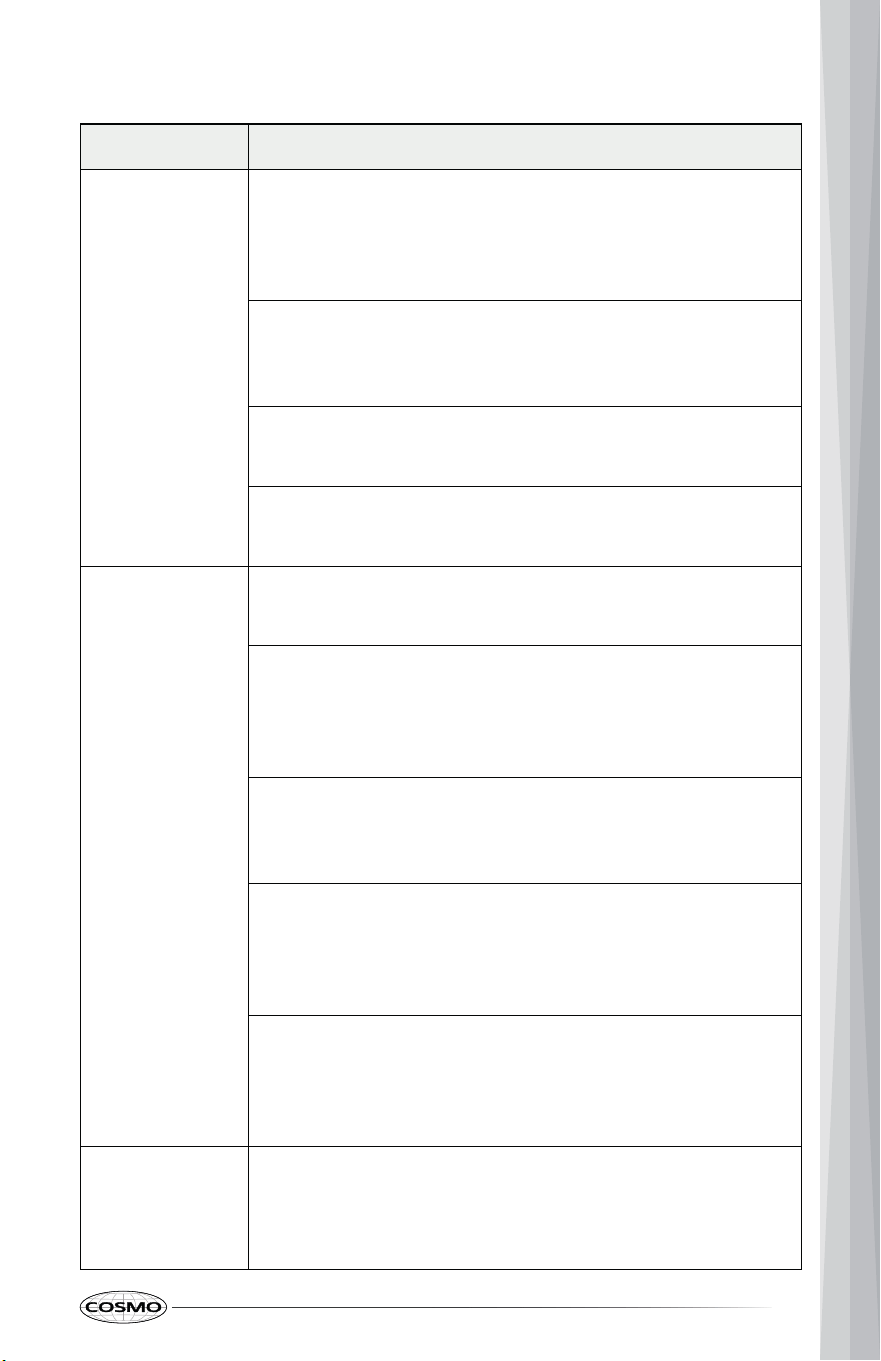
73
OVEN PROBLEMS
Problem Possible Causes & Solutions
Oven will not
work.
Plug on range is not completely inserted in the electrical
outlet.
• Make sure electrical plug is plugged into a live,
properly grounded outlet.
A fuse in your home may be blown or the circuit breaker
tripped.
• Replace the fuse or reset the circuit breaker.
Oven controls improperly set.
• See "Oven" in the "Operation" section.
Oven too hot.
• Allow the oven to cool to below locking temperature.
Oven smokes
excessively
during broiling.
Control not set properly.
• See "Oven" in the "Operation" section.
Meat too close to the element.
• Reposition the rack to provide proper clearance
between the meat and the element. Preheat broil
element for searing.
Meat not properly prepared.
• Remove excess fat from meat. Cut remaining fatty
edges to prevent curling.
Insert on broiler pan wrong side up and grease not
draining.
• Always place the grid on the broiler pan with ribs up
and slots down to allow grease to drip into the pan.
Grease has built up on oven surfaces. Old grease or food
spatters cause excessive smoking.
• Regular cleaning is necessary when broiling
frequently.
Steam is
exhausted
through the
oven vent.
Cooking foods with high moisture produces steam.
• This is normal.
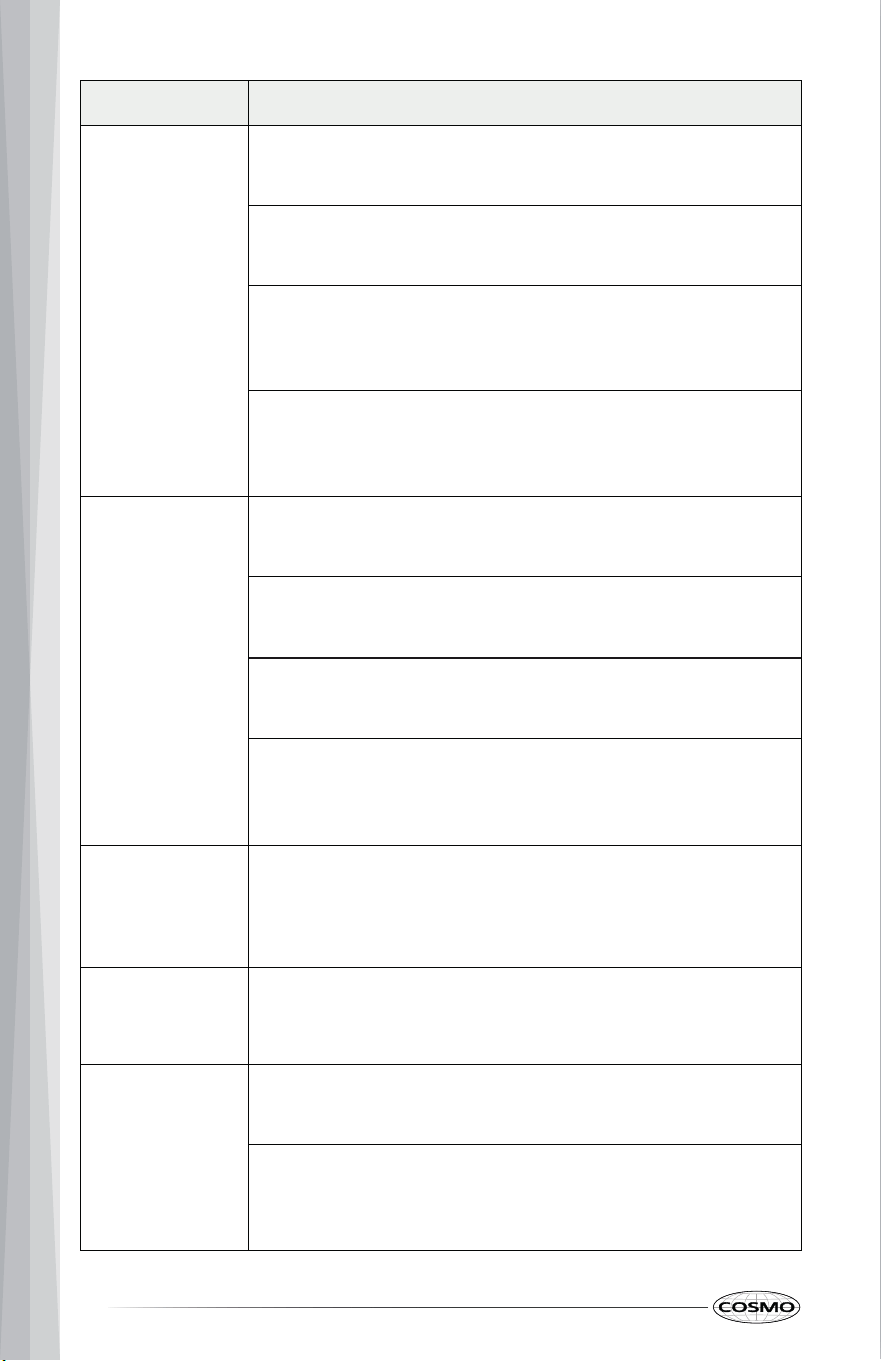
74
Problem Possible Causes & Solutions
Food does not
bake or roast
properly.
Oven controls improperly set.
• See "Oven" in the "Operation" section.
Rack position is incorrect or the rack is not level.
• See "Oven" in the "Operation" section.
Incorrect cookware or cookware of improper size being
used.
• See "Oven" in the "Operation" section.
Oven sensor needs to be adjusted.
• See "Adjusting the Oven Thermostat" in the "Oven
Settings" section.
Food does not
broil properly.
Oven controls improperly set.
• Make sure you select the Broil mode properly.
Improper rack position being used.
• See "Broil" in the "Oven" section.
Cookware not suited for broiling.
• Use broiling pan and grid.
Aluminum foil used on the broiling pan and grid has not
been fitted properly and slit as recommended.
• See "Oven" in the "Operation" section.
Oven
temperature
too hot or too
cold.
Oven sensor needs to be adjusted.
• See "Adjusting the Oven Thermostat" in the "Oven
Settings" section.
Burning or oily
odor emitting
from the vent.
This is normal in a new oven.
• This will disappear in time.
Moisture
collects on oven
window or
steam comes
from oven vent.
This happens when cooking foods high in moisture.
• This is normal.
Excessive moisture was used when cleaning the window.
• Do not use excessive moisture when cleaning the
window.
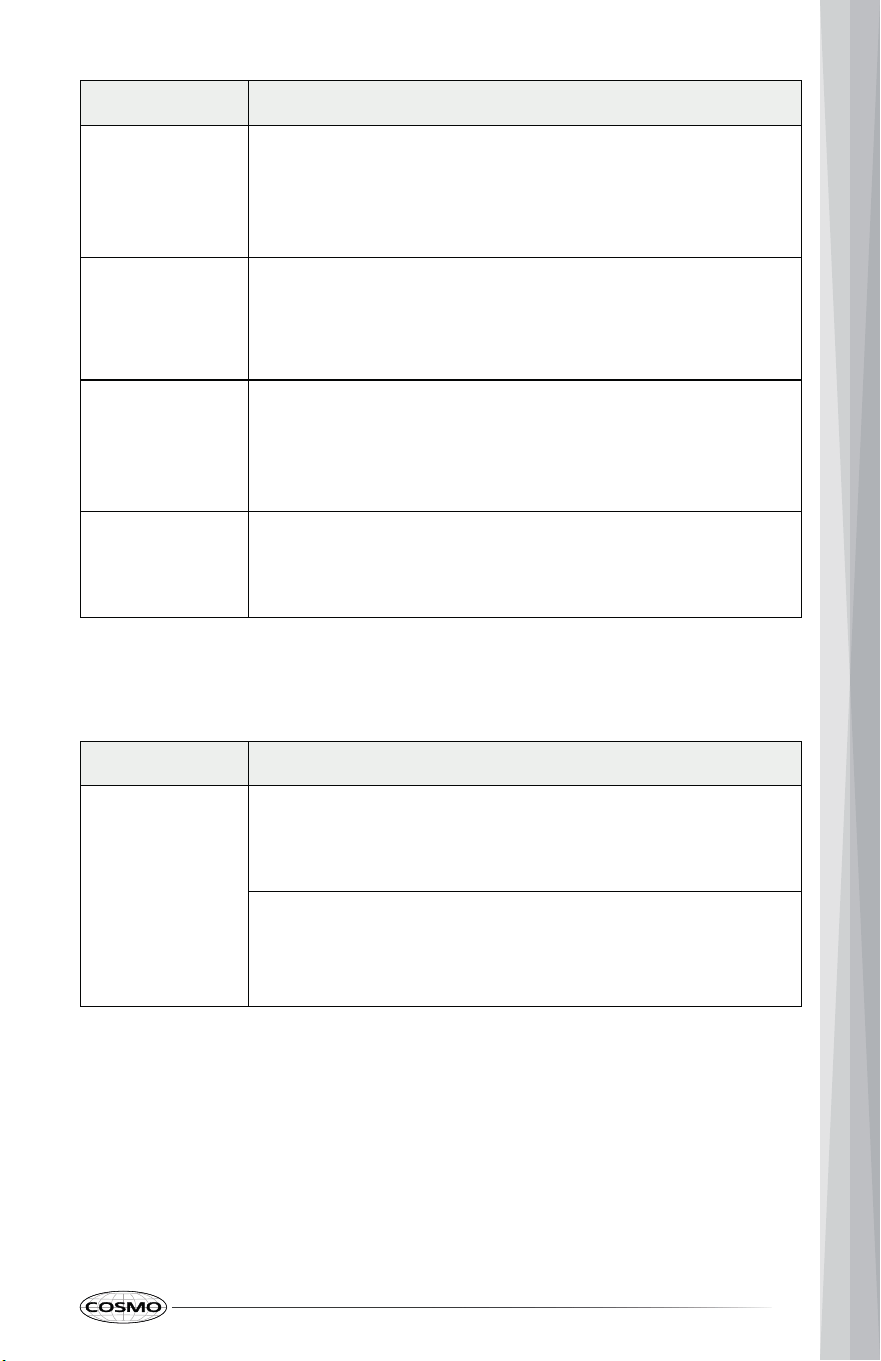
75
Problem Possible Causes & Solutions
Oven control
displays any E
or F error code.
Electronic control has detected a fault condition.
Lock icon is on
in the display
when you want
to cook.
The oven is locked because of the Control Lock feature.
Oven light does
not work.
It is time to replace the lamp or the lamp is loose.
"Crackling" or This is the sound of the metal heating and cooling during
cooking.
"popping"
sound.
DRAWER PROBLEMS
Problem Possible Causes & Solutions
Drawer does
The drawer is out of alignment
not slide
smoothly or
drags.
The drawer is overloaded or the load is unbalanced
• Turn off the oven function you are using to clear the
display and stop beeping. Reprogram oven. If fault
recurs, record error code and contact a service agent.
• Deactivate the Control Lock / Lockout feature.
• Visit www.cosmoappliances.com or reference the
contact information at the end of this manual to
purchase replacement parts.
• This is normal.
• Fully extend the drawer and push it all the way back
in.
• Reduce load weight.
• Redistribute drawer loads.
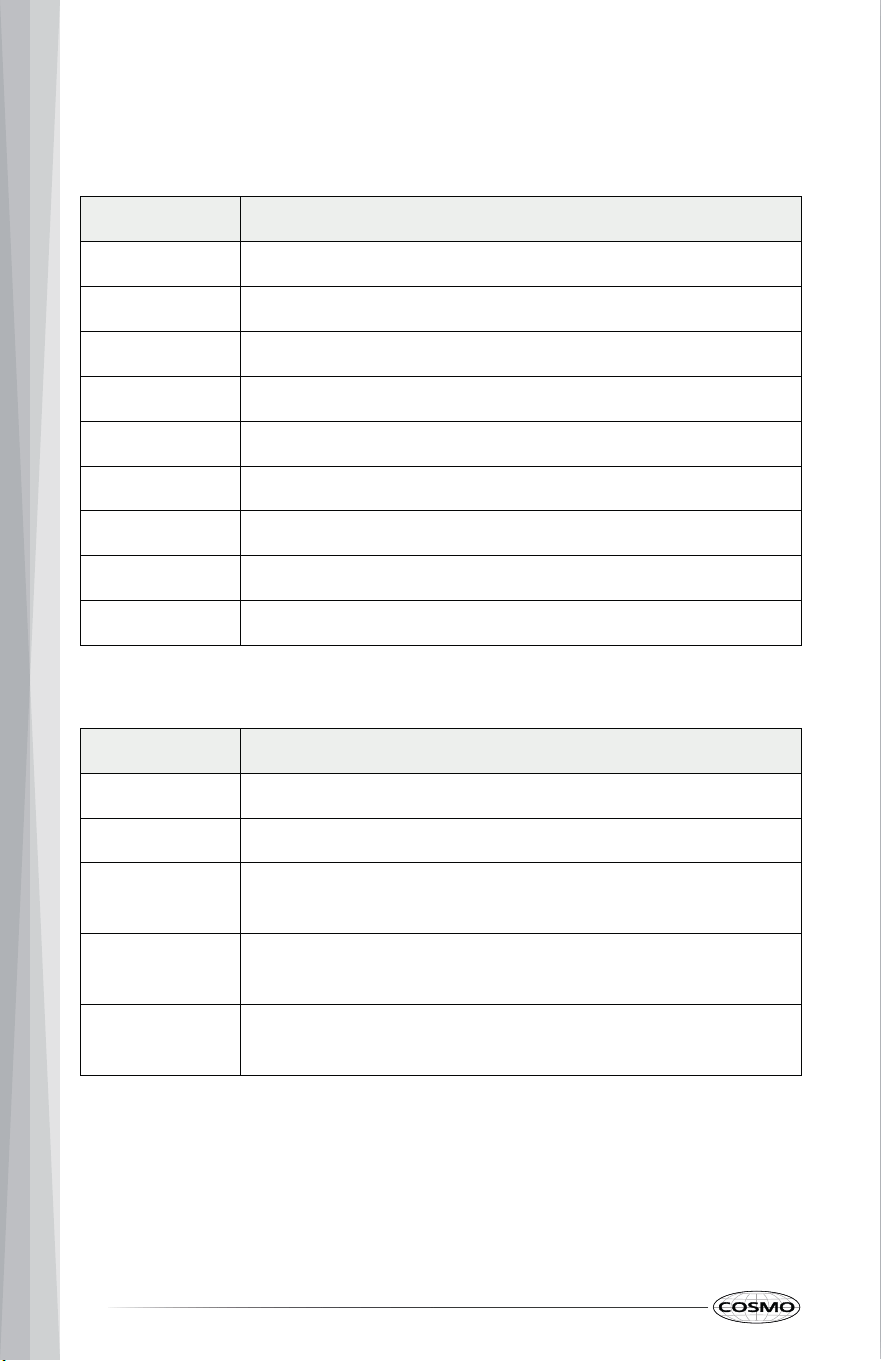
76
ERROR CODES
ELEMENT DISPLAY
Error Code Description
E0 IGBT overheating.
E2 Low input voltage.
E3 High input voltage.
E4 Surface temperature sensor (NTC2) failure.
E7 Surface temperature sensor (NTC1) open circuit.
E8 Surface temperature sensor (NTC1) short circuit.
E9 Surface temperature sensor (NTC2) open circuit.
EE Surface temperature sensor (NTC2) short circuit.
F Surface element communication error.
OVEN DISPLAY
Error Code Description
F1E1 System communication failure.
F3E1 Oven cavity sensor circuit error (open/short).
F3E2 Problem with the oven temperature sensor receptacle on
PCB.
F3E3 Oven is not heating after a cooking mode has started for
15 minutes.
F6E5 Oven temperature has exceeded 649°F (343°C) preset
maximum threshold.
77
LIMITED WARRANTY
WARRANTY AND SERVICE
To receive warranty service, your product must be registered. To register and
review full warranty details, visit:
www.cosmoappliances.com/warranty
Scan to Register
CUSTOMER SUPPORT
To contact customer service for assistance, visit:
www.cosmoappliances.com/chat
Scan to Contact
78
IMPORTANT
Do Not Return This Product to The Store
If you have a problem with this product, please contact Customer Support at
+1 (888) 784-3108
Dated proof of purchase, model #, and serial # required for warranty service.
IMPORTANT
Ne pas Réexpédier ce Produit au Magasin
Pour tout problème concernant ce produit, veuillez contacter le service des
consommateurs Customer Support au
+1 (888) 784-3108
Une preuve d’achat datee est requise pour beneficier de la garantie.
IMPORTANTE
No regrese este producto a la tienda
Si tiene algún problema con este producto, por favor contacte el ayuda al
cliente al
+1 (888) 784-3108
(Válido solo en E.U.A.)
Necesita una prueba de de compra fechada, número de modelo y de serie
para e
l servicio de la garantía.
Correct disposal of this product:
This marking indicates that this appliance should not be
disposed with other household wastes. To prevent
possible harm to the environment or human health from
uncontrolled waste disposal, recycle it responsibly to
promote the sustainable reuse of material resources.

MEMO