OWNER’S MANUAL
INCOGNEETO

INCOGNEETO
.
INC-OWN-A / April 2026
2801 Trade Center Drive
Carrollton, Texas 75007
cooktek.com
Page 2 of 23
TABLE OF CONTENTS
1. REVISION HISTORY ......................................................................................................................................................................... 5
2. IMPORTANT SAFETY INSTRUCTIONS ........................................................................................................................................ 6
2.1 General Safety Information .................................................................................................................................................. 6
2.2 Reducing Fire Risk ................................................................................................................................................................. 7
2.3 Grounding Instructions ......................................................................................................................................................... 8
2.4 Power Cord Replacement ..................................................................................................................................................... 8
2.5 Protective Earth (Ground) Symbol ...................................................................................................................................... 8
2.6 Equipotential Bonding Symbol............................................................................................................................................. 8
3. SPECIFICATIONS ............................................................................................................................................................................. 9
3.1 Performance ........................................................................................................................................................................... 9
3.2 Dimensions.............................................................................................................................................................................. 9
3.3 Certifications ......................................................................................................................................................................... 10
3.4 Buffet Warmer Construction .............................................................................................................................................. 10
3.5 Electrical Specifications ...................................................................................................................................................... 10
3.6 Applicable Models ................................................................................................................................................................ 10
4. INSTALLATION ............................................................................................................................................................................... 11
4.1 Important Characteristics of Natural Stone .................................................................................................................... 11
4.2 Design Considerations ........................................................................................................................................................ 11
4.3 Best Practices for Installation Under Natural Stone ...................................................................................................... 11
4.4 Surface Materials ................................................................................................................................................................. 12
4.5 Unpacking .............................................................................................................................................................................. 12
4.6 Mounting ................................................................................................................................................................................ 13
4.7 Installation Tips .................................................................................................................................................................... 15
5. CLEANING ....................................................................................................................................................................................... 16
5.1 Incogneeto™ Buffet Warmer .............................................................................................................................................. 16
5.2 Magneeto™ II ......................................................................................................................................................................... 16
6. CONTROLS ..................................................................................................................................................................................... 17

INCOGNEETO
.
INC-OWN-A / April 2026
2801 Trade Center Drive
Carrollton, Texas 75007
cooktek.com
Page 3 of 23
7. OPERATION .................................................................................................................................................................................... 18
7.1 Program Magneeto™ ........................................................................................................................................................... 18
7.2 Magneeto™ II Operation ...................................................................................................................................................... 18
7.3 Change Temperature Scale................................................................................................................................................ 19
7.4 Change Temperature Options (Short/Long) ................................................................................................................... 19
7.5 Set Timer ............................................................................................................................................................................... 19
7.6 Time Operation ..................................................................................................................................................................... 19
7.7 Pan Placement Tips ............................................................................................................................................................. 20
8. TROUBLESHOOTING .................................................................................................................................................................... 21
8.1 Error Codes ............................................................................................................................................................................ 22
9. WARRANTY .................................................................................................................................................................................... 23

INCOGNEETO
.
INC-OWN-A / April 2026
2801 Trade Center Drive
Carrollton, Texas 75007
cooktek.com
Page 4 of 23
For further information, call
800.908.8726
or
+1 214.379.6000

INCOGNEETO
.
INC-OWN-A / April 2026
2801 Trade Center Drive
Carrollton, Texas 75007
cooktek.com
Page 5 of 23
1. REVISION HISTORY
Revision
Revision Date
By
Revision Description
A
18-Dec-25
BA
• Updated control panel dimensions
• New template, updated version CT-103456
• Installation clarifications

INCOGNEETO
.
INC-OWN-A / April 2026
2801 Trade Center Drive
Carrollton, Texas 75007
cooktek.com
Page 6 of 23
I M P O R T A N T S A F E T Y I N S T R U C T I O N S
2. IMPORTANT SAFETY INSTRUCTIONS
This manual provides essential information for the installation, operation, maintenance, and service of this oven.
Information and specifications are subject to change without notice. Read all instructions before using this appliance.
Retain for future reference.
WARNING: When operating the Incogneeto™, strictly adhere to the following safety precautions to reduce the risk of
burns, electric shock, fire, injury, or damage to the oven or property near the Incogneeto™.
2.1 General Safety Information
✓ To ensure proper use of the appliance, read all parts of this manual carefully and store it safely. Before using
the appliance, clean all surfaces that will come into contact with food.
✓ This appliance must be grounded. Connect only to a properly grounded outlet. Refer to the Grounding
Instructions section.
✓ Install or locate this appliance only in accordance with the installation instructions provided.
✓ This appliance should be serviced by qualified service personnel only. Contact the nearest authorized service
facility for examination, repair, or adjustment.
✓ Keep the cord away from heated surfaces.
✓ Never heat an empty pan. It may damage the buffet or cookware and overheat the unit.
✓ Turn off after use.
✓ Use this appliance only for its intended uses as described in this manual.
✓ This appliance is designed for professional use. Only allow qualified or duly instructed personnel to use.
✓ Always monitor the appliance during operation.
✓ In the event of a failure, breakage, or irregular function, switch the appliance off and disconnect from the power
supply.
✓ Always ensure the Incogneeto™ is disconnected from the power supply before servicing, repairing, or adjusting
any components or parts.
✓ This appliance is not to be used by children or persons with reduced physical, sensory, or mental capabilities, or
a lack of experience and knowledge, unless a responsible person has given them supervision or instruction.
✓ Unplug the appliance to allow for cooling if handling, transporting, or storing.

INCOGNEETO
.
INC-OWN-A / April 2026
2801 Trade Center Drive
Carrollton, Texas 75007
cooktek.com
Page 7 of 23
I M P O R T A N T S A F E T Y I N S T R U C T I O N S
DO NOT perform the following:
Use corrosive chemicals or vapors in this appliance; it is not designed for industrial/laboratory use.
Operate this appliance if it has a damaged cord or plug, is not working properly, has been damaged or dropped.
Refer to the Power Cord Replacement section.
Store this appliance outdoors or upside down.
Use this appliance near water (e.g., a kitchen sink, a wet basement, or a swimming pool).
Immerse the cord or plug in water.
Let the cord hang over the edge of a table or counter.
Place the cord near heated surfaces.
Use any accessories or attachments that the manufacturer does not recommend. Use of unapproved
accessories may cause injuries and void the warranty.
Move the appliance while it is plugged in or while a hot pan or a pan containing hot liquids is on top of the
appliance.
Obstruct, block, or alter the air entrance or outlet, or stick foreign objects into these openings.
Strike or damage the buffet.
Put the buffet in your luggage. Throwing or dropping the buffet can damage the internal components or crack
the buffet, voiding your warranty.
2.2 Reducing Fire Risk
✓ In the unlikely event of a grease fire, smother flame by covering the pan with a tight-fitting lid, cookie sheet, or
flat tray. DO NOT USE WATER. When the fire is under control, turn off the appliance and unplug it from the wall.
✓ Keep away from gas or electric ranges or open flames.
✓ Dry the outside of the pan before use, as water droplets on the exterior may start to boil and spatter as the pan
heats up.
DO NOT perform the following
Put food or unopened cans on the buffet warmer surface.
Use aluminum foil on top of the buffet warmer.
Overcook food.
Place in an oven.

INCOGNEETO
.
INC-OWN-A / April 2026
2801 Trade Center Drive
Carrollton, Texas 75007
cooktek.com
Page 8 of 23
I M P O R T A N T S A F E T Y I N S T R U C T I O N S
2.3 Grounding Instructions
This appliance must be grounded. In the event of an electrical short circuit, grounding reduces the risk of electric shock by
providing a safe path for the current. This appliance is equipped with a cord that includes a grounding wire and a
grounding plug, which must be plugged into a properly installed and grounded outlet. Consult a qualified electrician or
service technician if you're unsure how to follow grounding instructions or have questions about whether the appliance is
properly grounded. It is the owner’s responsibility to replace any 2-prong wall outlet with a properly grounded 3-prong wall
receptacle.
WARNING: Improper grounding can result in risk of electric shock.
Do not use an extension cord. If the power cord is too short, have a qualified electrician or serviceman install an
outlet near the appliance.
2.4 Power Cord Replacement
If the power cord is damaged, it must be replaced by the manufacturer, its service agent, or a similarly
qualified person.
WARNING: If the Incogneeto™ is unplugged during service or maintenance, the user must always be able to access
and see the plug to ensure that the oven remains unplugged.
2.5 Protective Earth (Ground) Symbol
This symbol identifies the terminal intended for connecting an external conductor to protect against electric
shock in case of a fault, or the terminal of a protective earth (ground) electrode.
2.6 Equipotential Bonding Symbol
This symbol identifies the terminals which, when connected, bring the various parts of an equipment or of a
system to the same potential, not necessarily being the earth (ground) potential, e.g., for local bonding.
INCOGNEETO
.
INC-OWN-A / April 2026
2801 Trade Center Drive
Carrollton, Texas 75007
cooktek.com
Page 9 of 23
S P E C I F I C A T I O N S
3. SPECIFICATIONS
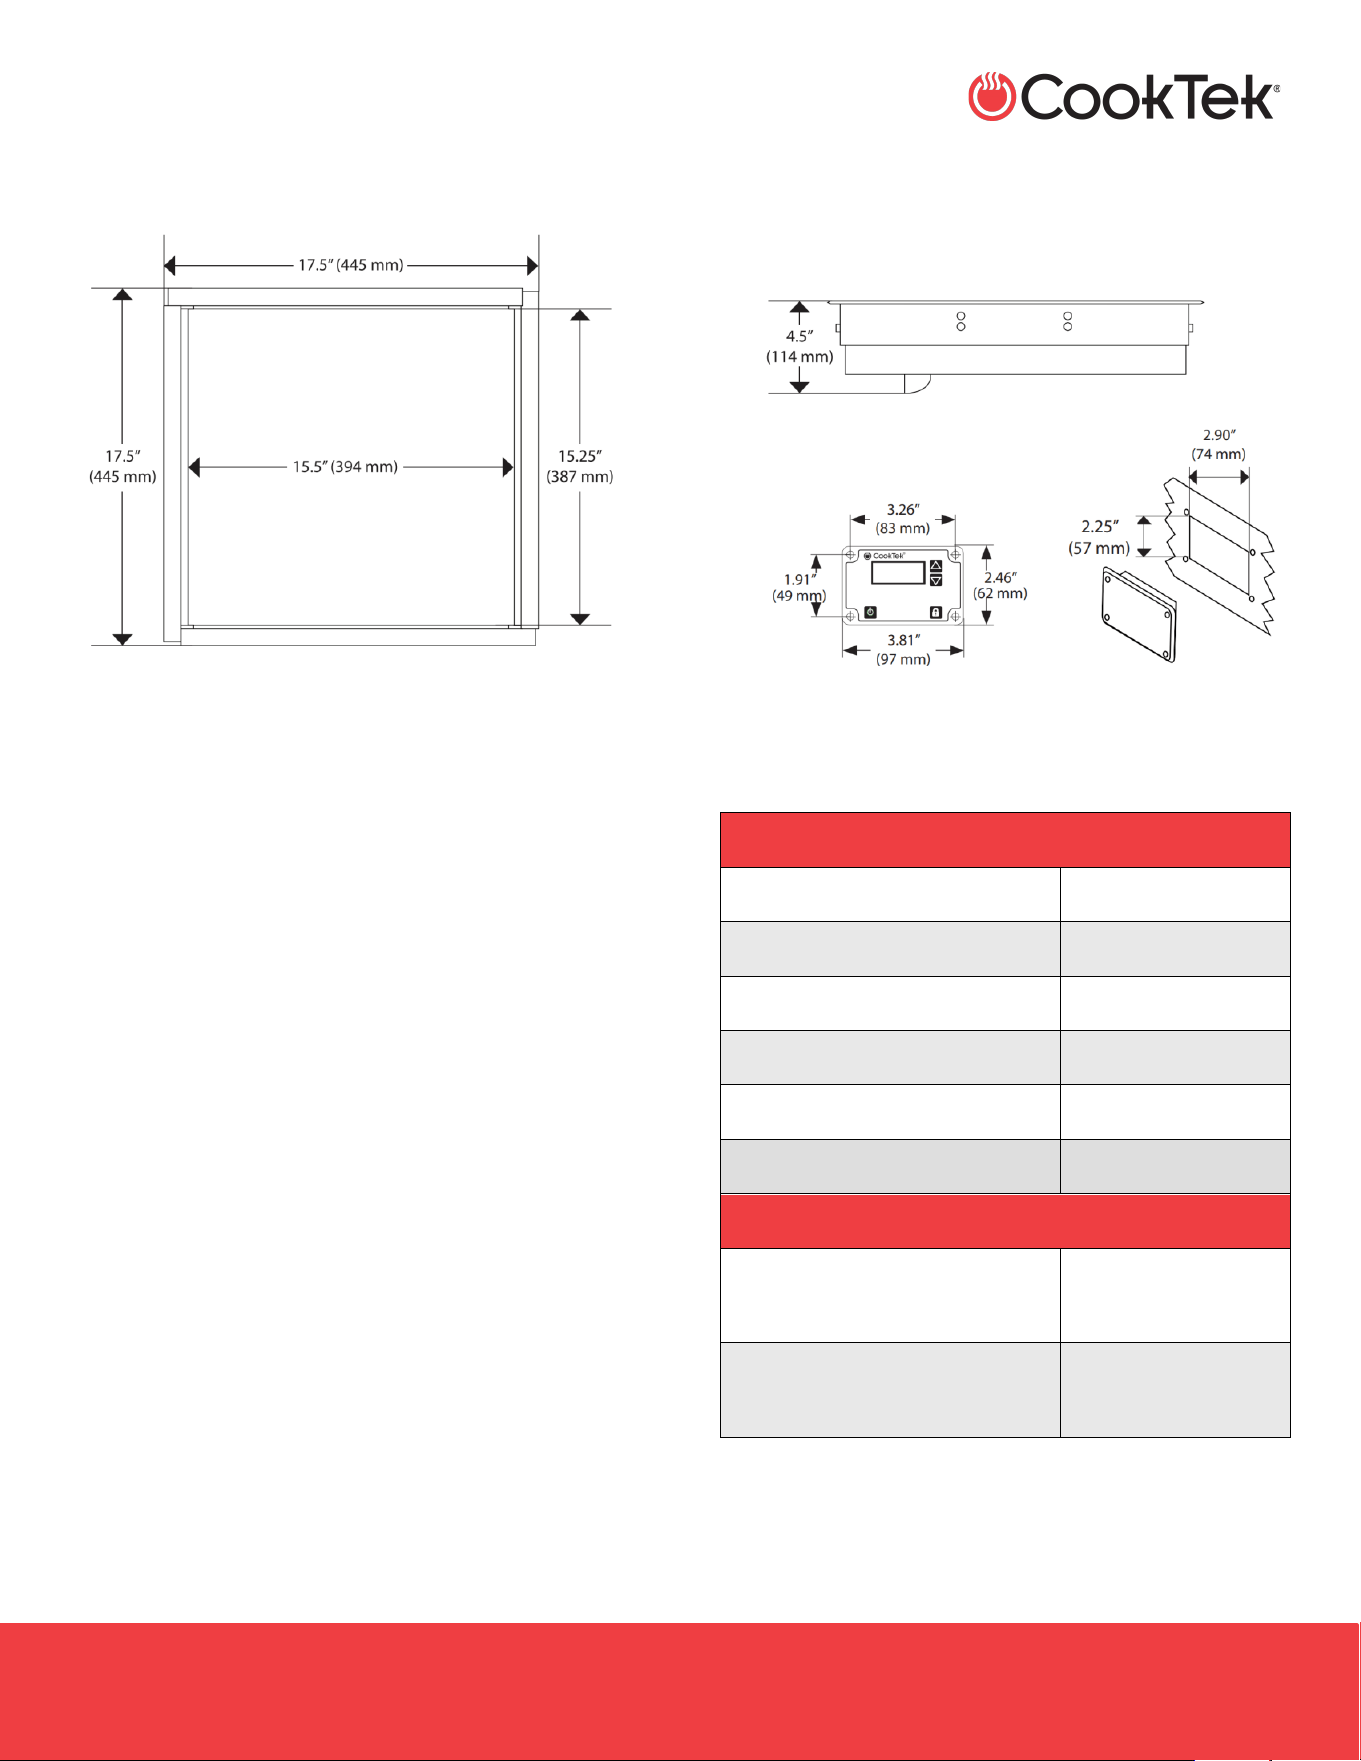
Figure 3-1: Incogneeto Dimensions
3.1 Performance
The CookTek Incogneeto™ is an undercounter buffet
warmer designed to mount under natural stone or
“engineered” stone countertops – no cutting into the
stone is required. A Magneeto™ II trivet (included with
purchase) is placed on the countertop and acts as a
temperature sensor, communicator, and locator device,
enabling efficient heating of any induction-compatible
pan through the stone countertop.
Note: Induction buffet units require induction-compatible
cookware (i.e., magnetic).
3.2 Dimensions
DIMENSIONS
Height
4.5” (114 mm)
Width
17.5” (445 mm)
Depth
17.5” (445 mm)
Interior Surface Width
15.5” (394 mm)
Interior Surface Depth
15.25” (387 mm)
Weight
15 lb (6.8 kg)
COOLING REQUIREMENTS AND SPECIFICATIONS
Minimum Ventilation
Requirements
16 in
2
(103 cm
2)
Internal Cooling Fan
Displacement
70 CFM (2.0m
3
/min)

INCOGNEETO
.
INC-OWN-A / April 2026
2801 Trade Center Drive
Carrollton, Texas 75007
cooktek.com
Page 10 of 23
S P E C I F I C A T I O N S
3.3 Certifications
FCC, ETL (cETLus), NSF, CE
CookTek’s buffet conforms to UL 197 and CSA
22.2 No. 109 standards and bears the
commercially rated approvals. CookTek’s buffet
conforms to European Economic Area standards
and bears the CE marking, signifying European
Conformity.
3.4 Buffet Warmer Construction
• Under-the-counter design with a polycarbonate
top and aluminum housing
• Magneeto™ II trivet locates heat zone when
placed on countertop – one included with
purchase
• Accommodates up to a 12” (305 mm)
induction-compatible enamel cast ironware or
traditional chafer
• Can be safely used under natural stone or
engineered “stone” countertops
• Automatic pan detection allows for instant
energy transmission to pan; almost no energy
consumption when pan is not present
3.5 Electrical Specifications
An independent, dedicated circuit is recommended for up
to 3 units on a 15 A (120 VAC) circuit, 4 units on a 20 A
(120 VAC) circuit, or up to 5 units on a 20 A (240 VAC)
circuit.
3.6 Applicable Models
• B651-U2
• B652-U2

INCOGNEETO
.
INC-OWN-A / April 2026
2801 Trade Center Drive
Carrollton, Texas 75007
cooktek.com
Page 11 of 23
I N S T A L L A T I O N
4. INSTALLATION
Install or position this appliance only as directed below.
Note: Installing the product without following the
specifications in this manual will void the warranty.
4.1 Important Characteristics of Natural
Stone
Natural stone contains inherent variations and
flaws. Cracking may occur due to:
• Insufficient structural support
• Shifting or uneven cabinet joints
• Uneven weight distribution
• Localized temperature differences
Heat sources that may contribute to localized
stress include:
• Heat lamps above the surface
• Equipment installed below the stone
• Hot cookware placed on the surface
CookTek testing shows that natural stone neither
affects wireless signals nor absorbs induction
energy from Incogneeto™ or Magneeto™ II devices.
4.2 Design Considerations
• Cabinet ventilation must maintain interior
temperatures as close to room temperature as
possible. Poor ventilation increases stress on
the stone.
• Stone strength increases with thickness.
o A 1.2 in (30 mm) stone offers increased
crack resistance and better heat
dissipation.
o A 0.8 in (20 mm) stone has reduced tensile
strength and is more vulnerable to stress.
• Provide as much surrounding stone surface
area as possible around the Incogneeto™
opening to improve structural integrity.
• Avoid mechanical seams in cabinet supports
near the Incogneeto™ installation area.
• The Incogneeto™ units can be installed side by
side without requiring extra cooling space.
However, the serving vessel on top may restrict
side-by-side setup.
4.3 Best Practices for Installation Under
Natural Stone
For assistance, contact customer service at
214-379-6000 (Option 1) or
customerservice@cooktek.com
• A 1.2 in (30 mm) natural stone is
recommended for high-use applications.
• A 0.8 in (20 mm) engineered stone is
acceptable for all applications.
• A 0.8 in (20 mm) top (any material) requires a
plywood substrate.
• Maintain a minimum of 8 in (203 mm) of stone
from the edge of the Incogneeto™ cutout to any
finished stone edge.
• Use caution with overhead heat lamps. Heat
lamps can damage Magneeto™ II trivets if no
cookware is present to absorb the heat.
• Metals should not be used directly above an
installed Incogneeto™ unit in countertop
construction, although trace metals in the
stone or engineered stone are permitted.
Metals in cabinet construction may cause
heating or interfere with communication
between the Magneeto™ II and Incogneeto.
INCOGNEETO
.
INC-OWN-A / April 2026
2801 Trade Center Drive
Carrollton, Texas 75007
cooktek.com
Page 12 of 23
I N S T A L L A T I O N
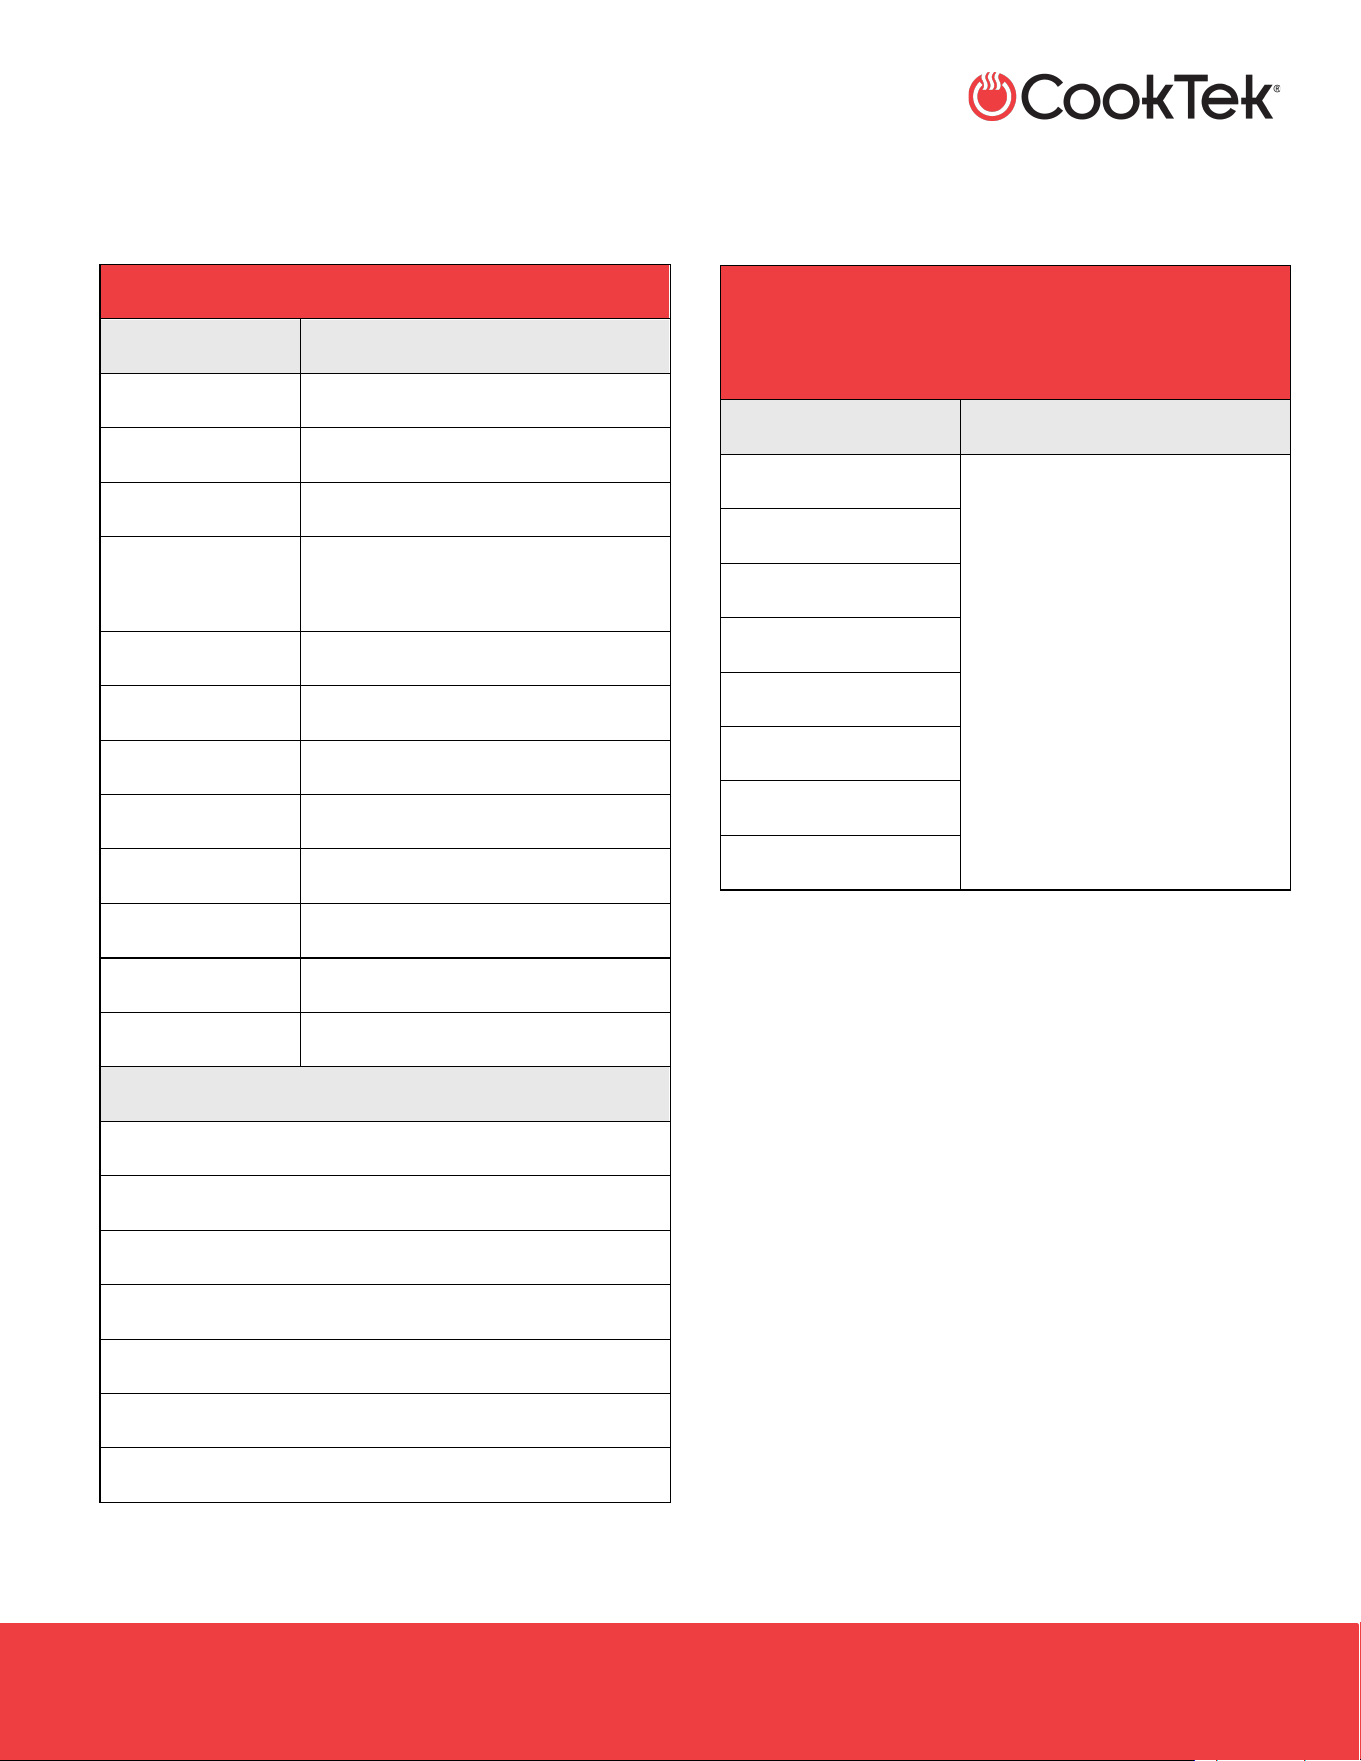
4.4 Surface Materials
Approved Surfaces
SYNTHETIC/ENGINEERED STONE*
BRAND
MATERIAL COMPOSITION
Caesarstone
Quartz / Porcelain
Cambria
Quartz
Concetto
Gray Agate / Ice Quartz / Amethyst
Granite
Transformations
Quartz / Granite / Sand
IceStone
Recycled Glass and Cement
Okite
Quartz
Santa Margherita
Quartz
Santa Margherita
Marble
Silestone
Quartz
Technistone
Quartz / Granite / Sand
Viatera
Quartz
Zodiaq
Quartz
NATURAL STONE
Granite
Marble
Soapstone
Quartzite
Slate
Limestone
Quart
Unapproved Surfaces
SOLID-SURFACE COUNTERTOPS ARE A BLEND OF
ACRYLIC OR POLYESTER RESIN, POWDERED FILLERS
AND PIGMENTS, CAST INTO SLABS
BRAND
MATERIAL COMPOSITION
DuPont Corian
Acrylic / Polyester Resins
Durat
Formica
LG HI-MACS
Livingstone
Staron
Swanstone
Wilsonart
4.5 Unpacking
1. Remove the Incogneeto™ from its packaging.
2. Before discarding, check the packaging
thoroughly for accessories and literature.
Note: Keeping the packaging is recommended in
case the buffet warmer may be shipped to
another location.
INCOGNEETO
.
INC-OWN-A / April 2026
2801 Trade Center Drive
Carrollton, Texas 75007
cooktek.com
Page 13 of 23
I N S T A L L A T I O N
4.6 Mounting
CAUTIONS:
• Keep the unit away from other heat
sources.
• Leave at least two inches of space on the
sides, front, and rear for air circulation.
Blocking either the air intake or exhaust
outlet will cause the internal temperature
to rise, which may trigger an error code.
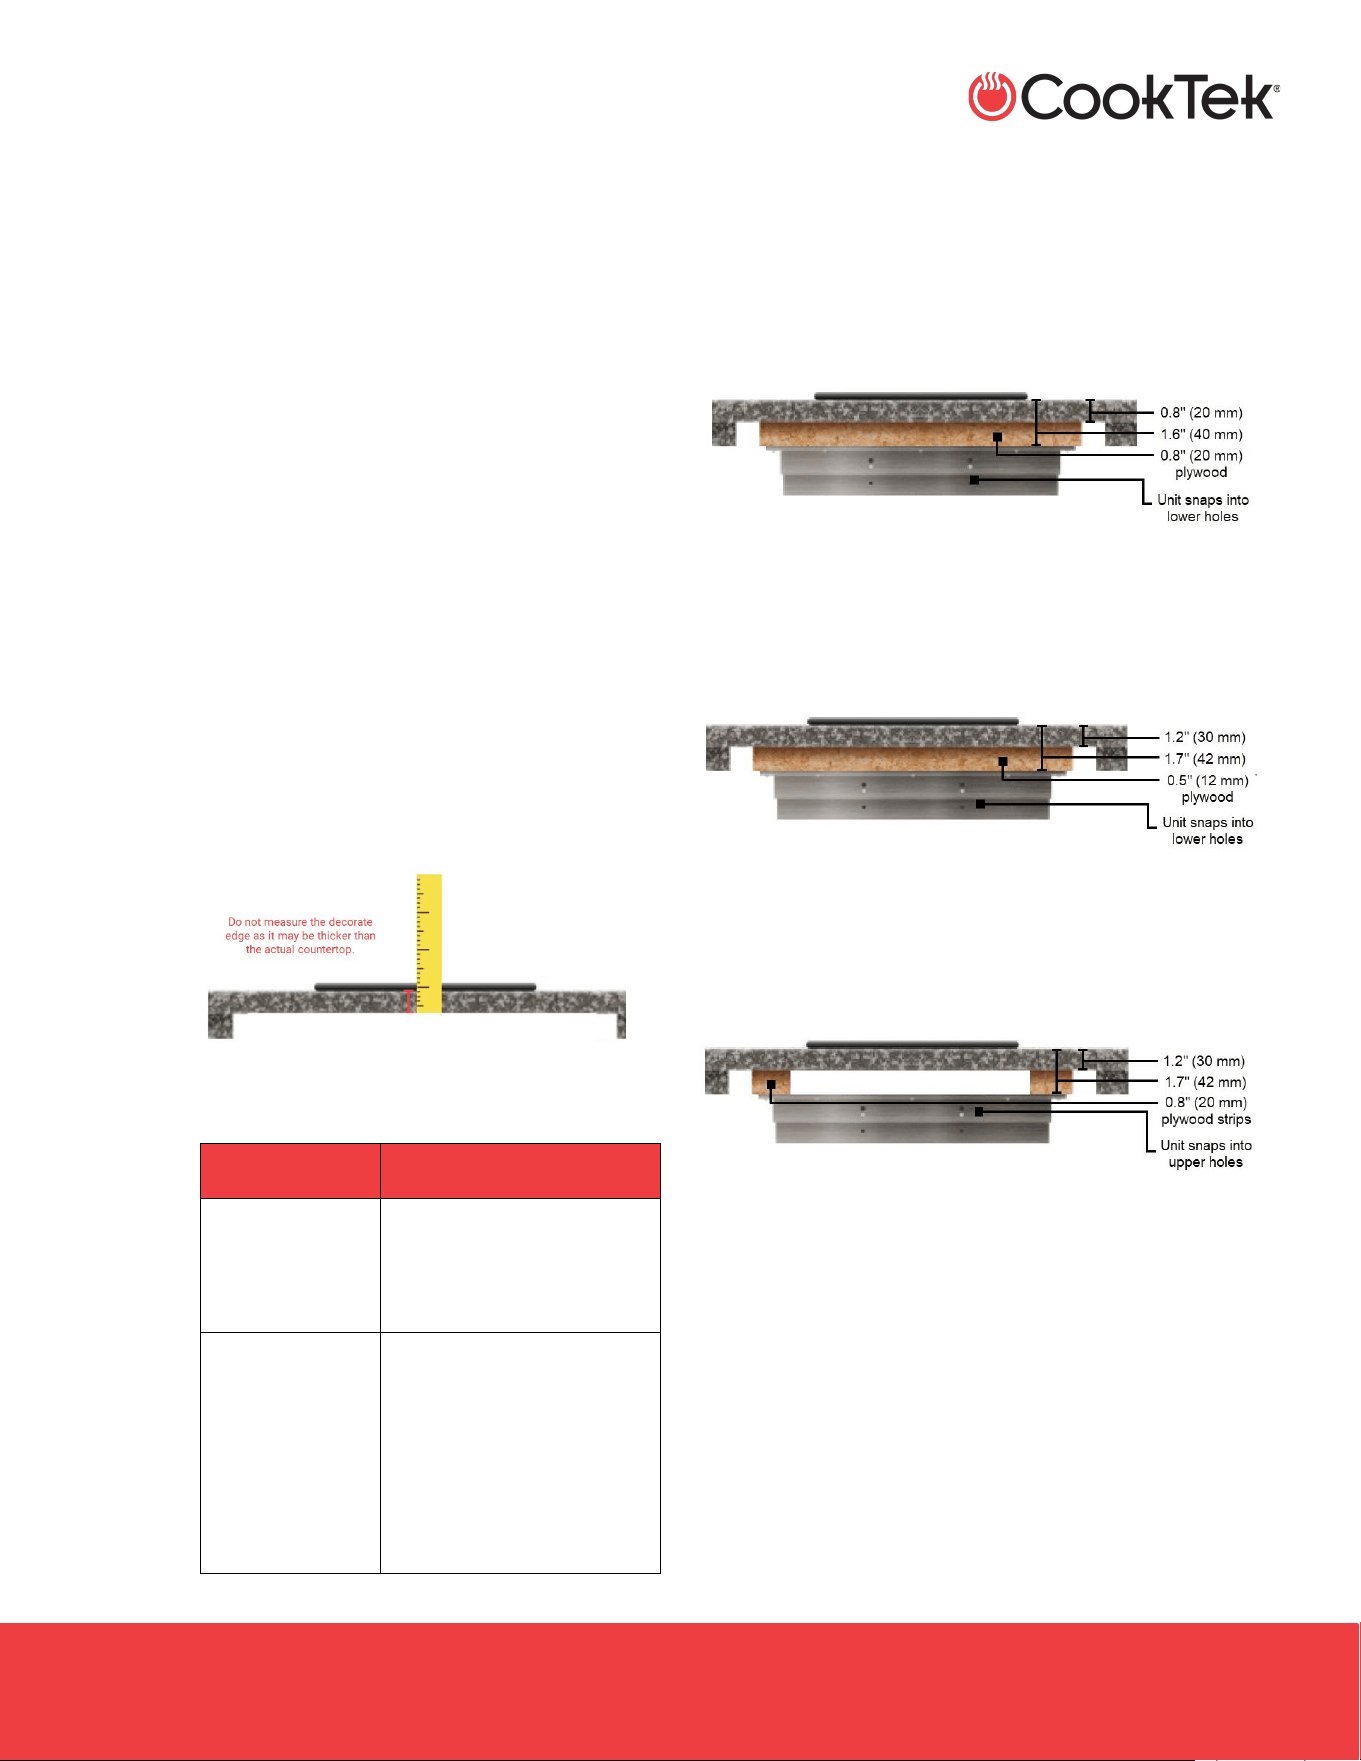
1. Measure the countertop thickness where the
unit will be installed.
IMPORTANT: Do not measure the decorative
edge of the countertop if it is thicker. Some
countertops have a thicker edge that does not
reflect the actual surface thickness.
Note: The top of the unit must be 1.5–1.65 in
(38–42 mm) from the top of the counter.
2. Glue plywood or plywood strips to the stone
countertop.
If
Then
Using a 0.8 in
(20 mm) stone
countertop
A 0.8 in (20 mm) plywood
sheet must be installed.
Using a 1.2” (30
mm) stone
countertop
A 0.5-in (12-mm) plywood
sheet must be installed.
OR
Two 0.8 in (30 mm) strips
must be installed.
Figure 4-1: Stone Countertop 0.8” (20 mm)
Figure 4-2: Stone Countertop 1.2” (30 mm)
Figure 4-3: Stone Countertop 1.2” (30 mm) with Plywood
Strips
INCOGNEETO
.
INC-OWN-A / April 2026
2801 Trade Center Drive
Carrollton, Texas 75007
cooktek.com
Page 14 of 23
I N S T A L L A T I O N
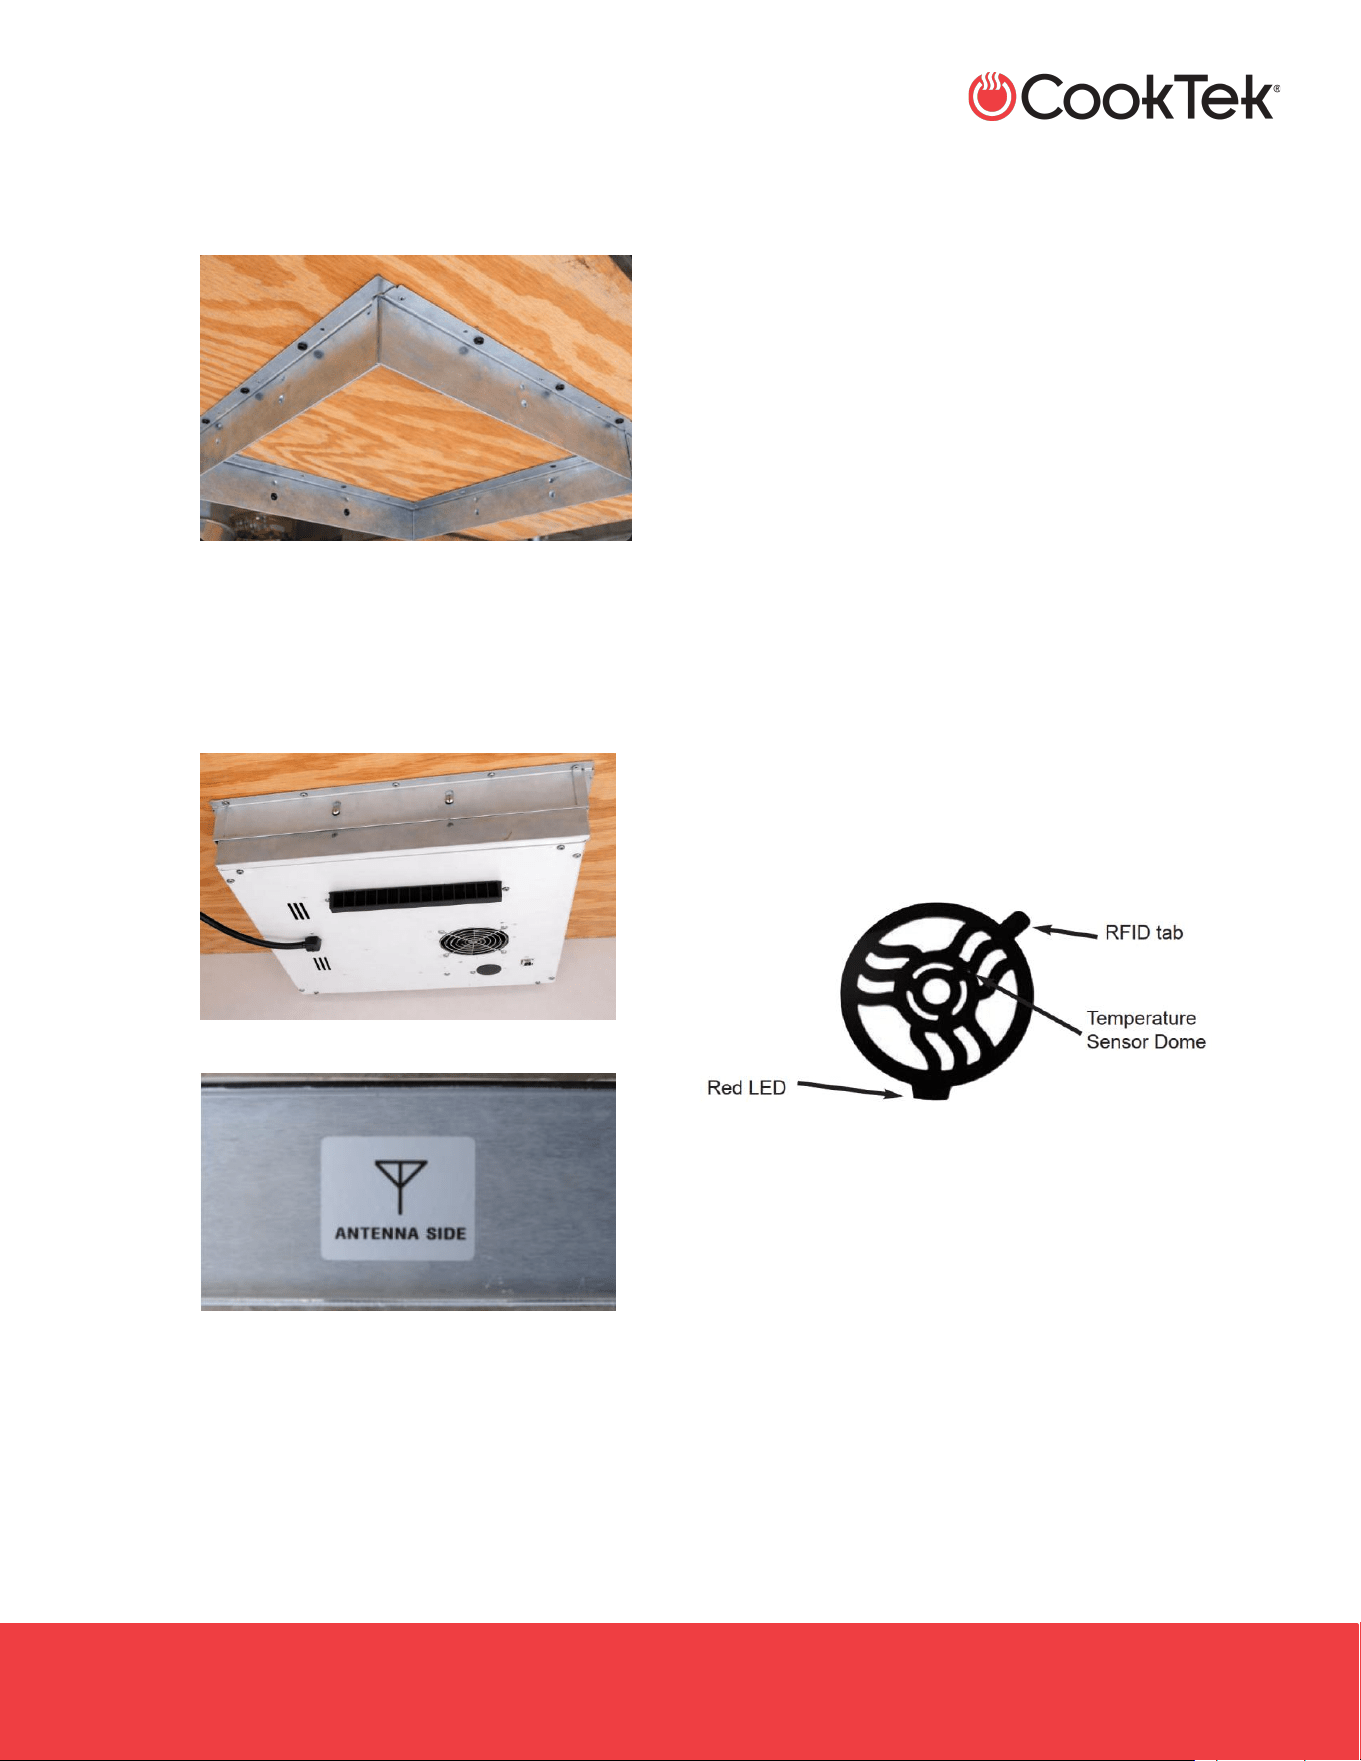
3. Attach the mounting frame to the plywood or
strips with 0.5 in (12.7 mm) wood screws.
4. Snap the Incogneeto™ into the frame place.
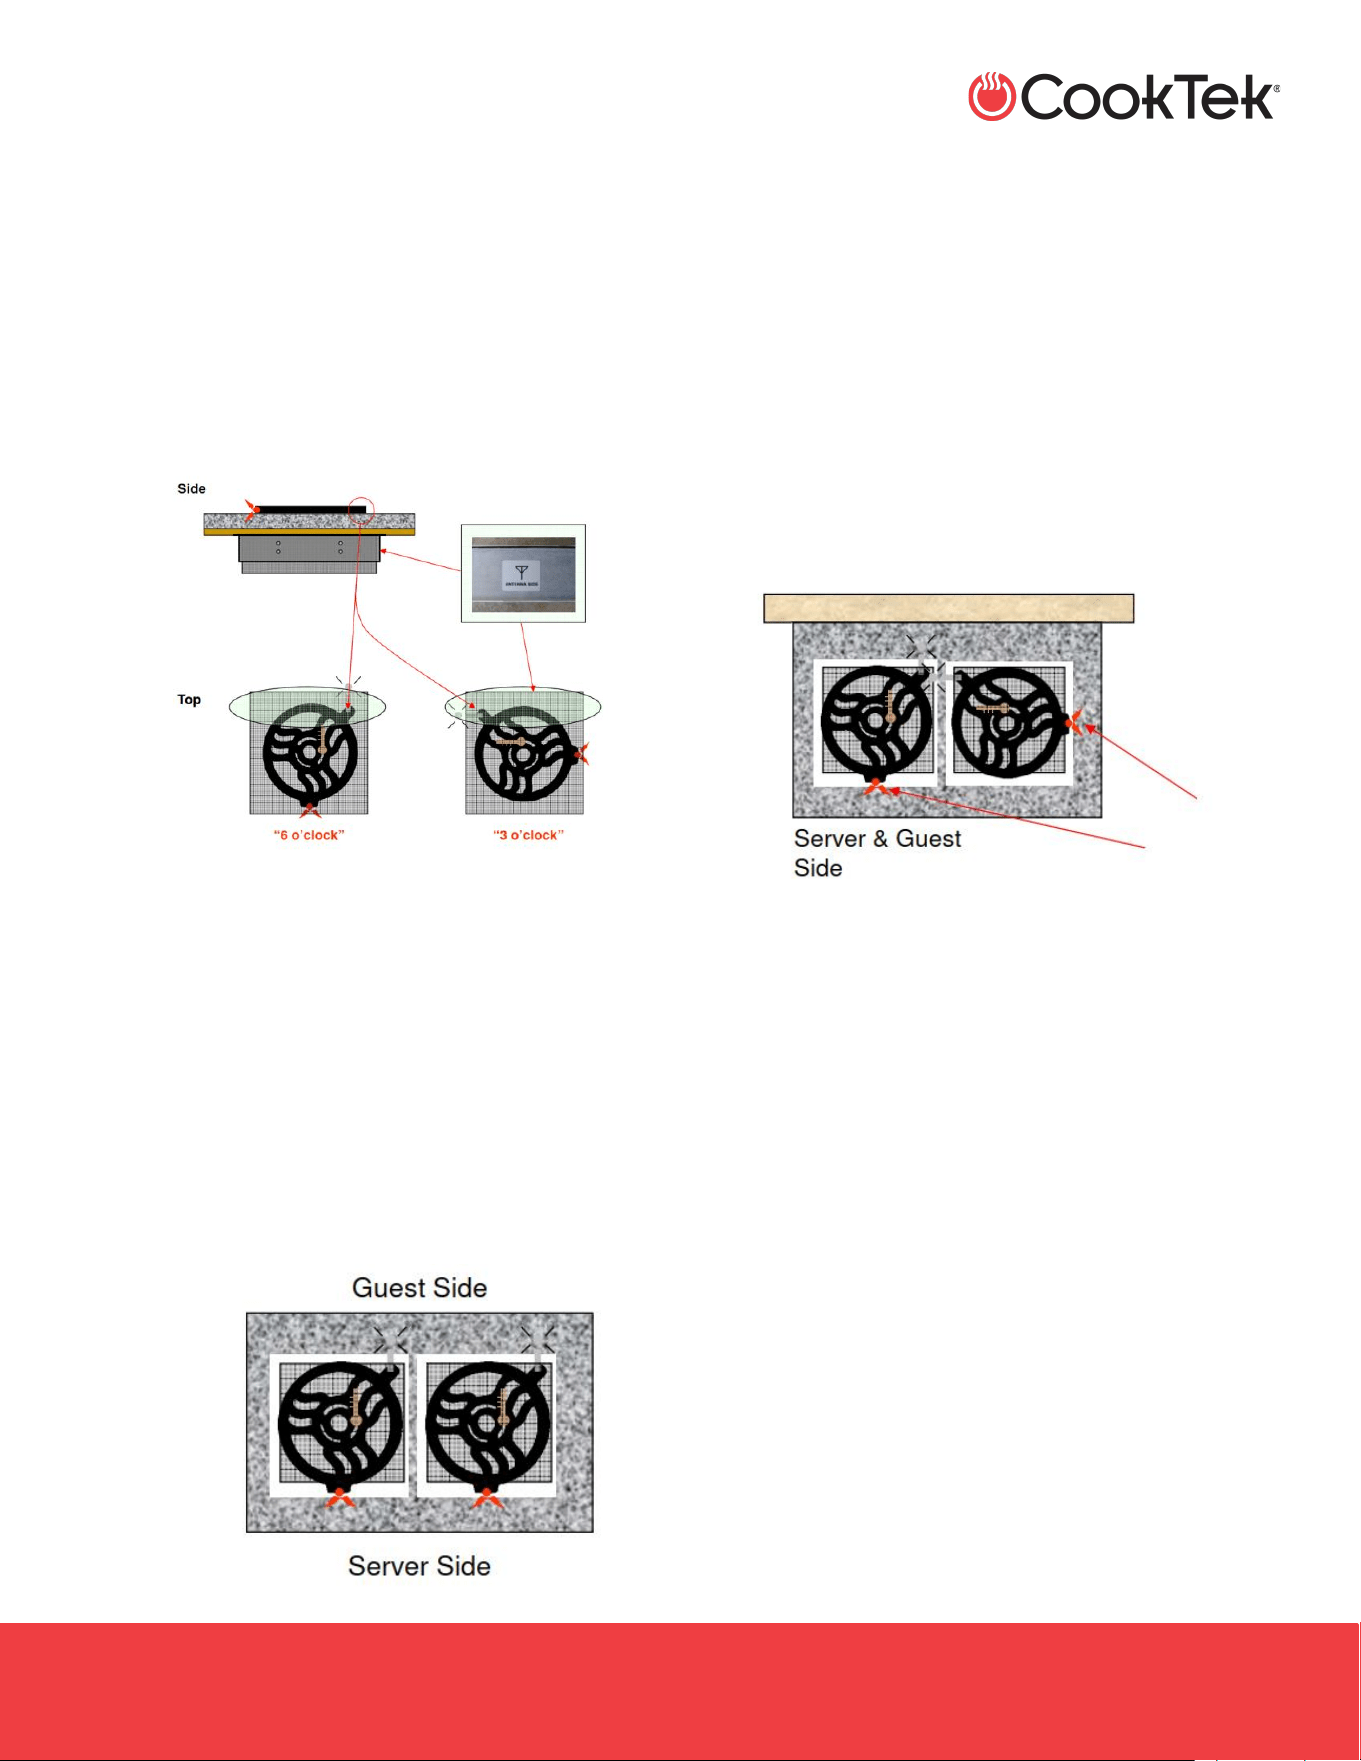
Note: Install the unit so that the ANTENNA SIDE
sticker is under where the Magneeto™ II RFID tab
will be located.
INCOGNEETO
.
INC-OWN-A / April 2026
2801 Trade Center Drive
Carrollton, Texas 75007
cooktek.com
Page 15 of 23
I N S T A L L A T I O N
4.7 Installation Tips
Example 1:
The Magneeto™ II RFID tab must be positioned
over the antenna side of the unit. The antenna runs
the entire length of the unit, allowing the
Magneeto™ II to be used in the 3 or 6 o'clock
positions.
Example: Island Installation
Mount units with the antenna side facing the
guests. The Magneeto™ II RFID tab must be over
the antenna side. Magneeto II can be used with the
LED indicator in the 3 or 6 o’clock position, facing
the servers and not the guests. Servers can see
that the system is working and the guests are not
distracted by the lights.
Example 3: Flush with Wall
Mount units with the antenna side against the wall. The
Magneeto™ II RFID tab must be over the antenna side.
Magneeto II can be used with the LED indicator in the 3 or 6
o’clock positions. The 3 o’clock position avoids the lights
shining directly at seated guests, but servers can see that
the system is working.

INCOGNEETO
.
INC-OWN-A / April 2026
2801 Trade Center Drive
Carrollton, Texas 75007
cooktek.com
Page 16 of 23
C L E A N I N G
5. CLEANING
5.1 Incogneeto™ Buffet Warmer
Turn the unit off and remove the plug from any
power outlets before cleaning.
CAUTION: Never immerse the buffet in water or
put it in the dishwasher.
5.2 Magneeto™ II
• Clean the Magneeto™ II with a mild soap or
detergent.
• Control panels should only be cleaned with a
damp cloth.
CAUTIONS:
• Do not place the Magneeto™ II in the
dishwasher.
• Do not significantly bend or twist the
Magneeto™ II as damage may result.
• Exposure to water spray may cause control
panel failures.
• Control panels are NOT water-tight.
• Control panels should only be mounted
vertically, never horizontally.
INCOGNEETO
.
INC-OWN-A / April 2026
2801 Trade Center Drive
Carrollton, Texas 75007
cooktek.com
Page 17 of 23
C O N T R O L S
6. CONTROLS
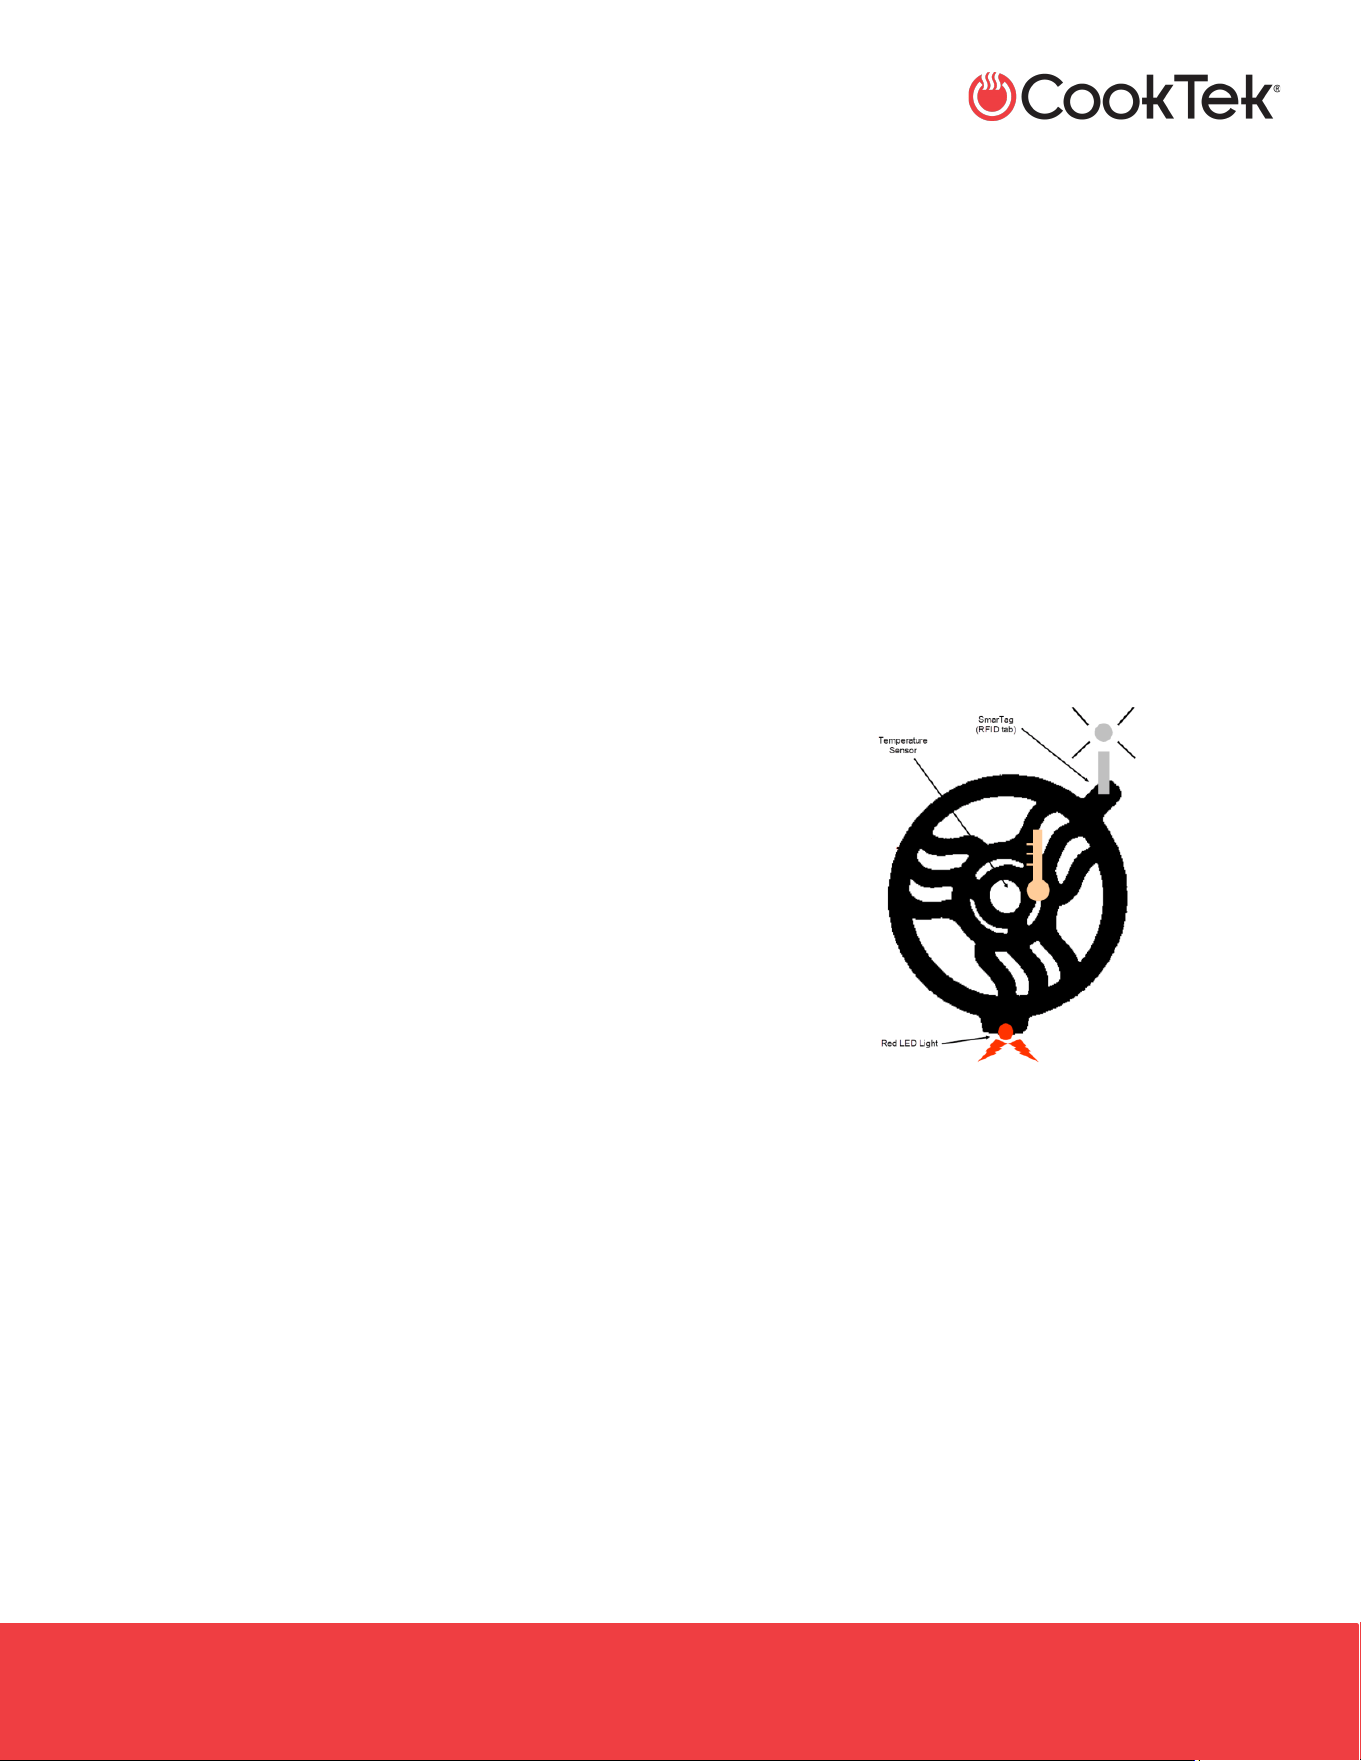
Figure 6-1: Control Panel
1. POWER button
Press to turn the oven on or off. A green LED light
indicates when the unit is on.
2. LOCK button
Use this button to prevent users from adjusting
settings. Press three times to lock and unlock the
unit. When the unit is locked, the only button that
will continue to work is the POWER button. The red
LED to the right of the button will indicate when the
unit is locked.
3. SmarTag™
The SmarTag™ LED will illuminate once a
Magneeto™ II is placed on the countertop.
4. Pan Detected
The Pan Detected LED will illuminate once an
induction compatible is placed on top of the
Magneeto™ II.
5. Up and Down Keys
Press the up and down keys to change the
temperature.
6. Display
Displays the holding temperature (Fahrenheit or
Celsius) and error code information.
INCOGNEETO
.
INC-OWN-A / April 2026
2801 Trade Center Drive
Carrollton, Texas 75007
cooktek.com
Page 18 of 23
O P E R A T I O N
7. OPERATION
Notes:
• Models will operate on 100–120VAC drawing up to
650 W, or on 200-240 VAC drawing a maximum of
650 W. Check the rating plate on the unit to verify
the correct voltage and wattage. Voltages below
120 VAC or 240 VAC may result in reduced power
and slower heating times.
• This unit requires a Magneeto™ II for operation.
The Incogneeto™ unit will not work with a
Magneeto™ I module or an RFID-equipped chafing
dish.
7.1 Program Magneeto™
1. With the Incogneeto™ off, hold the down arrow
while pressing the POWER button until CLR
displays.
Notes:
• The screen will display CLR.
• The unit will no longer enter auto mode.
2. To set the tag, press LOCK twice.
Note: The screen will display TAG SET.
3. Repeat for all Magneeto™ II.
7.2 Magneeto™ II Operation
Note: Upward bowing of Magneeto™ II when hot and
a dish is removed is normal and disappears with
cooling or when a dish is placed on top.
1. Press the POWER button to turn the
Incogneeto™ on.
Note: The green LED beside the POWER button
will light up.
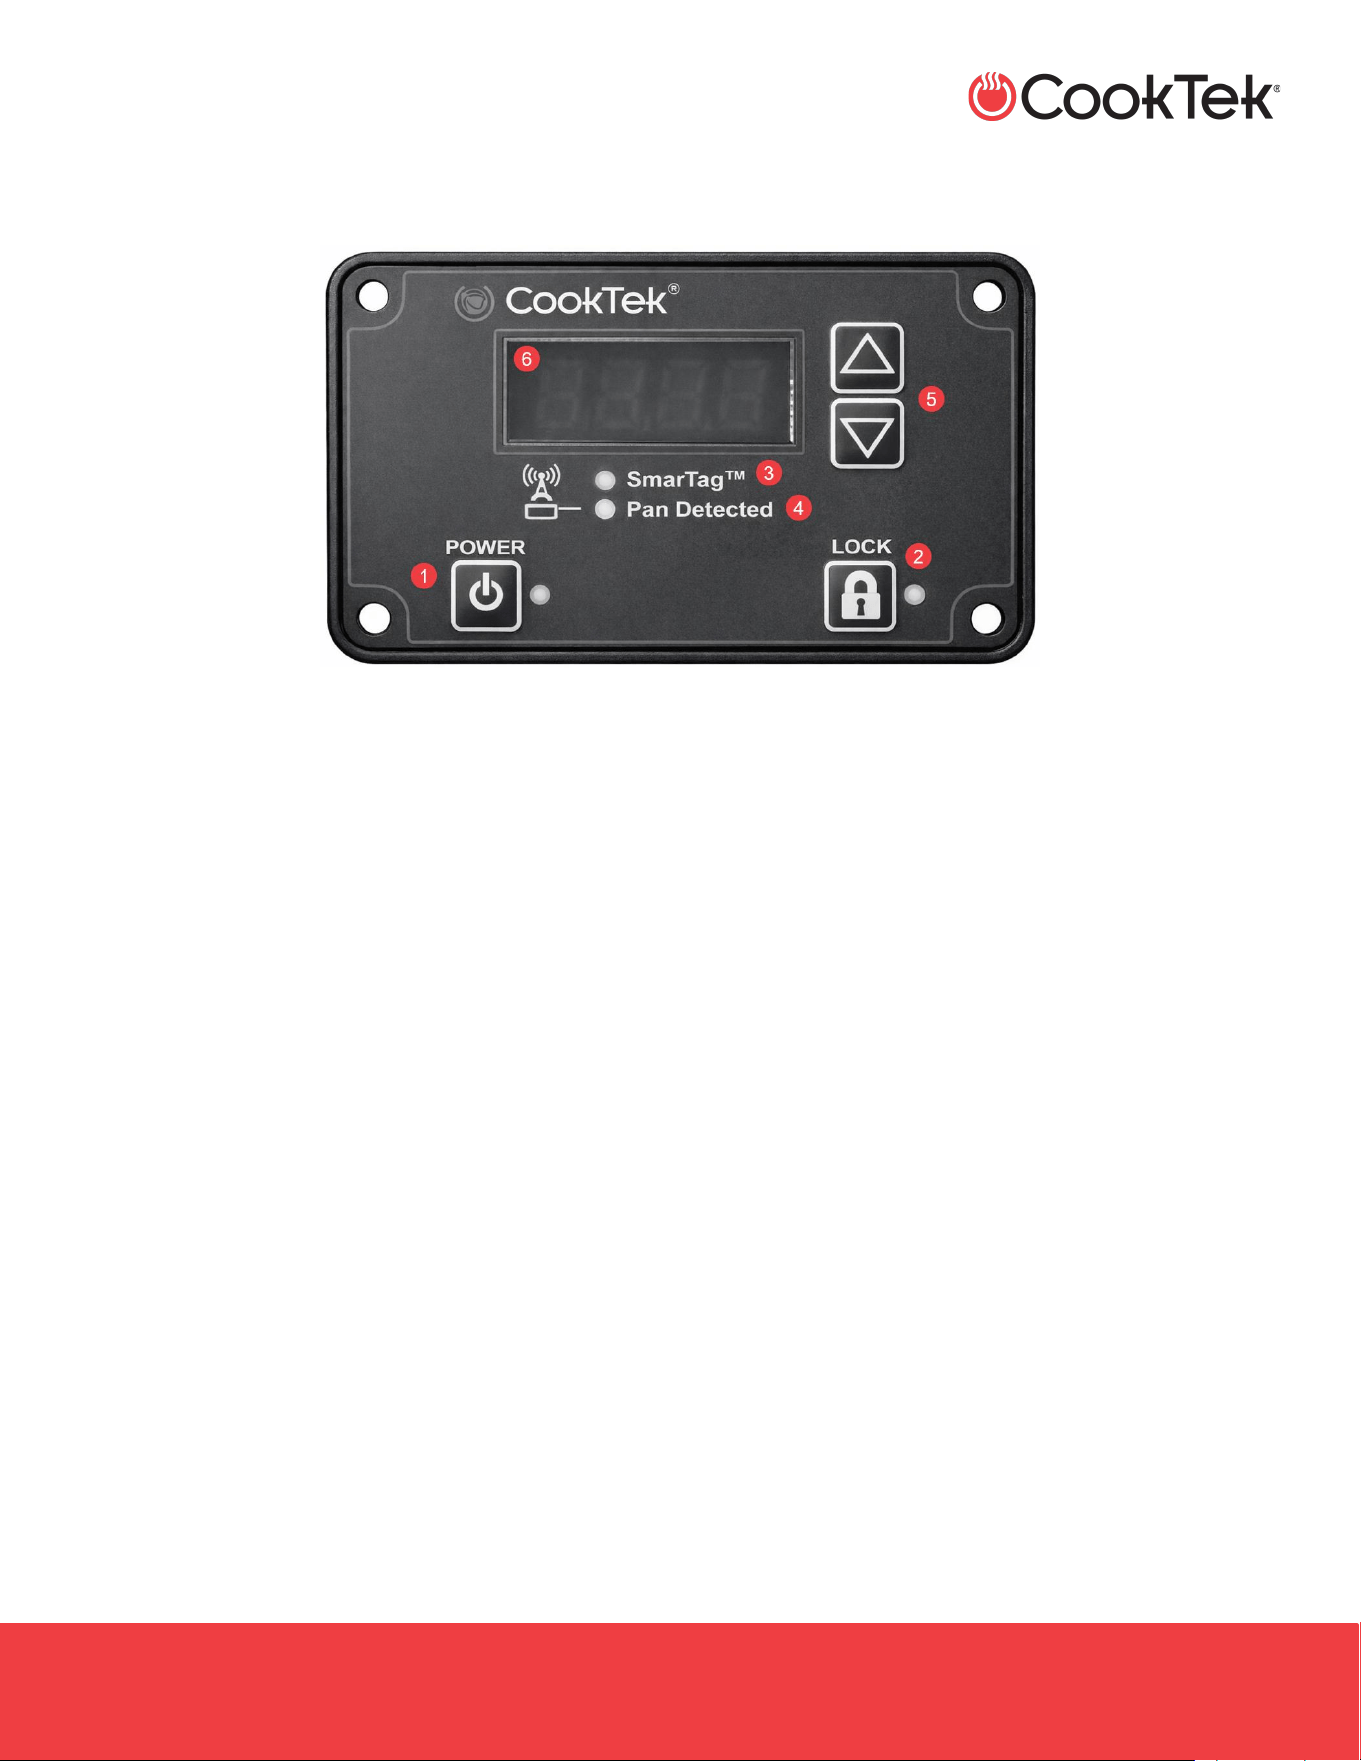
2. Place a Magneeto™ II on the countertop and
slowly slide it until the LED starts flashing and
the SmarTag™ LED lights up.
Note: The best position is where the light flashes
brightest.
3. Place an induction-compatible dish on the
Magneeto™ II, making sure it covers the
temperature sensor.
Notes:
• Do not cover the RDIF tab with the dish.
• The Pan Detect LED will illuminate.
• The unit will begin to warm up to either 80
°F or the latest temperature entered.
4. Press the up and down arrows to select the desired
preset temperature options.
- Fahrenheit settings (80–190)
- Celsius settings (30-85)
Note: Once the unit reaches the set temperature, the
F or C stops flashing and stays on the display.
5. To prevent temperature settings changes, press
the LOCK button three times.
Notes:
• The red LED to the right of the lock button
will illuminate to indicate the unit is locked.
• The POWER button will continue to function
while locked.

INCOGNEETO
.
INC-OWN-A / April 2026
2801 Trade Center Drive
Carrollton, Texas 75007
cooktek.com
Page 19 of 23
O P E R A T I O N
6. When you are finished using the unit, press the
POWER button.
Note: The green LED beside the POWER button will
turn off.
7.3 Change Temperature Scale
Start with the unit off, hold down the up arrow while
pressing the POWER button. Then use the down
arrow to choose the desired setting. Turning the
unit off completes the selection.
Note: If a button is not pressed for more than 5
minutes, the unit will turn off while maintaining the
previously set temperature scale.
7.4 Change Temperature Options
(Short/Long)
With the unit off, hold down both the up and down
arrows, then press the POWER button. Use the
arrows to select NUM and press the LOCK button.
Use the arrows again to select PART or FULL for
the partial or full set of temperatures. Press the
POWER button to set the value.
7.5 Set Timer
The Incogneeto™ is equipped with a timer alarm
that can be set to alert the operator when a pan has
been on the unit for up to 240 minutes (4 hours).
To enable/disable the timer:
1. Starting with the unit off, hold the down arrow
while pressing the POWER Button.
2. Release the buttons once the display turns on.
3. Use the up and down arrows to toggle through
the options until t En displays.
4. Press the LOCK Button once to select the
enable option.
5. Press the up and down arrows to toggle
between the settings options ON and OFF.
6. Once the desired option is displayed, press the
LOCK Button to enter the option.
Note: The display will flash three times to
indicate the option has been saved.
7. Press the Power Button to exit this mode.
To set the timer interval:
1. Starting with the unit off, hold the down arrow while
pressing the POWER Button.
2. Release the buttons when the display turns on.
3. Use the up and down arrows to toggle through the
options until t Int displays.
4. Press the LOCK Button to select the interval option.
5. Press the up and down arrows to adjust the timer
interval.
6. When the desired time (displayed in minutes)
appears, press the LOCK Button to select this
option.
Note: The display will flash three times to confirm it
has been saved.
7. Press the POWER button to exit this mode.
7.6 Time Operation
Note: If not enabled, enable the timer by completing
the steps in the Set Time section.
• If the timer is enabled, it will start counting
when a pan is placed on the unit, and the
Heating or At Temp light will turn on.
• The timer will count to the preset interval (in
minutes).
• Once the interval is reached, the unit will beep
once per second to alert the operator and flash
DONE on the display.
INCOGNEETO
.
INC-OWN-A / April 2026
2801 Trade Center Drive
Carrollton, Texas 75007
cooktek.com
Page 20 of 23
O P E R A T I O N
• The unit will keep the pan at the set
temperature when the timer expires.
• The timer is reset when the pan is removed
from the unit, and the Heating or At Temp LED
turns off.
• The next time a pan is placed on the unit, the
timer will restart from the beginning. To view
the elapsed time since the pan was placed on
the unit, press the Lock button once. This will
display the time (in minutes) from when the
pan was placed on the unit for 5 seconds. After
5 seconds, the normal temperature display will
return.
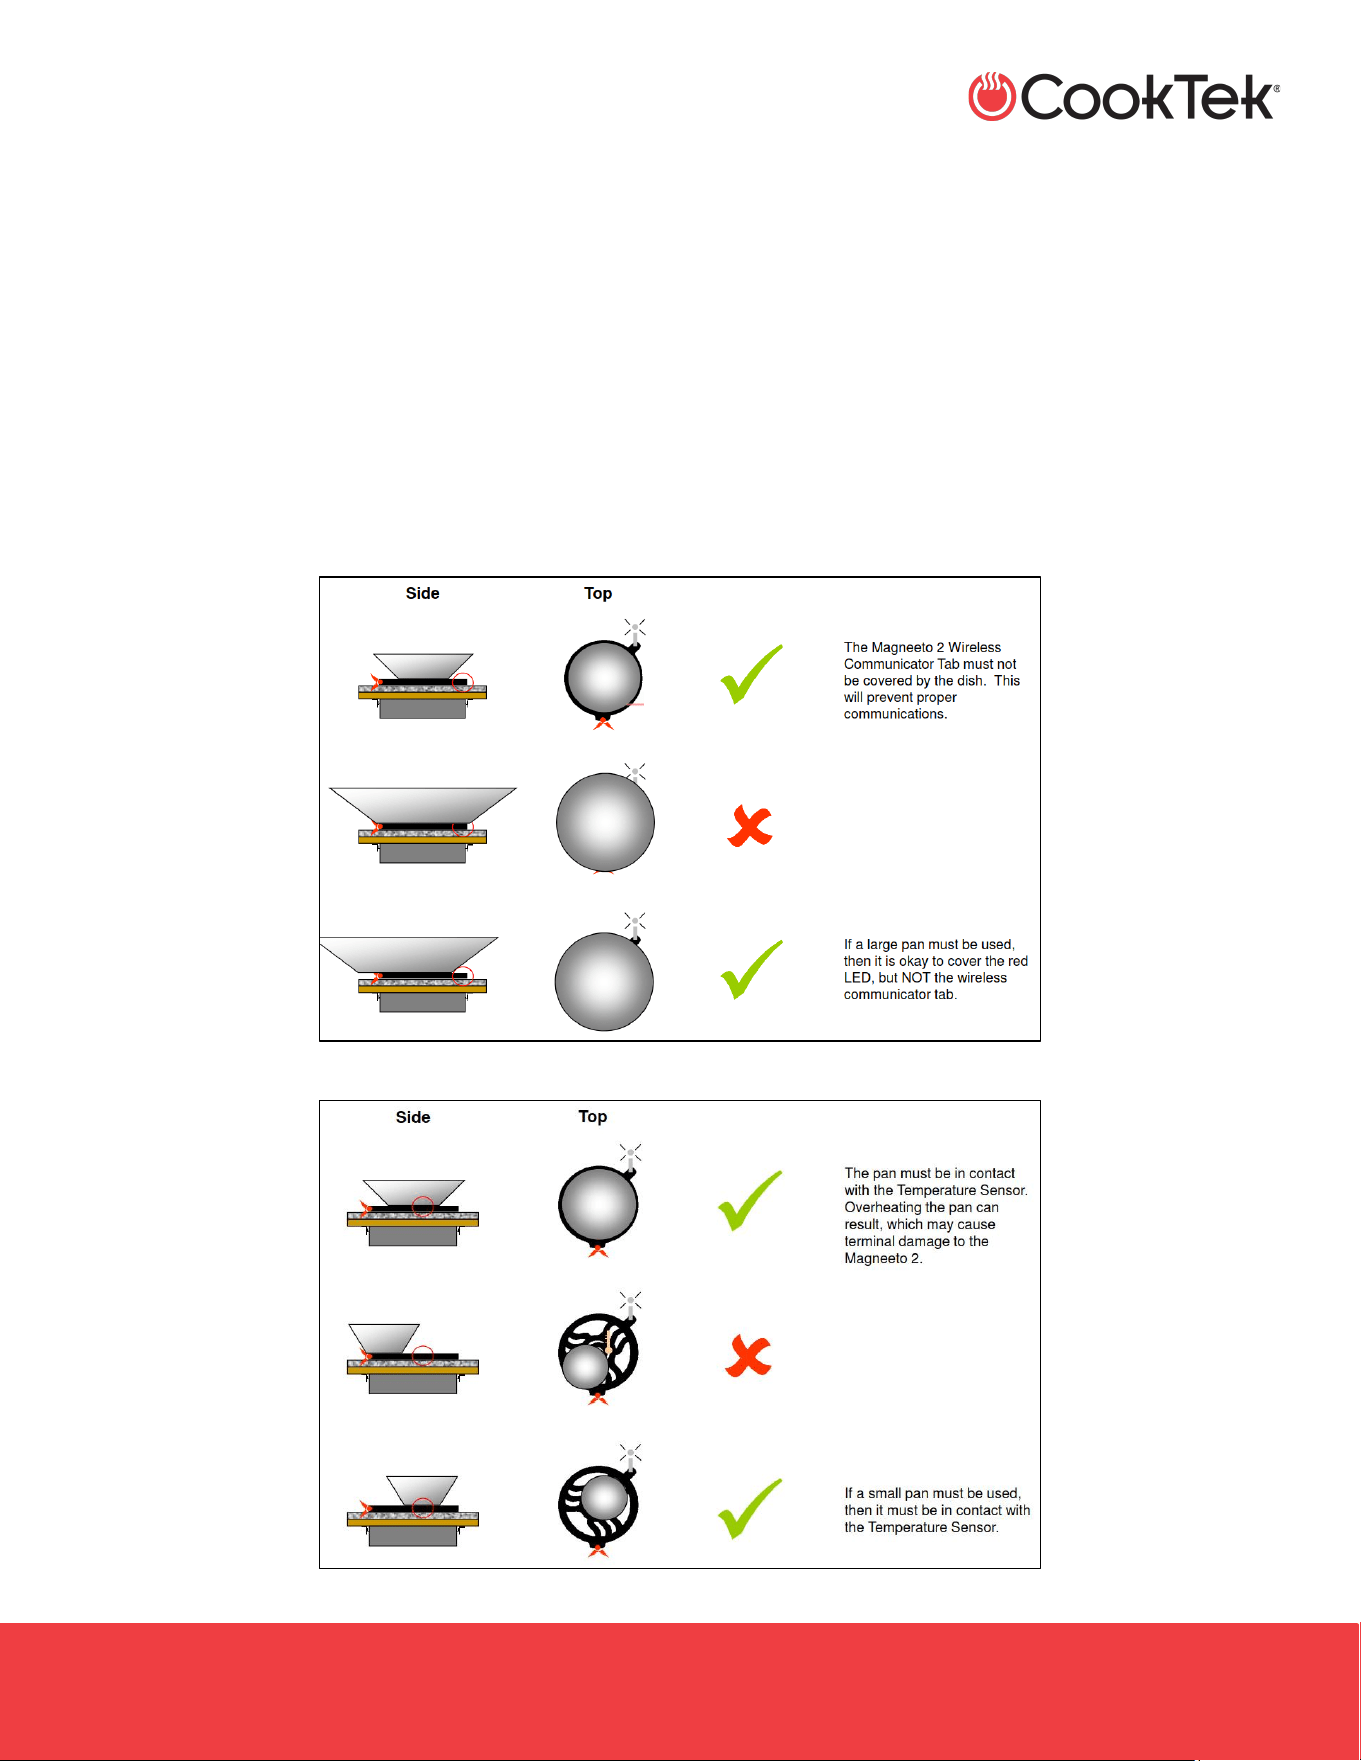
7.7 Pan Placement Tips

INCOGNEETO
.
INC-OWN-A / April 2026
2801 Trade Center Drive
Carrollton, Texas 75007
cooktek.com
Page 21 of 23
T R O U B L E S H O O T I N G
8. TROUBLESHOOTING
The following is a list of issues, along with the possible cause(s), that the oven may be experiencing. Please attempt the
recommended resolution before calling customer support or your Authorized Distributor.
If any issue occurs that is not listed below, contact customer support 800.908.8726 or 214.379-6000.
Issue
Possible Cause(s)
Resolution
No power to unit
• Unit is not plugged in
• Main circuit breaker is tripped
• Plug unit in
• Plug a different electronic device into the receptacle
to make sure that power is present
• Reset the breaker and then power the oven back on
• Check wall switches
Pan is not:
- warming up
- heats unevenly
- maintaining heat
level
- overheats
• Pan is not suited for induction cooking
• Pan may not be centered
• Pan may not have a flat enough
bottom
• Pan diameter is less than 7” (17.8 cm)
or more than 12” 30.5 cm)
• Use an induction-compatible pan that measures
between 7" and 12” (17.8-30.5 cm)
• Center pan
Note: Refer to the Pan Placement Tips section for
examples.
• Use a flatter pan
Unit suddenly stopped
heating
• Circuit shared with another electrical
device
• Safety shut off engaged
• Ensure proper voltage and power levels
• Ensure the buffet is not connected to the same
circuit as other electrical devices
• Make sure that the buffet surface is clear, wait 15-
20 minutes for the unit to reset
Note: The safety shut-off activates if an empty pan is
left on the buffet surface while the unit is operating at
full power.
Induction-compatible
pan does not heat up
enough despite high
power levels
• Extension cord in use
• Circuit shared with another electrical
device
• Remove from extension cord
Note: Refer to the Grounding Instructions section for
safety information.
• Ensure the buffet is not connected to the same
circuit as other electrical devices

INCOGNEETO
.
INC-OWN-A / April 2026
2801 Trade Center Drive
Carrollton, Texas 75007
cooktek.com
Page 22 of 23
T R O U B L E S H O O T I N G
8.1 Error Codes
If a possible malfunction, your CookTek Incogneeto™ Buffet will display an error code on the alphanumeric display.
Some models will beep a specific number of times, indicated by the error and flash the lights on the control
box. Consult the following table when encountering an error code. To reset error conditions, remove the pan from
the unit and press the POWER button, or unplug the unit.
Error Code
Displayed Message
Troubleshooting
E-01
Broken Temperature Sensor
Service required.
E-03
Over current (peak)
Try different cookware.
Service may be required.
E-06
High line voltage
To reset, unplug unit, wait 5 seconds, and plug in again. If
problem persists, have an electrician monitor the line voltage.
E-07
Hardware failure
Service required.
E-08
Zero cross failure
Turn unit off, then on.
Plug unit into outlet on different circuit breaker.
If problem persists, service is required on device.
E-10
Magneeto™ II RTD Failure
Service required.
E-11
Tag communication
Ensure the RFID tag on the pan is properly located.
E-12
RFID reader failure
Service required.
E-13
User interface error
Check control panel connection, cycle power.
Service may be required.
E-16
Critical error
Service required.

INCOGNEETO
.
INC-OWN-A / April 2026
2801 Trade Center Drive
Carrollton, Texas 75007
cooktek.com
Page 23 of 23
W A R R A N T Y
9. WARRANTY
Refer to the Advanced Replacement Warranty policy for more information.
Global Operations
2801 Trade Center Drive
Carrollton, Texas 75007 USA
+1 214.379.6000
+1 214.379.6073 fax
Business & Technology Centre
Bessemer Drive
Stevenage
Herts SG1 2DX
United Kingdom
+44 8456021544
+44 8456021636 fax
Customer Support
+1 214.379.6000
+1 214-379-6073 fax
cooktek.com
Country Code: NA/EU