
Technical Support and E-Warranty Certificate www.vevor.com/support
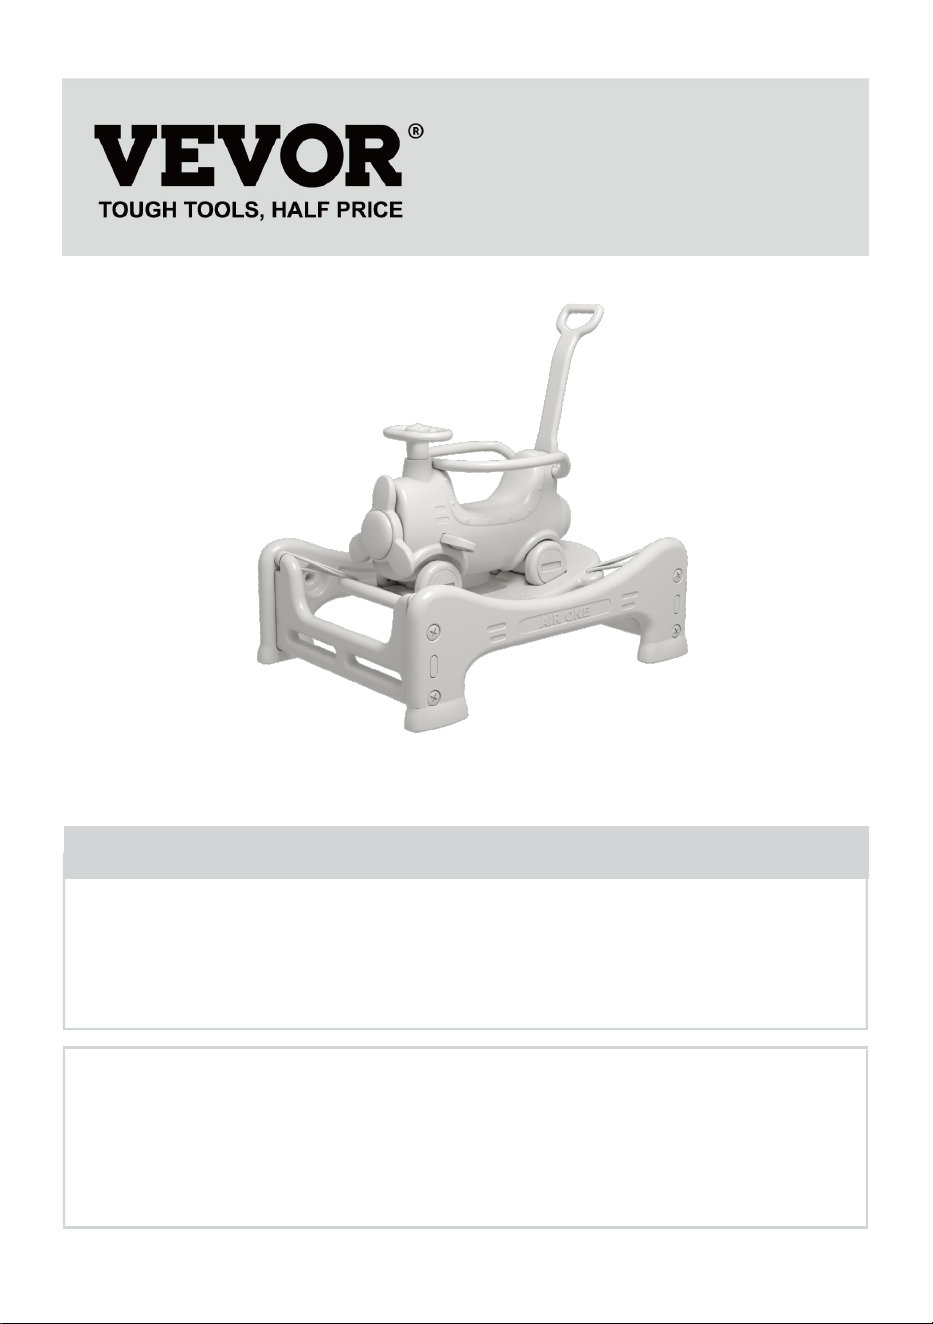
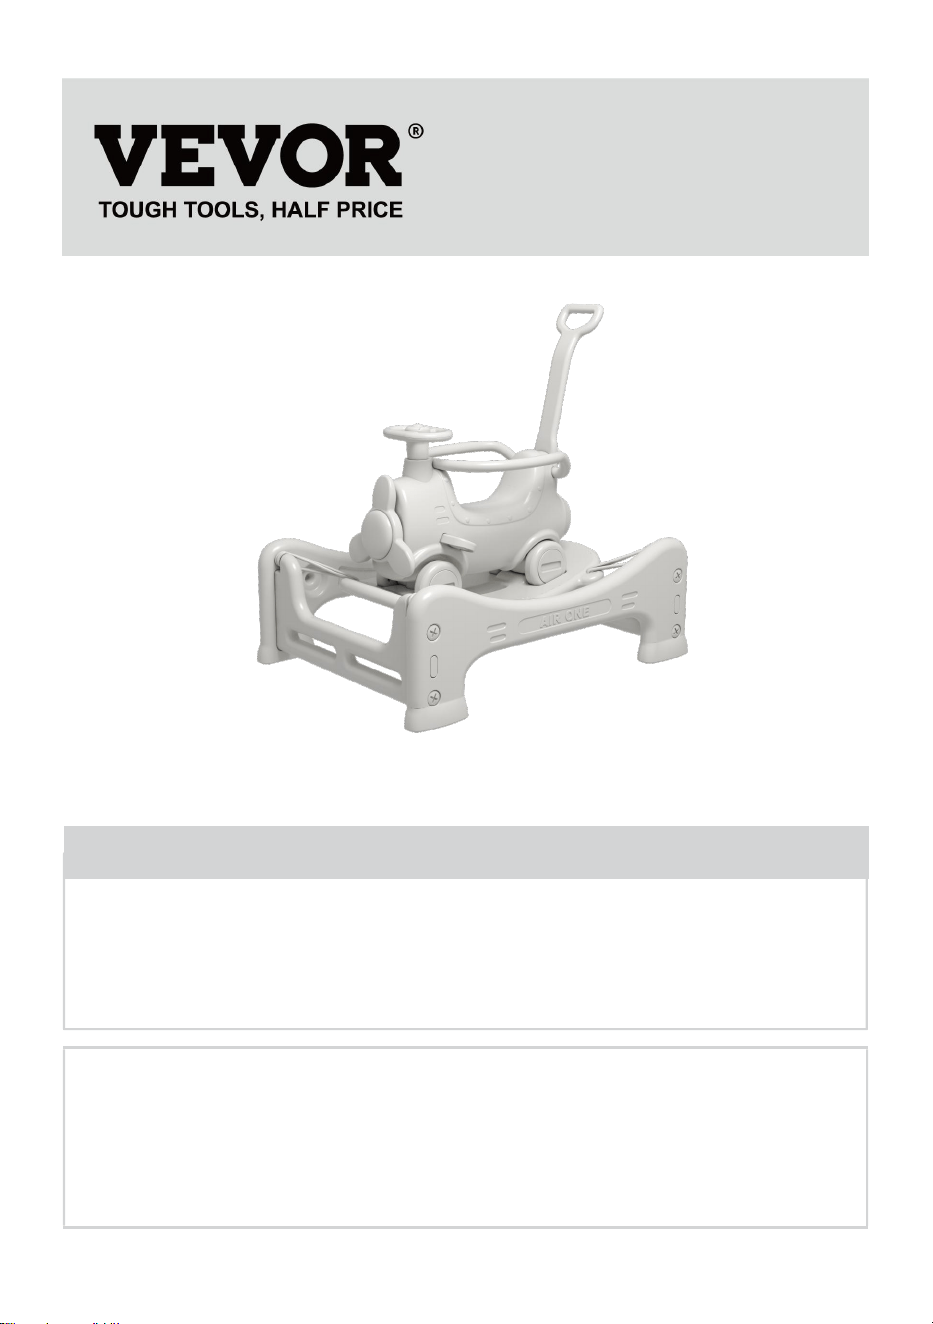
Children's Rocking Horse
We continue to be committed to provide you tools with competitive price.
"Save Half", "Half Price" or any other similar expressions used by us only represents an
estimate of savings you might benefit from buying certain tools with us compared to the major
top brands and does not necessarily mean to cover all categories of tools offered by us. You
are kindly reminded to verify carefully when you are placing an order with us if you are
actually saving half in comparison with the top major brands.
- 1 -
MODEL: C-YM101
Have product questions? Need technical support? Please feel free to
contact us:
Technical Support and E-Warranty Certificate
www.vevor.com/support
This is the original instruction, please read all manual instructions
carefully before operating. VEVOR reserves a clear interpretation of our
user manual. The appearance of the product shall be subject to the
product you received. Please forgive us that we won't inform you again if
there are any technology or software updates on our product.
Children's Rocking Horse
- 2 -
INSTRUCTIONS
Thank you very much for choosing this Children's Rocking Horse.
- Please read all of the instructions before using it. The information will help
you achieve the best possible results.
The products carried in this catalog may be different in color than the actual
item.
The assembly must be carried out by a guardian. For safety reasons, the
assembly must be checked before and after use.
WARNING:
Notice : Please read the following precautions carefully before
mounting !
1. For home use only.
2. For indoor use only.
3. Warning! Small hazardous parts are included. Must be installed by an
adult
4. Please place it on a flat and spacious ground, leaving an appropriate
open area around the installation area.
5. Do not place it in water or seepage, uneven or rough ground, slopes,
etc.
6. Before installation, please carefully check that all parts are secure and
that there are no unsafe elements around.
7. During use, please check the product body and nuts, etc. regularly,
and stop using it if it is cracked or worn; otherwise, it may tip over or other
dangers may occur.

- 3 -
8. If the product nut is worn and cannot be tightened, please contact the
manufacturer to purchase and replace the corresponding accessories.
9. Please keep the packaging properly and keep it away from infants and
young children to avoid danger.
10. Please store in a cool and dry place, avoid direct sunlight, and keep
away from fire and heat sources.
11. Adult accompany is highly recommended.
12. Do not let children play with toys disassembled, damaged or
deformed to avoid accidental swallowing, suffocation and other injuries.
13. Please save the User Manual for future reference.
MODEL AND PARAMETERS
Model
C-YM101
Material
HDPE
Music Playing
Yes
Power Music
Playing
3PCS 1.5V button cell
Rating Loading
80lbs
Color
Gray and white and khaki
The button cell for the music playing needs to be purchased separately.

- 4 -
ASSEMBLY AND USE
Children's-Rocking-Horse
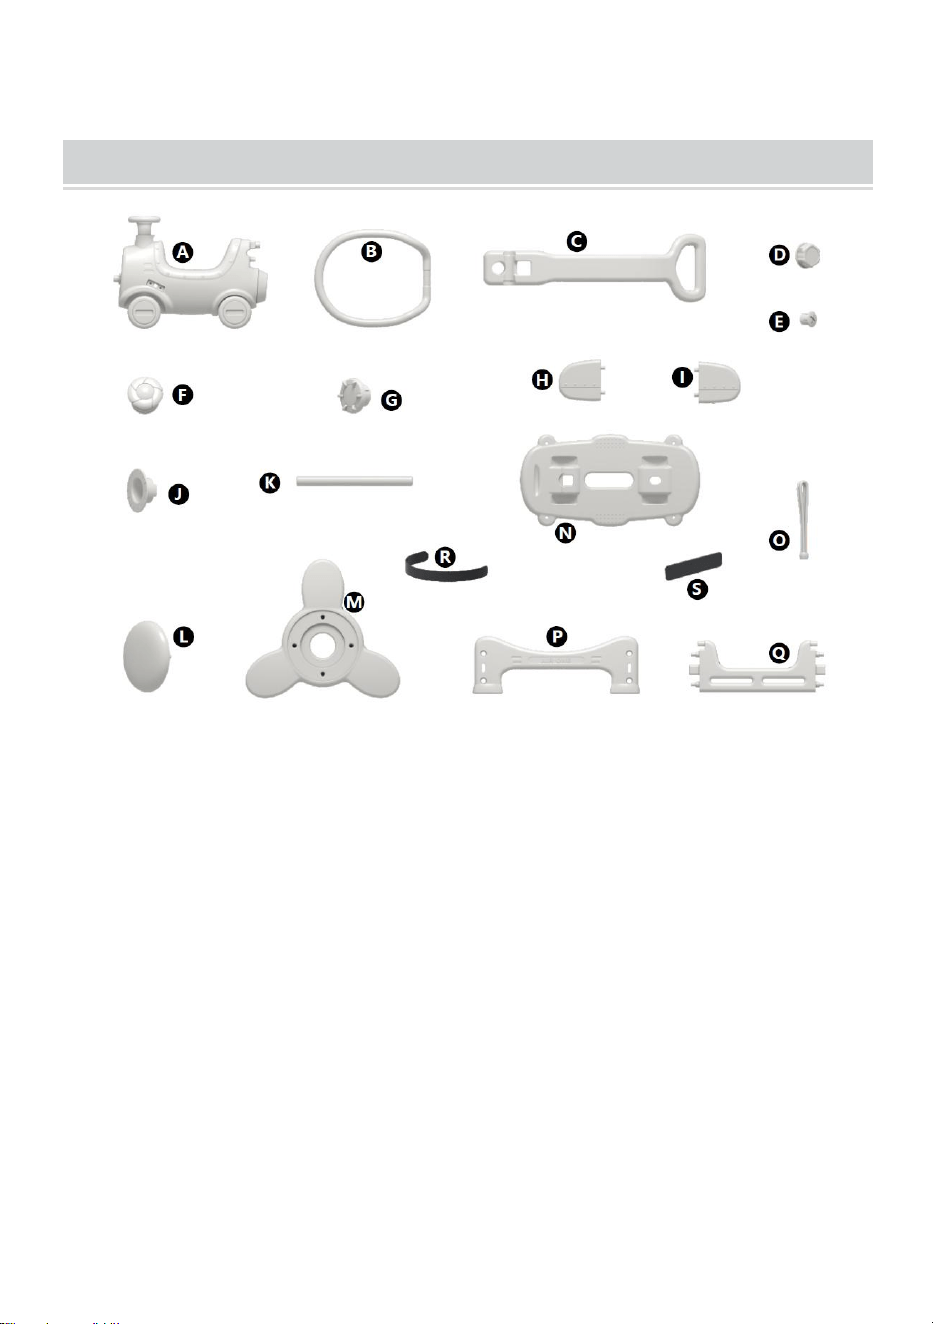
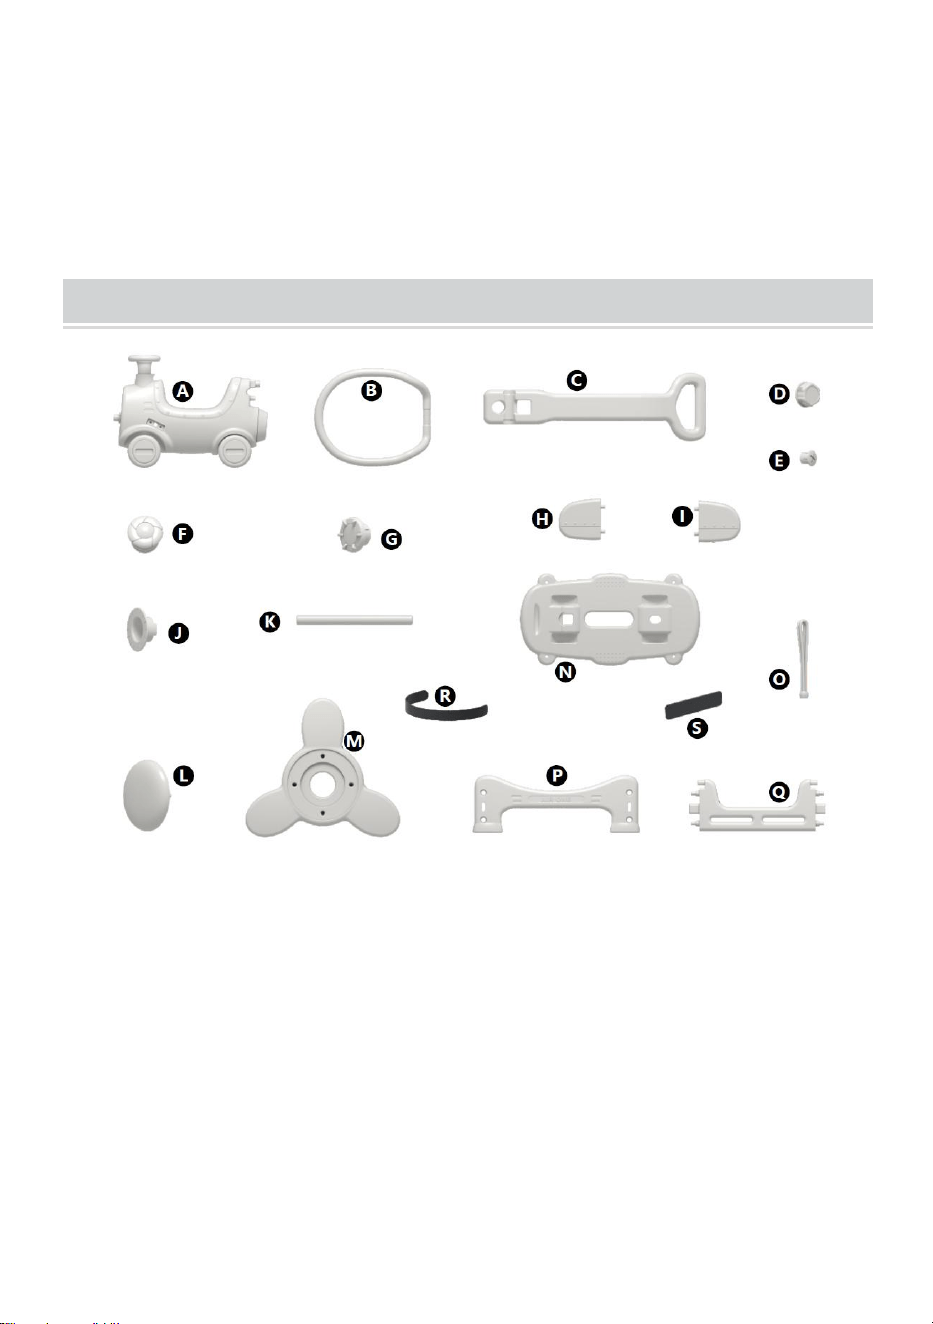
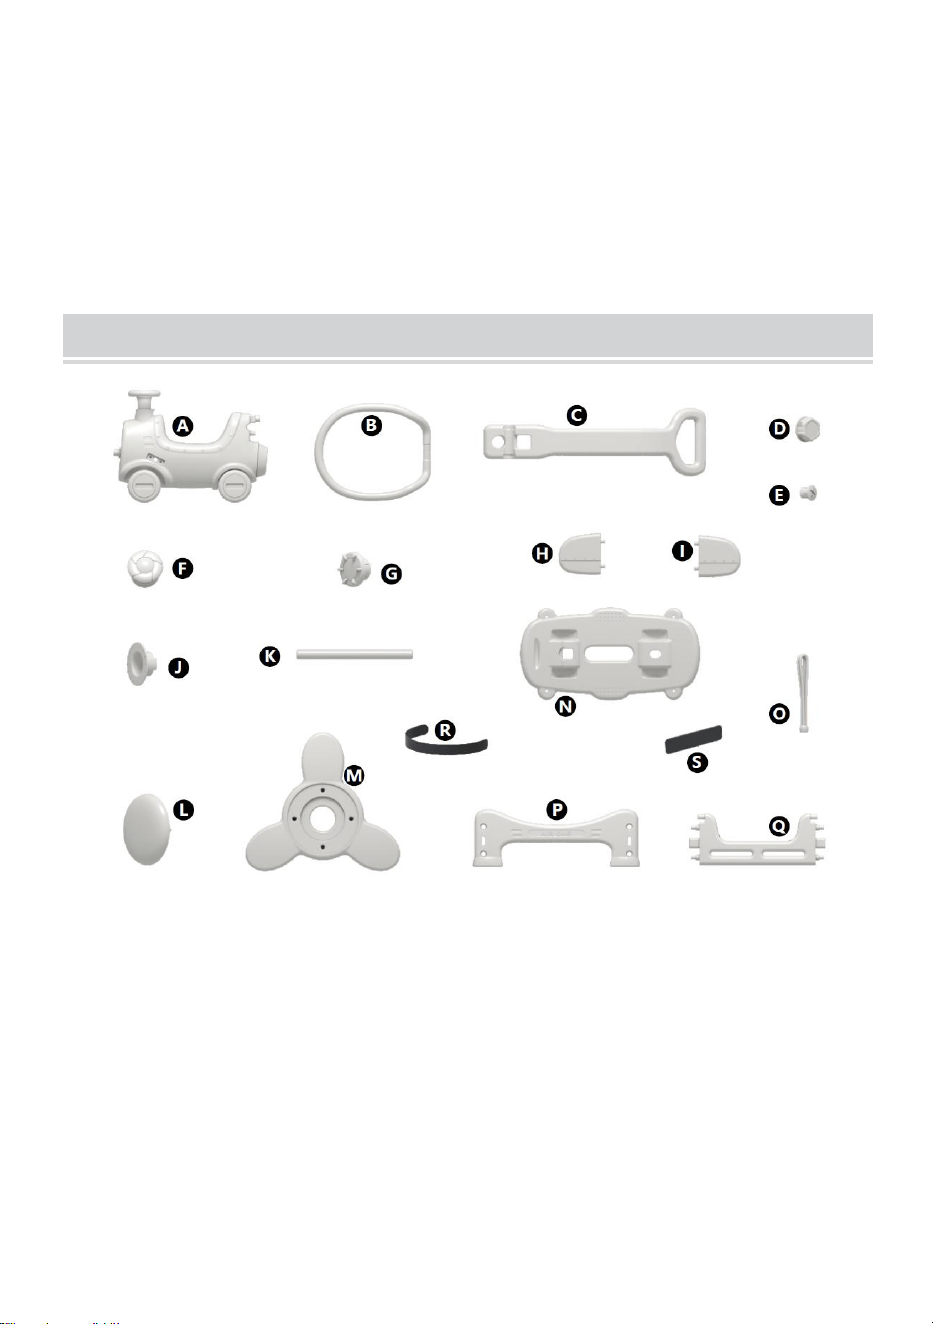
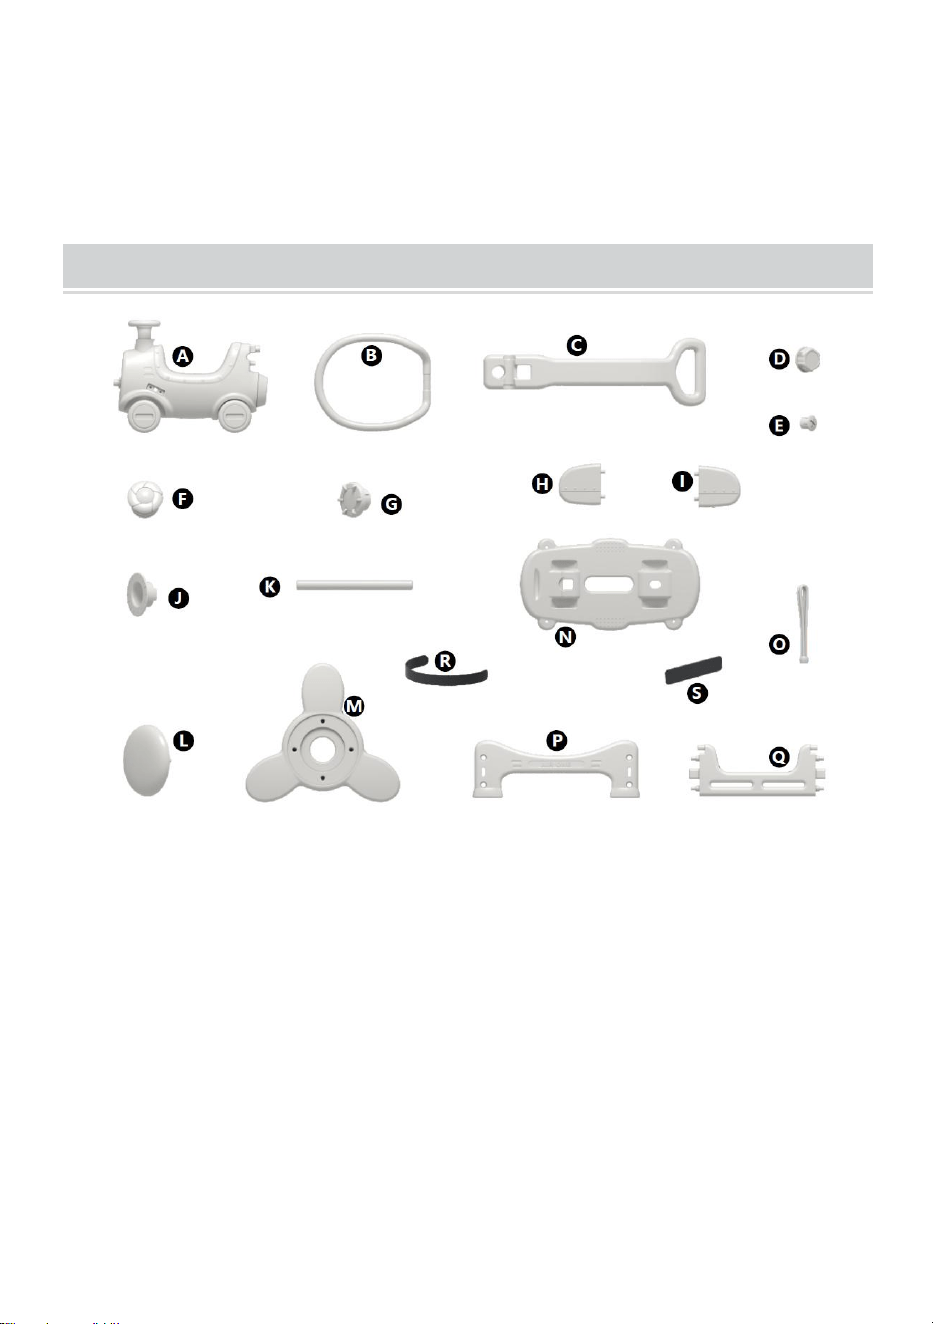
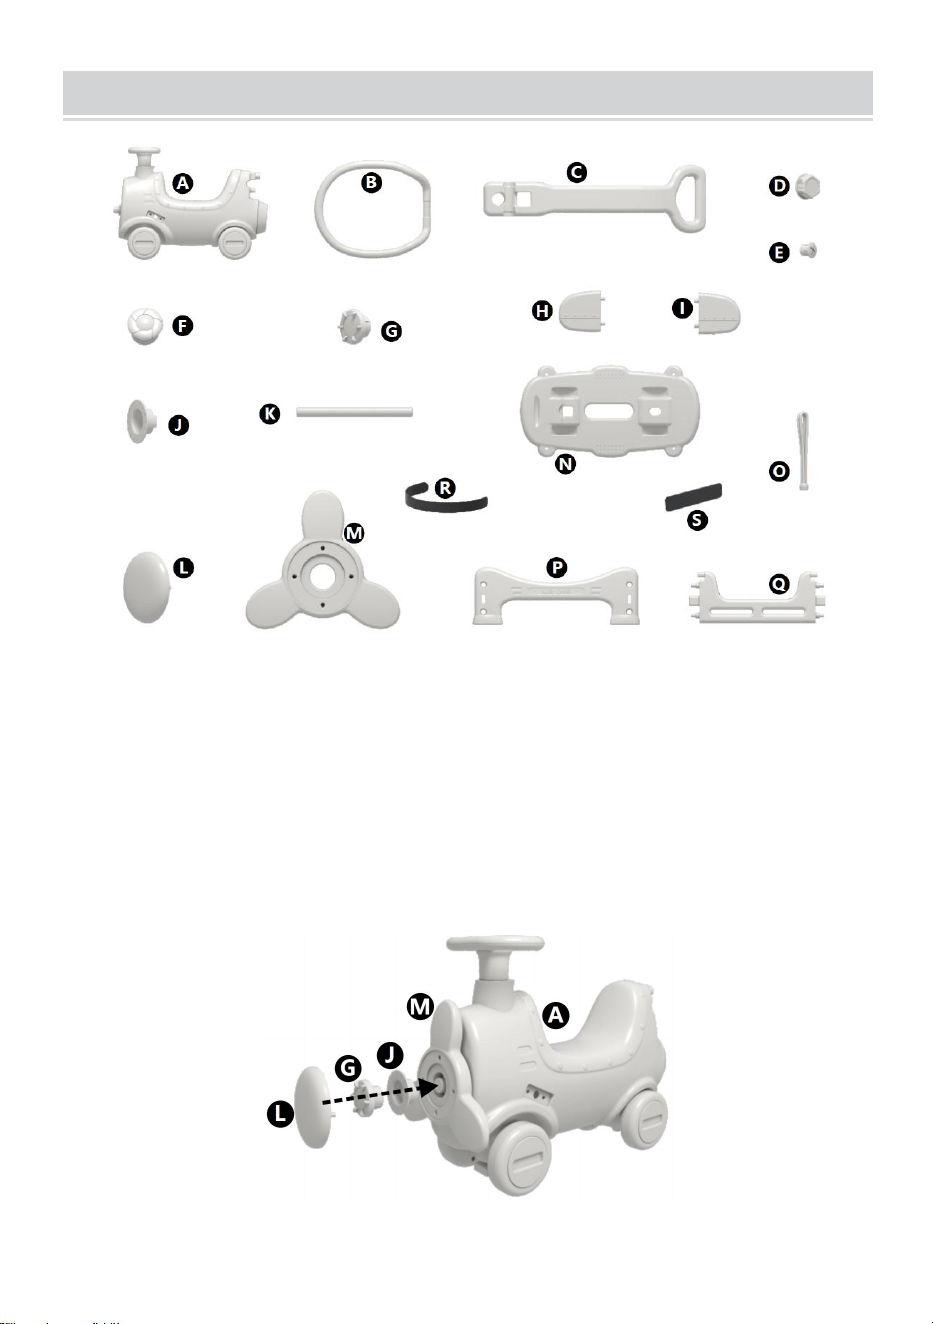
Ⓐx1 Ⓑx1 Ⓒx1 Ⓓx2 Ⓔx9 Ⓕx1 Ⓖx1 Ⓗx1 ⓛx1 Ⓙx1 Ⓚx1 Ⓛx1Ⓜx1
Ⓝx1 Ⓞx4 Ⓟx2 Ⓠx2 Ⓡx2 Ⓢx4
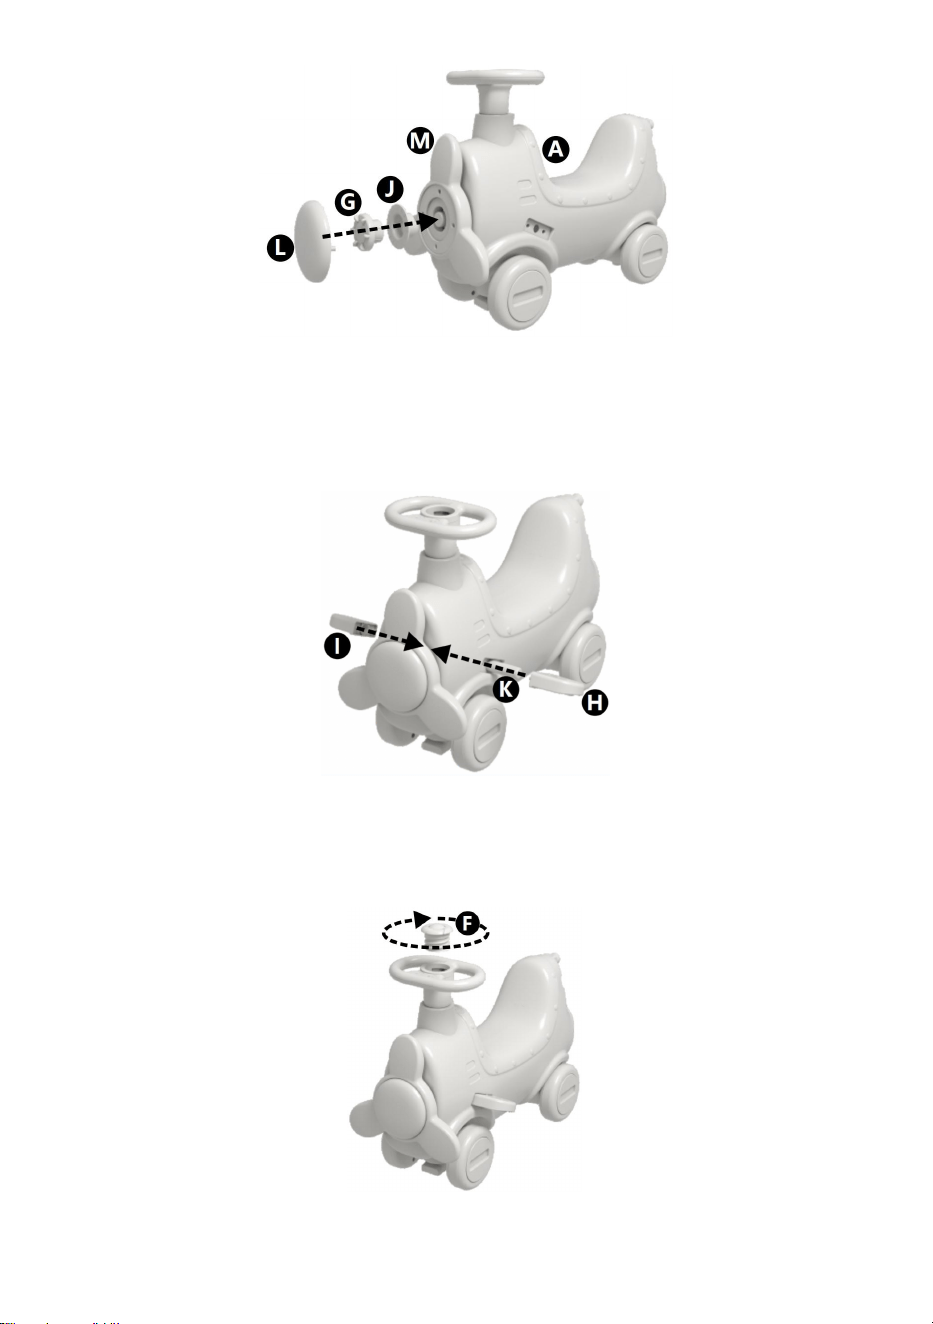
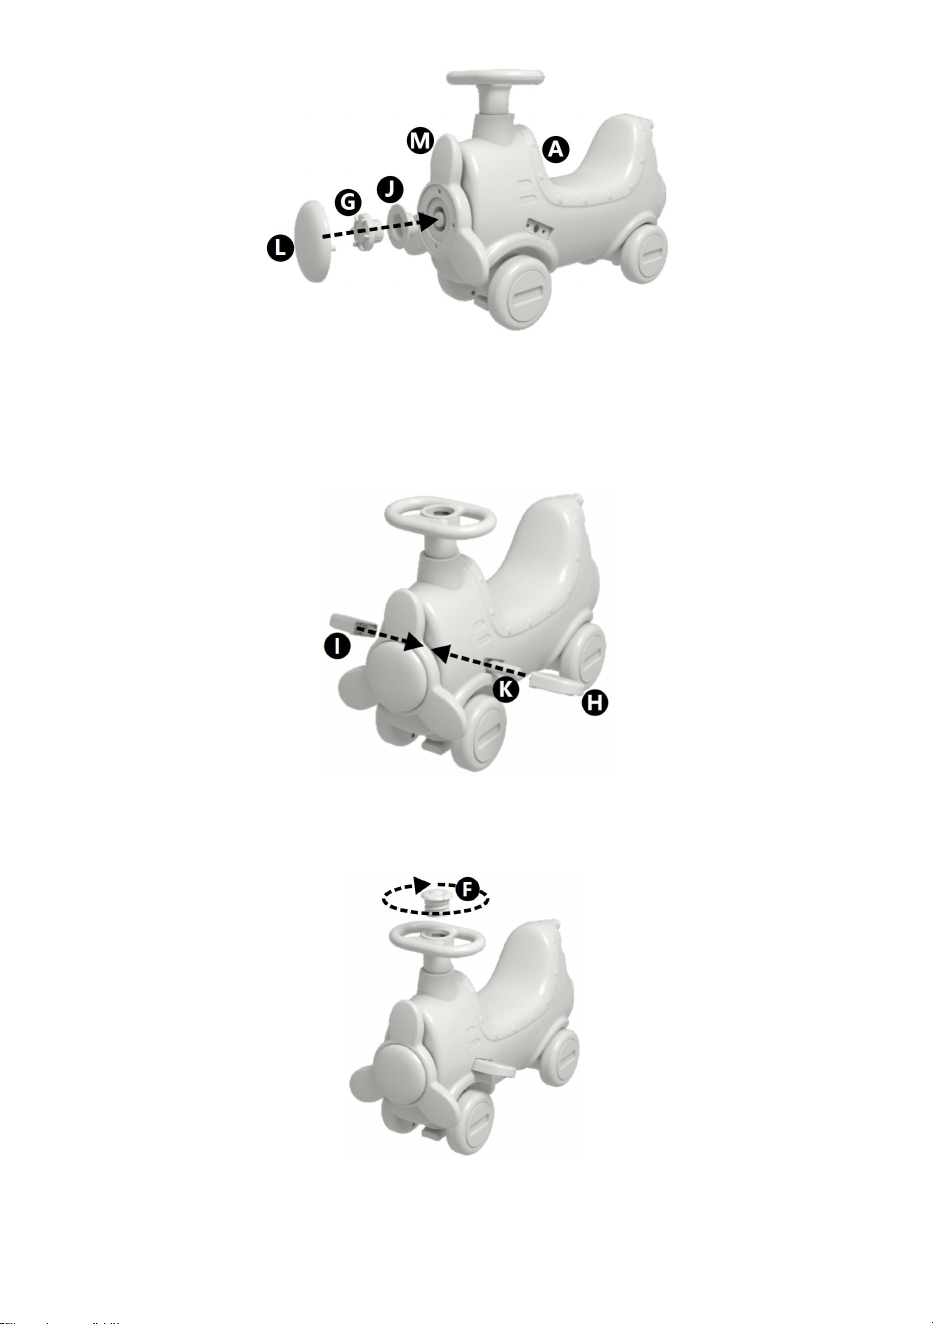
1.Put M onto A and cover the J locking cover with G nut and tighten it
( loosen a little to allow M to rotate)
Figure 1-1
- 5 -
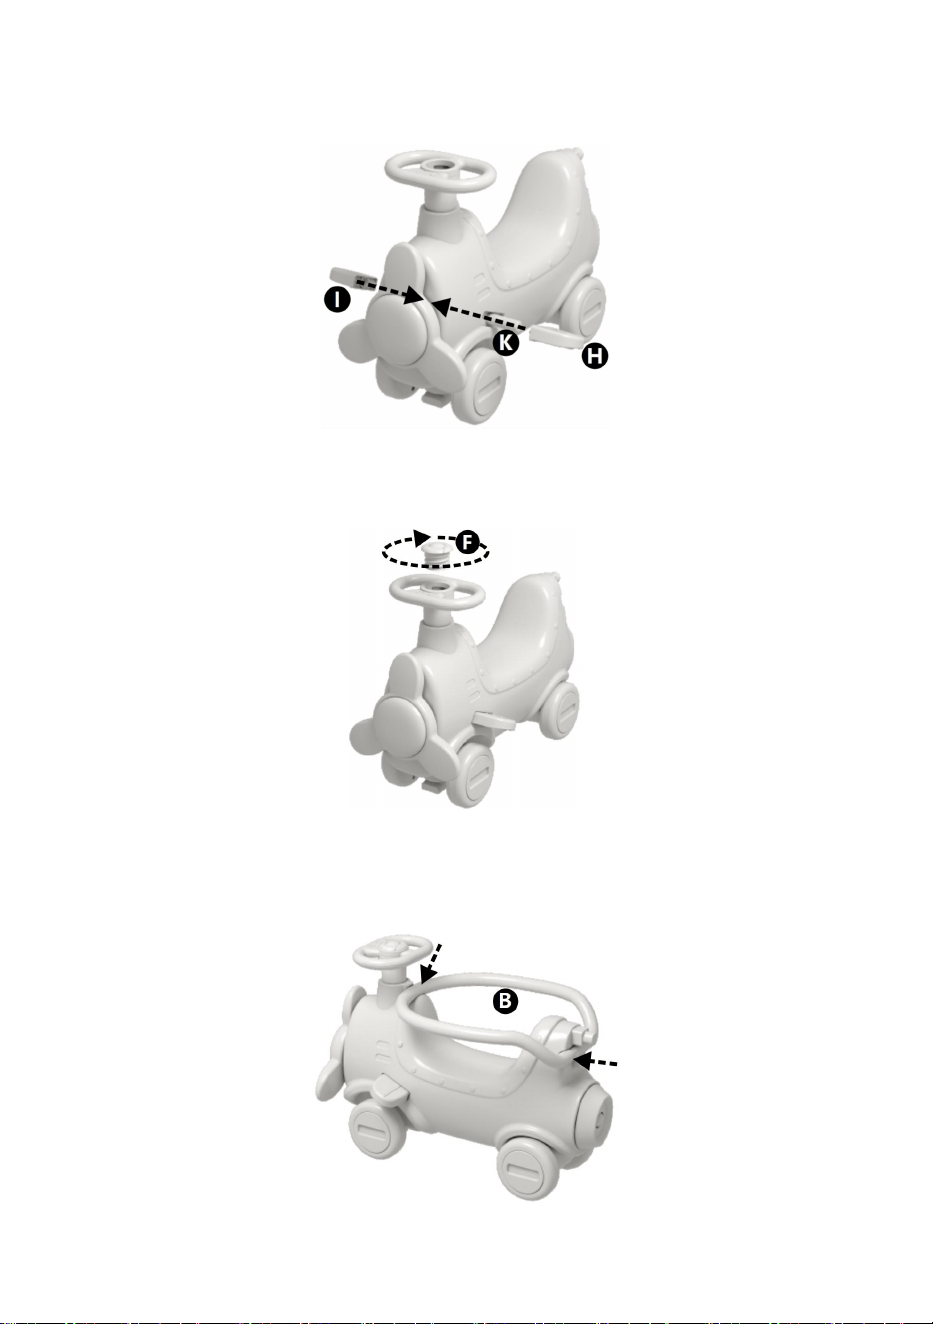
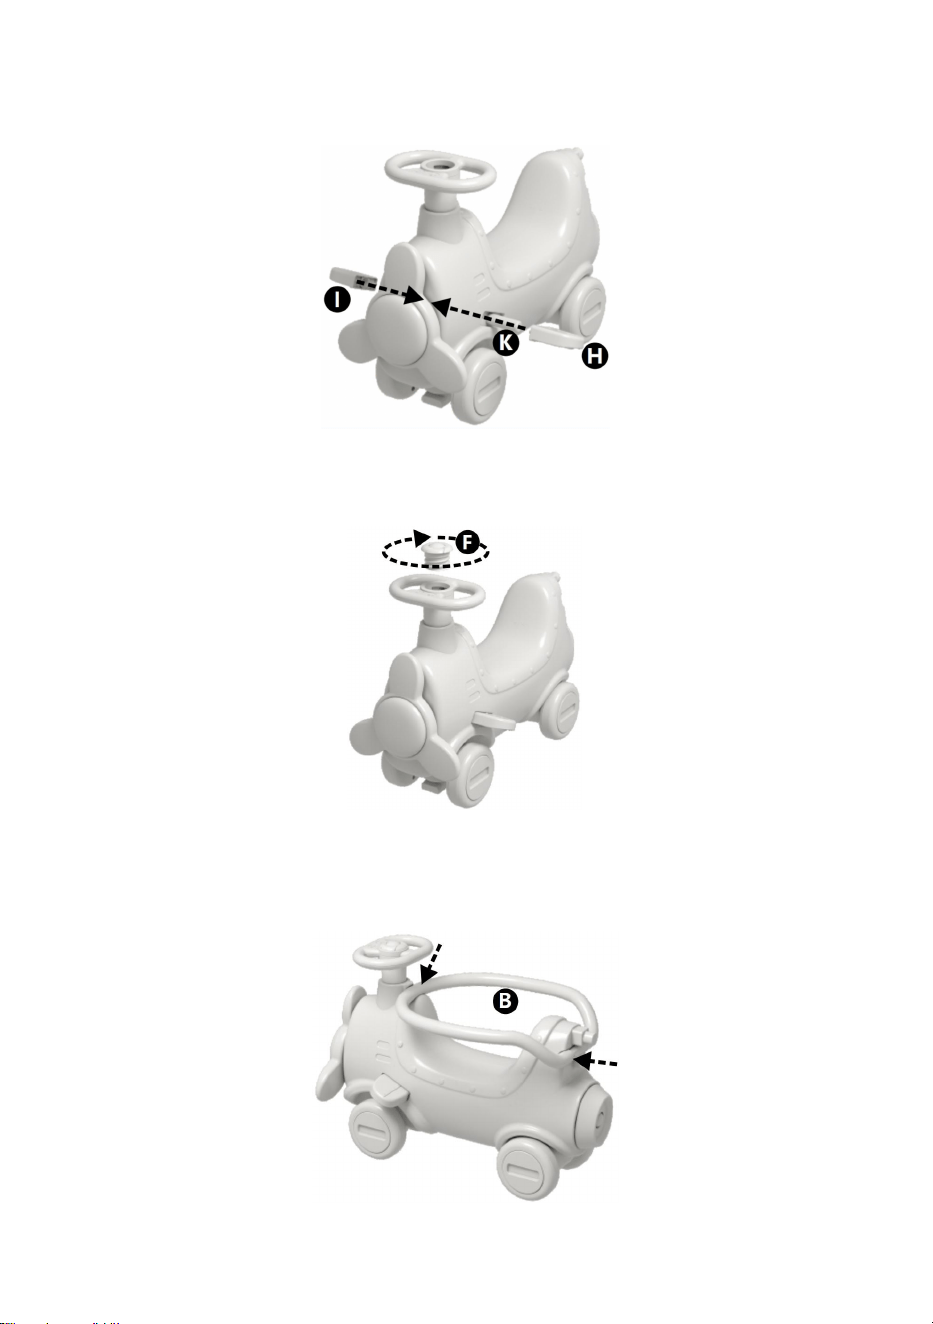
2. Insert the K pipe into the corresponding hole, put H and I on the left and right
sides of about the same length, and press them inward. Please refer to Figure 1-2.
Figure 1-2
3. Put the F-story machine on the steering wheel as shown in Figure 1-3.
Figure 1-3
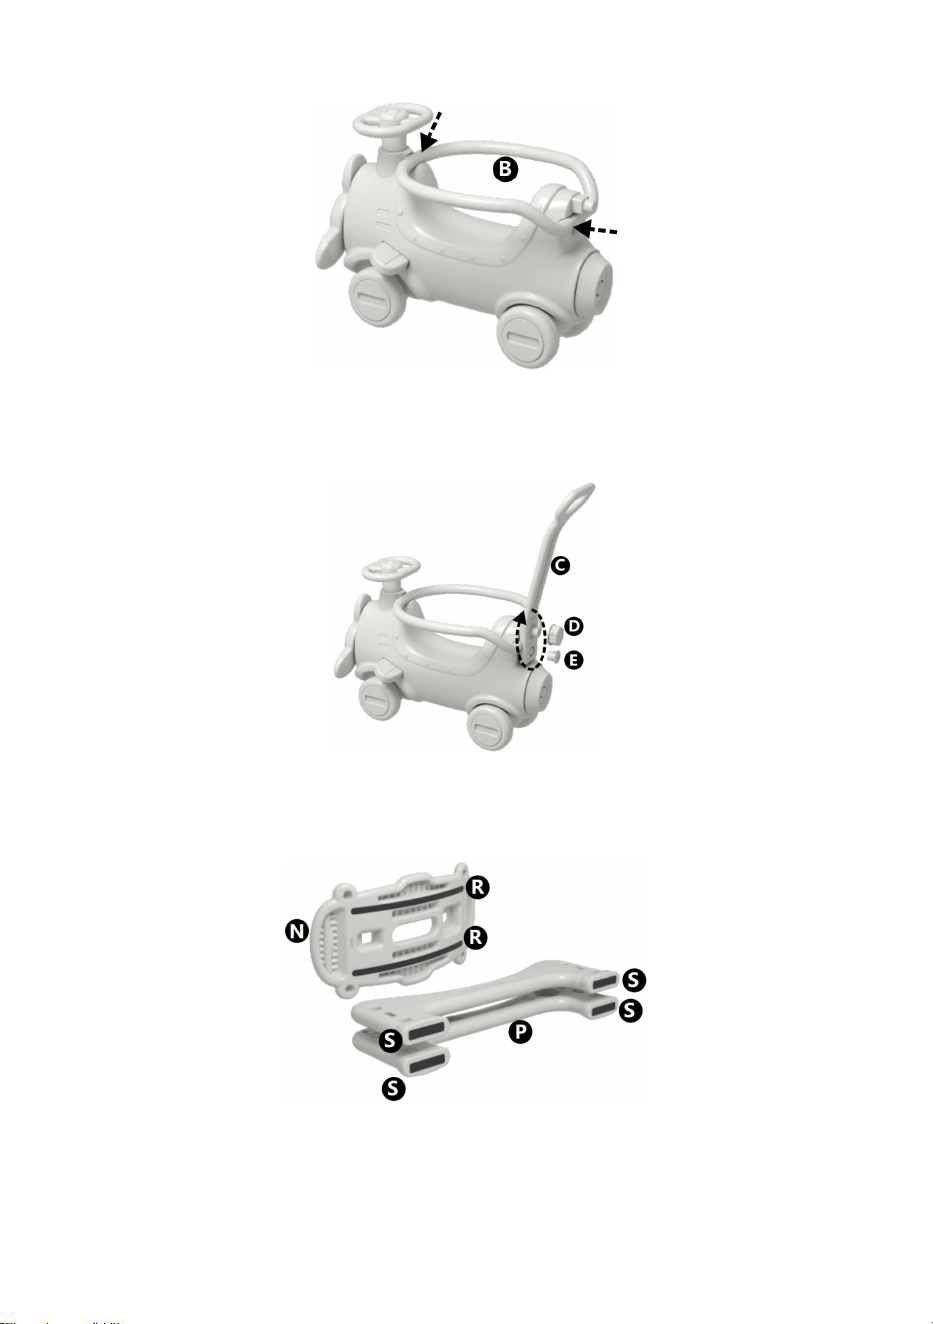
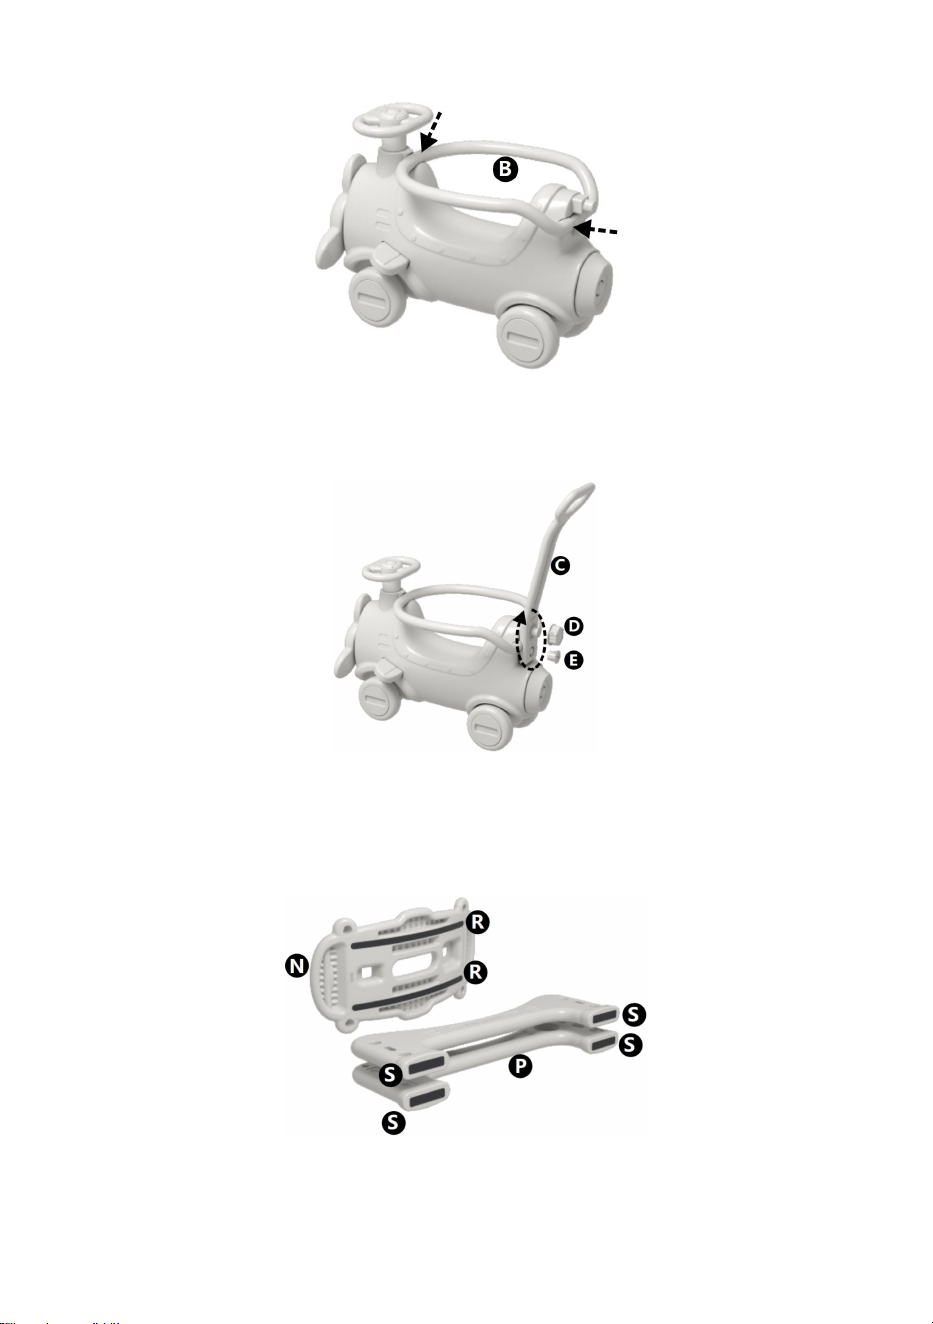
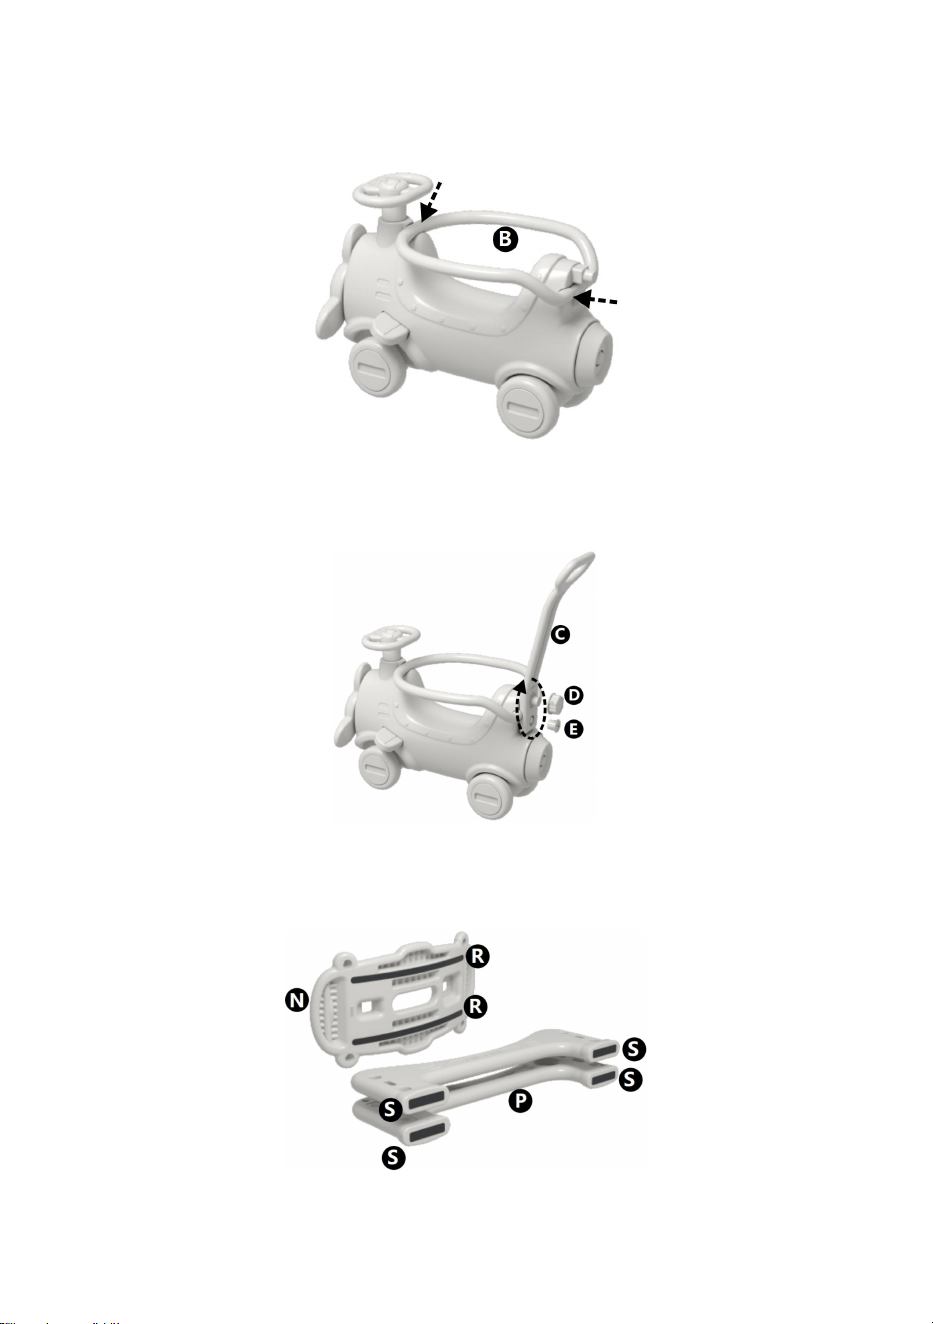
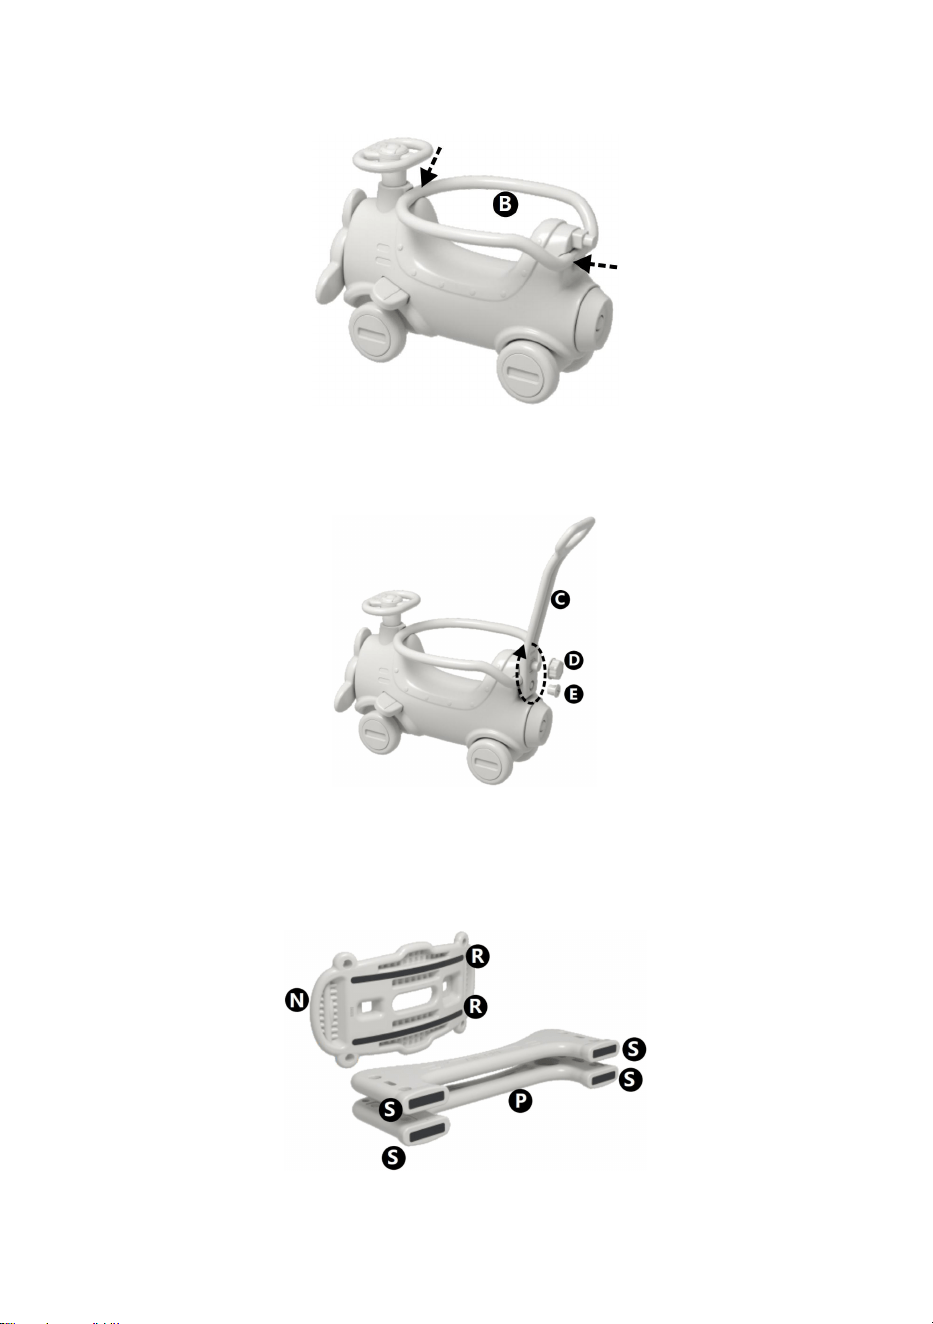
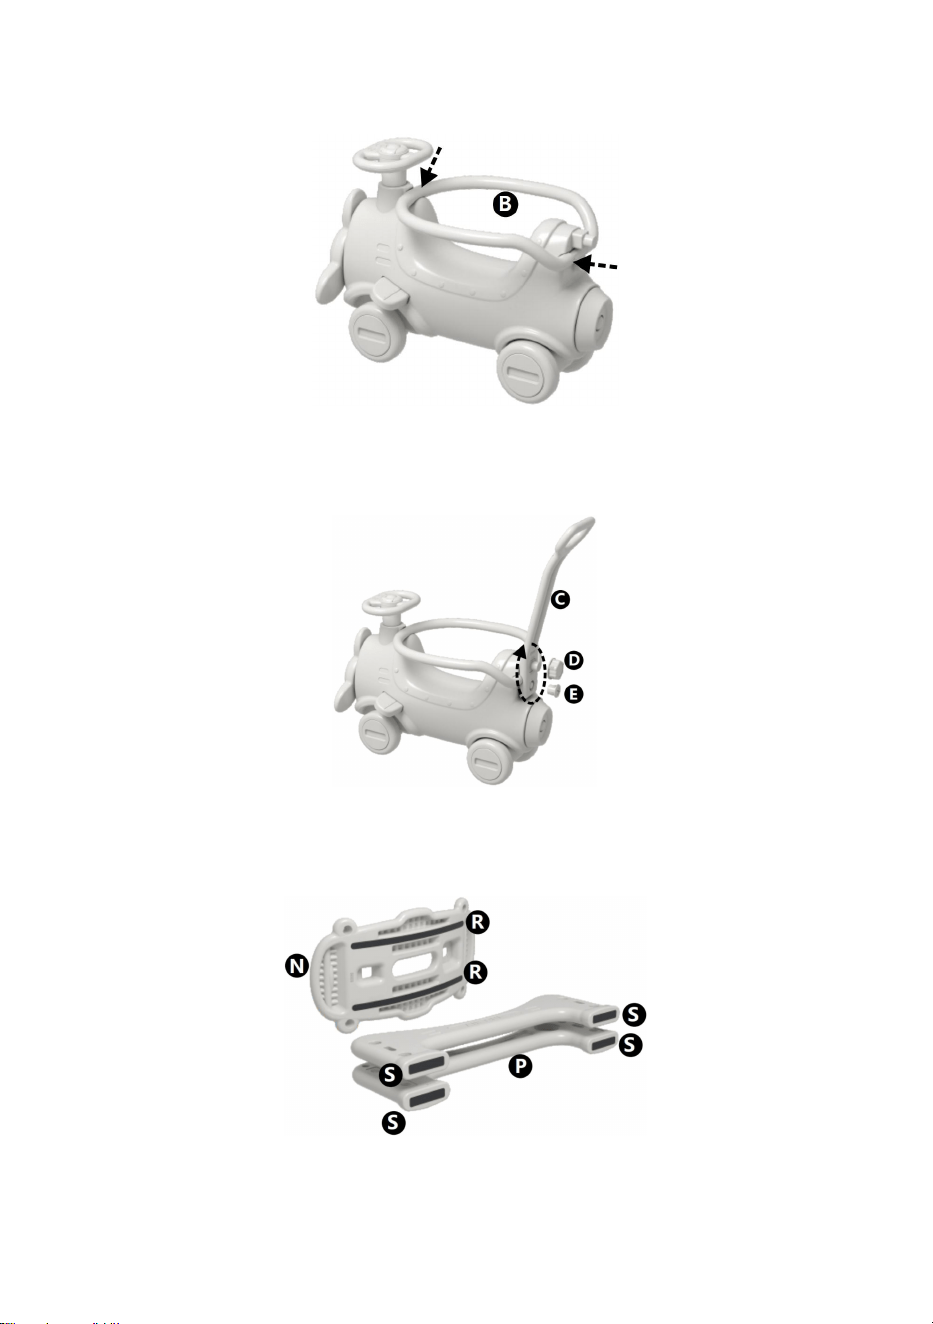
4. Put the B retainer on the back of the backrest first, and then snap it into the
front bayonet position . as shown in Figure 1-4.
Figure 1-4

- 6 -
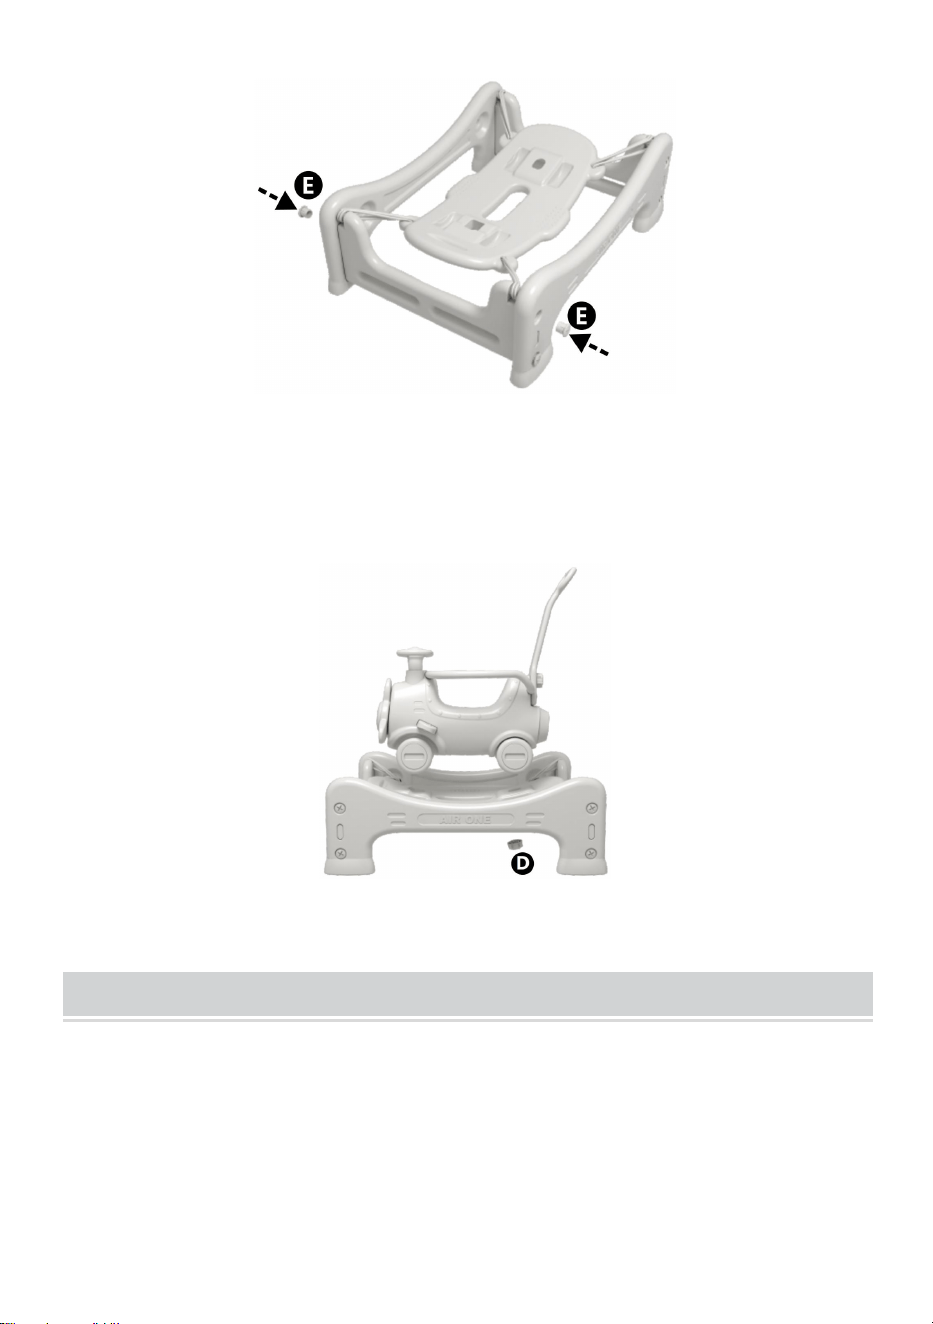
5. Put the C push rod into the corresponding hole and tighten it with D and E nuts
as shown in Figure 1-5.
Figure 1-5.
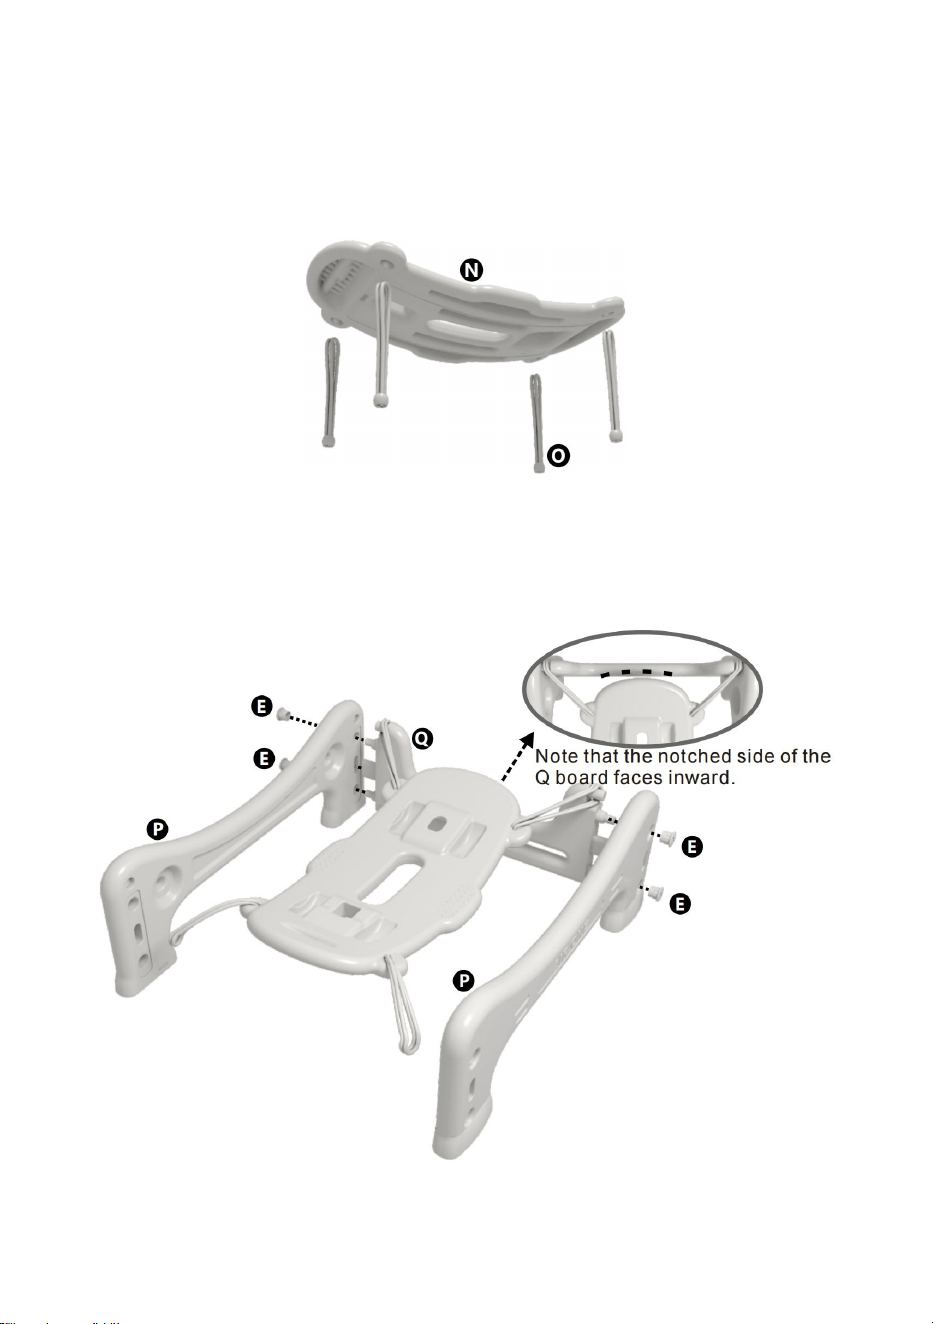
6. Attach the R anti-slip strip to the N platform board . The S anti-slip pad is
attached to the P bungee side panel. Please refer to Figure 1-6.
Figure 1-6
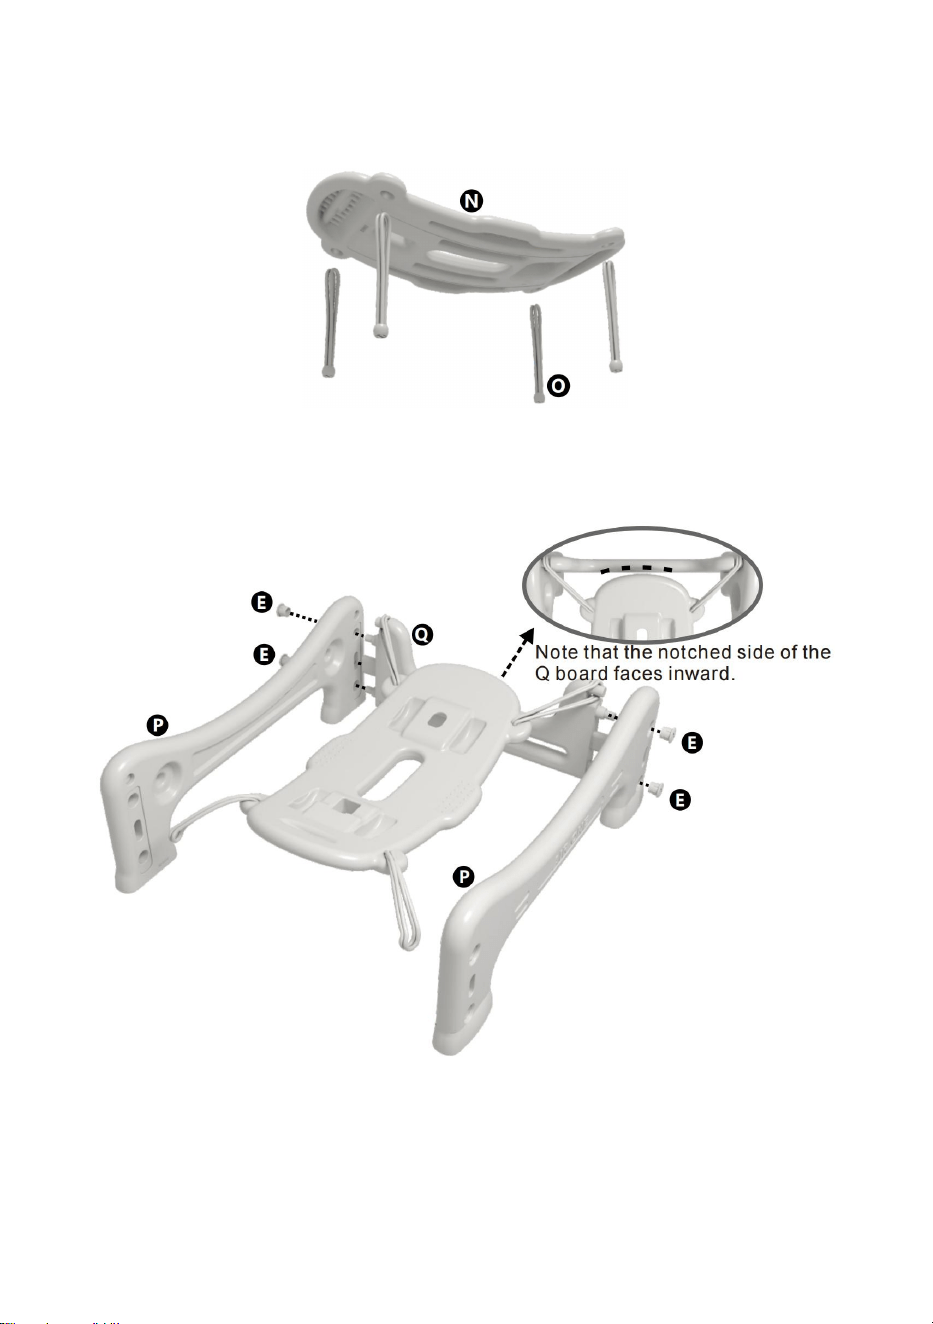
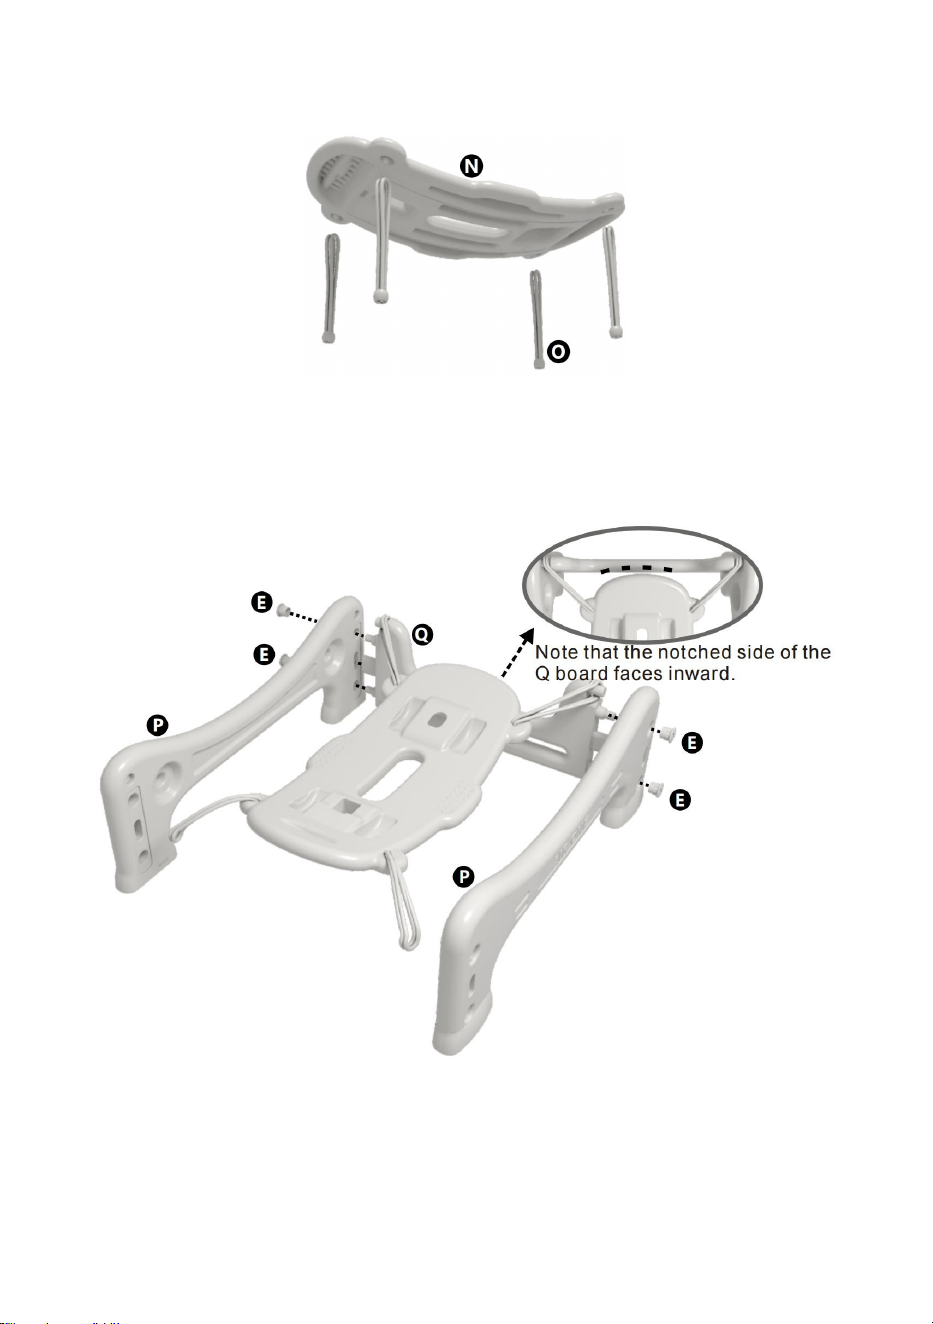
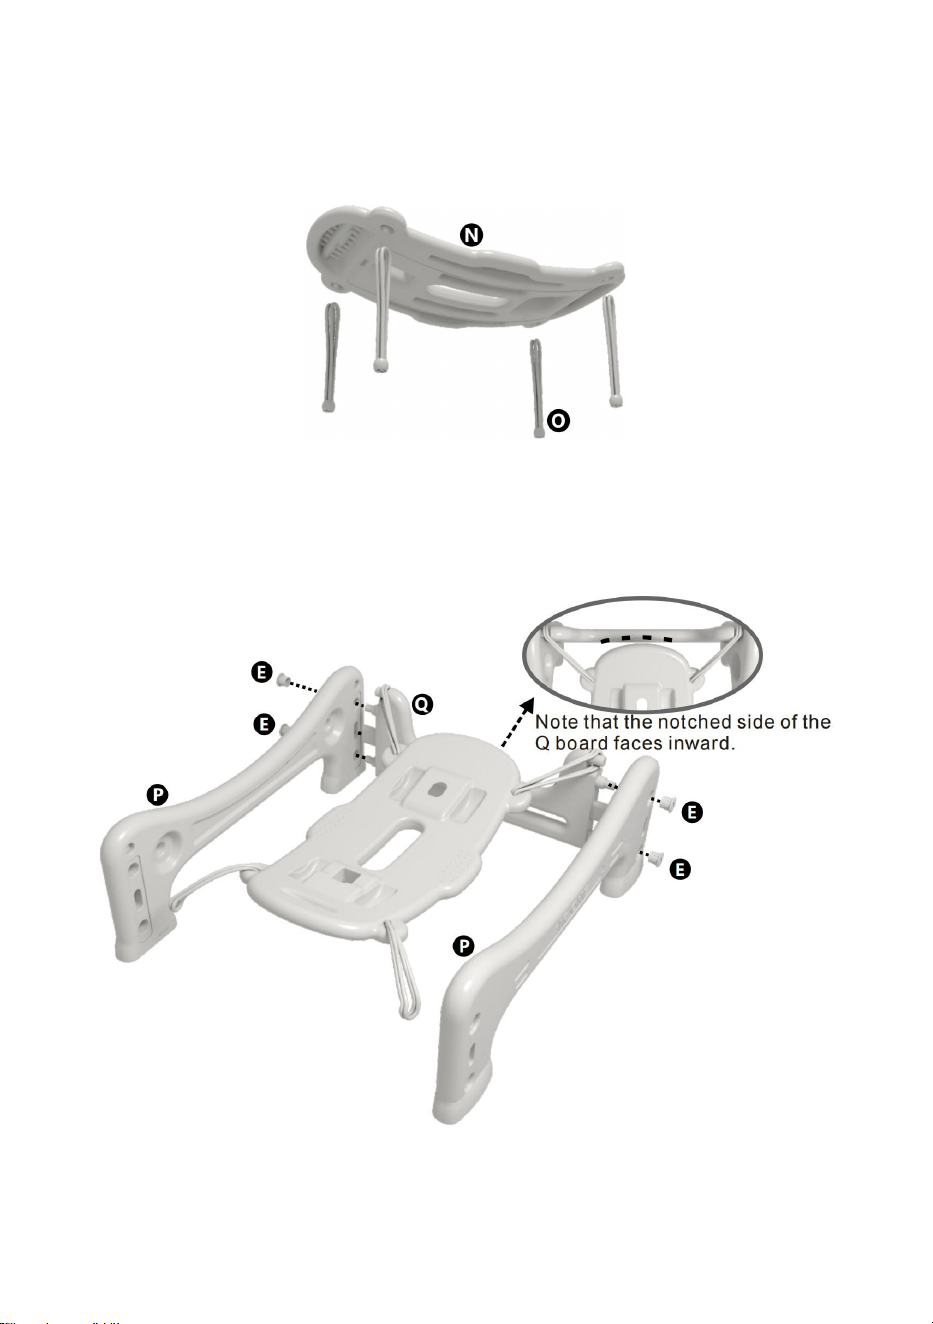
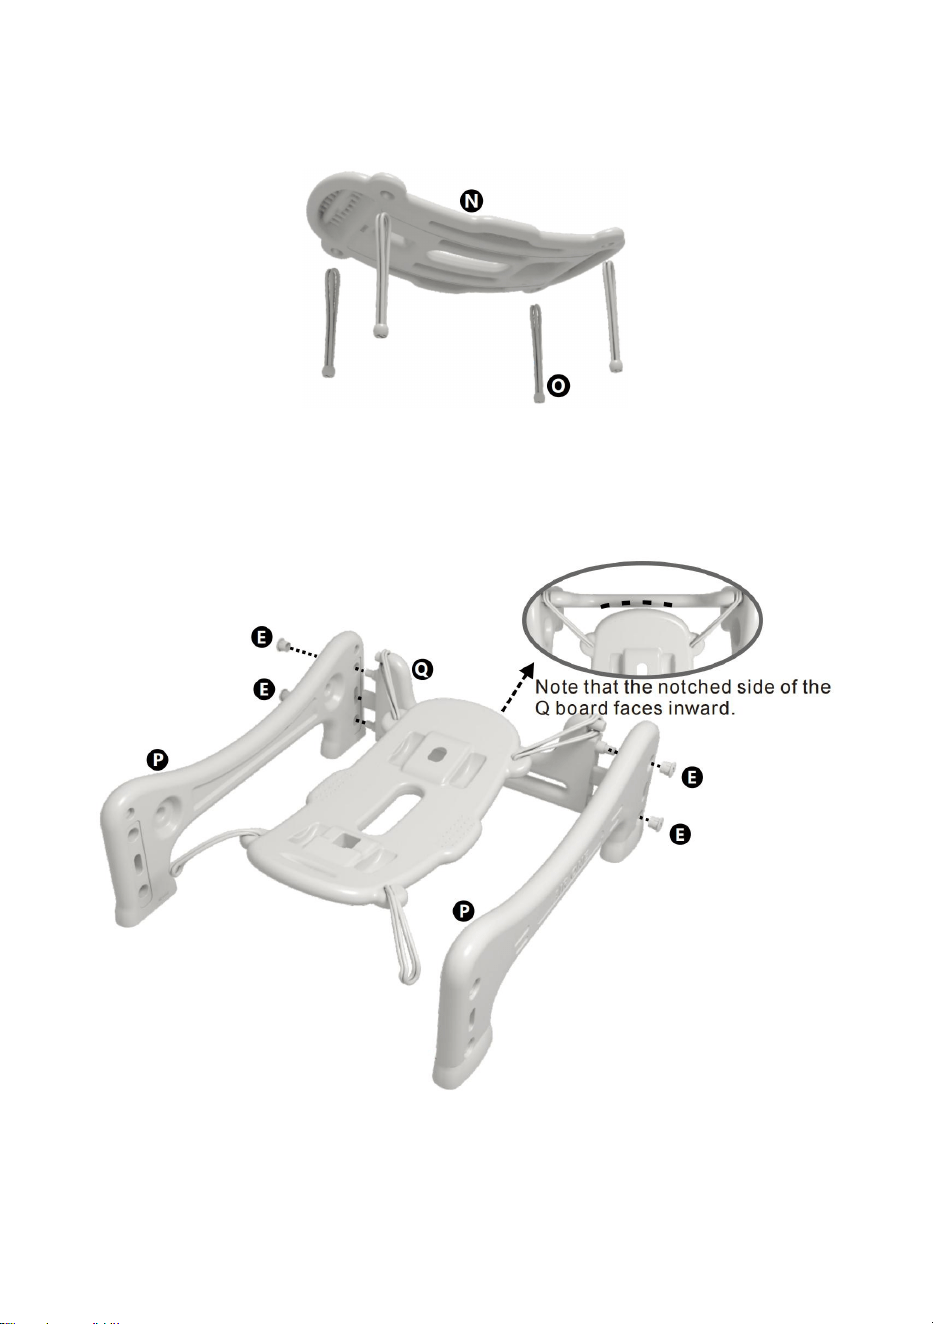
7. Insert the O bungee cord into the N platform board. Independent double rope
structure is stronger and safer, even if there is a problem with one rope, the other
rope can support the strength and prevent accidents such as stipping over. Elastic
rope material and no spring noise, so you don't have to worry about interference
accidents. Please refer to Figure 1-7.
Figure 1-7
- 7 -
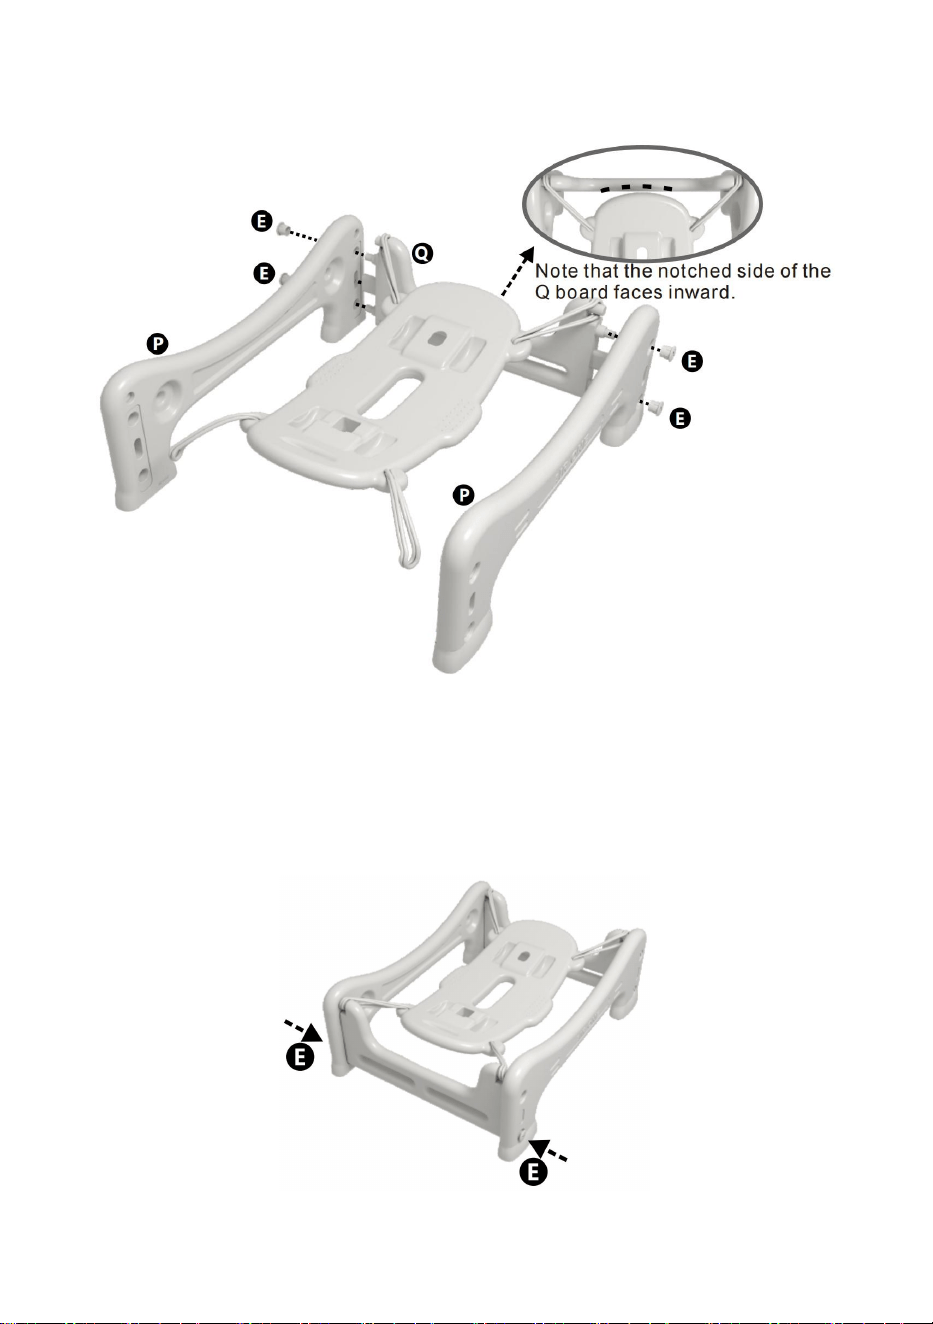
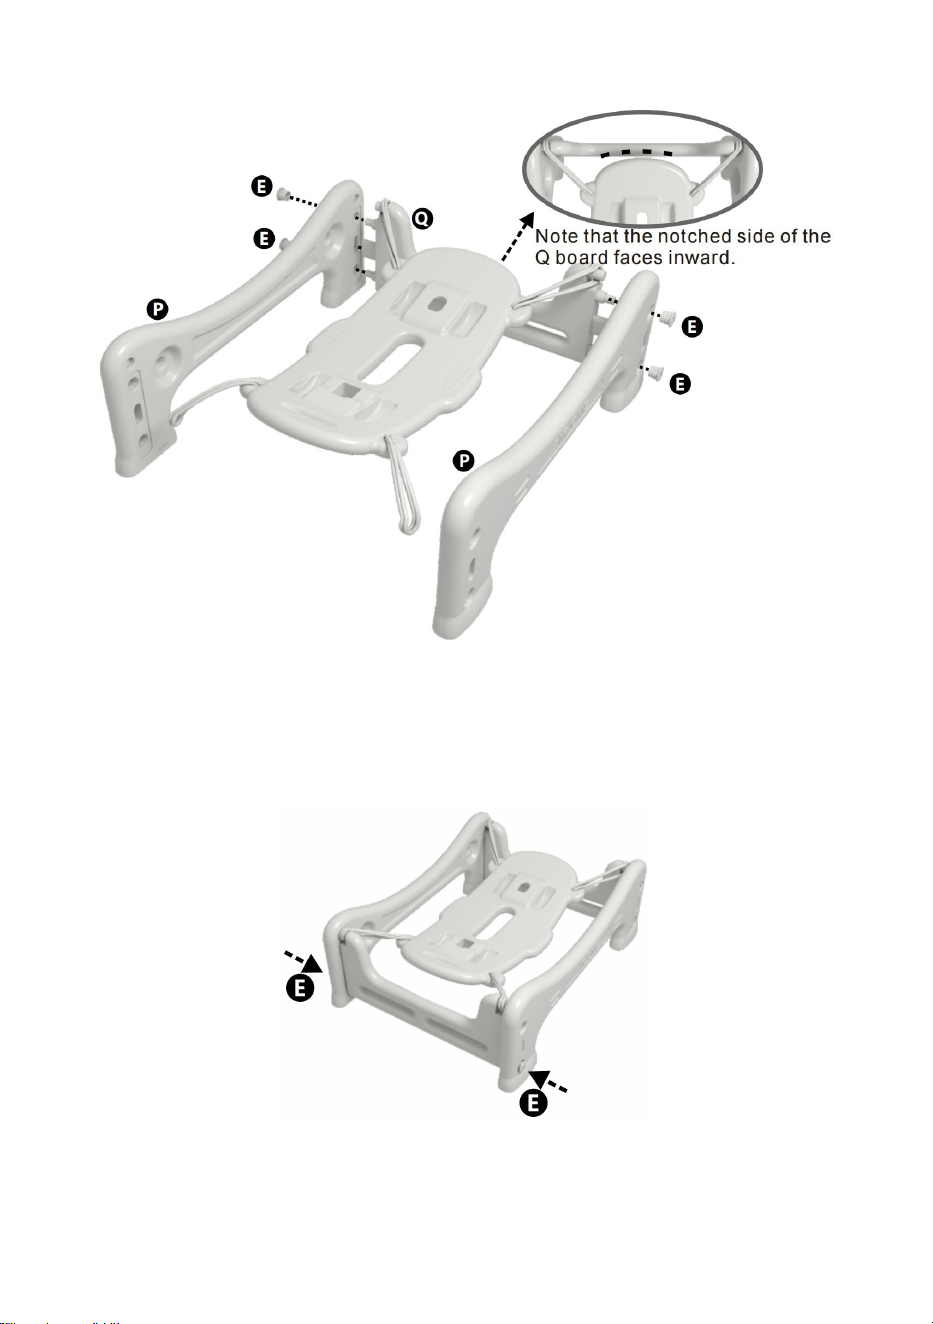
8. Put the O bungee cord on the fixed position on the top of the Q board, then
insert Q into the P board and fix it with the E nut . Please refer to Figure 1-8.
Figure 1-8
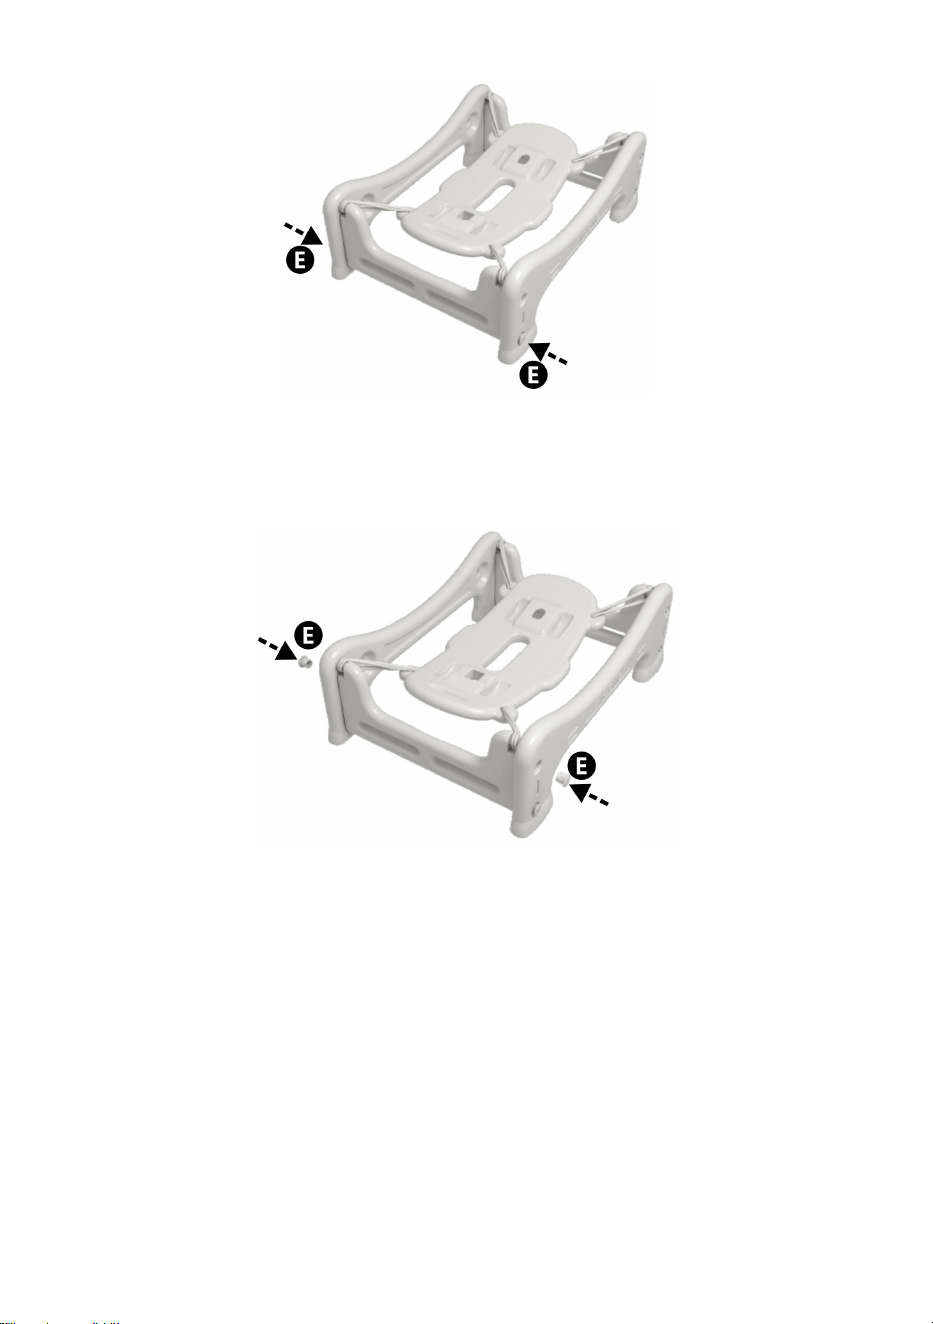
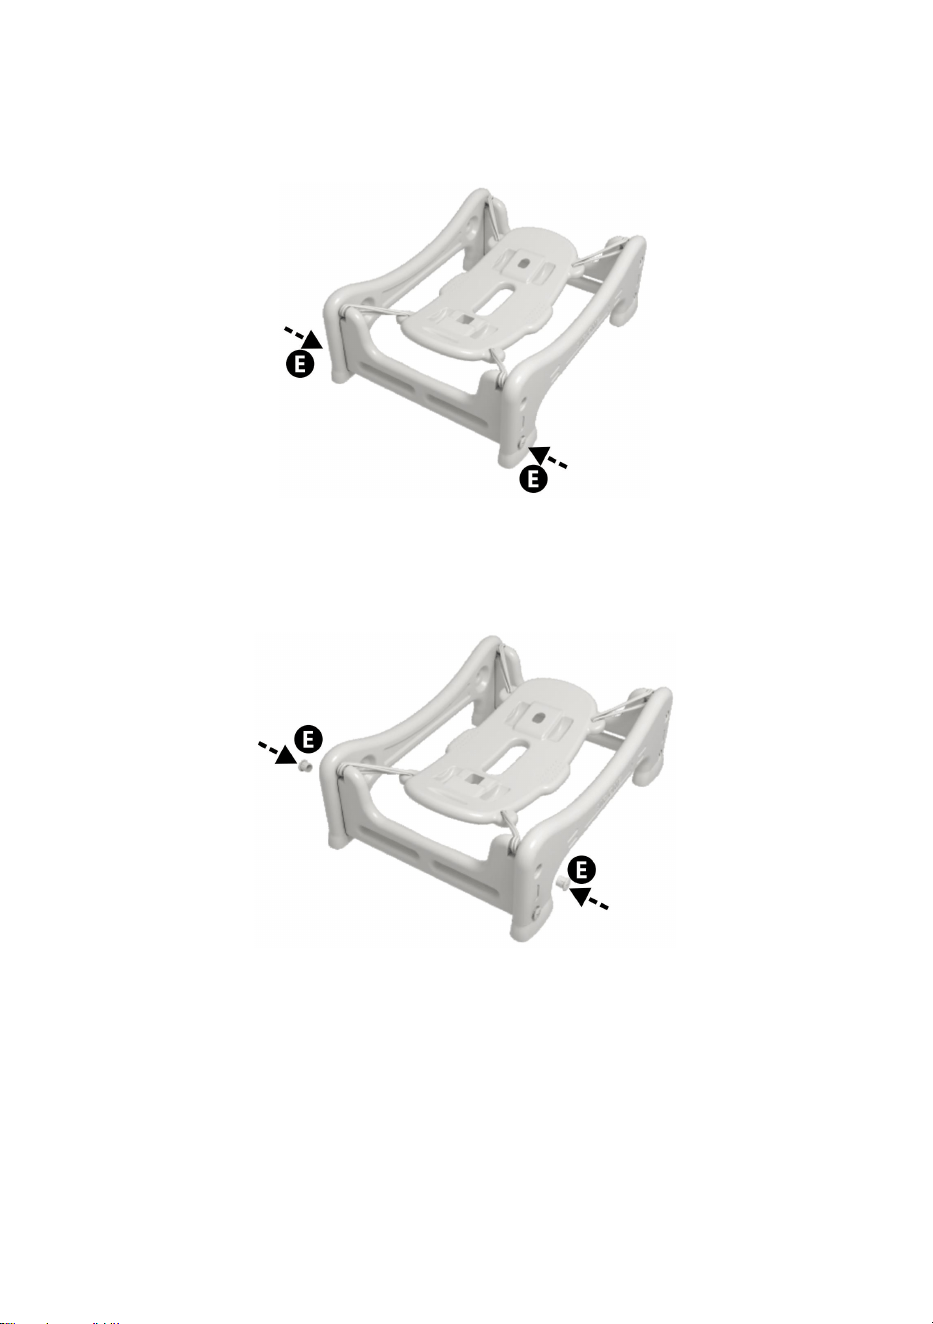
9. Insert another Q board into the P board and use E nuts to fix the lower two and
leave them loose. Then put the bungee cord into the fixed position of the Q board.
( Note that the notched side of the Q board faces inward), please refer to Figure
1-9.
Figure 1-9
- 8 -
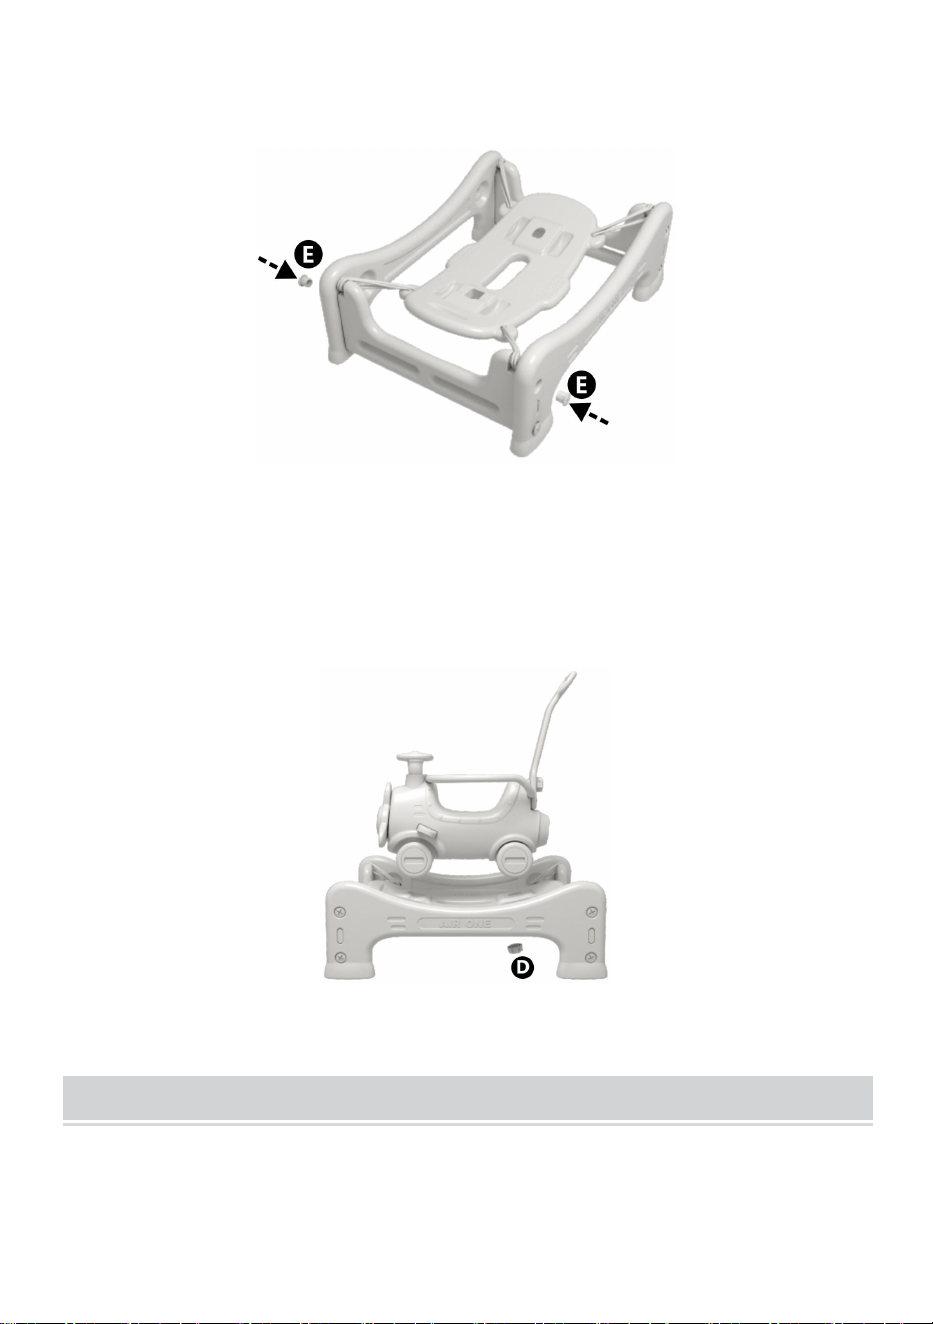
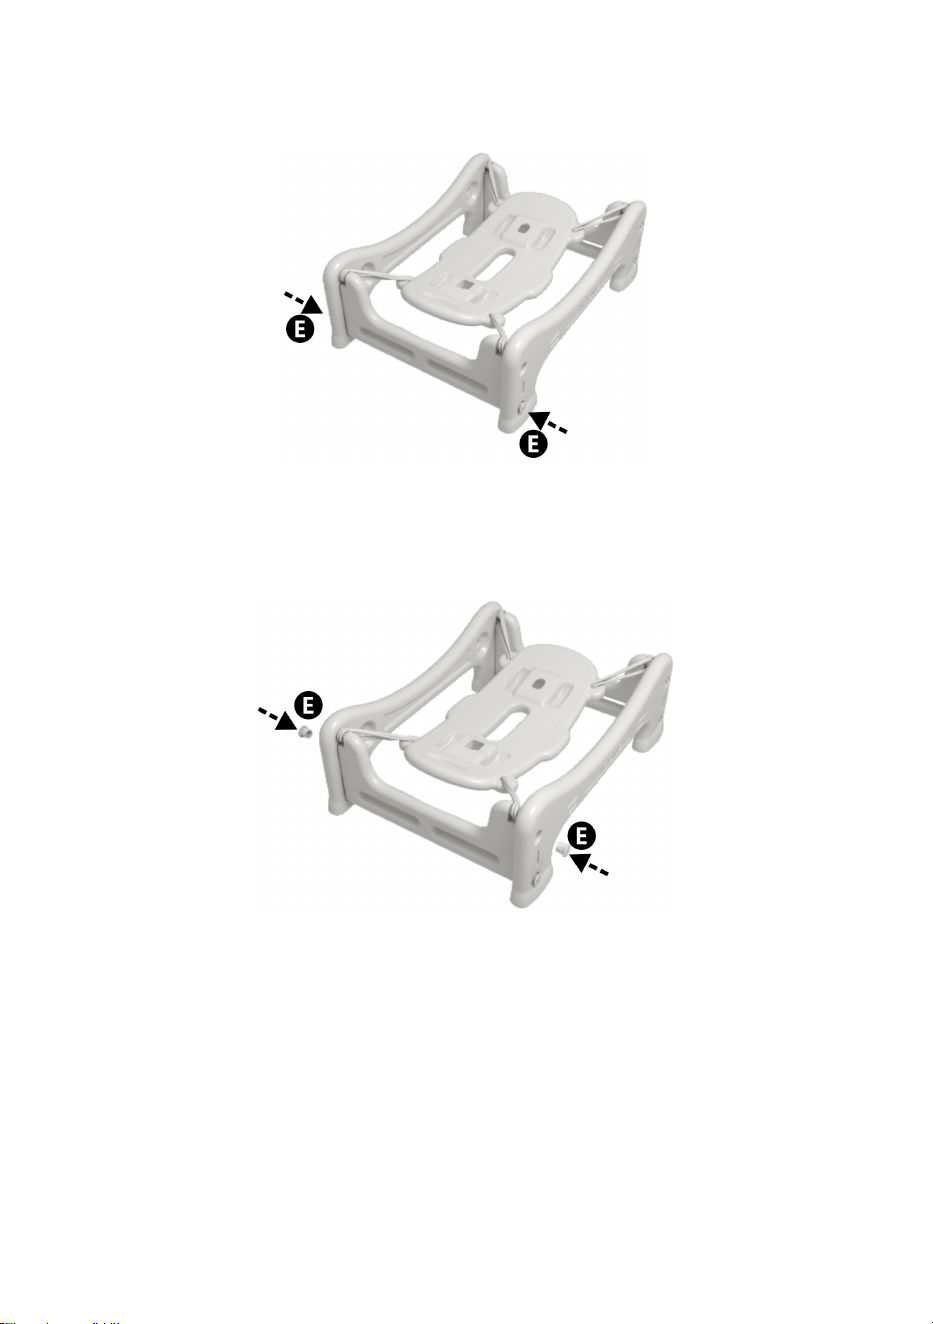
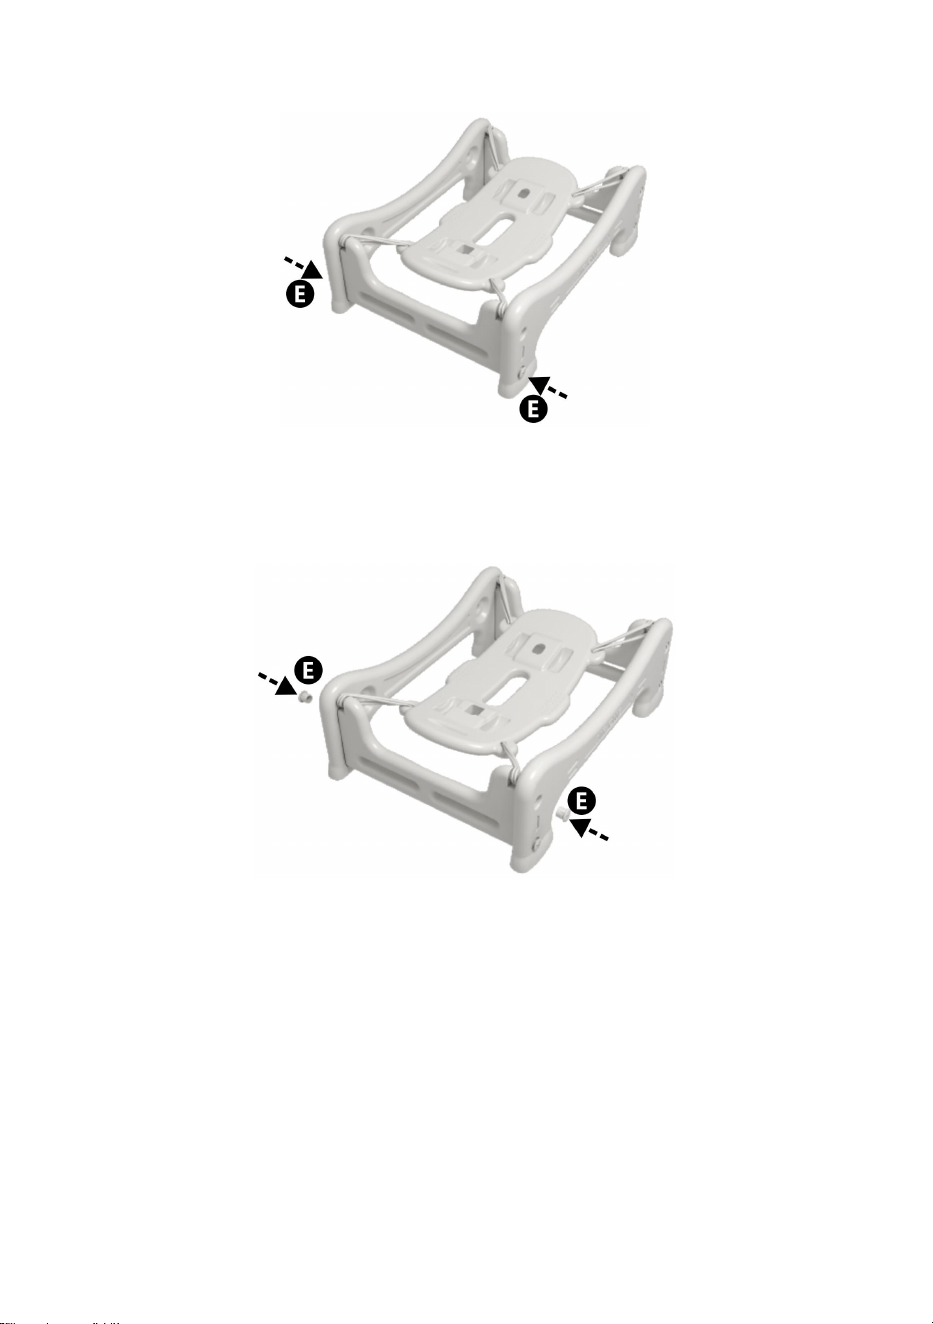
10. Secure the upper two with E nuts and tighten all E nuts. please refer to Figure
1-10.
Figure 1-10
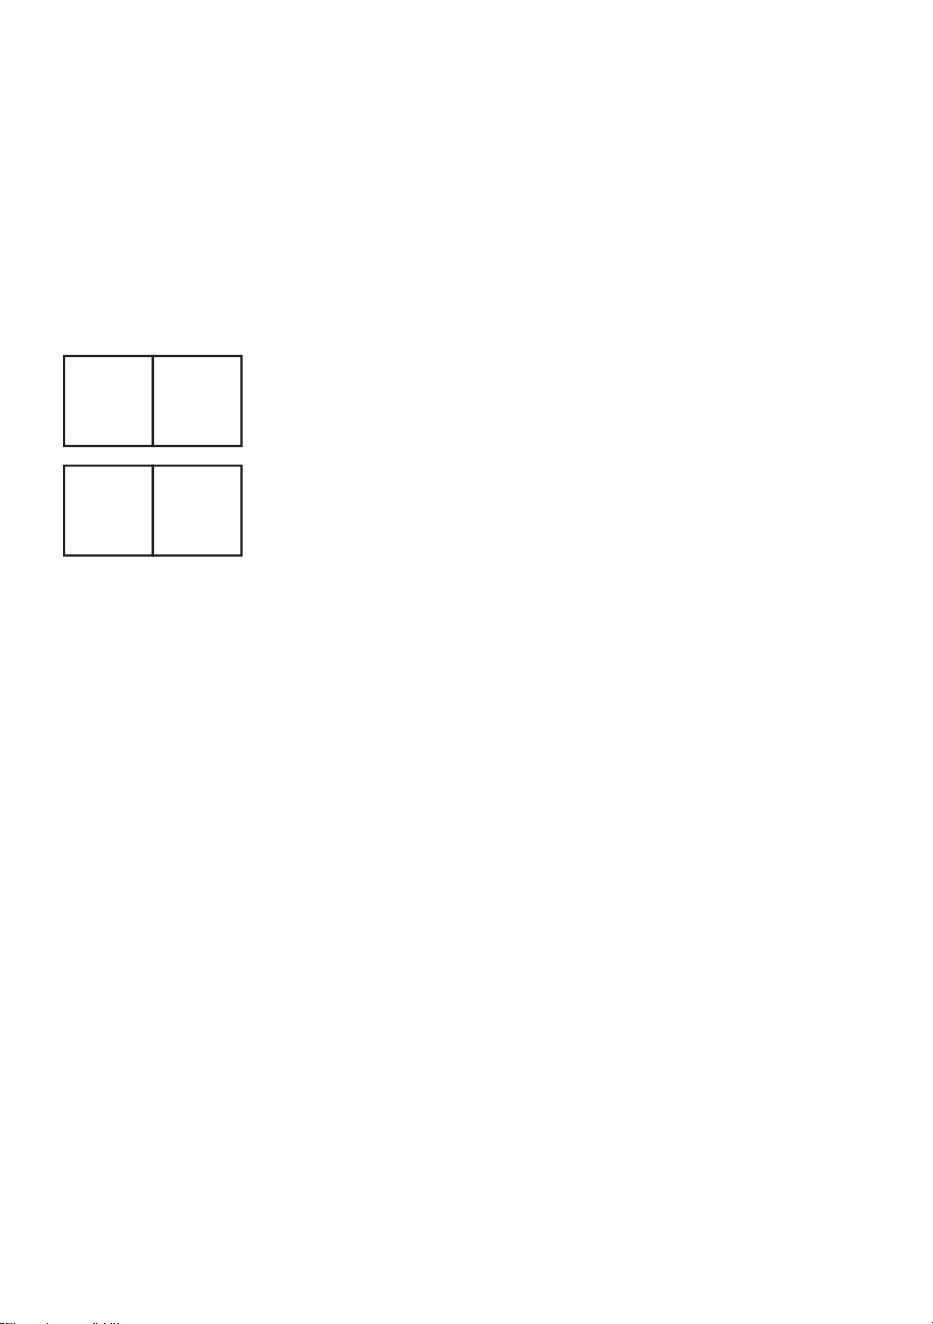
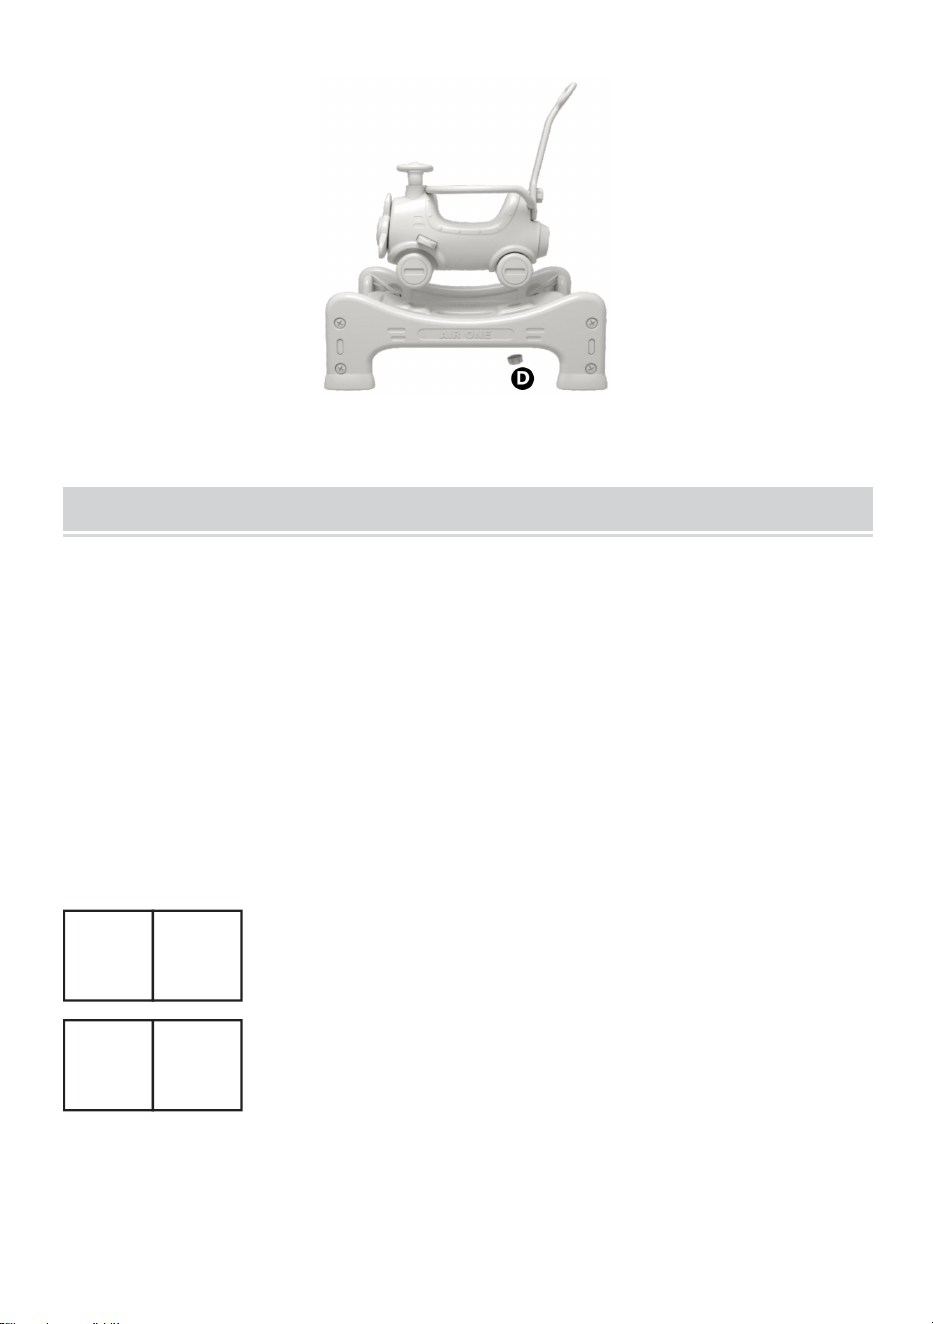
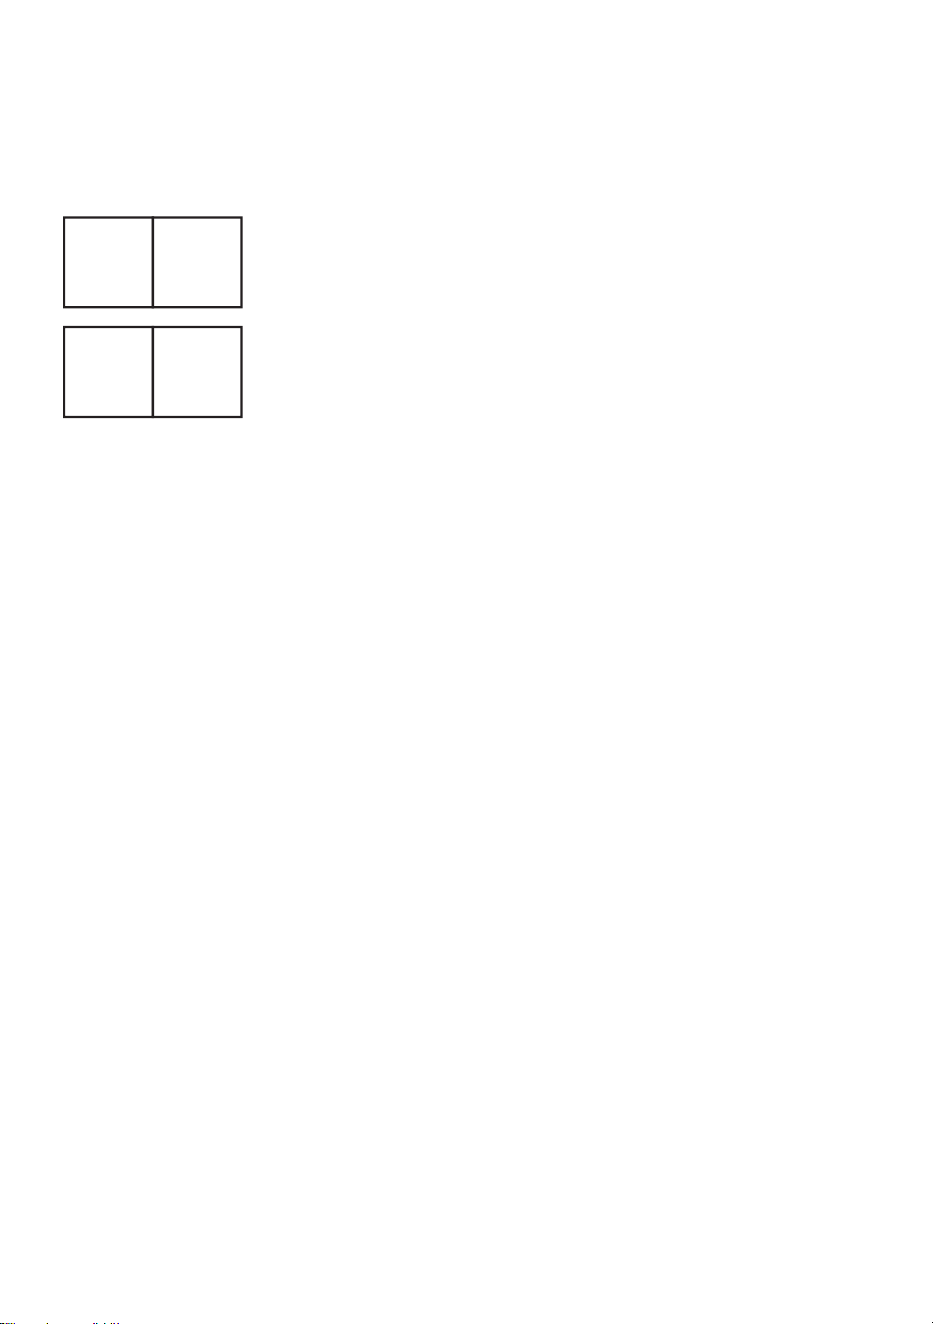
11. Put the middle of the front wheel of the previously installed scooter into the
corresponding hole of the N platform plate, then put down the rear wheel, turn it
sideways and tighten the bottom of the rear wheel with the D nut. Please refer to
Figure 1-11.
Figure 1-11
MAINTENANCE
1. Avoid prolonged exposure to the sun to avoid aging.
- 9 -
Manufacturer: Kule Suplayer(Wenzhou)Trading Co.,Ltd
Address:907Room 907, Zhongou International Building, Oubei Town,
Yongjia County, Wenzhou City, Zhejiang Province
Imported to AUS: SIHAO PTY LTD, 1 ROKEVA STREETEASTWOOD NSW
2122 Australia
Imported to USA: Sanven Technology Ltd., Suite 250, 9166 Anaheim Place,
Rancho Cucamonga, CA 91730
REP
EC
E-CrossStu GmbH
Mainzer Landstr.69, 60329 Frankfurt am Main.
REP
UK
YH CONSULTING LIMITED.
C/O YH Consulting Limited Office 147, Centurion House,
London Road, Staines-upon-Thames, Surrey, TW18 4AX
Made In China


Soporte técnico y certificado de garantía electrónica www.vevor.com/support
Para niños Balanceo Caballo
We continue to be committed to provide you tools with competitive price.
"Save Half", "Half Price" or any other similar expressions used by us only represents an
estimate of savings you might benefit from buying certain tools with us compared to the major
top brands and does not necessarily mean to cover all categories of tools offered by us. You
are kindly reminded to verify carefully when you are placing an order with us if you are
actually saving half in comparison with the top major brands.

- 1 -
MODELO: C-YM101
Have product questions? Need technical support? Please feel free to
contact us:
Technical Support and E-Warranty Certificate
www.vevor.com/support
This is the original instruction, please read all manual instructions
carefully before operating. VEVOR reserves a clear interpretation of our
user manual. The appearance of the product shall be subject to the
product you received. Please forgive us that we won't inform you again if
there are any technology or software updates on our product.
Children's Rocking Horse
- 2 -
INSTRUCTIONS
Muchas gracias por elegir este Infantil Balanceo Caballo.
- Lea todas las instrucciones antes de usarlo. La información le ayudará a
conseguir los mejores resultados posibles.
Los productos mostrados en este catálogo pueden ser de color diferente al
artículo real .
El montaje deberá ser realizado por un tutor. Por razones de seguridad, el
montaje debe realizarse Comprobado antes y después del uso.
ADVERTENCIA:
Aviso: Por favor lea el ¡Tenga en cuenta las siguientes
precauciones antes del montaje!
14. Sólo para uso doméstico.
15. Sólo para uso en interiores.
16. ¡Atención! Se incluyen piezas pequeñas peligrosas. Debe ser
instalado por un adulto.
17. Colóquelo sobre un terreno plano y espacioso, dejando un área
abierta adecuada alrededor del área de instalación.
18. No lo coloque en agua o filtraciones, terreno irregular o accidentado,
pendientes, etc.
19. Antes de la instalación, verifique cuidadosamente que todas las
piezas estén seguras y que no haya elementos peligrosos alrededor.
20. Durante el uso, revise periódicamente el cuerpo del producto y las
tuercas, etc., y deje de usarlo si está agrietado o desgastado; de lo
contrario, podría volcarse o podrían ocurrir otros peligros.

- 3 -
21. Si la tuerca del producto está desgastada y no se puede apretar,
comuníquese con el fabricante para comprar y reemplazar los accesorios
correspondientes.
22. Conserve el embalaje de forma adecuada y manténgalo fuera del
alcance de bebés y niños pequeños para evitar peligros.
23. Guárdelo en un lugar fresco y seco, evite la luz solar directa y
manténgalo alejado del fuego y fuentes de calor.
24. Se recomienda encarecidamente estar acompañado por un adulto.
25. No permita que los niños jueguen con juguetes desmontados,
dañados o deformados para evitar la ingestión accidental, asfixia y otras
lesiones.
26. Guarde el manual del usuario para referencia futura.
MODEL AND PARAMETERS
Modelo
C-YM101
Material
HDPE
Música sonando
Sí
Música potente que
suena
3 pilas de botón de 1,5 V
Cargando
calificación
80 libras
Color
Gris y blanco y caqui
La pila de botón para reproducir música debe comprarse por separado.
- 4 -
ASSEMBLY AND USE
Caballo balancín para niños
Ⓐx1 Ⓑx1 Ⓒx1 Ⓓx2 Ⓔx9 Ⓕx1 Ⓖx1 Ⓗx1 ⓛx1 Ⓙx1 Ⓚx1 Ⓛx1Ⓜx1
Ⓝx1 Ⓞx4 Ⓟx2 Ⓠx2 Ⓡx2 Ⓢx4
1. Coloque M sobre A y cubra la tapa de bloqueo J con la tuerca G y apriétela.
(afloje un poco para permitir que M gire)

- 5 -
Figura 1-1
12. Inserte el tubo K en el orificio correspondiente, coloque H e I en los lados
izquierdo y derecho con una longitud aproximadamente igual y presiónelos hacia
adentro. Consulte la Figura 1-2 .
Figura 1-2
13. Coloque la máquina de historia F en el volante como se muestra en la Figura
1-3.
Figura 1-3

- 6 -
14. Coloque primero el retenedor B en la parte posterior del respaldo y luego
encájelo en la posición de bayoneta delantera, como se muestra en la Figura 1-4.
Figura 1-4
15. Coloque la varilla de empuje C en el orificio correspondiente y apriétela con las
tuercas D y E como se muestra en la Figura 1-5.
Figura 1-5.
16. Coloque la tira antideslizante R en la Tabla de plataforma N. La almohadilla
antideslizante S está unida al bungee P. Panel lateral. Consulte la Figura 1-6.
Figura 1-6
17. Inserte el cordón elástico O en la plataforma N. La estructura de cuerda doble
independiente es más fuerte y segura, incluso si hay un problema con una cuerda,
- 7 -
la Otra cuerda puede soportar la fuerza. y evitar accidentes como vuelcos .
Material de cuerda elástica y sin ruido de resorte, por lo que no tendrá que
preocuparse por accidentes por interferencias. Consulte la Figura 1-7.
Figura 1-7
18. Coloque el cordón elástico O en el posición fija en la parte superior de la placa
Q, luego inserte Q en la placa P y fíjela con la tuerca E. Consulte la Figura 1-8.
Figura 1-8
19. Inserte otra placa Q en la placa P y utilice tuercas E para fijar las dos inferiores
y déjelas sueltas. Luego, coloque el cordón elástico en la posición fija de la placa
Q. (Tenga en cuenta que el lado con muescas de la placa Q mira hacia adentro),
consulte la Figura 1-9.

- 8 -
Figura 1-9
20. Asegure los dos superiores con tuercas E y apriete todas las tuercas E.
Consulte la Figura 1-10.
Figura 1-10
21. Coloque la mitad de la rueda delantera del scooter previamente instalado en el
orificio correspondiente de la placa de la plataforma N, luego baje la rueda trasera,
gírela hacia un lado y apriete la parte inferior de la rueda trasera con la tuerca D.
Consulte la Figura 1-11.

- 9 -
Figura 1-11
MAINTENANCE
2. Evite la exposición prolongada al sol para evitar el envejecimiento.
Fabricante: Kule Suplayer (Wenzhou) Trading Co., Ltd.
Dirección: 907, sala 907, edificio Zhongou International, ciudad de Oubei,
condado de Yongjia, ciudad de Wenzhou, provincia de Zhejiang
Importado a AUS: SIHAO PTY LTD, 1 ROKEVA STREETEASTWOOD NSW
2122 Australia
Importado a EE. UU.: Sanven Technology Ltd., Suite 250, 9166 Anaheim
Place, Rancho Cucamonga, CA 91730
REP
EC
E-CrossStu GmbH
Mainzer Landstr.69, 60329 Frankfurt am Main.
REP
UK
YH CONSULTING LIMITED.
C/O YH Consulting Limited Office 147, Centurion House,
London Road, Staines-upon-Thames, Surrey, TW18 4AX

- 10 -
Hecho en china


Supporto tecnico e certificato di garanzia elettronica www.vevor.com/support
Bambini A dondolo Cavallo
We continue to be committed to provide you tools with competitive price.
"Save Half", "Half Price" or any other similar expressions used by us only represents an
estimate of savings you might benefit from buying certain tools with us compared to the major
top brands and does not necessarily mean to cover all categories of tools offered by us. You
are kindly reminded to verify carefully when you are placing an order with us if you are
actually saving half in comparison with the top major brands.

- 1 -
MODELLO: C-YM101
Have product questions? Need technical support? Please feel free to
contact us:
Technical Support and E-Warranty Certificate
www.vevor.com/support
This is the original instruction, please read all manual instructions
carefully before operating. VEVOR reserves a clear interpretation of our
user manual. The appearance of the product shall be subject to the
product you received. Please forgive us that we won't inform you again if
there are any technology or software updates on our product.
Children's Rocking Horse

- 2 -
INSTRUCTIONS
Grazie mille per aver scelto questo prodotto per bambini A dondolo
Cavallo.
- Si prega di leggere attentamente le istruzioni prima di utilizzare il prodotto.
Le informazioni ti aiuteranno a raggiungere i migliori risultati possibili.
I prodotti rappresentati in questo catalogo potrebbero essere di colore
diverso rispetto all'articolo reale .
L' assemblea deve essere tenuta da un tutore. Per motivi di sicurezza, il
montaggio deve essere controllati prima e dopo l'uso.
AVVERTIMENTO:
Avviso: si prega di leggere IL seguire attentamente le
precauzioni prima del montaggio!
27. Solo per uso domestico.
28. Solo per uso interno.
29. Attenzione! Sono incluse piccole parti pericolose. Deve essere
installato da un adulto
30. Si prega di posizionarlo su un terreno pianeggiante e spazioso,
lasciando un'area aperta adeguata attorno all'area di installazione.
31. Non posizionarlo in acqua o infiltrazioni, su terreni irregolari o ruvidi,
su pendii, ecc.
32. Prima dell'installazione, verificare attentamente che tutti i componenti
siano ben fissati e che non vi siano elementi pericolosi nelle vicinanze.

- 3 -
33. Durante l'uso, controllare regolarmente il corpo del prodotto, i dadi,
ecc. e interromperne l'uso se risultano incrinati o usurati; in caso contrario,
potrebbe ribaltarsi o potrebbero verificarsi altri pericoli.
34. Se il dado del prodotto è usurato e non può essere serrato, contattare
il produttore per acquistare e sostituire gli accessori corrispondenti.
35. Si prega di conservare l'imballaggio in modo appropriato e di tenerlo
lontano dalla portata dei neonati e dei bambini piccoli per evitare pericoli.
36. Conservare in luogo fresco e asciutto, evitare la luce solare diretta e
tenere lontano da fiamme e fonti di calore.
37. Si raccomanda vivamente la presenza di un adulto accompagnatore.
38. Non lasciare che i bambini giochino con giocattoli smontati,
danneggiati o deformati per evitare ingestione accidentale, soffocamento e
altre lesioni.
39. Si prega di conservare il Manuale d'uso per riferimento futuro.
MODEL AND PARAMETERS
Modello
Modello C-YM101
Materiale
PEAD
Musica in
riproduzione
SÌ
Riproduzione di
musica potente
3 pile a bottone da 1,5 V
Valutazione
Caricamento
80 libbre
Colore
Grigio e bianco e cachi
La pila a bottone per la riproduzione della musica deve essere acquistata
separatamente.

- 4 -
ASSEMBLY AND USE
Cavallo a dondolo per bambini
Ⓐx1 Ⓑx1 Ⓒx1 Ⓓx2 Ⓔx9 Ⓕx1 Ⓖx1 Ⓗx1 ⓛx1 Ⓙx1 Ⓚx1 Ⓛx1Ⓜx1
Ⓝx1 Ⓞx4 Ⓟx2 Ⓠx2 Ⓡx2 Ⓢx4
1. Posizionare M su A e coprire il coperchio di bloccaggio J con il dado G e serrarlo
(allentare un po' per consentire a M di ruotare)

- 5 -
Figura 1-1
22. Inserire il tubo K nel foro corrispondente, mettere H e I sui lati sinistro e destro
di circa la stessa lunghezza e premerli verso l'interno. Fare riferimento alla Figura
1-2 .
Figura 1-2
23. Posizionare la macchina F-story sul volante come mostrato nella Figura 1-3.
Figura 1-3
24. Posizionare prima il fermo B sul retro dello schienale , quindi agganciarlo nella
- 6 -
posizione a baionetta anteriore, come mostrato nella Figura 1-4.
Figura 1-4
25. Inserire la barra di spinta C nel foro corrispondente e serrarla con i dadi D ed E
come mostrato nella Figura 1-5.
Figura 1-5.
26. Fissare la striscia antiscivolo R al N piattaforma. Il cuscinetto antiscivolo S è
attaccato al bungee P pannello laterale. Fare riferimento alla Figura 1-6.
Figura 1-6
27. Inserire la corda elastica O nella tavola della piattaforma N. La struttura
indipendente a doppia corda è più forte e sicura, anche se c'è un problema con
una corda, la un'altra corda può sostenere la forza e prevenire incidenti come il
- 7 -
calpestamento. Materiale elastico della corda e nessun rumore di molla, così non
devi preoccuparti di incidenti da interferenza. Fare riferimento alla Figura 1-7.
Figura 1-7
28. Metti la corda elastica O sul posizione fissa sulla parte superiore della scheda
Q, quindi inserire Q nella scheda P e fissarla con il dado E. Fare riferimento alla
Figura 1-8.
Figura 1-8
29. Inserire un'altra scheda Q nella scheda P e utilizzare i dadi E per fissare le due
inferiori e lasciarle allentate. Quindi inserire il cordino elastico nella posizione fissa
della scheda Q. (Nota che il lato dentellato della scheda Q è rivolto verso l'interno),
fare riferimento alla Figura 1-9.
- 8 -
Figura 1-9
30. Fissare i due superiori con i dadi E e serrare tutti i dadi E. Fare riferimento alla
Figura 1-10.
Figura 1-10
31. Inserire la parte centrale della ruota anteriore dello scooter precedentemente
installato nel foro corrispondente della piastra della piattaforma N, quindi
appoggiare la ruota posteriore, girarla lateralmente e serrare la parte inferiore
della ruota posteriore con il dado D. Fare riferimento alla Figura 1-11.

- 9 -
Figura 1-11
MAINTENANCE
3. Evitare l'esposizione prolungata al sole per prevenire l'invecchiamento.
Produttore: Kule Suplayer (Wenzhou) Trading Co., Ltd
Indirizzo: 907Stanza 907, Zhongou International Building, Città di Oubei,
Contea di Yongjia, Città di Wenzhou, Provincia di Zhejiang
Importato in AUS: SIHAO PTY LTD, 1 ROKEVA STREETEASTWOOD NSW
2122 Australia
Importato negli USA: Sanven Technology Ltd., Suite 250, 9166 Anaheim
Place, Rancho Cucamonga, CA 91730
REP
EC
E-CrossStu GmbH
Mainzer Landstr.69, 60329 Frankfurt am Main.
REP
UK
YH CONSULTING LIMITED.
C/O YH Consulting Limited Office 147, Centurion House,
London Road, Staines-upon-Thames, Surrey, TW18 4AX

- 10 -
Made in China


Wsparcie techniczne i certyfikat gwarancji elektronicznej www.vevor.com/support
Dziecięce Kołysanie Koń
We continue to be committed to provide you tools with competitive price.
"Save Half", "Half Price" or any other similar expressions used by us only represents an
estimate of savings you might benefit from buying certain tools with us compared to the major
top brands and does not necessarily mean to cover all categories of tools offered by us. You
are kindly reminded to verify carefully when you are placing an order with us if you are
actually saving half in comparison with the top major brands.
- 1 -
MODELE: C-YM101
Have product questions? Need technical support? Please feel free to
contact us:
Technical Support and E-Warranty Certificate
www.vevor.com/support
This is the original instruction, please read all manual instructions
carefully before operating. VEVOR reserves a clear interpretation of our
user manual. The appearance of the product shall be subject to the
product you received. Please forgive us that we won't inform you again if
there are any technology or software updates on our product.
Children's Rocking Horse

- 2 -
INSTRUCTIONS
Dziękujemy bardzo za wybranie tego dziecięcego sklepu. Kołysanie Koń.
- Przed użyciem należy dokładnie przeczytać instrukcję. Informacje te
pomogą Ci osiągnąć najlepsze możliwe rezultaty.
Produkty prezentowane w tym katalogu mogą różnić się kolorem od
rzeczywistego produktu .
Zgromadzenie musi być przeprowadzone przez opiekuna. Ze względów
bezpieczeństwa montaż musi być sprawdzane przed i po użyciu.
OSTRZEŻENIE:
Uwaga: Proszę przeczytać ten przed montażem zachowaj
szczególną ostrożność!
40. Tylko do użytku domowego.
41. Tylko do użytku wewnątrz pomieszczeń.
42. Ostrzeżenie! W zestawie znajdują się małe niebezpieczne części.
Montaż musi być przeprowadzony przez osobę dorosłą.
43. Należy umieścić urządzenie na płaskim i przestronnym podłożu,
pozostawiając odpowiednią ilość wolnej przestrzeni wokół miejsca
instalacji.
44. Nie umieszczaj urządzenia w wodzie lub w miejscu przesiąkania, na
nierównym lub szorstkim podłożu, zboczach itp.
45. Przed montażem należy dokładnie sprawdzić, czy wszystkie części
są dobrze zamocowane i czy w pobliżu nie ma żadnych niebezpiecznych
elementów.

- 3 -
46. Podczas użytkowania należy regularnie sprawdzać obudowę
produktu, nakrętki itp. i zaprzestać używania produktu, jeśli jest pęknięty
lub zużyty. W przeciwnym razie może się przewrócić lub wystąpić inne
niebezpieczeństwo.
47. Jeśli nakrętka produktu jest zużyta i nie można jej dokręcić, należy
skontaktować się z producentem w celu zakupu i wymiany odpowiednich
akcesoriów.
48. Aby uniknąć zagrożenia, należy odpowiednio przechowywać
opakowanie i trzymać je w miejscu niedostępnym dla niemowląt i małych
dzieci.
49. Przechowywać w chłodnym i suchym miejscu, unikać bezpośredniego
światła słonecznego, ognia i źródeł ciepła.
50. Zdecydowanie zaleca się obecność osoby dorosłej.
51. Nie pozwalaj dzieciom bawić się zabawkami rozmontowanymi,
uszkodzonymi lub zdeformowanymi, aby uniknąć przypadkowego
połknięcia, uduszenia i innych obrażeń.
52. Proszę zachować instrukcję obsługi odniesienie do przyszłości.
MODEL AND PARAMETERS
Model
C-YM101
Tworzywo
HDPE
Odtwarzanie
muzyki
Tak
Odtwarzanie
muzyki Power
3 sztuki ogniw guzikowych
1,5 V
Ocena Ładowanie
80 funtów
Kolor
Szary, biały i khaki
Baterię guzikową do odtwarzania muzyki należy zakupić osobno.

- 4 -
ASSEMBLY AND USE
Dziecięcy koń bujany
Ⓐx1 Ⓑx1 Ⓒx1 Ⓓx2 Ⓔx9 Ⓕx1 Ⓖx1 Ⓗx1 ⓛx1 Ⓙx1 Ⓚx1 Ⓛx1Ⓜx1
Ⓝx1 Ⓞx4 Ⓟx2 Ⓠx2 Ⓡx2 Ⓢx4
1. Umieść M na A i zakryj pokrywę blokującą J nakrętką G, a następnie dokręć ją.
(poluzuj trochę, aby umożliwić obrót M)

- 5 -
Rysunek 1-1
32. Włóż rurę K do odpowiedniego otworu, umieść H i I po lewej i prawej stronie
mniej więcej tej samej długości i wciśnij je do środka. Zapoznaj się z rysunkiem
1-2 .
Rysunek 1-2
33. Umieść maszynę F-story na kierownicy, jak pokazano na rysunku 1-3.
Rysunek 1-3
34. Najpierw załóż zatrzask B z tyłu oparcia , a następnie zatrzaśnij go w przedniej
- 6 -
pozycji bagnetu, jak pokazano na rysunku 1-4.
Rysunek 1-4
35. Umieść popychacz C w odpowiednim otworze i dokręć go nakrętkami D i E, jak
pokazano na rysunku 1-5.
Rysunek 1-5.
36. Przymocuj pasek antypoślizgowy R do N deska platformy. Podkładka
antypoślizgowa S jest przymocowana do bungee P panel boczny. Proszę
zapoznać się z rysunkiem 1-6.
Rysunek 1-6
37. Włóż linę bungee O do deski platformy N. Niezależna podwójna konstrukcja
linowa jest mocniejsza i bezpieczniejsza, nawet jeśli występuje problem z jedną

- 7 -
liną, inna lina może utrzymać siłę i zapobiegaj wypadkom, takim jak potykanie się.
Elastyczny materiał liny i brak hałasu sprężyny, więc nie musisz się martwić o
wypadki związane z zakłóceniami. P rzeczytaj rysunek 1-7.
Rysunek 1-7
38. Załóż linkę bungee na ustaloną pozycję na górze płyty Q, a następnie włóż Q
do płyty P i zamocuj ją za pomocą nakrętki E. P rzeczytaj rysunek 1-8.
Rysunek 1-8
39. Włóż kolejną deskę Q do deski P i użyj nakrętek E, aby przymocować dwie
dolne i pozostawić je luźne. Następnie umieść linkę bungee w ustalonej pozycji
deski Q. (Zwróć uwagę, że karbowana strona deski Q jest skierowana do
wewnątrz), zapoznaj się z rysunkiem 1-9.

- 8 -
Rysunek 1-9
40. Zabezpiecz górne dwie nakrętki E i dokręć wszystkie nakrętki E. Patrz
Rysunek 1-10.
Rysunek 1-10
41. Umieść środek przedniego koła wcześniej zamontowanego skutera w
odpowiednim otworze płyty platformy N, następnie opuść tylne koło, obróć je na
bok i dokręć dolną część tylnego koła nakrętką D. Proszę zapoznać się z
rysunkiem 1-11.

- 9 -
Rysunek 1-11
MAINTENANCE
4. Aby zapobiec starzeniu się skóry, należy unikać długotrwałego
wystawiania się na działanie promieni słonecznych.
Producent: Kule Suplayer(Wenzhou) Trading Co.,Ltd
Adres: 907Pokój 907, Budynek Zhongou International, Miasto Oubei,
Powiat Yongjia, Miasto Wenzhou, Prowincja Zhejiang
Importowane do AUS: SIHAO PTY LTD, 1 ROKEVA STREETEASTWOOD
NSW 2122 Australia
Importowane do USA: Sanven Technology Ltd., Suite 250, 9166 Anaheim
Place, Rancho Cucamonga, CA 91730
REP
EC
E-CrossStu GmbH
Mainzer Landstr.69, 60329 Frankfurt am Main.
REP
UK
YH CONSULTING LIMITED.
C/O YH Consulting Limited Office 147, Centurion House,
London Road, Staines-upon-Thames, Surrey, TW18 4AX

- 10 -
Wyprodukowano w Chinach


Technischer Support und E-Garantie-Zertifikat www.vevor.com/support
Kinder Schaukeln Pferd
We continue to be committed to provide you tools with competitive price.
"Save Half", "Half Price" or any other similar expressions used by us only represents an
estimate of savings you might benefit from buying certain tools with us compared to the major
top brands and does not necessarily mean to cover all categories of tools offered by us. You
are kindly reminded to verify carefully when you are placing an order with us if you are
actually saving half in comparison with the top major brands.

- 1 -
MODELL: C-YM101
Have product questions? Need technical support? Please feel free to
contact us:
Technical Support and E-Warranty Certificate
www.vevor.com/support
This is the original instruction, please read all manual instructions
carefully before operating. VEVOR reserves a clear interpretation of our
user manual. The appearance of the product shall be subject to the
product you received. Please forgive us that we won't inform you again if
there are any technology or software updates on our product.
Children's Rocking Horse

- 2 -
INSTRUCTIONS
Vielen Dank für die Wahl dieses Kinder Schaukeln Pferd.
- Bitte lesen Sie vor der Verwendung alle Anweisungen. Die Informationen
helfen Ihnen, die bestmöglichen Ergebnisse zu erzielen.
Die Farbe der in diesem Katalog aufgeführten Produkte kann vom
tatsächlichen Artikel abweichen .
Die Versammlung muss durch einen Erziehungsberechtigten erfolgen. Aus
Sicherheitsgründen muss die Montage vor und nach dem Gebrauch
überprüft.
WARNUNG:
Hinweis: Bitte lesen Die Lesen Sie vor der Montage die folgenden
Vorsichtsmaßnahmen sorgfältig durch!
53. Nur für den Heimgebrauch.
54. Nur für den Innenbereich.
55. Achtung! Kleine gefährliche Teile sind enthalten. Muss von einem
Erwachsenen installiert werden
56. Bitte stellen Sie es auf einen ebenen und großen Untergrund und
lassen Sie rund um den Installationsbereich ausreichend Freiraum.
57. Stellen Sie es nicht in Wasser oder Sickerwasser, auf unebenem
oder unebenem Boden, an Hängen usw.
58. Bitte überprüfen Sie vor der Installation sorgfältig, ob alle Teile sicher
sind und sich keine unsicheren Elemente in der Nähe befinden.
59. Bitte überprüfen Sie während des Gebrauchs regelmäßig den
Produktkörper sowie die Muttern etc. und verwenden Sie das Produkt nicht

- 3 -
mehr, wenn es Risse oder Abnutzungserscheinungen aufweist, da es
sonst zum Umkippen oder anderen Gefahren kommen kann.
60. Wenn die Produktmutter abgenutzt ist und nicht festgezogen werden
kann, wenden Sie sich bitte an den Hersteller, um das entsprechende
Zubehör zu kaufen und auszutauschen.
61. Bitte bewahren Sie die Verpackung ordnungsgemäß auf und
bewahren Sie diese außerhalb der Reichweite von Säuglingen und
Kleinkindern auf, um Gefahren zu vermeiden.
62. Bitte kühl und trocken lagern, direkte Sonneneinstrahlung vermeiden
und von Feuer und Wärmequellen fernhalten.
63. Eine Begleitung durch einen Erwachsenen wird dringend empfohlen.
64. Lassen Sie Kinder nicht mit zerlegtem, beschädigtem oder
verformtem Spielzeug spielen, um ein versehentliches Verschlucken,
Ersticken und andere Verletzungen zu vermeiden.
65. Bitte bewahren Sie das Benutzerhandbuch für zukünftige
Bezugnahme.
MODEL AND PARAMETERS
Modell
C-YM101
Material
HDPE
Musikwiedergabe
Ja
Power-Musikwiedergabe
3 Stück 1,5 V Knopfzelle
Bewertung wird geladen
80 Pfund
Farbe
Grau und Weiß und Khaki
Die Knopfzelle zur Musikwiedergabe muss separat erworben werden.
- 4 -
ASSEMBLY AND USE
Kinderschaukelpferd
Ⓐx1 Ⓑx1 Ⓒx1 Ⓓx2 Ⓔx9 Ⓕx1 Ⓖx1 Ⓗx1 ⓛx1 Ⓙx1 Ⓚx1 Ⓛx1Ⓜx1
Ⓝx1 Ⓞx4 Ⓟx2 Ⓠx2 Ⓡx2 Ⓢx4
1.M auf A setzen und die J-Verriegelungsabdeckung mit der G-Mutter abdecken
und festziehen
(etwas lösen, damit M rotieren kann)
- 5 -
Abbildung 1-1
42. Führen Sie das K-Rohr in das entsprechende Loch ein, platzieren Sie H und I
auf der linken und rechten Seite in etwa gleicher Länge und drücken Sie sie nach
innen. Siehe Abbildung 1-2 .
Abbildung 1-2
43. Setzen Sie die F-Story-Maschine wie in Abbildung 1-3 gezeigt auf das
Lenkrad.
Abbildung 1-3
- 6 -
44. Setzen Sie zuerst die Halterung B auf die Rückseite der Rückenlehne und
rasten Sie sie dann in der vorderen Bajonettposition ein, wie in Abbildung 1-4
gezeigt.
Abbildung 1-4
45. Setzen Sie die Schubstange C in die entsprechende Öffnung ein und ziehen
Sie sie mit den Muttern D und E fest, wie in Abbildung 1-5 gezeigt.
Abbildung 1-5.
46. Befestigen Sie den Antirutschstreifen R an der N Plattformbrett . Das S
Anti-Rutsch-Pad ist am P Bungee befestigt Seitenwand. Siehe Abbildung 1-6.
Abbildung 1-6
47. Legen Sie das O-Bungee-Seil in die N-Plattformplatte. Unabhängige
- 7 -
Doppelseilstruktur ist stärker und sicherer, auch wenn es ein Problem mit einem
Seil gibt, das anderes Seil kann die Kraft unterstützen und verhindert Unfälle wie
Umkippen . Elastisches Seilmaterial und kein Federgeräusch, sodass Sie sich
keine Sorgen über Störungen machen müssen. Siehe Abbildung 1-7.
Abbildung 1-7
48. Legen Sie das O-Bungee-Seil auf die fixe Position oben auf der Q-Platine,
dann Q in die P-Platine einsetzen und mit der E-Mutter fixieren. Siehe Abbildung
1-8 .
Abbildung 1-8
49. Setzen Sie ein weiteres Q-Brett in das P-Brett ein und verwenden Sie
E-Muttern, um die unteren beiden zu fixieren und sie lose zu lassen. Setzen Sie
- 8 -
dann das Gummiseil in die fixierte Position des Q-Bretts. (Beachten Sie, dass die
gekerbte Seite des Q-Bretts nach innen zeigt), siehe Abbildung 1-9.
Abbildung 1-9
50. Sichern Sie die oberen beiden mit E-Muttern und ziehen Sie alle E-Muttern fest.
Siehe Abbildung 1-10.
Abbildung 1-10
51. Stecken Sie die Mitte des Vorderrads des zuvor montierten Rollers in die
entsprechende Öffnung der N-Plattformplatte, setzen Sie dann das Hinterrad ab,
drehen Sie es seitwärts und ziehen Sie die Unterseite des Hinterrads mit der
D-Mutter fest. Bitte beachten Sie Abbildung 1-11.
- 9 -
Abbildung 1-11
MAINTENANCE
5. Vermeiden Sie längere Sonneneinstrahlung, um der Hautalterung
vorzubeugen.
Hersteller: Kule Superplayer (Wenzhou) Trading Co., Ltd.
Adresse: 907, Zimmer 907, Zhongou International Building, Stadt Oubei,
Kreis Yongjia, Stadt Wenzhou, Provinz Zhejiang
Nach AUS importiert: SIHAO PTY LTD, 1 ROKEVA STREETEASTWOOD
NSW 2122 Australien
Importiert in die USA: Sanven Technology Ltd., Suite 250, 9166 Anaheim
Place, Rancho Cucamonga, CA 91730
REP
EC
E-CrossStu GmbH
Mainzer Landstr.69, 60329 Frankfurt am Main.
REP
UK
YH CONSULTING LIMITED.
C/O YH Consulting Limited Office 147, Centurion House,
London Road, Staines-upon-Thames, Surrey, TW18 4AX

- 10 -
In China hergestellt


Assistance technique et certificat de garantie électronique www.vevor.com/support
Enfants Balancement Cheval
We continue to be committed to provide you tools with competitive price.
"Save Half", "Half Price" or any other similar expressions used by us only represents an
estimate of savings you might benefit from buying certain tools with us compared to the major
top brands and does not necessarily mean to cover all categories of tools offered by us. You
are kindly reminded to verify carefully when you are placing an order with us if you are
actually saving half in comparison with the top major brands.

- 1 -
MODÈLE : C-YM101
Have product questions? Need technical support? Please feel free to
contact us:
Technical Support and E-Warranty Certificate
www.vevor.com/support
This is the original instruction, please read all manual instructions
carefully before operating. VEVOR reserves a clear interpretation of our
user manual. The appearance of the product shall be subject to the
product you received. Please forgive us that we won't inform you again if
there are any technology or software updates on our product.
Children's Rocking Horse
- 2 -
INSTRUCTIONS
Merci beaucoup d'avoir choisi ce produit pour enfants Balancement
Cheval.
- Veuillez lire toutes les instructions avant de l'utiliser. Ces informations
vous aideront à obtenir les meilleurs résultats possibles.
Les produits présentés dans ce catalogue peuvent avoir une couleur
différente de celle de l'article réel .
Le montage doit être effectué par un tuteur. Pour des raisons de sécurité,
l'assemblage doit être vérifié avant et après utilisation.
AVERTISSEMENT:
Avis : Veuillez lire le Suivez attentivement les précautions
suivantes avant le montage !
66. Pour usage domestique uniquement.
67. Pour usage intérieur uniquement.
68. Attention ! Contient de petites pièces dangereuses. Doit être installé
par un adulte
69. Veuillez le placer sur un sol plat et spacieux, en laissant un espace
ouvert approprié autour de la zone d'installation.
70. Ne le placez pas dans l'eau ou dans une zone d'infiltration, sur un sol
irrégulier ou accidenté, sur des pentes, etc.
71. Avant l'installation, veuillez vérifier soigneusement que toutes les
pièces sont sécurisées et qu'il n'y a pas d'éléments dangereux autour.

- 3 -
72. Pendant l'utilisation, veuillez vérifier régulièrement le corps du produit
et les écrous, etc., et cessez de l'utiliser s'il est fissuré ou usé ; sinon, il
risque de basculer ou d'autres dangers peuvent survenir.
73. Si l'écrou du produit est usé et ne peut pas être serré, veuillez
contacter le fabricant pour acheter et remplacer les accessoires
correspondants.
74. Veuillez conserver l'emballage correctement et le tenir hors de portée
des nourrissons et des jeunes enfants pour éviter tout danger.
75. Veuillez conserver dans un endroit frais et sec, éviter la lumière directe
du soleil et tenir à l'écart du feu et des sources de chaleur.
76. L'accompagnement d'un adulte est fortement recommandé.
77. Ne laissez pas les enfants jouer avec des jouets démontés,
endommagés ou déformés afin d’éviter toute ingestion accidentelle,
suffocation ou autres blessures.
78. Veuillez conserver le manuel d'utilisation pour référence future.
MODEL AND PARAMETERS
Modèle
C-YM101
Matériel
PEHD
Jouer de la
musique
Oui
Jouer de la
musique avec
puissance
Lot de 3 piles bouton 1,5 V
Évaluation
Chargement
80 livres
Couleur
Gris et blanc et kaki
La pile bouton pour la lecture de musique doit être achetée séparément.
- 4 -
ASSEMBLY AND USE
Cheval à bascule pour enfants
Ⓐx1 Ⓑx1 Ⓒx1 Ⓓx2 Ⓔx9 Ⓕx1 Ⓖx1 Ⓗx1 ⓛx1 Ⓙx1 Ⓚx1 Ⓛx1Ⓜx1
Ⓝx1 Ⓞx4 Ⓟx2 Ⓠx2 Ⓡx2 Ⓢx4
1. Placez M sur A et couvrez le couvercle de verrouillage J avec l'écrou G et
serrez-le
(desserrer un peu pour permettre à M de tourner)

- 5 -
Figure 1-1
52. Insérez le tube K dans le trou correspondant, placez H et I sur les côtés
gauche et droit à peu près de la même longueur et appuyez-les vers l'intérieur.
Veuillez vous référer à la figure 1-2 .
Figure 1-2
53. Placez la machine F-story sur le volant comme indiqué sur la figure 1-3.
Figure 1-3
54. Placez d’abord le dispositif de retenue B à l’arrière du dossier , puis
- 6 -
enclenchez-le dans la position de baïonnette avant, comme illustré dans la Figure
1-4.
Figure 1-4
55. Placez la tige de poussée C dans le trou correspondant et serrez-la avec les
écrous D et E comme indiqué sur la figure 1-5.
Figure 1-5.
56. Fixez la bande antidérapante R sur le Planche plate-forme N. Le patin
antidérapant S est fixé à l'élastique P panneau latéral. Veuillez vous référer à la
figure 1-6.
Figure 1-6
57. Insérez le cordon élastique O dans la planche de la plate-forme N. La structure
- 7 -
indépendante à double corde est plus solide et plus sûre, même s'il y a un
problème avec une corde, la une autre corde peut supporter la force et évite les
accidents tels que les chutes. Matériau de corde élastique et aucun bruit de
ressort, vous n'avez donc pas à vous soucier des accidents d'interférence.
Veuillez vous référer à la figure 1-7.
Figure 1-7
58. Placez le cordon élastique O sur le Position fixe sur le dessus de la carte Q,
puis insérez Q dans la carte P et fixez-le avec l'écrou E. Veuillez vous référer à la
figure 1-8.
Figure 1-8
59. Insérez une autre carte Q dans la carte P et utilisez des écrous E pour fixer les
- 8 -
deux inférieures et laissez-les lâches. Placez ensuite le cordon élastique dans la
position fixe de la carte Q. (Notez que le côté entaillé de la carte Q est orienté vers
l'intérieur), veuillez vous référer à la Figure 1-9.
Figure 1-9
60. Fixez les deux supérieurs avec des écrous E et serrez tous les écrous E.
Veuillez vous référer à la figure 1-10.
Figure 1-10
61. Placez le milieu de la roue avant du scooter précédemment installé dans le
trou correspondant de la plaque de plate-forme N, puis posez la roue arrière,
tournez-la sur le côté et serrez le bas de la roue arrière avec l'écrou D. Veuillez
vous référer à la figure 1-11.
- 9 -
Figure 1-11
MAINTENANCE
6. Évitez l'exposition prolongée au soleil pour éviter le vieillissement.
Fabricant: Kule Suplayer (Wenzhou) Trading Co., Ltd
Adresse : 907, salle 907, bâtiment international Zhongou, ville d'Oubei,
comté de Yongjia, ville de Wenzhou, province du Zhejiang
Importé en Australie : SIHAO PTY LTD, 1 ROKEVA STREET, ASTWOOD
NSW 2122 Australie
Importé aux États-Unis : Sanven Technology Ltd., Suite 250, 9166 Anaheim
Place, Rancho Cucamonga, CA 91730
REP
EC
E-CrossStu GmbH
Mainzer Landstr.69, 60329 Frankfurt am Main.
REP
UK
YH CONSULTING LIMITED.
C/O YH Consulting Limited Office 147, Centurion House,
London Road, Staines-upon-Thames, Surrey, TW18 4AX

- 10 -
Fabriqué en Chine


Technische ondersteuning en e-garantiecertificaat www.vevor.com/support
Kinderen Schommelen Paard
We continue to be committed to provide you tools with competitive price.
"Save Half", "Half Price" or any other similar expressions used by us only represents an
estimate of savings you might benefit from buying certain tools with us compared to the major
top brands and does not necessarily mean to cover all categories of tools offered by us. You
are kindly reminded to verify carefully when you are placing an order with us if you are
actually saving half in comparison with the top major brands.

- 1 -
MODEL: C-YM101
Have product questions? Need technical support? Please feel free to
contact us:
Technical Support and E-Warranty Certificate
www.vevor.com/support
This is the original instruction, please read all manual instructions
carefully before operating. VEVOR reserves a clear interpretation of our
user manual. The appearance of the product shall be subject to the
product you received. Please forgive us that we won't inform you again if
there are any technology or software updates on our product.
Children's Rocking Horse

- 2 -
INSTRUCTIONS
Hartelijk dank dat u voor deze kinder- Schommelen Paard.
- Lees de volledige instructies aandachtig door voordat u het product
gebruikt. Met deze informatie kunt u de best mogelijke resultaten behalen.
De producten in deze catalogus kunnen qua kleur afwijken van het
daadwerkelijke artikel .
De vergadering moet door een voogd worden geleid. Om
veiligheidsredenen moet de montage gecontroleerd voor en na gebruik.
WAARSCHUWING:
Let op: Lees dit alstublieft de Neem de volgende
voorzorgsmaatregelen zorgvuldig in acht voordat u het product
monteert!
79. Alleen voor thuisgebruik.
80. Alleen voor gebruik binnenshuis.
81. Waarschuwing! Kleine gevaarlijke onderdelen zijn inbegrepen. Moet
door een volwassene worden geïnstalleerd
82. Plaats het op een vlakke en ruime ondergrond en laat voldoende
open ruimte vrij rond de installatieplek.
83. Plaats het niet in water of insijpelend water, op oneffen of ruwe grond,
hellingen, enz.
84. Controleer vóór de installatie zorgvuldig of alle onderdelen goed
vastzitten en er zich geen onveilige elementen in de buurt bevinden.
85. Controleer tijdens het gebruik regelmatig de behuizing van het
product, de moeren etc. en stop met het gebruik als er scheuren of slijtage

- 3 -
is. Anders kan het product omvallen of kunnen er andere gevaren
ontstaan.
86. Als de moer van het product versleten is en niet meer kan worden
vastgedraaid, neem dan contact op met de fabrikant om de bijbehorende
accessoires te kopen en te vervangen.
87. Bewaar de verpakking zorgvuldig en houd deze buiten bereik van
baby's en jonge kinderen om gevaar te voorkomen.
88. Bewaar het op een koele en droge plaats, vermijd direct zonlicht en
houd het uit de buurt van vuur en warmtebronnen.
89. Begeleiding door een volwassene wordt sterk aanbevolen.
90. Laat kinderen niet spelen met speelgoed dat uit elkaar is gehaald,
beschadigd of vervormd is, om te voorkomen dat ze het per ongeluk
inslikken, stikken of andere verwondingen oplopen.
91. Bewaar de gebruikershandleiding voor toekomstige referentie.
MODEL AND PARAMETERS
Model
C-JM101
Materiaal
HDPE
Muziek spelen
Ja
Power Muziek
Afspelen
3PCS 1.5V knoopcel
Beoordeling laden
80 pond
Kleur
Grijs en wit en kaki
De knoopcel voor het afspelen van muziek moet apart worden
aangeschaft.
- 4 -
ASSEMBLY AND USE
Kinderschommelpaard
Ⓐx1 Ⓑx1 Ⓒx1 Ⓓx2 Ⓔx9 Ⓕx1 Ⓖx1 Ⓗx1 ⓛx1 Ⓙx1 Ⓚx1 Ⓛx1Ⓜx1
Ⓝx1 Ⓞx4 Ⓟx2 Ⓠx2 Ⓡx2 Ⓢx4
1. Plaats M op A en bedek de J-vergrendelingskap met de G-moer en draai deze
vast
(een beetje losmaken zodat M kan draaien)
- 5 -
Figuur 1-1
62. Plaats de K-buis in het overeenkomstige gat, plaats H en I aan de linker- en
rechterkant van ongeveer dezelfde lengte en druk ze naar binnen. Zie Afbeelding
1-2 .
Figuur 1-2
63. Plaats de F-story machine op het stuur zoals afgebeeld in Figuur 1-3.
Figuur 1-3
64. Plaats eerst de B-bevestiging aan de achterkant van de rugleuning en klik
- 6 -
deze vervolgens vast in de voorste bajonetpositie, zoals weergegeven in
Afbeelding 1-4.
Figuur 1-4
65. Plaats de C-drukstang in het overeenkomstige gat en draai deze vast met de
moeren D en E zoals weergegeven in Afbeelding 1-5.
Figuur 1-5.
66. Bevestig de R-antislipstrip aan de N platformbord. De S antislip pad is
bevestigd aan de P bungee zijpaneel. Zie Figuur 1-6.
Figuur 1-6
67. Plaats het O-bungeekoord in het N-platformbord. De onafhankelijke dubbele
touwstructuur is sterker en veiliger, zelfs als er een probleem is met één touw, de
- 7 -
ander touw kan de sterkte ondersteunen en voorkom ongelukken zoals het
omvallen. Elastisch touwmateriaal en geen veergeluid, dus u hoeft zich geen
zorgen te maken over interferentie-ongelukken. Raadpleeg Afbeelding 1-7.
Figuur 1-7
68. Doe het O-bungeekoord om de vaste positie op de bovenkant van het Q-bord,
plaats vervolgens Q in het P-bord en bevestig het met de E-moer. Raadpleeg
Afbeelding 1-8.
Figuur 1-8
69. Plaats een ander Q-bord in het P-bord en gebruik E-moeren om de onderste
twee vast te zetten en laat ze los. Plaats vervolgens het bungee-koord in de vaste
positie van het Q-bord. (Let op dat de gekartelde kant van het Q-bord naar binnen
- 8 -
wijst), zie Afbeelding 1-9.
Figuur 1-9
70. Bevestig de bovenste twee met E-moeren en draai alle E-moeren vast. Zie
figuur 1-10.
Figuur 1-10
71. Plaats het midden van het voorwiel van de eerder geïnstalleerde step in het
overeenkomstige gat van de N-platformplaat, plaats vervolgens het achterwiel,
draai het zijwaarts en draai de onderkant van het achterwiel vast met de D-moer.
Zie Figuur 1-11.

- 9 -
Figuur 1-11
MAINTENANCE
7. Vermijd langdurige blootstelling aan de zon om veroudering te
voorkomen.
Fabrikant: Kule Suplayer (Wenzhou) Trading Co., Ltd
Adres: 907Kamer 907, Zhongou International Building, Oubei Town,
Yongjia County, Wenzhou City, provincie Zhejiang
Geïmporteerd naar AUS: SIHAO PTY LTD, 1 ROKEVA
STREETEASTWOOD NSW 2122 Australië
Geïmporteerd naar de VS: Sanven Technology Ltd., Suite 250, 9166
Anaheim Place, Rancho Cucamonga, CA 91730
REP
EC
E-CrossStu GmbH
Mainzer Landstr.69, 60329 Frankfurt am Main.
REP
UK
YH CONSULTING LIMITED.
C/O YH Consulting Limited Office 147, Centurion House,
London Road, Staines-upon-Thames, Surrey, TW18 4AX

- 10 -
Gemaakt in China


Teknisk support och e-garanticertifikat www.vevor.com/support
Barns Gungande Häst
We continue to be committed to provide you tools with competitive price.
"Save Half", "Half Price" or any other similar expressions used by us only represents an
estimate of savings you might benefit from buying certain tools with us compared to the major
top brands and does not necessarily mean to cover all categories of tools offered by us. You
are kindly reminded to verify carefully when you are placing an order with us if you are
actually saving half in comparison with the top major brands.

- 1 -
MODELL: C-YM101
Have product questions? Need technical support? Please feel free to
contact us:
Technical Support and E-Warranty Certificate
www.vevor.com/support
This is the original instruction, please read all manual instructions
carefully before operating. VEVOR reserves a clear interpretation of our
user manual. The appearance of the product shall be subject to the
product you received. Please forgive us that we won't inform you again if
there are any technology or software updates on our product.
Children's Rocking Horse
- 2 -
INSTRUCTIONS
Tack så mycket för att du valde detta barn Gungande Häst.
- Läs alla instruktioner innan du använder den. Informationen hjälper dig att
uppnå bästa möjliga resultat.
Produkterna i denna katalog kan ha en annan färg än den faktiska varan .
Samlingen ska utföras av en målsman. Av säkerhetsskäl måste
monteringen vara kontrolleras före och efter användning.
VARNING:
Observera: Vänligen läs de Följ försiktighetsåtgärderna
noggrant före montering!
92. Endast för hemmabruk.
93. Endast för inomhusbruk.
94. Varning! Små farliga delar ingår. Måste installeras av en vuxen
95. Placera den på ett plant och rymligt underlag och lämna ett lämpligt
öppet område runt installationsområdet.
96. Placera den inte i vatten eller läckage, ojämn eller ojämn mark,
sluttningar etc.
97. Före installation, kontrollera noggrant att alla delar är säkra och att
det inte finns några osäkra element i närheten.
98. Under användning, kontrollera produktens kropp och muttrar etc.
regelbundet, och sluta använda den om den är sprucken eller sliten;
annars kan den välta eller andra faror uppstå.
99. Om produktmuttern är sliten och inte kan dras åt, kontakta tillverkaren
för att köpa och byta ut motsvarande tillbehör.

- 3 -
100. Förvara förpackningen på rätt sätt och förvara den borta från
spädbarn och småbarn för att undvika fara.
101. Förvara på en sval och torr plats, undvik direkt solljus och håll borta
från eld och värmekällor.
102. Vuxen sällskap rekommenderas starkt.
103. Låt inte barn leka med leksaker som är demonterade, skadade eller
deformerade för att undvika oavsiktlig sväljning, kvävning och andra
skador.
104. Spara bruksanvisningen till framtida referens.
MODEL AND PARAMETERS
Modell
C-YM101
Material
HDPE
Spelar musik
Ja
Power Music spelar
3st 1,5V knappcell
Betyg Laddas
80 pund
Färg
Grå och vit och khaki
Knappcellen för musiken som spelas måste köpas separat.
- 4 -
ASSEMBLY AND USE
Barn-Gung-häst
Ⓐx1 Ⓑx1 Ⓒx1 Ⓓx2 Ⓔx9 Ⓕx1 Ⓖx1 Ⓗx1 ⓛx1 Ⓙx1 Ⓚx1 Ⓛx1Ⓜx1
Ⓝx1 Ⓞx4 ↓x2 ∓ x4 ↅx2
1. Sätt M på A och täck J-låslocket med G-mutter och dra åt det
(lossa lite så att M kan rotera)
Bild 1-1
- 5 -
72. Sätt in K-röret i motsvarande hål, sätt H och I på vänster och höger sida av
ungefär samma längd och tryck dem inåt. Se figur 1-2 .
Bild 1-2
73. Sätt F-story-maskinen på ratten som visas i figur 1-3.
Bild 1-3
74. Sätt B-hållaren på baksidan av ryggstödet först och snäpp den sedan i det
främre bajonettläget. som visas i figur 1-4.
Bild 1-4

- 6 -
75. Sätt C tryckstången i motsvarande hål och dra åt den med D- och E-muttrar
som visas i Figur 1-5.
Bild 1-5.
76. Fäst anti-halksremsan R på N plattformsbräda. S-anti-slip-kudden är fäst på
P-bungee sidopanel. Se figur 1-6.
Bild 1-6
77. Sätt i O bungee-linan i N-plattformskortet. Oberoende dubbelrepstruktur är
starkare och säkrare, även om det finns ett problem med ett rep, den annat rep
kan stödja styrkan och förebygga olyckor som t.ex. Elastiskt repmaterial och inget
fjäderljud, så du behöver inte oroa dig för störningsolyckor. Se figur 1-7.
Bild 1-7
78. Sätt O bungee-linan på fast position på toppen av Q-kortet, sätt sedan in Q i
- 7 -
P-kortet och fixera det med E-muttern. Se figur 1-8.
Bild 1-8
79. Sätt i ytterligare en Q-bräda i P-brädan och använd E-muttrar för att fixera de
två nedre och lämna dem lösa. Sätt sedan bungee-linan i Q-brädans fasta position.
(Observera att den skårade sidan av Q-kortet är vänd inåt), se figur 1-9.
Bild 1-9
80. Fäst de två översta med E-muttrar och dra åt alla E-muttrar. se figur 1-10.
- 8 -
Bild 1-10
81. Sätt mitten av framhjulet på den tidigare installerade skotern i motsvarande hål
på N-plattformsplattan, lägg sedan ner bakhjulet, vrid det i sidled och dra åt botten
av bakhjulet med D-muttern. Se figur 1-11.
Bild 1-11
MAINTENANCE
8. Undvik långvarig exponering för solen för att undvika åldrande.
Tillverkare: Kule Suplayer(Wenzhou)Trading Co.,Ltd
Adress: 907Room 907, Zhongou International Building, Oubei Town,
Yongjia County, Wenzhou City, Zhejiang-provinsen
- 9 -
Importerad till AUS: SIHAO PTY LTD, 1 ROKEVA STREETEASTWOOD
NSW 2122 Australien
Importerad till USA: Sanven Technology Ltd., Suite 250, 9166 Anaheim
Place, Rancho Cucamonga, CA 91730
REP
EC
E-CrossStu GmbH
Mainzer Landstr.69, 60329 Frankfurt am Main.
REP
UK
YH CONSULTING LIMITED.
C/O YH Consulting Limited Office 147, Centurion House,
London Road, Staines-upon-Thames, Surrey, TW18 4AX
Tillverkad i Kina


