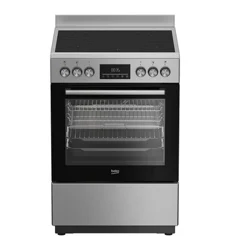
SM 5770
Slushie
Maker
User Manual
EN
01M-8919953200-3125-01
Please read this manual first!
Dear Customer,
Thank you for choosing a Beko product. We want you to get the most out of this appliance, which has
been manufactured with state of the art technology. Please make sure you read and understand this
guide and supplementary documentation fully before use and keep it as a reference. If you give the
appliance to someone else, give them this user manual as well. Observe all warnings and information in
this guide and follow the instructions.
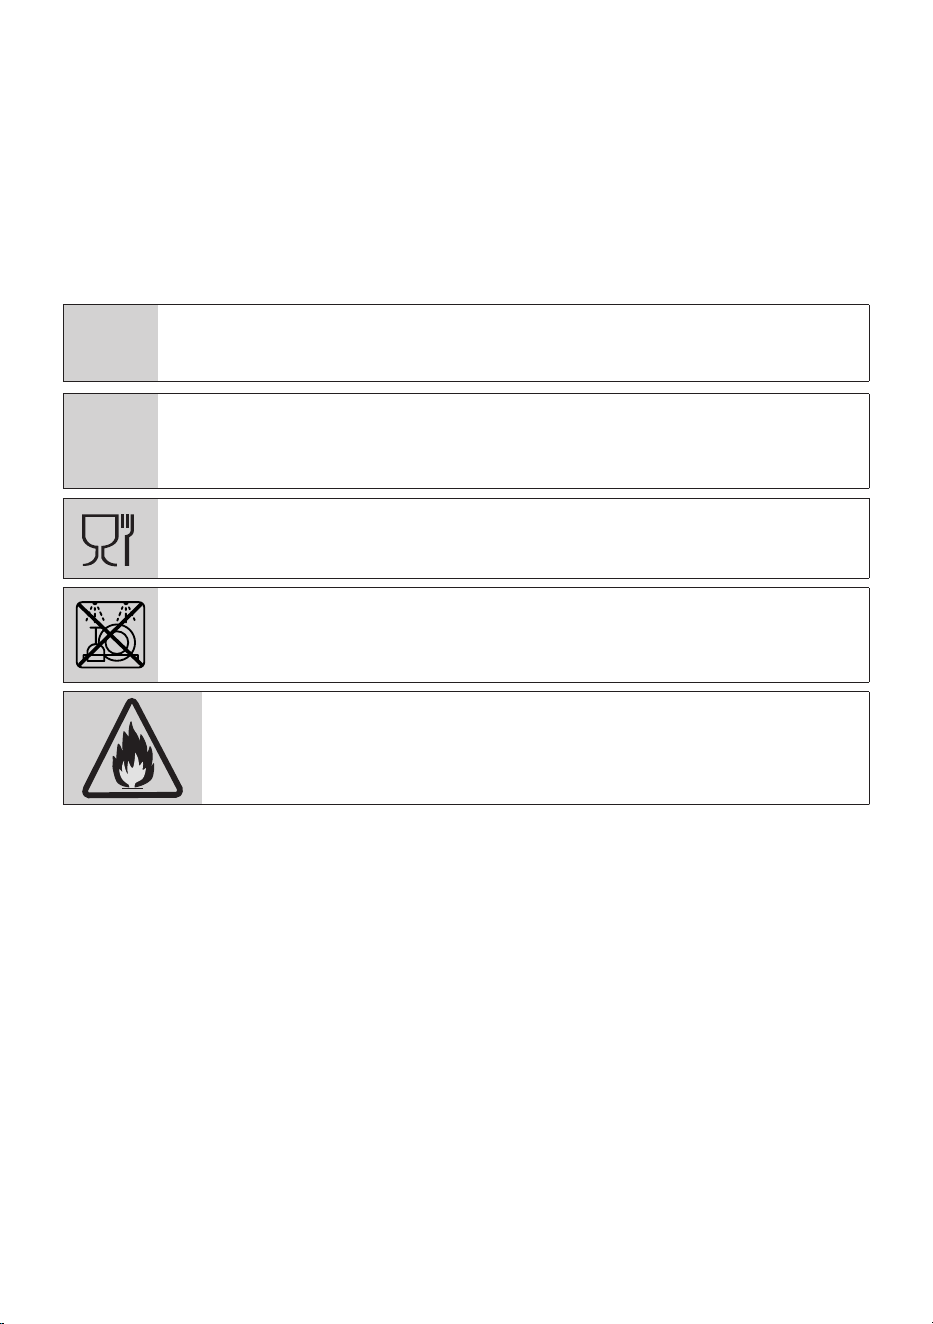
Symbols and their meanings
The following symbols are used throughout this guide:
C
Important information and useful tips for using the appliance.
A
WARNING: Warnings about dangerous situations concerning safety of life and property.
Food-grade appliance.
Do not wash the parts in a dishwasher.
This symbol shows that the appliance used a flammable refrigerant.. Risk of fire if the
refrigerant leaks and is exposed to an ignition source.
WARNING: Servicing shall only be carried out as specified by the equipment manufacturer. Maintenance
and repair work requiring the use of other qualified persons shall only be carried out under the supervi-
sion of someone competent in the use of flammable refrigerants. (This rule only applies when the R290
refrigerant is is used)

3 / EN
TABLE OF CONTENTS
1 Important Safety and Environmental
Instructions 4
1.1 General safety .........................................4
1.2 Compliance with the WEEE Regulation
and Waste Disposal ......................................5
1.3 Information on Chemical Legislation .5
1.4 Packaging Information ..........................5
2 Slushie Maker 6
3 Operation 10
3.1 Preparation ........................................... 10
3.2 Use .......................................................... 10
4 Cleaning and Maintenance 13
4.1 Automatic Cleaning Mode ................. 13
4.2 Cleaning and Maintenance ................ 13
4.3 Storage................................................... 15
4.4 Transportation and Handling ............ 15
4.5 Important points for energy saving .. 15
5 Troubleshooting 16

4 / EN
Slushie Maker / User Manual
Please read this instruction manual thoroughly
prior to using this appliance! Follow all safety in-
structions in order to avoid damage due to improp-
er use!
Keep the user manual for future reference. If you
give the appliance to a third party, please also de-
liver the user manual.
1.1 General safety
• Read all the instructions.
• Before using the appliance, make sure that the
voltage and power match the values on the ap-
pliance’s rating plate.
• Remove all packaging and bags before using the
appliance.
• Never leave the appliance unattended during
use.
• Before using the appliance, make sure it has
been thoroughly cleaned.
• Do not the appliance for anything other than its
intended use. The appliance is not suitable for
commercial use, only household use. Do not use
the appliance outdoors.
• To prevent electric shock, never immerse the
cord, plugs, motor or electrical parts in water or
other liquids..
• Do not use the appliance if the cord or plug
are damaged. Do not turn the appliance on if
it breaks down or is damaged. In the event of
breakdown or damage, take the appliance to the
nearest service centre to be examined, repaired
or adjusted.
• If the power cord is damaged, it must be re-
placed by the manufacturer, its service agent, or
similarly qualified persons.
• Do not place the appliance on or near hot equip-
ment such as a gas or electric hob or oven.
• To avoid the risk of fire, electric shock or injury,
do not use accessories not recommended or
sold by the manufacturer.
• Do not let the power cord touch hot surfaces, or
hang over the edge of the table or worktop.
• This appliance is not suitable for use by the
following persons, including children, without
adult supervision or being given the necessary
instructions. - Persons with reduced physical,
sensory or mental capabilities - Persons lacking
experience and knowledge
• Supervise children at all times to stop them play-
ing with the appliance.
• Avoid contact with the moving parts.
• Make sure to unplug the appliance before mov-
ing it, cleaning it, storing it, or when not in use.
• Always use this appliance on a sound, stable
surface.
• Improper use of the appliance may result in
property damage or even physical injury.
• Never use coarse or abrasive cleaners to clean
the appliance.
• Always keep the appliance upright. If the appli-
ance is on its side or upside down, turn it upright
and wait 24 hours before using it.
• WARNING: When placing the appliance, make
sure the power cord is not pinched or damaged.
• WARNING: Do not place multiple portable plug
sockets or portable power sources behind the
appliance.
• Operate the appliance on a level surface and do
not tilt the appliance when it is working.
• Keep the back and sides of the appliance clear
so the compressor can work properly and avoid
overheating.
• WARNING: Make sure the ventilation holes in the
appliance’s body or inside are not blocked.
• WARNING: Do not use mechanical devices or
other methods apart from those recommended
by the manufacturer to speed up defrosting.
• To avoid damage to the compressor, do not turn
the compressor on frequently. Wait at least 5
minutes minutes before each operation.
• To avoid fire or short circuits, do not insert metal
plates or other conductive materials into the ap-
pliance.
• Never operate the appliance by means of an ex-
ternal timer or separate remote control system.
• Dispose of used refrigerant in accordance with
local regulations.
• Do not move or set up the appliance roughly or
by using force. Otherwise, the refrigerant pipes
could become damaged and leak.
• Parts such as the compressor, condenser, motor
and copper pipes must be replaced with suitable
1 Important Safety and Environmental Instructions
5 / EN
Slushie Maker / User Manual
parts. Have care and maintenance carried out
by the authorised service to avoid the risk of fire
due to incorrect parts or repair.
• WARNING: Do not damage the refrigerant circuit.
• Do not put aerosol cans containing combustible
gas or similar explosive materials inside the ap-
pliance.
• Never put flammable, explosive, or chemically
corrosive substances inside the appliance.
• If there is a combustible gas leak, do not use the
appliance.
• To avoid a possible fire, never place or use gas or
other flammable substances near the appliance.
• To avoid causing a fire or explosion, do not clean
the appliance with flammable liquids.
• Do not electric tools in the appliance’s food stor-
age compartments as long unless the manufac-
turer recommends it.
• WARNING: Only fill with potable water.
• The following person may use the appliance only
with adult supervision or after receiving the nec-
essary instructions. - Children aged 8 years or
older - people with reduced physical, sensory or
mental capabilities - Persons lacking experience
and knowledge Never let children play with the
appliance. Unsupervised children must not per-
form cleaning or maintenance.
• Regularly clean the accessible drainage systems
and those surfaces that come into contact with
food.
• Clean the water tanks if they haven’t been used
for 48 hours.
• The appliance is suitable for use at home and in
the following places:
– The staff kitchens of stores, offices and other
working environments
– Farmhouses and hotels, motels, B&Bs and
similar accommodations.
– Places like room breakfast bars
– Meal service and similar non-retail practices
• Keep these instruction for future reference.
1 Important Safety and Environmental Instructions
1.2 Compliance with the WEEE
Regulation and Waste Disposal
This product complies with EU WEEE
Directive (2012/19/EU). This product
bears a classification symbol for waste
electrical and electronic equipment
(WEEE).
This symbol indicates that this product shall not be
disposed with other household wastes at the end
of its service life. Used device must be returned to
offical collection point for recycling of electrical
and electronic devices. To find these collection
systems please contact to your local authorities
or retailer where the product was puchased. Each
household performs important role in recovering
and recycling of old appliance. Appropriate dis-
posal of used appliance helps prevent potential
negative consequences for the environment and
human health.
1.3 Compliance with RoHS Direc-
tive
The product you have purchased complies with EU
RoHS Directive (2011/65/EU). It does not contain
harmful and prohibited materials specified in the
Directive.
1.4 Packaging Information
The appliance's packaging is made of
recyclable materials in accordance with
the National Legislation. Do not dispose
of the packaging waste with the house-
hold waste or other wastes, dispose of it in the
packaging collection areas specified by local au-
thorities.
6 / EN
Slushie Maker / User Manual
2 Slushie Maker
8
1
2
3
4
7
6
5
9
10 11
12 13
7 / EN
Slushie Maker / User Manual
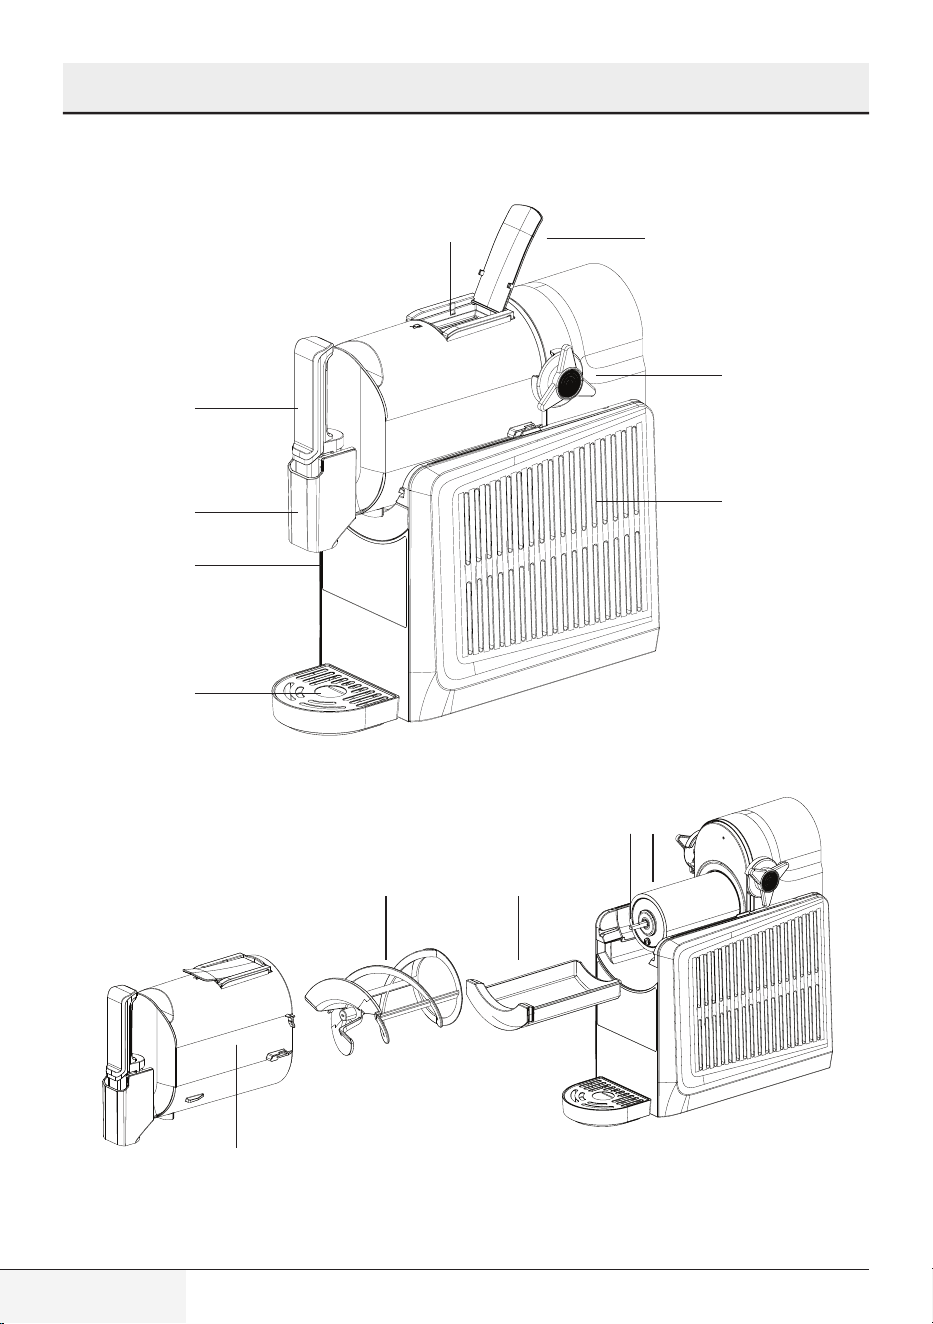
2 Slushie Maker
1. Filler Port
2. Lid
3. Bail Handle
4. Body
5. Drip tray
6. Control panel
7. Spout
8. Dispensing handle
9. Vessel
10. Auger
11. Condensation catch
12. Pin
13. Evaporator
Technical data
Voltage: 220-240 V~, 50 Hz
Power consumption: 170 W
Capacity: 1,8 L
Nominal electric current: 1.3A
Thermal insulation material: Cyclopentane
Refrigerant R290; 23g
Climate type: ST/SN/N
Manufacturer reserves the right to make technical
and design changes.
The values provided with the appliance or its ac-
companying documents are laboratory readings in
accordance with the respective standards. These
values may differ depending on the use and ambi-
ent conditions.
Extra Information for the User Manual:
Technical information for operating in Low Power Modes
according to EU Directive 2023/826
Mode Power Consumption (Watts) Duration (Minutes)*
Off 0.5 -
Standby Mode - -
Info or status display
Standby Mode
- -
Connected to Network Standby
Mode
- -
The time it takes for the appliance to automatically switch to standby mode, off mode, or network standby
mode is measured in minutes and rounded to the nearest whole minute.
8 / EN
Slushie Maker / User Manual
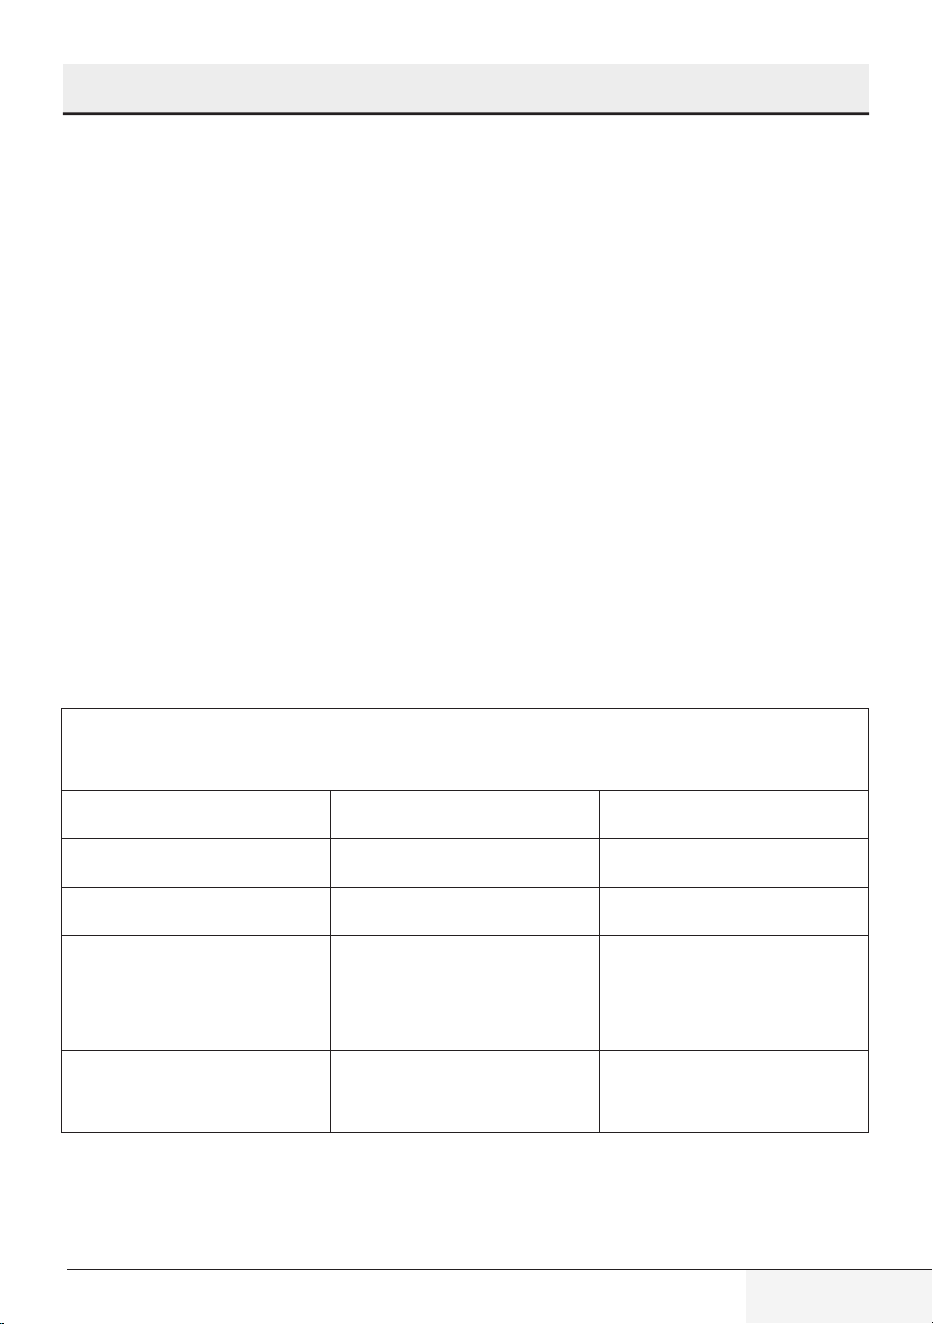
Power Button:
Press the power button to turn on the appliance. The appliance will enter standby mode. Press the power
button to turn off the appliance.
Start/Stop Button:
1. Press the Start/Stop button when in standby mode. The appliance will enter operating mode.
2. Press the Start/Stop button when in operating mode. The appliance will exit the current operating
mode.
Preset Button:
When in standby mode, press the Preset button to select the preset menu. All preset menus come with
recommended temperature temperature settings. The following table gives the recommended tempera-
tures for the preset menus.
Preset Menu
Optimal Temperature
Setting
Slush 2
Frappe 3
Milk Shake 3
Mix Slush 3
Frozen Juice 2
2 Slush Maker
9 / EN
Slushie Maker / User Manual
2 Slush Maker
Temperature Setting Button
Press the Set Temperature button to select the desired temperature setting. There are five (5) tempera-
ture settings to choose from. Increase the temperature setting for thicker and colder slushes.
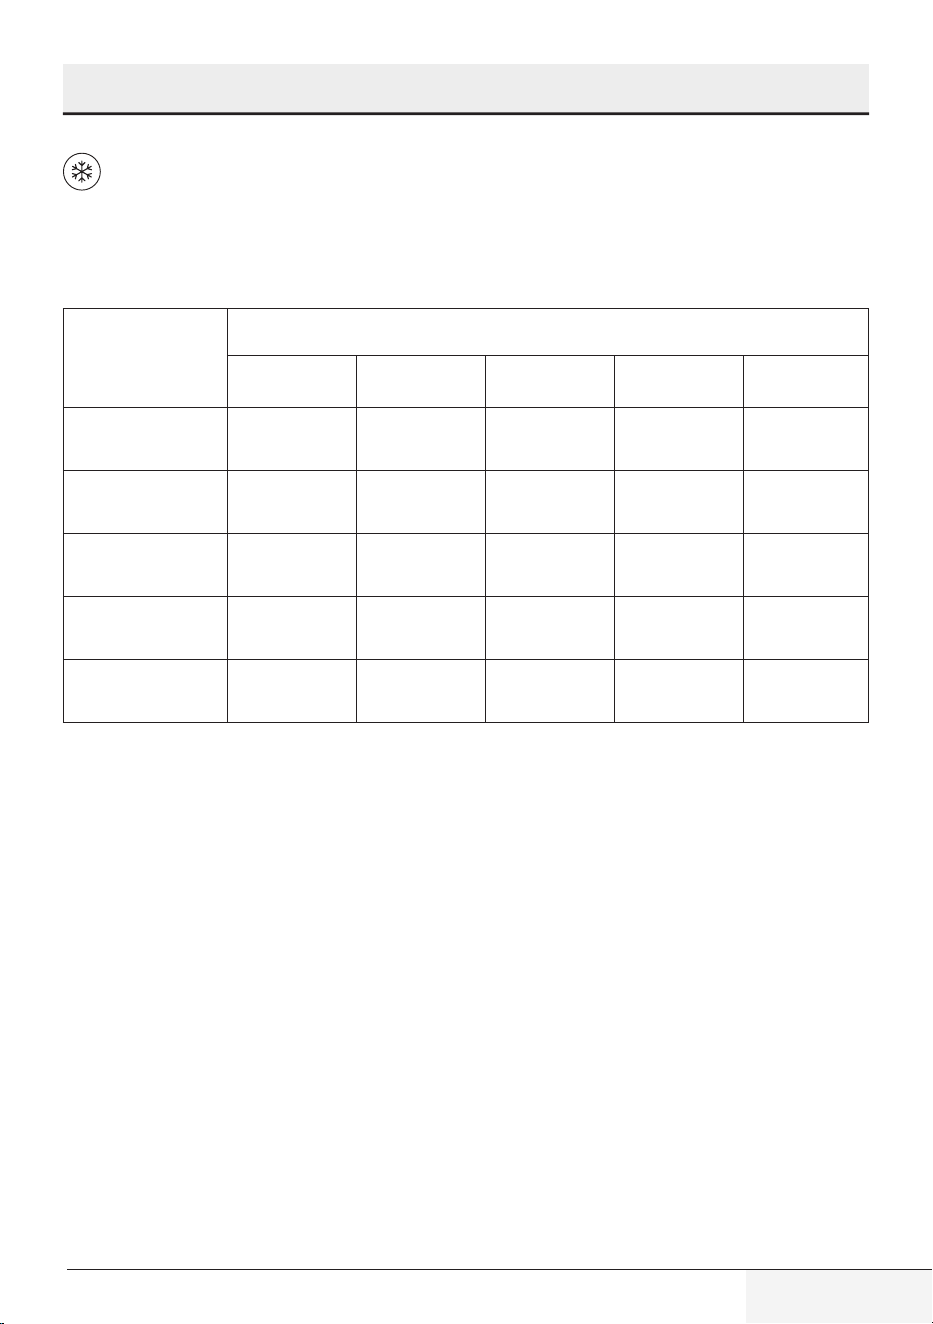
The following table shows the average temperatures for the drink modes. (°C)
Drink Preset
Temp Preset
Tempera-
ture 1
Tempera-
ture 2
Tempera-
ture 3
Tempera-
ture 4
Tempera-
ture 5
Slush -1.9 °C -2.1 °C -2.2 °C -2.5 °C -2.7 °C
Frappe -1.2 °C -1.3 °C -1.4 °C -1.7 °C -2.1 °C
Milk Shake -2.6 °C -2.8 °C -3.0 °C -3.1 °C -3.2 °C
Mix Slush -2.5 °C -4.0 °C -5.5 °C -7.0 °C -8.0 °C
Frozen Juice -1.8 °C -1.9 °C -2.0 °C -2.3 °C -2.5 °C
10 / EN
Slushie Maker / User Manual
3 Operation
3.1 Preparation
1. Remove all packaging and labelling materials and dispose of them in accordance with the applicable
law. Make sure there are no parts missing.
2. Before using the appliance, carefully clean all parts that will come into contact with foods (See
‘Cleaning and Maintenance’).
3. Do not lean the appliance against the wall. Leave a gap of at least 10 cm.
3.2 Use
• Do not add ice or solid ingredients such as fruit, ice cream, frozen fruit, etc.
• Do not add hot ingredients.
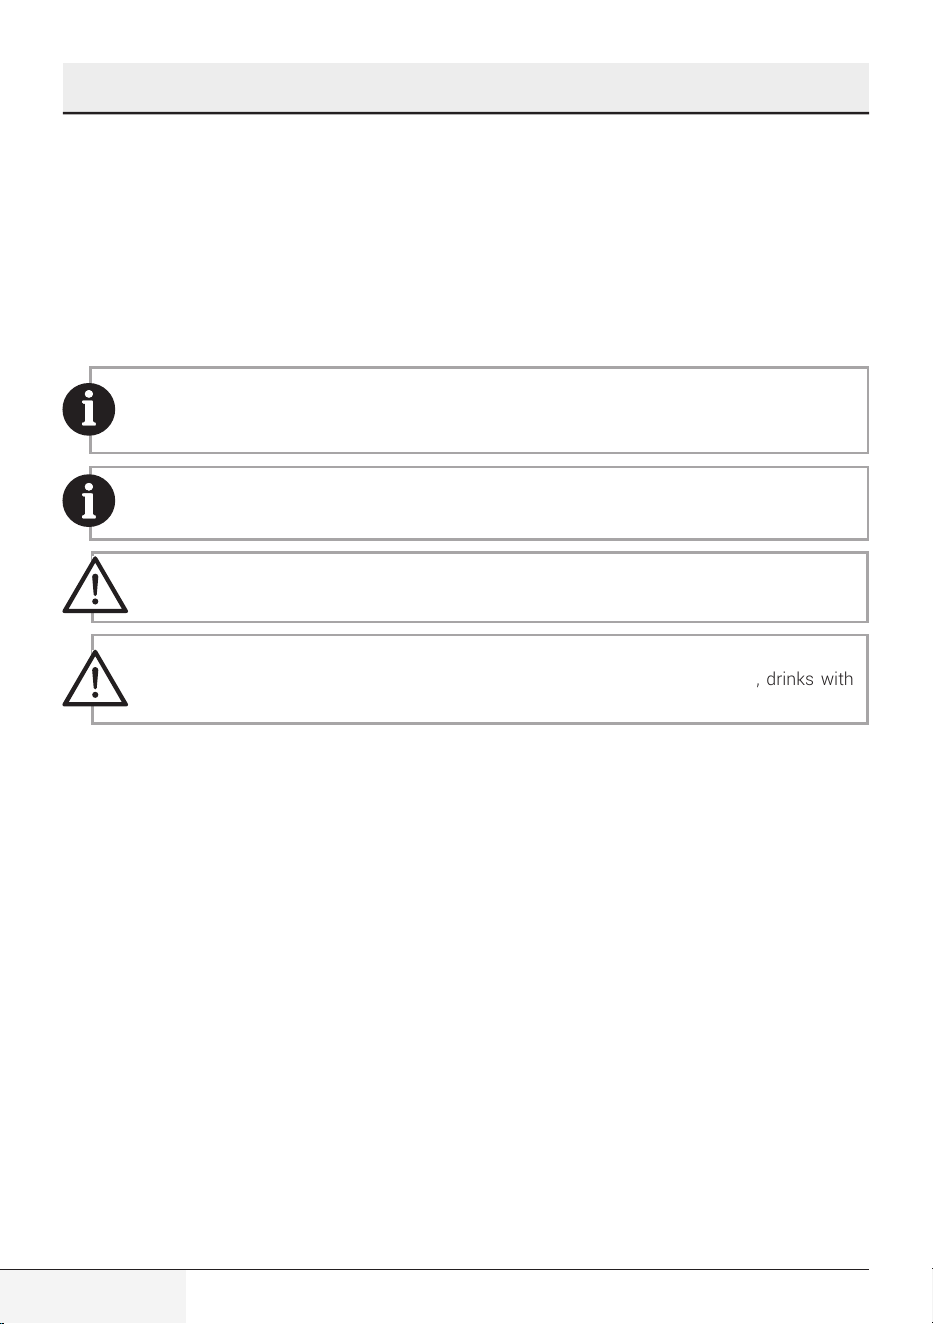
Make sure the mixture is between the MIN and MAX marks on the tank. Pre-chill ingredients
to speed up the process.
WARNING: All added ingredients must contain at least 5% sugar.
WARNING: For frothy drinks, we recommend reducing the amount shown below to 1.5 litres.
Common frothy drinks: Strawberry juice, coconut milk, lemonade, milk drinks, drinks with
artificial sweeteners such as sugar-free cola, etc.
Special Functions and Explanations
Tilt warning
1. If the appliance is tilted more than 60°’ in any direction, press the Power button. The 1 and 3
temperature setting lights will flash and the appliance will sound at the same time. In addition, all the
buttons will be disabled and cannot be operated If the appliance is tilted less than 60°’ it will enter
standby mode.
2. If the appliance is moved and tilted more than 60°’ when operating normally, the 1 and 3 temperature
setting lights will flash and the appliance will sound at the same time. If the appliance is tilted less
than 60°’ it will continue to operate in the previous operating mode.
11 / EN
Slushie Maker / User Manual
3 Operation
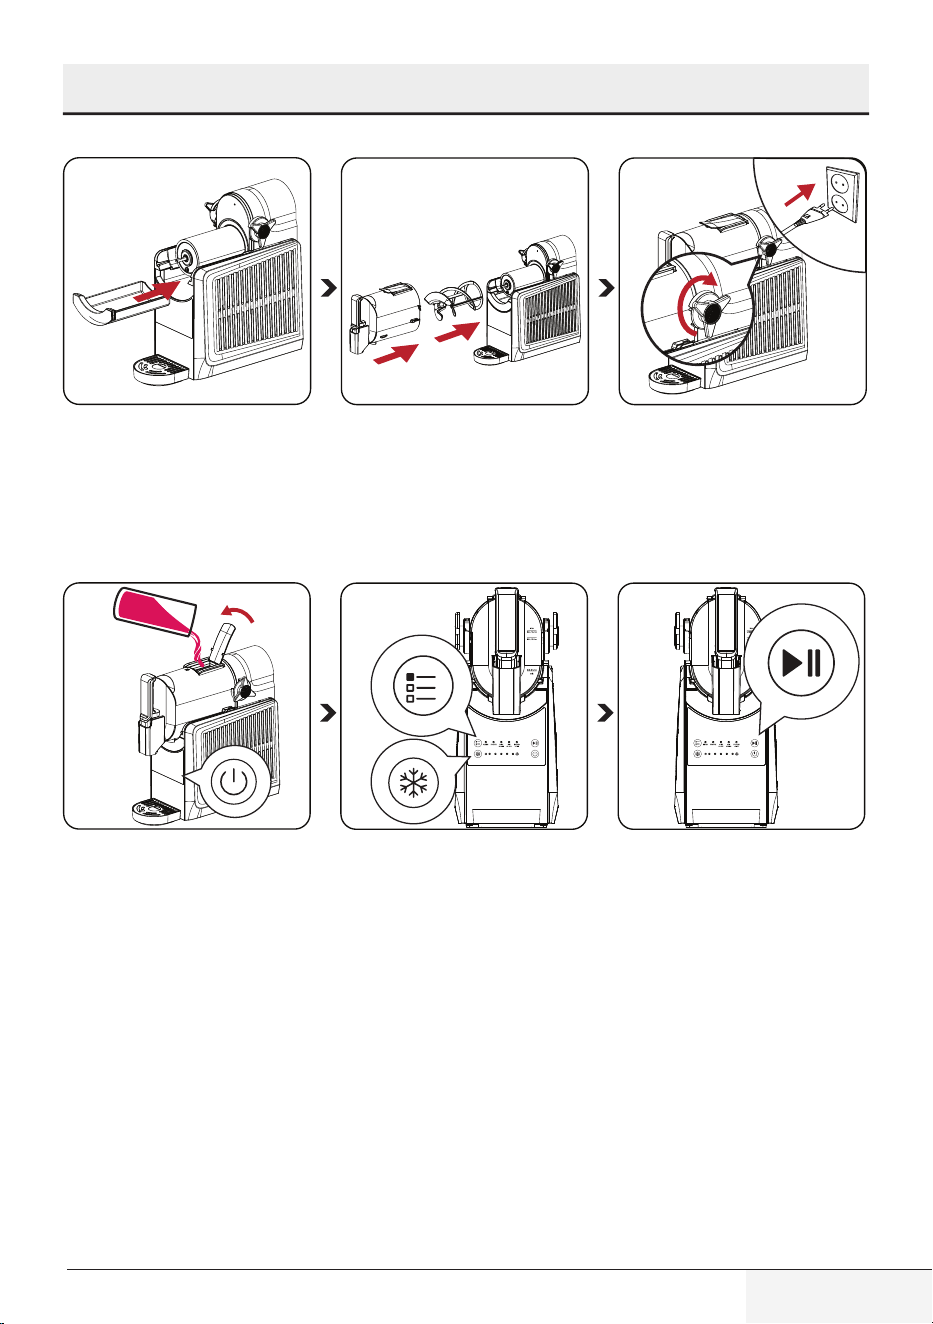
Install the condensation catch
under the evaporator by sliding
it into the rail grooves.
Install the auger by sliding it
over the evaporator and rotat-
ing until it fits into place onto
the pin.
Slide the vessel over the in-
stalled auger and evaporator.
Lock the vessel in place with
the bail handle. Plug in the ap-
pliance.
1
2
Add liquid(s) and/or blended
ingredients through the easy-fill
port and close the cover. Press
the power button.
Press the Preset button to se-
lect the desired menu. Each
menu comes with an optimal
temperature setting. You can
change the temperature if you
want with the temperature set-
ting button.
Press the Start/Stop button. The
appliance will start to chill and
stir the slush mixture. Process-
ing time depends on the select-
ed preset and the temperature
of the materials.
12 / EN
Slushie Maker / User Manual
3 Operation
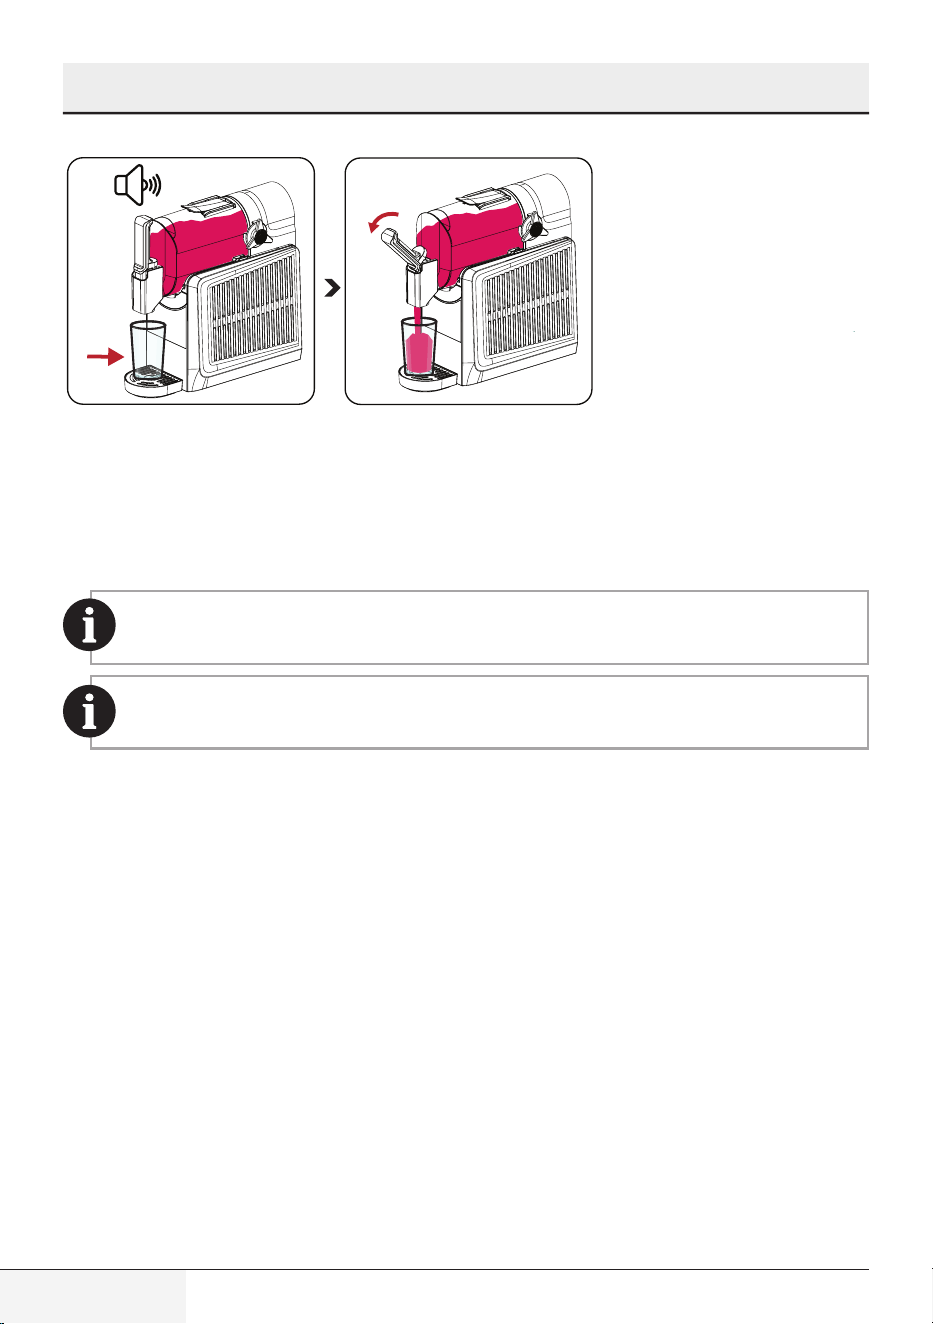
3x
The LEDs will flash on and off
while the slush drink is being
prepared. Once the drink is
ready, the LEDs will become
solid and three beeps will sound.
Place a cup under the spout.
Slowly pull the dispensing
handle down to let the slush
pour out.
When the slush is ready, the appliance will continue working to keep your drink at the ideal
temperature. For the best taste, we recommend consuming the drink within 3 hours.
To maximise the compressor’s lifespan, the standby time should not be more than 4 hours.
13 / EN
Slushie Maker / User Manual
4 Cleaning and Maintenance
4.1 Automatic Cleaning Mode
Fill the vessel up to the MAX line. To start auto-clean, press the Preset button for 3 seconds. All the LEDs
will blink in a clockwise rotation. The cleaning mode lasts 10 minutes. To exit cleaning mode while in
cleaning mode, press the Start/Start/Stop button.
4.2 Cleaning and Maintenance
Auto-cleaning mode makes it easier to keep the appliance in the best condition. Start the
cleaning cycle after each time you use the slush maker.
WARNING: Never use petrol, solvents, abrasive cleaners, metal objects or hard brushes to
clean the appliance.
WARNING: Do not immerse the motor unit or power cord into water or other liquids and never
hold under the running water.
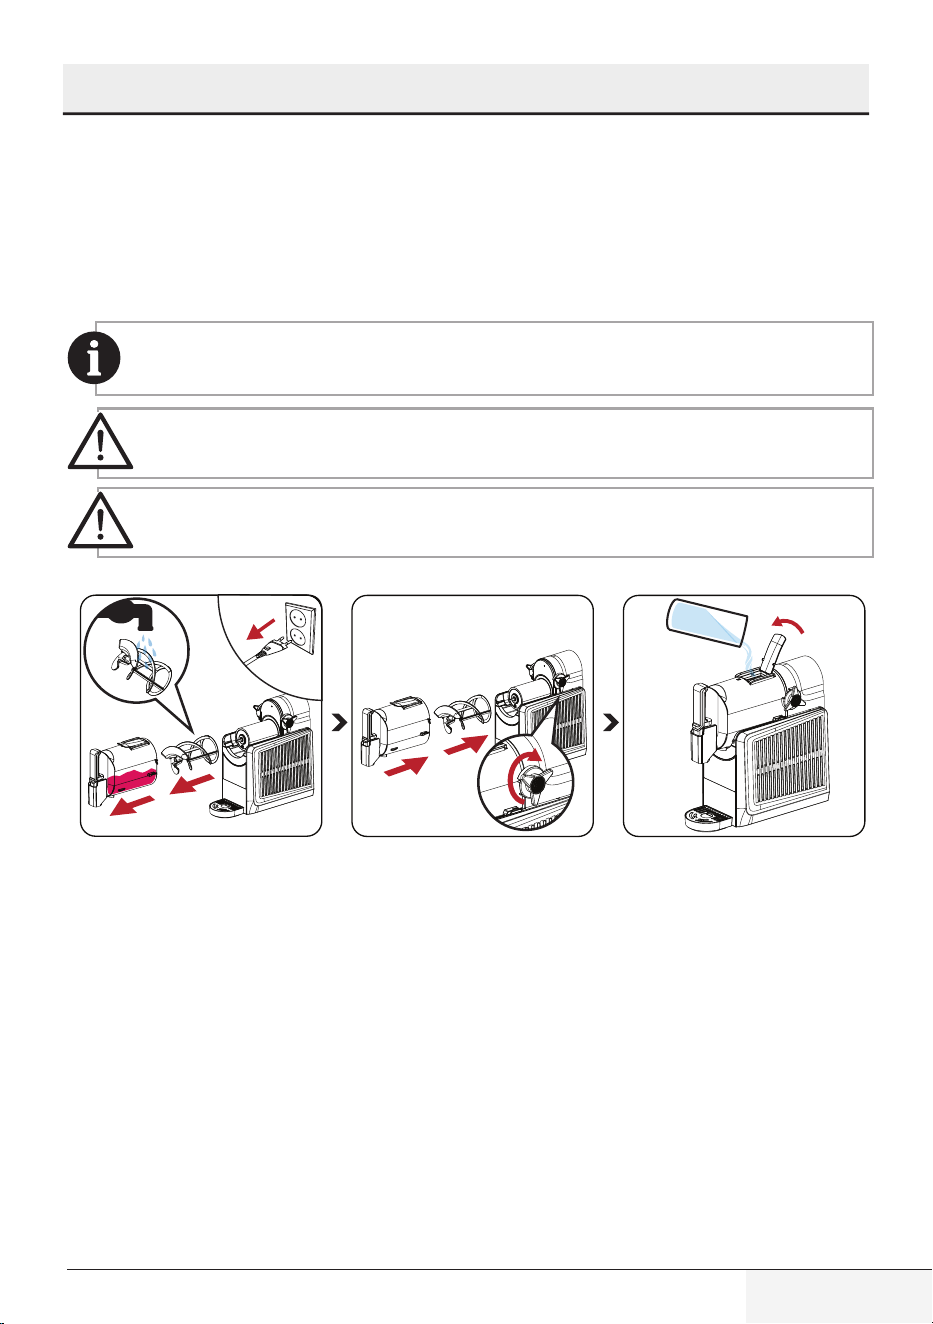
1
2
3
Unplug the appliance. Remove
the vessel and empty the re-
maining slush. Remove the au-
ger and clean it.
Reattach the auger and then re-
attach the vessel. Lock the ves-
sel in place with the bail handle..
Fill the vessel with water until
the MAX fill line.
14 / EN
Slushie Maker / User Manual
4 Cleaning and Maintenance
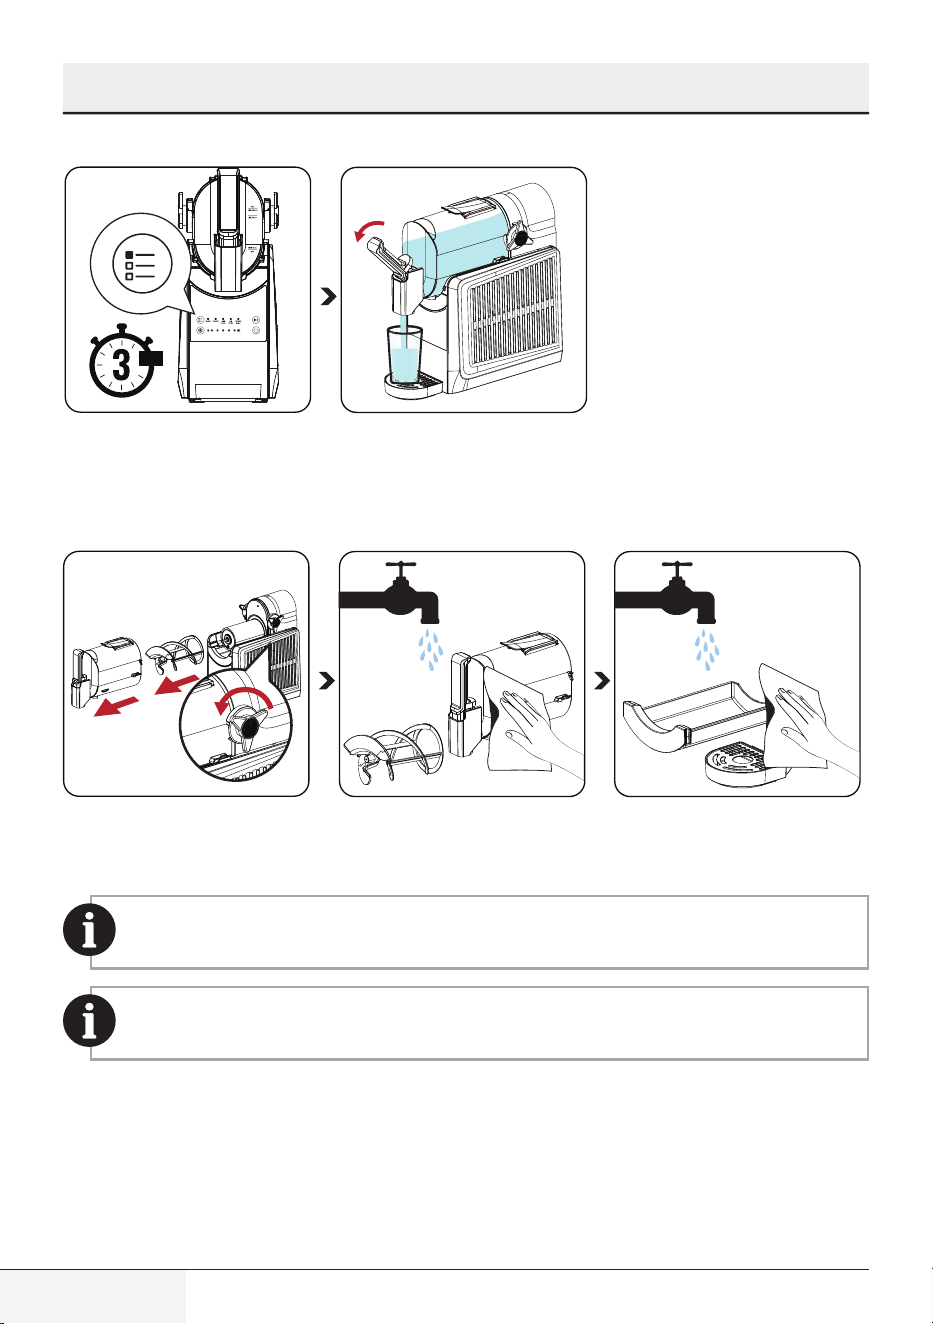
sn.
To enter cleaning mode, press
the Preset button for 3 seconds.
All the LEDs will blink in a clock-
wise rotation.
When the process is complete,
the unit will automatically stop
working. Pull the dispensing
handle down and slowly drain
the water from the unit.
1
2
3
Loosen the bail handle and re-
move the vessel.
Rinse the vessel and auger well,
then dry with a soft cloth.
Clean the condensation catch
and drip tray with soapy water,
then rinse and dry thoroughly.
Make sure the parts are completely dry before refitting them.
After cleaning, dry all parts with a soft cloth before using the appliance.

15 / EN
Slushie Maker / User Manual
4 Cleaning and Maintenance
4.3 Storage
• If you do not plan to use the appliance for a long period of time, please store it carefully.
• Ensure that the appliance is unplugged, cooled down completely.
• Do not wrap the power cord around the appliance.
• Store the appliance in a cool and dry environment.
• Always make sure the appliance is kept out of reach of children.
4.4 Transportation and Handling
• Transport the appliance in its original packaging during handling and transport. The packaging pro-
tects the appliance from physical damage.
• Do not place heavy objects on the appliance or its packaging. The appliance may get damaged.
• If the appliance is dropped, it may stop working or permanent damage may occur.
4.5 Important points for energy saving
Turn off and unplug the appliance after each use.

16 / EN
Slushie Maker / User Manual
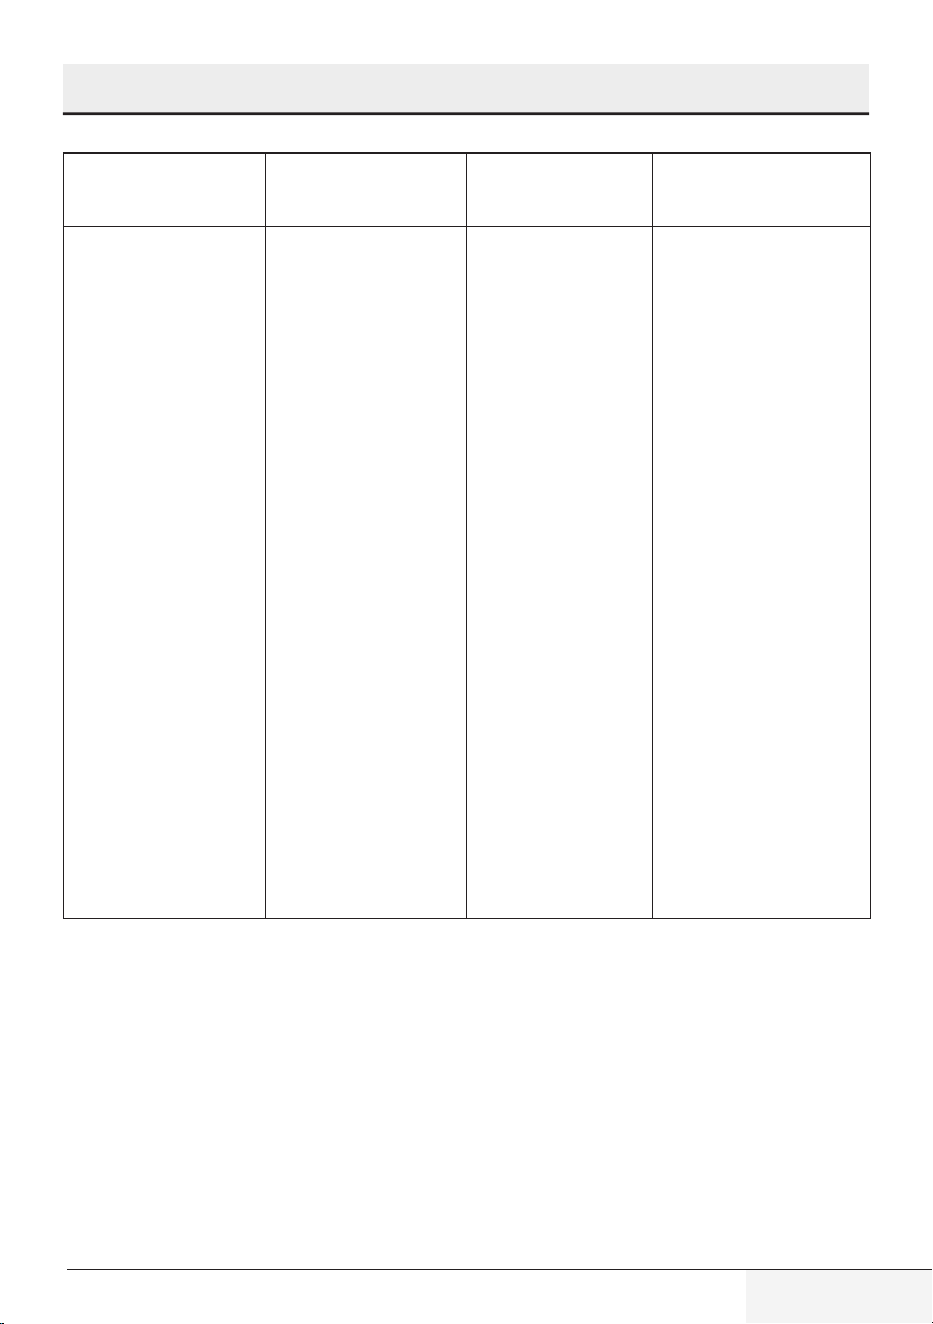
5 Troubleshooting
Problem Indicator Cause Solution
Auger is noisy. Not Available When the slush has
low sugar content,
this causes the
evaporator to freeze.
Add sugar, syrup, etc. to
the frozen mixture.
The auger is scraping
the inside of the tank or
splashing the liquid to
the sides.
Not Available The auger needs
to be cleaned or its
form is broken.
Remove the auger,
clean it and refit it. If the
problem persists, check
whether the auger is
crushed, warped, or bent.
In that case, contact
Customer Services to
have the auger replaced.
Micro switch
malfunction
All the preset menu
LEDs and the
temperature setting
LEDs will flash in
sequence.
The vessel may
have been fitted
incorrectly.
Make sure the vessel
is fitted properly.. If the
problem persists, contact
Customer Services..
Tilt switch malfunction The 1 and 3
temperature setting
lights will flash and
the appliance will beep
three times.
The appliance is
tilted at more than
60°.
Turn off the appliance
and place it on a level
surface before use. If the
problem persists, contact
Customer Services..
Sensor malfunction The 1 and 5
temperature setting
lights will flash and
the appliance will beep
three times.
The sensor has short
circuited or there is
a problem with the
sensor.
Turn off and on the
device. If the problem
persists, contact
Customer Services..
17 / EN
Slushie Maker / User Manual
5 Troubleshooting
Problem Indicator Cause Solution
Jammed rotor
malfunction
The 3 and 5
temperature setting
lights will flash and
the appliance will beep
three times.
May be due to the
ingredients being too
cold or having a low
sugar content..
Turn off the appliance.
Check the liquid. If the
liquid hasn’t frozen, add
warm water (not hot
water), empty out the
fluid, turn the appliance
back on, and start the
cleaning cycle. Check
whether the auger is
working properly. If the
auger is not working,
this indicates a motor
malfunction. Please
contact Customer
Services to have it
repaired. If the auger is
working normally, place
a new drink and continue
preparing it. Check the
liquid. If the liquid is
partially frozen or stuck
to the auger, this shows
that the liquid has a low
sugar content. Turn off
the appliance, then add
warm water (not hot
water), empty out the
fluid, clean the auger’s
chamber, add new drink
and add sugar to it (make
sure the sugar content is
more than 5%%).

18 / EN
Slushie Maker / User Manual
Problem Indicator Cause Solution
Hoot ingredients alarm The 4 and 5
temperature setting
lights will flash and
the appliance will beep
three times.
This could due to
the ingredients being
warmer than 60°C.
Turn off the appliance.
Empty out the ingredients
in the feeding chamber
and refill with ingredients
cooler than 60°C. If the
problem persists, contact
Customer Services..
Connection error The 2 and 3
temperature setting
lights will flash and
the appliance will beep
three times.
This could be due
to damage to the
electronic board.
Please contact Customer
Services to have it
repaired.
5 Troubleshooting

55 Blanck Street, Ormeau Q 4208
P O Box 354, Ormeau Q 4208
p : 5549 3146 f : 5549 3546
ABN : 49 152 055 162
ORIGINAL MANUFACTURER’S WARRANTY
ADVICE FORM
BEKO SMALL KITCHEN APPLIANCES
(including Coffee Machines, Slushie Maker & Air Fryer)
24 months warranty, full parts and labour warranty only.
WARRANTY CONDITIONS
The following conditions apply only in relations to the warranty expressly given on this Warranty Advice Form supplied with t he product. This
warranty only applies to appliances purchased and used in Australia or New Zealand and is in addition to (and does not exclude, restrict or
modify in any way) other rights and remedies under a law to which the appliances relate, including any non-excludable statutory guarantees in
Australia and New Zealand. It applies to the original purchaser and for appliances used in domestic applications only.
1. This warranty does not apply:
(a) if the identification number attached to the appliance has been altered, rendered illegible or removed;
(b) to light globes;
(c) to paint and vitreous enamel finishes and glass;
(d) to surfaces damaged by use of aerosols or cleaners;
(e) if the appliance has been –
(i) subject to misuse, abuse, negligence, accident, fire or floods;
(ii) connected or improper, inadequate or faulty electricity, gas, water or drainage services or intake or exhaust
ducts or flues, or operated using incorrect or contaminated fuels or lubricants;
(iii) installed, maintained or operated otherwise than in accordance with the instructions furnished by Beko including the
improper use of detergents, bleaches, cleaners or other additives;
(iv) damaged by foreign objects in the appliance;
(v) serviced, repaired or altered otherwise than by Beko authorised service agents of Beko, or using other than Beko
approved replacement parts.
2. The purchaser shall be responsible for any expenses involved in making the appliances readily accessible for servicing, the purchaser
shall be responsible for any costs of transporting the appliance or parts thereof to and from the nearest Beko authorised service agent.
3. This warranty is the only expressed warranty given by Beko.
4. Beko reserves the right to determine whether or not the fault is caused by faulty workmanship or material or that any part is defective.
5. Where permitted by law, this warranty shall not apply to loss suffered through or resulting from the non-operation or the ineffective
operation of the appliance or any part of the appliance.
6. The purchaser must produce proof of the date of purchase together with this Warranty Advise Form when making a claim.
7. Subject to your statutory rights as to the merchantable quality of the product or accessory. In the event of a product or accessory being
replaced during the guarantee, the guarantee on the replacement will expire at the original date, i.e., 24 months from the original
purchase date.
8. Australia: For Appliances and services provided by Beko in Australia, Beko goods come with a guarantee by Beko that cannot be
excluded under the Australian Consumer Law. You are entitled to a replacement or refund for a major failure and for compensation for
any other reasonably foreseeable loss or damage. You are also entitled to have the Appliance repaired or replaced if the Appliance
fails to be of acceptable quality and the failure does not amount to a major failure. ‘Acceptable quality’ and ‘major failure’ have the
same meaning as referred to in the Australian Consumer Law.
9. New Zealand: For Appliances and services provided by Beko in New Zealand, the Appliances come with a guarantee by Beko
pursuant to the provisions of the Consumer Guarantees Act, the Sales of Goods Act and the Fair Trading Act. Where the Appliance
was purchased in New Zealand for commercial purposes the Consumer Guarantee Act does not apply.
These Warranty Conditions supersedes and excludes all other representations, conditions and warranties, except those implied
by legislation previously referred to.
For Service or Spare Parts: Aust 1300 282 356 NZ 0800 692 356

Beko A&NZ Pty Ltd
55 Blanck Street, Ormeau QLD,
4208 AUSTRALIA
www.beko.com.au