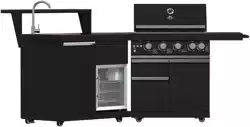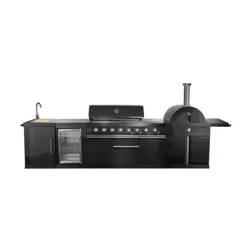
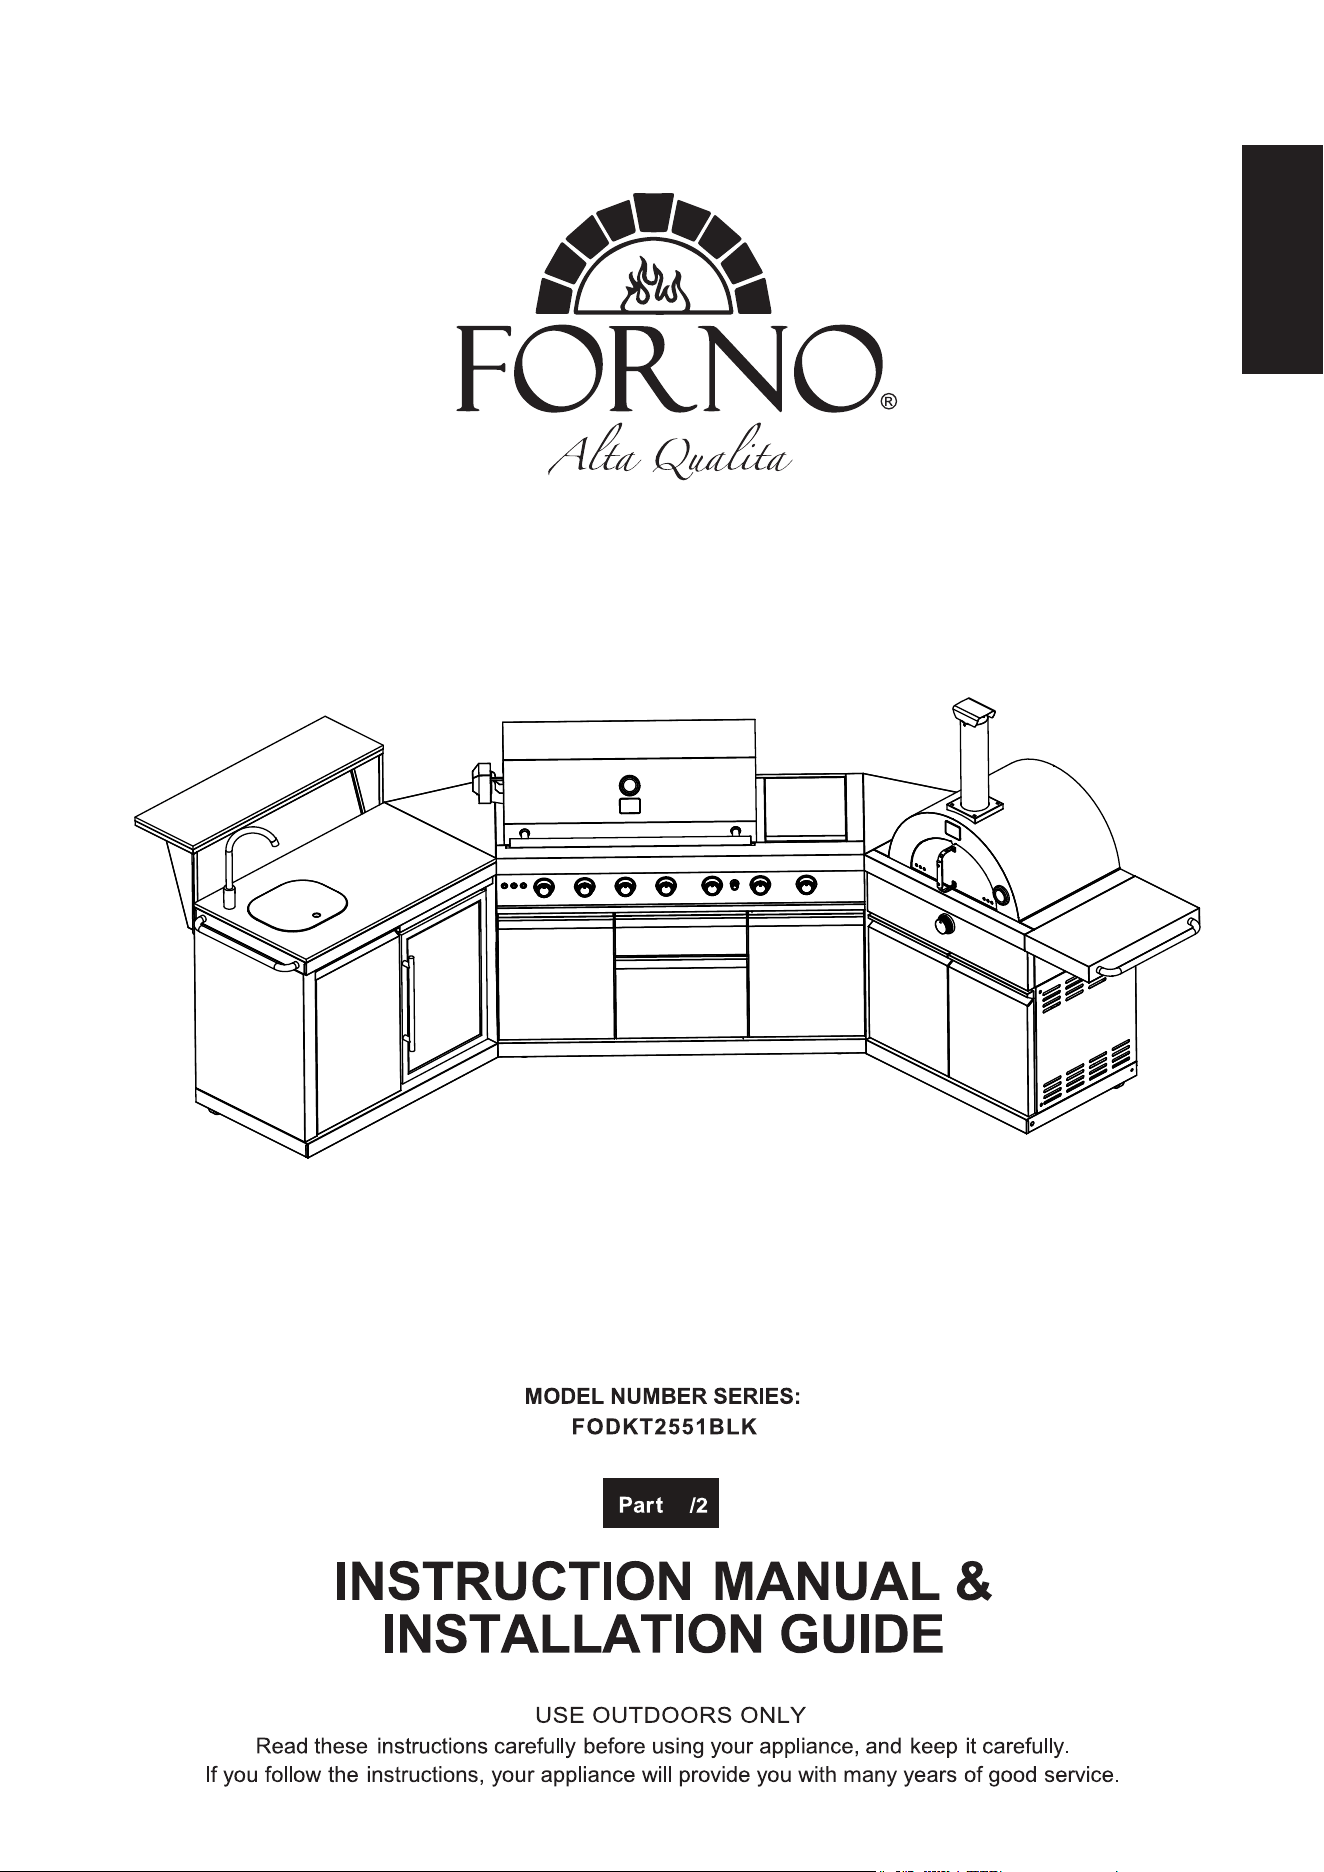
3-Piece Black Aluminum OutdoorKitchen Set. 6-Burners gas grill with side burner,
17.5”Refrigerator, 18" gas pizza oven,and black Dekton countertops
ENGLISH
1
California Proposition 65 Warning:
Chemicals including Chromium(hex avalent compounds) known to the State
of California to cause cancer, birth defects or other reproductive harm are
found in and/or created by the combustion of natural gas, propane, butane
and other fuels. Always operate this unit as described in the owner's manual
and in well ventilated areas.
Read all instructions before you operate your grill. Save these instructions!
For more information go to
Forno
Forno
Forno
120V
120V
3
CSA/ANSIZ21.58-22 CSA 1.6-22
CSA/ANSIZ21.58-22 CSA 1.6-22
Minimum ambient operating temperature: -4°F (-20°C)
Minimum ambient operating temperature: -4°F (-20°C)
18"Gas Pizza Oven
5+2Burner BBQ
36
20161918
17
21
22 23
24
25
27
28
26
29
30
31
35
33
34
rod
Drainer & pipe
M6x10
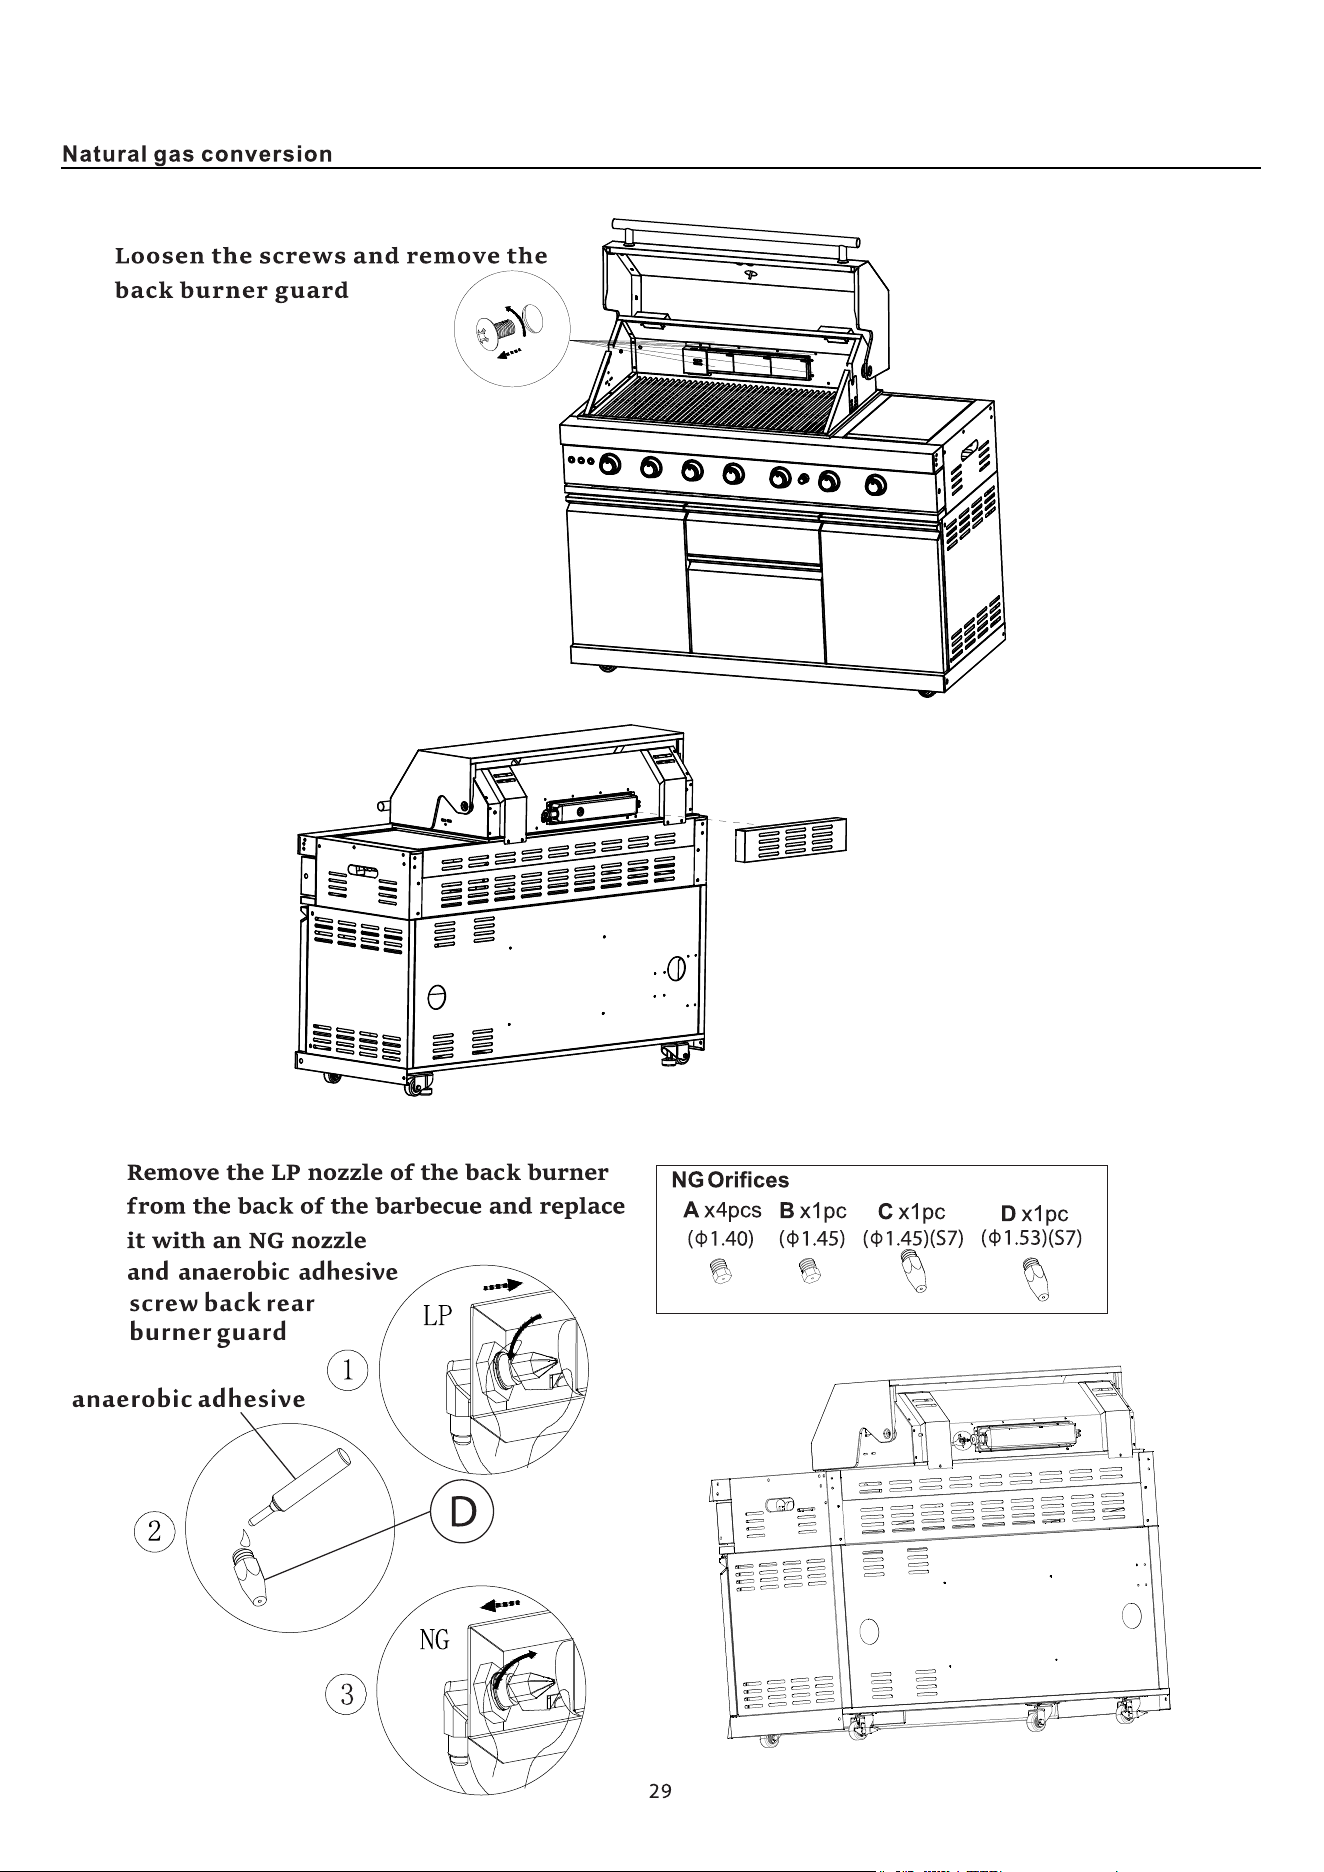
NG Orifices
51
M6 Nuts
4
16
17
18
19
21
23
24
25
26
27
28
29
30
31
32
33
34
35
36
37
38
Rotisserie fork
20
22
Cross
screwdriver
(installed)
(installed)
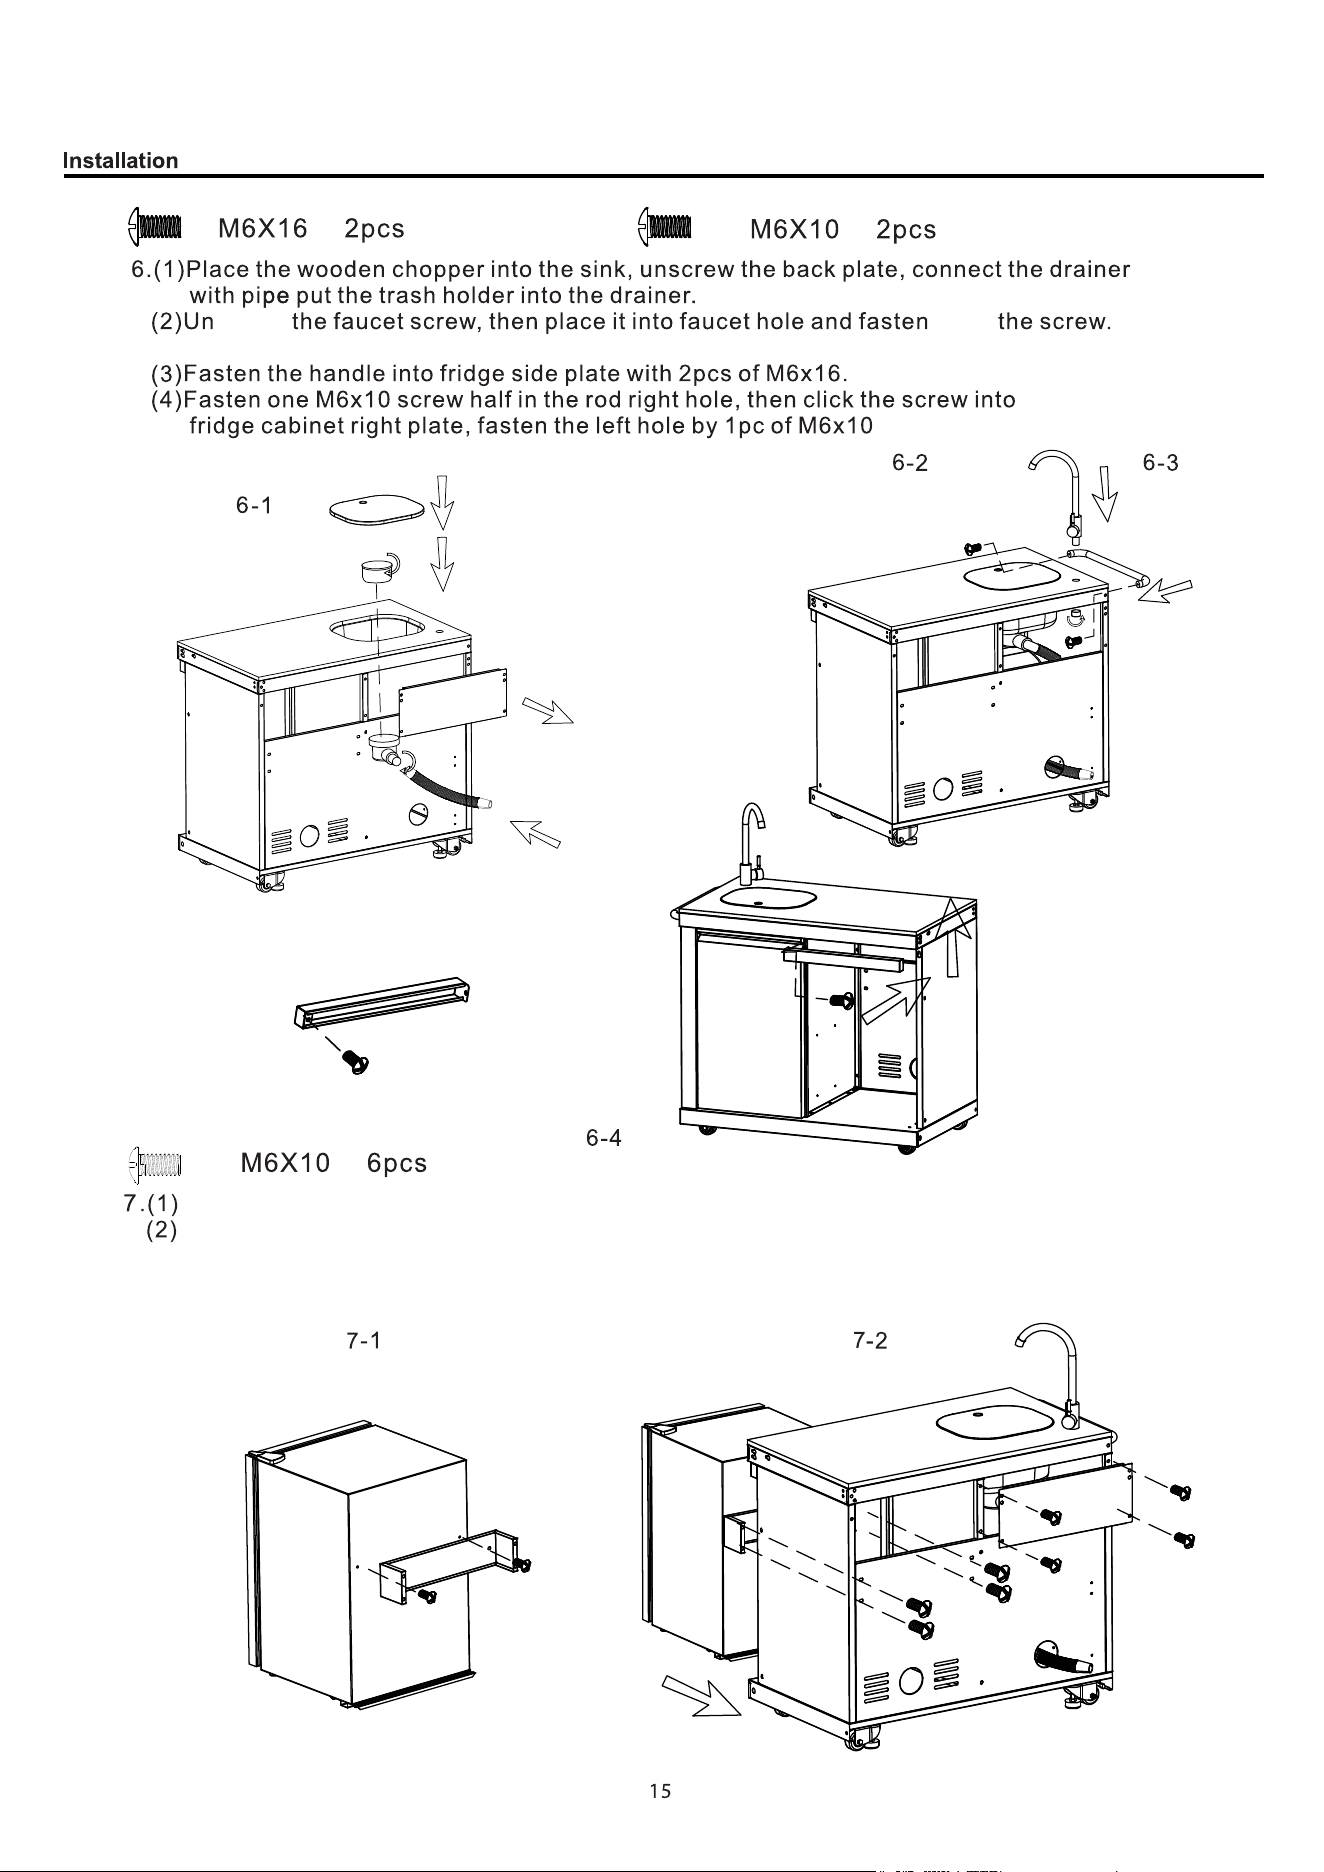
Fasten the fridge & fridge bracket with 2pcs of M6x10, then
Fasten the fridge bracket into the cabinet back plate with 4pcs of M6x10.
Fasten back the small back plate with 4pcs of M6x10.
fasten
back
Connect with G1/2 water pipe.
then put connector into the left hole, leave white wire outside.
then put connector into the left hole,
leave white wire outside.
7
OR
8
4
0
1
2
11-3
11-1
11-2
48
5
2
17
Forno
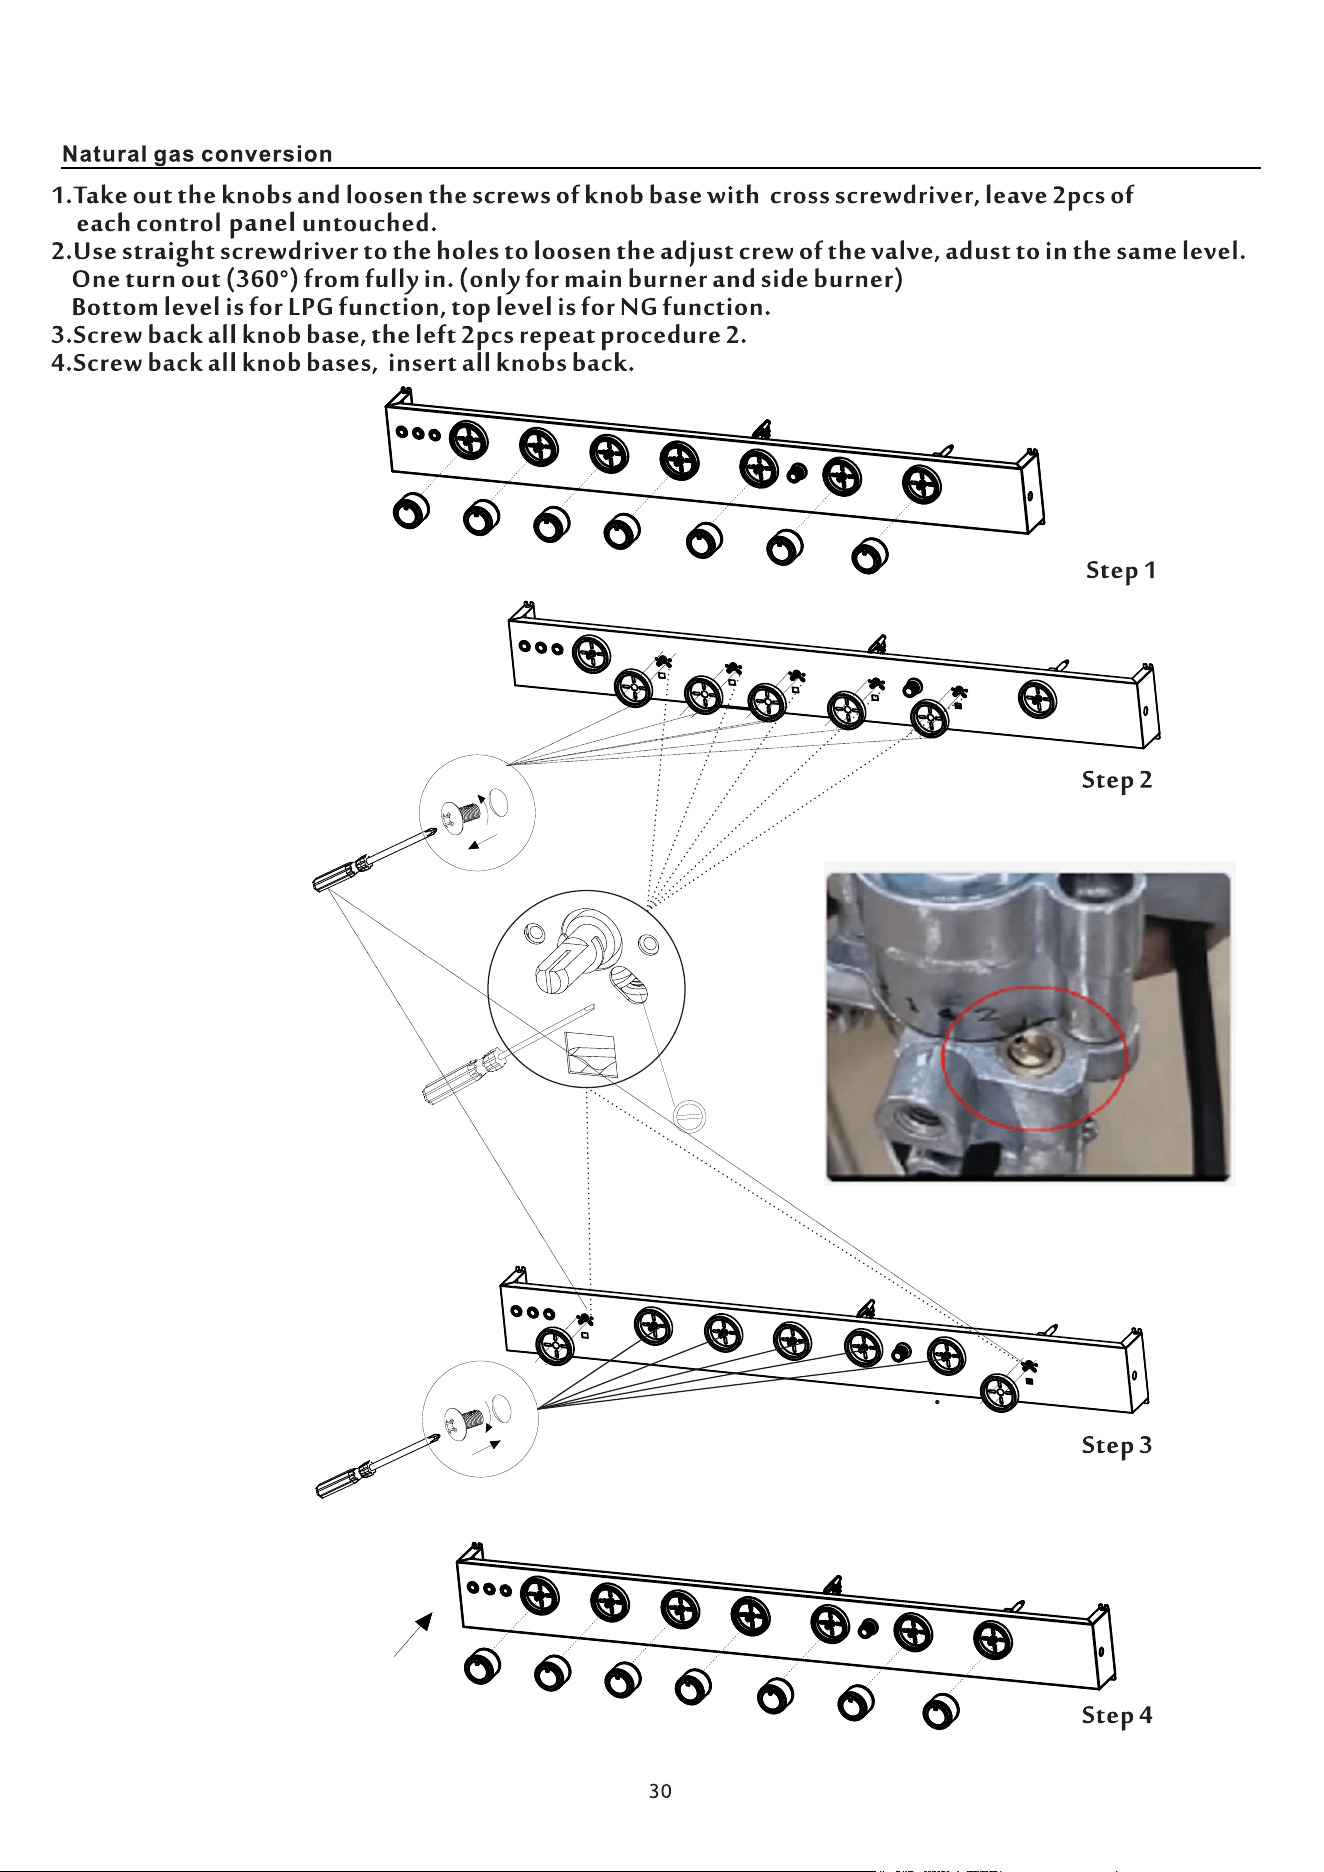
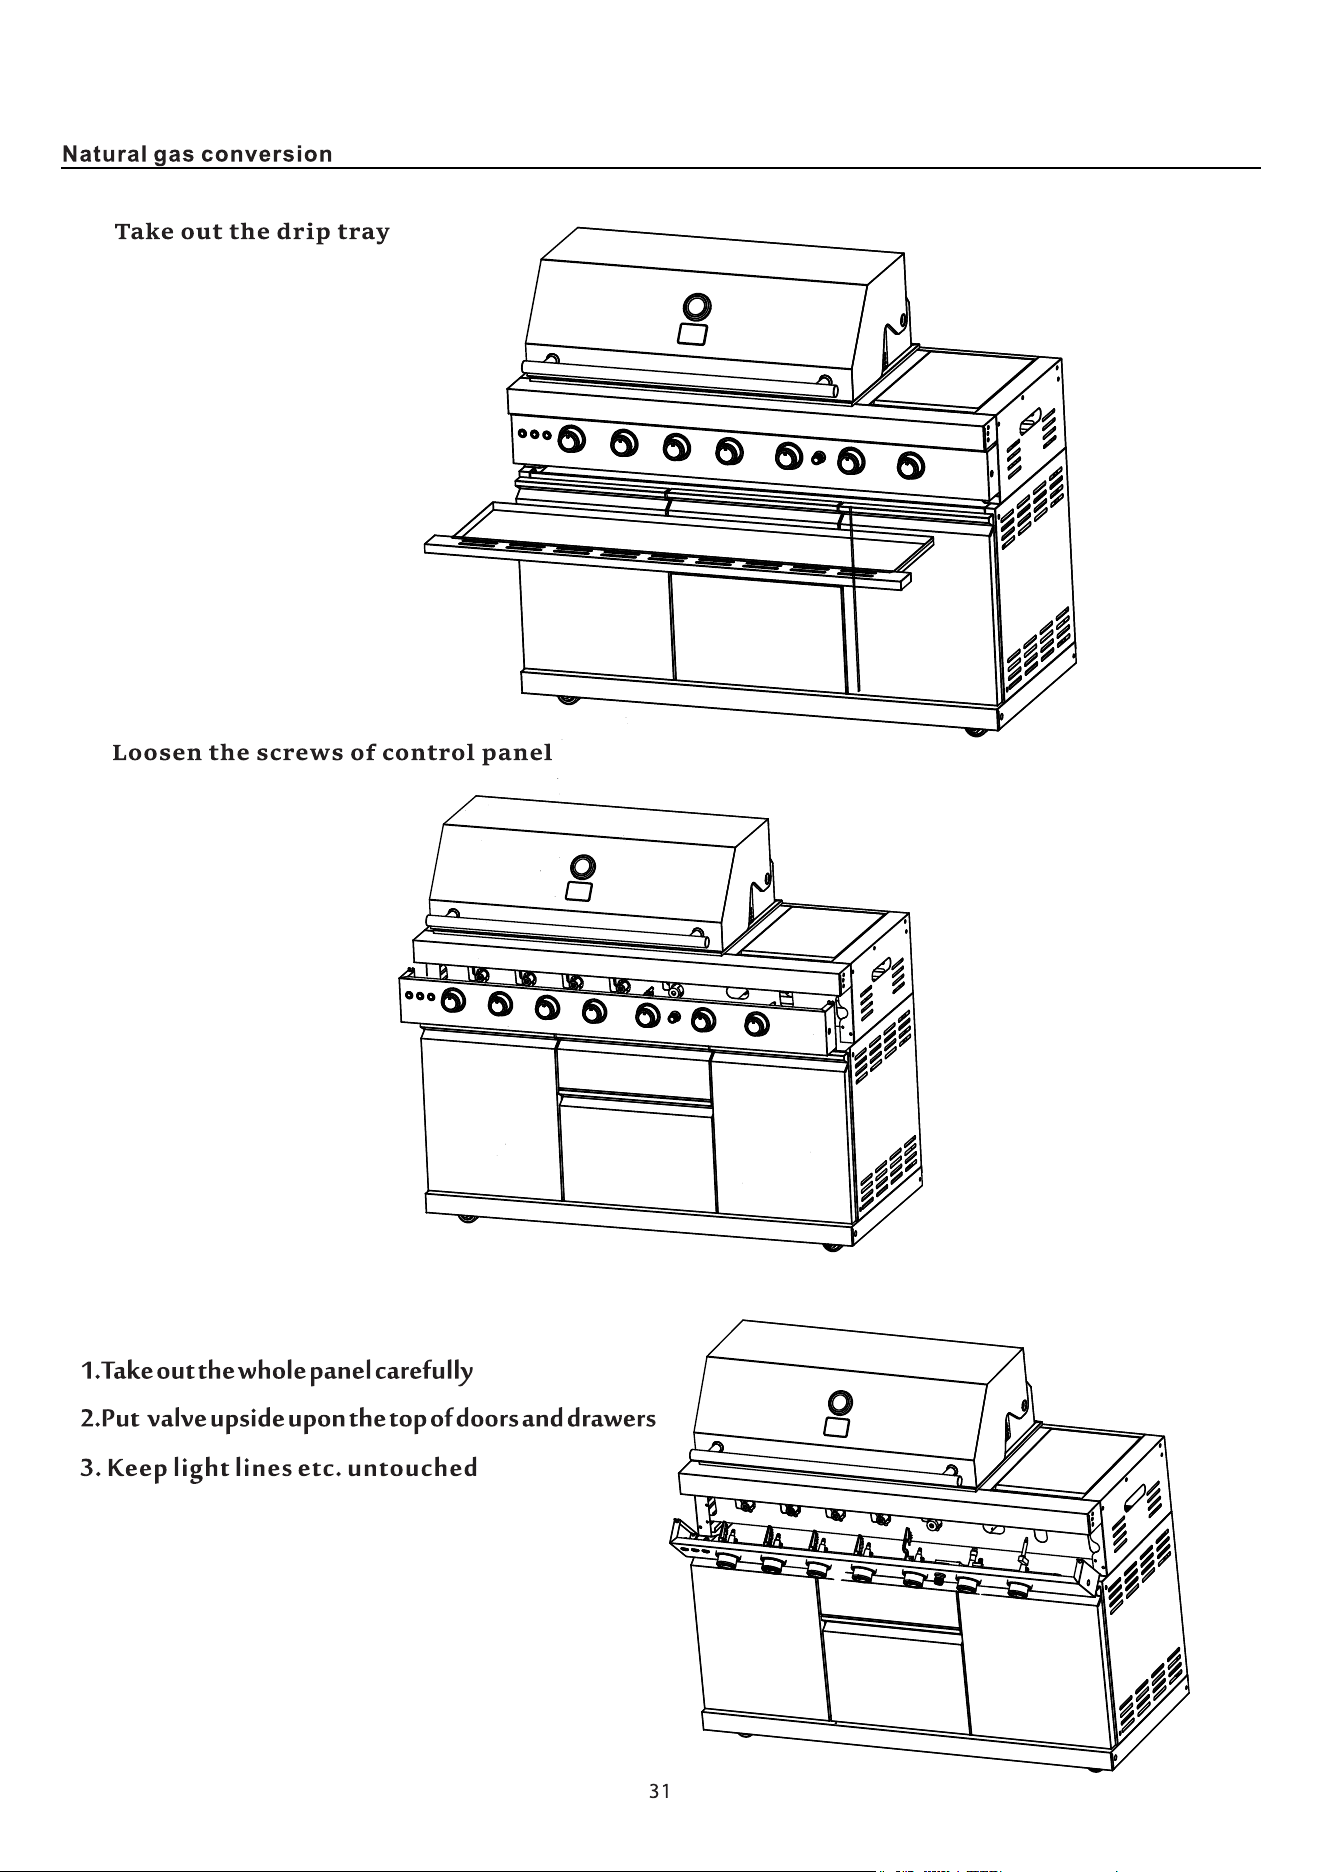
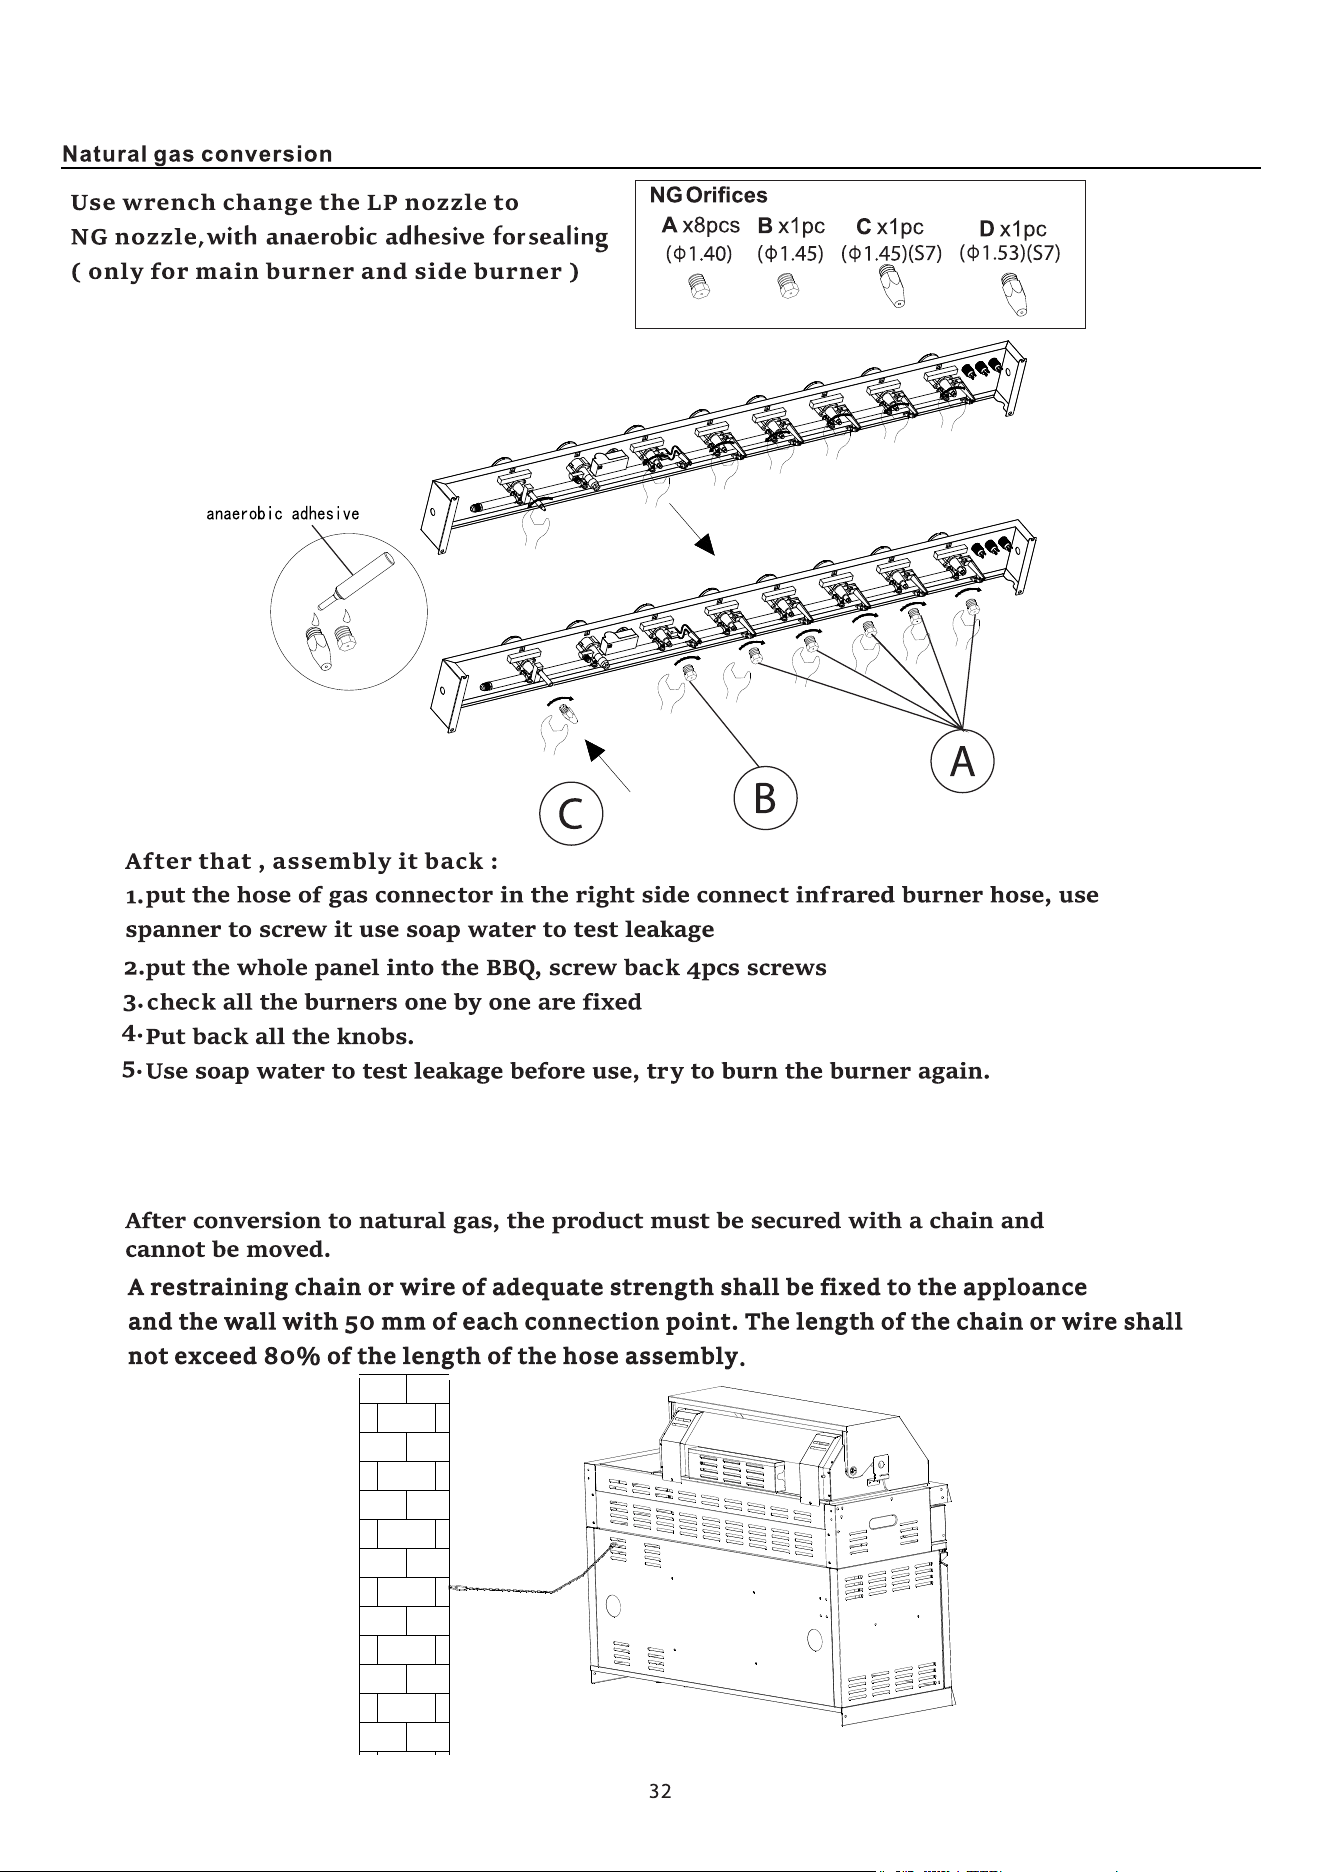
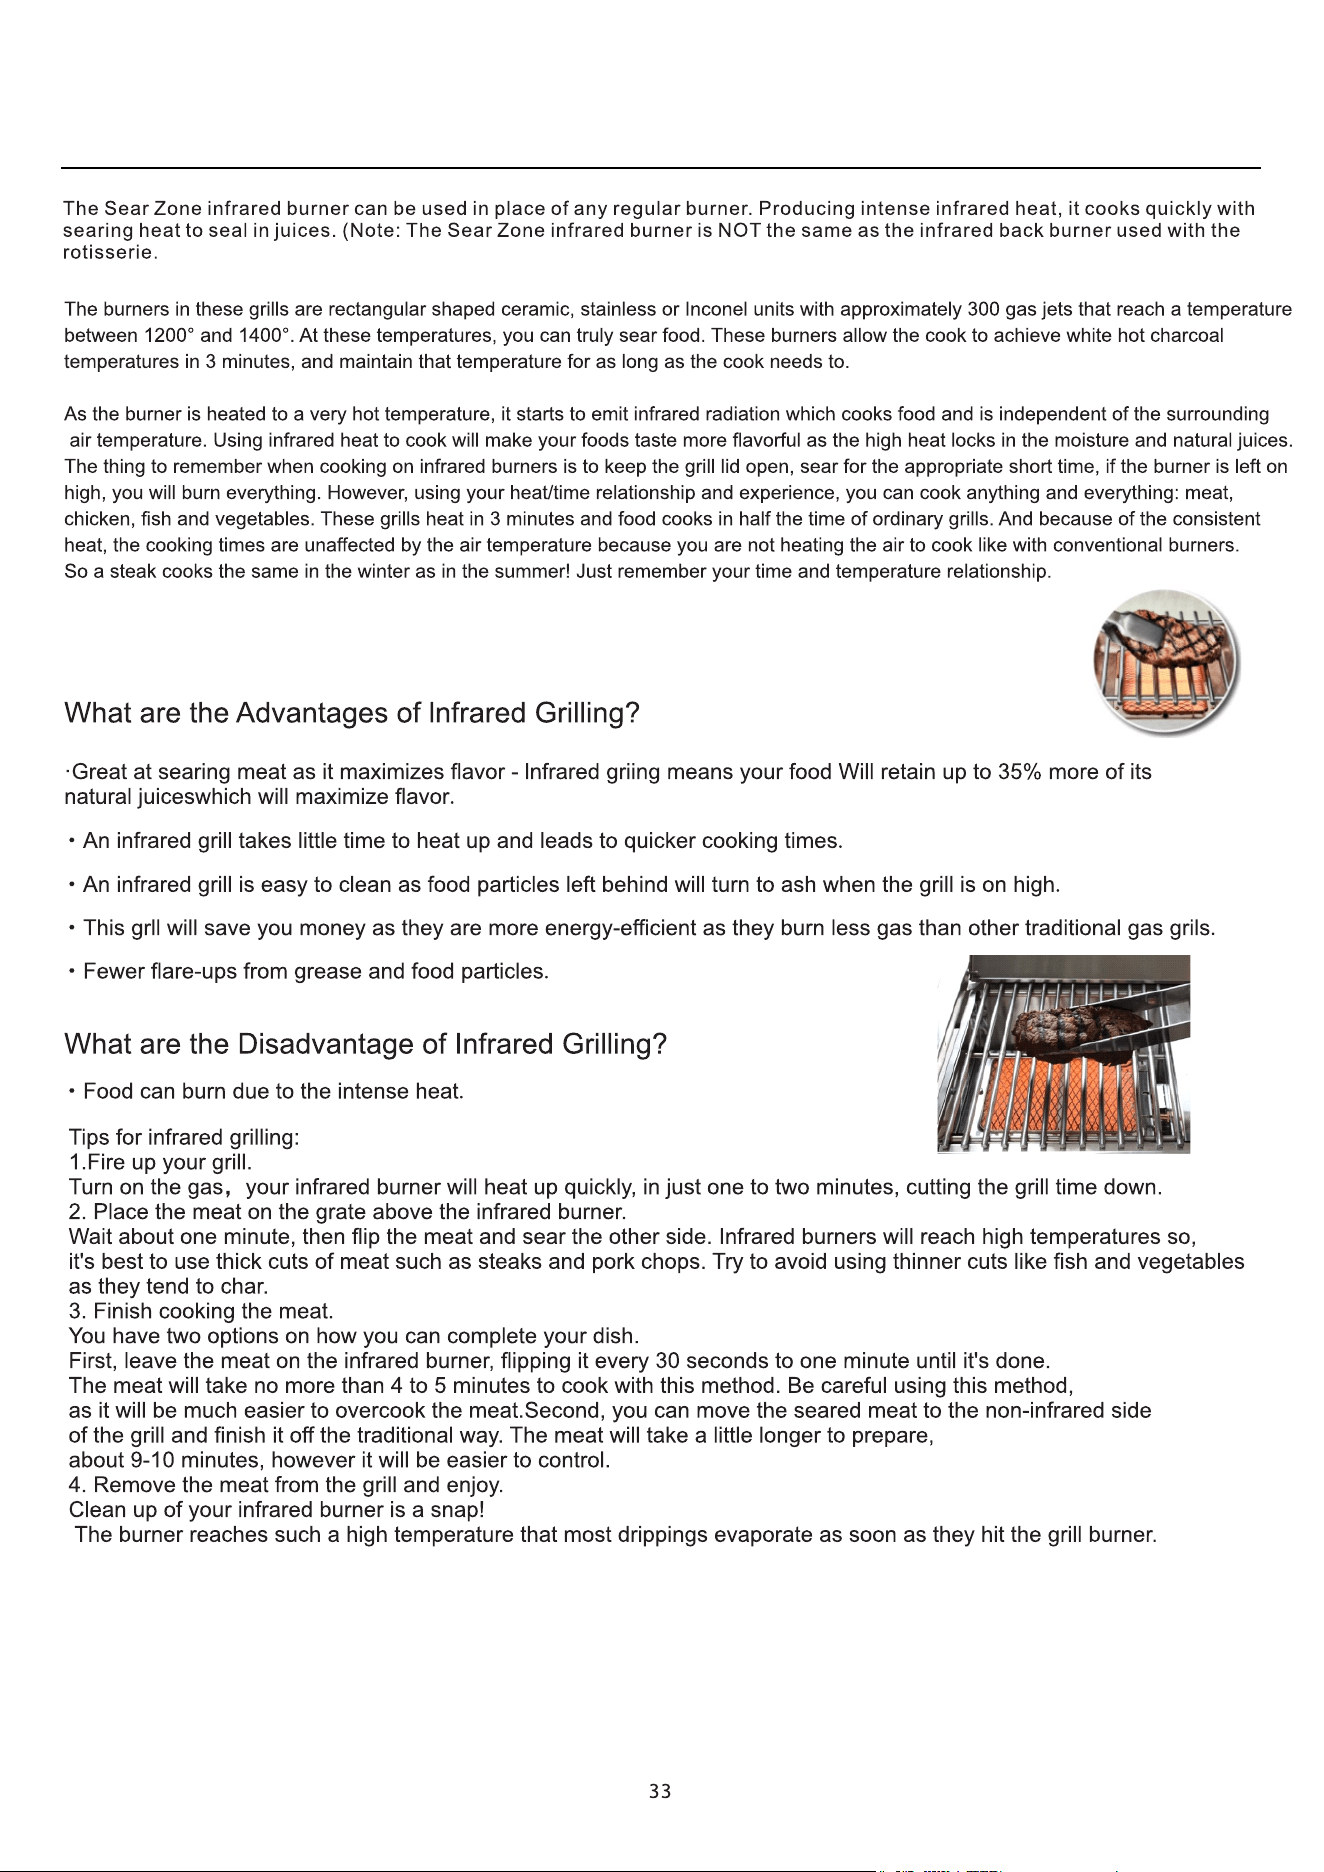
Sear Zone Infrared Burner
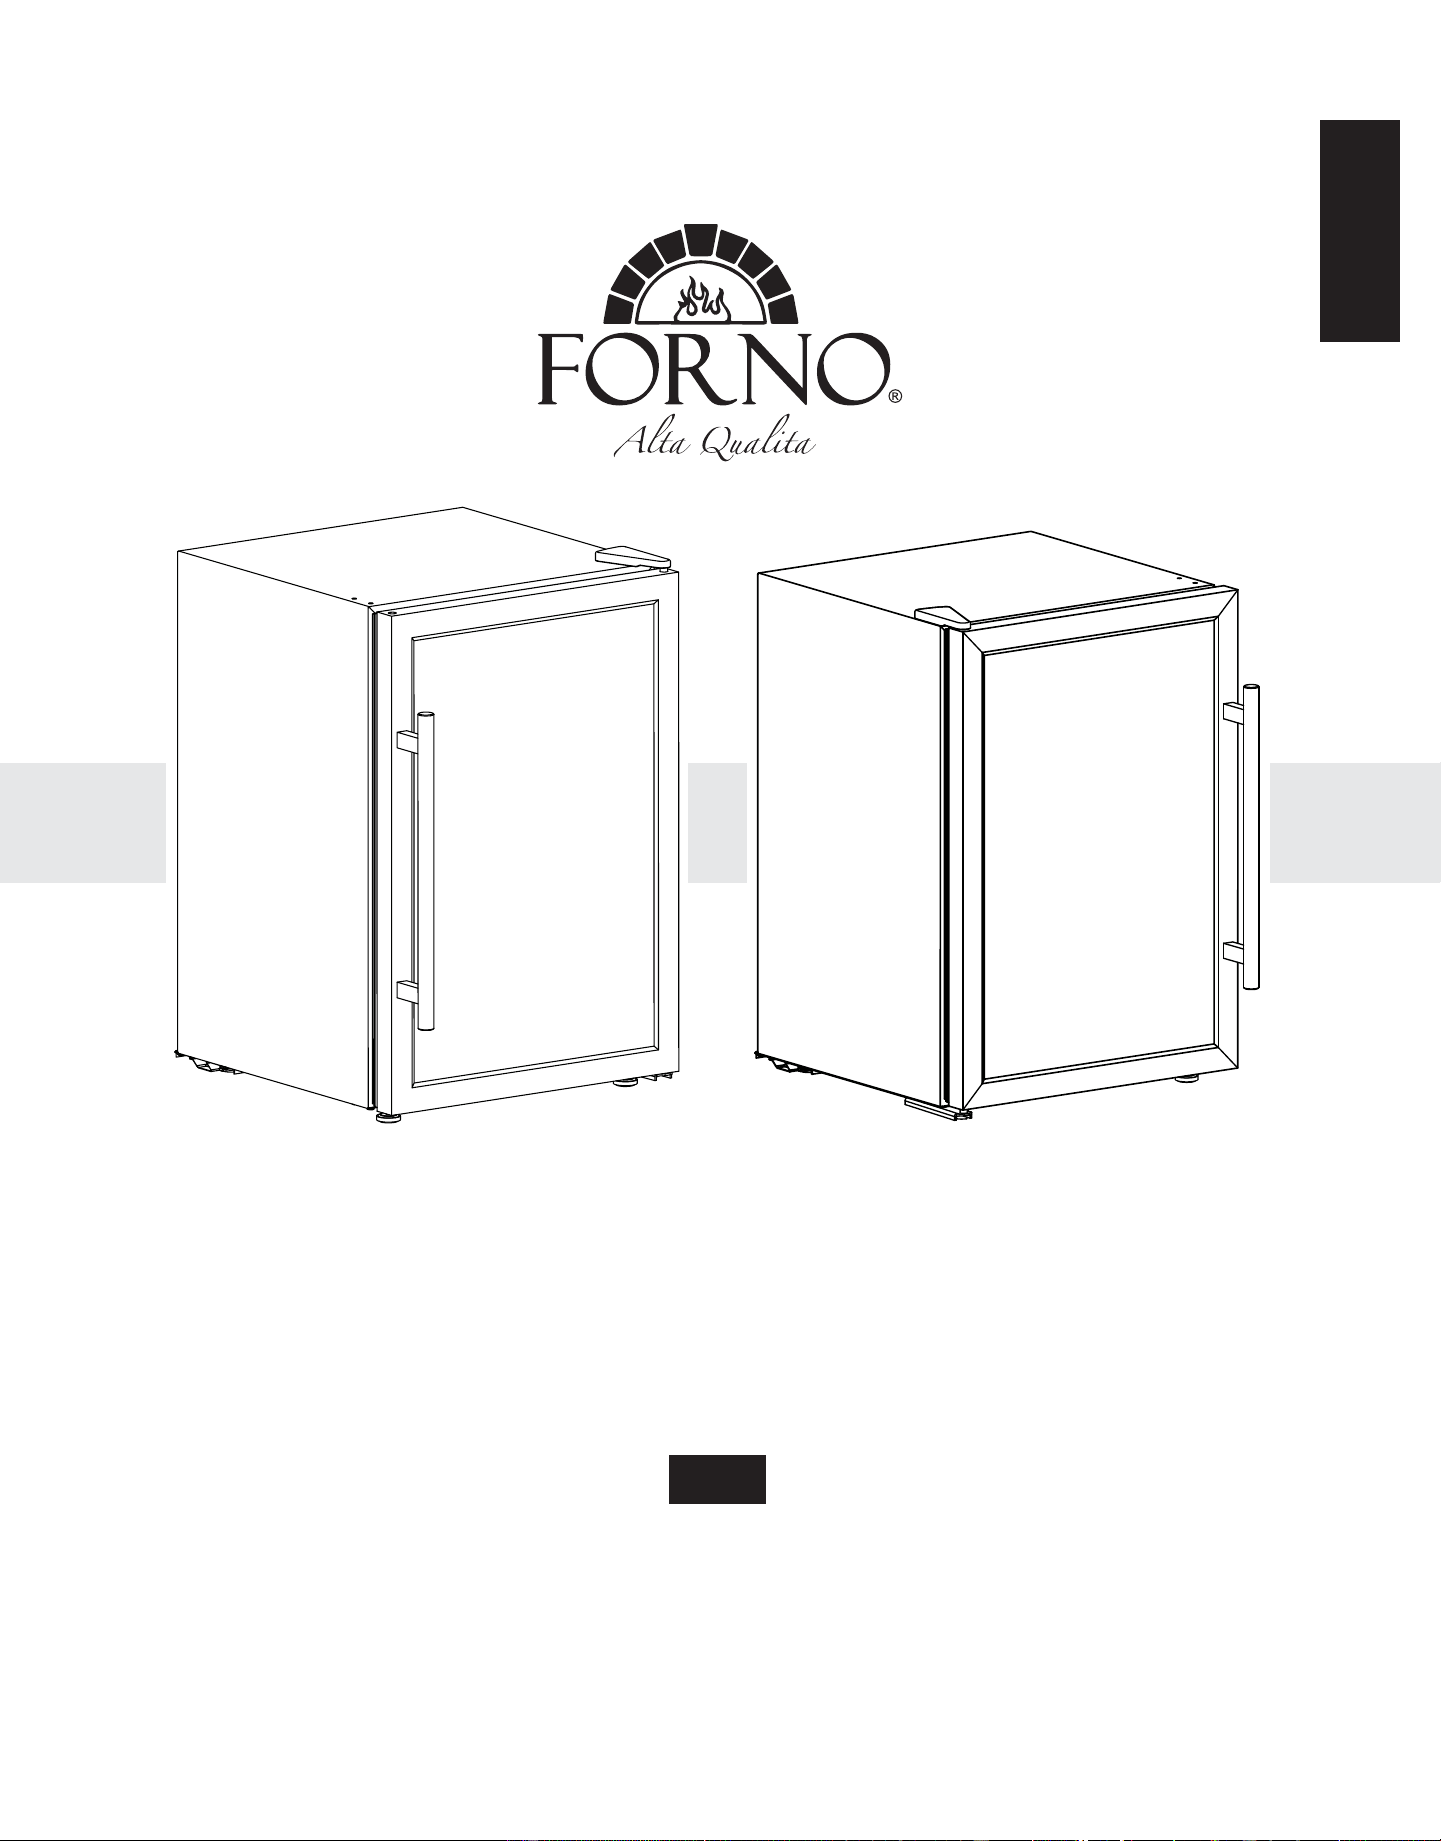
ENGLISH
MODEL NUMBER SERIES:
FODKT2544BLK
FODKT2551BLK
FODKT2568BLK
FODKT2575WHT
INSTRUCTION MANUAL &
INSTALLATION GUIDE
Outdoor Mini Stainless Steel Refrigerator
Read these instructions carefully before using your appliance, and keep it carefully.
If you follow the instructions, your appliance will provide you with many years of good service.
Part 2/2

2
3
Customer Care
Warning
Important Safety
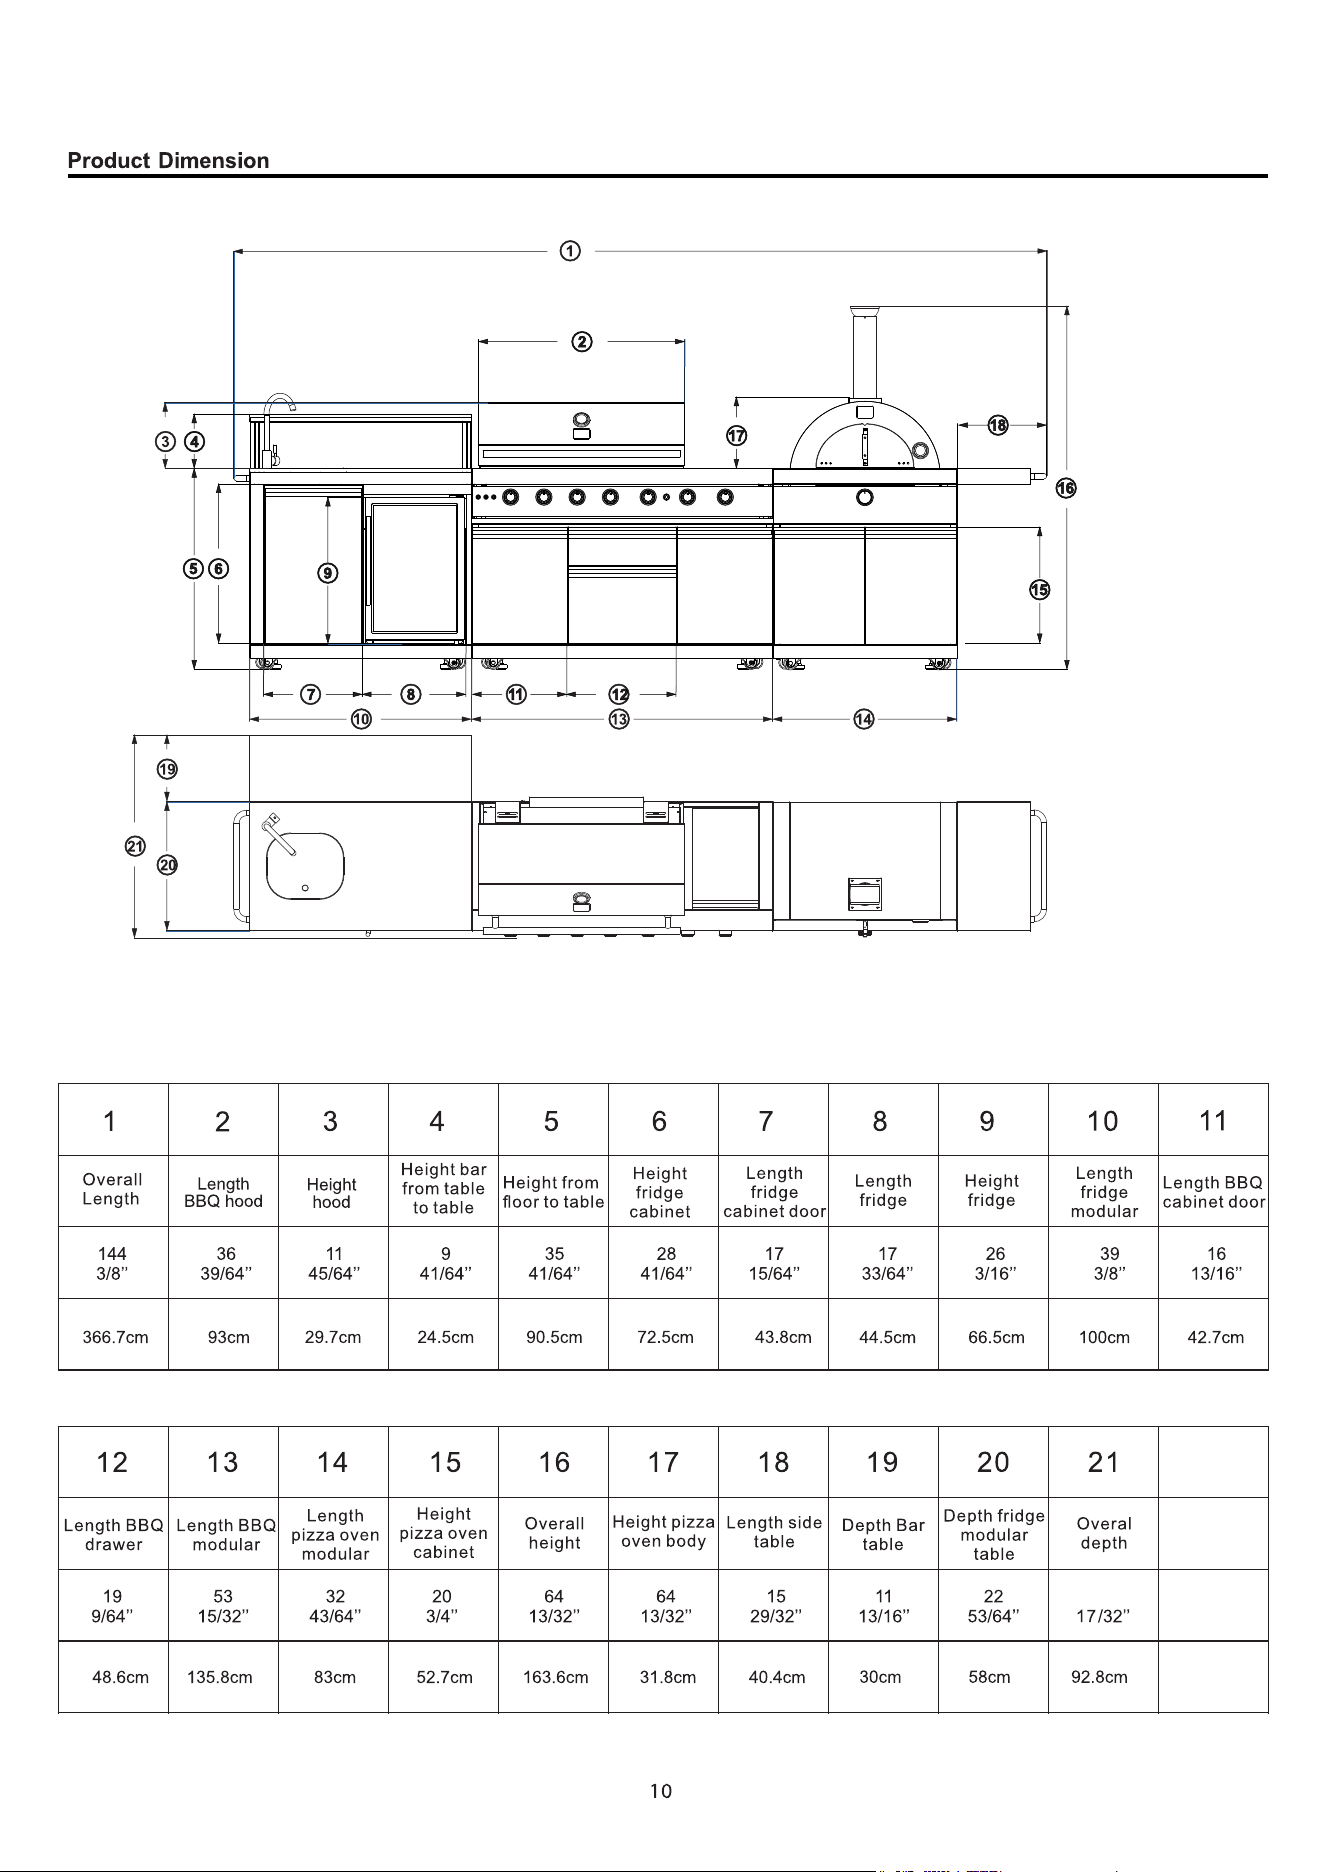
Product Dimension
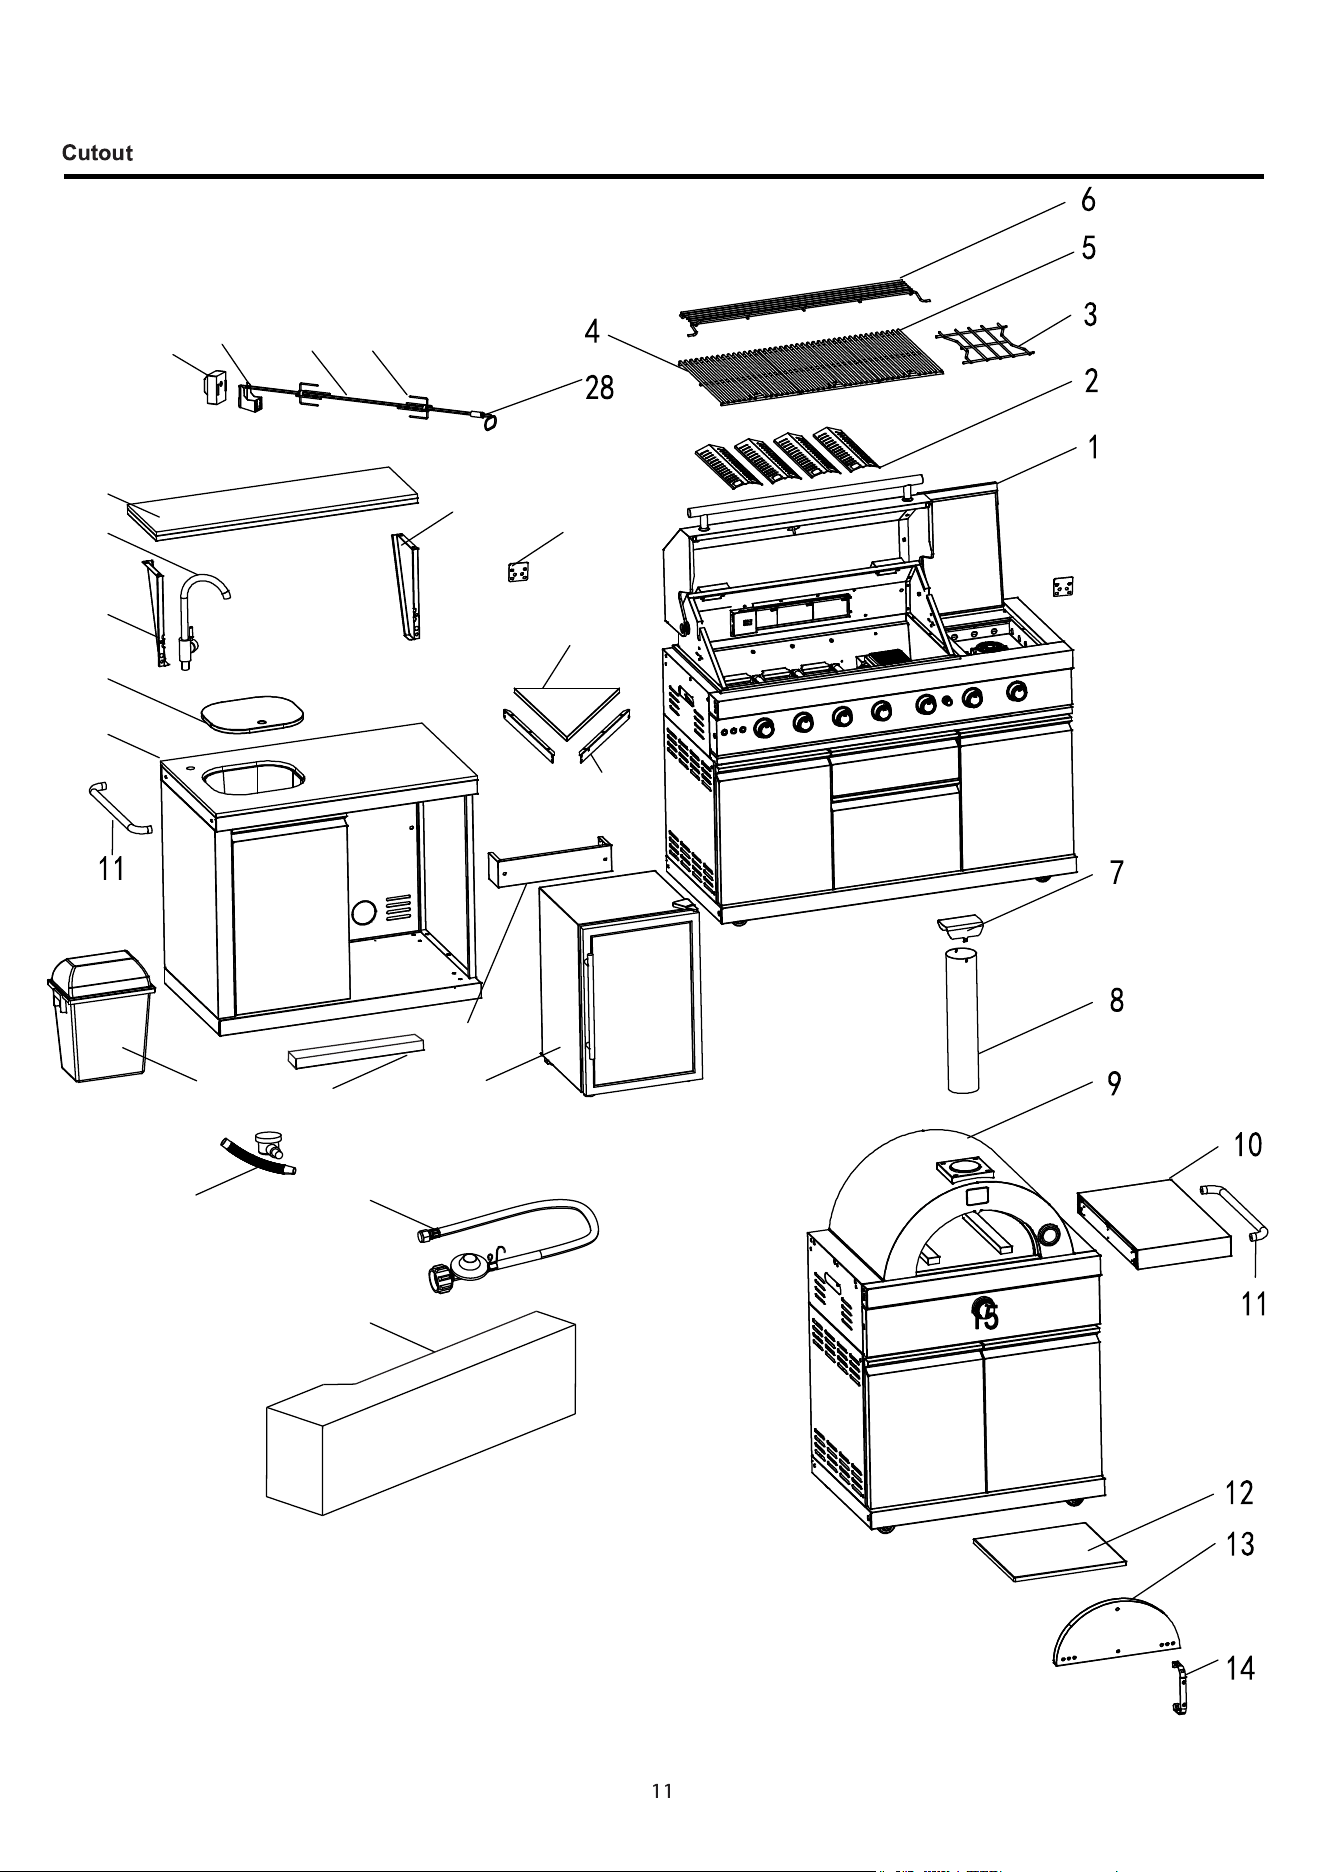
Cutout
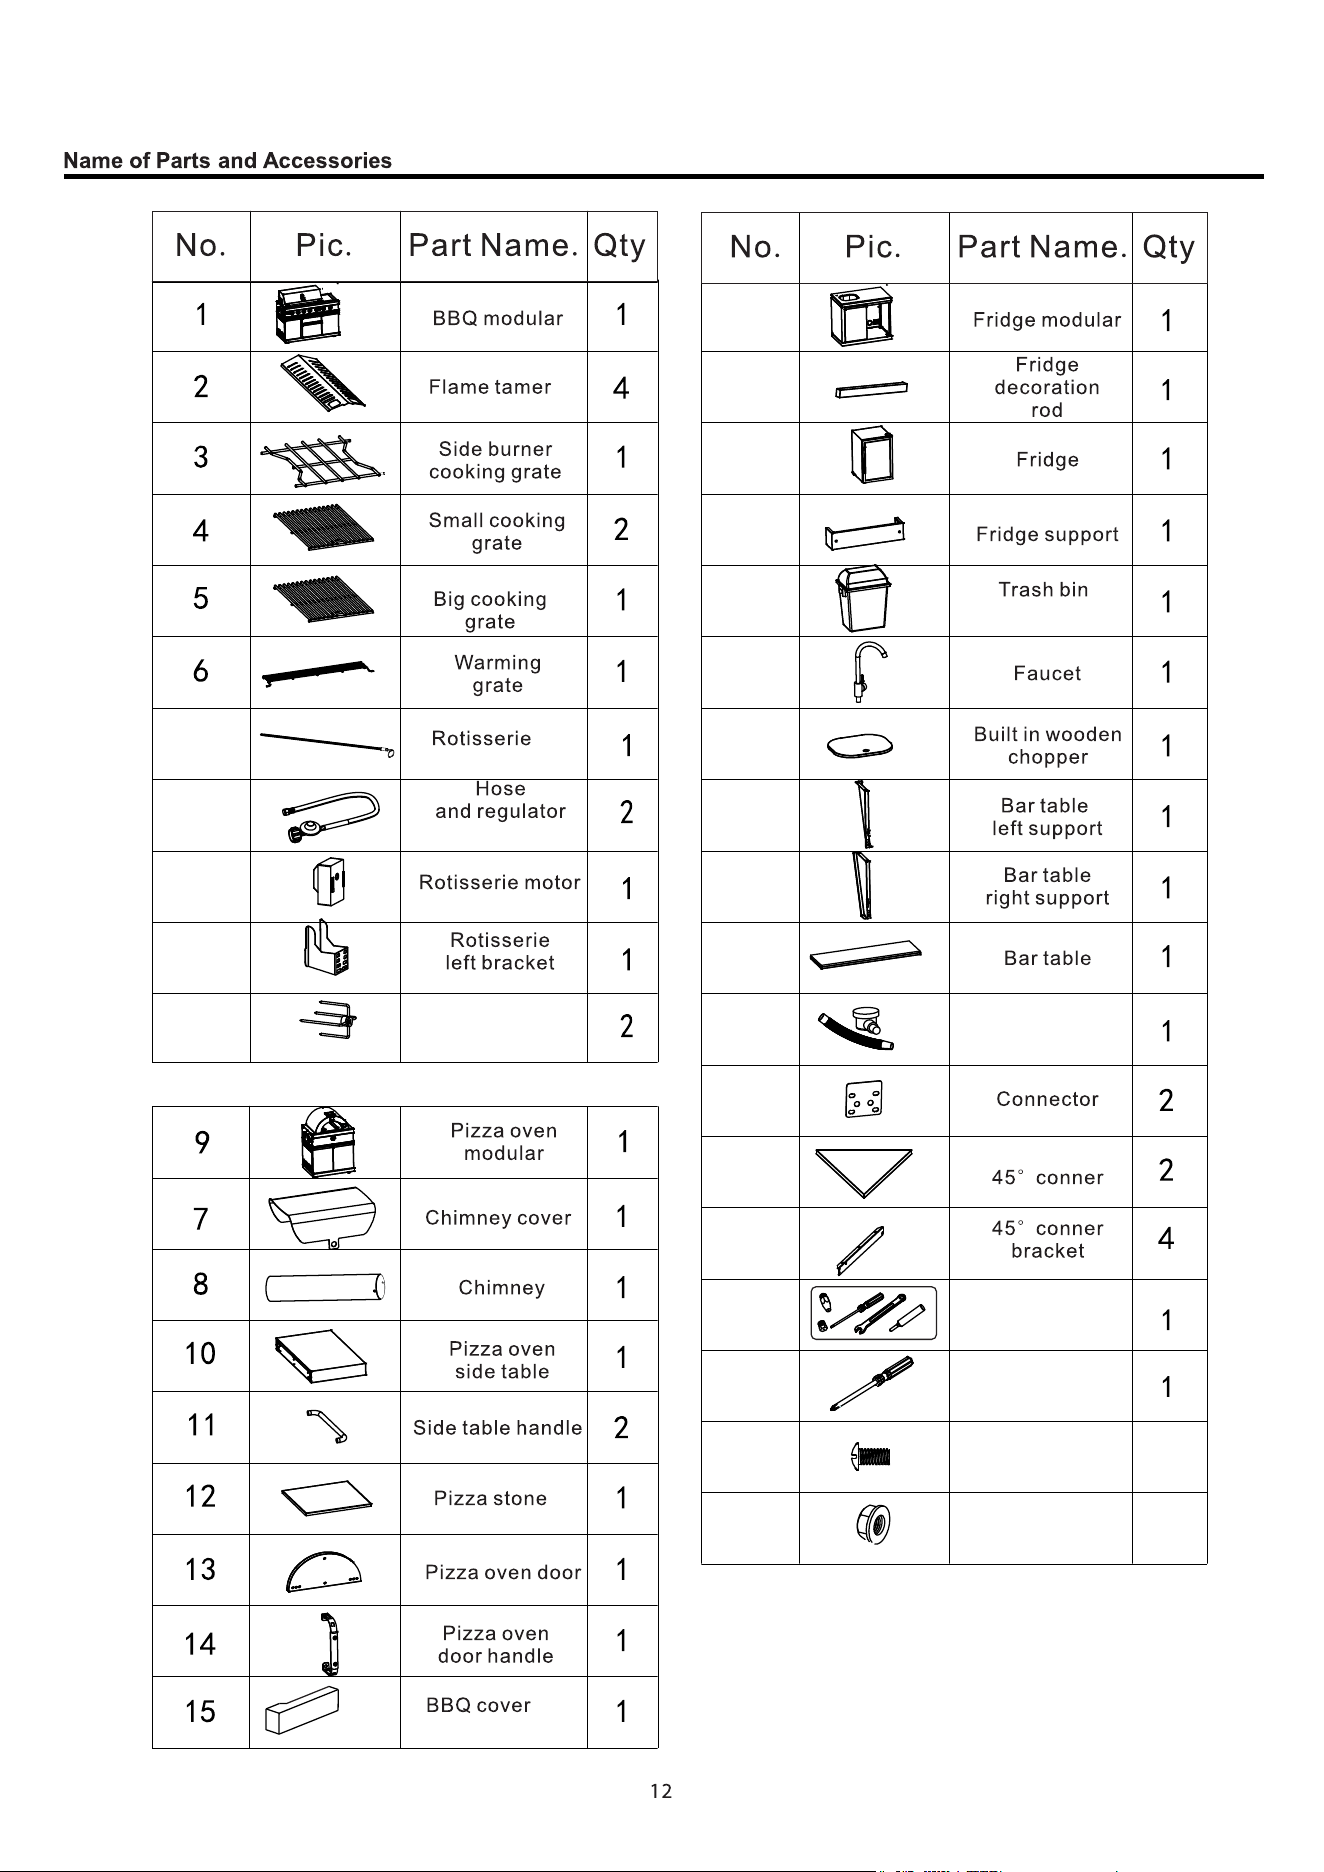
Names of Parts and Accessories
Operating Instruction
Care & Maintenance
Troubleshooting
Wire Diagram
Warranty
4
5
6
7
8
9
12
13
14
15
16-17
TABLE OF CONTENTS
4
Customer Care
Thank you for purchasing a Forno product. Please read the entire instruction manual before operating your new appliance
for the first time. Whether you are an occasional user or an expert, it will be beneficial to familiarize yourself with the safety
practices, features, operation and care recommendations of your appliance.
Both the model and serial number are listed inside the product. For warranty purposes, you will also need the date of
purchase .
Record this information below for future reference.
Services in Canada and Untied States
Keep the instruction manual handy to answer your questions. If you don’t understand something or need more assistance,
please visit our website for fast support. Please provide us your name, number, address,serial number of the product that
troubleshooting, proof of purchase, and a short description of the issue. A customer service representative will contact you
as soon as possible. All warranty work needs to be authorized by FORNO customer service. All our authorized service
providers are carefully selected and rigorously trained by us.
Product Information
Model Number : ______________________________________
Serial Number :
Date of Purchase : ___________________________________
Purchase Address And Phone :
_______________________________
_________________________________________________________
Service Information
Use these numbers in any correspondence
or services calls concerning your product.
If you received a damaged product, immedi-
ately contact Forno.
To save time and money, before you call for
service, check the troubleshooting guide. It
lists the causes of minor operation prob -
lems that you can correct yourself.
“Need some quick help? Simply scan the qr code and get access to our
fast support form. We’re always here to assist you with any questions or
concerns you may have. So, don’t hesitate to reach out!”
5
WARNING
FOR YOUR SAFETY
DANGER
WARNING
CAUTION
We have provided many important safety messages in this manual and on your appliance. Always read and obey all
safety messages.
All safety messages will tell you what the potential hazard is, tell you how to reduce the chance of injury, and tell you
what can happen if the instructions are not followed.
You can be killed or seriously injured if you don’t immediately follow instructions.
You can be killed or seriously injured if you don’t follow instructions.
A potentially hazardous situation which, if not avoided, could result in minor or
moderate injury.
This is the safety alert symbol. This symbol alerts you to potential hazards that can kill or hurt you
and others. All safety messages will follow the safety alert symbol and either the word “DANGER,”
“WARNING” or “CAUTION.” These words mean:
WARNING : This product can expose you to chemicals including [Lead, lead and lead
compound, which is [are] known to the state of California to cause cancer and birth defects
or other reproductive harm. For more information go to www.P65Warning.ca.gov.
Important Safety Instructions
6
SAFETY REQUIREMENTS
DANGER: Risk of fire or explosion. Flammable refrigerant used. Do not puncture refrigerant tubing.
Do not use mechanical devices to defrost refrigerator.
Ensure that servicing is done by factory authorized service personnel, to minimize product damage or safety issues.
If the power supply cord is damaged, it must be replaced by the manufacturer, its service agent or similar qualified
person in order to avoid hazard.
Consult repair manual or owner’s guide before attempting to service this product. All safety precautions must be followed.
Dispose of properly in accordance with federal or local regulations.
Follow handling instructions carefully.
Do not store explosive substances such as aerosol cans with a flammable propellant in this appliance.
WARNING: Keep ventilation openings, in the appliance enclosure or in the built-in structure, clear of obstruction.
WARNING: Do not use mechanical devices or other means to accelerate the defrosting process, other than those
recommended by the manufacturer.
WARNING: Do not damage the refrigerant circuit.
WARNING: Do not use electrical appliances inside the food storage compartments of the appliance, unless they are of
the type recommended by the manufacturer.
CAUTION: Children should be supervised to ensure that they do not play with the appliance.
DANGER: Risk of child entrapment. Before throwing away an old appliance:
Remove the door or lid.
Leave shelves in place so that children may not easily climb inside.
DANGER: Do not add a lock to the door or lid. This can cause child entrapment and harm.
This appliance is not intended for use by persons (including children) whose physical, sensory or mental capabilities may
be different or reduced, or who lack experience or knowledge, unless such persons receive supervision or training to
operate the appliance by a person responsible for their safety.
This appliance is not a medical refrigerator, it CANNOT be used to store medicines, blood or vaccines.
GROUNDING INSTRUCTIONS
This appliance must be grounded. Grounding reduces the risk of electrical shock by providing an escape wire for the
electrical current.
This appliance has a cord that has a grounding wire with a 3-prong plug. The power cord must be plugged into an outlet
that is properly grounded. If the outlet is a 2-prong wall outlet, it must be replaced with a properly grounded 3-prong wall
outlet. The serial rating plate indicates the voltage and frequency the appliance is designed for.
WARNING - Improper use of the grounding plug can result in a risk of electric shock. Consult a qualified electrician or
service agent if the grounding instructions are not completely understood, or if doubt exists as to whether the appliance is
properly grounded.
Do not connect your appliance to extension cords or together with another appliance in the same wall outlet. Do not splice
the power cord. Do not under any circumstances cut or remove the third ground prong from the power cord. Do not use
extension cords or ungrounded (two prongs) adapters.
7
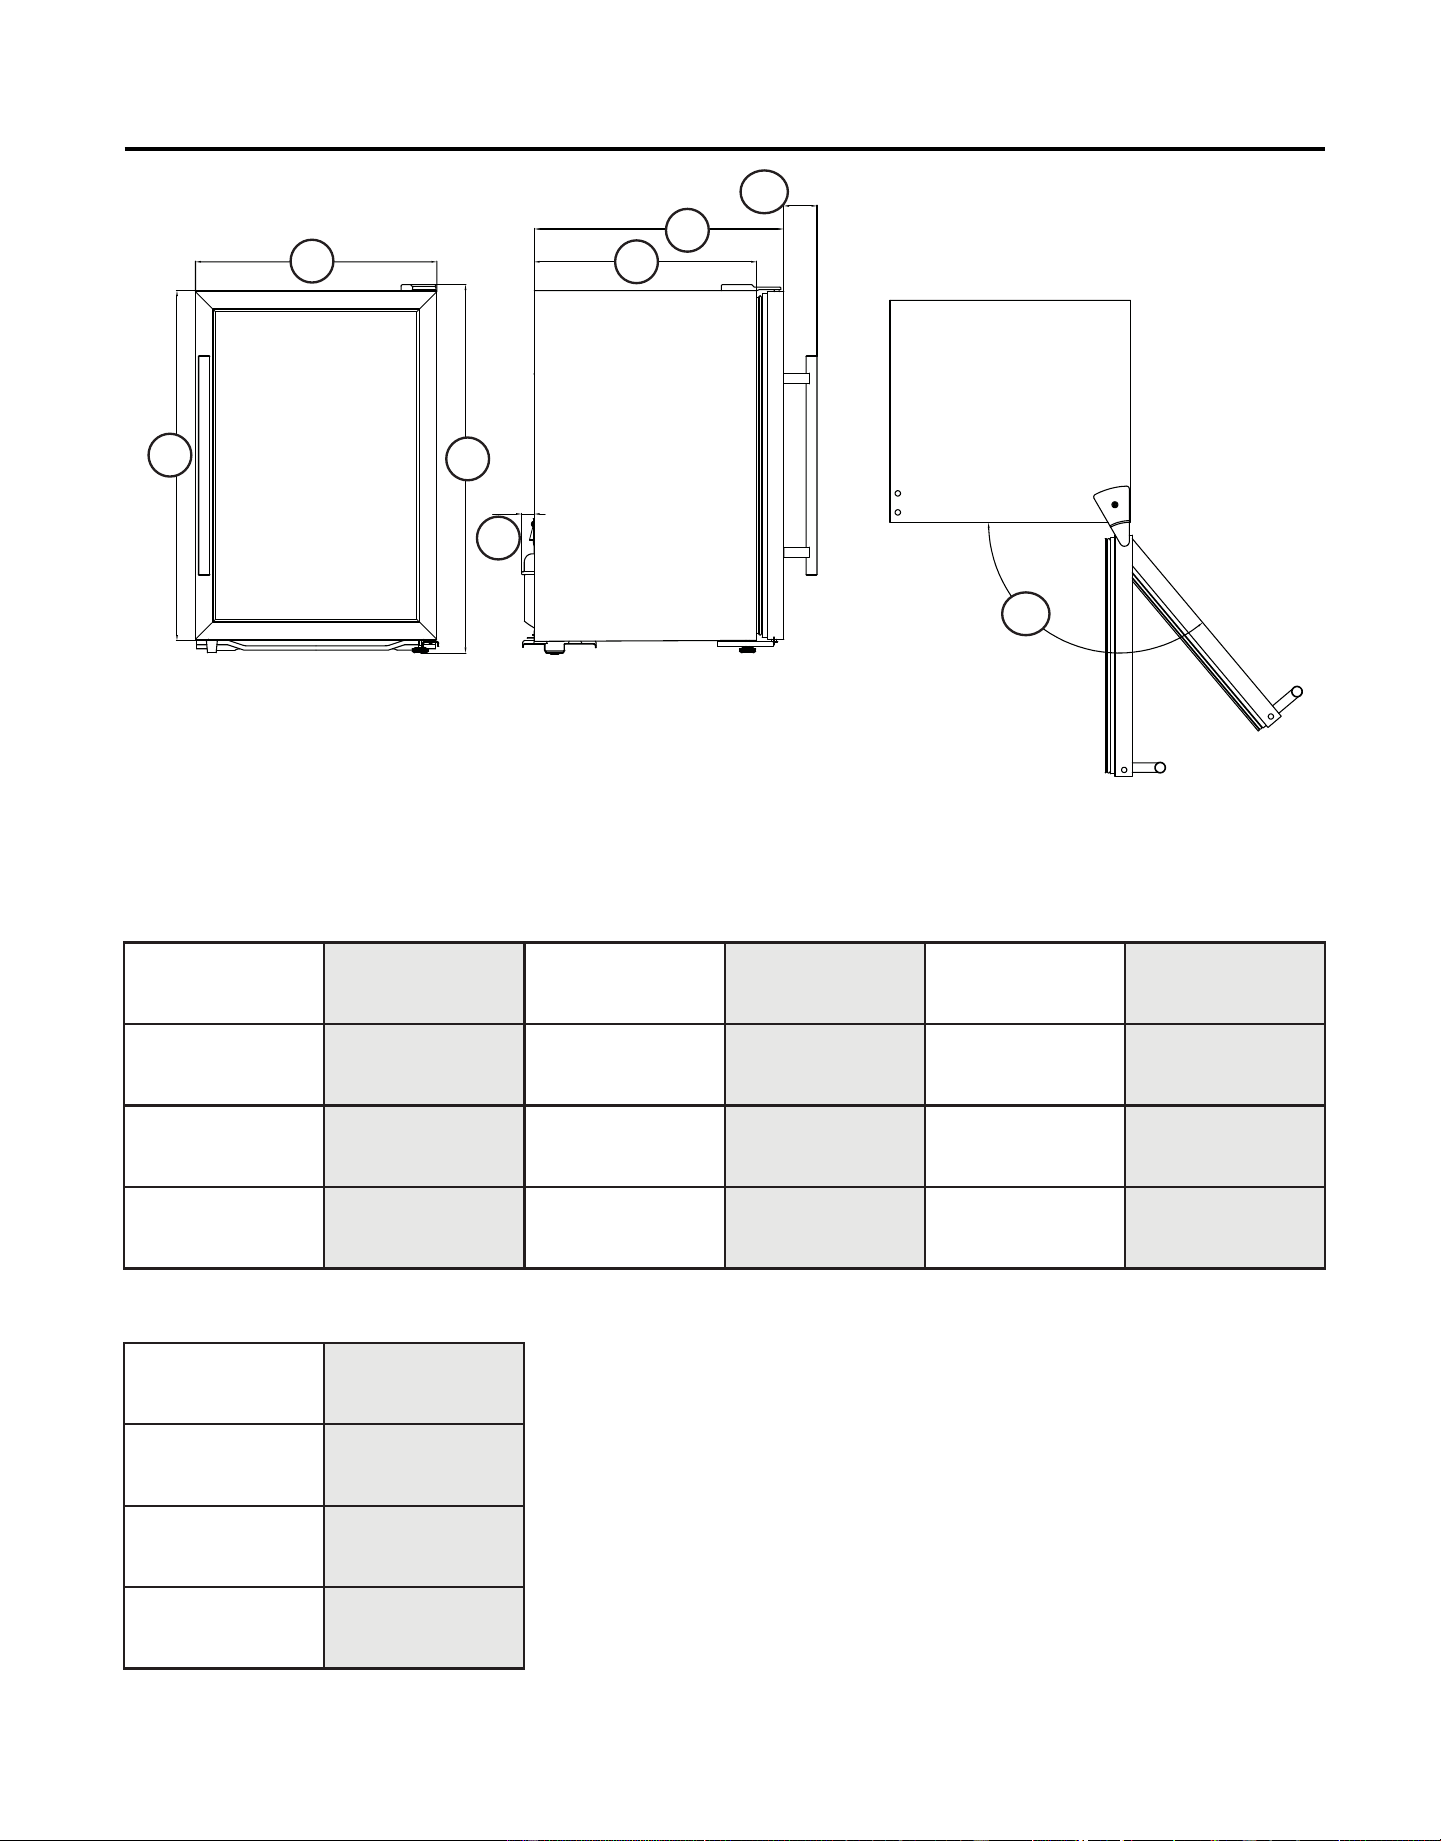
Product Dimension
Overall Height
Hing to foot
(on maximum)
Depth Door to
back
Depth Without
door to back
Opening
(Fully open door)
130°
A
A
B
Overall Width
17 1/2" "
C
"
679mm
Height Hing to foot
(on minimum )
H
D
"
23.5mm
Shock Absorber
Block
E
410mm
Depth Handle
G
61.4mm
F
460mm
A
B
C
D
E
F
G
H
645mm445mm
25 3/8 26 3/4 15/16 16 1/8
"
18 1/8
"
2 7/16
"
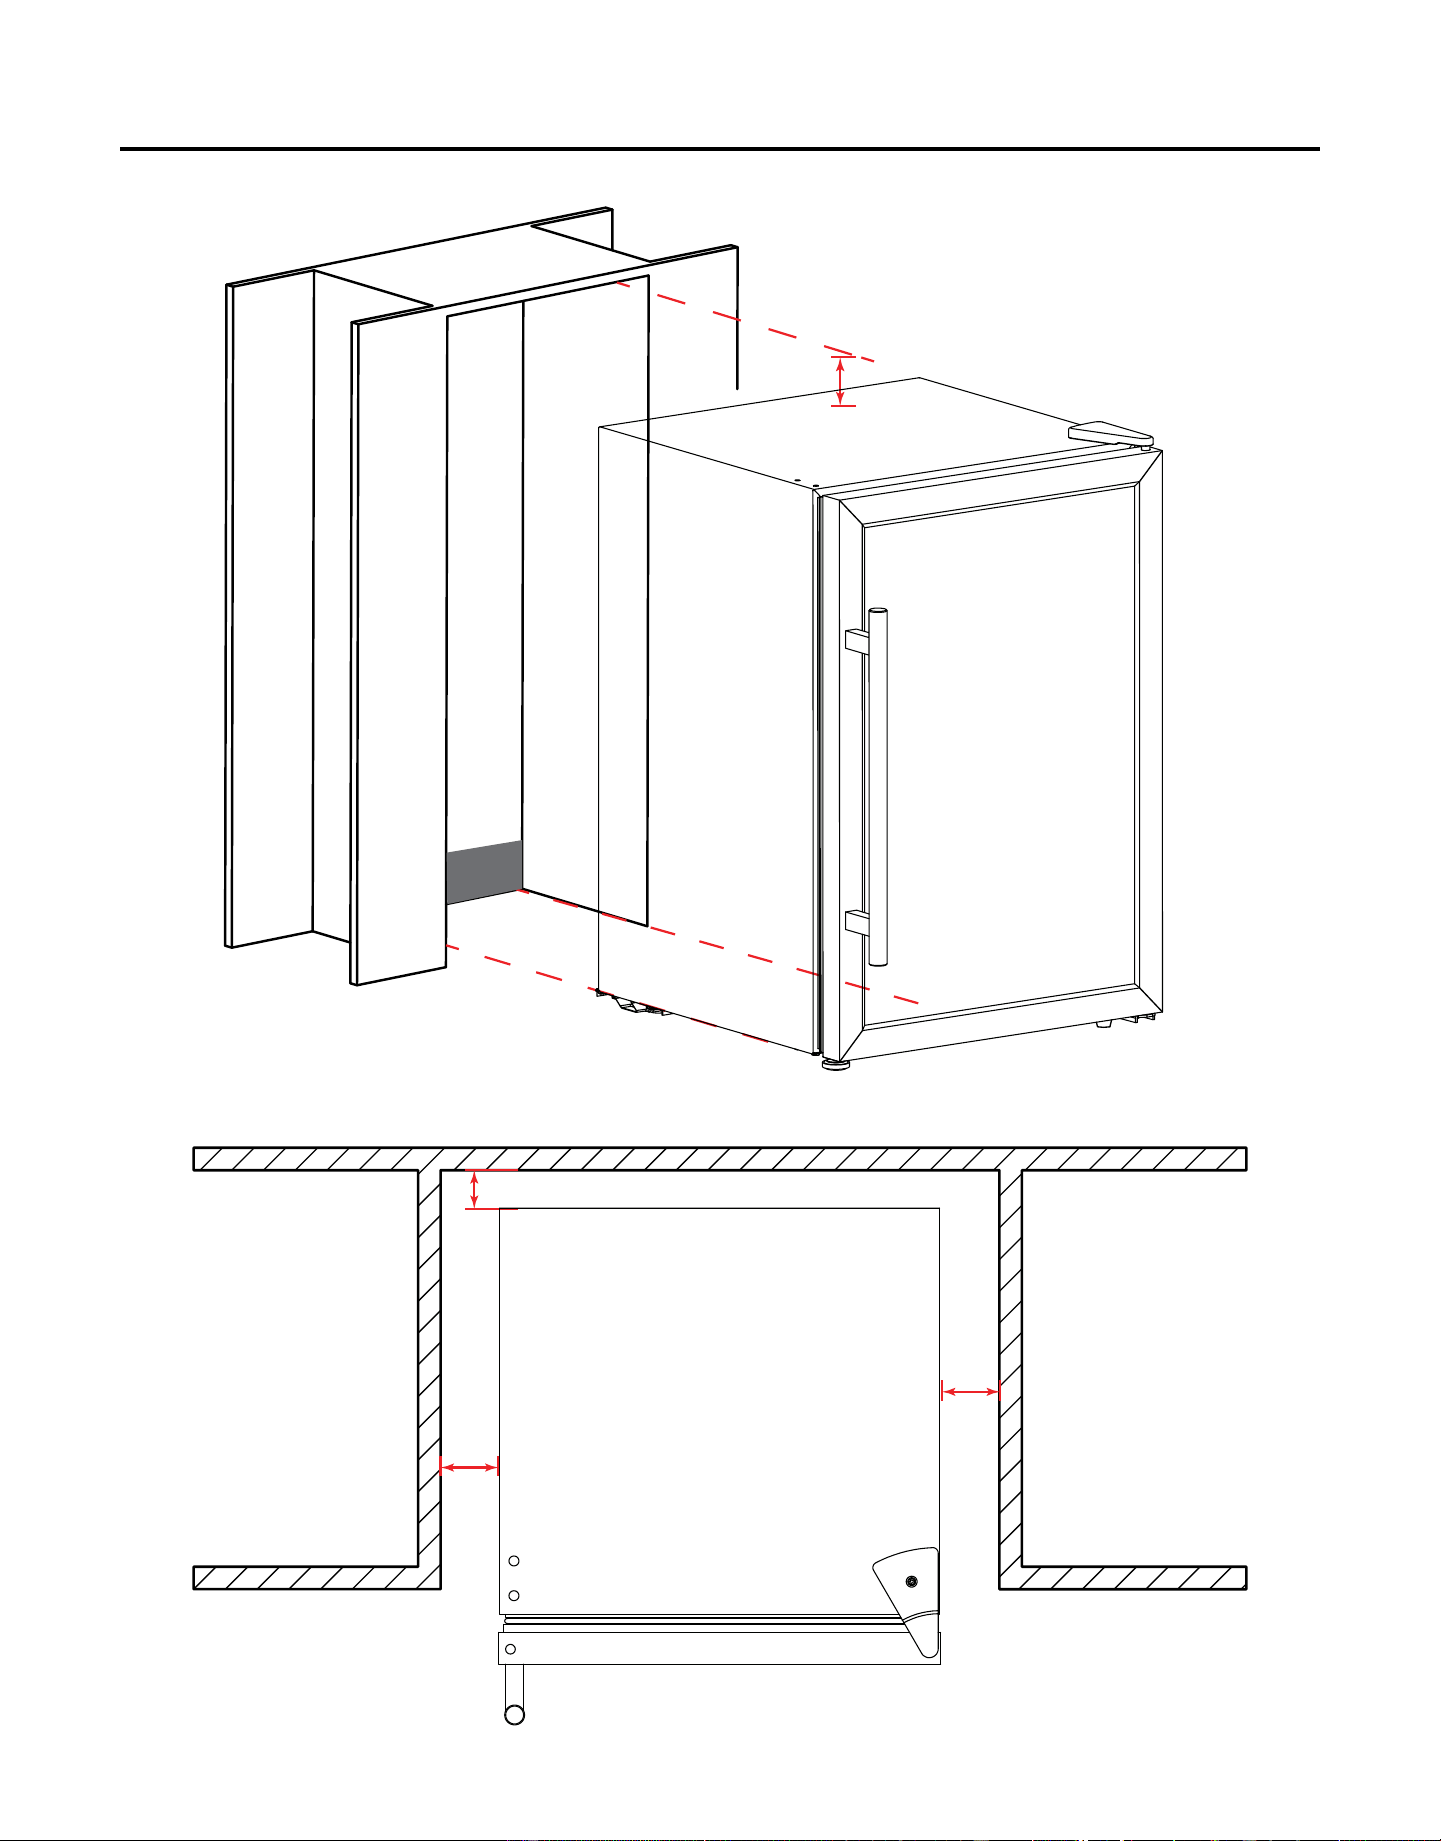
Cutout
8
4”
4”
4”
2”
Counter Top Counter Top
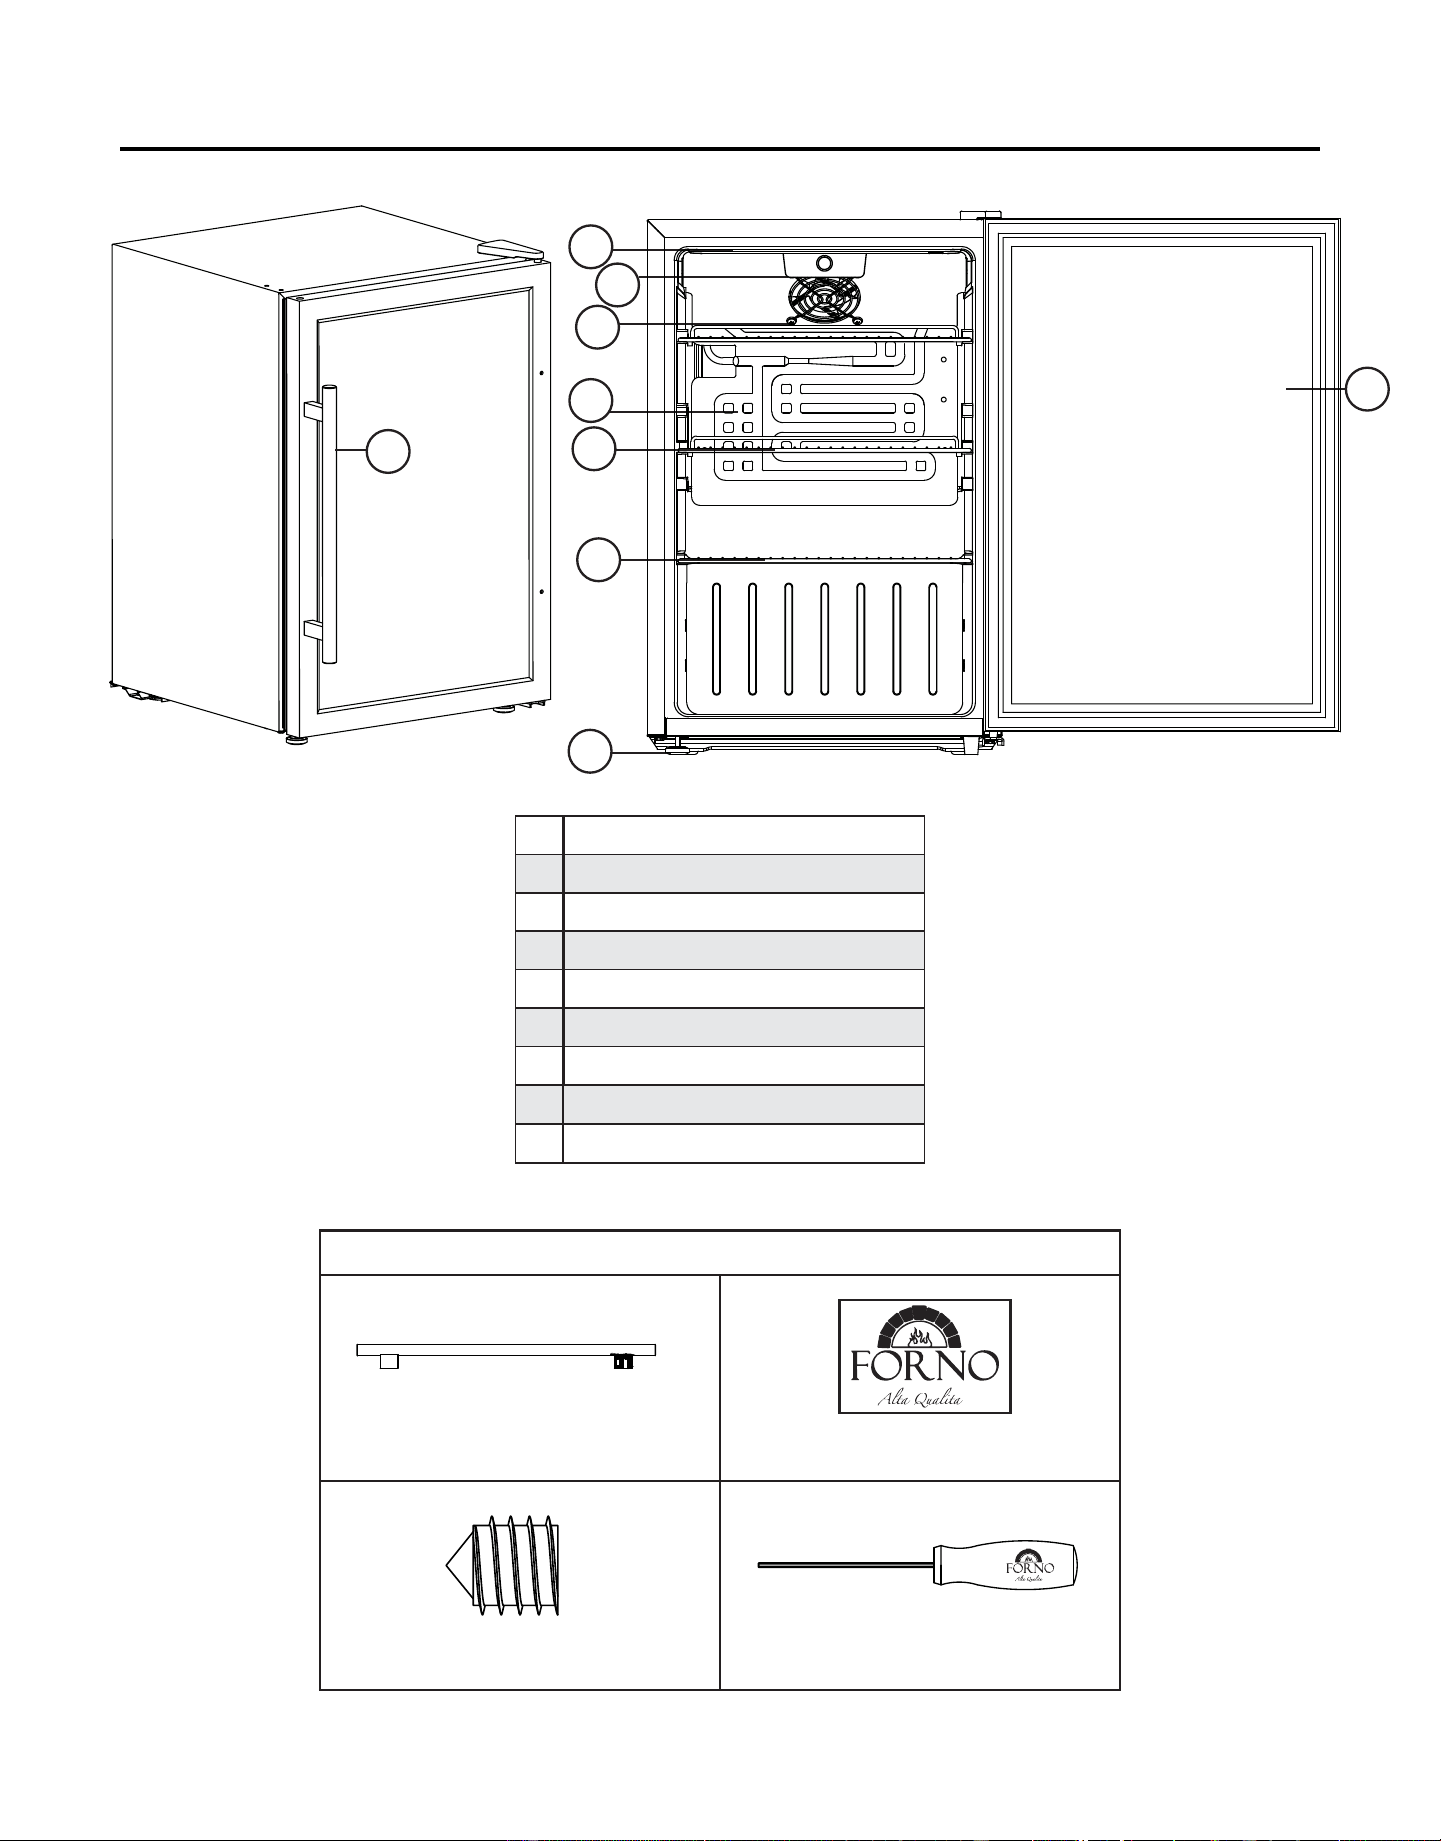
Name of Parts and Accessories
9
LED light
1
2
3
4
5
6
7
Supplied Parts
1x Handle Logo Plate
2x Screws for the handle
9
1
2
4
7
5
6
8
8
3
9
Mechanical Thermostat
Fan Motor
Evaporator
Shelf II
Bottom Shelf
Adjustable feet
Glass door
Handle
Screw Driver
Installation
10
Anti-tip bracket installation
To avoid the risk of serious personal injury or damage to the appliance due to the instability of the appliance, it must be fixed
to the floor with anti-tip brackets and screws(supplied). Before installing, carefully read these instructions.
1. Take the fixing brackets(2pcs) and the expansion bolts(2pcs) out of the instruction packet.
2. Drill holes into the floor according to the dimensions shown below. This will allow you to fix the brackets to the floor.
According to the size and location, the holes on the floor should be Ø0.39
3. (A) Next insert the expansion bolt into the drilled hole. Make sure it is flush to the floor.
(B) Unscrew the nut, washer and lock ring from the screw. ” (10mm).
4. Next, align the bracket hole with the s
crew and reattach the washer and lock ring. Finally, tighten the nut with a
wrench or socket to the maximum. As you tighten the shield, it will bend outwards, creating an anchor that provides
extra security for your unit.
Location
the inside with a lukewarm wet cloth.
electrical consumption. Extreme cold ambient temperatures may also cause the appliance to perform improperly.
possibility of a malfunction in the cooling system from handling during transportation.
44.5 17.52 67.9 26.73 54.5 1.46
Building in this appliance can cause it to malfunction.
IMPORTANT
Ensure that the door is fully closed when the
appliance is in operation. Failure to fully close
the door can lead to excessive condensation
and potential water damage to ooring under
the appliance. Forno will not be responsible for
damages from misuse.
Allow 5.1 - 10.16 cm (2-4 inches) of space between the back, sides and top of the appliance and all adjacent walls.
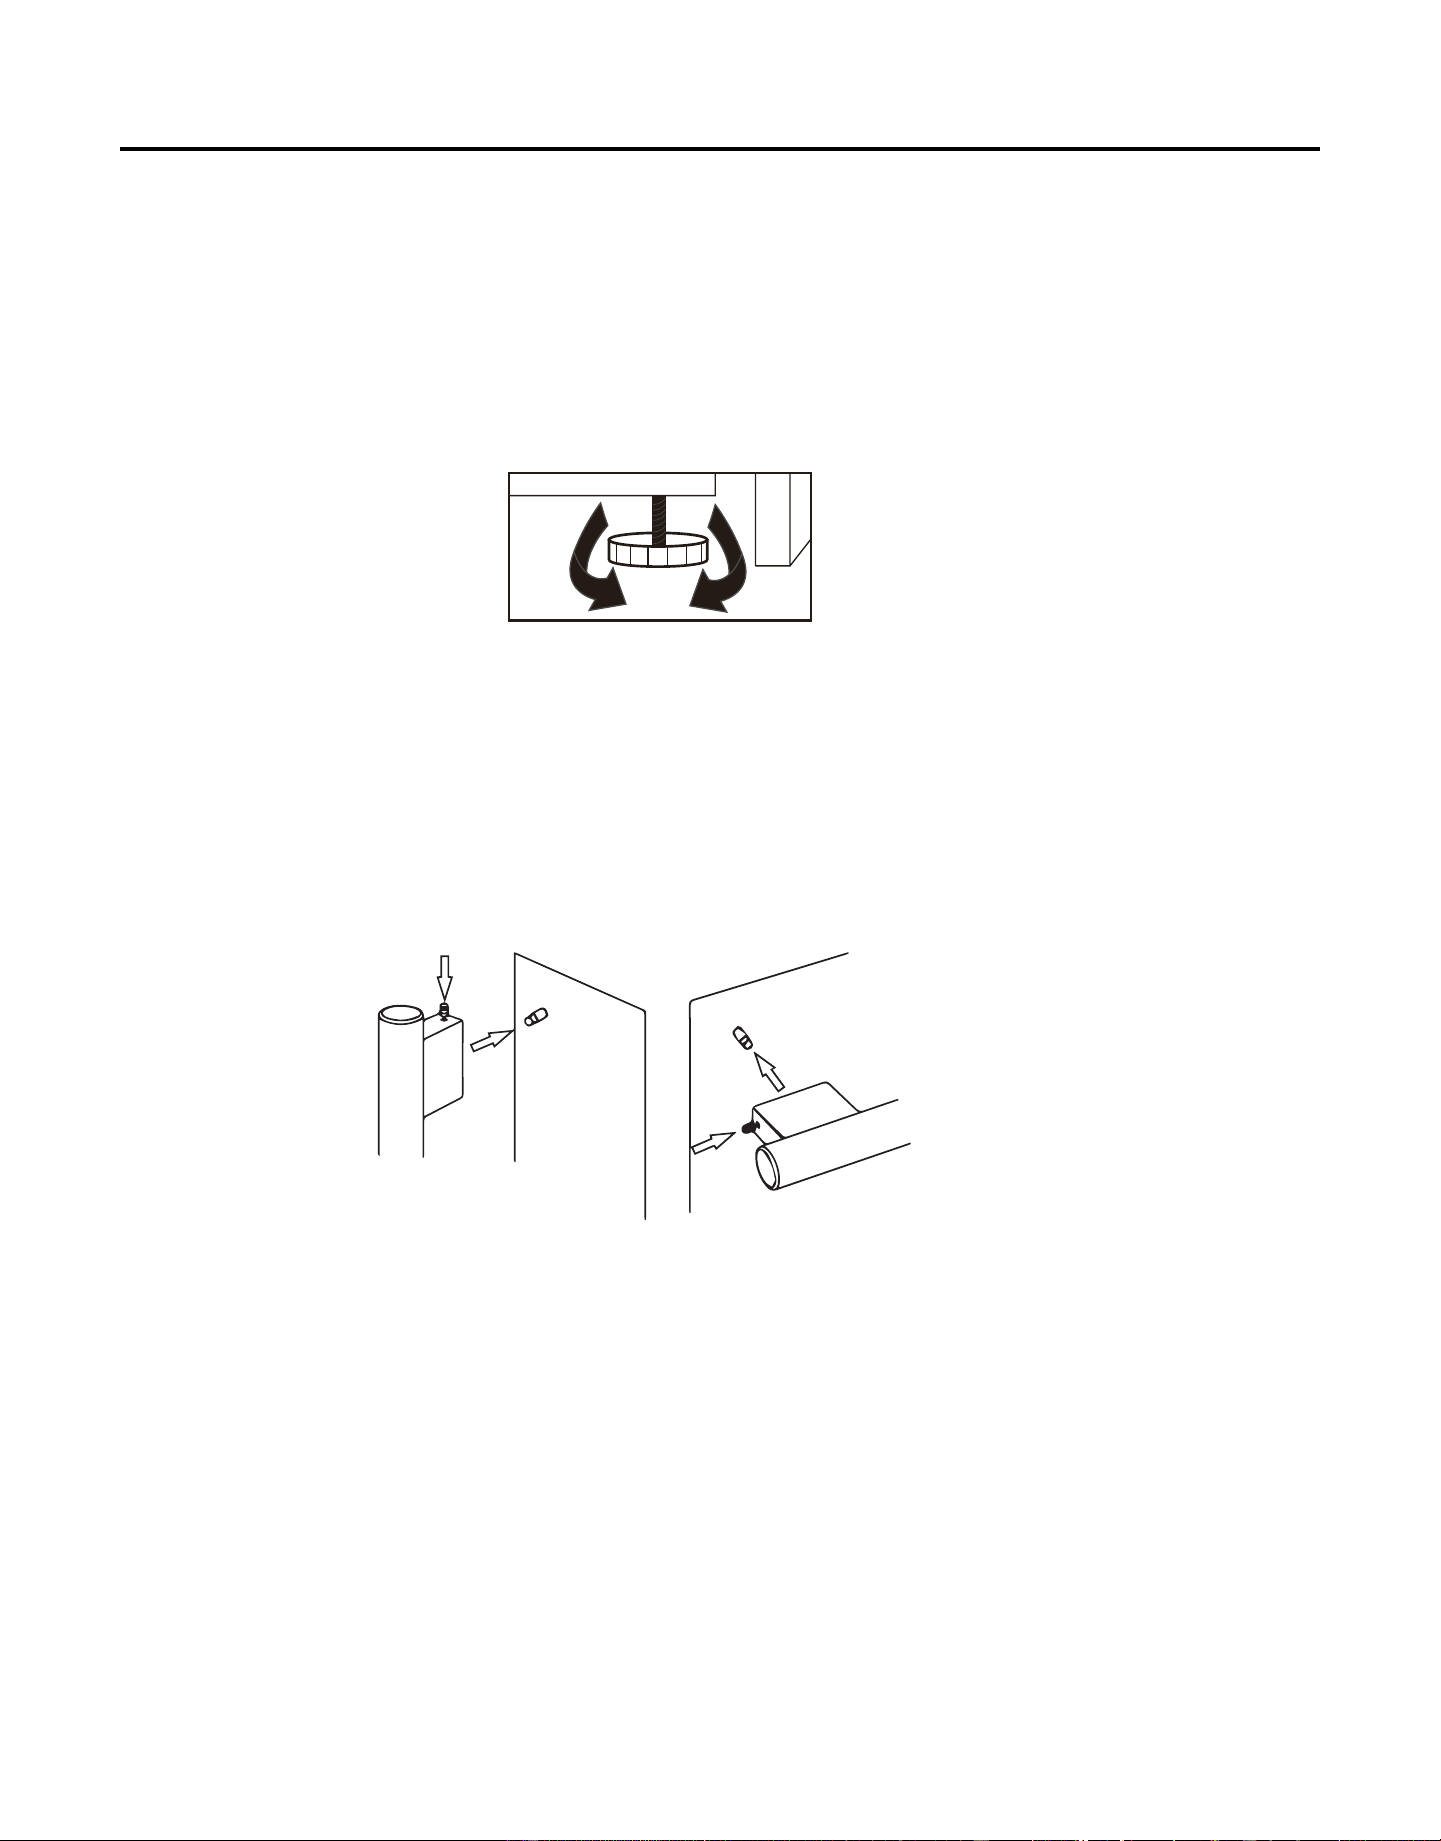
5. Push the appliance back into its place, Ensure that the bottom of the opening slides under the bracket, as shown in the
example below.
Installation (continued)
11
Installing The Handle
1.Locate the handle over the pins on the door panel.
2.Fix the handle by tighten the screw.
CONTROL PANEL
Temperature Display
Displays the current temperature of the unit. If the display reads “Lc” the control panel is locked.
Mode Buttons
Pressing the mode button will cycle the unit through the available settings.
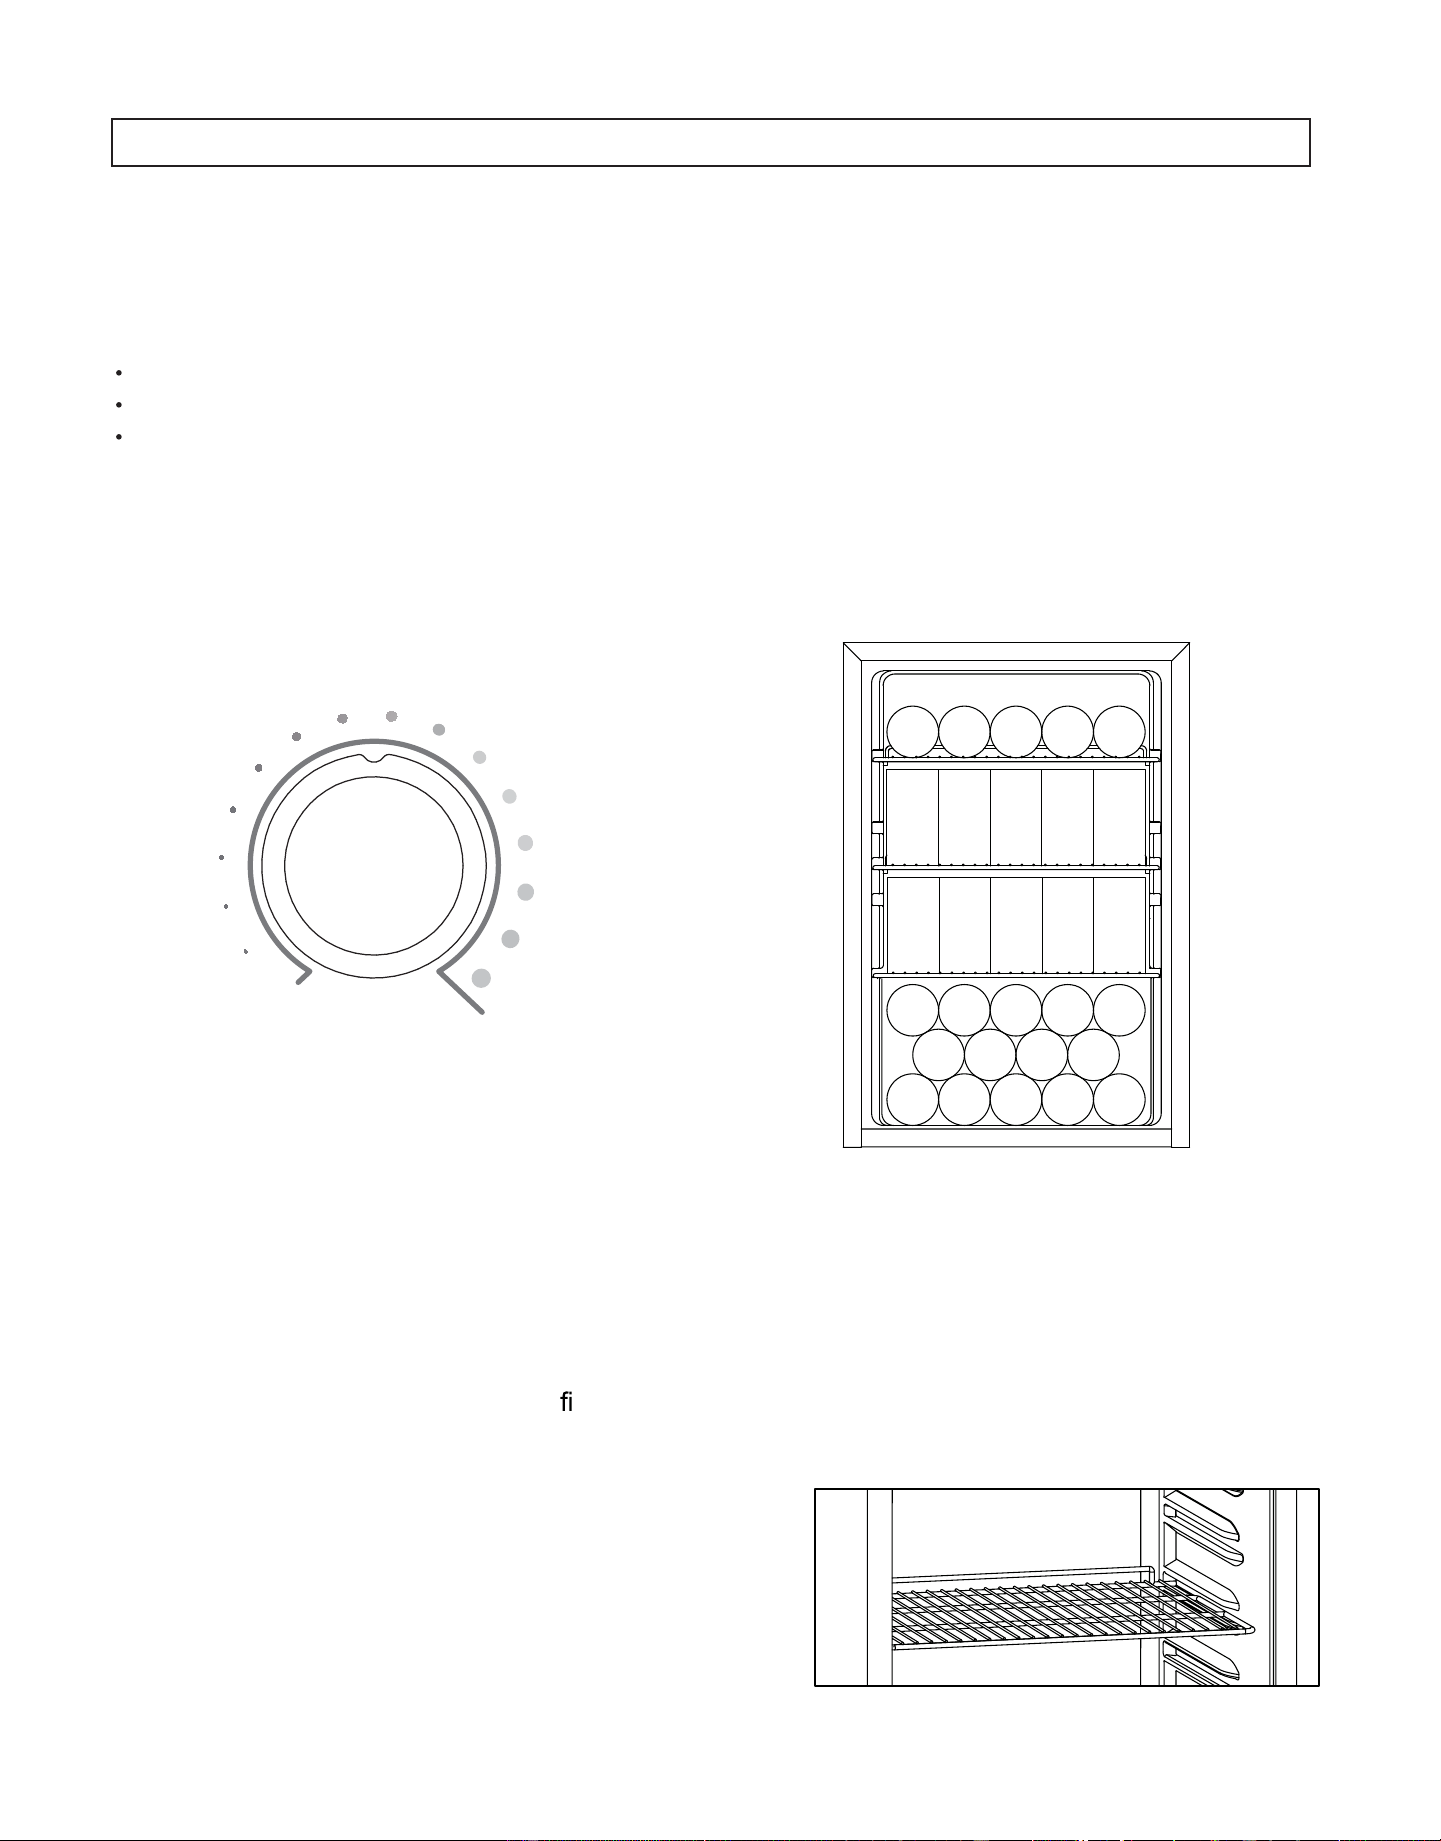
Leveling instructions
There are two adjustable feet on the bottom of the appliance that can be turned up or down to ensure that
the appliance is level.
1. Turn the adjustable foot counter-clockwise as far as it will go, until the top of the foot is touching the bottom of
the cabinet.
2. Slowly turn the adjustable foot clockwise until the appliance is level.
OPERATING INSTRUCTIONS
INTERIOR LIGHT
To manually operate the interior light, press the light
switch situated on the right side of the interior light
housing on the ceiling of the unit. This will allow the
light to remain on while the door is closed.
Note: The light will default to off. It can be turned
on to run continually. Due to energy ef ciency
requirements for a beverage center in this size,
there is no option to have the light turn on when the
door opens.
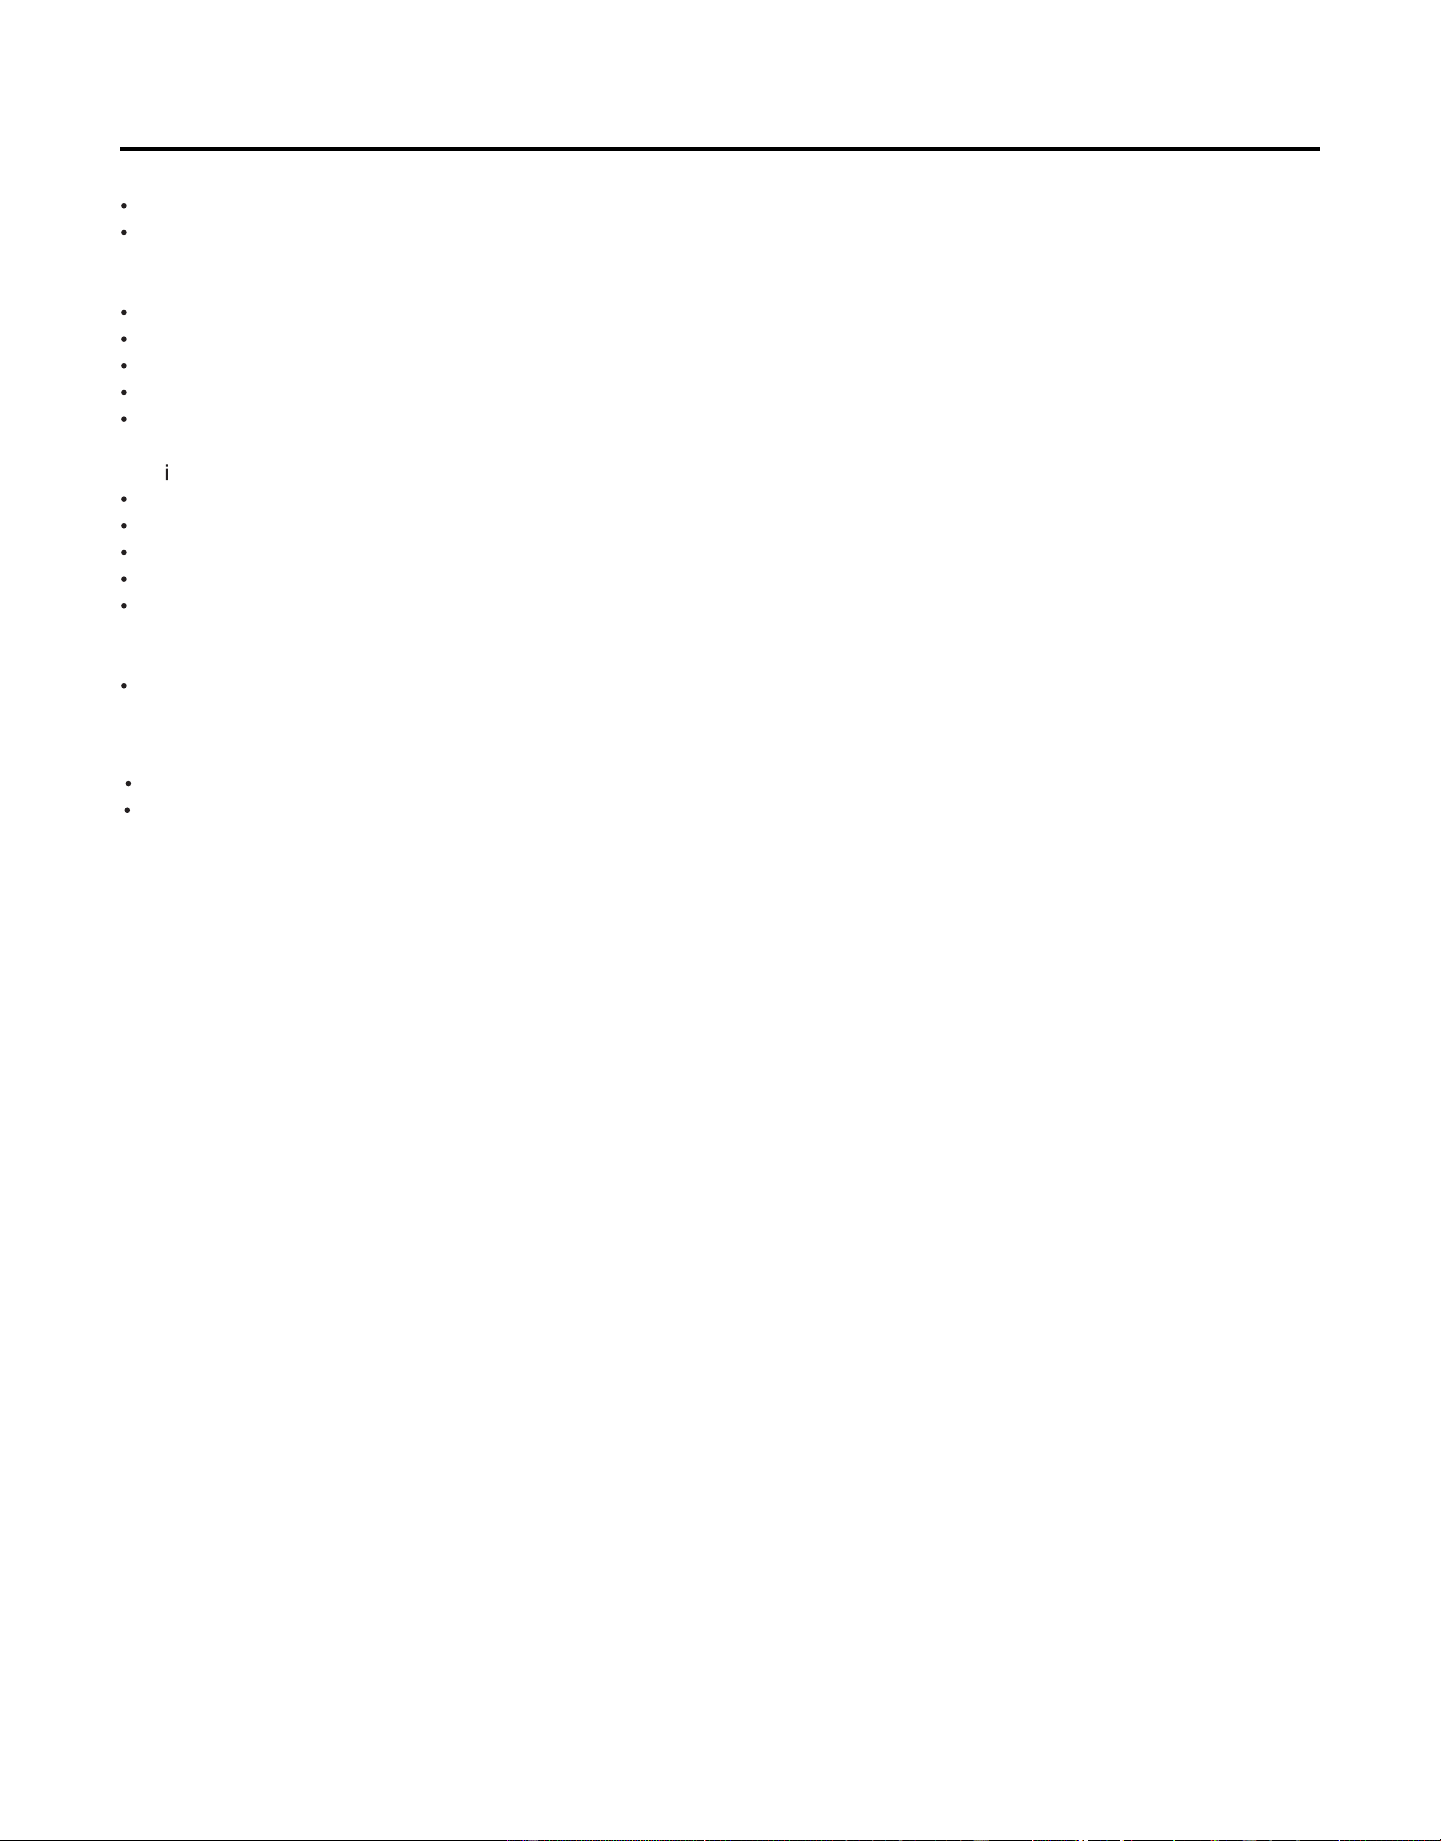
SHELF INSTRUCTIONS
To remove a shelf from its locked position, lift the
rear of the shelf upward and then slide the shelf out
of the unit.
To replace the shelf, ensure it is resting securely on
the support brackets and then push inward until the
shelf locks into place.
STOCKING INSTRUCTIONS
This beverage center has a maximum capacity of
87 355 ml cans when stocked as pictures below.
The first shelf will hold 10 cans.
The second shelf will hold 25 cans.
The third shelf will hold 24 cans.
The bottom section will hold 28 cans.
OFF
TEMPERATURE SELECTION
The temperature of the appliance can be adjusted
by turning the thermostat dial.
The larger dots indicate the coldest setting.
The smaller dots indicate the warmest setting.
Internal temperature of the appliance can vary
based on ambient
temperature, the quantity of
opened.
The “OFF” position will turn off the cooling
function.
items stored and how frequently the door is
12

13
CLEANING
Ensure the appliance is unplugged before cleaning. To clean the inside of the appliance, use a soft cloth and a solution of
one tablespoon of baking soda to one quart of water or some mild detergent. Wash removable shelves in a mild detergent
solution, then dry and wipe with a soft cloth. Clean the outside with a soft, damp cloth and
some mild detergent. It is important to keep the area clean where the door seals against the cabinet. Clean this area
with a soapy cloth. Rinse with a damp cloth and let dry.
Note: Do not use cleaners containing ammonia or alcohol on the appliance. Ammonia or alcohol can damage the
appearance of the appliance. Never use any commercial or abrasive cleaners or sharp objects on any part of the
appliance.
POWER FAILURE
Most power failures are corrected within a few hours and should not affect the temperature of your
appliance if you minimize the number of times the door is opened. If the power is going to be off for
a longer period of time, take the proper steps to protect your contents.
Note: Wait 3 to 5 minutes before attempting to restart the refrigerator if operation has been
interrupted
DEFROST
This unit is equipped with an automatic defrost function and does not require manual defrosting. Defrost water from the
appliance is channeled into a drip tray located in the compressor room. Heat transfer from the evaporating pipe causes
the defrost water to evaporate.
VACATION
Short vacations: Leave the appliance operating during vacations of less than three weeks.
Long vacations: If the appliance will not be used for several months, remove all items and turn off the appliance.
Clean and dry the Interior thoroughly. To prevent odor and mold growth, leave the door open slightly, blocking it open
if necessary.
MOVING
Remove all items.
Tape down all shelves.
Turn the adjustable feet up to the base to avoid damage.
Tape the door shut.
Ensure the appliance stays in the upright position during transportation. Protect the outside of the appliance with a
blanket.
If the appliance is placed on its back or side during transportation, upon reaching the destination, allow it to remain
upright for 6 hours before plugging in to avoid damage to internal components.
DISPOSAL
This appliance may not be treated as a regular household waste, it should be taken to the appropriate waste collection
point for the recycling of electrical components. For information on local waste collection points, contact your local waste
removal agency or government office.
Care & Maintenance
14
Troubleshooting
No power
A fuse may be blown or the circuit breaker tripped
Plug not fully inserted into the wall outlet
Internal temperature not cold enough
Temperature setting is too warm
The door or lid is not shut properly or opened excessively
Recently added a large quantity of warm food to the cabinet
Close proximity to heat source or direct sunlight
Ambient temperature or humidity is very high
Appl ance runs continuously
Temperature setting is too cold
The door or lid is not shut properly or opened excessively
Recently added a large quantity of warm food to the cabinet
Close proximity to heat source or direct sunlight
Ambient temperature or humidity is very high
Freezer makes a gurgling noise when operating
This noise is completely normal. The refrigerant inside the appliance will make a gurgling noise as it changes from a
liquid to a gas and back again.
Condensatoon on the cabinet on door
Door is not shut propenly on opened excessively
Ambient trmpenature on humidily is very high
15
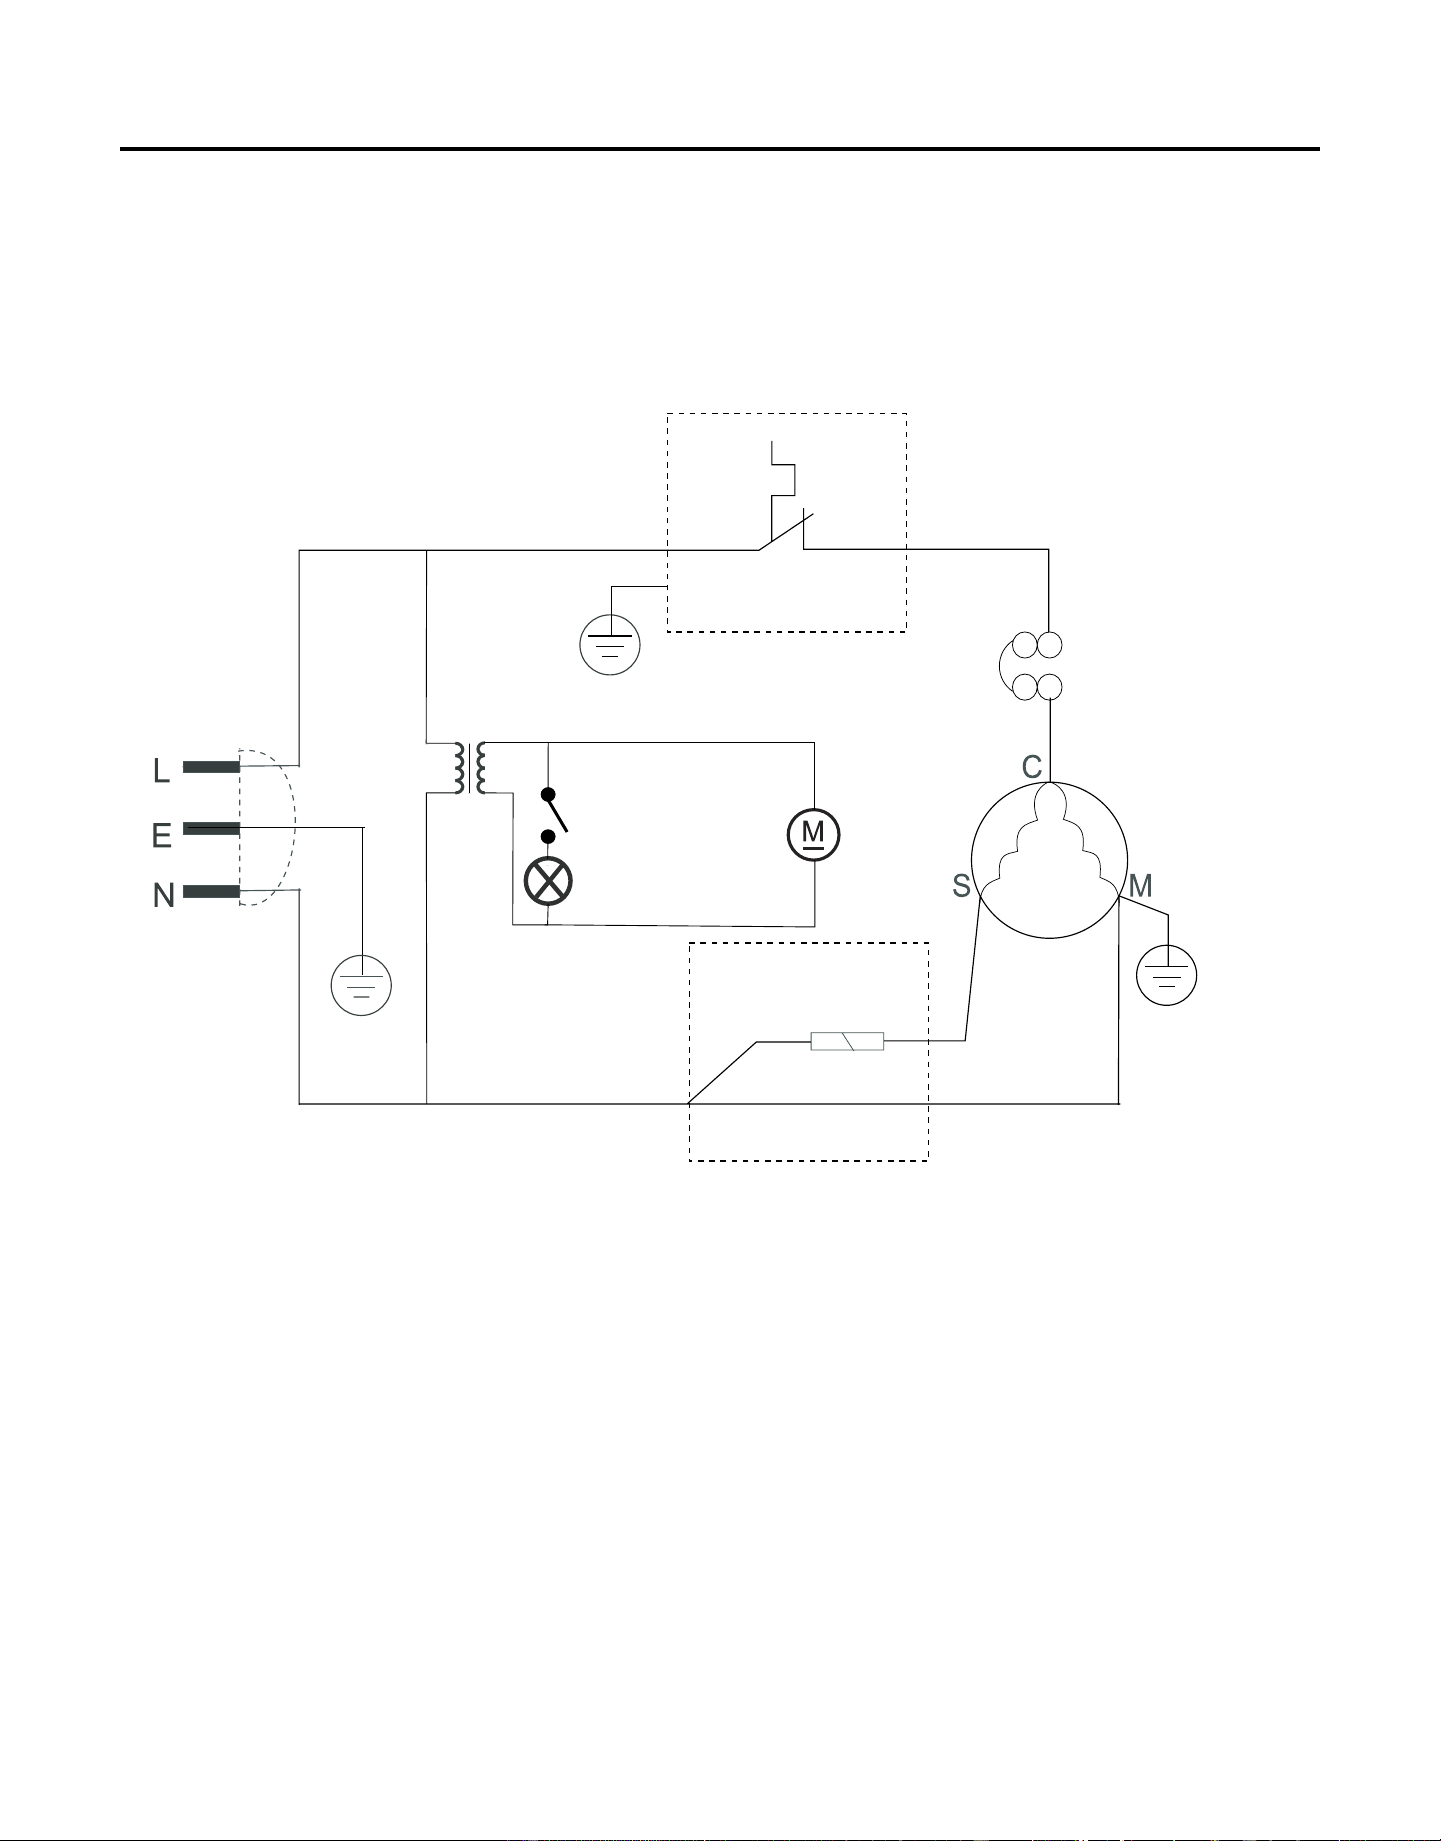
Wire Diagram
THERMOSTAT
REDBLACK
GREEN
WHITE
YELLOW/GREEN
PTC STARTER
YELLOW/GREEN
COMPRESSOR
OVERLOAD
PROTECTOR
INSIDE FAN
SWITCH
LAMP
POWER PLUG
TRANSFORMER

16
Warranty
What this limited warranty covers:
The Warranty coverage provided by Forno Appliances in
this statement applies exclusively to the original Forno
appliance (“Product”) sold to the consumer (“Purchaser”) by
an authorized Forno dealer/distributor/retailer, purchased
and installed in the United States or Canada, and which has
always remained within the original country of purchase (the
United States or Canada). Warranty coverage is activated
on the date of the Product’s original retail purchase and has
a duration of two (2) years.
Warranty coverage is non-transferable. In the event
o
f replacement of parts or of the entire product, the
replacement Product (or parts) shall assume the remaining
original Warranty activated with the original retail purchase
document. This Warranty shall not be extended with respect
to such replacement. Forno Appliances will repair or replace
any component/part which fails or proves defective due to
materials and/or workmanship within 2 years of the date of
the original retail purchase and under conditions of ordinary
residential, non-commercial use. Repair or replacement
will be free of charge, including labor at standard rates
and
shipping expenses. Purchaser is responsible for making the
Product reasonably accessible for service. Repair service
must be performed by a Forno Authorized Service company
during normal working hours.
Important
Retain proof of original purchase to establish warranty period.
Forno’s liability on any claim of any kind, with respect to the
goods and/or services provided, shall in no event exceed the
value of the goods or service or part there of which has given
rise to the claim.
30-Day Cosmetic Warranty
The Purchaser must inspect the product
at the time of
delivery. Forno warrants that the Product is free from
manufacturing defects in materials and workmanship for
a period of thirty (30) days from date of the original retail
purchase of the Product.
This coverage includes:
• Paint blemishes
• Chips
• Macroscopic finish defects
Cosmetic warranty does NOT cover:
• Issues resulting from incorrect transport, handling and/or
installation (e.g.: dents, broken, warped or deformed
structures or components, cracked or otherwise damaged
glass components);
• Slight color variations on painted/enameled components;
• Differences caused by natural or artificial
lighting, location or other analogous factors; >
stains/corrosion/discoloration caused by external
subs
tances and/or environmental factors; > labor costs,
display, floor, B-stock, out- of-box,“as is” appliances and
demo units.
How to receive service
To receive warranty services, the Purchaser must contact the
Forno Support department in order to determine the problem
and the required service procedures. Troubleshooting with
a customer service representative will be necessary before
moving forward with the service. Model number, serial number
and date of original retail purchase will be requested.
Warranty Exclusions: What Is Not Covered.
• Use of the Product in any non-residential, commercial
application.
• Use of the Product for anythi
ng other than its intended
purpose.
• Repair services provided by anyone other than a Forno
Authorized Service agency.
• Damages or repair services to correct services provided
by unauthorized parties or the use of unauthorized parts.
• Installation not in accordance with local/state/city/county
fire codes, electrical codes, gas codes, plumbing codes,
building codes, laws or regulations.
• Defects or damage due to improper storage of the
Product.
• Defects, damage or missing parts on products sold out of
the original factory packaging or from displays. > Service
calls or repairs to correct an incorrect installation of the
Product and/or related accessories.
• Replacement of parts/service calls to connect, convert
or otherwise repair the electrical wiring and/or gas li
ne in
order to properly use the product.
• Replacement of parts/service calls to provide instructions
and information on the use of the Product.
• Replacement of parts/service calls to correct issues
arising from the product being used in a manner other
than what is normal and customary for residential use.
• Replacement of parts/service calls due to wear and tear
of components such as seals, knobs, pan supports,
shelving, cutlery baskets, buttons, touch displays,
scratched or broken ceramic-glass tops.
• Replacement of parts/service ca
lls for lack of/improper
maintenance, including but not limited to: build up of
residues, stains, scratches, discoloration, corrosion.
• Defects and damages arising from accidents, alteration,
misuse, abuse or improper installation.
• Defects and damages arising from Product transport,
logistics and handling. Inspection of the product must be
made at time of delivery. Following receipt and inspection,
the selling dealer/delivery company must be notified of
any issues arising from handling, transport and logistics.
• Defects and damages arising from external forces bey
ond
the control of Forno Appliances, including but not limited
to wind, rain, sand, fires, floods, mudslides, freezing
temperatures, excessive moisture or extended exposure
to humidity, power surges,
• Lightning, structural failures surrounding the appliance
and other acts of God.
• Products whose serial number has been
altered/damaged/tampered with. In no case shall Forno
be held liable or responsible for damage to surrounding
property, including furniture, cabinetry, flooring, panels,
and other structures surrounding the Product. Forno is
neither liable nor responsible for the Product if it is located
in a remot
e area or an area where certified trained
technicians are not reasonably available. Purchaser must
bear any transportation and delivery costs of the Product
to the nearest Authorized Service Center or the additional
travel expenses of a certified trained technician
17
Warranty
THERE ARE NO EXPRESS WARRANTIES OTHER THAN THOSE LISTED AND DESCRIBED ABOVE, AND NO WARRANTIES, EITHER EXPRESS OR IMPLIED,
INCLUDING, BUT NOT LIMITED TO, ANY IMPLIED WARRANTIES OF MERCHANTABILITY OR FITNESS FOR A PARTICULAR PURPOSE THAT SHALL APPLY
AFTER THE EXPRESS WARRANTY PERIODS STATED ABOVE, AND NO OTHER EXPRESS WARRANTY OR GUARANTEE GIVEN BY ANY PERSON, FIRM
OR CORPORATION WITH RESPECT TO THIS PRODUCT SHALL BE BINDING ON FORNO. FORNO SHALL NOT BE LIABLE FOR LOSS OF REVENUE OR
PROFITS, FAILURE TO REALIZE SAVIN
GS OR OTHER BENEFITS, TIME AWAY FROM WORK, MEALS, LOSS OF FOOD OR BEVERAGES, TRAVELING OR
HOTEL EXPENSES, EXPENSES TO RENT OR PURCHASE APPLIANCES, REMODELING/CONSTRUCTION EXPENSES IN EXCESS OF DIRECT DAMAGES
WHICH ARE UNDENIABLY CAUSED EXCLUSIVELY BY FORNO OR ANY OTHER SPECIAL, INCIDENTAL OR CONSEQUENTIAL DAMAGES CAUSED BY THE
USE, MISUSE OR INABILITY TO USE THIS PRODUCT, REGARDLESS OF THE LEGAL THEORY ON WHICH THE CLAIM IS BASED, AND EVEN IF FORNO
HAS BEEN ADVISED OF THE POSSIBILITY OF SUCH DAMAGES. NOR SHALL RECOVER
Y OF ANY KIND AGAINST FORNO BE GREATER IN AMOUNT
THAN THE PURCHASE PRICE OF THE PRODUCT SOLD BY FORNO AND CAUSING THE ALLEGED DAMAGE. WITHOUT PREJUDICE TO THE FOREGOING,
PURCHASER ASSUMES ALL RISK AND LIABILITY FOR LOSS, DAMAGE OR INJURY TO PURCHASER AND PURCHASER’S PROPERTY AND TO OTHERS
AND THEIR PROPERTY ARISING FROM THE USE, MISUSE, OR INABILITY TO USE THIS PRODUCT SOLD BY FORNO THAT IS NOT A DIRECT RESULT OF
NEGLIGENCE ON THE PART OF FORNO THIS LIMITED WARRANTY SHALL NOT EXTEND TO ANYON
E OTHER THAN THE ORIGINAL PURCHASER OF THIS
PRODUCT, IS NON-TRANSFERABLE, AND STATES YOUR EXCLUSIVE REMEDY.
Correct Disposal of this product:
This marking indicates that this appliance should not be disposed with
other household wastes. To prevent possible harm to the environment
or human health from uncontrolled waste disposal, recycle it responsibly
to promote the sustainable reuse of material resources.
Customer Support: Call 1-866-231-8893 or email: [email protected]