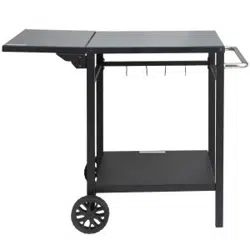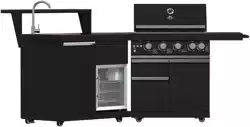
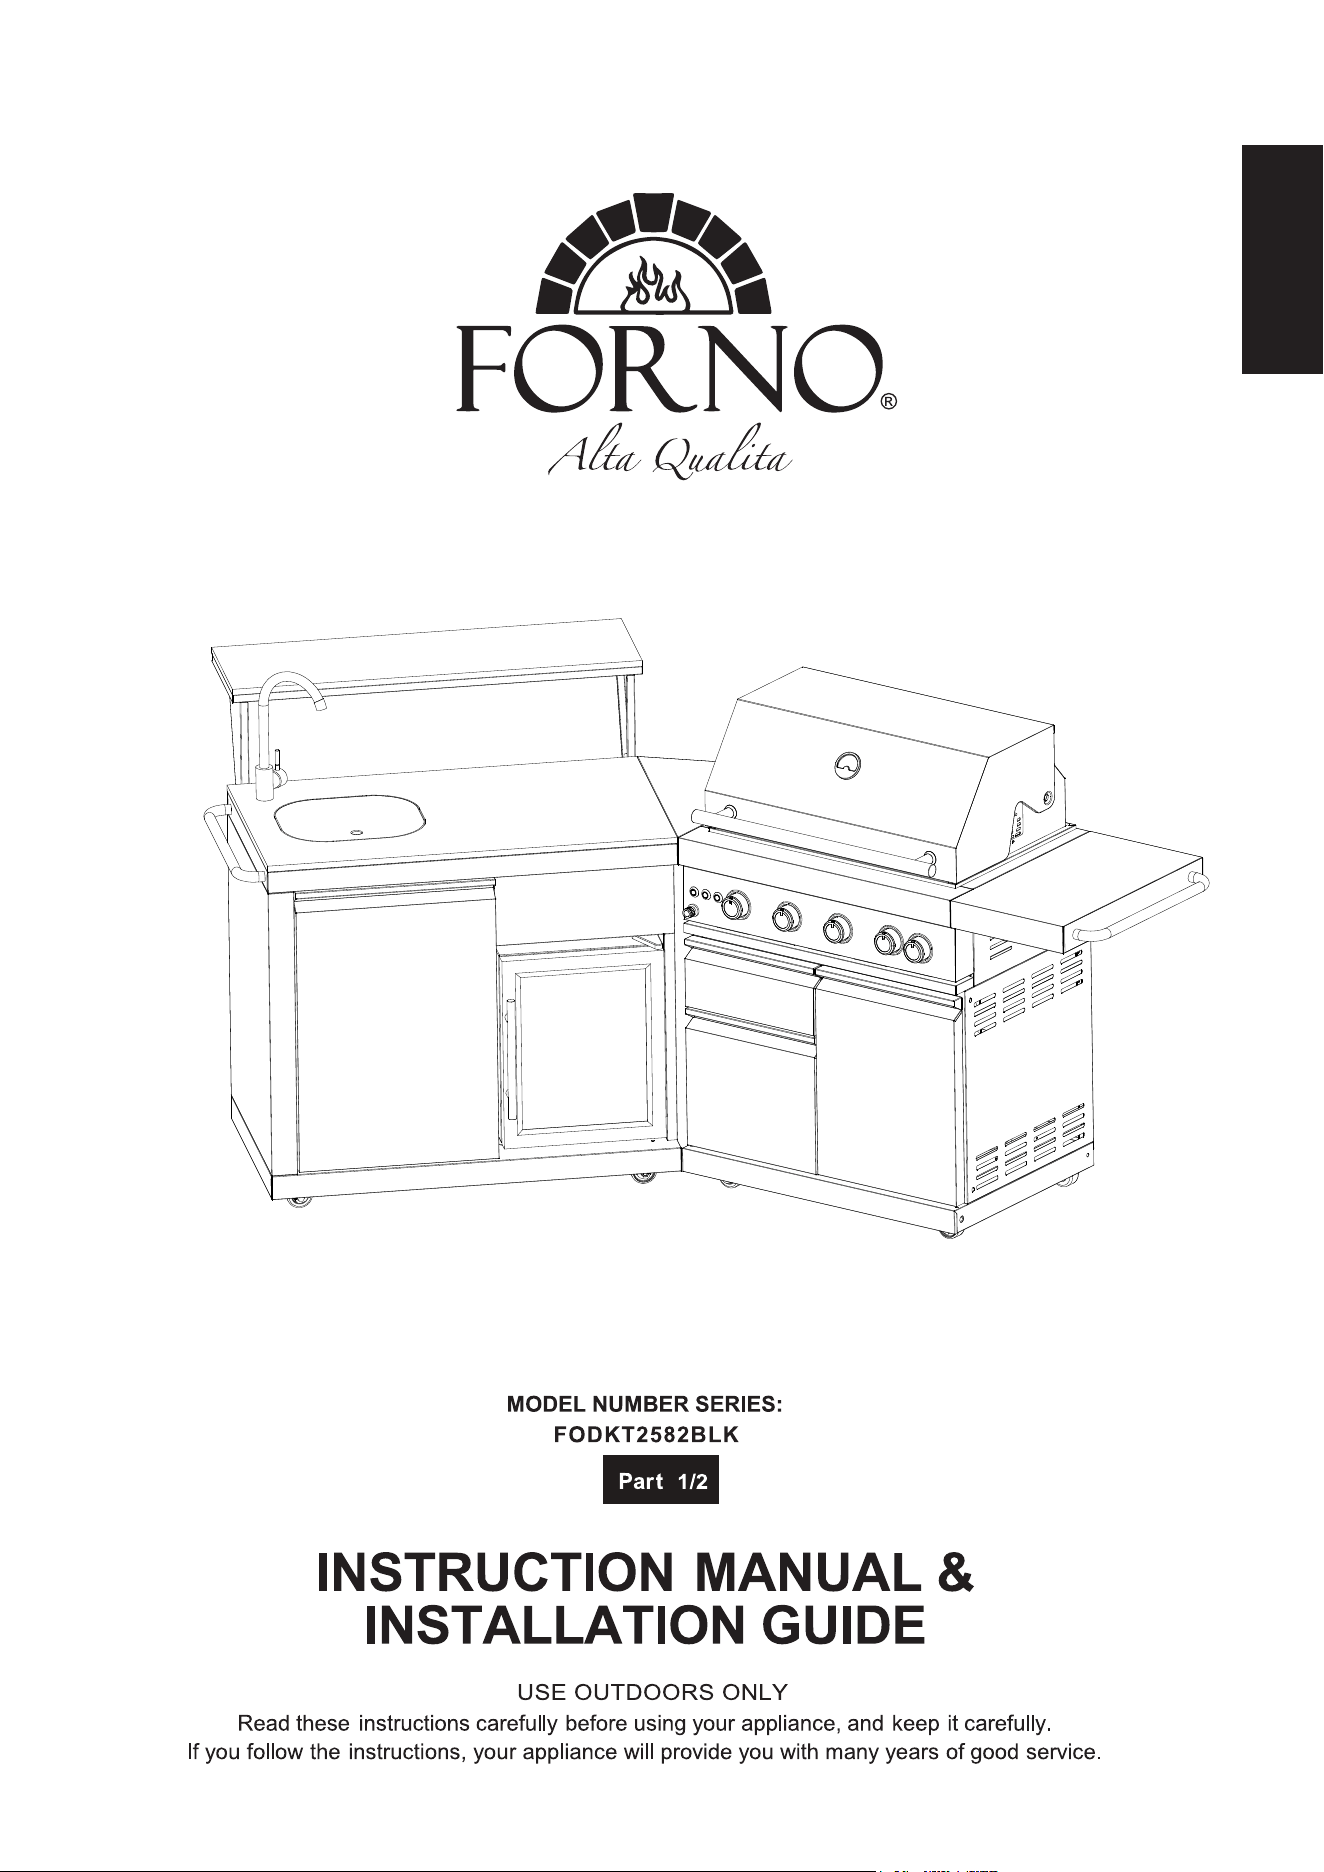
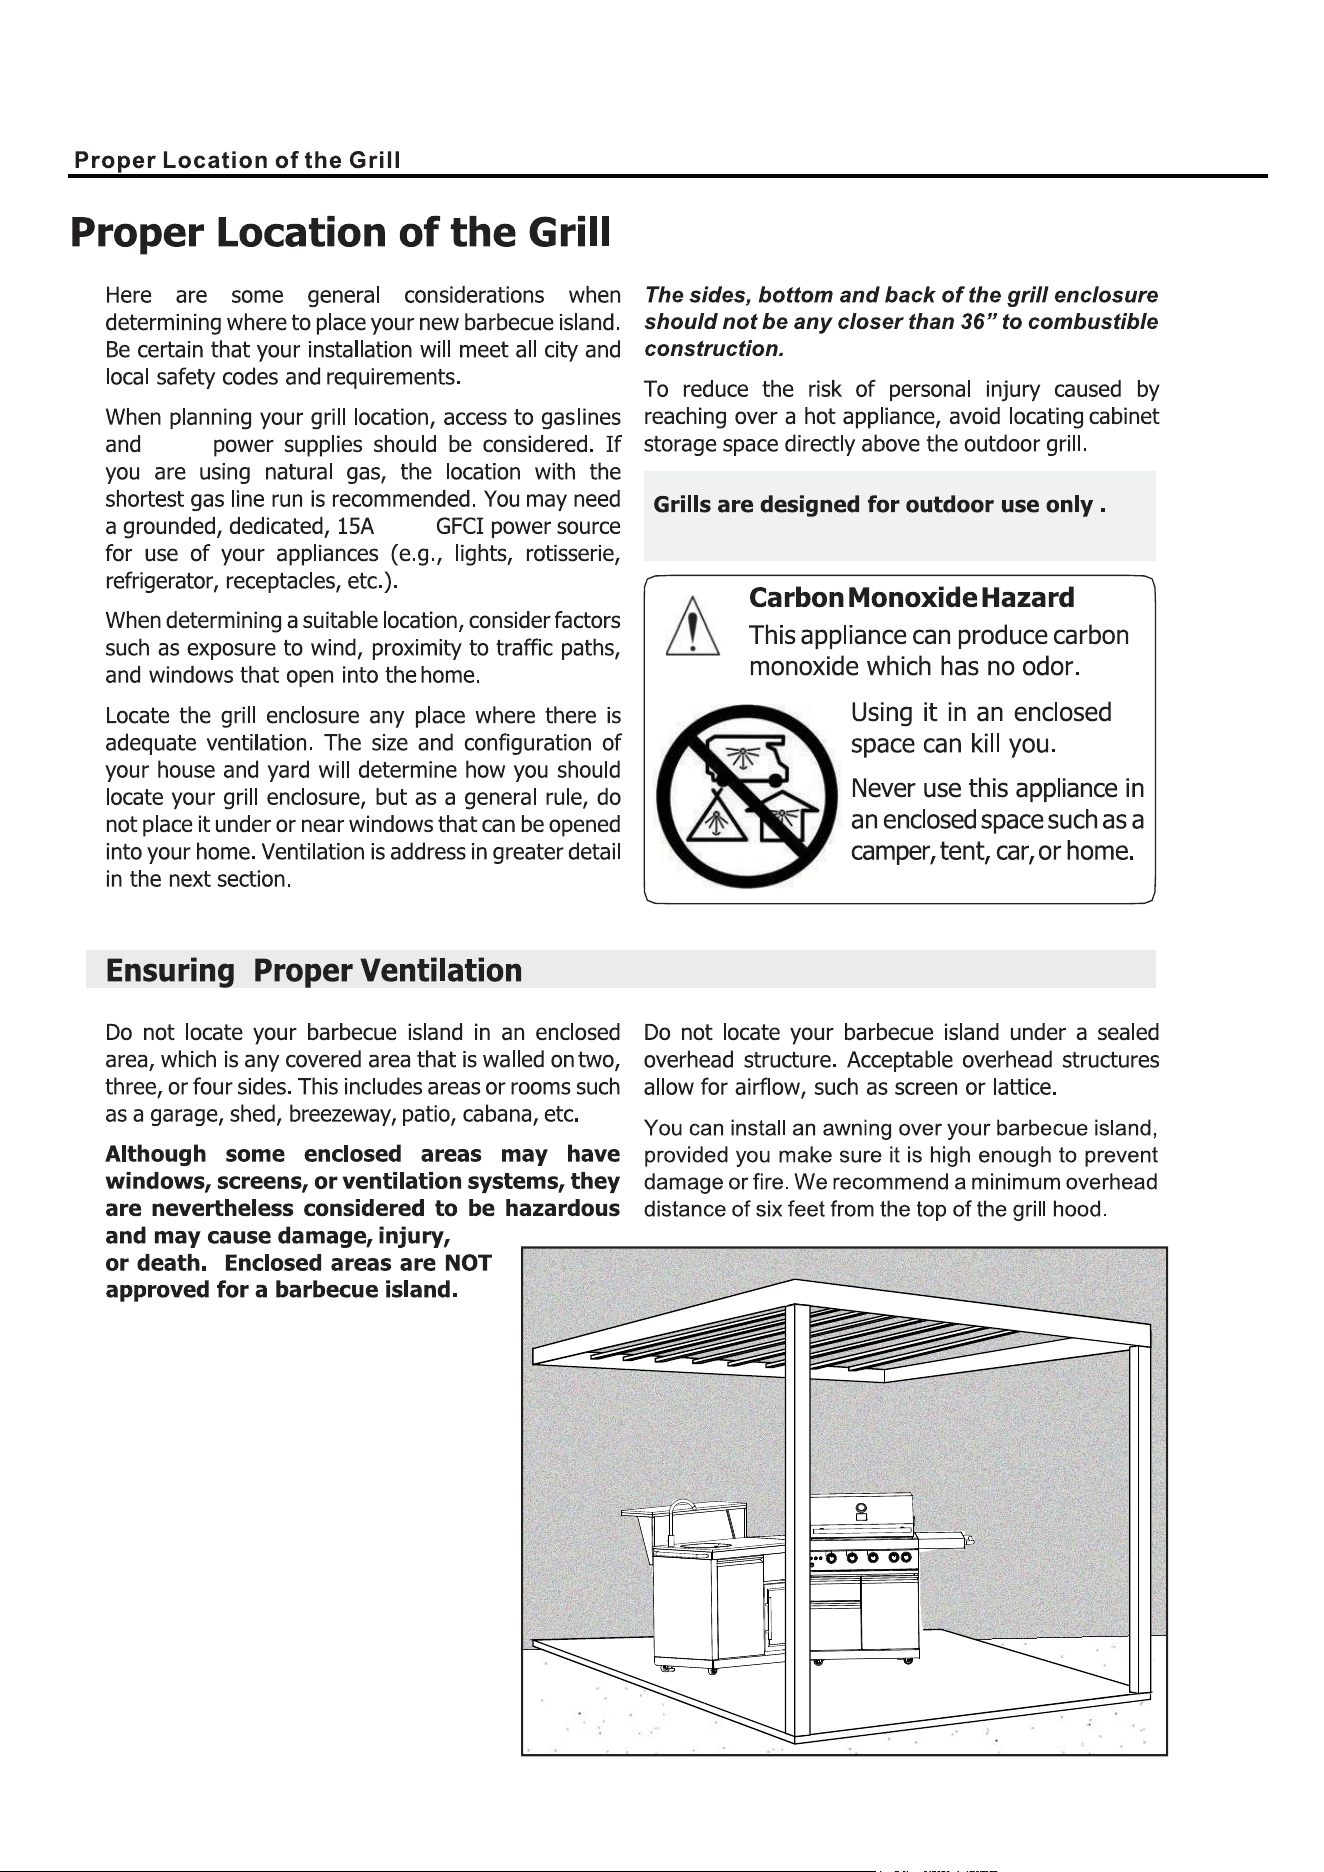
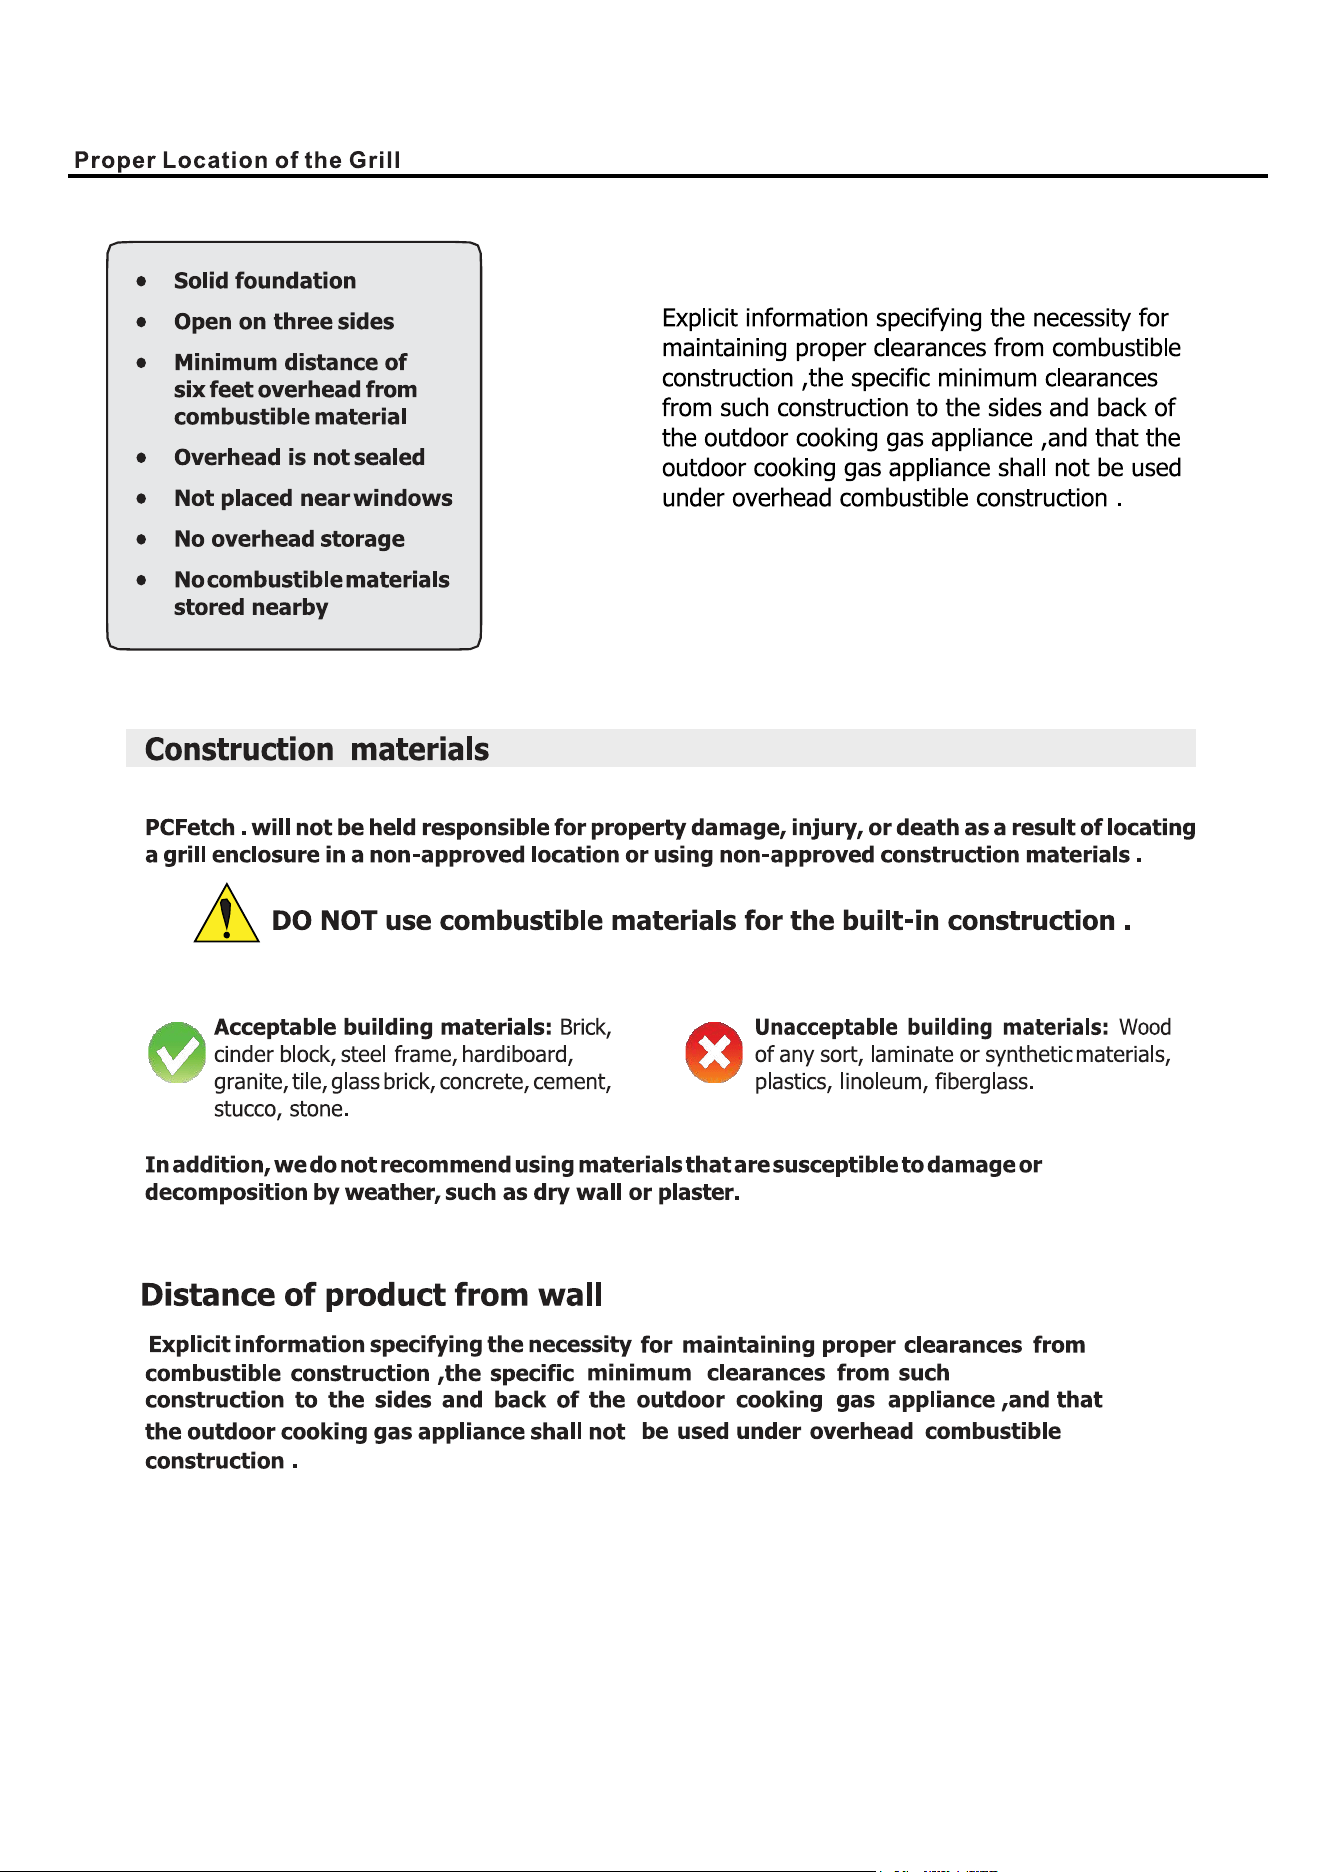
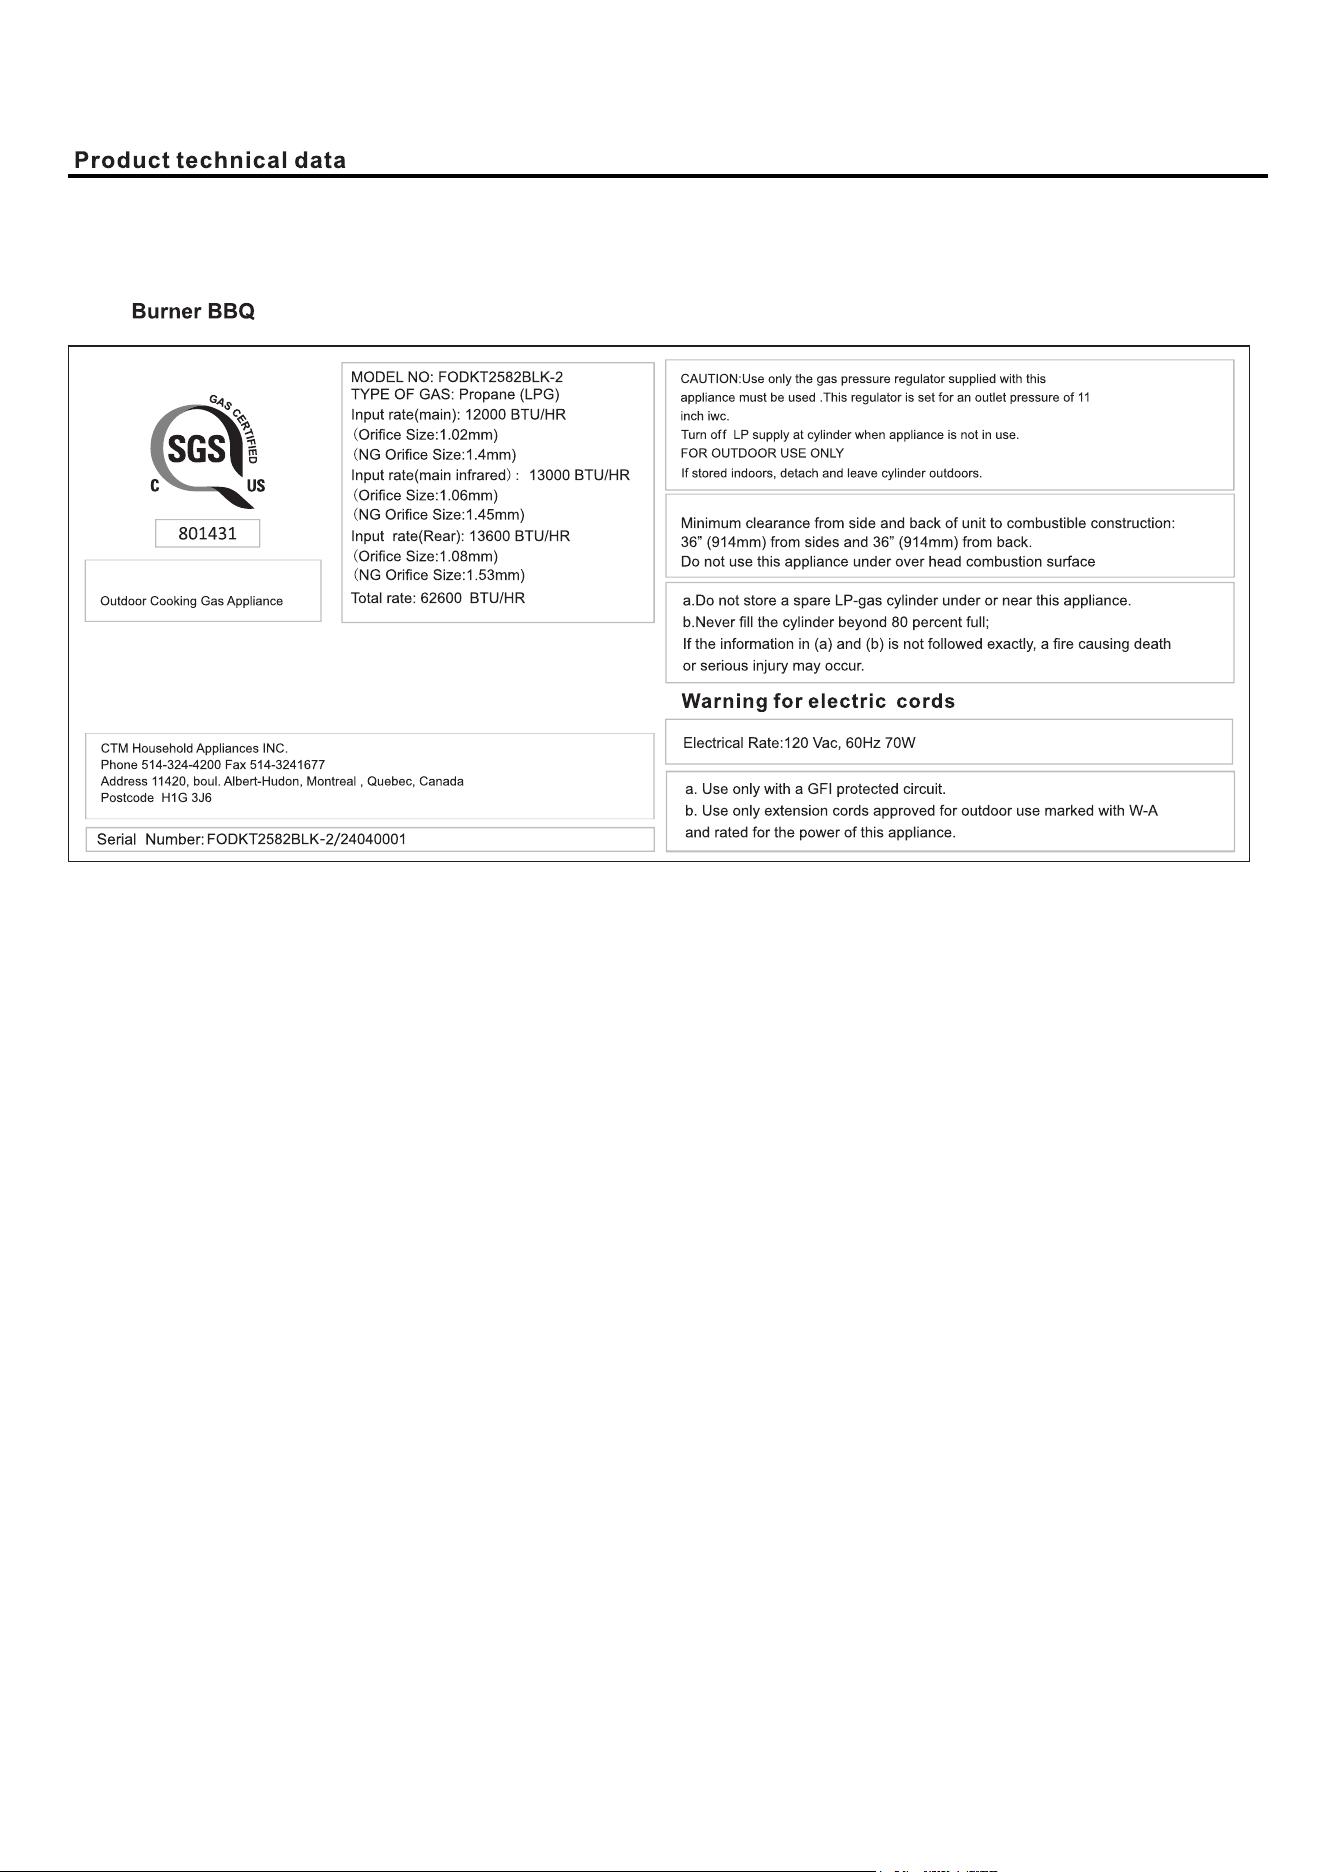
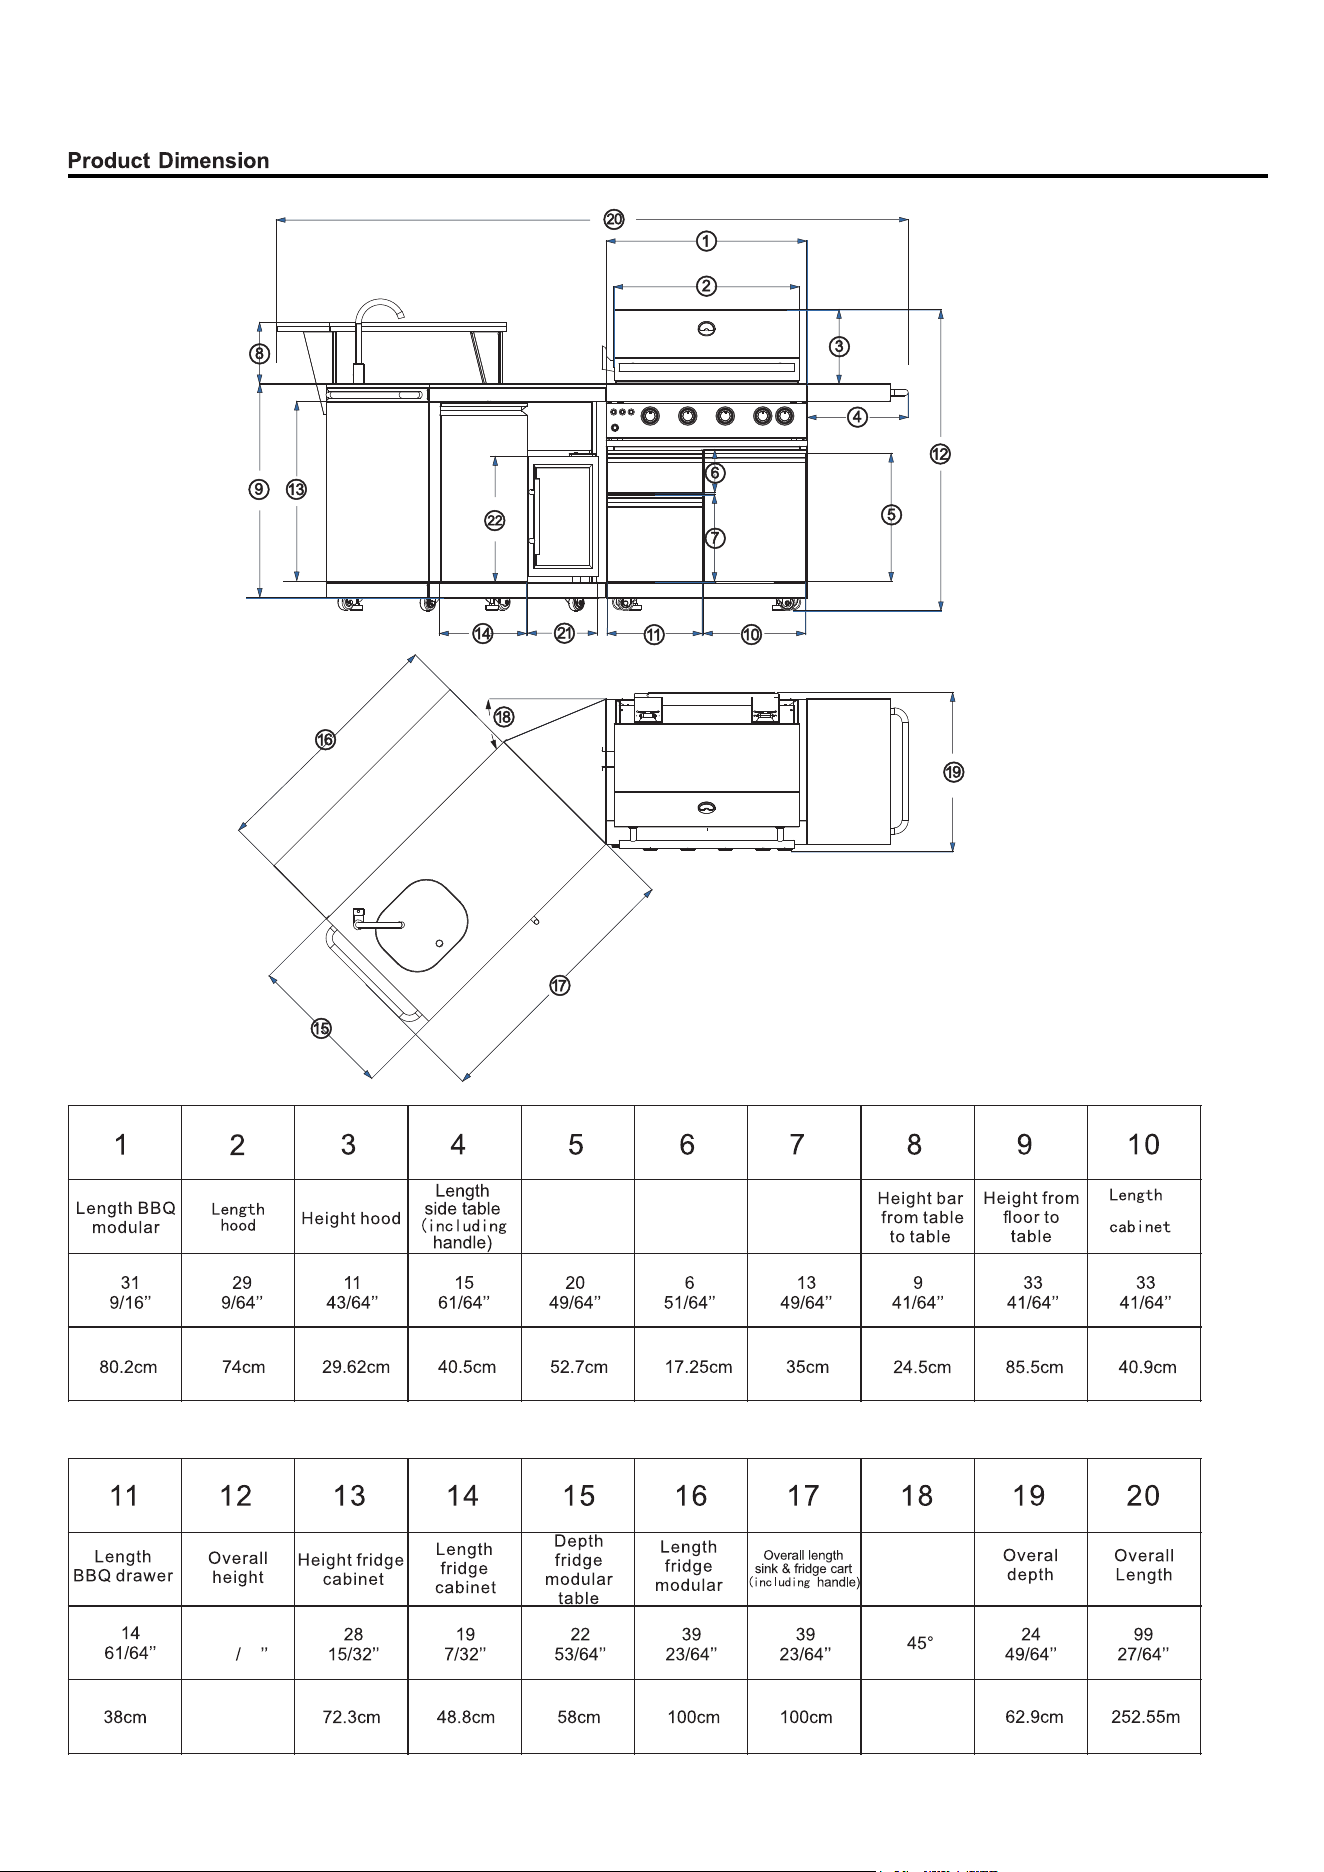
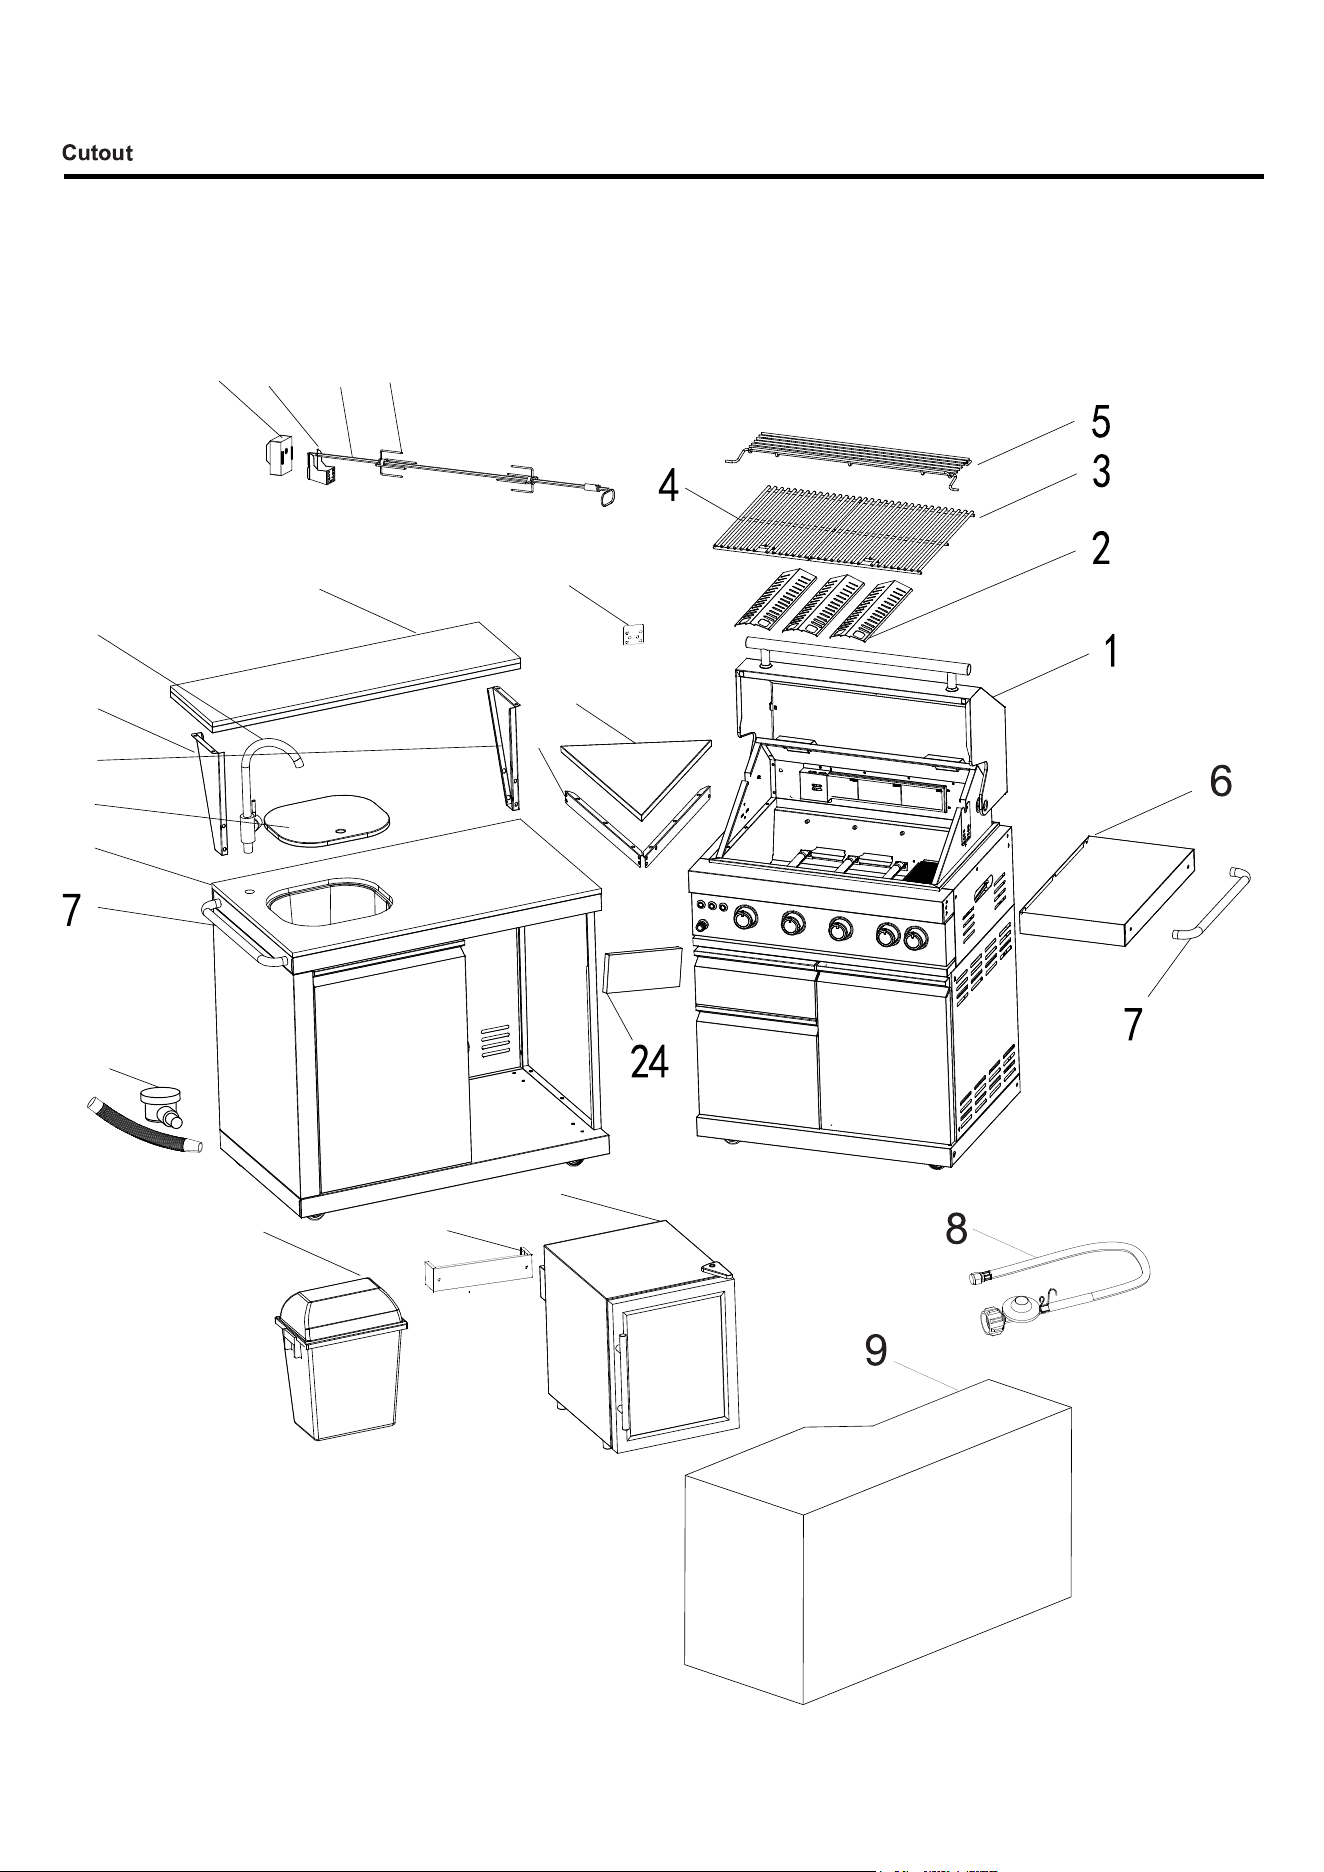
2-Piece Black Aluminum Outdoor Kitchen Set, 4-Burners Gas Grill with Side Burner, and a
Kitchen Sink with Black Sintered Stone Countertops
ENGLISH
32
31
25
16
18
21
24
3
4
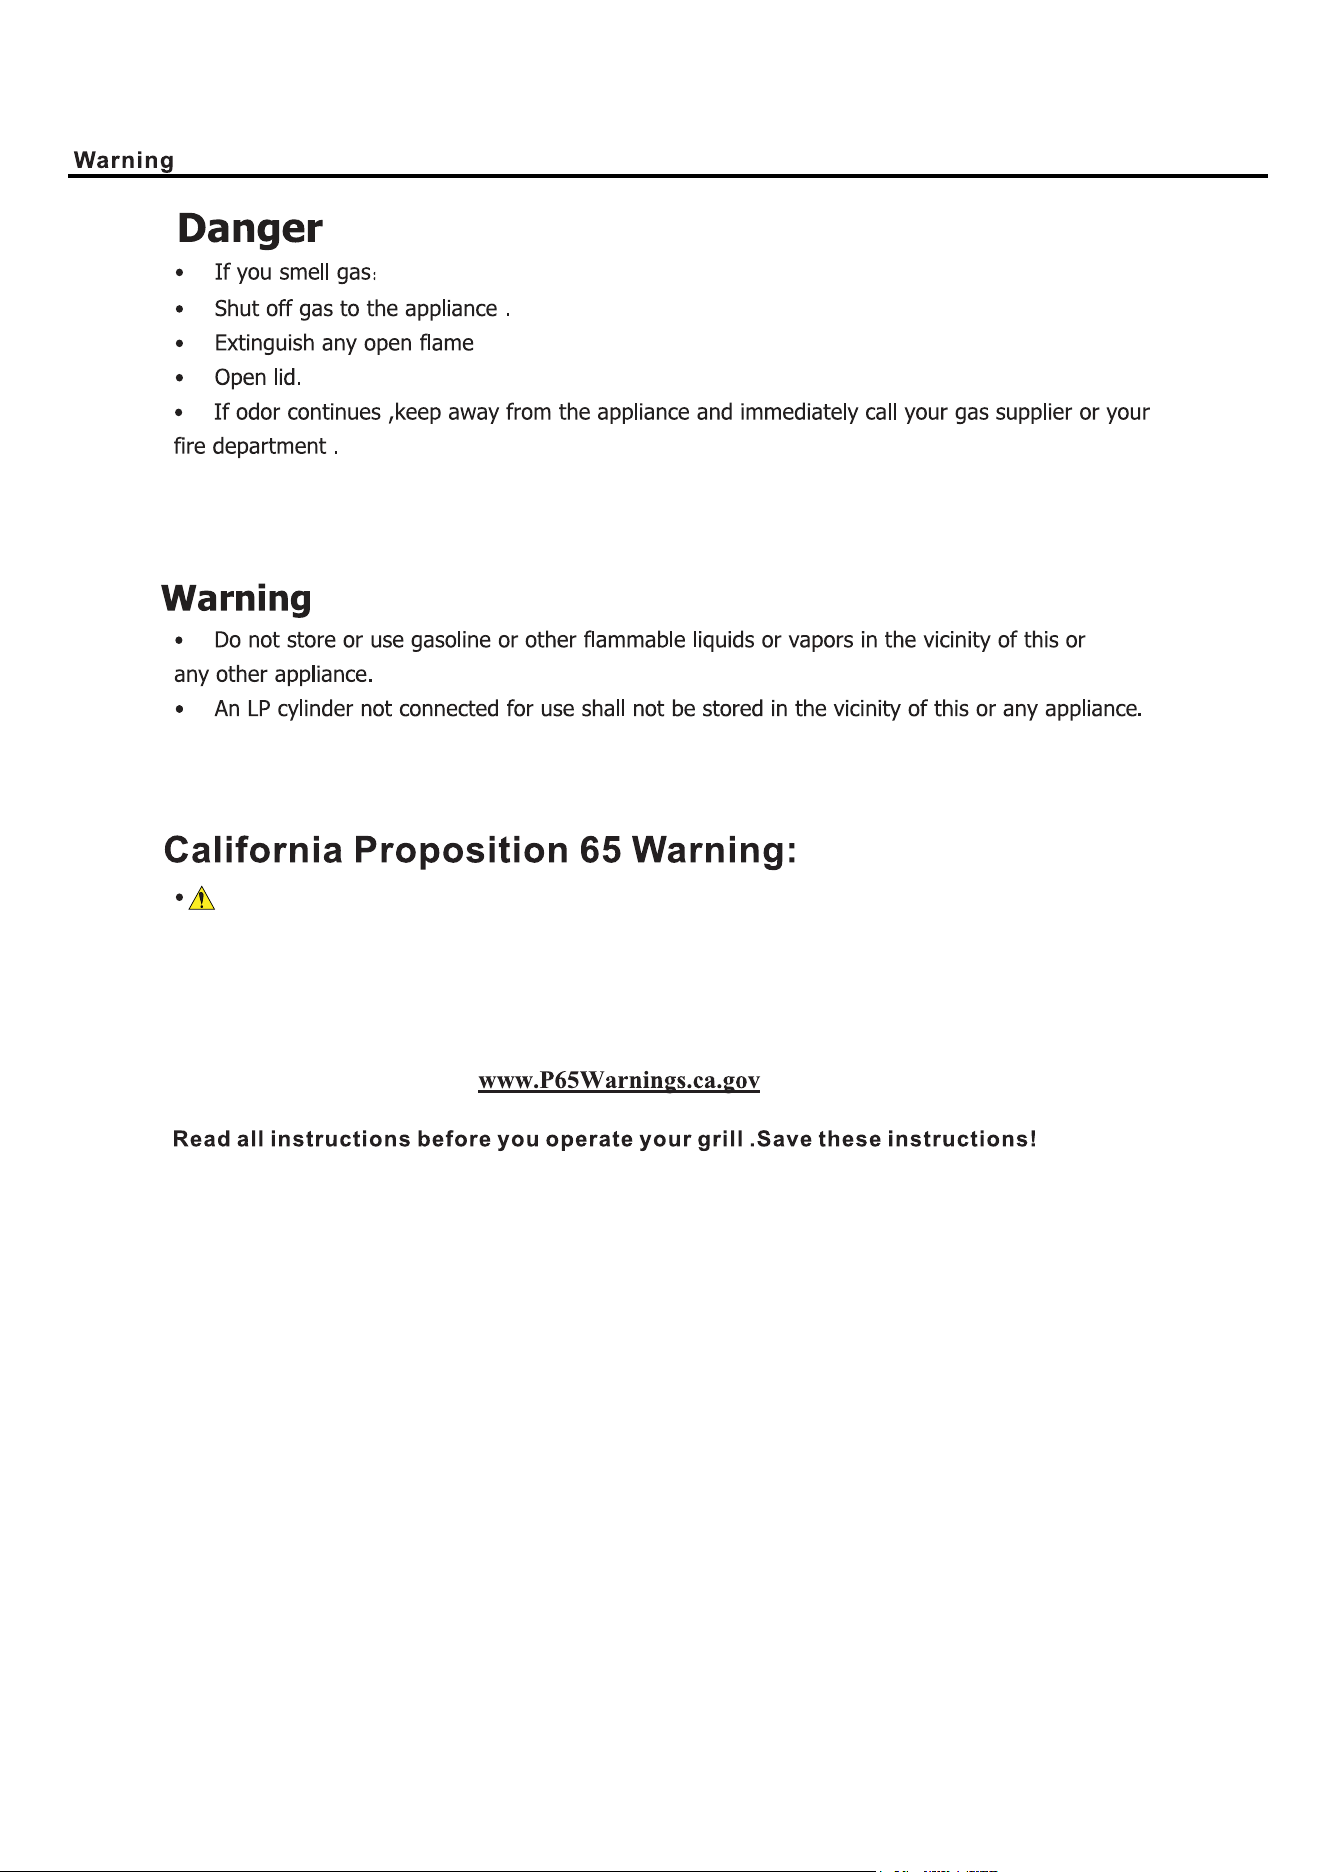
California Proposition 65 Warning:
Chemicals including Chromium(hex avalent compounds) known to the State
of California to cause cancer, birth defects or other reproductive harm are
found in and/or created by the combustion of natural gas, propane, butane
and other fuels. Always operate this unit as described in the owner's manual
and in well ventilated areas.
Read all instructions before you operate your grill. Save these instructions!
For more information go to
5
Forno
Forno
Forno
6
7
120V
120V
8
9
4+1
CSA/ANSIZ21.58-22 CSA 1.6-22
Minimum ambient operating temperature: -4 °F (-20°C)
4+1Burner BBQ
10
119.2cm
46
59 64
Height BBQ
cabinet
BBQ
Height
drawer 1
Height
drawer 2
Corner
11
10 11
1312
14
15
16
17
2518
19
20
21
22
23
26
27
12
rod
Drainer & pipe
(installed)
(installed)
M6x10
10
11
12
14
15
16
17
18
19
20
21
22
23
27
24
25
26
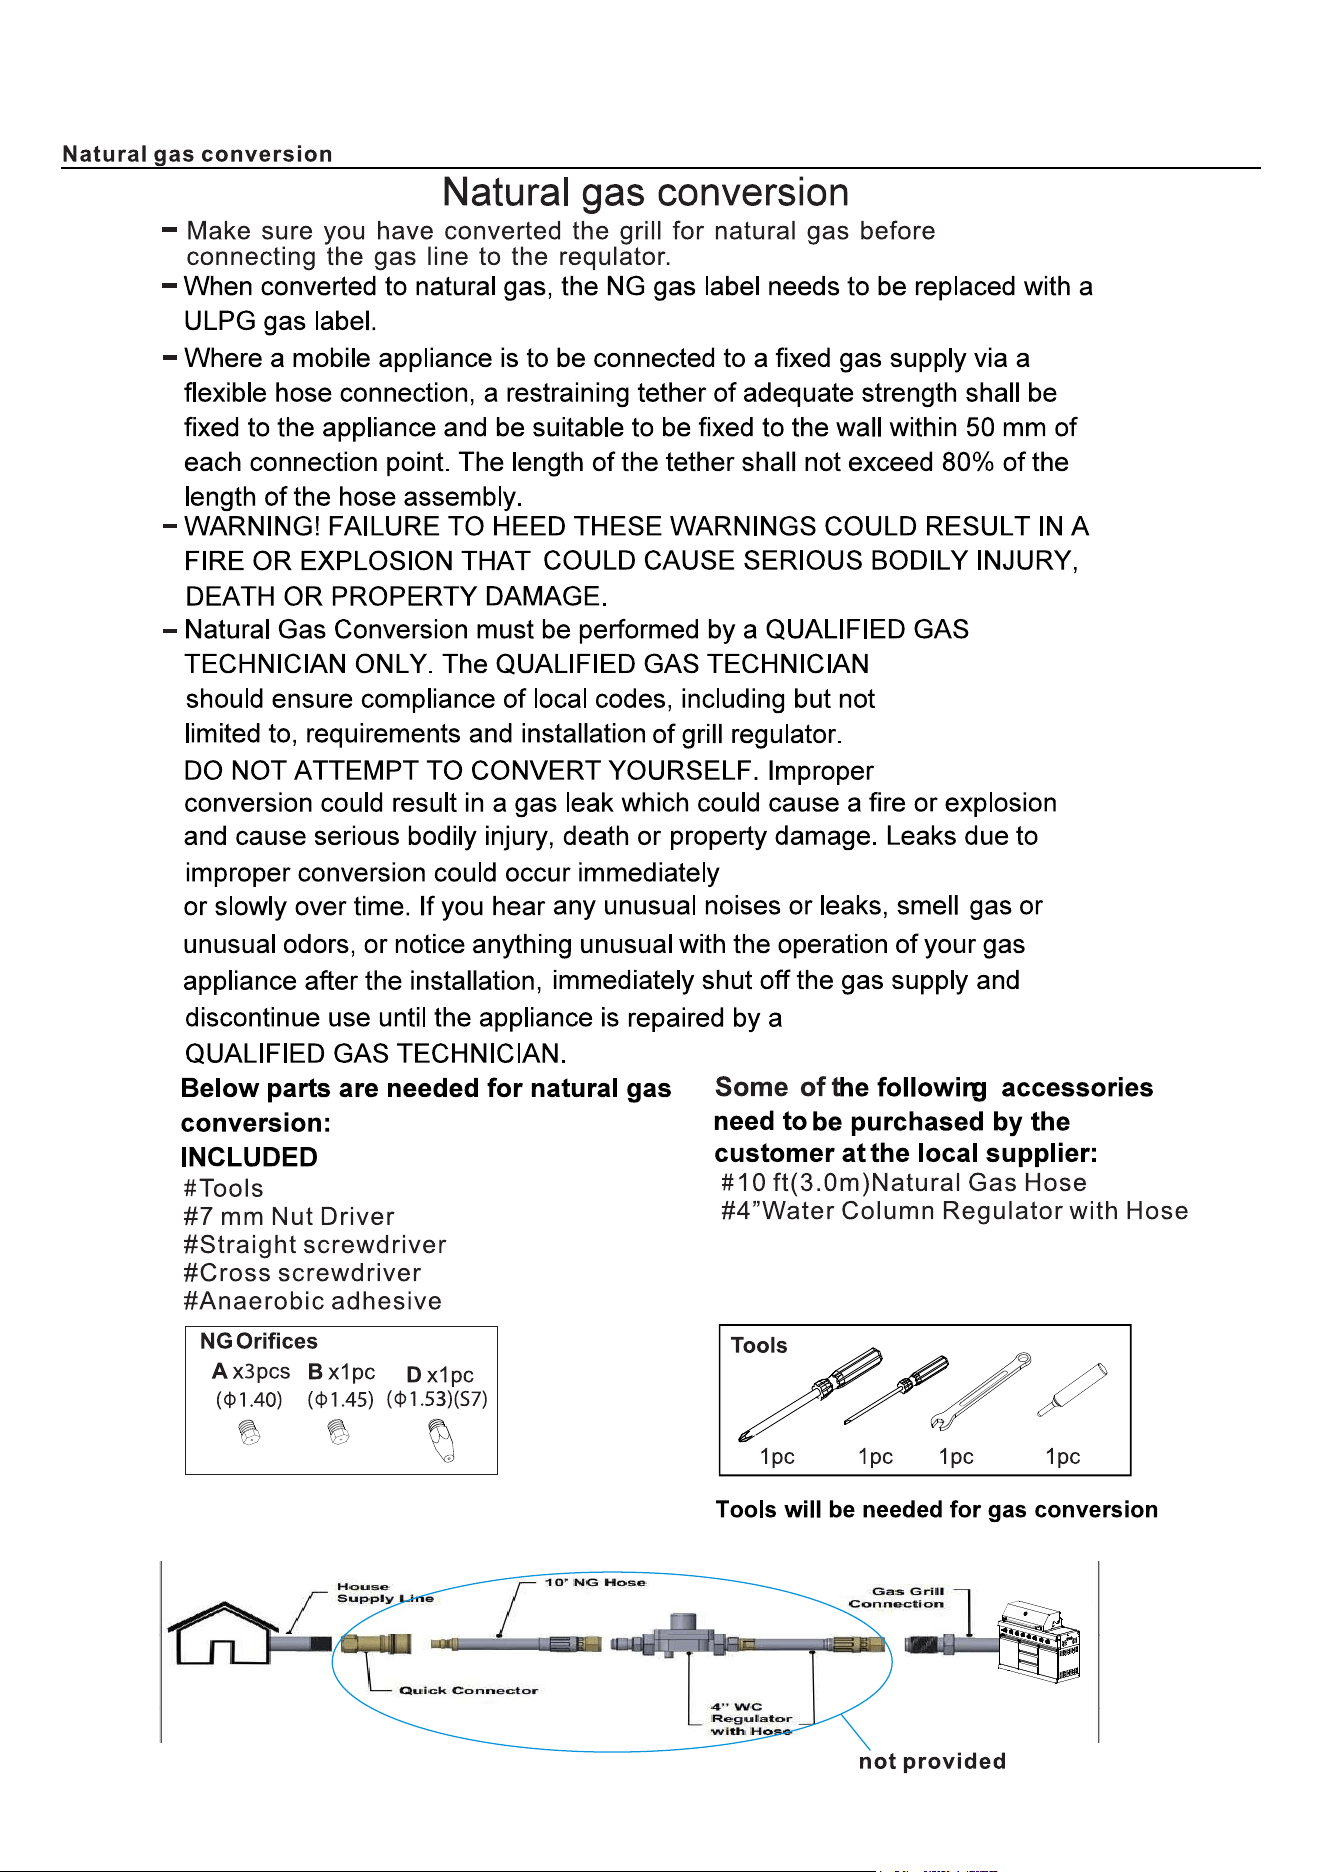
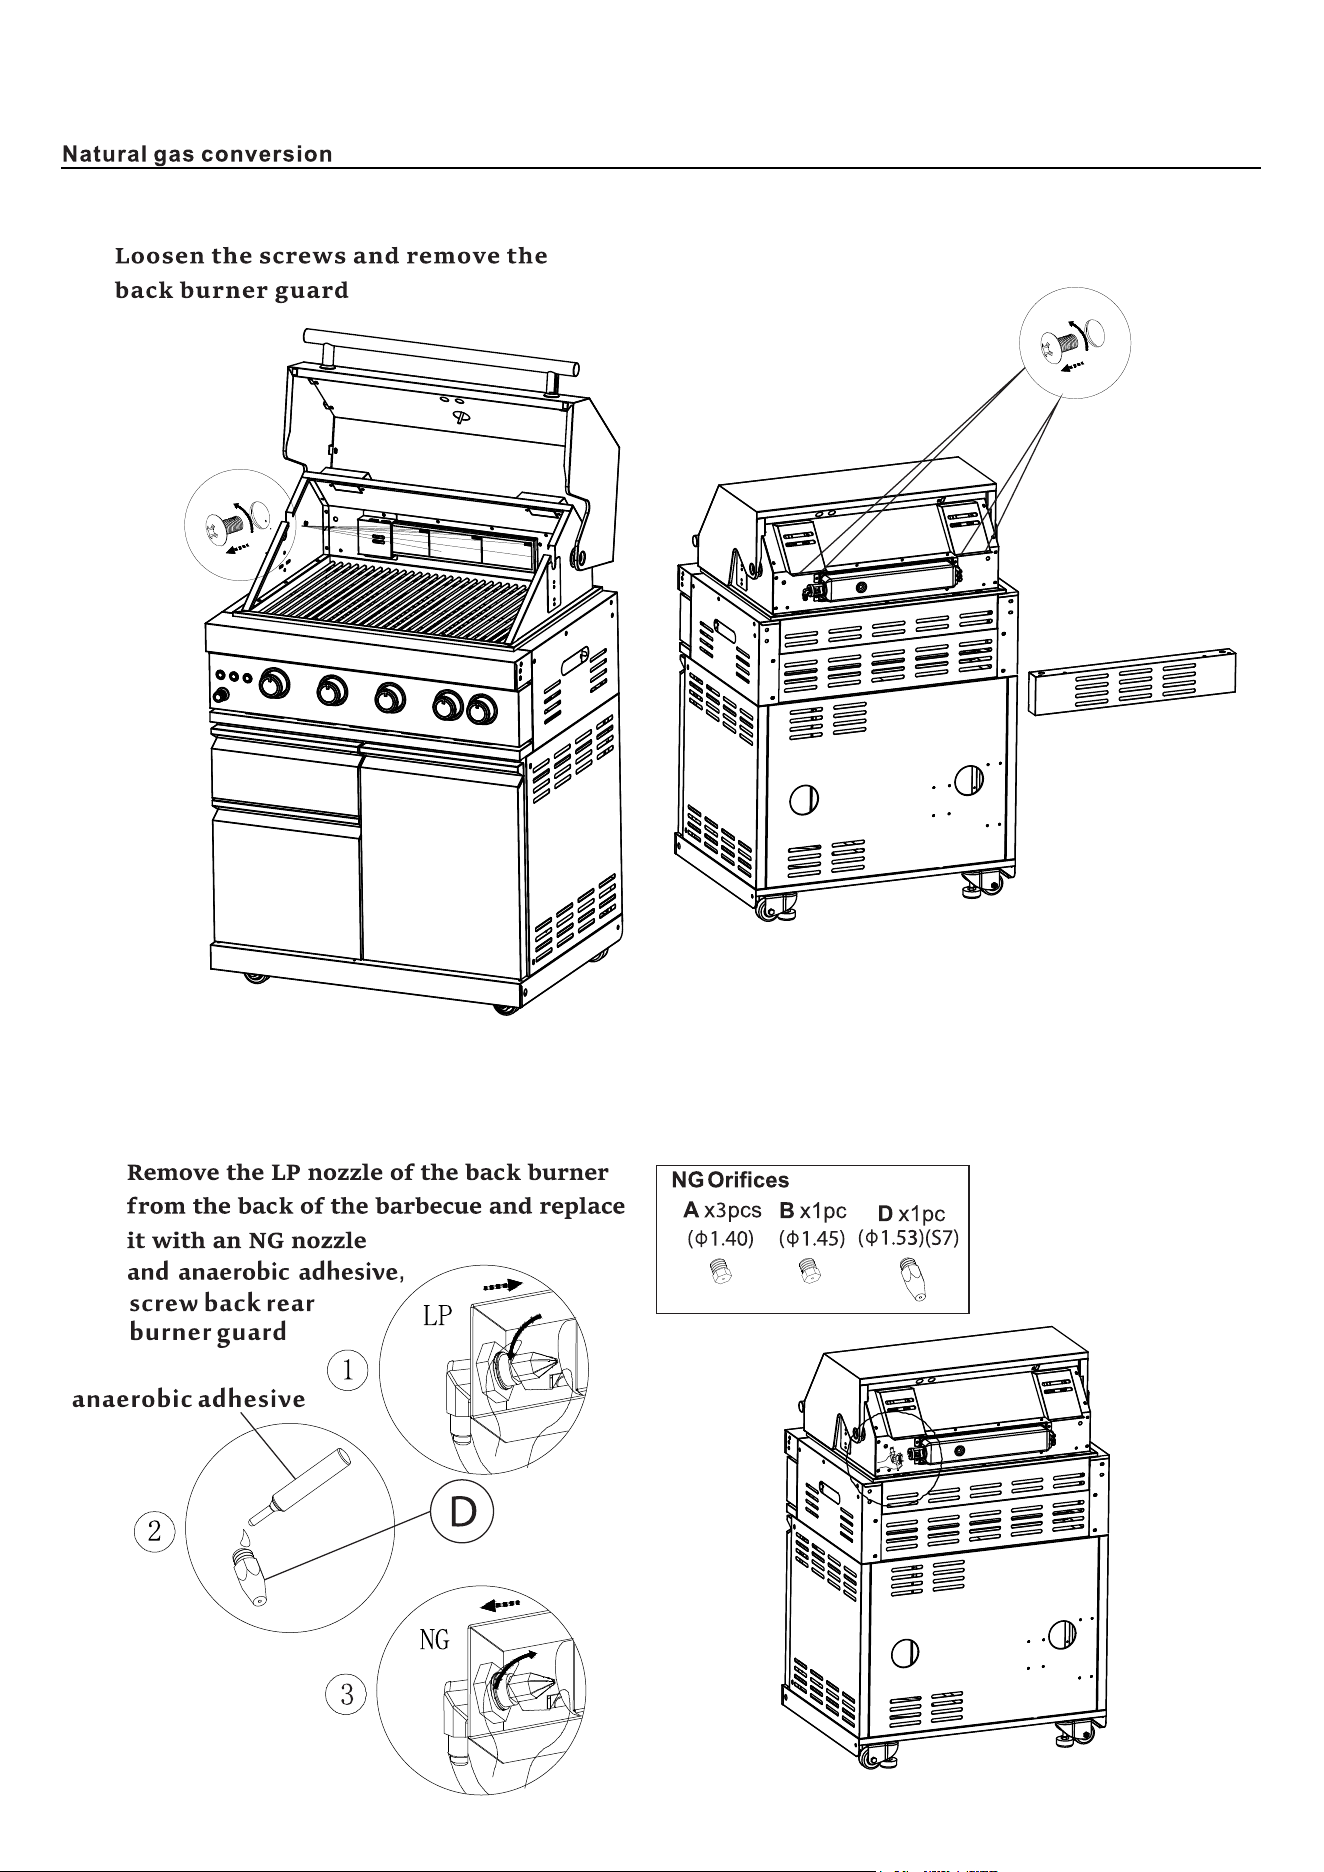
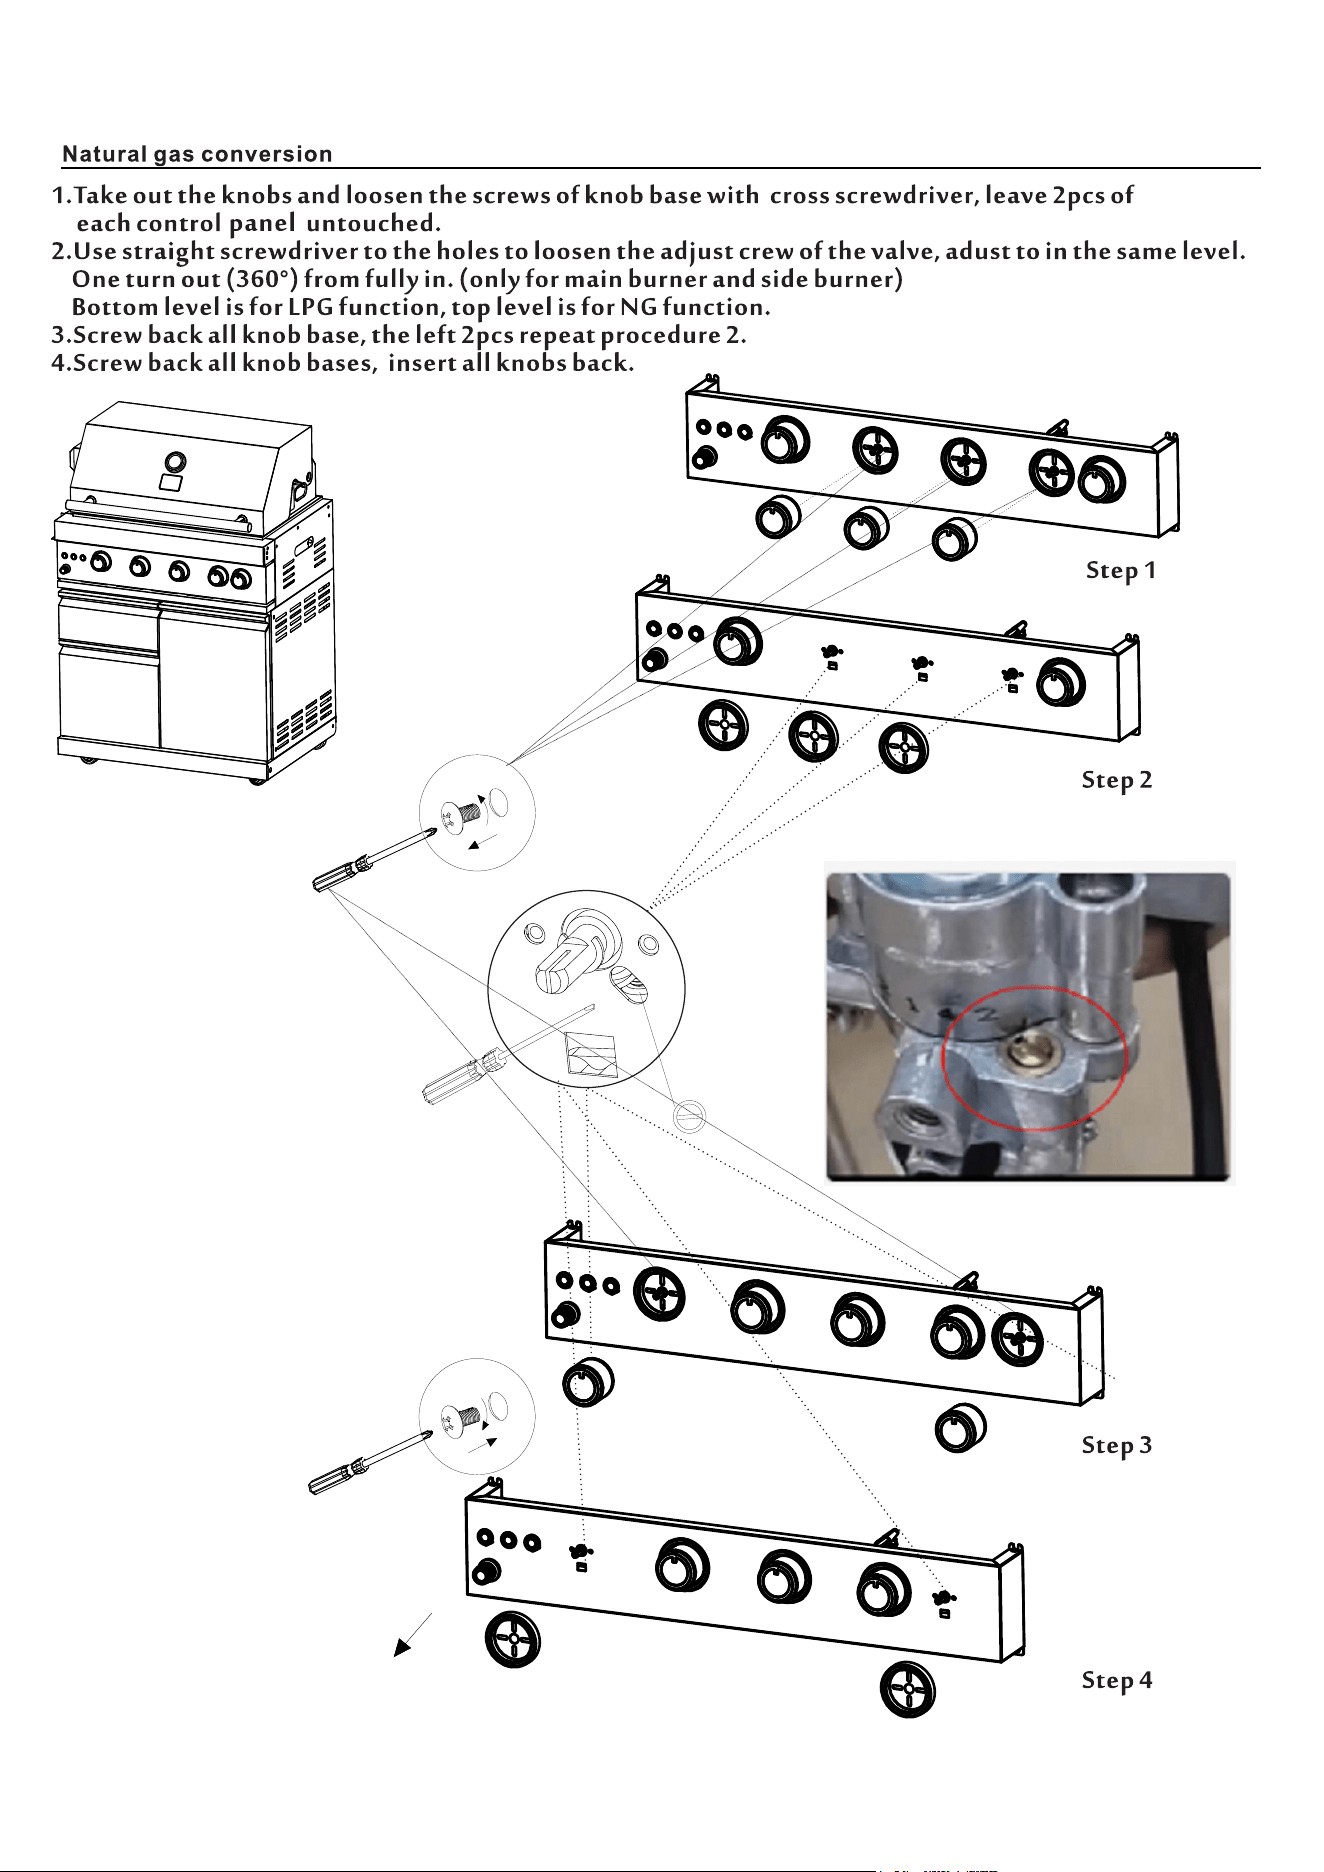
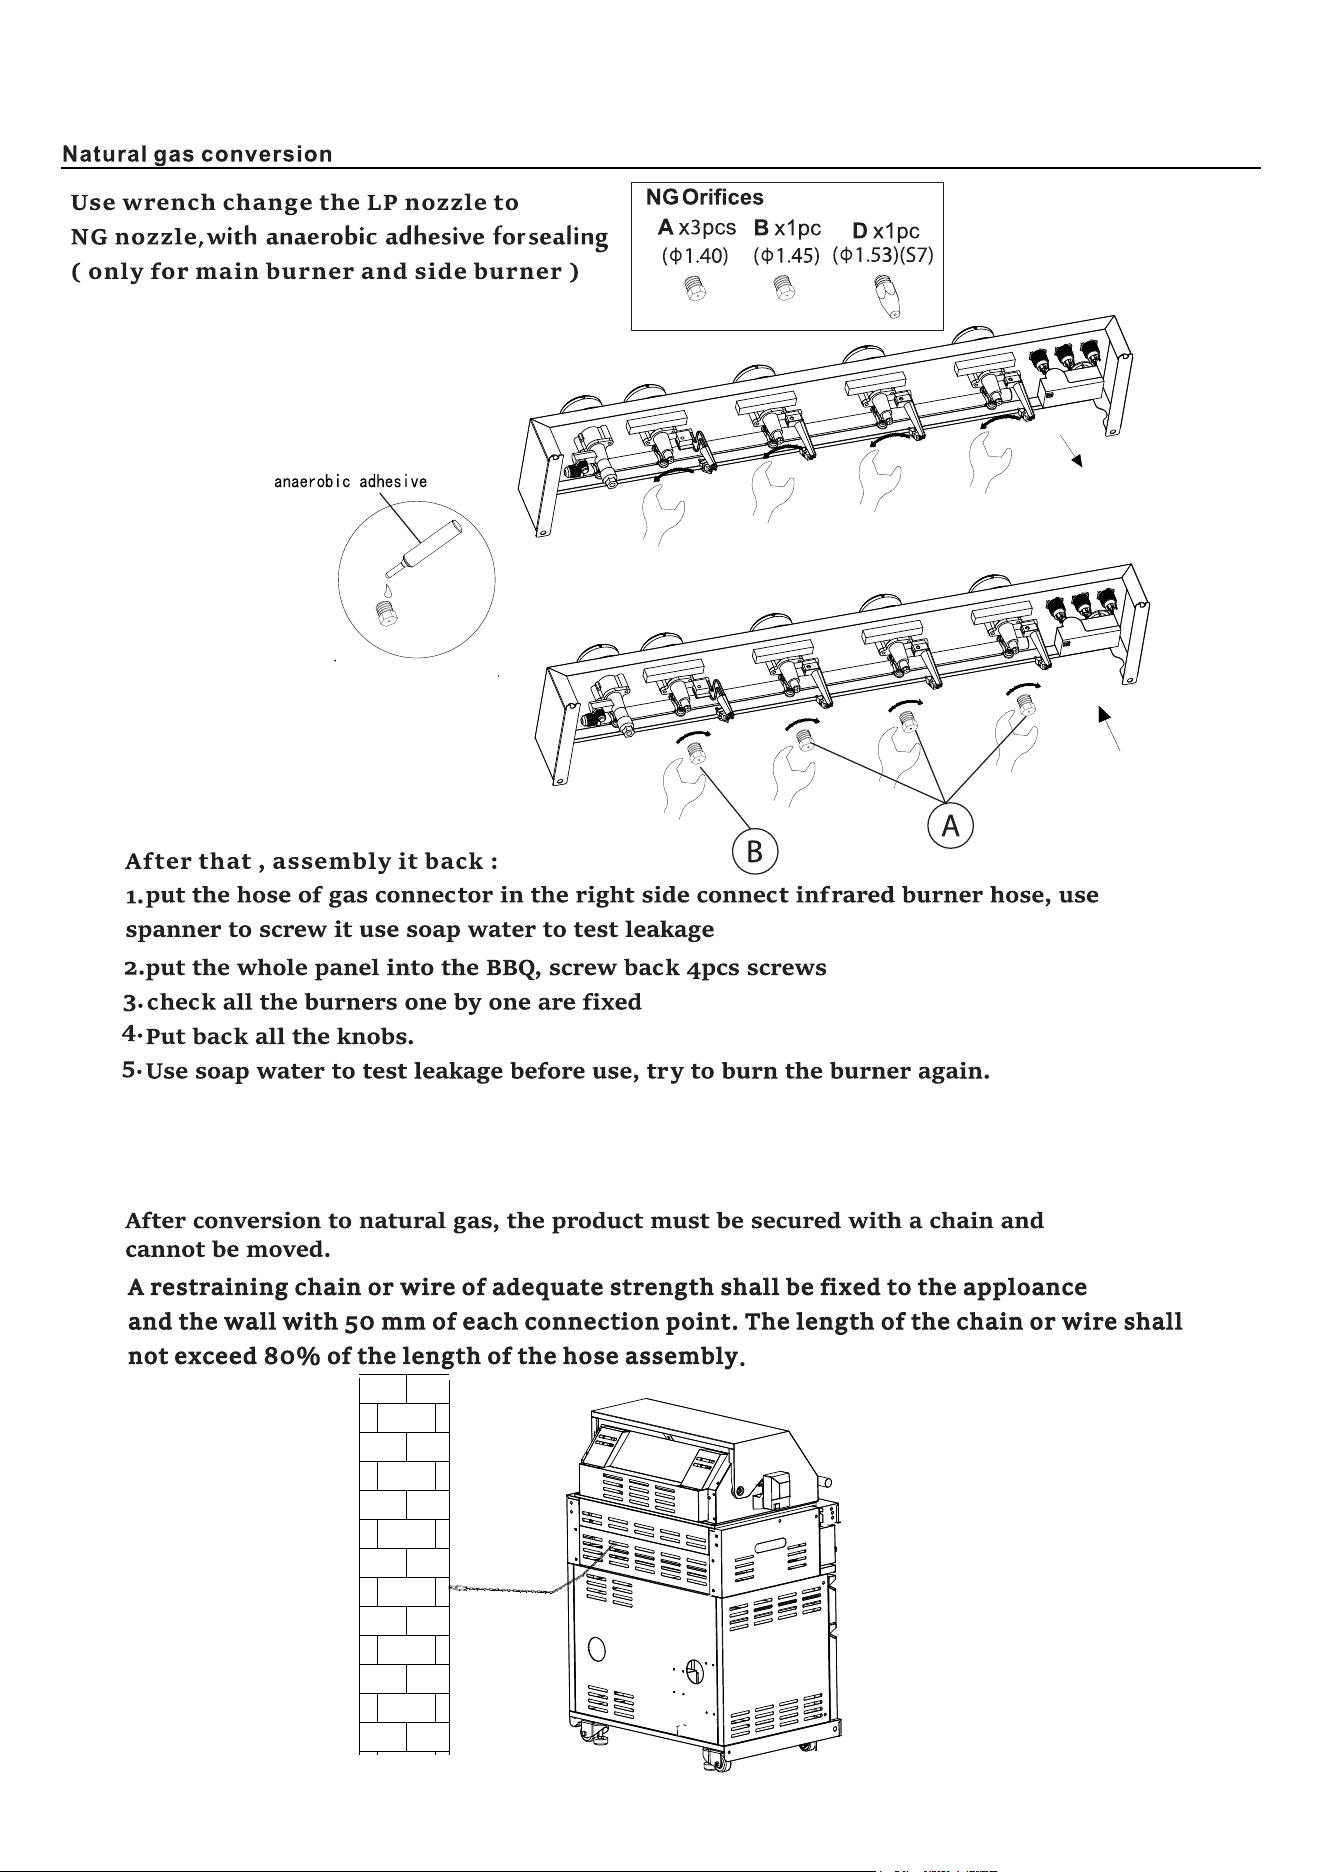
NG Orifices
28
Rotisserie fork
13
29
30
31
39
M6 Nuts
4
Cross
screwdriver
13
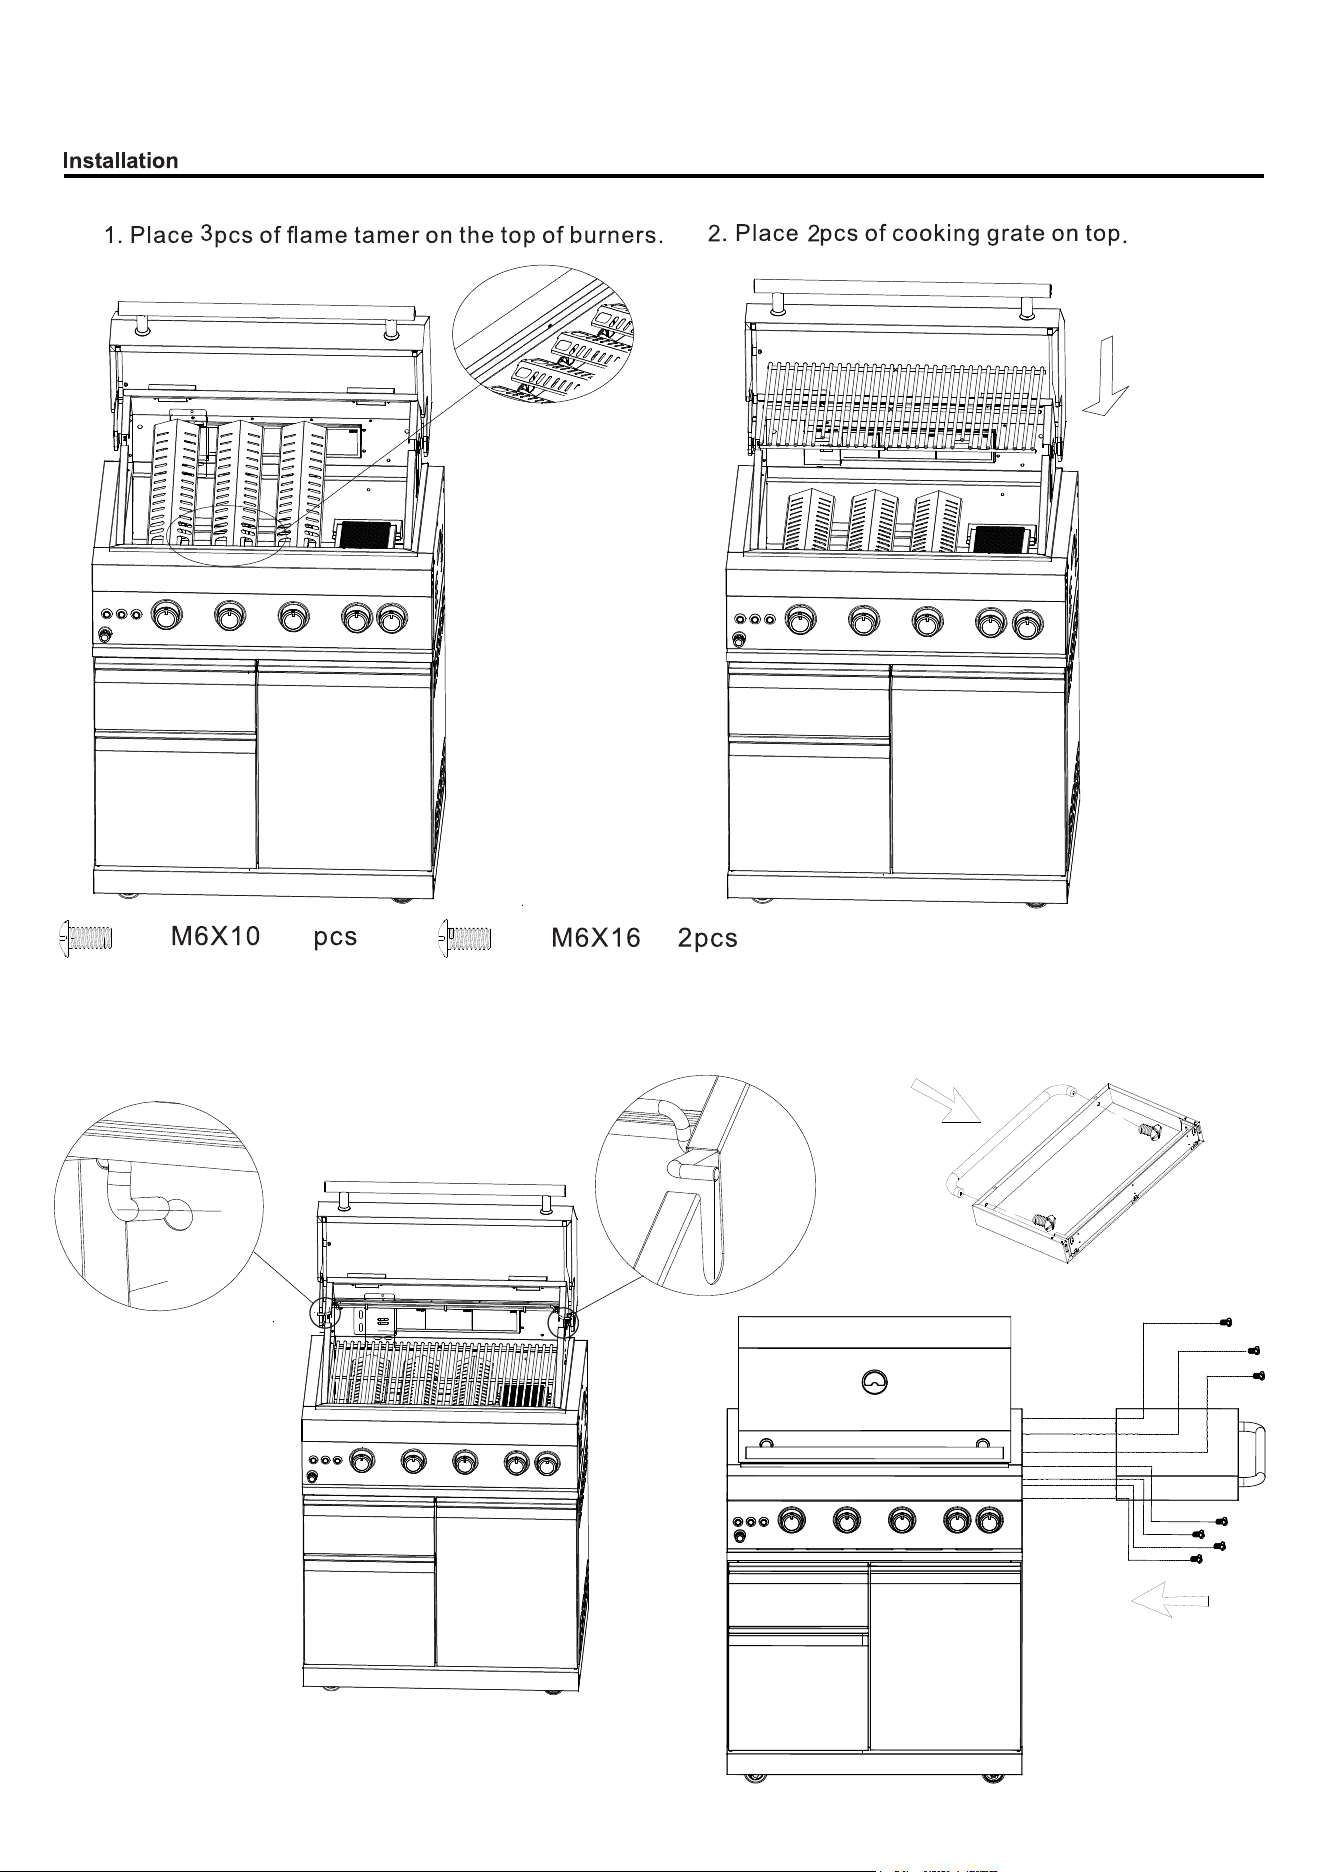
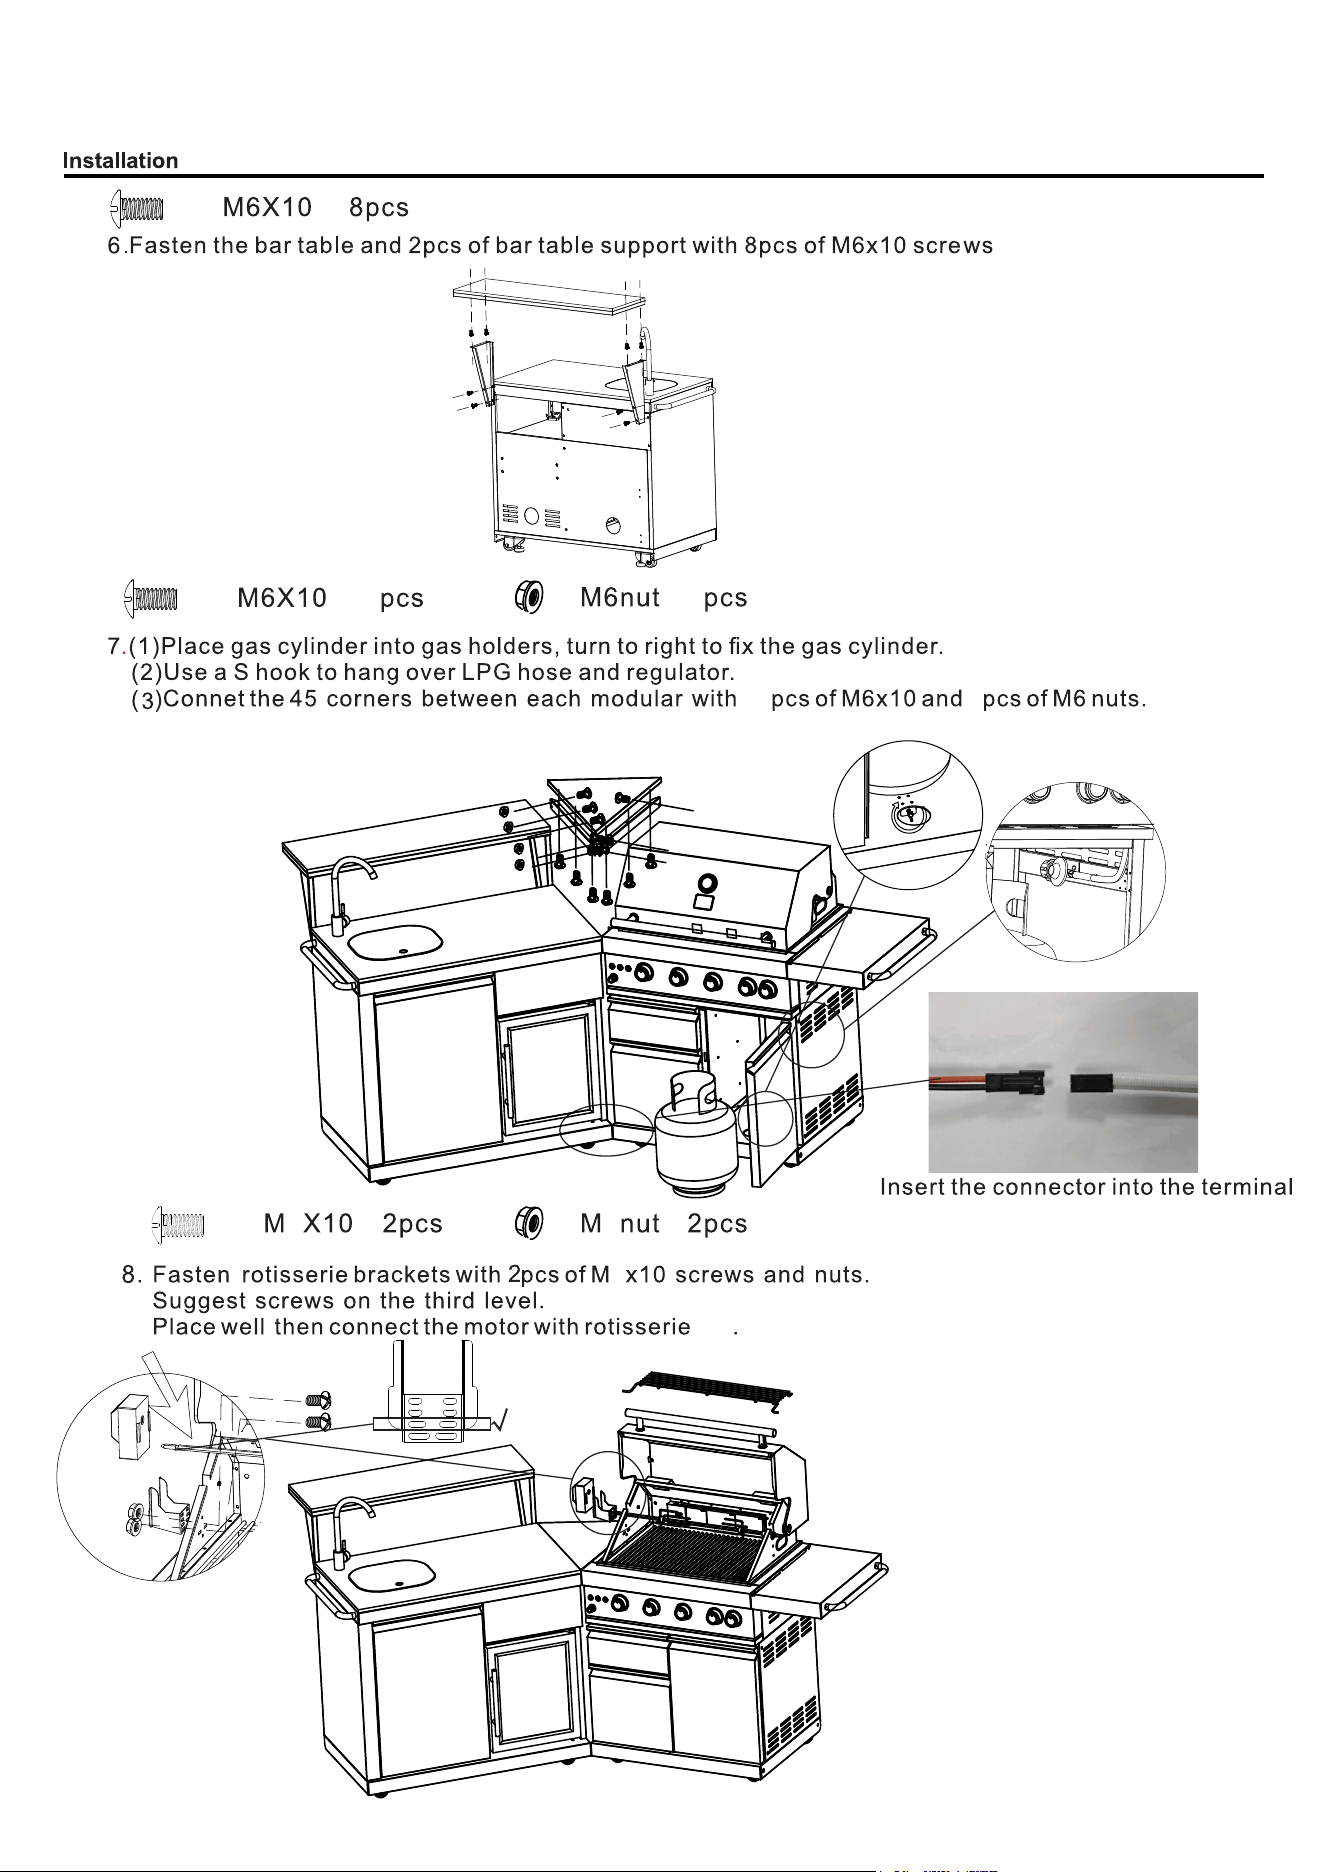
3.(1)Insert the warning grid into two side holes.
(2)Fasten a handle to the side table with 2pcs of M6x16 screws.
(3)Fasten the side table with 4B gas BBQ right side plate with 7pcs of M6x10.
3-1
3-2
3-3
7
14
hole
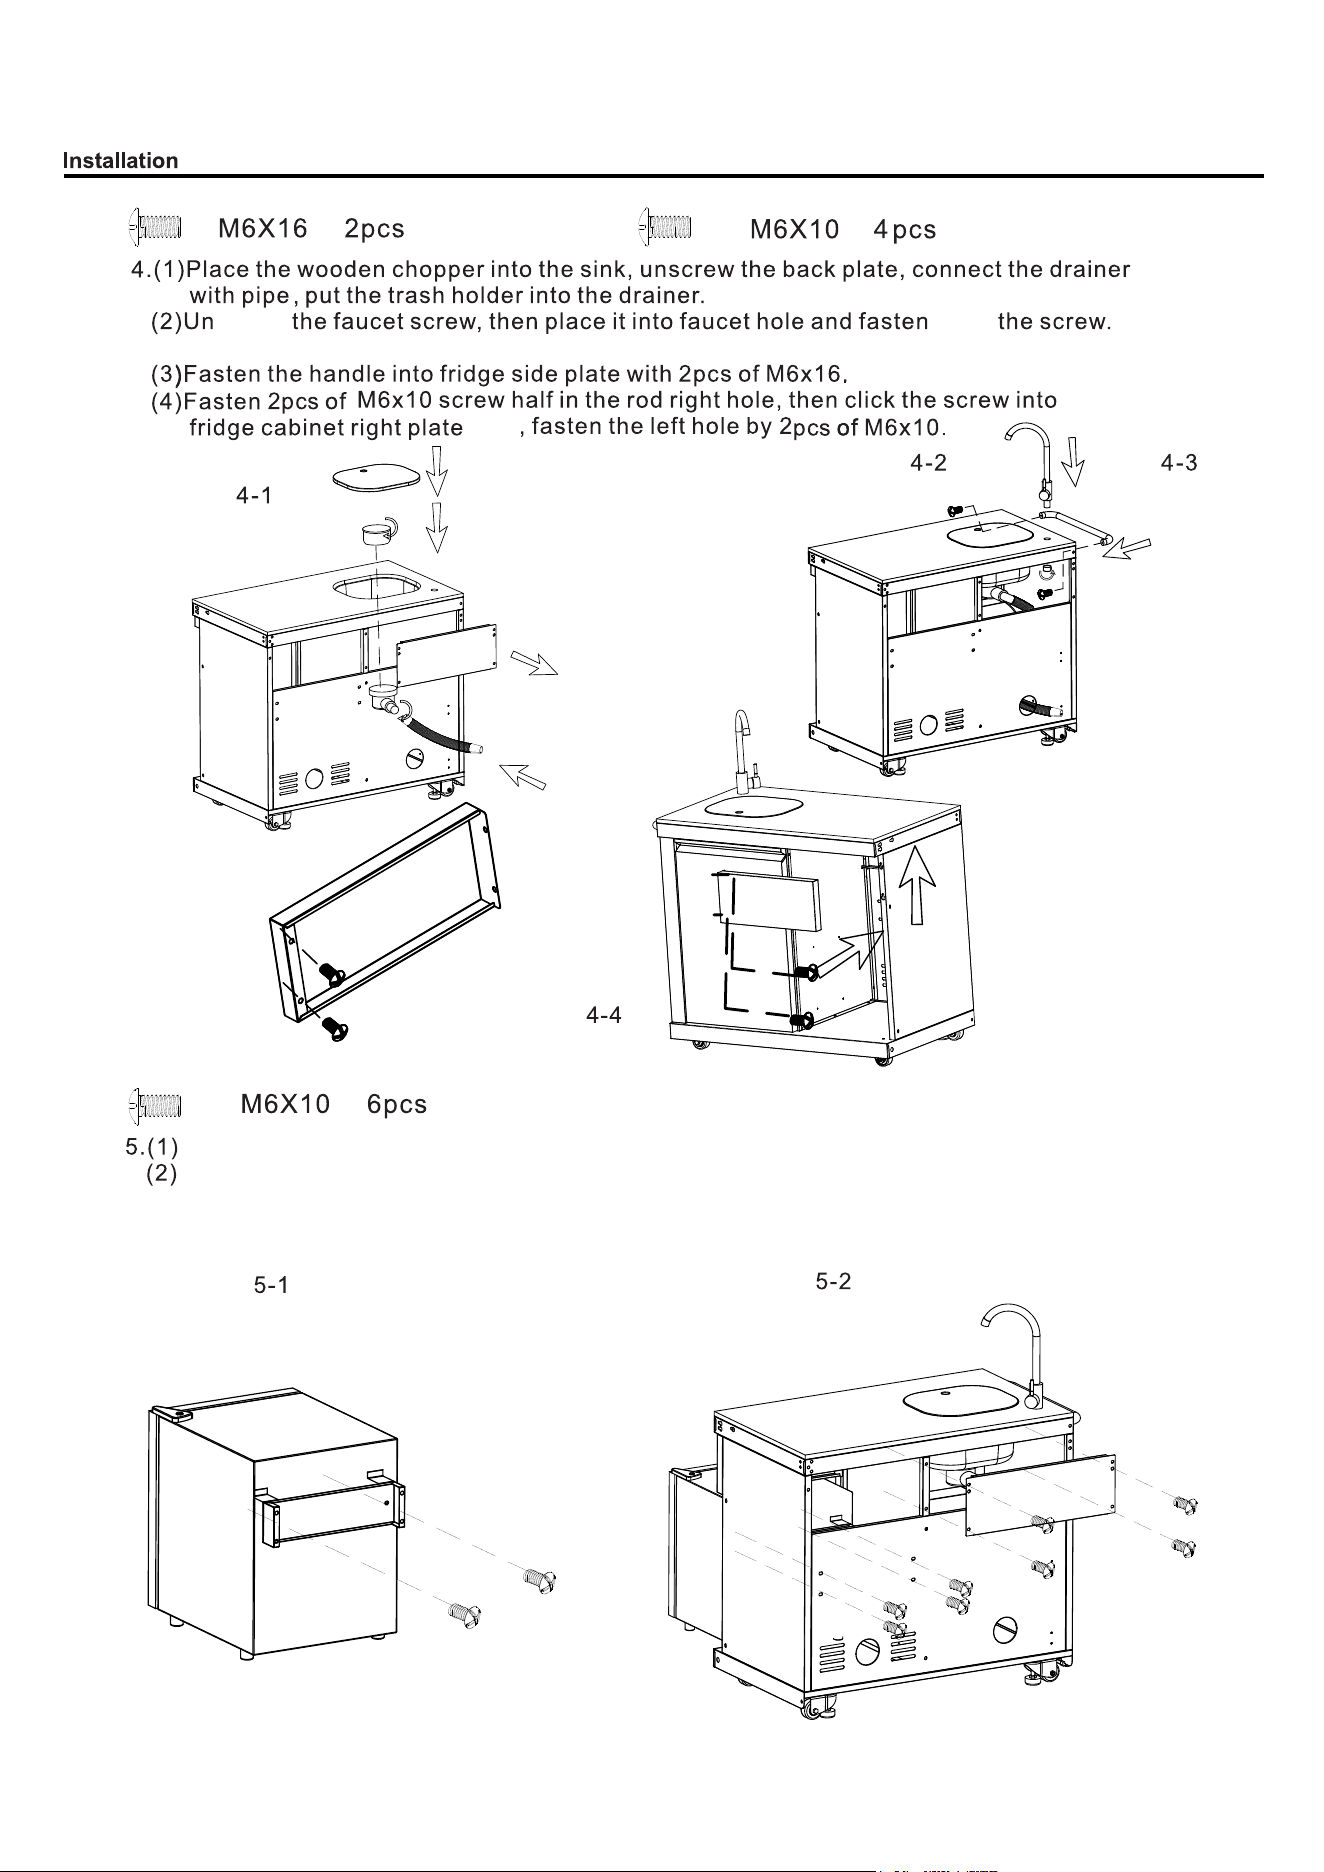
Fasten the fridge & fridge bracket with 2pcs of M6x10, then
Fasten the fridge bracket into the cabinet back plate with 4pcs of M6x10.
Fasten back the small back plate with 4pcs of M6x10.
fasten
back
Connect with G1/2 water pipe.
15
then put connector into the left hole,
leave white wire outside.
14
7-1
7-2
rod
7-3
4
14
4
OR
5
5
Take off warming grate when motor working.
5
16
17
25
18
19
20
15
21
22
23
Forno
24
25
26
not provided
27
28
3. Keep light lines etc. untouched
29
30
31
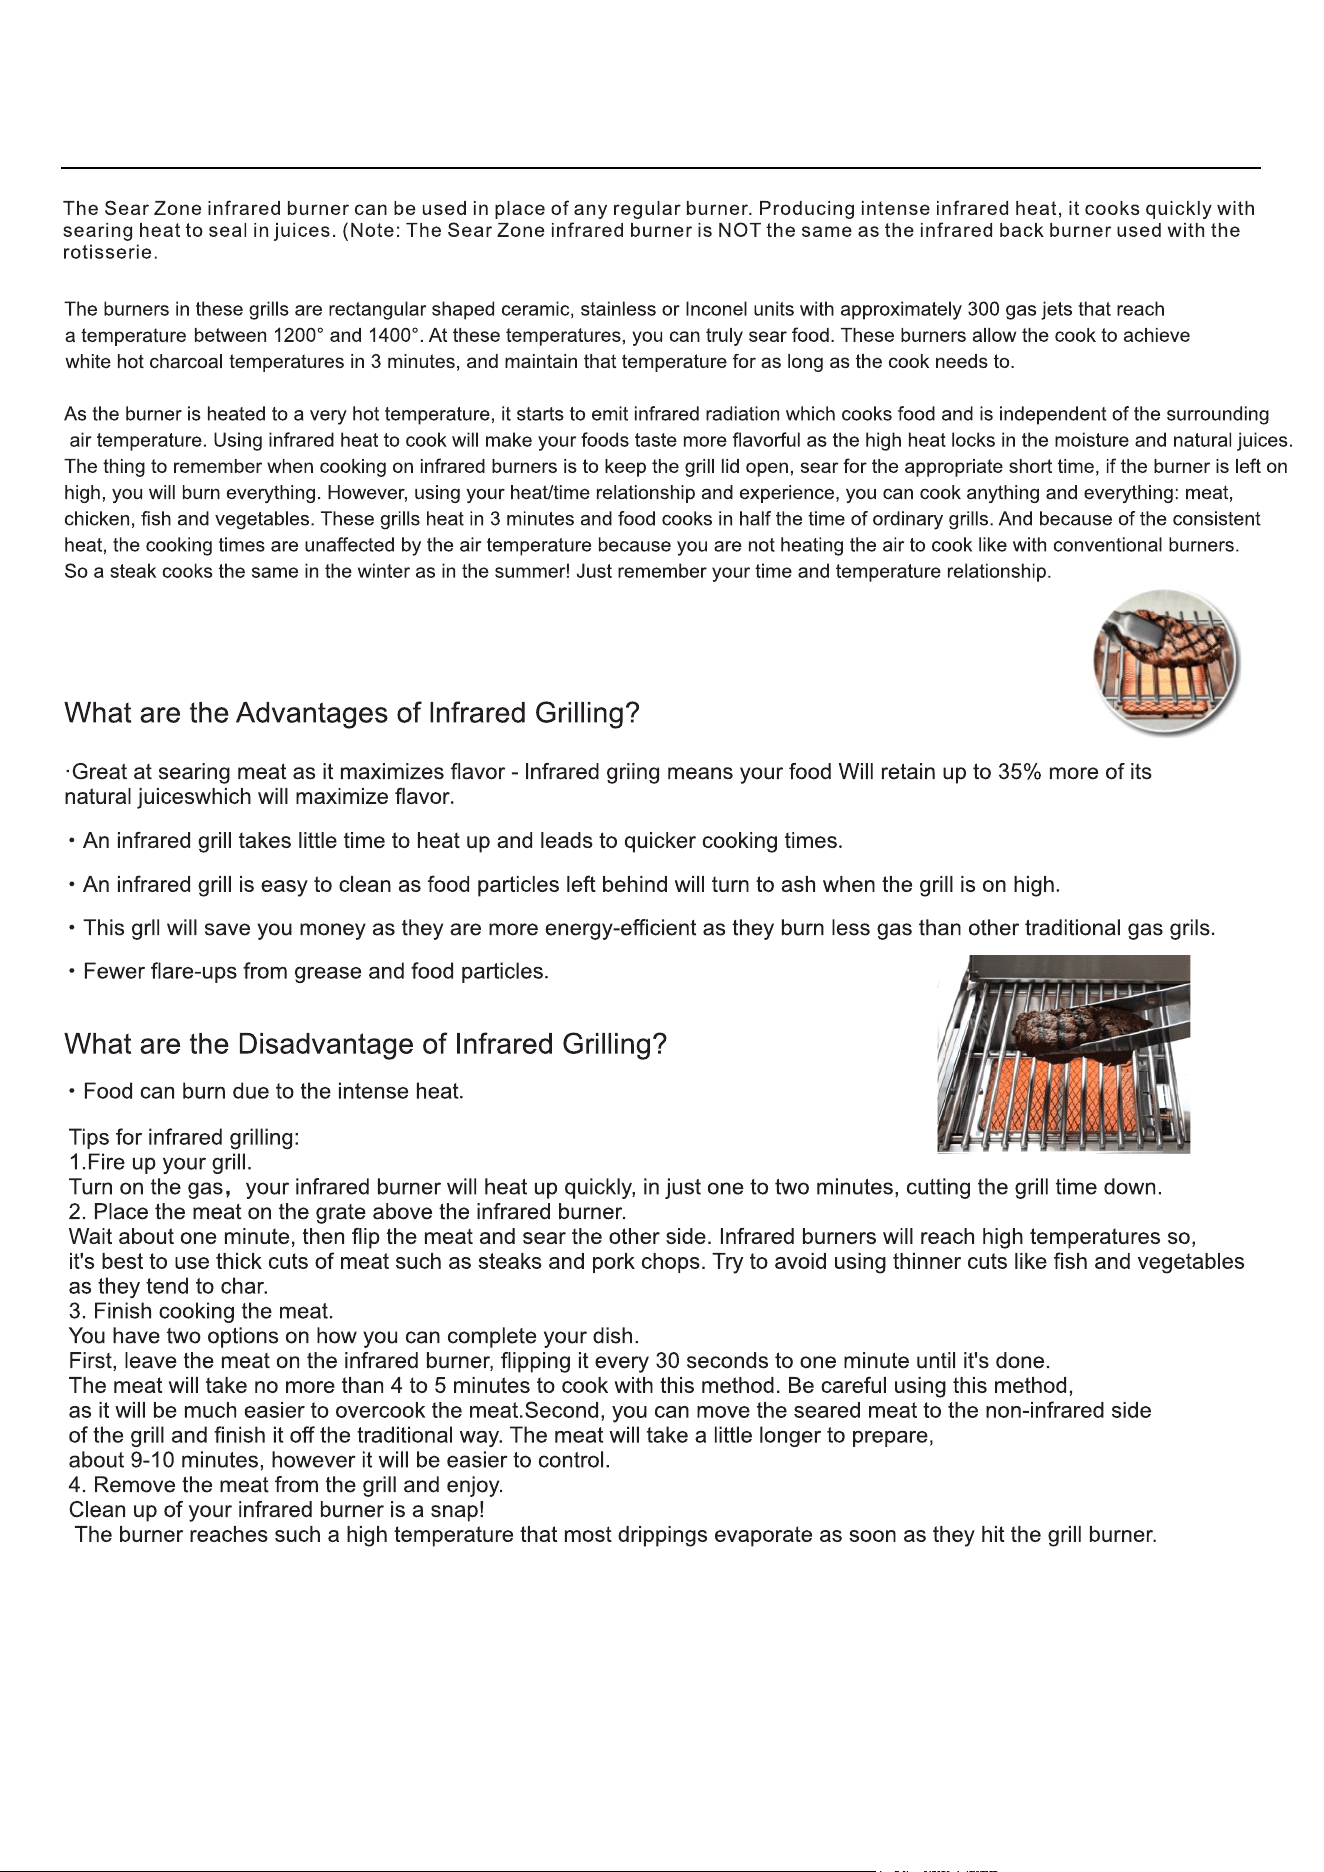
Sear Zone Infrared Burner
32
33

F� 0
AQ�
F� 0
AQ�

FODKT2582BLK-1
Part 2/2
MODEL BBQ NUMBER SERIES FOR:
INSTRUCTION MANUAL &
INSTALLATION GUIDE
Read these instructions carefully before using your appliance, and keep it carefully.
If you follow the instructions, your appliance will provide you with many years of good service.
ENGLISH
outdoorini Stainless Steel refrigeratorM

2

3
TABLE OF CONTENTS
Customer Care ............................................................................................................
4
Explanation .................................................................................................................. 6
Operating Your Device ............................................................................................... 8
Maintenance ...........
......................................................................................................13
Trouble Shooting ..........................................................................................................14
Matters need attention ................................................................................................ 14
Warning ......................................
.................................................................................. 15

4
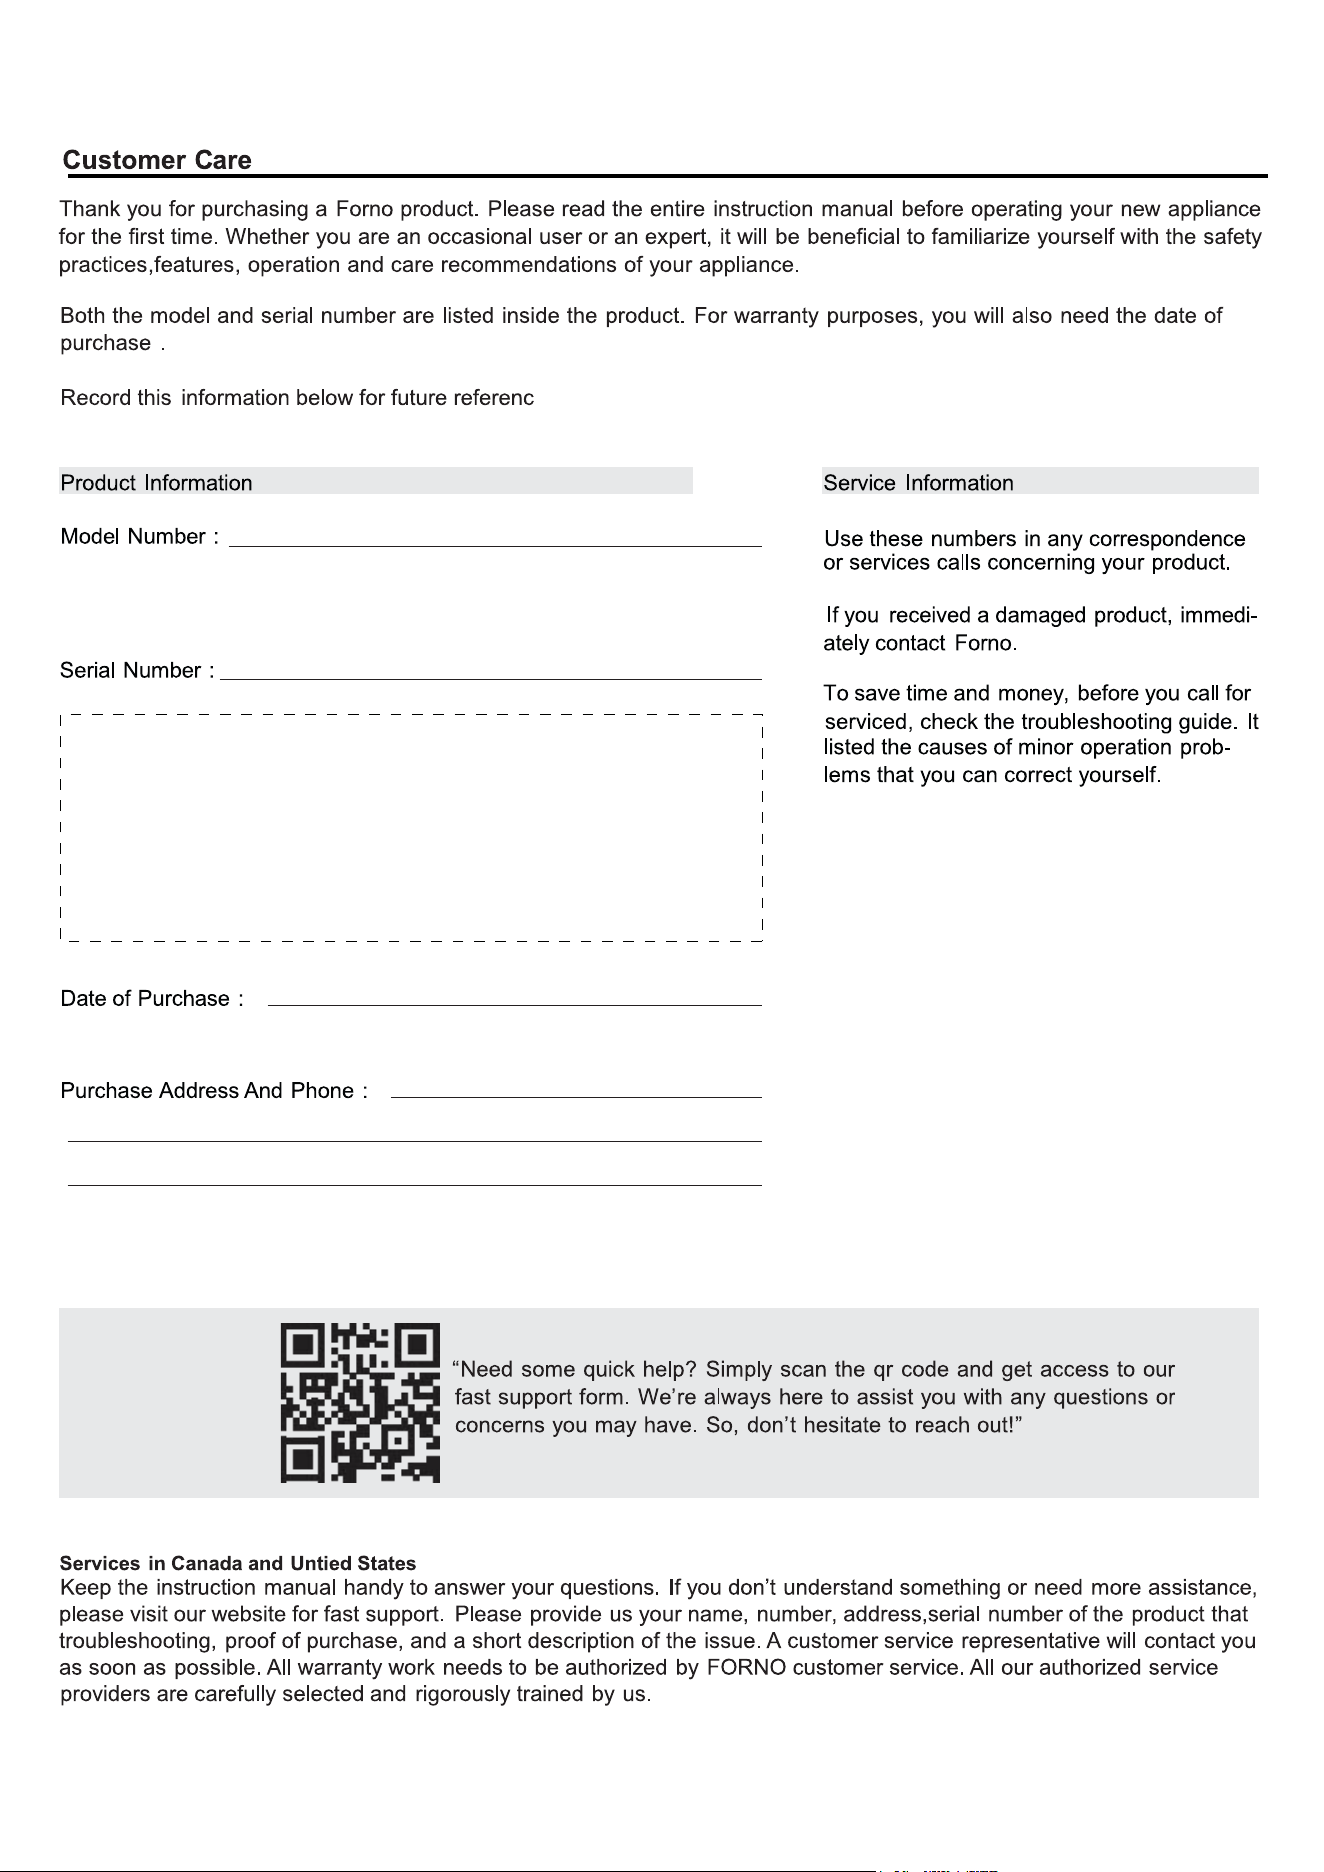
Customer Care
Thank you for purchasing a Forno product. Please read the entire instruction manual before operating your new appliance
for the first time. Whether you are an occasional user or an expert, it will be beneficial to familiarize yourself with the safety
practices, features, operation and care recommendations of your appliance.
Both the model and serial number are listed inside the product. For warranty purposes, you will also need the date of
purchase .
Record this information below for future reference.
Services in Canada and Untied States
Keep the instruction manual handy to answer your questions. If you don’t understand something or need more assistance,
please visit our website for fast support. Please provide us your name, number, address,serial number of the product that
troubleshooting, proof of purchase, and a short description of the issue. A customer service representative will contact you
as soon as possible. All warranty work needs to be authorized by FORNO customer service. All our authorized service
providers are carefully selected and rigorously trained by us.
Product Information
Model Number : ______________________________________
Serial Number :
Date of Purchase : ___________________________________
Purchase Address And Phone :
_______________________________
_________________________________________________________
Service Information
Use these numbers in any correspondence
or services calls concerning your product.
If you received a damaged product, immedi-
ately contact Forno.
To save time and money, before you call for
service, check the troubleshooting guide. It
lists the causes of minor operation prob -
lems that you can correct yourself.
“Need some quick help? Simply scan the qr code and get access to our
fast support form. We’re always here to assist you with any questions or
concerns you may have. So, don’t hesitate to reach out!”
5
WARNING
FOR YOUR SAFETY
DANGER
WARNING
CAUTION
We have provided many important safety messages in this manual and on your appliance. Always read and obey all
safety messages
All safety messages will tell you what the potential hazard is, tell you how to reduce the chance of injury, and tell you
what can happen if the instructions are not followed.
• You can be killed or seriously injured if you don’t immediately follow instructions.
• You can be killed or seriously injured if you don’t follow instructions.
• A potentially hazardous situation which, if not avoided, could result in minor or
moderate injury.
This is the safety alert symbol. This symbol alerts you to potential hazards that can kill or hurt you
and others. All safety messages will follow the safety alert symbol and either the word “DANGER,”
“WARNING” or “CAUTION.” These words mean:
WARNING : This product can expose you to chemicals including [Lead, lead and lead
compound, which is [are] known to the state of California to cause cancer and birth defects
or other reproductive harm. For more information go to www.P65Warning.ca.gov.

6
This Instruction Manual is the universal-purpose version for the models of beverage cooler manufactured by our Co. The
appearance of the units that you purchase might be slightly different from the Manual, but it does not affect your proper
operations and usage.
Please read carefully the sections corresponding to the specific model you choose, and keep the manual properly so as to
facilitate your reference at later time.
Electrical Requirement
• Make sure there is a suitable power Outlet with proper grounding to power the device.
• Avoid the use of three plug adapters or cutting off the third grounding in order to accommodate a two plug outlet. This
is an dangerous practice since it provides no effective grounding for the cooler and may result in shock hazard.Install
Limitations
• Do not install your cooler in any location not properly insulated or heated e.g. garage etc.
• Select a suitable location for the cooler on a hard even surface away from direct sunlight or heat source e.g. radiators,
baseboard heaters, cooking appliances etc. Any floor unevenness should be corrected with the leveling legs located
on the front and rear bottom corners of cooler.
Use of Extension Cords
• Avoid the use of an extension cord because of potential safety hazards under certain conditions. If it is necessary to
use an extension cord, use only a 3-wire extension cord that has a 3-blade grounding plug and a 3-slot outlet that will
accept the plug. The marked rating of the extension cord must be equal to or greater than the electrical rating of the
appliance.
Beverage Cooler Installation:
• When you receive the cabinet, please unpack the unit and make sure there is no flaws in its external appearance
(from shocks, deformation, ect.)
• Open the door and check all interior fittings and supplied items if are all complete (shelves, instruction, control panel,
etc.) Please install it according to the following points if the shelves or shelf brackets fall off during transit.
• After checking, if no problem, then, pls carry to the final place, which should be care as follows:
• Leaving space of minimum 5cm between your Beverage Cooler and left & right wall; at least 8cm between back of
cabinet and the wall. (Freestanding only)
• Position the Beverage Cooler on a flat level surface, if not, adjust the feet of Beverage Cooler to keep level.
• Away from sources of heat and high humidity areas (laundry room and bathroom, etc).
• Do not tilt it at an angle of more than 45° when move the cabinet. Allow a minimum 10 minutes interval between
transit and re-starting.
• Make sure the ventilation is free if you wish to install your cabinet into a worktable, otherwise, it will reduce the effect
of usage.
Beverage Cooler Features and Use Initial Setup
• Before connecting the beverage cooler to the power source, let it stand upright for approximately 24 hours. This will
reduce the possibility of a malfunction in the cooling system from handling during transportation.
• Once you have plugged the unit into an electrical outlet, let the unit run for at least 30 minutes to acclimate before
making any adjustments.
• The cooler can be set to any temperature between 2°C~14°C (36°F ~57°F) to accommodate your beverage cooler
requirements. (Digital control only)
Shelving
• (Type and number of shelves will vary per model)
• Remove packing materials from shelves once unit is stable and ready for storage.
• Disperse the bottles evenly to avoid concentrating weight in one place. Bottles must not touch either the back of the
cabinet or the step at the bottom.
• Make sure that the bottles are not all grouped together either at the top or bottom of the cabinet.
• Only pull out one rolling shelf at a time. Never attempt to pull more than one.
Important Safety Instructions
• Basic precautions when using,
• Only use your Beverage Cooler for intended purposes, as described in this guide.
• Never unplug the Beverage Cooler by pulling out the power cord, grip the plug firmly and pull straight out to remove
from wall socket.
• Immediately repair or replace any worn or damaged cord, never use a cord that is split or which shows signs of wear
along its length or on its ends.
• This appliance is not intended for use by persons (including children) with reduced physical, sensory or mental
capabilities, or lack of experience and knowledge, unless they have been given supervision or instruction concerning
use of the appliance by a person responsible for their safety
• Children should be supervised to ensure that they do not play with the appliance. Do not allow children to climb on,
sit on or stand on the Beverage Cooler, nor hang from its shelves. They could damage the cabinet.
• Do not use an extension cord. Do not operate this device if its power cable or plug is damaged, or it does not work
properly, or it is damaged, or hasn't work properly, or it is damaged, or has been dropped. If the power cable is
damaged, it will need to be replaced by the manufacturer or his service agency or a similar qualified person, to avoid
any dangers.
Important Safety Instructions

7
This Instruction Manual is the universal-purpose version for the models of beverage cooler manufactured by our Co. The
appearance of the units that you purchase might be slightly different from the Manual, but it does not affect your proper
operations and usage.
Please read carefully the sections corresponding to the specific model you choose, and keep the manual properly so as to
facilitate your reference at later time.
Electrical Requirement
• Make sure there is a suitable power Outlet with proper grounding to power the device.
• Avoid the use of three plug adapters or cutting off the third grounding in order to accommodate a two plug outlet. This
is an dangerous practice since it provides no effective grounding for the cooler and may result in shock hazard.Install
Limitations
• Do not install your cooler in any location not properly insulated or heated e.g. garage etc.
• Select a suitable location for the cooler on a hard even surface away from direct sunlight or heat source e.g. radiators,
baseboard heaters, cooking appliances etc. Any floor unevenness should be corrected with the leveling legs located
on the front and rear bottom corners of cooler.
Use of Extension Cords
• Avoid the use of an extension cord because of potential safety hazards under certain conditions. If it is necessary to
use an extension cord, use only a 3-wire extension cord that has a 3-blade grounding plug and a 3-slot outlet that will
accept the plug. The marked rating of the extension cord must be equal to or greater than the electrical rating of the
appliance.
Beverage Cooler Installation:
• When you receive the cabinet, please unpack the unit and make sure there is no flaws in its external appearance
(from shocks, deformation, ect.)
• Open the door and check all interior fittings and supplied items if are all complete (shelves, instruction, control panel,
etc.) Please install it according to the following points if the shelves or shelf brackets fall off during transit.
• After checking, if no problem, then, pls carry to the final place, which should be care as follows:
• Leaving space of minimum 5cm between your Beverage Cooler and left & right wall; at least 8cm between back of
cabinet and the wall. (Freestanding only)
• Position the Beverage Cooler on a flat level surface, if not, adjust the feet of Beverage Cooler to keep level.
• Away from sources of heat and high humidity areas (laundry room and bathroom, etc).
• Do not tilt it at an angle of more than 45° when move the cabinet. Allow a minimum 10 minutes interval between
transit and re-starting.
• Make sure the ventilation is free if you wish to install your cabinet into a worktable, otherwise, it will reduce the effect
of usage.
Beverage Cooler Features and Use Initial Setup
• Before connecting the beverage cooler to the power source, let it stand upright for approximately 24 hours. This will
reduce the possibility of a malfunction in the cooling system from handling during transportation.
• Once you have plugged the unit into an electrical outlet, let the unit run for at least 30 minutes to acclimate before
making any adjustments.
• The cooler can be set to any temperature between 2°C~14°C (36°F ~57°F) to accommodate your beverage cooler
requirements. (Digital control only)
Shelving
• (Type and number of shelves will vary per model)
• Remove packing materials from shelves once unit is stable and ready for storage.
• Disperse the bottles evenly to avoid concentrating weight in one place. Bottles must not touch either the back of the
cabinet or the step at the bottom.
• Make sure that the bottles are not all grouped together either at the top or bottom of the cabinet.
• Only pull out one rolling shelf at a time. Never attempt to pull more than one.
Important Safety Instructions
• Basic precautions when using,
• Only use your Beverage Cooler for intended purposes, as described in this guide.
• Never unplug the Beverage Cooler by pulling out the power cord, grip the plug firmly and pull straight out to remove
from wall socket.
• Immediately repair or replace any worn or damaged cord, never use a cord that is split or which shows signs of wear
along its length or on its ends.
• This appliance is not intended for use by persons (including children) with reduced physical, sensory or mental
capabilities, or lack of experience and knowledge, unless they have been given supervision or instruction concerning
use of the appliance by a person responsible for their safety
• Children should be supervised to ensure that they do not play with the appliance. Do not allow children to climb on,
sit on or stand on the Beverage Cooler, nor hang from its shelves. They could damage the cabinet.
• Do not use an extension cord. Do not operate this device if its power cable or plug is damaged, or it does not work
properly, or it is damaged, or hasn't work properly, or it is damaged, or has been dropped. If the power cable is
damaged, it will need to be replaced by the manufacturer or his service agency or a similar qualified person, to avoid
any dangers.
Important Safety Instructions (Continued)
8
This Instruction Manual is the universal-purpose version for the models of beverage cooler manufactured by our Co. The
appearance of the units that you purchase might be slightly different from the Manual, but it does not affect your proper
operations and usage.
Please read carefully the sections corresponding to the specific model you choose, and keep the manual properly so as to
facilitate your reference at later time.
Electrical Requirement
• Make sure there is a suitable power Outlet with proper grounding to power the device.
• Avoid the use of three plug adapters or cutting off the third grounding in order to accommodate a two plug outlet. This
is an dangerous practice since it provides no effective grounding for the cooler and may result in shock hazard.Install
Limitations
• Do not install your cooler in any location not properly insulated or heated e.g. garage etc.
• Select a suitable location for the cooler on a hard even surface away from direct sunlight or heat source e.g. radiators,
baseboard heaters, cooking appliances etc. Any floor unevenness should be corrected with the leveling legs located
on the front and rear bottom corners of cooler.
Use of Extension Cords
• Avoid the use of an extension cord because of potential safety hazards under certain conditions. If it is necessary to
use an extension cord, use only a 3-wire extension cord that has a 3-blade grounding plug and a 3-slot outlet that will
accept the plug. The marked rating of the extension cord must be equal to or greater than the electrical rating of the
appliance.
Beverage Cooler Installation:
• When you receive the cabinet, please unpack the unit and make sure there is no flaws in its external appearance
(from shocks, deformation, ect.)
• Open the door and check all interior fittings and supplied items if are all complete (shelves, instruction, control panel,
etc.) Please install it according to the following points if the shelves or shelf brackets fall off during transit.
• After checking, if no problem, then, pls carry to the final place, which should be care as follows:
• Leaving space of minimum 5cm between your Beverage Cooler and left & right wall; at least 8cm between back of
cabinet and the wall. (Freestanding only)
• Position the Beverage Cooler on a flat level surface, if not, adjust the feet of Beverage Cooler to keep level.
• Away from sources of heat and high humidity areas (laundry room and bathroom, etc).
• Do not tilt it at an angle of more than 45° when move the cabinet. Allow a minimum 10 minutes interval between
transit and re-starting.
• Make sure the ventilation is free if you wish to install your cabinet into a worktable, otherwise, it will reduce the effect
of usage.
Beverage Cooler Features and Use Initial Setup
• Before connecting the beverage cooler to the power source, let it stand upright for approximately 24 hours. This will
reduce the possibility of a malfunction in the cooling system from handling during transportation.
• Once you have plugged the unit into an electrical outlet, let the unit run for at least 30 minutes to acclimate before
making any adjustments.
• The cooler can be set to any temperature between 2°C~14°C (36°F ~57°F) to accommodate your beverage cooler
requirements. (Digital control only)
Shelving
• (Type and number of shelves will vary per model)
• Remove packing materials from shelves once unit is stable and ready for storage.
• Disperse the bottles evenly to avoid concentrating weight in one place. Bottles must not touch either the back of the
cabinet or the step at the bottom.
• Make sure that the bottles are not all grouped together either at the top or bottom of the cabinet.
• Only pull out one rolling shelf at a time. Never attempt to pull more than one.
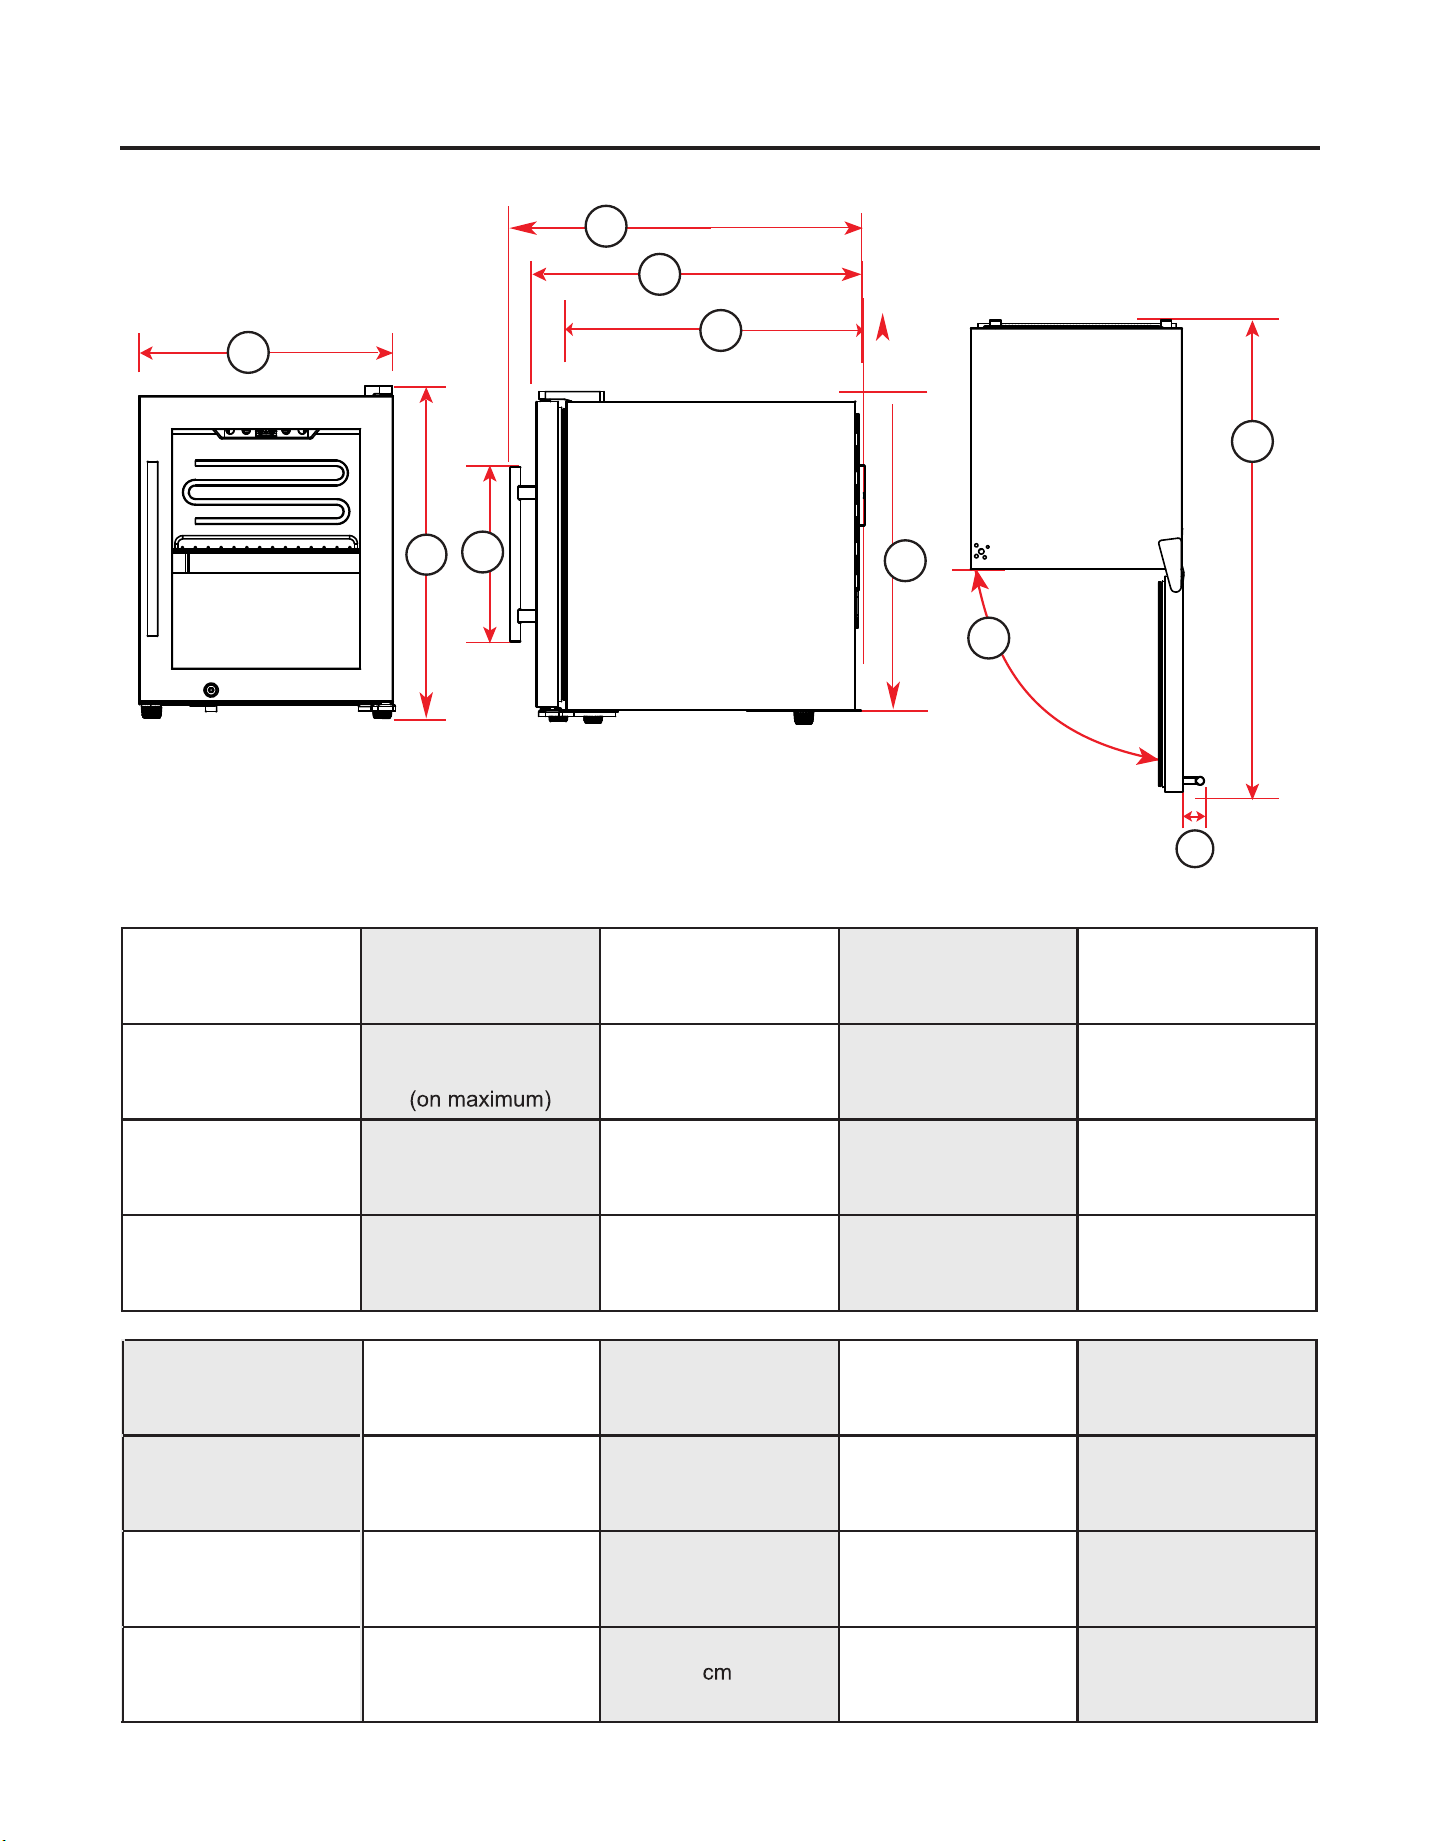
Product Dimension
I
F
E
D
G
J
C
B
A
H
A B C D E
Overall Width
Overall Height
Hinge to Foot
Height
Top to Bottom
Overall Depth
Handle to Back
Depth
Door to Back
F G H I J
Depth
Front Frame to Back
Handle Height Handle Width
Depth with
Door Fully Open
Opening
15 9/16" 20 5/16" 19 9/16" 22 1/2" 20 3/16"
39.5cm 51.6cm 49.6cm 57.2cm 51.2cm
18 5/16" 11 5/16" 34 5/8"
46.5cm 28.8cm 88cm -
180°
6
2 3/8"
9
Names of Parts and Accessories
Forno Handle
Stainless Steel Frame
Key Lock
Adjusteble Stainless Steel Shelf
1
2
3
4
Control Panel
Shelf Track
Adjusteble Foot
1x Handle
Supplied Parts
1x Adjusteble Stainless Steel Shelf
4x Adjusteble Foot
1
2
6
4
5
7
Screw Driver
1x
6
7
5
3

Operating Your Wine Cellar
10
1.
Removing the Shelf
Remove all bottles from the shelves. Lift the shelf upwards and the gently pull it out, (eventually untighten the screws).
2.
Installing Your Handle (If it has handle)
3.
Operating Your beverage cooler
Each beverage cooler includes an operating panel on the front of the unit. This operating panel includes several
features to operate and control the temperature.
4.
Temperature Setting
4.1
The temperature setting of Beverage Cooler
4.1.1
Control panel
ON/OFF of the whole system
ON/OFF of inside cabinet LED light
Temperature Up setting
Temperature Down setting
4.1.2
Pushing the temperature key up and down for 5 seconds, then, temperature display will be exchange
between ℃ and ℉
Remark:
1.
The temperature readout shows the actual cellar temperature, it will temporarily show the setting temperature while
making adjustments, then, reverts back after 5 seconds without any operation.
2.
It is normal that the key is flashing after turn off the power, but the plug is connected.
Please refer to the manual for detailed o
peration steps.
4.4
The item will be used under the room temperature ranging from 16 to 38℃ (61℉-100℉)
4.5
Temperature setting range of cabinet is 2°C~14°C (36°F ~ 57°F) . Customers can set the temperature according to
their actual demands.
1.
Locate the handle over the pins on the door panel.
2.
11
5.
Loading and Storage of Beverage:
5.1
Bottle Loading Method:
Operating Your Wine Cellar (Contiued)
Remark:
a)
There is no heating element , so temperature will be affected by the ambient
temperature.
b)
c)
d)
Both the Beverage Cooler and the indicator will turn on until the desired temperature is achieved.
The temperature readout shows the actual cooler temperature, it will temporarily show the set temperature while making
adjustments, then reverts back after 5 seconds without any operation.
Temperatures may fluctuate depending on whether the interior light is ON or OFF and depending on the position of the bottles.
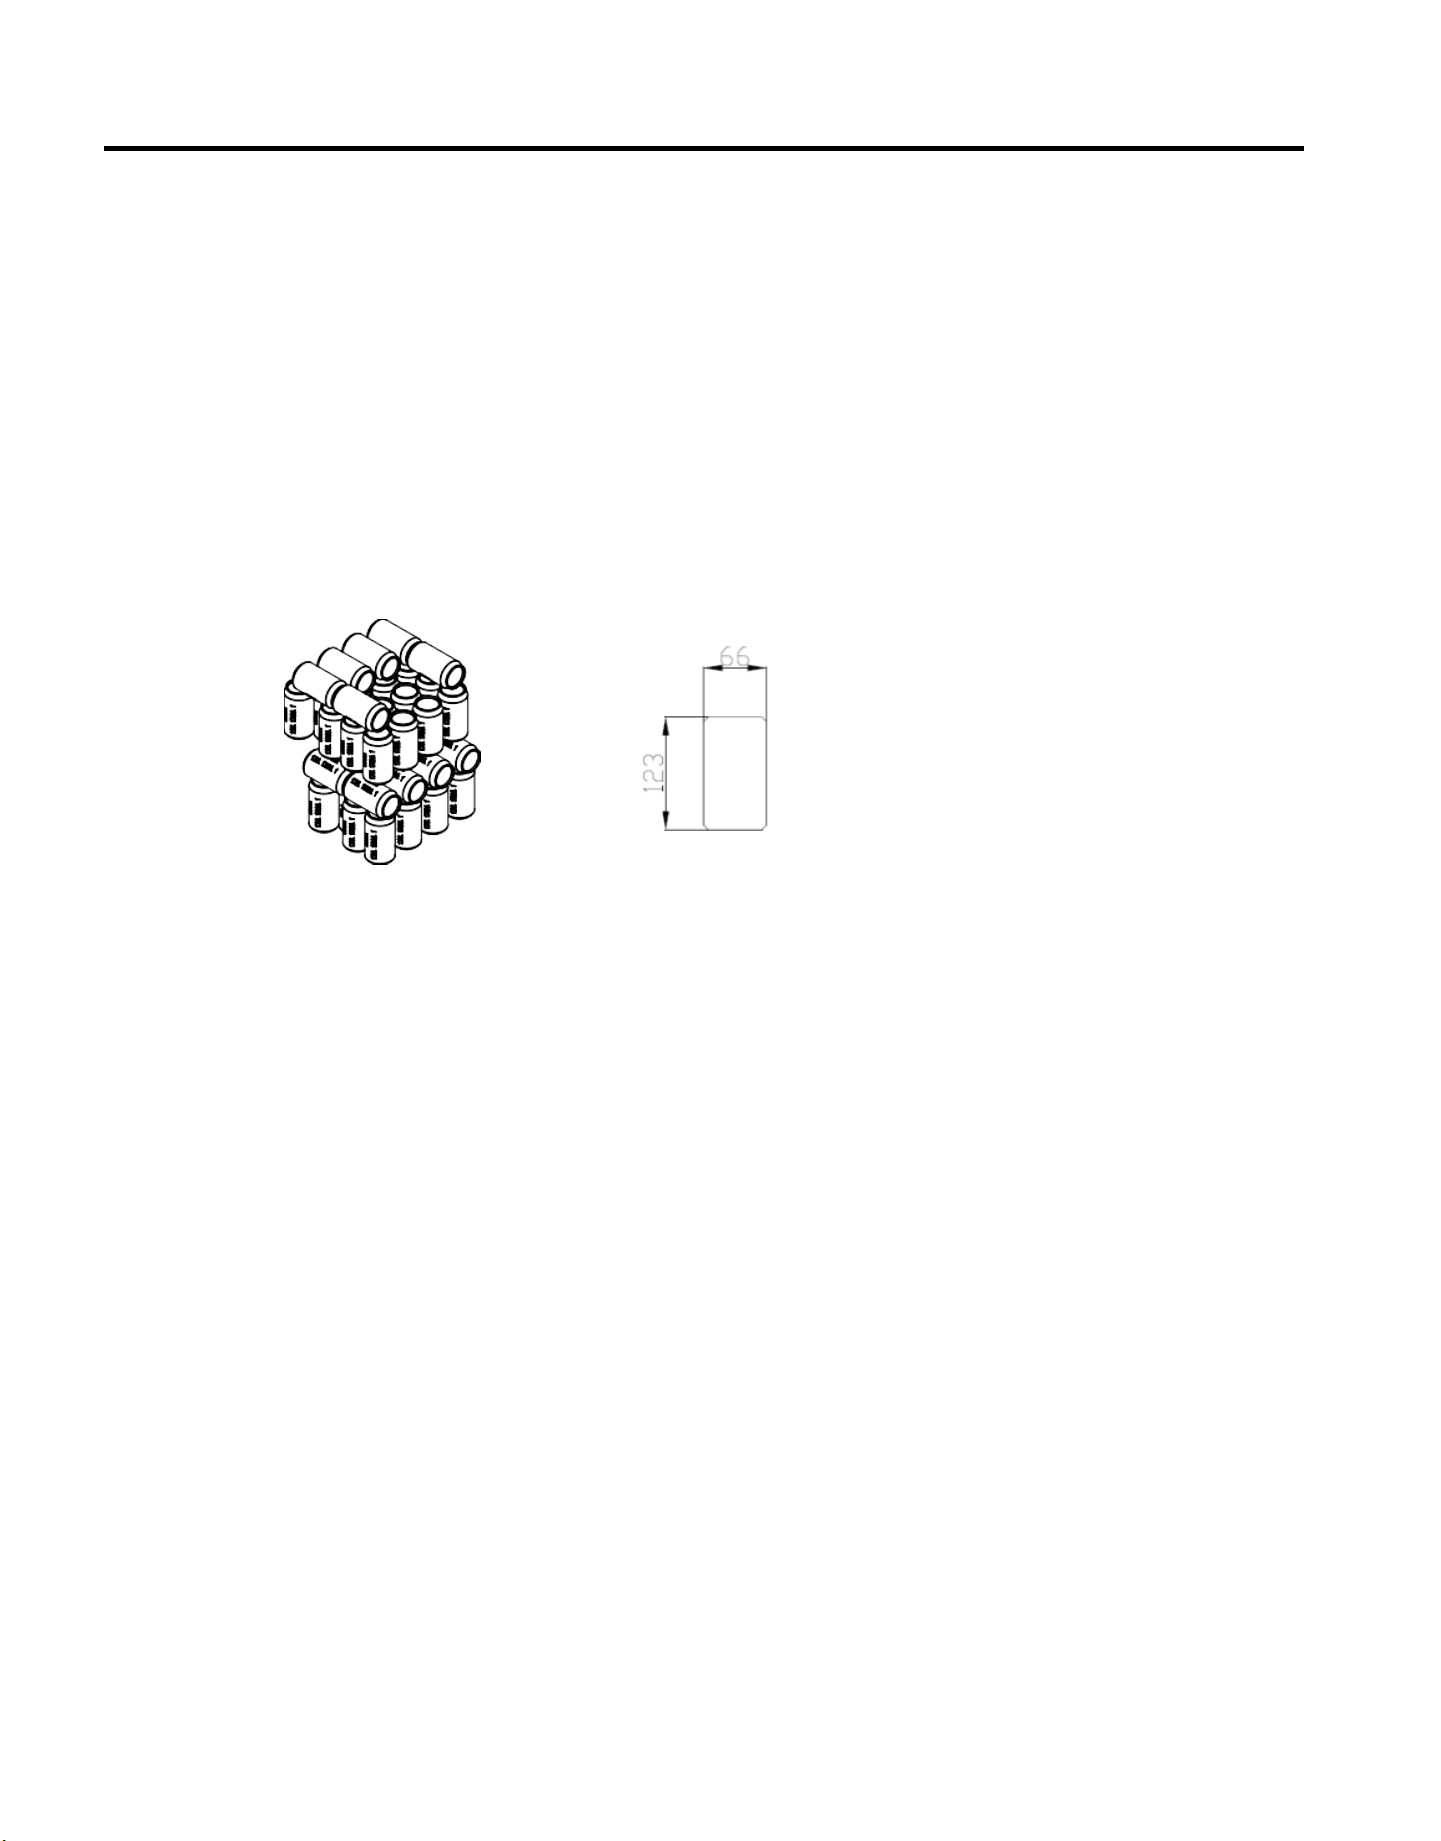
• Wire shelf capacity:
• SW-12:19 cans/shelf
Maintain a minimum 20mm between bottle and back plate
• Ensure storage can Dia.66mm & Height 123mm, otherwise, less cans loading
5.2Ensure bottle and shelf safety, check the following tips:
A. Spread your bottles out as evenly as possible over the shelves, so weight is not concentrated in one point, and make
sure your bottles will not touch the back of the cabinet

2
Installation
Location
the inside with a lukewarm wet cloth.
electrical consumption. Extreme cold ambient temperatures may also cause the appliance to perform improperly.
possibility of a malfunction in the cooling system from handling during transportation.
Building in this appliance can cause it to malfunction.
IMPORTANT
Ensure that the door is fully closed when the
appliance is in operation. Failure to fully close
the door can lead to excessive condensation
and potential water damage to ooring under
the appliance. Forno will not be responsible for
damages from misuse.
Leveling instructions
There are four adjustable feet on the bottom of the appliance that can be turned up or down to ensure that
the appliance is level.
1. Turn the adjustable foot counter-clockwise as far as it will go, until the top of the foot is touching the bottom of
the cabinet.
2. Slowly turn the adjustable foot clockwise until the appliance is level.
16 38
12
61
39.5
15.55
51.6
20.32
51.2 20.16

CLEANING
Ensure the appliance is unplugged before cleaning. To clean the inside of the appliance, use a soft cloth and a solution of
one tablespoon of baking soda to one quart of water or some mild detergent. Wash removable shelves in a mild detergent
solution, then dry and wipe with a soft cloth. Clean the outside with a soft, damp cloth and
some mild detergent. It is important to keep the area clean where the door seals against the cabinet. Clean this area
with a soapy cloth. Rinse with a damp cloth and let dry.
Note: Do not use cleaners containing ammonia or alcohol on the appliance. Ammonia or alcohol can damage the
appearance of the appliance. Never use any commercial or abrasive cleaners or sharp objects on any part of the
appliance.
POWER FAILURE
Most power failures are corrected within a few hours and should not affect the temperature of your
appliance if you minimize the number of times the door is opened. If the power is going to be off for
a longer period of time, take the proper steps to protect your contents.
Note: Wait 3 to 5 minutes before attempting to restart the refrigerator ifoperation has been
interrupted
VACATION
• Short vacations: Leave the appliance operating during vacations of less than three weeks.
• Long vacations: If the appliance will not be used for several months, remove all items and turn off the appliance.
Clean and dry the Interior thoroughly. To prevent odor and mold growth, leave the door open slightly, blocking it open
if necessary.
MOVING
• Remove all items.
• Tape down all shelves.
• Turn the adjustable feet up to the base to avoid damage.
• Tape the door shut.
• Ensure the appliance stays in the upright position during transportation. Protect the outside of the appliance with a
blanket.
• If the appliance is placed on its back or side during transportation, upon reaching the destination, allow it to remain
upright for 6 hours before plugging in to avoid damage to internal components.
DISPOSAL
This appliance may not be treated as a regular household waste, it should be taken to the appropriate waste collection
point for the recycling of electrical components. For information on local waste collection points, contact your local waste
removal agency or government office.
Care & Maintenance
To ensure best performance & long-last reliable working item, pls follow the simple maintenance and cleaning operations
as below:
• Make sure the power cord is unplugged before cleaning the back of your cabinet, or before moving it.
• Clean the inside of your cooler thoroughly once a year, after unplugging and unloading it (uses water and a mild
cleaning item, then rinse carefully).
• To ensure that your Beverage Cooler provides long-lasting reliable performance, you should check it regularly and
inform your dealer if anything unusual is found.
13

Trouble Shooting
14
Note: normal operation for following phenomenon:
A)Compressor does not start:
Compressor will not start if room temperature is lower than desired temperature, but item is still working with heater inside till
desired temperature achieved.
B)Compressor re-start:
Compressor will stop working when cooling system in the cabinet reaches presetting temperature, and re-start working until
the desired temperature is achieved. Allow a minimum 5 minute interval before re-starting.
C)Dew on the surface of cabinet:
The surface of Beverage Cooler especially the glass door appears some frost if item in a damp room. This is due to the
moisture in the air coming into contact with the cabinet.
Please wipe it away with dry cloth.
D)Normal Operating sounds you may hear
• Boiling water, gurgling sounds or slight vibrations that are the result of the refrigerant circulating through the cooling coils.
• Liquid Sound:
1)The sound of compressor when starts or stops working
2)The flowing sound of refrigerant in the refrigeration system
3)The evaporating sound of refrigerant in the evaporator
E)Condensation formed inside the cabinet
Under the environment with high level of humidity or the door of Beverage Cooler has been left open for a long period or
opened frequently, there are much condensation, and pls wipe off the water from the door and walls and leave the door
closed as long as possible
F)Heat function on bottom zone:
Heat function on bottom zone will automatically be on as below reason.
1)When setting temp. is upper than Room Temp.
2)When inside bottom Temperature is lower than setting temp.
G)Indicator light:
When temperature inside cabinet is out of range of setting temperature, both up and down indicator light will be on. Once
temperature reaches setting temperature, then, this light will be off automatically.
Error code:
E9 - The signal cable is loose, it needs to re-connect the signal cable
H2 - Temperature Sensor
Matters need attention
Waste disposal tips
Wrappage is used to protect electric appliance during transport and every part of materials are recycled materials.
• Corrugated paperboard/paperboard (made from waste paper)
• Polystyrene block (foam fluoride-free polystyrene)
• Plastic film, bag (polystyrene)
• Packing string (polystyrene)
• Never let child play with packing materials, plastic film may cause suffocation.
• Transport packing materials to public environmental collection depot.

15
1
Warranty
What this limited warranty covers:
The Warranty coverage provided by Forno Appliances in
this statement applies exclusively to the original Forno
appliance (“Product”) sold to the consumer (“Purchaser”) by
an authorized Forno dealer/distributor/retailer, purchased
and installed in the United States or Canada, and which has
always remained within the original country of purchase (the
United States or Canada). Warranty coverage is activated
on the date of the Product’s original retail purchase and has
a duration of two (2) years.
Warranty coverage is non-transferable. In the event
of replacement of parts or of the entire product, the
replacement Product (or parts) shall assume
the remaining
original Warranty activated with the original retail purchase
document. This Warranty shall not be extended with respect
to such replacement. Forno Appliances will repair or replace
any component/part which fails or proves defective due to
materials and/or workmanship within 2 years of the date of
the original retail purchase and under conditions of ordinary
residential, non-commercial use. Repair or replacement
will be free of charge, including labor at standard rates and
shipping expenses. Purchaser is responsible for making the
Product reasonably accessible for service. Repair service
must be performed by a Forno Authorized Service company
during normal working
hours.
Important
Retain proof of original purchase to establish warranty period.
Forno’s liability on any claim of any kind, with respect to the
goods and/or services provided, shall in no event exceed the
value of the goods or service or part there of which has given
rise to the claim.
30-Day Cosmetic Warranty
The Purchaser must inspect the product at the time of
delivery. Forno warrants that the Product is free from
manufacturing defects in materials and workmanship for
a period of thirty (30) days from date of the original retail
purchase of the Product.
This coverage includes:
• Paint blemishes
• Chips
• Macroscopic finish defects
Cosmetic warranty does NOT cover:
• Issues resulting from incorrect transport, handling
and/or
installation (e.g.: dents, broken, warped or deformed
structures or components, cracked or otherwise damaged
glass components);
• Slight color variations on painted/enameled components;
• Differences caused by natural or artificial
lighting, location or other analogous factors; >
stains/corrosion/discoloration caused by external
substances and/or environmental factors; > labor costs,
display, floor, B-stock, out- of-box,“as is” appliances and
demo units.
How to receive service
To receive warranty services, the Purchaser must contact the
Forno Support department in order to determine the problem
and the required service procedures. Troubleshooting with
a customer service representative will be necessary before
moving forwa
rd with the service. Model number, serial number
and date of original retail purchase will be requested.
Warranty Exclusions: What Is Not Covered.
• Use of the Product in any non-residential, commercial
application.
• Use of the Product for anything other than its intended
purpose.
• Repair services provided by anyone other than a Forno
Authorized Service agency.
• Damages or repair services to correct services provided
by unauthorized parties or the use of unauthorized parts.
• Installation not in accordance with local/state/city/county
fire codes, electrical codes, gas codes, plumbing codes,
building codes, laws or regulations.
• Defects or damage due to improper storage of the
Product.
• Defects, damage or missing parts on products sold out of
the original factory packaging or from displays. > Service
calls or repairs to correct an incorrect installation of the
Product and/or related accessories.
• Replacement of
parts/service calls to connect, convert
or otherwise repair the electrical wiring and/or gas line in
order to properly use the product.
• Replacement of parts/service calls to provide instructions
and information on the use of the Product.
• Replacement of parts/service calls to correct issues
arising from the product being used in a manner other
than what is normal and customary for residential use.
• Replacement of parts/service calls due to wear and tear
of components such as seals, knobs, pan supports,
shelving, cutlery baskets, buttons, touch displays,
scratched or broken ceramic-glass tops.
• Replacement of pa
rts/service calls for lack of/improper
maintenance, including but not limited to: build up of
residues, stains, scratches, discoloration, corrosion.
• Defects and damages arising from accidents, alteration,
misuse, abuse or improper installation.
• Defects and damages arising from Product transport,
logistics and handling. Inspection of the product must be
made at time of delivery. Following receipt and inspection,
the selling dealer/delivery company must be notified of
any issues arising from handling, transport and logistics.
• Defects and damages arising from external forces beyond
the control of Forno Appliances, including but not limited
to wind, rain, sand, fires,
floods, mudslides, freezing
temperatures, excessive moisture or extended exposure
to humidity, power surges,
• Lightning, structural failures surrounding the appliance
and other acts of God.
• Products whose serial number has been
altered/damaged/tampered with. In no case shall Forno
be held liable or responsible for damage to surrounding
property, including furniture, cabinetry, flooring, panels,
and other structures surrounding the Product. Forno is
neither liable nor responsible for the Product if it is located
in a remote area or an area where certified trained
technicians are not reasonably available. Purchaser must
bear any transportation and delivery costs of the Product
to the nearest Authorized Service Center or the addi
tional
travel expenses of a certified trained technician

16
Warranty
THERE ARE NO EXPRESS WARRANTIES OTHER THAN THOSE LISTED AND DESCRIBED ABOVE, AND NO WARRANTIES, EITHER EXPRESS OR IMPLIED,
INCLUDING, BUT NOT LIMITED TO, ANY IMPLIED WARRANTIES OF MERCHANTABILITY OR FITNESS FOR A PARTICULAR PURPOSE THAT SHALL APPLY
AFTER THE EXPRESS WARRANTY PERIODS STATED ABOVE, AND NO OTHER EXPRESS WARRANTY OR GUARANTEE GIVEN BY ANY PERSON, FIRM
OR CORPORATION WITH RESPECT TO THIS PRODUCT SHALL BE BINDING ON FORNO. FORNO SHALL NOT BE LIABLE FOR LOSS OF REVENUE OR
PROFITS, FAILURE TO REALIZE SAVINGS OR OTHER BENEFITS, TIME AWAY FROM WORK, MEALS, LOSS OF FOOD OR BEVERAGES, TR
AVELING OR
HOTEL EXPENSES, EXPENSES TO RENT OR PURCHASE APPLIANCES, REMODELING/CONSTRUCTION EXPENSES IN EXCESS OF DIRECT DAMAGES
WHICH ARE UNDENIABLY CAUSED EXCLUSIVELY BY FORNO OR ANY OTHER SPECIAL, INCIDENTAL OR CONSEQUENTIAL DAMAGES CAUSED BY THE
USE, MISUSE OR INABILITY TO USE THIS PRODUCT, REGARDLESS OF THE LEGAL THEORY ON WHICH THE CLAIM IS BASED, AND EVEN IF FORNO
HAS BEEN ADVISED OF THE POSSIBILITY OF SUCH DAMAGES. NOR SHALL RECOVERY OF ANY KIND AGAINST FORNO BE GREATER IN AMOUNT
THAN THE PURCHASE PRICE OF THE PRODUCT SOLD BY FORNO AND CAUSING THE ALLEGED DAMAGE. WITHOUT PREJUDIC
E TO THE FOREGOING,
PURCHASER ASSUMES ALL RISK AND LIABILITY FOR LOSS, DAMAGE OR INJURY TO PURCHASER AND PURCHASER’S PROPERTY AND TO OTHERS
AND THEIR PROPERTY ARISING FROM THE USE, MISUSE, OR INABILITY TO USE THIS PRODUCT SOLD BY FORNO THAT IS NOT A DIRECT RESULT OF
NEGLIGENCE ON THE PART OF FORNO THIS LIMITED WARRANTY SHALL NOT EXTEND TO ANYONE OTHER THAN THE ORIGINAL PURCHASER OF THIS
PRODUCT, IS NON-TRANSFERABLE, AND STATES YOUR EXCLUSIVE REMEDY.
Correct Disposal of this product:
This marking indicates that this appliance should not be disposed with
other household wastes. To prevent possible harm to the environment
or human
health from uncontrolled waste disposal, recycle it responsibly
to promote the sustainable reuse of material resources.

FODKT2582BLK-1
Part 2/2
MODEL BBQ NUMBER SERIES FOR:
INSTRUCTION MANUAL &
INSTALLATION GUIDE
Read these instructions carefully before using your appliance, and keep it carefully.
If you follow the instructions, your appliance will provide you with many years of good service.
ENGLISH
outdoorini Stainless Steel refrigeratorM

2

3
TABLE OF CONTENTS
Customer Care ............................................................................................................
4
Explanation .................................................................................................................. 6
Operating Your Device ............................................................................................... 8
Maintenance ...........
......................................................................................................13
Trouble Shooting ..........................................................................................................14
Matters need attention ................................................................................................ 14
Warning ......................................
.................................................................................. 15
4
Customer Care
Thank you for purchasing a Forno product. Please read the entire instruction manual before operating your new appliance
for the first time. Whether you are an occasional user or an expert, it will be beneficial to familiarize yourself with the safety
practices, features, operation and care recommendations of your appliance.
Both the model and serial number are listed inside the product. For warranty purposes, you will also need the date of
purchase .
Record this information below for future reference.
Services in Canada and Untied States
Keep the instruction manual handy to answer your questions. If you don’t understand something or need more assistance,
please visit our website for fast support. Please provide us your name, number, address,serial number of the product that
troubleshooting, proof of purchase, and a short description of the issue. A customer service representative will contact you
as soon as possible. All warranty work needs to be authorized by FORNO customer service. All our authorized service
providers are carefully selected and rigorously trained by us.
Product Information
Model Number : ______________________________________
Serial Number :
Date of Purchase : ___________________________________
Purchase Address And Phone :
_______________________________
_________________________________________________________
Service Information
Use these numbers in any correspondence
or services calls concerning your product.
If you received a damaged product, immedi-
ately contact Forno.
To save time and money, before you call for
service, check the troubleshooting guide. It
lists the causes of minor operation prob -
lems that you can correct yourself.
“Need some quick help? Simply scan the qr code and get access to our
fast support form. We’re always here to assist you with any questions or
concerns you may have. So, don’t hesitate to reach out!”

5
WARNING
FOR YOUR SAFETY
DANGER
WARNING
CAUTION
We have provided many important safety messages in this manual and on your appliance. Always read and obey all
safety messages
All safety messages will tell you what the potential hazard is, tell you how to reduce the chance of injury, and tell you
what can happen if the instructions are not followed.
• You can be killed or seriously injured if you don’t immediately follow instructions.
• You can be killed or seriously injured if you don’t follow instructions.
• A potentially hazardous situation which, if not avoided, could result in minor or
moderate injury.
This is the safety alert symbol. This symbol alerts you to potential hazards that can kill or hurt you
and others. All safety messages will follow the safety alert symbol and either the word “DANGER,”
“WARNING” or “CAUTION.” These words mean:
WARNING : This product can expose you to chemicals including [Lead, lead and lead
compound, which is [are] known to the state of California to cause cancer and birth defects
or other reproductive harm. For more information go to www.P65Warning.ca.gov.

6
This Instruction Manual is the universal-purpose version for the models of beverage cooler manufactured by our Co. The
appearance of the units that you purchase might be slightly different from the Manual, but it does not affect your proper
operations and usage.
Please read carefully the sections corresponding to the specific model you choose, and keep the manual properly so as to
facilitate your reference at later time.
Electrical Requirement
• Make sure there is a suitable power Outlet with proper grounding to power the device.
• Avoid the use of three plug adapters or cutting off the third grounding in order to accommodate a two plug outlet. This
is an dangerous practice since it provides no effective grounding for the cooler and may result in shock hazard.Install
Limitations
• Do not install your cooler in any location not properly insulated or heated e.g. garage etc.
• Select a suitable location for the cooler on a hard even surface away from direct sunlight or heat source e.g. radiators,
baseboard heaters, cooking appliances etc. Any floor unevenness should be corrected with the leveling legs located
on the front and rear bottom corners of cooler.
Use of Extension Cords
• Avoid the use of an extension cord because of potential safety hazards under certain conditions. If it is necessary to
use an extension cord, use only a 3-wire extension cord that has a 3-blade grounding plug and a 3-slot outlet that will
accept the plug. The marked rating of the extension cord must be equal to or greater than the electrical rating of the
appliance.
Beverage Cooler Installation:
• When you receive the cabinet, please unpack the unit and make sure there is no flaws in its external appearance
(from shocks, deformation, ect.)
• Open the door and check all interior fittings and supplied items if are all complete (shelves, instruction, control panel,
etc.) Please install it according to the following points if the shelves or shelf brackets fall off during transit.
• After checking, if no problem, then, pls carry to the final place, which should be care as follows:
• Leaving space of minimum 5cm between your Beverage Cooler and left & right wall; at least 8cm between back of
cabinet and the wall. (Freestanding only)
• Position the Beverage Cooler on a flat level surface, if not, adjust the feet of Beverage Cooler to keep level.
• Away from sources of heat and high humidity areas (laundry room and bathroom, etc).
• Do not tilt it at an angle of more than 45° when move the cabinet. Allow a minimum 10 minutes interval between
transit and re-starting.
• Make sure the ventilation is free if you wish to install your cabinet into a worktable, otherwise, it will reduce the effect
of usage.
Beverage Cooler Features and Use Initial Setup
• Before connecting the beverage cooler to the power source, let it stand upright for approximately 24 hours. This will
reduce the possibility of a malfunction in the cooling system from handling during transportation.
• Once you have plugged the unit into an electrical outlet, let the unit run for at least 30 minutes to acclimate before
making any adjustments.
• The cooler can be set to any temperature between 2°C~14°C (36°F ~57°F) to accommodate your beverage cooler
requirements. (Digital control only)
Shelving
• (Type and number of shelves will vary per model)
• Remove packing materials from shelves once unit is stable and ready for storage.
• Disperse the bottles evenly to avoid concentrating weight in one place. Bottles must not touch either the back of the
cabinet or the step at the bottom.
• Make sure that the bottles are not all grouped together either at the top or bottom of the cabinet.
• Only pull out one rolling shelf at a time. Never attempt to pull more than one.
Important Safety Instructions
• Basic precautions when using,
• Only use your Beverage Cooler for intended purposes, as described in this guide.
• Never unplug the Beverage Cooler by pulling out the power cord, grip the plug firmly and pull straight out to remove
from wall socket.
• Immediately repair or replace any worn or damaged cord, never use a cord that is split or which shows signs of wear
along its length or on its ends.
• This appliance is not intended for use by persons (including children) with reduced physical, sensory or mental
capabilities, or lack of experience and knowledge, unless they have been given supervision or instruction concerning
use of the appliance by a person responsible for their safety
• Children should be supervised to ensure that they do not play with the appliance. Do not allow children to climb on,
sit on or stand on the Beverage Cooler, nor hang from its shelves. They could damage the cabinet.
• Do not use an extension cord. Do not operate this device if its power cable or plug is damaged, or it does not work
properly, or it is damaged, or hasn't work properly, or it is damaged, or has been dropped. If the power cable is
damaged, it will need to be replaced by the manufacturer or his service agency or a similar qualified person, to avoid
any dangers.
Important Safety Instructions

7
This Instruction Manual is the universal-purpose version for the models of beverage cooler manufactured by our Co. The
appearance of the units that you purchase might be slightly different from the Manual, but it does not affect your proper
operations and usage.
Please read carefully the sections corresponding to the specific model you choose, and keep the manual properly so as to
facilitate your reference at later time.
Electrical Requirement
• Make sure there is a suitable power Outlet with proper grounding to power the device.
• Avoid the use of three plug adapters or cutting off the third grounding in order to accommodate a two plug outlet. This
is an dangerous practice since it provides no effective grounding for the cooler and may result in shock hazard.Install
Limitations
• Do not install your cooler in any location not properly insulated or heated e.g. garage etc.
• Select a suitable location for the cooler on a hard even surface away from direct sunlight or heat source e.g. radiators,
baseboard heaters, cooking appliances etc. Any floor unevenness should be corrected with the leveling legs located
on the front and rear bottom corners of cooler.
Use of Extension Cords
• Avoid the use of an extension cord because of potential safety hazards under certain conditions. If it is necessary to
use an extension cord, use only a 3-wire extension cord that has a 3-blade grounding plug and a 3-slot outlet that will
accept the plug. The marked rating of the extension cord must be equal to or greater than the electrical rating of the
appliance.
Beverage Cooler Installation:
• When you receive the cabinet, please unpack the unit and make sure there is no flaws in its external appearance
(from shocks, deformation, ect.)
• Open the door and check all interior fittings and supplied items if are all complete (shelves, instruction, control panel,
etc.) Please install it according to the following points if the shelves or shelf brackets fall off during transit.
• After checking, if no problem, then, pls carry to the final place, which should be care as follows:
• Leaving space of minimum 5cm between your Beverage Cooler and left & right wall; at least 8cm between back of
cabinet and the wall. (Freestanding only)
• Position the Beverage Cooler on a flat level surface, if not, adjust the feet of Beverage Cooler to keep level.
• Away from sources of heat and high humidity areas (laundry room and bathroom, etc).
• Do not tilt it at an angle of more than 45° when move the cabinet. Allow a minimum 10 minutes interval between
transit and re-starting.
• Make sure the ventilation is free if you wish to install your cabinet into a worktable, otherwise, it will reduce the effect
of usage.
Beverage Cooler Features and Use Initial Setup
• Before connecting the beverage cooler to the power source, let it stand upright for approximately 24 hours. This will
reduce the possibility of a malfunction in the cooling system from handling during transportation.
• Once you have plugged the unit into an electrical outlet, let the unit run for at least 30 minutes to acclimate before
making any adjustments.
• The cooler can be set to any temperature between 2°C~14°C (36°F ~57°F) to accommodate your beverage cooler
requirements. (Digital control only)
Shelving
• (Type and number of shelves will vary per model)
• Remove packing materials from shelves once unit is stable and ready for storage.
• Disperse the bottles evenly to avoid concentrating weight in one place. Bottles must not touch either the back of the
cabinet or the step at the bottom.
• Make sure that the bottles are not all grouped together either at the top or bottom of the cabinet.
• Only pull out one rolling shelf at a time. Never attempt to pull more than one.
Important Safety Instructions
• Basic precautions when using,
• Only use your Beverage Cooler for intended purposes, as described in this guide.
• Never unplug the Beverage Cooler by pulling out the power cord, grip the plug firmly and pull straight out to remove
from wall socket.
• Immediately repair or replace any worn or damaged cord, never use a cord that is split or which shows signs of wear
along its length or on its ends.
• This appliance is not intended for use by persons (including children) with reduced physical, sensory or mental
capabilities, or lack of experience and knowledge, unless they have been given supervision or instruction concerning
use of the appliance by a person responsible for their safety
• Children should be supervised to ensure that they do not play with the appliance. Do not allow children to climb on,
sit on or stand on the Beverage Cooler, nor hang from its shelves. They could damage the cabinet.
• Do not use an extension cord. Do not operate this device if its power cable or plug is damaged, or it does not work
properly, or it is damaged, or hasn't work properly, or it is damaged, or has been dropped. If the power cable is
damaged, it will need to be replaced by the manufacturer or his service agency or a similar qualified person, to avoid
any dangers.
Important Safety Instructions (Continued)

8
This Instruction Manual is the universal-purpose version for the models of beverage cooler manufactured by our Co. The
appearance of the units that you purchase might be slightly different from the Manual, but it does not affect your proper
operations and usage.
Please read carefully the sections corresponding to the specific model you choose, and keep the manual properly so as to
facilitate your reference at later time.
Electrical Requirement
• Make sure there is a suitable power Outlet with proper grounding to power the device.
• Avoid the use of three plug adapters or cutting off the third grounding in order to accommodate a two plug outlet. This
is an dangerous practice since it provides no effective grounding for the cooler and may result in shock hazard.Install
Limitations
• Do not install your cooler in any location not properly insulated or heated e.g. garage etc.
• Select a suitable location for the cooler on a hard even surface away from direct sunlight or heat source e.g. radiators,
baseboard heaters, cooking appliances etc. Any floor unevenness should be corrected with the leveling legs located
on the front and rear bottom corners of cooler.
Use of Extension Cords
• Avoid the use of an extension cord because of potential safety hazards under certain conditions. If it is necessary to
use an extension cord, use only a 3-wire extension cord that has a 3-blade grounding plug and a 3-slot outlet that will
accept the plug. The marked rating of the extension cord must be equal to or greater than the electrical rating of the
appliance.
Beverage Cooler Installation:
• When you receive the cabinet, please unpack the unit and make sure there is no flaws in its external appearance
(from shocks, deformation, ect.)
• Open the door and check all interior fittings and supplied items if are all complete (shelves, instruction, control panel,
etc.) Please install it according to the following points if the shelves or shelf brackets fall off during transit.
• After checking, if no problem, then, pls carry to the final place, which should be care as follows:
• Leaving space of minimum 5cm between your Beverage Cooler and left & right wall; at least 8cm between back of
cabinet and the wall. (Freestanding only)
• Position the Beverage Cooler on a flat level surface, if not, adjust the feet of Beverage Cooler to keep level.
• Away from sources of heat and high humidity areas (laundry room and bathroom, etc).
• Do not tilt it at an angle of more than 45° when move the cabinet. Allow a minimum 10 minutes interval between
transit and re-starting.
• Make sure the ventilation is free if you wish to install your cabinet into a worktable, otherwise, it will reduce the effect
of usage.
Beverage Cooler Features and Use Initial Setup
• Before connecting the beverage cooler to the power source, let it stand upright for approximately 24 hours. This will
reduce the possibility of a malfunction in the cooling system from handling during transportation.
• Once you have plugged the unit into an electrical outlet, let the unit run for at least 30 minutes to acclimate before
making any adjustments.
• The cooler can be set to any temperature between 2°C~14°C (36°F ~57°F) to accommodate your beverage cooler
requirements. (Digital control only)
Shelving
• (Type and number of shelves will vary per model)
• Remove packing materials from shelves once unit is stable and ready for storage.
• Disperse the bottles evenly to avoid concentrating weight in one place. Bottles must not touch either the back of the
cabinet or the step at the bottom.
• Make sure that the bottles are not all grouped together either at the top or bottom of the cabinet.
• Only pull out one rolling shelf at a time. Never attempt to pull more than one.
Product Dimension
I
F
E
D
G
J
C
B
A
H
A B C D E
Overall Width
Overall Height
Hinge to Foot
Height
Top to Bottom
Overall Depth
Handle to Back
Depth
Door to Back
F G H I J
Depth
Front Frame to Back
Handle Height Handle Width
Depth with
Door Fully Open
Opening
15 9/16" 20 5/16" 19 9/16" 22 1/2" 20 3/16"
39.5cm 51.6cm 49.6cm 57.2cm 51.2cm
18 5/16" 11 5/16" 34 5/8"
46.5cm 28.8cm 88cm -
180°
6
2 3/8"

9
Names of Parts and Accessories
Forno Handle
Stainless Steel Frame
Key Lock
Adjusteble Stainless Steel Shelf
1
2
3
4
Control Panel
Shelf Track
Adjusteble Foot
1x Handle
Supplied Parts
1x Adjusteble Stainless Steel Shelf
4x Adjusteble Foot
1
2
6
4
5
7
Screw Driver
1x
6
7
5
3
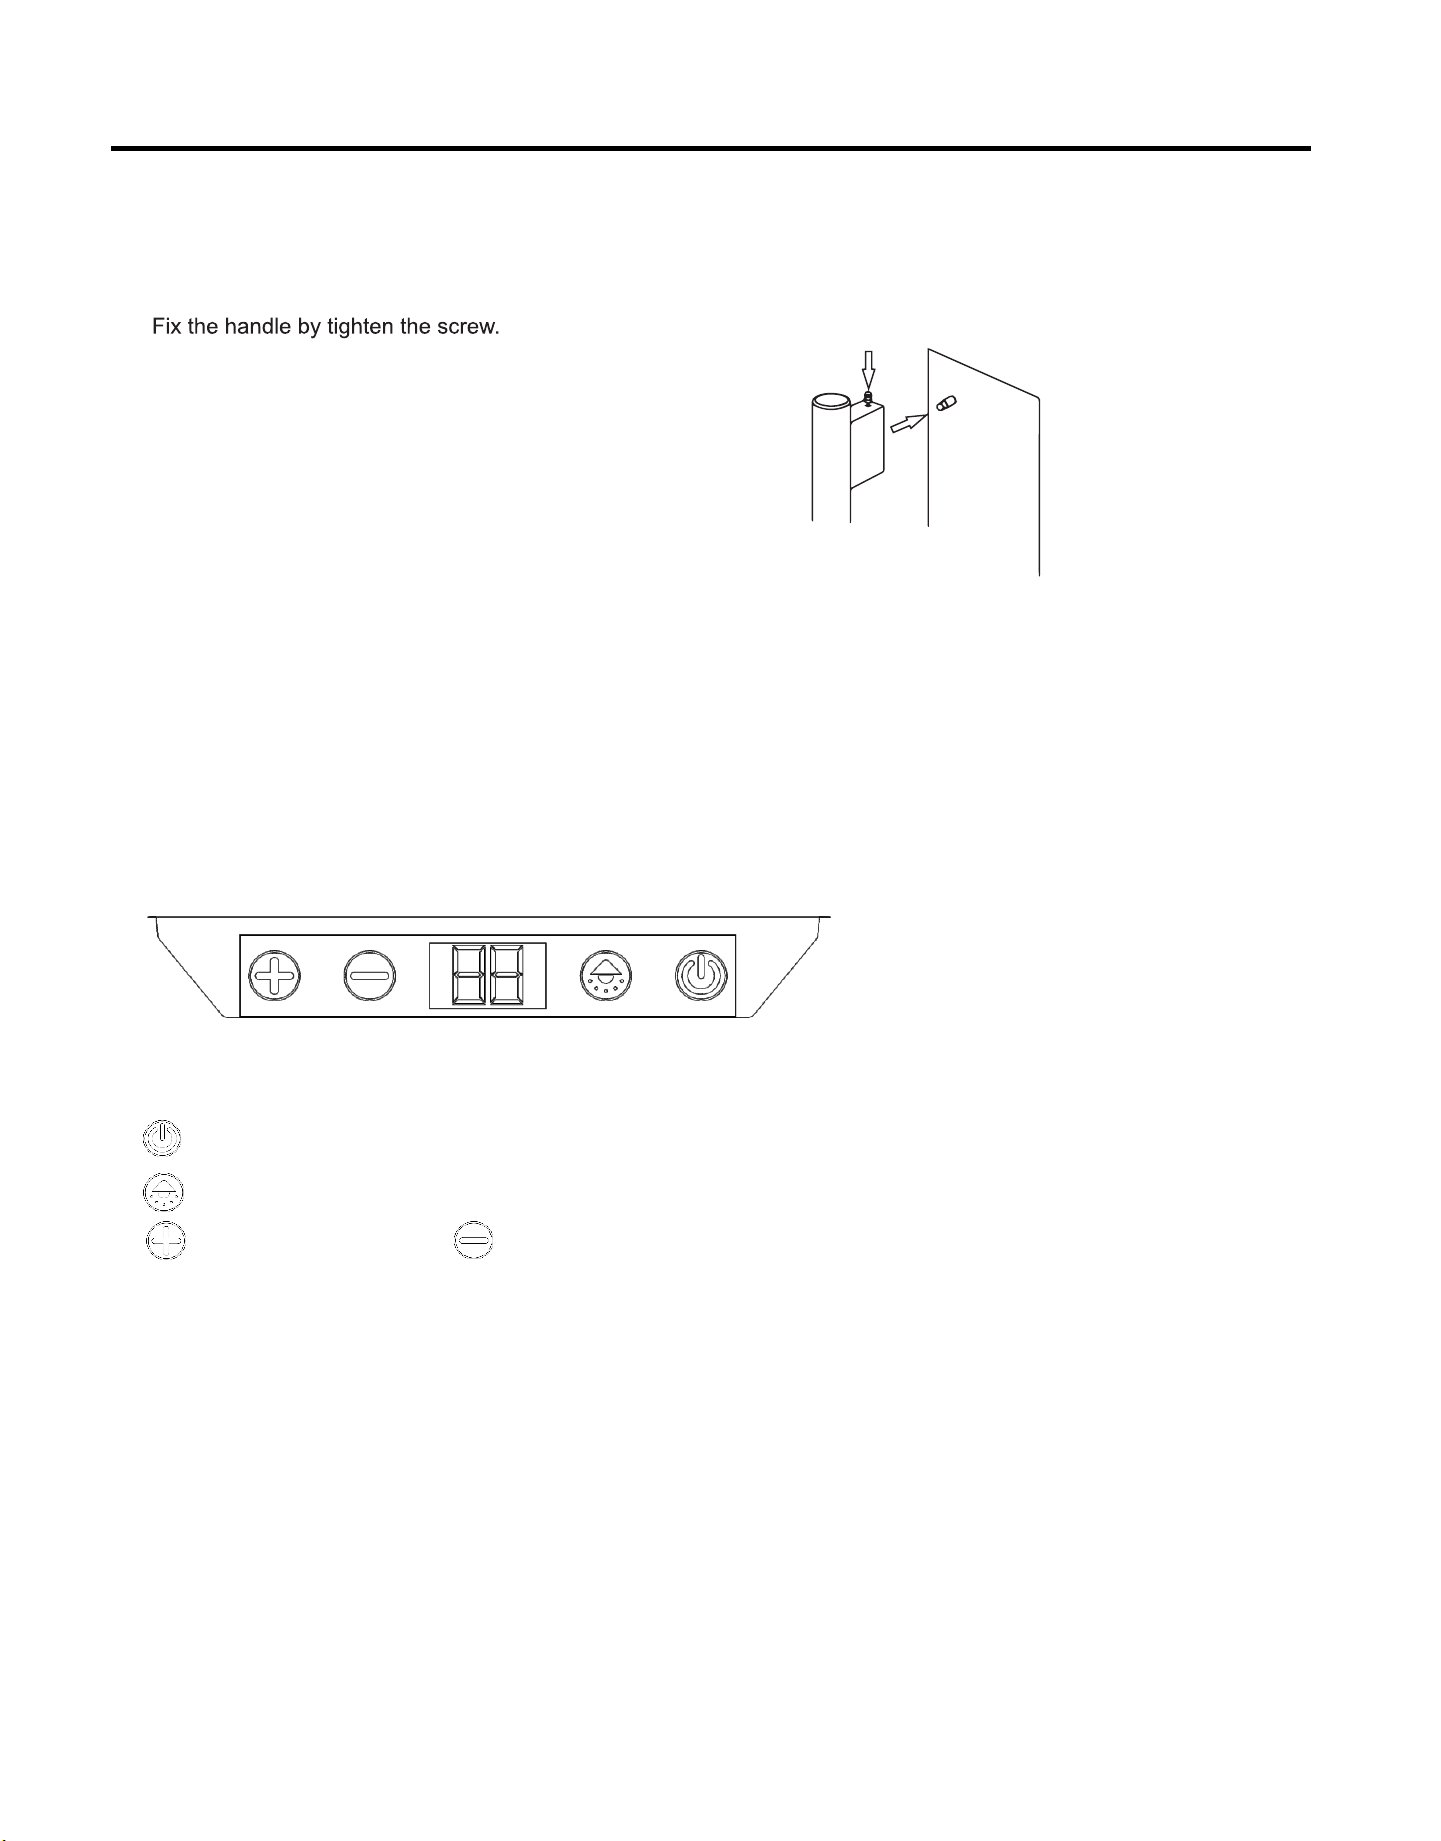
Operating Your Wine Cellar
10
1.
Removing the Shelf
Remove all bottles from the shelves. Lift the shelf upwards and the gently pull it out, (eventually untighten the screws).
2.
Installing Your Handle (If it has handle)
3.
Operating Your beverage cooler
Each beverage cooler includes an operating panel on the front of the unit. This operating panel includes several
features to operate and control the temperature.
4.
Temperature Setting
4.1
The temperature setting of Beverage Cooler
4.1.1
Control panel
ON/OFF of the whole system
ON/OFF of inside cabinet LED light
Temperature Up setting
Temperature Down setting
4.1.2
Pushing the temperature key up and down for 5 seconds, then, temperature display will be exchange
between ℃ and ℉
Remark:
1.
The temperature readout shows the actual cellar temperature, it will temporarily show the setting temperature while
making adjustments, then, reverts back after 5 seconds without any operation.
2.
It is normal that the key is flashing after turn off the power, but the plug is connected.
Please refer to the manual for detailed o
peration steps.
4.4
The item will be used under the room temperature ranging from 16 to 38℃ (61℉-100℉)
4.5
Temperature setting range of cabinet is 2°C~14°C (36°F ~ 57°F) . Customers can set the temperature according to
their actual demands.
1.
Locate the handle over the pins on the door panel.
2.

11
5.
Loading and Storage of Beverage:
5.1
Bottle Loading Method:
Operating Your Wine Cellar (Contiued)
Remark:
a)
There is no heating element , so temperature will be affected by the ambient
temperature.
b)
c)
d)
Both the Beverage Cooler and the indicator will turn on until the desired temperature is achieved.
The temperature readout shows the actual cooler temperature, it will temporarily show the set temperature while making
adjustments, then reverts back after 5 seconds without any operation.
Temperatures may fluctuate depending on whether the interior light is ON or OFF and depending on the position of the bottles.
• Wire shelf capacity:
• SW-12:19 cans/shelf
Maintain a minimum 20mm between bottle and back plate
• Ensure storage can Dia.66mm & Height 123mm, otherwise, less cans loading
5.2Ensure bottle and shelf safety, check the following tips:
A. Spread your bottles out as evenly as possible over the shelves, so weight is not concentrated in one point, and make
sure your bottles will not touch the back of the cabinet
2
Installation
Location
the inside with a lukewarm wet cloth.
electrical consumption. Extreme cold ambient temperatures may also cause the appliance to perform improperly.
possibility of a malfunction in the cooling system from handling during transportation.
Building in this appliance can cause it to malfunction.
IMPORTANT
Ensure that the door is fully closed when the
appliance is in operation. Failure to fully close
the door can lead to excessive condensation
and potential water damage to ooring under
the appliance. Forno will not be responsible for
damages from misuse.
Leveling instructions
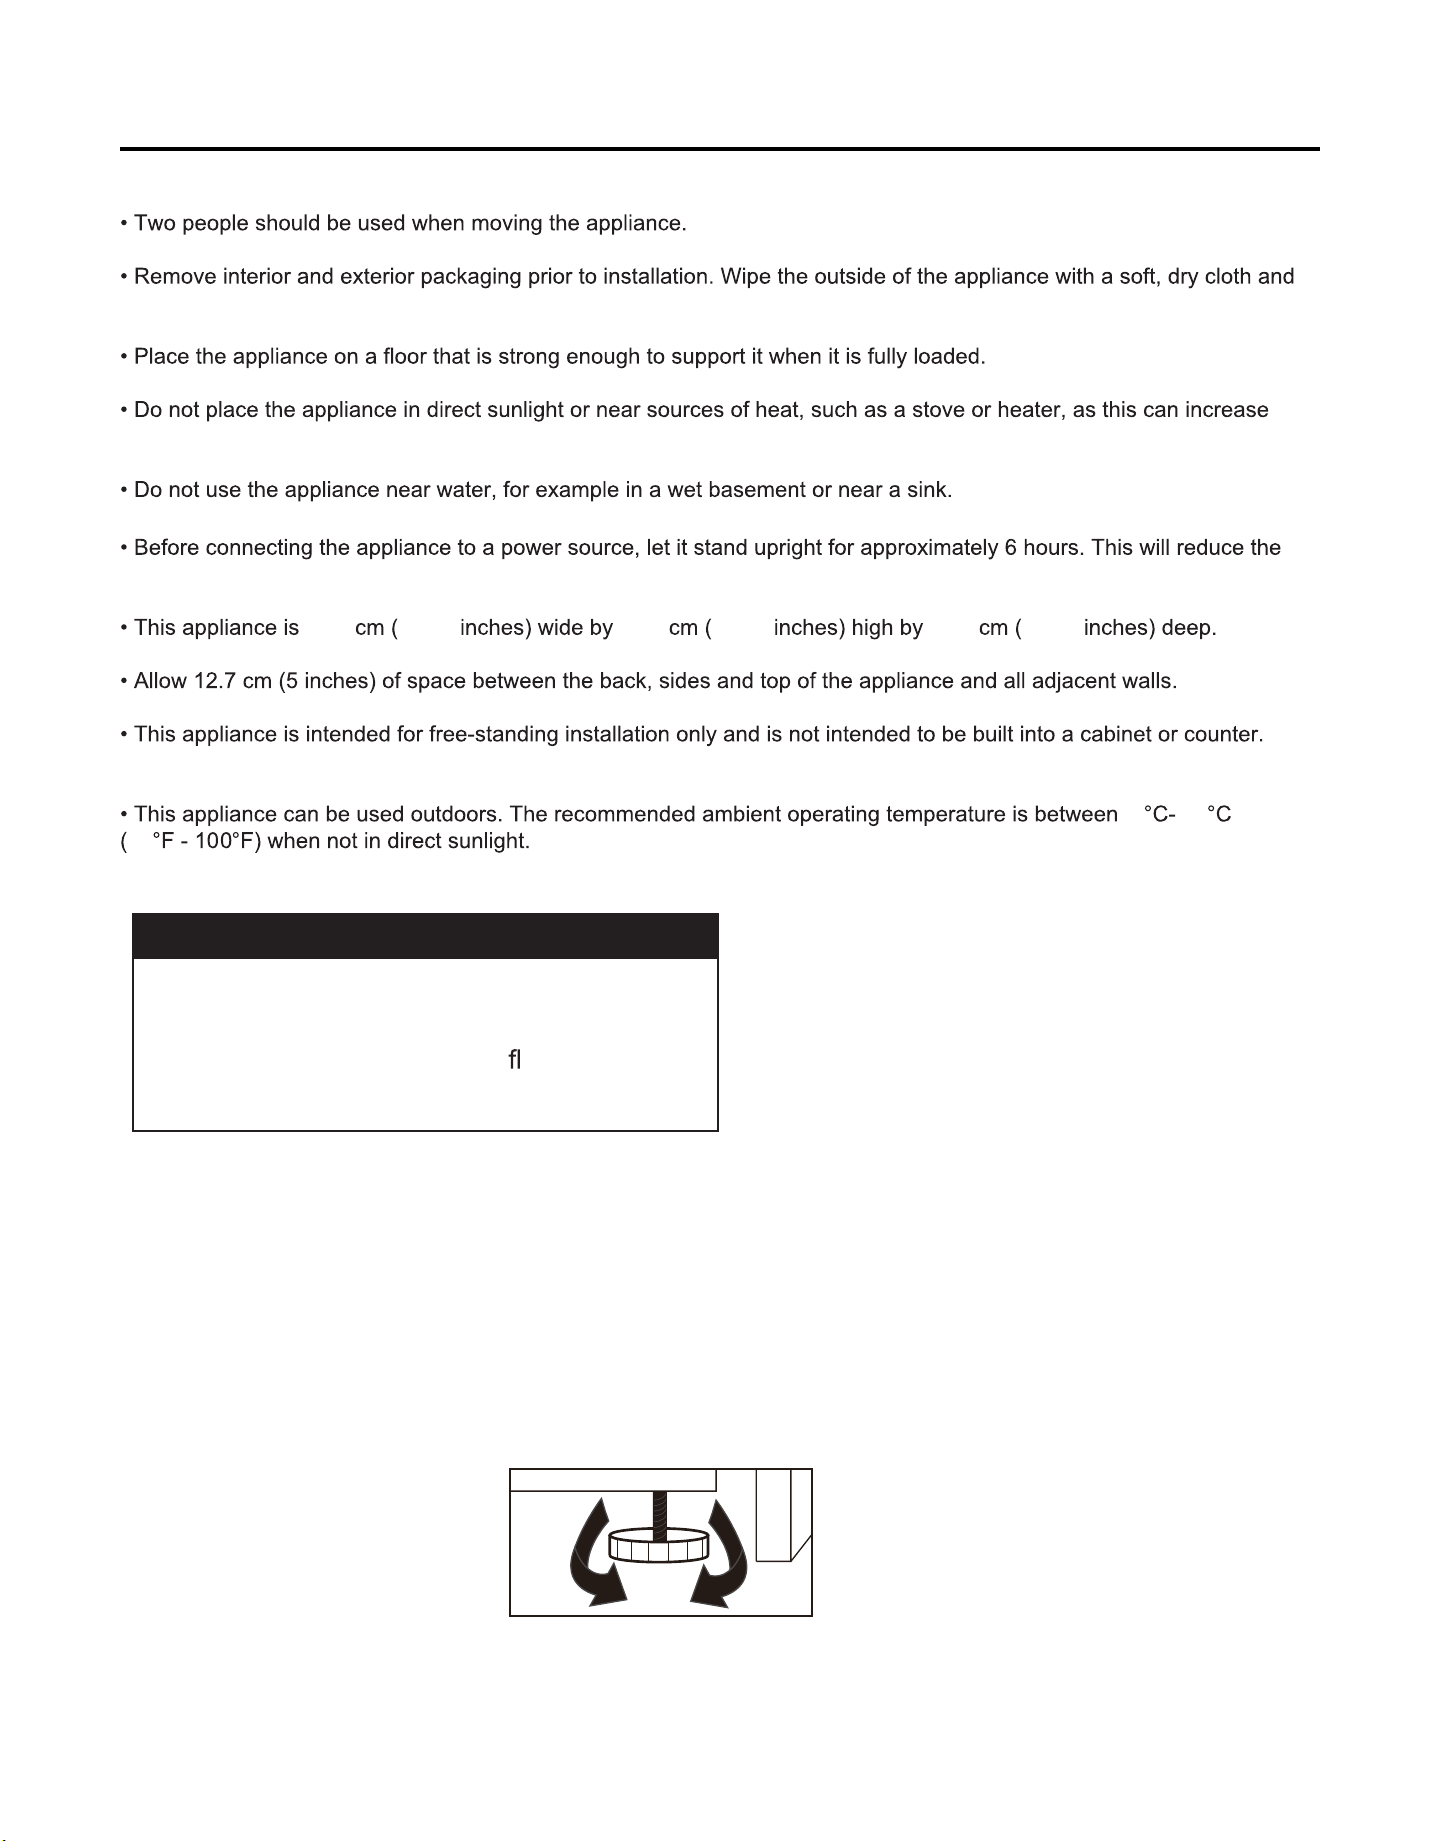
There are four adjustable feet on the bottom of the appliance that can be turned up or down to ensure that
the appliance is level.
1. Turn the adjustable foot counter-clockwise as far as it will go, until the top of the foot is touching the bottom of
the cabinet.
2. Slowly turn the adjustable foot clockwise until the appliance is level.
16 38
12
61
39.5
15.55
51.6
20.32
51.2 20.16

CLEANING
Ensure the appliance is unplugged before cleaning. To clean the inside of the appliance, use a soft cloth and a solution of
one tablespoon of baking soda to one quart of water or some mild detergent. Wash removable shelves in a mild detergent
solution, then dry and wipe with a soft cloth. Clean the outside with a soft, damp cloth and
some mild detergent. It is important to keep the area clean where the door seals against the cabinet. Clean this area
with a soapy cloth. Rinse with a damp cloth and let dry.
Note: Do not use cleaners containing ammonia or alcohol on the appliance. Ammonia or alcohol can damage the
appearance of the appliance. Never use any commercial or abrasive cleaners or sharp objects on any part of the
appliance.
POWER FAILURE
Most power failures are corrected within a few hours and should not affect the temperature of your
appliance if you minimize the number of times the door is opened. If the power is going to be off for
a longer period of time, take the proper steps to protect your contents.
Note: Wait 3 to 5 minutes before attempting to restart the refrigerator ifoperation has been
interrupted
VACATION
• Short vacations: Leave the appliance operating during vacations of less than three weeks.
• Long vacations: If the appliance will not be used for several months, remove all items and turn off the appliance.
Clean and dry the Interior thoroughly. To prevent odor and mold growth, leave the door open slightly, blocking it open
if necessary.
MOVING
• Remove all items.
• Tape down all shelves.
• Turn the adjustable feet up to the base to avoid damage.
• Tape the door shut.
• Ensure the appliance stays in the upright position during transportation. Protect the outside of the appliance with a
blanket.
• If the appliance is placed on its back or side during transportation, upon reaching the destination, allow it to remain
upright for 6 hours before plugging in to avoid damage to internal components.
DISPOSAL
This appliance may not be treated as a regular household waste, it should be taken to the appropriate waste collection
point for the recycling of electrical components. For information on local waste collection points, contact your local waste
removal agency or government office.
Care & Maintenance
To ensure best performance & long-last reliable working item, pls follow the simple maintenance and cleaning operations
as below:
• Make sure the power cord is unplugged before cleaning the back of your cabinet, or before moving it.
• Clean the inside of your cooler thoroughly once a year, after unplugging and unloading it (uses water and a mild
cleaning item, then rinse carefully).
• To ensure that your Beverage Cooler provides long-lasting reliable performance, you should check it regularly and
inform your dealer if anything unusual is found.
13

Trouble Shooting
14
Note: normal operation for following phenomenon:
A)Compressor does not start:
Compressor will not start if room temperature is lower than desired temperature, but item is still working with heater inside till
desired temperature achieved.
B)Compressor re-start:
Compressor will stop working when cooling system in the cabinet reaches presetting temperature, and re-start working until
the desired temperature is achieved. Allow a minimum 5 minute interval before re-starting.
C)Dew on the surface of cabinet:
The surface of Beverage Cooler especially the glass door appears some frost if item in a damp room. This is due to the
moisture in the air coming into contact with the cabinet.
Please wipe it away with dry cloth.
D)Normal Operating sounds you may hear
• Boiling water, gurgling sounds or slight vibrations that are the result of the refrigerant circulating through the cooling coils.
• Liquid Sound:
1)The sound of compressor when starts or stops working
2)The flowing sound of refrigerant in the refrigeration system
3)The evaporating sound of refrigerant in the evaporator
E)Condensation formed inside the cabinet
Under the environment with high level of humidity or the door of Beverage Cooler has been left open for a long period or
opened frequently, there are much condensation, and pls wipe off the water from the door and walls and leave the door
closed as long as possible
F)Heat function on bottom zone:
Heat function on bottom zone will automatically be on as below reason.
1)When setting temp. is upper than Room Temp.
2)When inside bottom Temperature is lower than setting temp.
G)Indicator light:
When temperature inside cabinet is out of range of setting temperature, both up and down indicator light will be on. Once
temperature reaches setting temperature, then, this light will be off automatically.
Error code:
E9 - The signal cable is loose, it needs to re-connect the signal cable
H2 - Temperature Sensor
Matters need attention
Waste disposal tips
Wrappage is used to protect electric appliance during transport and every part of materials are recycled materials.
• Corrugated paperboard/paperboard (made from waste paper)
• Polystyrene block (foam fluoride-free polystyrene)
• Plastic film, bag (polystyrene)
• Packing string (polystyrene)
• Never let child play with packing materials, plastic film may cause suffocation.
• Transport packing materials to public environmental collection depot.

15
1
Warranty
What this limited warranty covers:
The Warranty coverage provided by Forno Appliances in
this statement applies exclusively to the original Forno
appliance (“Product”) sold to the consumer (“Purchaser”) by
an authorized Forno dealer/distributor/retailer, purchased
and installed in the United States or Canada, and which has
always remained within the original country of purchase (the
United States or Canada). Warranty coverage is activated
on the date of the Product’s original retail purchase and has
a duration of two (2) years.
Warranty coverage is non-transferable. In the event
of replacement of parts or of the entire product, the
replacement Product (or parts) shall assume
the remaining
original Warranty activated with the original retail purchase
document. This Warranty shall not be extended with respect
to such replacement. Forno Appliances will repair or replace
any component/part which fails or proves defective due to
materials and/or workmanship within 2 years of the date of
the original retail purchase and under conditions of ordinary
residential, non-commercial use. Repair or replacement
will be free of charge, including labor at standard rates and
shipping expenses. Purchaser is responsible for making the
Product reasonably accessible for service. Repair service
must be performed by a Forno Authorized Service company
during normal working
hours.
Important
Retain proof of original purchase to establish warranty period.
Forno’s liability on any claim of any kind, with respect to the
goods and/or services provided, shall in no event exceed the
value of the goods or service or part there of which has given
rise to the claim.
30-Day Cosmetic Warranty
The Purchaser must inspect the product at the time of
delivery. Forno warrants that the Product is free from
manufacturing defects in materials and workmanship for
a period of thirty (30) days from date of the original retail
purchase of the Product.
This coverage includes:
• Paint blemishes
• Chips
• Macroscopic finish defects
Cosmetic warranty does NOT cover:
• Issues resulting from incorrect transport, handling
and/or
installation (e.g.: dents, broken, warped or deformed
structures or components, cracked or otherwise damaged
glass components);
• Slight color variations on painted/enameled components;
• Differences caused by natural or artificial
lighting, location or other analogous factors; >
stains/corrosion/discoloration caused by external
substances and/or environmental factors; > labor costs,
display, floor, B-stock, out- of-box,“as is” appliances and
demo units.
How to receive service
To receive warranty services, the Purchaser must contact the
Forno Support department in order to determine the problem
and the required service procedures. Troubleshooting with
a customer service representative will be necessary before
moving forwa
rd with the service. Model number, serial number
and date of original retail purchase will be requested.
Warranty Exclusions: What Is Not Covered.
• Use of the Product in any non-residential, commercial
application.
• Use of the Product for anything other than its intended
purpose.
• Repair services provided by anyone other than a Forno
Authorized Service agency.
• Damages or repair services to correct services provided
by unauthorized parties or the use of unauthorized parts.
• Installation not in accordance with local/state/city/county
fire codes, electrical codes, gas codes, plumbing codes,
building codes, laws or regulations.
• Defects or damage due to improper storage of the
Product.
• Defects, damage or missing parts on products sold out of
the original factory packaging or from displays. > Service
calls or repairs to correct an incorrect installation of the
Product and/or related accessories.
• Replacement of
parts/service calls to connect, convert
or otherwise repair the electrical wiring and/or gas line in
order to properly use the product.
• Replacement of parts/service calls to provide instructions
and information on the use of the Product.
• Replacement of parts/service calls to correct issues
arising from the product being used in a manner other
than what is normal and customary for residential use.
• Replacement of parts/service calls due to wear and tear
of components such as seals, knobs, pan supports,
shelving, cutlery baskets, buttons, touch displays,
scratched or broken ceramic-glass tops.
• Replacement of pa
rts/service calls for lack of/improper
maintenance, including but not limited to: build up of
residues, stains, scratches, discoloration, corrosion.
• Defects and damages arising from accidents, alteration,
misuse, abuse or improper installation.
• Defects and damages arising from Product transport,
logistics and handling. Inspection of the product must be
made at time of delivery. Following receipt and inspection,
the selling dealer/delivery company must be notified of
any issues arising from handling, transport and logistics.
• Defects and damages arising from external forces beyond
the control of Forno Appliances, including but not limited
to wind, rain, sand, fires,
floods, mudslides, freezing
temperatures, excessive moisture or extended exposure
to humidity, power surges,
• Lightning, structural failures surrounding the appliance
and other acts of God.
• Products whose serial number has been
altered/damaged/tampered with. In no case shall Forno
be held liable or responsible for damage to surrounding
property, including furniture, cabinetry, flooring, panels,
and other structures surrounding the Product. Forno is
neither liable nor responsible for the Product if it is located
in a remote area or an area where certified trained
technicians are not reasonably available. Purchaser must
bear any transportation and delivery costs of the Product
to the nearest Authorized Service Center or the addi
tional
travel expenses of a certified trained technician

16
Warranty
THERE ARE NO EXPRESS WARRANTIES OTHER THAN THOSE LISTED AND DESCRIBED ABOVE, AND NO WARRANTIES, EITHER EXPRESS OR IMPLIED,
INCLUDING, BUT NOT LIMITED TO, ANY IMPLIED WARRANTIES OF MERCHANTABILITY OR FITNESS FOR A PARTICULAR PURPOSE THAT SHALL APPLY
AFTER THE EXPRESS WARRANTY PERIODS STATED ABOVE, AND NO OTHER EXPRESS WARRANTY OR GUARANTEE GIVEN BY ANY PERSON, FIRM
OR CORPORATION WITH RESPECT TO THIS PRODUCT SHALL BE BINDING ON FORNO. FORNO SHALL NOT BE LIABLE FOR LOSS OF REVENUE OR
PROFITS, FAILURE TO REALIZE SAVINGS OR OTHER BENEFITS, TIME AWAY FROM WORK, MEALS, LOSS OF FOOD OR BEVERAGES, TR
AVELING OR
HOTEL EXPENSES, EXPENSES TO RENT OR PURCHASE APPLIANCES, REMODELING/CONSTRUCTION EXPENSES IN EXCESS OF DIRECT DAMAGES
WHICH ARE UNDENIABLY CAUSED EXCLUSIVELY BY FORNO OR ANY OTHER SPECIAL, INCIDENTAL OR CONSEQUENTIAL DAMAGES CAUSED BY THE
USE, MISUSE OR INABILITY TO USE THIS PRODUCT, REGARDLESS OF THE LEGAL THEORY ON WHICH THE CLAIM IS BASED, AND EVEN IF FORNO
HAS BEEN ADVISED OF THE POSSIBILITY OF SUCH DAMAGES. NOR SHALL RECOVERY OF ANY KIND AGAINST FORNO BE GREATER IN AMOUNT
THAN THE PURCHASE PRICE OF THE PRODUCT SOLD BY FORNO AND CAUSING THE ALLEGED DAMAGE. WITHOUT PREJUDIC
E TO THE FOREGOING,
PURCHASER ASSUMES ALL RISK AND LIABILITY FOR LOSS, DAMAGE OR INJURY TO PURCHASER AND PURCHASER’S PROPERTY AND TO OTHERS
AND THEIR PROPERTY ARISING FROM THE USE, MISUSE, OR INABILITY TO USE THIS PRODUCT SOLD BY FORNO THAT IS NOT A DIRECT RESULT OF
NEGLIGENCE ON THE PART OF FORNO THIS LIMITED WARRANTY SHALL NOT EXTEND TO ANYONE OTHER THAN THE ORIGINAL PURCHASER OF THIS
PRODUCT, IS NON-TRANSFERABLE, AND STATES YOUR EXCLUSIVE REMEDY.
Correct Disposal of this product:
This marking indicates that this appliance should not be disposed with
other household wastes. To prevent possible harm to the environment
or human
health from uncontrolled waste disposal, recycle it responsibly
to promote the sustainable reuse of material resources.