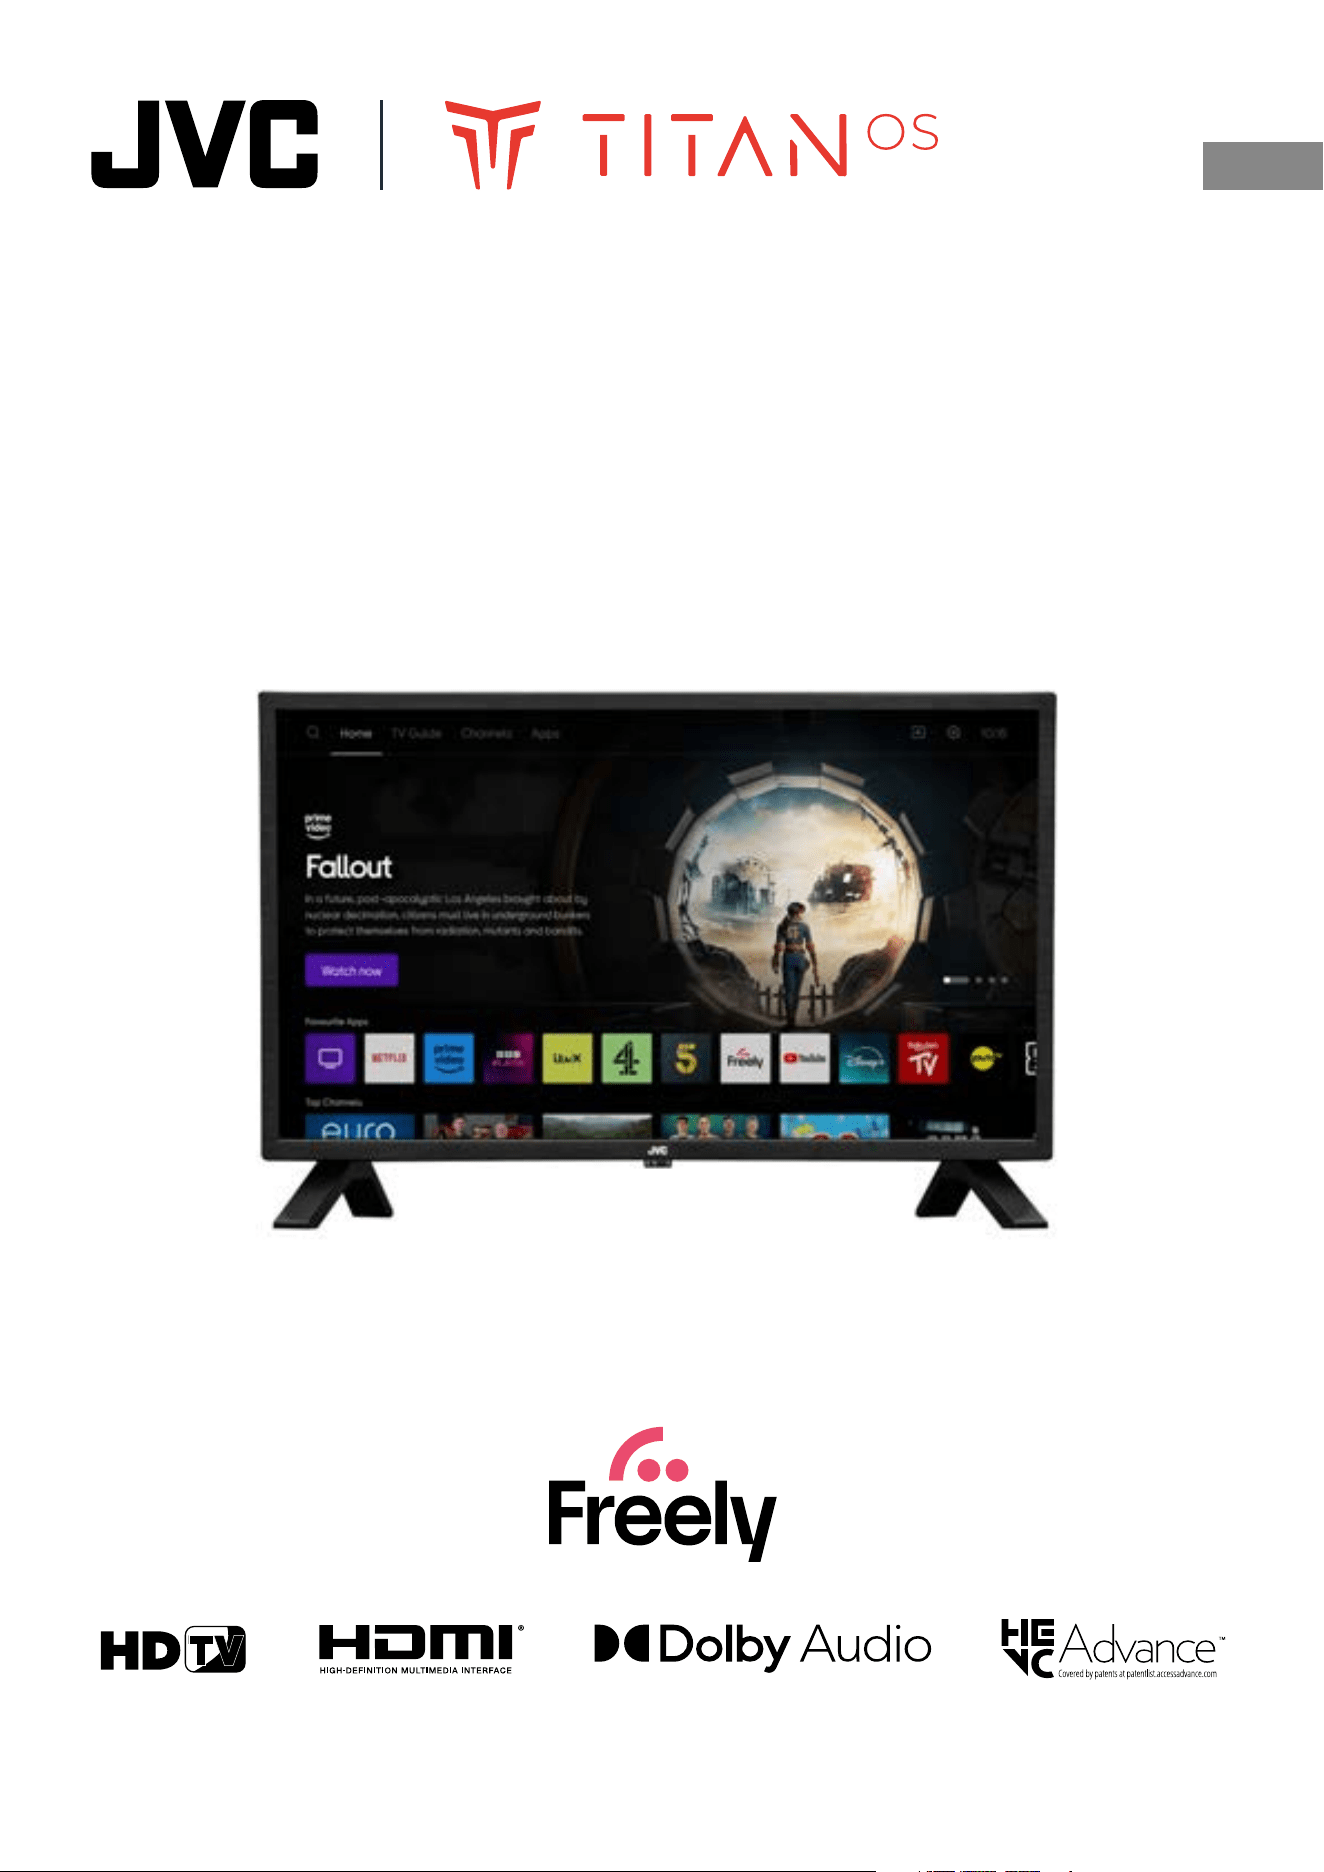
Instruction Manual
Smart LED TV
LT-24CT250, LT-32CT250, LT-40CT350, LT-43CT350
GB
Contents
1 Safety Warnings ...........................................................................................................................................................................4
2 Preparation ...................................................................................................................................................................................7
Unpacking the TV ...............................................................................................................................................................................................................7
Installing / Removing the Base Stand .........................................................................................................................................................................8
− Fitting the Stand .....................................................................................................................................................................................................8
Mounting the TV to a Wall ............................................................................................................................................................................................... 9
Standby button on the TV ...............................................................................................................................................................................................9
Rear View and Sockets ....................................................................................................................................................................................................10
Installing Batteries in the Remote Control ..............................................................................................................................................................11
Remote Control .................................................................................................................................................................................................................12
3 Initial Setup ................................................................................................................................................................................14
Turning the TV On for the First Time .........................................................................................................................................................................14
− Choosing your language, country and viewing mode ...........................................................................................................................15
− Connecting to the Internet ...............................................................................................................................................................................16
− Tuning in Your TV ..................................................................................................................................................................................................18
4 Freely ...........................................................................................................................................................................................20
− Getting to Know Freely ..................................................................................................................................................................................... 20
5 Customising TV Settings ...........................................................................................................................................................21
Picture Settings .................................................................................................................................................................................................................21
Screen Settings ................................................................................................................................................................................................................. 22
Sound Settings ................................................................................................................................................................................................................. 23
Network Settings ............................................................................................................................................................................................................. 24
Channel Settings ..............................................................................................................................................................................................................25
General Settings ............................................................................................................................................................................................................... 26
Universal Access Settings ............................................................................................................................................................................................. 27
Child Lock Settings .......................................................................................................................................................................................................... 28
Region and Language Settings .................................................................................................................................................................................. 29
Software Settings ............................................................................................................................................................................................................ 30
6 Connecting Devices ...................................................................................................................................................................31
Connecting a Soundbar via HDMI (ARC) ..................................................................................................................................................................31
− Media Browser ...................................................................................................................................................................................................... 32
7 Technical Information and Help ...............................................................................................................................................33
Maintenance ...................................................................................................................................................................................................................... 33
Hints and Tips .................................................................................................................................................................................................................... 34
Declaration of Conformity ............................................................................................................................................................................................ 36
License Information used with JVC Televisions .................................................................................................................................................... 37
− About Open Source License ............................................................................................................................................................................ 37
− Open Source .......................................................................................................................................................................................................... 37
Safety
Warnings
PreparationInitial SetupFreely
Customising
TV Setting
Connecting
Devices
Technical
Information
and Help
5
1
Safety Warnings
4
1 Safety Warnings
Chapter
1
• Read all the instructions carefully before using the unit
and keep them for future reference.
• Retain the manual. If you pass the unit onto a third
party make sure to include this manual.
• Check that the voltage marked on the rating label
matches your mains voltage.
• WARNING: Never let people (including children) with
reduced physical, sensory or mental capabilities or lack
of experience and / or knowledge use electrical devices
unsupervised.
• To avoid danger of suffocation, keep plastic bags out of
reach of babies, children and domestic animals.
• Carefully attach the stand to the TV. If the stand is
provided with screws, tighten the screws firmly to
prevent the TV from tilting. Do not over tighten the
screws and mount the stand rubbers properly.
Damage
• Please inspect the unit for damage after unpacking.
• Do not continue to operate the unit if you are in any
doubt about it working normally, or if it is damaged
in any way - switch off, withdraw the mains plug and
consult your dealer.
Location of Unit
• The unit must be placed on a flat stable surface and
should not be subjected to vibrations.
• Do not place the unit on sloped or unstable surfaces
as the unit may fall off or tip over causing serious
personal injury or death.
• The mains socket must be located near the unit and
should be easily accessible.
• This unit is designed for indoor, domestic use only.
• Use this TV set at an altitude of less than 2000 meters
above sea level, in dry locations and in regions with
moderate or tropical climates.
Many injuries, particularly to children, can be avoided by
taking simple precautions such as;
• Using cabinets or stands recommended by the
manufacturer of the television set.
• Only use furniture that can safely support the
television set.
• Ensuring the television set is not overhanging the edge
of the supporting furniture.
• Not placing the television set on tall furniture (for
example, cupboards or bookcases) without anchoring
both furniture and the television set to a suitable
support.
• Not standing the television set on cloth or other
materials placed between the television and
supporting furniture.
• Educating children about the dangers of climbing
on furniture to reach the television set or its controls.
If your existing television set is being retained and
relocated, the same considerations as above should be
applied.
Wall Mounting
• Read the TV and wall mount instructions before
mounting your TV on the wall.
• For TVs over 40" in size, wall mounting requires 2
people to lift and position the TV on to the wall mount.
• The wall mount bracket is not supplied, they can be
purchased from your dealer.
• Do not install the TV on a ceiling or an inclined wall.
• Only use the screws supplied with the wall mount
bracket when attaching the TV to the bracket. See your
TV instructions for screw type.
• Tighten the wall mount screw firmly to prevent the TV
from falling. Do not over tighten the screws.
• If you are in any doubt how to mount your TV, contact
a professional.
Temperature
• Avoid extreme degrees of temperature, either hot or
cold. Place the unit well away from heat sources such
as radiators or gas / electric fires.
• Avoid exposure to direct sunlight and other sources of
heat.
Naked Flames
• Never place any type of candle or naked flame on the
top of or near the unit.
Moisture
• To reduce the risk of fire, electric shock or product
damage, do not expose this unit to rain, moisture,
dripping or splashing. No objects filled with liquids,
such as vases, should be placed on the unit.
• If you spill any liquid into the unit, it can cause serious
damage. Switch it off at the mains immediately.
Withdraw the mains plug and consult your dealer.
Ventilation
• To prevent the risk of electric shock or fire hazard
due to overheating, ensure that curtains and other
materials do not obstruct the ventilation vents.
• Do not install or place this unit in a bookcase, built-in
cabinet or in another confined space. Ensure the unit is
well ventilated.
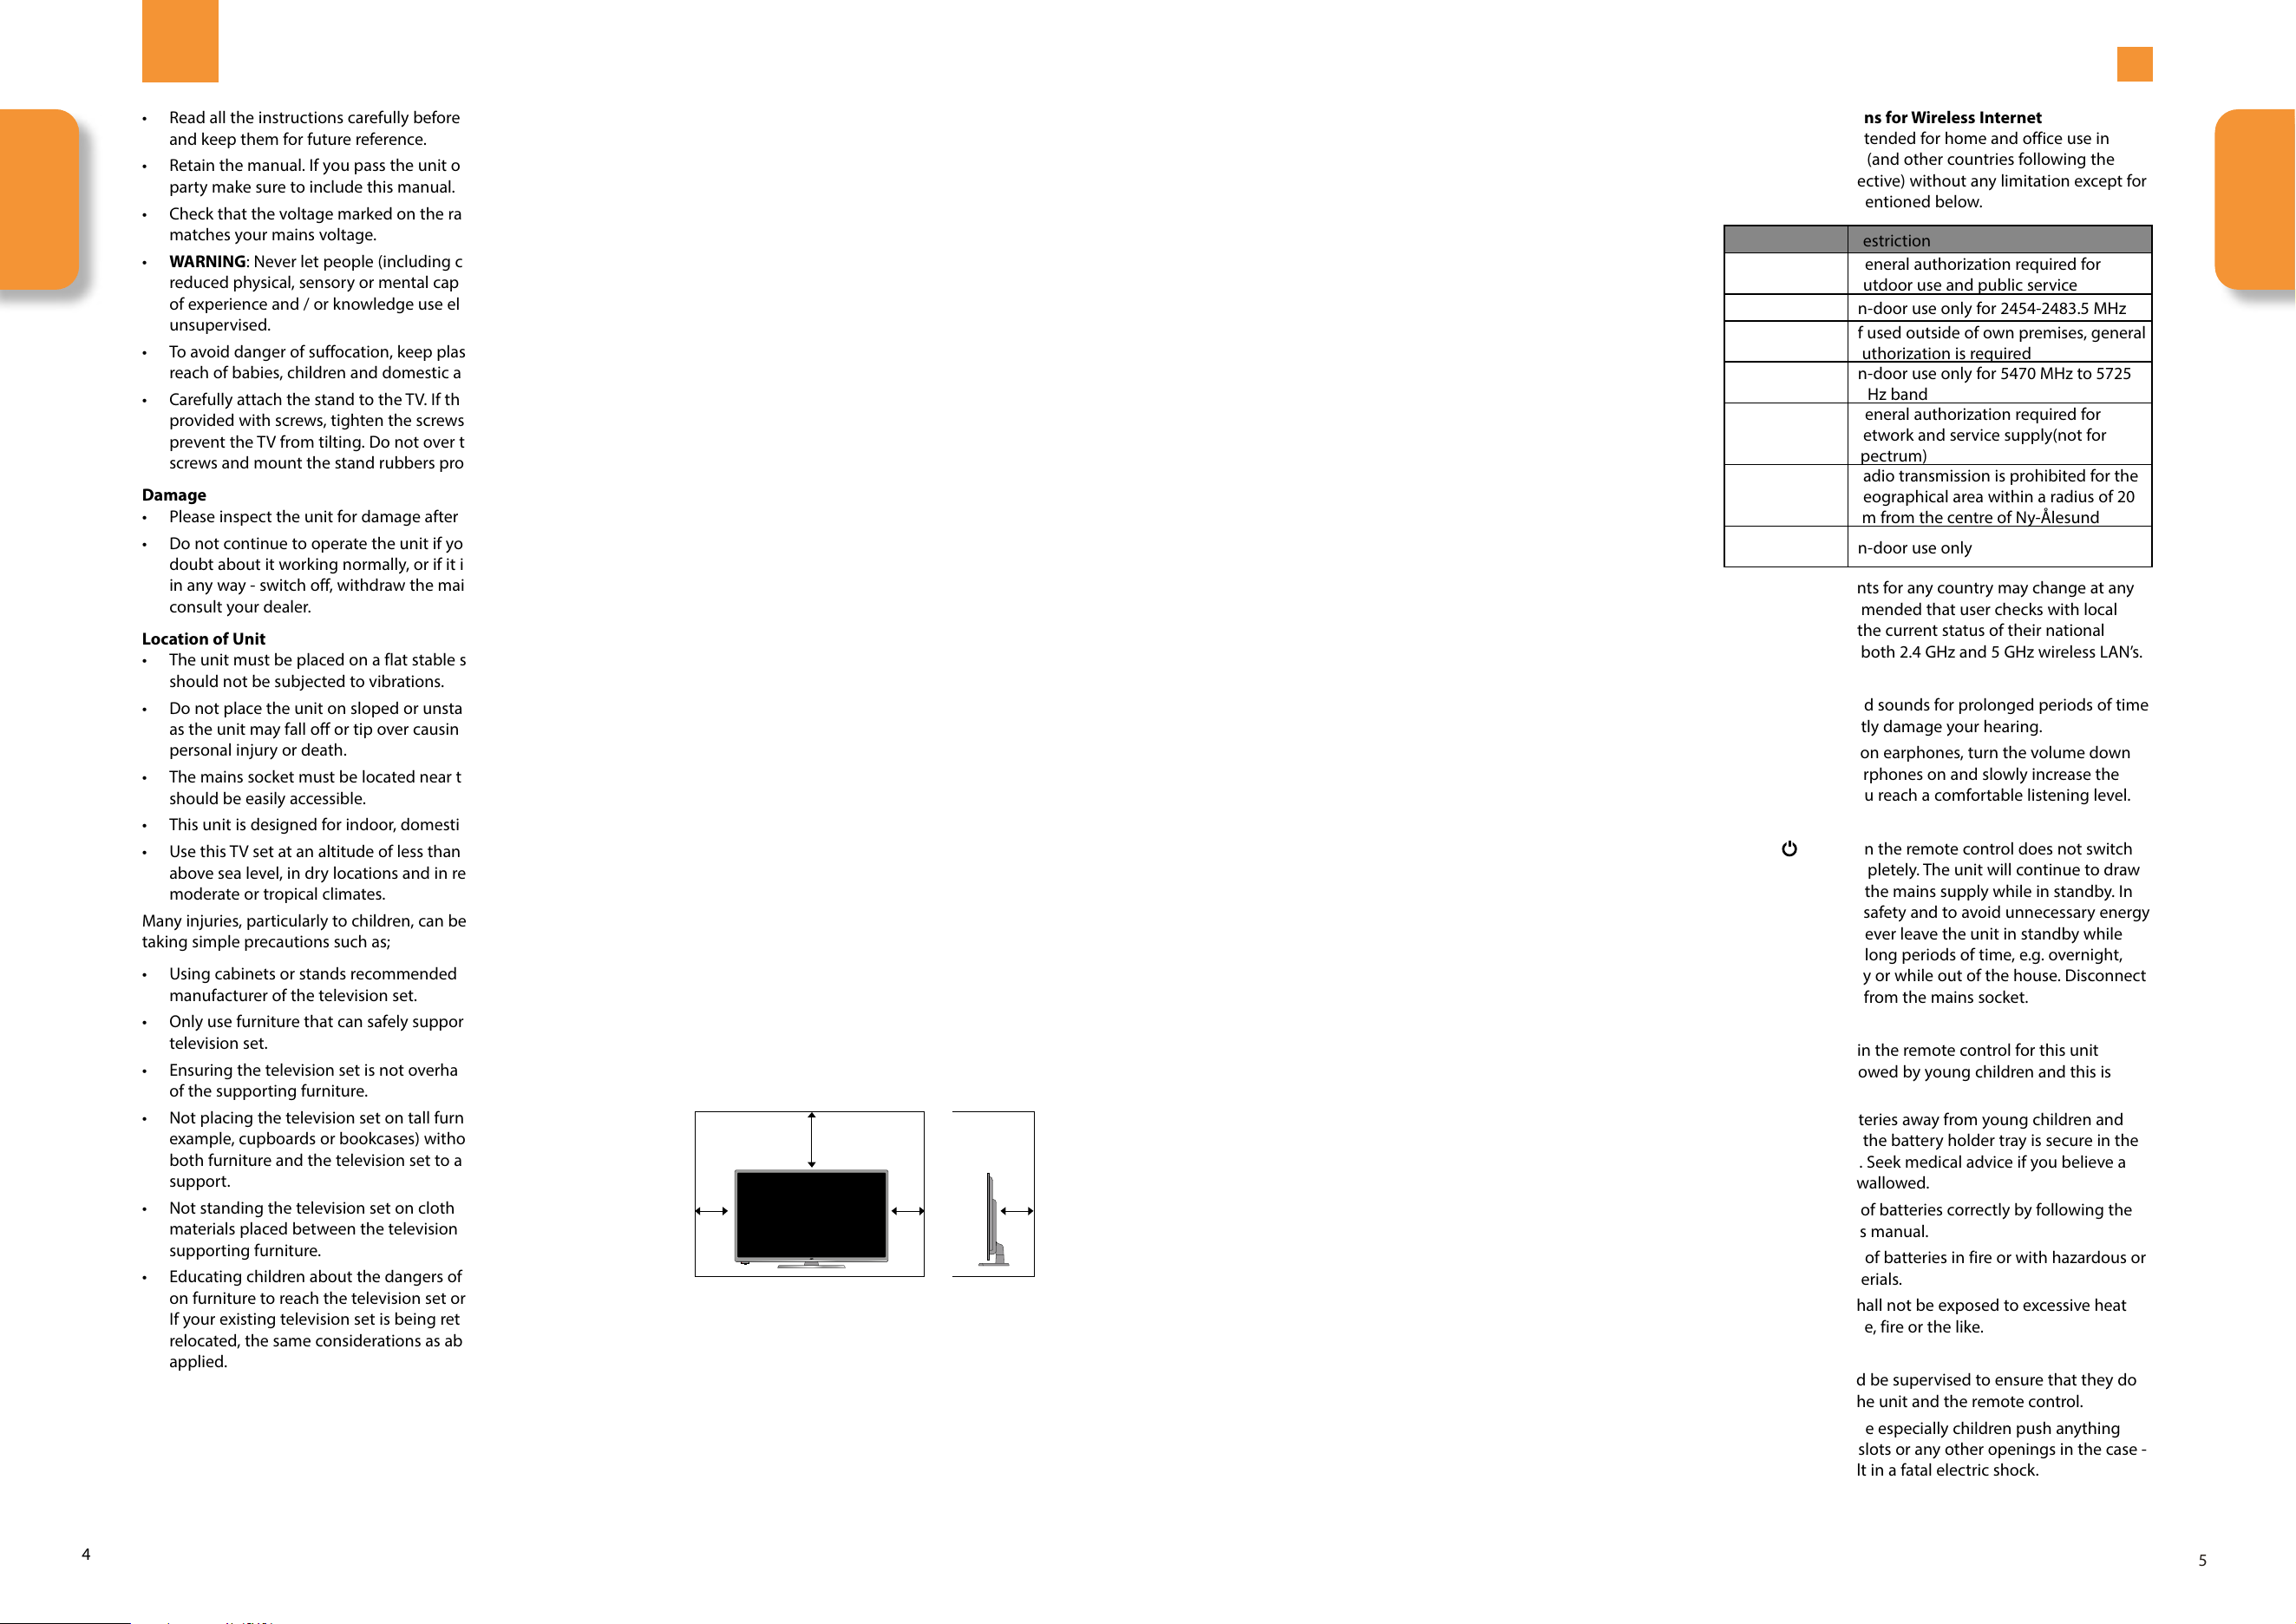
• Make sure that there is a gap of at least 10 cm on both
sides and a gap of 20 cm at the top.
Safety
• Always disconnect the unit from the mains supply
before connecting / disconnecting other devices or
moving the unit.
• Unplug the unit from the mains socket during a
lightning storm and long inactivity periods (going on
holiday).
Mains Cable
• Make sure the unit or unit stand is not resting on top of
the mains cable, as the weight of the unit may damage
the mains cable and create a safety hazard.
• A damaged power cord/plug can cause fire or give
you an electric shock. Handle the power cord by the
plug, do not unplug the TV by pulling the power cord.
Never touch the power cord/plug with wet hands
as this could cause a short circuit or electric shock.
Never make a knot in the power cord or tie it with
other cords. If the mains cable is damaged it must be
replaced by the manufacturer, its service agent, or
similarly qualified persons in order to avoid a hazard.
Interference
• Do not place the unit on or near appliances which may
cause electromagnetic interference. If you do, it may
adversely affect the operating performance of the unit,
and cause a distorted picture or sound.
Optimum viewing
• View the unit in moderate light to prevent eye strain. It
is recommended to watch the unit from a distance
3-7 times that of the screen height.
LCD screen
• The LCD screen is manufactured using high-precision
technology. However, some tiny black points and /
or bright points (red, blue or green in colour) may
constantly appear on the LCD screen. These points
are generated in the manufacturing process and are
normal.
Screen Burn
• A characteristic of Plasma and TV Panels is that
displaying the same image for a long time may cause
a permanent after-image to remain on the screen. This
is called screen burn. Most pictures shown on the unit
will be constantly moving and fill the screen.
• Examples of images that you need to watch out for are
as follows (this is not an all-inclusive list):
1. Black Bars: If black bars appear at the left / right or
top / bottom of the screen, it is recommended to
change the format so that the picture fills the entire
screen.
2. TV Channel Logos: e.g. Shopping channel logos
and pricing displays - especially if they are bright
and stationary. Moving or low-contrast graphics are
less likely to cause ageing of the screen.
3. Time Displays
4. Interactive Services: Do not view a stationary
page for long periods of time.
5. TV Menus
6. Pause Mode: Do not leave the screen in pause
mode for long periods of time, e.g. when watching
videos.
• To prevent screen burn if viewing any of the above for
long periods of time, reduce contrast and brightness
when viewing. Once burn-in occurs it will never
disappear completely.
Country Restrictions for Wireless Internet
• This device is intended for home and office use in
all EU countries (and other countries following the
relevant EU directive) without any limitation except for
the countries mentioned below.
Country Restriction
Bulgaria (BG)
General authorization required for
outdoor use and public service
France (FR) In-door use only for 2454-2483.5 MHz
Italy (IT)
If used outside of own premises, general
authorization is required
Greece (GR)
In-door use only for 5470 MHz to 5725
MHz band
Luxembourg
(EL)
General authorization required for
network and service supply(not for
spectrum)
Norway (NO)
Radio transmission is prohibited for the
geographical area within a radius of 20
km from the centre of Ny-Ålesund
Russian
Federation (RU)
In-door use only
• The requirements for any country may change at any
time. It’s recommended that user checks with local
authorities for the current status of their national
regulations for both 2.4 GHz and 5 GHz wireless LAN’s.
Earphones
• Listening to loud sounds for prolonged periods of time
may permanently damage your hearing.
• Before putting on earphones, turn the volume down
then put the earphones on and slowly increase the
volume until you reach a comfortable listening level.
Standby
• The
button on the remote control does not switch
off the unit completely. The unit will continue to draw
electricity from the mains supply while in standby. In
the interests of safety and to avoid unnecessary energy
consumption, never leave the unit in standby while
unattended for long periods of time, e.g. overnight,
while on holiday or while out of the house. Disconnect
the mains plug from the mains socket.
Batteries
• Batteries used in the remote control for this unit
are easily swallowed by young children and this is
dangerous.
• Keep loose batteries away from young children and
make sure that the battery holder tray is secure in the
remote control. Seek medical advice if you believe a
cell has been swallowed.
• Please dispose of batteries correctly by following the
guidance in this manual.
• Do not dispose of batteries in fire or with hazardous or
flammable materials.
• The batteries shall not be exposed to excessive heat
such as sunshine, fire or the like.
Supervision
• Children should be supervised to ensure that they do
not play with the unit and the remote control.
• Never let anyone especially children push anything
into the holes, slots or any other openings in the case -
this could result in a fatal electric shock.
10 cm 10 cm
20 cm
10 cm
Safety
Warnings
Safety
Warnings
76
1
Safety Warnings
Earthing
• Apparatus connected to the protective earthing of the
building installation through the MAINS connection
or through other apparatus with a connection to
protective earthing - and to a television distribution
system using coaxial cable, may in some circumstances
create a fire hazard. Connection to a television
distribution system has therefore to be provided
through a device providing electrical isolation below a
certain frequency range (galvanic isolator,
see EN 60728-11)
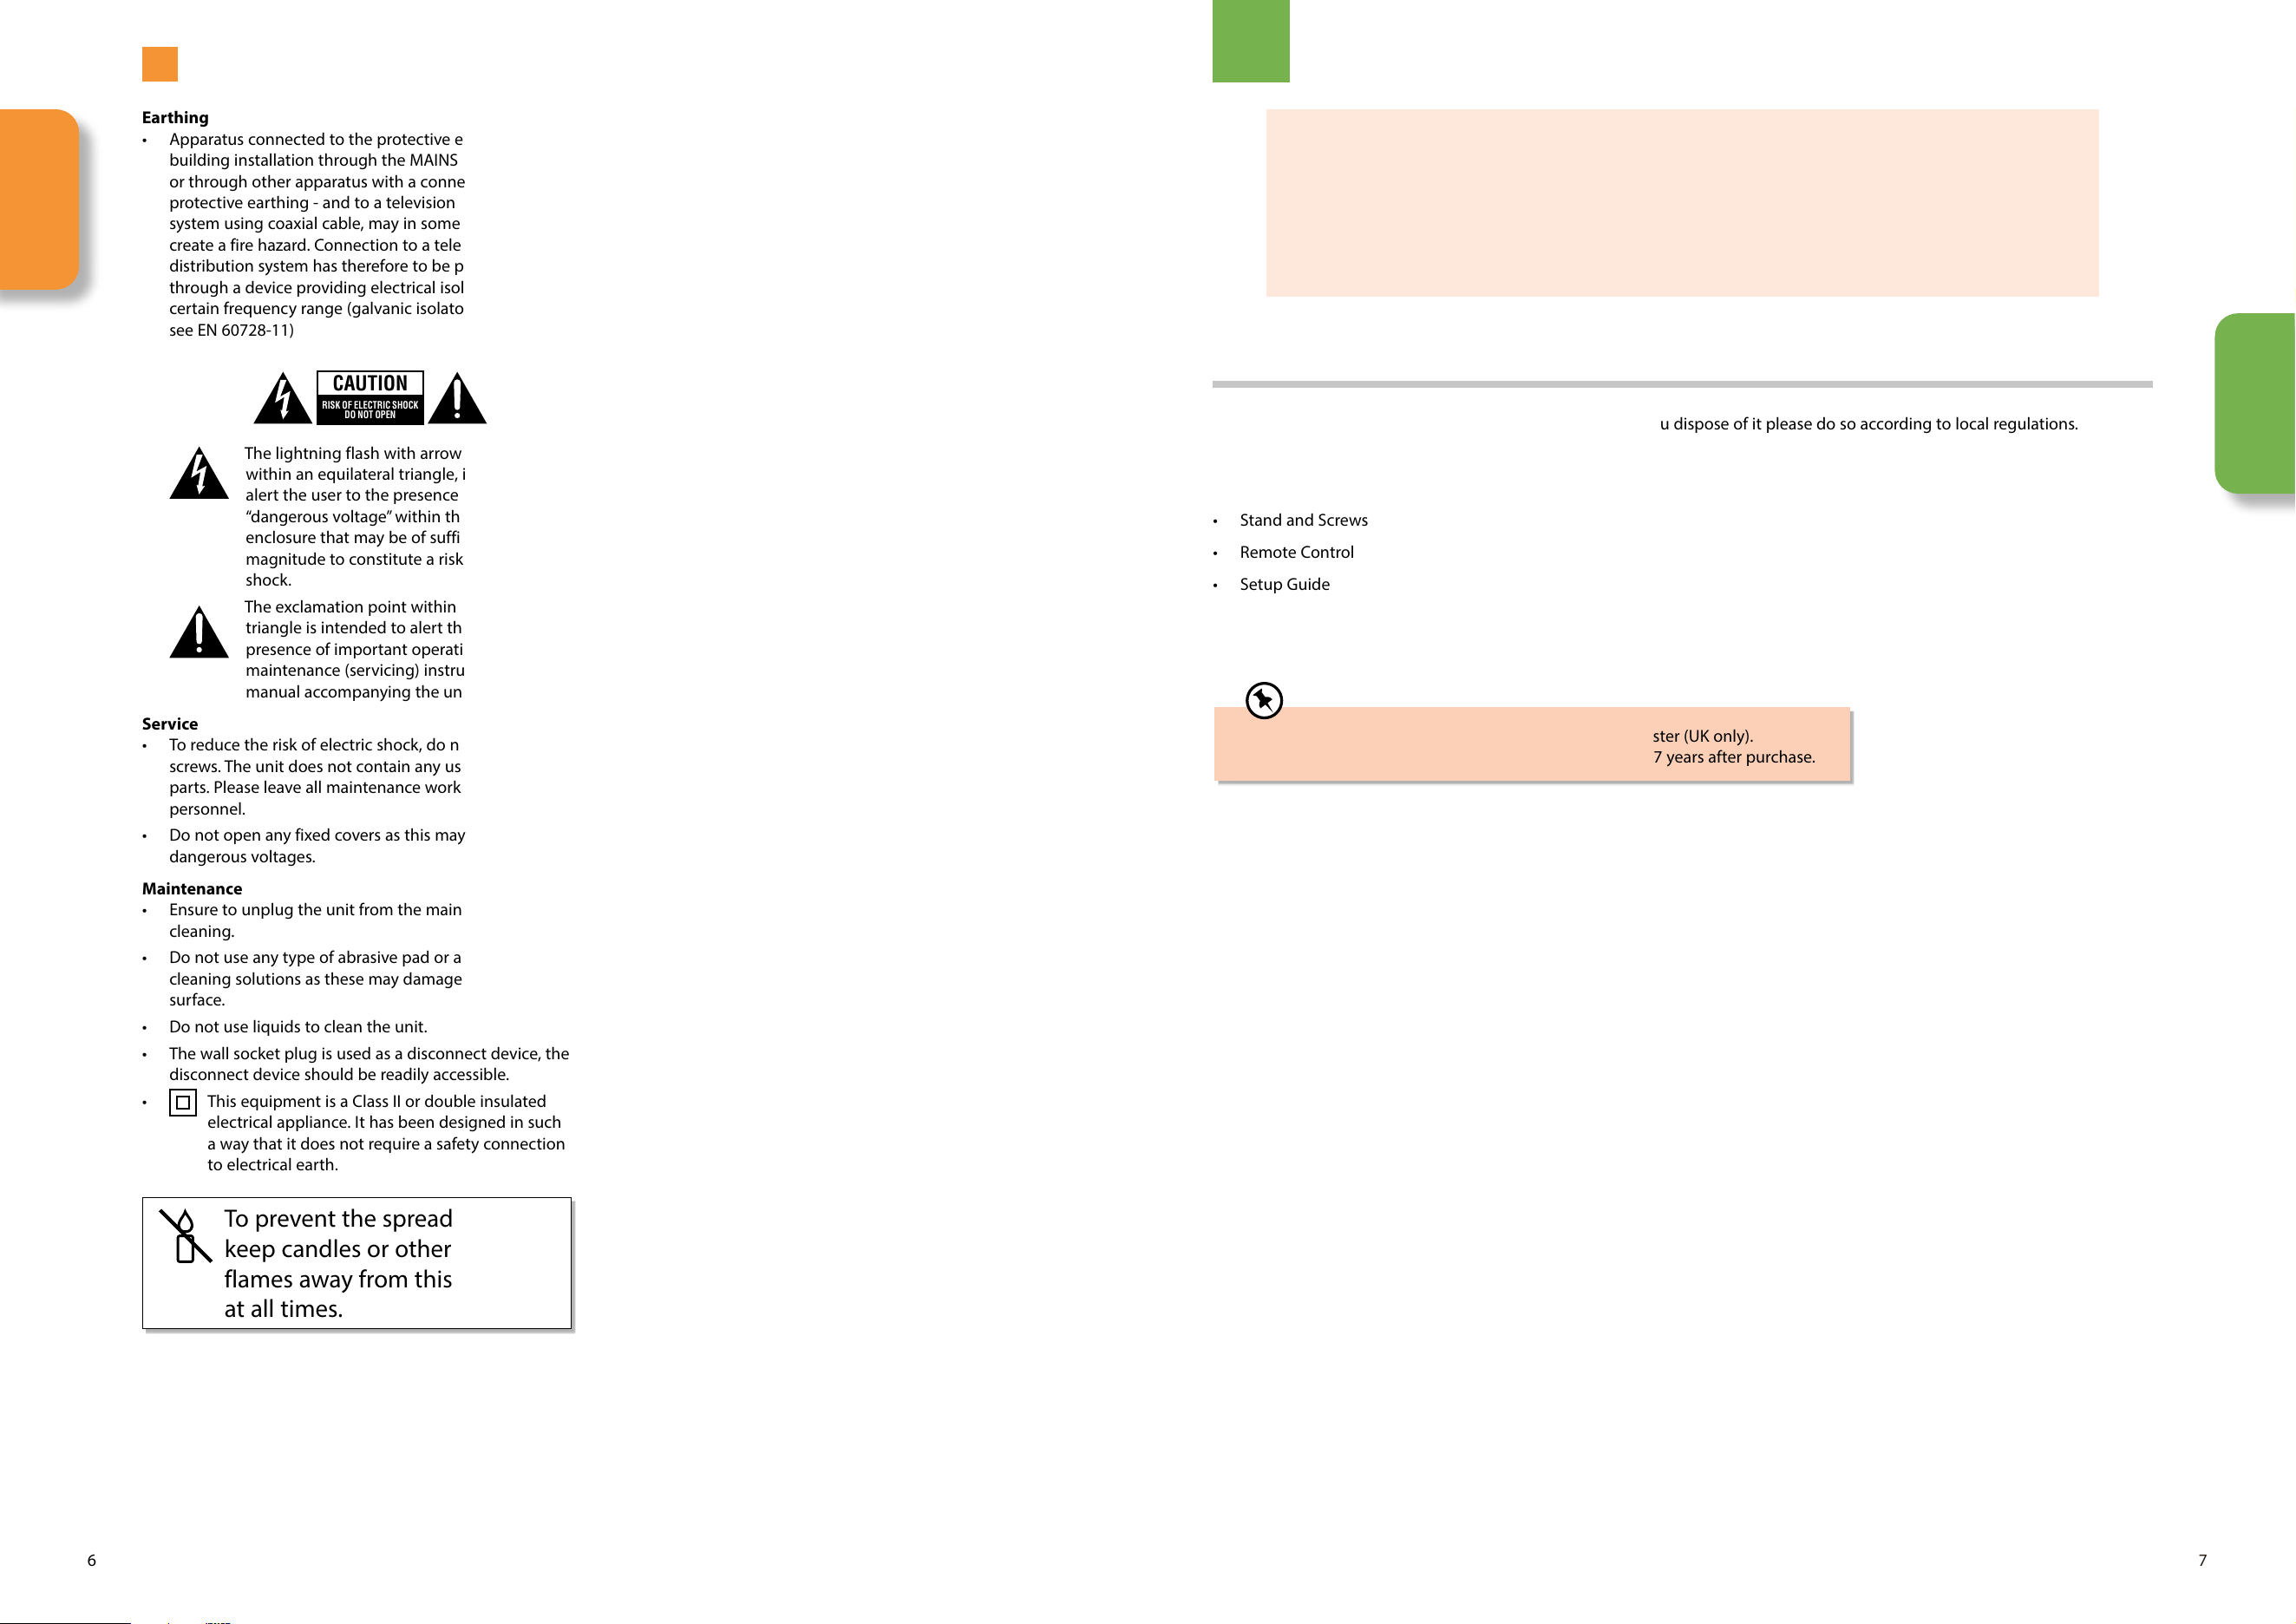
CAUTION
RISK OF ELECTRIC SHOCK
DO NOT OPEN
The lightning flash with arrowhead symbol,
within an equilateral triangle, is intended to
alert the user to the presence of uninsulated
“dangerous voltage” within the unit’s
enclosure that may be of sufficient
magnitude to constitute a risk of electric
shock.
The exclamation point within an equilateral
triangle is intended to alert the user to the
presence of important operating and
maintenance (servicing) instructions in the
manual accompanying the unit.
Service
• To reduce the risk of electric shock, do not remove
screws. The unit does not contain any user-serviceable
parts. Please leave all maintenance work to qualified
personnel.
• Do not open any fixed covers as this may expose
dangerous voltages.
Maintenance
• Ensure to unplug the unit from the mains socket before
cleaning.
• Do not use any type of abrasive pad or abrasive
cleaning solutions as these may damage the unit’s
surface.
• Do not use liquids to clean the unit.
• The wall socket plug is used as a disconnect device, the
disconnect device should be readily accessible.
•
This equipment is a Class II or double insulated
electrical appliance. It has been designed in such
a way that it does not require a safety connection
to electrical earth.
To prevent the spread of fire,
keep candles or other open
flames away from this product
at all times.
2 Preparation
Thank you for purchasing your new JVC TV.
Your new TV has many features and incorporates the latest technology to enhance your viewing
experience. We recommend that you spend some time reading this instruction manual so that you fully
understand these features. You will also find some hints and tips to help you resolve any issues.
Read all the safety instructions carefully before use and keep this instruction manual for future reference.
Chapter
2
Unpacking the TV
Remove all packaging from the TV. Retain the packaging. If you dispose of it please do so according to local regulations.
The following items are included:
• TV
• Stand and Screws
• Remote Control
• Setup Guide
• If items are missing, or damaged please contact Partmaster (UK only).
Tel: 0344 800 3456 for assistance. Parts are available for 7 years after purchase.
Safety
Warnings
Preparation
2
2
8
Preparation Preparation
9
Installing / Removing the Base Stand
The LCD display is very fragile, and must be protected at all times when installing and removing the base stand. Be sure that
no hard or sharp object, or anything that could scratch or damage the LCD display, comes into contact with it. DO NOT exert
pressure on the front of the TV at any time because the screen could crack.
If you don't have a table big enough, you can use the TV box. Lie the box flat, make sure you place the polystyrene back in
the box first to give the box some rigidity and strength.
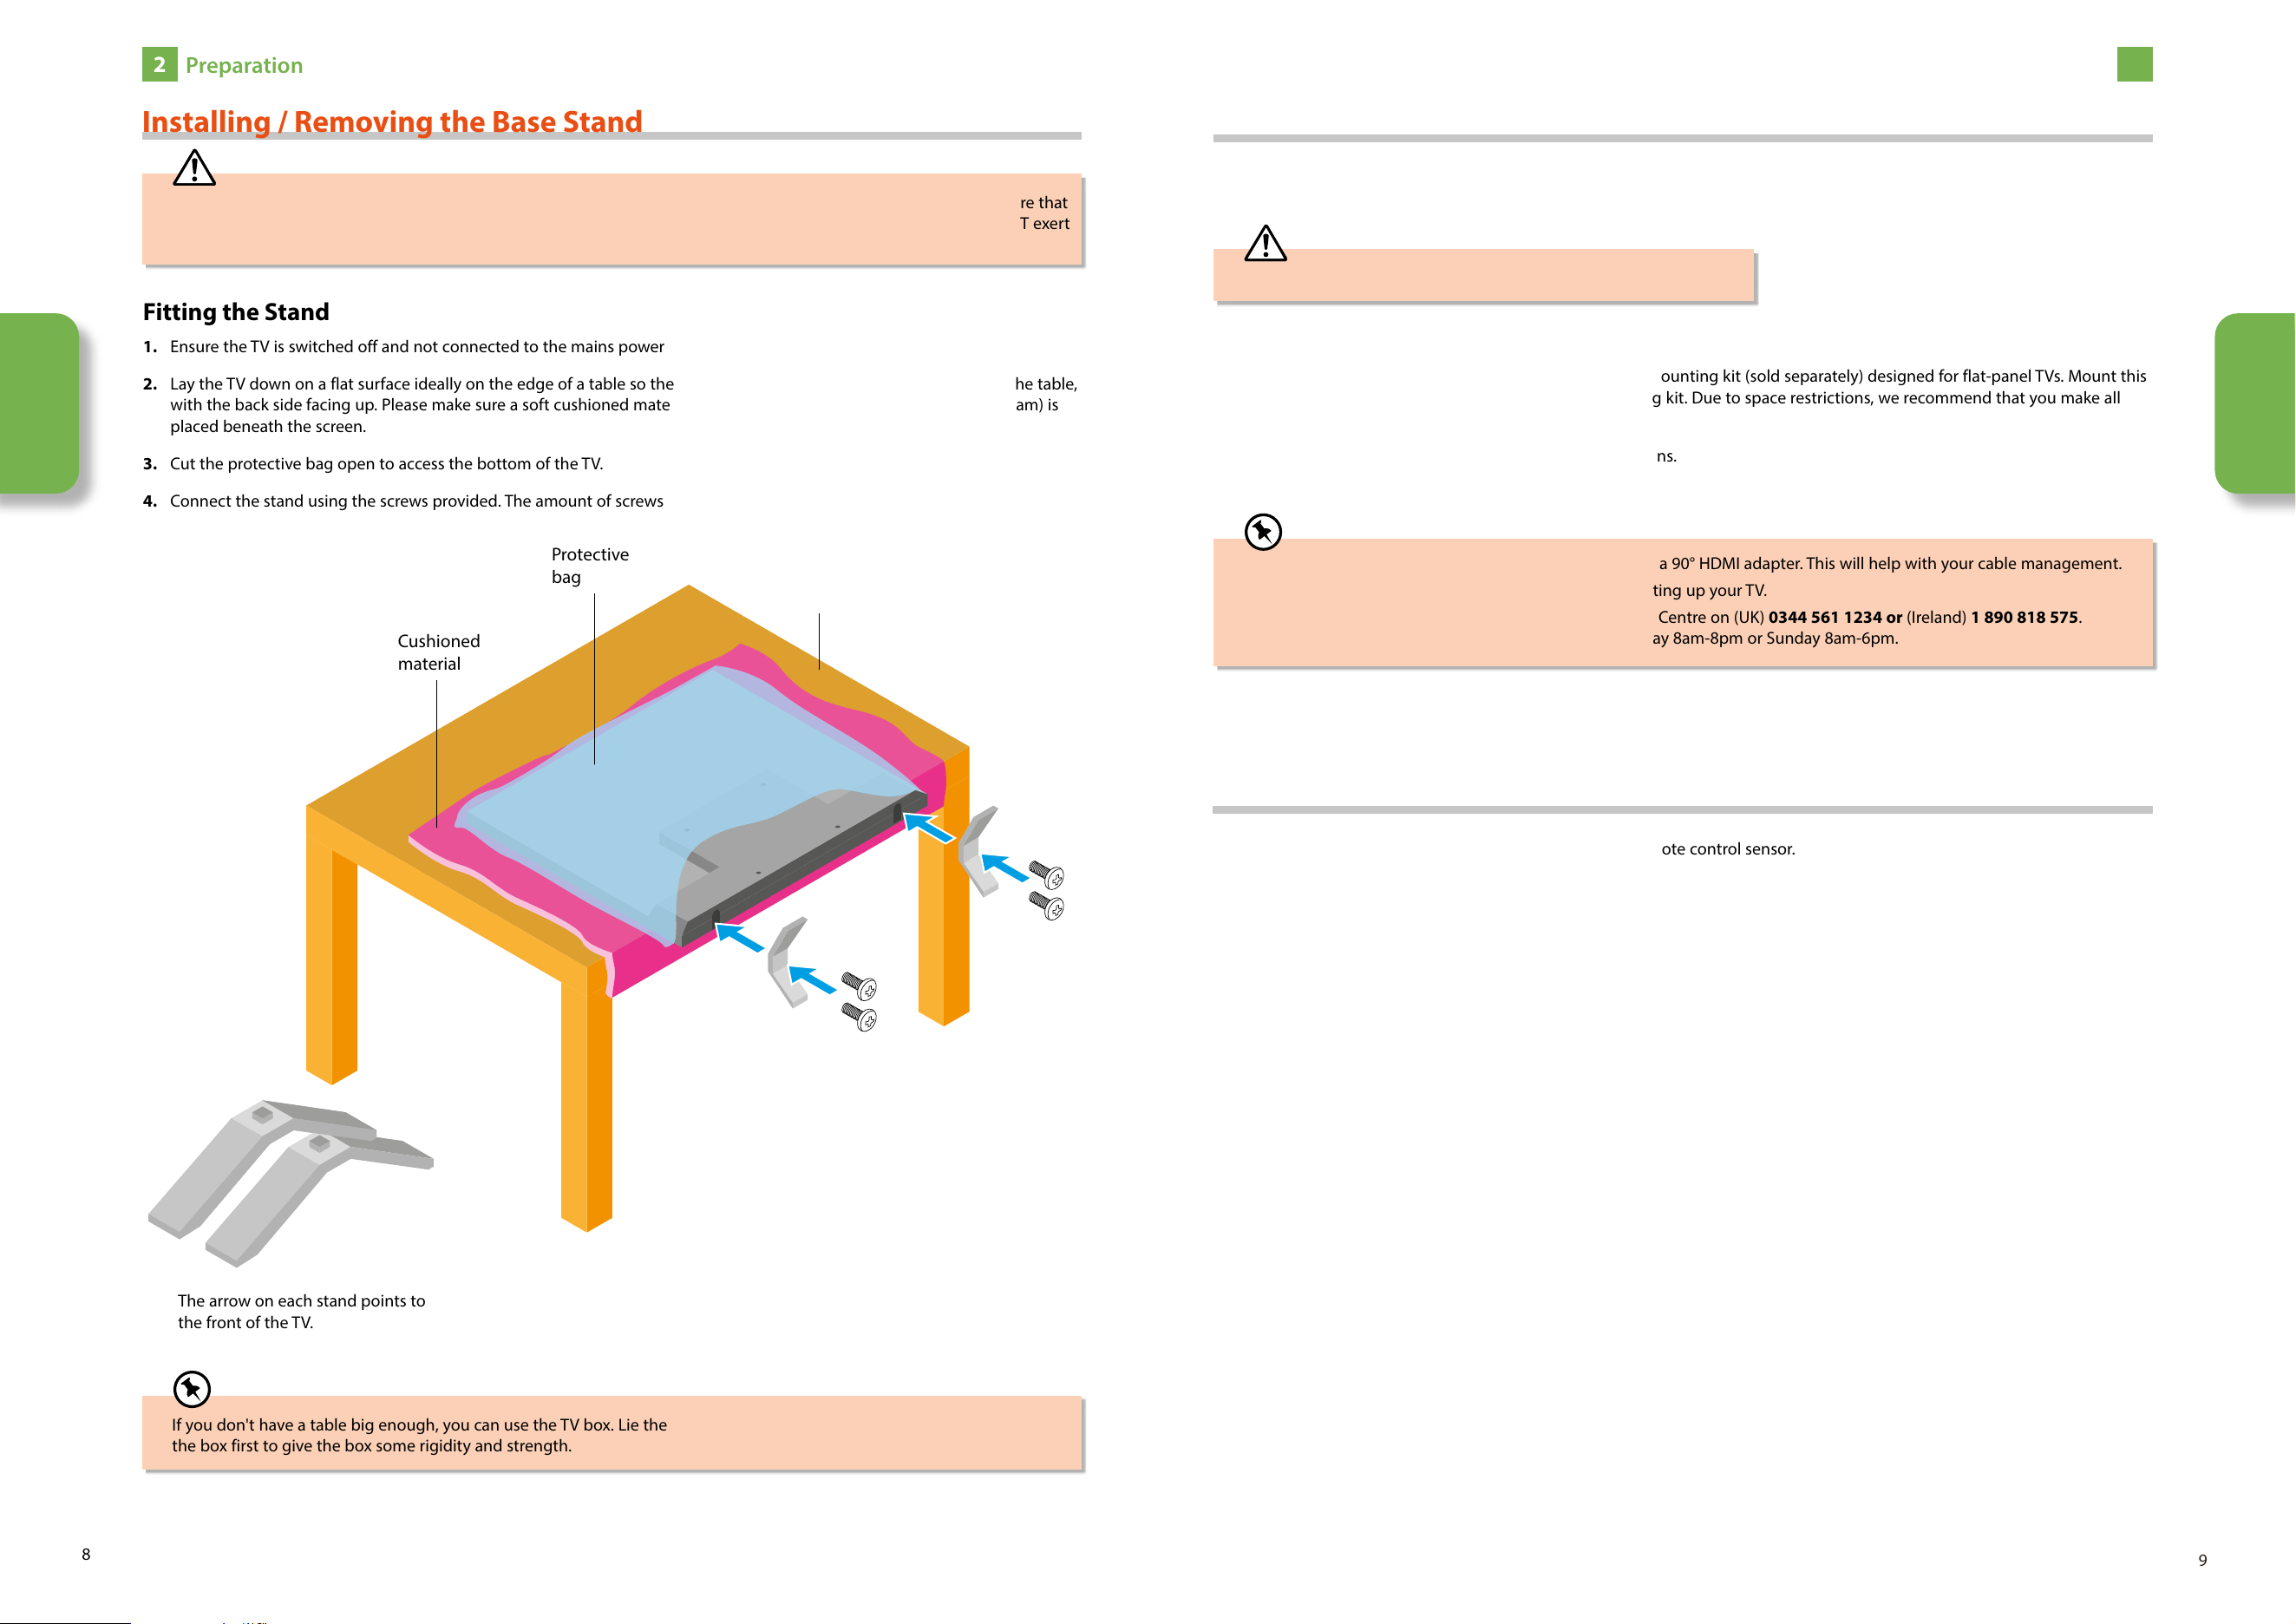
Fitting the Stand
1. Ensure the TV is switched off and not connected to the mains power supply.
2. Lay the TV down on a flat surface ideally on the edge of a table so the base of the TV slightly overhangs the edge of the table,
with the back side facing up. Please make sure a soft cushioned material (such as a dry bath towel or thick piece of foam) is
placed beneath the screen.
3. Cut the protective bag open to access the bottom of the TV.
4. Connect the stand using the screws provided. The amount of screws may vary depending on your TVs screen size.
Table
Cushioned
material
Protective
bag
The arrow on each stand points to
the front of the TV.
Remove the stand assembly before mounting the TV onto the wall.
• If you are wall mounting your TV you may wish to buy a 90° HDMI adapter. This will help with your cable management.
• Please read this instruction manual carefully while setting up your TV.
• If you require additional assistance please call our Call Centre on (UK) 0344 561 1234 or (Ireland) 1 890 818 575.
Our Customer Contact Centre is open Monday-Saturday 8am-8pm or Sunday 8am-6pm.
1. Remove the stand.
2. This TV is designed to be wall-mounted with a standard mounting kit (sold separately) designed for flat-panel TVs. Mount this
TV according to the instructions included in the mounting kit. Due to space restrictions, we recommend that you make all
connections before mounting on to the wall.
3. Check your setup guide for vesa mount screw specifications.
Mounting the TV to a Wall
Use the instructions in your Quick Start Guide if you are wall mounting your TV straight out of the box. If you have already
attached the stand then follow the instructions below.
Standby button on the TV
The standby button on the TV is situated to the left of the remote control sensor.
Preparation
Preparation
2
2
10
Preparation Preparation
11
NETWORK
DIGITAL
AUDIO
OUT
TV ANTENNA
USB1
USB2
5.0V 500mA
CI
HDMI2
HDMI3
HDMI 1
(ARC)
LNB
13V/18V 500mA
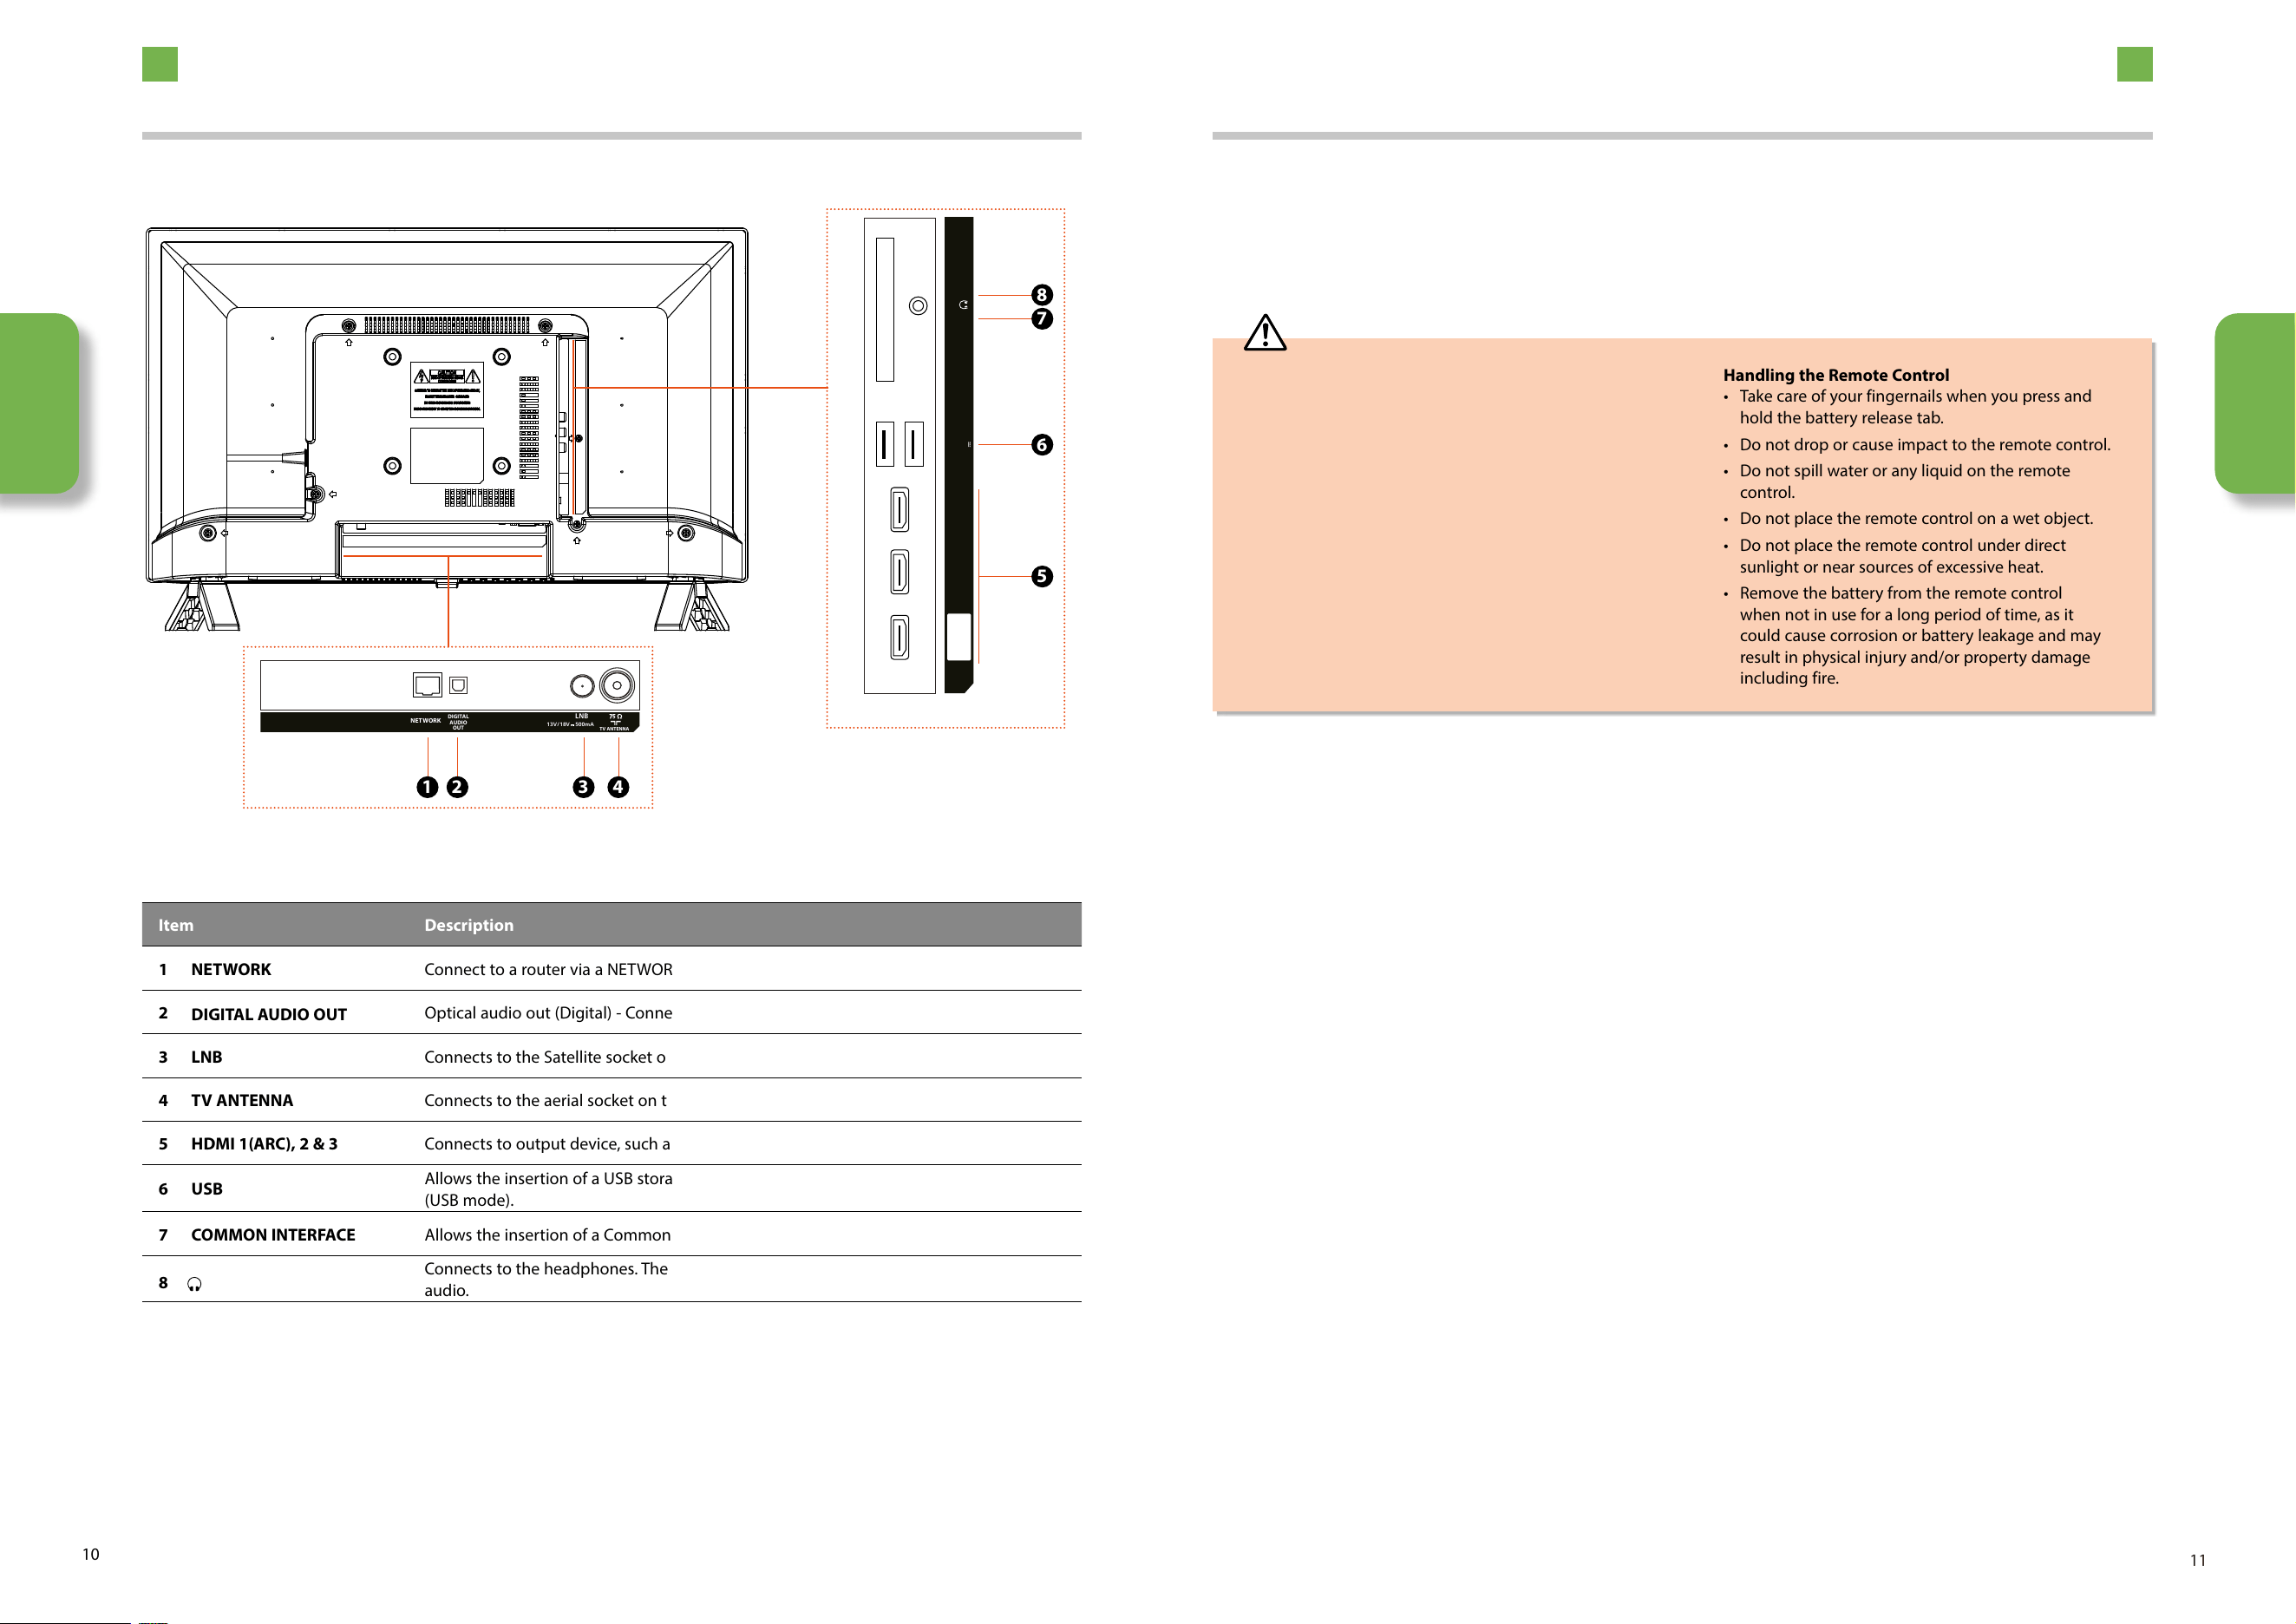
Rear View and Sockets
Item Description
1 NETWORK Connect to a router via a NETWORK cable for smart TV services.
2
DIGITAL AUDIO OUT
Optical audio out (Digital) - Connects to an audio device via an optical cable.
3 LNB Connects to the Satellite socket on the wall with the RF coaxial cable.
4 TV ANTENNA Connects to the aerial socket on the wall with the RF coaxial cable.
5 HDMI 1(ARC), 2 & 3 Connects to output device, such as a set-top box, blu-ray disc player or AV receiver.
6 USB
Allows the insertion of a USB storage device to play video, audio, photo and text files
(USB mode).
7 COMMON INTERFACE Allows the insertion of a Common Access Module.
8
Connects to the headphones. The headphone jack must only have 2 divisions to mute the
audio.
5
6
7
8
1 2 3 4
Handling the Batteries
• Improper or incorrect use of batteries may cause
corrosion or battery leakage, which could cause
fire, personal injury or damage to property.
• Only use the battery type indicated in this manual.
• When the batteries are exhausted, the remote will
not function. Replace both batteries at the same
time with new ones.
• Do not install new batteries with used ones and do
not mix different types of batteries.
• Do not dispose of used batteries as domestic
waste. Dispose of them in accordance with local
regulations.
Handling the Remote Control
• Take care of your fingernails when you press and
hold the battery release tab.
• Do not drop or cause impact to the remote control.
• Do not spill water or any liquid on the remote
control.
• Do not place the remote control on a wet object.
• Do not place the remote control under direct
sunlight or near sources of excessive heat.
• Remove the battery from the remote control
when not in use for a long period of time, as it
could cause corrosion or battery leakage and may
result in physical injury and/or property damage
including fire.
Installing Batteries in the Remote Control
1. Slide open the battery compartment on the back of the remote control.
2. Insert two AAA size batteries. Make sure to match the (+) and ( - ) ends of the batteries with the (+) and ( - ) ends indicated in
the battery compartment.
3. Replace the battery compartment cover. Make sure it clicks into place.
Preparation
Preparation
2
2
12
Preparation Preparation
13
Remote Control
Preparation
Preparation
3
6
7
8
11
13
14
17
18
19
10
2
5
15
4
9
12
16
20
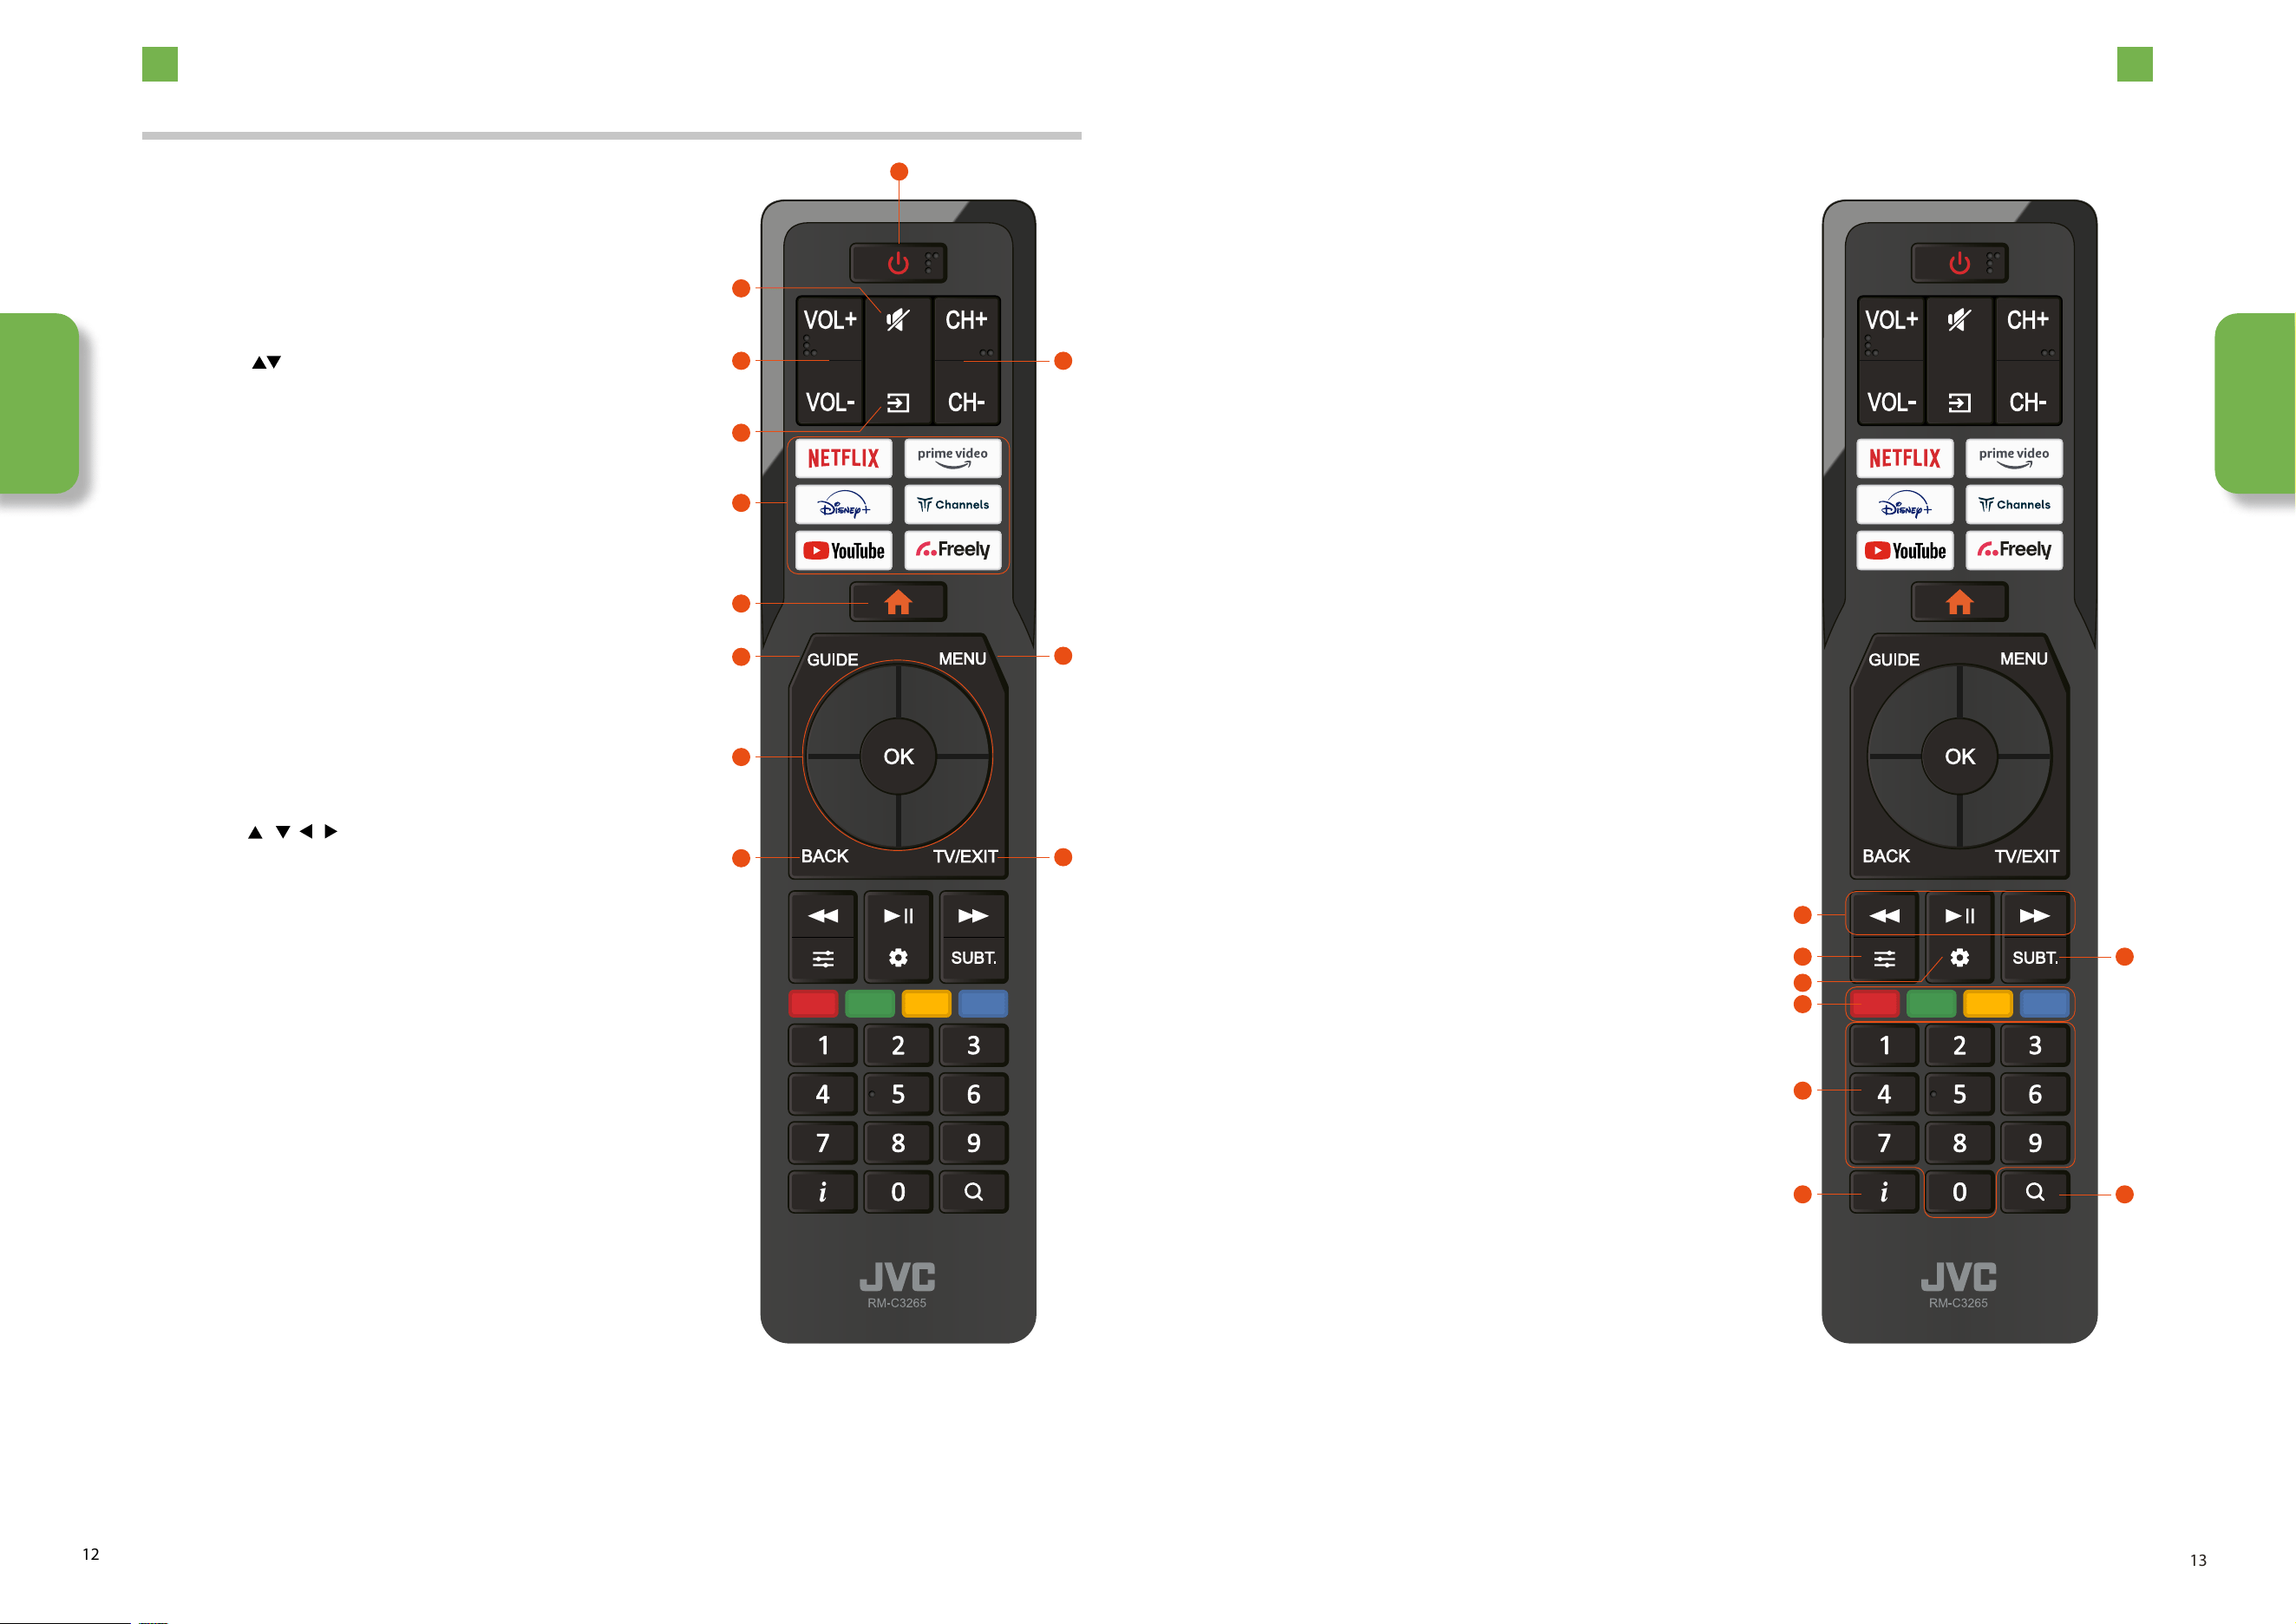
1
1. STANDBY Button
Press to switch between on and standby.
2. MUTE
Press to mute or un-mute the volume.
3. VOLUME +/- buttons
Press to increase and decrease the volume level.
4. CHANNEL
buttons
• Press to scroll up and down the channel list.
5. INPUT Button
Press to access the input menu.
6. PARTNER Buttons
Dedicated buttons show the logo of a pre-set streaming
content provider. Dedicated content providers vary by
model and region. Pressing a button turns on the TV and:
• Displays the streaming channel’s main page if you have
already added the channel to your Home screen.
• Displays the streaming channel’s sign-up page if you
have not already added the channel.
7. HOME Button
• Press to view the home screen.
8. GUIDE Button
Press to view the Live TV Programme Guide.
9. SETTINGS MENU Button
Press to access the settings menus.
10. OK/NAVIGATION Button
• Press centre to select items in menus.
• Press to navigate up, down, left
or right (
/ / / ).
11. BACK Button
Press the move back through menus.
12. TV/EXIT Button
• Press to exit menus or apps.
• Press to select live TV.
13. REWIND, PLAY/PAUSE & FAST FORWARD Buttons
• Press to rewind streaming content.
• Press to fast streaming content.
• Press to play live TV or streaming content.
• Press to pause live TV or streaming content.
14. OPTIONS MENU Button
Press to access a set of options.
15. SETTING Button
Press to access the settings menu.
16. SUBTITLES Button
Press to access the subtitles menu.
17. COLOURED Buttons
• Press the RED button to access Red button services if
available.
• Access the TELETEXT items (LIVE TV mode).
18. NUMBER Buttons
Press to select a Live TV channel.
19. INFO Button
Press to view channel information.
20. SEARCH Button
Press to search for content.
Press and hold to activate/deactivate Voice Guidance.
15
3
Initial Setup
14
3 Initial Setup
Chapter
3
Choosing your language, country and viewing mode
The first time you switch your TV on it will automatically be in the initial setup mode. Follow the steps on screen to fully setup
your TV.
Turning the TV On for the First Time
Always disconnect the TV from the mains socket when not in use for a long period of time.
The
button on the remote control is only used for switching the TV into standby, it does not disconnect the TV from the
mains power. To completely disconnect the mains power, please remove the mains plug from the mains socket.
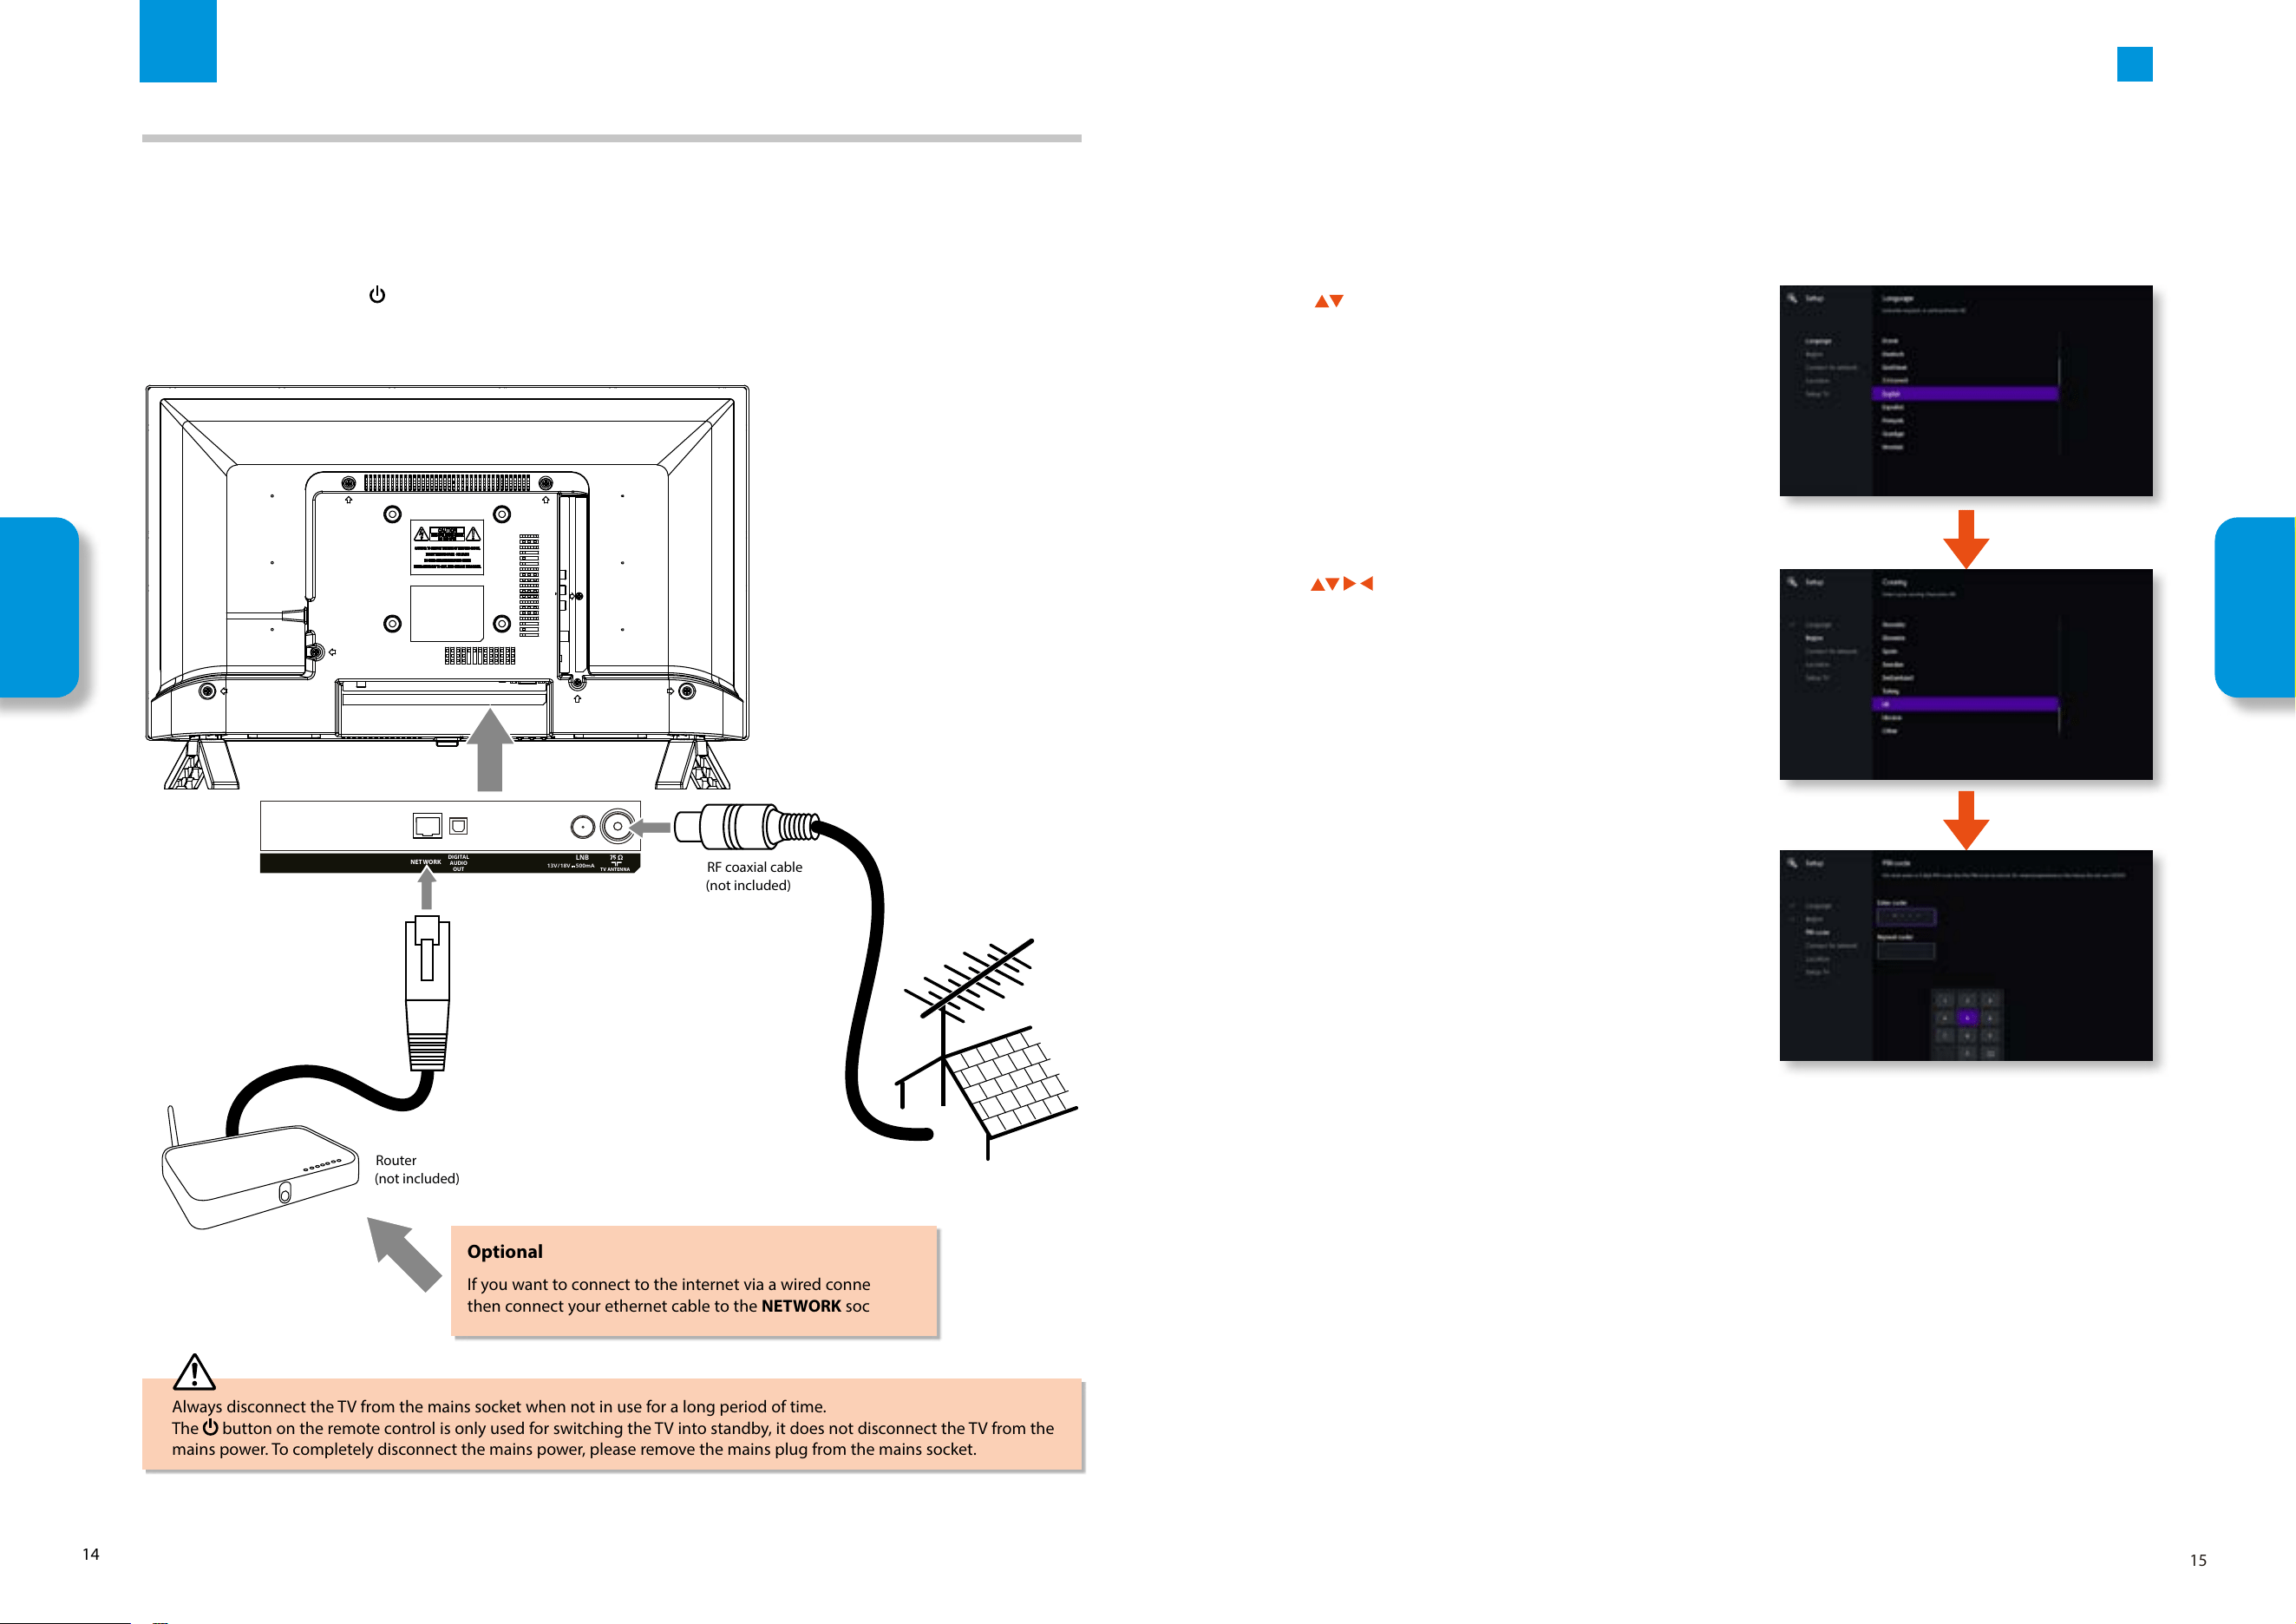
1. Connect one end of the RF coaxial cable to the aerial socket on the wall and the other end of the cable to the TV ANTENNA
socket on the back of your TV.
2. Plug the TV into a mains socket and switch on at the mains.
3. In standby mode, press the
button on the remote control to turn the TV on. The LED indicator will flash for a few seconds
then the TV will switch on.
RF coaxial cable
(not included)
NETWORK
DIGITAL
AUDIO
OUT
TV ANTENNA
LNB
13V/18V 500mA
Router
(not included)
Optional
If you want to connect to the internet via a wired connection
then connect your ethernet cable to the NETWORK socket.
Initial Setup
Initial Setup
1. Press the buttons to highlight your LANGUAGE then press
the OK button.
2. Press the buttons to highlight your COUNTRY then
press the OK button.
3. Now set a PIN code for your TV. You will need to remember this
code so write it down and keep it safe.
16 17
3
3
Initial Setup Initial Setup
Make sure your TV is as close to your router as possible, within 5m and ideally in the same room as the TV
Best connection
speed
Maximum distance
5m
Wireless Router Wireless Router
WIRED Connection
• If you have connected your ethernet cable to the LAN socket on the back of your TV, you will need to select WIRED DEVICE.
WIRELESS Connection
You can connect using a wireless connection via your router.
Connecting to the Internet
Initial Setup
Initial Setup
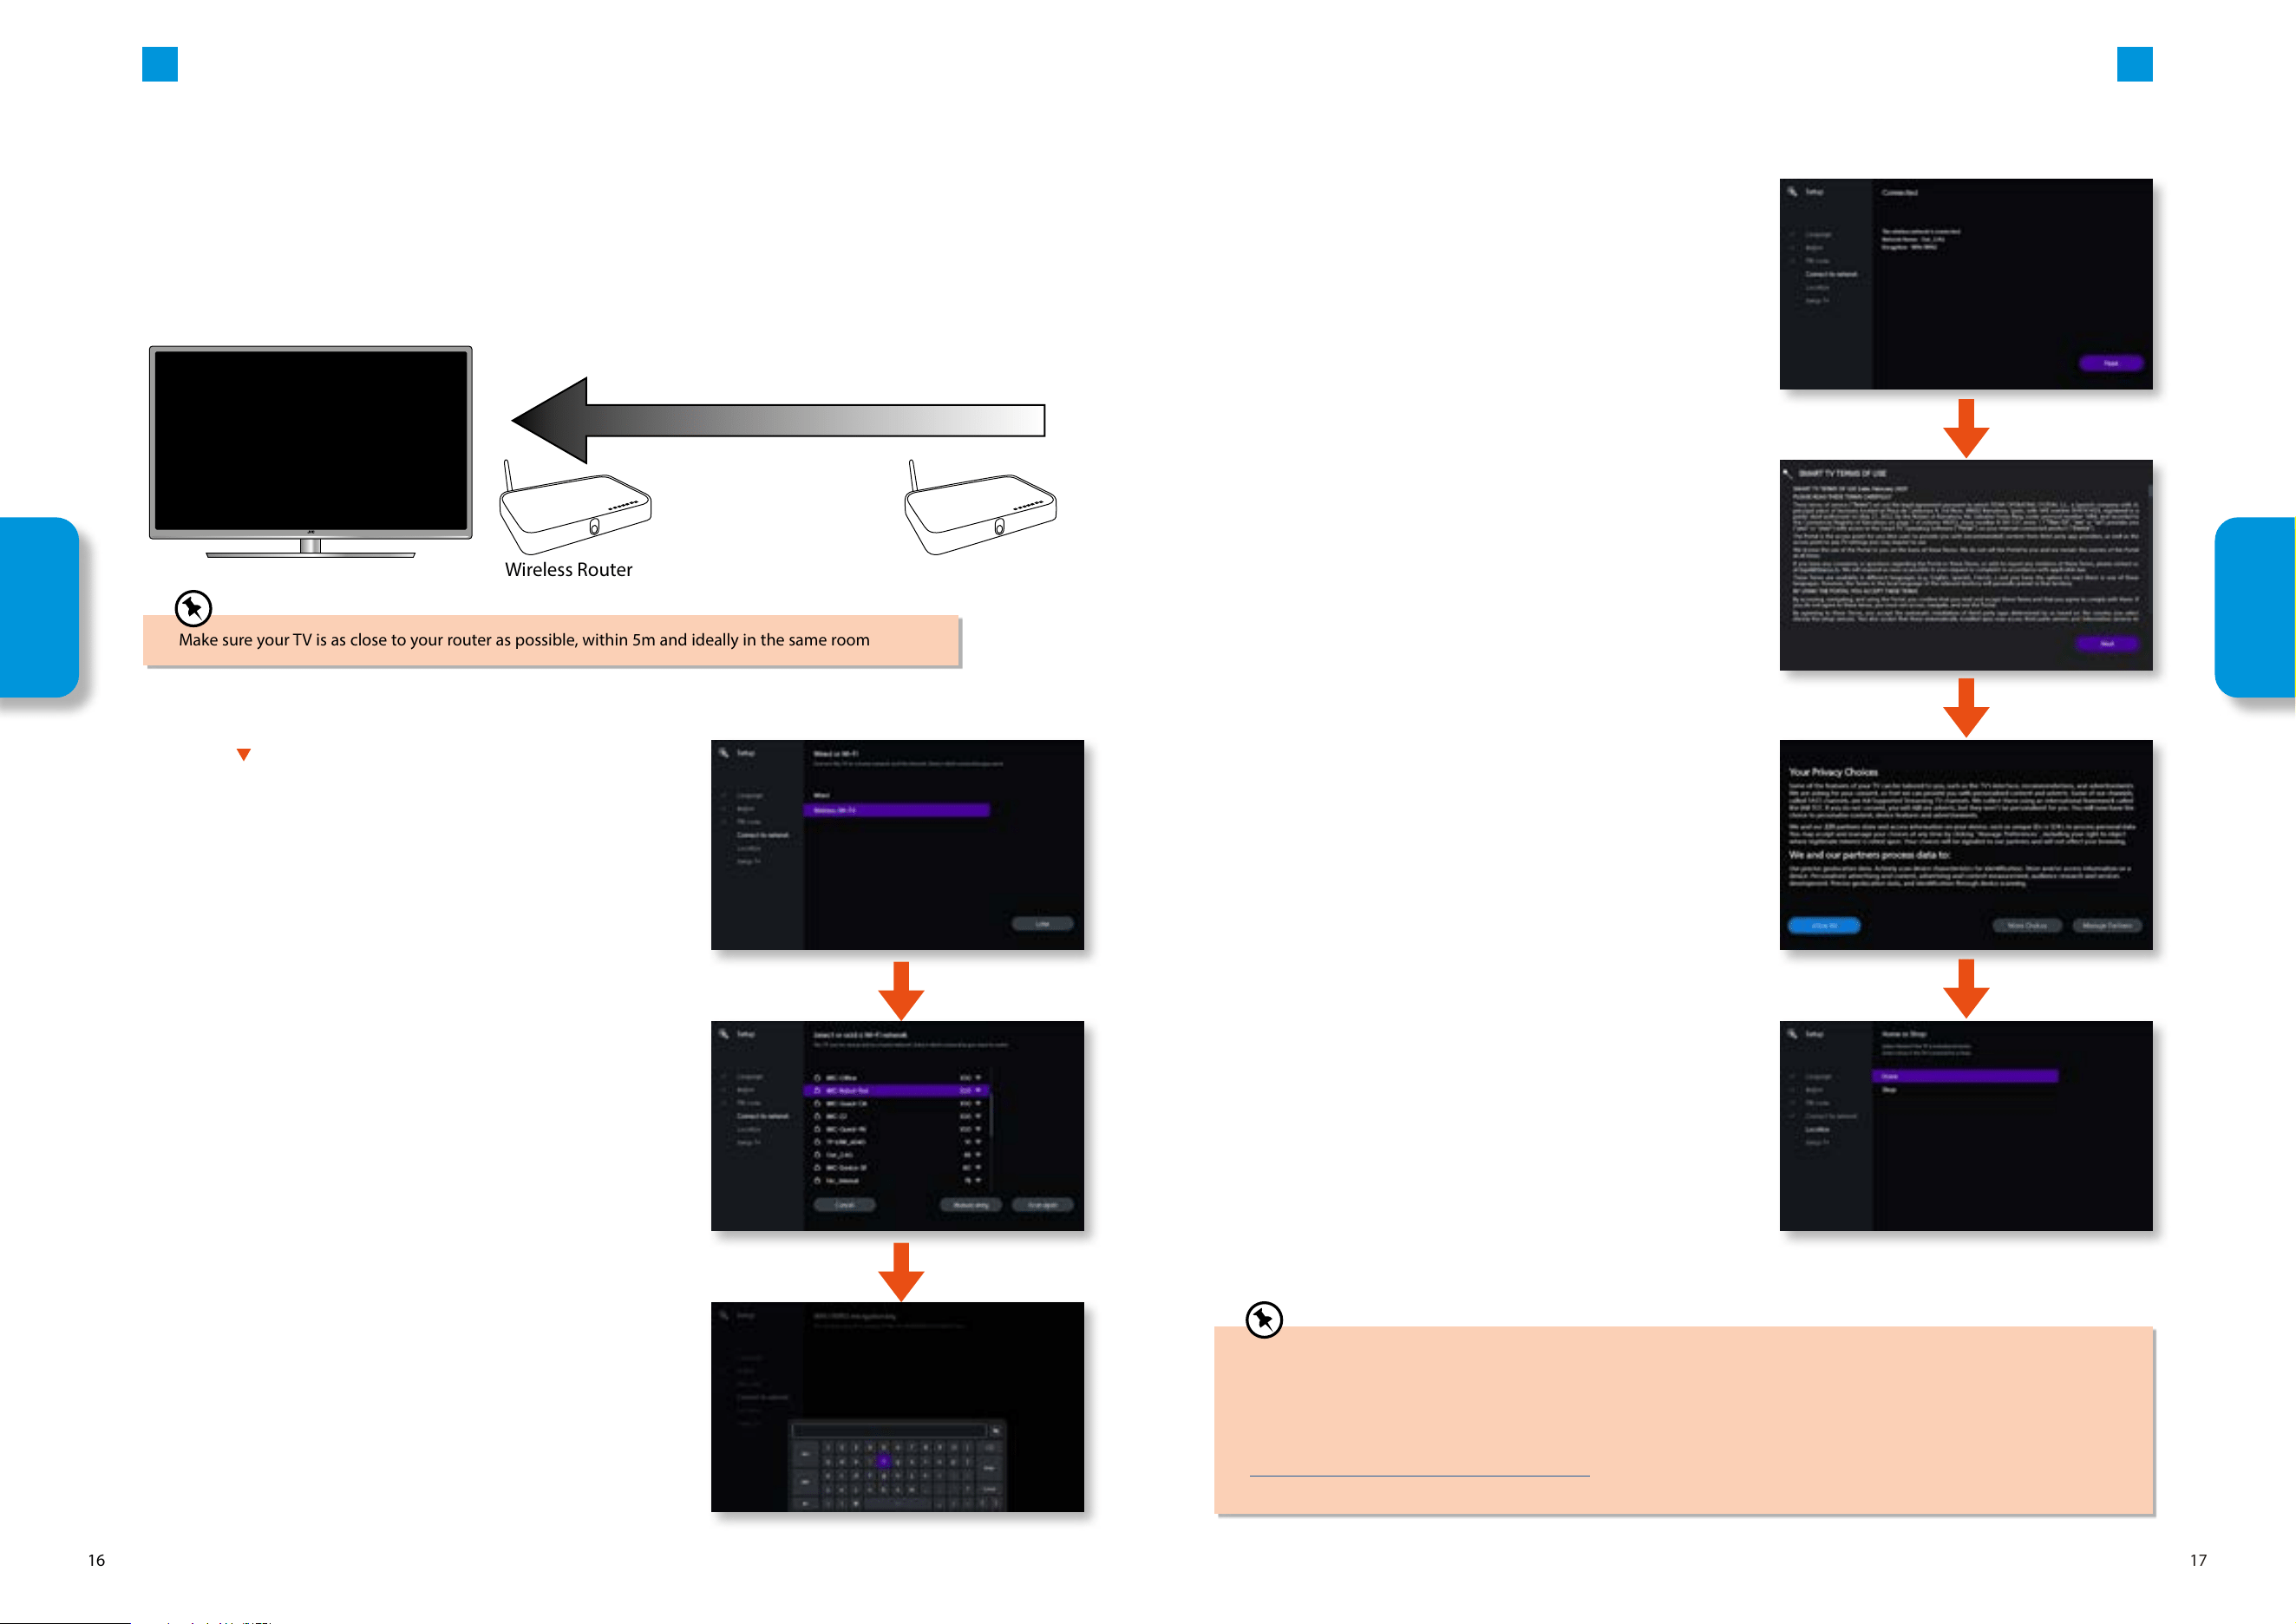
1. Press the button to select WIRELESS (Wi-Fi) then press the OK
button.
2. A list of all the available wireless networks will appear, highlight
your network then press the OK button.
3. Enter your Wi-Fi password, then highlight OK and press the OK
button.
4. In a second or two your TV will show Connected, press the OK
button to continue.
5. The ‘SMART TV TERMS OF USE’ information will be displayed.
Read the information and continue.
6. The ‘YOUR PRIVACY CHOICES’ information will be displayed.
Either allow all or make your choices and continue.
7. Now you need to select where you are watching your TV. Select
HOME and press the OK button.
Next you will need to choose if you would like to view Freely channels via the internet or tune in your TV using an aerial
connection.
• To view just Freely internet channels go to Viewing Freely Internet Channels.
• To tune in your TV via the aerial and watch Freely broadcast channels go to Tuning in your TV.
To help you choose, here's a link to all the internet channels currently available on Freely:
https://www.freely.co.uk/help/faqs/channel-list
18 19
3
3
Initial Setup Initial Setup
Initial Setup
Initial Setup
Viewing Freely Internet Channels
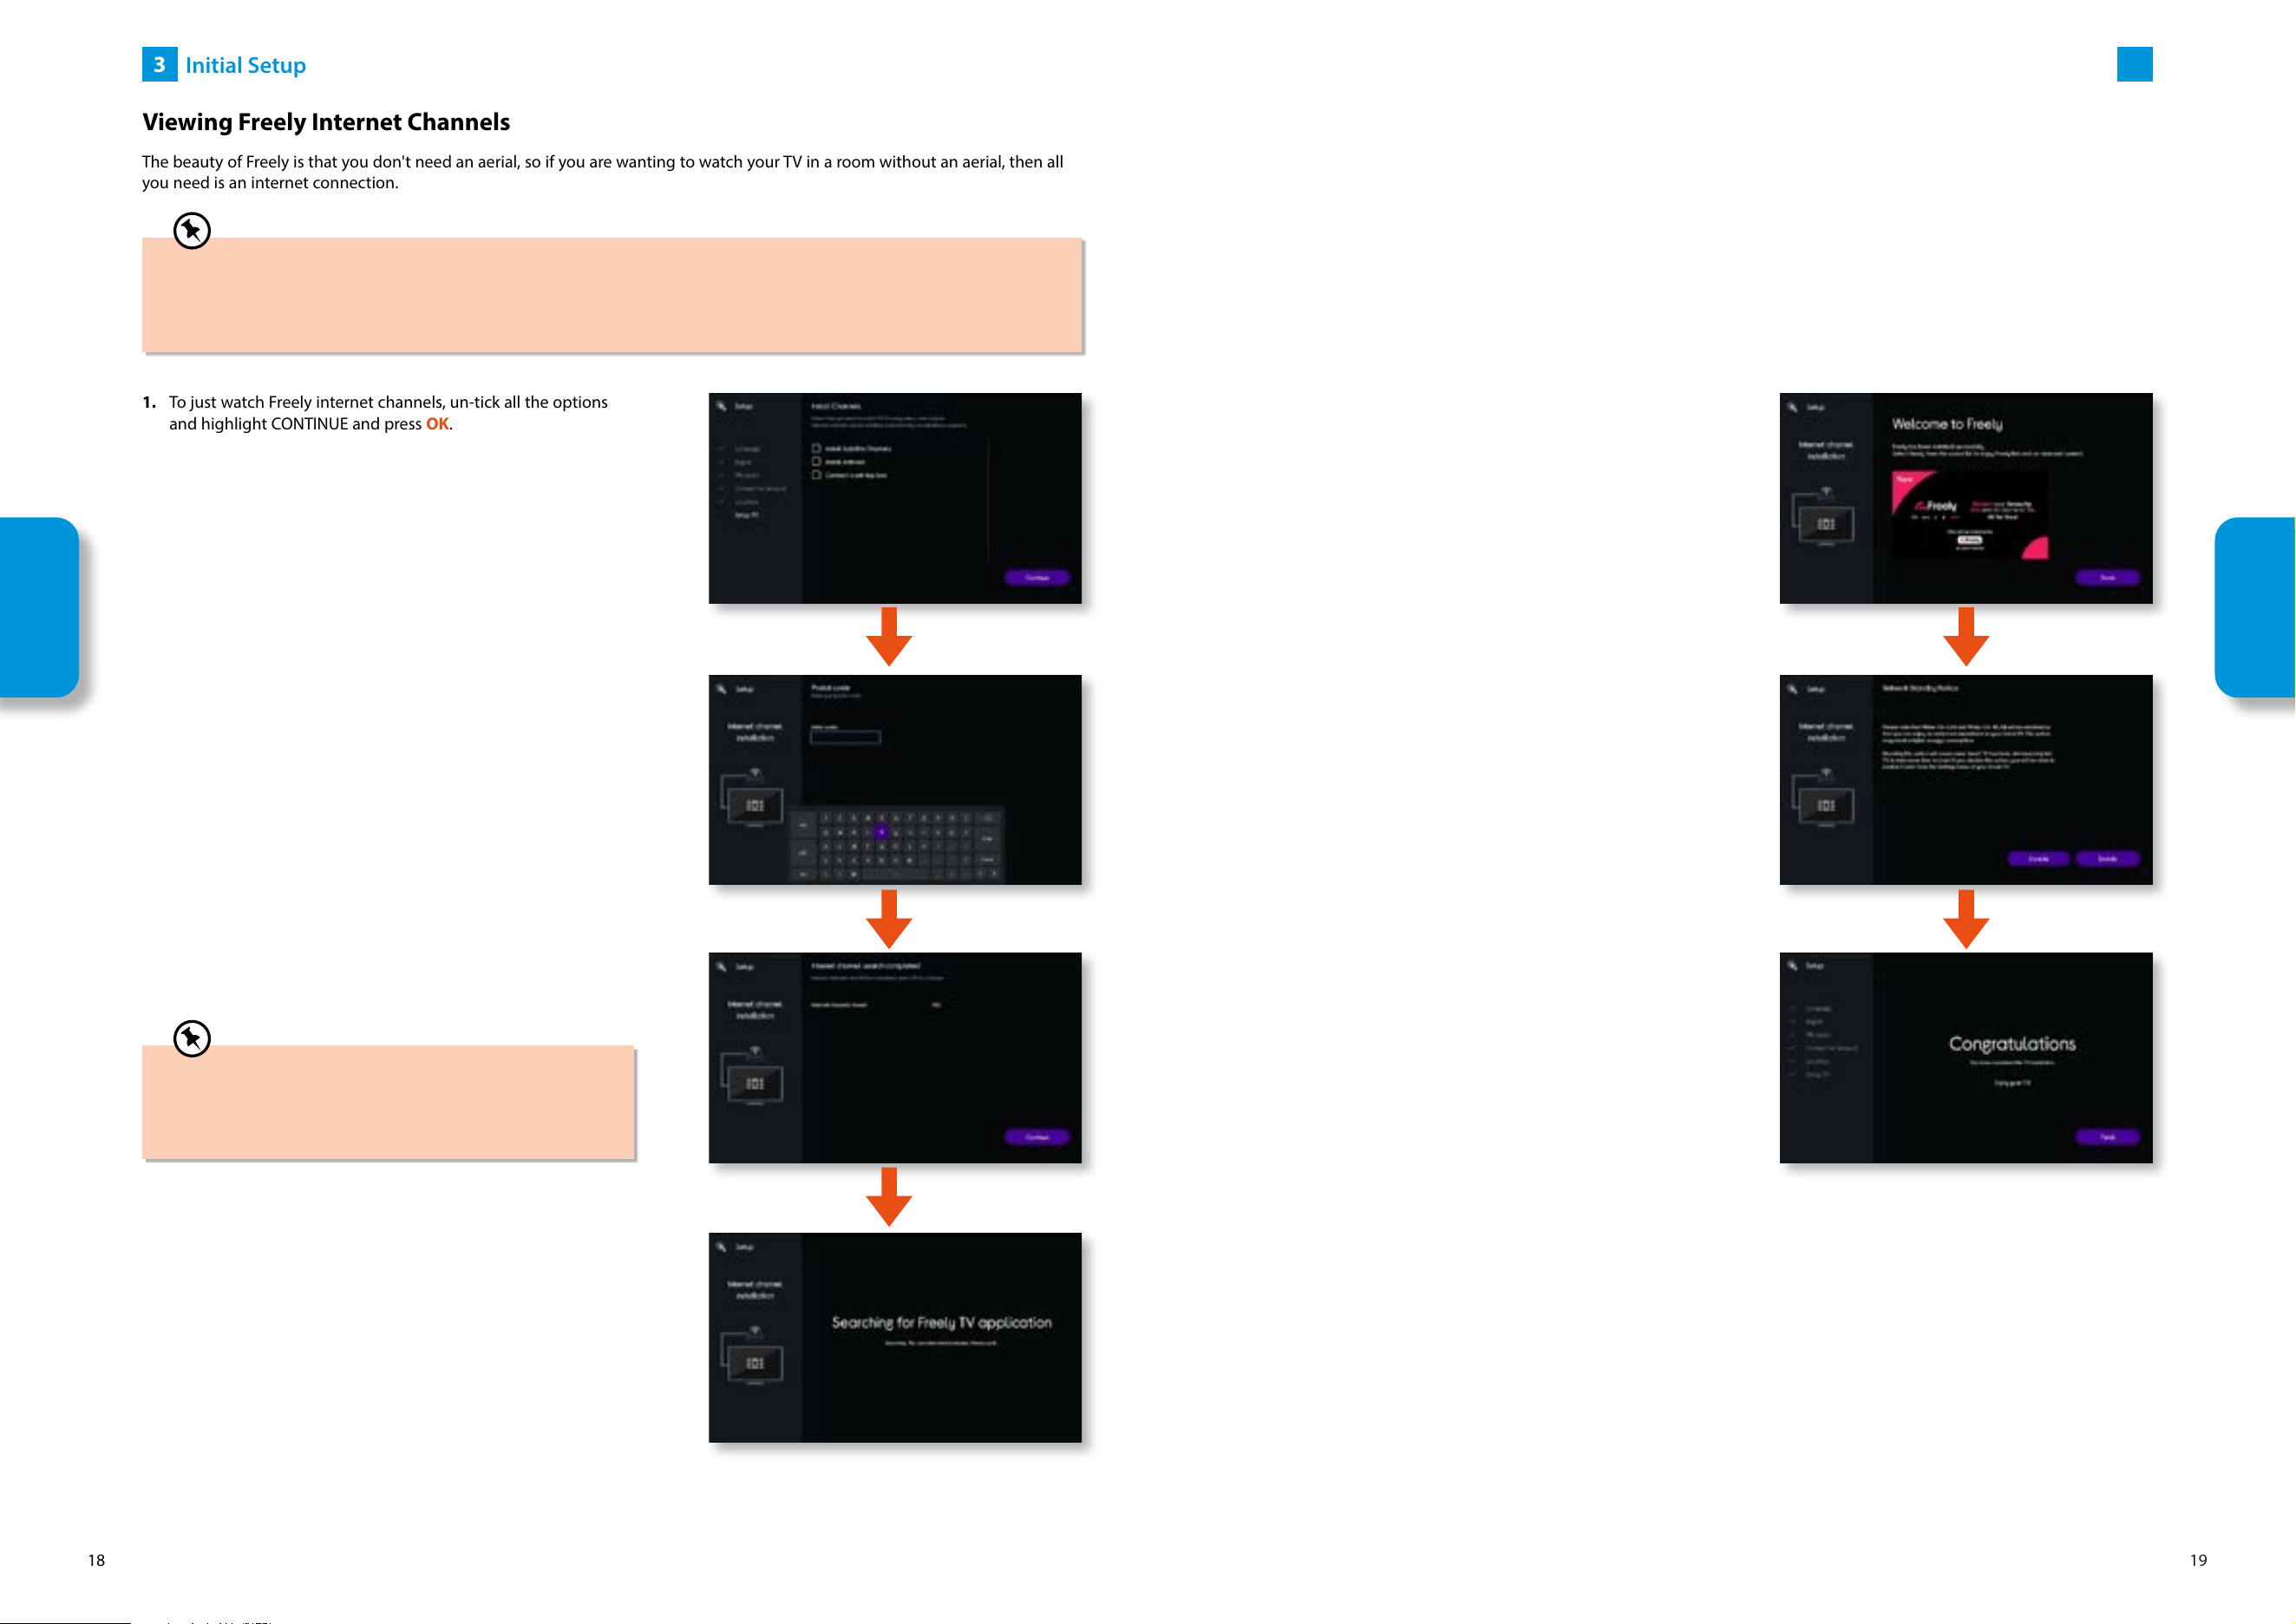
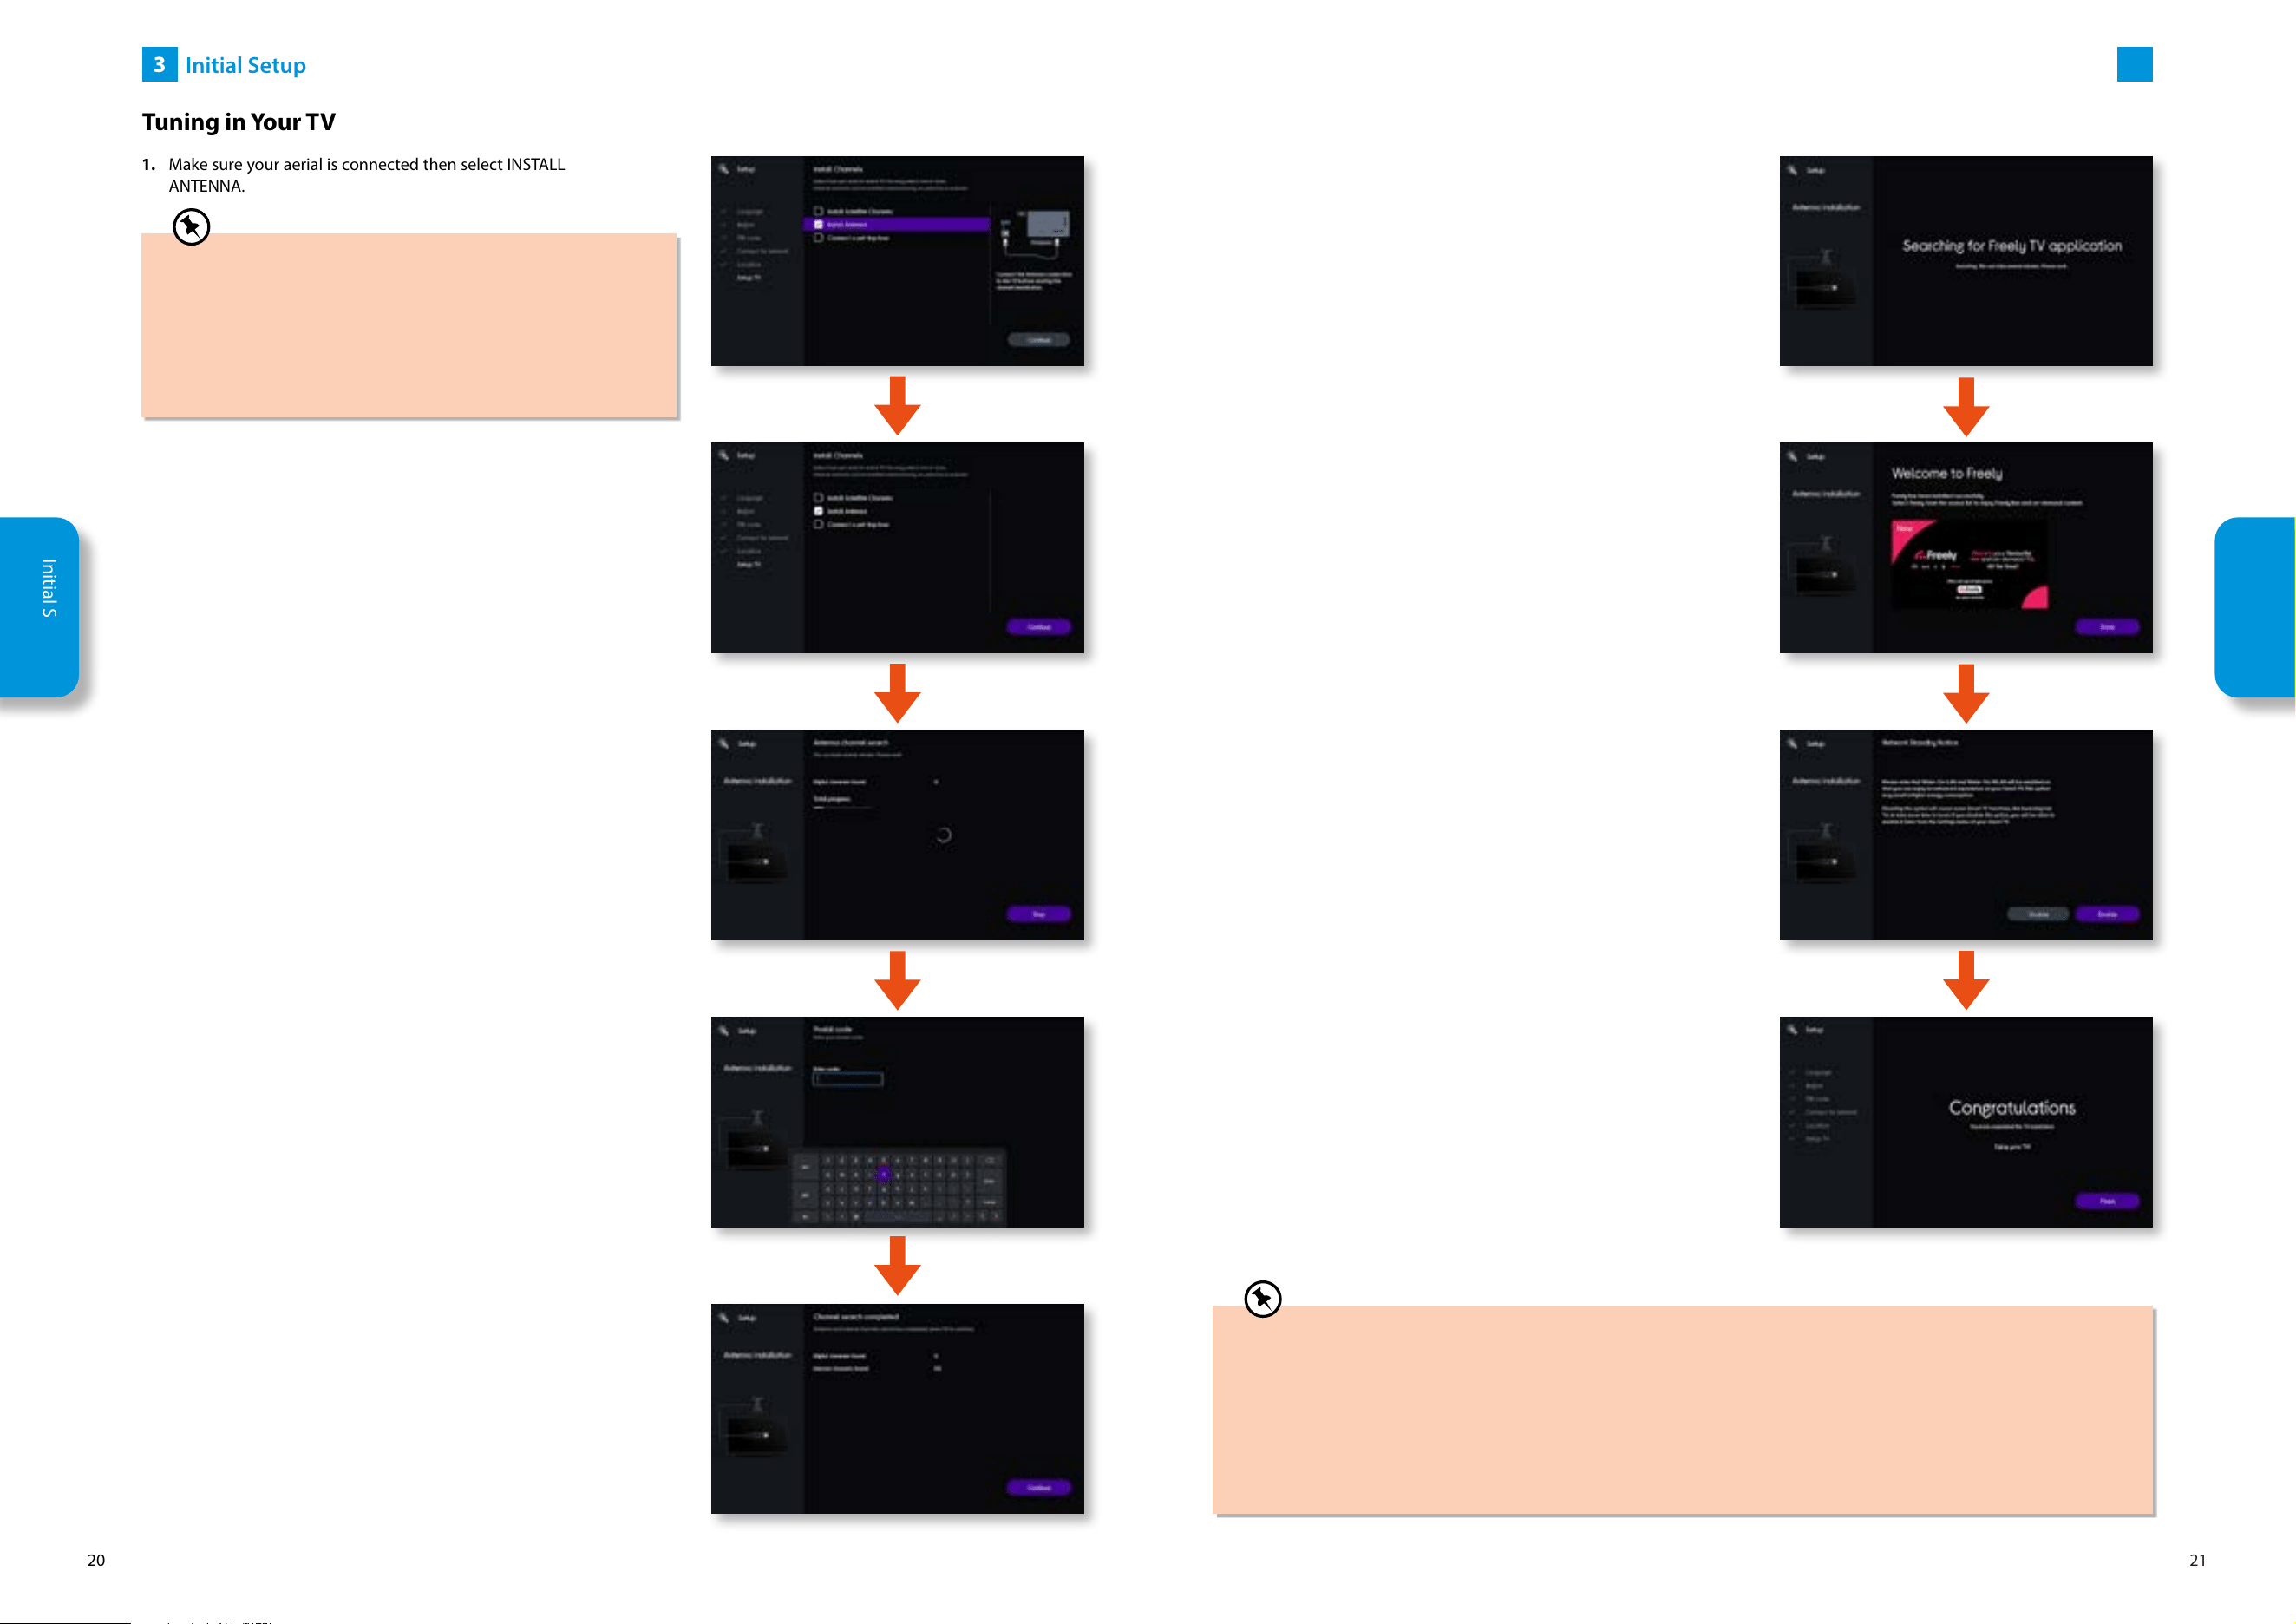
1. To just watch Freely internet channels, un-tick all the options
and highlight CONTINUE and press OK.
The beauty of Freely is that you don't need an aerial, so if you are wanting to watch your TV in a room without an aerial, then all
you need is an internet connection.
2. Use the onscreen keyboard to enter your postcode, then select
ENTER.
If you View TV Through a Set Top Box
If you have attached a Set top box such as Sky/Virgin or BT via a HDMI cable then highlight select CONNECTED A SET-TOP
BOX then select the HDMI socket its plugged into. This will mean your TV will not try to tune any channels in and will got
straight to the Home page. To view your set top box select the Input that you have connected it to.
The number of channel may appear less than if you had
selected to tune in your TV in via an aerial. This is due to not
needing the +1 channels and most radio channels are now
accessed through the BBC Sounds app.
3. Your TV will search for all the internet channels. The number
shown is the number of channels found.
4. You will now briefly see SEARCHING FOR FREELY TV
APPLICATION. Please wait for Freely to install.
5. You will then see te WELCOME TO FREELY screen highlight
DONE and press OK.
6. The NETWORK STANDBY NOTICE will be displayed, choose if
you would like to enable or disable Wake-on-LAN.
7. Congratulations you’re now all setup, highlight FINISH and press
the OK button.
20 21
3
3
Initial Setup Initial Setup
Tuning in Your TV
Initial Setup
Initial Setup
1. Make sure your aerial is connected then select INSTALL
ANTENNA.
3. Your TV will now start to search for TV channels.
If you View TV Through a Set Top Box
If you have attached a Set top box such as Sky/Virgin or BT via
a HDMI cable then highlight select CONNECTED A SET-TOP BOX
then select the HDMI socket its plugged into. This will mean your
TV will not try to tune any channels in and will got straight to the
Home page. To view your set top box select the Input that you
have connected it to.
2. Press OK to continue.
4. Once the channel scan is complete you’ll be asked to enter your
postcode. This is so that you receive the correct local channels.
Use the on-screen keyboard to enter your postcode, then
highlight ENTER and press the OK button.
5. The scan results will be displayed, highlight CONTINUE and
press the OK button.
7. When Freely has installed, highlight DONE and press the OK
button.
6. You will now briefly see SEARCHING FOR FREELY TV
APPLICATION. Please wait for Freely to install.
8. The NETWORK STANDBY NOTICE will be displayed, choose if
you would like to enable or disable Wake-on-LAN.
9. Congratulations you’re now all setup, highlight FINISH and press
the OK button.
Moving rooms after tuning in
If you have tuned in your TV via the aerial and later decide to move it to another room in your house and just view Freely
internet channels you may wish to install internet channels which removes the channels that have been installed via the
aerial. The reason for doing this is to reset the channel list, which will make it easier when just viewing Freely internet
channels. To install internet channels follow the steps below:
• Go to MENU - SETTINGS CHANNEL - INTERNET CHANNEL INSTALLATION, then follow the onscreen instructions.
Using this method will install all the internet channels but won't totally reset your TV, so any apps you have logged into
will still remember your details.

22
23
4 Freely
Chapter
4
Getting to Know Freely
Click on the link below to get and overview of the features and benefits of a Freely TV.
https://www.freely.co.uk
Key Features:
• Stream live and on demand.
• No aerial is needed, just wifi.
• Less scrolling and more watching with the Mini guide.
• Pause and restart live TV (max 15 mins).
• Easily find more episodes of your favourite programme using the browse feature.
5 Customising TV Settings
Chapter
5
Picture Settings
To access the PICTURE settings menu, press the SETTINGS button on your remote control. Then highlight PICTURE and press OK.
The following table show all the available picture setting adjustment on your TV. Not all of these setting apply to all Inputs.
Picture style
Your TV has preset picture styles which you can choose to match you viewing needs. Adjust the picture
style as follows: PERSONAL - CRYSTAL CLEAR - HOME CINEMA - STANDARD - MOVIE - GAME (HDMI only) -
MONITOR (HDMI only).
Contrast &
Brightness
Adjust the backlight levels, contrast mode and contrast.
Colour Adjust the colour levels of the picture.
Sharpness Adjust the sharpness of the picture.
Picture Noise Adjust the noise level of the picture.
Restore picture
style
If you would like to reset all your picture setting to factory settings then select restore the picture.
Quick picture
settings
If you re-tunned your TV or changed source you may have set some picture settings, you can redo these
steps with QUICK PICTURE SETTINGS menu. Select the picture setting you prefer and go to the next
setting. To do these steps, make sure the TV can tune to a TV channel or can show a programme from a
connected device.
Freely
Customising
TV Setting
24 25
5
5
Customising TV Settings Customising TV Settings
Screen Settings
To access the Screen settings menu, press the SETTINGS button on your remote control. Then highlight SCREEN and press OK.
The following table show all the available screen setting adjustment on your TV, these are only available while watching HDMI
source.
Picture format
Picture format will adjust the aspect ratio of the picture. Your TV has the following preset picture formats:
WIDE SCREEN - FILL SCREEN - FIT TO SCREEN - ORIGINAL - ADVANCED.
Advanced
options
The picture format can be manually adjusted in ADVANCED setting. Here you can select more manual
options. The options are as follows: SHIFT - ZOOM - STRETCH - UNDO.
Sound Settings
To access the SOUND settings menu, press the SETTINGS MENU button on your remote control. Then highlight SOUND and press
OK.
The following table show all the available sound setting adjustment on your TV.
Sound style
For easy sound adjustment, you can select a preset sound style. The sound styles are as follows:
ENTERTAINMENT - MUSIC - DIALOGUE - PERSONAL.
Personal
setting
With personal setting you can adjust the dialogue level, this can make the dialogue level more or less
prominent. Vocal boost can be adjusted between 0 -10, each equaliser setting can also be adjusted.
TV placement
Installing your TV on the wall or on the TV stand can effect the sound output so in the TV PLACEMENT
menu select the option that matches your installation.
Advanced
Auto volume
Select ON to automatically level out sudden volume differences. Typically when you
are switching channels. Select NIGHT MODE for a more comfortable quiet listening
experience.
Delta volume
The Delta volume setting can be used to adjust to balance the sound level difference
between the TV channel and the HDMI source input. Press the
buttons to
adjust the delta value for TV speaker volume.
Delta volume is available when the input source is set to HDMI or Analogue sources and
the Audio out is set to TV Speaker or HDMI sound system .
Audio out
Set the TV to play the sound on TV or on the connected audio system.
You can select where you want to hear the TV sound and how you want to control it.
• If you select TV SPEAKER, the TV speakers are always on. All the sound related
settings are applicable to this mode.
• If you select WIRED HEADPHONES, the sound will be played through headphones.
• If you select OPTICAL , the TV speakers are switched off and the sound will be
played through the device connected to Digital Audio Out - Optical.
• If you select TV SPEAKER + WIRED HEADPHONES, the sound will be played
through TV speakers and headphones.
With an audio device connected with HDMI CEC, select HDMI sound system. The TV
will switch off the TV speakers when the device is playing the sound
Digital out format
Digital output settings are available for SPDIF output (optical) and HDMI ARC sound
signals.
Set the audio out signal of the TV to fit the sound capabilities of the connected
Home Theatre System.
• STEREO (uncompressed): If your audio playback devices have no multichannel
sound processing, select to only output stereo content to your audio playback
devices.
• MULTICHANNEL: Select to output multichannel audio content (compressed
multichannel sound signal) or stereo audio content to your audio playback
devices.
• MULTICHANNEL (bypass): Select to send original bitstream from HDMI ARC to the
connected HDMI Sound System.
Make sure your audio playback devices support Dolby Atmos feature.
SPDIF output (DIGITAL AUDIO OUT) will be disabled when streaming Dolby Digital Plus
content.
Digital Out
levelling
Adjust the loudness level from device which is connected to digital audio output
(SPDIF) or HDMI.
• Select MORE to have louder volume.
• Select LESS to have softer volume.
Digital out delay
For some Home Theatre Systems you might need to adjust the audio sync delay to
synchronise the audio to the video. Select OFF if a sound delay is set on your Home
Theatre System.
Digital out offset
Digital out offset is only available when Digital Out delay is set to ON.
• If you cannot set a delay on the Home Theatre System, you can set the TV to sync
the sound.
• You can set an offset that compensates for the time necessary for the Home
Theatre System to process the sound of the TV picture.
• You can set the value from 0 to 60ms.
Customising
TV Setting
Customising
TV Setting
26 27
5
5
Customising TV Settings Customising TV Settings
Network Settings
To access the NETWORK settings menu, press the SETTINGS MENU button on your remote control. Then highlight NETWORK and
press OK.
The following table show all the available network setting adjustment on your TV. Highlight WIRED or WIFI and press OK.
Connect to
network
If you would like to connect to a new network choose CONNECT TO NETWORK.
Check the
network
To check the connection of your network select CHECK THE NETWORK.
View network
settings
You can view all current network settings here. The IP and MAC address, signal strength, speed,
encryption method, etc.
Network
configuration
If your router has a WPS button, you can directly connect to it using this option. Highlight this option and
press OK. Go to your router and press the WPS button on the router to make the connection. This will only
be available is WIRELESS DEVICE is selected as your network type.
Static IP
configuration
If you are an advanced user and want to install your network with Static IP addressing, set the TV to
STATIC IP.
Switch on with
LAN
You can switch this TV on from your smartphone or tablet if the TV is in Standby. The setting SWITCH ON
WITH LAN must be switched on.
Wi-Fi On/Off You can switch on or off Wi-Fi connection on your TV.
TV network
name
If you have more than one TV in your home network, you can give the TV a unique name.
Netflix settings With NETFLIX SETTINGS, you can view ESN number or deactivate Netflix device.
Clear internet
memory
With Clear Internet Memory you clear your server registration and parental rating settings, your video
store app logins, all App Gallery favourites, Internet bookmarks and history. Interactive MHEG applications
can also save so-called 'cookies', on your TV. These files will also be cleared.
Channel Settings
To access the CHANNEL settings menu, press the SETTINGS MENU button on your remote control. Then highlight CHANNEL and
press OK.
The following table show all the available channel setting adjustment on your TV. The pin number you set when you installed
your TV will be required.
Antenna
installation
Update channels or re-tune your tv in this menu.
Satellite
installation
Update satellite channels or re-tune your tv in this menu.
Internet
channel
installation
Update internet channels or re-tune your tv in this menu.
CAM operator
profile
Switch on/off CAM operator profile (not applicable in the UK).
CAM profile
name
Change the name of the CAM profile name (not applicable in the UK).
HBBTV and
operator Apps
settings
View and adjust all the HBBTV settings.
CAM interface Change the CAM interface from PCMCIA or USB.
Customising
TV Setting
Customising
TV Setting
28 29
5
5
Customising TV Settings Customising TV Settings
General Settings
To access the GENERAL settings menu, press the SETTINGS MENU button on your remote control. Then highlight GENERAL
SETTINGS and press OK.
The following table show all the available devices setting adjustment on your TV.
USB keyboard
settings
Adjust the keyboard settings (a keyboard must be already attached to a USB socket).
Mouse settings Adjust the mouse settings (a mouse must be already attached to a USB socket).
Power and
energy
Select the TVs power and energy settings. The following settings can be adjusted: POWER-ON
BEHAVIOUR, SCREEN OFF, SLEEP TIMER, SWITCH OFF TIMER (240 mins default), NO SIGNAL TIMER.
HDMI CEC Switch HDMI CEC ON or OFF.
HDMI CEC
remote control
Switch HDMI CEC remote control ON or OFF. This will allow your TV remote control to control HDMI
connected devices.
Screensaver
settings
Select to adjust the screensaver settings of your TV.
Location Choose the location of your TV, select either HOME or SHOP.
Edit input
sources
Change the name of your input sources, choose from the preset list.
Terms of use Select to read the SMART TV TERMS OF USE.
Privacy settings
Select to read the PRIVACY SETTINGS of your TV. You can also view your ADVERTISING ID and LIMIT AD
TRACKING.
Default settings Select if you would like to set your SOUND and PICTURE setting back to factory settings.
Factory reset
To fully reset your TV, select FACTORY RESET, your pin code will be needed. This will delete all your
settings.
Universal Access Settings
To access the UNIVERSAL ACCESS (accessibility) settings menu, press the SETTINGS MENU button on your remote control. Then
highlight UNIVERSAL ACCESS and press OK.
The following table show all the available devices setting adjustment on your TV.
Universal
access
Selecting Universal access will add Universal access to the OPTIONS menu.
Hearing
impaired
Switching on hearing impaired will display captions describing the non vocal parts of a scene, like a door
opening. This is broadcaster dependant.
Audio
description
Audio description describes what's happening in the screen. When you switch audio description on you
will see the audio description menu. Here you can choose to adjust the mixed volume of the description
and switch audio effects on or off.
Dialogue
enhancement
Dialogue enhancement can make the dialogue clearer by altering the volume level of the dialogue. Only
on certain content.
Voice guidance
Voice guidance will audibly guide you through on screen menus. This can also be activated and
deactivated by pressing and holding the SEARCH button on the remote control.
Text
magnification
Enabling text magnification will increase the font size of text in menus.
Customising
TV Setting
Customising
TV Setting
30 31
5
5
Customising TV Settings Customising TV Settings
Child Lock Settings
To access the CHILD LOCK settings menu, press the SETTINGS MENU button on your remote control. Then highlight CHILD LOCK
and press OK.
The following table show all the available devices setting adjustment on your TV. To access these setting you will need to know
the pin code you set when you installed your TV.
Parental rating
Set the parental rating of your TV. Viewers will then require a code to watch content that is above the
parental rating.
App lock Select APP LOCK to lock adult apps.
Change code
Set new code or reset change code. The child lock code is used to lock or unlock channels or programmes.
If you forgot your PIN code, you can override the current code use 8888 and enter a new code.
Region and Language Settings
To access the REGION AND LANGUAGE settings menu, press the SETTINGS MENU button on your remote control. Then highlight
REGION AND LANGUAGE and press OK.
The following table show all the available devices setting adjustment on your TV.
Language
Digital TV channels can broadcast audio, subtitles and text with in multiple languages for a programme.
You can set a preferred primary and secondary audio, subtitle and text language. If one of these
languages is available, the TV will switch to this language.
Clock
The standard setting for the TV clock is AUTOMATIC. The time information comes from the broadcasted
UTC - Coordinated Universal Time information.
• If the clock is not correct, you can set the TV clock to COUNTRY DEPENDENT.
• When you select COUNTRY DEPENDENT, you can set the time for AUTOMATIC, STANDARD TIME , or
DAYLIGHT SAVING TIME.
Customising
TV Setting
Customising
TV Setting
3332
5
Customising TV Settings
Software Settings
To access the SOFTWARE settings menu, press the SETTINGS MENU button on your remote control. Then highlight UPDATE
SOFTWARE and press OK.
The following table show all the available devices setting adjustment on your TV.
Search of
updates
Look for a software update yourself.
• If the TV is connected to the Internet, you may receive a message to update the TV software. You need a
high-speed (broadband) Internet connection. If you receive this message, we recommend you to carry
out the update.
• During the software update, there is no picture and the TV will switch off and on again. This might
happen several times. The update can take a few minutes.
• Wait until the TV picture comes back up. Do not press the STANDBY button on the TV or on the remote
control during the software update.
Current
software info
To view the current software version select CURRENT SOFTWARE INFO.
Automatic
software
update
To switch on Automatic software update to update your TV software automatically. Leave the TV in
standby. When the setting is enabled, the upgrade gets downloaded when the TV is powered ON and
installed 15min after the TV has gone to standby (as long as there is no alarm scheduled).
When the setting is disabled, the "Upgrade Now" / "Later" OSD will be shown.
View software
update history
Display the list of software versions that are successfully update on the TV.
USB1
USB2
5.0V 500mA
CI
HDMI2
HDMI3
HDMI 1
(ARC)
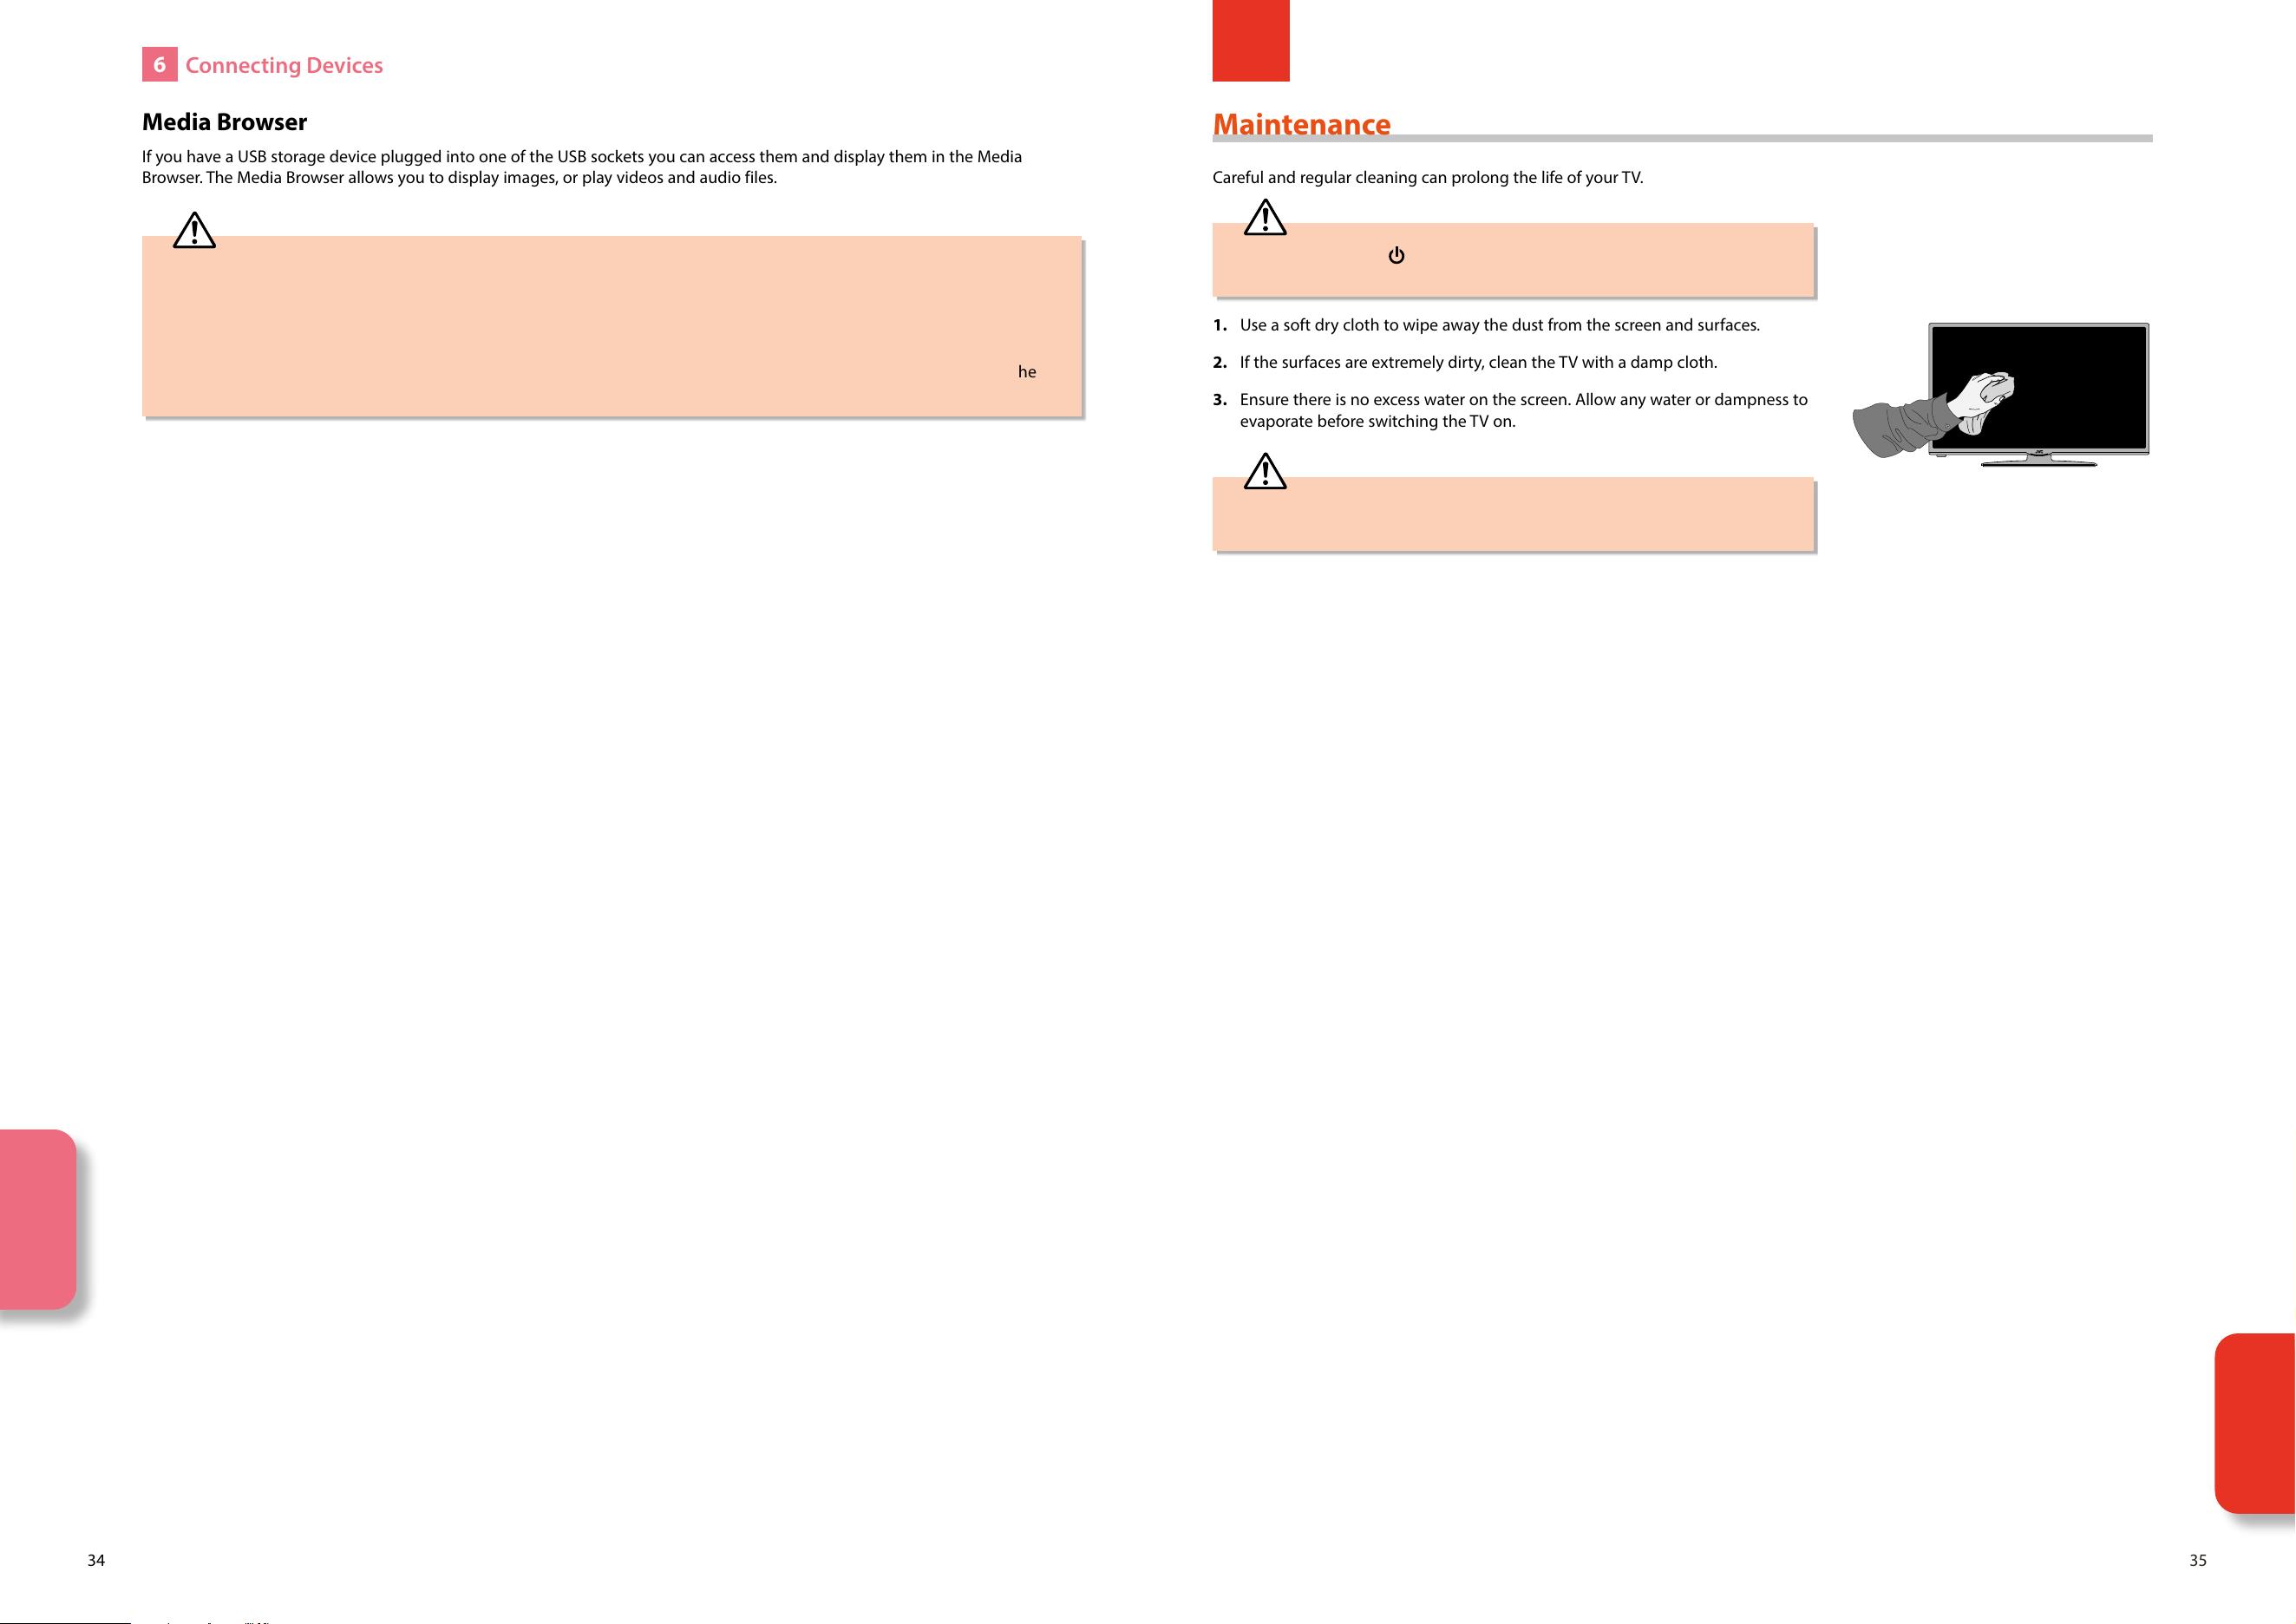
HDMI-ARC Connection
To enjoy the ARC function, please ensure your ARC-compliant audio devices are connected by an HDMI cable that support the
ARC function to the HDMI 1(ARC) port of your ARC-compliant TV. When correctly set up, you can use your TV remote control to
adjust the volume output (VOL +/– and MUTE) of the connected audio device.
1. Make sure your TV and ARC-compliant device are disconnected from the main and switched off.
2. Connect your ARC-compliant device to your TV making sure you use the HDMI 1 (ARC) socket on the back of the TV. The plug
in and switch on at the mains.
Your soundbar will now switch on and off when you turn your TV on and off and you will also be able to adjust the volume
using your TV remote control. If you find this isn't working check HDMI CEC DEVICE CONTROL is switched ON. Go to SETTINGS -
DEVICES- CEC AUTO POWER ON.
External speaker e.g. Soundbar
Make sure CEC is enabled when using
an ARC-compliant device.
Connecting a Soundbar via HDMI (ARC)
The ARC (Audio Return Channel) function allows you to send audio from your ARC-compliant TV to ARC-compliant audio devices
(e.g. soundbar) through a single HDMI connection.
6 Connecting Devices
Chapter
6
ARC enabled devices
MUST be connected
to the socket marked
HDMI 1 (ARC).
Customising
TV Setting
Connecting
Devices
3534
6
Connecting Devices
Media Browser
If you have a USB storage device plugged into one of the USB sockets you can access them and display them in the Media
Browser. The Media Browser allows you to display images, or play videos and audio files.
• Supported file Video formats: MPEG, MP4, MOV and WMV.
• Supported file Picture formats: JPEG, JPG, BMP and PNG.
• Supported file Music formats: MP3 and WAV.
• If you are using a USB 3.0 storage device it will work at a slower data transfer rate (the USB port is 2.0).
• Partitioned hard drives are NOT supported. If your hard drive has two partitions such as one NTFS and one FAT32. The
NTFS partition may not work or could work slowly.
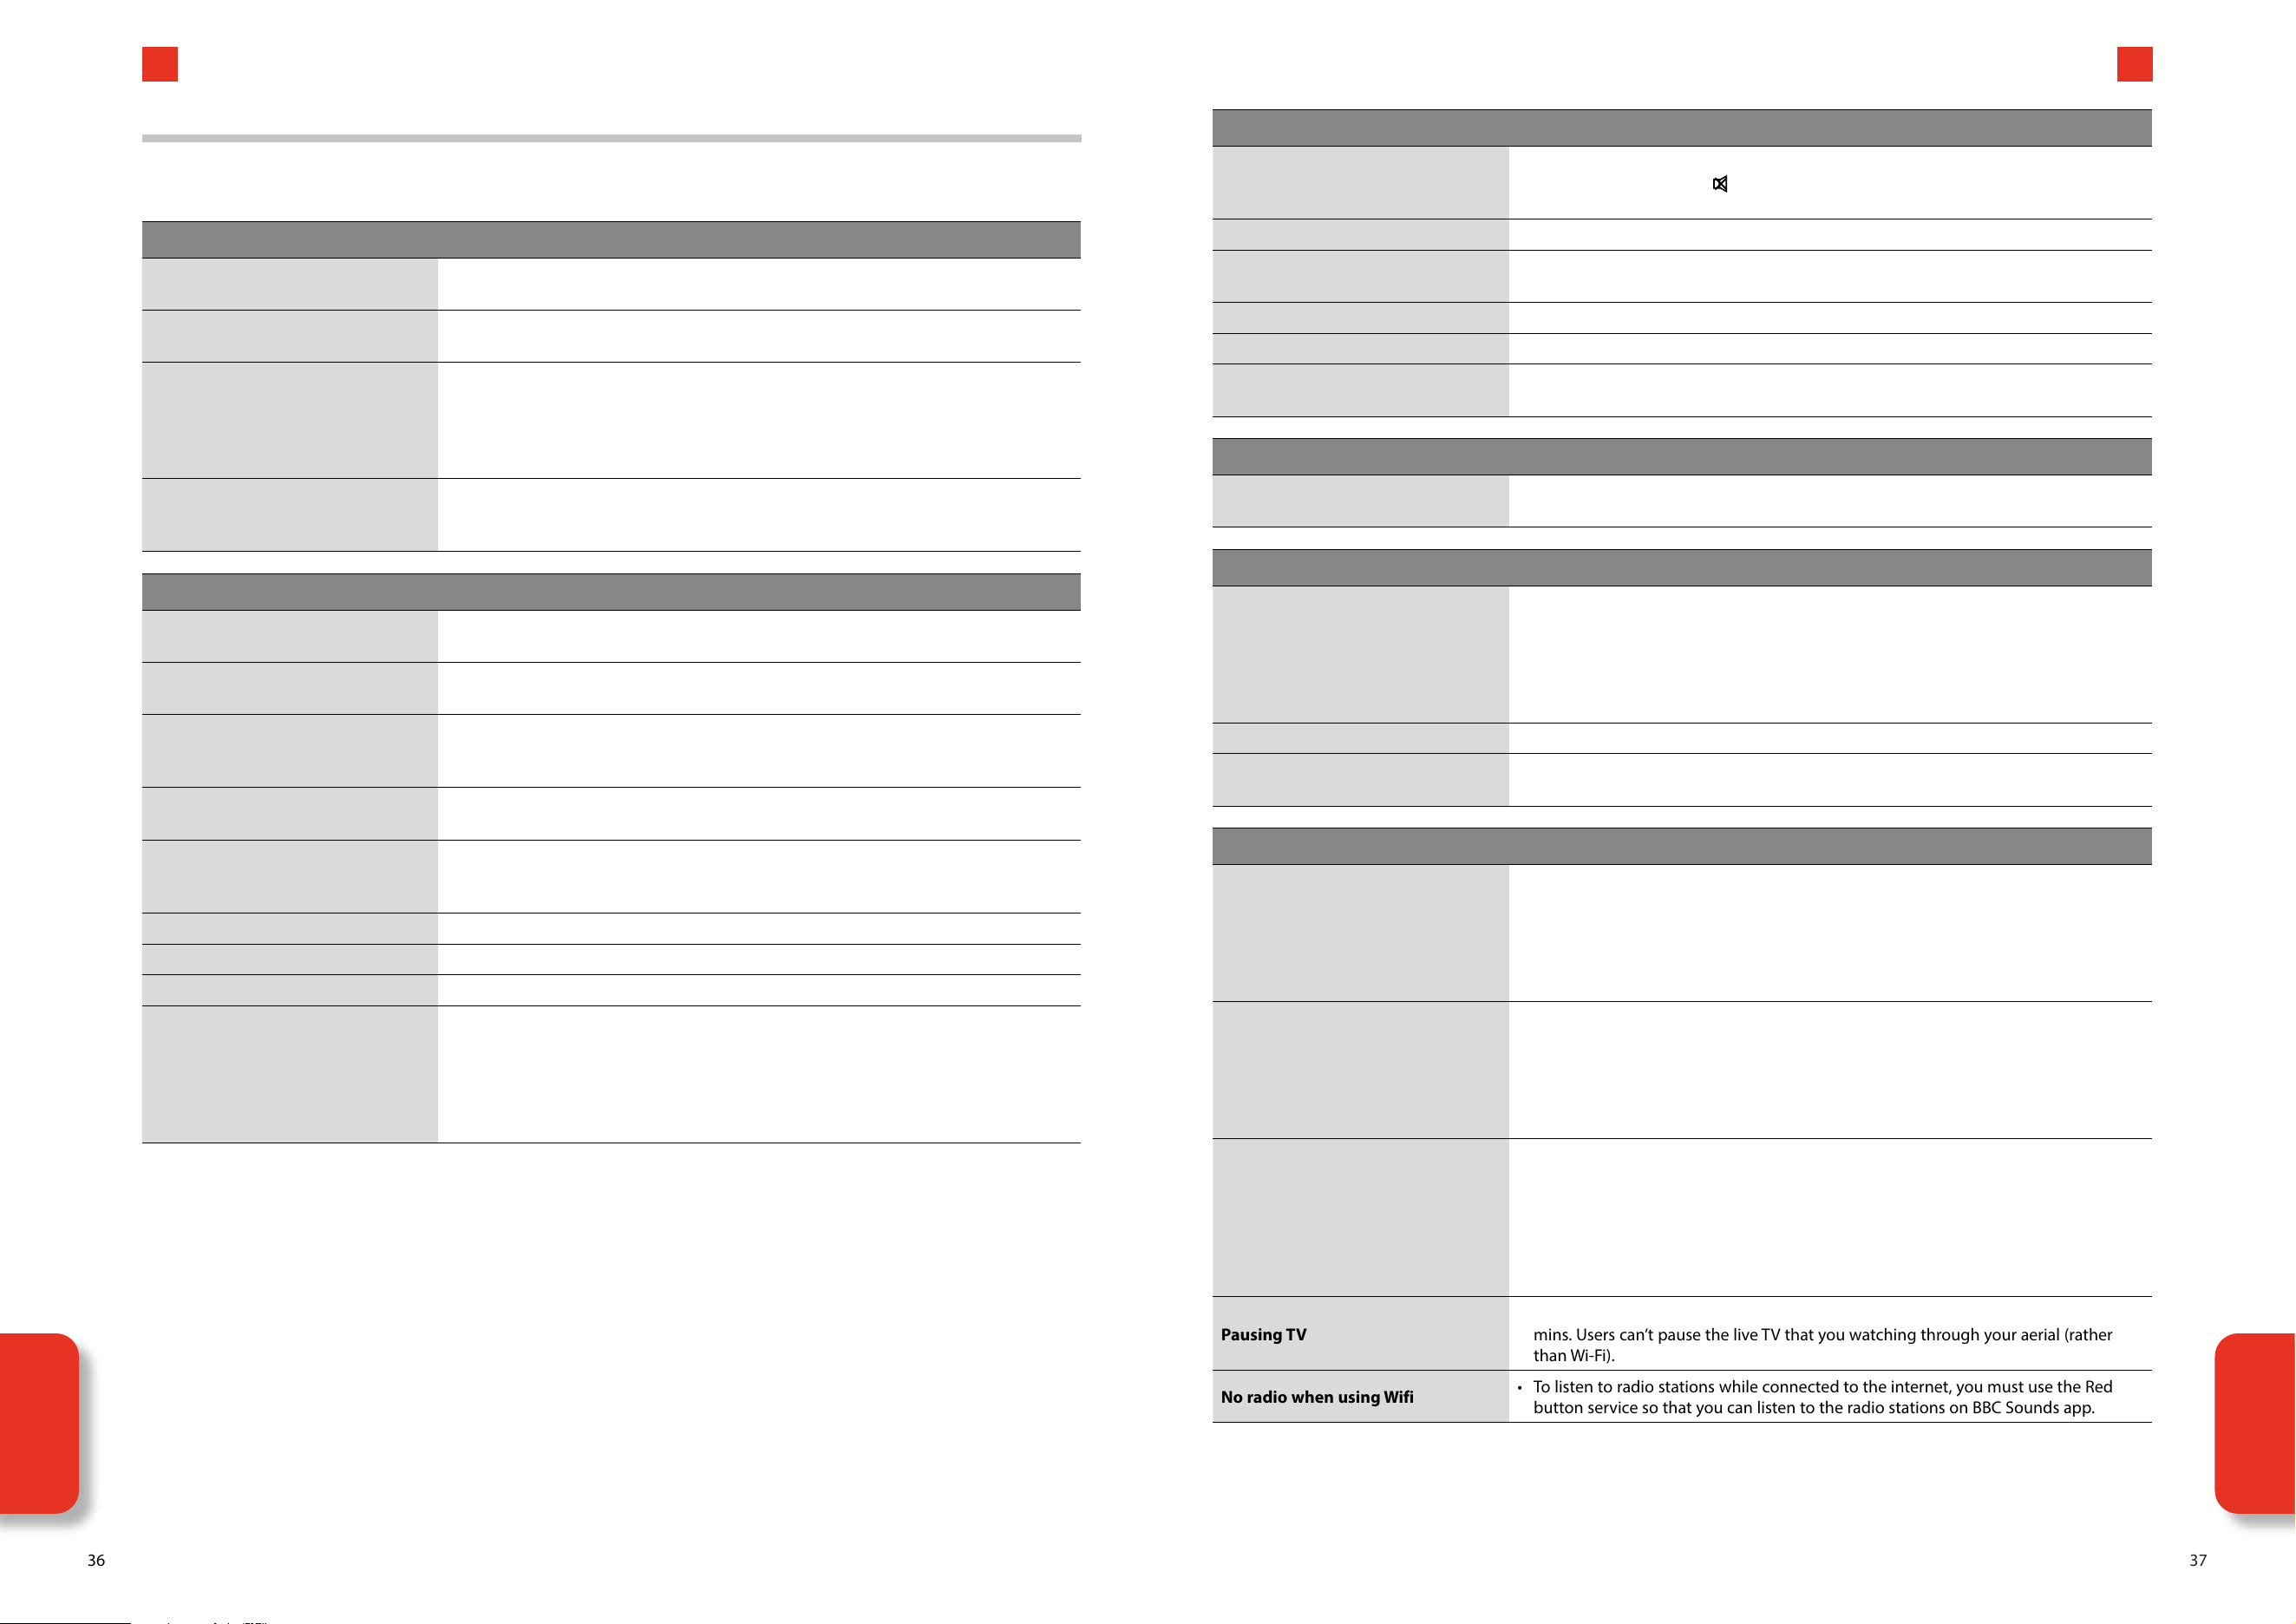
1. Use a soft dry cloth to wipe away the dust from the screen and surfaces.
2. If the surfaces are extremely dirty, clean the TV with a damp cloth.
3. Ensure there is no excess water on the screen. Allow any water or dampness to
evaporate before switching the TV on.
Maintenance
Careful and regular cleaning can prolong the life of your TV.
Be sure to press the button on the remote control and disconnect the
mains cable from the mains socket before any cleaning.
Never use alcohol, benzine, paint-thinner, cleaning fluid or other chemicals.
Do not use compressed air to remove dust.
7 Technical Information and Help
Chapter
7
Connecting
Devices
Technical
Information
and Help
36 37
7
7
Technical Information and Help Technical Information and Help
Hints and Tips
The following table contains various hints and tips to get the best performance from your TV. If you require additional assistance
please call our Call Centre on (UK) 0344 561 1234 or (Ireland) 1 890 818575. Our Customer Contact Centre is open 24/7.
The TV does not operate properly.
The TV does not respond when
pressing any buttons
• The TV may freeze up during use. Switch the TV off at the mains for a few minutes.
Switch on again and try to operate it again as usual.
TV cannot be switched on
• Check that the TV is connected to the mains supply and switched on.
• Make sure all connected AV devices are switched off before switching on your TV.
The remote control does not work
• Check to see if there are any objects between the TV and the remote control
causing an obstruction. Ensure that you are pointing the remote control directly at
the TV.
• Ensure that the batteries are installed with the correct polarity (+ to +, - to -).
• Install new batteries.
Power is suddenly turned off
• Check the TV has power to it. The mains supply maybe interrupted.
• Check if the sleep timer is set.
• Check whether the Auto Standby is activated.
The video function does not work.
No Picture & No Sound
• Check whether the TV is switched on.
• Try another channel. The problem may be caused by the broadcaster.
Picture appears slowly after
switching on
• This is normal, the image is muted during the TV startup process. Please contact
your service centre, if the picture has not appeared after five minutes.
No or poor colour or poor picture
• Adjust the settings in the PICTURE menu.
• Try another channel. The problem may be caused by the broadcaster.
• Check if the video cables are connected properly.
Horizontal / Vertical bar or picture
shaking
• Check for local interference such as an electrical appliance or power tool.
Poor reception on some channels
• Station or cable channel may be experiencing problems, tune to another station.
• Station signal is weak, reposition the aerial for better reception.
• Check for sources of possible interference.
Lines or streaks in pictures • Check aerial (Change the position of the aerial.)
No pictures when connecting HDMI • Check if the input source is HDMI 1, 2 or 3.
Picture appears in wrong ratio • Adjust the Aspect Ratio in the PICTURE menu.
What is HDR?
• This TV has High Dynamic Range (HDR) and is compatible with HDR 10. Using
this feature the TV can reproduce a greater dynamic range of luminosity by
capturing and combining several different exposures. HDR promises better picture
quality thanks to brighter, more realistic highlights, more realistic colour and other
improvements. It delivers the look that film makers intended to achieve, showing
hidden areas of dark shadows and sunlight in full clarity colour and detail.
The audio function does not work.
Picture OK but no sound
• Press the VOL + / – buttons.
• Sound muted? Press the
MUTE button.
• Try another channel. The problem may be caused by the broadcaster.
No output from one of the speakers • Adjust the Balance settings in the SOUND menu.
Unusual sound from inside the TV
• A change in ambient humidity or temperature may result in an unusual noise when
the TV is switched on or off and does not indicate a fault with the TV.
No sound when connecting HDMI • Check if the input source is HDMI1, 2 or 3.
Audio noise • Keep the RF coaxial cable away from other connected cables.
TV not muting when Headphones
are connected
• Make sure you have selected 'HEADPHONE ONLY' in the sound menu, SOUND -
SOUND OUTPUT - HEADPHONE ONLY. Also reduce the TV volume to 0.
Password
Lost password
• Factory reset your TV, then when you setup your TV again make a note of the
password you set and keep it safe.
Smart TV isn't working
Can't access Smart TV
• Check you are connected to your router and that the router is switch on and
working.
• Your router may be to far away from your TV, move your router closer to your TV.
• Try connecting your TV to your router using an ethernet cable.
• You must accept 'HBBTV and INTERNET CONNECTION' to be able to access any
smart functionality on your TV. Go to SETTINGS - LEGAL - CONSENT SETTINGS.
Smart TV is very slow to activate • Your internet speed may be very slow, check your speed with your internet provider.
Some of the Apps have disappeared
or changed
• The Apps on your TV may have been updated or even removed this can happen at
any time. Its normal and not a fault of your TV.
FAQs (Frequently Asked Questions)
Why have I lost some / all of my
channels?
• It happens sometimes if you have a weak signal. Usually it just means you’ll need to
re-tune your TV. Don’t worry, it is easy to do. And once you’ve done it, you should
get all the channels available to you. If problems persist you may need to get your
aerial checked. Talk to your retailer or contact your local aerial installer.
• You may find that some of the channel are different or on different channel
numbers now that you have a Freely TV.
Why do I get ‘blocking’ on my digital
picture?
• In most cases, blocking is caused by a reception problem – either the signal is too
weak or there is some kind of interference. Talk to your retailer or contact your local
aerial installer.
• Blocking can also be caused by a digital signal that is too strong. If you are still
experiencing blocking and the signal is strong, consult your local aerial installer
for advice.
What type of aerial do I need?
• For viewing Freely content (TV through the internet) an aerial is not required. If you
wish to top up your channels then an aerial is required.
• If you are installing a new aerial, we recommend a wideband rooftop aerial rather
than a loft aerial. Loft aerials generally receive a weaker digital signal and are more
likely to get interference from other electrical devices at home. We suggest you
have an aerial survey done before getting an aerial upgrade.
• Talk to your retailer or contact your local aerial installer.
Pausing TV
• You can pause live TV on most channels when you watch over Wi-Fi for up to 15
mins. Users can’t pause the live TV that you watching through your aerial (rather
than Wi-Fi).
No radio when using Wifi
• To listen to radio stations while connected to the internet, you must use the Red
button service so that you can listen to the radio stations on BBC Sounds app.
Technical
Information
and Help
Technical
Information
and Help

38 39
7
7
Technical Information and Help Technical Information and Help
Declaration of Conformity
Hereby, Currys Group Limited., declares that this TV is in compliance
with Directive 2014/53/EU. The full text of the EU declaration of
conformity is available at the following internet address:
https://www.currys.co.uk
Click on SEARCH and enter the model number.
License Information used with JVC Televisions
This television contains open source software.
Upon request, a copy of the complete corresponding source code for the copyrighted open source software packages used in this
product for which such offer is requested by the respective licences will be shared.
This offer is valid up to three years after product purchase to anyone in receipt of this information. To obtain the source code,
please write in English to:
Open Source
apr (1.7.0)
The Apache Portable Runtime Library provides a predictable and consistent interface to underlying platform-specific
implementations, with an API to which software developers may code and be assured of predictable if not identical behaviour
regardless of the platform on which their software is built, relieving them of the need to code special-case conditions to work
around or take advantage of platform-specific deficiencies or features.
Source: https://github.com/apache/apr
bind ( 9.11.36)
BIND (Berkeley Internet Name Domain) is a complete, highly portable implementation of the Domain Name System (DNS)
protocol.
Source: https://github.com/isc-projects/bind9
busybox (1.31.1)
BusyBox combines tiny versions of many common UNIX utilities into a single small executable. It provides replacements for most
of the utilities you usually find in GNU fileutils, shellutils, etc. The utilities in BusyBox generally have fewer options than their full-
featured GNU cousins; however, the options that are included provide the expected functionality and behave very much like their
GNU counterparts. BusyBox provides a fairly complete environment for any small or embedded system.
Source: https://www.busybox.net/downloads/
binutils (2.31.510)
The GNU Binutils are a collection of binary tools. The main ones are:
ld - the GNU linker.
as - the GNU assembler.
Source: https://www.gnu.org/software/binutils/
bzip2 (1.0.6)
bzip2 is a free and open-source file compression program that uses the Burrows–Wheeler algorithm. It only compresses single
files and is not a file archiver. It was developed by Julian Seward, and maintained by Mark Wielaard and Micah Snyder.
Source: https://sourceware.org/bzip2/
c-ares (1.10.1)
c-ares is a C library for asynchronous DNS requests (including name resolves)
Source: https://c-ares.org/
cario (1.16.0)
Cairo is a 2D graphics library with support for multiple output devices. Currently supported output targets include the X Window
System (via both Xlib and XCB), Quartz, Win32, image buffers, PostScript, PDF, and SVG file output. Experimental backends include
OpenGL, BeOS, OS/2, and DirectFB.
source https://www.cairographics.org/
dbus (1.11.2)
D-Bus is a simple system for interprocess communication and coordination. The "and coordination" part is important; D-Bus
provides a bus daemon that does things like:
- notify applications when other apps exit
26.1. Open Source Software
Technical
Information
and Help
Technical
Information
and Help
40 41
7
7
Technical Information and Help Technical Information and Help
26.2. Open Source License
- start services on demand
- support single-instance applications
Source: https://github.com/freedesktop/dbus
e2fsprogs (1.43.3)
e2fsprogs (sometimes called the e2fs programs) is a set of utilities for maintaining the ext2, ext3 and ext4 file systems. Since those
file systems are often the default for Linux distributions, it is commonly considered to be essential software
Source: http://e2fsprogs.sourceforge.net/
expat (2.2.9)
xml parser; Expat is an XML parser library written in C. It is a stream-oriented parser in which an application registers handlers for
things the parser might find in the XML document (like start tags). An introductory article on using.
This piece of software is made available under the terms and conditions of the Expat license, which can be found below.
Source: http://expat.sourceforge.net/
fuse (2.9.7)
JBoss Fuse is an open source ESB with capabilities based on Apache Camel, Apache CXF, Apache ActiveMQ, Apache Karaf and
Fabric8 in a single integrated distribution.
Source https://github.com/jboss-fuse/fuse
gdb (8.2.1)
GDB, the GNU Project debugger, allows you to see what is going on `inside' another program while it executes -- or what another
program was doing at the moment it crashed.
Source: https://www.sourceware.org/gdb/
glibc (2.30.0)
Any Unix-like operating system needs a C library: the library which defines the “system calls” and other basic facilities such as
open, malloc, printf, exit...The GNU C library is used as the C library in the GNU system and most systems with the Linux kernel
This piece of software is made available under the terms and conditions of the glibc license, which can be found below.
Source: http://www.gnu.org/software/libc/
gstreamer (1.18.3)
The GStreamer team is excited to announce a new major feature release of your favourite cross-platform multimedia framework!
Source: https://gstreamer.freedesktop.org/
libasound (1.1.8)
The Advanced Linux Sound Architecture (ALSA) provides audio and MIDI functionality to the Linux operating system. ALSA has
the following significant features:
Efficient support for all types of audio interfaces, from consumer sound cards to professional multichannel audio interfaces.
Fully modularized sound drivers. SMP and thread-safe design (PLEASE READ THIS). User space library (alsa-lib) to simplify
application programming and provide higher level functionality. Support for the older Open Sound System (OSS) API, providing
binary compatibility for most OSS programs.
Source: https://www.alsa-project.org/wiki/Main_Page
Libcurl (7.79.1)
HTTP client;libcurl is a free and easy-to-use client-side URL transfer library, supporting FTP, FTPS, HTTP, HTTPS, SCP, SFTP, TFTP,
TELNET, DICT, LDAP, LDAPS, FILE, IMAP, SMTP, POP3 and RTSP. libcurl supports SSL certificates, HTTP POST, HTTP PUT, FTP
uploading, HTTP form based upload, proxies, cookies, user+password authentication (Basic, Digest, NTLM, Negotiate, Kerberos4),
file transfer resume, http proxy tunneling and more! This piece of software is made available under the terms and conditions of
the Libcurl license, which can be found below.
Source: http://curl.haxx.se/
libevent (1.4.13)
The libevent API provides a mechanism to execute a callback function when a specific event occurs on a file descriptor or after a
timeout has been reached. Furthermore, libevent also support callbacks due to signals or regular timeouts.
source: https://libevent.org/
libjpeg-turbo (2.1.1)
libjpeg-turbo is a JPEG image codec that uses SIMD instructions (MMX, SSE2, AVX2, Neon, AltiVec) to accelerate baseline JPEG
compression and decompression on x86, x86-64, Arm, and PowerPC systems, as well as progressive JPEG compression on x86 and
x86-64 systems. On such systems, libjpeg-turbo is generally 2-6x as fast as libjpeg, all else being equal. On other types of systems,
libjpeg-turbo can still outperform libjpeg by a significant amount, by virtue of its highlyoptimized Huffman coding routines. In
many cases, the performance of libjpeg-turbo rivals that of proprietary high-speed JPEG codecs.
Source: https://libjpeg-turbo.org/
libjpg (6b)
This library is used to perform JPEG decoding tasks. This piece of software is made available under the terms and conditions of
the libjpg license, which can be found below.
Source: http://www.ijg.org/
libpng (1.0.1)
libpng -THE reference library for reading, displaying, writing and examining png Image Network Graphics. This piece of software is
made available under the terms and conditions of the libpng license, which can be found below.
Source: http://sourceforge.net/projects/libpng/files/
libffi (3.2.1)
Compilers for high level languages generate code that follows certain conventions. These conventions are necessary, in part, for
separate compilation to work. One such convention is the "calling convention". The "calling convention" is a set of assumptions
made by the compiler about where function arguments will be found on entry to a function. A "calling convention" also specifies
where the return value for a function is found.
Source: https://sourceware.org/libffi/
libjansson (2.13.1)
Jansson is a C library for encoding, decoding and manipulating JSON data. Its main features and design principles are:
Simple and intuitive API and data model
Comprehensive documentation
No dependencies on other libraries
Full Unicode support (UTF-8)
Extensive test suite
Source: https://github.com/akheron/jansson
libmicrohttpd (0.9.73)
GNU libmicrohttpd is a small C library that is supposed to make it easy to run an HTTP server as part of another application. GNU
Libmicrohttpd is free software and part of the GNU project
Source:https://www.gnu.org/software/libmicrohttpd/
libupnp (1.6.10)
The portable SDK for UPnP™ Devices (libupnp) provides developers with an API and open source code for building control points,
devices, and bridges that are compliant with Version 1.0 of the Universal Plug and Play Device Architecture Specification and
support several operating systems like Linux, *BSD, Solaris and others.
Source: https://pupnp.sourceforge.io/
libuuid (1.3.0)
This library is free software; you can redistribute it and/or modify it under the terms of the Modified BSD License. The complete
text of the license is available at the Documentation/licenses/COPYING.BSD-3 file
Source:https://sourceforge.net/projects/libuuid/
Libxml2 (2.9.12)
The "libxml2" library is used in AstroTV as a support for the execution of NCL application. This library was developed for the
GNOME software suite and is available under a "MIT" license.
Source: http://www.xmlsoft.org
linux_kernel (4.19)
The Linux kernel is a mostly free and open-source,[11] monolithic, modular, multitasking, Unix-like operating system kernel. It was
originally authored in 1991 by Linus Torvalds for his i386-based PC, and it was soon adopted as the kernel for the GNU operating
system, which was written to be a free (libre) replacement for UNIX.
Source: https://www.kernel.org/
mbed TLS (2.26.0)
Mbed TLS is a C library that implements cryptographic primitives, X.509 certificate manipulation and the SSL/TLS and DTLS
protocols. Its small code footprint makes it suitable for embedded systems.
Source: https://github.com/ARMmbed/mbedtls
ncurses (6.1)
Technical
Information
and Help
Technical
Information
and Help
42 43
7
7
Technical Information and Help Technical Information and Help
The ncurses (new curses) library is a free software emulation of curses in System V Release 4.0 (SVr4), and more. It uses terminfo
format, supports pads and color and multiple highlights and forms characters and function-key mapping, and has all the other
SVr4-curses enhancements over BSD curses. SVr4 curses is better known today as X/Open Curses.
Source: http://www.gnu.org/software/ncurses/
nghttp2 (1.6.3)
nghttp2 is an implementation of HTTP/2 and its header compression algorithm HPACK in C.
Source: https://nghttp2.org/
NTFS-3G (7.8)
NTFS-3G is an open source cross-platform implementation of the Microsoft Windows NTFS file system with read-write support.
NTFS-3G often uses the FUSE file system interface, so it can run unmodified on many different operating systems. It is runnable
on Linux, FreeBSD, NetBSD, OpenSolaris, BeOS, QNX, WinCE, Nucleus, VxWorks, Haiku,MorphOS, and Mac OS X It is licensed under
either the GNU General Public License or a proprietary license. It is a partial fork of ntfsprogs and is under active maintenance and
development. This piece of software is made available under the terms and conditions of the NTFS-3G Read/Write Driver license,
which can be found below.
Source: http://www.tuxera.com
openssl (1.1.1l)
OpenSSL is an open source implementation of the SSL and TLS protocols. The core library (written in the C programming
language) implements the basic cryptographic functions and provides various utility functions. Wrappers allowing the use of the
OpenSSL library in a variety of computer languages are available.
Source: http://www.openssl.org/
pcre (8.45)
The PCRE library is a set of functions that implement regular expression pattern matching using the same syntax and semantics as
Perl 5. PCRE has its own native API, as well as a set of wrapper functions that correspond to the POSIX regular expression API. The
PCRE library is free, even for building proprietary software.
https://www.pcre.org/
procps (ps, top) (3.3.15)
procps is the package that has a bunch of small useful utilities that give information about processes using the /proc filesystem.
The package includes the programs ps, top, vmstat, w, kill, free, slabtop, and skill.
Source: http://procps.sourceforge.net/index.html
SQLite3 (3.36.0)
SQLite is an in-process library that implements a selfcontained, serverless, zero-configuration, transactional SQL database engine.
This piece of software is made available under the terms and conditions of the SQLite3 license, which can be found below.
Source: http://www.sqlite.org/
util-linux-ng (2.35.2)
Various system utilities.
Source: http://userweb.kernel.org/~kzak/util-linux-ng/
wpa_supplicant (2.9)
wpa_supplicant is a WPA Supplicant for Linux, BSD, Mac OS X, and Windows with support for WPA and WPA2 (IEEE 802.11i / RSN).
It is suitable for both desktop/laptop computers and embedded systems. Supplicant is the IEEE 802.1X/WPA component that is
used in the client stations. It implements key negotiation with a WPA Authenticator and it controls the roaming and IEEE 802.11
authentication/association of the wlan driver.
Source: https://w1.fi/wpa_supplicant/
zlib (1.2.8)
The 'zlib' compression library provides in-memory compression and decompression functions, including integrity checks of the
uncompressed data. This piece of software is made available under the terms and conditions of the zlib license, which can be
found below.
Source: http://www.zlib.net/
Technical
Information
and Help
Technical
Information
and Help
Visit Partmaster.co.uk today for the easiest way to buy electrical spares and accessories. With over
1 million spares and accessories available we can deliver direct to your door the very next day. Visit
www.partmaster.co.uk or call 0344 800 3456 (UK customers only). Calls charged at National Rate.
The symbol on the product or its packaging indicates that this product must not be disposed of with your other
household waste. Instead, it is your responsibility to dispose of your waste equipment by handing it over to a
designated collection point for the recycling of waste electrical and electronic equipment. The separate collection
and recycling of your waste equipment at the time of disposal will help conserve natural resources and ensure
that it is recycled in a manner that protects human health and the environment.
For more information about where you can drop off your waste for recycling, please contact your local authority,
or where you purchased your product.
Whether it’s a tech emergency or you need plain good advice, we’re always on hand to help,
call (UK) 0344 5611234 or (Ireland) 1 890 818 575.
Notes for Battery Disposal
The batteries used with this product contain chemicals that are harmful to the environment. To preserve our
environment, dispose of used batteries according to your local laws or regulations. Do not dispose of batteries
with normal household waste.
For more information, please contact the local authority or your retailer where you purchased the product.
All the support you need.
Currys.co.uk
MPEG-2 NOTICE
Any use of this product in any matter other than personal
use that complies with the MPEG-2 standard for encoding
video information for packaged media is expressly prohibited
without a license under applicable patents in the MPEG-2
Patent Portfolio, which license is available from MPEG LA, LLC,
6312 S. Fiddlers Green Circle, Suite 400E, Greenwood Village,
Colorado, 80111 U.S.A.
Rovi Proprietary Rights
This item incorporates copy protection technology that is
protected by U.S. patents and other intellectual property rights
of Rovi Corporation. Reverse engineering and disassembly are
prohibited.
Restriction on Use & Rovi Trade Mark Rights
Use of the copyright protection technology contained in
this product must be authorised by Rovi Corporation and is
intended for home and other limited viewing uses only unless
otherwise authorised by Rovi Corporation. The names “Rovi
Corporation” and “Macrovision” are protected by trademarks.
Dolby Audio
Manufactured under license from Dolby Laboratories. Dolby,
Dolby Audio and the double-D symbol are trademarks of
Dolby Laboratories Licensing Corporation.
Freely
A minimum broadband speed of 10Mbps is recommended
to stream live internet channels or watch on demand shows.
Services, players and channels may not be available on all TVs.
Extra costs may apply for certain players or services.
Prime Video
©2026 Amazon.com, Inc, or its affiliates. Amazon, Prime Video,
and all related marks are trademarks of Amazon.com, Inc. or
its affiliates. Amazon Prime membership or Prime Video fees
apply. See primevideo.com/terms for details.
The terms HDMI, HDMI High-Definition Multimedia Interface,
HDMI trade dress and the HDMI logos are trademarks or
registered trademarks of HDMI License Administrator, Inc.
All trademarks are the property of their respective owners and
all rights are acknowledged.

(IB-LT-24CT250 / LT-32CT250 / LT-40CT350 / LT-43CT350 - 110226V2)
This product is distributed and warranted exclusively by Currys Group Limited “JVC” is the trademark of JVCKENWOOD
Corporation, used by Currys Group Limited Under licence.
Dear Customer,
This apparatus is in conformance with the valid European directives compatibility and electrical
safety.
For Help and Support Call
UK: 0344 561 1234
Ireland: 0818 810575
Currys Group Limited (Registered in England No. 504877)
1 Portal Way, London, W3 6RS, UK
www.currys.co.uk
Contact details: [email protected].uk
EU Representative
Currys Ireland Limited (Registered in Ireland No. 259460)
3rd Floor Office Suite
Omni Park SC, Santry, Dublin 9, Republic of Ireland
www.currys.ie
Responsible person: Currys Ireland Limited
Contact details: [email protected].uk