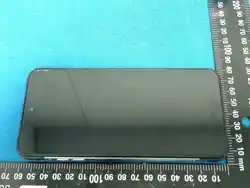
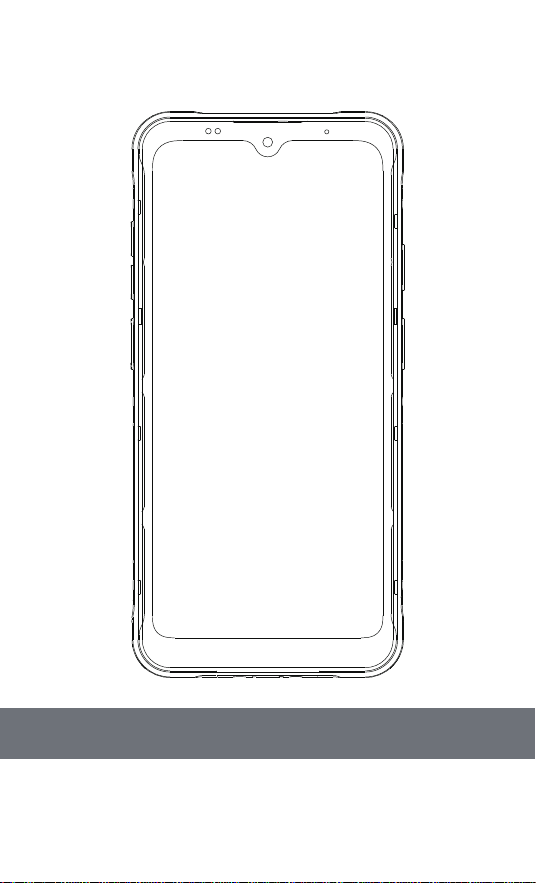
L611 User Manual
4G Handheld Terminal

FCC Caution:
Any Changes or modifications not expressly approved by the party
responsible for compliance could void the user's authority to operate
the equipment.
This device complies with part 15 of the FCC Rules. Operation is subject
to the following two conditions: (1) This device may not cause harmful
interference, and (2) this device must accept any interference received,
including interference that may cause undesired operation.
Note: This equipment has been tested and found to comply with the limits
for a Class B digital device, pursuant to part 15 of the FCC Rules. These
limits are designed to provide reasonable protection against harmful
interference in a residential installation. This equipment generates, uses
and can radiate radio frequency energy and, if not installed and used in
accordance with the instructions, may cause harmful interference to radio
communications. However, there is no guarantee that interference will not
occur in a particular installation. If this equipment does cause harmful
interference to radio or television reception, which can be determined by
turning the equipment off and on, the user is encouraged to try to correct the
interference by one or more of the following measures:
—Reorient or relocate the receiving antenna.
—Increase the separation between the equipment and receiver.
—Connect the equipment into an outlet on a circuit different from that to
which the receiver is connected.
—Consult the dealer or an experienced radio/TV technician for help.
The device has been tested and comply with FCC SAR limits.
This equipment complies with FCC radiation exposure limits set forth for
an uncontrolled environment.
Frequency Range
EGSM900: 880-915MHz(TX),925-960MHz(RX)
DCS 1800: 1710-1785MHz(TX), 1805-1880MHz(RX)
WCDMA 2100:1920-1980MHz(TX),2100:2110-2170MHz(RX)
WCDMA 900:880-915MHz(TX),925-960MHz(RX)
LTE Band 1: 1920-1980MHz(TX),2110-2170MHz(RX)
LTE Band 3: 1710-1785MHz(TX),1805-1880MHz(RX)
LTE Band 7: 2500-2570MHz(TX),2620-2690MHz(RX)
LTE Band 8: 880-915MHz(TX),925-960MHz(RX)
LTE Band 20: 832-862MHz(TX),791-821MHz(RX)
LTE Band 28: 703-748MHz(TX),758-803MHz (RX)
LTE Band 34: 2010-2025MHz(TX)(RX)
LTE Band 38:2570-2620MHz(TX)(RX)
LTE Band 40:2300-2400MHz(TX)(RX)
Bluetooth: 2402-2480MHz(TX)(RX)
BLE 1M/2M: 2402-2480MHz(TX)(RX)
2.4G Wi-Fi: 2412-2472MHz(TX)(RX)
5G Wi-Fi: 5180-5240MHz, 5260-5320MHz, 5500-5700MHz,
5745-5825MHz(TX)(RX)
Manufacturer Information:
Shenzhen Tianlong Century TechnologyDevelopment Co.,Ltd.
3F,5F, Industrial Building,No.1, Quanxinyuan Industrial Zone, Tongsheng
Community, Dalang Street, Longhua District,Shenzhen China
NFC:13.56MHz(TX)(RX)
GPS L1 C/A, BDS B1I, Galileo E1, SBAS L1: 1559-1610MHz(RX)
FM: 87.5-108MHz(RX)
RF-Output Power
EGSM900: 33.34dBm (GMSK), 27.68dBm (8PSK)
DCS 1800: 30.11dBm (GMSK), 27.52dBm (8PSK)
WCDMA Band 1: 23.80dBm
WCDMA Band 8: 24.11dBm
LTE Band 1:23.07dBm
LTE Band 3: 23.57dBm
LTE Band 7: 22.98dBm
LTE Band 8: 24.38dBm
LTE Band 20: 23.81dBm
LTE Band 28: 23.91dBm
LTE Band 34: 23.23dBm
LTE Band 38: 22.68dBm
LTE Band 40: 23.01dBm
Bluetooth:4.59dBm
BLE: 6.08dBm
2.4G Wi-Fi: 15.64 dBm
5.2 Wi-Fi: 16.141 dBm
5.3G Wi-Fi: 16.497 dBm
5.8G Wi-Fi: 12.604 dBm
NFC:7.39dBμA/m@3m
For body worn operation, this device has been tested and meets the FCC RF
exposure guidelines when used with an accessory designated for this
product or when used with an accessory that contains no metal. Please
keep the device minimum 10mm to the Body when normal use.

2
Do not use the mobile phone in areas where its use is prohibited or where
it may cause interference or danger.
Do not use the mobile phone while driving to ensure safe driving.
SafetyPrecautions
For the safe and effecve use of your mobile phone, please read the
following informaon carefully before use.
SafePowerOn
Traffic Safety Comes First
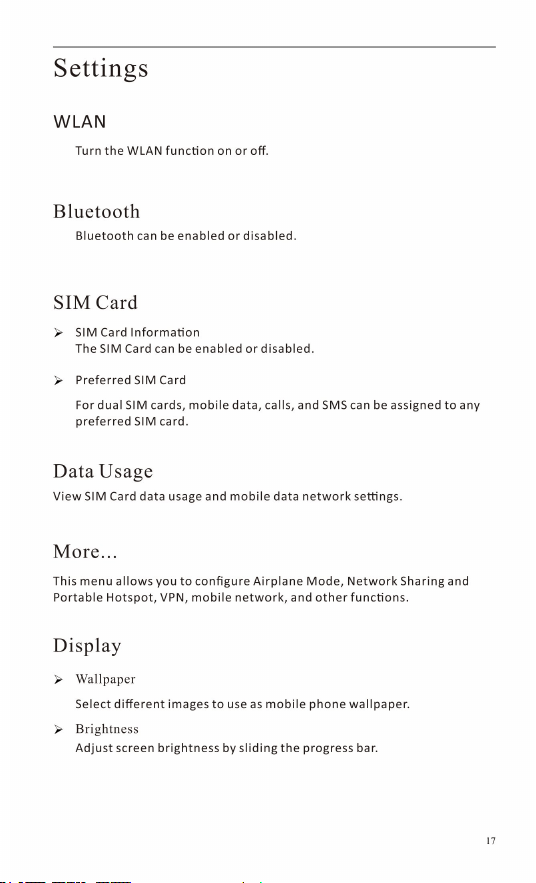
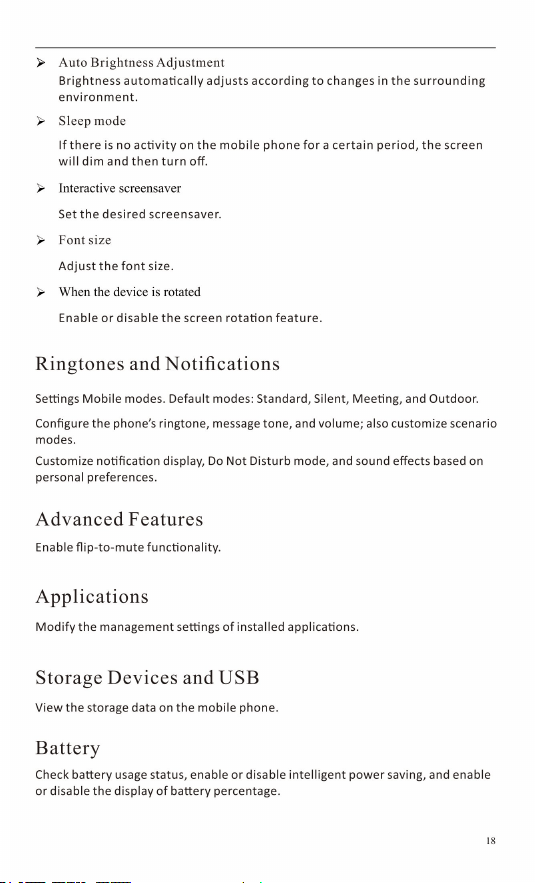
Advanced Features .........................................................................................15
Applications ....................................................................................................15
Storage and USB .............................................................................................16
Battery ..............................................................................................................16
Memory ............................................................................................................16
Location Information ....................................................................................16
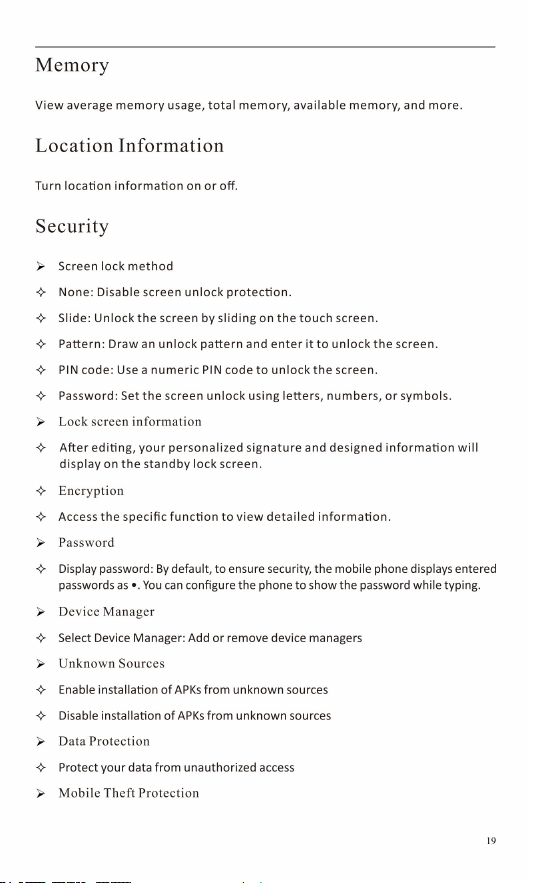
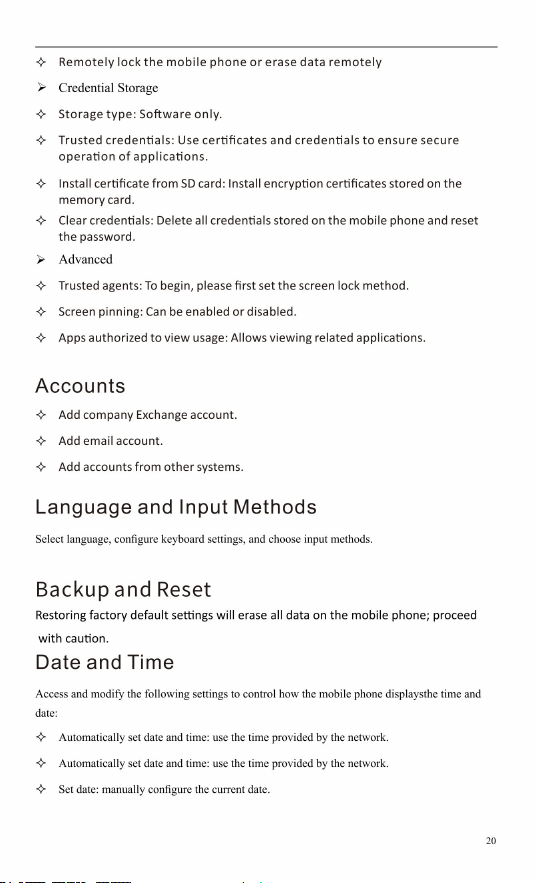
Security ............................................................................................................16
Accounts ...........................................................................................................17
Language and Input Methods .....................................................................17
Backup and Reset ...........................................................................................17
Date and Time .................................................................................................17
Scheduled Power On/Off ...............................................................................18
Accessibility ....................................................................................................18
Print ...................................................................................................................18
About the Mobile Phone ...............................................................................18
Frequently Asked Questions and Solutions .......................................................18
3
SwitchOfftheDeviceinRestrictedAreas
Please comply with all applicable restricons and regulaons. Turn off the mobile
phone on airplanes and near flammable materials, chemicals, or medical equipment.
Mobile communicaons may be subject to radio interference, which canaffect
performance.
This mobile phone is waterproof.
The mobile phone and all its accessories should be kept out of reach of
children.
Please use only the baery and charger specified by our company; otherwise,
an explosion may occur.
Do not disassemble the mobile phone or its accessories without authorizaon;
only authorized service centers may repair this mobile phone.
Verify that the following items are included in the product package:
• Mobile phone
4
When you order mobile phone service, you will receive a Subscriber Identy Module
(SIM) card containing your subscripon details, such as the Personal Idenficaon
Number (PIN) and oponal services.
To install the SIM card:
When you subscribe to mobile phone services, a Subscriber Identy Module (SIM) card
is used, which contains your subscripon details such as the Personal
Idenficaon Number (PIN) and oponal services. To use UMTS or HSDPA services,
you may purchase a Universal Subscriber Identy Module (USIM) card. The
installaon procedure for the SIM card or USIM card is as follows:
1. Insert the SIM card eject tool into the hole on the SIM card tray. Press firmly
and push unl the tray ejects.
2. Remove the SIM card tray and place the SIM card into the tray.
3. Ensure the SIM card is aligned parallel to the tray, then carefully reinsert the tray.
² If the SIM card or USIM card is not inserted, only non-network services and
certain menu funcons of the mobile phone will be available.
To install a memory card (oponal):
You may use a microSD™ or microSDHC™ memory card.
² The mobile phone supports only the FAT file system for memory cards. If a memory
card with a different file system is inserted, the mobile phone will prompt you
to reformat the memory card.
² Frequent data wring and deleon will shorten the lifespan of the memory card.
² When a memory card is inserted into the mobile phone, its file directory will
appear under the /sdcard/sd folder in the internal storage (moviNAND™).
Ø Installing the memory card
•Baery
•Travelcharger(charger)
•Usermanual
•SIMejectortool
•Headset

5
1. Insert the ejector tool into the hole on the memory card tray. Press firmly and push
down unl the tray ejects.
2. Pull out the memory card tray and place the memory card into the tray.
3. Align the memory card parallel to the tray and carefully reinsert it.
Ø Remove the memory card
Before removing the memory card, unmount it to ensure safe removal.
1. In standby mode, select Sengs → Storage → Unmount SD card.
2. Insert the eject tool into the hole on the memory card tray. Press firmly and
push down unl the tray ejects.
3. Pull out the memory card tray and remove the memory card.
Do not remove the memory card while the mobile phone is transming or accessing
data, as this may cause data loss or damage to the phone and memory card.
Ø Format the memory card
1. Formang the memory card on a computer may cause incompability with the
mobile phone. Please format the memory card only on the mobile phone.
2. In standby mode, select Sengs → Storage → Format SD Card.
Before formang the memory card, ensure all important data stored on the mobile
phone is backed up. Manufacturer warranty does not cover data loss caused by user
operaons.
ChargingtheBattery
² Charge the baery before using the mobile phone for the first me. Use the
provided travel charger or connect the mobile phone to a computer with the
computer data cable to charge the device.
² Use only authorized chargers and data cables. Unauthorized chargers or data
cables may cause the baery to explode or damage your mobile phone.
² When the baery level is low, the mobile phone will emit a warning sound and
display a low baery message. The baery icon will also appear empty and turn
red. If the baery level is crically low, the mobile phone will automacally
shut down. Charge the baery before connuing to use the mobile phone.
Ø Charging with computer data cable
Before charging, ensure the computer is powered on.
1. Insert one end of the computer data cable (Type-C USB) into the Type-C port of

6
mobile phone.
2. Connect the other end of the computer data cable to the computer’s USB port.
Depending on the type of data cable used, charging may start aer a brief delay.
3. When the baery is fully charged (the baery icon no longer moves), disconnect
the computer data cable from the mobile phone, then unplug it from the computer.
To power on, press and hold the [POWER] key unl the device powers on.
To power off, press and hold the [POWER] key, then select Power Off.
In areas where wireless device use is prohibited (such as airplanes and
hospitals), comply with all posted warnings and instrucons from
authorized personnel.
To use only non-network services on the mobile phone, switch to Airplane Mode.
Pull down the dropdown menu and select Airplane Mode.
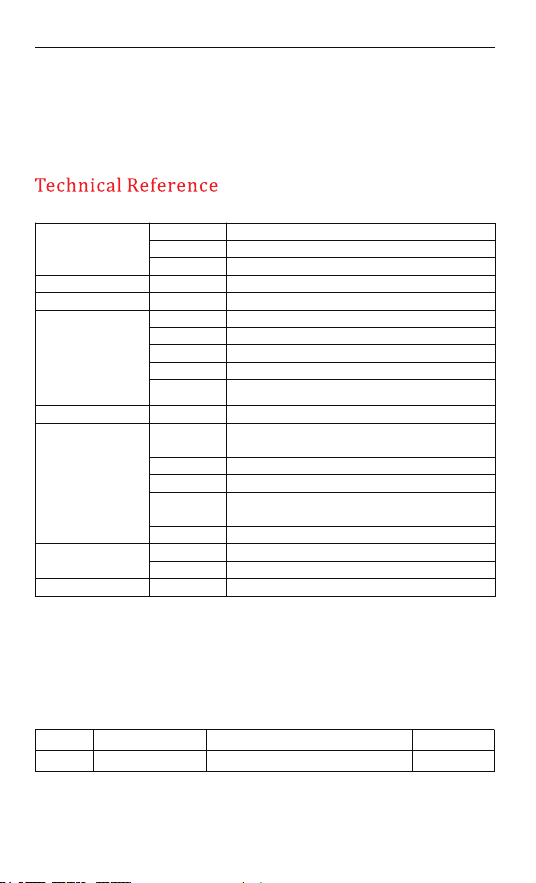
OS
System
Screen
Cameras
Communication
Electric Acousc
Parts
Positioning
Electrical Parts
Industrial Features
Chipset
Memory
LCD
Front/Rear
SIM
TF Card
NFC
BT
WiFi
Supports
Sensors
Speaker
Microphone
Touchscreen
Port
Baery
Charger
Ruggedness
Powered by Android15
MT8781, Octa-core 2.2GHz
64GB ROM + 4GB RAM/256GB+8GB
6.088” 1560*720 HD
5MP FF/16MP AF
Dual Nano SIM
Supported, up to 512GB
13.56MHz ( ID card recognion Supported)
Bluetooth 5.2
Supports 2.4GHz/5GHz Dual-band
GPS , Galileo, Beidou
Accelerometer, Compass, Proximity Sensor,
Ambient Light Senor and Three-axis Gyroscope
1.5W (Front)
Dual MIC with Noise Reducon
Capacive screen, 5-point touch, supports
glove mode and gesture operaon
TYPE-C earphone supported
5000mAh removable baery
TYPE-C Port/ Dock charging
IP68; water-proof, dust-proof and shock-proof
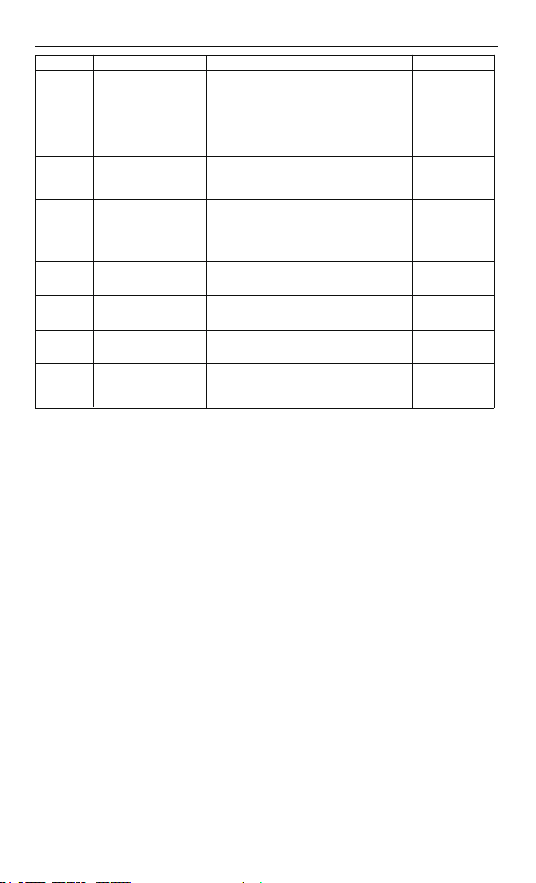
Getting to Know the Mobile Phone
Number Number Number
1 Microphone Also referred to as the
7
8
Using the mobile phone touchscreen allows easier selecon of items or e xecuon
of funcons. Learn the basic oper aons of the touchscreen.
² To avoid scratching the touchscreen, do not use sharp objects.
² Do not allow the touchscreen to come into contact with other electr onic devices.
Electrostac discharge may cause malfuncon of the touchscreen.
² The touchscreen has a protecve layer that detects small electric charges emied
by the human body. For opmal performance, tap the
touchscreen with your fingerp. The touchscreen does not respond to contact fr om
sharp objects, such as needles, pens, or f ountain pens.
The following operaons can be used to control the touchscreen:
² Tap: Tap once with your finger to select or launch a menu, opon, or
applicaon.
2
telephone transmier.
Also referred to as the
telephone receiver; to
Earpiece
ensure sound quality during
calls, keep the earpiece
close to your ear.
Volume side
key
Also referred to as the side
volume buon.
USB/charging
port
Also referred to as the I/O
port; the USB port and
charging port are combined.
Power buon
Performs power on and off
funcons.
Rear camera
Built-in camera, 5
megapixels.
Speaker
Speaker located at the
lower rear.
Le upper side key
Programable
key Le upper side key
3
4
5
6
7
8
Using the Touchscreen

9
² Enter menu: Tap the menu name to access the menu interface.
² Scroll: Tap and drag your finger up, down, le, or right to move through
items in a list.
² Drag and drop: Tap and hold an item with your finger, then drag it to move
the item.
² Double tap: When viewing photos or web pages, quickly tap twice with your
finger to zoom in or out.
² If the mobile phone is inacve for a specified period, the touchscreen will
turn off. To reacvate the touchscreen, press the [POWER] buon.
² You can also adjust the screen meout. In standby mode, select Sengs
→ Display → Sleep.
The touchscreen can be locked to prevent accidental operaon on the mobile
phone.
To lock the mobile phone, press the [POWER] key. To unlock, press the [POWER]
key to light the screen, then operate the touchscreen with your finger.
When the mobile phone is in standby mode, the standby screen is displayed. On
the standby screen, you can view the phone’s status and access
applications.
Ø Select wallpaper
You can set the wallpaper to customize the standby screen or lock screen.
Ø Gallery: Set the image for the lock screen or desktop interface.
Ø Wallpaper: Set the image for the lock screen or desktop interface.
Ø Moving items on the standby screen
Ø Tap and hold the item you want to move.
Ø When the item icon flashes, drag the item to the desired locaon.
Ø Removing items from the standby screen
Ø Tap and hold the item you want to remove; a delete icon will appear
in the top-le corner.
Locking or Unlocking the Touchscreen
Step-by-Step Guide to the Standby Screen

Ø Using the shortcut panel
² Tap the delete buon in the top-le corner.
In standby mode or while using applicaons, touch the indicator icon area at the
top of the touchscreen, then dr ag your finger downward to open the shortcut panel.
You can enable or disable wireless connecons and other funcons, and access a
list of noficaons such as messages, calls,acvies, or pr ocessing status. To hide
the list, drag its lower edge upward.
² The following opons are available on the display interface of the
shortcut panel:
² Baery: View baery status.
² Settings:Quicklyaccessthesettingsmenu.
² Hotspot:Turnthehotspotonoroff.
² Brightness: Adjust the screen brightness.
² WLAN: Turn WLAN on or off.
² Bluetooth: Turn Bluetooth on or off.
² Data connecon: Turn data connecon on or off.
² Airplane Mode: Turn Airplane Mode on or off.
² Do Not Disturb Mode: Set Do Not Disturb duraon and applicaons.
² Auto-Rotate: Enable or disable screen rotaon.
² Flashlight: Turn the flashlight on or off.
² Sound: Switch between sound, vibraon, and silent modes.
² Locaon informaon: Enable or disable locaon informaon.
² Night mode: Can be turned on or off.
² Data saver: Can be turned on or off.
² Invert colors: Can enable or disable dark mode and light mode.
10
Customize your mobile phone according to personal preferences to access
addional funcons.
Ø
Ø
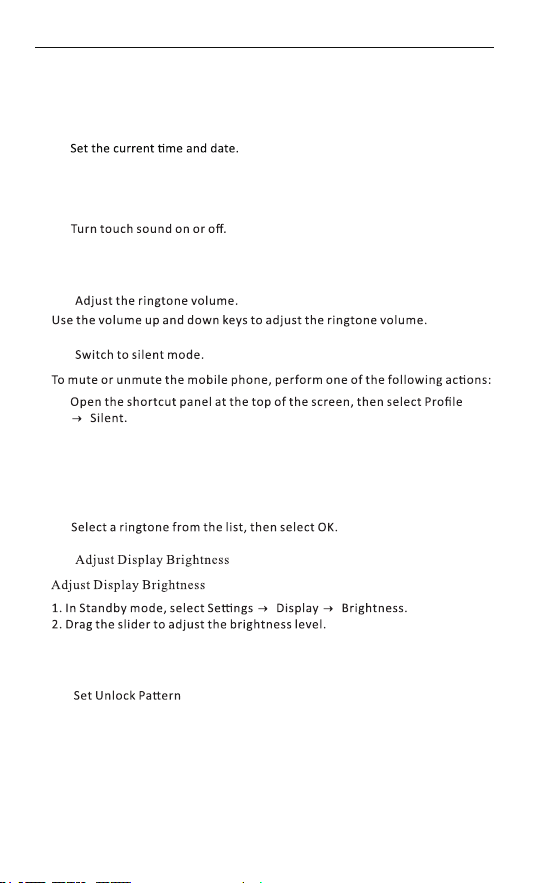
² In Standby mode, select Sengs → Date and Time.
² Set the me and date, and modify other opons.
In Standby mode, select Sengs → Prompts and Noficaons → Standard
→ Sengs opons → Select touch sound.
Ø
Ø
²
11
Change Ringtone
Ø
²
In Standby mode, open the Applicaon list, then select Sengs →
Sounds and noficaons → Standard → Mobile phone ringtone,
noficaon tone.
²
Ø
The display brightness level affects the rate at which the mobile phone
consumes Baery power.
Ø
You can set an unlock paern to prevent unauthorized use of the mobile
phone.
Customizing the Mobile Phone
Lock SIM
Dial pad
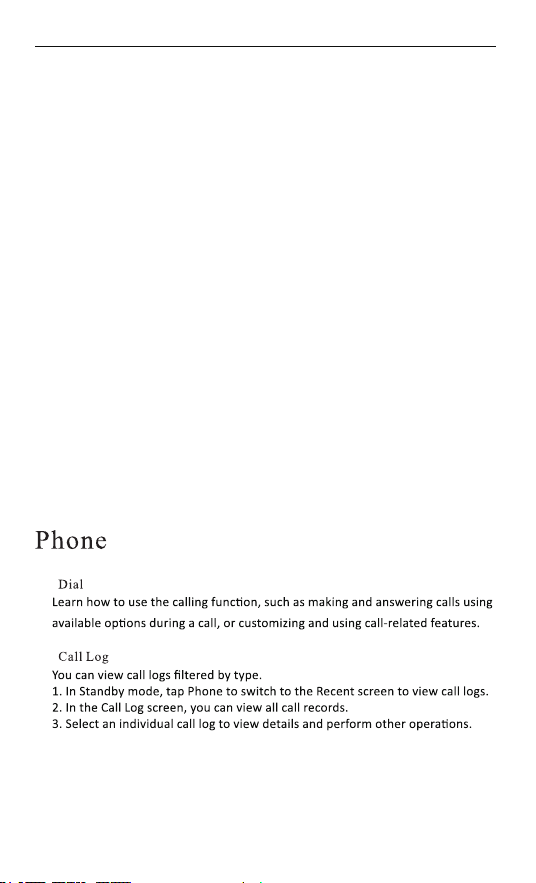
1. In standby mode, select Sengs → Security → Screen lock method →Paern.
2. Pay aenon to the on-screen prompts (if necessary).
3. Select Connue.
4. Aer drawing the unlock paern, select Connue.
5. Draw the paern again to confirm, then select Confirm.
6. Click Finish. The paern unlock has been set successfully.
Ø
The mobile phone can be locked by enabling SIM or PIN code lock.
1. In standby mode, open the applicaon list, then select Sengs →Security →
Set SIM card lock method → Lock SIM card.
2. Enter the PIN code and select OK.
² If PIN code lock is enabled, the PIN code must be entered each me the
mobile phone is powered on.
² If the PIN code is entered incorrectly mulple mes, the SIM card will
be locked. At this me, you must enter the PIN Unlock Key (PUK) to unlock
the SIM.
² If the SIM is locked due to incorrect PUK entry, please take the card
to the Service Provider for unlocking.
Ø
Ø
Ø
Tap the buon to open the dial pad. Swipe on the blank area above the dial pad
12