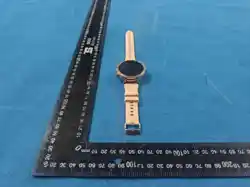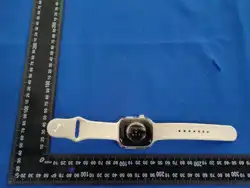

4G smart watch
M16
User Manual
V1.0
Suitable for pull-out camera

1.Please read the instruction manual below before use, in order to install the SIM
card properly and use the product easily.
2.The product pictures displayed in the manual are for illustration only, please refer
to the actual product.
1) SIM card installation method:
1.Prepare a Nano SIM card.
2.Turn off your watchRemove the card trayPlace the SIM card into the tray
with the notch on the SIM card aligned with the notch on the tray(it will only fit
one way because of the notch), then insert the tray into the device completely
and in the same orientation that you removed it(the tray also only fits one way).
3.Caller display function and data flow must be opened (Data flow is not less
than 50M per month).
4.If the card supports the VoLTE function, please activate the VoLTE function
first. You can consult the card operator for activation methods.
Note: (1)The SIM card tray is on the side of the watch. Do not insert a
paper clip or SIM card eject tool into any holes.
(2)The SIM card tray is on the underside of the watch. Insert a paper
clip or SIM card eject tool into the small hole on the tray to eject it,
but do not use excessive force.
2) How to Use the watch:
1.Power on: hold the power button for 3 seconds to start the watch.
2.How to power off:
(Option 1) Press and hold the power button to pop up a new page,press and
hold the shutdown icon to slide to shut down.
(Option 2) By APP: ‘Function’ ‘Remote Power Off’.
3. Battery Charge: Fully charge the battery before first use.
Align the charging base with the charging area on the back of the watch,
connect the other end to the charger and turn on the power until the charging
icon appears on the device screen.
4. Switch and clean up background apps:
(Option 1)Click the white floating ball on the desktop and select ‘Recent’ tasks
to switch or clean up background apps.
(Option 2)Swipe up from the bottom and hold for about 1 second to enter the
recent tasks.
5. Volume adjustment:
(Option 1)Click the white floating ball on the desktop and select the volume
icon to adjust the volume.
(Option 2)Click the volume shortcut icon in the status bar to adjust the volume.
6. How to use the rotating camera:
Pull out the camera and rotate it to face forward or backward. Push the
camera in to hide it.
When using the camera, you can also adjust the display through the camera
switch icon in the floating ball or the camera switch icon at the top of the
camera page.
7. How to use the floating ball:
Turn the floating ball function on or off through the watch's
‘SettingsAssistSuspension Touch’ path.Check or uncheck to show or hide
the corresponding function.Press and hold to drag up and down to adjust the
order.
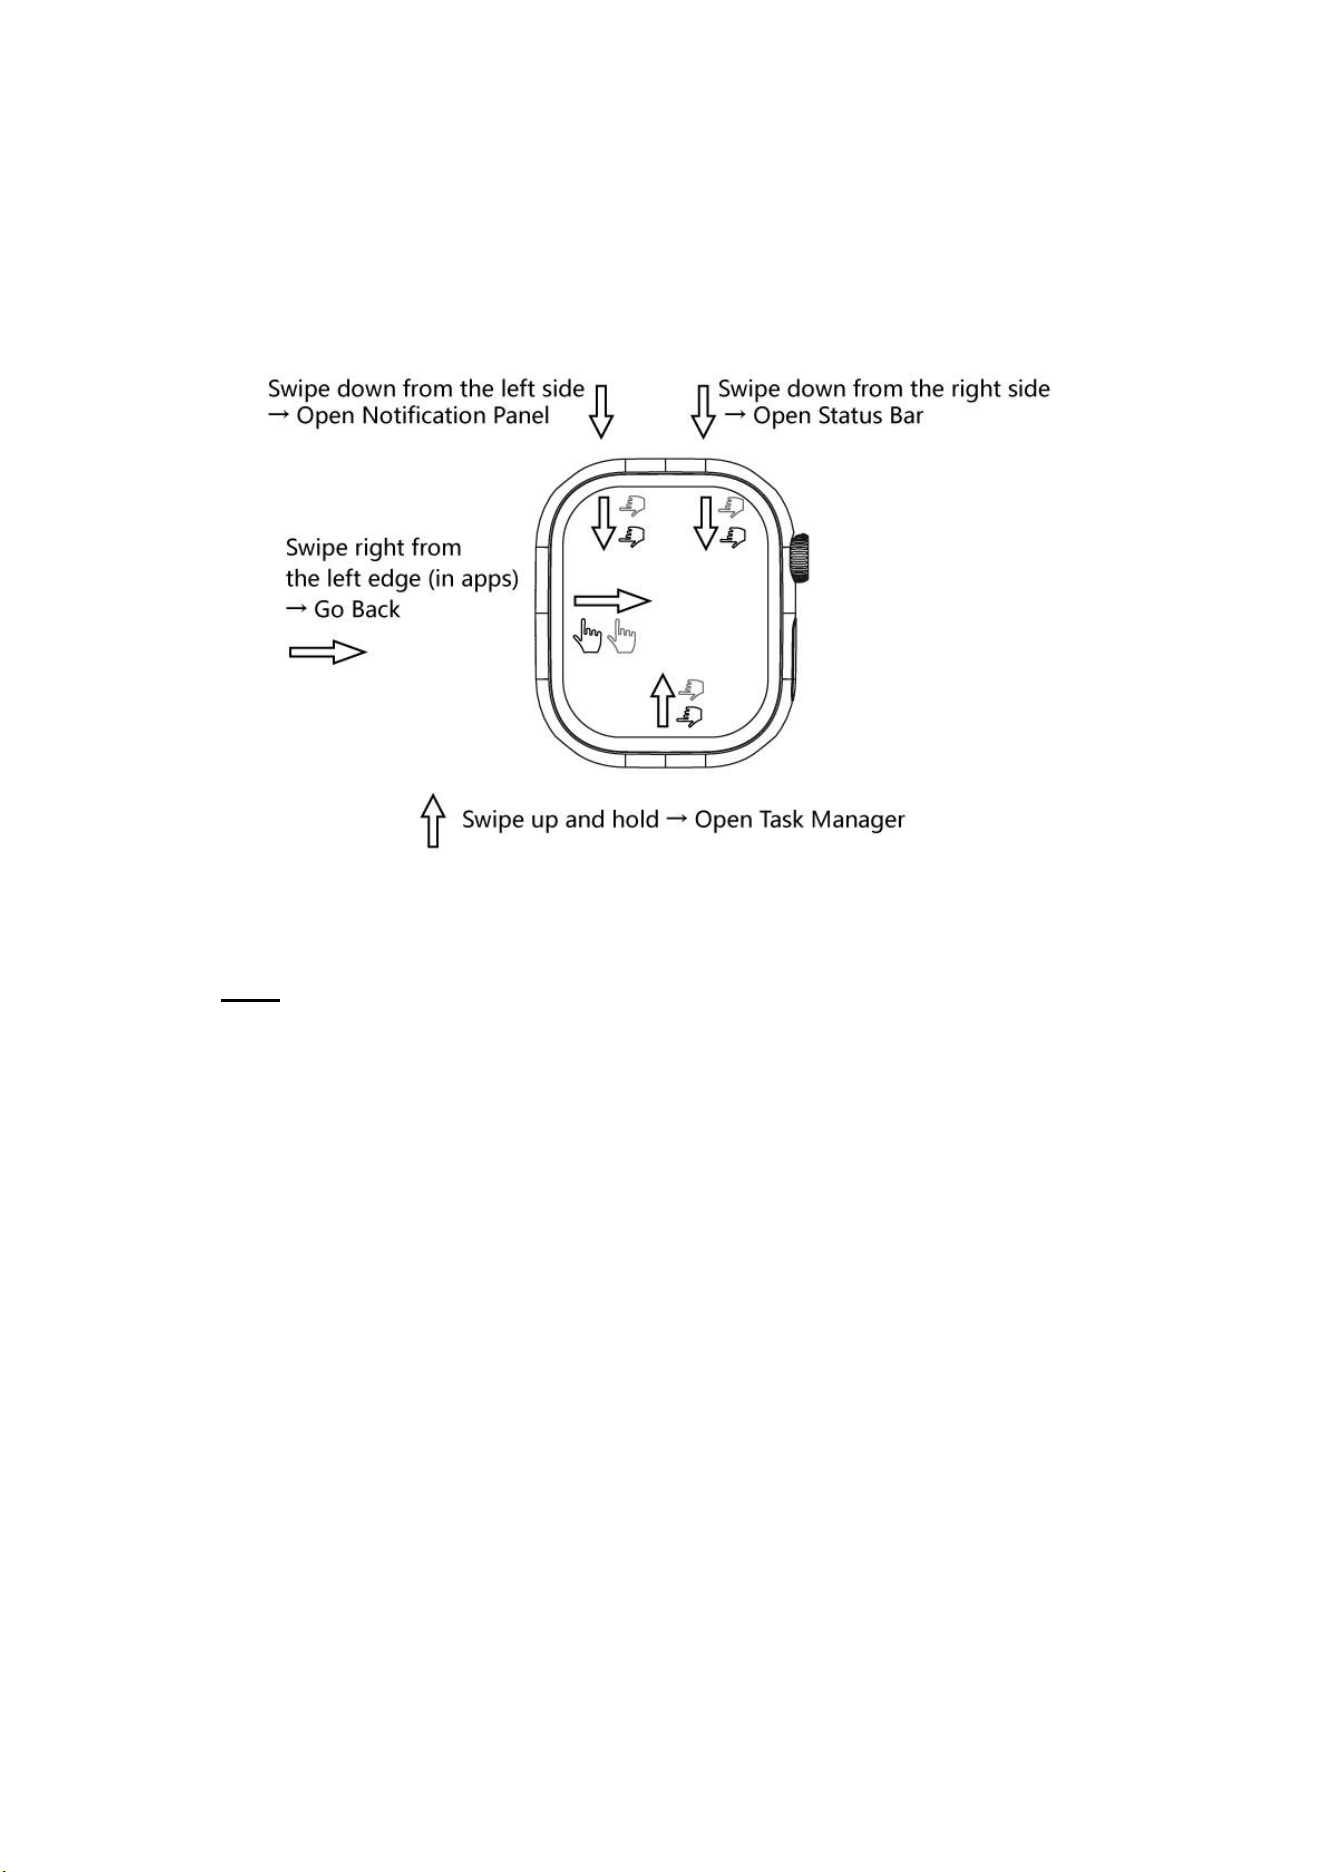
8. Gesture Operation:
Note:(1) The watch takes about one minute to read the SIM card. Once the
signal is stable, the time updates automatically.
(2) If the watch cannot be turned on normally, please check whether
the watch has electricity, if there is no electricity, please charge it in
time and turn it on again.
(3) If the card is not inserted or the card cannot be read after power
on, you can re-insert the card or replace the SIM card, and then
restart to confirm the card reading.
(4)Make sure you're using the magnetic charging cable that came
with your watch. Using other charging cables may damage your
watch.Please take off the watch in time after it is fully charged and
unplug the charging base.
(5)Please keep the surface of the charging base and the charging
area of the watch clean. If there are any foreign objects, please
remove them.
(6)The charger supports DC 5V~1A output. Do not use a charger
with an output voltage exceeding 5V, otherwise it will damage the
device.
(7)The camera with 3D Hall will automatically adjust the imaging
direction during rotation, without manual switching.
(8)Do not use excessive force when pulling out or rotating the
camera, otherwise the camera will be damaged.
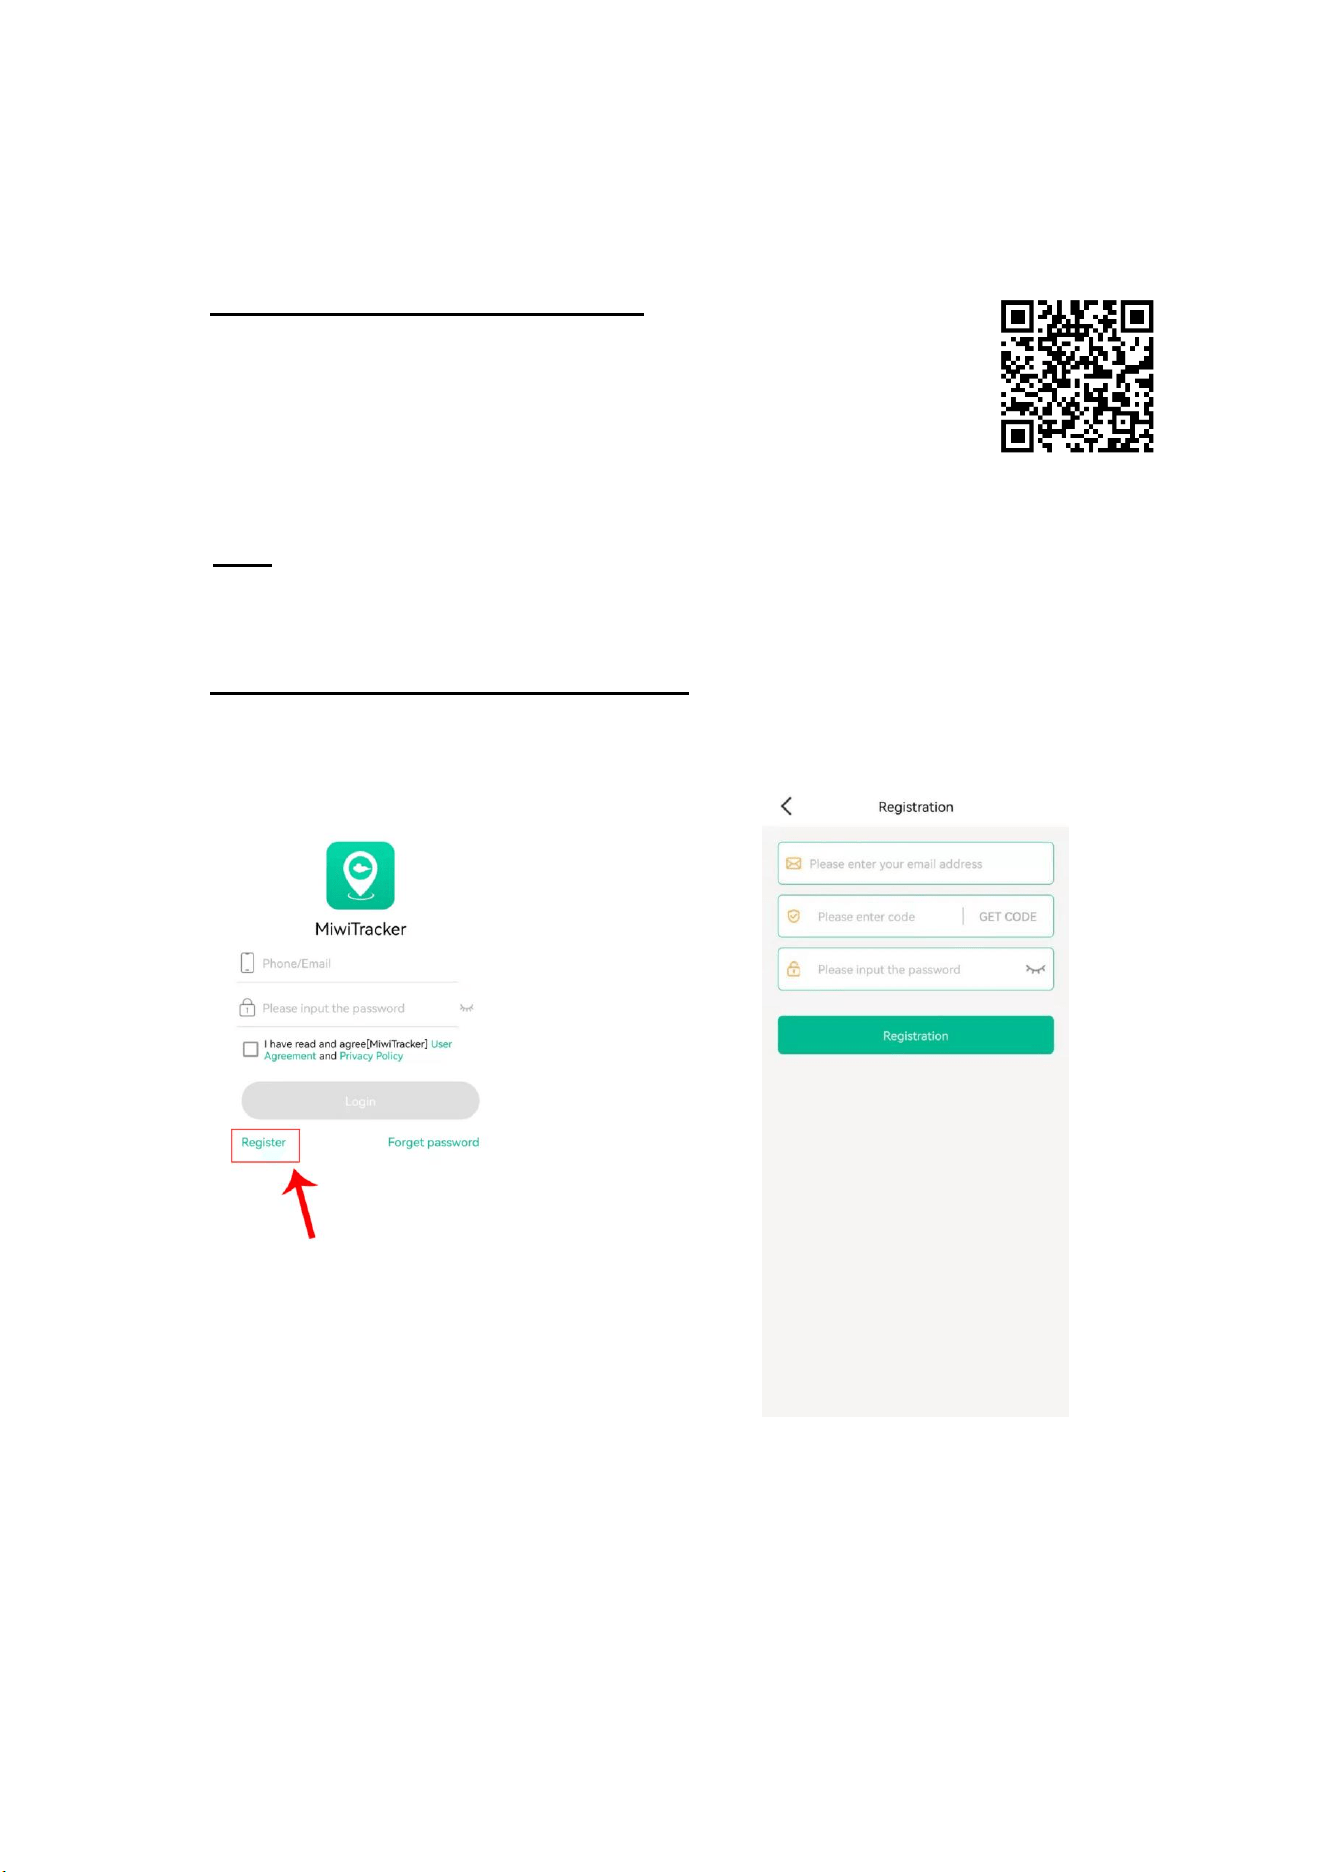
3) Download and install the App:
(Option1) - Scan the following QR code, download and install
the App
(Option 2) - Scan code to download in the GPS watch in ‘QR
Code’
(Option 3)-Search “MiWiTracker” in App Store - Apple or Google Play
Note: During installation, the phone prompts whether to trust the APP or
whether to allow prompt access to phone location, etc. Please
select trusted and allowed all the time.
4) Registering the watch and log in:
Open the App, new users will need to register a new account by clicking on the
bottom left “Register” button, complete the registration steps.
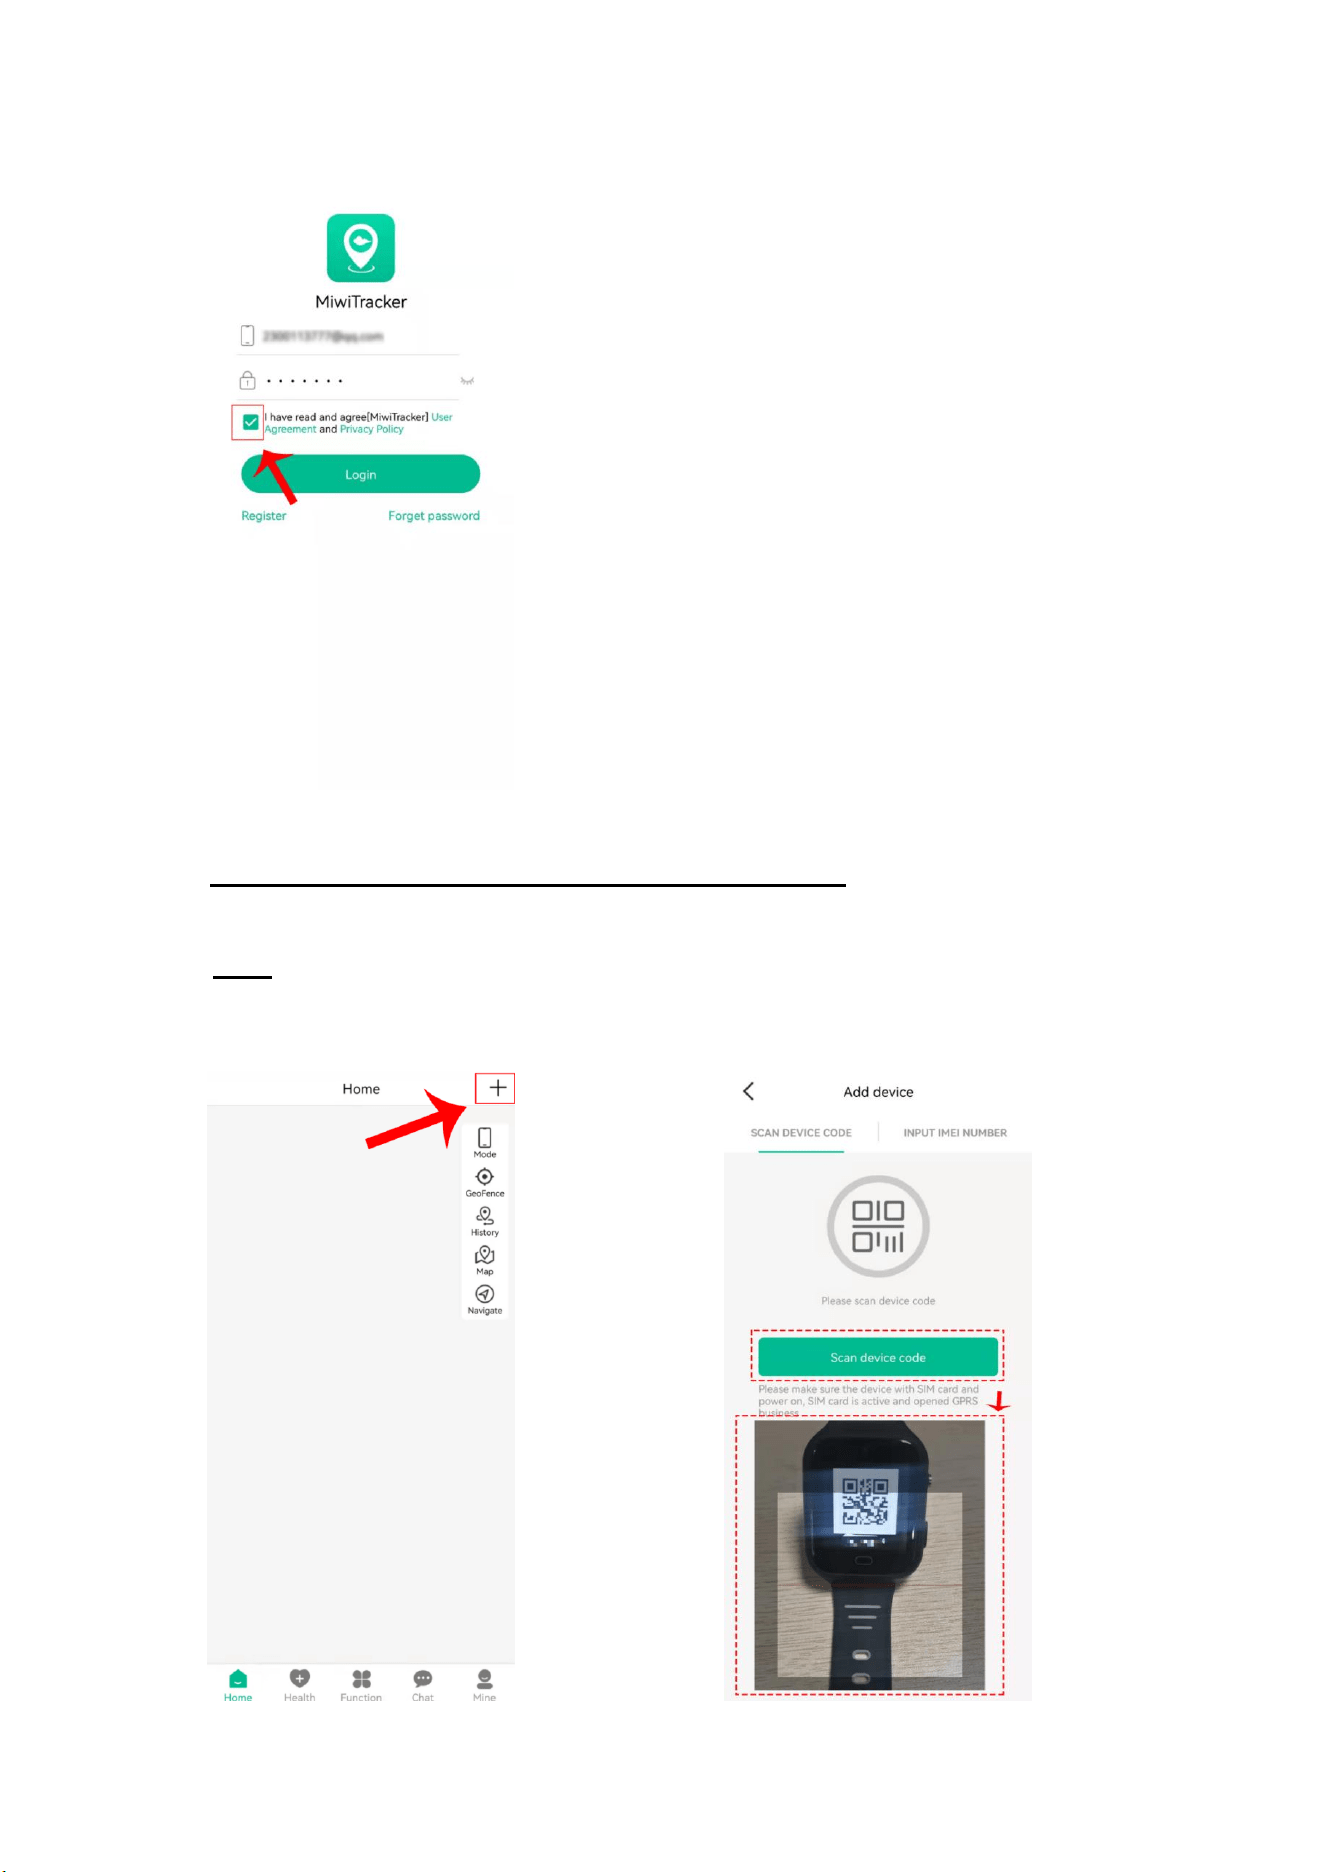
5) Connecting the watch to your APP account:
After successful registration, login to the account, select ‘+’ Add watch, scan
the QR code on the watch.
Note: During the process, the phone prompts whether to trust the APP or
whether to allow prompt access to phone location, etc. Please
select trusted and allowed all the time.
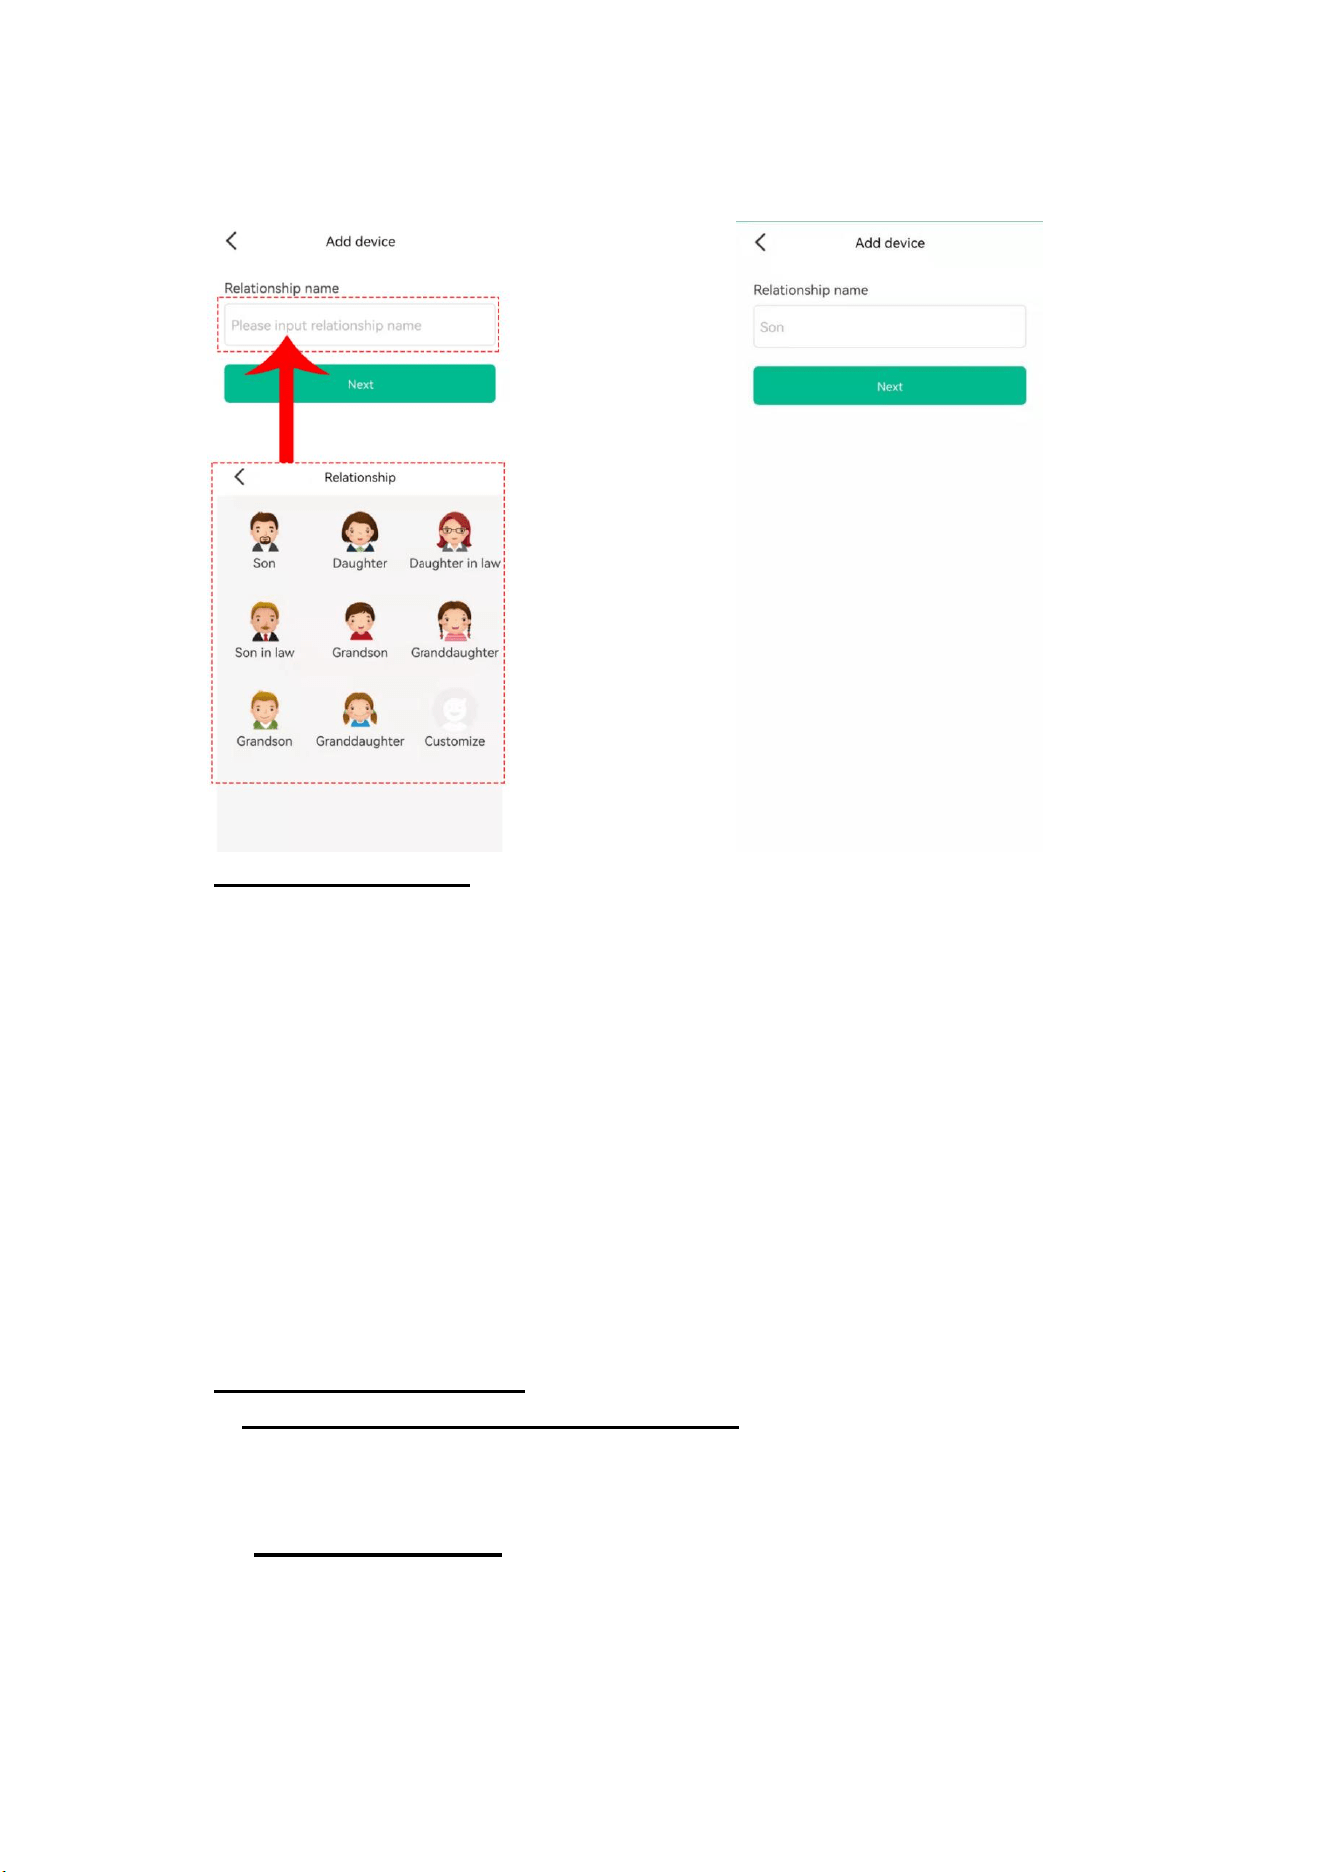
6) Product Features:
1.Real-time GPS, WIFI & CELL location
2.Historical track, Geofence
3.Calling (Contacts, SOS, two-way communication)
4.Voice Chat message
5.Camera function
6.Health pedometer
7.Location Update Modes
8.Clock
9.Heart Rate[*Optional, only for devices with heart rate]
10.Do Not Disturb
11.App Management
12.Class Mode
13.Other settings and functions
7) Function Description:
1. Location Update Schedule Modes:
There are two location update modes. User can combine the two modes to
better experience location services.
(1) Manual positing: Click‘Refresh’ in the real-time location map interface of
APP or click ‘Function’‘Real-time Position’ to update current location
information,and the watch will report the up-to-date position as soon as possible.

(2) Real-time positing: Updates location data to APP according to the set
interval when there is continuous movement.
Note: ①User can click‘Function’‘Upload Interval’ to set the device
upload interval in minutes.The value should be an integer between 0
and 86400.
②The default mode is manual positioning.This mode corresponds
to an upload interval of 0 minutes.
③ In the real-time positioning, the watch will regularly update the
location on the APP Map page and History.
④How to switch between manual mode and real-time mode: Set the
upload interval to 0 minutes for manual mode, and non-zero minutes
for real-time mode. In real-time mode, it is recommended to set it to
no less than 10 minutes.
2. Historical Location Playback:
In the real-time location map interface of APP, click the ‘History’ button on the
right, you can check the location history playback.
3. Geo-fence (safe area):
This feature defines a Geo-fence (safe area) perimeter and sends the user a
push notification if the tracker has left or entered the safe area.
Click ‘GeoFence’ Click the "+" icon in the upper right corner Click and
drag the map to set the centre point Drag to set the coordinates coordinate
area range Click ‘√’ at the top right Enter fence name Click confirm to
save .
Note:
(1)App will show enter or leave geofence alarm information (Click
‘Mine’ ‘message’).
(2) After the watch uploads the location, the APP can judge whether to
enter or exit the geofence.
4. Calling:
(1)Phone Book:
①Add a contact: Click APP ‘Function’‘Set phone book’ Click the ‘+’ icon
Insert name, number , and finally click ‘SAVE’ to save.
②Edit Contact:Click APP ‘Function’Set phone book drag to select the
number you want to edit Save after editing
③Delete Contact: Click APP ‘Function’Set phone book drag the number
you want to delete Click ‘Delete’ (delete information will be synchronized
in both of watches and app).
(2)Call:
①Use phonebook to call: Click ‘Contact’ icon in the watch to view the
contact list, slide up and down to select a contact to Call.
②One Button SOS:
Click APP ‘SOS Number’enter the SOS number (the sos number is the
guardian's mobile phone number, up to 3 groups)finally click ‘setting’ to
save.

In case of emergency, press and hold the power button to pop up a new
page, click the ‘SOS’ icon. At this time, the watch will call the 3 preset
emergency numbers circularly.
③Call dialing: Click the ‘Phone’ icon in the watch, enter phone numbers
manually, the telephone dial-out.
5. Chat features:
(1) Voice message:
①From APP send to watch: Click ‘Chat’ in main page of APP, voice can be
sent to the watch.
②From Watch send to APP: Click the ‘Chat’ icon in watch holding down the
talk button to speak release your finger to complete the recording.
8) APN and VoLTE whitelist settings:
1. APN settings:
The GPS watch by default has most of the APN information, however if you can
call and receive SMS but cannot get the GPS watch online from the beginning
of unboxing, then you need to set up APN. Ask your carrier about APN
information, and set in the GPS watch. Or you can check your SIM card APN
information by installing SIM card in a android mobile phone, check APN in the
network profile page in settings of mobile phone.
How to set APN in the GPS watch: Settings Network Mobile
networkAdvanced Access Point Names ‘+’ fill in APN
informationsave.
User needs to fill out: ‘Name’, ‘APN name’, ‘Username’,‘Password’,‘MCC’,
‘MNC’. Keep the rest as default.
Note: (1)Each operator's APN information is different; please contact the
operator for their APN and MCC, MNC information.
(2)Fill in "Username" and "Password" if you have them, otherwise
leave them as default.
2.VoLTE whitelist settings:
If you can use the SIM card's data to access the Internet and it supports the
VoLTE function, but cannot make calls, you need to set up a VoLTE whitelist.
How to set VoLTE whitelist in the GPS watch:Settings Network Mobile
networkVoLTE Whitelist ‘┆’ NEWfill in ‘PLMN’
information’√’save.
Note: (1)PLMN=MCC+MNC.For example, if mcc=505, mnc=03, then
PLMN=50503.
(2)This parameter is different for each card operator, please set it
accordingly. Please do not think that setting 50503 will work, this is
just an example
(3)Make sure your SIM card supports the VoLTE function. If it is not
activated, please consult your operator to activate it.
(4)If the status bar shows HD, it means VoLTE is functioning
properly.
9) Adding a secondary administrator account:
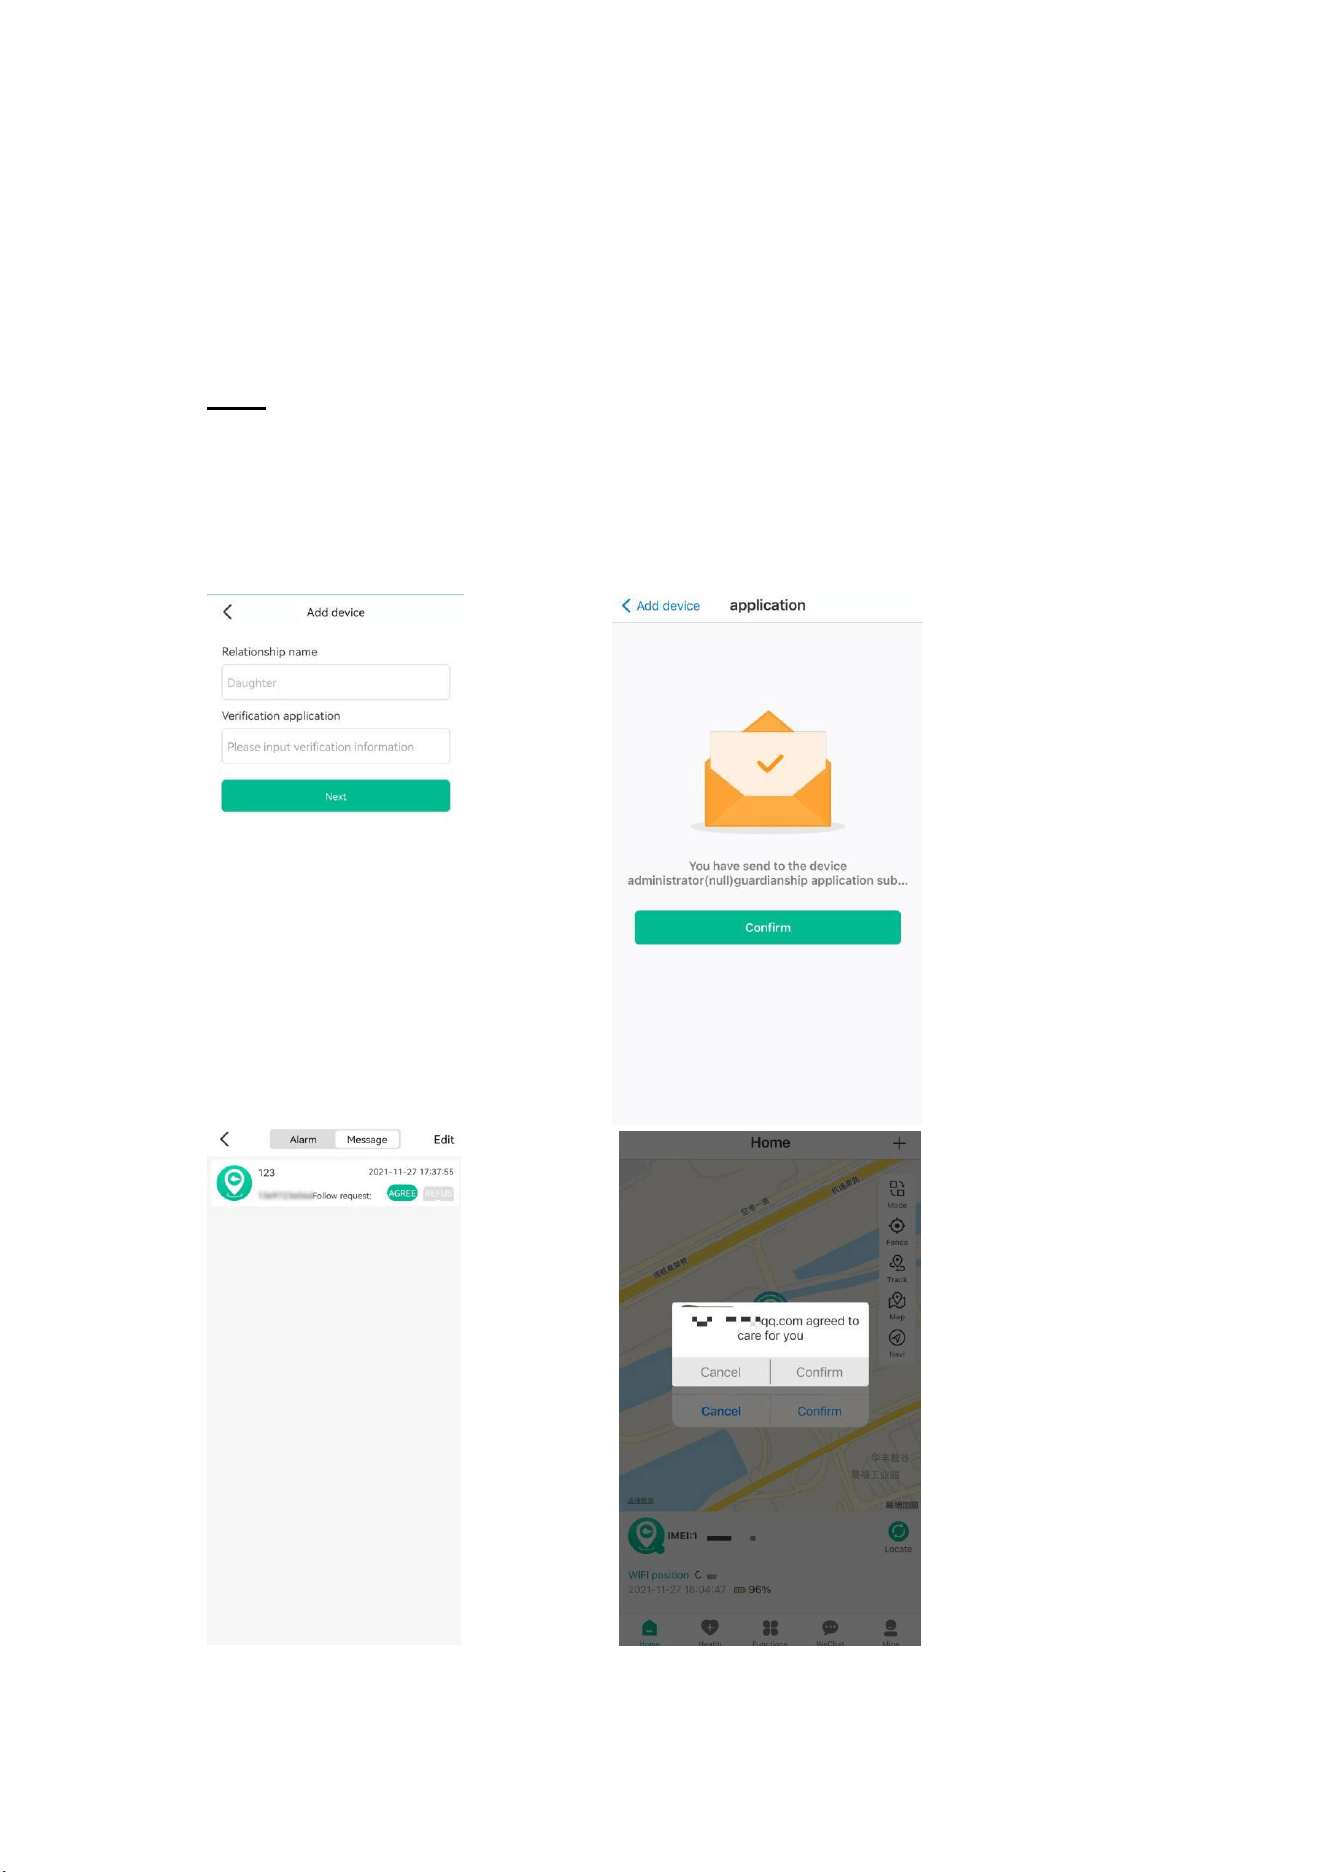
The first account created for the GPS Watch is the primary administrator account.
You can add a secondary account to the app for two parents, as an example, to
be able to login. Adding a secondary administrator account requires
authorization from the primary administrator, there will be a note when the
secondary administrator account wants to add the same GPS tracker, the
primary administrator will also receive the authorization notification.
Note: One APP account can bind multiple GPS trackers; while one GPS
tracker can also be connected with multiple secondary accounts
with the authorization from primary administrator.
A prompt will appear inside your (the main administrator) App account for
authorization after the secondary administrator has scanned the same watch QR
code into their App.
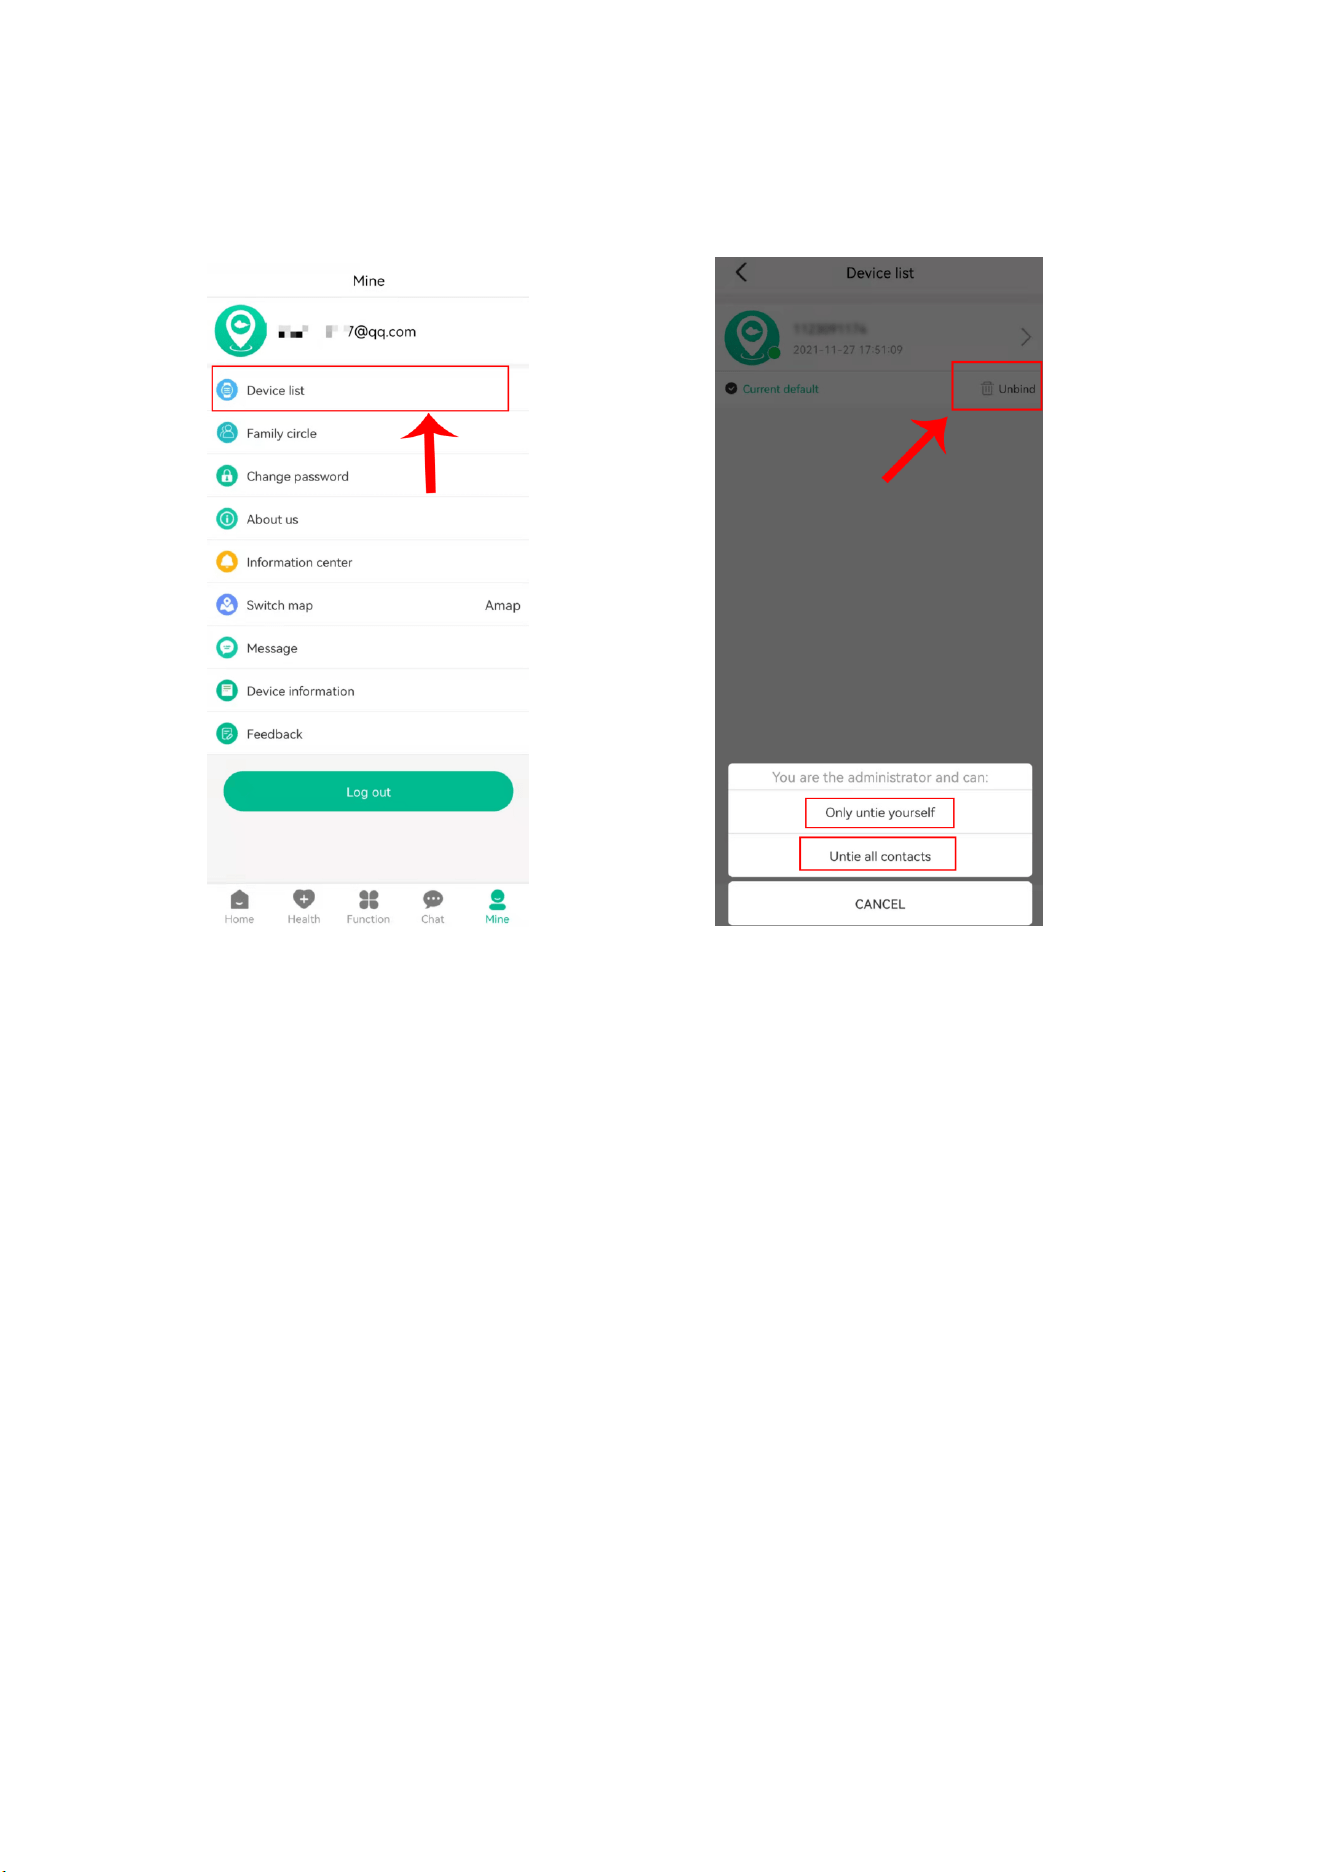
10) Deleting a GPS watch from the APP account
APP Mine Devices list Select the device you want to delete Unblind
‘Only untie yourself’ or ‘Untie all contacts’.

Declaration:
• If you are removing or tampering with the product casing, the product will
void the warranty.
• The manufacturer shall not be liable for illegal use of the product.
• By using this GPS tracker, you acknowledge that you accept the following
precautions terms. In the event that you do not understand or accept any
of the precaution terms herein, you should discontinue your use of this
GPS Tracker.
Precautions
1. Do not immerse the product in liquid or chemicals such as salt water and
detergents.
2. Do not wear the product in the shower, in case different PH range of
shower gel, shampoo and conditioner, or hot water damages the GPS
tracker.
3. Keep the product away from fire, heat and other extreme high
temperature environments.
4. Keep out of children’s mouths.
5. It is recommended that you use a certified 5V/1A adapter to charge the
watch. If you use a computer USB port, a third-party adapter not certified
for safety requirements to charge the watch, the watch may not charge
properly and there may be a risk of damage.
6. Do not directly attach the magnetic charging lead to any metal or
conductive objects except the GPS Tracker, otherwise it may cause the
charging head to short circuit.
7. In the case of excessive heating of the battery during charging,
immediately disconnect it from the power supply.
8. Before first use, fully charge the battery.
9. If the watch becomes very hot while you are wearing it, please take it off
immediately and close background apps through recent tasks or turn off
the watch directly.
10. Never connect to a mechanically damaged charger or if the batteries are
swollen. Do not use batteries in this condition due to risk of explosion.
11. When this product is in a de-energized state and outside the service area,
location function does not work.

This device complies with part 15 of the FCC Rules. Operation is subject to the
following two conditions: (1) This device may not cause harmful interference, and (2)
this device must accept any interference received, including interference that may cause
undesired operation.
Any Changes or modifications not expressly approved by the party responsible for
compliance could void the user's authority to operate the equipment.
Note: This equipment has been tested and found to comply with the limits for a Class B
digital device, pursuant to part 15 of the FCC Rules. These limits are designed to
provide reasonable protection against harmful interference in a residential installation.
This equipment generates uses and can radiate radio frequency energy and, if not
installed and used in accordance with the instructions, may cause harmful interference
to radio communications. However, there is no guarantee that interference will not
occur in a particular installation. If this equipment does cause harmful interference to
radio or television reception, which can be determined by turning the equipment off and
on, the user is encouraged to try to correct the interference by one or more of the
following measures:
-Reorient or relocate the receiving antenna.
-Increase the separation between the equipment and receiver.
-Connect the equipment into an outlet on a circuit different from that to which the
receiver is connected.
-Consult the dealer or an experienced radio/TV technician for help.
Specific Absorption Rate (SAR) information
SAR tests are conducted using standard operating positions accepted by the
FCC with the 4G smart watch transmitting at its highest certified power
level in all tested frequency bands, although the SAR is determined at the
highest certified power level, the actual SAR level of the 4G smart watch
while operating can be well below the maximum value. Before a new model
4G smart watch is a available for sale to the public, it must be tested and
certified to the FCC that it does not exceed the exposure limit established by
the FCC, tests for each 4G smart watch are performed in positions and
locations as required by the FCC.
For body worn operation, this model 4G smart watch has been tested and
meets the FCC RF exposureguidelines when used with an accessory
designated for this product or when used with an accessory that contains no
metal and that positions the 4G smart watch a minimum of 0 cm from the
body.
Non-compliance with the above restrictions may result in violation of RF
exposure guidelines.
Front of face: 0.600 W/kg (1g)
Wrist:1.002 W/kg(10g)