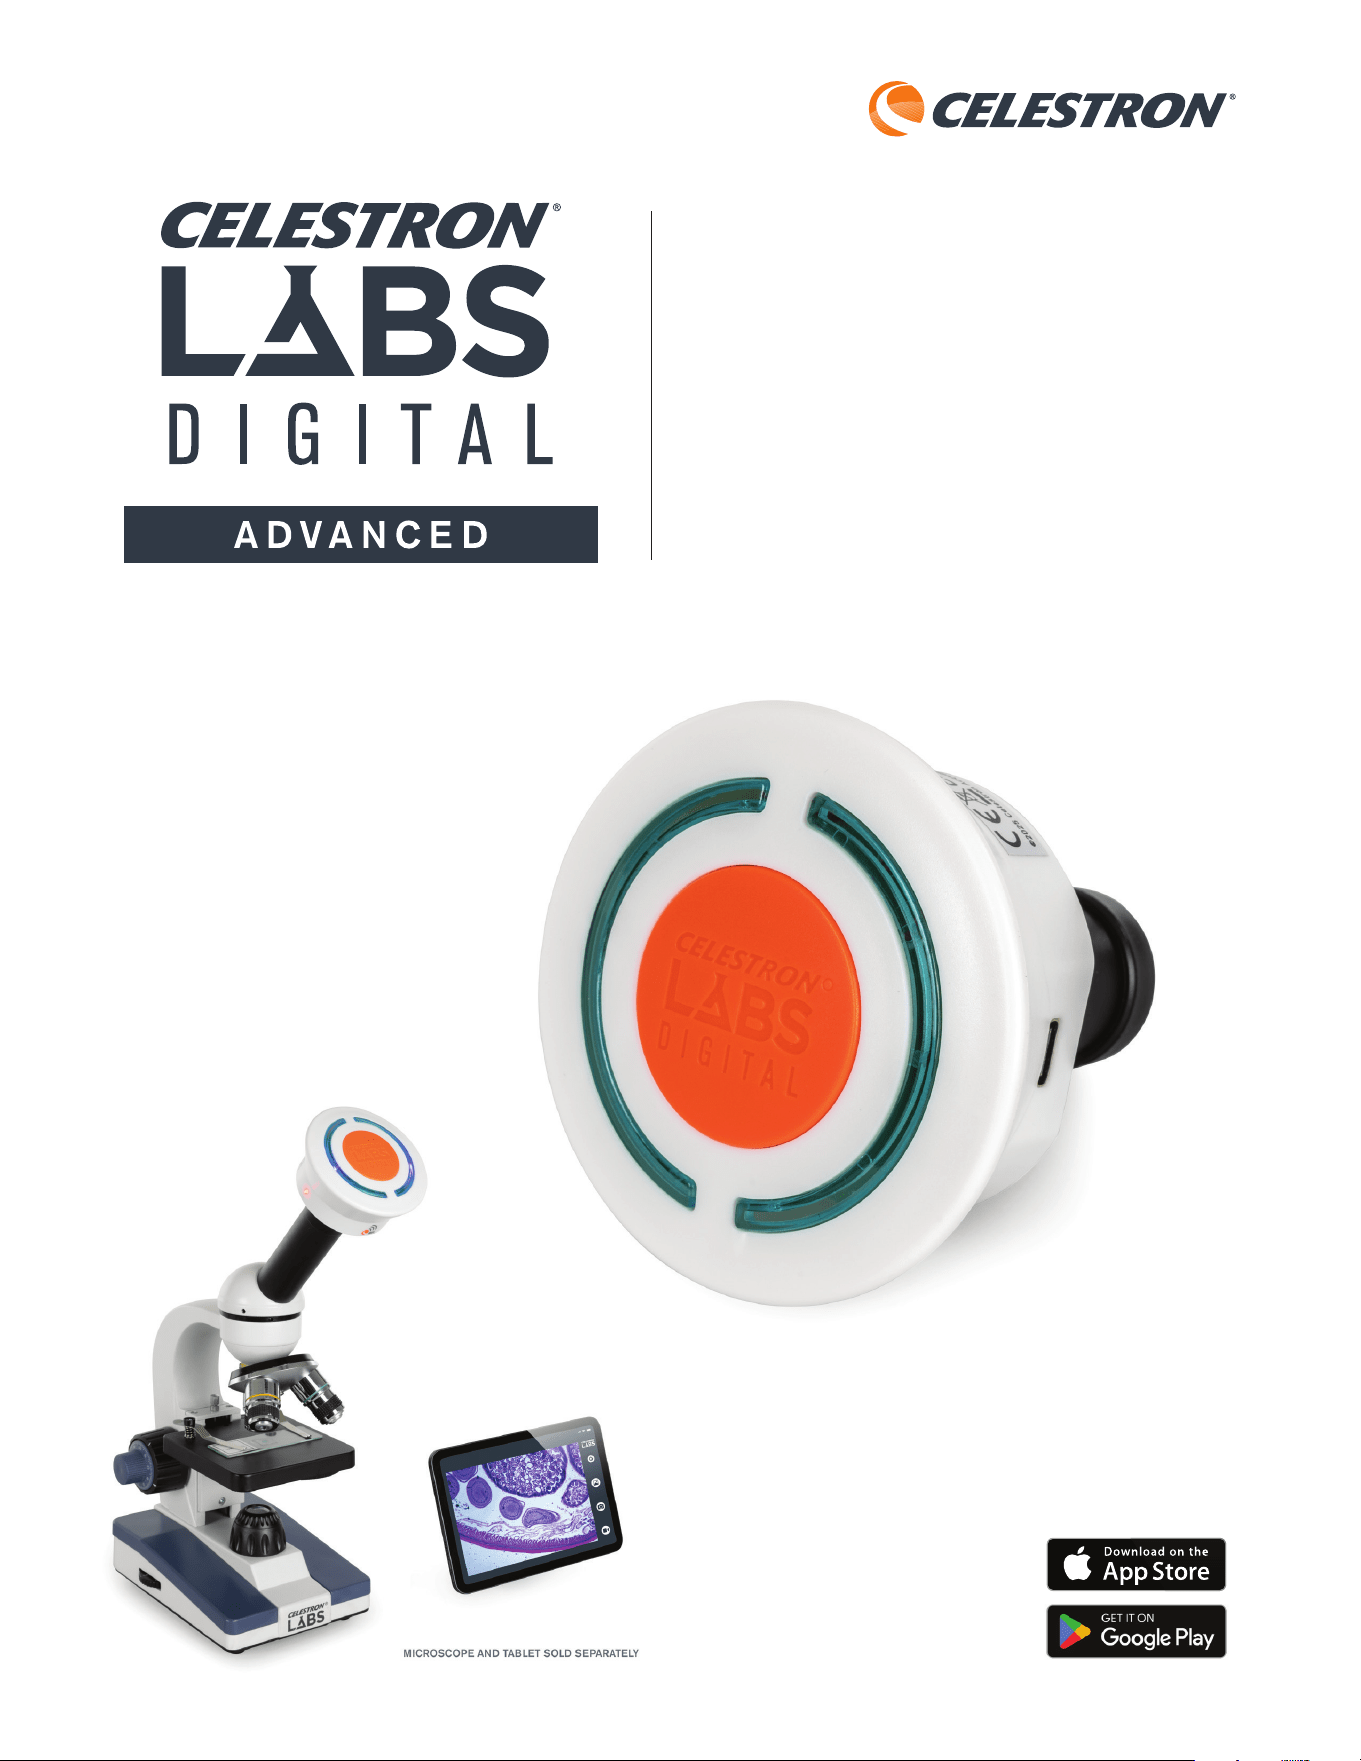
MODEL #44429
INSTRUCTION MANUAL
2MP Wi-Fi MICROSCOPE IMAGER
2 I ENGLISH
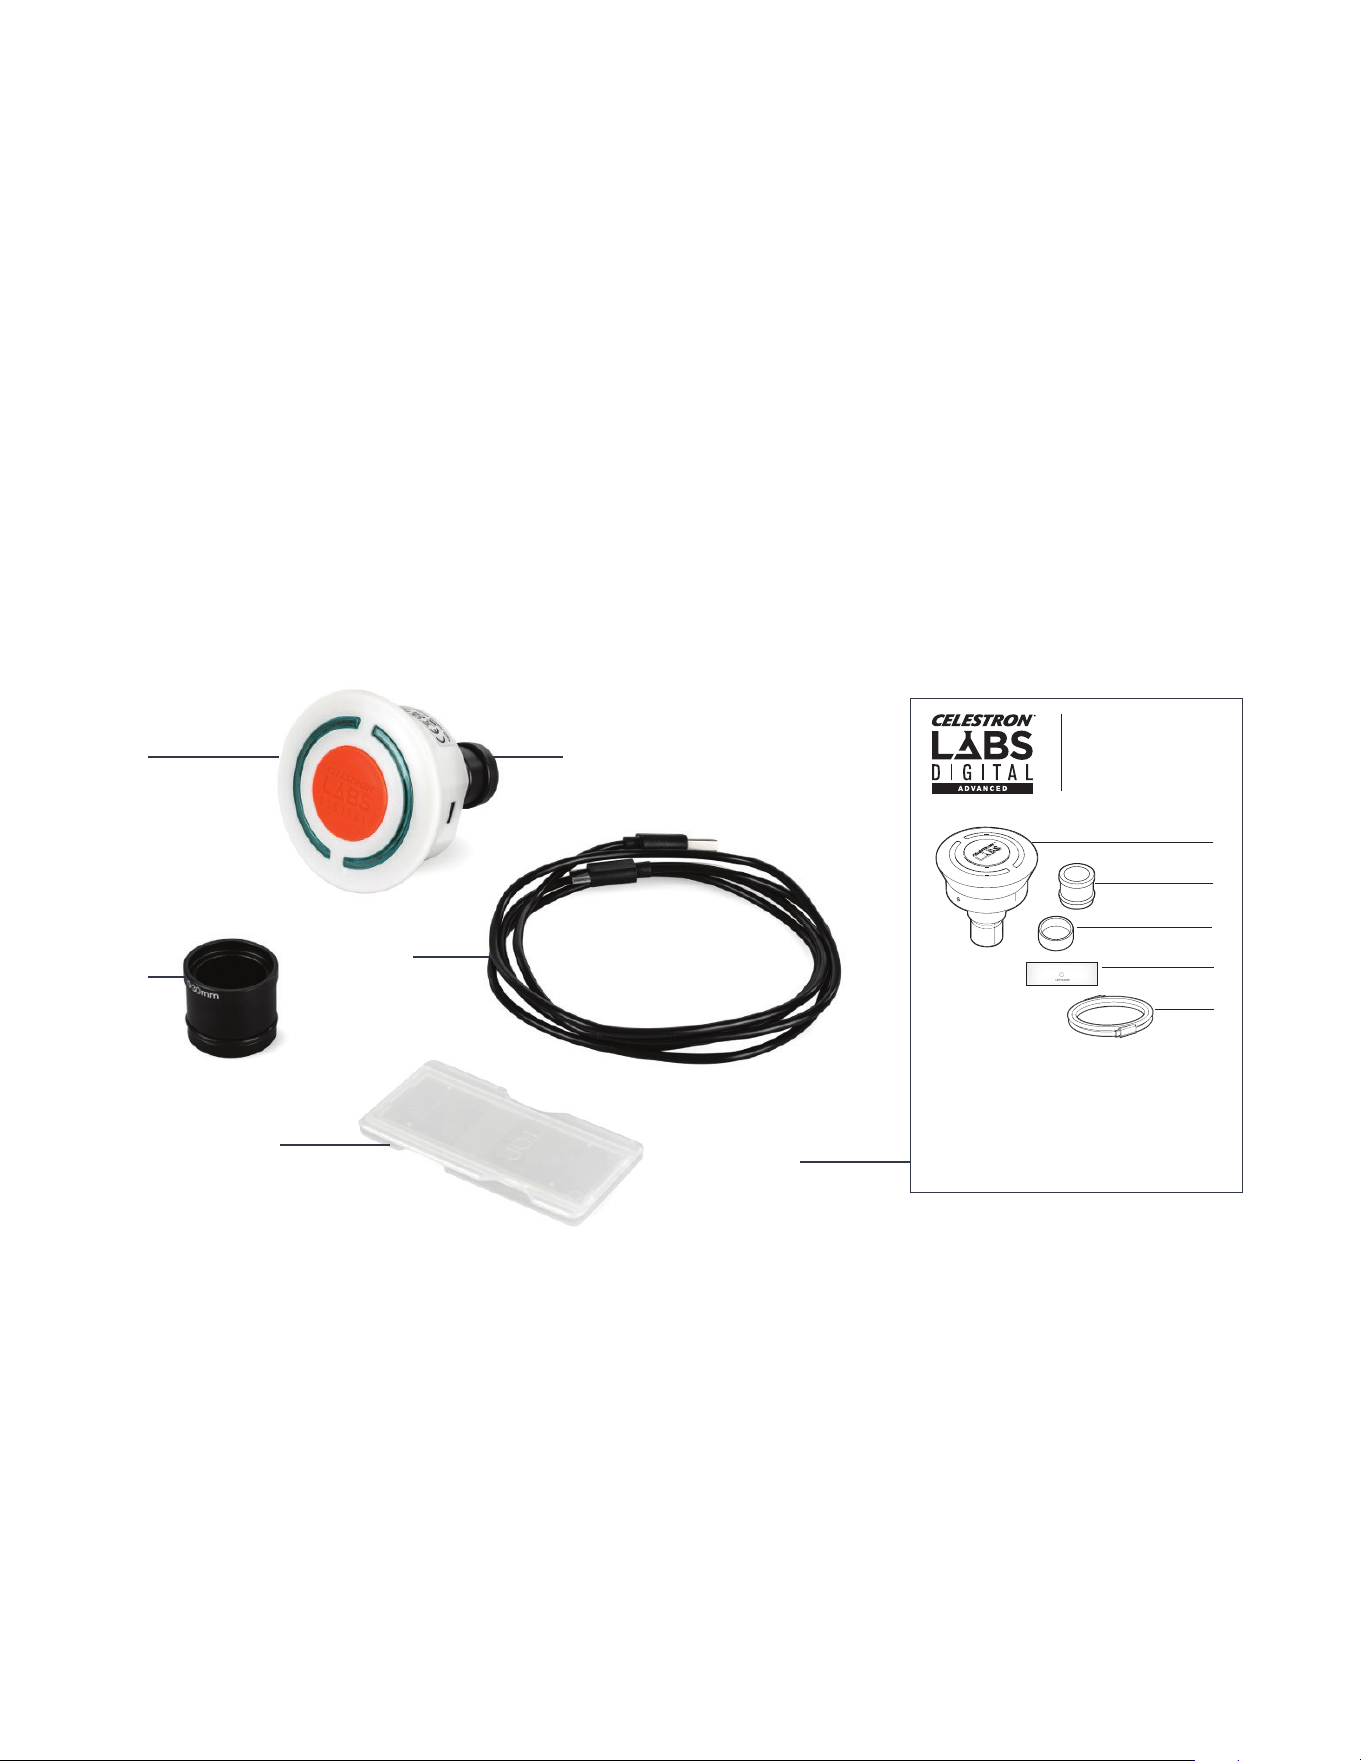
WHAT’S IN THE BOX
INTRODUCTION
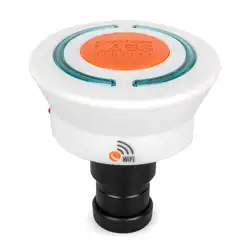
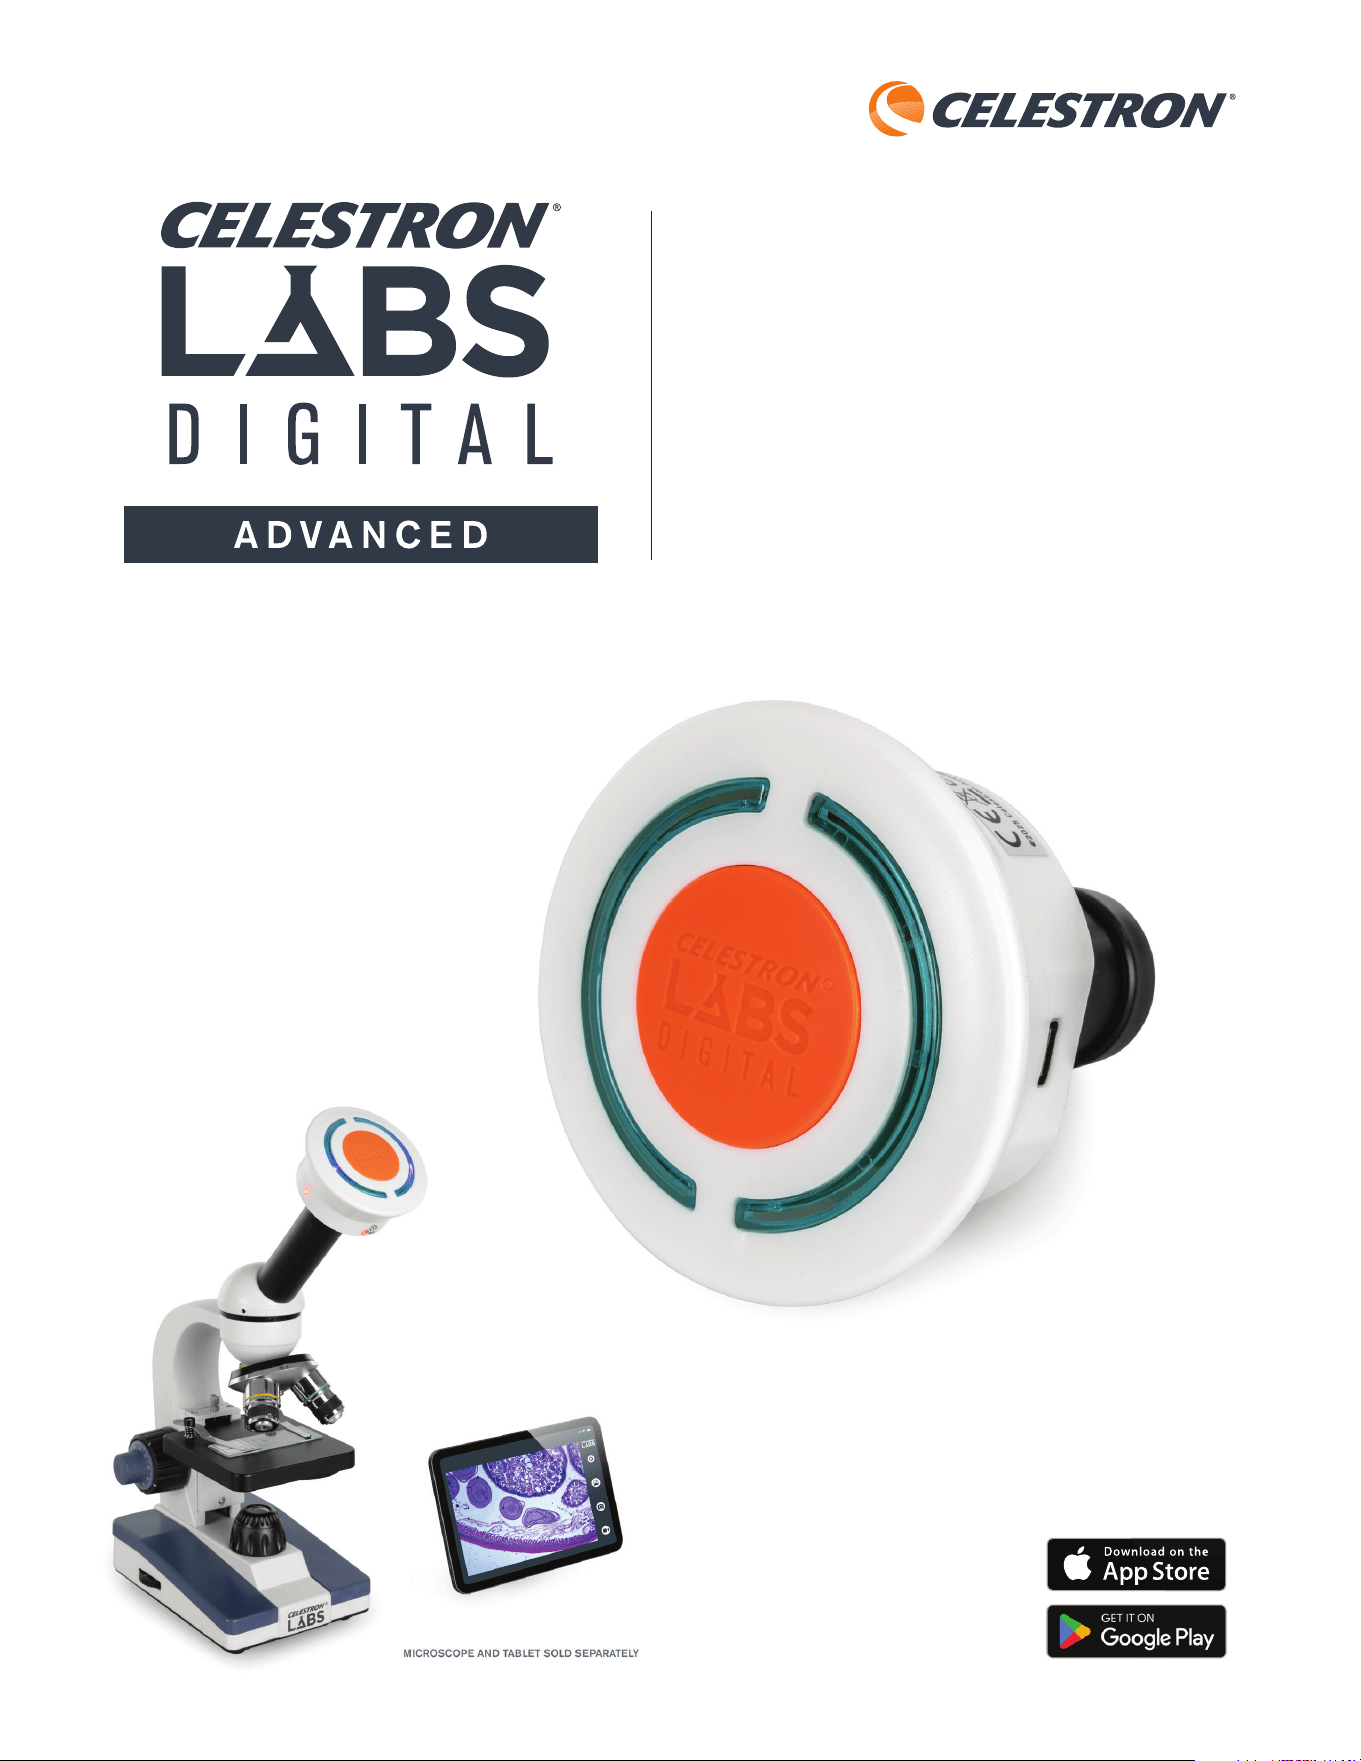
Thank you for purchasing the Celestron Labs Digital Wi-Fi Microscope Imager. This device replaces your microscope’s eyepiece and
streams a live image directly to your smartphone or tablet via its dedicated Wi-Fi signal. No internet connection is required. Capture
still images, record video, and share your discoveries without crowding around an eyepiece.
The imager fits most microscopes with a 23mm eyepiece tube
and includes a 30mm adapter for larger stereo microscopes.
Simply insert the imager in place of the eyepiece, connect your
smart device to the Celestron Labs Wi-Fi network, and open the
Celestron Labs Wi-Fi App to begin viewing.
The free Celestron Labs Digital Wi-Fi App works with iOS and
Android devices. With it, you can adjust resolution, capture
photos and video, enable measurement tools, and save files
directly to your device for easy sharing.
Before getting started, read through the setup instructions and
review the diagrams in this manual. A few minutes of preparation
will ensure smooth setup and the best possible performance.
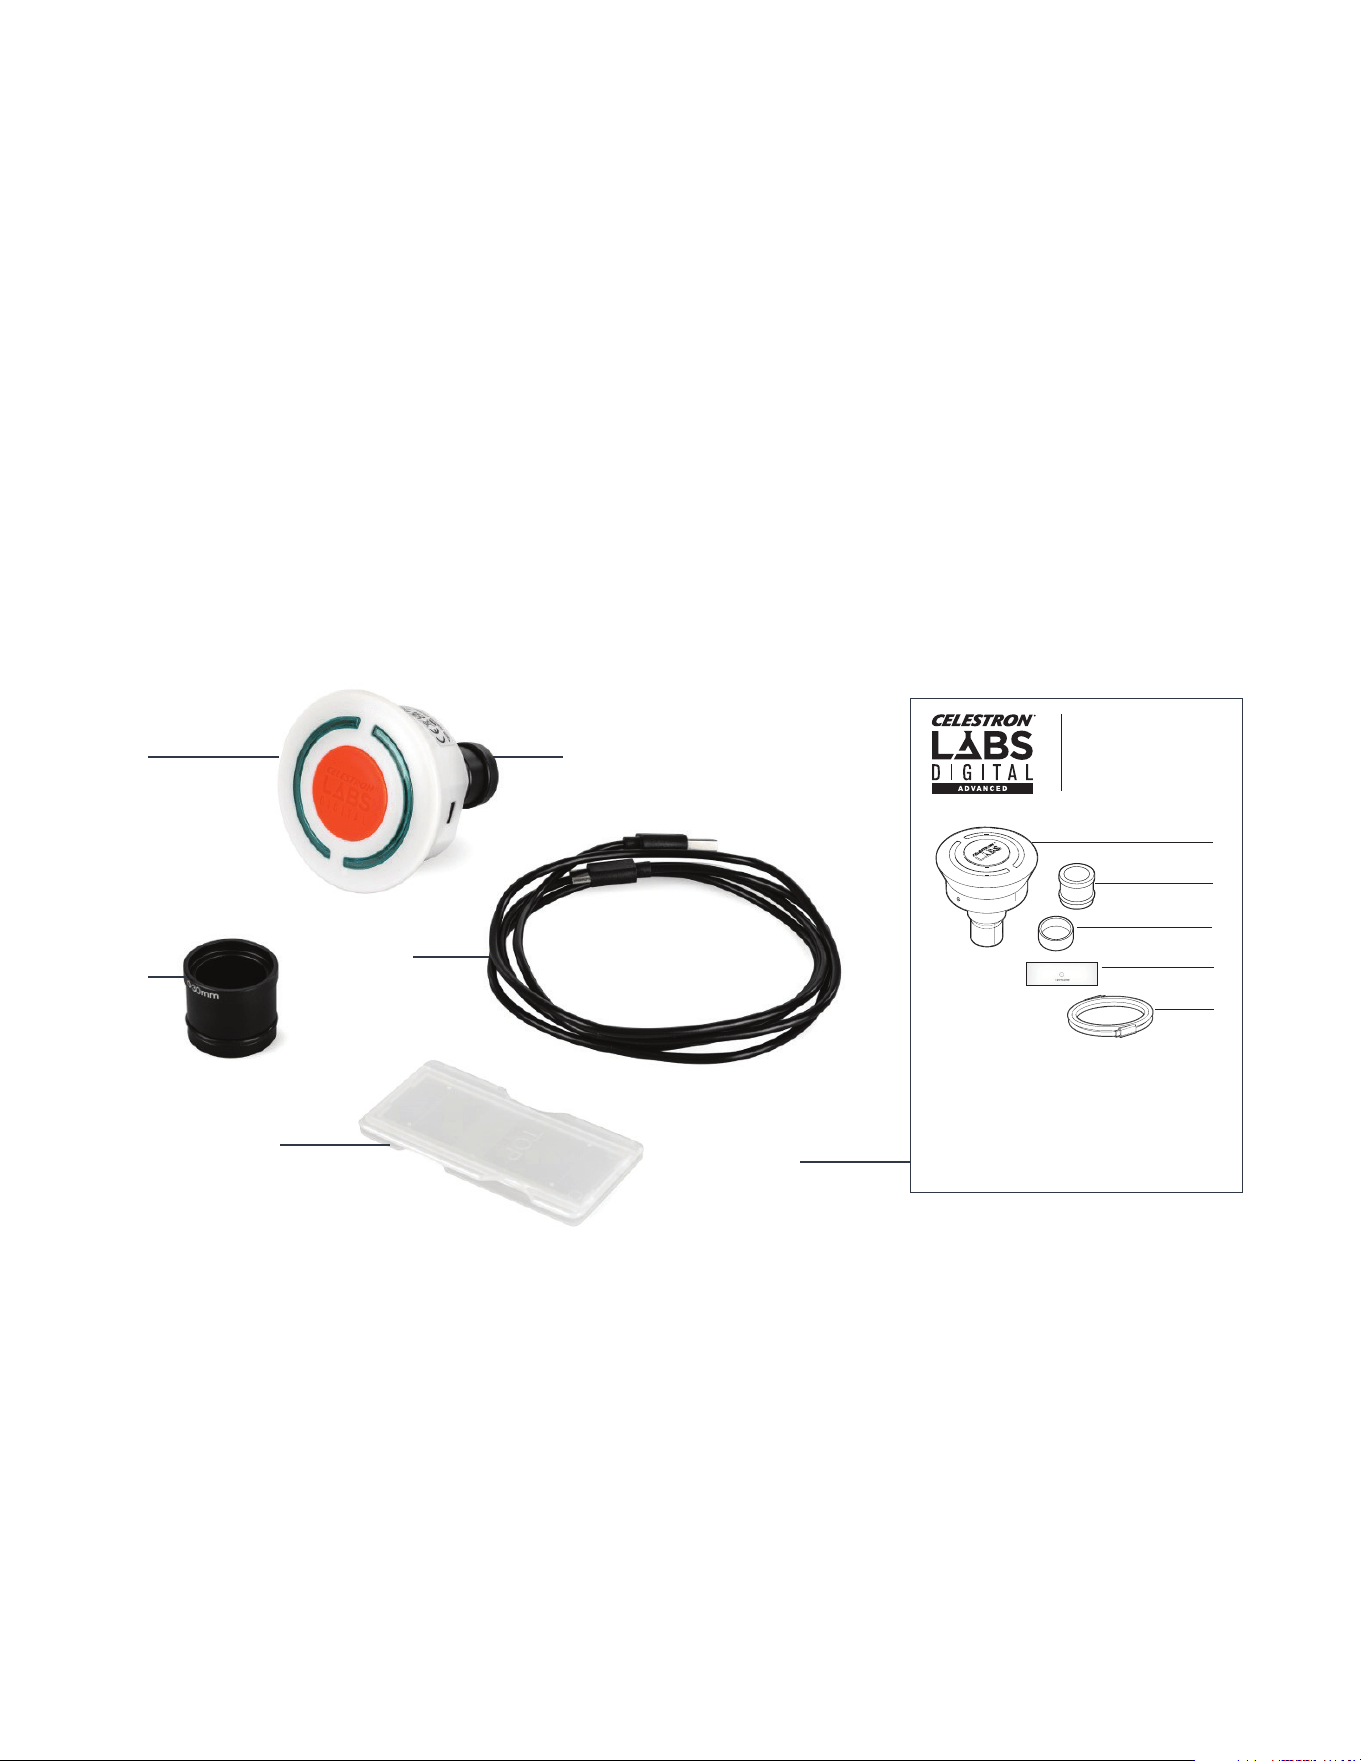
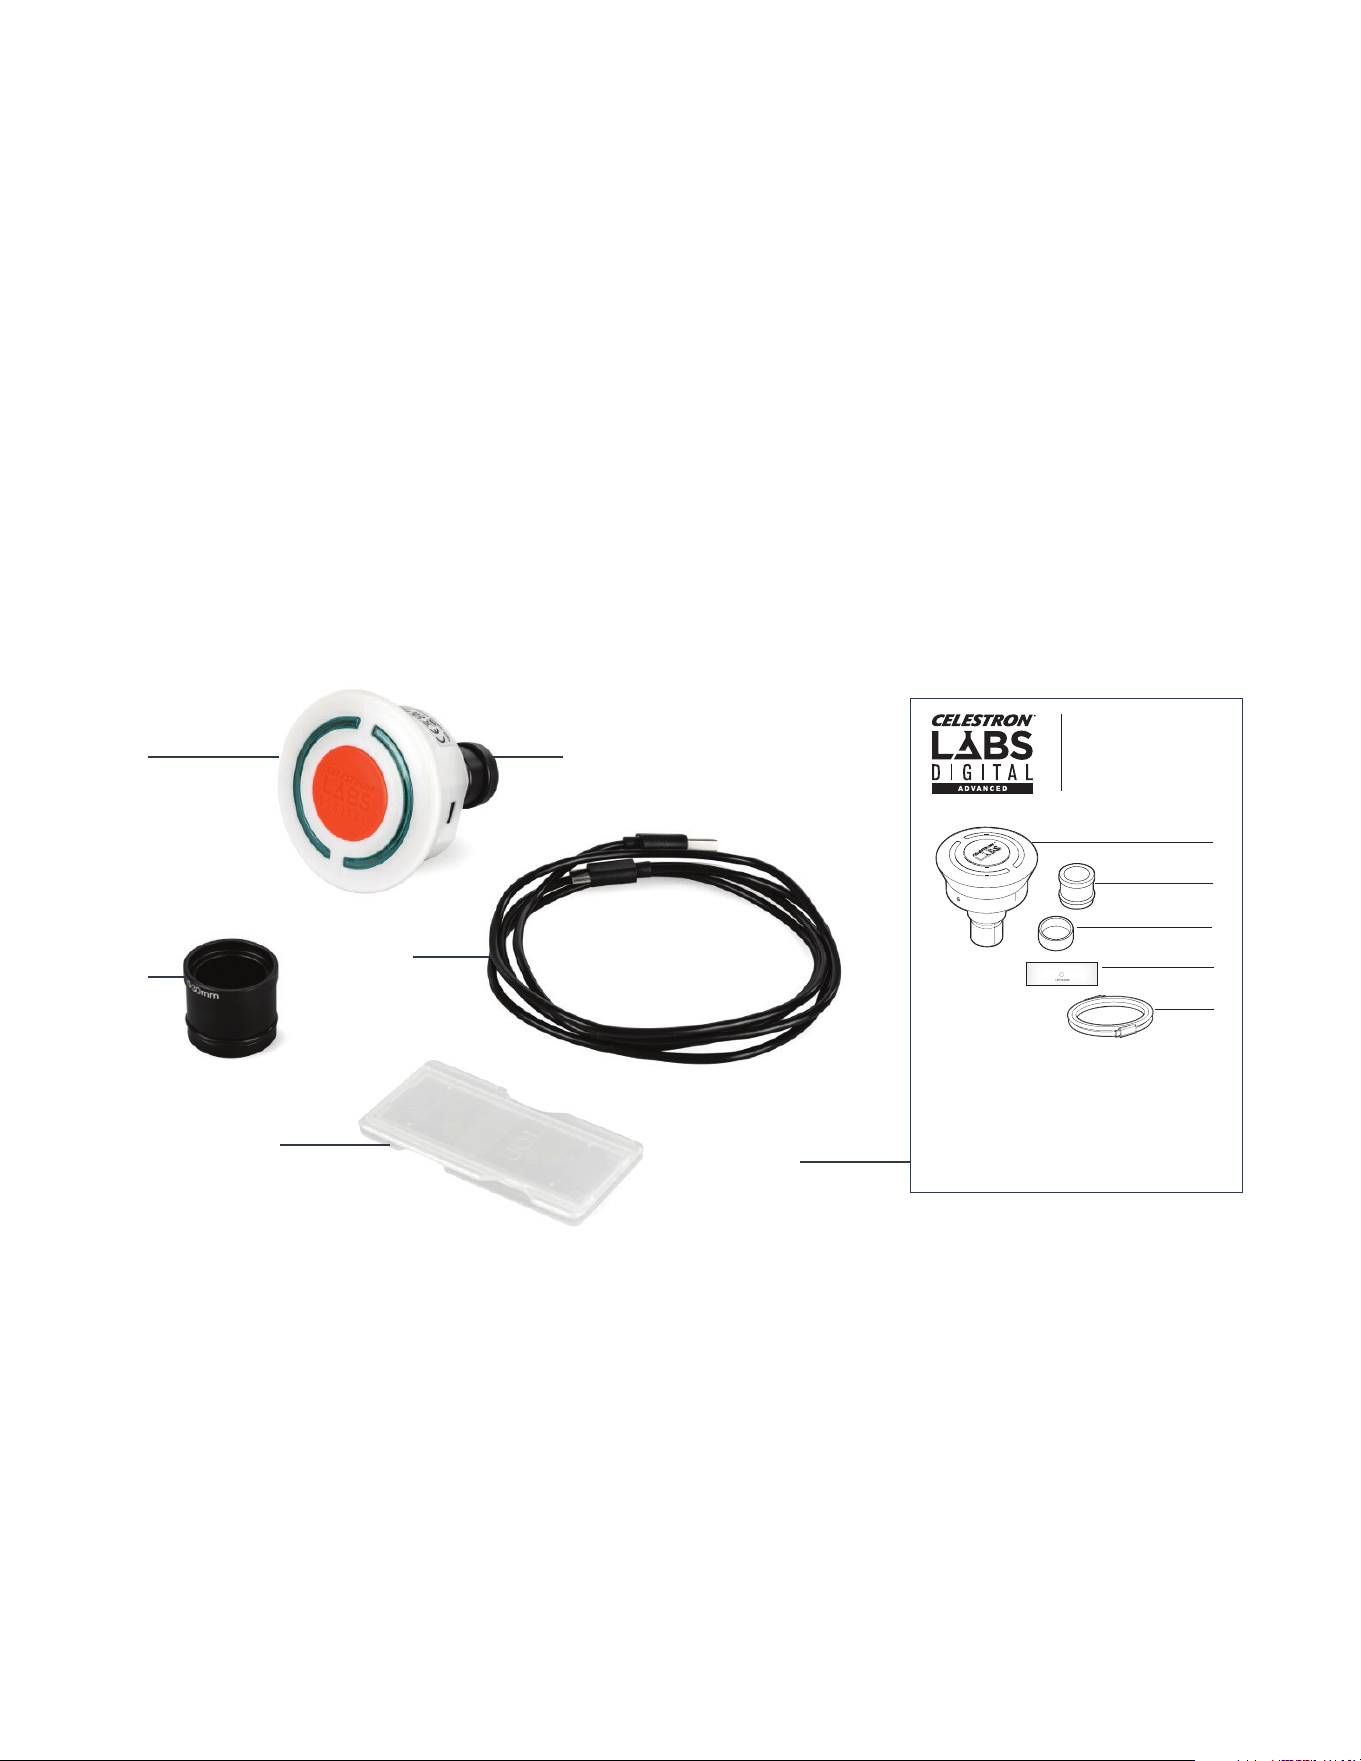
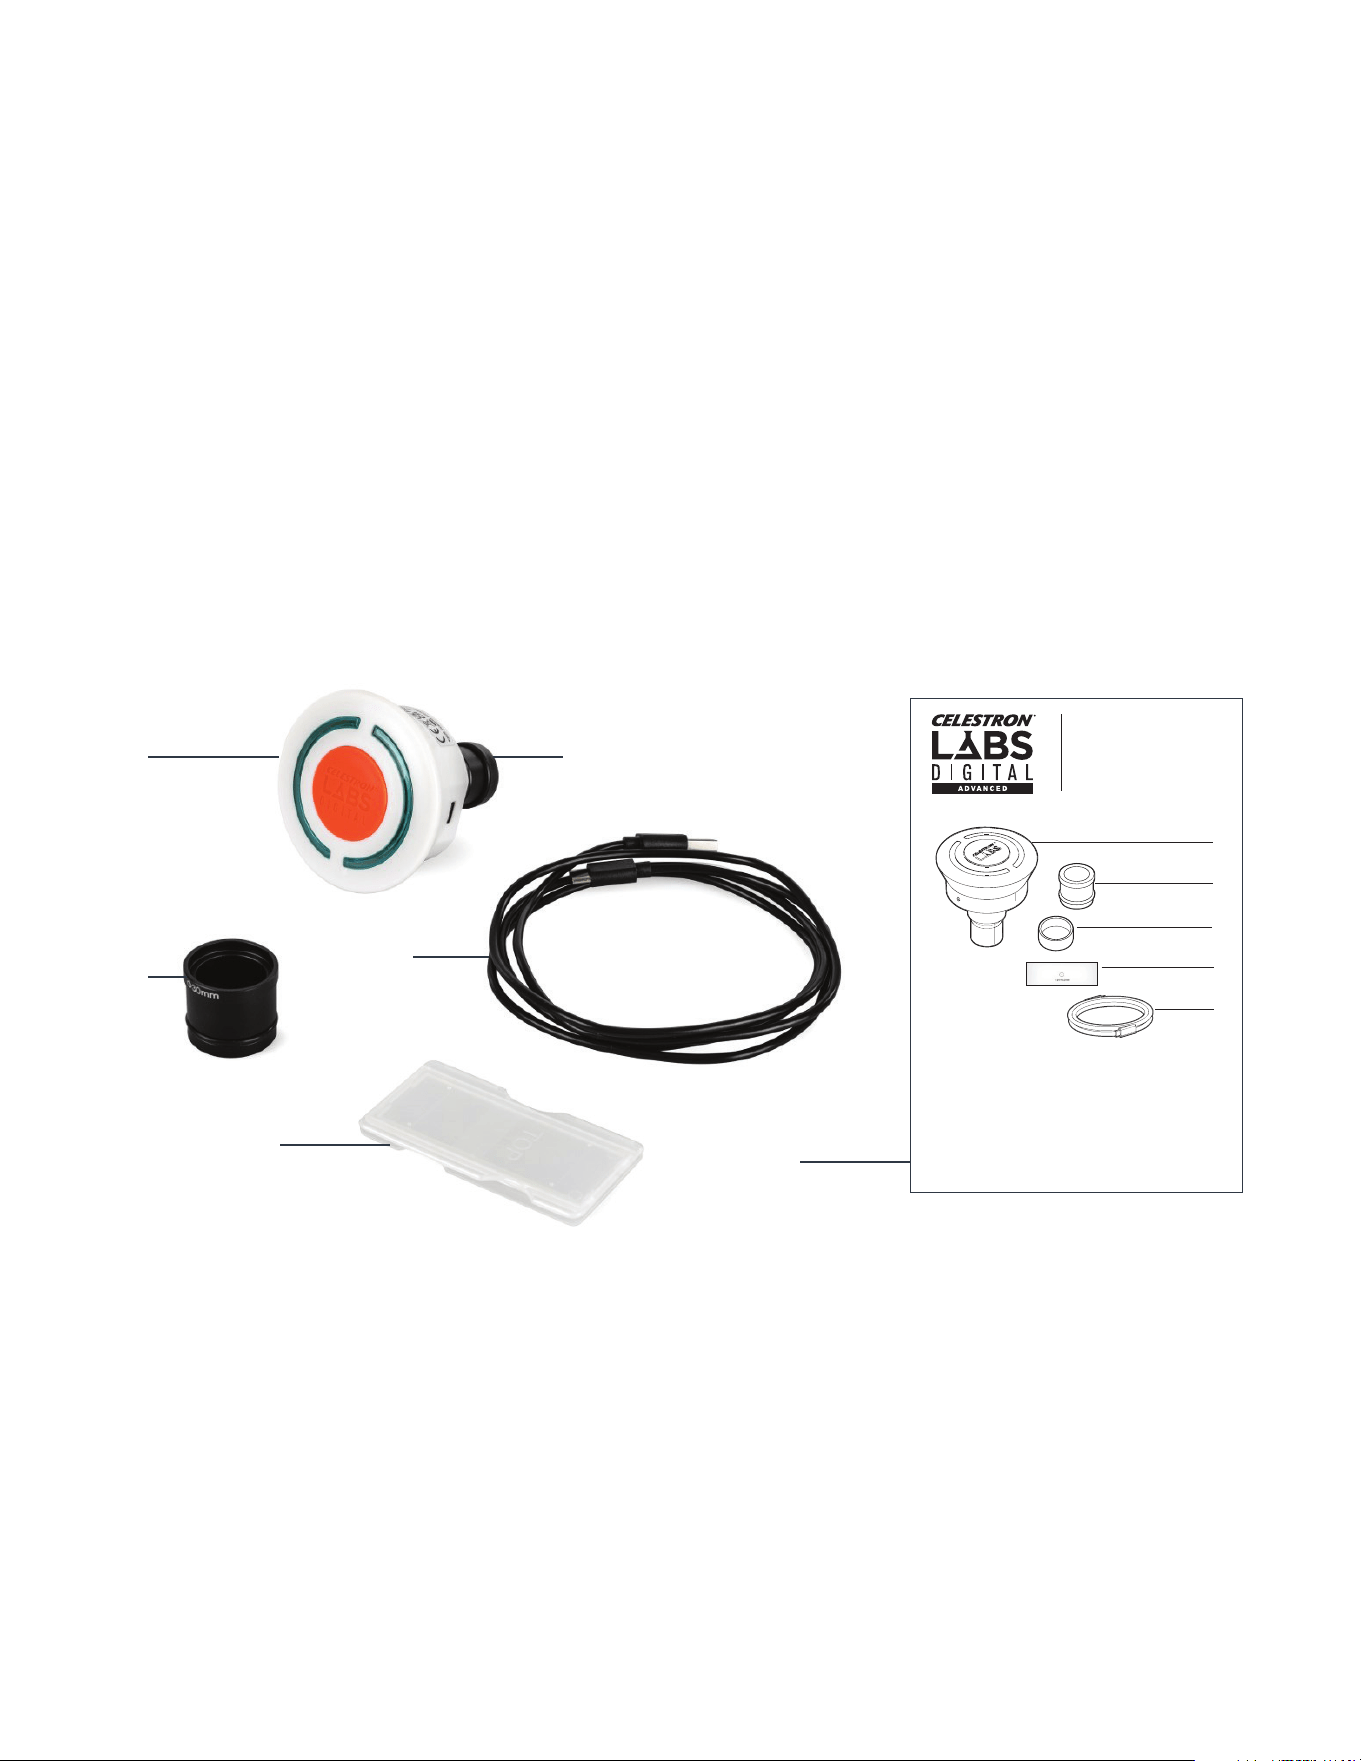
Carefully unpack your Wi-Fi Imager and verify that all items listed
below are present:
[A] Celestron Labs 2MP Wi-Fi Microscope Imager
[B] 30mm diameter adapter
[C] Lens cap
[D] Calibration ruler
[E] USB-C charging cable
[F] Quick Setup Guide
A.
D.
F.
E.
B.
C.
Model #44429
QUICK START GUIDE
Contenu de la boîte
[A] 1 x Microscope imageur Wi-Fi 2 MP
Celestron Labs
[B] 1 x Adaptateur de 30 mm de diamètre
[C] 1 x Cache d’objectif
[D] 1 x Règle d’étalonnage
[E] 1 x Câble de charge USB-C
What’s in the Box
[A] 1 x Celestron Labs 2MP Wi-Fi
Microscope Imager
[B] 1 x 30mm diameter adapter
[C] 1 x Lens cap
[D] 1 x Calibration ruler
[E] 1 x USB-C charging cable
Lieferumfang
[A] 1 x Celestron Labs 2MP WLAN-
Mikroskop
[B]1 x Adapter (30 mm Durchmesser)
[C] 1 x Objektivdeckel
[D] 1 x Kalibrierlineal
[E] 1 x USB-C-Ladekabel
Contenuto della confezione
[A] 1 x Microscopio Wi-Fi Celestron Labs 2MP
[B] 1 x Adattatore da 30 mm di diametro
[C] 1 x Copriobiettivo
[D] 1 x Righello di calibrazione
[E] 1 x Cavo di ricarica USB-C
Contenido de la caja
[A] 1 microscopio Celestron Labs Wi-Fi de 2 MP
[B] 1 adaptador de 30 mm de diámetro
[C] 1 tapa de lente
[D] 1 regla de calibración
[E] 1 cable de carga USB-C
2MP Wi-Fi MICROSCOPE IMAGER
ENGL ISH
NEED ASSISTANCE? Contact Celestron Technical Support
celestron.com/pages/technical-support
Product design and specifications are subject to change without prior
notification. • This product is designed and intended for use by those
14 years of age and older.
©2025 Celestron. Celestron and Symbol
are trademarks of Celestron, LLC. • All rights reserved. • Celestron.com
US: Celestron, 2835 Columbia Str eet, Torrance, CA 90503 USA • UK:
Celestron Global Ltd., Unit 2 Transigo, Gables Way, Thatcham RG19 4JZ,
United Kingdom • Made in China | 07-25
FRANÇAIS
BESOIN D’ASSISTANCE? Contactez le support technique de
Celestron celestron.com/pages/technical-support
Le design et les spécifications du produit sont sujettes à modification sans
préavis. • Ce produit est conçu et prévu pour être utilisé par des personnes
âgées de 14 ans et plus
©2025 Celestron. Celestron et le Symbol sont
des marques déposées de Celestron, LLC. • Tous droits réservés • Celestron.
com • US: Celestron.com • 2835 Columbia Street, Torrance, CA 90503 USA •
UK: Celestron Global Ltd., Unit 2 Transigo, Gables Way, Thatcham RG19 4JZ,
Royaume-Uni • Fabriqué en Chine | 07-25
DEUTSCH
BENÖTIGEN SIE UNTERSTÜTZUNG? Wenden Sie sich an die
technische Unterstützung von Celestron unter
celestron.com/pages/technical-support
Produktdesign und technische Daten können ohne vorherige Ankündigung
geändert werden. Dieses Produk t ist für Personen ab 14 Jahren konzipiert
und vorgesehen.
©2025 Celestron. Celestron und Symbol
sind Warenzeichen von Celestron, L LC. Alle Rechte vorbehalten. Celestron.
com • USA: Celestron, 2835 Columbia Street, Torrance, CA 90503 USA • UK:
Celestron Global Ltd., Einheit 2 Transigo, Gables Way, Thatcham RG19 4JZ,
Vereinigtes Königreich • Hergestellt in China | 07-25
celestron.com/pages/warranty
ITALIANO
BISOGNO DI AIUTO? Contattare il supporto tecnico Celestron
celestron.com/pages/technical-support
Il design del prodotto e le specifiche sono sogget ti a modifiche senza
previa notifica. Questo prodotto è progettato per essere utilizzato da
persone di età pari o superiore ai 14 anni.
©2025 Celestron. Celetron e Symbol
sono marchi di Celestron, LLC. • Tutti i diritti riser vati. • Celestron.com
• Stati Uniti: Celestron, 2835 Columbia Street, Torrance, CA 9 0503 Stati
Uniti • Regno Unito: Celestron Global Ltd., Unit 2 Transigo, Gables Way,
Thatcham RG18 4JZ Regno Unito • Prodot to in Cina | 07-25
ESPAÑOL
¿NECESITA AYUDA? Contacte con el soporte técnico de
Celestron
celestron.com/pages/technical-support
El diseño y las especificaciones del producto están sujetos a cambios sin
notificación previa. Este producto ha sido diseñado y está pensado para
ser usado por personas de 14 años o más de edad.
©2025 Celestron. Celestron y su símbolo
son marcas comerciales de Celestron, LLC. • Todos los derechos reservados.
• Celestron.com • EE.UU.: Celestron, 283 5 Columbia St reet, Torrance, CA
90503 EE.UU. • GB: Celestron Global Ltd., Unit 2 Transigo, Gables Way,
Thatcham RG19 4JZ, Reino Unido • Fabricado en China | 07-25
A
B
C
D
E
CLICK FOR FULL MANUAL
CLIQUEZ POUR CONSULTER LE MODE D’EMPLOI COMPLET
FÜR DIE VOLLSTÄNDIGE ANLEITUNG KLICKEN
FARE CLIC PER IL MANUALE COMPLETO
PULSE PARA EL MANUAL COMPLETO
ENGLISH 3
SETUP
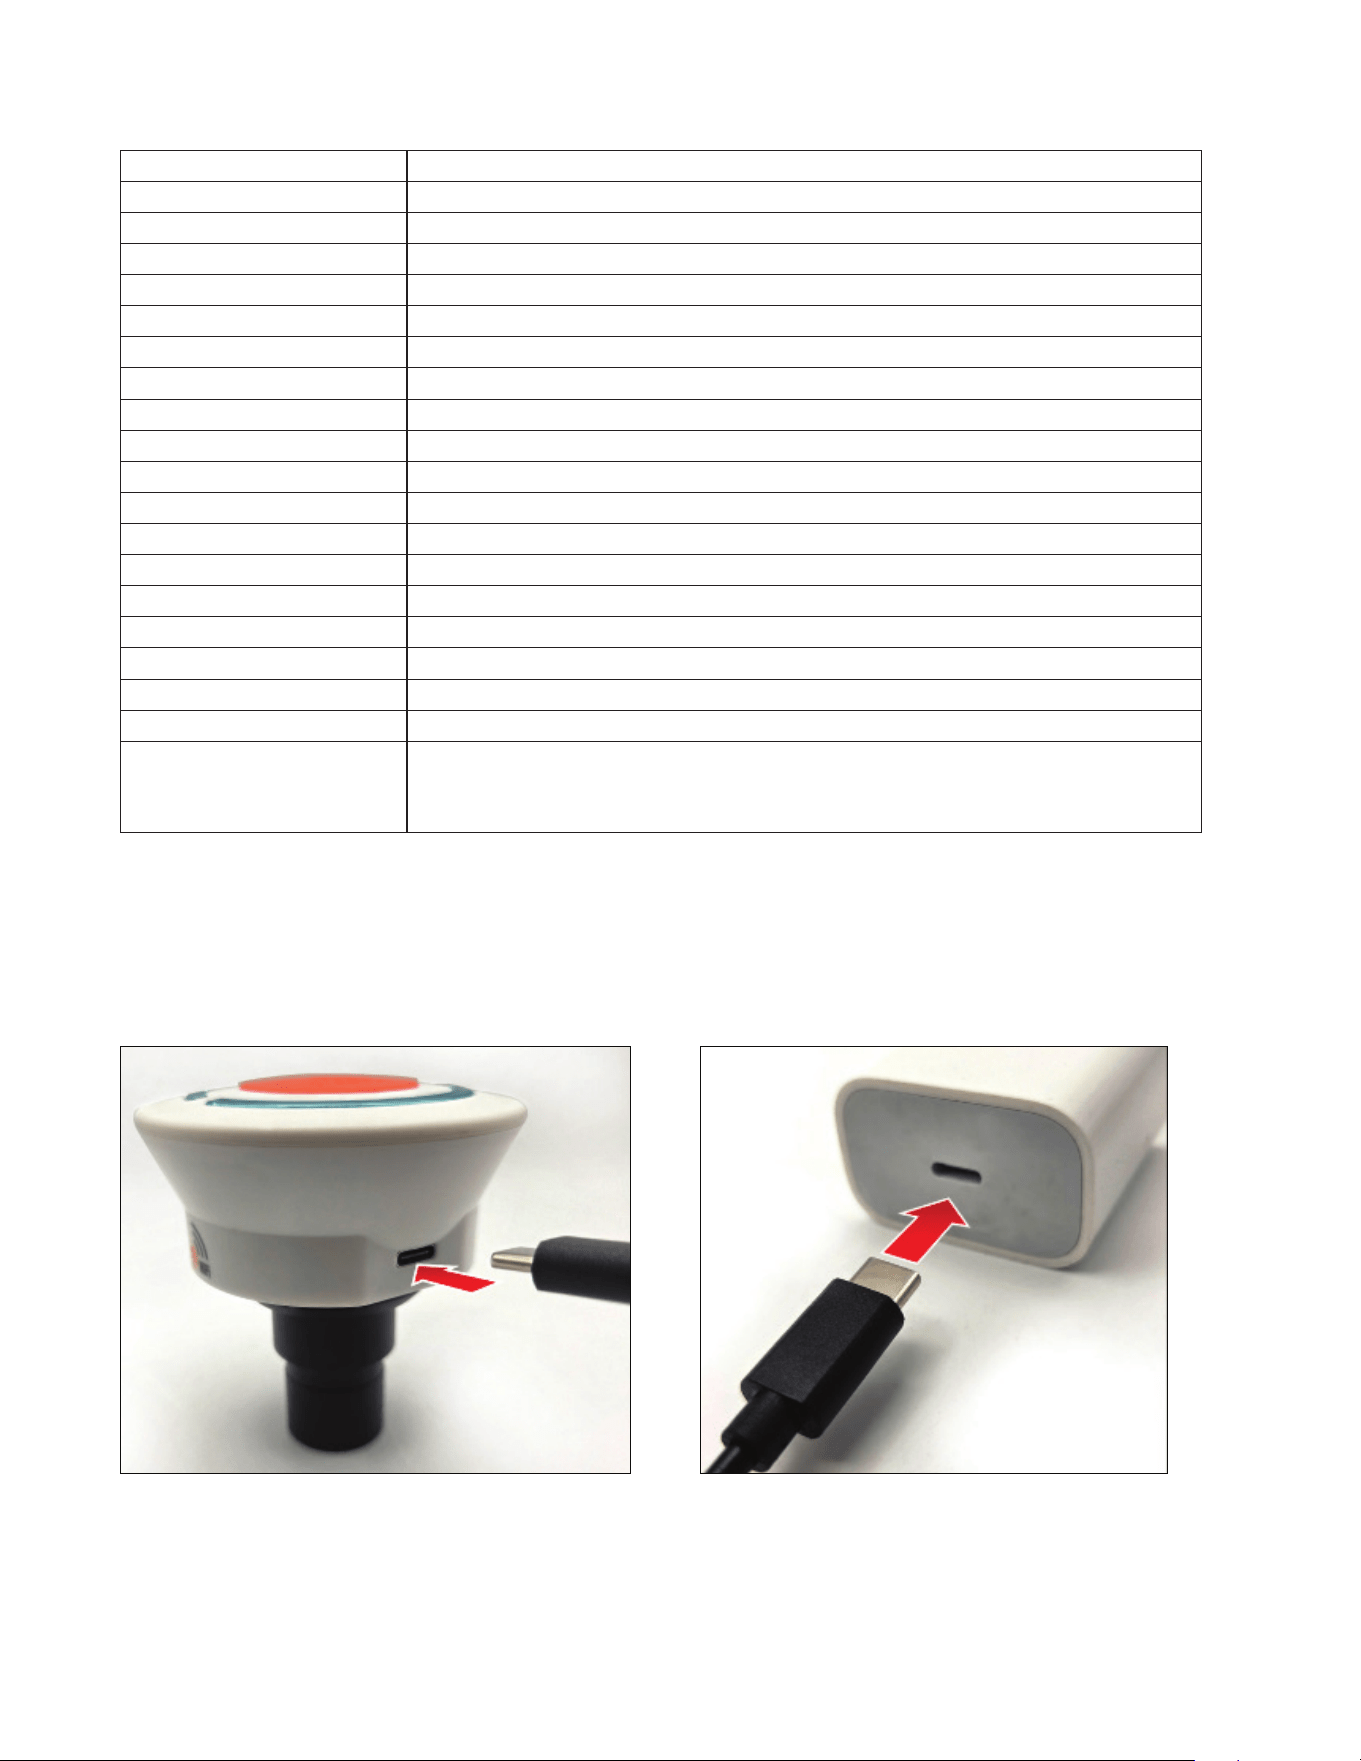
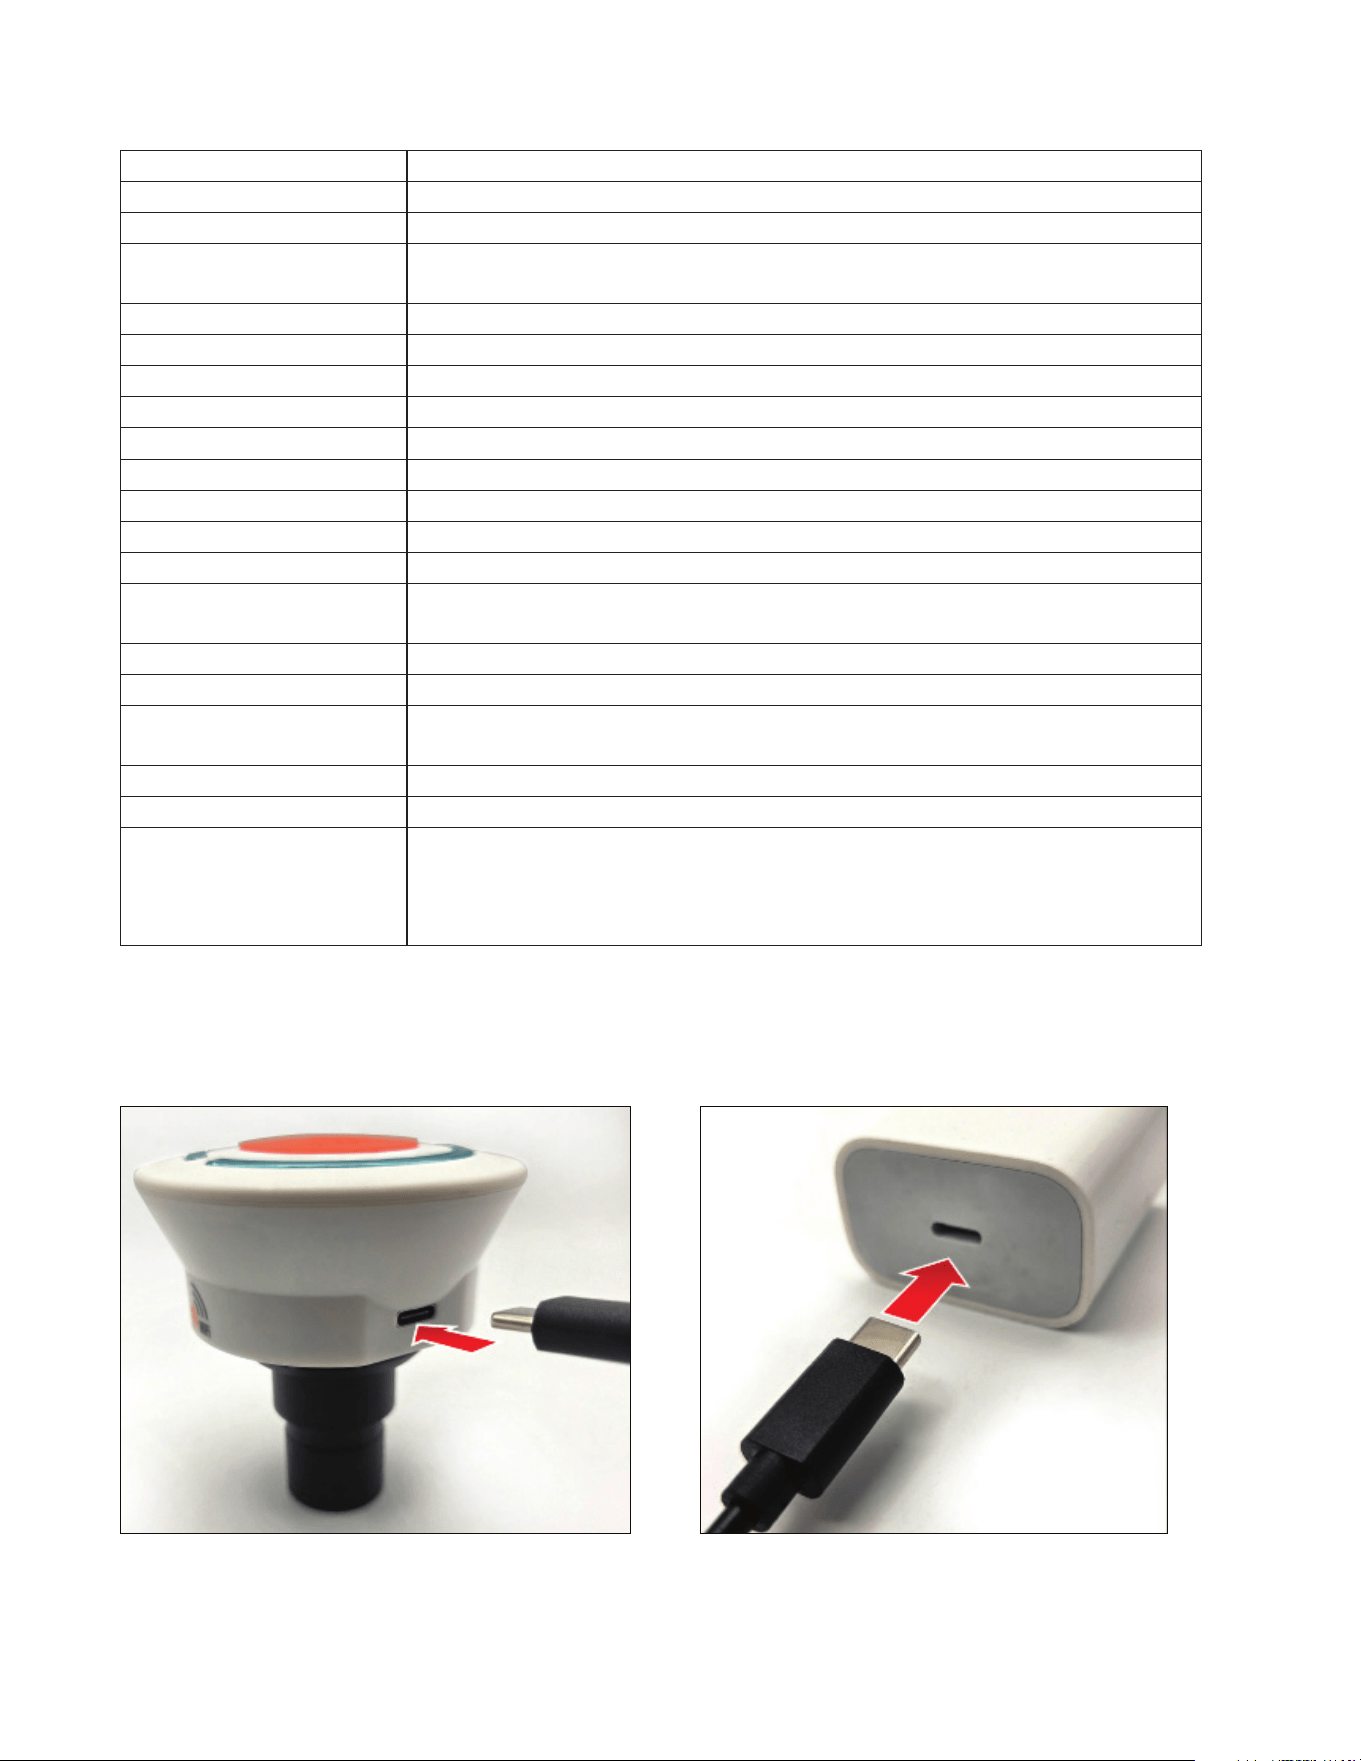
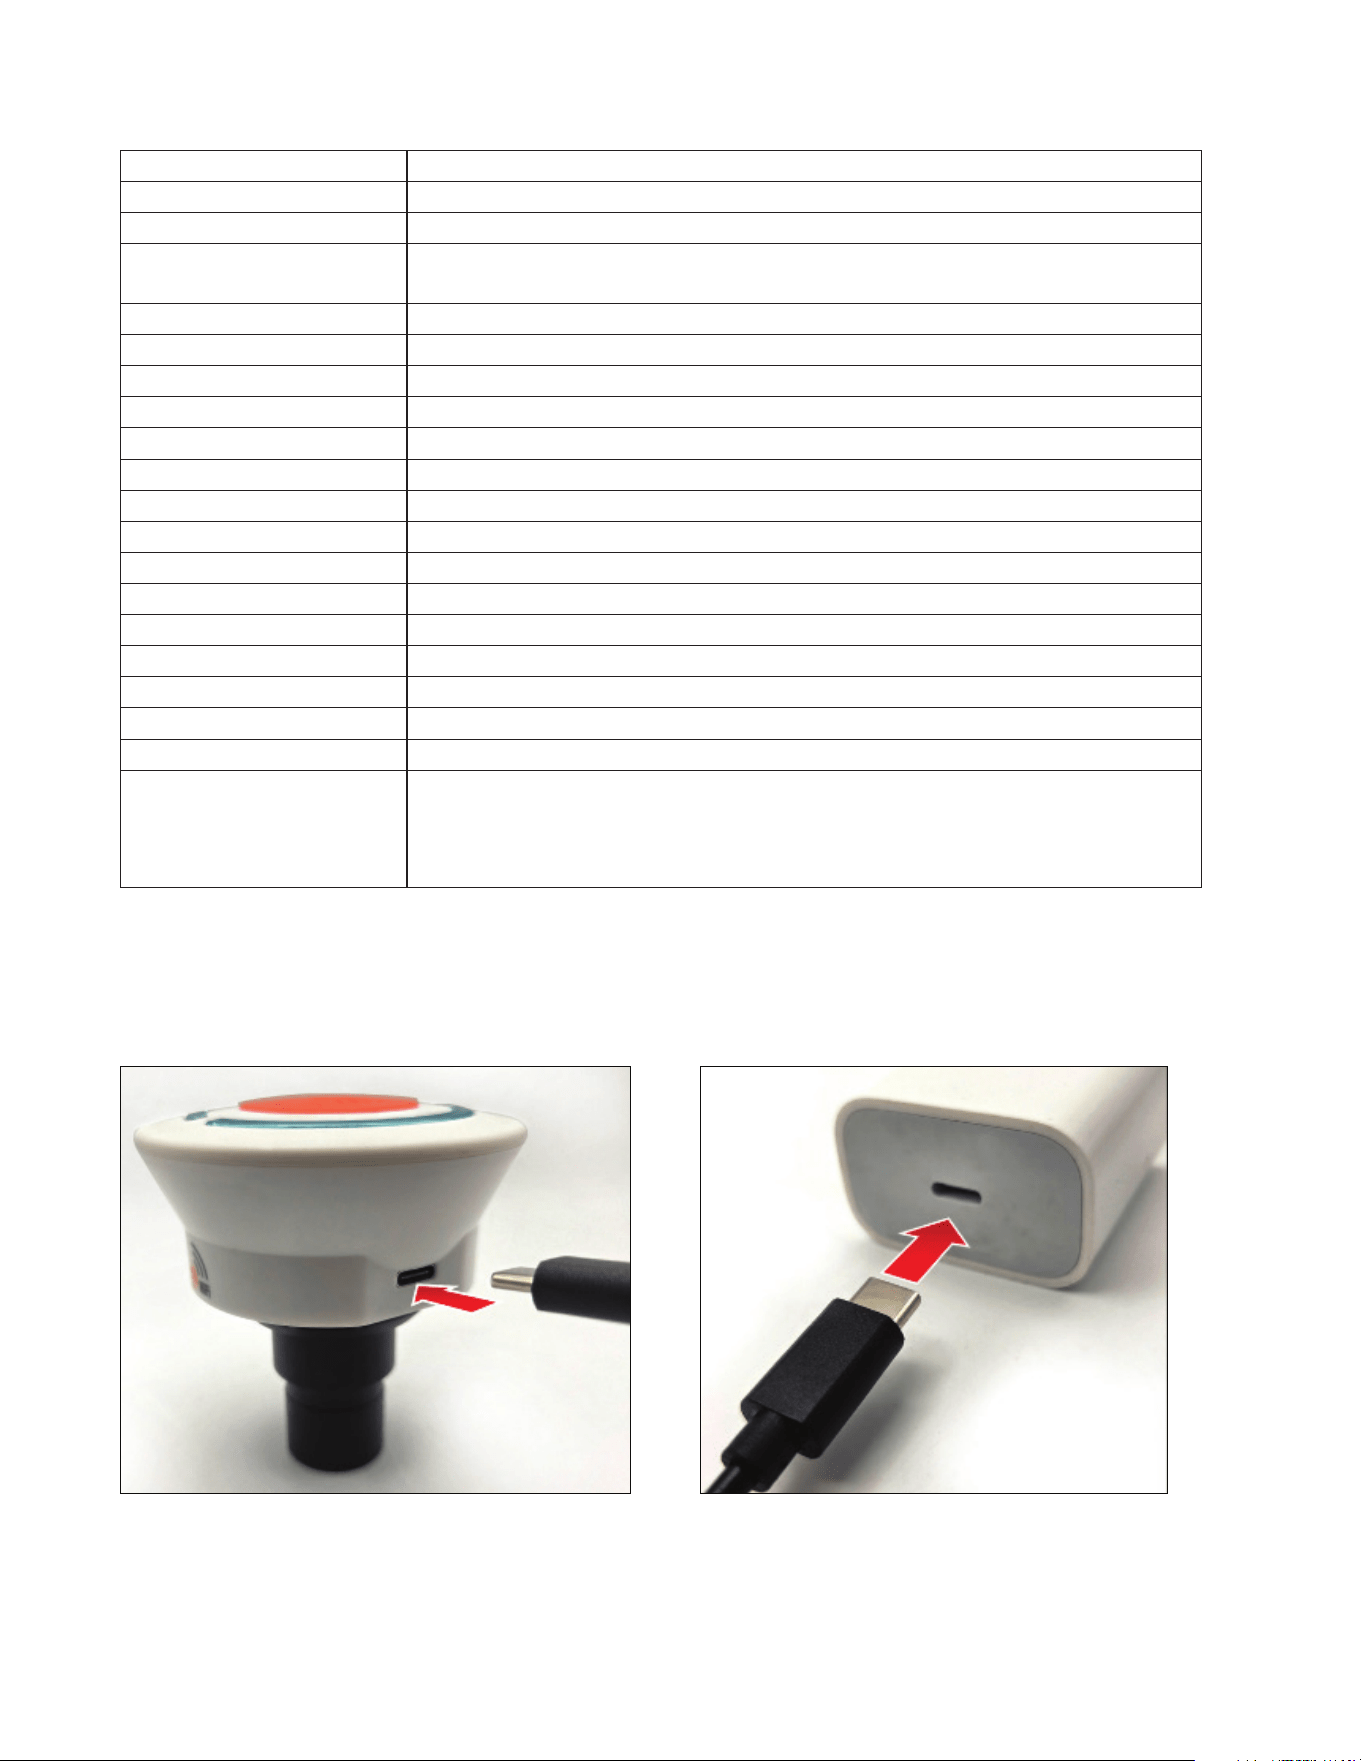
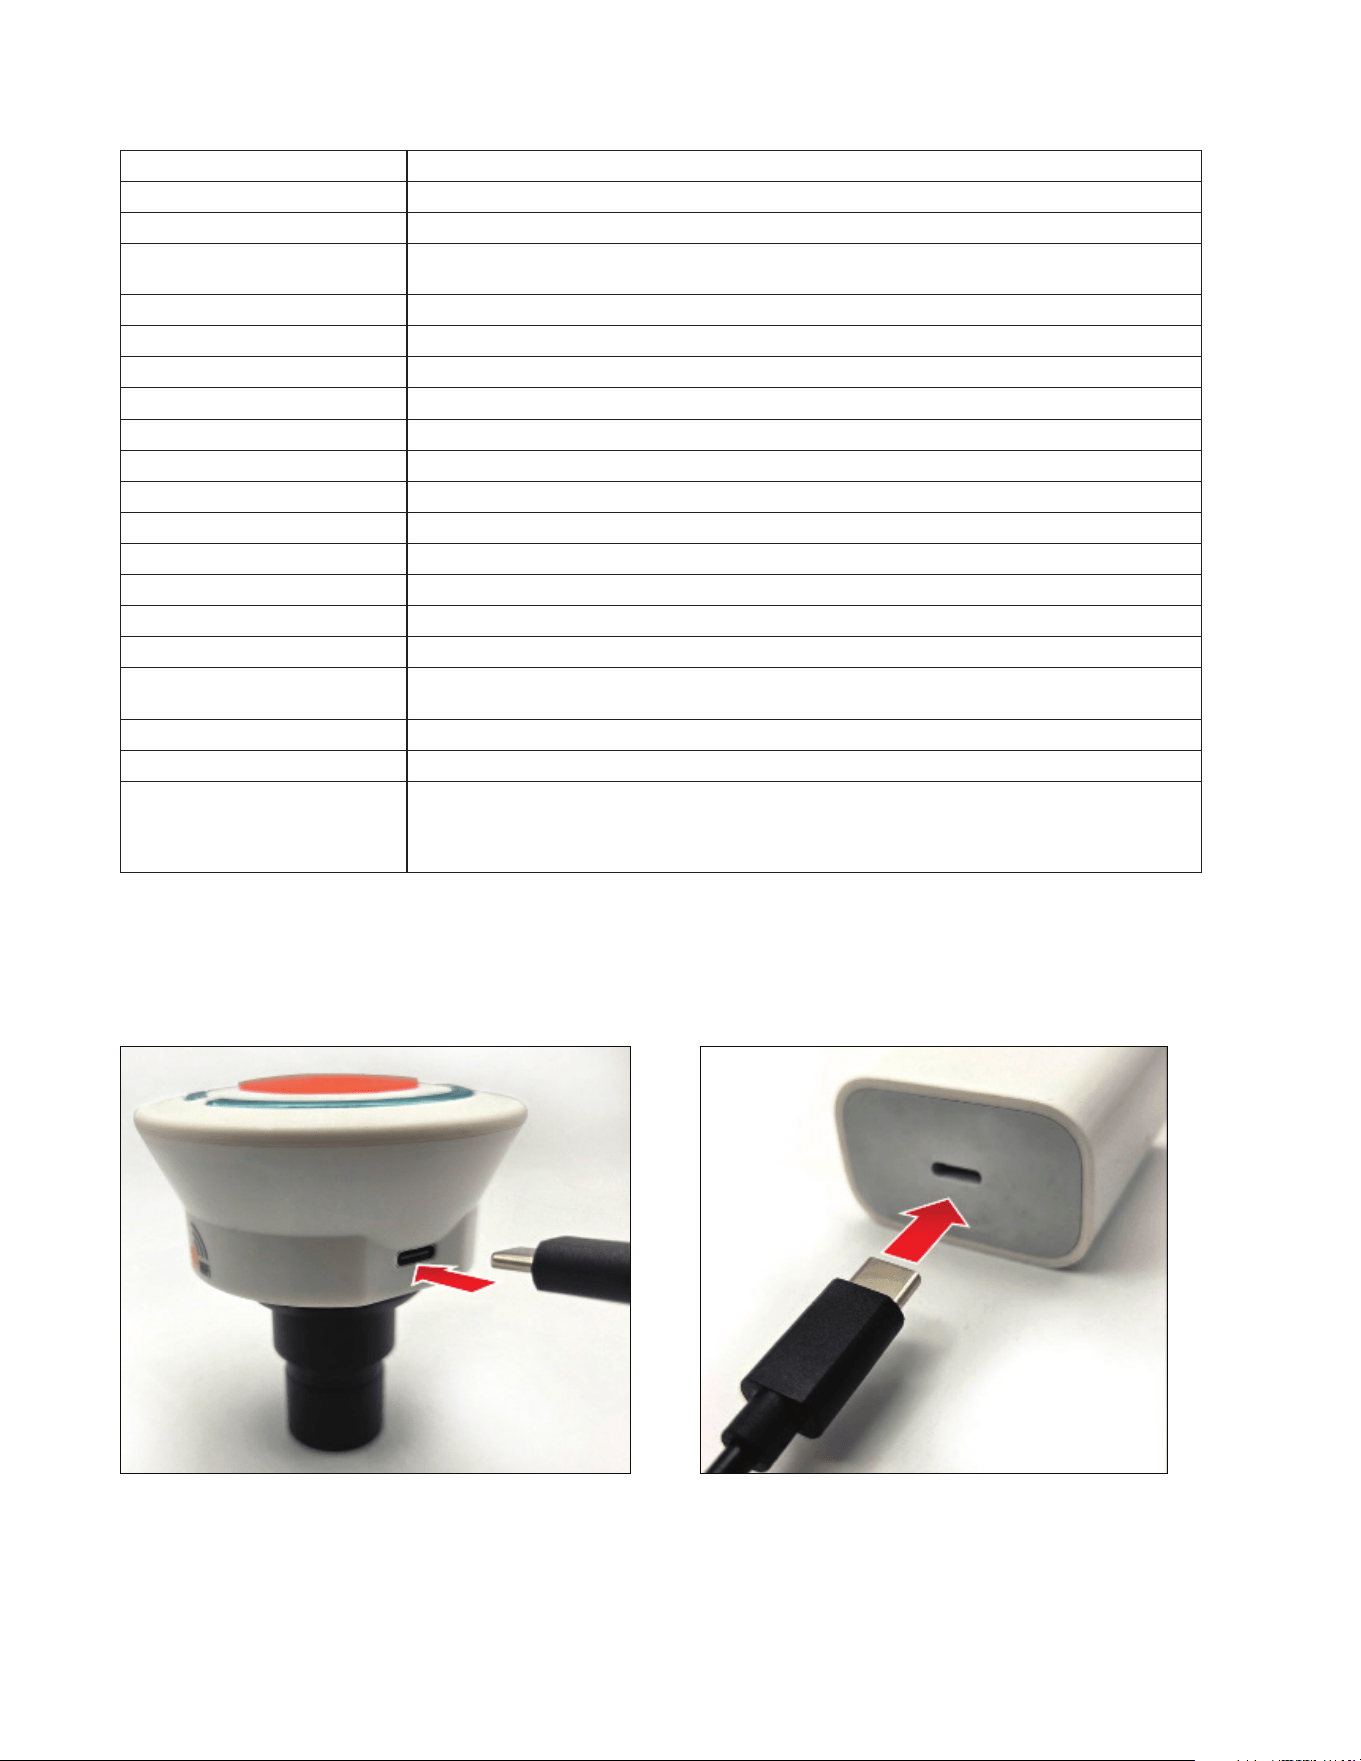
STEP 1: CHARGE THE IMAGER
2. Plug the other end into a standard USB wall charger (such
as a typical phone charger) or a portable USB power bank.
(Output: 5V, 1A-1.8A)
1. Connect the included USB-C cable to the imager.
The Wi-Fi Imager includes a built-in rechargeable lithium-ion battery and must be fully charged before first use.
The red LED will illuminate while charging. When the red LED turns off, the battery is fully charged, and you’re ready to move to the
next step. A full charge provides approximately 3 hours of operation.
SPECIFICATIONS
Type of Microscope: Wi-Fi enabled Microscope Camera
Sensor: 2MP CMOS
Sensor Size: 1/4” SONY
Sensor Magnification: 30X (Final determined by device screen size. Spec based on 5” smartphone screen size)
Pixel Size: 2.9 μm x 2.9 μm
Memory Type: No memory- uses smart device memory to save images and video
Still image capture resolution: 1920x1080/1280x720/640x480
Video resolution: 1920x1080/1280x720/640x480
Video Format - Recording: MJPEG: 30 fps @ 1024x768/ 12fps @ 2592x1944
Shutter trigger position: In APP
Software: Celestron Labs Digital Wi-Fi APP
Software Compatibility: • iOS • Android
Power Source: Rechargeable lithium ion battery (1100 mAh)
Battery life on full charge: 3 hours
Port(s) In: USB-C Port for charging
Port(s) Out: NA
Cable USB-C Cable for charging battery (compatible with most 5V-1A to 1.8A AC Adapters)
Dimensions: 75mm x 75mm x 81.3mm (2.95” x 2.95” x 3.20”)
Weight: 3.4 oz (97 g)
Included Items: • (1) Aluminum collar adapter for 30mm stereo scope eyepiece tube
• (1) Rubber Lens cover for protection
• (1) Calibration ruler in plastic case
• (1) USB-C charging cable
4 I ENGLISH
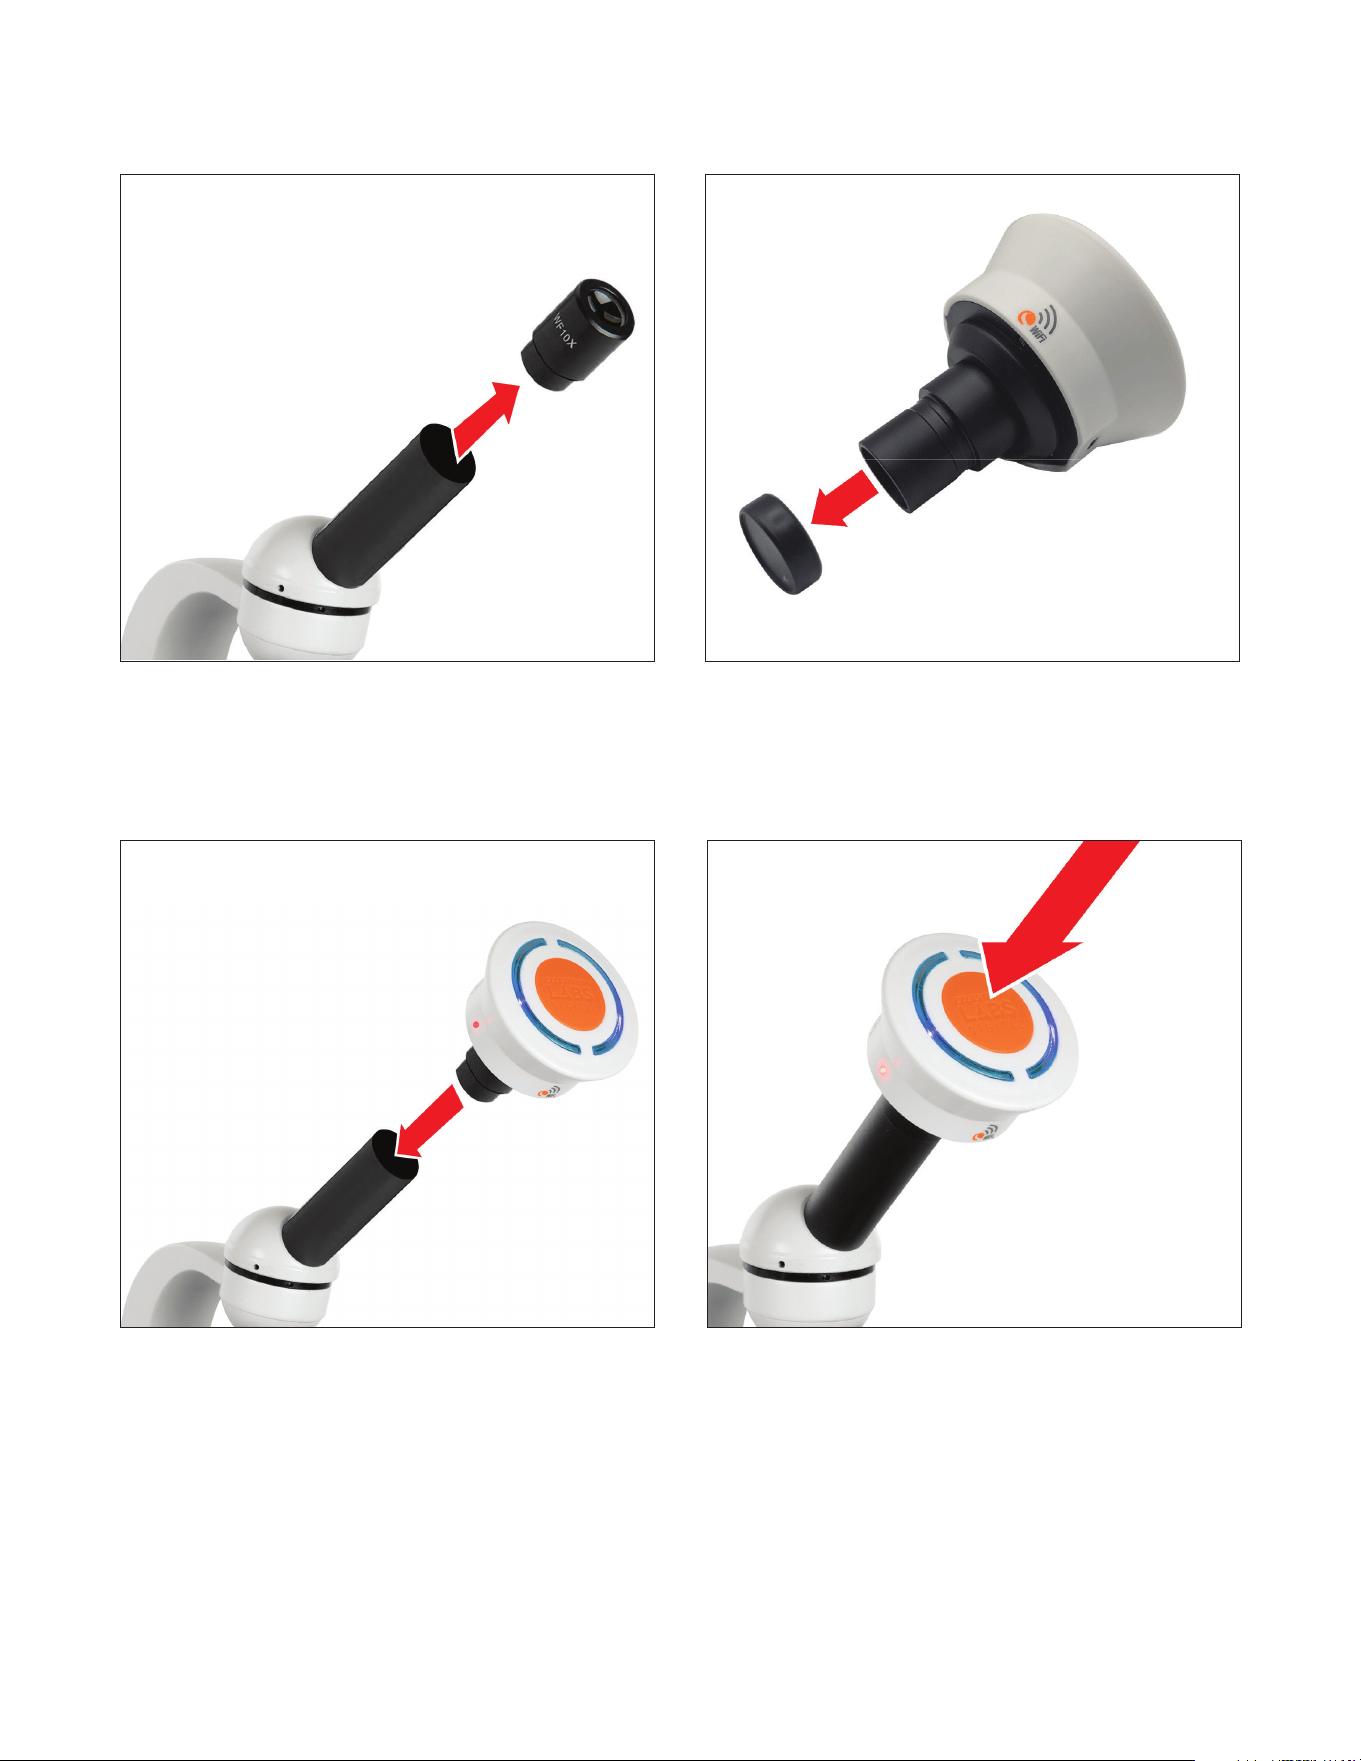
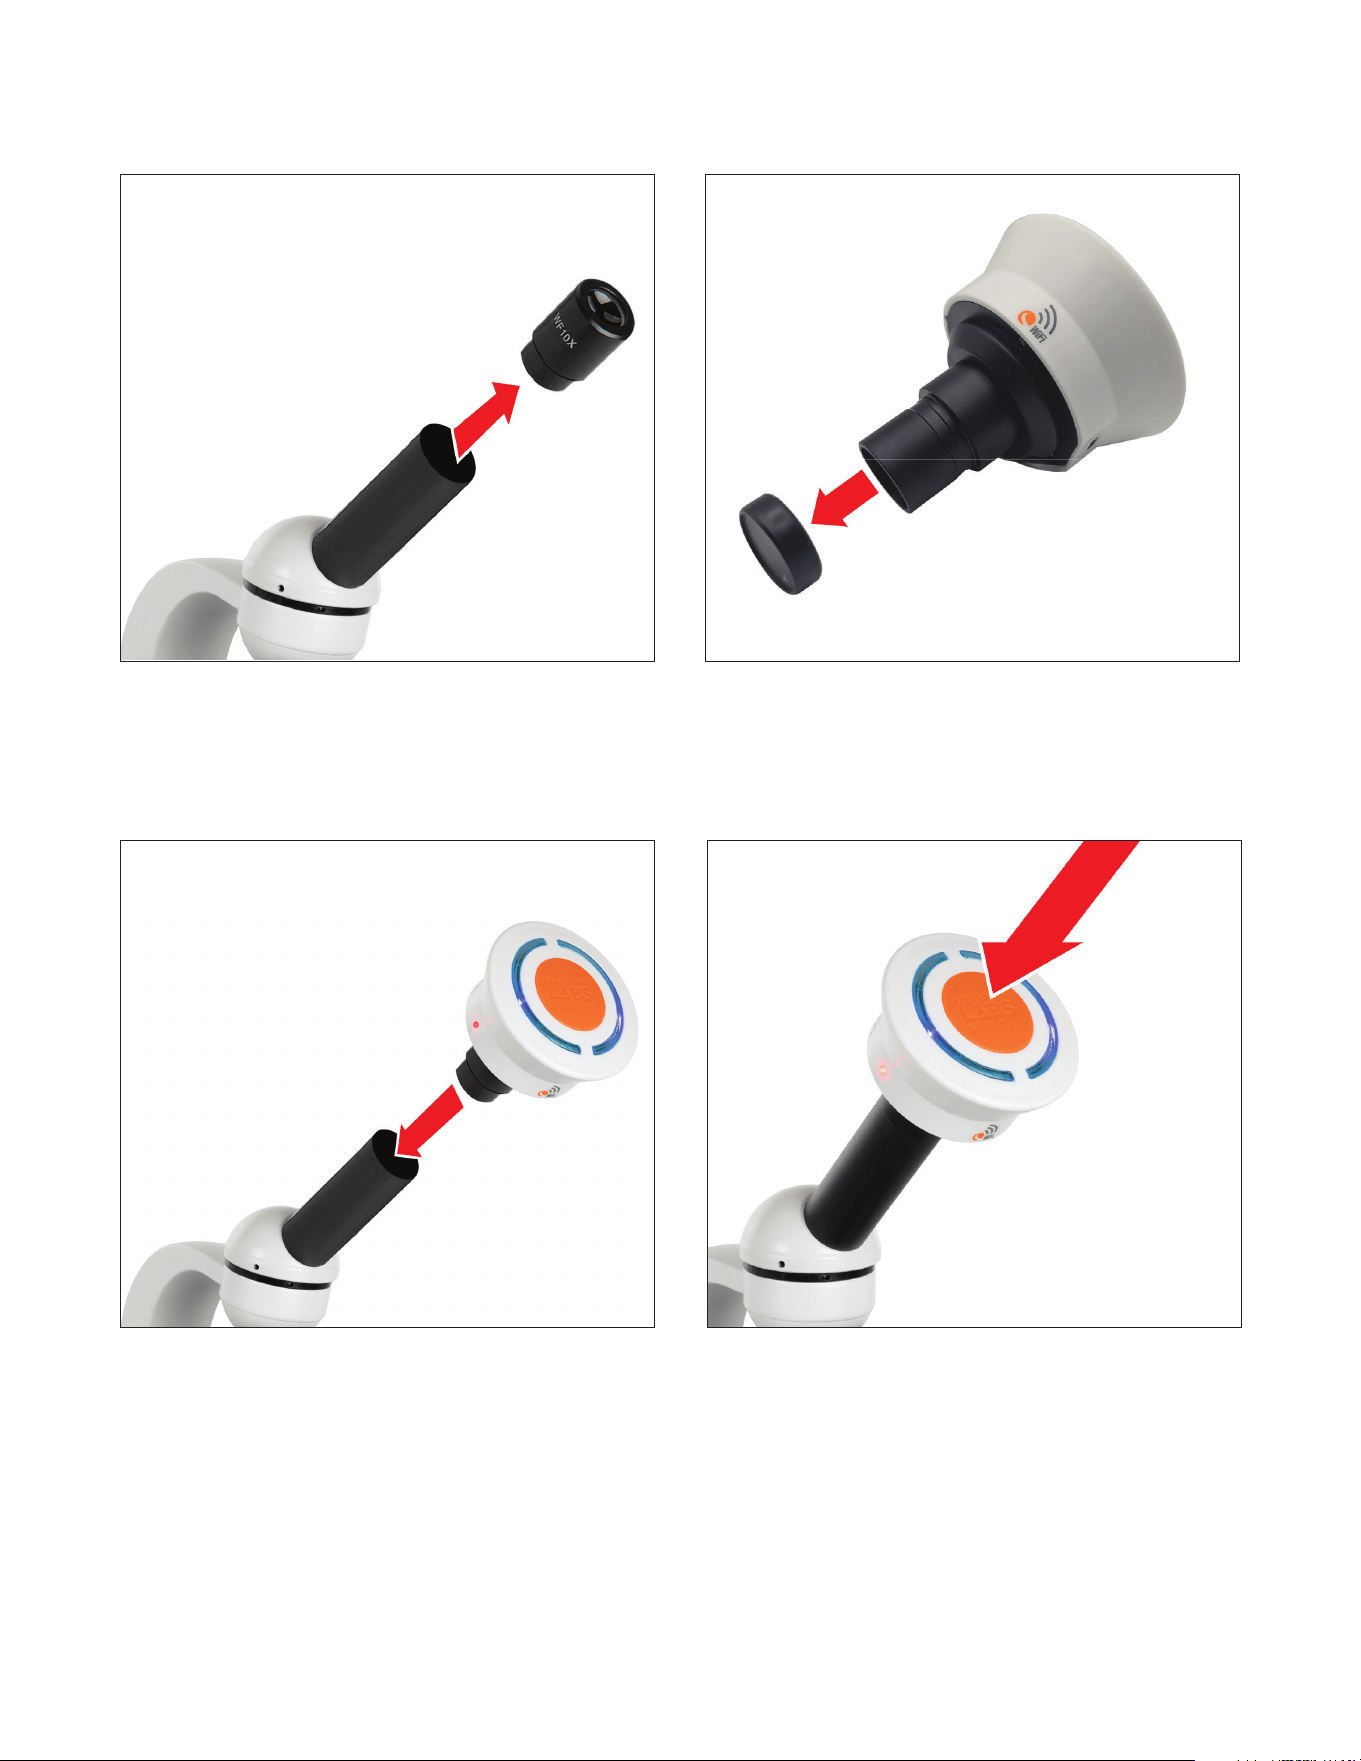
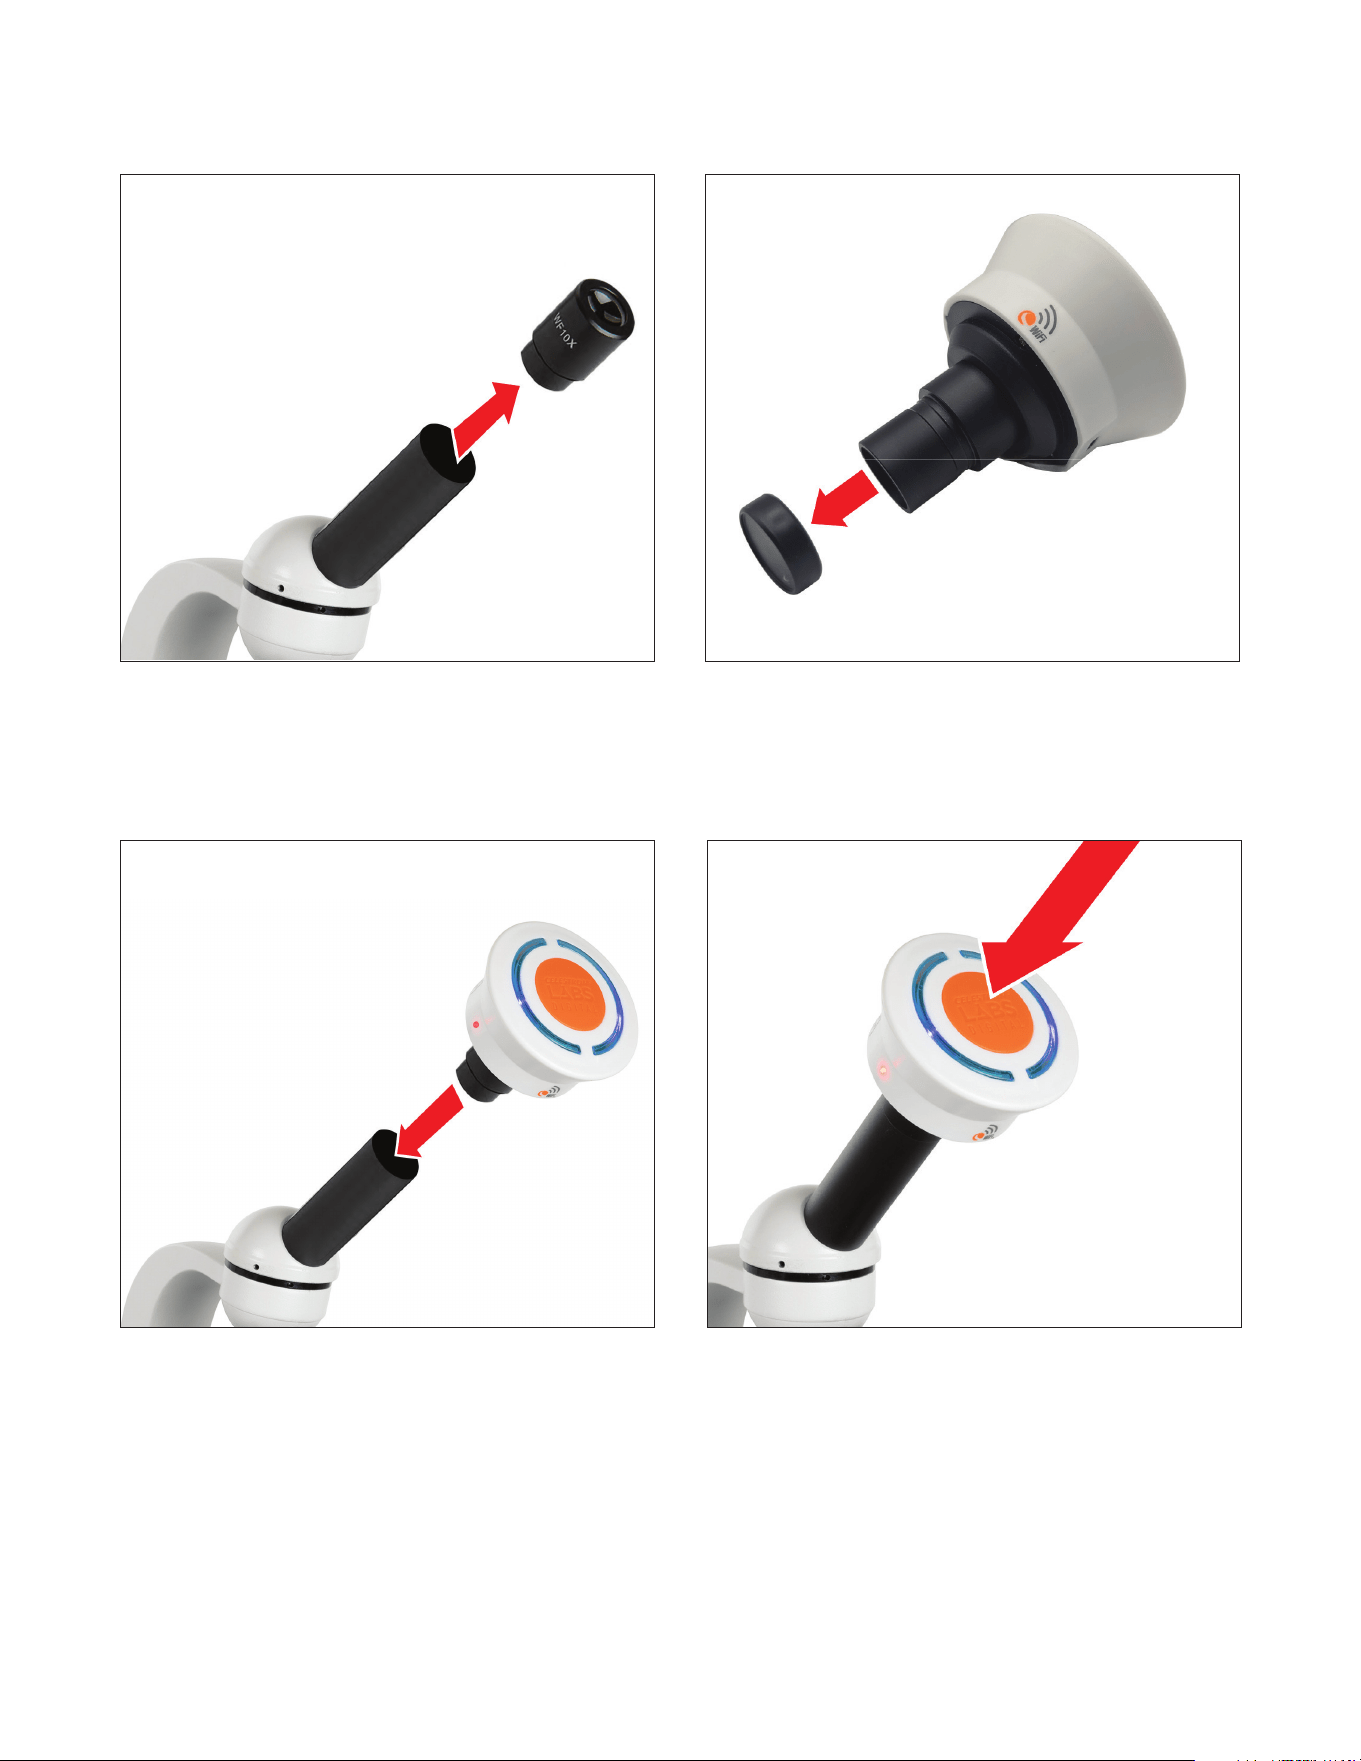
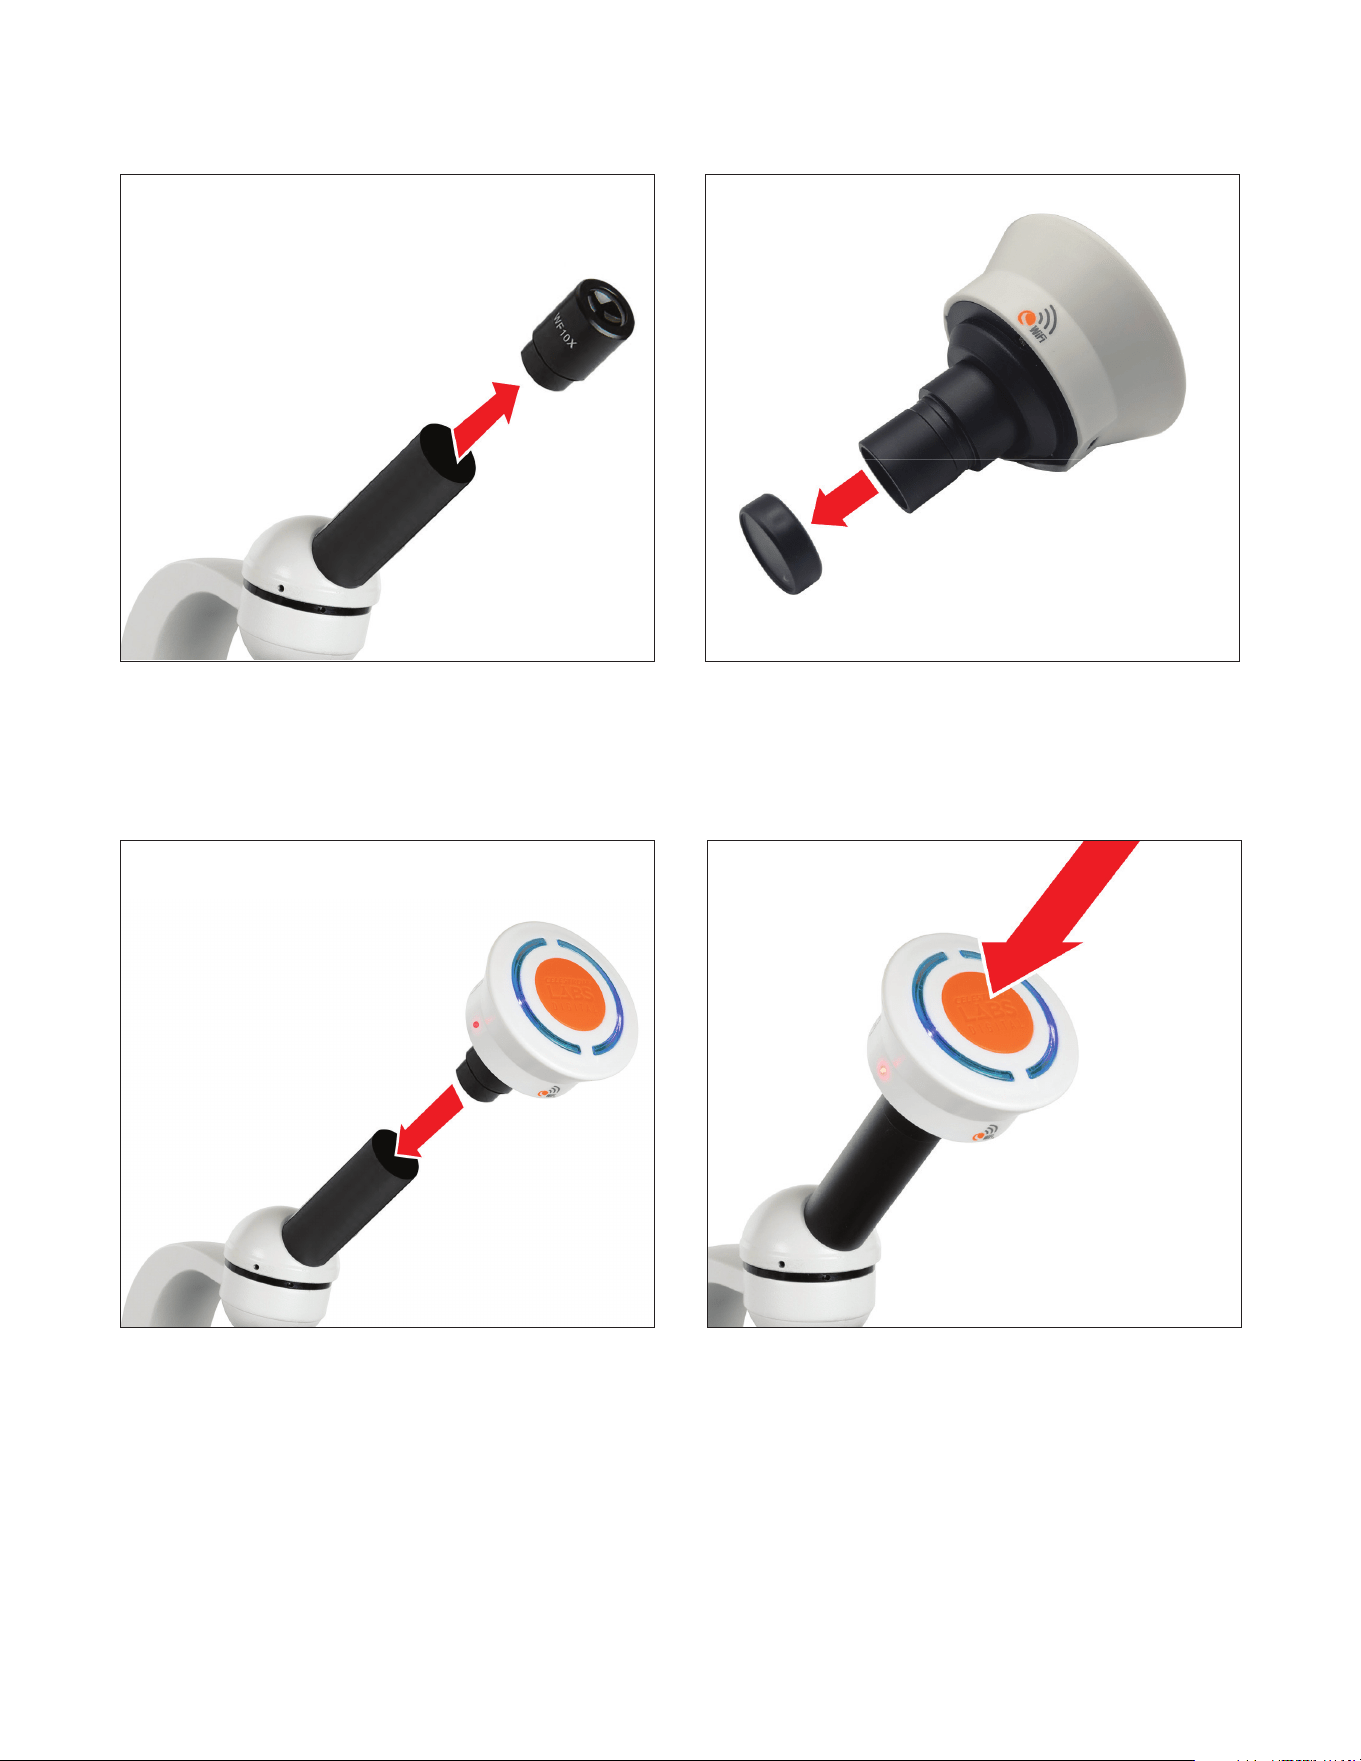
STEP 2: INSTALL THE IMAGER
STEP 3: POWER ON
Press and hold the orange power button until the blue LED
indicators illuminate. The blue LEDs will begin blinking. This
indicates the imager is broadcasting its Wi-Fi signal.
If the blue LEDs do not turn on:
• Confirm the battery is charged.
• Press and hold the power button for several seconds.
1. Remove the eyepiece from your microscope.
NOTE: If your microscope uses a 30mm eyepiece tube, you’ll need to attach the
included 30mm adapter. For more information, see the “Using the 30m Adapter”.
2. Remove the rubber lens cap from the imager.
3. Insert the imager fully into the microscope’s eyepiece tube.
The imager should fit securely without force.
ENGLISH 5
STEP 4: INSTALL THE APP
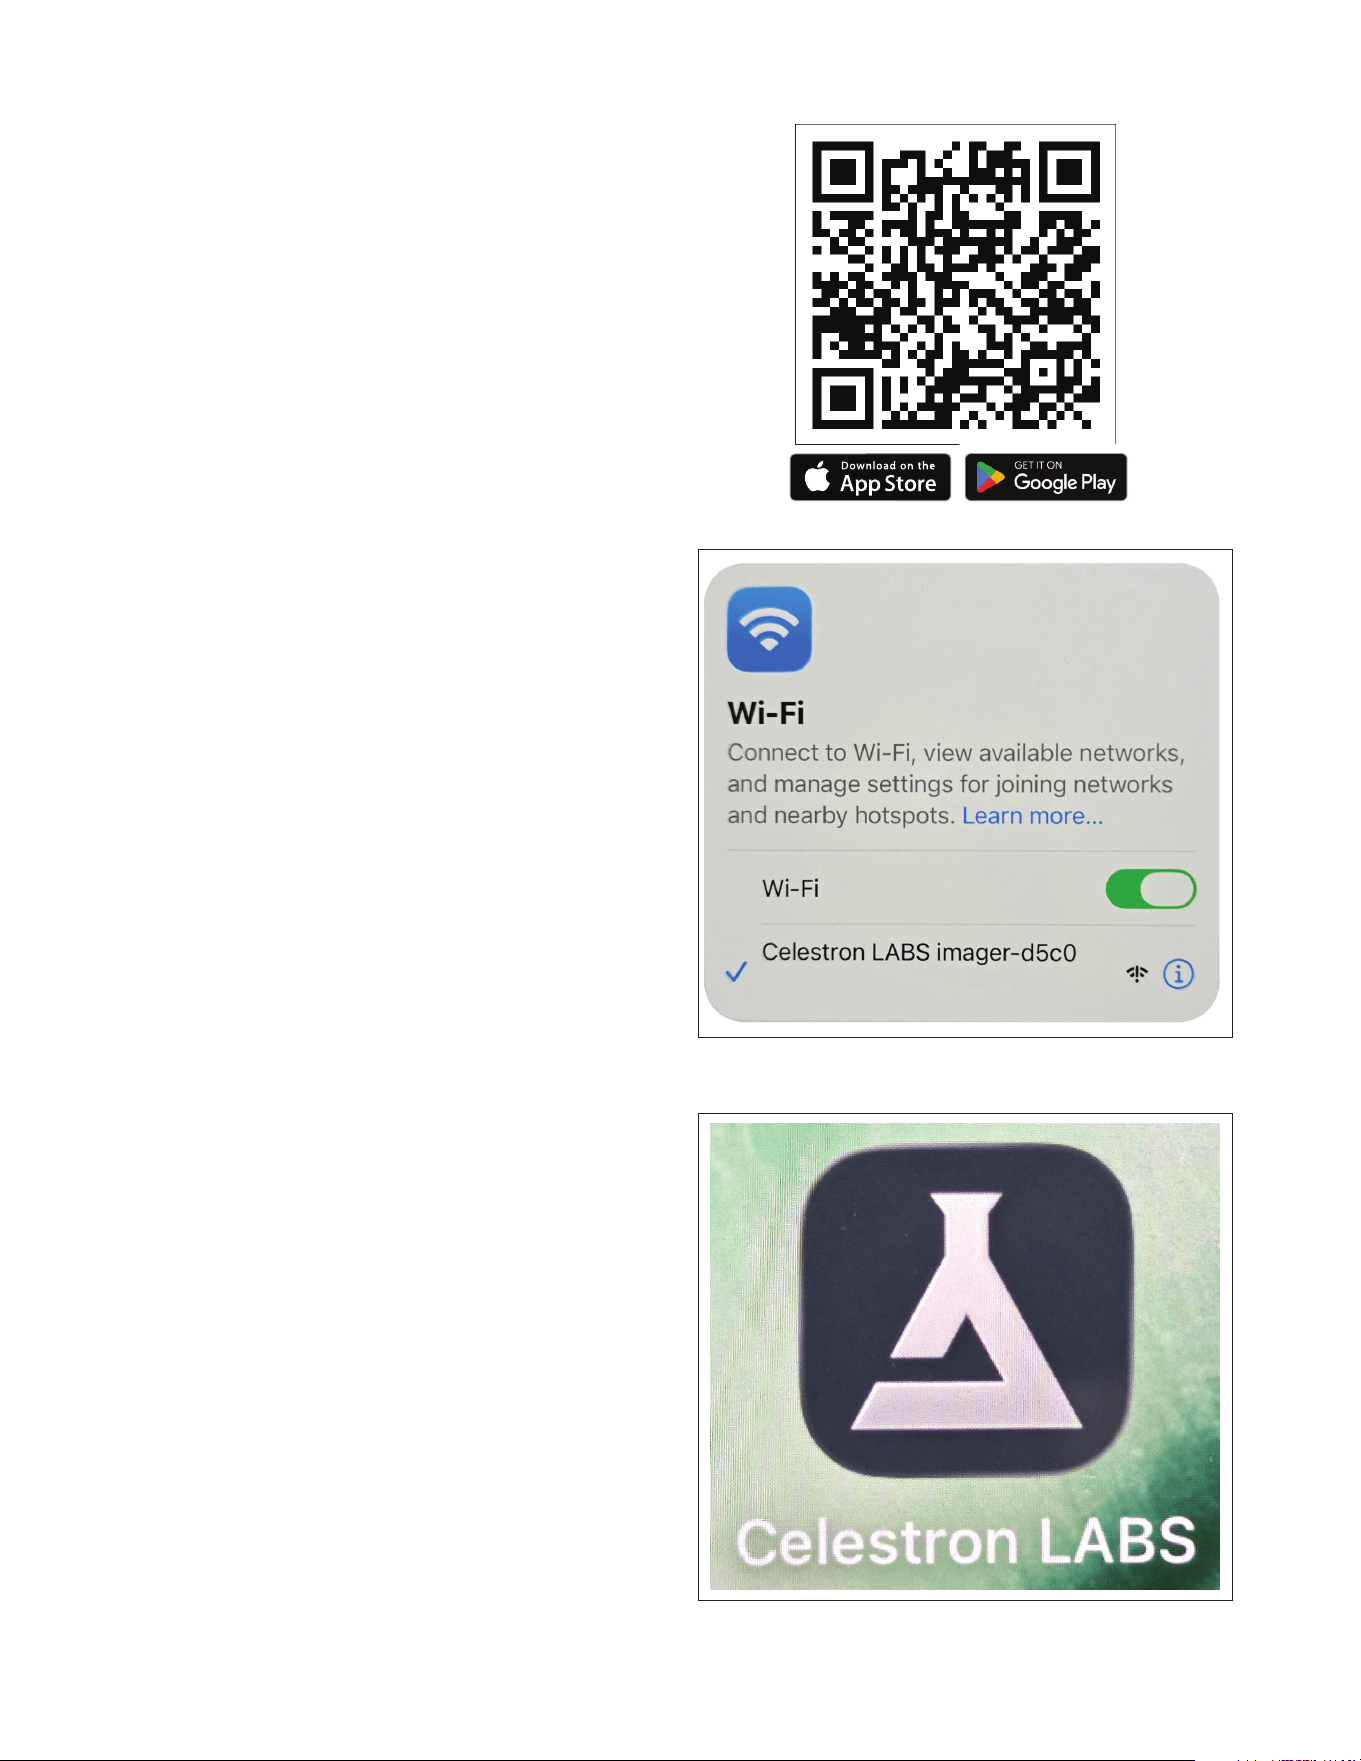
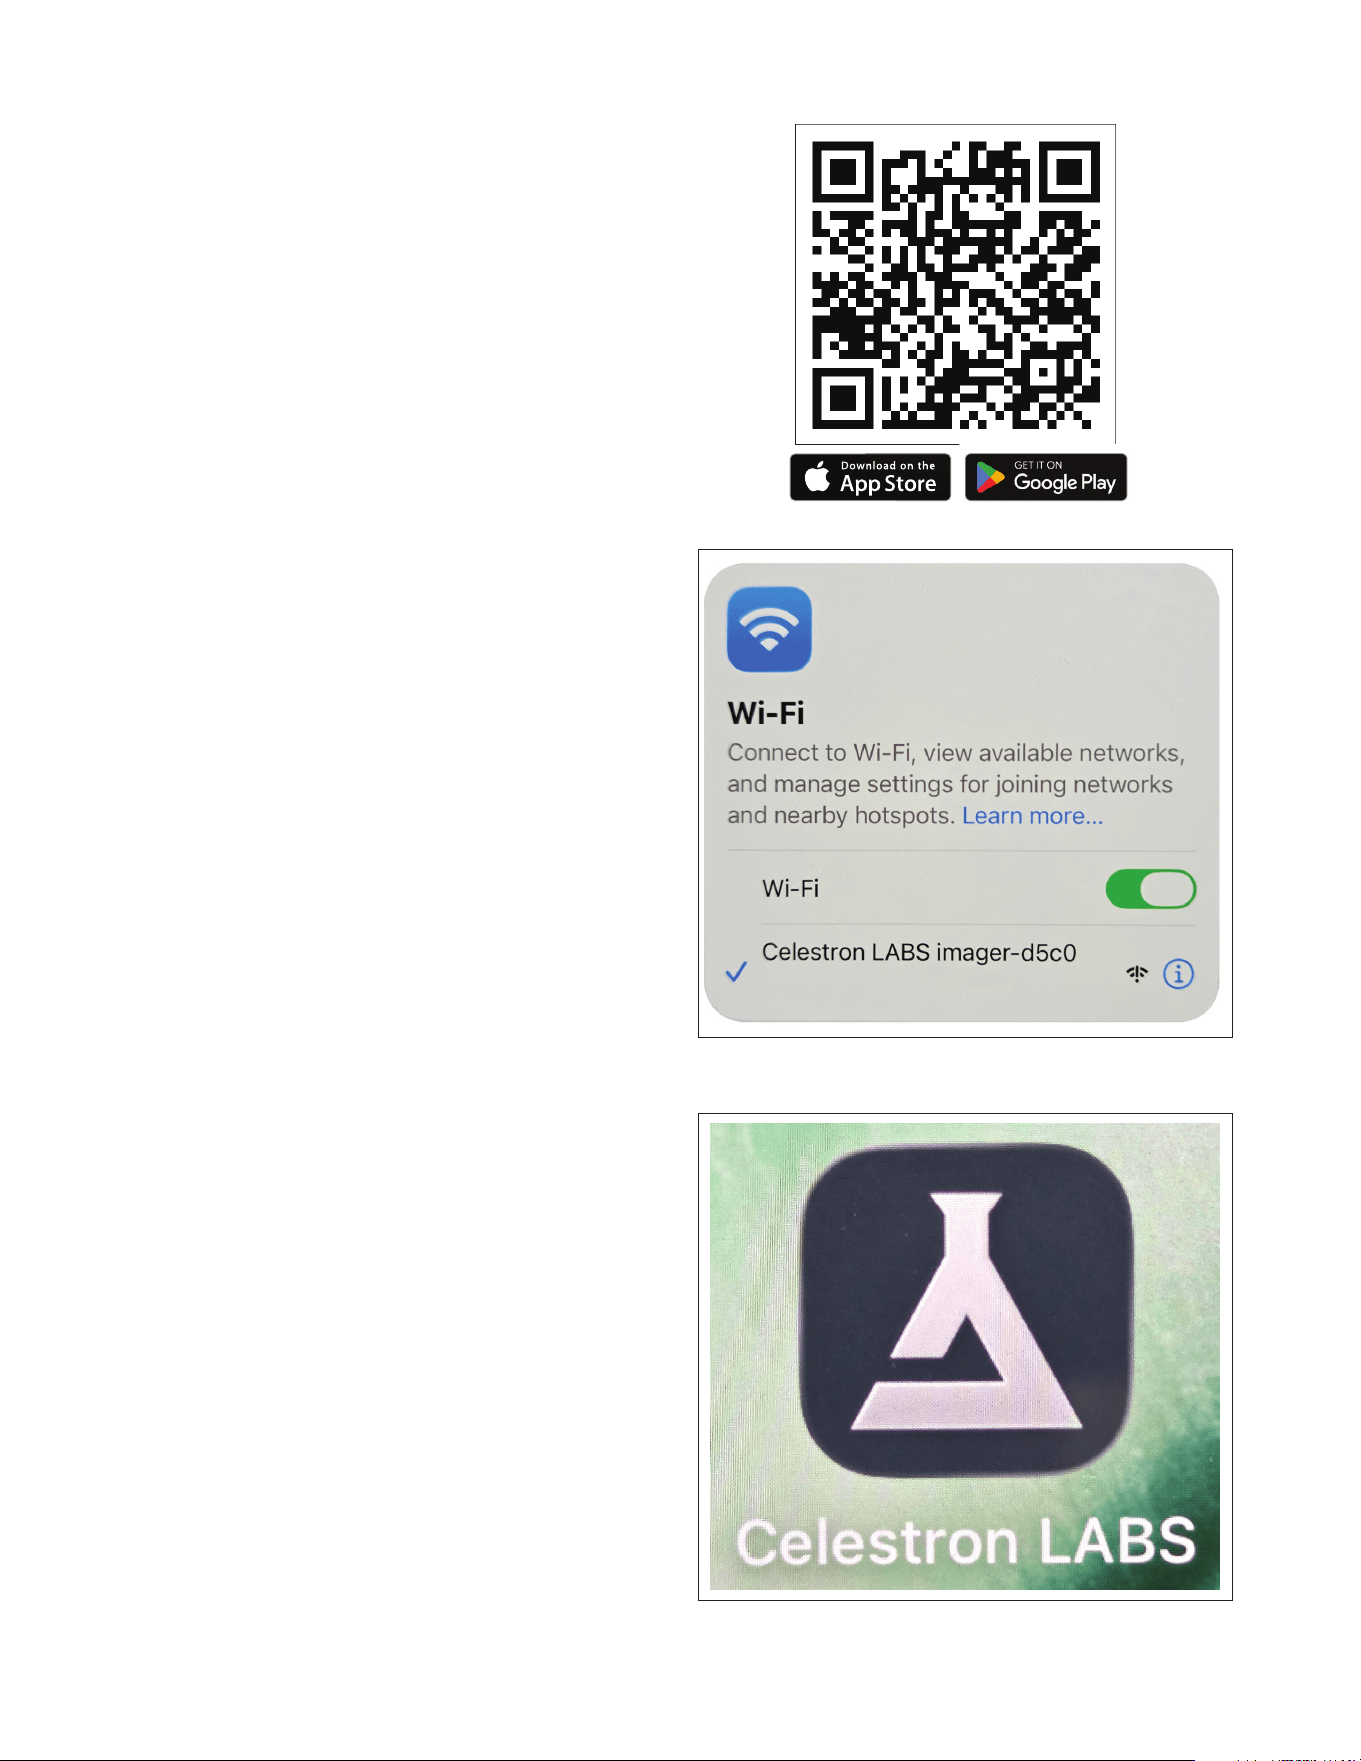
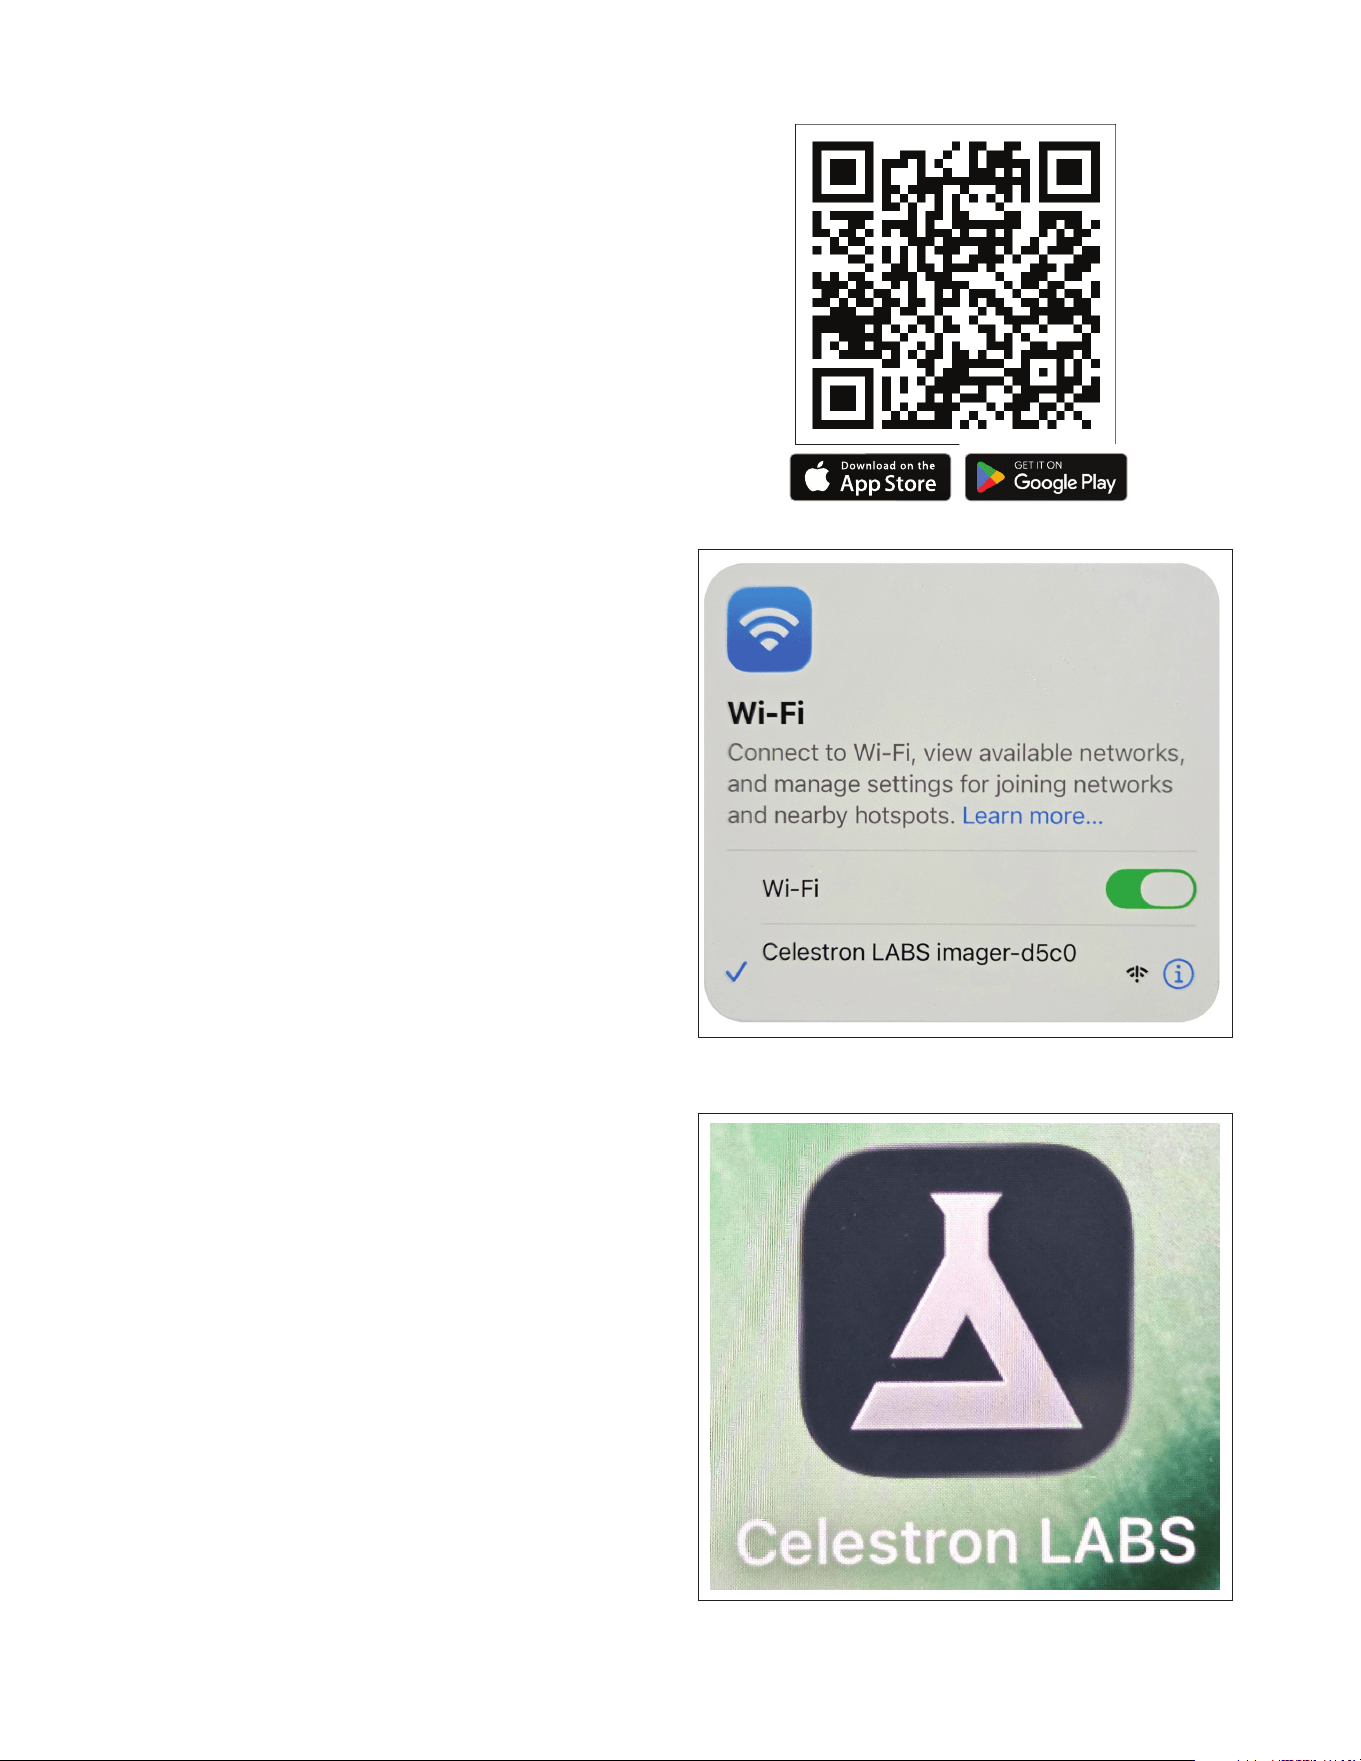
Scan the QR code provided or search for Celestron Labs
Digital Wi-Fi in the Apple App Store or Google Play Store.
Download and install the free app. The app works with iOS
and Android devices.
STEP 5: CONNECT TO THE
IMAGER’S WI-FI NETWORK
1. Open the Wi-Fi settings on your smartphone or tablet.
2. Look for a network named: Celestron LABS ImagerXXXX
(The four X’s represent a unique letter/number combination.)
3. Select the network to connect.
Once connected, the blue LED on the imager will stop blinking
and remain steady.
Your device may display a message stating that there is no
internet connection. This is normal. The imager creates its own
direct Wi-Fi connection and does not use your Wi-Fi network.
STEP 6: START VIEWING
Open the Celestron Labs Digital Wi-Fi App.
Live video should begin streaming within about 30 seconds.
If the video does not appear:
• Confi rm your device is connected to the Celestron LABS
ImagerXXX Wi-Fi network.
• Close and reopen the app.
6 I ENGLISH
You may operate the imager while it is connected to external
power. When doing so:
• Do not power the device from a computer USB port. This may
interfere with the Wi-Fi signal.
• The blue LED may continue blinking while charging, even
when connected to Wi-Fi. This is normal.
USING THE APP
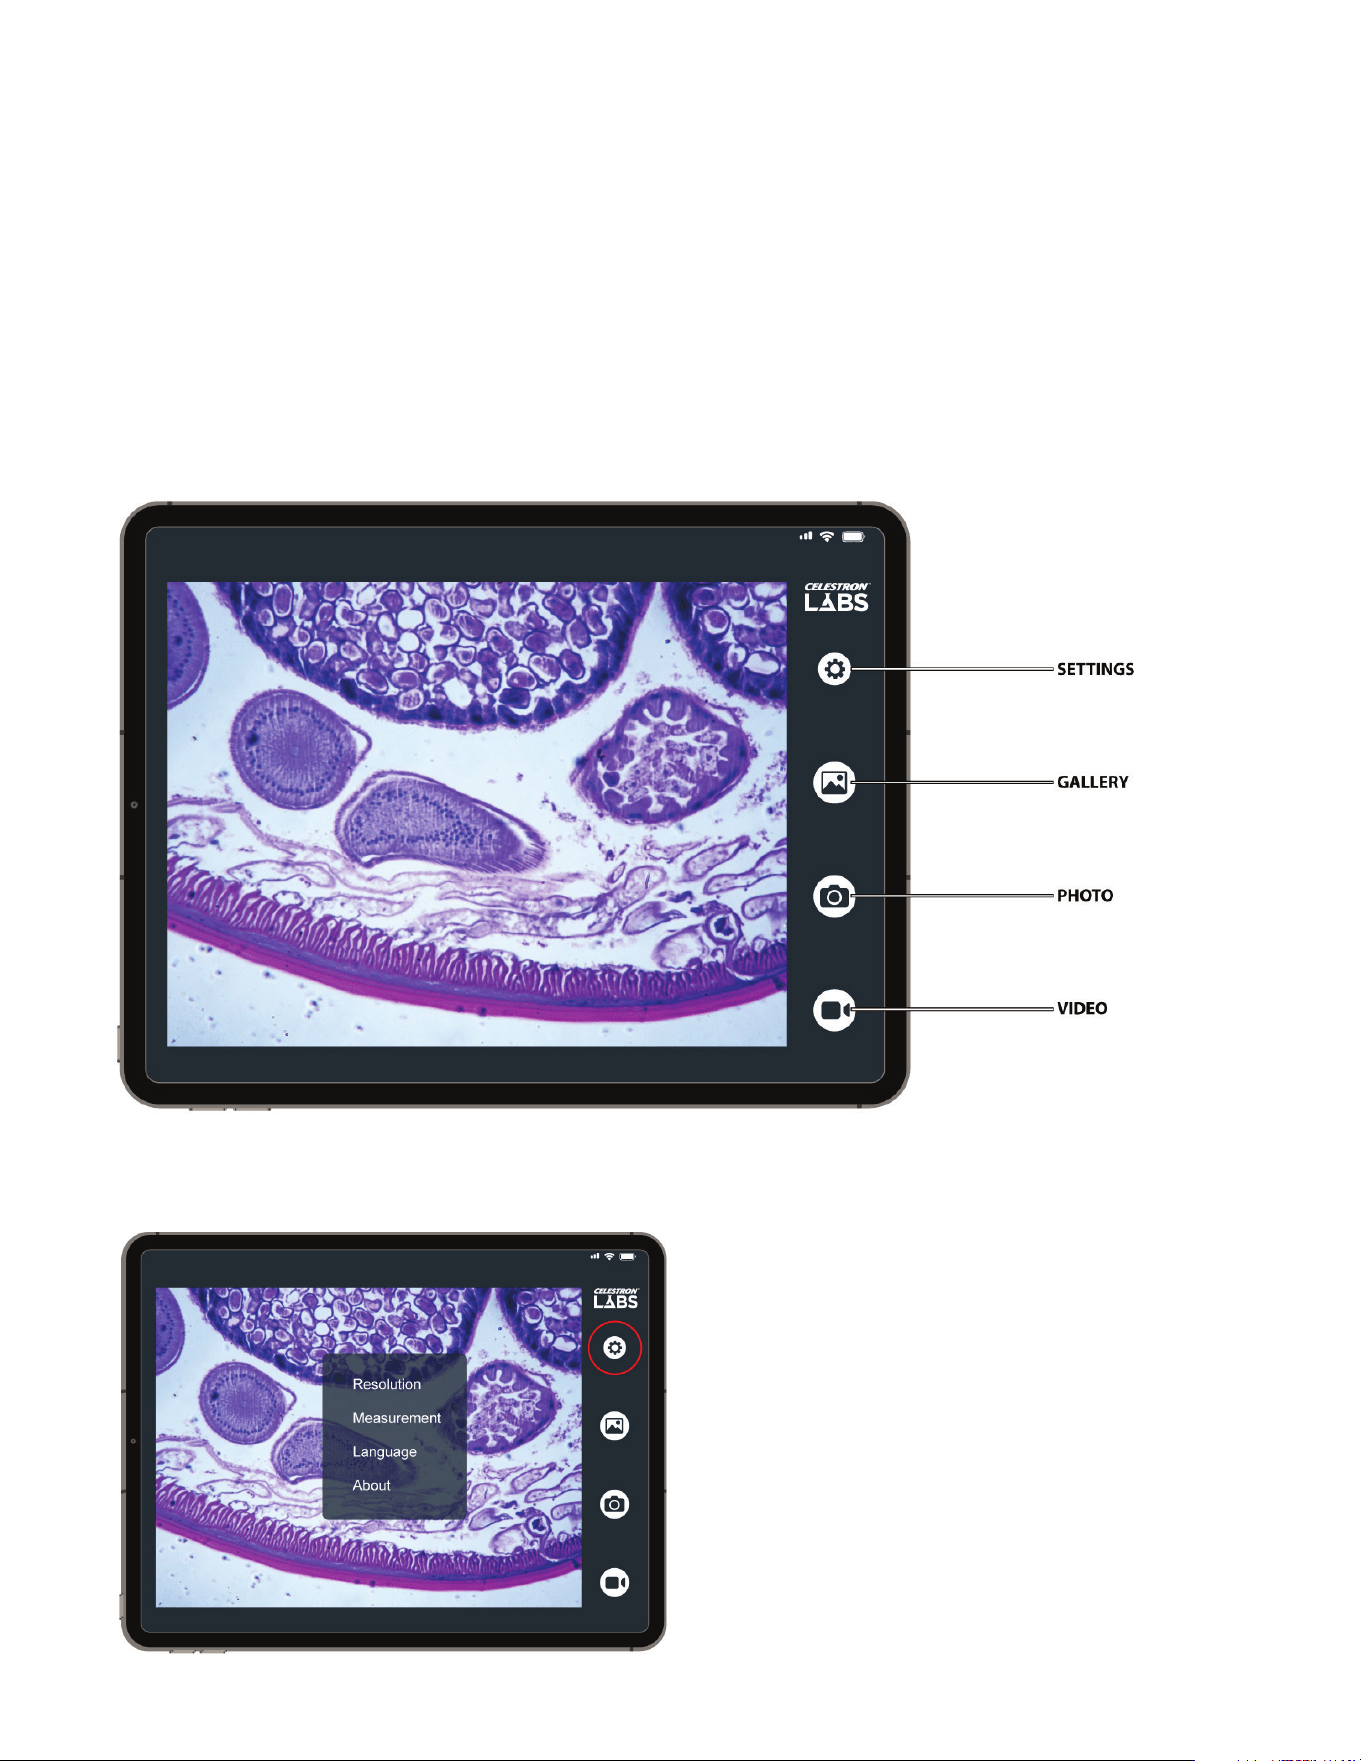
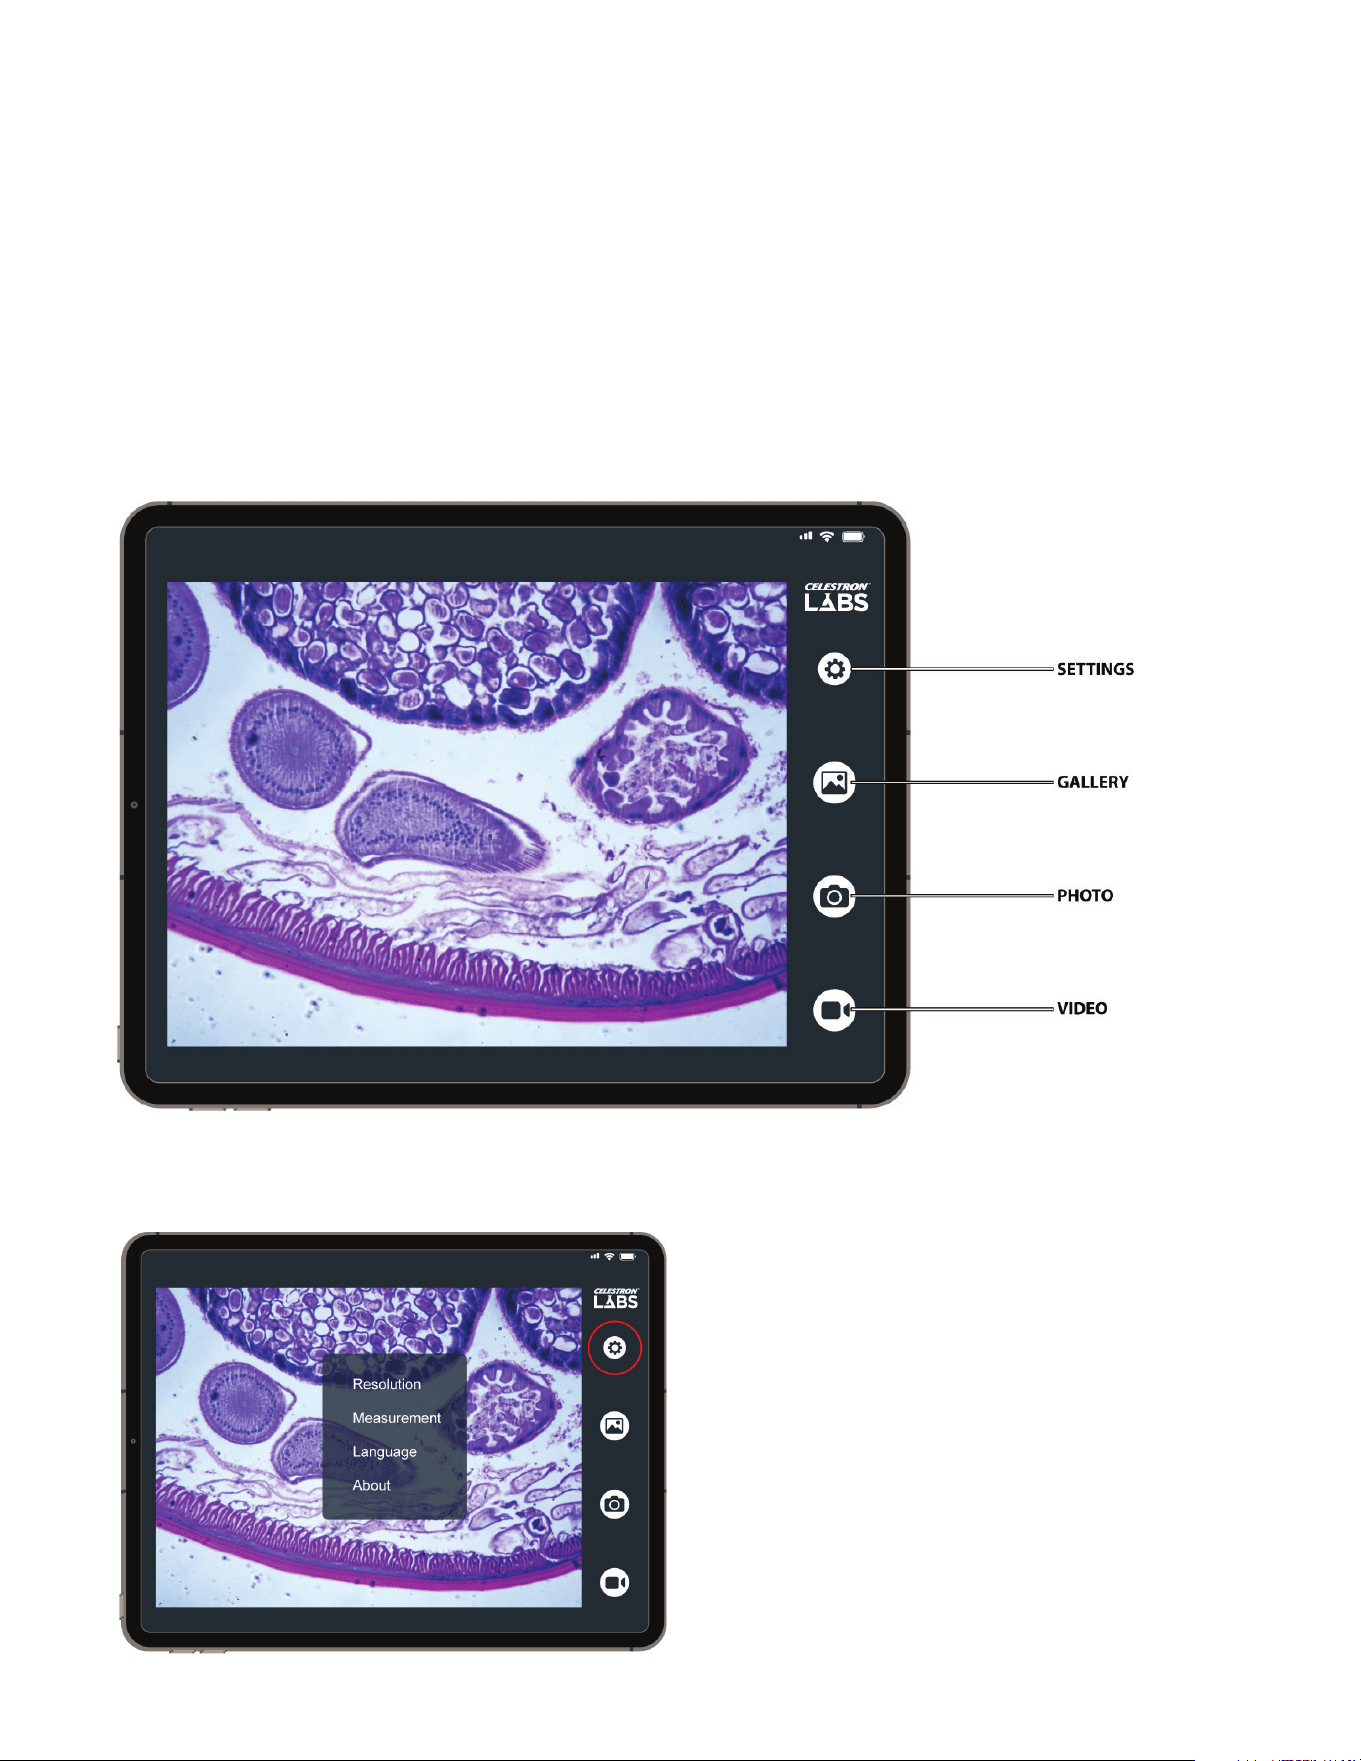
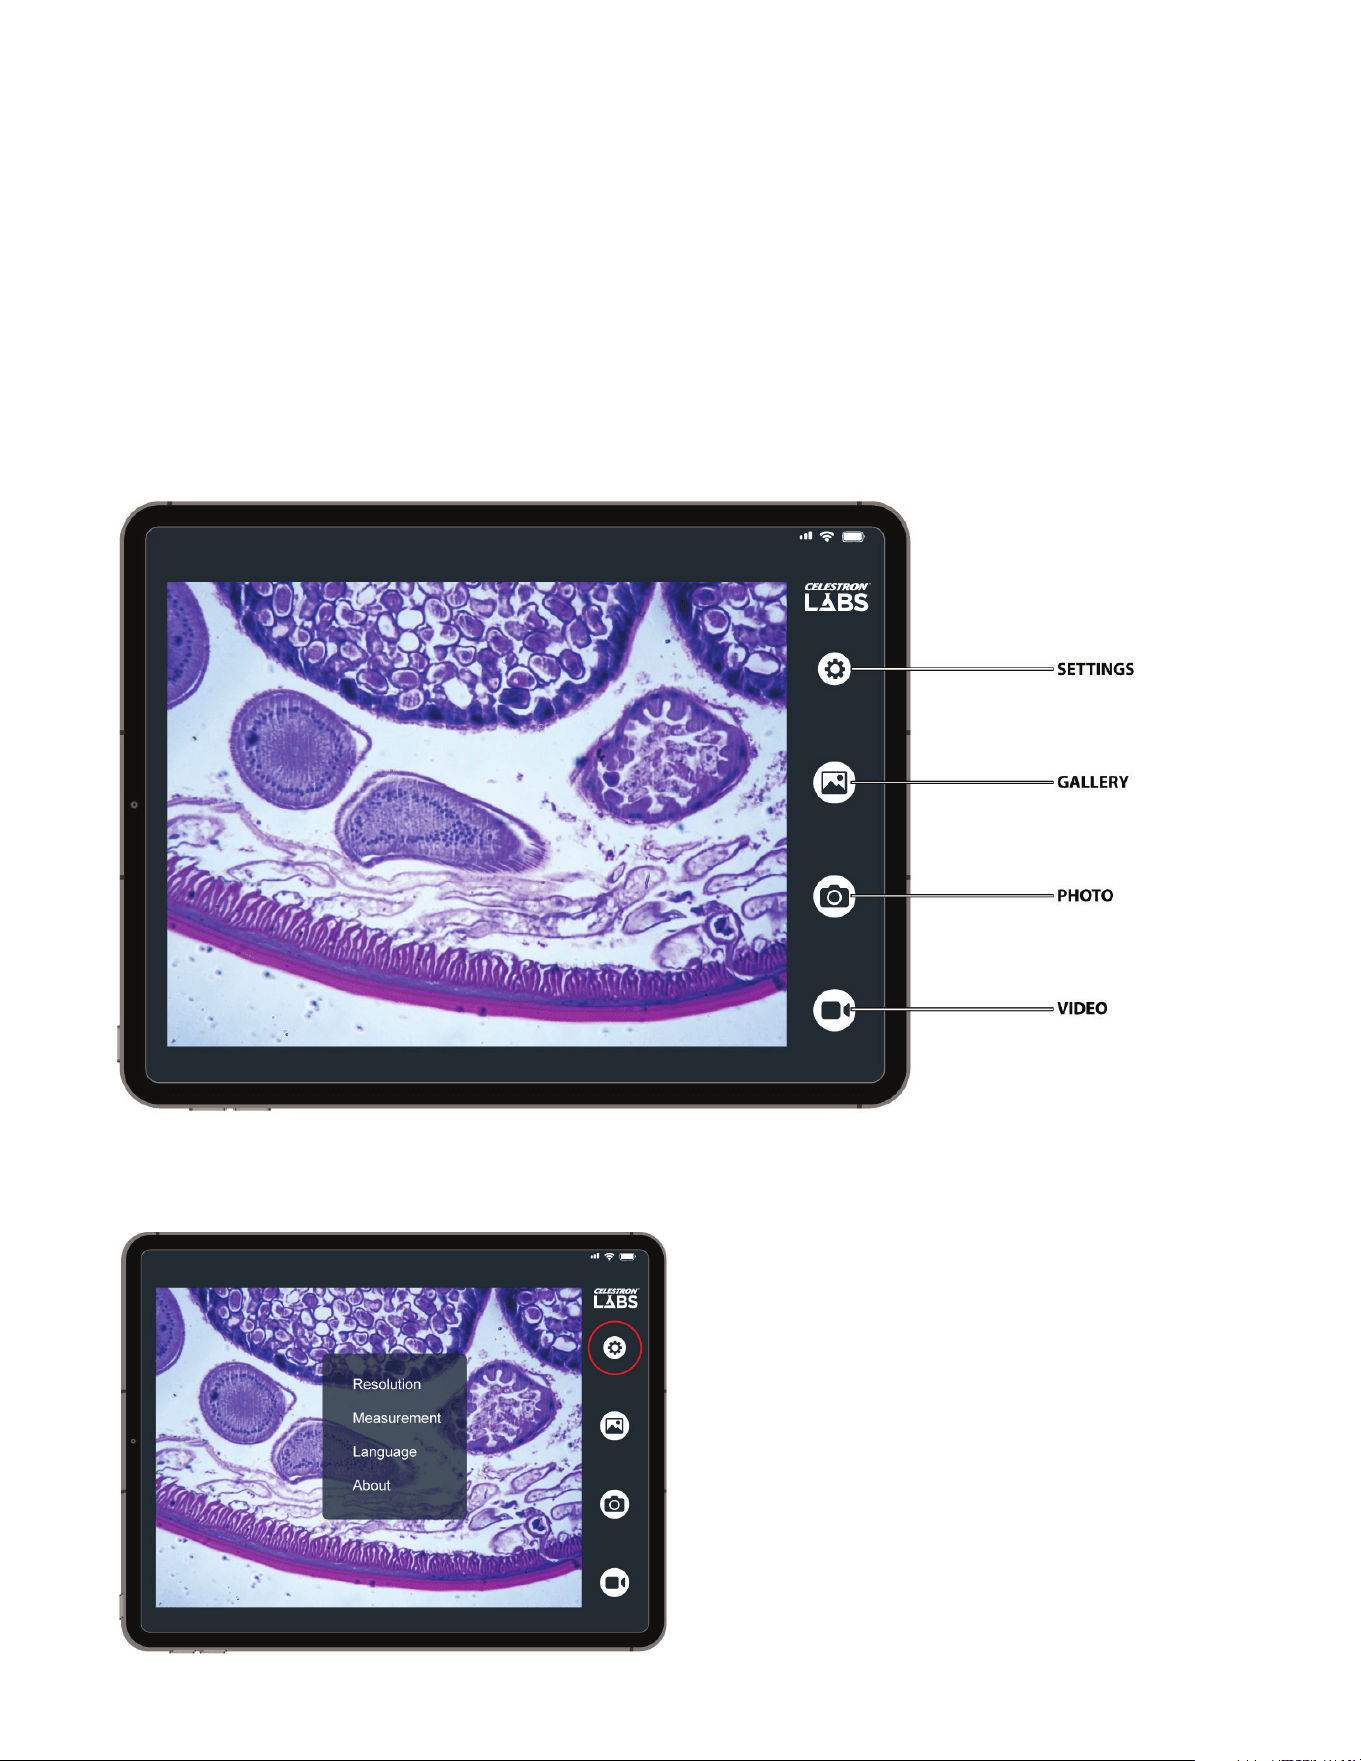
The main interface is shown below. The labeled callouts identify
each feature described in this section.
USING THE IMAGER WHILE CHARGING
Once connected to the imager’s Wi-Fi network, open the Celestron Labs Digital Wi-Fi App. Live video will stream directly
to your device.
ENGLISH 7
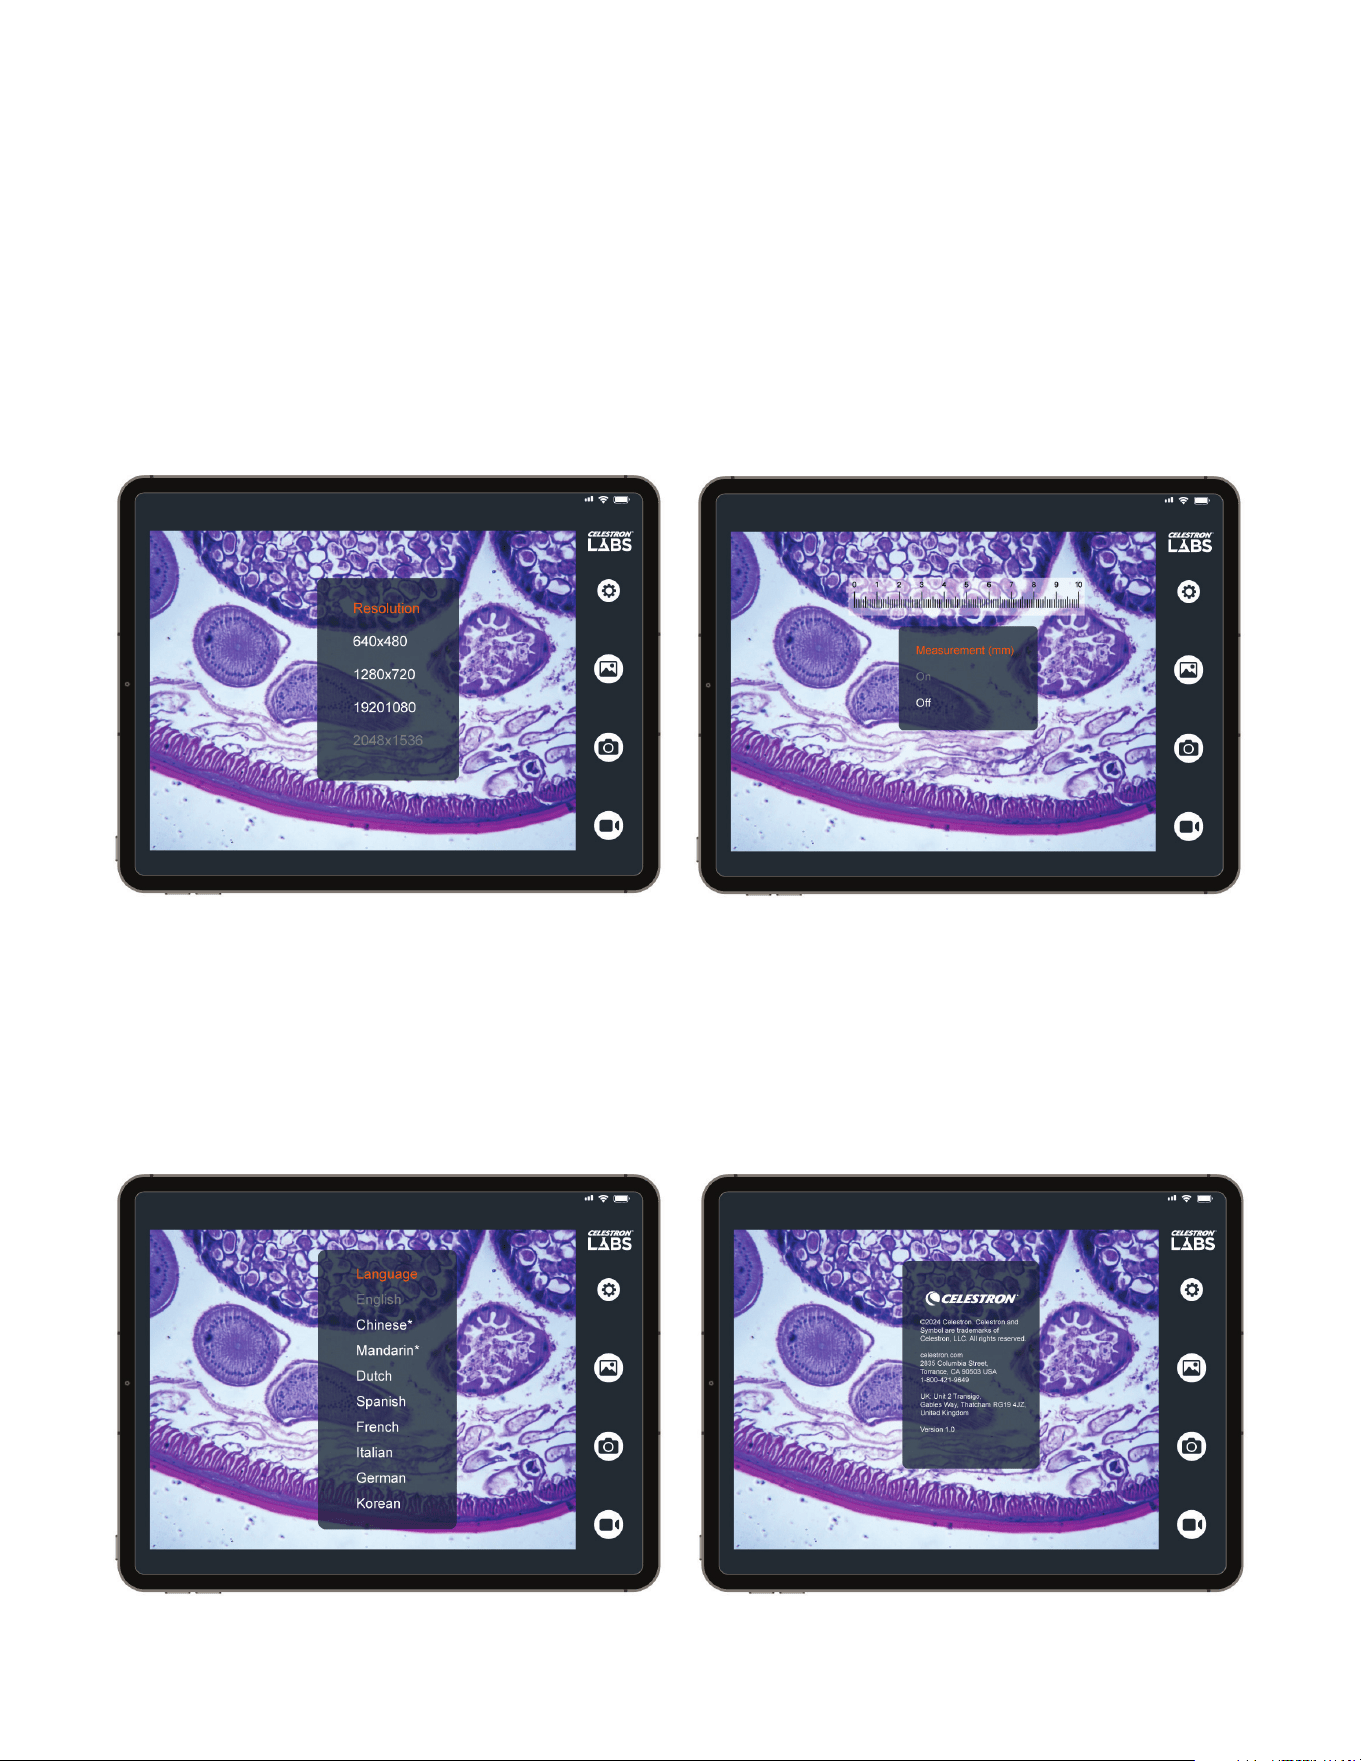
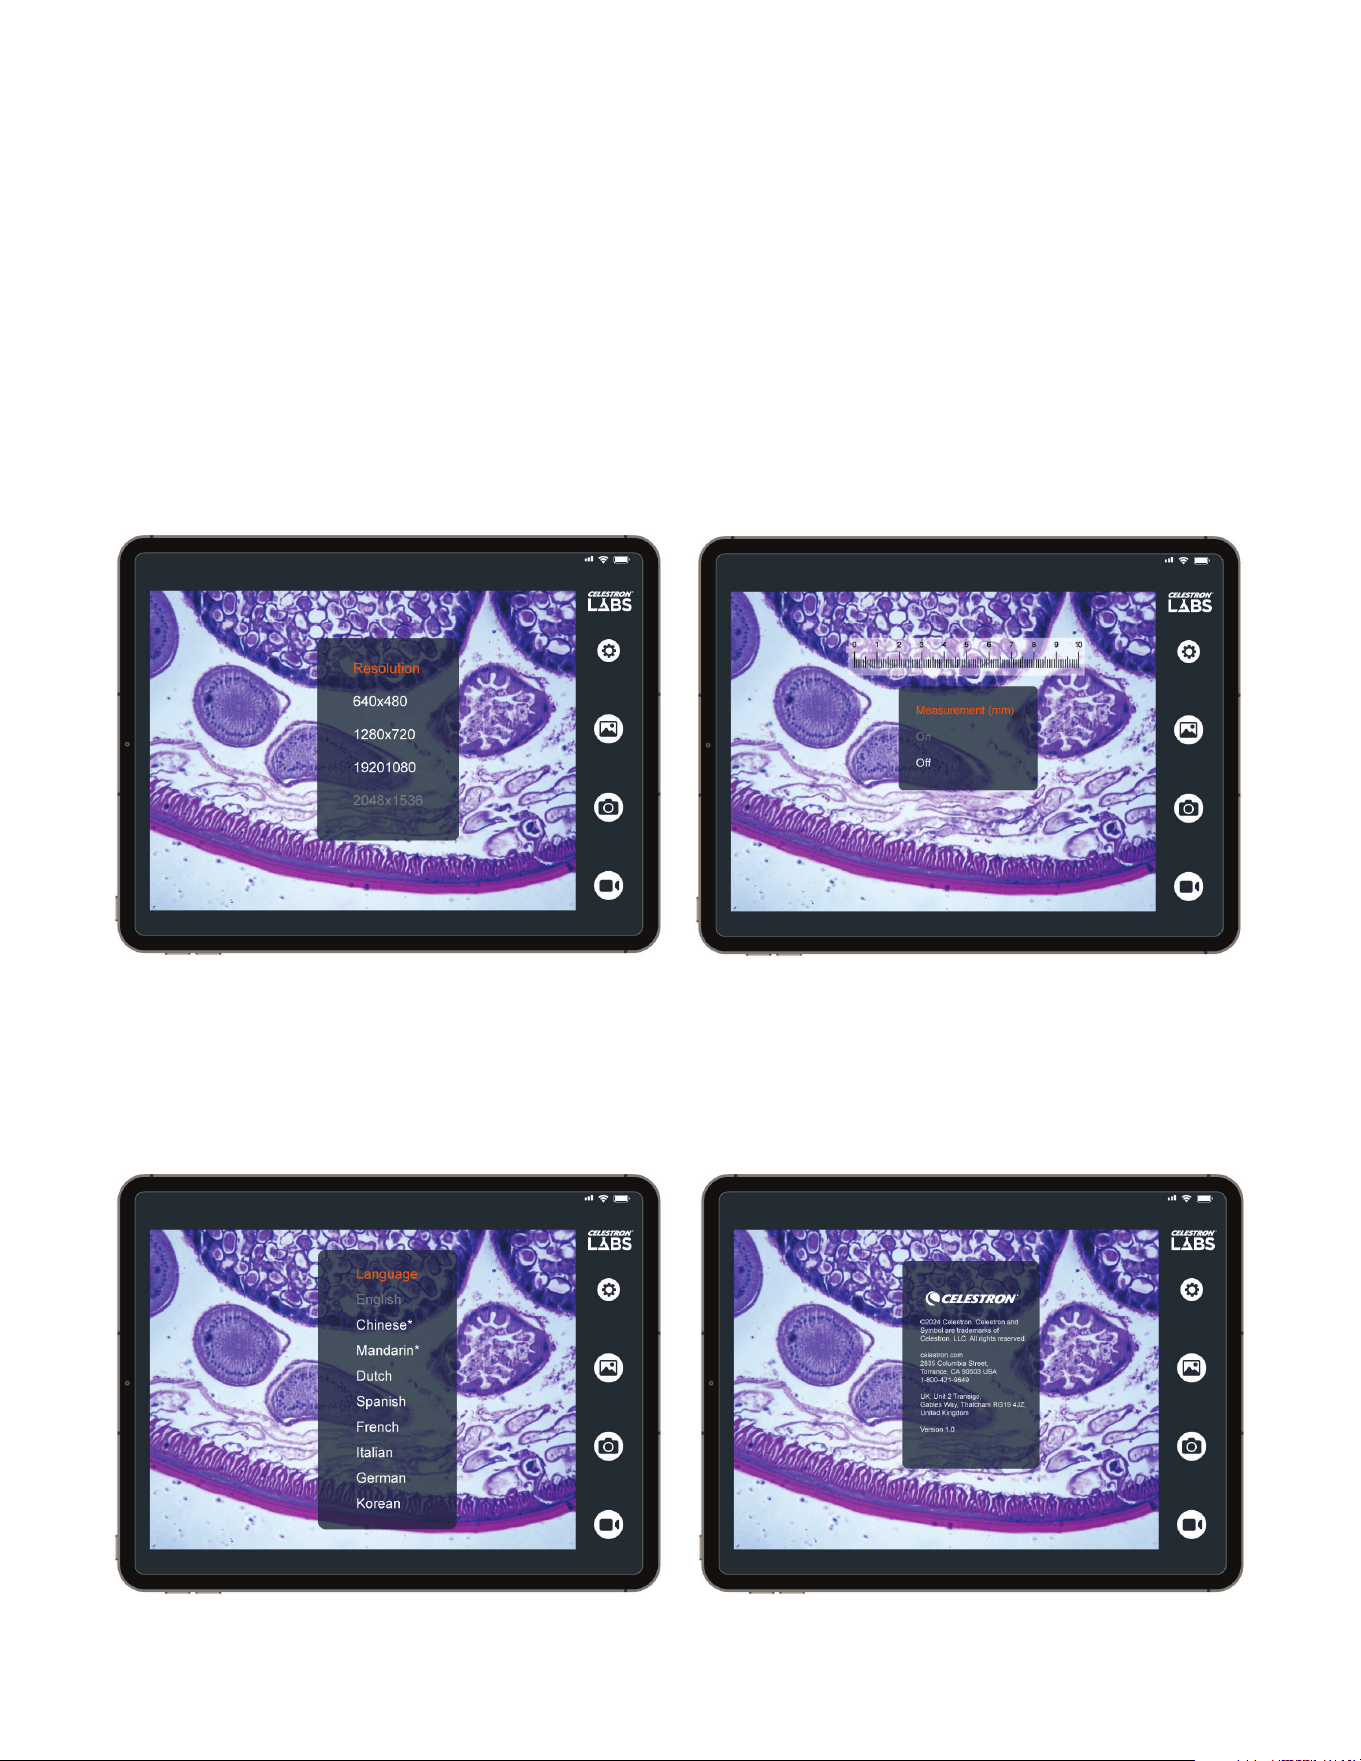
A. SETTINGS
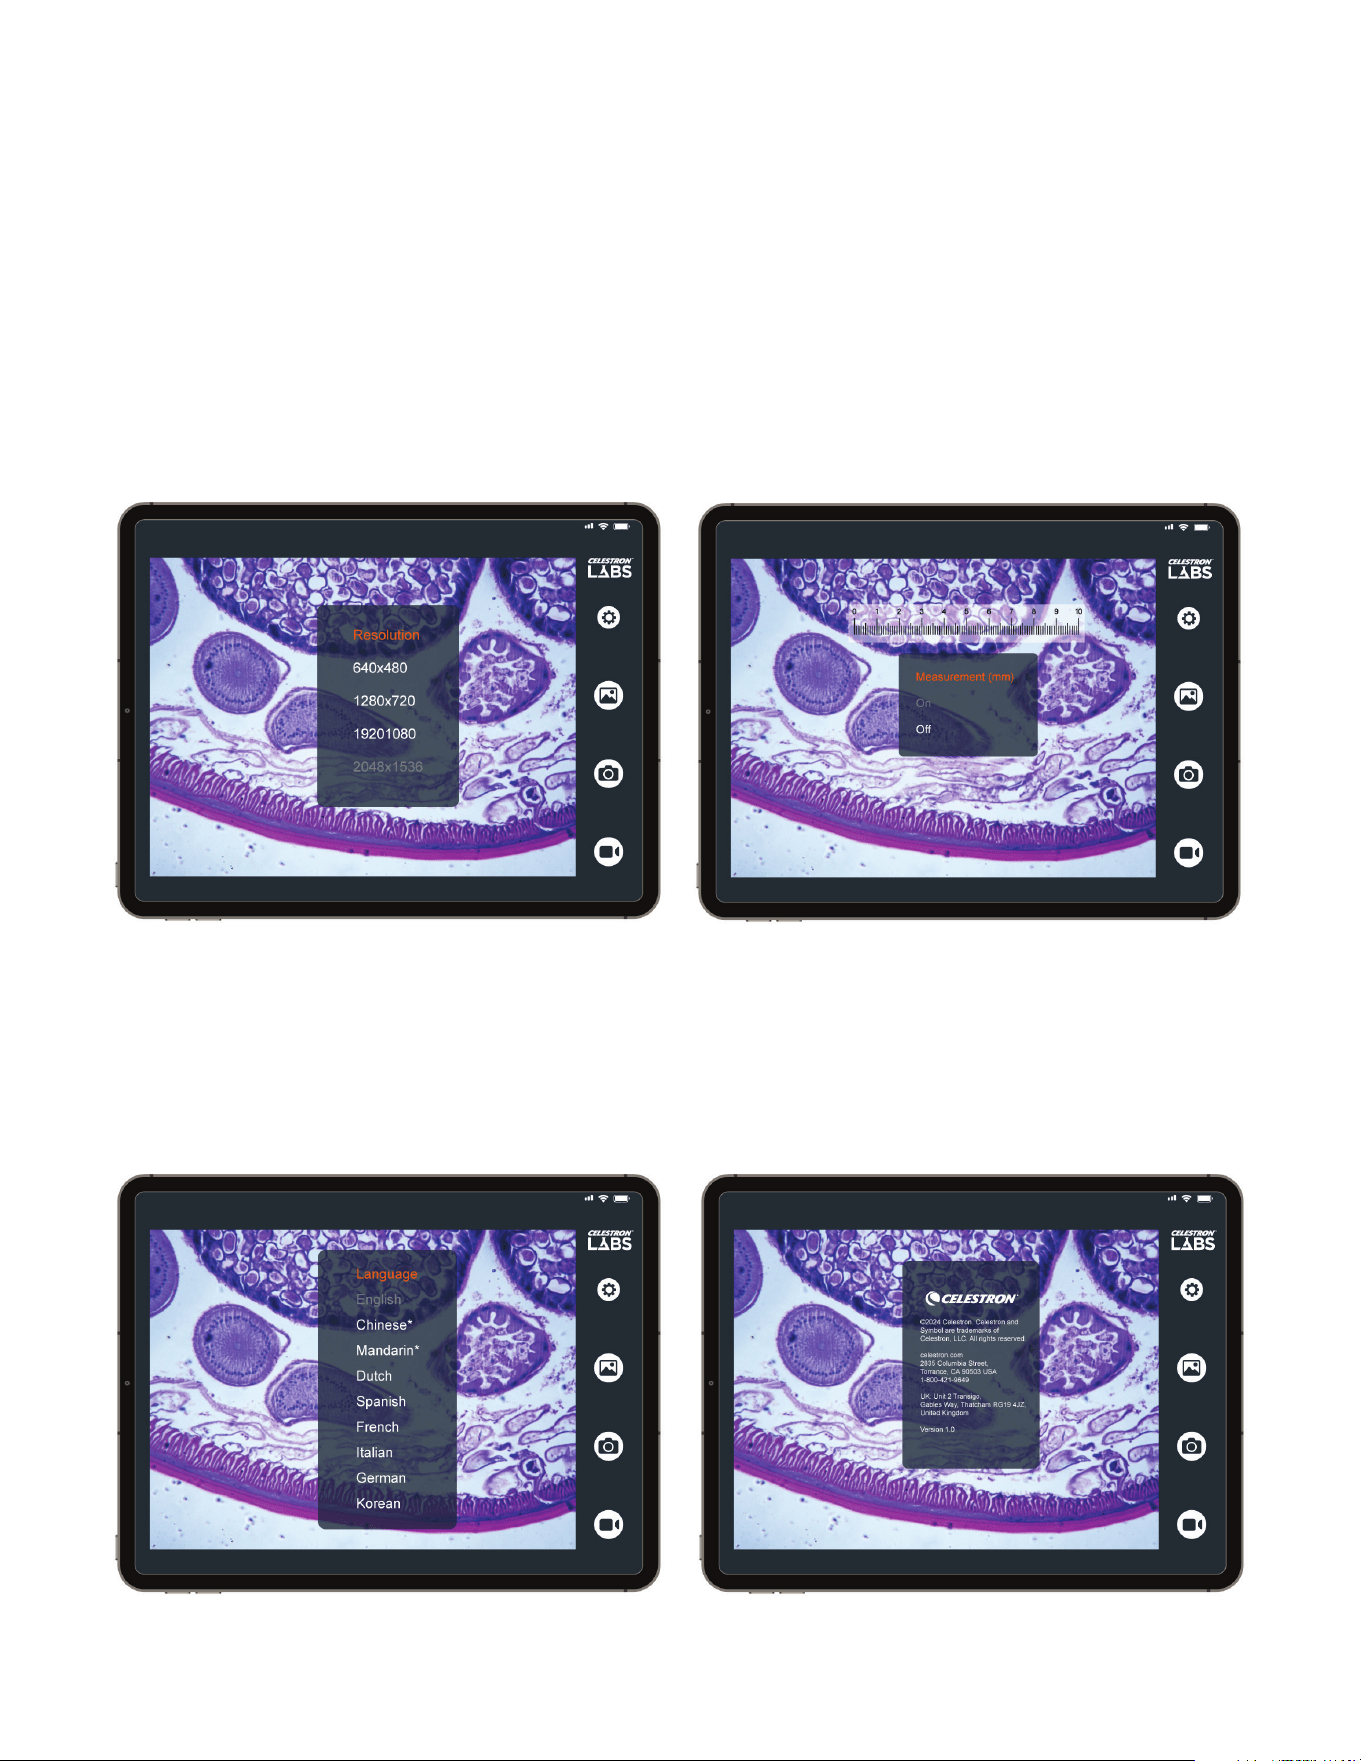
Tap the Settings icon to access the following options:
Resolution
Select the image and video resolution. Higher resolutions provide
greater detail but create larger file sizes. Available settings:
• 640 × 480
• 1280 × 720
• 1920 × 1080
• 2048 × 1536 (maximum resolution)
Language
Change the interface language.
Available options include: English (default), Chinese (Simplified),
Chinese (Traditional), Dutch, Spanish, French, Italian, German,
and Korean.
About
Displays the app version number, legal information,
and Celestron contact details.
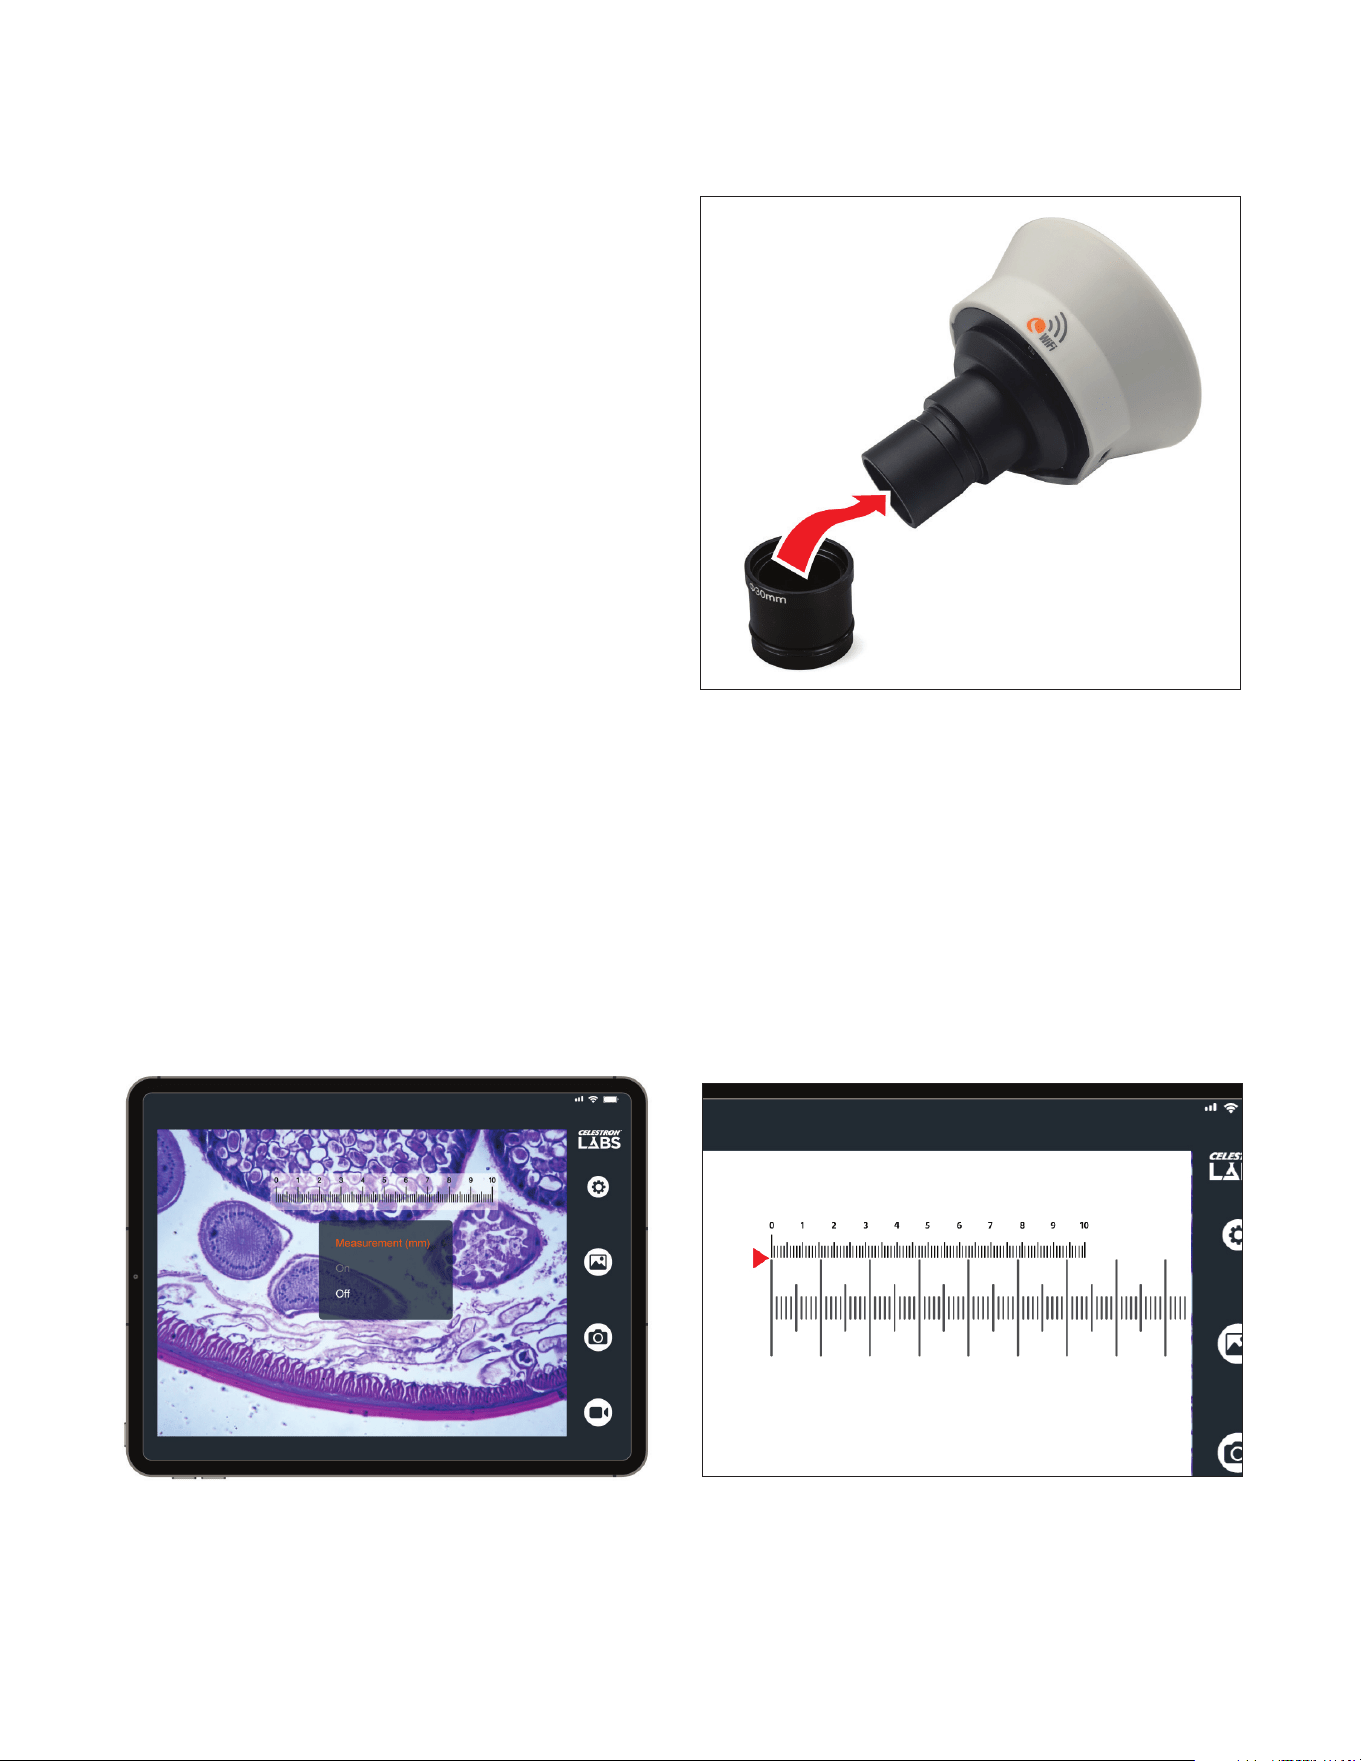
Measurement
Turn the digital measurement reticle on or off.
When calibrated, the reticle allows you to estimate specimen
dimensions directly on screen.
8 I ENGLISH
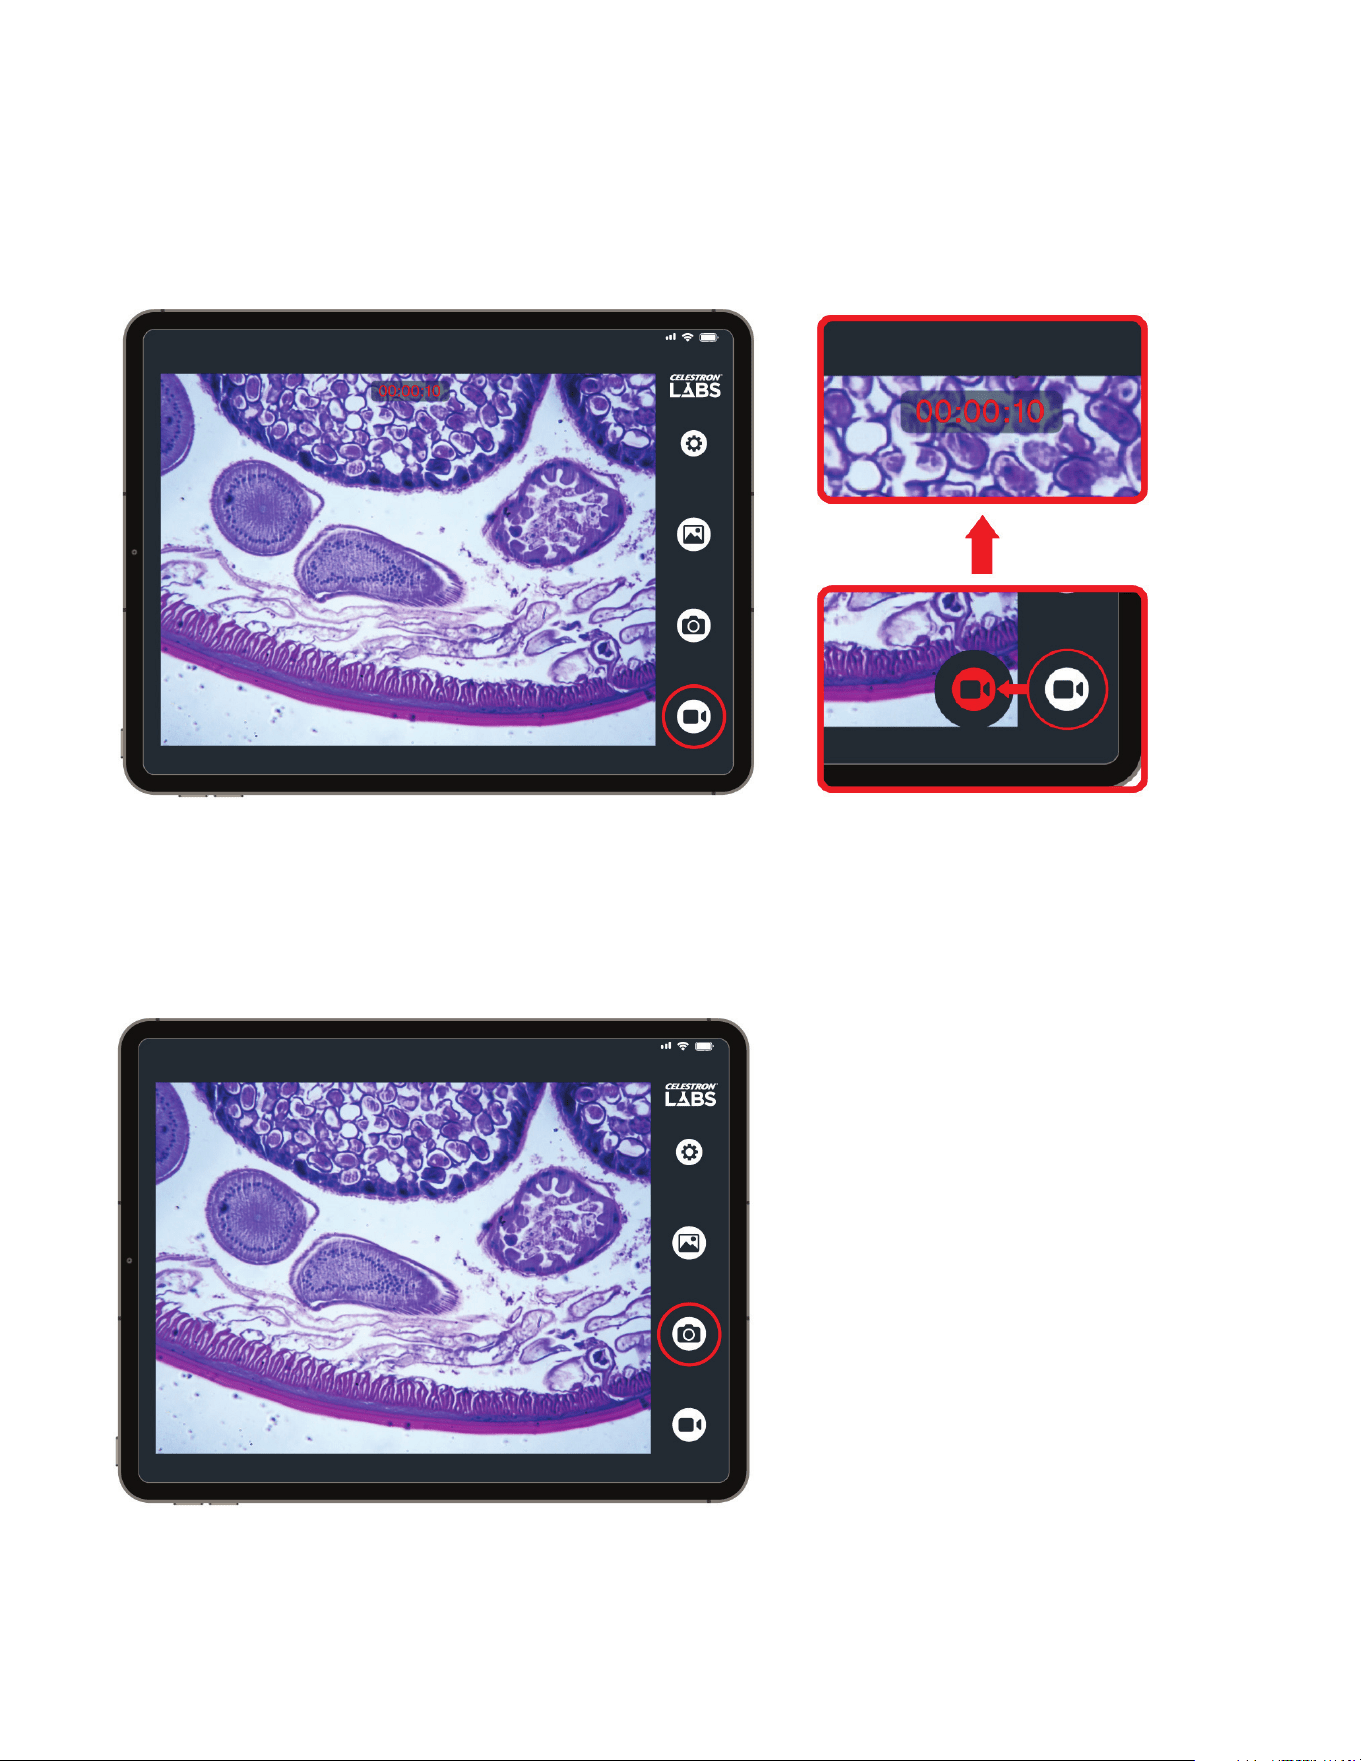
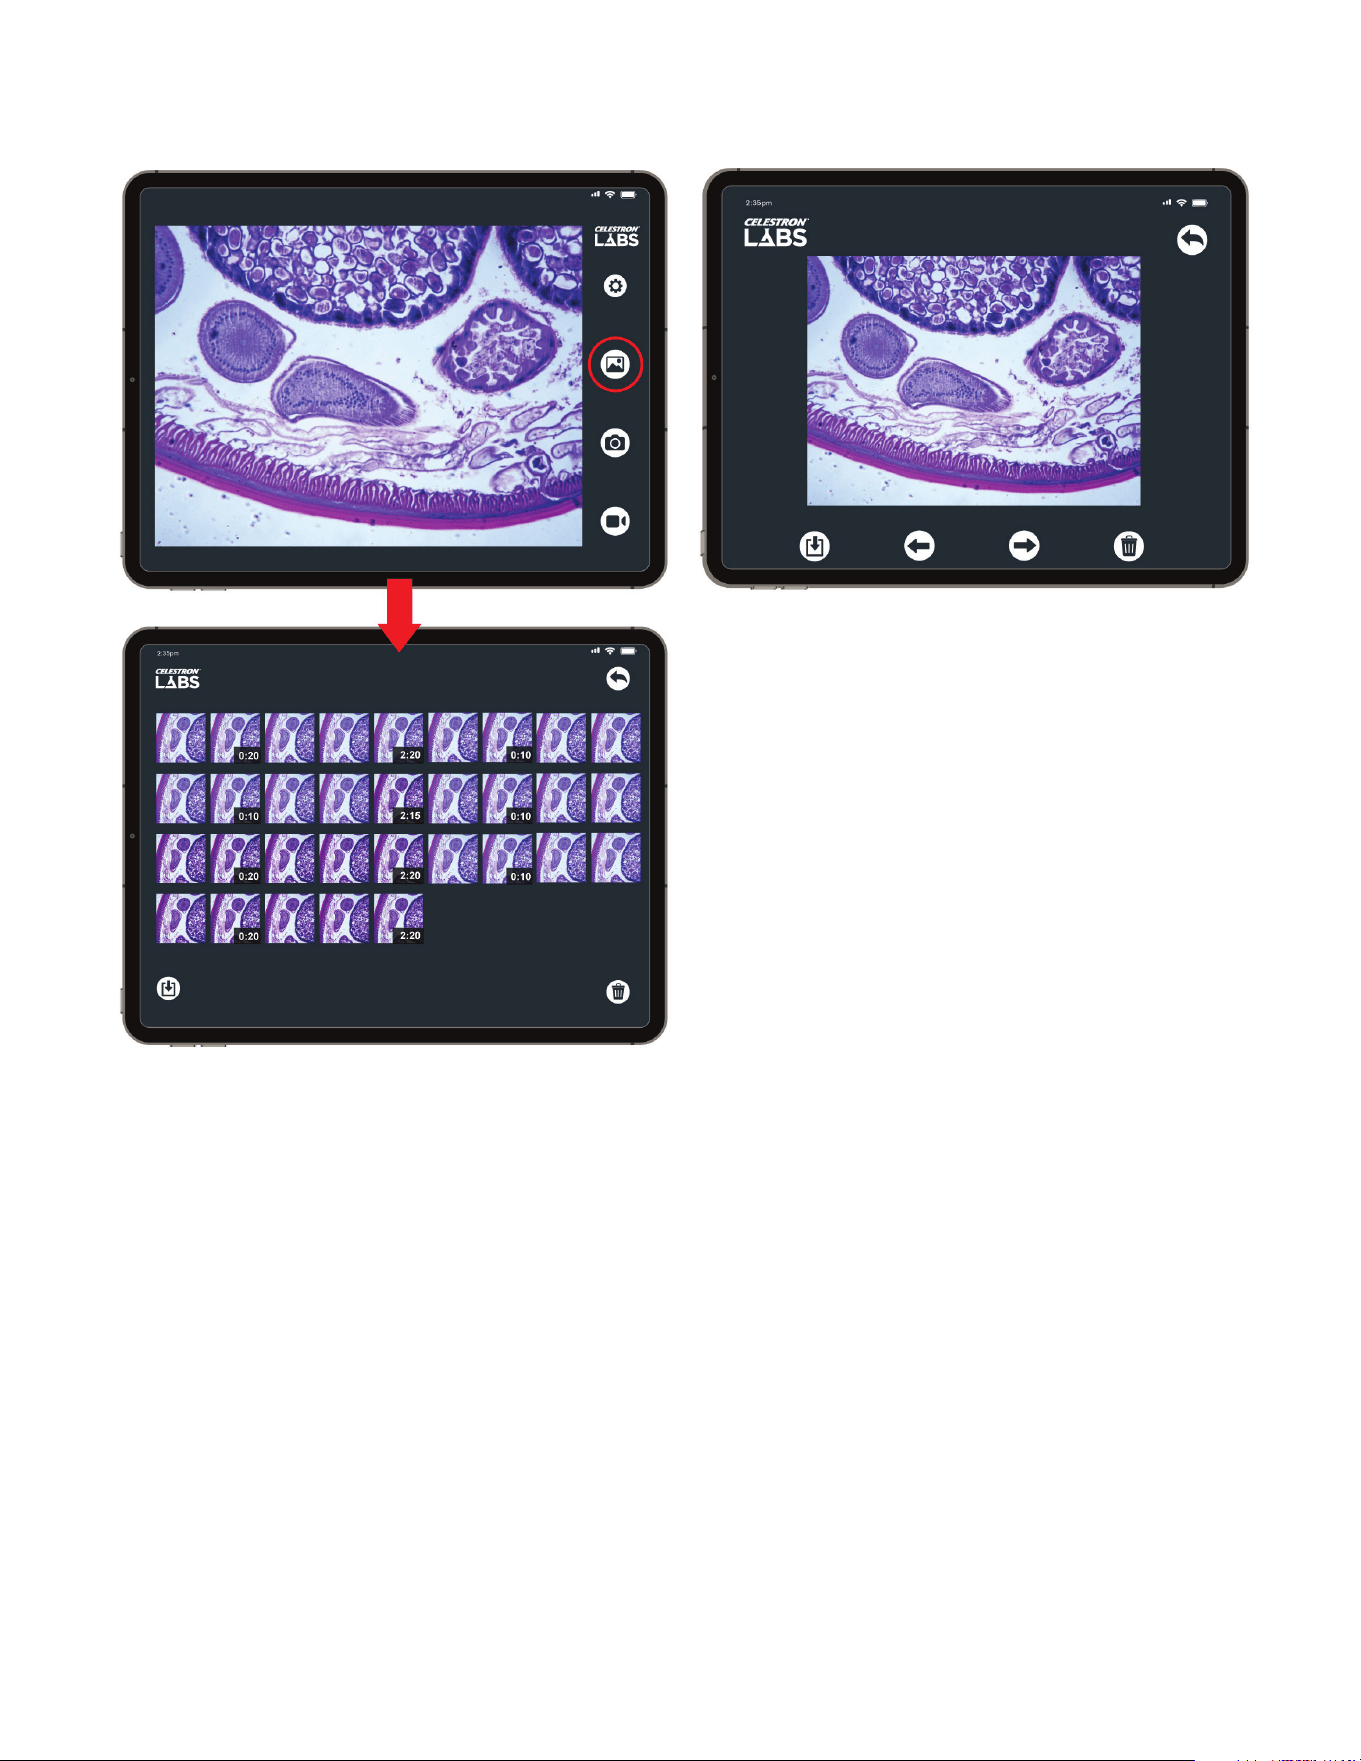
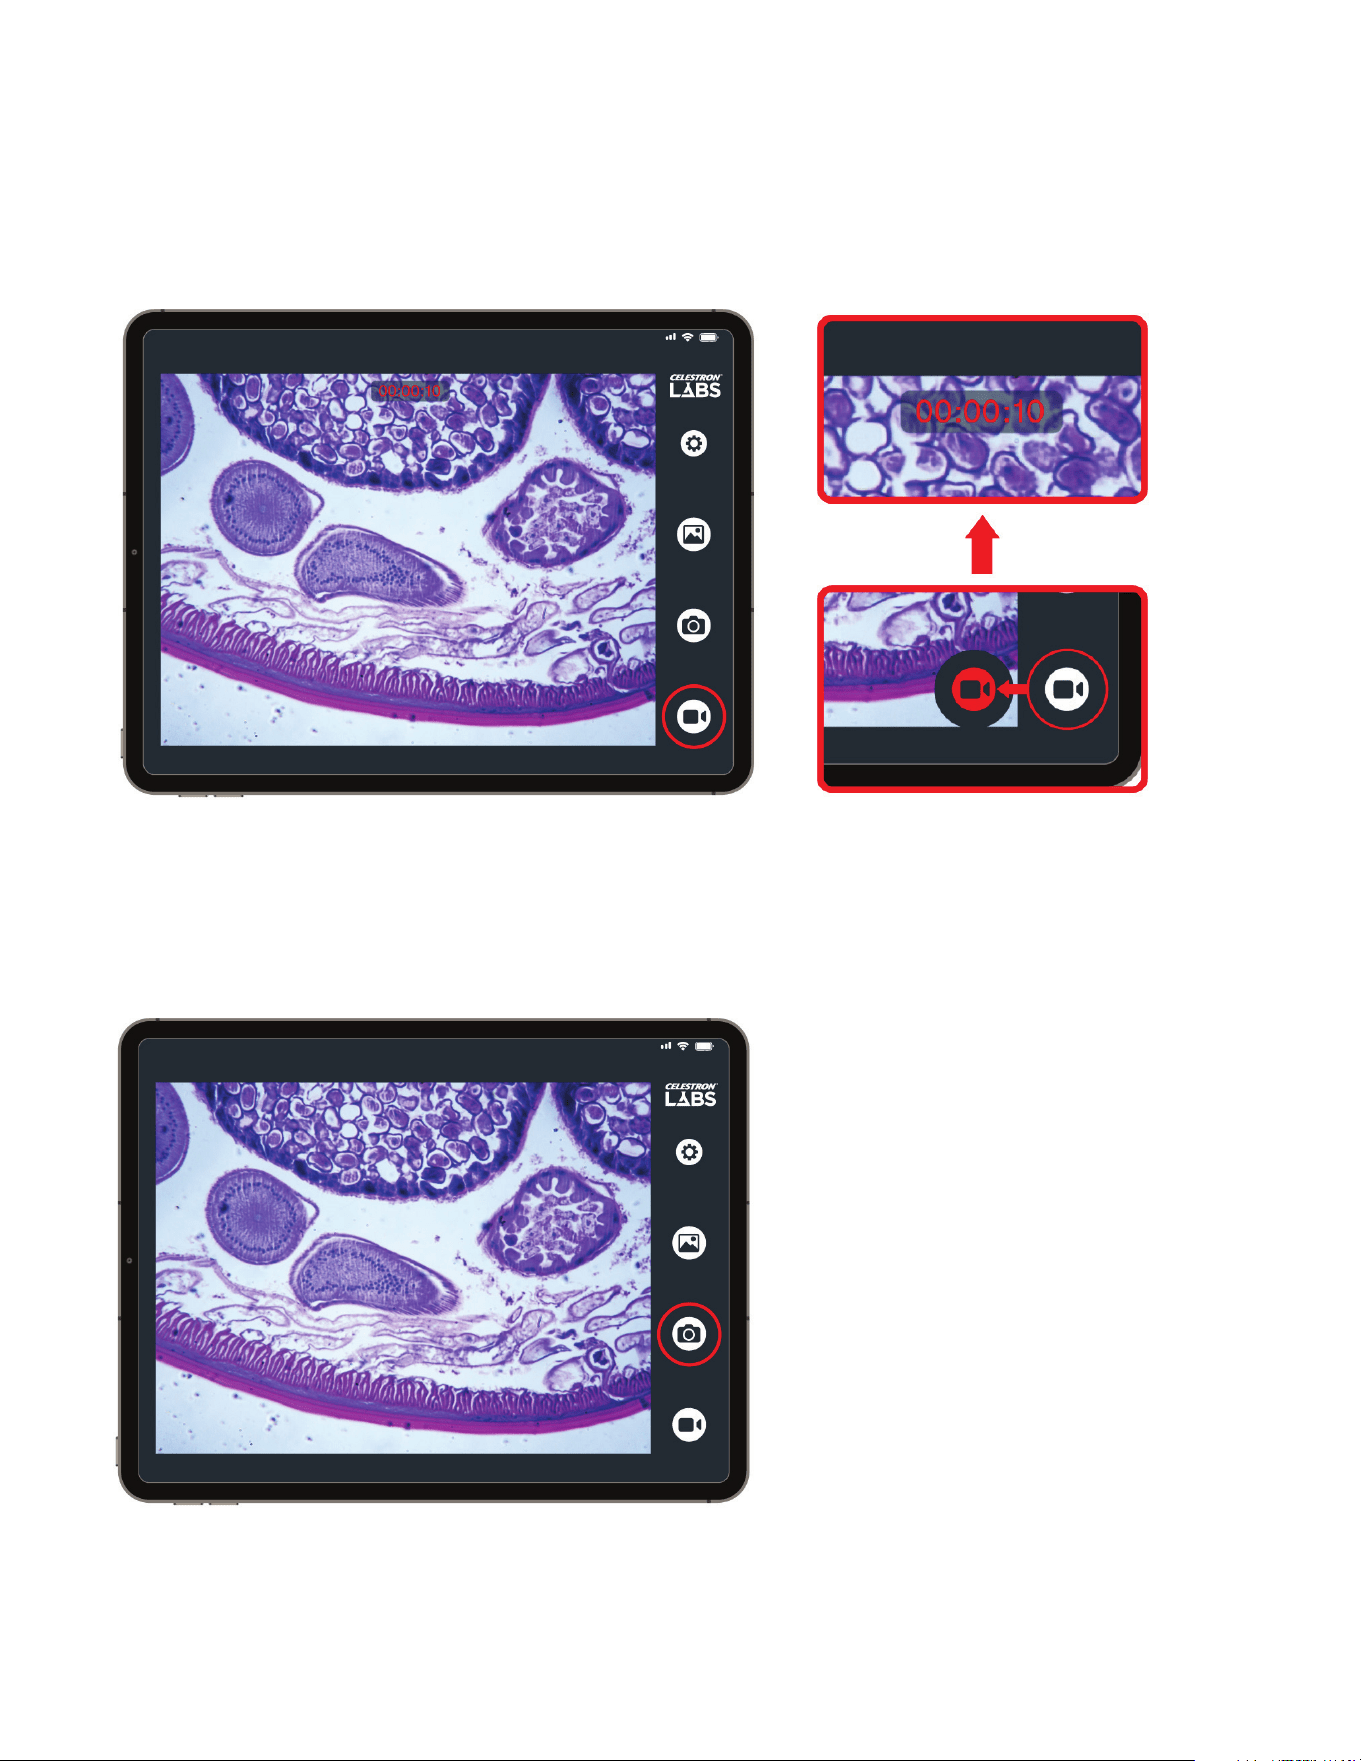
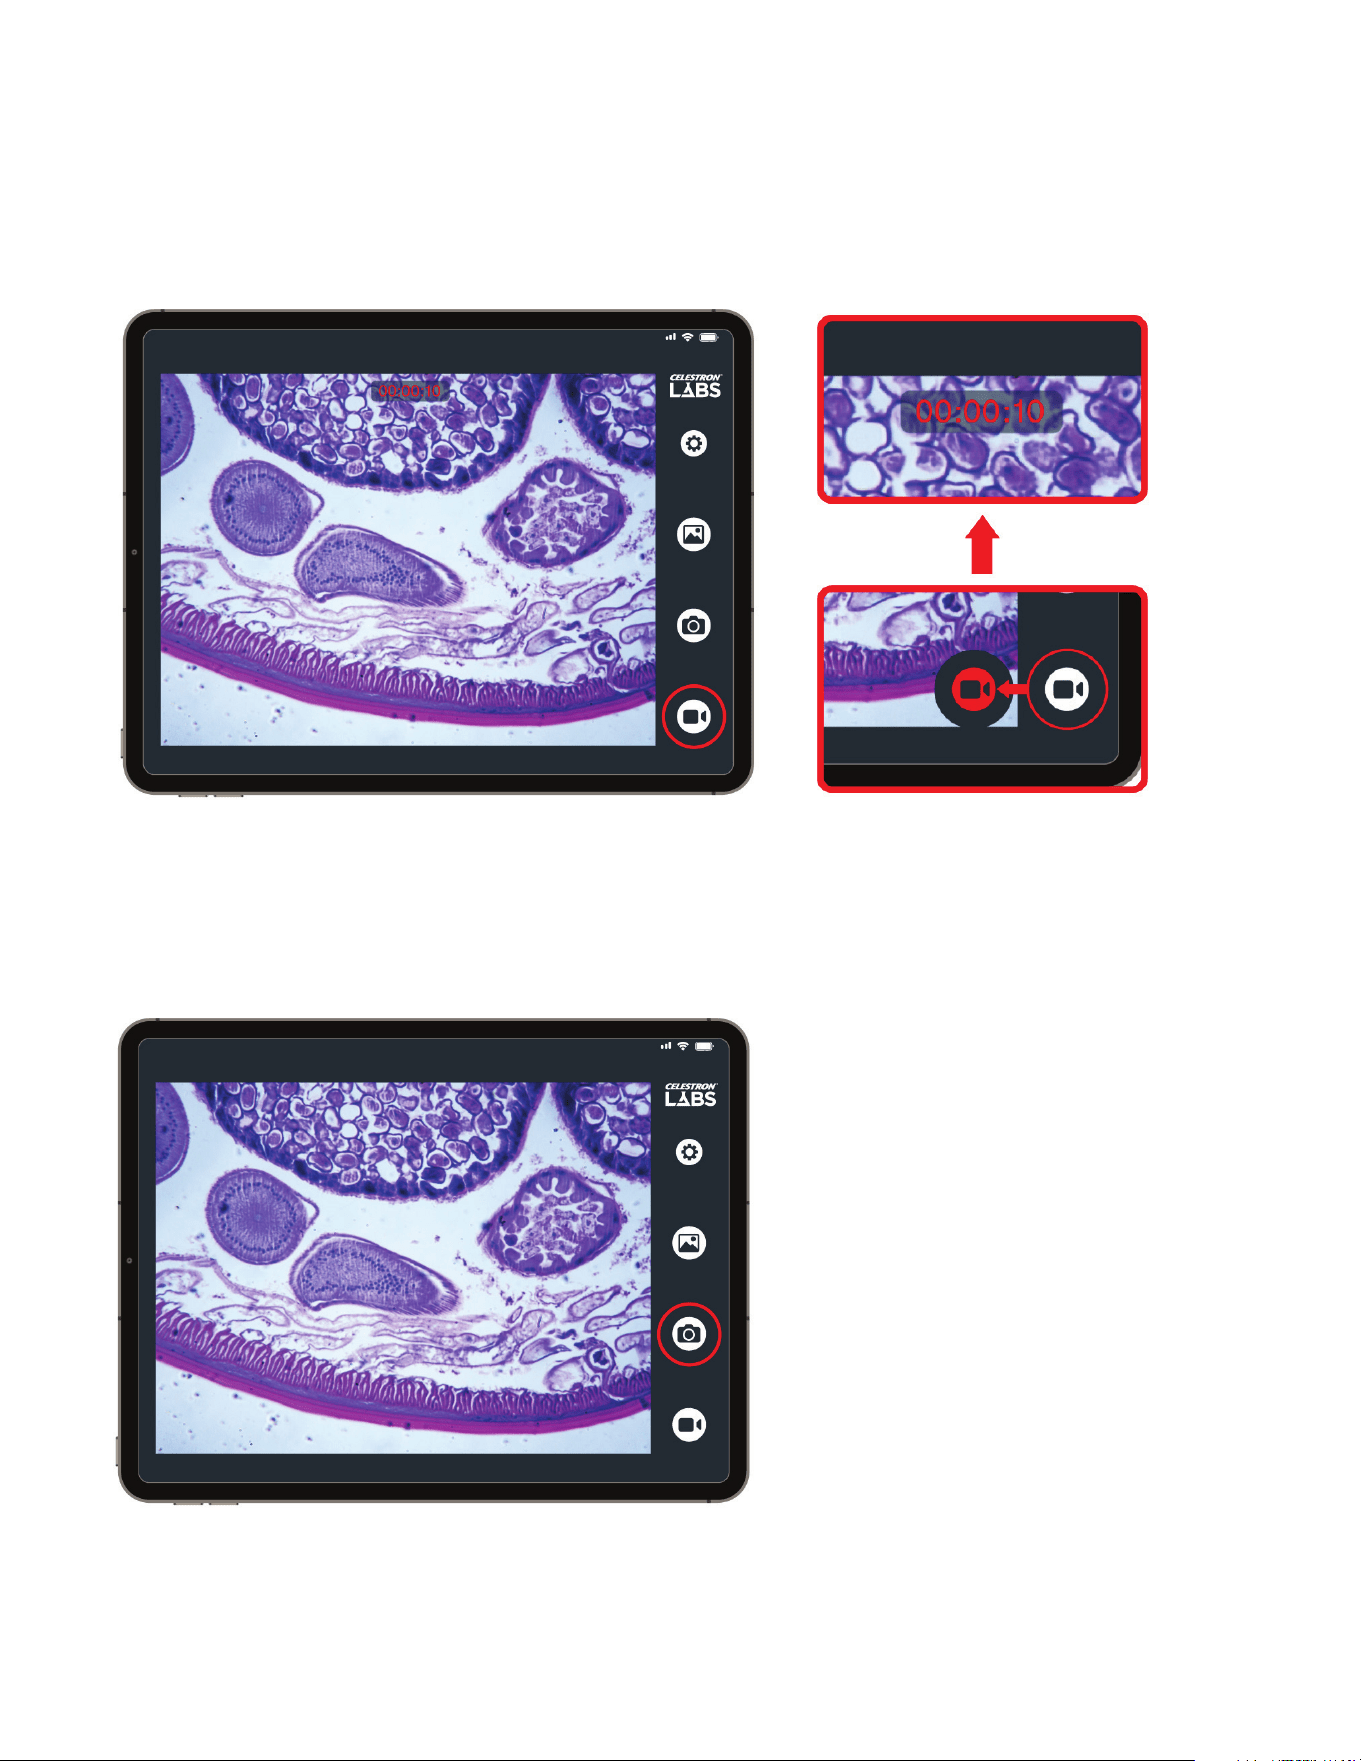
B. VIDEO RECORDING
Tap the Video icon to begin recording. A timer will appear at
the top of the screen while recording is in progress.
Tap the icon again to stop recording.
Videos are saved directly to your device.
C. TAKING PHOTOS
Tap the Photo icon to capture a still image.
Images are saved directly to your device.
ENGLISH 9
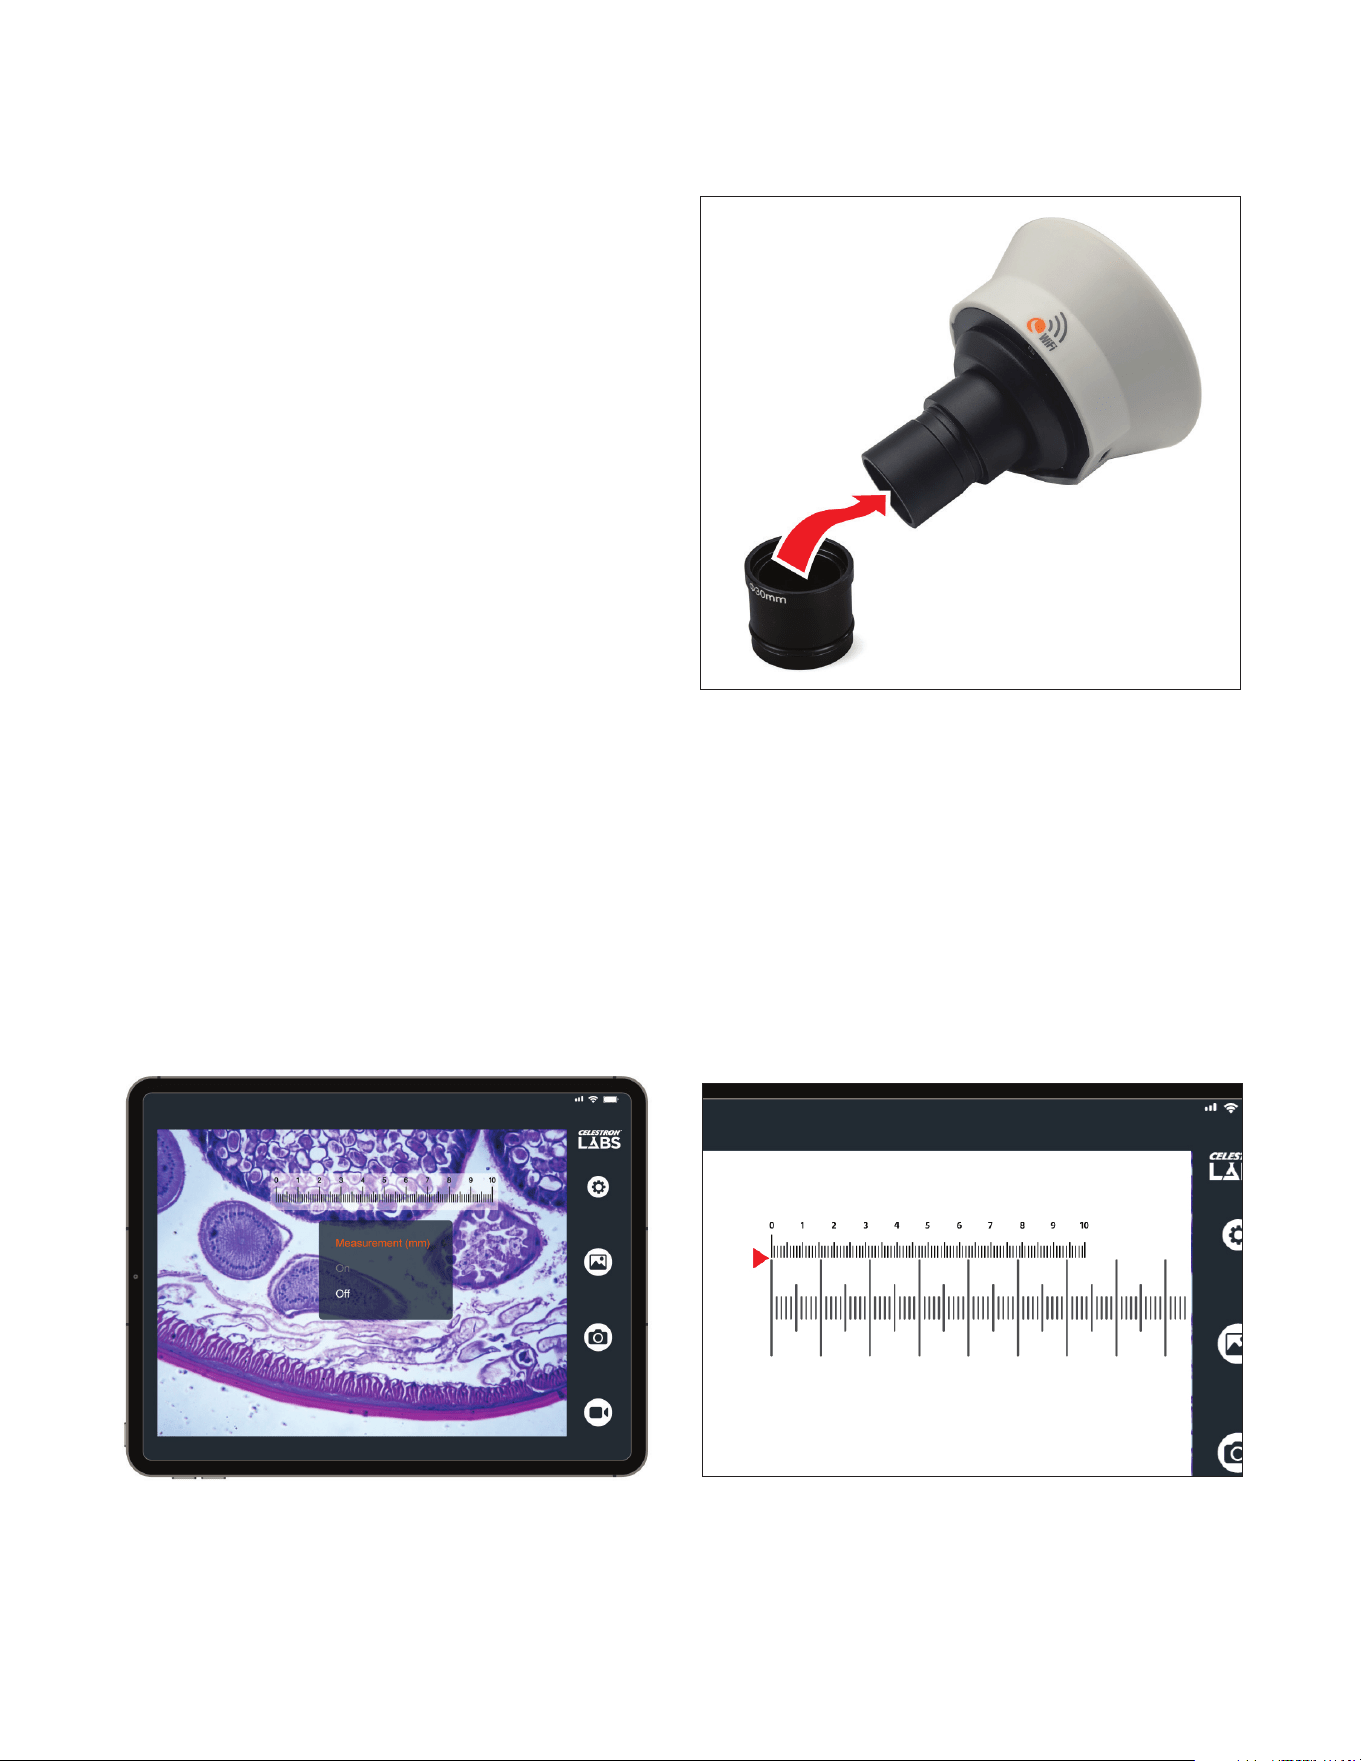
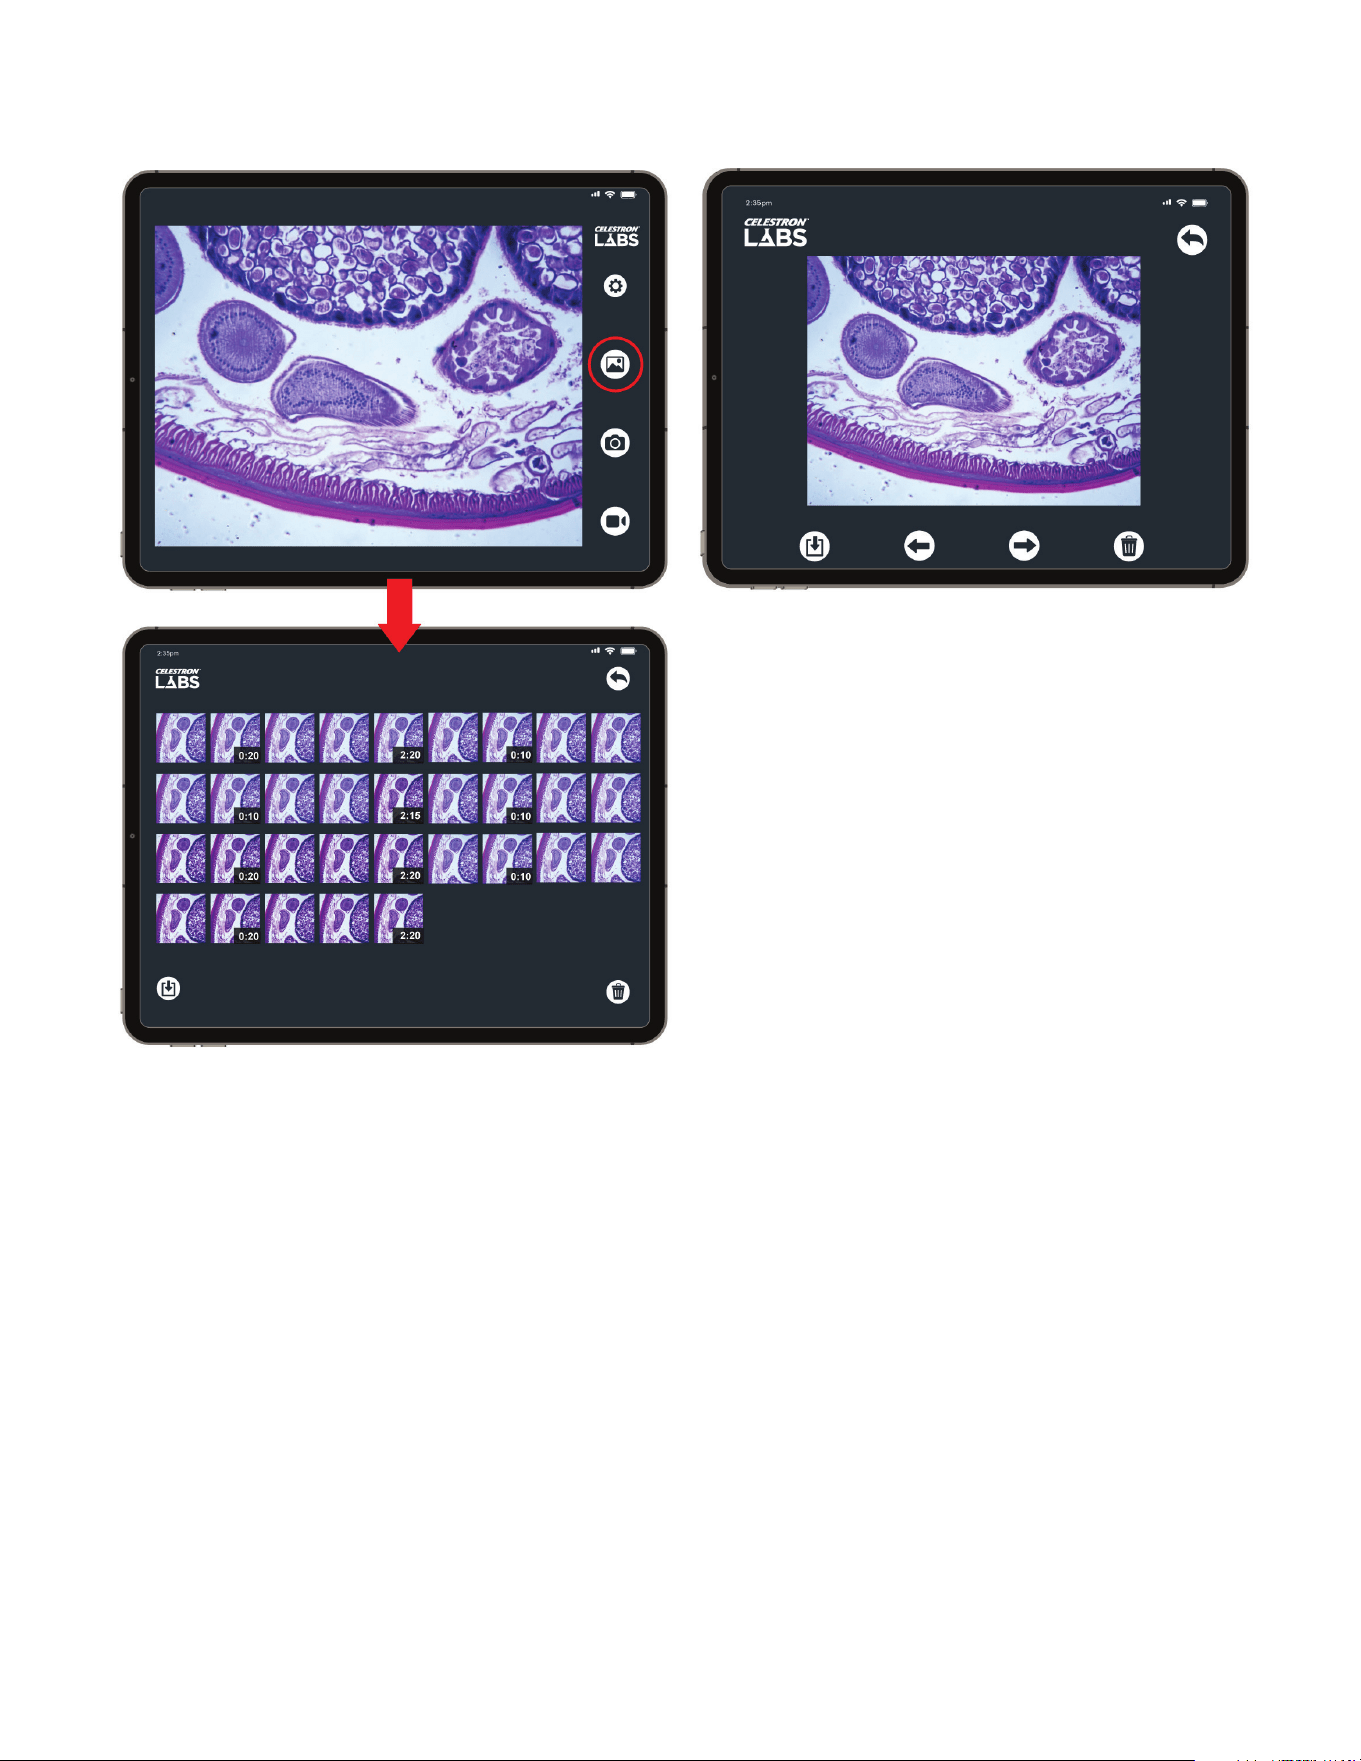
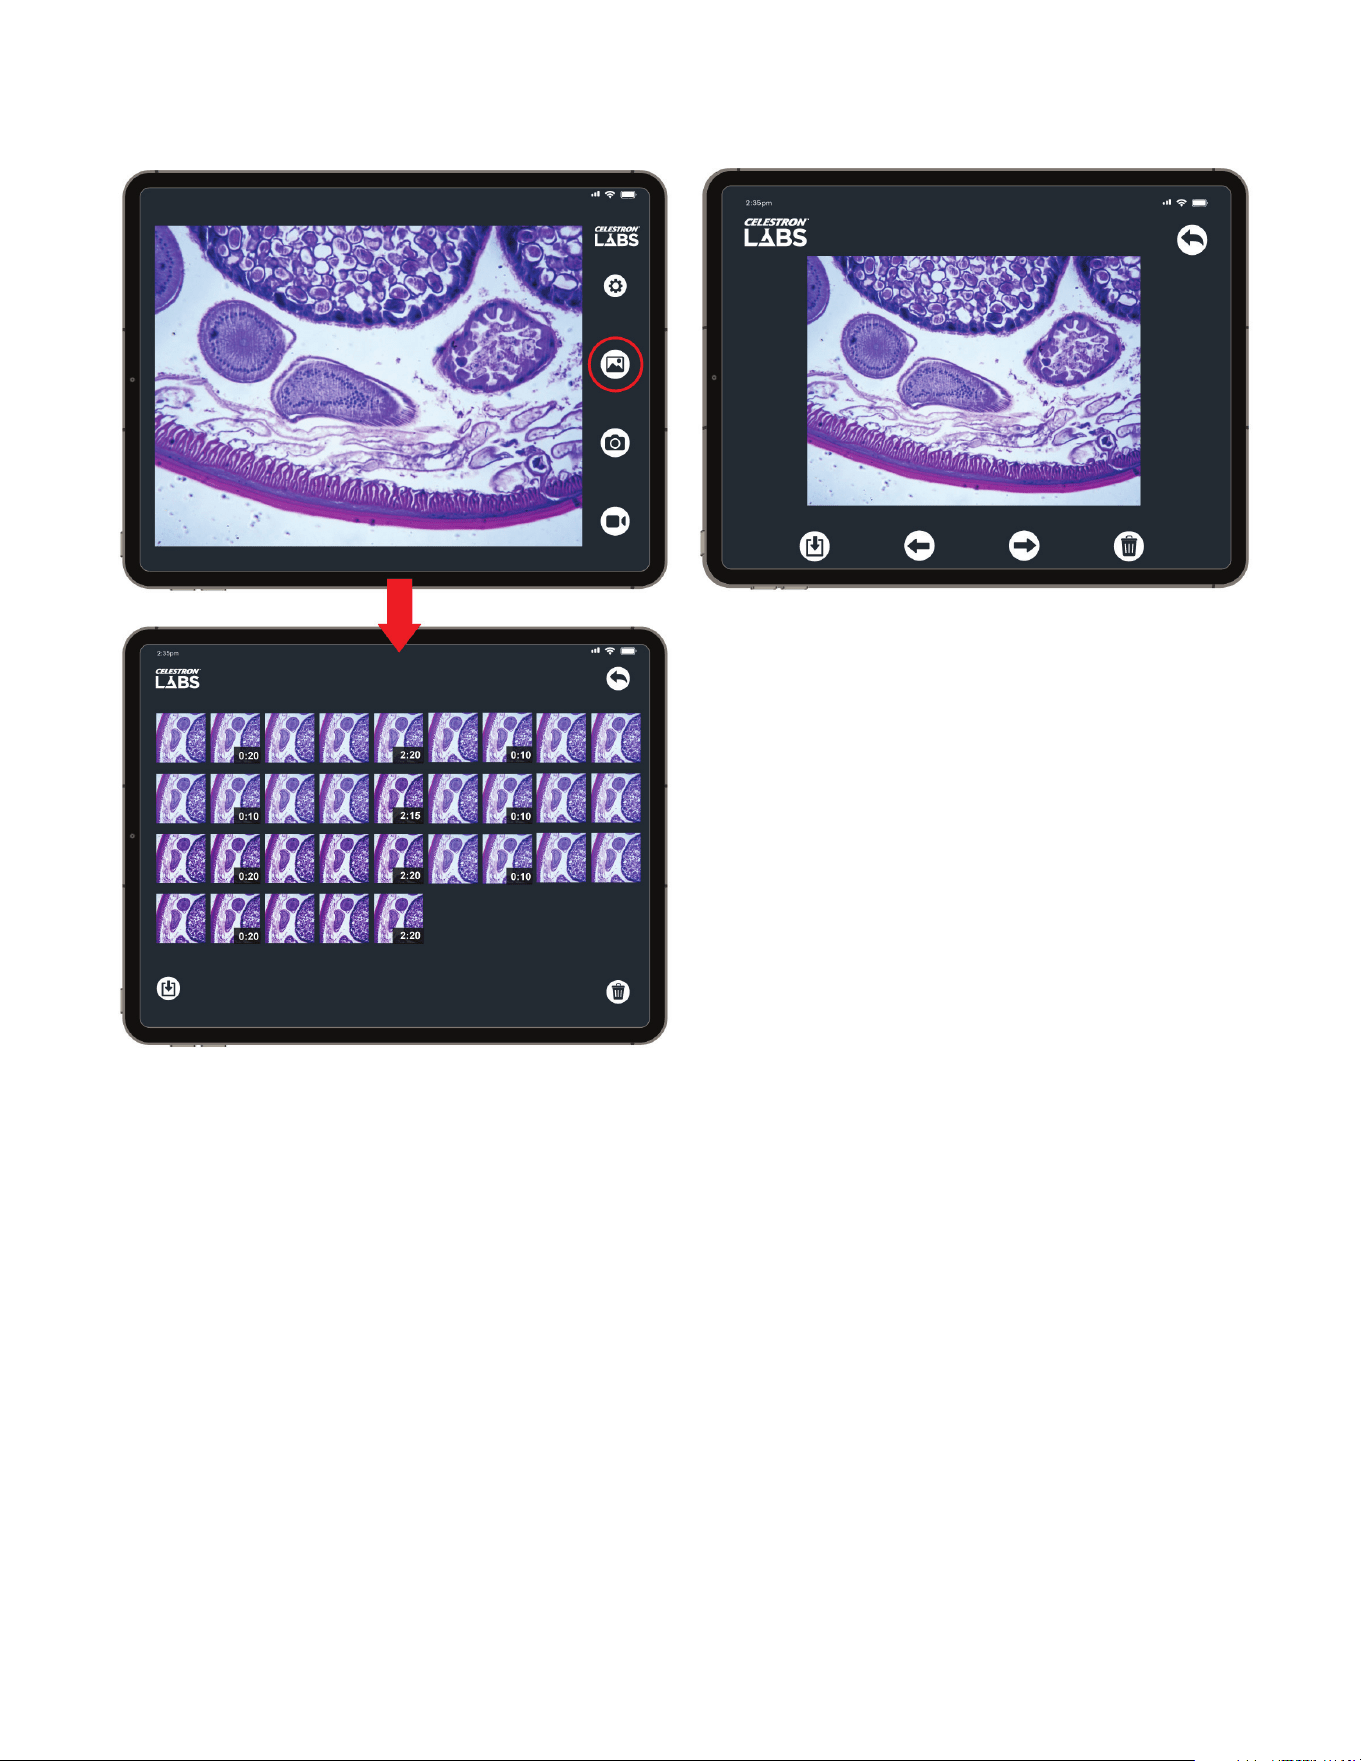
D. GALLERY
Tap the Gallery icon to view saved images and videos.
• Tap a thumbnail to view full screen.
• Swipe left or right to scroll through saved files.
• To play a video, tap the screen and select Play.
IMPORTANT PERMISSION NOTICE
Depending on your device settings, you may be prompted to
allow the app access to your photos and files. Full access is
required to save images and videos.
10 I ENGLISH
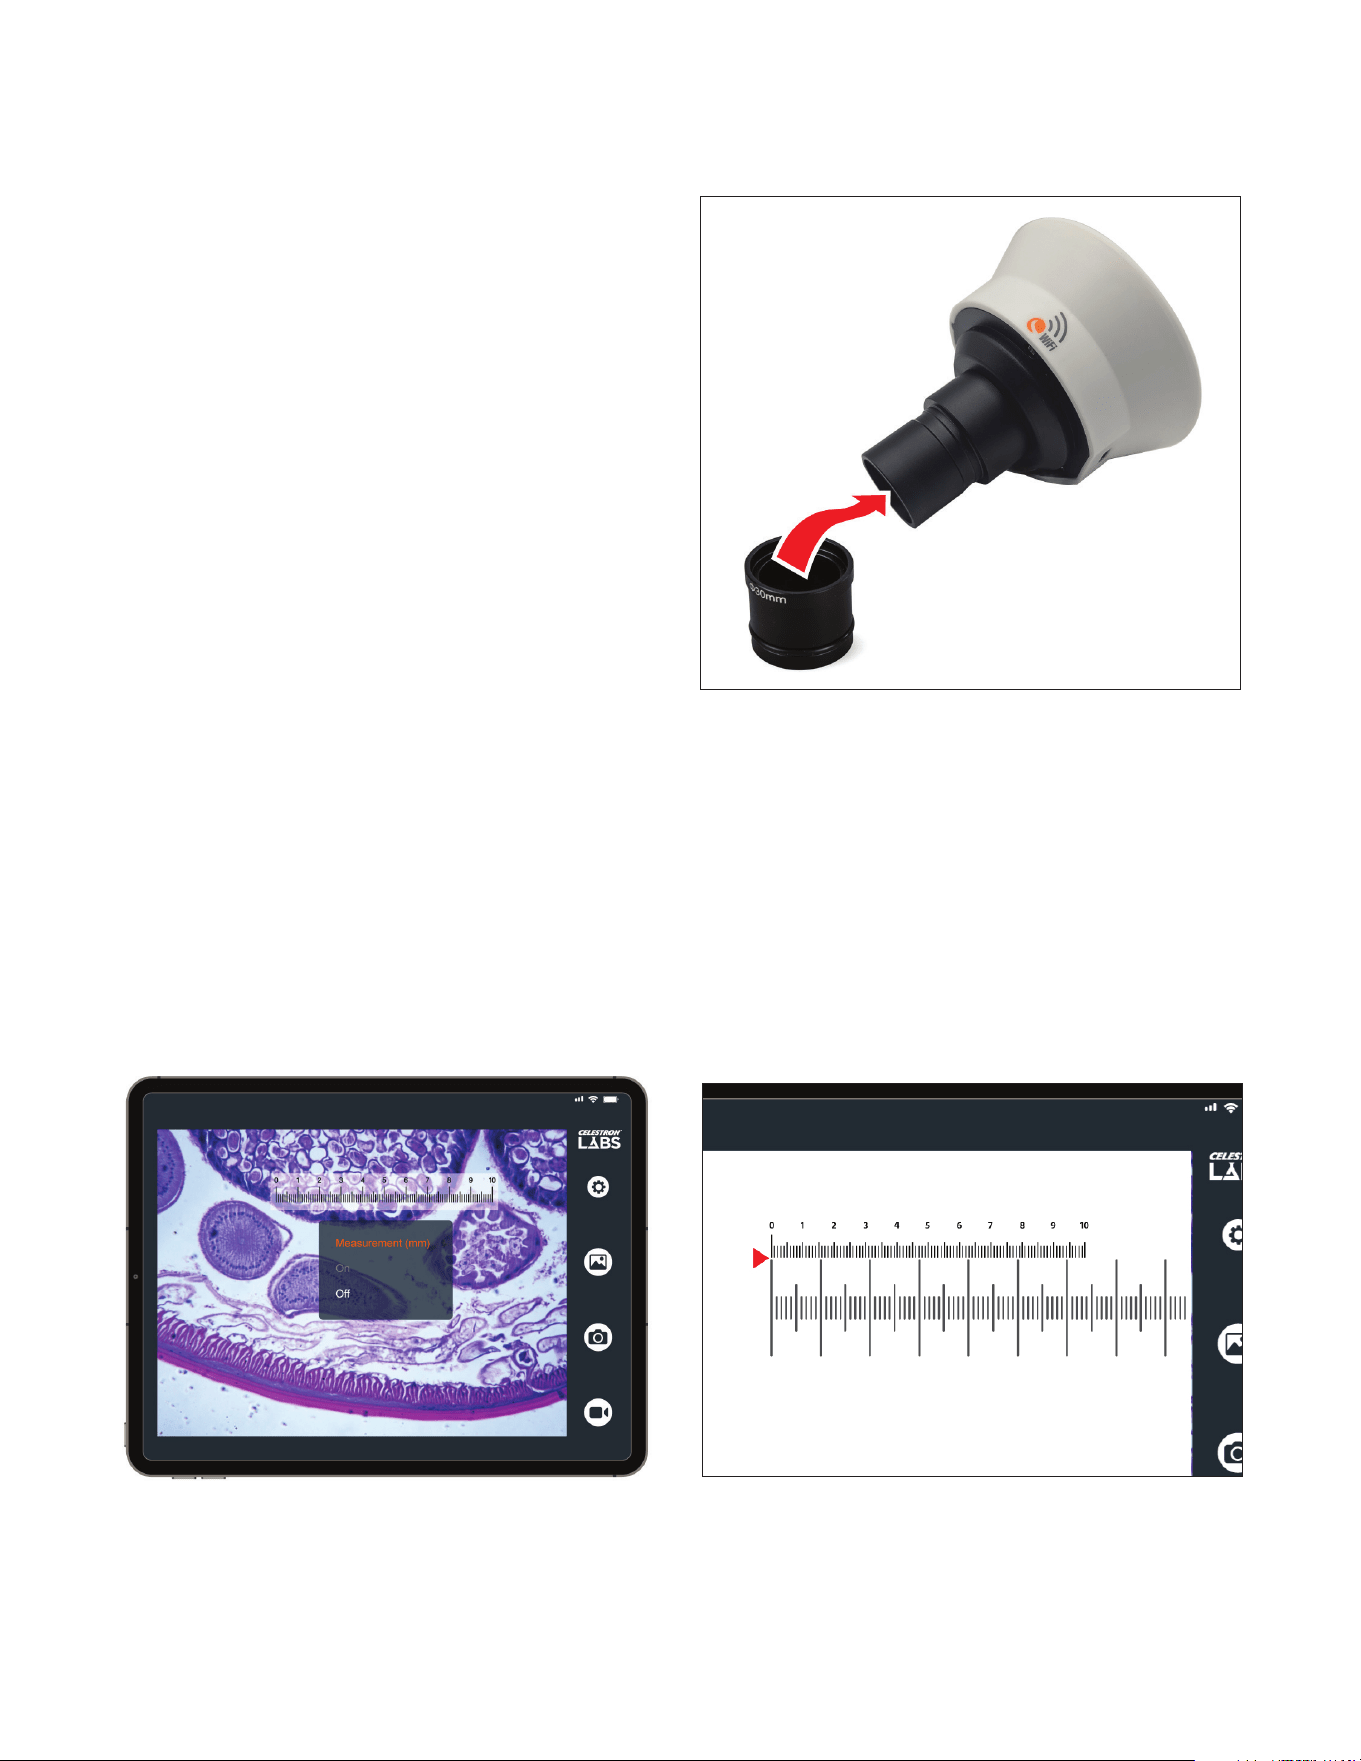
USING THE 30MM ADAPTER
The Wi-Fi Imager is designed to fit standard 23mm eyepiece
tubes. If your microscope has a 30mm eyepiece tube, attach
the included 30mm adapter to the base of the imager before
inserting it into the microscope.
The adapter slides securely over the imager barrel,
increasing its diameter from 23mm to 30mm. Once
attached, insert the imager into the eyepiece tube as
you would a standard eyepiece.
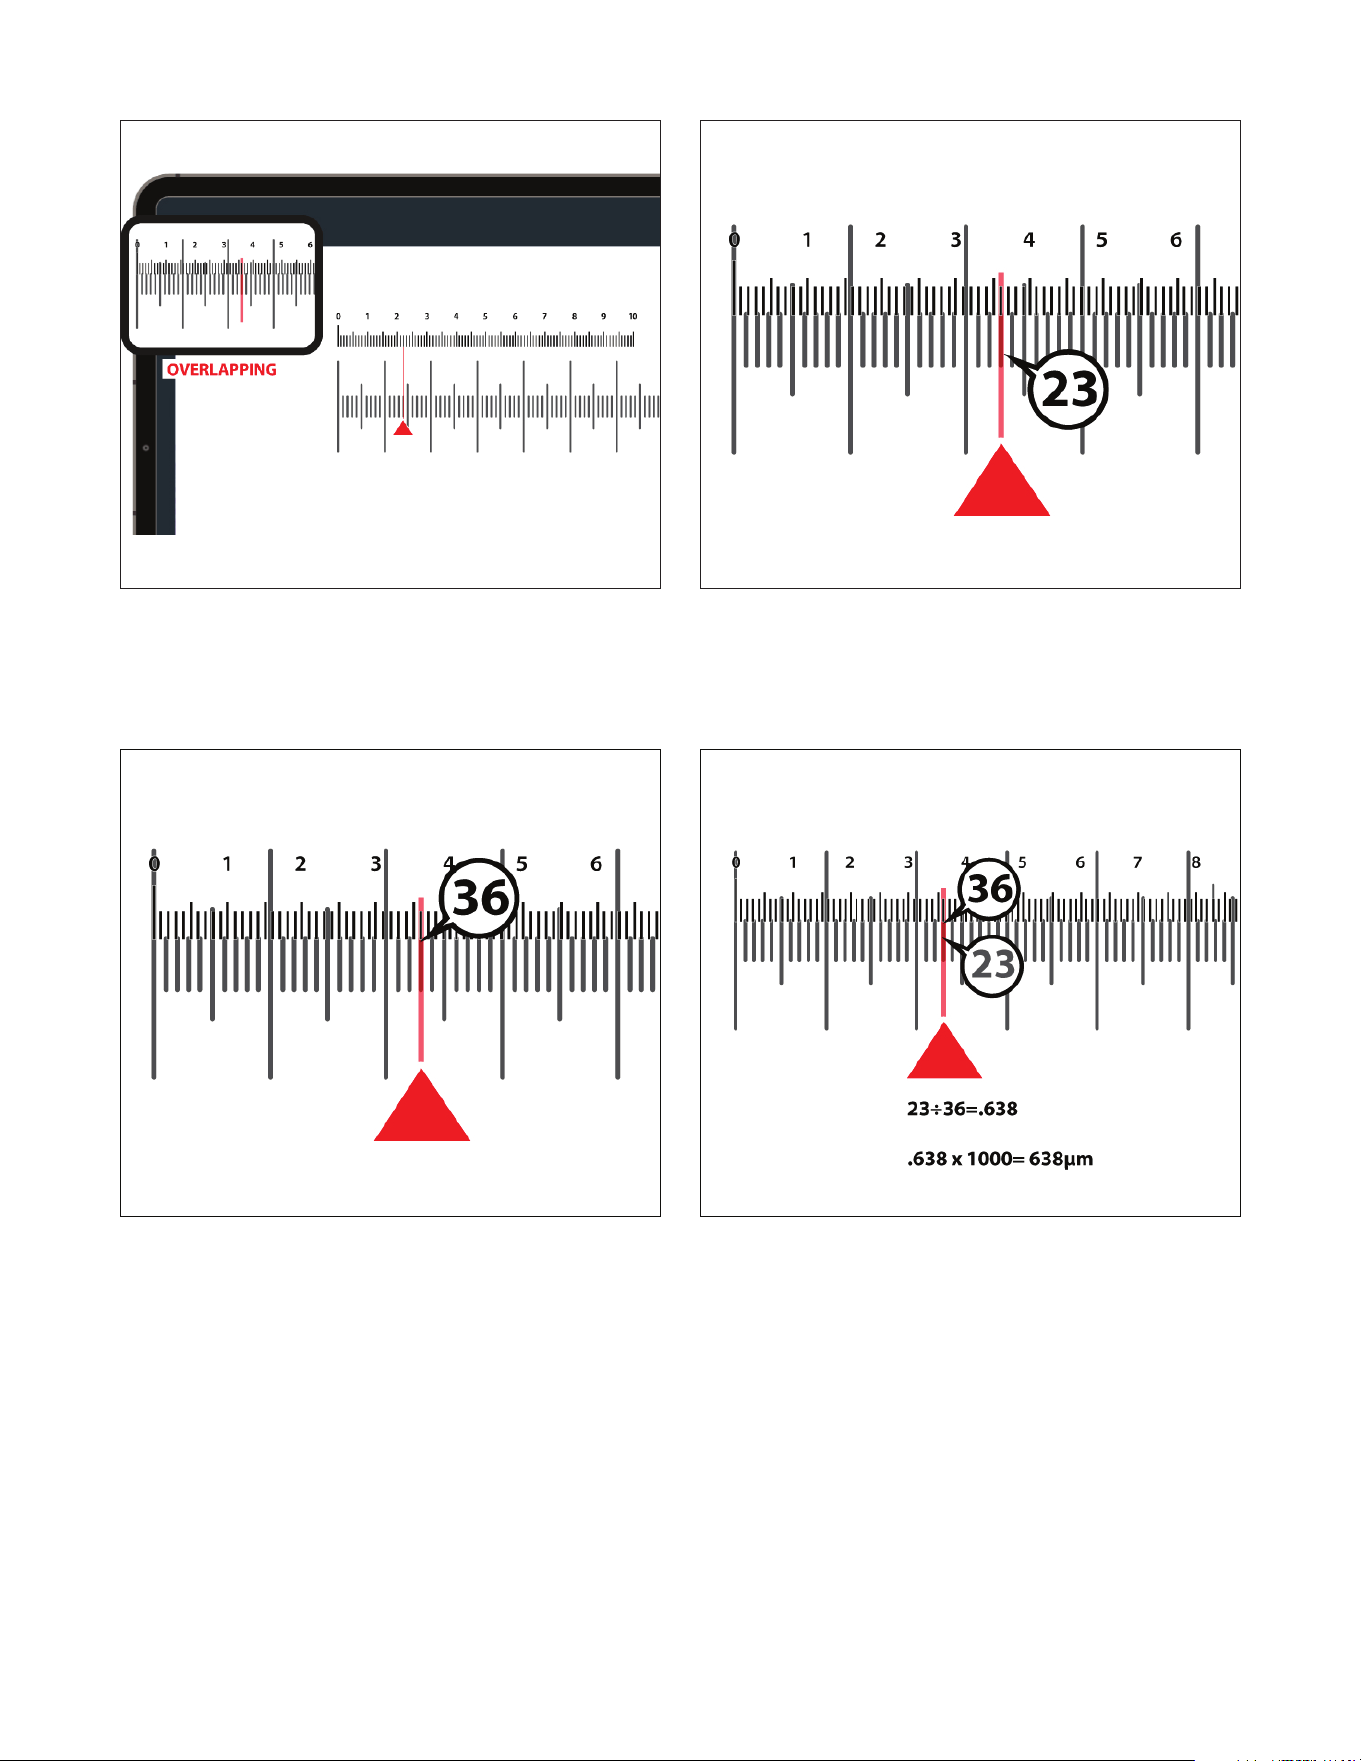
USING THE CALIBRATION SLIDE
The measurement reticle in the app displays evenly spaced lines on the screen. However, the app does not automatically know
how much real-world distance those lines represent at your current magnification. The included calibration slide, also called a
stage micrometer, solves this.
The slide contains a precisely etched ruler. Each small division on the slide equals 0.01mm (10 micrometers). By comparing the
known distances on the calibration slide to the onscreen reticle, you can calculate the actual distance represented by each
reticle division.
Calibration is specific to the objective lens you are using. If you change magnification, you must recalibrate before taking new
measurements.
To Calibrate:
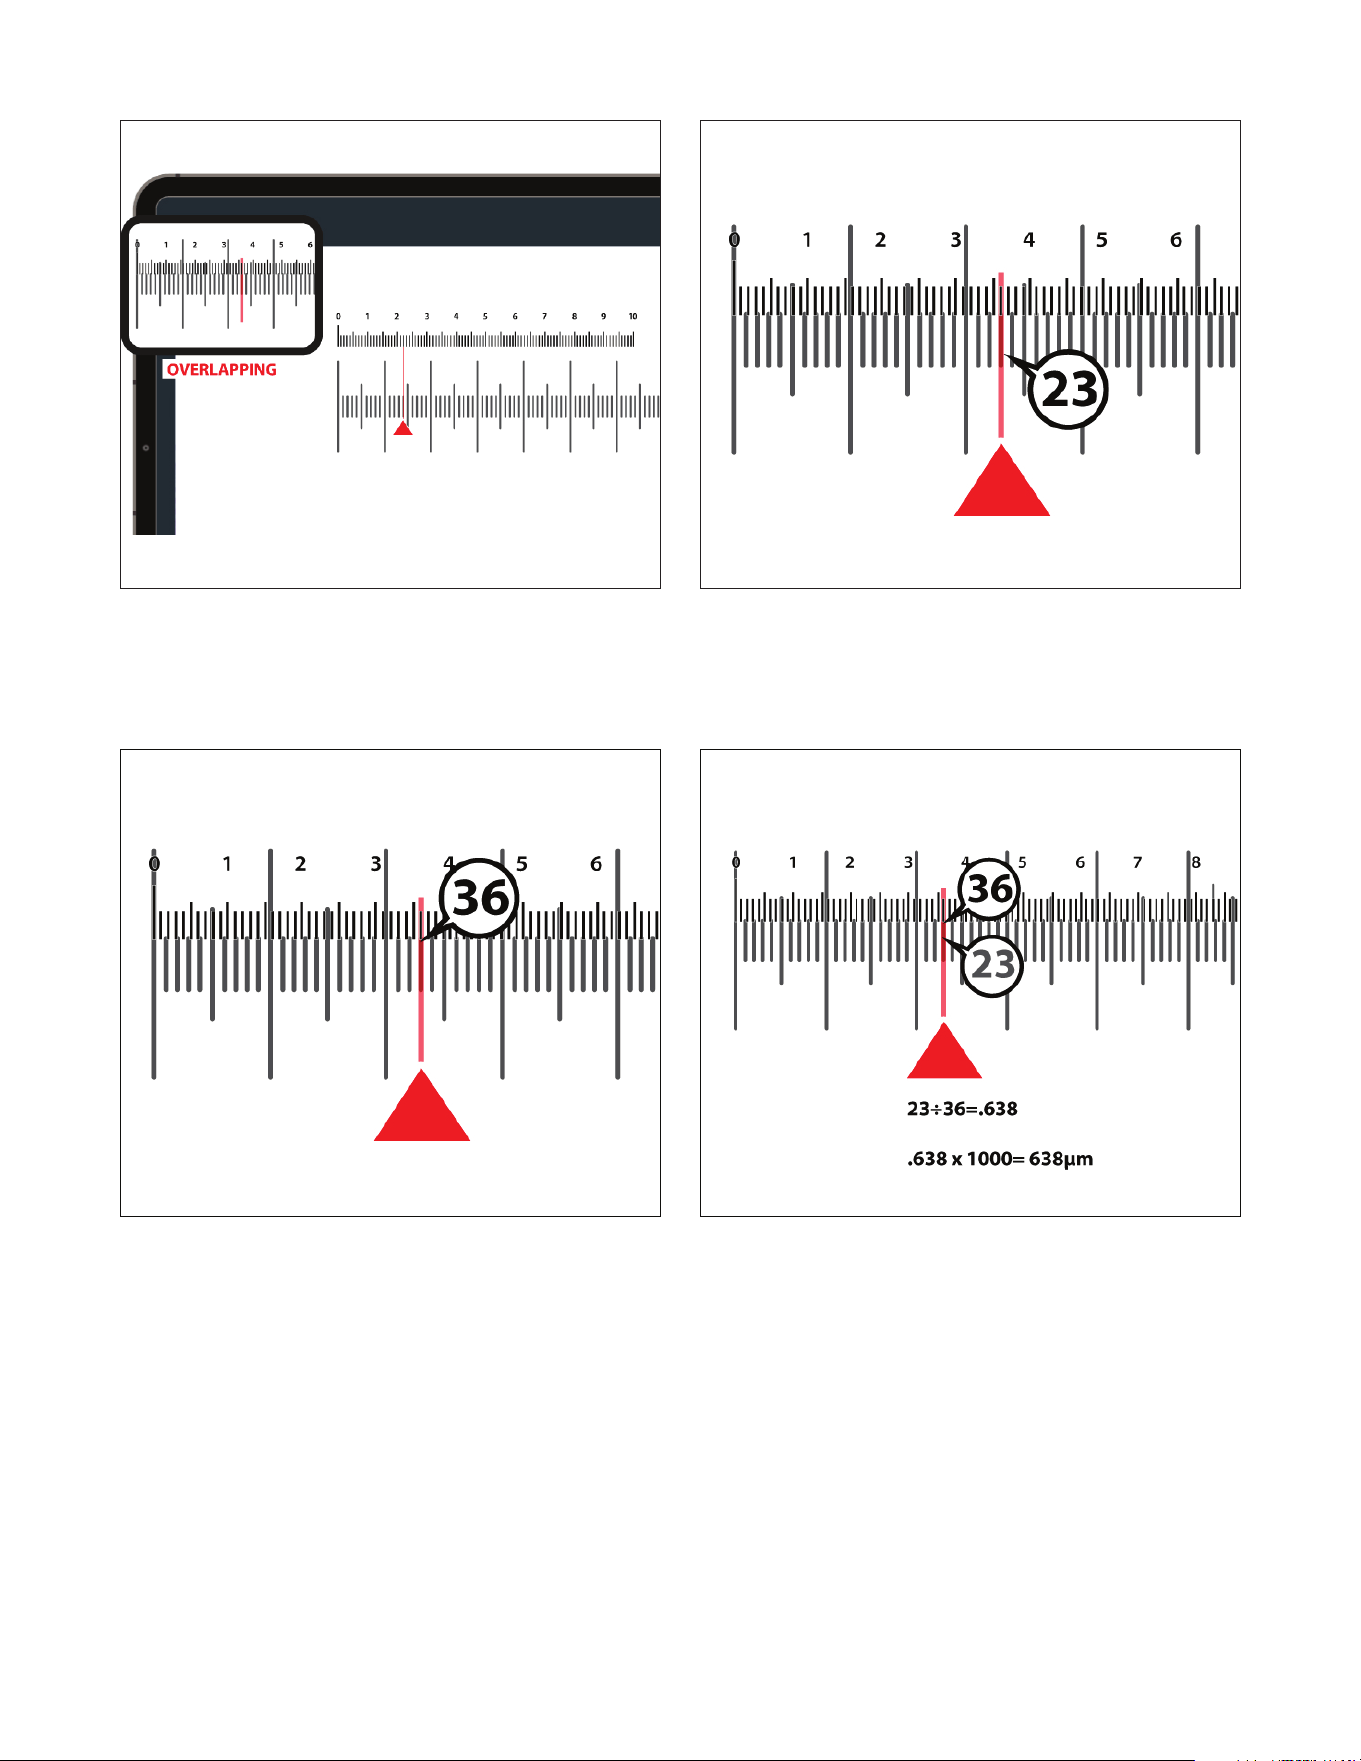
1. Place the calibration slide on the microscope stage.
2. In the app, turn the Measurement reticle ON.
3. Adjust the stage so the calibration slide ruler is visible and
focus the microscope until it appears sharp on screen.
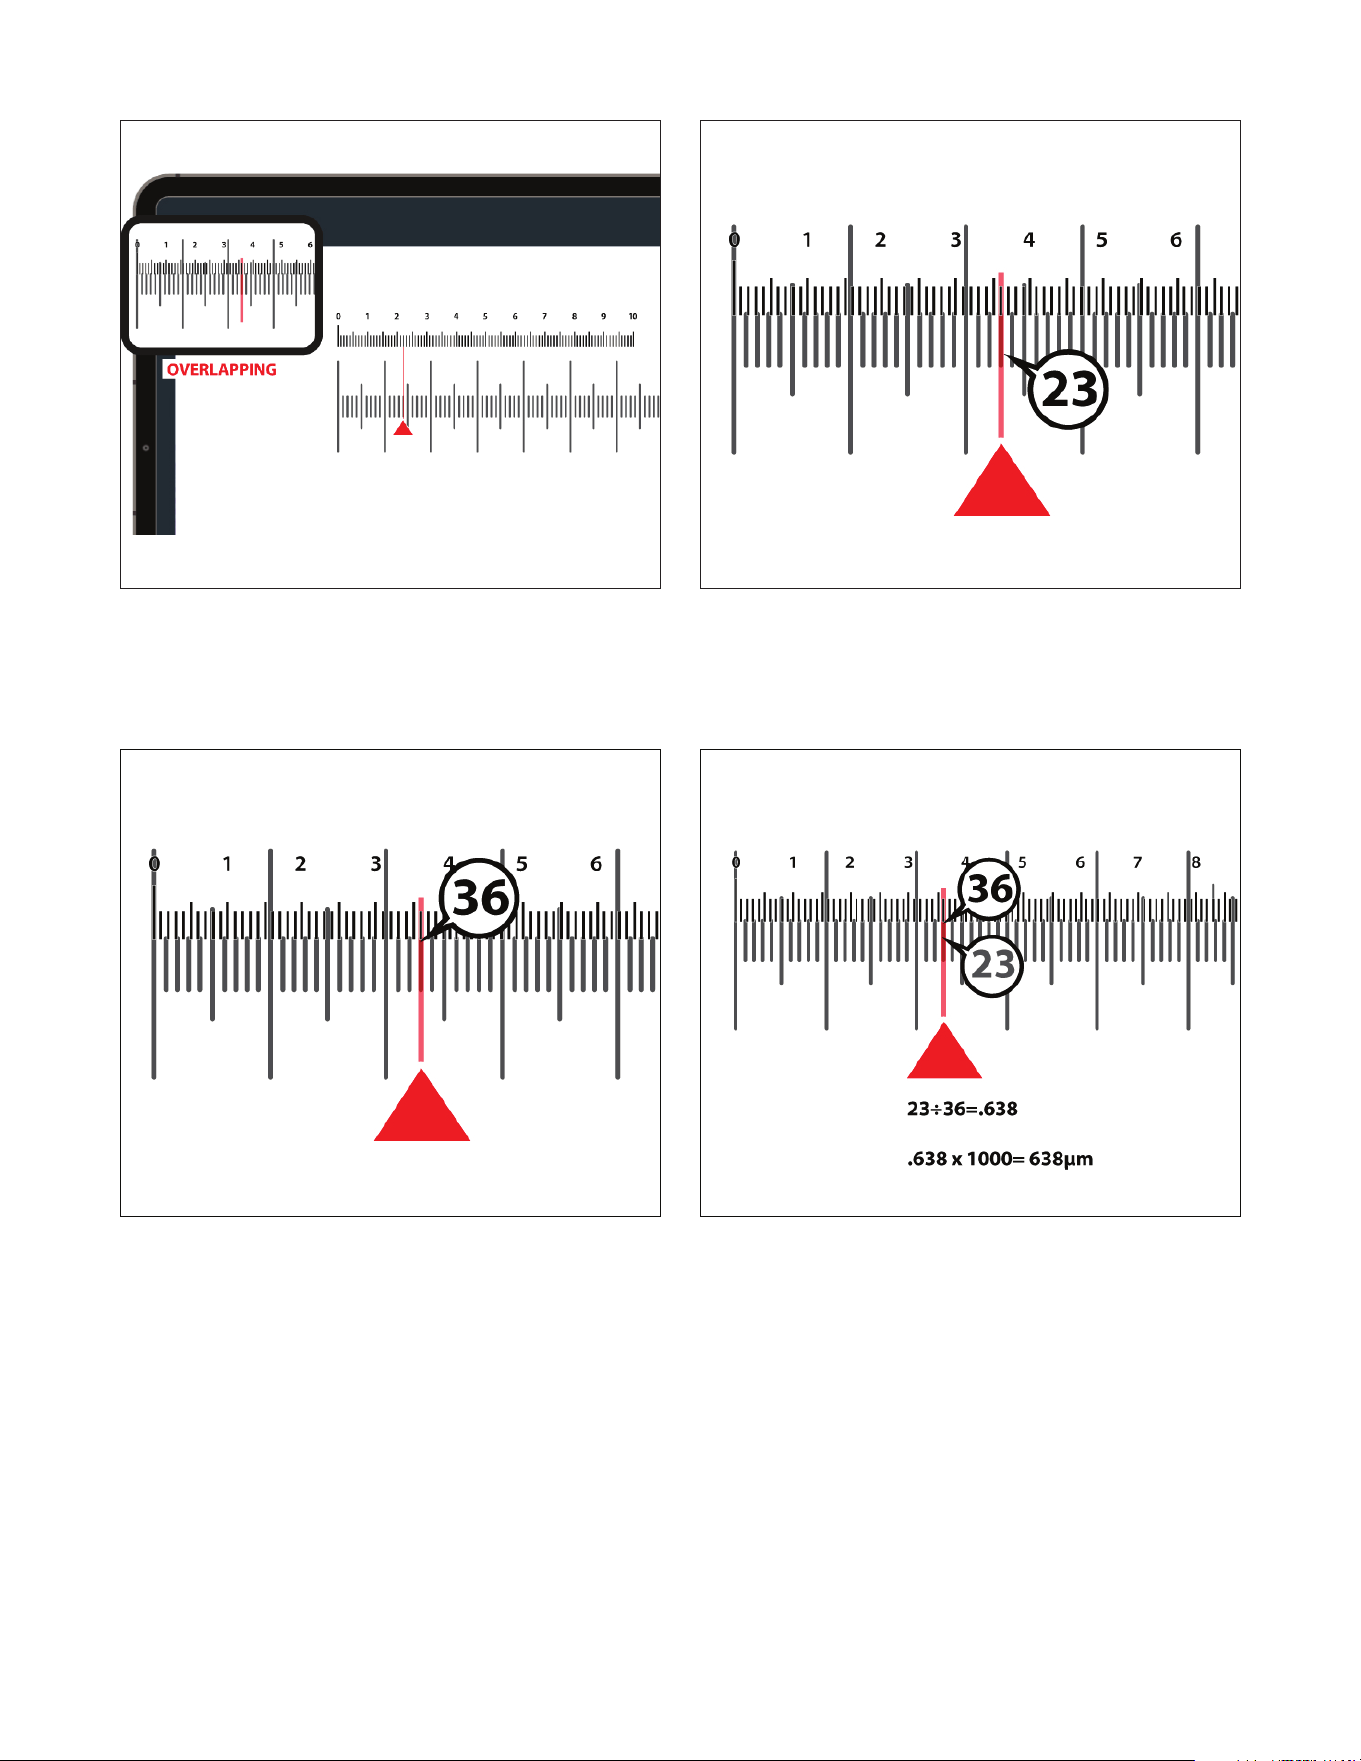
4. Align the “0” mark on the digital measurement reticle with the
“0” mark on the calibration slide.
ENGLISH 11
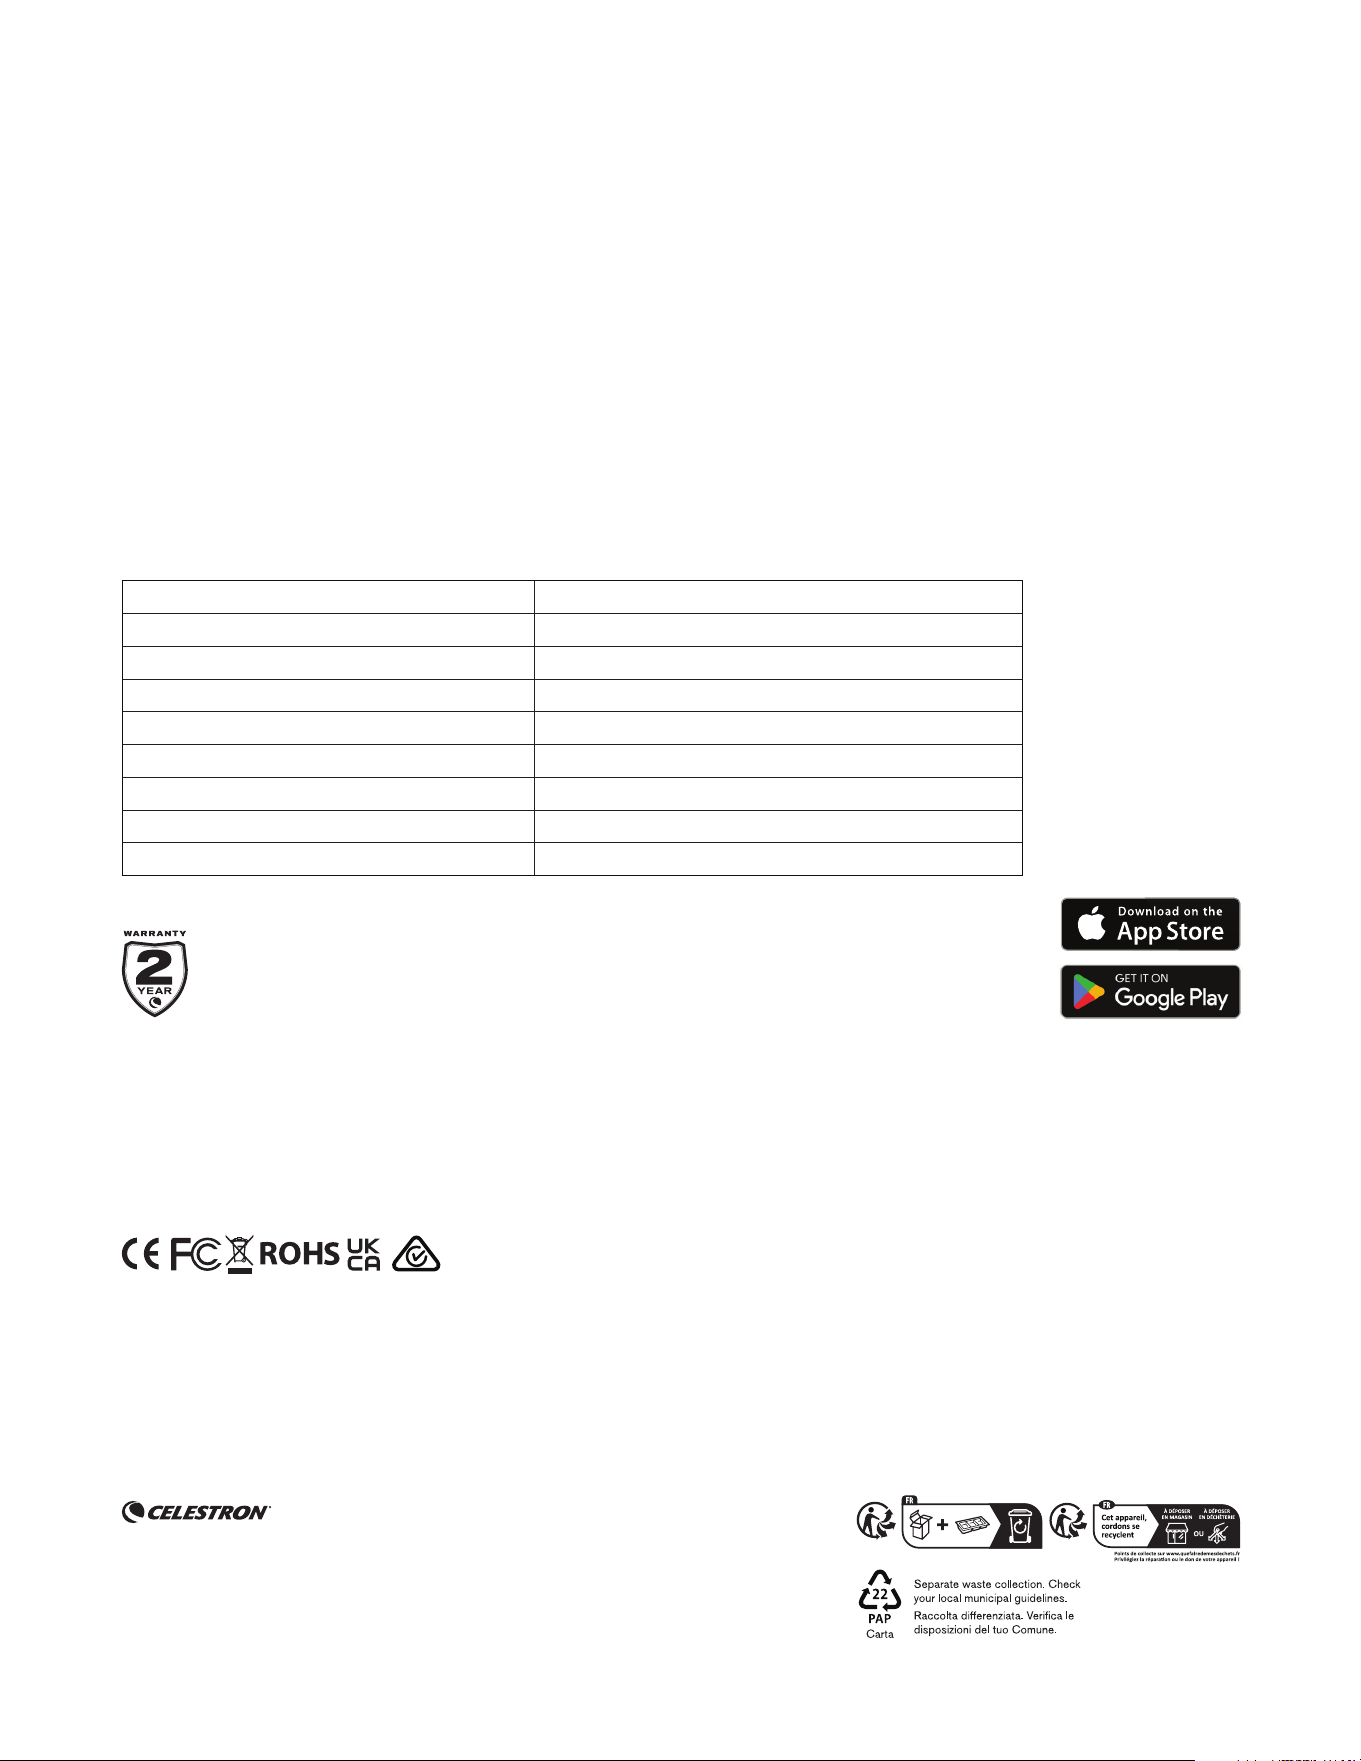
5. Without moving the slide, move across the scale and locate
the next point where a line on the digital reticle aligns exactly
with a line on the calibration slide.
6. Count the number of divisions on the calibration slide
between the two aligned points. In this example, it’s 23
divisions.
7. Count the number of divisions on the digital reticle
between those same two aligned points. In this example,
it’s 36 divisions.
8. Calculate the size represented by one reticle division.
First, divide the calibration slide divisions by the reticle
divisions: 23 ÷ 36 = 0.638
Then, multiply this result by 1000 to convert to micrometers:
0.638 × 1000 = 638 µm
In this example, each division on the digital reticle equals
638 µm.
9. You can now use the calibrated reticle to estimate specimen
dimensions.
Important
If you change objective lenses or magnification, you must recalibrate before taking new measurements.
12 I ENGLISH
9. CARE AND MAINTENANCE
+
Store the imager in a clean, dry environment when not in use.
+
Do not use the imager in environments where electronic
devices are prohibited. Improper use could result in serious
accident.
+
Operate the imager only within a temperature range of 23° to
120°F (-5° to 50°C). Avoid sudden temperature changes, as
condensation may form inside the housing.
+
Keep the imager away from water and other liquids. Do not
use it in rain or damp conditions. Moisture poses a risk of fi re
and electric shock.
+
Do not attempt to open or modify the device. Internal
components should only be serviced by authorized
technicians.
+
To clean the exterior, wipe gently with a soft, dry cloth.
FCC Note: This equipment has been tested and found to comply with the limits for a Class B digital device, pursuant to part 15 of the FCC Rules. These limits are designed to provide reasonable protection
against harmful interference in a residential installation. This equipment generates, uses, and can radiate radio frequency energy and, if not installed and used in accordance with the instructions, may
cause harmful interference to radio communications. However, there is no guarantee that interference will not occur in a particular installation. If this equipment does cause harmful interference to radio
or television reception, which can be determined by turning the equipment off and on, the user is encouraged to try to correct the interference by one or more of the following measures:
+ Reorient or relocate the receiving antenna.
+ Increase the separation between the equipment and receiver.
+ Connect the equipment into an outlet on a circuit different from that to which the receiver is connected.
+ Consult the dealer or an experienced radio/TV technician for help.
celestron.com/pages/warranty
NEED ASSISTANCE? Contact Celestron Technical Support
celestron.com/pages/technical-support
Product design and specifi cations are subject to change without prior notifi cation.
This product is designed and intended for use by those 14 years of age and older.
©2026 Celestron.
Celestron and Symbol are trademarks of Celestron, LLC. • All rights reserved. • Celestron.com
US: Celestron, 2835 Columbia Street, Torrance, CA 90503 USA
UK: Celestron Global Ltd., Unit 2 Transigo, Gables Way, Thatcham RG19 4JZ, United Kingdom
EU Authorized Representative: AR Experts B.V., Boeingavenue 209, 1119 PD Schiphol-Rijk,
The Netherlands, info@ar-experts.eu
Made in China | 03-26
Your Celestron Labs Digital Wi-Fi Imager is a precision optical device. Proper care will ensure reliable performance for years to come.
Celestron hereby declares that the radio equipment type 44429 WiFi Micro Imager 2MP complies with Directive
2014/53/EU. The full text of the EU declaration of conformity is available at the following internet address
www.celestron.com/productcompliance.
Product Model Celestron Labs Digital-Wi-Fi Micro Imager #44429
Friendly model name WH-44429
WiFi Standard WiFi4,802.11b/n
Tri-Band WiFi option 20M
2.4 GHz connected client limit 1
5 GHz connected client Limit None
6 GHz connected client limit None
Maximum data throughput 65M
WPS (WiFi Protected Setup) Not confi gured
WIFI PARAMETERS
FRENCH 13
MODÈLE #44429
CAMÉRA DE MICROSCOPE 2MP WI-FI
MODE D'EMPLOI
14 I FRENCH
CONTENU DE LA BOÎTE
INTRODUCTION
Merci d’avoir acheté cette caméra Wi-Fi numérique Celestron Labs. Cet appareil remplace l’oculaire de votre microscope et transmet une
image en direct sur votre smartphone ou tablette via son point d’accès Wi-Fi dédié. Aucune connexion internet n’est requise. Capturez des
images fixes, enregistrez des vidéos et partagez vos découvertes sans avoir à vous regrouper autour d’un oculaire.
L’imageur s’adapte à la plupart des microscopes dotés d’un tube
oculaire de 23 mm et comprend un adaptateur de 30 mm pour les
microscopes stéréoscopiques plus grands. Insérez simplement la
caméra à la place de l’oculaire, connectez votre appareil intelligent
au réseau Wi-Fi de Celestron Labs et ouvrez l’application Wi-Fi
de Celestron Labs pour commencer la visualisation.
L’application gratuite Celestron Labs Digital Wi-Fi est compatible
avec les appareils iOS et Android. Grâce à elle, vous pouvez
ajuster la résolution, prendre des photos et des vidéos, activer
des outils de mesure et enregistrer des fichiers directement sur
votre appareil pour un partage facile.
Avant de commencer, veuillez lire attentivement les instructions
d’installation et consulter les schémas de ce manuel. Quelques
minutes de préparation garantiront une installation sans difficulté
et des performances optimales.
Déballez soigneusement votre caméra Wi-Fi et vérifiez que tous
les éléments énumérés ci-dessous sont présents:
[A] Caméra de microscope 2Mp Wi-Fi Celestron Labs
[B] Adaptateur de 30mm
[C] Capuchon de lentille
[D] Règle d’étalonnage
[E] Câble de charge USB
[F] Guide de configuration rapide
A.
D.
F.
E.
B.
C.
Model #44429
QUICK START GUIDE
Contenu de la boîte
[A] 1 x Microscope imageur Wi-Fi 2 MP
Celestron Labs
[B] 1 x Adaptateur de 30 mm de diamètre
[C] 1 x Cache d’objectif
[D] 1 x Règle d’étalonnage
[E] 1 x Câble de charge USB-C
What’s in the Box
[A] 1 x Celestron Labs 2MP Wi-Fi
Microscope Imager
[B] 1 x 30mm diameter adapter
[C] 1 x Lens cap
[D] 1 x Calibration ruler
[E] 1 x USB-C charging cable
Lieferumfang
[A] 1 x Celestron Labs 2MP WLAN-
Mikroskop
[B]1 x Adapter (30 mm Durchmesser)
[C] 1 x Objektivdeckel
[D] 1 x Kalibrierlineal
[E] 1 x USB-C-Ladekabel
Contenuto della confezione
[A] 1 x Microscopio Wi-Fi Celestron Labs 2MP
[B] 1 x Adattatore da 30 mm di diametro
[C] 1 x Copriobiettivo
[D] 1 x Righello di calibrazione
[E] 1 x Cavo di ricarica USB-C
Contenido de la caja
[A] 1 microscopio Celestron Labs Wi-Fi de 2 MP
[B] 1 adaptador de 30 mm de diámetro
[C] 1 tapa de lente
[D] 1 regla de calibración
[E] 1 cable de carga USB-C
2MP Wi-Fi MICROSCOPE IMAGER
ENGL ISH
NEED ASSISTANCE? Contact Celestron Technical Support
celestron.com/pages/technical-support
Product design and specifications are subject to change without prior
notification. • This product is designed and intended for use by those
14 years of age and older.
©2025 Celestron. Celestron and Symbol
are trademarks of Celestron, LLC. • All rights reserved. • Celestron.com
US: Celestron, 2835 Columbia Str eet, Torrance, CA 90503 USA • UK:
Celestron Global Ltd., Unit 2 Transigo, Gables Way, Thatcham RG19 4JZ,
United Kingdom • Made in China | 07-25
FRANÇAIS
BESOIN D’ASSISTANCE? Contactez le support technique de
Celestron celestron.com/pages/technical-support
Le design et les spécifications du produit sont sujettes à modification sans
préavis. • Ce produit est conçu et prévu pour être utilisé par des personnes
âgées de 14 ans et plus
©2025 Celestron. Celestron et le Symbol sont
des marques déposées de Celestron, LLC. • Tous droits réservés • Celestron.
com • US: Celestron.com • 2835 Columbia Street, Torrance, CA 90503 USA •
UK: Celestron Global Ltd., Unit 2 Transigo, Gables Way, Thatcham RG19 4JZ,
Royaume-Uni • Fabriqué en Chine | 07-25
DEUTSCH
BENÖTIGEN SIE UNTERSTÜTZUNG? Wenden Sie sich an die
technische Unterstützung von Celestron unter
celestron.com/pages/technical-support
Produktdesign und technische Daten können ohne vorherige Ankündigung
geändert werden. Dieses Produk t ist für Personen ab 14 Jahren konzipiert
und vorgesehen.
©2025 Celestron. Celestron und Symbol
sind Warenzeichen von Celestron, L LC. Alle Rechte vorbehalten. Celestron.
com • USA: Celestron, 2835 Columbia Street, Torrance, CA 90503 USA • UK:
Celestron Global Ltd., Einheit 2 Transigo, Gables Way, Thatcham RG19 4JZ,
Vereinigtes Königreich • Hergestellt in China | 07-25
celestron.com/pages/warranty
ITALIANO
BISOGNO DI AIUTO? Contattare il supporto tecnico Celestron
celestron.com/pages/technical-support
Il design del prodotto e le specifiche sono sogget ti a modifiche senza
previa notifica. Questo prodotto è progettato per essere utilizzato da
persone di età pari o superiore ai 14 anni.
©2025 Celestron. Celetron e Symbol
sono marchi di Celestron, LLC. • Tutti i diritti riser vati. • Celestron.com
• Stati Uniti: Celestron, 2835 Columbia Street, Torrance, CA 9 0503 Stati
Uniti • Regno Unito: Celestron Global Ltd., Unit 2 Transigo, Gables Way,
Thatcham RG18 4JZ Regno Unito • Prodot to in Cina | 07-25
ESPAÑOL
¿NECESITA AYUDA? Contacte con el soporte técnico de
Celestron
celestron.com/pages/technical-support
El diseño y las especificaciones del producto están sujetos a cambios sin
notificación previa. Este producto ha sido diseñado y está pensado para
ser usado por personas de 14 años o más de edad.
©2025 Celestron. Celestron y su símbolo
son marcas comerciales de Celestron, LLC. • Todos los derechos reservados.
• Celestron.com • EE.UU.: Celestron, 283 5 Columbia St reet, Torrance, CA
90503 EE.UU. • GB: Celestron Global Ltd., Unit 2 Transigo, Gables Way,
Thatcham RG19 4JZ, Reino Unido • Fabricado en China | 07-25
A
B
C
D
E
CLICK FOR FULL MANUAL
CLIQUEZ POUR CONSULTER LE MODE D’EMPLOI COMPLET
FÜR DIE VOLLSTÄNDIGE ANLEITUNG KLICKEN
FARE CLIC PER IL MANUALE COMPLETO
PULSE PARA EL MANUAL COMPLETO
FRENCH 15
CONFIGURATION
ÉTAPE 1: CHARGER LA CAMÉRA
2. Branchez l’autre extrémité dans un chargeur mural USB
standard (tel qu’un chargeur de téléphone classique) ou
une batterie externe USB portable. (Sortie: 5V, 1A-1,8A)
1. Connectez le câble USB-C fourni à la caméra.
La caméra Wi-Fi comprend une batterie lithium-ion rechargeable intégrée et doit être complètement chargé avant la première utilisation.
La LED rouge s’allumera pendant la charge. Lorsque la LED rouge s’éteint, la batterie est complètement chargée et vous pouvez
passer à l’étape suivante. Une charge complète offre environ 3 heures d’autonomie.
SPÉCIFICATIONS
Type de microscope Caméra de microscope compatible Wi-Fi
Capteur: 2MP CMOS
Caractéristiques du capteur: SONY 1/4”
Grossissement du capteur: 30X (Grossissement réel déterminé par la taille de l'écran de l'appareil. Spécifications basées sur la base
d’un smartphone de 5 pouces)
Pas de pixel: 2,9 μm x 2,9 μm
Type de stockage: Aucun stockage: c’est le stockage du smartphone qui contiendra les images et les vidéos.
Résolution de capture d'image fixe: 1920x1080/1280x720/640x480
Résolution vidéo: 1920x1080/1280x720/640x480
Format vidéo - Enregistrement: MJPEG: 30 ips @ 1024x768/ 12 ips @ 2592x1944
Position du déclencheur: Le déclencheur se trouve dans l’APPLICATION
Logiciel: Application Wi-Fi numérique Celestron Labs
Compatibilité logicielle: • iOS • Android
Source d'alimentation: Batterie lithium-ion rechargeable (1100 mAh)
Autonomie de la batterie après une
charge complète:
3heures
Port(s) d'entrée: Port USB-C pour la charge
Port(s) de sortie: N/A
Câble: Câble USB-C pour charger la batterie (compatible avec la plupart des adaptateurs secteur 5V-1A à
1,8A)
Dimensions: 75mm x 75mm x 81,3mm (2,95" x 2,95" x 3,20")
Poids: 3,4oz (97g)
Éléments inclus: • (1) Collier adaptateur en aluminium pour tube oculaire de lunette stéréoscopique de 30 mm
• (1) Cache-objectif en caoutchouc pour la protection de l'objectif
• (1) Règle de calibration dans un étui en plastique
• (1) Câble de chargement USB-C
16 I FRENCH
ÉTAPE 2: INSTALLER LA CAMÉRA
ÉTAPE 3: ALLUMER
Maintenez le bouton d’alimentation orange enfoncé jusqu’à
ce que les voyants LED bleus s’allument. Les LED bleues
commenceront à clignoter. Cela indique que la caméra
diffuse son signal Wi-Fi.
Si les LED bleues ne s’allument pas:
• Vérifiez que la batterie est chargée.
• Appuyez sur le bouton d’alimentation et maintenez-le
enfoncé pendant plusieurs secondes.
1. Retirer la caméra de votre microscope.
REMARQUE: Si votre microscope est doté d’un tube oculaire de 30 mm, vous
devrez fixer l’adaptateur de 30 mm fourni. Pour plus d’informations, consultez la
section «Utilisation de l’adaptateur 30mm».
2. Retirez le capuchon en caoutchouc de l’objectif de la caméra.
3. Insérez complètement la caméra dans le tube oculaire du
microscope.
Elle doit s’emboîter correctement sans forcer.
FRENCH 17
ÉTAPE 4: INSTALLER
L’APPLICATION
Scannez le code QR fourni ou recherchez Celestron Labs
Digital Wi-Fi sur l’Apple App Store ou le Google Play Store.
Téléchargez et installez l’application gratuite. L’application est
compatible avec les appareils iOS et Android.
ÉTAPE 5: SE CONNECTER AU
RÉSEAU WI-FI DE L’APPAREIL
D’IMAGERIE
1. Ouvrez les paramètres Wi-Fi sur votre smartphone ou votre
tablette.
2. Recherchez un réseau nommé: Celestron LABS ImagerXXXX
(Les quatre X représentent une combinaison unique de lettre
et de chiffres.)
3. Sélectionnez le réseau auquel vous connecter.
Une fois la connexion établie, la LED bleue de la caméra cessera
de clignoter et restera fi xe.
Votre appareil peut affi cher un message indiquant qu’il n’y a
pas de connexion Internet. Ceci est normal. La caméra crée
sa propre connexion Wi-Fi directe et n’utilise pas votre réseau
Wi-Fi.
ÉTAPE 6: COMMENCER
L’OBSERVATION
Ouvrez l’application Celestron Labs Digital Wi-Fi.
La diffusion vidéo en direct devrait commencer après un délai
d’environ 30 secondes.
Si la vidéo n’apparaît pas:
Vérifi ez que votre appareil est connecté au réseau Wi-Fi
Celestron LABS ImagerXXXX.
• Fermez et rouvrez l’application.
18 I FRENCH
Vous pouvez utiliser la caméra même lorsqu’elle est connectée
à une source d’alimentation externe. Dans cette situation:
• Ne pas alimenter l’appareil à partir d’un port USB
d’ordinateur. Cela peut perturber le signal Wi-Fi.
• La LED bleue peut continuer à clignoter pendant la charge,
même lorsqu’elle est connectée au Wi-Fi. Ceci est normal.
UTILISATION DE L’APPLICATION
L’interface principale est illustrée ci-dessous. Les légendes
identifient chaque fonctionnalité décrite dans cette section.
UTILISATION DE LA CAMÉRA PENDANT LA CHARGE
Une fois connecté au réseau Wi-Fi de la caméra, ouvrez l’application Celestron Labs Digital Wi-Fi. La vidéo en direct sera diffusée
directement sur votre appareil.
FRENCH 19
A. PARAMÈTRES
Appuyez sur l’icône Paramètres pour accéder aux options
suivantes:
Résolution
Sélectionnez la résolution de l’image et de la vidéo. Les réso-
lutions plus élevées offrent plus de détails, mais génèrent des
fichiers plus volumineux. Paramètres disponibles:
• 640 × 480
• 1280 × 720
• 1920 × 1080
• 2048 × 1536 (résolution maximale)
Langage
Changer la langue de l’interface.
Les options disponibles comprennent: Anglais (par défaut),
Chinois (Simplifié), Chinois (Traditionnel), Néerlandais,
Espagnol, Français, Italien, Allemand, et Coréen.
À propos
Affiche le numéro de version de l’application, les informations
légales et les coordonnées de Celestron.
Mesure
Activer ou désactiver le réticule de mesure numérique.
Une fois calibré, le réticule permet d’estimer directement les
dimensions de l’échantillon à l’écran.
20 I FRENCH
B. ENREGISTREMENT VIDÉO
Appuyez sur l’icône Vidéo pour démarrer l’enregistrement. Un minuteur
apparaîtra en haut de l’écran pendant l’enregistrement.
Appuyez de nouveau sur l’icône pour arrêter l’enregistrement.
Les vidéos sont enregistrées directement sur votre appareil.
C. PRENDRE DES PHOTOS
Appuyez sur l’icône de photo pour prendre une photo.
Les images sont enregistrées directement sur votre appareil.
FRENCH 21
D. GALERIE
Appuyez sur l’icône Galerie pour afficher les images et vidéos
enregistrées.
• Appuyez sur une vignette pour afficher en plein écran.
• Balayez vers la gauche ou la droite pour faire défiler les
fichiers enregistrés.
• Pour lire une vidéo, appuyez sur l’écran et sélectionnez
Lecture.
AVIS D’AUTORISATION
IMPORTANT
Selon les paramètres de votre appareil, il se peut que l’on vous
demande d’autoriser l’application à accéder à vos photos et à
vos fichiers. Un accès complet est requis pour enregistrer des
images et des vidéos.
22 I FRENCH
UTILISATION DE L’ADAPTATEUR DE 30MM
La caméra Wi-Fi est conçue pour s’adapter aux tubes
oculaires standard de 23 mm. Si votre microscope possède
un tube oculaire de 30 mm, fixez l’adaptateur de 30 mm
fourni à la base de la caméra avant de l’insérer dans le
microscope.
L’adaptateur se glisse en toute sécurité sur le barillet de la
caméra, augmentant son diamètre de 23 mm à 30 mm. Une
fois fixé, insérez l’imageur dans le tube oculaire comme
vous le feriez pour un oculaire standard.
UTILISATION DE LA RÈGLE D’ÉTALONNAGE
Le réticule de mesure de l’application affiche des lignes régulièrement espacées à l’écran. Cependant, l’application ne sait pas
automatiquement quelle distance réelle représentent ces lignes à votre niveau de grossissement actuel. La règle d’étalonnage
incluse, également appelée micromètre de platine, résout ce problème.
La règle est dotée de graduations gravées avec précision. Chaque petite division sur la lame équivaut à 0,01 mm (10 micro-
mètres). En comparant les distances connues sur la lame d’étalonnage au réticule à l’écran, vous pouvez calculer la distance réelle
représentée par chaque division du réticule.
L’étalonnage est spécifique à l’objectif que vous utilisez. Si vous modifiez le grossissement, vous devez recalibrer l’appareil avant
de prendre de nouvelles mesures.
Pour étalonner:
1. Placez la règle d’étalonnage sur la platine du microscope.
2. Dans l’application, activez le réticule de mesure.
3. Réglez la platine de manière à ce que la règle d’étalonnage
soit visible et effectuez la mise au point du microscope
jusqu’à ce qu’elle apparaisse nette à l’écran.
4. Alignez la marque «0» du réticule de mesure numérique
avec la marque «0» de la règle d’étalonnage.
FRENCH 23
5. Sans déplacer la règle, déplacez la vue le long des
graduations et repérez le prochain point où une ligne sur le
réticule numérique s’aligne exactement avec une ligne sur la
règle d’étalonnage.
6. Comptez le nombre de graduations sur la règle d’étalonnage
entre ces deux mêmes points alignés. Dans cet exemple, il y
a 23 graduations.
7. Comptez le nombre de divisions sur le réticule numérique
entre ces deux mêmes points alignés. Dans cet exemple, il y
a 36 divisions.
8. Calculer la taille représentée par une division du réticule.
Premièrement, divisez les divisions de la règle d’étalonnage
par les divisions du réticule: 23 ÷ 36 = 0,638
Ensuite, multipliez ce résultat par 1000 pour le convertir en
micromètres: 0,638 × 1000 = 638 µm
Dans cet exemple, chaque division sur le réticule numérique
équivaut à 638 µm.
9. Vous pouvez maintenant utiliser le réticule calibré pour estimer
les dimensions de l’échantillon.
Important
Si vous changez d’objectif ou de grossissement, vous devez recalibrer l’appareil avant de prendre de nouvelles mesures.
24 I FRENCH
9. ENTRETIEN ET MAINTENANCE
+
Rangez la caméra dans un environnement propre et sec
lorsqu’elle n’est pas utilisée.
+
N’utilisez jamais la caméra dans des endroits où des appareils
électroniques sont interdits. Une mauvaise utilisation peut
entraîner des accidents graves.
+
Utilisez la caméra uniquement dans une plage de température
de 23° à 120°F (-5° à 50°C). Éviter les variations soudaines
de température qui peuvent causer la formation d’humidité à
l’intérieur du boîtier.
+
Tenez la caméra numérique en éloignée de l’eau ou d’autres
liquides. Ne l’utilisez jamais sous la pluie ou la neige. L’humidité
peut causer des risques d’électrocution ou d’incendie.
+
Ne tentez pas d’accéder aux composants internes ou de les
modifi er. Les composants internes ne doivent être réparés que
par des techniciens agréés.
+
Pour nettoyer l’extérieur, essuyez-le délicatement avec un
chiffon doux et sec.
Votre caméra numérique Wi-Fi Celestron Labs est un appareil optique de précision. Un entretien approprié garantira des performances
fi ables pour les années à venir.
Celestron déclare par la présente que l’équipement radio de type 44429 Celestron Labs Digital 2MP WiFi
Microscope Imager, est conforme à la directive 2014/53/UE. Le texte intégral de la déclaration de conformité
UE est disponible à l’adresse www.celestron.com/productcompliance.
NOTE DE LA FCC: Cet équipement a été testé et jugé conforme aux limites établies pour un dispositif numérique de classe B, conformément à la partie 15 de la réglementation de la FCC. Ces limites sont conçues pour
fournir une protection raisonnable contre les interférences nuisibles dans une installation résidentielle. Cet équipement génère, utilise et peut émettre une énergie de fréquence radio et, s’il n’est pas installé et utilisé
conformément aux instructions, peut causer des interférences nuisibles aux communications radio. Mais il n'existe aucune garantie que des interférences ne seront pas produites dans une installation particulière. Si cet
équipement cause des interférences nuisibles à la réception de la radio ou de la télévision, ce qui peut être déterminé en éteignant et en rallumant l'équipement, l'utilisateur est encouragé à essayer de corriger l'interférence
par une ou plusieurs des mesures suivantes:
+ Réorientez ou déplacez l’antenne réceptrice.
+ Augmentez la distance entre l’équipement et le récepteur.
+ Connectez l'équipement à une prise sur un circuit différent de celui auquel le récepteur est connecté.
+ Prenez contact avec un revendeur ou un technicien expérimenté de radio/TV pour obtenir de l’aide.
celestron.com/pages/warranty
BESOIN D'ASSISTANCE? Pour contacter l’assistance technique de Celestron
celestron.com/pages/technical-support
Le design et les spécifi cations du produit sont sujettes à modifi cation sans préavis.
Ce produit est conçu et prévu pour être utilisé par des personnes âgées de 14 ans et plus.
©2026 Celestron.
Celestron et le Symbol sont des marques déposées de Celestron, LLC. • Tous droits réservés • Celestron.com
US: Celestron, 2835 Columbia Street, Torrance, CA 90503 USA
UK: Unit 2 Transigo, Gables Way, Thatcham RG19 4JZ, Royaume Uni
Représentant autorisé dans l’UE : AR Experts B.V. is Boeingavenue 209, 1119 PD Schiphol-Rijk,
Pays-Bas, info@ar-experts.eu
Fabriqué en Chine | 03- 26
Modèle du produit Celestron Labs Digital-Wi-Fi Micro Imager #44429
Nom de modèle simplifi é WH-44429
Standard Wi-Fi WiFi4,802.11b/n
Option de Wi-Fi tribande 20M
Limite de clients 2,4 Ghz connectés 1
Limite de clients 5Ghz connectés Aucun
Limite de clients 6Ghz connectés Aucun
Bande passante de données max. 65M
WPS (Confi guration Wi-Fi sécurisée) Non confi gurée
RÉGLAGES WI-FI
DEUTSCH 25
MODELL NR. 44429
BEDIENUNGSANLEITUNG
2MP WLAN MIKROSKOP-IMAGER
26 I DEUTSCH
LIEFERUMFANG
EINFÜHRUNG
Vielen Dank für den Kauf des Celestron Labs Digital WLAN Mikroskop-Imagers. Dieses Gerät ersetzt das Okular Ihres Mikroskops
und überträgt ein Livebild direkt per WLAN auf Ihr Smartphone oder Tablet. Es ist keine Internetverbindung erforderlich. Nehmen Sie
Standbilder auf, zeichnen Sie Videos auf und teilen Sie Ihre Entdeckungen, ohne sich um ein Okular drängen zu müssen.
Der Bildsensor passt auf die meisten Mikroskope mit einem
23-mm-Okularrohr und enthält einen 30-mm-Adapter für
größere Stereomikroskope. Setzen Sie einfach den Bildgeber
anstelle des Okulars ein, verbinden Sie Ihr Smartphone oder
Tablet mit dem Celestron Labs WLAN-Netzwerk und öffnen die
Celestron Labs WLAN-App, um mit der Ansicht zu beginnen.
Die kostenlose Celestron Labs Digital WLAN-App ist mit
iOS- und Android-Geräten kompatibel. Mit ihr können Sie
die Auflösung anpassen, Fotos und Videos aufnehmen,
Messwerkzeuge aktivieren und Dateien direkt auf Ihrem Gerät
speichern, um sie einfach zu teilen.
Lesen Sie vor dem Start die Einrichtungsanweisungen durch und
überprüfen Sie die Diagramme in diesem Handbuch. Ein paar
Minuten Vorbereitung sorgen für eine reibungslose Einrichtung
und die bestmögliche Leistung.
Packen Sie Ihren WLAN-Bildgeber vorsichtig aus und
überprüfen, ob alle unten aufgeführten Teile vorhanden sind:
[A] Celestron Labs 2MP WLAN Mikroskop-Imager
[B] Adapter mit 30 mm Durchmesser
[C] Objektivdeckel
[D] Kalibrierlineal
[E] USB-C-Ladekabel
[F] Kurzanleitung
A.
D.
F.
E.
B.
C.
Model #44429
QUICK START GUIDE
Contenu de la boîte
[A] 1 x Microscope imageur Wi-Fi 2 MP
Celestron Labs
[B] 1 x Adaptateur de 30 mm de diamètre
[C] 1 x Cache d’objectif
[D] 1 x Règle d’étalonnage
[E] 1 x Câble de charge USB-C
What’s in the Box
[A] 1 x Celestron Labs 2MP Wi-Fi
Microscope Imager
[B] 1 x 30mm diameter adapter
[C] 1 x Lens cap
[D] 1 x Calibration ruler
[E] 1 x USB-C charging cable
Lieferumfang
[A] 1 x Celestron Labs 2MP WLAN-
Mikroskop
[B]1 x Adapter (30 mm Durchmesser)
[C] 1 x Objektivdeckel
[D] 1 x Kalibrierlineal
[E] 1 x USB-C-Ladekabel
Contenuto della confezione
[A] 1 x Microscopio Wi-Fi Celestron Labs 2MP
[B] 1 x Adattatore da 30 mm di diametro
[C] 1 x Copriobiettivo
[D] 1 x Righello di calibrazione
[E] 1 x Cavo di ricarica USB-C
Contenido de la caja
[A] 1 microscopio Celestron Labs Wi-Fi de 2 MP
[B] 1 adaptador de 30 mm de diámetro
[C] 1 tapa de lente
[D] 1 regla de calibración
[E] 1 cable de carga USB-C
2MP Wi-Fi MICROSCOPE IMAGER
ENGL ISH
NEED ASSISTANCE? Contact Celestron Technical Support
celestron.com/pages/technical-support
Product design and specifications are subject to change without prior
notification. • This product is designed and intended for use by those
14 years of age and older.
©2025 Celestron. Celestron and Symbol
are trademarks of Celestron, LLC. • All rights reserved. • Celestron.com
US: Celestron, 2835 Columbia Str eet, Torrance, CA 90503 USA • UK:
Celestron Global Ltd., Unit 2 Transigo, Gables Way, Thatcham RG19 4JZ,
United Kingdom • Made in China | 07-25
FRANÇAIS
BESOIN D’ASSISTANCE? Contactez le support technique de
Celestron celestron.com/pages/technical-support
Le design et les spécifications du produit sont sujettes à modification sans
préavis. • Ce produit est conçu et prévu pour être utilisé par des personnes
âgées de 14 ans et plus
©2025 Celestron. Celestron et le Symbol sont
des marques déposées de Celestron, LLC. • Tous droits réservés • Celestron.
com • US: Celestron.com • 2835 Columbia Street, Torrance, CA 90503 USA •
UK: Celestron Global Ltd., Unit 2 Transigo, Gables Way, Thatcham RG19 4JZ,
Royaume-Uni • Fabriqué en Chine | 07-25
DEUTSCH
BENÖTIGEN SIE UNTERSTÜTZUNG? Wenden Sie sich an die
technische Unterstützung von Celestron unter
celestron.com/pages/technical-support
Produktdesign und technische Daten können ohne vorherige Ankündigung
geändert werden. Dieses Produk t ist für Personen ab 14 Jahren konzipiert
und vorgesehen.
©2025 Celestron. Celestron und Symbol
sind Warenzeichen von Celestron, L LC. Alle Rechte vorbehalten. Celestron.
com • USA: Celestron, 2835 Columbia Street, Torrance, CA 90503 USA • UK:
Celestron Global Ltd., Einheit 2 Transigo, Gables Way, Thatcham RG19 4JZ,
Vereinigtes Königreich • Hergestellt in China | 07-25
celestron.com/pages/warranty
ITALIANO
BISOGNO DI AIUTO? Contattare il supporto tecnico Celestron
celestron.com/pages/technical-support
Il design del prodotto e le specifiche sono sogget ti a modifiche senza
previa notifica. Questo prodotto è progettato per essere utilizzato da
persone di età pari o superiore ai 14 anni.
©2025 Celestron. Celetron e Symbol
sono marchi di Celestron, LLC. • Tutti i diritti riser vati. • Celestron.com
• Stati Uniti: Celestron, 2835 Columbia Street, Torrance, CA 9 0503 Stati
Uniti • Regno Unito: Celestron Global Ltd., Unit 2 Transigo, Gables Way,
Thatcham RG18 4JZ Regno Unito • Prodot to in Cina | 07-25
ESPAÑOL
¿NECESITA AYUDA? Contacte con el soporte técnico de
Celestron
celestron.com/pages/technical-support
El diseño y las especificaciones del producto están sujetos a cambios sin
notificación previa. Este producto ha sido diseñado y está pensado para
ser usado por personas de 14 años o más de edad.
©2025 Celestron. Celestron y su símbolo
son marcas comerciales de Celestron, LLC. • Todos los derechos reservados.
• Celestron.com • EE.UU.: Celestron, 283 5 Columbia St reet, Torrance, CA
90503 EE.UU. • GB: Celestron Global Ltd., Unit 2 Transigo, Gables Way,
Thatcham RG19 4JZ, Reino Unido • Fabricado en China | 07-25
A
B
C
D
E
CLICK FOR FULL MANUAL
CLIQUEZ POUR CONSULTER LE MODE D’EMPLOI COMPLET
FÜR DIE VOLLSTÄNDIGE ANLEITUNG KLICKEN
FARE CLIC PER IL MANUALE COMPLETO
PULSE PARA EL MANUAL COMPLETO
DEUTSCH 27
EINRICHTUNG
SCHRITT 1: DEN IMAGER AUFLADEN
2. Stecken Sie das andere Ende in ein Standard-USB-
Wandladegerät (wie ein typisches Handyladegerät) oder eine
tragbare USB-Powerbank. (Ausgang: 5 V, 1 A-1,8 A)
1. Verbinden Sie das mitgelieferte USB-C-Kabel mit dem Imager.
Der WLAN-Imager enthält einen eingebauten wiederaufladbaren Lithium-Ionen-Akku und muss vor dem ersten Gebrauch vollständig
aufgeladen werden.
Die rote LED leuchtet während des Ladevorgangs. Wenn die rote LED erlischt, ist der Akku vollständig geladen und Sie können
zum nächsten Schritt übergehen. Eine volle Ladung bietet ungefähr 3 Stunden Betriebszeit.
SPECIFICATIONS
Mikroskoptyp: WLAN-fähige Mikroskopkamera
Sensor: 2-MP-CMOS-Sensor
Sensorgröße: 1/4” SONY
Sensorvergrößerung: 30x (Endgültig abhängig von der Bildschirmgröße des Geräts. Die Angabe basiert auf einer
Displaygröße von 5" eines Smartphones)
Pixelgröße: 2,9 μm x 2,9 μm
Speichertyp: Kein Speicher – verwendet den Speicher des Smart-Geräts zum Speichern von Bildern und Videos
Standbildaufnahme-Auflösung: 1920 x 1080/1280 x 720/640 x 480
Videoauflösung: 1920 x 1080/1280 x 720/640 x 480
Videoformat – Aufnahme: MJPEG: 30 fps @ 1024 x 768/12 fps @ 2592 x 1944
Auslöserposition: In der APP
Software: Celestron Labs Digital Wi-Fi APP
Software-Kompatibilität: • iOS • Android
Stromquelle: Wiederaufladbarer Lithium-Ionen-Akku (1100 mAh)
Akkulaufzeit bei voller Ladung: 3 Stunden
Anschluss Eingang: USB-C-Anschluss zum Laden
Anschluss Ausgang: N/V
Kabel USB-C-Kabel zum Laden des Akkus (kompatibel mit den meisten 5V-1A bis 1,8A Netzteilen)
Abmessungen: 75 mm x 75 mm x 81,3 mm (2,95" x 2,95" x 3,20")
Gewicht: 3,4 oz (97 g)
Enthaltene Teile: • (1) Aluminium-Kragenhalterung-Adapter für 30mm-Stereomikroskop-Okulartubus
• (1) Gummi-Objektivdeckel zum Schutz
• (1) Kalibrierlineal in Kunststoffetui
• (1) USB-C-Ladekabel
28 I DEUTSCH
SCHRITT 2: DEN IMAGER INSTALLIEREN
SCHRITT 3: EINSCHALTEN
Halten Sie die orangefarbene Ein-/Aus-Taste gedrückt, bis die
blauen LED-Anzeigen aufleuchten. Die blauen LEDs beginnen
zu blinken. Dies zeigt an, dass der Imager sein WLAN-Signal
sendet.
Wenn die blauen LEDs nicht aufleuchten:
• Überprüfen Sie, ob der Akku geladen ist.
• Halten Sie die Ein-/Aus-Taste mehrere Sekunden lang
gedrückt.
1. Entfernen Sie das Okular von Ihrem Mikroskop.
HINWEIS: Wenn Ihr Mikroskop einen 30 mm Okulartubs, 30 mm Adapter anbringen.
Weitere Informationen finden Sie unter „Verwendung des 30 mm Adapter“.
2. Entfernen Sie den Gummi-Objektivdeckel vom Imager.
3. Setzen Sie den Imager vollständig in den Okulartubus des
Mikroskops ein.
Der Imager sollte sicher und ohne Kraftaufwand sitzen.
DEUTSCH 29
SCHRITT 4: DIE APP
INSTALLIEREN
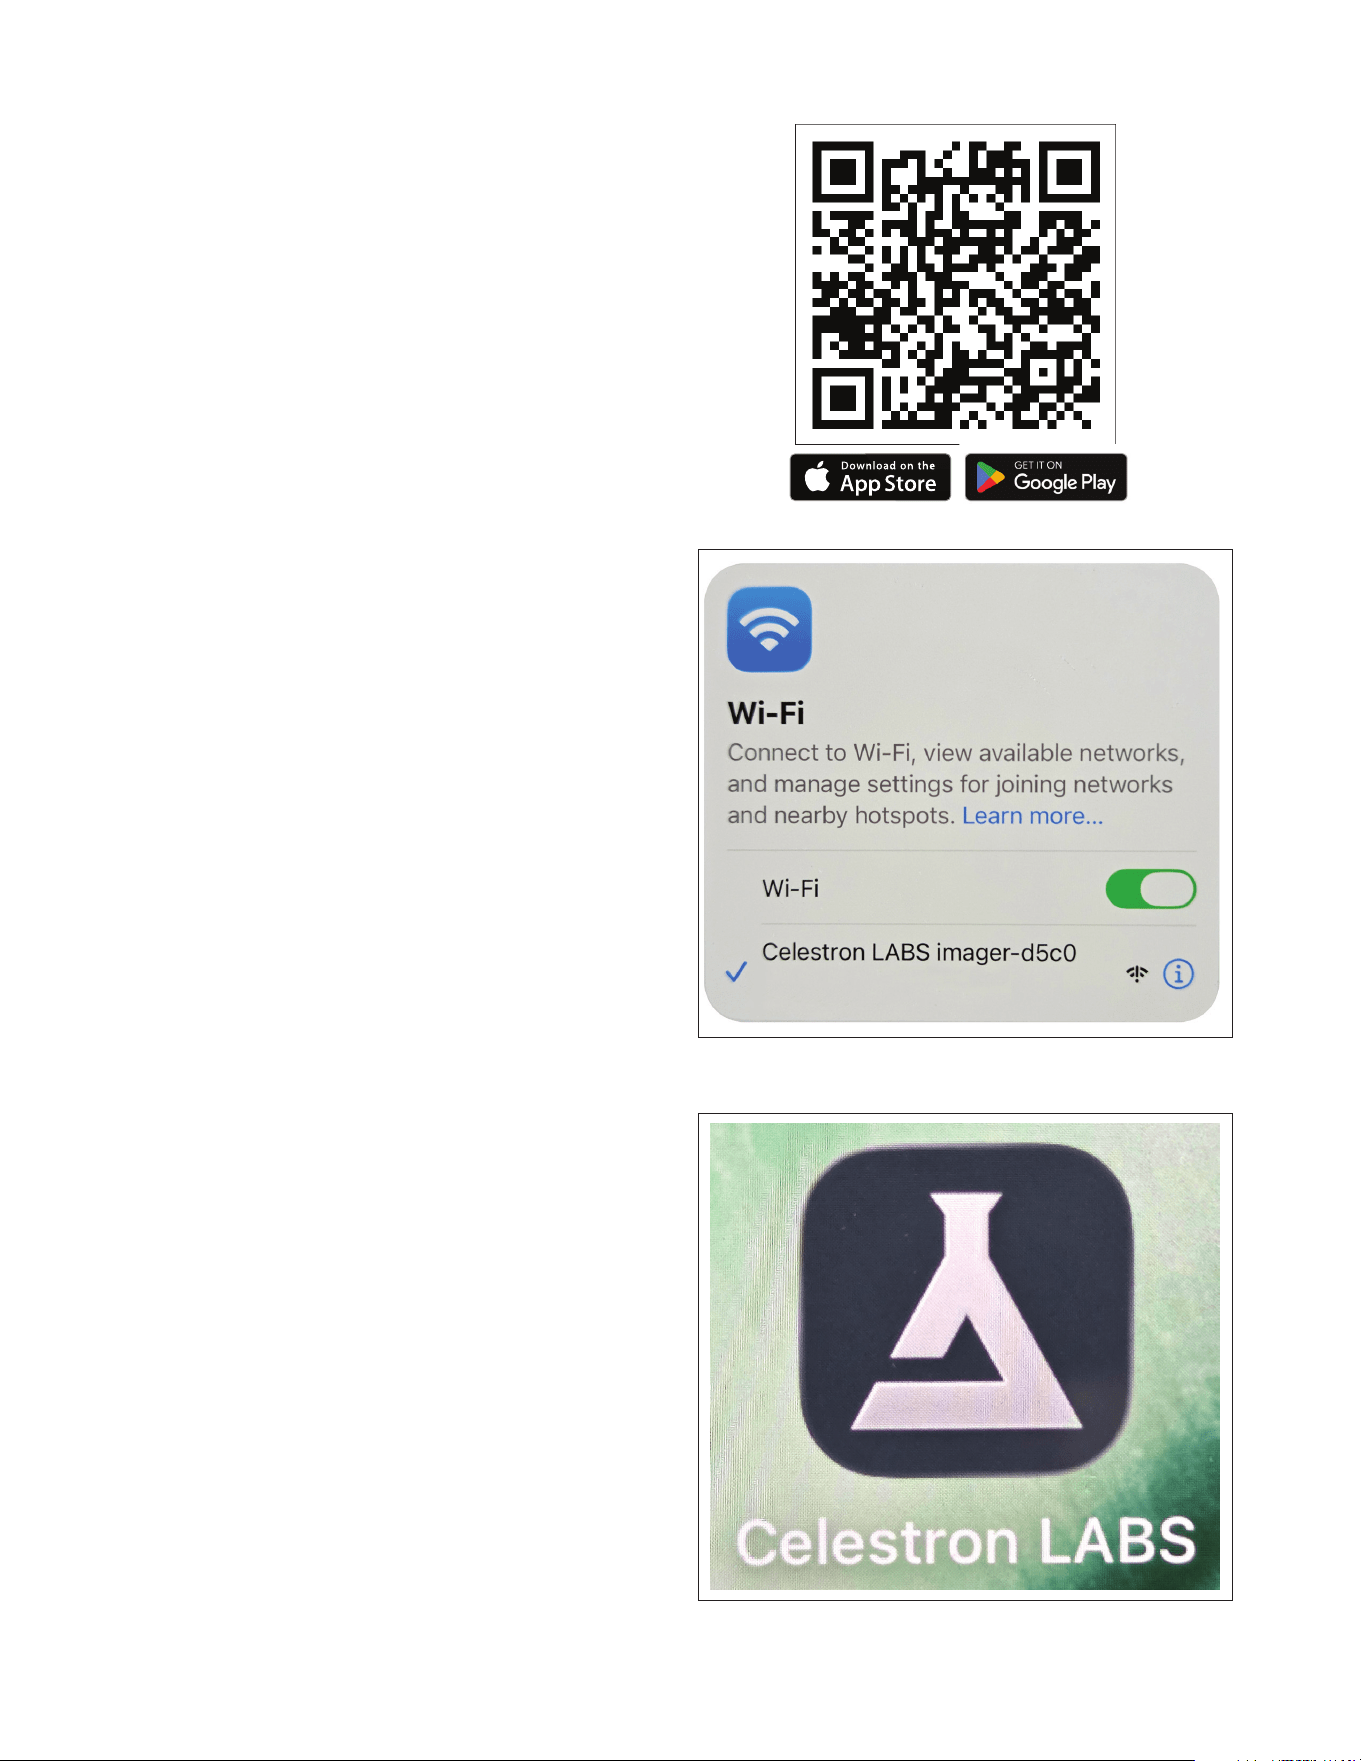
Scannen Sie den bereitgestellten QR-Code oder suchen Sie
nach Celestron Labs Digital Wi-Fi im Apple App Store oder
Google Play Store. Laden Sie die kostenlose App herunter
und installieren Sie sie. Die App funktioniert mit iOS- und
Android-Geräten.
SCHRITT 5: MIT DEM WLAN-
NETZWERK DES IMAGERS
VERBINDEN
1. Öffnen Sie die WLAN-Einstellungen auf Ihrem Smartphone
oder Tablet.
2. Suchen Sie nach einem Netzwerk mit dem Namen:
Celestron LABS ImagerXXXX
(Die vier X stehen für eine eindeutige Buchstaben-/
Zahlenkombination.)
3. Wählen Sie das Netzwerk aus, um sich zu verbinden.
Sobald die Verbindung hergestellt ist, hört die blaue LED am
Imager auf zu blinken und leuchtet dauerhaft.
Ihr Gerät zeigt möglicherweise eine Meldung an, dass keine
Internetverbindung besteht. Dies ist normal. Der Imager erstellt
seine eigene direkte WLAN-Verbindung und verwendet nicht
Ihr WLAN-Netzwerk.
SCHRITT 6: MIT DER
BETRACHTUNG STARTEN
Öffnen Sie die Celestron Labs Digital Wi-Fi App.
Live-Video sollte innerhalb von etwa 30 Sekunden gestreamt
werden.
Wenn das Video nicht erscheint:
• Vergewissern Sie sich, dass Ihr Gerät mit dem WLAN-
Netzwerk Celestron LABS ImagerXXX verbunden ist.
• Schließen Sie die App und öffnen Sie sie erneut.
30 I DEUTSCH
Sie können den Imager verwenden, während er an eine externe
Stromversorgung angeschlossen ist. Beachten Sie dabei:
• Versorgen Sie das Gerät nicht über einen USB-Anschluss
eines Computers mit Strom. Dies kann das WLAN-Signal
stören.
• Die blaue LED kann während des Ladens weiterhin blinken,
auch wenn eine WLAN-Verbindung besteht. Dies ist normal.
VERWENDUNG DER APP
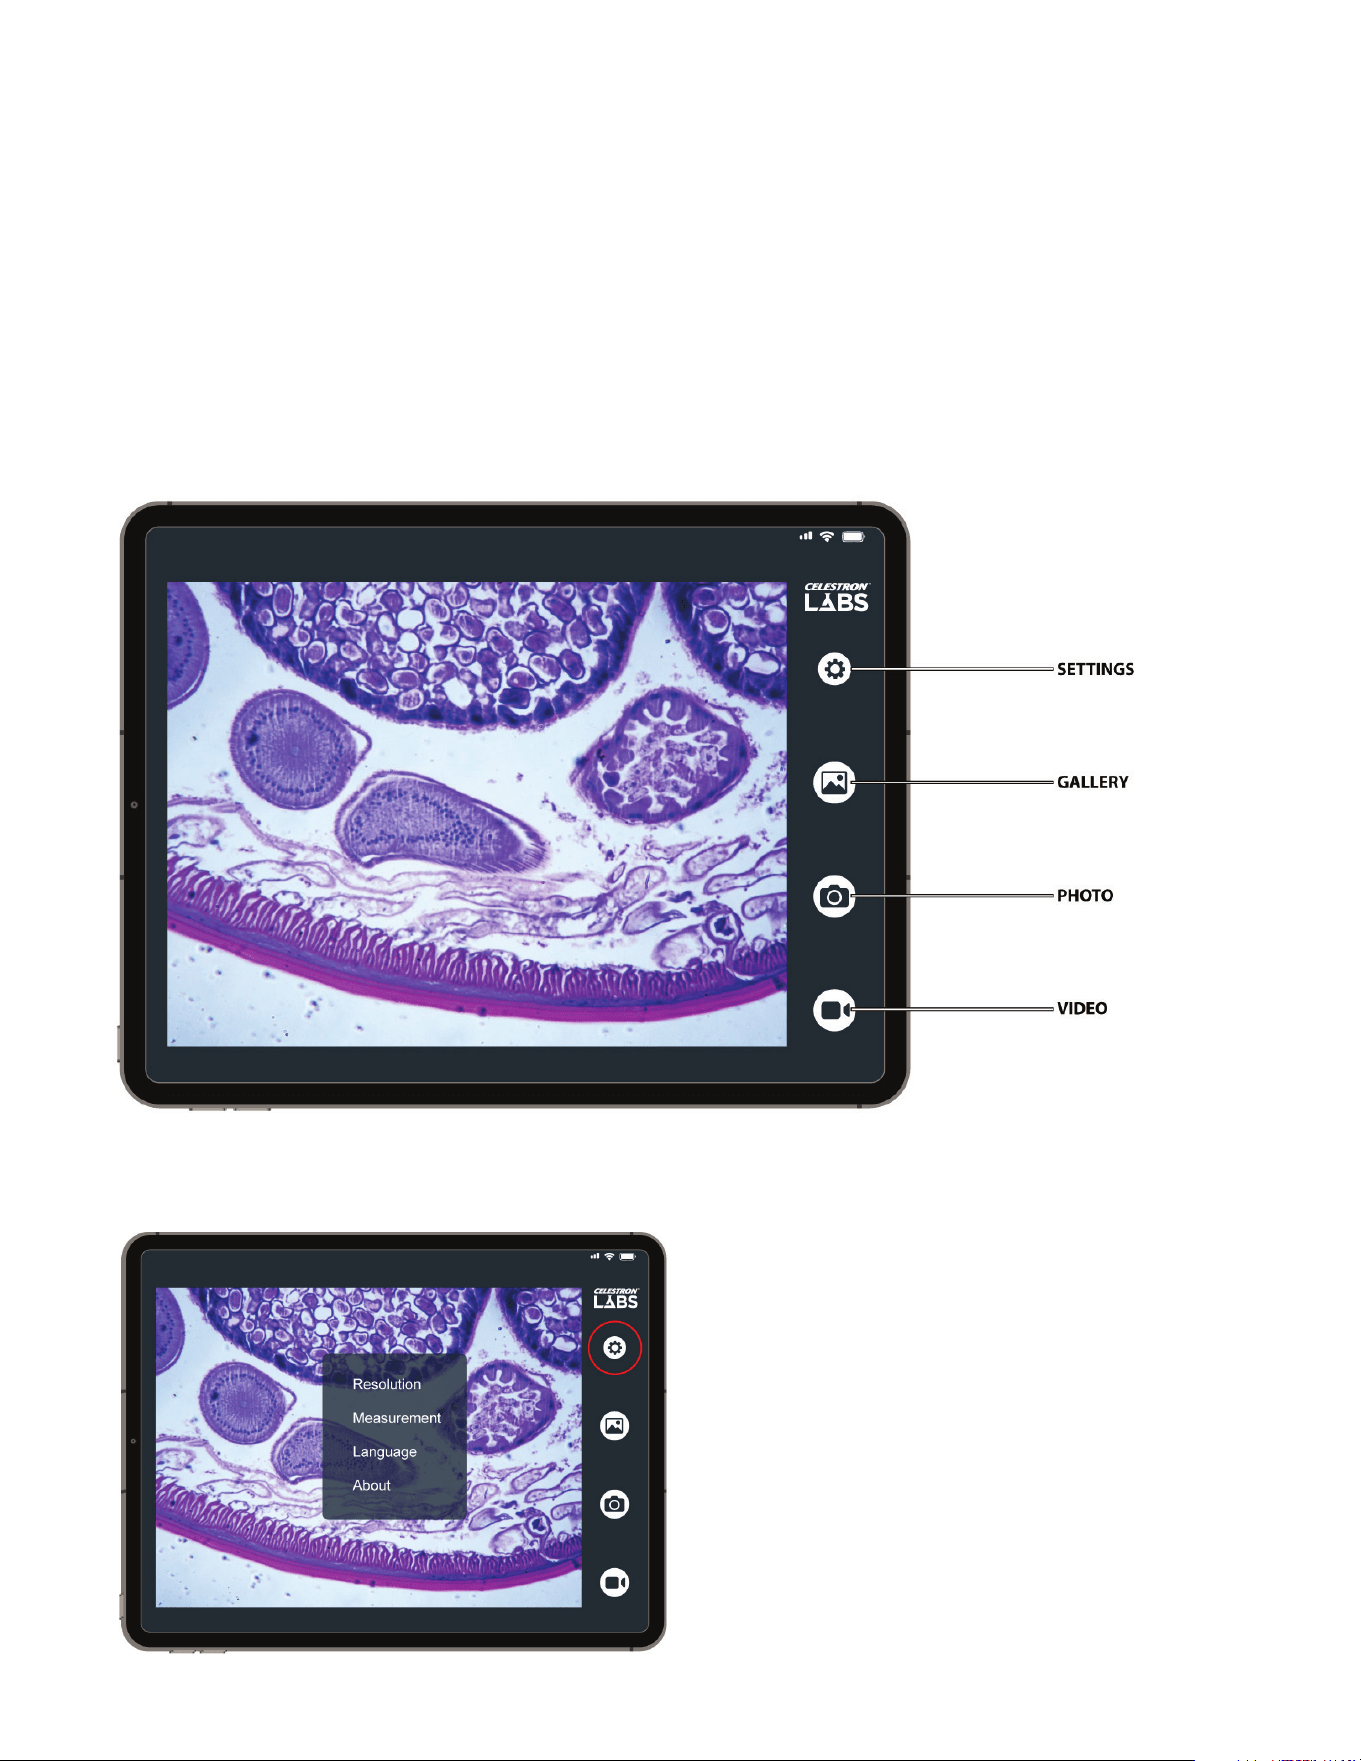
Die Hauptoberfläche ist unten dargestellt. Die beschrifteten Hinweise
identifizieren jede in diesem Abschnitt beschriebene Funktion.
VERWENDUNG DES IMAGERS WÄHREND DES LADEVORGANGS
Sobald Sie mit dem WLAN-Netzwerk des Imagers verbunden sind, öffnen Sie die Celestron Labs Digital Wi-Fi App. Live-Video wird
direkt auf Ihr Gerät gestreamt.
DEUTSCH 31
A. EINSTELLUNGEN
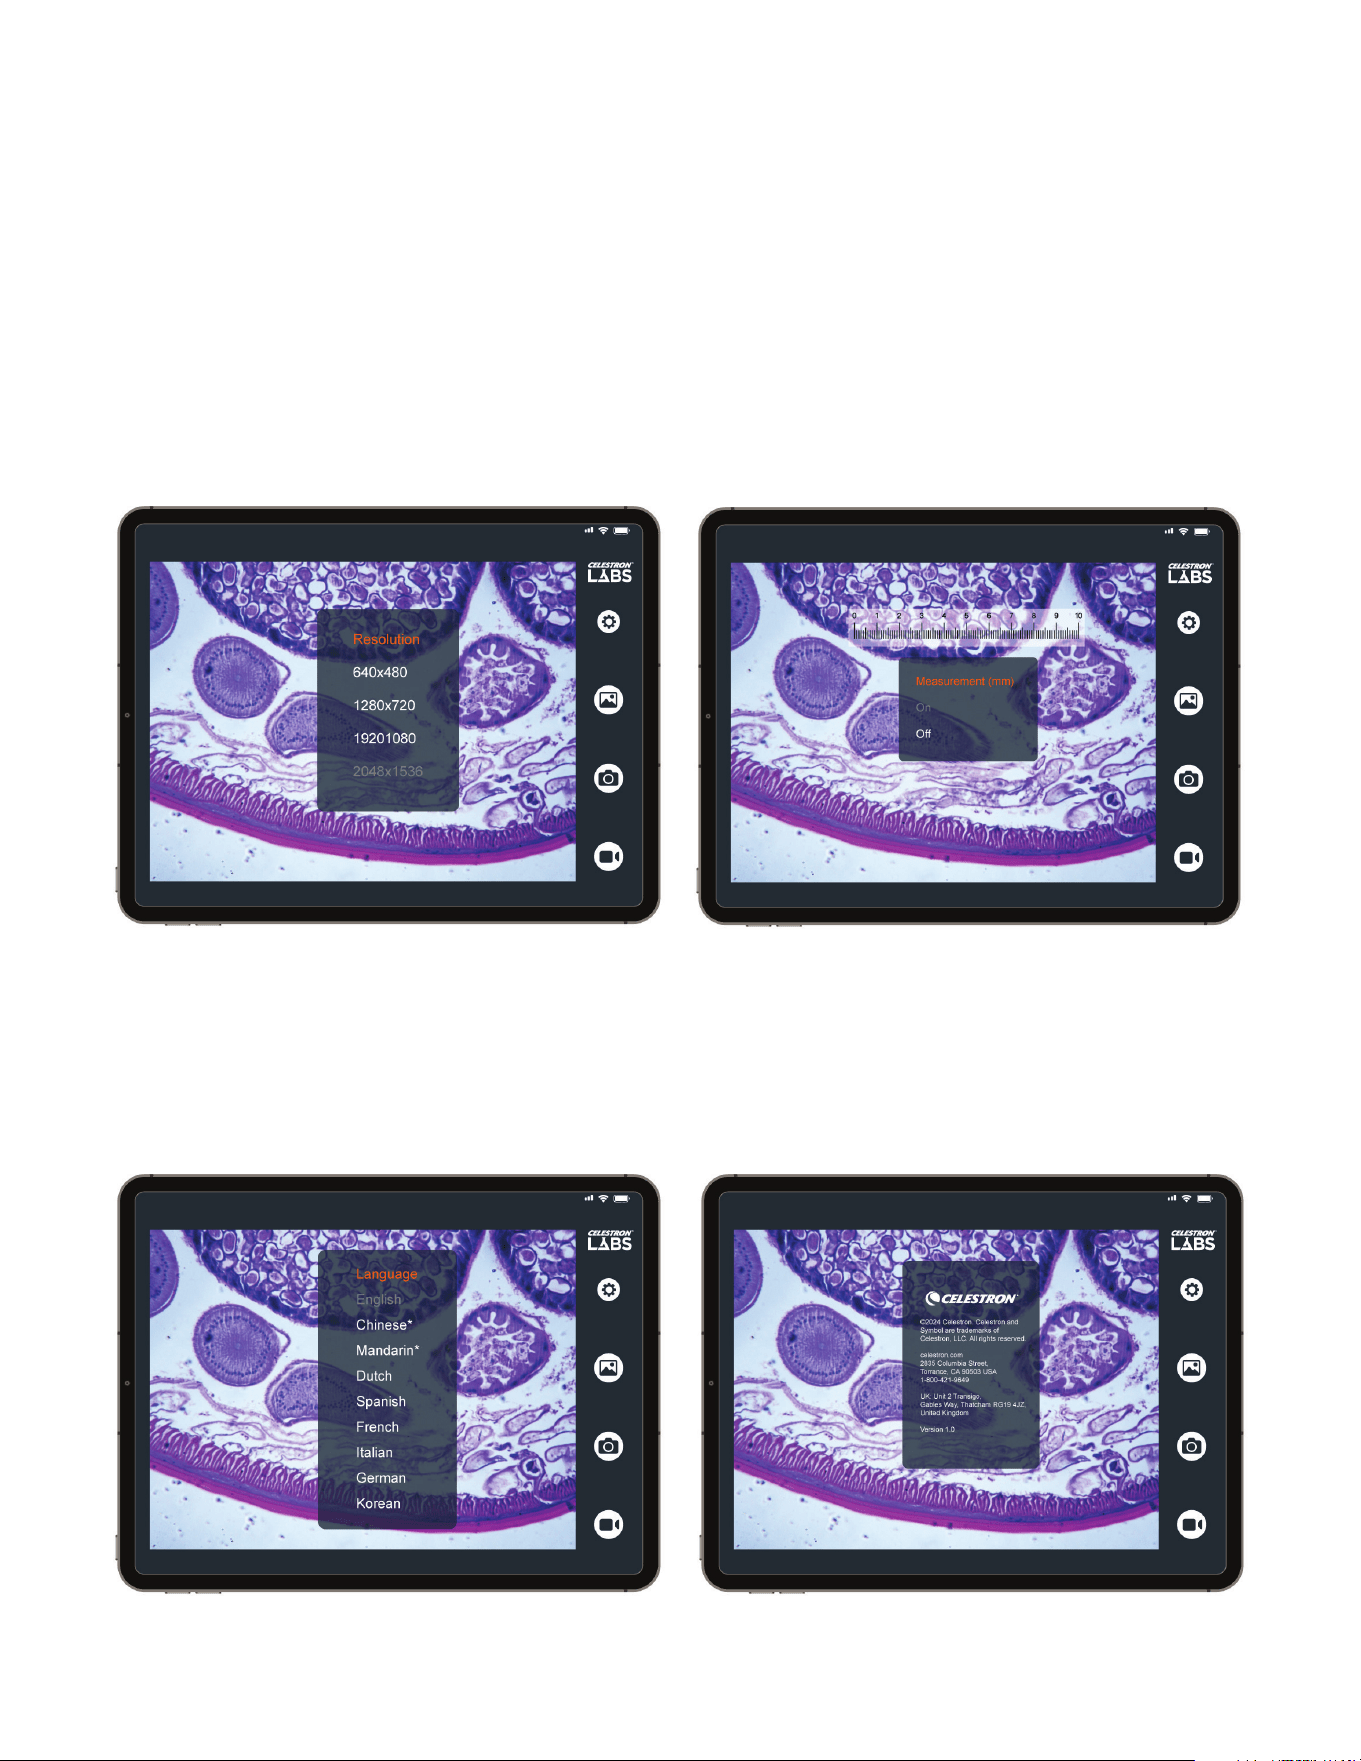
Tippen Sie auf das Einstellungssymbol, um auf die folgenden
Optionen zuzugreifen:
Auflösung
Wählen Sie die Bild- und Videoauflösung. Höhere Auflösungen
bieten mehr Detail, erzeugen aber größere Dateigrößen. Verfüg-
bare Einstellungen:
• 640 × 480
• 1280 × 720
• 1920 × 1080
• 2048 × 1536 (maximale Auflösung)
Sprache
Ändern Sie die Sprache der Benutzeroberfläche.
Verfügbare Optionen umfassen: Englisch (Standard), Chine-
sisch (Vereinfacht), Chinesisch (Traditionell), Niederländisch,
Spanisch, Französisch, Italienisch, Deutsch und Koreanisch.
Über
Zeigt die App-Versionsnummer, rechtliche Informationen und
Celestron-Kontaktdaten an.
Messung
Schalten Sie das digitale Messkreuz ein oder aus.
Wenn kalibriert, ermöglicht das Fadenkreuz die Schätzung von
Probenabmessungen direkt auf dem Bildschirm.
32 I DEUTSCH
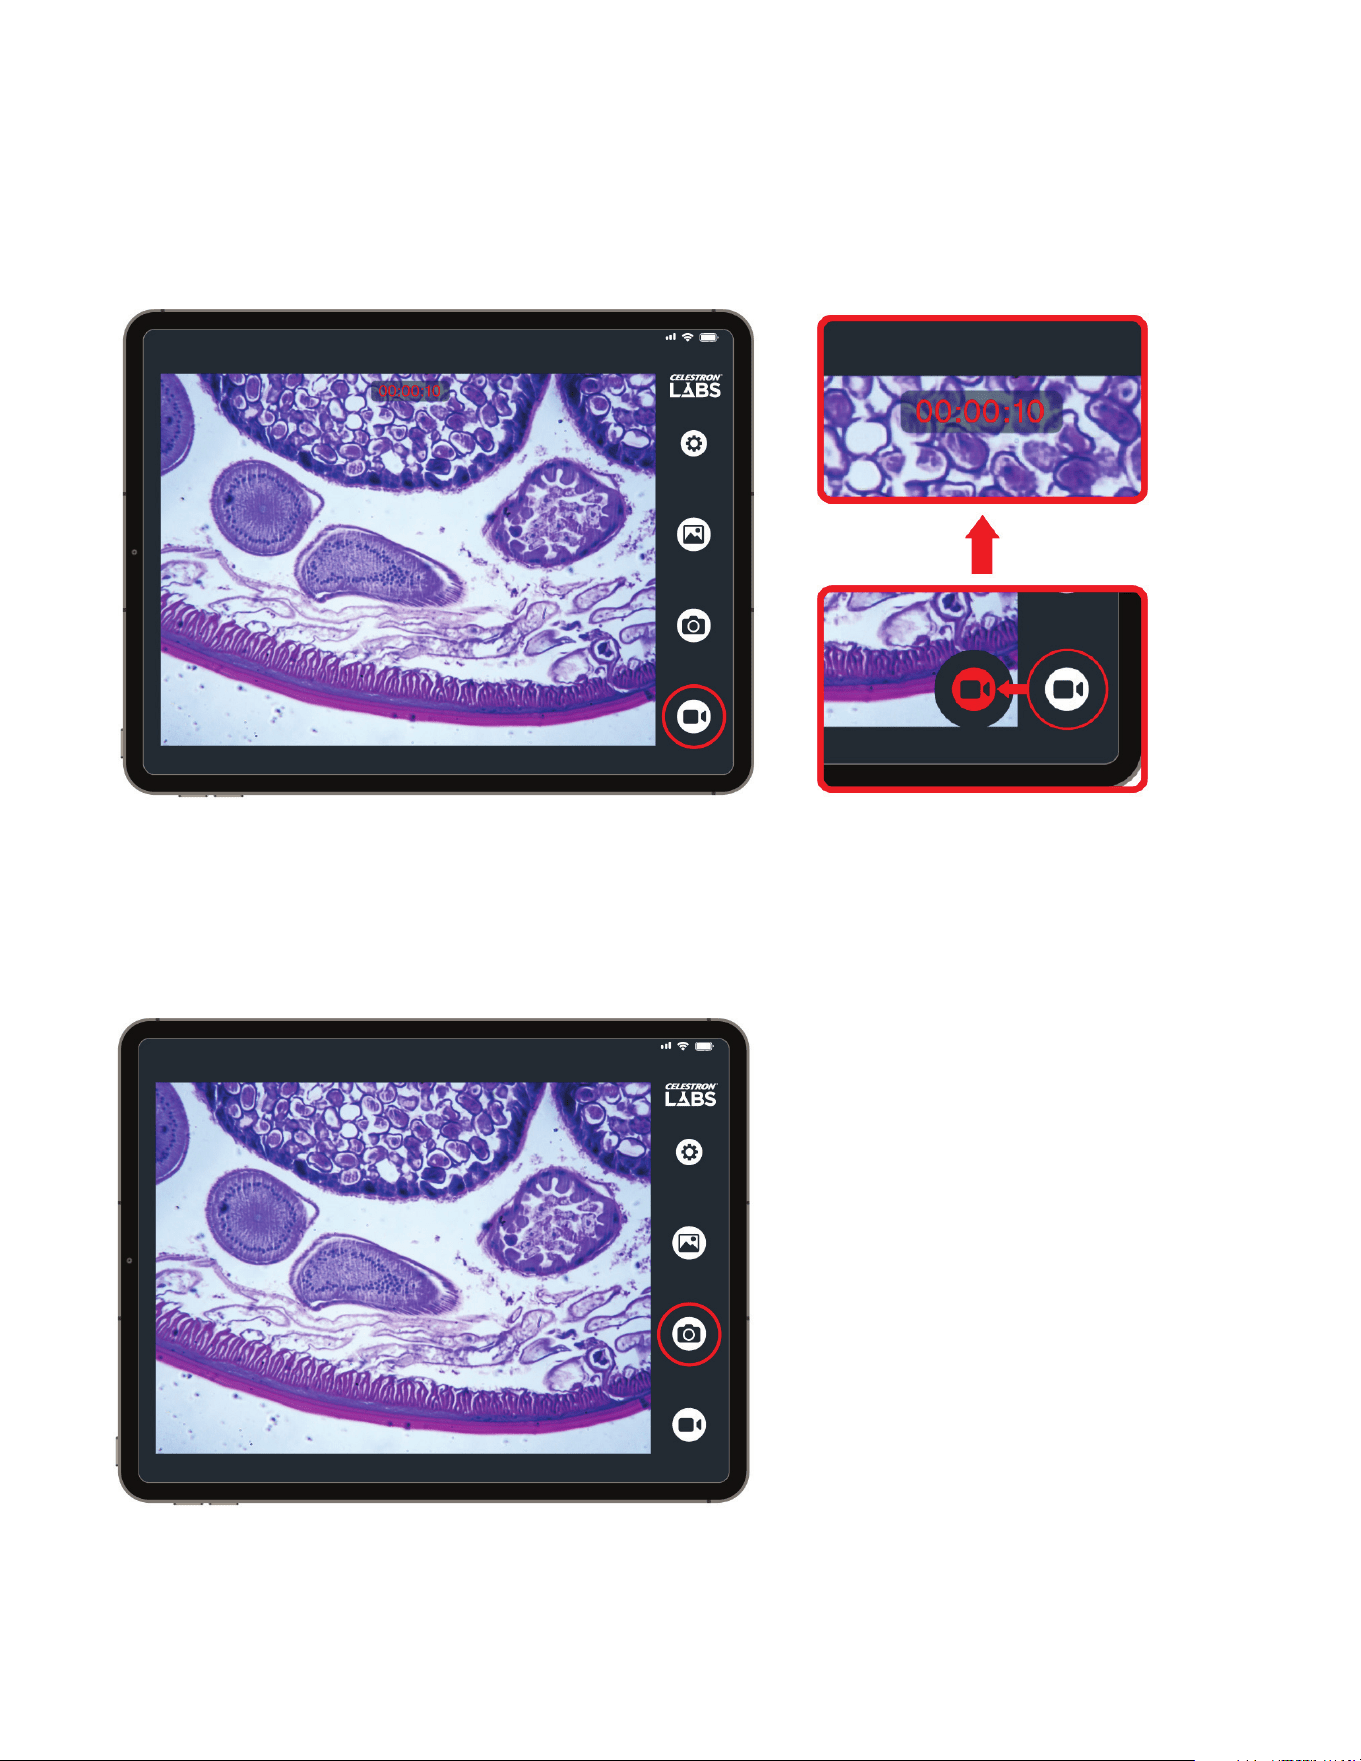
B. VIDEOAUFNAHME
Tippen Sie auf das Video-Symbol, um die Aufnahme zu starten. Ein Timer
erscheint oben auf dem Bildschirm, während die Aufnahme läuft.
Tippen Sie erneut auf das Symbol, um die Aufnahme zu beenden.
Videos werden direkt auf Ihrem Gerät gespeichert.
C. FOTOS AUFNEHMEN
Tippen Sie auf das Foto-Symbol, um ein Standbild aufzunehmen.
Bilder werden direkt auf Ihrem Gerät gespeichert.
DEUTSCH 33
D. GALERIE
Tippen Sie auf das Galerie-Symbol, um gespeicherte Bilder
und Videos anzuzeigen.
• Tippen Sie auf ein Vorschaubild, um es im Vollbildmodus
anzuzeigen.
• Tippen Sie auf ein Vorschaubild, um es im Vollbildmodus
anzuzeigen.
• Um ein Video abzuspielen, tippen Sie auf den Bildschirm und
wählen Sie Wiedergabe.
WICHTIGER HINWEIS ZU
BERECHTIGUNGEN
Je nach Geräteeinstellungen werden Sie möglicherweise
aufgefordert, der App Zugriff auf Ihre Fotos und Dateien zu
gewähren. Voller Zugriff ist erforderlich, um Bilder und Videos
zu speichern.
34 I DEUTSCH
VERWENDUNG DES 30 MM ADAPTER
Der Wi-Fi-Imager ist für Standard 23 mm Okulartuben
ausgelegt. Wenn Ihr Mikroskop einen 30 mm Okulartubus
hat, befestigen Sie den mitgelieferten 30 mm Adapter an
der Unterseite des Imagers, bevor Sie ihn in das Mikroskop
einsetzen.
Der Adapter lässt sich sicher über den Imager-Tubus
schieben und vergrößert dessen Durchmesser von 23 mm
auf 30 mm. Nach der Befestigung setzen Sie den Imager wie
ein Standardokular in das Okulartubus ein.
VERWENDUNG DES KALIBRIERGLASES
Das Messkreuz in der App zeigt gleichmäßig verteilte Linien auf dem Bildschirm an. Die App weiß jedoch nicht automatisch, wel-
cher realen Entfernung diese Linien bei Ihrer aktuellen Vergrößerung entsprechen. Das mitgelieferte Kalibrierglas, auch Objektmik-
rometer genannt, löst dieses Problem.
Das Glas enthält ein präzise geätztes Lineal. Jede kleine Teilung auf dem Glas entspricht 0,01mm (10 Mikrometer). Durch den
Vergleich der bekannten Abstände auf dem Kalibrierglas mit dem Bildschirm-Fadenkreuz können Sie die tatsächliche Entfernung
berechnen, die jede Fadenkreuz-Teilung darstellt.
Die Kalibrierung ist spezifisch für das verwendete Objektiv. Wenn Sie die Vergrößerung ändern, müssen Sie vor neuen
Messungen neu kalibrieren.
Zum Kalibrieren:
1. Legen Sie das Kalibrierglas auf den Mikroskoptisch.
2. Schalten Sie in der App das Messkreuz EIN.
3. Stellen Sie den Tisch so ein, dass das Lineal des
Kalibrierglases sichtbar ist, fokussieren Sie das Mikroskop, bis
es scharf auf dem Bildschirm erscheint.
4. Richten Sie die „0“-Markierung auf dem digitalen Messkreuz
mit der „0“-Markierung auf dem Kalibrierglas aus.
DEUTSCH 35
5. Bewegen Sie sich ohne das Glas zu verschieben über die
Skala und finden Sie den nächsten Punkt, an dem eine Linie
auf dem digitalen Messkreuz genau mit einer Linie auf dem
Kalibrierglas übereinstimmt.
6. Zählen Sie die Anzahl der Teilungen auf der Kalibrierscheibe
zwischen den beiden ausgerichteten Punkten. In diesem
Beispiel sind es 23 Teilungen.
7. Zählen Sie die Anzahl der Teilungen auf dem digitalen
Messkreuz zwischen denselben zwei ausgerichteten
Punkten. In diesem Beispiel sind es 36 Unterteilungen.
8. Berechnen Sie die Größe, die eine Messkreuz-Teilung
darstellt.
Teilen Sie zunächst die Kalibrierglas-Unterteilungen durch die
Messkreuz-Unterteilungen: 23 ÷ 36 = 0,638
Multiplizieren Sie dieses Ergebnis dann mit 1000, um in
Mikrometer umzurechnen: 0,638 × 1000 = 638 µm.
In diesem Beispiel entspricht jede Teilung auf dem digitalen
Messkreuz 638 µm.
9. Sie können nun das kalibrierte Messkreuz verwenden, um
Probenabmessungen zu schätzen.
Wichtig
Wenn Sie Objektive oder die Vergrößerung wechseln, müssen Sie vor neuen Messungen neu kalibrieren.
36 I DEUTSCH
Celestron erklärt hiermit, dass der Funkanlagentyp 44429 Celestron Labs Digital 2MP WiFi Microscope Imager
der Richtlinie 2014/53/EU entspricht. Der vollständige Text der EU-Konformitätserklärung ist unter der folgenden
Internetadresse verfügbar www.celestron.com/productcompliance.
9. PFLEGE UND WARTUNG
+
Lagern Sie den Imager bei Nichtgebrauch in einer sauberen,
trockenen Umgebung.
+
Verwenden Sie den Imager nicht in Umgebungen, in denen
elektronische Geräte verboten sind. Unsachgemäßer
Gebrauch kann zu schweren Unfällen führen.
+
Betreiben Sie die Kamera nur in einem Temperaturbereich von
-5 °C bis 50 °C (23 °F bis 120 °F). Vermeiden Sie plötzliche
Temperaturänderungen, da sich Kondenswasser im Gehäuse
bilden kann.
+
Halten Sie den Imager von Wasser und anderen Flüssigkeiten
fern. Verwenden Sie ihn nicht bei Regen oder feuchten
Bedingungen. Feuchtigkeit birgt die Gefahr von Feuer und
Stromschlag.
+
Versuchen Sie nicht, das Gerät zu öffnen oder zu modifi zieren.
Interne Komponenten sollten nur von autorisierten Technikern
gewartet werden.
+
Zur Reinigung des Äußeren wischen Sie vorsichtig mit einem
weichen, trockenen Tuch.
Ihr Celestron Labs Digital WLAN Imager ist ein optisches Präzisionsgerät. Richtige Pfl ege gewährleistet zuverlässige Leistung über
Jahre hinweg.
FCC-Hinweis: Dieses Gerät wurde geprüft und entspricht den Grenzwerten für digitale Geräte der Klasse B gemäß Teil 15 der FCC-Bestimmungen. Diese Grenzwerte sollen einen angemessenen Schutz
vor schädlichen Störungen in Wohngebieten gewährleisten. Dieses Gerät erzeugt, verwendet und kann Hochfrequenzenergie abstrahlen. Bei nicht vorschriftsmäßiger Installation und Verwendung kann es
Störungen des Funkverkehrs verursachen. Es kann jedoch nicht ausgeschlossen werden, dass in bestimmten Fällen Störungen auftreten. Sollte dieses Gerät Störungen beim Radio- oder Fernsehempfang
verursachen (was durch Ein- und Ausschalten des Geräts festgestellt werden kann), wird dem Benutzer empfohlen, die Störung durch eine oder mehrere der folgenden Maßnahmen zu beheben:
+ Richten Sie die Empfangsantenne neu aus oder stellen Sie sie an einem
anderen Ort auf.
+ Vergrößern Sie den Abstand zwischen Gerät und Empfänger.
+ Schließen Sie das Gerät an eine Steckdose an, die zu einem anderen Stromkreis gehört als der, an dem der Empfänger
angeschlossen ist.
+ Wenden Sie sich an Ihren Händler oder einen erfahrenen Radio-/Fernsehtechniker.
celestron.com/pages/warranty
BENÖTIGEN SIE UNTERSTÜTZUNG? Wenden Sie sich an die technische Unterstützung von
celestron.com/pages/technical-support
Produktdesign und technische Daten können ohne vorherige Ankündigung geändert werden.
Dieses Produkt ist für Personen ab 14 Jahren konzipiert und vorgesehen.
©2026 Celestron.
Celestron und Symbol sind Warenzeichen von Celestron, LLC. • Alle Rechte vorbehalten. • Celestron.com
US: Celestron, 2835 Columbia Street, Torrance, CA 90503 USA
UK: Celestron Global Ltd., Einheit 2 Transigo, Gables Way, Thatcham RG19 4JZ, Vereinigtes Königreich
EU-Bevollmächtigter: AR Experts B.V. ist Boeingavenue 209, 1119 PD Schiphol-Rijk, Niederlande,
Hergestellt in China | 03-26
Produktmodell Celestron Labs Digital-Wi-Fi Micro Imager #44429
Benutzerfreundliche Modellbezeichnung WH-44429
WLAN-Standard WLAN 4.802.11b/n
Tri-Band-WLAN-Option 20 Mbit/s
Limit für verbundene Clients im 2,4-GHz-Band 1
Limit für verbundene Clients im 5-GHz-Band Keine
Limit für verbundene Clients im 6-GHz-Band Keine
Maximaler Datendurchsatz 65 Mbit/s
WPS (WiFi Protected Setup) Nicht konfi guriert
WLAN-PARAMETER
ITALIANO 37
MODELLO N. 44429
MANUALE DI ISTRUZIONI
IMAGER MICROSCOPIO 2MP Wi-Fi
38 I ITALIANO
CONTENUTO DELLA CONFEZIONE
INTRODUZIONE
Grazie per avere acquistato l’imager microscopio Wi-Fi Celestron Labs Digital. Questo dispositivo sostituisce l’oculare del microscopio
e trasmette un’immagine live direttamente sullo smartphone o sul tablet attraverso un segnale Wi-Fi dedicato. Non occorre alcuna
connessione internet. Cattura immagini, registra video e condivide le scoperte senza che occorra riunirsi tutti intorno all’obiettivo.
L’imager si adatta alla maggior parte dei microscopi con tubo
oculare da 23 mm e comprende un adattatore da 30 mm per
microscopi stereo di grandi dimensioni. Inserire semplicemente
l’imager al posto dell’oculare, collegare il dispositivo smart alla
rete Wi-Fi Celestron Labs, quindi aprire l’app Celestron Labs
Digital Wi-Fi per avviare la visualizzazione.
L’app gratuita Celestron Labs Digital Wi-Fi funziona con
dispositivi iOS e Android. Mediante l’app, è possibile regolare
la risoluzione, catturare foto e video, attivare strumenti di
misurazione e salvare file direttamente sul dispositivo per una
facile condivisione.
Prima di iniziare, leggere per intero le istruzioni di configurazione
e consultare le immagini presenti nel presente manuale. Alcuni
minuti di preparazione consentono una configurazione senza
problemi e prestazioni ottimali.
Estrarre dalla confezione con cautela l’imager Wi-Fi e verificare la
presenza di tutti i componenti:
[A] Imager microscopio Wi-Fi Celestron Labs 2MP
[B] Adattatore diametro 30 mm
[C] Tappo lente
[D] Righello di calibrazione
[E] Cavo di ricarica USB-C
[F] Guida rapida
A.
D.
F.
E.
B.
C.
Model #44429
QUICK START GUIDE
Contenu de la boîte
[A] 1 x Microscope imageur Wi-Fi 2 MP
Celestron Labs
[B] 1 x Adaptateur de 30 mm de diamètre
[C] 1 x Cache d’objectif
[D] 1 x Règle d’étalonnage
[E] 1 x Câble de charge USB-C
What’s in the Box
[A] 1 x Celestron Labs 2MP Wi-Fi
Microscope Imager
[B] 1 x 30mm diameter adapter
[C] 1 x Lens cap
[D] 1 x Calibration ruler
[E] 1 x USB-C charging cable
Lieferumfang
[A] 1 x Celestron Labs 2MP WLAN-
Mikroskop
[B]1 x Adapter (30 mm Durchmesser)
[C] 1 x Objektivdeckel
[D] 1 x Kalibrierlineal
[E] 1 x USB-C-Ladekabel
Contenuto della confezione
[A] 1 x Microscopio Wi-Fi Celestron Labs 2MP
[B] 1 x Adattatore da 30 mm di diametro
[C] 1 x Copriobiettivo
[D] 1 x Righello di calibrazione
[E] 1 x Cavo di ricarica USB-C
Contenido de la caja
[A] 1 microscopio Celestron Labs Wi-Fi de 2 MP
[B] 1 adaptador de 30 mm de diámetro
[C] 1 tapa de lente
[D] 1 regla de calibración
[E] 1 cable de carga USB-C
2MP Wi-Fi MICROSCOPE IMAGER
ENGL ISH
NEED ASSISTANCE? Contact Celestron Technical Support
celestron.com/pages/technical-support
Product design and specifications are subject to change without prior
notification. • This product is designed and intended for use by those
14 years of age and older.
©2025 Celestron. Celestron and Symbol
are trademarks of Celestron, LLC. • All rights reserved. • Celestron.com
US: Celestron, 2835 Columbia Str eet, Torrance, CA 90503 USA • UK:
Celestron Global Ltd., Unit 2 Transigo, Gables Way, Thatcham RG19 4JZ,
United Kingdom • Made in China | 07-25
FRANÇAIS
BESOIN D’ASSISTANCE? Contactez le support technique de
Celestron celestron.com/pages/technical-support
Le design et les spécifications du produit sont sujettes à modification sans
préavis. • Ce produit est conçu et prévu pour être utilisé par des personnes
âgées de 14 ans et plus
©2025 Celestron. Celestron et le Symbol sont
des marques déposées de Celestron, LLC. • Tous droits réservés • Celestron.
com • US: Celestron.com • 2835 Columbia Street, Torrance, CA 90503 USA •
UK: Celestron Global Ltd., Unit 2 Transigo, Gables Way, Thatcham RG19 4JZ,
Royaume-Uni • Fabriqué en Chine | 07-25
DEUTSCH
BENÖTIGEN SIE UNTERSTÜTZUNG? Wenden Sie sich an die
technische Unterstützung von Celestron unter
celestron.com/pages/technical-support
Produktdesign und technische Daten können ohne vorherige Ankündigung
geändert werden. Dieses Produk t ist für Personen ab 14 Jahren konzipiert
und vorgesehen.
©2025 Celestron. Celestron und Symbol
sind Warenzeichen von Celestron, L LC. Alle Rechte vorbehalten. Celestron.
com • USA: Celestron, 2835 Columbia Street, Torrance, CA 90503 USA • UK:
Celestron Global Ltd., Einheit 2 Transigo, Gables Way, Thatcham RG19 4JZ,
Vereinigtes Königreich • Hergestellt in China | 07-25
celestron.com/pages/warranty
ITALIANO
BISOGNO DI AIUTO? Contattare il supporto tecnico Celestron
celestron.com/pages/technical-support
Il design del prodotto e le specifiche sono sogget ti a modifiche senza
previa notifica. Questo prodotto è progettato per essere utilizzato da
persone di età pari o superiore ai 14 anni.
©2025 Celestron. Celetron e Symbol
sono marchi di Celestron, LLC. • Tutti i diritti riser vati. • Celestron.com
• Stati Uniti: Celestron, 2835 Columbia Street, Torrance, CA 9 0503 Stati
Uniti • Regno Unito: Celestron Global Ltd., Unit 2 Transigo, Gables Way,
Thatcham RG18 4JZ Regno Unito • Prodot to in Cina | 07-25
ESPAÑOL
¿NECESITA AYUDA? Contacte con el soporte técnico de
Celestron
celestron.com/pages/technical-support
El diseño y las especificaciones del producto están sujetos a cambios sin
notificación previa. Este producto ha sido diseñado y está pensado para
ser usado por personas de 14 años o más de edad.
©2025 Celestron. Celestron y su símbolo
son marcas comerciales de Celestron, LLC. • Todos los derechos reservados.
• Celestron.com • EE.UU.: Celestron, 283 5 Columbia St reet, Torrance, CA
90503 EE.UU. • GB: Celestron Global Ltd., Unit 2 Transigo, Gables Way,
Thatcham RG19 4JZ, Reino Unido • Fabricado en China | 07-25
A
B
C
D
E
CLICK FOR FULL MANUAL
CLIQUEZ POUR CONSULTER LE MODE D’EMPLOI COMPLET
FÜR DIE VOLLSTÄNDIGE ANLEITUNG KLICKEN
FARE CLIC PER IL MANUALE COMPLETO
PULSE PARA EL MANUAL COMPLETO
ITALIANO 39
CONFIGURAZIONE
FASE 1: CARICARE L’IMAGER
2. Collegare l’altra estremità a un caricatore USB a parete
standard (come un normale caricatore per cellulare) o a un
caricatore USB portatile. (Uscita: 5V, 1 A-1,8 A)
1. Collegare il cavo USB-C in dotazione all’imager.
L’imager Wi-Fi include una batteria agli ioni di litio ricaricabile integrata e deve essere completamente caricata prima del primo utilizzo.
Il LED rosso si illumina durante la ricarica. Quando il LED rosso si spegne, la batteria è completamente carica ed è possibile passare
alla fase successiva. Una ricarica completa garantisce circa 3 ore di funzionamento.
SPECIFICHE
Tipo di microscopio: Fotocamera per microscopio con Wi-Fi abilitato
Sensore: CMOS 2MP
Dimensione sensore: 1/4” SONY
Ingrandimento sensore: 30X (quello finale dipende dalle dimensioni dello schermo. Spec basate sulle dimensioni di uno schermo
da 5”)
Dimensione pixel: 2,9 μm x 2,9 μm
Tipo di memoria: Nessuna memoria - utilizza la memoria del dispositivo smart per salvare immagini e video
Risoluzione immagine catturata: 1920x1080/1280x720/640x480
Risoluzione video: 1920x1080/1280x720/640x480
Formato video - registrazione: MJPEG: 30 fps @ 1024x768/ 12 fps @ 2592x1944
Posizione tasto otturatore: Nell’APP
Software: App Celestron Labs Digital Wi-Fi
Compatibilità software: • iOS • Android
Alimentazione: Batteria ricaricabile agli ioni di litio (1100 mAh)
Durata batteria a piena carica: 3 ore
Porte ingresso: Porta USB-C per la ricarica
Porte uscita: NA
Cavo Cavo USB-C per la ricarica della batteria (compatibile con la maggior parte degli adattatori CA da 5 V-1
A a 1,8 A)
Dimensioni: 75 mm x 75 mm x 81,3 mm (2,95" x 2,95" x 3,20")
Peso: 97 g (3,4 once)
Componenti in dotazione: • (1) Collare adattatore in alluminio per oculari per microscopi stereo da 30 mm
• (1) Coperchio di protezione lente in gomma
• (1) Righello di calibrazione in custodia di plastica
• (1) Cavo di ricarica USB-C
40 I ITALIANO
FASE 2: INSTALLARE L’IMAGER
FASE 3: ACCENSIONE
Premere e tenere premuto il tasto di alimentazione arancione
fino a quando si illuminano gli indicatori LED blu. I LED
blu iniziano a lampeggiare. Ciò significa che l’imager sta
trasmettendo il suo segnale Wi-Fi.
Se i LED blu non si accendono:
• Verificare che la batteria sia carica.
• Tenere premuto il pulsante di alimentazione per alcuni
secondi.
1. Rimuovere l’oculare dal microscopio.
NOTA: Se il microscopio utilizza un tubo oculare da 30 mm, occorre collegare
l’adattatore da 30 mm in dotazione. Per maggiori informazioni, consultare la sezione
“Utilizzo dell’adattatore da 30 mm”.
2. Rimuovere il tappo della lente in gomma dall’imager.
3. Inserire completamente l’imager nel tubo oculare del
microscopio.
L’imager dovrebbe inserirsi saldamente senza forzare.
ITALIANO 41
FASE 4: INSTALLAZIONE
DELL’APP
Scansionare il codice QR fornito o cercare Celestron Labs
Digital Wi-Fi nell’App Store Apple o sul Play Store Google.
Scaricare e installare l’app gratuita. L’app funziona con
dispositivi iOS e Android.
FASE 5: COLLEGAMENTO ALLA
RETE WI-FI DELL’IMAGER.
1. Aprire le impostazioni Wi-Fi sullo smartphone o tablet.
2. Cercare una rete chiamata: Celestron LABS ImagerXXXX
(le quattro X rappresentano una combinazione unica di
lettere/numeri).
3. Selezionare la rete per collegarsi.
Una volta collegato, il LED blu sull’imager smette di lampeggiare
e rimane acceso fi sso.
Il dispositivo potrebbe mostrare un messaggio che informa che
non è presente alcuna connessione internet. Ciò è normale.
L’imager crea la sua connessione diretta Wi-Fi e non utilizza la
rete Wi-Fi presente.
FASE 6: INIZIO DELLA
VISUALIZZAZIONE
Aprire l’app Celestron Labs Digital Wi-Fi.
Il video live dovrebbe apparire dopo circa 30 secondi.
Nel caso di mancata apparizione del video:
• Verifi care che il dispositivo sia collegato alla rete Wi-Fi
Celestron LABS ImagerXXXX.
• Chiudere e aprire nuovamente l’app.
42 I ITALIANO
È possibile mettere in funzione l’imager mentre è collegato a
un’alimentazione esterna. Mentre si fa ciò:
• Non alimentare il dispositivo da una porta USB del computer.
Ciò potrebbe interferire con il segnale Wi-Fi.
• Il LED blu potrebbe continuare a lampeggiare durante la
ricarica, anche se è presente il collegamento Wi-Fi. Ciò è
normale.
UTILIZZO DELL’APP
L’interfaccia principale è mostrata sotto. Le scritte presenti sull’immagine
identificano le diverse funzioni descritte in questa sezione.
UTILIZZO DELL’IMAGER DURANTE LA RICARICA
Una volta collegato alla rete Wi-Fi dell’imager, aprire l’app Celestron Labs Digital Wi-Fi. Il video live viene trasmesso direttamente
sul dispositivo.
ITALIANO 43
A. IMPOSTAZIONI
Toccare l’icona delle impostazioni per accedere alle seguenti
opzioni.
Risoluzione
Selezionare la risoluzione immagine e video. Risoluzioni più
alte forniscono maggiori dettagli, ma creano file di dimensioni
maggiori. Impostazioni disponibili:
• 640× 480
• 1280× 720
• 1920× 1080
• 2048 × 1536 (risoluzione massima)
Lingua
Modificare la lingua dell’interfaccia.
Le opzioni disponibili sono: Inglese (predefinito), cinese (sem-
plificato), cinese (tradizionale), olandese, spagnolo, francese,
italiano, tedesco e coreano.
Informazioni
Mostra la versione dell’app, le informazioni legali e i contatti
Celestron.
Misurazione
Attivare o disattivare il reticolo di misurazione digitale.
Quando calibrato, il reticolo consente di stimare le dimensioni
del campione direttamente sullo schermo.
44 I ITALIANO
B. REGISTRAZIONE VIDEO
Toccare l’icona Video per iniziare la registrazione. Appare un
timer in cima allo schermo durante la registrazione.
Toccare nuovamente l’icona per interrompere la registrazione.
I video vengono salvati direttamente sul dispositivo.
C. SCATTARE FOTO
Toccare l’icona Foto per scattare una foto.
Le foto vengono salvate direttamente sul dispositivo.
ITALIANO 45
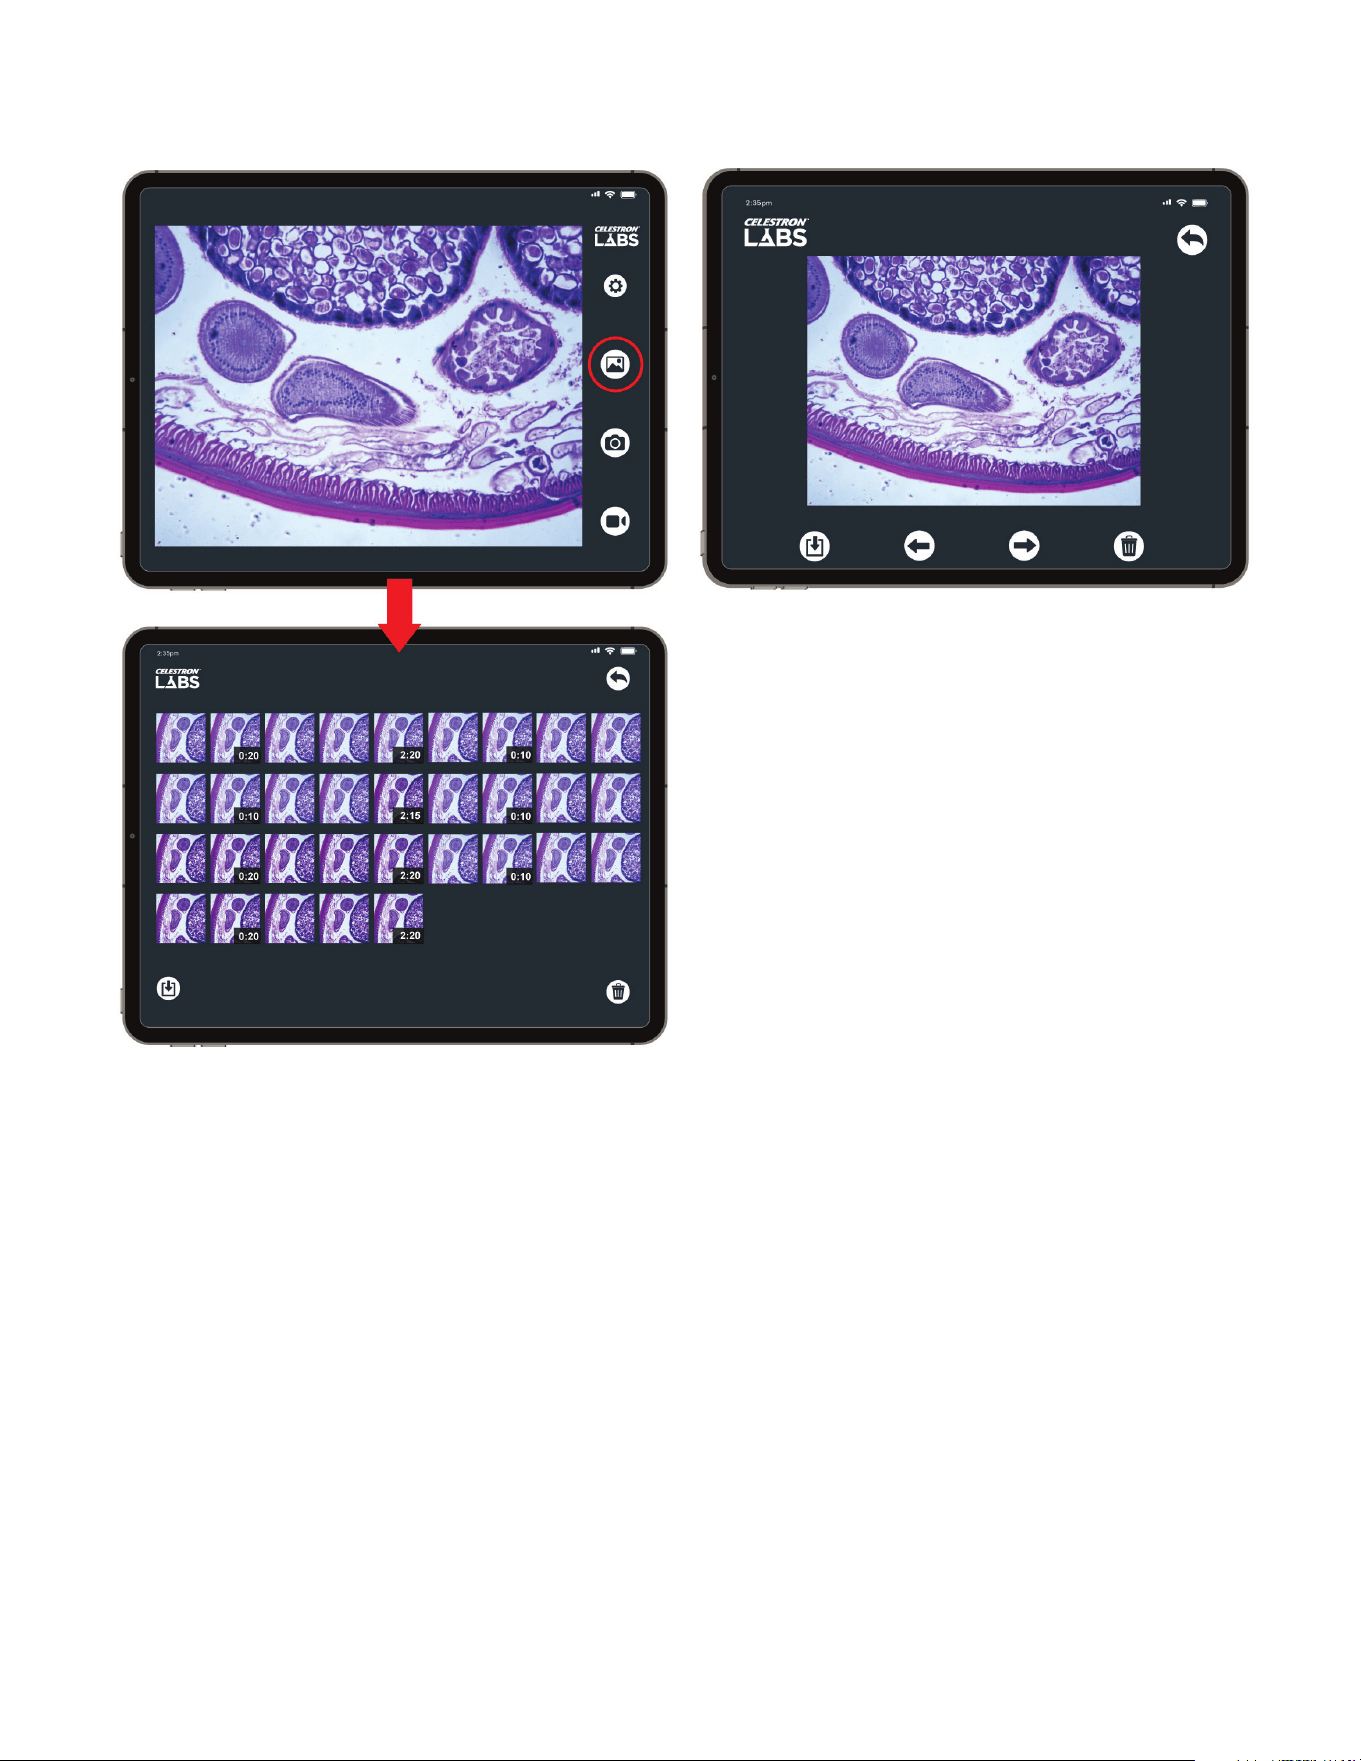
D. GALLERIA
Toccare l’icona Galleria per visualizzare immagini e video
salvati.
• Toccare l’anteprima per visualizzarla a schermo intero.
• Scorrere a sinistra o a destra per scorrere tra i file salvati.
• Per riprodurre un video, toccare lo schermo e selezionare Play.
IMPORTANTE NOTA SUI
PERMESSI
A seconda delle impostazioni del proprio dispositivo, potrebbe
venire richiesta l’autorizzazione ad accedere a foto e file. È
richiesto l’accesso completo per salvare immagini e video.
46 I ITALIANO
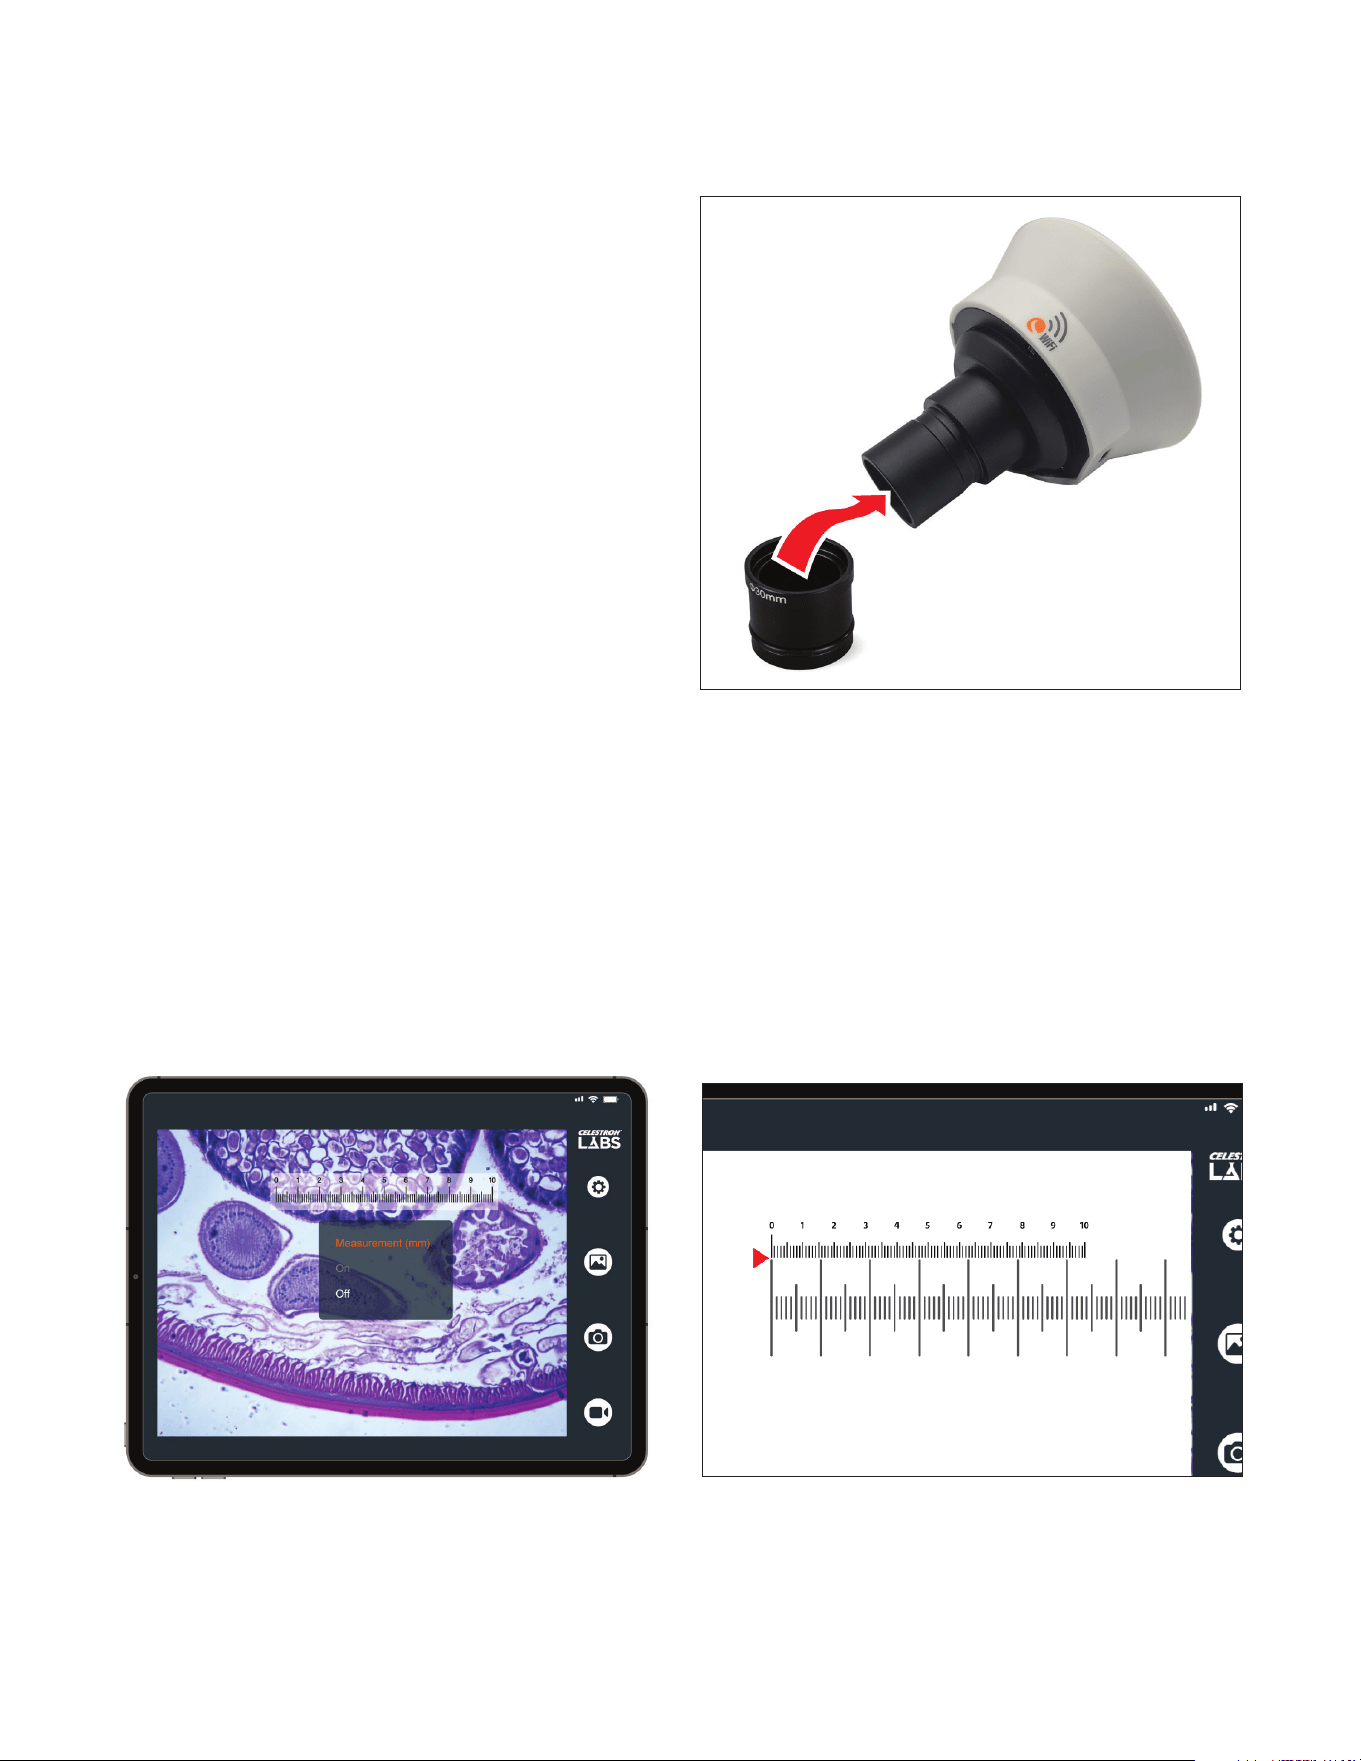
UTILIZZO DELL’ADATTATORE DA 30 MM
L’imager Wi-Fi è ideato per adattarsi a tubi oculari standard
da 23 mm. Se il microscopio è dotato di un tubo oculare da
30 mm, collegare l’adattatore in dotazione da 30 mm alla
base dell’imager prima di inserirlo nel microscopio.
L’adattatore scorre saldamente sul cilindro dell’imager,
aumentando il suo diametro da 23 mm a 30 mm. Una volta
collegato, inserire l’imager nel tubo oculare come con un
normale oculare.
UTILIZZO DEL VETRINO DI CALIBRAZIONE
Il reticolo di misurazione dell’app mostra righe a distanza regolare sullo schermo. Tuttavia, l’app non conosce automaticamente le
distanze reali tra le righe che dipendono dall’ingrandimento corrente. Il vetrino di calibrazione in dotazione, chiamato vetrino micro-
metro, aiuta in questo senso.
Il vetrino presenta un righello con precise incisioni. Ciascuna piccola porzione del vetrino misura 0,01 mm (10 micrometri). Con-
frontando le distanze note sul vetrino di calibrazione con il reticolo sullo schermo, è possibile calcolare l’attuale distanza rappre-
sentata da ciascuna porzione del reticolo.
La calibrazione è specifica per l’obiettivo che si sta utilizzando. In caso di modifica dell’ingrandimento, occorre calibrare
nuovamente prima di prendere nuove misurazioni.
Procedura di calibrazione.
1. Sistemare il vetrino di calibrazione sul piano del microscopio.
2. Nell’app, attivare il reticolo di misurazione.
3. Regolare il piano in modo che il vetrino di calibrazione sia
visibile e mettere a fuoco il microscopio fino a quando
appare nitido sullo schermo.
4. Allineare il segno “0” sul reticolo di misurazione digitale con
il segno “0” sul vetrino di calibrazione.
ITALIANO 47
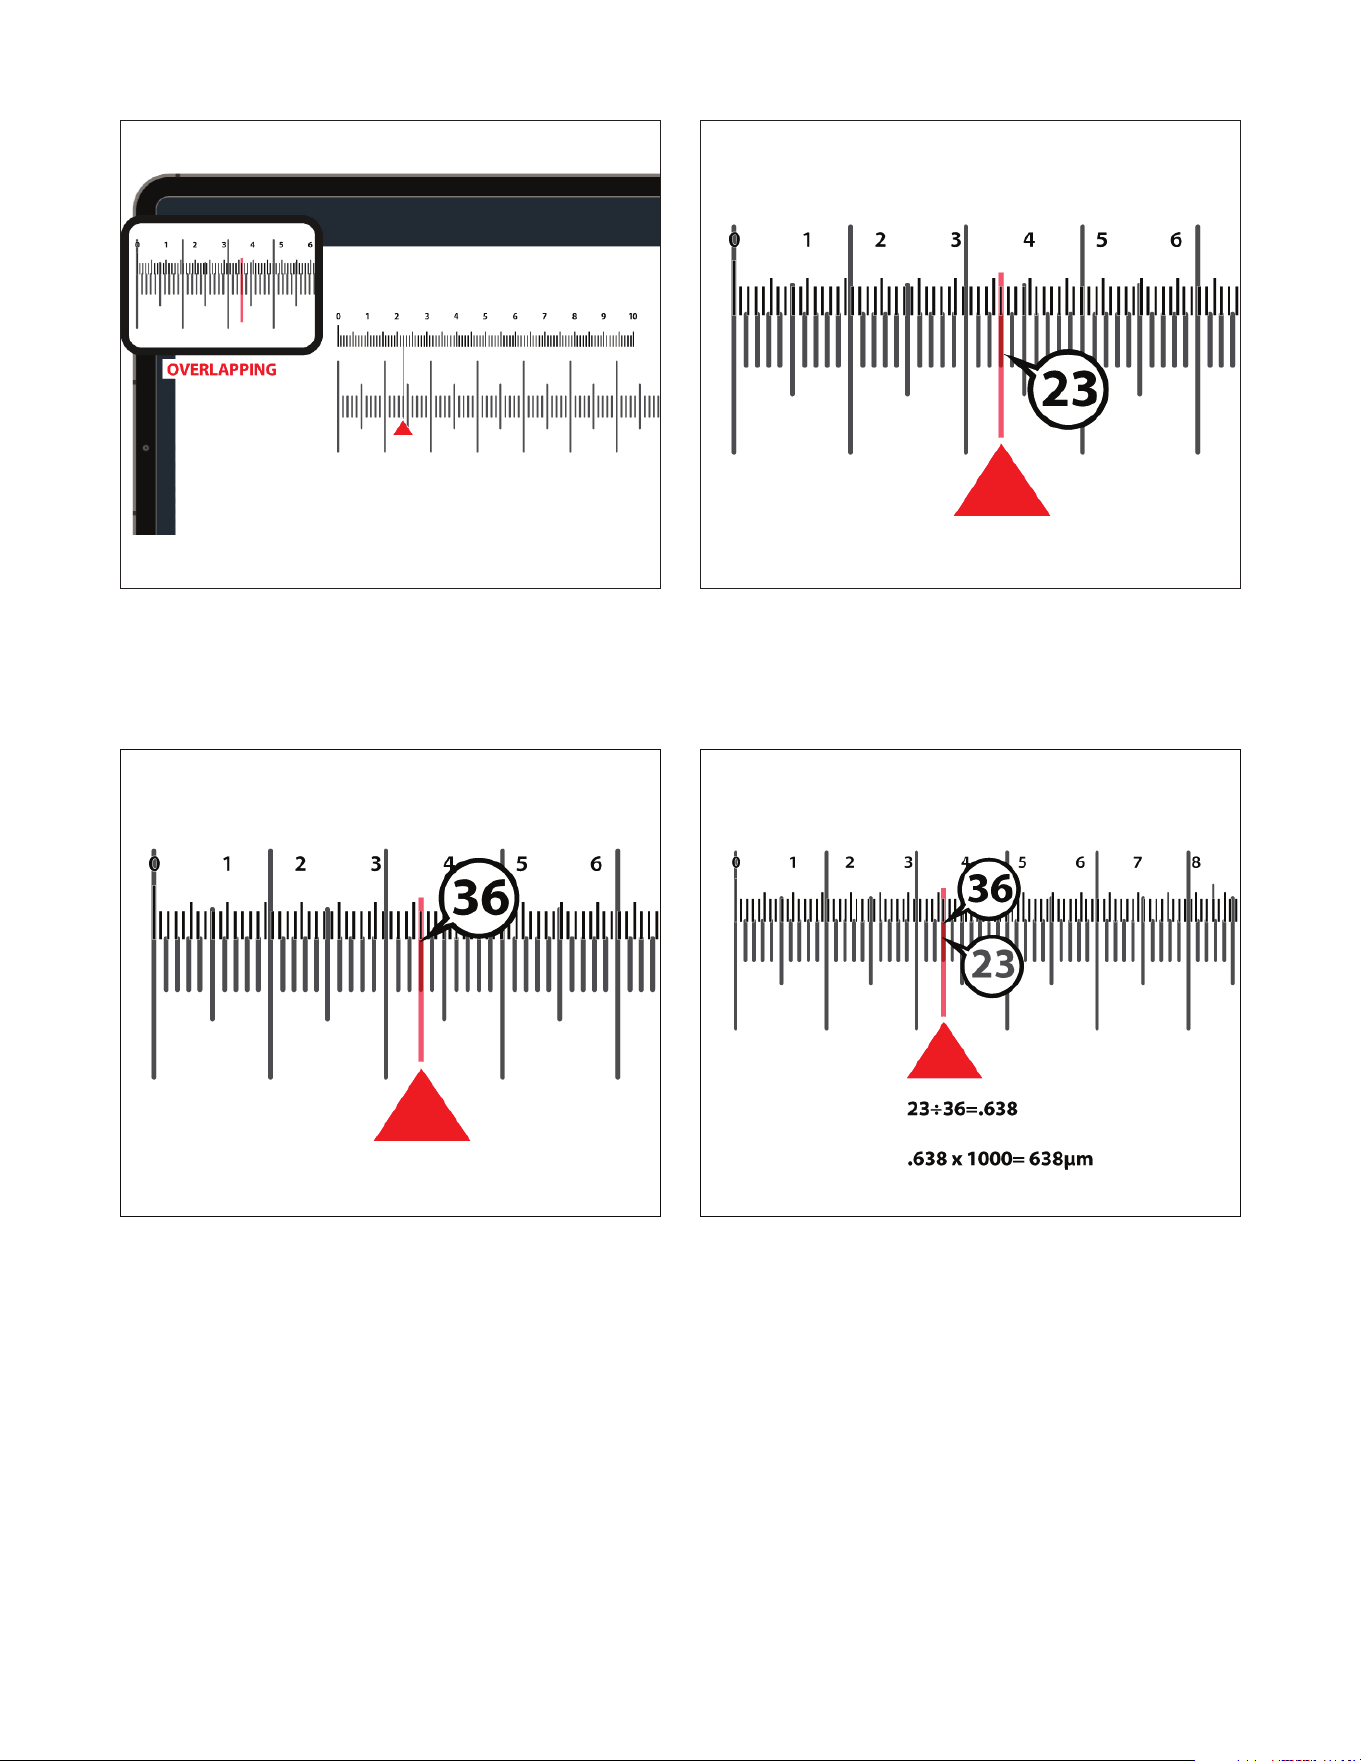
5. Senza spostare il vetrino, spostarsi lungo la scala e
individuare il punto successivo dove una riga del reticolo
digitale si allinea esattamente con una riga del vetrino di
calibrazione.
6. Contare il numero di porzioni sul vetrino di calibrazione tra
i due punti sovrapposti. In questo esempio, si tratta di 23
porzioni.
7. Contare il numero di porzioni sul reticolo digitale tra gli
stessi due punti sovrapposti. In questo esempio, si tratta di
36 porzioni.
8. Calcolare la dimensione rappresentata da una porzione di
reticolo.
Innanzitutto, dividere le porzioni del vetrino di calibrazione per
le porzioni del reticolo: 23 ÷ 36 = 0,638
Quindi, moltiplicare il risultato per 1000 per convertire in
micrometri: 0,638 × 1000 = 638 µm
In questo esempio, ciascuna porzione del reticolo digitale è
pari a 638 µm.
9. È ora possibile utilizzare il reticolo calibrato per stimare le
dimensioni del campione.
Importante
In caso di modifica dell’obiettivo o dell’ingrandimento, occorre calibrare nuovamente prima di prendere nuove misurazioni.
48 I ITALIANO
celestron.com/pages/warranty
Celestron dichiara che l’apparecchiatura radio tipo 44429 Celestron Labs Digital 2MP WiFi Microscope Imager è conforme
alla Direttiva 2014/53/UE. Il testo completo della dichiarazione di conformità UE è disponibile al seguente indirizzo internet:
www.celestron.com/productcompliance.
9. CURA E MANUTENZIONE
+
Conservare l’imager in un luogo pulito e asciutto quando non
in uso.
+
Non utilizzare l’imager in luoghi in cui è vietato l’uso di
apparecchi elettronici. Un utilizzo improprio può portare a
incidenti gravi.
+
Mettere in funzione l’imager esclusivamente in un intervallo
di temperatura compreso tra -5° e 50 °C (da 23° a 120 °F).
Evitare sbalzi improvvisi di temperatura, poiché ciò potrebbe
causare la formazione di umidità all’interno.
+
Tenere l’imager lontano da acqua o altri liquidi. Non utilizzarlo
in presenza di pioggia o in condizioni di umidità. L'umidità crea
pericoli di incendio e scosse elettriche.
+
Non provare ad aprire o a modifi care il dispositivo. I componenti
interni devono essere oggetto di intervento esclusivamente da
parte di personale tecnico autorizzato.
+
Per pulire la parte esterna, strofi nare delicatamente con un
panno asciutto e morbido.
L’imager Wi-Fi Celestron Labs Digital è uno strumento ottico di precisione. Una cura adeguata garantisce prestazioni affi dabili per
lungo tempo.
Nota FCC: La presente apparecchiatura è stata testata ed è risultata conforme ai limiti imposti per i dispositivi digitali di Classe B, ai sensi della Parte 15 delle Normative FCC. Tali limiti sono stati ideati per
fornire un’adeguata protezione nei confronti di interferenze dannose in installazioni residenziali. La presente apparecchiatura genera, utilizza e può irradiare energia in radio frequenza e, se non installata
e utilizzata conformemente alle istruzioni, può causare interferenze dannose alle radiocomunicazioni. Tuttavia, non esiste alcuna garanzia che l’interferenza non si verifi chi in una particolare installazione.
Nel caso in cui la presente apparecchiatura causi interferenze dannose alla ricezione radio o televisiva, il che potrebbe essere determinato dall'accensione e dallo spegnimento dell'apparecchiatura, l'utente
è incoraggiato a tentare di correggere l'interferenza mediante una o più delle misure seguenti:
+ Riorientare o riposizionare l’antenna di ricezione.
+ Aumentare la distanza tra l'apparecchiatura e il ricevitore.
+ Connettere l’apparecchiatura a una presa su un circuito differente da quello cui è collegato il ricevitore.
+ Consultare il rivenditore o un tecnico radio/TV esperto per l’assistenza.
BISOGNO DI AIUTO? Contattare l’assistenza tecnica Celestron su
celestron.com/pages/technical-support
Il design del prodotto e le specifi che sono soggetti a modifi che senza previa notifi ca.
Questo prodotto è progettato per essere utilizzato da persone di età pari o superiore ai 14 anni.
©2026 Celestron.
Celetron e Symbol sono marchi di Celestron, LLC. • Tutti i diritti riservati. • Celestron.com
Stati Uniti: Celestron, 2835 Columbia Street, Torrance, CA 90503 Stati Uniti
Regno Unito: Celestron Global Ltd., Unit 2 Transigo, Gables Way, Thatcham RG19 4JZ, Regno Unito
Rappresentante autorizzato UE: AR Experts B.V. è Boeingavenue 209, 1119 PD Schiphol-Rijk,
Paesi Bassi, info@ar-experts.eu
Prodotto in Cina | 03-26
Modello prodotto Micro Imager Celestron Labs Digital-Wi-Fi n. 44429
Nome modello abbreviato WH-44429
Standard Wi-Fi WiFi 4.802,11 b/n
Opzione Wi-Fi tri-band 20 M
2,4 GHz collegamento limite cliente 1
5 GHz collegamento limite cliente Nessuno
6 GHz collegamento limite cliente Nessuno
Massimo volume dati 65 M
WPS (WiFi Protected Setup) Non confi gurato
PARAMETRI WI-FI
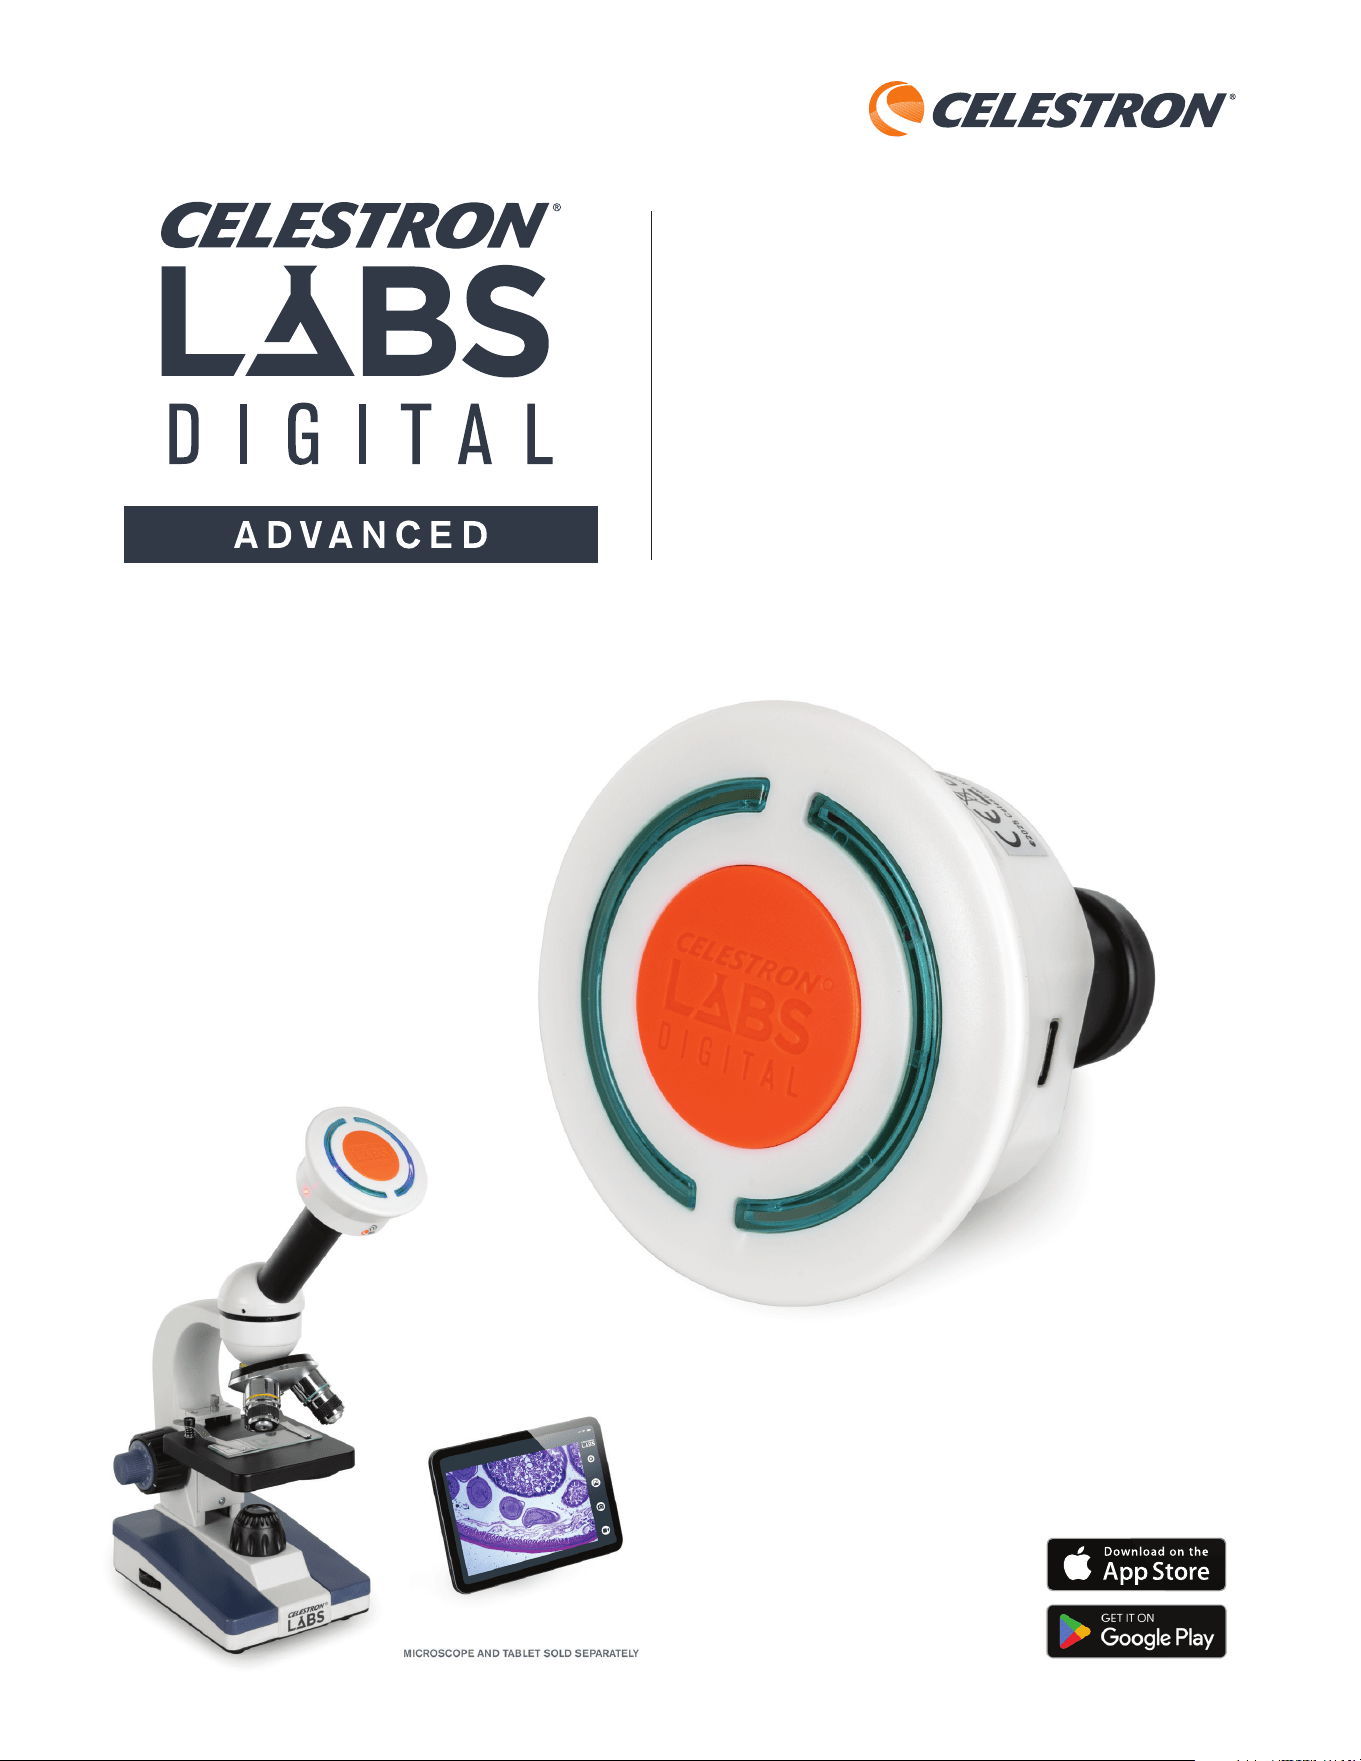
ESPAÑOL 49
MODELO #44429
MANUAL DE INSTRUCCIONES
CAPTURADOR MICROSCOPIO 2MP WiFi
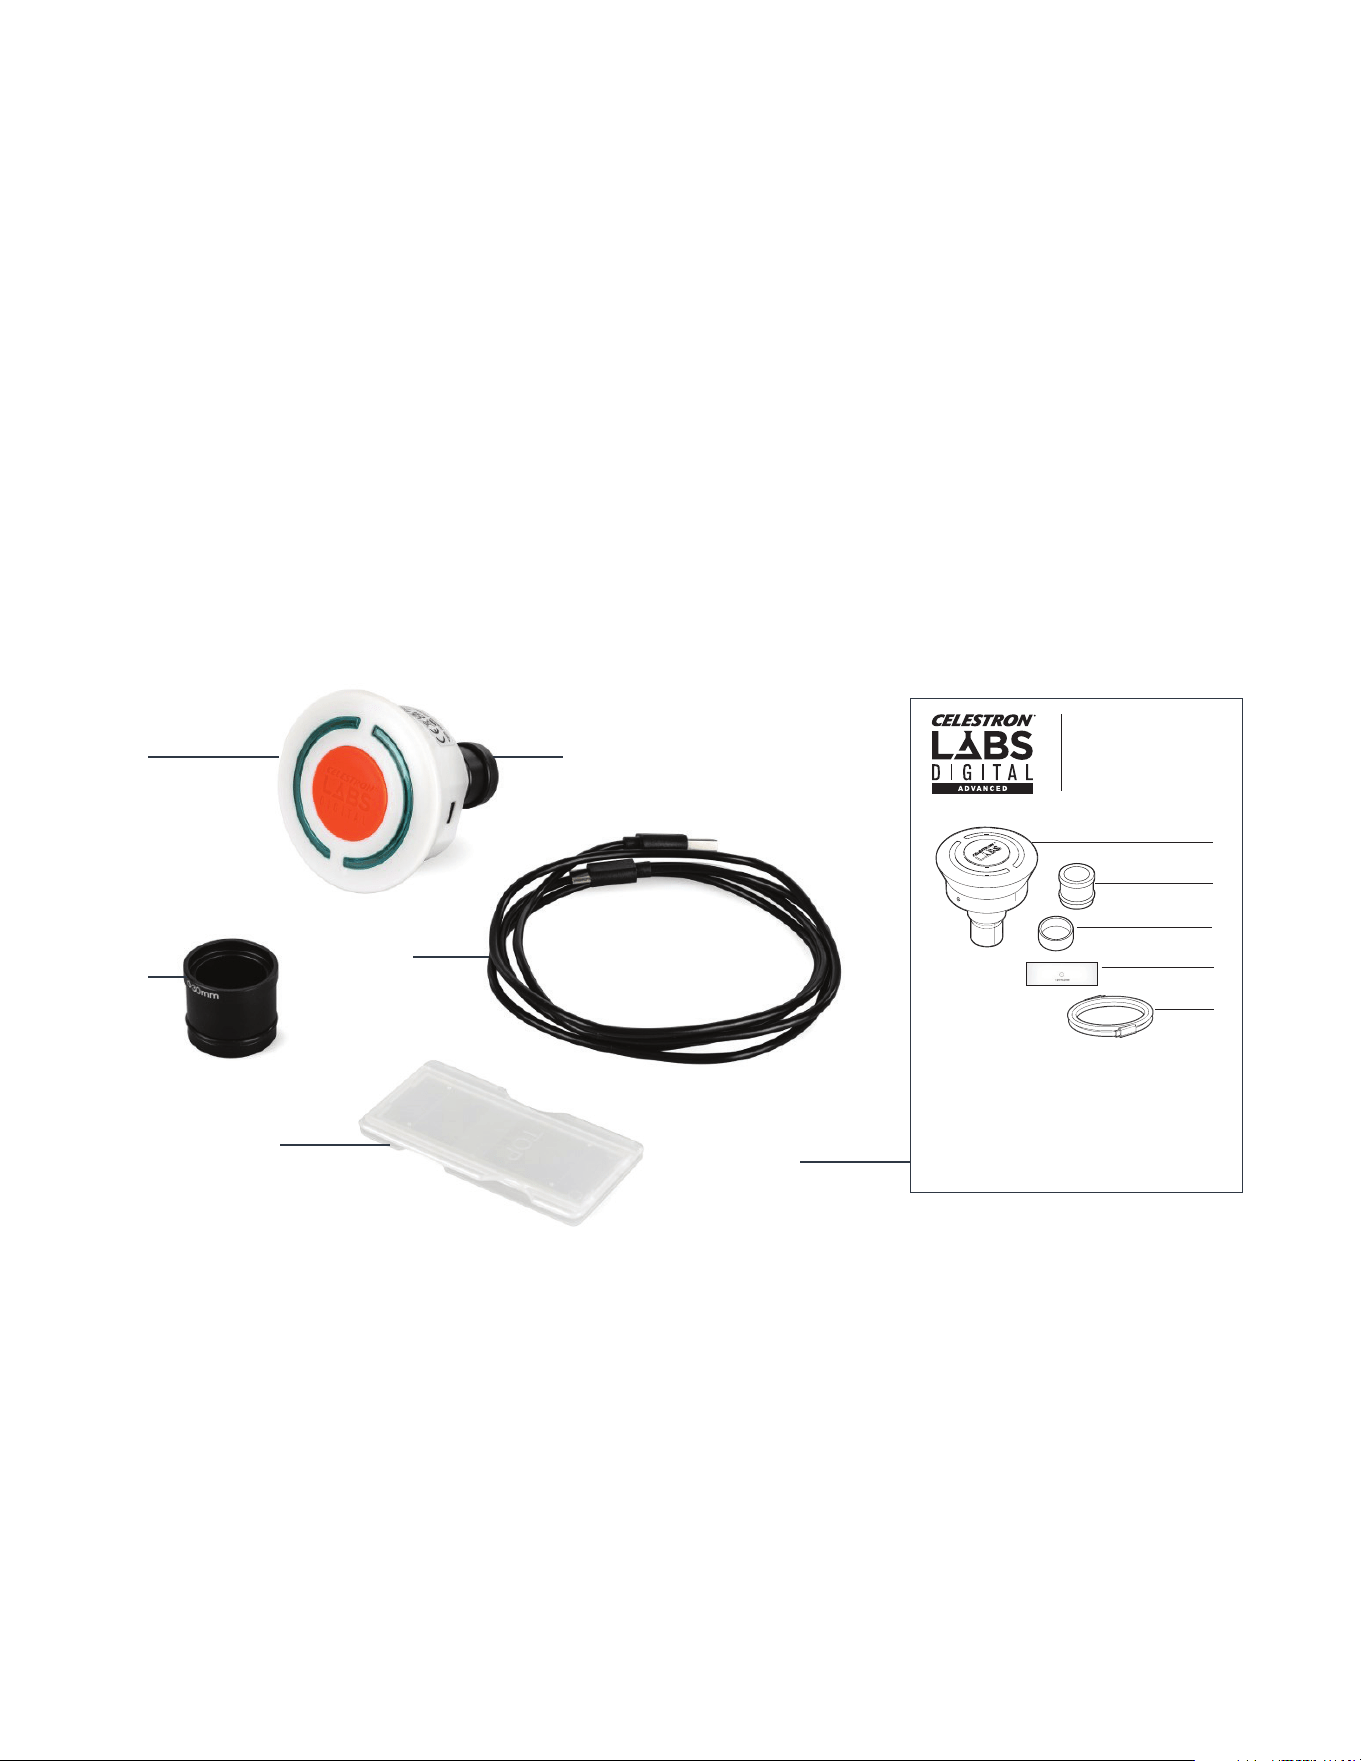
50 I ESPAÑOL
CONTENIDO DE LA CAJA
INTRODUCCIÓN
Gracias por adquirir este capturador microscopio WiFi de Celestron Labs Digital. Este dispositivo sustituye al ocular de su microscopio y
transmite una imagen en directo a su teléfono o tableta mediante su señal WiFi dedicada. No necesita conexión a internet. Capture imágenes
fijas, grabe video y comparta sus descubrimientos sin amontonarse alrededor de un ocular.
El capturador se adapta a la mayoría de microscopios con tubo
de ocular de 23mm e incluye un adaptador de 30mm para
estereomicroscopios de mayor tamaño. Inserte el capturador en
lugar del ocular, conecte su dispositivo inteligente a la red WiFi
de Celestron Labs y abra la aplicación Celestron Labs Digital
Wi-Fi para comenzar a observar.
La aplicación gratuita Celestron Labs Digital Wi-Fi funciona
con dispositivos iOs y Android. Con ella puede ajustar la
resolución, capturar fotos y video, habilitar herramientas de
medición y guardar archivos directamente en su dispositivo para
compartirlos fácilmente.
Antes de empezar, lea por completo las instrucciones de
instalación y revise los diagramas de este manual. Unos minutos
de preparación garantizarán una instalación sencilla y el mejor
rendimiento posible.
Desembale cuidadosamente su capturador WiFi y verifique que
estén presentes todos los elementos indicados a continuación:
[A] Capturador de microscopio WiFi 2MP Celestron Labs
[B] Adaptador de 30mm de diámetro
[C] Tapa de lente
[D] Regla de calibración
[E] Cable de carga USB-C
[F] Guía de instalación rápida
A.
D.
F.
E.
B.
C.
Model #44429
QUICK START GUIDE
Contenu de la boîte
[A] 1 x Microscope imageur Wi-Fi 2 MP
Celestron Labs
[B] 1 x Adaptateur de 30 mm de diamètre
[C] 1 x Cache d’objectif
[D] 1 x Règle d’étalonnage
[E] 1 x Câble de charge USB-C
What’s in the Box
[A] 1 x Celestron Labs 2MP Wi-Fi
Microscope Imager
[B] 1 x 30mm diameter adapter
[C] 1 x Lens cap
[D] 1 x Calibration ruler
[E] 1 x USB-C charging cable
Lieferumfang
[A] 1 x Celestron Labs 2MP WLAN-
Mikroskop
[B]1 x Adapter (30 mm Durchmesser)
[C] 1 x Objektivdeckel
[D] 1 x Kalibrierlineal
[E] 1 x USB-C-Ladekabel
Contenuto della confezione
[A] 1 x Microscopio Wi-Fi Celestron Labs 2MP
[B] 1 x Adattatore da 30 mm di diametro
[C] 1 x Copriobiettivo
[D] 1 x Righello di calibrazione
[E] 1 x Cavo di ricarica USB-C
Contenido de la caja
[A] 1 microscopio Celestron Labs Wi-Fi de 2 MP
[B] 1 adaptador de 30 mm de diámetro
[C] 1 tapa de lente
[D] 1 regla de calibración
[E] 1 cable de carga USB-C
2MP Wi-Fi MICROSCOPE IMAGER
ENGL ISH
NEED ASSISTANCE? Contact Celestron Technical Support
celestron.com/pages/technical-support
Product design and specifications are subject to change without prior
notification. • This product is designed and intended for use by those
14 years of age and older.
©2025 Celestron. Celestron and Symbol
are trademarks of Celestron, LLC. • All rights reserved. • Celestron.com
US: Celestron, 2835 Columbia Str eet, Torrance, CA 90503 USA • UK:
Celestron Global Ltd., Unit 2 Transigo, Gables Way, Thatcham RG19 4JZ,
United Kingdom • Made in China | 07-25
FRANÇAIS
BESOIN D’ASSISTANCE? Contactez le support technique de
Celestron celestron.com/pages/technical-support
Le design et les spécifications du produit sont sujettes à modification sans
préavis. • Ce produit est conçu et prévu pour être utilisé par des personnes
âgées de 14 ans et plus
©2025 Celestron. Celestron et le Symbol sont
des marques déposées de Celestron, LLC. • Tous droits réservés • Celestron.
com • US: Celestron.com • 2835 Columbia Street, Torrance, CA 90503 USA •
UK: Celestron Global Ltd., Unit 2 Transigo, Gables Way, Thatcham RG19 4JZ,
Royaume-Uni • Fabriqué en Chine | 07-25
DEUTSCH
BENÖTIGEN SIE UNTERSTÜTZUNG? Wenden Sie sich an die
technische Unterstützung von Celestron unter
celestron.com/pages/technical-support
Produktdesign und technische Daten können ohne vorherige Ankündigung
geändert werden. Dieses Produk t ist für Personen ab 14 Jahren konzipiert
und vorgesehen.
©2025 Celestron. Celestron und Symbol
sind Warenzeichen von Celestron, L LC. Alle Rechte vorbehalten. Celestron.
com • USA: Celestron, 2835 Columbia Street, Torrance, CA 90503 USA • UK:
Celestron Global Ltd., Einheit 2 Transigo, Gables Way, Thatcham RG19 4JZ,
Vereinigtes Königreich • Hergestellt in China | 07-25
celestron.com/pages/warranty
ITALIANO
BISOGNO DI AIUTO? Contattare il supporto tecnico Celestron
celestron.com/pages/technical-support
Il design del prodotto e le specifiche sono sogget ti a modifiche senza
previa notifica. Questo prodotto è progettato per essere utilizzato da
persone di età pari o superiore ai 14 anni.
©2025 Celestron. Celetron e Symbol
sono marchi di Celestron, LLC. • Tutti i diritti riser vati. • Celestron.com
• Stati Uniti: Celestron, 2835 Columbia Street, Torrance, CA 9 0503 Stati
Uniti • Regno Unito: Celestron Global Ltd., Unit 2 Transigo, Gables Way,
Thatcham RG18 4JZ Regno Unito • Prodot to in Cina | 07-25
ESPAÑOL
¿NECESITA AYUDA? Contacte con el soporte técnico de
Celestron
celestron.com/pages/technical-support
El diseño y las especificaciones del producto están sujetos a cambios sin
notificación previa. Este producto ha sido diseñado y está pensado para
ser usado por personas de 14 años o más de edad.
©2025 Celestron. Celestron y su símbolo
son marcas comerciales de Celestron, LLC. • Todos los derechos reservados.
• Celestron.com • EE.UU.: Celestron, 283 5 Columbia St reet, Torrance, CA
90503 EE.UU. • GB: Celestron Global Ltd., Unit 2 Transigo, Gables Way,
Thatcham RG19 4JZ, Reino Unido • Fabricado en China | 07-25
A
B
C
D
E
CLICK FOR FULL MANUAL
CLIQUEZ POUR CONSULTER LE MODE D’EMPLOI COMPLET
FÜR DIE VOLLSTÄNDIGE ANLEITUNG KLICKEN
FARE CLIC PER IL MANUALE COMPLETO
PULSE PARA EL MANUAL COMPLETO
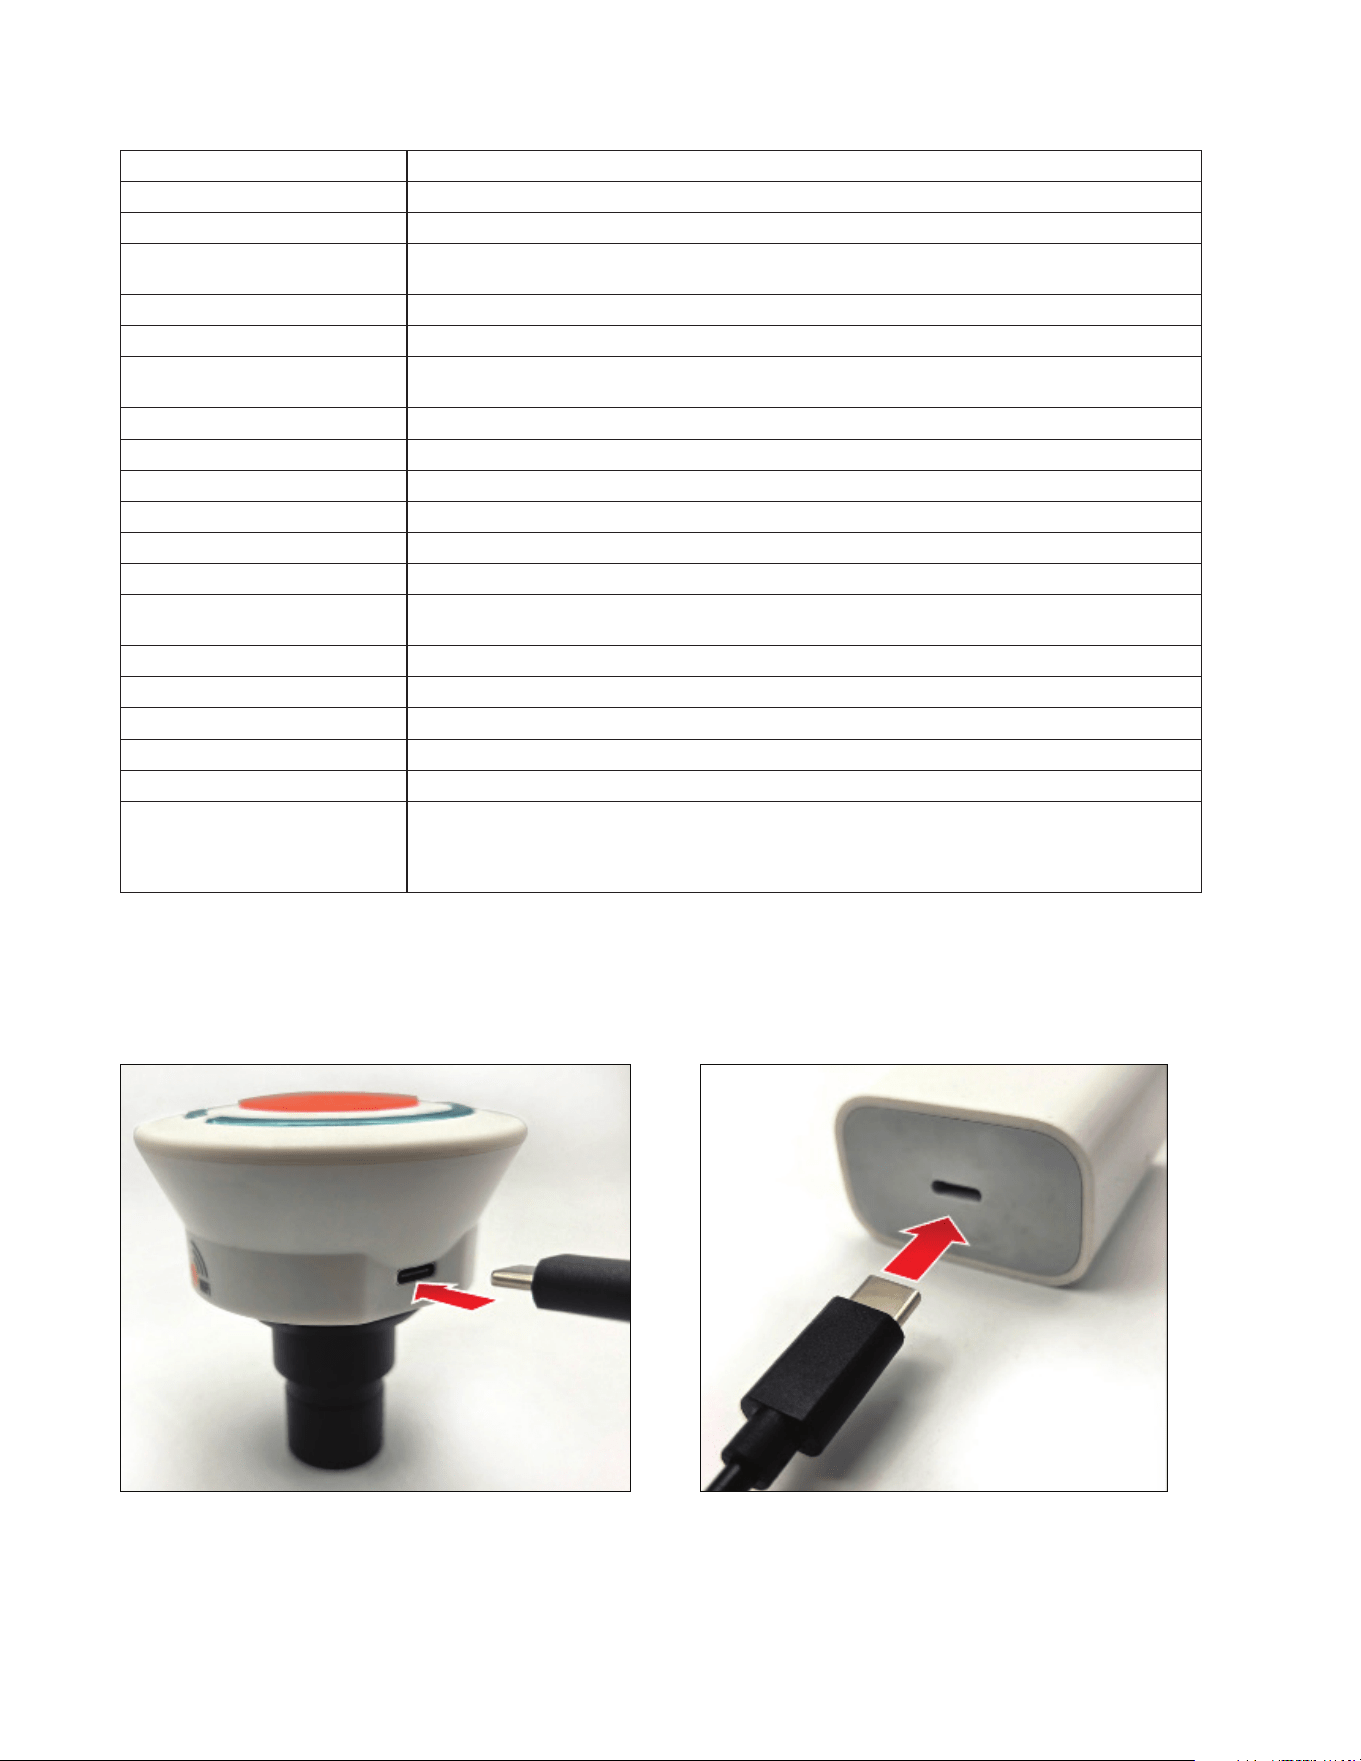
ESPAÑOL 51
INSTALACIÓN
PASO 1: CARGAR EL CAPTURADOR
2. Conecte el otro extremo a un cargador de corriente USB
estándar (como un cargador de teléfono habitual) o a un
banco de energía USB portátil. (Salida: 5V, 1A-1,8A)
1. Conecte el cable USB-C incluido al capturador.
El capturador WiFi incluye una batería de iones de litio recargable y debe cargarse por completo antes del uso.
El LED rojo se iluminará durante la carga. Cuando el LED rojo se apague la batería estará totalmente cargada y podrá pasar al paso
siguiente. Una carga completa ofrece aproximadamente 3 horas de funcionamiento.
ESPECIFICACIONES
Tipo de microscopio: Cámara de microscopio con WiFi habilitado
Sensor: CMOS 2MP
Tamaño de sensor: 1/4” SONY
Aumento del sensor: 30X (final determinado por tamaño de pantalla del dispositivo. Especificaciones basadas en tamaño de
pantalla de teléfono de 5")
Tamaño de píxel 2,9 μm x 2,9 μm
Tipo de memoria: Sin memoria-usa la memoria del dispositivo inteligente para guardar imágenes y video
Resolución de captura de imagen
fija:
1920x1080/1280x720/640x480
Resolución video: 1920x1080/1280x720/640x480
Formato video - Grabación: MJPEG: 30 fps a 1024x768/ 12fps a 2592x1944
Posición del botón del obturador: En la aplicación
Software: Aplicación Celestron Labs Digital Wi-Fi
Compatibilidad de software: • iOS • Android
Fuente de alimentación: Batería de iones de litio recargable (1100 mAh)
Duración de batería con carga
completa:
3 horas
Puerto(s) de entrada: Puerto USB-C para carga
Puerto(s) de salida: NA
Cable Cable USB-C para carga de batería (compatible con la mayoría de adaptadores de 5V-1A a 1,8A CA)
Dimensiones: 75mm x 75mm x 81,3mm (2,95” x 2,95” x 3,20”)
Peso: 3,4oz (97 g)
Elementos incluidos: • (1) Adaptador de arandela de aluminio para tubo de ocular de estereomicroscopio de 30mm
• (1) Tapa de lente de goma para protección
• (1) Regla de calibración en funda de plástico
• (1) Cable de carga USB-C
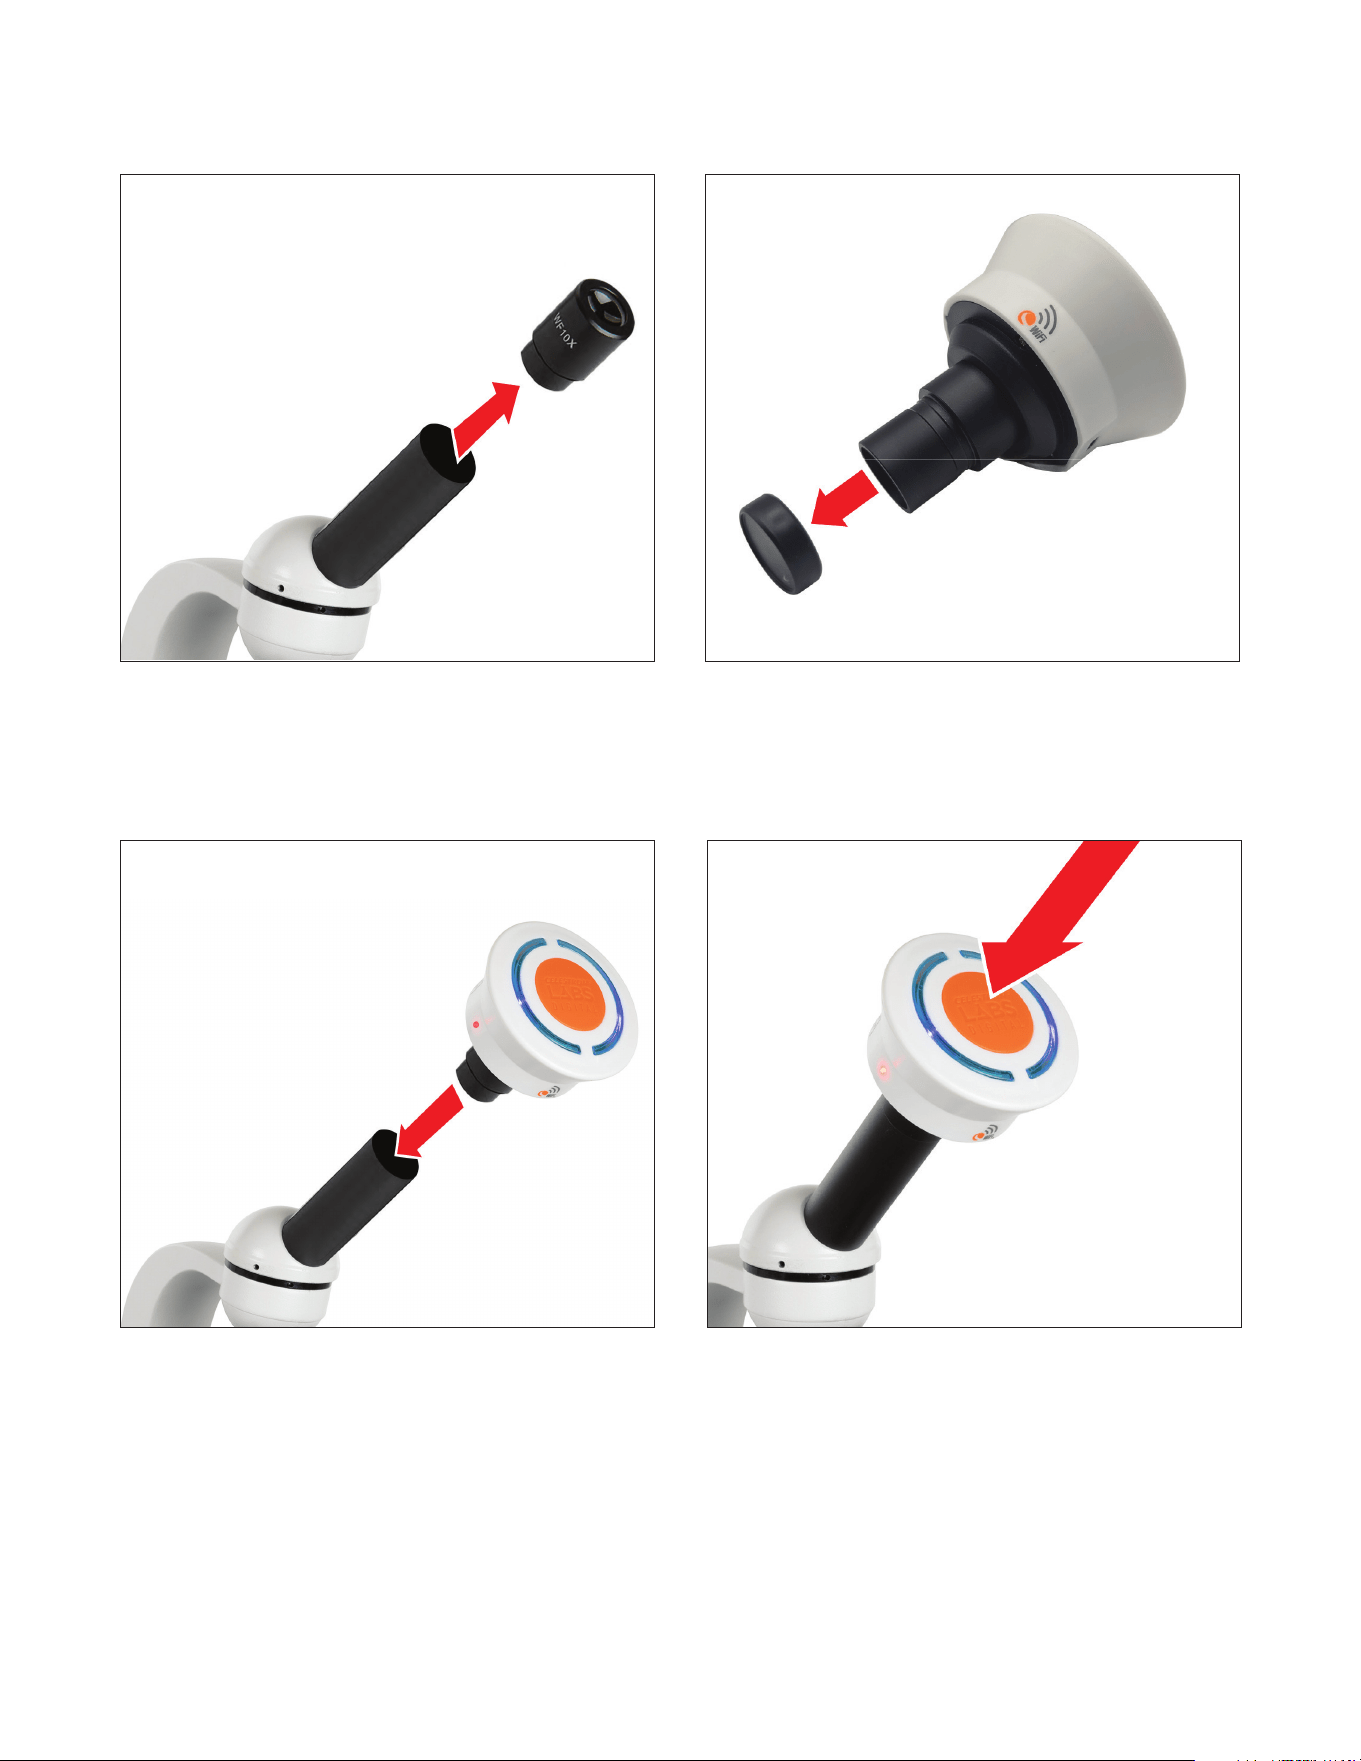
52 I ESPAÑOL
PASO 2: INSTALAR EL CAPTURADOR
PASO 3: ENCENDIDO
Presione y mantenga el botón de encendido naranja
hasta que se enciendan los indicadores LED azules. Los
LED azules comenzarán a parpadear. Esto indica que el
capturador está emitiendo su señal WiFi.
Si los LED azules no se encienden:
• Confirme que la batería está cargada.
• Mantenga pulsado el botón de encendido varios segundos.
1. Retire el ocular de su microscopio.
NOTA: Si su microscopio usa un tubo de ocular de 30mm, necesitará instalar el
adaptador de 30mm incluido. Para más información, consulte “Usar el adaptador de
30mm”.
2. Retire la tapa de la lente de caucho del capturador.
3. Inserte por completo el capturador en el tubo del ocular del
microscopio.
El capturador debe encajar con seguridad sin esfuerzo.
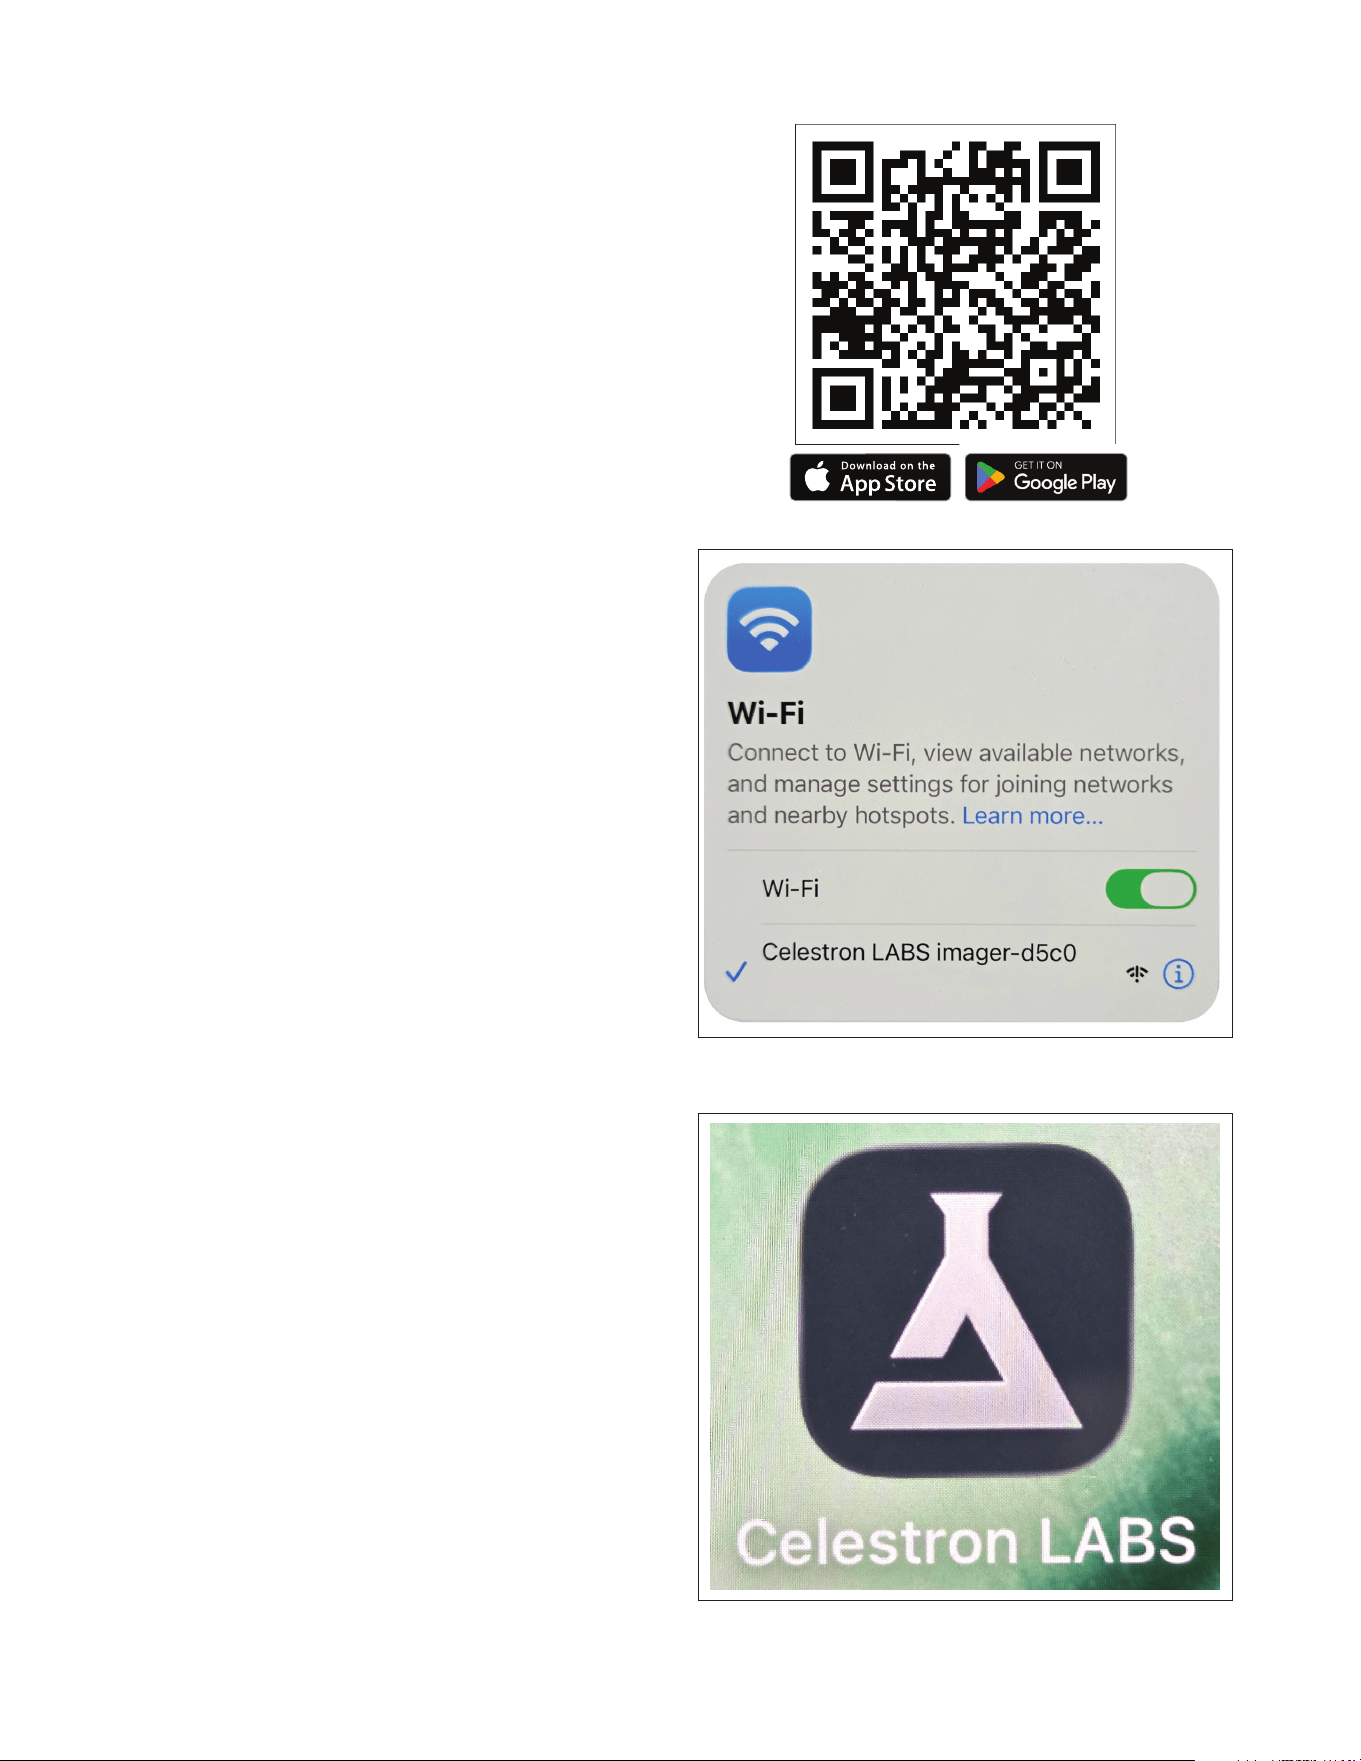
ESPAÑOL 53
PASO 4: INSTALAR LA
APLICACIÓN
Escanee el código QR incluido o busque Celestron Labs
Digital Wi-Fi en Apple App Store o Google Play Store.
Descargue e instale la aplicación gratuita. La aplicación
funciona con dispositivos iOs y Android.
PASO 5: CONECTAR A LA RED
WIFI DEL CAPTURADOR
1. Abra la confi guración WiFi de su teléfono o tableta.
2. Busque una red con nombre: Celestron LABS ImagerXXXX
(las cuatro X representan una combinación única de letras/
números).
3. Seleccione la red para conectar.
Una vez conectado, el LED azul del capturador dejará de
parpadear y quedará fi jo.
Su dispositivo puede mostrar un mensaje indicando que no hay
conexión a internet. Es normal. El capturador crea su propia
conexión WiFi directa y no usa su red WiFi.
PASO 6: COMENZAR A
OBSERVAR
Abra la aplicación Celestron Labs Digital Wi-Fi.
Debería comenzarse a emitir video en directo en unos 30
segundos.
Si el video no aparece:
• Confi rme que su dispositivo está conectado a la red
Celestron LABS ImagerXXX Wi-Fi.
• Cierre y vuelva a abrir la aplicación.
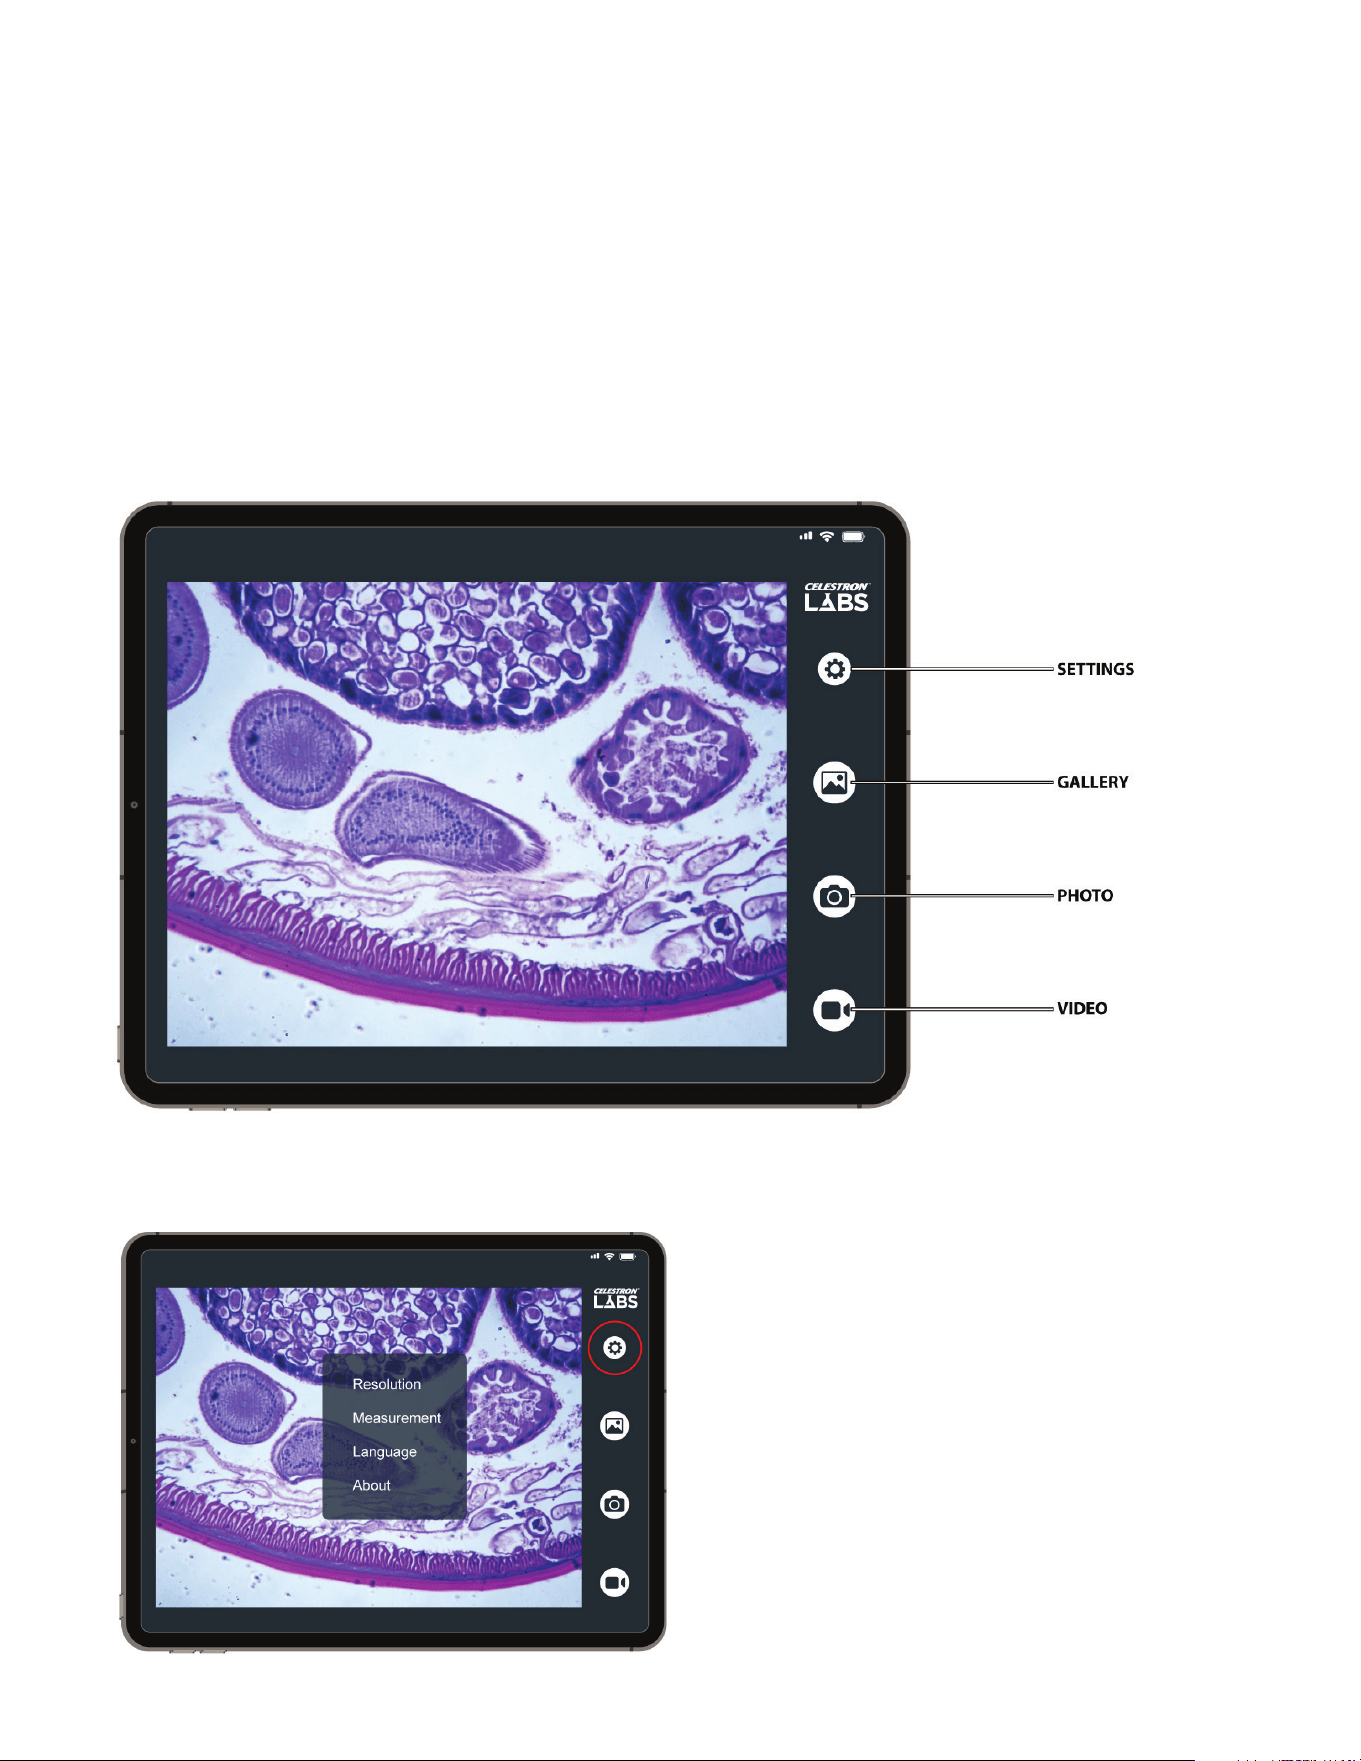
54 I ESPAÑOL
Puede usar el capturador cuando esté conectado a
alimentación externa. Al hacerlo:
• No alimente el dispositivo con el puerto USB de un
ordenador. Podría interferir con la señal WiFi.
• El LED azul puede seguir parpadeando durante la carga,
incluso cuando esté conectado a WiFi. Es normal.
USAR LA APLICACIÓN
A continuación se muestra la interfaz principal. Las etiquetas
identifican cada característica descrita en esta sección.
USAR EL CAPTURADOR DURANTE LA CARGA
Una vez conectado a la red WiFi del capturador, abra la aplicación Celestron Labs Digital Wi-Fi. Se emitirá video en directo
en su dispositivo.
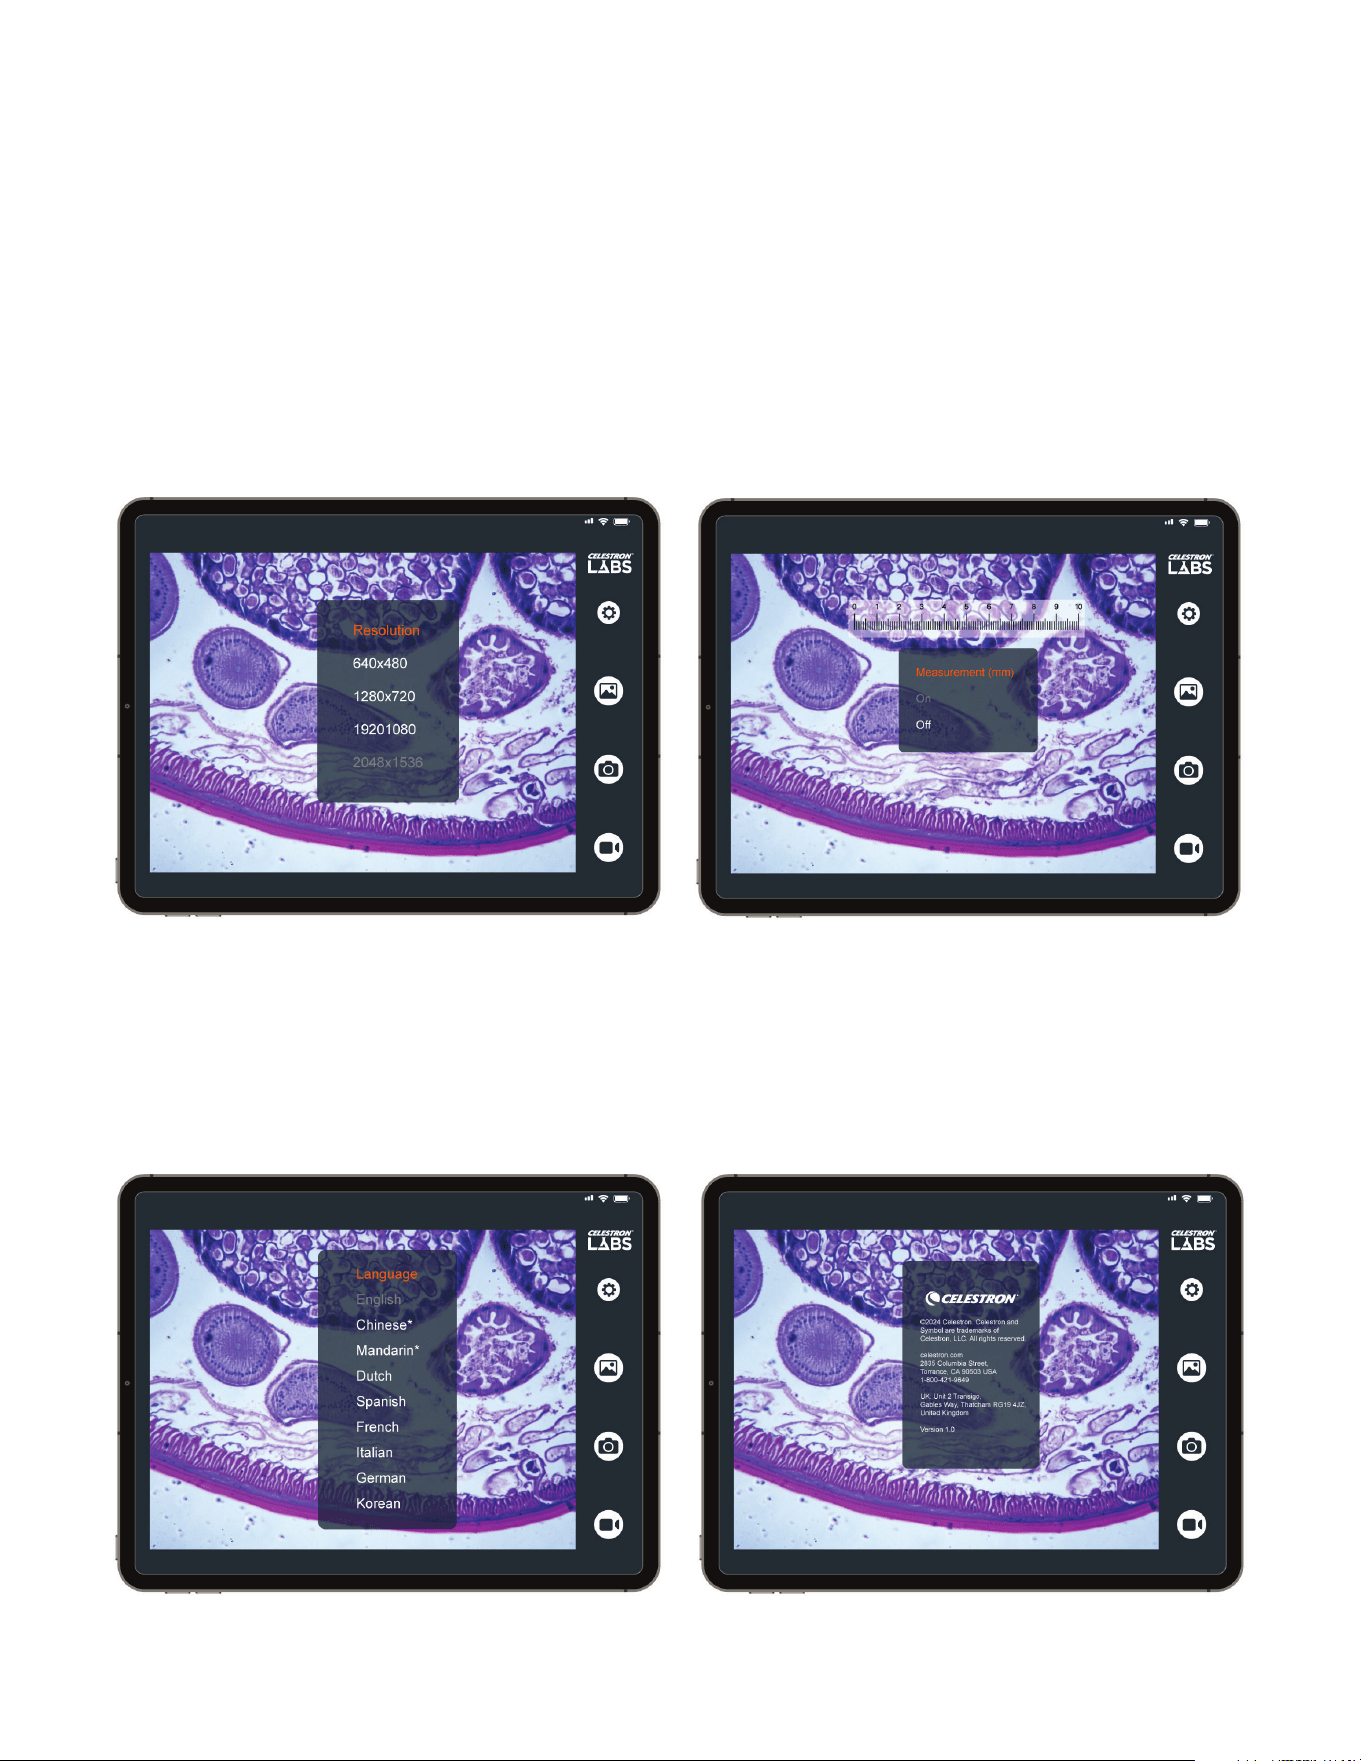
ESPAÑOL 55
A. CONFIGURACIÓN
Toque el icono Configuración para acceder a las opciones
siguiente:
Resolución
Seleccione la resolución de imagen y video. Las resoluciones
más altas proporcionan más detalle, pero crean archivos más
grandes. Configuraciones disponibles:
• 640 × 480
• 1280 × 720
• 1920 × 1080
• 2048 × 1536 (resolución máxima)
Idioma
Cambia el idioma de la interfaz.
Las opciones disponibles incluyen: Inglés (predeterminado),
chino (simplificado), chino (tradicional), holandés, español,
francés, italiano, alemán y coreano.
Acerca de
Muestra el número de versión de la aplicación,
información legal y detalles de contacto de Celestron.
Mediciones
Activa o desactiva la retícula de medición digital.
Cuando esté calibrado, la retícula le permite estimar las dimen-
siones del especimen directamente en pantalla.
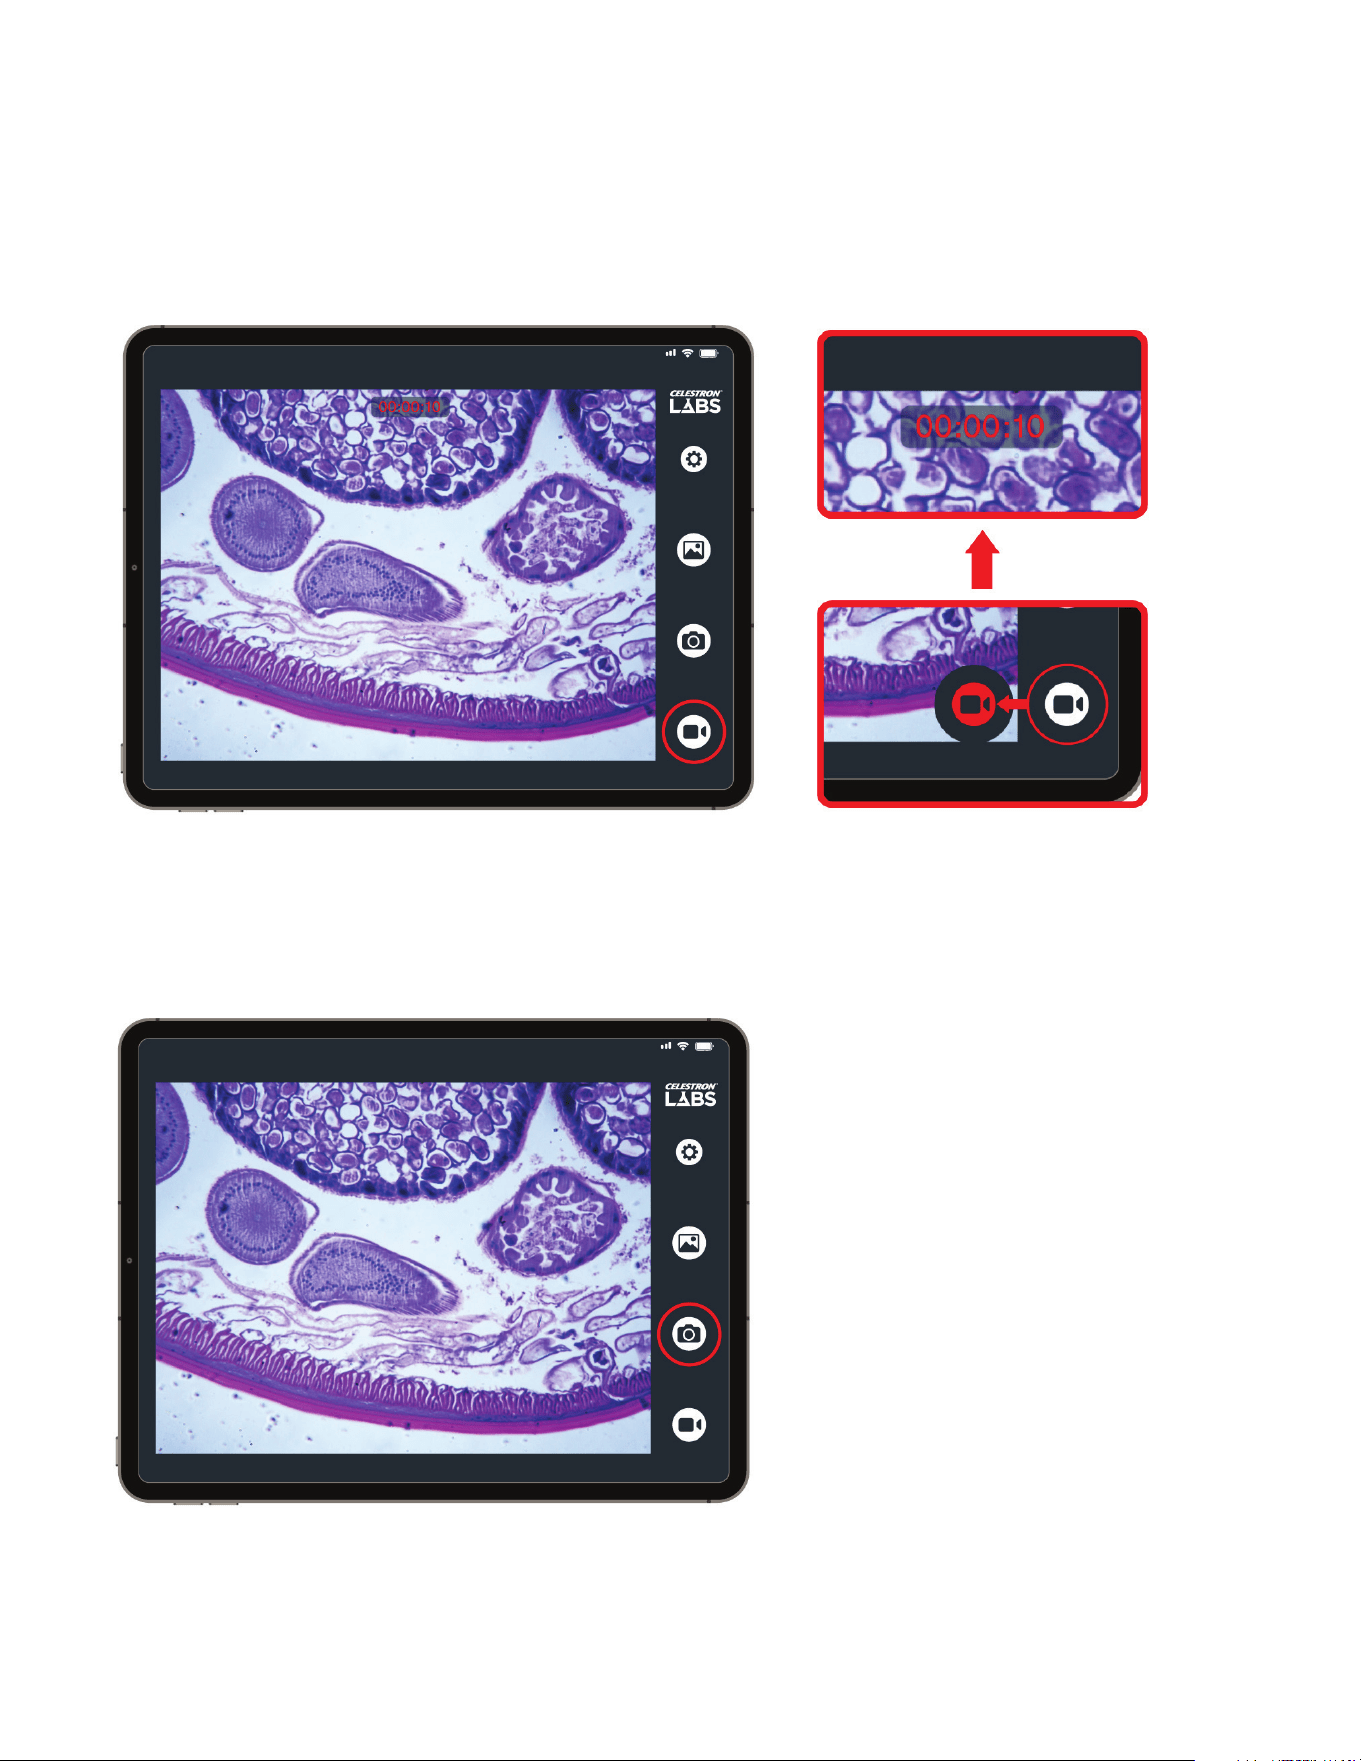
56 I ESPAÑOL
B. GRABACIÓN VIDEO
Toque el icono de video para comenzar a grabar. Aparecerá
un temporizador en la parte superior de la pantalla durante la
grabación.
Toque el icono de nuevo para detener la grabación.
Los videos se guardan directamente en su dispositivo.
C. CAPTURA DE FOTOGRAFÍAS
Toque el icono de foto para capturar una imagen fija.
Las imágenes se guardan directamente en su dispositivo.
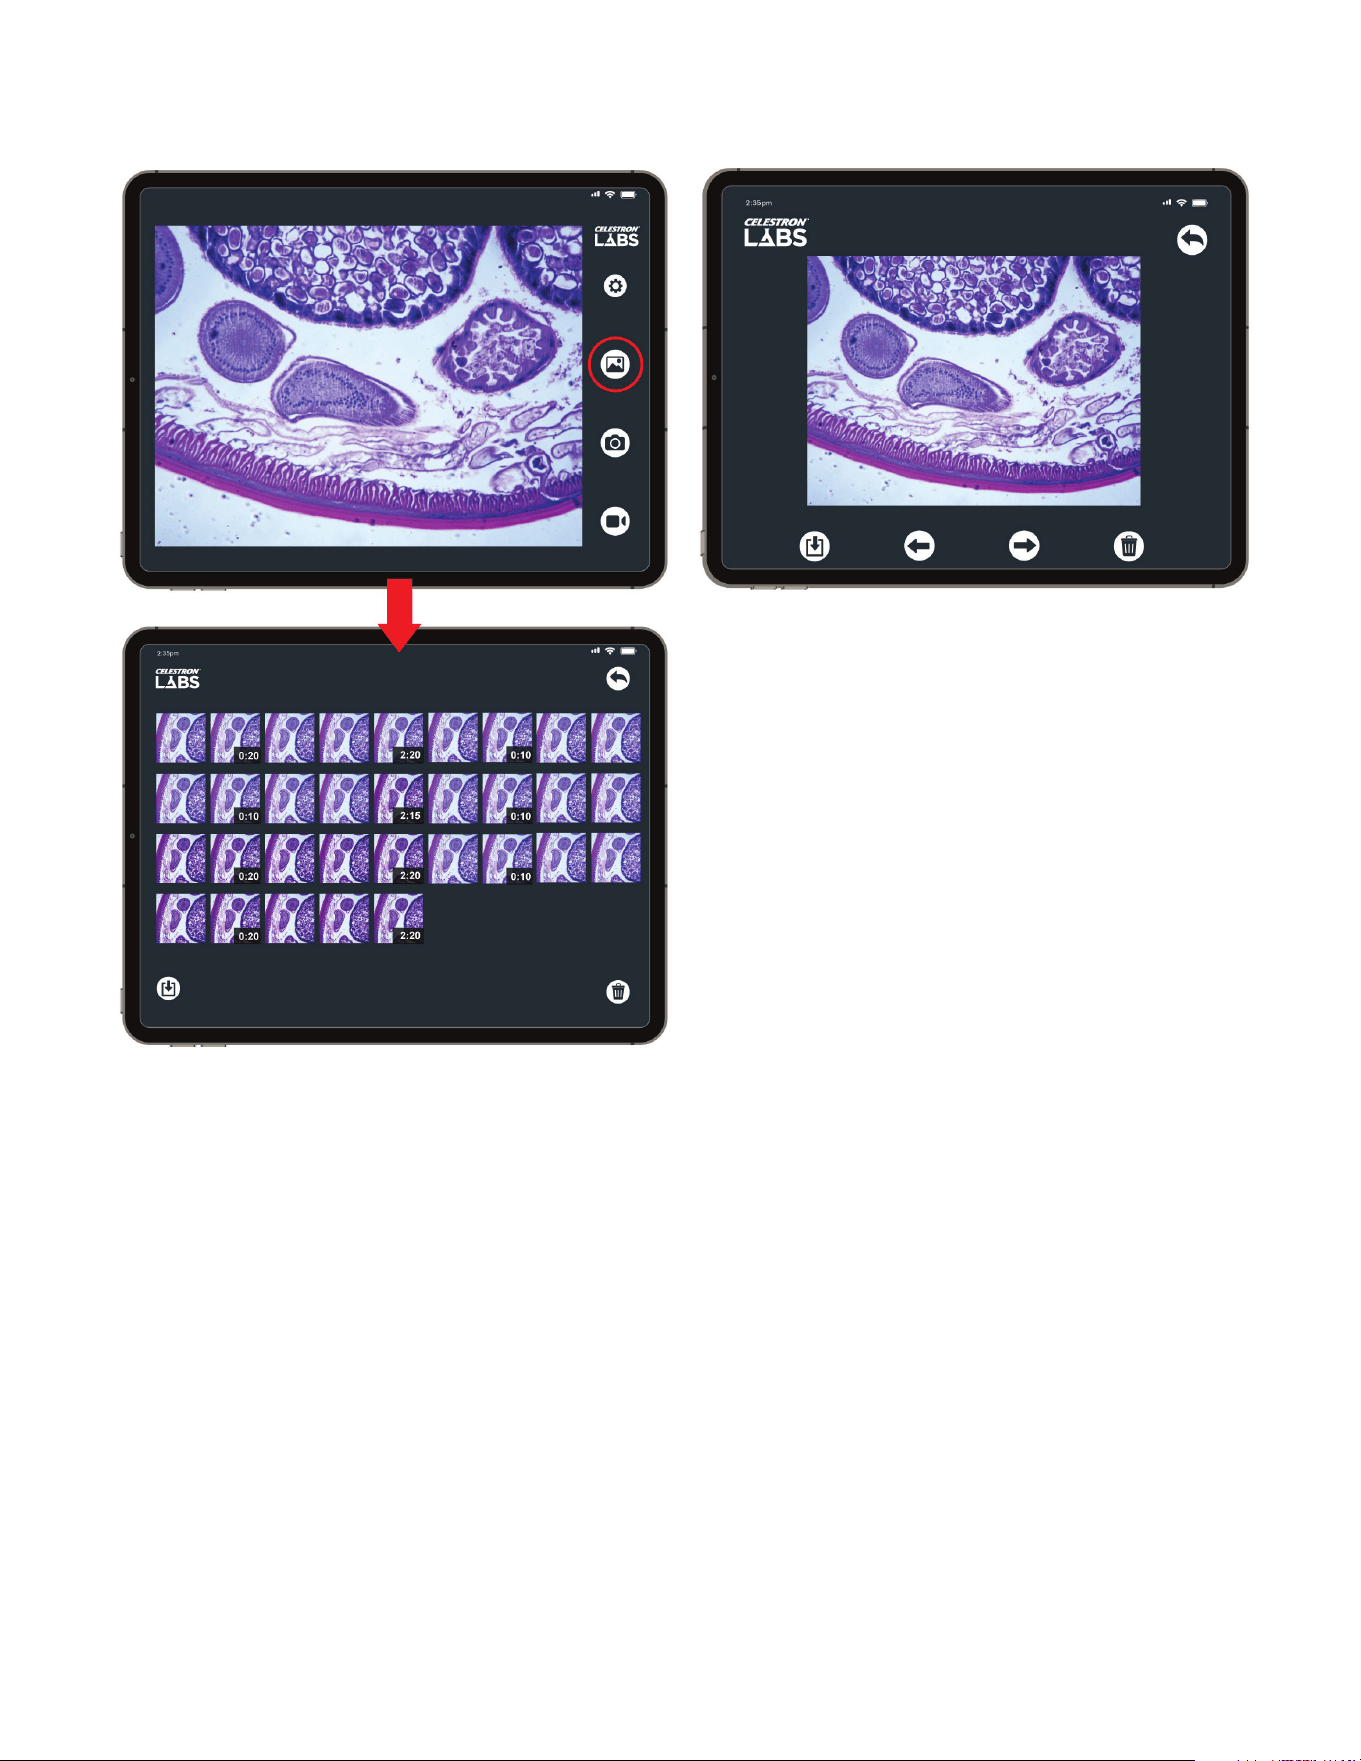
ESPAÑOL 57
D. GALERÍA
Toque el icono Galería para ver las imágenes y videos
guardados.
• Toque una miniatura para verlo a pantalla completa.
• Deslice a izquierda o derecha para desplazarse por los
archivos guardados.
• Para reproducir un video, toque la pantalla y seleccione
Reproducir.
NOTIFICACIÓN IMPORTANTE DE
PERMISOS
Según la configuración de su dispositivo, puede que se solicite
permitir a la aplicación el acceso a sus fotos y archivos. Es
necesario un acceso completo para guardar imágenes y videos.
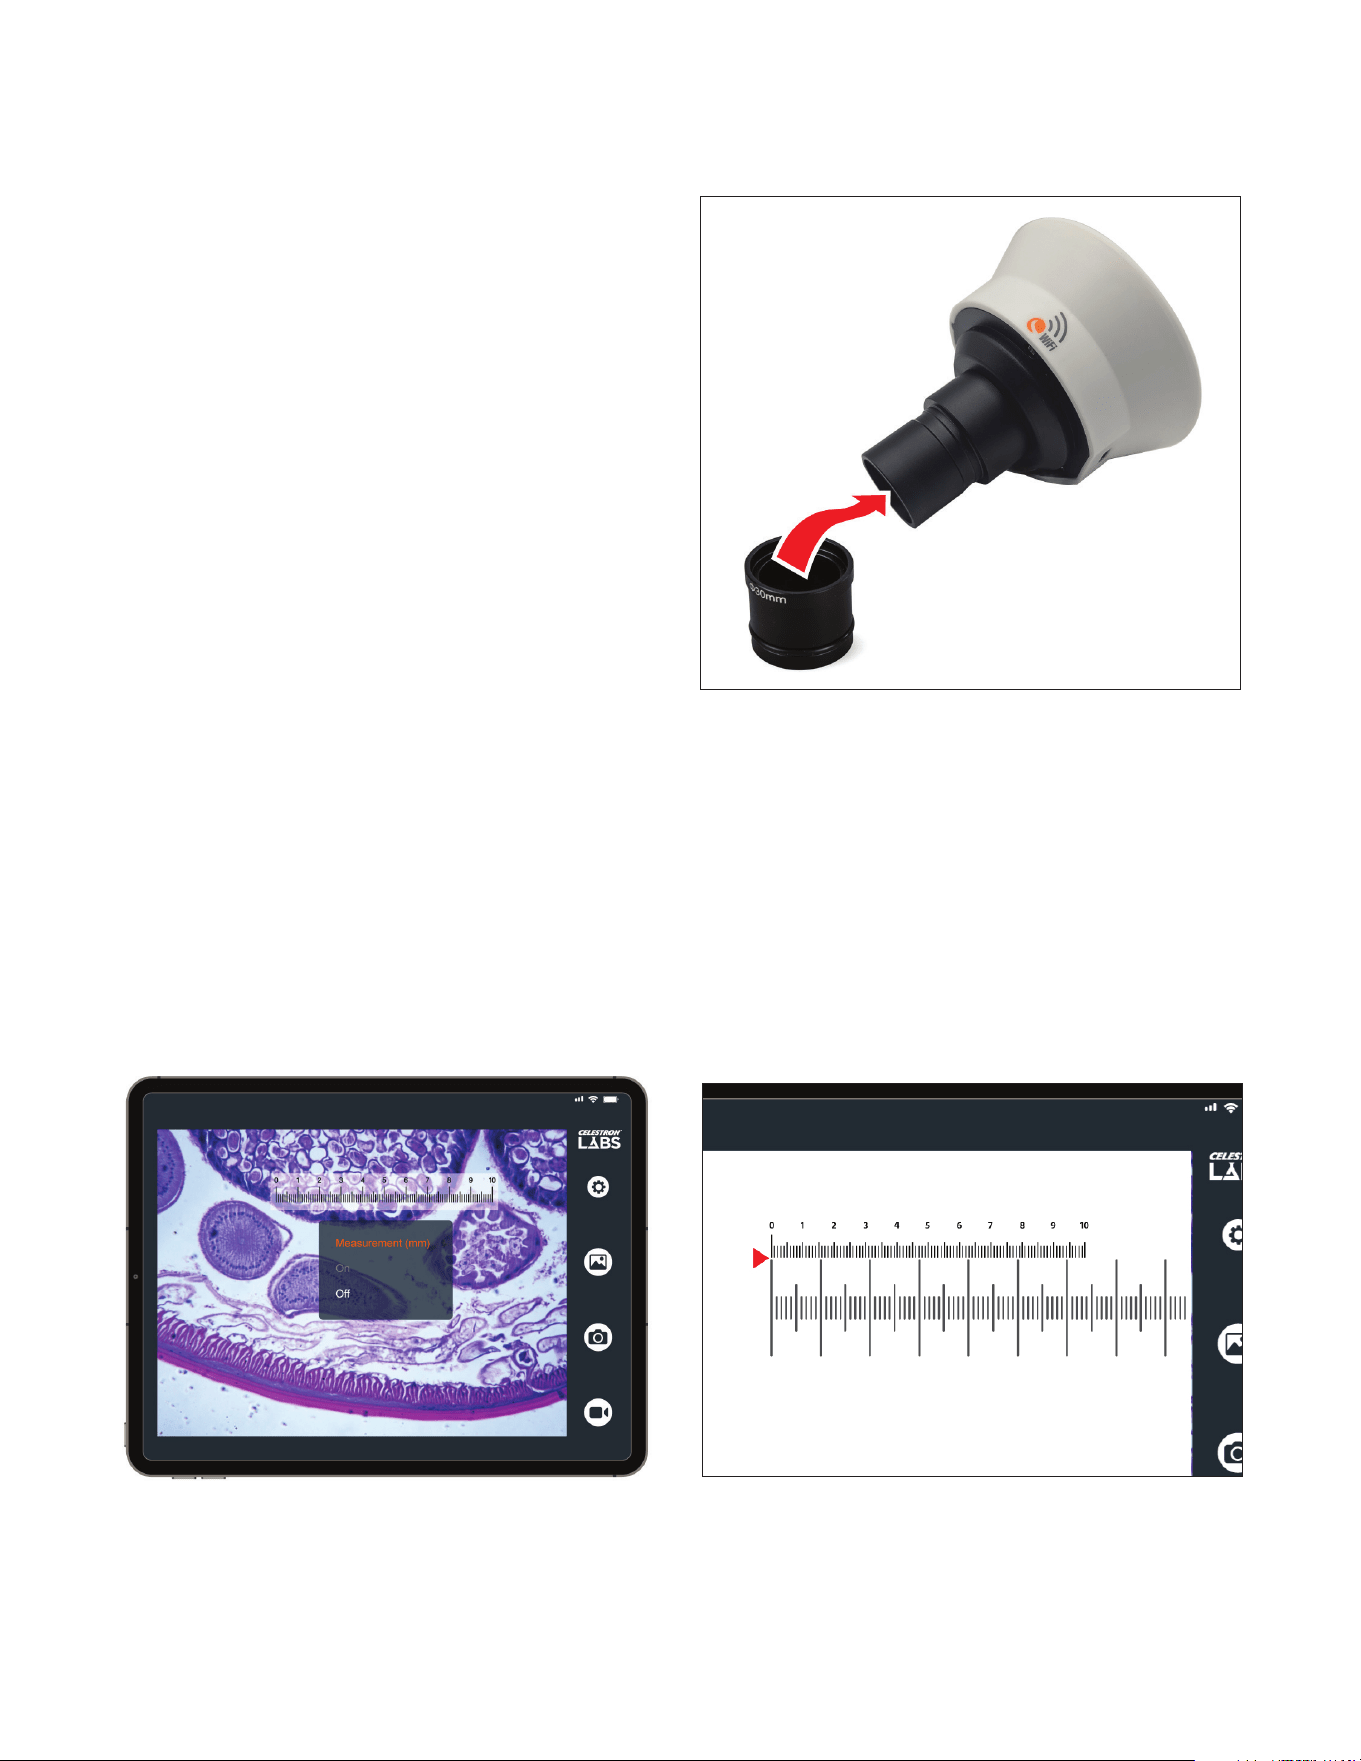
58 I ESPAÑOL
USO DEL ADAPTADOR DE 30MM
El capturador WiFi ha sido diseñado para encajar con tubos
de ocular estándar de 23mm. Si su microscopio tiene un
tubo de ocular de 30mm, instale el adaptador de 30mm
incluido en la base del capturador antes de insertarlo en el
microscopio.
El adaptador se desliza con seguridad sobre el cañón del
capturador, aumentando su diámetro de 23mm a 30mm.
Una vez instalado, inserte el capturador en el tubo del ocular
como haría con un ocular estándar.
USO DEL PORTAMUESTRAS DE CALIBRACIÓN
La retícula de medición de la aplicación muestra líneas con separación homogénea en pantalla. Sin embargo, la aplicación no
conoce automáticamente la distancia en el mundo real que represenan estas líneas a su aumento actual. La regla de calibración
incluida, también llamada micrómetro de soporte, lo soluciona.
El portamuestras contiene una regla grabada con precisión. Cada pequeña división del portamuestras equivale a 0,01mm (10
micrometros). Comparando las distancias conocidas en el portamuestras de calibración con la retícula en pantalla, puede calcular
la distancia real representada por cada división de la retícula.
La calibración es específica para la lente de objetivo que use. Si cambia el aumento deberá recalibrar antes de tomar nuevas
mediciones.
Para calibrar:
1. Coloque el portamuestras de calibración sobre el soporte
del microscopio.
2. En la aplicación, active la retícula de medición.
3. Ajuste el soporte de forma que el portamuestras de
calibración sea visible y enfoque el microscopio hasta que
aparezca definido en pantalla.
4. Alinee la marca “0” en la retícula de medición digital con la
marca “0” del portamuestras de calibración.
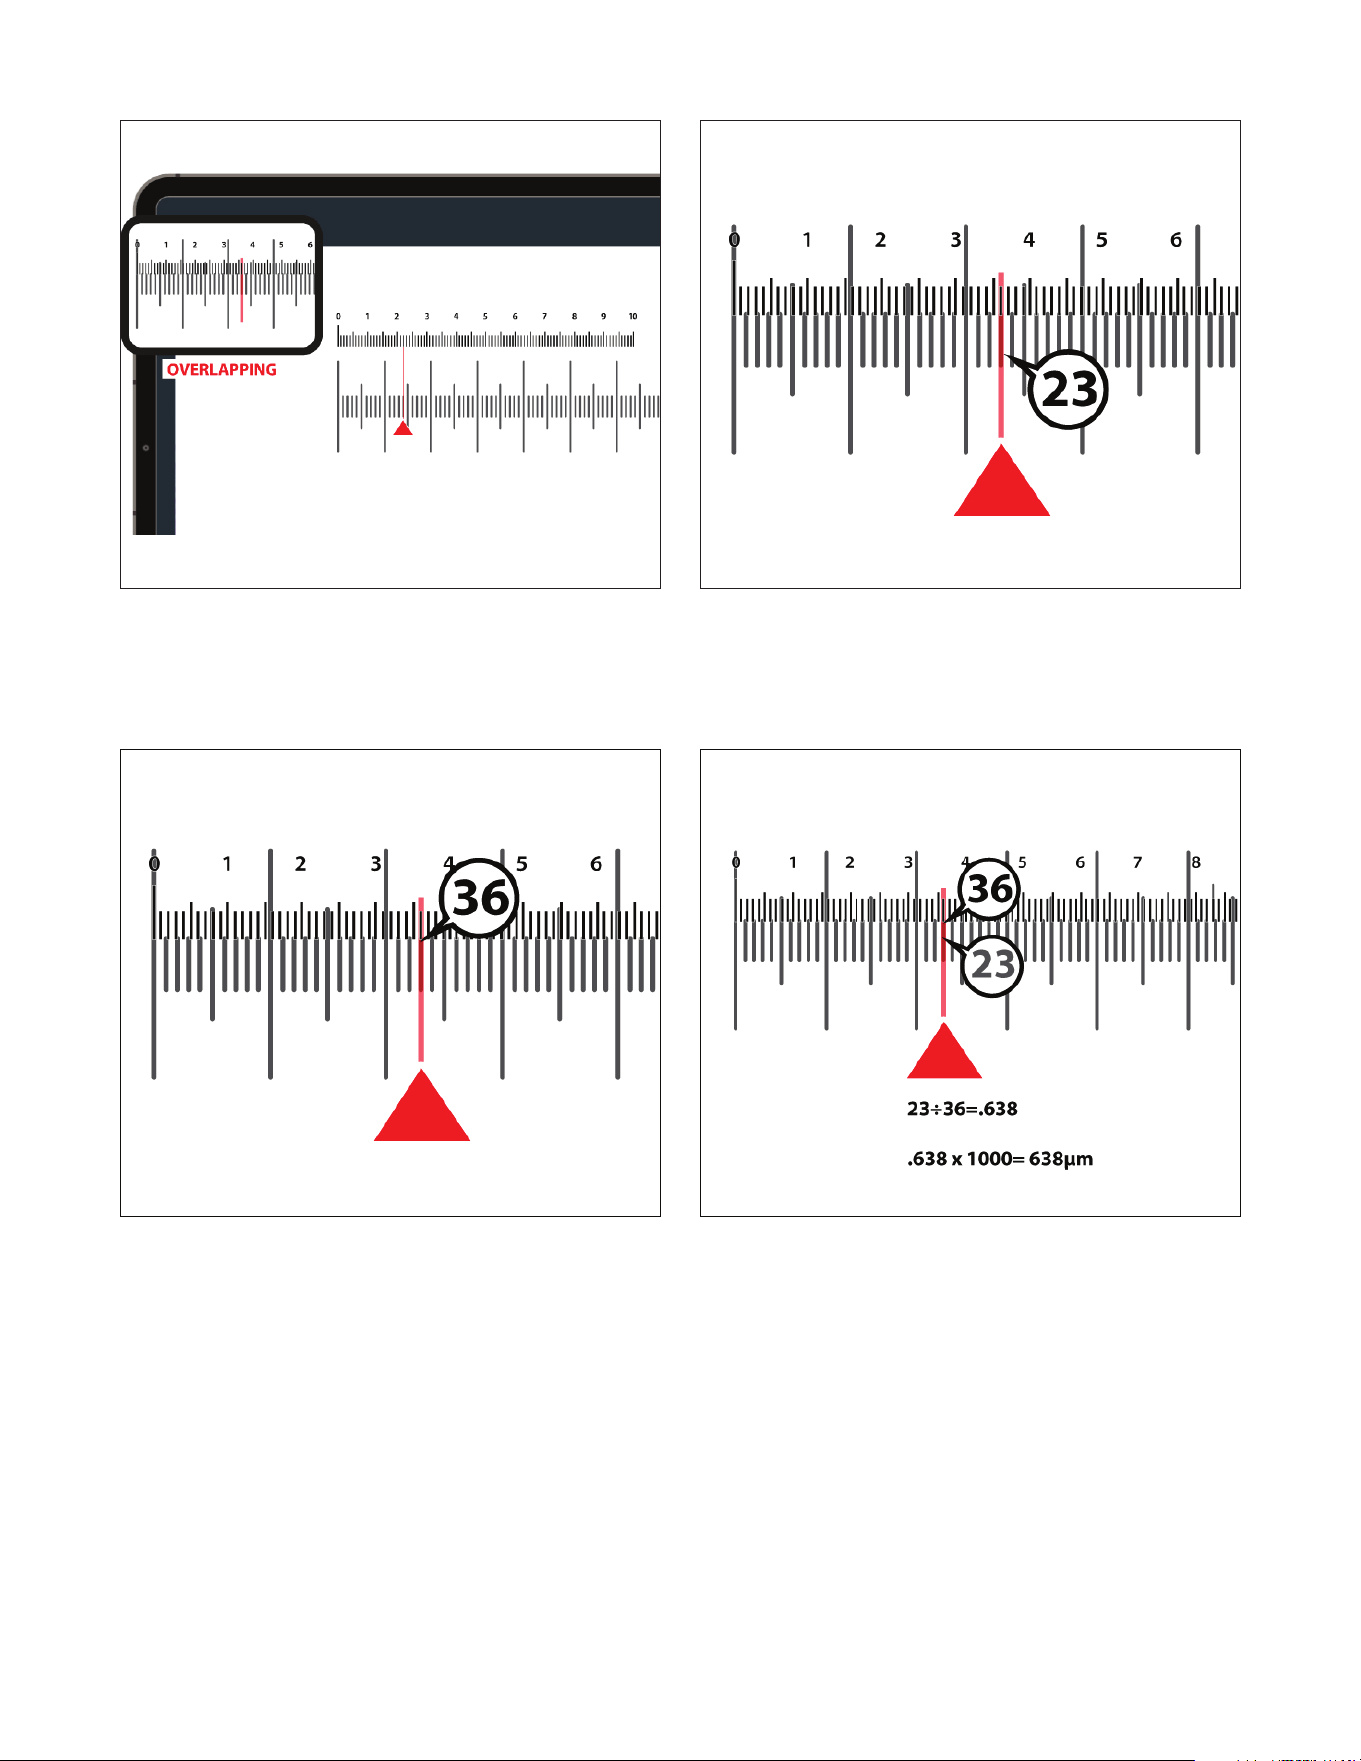
ESPAÑOL 59
5. Sin mover el portamuestras, muévase por la escala y localice
el siguiente punto en el que una línea de la retícula digital
se alinee con exactitud con una línea del portamuestras de
calibración.
6. Cuente el número de divisiones en el portamuestras de
calibración entre los dos puntos alineados. En este ejemplo,
son 23 divisiones.
7. Cuente el número de divisiones en la retícula digital entre
estos dos mismos puntos alineados. En este ejemplo, son
36 divisiones.
8. Calcule el tamaño representado por una división de la
retícula.
Divida primero las divisiones del portamuestras de
calibración por las divisiones de la retícula: 23 ÷ 36 = 0,638
A continuación, multiplique este resultado por 1000 para
convertirlo a micrometros: 0,638 × 1000 = 638 µm
En este ejemplo, cada división de la retícula digital equivale a
638 µm.
9. Ahora puede usar la retícula calibrada para estimar las
dimensiones del especimen.
Importante
Si cambia de lente de objetivo o aumento, deberá recalibrar antes de tomar nuevas mediciones.
60 I ESPAÑOL
Por la presente, Celestron declara que el equipo de radio tipo 44429 Capturador microscopio WiFi 2MP de Celestron
Labs Digital cumple con la directiva 2014/53/UE. El texto completo de la declaración de cumplimiento UE está
disponible en la siguiente dirección de Internet www.celestron.com/productcompliance.
9. CUIDADOS Y MANTENIMIENTO
+
Guarde el capturador en un entorno limpio y seco cuando no
lo use.
+
No use el capturador en entornos donde estén prohibidos
dispositivos electrónicos. Un uso incorrecto puede causar
accidentes graves.
+
Use el capturador exclusivamente en una temperatura de 23° a
120°F (-5° a 50°C). Evite los cambios de temperatura súbitos,
podría causar condensación dentro de la carcasa.
+
Mantenga alejado el capturador de agua y otros líquidos. No
lo use nunca en la lluvia ni en condiciones de humedad. La
humedad es un riesgo de incendio y electrocución.
+
No intente abrir ni modifi car el dispositivo. Los componentes
internos solamente deben ser atendidos por técnicos
autorizados.
+
Para limpiar el exterior, frote suavemente con una gamuza suave
y seca.
Su capturador WiFi de Celestron Labs Digital es un dispositivo óptico de precisión. Un cuidado adecuado garantizará un rendimiento
fi able durante años.
Nota FCC: Este equipo ha sido probado y cumple con los límites de un dispositivo digital de Clase B, según el apartado 15 de las normas FCC. Estos límites están diseñados para proporcionar una protección razonable
contra interferencias dañinas en una instalación doméstica. Este equipo genera, usa y puede radiar energía de radiofrecuencia, y podría causar interferencias perjudiciales a comunicaciones de radio si no se instala
y usa según las instrucciones. Sin embargo, no existe ninguna garantía de que no se produzcan interferencias en una instalación concreta. Si este equipo causa interferencias dañinas en la recepción de radio
o televisión, lo que puede determinarse apagando y encendiendo el equipo, se recomienda al usuario intentar corregir las interferencias con una o varias de las medidas siguientes:
+ Reorientar o recolocar la antena receptora.
+ Aumentar la separación entre el equipo y el receptor.
+ Conectar el equipo a una toma de corriente o circuito distinto de aquél al que esté conectado el receptor.
+ Consultar al vendedor o a un técnico experimentado de radio/TV para obtener ayuda.
¿NECESITA AYUDA? Contacte con el soporte técnico de Celestron
celestron.com/pages/technical-support
El diseño y las especifi caciones del producto están sujetos a cambios sin notifi cación previa.
Este producto ha sido diseñado y está pensado para ser usado por personas de 14 años o más de edad.
©2026 Celestron.
Celestron y su símbolo son marcas comerciales de Celestron, LLC. • Todos los derechos reservados. • Celestron.com
EE.UU.: Celestron, 2835 Columbia Street, Torrance, CA 90503 EE.UU.
GB: Celestron Global Ltd., Unit 2 Transigo, Gables Way, Thatcham RG19 4JZ, Reino Unido
Representante autorizado en la UE: AR Experts B.V. es Boeingavenue 209, 1119 PD Schiphol-Rijk,
Holanda, [email protected]
Fabricado en China | 03-26
celestron.com/pages/warranty
Modelo de producto Capturador micro WiFi Celestron Labs Digital #44429
Nombre de modelo simple WH-44429
Estándar WiFi WiFi4,802.11b/n
Opción WiFi tribanda 20M
Límite de clientes conectados 2,4 GHz 1
Límite de clientes conectados 5 GHz Ninguno
Límite de clientes conectados 6 GHz Ninguno
Emisión de datos máxima 65M
WPS (coniguración protegida WiFi) No confi gurado
PARÁMETROS WIFI