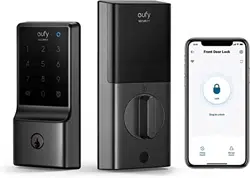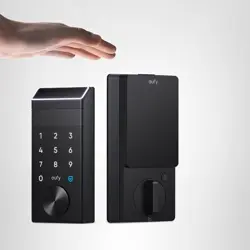

Before You Start
What You Need (Not Provided)
Preparation
At a Glance
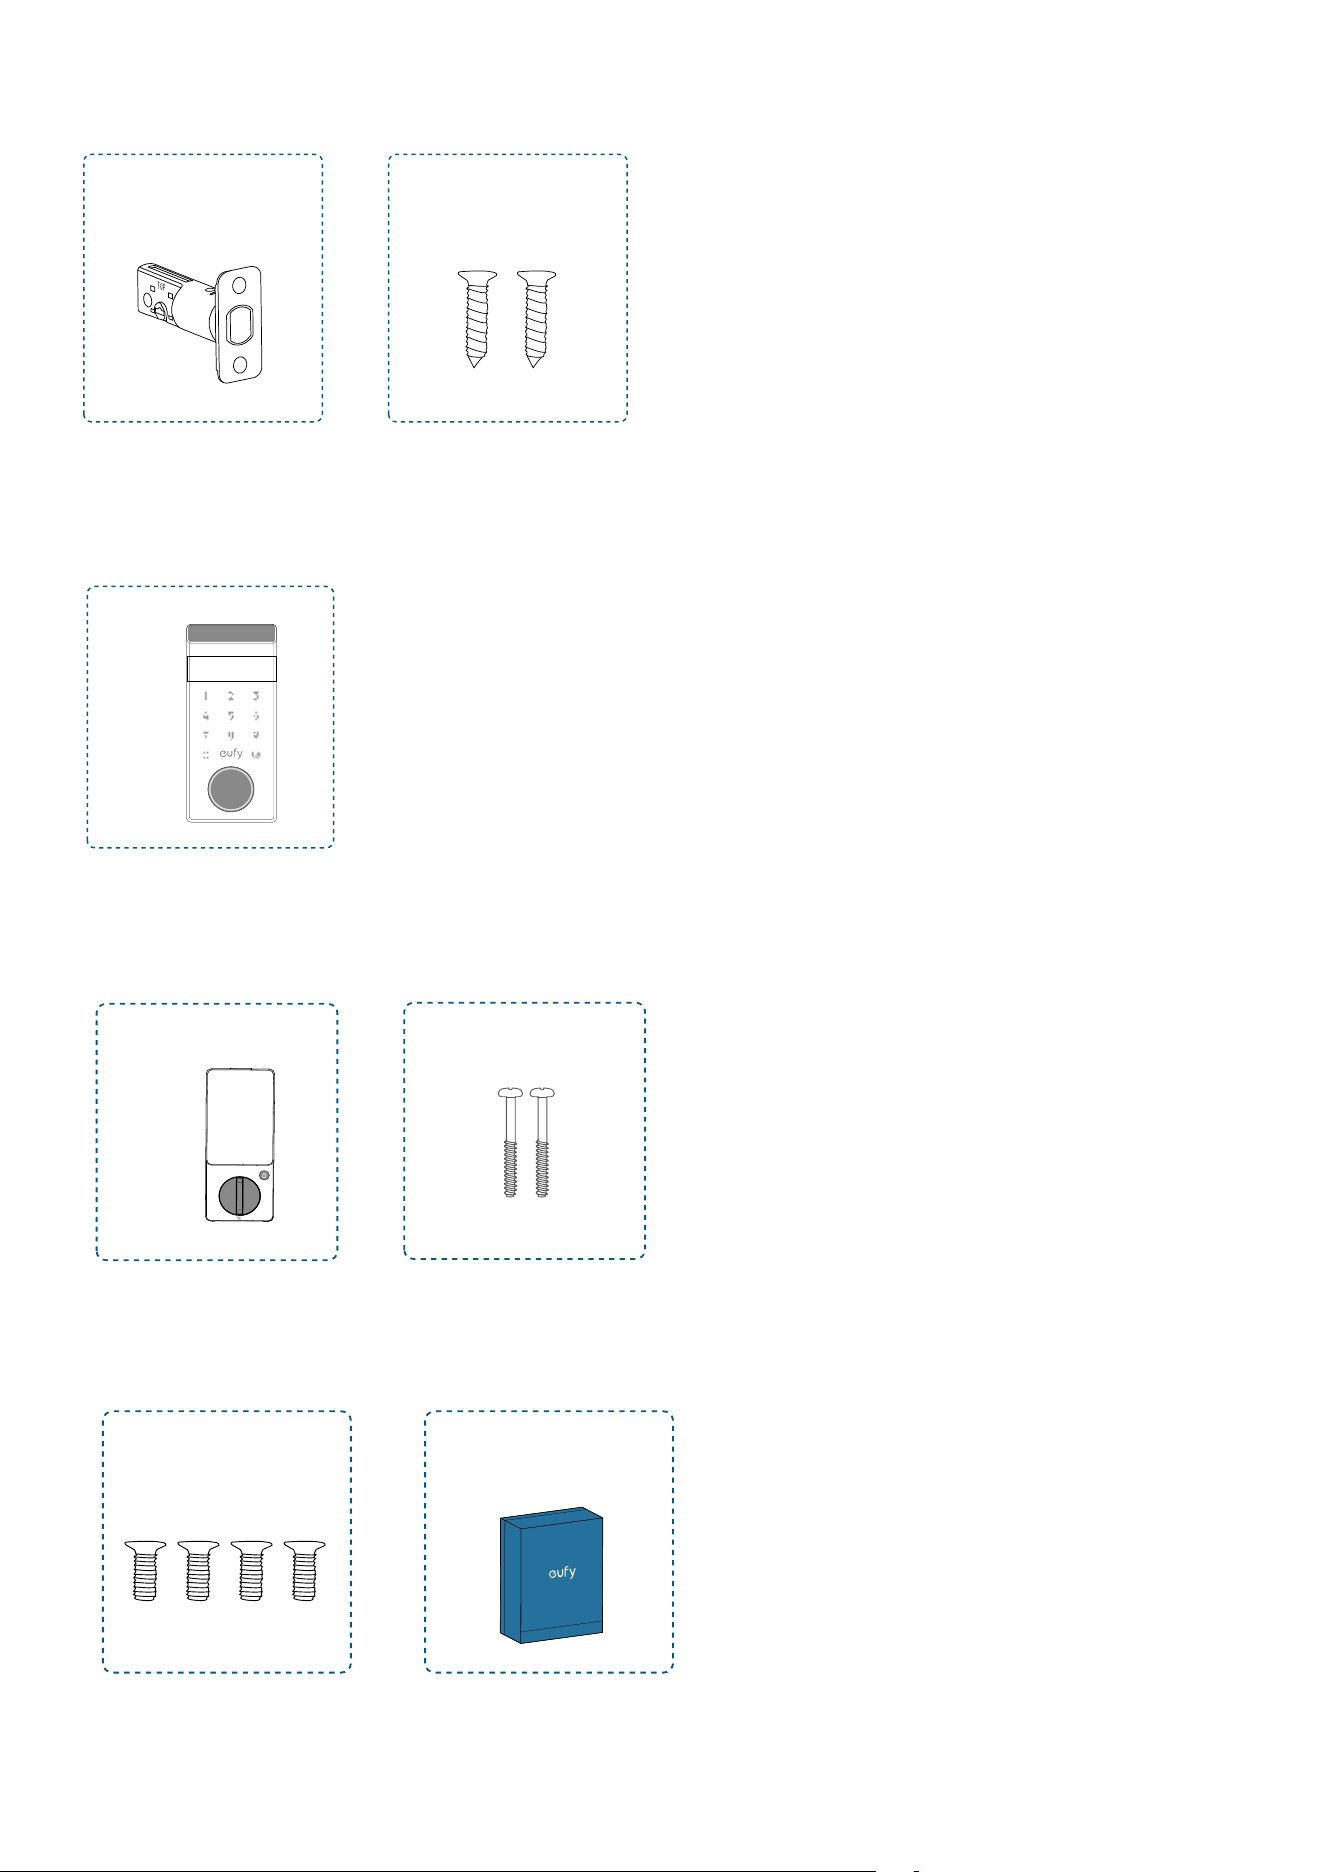
What's in the Box
Step 1. Install the Deadbolt
Step 2. Install the Exterior Assembly
Step 3. Install the Interior Assembly
Step 4. Install the Strike Plate
Step 5. Set up the System & Register Palm Vein ID
Congratulations!
Open / Close the Lock Cylinder Cover
Disconnect the Radar Cable
Remove the Batteries
Before You Start
Make sure your door is a standard entry door without a storm door. eufy FamiLock E34 is not
compatible with storm doors and doors behind them.
What You Need (Not Provided)
• Phillips screwdriver
• 5V / 2A power adapter and USB-C charging cable
• Flathead screwdriver (optional)
• Screwdriver with drill bits (optional)
Installation generally takes less than 15 minutes. If you have any questions or concerns, visit
support.eufy.com for assistance.
Preparation
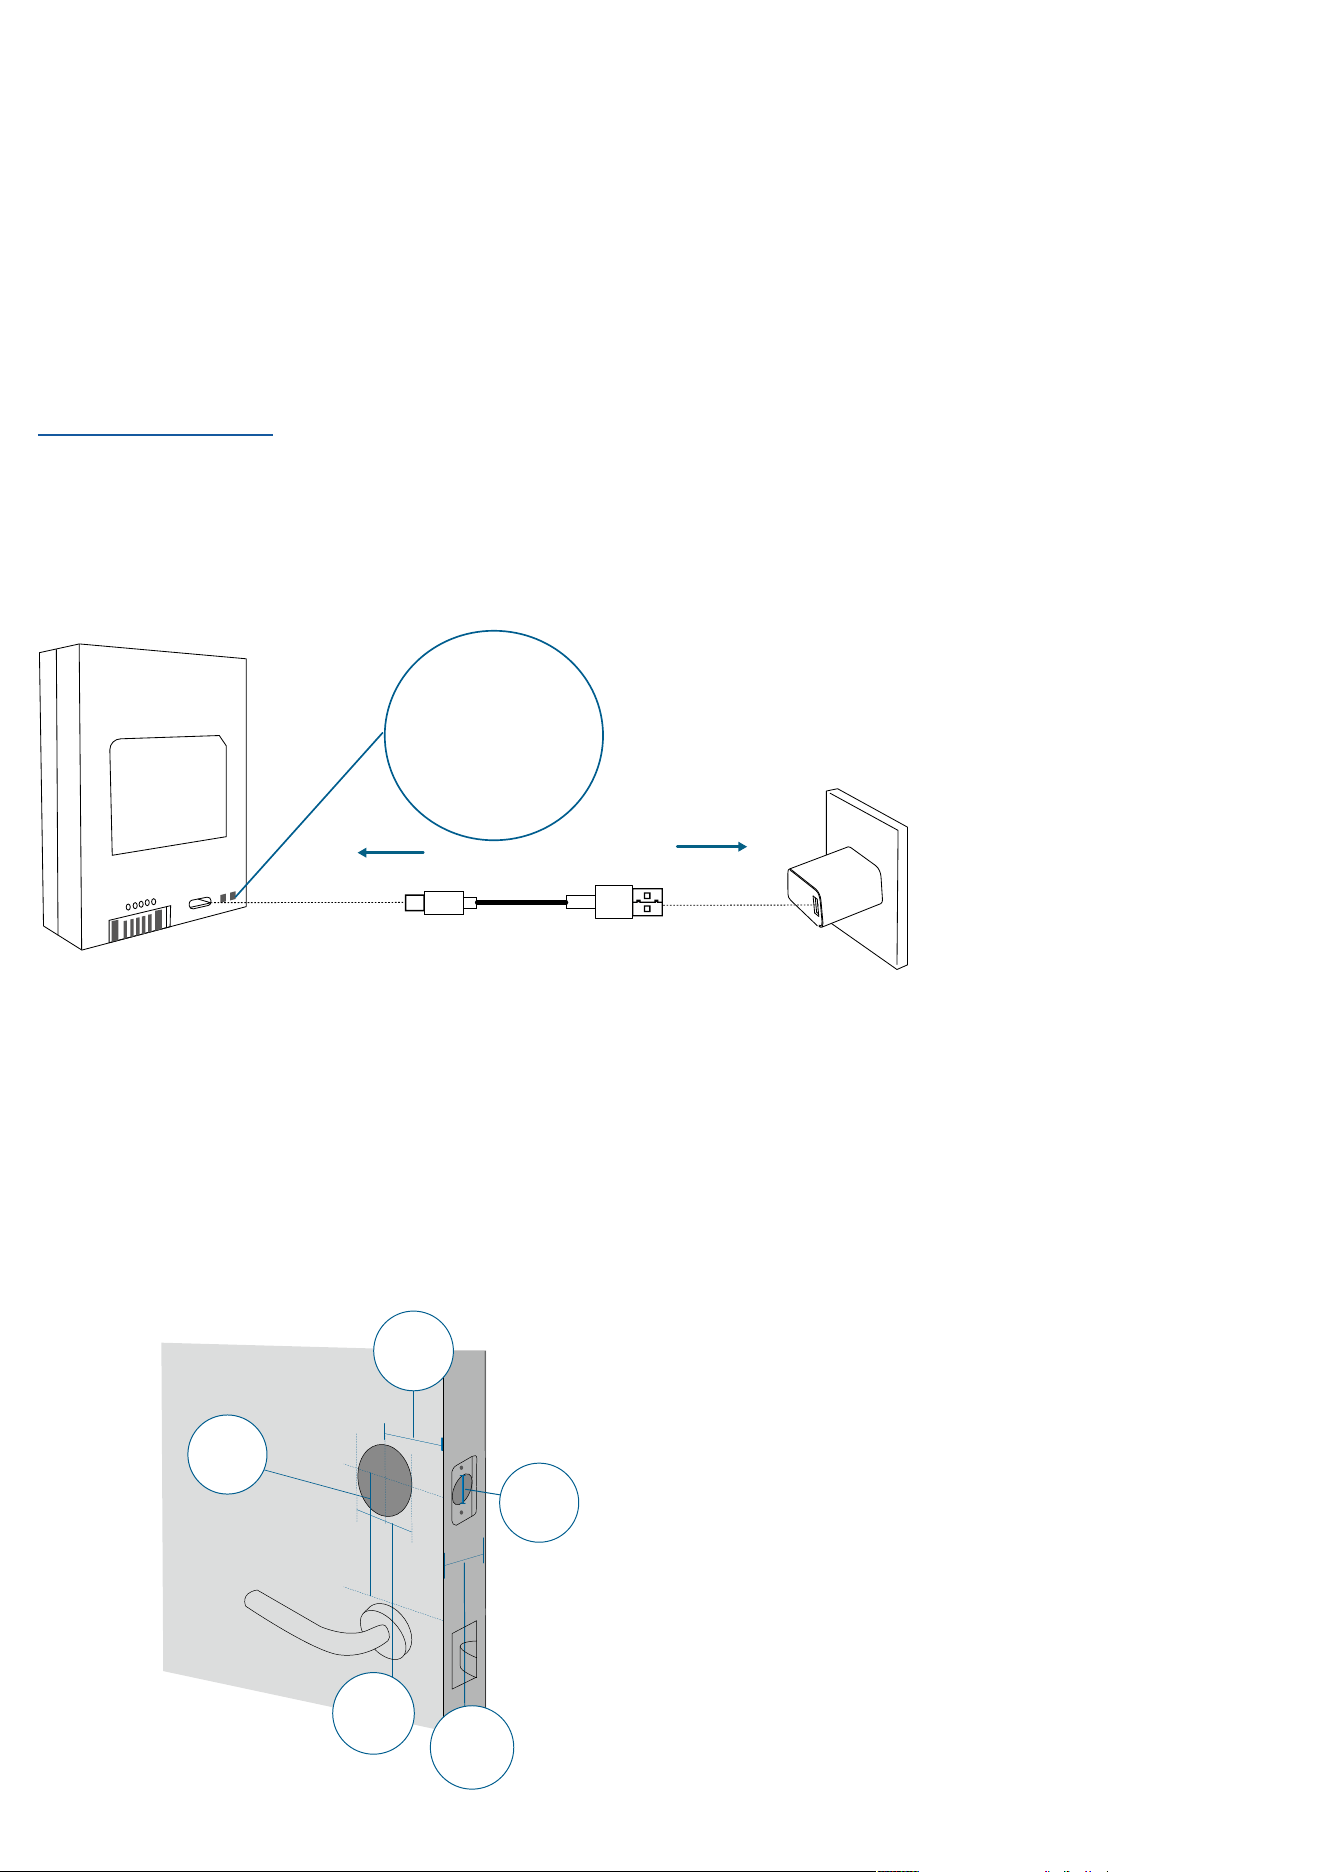
1. Fully Charge the Battery
For extended use, fully charge the rechargeable battery before first use (The battery is
shipped with less than 30% charge due to regulations).
LED Indicator
Red: Charging
Blue: Fully Charged
6-8 Hours
2. Prepare the Door
1. Remove the existing lock.
2. Measure and confirm your door:
a. Door thickness: 1⅜’’ (35 mm) or 2⅙’’ (55 mm)
b. Cross bore diameter: 1½’’ (38 mm) or 2⅛’’ (54 mm)
c. Backset: 2⅜’’ (60 mm) or 2¾ (70 mm)
d. Door hole diameter: 1’’ (25.4 mm)
e. Lock spacing: at least 1¾’’ (45 mm) from existing lock
3. Use the template to drill new holes if needed.
Door Hole
Diameter
1’’ (25.4 mm)
Minimum
Distance
1¾’’ (45 mm)
Backset
2⅜’’ (60 mm)
or 2¾ (70 mm)
Cross Bore
Diameter
1½’’ (38 mm)
or 2⅛’’ (54 mm)
Door Thickness
1⅜’’ (35 mm)
or 2⅙’’ (55 mm)
At a Glance
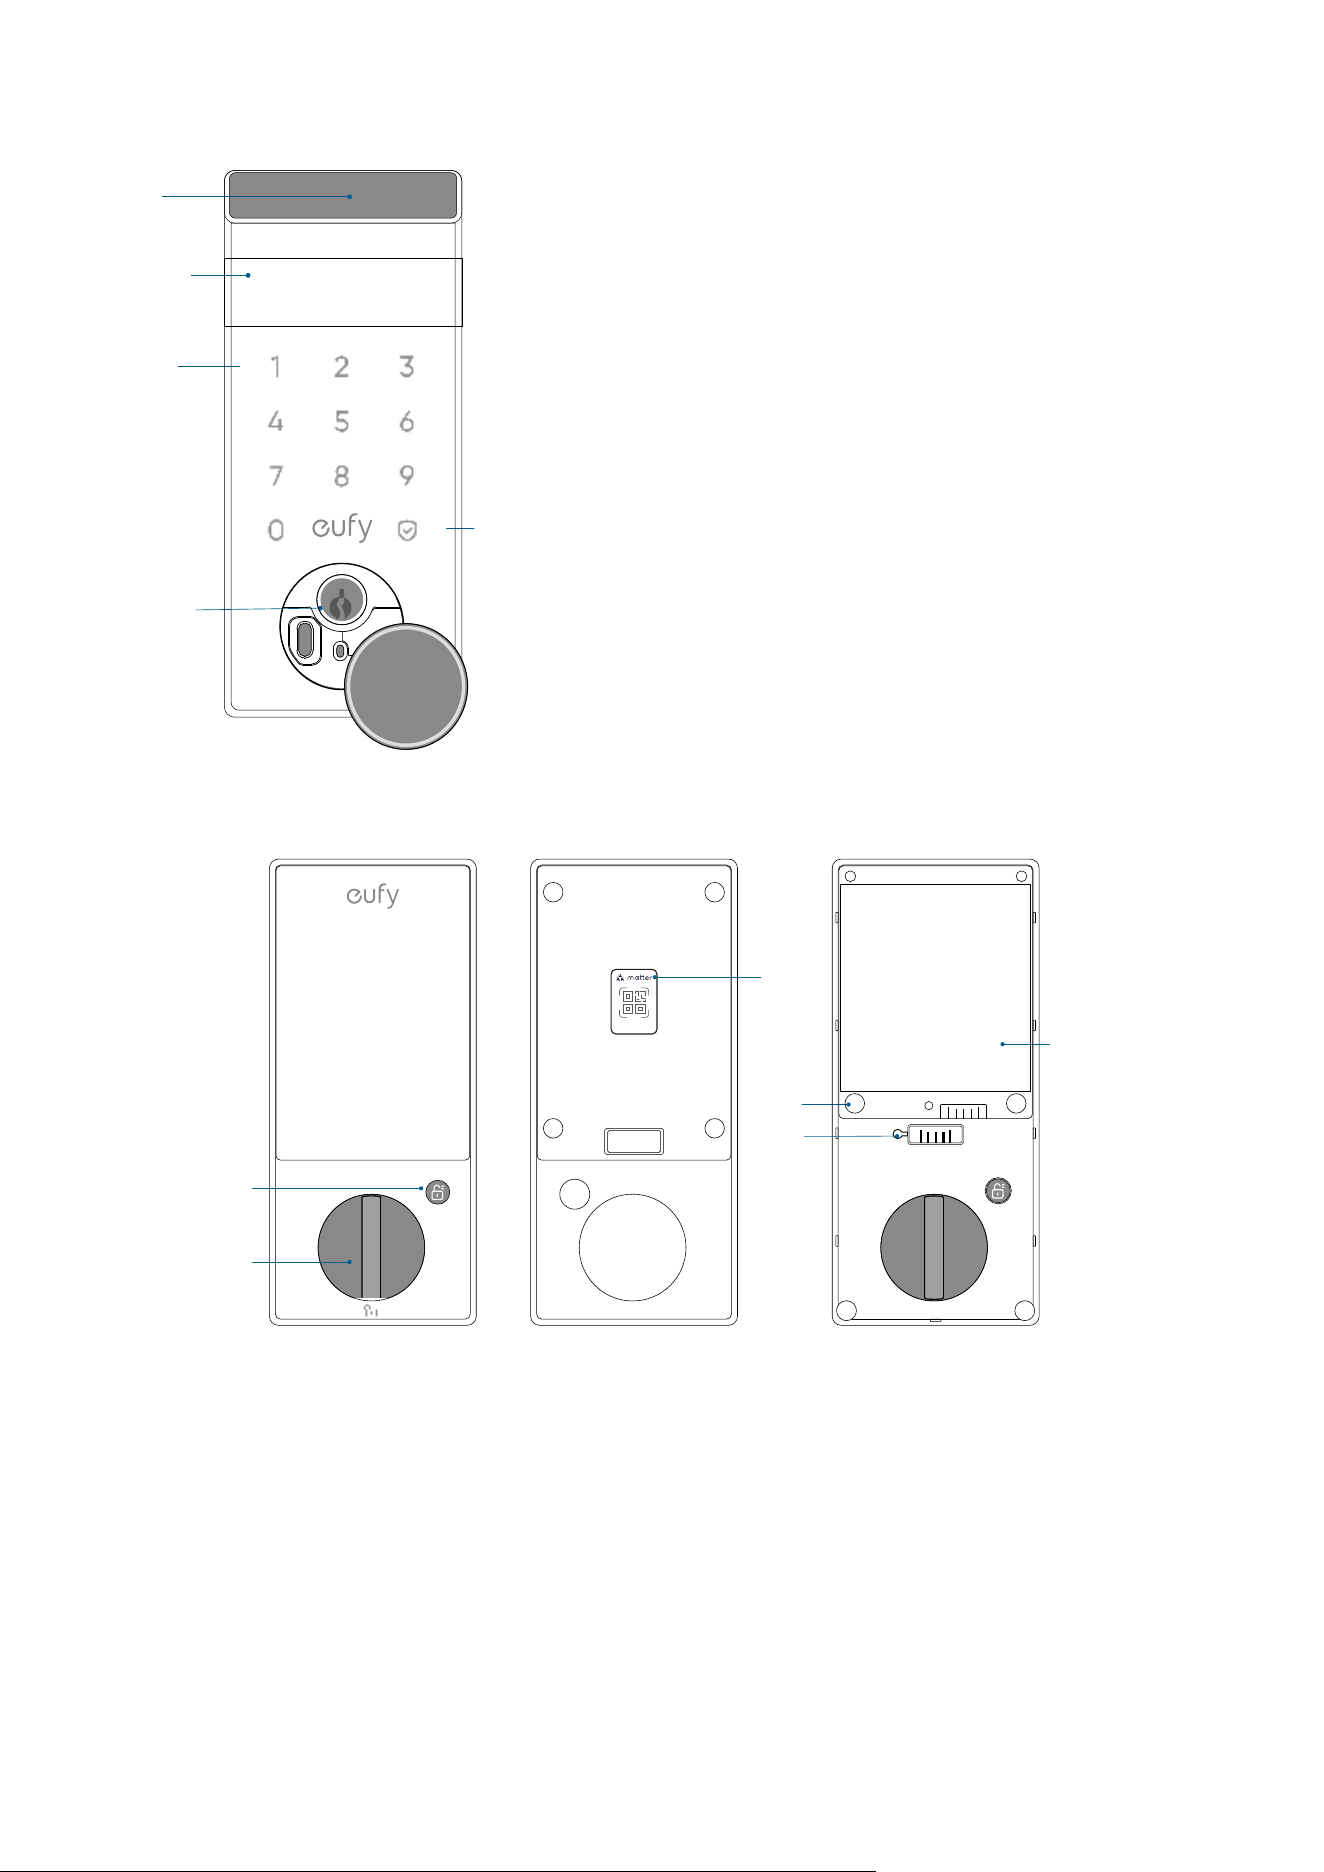
Exterior Assembly
②
④
①
⑤
③
①
Palm Scanner
• Unlock the door with your palm ID.
②
Motion Sensors
③
Keypad
④
Emergency USB-C Port & Mechanical Keyhole
• Charges the lock or unlock the door in
emergency situations.
⑤
Status Light and Lock / Unlock Button
• Blue: Door Unlocked
• Orange: Door Locked
• Red: Abnormal State
Interior Assembly
③
④
⑤
②
①
⑥
①
Lock / Unlock Button
• Press to lock or unlock the door.
②
Thumbturn
③
QR Code
• Scan to add Smart Lock in the app.
④
Battery Compartments
⑤
Screw Holes
⑥
Set Button
• Pair: Press and hold for 2 seconds.
• Reset: Press and hold for 10 seconds.
• Recalibrate: Press 5 times in a row.
What's in the Box
For Deadbolt Installation
A
B
Deadbolt
Deadbolt Screws × 2
For Exterior Assembly Installation
C
Exterior Assembly
For Interior Assembly Installation
F
G
E
D
Interior Assembly
Interior Assembly Screws × 4
Rechargeable Battery
Mounting Plate Screws × 2
F
G
E
D
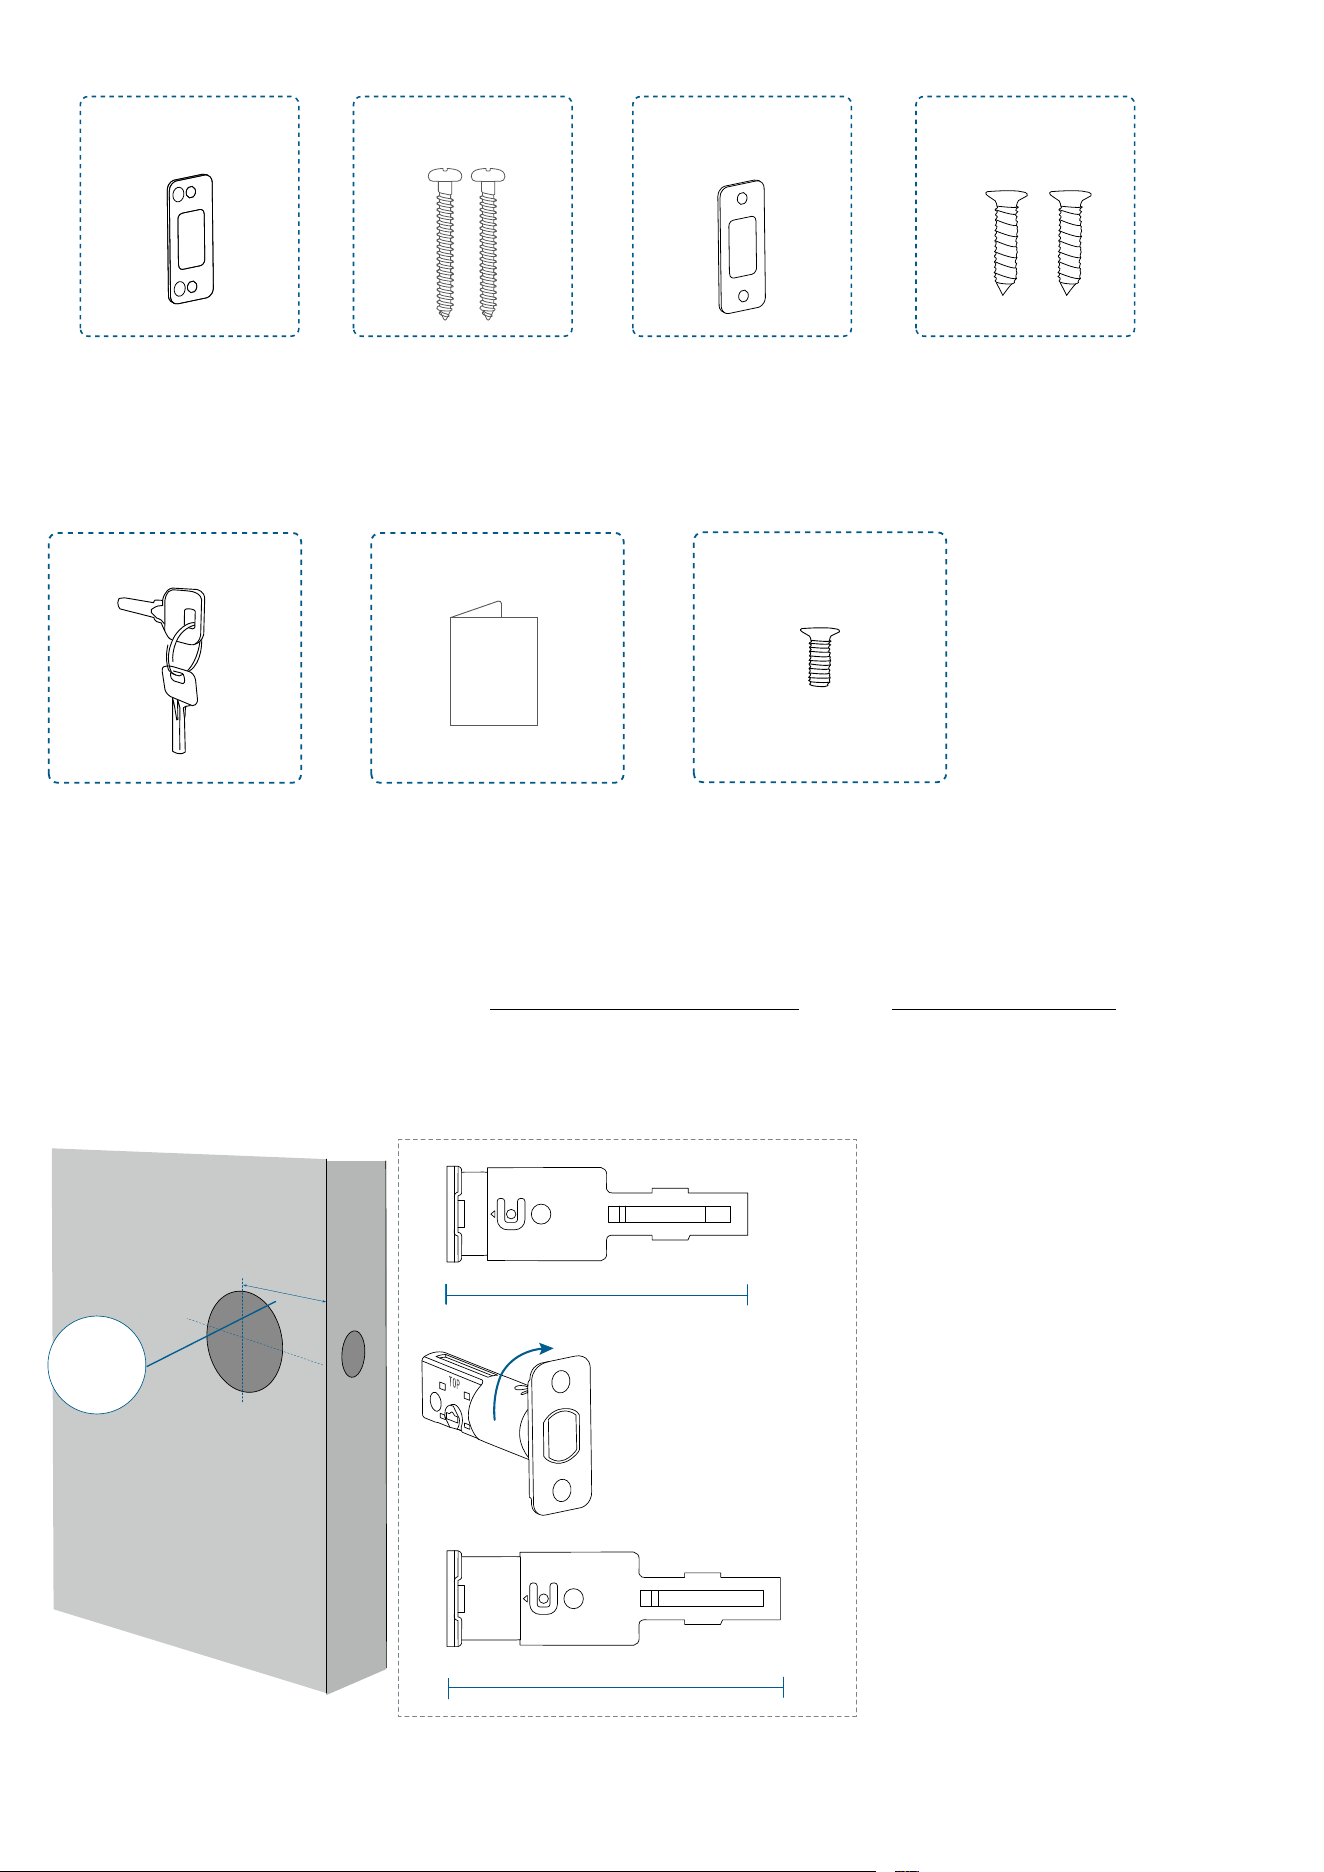
For Strike Plate Installation
H
I J K
Strike Reinforcer Strike Plate Strike Plate Screws × 2Reinforcer Screws × 2
Others
QSG
Keys
Quick Start Guide Spare Screw × 1
Step 1. Install the Deadbolt
1. Adjust the Deadbolt
Measure the distance between center of the door hole to the edge of the door.
• If the backset is 2⅜ in (60 mm), insert the deadbolt directly.
• If the backset is 2¾ in (70 mm), rotate the faceplate of the deadbolt 180° to adjust
the deadbolt to 70 mm.
2-3/8
2-3/4
180°
Backset
2⅜’’ (60 mm)
2¾’’ (70 mm)
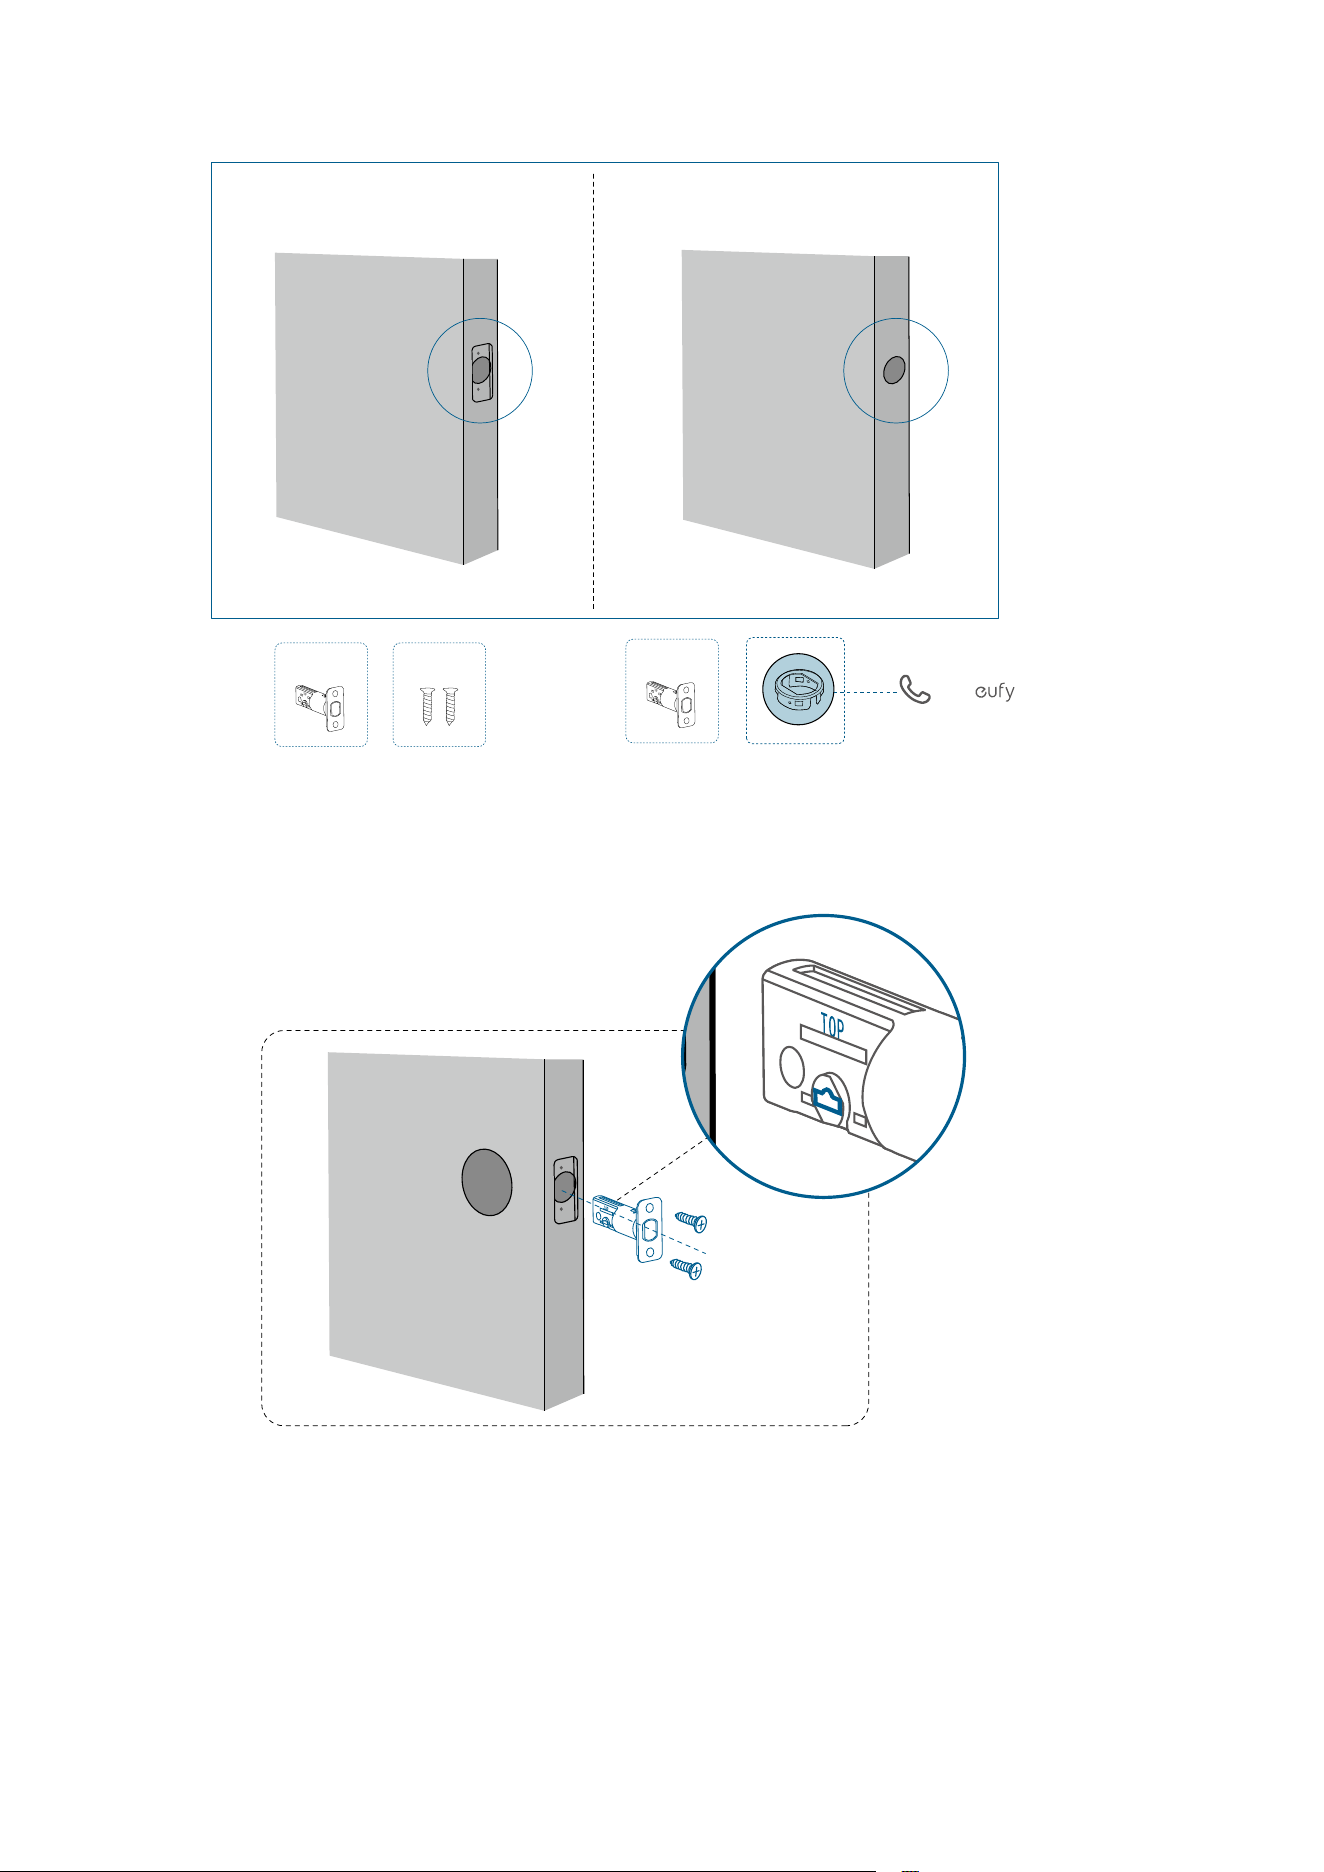
2. Check the Latch Recess
If your latch recess is round, contact eufy Support to get a round drive-in faceplate, and
replace the existing one.
Call Support
A
B
A
Rectangular Latch Recess
Round Latch Recess
3. Install the Deadbolt
• If your latch recess is rectangular, insert and screw the provided deadbolt directly.
Ensure the word "TOP" on the deadbolt faces up and the T-shaped hub is centered.
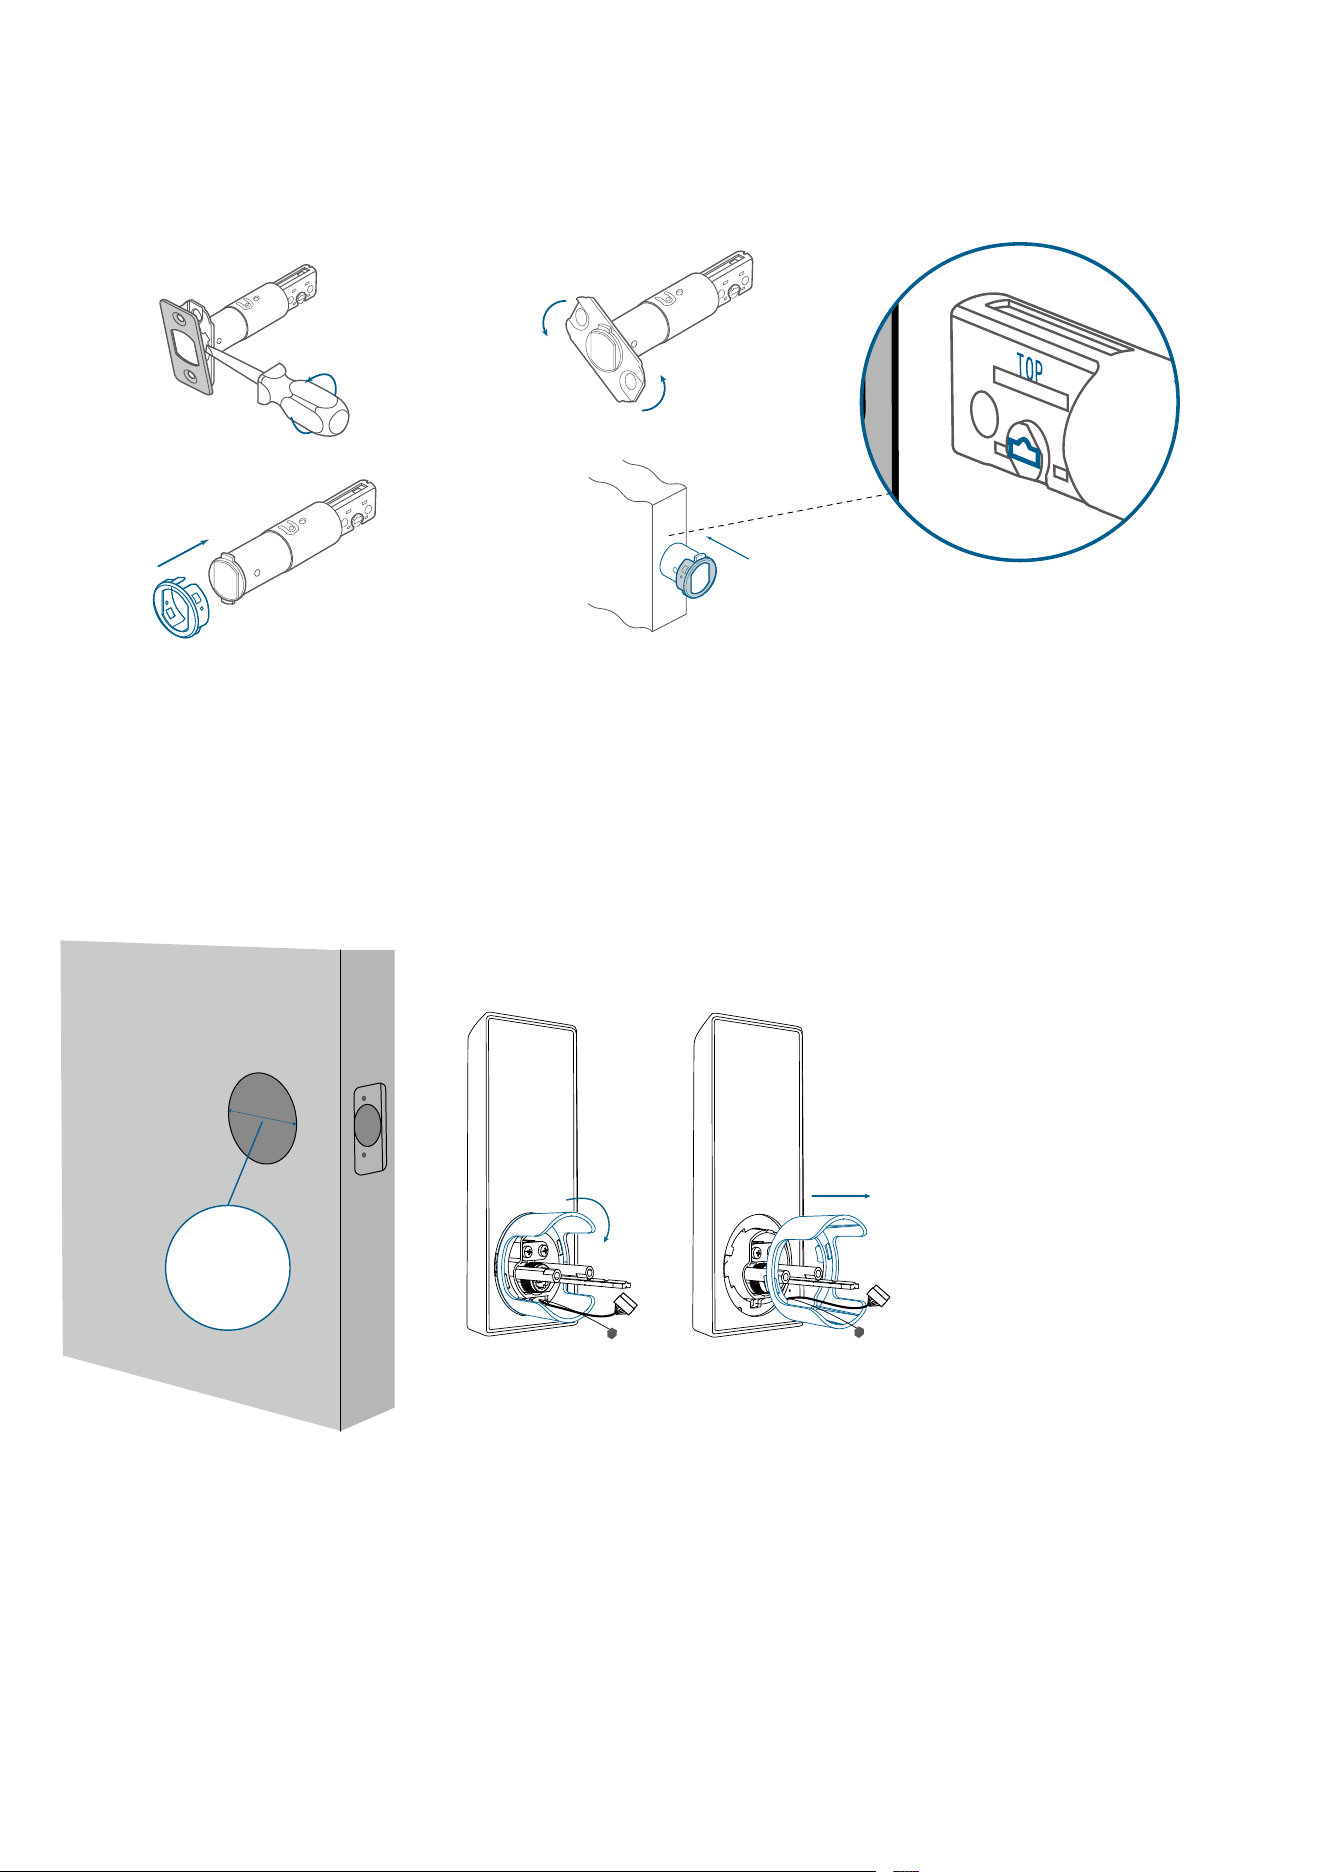
• If your latch recess is round, swap the faceplate first:
1) Take apart the current faceplate with a flathead screwdriver.
2) Take o the other part of the faceplate.
3) Slide the round drive-in faceplate onto the deadbolt.
And then install the deadbolt into the door frame.
❷❶
❸ ❹
Step 2. Install the Exterior Assembly
1. Measure Cross Bore Diameter
• If 2 ⅛ in (54 mm), install the exterior assembly.
• If 1 ½ in (38 mm), remove the spacer first, and install the exterior assembly.
Cross Bore
Diameter
1 ½ in (38 mm)
2. Attach Exterior Assembly to the Door
1. Feed the T-shaped tailpiece of the exterior assembly through the T-shaped tailpiece slot
on the deadbolt.
2. Make sure the cables go underneath the deadbolt.
6
1
2
3
4
5
7
0
8
9
❷
❶
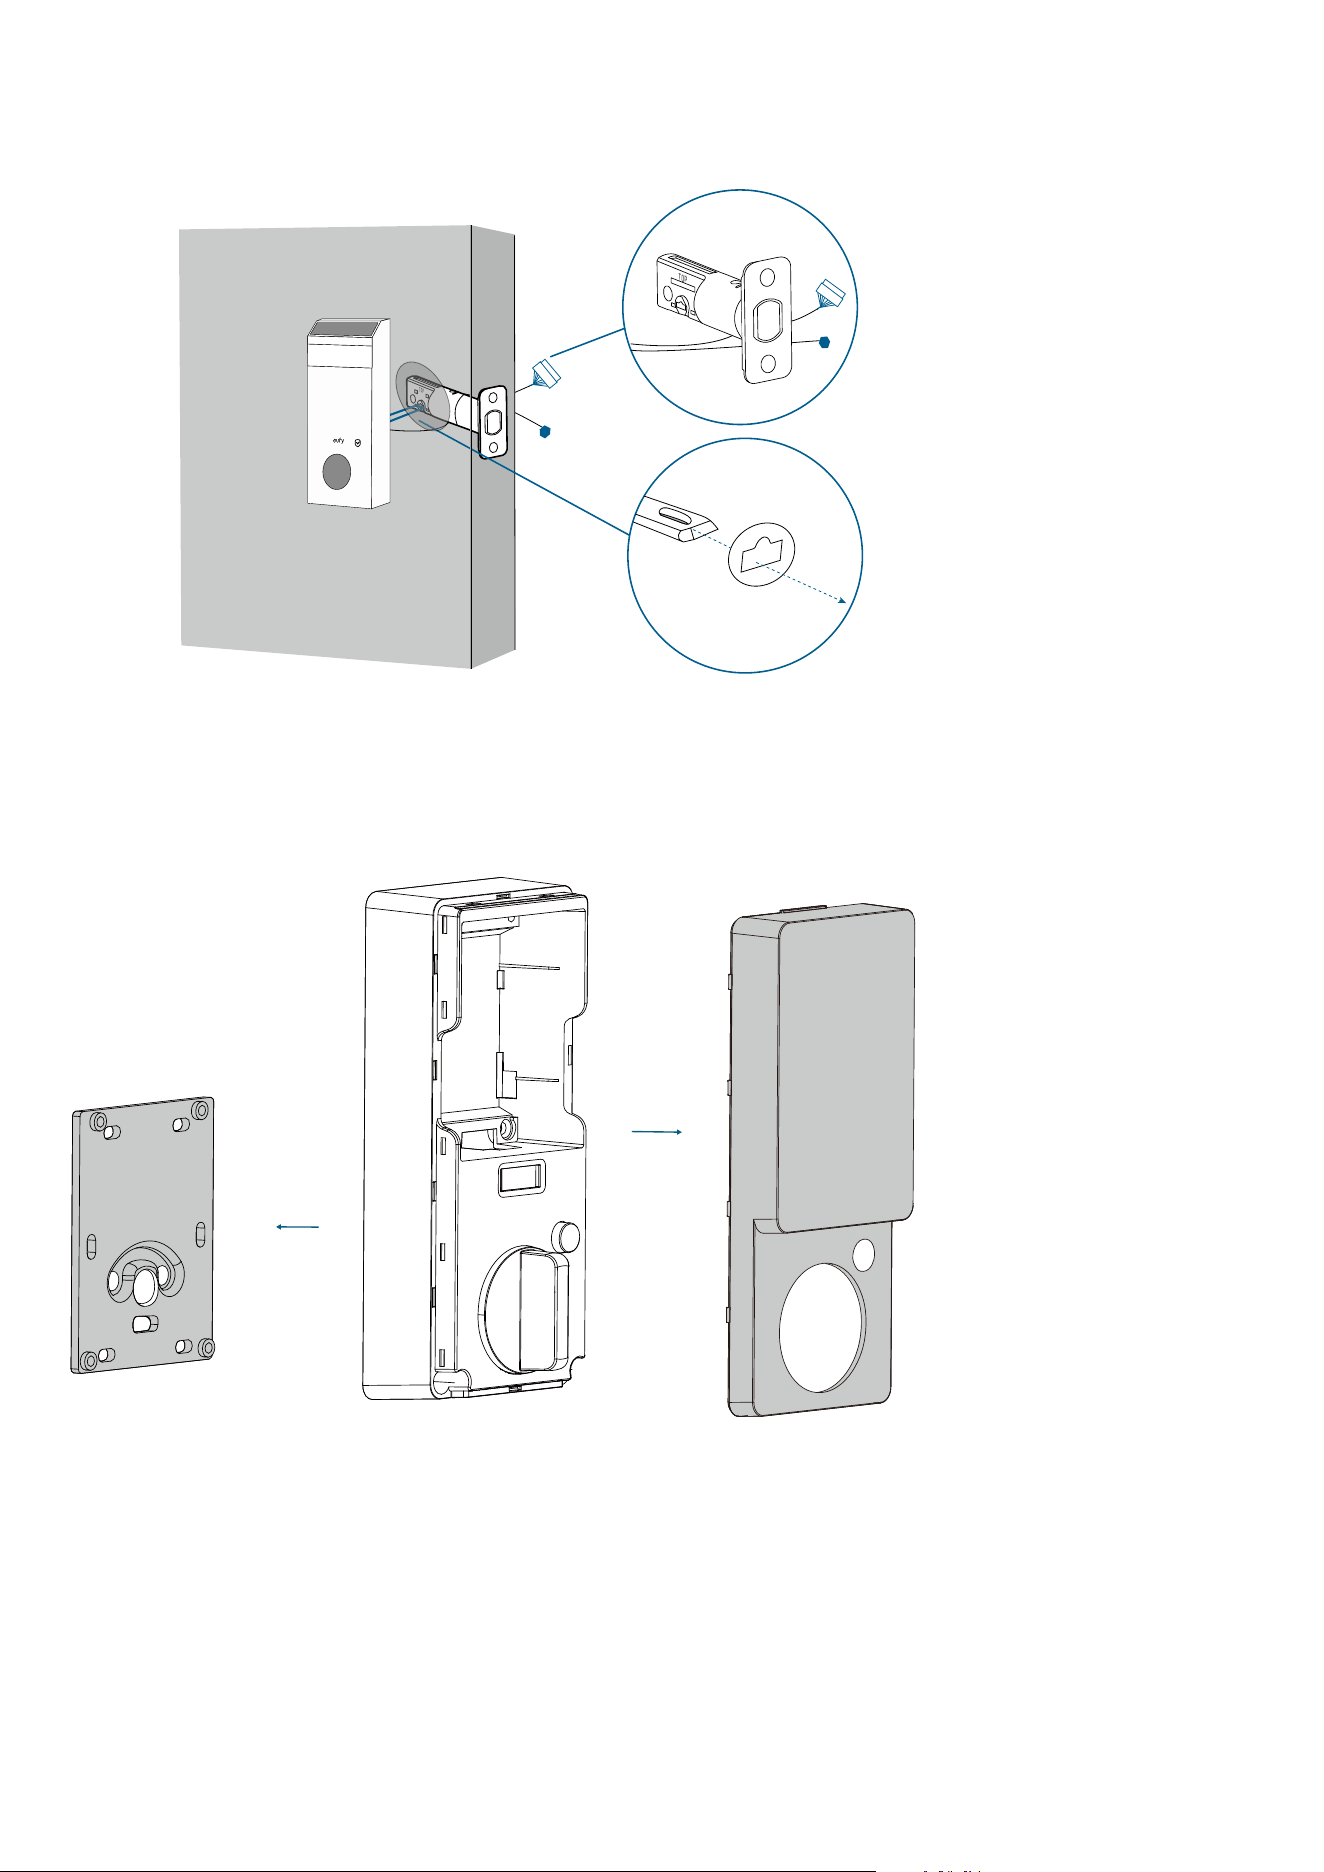
Step 3. Install the Interior Assembly
1. Detach Mounting Plate and Battery Cover
UP
Cable
DOWN
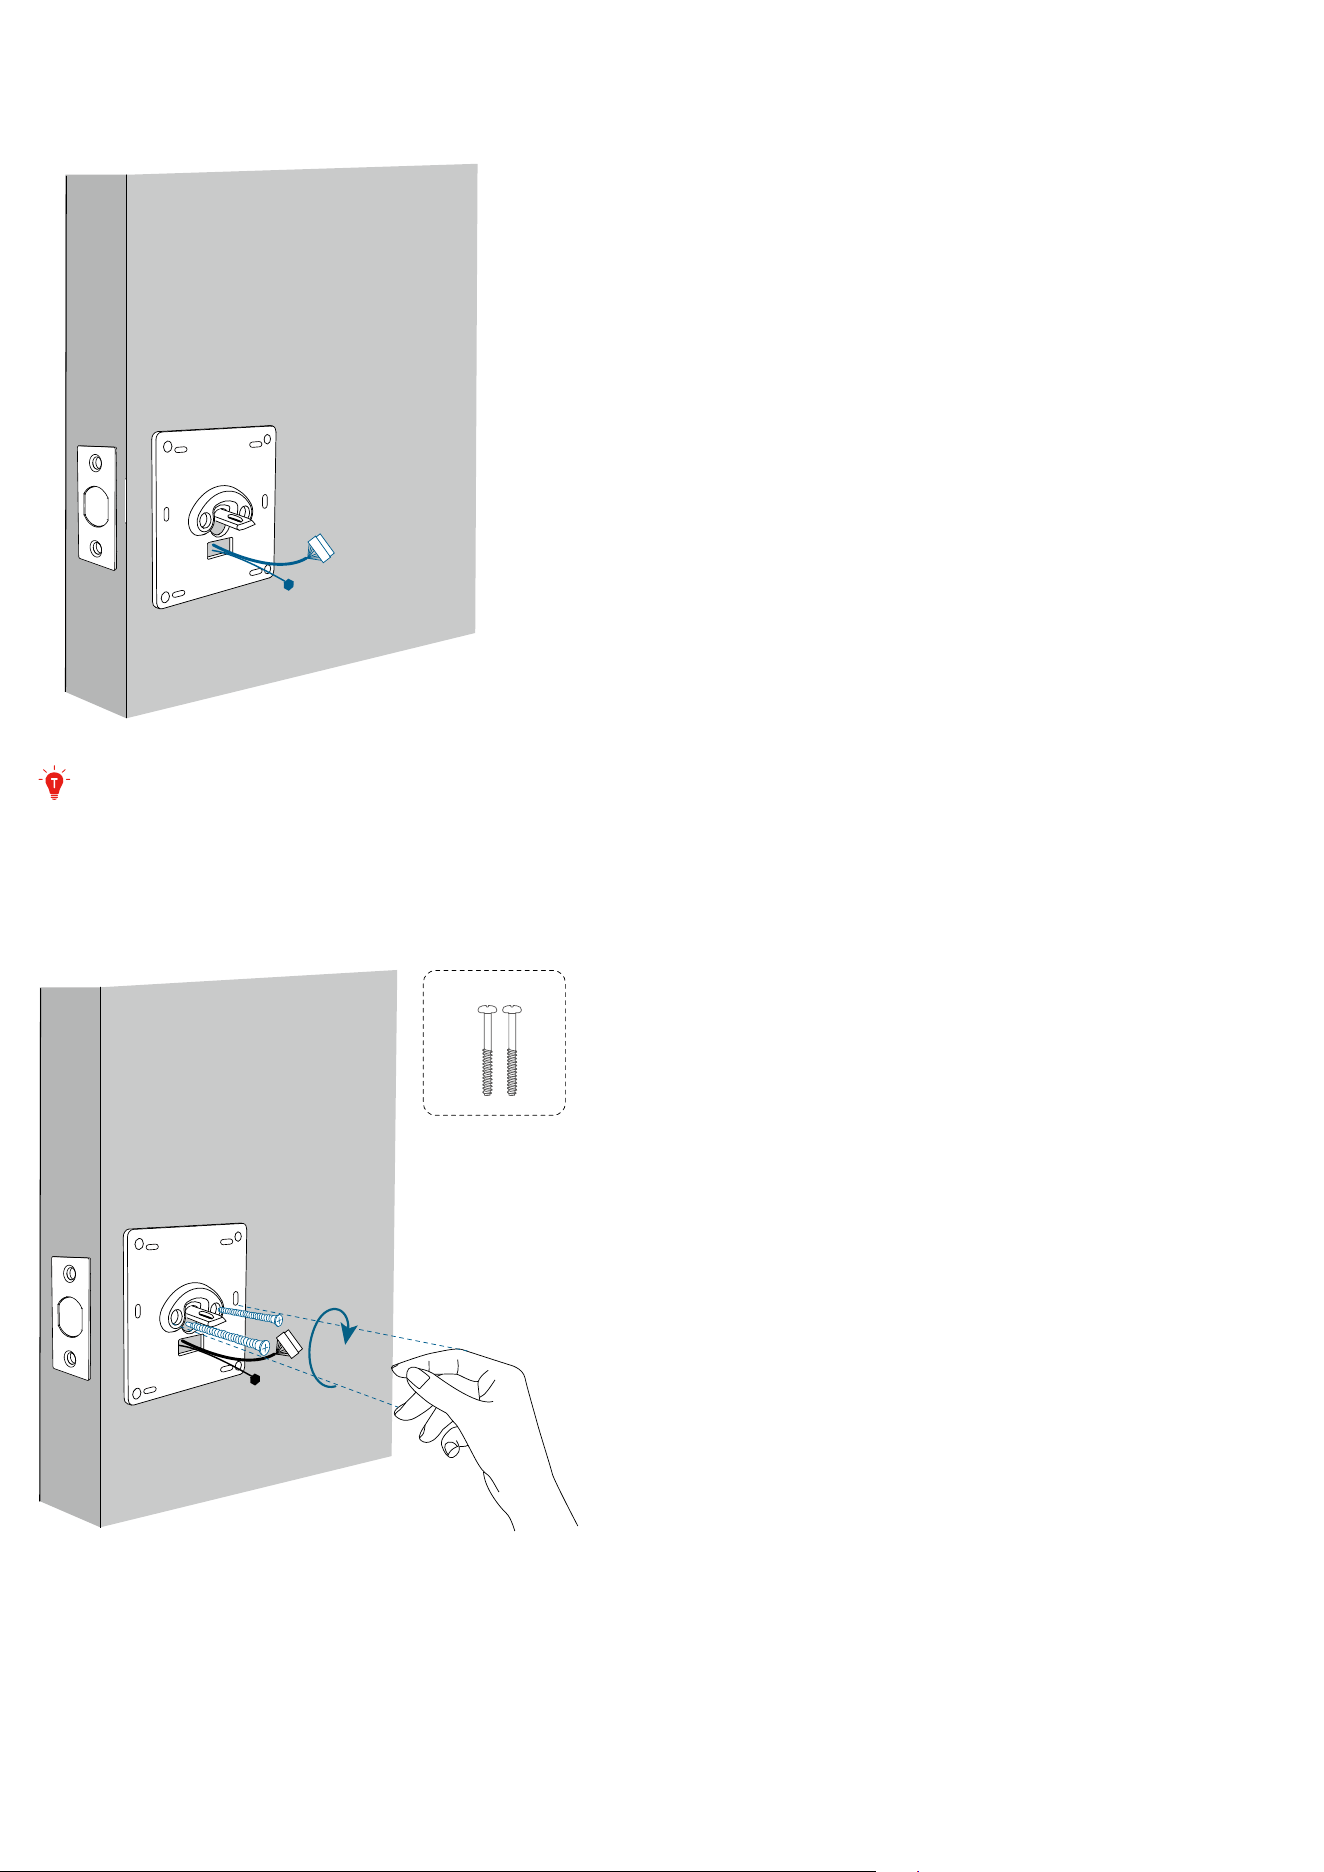
2. Run the Cables
Run the cables through the slot on the mounting plate.
• Make sure the silicone pad is against the door.
UP
Cable
DOWN
Pay attention to the "UP" and "DOWN" markings on the mounting plate, and place it
correctly as instructed.
3. Secure the Mounting Plate
1. Align the mounting plate with the threaded screw receptacles of the exterior assembly.
2. Set the screws (E) with your hands, then fasten with a screwdriver.
UP
Cable
DOWN
E
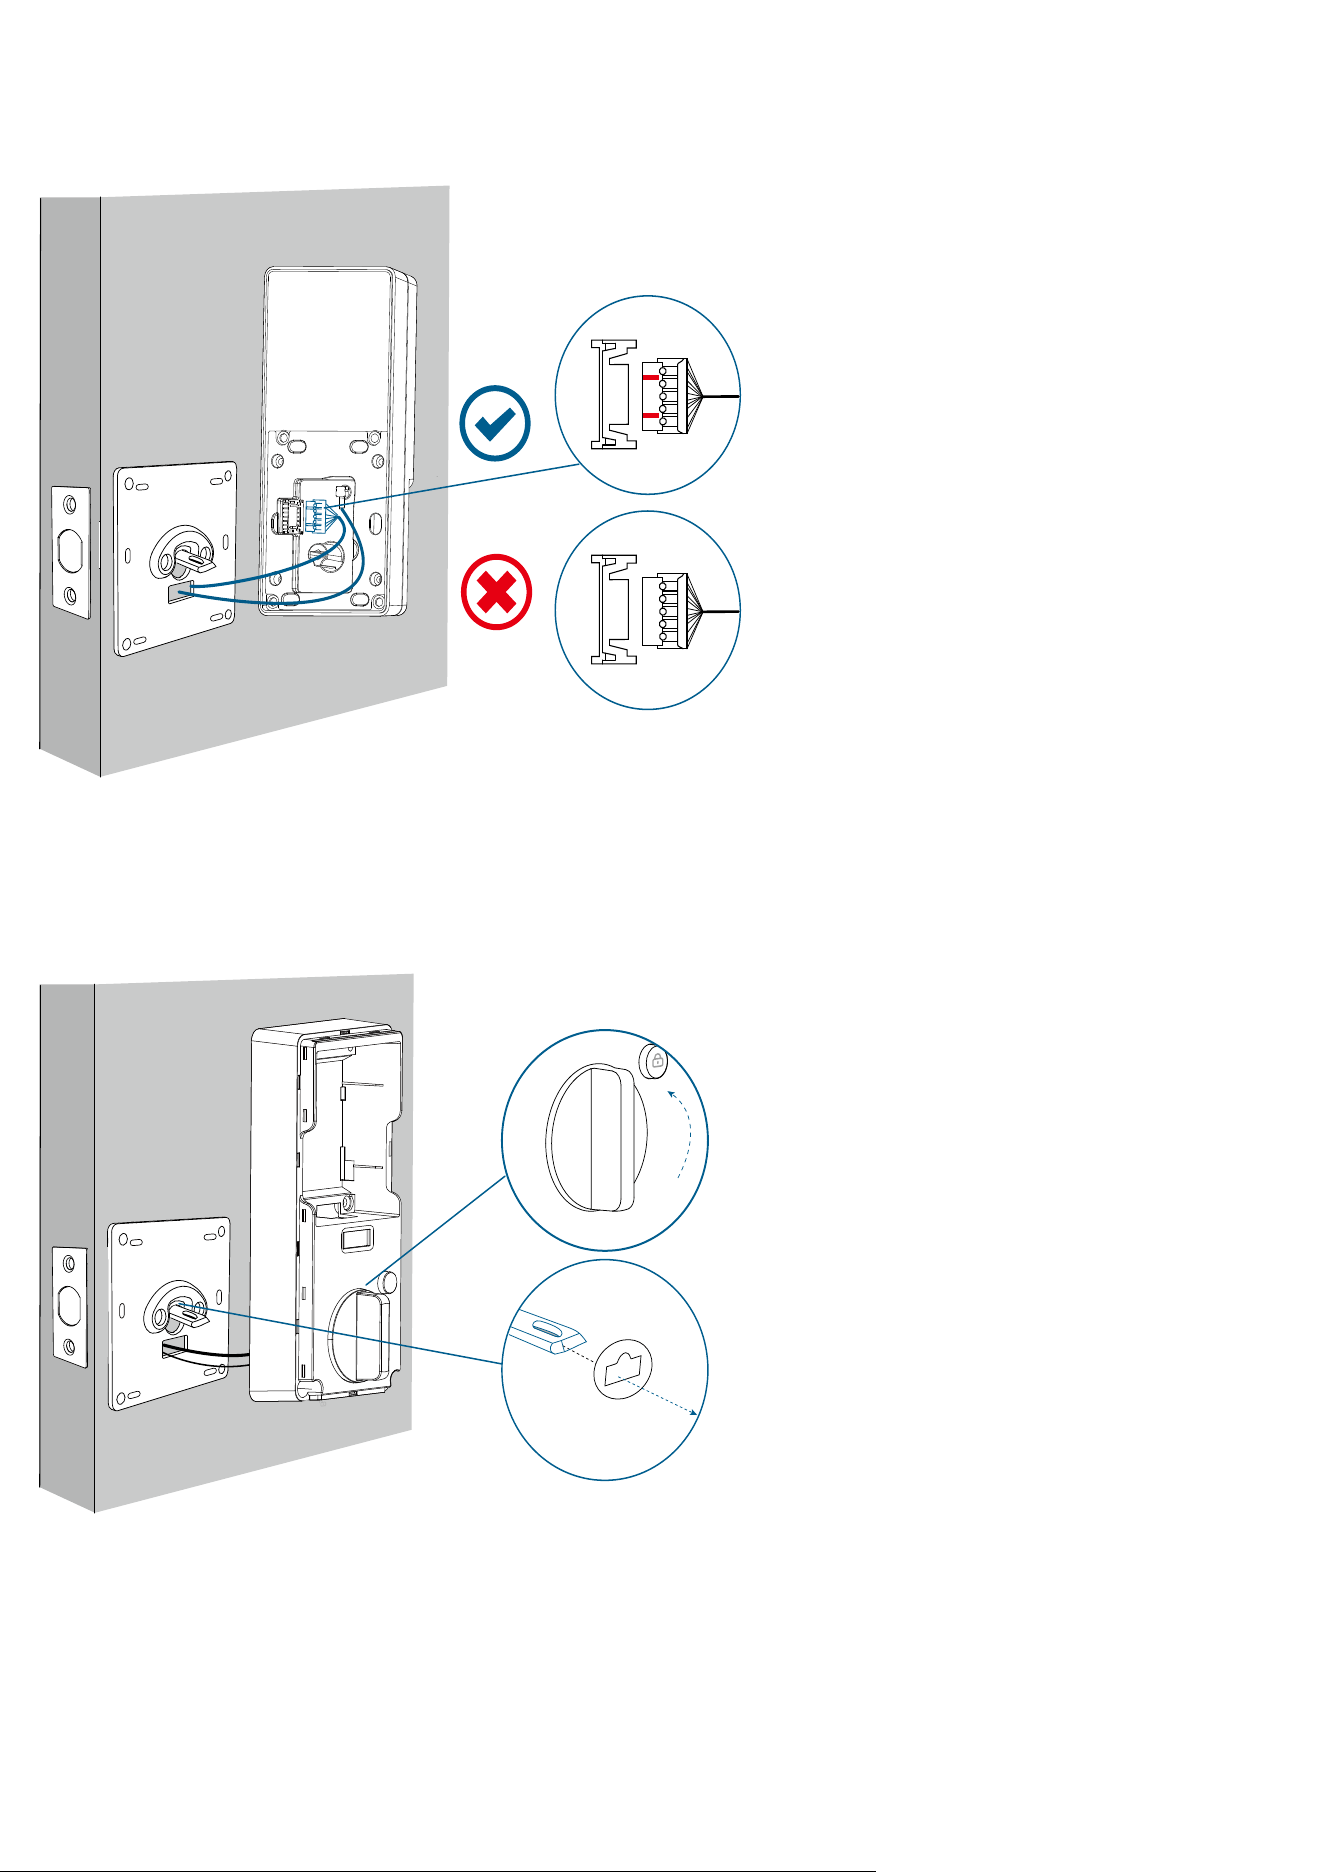
4. Connect the Cables
Plug the power cable (large connector) and then the radar cable (small connector) into the
sockets on the back of the interior assembly.
• Route the cables around the tailpiece receiver to avoid pinching during installation.
UP
Cable
DOWN
5. Secure the Interior Assembly
1. Insert the T-shaped tailpiece into the T-shaped tailpiece receiver of the interior assembly.
• Make sure both wires are tucked into the cavity on the back of the interior assembly.
2. Make sure the deadbolt is retracted and the thumbturn knob is at the "unlock" position.
UP
Cable
DOWN
❷
❶
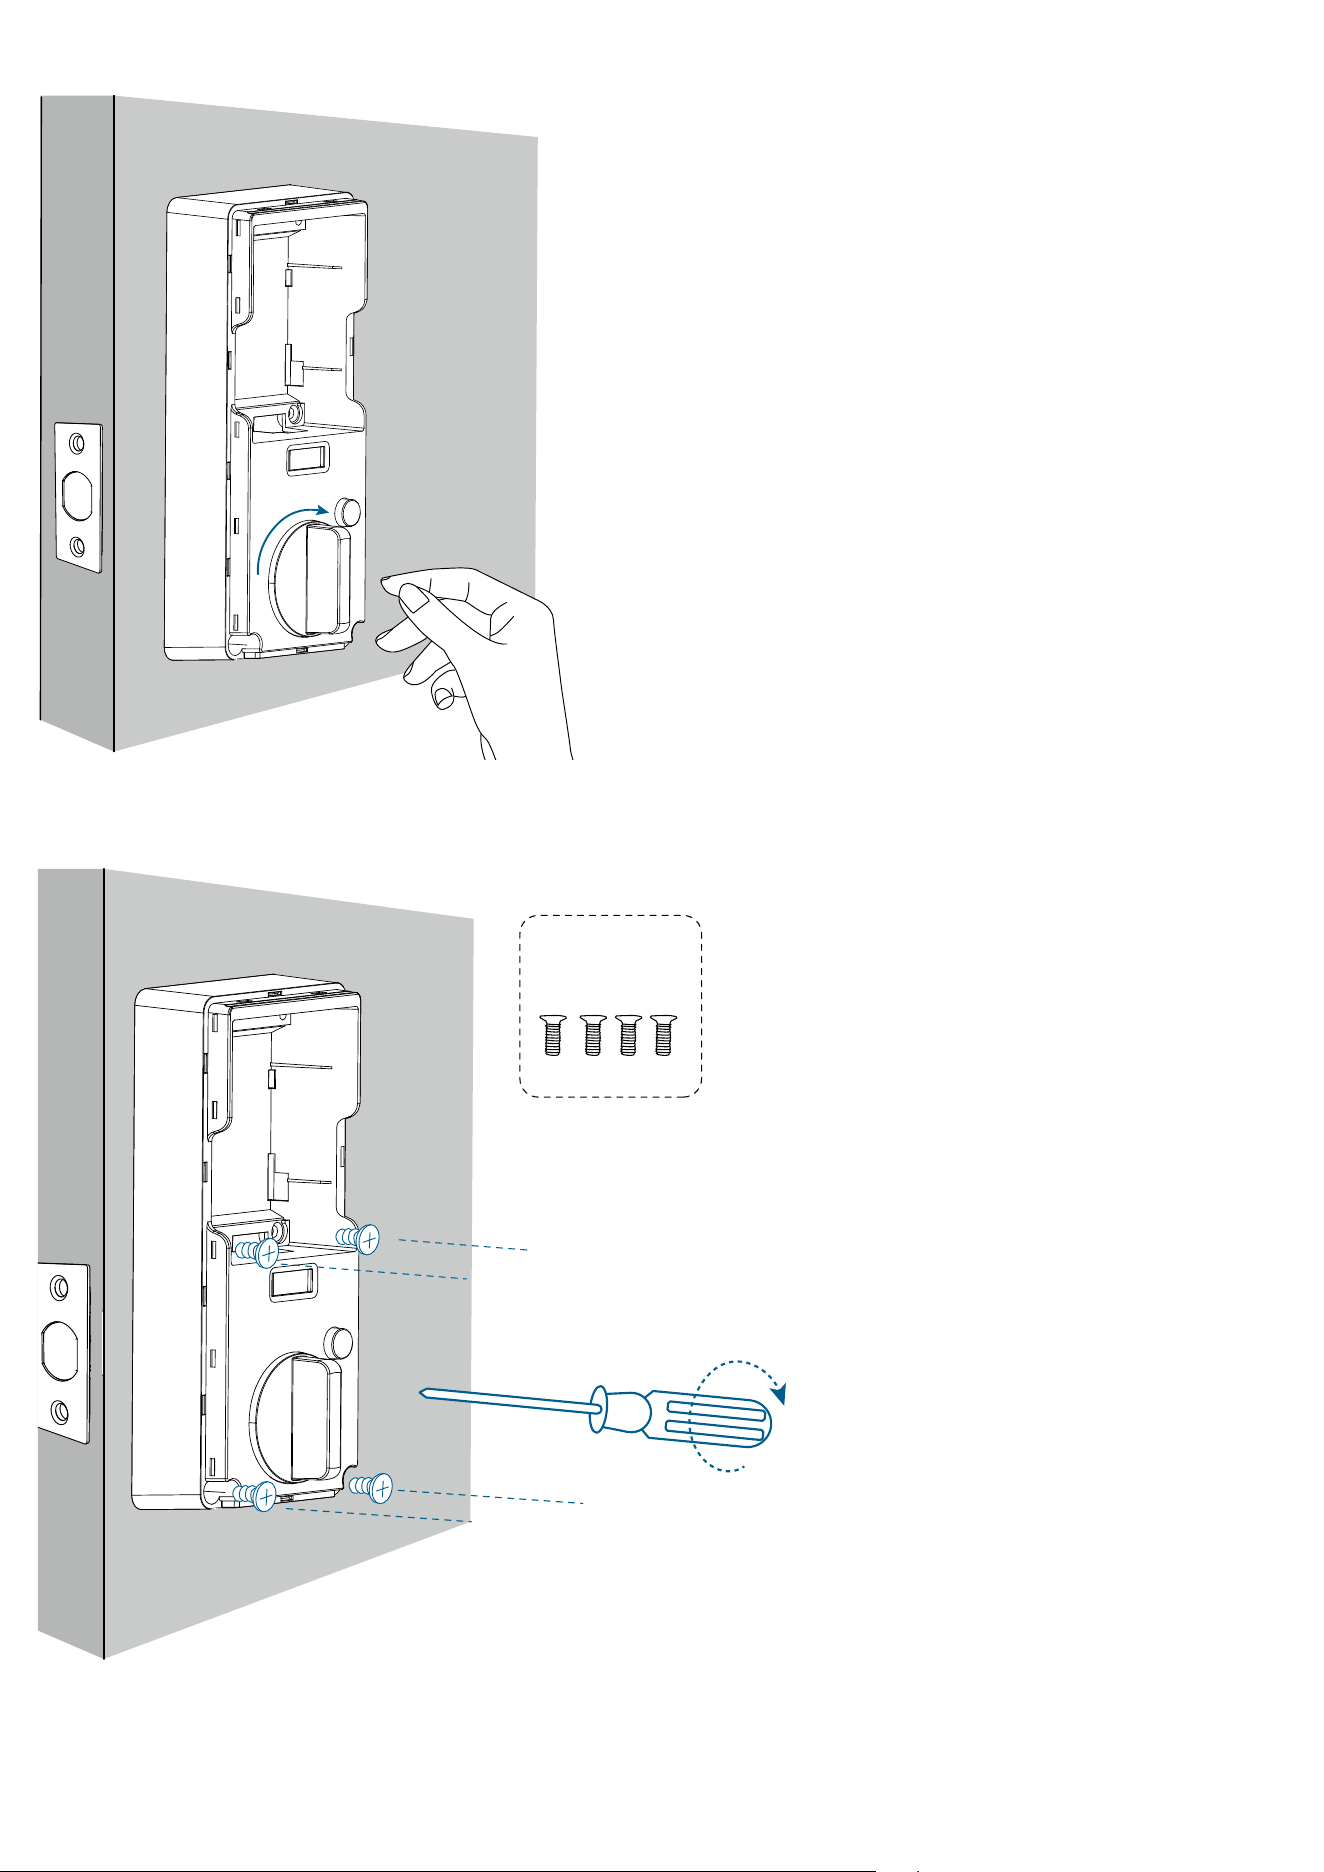
3. Check if the deadbolt moves properly by turning the thumbturn.
4. Use a long screwdriver to fasten the interior assembly screws (F).
Ensure there is no gap between the mounting plate and the interior assembly.
F
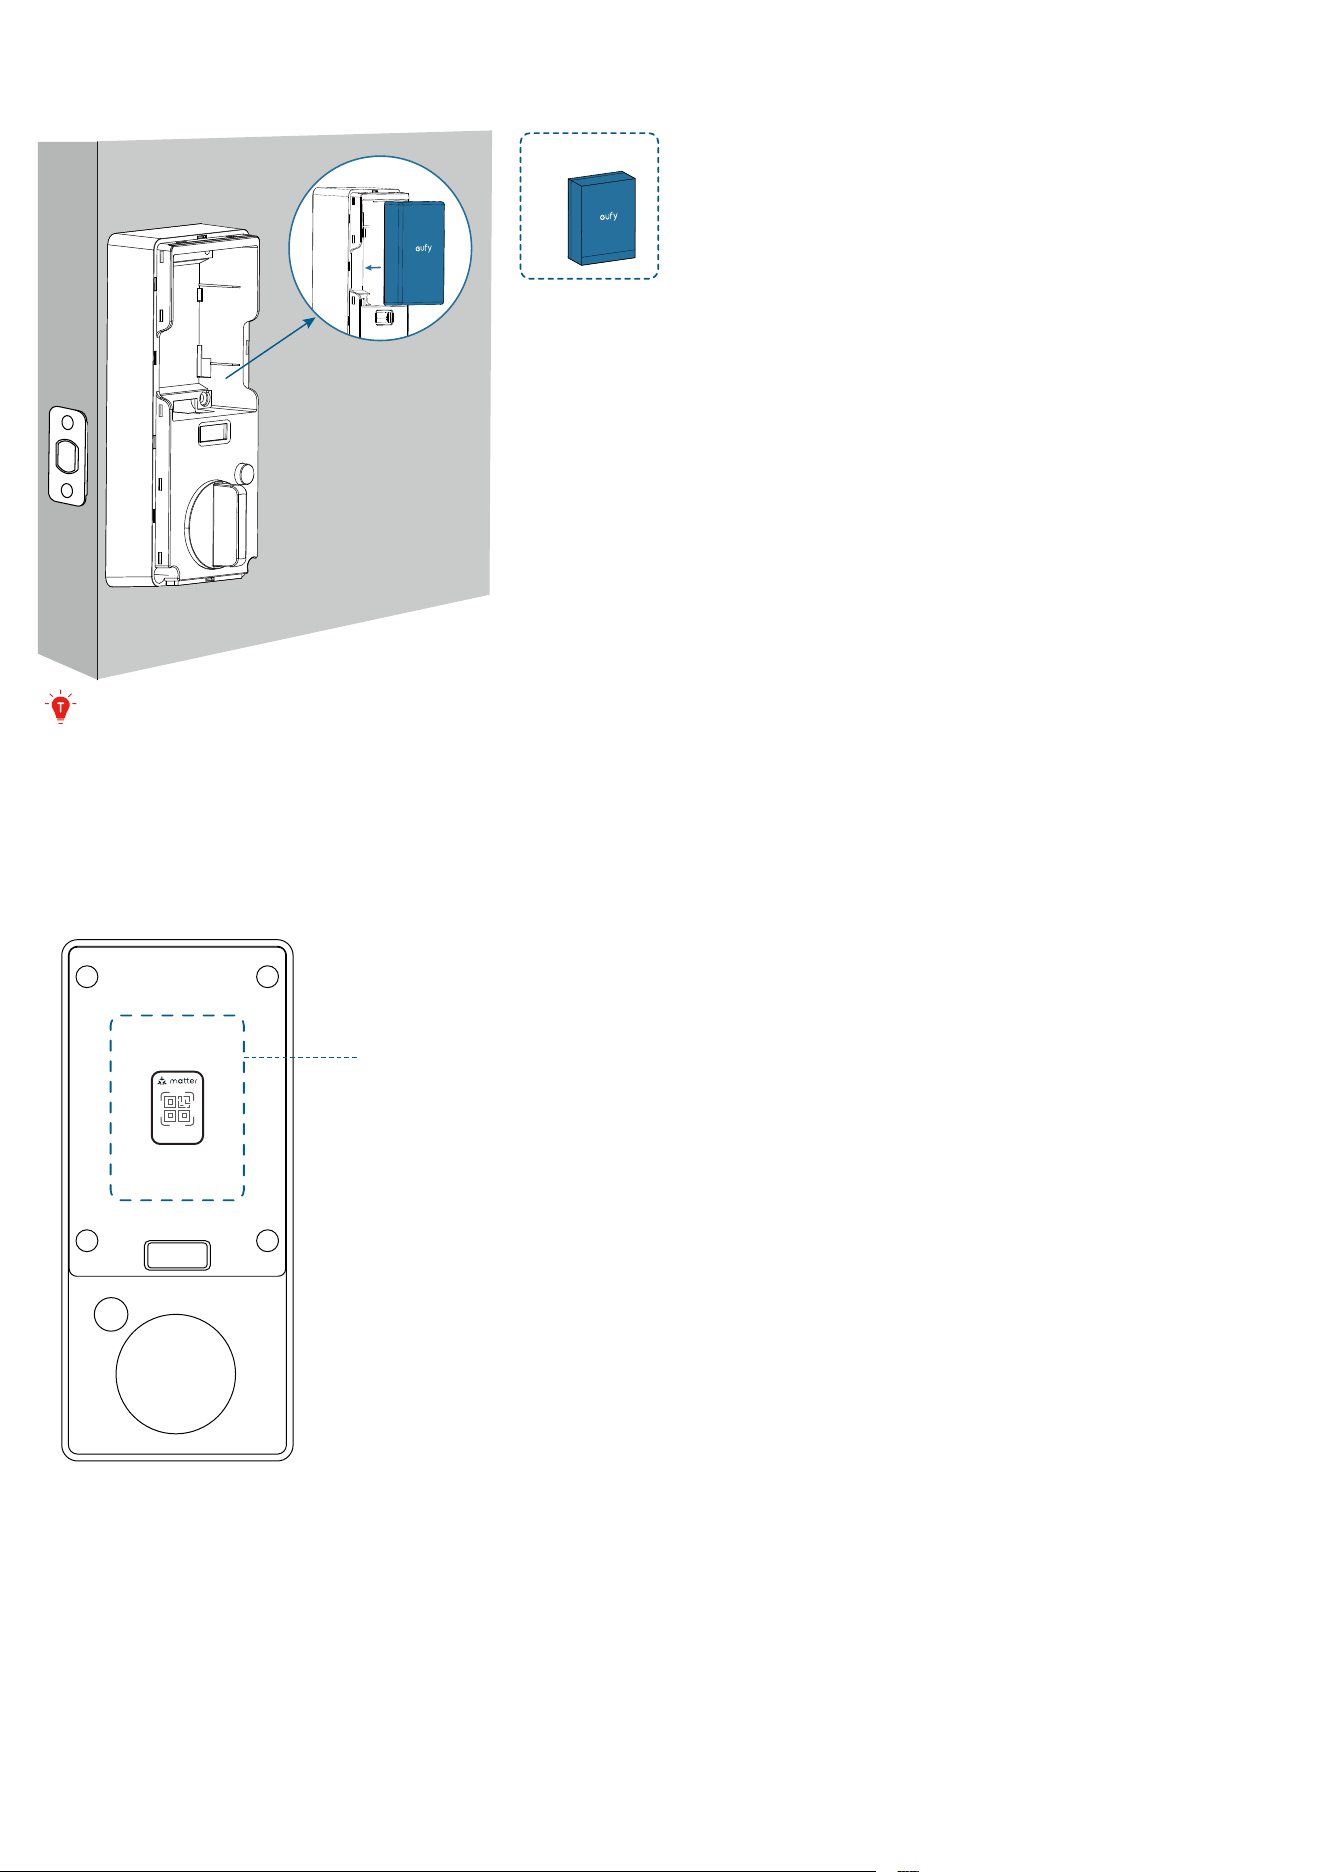
6. Install the Batteries
Install the rechargeable battery.
G
Backup Battery Inside
Close the battery cover to use the
backup battery when the main battery
is removed for charging.
The battery cover includes a built-in backup battery. It powers the lock when the main
battery is low or charging, and the main battery recharges it automatically when needed.
The backup battery oers:
· Longer battery life.
· Up to 2 weeks of emergency use.
· Uninterrupted operation during battery replacement or charging.
G
Backup Battery Inside
Close the battery cover to use the
backup battery when the main battery
is removed for charging.
Backup Battery Inside
Close the battery cover to use the
backup battery when the main battery
is removed for charging.
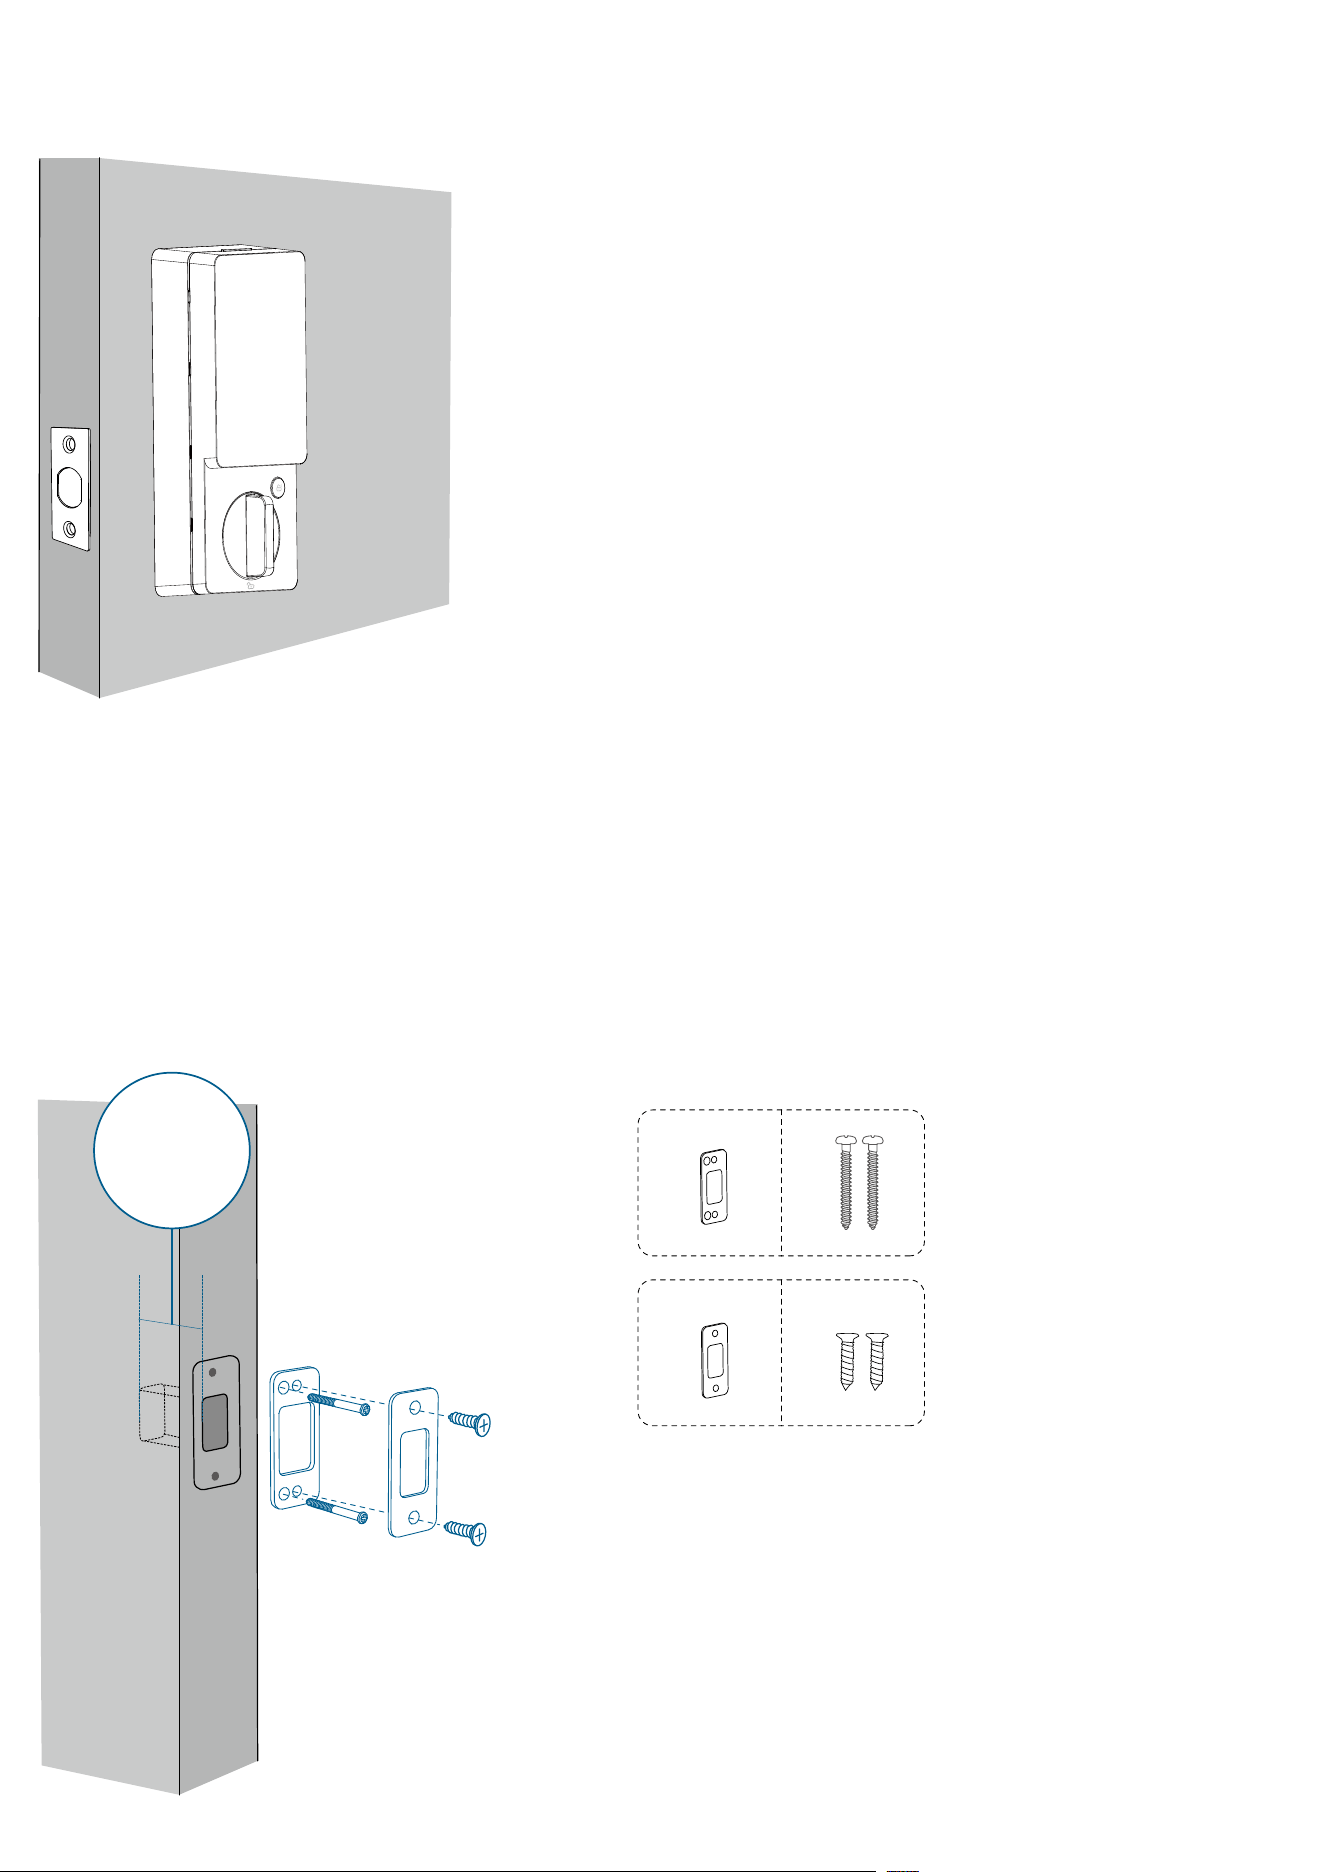
7. Close the Battery Cover
• Close the cover by snapping it into place.
• To remove the battery cover, pull it o from the top.
Step 4. Install the Strike Plate
1. Check the Strike Hole Depth
Strike hole depth in the door frame: at least 1” (25.4 mm).
Otherwise calibration may fail during setup, and the lock may not function as expected.
2. Install the Strike Reinforcer
Install the strike reinforcer (I) with the long screws (J).
3. Install the Strike Plate
Install the strike plate (K) on top of the reinforcer with the short screws (L).
J
K L
I
Latch Hole
Depth
1” (25.4mm)

Step 5. Set up the System & Register Palm Vein ID
1. Download the App
Download and install the eufy app, then sign up for an account.
2. Add eufy FamiLock E34 to Device List
Follow the in-app instructions to add the lock to your device list.
• Ensure your eufy FamiLock E34 battery is charged, or it may fail to be added to the eufy
app.
3. Register Your Palm Vein ID
Follow the in-app instructions to register your palm vein ID.
Before registering your palm vein ID, please make sure that
• The smart lock is fully installed.
• Your palm is dry and free of significant damage or dirt.
4. Set up the Lock with Matter
This smart lock is Matter-compatible, enabling seamless integration with Apple Home,
SmartThings, Alexa, and Google-enabled devices in your home. To set it up, use the eufy
app and navigate to Device >> Settings >> Work with Matter to pair with the third-party
ecosystems.
• Click here to read the Matter device setup guide and set up the device in the
corresponding app.
Congratulations!
Now you are all set to use the lock.
Read on for more information about your lock.
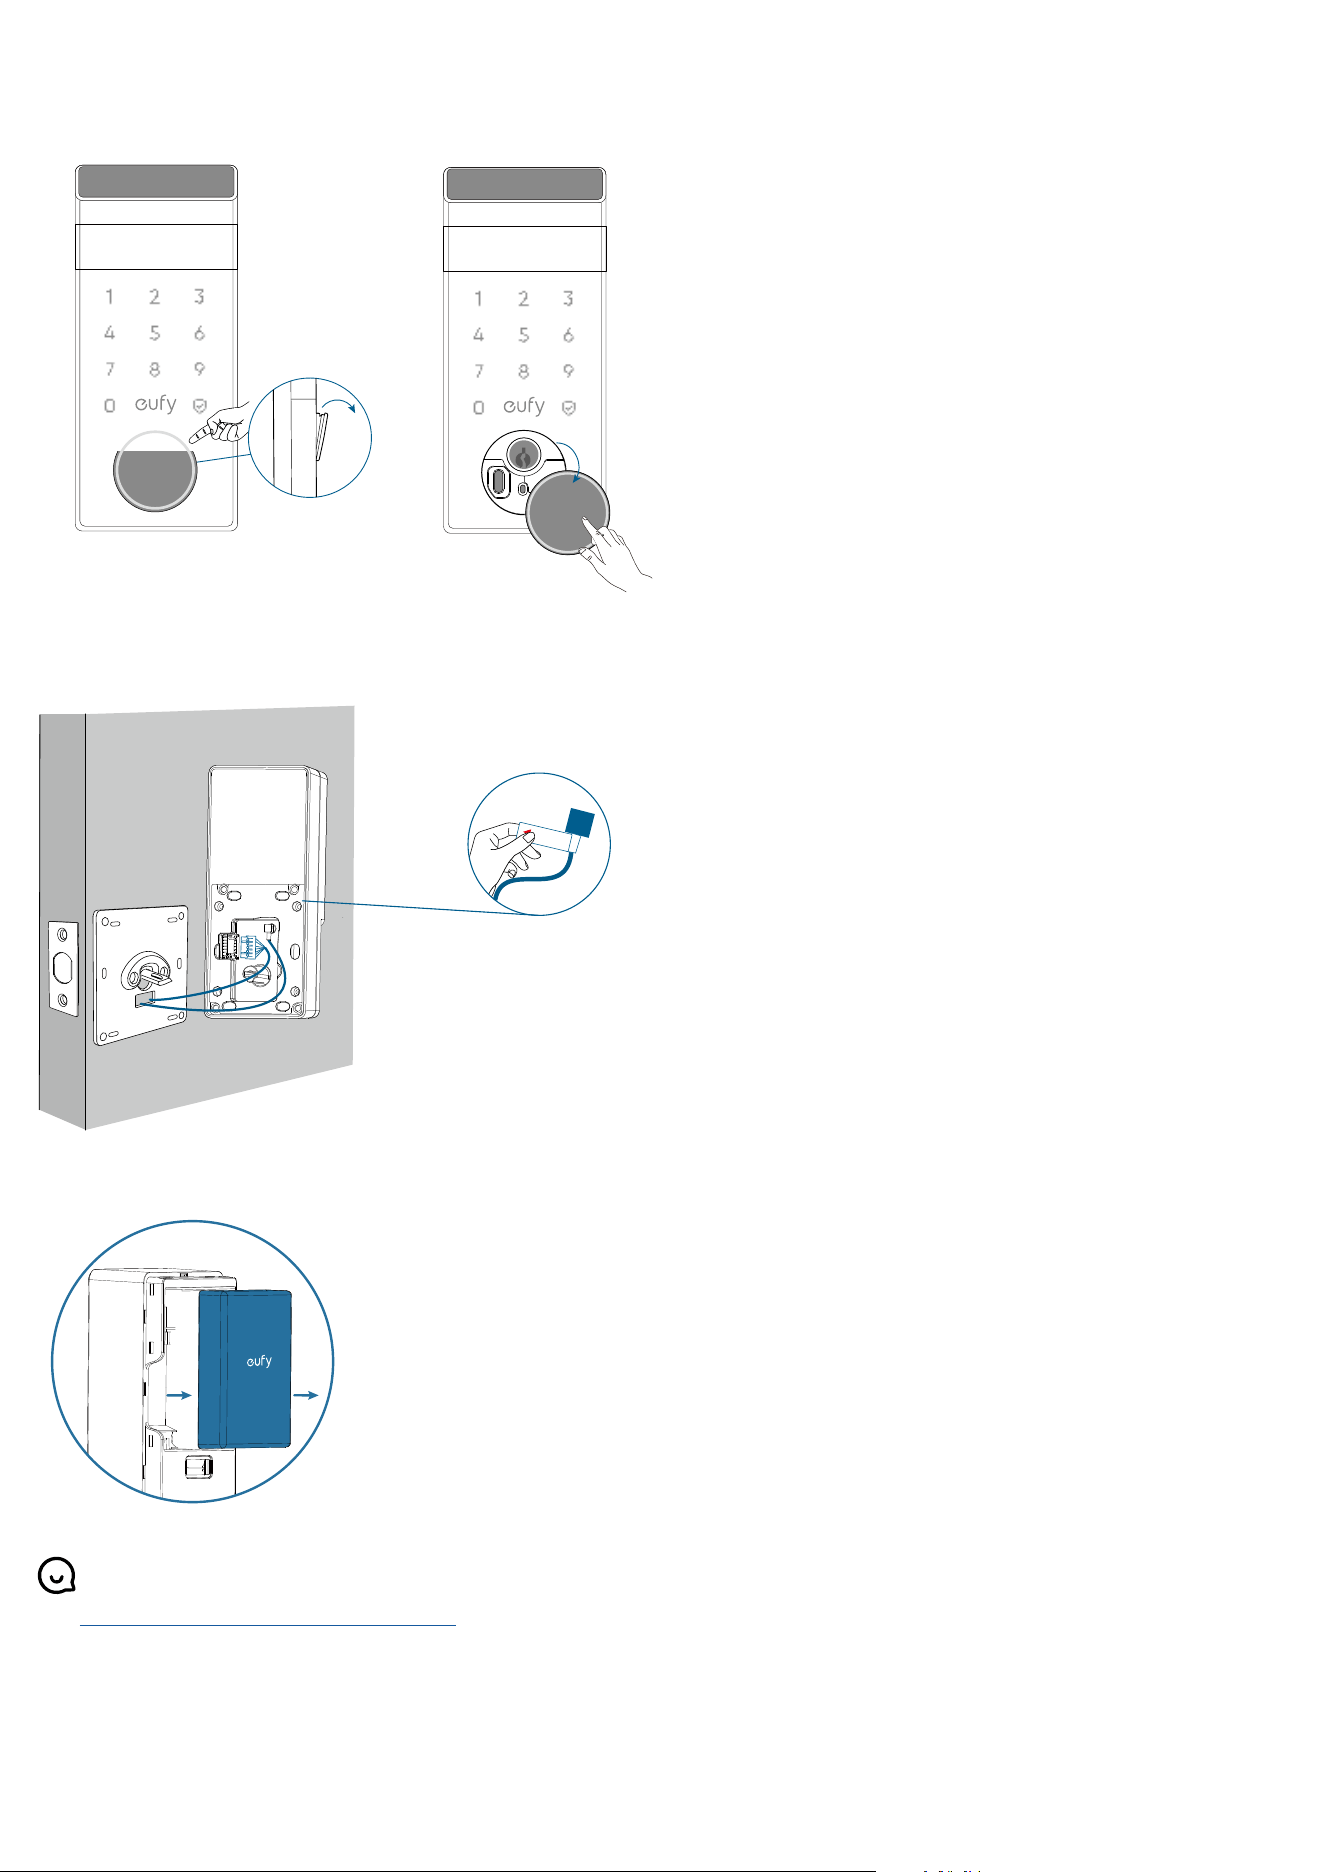
Open / Close the Lock Cylinder Cover
• To open the cover, gently pull on the cover and rotate it counterclockwise.
• To close the cover, turn it clockwise and slide it back into place.
Disconnect the Radar Cable
Gently pull the tag.
PULL
UP
Cable
DOWN
Remove the Batteries
For online support, tutorial videos, FAQs, and more information, please visit
https://support.eufy.com/s/.