model number 060-3058-2 | contact us: 1.866.523.5218
IMPORTANT:
Read and follow all safety rules and operating
instructions before using this product.
Instruction
Manual
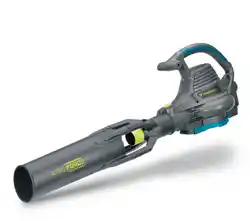
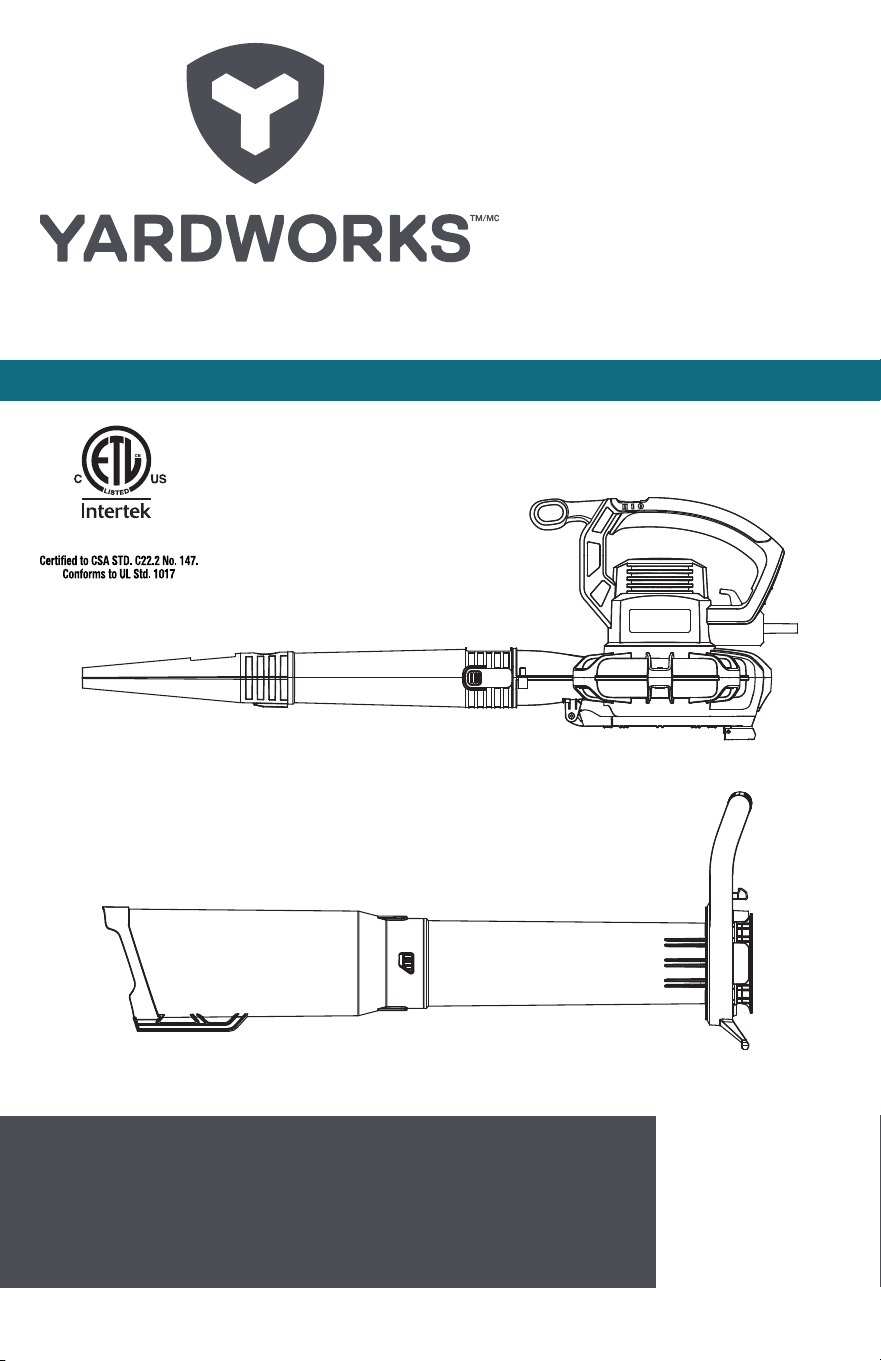
HIGH-PERFORMANCE LEAF BLOWER & VACUUM
3025736

model number 060-3058-2 | contact us: 1.866.523.5218
2
Table of Contents
Technical Specications
TECHNICAL SPECIFICATIONS
Rated voltage 120 V~ 60 Hz
Rated power 12 A
No load speed 16000 /min
Airow 400 CFM
Air speed 160 or 250 MPH (257 or 402 km/h)
Mulching ratio 16:1
Collection bag capacity 1.2 bushels (42.2 L)
Weight 10 lb (4.5 kg)
Protection class II
Technical Specications 2
General Safety Rules 3
Know Your Blower 8
Accessories 8
Exploded View 9
Parts List 10
Assembly 11
Troubleshooting 15
Storage 16
Maintenance 16
Symbols 17
Warranty 18

model number 060-3058-2 | contact us: 1.866.523.5218 model number 060-3058-2 | contact us: 1.866.523.5218
3
General Safety Rules
WARNING: Some dust created by power
sanding, sawing, grinding, drilling and
other construction activities contains
chemicals known to cause cancer, birth
defects or other reproductive harm. Some
examples of these chemicals are:
• Lead from lead-based paints;
• Crystalline silica from bricks and
cement and other masonry products;
and
• Arsenic and chromium from
chemically-treated lumber.
Your risk from these exposures varies,
depending on how often you do this type
of work. To reduce your exposure to
these chemicals: work in a well-ventilated
area, and work with approved safety
equipment, such as those dust masks
that are specially designed to lter out
microscopic particles.
FOR ALL APPLIANCES
• Avoid Dangerous Environments — Don’t
use appliances in damp or wet locations.
• Don’t Use In Rain.
• Keep Children Away — All visitors
should be kept at a distance from work
area.
• Dress Properly — Do not wear loose
clothing or jewellery. They can be
caught in moving parts. Use of rubber
gloves and substantial footwear is
recommended when working outdoors.
Wear protective hair covering to contain
long hair.
• Use Safety Glasses — Always use face
or dust mask if operation is dusty.
• Use Right Appliance — Do not use
appliance for any job except that for
which it is intended.
• Ground Fault Circuit Interrupter (GFCI)
protection should be provided on the
circuit(s) or outlet(s) to be used for the
gardening appliance. Receptacles are
available having built-in GFCI protection
and may be used for this measure of
safety.
• Warning — To reduce the risk of electric
shock, use only with an extension cord
!
WARNING: This product can expose you to chemicals including lead,
phthalate or bisphenol A which are known to cause cancer, birth defects or
other reproductive harm. Wash your hands after use.
!
WARNING: Read all instructions.
!
WARNING: When using electric gardening appliances, basic safety precautions
should always be followed to reduce the risk of re, electric shock, and personal
injury, including the following:
model number 060-3058-2 | contact us: 1.866.523.5218
4
General Safety Rules
intended for outdoor use, such as an
extension cord of cord type SW-A,
SOW-A, STW-A, STOW-A, SJW-A,
SJOW-A, SJTW-A. or SJTOW-A.
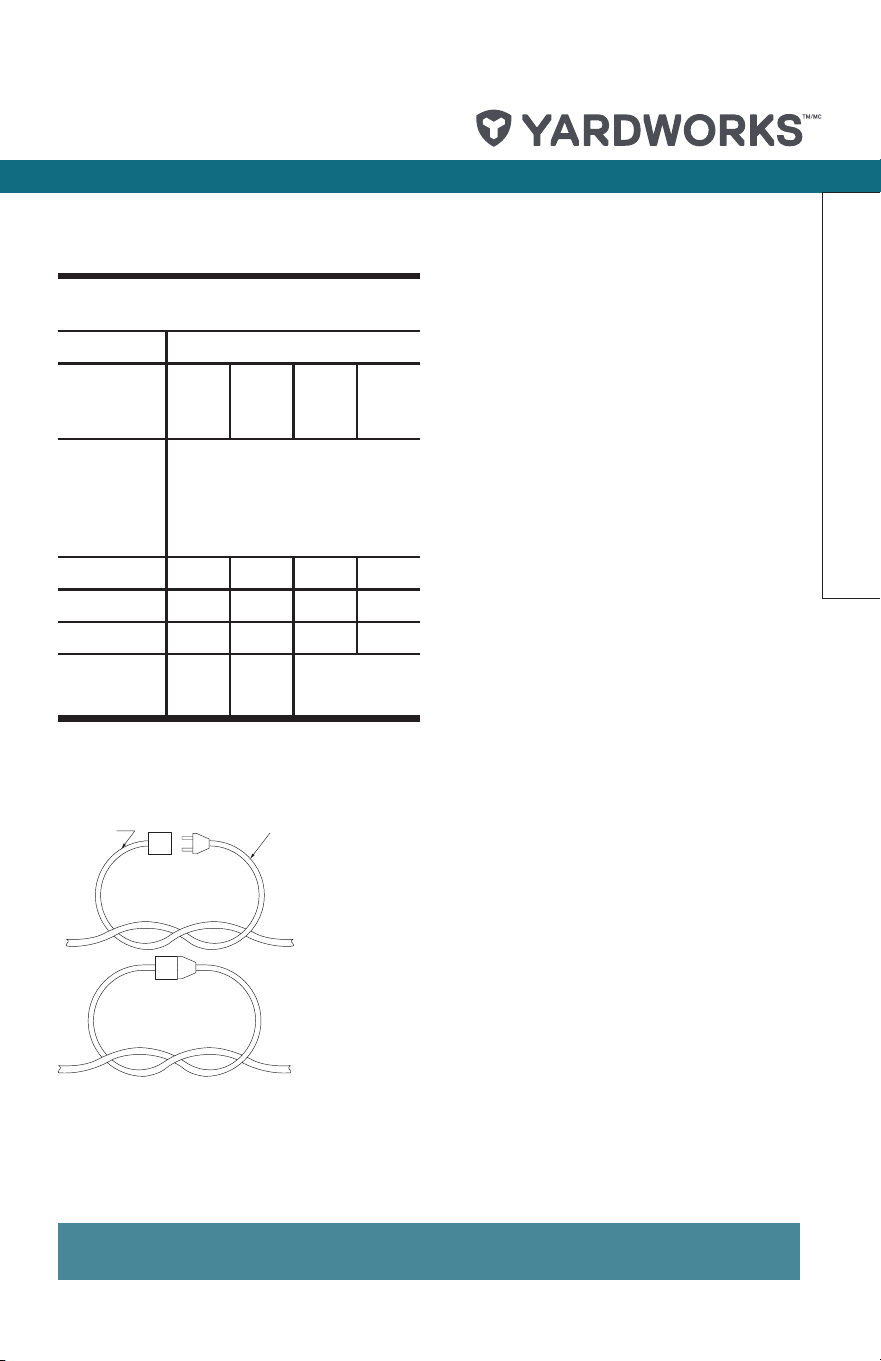
• Extension Cord — Make sure your
extension cord is in good condition.
When using an extension cord, be
sure to use one heavy enough to carry
the current your product will draw. An
undersized extension cord will cause a
drop in line voltage resulting in loss of
power and overheating. Table 1 shows
the correct size to use depending on cord
length and nameplate ampere rating.
If in doubt, use the next heavier gauge.
The smaller the gauge number, the
heavier the cord. To reduce the risk of
disconnection of appliance cord from the
extension cord during operating:
i) Make a knot as shown in Figure 1.
ii) Use one of the plug-receptacle
retaining straps or connectors
described in this manual.
• Avoid Unintentional Starting — Don’t
carry plugged-in appliance with nger
on switch. Be sure switch is off when
plugging in.
• Don’t Abuse Cord — Never carry
appliance by cord or yank it to
disconnect from receptacle. Keep cord
from heat, oil, and sharp edges.
• Don’t Force Appliance — It will do the
job better and with less likelihood of a
risk of injury at the rate for which it was
designed.
• Don’t Overreach — Keep proper footing
and balance at all times.
• Stay Alert — Watch what you are doing.
Use common sense. Do not operate
appliance when you are tired.
• Disconnect Appliance — Disconnect
the appliance from the power supply
when not in use, before servicing, when
changing accessories such as blades,
and the like.
• Store Idle Appliances Indoors — When
not in use, appliances should be stored
indoors in dry, and in a high or locked-up
place — out of reach of children.
• Maintain Appliance With Care — Keep
cutting edge sharp and clean for
best performance and to reduce the
risk of injury. Follow instructions for
lubricating and changing accessories.
Inspect appliance cord periodically,
and if damaged, have it repaired by
an authorized service facility. Inspect
extension cords periodically and replace
if damaged. Keep handles dry, clean,
and free from oil and grease.
• Check Damaged Parts — Before further
use of the appliance, a guard or other
part that is damaged should be carefully
checked to determine that it will operate
properly and perform its intended
function. Check for alignment of moving
parts, binding of moving parts, breakage
of parts, mounting, and any other
condition that may affect its operation.
A guard or other part that is damaged
should be properly repaired or replaced
by an authorized service centre unless
indicated elsewhere in this manual.
!
WARNING: Read all safety warnings and instructions. Failure to follow
the warnings and instructions may result in electric shock, re and/or
serious injury.
model number 060-3058-2 | contact us: 1.866.523.5218 model number 060-3058-2 | contact us: 1.866.523.5218
5
General Safety Rules
SAVE THESE INSTRUCTIONS!
Table 1
Minimum gauge for extension cords
Volts Total length of cord
120 V
25’
(7.6
m)
50’
(15.2
m)
100’
(30.5
m)
150’
(45.7
m)
Ampere
rating
more than
not more
than
AWG
0-6 18 16 16 14
6-10 18 16 14 12
10-12 16 16 14 12
12-16 14 12
Not recom-
mended
Figure 1
Method of securing extension cord
CORD SET
APPLIANCE CORD
(A) TIE CORD AS
SHOWN
(B) CONNECT PLUG
AND RECEPTACLE
FOR ALL DOUBLE-INSULATED
APPLIANCES
• Replacement Parts: When servicing use
only identical replacement parts.
• Polarized Appliance Connections:
To reduce the risk of electric shock, this
appliance has a polarized plug (one
blade is wider than the other) and will
require the use of a polarized extension
cord. The appliance plug will t into a
polarized extension cord only one way.
If the plug does not t fully into the
extension cord, reverse the plug. If the
plug still does not t, obtain a correct
polarized extension cord. A polarized
extension cord will require the use of a
polarized wall outlet. This plug will t
into the polarized wall outlet only one
way. If the plug does not t fully into
the wall outlet, reverse the plug. If the
plug still does not t, contact a qualied
electrician to install the proper wall
outlet. Do not change the equipment
plug, extension cord receptacle, or
extension cord plug in any way.
ADDITIONAL SAFETY WARNINGS
IMPORTANT SAFETY INSTRUCTIONS
• When using an electrical appliance, basic
precautions should always be followed,
including the following:
model number 060-3058-2 | contact us: 1.866.523.5218
6
READ ALL INSTRUCTIONS BEFORE
USING THIS APPLIANCE
WARNING – TO REDUCE THE RISK OF
FIRE, ELECTRIC SHOCK, OR INJURY:
• Do not leave appliance when plugged
in. Unplug from outlet when not in use
and before servicing.
• To reduce the risk of electric shock
– Do not use on wet surfaces. Do not
expose to rain. Store indoors.
• Do not allow to be used as a toy. Close
attention is necessary when used by or
near children.
• Use only as described in this manual.
Use only manufacturer’s recommended
attachments.
• Do not use with damaged cord or plug.
If appliance is not working as it should,
has been dropped, damaged, left
outdoors, or dropped into water, return
it to a service centre.
• Do not pull or carry by cord, use cord
as a handle, close a door on cord,
or pull cord around sharp edges or
corners. Do not run appliance over
cord. Keep cord away from heated
surfaces.
• Do not handle plug or appliance with
wet hands.
• Do not put any object into openings.
Do not use with any opening blocked;
keep free of dust, lint, hair, and
anything that may reduce airow.
• Keep hair, loose clothing, ngers, and
all parts of body away from openings
and moving parts.
• Turn off all controls before unplugging.
• Use extra care when cleaning on stairs.
• Do not use to pick up ammable or
combustible liquids, such as gasoline,
or use in areas where they may be
present.
• Do not pick up anything that is burning
or smoking, such as cigarettes,
matches, or hot ashes.
• Do not use without dust bag and/or
lters in place.
• Do not unplug by pulling on cord. To
unplug, grasp the plug, not the cord.
• This appliance is provided with
double insulation. Use only identical
replacement parts. See instructions
for Servicing of Double-Insulated
Appliances.
General Safety Rules
model number 060-3058-2 | contact us: 1.866.523.5218 model number 060-3058-2 | contact us: 1.866.523.5218
7
SAVE THESE INSTRUCTIONS
SERVICING OF DOUBLE-INSULATED
APPLIANCES
A double-insulated appliance is marked with
one or more of the following: The words
“DOUBLE INSULATION” or “DOUBLE
INSULATED” or the double insulation
symbol (square within a
square).
In a double-insulated appliance, two
systems of insulation are provided instead of
grounding.
No grounding means is provided on a
double-insulated appliance, nor should
a means for grounding be added to the
appliance. Servicing a double-insulated
appliance requires extreme care and
knowledge of the system, and should be
done only by qualied service personnel.
Replacement parts for a double-insulated
appliance must be identical to the parts they
replace.
General Safety Rules
model number 060-3058-2 | contact us: 1.866.523.5218
8
Know Your BlowerAccessories
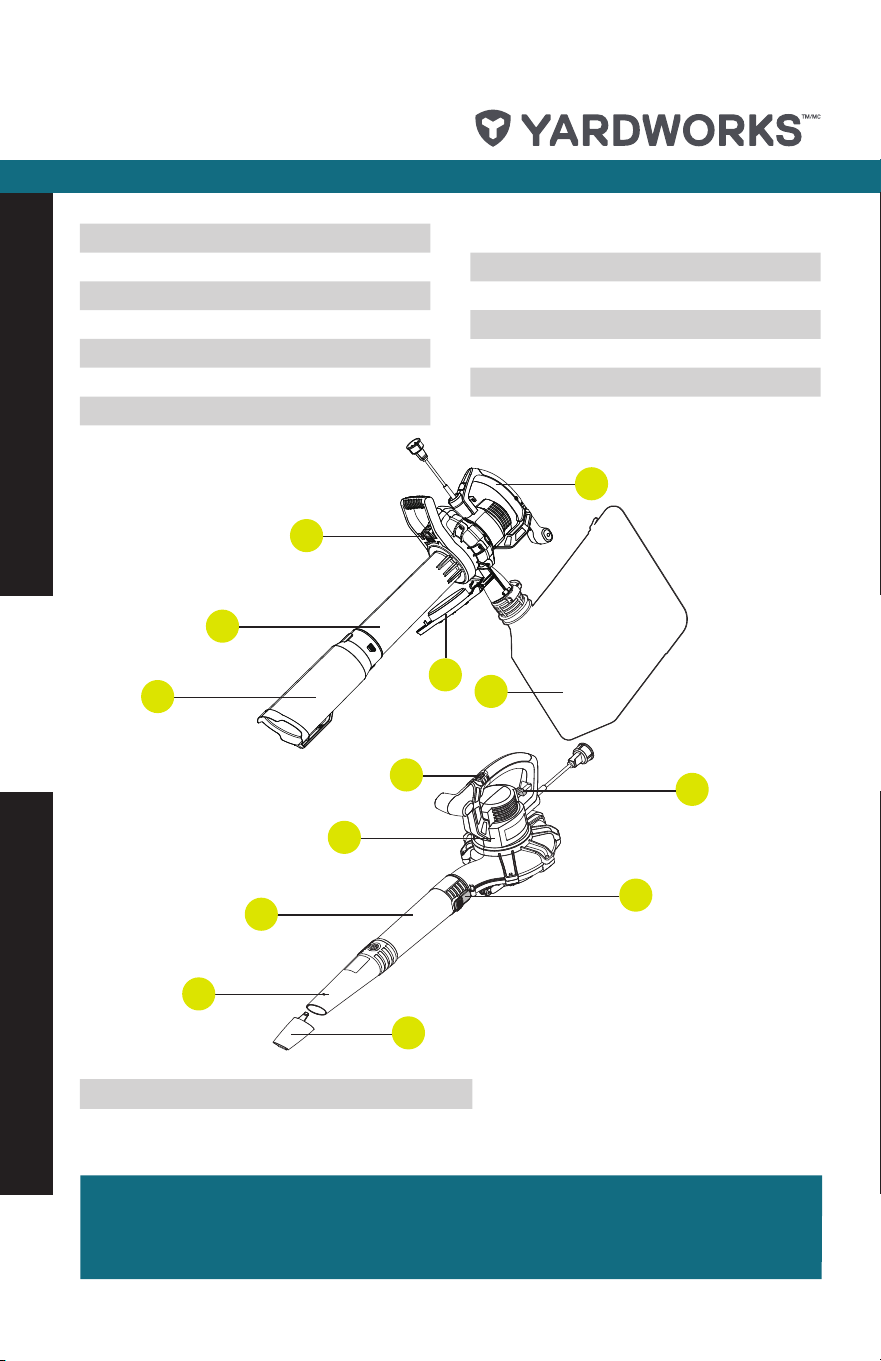
1. Handle
2. Vac Tube Release Button
3. Upper Vacuum Tube
4. Lower Vacuum Tube
5. Fan Cover
6. Leaf Collection Bag
7.
On/Off Switch/2-Speed Switch
8. Motor Housing
9. Upper Blower Tube
10. Lower Blower Tube
11. Concentrator Nozzle
12.
Blower Tube Release Button
13. Extension Cord Retainer
We recommend that you purchase your accessories listed in the above list
from the same store that sold you the tool. Refer to the accessory packaging
for further details. Store personnel can assist you and offer advice.
Leaf Collection Bag 1
Concentrator Nozzle 1
1
5
13
12
11
3
4
7
6
8
9
10
2
model number 060-3058-2 | contact us: 1.866.523.5218 model number 060-3058-2 | contact us: 1.866.523.5218
9
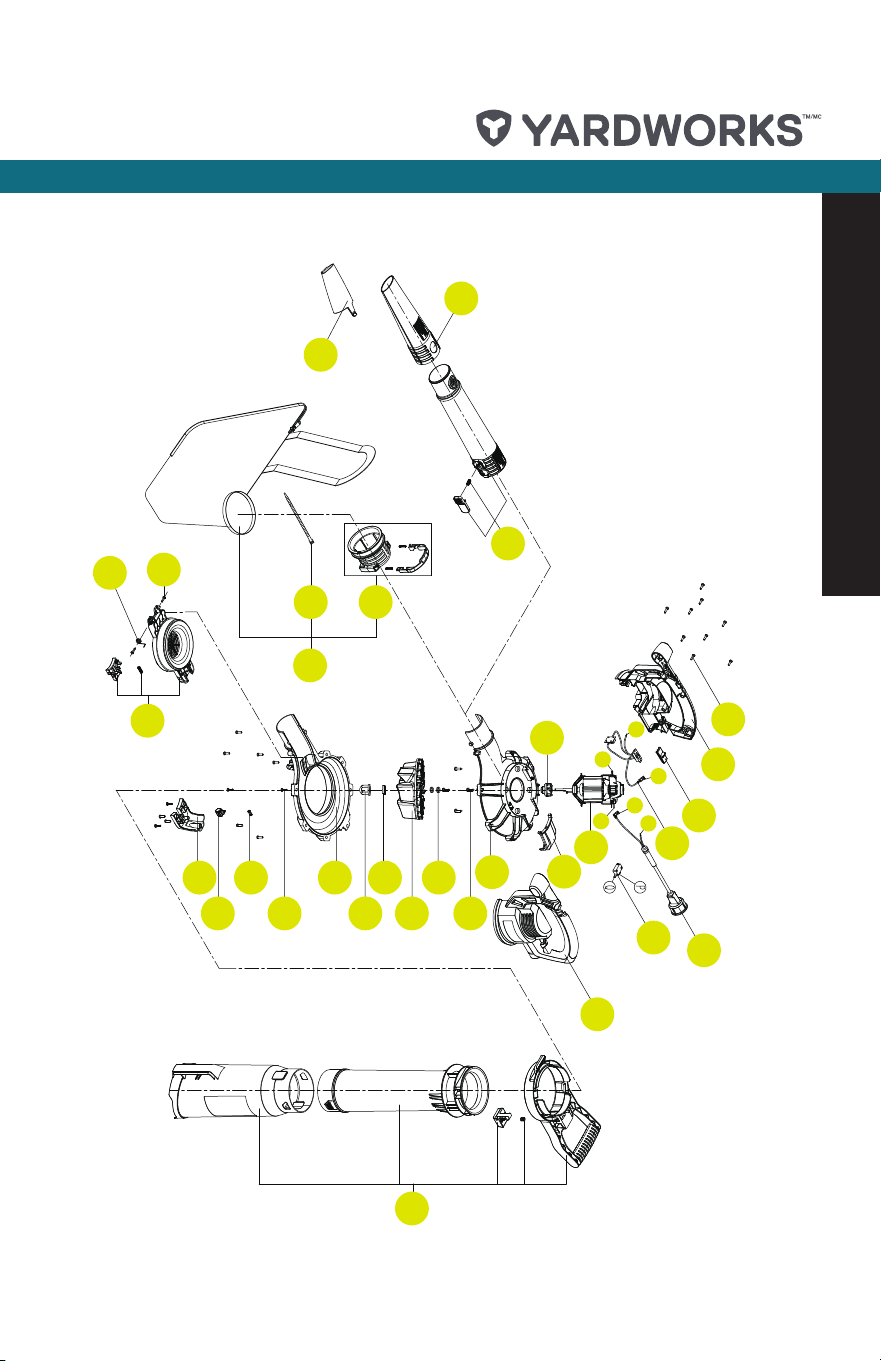
Exploded View
12
41
14 13
26
25
24
23 22
21 20
38
37
17
16
3
R
J
Q
S
S
P
1(12)
19(2)
36(2)
18(4)
103
102
101
101
105
1(9)
104
6
5
4
2

model number 060-3058-2 | contact us: 1.866.523.5218
10
Parts List
Item Description QTY.
1 Self-tapping Screw 21
2 Push Button 1
3 Motor 1
4 Speed Control 1
5 Power Cord 1
6 Switch 1
12 Blower Tube II 1
13 Dust Port 1
14 Bind Tape 1
16 Up Cover 1
17 Up Volute 1
18 Self-tapping Screw 4
19 Washer 2
20 Fan 1
21 Nut 1
22 Down Volute 1
23 Compression Spring 1
24 Sliding Block 1
25 Down Cover 1
26 Compression Spring 1
36 Self-tapping Screw 2
37 Shaft Cover 1
38 Washer 1
41 Blower Tube III 1
101 Left/Right Housing 1
102 Blower Tube I 1
103 Dust Collector 1
104 Safety Guard 1
105 Vacuum Tube 1

model number 060-3058-2 | contact us: 1.866.523.5218 model number 060-3058-2 | contact us: 1.866.523.5218
11
Assembly
OPERATION
INTENDED USE
The blower/vacuum is intended for residential use only. Use the blower outdoors to move or
vacuum yard debris as needed.
ASSEMBLY AND OPERATION
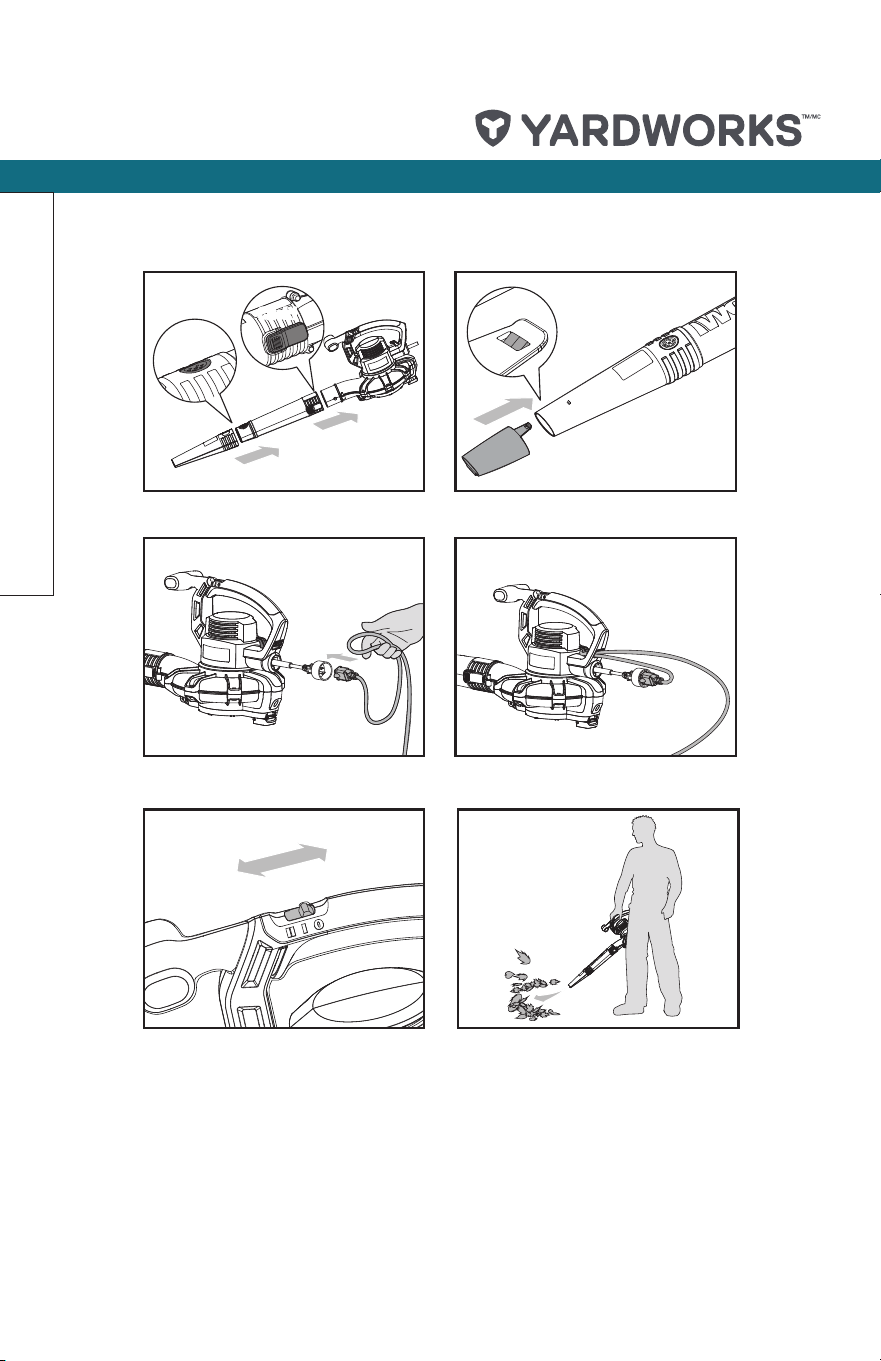
ACTION FIGURE
BLOW MODE
Assembling the Blower Tube See Fig. A1
Assembling the Concentrator Nozzle (optional) See Fig. A2
Attaching the Extension Cord See Figs. B1 and B2
Starting and Stopping See Fig. C
Using the Blower See Fig. D
Adjusting the Blowing Speed See Fig. E
VACUUM MODE
Disassembling the Blower See Fig. F
Assembling the Vacuum Tube See Figs. G1, G2 and G3
Attaching the Leaf Collection Bag See Fig. H
Attaching the Extension Cord See Figs. B1 and B2
Starting and Stopping See Fig. C
Using the Vacuum See Fig.I
Emptying the Leaf Collection Bag See Figs. J1 and J2
Removing Clogged Debris from the Impeller (no tool
included)
See Figs. K1 and K2
model number 060-3058-2 | contact us: 1.866.523.5218
12
Assembly
ON
OFF
Click!
Click!
Click!
A1
A2
B1
B2
C D
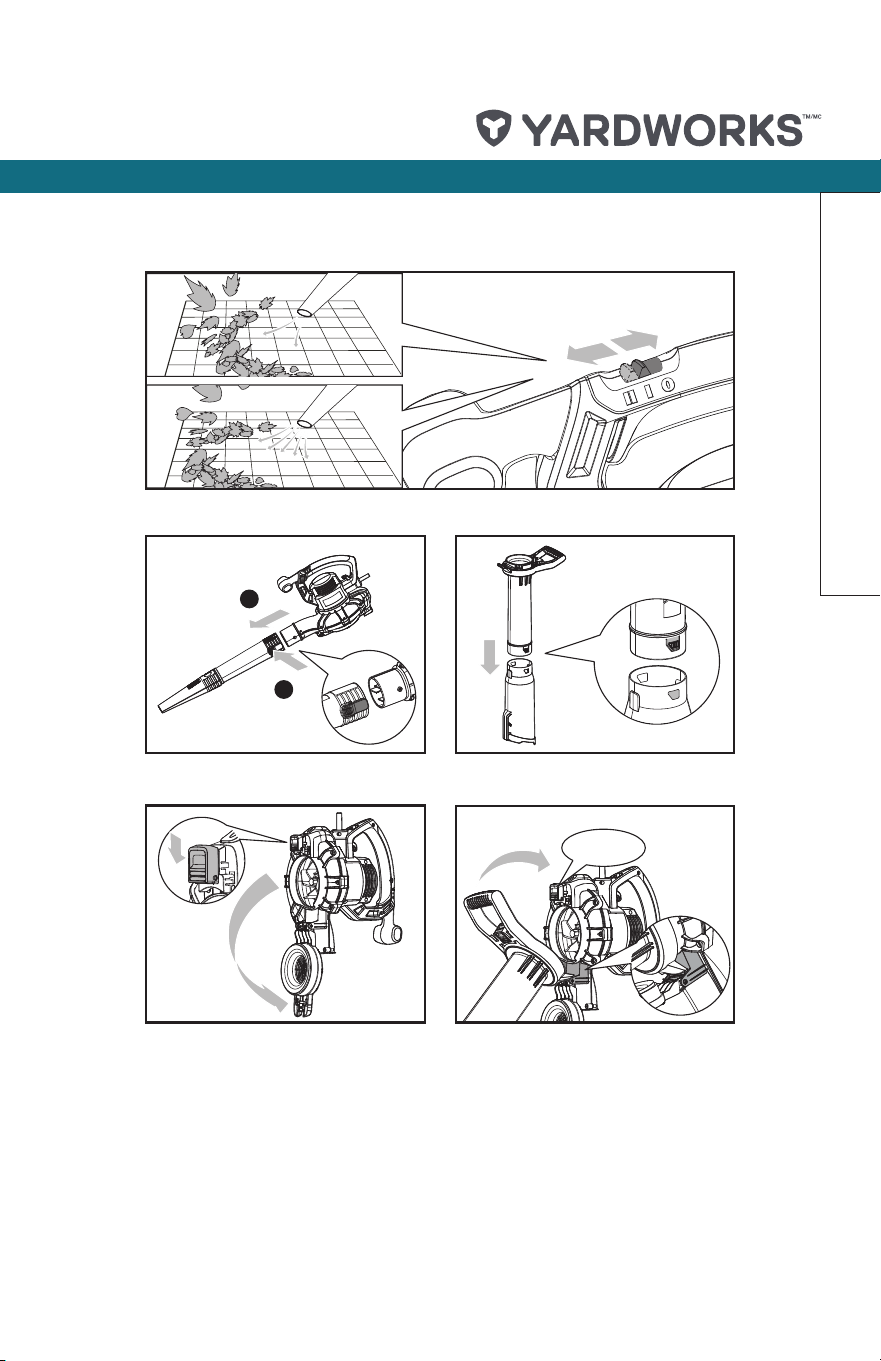
model number 060-3058-2 | contact us: 1.866.523.5218 model number 060-3058-2 | contact us: 1.866.523.5218
13
Click!
II
I
2
1
E
F
G1
G2
G3
Assembly
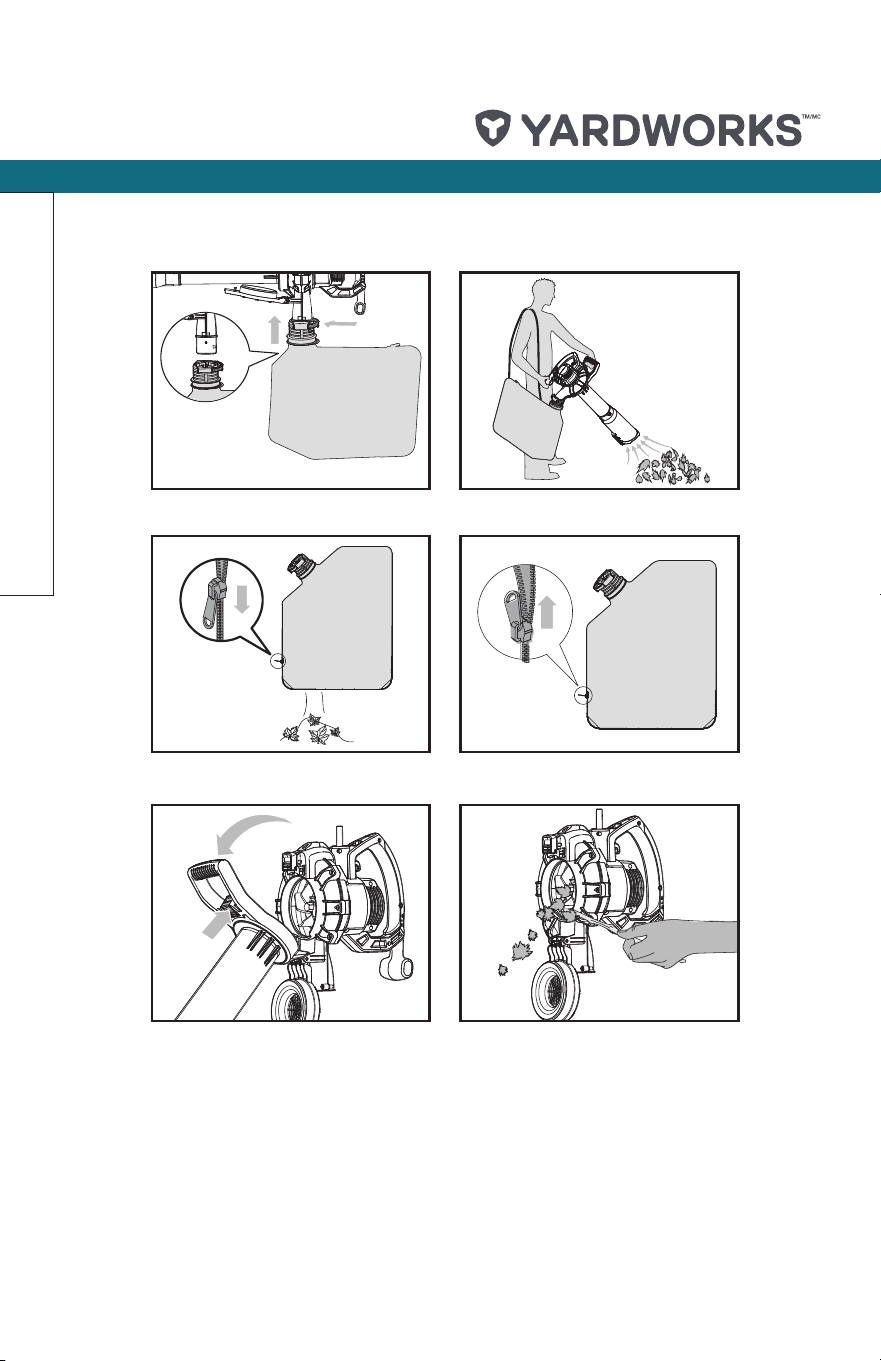
model number 060-3058-2 | contact us: 1.866.523.5218
14
*No tool included*
2
1
2
1
H
I
J1
J2
K1
K2
Assembly
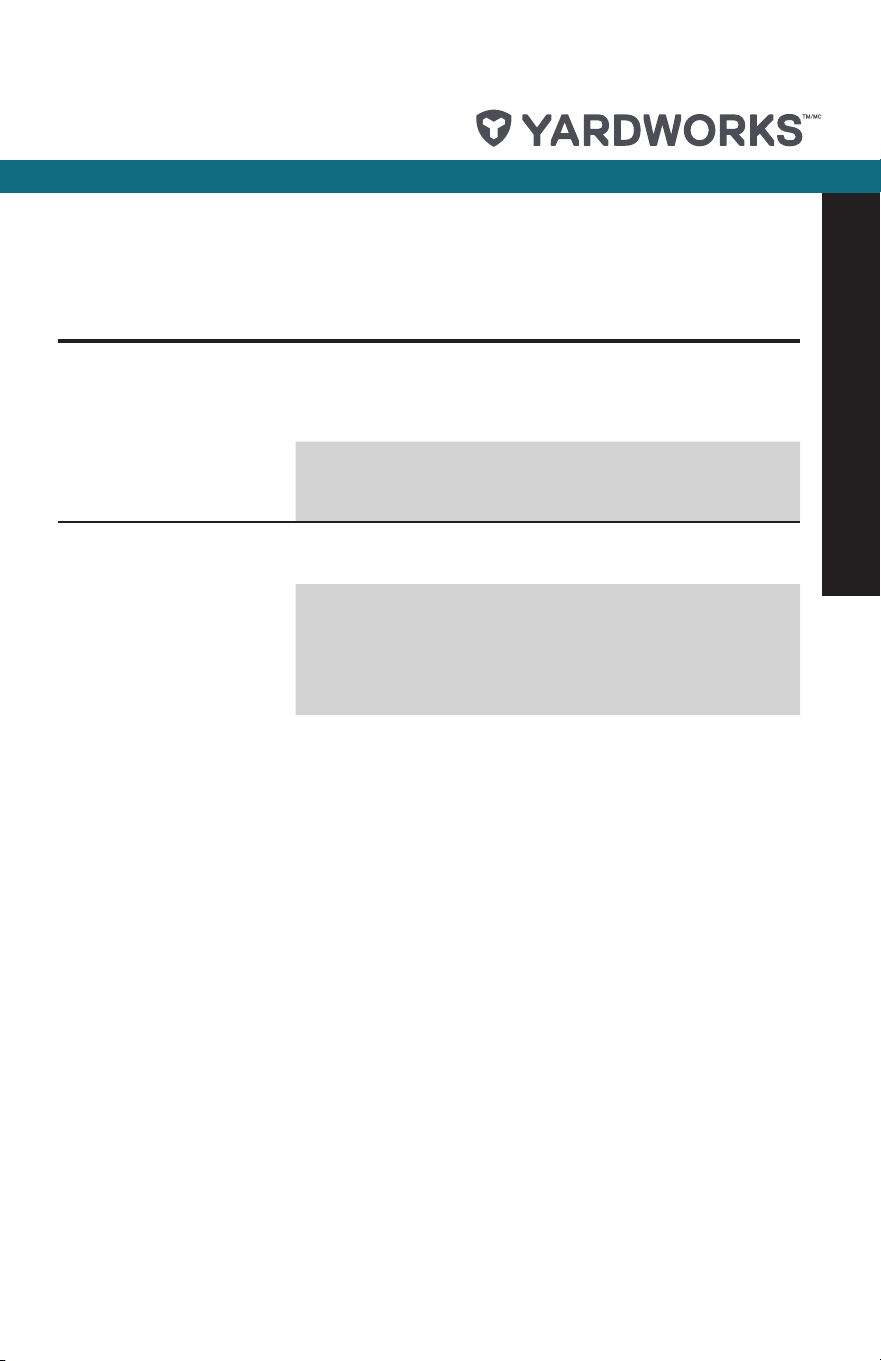
model number 060-3058-2 | contact us: 1.866.523.5218 model number 060-3058-2 | contact us: 1.866.523.5218
15
Troubleshooting
TROUBLESHOOTING
Problems Possible Causes Corrective Action
The blower/vac does not
operate.
The vacuum tube or the fan
cover is not attached to the
motor housing.
Attach the vacuum tube or
the fan cover to the motor
housing.
Power cord is not connected
to the power source.
Connect the power cord to a
power source.
The blower/vac jammed or
clogged.
Debris blocking in the
impeller.
Remove clogged debris from
the impeller.
Debris blocking the vacuum
tube or the connection of the
leaf collection bag.
Remove clogged debris
from the vacuum tube or
the connection of the leaf
collection bag.

model number 060-3058-2 | contact us: 1.866.523.5218
16
Remove the plug before carrying out any adjustment, servicing or maintenance.
Never use water or chemical cleaners to clean your power tool. Wipe clean with a dry cloth.
Keep the motor ventilation slots clean. Keep all working controls free of dust. If the replacement
of the supply cord is necessary, this has to be done by the manufacturer or his agent in order to
avoid a safety hazard.
Store the blower/vacuum and extension cord indoors, in a cool, dry location, out of
reach of children and animals.
Storage Maintenance
model number 060-3058-2 | contact us: 1.866.523.5218 model number 060-3058-2 | contact us: 1.866.523.5218
17
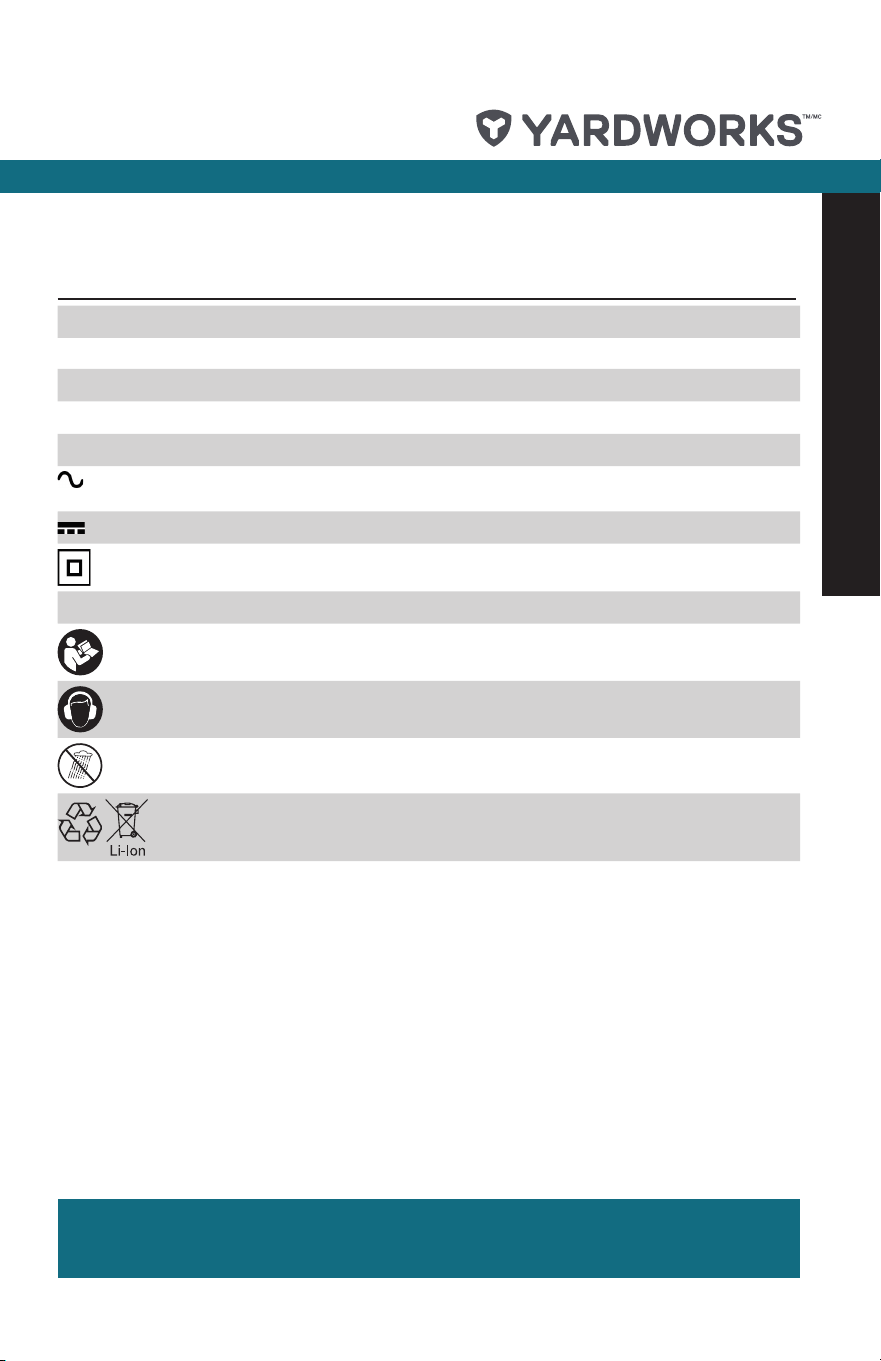
Symbols
Symbol Name Designation/Explanation
V Volts Voltage
A Amperes Current
Hz Hertz Frequency (cycles per second)
W Watts Power
min Minutes Time
Alternating Current Type of current
Direct Current Type of current
Class II Construction Double-insulated construction
/min Per Minute Revolutions, strokes, surface speed, orbits etc., per minute.
Read The Operator’s
Manual
To reduce the risk of injury, user must read instruction manual.
Ear Protection Wear ear protection.
Operation condition
Do not expose to rain.
Li-ion Battery Lithium-ion. Separate collection: battery must be recycled.
SAVE THESE INSTRUCTIONS!

model number 060-3058-2 | contact us: 1.866.523.5218
18
Warranty
TWO-YEAR LIMITED WARRANTY
For Two (2) Years from the date of purchase
within Canada, YARDWORKS CANADA
will, at its option, repair or replace for the
original purchaser, free of charge, any part
or parts found to be defective in material or
workmanship.
THIS WARRANTY DOES NOT COVER
1. Any part that has become inoperative
due to misuse, commercial use,
abuse, neglect, accident, improper
maintenance, or alteration;
2. The unit, if it has not been operated and/
or maintained in accordance with the
owner’s manual;
3. Normal wear, except as noted below;
4. Routine maintenance items such as
lubricants, blade sharpening; or
5. Normal deterioration of the exterior nish
due to use or exposure.
FULL ONE HUNDRED TWENTY (120)DAYS
WARRANTY ON NORMAL WEAR PARTS
Normal wear parts are dened as blade
adaptors, blades, grass bags and tires.
These parts are warranted to the original
purchaser to be free from defects in
material and workmanship for a period of
one hundred twenty (120) days from the
date of retail purchase.
HOW TO OBTAIN SERVICE
Warranty service is available by calling
the toll-free helpline, at 1.866.523.5218.
The factory will not accept the return of a
complete unit unless prior written permission
has been extended by YARDWORKS
CANADA.
TRANSPORTATION CHARGES
Transportation charges for the movement
of any power equipment unit or attachment
are the responsibility of the purchaser.
The purchaser must pay transportation
charges for any part submitted for
replacement under this warranty unless
such return is requested in writing by
YARDWORKS CANADA.
OTHER WARRANTIES
All other warranties, express or implied,
including any implied warranty of
merchantability is limited in its duration to
that set forth in this express limited warranty.
The provisions as set forth in this warranty
provide the sole and exclusive remedy of
YARDWORKS CANADA obligations arising
from the sale of its products.


Made in China. Imported by Yardworks Canada
Toronto, Canada M4S 2B8