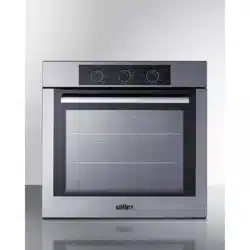
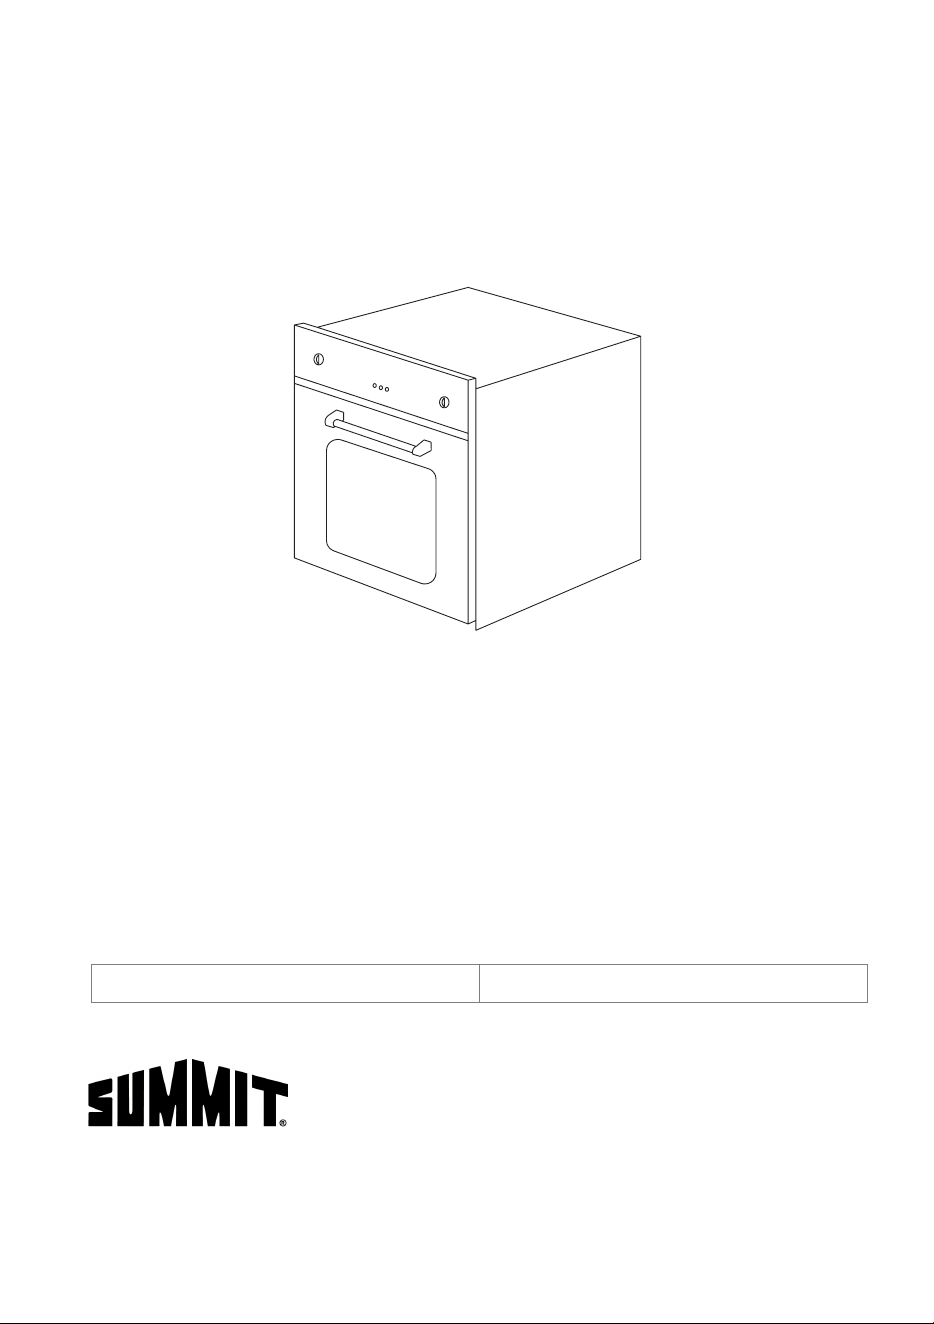
24" Built-In Wall Oven
User Manual
Felix Storch, Inc.
Summit Appliance Division
An ISO 9001:2015 registered company
770 Garrison Avenue
Bronx, New York 10474
www.summitappliance.com
Models:
Serial Number:
Models:
SEW24115V2 | LWOE24115 | EWOS24115
SEW24115V2P* | LWOE24115P* | EWOS24115P*
* Models with P have a 120V (NEMA 5-20P) plug
BEFORE USE, PLEASE READ AND FOLLOW ALL SAFETY RULES AND
OPERATING INSTRUCTIONS.

CONTENTS
LIMITED WARRANTY . . . . . . . . . . . . . . . . . . . . . . . . . . . . . . . . . . . . . . . . . . . . . . . . . . . . . . . . . . 33
IMPORTANT SAFETY INSTRUCTIONS . . . . . . . . . . . . . . . . . . . . . . . . . . . . .
. . . . . . . . . . . . . . . . 1
SPECIFICATIONS . . . .
. . . . . . . . . . . . . . . . . . . . . . . . . . . . . . . . . . . . . . . . . . . . . . . . . . . . . . . . . 6
PARTS AND FEATURES . . . . . . . . . . . . . . . . . . . . . . . . . . . . . . . . . . . . . . . . . . . . . . . . . . . . . . . . 7
INSTALLATION INSTRUCTIONS . . . . . . . . . . . . . . . . . . . . . . . . . . . . . . . . . . . . . . . . . . . . . . . . . . 8
OPERATION INSTRUCTIONS . . . . . . . . . . . . . . . . . . . . . . . . . . . . . . . . . . . . . . . . . . . . . . . . . . . . 15
CARE AND MAINTENANCE . . . . . . . . . . . . . . . . . . . . . . . . . . . . . . . . . . . . . . . . . . . . . . . . . . . . . 26
TROUBLESHOOTING. . . . . . . . . . . . . . . . . . . . . . . . . . . . . . . . . . . . . . . . . . . . . . . . . . . . . . . . . . 30
WARNING: When properly cared for, your wall oven has
been designed to be safe and reliable. Read all instructions
carefully before use. These precautions will reduce the risk of
burns, electric shock, fire and injury to people. When using this
kitchen appliance, basic safety precautions must be followed;
including those in the following pages.
PROPER INSTALLATION AND MAINTENANCE
• Have the installer show you the location of the circuit breaker or
fuse. Mark it for easy reference.
• Ensure your appliance is properly installed and grounded by a
qualified service personnel.
• Connect only to a properly grounded outlet. (Refer to
"Installation Instructions" on pages 8 - 13 for details.)
• This appliance is intended for normal family household use
only. It is not approved for outdoor use. If you have any
questions, contact the manufacturer.
• DO NOT store or use corrosive chemicals, vapors, flammables,
or nonfood products in or near this appliance. It is specifically
designed for use when heating or cooking food. The use of
corrosive chemicals in heating or cleaning will damage the
appliance and could result in injury.
• DO NOT operate this appliance if it is not working properly, or if
it has been damaged. Contact a qualified service personnel.
• DO NOT obstruct oven vents.
• DO NOT repair or replace any part of the appliance, unless
specifically recommended in this manual. Refer all servicing of
this appliance to a qualified service personnel.
IMPORTANT: Save this manual for the local electrical
inspectors use.
IMPORTANT SAFETY
INSTRUCTIONS
1
FIRE SAFETY
• DO NOT use aluminum foil or protective liners to line any part
of the appliance, especially the ov
en bottom. Installing these
liners may result in risk of electric shock or fire.
• If materials inside an oven should ignite, keep door closed. Turn
off the appliance and disconnect the circuit at the circuit breaker
box.
• Use this appliance only for its intended purpose as described in
this manual. For example, NEVER use the appliance for
warming or heating the room. NEVER use the appliance for
storage.
• ALWAYS have a working smoke detector near the kitchen.
• In the event that clothing or hair catches fire, drop and roll
immediately to extinguish flames. Smother flames from food
fires other than grease fires with baking soda. Have an
appropriate fire extinguisher available, nearby, highly visible,
and easily accessible near the oven.
GREASE FIRES
WARNING: To reduce the risk
of
personal
injury
i
n the event
of
a
grease fire,
observ
e
the following.
• SMOTHER FLAMES with a close-fitting lid, cookie sheet, or
metal tray, then turn off the burner. EXERCISE CAUTION TO
PREVENT BURNS. If the flames do not go out immediately,
EVACUATE AND CALL THE FIRE DEPARTMENT.
• NEVER PICK UP A FLAMING PAN. You may be burned.
• DO NOT USE WATER ON GREASE FIRES. Smother the fire
or flame. Or use dry chemical or foam-type extinguishers.
• Use an extinguisher ONLY if:
a. You know you have a Class ABC extinguisher, and you
already know how to operate it.
b. The fire is small and contained in the area where it started.
c. The fire department is being called.
d. You can fight the fire with your back to an exit.
2

BURN PREVENTION
• DO NOT TOUCH HEATING ELEMENTS OR INTERIOR
SURFACES OF OVEN.
• Heating elements may be hot even though they are dark in
color. Interior surfaces of an oven become hot enough to cause
burns. During and after use, DO NOT touch, or let clothing,
potholders, or other flammable materials contact heating
elements or interior surfaces of oven until they have had
sufficient time to cool. Other surfaces of the appliance may
become hot enough to cause burns. Among these surfaces are
oven vent openings, surfaces near these openings and oven
doors.
• Exercise caution when opening the appliance. Stand to the
side, open the door slightly, and let hot air and/or steam escape
slowly. Keep your face clear of the opening and make sure
there are no children or pets near the unit. After releasing the
hot air and/or steam, proceed with your cooking. Keep doors
shut unless necessary for cooking or cleaning purposes. DO
NOT leave open doors unattended.
• DO NOT heat or warm unopened food containers. Build-up of
pressure may cause the container to burst and cause injury.
• ALWAYS place oven racks in desired location while oven is
cool. If a rack must be moved while oven is hot, DO NOT let
potholder contact the heating elements.
• ALWAYS use dry potholders. Moist or damp potholders on hot
surfaces may result in burns from steam. DO NOT let potholder
touch hot heating elements. DO NOT use a towel or other bulky
cloth.
• Secure all loose garments before beginning. Tie long hair so
that it does not hang loose, and DO NOT wear loose fitting
clothing or hanging garments, such as ties, scarves, jewelry, or
dangling sleeves.
3

CHILD SAFETY
• Secure all loose garments, ect. before beginning. Tie long hair
so that it does not hang loose, and do not wear loose fitting
clothing or hanging garments, such as ties, scarves, jewelry, or
dangling sleeves.
• When children are old enough to use the appliance, it is the
legal responsibility of the parents or legal guardians to ensure
that they are instructed in safe operation of the appliance by
qualified persons.
• DO NOT allow anyone to climb, stand, lean, sit, or hang on any
part of the appliance, especially a door, warming drawer or
storage drawer. This can damage the appliance, and the unit
may tip over, potentially causing severe injury.
• DO NOT allow children to use this appliance unless closely
supervised by an adult. Children and pets should not be left
alone or unattended in the area where the appliance is in use.
They should NEVER be allowed to play in its vicinity, whether
or not the appliance is in use.
• Items of interest to children should NOT be stored in an
appliance, in cabinets above an appliance or on the
backsplash. Children climbing on an appliance to reach items
could potentially cause serious injury.
COOKWARE SAFETY
• Birds have very sensitive respiratory systems. Keep pet birds
out of the kitchen or other
rooms where kitchen fumes could
reach them. Kitchen fumes such as overheating margarines
or cooking oils may also be harmful.
• Keep oven free from grease build up.
• Do not place food directly on oven bottom.
• Follow the manufacturer’s directions when using cooking or
roasting bags.
4
SAVE THESE INSTRUCTIONS FOR
FUTURE REFERENCE
CAUTION: Do not clean the appliance while it is still hot.
Some cleaners produce noxious fumes when applied to a
hot surface. Wet cloths or sponges can cause burns from
steam.
CAUTION: Do not use oven cleaners – no commercial
oven cleaners or oven liner protective coating of any kind
should be used in or around any part of the oven.
CLEANING SAFETY
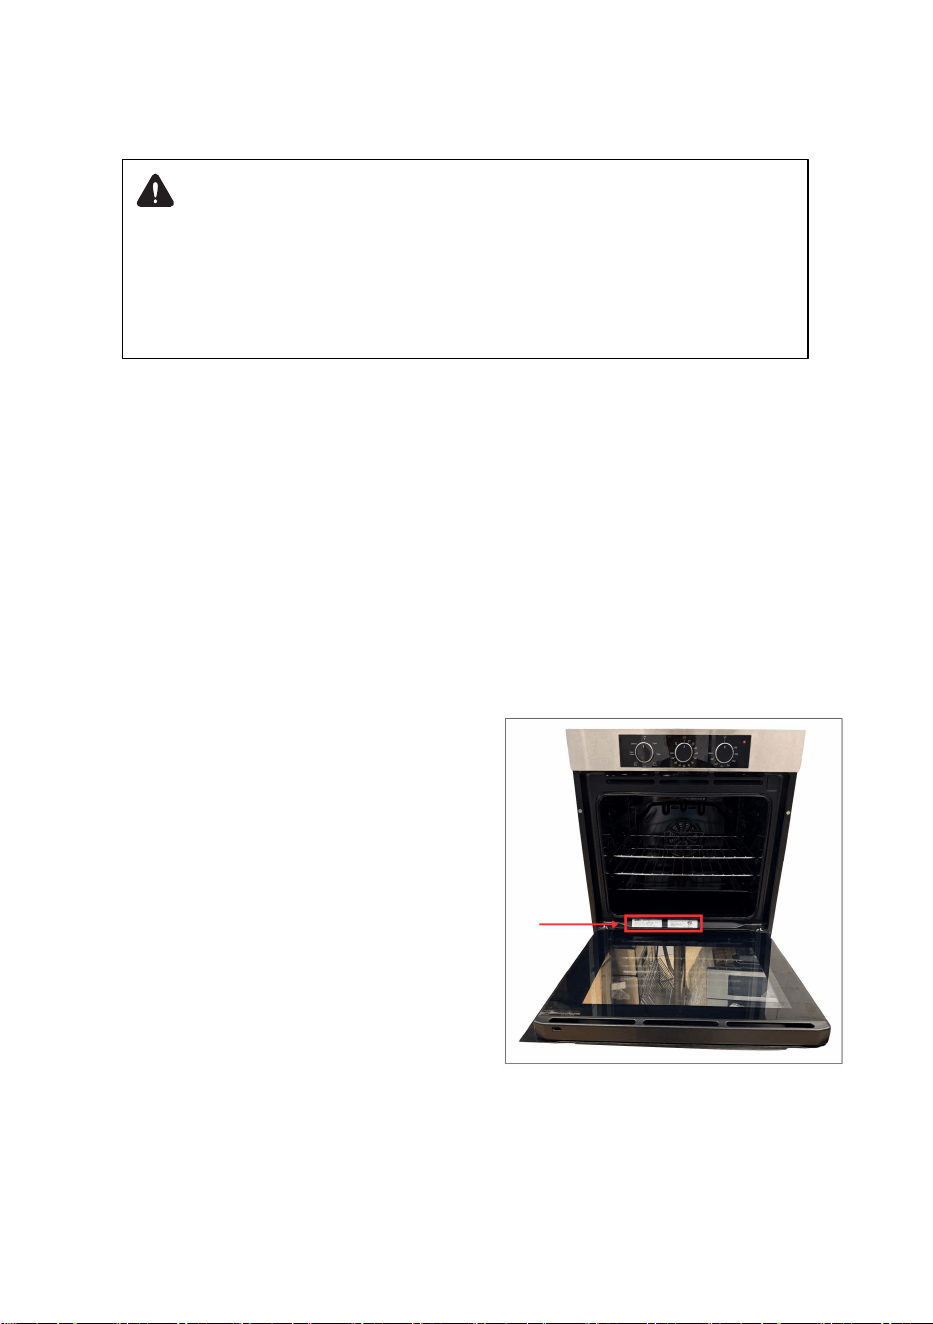
Nameplate Location:
This appliance is equipped with a
permanent nameplate label which
contains essential electrical and
product identification information,
including model number, serial
number, electrical ratings, and
regulatory markings.
Open the oven door. The label is
attached to the lower front frame of the
oven cavity, centered above the door
opening and visible when the door is
fully open (See Figure 1)
5
Figure 1
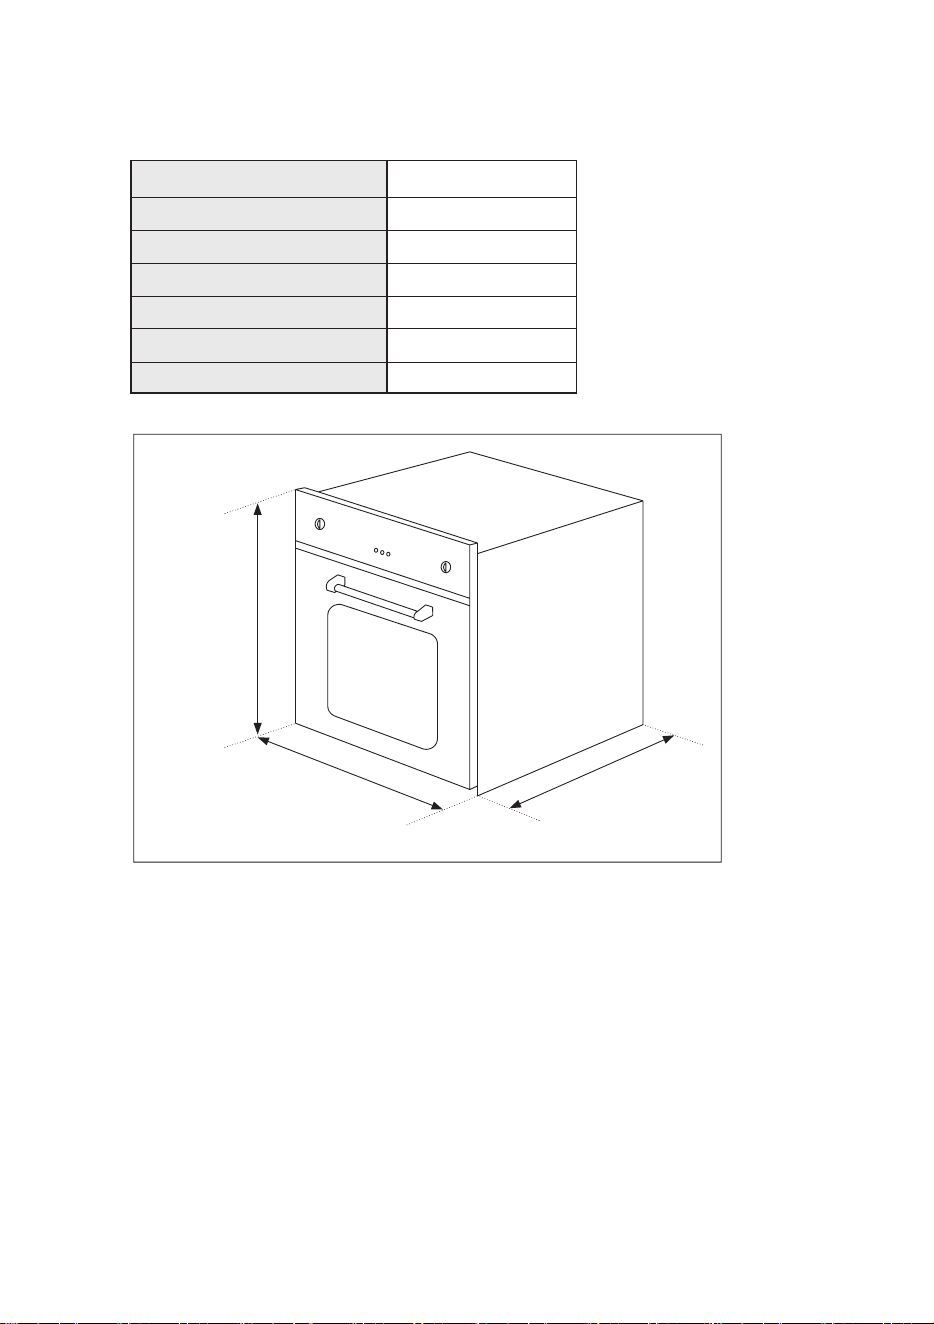
22.64”
(575mm)
2.86 cu. ft. / 81 L
1800 W
23.4”
(594mm)
23.4"
(594mm)
23.4”(594mm)
23.4”(594mm)
120 V / 60 Hz
22.64”(575mm)
71.6 lbs.(32.5kg)
Specifications
Gross / Total Capacity
Rated Power
Width
Height
Power Supply
Depth
Weight
6
k
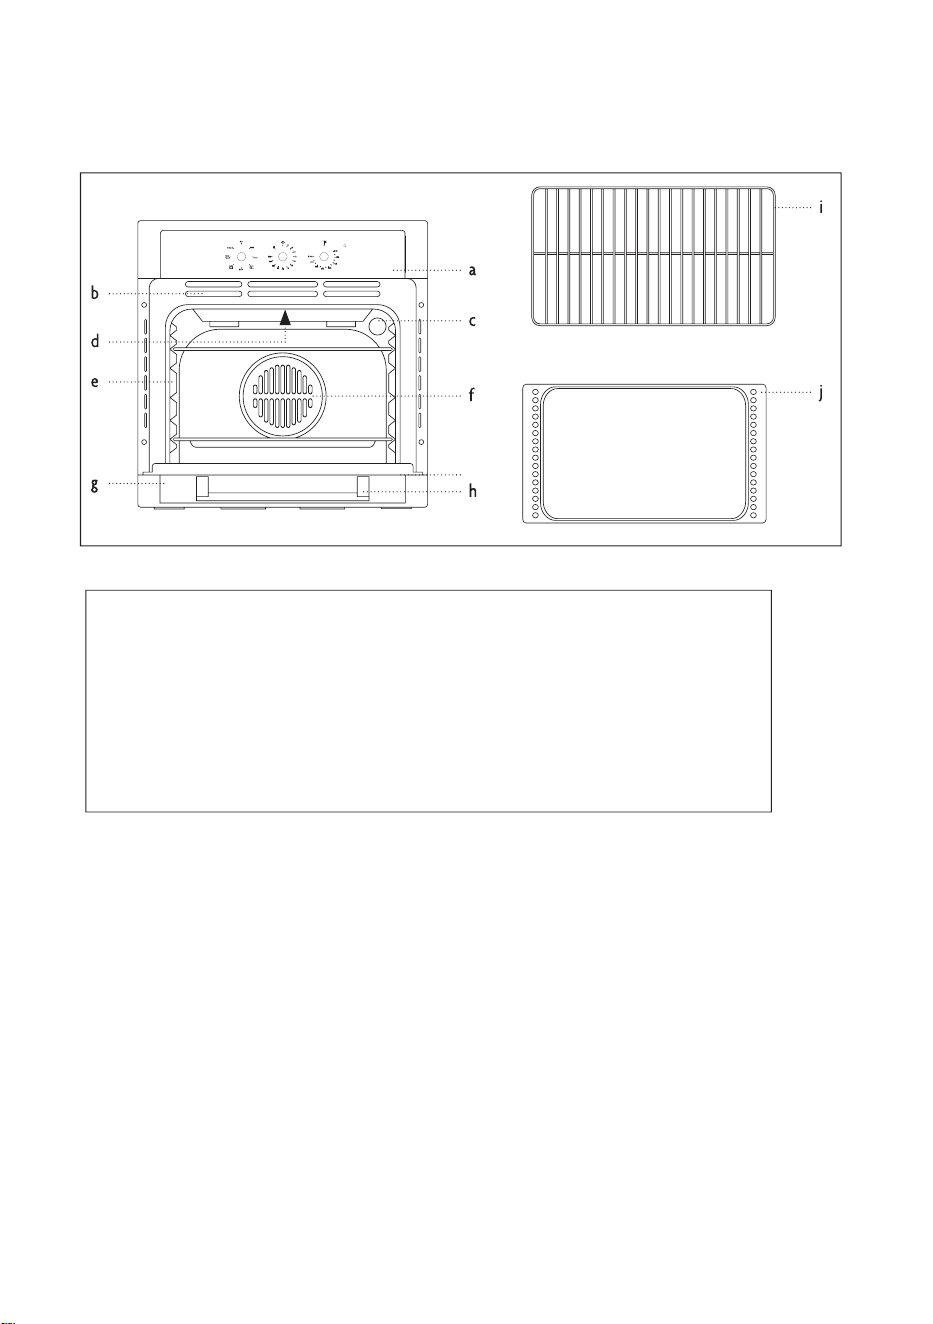
Parts & Features
a. Control Kobs
b. Cooling Vent
c. Oven Interior Light
d. Top Central Heating Element
e. Rack Support Guides
f. Convection Fan
g. Oven Door
h. Door Handle
i. Oven Rack (2)
j. Baking Tray
k. Lower Heating Element
7
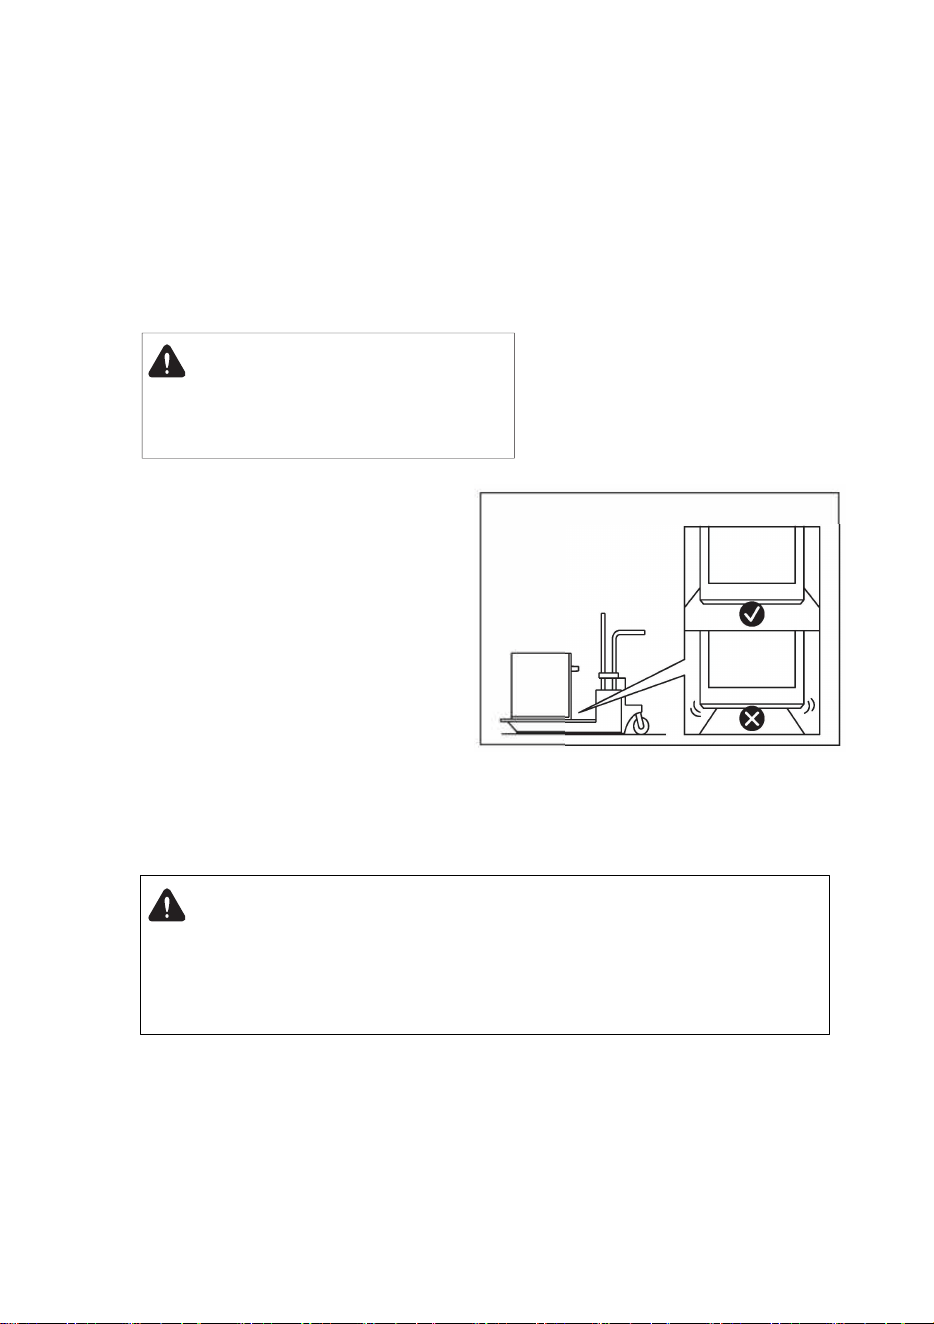
Transporting
1. Before moving your oven, or
performing maintenance,
disconnect it from the power
supply.
2. To avoid damage to the oven
vent, use transportation that is
wide enough to hold the entire
bottom of the unit.(Refer to
Figure 2)
Figure 2
INSTALLATION INSTRUCTIONS
WARNING: Only a qualified service personnel in compliance
with the instructions provided must install the appliance. The
manufacturer declines all responsibility for improper
installation, which may harm persons and animals and damage
property.
WARNING: Electrical Shock
Hazard Failure to follow these
instructions can result in death,
fire, or electrical shock.
8
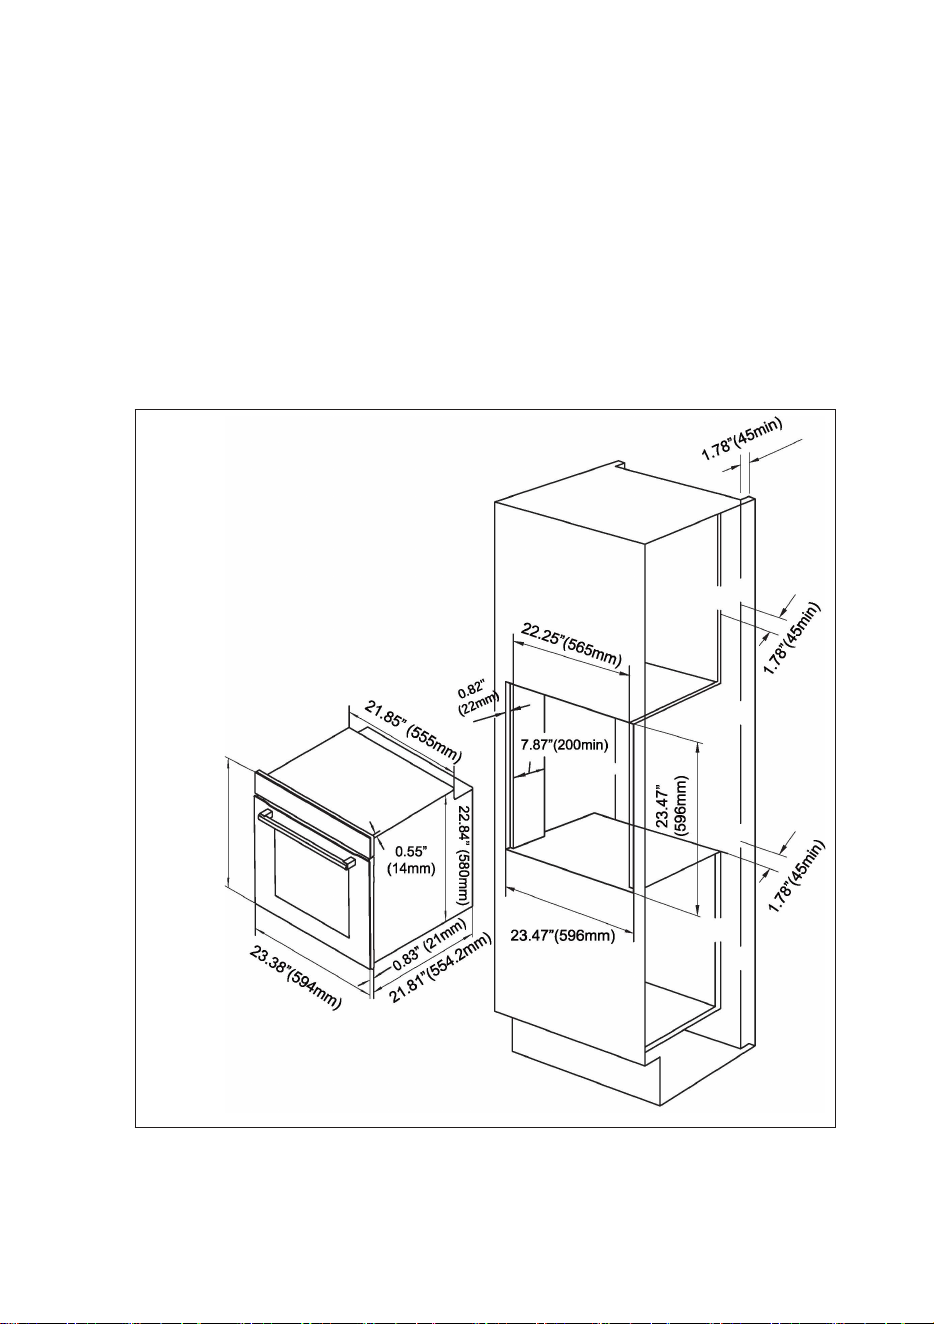
23.38"
(594mm)
Figure 3
Location Requirements
In order to ensure that the built-in appliance functions properly, the
cabinet containing it must be appropriate. The figures below and
the next page give the dimensions of the cut-out for installation in
a wall cabinet unit or under the counter. (See Figure 3 and 4)
Installation in a Wall Cabinet Unit
9
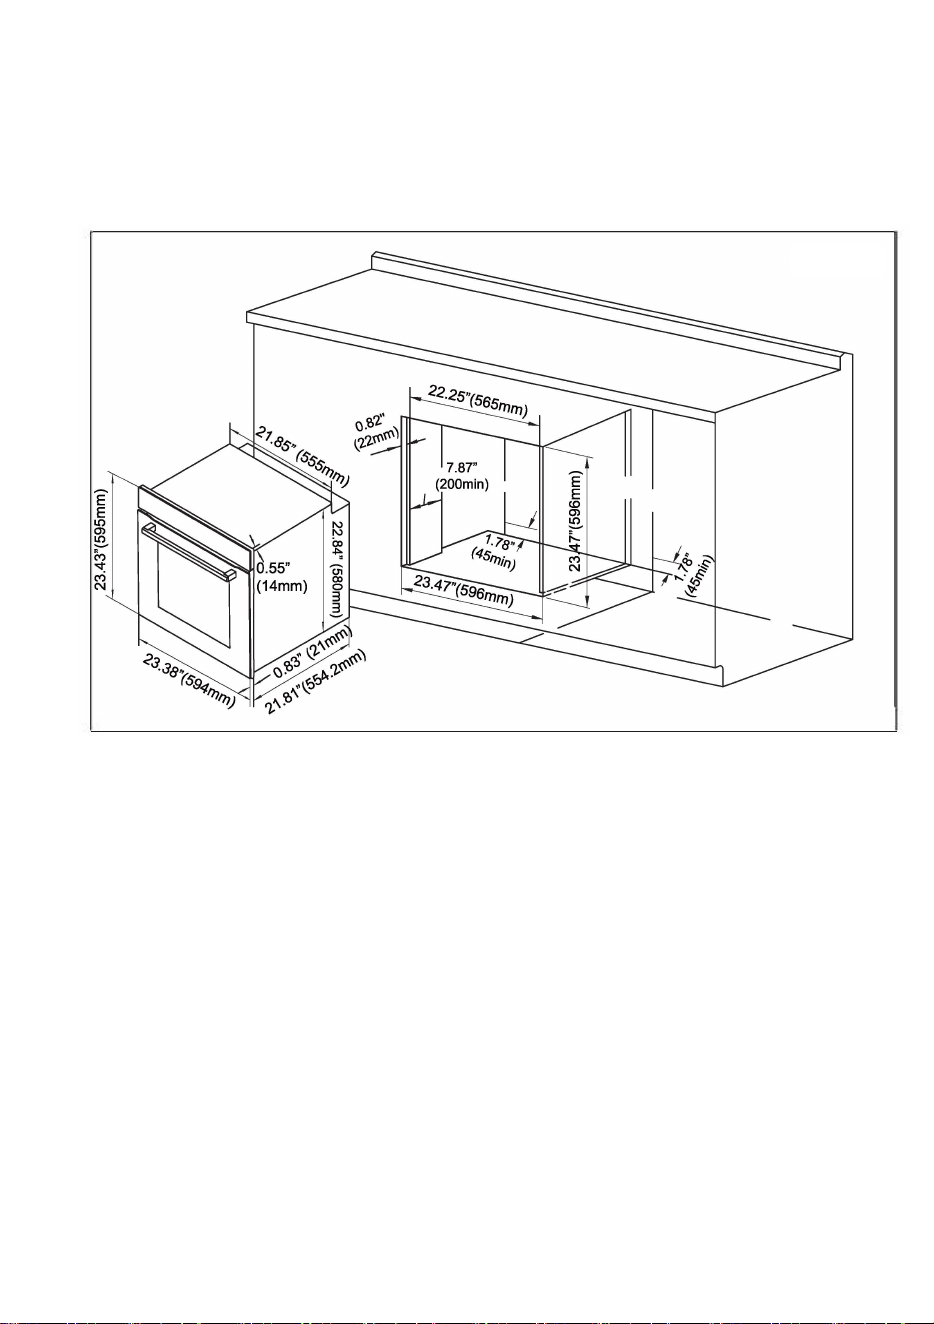
Installation Under the Counter
10
Figure 4
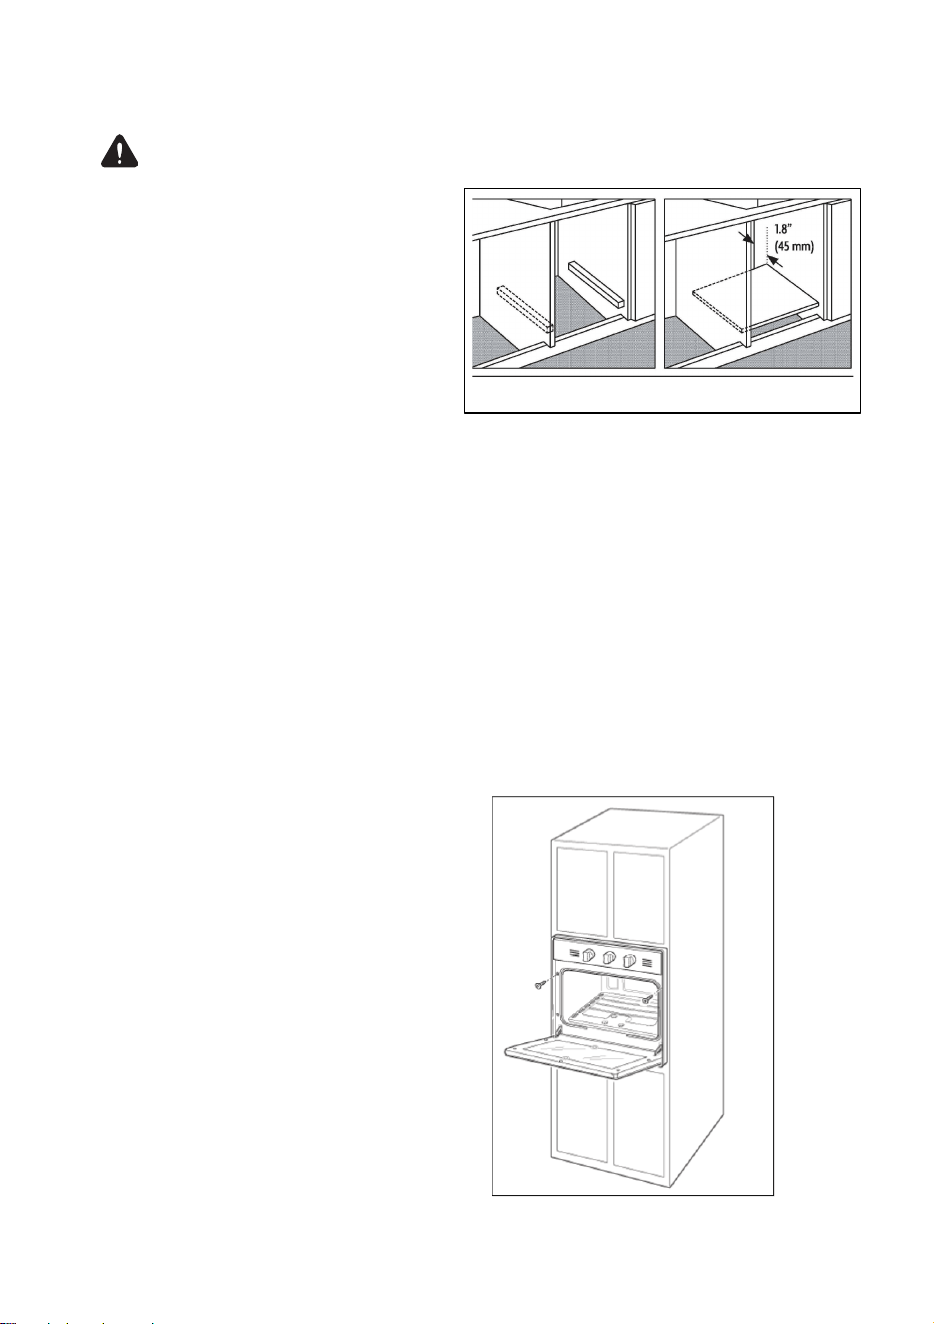
Mounting the Oven to the
Cabinet
For safety considerations, the wall
oven shall be fastened to the cabinet
using two (2) suitable screws through
the holes of the trim (See Figure 6).
The unit must be properly leveled
before being secured to the cabinet.
The panels of the adjacent cabinets must be made of heat-resistant
material. In particular, cabinets with a veneer exterior must be assembled
with glues which can withstand temperatures of up to 212°F (100°C).
In compliance with current safety standards, contact with the electrical
parts of the oven must not be possible once it has been installed.
All parts, which ensure the safe operation of the appliance, must be
removable only with the aid of a tool. To fasten the oven to the cabinet,
open the door of the oven and attach it by inserting the 4 wooden screws
into the 4 holes located on the perimeter of the frame.
Figure 6
Figure 5
IMPORTANT:
Installation must be in compliance
with the consumption declaration.
In order to ensure adequate
ventilation, the back panel of the
cabinet unit must be removed.
Installing the oven so that it rests
on two strips of wood is preferable.
If the oven rests on a continuous,
flat surface, there must be an
aperture of at least 1¾" x 22" (45 x
560 mm). See Figure 5.
11

WARNING: Electrical Shock Hazard
• DO NOT use an extension cord.
• Failure to follow these instructions can result in death, fire, or
electrical shock.
• Any additions, changes or conversions required in order for this
appliance to satisfactorily meet the application needs must be made
by a qualified service personnel in accordance with the
manufacturer’s instructions and all codes and requirements of the
authority having jurisdiction. Failure to follow the instructions could
result in serious injury or property damage. The qualified service
personnel performing this work assumes responsibility for the
conversion.
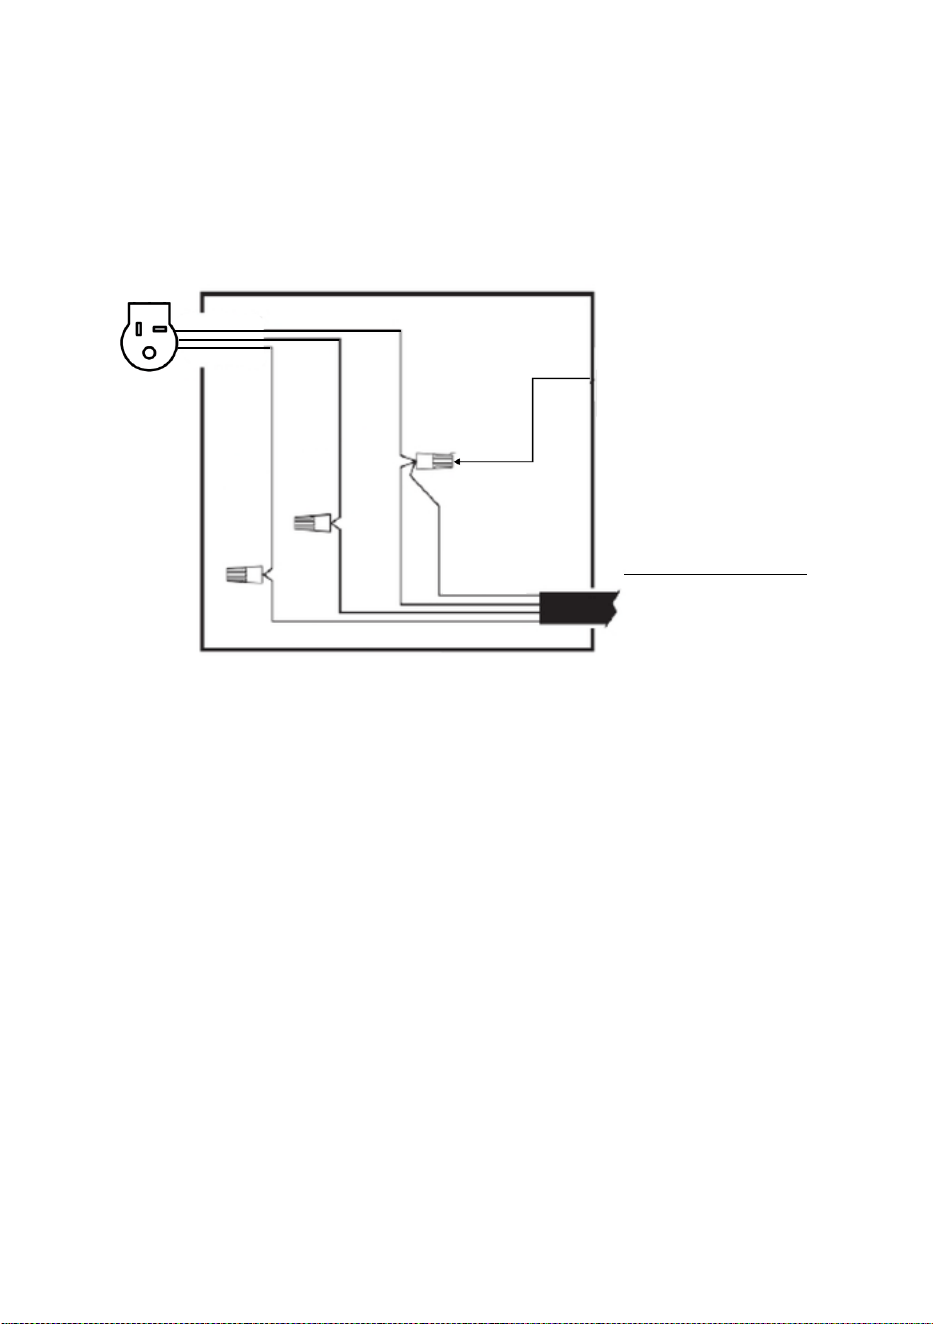
• Models with a P suffix are supplied with a NEMA 5-20P plug and
can be plugged directly into a properly grounded 3-prong wall
receptacle installed by a qualified service personnel. For models
without a plug, the wall oven is supplied with a conduit to connect to
an accessible junction box. This must be done by qualified service
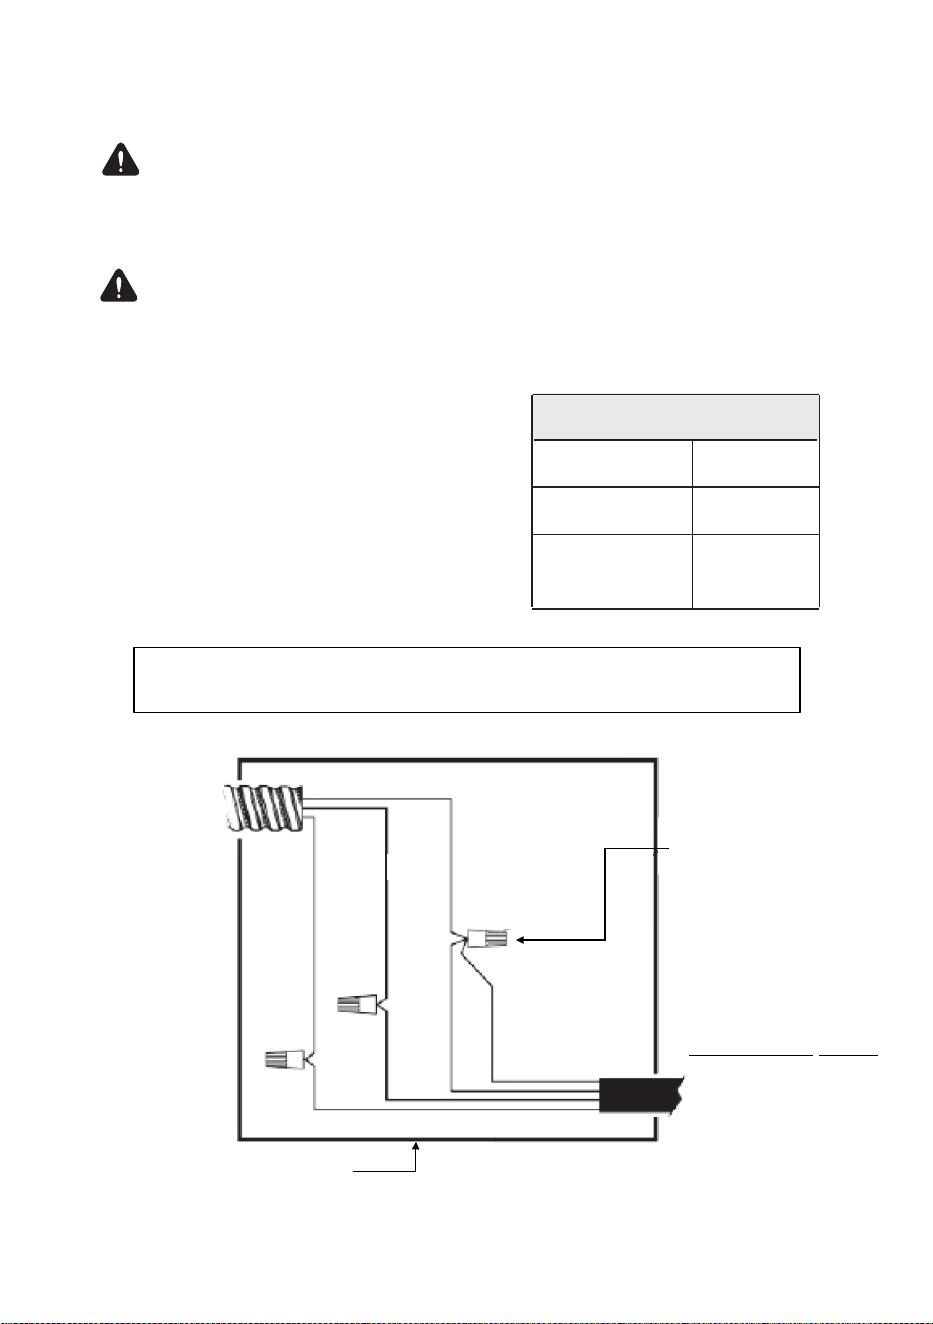
personnel. Refer to wiring diagram on page 13 to attach conductor
wires to residence wiring in accordance with national, state, and local
electric codes.
• DO NOT operate this appliance using a 2-prong adapter or an
extension cord. If a 2-prong wall receptacle is the only available
outlet, it is the personal responsibility of the consumer to have it
replaced with a properly grounded 3-prong wall receptacle installed
by a qualified service personnel. Severe shock or damage to the
range may occur if the range is not installed by a qualified service
personnel.
• This appliance features a pilotless electric ignition for energy savings
and reliability. It operates on a 120V/60Hz 20-amp power supply.
• A standard electrical supply (120V AC, 60 Hz) properly grounded in
accordance with National Electrical Code and local codes and
ordinances, is required.
• A separate circuit, protected by a 20-amp fuse or circuit breaker, is
required.
• For personal safety, the appliance must be properly grounded.
Electrical Requirements
12
CIRCUIT REQUIRED
120V/ 60Hz
This oven is designed to be
connected to a 120V AC, 60Hz,
3-wire, single-phase power supply.
1800 W
WARNING: It is the responsibility and obligation of the consumer to
contact a qualified service personnel to ensure the electrical
installation is adequate and conformance with all local codes and
ordinances.
IMPORTANT: The power supply to the appliance must be cut off
before any adjustments or maintenance work is done on it. Air duct
is supposed to use in ventilation.
20 Amp
Power Supply
Rated Power
Recommended
Circuit Size
(Dedicated)
Suggestion:
Attach conduc
tors
to
residence wiring as
shown by
wiring
d
i
a
gr
am
.
CONDUIT
FROM OVEN
GREEN
BLACK
WHITE
BLACK
GROUND
WHITE
(Neutral)
UL APPROVED
JUNCTION BOX AND COVER
UL APPROVED
CONNECTOR
TO BREAKER PANEL
#12-#10 AWG COPPER
NMD90 WIRE FUSE 20
AMP CIRCUIT
BREAKERS
Electrical Installation
13
14
GREEN
BLACK
WHITE
WHITE
(Neutral)
BLACK
UL APPROVED
CONNECTOR
TO BREAKER PANEL
#12-#10 AWG COPPER
NMD90 WIRE FUSE
20 AMP CIRCUIT BREAKERS
120 V NEMA 5-20 PLUG
GROUND
OPERATION INSTRUCTIONS
Before Use
This multi-function wall oven combines the advantages of traditional
convection ovens with those of the more modern fan assisted models
in a single appliance. It is an extremely versatile appliance that allows
you to choose easily and safely between different cooking modes.
Using the Racks
ALWAYS place your cookware (dishes, aluminum foil, etc.) on the racks
provided with your wall oven.
Ensure the rack is fully inserted onto the side support guides. Never
place items directly on the oven floor.
• NEVER use the bottom shelf for normal cooking.
• NEVER place anything on the oven floor while it is on.
This could deteriorate the oven’s enamel finish.
IMPORTANT: To use your appliance for the first time,
set the thermostat to the highest setting, keep the door
closed
for 30 minutes with nothing inside, and then air it out.
The odor from the initial use comes from oils used to
protect the metal during storage and shipping.
15
IMPORTANT: When broiling food, place a 2-piece broiler
pan drip pan on the bottom shelf of the oven to
prevent any sauce and or grease from dripping onto the oven
floor.
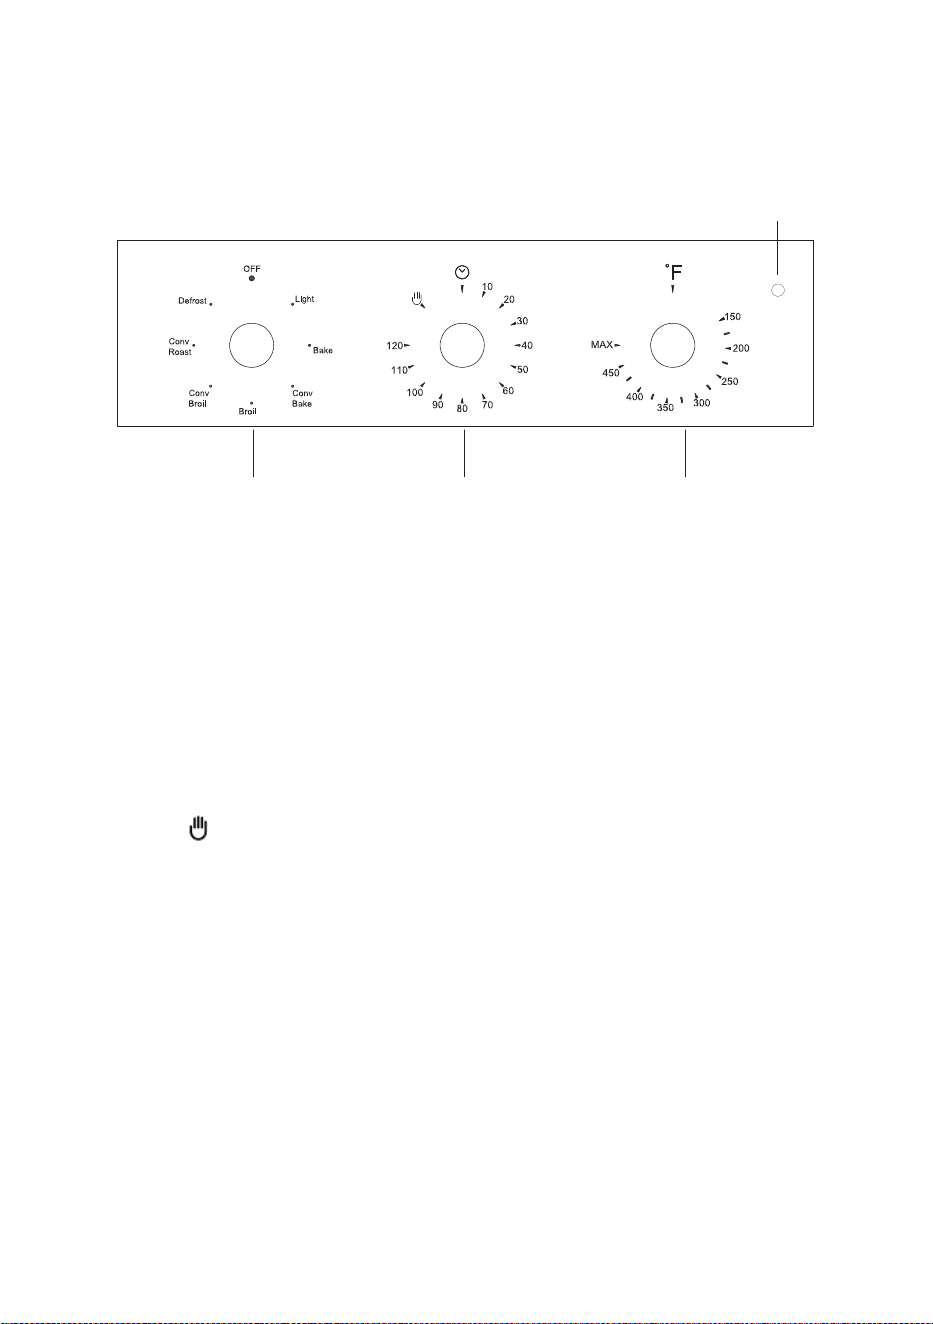
Timer
Temperature
Function
Knob
Indicator
Light
Control Knobs
Function Knob:
The Function Knob controls the cooking mode, oven light, and turns OFF
the oven.
The light will remain on for all the cooking functions.
Timer Knob:
The Timer Knob controls the cooking duration on the cooking mode. When
the countdown on the timer ends, the heating elements turn off. To set the
oven to manual without the countdown, turn the knob to the manual
symbol and the oven will remain on.
Temperature Knob:
The temperature knob controls the internal heat level of the oven. The
temperature rage is from (150°F – 500°F).
Indicator Light:
The indicator light turns on when the oven reaches the selected
temperature.
16
• Use one rack in bake mode.
• Occasionally check the oven to check if food is done.
• Use metal bakeware (with or without a non-stick finish), heatproof glass,
glass ceramic, pottery, or other utensils suitable for the oven.
• For best results, bake food on a single rack with at least 1” -
1½” (2.5 - 4 cm) space between bakeware and oven walls.
• When using heatproof glass, reduce temperature by 25°F (15°C) from
recommended temperature. Use baking sheets with or without sides or
jelly roll pans.
• Dark metal pans or nonstick coatings will cook faster with more
browning. Insulated bakeware will slightly lengthen the cooking time for
most foods.
• Do not use aluminum foil or disposable aluminum trays to line any part of
the oven. Foil is an excellent heat insulator and heat will be trapped
beneath it. This will alter the cooking performance and can damage the
finish of the oven. You can line a baking tray with foil and use this on the
bottom shelf.
• Avoid placing pans on the oven door when it’s open.
• See the Troubleshooting section for tips on solving baking and roasting
problems.
Cooking Modes and Cooking Advice
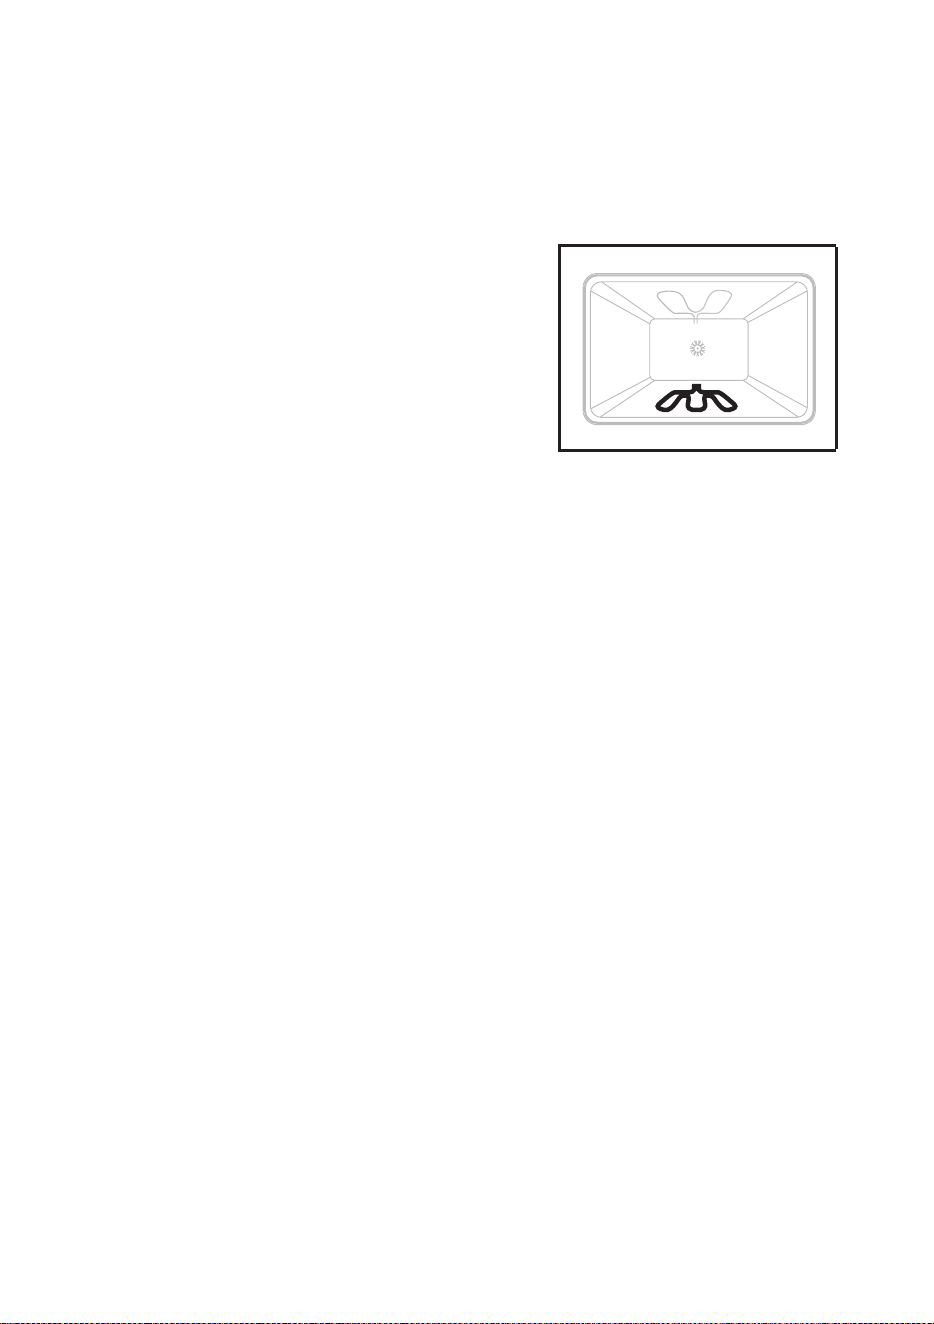
Bake Function
When using the BAKE, the bottom element of
the oven will activate, the fan will activate
momentarily for preheating.
Follow the recipe or manufacturer’s baking
directions for temperature, time, and rack
positioning. Baking time will vary with the
temperature of ingredients and the size,
shape, and finish of the baking utensil. The
temperature can be set from 170°F to 500°F
(77°C to 260°C).
Practical Baking Advice
17
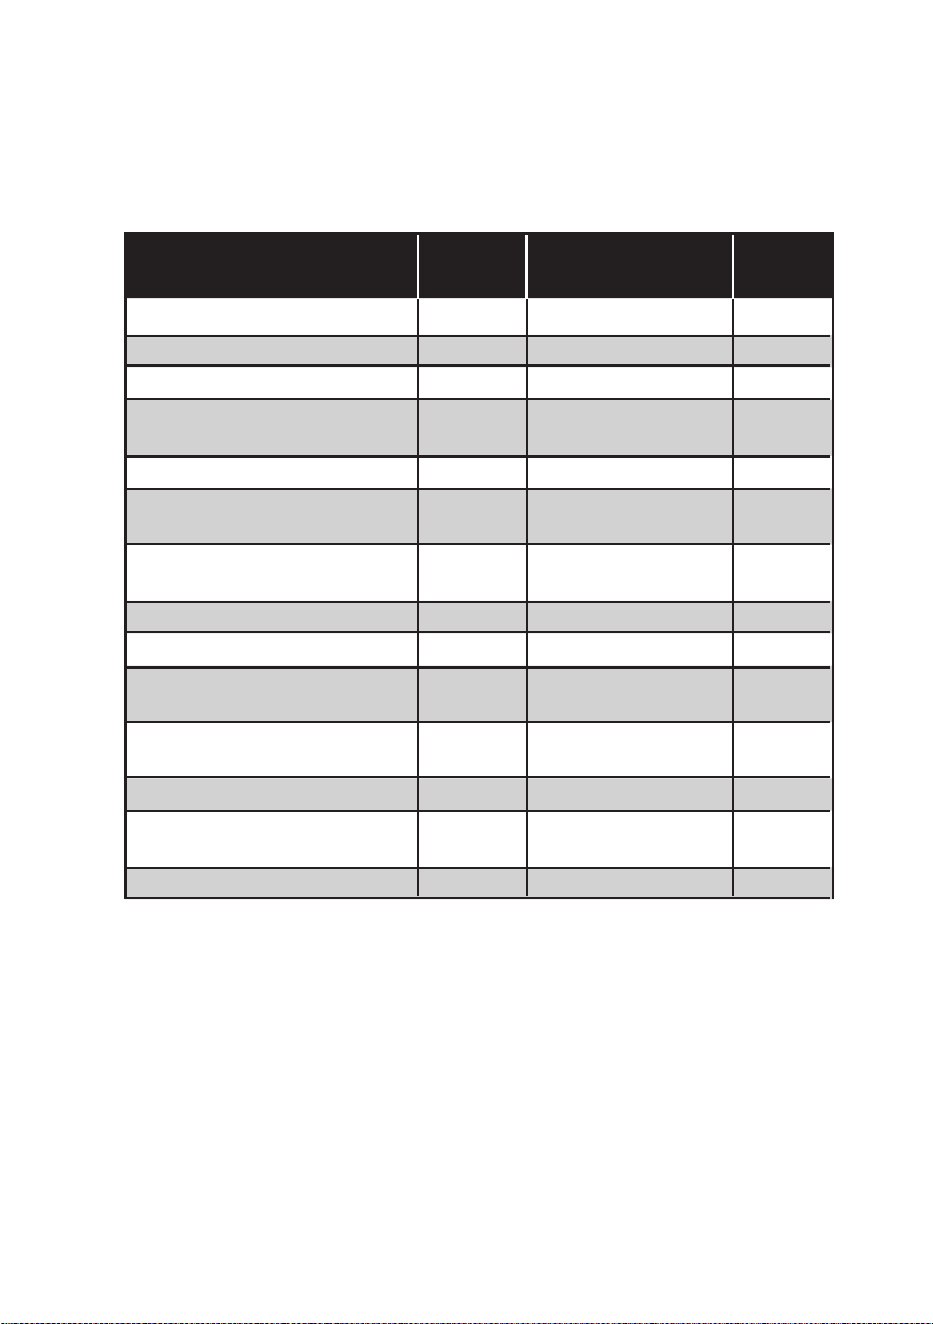
Food Item
Rack
Position
Temp. °F (°C)
(Preheated Oven)
Time
(Min)
Cupcakes
2
350 (175)
19-22
Bundt Cake
1
350 (175)
40-45
Angel Food
1
350 (175)
35-39
Two 9" Pie Crusts (Fresh)
2
375-400
(190-205)
45-50
Two 9" Pie Crusts (Frozen)
2
375 (190)
68-78
Sugar Cookies
2
350-375
(175-190)
8-10
Chocolate Chip Cookies
2
350-375
(175-190)
8-13
Brownies
2
350 (175)
29-36
Yeast Bread Loaf (9 x 5)
2
375 (190)
18-22
Yeast Rolls
2
375-400
(190-205)
12-15
Biscuits
2
375-400
(190-205)
7-9
Muffins
2
425 (220)
15-19
Frozen Pizza
2
400-450
(205-235)
23-26
Fresh Pizza
2
425 (246)
15-18
Oven Bake Guide
18

• For best results, use a two-piece broiler pan with a grid (not
provided). It is designed to drain juices which helps to avoid spills
and splatters.
• For proper draining, do not cover the grid with foil. The bottom of the
pan may be lined with aluminum foil for easier cleaning.
• Trim excess fat to reduce spattering. Slit the remaining fat on the
edges to avoid curling.
• Pull out the oven rack to stop position before turning or removing
food. Use tongs to turn food to avoid the loss of juices. Very thin
cuts of fish, poultry, or meat may not need to be turned.
• After broiling, remove the pan from the oven when removing the
food. Drippings will bake on the pan if left in the heated oven,
making cleaning more difficult.
• Position food on the grid in the broiler pan, then place it in the center
of the oven rack. Close the oven door and set the knobs
accordingly.
Broil Function
BROIL uses direct radiant heat to cook
food. Thicker cuts and unevenly shaped
of meat, fish, and poultry may cook
better at lower broiling temperatures.
Tip: Keep the oven door closed while broiling. When checking the
food, open the door no more than two inches.
Note: Position the rack to your needs before broiling.
Practical Broiling Advice
19
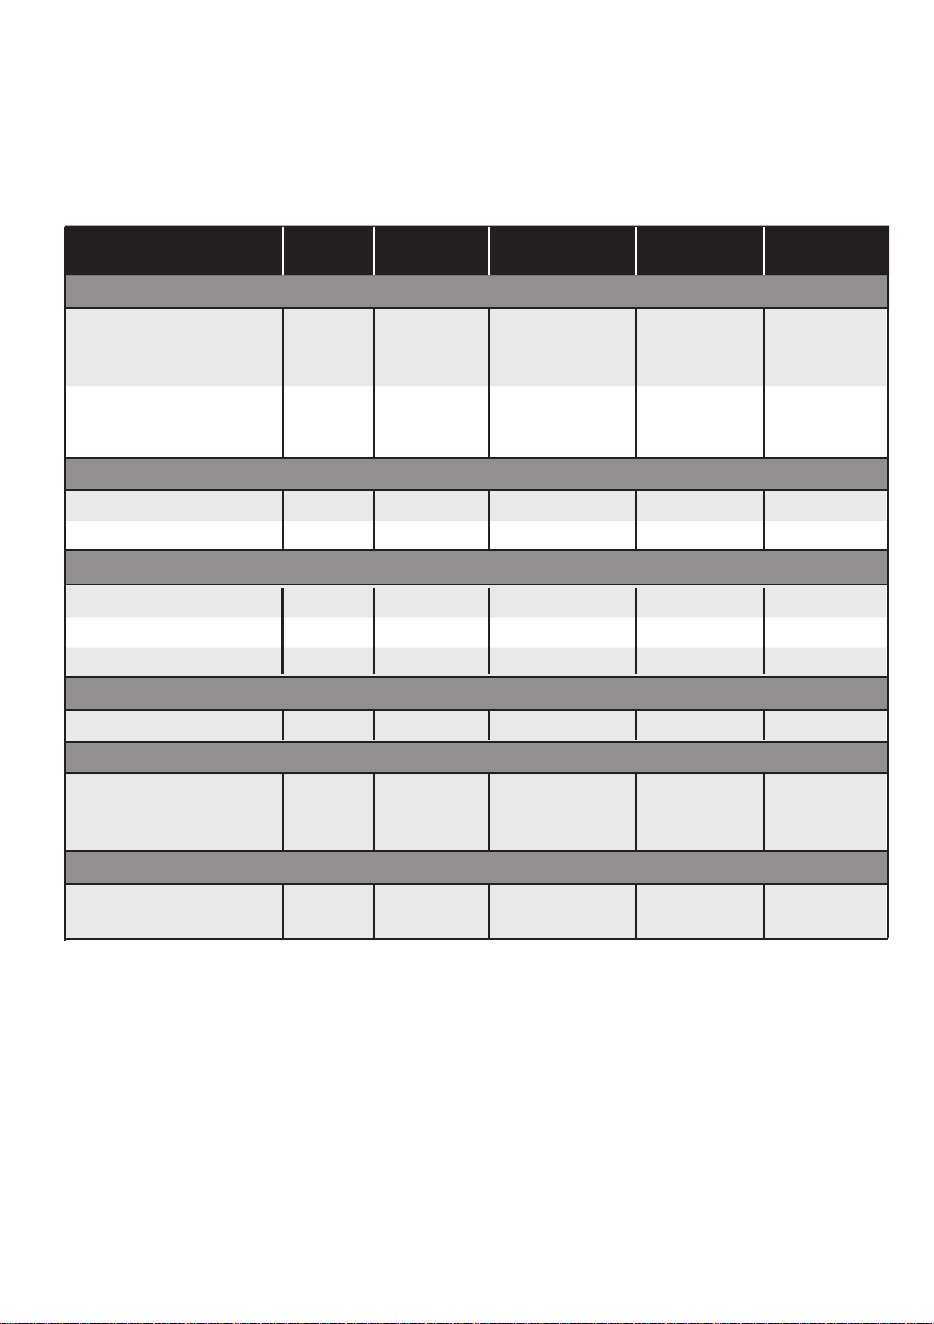
Oven Broiling Guide
20
Food And Thickness
Rack
Position
Broil Setting
°F (°C)
Level of
Doneness
SIDE 1
Time (Min)
SIDE 2
Time (Min)
BEEF
Steak (¾" - 1)
5
500 (260)
Medium Rare
Medium Well
Done
7)(5 -
(6 - 8)
(8 - 10)
(4 - 6)
(5 - 7)
(7 - 0)
Hamburgers (¾" - 1")
4
500 (260)
Medium
Well Done
(8 - 11)
(10-13)
(6 - 9)
(8 - 10)
POULTRY
Breast (bone-in)
4
450 (235) Well Done (10 - 12) (8 - 10)
Thigh (very well done)
4
500 (260)
Well Done (28 - 30) (13 - 15)
PORK
Pork Chops (1")
5
500 (260)
Well Done (7- 9) (5 - 7)
Sausage - fresh
5
500 (260)
Well Done (5 - 7) (3 - 5)
Ham Slice (½")
5
500 (260)
Well Done (4 - 6) (3 - 5)
SEAFOOD
Fish Filets, 1" Buttered
4
450 (235) Well Done (10 - 14) Do not turn
LAMB
Chops (1")
5
500 (260)
Medium Rare
Medium Well
Done
(5 - 7)
(6 - 8)
9)(7 -
(4 - 6)
(4 - 6)
(5 - 7)
BREAD
Garlic Bread, 1" slices
4
3
500 (260)
2:30)(2 -
(4 – 6)
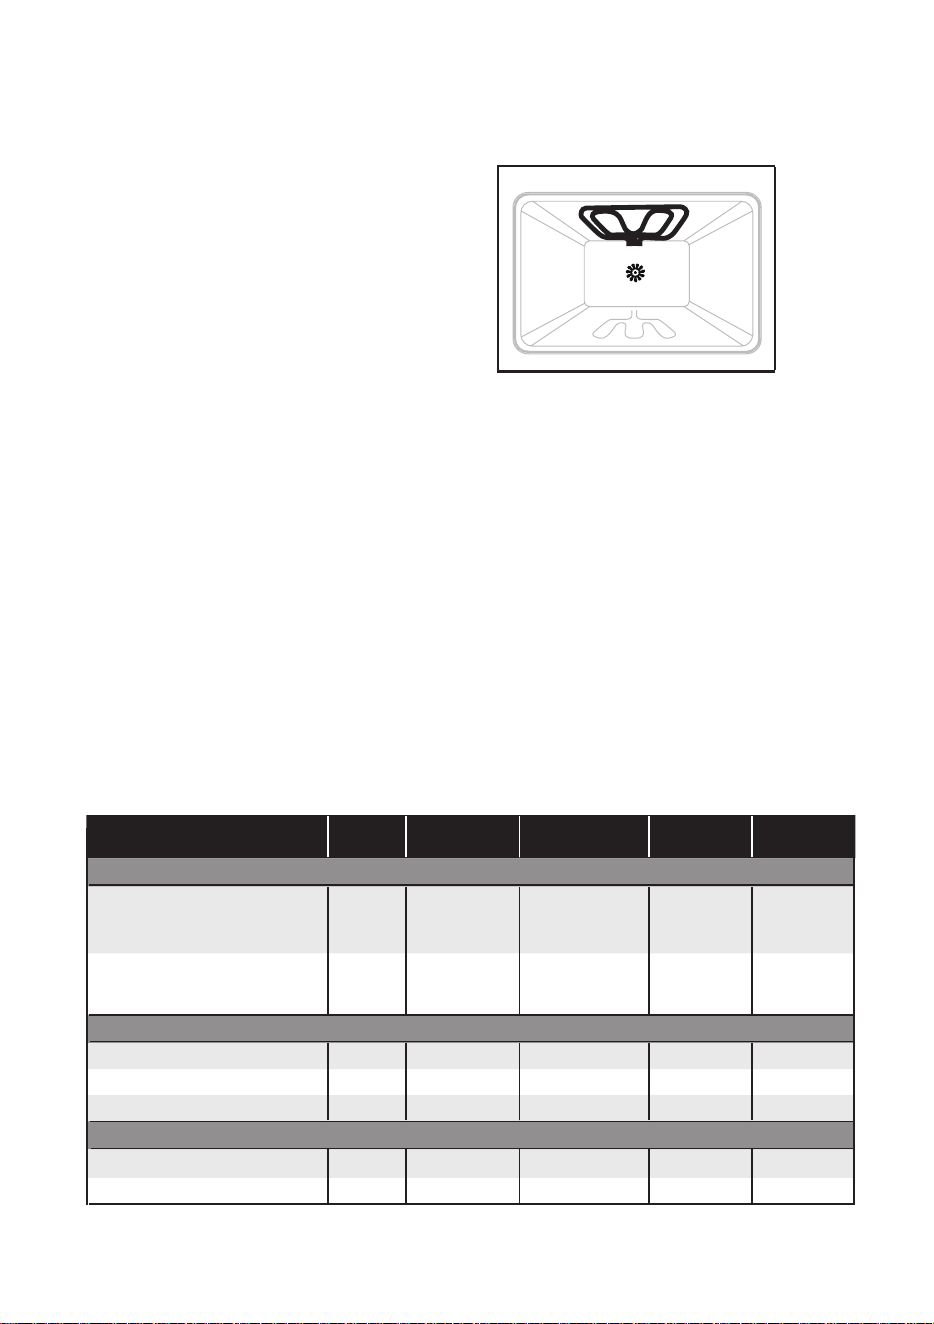
Convection Broiling
CONVECTION BROIL uses the
convection fan to circulate hot air for
even cooking. It is recommended to
place the rack in the middle position
(depending on your recipe's browning
and cooking needs).
• Before turning on the oven, place rack on the desired position.
• Use CONVECTION BROIL with the oven door closed.
• Set the temperature knob to your normal broiling heat.
• Do not preheat oven.
• Use a 2-piece broil pan (not provided)
• Turn meats once halfway through the cooking time. (See the
Convection Broil Guide).
• Thicker cuts and unevenly shaped pieces of meat, fish, and poultry may
cook better at lower broiling temperatures.
Practical Convection Broiling Advice
Food And Thickness
Rack
Position
Broil Setting
°F (°C)
Level of
Doneness
SIDE 1
Time (Min)
SIDE 2
Time (Min)
BEEF
Steak
(1½” or thicker)
4
Medium Rare
Medium
Well Done
(9 - 12)
(11 - 13)
(18 - 20)
(8 - 10)
(10 - 12)
(16 - 17)
Hamburgers
(1" or thicker)
4
500 (260)
Medium
Well Done
(8 - 11)
(11-13)
(5 - 7)
(8 - 10)
POULTRY
Chicken Quarters
4
450 (235)
Well Done (16 - 18) (10 - 13)
Chicken Halves
3
450 (235)
Well Done (25 - 27) (15 - 18)
Chicken Breasts
4
450 (235)
Well Done
(13 - 15) (9 - 13)
PORK
Pork Chops (1¼" or thicker)
4 450 (235)
Well Done
(12 - 14)
(11 - 13)
Sausage (fresh)
4
450 (235)
Well Done
(4 - 6)
(3 - 5)
Convection Broiling Guide
21
450 (235)

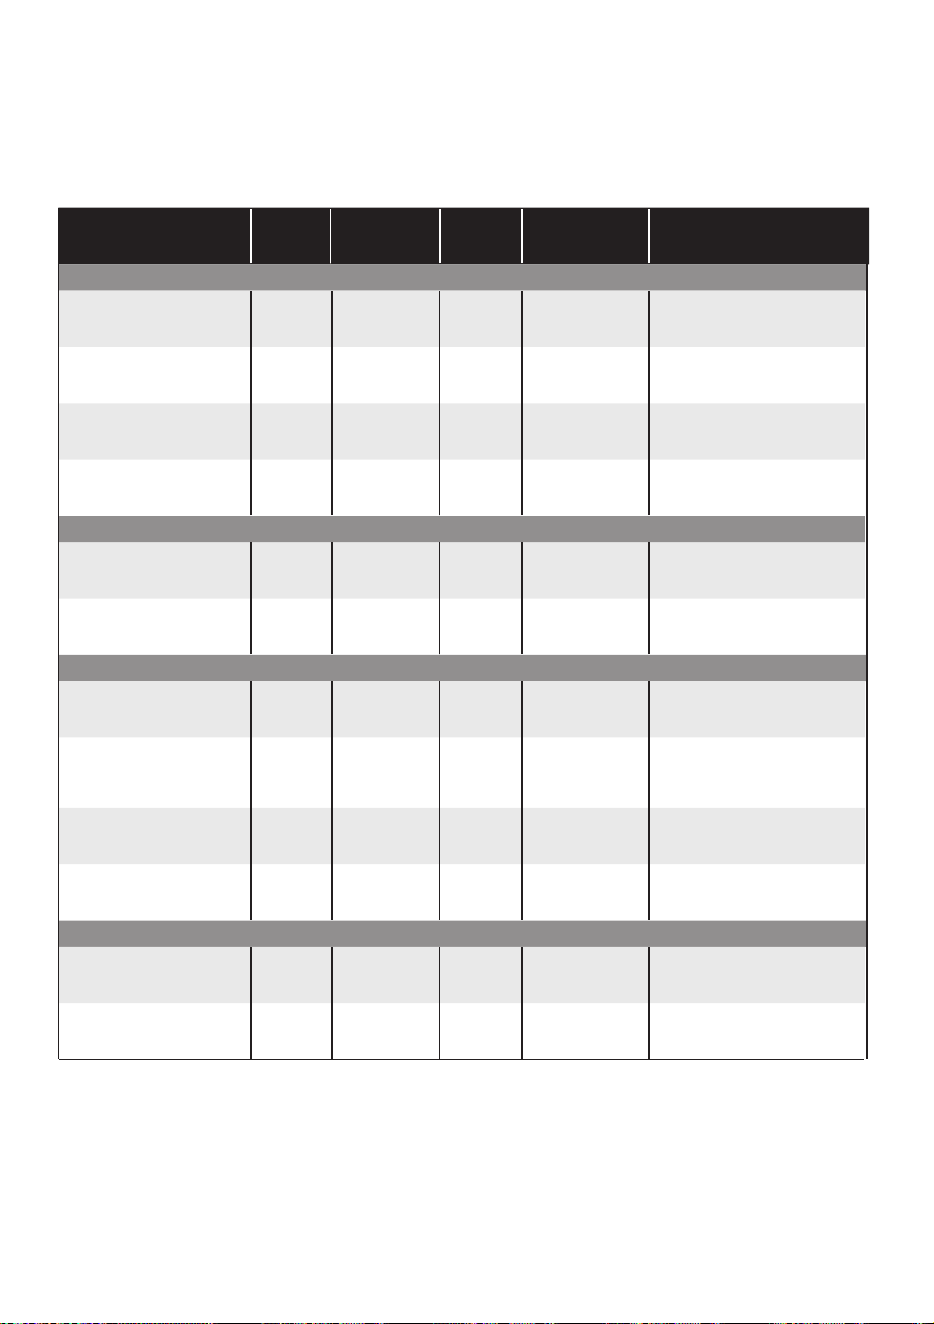
Convection Roast
When convection roasting, turn to your
normal roasting temperature. The
roasting time should be 15-30% less
than in conventional cooking. It is not
necessary to preheat the oven for
Convection Roast.
Practical Convection Roasting Advice:
• Do not preheat for Convection Roast.
• Roast in a low-sided, uncovered pan.
• When roasting whole chickens or turkey, tuck the wings behind
back and loosely tie legs with kitchen string.
• Use a 2-piece broil pan for roasting uncovered.
• Double-check the internal temperature of meat or poultry by
inserting meat thermometer into another position.
• Large poultry may need to be covered with foil (and pan roasted)
during a portion of the roasting time to prevent over-browning.
• The minimum safe temperature for stuffing in poultry is 165ºF
(75ºC).
• After removing the food from the oven, cover loosely with foil for 10
to 15 minutes before carving if necessary to increase the final
foodstuff temperature by 5° to 10°F (3° to 6° C).
22
Food And Thickness
Weight
(lbs)
Oven Temp.
°F (°C)
Rack
Position
Time
(min. per llbs)
Internal T
emp.
°F (°C)
BEEF
Rib Roast
Rib Eye Roast
(boneless)
Rump, Eye, Tip, Sirloin
(boneless)
Tenderloin Roast
PORK
Loin Roast
(boneless or bone-in)
Shoulder
POULTRY
Whole Chicken
Turkey
(not stuffed)
Turkey Breast
Comish Hen
LAMB
Half Leg
Whole Leg
4 - 6
3 - 6
2 - 3
5 - 8
3 - 6
3 - 4
12 - 15
16 - 20
21 - 25
3 - 8
1 - 1½
3 - 4
6 - 8
325 (160)
325 (160)
400 (205)
350 (205)
400 (205)
375 (190)
325 (160)
325 (160)
325 (160)
325 (160)
350 (205)
325 (160)
325 (160)
2
2
2
2
2
2
1
1
2
2
1
1
1
16-20
18-22
16-20
18-22
15-20
20-25
18-21
10-14
9-11
6 - 11
15-20
45-75
total
22 - 27
28 - 33
22 - 27
28 - 33
16-20
Medium Rare: 145 (63)
Medium: 160 (71)
Medium: 160 (71)
180 (82)
180 (82)
180 (82)
180 (82)
170 (77)
180 (82)
Medium: 160 (71)
Well: 170 (77)
Medium Rare: 145 (63)
Medium: 160 (71)
Medium Rare: 145 (63)
Medium: 160 (71)
Medium Rare: 145 (63)
Medium: 160 (71)
Medium: 160 (71)
Well:
170 (77)
4 - 6
325 (160)
2
16-20
18-22
Convection Roast Guide
23
• Use Convection Bake for single or multiple-rack baking. Reduce
standard recipe baking temperature by 25°F (15°C).
• For best results, foods should be cooked uncovered, in low-sided
pans to take advantage of the forced air circulation. Use shiny
aluminum pans for best results unless otherwise specified.
• Heatproof glass or ceramic can be used. Reduce the temperature by
another 25°F (15°C) when using heatproof glass dishes for a total
reduction of 50°F (30°C). Check your baking progress to make sure
your dish is not overcooked.
• Dark metal pans may be used. Note that food may brown faster when
using dark metal bakeware.
• The number of racks used is determined by the height of the food to
be cooked.
• Baked items, for the most part, cook extremely well in convection.
Don’t try to convert recipes such as custards, quiches, pumpkin pie, or
cheesecakes, which do not benefit from the convection-heating
process. Use regular BAKE mode for these foods.
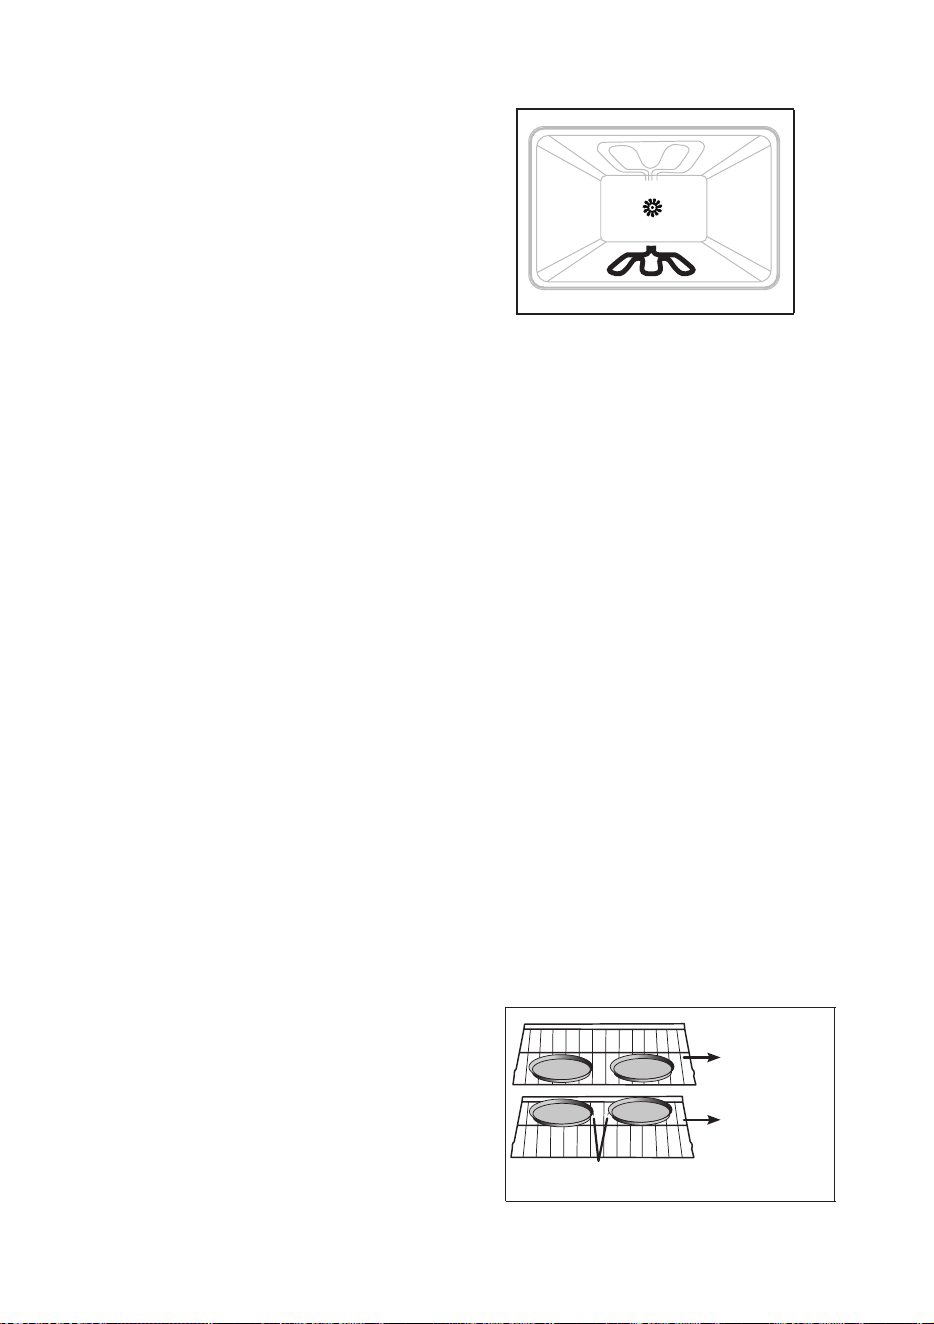
Convection Bake
Compared to BAKE function,
CONVECTION BAKE adds the use of
convection fan(s) to circulate heated air.
Both the temperature and cooking time
may be slightly reduced.
Tip:When using the convection bake function, your dish will usually
cook faster than standard bake. It is generally recommended to
reduce the temperature by 25ºF or to check your baking progress to
make sure your dish is not overcooked.
Practical Convection Baking Advice:
2 at the front
2 at the rear
1 ½"
• When baking four cake layers at the
same time, stagger pans so that one
pan is not directly above another.
For best results, place cakes on
front of upper rack and back of lower
rack. Allow 1” - 1½” (2.5 - 4 cm) air
space around pans.
24

Defrost
• Position temperature knob to any temperature.
• The fan in the oven will circulate the air at room temperature
around the food.
• This setting is recommended for defrosting all types of food,
especially delicate items that do not require heat,
such as ice
cream cakes, cream or custard desserts, and fruitcakes.
• The fan cuts defrosting time by about half. To speed up
defrosting for meat, fish, or bread even more, select Convection
Broil and set the temperature between 175°F and 225°F.
Light
• Turn the function knob to the light setting to switch on the
oven light.
Additional Functions
25
CARE & MAINTENANCE
• For general cleaning, use hot, soapy water and a cloth.
• For more difficult soils and built-up grease, apply a liquid detergent
directly onto the soil. Rinse with a damp cloth and dry.
• DO NOT use steel wool or acidic cleaners on the knobs as they can
scratch.
• Clean stainless steel with hot, soapy water and a dishcloth. Rinse
with clean water and a cloth.
• DO NOT use cleaners with high concentrations of chlorides or
chlorines.
• DO NOT use harsh scrubbing cleaners. Only use kitchen cleaners
that are especially made for cleaning stainless steel.
WARNING: To avoid the risk of electric shock, ALWAYS ens
ure
the
appliance
is turned off and completely cool before cleaning
or doing any sort of maintenance.
• To avoid possible burns, use care when cleaning the
appliance.
• DO NOT attempt to clean the appliance whenever the oven or
burner heads are still hot.
• To avoid possible burns, DO NOT attempt any of the following
cleaning instructions before turning off the oven and allowing it
to cool.
CAUTION:
NOTE: ALWAYS follow label instructions on cleaning products.
Stainless Steel Exterior
Control Knobs
26

Oven Interior
• This appliance DOES NOT have a self-cleaning feature.
• Use an appropriate cleaning product designed specifically to clean the
inside of ovens.
• The soap should be rinsed away and the interior dried thoroughly.
• Avoid using abrasive detergents (for example cleaning powders, etc)
and abrasive sponges for
dishes or acids (such as lime scale –
remover, etc) as these could damage the enamel.
• If the grease spots and dirt are particularly tough to remove, use a
special product for oven
cleaning, following the instructions provided
on the packet.
• NEVER use a steam cleaner for cleaning inside of oven.
• If you use your oven for an extended period of time, condensation may
form. Dry it using a soft cloth.
• The oven door gasket seals the opening and keeps the oven working
properly. Check that the gasket is in good condition often. Clean it
gently without harsh scrubbing tools or cleaners. If it is damaged, call
the vendor and avoid using the oven until it is fixed.
• NEVER line the oven bottom with aluminum foil, as the consequent
accumulation of heat could
compromise the cooking and even damage
the enamel.
Glass Door Exterior
• Apply glass cleaner to soft cloth or sponge, not directly on
panel.
• Clean the glass door using non-abrasive products or sponges and dry
it with a soft cloth. Use glass cleaner.
27

WARNING:
• Make sure oven is cool and power to the oven has been turned off
before removing the door. Failure to do so could result in electrical
shock or burns.
• The oven door is heavy and fragile. Use both hands to remove the
oven door. The door front is glass. Handle carefully to avoid
breaking.
• Grasp only the sides of the oven door. DO NOT grasp the handle
as it may swing in your hand and cause damage or injury.
• Failure to grasp the oven door firmly and properly could result in
personal injury or product damage.
• To avoid injury from hinge bracket snapping closed, be sure that
both levers are securely in place before removing the door. Also,
DO NOT force door open or closed. The hinge could be damaged
and injury could result.
• Refer to page 29 for oven door removal instructions.
Removing Oven Door
28
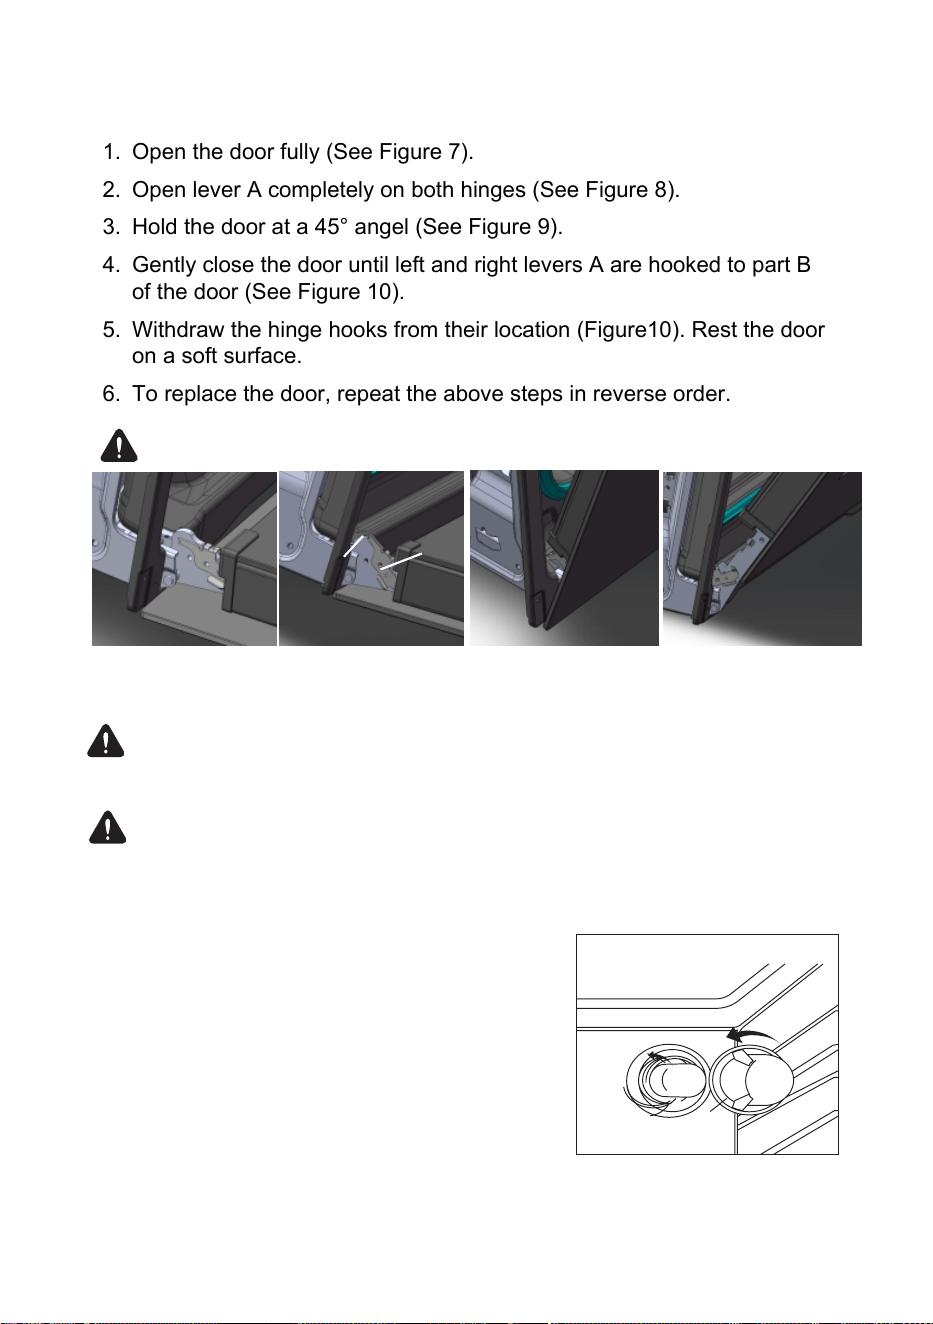
Removing the Oven Door
1. Open the door fully (See Figure 7).
2. Open lever A completely on both hinges (See Figure 8).
3. Hold the door at a 45° angel (See Figure 9).
4. Gently close the door until left and right levers A are hooked to part B
of the door (See Figure 10).
5. Withdraw the hinge hooks from their location (Figure10). Rest the door
on a soft surface.
6. To replace the door, repeat the above steps in reverse order.
NOTE: If door does not come away from oven easily, DO NOT force it.
Figure10Figure 9
Figure 8
Figure 7
B
A
WARNING: Electrical Shock Hazard
Failure to follow these instructions can result in death, fire, or electrical
shock.
IMPORTANT: Before replacing the bulb, make sure the oven is cool
and the controls are turned off.
The oven light is a standard 25-watt (G9) appliance bulb.
1. Disconnect the power.
2. Remove the bulb cover by turning it
counterclockwise (See Figure 11)
3. Remove the burned-out bulb from the socket.
NOTE: To avoid damage or decreasing the
life of the new bulb, do not touch the bulb with
bare fingers. Wear gloves or use a tissue
when replacing the light bulb.
4. Replace the bulb and then replace the bulb
cover.
5. Reconnect the power.
Figure 11
Replacing Oven Interior Light
29

TROUBLESHOOTING
If you have checked the table above and find that you still need help with your appliance, call
our Customer Service facility at 800-932-4267 (Ext. 513) between 9:00 AM and 5:00 PM ET
or visit
summitappliance.com/support. We will do our best to answer
your questions.
To order replacement parts, visit our website: summitapplianceparts.com
30
Problem Possible Cause Solution
The oven does
not turn on.
• The oven is not connected to
the power
• The household fuse is blown,
or circuit breaker is tripped.
• Verify the electrical wires are
properly connected to the mains.
Refer to the “Electrical
Installation” section on page 13
.
• Replace the fuse or reset the
circuit breaker.
The oven will not
operate.
The oven knobs are set
incorrectly.
Ensure the oven is ON and the knob
is on the proper cooking mode.
The cooling fan
runs during baking
and broiling.
Normal operation.
It is normal for the fan to run
automatically while the oven is in
us
e and sometime after to cool down
the oven
.
The oven
temperature is
too high or too
low.
• The oven was not preheated.
• The racks are positioned
incorrectly.
• The batter is not evenly
distributed.
• The cooking time was set
incorrectly.
• T
he oven door was opened
while cooking.
• Allow the oven to preheat before
placing the food.
• Change the rack position.
• Check t
hat the is level in the pan.
• Adjust the cooking time.
• Opening the door will let the air
escape and result
in longer cooking
time.
Baked i
tems are
too brown
underneath.
The oven rack is placed too low. Move the rack higher up.
Pie crust edges
are browning too
quickly.
The temperature is too high. Use aluminum foil to cover the
edges of the crust and/or reduce the
temperature.
The oven light
does not work.
The light bulb is loose or
defective.
Tighten or replace the bulb.
The oven makes
a clicking noise.
Normal operation.
It is normal for the heating elements
to make sounds when they turn on
and off.

NOTES
31

NOTES
32
33
LIMITED WARRANTY
WARNING: This product can expose you to chemicals including Nickel
(Metallic) which is known to the State of California to cause cancer.
For more information go to www.P65Warnings.ca.gov
Note: Nickel is a component in all stainless steel and some other metallic compositions.
ONE-YEAR LIMITED WARRANTY
Warranty coverage is available within the 48 contiguous United States, along with select
areas of Alaska, Hawaii, and Canada. For locations not covered, consumers can either
contact a local provider or coordinate with Felix Storch, Inc. to find nearby service
options, which may qualify for partial reimbursement.
The warranty for this appliance is valid for one year from the date of purchase, provided
the appliance is operated and maintained according to the instructions included with
the product. The warrantor will cover the cost of factory-specified parts and repair
labor needed to correct defects in materials or workmanship. Service must be
performed by a designated service company.
All parts, except the compressor, are warranted for one year against manufacturing
defects. Plastic parts, shelves, and cabinets are produced to commercially acceptable
standards but are not covered for damages incurred during handling or for breakage.
ITEMS WARRANTOR WILL NOT PAY FOR:
1. Serv
ice calls
to
corre
ct the installation of your appliance, to instruct you how
to use
your appliance, to
replace
or repai
r fuses
o
r to correct wiring or plumbing.
2. Service calls to repair or replace appliance light bulbs or broken shelves.
Consumable parts (such as filters) are excluded from warranty coverage.
3. Damage resulting from accident, alteration, misuse, abuse, fire, flood, acts of
God, improper installation, installation not in accordance with electrical or
plumbing codes, or use of products not approved by warrantor.
4. Replacement parts or repair labor costs for units operated outside the 48
contiguous United States, along with select areas of Alaska, Hawaii, and Canada.
5. Repairs to parts or systems resulting from unauthorized modifications made to the
appliance.
6. Expenses for travel and transportation for product service in remote locations.
7. The removal and reinstallation of your appliance if it is installed in an inaccessible
location or is not installed in accordance with published installation instructions.
DISCLAIMER OF IMPLIED WARRANTIES; LIMITATION OF REMEDIES
CUSTOMER'S SOLE AND EXCLUSIVE REMEDY UNDER THIS LIMITED WARRANTY SHALL BE
PRODUCT REPAIR AS PROVIDED HEREIN. IMPLIED WARRANTIES, INCLUDING WARRANTIES OF
MERCHANTABILITY OR FITNESS FOR A PARTICULAR PURPOSE, ARE LIMITED TO ONE YEAR.
WARRANTOR SHALL NOT BE LIABLE FOR INCIDENTAL OR CONSEQUENTIAL DAMAGES. SOME
STATES DO NOT ALLOW THE EXCLUSION OR LIMITATION OF INCIDENTAL OR CONSEQUENTIAL
DAMAGES, OR LIMITATIONS ON THE DURATION OF IMPLIED WARRANTIES OF
MERCHANTABILITY OR FITNESS, SO THESE EXCLUSIONS OR LIMITATIONS MAY NOT APPLY TO
YOU. THIS WARRANTY GIVES YOU SPECIFIC LEGAL RIGHTS AND YOU MAY ALSO HAVE OTHER
RIGHTS, WHICH VARY FROM STATE TO STATE.

Felix Storch, Inc.
Summit Appliance Division
An ISO 9001:2015 registered company
770 Garrison Avenue
Bronx, New York 10474
www.summitappliance.com
Printed in USA
Revised: 2026-08-28