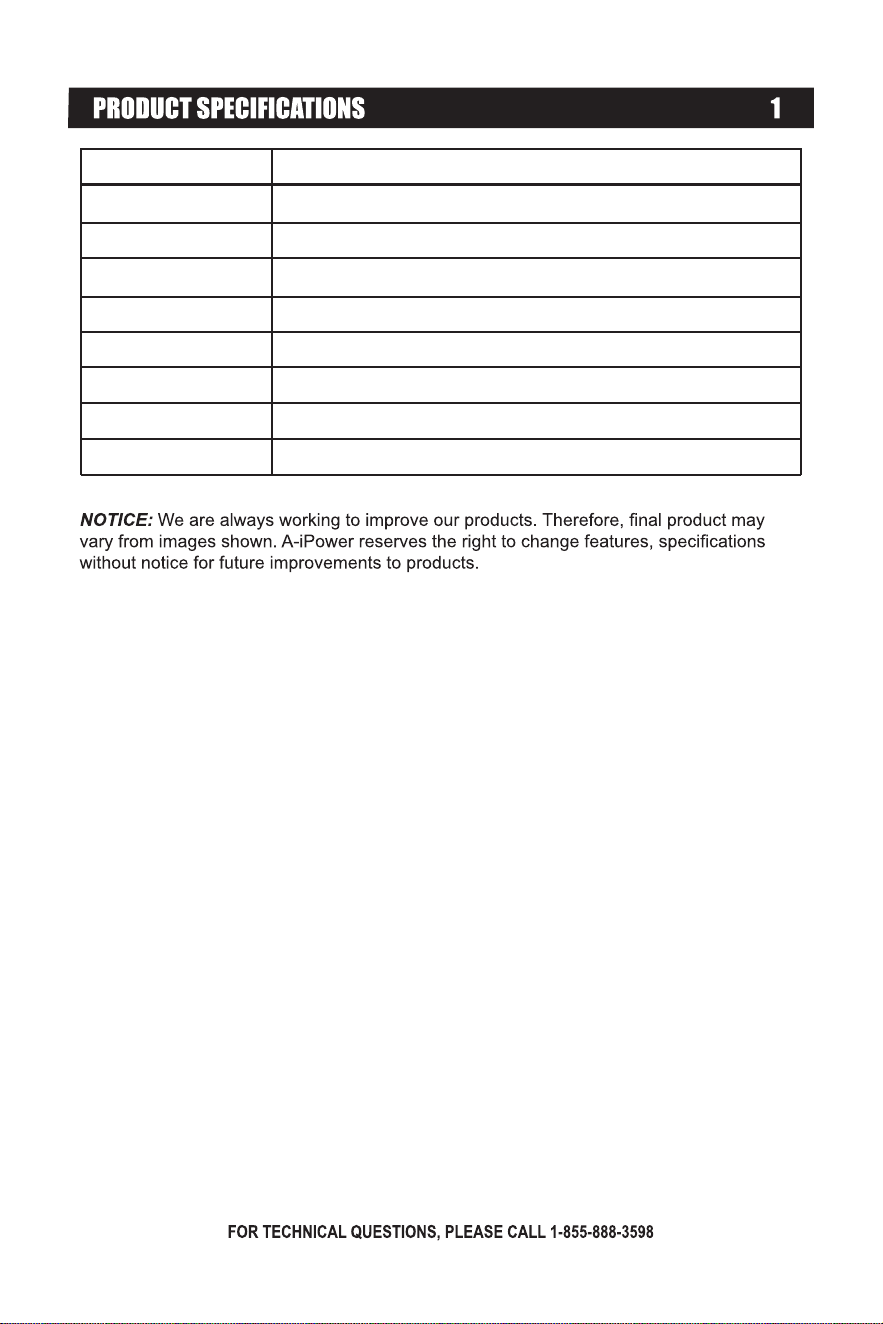
MODEL: E2800-FM

22
10
11
13
14
17
18
20
21
CARE AND MAINTENANCE
E2800-FM
Nozzle Selection
2800 PSI Internal Pressure at Initial Discharge
1.7 GPM with Soap Dispensing
6.5” x 1/4 QC x M22
0°,15°, 25°, 40° and Turbo Nozzle
Rated Pressure 2000 PSI
Rated Flow 1.2 GPM
Model
Motor
Max Pressure
Max Flow
Hose
Wand
1/4” x 25’ x M22
Universal,120V - 60Hz,13 Amps
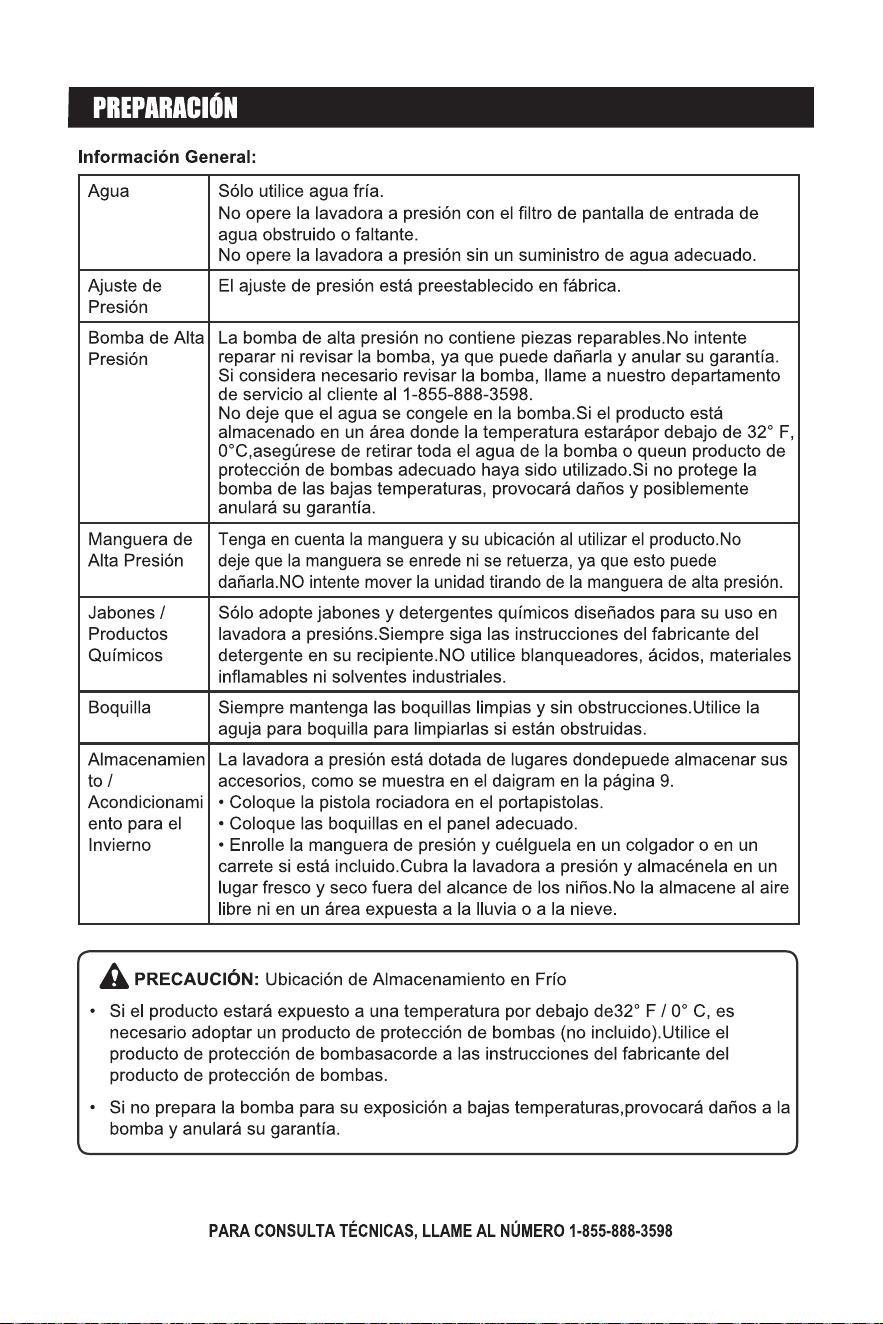
For cold water only.
Outdoor use only. Household use only.
If connection is made to a potable water system, the system should be
protected against backflow.
Caution
If connected to circuit protected by fuses, use time delay fuse marked "D"
Caution
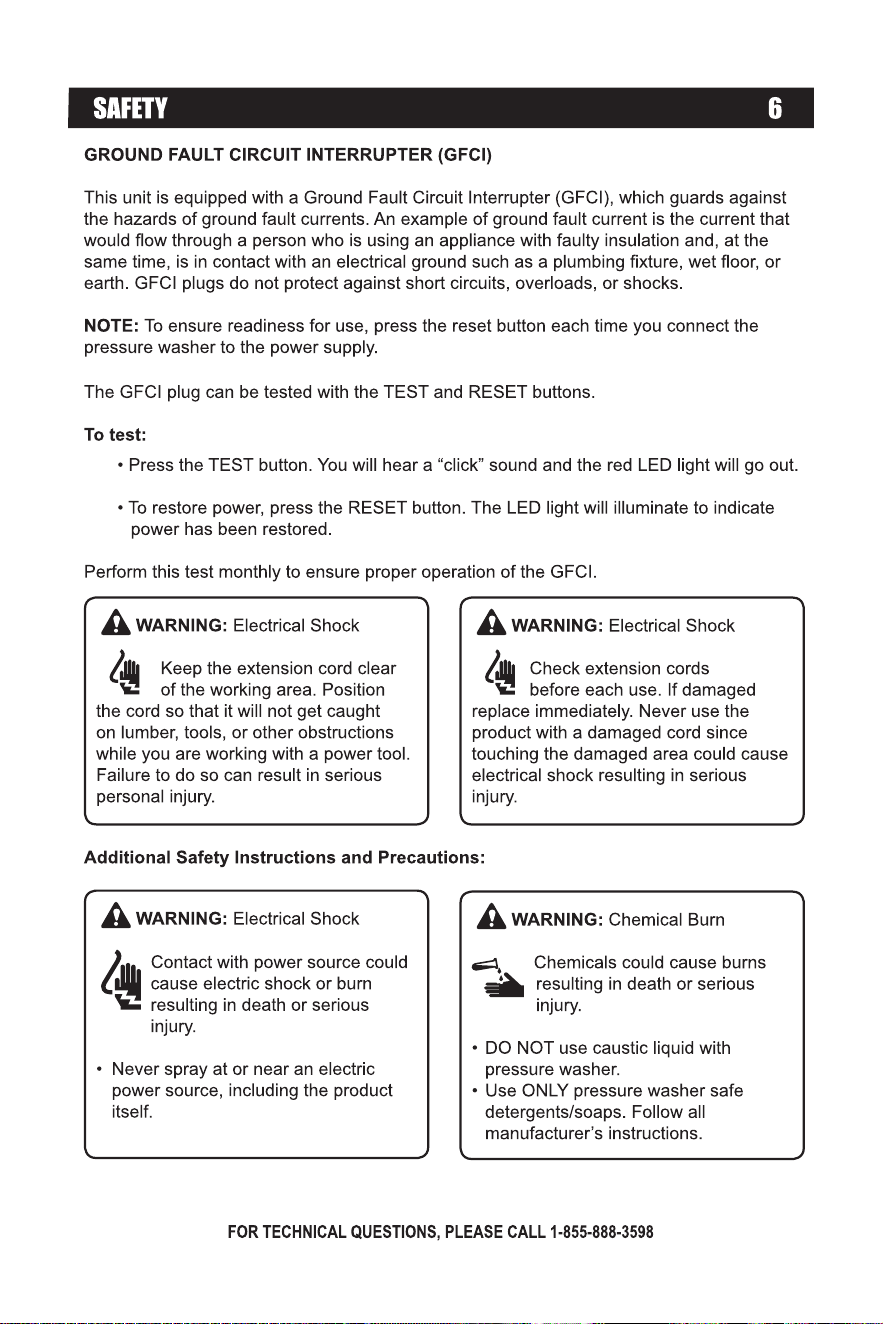
DO NOT spray flammable liquids.
Risk of Explosion
DO NOT discharge stream at persons.
WARNING
Risk of electrocution
1. Inspect cord before using. Do not use if the cord is damaged.
2. Keep all connections dry and off the ground.
3. Do not touch plug with wet hands.
4. Double-insulated—when servicing, use only identical replacement parts.
5. This product is provided with a ground fault circuit interrupter built into the power cord plug.
If replacement of the plug or cord is needed, use only identical replacement parts.
6. Do not spray electrical apparatus or wiring.
7. Read instruction manual before using. Do not remove this tag.
9
WARNING: California Proposition 65
This product, the engine exhaust and other substances that may become airborne from
its use contains chemicals, including lead, known to the State of California to cause
cancer, birth defects, or other reproductive harm. Wash your hands after handling
product.
10
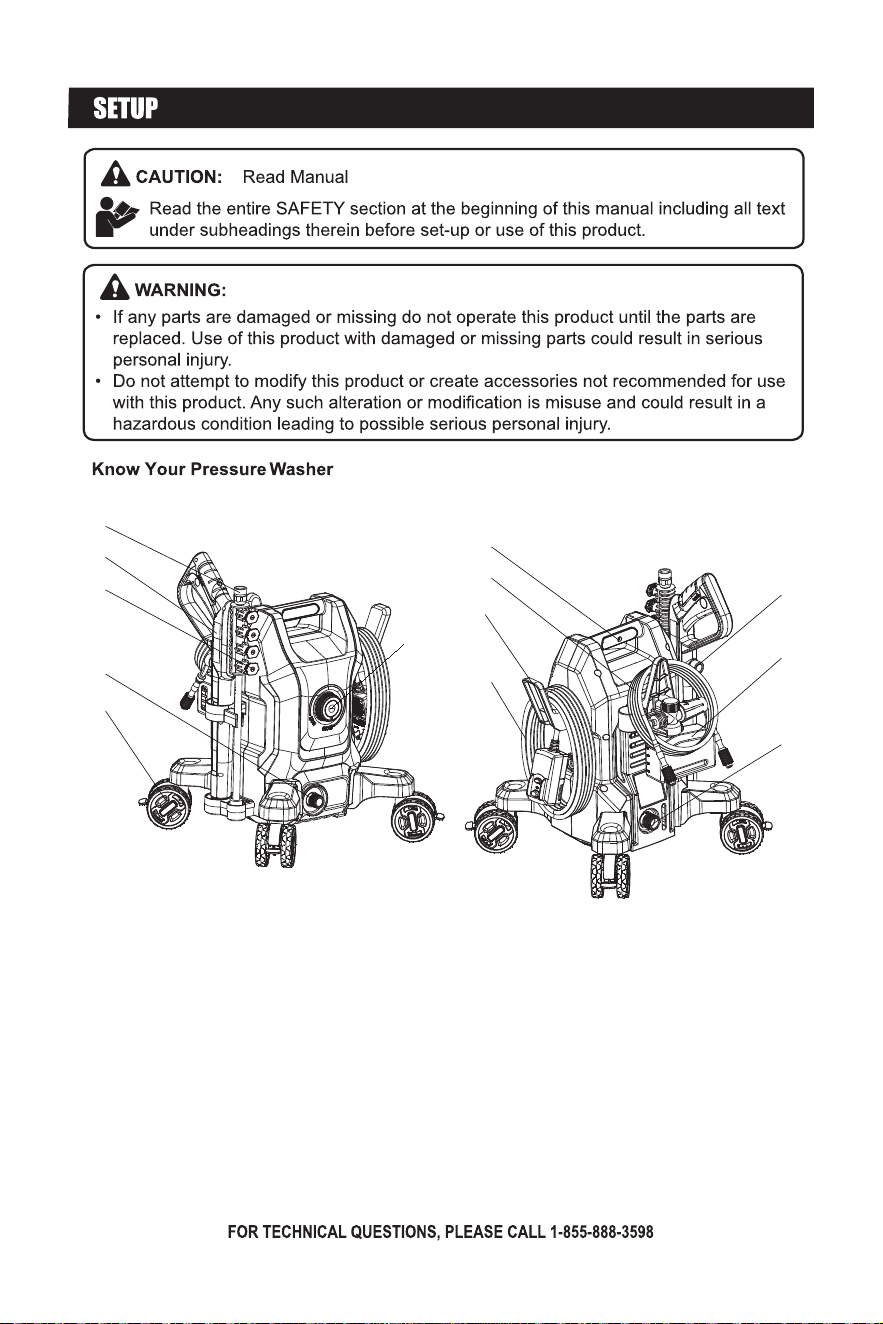
A
B
C
D
E
F
G
H
I
J
K
M
L
A
B
C
D
E
- Spray wand
- Spray gun handle
- Nozzle kit
- Water outlet
- Wheel
F
G
H
I
J
- Start/Stop switch
- Handle
- High-pressure hose
- Power cord hook
- Power cord
K
L
M
- Spray gun connector
- Water inlet
- Soap cannon
11
Do not connect the pressure washer to a power
supply until it is fully assembled. To avoid accidental
starting and possible serious injury, only connect a
power supply when the pressure washer is ready for
use.
This product requires assembly. Do not attempt to
operate this product if any items in the INCLUDED
LIST are already assembled when you remove the
carton contents. These items are not assembled by
the manufacturer and should require customer
assembly. Using an improperly assembled product
can be hazardous and could result in serious
personal injury.
• Carefully cut down the sides of the packaging
and remove the carton contents.
• Inspect the carton contents. verify that all the
items in the INCLUDED LIST are present and
undamaged.
• Recycle or dispose of the packaging materials
properly.
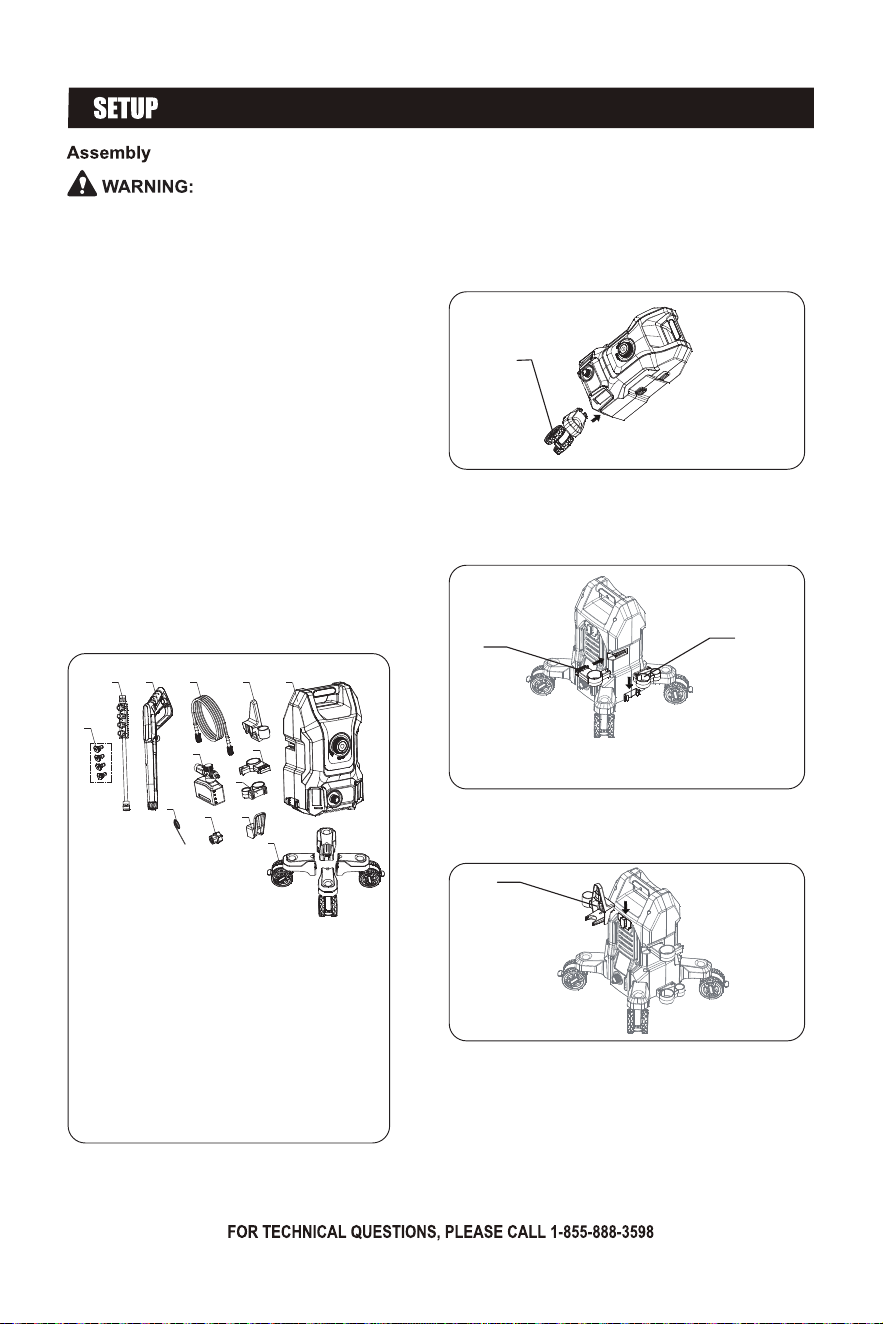
A
B C
D
E
F
H
G
J
K
L
M
I
A - Nozzle
B - Spray wand
C - Spray gun handle
D - High-pressure hose
E - Accessory hook
F - Pressure washer
G - Soap cannon
H - Spray gun holder
I - Spray gun holder base
J - Nozzle cleaning needle
K - Inlet adapter
L - Power cord hook
M - Wheel
Assembling The Pressure Washer
1. Hold the pressure washer unit at a slight angle.
2. Push the caster wheels into the slots until they
snap into place.
3. Make sure the casters are secure, then return
the unit to a fully upright position.
4. Align the tabs on the upper and lower spray-gun
holsters with the slots on the side and bottom of
the pressure washer, then slide until they lock.
5. Align the attachment hook with the back slot and
slide it into place.
M - Wheel
M
H
I
H - Spray gun holder
I - Spray gun holder base
E
E - Accessory hook
6. Press the wire clip fully into the slot as
shown.
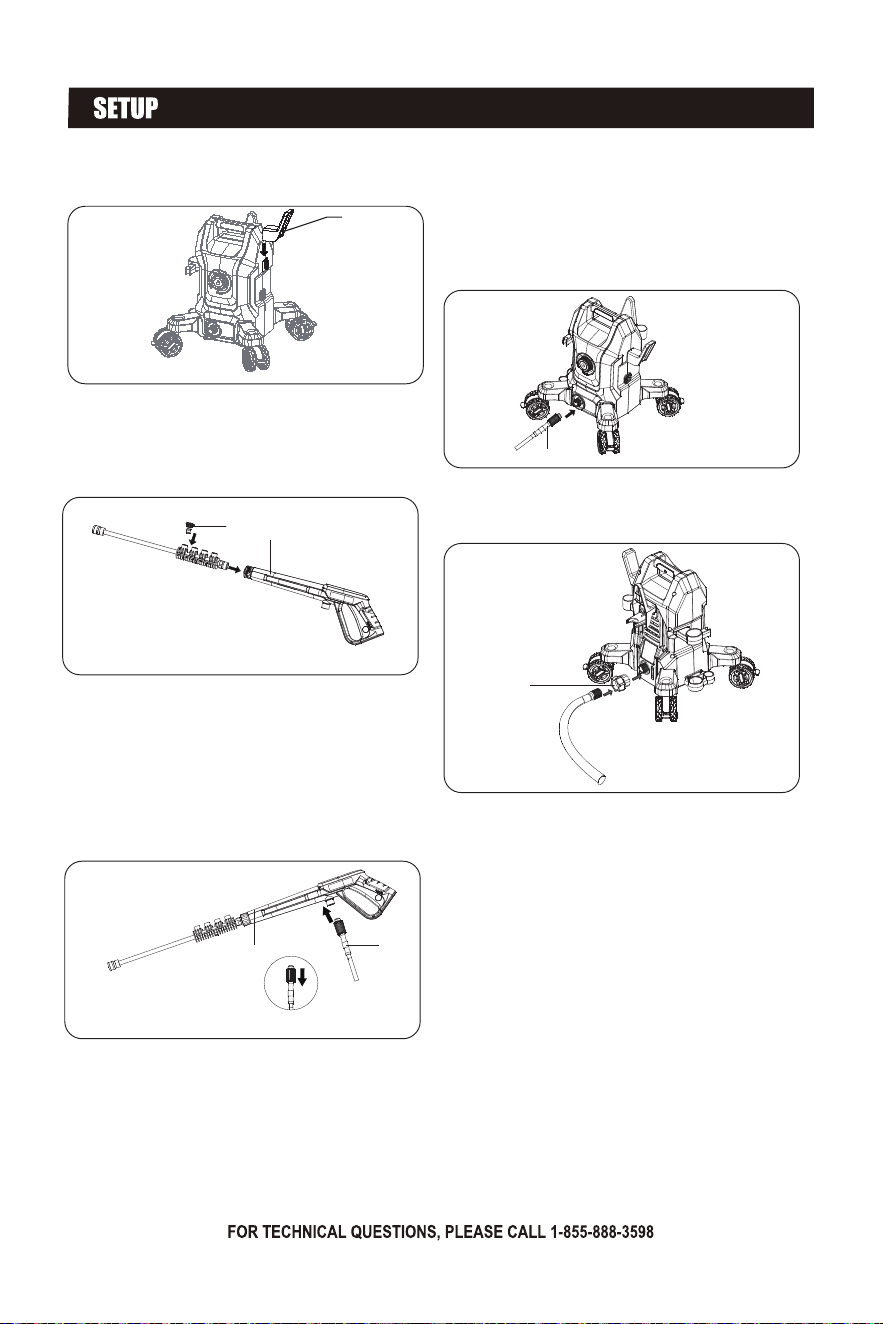
1. Align the threads of the spray gun with the spray
rod and tighten them securely. The nozzle can be
stored in the nozzle sleeve.
12
L - Power cord hook
L
A - Nozzle
C - Spray gun handle
C
A
Connecting The spray wand To The Spray Gun
Connecting The High-pressure Hose To
The Spray Gun
1. Pull the collar of either end of the high-pressure
hose backwards, and then firmly push the hose
connector into the spray gun.
2. Screw the collar onto the spray gun and tighten it
securely.
Connecting The High-pressure Hose To The
Pressure Washer
Connecting A Garden Hose To
The Pressure Washer
D
C
C - Spray gun handle
D - High-pressure hose
K
D
D - High-pressure hose
K - Inlet adapter
1. Pull the collar of the other end of the high-pressure
hose backwards, and then firmly push the hose
connector into the pressure washer. Screw the
collar onto the joint and tighten it securely.
13

STARTING AND STOPPING THE
PRESSURE WASHER
•Connect a garden hose as described
previously and turn the water on.
•Connect a garden hose and turn the water on.
•Completely unwind the power cord and connect
it to a grounded 120-volt outlet.
WARNING
!
Do not alter or modify this product unless instructed
to do so in this manual or by the manufacturer. Do
not use attachments or accessories that are not
recommended for use with this product. Making
unauthorized modifications and using incompatible
accessories can damage the unit and may void your
warranty.
WARNING
!
WARNING
!
NEVER spray directly at a person, animal, electrical
device, or the unit itself. Failure to heed this warning
could will result in damage or serious injury.
WARNING
!
ALWAYS wear eye protection to prevent injury to
eyes when operating the pressure washer.
USING THE SPRAY GUN
WARNING
!
Hold the spray gun and lance with two hands (one
hand to pull the trigger and the other to stabilize the
gun) until you get used to the 'recoil'. Do not lose
control of the spray gun doing so could result in
injury to yourself and others.
•Start the pressure washer.
•Release the safety lock by pushing it down into
the slot in the trigger.
•Squeeze and hold the trigger to start the flow of
water.
•Release the trigger to stop the flow of water.
•Lock the trigger by pushing it up to its original
position.
NOTE: Squeeze the trigger to make sure it’s locked
and will not move. ALWAYS keep the spray gun
locked when it’s not in use.
14
A - Start/Stop switch
A
•Hold the spray gun with both hands and point
the lance in a safe direction.
•Turn the Start/Stop switch to ON to start and
to OFF to stop. The unit will run for several
seconds and shut off. This is a normal
function of the auto-start feature, the unit will
restart when the trigger is pulled.
•Turn the switch clockwise/counterclockwise
again to stop/start the pressure washer.
•When you stop the pressure washer, water
pressure may remain in the system. Point the
spray gun in a safe direction and pull the
trigger to release the water pressure.
Keep all connections dry and off the ground. Do
not touch the plug with wet hands.
NOTICE: ALWAYS turn the water supply “ON”
before turning the pressure washer power to
“ON”. Running the pump dry of water will
cause damage to the internal components and
render the pressure washer inoperable.
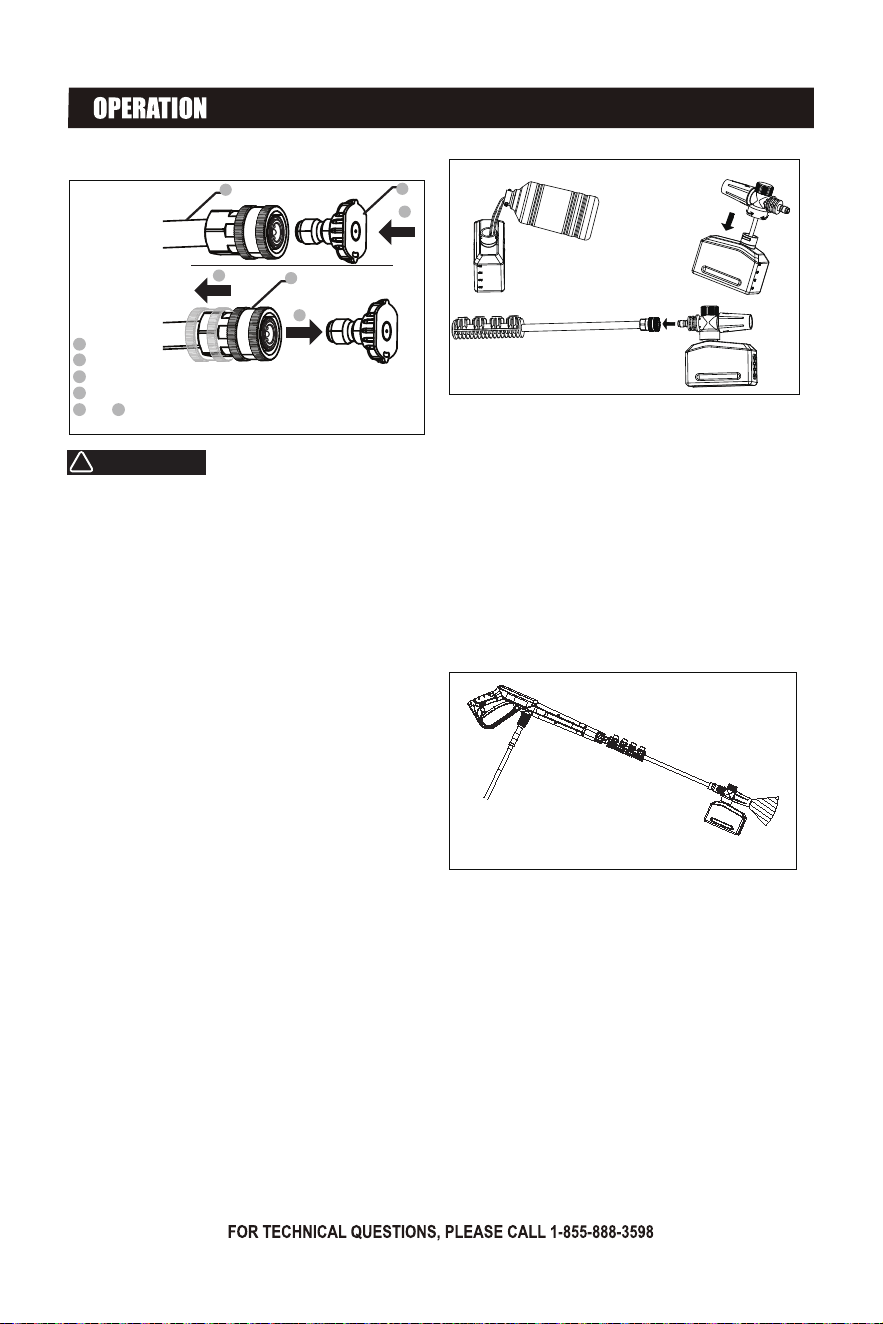
INSTALLING NOZZLES
A - Nozzle
B - Spray wand
C - Quick-connect coupler
D - Install nozzle vertically
E AND F - Pull back the quick-connect spray wand coupler
to remove the nozzle
WARNING
!
ALWAYS turn off the pressure washer, release the
pressure in the spray gun, and lock the trigger
before removing or installing a nozzle. NEVER point
the lance at your face. Failure to heed this warning
could result in serious injury.
•Stop the pressure washer and turn the water
faucet completely off.
•Point the spray gun in a safe direction and pull
the trigger to release the water pressure.
•Lock the trigger.
•Push the nozzle into the lance until it clicks into
place and is secure. To remove the nozzle, pull
the collar back and move the nozzle away from
the lance.
D
E
F
C
B
A
•Turn to open the top of the soap bottle nozzle,
slowly pour in the detergent, and then tighten it
securely.
•Attach the soap bottle nozzle to the spray gun.
•Turn the water on and start the pressure
washer.
•Squeeze the trigger and wait several seconds
for detergent to appear in the water stream.
•Start cleaning at the bottom of the surface and
work your way up in a side-to-side motion. Do
not allow soap to dry on the surface being
cleaned.
OPERATION TIP
•Fill the soap bottle with a properly formulated
detergent to water ratio, following the
detergent manufacturer’s instructions.
NOTE: Use detergents designed for pressure
washers. The detergent should be the consistency
of water. DO NOT use thick, gel-like detergents, as
they will clog the pressure washer and may cause
damage.
15
When you are finished, remove excess
detergent from the soap bottle and fill it with
clean water. Spray the water through the soap
nozzle to flush the system.
•Release the trigger to stop the flow of water.
The unit may automatically stop the motor.
•Allow the motor to come to a complete stop
before squeezing the trigger again.
NOTE: Rapidly cycling the trigger may
interrupt the auto-start/auto-stop. Use slow,
deliberate trigger pulls.

OPERATING TIPS
To clean without detergent:
•Stop the pressure washer and turn the water
faucet completely off.
•Point the spray gun in a safe direction and pull
the trigger to release the water pressure.
•If installed, remove the soap nozzle.
•Install an appropriate nozzle for the task you
are performing.
•Turn the water on and start the pressure
washer.
•Release the safety lock and begin pressure
washing by squeezing the trigger all the way
into the handle.
NOTE: Always test in a small inconspicuous area to
avoid or reduce damage.
•Start cleaning at the bottom of the surface and
work your way up in a side-to-side motion.
•It is normal to hear the motor run intermittently
when the trigger is not being squeezed. The
pump is priming itself to operate when the
trigger is squeezed again.
•To avoid damaging surfaces:
+ Always use an appropriate nozzle.
+ Reduce water pressure by adjusting the angle
of the stream or by increasing the distance
from the nozzle to the surface.
•Always spray detergent on a dry surface. Do not
pre-soak the surface. Wetting the surface first
dilutes the detergent and reduces its cleaning
ability.
•For tough stains, it may be necessary to reapply
the detergent and use a bristled brush to scrub
the stain.
16
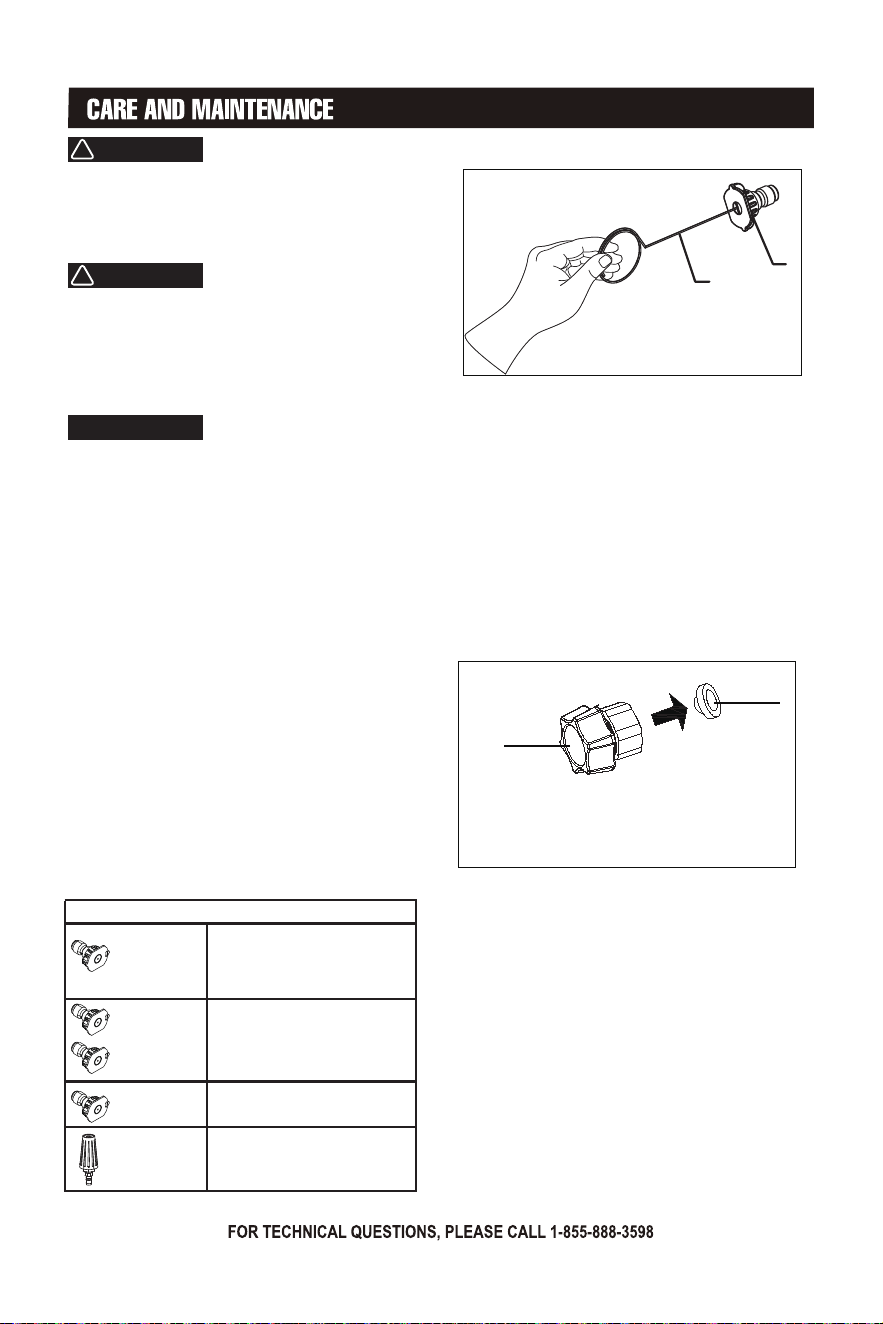
CLEANING THE PRESSURE WASHER
CLEANING THE NOZZLES
WARNING
!
WARNING
!
ALWAYS turn off the pressure washer, release the
pressure in the spray gun, and unplug the pressure
washer before performing maintenance.
Replace damaged or worn items with recommended
or equivalent replacement parts. Using an incorrect
or incompatible part might create a hazard that
could result in serious personal injury.
NOTICE
Check the physical condition of the product prior to
each use. Look for loose bolts, fluid leaks, and other
signs of wear. Replace all damaged items. For
replacement parts or assistance, contact our
customer service team.
• Stop the pressure washer and turn the water
faucet completely off.
• Release the pressure in the spray gun and
unplug the pressure washer.
• Remove the nozzle from the spray gun.
• Use a nozzle cleaning tool or fine needle to
clean debris from the inside of the nozzle.
• Using a garden hose, back flush water through
the nozzle.
• When the nozzle is clean, place it back on the
lance or in the nozzle storage area.
Do not store or operate your pressure washer in
dirty, dusty, or corrosive environments. Do not allow
foreign materials and debris to clog the vents on the
unit.
NEVER clean the pressure washer with a garden
hose. Water can damage the pressure washer’s elec-
trical components. If the unit needs to be cleaned,
use a soft brush and damp cloth to clean the exterior
and use low-pressure air (≤ 25 psi) to clean the
vents.
Never use gasoline as a cleaning agent.
A - Nozzle cleaning tool
B - Turbo nozzle
A
B
17
CLEANING THE WATER INLET SCREENS
A - O-ring
B - Water inlet filter screen
A
B
NOZZLE GENERAL USE
0°(Red)
15 °(Yellow)
25°(Green)
40°(White)
High Pressure. Use to clean
concrete, remove tough
stains, and strip paint. Use
with caution.
Moderate pressure. Safe to
use on brick and paver
patios.
Low pressure. Safe for cars,
windows, and decks
To prolong the life of this product, follow the care
and maintenance instructions in this section. Contact
customer service before servicing any warranty
parts.
Clean the screens inside the garden-hose adapter
periodically. Remove the screens, rinse them with
clean water, and place them back in the
inlet.
Turbo nozzle
(black)
High Pressure. Can be used
for irrigation in farmland,
lawns, and gardens.
18
19
20
1
2
3
4
5
6
7
8
9
1
0
1
1
1
5
1
2
1
6
1
7
1
3
1
8
1
9
20
37
36
35
34
33
32
3
1
30
29
28
27
22
26
25
24
23
21
1
4
21
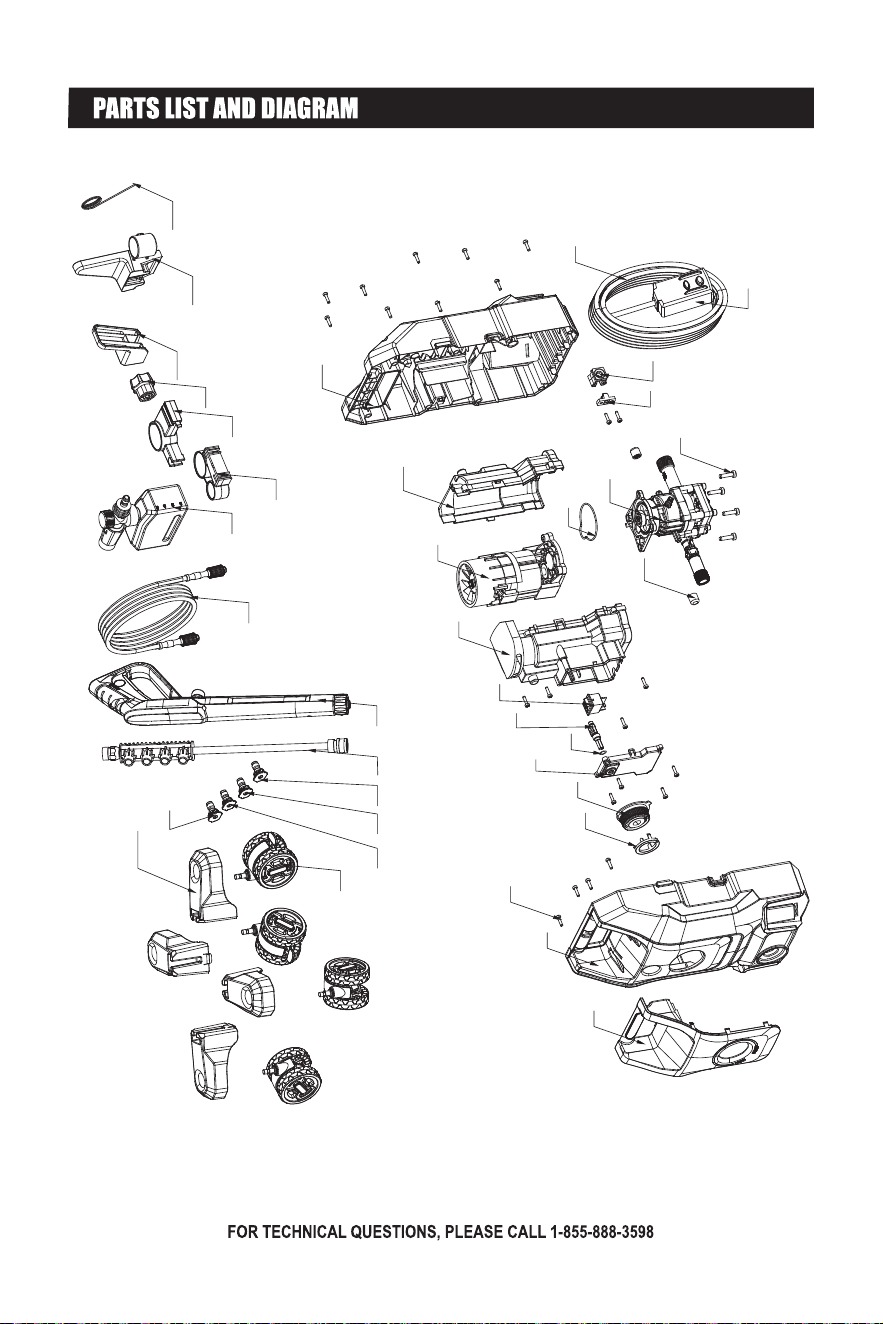
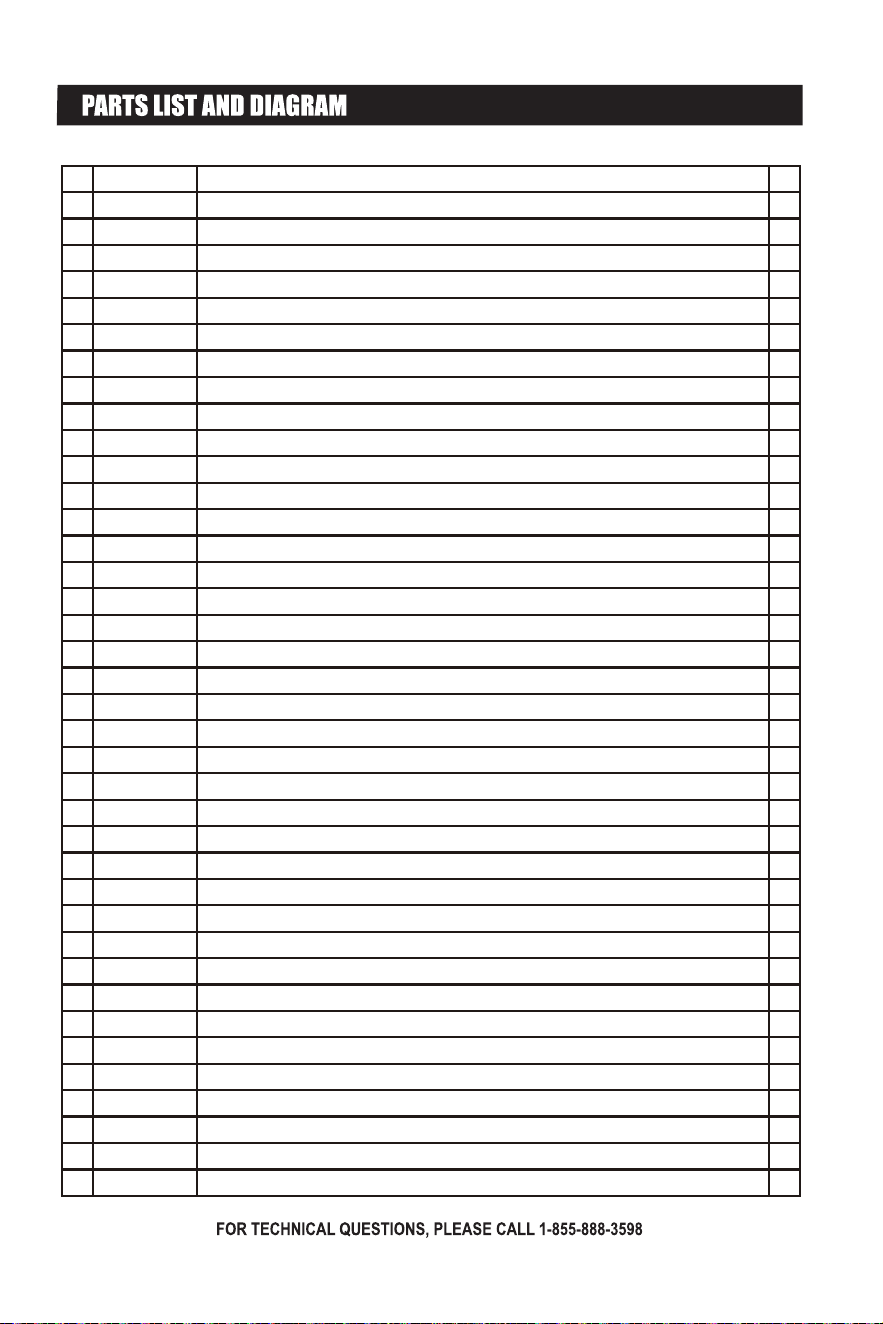
Parts List
NO.
1
2
3
4
5
6
7
8
9
10
11
12
13
14
15
16
17
18
19
20
21
22
23
24
25
26
27
28
29
30
31
32
33
34
35
36
37
Qty.
1
1
23
1
1
1
1
1
1
1
1
1
1
1
2
1
4
1
1
1
1
4
4
1
1
1
1
1
1
1
1
1
1
1
1
1
1
Part Number
33013-02450-00
33013-02448-00
30117-00122-00
33708-00111-00
31026-00811-00
20187-00046-00
30152-00603-00
31026-00810-00
31026-00719-00
34021-00835-00
20261-00556-00
30152-00605-00
34021-00836-00
33013-02449-00
34030-00343-00
20100-00861-00
30117-00122-00
33593-00855-00
33593-00856-00
20196-07076-00
31033-00290-00
20134-00548-01
33013-02451-00
34036-00222-00
34036-00223-00
34036-00224-00
34036-00225-00
20092-00052-00
20091-00065-00
20048-00187-00
70010-04486-01
34035-00084-00
34035-00085-00
70009-00860-00
33624-00688-00
33624-00689-00
70003-04614-00
Description
Decorative cover
Front shell
Screw(ST5.5*19)
Knob decorative cover
Switch knob
Switch box cover
O-ring
Switch lever
Switch
Upper cover of motor hood
Universal motor
O-ring
Lower cover of motor hood
Rear case
Shock-absorbing pad
Pump assembly
Screw(ST5.5*19)
Wire crimping plate
Cord lock
Wire harness components
Plug
Universal Wheel Assembly
Wheel carrier
0° nozzle
15° nozzle
25° nozzle
40° nozzle
Spray wand
Spray gun
High-pressure hose
Foam kettle assembly
Gun rack base
Gun holster storage
Inlet union nut
Wire hanging
Attachment hook
Nozzle cleaning needle
22
23

24


32082-08940-00
MODEL: E2800-FM
11
12
14
17
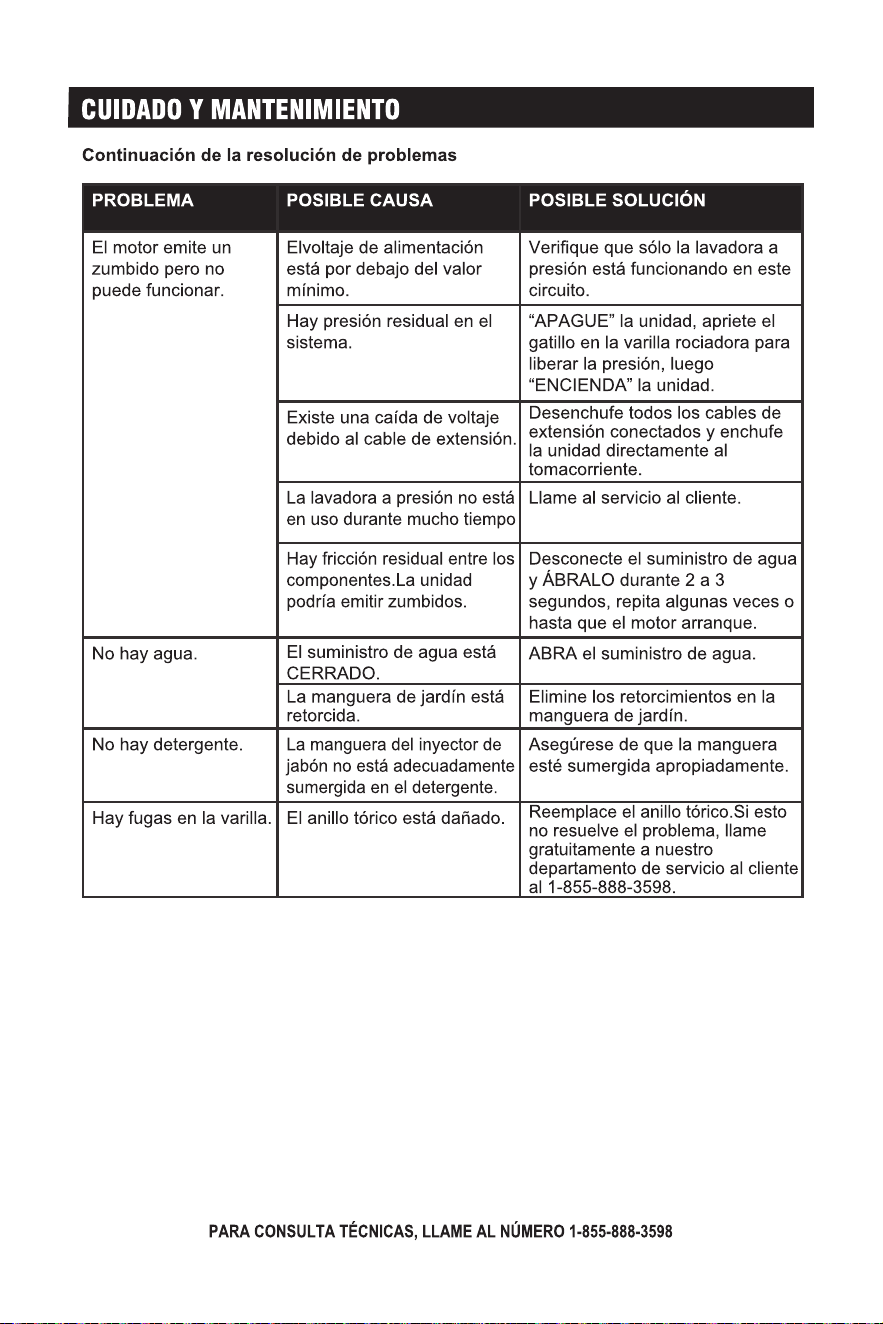
CUIDADO Y MANTENIMIENTO
E2800-FM
Selección de boquilla
Presión interna de 2800 PSI en la descarga inicial
1.7 GPM con dispensador de jabón
6.5” x 1/4 QC x M22
0°, 15°, 25°, 40° y boquilla Turbo
Presión nominal 2000 PSI
Flujo Calificado 1.2 GPM
Modelo
Motor
Presión máxima
Flujo Máximo
Manguera
Varita
1/4” x 25’ x M22
Universal, 120V - 60Hz, 13 Amperios
ADVERTENCIA
Riesgo de electrocución
1. Inspeccione el cable antes de usarlo. No lo use si el cable está dañado.
2. Mantenga todas las conexiones secas y fuera del suelo.
3. No toque el enchufe con las manos húmedas.
4. Doble aislamiento; al realizar mantenimiento, use solo piezas de repuesto idénticas.
5. Este producto está equipado con un interruptor de circuito por falla a tierra incorporado en
el enchufe del cable de alimentación. Si es necesario reemplazar el enchufe o el cable, use
solo piezas de repuesto idénticas.
6. No rocíe aparatos eléctricos o cableado.
7. Lea el manual de instrucciones antes de usar. No retire esta etiqueta.
9
ADVERTENCIA
Proposición 65 de California
Este producto, el escape del motor y otras sustancias que pueden transportarse por el
aire debido a su uso contienen sustancias químicas, incluido el plomo, que el estado de
California reconoce como causantes de cáncer, defectos congénitos u otros daños
reproductivos. Lávese las manos después de manipular el producto.
10
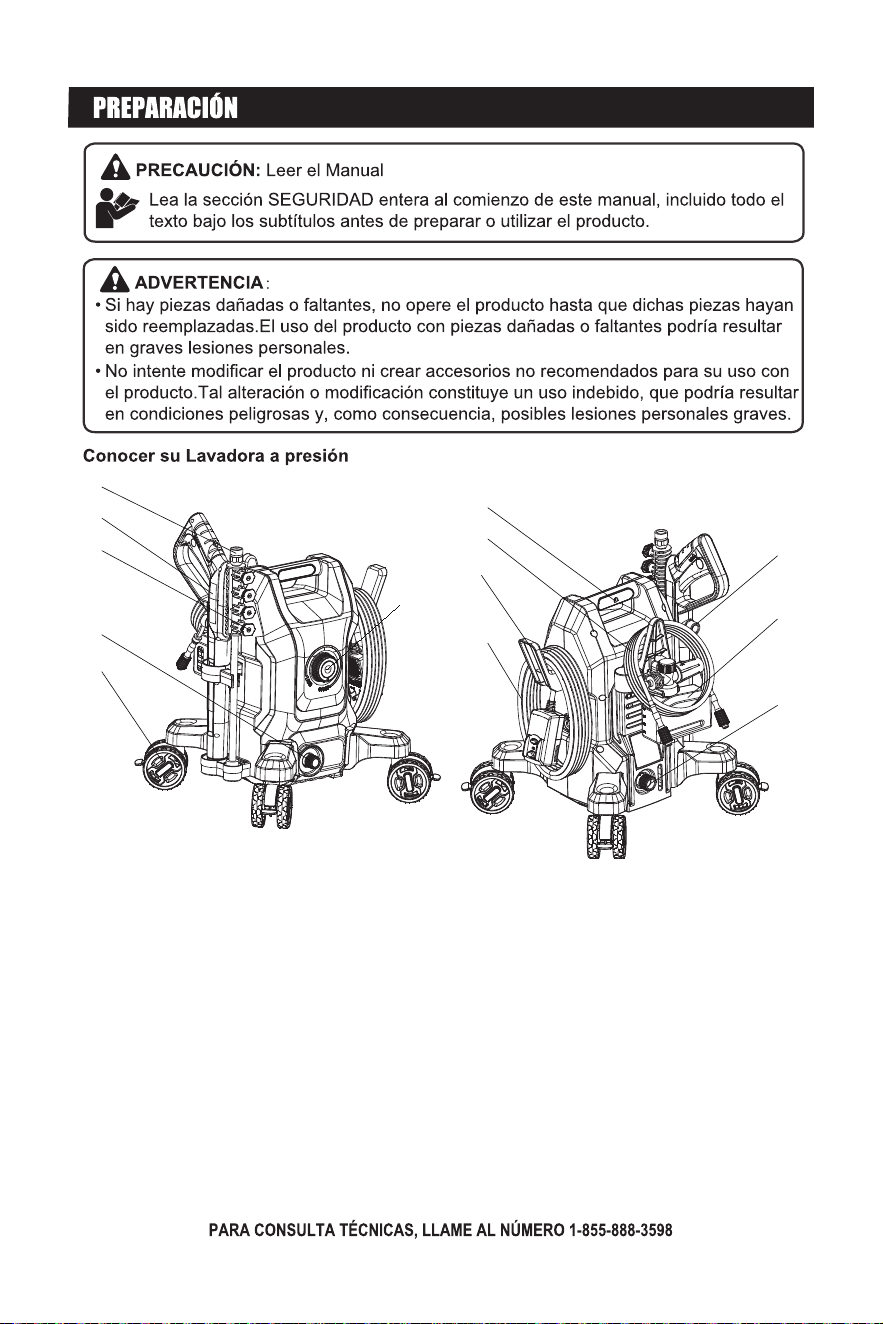
A
B
C
D
E
F
G
H
I
J
K
M
L
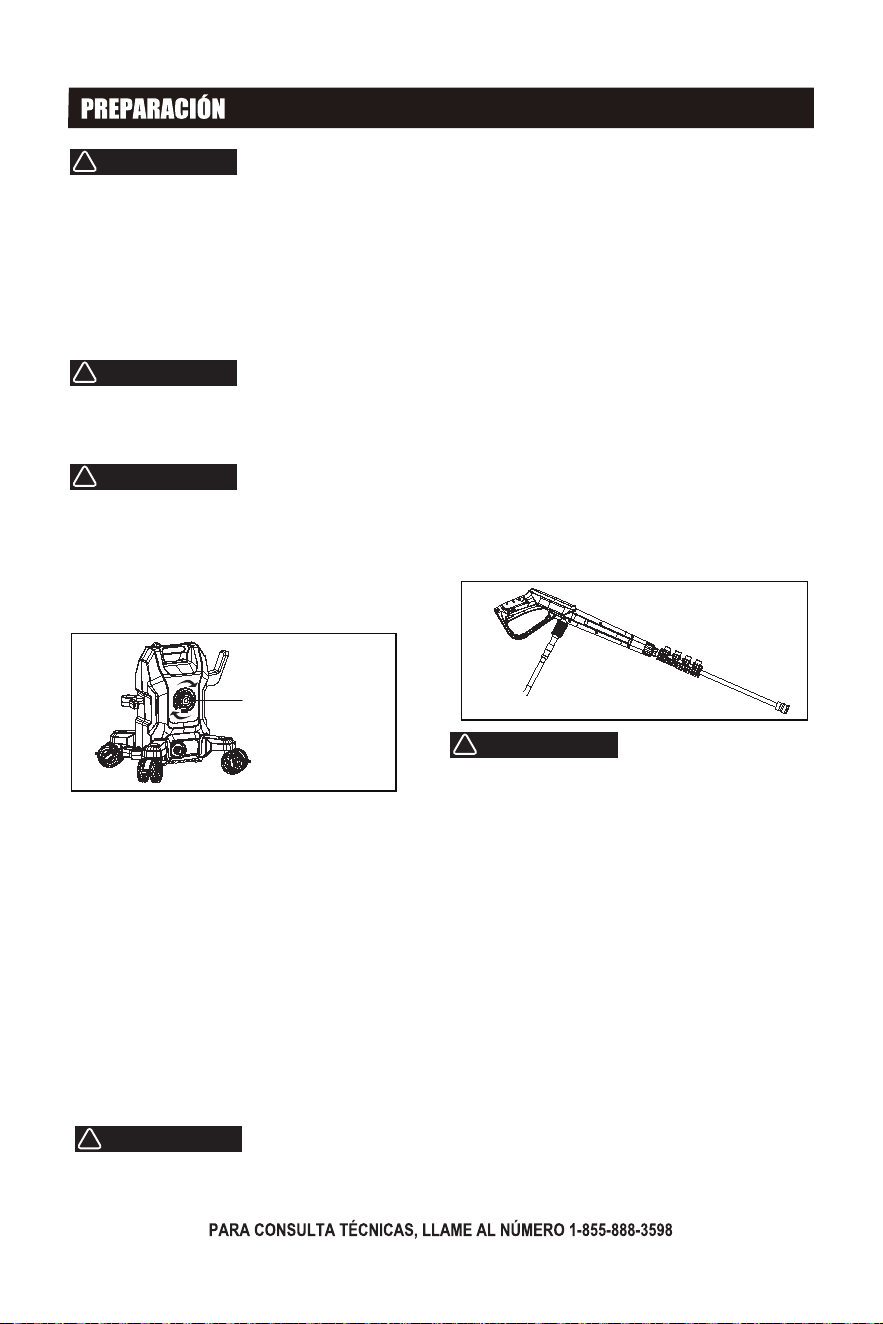
A - Varita de
pulverización
B - Pistola de
pulverización
C - Kit de boquilla
D - Salida de agua
E - Rueda
F - Interruptor de inicio
/Parada
G - Mango
H - Manguera de alta presión
I - Gancho para cable
de alimentación
J - Cable de alimentación
K - Conector de pistola
de pulverización
L - Entrada de agua
M - Cañón de jabón
11
ADVERTENCIA: No conecte la hidrolavadora a
una fuente de alimentación hasta que esté
completamente ensamblada. Para evitar un
arranque accidental y posibles lesiones graves,
conecte una fuente de alimentación solo cuando
la hidrolavadora esté lista para usar.
Este producto requiere ensamblaje. No intente operar
este producto si algún artículo de la LISTA INCLUIDA
ya está ensamblado cuando retire el contenido de la
caja. Estos artículos no son ensamblados por el
fabricante y deben requerir ensamblaje por parte del
cliente. Usar un producto incorrectamente ensamblado
puede ser peligroso y podría resultar en lesiones
personales graves.
• Corte cuidadosamente los lados del embalaje y
retire el contenido de la caja.
• Inspeccione el contenido de la caja. Verifique que
todos los artículos de la LISTA INCLUIDA estén
presentes y sin daños.
• Recicle o elimine los materiales de embalaje
adecuadamente.
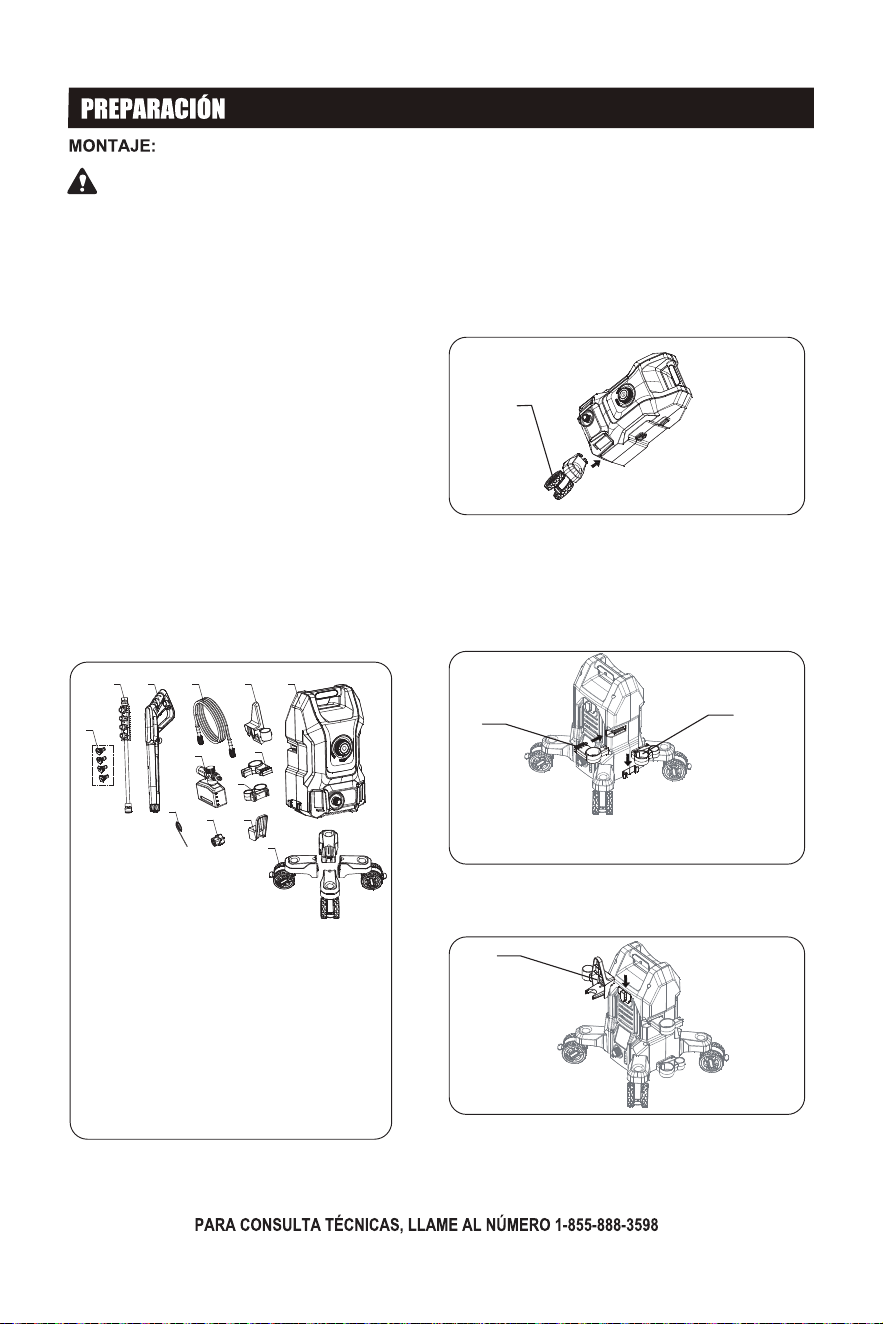
A
B C
D
E
F
H
G
J
K
L
M
I
A - Boquilla
B - Pistola de pulverización
C - Mango de pistola
D - Tubo de alta presión
E - Gancho de accesorio
F - Lavadora a presión
G - Cañón de jabón
H - Soporte para pistola de spray
I - Base de bastidor de pistolas
J - Aguja de limpieza de boquillas
K - Adaptador de entrada
L - Gancho para el cable de alimentación
M - Rueda
Armando el limpiador a presión
1. Sostenga la unidad del limpiaparabrisas a un
ligero ángulo.
2. Presione las ruedas giratorias en las ranuras
hasta que encajen en su lugar.
3. Asegúrese de que los giratorios estén seguros,
luego devuelva la unidad a una posición
completamente vertical.
4. Alinee las lengüetas en los compartimentos de la
pistola rociadora superior e inferior con las
ranuras en el lado y la parte inferior de la
limpiadora a presión, luego deslice hasta que se
bloqueen.
5. Alinea el gancho de sujeción con la ranura trasera
y deslízalo en su lugar.
A - Castillo
M - Rueda
M
H
I
H - Soporte para pistola de pulverización
I - Base del soporte para pistola de pulverización
E
E - Gancho accesorio
ADVERTENCIA:
12
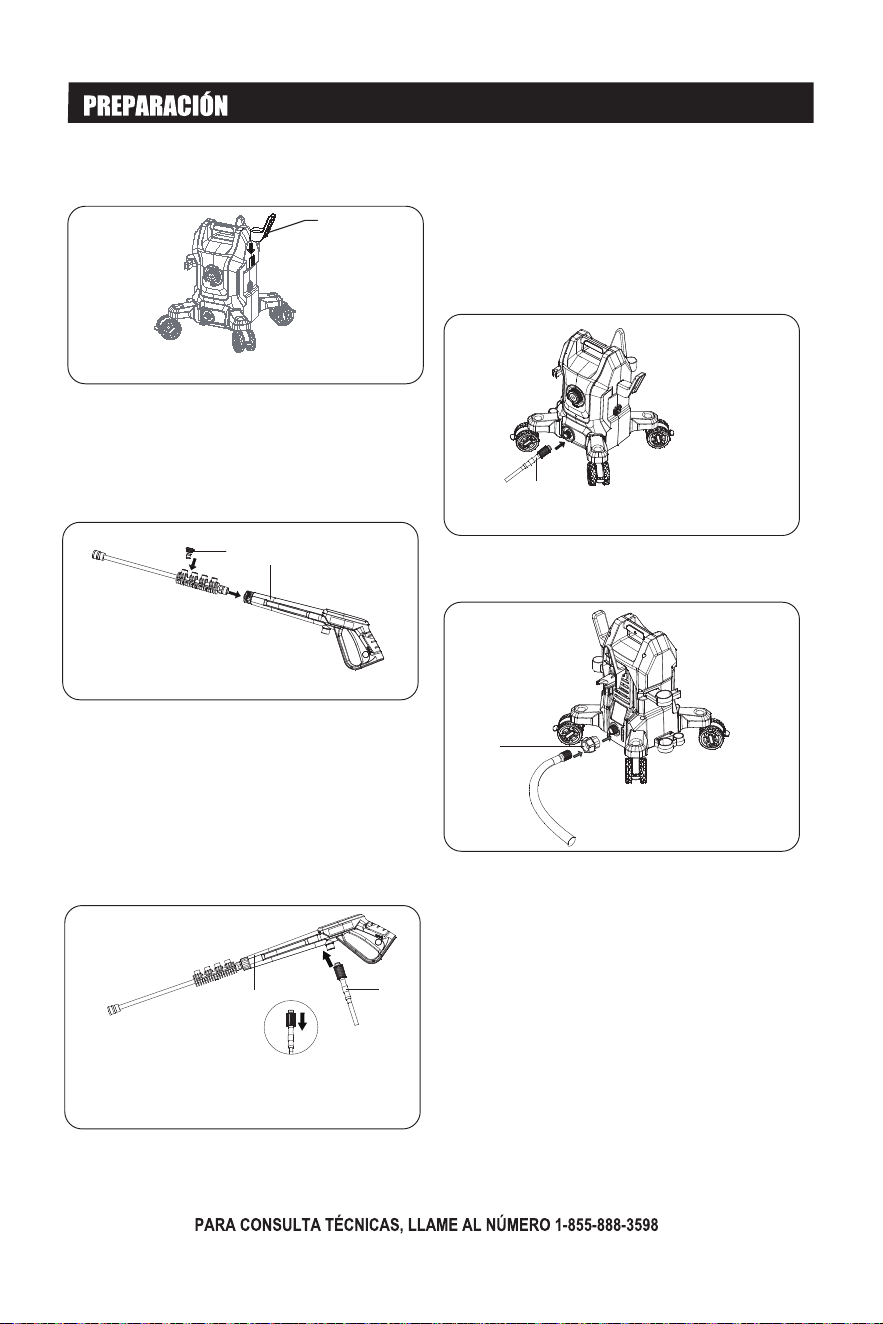
6. Presione el clip de alambre completamente
en la ranura como se muestra.
1. Alinea los hilos de la pistola rociadora con la
varilla de rociado y apriétalos de forma segura.
La boquilla se puede almacenar en la funda de la
boquilla.
L - Gancho para el cable de alimentación
L
A - Boquilla
C - Mango de la pistola de
pulverización
C
A
Conectar la lanza a la pistola de pulverización
Conexión de la manguera de alta presión a la
pistola de pulverización
1. Tira del collar de cualquiera de los extremos de
la manguera de alta presión hacia atrás, y luego
empuja firmemente el conector de la manguera
en la pistola de pulverización.
2. Atornille el collar en la pistola rociadora y
apriételo firmemente.
Conexión de la manguera de alta presión a la
lavadora de presión
Conexión de una manguera de jardín a la
lavadora a presión
D
C
C - Mango de la pistola de pulverización
D - Manguera de alta presión
D
D - Manguera de alta presión
K - Adaptador de entrada
1. Tira del collar de la otra extremidad de la
manguera de alta presión hacia atrás, y luego
presiona firmemente el conector de la manguera
en la hidrolavadora. Atornilla el collar en la unión
y apriétalo de manera segura.
K
13
INICIANDO Y DETENIENDO LA
LIMPIADORA A PRESIÓN
ADVERTENCIA
!
ADVERTENCIA
!
ADVERTENCIA
!
ADVERTENCIA
!
USANDO LA PISTOLA DE
PULVERIZACIÓN
14
A - Interruptor de
inicio/Parada
ADVERTENCIA
!
No altere ni modifique este producto a menos
que se le indique en este manual o por el
fabricante. No utilice accesorios o comple-
mentos que no estén recomendados para su
uso con este producto. Hacer modificaciones
no autorizadas y usar accesorios incompati-
bles puede dañar la unidad y puede anular su
garantía.
SIEMPRE use protección ocular para
prevenir lesiones en los ojos al operar la
hidrolavadora.
NUNCA rocíe directamente a una persona,
animal, dispositivo eléctrico o a la unidad
misma. No atender esta advertencia podría
resultar en daños o lesiones graves.
• Conecte una manguera de jardín como
se describió anteriormente y abra el
suministro de agua.
AVISO: Siempre encienda el suministro
de agua "ON" antes de encender la
potencia de la lavadora a presión "ON".
Hacer funcionar la bomba sin agua
dañará los componentes internos y
dejará la lavadora a presión inoperante.
• Conecte una manguera de jardín y abra
el suministro de agua.
• Desenrolle completamente el cable de
alimentación y conéctelo a una toma de
corriente de 120 voltios con puesta a
tierra.
Mantenga todas las conexiones secas y
despejadas del suelo. No toque el enchufe
con las manos mojadas.
• Sostenga la pistola rociadora con ambas
manos y apunte la lanza en una dirección
segura.
• Gire el interruptor de Inicio/Detención a ON
para encender y a OFF para apagar. La
unidad funcionará durante varios segundos
y se apagará. Esta es una función normal de
la característica de arranque automático, la
unidad se reiniciará cuando se tire del
gatillo.
• Gire el interruptor en sentido horario/
antihorario nuevamente para apagar/
encender la hidrolavadora.
• Cuando apague la hidrolavadora, puede que
quede presión de agua en el sistema. Apunte
la pistola rociadora en una dirección segura
y apriete el gatillo para liberar la presión del
agua.
Sostén la pistola de pulverización y la lanza
con las dos manos (una mano para presionar
el gatillo y la otra para estabilizar la pistola)
hasta que te acostumbres al 'retroceso'. No
pierdas el control de la pistola de pulverización,
hacerlo podría resultar en lesiones para ti y
para otros.
• Encienda la hidrolavadora.
• Libere el seguro de seguridad presionándolo
hacia abajo en la ranura del gatillo.
• Apriete y mantenga presionado el gatillo para
iniciar el flujo de agua.
• Suelte el gatillo para detener el flujo de agua.
• Bloquee el gatillo empujándolo hacia arriba a
su posición original.
NOTA: Apriete el gatillo para asegurarse de
que esté bloqueado y no se moverá.
SIEMPRE mantenga la pistola de rociado
bloqueada cuando no esté en uso.
A
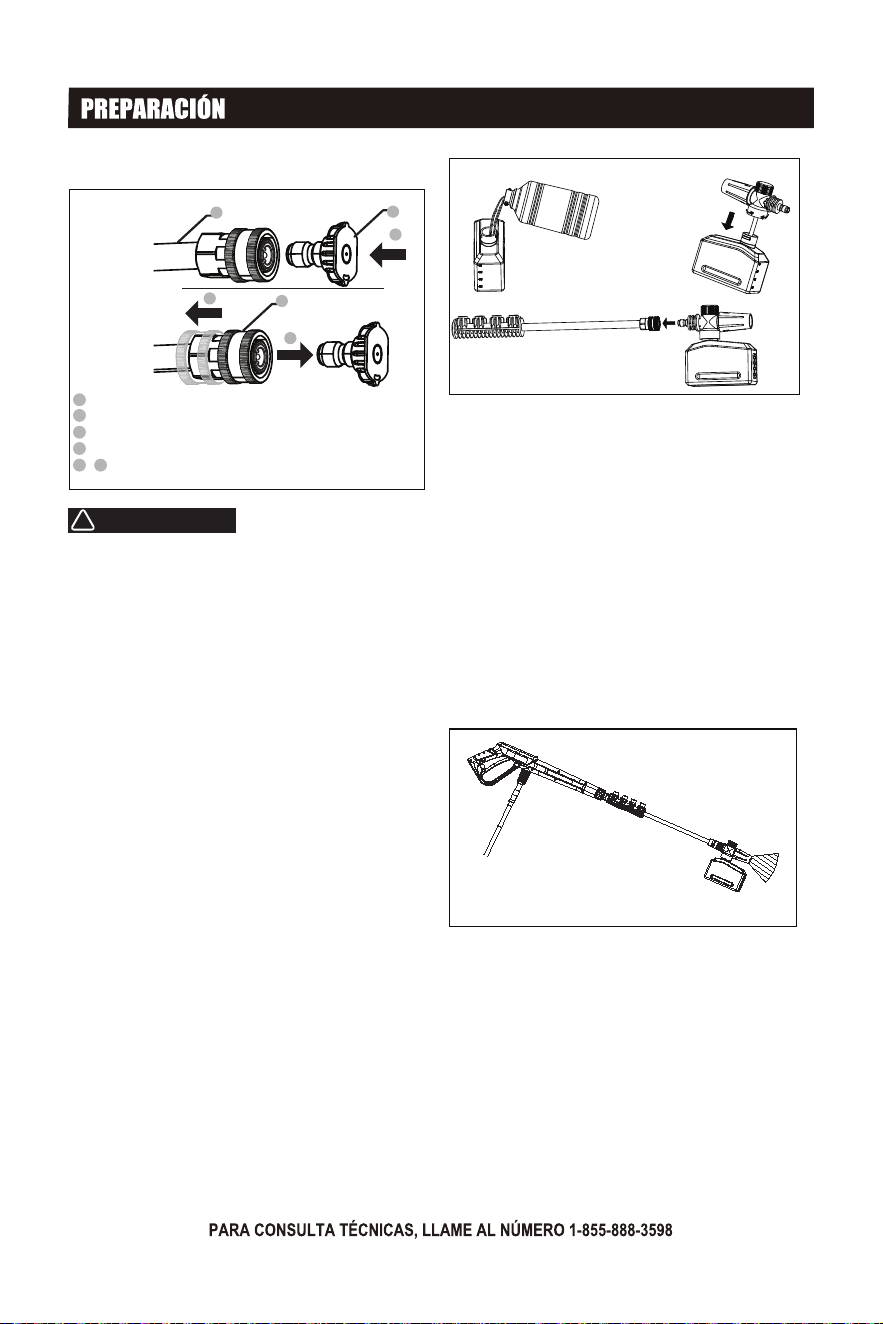
INSTALACIÓN DE BOQUILLAS
A - Boquilla
B - Pistola de pulverización
C - Acoplador de Conexión Rápida
D - Instalar la boquilla verticalmente
E Y F - Tira del acoplador de la vara de pulverización de
conexión rápida para quitar la boquilla
D
E
F
C
B
A
SUGERENCIA DE OPERACIÓN
15
ADVERTENCIA
!
SIEMPRE apague la hidrolavadora, libere
la presión en la pistola rociadora y
bloquee el gatillo antes de quitar o instalar
una boquilla. NUNCA apunte la lanza hacia
su cara. No obedecer esta advertencia
podría resultar en lesiones graves.
• Detenga el lavadora a presión y cierre
completamente la llave de agua.
• Apunte la pistola de pulverización en
una dirección segura y presione el
gatillo para liberar la presión del agua.
• Bloquee el gatillo.
• Empuje la boquilla en la lanza hasta que
haga clic en su lugar y esté segura. Para
quitar la boquilla, tire del collar hacia
atrás y aleje la boquilla de la lanza.
•Llene la botella de jabón con una
proporción adecuada de detergente
a agua, siguiendo las instrucciones
del fabricante del detergente.
NOTA: Activar rápidamente el disparador
puede interrumpir el inicio/parada
automática. Use tirones del disparador
lentos y deliberados.
•Turn to open the top of the soap bottle
nozzle, slowly pour in the detergent,
and then tighten it securely.
•Attach the soap bottle nozzle to the
spray gun.
•Turn the water on and start the
pressure washer.
•Squeeze the trigger and wait several
seconds for detergent to appear in the
water stream.
•Start cleaning at the bottom of the
surface and work your way up in a
side-to-side motion. Do not allow soap
to dry on the surface being cleaned.

16
CONSEJOS DE OPERACIÓN
Limpiar sin detergente:
•Detenga la hidrolavadora y cierre
completamente el grifo de agua.
•Apunte la pistola de pulverización en una
dirección segura y apriete el gatillo para
liberar la presión del agua.
•Si está instalada, retire la boquilla de jabón.
•Instale una boquilla apropiada para la tarea
que está realizando.
•Ajuste el agua y encienda la hidrolavadora.
•Libere el seguro de seguridad y comience a
lavar a presión apretando el gatillo
completamente hacia el mango.
NOTA: Siempre pruebe en un área pequeña y
poco visible para evitar o reducir daños.
•Comience a limpiar desde la parte inferior de la
superficie y trabaje hacia arriba en un
movimiento de lado a lado.
•Es normal escuchar el motor funcionar de forma
intermitente cuando el disparador no se está
apretando. La bomba se está preparando para
funcionar cuando se aprieta el disparador
nuevamente.
•Para evitar dañar superficies: Siempre usa una
boquilla apropiada. Reduce la presión del agua
ajustando el ángulo del chorro o aumentando la
distancia de la boquilla a la superficie.
•Siempre rocía el detergente sobre una superficie
seca. No humedezcas la superficie primero. Mojar
la superficie primero diluye el detergente y
reduce su capacidad de limpieza.
•Para manchas difíciles, puede ser necesario
reaplicar el detergente y usar un cepillo con
cerdas para fregar la mancha.
LIMPIANDO LA HIDROLAVADORA
LIMPIANDO LAS BOQUILLAS
NOTICE
A - Herramienta de limpieza
de boquillas
B - Boquilla Turbo
A
B
17
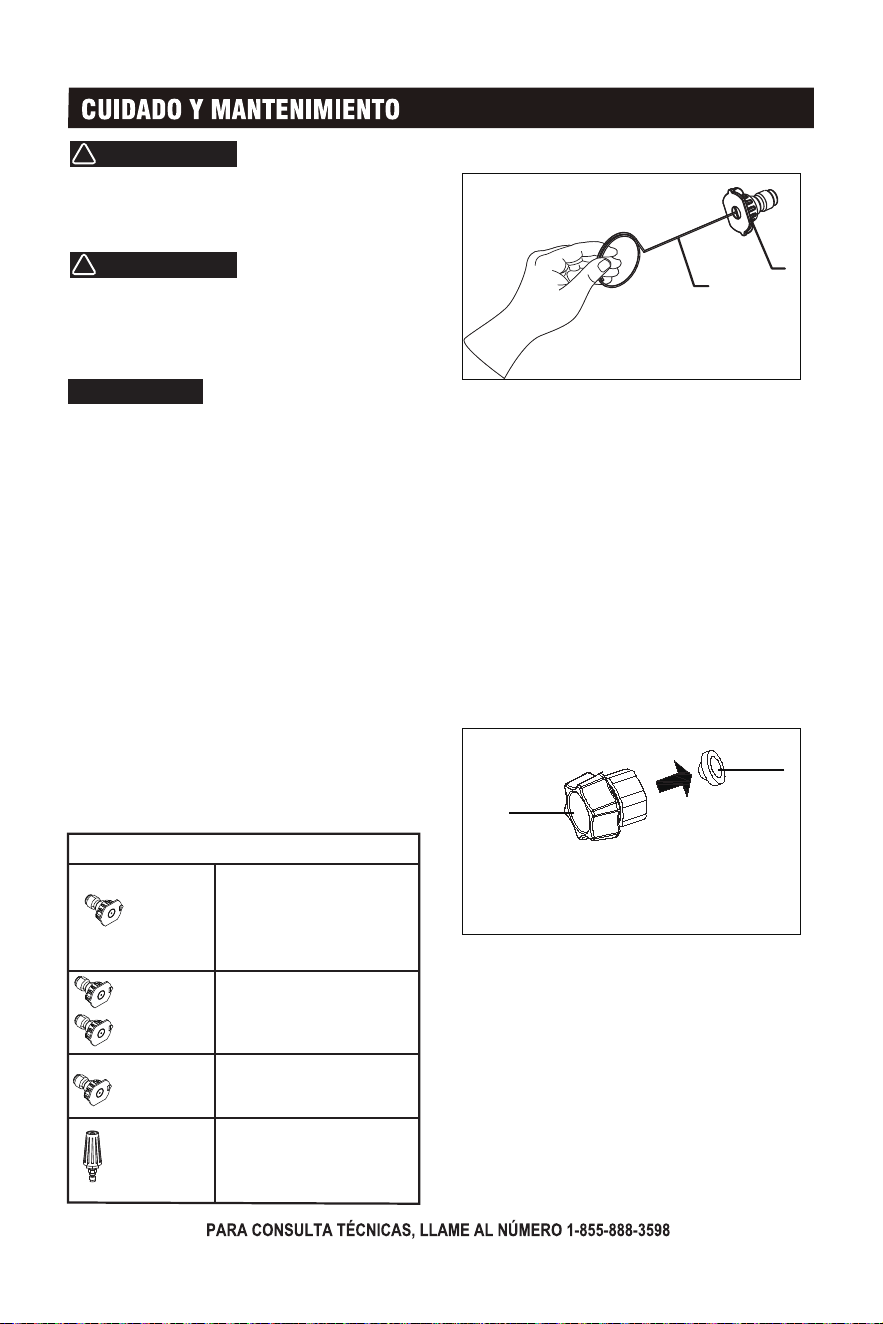
LIMPIEZA DE LAS MALLAS DE
ENTRADA DE AGUA
A - O-Ring
B - Filtro de entrada de agua
A
B
Limpie las pantallas dentro del adaptador de
manguera de jardín periódicamente. Quite las
pantallas, enjuáguelas con agua limpia y
colóquelas de nuevo en la entrada.
ADVERTENCIA
!
ADVERTENCIA
!
SIEMPRE apague la hidrolavadora, libere la
presión en la pistola rociadora y desconecte
la hidrolavadora antes de realizar el
mantenimiento.
Reemplace los artículos dañados o desgastados
con piezas de repuesto recomendadas o
equivalentes. Utilizar una pieza incorrecta o
incompatible podría crear un peligro que podría
resultar en lesiones personales graves.
Verifique la condición física del producto antes de
cada uso. Busque tornillos sueltos, fugas de
fluidos y otros signos de desgaste. Reemplace
todos los elementos dañados. Para piezas de
repuesto o asistencia, comuníquese con nuestro
equipo de servicio al cliente.
Para prolongar la vida de este producto, siga las
instrucciones de cuidado y mantenimiento en esta
sección. Contacte al servicio al cliente antes de
reparar cualquier parte cubierta por la garantía.
No almacene ni opere su lavadora a presión en
entornos sucios, polvorientos o corrosivos. No
permita que materiales extraños y escombros
obstruyan las salidas de la unidad.
NUNCA limpie la hidrolavadora con una
manguera de jardín. El agua puede dañar los
componentes eléctricos de la hidrolavadora. Si
la unidad necesita ser limpiada, use un cepillo
suave y un paño húmedo para limpiar el exterior
y use aire a baja presión (≤ 25 psi) para limpiar
las rejillas. Nunca use gasolina como agente de
limpieza.
• Detenga la lavadora a presión y cierre
completamente el grifo de agua.
• Libere la presión en la pistola de
pulverización y desenchufe la lavadora a
presión.
• Retire la boquilla de la pistola de
pulverización.
• Use una herramienta de limpieza de boquillas
o una aguja fina para limpiar los residuos del
interior de la boquilla.
• Usando una manguera de jardín, realice un
lavado inverso con agua a través de la
boquilla.
• Cuando la boquilla esté limpia, colóquela de
nuevo en la lanza o en el área de
almacenamiento de boquillas.
Boquilla turbo
(negra)
Alta presión. Se puede
usar para riego en tierras
agrícolas, césped y
jardines.
BOQUILLA USO GENERAL
0°(Roja)
15 °(Amarilla)
25°(Verde)
40°(Blanca)
Alta presión. Úselo para
limpiar concreto, eliminar
manchas difíciles y quitar
pintura. Úselo con
precaución.
Presión moderada. Seguro
para usar en patios de
ladrillo y adoquines.
Baja presión. Seguro para
coches, ventanas y
terrazas.
18
19

20
1
2
3
4
5
6
7
8
9
1
0
1
1
1
5
1
2
1
6
1
7
1
3
1
8
1
9
20
37
36
35
34
33
32
3
1
30
29
28
27
22
26
25
24
23
21
1
4
21
NO.
1
2
3
4
5
6
7
8
9
10
11
12
13
14
15
16
17
18
19
20
21
22
23
24
25
26
27
28
29
30
31
32
33
34
35
36
37
Can.
1
1
23
1
1
1
1
1
1
1
1
1
1
1
2
1
4
1
1
1
1
4
4
1
1
1
1
1
1
1
1
1
1
1
1
1
1
Número de pieza
33013-02450-00
33013-02448-00
30117-00122-00
33708-00111-00
31026-00811-00
20187-00046-00
30152-00603-00
31026-00810-00
31026-00719-00
34021-00835-00
20261-00556-00
30152-00605-00
34021-00836-00
33013-02449-00
34030-00343-00
20100-00861-00
30117-00122-00
33593-00855-00
33593-00856-00
20196-07076-00
31033-00290-00
20134-00548-01
33013-02451-00
34036-00222-00
34036-00223-00
34036-00224-00
34036-00225-00
20092-00052-00
20091-00065-00
20048-00187-00
70010-04486-01
34035-00084-00
34035-00085-00
70009-00860-00
33624-00688-00
33624-00689-00
70003-04614-00
Descripción
Cubierta decorativa
Carcasa delantera
Tornillo (ST5.5 * 19)
Cubierta decorativa del botón
Botón de interruptor
Cubierta de la caja del interruptor
anillo tórico
Palanca de conmutación
Interruptor
Cubierta superior del capó del motor
Motor universal
Anillo tórico
Cubierta inferior del capó del motor
Caja trasera
Almohadilla amortiguadora
Montaje de bomba
Tornillo (ST5.5 * 19)
Placa de prensado de alambre
Bloqueo de cable
Componentes de arnés de alambre
Enchufe
Montaje universal de ruedas
Carretero de ruedas
Boquilla de 0°
Boquilla de 15°
Boquilla de 25°
Boquilla de 40°
Vaca de pulverización
Pistola de pulverización
Manguera de alta presión
Conjunto de hervidor de espuma
Base de bastidor de pistolas
Almacenamiento de carcasa de pistola
Tuca de unión de entrada
Colgante de alambre
Gancho de fijación
Aguja de limpieza de boquillas
Lista de piezas
22
23

24


32082-08940-00
