

Technical Support and E-Warranty Certificate www.vevor.com/support
MANUAL TRAILER MOVER
USER MANUAL
MODEL:QYC500-WB
We continue to be committed to provide you tools with competitive price.
"Save Half", "Half Price" or any other similar expressions used by us only
represents an estimate of savings you might benefit from buying certain tools
with us compared to the major top brands and does not necessarily mean to cover
all categories of tools offered by us. You are kindly reminded to verify carefully
when you are placing an order with us if you are actually Saving
Half in comparison with the top major brands.

- 1 -
MODEL:QYC500-WB
Have product questions? Need technical support? Please feel free to
contact us:
Technical Support and E-Warranty Certificate
www.vevor.com/support
NEED HELP? CONTACT US!
This is the original instruction, please read all manual instructions
carefully before operating. VEVOR reserves a clear interpretation of our
user manual. The appearance of the product shall be subject to the
product you received. Please forgive us that we won't inform you again if
there are any technology or software updates on our product.
MANUAL TRAILER MOVER

- 2 -
SAFETY INSTRUCTIONS
WARNING: Read and understand all instructions. Failure to follow all
instructions listed below may result in serious injury.
1.Check whether the tire has enough gas before use. If the tire gas is not
enough, please inflate the tire before use.
2.Check whether the screw part is loose, if yes, please tighten it. 3.Do not
overload.
CAUTION: Please read the instructions for safe operation carefully.
Assembly Precautions
1.Assemble only according to these instructions. Improper assembly can
create hazards.
2. Wear ANSI-approved safety goggles and heavy-duty work gloves during
assembly.
3.Keep assembly area clean and well-lit.
4.Keep bystanders out of the area during assembly.
5.Do not assemble when tired or when under the influence of alcohol,
drugs or medication.
6.Weight capacity and other product capabilities apply to properly and
completely assembled product only.
Use Precautions
TO PREVENT SERIOUS INJURY AND DEATH FROM TIPPING:
1.Do not sit, stand or climb on this item.
2.This product is not a toy. Do not allow children to play with or near this
item.
3
.Do not lift while loaded.
4.To prevent tipping, push/pull using supplied handle only. 5.Use as
intended only.
6.Inspect before every use. Do not use it if parts are loose or damaged.
7.After use, please dry before storage to avoid rusting of bolts affecting
use.
SAVE THESE INSTRUCTIONS
- 3 -
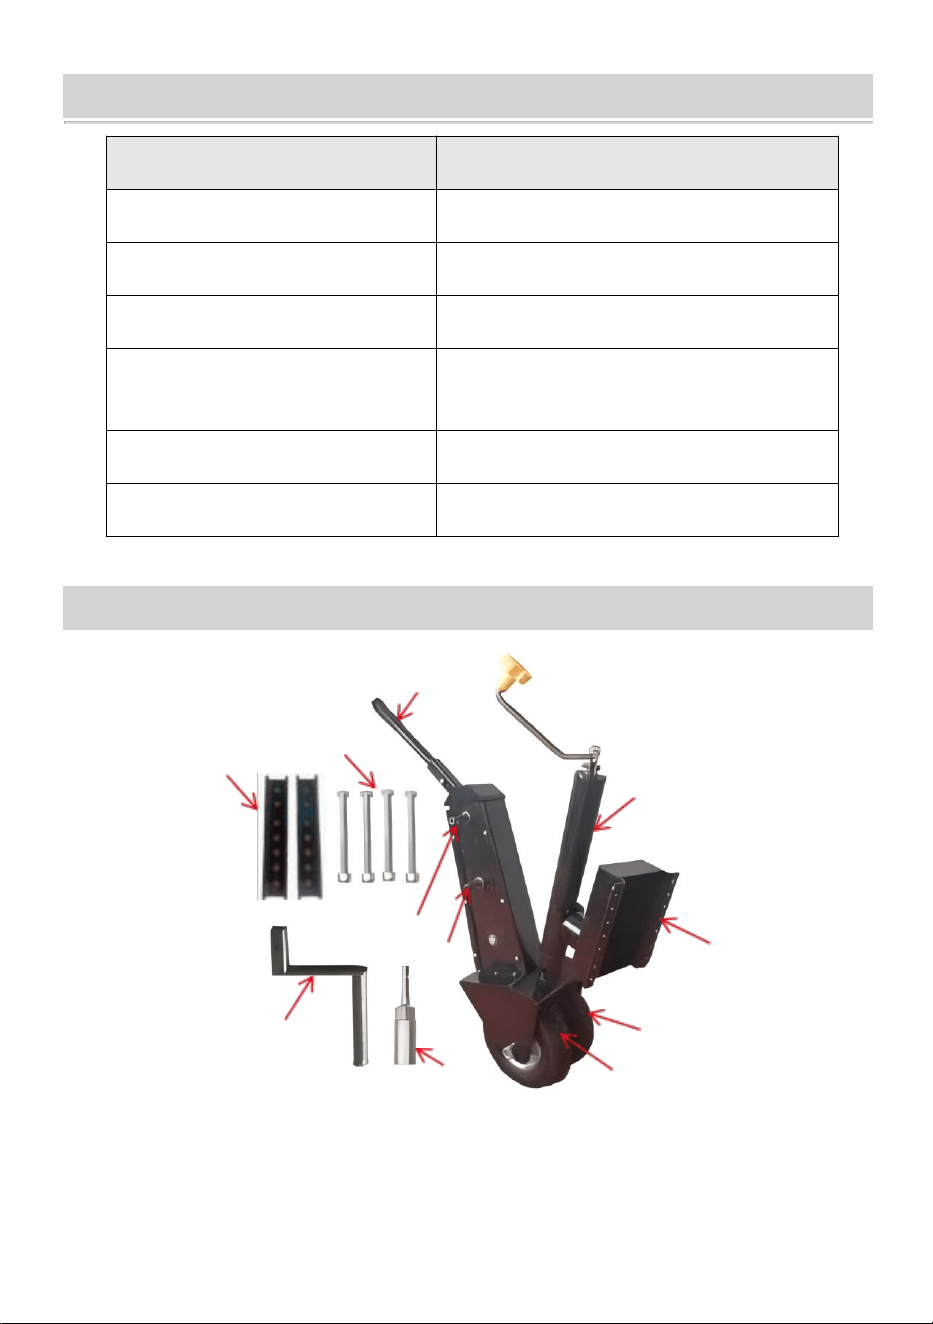
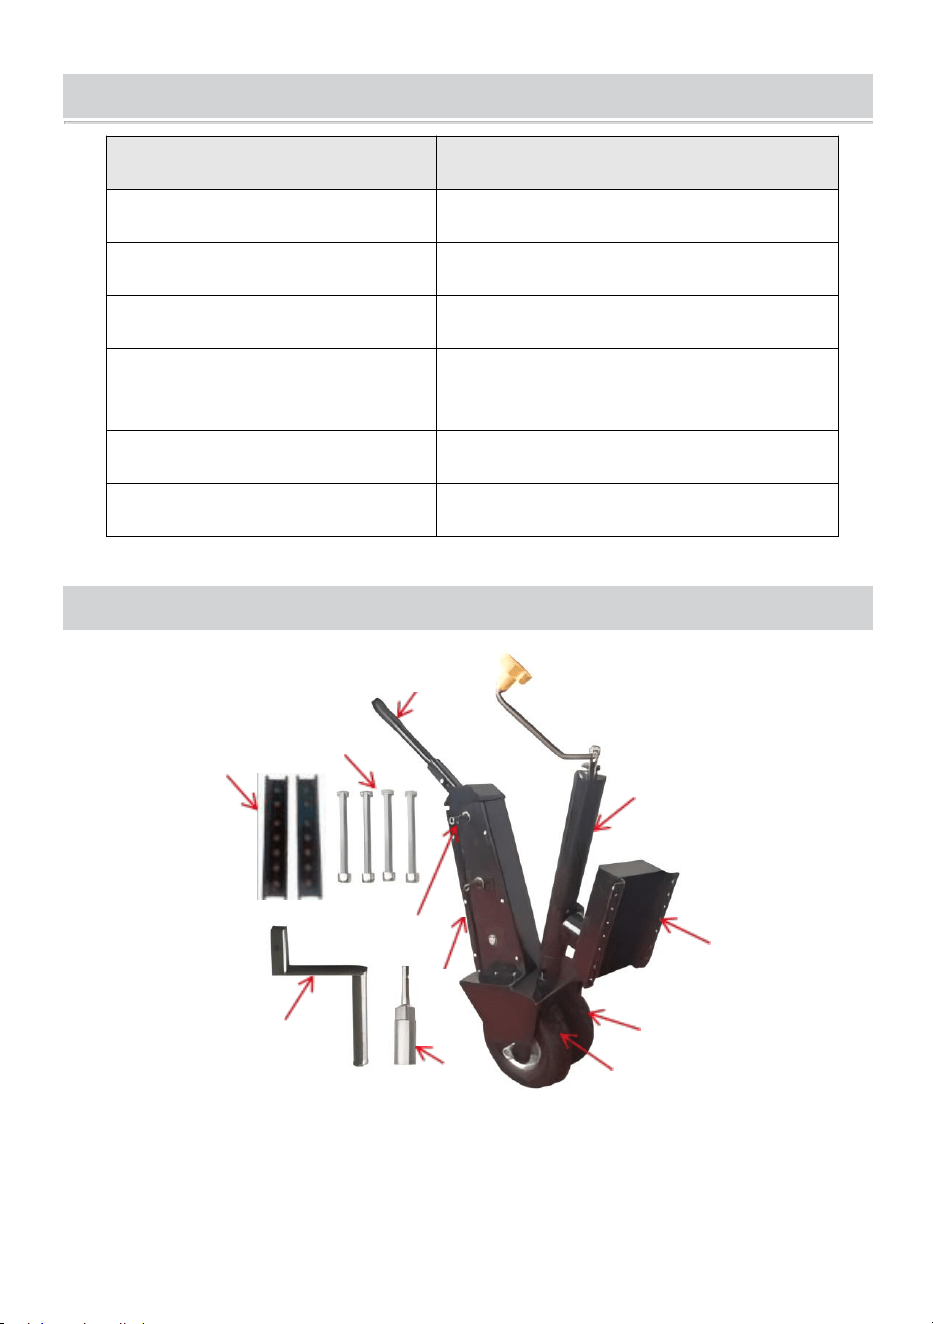
MODEL AND PARAMETERS
Model
QYC500-WB
Max. Gross Trailer WT
500 lbs
Mounting Bracket Type
Bolt-On Mounting Bracket
Crank Type
Top-Wind
Range(Height of the
receiving tube above ground)
13-23.2inch
Wheel
9"
Material
Steel
STRUCTURE DIAGRAM
<—
1
12
2
3
4
5
7
8
10
11
6
9
1. Jack Handle 2. Jack 3. Connecting Plate 4. Wheels 5. Gear Chains
6. Steering/Brake Handle 7. Low Gear Driveshaft 8. Medium Gear Driveshaft
9. Drive Handle 10. Sleeve 11. Mounting Fittings 12. Mounting bolts
- 4 -
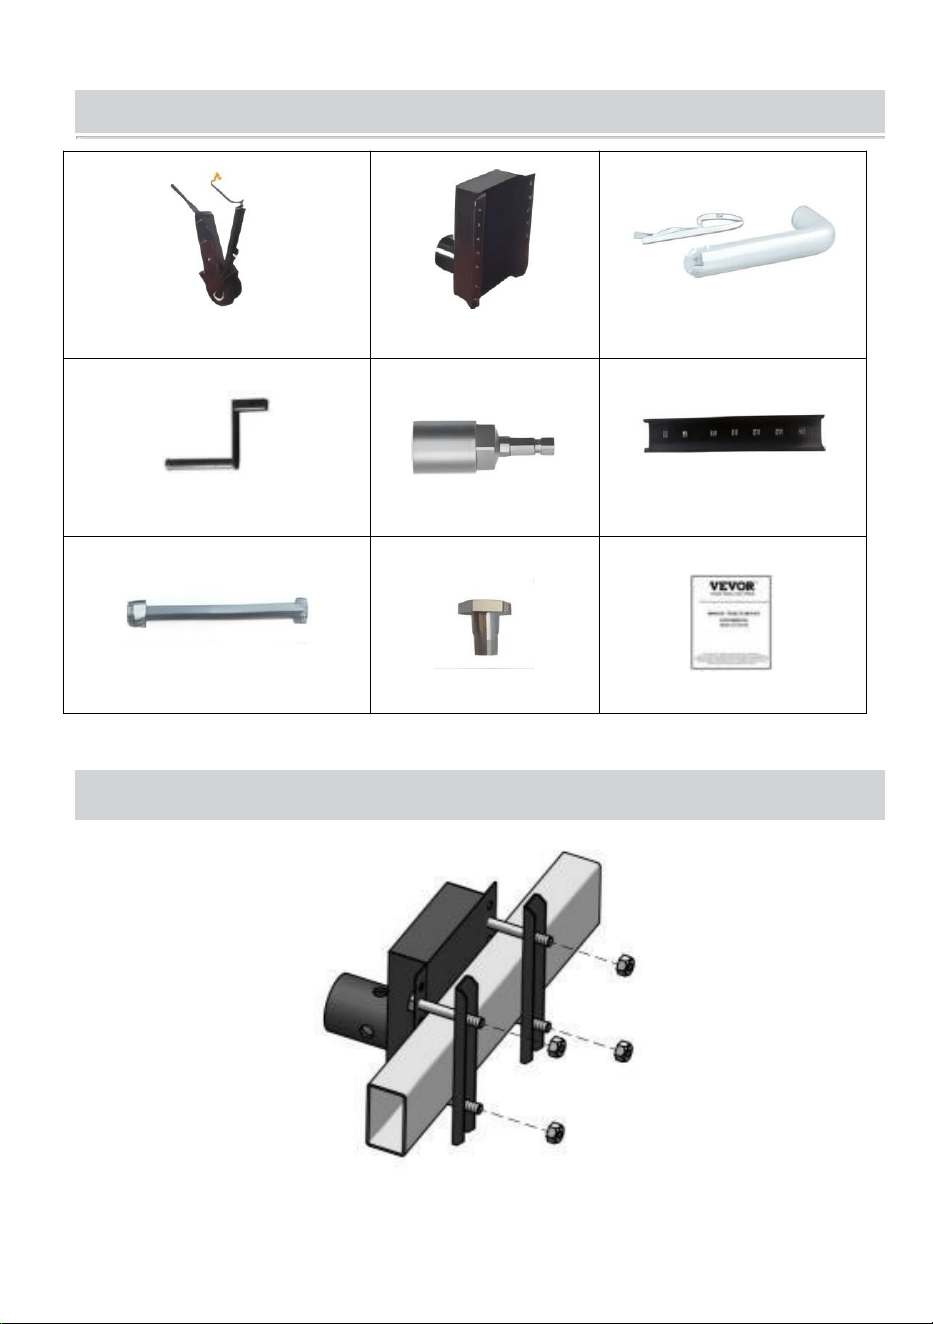
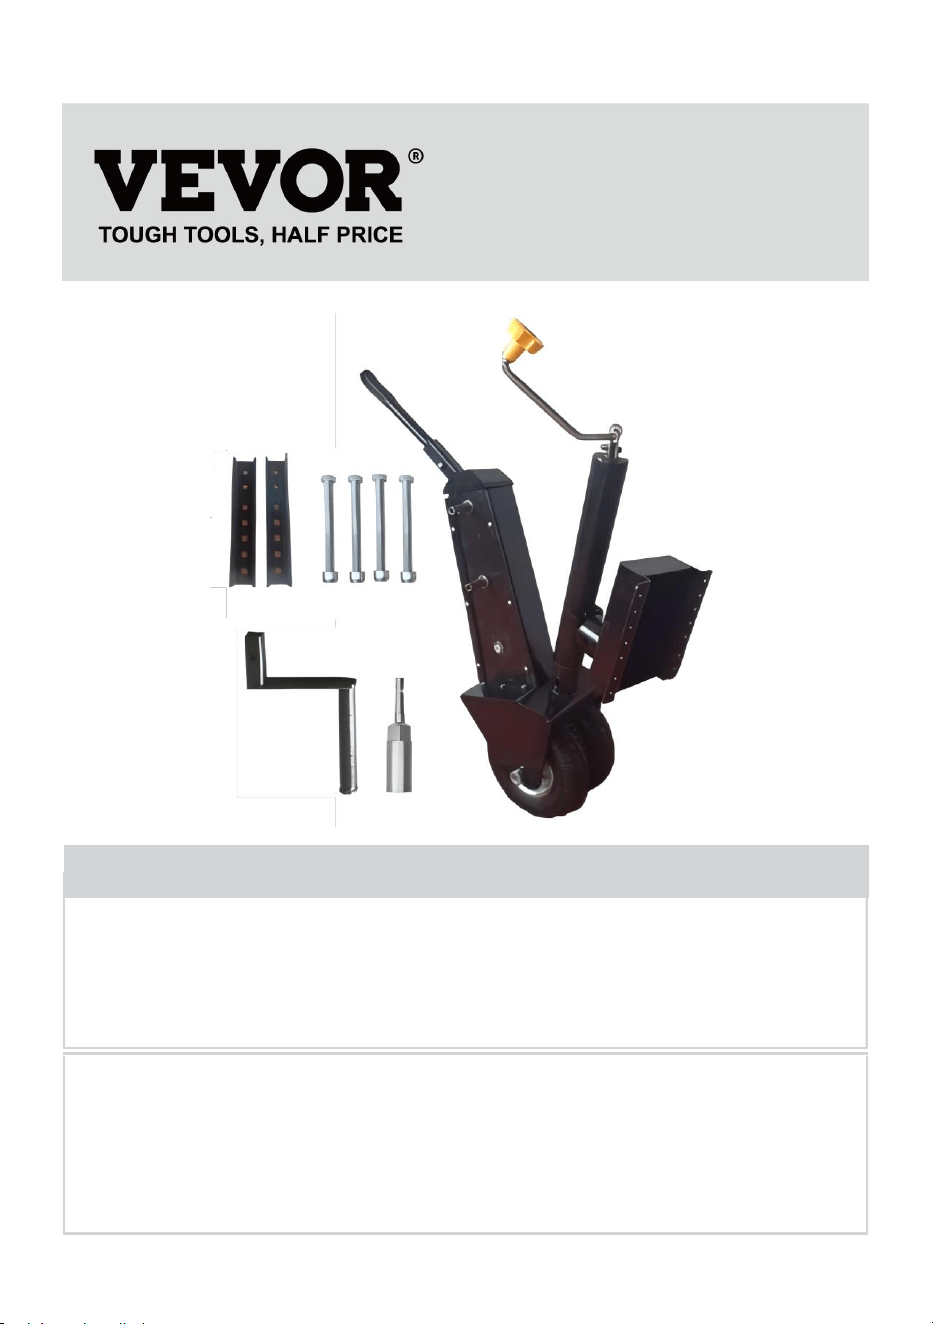
COMPONENTS
A ×1
B ×1
C ×1
D ×1
E ×1
F ×2
G ×4
H ×1
I ×1
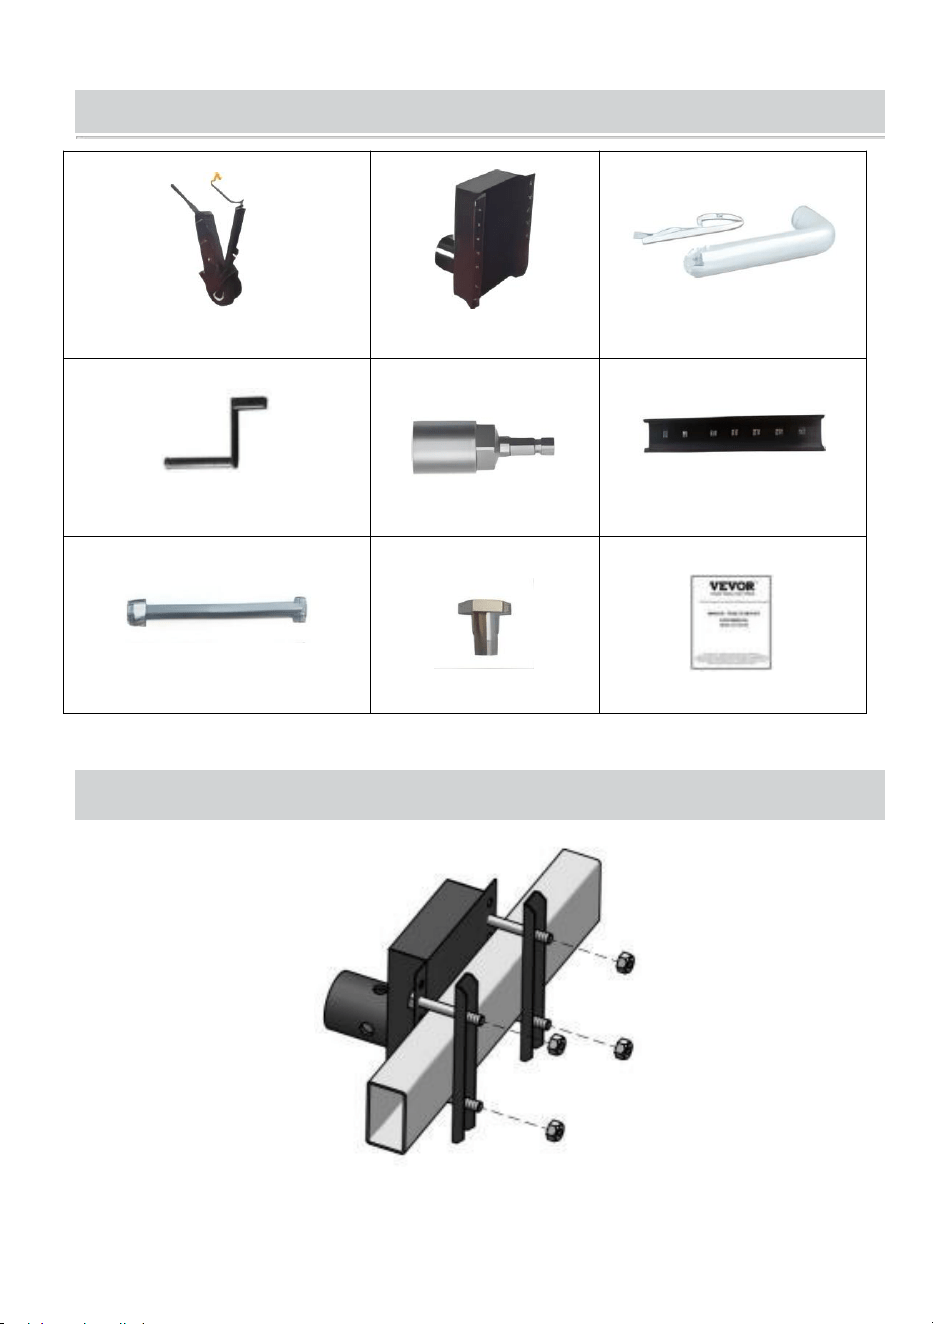
ASSEMBLY
1. When mounting trailer jack, it is best to hook up to the tow vehicle
to make sure the trailer is secure.
- 5 -
2. Mount jack based on drawing shown above.
3. Make sure bolts and nylock nut are securely tightened. Regularly
check to make sure bolts and nylock nuts are securely tight.
TESTING THE ASSEMBLY:
WARNING!
Always ensure the operator and bystanders are aware of the stability of
the load.
1) Lower the trailer gradually until the jack is above ground and the trailer
is completely supported by the Trailer Valet.
NOTE: Keeping the trailer jock close to the ground prevents
serious damages from occuring due to unexpected failures.
NOTE: If the tires on the Trailer Valet seem too deflated and unable to
hold the weight,then you must lower the jack and remove the device to
check air pressure.
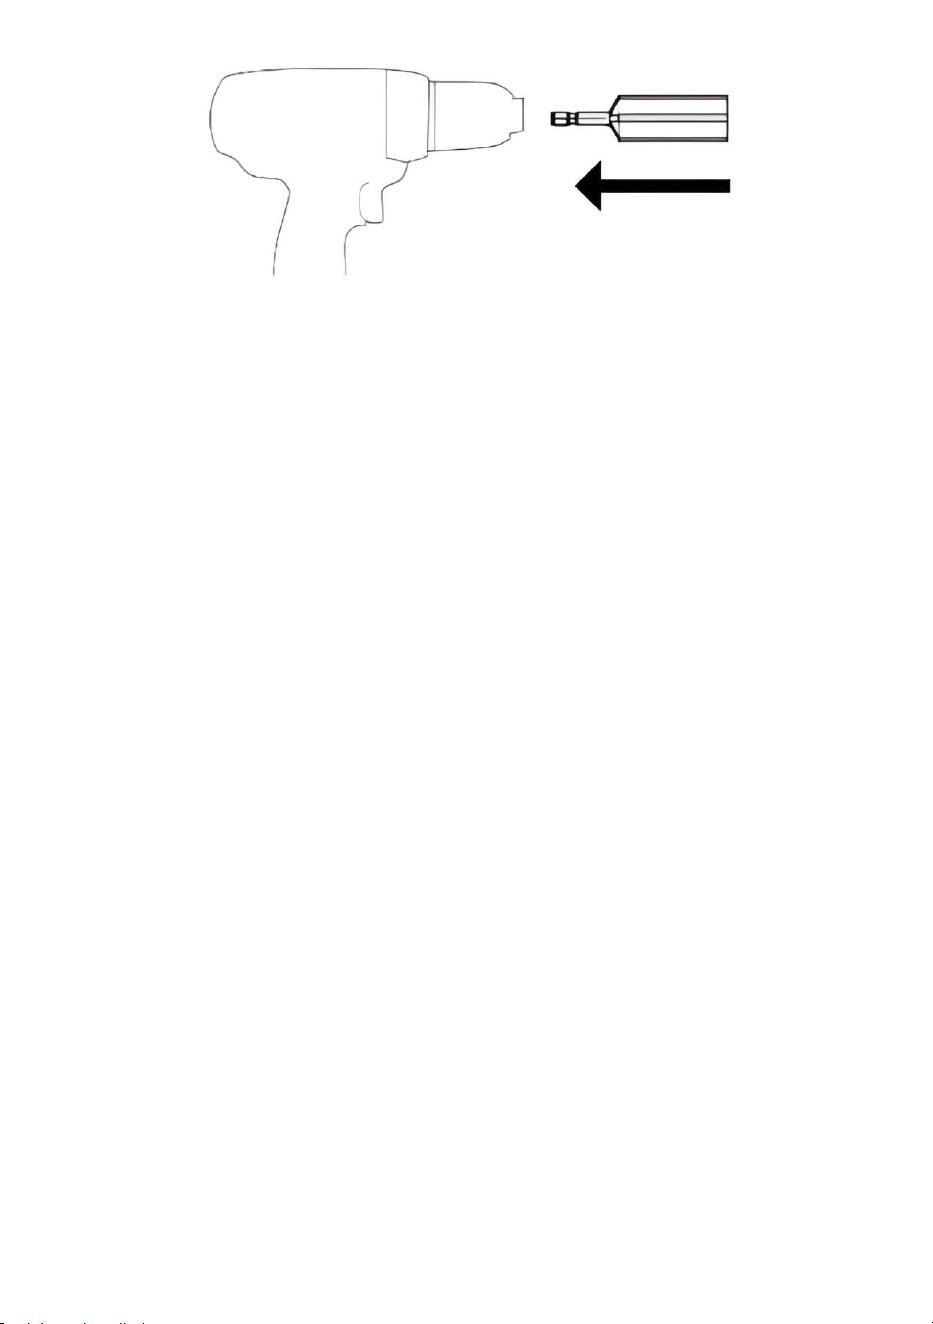
ATTACHING DRIVER
Option 1: Manual Operation
1) Attach the drive handle to the low or medium gear driveshaft.
Option 2:Using the Drill socket
WARNING!
If you are using a cordless dril, be sure your battery pack is fully
charged before use. Follow your drill/driver manufacturer's
recommendations.
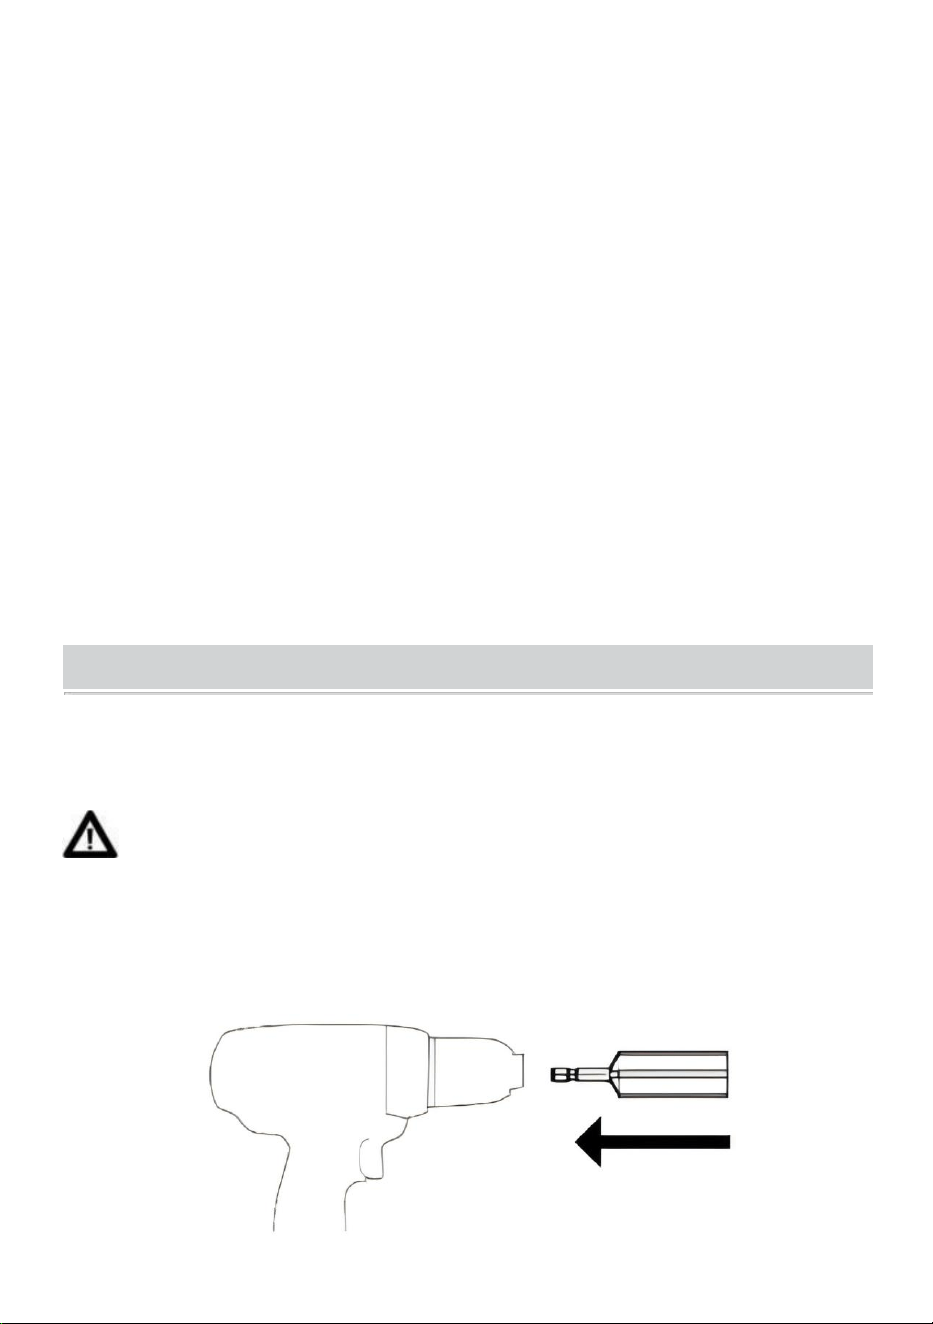
1) Using the chuck of your drill/driver,connect to the drill socket.

- 6 -
WARNING!
2
)
Always tighten drill to drill socket.Drill can come lose and cause injury.
3) If using a corded drill/driver,verify that power cords and
extension cords are postioned so that the tires on the Trailer Valet
or moving
vehice will not damage the cords or that cords can not be stepped on,
tripped over,or otherwise subjected to damage or stress.
4) Align and insert the drill socket to the low gear driveshaft.
OPERATING DEVICE
WARNING!
Hold the dril/driver firmly when engaing.Drill will have high initial torque.
1)When you're getting ready to operate the device,make sure you
have one hand gripped firmly on the brake,and the other hand gripped
firmly on the drive handle.
2)Slowly lift the steering handle until the brake is disengaged and
start cranking.
NOTE:It is important that you steer the device only when you are
cranking and the trailer is moving.Attempting to turn the steering handle
at a dead stop will cause the gears to fall out of alignment.
REMOVING THE DEVICE
1) Remove the dril/drive handle.
2) Lower the jack until the Trailer Valet is above the ground.
3) Losen the lock nut and release the mounting fittings.

- 7 -
MAINTENANCE
Do not overload.
After use, please dry before storage to avoid rusting of bolts
affecting use.
Check bolts regularly for looseness.
Apply multipurpose grease to the chain by removing the front cover
of the device.
Inspect tires for damage. Replace tire immediately if damaged.
Manufacturer: Shanghaimuxinmuyeyouxiangongsi
Address:Shuangchenglu803nong11hao1602A-1609shi,baoshanqu, shanghai
200000 CN.
Imported to AUS: SIHAO PTY LTD, 1 ROKEVA STREETEASTWOOD NSW
2122 Australia
Imported to USA: Sanven Technology Ltd., Suite 250, 9166 Anaheim Place,
Rancho Cucamonga, CA 91730
E- CrossStu GmbH
Mainzer Landstr.69, 60329 Frankfurt am Main.
YH CONSULTING LIMITED.
C/O YH Consulting Limited Office 147, Centurion House,
London Road, Staines-upon-Thames, Surrey, TW18 4AX
Technical Support and E-Warranty Certificate www.vevor.com/support
UK
REP
EC
REP

- 8 -
Support technique et Certificat de garantie électronique www.vevor.com/support
REMORQUE MANUELLE DÉMÉNAGEUR
UTILISATEUR MANUEL
MODÈLE : QYC 500- WB
Nous continuons à nous engager à vous fournir des outils à des prix compétitifs.
« Économisez la moitié », « Moitié prix » ou toute autre expression similaire utilisée par
nous uniquement
représente une estimation des économies dont vous pourriez bénéficier en achetant
certains outils
avec nous par rapport aux grandes marques et ne signifie pas nécessairement couverture
toutes les catégories d'outils que nous proposons. Nous vous rappelons de bien vouloir
vérifier soigneusement
lorsque vous passez une commande chez nous si vous êtes réellement Économie
Moitié par rapport aux plus grandes marques.

- 1 -
MODÈLE : QYC500-WB
Have product questions? Need technical support? Please feel free to
contact us:
Technical Support and E-Warranty Certificate
www.vevor.com/support
NEED HELP? CONTACT US!
This is the original instruction, please read all manual instructions
carefully before operating. VEVOR reserves a clear interpretation of our
user manual. The appearance of the product shall be subject to the
product you received. Please forgive us that we won't inform you again if
there are any technology or software updates on our product.
MANUAL TRAILER MOVER

- 2 -
SAFETY INSTRUCTIONS
AVERTISSEMENT: Lisez et comprenez tout instructions . Défaut de
suivre tous les instructions énumérées ci-dessous peut résulter
sérieusement blessure.
1. Vérifiez si le pneu a suffisamment de gaz avant utiliser. Si le gaz des
pneus est pas assez, veuillez gonfler le pneu avant utiliser.
2.Vérifiez si la partie vissée est lâche, si oui, S'il vous plaît, serrez-le. 3. Ne
pas surcharge.
PRUDENCE: Veuillez lire attentivement les instructions pour une
utilisation en toute sécurité. Assemblée Précautions
1. Assemblez uniquement selon ces instructions. Un assemblage incorrect
peut créer dangers.
2. Porter Des lunettes de sécurité et des gants de travail robustes
approuvés par l'ANSI pendant assemblée.
3. Gardez la zone de montage propre et bien éclairée.
4. Gardez les spectateurs hors de la zone pendant le montage .
5. Ne vous assemblez pas lorsque vous êtes fatigué ou lorsque sous
l'influence de l'alcool, drogues ou médicament.
6. La capacité de poids et les autres capacités du produit s'appliquent à
correctement et produit entièrement assemblé seulement.
Utiliser Précautions
POUR PRÉVENIR LES MALADIES GRAVES BLESSURE UNE MORT
DE TIPPING:
1. Ne vous asseyez pas, ne restez pas debout ou grimper sur ce article.
2. Ce produit est pas à oy. Ne pas permettre enfants à jouer avec ou près
ce article.
3.
Ne pas soulever pendant la charge.
4. Pour éviter tout basculement, poussez/tirez uniquement à l'aide de la
poignée fournie. 5. À utiliser uniquement comme prévu.
6. Inspectez avant chaque utilisation. Ne pas utiliser il si parties sont lâche
ou endommagé.

- 3 -
7.Après utilisation, veuillez sécher avant stockage à éviter rouille de
boulons affectant utiliser.
SAUVEZ-LES INSTRUCTIONS

- 4 -
MODÈLE ET PARAMÈTRES
Modèle
QYC500-WB
Max. Brut Remorque WT
500 livres
Montage Type de support
Boulonné Montage Support
Type de manivelle
Haut - Vent
Plage (hauteur de la
tube de réception au dessus
sol)
13-23,2 pouces
Roue
9"
Matériel
Acier
STRUCTURE DIAGRAMME
<—
1
12
2
3
4
5
7
10
11
6
9
1. Jack Poignée 2. Prise 3. Connexion Planche 4. Roues 5. Engrenage Chaînes
6. Direction / Frein Poignée 7. Basse Engrenage Arbre de transmission 8. Moyen
Engrenage Arbre de transmission
9. Conduire Poignée 10. Manche 11. Montage Raccords 12. Montage boulons

- 5 -
COMPOSANTS
Un ×1
B × 1
C × 1
D × 1
E × 1
F ×2
G ×4
H ×1
je ×1
ASSEMBLÉE

- 6 -
1. Lors du montage du cric de remorque, il est il vaut mieux se
connecter au véhicule de remorquage à assurez-vous que la
remorque est sécurisé.

- 7 -
2. Montez le cric selon le schéma indiqué au-dessus de.
3. Assurez-vous boulons et nylock l'écrou est bien serré. Vérifiez
régulièrement pour s'assurer que les boulons et nylock noix sont bien
serré.
TEST DE L'ASSEMBLAGE :
AVERTISSEMENT!
Assurez-vous toujours que l'opérateur et les personnes à proximité sont
conscients de la stabilité de l'appareil. charger.
1) Abaissez progressivement la remorque jusqu'à ce que le cric est au-
dessus du sol et la remorque est entièrement pris en charge par le Trailer
Valet.
NOTE: Garder la remorque Le jock près du sol empêche que des
dommages graves ne surviennent en raison de défaillances
inattendues .
NOTE: Si les pneus du Trailer Valet semblent trop dégonflés et incapables
de tenir le poids, alors vous devez abaisser le prise jack et retirez l'appareil
pour vérifier l'air pression.
FIXATION CONDUCTEUR
Option 1: Fonctionnement manuel
1) Fixer le lecteur poignée vers le bas ou vitesse moyenne arbre de
transmission.
Option 2 : Utilisation de la douille de forage
AVERTISSEMENT!
Si tu sont en utilisant un sans fil percer, être bien sûr ton batterie paquet
est pleinement chargé avant utilisation. Suivez les recommandations du
fabricant de votre perceuse/visseuse.
1) À l'aide du mandrin de votre perceuse/visseuse, connectez-le à la prise
de la perceuse.

- 8 -

- 9 -
AVERTISSEMENT!
2 )
Serrez toujours le foret dans la douille du foret. Le foret peut venir
perdre et cause blessure.
3) Si vous utilisez une perceuse/visseuse filaire, vérifiez que
cordons d'alimentation et rallonges les cordons sont positionnés de
manière à ce que les pneus du Trailer Valet ou mobile
le véhicule va ne pas endommager les cordons ou que les cordons
puissent pas être mis à l'épreuve sur, trébuché ou soumis à d'autres
dommages ou contraintes.
4) Aligner et insérez la douille de la perceuse dans la partie basse arbre
de transmission à engrenages.
FONCTIONNEMENT APPAREIL
AVERTISSEMENT!
Tenez fermement la perceuse/le tournevis lors de l'engagement. La
perceuse avoir couple initial élevé.
1)Quand tu es obtenir prêt à fonctionner le appareil, faire bien sûr toi
en avoir un main fermement agrippée sur le frein, et le autre main saisi
fermement sur le lecteur poignée.
2) Lentement soulever le volant poignée jusqu'à ce que le frein soit
désengagé et commencer démarrage.
REMARQUE : Il est il est important que vous dirigiez l'appareil
uniquement quand toi sont démarrage et le bande-annonce est en
mouvement. Tentative de à tourner le pilotage poignée à un un arrêt
complet entraînera un désalignement des engrenages .
ENLEVER LE APPAREIL
1) Retirer la perceuse/le tournevis poignée.
2) Abaissez le cric jusqu'au Trailer Valet est au dessus du sol.

- 10 -
3) Desserrer le verrou noix et libérer les ferrures de montage .

- 11 -
ENTRETIEN
Faire ne pas surcharger.
Après utiliser, s'il te plaît sec avant stockage à éviter rouille de
boulons affectant utiliser.
Vérifiez régulièrement les boulons pour desserrer .
postule graisse multi- usages à le chaîne par suppression le
devant couverture de l'appareil.
Inspectez les pneus pour détecter tout dommage. Remplacer le pneu
immédiatement si endommagé.
Fabricant : Shanghaimuxinmuyeyou xiangongsi
Adresse : Shuangchenglu 803 nong 11 hao 1602A-1609 shi , baoshanqu ,
Shanghai
200 000 CN .
Importé vers AUS : JE NE PTY LTD, 1 RUE ROKEVA EASTWOOD
Nouvelle-Galles du Sud
2122 Australie
Importé à États-Unis : Sanven Technologie SARL ., Suite 250, 9166
Anaheim Lieu , Rancho Cucamonga , Californie 91730
E- CrossStu SARL
Mayence Landstrasse .69, 60329 Francfort sur Principal .
YH CONSULTANT LIMITÉ.
C/ O Oui Consultant Limité Bureau 147, Centurion
Maison , Londres Route , Staines - upon - Thames ,
Surrey , TW 18 4 AX
UK
REP
EC
REP


- 13 -
Technischer Support und E-Garantie- Zertifikat www.vevor.com/support
HANDBUCH-ANHÄNGER MOVER
BENUTZER HANDBUCH
MODELL : QYC 500- WB
Wir sind weiterhin bestrebt, Ihnen Werkzeuge zu wettbewerbsfähigen Preisen anzubieten.
"Sparen Sie die Hälfte", "Halber Preis" oder andere ähnliche Ausdrücke, die wir nur
verwenden
stellt eine Schätzung der Einsparungen dar, die Sie durch den Kauf bestimmter
Werkzeuge erzielen können
mit uns im Vergleich zu den großen Top-Marken und bedeutet nicht unbedingt, Abdeckung
alle von uns angebotenen Werkzeugkategorien. Wir möchten Sie bitten, zu überprüfen
sorgfältig
wenn Sie bei uns eine Bestellung aufgeben, wenn Sie tatsächlich Speichern
Hälfte im Vergleich mit den Top-Großmarken.

- 1 -
MODELL:QYC500-WB
Have product questions? Need technical support? Please feel free to
contact us:
Technical Support and E-Warranty Certificate
www.vevor.com/support
NEED HELP? CONTACT US!
This is the original instruction, please read all manual instructions
carefully before operating. VEVOR reserves a clear interpretation of our
user manual. The appearance of the product shall be subject to the
product you received. Please forgive us that we won't inform you again if
there are any technology or software updates on our product.
MANUAL TRAILER MOVER

- 2 -
SAFETY INSTRUCTIONS
WARNUNG: Lesen und verstehen Sie alles Anweisungen .
Nichtbefolgen aller Anweisungen aufgeführt unten kann das Ergebnis sein
im Ernst Verletzung.
1.Überprüfen Sie, ob der Reifen genügend Gas hat, bevor verwenden.
Wenn das Reifengas Ist nicht genug, Bitte pumpen Sie den Reifen vor
verwenden.
2.Überprüfen Sie, ob das Schraubteil lose, wenn ja, bitte festziehen.
3.Nicht Überlast.
VORSICHT: Für einen sicheren Betrieb lesen Sie bitte die Anleitung
sorgfältig durch. Montage Vorsichtsmaßnahmen
1. Nur gemäß dieser Anleitung zusammenbauen. Eine unsachgemäße
Montage kann erstellen Gefahren.
2. Tragen ANSI-zugelassene Schutzbrille und strapazierfähige
Arbeitshandschuhe während Montage.
3. Halten Sie den Versammlungsbereich sauber und gut beleuchtet.
4. Halten Sie während der Montage unbeteiligte Personen vom Bereich
fern .
5. Nicht zusammenbauen, wenn Sie müde sind oder unter Alkoholeinfluss,
Drogen oder Medikamente.
6.Gewichtskapazität und andere Produkteigenschaften gelten für richtig
Und komplett montiertes Produkt nur.
Verwenden Vorsichtsmaßnahmen
UM SCHWERE VERLETZUNG UND TOD VOM TRINKGELD:
1. Nicht sitzen, stehen oder Aufstieg An Das Artikel.
2.Dieses Produkt ist nicht bei oy. Nicht erlauben Kinder Zu spielen mit
oder nahe Das Artikel.
3.
Nicht unter Last heben.
4.Um ein Umkippen zu verhindern, drücken/ziehen Sie nur mit dem
mitgelieferten Griff. 5.Verwenden Sie es nur bestimmungsgemäß.
6.Vor jedem Gebrauch überprüfen. Nicht verwenden Es Wenn Teile Sind
lose oder beschädigt.

- 3 -
7.Nach Gebrauch bitte trocknen, bevor Lagerung zu vermeiden
Rostbildung von Bolzen beeinflussend verwenden.
SPEICHERN SIE DIESE ANWEISUNGEN

- 4 -
MODELL UND PARAMETER
Modell
QYC500-WB
Max. Brutto Trailer WT
500 Pfund
Montage Halterungstyp
Anschraubbar Montage Klammer
Kurbeltyp
Oberteil - Wind
Reichweite(Höhe des
Aufnahmerohr oben Boden)
13-23,2 Zoll
Rad
9"
Material
Stahl
STRUKTUR DIAGRAMM
<—
1
12
2
3
4
5
7
10
11
6
9
1. Jack Griff 2. Buchse 3. Anschluss Platte 4. Räder 5. Gang Ketten
6. Lenkung / Bremse Griff 7. Niedrig Gang Antriebswelle 8. Medium Gang
Antriebswelle
9. Fahren Griff 10. Hülse 11. Montage Beschläge 12. Montage Bolzen

- 5 -
KOMPONENTEN
Ein ×1
B ×1
C ×1
T ×1
E ×1
F ×2
G ×4
H ×1
ICH ×1
MONTAGE
1. Bei der Montage des Anhängerhebers Ist am besten anschließen
zur Zugfahrzeug Zu Stellen Sie sicher, dass der Anhänger sicher.

- 6 -
2. Wagenheber gemäß Zeichnung montieren über.
3. Stellen Sie sicher Bolzen und Nylon Muttern sind fest angezogen.
Überprüfen Sie regelmäßig um sicherzustellen, dass Schrauben und
Nylon Nüsse Sind sicher fest.
TESTEN DER MONTAGE:
WARNUNG!
Stellen Sie immer sicher, dass der Bediener und die umstehenden
Personen sich der Stabilität des laden.
1) Den Anhänger langsam absenken, bis der Der Wagenheber ist über
dem Boden und der Anhänger ist vollständig unterstützt durch den Trailer
Valet.
NOTIZ: Den Anhänger behalten Ein bodennaher Jock verhindert ,
dass durch unerwartete Ausfälle schwere Schäden entstehen .
NOTIZ: Wenn die Reifen des Trailer Valet zu platt sind und nicht halten
können das Gewicht, dann müssen Sie senken die den Wagenheber und
entfernen Sie das Gerät, um die Luft Druck.
ANBRINGEN TREIBER
Option 1: Manuelle Bedienung
1) Schließen Sie das Laufwerk an Griff auf die niedrige oder mittlerer
Gang Antriebswelle.
Option 2: Verwendung der Bohrbuchse
WARNUNG!
Wenn du Sind mit A schnurlos bohren, Sei Sicher dein Batterie Pack Ist
voll vor Gebrauch aufladen . Befolgen Sie die Empfehlungen des
Herstellers Ihres Bohrers/Schraubers .
1) Verbinden Sie das Bohrfutter Ihres Bohrschraubers mit der Bohrbuchse.

- 7 -

- 8 -
WARNUNG!
2
)
Immer den Bohrer an der Bohrbuchse festziehen. Der Bohrer kann
verlieren und Ursache Verletzung.
3) Wenn Sie einen kabelgebundenen Bohrschrauber verwenden,
überprüfen Sie, ob Netzkabel und Verlängerungskabel Die Schnüre
sind so positioniert, dass die Reifen des Trailer Valet oder Umzug
Fahrzeug wird die Kabel nicht beschädigen oder nicht getreten sein
darauf gestoßen wird, darüber gestolpert wird oder es auf andere
Weise beschädigt oder beansprucht wird.
4) Ausrichten und die Bohreraufnahme bis zur unteren
Zahnradantriebswelle.
BETRIEB GERÄT
WARNUNG!
Halten Sie den Bohrer/Schraubendreher fest , wenn Sie ihn eindrehen.
haben hohes Anfangsdrehmoment.
1)Wann du bist bekommen bereit Zu arbeiten Die Gerät, machen
Sicher Du habe eins Hand fest umklammert die Bremse,und die andere
Hand gegriffen fest An Der Antrieb handhaben.
2)Langsam heben Sie die Lenkung Handgriff, bis die Bremse
ausgekuppelt Und Start Ankurbeln.
HINWEIS: Es Ist Wichtig ist, dass Sie das Gerät nur steuern Wann Du
Sind Ankurbeln Und Die Anhänger Ist bewegen.Versuch Zu drehen
Die Lenkung handhaben bei A Ein absoluter Anschlag führt dazu, dass
die Zahnräder ihre Ausrichtung verlieren .
ENTFERNEN DER GERÄT
1) Entfernen Sie den Bohrer/Antrieb handhaben.
2) Senken Sie die Wagenheber bis zum Trailer Valet ist über dem Boden.

- 9 -
3) Das Schloss lösen Nuss und Lösen Sie die Befestigungsbefestigungen .

- 10 -
WARTUNG
Tun nicht überlasten.
Nach verwenden, Bitte trocken vor Lagerung zu vermeiden
Rostbildung von Bolzen beeinflussen verwenden.
Überprüfen Sie die Schrauben regelmäßig auf lockern .
Bewerben Mehrzweckfett Zu Die Kette von Entfernen die Front
Abdeckung von das Gerät.
Reifen auf Schäden prüfen. Reifen sofort ersetzen wenn beschädigt.
Hersteller: Shanghaimuxinmuyeyou xiangongsi
Adresse : Shuangchenglu 803 Nong 11 Hao 1602A-1609 Shi , Baoshanqu ,
Shanghai
200000 CN .
Importiert nach AUS: ICH TU NICHT PTY LTD, 1 ROKEVA STREET
EASTWOOD NSW
2122 Australien
Importiert Zu Vereinigte Staaten : Sanven Technologie GmbH , Suite 250,
9166 Anaheim Ort , Rancho Cucamonga , Kalifornien 91730
E- CrossStu GmbH
Mainzer Landstr.69, 60329 Frankfurt am Main.
YH CONSULTING LIMITED.
C/ O YH Beratung Beschränkt Büro 147, Zenturio Haus ,
London Road , Staines - upon - Thames , Surrey , TW
18 4 AX
UK
REP
EC
REP


- 12 -
Supporto tecnico e Certificato di garanzia elettronica www.vevor.com/support
RIMORCHIO MANUALE TRASLOCATORE
UTENTE MANUALE
MODELLO : QYC 500- WB
Continuiamo a impegnarci per fornirvi strumenti a prezzi competitivi.
"Risparmia la metà", "Metà prezzo" o altre espressioni simili utilizzate solo da noi
rappresenta una stima dei risparmi che potresti ottenere acquistando determinati strumenti
con noi rispetto ai principali marchi top e non significa necessariamente copertina
tutte le categorie di strumenti da noi offerti. Ti ricordiamo cortesemente di verificare
accuratamente
quando effettui un ordine con noi se sei effettivamente Risparmio
Metà rispetto ai marchi più importanti.

- 1 -
MODELLO:QYC500-WB
Have product questions? Need technical support? Please feel free to
contact us:
Technical Support and E-Warranty Certificate
www.vevor.com/support
NEED HELP? CONTACT US!
This is the original instruction, please read all manual instructions
carefully before operating. VEVOR reserves a clear interpretation of our
user manual. The appearance of the product shall be subject to the
product you received. Please forgive us that we won't inform you again if
there are any technology or software updates on our product.
MANUAL TRAILER MOVER

- 2 -
SAFETY INSTRUCTIONS
AVVERTIMENTO: Leggi e comprendi tutto istruzioni . Mancato
rispetto di tutti gli istruzioni elencate sotto potrebbe risultare in modo serio
infortunio.
1. Controllare che il pneumatico abbia abbastanza carburante prima
utilizzo. Se il gas del pneumatico È non Abbastanza, si prega di gonfiare il
pneumatico prima utilizzo.
2. Controllare se la parte della vite è sciolto, se sì, per favore stringilo. 3.
Non sovraccarico.
ATTENZIONE: Si prega di leggere attentamente le istruzioni per un
funzionamento sicuro. Assemblea Precauzioni
1. Montare solo seguendo queste istruzioni. Un montaggio non corretto
può creare pericoli.
2. Indossare Occhiali di sicurezza approvati ANSI e guanti da lavoro
resistenti durante assemblaggio.
3. Mantenere l'area di assemblaggio pulita e ben illuminata.
4. Tenere gli astanti fuori dall'area durante l'assemblea .
5. Non riunirsi quando si è stanchi o quando sotto l'effetto dell'alcool,
droga o farmaco.
6. La capacità di peso e altre capacità del prodotto si applicano a
correttamente E prodotto completamente assemblato soltanto.
Utilizzo Precauzioni
PER PREVENIRE GRAVI INFORTUNIO E MORTE DALLA
MANCANZA:
1. Non stare seduto, non stare in piedi O scalata SU Questo articolo.
2.Questo prodotto è non a oy. Non fare permettere bambini A giocare con
O vicino Questo articolo.
3.
Non sollevare mentre è carico.
4. Per evitare il ribaltamento, spingere/tirare utilizzando solo la maniglia in
dotazione. 5. Utilizzare solo come previsto.
6.Ispezionare prima di ogni utilizzo. Non utilizzare Esso Se parti Sono
allentati o danneggiati.

- 3 -
7. Dopo l'uso, asciugare prima conservazione da evitare arrugginire Di
bulloni che colpisce utilizzo.
SALVA QUESTI ISTRUZIONI

- 4 -
MODELLO E PARAMETRI
Modello
Modello QYC500-WB
Max. Lordo Rimorchio WT
500 libbre
Montaggio Tipo di staffa
Imbullonato Montaggio Staffa
Tipo di manovella
In alto - Vento
Intervallo (altezza del
tubo ricevente sopra terra)
13-23,2 pollici
Ruota
9"
Materiale
Acciaio
STRUTTURA DIAGRAMMA
<—
1
12
2
3
4
5
7
10
11
6
9
1. Jack Maniglia 2. Jack 3. Collegamento Tavola 4. Ruote 5. Ingranaggio Catene
6. Sterzo / Freno Maniglia 7. Bassa Ingranaggio Albero di trasmissione 8. Medio
Ingranaggio Albero di trasmissione
9. Guidare Manico 10. Manica 11. Montaggio Raccordi 12. Montaggio bulloni
- 5 -
COMPONENTI
Un ×1
La ×1
La ×1
E ×1
E ×1
E ×2
Il ×4
H ×1
IO ×1
ASSEMBLAGGIO
1. Durante il montaggio del cric del rimorchio, È meglio agganciarsi
al veicolo di traino A assicurati che il rimorchio sia sicuro.

- 6 -
2. Montare il martinetto in base al disegno mostrato Sopra.
3. Assicurati bulloni e lucchetto il dado sia serrato saldamente. Controllare
regolarmente per assicurarsi che i bulloni e lucchetto noci Sono
saldamente stretto.
TEST DEL MONTAGGIO:
AVVERTIMENTO!
Assicurarsi sempre che l'operatore e gli astanti siano consapevoli della
stabilità del carico.
1) Abbassare gradualmente il rimorchio fino a quando il il cric è fuori terra
e il rimorchio è completamente supportato dal Trailer Valet.
NOTA: Mantenere il rimorchio Il jock vicino al terreno impedisce
che si verifichino gravi danni dovuti a guasti imprevisti.
NOTA: Se gli pneumatici del Trailer Valet sembrano troppo sgonfi e non
riescono a tenere il peso, allora devi abbassare il jack e rimuovere il
dispositivo per controllare l'aria pressione.
ALLEGANDO AUTISTA
Opzione 1: Funzionamento manuale
1) Collegare l'unità gestire al basso o marcia media albero di trasmissione.
Opzione 2: utilizzo della presa per trapano
AVVERTIMENTO!
Se tu Sono usando UN senza fili trapano, Essere Sicuro tuo batteria
pacchetto È completamente caricato prima dell'uso. Seguire le
raccomandazioni del produttore del trapano/avvitatore.
1) Utilizzando il mandrino del trapano/avvitatore, collegarlo alla presa del
trapano.

- 7 -

- 8 -
AVVERTIMENTO!
2 )
Serrare sempre il trapano alla presa del trapano. Il trapano può venire
perdere e causa infortunio.
3) Se si utilizza un trapano/avvitatore con cavo, verificare che cavi
di alimentazione e prolunghe i cavi sono posizionati in modo che gli
pneumatici del Trailer Valet o in movimento
il veicolo sarà non danneggiare i cavi o che i cavi possano non
essere calpestato accesi, inciampati o altrimenti sottoposti a danni o
stress.
4) Allinea e inserire la bussola del trapano nella parte bassa albero di
trasmissione ad ingranaggi.
OPERATIVO DISPOSITIVO
AVVERTIMENTO!
Tenere saldamente il trapano/avvitatore durante l'inserimento. Il trapano
Avere elevata coppia iniziale.
1)Quando tu sei ottenere pronto A operare IL dispositivo,fare Sicuro
Voi averne uno mano stretta saldamente sul freno, e il altro mano
afferrato fermamente SU la guida maniglia.
2) Lentamente sollevare lo sterzo maniglia fino a quando il freno è
disimpegnato E inizio a manovella.
NOTA: Esso È importante che tu guidi il dispositivo solo Quando Voi
Sono manovella E IL rimorchio È in movimento. Tentando A giro IL
sterzo maniglia A UN L'arresto completo causerà lo spostamento degli
ingranaggi fuori allineamento .
RIMOZIONE DEL DISPOSITIVO
1) Rimuovere il trapano/drive maniglia.
2) Abbassare il cricco fino al Trailer Valet è sopra il suolo.

- 9 -
3) Allentare la serratura noce e allentare i dispositivi di fissaggio .

- 10 -
MANUTENZIONE
Fare non sovraccaricare.
Dopo utilizzo, Per favore Asciutto Prima stoccaggio a Evitare
arrugginire Di bulloni che colpisce utilizzo.
Controllare regolarmente i bulloni per allentare ess.
Applicare grasso multiuso A IL catena di rimozione la parte
anteriore copertina Di il dispositivo.
Controllare che gli pneumatici non siano danneggiati. Sostituire
immediatamente lo pneumatico se danneggiato.
Produttore: Shanghaimuxinmuyeyou xiangongsi
Indirizzo : Shuangchenglu 803 nong 11 hao 1602A-1609 shi , baoshanqu ,
Shanghai
200000 CN .
Importato verso l'Australia: IO NON PTY LTD, 1 ROKEVA VIA
EASTWOOD Nuovo Galles del Sud
2122Australia
Importato A Stati Uniti d'America : Sanven Tecnologia Società a
responsabilità limitata , Suite 250, 9166 Roma Luogo , Rancho Cucamonga ,
CA 91730
E- CrossStu Società a responsabilità limitata
Magonza Landstraße .69, 60329 Francoforte SU Principale
.
YH CONSULENZA LIMITATO.
C/ O YH Consulenza Limitato Ufficio 147, Centurione
Casa , Londra Strada , Staines - upon - Thames , Surrey ,
TW 18 4 AX
UK
REP
EC
REP


- 12 -
Soporte técnico y Certificado de garantía electrónica www.vevor.com/support
REMOLQUE MANUAL AGENTE DE
MUDANZAS
USUARIO MANUAL
MODELO : QYC 500- WB
Seguimos comprometidos a brindarle herramientas a precios competitivos.
"Ahorra la mitad", "mitad de precio" o cualquier otra expresión similar utilizada únicamente
por nosotros
Representa una estimación de los ahorros que podría obtener al comprar ciertas
herramientas.
con nosotros en comparación con las principales marcas líderes y no significa
necesariamente cubrir
Todas las categorías de herramientas que ofrecemos. Le recordamos que debe verificar
con cuidado
Cuando realiza un pedido con nosotros, si realmente está Ahorro
Medio en comparación con las principales marcas líderes.

- 1 -
MODELO: QYC500-WB
Have product questions? Need technical support? Please feel free to
contact us:
Technical Support and E-Warranty Certificate
www.vevor.com/support
NEED HELP? CONTACT US!
This is the original instruction, please read all manual instructions
carefully before operating. VEVOR reserves a clear interpretation of our
user manual. The appearance of the product shall be subject to the
product you received. Please forgive us that we won't inform you again if
there are any technology or software updates on our product.
MANUAL TRAILER MOVER

- 2 -
SAFETY INSTRUCTIONS
ADVERTENCIA: Lea y comprenda todo instrucciones . No seguir
todas las instrucciones enumeradas abajo puede resultar En serio lesión.
1. Compruebe si el neumático tiene suficiente combustible antes usar. Si
el gas de los neumáticos es no suficiente, Por favor, infle el neumático
antes usar.
2. Compruebe si la parte del tornillo está perder, en caso afirmativo, Por
favor apriételo. 3.No lo hagas sobrecarga.
PRECAUCIÓN: Lea atentamente las instrucciones para un uso
seguro. Asamblea Precauciones
1. Realice el montaje únicamente de acuerdo con estas instrucciones. Un
montaje inadecuado puede crear peligros
2. Desgaste Gafas de seguridad aprobadas por ANSI y guantes de trabajo
resistentes durante asamblea.
3. Mantenga el área de reunión limpia y bien iluminada.
4. Mantenga a los transeúntes fuera del área durante el montaje .
5. No realice el montaje cuando esté cansado o cuando bajo la influencia
del alcohol, drogas o medicamento.
6. La capacidad de peso y otras capacidades del producto se aplican a
adecuadamente y producto completamente ensamblado solo.
Usar Precauciones
PARA PREVENIR GRAVES LESIÓN YLA MUERTE DE PROPINA:
1.No te sientes, quédate de pie o trepar en este artículo.
2.Este producto es No en oy. No permitir niños a jugar con o cerca este
artículo.
3.
No levante mientras esté cargado.
4. Para evitar que se vuelque, empuje o tire utilizando únicamente el
mango suministrado. 5. Utilícelo únicamente según lo previsto.
6. Inspeccione antes de cada uso. No utilice él si regiones son suelto o
dañado.
7. Después del uso, séquelo antes almacenamiento para evitar Oxidación
de pernos conmovedor usar.

- 3 -
GUARDE ESTOS INSTRUCCIONES
- 4 -
MODELO Y PARÁMETROS
Modelo
QYC500-WB
Máximo Bruto Tráiler WT
500 libras
Montaje Tipo de soporte
Atornillable Montaje Soporte
Tipo de manivela
Arriba - Viento
Rango(Altura de la
tubo receptor arriba suelo)
13-23,2 pulgadas
Rueda
9"
Material
Acero
ESTRUCTURA DIAGRAMA
<—
1
12
2
3
4
5
7
10
11
6
9
1. Jacobo Mango 2. Gato 3. Conexión Placa 4. Ruedas 5. Engranaje Cadenas
6. Dirección / Freno Manejar 7. Bajo Engranaje Eje de transmisión 8. Medio
Engranaje Eje de transmisión
9. Conducir Mango 10. Manga 11. Montaje Accesorios 12. Montaje pernos

- 5 -
COMPONENTES
Un ×1
B×1
C ×1
D×1
mi×1
F×2
G ×4
yo ×1
I ×1
ASAMBLEA
1. Al montar el gato del remolque, es Lo mejor es ligar hacia
vehículo remolcador a Asegúrese de que el remolque esté seguro.

- 6 -
2. Monte el gato según el dibujo que se muestra. arriba.
3. Asegúrese pernos y Bloqueo de nailon Las tuercas están bien
apretadas. Revisar periódicamente para asegurarse de que los pernos y
Bloqueo de nailon cojones son Bien apretado.
PRUEBA DEL CONJUNTO:
¡ADVERTENCIA!
Asegúrese siempre que el operador y los transeúntes sean conscientes
de la estabilidad del carga.
1) Baje el remolque gradualmente hasta que El gato está sobre el suelo y
el remolque está Completamente compatible con Trailer Valet.
NOTA: Manteniendo el remolque El apoyo cercano al suelo evita
que se produzcan daños graves debido a fallos inesperados.
NOTA: Si los neumáticos del Trailer Valet parecen estar demasiado
desinflados y no pueden sostenerse el peso, entonces debes bajar el
Conecte y retire el dispositivo para verificar el aire. presión.
ADJUNTO CONDUCTOR
Opción 1: Operación manual
1) Conecte la unidad manejar hacia abajo o hacia abajo marcha media
Eje de transmisión.
Opción 2: Uso del zócalo del taladro
¡ADVERTENCIA!
Si usted son usando a sin cable taladro, ser seguro su batería embalar
es completamente Cárguelo antes de usar. Siga las recomendaciones del
fabricante de su taladro/atornillador.
1) Usando el portabrocas de su taladro/destornillador, conéctelo al zócalo
del taladro.

- 7 -

- 8 -
¡ADVERTENCIA!
2
)
Siempre apriete el taladro al zócalo del taladro. El taladro puede
salirse perder y causa lesión.
3) Si utiliza un taladro/destornillador con cable, verifique que
Cables de alimentación y extensiones Los cables están colocados
de manera que los neumáticos del Trailer Valet o emocionante
El vehículo lo hará No dañe los cables ni permita que los cables se
dañen. no ser pisado sobre, tropezar o estar sujeto de cualquier otra
forma a daños o tensiones.
4) Alinear y Inserte el zócalo del taladro hasta el fondo. eje de transmisión
de engranajes.
OPERANTE DISPOSITIVO
¡ADVERTENCIA!
Sujete el taladro/destornillador firmemente al colocarlo. El taladro tener
Alto par inicial.
1)Cuando estás conseguir listo a funcionar el dispositivo,hacer seguro
tú tener uno mano agarrada firmemente en el freno,y el otro mano
Agarrado firmemente en La unidad manejar.
2) Lentamente Levante la dirección Manejar hasta que el freno esté
desacoplado y comenzar Arranque.
NOTA: Es es Es importante que manejes el dispositivo únicamente
cuando tú son Arranque y el tráiler es moviéndose.Intentando a doblar
el gobierno manejar en a El punto muerto provocará que los
engranajes se desalineen .
QUITAR EL DISPOSITIVO
1) Retire el taladro/accionamiento manejar.
2) Bajar el Gato hasta el Trailer Valet Está por encima del suelo.

- 9 -
3) Aflojar la cerradura nuez y Suelte los accesorios de montaje .

- 10 -
MANTENIMIENTO
Hacer No sobrecargue.
Después usar, por favor seco antes almacenamiento a evitar
Oxidación de pernos afectando usar.
Revise los pernos regularmente para aflojar
Aplicar Grasa multiusos a el cadena por eliminando El frente cubrir
de el dispositivo.
Inspeccione los neumáticos para detectar daños. Reemplace el
neumático inmediatamente Si está dañado.
Fabricante: Shanghaimuxinmuyeyou xiangongsi
Dirección : Shuangchenglu 803 nong 11 hao 1602A-1609 shi , baoshanqu ,
llevar a la fuerza
200000 CN .
Importado a Australia: NO PTY LIMITADO, 1 CALLE ROKEVA
EASTWOOD Nueva Gales del Sur
2122 Australia
Importado a EE.UU : Sanven Tecnología Limitada ., Suite 250, 9166
Anaheim Lugar , Rancho Cucamonga , CA 91730
E- CrossStu Sociedad Limitada
Maguncia Landstrasse .69, 60329 Fráncfort en Principal .
YH CONSULTANTE LIMITADO.
C/ O Sí Consultante Limitado Oficina 147, Centurión
Casa , Londres Carretera , Staines - upon - Thames ,
Surrey , TW 18 4 AX
UK
REP
EC
REP


- 12 -
Wsparcie techniczne i Certyfikat E-Gwarancji www.vevor.com/support
PRZYCZEPA RĘCZNA WNIOSKODAWCA
UŻYTKOWNIK PODRĘCZNIK
MODEL : QYC 500- WB
Nadal staramy się oferować Państwu narzędzia w konkurencyjnych cenach.
„Oszczędź połowę”, „Połowa ceny” lub jakiekolwiek inne podobne wyrażenia używane
wyłącznie przez nas
przedstawia szacunkowe oszczędności, jakie możesz uzyskać kupując określone
narzędzia
z nami w porównaniu do głównych, najlepszych marek i niekoniecznie oznacza to okładka
wszystkie kategorie narzędzi oferowanych przez nas. Przypominamy o sprawdzeniu
ostrożnie
gdy składasz u nas zamówienie, jeśli faktycznie Oszczędność
Połowa w porównaniu z wiodącymi markami.
- 1 -
MODEL:QYC500-WB
Have product questions? Need technical support? Please feel free to
contact us:
Technical Support and E-Warranty Certificate
www.vevor.com/support
NEED HELP? CONTACT US!
This is the original instruction, please read all manual instructions
carefully before operating. VEVOR reserves a clear interpretation of our
user manual. The appearance of the product shall be subject to the
product you received. Please forgive us that we won't inform you again if
there are any technology or software updates on our product.
MANUAL TRAILER MOVER

- 2 -
SAFETY INSTRUCTIONS
OSTRZEŻENIE: Przeczytaj i zrozum wszystko instrukcje .
Nieprzestrzeganie wszystkich wymienione instrukcje poniżej może
wyniknąć poważnie obrażenia.
1. Sprawdź, czy opona ma wystarczającą ilość gazu przed używać. Jeśli
gaz w oponach Jest nie wystarczająco, proszę napompować oponę przed
używać.
2. Sprawdź, czy część śrubowa jest luźny, jeśli tak, Proszę dokręcić. 3.
Nie przeciążać.
OSTROŻNOŚĆ: Przeczytaj uważnie instrukcję, aby zapewnić
bezpieczną obsługę. Montaż Środki ostrożności
1. Montaż należy wykonywać wyłącznie zgodnie z niniejszą instrukcją.
Nieprawidłowy montaż może tworzyć zagrożenia.
2. Nosić Okulary ochronne i wytrzymałe rękawice robocze zatwierdzone
przez ANSI podczas montaż.
3. Utrzymuj miejsce zgromadzenia w czystości i zapewnij dobre
oświetlenie.
4. Nie dopuść, aby osoby postronne przebywały w pobliżu podczas
montażu .
5. Nie należy się zbierać, gdy jest się zmęczonym lub pod wpływem
alkoholu, narkotyki lub lek.
6. Nośność i inne możliwości produktu mają zastosowanie do odpowiednio
I produkt całkowicie zmontowany tylko.
Używać Środki ostrożności
ABY ZAPOBIEC POWAŻNYM OBRAŻENIA I ŚMIERĆ OD
NAPIWKÓW:
1. Nie siadaj, stań Lub wspinać się NA Ten przedmiot.
2. Ten produkt jest nie w oy. Nie umożliwić dzieci Do grać z Lub w pobliżu
Ten przedmiot.
3.
Nie podnoś, gdy jesteś obciążony.
4. Aby zapobiec przewróceniu, pchaj/ciągnij wyłącznie za dołączony
uchwyt. 5. Używaj wyłącznie zgodnie z przeznaczeniem.

- 3 -
6.Przed każdym użyciem sprawdź. Nie używaj To Jeśli strony Czy luźne
lub uszkodzone.
7. Po użyciu należy wysuszyć przed przechowywanie, którego należy
unikać rdzewienie z śruby wpływający używać.
ZAPISZ TO INSTRUKCJE

- 4 -
MODEL I PARAMETRY
Model
QYC500-WB
Maks. brutto Przyczepa
WT
500 funty
Montowanie Typ wspornika
Przykręcany Montowanie Nawias
Typ korby
Góra - Wiatr
Zakres(Wysokość
rura odbiorcza powyżej grunt)
13-23,2 cala
Koło
9"
Tworzywo
Stal
STRUKTURA DIAGRAM
<—
1
12
2
3
4
5
7
10
11
6
9
1. Podnośnik Uchwyt 2. Gniazdo 3. Łączenie Płyta 4. Koła 5. Bieg Więzy
6. Układ kierowniczy / hamulec Uchwyt 7. Niski Bieg Wał napędowy 8. Średni
Bieg Wał napędowy
9. Jedź Uchwyt 10. Rękaw 11. Montowanie Osprzęt 12. Montowanie śruby

- 5 -
SKŁADNIKI
×1
B ×1
C ×1
D ×1
E ×1
P ×2
G ×4
H ×1
I ×1
MONTAŻ

- 6 -
1. Podczas montażu podnośnika przyczepy, Jest najlepiej się
podłączyć do pojazd holowniczy Do upewnij się, że przyczepa jest
bezpieczny.

- 7 -
2. Zamontuj podnośnik w oparciu o przedstawiony rysunek powyżej.
3. Upewnij się śruby i nylok nakrętki są mocno dokręcone. Regularnie
sprawdzaj aby upewnić się, że śruby i nylok orzechy Czy mocno ciasno.
TESTOWANIE ZESTAWU:
OSTRZEŻENIE!
Zawsze upewnij się, że operator i osoby postronne są świadome
stabilności urządzenia. obciążenie.
1) Stopniowo opuszczaj przyczepę, aż podnośnik jest nad ziemią, a
przyczepa jest w pełni wspierane przez Trailer Valet.
NOTATKA: Utrzymanie przyczepy Jock blisko ziemi zapobiega
poważnym uszkodzeniom spowodowanym przez nieoczekiwane
awarie.
NOTATKA: Jeśli opony w przyczepie Trailer Valet wydają się zbyt słabe i
nie są w stanie utrzymać ciężar, wtedy musisz obniżyć podnośnik i wyjmij
urządzenie, aby sprawdzić powietrze ciśnienie.
DOŁĄCZANIE KIEROWCA
Opcja 1: Obsługa ręczna
1) Podłącz dysk uchwyt do dołu lub średni bieg wał napędowy.
Opcja 2: Użycie gniazda wiertarskiego
OSTRZEŻENIE!
Jeśli ty Czy używając A bezprzewodowy wiertło, Być Jasne twój bateria
pakiet Jest w pełni naładować przed użyciem. Postępuj zgodnie z
zaleceniami producenta wiertarki/wkrętarki .
1) Podłącz wiertarkę/wkrętarkę do gniazda wiertarskiego za pomocą
uchwytu wiertarskiego.

- 8 -

- 9 -
OSTRZEŻENIE!
2 )
Zawsze dokręcaj wiertło do gniazda wiertła. Wiertło może przyjść
przegrać i przyczyna obrażenia.
3) W przypadku korzystania z wiertarko-wkrętarki przewodowej
należy sprawdzić, czy: przewody zasilające i przedłużacze sznurki
są tak ustawione, że opony na lawecie lub poruszający
pojazd będzie nie uszkodzić przewodów ani nie uszkodzić
przewodów nie być wdeptanym na, potknięcia się o nie lub narażenia
ich na inne uszkodzenia lub naprężenia.
4) Wyrównaj i włóż gniazdo wiertła do dołu wał napędowy z przekładnią.
OPERACYJNY URZĄDZENIE
OSTRZEŻENIE!
Podczas włączania trzymaj wiertarkę/wkrętarkę mocno. Wiertło będzie
Posiadać wysoki początkowy moment obrotowy.
1) Kiedy jesteś dostawanie gotowy Do działać ten urządzenie,zrób
Jasne Ty mieć jeden mocno zaciśnięta dłoń hamulec i Inny ręka chwycił
mocno NA napęd uchwyt.
2)Powoli podnieś kierownicę uchwyt, aż hamulec zostanie zwolniony
wolny I start kręcenie.
UWAGA: To Jest ważne jest, aby kierować urządzeniem tylko Kiedy Ty
Czy kręcenie I ten przyczepa Jest poruszanie się.Próba Do zakręt ten
sterowniczy uchwyt Na A zatrzymanie się spowoduje utratę ustawienia
kół zębatych .
USUWANIE URZĄDZENIE
1) Wyjmij wiertło/napęd uchwyt.
2) Obniż Jack do momentu, aż Parkingowy Przyczepy jest nad ziemią.
3) Zwolnij zamek orzech i zwolnij elementy mocujące .

- 10 -

- 11 -
KONSERWACJA
Do nie przeciążać.
Po używać, Proszę suchy zanim przechowywanie do unikać
rdzewienie z śruby wpływający używać.
Regularnie sprawdzaj śruby pod kątem poluzować ess.
Zastosuj smar uniwersalny Do ten łańcuch przez usuwanie przód
okładka z Urządzenie.
Sprawdź opony pod kątem uszkodzeń. Natychmiast wymień oponę
jeśli uszkodzone.
Producent: Shanghaimuxinmuyeyou xiangongsi
Adres : Shuangchenglu 803 nong 11 hao 1602A-1609 shi , baoshanqu ,
Szanghaj
200 000 CN .
Importowany do Australii: JA NIE PTY spółka z ograniczoną
odpowiedzialnością, 1 ULICA ROKEVA EASTWOOD Nowa Południowa Walia
2122 Australii
Importowany Do Stany Zjednoczone : Sanven Technologia Sp . z o.o. ,
Apartament 250, 9166 Anaheim Miejsce , Rancho Cucamonga , Kalifornia
91730
E- CrossStu Spółka z o.o.
Moguncja Landstrasse .69, 60329 Frankfurt NA Główny .
YH ORDYNACYJNY OGRANICZONY.
C/ O YH Ordynacyjny Ograniczony Biuro 147, Centurion
Dom , Londyn Droga , Staines - upon - Thames , Surrey ,
TW 18 4 AX
UK
REP
EC
REP


- 13 -
Technische ondersteuning en E- garantiecertificaat www.vevor.com/support
HANDMATIGE AANHANGWAGEN
VERHUIZER
GEBRUIKER HANDMATIG
MODEL : QYC 500- WB
Wij streven er voortdurend naar om u gereedschappen tegen concurrerende prijzen te
leveren.
"Bespaar de helft", "halve prijs" of andere soortgelijke uitdrukkingen die alleen door ons
worden gebruikt
geeft een schatting van de besparingen die u kunt behalen door bepaalde
gereedschappen te kopen
bij ons vergeleken met de grote topmerken en betekent niet per se dat omslag
alle categorieën van tools die wij aanbieden. U wordt vriendelijk verzocht om te verifiëren
voorzichtig
wanneer u een bestelling bij ons plaatst, als u daadwerkelijk Besparing
Half in vergelijking met de grote topmerken.

- 1 -
MODEL:QYC500-WB
Have product questions? Need technical support? Please feel free to
contact us:
Technical Support and E-Warranty Certificate
www.vevor.com/support
NEED HELP? CONTACT US!
This is the original instruction, please read all manual instructions
carefully before operating. VEVOR reserves a clear interpretation of our
user manual. The appearance of the product shall be subject to the
product you received. Please forgive us that we won't inform you again if
there are any technology or software updates on our product.
MANUAL TRAILER MOVER

- 2 -
SAFETY INSTRUCTIONS
WAARSCHUWING: Lees en begrijp alles instructies . Het niet
naleven van alle instructies vermeld onderstaand kan resulteren in ernst
blessure.
1. Controleer of de band voldoende gas heeft voordat u gaat rijden gebruik.
Als het bandengas is niet genoeg, pomp de band op voordat u gebruik.
2. Controleer of het schroefgedeelte goed vastzit. loszittend, indien ja,
draai het vast. 3.Doe niet overbelasting.
VOORZICHTIGHEID: Lees de instructies zorgvuldig door voor een
veilige bediening. Montage Voorzorgsmaatregelen
1. Monteer het geheel uitsluitend volgens deze instructies. Onjuiste
montage kan creëren gevaren.
2. Draag ANSI-goedgekeurde veiligheidsbrillen en robuuste
werkhandschoenen tijdens montage.
3. Zorg dat de montageplek schoon en goed verlicht is.
4. Houd omstanders uit de buurt tijdens de montage .
5. Monteer niet als u moe bent of als u onder invloed van alcohol,
medicijnen of medicatie.
6. Gewichtscapaciteit en andere productmogelijkheden zijn van
toepassing op op de juiste manier En volledig gemonteerd product alleen.
Gebruik Voorzorgsmaatregelen
OM ERNSTIGE BLESSURE EN DOOD VAN TIPPING:
1. Ga niet zitten, sta niet of beklimmen op dit item.
2.Dit product is niet bij oy. Niet doen toestaan kinderen naar toneelstuk
met of in de buurt van dit item.
3.
Til niet terwijl het geladen is.
4. Om kantelen te voorkomen, duwt/trekt u alleen met behulp van de
meegeleverde handgreep. 5. Gebruik het product alleen zoals bedoeld.
6. Inspecteer voor elk gebruik. Niet gebruiken Het als onderdelen Zijn los
of beschadigd.
7. Na gebruik eerst laten drogen opslag om te vermijden roesten van
bouten beïnvloedend gebruik.

- 3 -
BEWAAR DEZE INSTRUCTIES

- 4 -
MODEL EN PARAMETERS
Model
QYC500-WB
Max. Bruto Aanhangwagen
WT
500 pond
Montage Beugeltype
Vastschroeven Montage Beugel
Krukastype
Boven - Wind
Bereik (Hoogte van de
ontvangstbuis boven grond)
13-23,2 inch
Wiel
9"
Materiaal
Staal
STRUCTUUR DIAGRAM
<—
1
12
2
3
4
5
7
10
11
6
9
1. krik Handvat 2. Jack 3. Aansluiten Plaat 4. Wielen 5. Versnelling Kettingen
6. Besturing / Rem Handvat 7. Laag Versnelling Aandrijfas 8. Medium
Versnelling Aandrijfas
9. Rijden Handvat 10. Mouw 11. Montage Fittingen 12. Montage bouten

- 5 -
COMPONENTEN
Een ×1
B×1
C×1
D×1
E×1
F×2
G×4
H ×1
I ×1
MONTAGE

- 6 -
1. Bij het monteren van een aanhangwagenkrik moet u is het beste
om aan te sluiten naar de sleepvoertuig naar zorg ervoor dat de
aanhanger zeker.

- 7 -
2. Monteer de krik op basis van de getoonde tekening boven.
3. Zorg ervoor bouten en slot moeren stevig vastgedraaid zijn. Controleer
regelmatig om ervoor te zorgen dat bouten en slot noten Zijn stevig vast.
TESTEN VAN DE
MONTAGE:
WAARSCHUWING!
Zorg er altijd voor dat de bediener en omstanders op de hoogte zijn van
de stabiliteit van de laden.
1) Laat de aanhanger geleidelijk zakken tot de krik staat boven de grond
en de aanhanger is volledig ondersteund door Trailer Valet.
OPMERKING: De trailer behouden Door de jock dicht bij de grond
te plaatsen, voorkomt u dat er ernstige schade ontstaat door
onverwachte storingen.
OPMERKING: Als de banden van de Trailer Valet te leeg lijken en niet
meer vast kunnen houden het gewicht, dan moet je het verlagen krik en
verwijder het apparaat om de lucht te controleren druk.
VASTMAKEN BESTUURDER
Optie 1: Handmatige bediening
1) Bevestig de schijf handvat naar de lage of gemiddelde versnelling
aandrijfas.
Optie 2: Gebruik van de boorhouder
WAARSCHUWING!
Als je Zijn gebruik makend van A snoerloos boren, zijn Zeker jouw
batterij pak is volledig opgeladen voor gebruik . Volg de aanbevelingen
van de fabrikant van uw boormachine/schroefmachine.
1) Sluit de boorkop van uw boormachine/schroevendraaier aan op de
boorhouder.
- 8 -

- 9 -
WAARSCHUWING!
2 )
Draai de boor altijd vast aan de boorhouder. De boor kan losraken.
verliezen en oorzaak blessure.
3) Als u een boormachine/schroevendraaier met snoer gebruikt,
controleer dan of netsnoeren en verlengsnoeren koorden zijn zo
geplaatst dat de banden op de Trailer Valet of bewegend
voertuig zal de snoeren niet beschadigen of dat de snoeren kunnen
niet worden gestapt erop wordt gegooid, erover wordt gestruikeld of
op een andere manier wordt blootgesteld aan schade of spanning.
4) Uitlijnen en steek de boorhouder in de lage stand tandwiel aandrijfas.
BEDIENING APPARAAT
WAARSCHUWING!
Houd de boor/schroevendraaier stevig vast tijdens het aandraaien. De
boor zal hebben hoog startkoppel.
1)Wanneer jij bent krijgen klaar naar bedienen de apparaat,maken
Zeker Jij heb er een hand stevig vastgegrepen op de remmen, en de
ander hand gegrepen stevig op de aandrijving hendel.
2) Langzaam til het stuur op handvat totdat de rem is losgekoppeld
En begin draaien.
: Het is belangrijk dat u het apparaat alleen bestuurt wanneer Jij Zijn
draaien En de aanhangwagen is bewegen.Proberen naar draai de
sturen hendel bij A Bij een volledige stop raken de tandwielen niet meer
uitgelijnd .
VERWIJDEREN VAN DE APPARAAT
1) Verwijder de boor/aandrijving hendel.
2) Verlaag de krik tot de Trailer Valet is boven de grond.
3) Maak het slot los moer en Maak de montagefittingen los.

- 10 -

- 11 -
ONDERHOUD
Doen niet overbelasten.
Na gebruik, Alsjeblieft droog voor opslag naar voorkomen roesten
van bouten aantastend gebruik.
Controleer de bouten regelmatig op maak los.
Toepassen multifunctioneel vet naar de ketting door verwijderen de
voorkant omslag van het apparaat.
Controleer de banden op schade. Vervang de band onmiddellijk
indien beschadigd.
Fabrikant: Shanghaimuxinmuyeyou xiangongsi
Adres : Shuangchenglu 803 nong 11 hao 1602A-1609 shi , baoshanqu ,
Sjanghai
200000 CN .
Geïmporteerd naar Australië: IK NIET PTY LTD, 1 ROKEVA STRAAT
EASTWOOD NSW
2122 Australië
Geïmporteerd naar Verenigde Staten : Sanven Technologie BV , Suite 250,
9166 Anaheim Plaats , Rancho Cucamonga , CA 91730
E- CrossStu Besloten vennootschap
Mainz Landstraße .69, 60329 Frankfurt op Voornaamst .
JH RAADPLEGING BEPERKT.
C/ O JH Advies Beperkt Kantoor 147, Centurio Huis ,
Londen Weg , Staines - upon - Thames , Surrey , TW 18
4 AX
UK
REP
EC
REP


- 13 -
Teknisk support och E- garanticertifikat www.vevor.com/support
MANUELL TRAILER UPPHOVSMAN
ANVÄNDARE MANUELL
MODELL : QYC 500- WB
Vi fortsätter att vara engagerade i att ge dig verktyg till konkurrenskraftiga priser.
"Spara hälften", "Halva priset" eller andra liknande uttryck som endast används av oss
representerar en uppskattning av besparingar du kan dra nytta av att köpa vissa verktyg
med oss jämfört med de stora toppmärkena och betyder inte nödvändigtvis att täcka
alla kategorier av verktyg som vi erbjuder. Du påminns vänligen om att verifiera försiktigt
när du gör en beställning hos oss om du faktiskt gör det Sparande
Halv i jämförelse med de främsta varumärkena.

- 1 -
MODELL: QYC500-WB
Have product questions? Need technical support? Please feel free to
contact us:
Technical Support and E-Warranty Certificate
www.vevor.com/support
NEED HELP? CONTACT US!
This is the original instruction, please read all manual instructions
carefully before operating. VEVOR reserves a clear interpretation of our
user manual. The appearance of the product shall be subject to the
product you received. Please forgive us that we won't inform you again if
there are any technology or software updates on our product.
MANUAL TRAILER MOVER

- 2 -
SAFETY INSTRUCTIONS
VARNING: Läs och förstå allt instruktioner . Underlåtenhet att följa
alla instruktioner listade nedan kan bli resultatet på allvar skada.
1.Kontrollera om däcket har tillräckligt med gas innan använda. Om däcket
gas är inte tillräckligt, snälla pumpa upp däcket innan använda.
2.Kontrollera om skruvdelen är lösa, om ja, snälla dra åt den. 3. Gör inte
det överbelastning.
FÖRSIKTIGHET: Läs instruktionerna för säker användning noggrant.
Montering Försiktighetsåtgärder
1. Montera endast enligt dessa instruktioner. Felaktig montering kan skapa
faror.
2. Slitage ANSI-godkända skyddsglasögon och kraftiga arbetshandskar
under montering.
3. Håll monteringsområdet rent och väl upplyst.
4. Håll åskådare borta från området under monteringen .
5. Montera inte när du är trött eller när under påverkan av alkohol, droger
eller medicin.
6.Viktkapacitet och andra produktegenskaper gäller för ordentligt och
färdigmonterad produkt endast.
Använda Försiktighetsåtgärder
FÖR ATT FÖRHINDRA ALLVARLIGA I JURY OCH DÖDEN FRÅN TI
PPING:
1.Sitt inte, stå eller klättra på detta punkt.
2.Denna produkt är inte vid oy. Gör inte det tillåta barn till spela med eller
nära detta punkt.
3.
Lyft inte medan den är lastad.
4.För att förhindra tippning, tryck/dra endast med det medföljande
handtaget. 5. Använd endast på avsett sätt.
6. Inspektera före varje användning. Använd inte det om delar är lös eller
skadad.
7. Efter användning, vänligen torka innan lagring för att undvika rostar av
bultar påverkar använda.

- 3 -
SPARA DESSA INSTRUKTIONER

- 4 -
MODELL OCH PARAMETRAR
Modell
QYC500-WB
Max. Brutto Trailer WT
500 lbs
Montering Typ av fäste
Bolt-On Montering Konsol
Vevtyp
Topp - Vind
Range(Höjden på
mottagningsrör ovan jord)
13-23,2 tum
Hjul
9"
Material
Stål
STRUKTURERA DIAGRAM
<—
1
12
2
3
4
5
7
10
11
6
9
1. Jack Handtag 2. Jack 3. Anslutning Plåt 4. Hjul 5. Redskap Kedjor
6. Styrning / Broms Handtag 7. Låg Redskap Drivaxel 8. Medium Redskap
Drivaxel
9. Kör Handtag 10. Hylsa 11. Montering Beslag 12. Montering bultar

- 5 -
KOMPONENTER
A ×1
B × 1
C x 1
D × 1
E ×1
F × 2
G × 4
H ×1
jag ×1
MONTERING
1. Vid montering av släpvagnsdomkraft är det är bäst att koppla upp
sig till dragfordon till se till att trailern är säkra.

- 6 -
2. Montera domkraften baserat på ritningen som visas ovan.
3. Se till bultar och nylock muttern är ordentligt åtdragna. Kolla
regelbundet att se till att bultar och nylock nötter är säkert tätt.
TESTA ENHETEN:
VARNING!
Se alltid till att operatören och åskådare är medvetna om stabiliteten hos
enheten ladda.
1) Sänk släpvagnen gradvis tills domkraften är ovan jord och släpet är helt
med stöd av Trailer Valet.
NOTERA: Behåller trailern jock nära marken förhindrar att
allvarliga skador uppstår på grund av oväntade fel.
NOTERA: Om däcken på Trailer Valet verkar för tömda d och inte kan
hålla vikten, då måste du sänka kontakta och ta bort enheten för att
kontrollera luften tryck.
ATT FÄSTA FÖRARE
Alternativ 1: Manuell drift
1) Fäst enheten hantera till det låga eller medium växel drivaxel.
Alternativ 2: Använda D rill socket
VARNING!
Om du är använder a sladdlös borra, vara säker din batteri packa är fullt
laddas före användning. Följ tillverkarens rekommendationer från din
borr/drivenhet.
1) Använd chucken på din borr/skruvdragare, anslut till borrhylsan.

- 7 -
VARNING!
2
)
Dra alltid åt borren mot borrhylsan. En läkare kan komma förlora och
orsaka skada.
3) Om du använder en borrmaskin/skruvdragare med sladd,
kontrollera det nätsladdar och förlängning sladdar placeras så att
däcken på Trailer Valet resp rörlig
fordon kommer inte skada sladdarna eller att sladdar kan inte bli
trampad på, snubblat eller på annat sätt utsatt för skador eller stress.
4) Rikta in och sätt in borrhylsan till det låga kugghjulsdrivaxel.
DRIFT ANORDNING
VARNING!
Håll stadigt i borren/skruvdragaren när du kopplar in ha högt initialt
vridmoment.
1) När du är få redo till fungera de enhet, fabrikat säker du har en
handen grep ordentligt om broms, och d andra hand greps fast på
enheten hantera.
2) Långsamt lyft upp styrningen handtag tills bromsen är urkopplad
och start veva.
OBS: Det är viktigt att du bara styr enheten när du är veva och de trailer
är flytta.Försök g till sväng de styrning hantera på a död stopp gör att
växlarna faller ur riktning .
TA BORT DEN ANORDNING
1) Ta bort borren/drivningen hantera.
2) Sänk domkraft till Trailer Valet är ovanför marken.
3) Tappa låset mutter och lossa monteringsbeslagen .

- 8 -
UNDERHÅLL
Do inte överbelasta.
Efter använda, behaga torka före förvaring till undvika rostar av
bultar påverkar använda.
Kontrollera regelbundet bultar för lossa ess.
Ansök multipurpose fett till de kedja av ta bort framsidan täcka o f
enheten.
Inspektera däcken för skador. Byt däck omedelbart om d skadad.
Tillverkare: Shanghaimuxinmuyeyou xiangongsi
Adress : Shuangchenglu 803 nong 11 hao 1602A-1609 shi , baoshanqu ,
shanghai
200 000 CN .
Importerad till AUS: JAG GÖR INTE PTY LTD, 1 ROKEVA STREET
EASTWOOD NSW
2122 Australien
Importerad till USA : Sanven Teknologi Ltd. , Svit 250, 9166 Anaheim Place
, Rancho Cucamonga , CA 91730
E- CrossStu GmbH
Mainz Landstrasse .69, 60329 Frankfurt på Huvudsaklig .
YH KONSULTAT BEGRÄNSAD.
C/ O YH Konsultverksamhet Begränsad Kontor 147,
Centurion House , London Road , Staines - upon -
Thames , Surrey , TW 18 4 AX
UK
REP
EC
REP

