User Manual
Models: CMS-8S, CMS-10S, CMS-11S

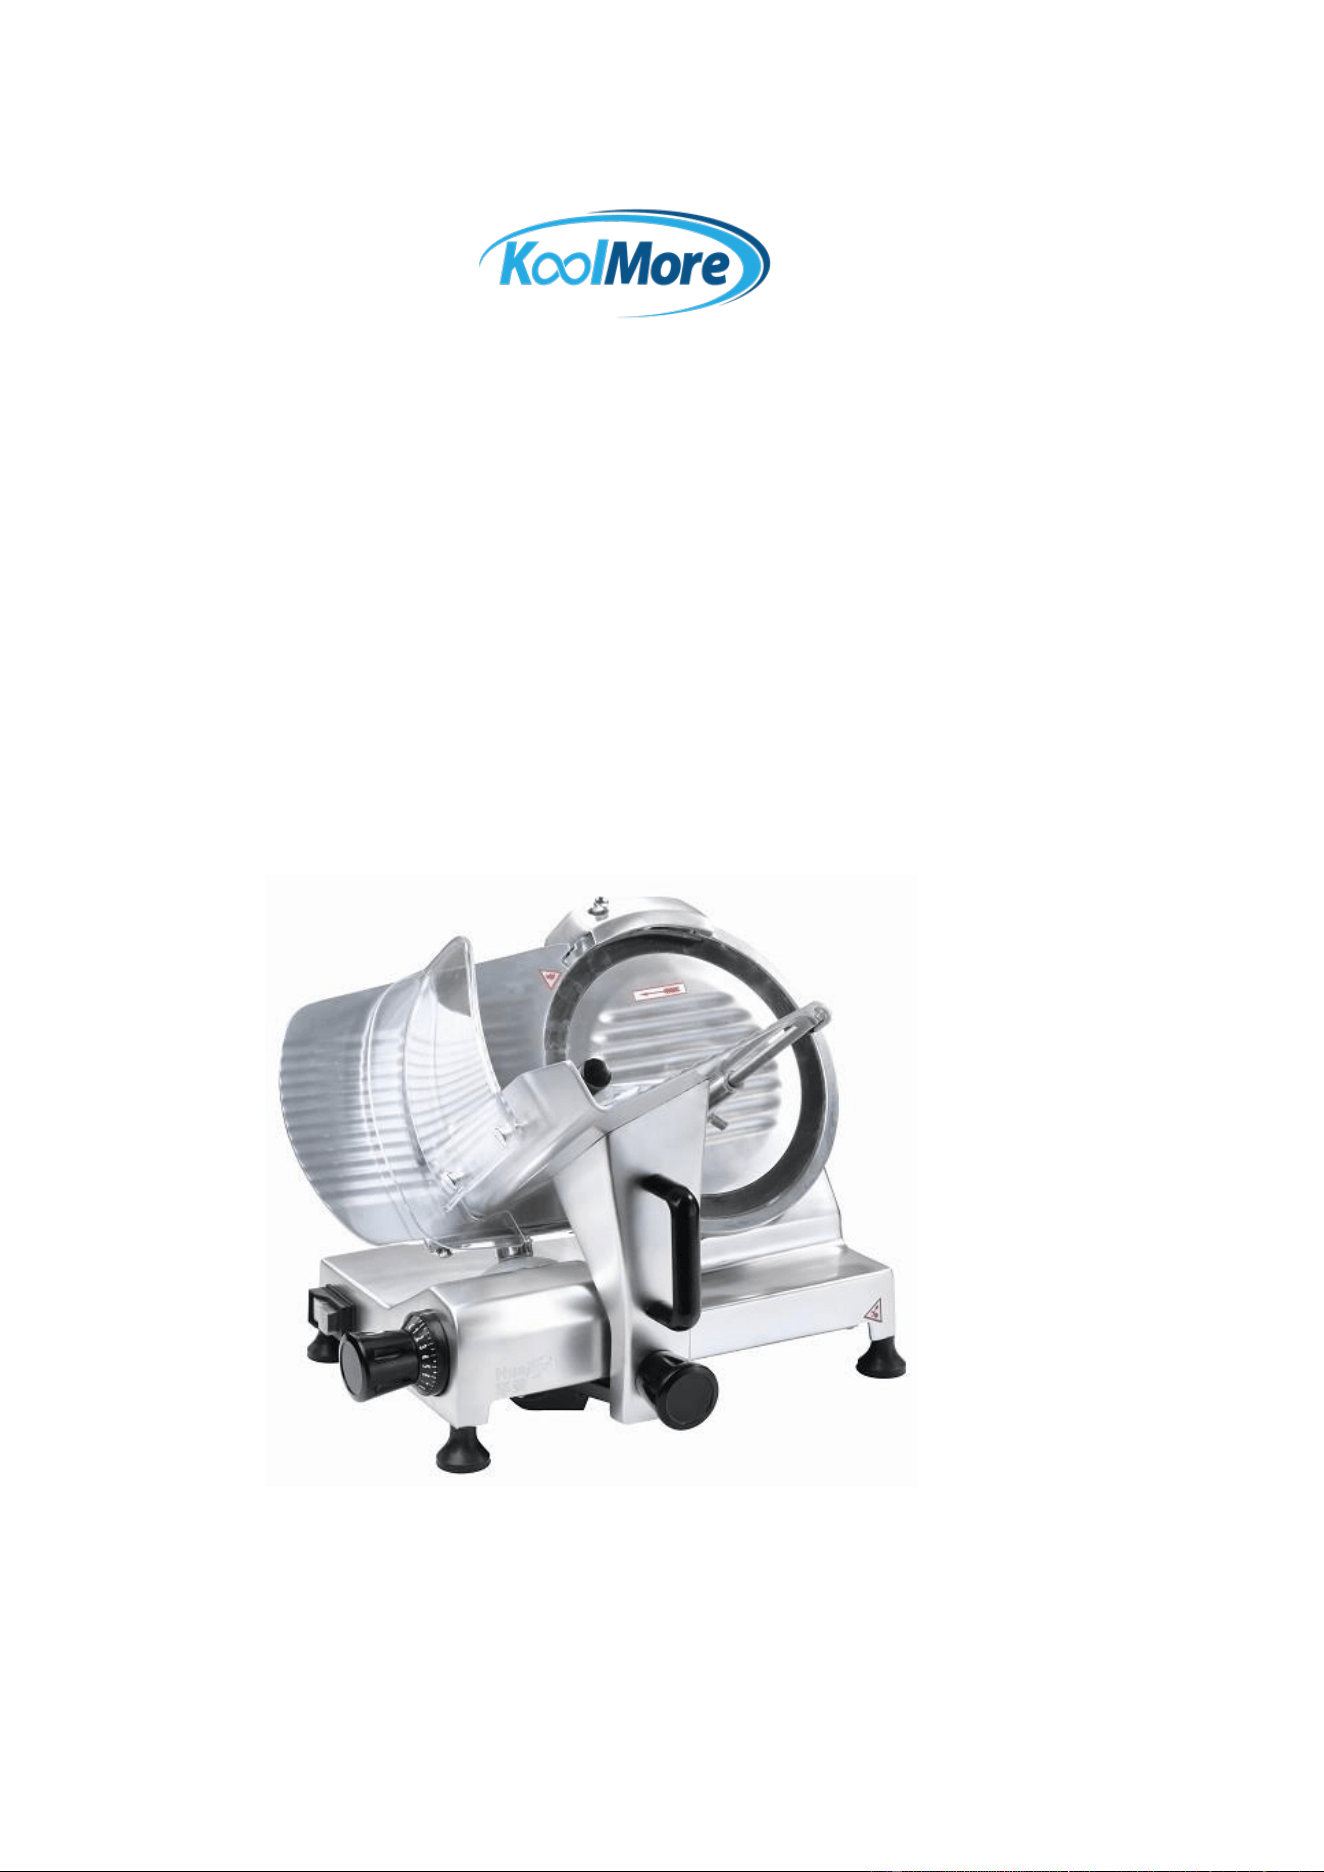
1. Sharpener
2. Blade protection
3. Blade cover Active pusher
4. Product pusher handle
5. Carriage
6. Food pusher knob
7. Switch
8. Size control knob
Ⅳ. Operation
1. The machine should be installed on a work surface that has sufficient stability and
strength to support the weight of the machine.
2. Make sure that the voltage matches the rated voltage of the machine.
3. Adjust the slice thickness by turning the size control knob counterclockwise. And
turn the fixing positioner knob counterclockwise. Make sure the fixing positioner is
making contact with the plate.
4. The meat support platform should be in the start position that is close to the
operator. Lift up the food pusher; place the meat to be sliced on the support
platform against the raw edge. Return the food pusher to its original position now on
top of the meat to be sliced.
5. Switch on the motor and using the handle on the food pusher, push the carriage
back and forth to begin cutting the food
6. .After you are finished cutting, turn off machine and collect the product slices in the
exit area.
Ⅴ. Cleaning:
1. Always turn off and unplug the machine before cleaning, and make sure to turn the
size control knob is in the zero position.
2. Never use any chemical or abrasive products. Do not use a brush or any other type
of instrument, that could damage the components of the slicer
3. Use a damp cloth with hot water and detergent. Make sure to clean the machine
completely every day.
4. Removing the blade cover away from the blade when cleaning, and clean the
product carriage too.
5. Allways wear safety gloves when cleaning the blade
6. Do not touch the edge of the blade;
7. Do not clean the blade in a dishwasher
8. The unit should never be immersed in water
9. After cleaning, wipe the appliance with a dry cloth and allow the unit to dry
completely before reuse
Ⅵ. Maintenance:
1. Blade rustproof:
a. If the operation of the food carriage is not smooth, lay the machine on its side,
clean the slide bar and lubricate with a food safe lubricant,
. Sharp the blade every day to prevent rust.
2. Guide lubrication:
a. Push the carriage to one side, and clean the grease dirt of the guide with dry
cloth;
b. Smear the guide surface with grease by finger, well spread and lubricate;
1

c. It is suitable to lubricate the guide every week.
3. Pusher axle lubrication:
a. Clean the pusher axle with dry cloth first;
b. Put the cooking oil on the both of the axles and pull the pusher up and down to
make the oil well spread and the pusher work well
c. It is suitable to lubricate the axle every day.
4. Sharpener lubrication
a. Clean the sharpener axle before sharpening;
b. Put the cooking oil on the both of the axles;
c. Turn around and slide the axle until the axles work well.
5. Localizing head lubrication:
a. Turn the fixing positioner on the opposite way of watch hands to the max length;
b. Clean the localizing head and put the cooking oil on;
c. The trun the fixing positioner back to the original position;
d. It is suitable to lubricate it every week and do not spread too much oil.
Ⅶ. Blade Sharpening:
1. This operation should be undertaken if the cutting blade becomes dull.
2. Unplug the unit
3. Carefully clean the edge of the blade before sharpening.
4. Loosen the bolt on the built in sharpener
5. Lift up the sharpening assembly and rotate it 180° so that the grinding wheels are in
the correct position and tighten the bolt
6. Lower the sharpening device and tighten the bolt. Make sure that the surface of
stone is nesting closely to the surface of edge. If not, please adjust it. .
7. plug in the machine and switch on
8. Return the sharpening device to its original position by unlocking the safety screw
and rotating by 180°..
\

If you are experiencing any issues with you
unit, please contact us right away.
Phone: 718-756-6342 Email:
support@koolmore.com
Limited Service Warranty
Valid only in the Continental United States
1 Year Parts and Labor Warranty
Koolmore warrants its equipment to be free from defects in material and
workmanship for a period of 1 year. This is the sole and exclusive warranty
made by Koolmore covering your Koolmore brand equipment. A claim under
this warranty must be made within 1 year from the date of purchase of the
equipment. Only the equipment’s original purchaser may make a claim under
this warranty. Koolmore reserves the right to approve or deny the repair or
replacement of any part or repair request. The warranty is not transferable.
What This Warranty Does Not Cover:
Koolmore Supply Inc
will not warrant coverage for component failure or other
damages that arise under the following conditions:
Failure to install and/or use the unit within proper operating conditions specified
by
Installation in non-commercial or residential applications.
Products sold or used outside of the Continental United States.
Any damage that occurs as a result of negligence or improper handling.
Defects and damage due to improper maintenance, wear and tear, misuse, abuse,
vandalism, or Act of God.
Equipment not purchased directly from an authorized dealer •
Equipment that has been altered, modified, or repaired by anyone other than an
authorized service agency
For Warranty Inquiries or Service:
•
Locate the model number (located on the front of the unit, or inside the door
jamb).
Failure to contact Koolmore Supply Inc prior to obtaining equipment service may void your
warranty