Front-Loading Dryer
Owner’s Guide:
Installation and Operation Instructions
BLDV243700SEWG
EN
2960314311_EN/220725.1006
Please read this user manual first!
Dear Customer,
Thank you for prefering a Blomberg product. We hope that your product
which has been manufactured with high quality and technology will give you
the best results. We advise you to read through this manual and the other
accompanying documentation carefully before using your product and keep
it for future reference. If you transfer the product to someone else, give its
manual as well. Pay attention to all details and warnings specified in the user
manual and follow the instructions given therein.
Use this user manual for the model indicated on the cover page.
Read the instructions.
Explanation of symbols
Throughout this user manual the following symbols are used:
C
Important information or useful hints about usage.
A
Warning for hazardous situations with regard to life and property.
B
Warning against electric shock.
Warning against hot surfaces.
Warning against fire hazard.
Packaging materials of the product are manufactured from recyclable
materials in accordance with our National Environment Regulations.
Do not dispose of the packaging wastes with the domestic waste or other
wastes, discard them to the dedicated collection points designated by the local
authorities.

1 Your Dryer 4
2 Important Safety Instructions 5
3 Installation Instructions 9
3.1 Electrical connection ............................. 9
3.2 Grounding Instructions .......................10
3.3 Appropriate installation location ..........11
3.4 Minimum Installation Clearances .........11
3.5 Use on top of a washer ......................11
3.6 Adjusting the feet ................................ 11
3.7 Ventilation duct and connection .........11
3.8 Destroying packaging material ............14
4 Operating Instructions 15
4.1 First Use .............................................15
4.2 Garments suitable for drying ...............15
4.3 Garments unsuitable for drying ...........15
4.4 Preparing clothes to be dried ..............16
4.5 Correct load capacity .........................16
5 Running the product 17
5.1 Control Panel ..................................... 17
5.2 Symbols ............................................. 17
5.3. Preparation of drying machine..........18
5.4 Program selection and consumption
chart.........................................................18
5.5 Auxiliary functions .............................. 19
5.6 Warning indicators .............................21
5.7 Starting the program .......................... 22
5.8 Child Lock .......................................... 22
5.9 Changing the program after it is
started......................................................22
5.10 Cancelling the program ...................23
5.11 End of program ................................23
5.12 Odour feature ..................................23
5.13 HomeWhiz Function ........................23
6 Technical Specifications 25
7 User maintenance and cleaning
instructions 26
7.1 Lint filter ............................................26
7.2 Sensor ..............................................26
8 Troubleshooting 27
9 Warranty Statement 28
TABLE OF CONTENTS
4 / EN
Dryer / User Manual
Overview
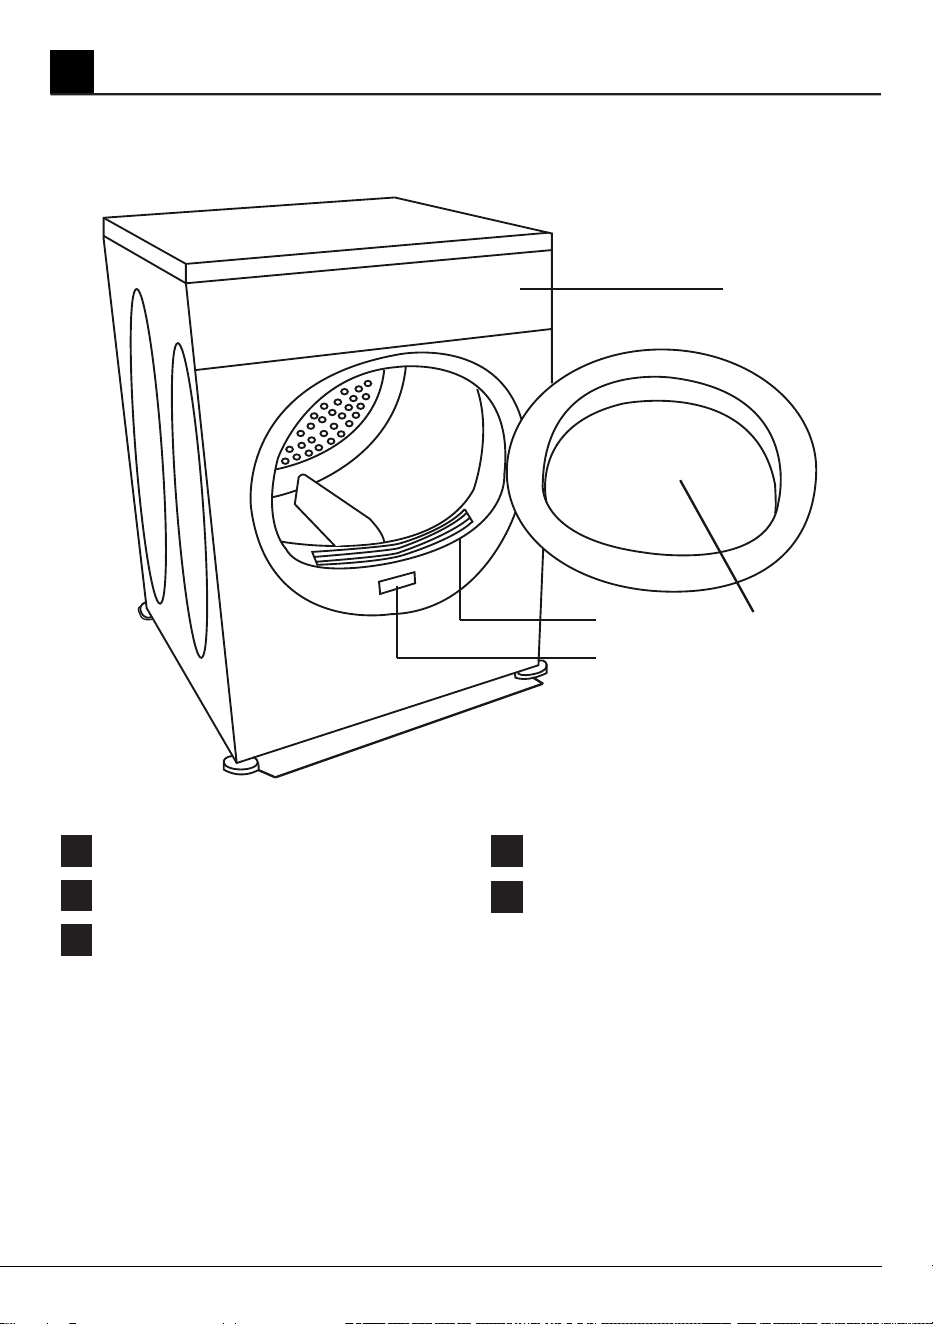
Figure 1
1
Your Dryer
1
2
5
1
2
3
4
5
3
4
Control Panel
Loading Door
Lint Filter
Type label
Adjustable Feet
NOTE: Specifications of this appliance may change without notice to improve the quality of the
product. Drawings in this manual are schematic and may not match your product exactly.
Values stated on the dryer labels or in the documentation accompanying it are obtained in the
laboratory in accordance with relevant standards. Depending on operational and environmental
conditions of the appliance, values may vary.
5 / EN
Dryer / User Manual
A
WARNING : To reduce the risk of fire or electric shock
resulting in serious injury or death when using this
appliance, follow the basic precautions including the
following:
Read all instructions before using the appliance. Failure to
follow these instructions will increase the risk of fire or electric
shock and will void the warranty.
A
WARNING :This product has been designed for home
use only.
The appliance must be operated at temperatures between
+5°C and +35°C. (41°F and +95°F)
The appliance must not be installed behind a lockable door, a
sliding door or a door with the hinges on the opposite side to
that of the tumble dryer.
Do not install or store this appliance where it will be exposed
to weather.
Do not tamper with the controls.
Do not repair or replace any part of the appliance or attempt
any servicing unless specifically recommended in the
user-maintenance instructions or in published user-repair
instructions that you understand and have the skills to carry
out.
Never wash the appliance with water.
Never touch the plug with wet hands.
Never pull from the cable to unplug the dryer.
Do not operate the appliance if the power cord or plug is
damaged.
For malfunctions that cannot be solved by information in the
operating manual: Turn off and unplug the appliance and call
an authorized service provider.
This appliance must be grounded. In the event of malfunction
or breakdown, grounding will reduce the risk of electric shock
by providing a path of least resistance for electric current.
2 Important Safety Instructions

6 / EN
Dryer / User Manual
This appliance is equipped with a cord having an equipment-
grounding conductor and a grounded plug. The plug must
be plugged into an appropriate outlet that is properly installed
and grounded in accordance with all local codes and
ordinances.
B
WARNING : Improper connection of the equipment-
grounding conductor can result in a risk of electric
shock. Check with a qualified electrician or service
representative or personnel if you are in doubt as to
whether the appliance is properly grounded.
Power cord plug must be within easy reach after installation.
To reduce the risk of fire or electric shock, do not use
extension cords, multi-plugs or an adapter to connect the
dryer to electrical mains.
Do not modify the plug provided with the appliance: if it will
not fit the outlet, have a proper outlet installed by a qualified
electrician.
If the power supply cord is damaged, it must be replaced
by the manufacturer, its service agent or similarly qualified
persons in order to avoid an electrical hazard.
The appliance must not be operated unless it is repaired!
Ventilation openings in the base must not be obstructed by
carpets, etc.
Exhaust air must not be discharged into a flue used for
exhausting fumes from appliances burning gas or other fuels.
Adequate ventilation must be provided to avoid the back flow
of gases into the room from appliances burning other fuels,
including open fires.
Do not dry articles that have been previously cleaned in,
washed in, soaked in or spotted with gasoline, dry-cleaning
solvents or other flammable or explosive substances as they
give off vapors that could ignite or explode.
Do not use the tumble dryer if industrial chemicals have been
used for cleaning what you want to dry.
Do not dry unwashed items in the tumble dryer.

7 / EN
Dryer / User Manual
Items such as foam rubber (latex foam), shower caps,
waterproof textiles, rubber-backed articles and clothes or
pillows fitted with foam rubber pads should not be dried in the
tumble dryer.
Do not use fabric softeners or products to eliminate static
unless recommended by the manufacturer of the fabric
softener or product.
does not recommend the use of fabric softening dryer sheets
in our Electric Dryers. The contents of these sheets can clog
the units filters, causing reduced air flow and possible damage
to the heating system. You may use fabric softeners in the
washing machine but not the dryer
The appliance may only be used for the drying of textiles that
are marked accordingly.
Undergarments that contain metal reinforcements should not
be placed in a tumble dryer. Damage to the tumble dryer can
result if any of the metal reinforcement come loose during
drying.
Before loading check all garments for lighters, coins, metal
pieces, needles, etc.
The use of fabric softener sheets is not recommended.
Do not place items exposed to cooking oils in your dryer.
Items contaminated with cooking oils may contribute to a
chemical reaction that could cause a load to catch fire. To
reduce the risk of fire due to contaminated loads, the final
part of a tumble dryer cycle occurs without heat (cool down
period). Avoid stopping a tumble dryer before the end of the
drying cycle unless all items are quickly removed and spread
out so that the heat is dissipated.
A
WARNING : Never stop the tumble dryer before the
end of the drying cycle unless all items are quickly
removed and spread out to dissipate heat.
Do not reach into the appliance if the drum is moving.

8 / EN
Dryer / User Manual
Do not allow children to play on or in the appliance.Close
supervision of children is necessary when the appliance is
used near children.
Keep pets away from the appliance during the drying cycle.
Before the appliance is removed from service or discarded,
remove the door to the drying compartment.
Close the loading door when you leave the area where the
dryer is located.
This appliance is not intended for use by persons (including
children) with reduced physical, sensory or mental capabilities,
or lack of experience and knowledge, unless they are
supervised or have been given instructions concerning the
use of the appliance by a person responsible for their safety.
Clean lint filter before or after each load.
Keep area around the exhaust vent and adjacent surrounding
areas free from the accumulation of lint, dust, and dirt.
The interior of the appliance and exhaust ductwork should be
cleaned periodically by qualified service personnel.
Never use the dryer without the lint filter.
When your dryer is not in use or after the laundry is taken out
following the completion of drying process, turn off by using
the On/Off button. In cases when the On/Off button is in the
On position while the dryer is plugged in, keep the door of
the dryer closed.
For power saving in models with lamps, when your dryer is
not in use, keep the door closed if the On/Off button is in the
On position and the dryer is energized.
Do not use replacement parts that have not been
recommended by the manufacturer (e.g. parts made at home
using a 3D printer).
A
WARNING : This product can expose you to
chemicals including Nickel (Metallic) which is known to
the State of California to cause cancer.
For more information go to www.P65Warnings.ca.gov
Note : Nickel is a component in all stainless steel and
some other metal components.
9 / EN
Dryer / User Manual
WARNING: Failure to follow
these instructions could result
in a risk of fire
•The clothes dryer (“appliance‘) installation
must be performed by a qualified installer.
•Install the appliance according to the
manufacturer’s instructions and local codes.
•Do not install a clothes dryer with flexible
plastic venting materials. If flexible metal (foil
type) duct is installed, it must be of a specific
type identified by the ap pliance manufacturer
as suitable for use with clothes dryers. Flexible
venting materials are known to collapse, be
easily crushed, and trap lint. These conditions
will obstruct the clothes dryer’s airflow and
increase the risk of fire.
SAVE THESE INSTRUCTIONS
3.1 Electrical connection
Connect the appliance to a grounded outlet
protected by a fuse or circuit breaker of
suitable capacity.
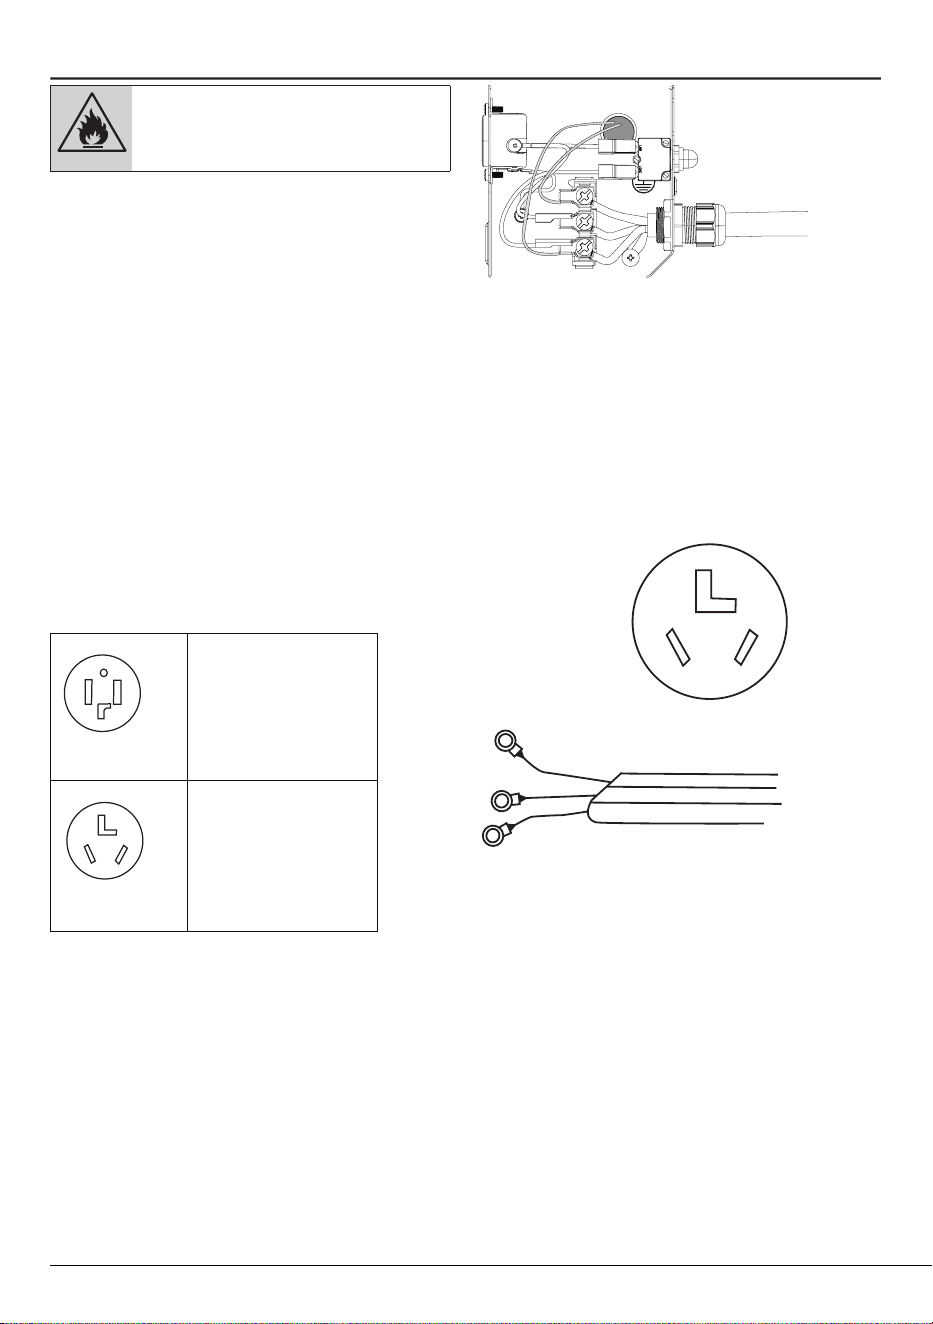
4-wire receptacle
(14 -30R)
3-wire receptacle
(10 -30R)
If yo u have 3-wir e receptacle, like
this , a 3-wire drye r cord must be
purchased locall y.
Dryer shipped with cord to fit this
type 4 -wire receptacle
Power Cabl
e
LL
G
N
3-Wire Electrical Connection
If your receptacle is a 3-wire receptacle as
shown below, you must obtain a 3-wire dryer
cord. A dryer cord can usually be found at
your local hardware supply, electrical supply
or home center. Cord should have closed loop
or upturned end wire terminating connectors.
The cord kit must be marked “For Use with
Clothes Dryers”.
3- wire receptacle
( 10-30R)
Typical 3- Wire Dryer Cord 240V/30 amp
NEMA 10-30 Type SRDT
3 Installation Instructions
10 / EN
Dryer / User Manual
A
If the dryer is installed in a mobile
home, recreational vehicles, new
branch-circuit installations or in
areas where local codes do not
permit grounding through the
neutral conductor, only a 4-wire
power supply cord shall be used.
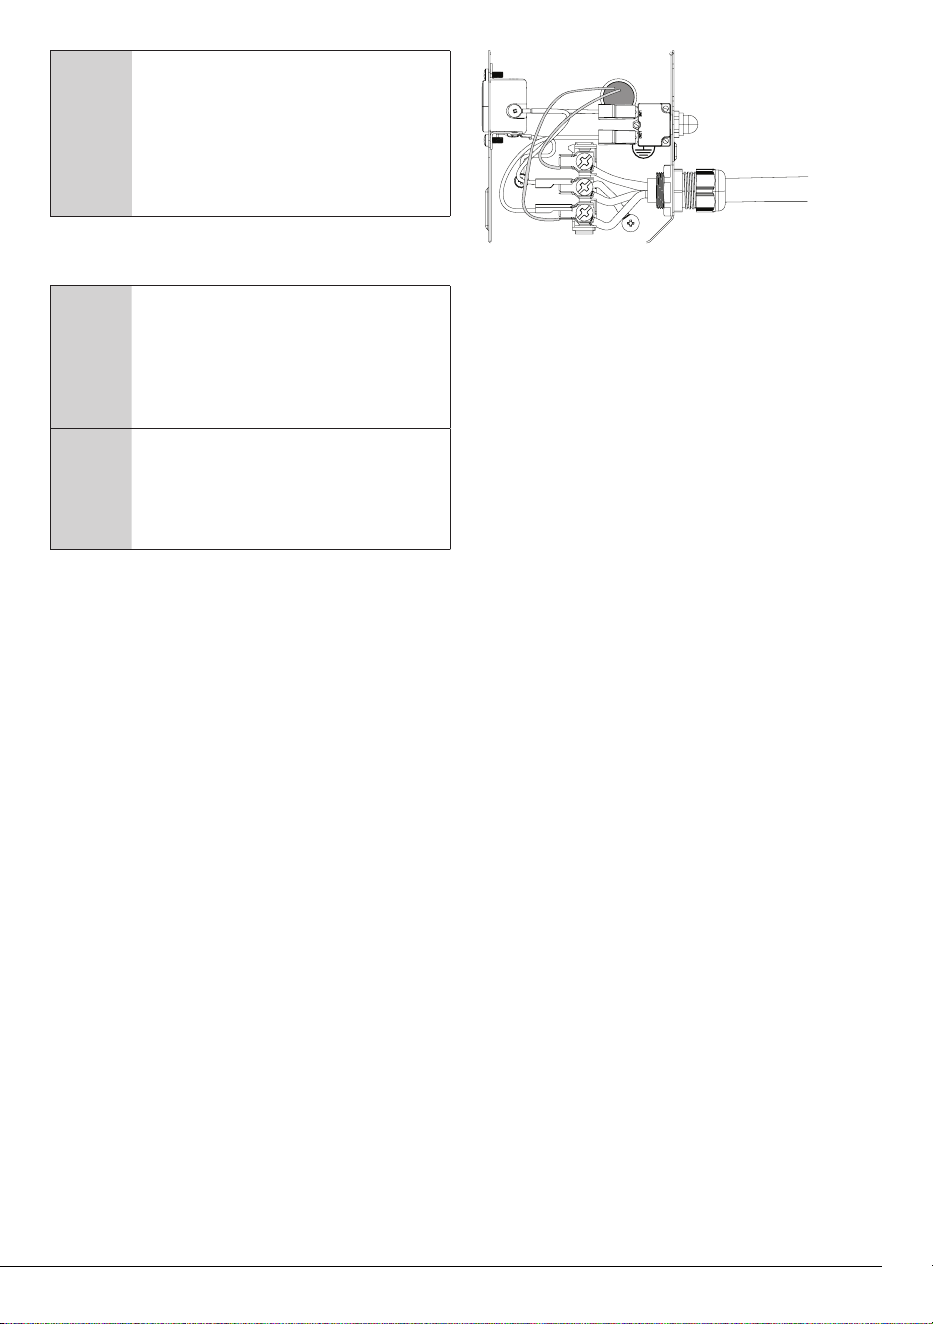
To change the cord:
1. Make sure that the dryer is not plugged into
any power outlet.
B
DO NOT plug end of dryer power
cord into a live receptacle before
connecting dryer power cord
to dryer terminals and closing
junction/splitter box as described
below.
B
DO NOT repair old power supply
cords. Power cord must be
changed only by a qualified
person. There is a risk of electric
shock!
2. Remove the screw from the cover of the
junction box located at the top rear of the
dryer.
3. Remove the red, white and black wire from
the terminal block.
4. Remove the green ground wire from the
ground terminal.
5. Loosen the strain relief clamp holding the
4-wire cable.
6. Thread the 4-wire cable out through the
strain relief clamp.
7. Thread the new 3-wire dryer cord through
the strain relief clamp.
8. Attach the power cord Ground conductor
(the center wire) to the terminal labeled N.
Connect the terminal labeled N and the
Ground terminal labeled G with the supplied
short cable. Tighten the terminals so that they
securely hold the conductors.
9. Attach the two remaining power cord
outer conductors to the 2 terminals labeled
L. Tighten both screws so that the power
conductors are securely held in place.
10. Tighten the strain relief so that the power
cord cannot be moved.
11. Replace the cover on the junction box and
fasten in place.
Power Cabl
e
LL
G
N
The dryer is now ready to be plugged into the
3-wire receptacle of the proper rating.
The receptacle should be located so that the
plug and receptacle will be accessible with the
dryer in its installed position.
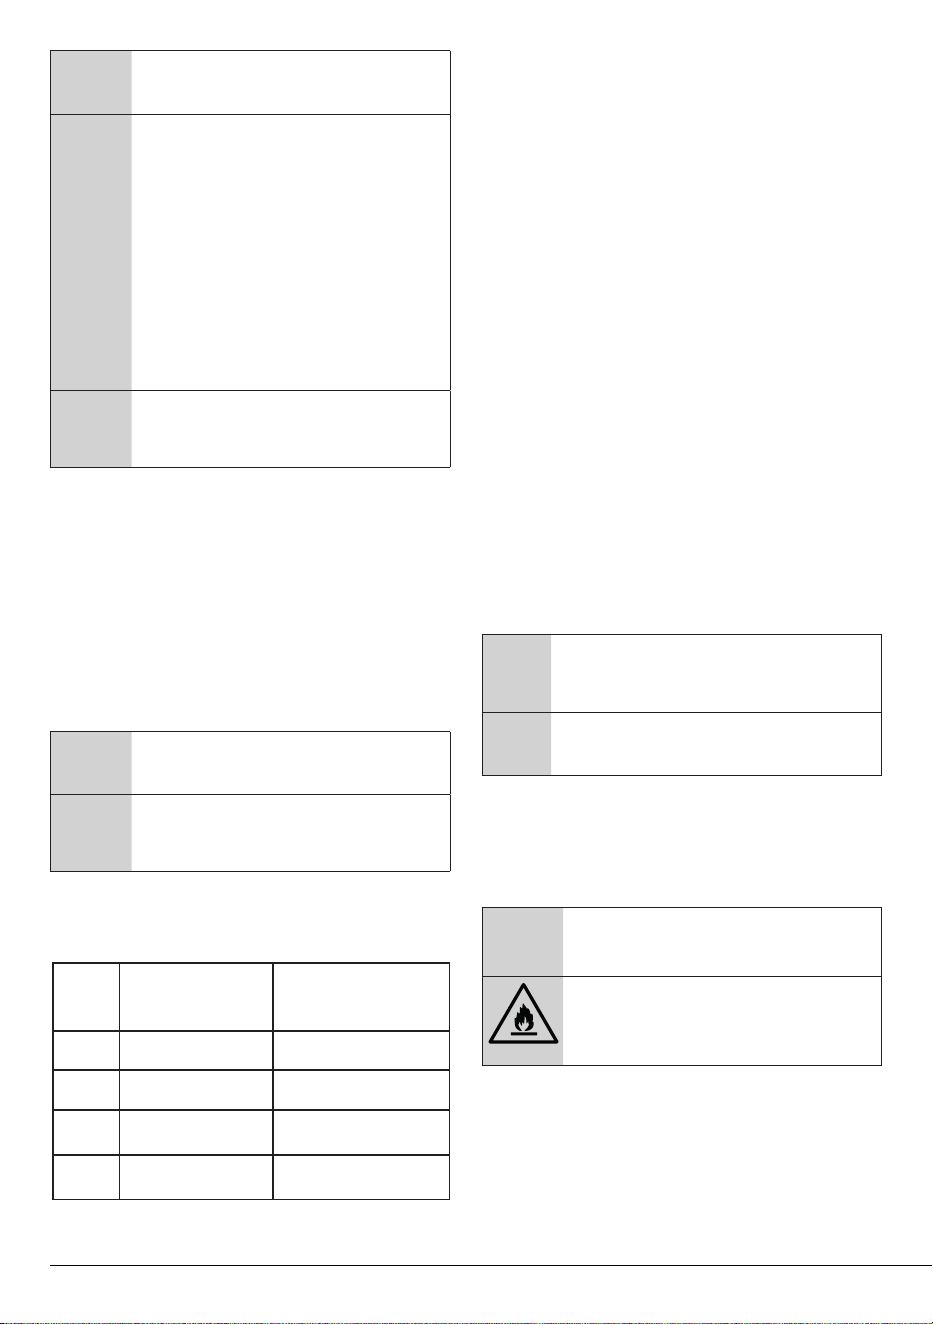
3.2 Grounding Instructions
This appliance must be grounded. In the event
of malfunction or breakdown, grounding will
reduce the risk of electric shock by providing
a path of least resistance for electric current.
This appliance is equipped with a cord having
an equipment-grounding conductor and a
grounding plug. The plug must be plugged
into an appropriate outlet that is properly
installed and grounded in accordance with all
local codes and ordinances.
• Power cord plug must be within easy reach
after installation.
• The voltage and the allowed fuse/breaker
protection are specified in the section
“Technical Specifications”.
• The stated voltage must match your mains
voltage.
• Connection via extension cords or multi-
plugs should not be made.
• The main fuse/breaker and switches must
have a contact distance of minimum 3 mm.
11 / EN
Dryer / User Manual
B
A damaged power cable must be
replaced by a qualified electrician.
B
WARNING – Improper connection
of the equipment-grounding
conductor can result in a risk
of electric shock. Check with a
qualified electrician or service
representative or personnel if you
are in doubt as to whether the
appliance is properly grounded.
Do not modify the plug provided
with the appliance: if it will not fit
the outlet, have a proper outlet
installed by a qualified electrician.
B
The appliance must not be
operated unless it is repaired!
There is the risk of electric shock!
3.3 Appropriate installation
location
•Install your appliance in environments that
have no risk of freezing and are in a stable and
level position.
•Do not place your appliance on a high pile
rug or on similar surfaces.
•Operate your appliance in a well-ventilated,
dust-free environment.
•Do not block the air ducts in front of and
under the dryer.
B
Make sure that your appliance is
not placed on the power cable.
B
Keep appliance at least 0.6”
(1.5 cm) from the edges of other
furniture.
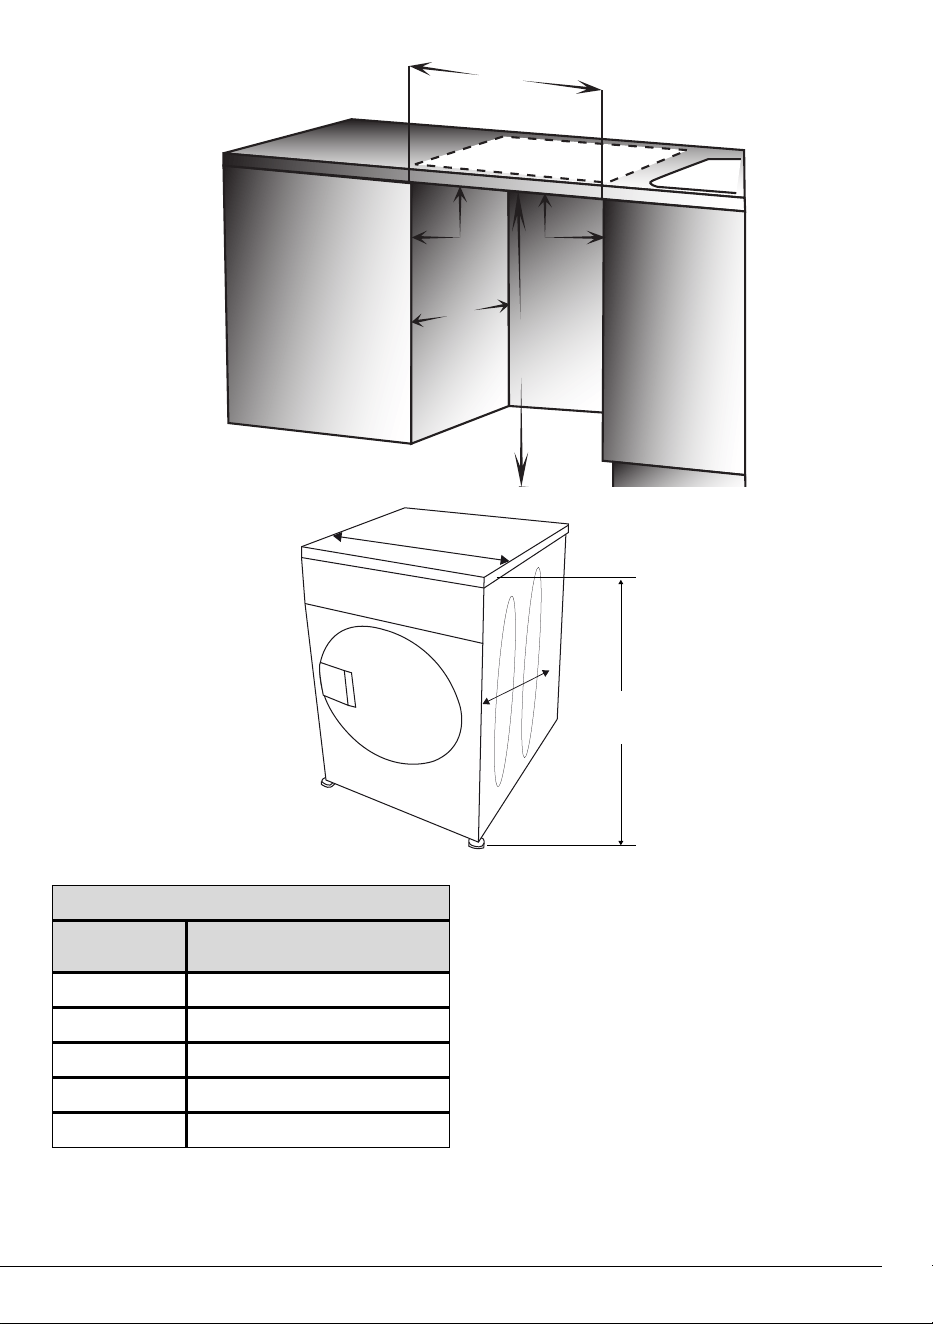
3.4 Minimum Installation
Clearances
Alcove or
Built-under
Closet
Sides 0.16 in. (4 mm) 0.16 in. (4 mm)
Top 1 in. (25 mm) 1 in. (25 mm)
Rear 4 in. (100 mm) 4 in. (100 mm)
Front 0.20 in. (5 mm) 0.20 in. (5 mm)
Ventilation Requirements
Closet door must have 2 openings, one
located 3.2 inches (8 cm) from bottom of door
having a minimum area of 16 sq. inches (103
cm2) and the other one located 3 inches (7.5
cm) from top of door having a minimum area
of 46 sq. inches (294 cm2).
3.5 Use on top of a washer
•A stacking-kit (Part no: 297 954 0100)
should be used between the washer and dryer
for use on top of a washer. The stacking-kit
should be installed by the Authorized Service
provider.
•Place the appliance on a solid floor. If it
is to be placed on top of a washer, the
approximate weight together may reach 397
lbs (180 kg) when they are full. Therefore,
the floor must be capable of carrying the load
placed on it!
3.6 Adjusting the feet
In order to ensure that your appliance
operates almost silently and vibration-free,
it must stand level and balanced on its feet.
The all feet of the appliance can be adjusted.
Balance the appliance by adjusting the feet.
C
Do not use any tools to loosen the
adjustable feet. Otherwise, they may
be damaged.
C
Never unscrew the adjustable feet
from their housings.
3.7 Ventilation duct and
connection
Ventilation duct ensures exhaust of air from
inside the appliance.
The vented dryer has 1 air outlet.
A
Only rigid or flexible metal duct
should be used for exhausting.
Risk of Fire. Do not install a
booster fan in the exhaust duct.
• In Canada, the diameter of the duct to be
used should be 4” (102 mm). In United States,
the regulation for the required exhaust duct
diameter must be followed.
Maximum duct length is given in the table
below:
12 / EN
Dryer / User Manual
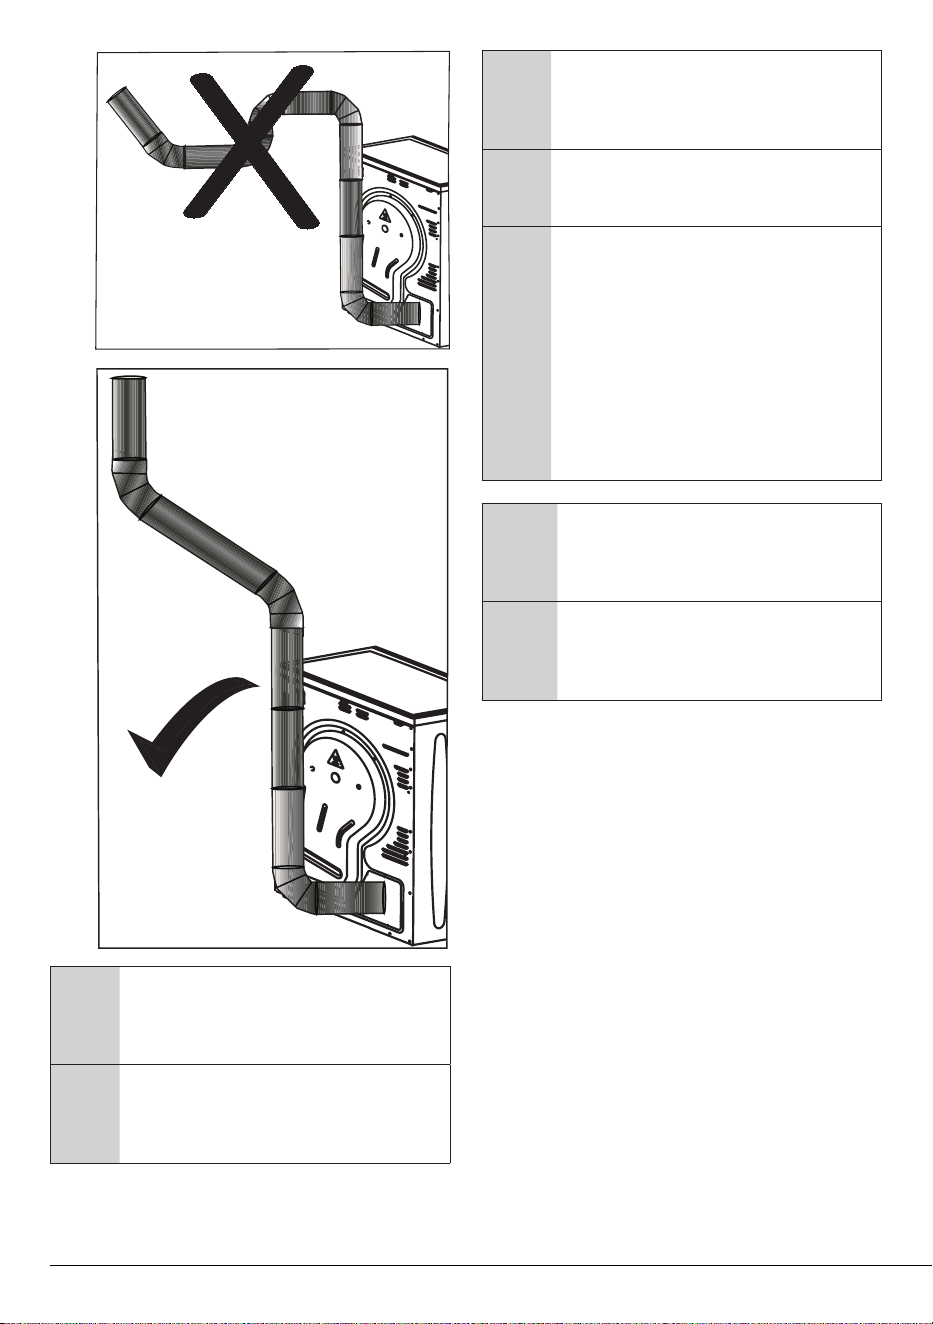
To connect a ventilation duct;
1.Connect the air outlet metal duct to the
spacer by turning it counter-clockwise.
2.Make the duct passages as shown in the
illustration below.
Metal rigid duct
Number of
Elbows
Length
0 92ft (28.0m)
1 82ft (25.0m)
2 72ft (21.9m)
3 62ft (18.9m)
4 52ft (15.8m)
Air Flow : 120 CFM (without duct connection)
33 ¾"
(856,5 mm)
23
(595 m m)
22
(58 3 mm )
7
16
"
/
15
/
16
"
90
0
90
0
36.14
(918 mm)
min.
23.7
603 mm
min.
24.6
(625 mm)
min.
”
”
”
13 / EN
Dryer / User Manual
C
Exhaust of humid air from the dryer
into the room is to be avoided. It
may damage the walls and furniture
in the room.
C
The ventilation duct can be routed
outdoors via a window or it can
be connected to the air outlet in a
bathroom.
C
Air outlet duct must be extended
directly outdoors. There must be
a limited number of elbows to not
hinder air flow.
C
To prevent water accumulation in
the duct, make sure it is not folded
on the floor.
C
In Canada only those foil-type
flexible ducts, if any, specificially
identified for use with the appliance
by the manufacturer shallbe used.
In the United States, only those foil-
type flexible ducts, if any, specifically
identified for use with the appliance
by the manufacturer and that
comply with the Outline for Clothes
Dryer Transition Duct, Subject
2158A, shall be used.
A
The appliance should not be
vented into a chimney, a wall, a
ceiling, an attic, a crawl space or a
concealed space of a building.
A
Do not operate the appliance at
the same time with heaters such
as a coal or gas stove. Airflow may
cause the chimney to flare up.

14 / EN
Dryer / User Manual
C
Care must be taken not to pinch or
bend the ducts.
C
The end of the hose should not be
bent, it should not be stepped on
and it must not be folded between
the drain and the dryer.
C
The total length of flexible metal
duct shall not exceed 7.8 foot
(2.4 m).
C
The duct shall not be assembled
with screws or other fastening
means that extend inside the duct
to catch lint.
A
The appliance should not be
vented into a chimney, a wall, a
ceiling, an attic, a crawl space or a
concealed space of a building.
3.8 Destroying packaging
material
A
Packaging material can be
dangerous to children. Keep the
packaging materials out of the
reach of children or dispose of
them accordingly.
Do not dispose of them together with normal
domestic waste.
Packaging materials of your appliance are
manufactured from recyclable materials.
15 / EN
Dryer / User Manual
A
WARNING: To reduce the risk of fire, electric shock, or personal injury,
read the 2. IMPORTANT SAFETY INSTRUCTIONS before operating this
appliance.
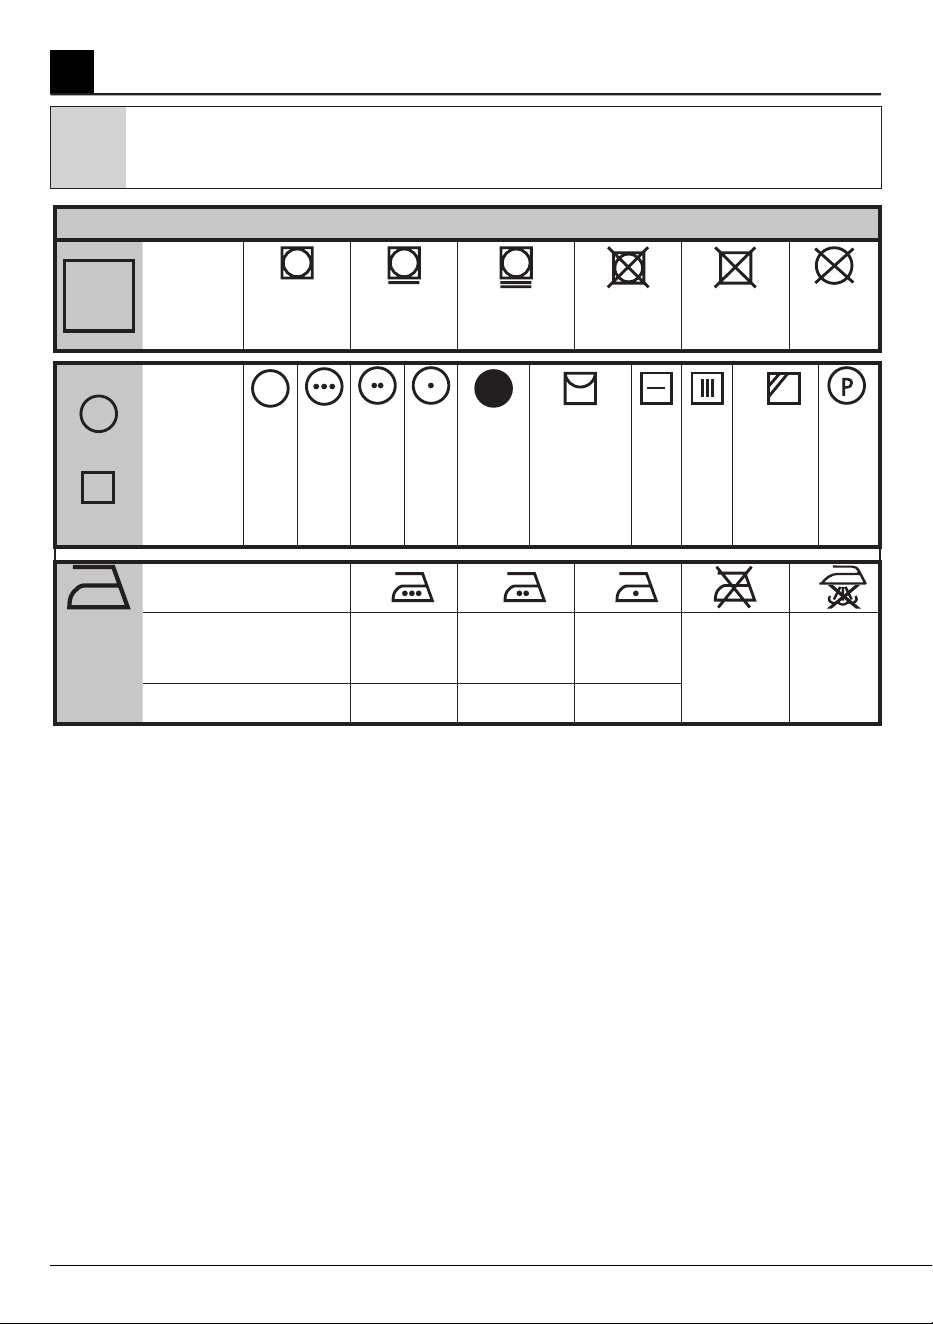
4 Operating Instructions
Drying
Settings
At any temperature
At high temperature
At medium
temperature
At low temperature
Without heating
Hang to dry
Lay to dry
Hang wet to dry
Lay in shadow
to dry
Dry-cleanable
Iron -
IRON
Dry or Steam
Iron at high
temperature
Iron at medium
temperature
Iron at low
temperature
Do not iron
Iron without
steam
Maximum temperature
200
0
C
392
0
F
150
0
C
302
0
F
110
0
C
230
0
F
LAUNDRY DRYING SYMBOLS
Drying
Symbols
Suitable for
dryer
No Iron
Sensitive /
Delicate dry
Do not dry
with dryer
Do not dry
Do not dry-
clean
4.1 First Use
•When operating your dryer for the first time
check inside the drum for any foreign objects.
•Partly load the drum with wet clothes and let
the dryer run for approximately 15 minutes.
This operation will clean the drum before
loading garments.
•You may smell an unpleasant odor and
excessive fiber/lint may accumulate during the
first drying cycle.
4.2 Garments suitable for
drying
Always follow the advice on garment labels.
Dry only laundry having a label stating that
they are suitable for tumble-drying.
4.3 Garments unsuitable for
drying
•Items with metal attachments like, belt
buckles and metal buttons can damage your
dryer.
•Do not dry items like woolens, silk garments
and nylon stockings, delicate embroidered
fabrics, garments with metal accessories and
items like sleeping bags in the dryer.
•Garments made of delicate and valuable
fabrics as well as lace curtains can be
permanently wrinkled. Do not dry these in your
dryer!
•Do not dry items made of hermetic fibers
such as pillows and quilts in the dryer.
•Garments made of foam or rubber may
deform.
•Do not dry clothes containing rubber in the
dryer.
•Do not dry clothes exposed to petroleum, oil,
combustible or explosive agents in the dryer
even if they are washed beforehand.
•Overly wet laundry or laundry with dripping
water must not be put into the dryer.
16 / EN
Dryer / User Manual
4.4 Preparing clothes to be
dried
•All laundry must be spun at the highest
possible spin speed the washer allows for the
textile type.
•Laundry may be tangled after washing.
Separate laundry before placing them into
your dryer.
•Sort laundry according to their types and
thicknesses. Dry similar types of laundry
together.
4.5 Correct load capacity
C
Please consult the information in
the “Program Selection” section.
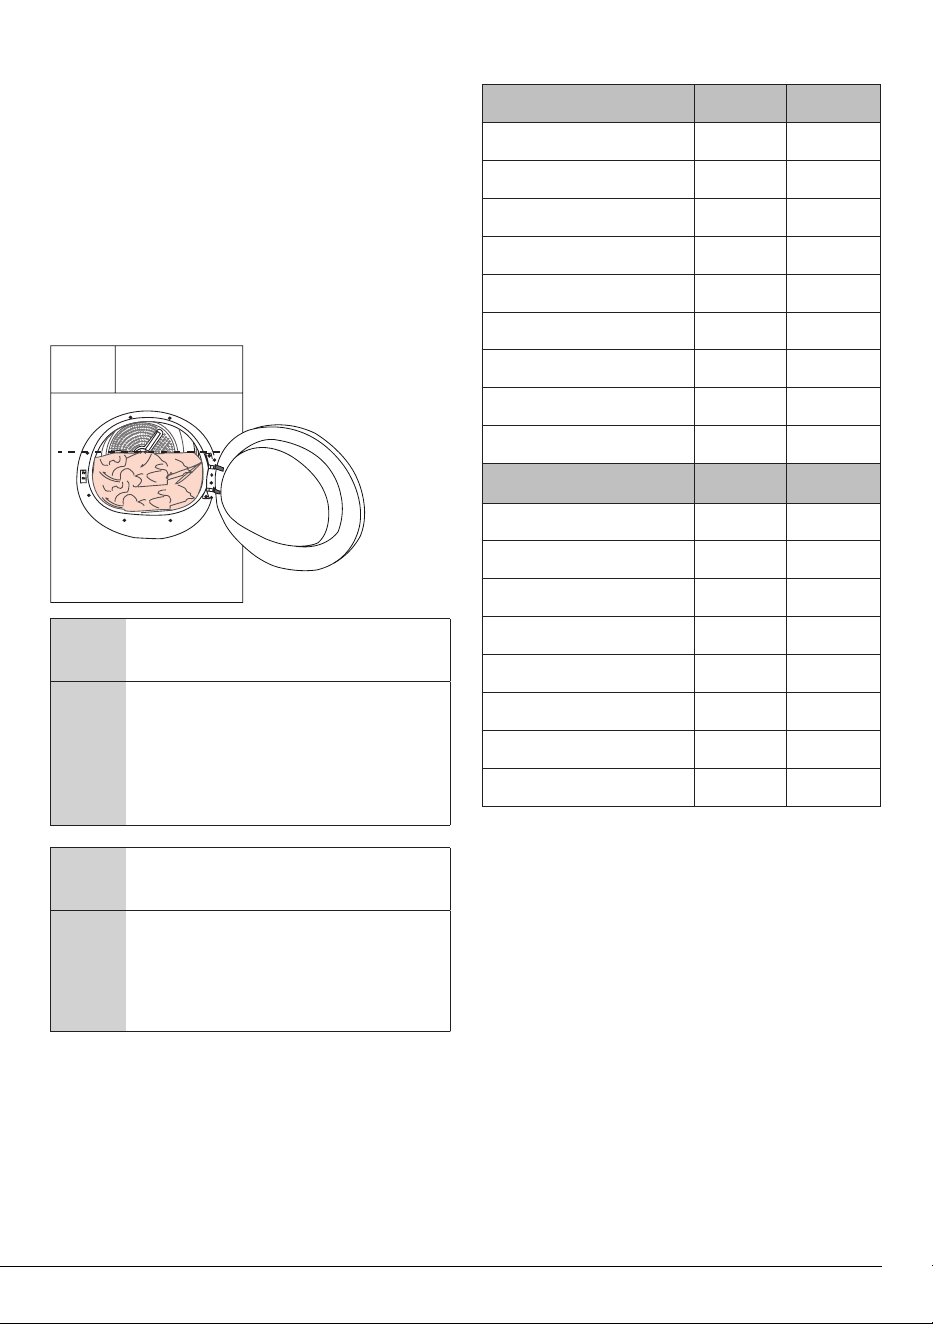
A
Adding laundry to the dryer over
the level shown in the figure is not
recommended. Drying performance
will be reduced when the dryer is
overloaded. Doing so may damage
your dryer and your clothes.
C
Place garments into the drum
loosely so they won’t get tangled.
C
Large items (e.g. bed sheets, quilt
covers, large tablecloths) may
bunch-up. Stop the dryer 1 or 2
times during drying process to
separate any bunched-up laundry.
The following weights are given as examples.
Home articles Weight (g)* Weight (lb)*
Cotton quit covers (double) 1500 3 ¼
Cotton quit covers (single) 1000 2 ¼
Bed sheets (double) 500 1 1/8
Bed sheets (single) 350 ¾
Large tablecloths 700 1 ½
Small tablecloths 250 ½
Tea napkins 100 ¼
Bath towels 700 1 ½
Hand towels 350 ¾
Garments
Weight (g)* Weight (lb)*
Blouses 150 3/8
Cotton shirts 300 5/8
Shirts 200 ½
Cotton dresses 500 1 1/8
Dresses 350 ¾
Jeans 700 1 ½
Handkerchiefs (10 pieces) 100 ¼
T-Shirts 125 ¼
*Dry laundry weight before washing.
Approximate weights of average home laundry
type.
17 / EN
Dryer / User Manual
5 Running the product
1. On/Off/Program Selection button.
2. Start / Stand-by button.
3. Remote control selection button.
4. End time selection button.
5. Time program selection button.
5.1 Control Panel
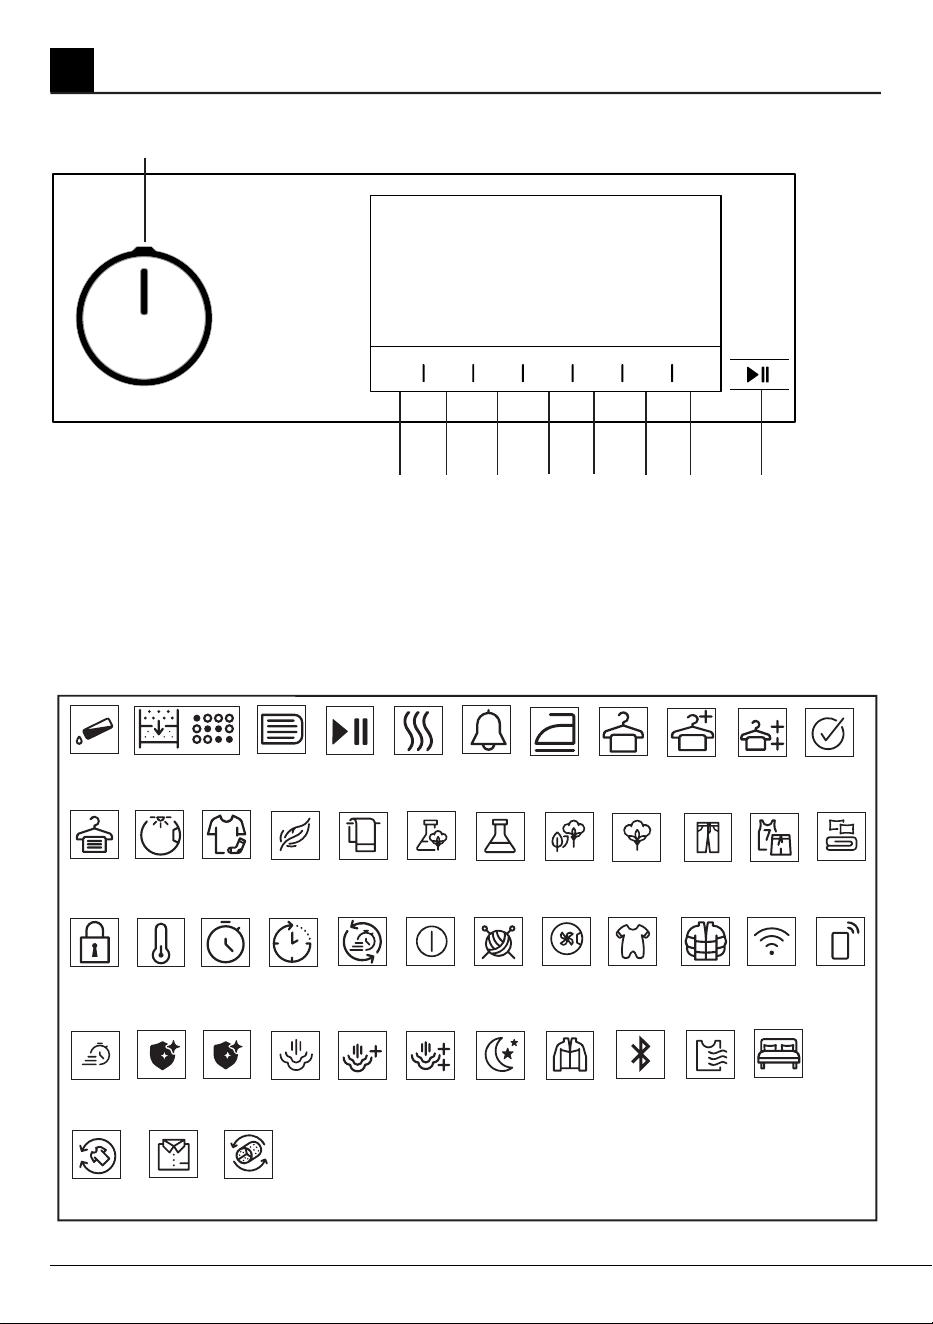
5.2 Symbols
1
4
5
6
3789 2
6. Low temperature selection button.
7. Audible warning and child lock selection
button.
8. Anti Creasing selection button.
9. Dryness level selection button.
Filter
Cleaning
Water tank
Filter drawer /
Heat exchanger
cleaning
Start
pause
cancel
Iron Dry
Drying Buzzer Cupboard
Dry
Cupboard
Dry +
Extra dry End
Anti-
creasing
Child-proof
lock
Low
temperature
TimeDry Ending In RapiDry
Drum
Light
Dryness
Level
EasyCare
Delicates
SyntheticsTowels Mix Cottons
Eco
Cottons Jeans Sport
Duvet/
DownWear
Shirts
Express Hygienic
Drying
Hygienic
Refresh
Steam Steam
Level 1
Steam
Level 2
On / Off Wool Protect
Night
Freshen
Up
Outdoor
Hygiene
(Baby Protect+)
Downwear Wifi
Remote
Control
Bluetooth Gentle
Dry
Reverse
Drum
Bedding
18 / EN
Dryer / User Manual
5.3. Preparation of drying machine
• Plug the drying machine.
• Open the loading door.
• Place the laundry to the drying machine
without jamming them.
• Push and close the loading door.
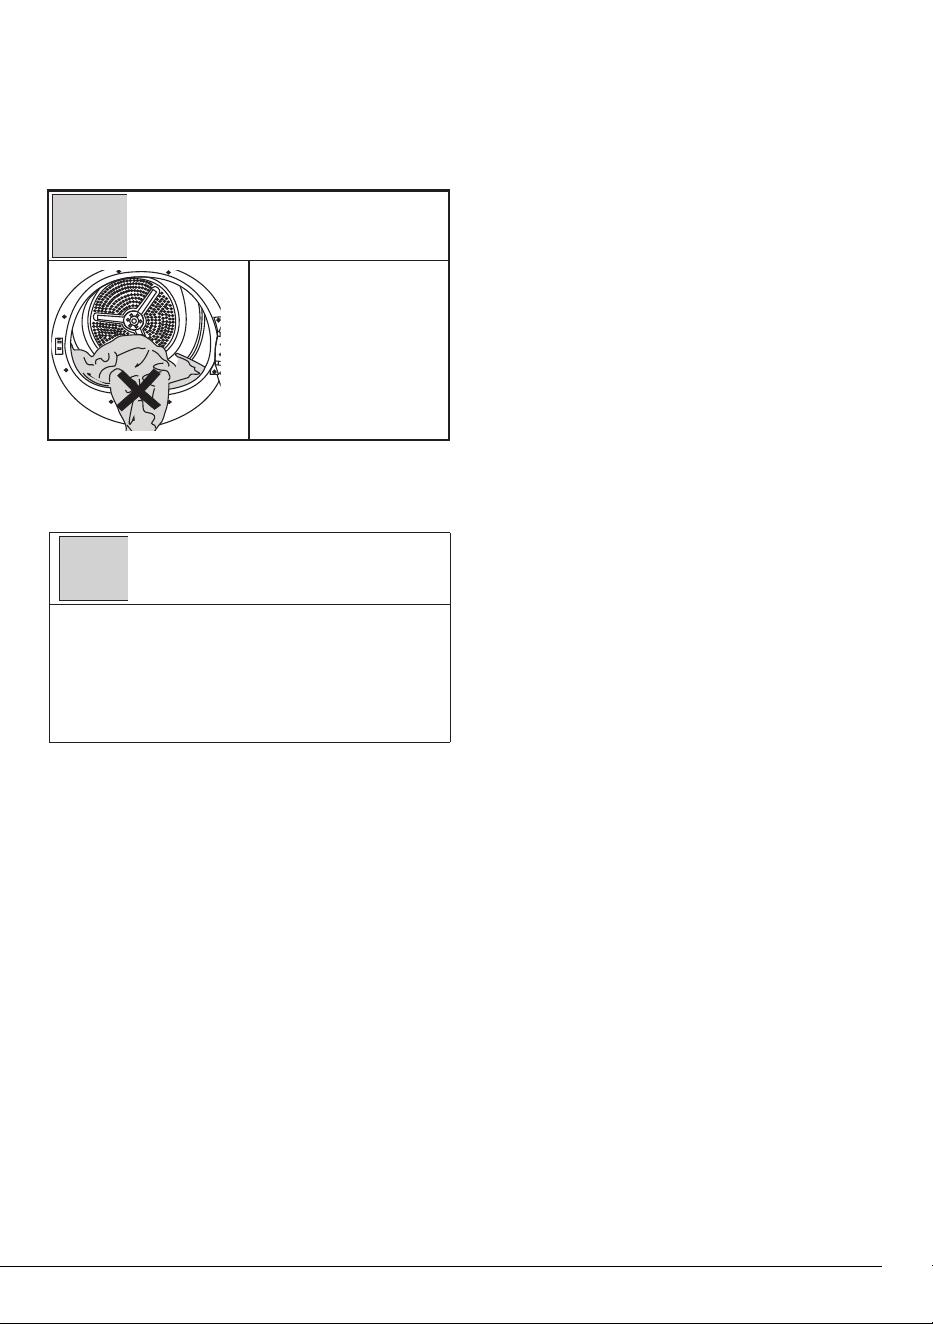
A
WARNING !
• Ensure that no
laundry is jammed
to the loading
door.
• Select the desired program by using
On/Off/Program Selection button, the
machine will turn on.
C
NOTE!
• Selecting the program with the On/Off/
Program Selection button does not mean
that the program started. Press Start /
Stand-by button to start the program.
5.4 Program selection and
consumption chart
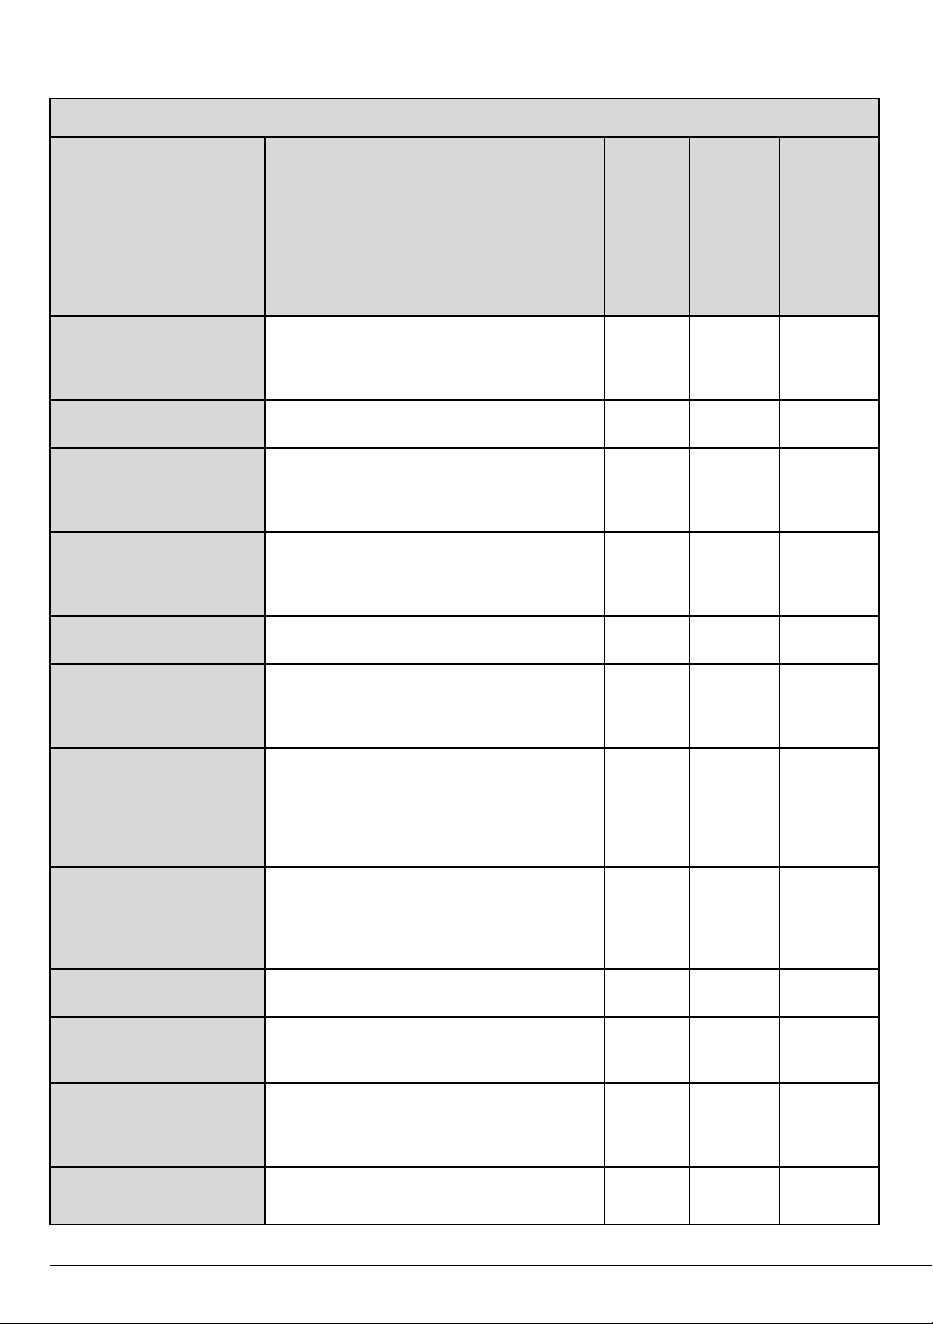
19 / EN
Dryer / User Manual
5.5 Auxiliary functions
EN
Programmes Programme Description
Capacity (kg)
Spin speed in washing
machine (rpm)
Drying Time (minutes)
Cottons
You can dry your heat-resistant cotton textiles
with this programme. A drying setting suitable for
the thickness of the products to be dried and the
desired level of dryness should be selected.
8 1000 165
Cottons Eco
It dries single layer, casual cotton textiles in the
most economical way.
8 1000 150
Sports Wear
Use it to dry your clothes made of synthetics,
cotton or mixed fabrics or waterproof products
such as functional jacket, raincoat etc. Turn them
inside out prior to drying.
2 1000 75
Mixed Fabric
Use this programme to dry non-pigmenting
synthetic and cotton laundry items together.
Sports and fitness clothes may be dried with this
program.
4 1000 90
Towel
Drying towels such as kitchen towel, bath towel
and hand towel.
5 1000 105
Delicates
You may dry your delicate laundry or laundry
with hand wash symbol (silk blouses, thin
underwear, etc.) at low temperature in this
program.
2 1200 40
Timed Dry
You may select from time programmes
between 10 and 160 minutes to achieve the
desired drying level at low temperature. In this
programme, tumble drier’s operation lasts for
the set time independently from the dryness of
laundry.
- - -
Sanitize
It is the programme that you can dry your
washed products you want to provide with extra
hygiene (baby clothes, underwear, towels, etc.).
It provides high hygiene for your textiles via heat
effect.
5 800 125
Jeans
You may dry denim pants, skirts, shirts or jackets
in this program.
4 1200 85
Quick Dry
You can use this program to dry your cotton
laundry that you have spun at high speeds in
your washing machine.
0,5 1200 45
Air Fluff
It only ventilates for 10-160 minutes without
giving hot air. You can ventilate the cotton and
linen clothes that have been enclosed for a long
time with this program to remove their odour.
- - 10
Shirts
It dries the shirts in a more sensitive manner, and
causes less creasing and easier ironing.
1,5 1200 30
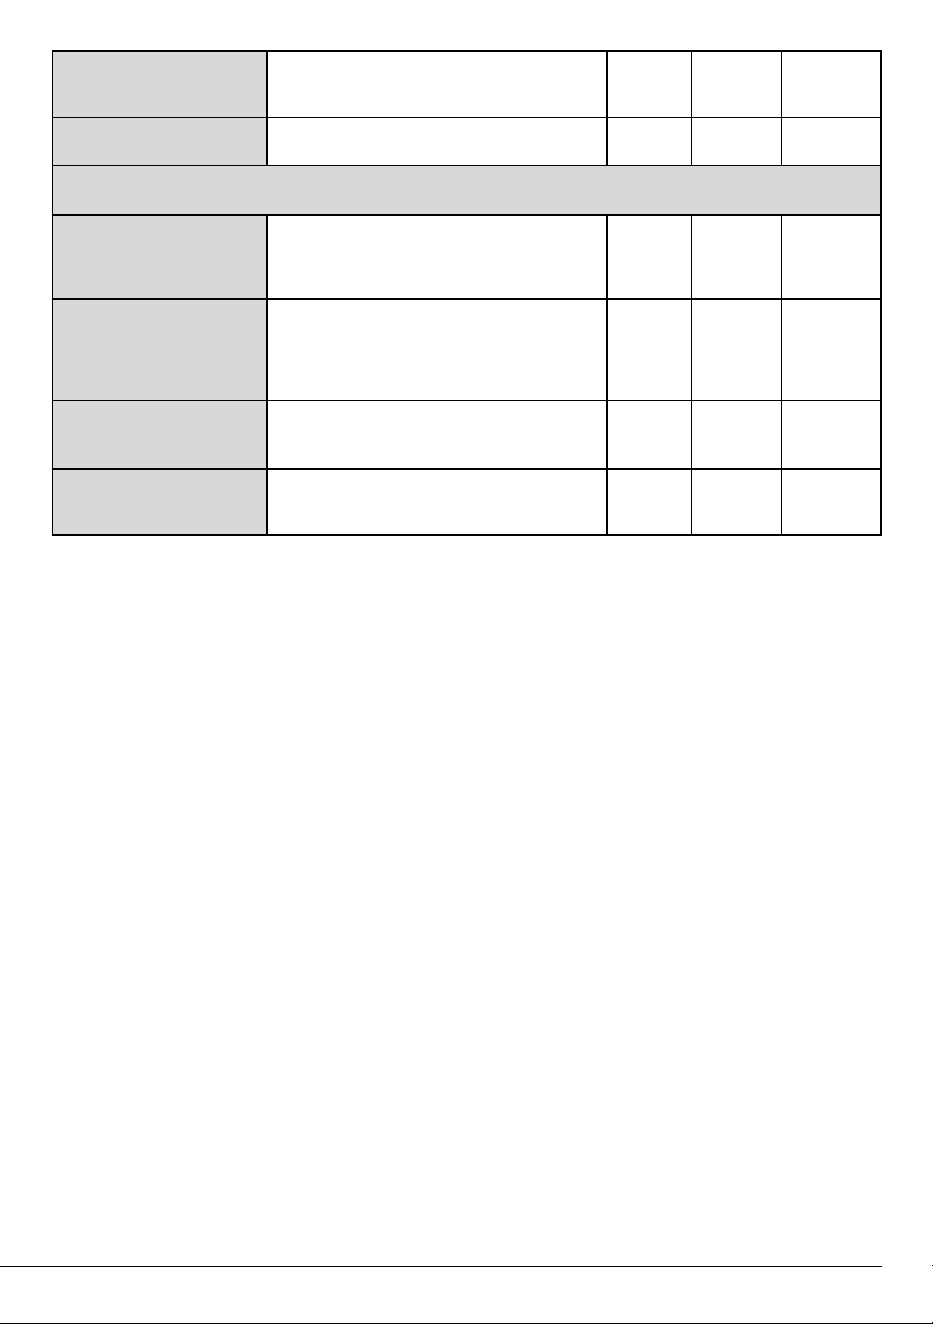
20 / EN
Dryer / User Manual
Shirts Quick
Use this program to have 2 shirts ready for
ironing.
0,5 1200 15
Bedding
Dry 1 cotton or synthetic duvet cover set by
closing the button / zipper.
- 800 55
Download Cycle
Freshen up
It only ventilates for 10-160 minutes without
giving hot air. You can ventilate the cotton and
linen clothes that have been enclosed for a long
time with this program to remove their odour.
- - 10
Wool Refresh
Use this programme to ventilate and soften
the woolen laundry that can be washed in the
washing machine. Do not use to dry the laundry
completely. Take out and ventilate the laundry
immediately after the programme is over.
- 800 20
Underwear
It provides hygienic drying for your underwear via
high temperature.
2 1000 95
Daily
You can dry both cotton and synthetic laundry
with this programme.Sports and fitness clothes
may be dried with this program.
4 1000 85
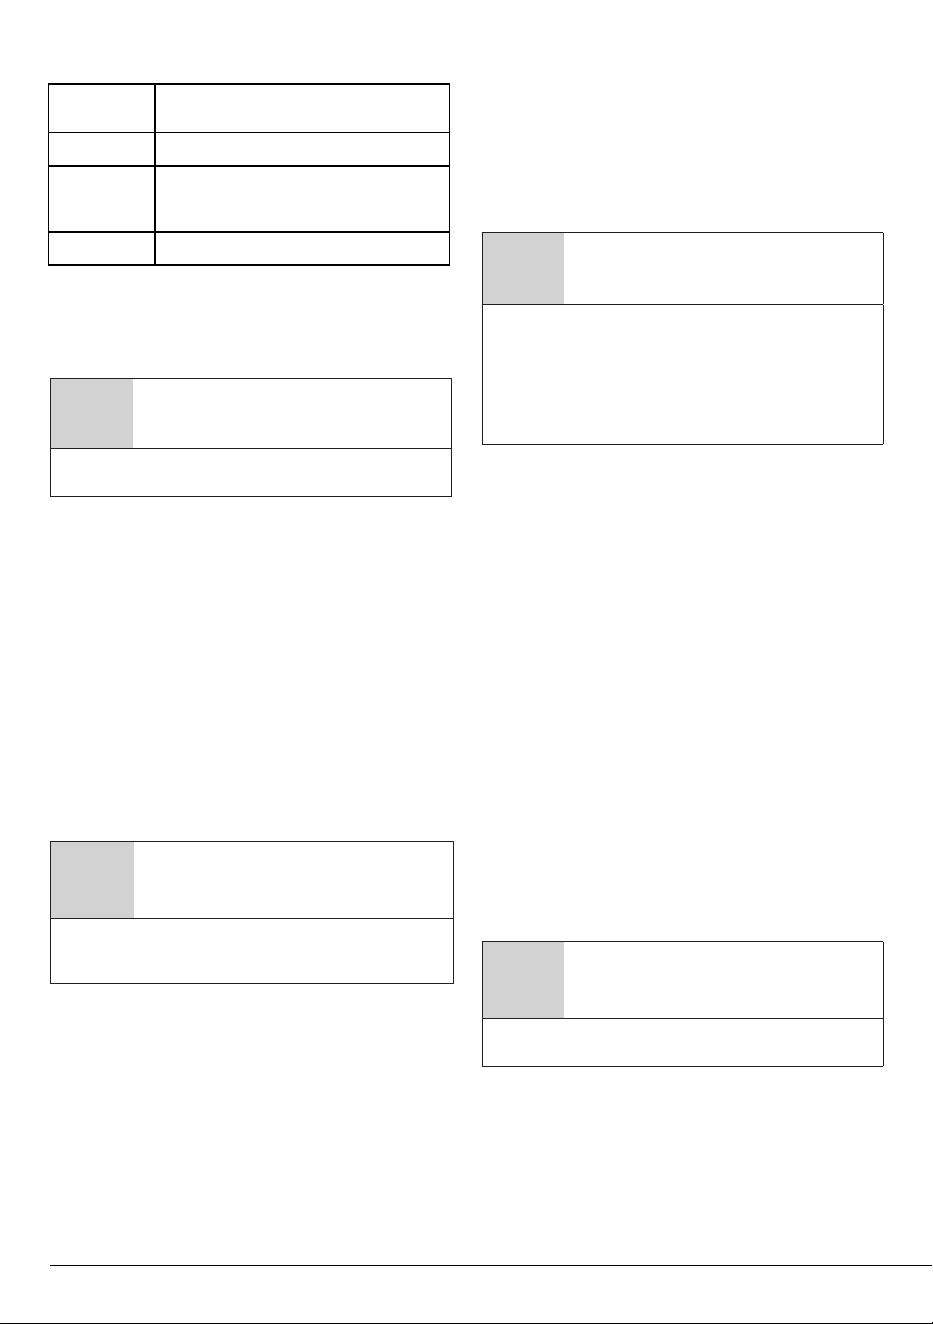
21 / EN
Dryer / User Manual
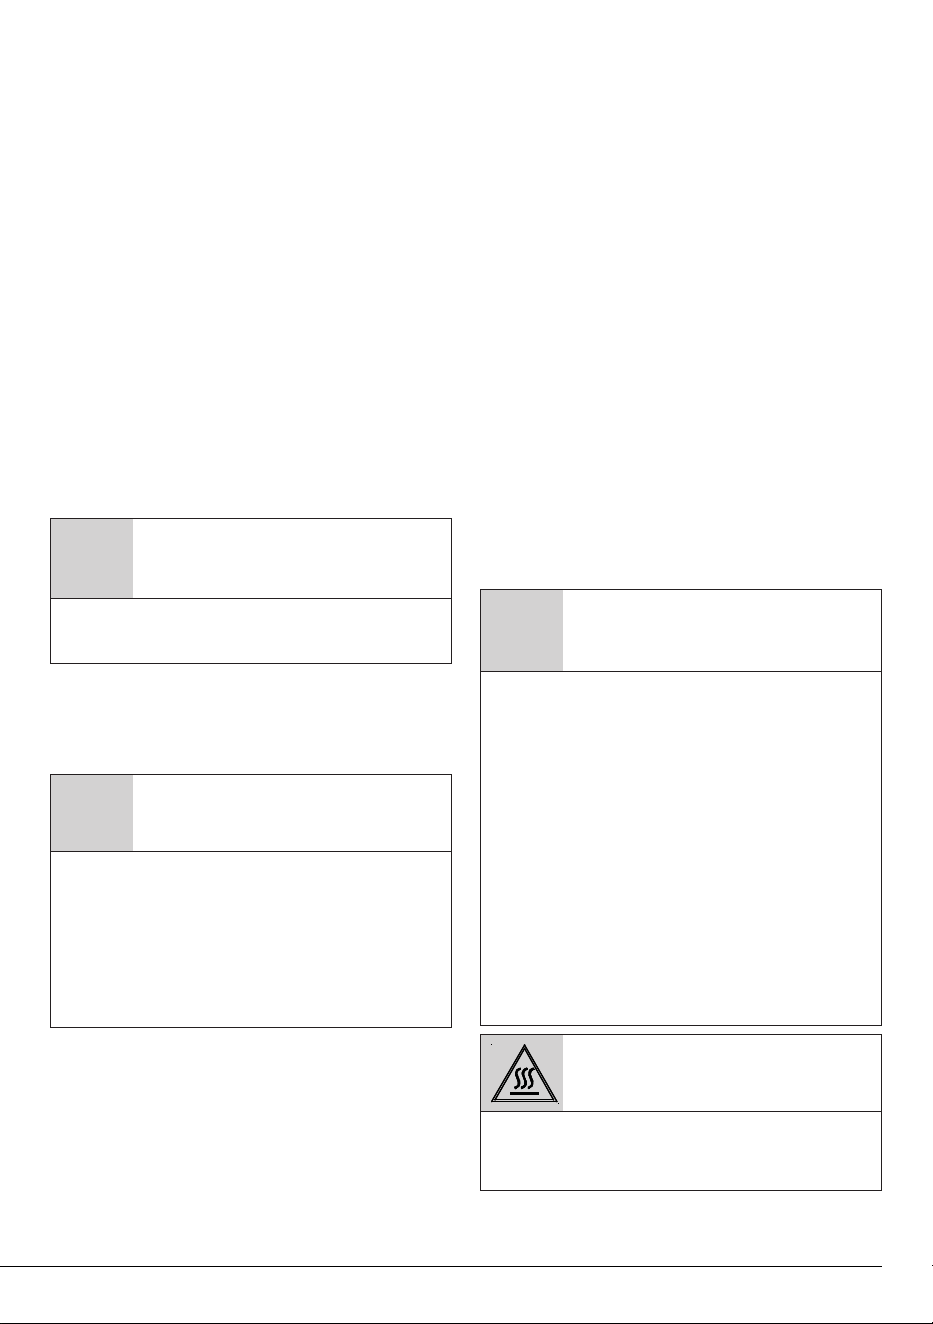
Super
Use for heavy-duty fabrics in to be
very dry
Extra Use for extra drying
Normal
Use for a normal dryness level. It
is recommended level for a energy
saving.
Damp Items can be partially damp
Dryness level
Dryness level button is used for adjusting
to desired dryness. Program time may change
depending on the selection.
C
NOTE!
• You can activate this function only prior
to start of program.
Anti Creasing
If you will not take the laundry out immediately
after the program has finished, you may use
Anti Creasing function to prevent wrinkling
of your laundry. This function is disabled by
default and can be enabled by pressing drum
light button for 3 seconds.
Audible warning
Drying machine makes an audible warning
when the program is completed. Press the
“Audible Warning” button if you do not want
audible warning. When you press the audible
warning button, the light goes off and it does
not sound when the program is completed.
C
NOTE!
• You can select this function before the
program starts or after the program
starts.
Low temperature
You can activate this function only prior to
start of a program. You can activate this func-
tion if you want to dry your laundry at a lower
temperature. The program duration will be
longer after it becomes activated.
End time
You can delay the end time of the program up
to 24 hours with end time function.
1.Open the loading door and place the laun-
dry.
2.Select the drying program.
3.Press the End Time selection button and set
the delay time you wish. End Time LED turns
on. (When pressed and hold the button, End
Time proceeds non-stop).
4.Press the Start / Stand-by button. End Time
countdown begins. The “:” sign in the middle
of displayed delay time flashes.
C
NOTE!
• You can add or remove laundry within
end time. Displayed time is the sum
of normal drying time and end time.
End Time LED turns off at the end of
countdown, the drying starts and the
drying LED turns on.
Changing the end time
If you want to change the duration during the
countdown:
Pause the program and Turn the On/Off/
Program Selection button and cancel the pro-
gram. Select the desired program and repeat
the End Time selection.
Cancelling the end time function
If you want to cancel the end time countdown
and start the program immediately:
Pause the program and Turn the On/Off/
Program Selection button and cancel the pro-
gram. Select the desired program and press
the “Start/Pause” button.
Drum Light
You can turn on and off the drum light by
pressing this button. The light turns on when
the button is pressed and turns off after cer-
tain time.
5.6 Warning indicators
C
NOTE!
• Warning indicators may vary depending
on the model of your drying machine.
Filter cleaning
When the program is completed, the warning
indicator for filter cleaning turns on.
Drying level
22 / EN
Dryer / User Manual
5.7 Starting the program
Press the Start/Stand-by button to start the
program.
Start/Stand-by and Drying indicators turn on
to show that program started.
5.8 Child Lock
The drying machine has a child lock which
prevents the program flow from being inter-
rupted when the buttons are pressed during
a program. When the Child Lock is activated,
all buttons on the panel except the On/Off/
Program Selection button are deactivated.
Press the Audible Warning button for 3 sec-
onds in order to activate the child lock.
The child lock has to be deactivated to be
able to start a new program after the current
program is finished or to be able to interfere
with the program. To deactivate the child lock,
keep the same buttons pressed for 3 sec-
onds.
C
NOTE!
• When the child lock is activated, the child
lock warning indicator on the screen
turns on.
When the child lock is active:
The drying machine runs, or in stand-by state
the indicator symbols will not change upon
changing the position of the program selection
button.
C
NOTE!
• When the drying machine is operating
and the child lock is activated, double
beep sound is heard when the program
selector switch is turned. If the child lock
is cancelled without turning the program
selector button back to its original
position, the program is terminated since
the program selector button is turned.
5.9 Changing the program
after it is started
You can change the program you selected to
dry your laundry with a different program after
the drying machine starts running.
• For example, Pause the program and turn
the On/Off/Program Selection button to
select the Extra Dry program in order to
select the Extra Dry program instead of
Ironing Dryness.
• Press the Start/Stand-by button to start
the program.
Adding and removing clothes during stand-by
If you want to add or remove clothes to/from
the drying machine after the drying program
starts:
• Press the Start/Stand-by button to put
the drying machine in Stand-by state. The
drying operation stops.
• Open the loading door while in Stand-
by state, and close the door after you
remove or add laundry.
• Press the Start/Stand-by button to start
the program.
C
NOTE!
• Adding laundry after the drying operation
starts may cause the dried laundry inside
the drying machine to mix with wet
laundry and leave the laundry damp at
the end of operation.
• Adding or removing laundry during drying
may be repeated as many times as you
wish. But this operation continuously
interrupts the drying operation, and thus
increases program duration and energy
consumption. So, it is recommended to
add laundry before the program starts.
• If a new program is selected by turning
the program selection button while
the drying machine is in stand-by, the
running program terminates.
WARNING !
• Do not touch the inner surface of the drum
while adding or removing clothes during a
continuing program. The drum surface is hot.
23 / EN
Dryer / User Manual
5.10 Cancelling the program
If you want to cancel the program and ter-
minate the drying operation for any reason
after the drying machine starts running, Pause
the program and turn the On/Off/Program
Selection button; the program terminates.
A
WARNING !
• The inside of the drying
machine shall be extremely hot
when you cancel the program
during machine operation, so
run the refreshing program to
allow it to cool down.
5.11 End of program
When the program ends, the LED’s of End/
Anti Creasing and Fibre Filter Cleaning
Warning on the program follow-up indicator
turn on. Loading door can be opened and
drying machine is ready for another operation.
Turn the On/Off/Program Selection button to
On/Off position in order to turn off the drying
machine.
C
NOTE!
• If the Anti Creasing mode is active and
the laundry is not removed after the
program is completed, the Anti Creasing
function activates for 2 hours to prevent
the laundry inside the machine to get
wrinkled. The program tumbles the
laundry with 10-minute intervals to
prevent them from wrinkling.
5.12 Odour feature
If your drying machine has odour feature, read
the ProScent manual to use this feature.
5.13 HomeWhiz Function
Firstly, the HomeWhiz application should be
installed on your phone.
The detailed information regarding the
HomeWhiz application is available on https://
www.homewhiz.com/
Turn on the Bluetooth on your phone.
Switch the unit to Off mode using the program
selection button.
Perform the following actions using the appli-
cation on your mobile device.
Devices->Add Device->Cleaning Devices-
>Dryer
Scan or type the product barcode into the
app.
Continue with the installation according to the
instructions of the app on your mobile device.
Press the “Dryness level” and “Remote con-
trol” buttons on your device simultaneously for
3 seconds according to the app instructions.
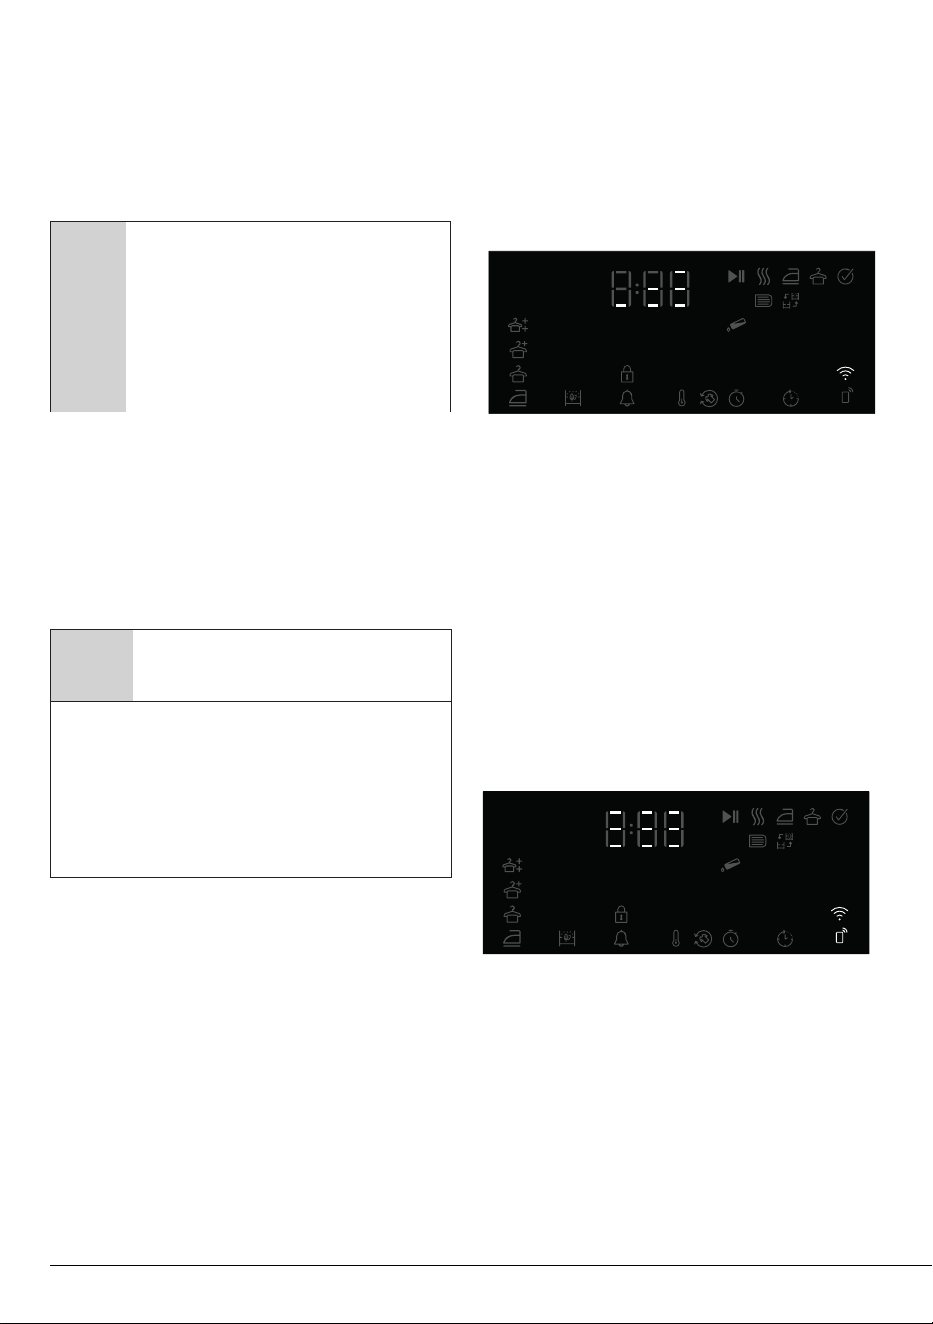
The screen displays 3-2-1 and the following
image appears.
The product screen is closed after the instal-
lation is completed and in the application, it is
asked to select the room where the product
will be added.
Using the remote connection:
Switch the product to Download programme
mode. If the Wi-Fi is connected, the icon
flashes.
If the Wi-Fi is disconnected, the icon does not
flash. Press the remote control button for 3
seconds to turn it on.
Press the remote control button to allow re-
mote control to the product while the Wi-Fi is
turned on.
When the remote control is turned on, the
unit can be controlled remotely using the
HomeWhiz app.
The detailed information regarding the
HomeWhiz application is available on https://
www.homewhiz.com/
24 / EN
Dryer / User Manual
Deleting the product from network:
Pressing and holding simultaneously Delay
and Wi-Fi buttons for 5 seconds while the
product is turned on, it counts down from 5
to appear on the screen. when the beep is
heard, the product is deleted from network
and the Wifi is turned off.
A
WARNING !
• When the door is opened, the
remote control turns off.
• When the programme button
is turned, the remote control
turns off.
• If the WIFI icon is illuminated
continuously, it means that
it is active and connected to
network
• If the WIFI icon is flashing
continuously, it means that it is
active and trying to connect to
network. You cannot connect
to the product unless it is
illuminated continuously.
• The connection to the product
is allowed if the remote control
icon is active and the WIFI icon
is illuminated continuously.
Getting the HomeWhiz Application
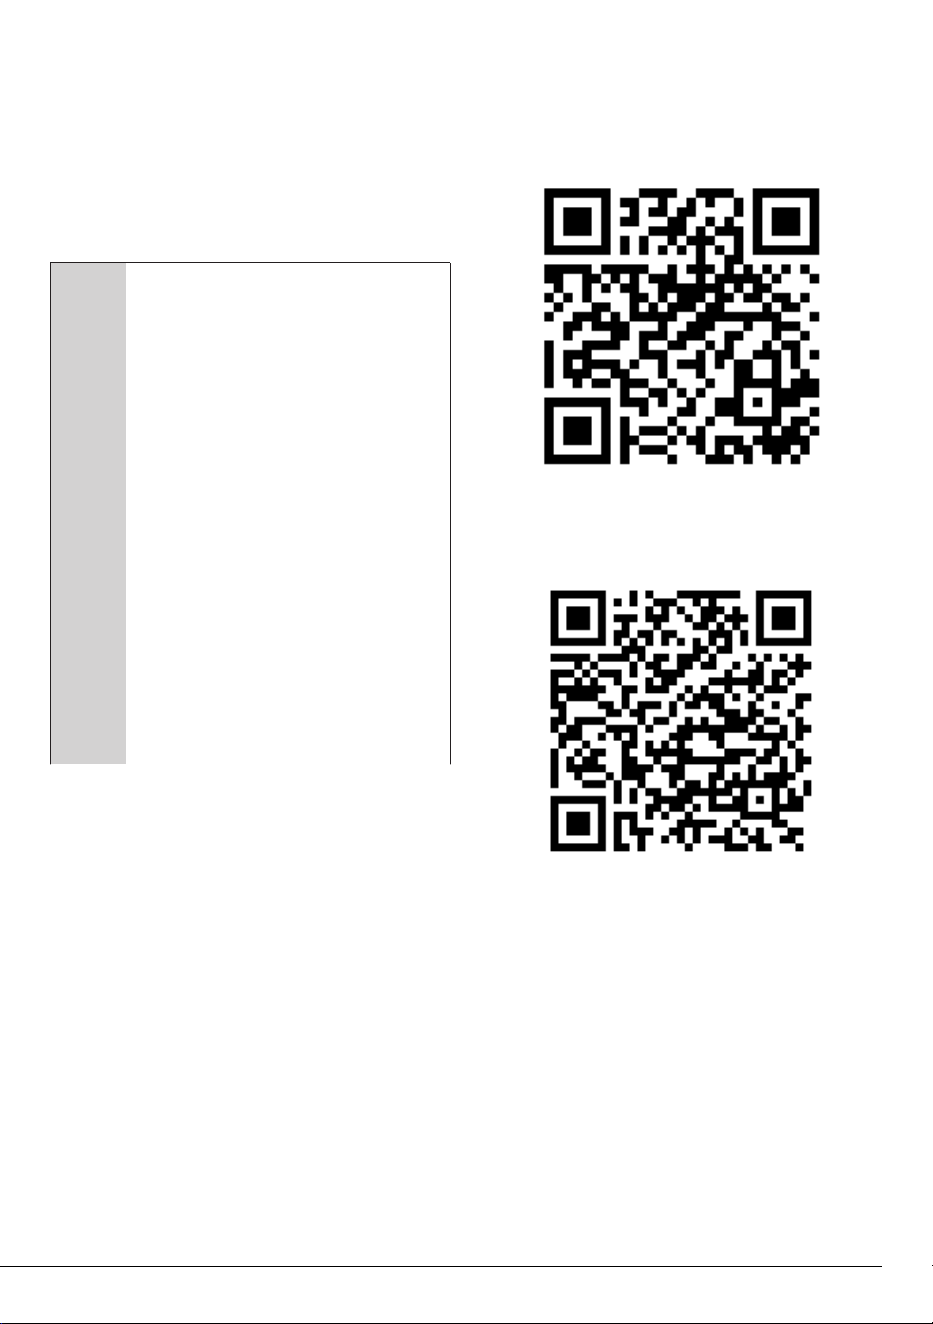
You can get the HomeWhiz application from
the application stores. You can use the below
QR codes to access the applications faster.
Apple App Store for the devices with IOS op-
erating system
Google Play Store for the devices with Android
operating system
25 / EN
Dryer / User Manual
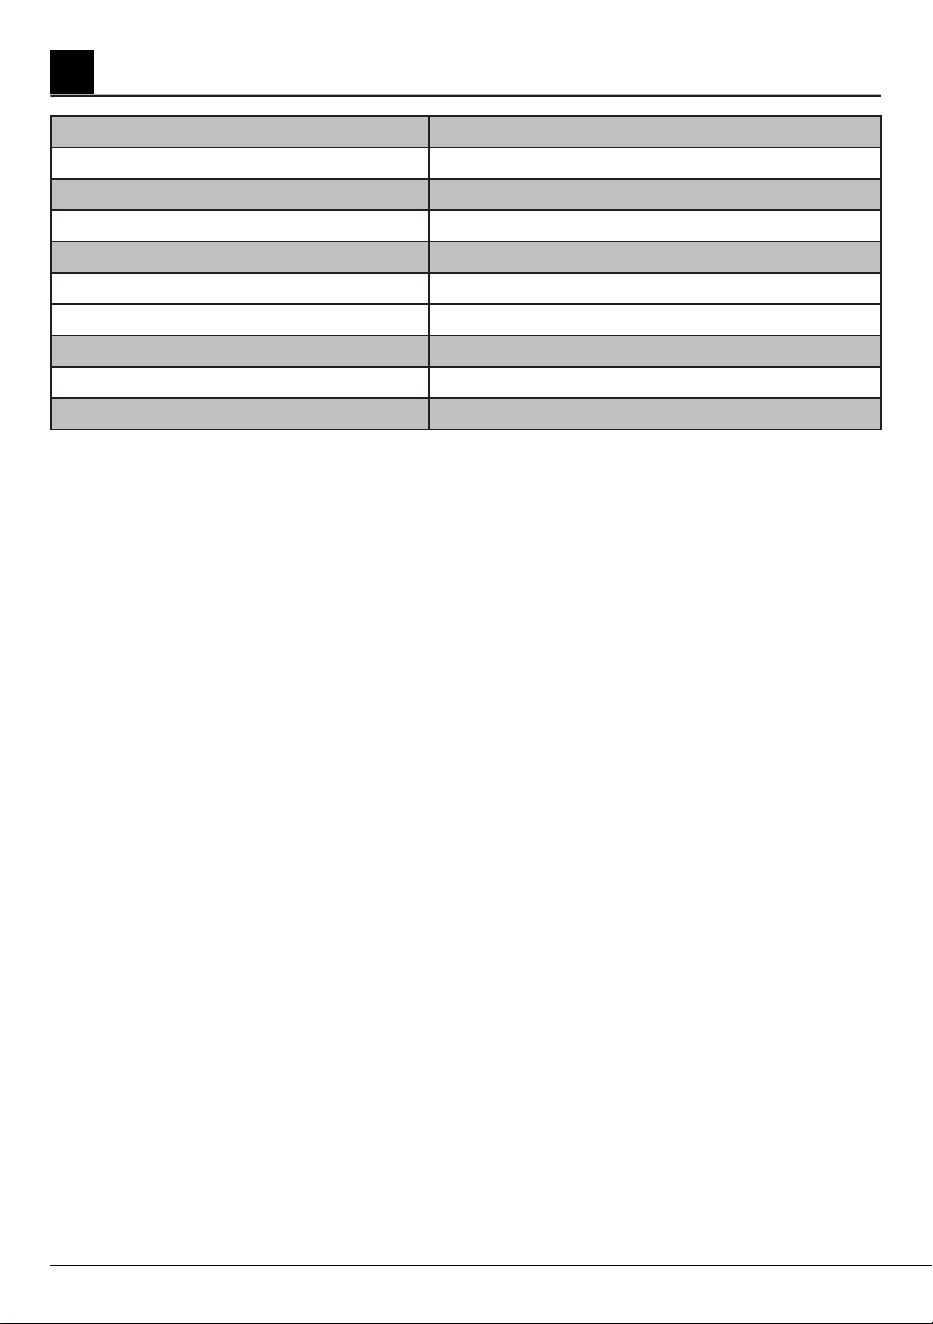
6 Technical Specifications
Model Vented Dryer with electronic sensor control
Height (in) 33.7
Witdth (in) 23.54
Depth (in) 23.46
Height adjustment of feet (in) 5 1/5
Net weight (plastic front door usage) (lbs) 69,7
Voltage / Frequency 208-240V ~ 6 0 Hz
Connected load 2000-2400 W
Dry Load Capacity 8kg / 17,6 lb
Capacity 3,80 cu-ft
26 / EN
Dryer / User Manual
7.2 Sensor
There are humidity sensors in your dryer that
detect whether the laundry is dry or not.
For sensor cleaning;
1. Open loading door.
2. Allow dryer to cool off if drying has been
done recently.
3. Wipe the metal sensors with a soft cloth
dampened with vinegar and dry the sensors
afterwards.
C
Clean the metal sensors at regular
intervals (4 times a year).
A
WARNING: Never use solvents,
cleaning agents or similar
substances when cleaning as
these might cause fire and/or an
explosion!
7.1 Lint filter
Lint and fibers released from the laundry in to
the air during the drying cycle are collected in
the “Lint Filter”.
C
Fibres and lint are formed during
wearing and washing.
A
WARNING: Always clean the filter
after each drying cycle.
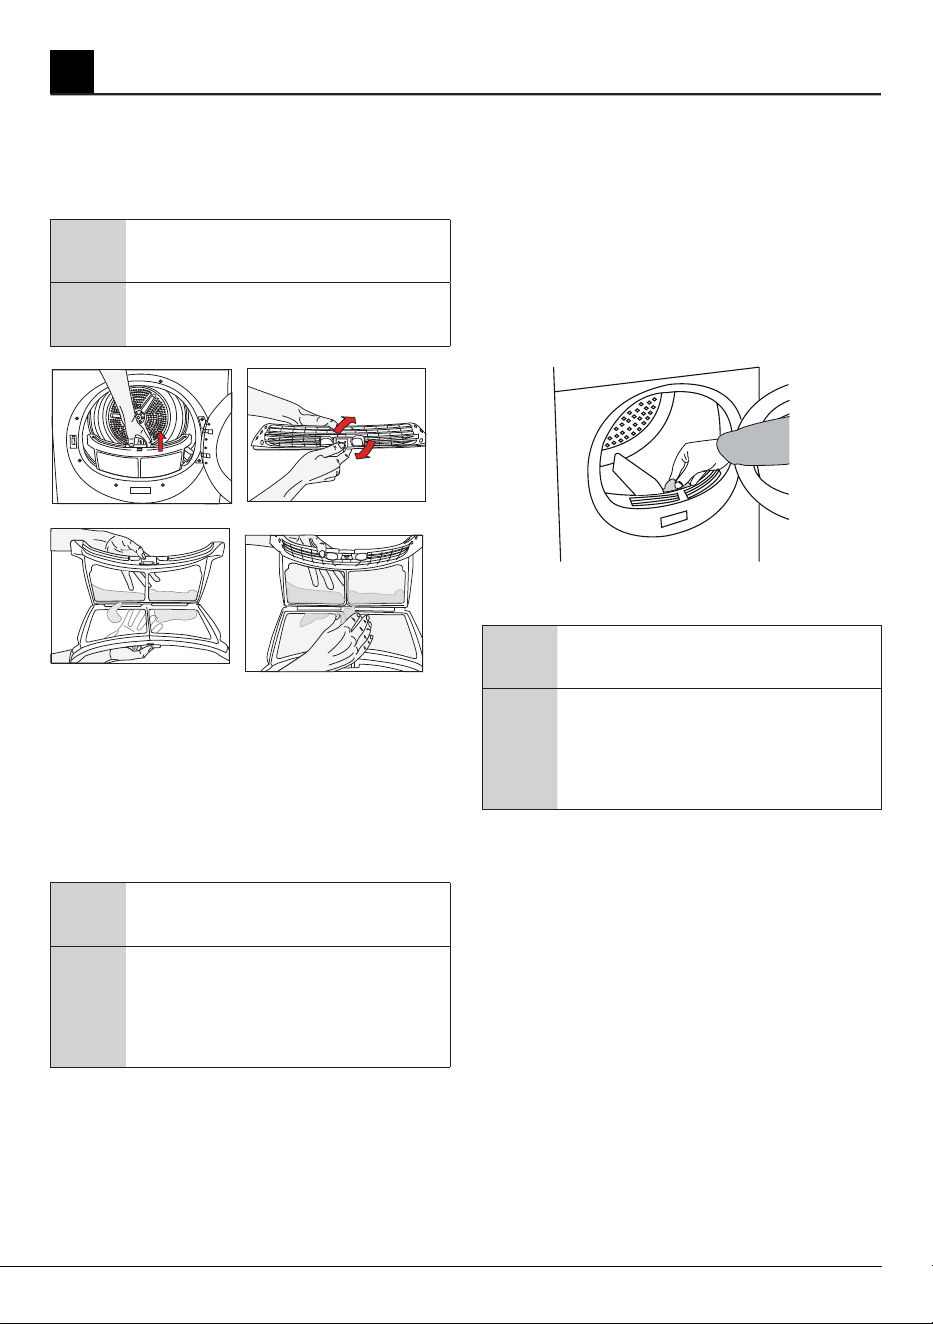
To clean the Filter;
1. Open loading door.
2. Remove the lint filter by pulling it up and
open the filter.
3. Clean lint, fiber, and by hand or with a soft
piece of cloth.
4. Close the filter and put it back in place.
C
You can clean the filter and filter
area with a vacuum cleaner.
C
Clogging may arise on the filter
surface after using your dryer for
some time; if this occurs, wash the
filter with water and dry it before
using again.
7 User maintenance and cleaning instructions
27 / EN
Dryer / User Manual
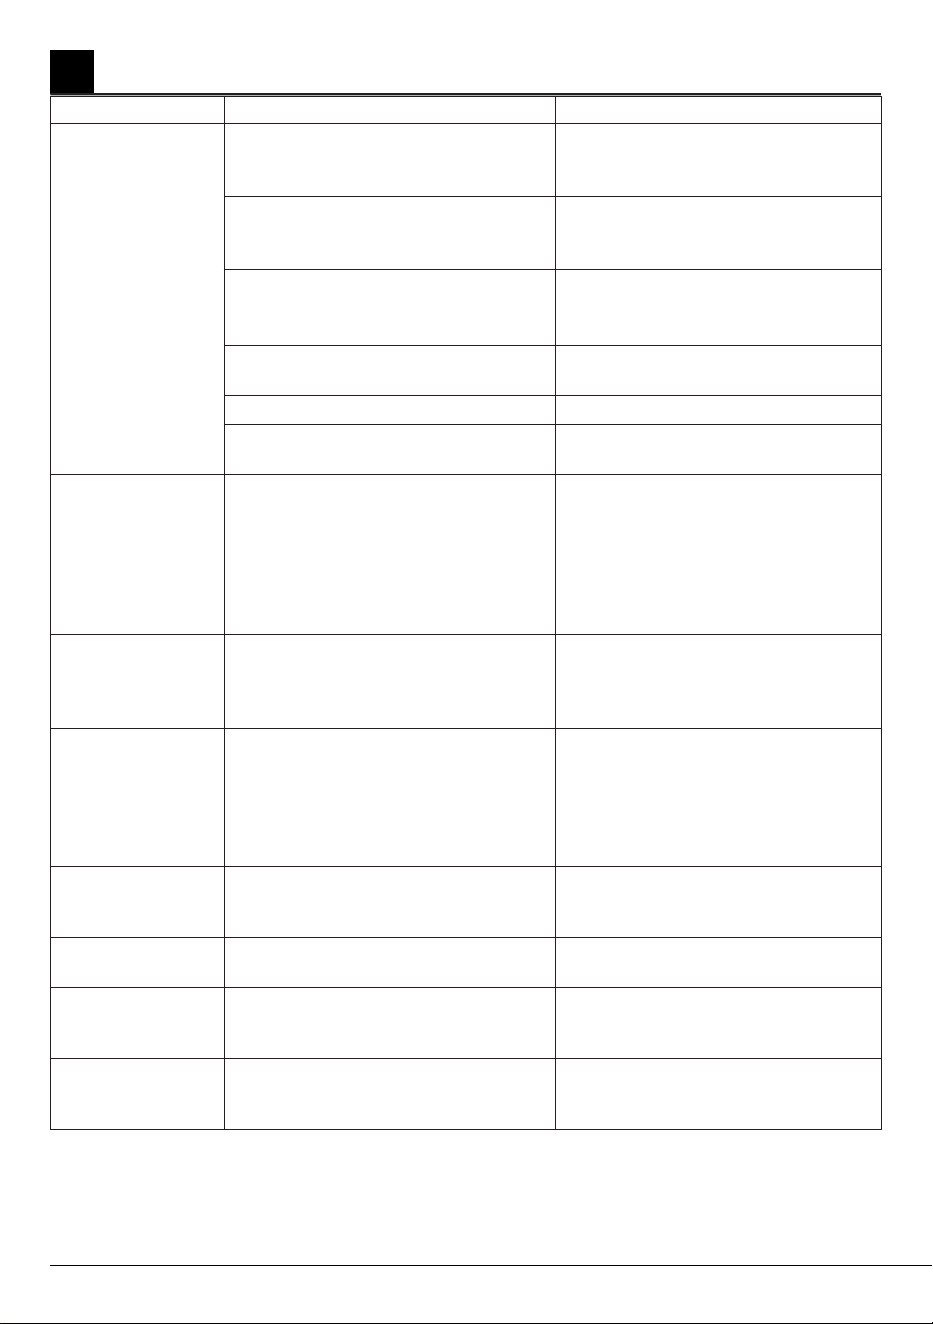
8 Troubleshooting
Problem Cause Explanation / Solution
Drying process
takes too long.
*Lint filter may not have been
cleaned.
* Clean the lint filter.
* Meshes of the filter may be
clogged. Wash with water.
*Ventilation grids on the front side of
the machine are blocked.
*Remove the objects (if any) that
block ventilation in front of the
ventilation grids.
*Ventilation is not sufficient since the
room where the machine is installed
is very small.
*Open the door and window of the
room to avoid the room temperature
increase too much.
*Lime deposit has built up on the
dampness sensor
*Clean the dampness sensor.
*Excessive laundry is loaded. *Do not load the dryer in excess.
*Laundry is not spun sufficiently
*Spin your laundry at a higher speed
in your washing machine.
Dryer does not
switch on or the
program does not
start. Dryer does
not start when set.
* It may not plugged in.
* The loading door may be ajar.
* Program may not be set or the
“Start/Pause/Cancel” button may
not have been pressed.
* “Childproof lock” may be activated.
* Make sure that the dryer is
plugged in.
* Make sure the loading door is
properly closed.
* Make sure the program has been
set and it is not in “Pause” mode.
* Deactivate the childproof lock.
Program is
interrupted for no
reason.
* The loading door may be ajar.
* Electricity may be cut off.
* Make sure the loading door is
properly closed.
* Press the “Start/Pause/Cancel”
button to start the program.
Laundry has
shrunk, become
felted or has
deteriorated.
* A program not suitable for the
laundry type might have been used.
* Dry only the laundry which is
suitable for drying in the dryer. First
check the labels on the clothes.
* Select a program a suitable low
temperature setting for the laundry
type to dry the clothes.
“End / Anticrease”
LED flashes.
* The 2-hour anti creasing program
to prevent laundry from wrinkling
may have been activated.
* Turn off the dryer and take the
laundry out of the dryer.
“End / Anticrease”
LED is on.
* Program has come to an end.
* Turn off the dryerand take the
laundry out of the dryer.
“Filter cleaning”
LED flashes.
* Lint filter may not have been
cleaned.
* Clean the lint filter.
* Meshes of the filter may be
clogged. Wash with water.
The “Drying” LED
flashes.
* A heat sensor failure has occurred.
dryer ends the program without
heating.
* Turn off the dryer and remove the
laundry. Call the authorized service.
NOTE:
Call an authorized service if the problem persists.
28 / EN
Dryer / User Manual
This product is fully tested and went through official
quality assurance inspections before leaving the
original manufacturing site. Warranty terms for this
Blomberg household appliance is not valid if the
product is altered, tampered, modifed, additional parts
assembled, fixed and re-packed by an authorized
distributor, servicer, a third party retailer, reseller or by
any other unauthorized person(s)
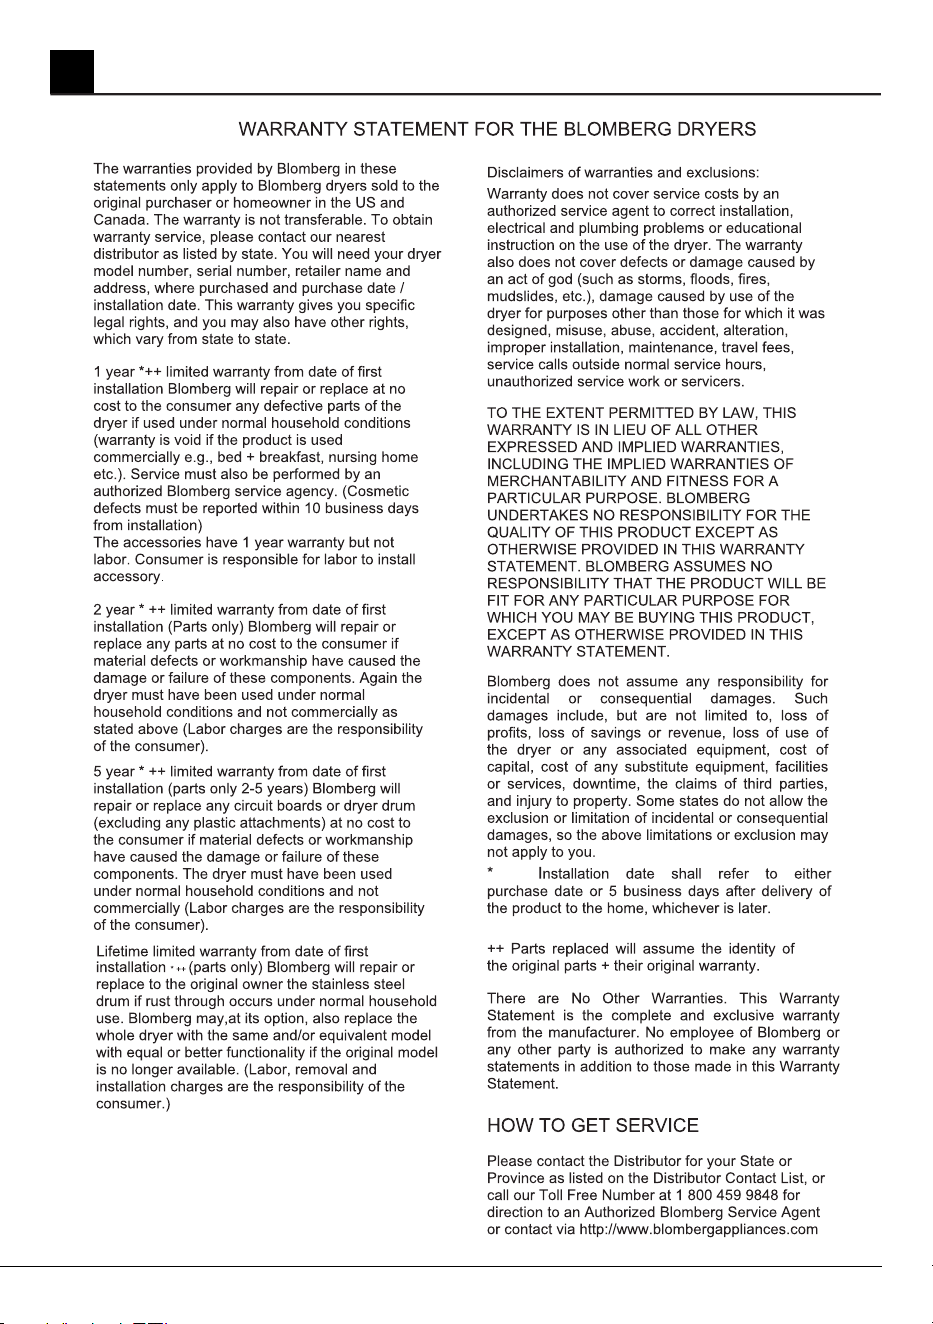
9 Warranty Statement