Instruction
& Recipe
Booklet
For your safety and continued enjoyment of this product, always
read the instruction book carefully before using.
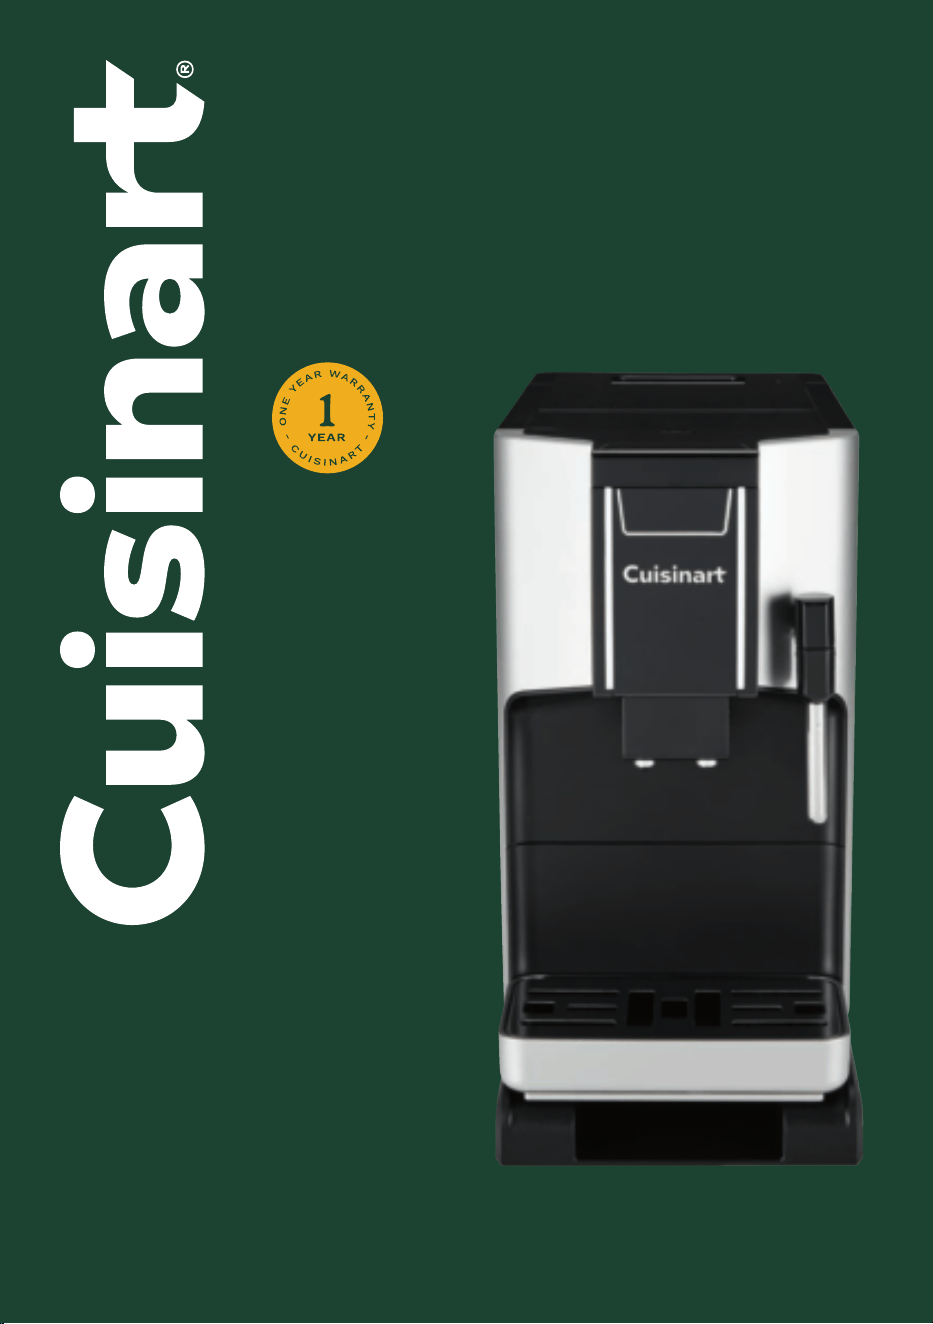
Fully Automatic
Espresso Machine
EM-550 SERIES
ESPRESSO BAR™

2
Important
Safeguards
We at Cuisinart are very safety conscious. We design
and manufacture consumer products with the safety
of you, our valued customer, foremost in mind.
In addition we ask that you exercise a degree of care
when using electrical appliances and adhere to the
following precautions.
When using electrical appliances, basic safety
precautions should always be followed, including
the following:
1. CAREFULLY READ ALL INSTRUCTIONS BEFORE
OPERATING APPLIANCE AND SAVE FOR FUTURE
REFERENCE.
2. Toprotectagainstre,electricalshock,and
injury to persons, do not immerse the appliance,
cord, or plug in water or any other liquid.
3. This appliance is for household use only.
4. Do not use this appliance for anything other
than its intended use.
5. Do not leave the appliance unattended when
in use.
6. Do not touch hot surfaces. Use handles or
knobs.
7. Always use the appliance on a dry, level surface.
8. Todisconnect,turnallcontrolso,thenremove
plug from power outlet.
9. Do not place this appliance on or near a hot gas
or electric burner, or where it could touch a
heated oven.
10. Do not let the cord hang over the edge of
a table or counter, touch hot surfaces, or
become knotted.
11. The use of accessory attachments not
recommended by Cuisinart may cause a risk
ofinjurytopersons,re,orelectricalshock.
12. Strictly follow cleaning and care instructions.
13. Do not use outdoors.
14. An extension cord is not recommended.
However, if one is needed, the extension cord
should be a grounded type and its electrical
rating must be the same or higher wattage as
the appliance. Regularly inspect the supply
cord, plug, and actual appliance for any damage.
If damaged in any way, immediately cease use
of the appliance and call Cuisinart Customer
Service at 1-800-726-0190.
15. Referservicingtoqualiedpersonnel.
16. Do not operate any appliance with a damaged
cord or plug, or after the appliance
malfunctions or has been damaged in any
manner. Return appliance to the nearest
authorized service facility for examination,
repair, or adjustment.
17. Unplug from outlet when not in use and before
cleaning. Allow to cool before putting on or
takingoparts,andbeforecleaningthe
appliance.
18. Do not operate your appliance in an appliance
garage or under a wall cabinet. When storing in
an appliance garage, always unplug the unit
from the electrical outlet. Not doing so could
createariskofre,especiallyiftheappliance
touches the walls of the garage or the door
touches the unit as it closes.
19. This appliance is not intended for use by
persons (including children) with reduced
physical, sensory, or mental capabilities, or lack
of experience and knowledge, unless they have
been given supervision or instruction concerning
use of the appliance by a person responsible for
their safety.
20. Children should be supervised to ensure that
they do not play with the appliance.
21. The heating element surface is subject to
residual heat after use.
22. Any servicing should be performed by an
authorized service representative.
23. Scalding may occur if the lid is removed during
the brewing cycle.
24. Warning: To avoid the risk of injury, do not open
the brew chamber during the brew process.
25. To unplug, grasp the plug and pull from
the outlet. Never pull from the power cord.
26. This appliance should not be used by or near
children or individuals with certain disabilities.
27. Alwaysattachplugtoappliancerst,thenplug
cord into the wall outlet. To disconnect, turn
anycontrolto“o,”thenremoveplugfromwall
outlet.
28. Avoid contacting moving parts. Do not attempt
to defeat any safety interlock mechanisms.
29. Usethegrinderforgrindingcoeebeanonly.
3
Save These
Instructions
For Household
Use Only
Warning: Risk of Fire
or Electric Shock
Thelightningashwitharrowhead
symbol within an equilateral triangle is
intended to alert the user to the
presence of uninsulated dangerous
voltage within the product’s enclosure
thatmaybeofsucientmagnitudeto
constituteariskofreorelectricshock
to persons.
The exclamation point within an
equilateral triangle is intended to alert
the user to the presence of important
operating and maintenance (servicing)
instructions in the literature
accompanying the appliance.
Special Cord Set
Instructions
1. A short power-supply cord (or detachable
power-supply cord) is provided to reduce risks
resulting from becoming entangled in or tripping
over a longer cord.
2. Longer detachable power-supply cords may be
used if care is exercised in their use.
3. If a long detachable power-supply cord is used:
• The marked electrical rating of the detachable
power-supply cord should be at least as great
as the electrical rating of the appliance;
• If the appliance is of the grounded type, the
cord should be a grounding-type 3-wire cord;
• The longer cord should be arranged so that it
will not drape over the counter top or table
top where it can be pulled on by children or
tripped over.
Notice
Whenbrewingcoeeintoatravelmug,youwill
need to remove the drip tray.
Note: There may be water found in the drip tray as
a result from normal brewing.

4
Table of Contents
Important Safeguards .........................2
Special Cord Set Instructions...................3
Features and Benefits..........................5
Getting to Know Your Control Panel.............6
Machine Installation ...........................7
Daily Operation ...............................7
Daily Cleaning of the Coffee Machine............9
Mode Selection ............................... 12
Cleaning & Maintenance ...................... 13
Cleaning the Appliance........................ 13
Troubleshooting.............................. 15
Warranty .................................... 16
Notes........................................ 18
5
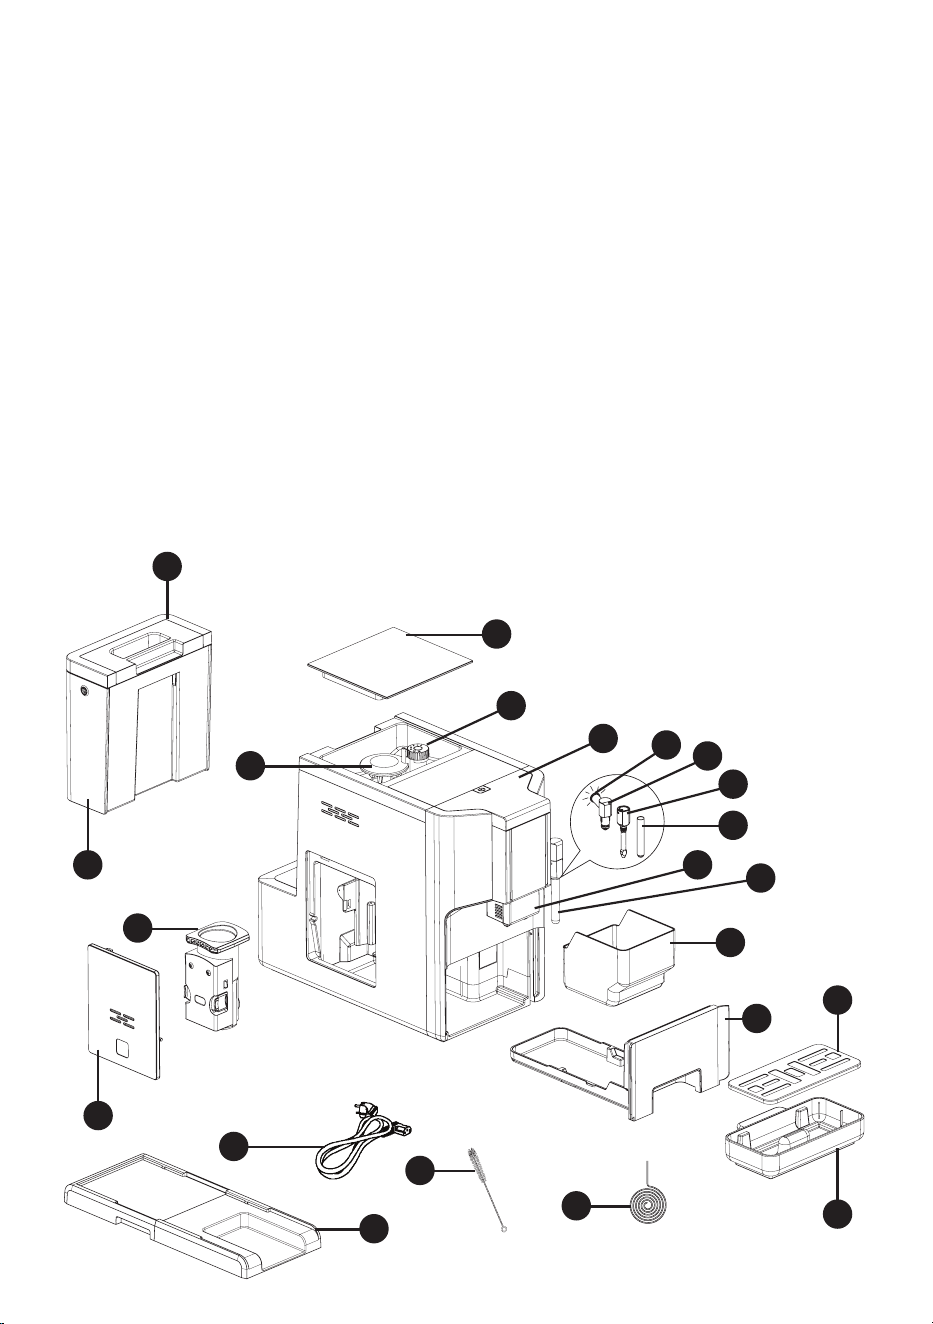
Features and Benefits
1. Removable Drip Tray
Removes for easy cleaning and to accommodate
up to a 20 oz. travel mug.
2. Removable Drip Tray Plate
3. Internal Drip Tray
4. Waste Container
Collects used grounds for easy cleanup.
5. Steam & Hot Water Wand
Steams milk for cappuccinos and lattes or
dispenses hot water.
5a. Steam Light Indicator
5b. Nozzle Cover
5c. Steam Nozzle
5d. Metal Tube
6. Brew Head with Coee Spout
Height-adjustable dispenser slides up and down
to accommodate various cup sizes.
7. Touchscreen Control Panel
See detailed illustration on next page.
8. Grind Control Knob
Adjuststhenenesslevelforgrinding.
9. Bean Hopper with Lid
Holdsupto150gamountofcoeebeans.
10. Conical Burr Mill (not shown)
11. Water Reservoir Lid
12. 1.5-Liter (50-Ounce) Water Reservoir
Removableforeasylling.
13. Brewing Unit Door
14. Brewing Unit
15. Cord/Outlet
16. Cleaning Brush
17. Needle
18. Separate Base
Elevates unit on countertop to accommodate
brewing into travel mugs.
19. 19 Bar Pump (not shown)
19 bars of pressure for balanced extraction.
9
15
16
17
10
14
4
3
18
5d
2
11
1
8
7
6
5
12
13
5c
5b
5a
6
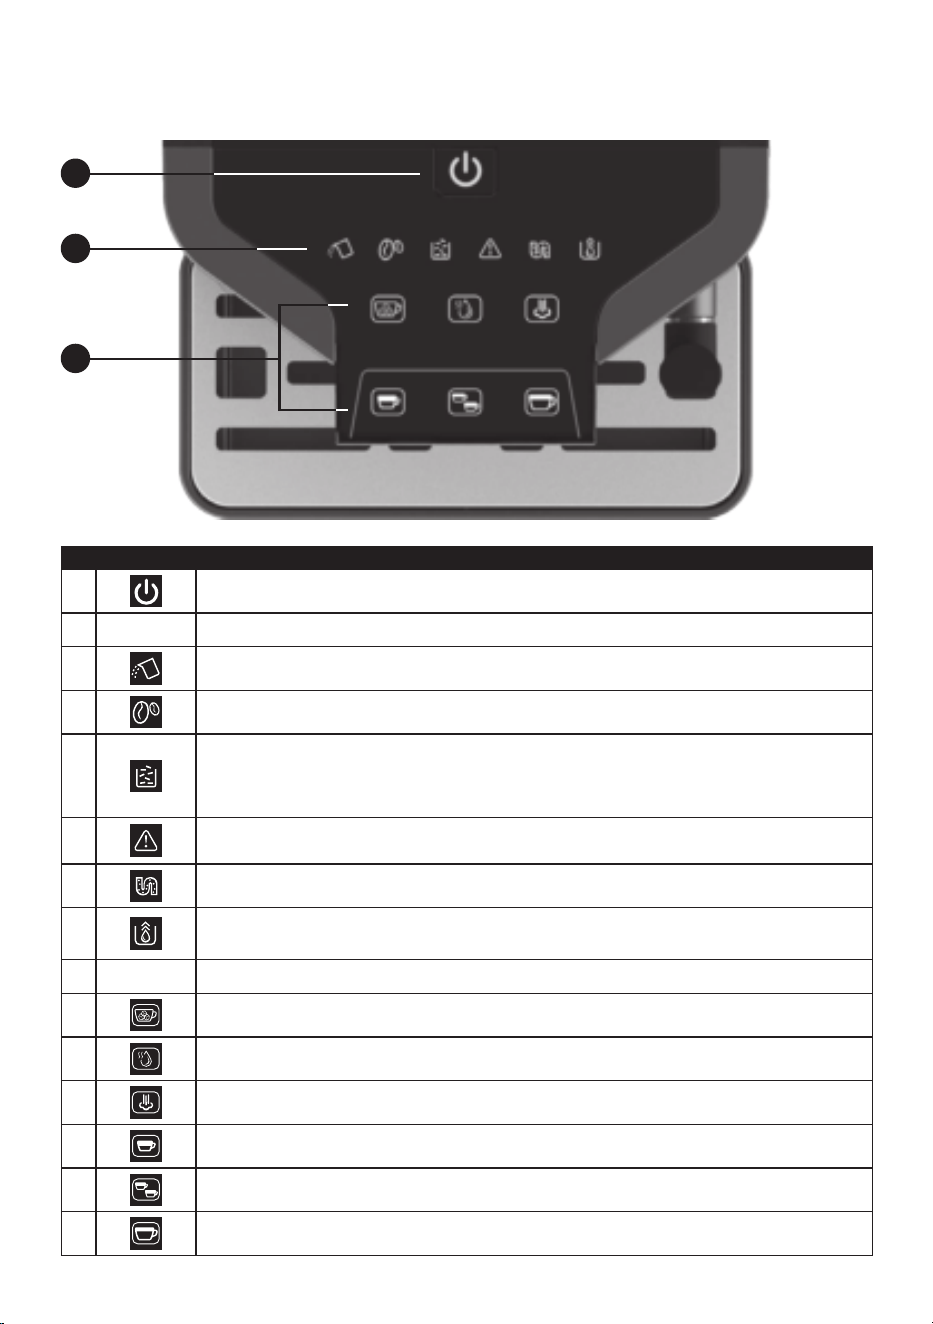
Getting to Know Your
Control Panel
ICON DESCRIPTION
1.
Power/O Button
Usetoturntheespressomakeronando.Thisbuttonwillilluminatethecontrolpanelindicatorsandbuttons.
2.
Indicators
Appear when unit is not ready to brew and needs attention.
2a.
Add Water Indicator
Flashes when water level is low or the reservoir is not in place on the unit.
2b.
Add Beans Indicator
Flashes when it is time to add beans to the hopper.
2c.
Waste Container Indicator
Illuminates when the grounds container is full and needs to be emptied.
Note:Indicatorwillashwhencontainerisnotinplace.
Note:Whenaccumulatedto10cups,willlightup,whichindicatesthatthecoeegroundcontainerneedstobeemptied.
Afterremovingthecoeegroundsboxforafewseconds,willlightoandenterthenext10-cupcumulativecycle.
2d.
Brewer Missing
Illuminateswhenbrewingunitismissingornotinstalledcorrectly.Iconwillashwhenbrewingdoorisopenormissing,
indicating it must be closed.
2e.
Clean/Descale Indicator
Illuminatesthenitistimetodescaletheunit.Iconwillashwhenadescalingcycleisactivated.
2f.
Rinsing Indicator
Flashes when unit is running a rinse cycle to prepare the machine for brewing.
Note: This is an automatic process.
3.
Buttons
Press to activate desired function.
3a.
Cold/Ambient Brew
Used to activate cold extraction function.
3b.
Hot Water
Use to dispense hot water from the steam/hot water wand.
3c.
Steam
Use when steaming milk for making cappuccinos and lattes with the steam wand.
3d.
Single Shot
Use for a single serving of espresso – 1.0 ounces.
3e.
Double Shot
Use for a double serving of espresso – 2.0 ounces
3f.
Americano
Use to brew an Americano-style beverage
1
2
3
2a 2b
3a
3d
2c
3b
3e
2d
3c
3f
2e 2f
7
Accessory
In the box, three packs of cleaning agents are
included for the process of descaling.
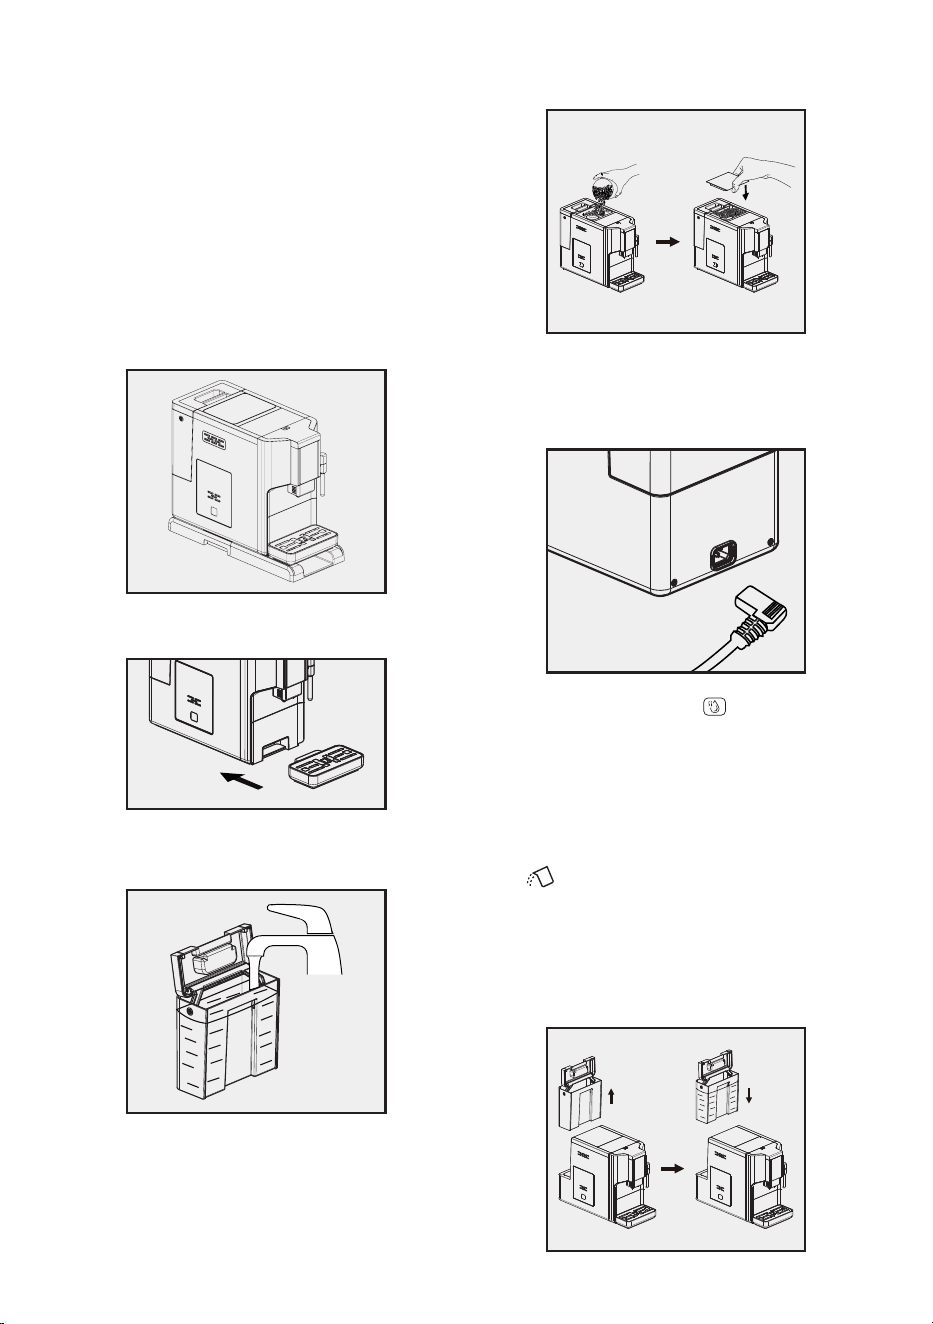
Machine Installation
1. Removeanyprotectivelms,stickers,andother
packing materials on the appliance.
2. Choose a safe and stable surface with an easily
reachable power supply. Allow minimum distances
from the sides of machine.
**The extended base adds height to allow
brewing into a travel mug.
3. Insert the external drip tray to the machine until
it is secured.
4. Fill the water tank with water (see “Filling
WaterTank”).
5.Fillthecontainerwithcoeebeans(see“Filling
BeanContainer”).
6. Unwind and straighten the power cord. Insert the
plug into socket located on the back of machine,
and the other end of power cord to wall socket
with correct power voltage.
Note: Press Hot Water button (see “Manual
Rinsing”) to clean inside of the coee machine
before the rst use.
Daily Operation
Filling the Water Tank
When isashing,thewatertankneedstobe
lled.
1. Lift the water tank using the lid as handle.
2. Rinse the water tank with fresh water. Fill the tank
to the Max level and place it back into the
machine. Make sure it is installed properly.
8
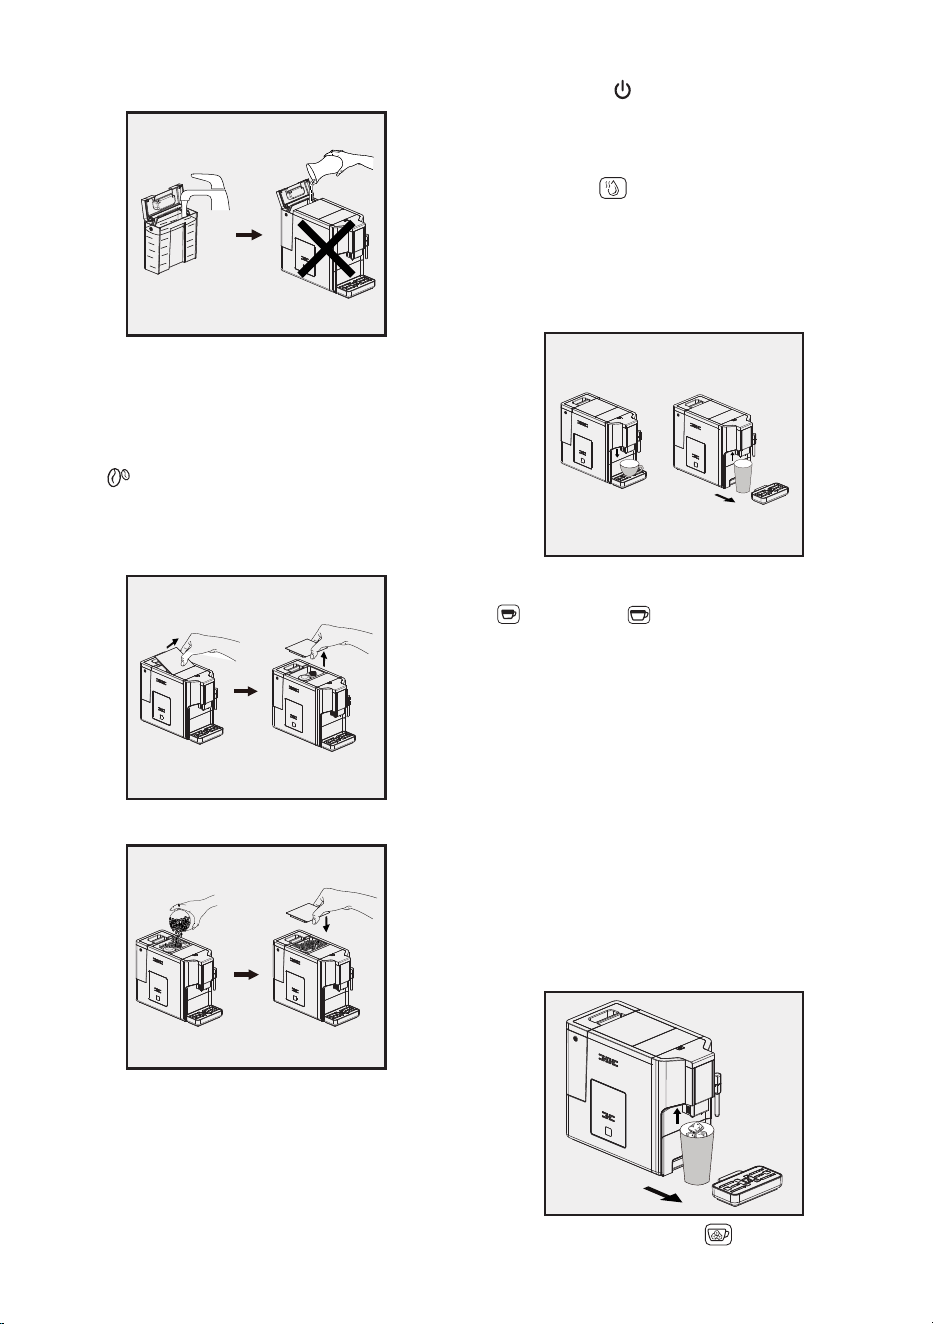
Note:Topreventtheriskofoverowingthewater
tank, do not add water directly into the appliance.
Important:Neverllthewatertankwithwarm,hot,
or sparkling water, or other liquids, which may
damage the water tank and machine.
Filling the Bean Container
When isashing,theapplianceneeds
coeebeans:
1. Remove the bean container lid.
2.Fillthebeanboxwithcoeebeans.
3. Install the container lid.
Important:Fillthebeancontainerwithcoeebeans
only.Ground,instant,caramelizedcoee,orother
objects may damage the machine.
Preparing Your Coffee
Note: Before rst use, run the Hot Water cycle one
time to clean inside of the coee maker.
1. Turn on the appliance by pressing the Power
ON/OFF button . Make sure the drip tray is
underthecoeespoutandwatertankislled.
The appliance will perform auto-rinsing on
steamnozzleandthencoeenozzleforasmall
cup of water. You can stop it by pressing Hot
Water button .
2. The appliance is then in standby mode.
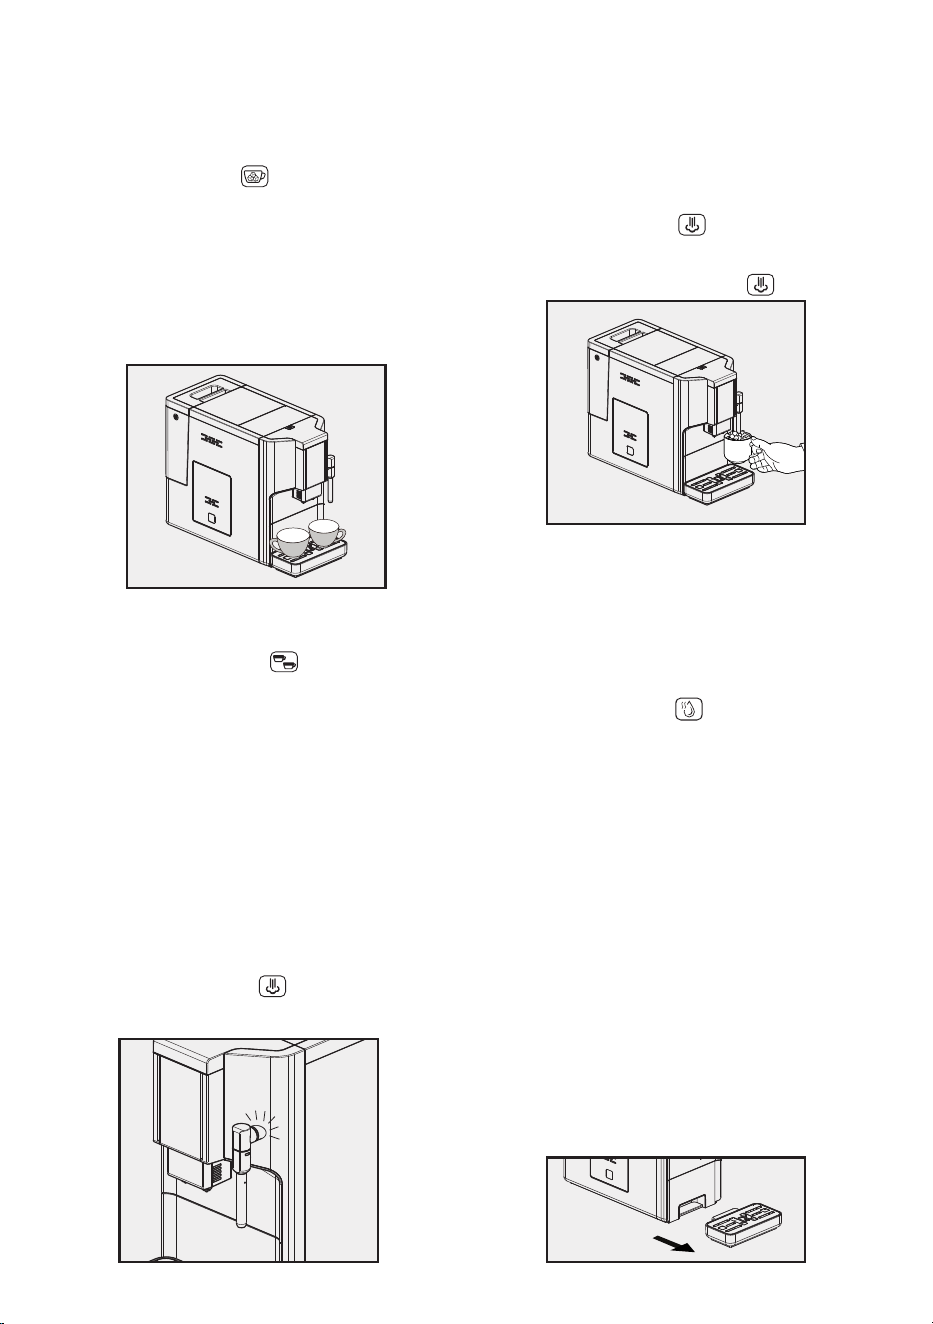
3.Placeacupunderthecoeespoutandadjustthe
heightofspouttotthecup.Dependingonthe
cup size (too tall or too wide), the drip tray can be
removed or adjusted as shown below:
4.ChooseyourcoeeavorbypressingEspresso
or Americano .
5.Thecoeebuttonpressedwilllightup,andthe
brewingcoeeindicatorandilluminationunder
spout will light up, indicating that the appliance is
preparingthecupofcoee.Youcanstop
dispensingcoeebypressingthebuttonagain.
6. When the appliance is back to standby mode, the
coeeisreadytoserve.
TIP:Espressobrewsstrongercoee.Thecoee
strengthcanbeadjusted(see“AdjustingCoee/Hot
WaterVolume”).
Preparing Ambient Brew Coffee
YoucanprepareAmbientBrewcoeewitha
single press.
1. Put a glass with ice under the spout.
2. Press Ambient Brew button . Both the Ambient
brew button and indicator light up, indicating the
9
applianceispreparingthecupofcoee.
Coeewillbedispensedandcompleteinunder
5 minutes.
3. Preparation will stop automatically. If you want to
stopdispensingcoeeduringoperation,pressthe
Ambient Brew button again.
Note: When brewing using the Ambient Brew
feature,thecoeevolumecannotbeadjustedby
the user.
Preparing Two Cups of Espresso
You can prepare two cups of espresso with one
button press.
1. Put one cup under the spout or two small cups
under each side of the spout.
2. Press Espresso x2 button . Both Espresso x2
button and indicator light up, indicating the
appliance is brewing the espresso. Two cups of
coeewillbedispensedconsecutively.
3. Preparation will stop automatically. If you want to
stopdispensingcoeeduringoperation,pressthe
button again.
Preparing Frothy Milk for Coffee
As the temperature of steam is higher than that of
espresso, espresso should be prepared before frothy
milk; otherwise your espresso might be burnt.
1. Prepare the espresso in a larger cup. Turn the
steam nozzle toward the drip tray.
2. Press the Steam button . The steam indicator
lightwillash,indicatingtheapplianceisheating
up. Drain the residual water into external drip tray
or another container.
3. When the espresso maker is ready, the Steam
button and indicator light will stay on. Prepare a
container with milk. Place the container under the
steam nozzle and immerse the steam nozzle
about 2 inches deep into the milk.
4. Press the Steam button again. Swirl the
container while the hot steam is coming out.
As the milk heats, froth will form. When the milk
is frothy, press the Steam button to stop.
5. Pour the hot frothy milk into the espresso.
6. Use a wet towel to clean the nozzle cover
and metal tube (see “Daily Cleaning of the
CoeeMachine”).
Preparing Hot Water
1. Put a cup under the steam nozzle.
2. Press Hot Water button . Both Hot Water
button and indicator light up, indicating the
appliance is heating up water.
3. Preparation will stop automatically. If you want
to stop hot water during operation, press the
button again.
Daily Cleaning of the
Coffee Machine
Daily cleaning and maintenance are important and
will prolong the life of your espresso maker.
Cleaning the Drip Tray and Coffee
Grounds Container
Empty and clean the drip tray every day.
1. Pull the external drip tray out of the machine.
Empty the water in the drip tray and rinse with
fresh water. Dry and then replace in the
espresso maker.
10
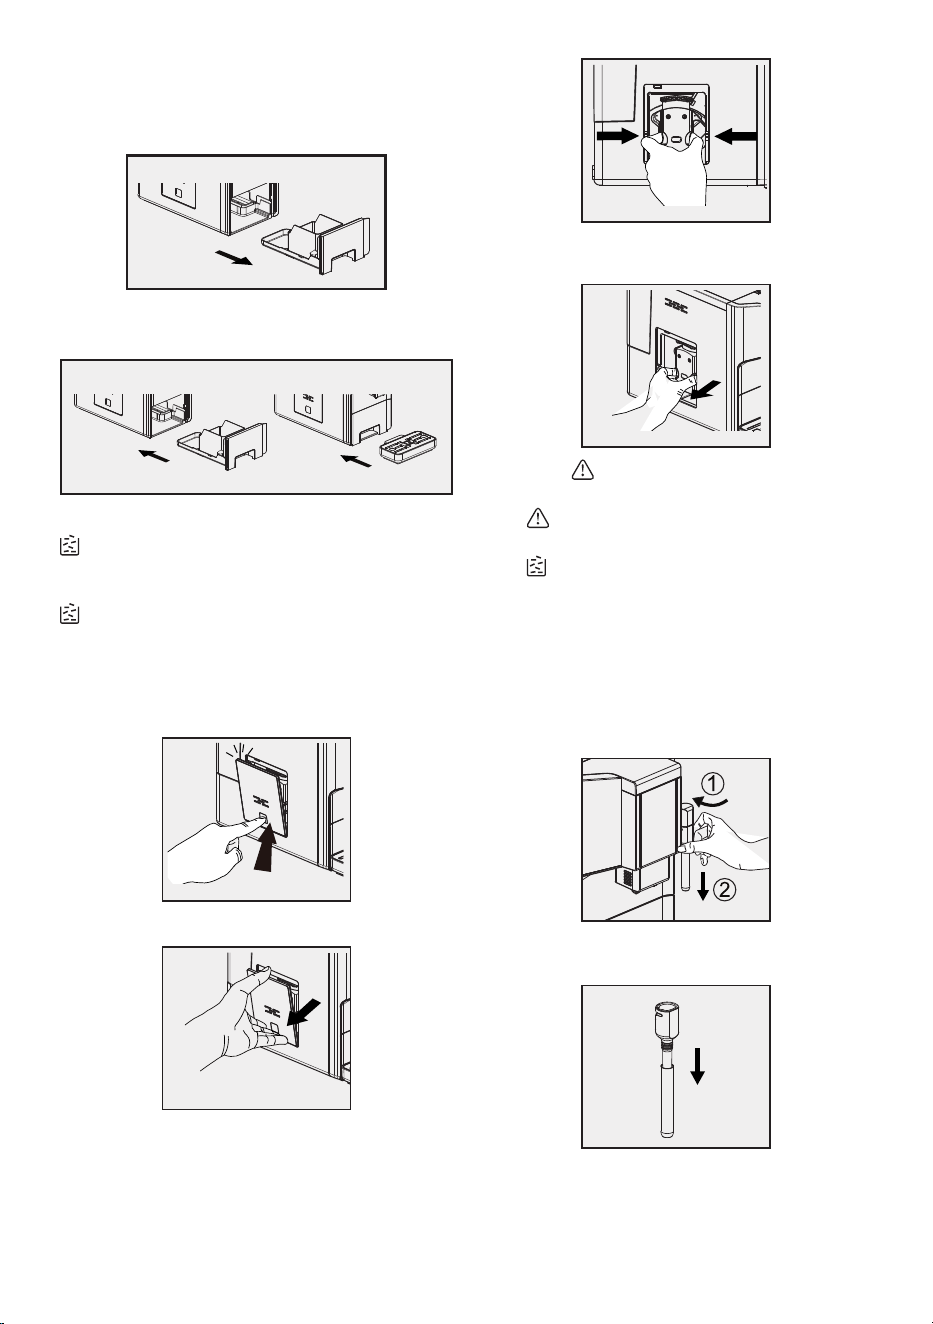
2.Slideopentheinternaldriptrayandcoee
groundscontainer.Emptythecoeegrounds
container and rinse with fresh water. Dry and then
replace in the espresso maker.
3. Secure the external drip tray at its
original position.
Note: When the coee grounds container is full,
will light up, which indicates that the container
needs to be emptied.
After the coee grounds are removed and emptied,
will turn o and reset.
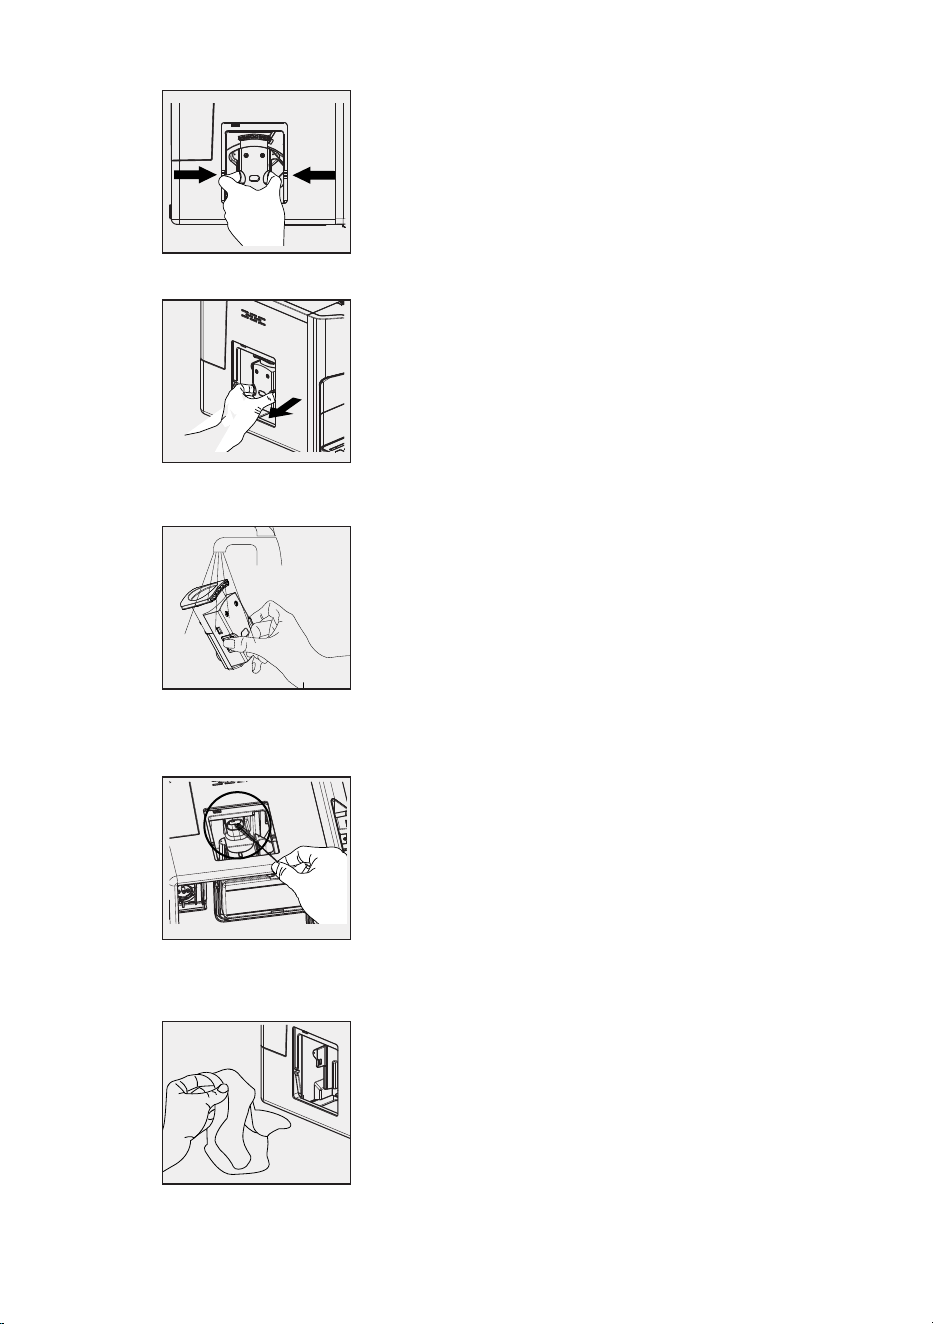
Cleaning the Brewer
1. Lightly press the bottom of service door to
open it.
2. Remove the service door from machine.
3. Press the release knob on the brewer and
remove from the machine. Rinse under warm
running water.
4. Insert the brewer back to its original position.
Put the service door back on the machine.
Note: When lights up solid, it indicates that the
brewer is missing / installed improperly.
When isashing,itindicatesthattheservice
door is missing/installed improperly.
When isashing,thecoeegroundscontainer
is missing.
Warning: Do not remove the brewer until the gear
position returns to idle position after use.
Cleaning the Steam Wand
1. Unlock the nozzle cover by turning to left. Pull it
downward to remove.
2. Pull the metal tube downward to disassemble
from the nozzle cover.
3. Wash both the nozzle cover and metal tube with
warm running water. Use needle or bristle brush
to clean the hole.
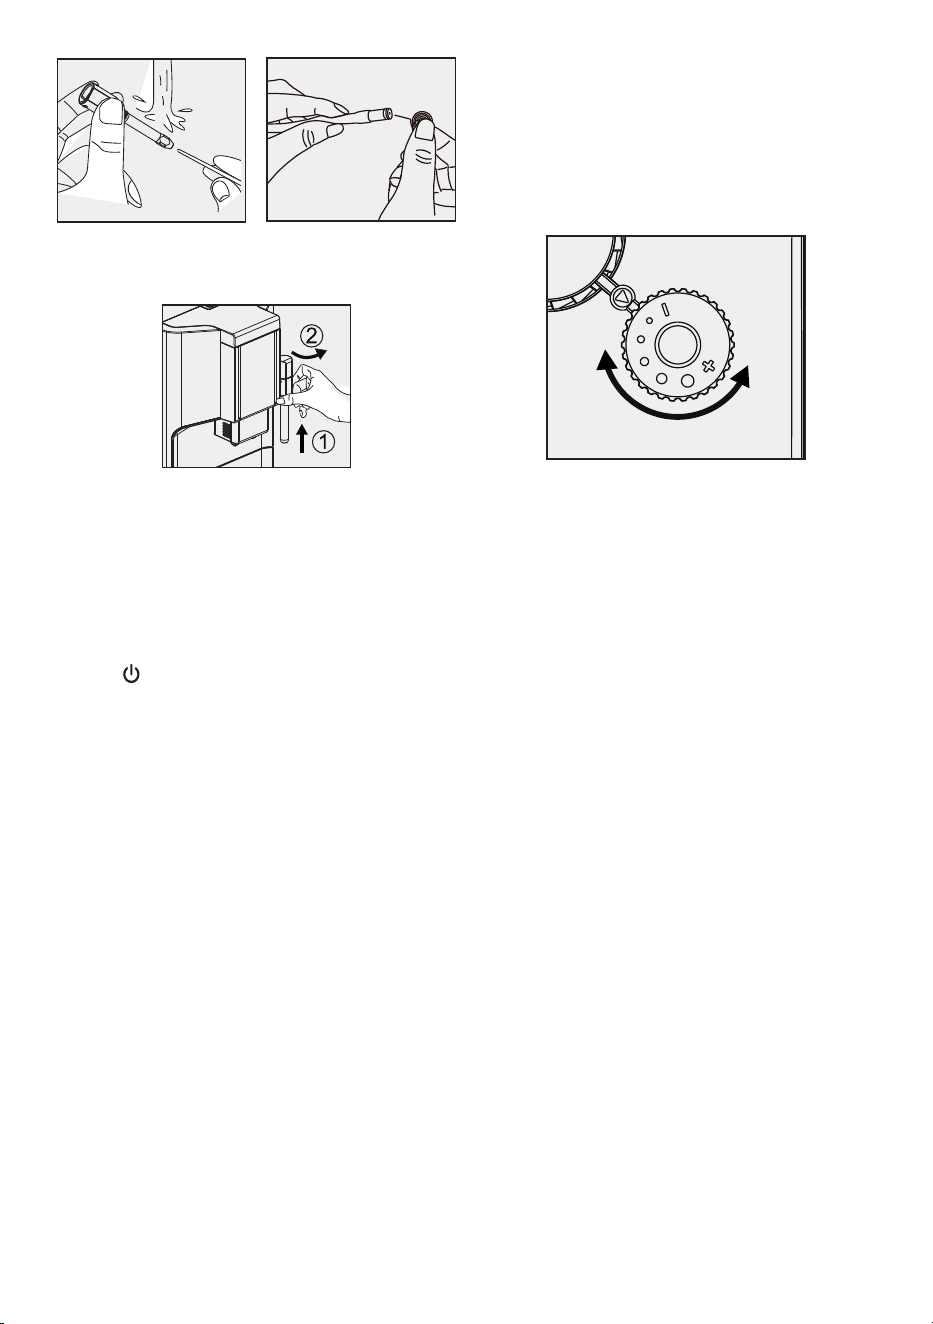
11
4. Put the metal tube back on the nozzle cover. Push
the assembly upward to the steam nozzle, and
turn it right to lock it.
Cleaning the Water Tank
1. Lift the water tank out of the machine and rinse
with fresh water.
2. Fill it to the Max level. Put it back in the machine.
Turning Off the Machine
SwitchotheappliancebypressingthePower
ON/OFF button.
Automatic Shutoff
Theapplianceisequippedwithautoshuto.
Depending on the mode you selected, the
appliancewillhavedierentautoshutotimes
(see“ModeSelection”).
Further Setting
Adjusting the Coffee/Hot
Water Volume
The machine can memorize your desired volume of
espresso, Americano, and hot water.
1. Whenmakingyourcoee(eitherespressoor
Americano) or dispensing hot water, press and
hold the respective button. The appliance will
continuetomakethecupofcoeeorhotwater.
2.Whenthevolumeofcoeeorhotwatermeets
your desired volume, release the button. Two
beepsindicatethevolumeofcoeehasbeen
memorized. For double espresso, the volume of
therstandsecondcuparethesame.
Grinding Adjustment
Youcanadjustthegrindertochoosedierent
coeeroastlevelsbyturningtheadjusterknobin
the bean container. The dots on adjuster knob
indicatethenenessofthegrind.
Whenthegrinderisgrindingcoeebeans,youcan
turntheadjusterknobtochangetheneness.
Warning: Never adjust the grinder when it is not
operating. It may damage the grinder.
12
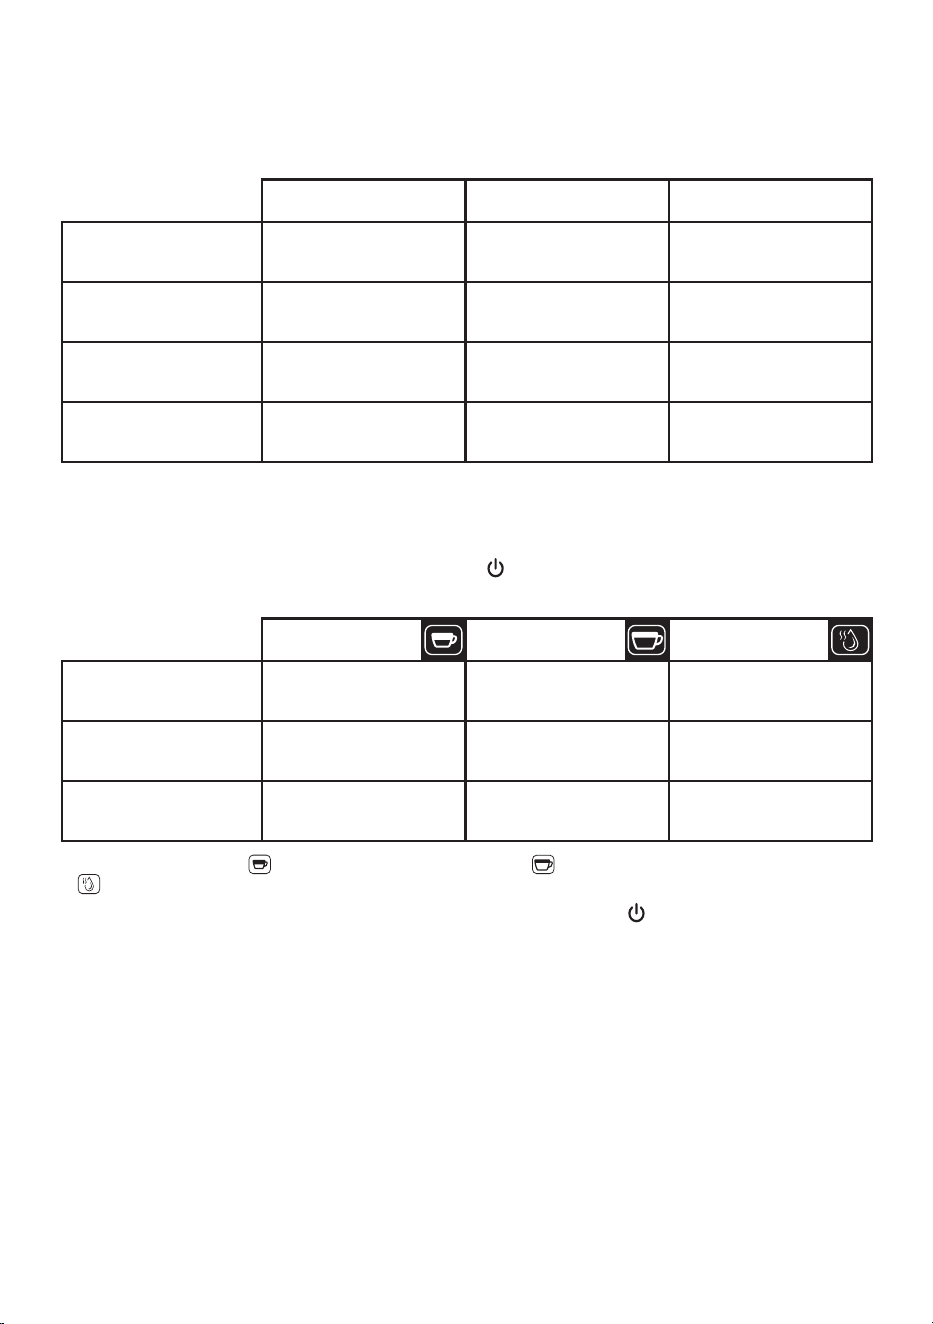
Mode Selection
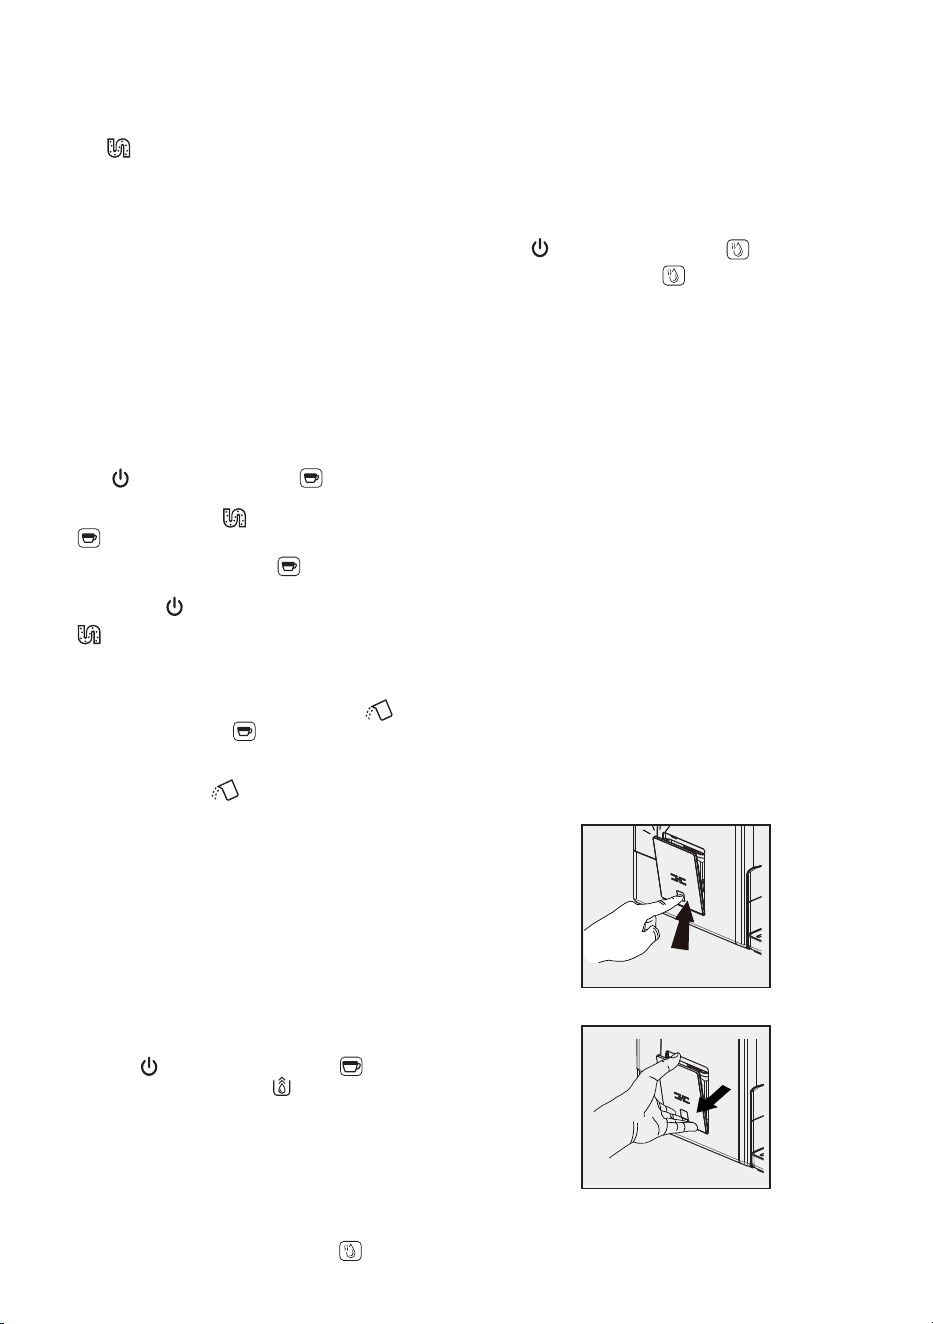
Themachinehasthreedierentsettings:defaultsetting,ECOmode,andspeedmode.InECOmode,the
appliancehelpstosaveenergy.Inspeedmode,youcanmakeyourcoeefasterthanindefaultsetting.
Whenthegrinderisgrindingcoeebeans,youcanturntheadjusterknobtochangetheneness.
Note: The pre-brewing function moistens the ground beans in the brewer with a small amount of water
before full extraction. This expands the coee grounds to build up greater pressure in the brewer, which
helps extraction of all the oils and full avor from the ground beans.
1. When the machine is in standby mode, press and hold for 5 seconds.
2.Buttonswillshowfollowingindicationsunderdierentsettings:
3. Press Espresso button in speed mode, Americano button in default setting, and Hot Water button
in ECO mode. Two beeps indicate that the mode is being selected.
4. If you would like to keep factory settings, press the Power ON/OFF button again or wait for 5 seconds
for the machine to return to standby mode.
Speed Mode Default Setting ECO Mode
Illumination light yes yes no
Pre-brewing* no yes yes
Auto shuto time 30 minutes 20 minutes 10 minutes
Cup volume memory yes yes yes
Espresso Button Americano Button Hot Water Button
In Speed Mode on ashing ashing
In Default Setting ashing on ashing
In ECO Mode ashing ashing on
13
Cleaning & Maintenance
Descaling
When lights up solid, it indicates that the
appliance needs to undergo descaling. The espresso
maker will work at its best if it is descaled at least
once a month or more regularly, depending on the
hardness of water used.
1. Fill the water tank to Max level.
2. Add one pack of cleaning agent to the water tank.
Important: Do not use vinegar or other cleaning
agents to descale this appliance. Other cleaning
agents might damage the appliance
3. Plug in the appliance.
4.Placeasucientlylargecontainerunderthe
coeespout.
5. In standby mode, press and hold the Power ON/
OFF and Espresso buttons for 5 seconds.
Two beeps will sound, and the the Clean/
Descaling indicator and the Espresso button
willash.
6. Press the Espresso button to start descaling.
To resume standby mode, press the Power ON/
OFF button .
7. willash,indicatingthattheapplianceis
undergoing the descaling process.
Warning: Do not touch the hot water.
8. When the water tank is almost empty, and
the Espresso button willash.Discardany
remainingsolutioninthewatertank,andthenll
the tank with tap water to Max level. When the
water tank is full, willgoo.Theappliance
will continue the descaling process.
9. When descaling process is completed, the
appliancewillswitchoautomatically.
Note: Be sure to allow the descaling cycle to run
completely.
Empty System Function
The empty system function is recommended
before storing, for frost protection, or before taking
for repairs.
1. In standby mode, press and hold the Power
ON/OFF and Americano buttons for 5
seconds. The Rinsing icon willash.
2. Remove the water tank from the appliance.
Then the empty system begins. The steam nozzle
will dispense a small amount of water.
3. When the empty system function is completed,
theappliancewillswitchoautomatically.
Important: After performing the empty system
function, press the Hot Water button until water
dispenses from the steam nozzle when the machine
is used again.
Manual Rinsing
You can perform a manual rinsing cycle to clean the
coeenozzleafteruse,oraftertheappliancehas
not been used for a long period of time.
1. In standby mode, press and hold the Power ON/
OFF and Hot Water buttons for 5 seconds.
2. The Hot Water button willash.Thecoee
nozzle will dispense a small amount of water.
Warning: Hot water will be dispensed from coee
spout into external drip tray. Avoid contact with
splashing water.
3. After rinsing, the appliance will return to
standby mode.
Cleaning the Appliance
1. Disconnect the power cord from the outlet.
2. Discard all water in both the internal and external
drip trays.
3. Use a damp cloth or nonscratching cleaner to
clean water stains on the appliance.
Important: Never use any abrasive, vinegar, or
descaling agents not included in the box to clean
the appliance.
Cleaning the Coffee Powder Outlet
Coeegroundsmayadheretothewallofthe
powder outlet. Cleaning the outlet ensures that
groundcoeecanbedeliveredtothebrewer.
1. Push the recessed area of the service door.
2. Take out the service door.
14
3. Press the release knob of the brewer.
4. Take the brewer out.
5. Rinse the brewer under running water. Let it dry
completely before reassembling the machine.
6. Use the cleaning brush to clean the powder outlet
andremoveanycoeegroundsorresiduefrom
the machine.
7. Use the included cloth to clean the inside of the
machine thoroughly. Dry completely before closing
the side door.
Warning: Do not take out the brewer until the gear
position returns to the idle position after use.
15
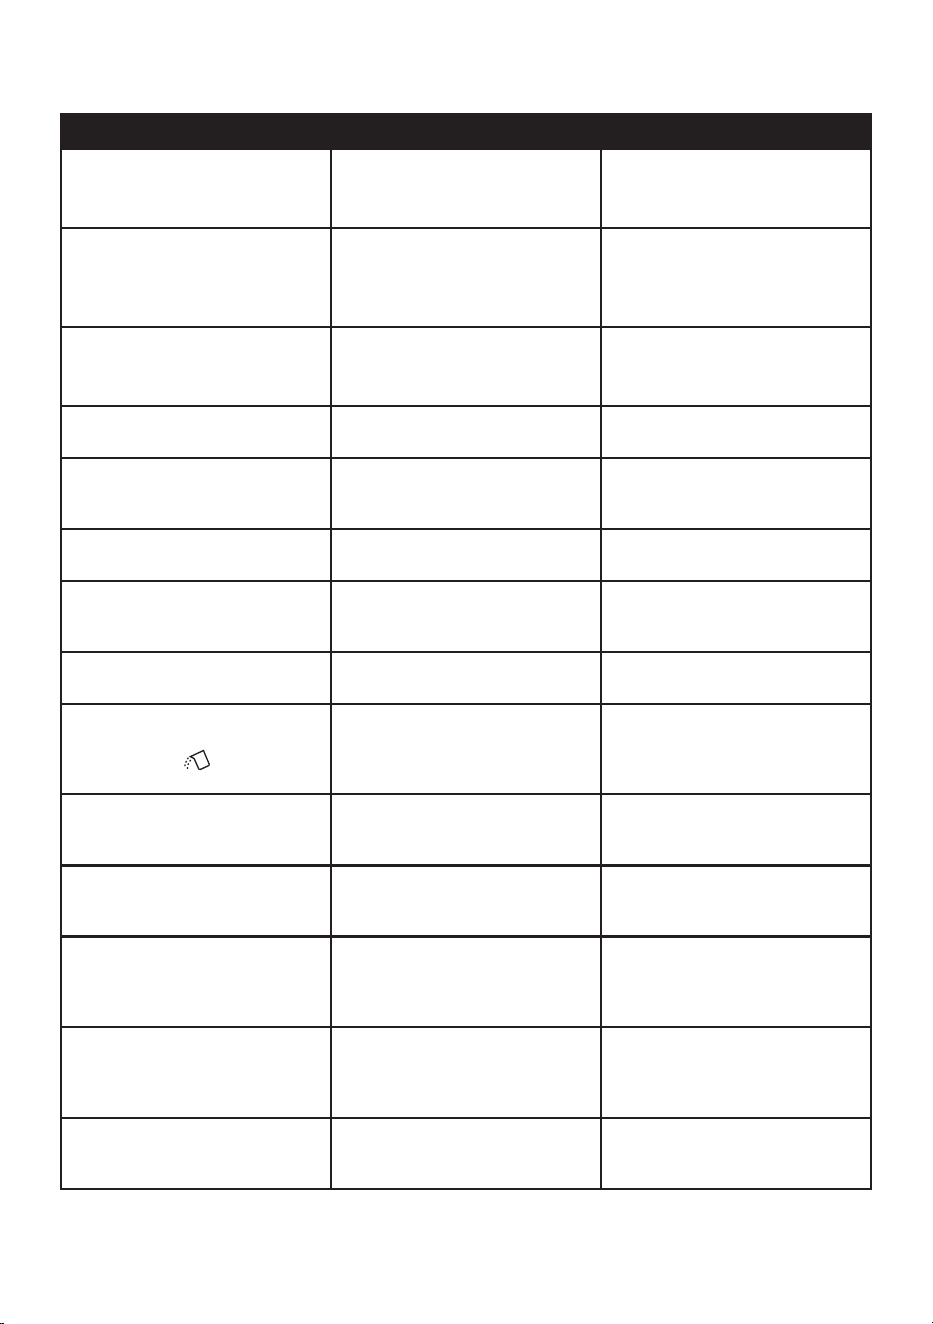
TROUBLESHOOTING
PROBLEM CAUSE SOLUTION
The appliance does not work. The appliance is not connected
properly.
Plug in and press the Power ON/
OFF button.
Check the cable and the plug.
No or delayed response after
several attempts to use the
function buttons on the panel.
Appliance is under
electromagnetic interference.
Dirt over the panel.
Unplug the appliance. Restart
after a few minutes.
Clean the panel with the cloth
provided.
Thecoeeisnothotenough. The cups have not been
preheated.
The brewing unit is too cold.
Rinse the appliance at least
3 times before making the
coee.
Thecoeecannotcomeoutof
the spout.
Empty system function may have
been used before.
Press the Hot Water button until
water comes out of the spout.
Therstcupofcoeeis
poor quality.
Therstrunofthegrinderdoes
not produce enough ground
coeeforthebrewingunit.
Throwthecoeeaway.
Subsequent cups will
be better.
Coeehasnocrema. Coeebeansarenotfresh. Change or use appropriate brand
ofcoeebean.
Touch buttons are not
responding.
Not pressing the buttons from
the front of the appliance.
Press the lower bottom part of
the icon of the button from the
front of the appliance.
The appliance takes too long time
to warm up.
Excessive scale has built up. Descale the appliance.
The water tank is removed/the
water level is very low in the
water tank but has
no alert.
The area near the water tank
connector is wet.
Dry around the water tank
connector.
Internaldriptrayislledwitha
lot of water.
Coeepowderistoone,which
blocks the water coming out.
Adjustthecoeenenesstoless
negrindduringgrinder
operation.
Coeeisdeliveredtooslowlyora
drop at a time.
Coeepowderistoone,which
blocks the water coming out.
Adjustthecoeenenesstoless
negrindduringgrinder
operation.
Lackofcoeebeanindicator
ashesbuttherearestill
alotofcoeebeansinsidethe
container.
Internalcoeepowderoutletis
blocked.
Follow the steps in Cleaning
CoeePowderOutlet
Descalingindicatorkeepsashing
even after the descaling process.
Descaling process is not
completed.
Waitfortheprocesstonish.The
machinewillshuto
automatically.Donotswitcho
the machine manually.
Milk foam cannot be created by
steam nozzle.
The nozzle is dirty, or the hole on
the nozzle cover or metal tube is
blocked by milk residue.
To follow the steps in Daily
CleaningoftheCoeeMachineto
clean steam nozzle.

16
Limited Warranty
Subject to the exclusions and limitations contained
herein,ConairLLCdbaCuisinart(“Cuisinart”)
warrants that the Cuisinart
®
Espresso Bar
™
Fully
AutomaticEspressoMachine(“Product”)willbefree
from material defects in materials and workmanship
under normal home use conditions for a period of
ONE (1) year beginning on the date the Product was
purchased in its original, sealed packaging, unless
otherwisespeciedinthisLimitedWarranty.This
LimitedWarrantyisonlyforU.S.consumers(dened
herein as purchasers at retail for personal, family, or
household use) who originally purchase the Product
from Cuisinart or an authorized Cuisinart
®
reseller (if
you are unsure whether a retailer or other point of
sale is an authorized or unauthorized Cuisinart
reseller, contact Cuisinart).
This Limited Warranty does NOT cover:
• Normal wear and tear;
• Any Product purchased by commercial purchasers
or for commercial or nonhousehold uses;
• Accessories, parts, or software added to the
Product after the system is shipped from Cuisinart;
• Any costs associated with the replacement or
repair of the Product, including labor, installation,
or other costs incurred by you without prior
Cuisinart approval;
• Damage to the Product, defective conditions, or
nonconformities due to: (1) external causes,
including shipping, accidents, problems with
electrical power (Product designed only for use
with 120-volt outlets), abnormal conditions (such
as mechanical or environmental); (2) usage not in
accordance with Product instructions; (3) misuse,
neglect, unauthorized alteration, unauthorized
repair; and (4) acts of God or other events beyond
Cuisinart’s control;
• Though necessary repairs and maintenance might
be performed by any company, damage caused by
you or any nonauthorized third party may void this
Limited Warranty;
• Damage caused by accessories or replacement
partsnotspecicallyauthorizedbyCuisinartmay
void this Limited Warranty; and
• Any Product where the original Product
identicationmarkings(trademarkorserial
number) have been removed, altered, or
obliterated from the Product.
It is recommended that you visit the website https://
www.cuisinart.com/register-your-product.html for a
fast,ecientwaytocompleteyourproduct
registration. However, product registration does not
eliminate the need for the consumer to maintain the
original proof of purchase in order to obtain the
warrantybenets.Intheeventthatyoudonothave
proof of purchase date, the purchase date for
purposes of this Limited Warranty will be the date of
manufacture.
HASSLE-FREE WARRANTY
If the Product that is the subject of this Limited
Warranty fails during the warranty period for reasons
covered by this Limited Warranty, Cuisinart will, at
its option, repair the Product, replace the Product
with another identical or reasonably equivalent
product, or if Cuisinart is unable to repair or replace
the Product, refund the purchase price, less the
amount directly attributable to the consumer’s prior
usage of the Product. To obtain a return shipping
label, email us at https://www.cuisinart.com/
customer-care/product-assistance/product-
inquiry/, or call our Consumer Service Center
toll-free at 1-800-726-0190 to speak with a
representative.
Upon receipt of the Product, Cuisinart will
inspect the Product and, if required under this
Limited Warranty, attempt to repair, replace, or
refund the Product within thirty (30) days. However,
there may be delays beyond Cuisinart’s control, in
which case that time period may be extended as
reasonably necessary.
Important: If the nonconforming Product is to
be serviced by someone other than Cuisinart’s
Authorized Service Center, please remind the
servicer to call our Consumer Service Center at
1-800-726-0190 to ensure that the problem is
properly diagnosed, the Product is serviced with
the correct parts, and the product is still
under warranty.
CALIFORNIA RESIDENTS ONLY
The ONE (1) year Limited Warranty period begins on
the date the Product was delivered, which may be
dierentthanthedatetheProductwaspurchased.
California residents also have the option of obtaining
thebenetsofthisLimitedWarrantybybringingthe
Product to (A) the store where it was purchased or
(B) another retail store that sells Cuisinart products
of the same type. The retail store shall then,
according to its preference, either repair the
Product, refer the consumer to an independent
repair facility, replace the Product with another
identical or reasonably equivalent product, or refund
the purchase price less the amount directly
attributable to the consumer’s prior usage of the
Product. California residents may also, according to
their preference, return nonconforming products
directly to Cuisinart for repair or, if necessary,
replacement with another identical or reasonably
equivalent product by calling our Consumer Service
Center toll-free at 1-800-726-0190. Cuisinart will be
responsible for the cost of such repair, replacement,

17
and/or shipping and handling for such
nonconforming products under warranty.
THIS LIMITED WARRANTY GIVES YOU SPECIFIC
LEGAL RIGHTS, AND YOU MAY ALSO HAVE OTHER
RIGHTS THAT VARY FROM STATE TO STATE OR BY
JURISDICTION. IN THE EVENT THIS LIMITED
WARRANTY IS BREACHED, YOU MAY HAVE CLAIMS
FOR REPLACEMENT, DAMAGES, OR OTHER
PENALTIES.
LIMITATIONS OF LIABILITY/ADDITIONAL LIMITATIONS
AND EXCLUSIONS
ALL EXPRESS AND IMPLIED WARRANTIES ARE
LIMITED IN DURATION TO THE LIMITED WARRANTY
PERIOD. NO WARRANTIES APPLY AFTER THAT
PERIOD. SOME STATES (OR JURISDICTIONS) DO NOT
ALLOW LIMITATIONS ON HOW LONG AN IMPLIED
WARRANTY LASTS, SO THIS LIMITATION MAY NOT
APPLY TO YOU. CUISINART’S RESPONSIBILITY UNDER
THIS OR ANY OTHER WARRANTY, IMPLIED OR
EXPRESS, IS LIMITED TO REPAIR, REPLACEMENT, OR
REFUND, AS SET FORTH ABOVE. THESE REMEDIES
ARE THE SOLE AND EXCLUSIVE REMEDIES FOR ANY
BREACH OF WARRANTY. TO THE MAXIMUM EXTENT
PERMITTED BY LAW, CUISINART IS NOT
RESPONSIBLE FOR ANY DIRECT, INDIRECT, SPECIAL,
INCIDENTAL, OR CONSEQUENTIAL DAMAGES
RESULTING FROM ANY BREACH OF WARRANTY OR
UNDER ANY OTHER LEGAL THEORY (INCLUDING, BUT
NOT LIMITED TO, LOST PROFITS, DOWNTIME, LOSS
OF GOODWILL, DAMAGE TO OR REPLACEMENT OF
EQUIPMENT AND PROPERTY, AND ANY COSTS OF
RECOVERING, REPROGRAMMING, OR REPRODUCING
ANY PROGRAM OR DATA STORED IN OR USED WITH
A SYSTEM CONTAINING THE PRODUCT), EVEN IF
CUISINART HAS BEEN ADVISED OF THE POSSIBILITY
OF SUCH DAMAGES. SOME STATES DO NOT ALLOW
THE EXCLUSION OR LIMITATION OF INCIDENTAL OR
CONSEQUENTIAL DAMAGES, SO THE ABOVE
LIMITATIONS OR EXCLUSIONS MAY NOT APPLY TO
YOU. ALL EXPRESS AND IMPLIED WARRANTIES ARE
LIMITED IN DURATION TO THE LIMITED WARRANTY
PERIOD. NO WARRANTIES APPLY AFTER THAT
PERIOD. SOME STATES (OR JURISDICTIONS) DO NOT
ALLOW LIMITATIONS ON HOW LONG AN IMPLIED
WARRANTY LASTS, SO THIS LIMITATION MAY NOT
APPLY TO YOU.
This Limited Warranty is issued by:
Conair LLC
1 Cummings Point Road
Stamford, CT 06902
1-800-726-0190

18
Notes

19
Notes

©2025 Cuisinart
Glendale, AZ 85307
Printed in China
25CE200375
G IB-18598