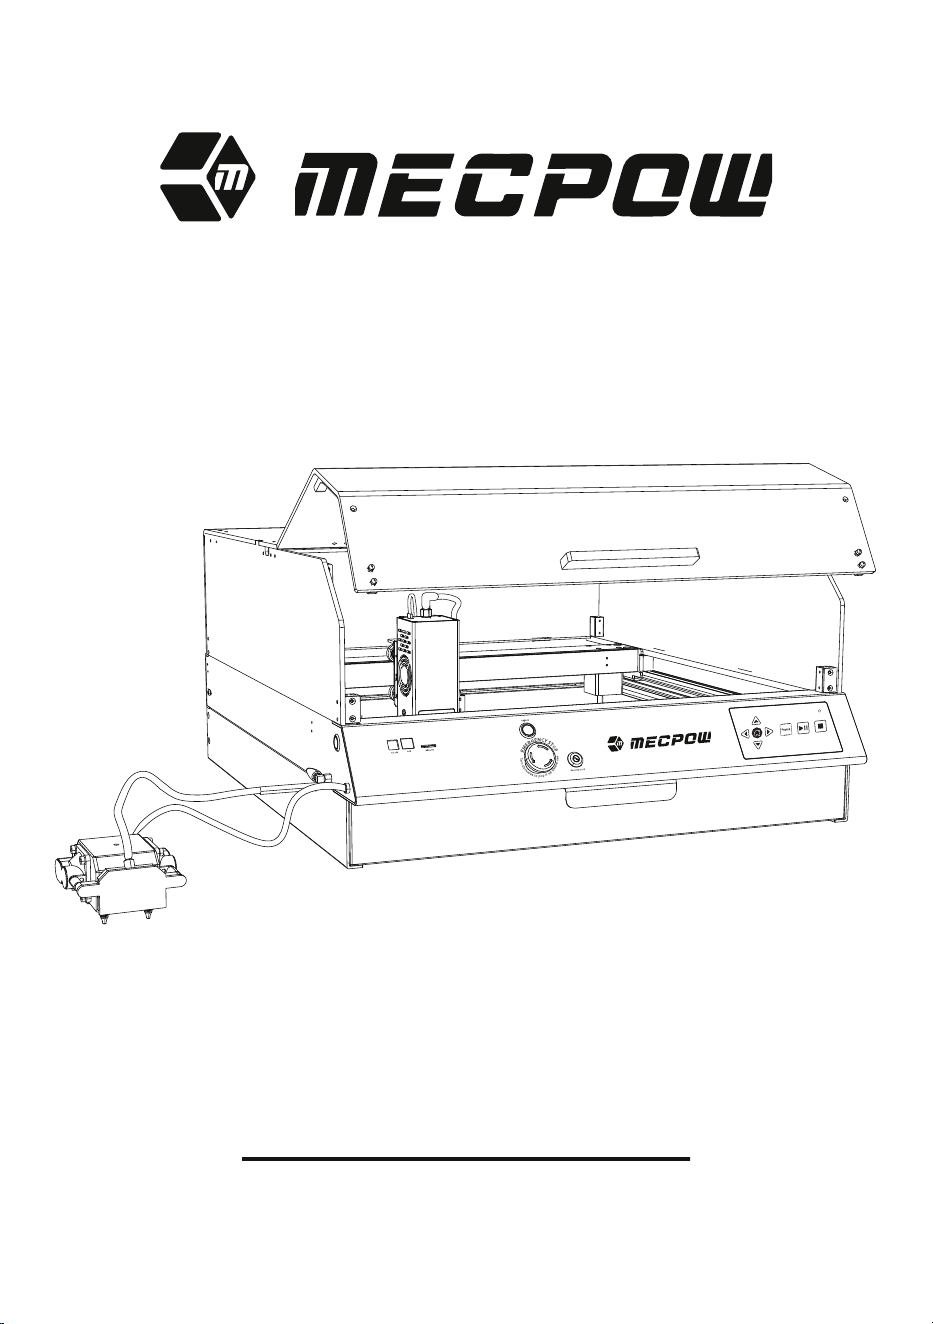
User Manual
X4 Pro

CATALOGUE
ENGLISH..........................................................
DEUTSCHE.......................................................
ESPAÑOL.........................................................
FRANÇAIS.......................................................
ITALIANO.......................................................
POLSKI...........................................................
01~24
25~49
50~74
75~99
100~124
125~149

1. Preface......................................................................
2. Security Statement.................................................
3. Diagram....................................................................
4. Specifications..........................................................
5. Package List............................................................
6. Assembly Guide......................................................
7. Functions & Operations.........................................
8. Driver........................................................................
9. Control via Computer Software............................
10. Control via Control Panel & TF Card...................
11. Control via Mobile App & TF Card........................
12.
Recommended Operating Parameters..........
13. Troubleshooting...................................................
14. Compliance Statement........................................
01
01
02
04
04
05
12
14
15
20
21
23
23
24
CONTENTS

1. Preface
Warning
2. Security Statement
Dear Customer,
Thank you for purchasing our laser engraving machine. This device is a high-tech product that integrates light,
machinery, and electricity. In order for you to use and maintain the equipment better, please read the user
manual carefully and follow the steps in the manual.
Disclaimer
Any losses caused by improper use or failure to follow the steps in the user manual will be borne by the
individual. The nal interpretation of the user manual belongs to our company, and we reserve the right to
modify any information, data, technical details, etc. in the manual.
* Laser processing can be risky, and users should carefully consider whether the object to be processed is
suitable for laser work.
* The object being processed and emissions must comply with local laws and regulations.
* This machine uses a Class IV laser (high-power laser radiation), which may cause the following situations:
(1) Ignition of surrounding ammable materials;
(2) During laser processing, other radiation and toxic and harmful gases may be produced, depending on the
object being processed;
(3) Direct exposure to laser radiation can cause harm to the human body. There must be re-ghting
equipment in the workplace, and ammable and explosive materials must not be stacked around the
workbench or machine. Good ventilation must also be maintained.
* The environment in which the machine is located should be dry, free from pollution, vibration, strong
electricity, strong magnetism and other interference. The working ambient temperature should be 5-30°C, and
the working ambient humidity should be 35-65%RH.
* The working voltage of the machine is AC100-240V.
* During the operation of the machine, it must be monitored throughout. Before leaving, all power must be cut
o to prevent any unforeseen issues. If an abnormal situation occurs, please immediately cut o the power and
deal with it!
* It is strictly prohibited to place any reective or diuse objects in the machine that are not relevant to its
operation to prevent laser reection on the human body or ammable materials.
* The machine should be kept away from electrical equipment sensitive to electromagnetic interference, which
may cause electromagnetic interference to it.
Safety Precautions
-01-
* It is strictly forbidden for non-professionals to disassemble the laser engraver as there may be dangers such as
high voltage inside the machine.
1. The laser engraving machine can produce laser light. It is strictly prohibited to place any living organisms
under the laser emission (the port is marked with a yellow warning sign).
2. Photosensitive patients are prohibited from using or getting close to the laser engraver.
3. When using the laser engraving machine, the operator and anyone near the machine must wear laser safety
glasses. Do not operate the laser machine without laser goggles. Our machine comes with a pair of laser safety
glasses. If you want to purchase additional goggles, the goggles should oer wavelength protection between
400-445nm (+-5nm), have an outer diameter of +5, and meet a minimum L5 level.
4. When the laser engraving machine is in operation, the user must pay close attention and not leave it
unattended to avoid ignition of the engraved material. Place the machine in a reproof area and ensure good
ventilation. It is recommended to have a re extinguisher nearby in case of emergencies.
5. Make sure there are no ammable materials near the laser engraving machine. We recommend placing a
honeycomb working table under the machine.
6. When operating the laser engraver, ensure that there is enough space around it. Engraving certain materials
may produce smoke, which should be vented out using a specialized exhaust system.
EN
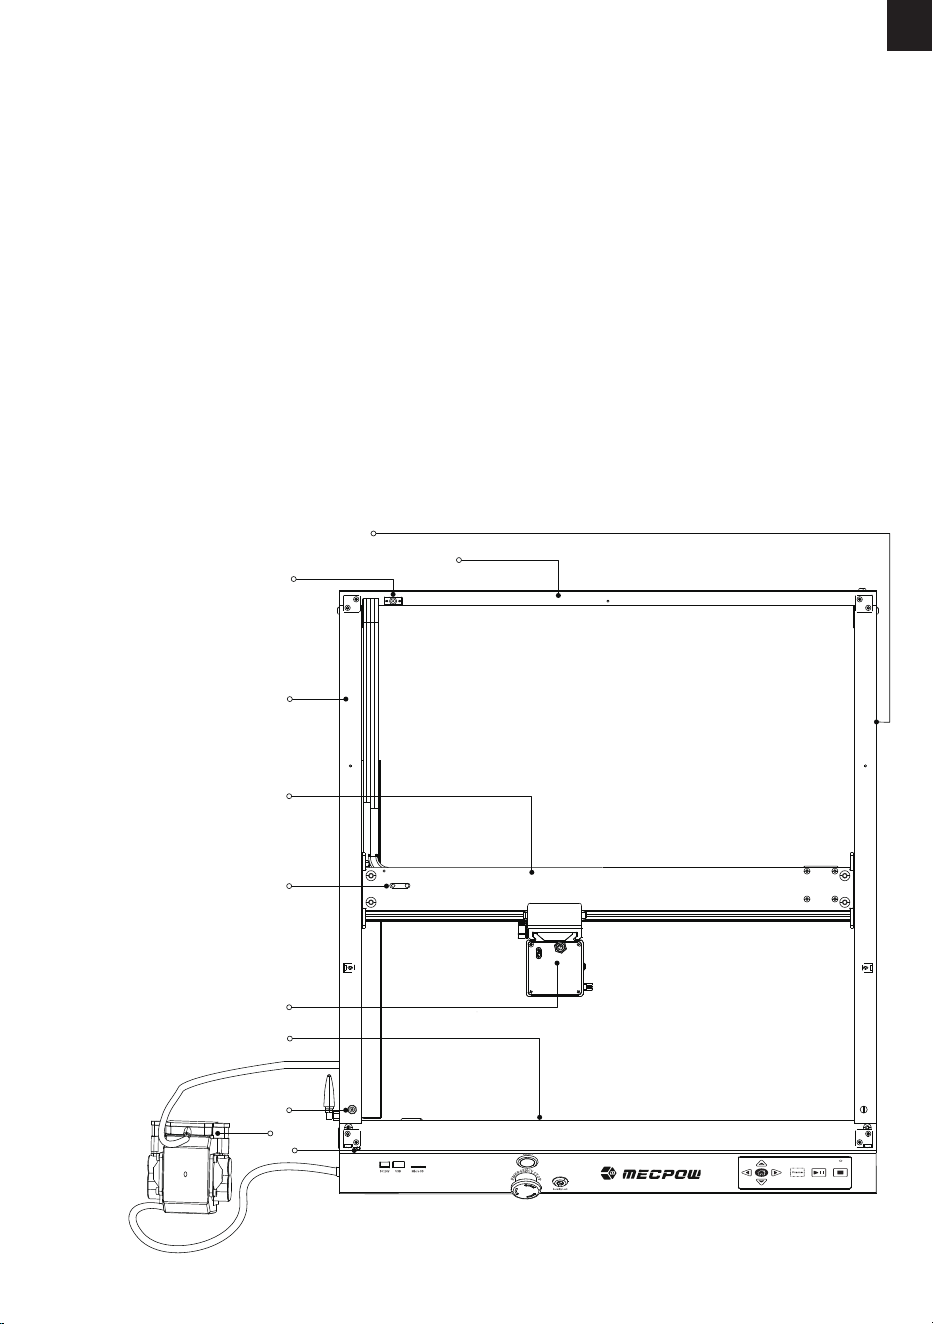
3. Diagram
-02-
7.Do not touch the laser beam or the object being processed while the machine is in operation, as this could
cause serious injury or beam reection. Additionally, avoid touching the radiator as it may be hot due to the
laser engraving machine working or just recently stopping.
8. Children or teenagers (especially those under 14 years old) are not allowed to use the laser engraving
machine alone and should be supervised by an adult at all times.
9. The operating temperature of the machine is 41°F-86°F (5°C-30°C)
10. Switch the machine o when it is not in use to avoid misuse by third parties.
11. When laser engraving, there is a risk of re. When the laser engraving machine is in use, it must be
supervised by a skilled operator who can use a re extinguisher to handle any accidents that may occur.
12. Our laser engraving machine is equipped with a built-in ame sensor to maximize the safety of our
equipment. But please note that no written or implied warranty is made regarding the availability or function-
ality of the ame sensor.
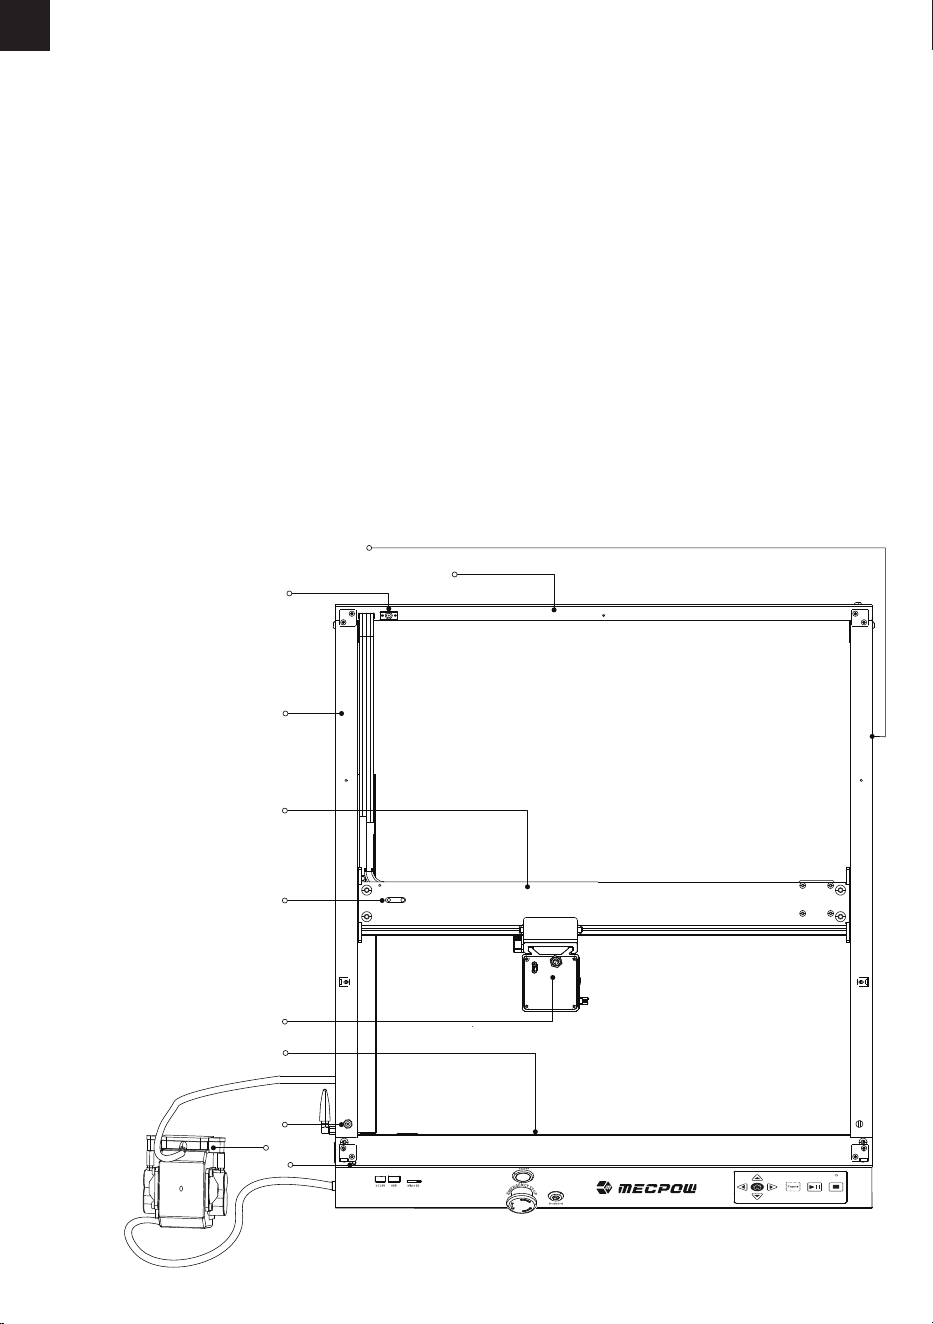
1. Right Y-Axis
2. Rear X-Axis
3. Exhaust Fan DC Port
4. Left Y-Axis
5. X-Axis Assembly
6. X-Axis Belt Tension Regulator
7. Laser Module
8. Front X-Axis
9. LED Light DC Port
10. Air Pump
11. Hall Switch
EN
Maintenance
Recommendations:
Switch o the machine for 10 minutes after 4 hours of engraving and 10 minutes after 1 hour of cutting.
The laser module is consumable.
2
4
5
8
10
1
9
6
11
3
7
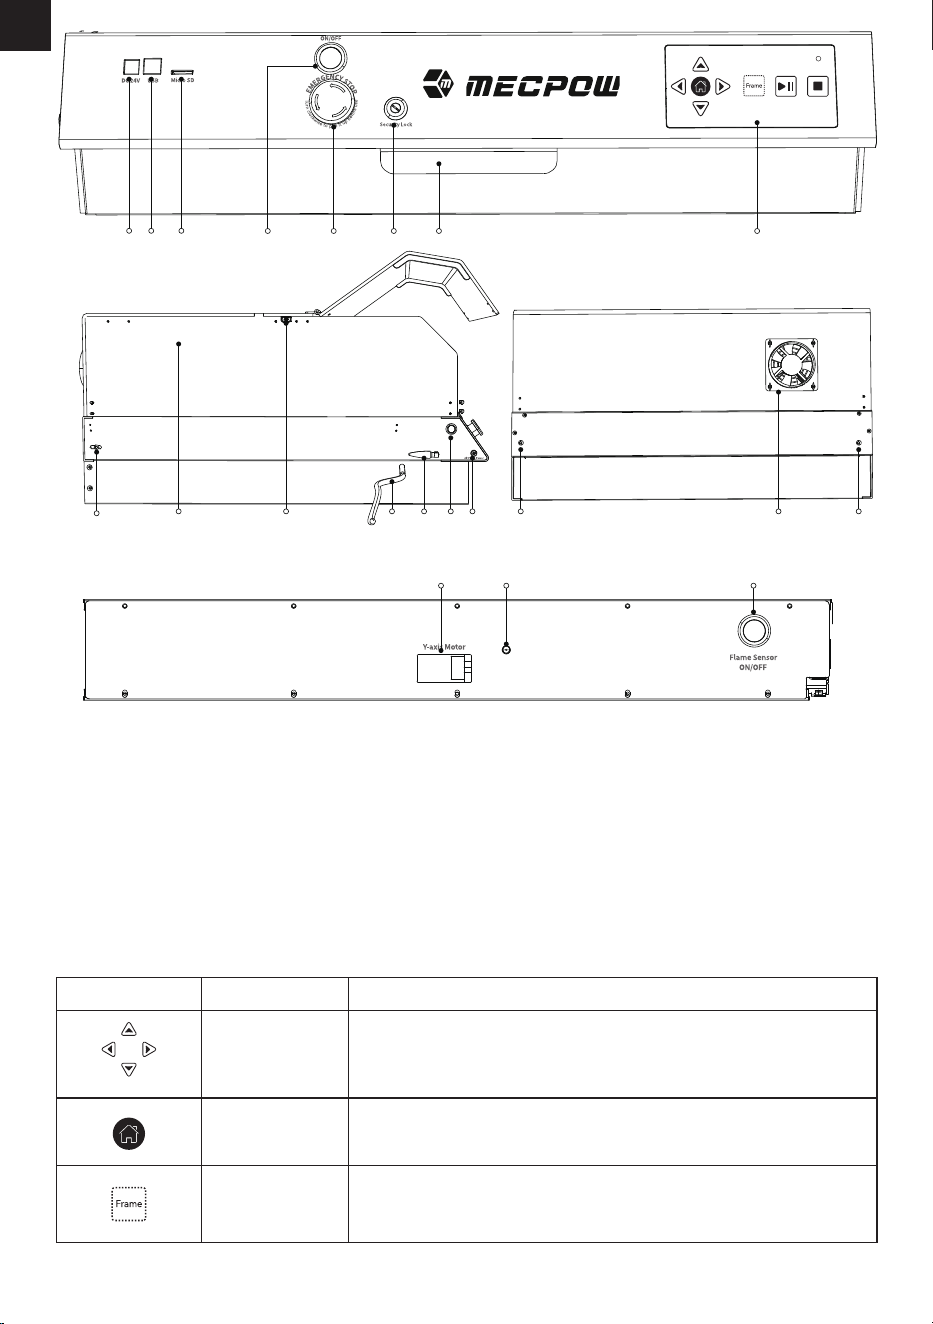
-03-
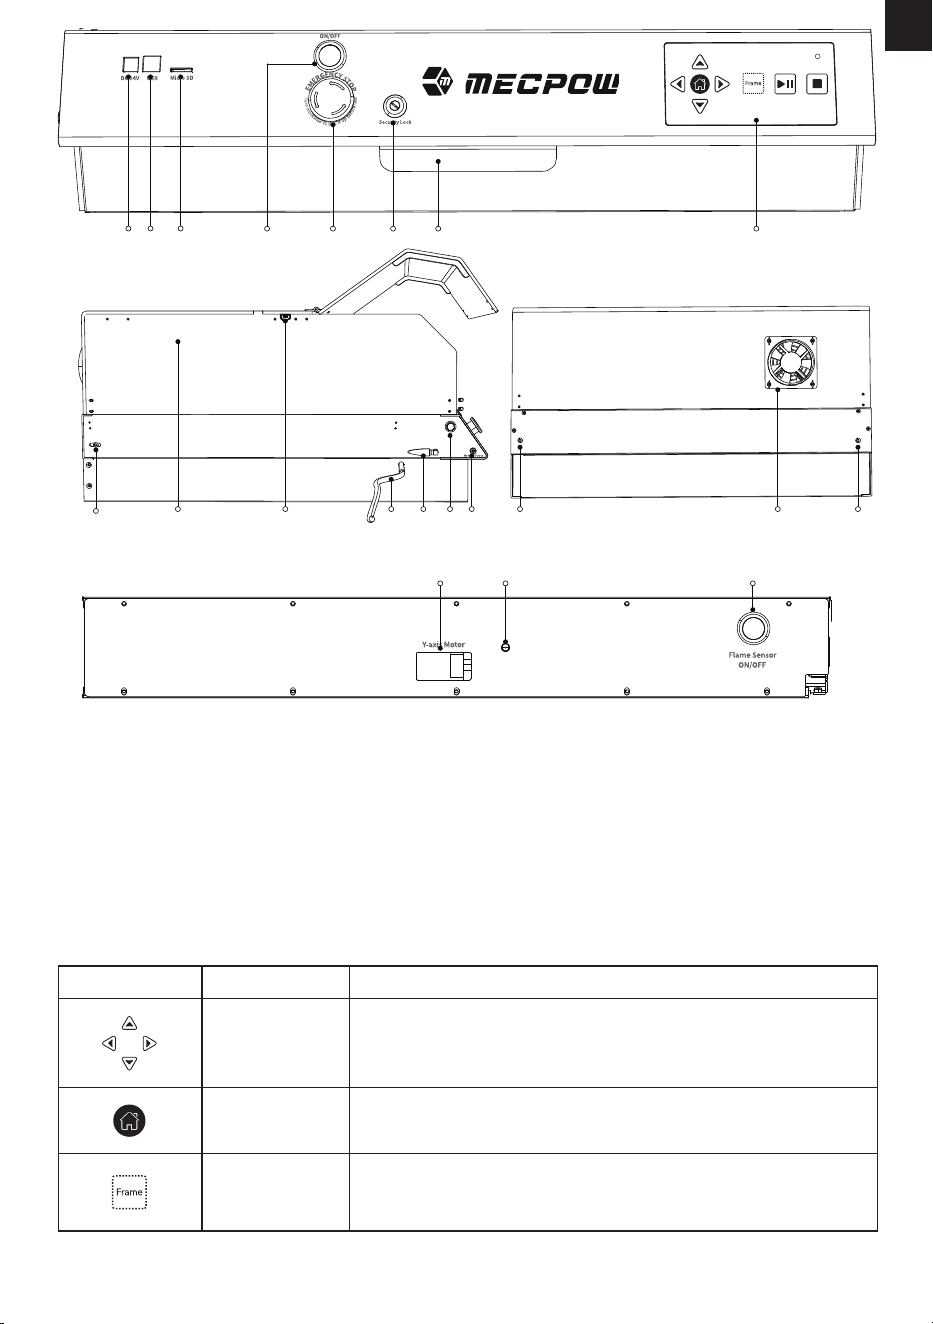
1. DC Input Port
2. USB Port
3. Micro SD Port
4. Power Switch
5. Emergency Stop Button
6. Security Lock
7. Bottom Tray Drawer
8. Control Panel
9. Screw for Fixing the Y-Axis Belt
10. Protective Cover
11. External Camera Interface
12. Hose for Air Pump
13. WiFi Antenna
EN
Control Panel Introduction
1
2 3
1110 1716 1614 15 1312
4 5 6
7 8
14. LED Light Switch
15. Air Pump Power Port
16. Screws for Adjusting the Y-Axis Belt
17. Exhaust Pipe
18. Y-Axis Motor
19. Flame Sensor
20. Flame Sensor Switch
9
18 2019
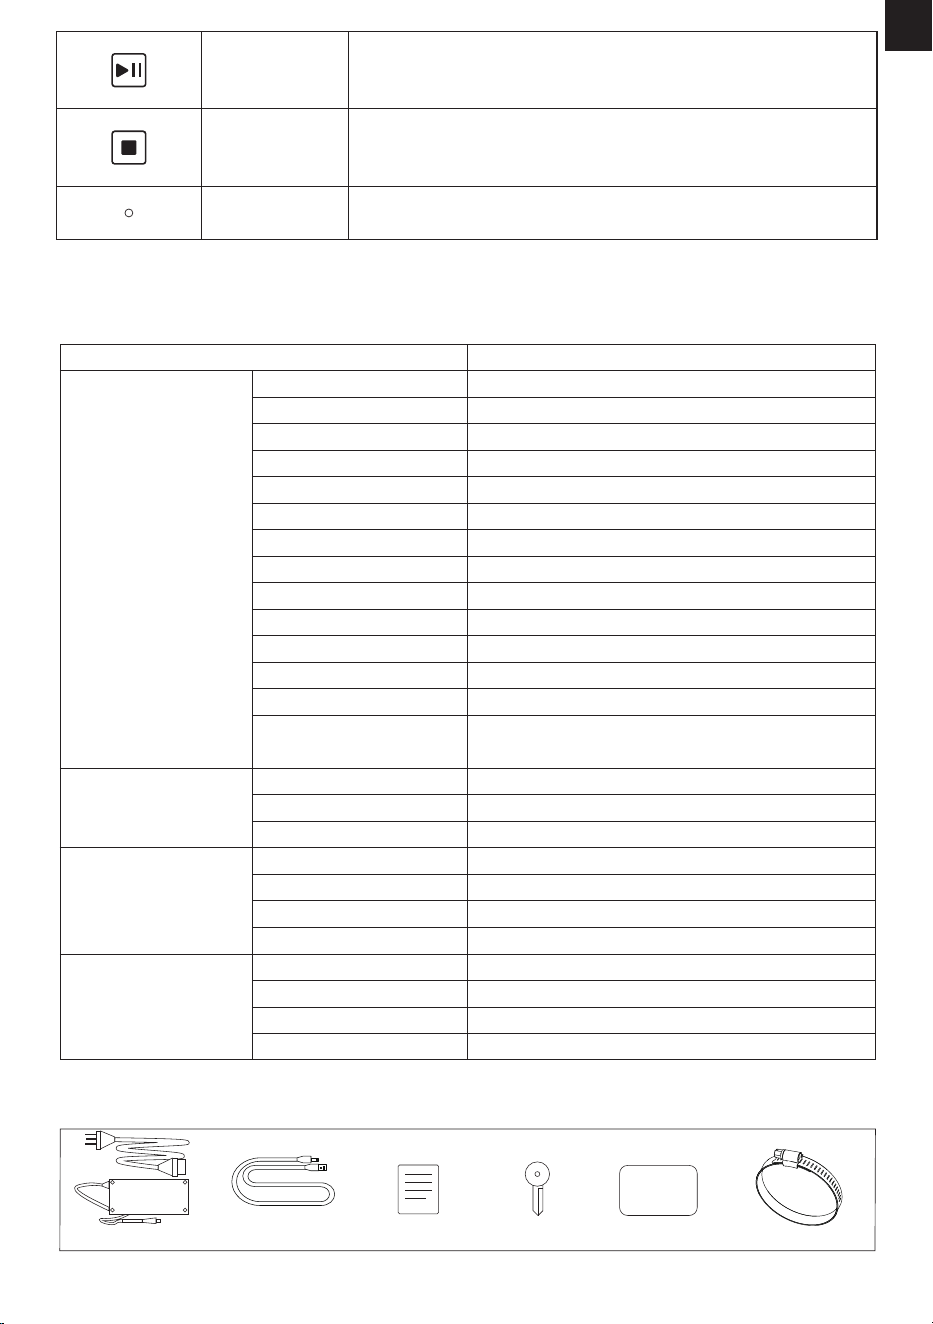
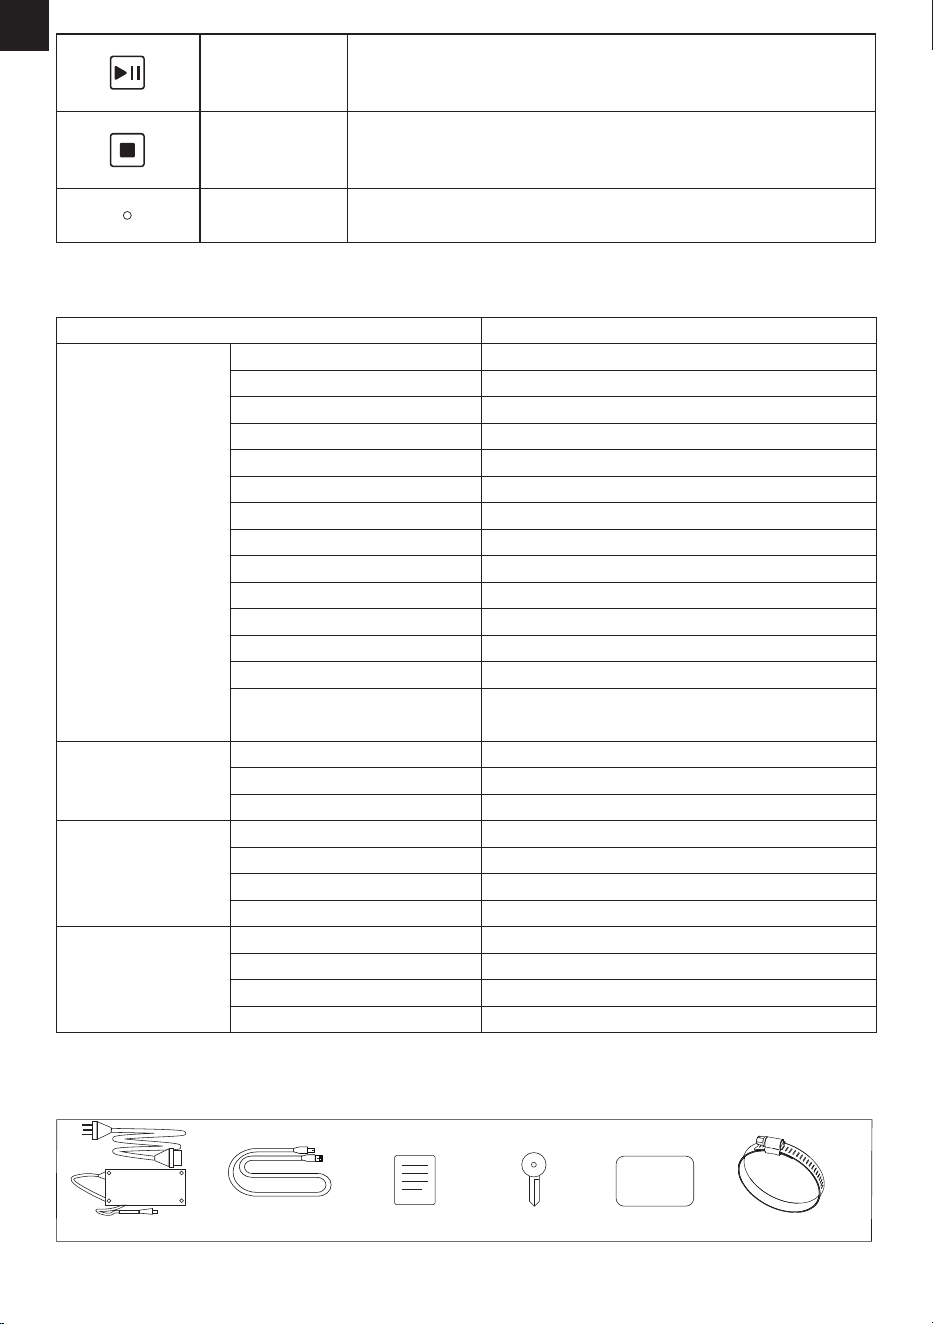
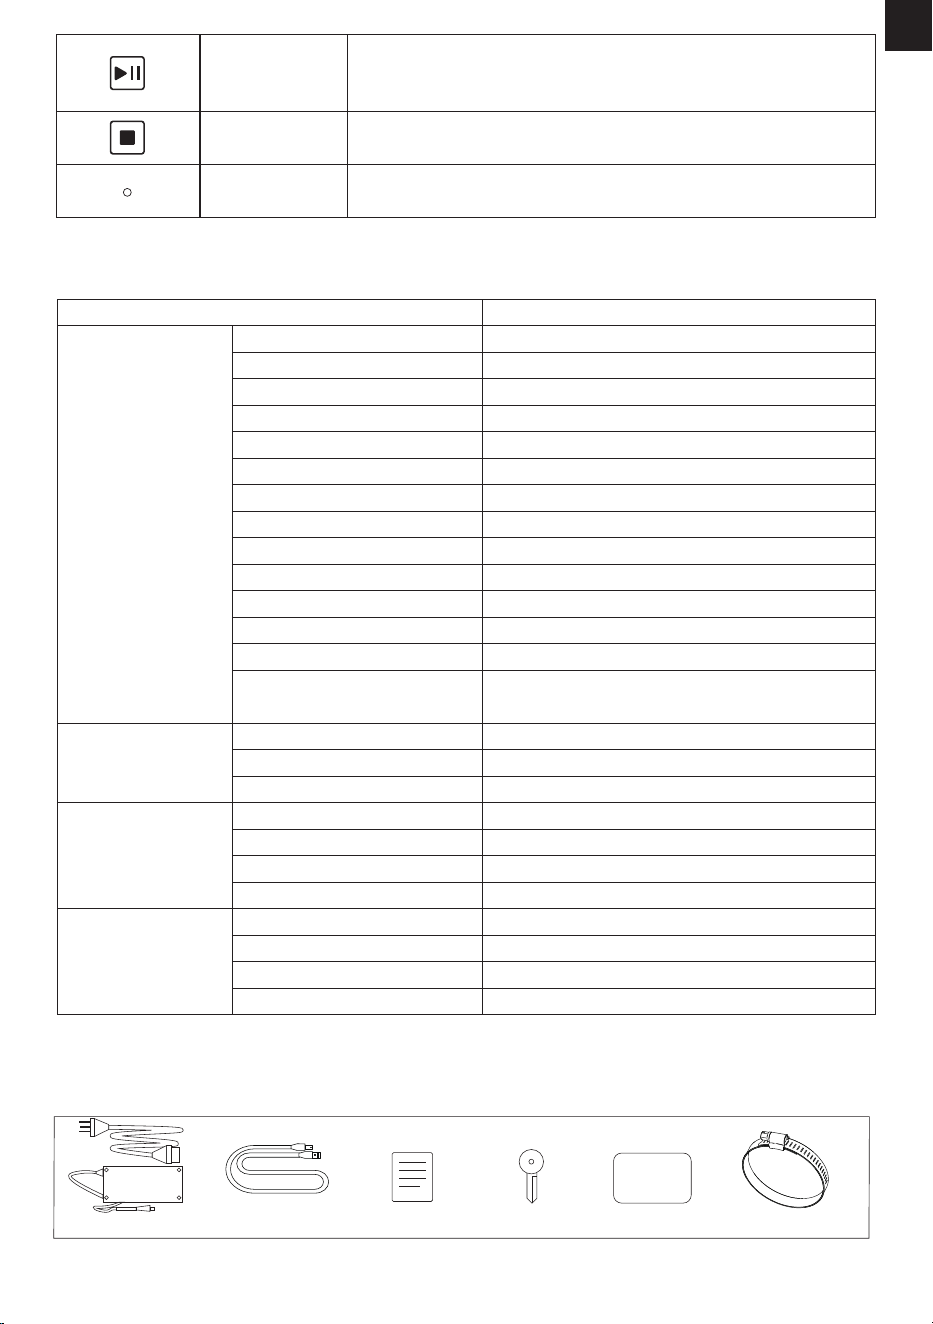
Keys Key Names
Arrow Keys
Home
Patrol Key
Key Functions
Press this key to return the laser module to the original position.
Press this key and the laser module will patrol the working area
of the rst G-code le in the TF card.
Briey press one of the keys, and the laser module will move 1mm in
the corresponding direction. Long press the key for 3 seconds or
more, and the laser module will keep moving till you release the key
or the laser module hits the limit switch.
4. Specifications
5. Package List
-04-
Model
Basic Specications
Laser Module
Air Pump
Charger
X4 Pro
790x655x235mm
21kg
685x620x310mm
DC 24V
410x400mm
22000mm/min
0.08x0.1mm
50°±5
MKSLaser APP,LaserGRBL, LightBurn
Windows, Mac, Linux
JPEG, BMP, GIF, PLT, PNG, DXF
Aluminum
Wood, Acrylic, China, Fabric, Bamboo, Plastic
Board, Leather, Fruit, Bread, etc.
Product Size
Package Size
Weight
Input Voltage
Rated Power
Max. Engraving Area
Max. Engraving Speed
Spot Size of Laser Beam
Tilt Alarm
Software Support
System Support
File Format Support
Frame Material
Rated Power
Input
Laser Power
Input Voltage
Input Current
Input Power
Air Velocity
Input Voltage
Input Current
Output Voltage
Output Current
Materials for
Laser Engraving
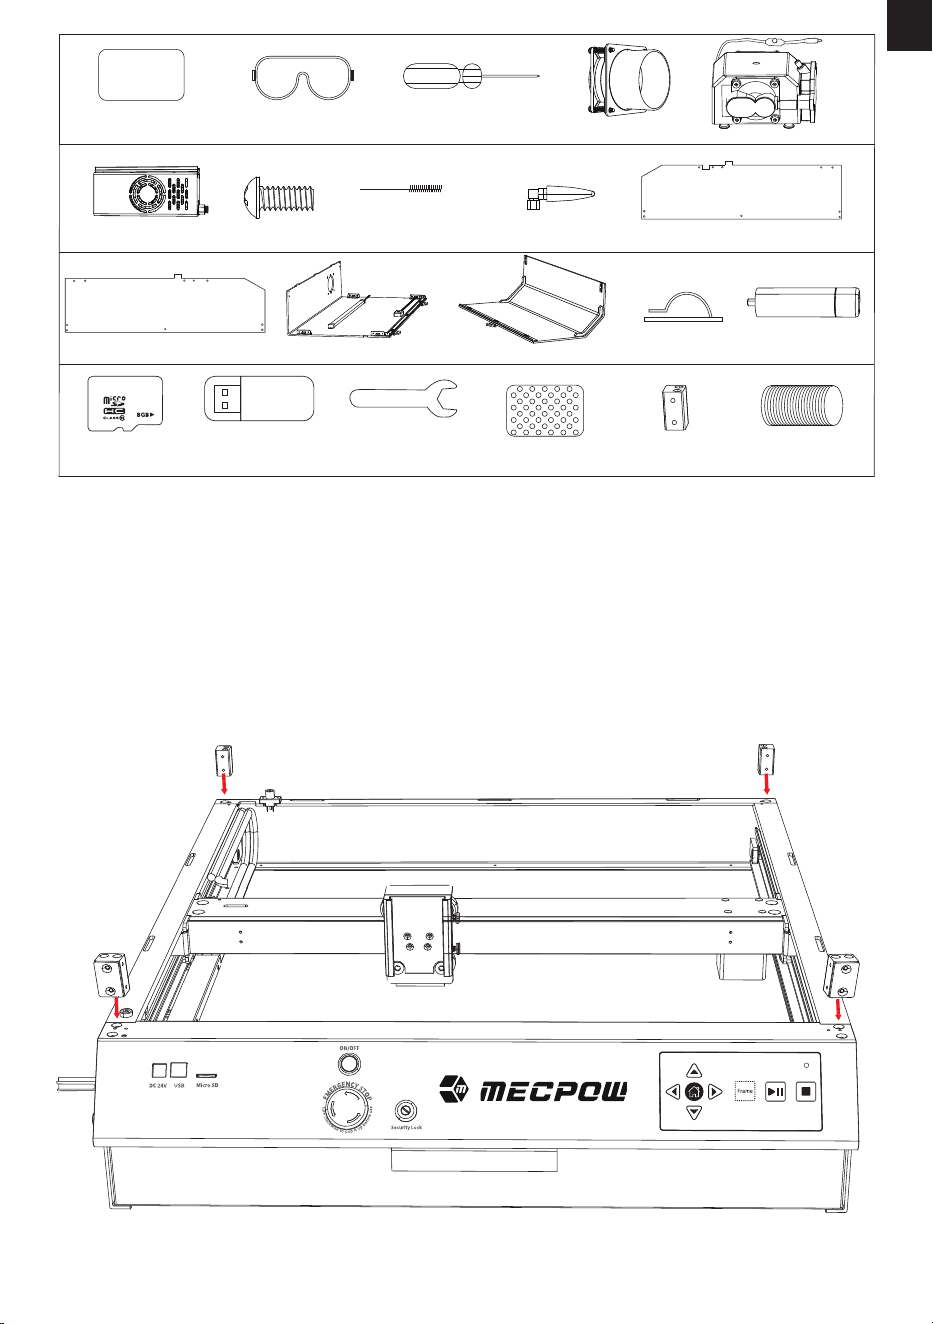
Power Adapter *1 USB Cable *2 Wood Board *2
Throat Hoop *1
Key *2User Manual *1
EN
144W
77W
22W
24V 6A
24V
1.5A
36W
30L/min
AC 100-240V
2.5A
24V
6A
Start/Pause Key
Stop Key
TF Card Indicator
Press this key to start/pause engraving.
Press this key to terminate engraving.
Light on when the TF card is detected and read.
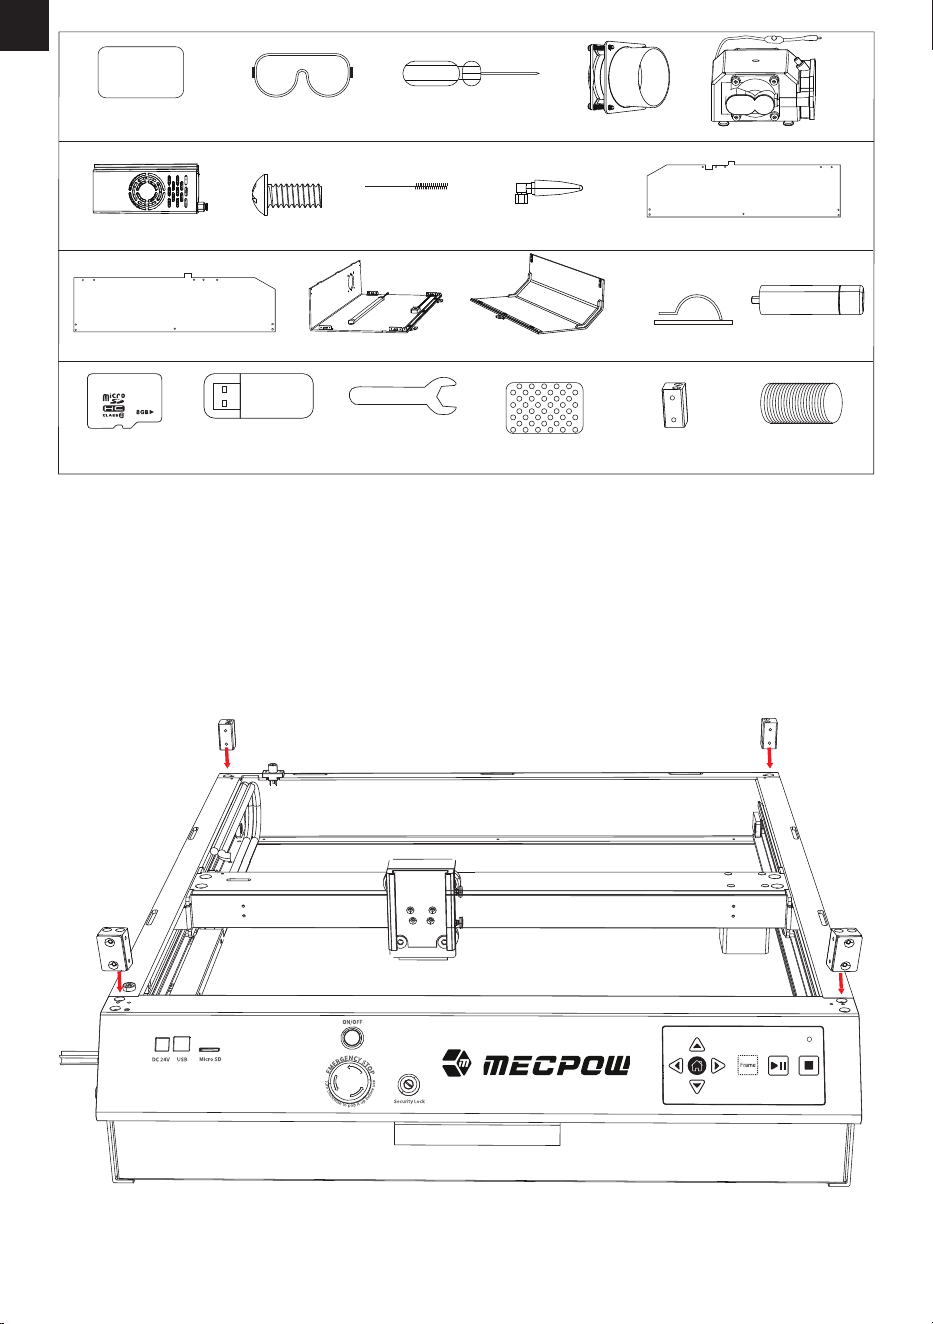
-05-
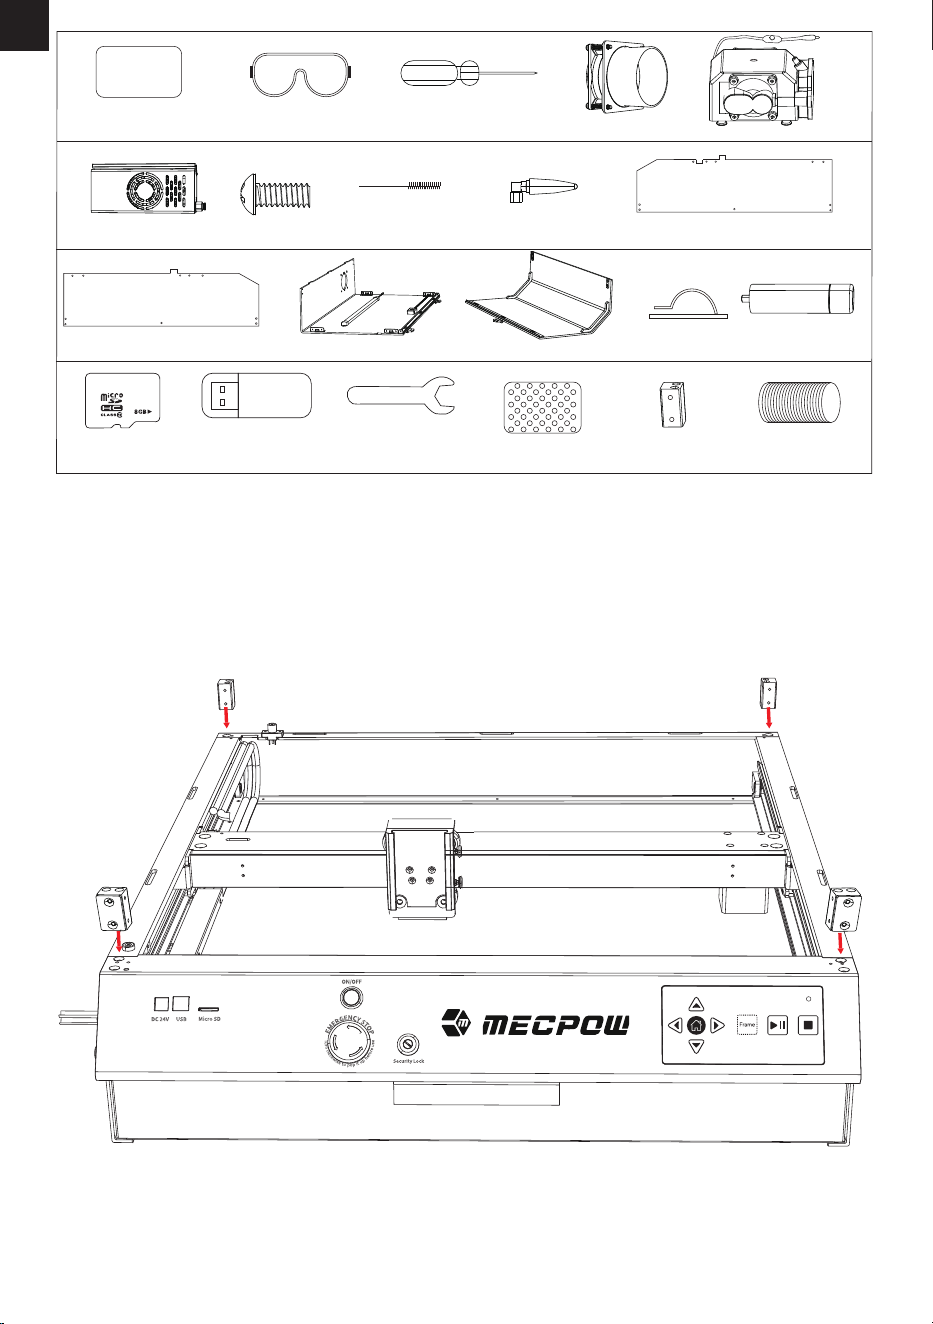
Metal Plate *1
Screwdriver *1
Screw Pack *1
Goggles *1
EN
Cleaning Brush *1
Front Protective Cover *1
Exhaust Fan *1
Adhesive Cable Clip *5
Right Protective Cover *1
Rear Protective Cover *1
6. Assembly Guide
Step 1: Installing the 4 Protective Cover Supports
Install the 4 supports into the corresponding holes as shown below. The two supports with a magnet tab
should be mounted on the front of the engraver and make sure the magnet tabs are facing forward.
Laser Module *1
Air Pump *1
Left Protective Cover *1
Exhaust Pipe *1
Protective Cover
Support *4
TF Card *1 Wrench *1 Calibration Card *1TF Card Reader *1
WiFi Antenna *1
L
R
Raiser *4
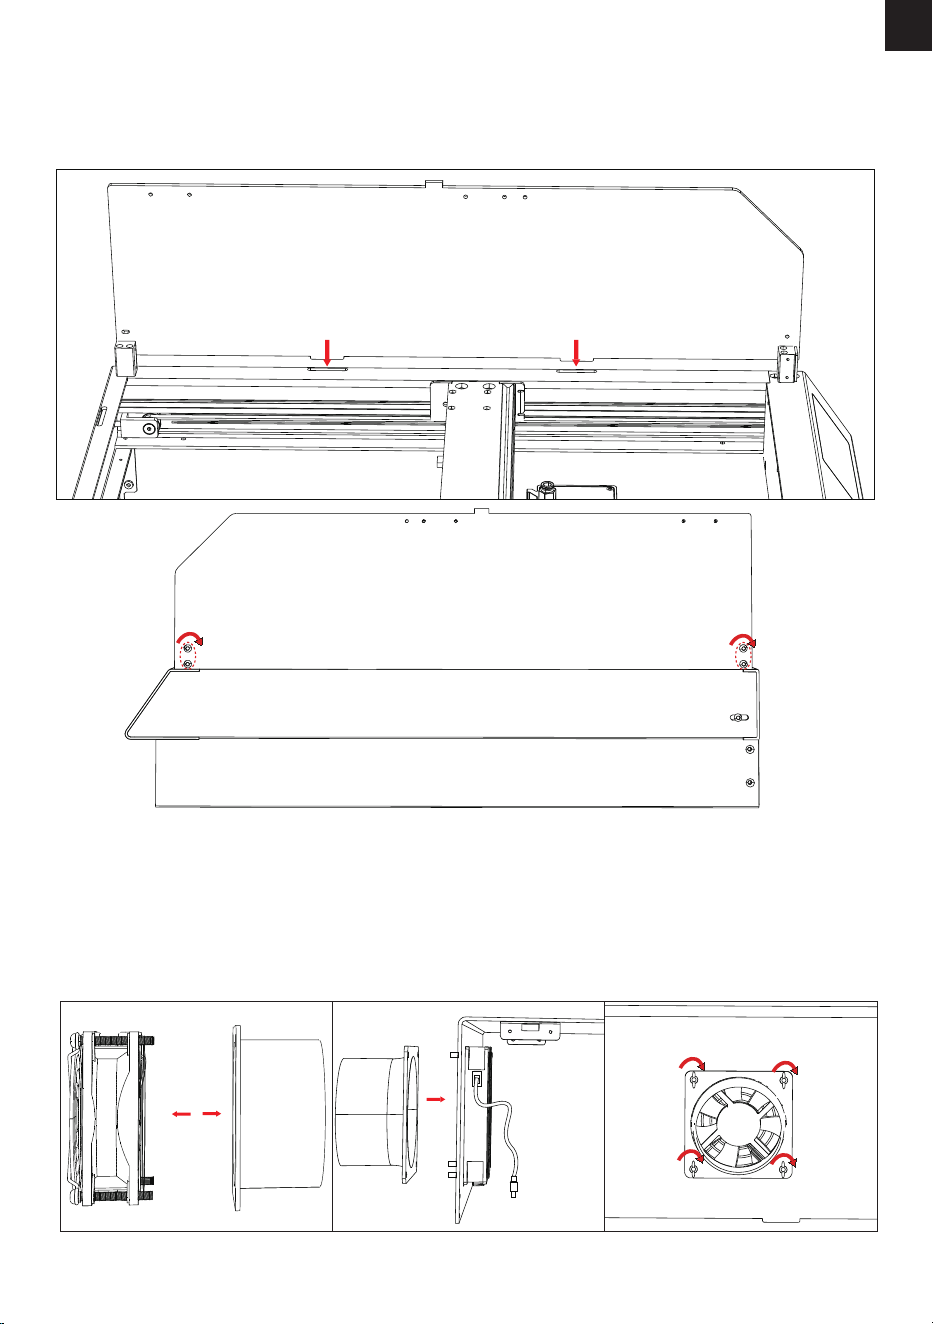
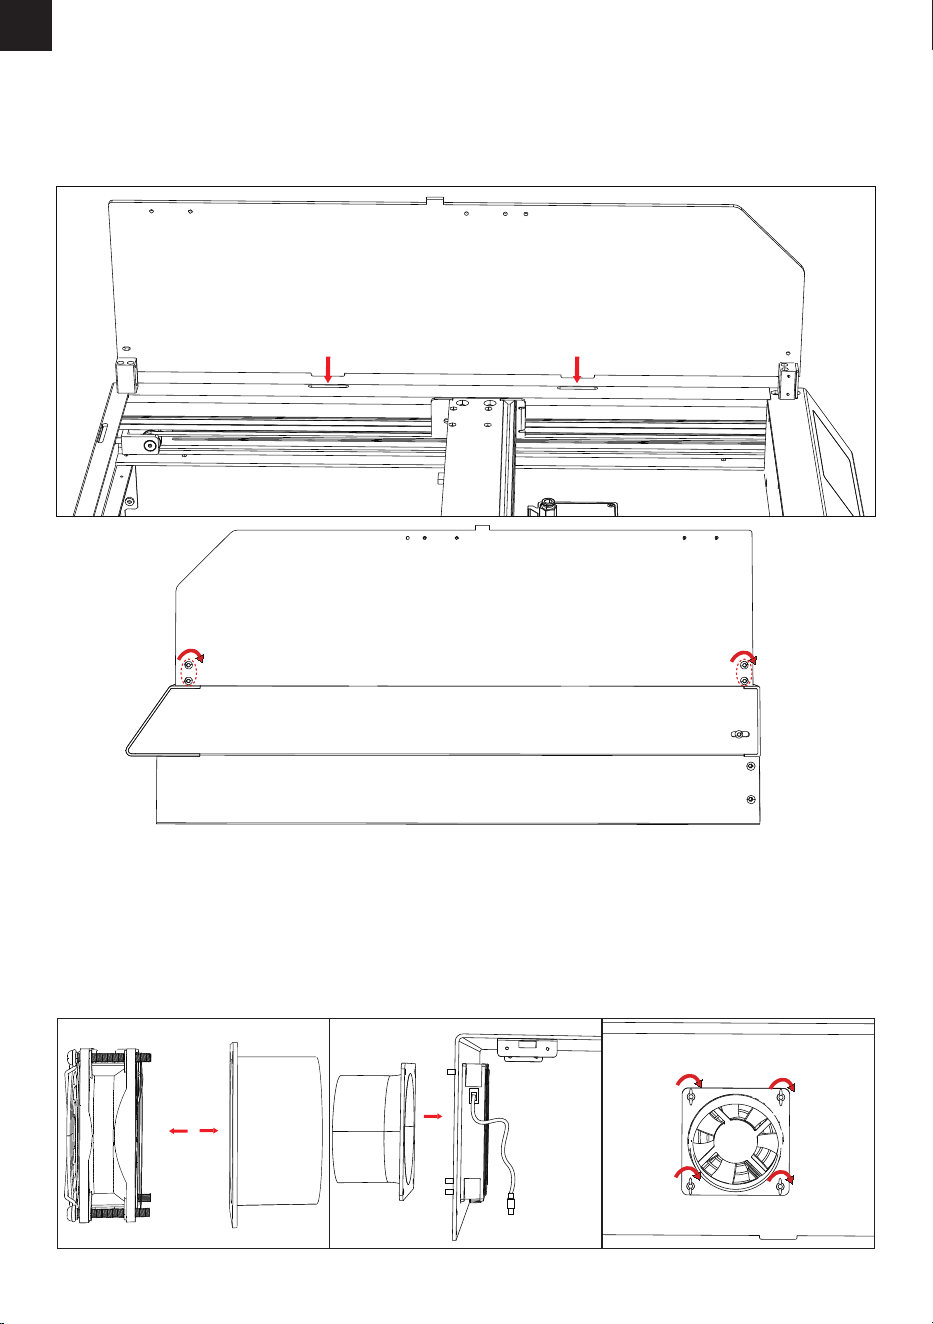
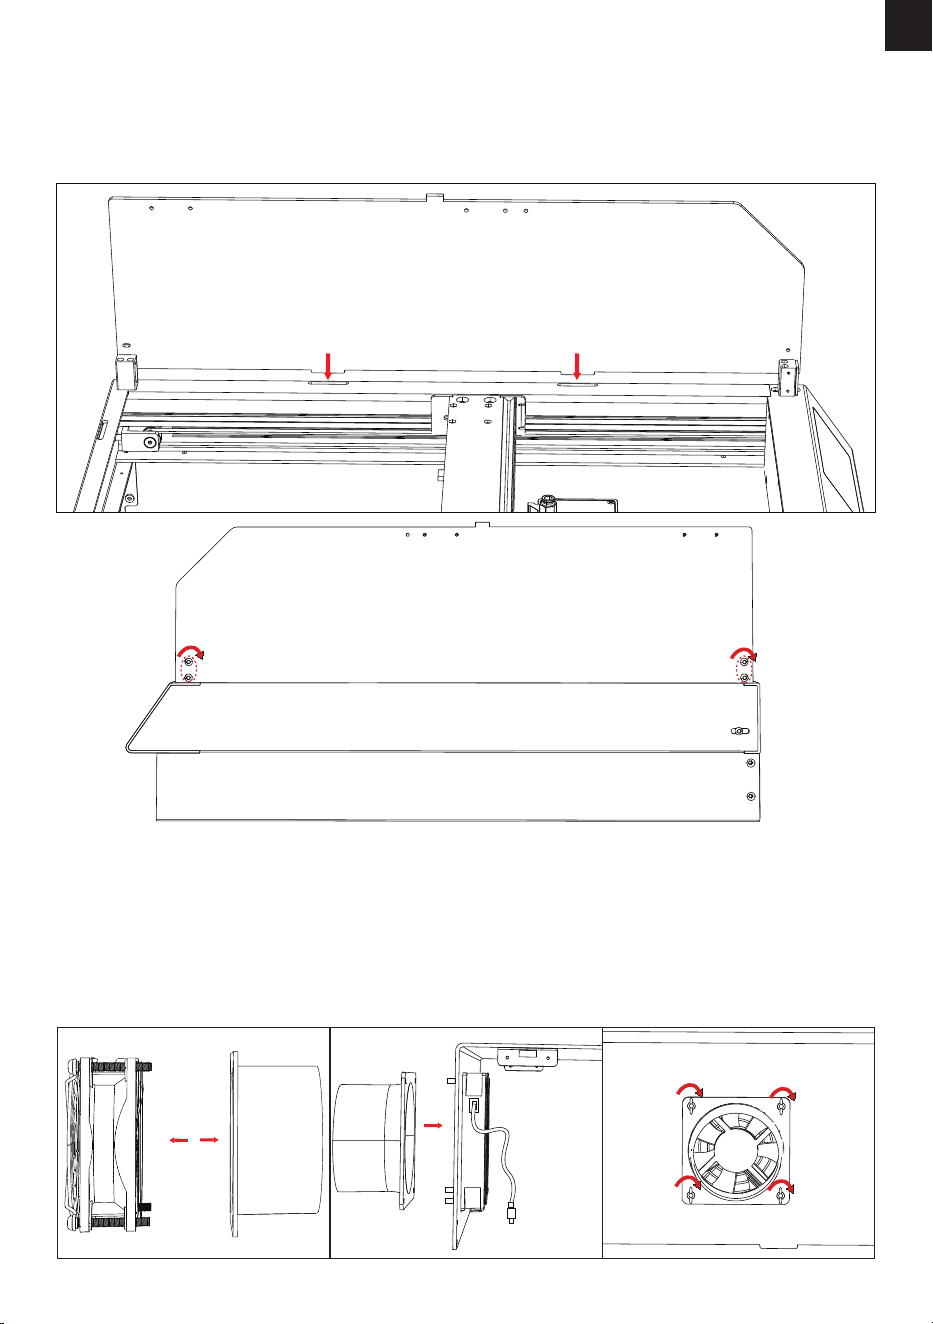
Step 3: Installing the Exhaust Fan
(1) Separate the air guide from the exhaust fan.
(2) Install the exhaust fan from the inside of the rear protective cover and slide the four screws of the
exhaust fan through the holes. Make sure the fan cable is on the left.
(3) Install the air guide from the outside of the rear protective cover and secure it with four wing bolts.
-06-
EN
Step 2: Installing the Left and Right Protective Covers
(1) Insert the bottom protrusions of the protective covers into the slots on the left and right Y-axis frames.
(2) Tighten the screws to secure the protective covers.
Note: The following drawings show the installation of the right protective cover. Please install the left
protective cover in the same way.
R
R
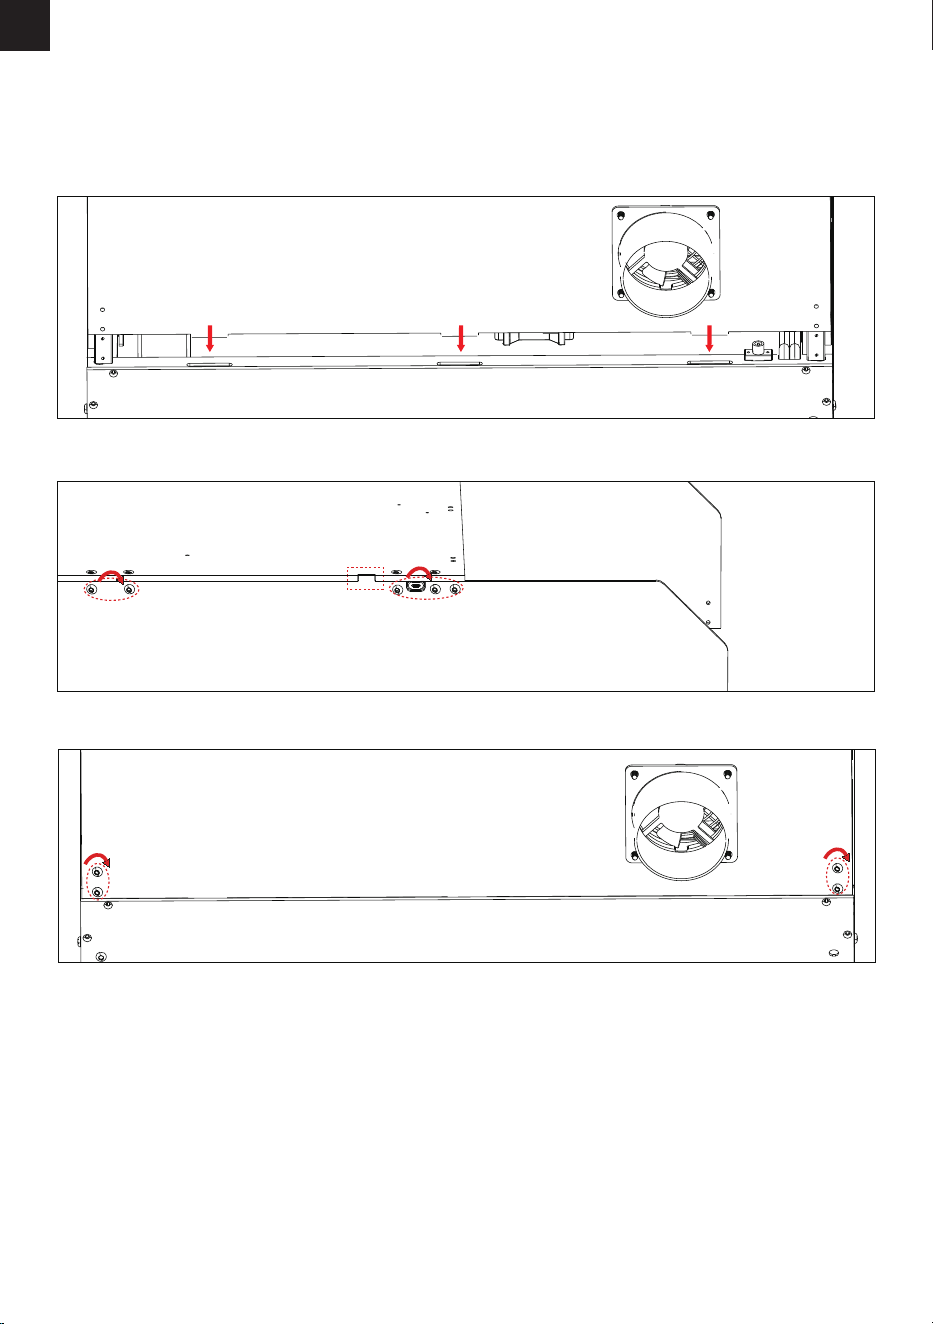
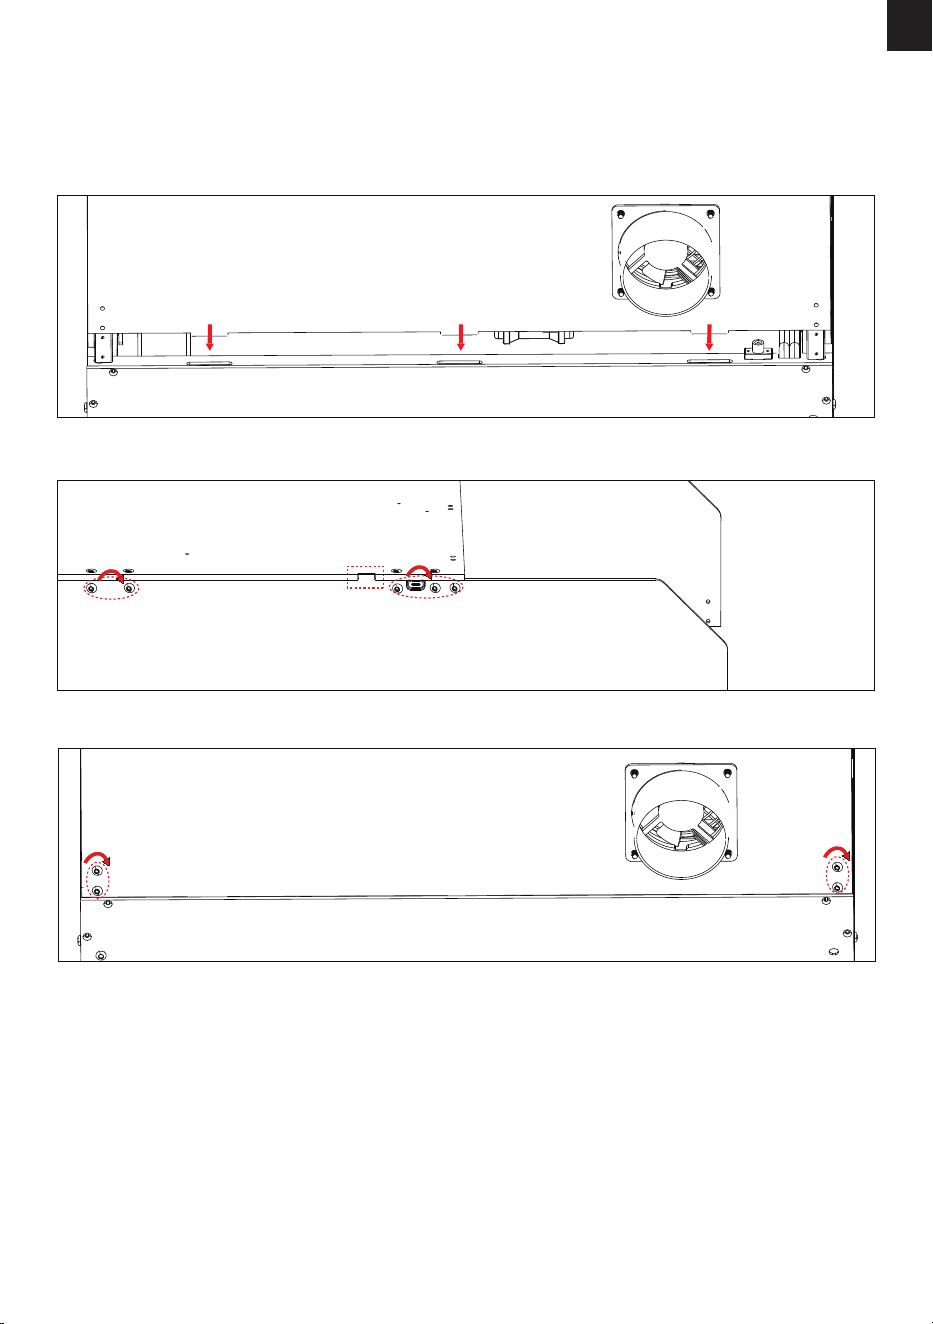
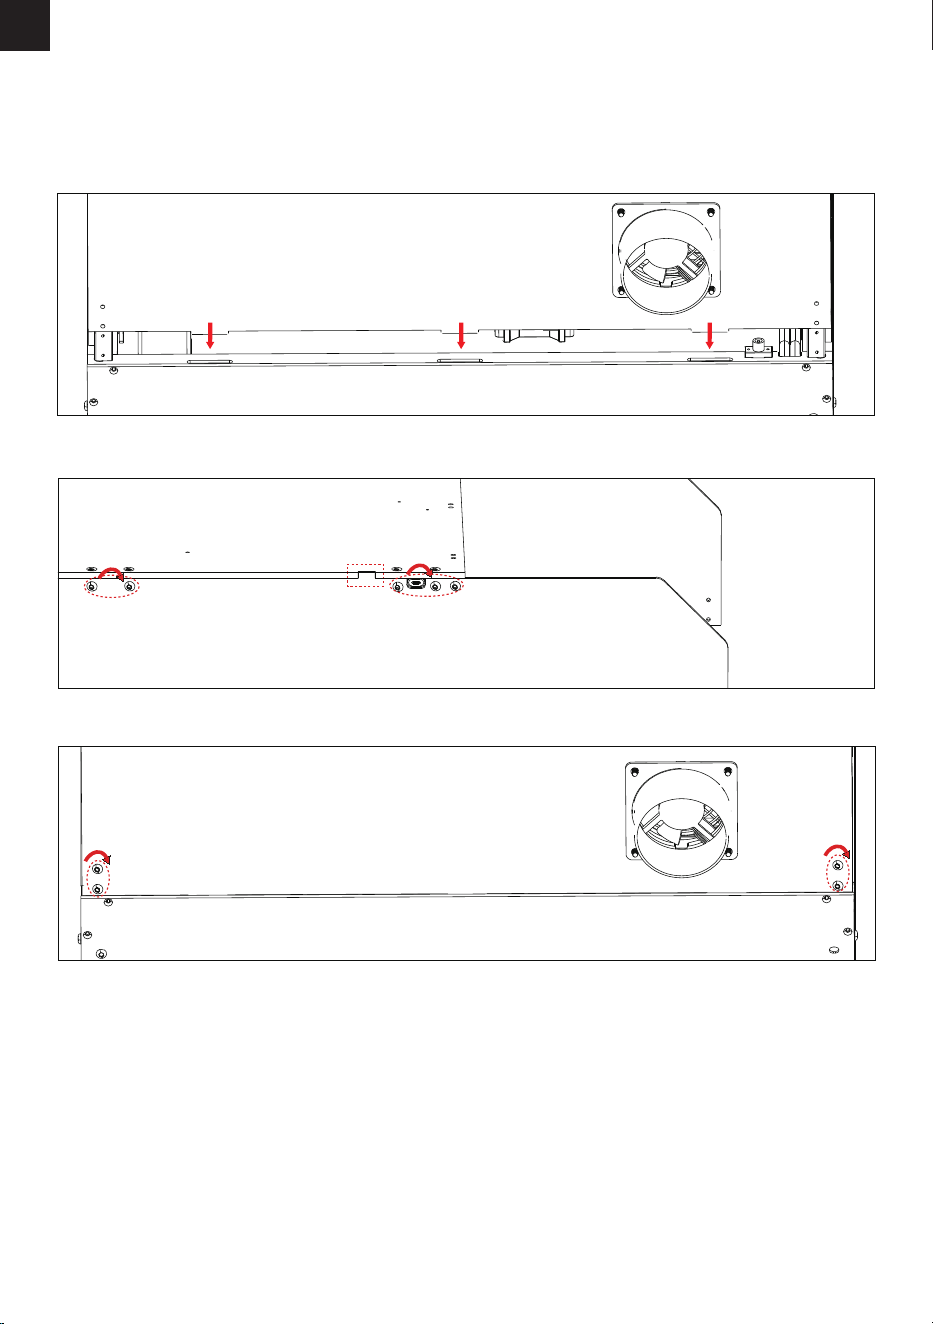
Step 4: Installing the Rear Protective Cover
(1) Insert the bottom protrusions of the rear protective cover into the slots on the rear X-axis frame.
(2) Align the side grooves of the rear protective cover with the protrusions on the top of the left and right
protective covers.
(3) Tighten the screws to secure the rear protective cover.
-07-
EN
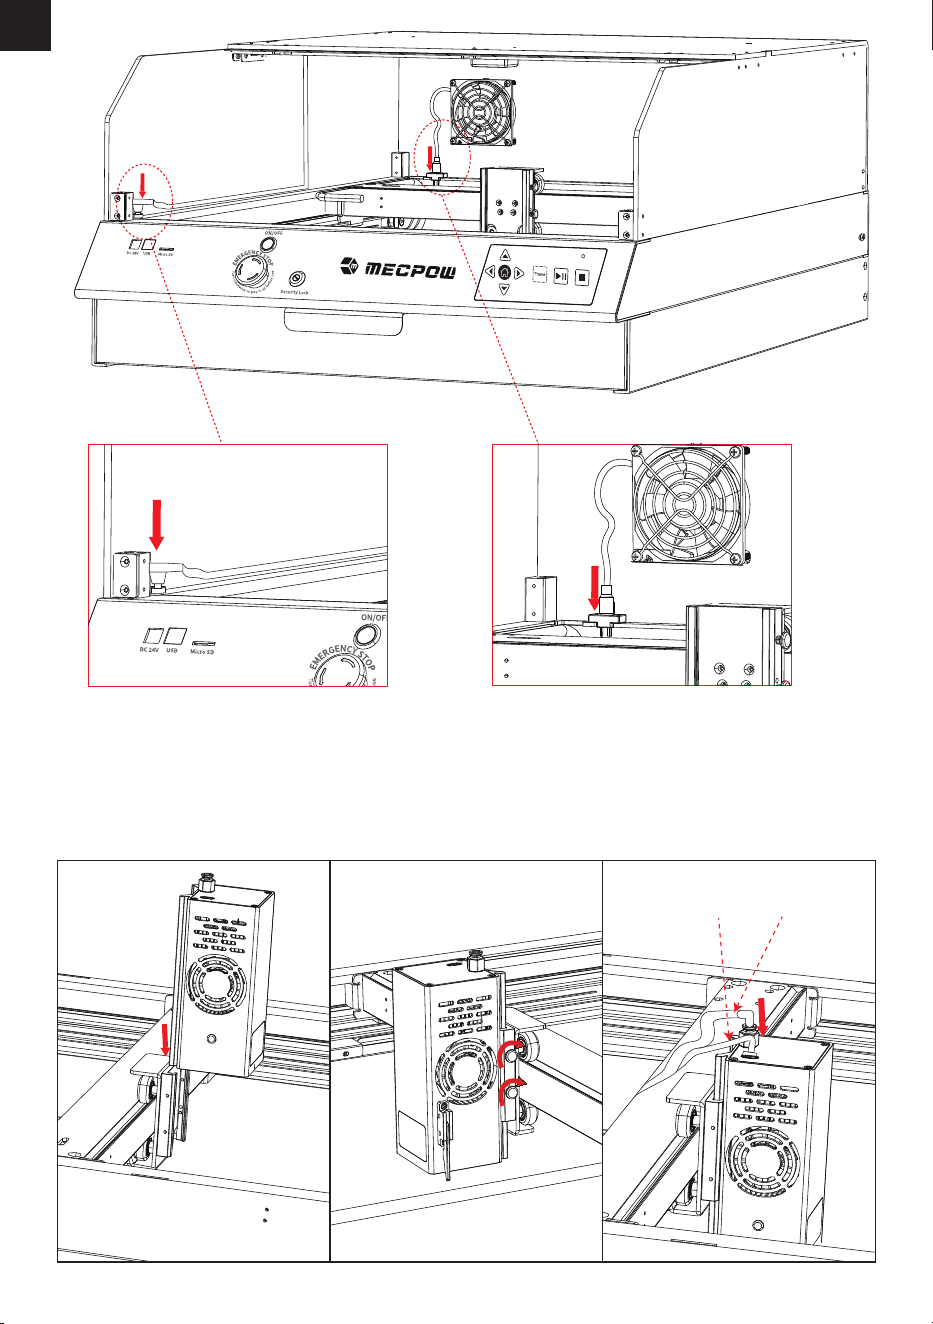
Step 5: Plugging in the Exhaust Fan and the LED Light
(1) Plug in the exhaust fan and the LED light in the positions shown in the line drawing and secure the
cables with the supplied cable clips.
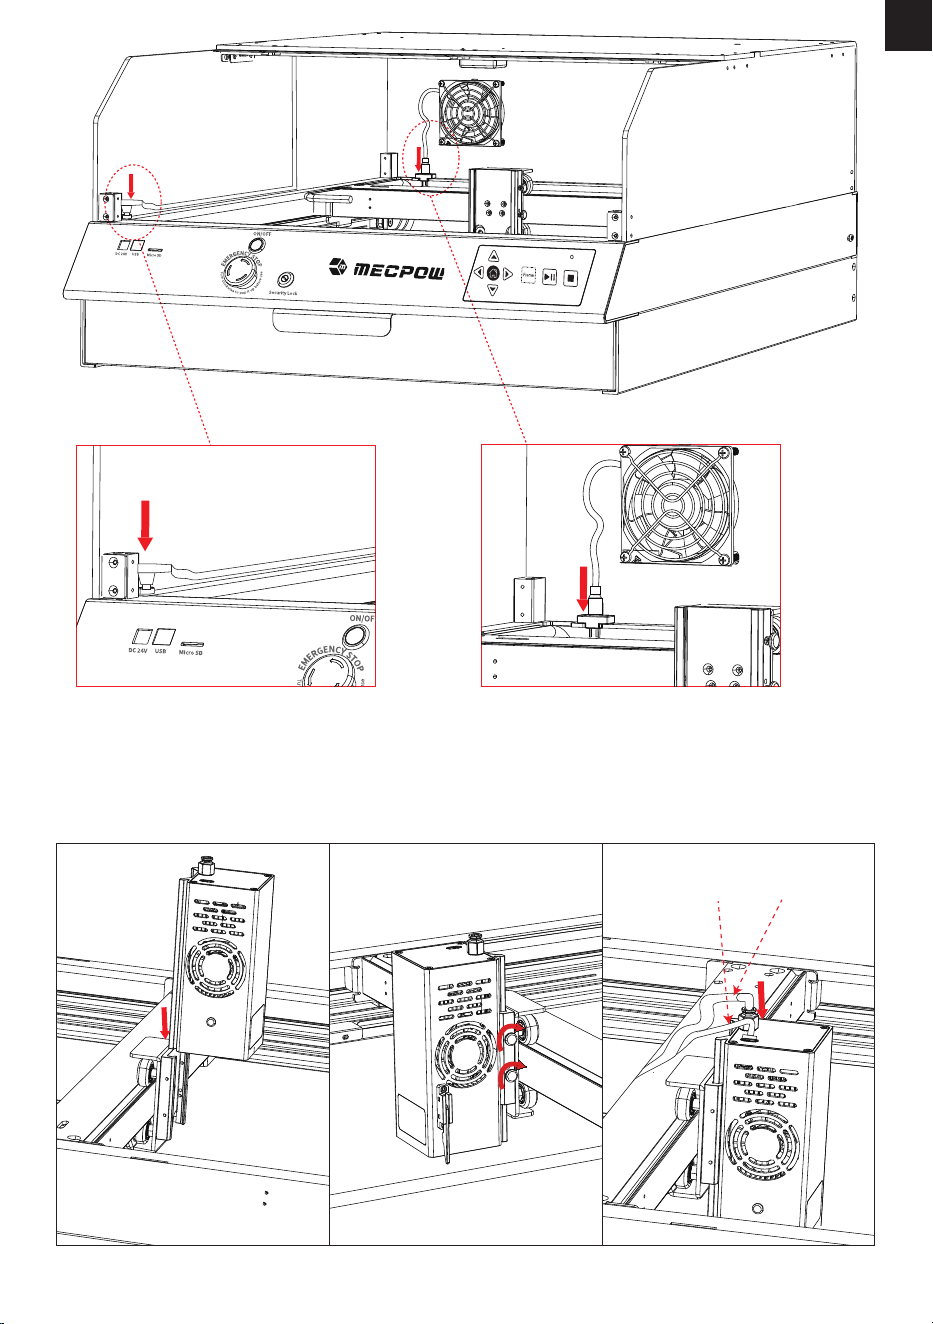
-08-
EN
Step 6: Installing the Laser Module
(1) Slide the laser module over the sliding plate. Adjust the laser module to the proper height and then hand
tighten the screws.
(2) Connect the power cable and exhaust pipe cable to the laser module according to the corresponding holes.
Note: A is the power cable of the laser module and B is the exhaust pipe cable.
A B
-09-
EN
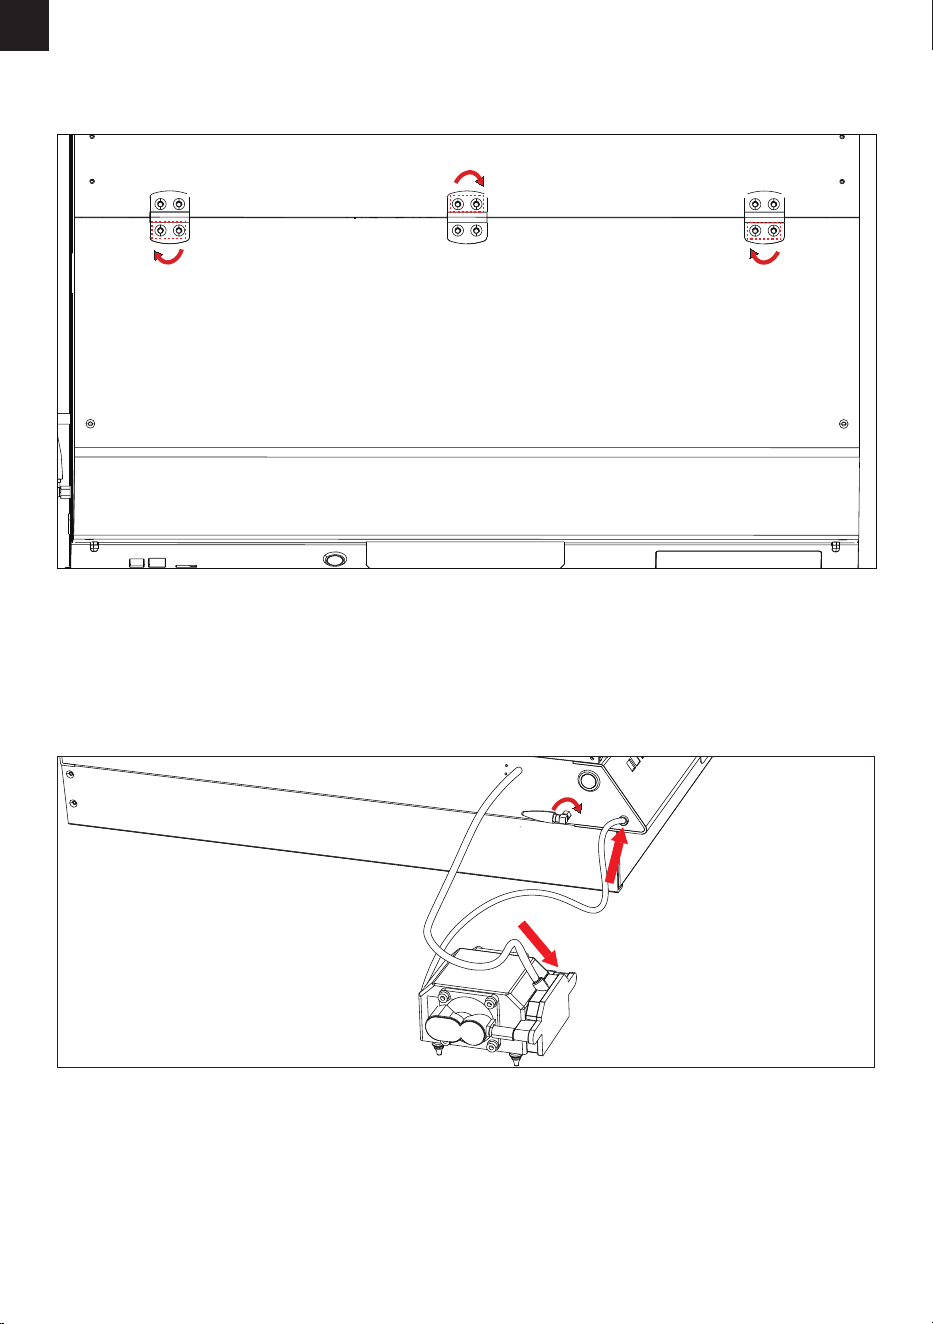
Step 7: Installing the Front Protective Cover
(1) Place the front protective cover on the top and align the hinges with the screw holes.
(2) Tighten the screws and bolts to secure the front protective cover.
(1) Attach the air pump to the tube of the machine and connect the air pump cable to the air pump interface.
(2) Attach the WiFi Antenna to the machine and turn it clockwise to tighten it.
Step 8: Installing the Air Pump and WiFi Antenna
-10-
EN
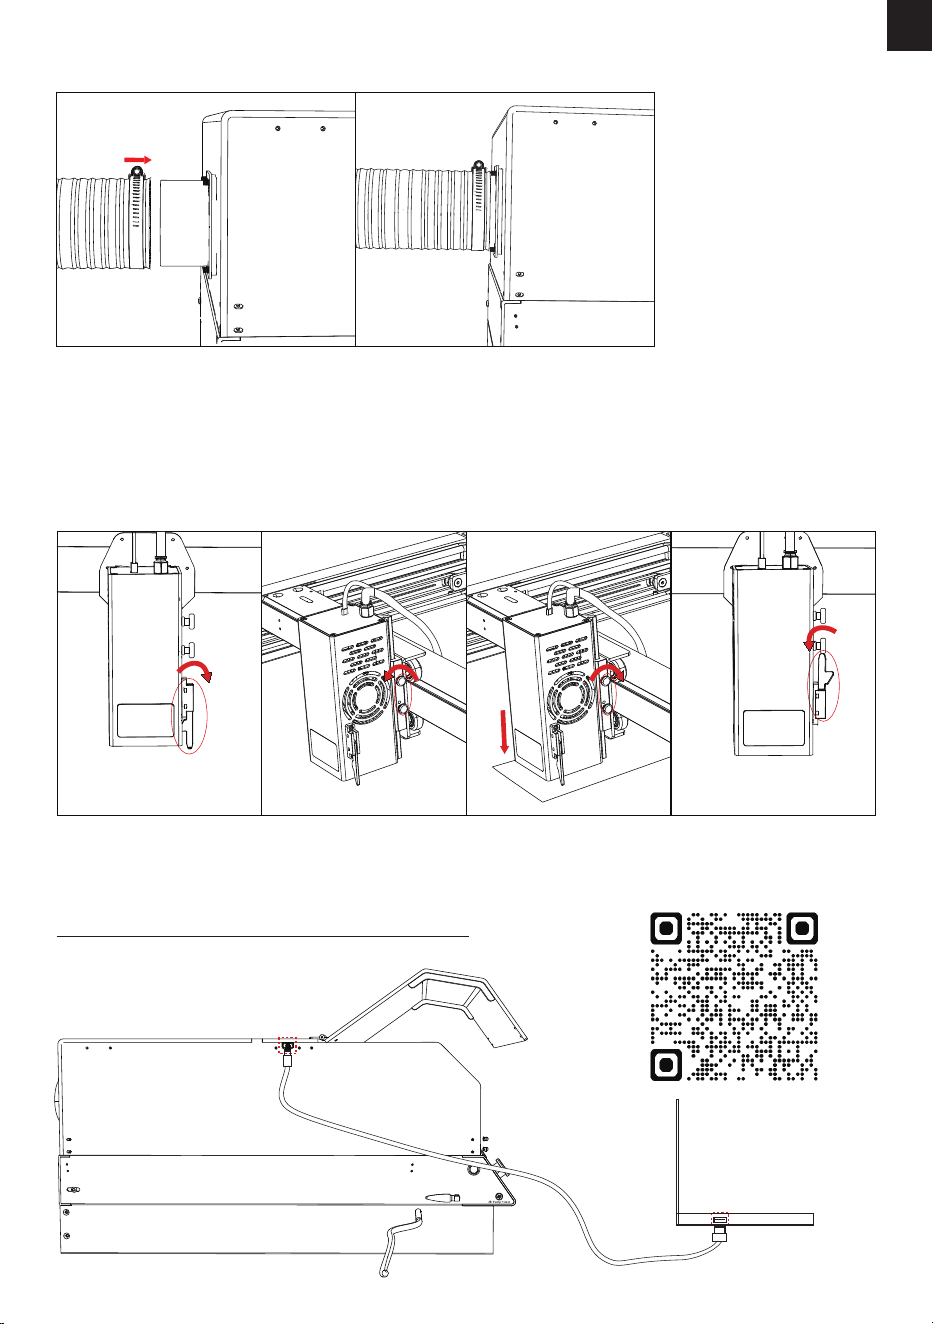
(1) Pull down the focusing bar on the laser module.
(2) Hold the laser module with one hand and loosen the 2 screws to move the laser module.
(3) Slide the laser module downward slightly till the focusing bar touches the engraving object.
(4) Tighten the screws to secure the laser module, and then push the focusing bar up into place.
(1) Install the exhaust pipe and tighten it with the throat hoop.
Step 10: Focusing
Step 9: Installing the Exhaust Pipe
Note: For detailed usage of the camera, please visit the link below or scan the QR code below.
https://docs.lightburnsoftware.com/Camera/index.html
Step 11: Connecting the USB Cable of the Camera
-11-
EN
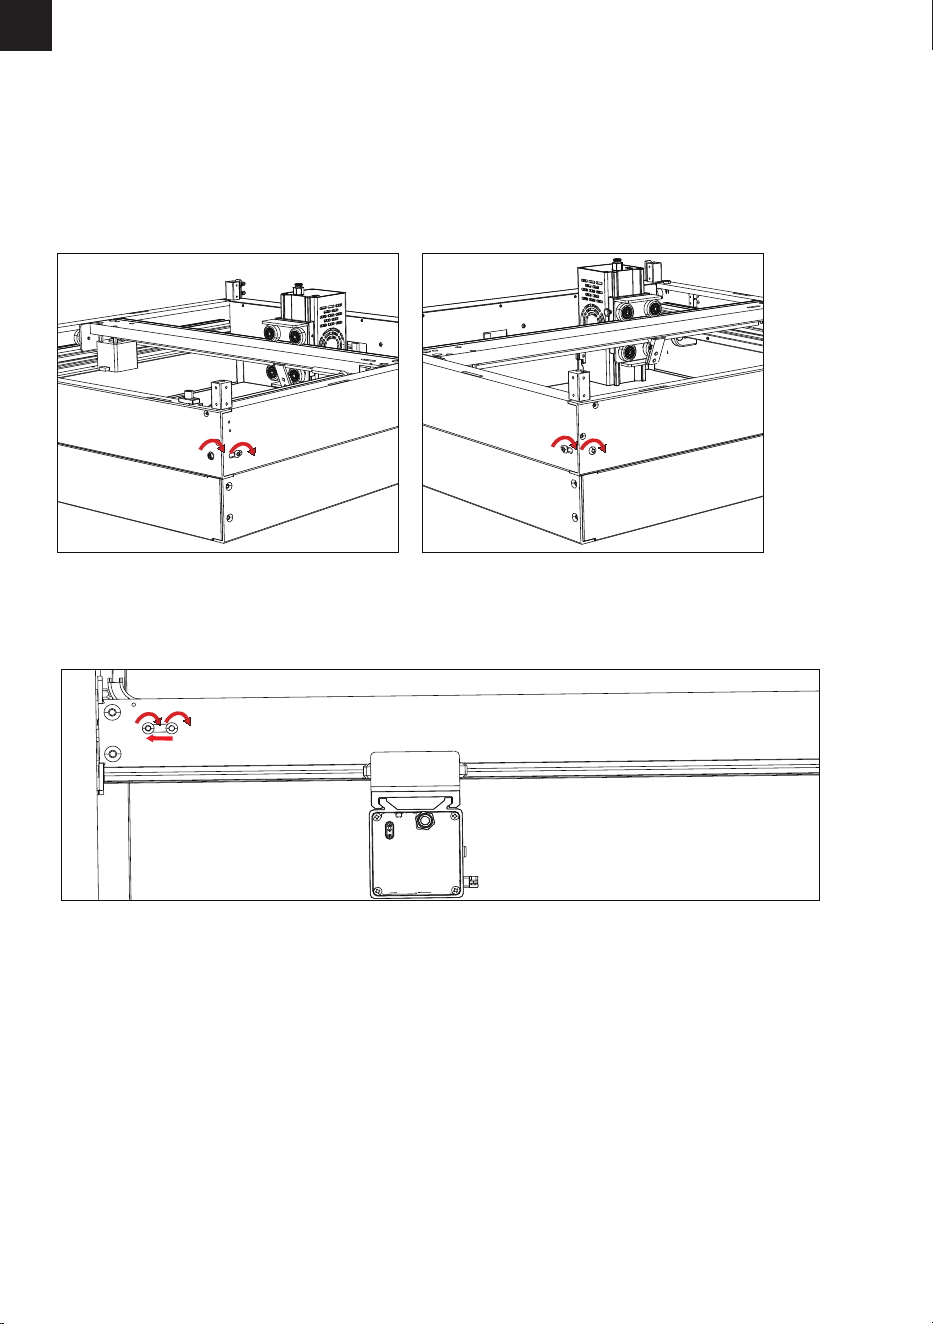
Tightening Y-Axis Belts
Tightening the X-Axis Belt
(1) Slightly loosen the screw 1 shown in the line drawing.
(2) Turn the screw 2 to tighten the belts as the line drawing shows.
(3) Tighten the screw 1 to secure the belts.
The belts are adjusted at the factory. If the belts become loose after a period of use, they can be adjusted to
the proper tightness as follows.
How to Adjust the Belt Tightness
(1) Loosen the two screws of the X-axis belt tension adjustment and adjust the belt.
(2) Tighten the screws to secure the regulator.
Screw 1Screw 2
Screw 1 Screw 2

-12-
EN
7.Functions & Operations
Parts Functions / Abnormalities Operations
Alarm The alarm will sound when
something abnormal occurs.
1. Find out the cause of the alarm.
2. Eliminate this factor.
3. Press the reset button for 3 seconds to reset
the machine. Rotate the button back to its
original position after pressing it.
4. Follow the software operating instructions to
resume work.
Laser Module It engraves objects and materials.
Abnormality: The laser module fails to
work or encounters operational
abnormalities.
1. Check if the connection cable of the
laser module is properly connected.
2. Check if the main control box is
functioning normally.
3. Conrm if the software is correctly
installed or congured.
4. Contact customer service if the
problem cannot be solved.
Stepper Motor It ensures the normal functioning of
the laser module.
1. Check if the cables match the
required specications.
2. Conrm that the cables are correctly
connected.
3. Check if the control box is properly
functioning.
4. Check if the software is properly
installed or congured.
5. Contact customer service if the
problem cannot be solved.
Emergency Stop It stops the machine from working
immediately.
Press the button to stop the machine
from working and rotate the button
clockwise to get the machine back to
work.
Flame Sensor
It detects if there is a re in or around
the machine and activates the alarm
while also halting the machine's
operation in the event of a re. It is
turned on/o via a mechanical switch.
1. Check the environment and avoid
placing the machine in direct sunlight.
2. Contact customer service to adjust
the sensitivity of the ame sensor.
Air Pump It assists the machine during
operation.
Abnormality: It ceases functioning or
encounters operational abnormalities.
1. Check if the power adapter is
connected to a power source.
2. Check if the DC connector of the air
pump is properly plugged in.
3. Contact customer service if the
problem cannot be solved.

-13-
EN
Security Lock It controls the power switch to
prevent false triggering of
power-on.
Keep the key.
Flame Sensor
Switch
It is used to control the activation
and deactivation of ame sensor
according to the actual situation.
ON state: the ame sensor is in
working condition, the machine stops
working automatically after checking
the ame.
OFF state: the ame sensor does not
work, you need to pay attention to the
re phenomenon in real time.
Tilt Sensor If the tilt angle of the machine is
greater than 50±5 degrees, the
machine will alarm and stop working.
Keep the machine at an angle of less
than 45 degrees.
Limit Switches They stop the movement of the laser
module when it moves to the home
point of the X-axis or Y-axis.
1. Check if the cable of the limit switch is
disconnected.
2. Check if the limit switch plug is installed in
place.
3. Check if the limit switch is making contact
with the corresponding component.
4. Contact the customer service if the
problem cannot be solved.
Front Protective
Cover
The machine stops working when the
front protective cover is open.
Close the front protective cover and
press the "Start/Pause" key to let the
machine continue the work.
Control Methods 1. Control via computer software
2. Control via control panel & TF card
3. Control via mobile App & TF card
1. Connect to a computer via the USB
cable and control via LightBurn or
LaserGRBL.
2. Work oine by using the control panel
and TF card.
3. Work oine by using MKSlaser and TF
card.
-14-
EN
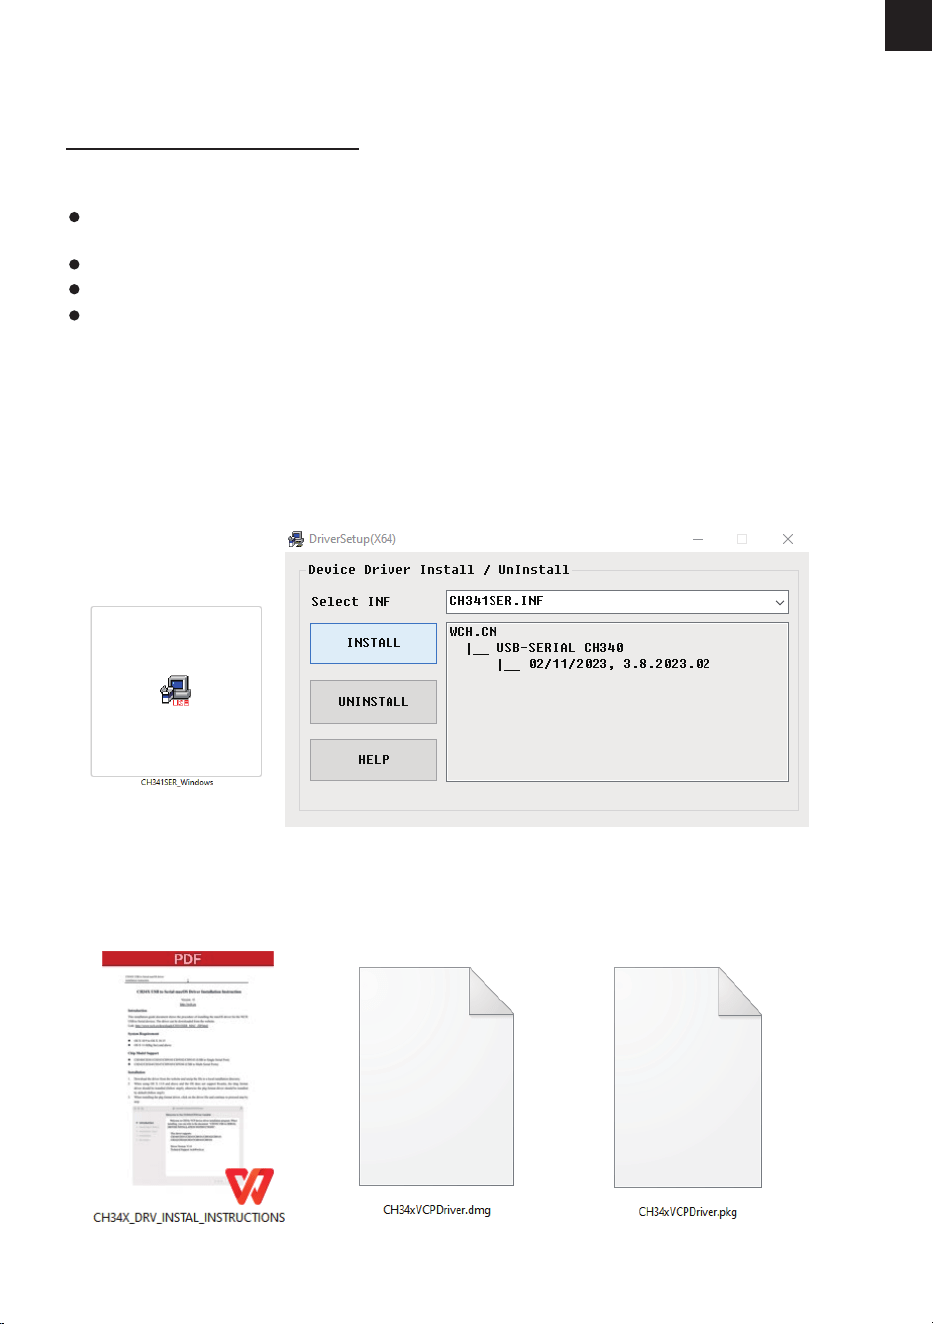
8. Driver
Download Methods
Installation
1.Download the driver from the link below.
https://mecpow.com/pages/driver-les
2.Contact the customer service to get the le of the driver.
Note:
For Windows users, if you're using a system below Win10, you'll need to install the driver manually.
If you're using the Win10 system or above, there is no need to install the driver.
The driver for Mac users supports OS X 10.9 to OS X 10.15 and OS X 11.0 (Big Sur) and above.
The driver for Linux users supports 32-bit and 64-bit systems.
Please turn on the machine and connect it to your computer via the USB cable before starting the
driver!
For Windows Users:
1. Open the downloaded driver.
2. Click "INSTALL".
3. Click "OK" when the driver is installed successfully.
For Mac Users:
1. Open the instructions.
2. Open the downloaded driver and follow the instructions to install it.
-15-
EN
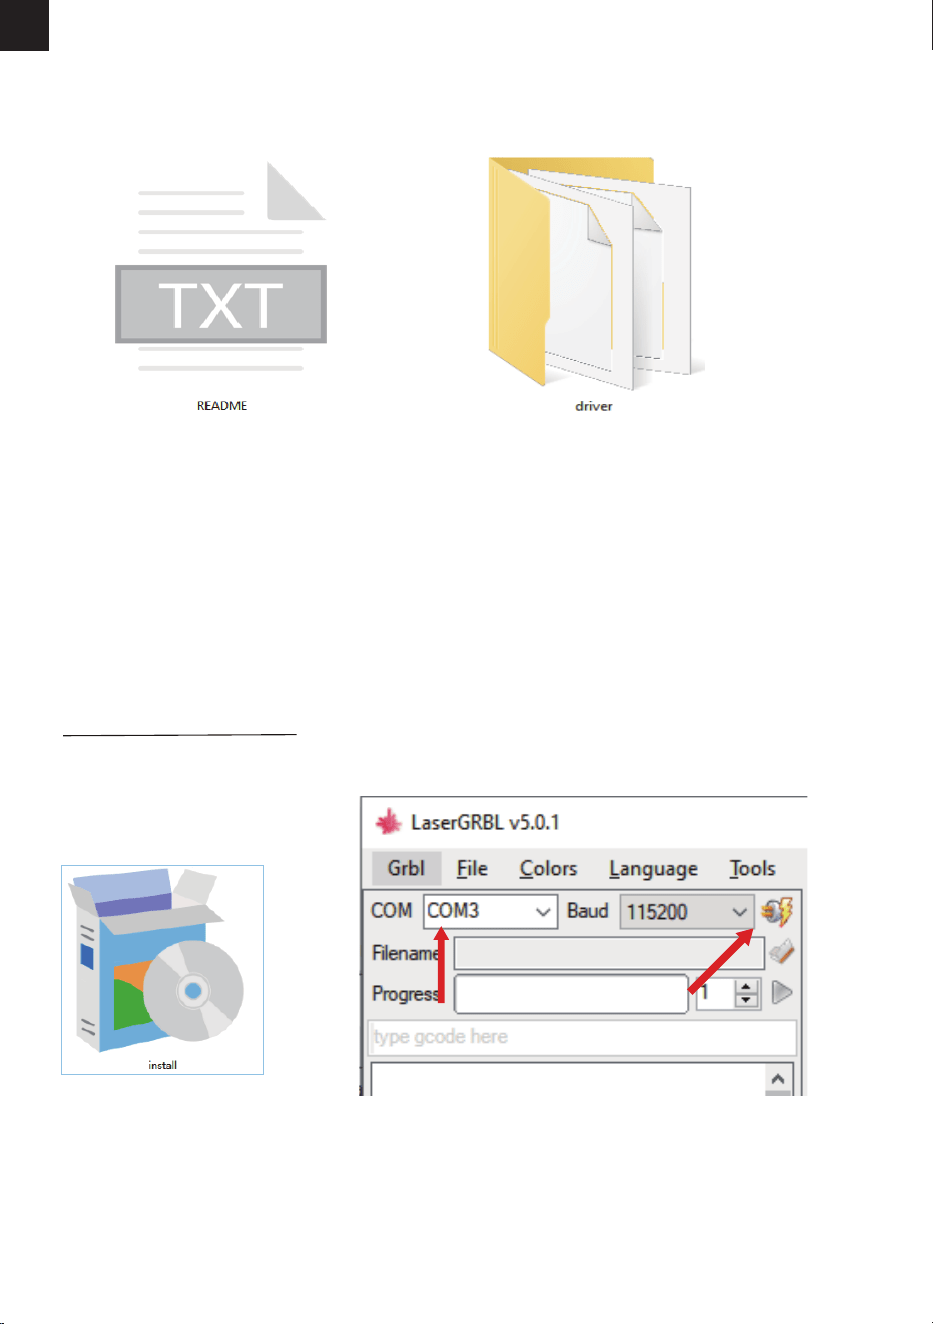
For Linux Users:
1. Open the le - README.
2. Open the le - driver, and follow the "README" to install it
LaserGRBL
It's a free open-source software that supports Windows computers. Download it from:
http://lasergrbl.com/download/
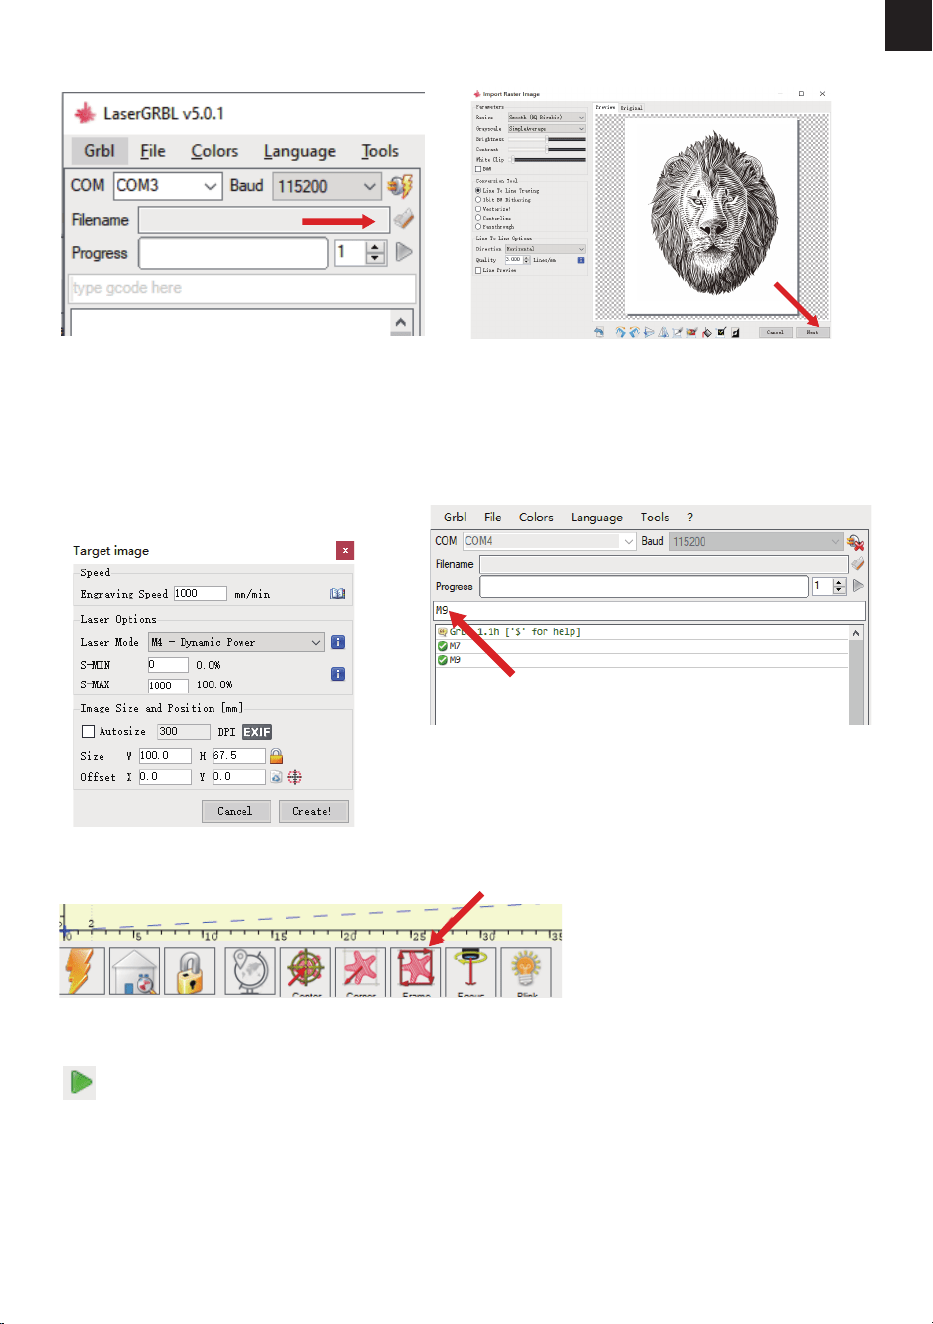
1. Install it. 2. Open the software. Select "COM3" and click "Connect".
9. Control via Computer Software
Connect the engraving machine with the software in real time via the USB cable. During operation,
you can start or stop the engraving machine through the control panel.
-16-
EN
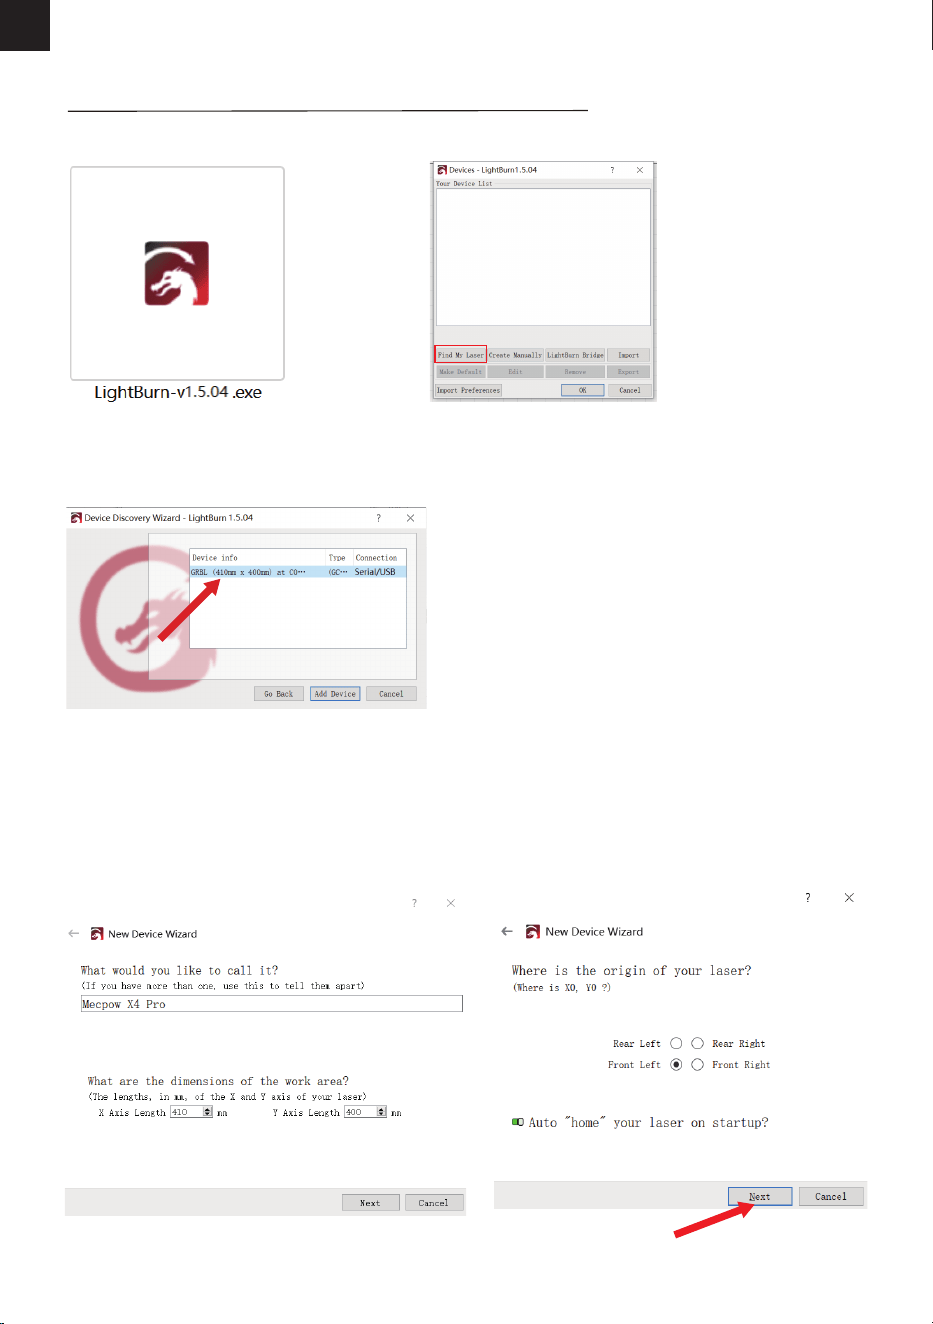
8. Click “Run Program” to start engraving
7. Click “Framing” to preview the engraving range and adjust the engraving position.
3. Click "Open File" to select the engraving le. 4. Select the engraving mode and click “Next”.
5. Select the operating parameters for laser
engraving or cutting. (M3 is for constant
power carving, and M4 is for variable power.
Please check section 10 for recommended
operating parameters for engraving or
cutting dierent materials.)
6. Enter “M7” in the command box and press
Enter to start the air pump. To stop the air
pump, enter "M9" in the same box and press
Enter.
-17-
EN
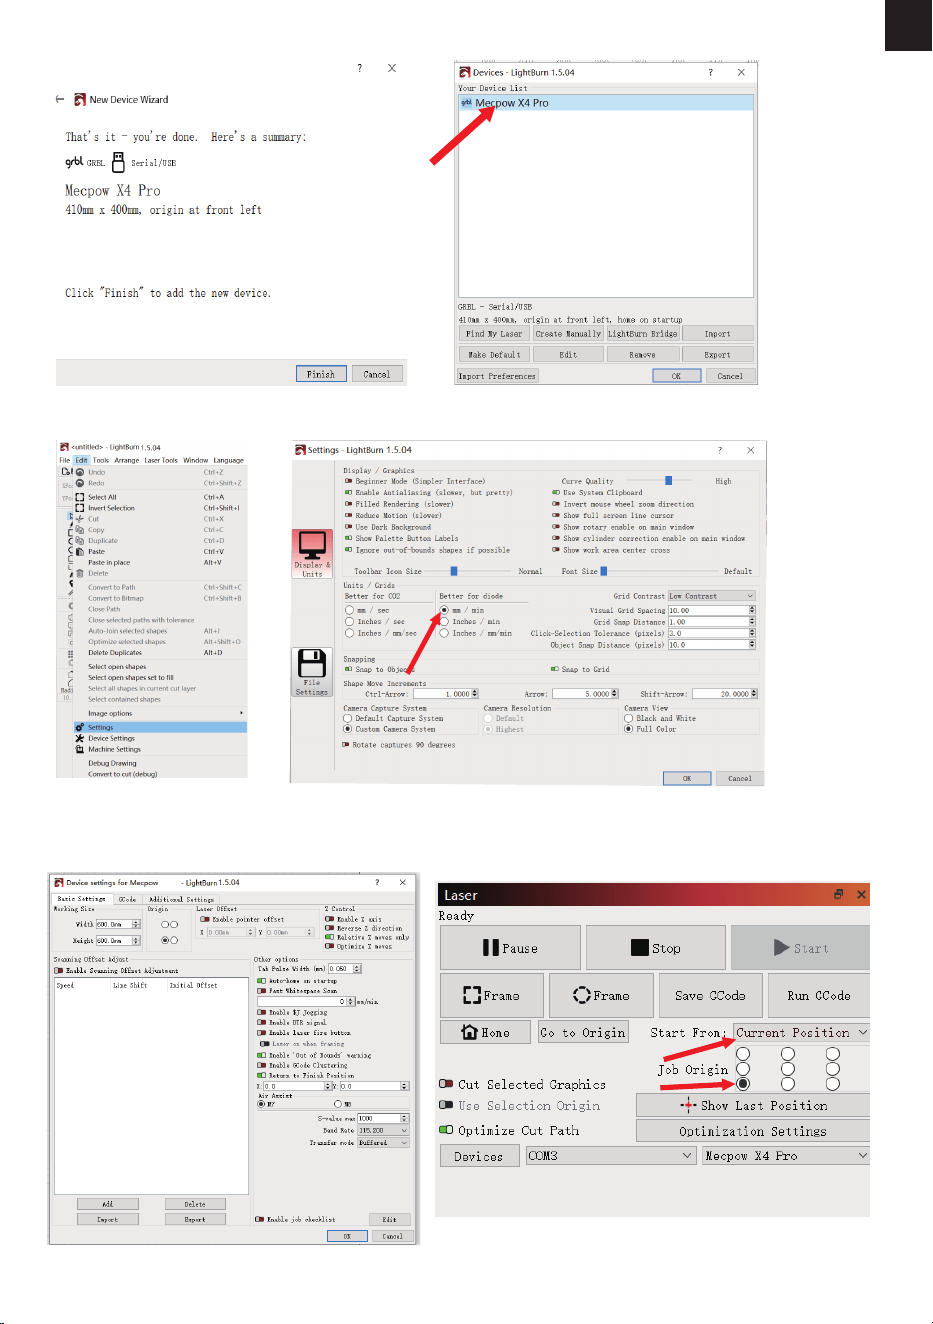
4. Name your device and enter the X-axis and
Y-axis lengths, then click “Next”.
Name: Mecpow X4 Pro
X Axis Length: 410mm
Y-Axis Length: 400mm
5. Select “Front Left” as the origin of
your laser and click “Next”.
LightBurn
It's a paid professional software that supports MAC, Linux and Windows computers. Download it from:
https://lightburnsoftware.com/pages/trial-version-try-before-you-buy
1.Install it.
2. Open the software and click “Find My Laser”.
3. Select your device and
click “Add Device”.
-18-
EN
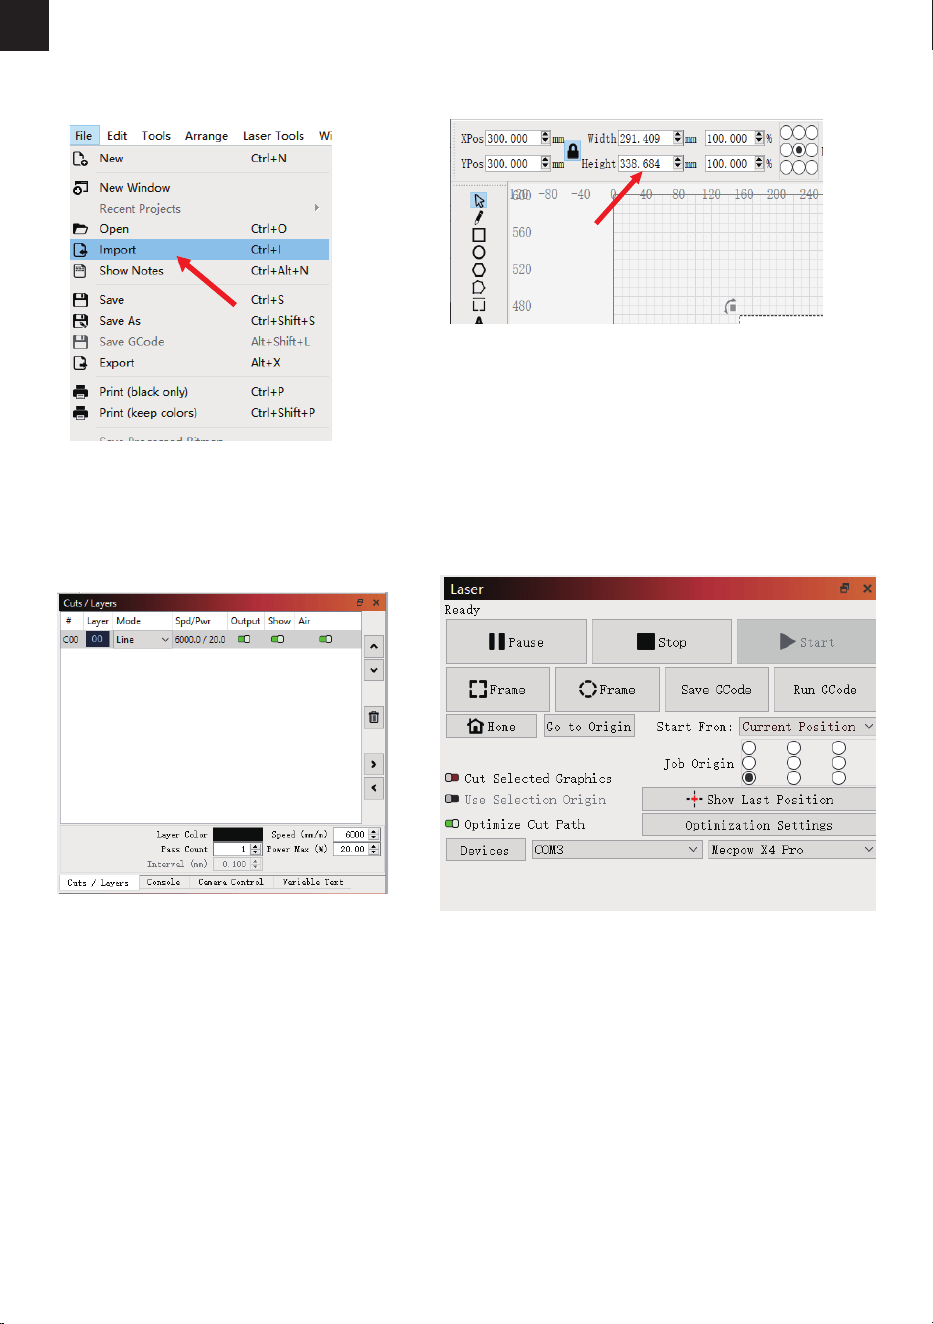
6. Click “Finish”. 7. Select Mecpow X4 Pro and click “OK”.
8. Click “Edit” - “Settings” and set the unit to “mm/min”, then click “OK”.
10.Select “Current Position” in the “Start From”
section, and then select the circle in the lower
left corner in the “Job Origin” section.
9.Click “Edit” - “Device Settings” and select “M7”
under “Air Assist” to allow the air pump to run in
sync with the machine.
X4 Pro
-19-
EN
11.Click “File” - “Import” to import the
engraving le.
12.You can modify the engraving size on the
top of the interface after importing the le.
13.Select the engraving mode and set the
operating parameters for laser engraving or
cutting. (Recommended operating parameters
for engraving or cutting dierent materials are
listed in the next section.).
14.Click “Frame” to preview the engraving range
and adjust the engraving position, then click
“Start” to start engraving.
-20-
EN
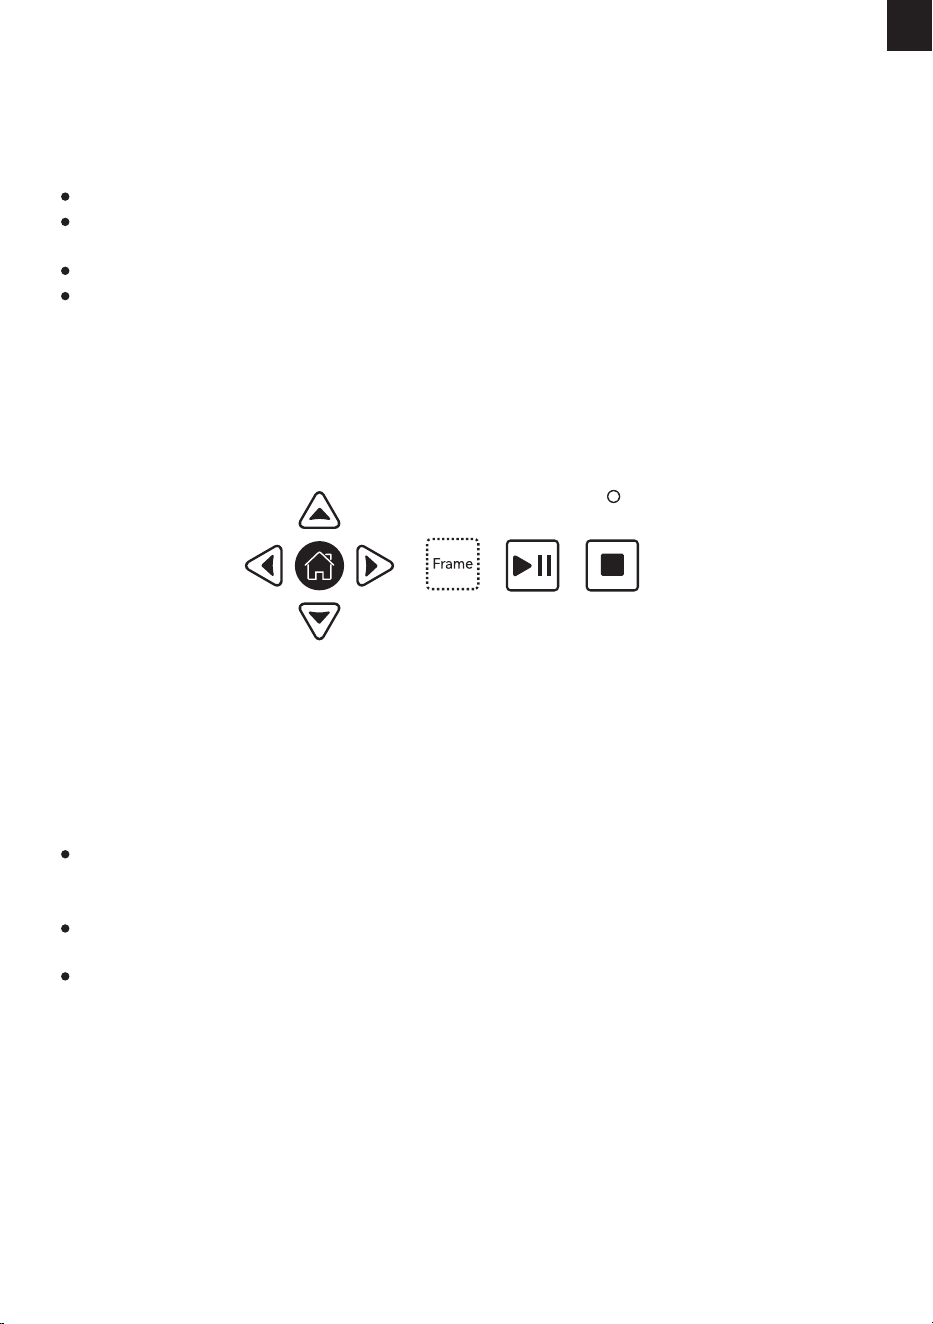
1. Prepare a LightBurn G-code le for engraving or cutting and save it in the root directory of the TF card.
Insert the TF card into the engraving machine. The indicator on the control panel lights up, indicating that the
le is loaded successfully.
2. Press the “Frame” key, and the machine will enter the preview mode. The laser module will move along the
X/Y axis to frame the target working area. You can then manually adjust the engraved object to the proper
position or use the arrow keys on the control panel to adjust the laser module to the proper position.
3. Press the “Start/Pause” key to start engraving/cutting. If you need to pause while the engraver is working,
press the "Start/Pause" key and then press it again to continue engraving/cutting. If you need to terminate the
task, press the “Stop” key. When the engraving/cutting is complete, the laser module will move back to the
starting position. When not in working condition, press the "Start/Pause" key, and the engraver will repeat the
last engraving/cutting task, which is suitable for mass production.
The TF card only supports the FAT32 format.
The engraving machine reads the latest modied le in the root directory of the TF card by default when
there is more than one le in it.
The engraver can only recognize NC and GC les with English names.
The engraver can recognize NC and GC les saved with LightBurn. However, NC and GC les saved with
LaserGRBL can only be recognized by the engraver after being converted with MKSLaser. MKSLaser can be
obtained from the attached TF card or Mecpow.com.
Note:
10. Control via Control Panel & TF Card
The “Start/Pause” and “Stop” keys have higher control access to the engraver than the computer software
and the mobile App, which means engraving/cutting tasks issued by your computer or mobile phone can be
started, paused and terminated directly through the control panel.
If an engraving/cutting task issued by the computer or mobile phone is terminated, it can only be restarted
by the computer or mobile phone.
The “Frame” and arrow keys do not work during the engraving/cutting process.
Note:
-21-
EN
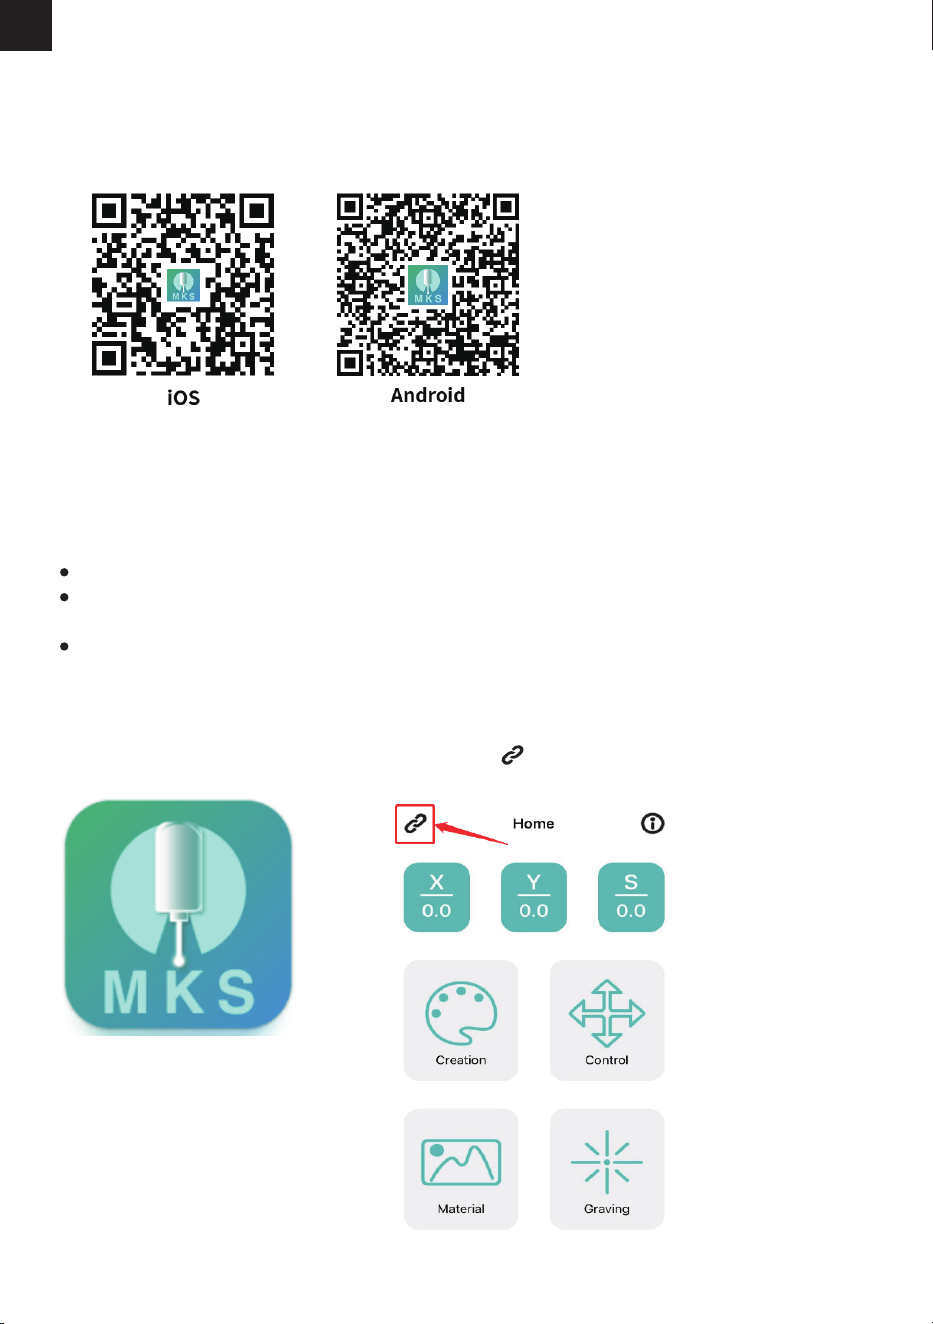
MKSLaser is a free mobile application that supports Android and iOS devices.
1. Enable the Wi-Fi function of your phone and connect the Wi-Fi “Mecpow_*****”.
Wi-Fi Name: Mecpow_*****
Wi-Fi Password: 12345678
2. Open the MKSLaser app.
3. Click on the icon.
Scan the QR code and download it.
App Download
Wi-Fi Connection
11. Control via Mobile App & TF Card
The "*****" in the Wi-Fi name is a random combination of numbers. It varies by machine.
To ensure the stability of the Wi-Fi signal, it is recommended to connect your phone to the Wi-Fi of the
engraving machine before inserting the TF card.
The app needs to be used with the TF card. The uploading of the engraving le will fail if the TF card has not
been inserted.
Note:
-22-
EN
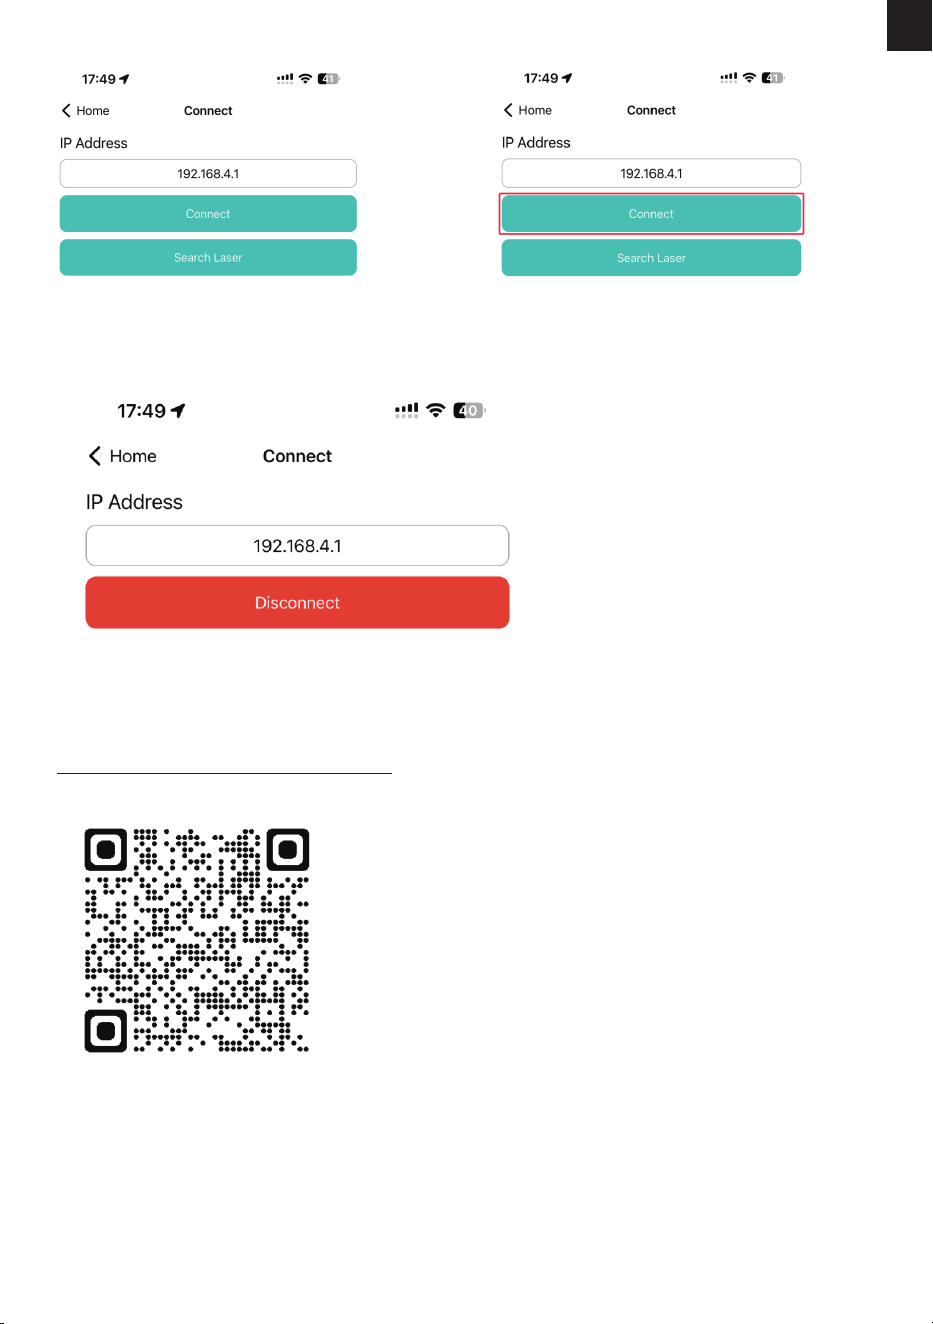
4. Enter the IP address: 192.168.4.1 5. Click on "Connect".
6.When "Connect" turns to "Disconnect", it means the Wi-Fi connection is successful.
For detailed usage of the MKSLaser app, please refer to the information in the TF card or download the user
manual by visiting the link below or scanning the QR code below.
https://mecpow.com/pages/download-center
-23-
EN
13. Troubleshooting
2. The machine fails to connect to the computer.
A. Check if the USB cable is properly connected to both the computer and the machine.
B. Install the driver as instructed, and make sure the computer recognizes the device as a serial port.
C. Disconnect the USB cable and power supply, wait for 5 seconds, and then reconnect.
3. The engraving is too light or non-existent.
A. Make sure the machine is accurately focused according to the manual.
B. Adjust the engraving speed. If it engraves too fast, it may not have enough time to burn the object.
C. The image is too shallow. Imported images need to be clear, with ne lines, and not too light in color, as this will
directly aect the engraving eect.
D. Ensure the object being engraved is placed at and parallel to the machine to avoid focusing issues.
1. The machine doesn't respond when powered on.
A. Check if the machine is properly plugged into the socket and turned on.
12.Recommended Operating Parameters
Mecpow X4 Pro (22W)
Mode
Engraving
Materials
Wood Board
Bamboo
Resin
Leather
Glass
Ceramics
Acrylic
Power
(%)
20 3000
3000
1000
3000
1000
1000
3000
50
13
20
50
80
50
Speed
(mm/min) Note
Rubber
Stainless Steel
Carton
8mm Thick Board
9mm Thick Board
Cutting
10mm Thick Board
0.2mm Paper
2mm Leather
5mm Acrylic
50
80
3000
600
3000
200
130
75
3000
100
15
100
100
100
80
80 300
100
The surface needs to be painted.
Do not engrave on mirror-polished
stainless steel.
The surface needs to be painted.
The surface needs to be applied with
heat transfer paper.
-24-
EN
14. Compliance Statement
This product is in compliance with the standards of the European Community.
This product complies with the Restriction of Hazardous Substances in Electrical and Electronic
Equipment (RoHS) EU rules restricting the use of hazardous substances in electrical and electronic
equipment to protect the environment and public health.
This device complies with Part 15 of the FCC Rules Operation is subject to the following two
conditions: (1) this device may not cause harmful interference, and (2) this device must accept any
interference received, including interference that may cause undesired operation.
The laser warning sign is used to alert users and visitors if there is a risk of being exposed to a naked
laser beam. Exposure to certain lasers can cause eye or optic damage and skin burns.
This symbol indicates that the product is capable of being recycled.
4.The offline engraving process stops unexpectedly.
A. Verify if the emergency stop button has been accidentally pressed. If pressed, turn it to the right to release.
B. Check if the switch has been accidentally toggled o. If so, turn it back on.
C. If all the above appear to be normal, please contact customer service.
5.The software stops running abruptly during engraving.
A. Check whether the USB cable is loose.
B. Conrm that the software is installed correctly and the conguration les are accurate.
C. Ensure the engraving le is working properly.
D. If all the above appear to be normal, please contact customer service.
6.The machine moves correctly, but the laser remains inactive.
A. Validate that the laser module cable is correctly connected.
B. Check if there's any slight noise coming from the laser module's fan.
C. If all the above appear to be normal, please contact customer service.
For more questions and answers, please refer to the link below or scan the QR code below.
https://mecpow.com/pages/faq

-25-
DE
1. Vorwort....................................................................
2. Sicherheitserklärung..............................................
3. Diagramm................................................................
4. Spezifikationen........................................................
5. Lieferumfang...........................................................
6. Montageanleitung..................................................
7. Funktionen & Betrieb.............................................
8. Treiber......................................................................
9. Steuerung über Computersoftware.....................
10. Steuerung über Bedienfeld und TF-Karte.........
11. Steuerung über Mobile App & TF-Karte............
12.
Empfohlene Betriebsparameter.....................
13. Problembewältigung...........................................
14. Konformitätserklärung.......................................
26
26
27
29
29
30
37
39
40
45
46
48
48
49
INHALTE

-26-
DE
1. Vorwort
2. Sicherheitserklärung
Sehr geehrter Kunde,
Vielen Dank, dass Sie sich für unser Lasergravurgerät entschieden haben. Dieses Gerät ist ein High-Tech-Pro-
dukt, das Licht, Maschinen und Elektrizität vereint. Damit Sie das Gerät besser nutzen und warten können,
lesen Sie bitte das Benutzerhandbuch sorgfältig durch und befolgen Sie die darin beschriebenen Schritte.
Haftungsausschluss
Jegliche Verluste, die durch unsachgemäßen Gebrauch oder Nichtbeachtung der Schritte im Benutzerhand-
buch verursacht werden, gehen zu Lasten der Person. Die endgültige Interpretation des Benutzerhandbuchs
obliegt unserem
und wir behalten uns das Recht vor, alle Informationen, Daten, technischen Details usw. in diesem
Handbuch zu ändern.
* Die Laserbearbeitung kann risikoreich sein, und Benutzer sollten sorgfältig prüfen, ob das zu bearbeitende
Objekt für die Laserarbeit geeignet ist.
* Das zu bearbeitende Objekt und die Emissionen müssen den örtlichen Gesetzen und Vorschriften entsprech-
en.
* Dieses Gerät verwendet einen Laser der Klasse IV (leistungsstarke Laserstrahlung), der die folgende
Situationen:
(1) Entzündung von brennbaren Materialien in der Umgebung;
(2) Bei der Laserbearbeitung können je nach dem zu bearbeitenden Objekt andere Strahlung sowie giftige und
schädliche Gase entstehen;
(3) Die direkte Einwirkung von Laserstrahlung kann den menschlichen Körper schädigen. Am Arbeitsplatz
müssen Feuerlöschgeräte vorhanden sein, und brennbare und explosive Materialien dürfen nicht um die
Werkbank oder Maschine herum gestapelt werden. Außerdem muss für eine gute Belüftung gesorgt werden.
* Die Umgebung, in der das Gerät steht, sollte trocken und frei von Verschmutzung, Vibrationen, starker
Elektrizität, starkem Magnetismus und anderen Störungen sein. Die Umgebungstemperatur sollte 5-30°C und
die Luftfeuchtigkeit 35-65%RH betragen.
* Die Betriebsspannung der Maschine ist AC100-240V.
* Während des Betriebs der Maschine muss diese durchgehend überwacht werden. Vor der Abreise muss der
Strom abgeschaltet werden, um unvorhergesehene Probleme zu vermeiden. Wenn eine abnormale Situation
auftritt, schalten Sie bitte sofort den Strom ab und kümmern Sie sich darum!
* Es ist strengstens untersagt, reektierende oder diuse Gegenstände in das Gerät zu stellen, die für den
Betrieb nicht relevant sind, um Laserreexionen auf den menschlichen Körper oder brennbare Materialien zu
vermeiden.
* Das Gerät sollte von elektrischen Geräten ferngehalten werden, die empndlich auf elektromagnetische
Störungen reagieren und diese verursachen können.
* Das Zerlegen des Lasergravierers durch Nichtfachleute ist strengstens untersagt, da im Inneren des Geräts
Gefahren wie Hochspannung bestehen können.
Sicherheitsvorkehrungen
Warnung
1. Die Lasergravurmaschine kann Laserlicht erzeugen. Es ist strengstens untersagt, lebende Organismen unter
den Laserstrahl zu bringen (der Anschluss ist mit einem gelben Warnschild gekennzeichnet). 2. Lichtempndli-
chen Patienten ist es untersagt, das Lasergerät zu benutzen oder sich ihm zu nähern. 3. Bei der Verwendung
der Lasergravurmaschine müssen der Bediener und alle Personen in der Nähe der Maschine eine
Laserschutzbrille tragen. Bedienen Sie das Lasergerät nicht ohne Laserschutzbrille. Unser Gerät wird mit einer
Laserschutzbrille geliefert. Wenn Sie eine zusätzliche Schutzbrille kaufen möchten, sollte diese einen Wellenlän-
genschutz zwischen 400-445nm (+-5nm) bieten, einen Außendurchmesser von +5 haben und mindestens der
Stufe L5 entsprechen.
4. Wenn das Lasergravurgerät in Betrieb ist, muss der Benutzer sehr aufmerksam sein und darf es nicht
unbeaufsichtigt lassen, um eine Entzündung des gravierten Materials zu vermeiden. Stellen Sie das Gerät an
einem feuerfesten Ort auf und sorgen Sie für eine gute Belüftung. Es wird empfohlen, ein Feuerlöscher in der
Nähe zu haben, für Notfälle.
5. Stellen Sie sicher, dass sich in der Nähe des Lasergraviergeräts keine brennbaren Materialien benden. Wir
empfehlen, einen Wabenarbeitstisch unter die Maschine zu stellen.
-27-
DE
Wartung
Empfehlungen:
Schalten Sie das Gerät nach 4 Stunden Gravieren und nach 1 Stunde Schneiden für 10 Minuten aus.
Das Lasermodul ist ein Verschleißteil.
6. Achten Sie beim Betrieb des Lasergravierers darauf, dass genügend Platz um ihn herum vorhanden ist. Beim
Gravieren bestimmter Materialien kann Rauch entstehen, der über ein spezielles Abluftsystem abgesaugt
werden sollte.
7.Berühren Sie weder den Laserstrahl noch das zu bearbeitende Objekt, während das Gerät in Betrieb ist, da dies
zu schweren Verletzungen oder Strahlenreexionen führen kann. Vermeiden Sie außerdem
den Kühler zu berühren, da er durch die Arbeit des Lasergravierers oder den kürzlichen Stillstand heiß sein kann.
8. Kinder oder Jugendliche (vor allem unter 14 Jahren) dürfen das Lasergravurgerät nicht allein benutzen und
sollten jederzeit von einem Erwachsenen beaufsichtigt werden.
9. Die Betriebstemperatur des Geräts beträgt 41°F-86°F (5°C-30°C).
10. Schalten Sie das Gerät aus, wenn es nicht benutzt wird, um Missbrauch durch Dritte zu vermeiden.
11. Bei der Lasergravur besteht Brandgefahr. Wenn das Lasergravurgerät in Betrieb ist, muss es von einem
geschulten Bediener beaufsichtigt werden, der mit einem Feuerlöscher umgehen kann, um alle Unfälle, die
passieren können zu verhindern.
12. Unsere Lasergravurmaschine ist mit einem eingebauten Flammensensor ausgestattet, um die Sicherheit
unserer Geräte zu maximieren. Bitte beachten Sie jedoch, dass keine schriftliche oder stillschweigende Garantie
gegeben wird bezüglich der Verfügbarkeit oder Funktionalität desFlammensensors.
3. Diagramm
1. Rechte Y-Achse
2. Hintere X-Achse
3. Abluftventilator DC-An-
schluss
4. Linke Y-Achse
5. X-Achsen-Baugruppe
6. Riemenspannungsregler für
die X-Achse
7. Laser-Modul
8. Vordere X-Achse
9. LED-Leuchte DC-Anschluss
10. Luftpumpe
11. Hall-Schalter
2
4
5
8
10
1
9
6
11
3
7
1. DC-Eingangsanschluss
2. USB-Anschluss
3. Micro-SD-Anschluss
4. Netzschalter
5. Not-Aus-Schalter
6. Sicherheitsschloss
7. Untere Schublade
8. Bedienfeld
9. Schraube zur Befestigung des
Y-Achsen-Bandes
10. Schutzabdeckung
11. Externe Kamera-Schnittstelle
12. Schlauch für Luftpumpe
13. WiFi-Antenne
1
2 3
1110 1716 1614 15 1312
4 5 6
7 8
14. LED-Lichtschalter
15. Stromanschluss für Luftpumpe
16. Schrauben zum Einstellen des Riemens
der Y-Achse
17. Auspurohr
18. Motor der Y-Achse
19. Flammensensor
20. Schalter Flammensensor
9
18 2019
-28-
DE
Schlüssel-Symbole Name der Taste
Pfeil-Tasten
Startseite
Taste Patrouille
Taste Funktion
Einführung in das Bedienfeld
Drücken Sie kurz eine der Tasten, und das Lasermodul bewegt sich 1
mm in die entsprechende Richtung. Wenn Sie die Taste 3 Sekunden
oder länger drücken, bewegt sich das Lasermodul weiter, bis Sie die
Taste loslassen oder das Lasermodul den Endschalter erreicht.
Drücken Sie diese Taste, um das Lasermodul in die Ausgangsposi-
tion zurückzubringen.
Drücken Sie diese Taste, und das Lasermodul fährt den Arbeitsbere-
ich der ersten G-Code-Datei auf der TF-Karte ab.
X4 Pro
790x655x235mm
21kg
685x620x310mm
5. Lieferumfang
Netzadapter *1 USB-Kabel *2 Holz-Brett *2
Schlüssel *2 Betriebshandbuch *1
-29-
DE
Start/Pause-Taste
Stopp-Taste
TF-Karten-Anzeige
Drücken Sie diese Taste, um die Gravur zu starten/pausieren.
Drücken Sie diese Taste, um die Gravur zu beenden.
Leuchtet auf, wenn die TF-Karte erkannt und gelesen wird.
0.08x0.1mm
MKSLaser APP, LaserGRBL, LightBurn
4. Spezifikationen
Modell
Grundlegende
Angaben
Laser-Modul
Luftpumpe
Ladegerät
DC 24V
410x400mm
22000mm/min
50°±5
Windows, Mac / Linux
JPEG, BMP, GIF, PLT, PNG, DXF
Aluminiumlegierung
Holz, Acryl, China, Sto, Bambus,
Kunststobrett, Leder, Obst, Brot, etc.
Produktgröße
Paketgröße
Gewicht
Eingangsspannung
Nennleistung
Max. Gravuräche
Max. Graviergeschwindigkeit
Spotgröße des Laserstrahls
Kipp-Alarm
Software-Support
Unterstützte Betriebssysteme
Unterstützte Dateiformate
Rahmen-Material
Nennleistung
Eingang
Laserleistung
Eingangsspannung
Eingangsstrom
Eingangsleistung
Luftgeschwindigkeit
Eingangsspannung
Eingangsstrom
Ausgangsspannung
Ausgangsstrom
Materialien für die Lasergravur
144W
77W
22W
24V 6A
24V
1.5A
36W
30L/min
AC 100-240V
2.5A
24V
6A
Kehlkopfbügel *1
Schritt 1: Anbringen der 4 Schutzabdeckungshalterungen
Bringen Sie die 4 Halterungen wie unten gezeigt in den entsprechenden Löchern an. Die beiden Halterun-
gen mit einer Magnetlasche sollten an der Vorderseite des Graviergeräts angebracht werden, und stellen Sie
sicher, dass die Magnetlaschen nach vorne zeigen.
Metallplatte *1
Schraubenzieher *1
Schraubenpaket *1
Schutzbrille *1
Reinigungsbürste *1
Vordere Schutzabdeckung *1
Abluftventilator *1
Selbstklebende
Kabelklemme *5
Rechte Schutzabdeckung *1
Hintere Schutzabdeckung *1
Lasermodul *1
Luftpumpe *1
Linke Schutzabdeckung *1
Auspurohr *1
Schutzkappenhal-
terung *4
TF-Karte *1 Schraubenschlüssel *1 Kalibrierungskarte *1TF-Kartenleser *1
-30-
DE
6. Montageanleitung
WiFi-Antenne *1
L
R
Erhöher*4
Schritt 3: Installation des Abluftventilators
(1) Trennen Sie die Luftführung vom Abluftventilator.
(2) Setzen Sie das Abluftgebläse von der Innenseite der hinteren Schutzabdeckung aus ein und schieben Sie
die vier Schrauben des Abluftgebläses durch die Löcher. Vergewissern Sie sich, dass das Lüfterkabel auf der
linken Seite liegt.
(3) Montieren Sie die Luftführung von der Außenseite der hinteren Schutzabdeckung und befestigen Sie sie
mit vier Flügelschrauben.
Schritt 2: Anbringen der linken und rechten Schutzabdeckungen
(1) Setzen Sie die unteren Vorsprünge der Schutzabdeckungen in die Schlitze am linken und rechten
Y-Achsen-Rahmen ein.
(2) Ziehen Sie die Schrauben fest, um die Schutzabdeckungen zu sichern.
Hinweis: Die folgenden Zeichnungen zeigen die Montage der rechten Schutzabdeckung. Bitte
installieren Sie die linke Schutzabdeckung auf die gleiche Weise.
-31-
DE
R
R
Schritt 4: Anbringen der hinteren Schutzabdeckung
(1) Setzen Sie die unteren Vorsprünge der hinteren Schutzabdeckung in die Schlitze am hinteren
X-Achsen-Rahmen ein.
(2) Richten Sie die seitlichen Nuten der hinteren Schutzabdeckung auf die Vorsprünge an der Oberseite der
linken und rechten Schutzabdeckung aus.
(3) Ziehen Sie die Schrauben fest, um die hintere Schutzabdeckung zu sichern.
Schritt 5: Anschließen des Abluftgebläses und der LED-Leucht
(1) Schließen Sie das Abluftgebläse und die LED-Leuchte an den in der Zeichnung gezeigten
Positionen an und sichern Sie die Kabel mit den mitgelieferten Kabelklemmen.
-32-
DE
Schritt 6: Installieren des Lasermoduls
(1) Schieben Sie das Lasermodul über die Gleitplatte. Stellen Sie das Lasermodul auf die richtige Höhe ein und
ziehen Sie dann die Schrauben handfest an.
(2) Verbinden Sie das Netzkabel und das Abluftkabel mit dem Lasermodul entsprechend den entsprechenden
Bohrungen.
Hinweis: Kabel A ist das Netzkabel des Lasermoduls und Kabel B ist das Abluftkabel.
-33-
DE
A B
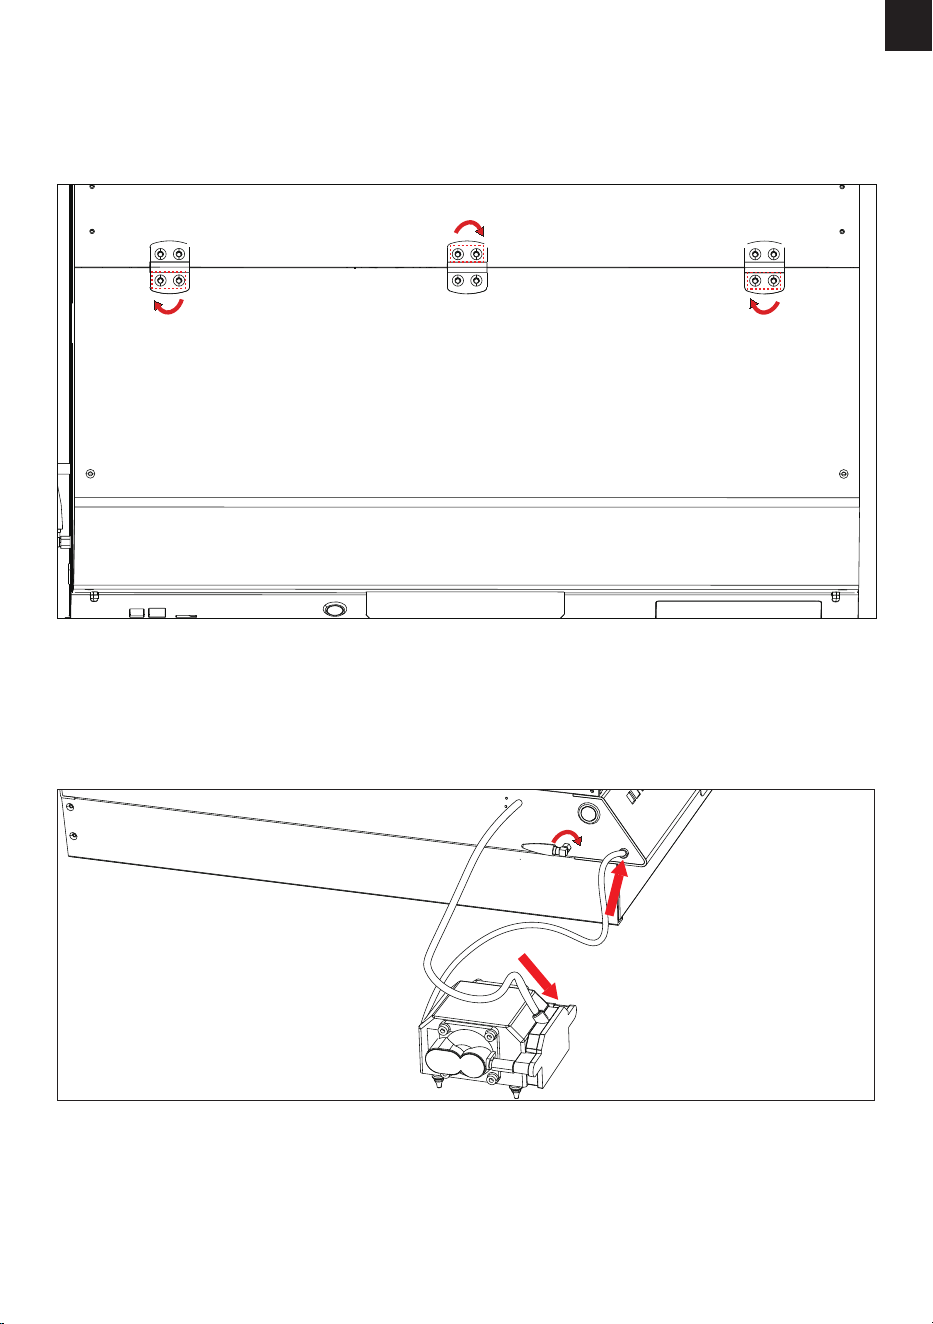
Schritt 7: Anbringen der vorderen Schutzabdeckung
(1) Setzen Sie die vordere Schutzabdeckung oben auf und richten Sie die Scharniere auf die Schraubenlöcher
aus.
(2) Ziehen Sie die Schrauben und Bolzen an, um die vordere Schutzabdeckung zu befestigen.
(1) Befestigen Sie die Luftpumpe am Schlauch des Geräts und schließen Sie das Kabel der Luftpumpe an die
Schnittstelle der Luftpumpe an.
(2) Bringen Sie die WiFi-Antenne am Gerät an und drehen Sie sie im Uhrzeigersinn, um sie festzuziehen.
Schritt 8: Installieren der Luftpumpe und der WiFi-Antenne
-34-
DE
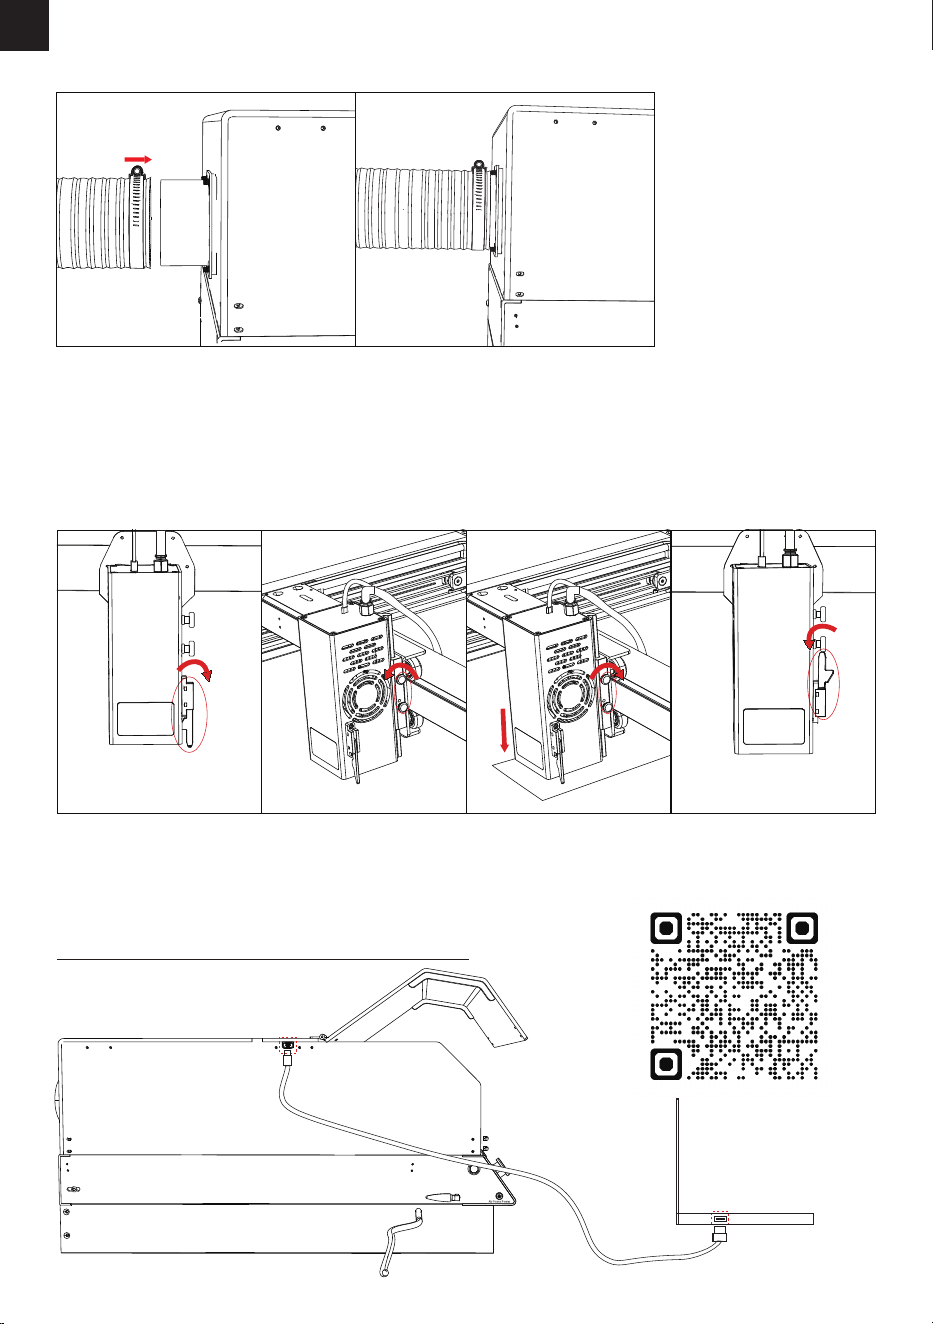
(1) Ziehen Sie die Fokussierleiste am Lasermodul nach unten.
(2) Halten Sie das Lasermodul mit einer Hand fest und lösen Sie die 2 Schrauben, um das Lasermodul zu bewegen.
(3) Schieben Sie das Lasermodul leicht nach unten, bis der Fokussierbalken das Gravierobjekt berührt.
(4) Ziehen Sie die Schrauben an, um das Lasermodul zu sichern, und schieben Sie dann die Fokussierleiste nach
oben in ihre Position.
(1) Montieren Sie das Auspurohr und ziehen Sie es mit dem Kehlkopfbügel fest.
Schritt 10: Fokussieren
Schritt 9: Installation des Auspuffrohrs
Hinweis: Detaillierte Informationen zur Verwendung der Kamera finden Sie unter dem nachstehenden
Link oder scannen Sie den nachstehenden QR-Code.
https://docs.lightburnsoftware.com/Camera/index.html
Schritt 11: Anschließen des USB-Kabels der Kamera
-35-
DE
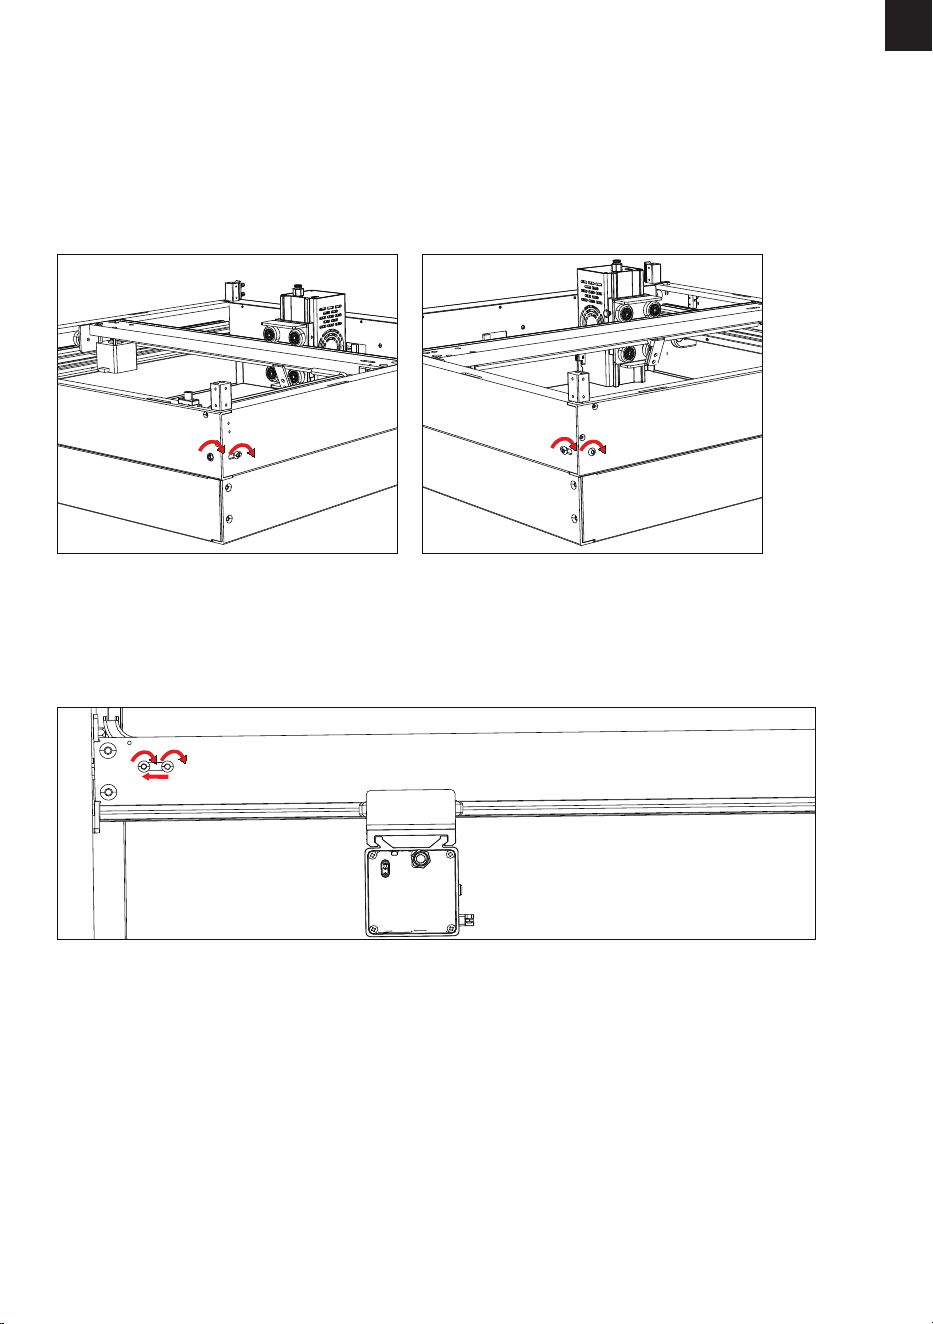
Spannen der Y-Achsen-Riemen
Straffen des X-Achsen-Riemens
(1) Lösen Sie die in der Strichzeichnung gezeigte Schraube 1 leicht.
(2) Drehen Sie die Schraube 2, um die Riemen zu spannen, wie in der Strichzeichnung dargestellt.
(3) Ziehen Sie die Schraube 1 fest, um die Riemen zu sichern.
Die Riemen werden im Werk eingestellt. Sollten sich die Gurte nach längerem Gebrauch lockern, können sie
wie folgt auf die richtige Spannung eingestellt werden.
So stellen Sie die Riemenspannung ein
(1) Lösen Sie leicht die beiden Schrauben des X-Achsen-Riemenspannungsreglers und bewegen Sie den
Regler, um den X-Achsen-Riemen zu spannen.
(2) Ziehen Sie die Schrauben fest, um den Regler zu befestigen.
-36-
DE
Schraube 1
Schraube 2
Schraube 1
Schraube 2

-37-
DE
7.Funktionen & Betrieb
Teile
Funktionen / Störungen Maßnahmen
Alarm
Der Alarm ertönt, wenn etwas
Ungewöhnliches passiert.
1. Bestimmen Sie die Ursache des Alarms.
2. Beseitigen Sie die Ursache.
3. Drücken Sie die Not-Aus-Taste für 3
Sekunden, um die Maschine zurückzusetzen.
Drehen Sie den Knopf nach dem Drücken
wieder in seine ursprüngliche Position.
4. Folgen Sie den Bedienungsanweisungen
der Software, um den Betrieb wieder
aufzunehmen.
Laser-Modul
Schrittmotor Er gewährleistet das normale
Funktionieren des Lasermoduls.
1. Prüfen Sie, ob die Kabel den erforderli-
chen Spezikationen entsprechen.
2. Stellen Sie sicher, dass die Kabel richtig
angeschlossen sind.
3. Prüfen Sie, ob die Steuerungs-Box
ordnungsgemäß funktioniert.
4. Prüfen Sie, ob die Software richtig
installiert oder konguriert ist.
5. Wenden Sie sich an den Kundenservice,
wenn das Problem nicht gelöst werden
kann.
Not-Aus
Das Gerät wird sofort angehalten.
Drücken Sie die Taste, um das Gerät
auszuschalten, und drehen Sie die Taste
im Uhrzeigersinn, um das Gerät wieder in
Betrieb zu nehmen.
Flammen-Sensor
Er erkennt, ob in der Maschine oder in
ihrer Umgebung ein Feuer ausgebro-
chen ist, löst den Alarm aus und stoppt
im Falle eines Brandes den Betrieb des
Geräts. Er wird über einen mecha-
nischen Schalter ein- und ausgeschaltet.
1. Überprüfen Sie die Umgebung und
vermeiden Sie es, das Gerät in
direktem Sonnenlicht aufzustellen.
2. Wenden Sie sich an den Kundend-
ienst, um die Empndlichkeit des
Flammen-Sensors einzustellen.
Luftpumpe
Sie unterstützt die Maschine während
des Betriebs.
Störung: Das Gerät funktioniert nicht
mehr oder weist Abweichungen vom
Normalbetrieb auf.
1. Prüfen Sie, ob der Netzadapter an eine
Stromquelle angeschlossen ist.
2. Prüfen Sie, ob der Gleichstromanschluss der
Luftpumpe richtig eingesteckt ist.
3. Wenden Sie sich an den Kundendienst, wenn
das Problem nicht behoben werden kann.
Er graviert Gegenstände und
Materialien.
Störung: Das Lasermodul funktioniert
nicht oder weist Betriebsabweichun-
gen auf.
1. Prüfen Sie, ob das Verbindungskabel des
Lasermoduls richtig angeschlossen ist.
2. Prüfen Sie, ob die Hauptsteuerungs-Ein-
heit ordnungsgemäß funktioniert.
3. Überprüfen Sie, ob die Software korrekt
installiert oder konguriert ist.
4. Wenden Sie sich an den Kundenservice,
wenn das Problem nicht behoben werden
kann.

-38-
DE
Flammensensor
Schalter
Es wird verwendet, um die
Aktivierung und Deaktivierung von
ame-Sensoren entsprechend der
aktuellen Situation zu steuern.
EIN-Zustand: Der Flammensensor ist in
Betrieb, die Maschine schaltet sich nach der
Überprüfung der Flamme automatisch ab.
AUS-Zustand: Der Flammensensor
funktioniert nicht, Sie müssen in Echtzeit
auf das Feuerphänomen achten.
Sicherheitss-
chloss
Er kontrolliert den Netzschalter, um ein
falsches Einschalten zu verhindern.
Bewahren Sie den Schlüssel auf.
Neigungssensor
Wenn der Neigungswinkel der
Maschine mehr als 50±5 Grad beträgt,
schlägt die Maschine Alarm und stellt
den Betrieb ein.
Halten Sie die Maschine in einem
Winkel von weniger als 45 Grad.
Endschalter
Sie stoppen die Bewegung des
Lasermoduls, wenn es sich zum
Ausgangspunkt der X-Achse oder
Y-Achse bewegt.
1. Prüfen Sie, ob das Kabel des Endschalters
abgeklemmt ist.
2. Prüfen Sie, ob der Stecker des Endschal-
ters richtig aufgesteckt ist.
3. Prüfen Sie, ob der Endschalter Kontakt mit
dem entsprechenden Bauteil hat.
4. Wenden Sie sich an den Kundendienst,
wenn das Problem nicht behoben werden
kann.
Front-Schutzab-
deckung
Die Maschine stoppt den Betrieb,
wenn die vordere Schutzabdeckung
geönet ist.
Schließen Sie die vordere Schutzab-
deckung und drücken Sie die Taste
"Start/Pause", um die Maschine
weiterarbeiten zu lassen.
Steuerungsmeth-
oden
1. Steuerung über Computersoftware
2. Steuerung über das Bedienfeld und
die TF-Karte
3. Steuerung über mobile App &
TF-Karte
1. Über das USB-Kabel an einen Computer
anschließen und über LightBurn oder
LaserGRBL steuern.
2. Arbeiten Sie oine über das Bedienfeld
und die TF-Karte.
3. Arbeiten Sie oine mit MKSlaser und
TF-Karte.
-39-
DE
1.Laden Sie den Treiber über den unten stehenden Link herunter.
https://mecpow.com/pages/driver-les
2.Wenden Sie sich an den Kundendienst, um die Datei des Treibers zu erhalten.
Anmerkung:
Für Windows-Benutzer: Wenn Sie ein System unter Win10 verwenden, müssen Sie den Treiber
manuell installieren. Wenn Sie ein Win10-System oder höher verwenden, müssen Sie den Treiber nicht
installieren.
Der Treiber für Mac-Benutzer unterstützt OS X 10.9 bis OS X 10.15 und OS X 11.0 (Big Sur) und höher.
Der Treiber für Linux-Benutzer unterstützt 32-Bit- und 64-Bit-Systeme.
Bitte schalten Sie das Gerät ein und verbinden Sie es über das USB-Kabel mit Ihrem Computer, bevor
Sie den Treiber starten!
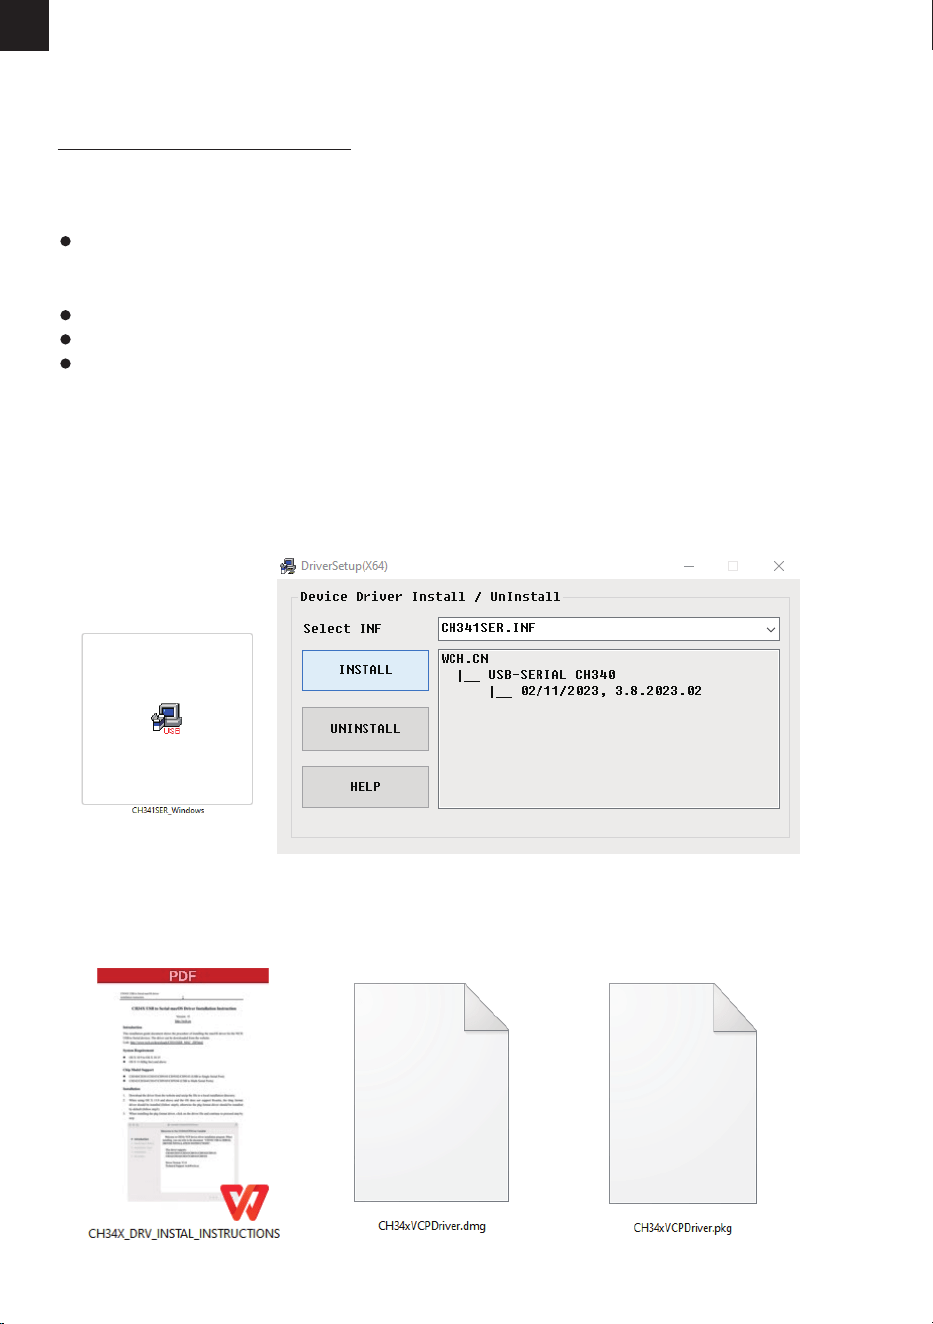
8. Treiber
Download-Methoden
Installation
Für Windows-Benutzer:
1. Önen Sie den heruntergeladenen Treiber.
2. Klicken Sie auf "INSTALL".
3. Klicken Sie auf "OK", wenn der Treiber erfolgreich installiert wurde.
Für Mac-Benutzer:
1. Önen Sie die Anleitung.
2. Önen Sie den heruntergeladenen Treiber und folgen Sie den Anweisungen, um ihn zu installieren.
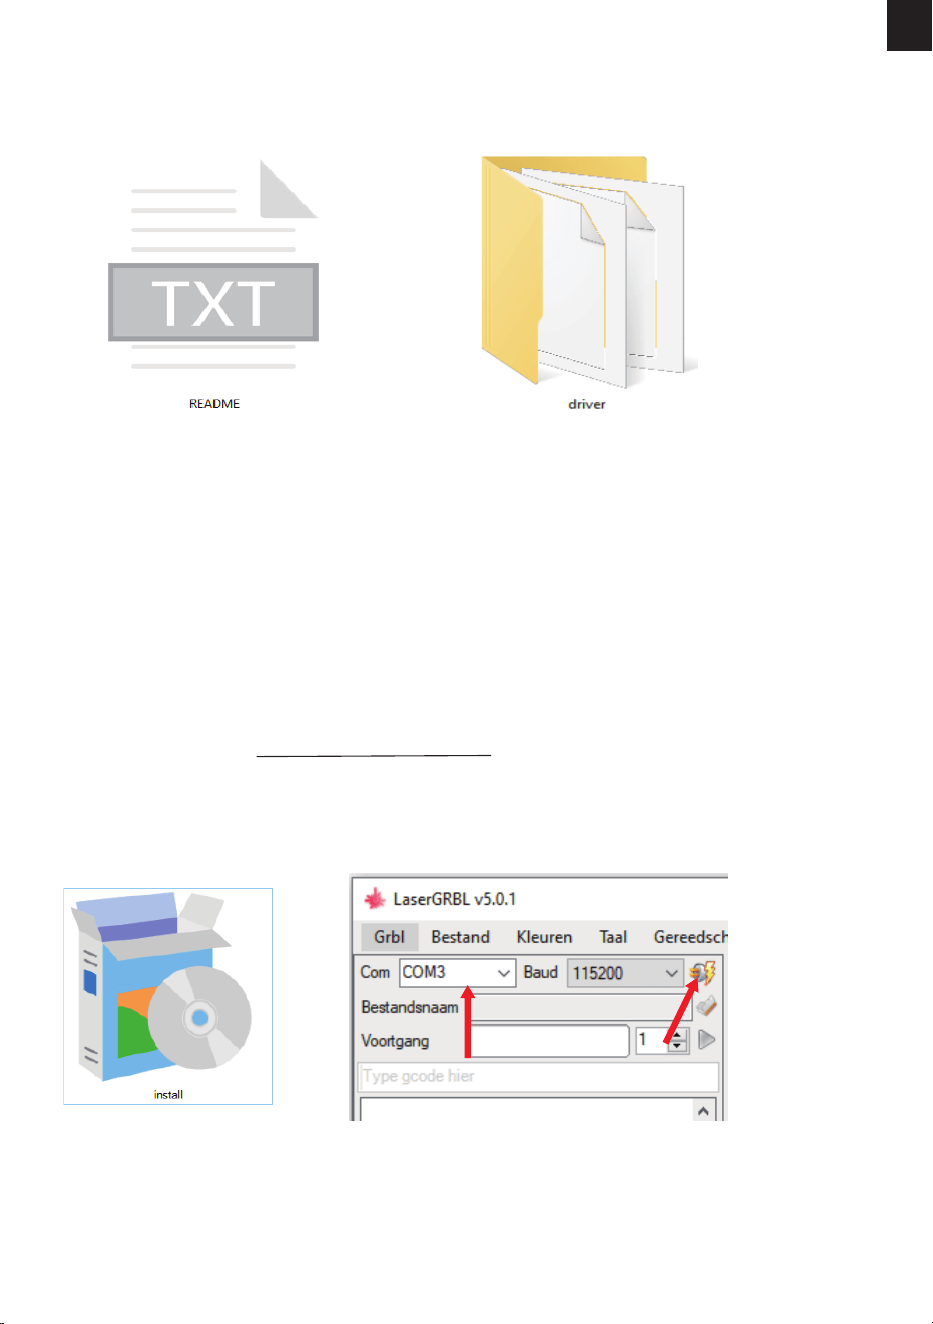
-40-
DE
Für Linux-Benutzer:
1. Önen Sie die Datei - README.
2. Önen Sie die Datei - Treiber, und folgen Sie den Anweisungen in "README", um ihn zu installieren.
IEs handelt sich um eine kostenlose Open-Source-Software, die Windows-Computer unterstützt.
Laden Sie es herunter von: http://lasergrbl.com/download/
9. Steuerung über Computersoftware
LaserGRBL
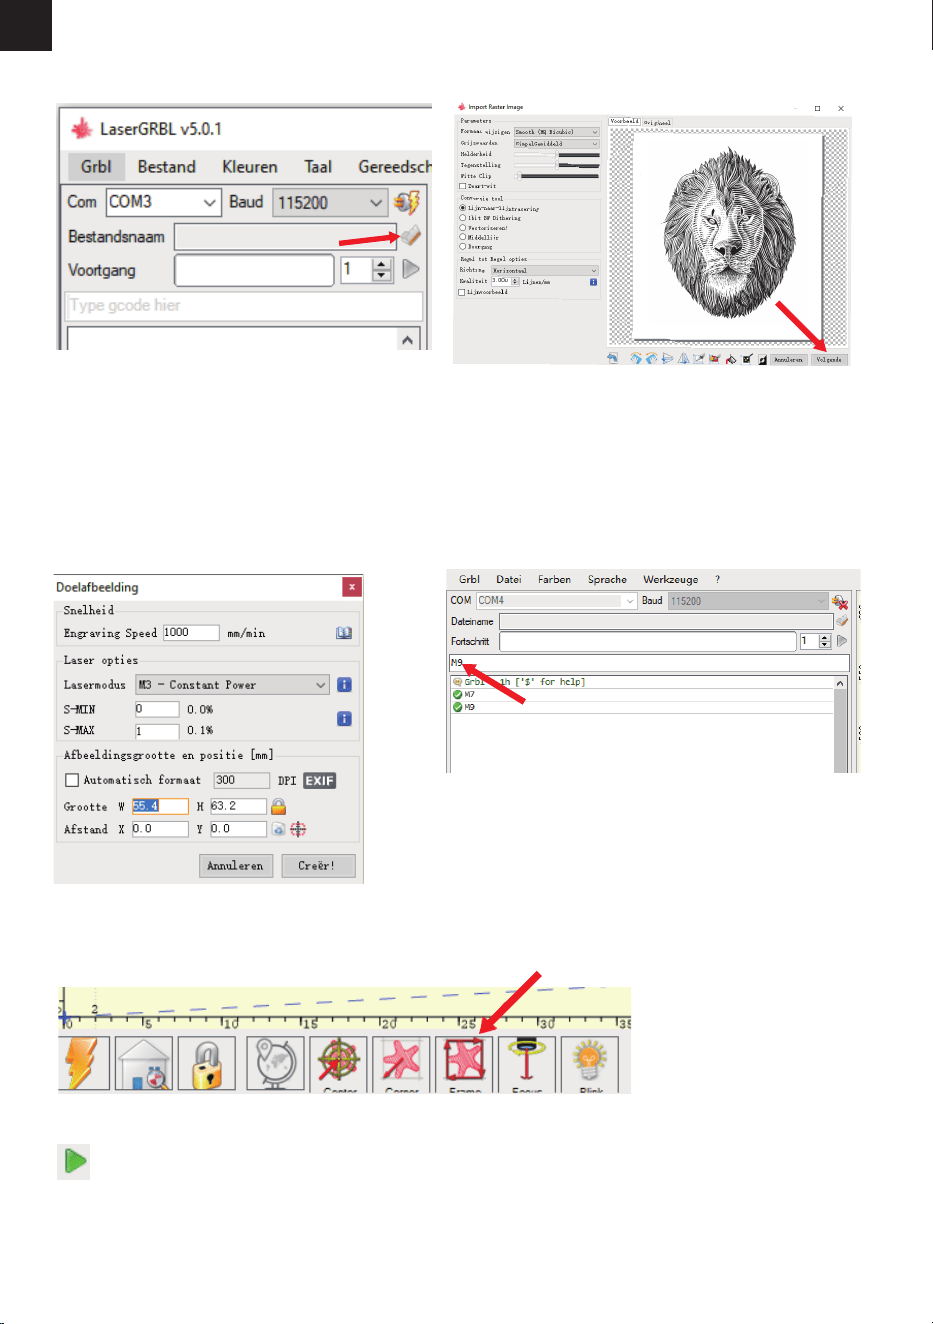
1. Installieren Sie es. 2. Önen Sie die Software. Klicken Sie auf „Verbinden“ und
wählen Sie „COM3“.
Verbinden Sie die Graviermaschine in Echtzeit über das USB-Kabel mit der Software. Während des
Betriebs können Sie die Graviermaschine über das Bedienfeld starten oder anhalten.
-41-
DE
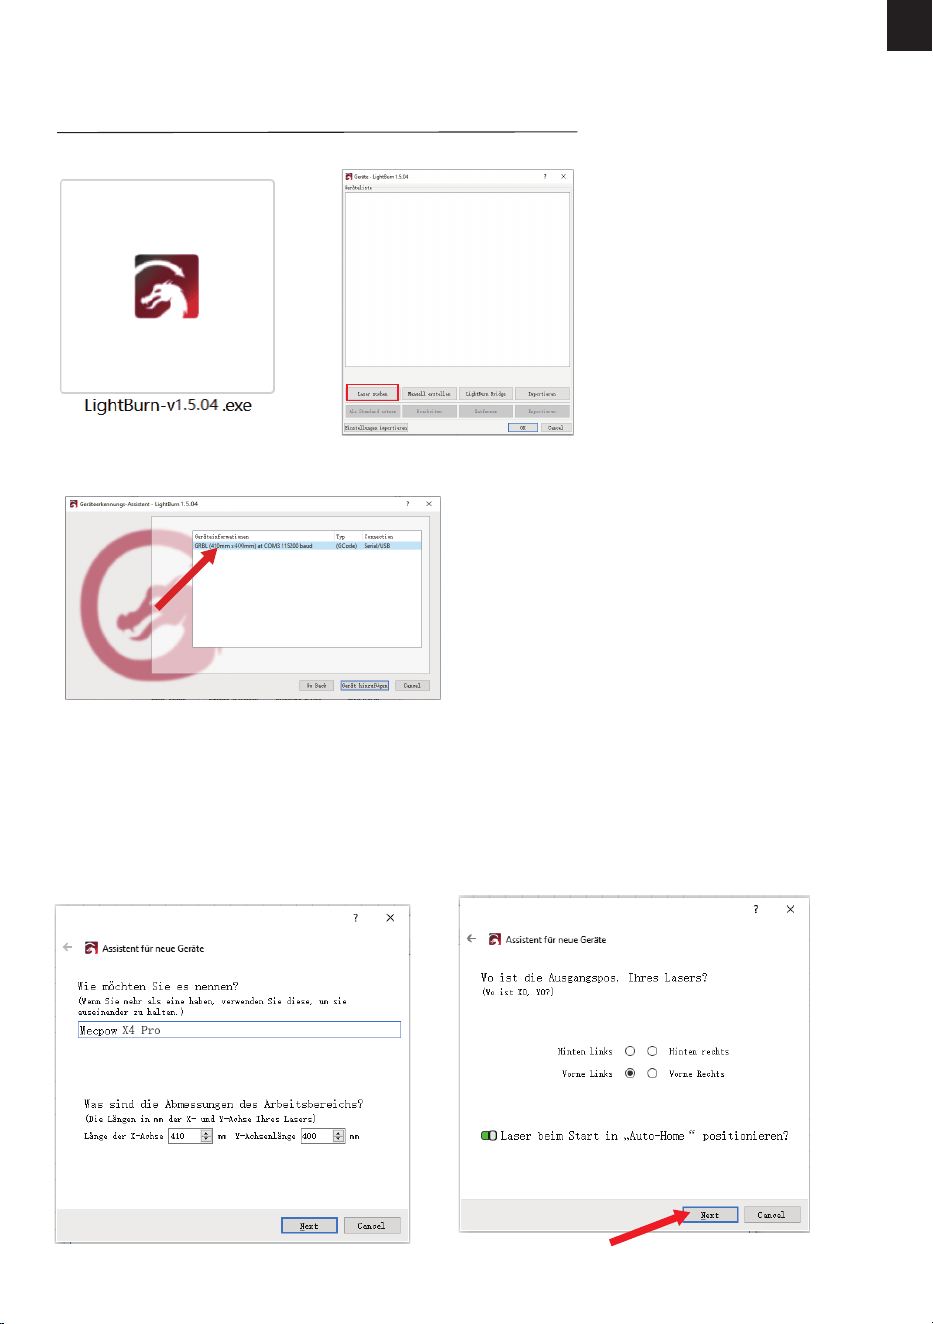
3. Klicken Sie auf „Open Bestand“, um die
Gravurdatei auszuwählen
4. Wählen Sie den Gravurmodus und klicken Sie
auf „Volgende“.
5. Wählen Sie die Betriebsparameter für die
Lasergravur oder das Laserschneiden aus. (M3 ist
für das Schnitzen mit konstanter Leistung und
M4 für das Schnitzen mit variabler Leistung. Die
empfohlenen Betriebsparameter zum Gravieren
oder Schneiden verschiedener Materialien
nden Sie in Abschnitt 10.)
6. Geben Sie "M7" in das Befehlsfeld ein und
drücken Sie Enter, um die Luftpumpe zu starten.
Um die Luftpumpe zu stoppen, geben Sie "M9"
in das gleiche Feld ein und drücken Sie die
Eingabetaste.
7. Klicken Sie auf „Framing“, um eine Vorschau des Gravurbereichs anzuzeigen und die Gravurposition
anzupassen.
8. Klicken Sie auf „Start Programma“, um mit der Gravur zu beginnen.
-42-
DE
LightBurn
Es handelt sich um eine kostenpichtige professionelle Software, die MAC-, Linux- und Windows-Comput-
er unterstützt. Laden Sie es herunter von:
https://lightburnsoftware.com/pages/trial-version-try-before-you-buy
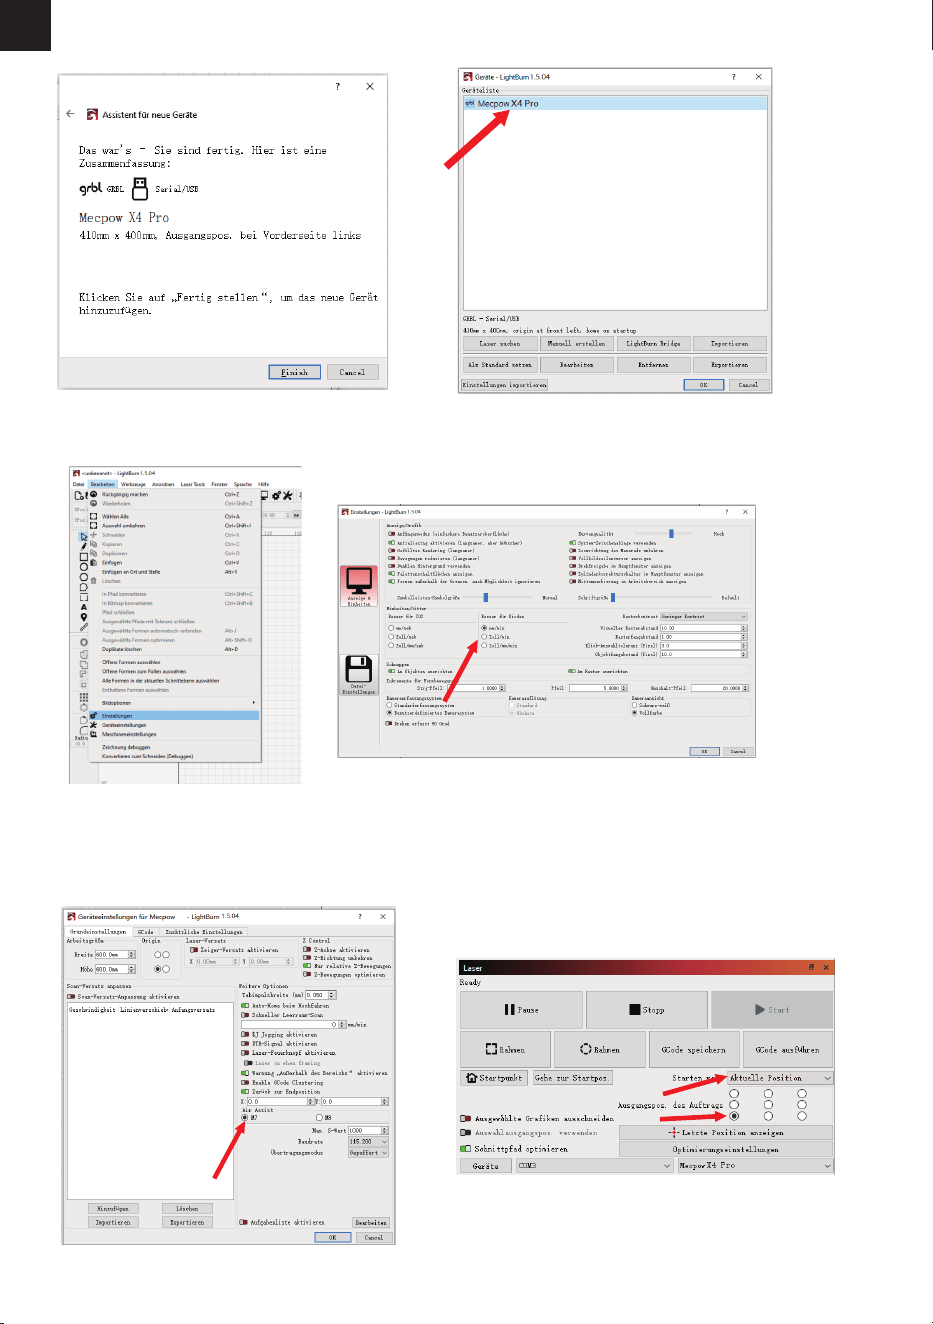
1. Installieren Sie es. 2. Önen Sie die Software und klicken Sie auf „Laser suchen“.
3. Wählen Sie Ihr Gerät aus und klicken Sie auf „Gerät hinzufügen“.
4. Benennen Sie Ihr Gerät, geben Sie die Längen der
X- und Y-Achse ein und klicken Sie dann auf „Next“.
Name: Mecpow X4 Pro
Länge der X-Achse: 410 mm
Y-Achsenlänge: 400 mm
5. Wählen Sie „Vorne Links“ als Ursprung
Ihres Lasers und klicken Sie auf „Next“.
-43-
DE
6. Klicken Sie auf „Finish“ 7. Wählen Sie Mecpow X4 Pro und klicken Sie auf „OK“.
8. Klicken Sie auf „Bearbeiten“ – „Einstellungen“, stellen Sie die Einheit auf „mm/min“
ein und klicken Sie dann auf „OK“.
9. Klicken Sie auf "Bearbeiten" - "Geräteeinstel-
lungen" und wählen Sie "M7" unter "Luftunter-
stützung", damit die Luftpumpe synchron mit
der Maschine läuft.
10. Wählen Sie „Aktuelle Position“ im
Abschnitt „Starten von“ und dann den Kreis in
der unteren linken Ecke im Abschnitt
„Ausganspos. des Auftrages“.
5
X4
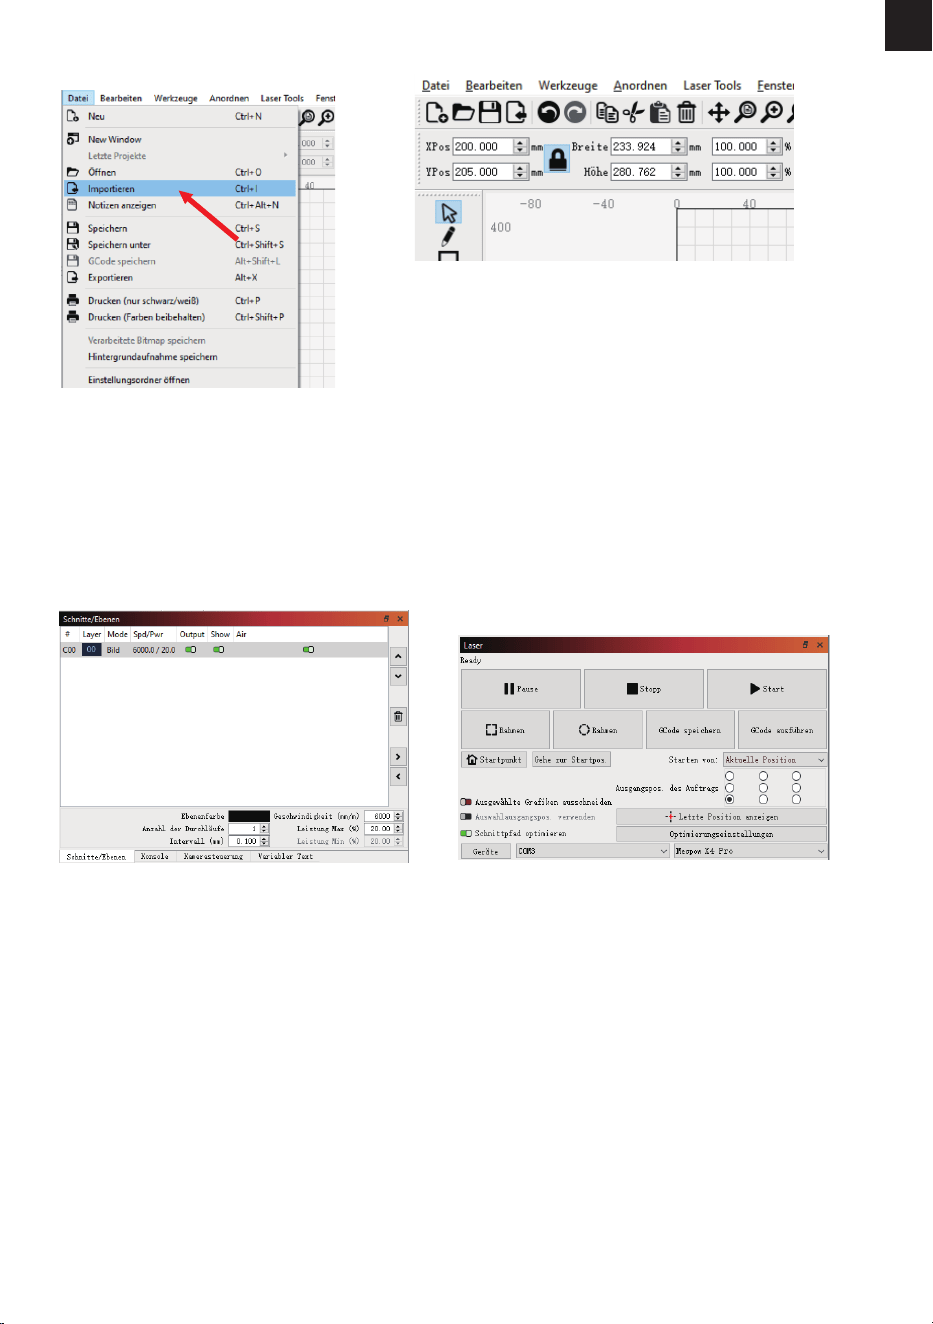
-44-
DE
11. Klicken Sie auf „Datei“ – „Importieren“,
um die Gravurdatei zu importieren.
12. Nach dem Importieren der Datei können Sie die
Gravurgröße oben auf der Benutzeroberäche ändern.
13. Wählen Sie den Gravurmodus und stellen
Sie die Betriebsparameter für die Lasergravur
oder das Laserschneiden ein. (Empfohlene
Betriebsparameter zum Gravieren oder
Schneiden verschiedener Materialien sind im
nächsten Abschnitt aufgeführt.)
14. Klicken Sie auf „Rahmen“, um eine Vorschau des
Gravurbereichs anzuzeigen und die Gravurposition
anzupassen. Klicken Sie dann auf „Start“, um mit der
Gravur zu beginnen.
-45-
DE
1. Bereiten Sie eine LightBurn G-Code-Datei zum Gravieren oder Schneiden vor und speichern Sie sie im
Stammverzeichnis der TF-Karte. Setzen Sie die TF-Karte in das Graviergerät ein. Die Anzeige auf dem
Bedienfeld leuchtet auf und zeigt an, dass die Datei erfolgreich geladen wurde.
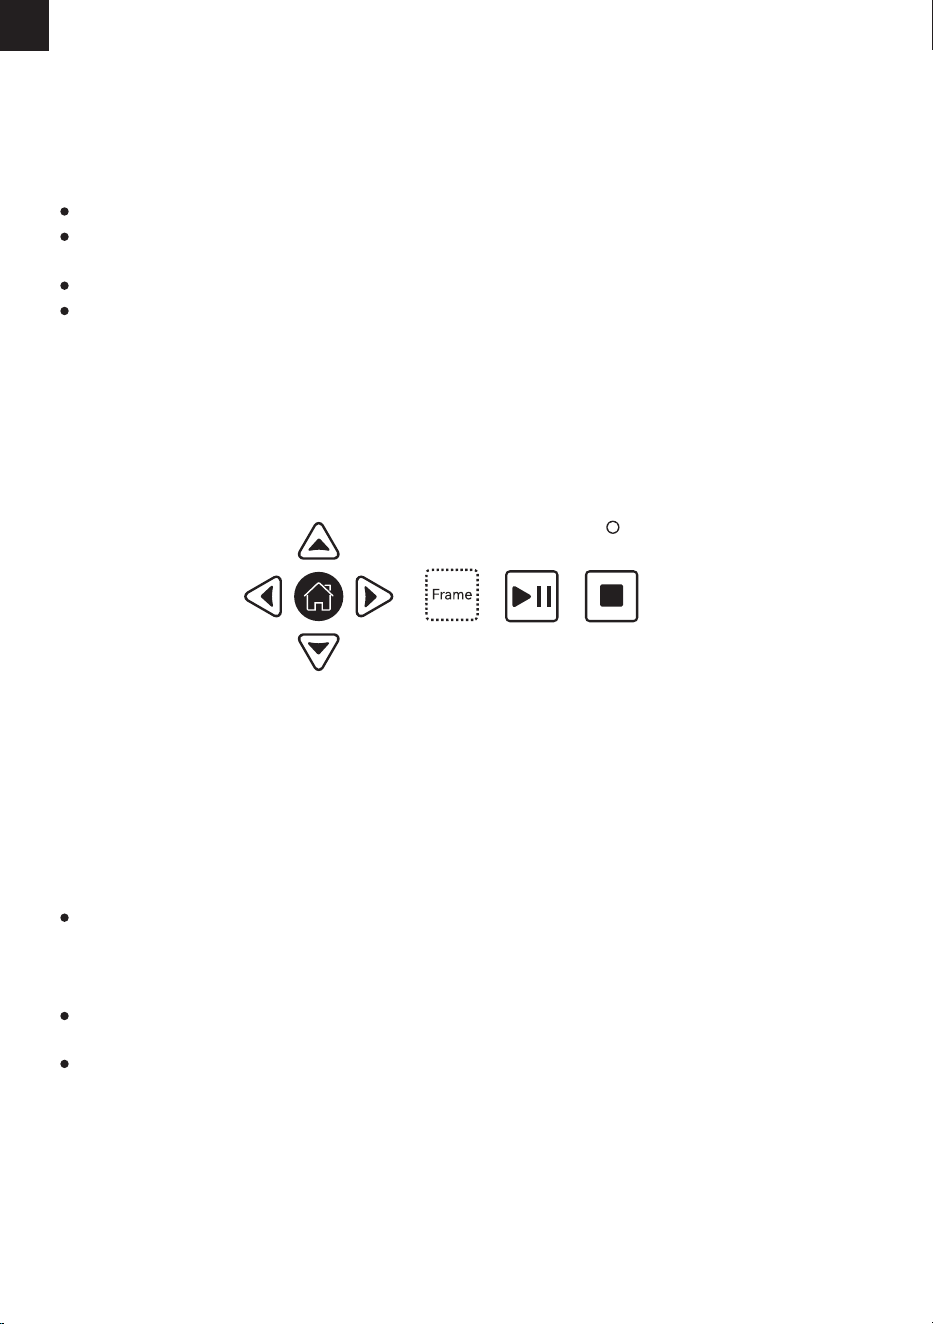
2. Drücken Sie die Taste "Frame", und das Gerät wechselt in den Vorschaumodus. Das Lasermodul bewegt sich
entlang der X/Y-Achse, um den Zielarbeitsbereich einzurahmen. Sie können dann das gravierte Objekt
manuell in die richtige Position bringen oder die Pfeiltasten auf dem Bedienfeld verwenden, um das
Lasermodul in die richtige Position zu bringen.
3. Drücken Sie die Taste "Start/Pause", um mit dem Gravieren/Schneiden zu beginnen. Wenn Sie die Arbeit des
Gravierers unterbrechen müssen, drücken Sie die Taste "Start/Pause" und dann erneut, um mit dem Gravie-
ren/Schneiden fortzufahren. Wenn Sie den Vorgang beenden möchten, drücken Sie die Taste "Stop". Wenn der
Gravier-/Schneidevorgang abgeschlossen ist, fährt das Lasermodul in die Ausgangsposition zurück. Wenn das
Gerät nicht in Betrieb ist, drücken Sie die Taste "Start/Pause", und der Gravierer wiederholt den letzten
Gravier-/Schneidevorgang, der für die Massenproduktion geeignet ist.
Die TF-Karte unterstützt nur das FAT32-Format.
Die Graviermaschine liest standardmäßig die zuletzt geänderte Datei im Stammverzeichnis der TF-Karte,
wenn sich mehr als eine Datei darauf bendet.
Der Graveur kann nur NC- und GC-Dateien mit englischen Namen erkennen.
Der Graveur kann NC- und GC-Dateien erkennen, die mit LightBurn gespeichert wurden. NC- und
GC-Dateien, die mit LaserGRBL gespeichert wurden, kann der Gravierer jedoch nur erkennen, nachdem sie mit
MKSLaser konvertiert wurden. MKSLaser kann von der beigefügten TF-Karte oder von Mecpow.com bezogen
werden.
Hinweis:
10. Steuerung über Bedienfeld und TF-Karte
Die Tasten "Start/Pause" und "Stop" haben einen höheren Steuerungszugri auf den Gravierer als die
Computersoftware und die mobile App, d. h. Gravur-/Schneideaufgaben, die von Ihrem Computer oder
Mobiltelefon ausgegeben werden, können direkt über das Bedienfeld gestartet, angehalten und beendet
werden.
Wird eine vom Computer oder Mobiltelefon ausgegebene Gravur-/Schneideaufgabe beendet, kann sie nur
über den Computer oder das Mobiltelefon neu gestartet werden.
Die "Rahmen"- und Pfeiltasten funktionieren während des Gravier-/Schneidevorgangs nicht.
Hinweis:
-46-
DE
Das „*****“ im WLAN-Namen ist eine zufällige Zahlenkombination. Es variiert je nach Maschine.
Um die Stabilität des WLAN-Signals zu gewährleisten, wird empfohlen, Ihr Telefon vor dem Einsetzen der
TF-Karte mit dem WLAN der Graviermaschine zu verbinden.
Die App muss mit der TF-Karte verwendet werden. Das Hochladen der Gravurdatei schlägt fehl, wenn die
TF-Karte nicht eingelegt ist.
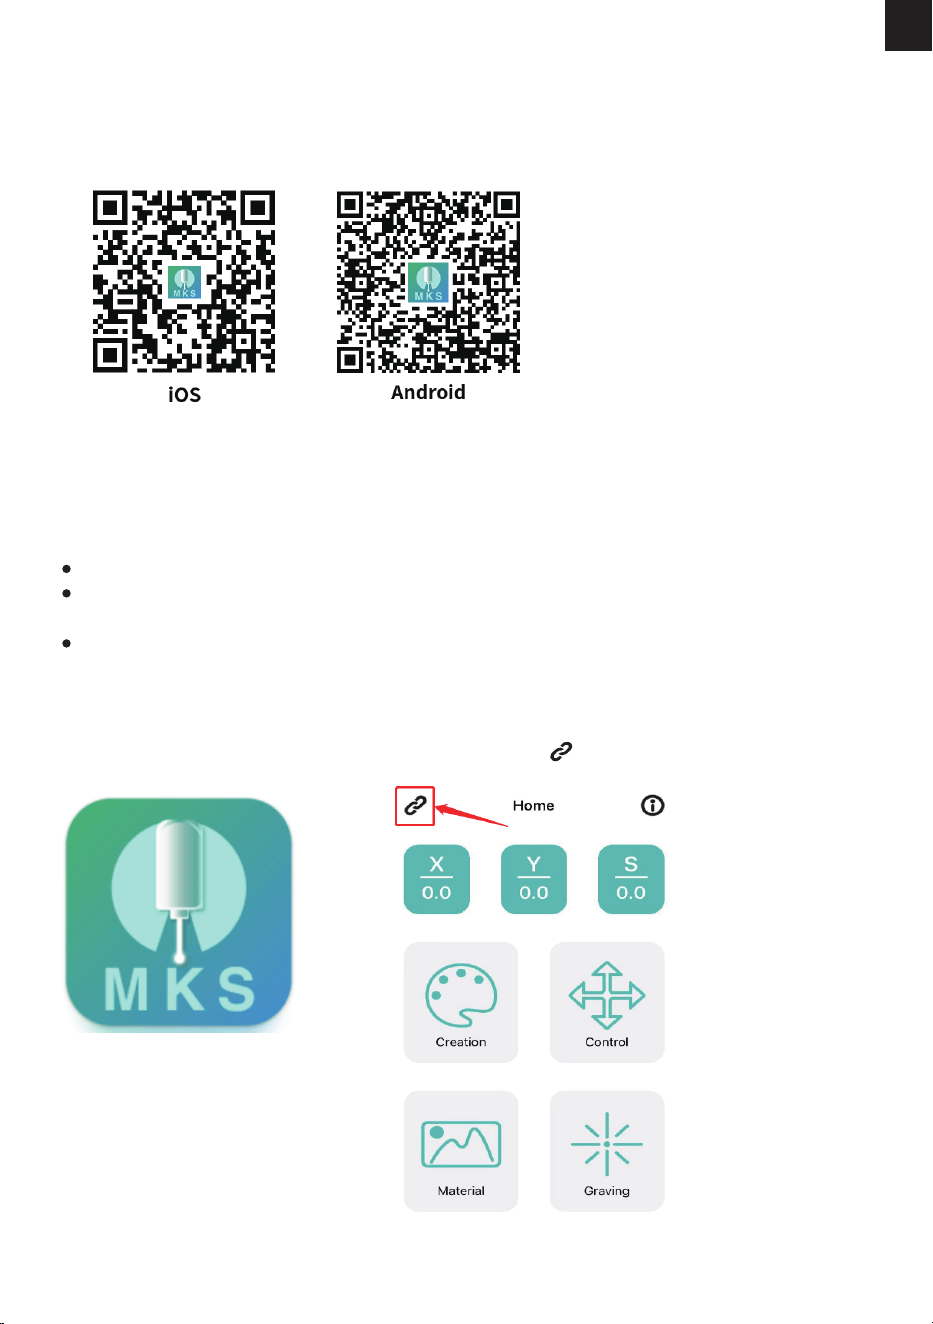
MKSLaser ist eine kostenlose mobile Anwendung, die Android- und iOS-Geräte unterstützt.
1. Aktivieren Sie die Wi-Fi Funktion Ihres Telefons und verbinden Sie das Wi-Fi "Mecpow_*****".
Wi-Fi Name: Mecpow_*****
Wi-Fi Kennwort: 12345678
2. Önen Sie die MKSLaser-App.
3. Klicken Sie auf das -Symbol.
Scannen Sie den QR-Code und laden Sie die App herunter.
App herunterladen
Wi-Fi-Verbindung
11. Steuerung über Mobile App & TF-Karte
Hinweis:
-47-
DE
Für die detaillierte Verwendung der MKSLaser-App lesen Sie bitte die Informationen auf der TF-Karte oder
laden Sie das Benutzerhandbuch herunter, indem Sie den untenstehenden Link aufrufen oder den QR-Code
scannen.
https://mecpow.com/pages/download-center
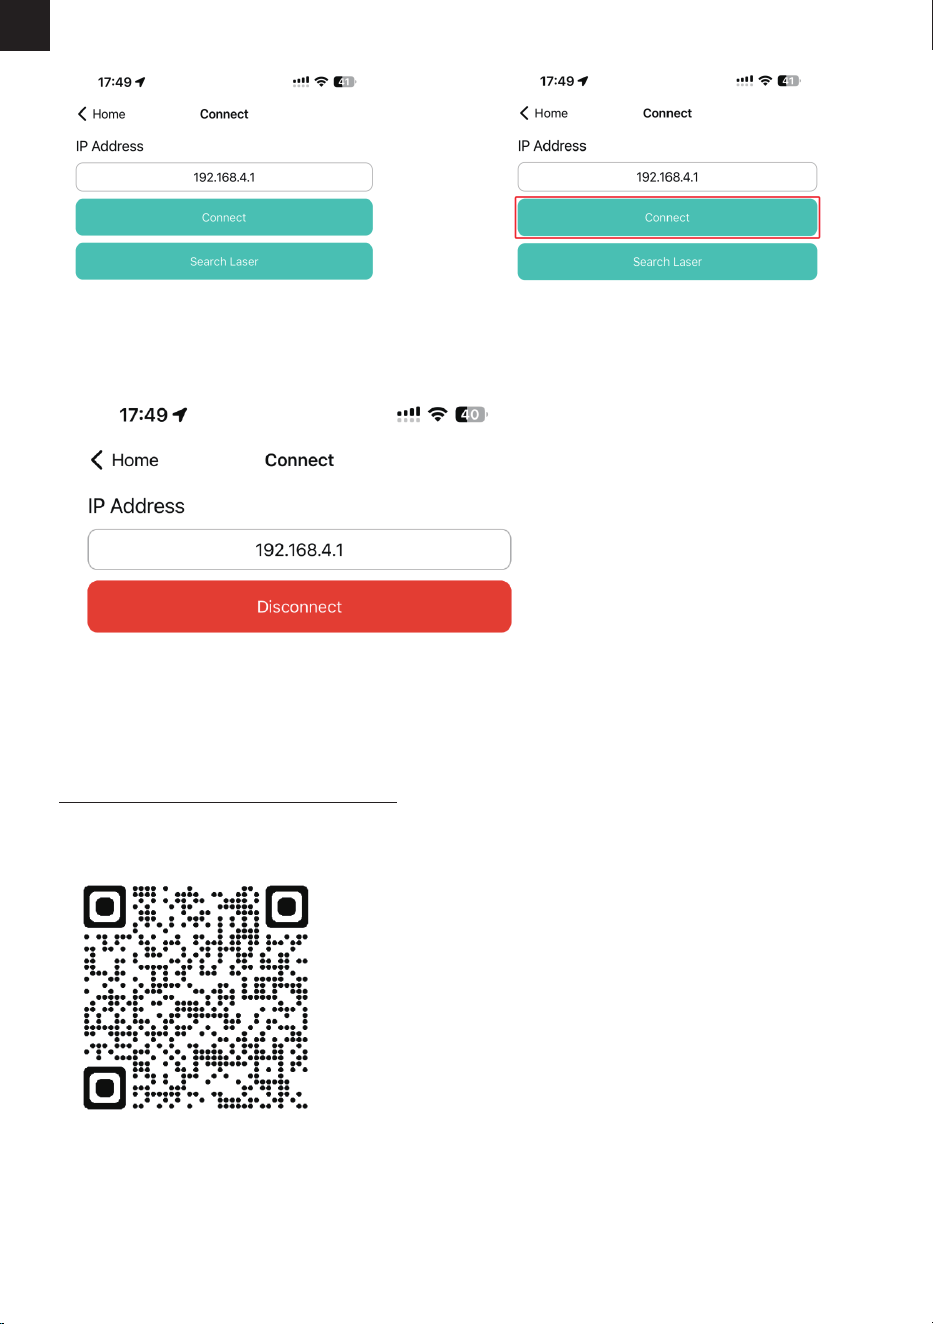
4. Geben Sie die IP-Adresse ein: 192.168.4.1 5. Klicken Sie auf „Verbinden“.
6. Wenn „Verbinden“ zu „Trennen“ wird, bedeutet dies, dass die Wi-Fi-Verbindung erfolgreich ist.
-48-
DE
13. Problembewältigung
2.Das Gerät kann keine Verbindung mit dem Computer herstellen.
A.Überprüfen Sie, ob das USB-Kabel richtig an den Computer und das Gerät angeschlossen ist.
B. Installieren Sie den Treiber wie angegeben und stellen Sie sicher, dass der Computer das Gerät als seriellen Anschluss erkennt.
C.Trennen Sie das USB-Kabel und die Stromversorgung, warten Sie 5 Sekunden und schließen Sie es dann wieder an.
3.Die Gravur ist zu schwach oder nicht vorhanden.
A. Vergewissern Sie sich, dass das Gerät gemäß der Bedienungsanleitung genau fokussiert ist.
B. Stellen Sie die Graviergeschwindigkeit ein. Wenn es zu schnell graviert, hat es möglicherweise nicht genug Zeit, das
Objekt zu brennen.
C. Das Bild ist zu unscharf. Importierte Bilder müssen klar, mit feinen Linien und nicht zu hell sein, da sich dies direkt
auf den Gravureekt auswirkt.
D. Stellen Sie sicher, dass das zu gravierende Objekt ach und parallel zur Maschine liegt, um Fokussierungsprobleme
zu vermeiden.
1.Das Gerät reagiert nicht, wenn es eingeschaltet wird.
A.Überprüfen Sie, ob das Gerät richtig an die Steckdose angeschlossen und eingeschaltet ist.
20 3000
3000
1000
3000
1000
1000
3000
50
13
20
50
80
50
50
80
3000
600
3000
200
130
75
3000
100
15
100
100
100
80
80 300
100
12. Empfohlene Betriebsparameter
Mecpow X4 Pro (22W)
Gummi
Kunstharz
Karton
8mm dicker Karton
9mm dicker Karton
10 mm dicker Karton
0,2 mm Papier
2mm Leder
5mm Acrylglas
Gravur
Holzbrett
Bambus
Leder
Die Oberäche muss gestrichen
werden.
Glas
Keramik
Acryl
Modus
Materialien
Leistung
(%)
Geschwindigkeit(mm/min)
Hinweis
Edelstahl
Schneiden
Die Oberäche muss mit
Wärmeübertragungspapier
aufgetragen werden.
Die Oberäche muss gestrichen
werden.
Gravieren Sie nicht auf
hochglanzpoliertem Edelstahl.
-49-
DE
Weitere Fragen und Antworten nden Sie unter dem nachstehenden Link oder scannen Sie den nachstehen-
den QR-Code.
https://mecpow.com/pages/faq
4. Der Offline-Graviervorgang wird unerwartet abgebrochen.
A. Prüfen Sie, ob der Notausschalter versehentlich gedrückt wurde. Wenn er gedrückt wurde, drehen Sie ihn nach
rechts, um ihn zu lösen.
B. Prüfen Sie, ob der Schalter versehentlich ausgeschaltet wurde. Wenn ja, schalten Sie ihn wieder ein.
C. Wenn alle oben genannten Punkte normal erscheinen, wenden Sie sich bitte an den Kundenservice.
5.Die Software hört während der Gravur abrupt auf zu laufen.
A. Prüfen Sie, ob das USB-Kabel locker ist.
B. Vergewissern Sie sich, dass die Software korrekt installiert ist und die Kongurationsdateien korrekt sind.
C. Vergewissern Sie sich, dass die Gravurdatei ordnungsgemäß funktioniert.
D. Wenn alle oben genannten Punkte normal zu sein scheinen, wenden Sie sich bitte an den Kundenservice.
6.Das Gerät bewegt sich korrekt, aber der Laser bleibt inaktiv.
A. Prüfen Sie, ob das Lasermodulkabel richtig angeschlossen ist.
B. Überprüfen Sie, ob der Lüfter des Lasermoduls ein leichtes Geräusch von sich gibt.
C. Wenn alle oben genannten Punkte normal zu sein scheinen, wenden Sie sich bitte an den Kundenservice.
14. Konformitätserklärung
Dieses Produkt entspricht den Normen der Europäischen Gemeinschaft.
Dieses Produkt erfüllt die Anforderungen der Beschränkung gefährlicher Stoe in Elektro- und
Elektronikgeräten (RoHS) EU-Vorschriften zur Beschränkung der Verwendung von gefährlichen
Stoen in Elektro- und Elektronikgeräten zum Schutz der Umwelt und Der öentlichen
Gesundheit.
Dieses Gerät entspricht Teil 15 der FCC-Bestimmungen Der Betrieb unterliegt den folgenden zwei
Bedingungen: (1) dieses Gerät darf keine schädlichen Störungen verursachen und (2) dieses Gerät
muss die empfangenen Störungen, einschließlich Störungen, die einen unerwünschten Betrieb
verursachen können, akzeptieren.
Das Laserwarnsymbol wird verwendet, um Benutzer und Besucher zu warnen, wenn das Risiko
besteht, einem ungeschirmten Laserstrahl ausgesetzt zu werden. Der Kontakt mit bestimmten
Lasern kann zu Augen- oder Sehschäden und Hautverbrennungen führen.
Dieses Symbol zeigt an, dass das Produkt recycelt werden kann.

-50-
ES
1. Introducción...................................................................
2. Declaración de seguridad.............................................
3. Diagrama........................................................................
4. Especificaciones.............................................................
5. Contenido del paquete.................................................
6. Guía de montaje............................................................
7. Funciones y operaciones..............................................
8. Controlador....................................................................
9. Control a través del software del ordenador.............
10. Control mediante panel de control y tarjeta TF.......
11. Control mediante aplicación móvil y tarjeta TF.......
12. Parámetros de funcionamiento recomendados......
13. Solución de problemas...............................................
14. Declaración de cumplimiento...................................
51
51
52
54
54
55
62
64
65
70
71
73
73
74
CONTENIDO

-51-
ES
1. Queda estrictamente prohibido exponer organismos vivos a la emisión del láser producida por la máquina de
grabado láser. Esto se indica claramente con una señal de advertencia amarilla en el puerto correspondiente.
2. Las personas que sean fotosensibles tienen prohibido utilizar o acercarse al grabador láser debido a los
posibles efectos adversos que esto puede tener en su salud.
3. Durante el uso de la máquina de grabado láser, tanto el operador como cualquier persona en las proximi-
dades deben utilizar gafas de seguridad láser. Es imprescindible no operar la máquina láser sin el uso de dichas
gafas. Nuestra máquina incluye un par de gafas de seguridad láser. Si desea adquirir gafas adicionales, estas
deben ofrecer protección para longitudes de onda entre 400-445 nm (+-5 nm), tener un diámetro exterior de +5
y cumplir con un nivel mínimo de clasicación L5.
4. Durante el funcionamiento de la máquina de grabado láser, es crucial que el usuario esté atento y no la deje
desatendida para evitar cualquier riesgo de ignición del material que se está grabando. Es recomendable ubicar
la máquina en un área que sea resistente al fuego y garantizar una adecuada ventilación. Se sugiere tener un
extintor de incendios cercano en caso de situaciones de emergencia.
5. Es importante garantizar que no haya materiales inamables en las proximidades de la máquina de grabado
láser. Se recomienda colocar una mesa de trabajo en forma de panal debajo de la máquina como medida
1. Introducción
Advertencia
2. Declaración de seguridad
Estimado/a cliente:
Agradecemos su adquisición de nuestra máquina de grabado láser. Este aparato representa un
producto avanzado que combina luz, maquinaria y electricidad. Para aprovechar al máximo el equipo
y asegurar su correcto mantenimiento, le recomendamos leer detenidamente el manual del usuario y
seguir sus instrucciones paso a paso.
Descargo de responsabilidad
La responsabilidad de cualquier pérdida derivada de un uso inadecuado o el no seguimiento de las
instrucciones del manual del usuario recae en el individuo. La interpretación nal del manual de
usuario pertenece a nuestra empresa, y nos reservamos el derecho de modicar cualquier información,
datos, detalles técnicos, etc. en el manual.
* Es importante tener en cuenta que el procesamiento láser puede implicar riesgos, por lo tanto, se recomien-
da a los usuarios evaluar cuidadosamente si el objeto a procesar es adecuado para trabajar con láser.
* Es imprescindible cumplir con las leyes y regulaciones locales respecto al objeto que se procesa y las
emisiones generadas.
* Esta máquina está equipada con un láser de clase IV, el cual emite radiación láser de alta potencia y puede
dar lugar a las siguientes situaciones:
(1) Ignición de materiales inamables circundantes;
(2) Durante el procesamiento láser, se pueden producir otras radiaciones y gases tóxicos y nocivos, dependien-
do del objeto que se procesa;
(3) La exposición directa a la radiación láser puede causar daños al cuerpo humano. Es necesario contar con
equipos contra incendios en el área de trabajo y se debe evitar apilar materiales inamables y explosivos cerca
del banco de trabajo o la máquina. Asimismo, es importante mantener una adecuada ventilación.
*Además, el entorno en el que se ubica la máquina debe estar seco, sin contaminantes, vibraciones, corrientes
eléctricas fuertes, campos magnéticos intensos y otras interferencias. La temperatura ambiente de trabajo
debe oscilar entre 5-30 ºC, y la humedad relativa del ambiente de trabajo debe situarse entre 35-65%.
* El voltaje de funcionamiento de la máquina es AC100-240V.
* Es fundamental mantener una supervisión constante durante el funcionamiento de la máquina. Antes de
iniciar cualquier actividad, es necesario apagar completamente la energía para evitar cualquier problema
imprevisto. En caso de que se presente una situación anormal, se debe interrumpir de inmediato la energía y
abordar la situación de manera adecuada.
* Se prohíbe de manera estricta colocar objetos reectantes o difusos en la máquina que no sean necesarios
para su funcionamiento. Esto se hace con el objetivo de evitar la reexión del láser en el cuerpo humano o en
materiales inamables.
* Es necesario mantener la máquina alejada de equipos eléctricos que sean sensibles a interferencias
electromagnéticas, ya que esto puede ocasionar interferencias electromagnéticas en dichos equipos.
* Está totalmente prohibido que personas no profesionales desmonten el grabador láser debido a los posibles
peligros, como la presencia de alto voltaje, dentro de la máquina.
Precauciones de seguridad
-52-
ES
Mantenimiento
Recomendaciones:
Apague la máquina durante 10 minutos después de 4 horas de grabado y 10 minutos después de 1 hora de
corte.
El módulo láser es consumible.
adicional de seguridad.
6. Al utilizar el grabador láser, es fundamental contar con suciente espacio alrededor de la máquina. El
proceso de grabado de ciertos materiales puede generar humo, por lo que se recomienda contar con un
sistema de escape especializado para garantizar una adecuada ventilación y eliminación del humo.
7. Es crucial no tocar ni el rayo láser ni el objeto en proceso mientras la máquina de grabado láser esté en
funcionamiento, ya que esto podría resultar en lesiones graves o la reexión del rayo. Asimismo, se debe evitar
tocar el radiador, ya que puede estar caliente debido al funcionamiento continuo o reciente detención de la
máquina de grabado láser. 8. Es necesario que los niños o adolescentes, especialmente aquellos menores de 14
años, no utilicen la máquina de grabado láser de forma individual. Siempre deben ser supervisados por un
adulto responsable durante su uso.
9. La temperatura de funcionamiento de la máquina es de 41°F a 86°F (5°C a 30°C).
10. Desconecte la máquina cuando no esté en uso para evitar el uso indebido por parte de terceros.
11. Durante el proceso de grabado con láser, existe un riesgo potencial de incendio. Por lo tanto, es esencial
que la máquina de grabado láser esté bajo la supervisión de un operador experto mientras está en funciona-
miento para controlar cualquier accidente que pueda ocurrir.
12. Nuestra máquina de grabado láser cuenta con un sensor de llama integrado para proporcionar un nivel
adicional de seguridad. Sin embargo, es importante tener en cuenta que no ofrecemos ninguna garantía, ya
sea explícita o implícita, en cuanto a la disponibilidad o funcionalidad del sensor de llama.
3. Diagrama
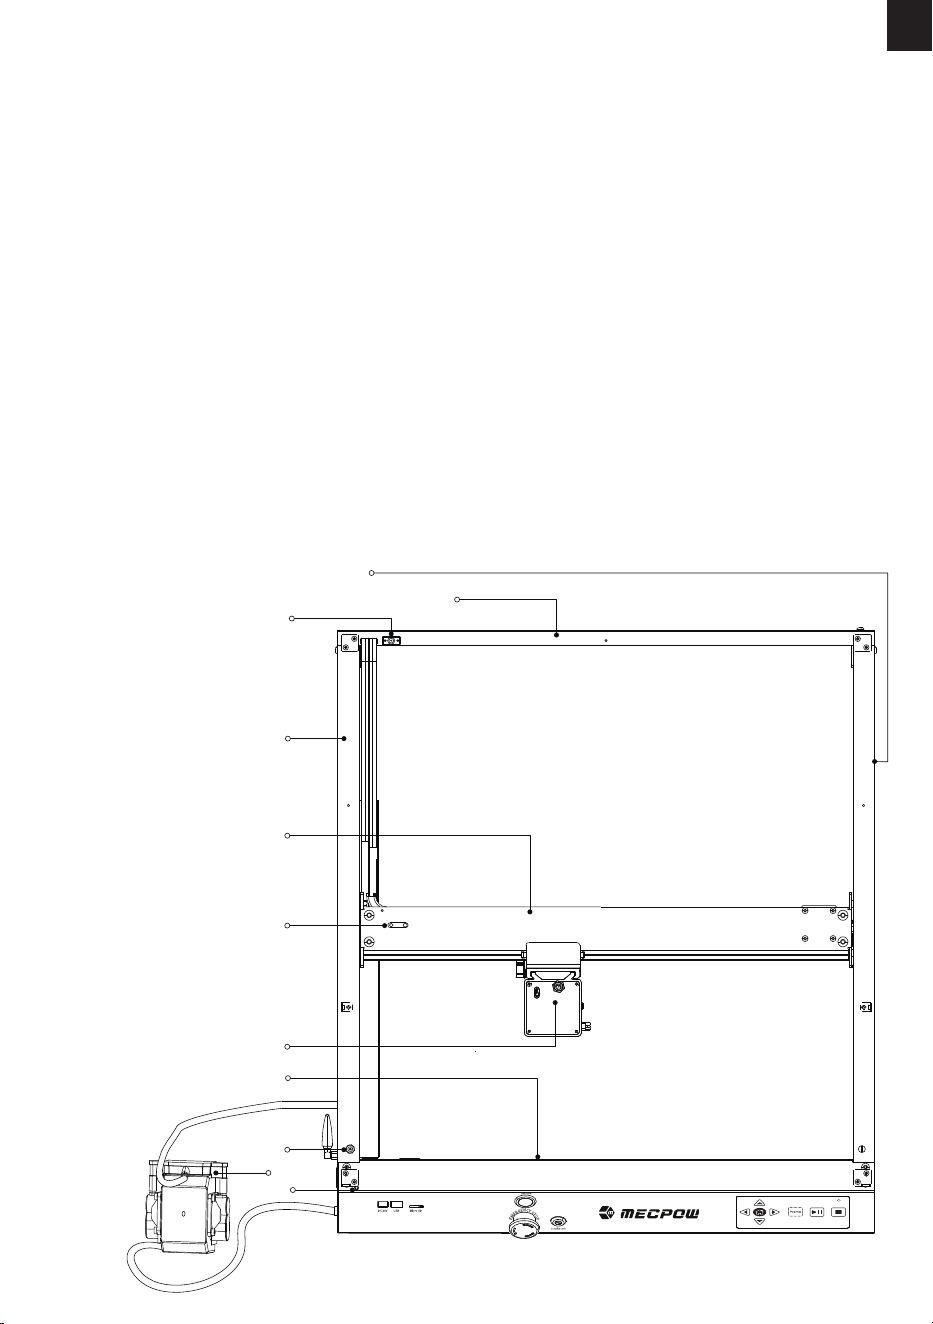
1. Eje Y derecho
2. Eje X trasero
3. Puerto DC del
ventilador de escape
4. Eje Y izquierdo
5. Montaje del eje X
6. Regulador de tensión
de la correa del eje X
7. Módulo láser
8. Eje X delantero
9. Luz LED Puerto DC
10. Bomba de aire
11. Interruptor Hall
2
4
5
8
10
1
9
6
11
3
7
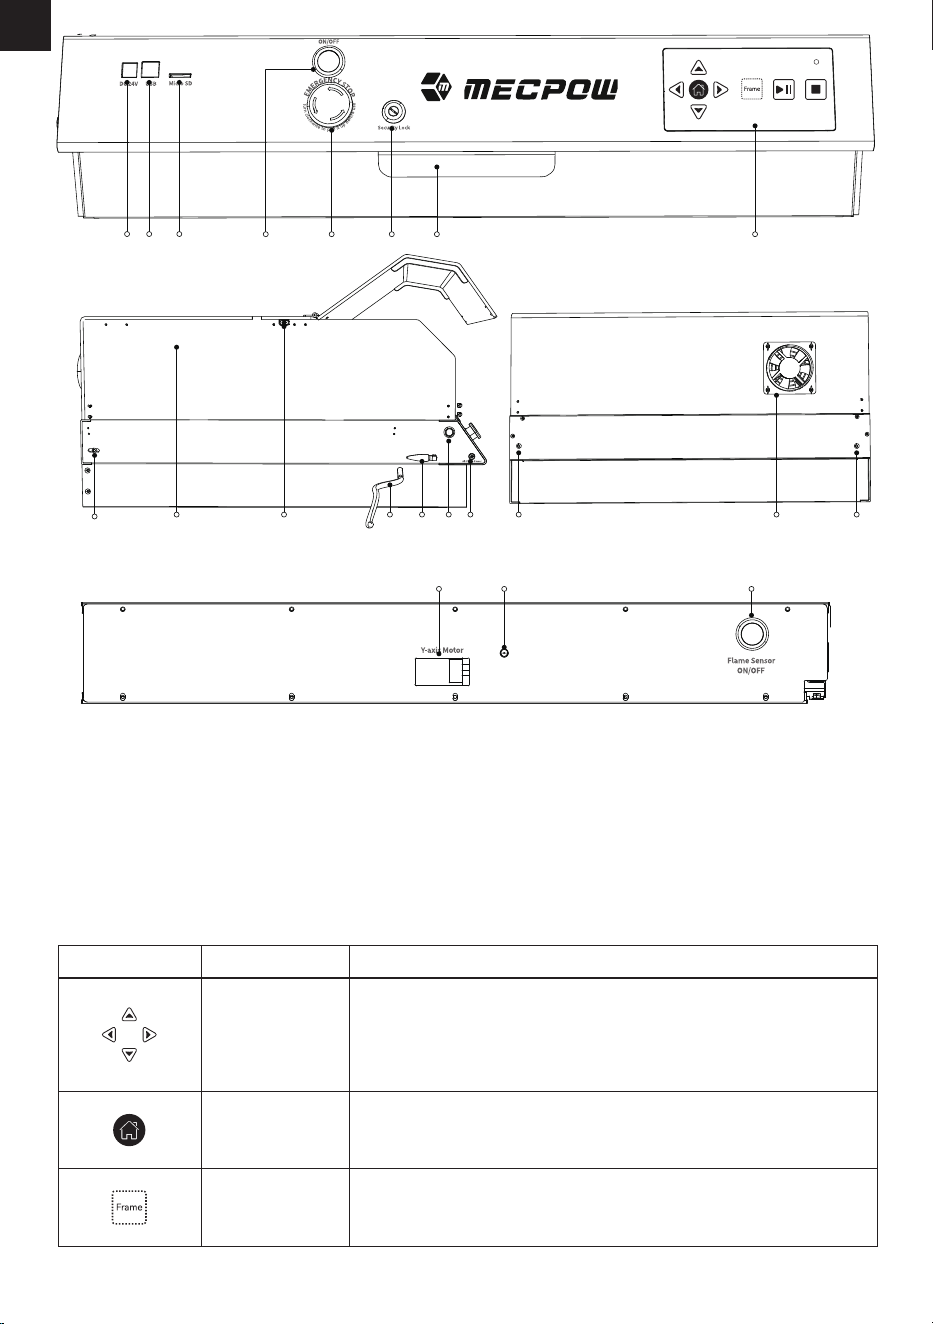
1. Puerto de entrada de CC
2. Puerto USB
3. Puerto Micro SD
4. Interruptor de encendido
5. Botón de parada de emergencia
6. Bloqueo de seguridad
7. Cajón de la bandeja inferior
8. Panel de control
9. Tornillo de jación de la correa del
eje Y
10. Cubierta protectora
11. Interfaz de cámara externa
12. Manguera para bomba de aire
13. Antena WiFi
1
2 3
1110 1716 1614 15 1312
4 5 6
7 8
14. Interruptor de luz LED
15. Puerto de alimentación de la bomba de
aire
16. Tornillos para ajustar la correa del eje Y
17. Tubo de escape
18. Motor del eje Y
19. Sensor de llama
20. Interruptor del sensor de llama
9
18 2019
-53-
ES
Iconos de las teclas
Nombre de la tecla
Teclas de echa
Inicio
Tecla Patrulla
Función de la tecla
Introducción al panel de control
Pulse brevemente una de las teclas y el módulo láser se moverá 1
mm en la dirección correspondiente. Presione prolongadamente la
tecla durante 3 segundos o más, y el módulo láser seguirá movién-
dose hasta que suelte la tecla o el módulo láser golpee el interruptor
de límite.
Pulse esta tecla para devolver el módulo láser a la posición original.
Pulse esta tecla y el módulo láser patrullará el área de trabajo del
primer archivo de código G de la tarjeta TF.
X4 Pro
790x655x235mm
21kg
685x620x310mm
5. Contenido del paquete
Adaptador de corriente *1
Cable USB *2
Tablero de madera *2
Llave *2 Manual de usuario *1
-54-
ES
Tecla Inicio/Pausa
Tecla Stop
Indicador de
tarjeta TF
Pulse esta tecla para iniciar/pausar el grabado.
Pulse esta tecla para nalizar el grabado.
Se enciende cuando se detecta y lee la tarjeta TF.
4. Especificaciones
Modelo
Especicaciones
básicas
Módulo láser
Bomba de aire
Cargador
DC 24V
410x400mm
22000mm/min
50°±5
Windows, Mac, Linux
JPEG, BMP, GIF, PLT, PNG, DXF
Aluminio
Madera, acrílico, porcelana, tela, bambú,
tablero de plástico, cuero, fruta, pan, etc
Tamaño del producto
Tamaño del paquete
Peso
Tensión de entrada
Potencia nominal
Área de grabado máx.
Velocidad de grabado máx.
Tamaño del punto del rayo láser
Alarma de inclinación
Soporte de software
Soporte del sistema
Soporte de formato de archivo
Material del marco
Potencia nominal
Entrada
Potencia láser
Voltaje de entrada
Corriente de entrada
Potencia de entrada
Velocidad del aire
Voltaje de entrada
Corriente de entrada
Voltaje de salida
Corriente de salida
Materiales para grabado láser
144W
77W
22W
24V 6A
24V
1.5A
36W
30L/min
AC 100-240V
2.5A
24V
6A
0.08x0.1mm
MKSLaser APP, LaserGRBL, LightBurn
Aro de garganta *1
Placa metálica *1
Destornillador *1
Paquete de tornillos *1
Gafas *1
Cepillo de limpieza *1
Cubierta protectora delantera *1
Ventilador *1
Clip adhesivo
para cable *5
Tapa protectora derecha *1
Cubierta protectora trasera *1
Módulo láser *1
Bomba de aire *1
Cubierta protectora izquierda *1
Tubo de escape *1
Soporte Cubierta
Protectora *4
Tarjeta TF *1 Llave inglesa *1 Tarjeta de calibración *1Lector de tarjetas TF *1
-55-
ES
Paso 1: Instalación de los 4 soportes de la cubierta protectora
Instale los 4 soportes en los oricios correspondientes como se muestra a continuación. Los dos soportes
con lengüeta imantada deben montarse en la parte frontal del grabador y asegúrese de que las lengüetas
imantadas miran hacia delante.
6. Guía de montaje
Antena WiFi *1
L
R
Elevador*4
Paso 3: Instalación del ventilador de extracción
(1) Separe la guía de aire del extractor.
(2) Instale el ventilador de escape desde el interior de la cubierta protectora trasera y deslice los cuatro
tornillos del ventilador de escape a través de los oricios. Asegúrese de que el cable del ventilador está a la
izquierda.
(3) Instale la guía de aire desde el exterior de la cubierta protectora trasera y fíjela con cuatro tornillos de
mariposa.
Paso 2: Instalación de las cubiertas protectoras izquierda y derecha
((1) Inserte los salientes inferiores de las cubiertas protectoras en las ranuras de los bastidores izquierdo y
derecho del eje Y.
(2) Apriete los tornillos para jar las cubiertas protectoras.
Nota: Los siguientes dibujos muestran la instalación de la cubierta protectora derecha. Por favor,
instale la cubierta protectora izquierda de la misma manera.
-56-
ES
R
R
Paso 4: Instalación de la cubierta protectora trasera
(1) Inserte los salientes inferiores de la cubierta protectora trasera en las ranuras del bastidor trasero del eje X.
(2) Alinee las ranuras laterales de la cubierta protectora trasera con los salientes de la parte superior de las
cubiertas protectoras izquierda y derecha.
(3) Apriete los tornillos para jar la cubierta protectora trasera.
Paso 5: Enchufar el ventilador de extracción y la luz LED
(1) Enchufe el ventilador de extracción y la luz LED en las posiciones indicadas en el dibujo lineal y je
los cables con las abrazaderas suministradas.
-57-
ES
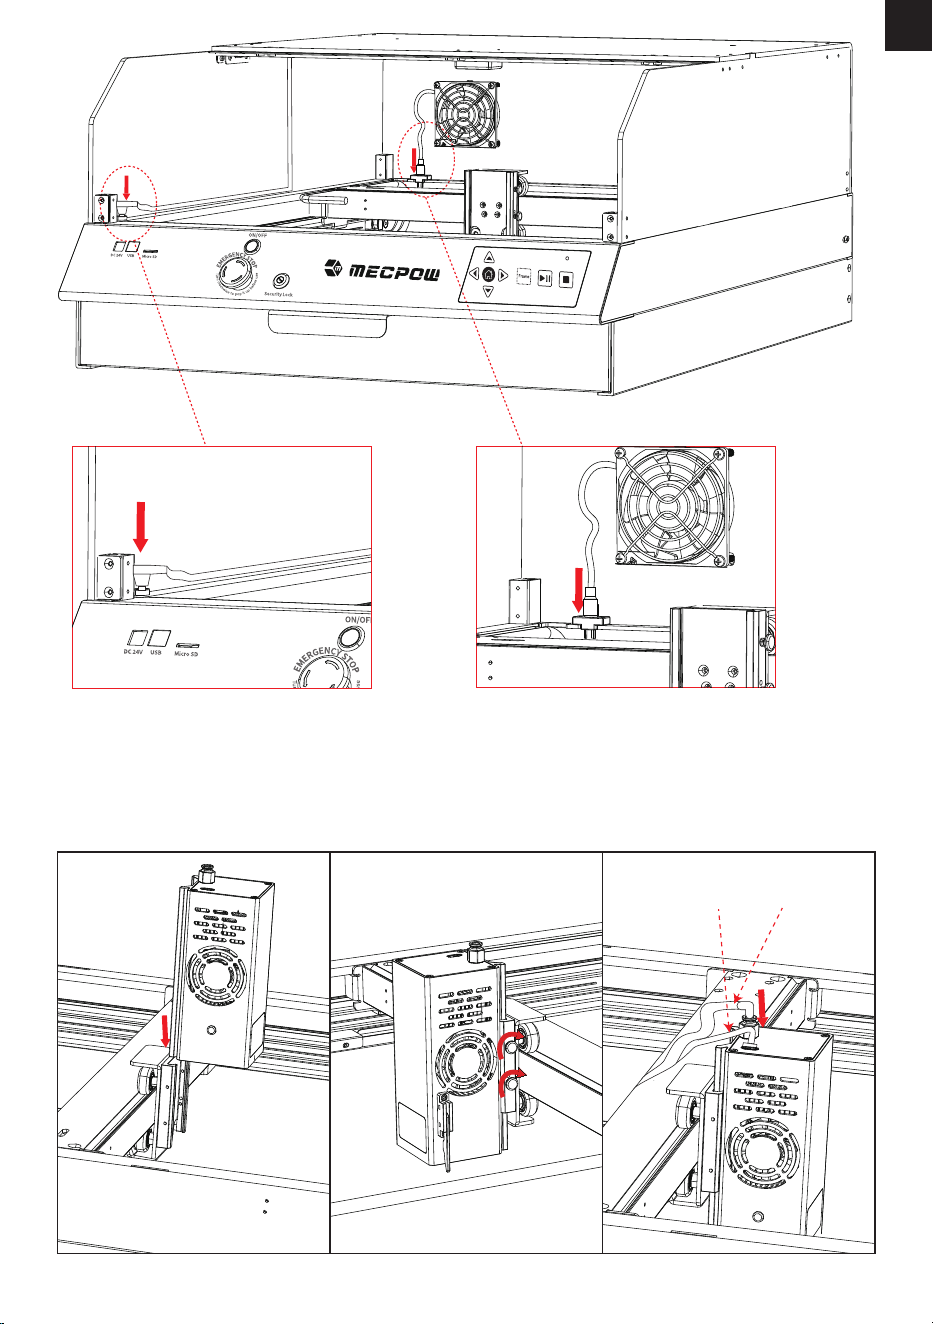
Paso 6: Instalación del módulo láser
(1) Deslice el módulo láser sobre la placa deslizante. Ajuste el módulo láser a la altura adecuada y luego apriete
a mano los tornillos.
(2) Conecte el cable de alimentación y el cable del tubo de escape al módulo láser según los oricios
correspondientes.
Nota: El cable A es el cable de alimentación del módulo láser y el cable B es el cable del tubo de escape.
-58-
ES
A B
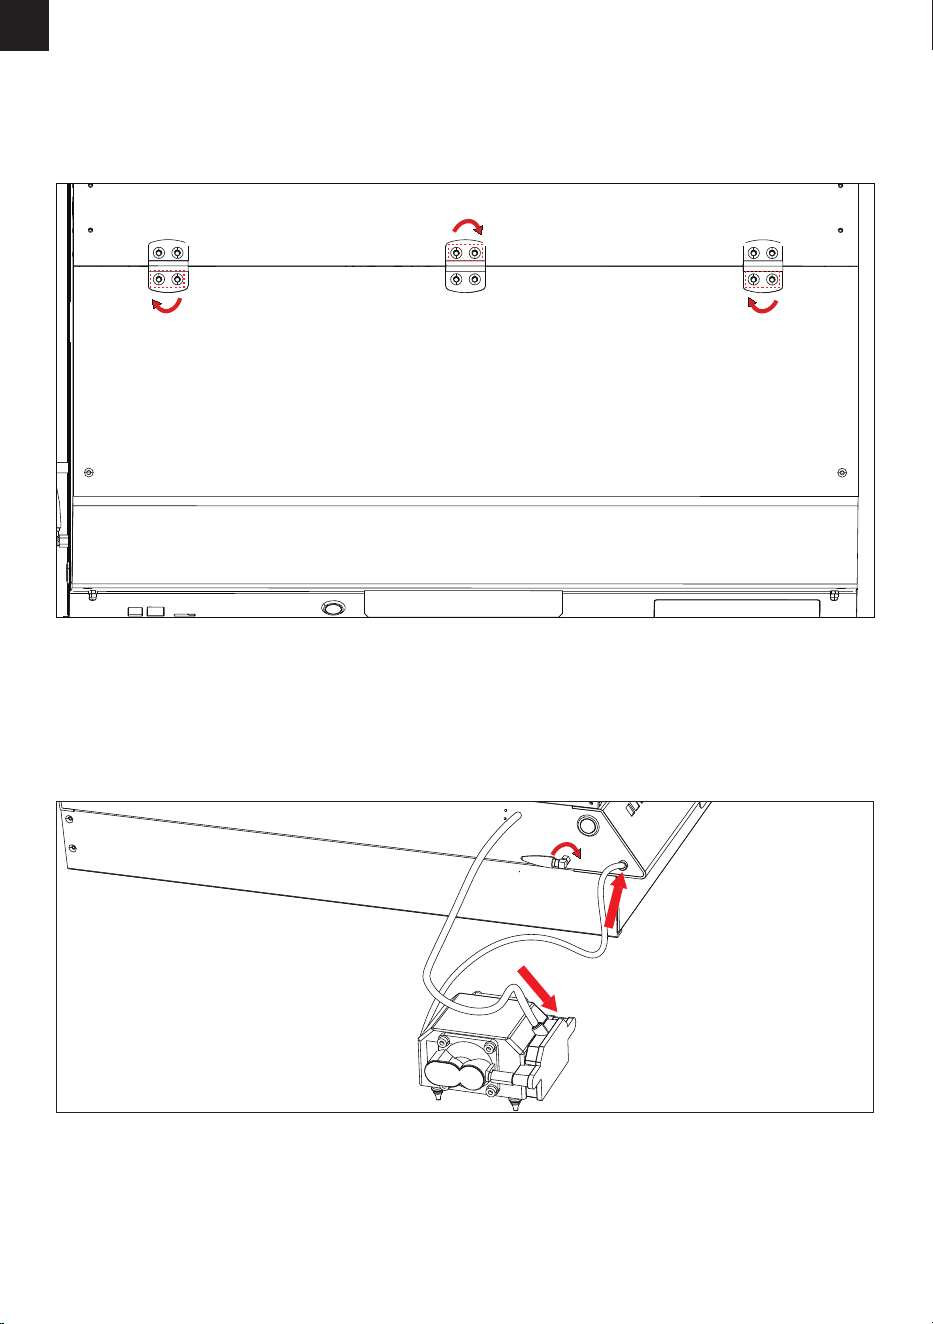
-59-
ES
Paso 7: Instalación de la cubierta protectora frontal
(1) Coloque la cubierta protectora delantera en la parte superior y alinee las bisagras con los oricios para los
tornillos.
(2) Apriete los tornillos y pernos para asegurar la cubierta protectora frontal.
(1) Acople la bomba de aire al tubo de la máquina y conecte el cable de la bomba de aire a la interfaz de la
bomba de aire.
(2) Conecte la antena WiFi a la máquina y gírela en el sentido de las agujas del reloj para apretarla.
Paso 8: Instalación de la bomba de aire y la antena WiFi
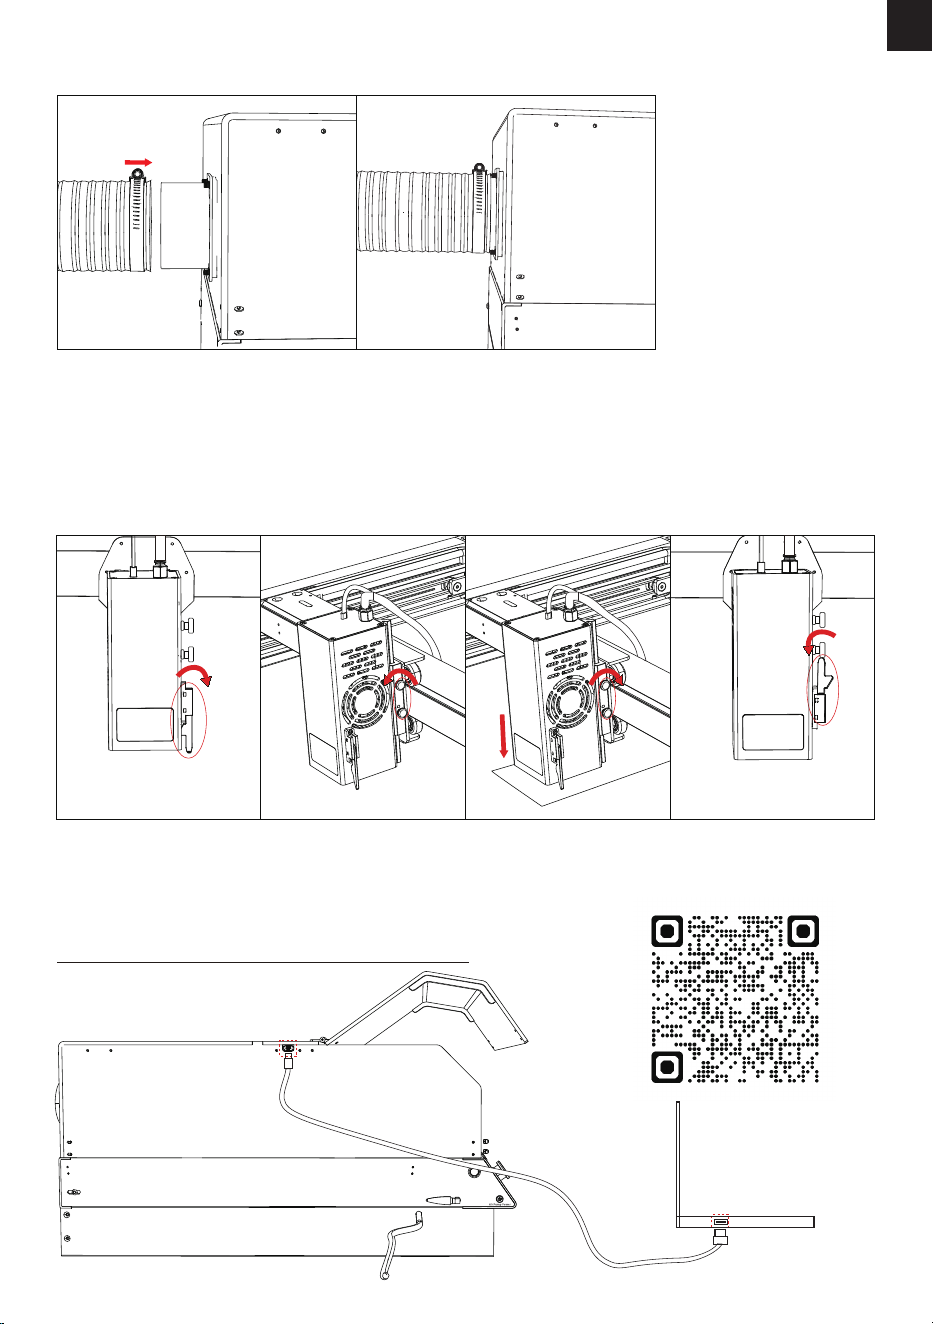
-60-
ES
(1) Tire hacia abajo de la barra de enfoque del módulo láser.
(2) Sujete el módulo láser con una mano y aoje los 2 tornillos para mover el módulo láser.
(3) Deslice el módulo láser ligeramente hacia abajo hasta que la barra de enfoque toque el objeto grabado.
(4) Apriete los tornillos para jar el módulo láser y, a continuación, empuje la barra de enfoque hacia arriba hasta
colocarla en su sitio.
(1) Instale el tubo de escape y apriételo con el aro de la garganta.
Paso 10: Enfoque
Paso 9: Instalación del tubo de escape
Nota: Para obtener información detallada sobre el uso de la cámara, visite el siguiente enlace o
escanee el código QR que aparece a continuación.
https://docs.lightburnsoftware.com/Camera/index.html
Paso 11: Conectar el cable USB de la cámara
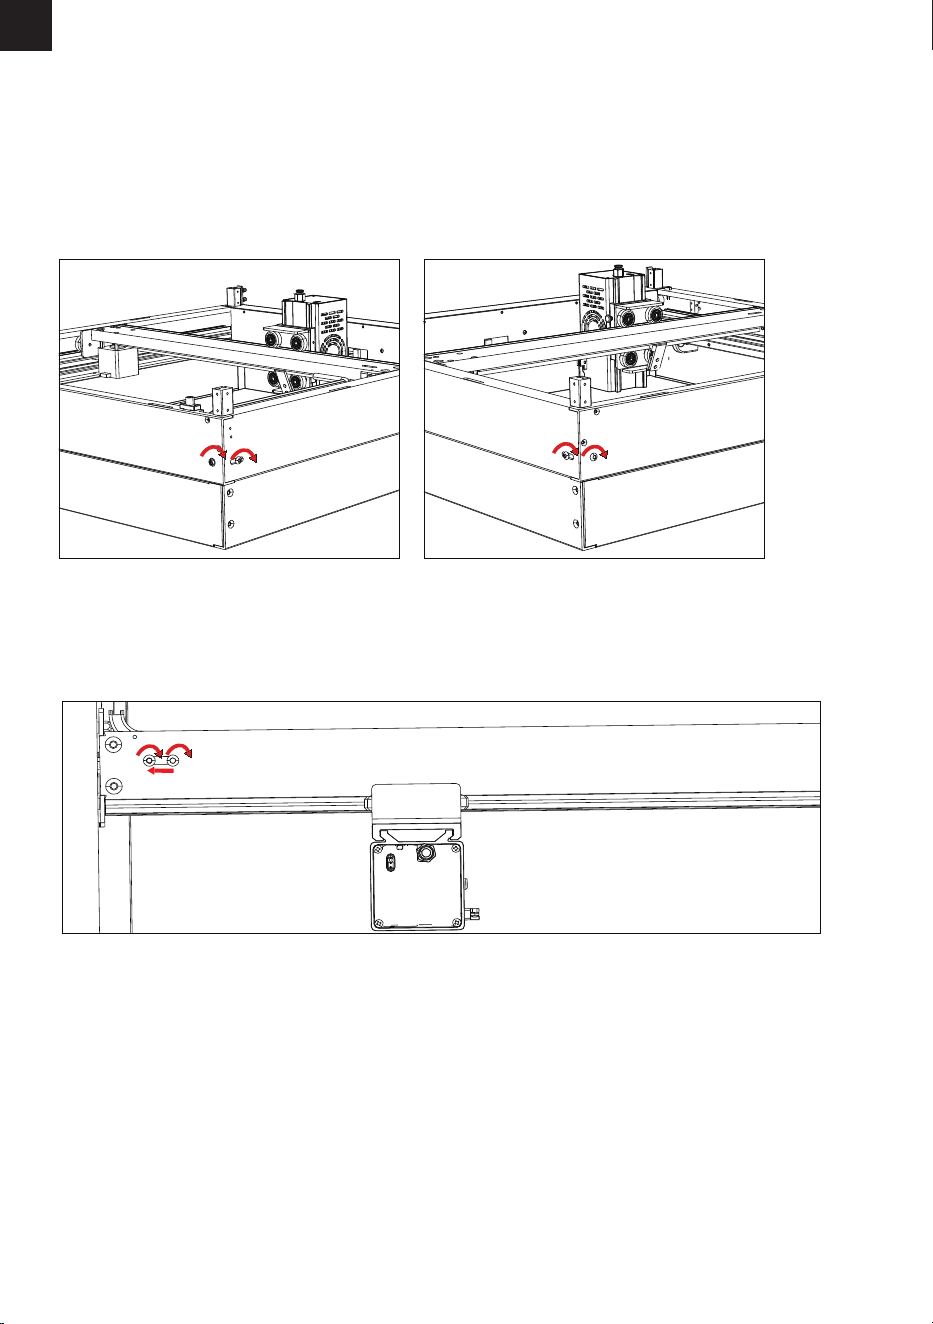
Apretar las correas del eje Y
Apretando el cinturón del eje X
(1) Aoje ligeramente el tornillo 1 que se muestra en el dibujo lineal.
(2) Gire el tornillo 2 para apretar los cinturones como muestra el dibujo lineal.
(3) Apriete el tornillo 1 para asegurar los cinturones.
Los cinturones están ajustados en fábrica. Si los cinturones se aojan después de un período de uso, se
pueden ajustar al ajuste adecuado de la siguiente manera.
Cómo ajustar la tensión del cinturón
(1) Aoje ligeramente los dos tornillos del regulador de tensión de la correa del eje X y mueva el regulador
para apretar la correa del eje X.
(2) Apriete los tornillos para jar el regulador.
-61-
ES
Tornillo 1Tornillo 2
Tornillo 1 Tornillo 2

-62-
ES
7. Funciones y operaciones
Partes
Funciones / Anomalías
Operaciones
Alarma La alarma sonará cuando ocurra algo
anormal.
1. Descubre la causa de la alarma.
2. Elimina este factor.
3. Pulse el botón de parada de emergencia
durante 3 segundos para reiniciar la
máquina. Gire el botón a su posición
original después de pulsarlo.4. Sigue las
instrucciones de funcionamiento del
software para reanudar el trabajo.
Módulo láser 1. Verica si el cable de conexión del módulo
láser está correctamente conectado.
2. Verica si la caja de control principal está
funcionando normalmente.
3. Conrma si el software está instalado o
congurado correctamente.
4. Ponte en contacto con el servicio al cliente
si el problema no se puede resolver.
Motor paso a
paso
Asegura el funcionamiento normal
del módulo láser.
1. Verica si los cables cumplen con las
especicaciones requeridas.
2. Conrma que los cables estén conecta-
dos correctamente.
3. Verica si la caja de control funciona
correctamente.
4. Verica si el software está instalado o
congurado correctamente.
5. Ponte en contacto con el servicio al
cliente si el problema no se puede resolver.
Parada de
emergencia
Detiene el funcionamiento de la
máquina de inmediato.
Pulse el botón para detener el funciona-
miento de la máquina y gírelo en el
sentido de las agujas del reloj para que la
máquina vuelva a funcionar.
Sensor de llama Detecta si hay fuego en o alrededor de
la máquina y activa la alarma,
deteniendo también la operación de la
máquina en caso de fuego. Se
activa/desactiva mediante un
interruptor mecánico.
1. Verica el entorno y evita colocar la
máquina bajo luz solar directa.
2. Ponte en contacto con el servicio al
cliente para ajustar la sensibilidad del
sensor de llama
Bomba de aire
Asiste a la máquina durante la
operación.
Anomalía: Deja de funcionar o
encuentra anomalías operativas.
1. Verica si el adaptador de corriente está
conectado a una fuente de alimentación.
2. Verica si el conector DC de la bomba de aire
está correctamente enchufado.
3. Ponte en contacto con el servicio al cliente si el
problema no se puede resolver.
Graba objetos y materiales.
Anomalía: El módulo láser no
funciona o encuentra anomalías
operativas.

-63-
ES
Interruptor del
sensor de llama
Sirve para controlar la activación y
desactivación del sensor ame en
función de la situación real.
Estado ON: el sensor de llama está en
condiciones de trabajo, la máquina
deja de funcionar automáticamente
después de comprobar la llama.
Estado OFF: el sensor de llama no
funciona, es necesario prestar atención
al fenómeno del fuego en tiempo real.
Interruptores de
n de carrera
Tapa protectora
frontal
Detienen el movimiento del módulo
láser cuando se desplaza al punto
inicial del eje X o del eje Y.
La máquina deja de funcionar cuando
la cubierta protectora frontal está
abierta.
Cierre la cubierta protectora frontal y
pulse la tecla "Inicio/Pausa" para que
la máquina continúe el trabajo.
1. Compruebe si el cable del nal de carrera
está desconectado.
2. Compruebe si el enchufe del nal de
carrera está instalado en su sitio.
3. Compruebe si el nal de carrera está
haciendo contacto con el componente
correspondiente.
4. Póngase en contacto con el servicio de
atención al cliente si el problema no puede
resolverse.
Bloqueo de
seguridad
Controla el interruptor de encendido
para evitar falsos disparos de
encendido.
Guarde la llave.
Sensor de
inclinación
Si el ángulo de inclinación de la
máquina es superior a 50±5 grados, la
máquina emitirá una alarma y dejará
de funcionar.
Mantenga la máquina en un ángulo
inferior a 45 grados.
Métodos de
control
1. Control a través del software del
ordenador
2. Control a través del panel de
control y la tarjeta TF
3. Control mediante aplicación móvil
y tarjeta TF
1. Conectar a un ordenador a través del
cable USB y controlar a través de LightBurn
o LaserGRBL.
2. Trabaja sin conexión mediante el panel
de control y la tarjeta TF.
3. 3. Trabajar sin conexión utilizando
MKSlaser y la tarjeta TF.
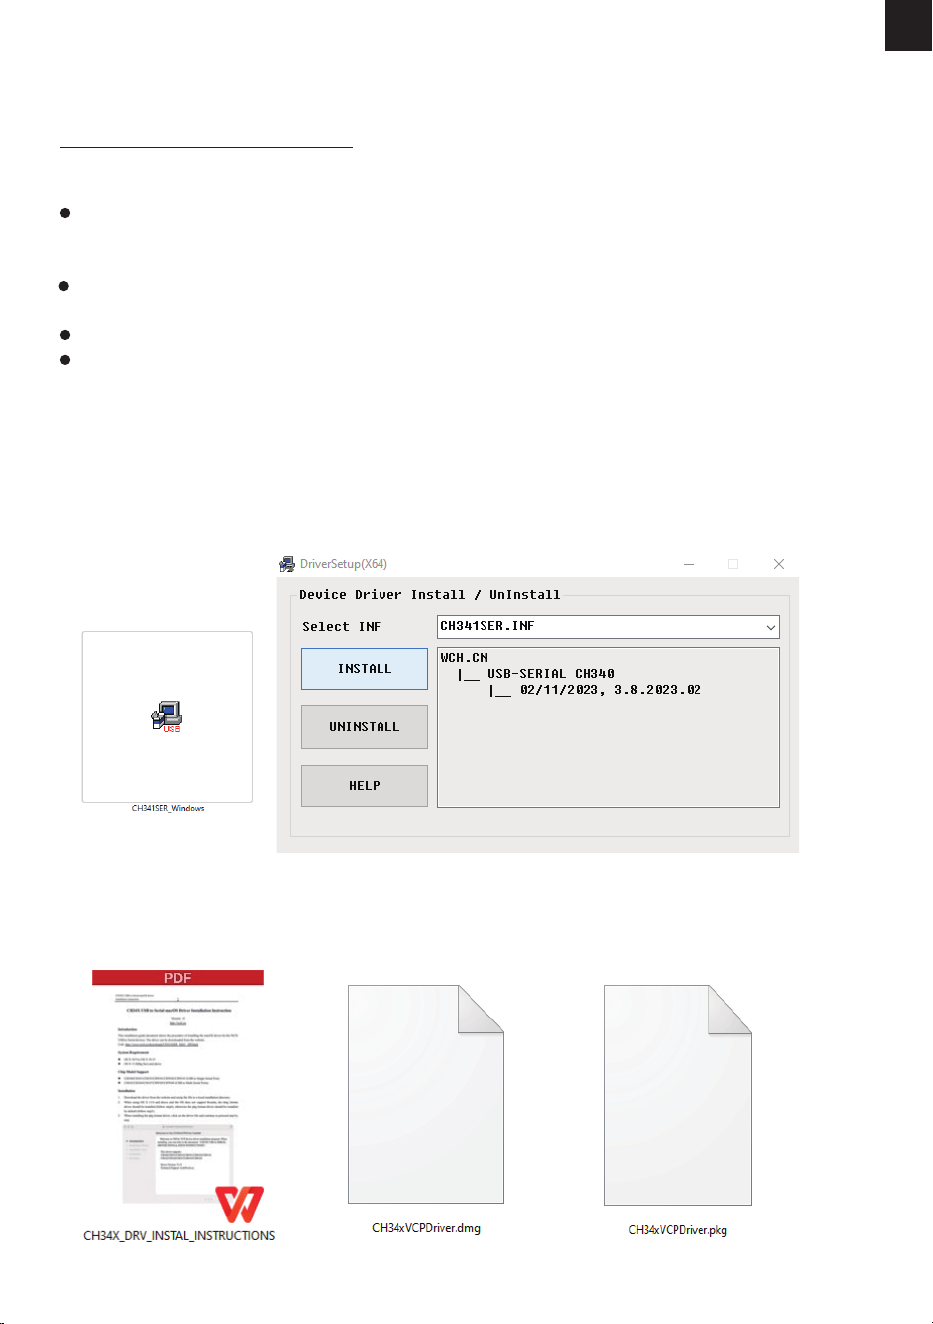
-64-
ES
1. Descargue el controlador desde el siguiente enlace.
https://mecpow.com/pages/driver-les
2.Póngase en contacto con el servicio de atención al cliente para obtener el archivo del controlador.
Nota:
Para los usuarios de Windows, si está utilizando un sistema por debajo de Win10, tendrá que
instalar el controlador manualmente. Si está utilizando el sistema Win10 o superior, no es necesario
instalar el controlador.
El controlador para usuarios de Mac es compatible con OS X 10.9 a OS X 10.15 y OS X 11.0 (Big Sur) y
superior.
El controlador para usuarios de Linux es compatible con sistemas de 32 y 64 bits.
Encienda la máquina y conéctela a su computadora a través del cable USB antes de iniciar el
controlador.
Para usuarios de Mac:
1. Abra las instrucciones.
2. Abra el controlador descargado y siga las instrucciones para instalarlo.
8. Controlador
Métodos de descarga
Instalación
Para usuarios de Windows:
1. Abra el controlador descargado.
2. Haga clic en "INSTALL".
3. Haga clic en "OK" cuando el controlador se haya instalado correctamente.
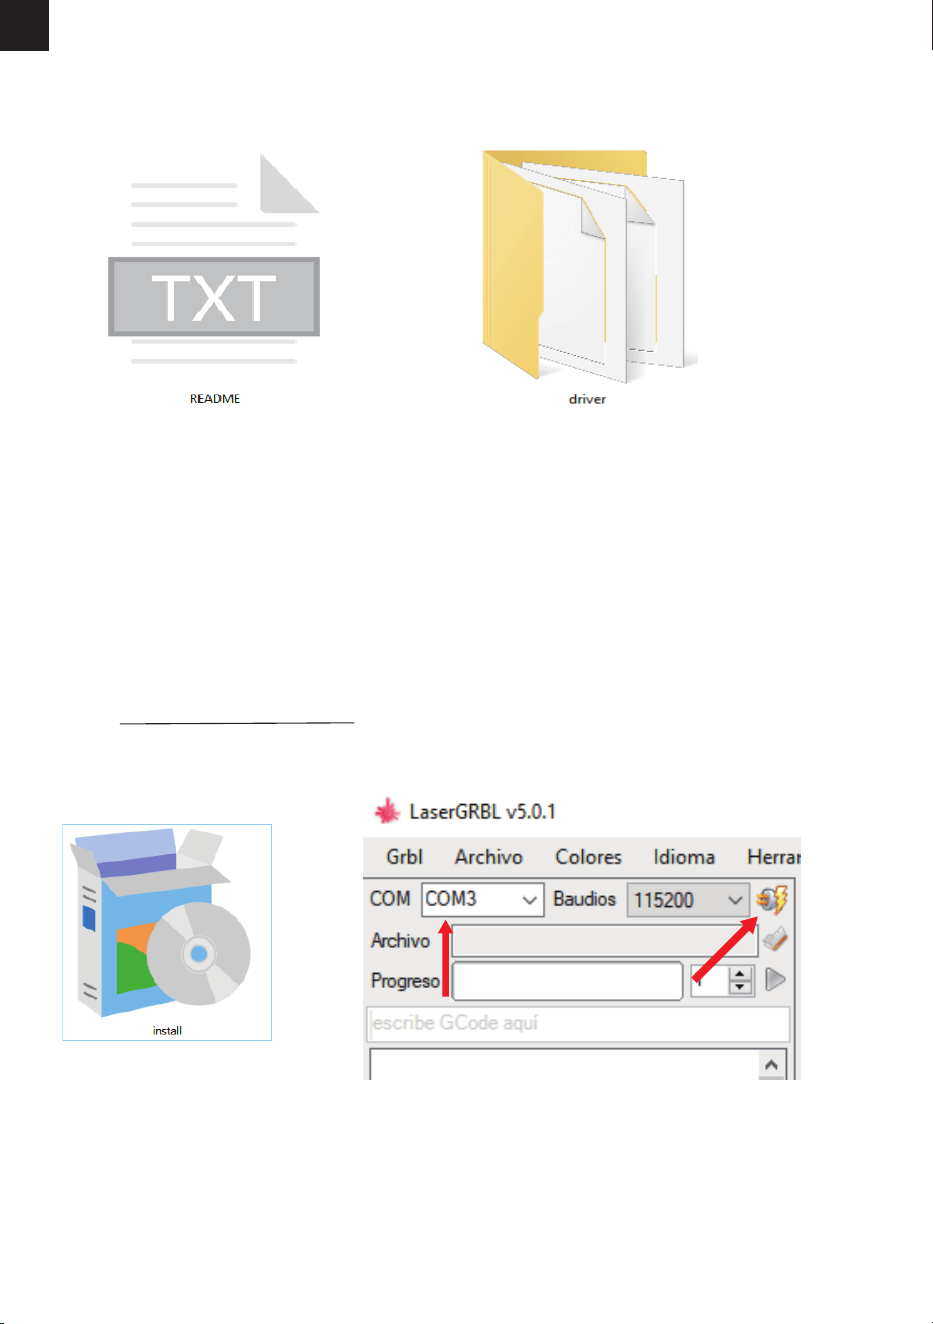
-65-
ES
9. Control a través del software del ordenador
Conecte la máquina de grabado con el software en tiempo real a través del cable USB. Durante el
funcionamiento, puede iniciar o detener la máquina de grabado a través del panel de control.
Para usuarios de Linux:
1. Abra el archivo README.
2. Abra el archivo - driver, y siga el "README" para instalarlo.
Es un software gratuito de código abierto que admite computadoras con Windows. Descárguelo
desde: http://lasergrbl.com/download/
Laser GRBL
1. Instálelo.
2. Abra el software. Haga clic en "Conectar" y seleccione "COM3".
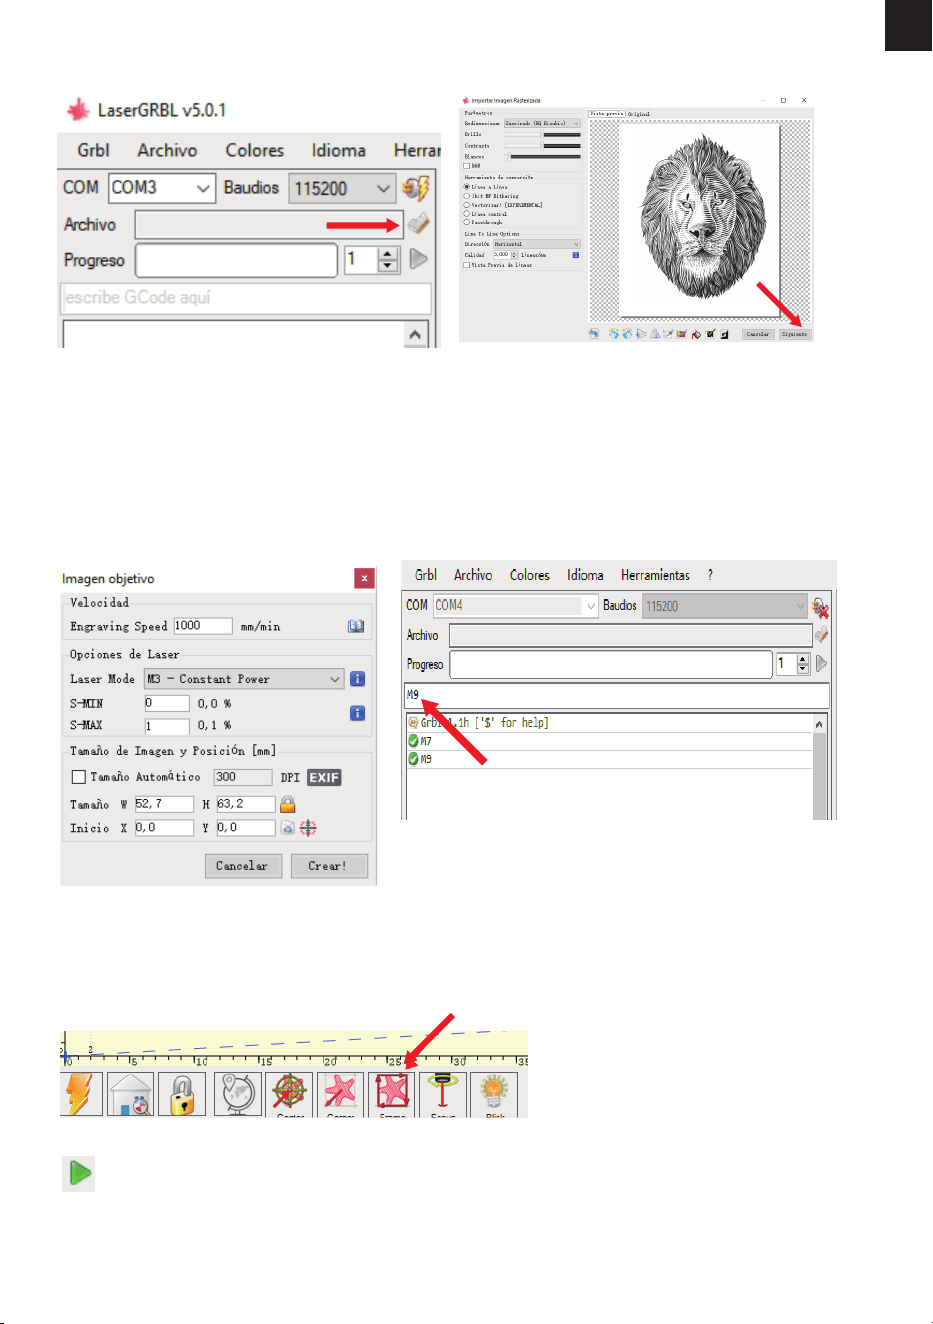
-66-
ES
7.Haga clic en "Framing" para obtener una vista previa del rango de grabado y ajustar la
posición de grabado.
8. Haga clic en "Ejecutar programa" para comenzar a grabar.
3. Haga clic en "Abrir archivo" para seleccio-
nar el archivo de grabado.
4. Seleccione el modo de grabado y haga clic en
"Siguiente".
5. Seleccione los parámetros operativos para el
grabado o corte por láser. (M3 es para tallado de
potencia constante y M4 es para potencia
variable. Consulte la sección 10 para conocer los
parámetros de funcionamiento recomendados
para grabar o cortar diferentes materiales).
6. Introduzca "M7" en la casilla de comandos y pulse
Intro para poner en marcha la bomba de aire. Para
detener la bomba de aire, introduce "M9" en la
misma casilla y pulsa Intro.
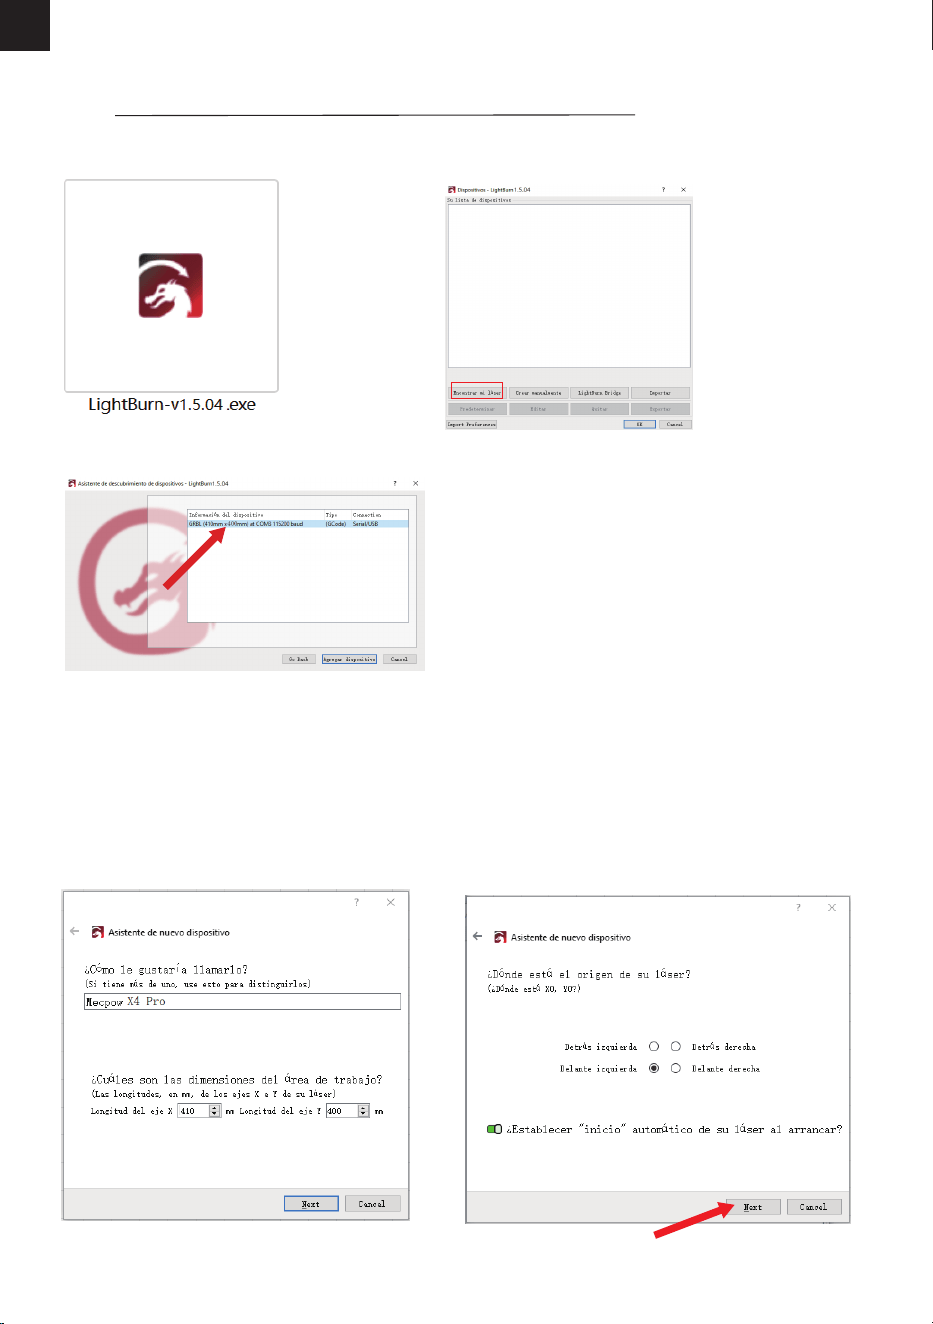
-67-
ES
Es un software profesional de pago compatible con ordenadores MAC, Linux y Windows. Descárguelo
desde: https://lightburnsoftware.com/pages/trial-version-try-before-you-buy
LightBurn
1. Instálelo.
2. Abra el software y haga clic en "Encontrar mi láser".
3. Seleccione su dispositivo y haga clic en "Agregar dispositivo".
4. Asigne un nombre a su dispositivo e ingrese
las longitudes del eje X y el eje Y, luego haga clic
en "Next".
Nombre: Mecpow X4 Pro
Longitud del eje X: 410 mm
Longitud del eje Y: 400 mm
5. Seleccione "Delante izquierda"
como origen de su láser y haga clic en
"Next".
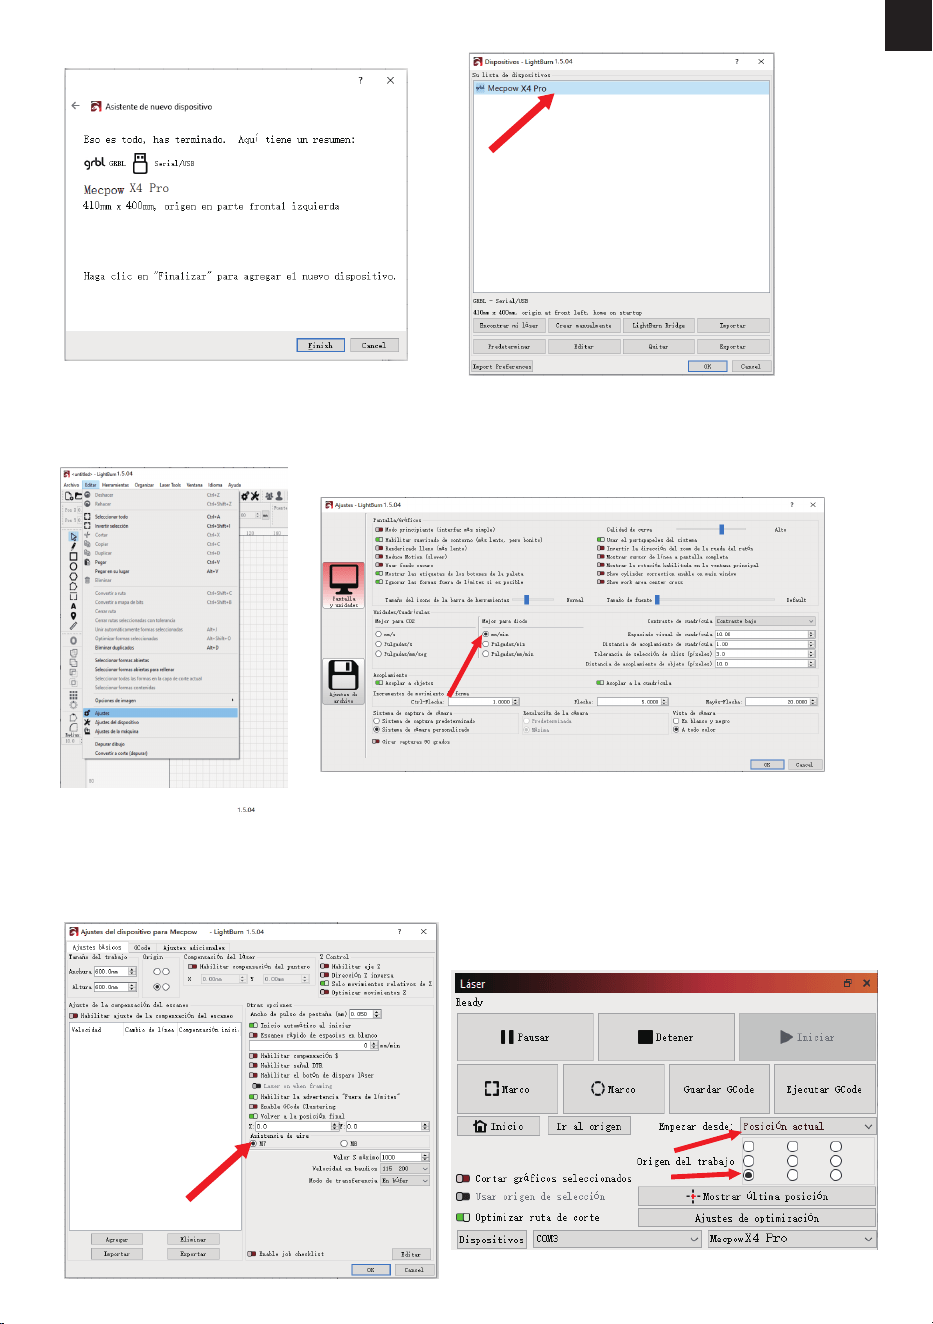
-68-
ES
6. Haga clic en "Finish". 7.Seleccione Mecpow X4 Pro y haga clic en "OK".
8. Haga clic en "Editar" - "Ajustes" y congure la unidad en "mm/min", luego haga clic
en "OK".
9. Haga clic en "Editar" - "Ajustes del dispositivo" y
seleccione "M7" en "Asistencia de aire" para
permitir que la bomba de aire funcione en
sincronización con la máquina.
10.Seleccione "Posición actual" en la sección
"Empezar desde" y luego seleccione el círculo
en la esquina inferior izquierda en la sección
"Origen del trabajo".
X4
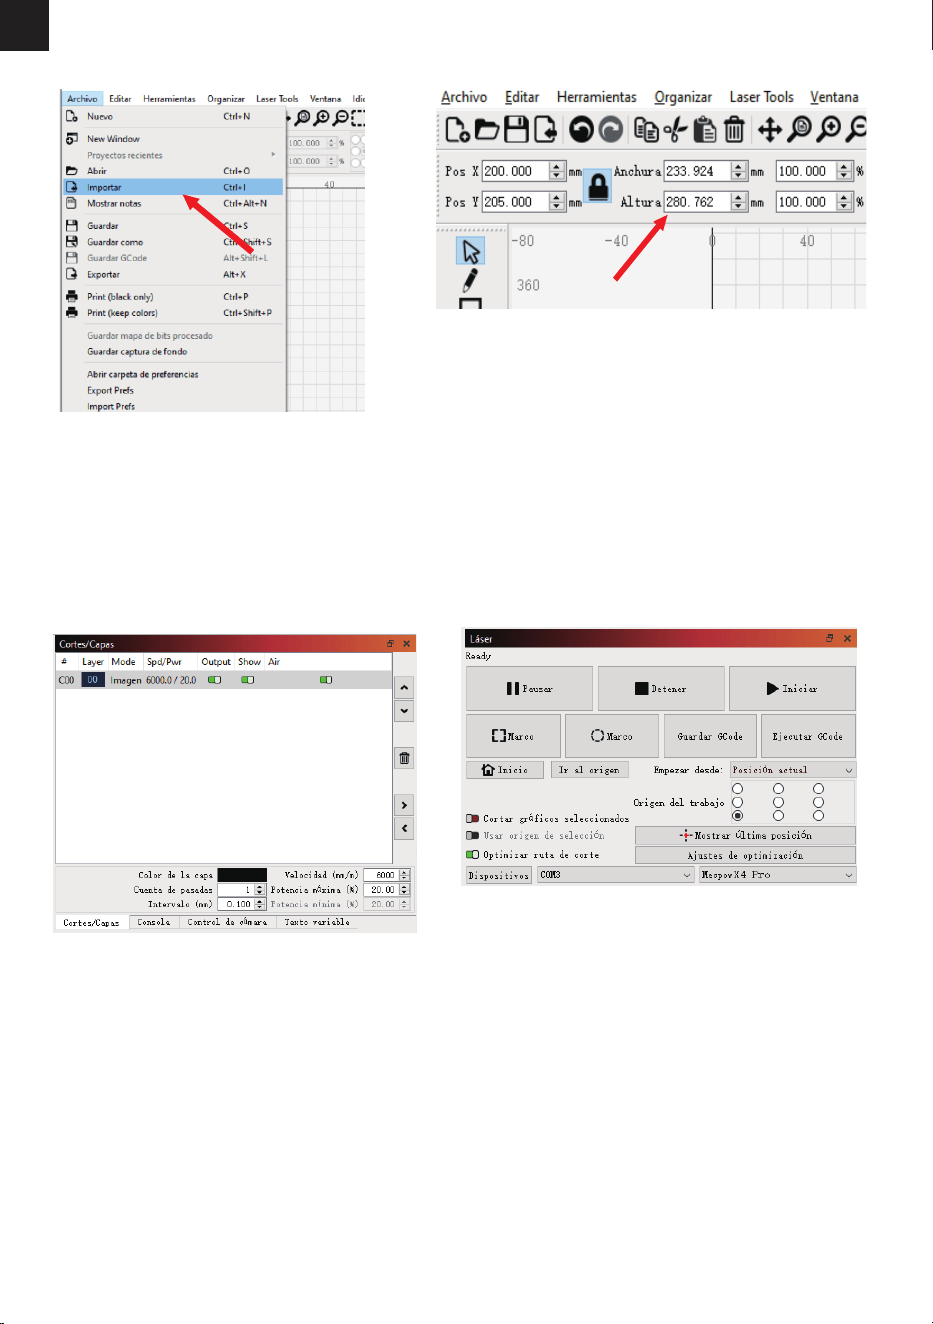
-69-
ES
11.Haga clic en "Archivo" - "Importar"
para importar el archivo de grabado.
12. Puede modicar el tamaño del grabado en la parte
superior de la interfaz después de importar el archivo.
13. Seleccione el modo de grabado y establezca
los parámetros operativos para el grabado o
corte por láser. (Los parámetros de funciona-
miento recomendados para grabar o cortar
diferentes materiales se enumeran en la
siguiente sección).
14.Haga clic en "Marco" para obtener una vista
previa del rango de grabado y ajuste la posición
de grabado, luego haga clic en "Iniciar" para
comenzar a grabar.
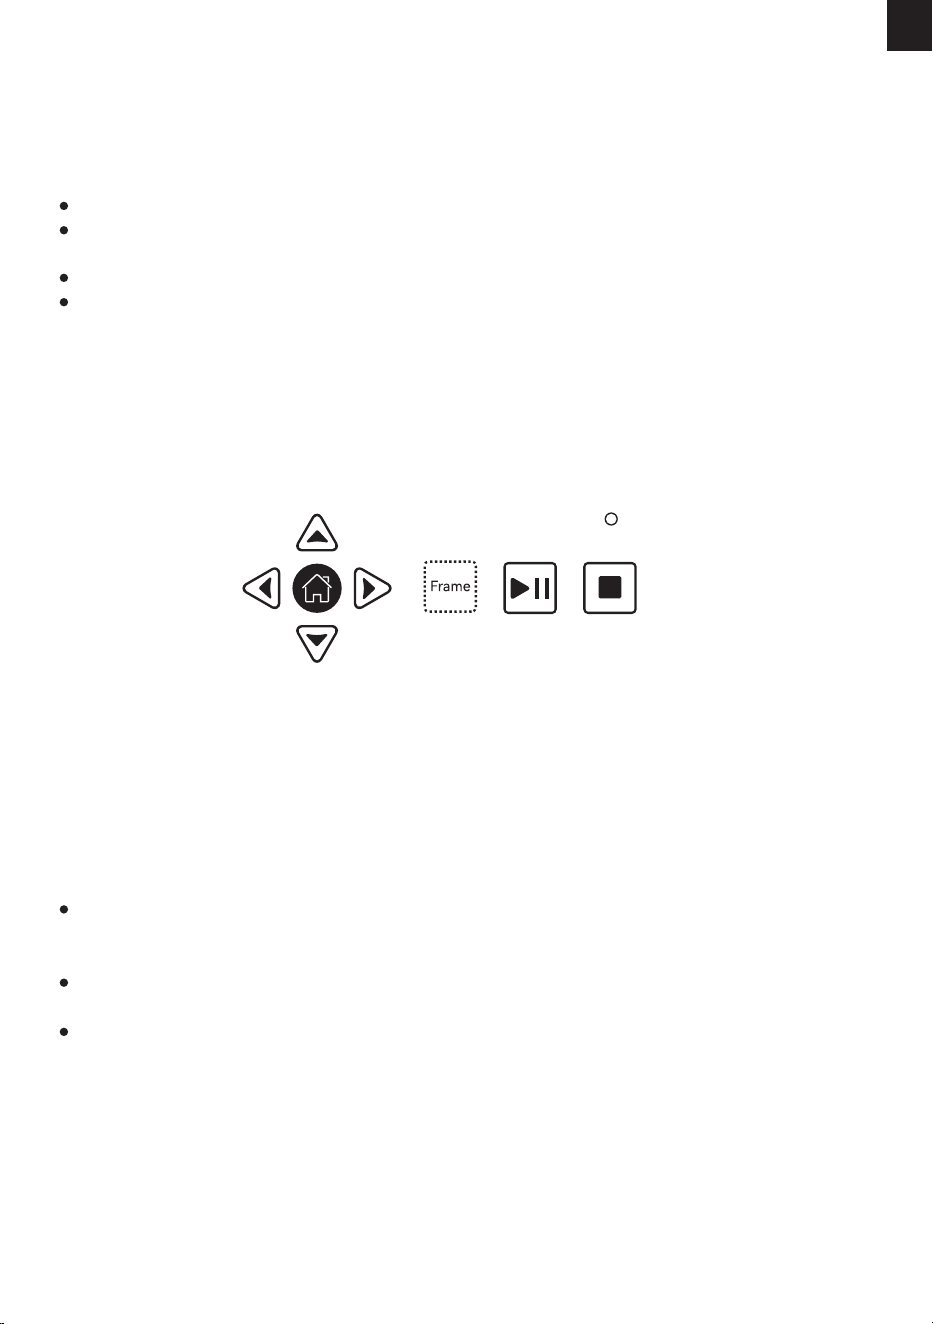
-70-
ES
1. Prepare un archivo LightBurn G-code para grabar o cortar y guárdelo en el directorio raíz de la tarjeta TF.
Inserte la tarjeta TF en la máquina de grabado. El indicador del panel de control se ilumina para indicar que el
archivo se ha cargado correctamente.
2. Pulse la tecla "Frame", y la máquina entrará en el modo de vista previa. El módulo láser se moverá a lo largo
del eje X/Y para enmarcar el área de trabajo objetivo. A continuación, puede ajustar manualmente el objeto
grabado a la posición adecuada o utilizar las teclas de echa del panel de control para ajustar el módulo láser
a la posición adecuada.
3. Pulse la tecla "Inicio/Pausa" para iniciar el grabado/corte. Si necesita hacer una pausa mientras el grabador
está trabajando, pulse la tecla "Inicio/Pausa" y luego púlsela de nuevo para continuar grabando/ cortando. Si
necesitas nalizar la tarea, pulsa la tecla "Stop". Una vez nalizado el grabado/corte, el módulo láser volverá a
la posición inicial. Cuando no esté en condiciones de trabajar, pulse la tecla "Inicio/Pausa", y el grabador
repetirá la última tarea de grabado/corte, lo cual es adecuado para la producción en masa.
La tarjeta TF sólo admite el formato FAT32.
La máquina de grabado lee el último archivo modicado en el directorio raíz de la tarjeta TF por defecto
cuando hay más de un archivo en ella.
El grabador sólo puede reconocer archivos NC y GC con nombres en inglés.
El grabador puede reconocer archivos NC y GC guardados con LightBurn. Sin embargo, los archivos NC y GC
guardados con LaserGRBL sólo pueden ser reconocidos por el grabador después de ser convertidos con
MKSLaser. MKSLaser se puede obtener de la tarjeta TF adjunta o Mecpow.com.
Nota:
10. Control a través del panel de control y la tarjeta TF
Las teclas "Inicio/Pausa" y "Stop" tienen un mayor acceso de control al grabador que el software del
ordenador y la aplicación móvil, lo que signica que las tareas de grabado/corte emitidas por el ordenador o
el teléfono móvil se pueden iniciar, pausar y nalizar directamente a través del panel de control.
Si se naliza una tarea de grabado/corte emitida por el ordenador o el teléfono móvil, solo puede reiniciarse
desde el ordenador o el teléfono móvil.
El "Marco" y las teclas de echa no funcionan durante el proceso de grabado/corte.
Nota:
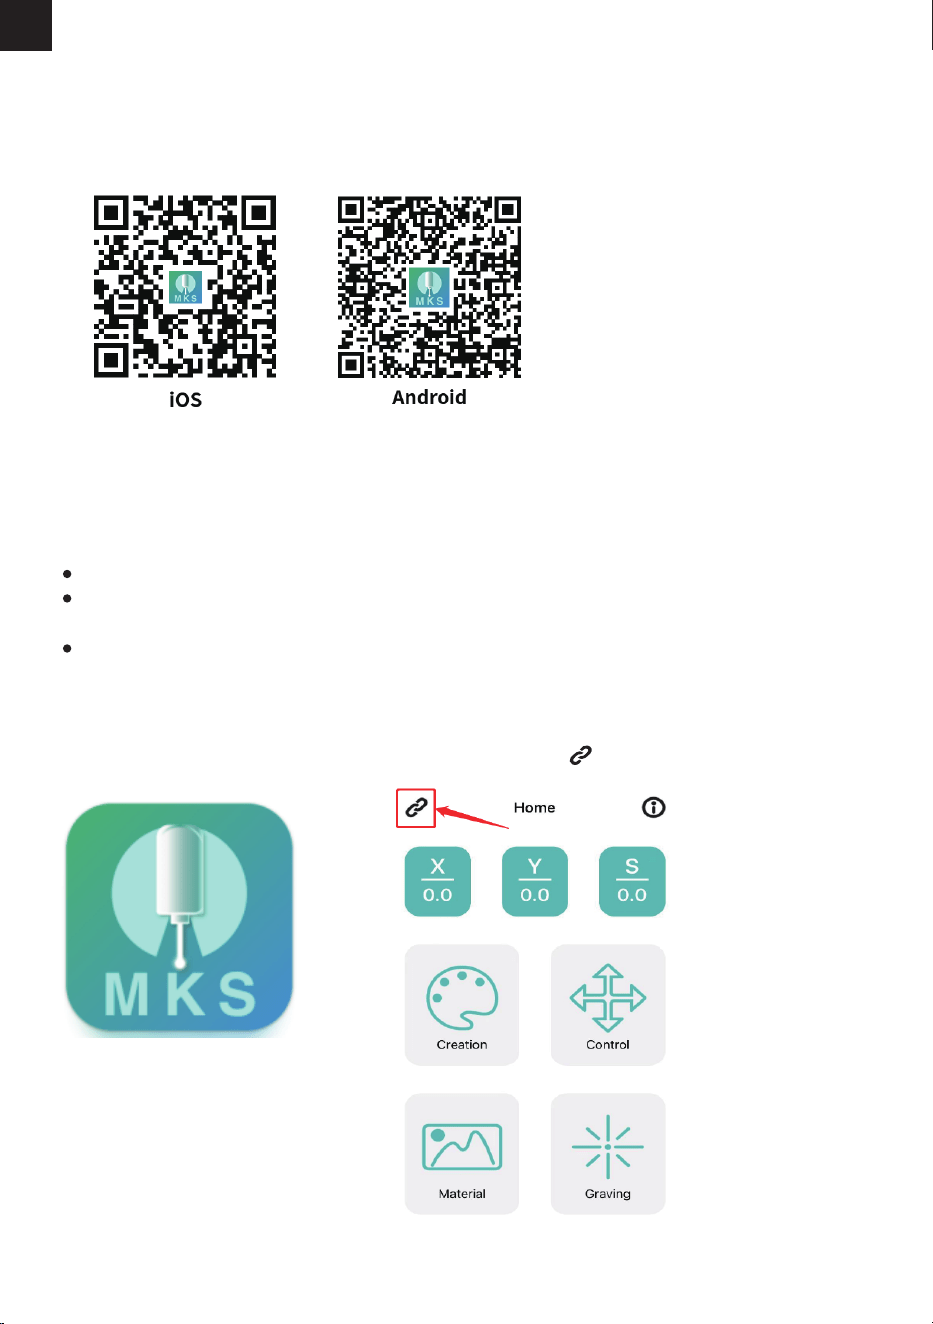
-71-
ES
El "*****" en el nombre de Wi-Fi es una combinación aleatoria de números. Varía según la máquina.
Para garantizar la estabilidad de la señal Wi-Fi, se recomienda conectar su teléfono al Wi-Fi de la máquina de
grabado antes de insertar la tarjeta TF.
La aplicación debe usarse con la tarjeta TF. La carga del archivo de grabado fallará si no se ha insertado la
tarjeta TF.
MKSLaser es una aplicación móvil gratuita compatible con dispositivos Android e iOS.
1. Active la función Wi-Fi de su teléfono y conecte el Wi-Fi "Mecpow_*****".
Nombre Wi-Fi: Mecpow_*****
Contraseña Wi-Fi: 12345678
2. Abra la aplicación MKSLaser.
3. Haga clic en el icono .
Escanee el código QR y descárguela.
Descarga de la App
Conexión Wi-Fi
11. Control mediante aplicación móvil y tarjeta TF
Nota:
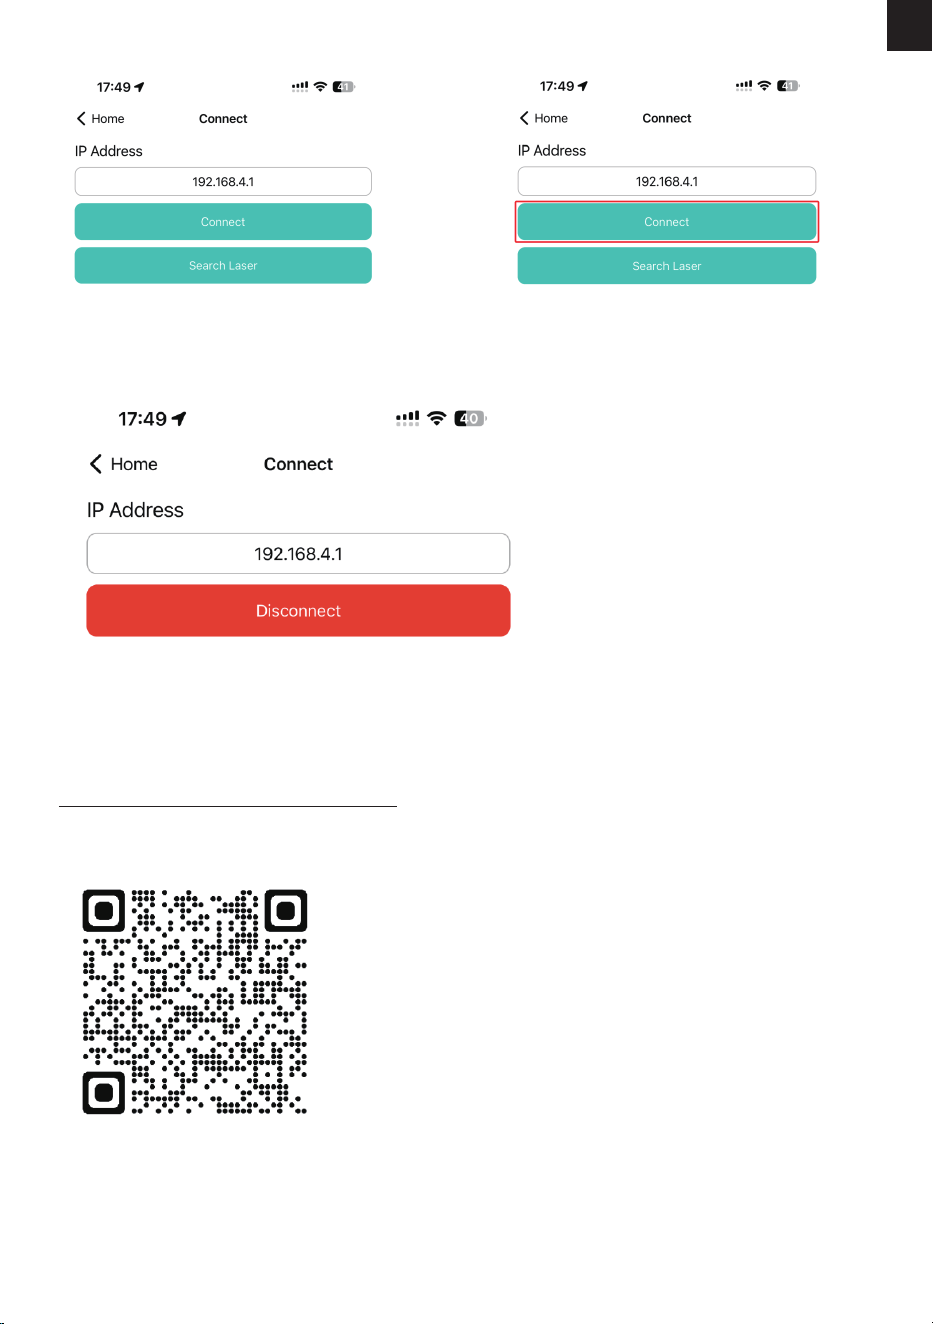
-72-
ES
Para obtener información detallada sobre el uso de la aplicación MKSLaser, consulte la información de la
tarjeta TF o descargue el manual de usuario visitando el siguiente enlace o escaneando el código QR que
aparece a continuación.
https://mecpow.com/pages/download-center
4. Ingrese la dirección IP: 192.168.4.1 5. Haga clic en "Connect".
6. Cuando "Connect" cambia a "Disconnect", signica que la conexión Wi-Fi se realizó correctamente.
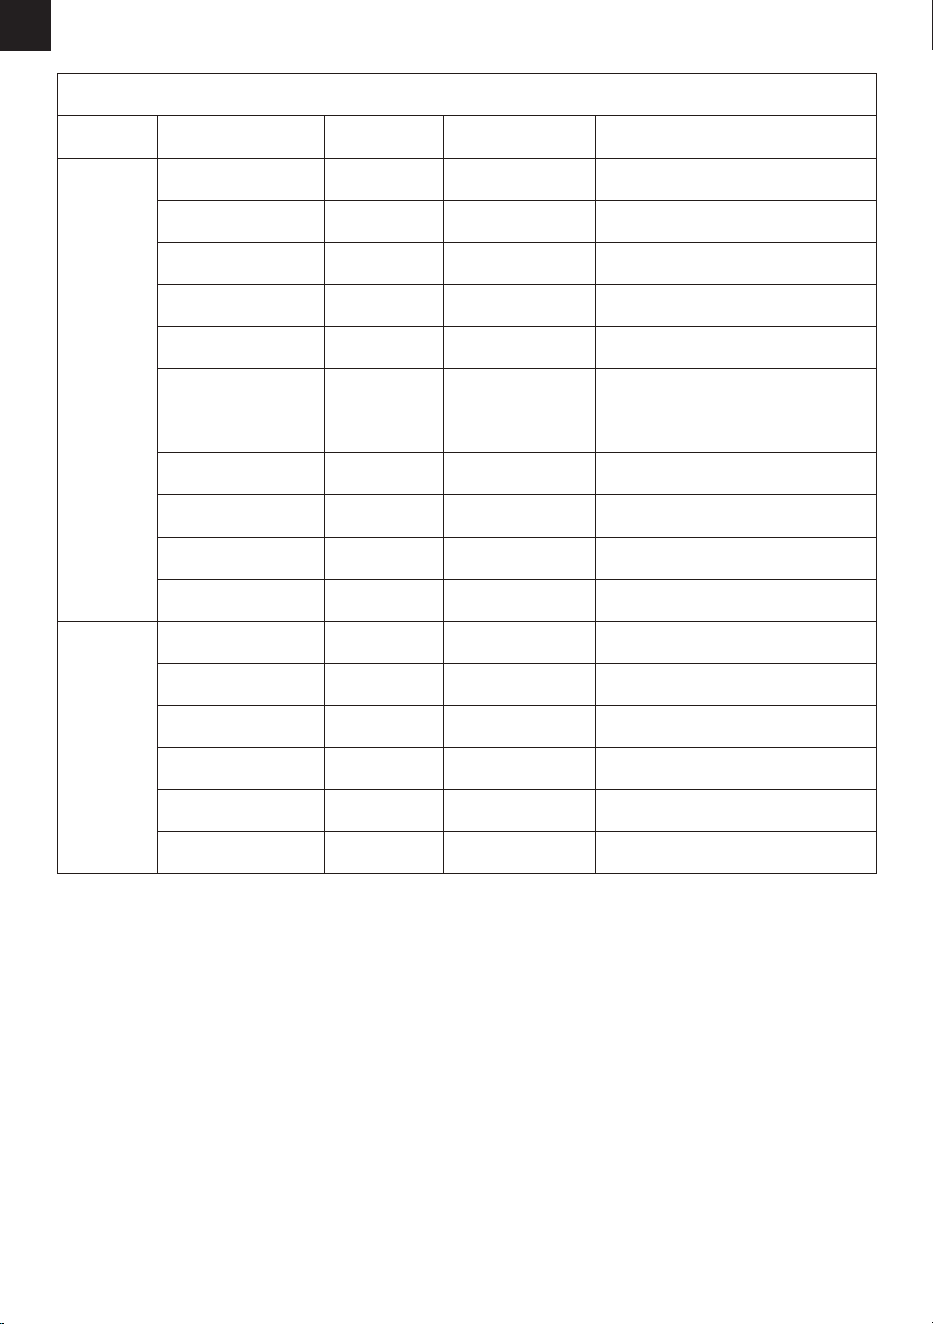
-73-
ES
20 3000
3000
1000
3000
1000
1000
3000
50
13
20
50
80
50
50
80
3000
600
3000
200
130
75
3000
100
15
100
100
100
80
80 300
100
12. Parámetros de funcionamiento recomendados
Mecpow X4 Pro (22W)
Grabado
Tablero de madera
Bambú
Resina
Cuero
La supercie necesita ser pintada.
La supercie necesita ser pintada.
No grabe sobre acero inoxidable
pulido a espejo.
La supercie debe aplicarse con
papel de transferencia de calor.
Vidrio
Cerámica
Acrílico
Modo Materiales Potencia
(%) Velocidad (mm/min) Nota
Goma
Acero inoxidable
Cartón
Cartón de 8 mm d
e grosor
Cartón de 9 mm
de grosor
Cartón de 10 mm
de grosor
Corte
Papel de 0,2 mm
Cuero de 2 mm
5mm Acrílico
13. Solución de problemas
1. La máquina no responde cuando está encendida.
A. Compruebe si la máquina está enchufada correctamente en el enchufe y encendida.
2. La máquina no puede conectarse a la computadora.
A. Verique si el cable USB está conectado correctamente tanto a la computadora como a la máquina.
B. Instale el controlador según las instrucciones y asegúrese de que la computadora reconozca el dispositivo como
un puerto serie.
C. Desconecte el cable USB y la fuente de alimentación, espere 5 segundos y luego vuelva a conectarlo.
3. El grabado es demasiado ligero o inexistente.
A. Asegúrese de que la máquina esté enfocada con precisión de acuerdo con el manual.
B. Ajuste la velocidad de grabado. Si hace un grabado demasiado rápido, es posible que no tenga tiempo suciente
para quemar el objeto.
C. La imagen es demasiado supercial. Las imágenes importadas deben ser claras, con líneas nas y sin colores
demasiado claros, ya que esto afectará directamente el efecto de grabado.
D. Asegúrese de que el objeto que se está grabando esté colocado plano y paralelo a la máquina para evitar
problemas de enfoque.
-74-
ES
Para obtener más preguntas y respuestas, consulte el siguiente enlace o escanee el código QR que aparece a
continuación.
https://mecpow.com/pages/faq
4. El proceso de grabado sin conexión se detiene inesperadamente.
A. Verica si se ha presionado accidentalmente el botón de parada de emergencia. Si está presionado, gíralo hacia la
derecha para liberarlo.
B. Verica si el interruptor se ha apagado accidentalmente. Si es así, vuelve a encenderlo.
C. Si todo lo anterior parece estar normal, ponte en contacto con el servicio al cliente.
5. El software se detiene abruptamente durante el grabado.
A. Verica si el cable USB está suelto.
B. Conrma que el software esté instalado correctamente y los archivos de conguración sean precisos.
C. Asegúrate de que el archivo de grabado esté funcionando correctamente.
D. Si todo lo anterior parece estar normal, ponte en contacto con el servicio al cliente.
6. La máquina se mueve correctamente, pero el láser permanece inactivo.
A. Valida que el cable del módulo láser esté correctamente conectado.
B. Verica si hay algún ruido leve proveniente del ventilador del módulo láser.
C. Si todo lo anterior parece estar normal, ponte en contacto con el servicio al cliente.
14. Declaración de cumplimiento
Este producto cumple con los estándares de la Comunidad Europea (UE).
DEste producto cumple con las normas de Restricción de Sustancias Peligrosas en Equipos
Eléctricos y Electrónicos (RoHS) de la UE que restringen el uso de sustancias peligrosas en
equipos eléctricos y electrónicos para proteger el medio ambiente y la salud pública.
Este dispositivo cumple con la Parte 15 de las Reglas de la FCC. El funcionamiento está sujeto a las
dos condiciones siguientes: (1) este dispositivo no puede causar interferencias perjudiciales y (2)
este dispositivo debe aceptar cualquier interferencia recibida, incluida la interferencia que pueda
causar un funcionamiento no deseado.
La señal de advertencia láser se utiliza para alertar a los usuarios y visitantes si existe el riesgo de
estar expuestos a un rayo láser desnudo. La exposición a ciertos láseres puede causar daños
oculares u ópticos y quemaduras en la piel.
Este símbolo indica que el producto es reciclable.

-75-
FR
1. Préface...............................................................................
2. Déclaration de sécurité...................................................
3. Diagramme.......................................................................
4. Spécifications....................................................................
5. Liste des éléments de la boite........................................
6. Guide d’assemblage........................................................
7. Fonctions & Opérations..................................................
8. Pilote.................................................................................
9. Contrôle via le logiciel de l'ordinateur.........................
10. Contrôle via le panneau de contrôle et la carte TF....
11. Contrôle via l'application mobile et la carte TF.........
12. Paramètres de fonctionnement recommandés........
13. Résolution des problèmes............................................
14. Déclaration de conformité...........................................
SOMMAIRE
76
76
77
79
79
80
87
89
90
95
96
98
98
99

-76-
FR
1. Préface
Attention
2. Déclaration de sécurité
Cher client,
Nous vous remercions d'avoir acheté notre machine à graver au laser. Cet appareil est un produit de haute
technologie qui intègre la lumière, les machines et l'électricité. An d'améliorer l'utilisation et l'entretien de
l'appareil, veuillez lire attentivement le manuel d'utilisation et suivre les étapes indiquées dans le manuel.
Clause de non-responsabilité
Toute perte causée par une utilisation incorrecte ou le non-respect des étapes du manuel d'utilisation sera à
la charge de l'utilisateur. L'interprétation nale du manuel d'utilisation appartient à notre société, et nous
nous réservons le droit de modier toute information, donnée, détail technique, etc. dans le manuel.
* Le traitement au laser peut être risqué, et les utilisateurs doivent soigneusement vérier si l'objet à traiter est
adapté au travail au laser.
* L'objet traité et les émissions doivent être conformes aux lois et réglementations locales. * Cette machine
utilise un laser de classe IV (radiation laser de haute puissance), qui peut provoquer les situations suivantes :
(1) Allumage des matériaux inammables environnants ;
(2) Pendant le traitement laser, d'autres radiations et des gaz toxiques et nocifs peuvent être produits, en
fonction de l'objet traité ;
(3) L'exposition directe au rayonnement laser peut causer des dommages au corps humain. Le lieu de travail
doit être équipé d'un dispositif de lutte contre l'incendie et les matériaux inammables et explosifs ne doivent
pas être empilés autour de l'établi ou de la machine. Une bonne ventilation doit également être assurée.
* L'environnement dans lequel se trouve la machine doit être sec, exempt de pollution, de vibrations,
d'électricité forte, de magnétisme fort et d'autres interférences. La température ambiante de travail doit être
comprise entre 5 et 30°C, et l'humidité ambiante de travail doit être comprise entre 35 et 65%HR.
* La tension de fonctionnement de l'appareil est de 100-240 V CA.
* Pendant le fonctionnement de la machine, celle-ci doit être surveillée en permanence. Avant de quitter
l'appareil, il convient de couper l'alimentation électrique an d'éviter tout problème imprévu. Si une situation
anormale se produit, veuillez immédiatement couper le courant et vous en occuper !
* Il est strictement interdit de placer dans la machine des objets rééchissants ou dius qui ne sont pas utiles à
son fonctionnement, an d'éviter que le laser ne se reète sur le corps humain ou sur des matériaux inamma-
bles.
* La machine doit être tenue à l'écart des équipements électriques sensibles aux interférences électromag-
nétiques, qui peuvent provoquer des interférences électromagnétiques.
* Il est strictement interdit aux non-professionnels de démonter le graveur laser, car il peut y avoir des dangers
tels que la haute tension à l'intérieur de la machine.
Précautions de sécurité
1. La machine à graver au laser peut produire de la lumière laser. Il est strictement interdit de placer des
organismes vivants sous l'émission laser (le port est marqué d'un panneau d'avertissement jaune).
2. Il est interdit aux patients photosensibles d'utiliser le graveur laser ou de s'en approcher.
3. Lors de l'utilisation de la machine à graver au laser, l'opérateur et toute personne se trouvant à proximité de
la machine doivent porter des lunettes de sécurité laser. Ne pas utiliser la machine laser sans lunettes de
protection laser. Notre machine est livrée avec une paire de lunettes de sécurité. Si vous souhaitez acheter des
lunettes supplémentaires, celles-ci doivent orir une protection contre les longueurs d'onde comprises entre
400 et 445 nm (+-5 nm), avoir un diamètre extérieur de +5 et correspondre à un niveau L5 minimum.
4. Lorsque la machine à graver au laser fonctionne, l'utilisateur doit être très attentif et ne pas la laisser sans
surveillance an d'éviter que le matériau gravé ne s'enamme. Placez la machine dans un endroit à l'abri du
feu et assurez une bonne ventilation. Il est recommandé d'avoir un extincteur à proximité en cas d'urgence.
5. Veillez à ce qu'aucun matériau inammable ne se trouve à proximité de la machine à graver au laser. Nous
recommandons de placer une table de travail en nid d'abeille sous la machine.
6. Lorsque vous utilisez le graveur laser, veillez à ce qu'il y ait susamment d'espace autour de lui. La gravure
de certains matériaux peut produire de la fumée, qui doit être évacuée à l'aide d'un système d'échappement
spécialisé.
7.Ne touchez pas le faisceau laser ou l'objet en cours de traitement lorsque la machine est en fonctionnement,
car cela pourrait provoquer des blessures graves ou une réexion du faisceau. En outre, évitez de toucher le
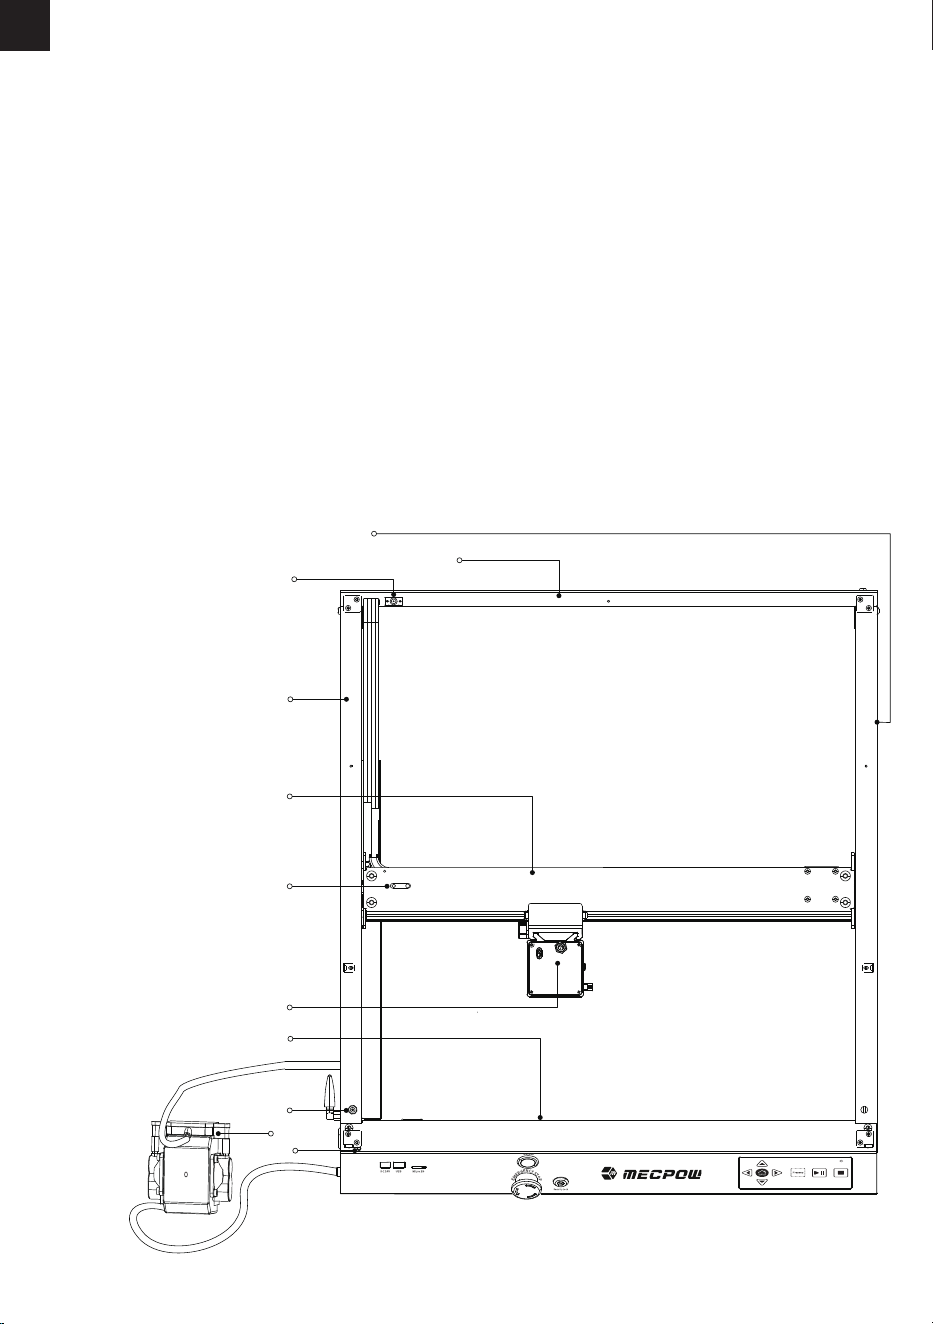
-77-
FR
Entretien
Recommandations :
Eteindre la machine pendant 10 minutes après 4 heures de gravure et 10 minutes après 1 heure de découpe.
Le module laser est un consommable.
radiateur car il peut être chaud en raison du fonctionnement de la machine à graver au laser ou de son arrêt
récent.
8. Les enfants et les adolescents (en particulier ceux de moins de 14 ans) ne sont pas autorisés à utiliser seuls la
machine à graver au laser et doivent être surveillés par un adulte à tout moment.
9. La température de fonctionnement de l'appareil est comprise entre 41°F et 86°F (5°C et 30°C).
10. Mettez la machine hors tension lorsqu'elle n'est pas utilisée an d'éviter toute utilisation abusive par des
tiers.
11. La gravure au laser présente un risque d'incendie. Lorsque la machine à graver au laser est utilisée, elle doit
être surveillée par un opérateur qualié qui peut utiliser un extincteur en cas d'accident.
12. Notre machine à graver au laser est équipée d'un détecteur de amme intégré an de maximiser la sécurité
de notre équipement. Toutefois, veuillez noter qu'aucune garantie écrite ou implicite n'est
donnée quant à la
disponibilité ou au fonctionnement du capteur de amme.
3. Diagramme
1. Axe Y droit
2. Axe X arrière
3. Port CC du ventilateur
d'extraction
4. Axe Y gauche
5. Assemblage de l'axe X
6. Régulateur de tension de
la courroie de l'axe X
7. Module laser
8. Axe X avant
9. Lumière LED Port DC
10. Pompe à air
11. Interrupteur de hall
2
4
5
8
10
1
9
6
11
3
7
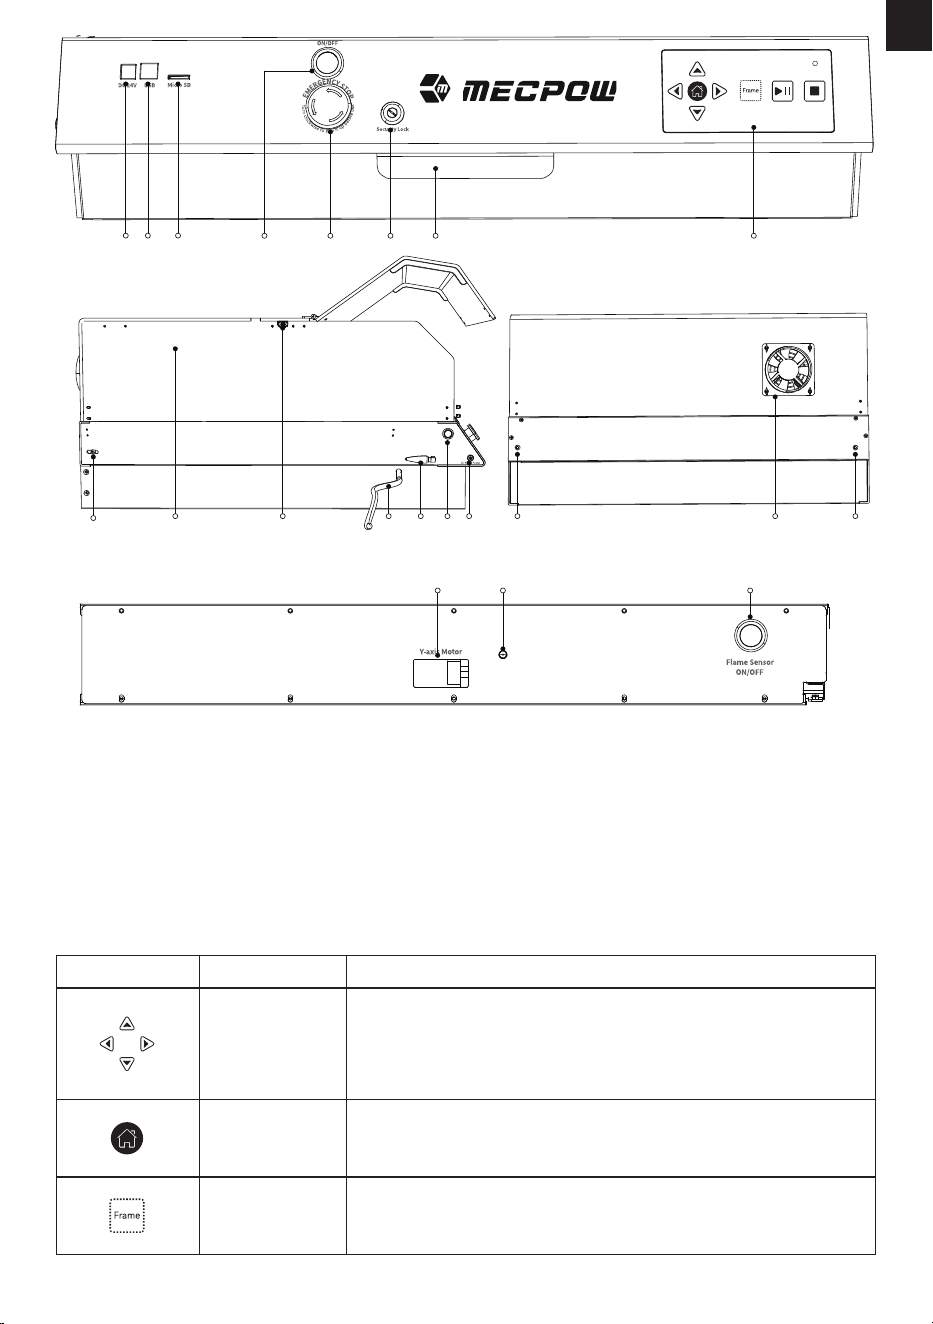
1. Port d'entrée CC
2. Port USB
3. Port Micro SD
4. Interrupteur d'alimentation
5. Bouton d'arrêt d'urgence
6. Verrou de sécurité
7. Tiroir du plateau inférieur
8. Panneau de commande
9. Vis de xation de la courroie de
l'axe Y
10. Couvercle de protection
11. Interface de caméra externe
12. Tuyau pour la pompe à air
13. Antenne WiFi
-78-
FR
1
2 3
1110 1716 1614 15 1312
4 5 6
7 8
14. Interrupteur de lumière LED
15. Port d'alimentation de la pompe à air
16. Vis de réglage de la courroie de l'axe Y
17. Tuyau d'échappement
18. Moteur de l'axe Y
19. Capteur de amme
20. Interrupteur du capteur de amme
9
18 2019
Icônes des touches Nom de la touche
Touches échées
Accueil
Touche Patrouille
Fonction de la touche
Introduction au panneau de contrôle
Appuyez brièvement sur l'une des touches et le module laser se
déplacera de 1 mm dans la direction correspondante. Appuyez
longuement sur la touche pendant 3 secondes ou plus, et le module
laser continuera à se déplacer jusqu'à ce que vous relâchiez la touche
ou que le module laser atteigne l'interrupteur de n de course.
Appuyez sur cette touche pour remettre le module laser dans sa
position initiale.
Appuyez sur cette touche pour que le module laser patrouille dans
la zone de travail du premier chier de code G de la carte TF.
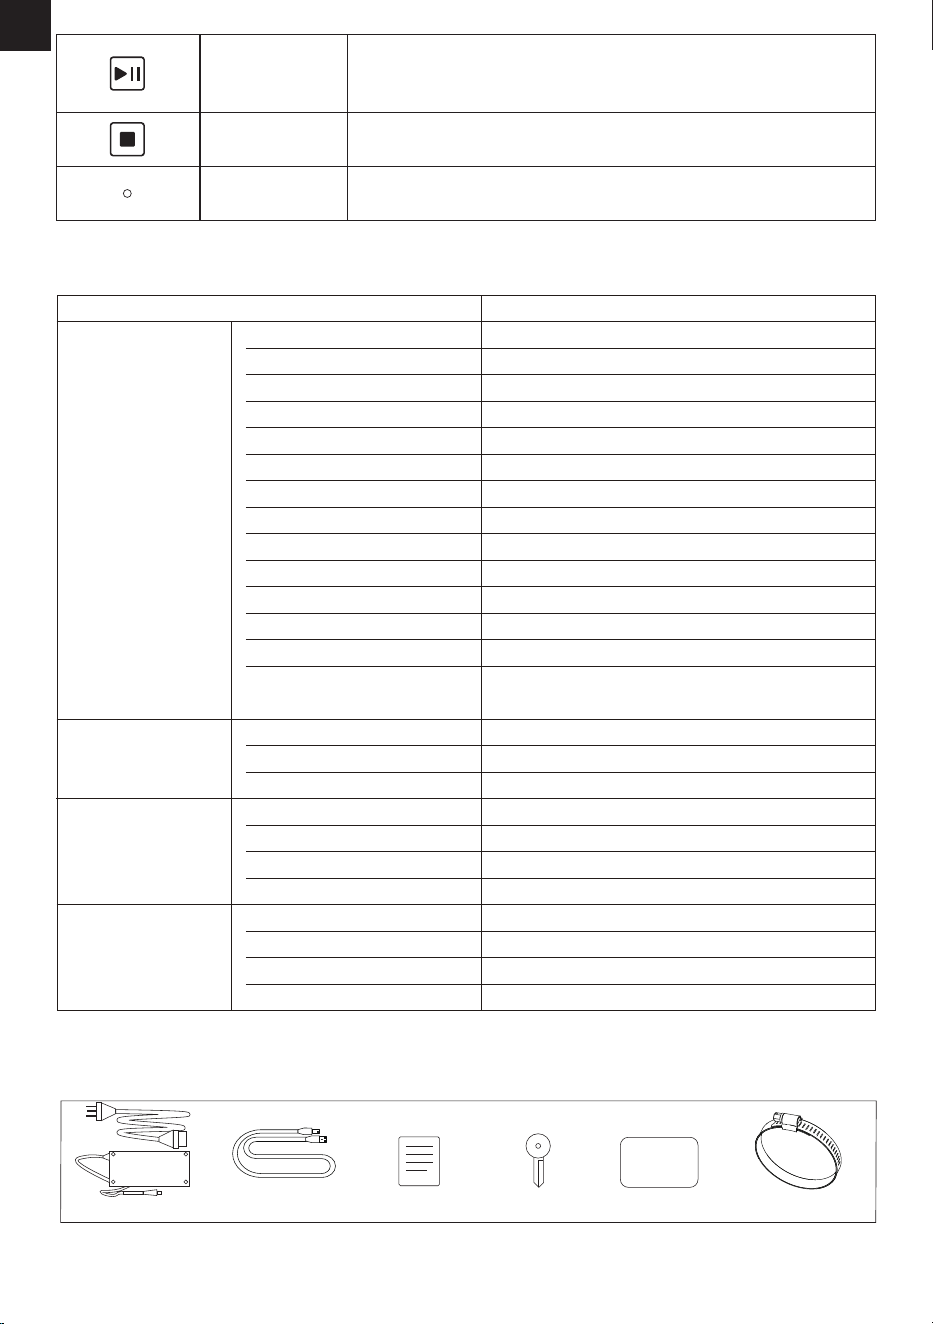
X4 Pro
790x655x235mm
21kg
685x620x310mm
Adaptateur électrique *1
Câble USB *2 Planche en bois *2
Clé *2 Manuel de l'utilisateur *1
-79-
FR
Touche Start/Pause
Touche Stop
Indicateur
de carte TF
Appuyez sur cette touche pour démarrer/pause la gravure.
Appuyez sur cette touche pour terminer la gravure.
S'allume lorsque la carte TF est détectée et lue.
4. Spécifications
Modèle
Spécications
de base
Module laser
Pompe à air
Chargeur
DC 24V
410x400mm
22000mm/min
50°±5
Windows, Mac, Linux
JPEG, BMP, GIF, PLT, PNG, DXF
Aluminium
Bois, acrylique, porcelaine, tissu, bambou,
panneau en plastique, cuir, fruits, pain, etc
Dimensions du produit
Dimensions du package
Poids
Tension d'entrée
Puissance nominale
Surface de gravure max.
Vitesse de gravure max.
Taille du spot du faisceau laser
Alarme d'inclinaison
Support logiciel
Support du système
Support du format de chier
Matériau du cadre
Puissance nominale
Entrée
Puissance du laser
Tension d'entrée
Courant d'entrée
Puissance d'entrée
Vélocité d'air
Tension d'entrée
Courant d'entrée
Tension de sortie
Courant de sortie
Matériaux pour la
gravure au laser
144W
77W
22W
24V 6A
24V
1.5A
36W
30L/min
AC 100-240V
2.5A
24V
6A
0.08 x 0.1mm
MKSLaser APP, LaserGRBL, LightBurn
5. Liste des éléments de la boite
Cerceau de gorge *1
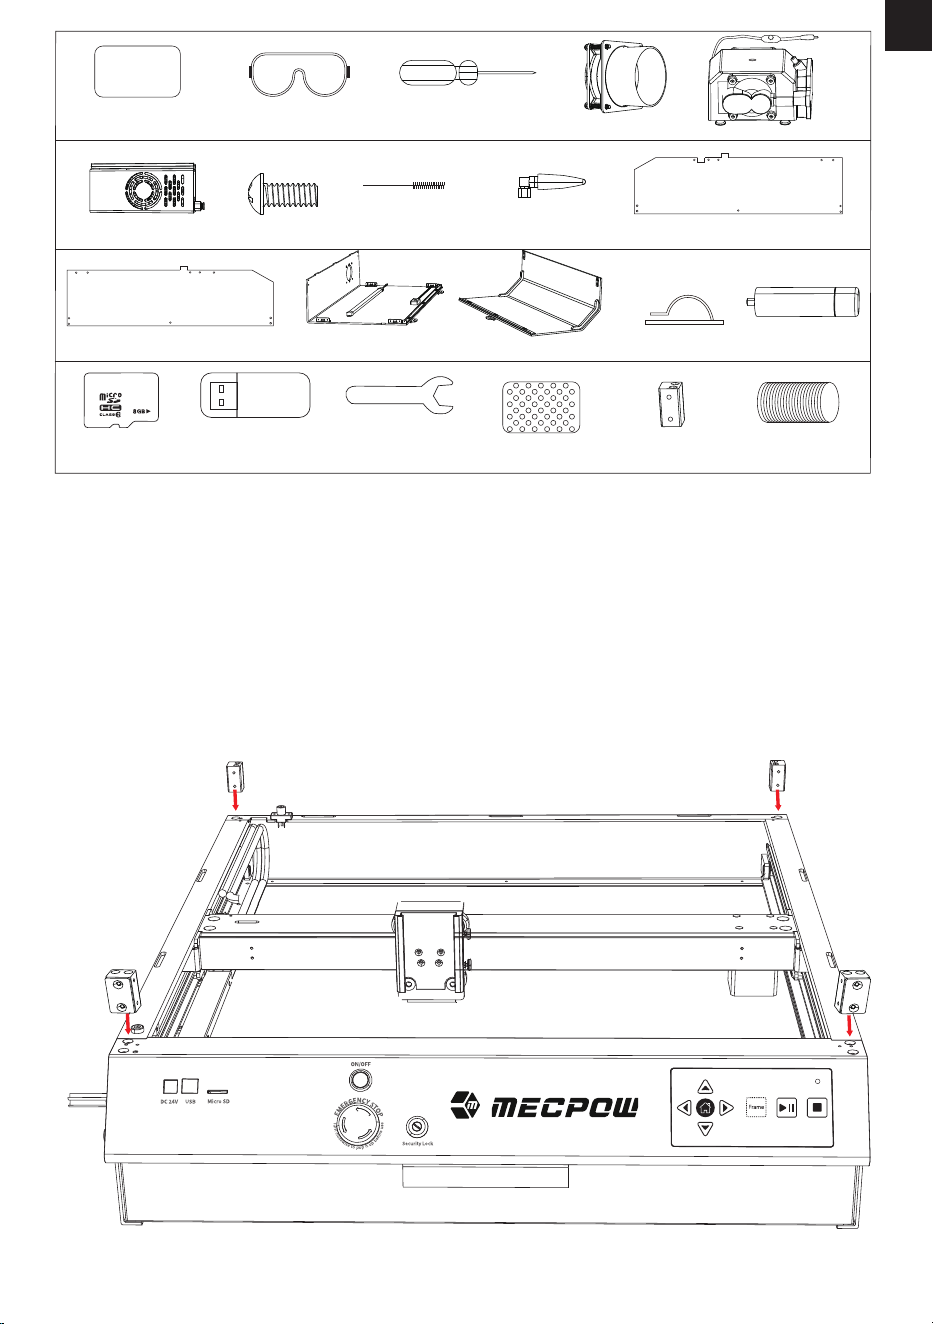
Plaque métallique *1
Tournevis *1
Paquet de vis *1
Lunettes de protection *1
-80-
FR
Brosse de nettoyage *1
Couvercle de
protection avant *1
Ventilateur d'extraction *1
Clip de câble adhésif *5
Couvercle de protection droit *1
Couvercle de
protection arrière *1
Étape 1 : Installation des 4 supports du couvercle de protection
Installez les 4 supports dans les trous correspondants comme indiqué ci-dessous. Les deux supports munis
d'une languette aimantée doivent être montés à l'avant du graveur et s'assurer que les languettes
aimantées sont orientées vers l'avant.
Module laser *1
Pompe à air *1
Couvercle de protection gauche *1
Tuyau
d'échappement *1
Support du couvercle de
protection *4
Carte TF *1 Clé de serrage *1 Carte d'étalonnage *1Lecteur de carte TF *1
6. Guide d’assemblage
Antenne WiFi *1
L
R
Réhausseur*4
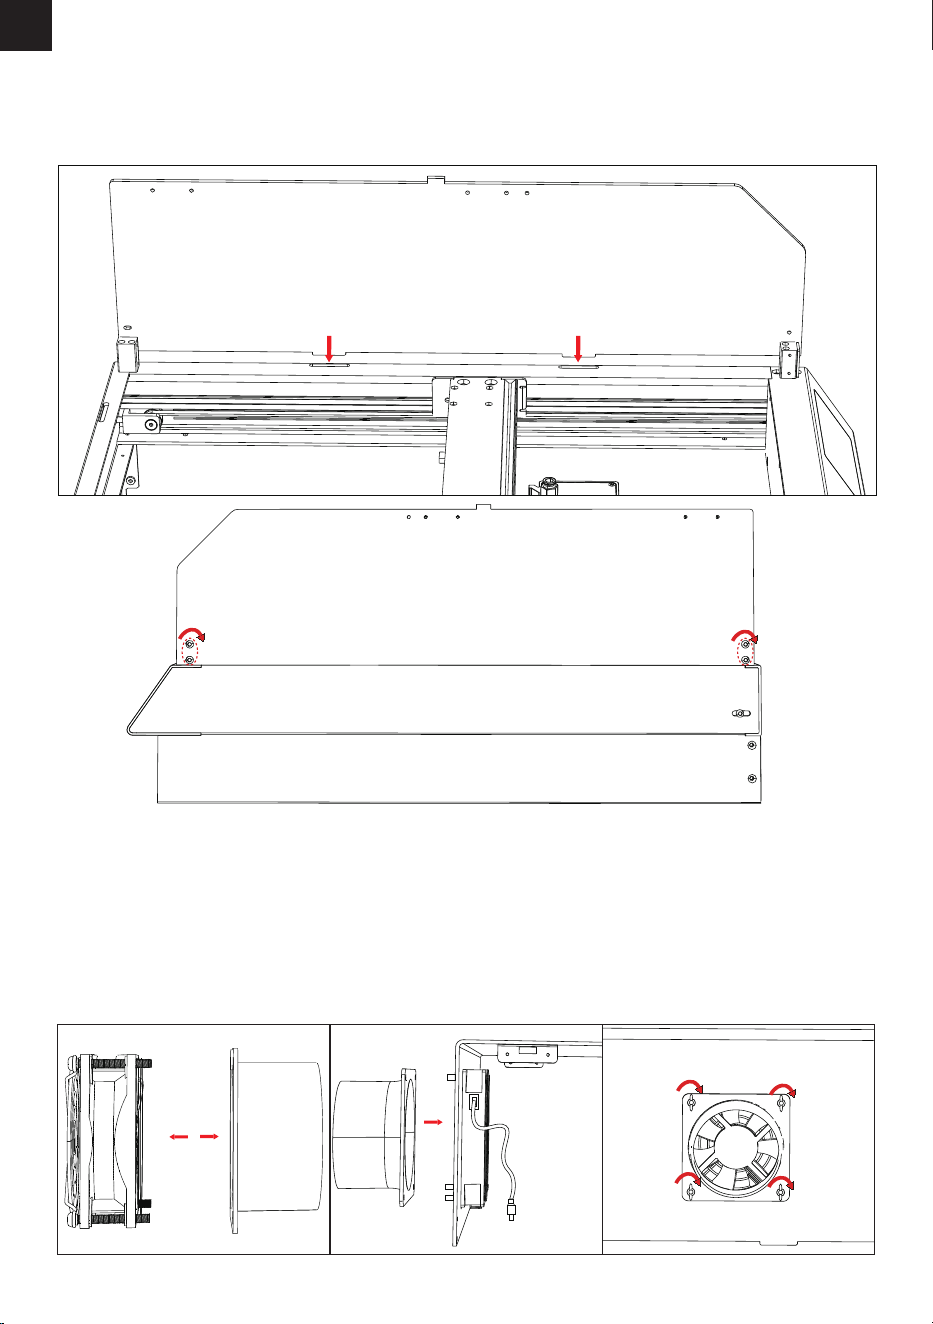
Étape 3 : Installation du ventilateur d'extraction
(1) Séparer le guide d'air du ventilateur d'extraction.
(2) Installez le ventilateur d'extraction depuis l'intérieur du couvercle de protection arrière et faites glisser les
quatre vis du ventilateur d'extraction à travers les trous. Assurez-vous que le câble du ventilateur se trouve à
gauche.
(3) Installez le guide d'air depuis l'extérieur du couvercle de protection arrière et xez-le à l'aide de quatre
boulons à ailettes.
-81-
FR
Étape 2 : Installation des couvercles de protection gauche et droit
(1) Insérer les saillies inférieures des couvercles de protection dans les fentes des cadres de l'axe Y gauche et droit.
(2) Serrez les vis pour xer les couvercles de protection.
Remarque : Les dessins suivants montrent l'installation du couvercle de protection droit. Veuillez installer
le couvercle de protection gauche de la même manière.
R
R
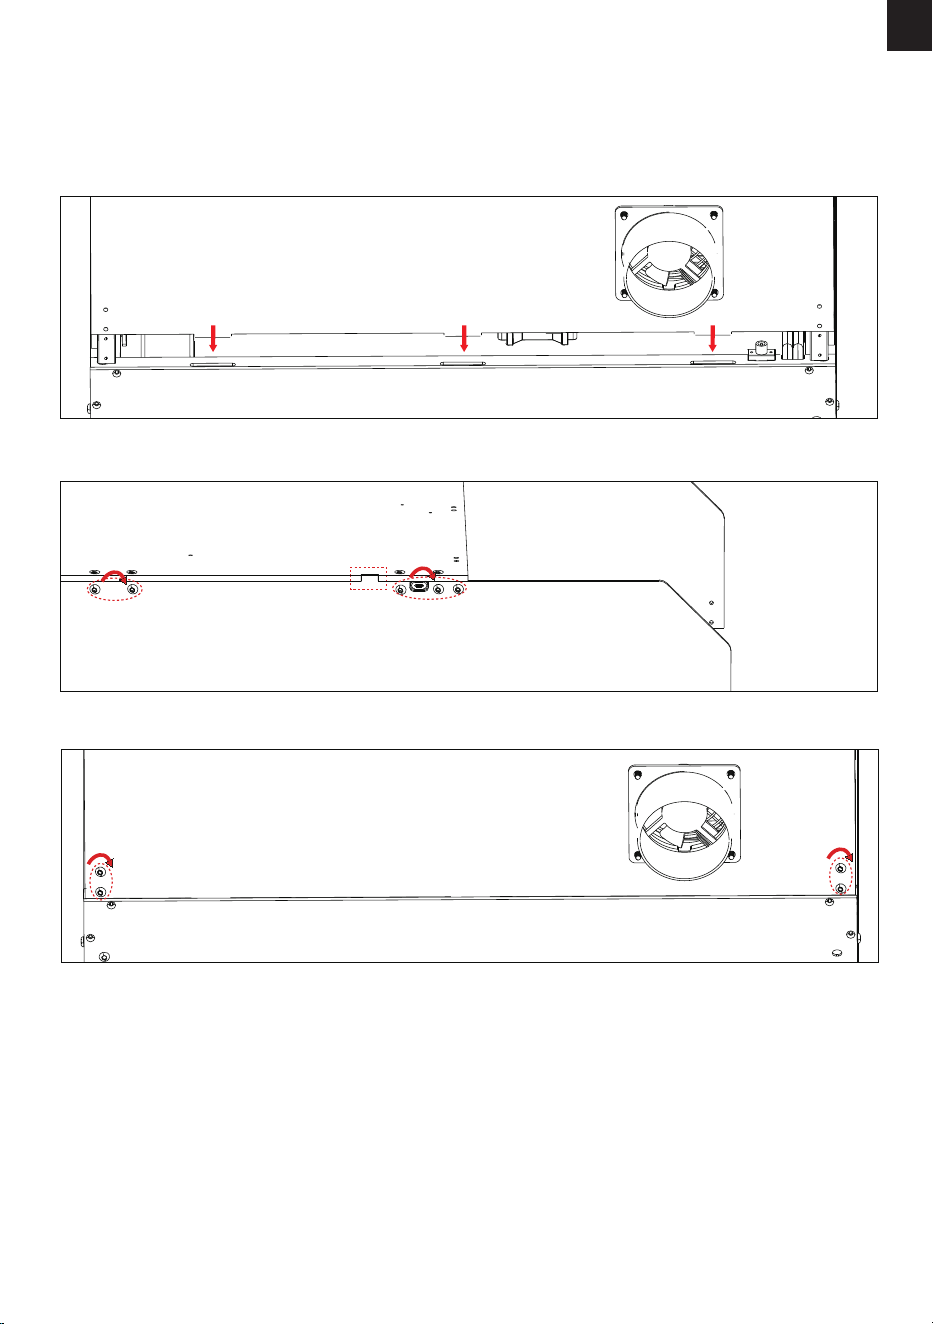
-82-
FR
Étape 4 : Installation du couvercle de protection arrière
(1) Insérez les protubérances inférieures du capot de protection arrière dans les fentes du cadre de l'axe X
arrière.
(2) Alignez les rainures latérales du capot de protection arrière avec les protubérances situées en haut des
capots de protection gauche et droit.
(3) Serrez les vis pour xer le couvercle de protection arrière.
Étape 5 : Branchement du ventilateur d'extraction et de la lampe LED
(1) Branchez le ventilateur d'extraction et la lampe LED dans les positions indiquées sur le schéma et
xez les câbles à l'aide des attaches fournies.
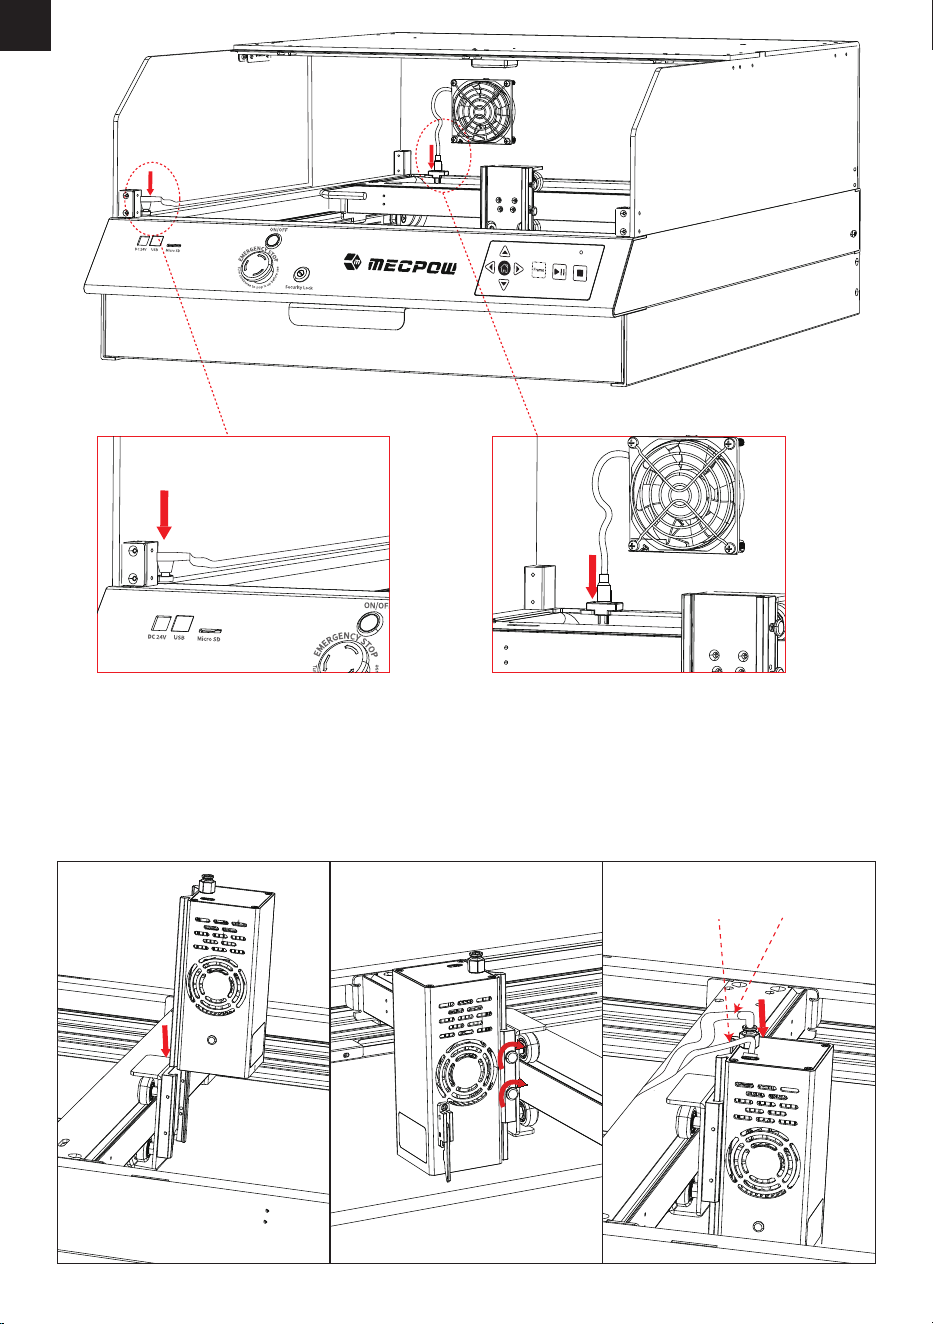
-83-
FR
Étape 6 : Installation du module laser
(1) Faites glisser le module laser sur la plaque coulissante. Ajustez le module laser à la bonne hauteur, puis
serrez les vis à la main.
(2) Connectez le câble d'alimentation et le câble du tuyau d'échappement au module laser en suivant les trous
correspondants.
Remarque : Le câble A est le câble d'alimentation du module laser et le câble B est le câble du tuyau
d'échappement.
A B
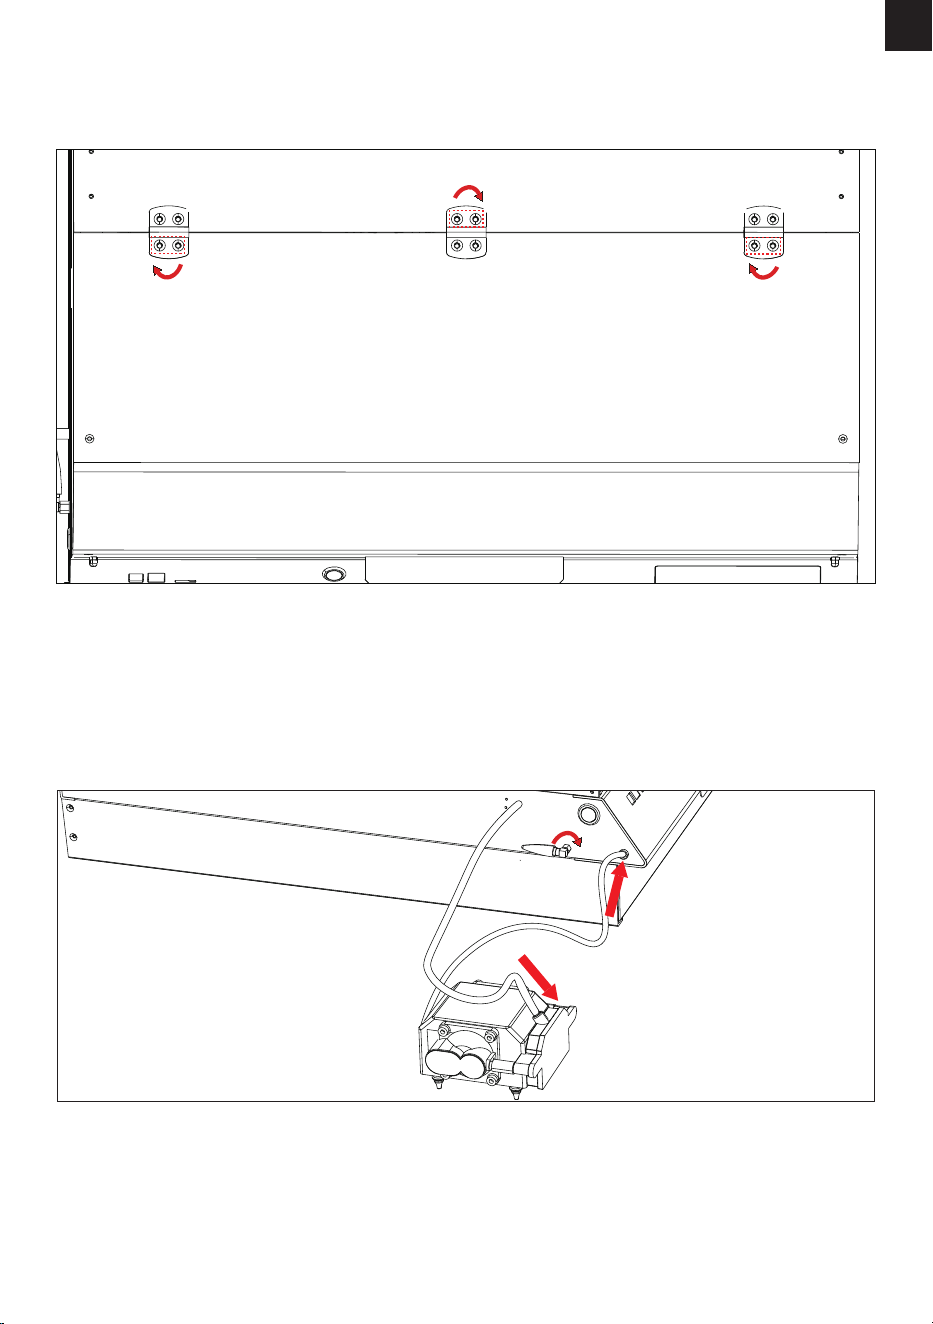
-84-
FR
(1) Placez le couvercle de protection avant sur le dessus et alignez les charnières avec les trous de vis.
(2) Serrez les vis et les boulons pour xer le couvercle de protection avant.
Étape 7 : Installation du couvercle de protection avant
(1) Attachez la pompe à air au tube de la machine et connectez le câble de la pompe à air à l'interface de la
pompe à air.
(2) Fixez l'antenne WiFi à la machine et tournez-la dans le sens des aiguilles d'une montre pour la serrer.
Étape 8 : Installation de la pompe à air et de l'antenne WiFi
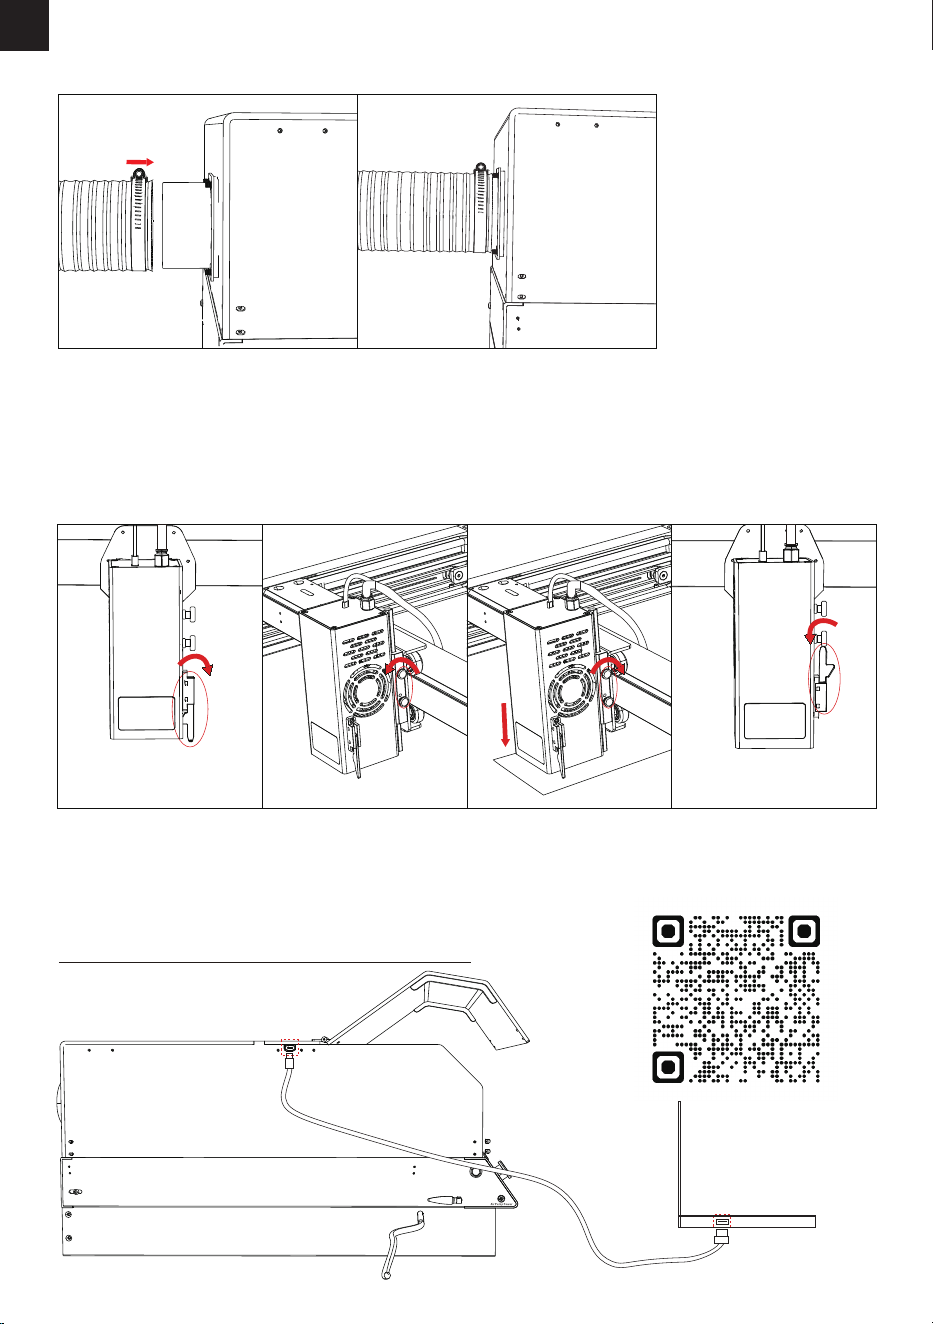
-85-
FR
(1) Abaissez la barre de mise au point du module laser.
(2) Tenez le module laser d'une main et desserrez les deux vis pour déplacer le module laser.
(3) Faites glisser le module laser vers le bas jusqu'à ce que la barre de mise au point touche l'objet à graver.
(4) Serrez les vis pour xer le module laser, puis poussez la barre de mise au point vers le haut pour la mettre
en place.
(1) Installez le tuyau d'échappement et serrez-le à l'aide de l'arceau.
Étape 10 : Mise au point
Étape 9 : Installation du tuyau d'échappement
Note : Pour une utilisation détaillée de la caméra, veuillez visiter le lien ci-dessous ou scanner le code
QR ci-dessous.
https://docs.lightburnsoftware.com/Camera/index.html
Étape 11 : Connexion du câble USB de l'appareil photo
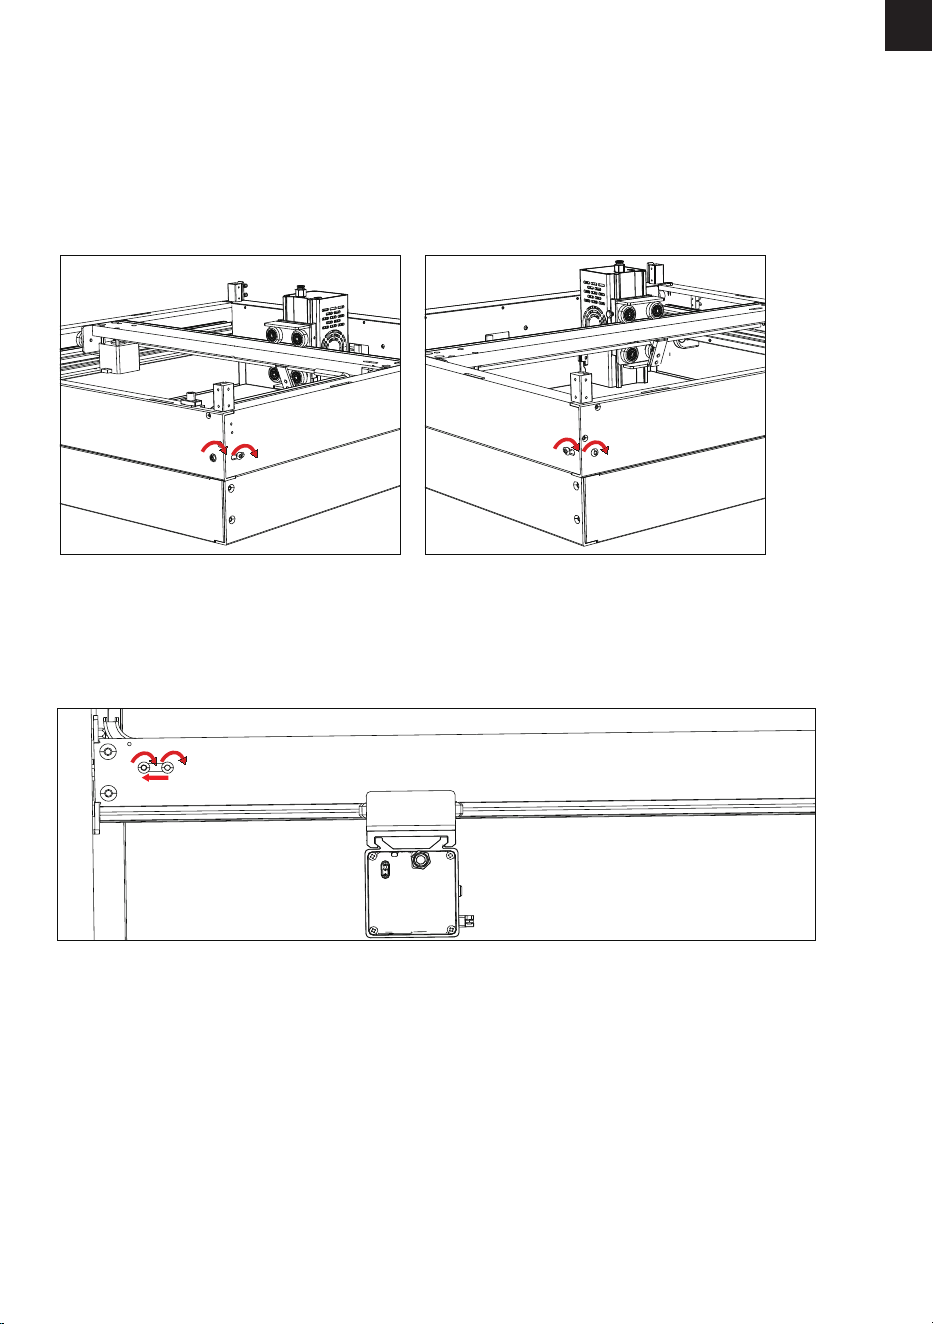
-86-
FR
Serrage des courroies de l'axe Y
Serrage de la ceinture de l'axe X
(1) Desserrez légèrement la vis 1 indiquée sur le dessin au trait.
(2) Tournez la vis 2 pour serrer les courroies comme le montre le dessin au trait.
(3) Serrez la vis 1 pour xer les courroies.
Les ceintures sont réglées en usine. Si les ceintures se desserrent après une période d'utilisation, elles
peuvent être ajustées comme suit.
Comment régler le serrage de la ceinture
(1) Desserrez légèrement les deux vis du régulateur de tension de la courroie de l'axe X et déplacez le
régulateur pour serrer la courroie de l'axe X.
(2) Serrez les vis pour xer le régulateur.
Vis 1
Vis 2
Vis 1
Vis 2

-87-
FR
7. Fonctions & Opérations
Pièces
Fonctionnalités / Anomalies
Opérations
Alarme
L'alarme retentit en cas d'anomalie. 1. Déterminez la cause de l'alarme.
2. Éliminez ce facteur.
3. Appuyez sur le bouton d'arrêt d'urgence
pendant 3 secondes pour réinitialiser la
machine. Tournez le bouton pour le
remettre dans sa position initiale après
l'avoir enfoncé.
4. Suivez les instructions d'utilisation du
logiciel pour reprendre le travail.
Module laser
Elle grave des objets et des matériaux.
Anomalie : Le module laser ne
fonctionne pas ou présente des
anomalies de fonctionnement.
1. Vériez que le câble de raccordement
du module laser est correctement
branché.
2. Vériez que le boîtier de commande
principal fonctionne normalement.
3. Vériez que le logiciel est correctement
installé ou conguré.
4. Contactez le service clientèle si le
problème persiste.
Moteur pas à
pas
Elle assure le fonctionnement
normal du module laser.
1. Vériez que les câbles répondent
aux spécications requises.
2. Conrmez que les câbles sont
correctement connectés.
3. Vériez que le boîtier de commande
fonctionne correctement.
4. Vériez que le logiciel est correcte-
ment installé ou conguré.
5. Contactez le service clientèle si le
problème persiste.
Arrêt
d'urgence
Elle arrête immédiatement le
fonctionnement de la machine.
Appuyez sur le bouton pour arrêter la
machine et tournez le bouton dans le
sens des aiguilles d'une montre pour
remettre la machine en marche.
Détecteur de
amme
Elle détecte la présence d'un incendie à
l'intérieur ou autour de la machine et
active l'alarme tout en arrêtant le
fonctionnement de la machine en cas
d'incendie. Elle est activée/désactivée
par un interrupteur mécanique.
1. Vériez l'environnement et évitez de
placer la machine en plein soleil.
2. Contactez le service clientèle pour
régler la sensibilité du détecteur de
amme.
Pompe à air
Elle assiste la machine durant son
fonctionnement.
Anomalie : Elle est activée/désactivée
par un interrupteur mécanique.
1. Vériez que l'adaptateur d'alimentation est
connecté à une source d'alimentation.
2. Vériez que le connecteur CC de la pompe à
air est correctement branché.
3. Contactez le service clientèle si le problème
persiste.

-88-
FR
Interrupteur du
capteur de amme
Il est utilisé pour contrôler
l'activation et la désactivation d'un
même capteur en fonction de la
situation réelle.
État ON : le capteur de amme est en état
de fonctionnement, la machine s'arrête
automatiquement après avoir vérié la
amme.
État OFF : le capteur de amme ne
fonctionne pas, vous devez être attentif au
phénomène d'incendie en temps réel.
Serrure de sécurité Il contrôle l'interrupteur d'alimenta-
tion an d'éviter tout déclenche-
ment intempestif de la mise sous
tension.
Conservez la clé.
Interrupteurs de n
de course
Ils arrêtent le mouvement du
module laser lorsqu'il se déplace
vers le point d'origine de l'axe X ou
de l'axe Y.
1. Vériez si le câble de l'interrupteur de n
de course est débranché.
2. Vérier si la che de l'interrupteur de n
de course est installée en place.
3. Vérier si l'interrupteur de n de course
est en contact avec le composant
correspondant.
4. Contacter le service clientèle si le
problème ne peut être résolu.
Capteur
d'inclinaison
Si l'angle d'inclinaison de la machine
est supérieur à 50±5 degrés, la
machine déclenche une alarme et
s'arrête de fonctionner.
Maintenez la machine à un angle
inférieur à 45 degrés.
Méthodes de
contrôle
1. Contrôle par logiciel informatique
2. Contrôle via le panneau de
commande et la carte TF
3. Contrôle via l'application mobile et
la carte TF
1. Connectez l'appareil à un ordinateur à
l'aide du câble USB et contrôlez-le à l'aide de
LightBurn ou LaserGRBL.
2. Travaillez hors ligne en utilisant le
panneau de commande et la carte TF.
3. Travailler hors ligne en utilisant MKSlaser
et la carte TF.
Couvercle de
protection avant
La machine cesse de fonctionner
lorsque le capot de protection avant
est ouvert.
Fermez le capot de protection avant et
appuyez sur la touche "Start/Pause" pour
permettre à la machine de poursuivre son
travail.
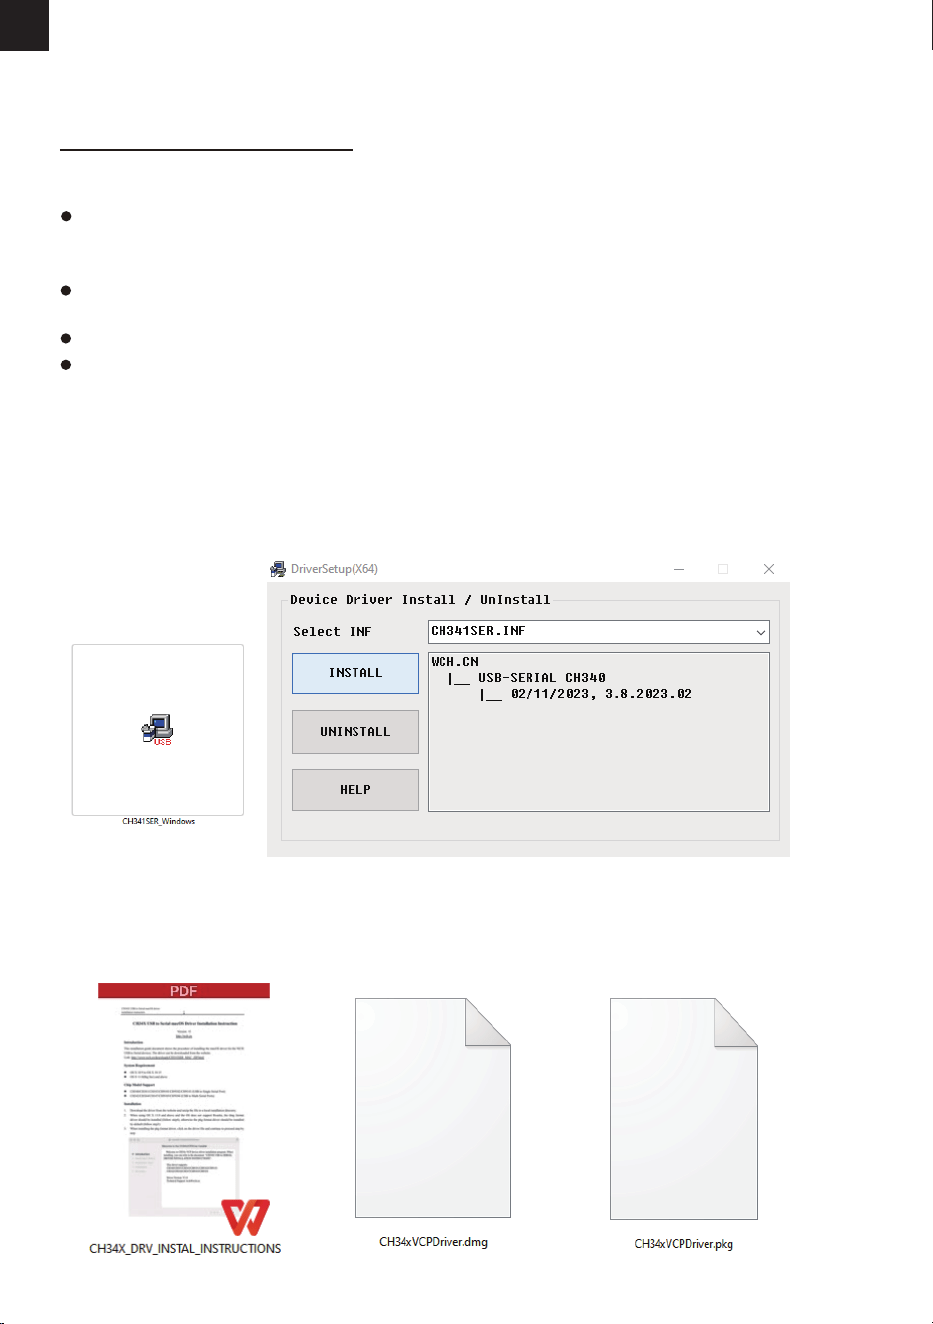
-89-
FR
1. Télécharger le pilote à partir du lien ci-dessous.
https://mecpow.com/pages/driver-les
2. Contacter le service clientèle pour obtenir le chier du pilote.
Remarque :
Pour les utilisateurs de Windows, si vous utilisez un système inférieur à Win10, vous devrez installer le
pilote manuellement. Si vous utilisez un système Win10 ou supérieur, il n'est pas nécessaire d'installer le
pilote.
Le pilote pour les utilisateurs Mac est compatible avec OS X 10.9 à OS X 10.15 et OS X 11.0 (Big Sur) et
supérieur.
Le pilote pour les utilisateurs de Linux est compatible avec les systèmes 32 bits et 64 bits.
Veuillez allumer l'appareil et le connecter à votre ordinateur via le câble USB avant de
lancer le pilote !
8. Pilote
Méthodes de téléchargement
Installation du pilote
Pour les utilisateurs de Windows :
1. Ouvrez le pilote téléchargé.
2. Cliquez sur "INSTALL".
3. Cliquez sur "OK" lorsque le pilote est installé avec succès.
Pour les utilisateurs de Mac :
1. Ouvrez les instructions.
2. Ouvrez le pilote téléchargé et suivez les instructions pour l'installer.
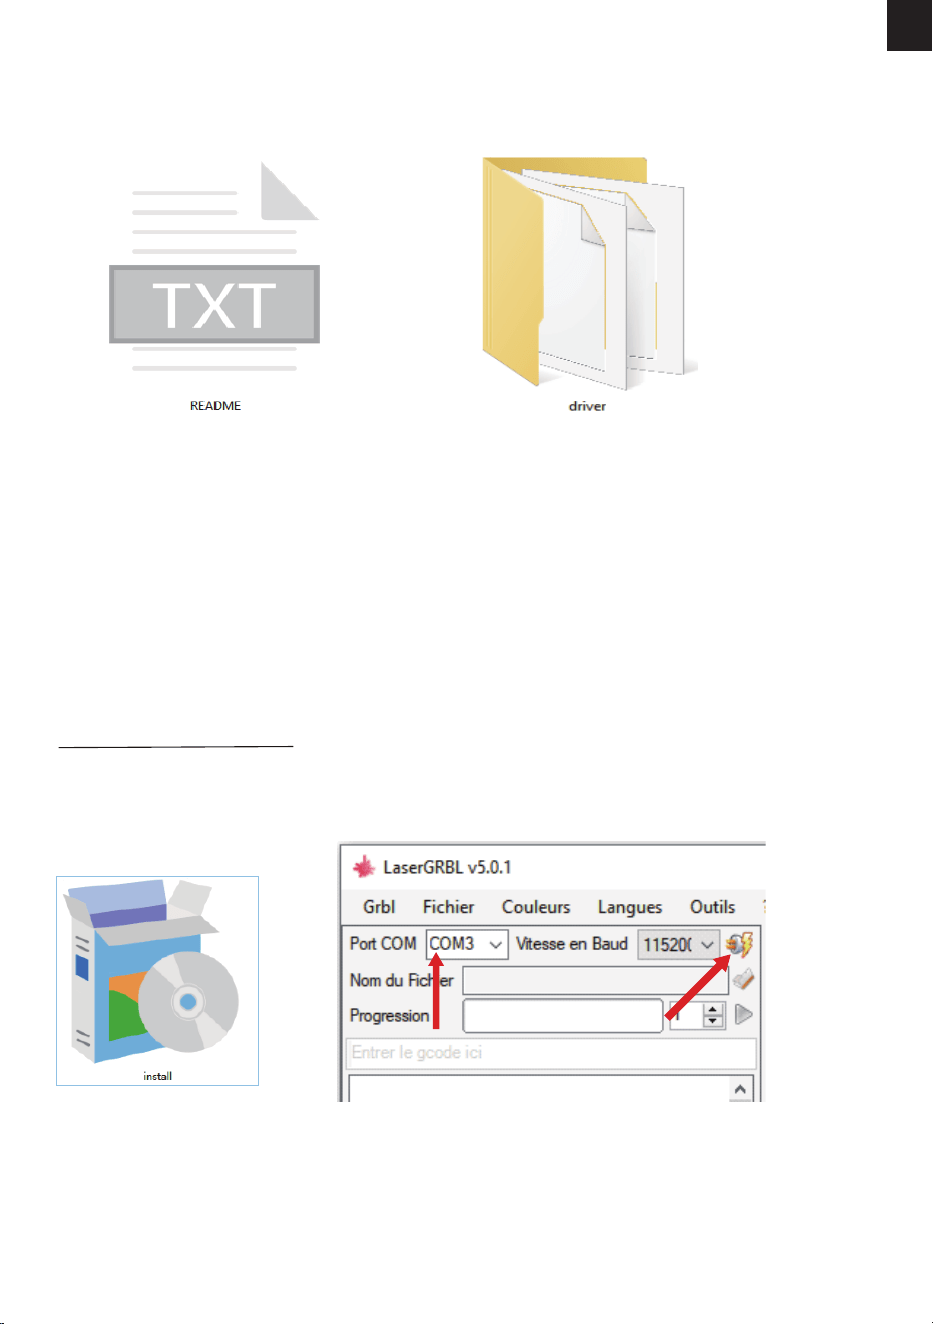
-90-
FR
Pour les utilisateurs de Linux :
1. Ouvrez le chier README.
2. Ouvrez le chier - driver, et suivez le "README" pour l'installer.
9. Contrôle via le logiciel de l'ordinateur
LaserGRBL
C'est un logiciel open source gratuit qui prend en charge les ordinateurs Windows. Téléchargez-le sur :
http://lasergrbl.com/download/
1. Installez-le. 2. Ouvrez le logiciel. Cliquez sur "Connexion" et sélectionnez
"COM3".
Connectez la machine à graver au logiciel en temps réel via le câble USB. En cours de fonctionnement, vous
pouvez démarrer ou arrêter la machine à graver via le panneau de commande.
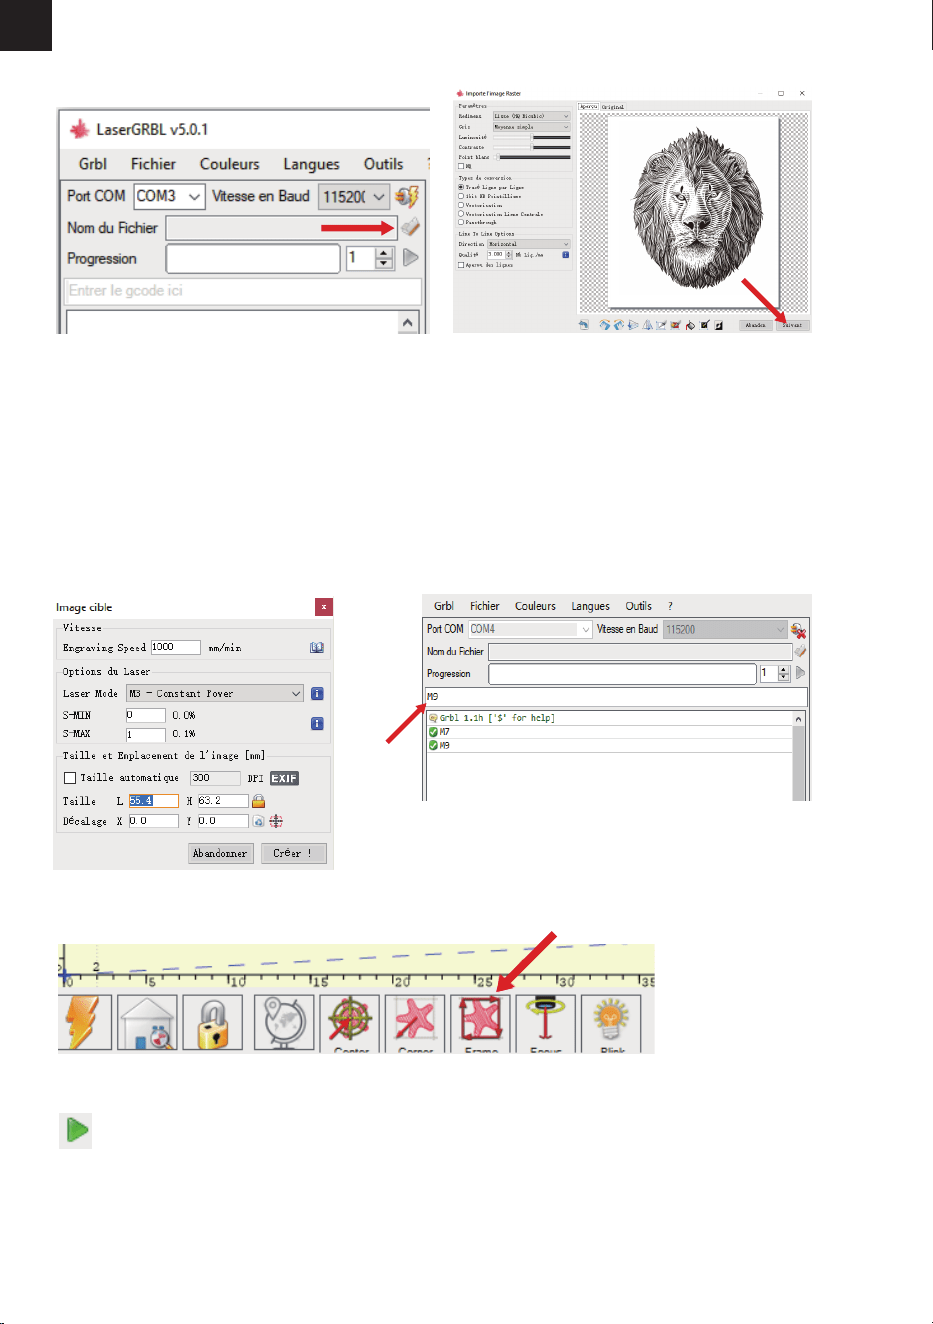
-91-
FR
3. Cliquez sur "Ouvrir le Fichier" pour
sélectionner le chier de gravure.
4. Sélectionnez le mode de gravure et cliquez sur
"Suivant".
5. Sélectionnez les paramètres de fonctionne-
ment pour la gravure ou la découpe au laser. (M3
correspond à la gravure à puissance constante et
M4 à la puissance variable. Veuillez consulter la
section 10 pour connaître les paramètres de
fonctionnement recommandés pour la gravure
ou la découpe de diérents matériaux.)
6. Entrez "M7" dans la boîte de commande
et appuyez sur Enter pour démarrer la
pompe à air. Pour arrêter la pompe à air,
entrez "M9" dans la même boîte et
appuyez sur Entrée.
7. Cliquez sur "Framing" pour prévisualiser la plage de gravure et ajuster la position de gravure.
8. Cliquez sur "Démarrer le Programme" pour commencer la gravure.
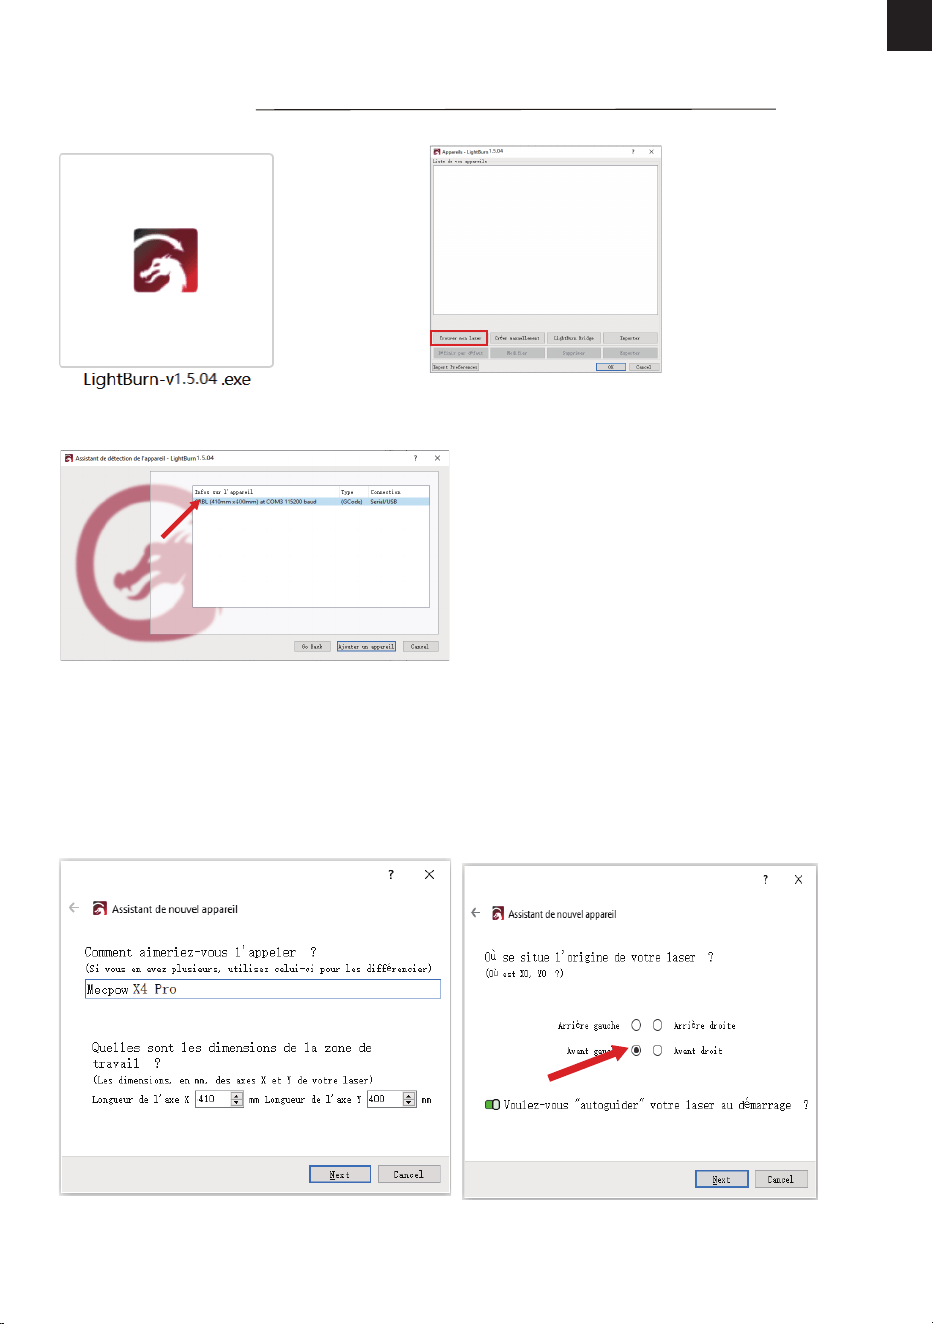
-92-
FR
LightBurn
C'est un logiciel professionnel payant qui prend en charge les ordinateurs MAC, Linux et Windows.
Téléchargez-le à partir de: https://lightburnsoftware.com/pages/trial-version-try-before-you-buy
1. Installez-le. 2. Ouvrez le logiciel et cliquez sur "Trouver mon laser".
3. Sélectionnez votre appareil et cliquez sur "Ajouter un appareil".
4. Nommez votre appareil et entrez les longueurs
des axes X et Y, puis cliquez sur "Next".
Nom : Mecpow X4 Pro
Longueur de l'axe X : 410 mm
Longueur de l'axe Y : 400 mm
5. Sélectionnez "Avant gauche" comme
origine de votre laser et cliquez sur "Next".
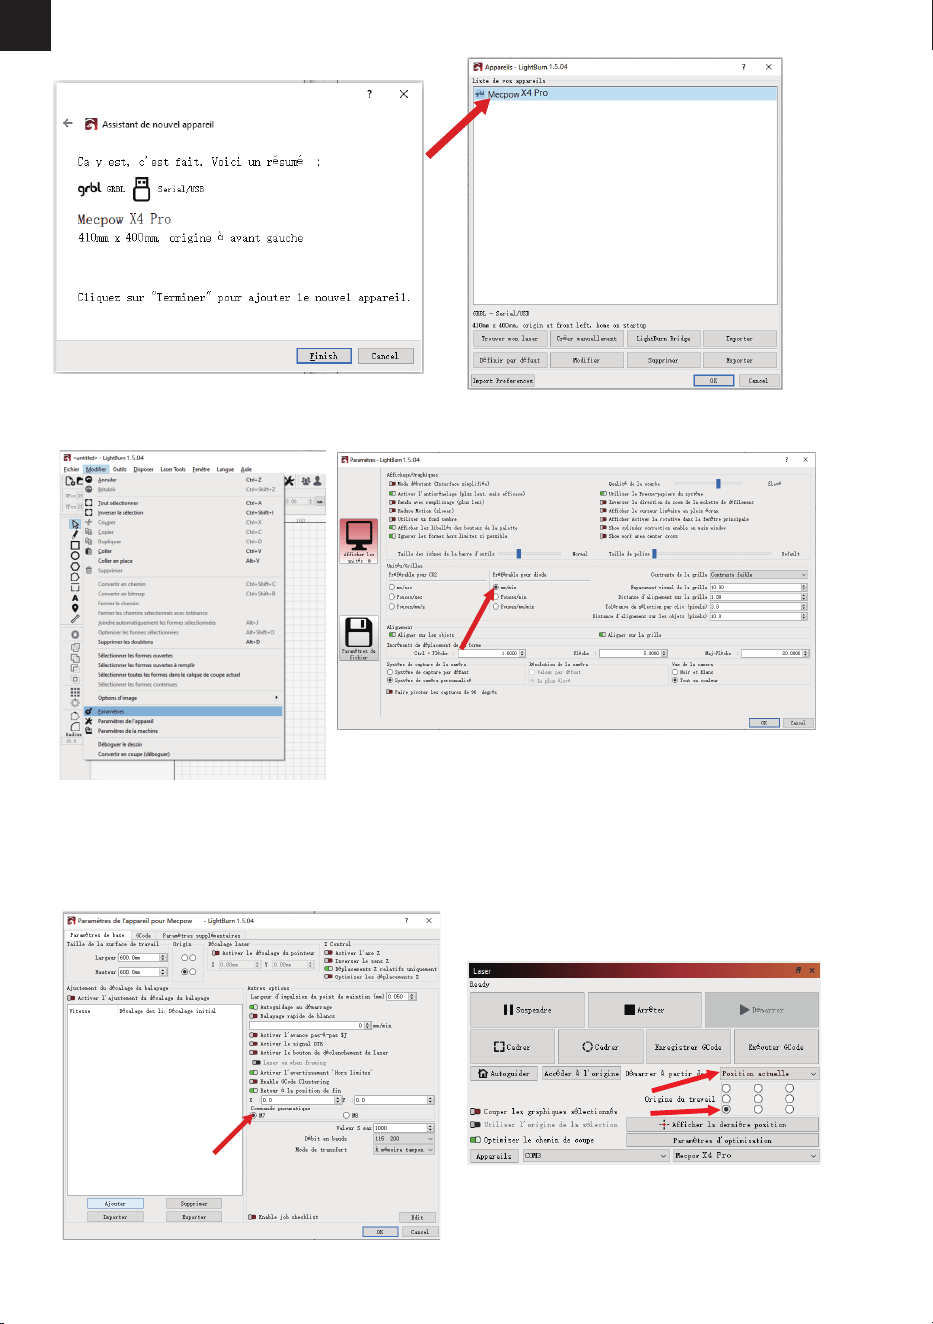
-93-
FR
6. Cliquez sur "Finish". 7. Sélectionnez Mecpow X4 Pro et cliquez sur "OK".
8. Cliquez sur "Modier" - "Paramètres" et réglez l'unité sur "mm/min", puis cliquez sur "OK".
10. Sélectionnez "Position actuelle" dans la
section "Démarrer à partir de", puis sélectionnez
le cercle dans le coin inférieur gauche de la
section"Origine du travail".
9. Cliquez sur "Edit" - "Paramètres de l'apparei" et
sélectionnez "M7" sous "Air Assist" pour
permettre à la pompe à air de fonctionner en
synchronisation avec la machine.
5
X4
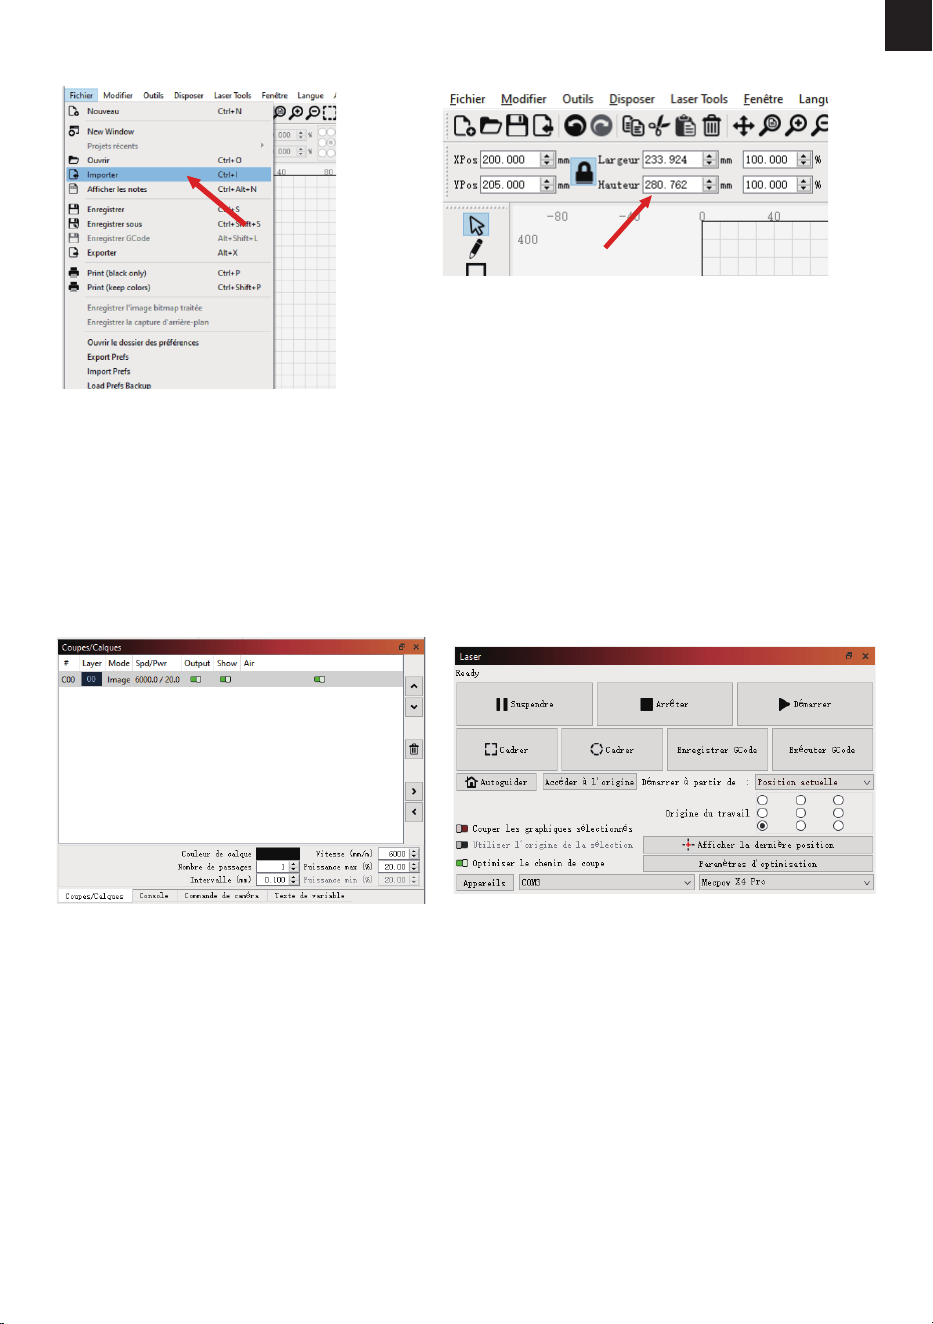
-94-
FR
11. Cliquez sur "Fichier" - "Importer"
pour importer le chier de gravure.
11. Vous pouvez modier la taille de la gravure en
haut de l'interface après avoir importé le chier.
13. Sélectionnez le mode de gravure et dénissez
les paramètres de fonctionnement pour la
gravure ou la découpe au laser. (Les paramètres
de fonctionnement recommandés pour la gravure
ou la découpe de diérents matériaux sont
répertoriés dans la section suivante.)
14. Cliquez sur "Cadrer" pour prévisualiser la plage
de gravure et ajuster la position de gravure, puis
cliquez sur "Démarrer" pour commencer la
gravure.
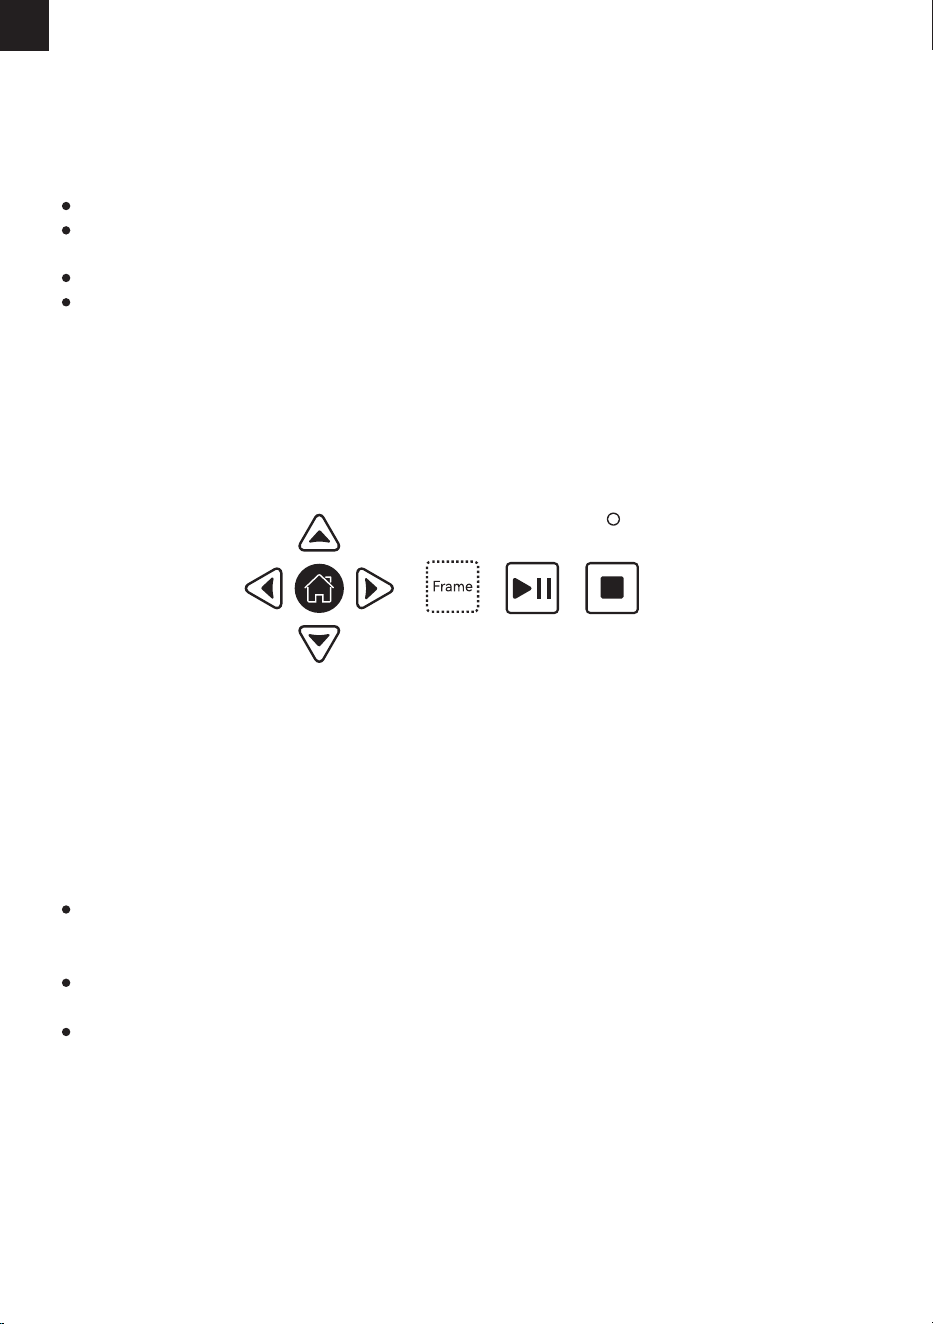
-95-
FR
1. Préparer un chier LightBurn G-code pour la gravure ou la découpe et l'enregistrer dans le répertoire racine
de la carte TF. Insérez la carte TF dans la machine à graver. Le voyant du panneau de commande s'allume,
indiquant que le chier a été chargé avec succès.
2. Appuyez sur la touche "Frame" et la machine entrera en mode de prévisualisation. Le module laser se
déplace le long de l'axe X/Y pour encadrer la zone de travail cible. Vous pouvez ensuite ajuster manuellement
l'objet gravé à la bonne position ou utiliser les touches échées du panneau de commande pour ajuster le
module laser à la bonne position.
3. Appuyez sur la touche "Start/Pause" pour lancer la gravure/la découpe. Si vous devez faire une pause
pendant que le graveur travaille, appuyez sur la touche "Start/Pause", puis appuyez à nouveau sur cette
touche pour continuer la gravure/découpe. Si vous devez interrompre la tâche, appuyez sur la touche "Stop".
Une fois la gravure/découpe terminée, le module laser revient à sa position initiale. Lorsqu'il n'est pas en état
de marche, appuyez sur la touche "Start/Pause" et le graveur répétera la dernière tâche de gravure/découpe,
ce qui convient à la production de masse.
La carte TF ne prend en charge que le format FAT32.
La machine à graver lit par défaut le dernier chier modié dans le répertoire racine de la carte TF
lorsqu'elle contient plus d'un chier.
Le graveur ne peut reconnaître que les chiers NC et GC dont le nom est en anglais.
Le graveur peut reconnaître les chiers NC et GC enregistrés avec LightBurn. Cependant, les chiers NC et
GC enregistrés avec LaserGRBL ne peuvent être reconnus par le graveur qu'après avoir été convertis avec
MKSLaser. MKSLaser peut être obtenu à partir de la carte TF jointe ou de Mecpow.com.
Remarque :
10. Contrôle via le panneau de contrôle et la carte TF
Les touches "Start/Pause" et "Stop" ont un meilleur accès au graveur que le logiciel de l'ordinateur et
l'application mobile, ce qui signie que les tâches de gravure émises par votre ordinateur ou votre téléphone
mobile peuvent être démarrées, mises en pause et terminées directement par le panneau de commande.
Si une tâche de gravure émise par l'ordinateur ou le téléphone portable est interrompue, elle ne peut être
redémarrée que par l'ordinateur ou le téléphone portable.
Les touches "Frame" et les touches échées ne fonctionnent pas pendant le processus de gravure/découpe.
Remarque :
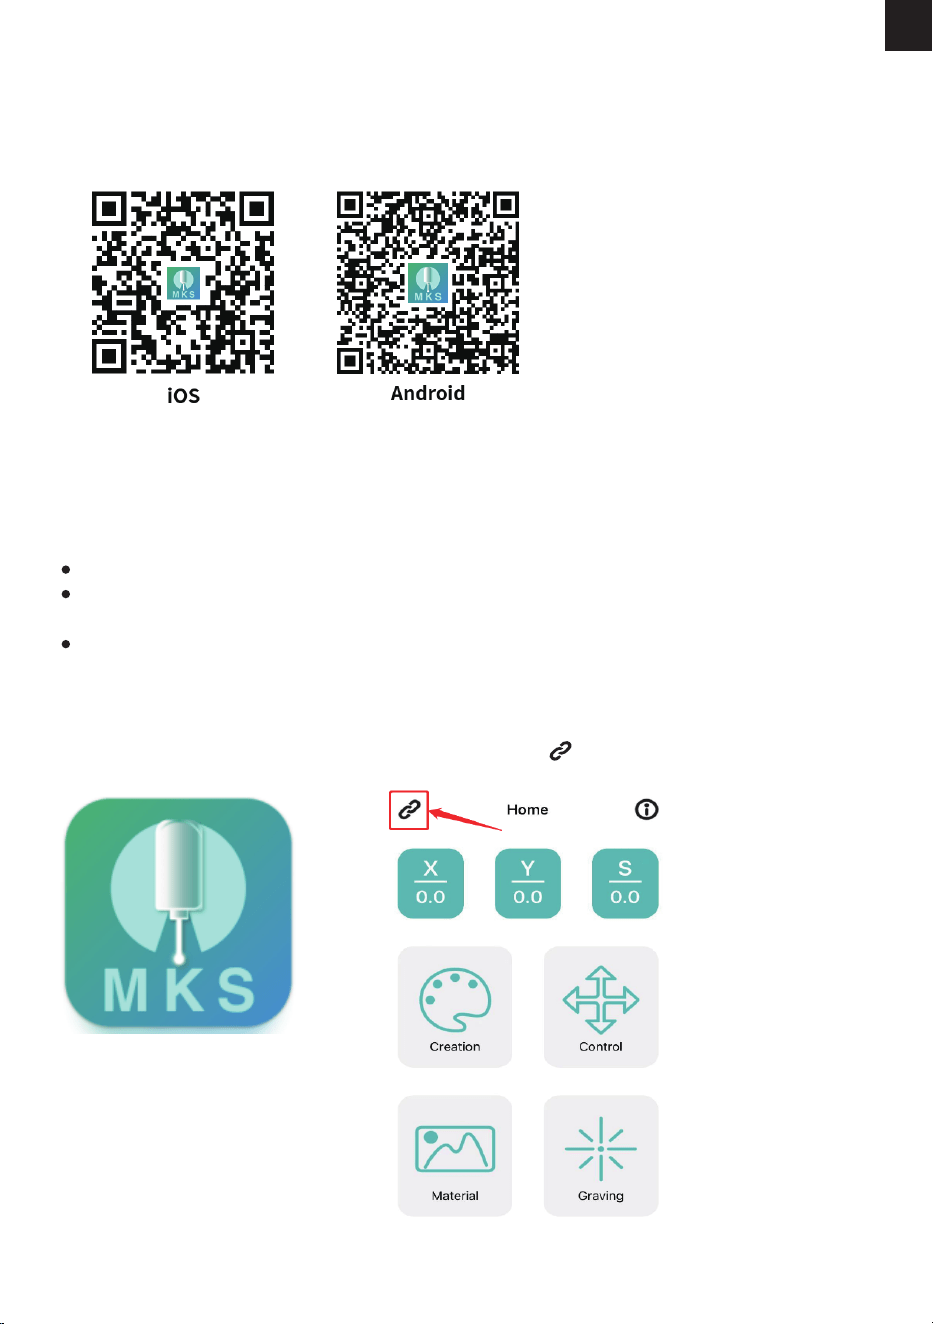
-96-
FR
Le « ***** » dans le nom du Wi-Fi est une combinaison aléatoire de chires. Cela varie selon la machine.
Pour garantir la stabilité du signal Wi-Fi, il est recommandé de connecter votre téléphone au Wi-Fi de la
machine de gravure avant d'insérer la carte TF.
L'application doit être utilisée avec la carte TF. Le téléchargement du chier de gravure échouera si la carte
TF n'a pas été insérée.
MKSLaser est une application mobile gratuite compatible avec les appareils Android et iOS.
1. Activez la fonction Wi-Fi de votre téléphone et connectez le Wi-Fi "Mecpow_*****".
Nom du Wi-Fi : Mecpow_*****
Mot de passe Wi-Fi : 12345678
2. Ouvrez l'application MKSLaser.
3. Cliquez sur l'icône .
Scannez le code QR et téléchargez l'application.
Téléchargement de l'application
Connexion Wi-Fi
11. Contrôle via l'application mobile et la carte TF
Note:
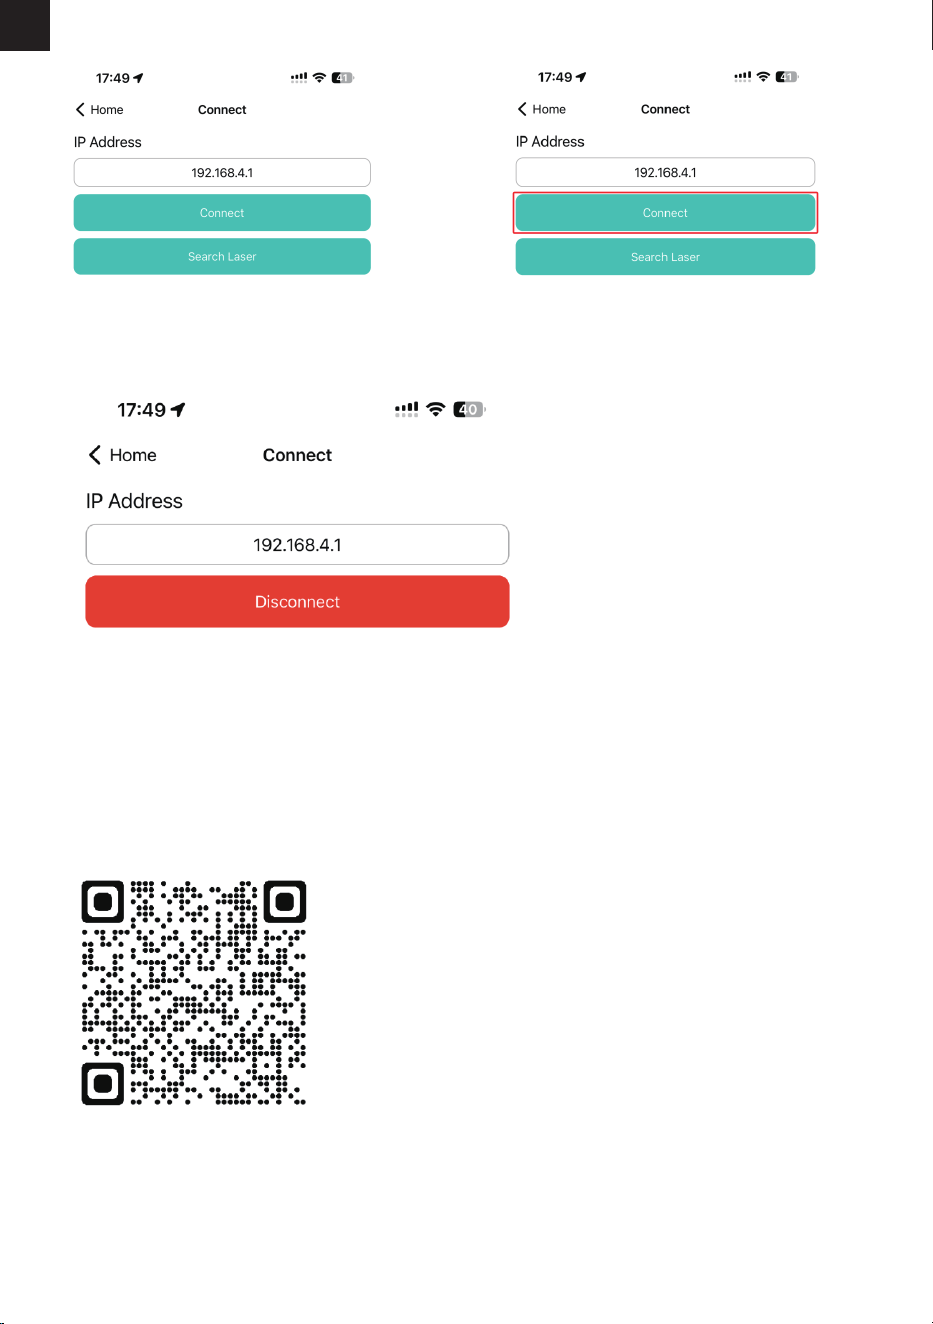
-97-
FR
Pour une utilisation détaillée de l'application MKSLaser, veuillez vous référer aux informations contenues dans
la carte TF ou télécharger le manuel d'utilisation en visitant le lien ci-dessous ou en scannant le code QR
ci-dessous.
https://mecpow.com/pages/download-center
4. Saisissez l'adresse IP : 192.168.4.1 5. Cliquez sur "Connecter".
6. Lorsque « Connecter » devient « Déconnecter », cela signie que la connexion Wi-Fi est réussie.
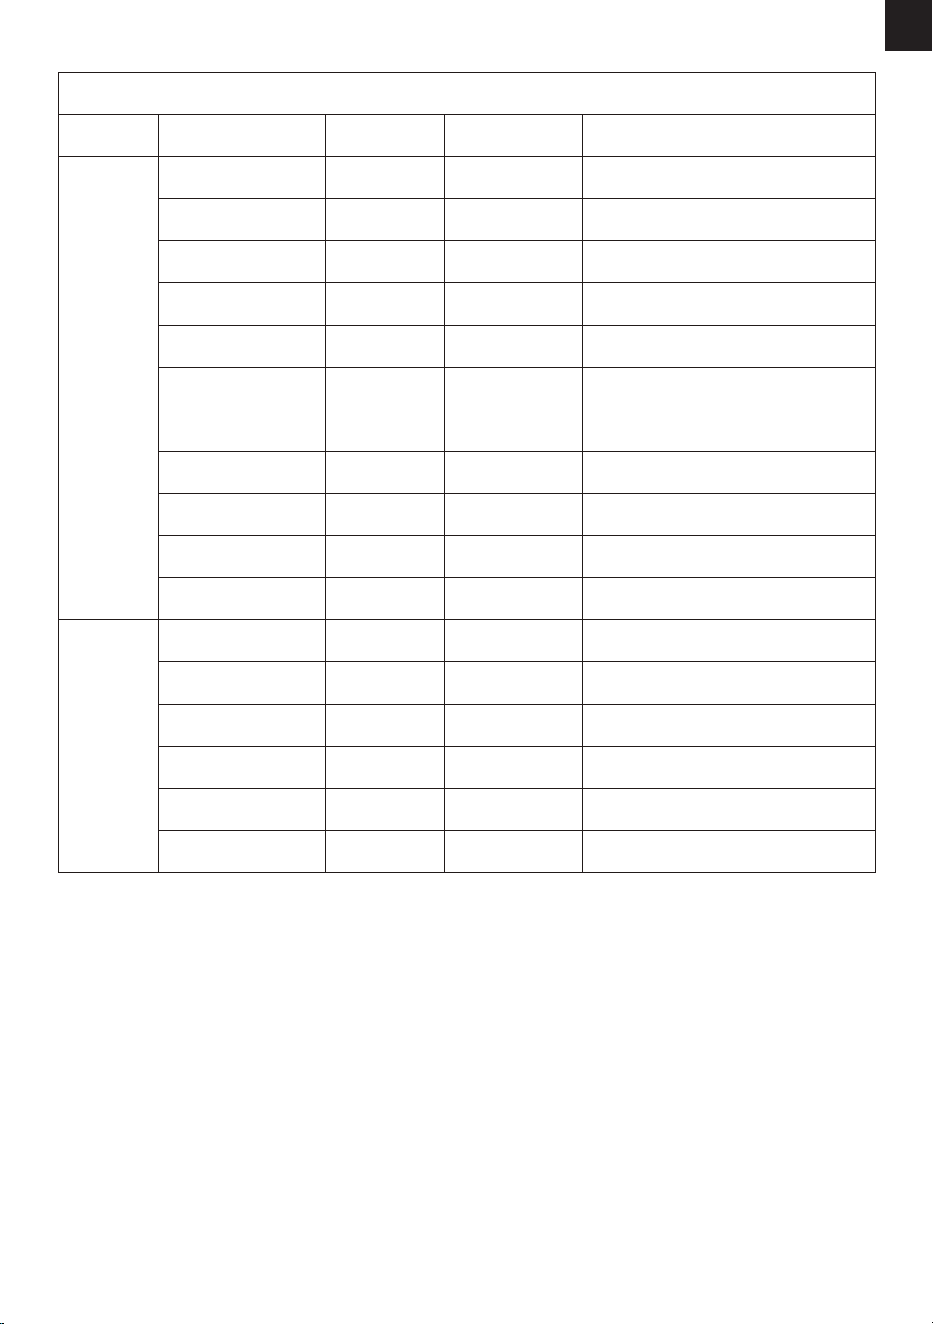
-98-
FR
13. Solución de problemas
1. L'appareil ne répond pas lorsqu'il est mis sous tension.
A. Vériez que la machine est correctement branchée dans la prise et allumée.
2. L'appareil ne parvient pas à se connecter à l'ordinateur.
A. Vérier que le câble USB est correctement connecté à l'ordinateur et à la machine.
B. Installez le pilote comme indiqué et assurez-vous que l'ordinateur reconnaît le périphérique comme un port série.
C. Déconnectez le câble USB et l'alimentation, attendez 5 secondes, puis reconnectez.
3. La gravure est trop légère ou inexistante.
A. S'assurer que la machine est correctement mise au point conformément au manuel.
B. Ajustez la vitesse de gravure. Si la gravure est trop rapide, il se peut qu'elle n'ait pas assez de temps pour brûler l'objet.
C. L'image est trop peu profonde. Les images importées doivent être claires, avec des lignes nes, et pas trop claires, car cela
aectera directement l'eet de la gravure.
D. Veillez à ce que l'objet à graver soit placé à plat et parallèlement à la machine pour éviter les problèmes de mise au point.
20 3000
3000
1000
3000
1000
1000
3000
50
13
20
50
80
50
50
80
3000
600
3000
200
130
75
3000
100
15
100
100
100
80
80 300
100
12. Paramètres de fonctionnement recommandés
Mecpow X4 Pro (22W)
Mode
Gravure
Matériaux
Planche de bois
Bambou
Résine
Cuir
La surface doit être peinte.
La surface doit être peinte.
Ne pas graver sur l'acier inoxydable
poli miroir.
La surface doit être appliquée avec du
papier de transfert thermique.
Verre
Céramique
Acrylique
Puissance
(%) Vitesse (mm/min)
Remarque
Caoutchouc
Acier inoxydable
Carton
Panneau de 8 mm
d'épaisseur
Panneau de 9 mm
d'épaisseur
Carton de 10 mm
d'épaisseur
Coupe
Papier de 0,2 mm
Cuir de 2 mm
5mm Acrylique
-99-
FR
Pour plus de questions et de réponses, veuillez vous référer au lien ci-dessous ou scanner le code QR
ci-dessous.
https://mecpow.com/pages/faq
4.Le processus de gravure hors ligne s'arrête de manière inattendue.
A. Vériez que le bouton d'arrêt d'urgence n'a pas été actionné accidentellement. Si c'est le cas, tournez-le vers la
droite pour le débloquer.
B. Vériez si l'interrupteur a été accidentellement désactivé. Si c'est le cas, réactivez-le.
C. Si tous les éléments ci-dessus semblent normaux, prière de contacter le service clientèle.
5.Le logiciel s'arrête brusquement en cours de gravure.
A. Vériez si le câble USB est mal branché.
B. Vériez que le logiciel est installé correctement et que les chiers de conguration sont conformes.
C. Vériez que le chier de gravure fonctionne correctement.
D. Si tous les éléments ci-dessus semblent normaux, prière de contacter le service clientèle.
6.La machine se déplace correctement, mais le laser reste inactif.
A. Vériez que le câble du module laser est correctement connecté.
B. Vériez si le ventilateur du module laser émet un léger bruit.
C. Si tous les éléments ci-dessus semblent normaux, prière de contacter le service clientèle.
14. Déclaration de conformité
Ce produit est conforme aux normes de la Communauté européenne.
Ce produit est conforme aux règles de l'UE relatives à la limitation des substances dangereuses
dans les équipements électriques et électroniques (RoHS), qui restreignent l'utilisation de
substances dangereuses dans les équipements électriques et électroniques an de protéger
l'environnement et la santé publique.
Cet appareil est conforme à la partie 15 des règles de la FCC Le fonctionnement est soumis aux
deux conditions suivantes : (1) cet appareil ne doit pas causer d'interférences nuisibles, et (2) cet
appareil doit accepter toute interférence reçue, y compris les interférences susceptibles de
provoquer un fonctionnement indésirable.
Le panneau d'avertissement laser est utilisé pour avertir les utilisateurs et les visiteurs qu'il
existe un risque d'exposition à un faisceau laser nu. L'exposition à certains lasers peut
provoquer des lésions oculaires ou optiques et des brûlures cutanées.
Ce symbole indique que le produit peut être recyclé.

-100-
IT
101
101
102
104
104
105
112
114
115
120
121
123
123
124
1. Prefazione.............................................................................
2. Dichiarazione di sicurezza..................................................
3. Diagramma..........................................................................
4. Specifiche.............................................................................
5. Pacchetto Elenco.................................................................
6. Montaggio Guida................................................................
7. Funzioni e operazioni.........................................................
8. Autista.................................................................................
9. Controllo tramite software del computer.......................
10. Controllo tramite pannello di controllo e scheda TF...
11. Controllo tramite app mobile e scheda TF...................
12.Parametri operativi consigliati.......................................
13. Risoluzione dei problemi................................................
14. Dichiarazione di conformità..........................................
CONTENUTI

-101-
IT
1. Prefazione
2. Dichiarazione di sicurezza
Gentile Cliente,
Grazie per aver acquistato la nostra macchina per incisione laser. Questo dispositivo è un prodotto high-tech che
integra luce, macchinari ed elettricità. Per poter utilizzare e mantenere meglio l'apparecchiatura, leggere
attentamente il manuale dell'utente e seguire i passaggi del Manuale.
Disclaimer
Eventuali perdite causate da un uso improprio o dal mancato rispetto dei passaggi nel manuale dell'utente
essere a carico dell'individuo. L'ultima interpretazione di il manuale d'uso appartiene al ns società, e ci
riserviamo il diritto di modicare qualsiasi informazione, dato, dettaglio tecnico , ecc. nel manuale.
Misure di sicurezza
Avvertimento
* L'elaborazione laser può essere rischiosa e gli utenti dovrebbero considerare attentamente se l'oggetto è
essere lavorato è adatto per il lavoro laser.
* L'oggetto in lavorazione e le emissioni devono essere conformi alle leggi e ai regolamenti locali .
* Questa macchina utilizza un laser di Classe IV (radiazione laser ad alta potenza), che può causare il seguenti
situazioni:
(1) Accensione di materiali inammabili circostanti;
(2) Durante la lavorazione laser possono essere presenti altre radiazioni e gas tossici e nocivi Essere prodotto, a
seconda dell'oggetto in lavorazione ;
(3) L'esposizione diretta alla radiazione laser può causare danni al corpo umano. Sul luogo di lavoro devono
essere presenti attrezzature antincendio e non devono essere presenti materiali inammabili ed esplosivi essere
impilati intorno al banco da lavoro o alla macchina. Occorre inoltre mantenere una buona ventilazione.
* L'ambiente in cui si trova la macchina deve essere asciutto, privo di inquinamento,
vibrazioni, forte elettricità, forte magnetismo e altre interferenze. La temperatura dell'ambiente di lavoro
dovrebbe essere compresa tra 5 e 30°C e l' umidità dell'ambiente di lavoro dovrebbe esserlo 35-65% di umidità
relativa.
* La tensione di lavoro di la macchina è AC100- 240V.
* Durante il funzionamento di la macchina, deve essere monitorata per tutto il tempo. Prima di partire, tutta
l'alimentazione deve essere interrotta per prevenire problemi imprevisti. Se una situazione anomala si verica,
si prega di interrompere immediatamente il potere e arontalo!
* È severamente vietato posizionare oggetti riettenti o diusi nella macchina che non sono rilevanti per il suo
funzionamento per impedire la riessione del laser sul corpo umano o materiali inammabili materiali.
* La macchina deve essere tenuta lontana da apparecchiature elettriche sensibili all'elettromagnete t-
interferenze elettriche, che possono causare interferenze elettromagnetiche.
* È severamente vietato ai non professionisti smontare l'incisore laser come lì possono esserci pericoli come
l'alta tensione all'interno della macchina.
1. La macchina per incisione laser può produrre luce laser. È rigorosamente vietato posizionare Qualunque
organismi viventi sotto l'emissione laser (la porta è contrassegnata da un segnale di avvertimento giallo).
2. Ai pazienti fotosensibili è vietato utilizzare o avvicinarsi all'incisore laser.
3. Quando si utilizza la macchina per incisione laser , l'operatore e chiunque si trovi nelle vicinanze della
macchina deve indossare occhiali di protezione laser. Non utilizzare la macchina laser senza occhiali laser. La
nostra macchina viene fornita con un paio di occhiali di protezione laser. Se si desidera acquistare ulteriori
occhiali protettivi, gli occhiali devono orire una protezione della lunghezza d'onda compresa tra 400 e 445 nm
(+-5 nm), hanno un diametro esterno di +5 e soddisfano un livello minimo L5.
4. Quando la macchina per incisione laser è in funzione, l'utente deve prestare molta attenzione e non lasciarla
incustodita per evitare l'accensione di il materiale inciso. Posizionare la macchina in una zona ignifuga e
garantire una buona ventilazione. Si consiglia di accendere un fuoco estintore nelle vicinanze in caso di
emergenza.
5. Assicurarsi che non vi siano materiali inammabili vicino alla macchina per incisione laser. Noi consiglia di
posizionare un piano di lavoro a nido d'ape sotto la macchina.
6. Quando si utilizza l'incisore laser, assicurarsi che vi sia spazio suciente attorno ad esso. L'incisione di alcuni
materiali può produrre fumo, che deve essere scaricato utilizzando a sistema di scarico specializzato.
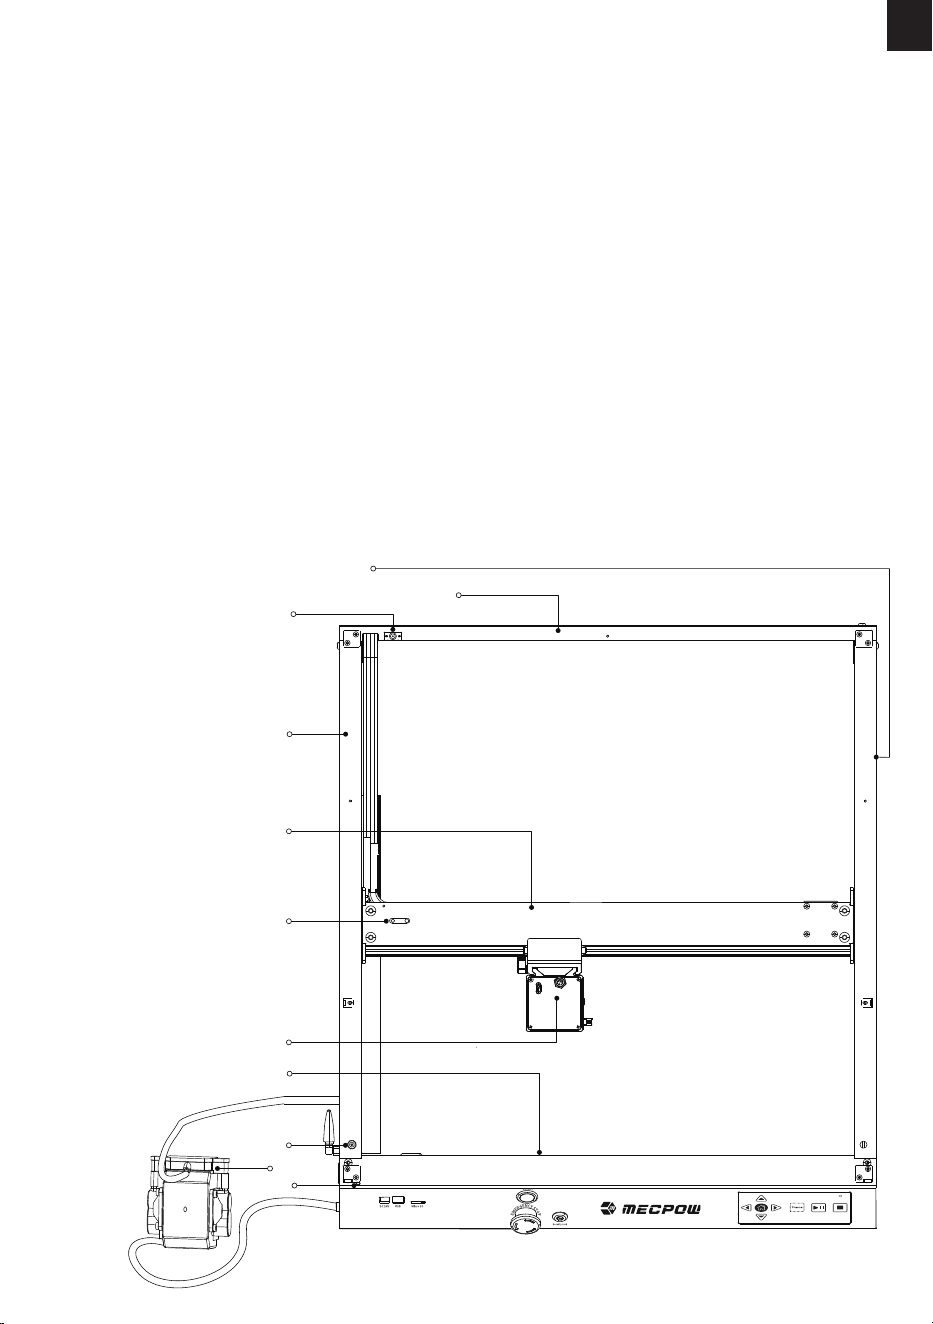
-102-
IT
Manutenzione
Raccomandazioni:
Spegnere la macchina per 10 minuti dopo 4 ore di incisione e 10 minuti dopo 1 ora di taglio.
Il modulo laser è consumabile.
7. Non toccare il raggio laser o l'oggetto in lavorazione mentre la macchina è all'interno
funzionamento, in quanto ciò potrebbe causare lesioni gravi o la riessione del raggio . Inoltre, evita toccare il
radiatore poiché potrebbe essere caldo a causa del funzionamento della macchina per incisione laser o Appena
fermandosi di recente.
8. I bambini o gli adolescenti (soprattutto quelli sotto i 14 anni) non sono autorizzati a utilizzare il macchina per
incisione laser da sola e deve essere sempre supervisionata da un adulto.
9. La temperatura di esercizio della macchina è di 41°F-86°F (5°C-30°C).
10. Spegnere la macchina quando non è in uso per evitare l'uso improprio da parte di terzi.
11. Durante l'incisione laser, esiste il rischio di fuoco. Quando la macchina per incisione laser è in uso, deve
essere supervisionata da un operatore esperto che può utilizzare un estintore per maneggiare eventuali
incidenti che potrebbero vericarsi.
12. La nostra macchina per incisione laser è dotata di un sensore di amma integrato per massimizzare la
sicurezza delle nostre apparecchiature. Ma si prega di notare che non viene fornita alcuna garanzia scritta o
implicita per quanto riguarda la disponibilità o la funzionalità di il sensore di amma.
3. Diagramma
1. Asse Y destro
2. Asse X posteriore
3. Porta CC della ventola di
scarico
4. Asse Y sinistro
5. Gruppo asse X
6. Regolatore di tensione
della cinghia dell'asse X
7. Modulo laser
8. Asse X anteriore
9. Luce LED Porta CC
10. Pompa dell'aria
11. Interruttore di sala
2
4
5
8
10
1
9
6
11
3
7
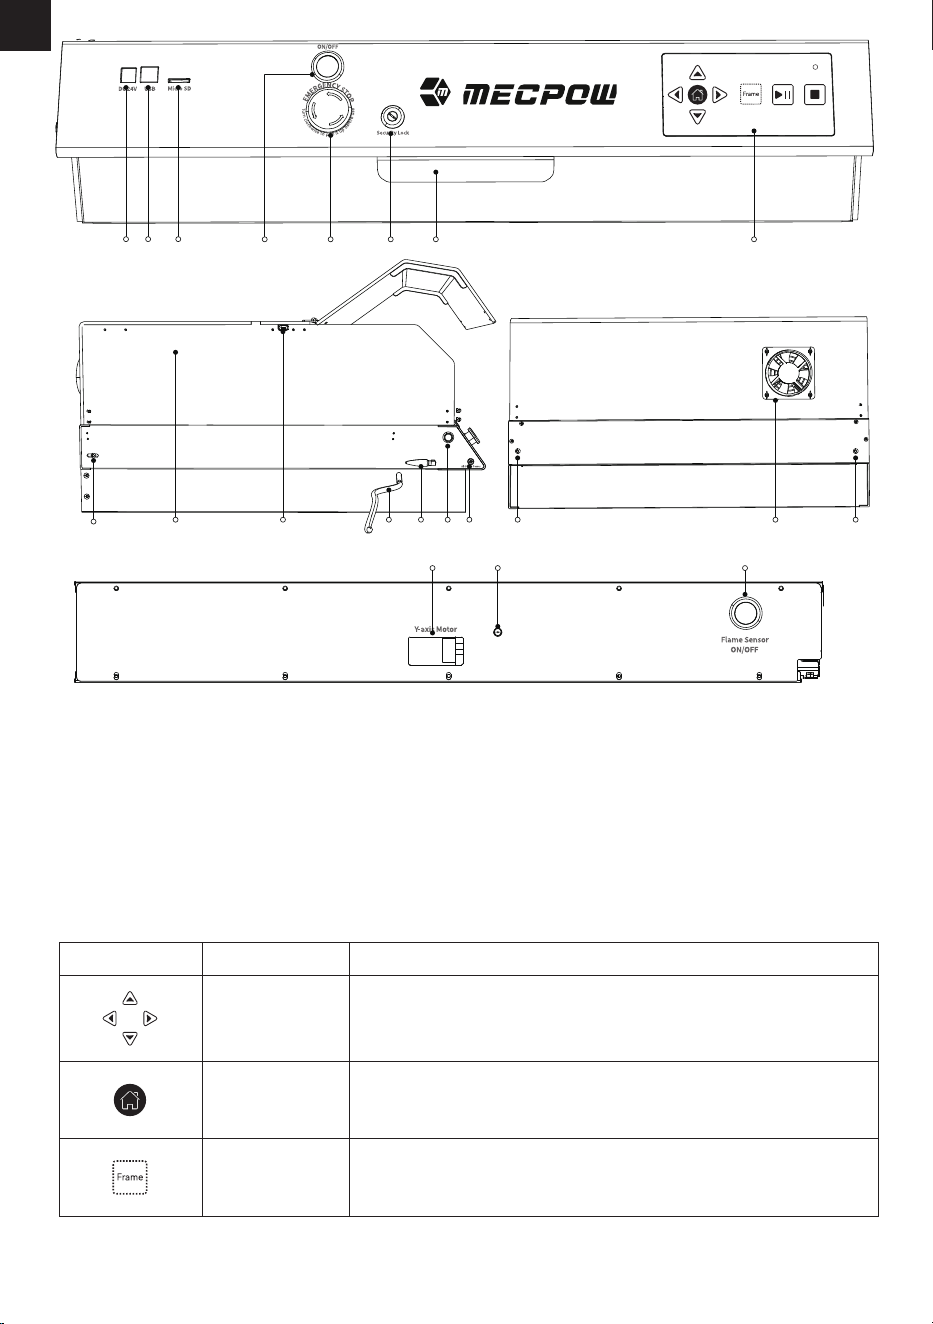
1. Porta di ingresso CC
2. Porta USB
3. Porta micro SD
4. Interruttore di alimentazione
5. Pulsante di arresto di emergenza
6. Blocco di sicurezza
7. Cassetto inferiore
8. Pannello di controllo
9. Vite di ssaggio della cinghia
dell'asse Y
10. Coperchio di protezione
11. Interfaccia telecamera esterna
12. Tubo essibile per la pompa
dell'aria
13. Antenna WiFi
14. Interruttore luce LED
1
2 3
1110 1716 1614 15 1312
4 5 6
7 8
15. Porta di alimentazione della pompa
dell'aria
16. Viti per la regolazione della cinghia
dell'asse Y
17. Tubo di scarico
18. Motore dell'asse Y
19. Sensore di amma
20. Interruttore del sensore di amma
9
18 2019
-103-
IT
Icone dei tasti Nome del tasto
Tasti freccia
Casa
Tasto pattuglia
Funzione del tasto
Introduzione al pannello di controllo
Premendo brevemente uno dei tasti, il modulo laser si sposta di 1 mm
nella direzione corrispondente. Premendo a lungo il tasto per almeno
3 secondi, il modulo laser continuerà a muoversi no a quando non
verrà rilasciato il tasto o il modulo laser non colpirà il necorsa.
Premere questo tasto per riportare il modulo laser alla posizione
originale.
Premendo questo tasto, il modulo laser perlustra l'area di lavoro del
primo le di codice G contenuto nella scheda TF.
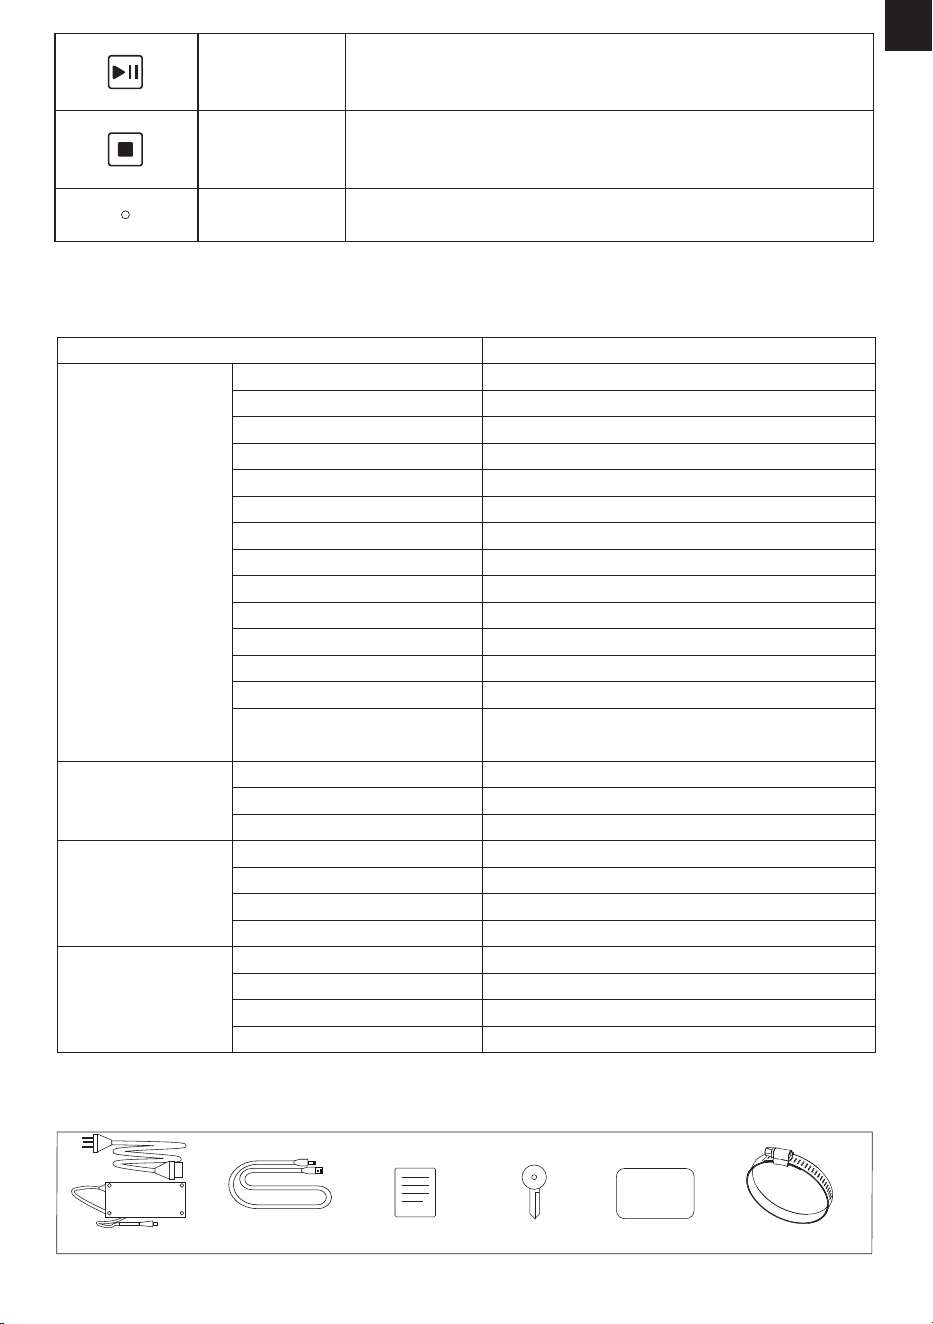
X4 Pro
790x655x235mm
21kg
685x620x310mm
Adattatore di alimentazione *1
Cavo USB *2 Tavola di legno *2
Chiave *2 Manuale d'uso *1
-104-
IT
Tasto Avvio/Pausa
Tasto Stop
Indicatore
della scheda TF
Premere questo tasto per avviare/ mettere in pausa l'incisione.
Premere questo tasto per terminare l'incisione.
Si accende quando la scheda TF viene rilevata e letta.
4. Specifiche
Modello
Speciche di base
Modulo laser
Pompa d'aria
Caricabatterie
DC 24V
410x400mm
22000mm/min
50°±5
Windows, Mac, Linux
JPEG, BMP, GIF, PLT, PNG, DXF
Alluminio
Legno, Acrilico, Porcellana, Tessuto, Bambù,
Pannello in plastica, Pelle, Frutta, Pane, ecc.
Taglia del prodotto
Dimensioni della confezione
Peso
Tensione di ingresso
Potenza nominale
Area di Incisione max.
Velocità di incisione max.
Dimensione del fascio laser
Allarme inclinazione
Supporto software
Sistemi supportati
File supportati
Materiale del telaio
Puissance nominale
Input
Potenza del laser
Tensione di ingresso
Corrente in ingresso
Potenza di ingresso
Velocità aerea
Tensione di ingresso
Corrente in ingresso
Tensione di uscita
Corrente in uscita
Materiali per
l'incisione laser
144W
77W
22W
24V 6A
24V
1.5A
36W
30L/min
AC 100-240V
2.5A
24V
6A
0.08x0.1mm
MKSLaser APP, LaserGRBL, LightBurn
5. Liste des éléments de la boite
Cerchio gola *1
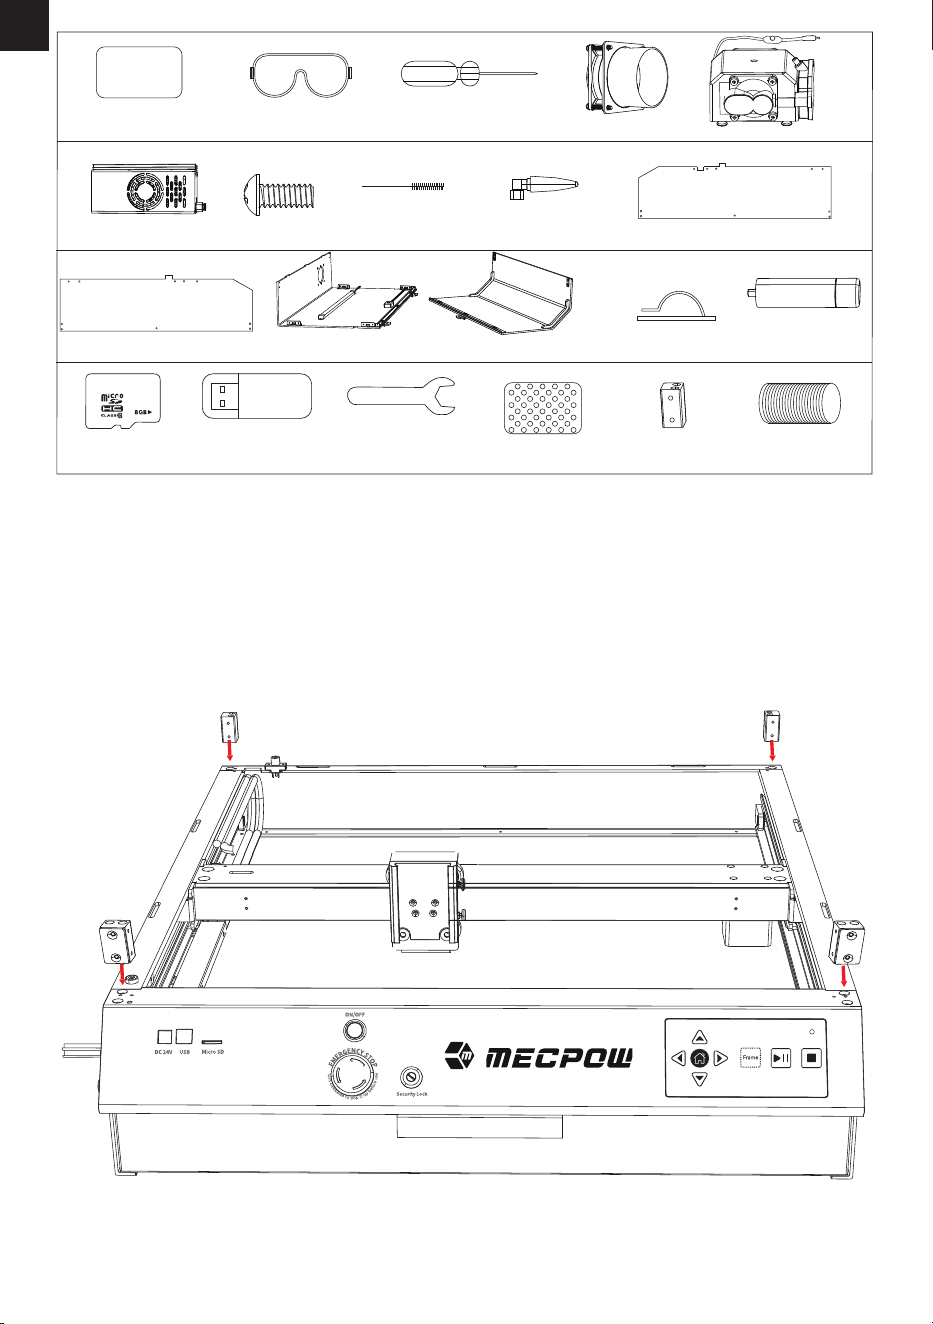
Fase 1: Installazione dei 4 supporti del coperchio di protezione
Installare i 4 supporti nei fori corrispondenti, come illustrato di seguito. I due supporti con linguetta
magnetica devono essere montati sulla parte anteriore dell'incisore e assicurarsi che le linguette magne-
tiche siano rivolte in avanti.
Piastra metallica *1
Cacciavite *1
Pacchetto viti *1
Occhiali di protezione *1
Spazzola di pulizia *1
Coperchio protettivo
anteriore *1
Ventola di scarico *1
Clip adesiva per cavo *5
Coperchio protettivo destro *1
Coperchio protettivo
posteriore *1
Modulo laser *1
Pompa dell'aria *1
Coperchio protettivo sinistro *1
Tubo di scarico *1
Supporto del coperchio
protettivo *4
Scheda TF *1 Chiave inglese *1 Scheda di calibrazione *1Lettore di schede TF *1
-105-
IT
6. Montaggio Guida
Antenna WiFi *1
L
R
Sollevatore *4
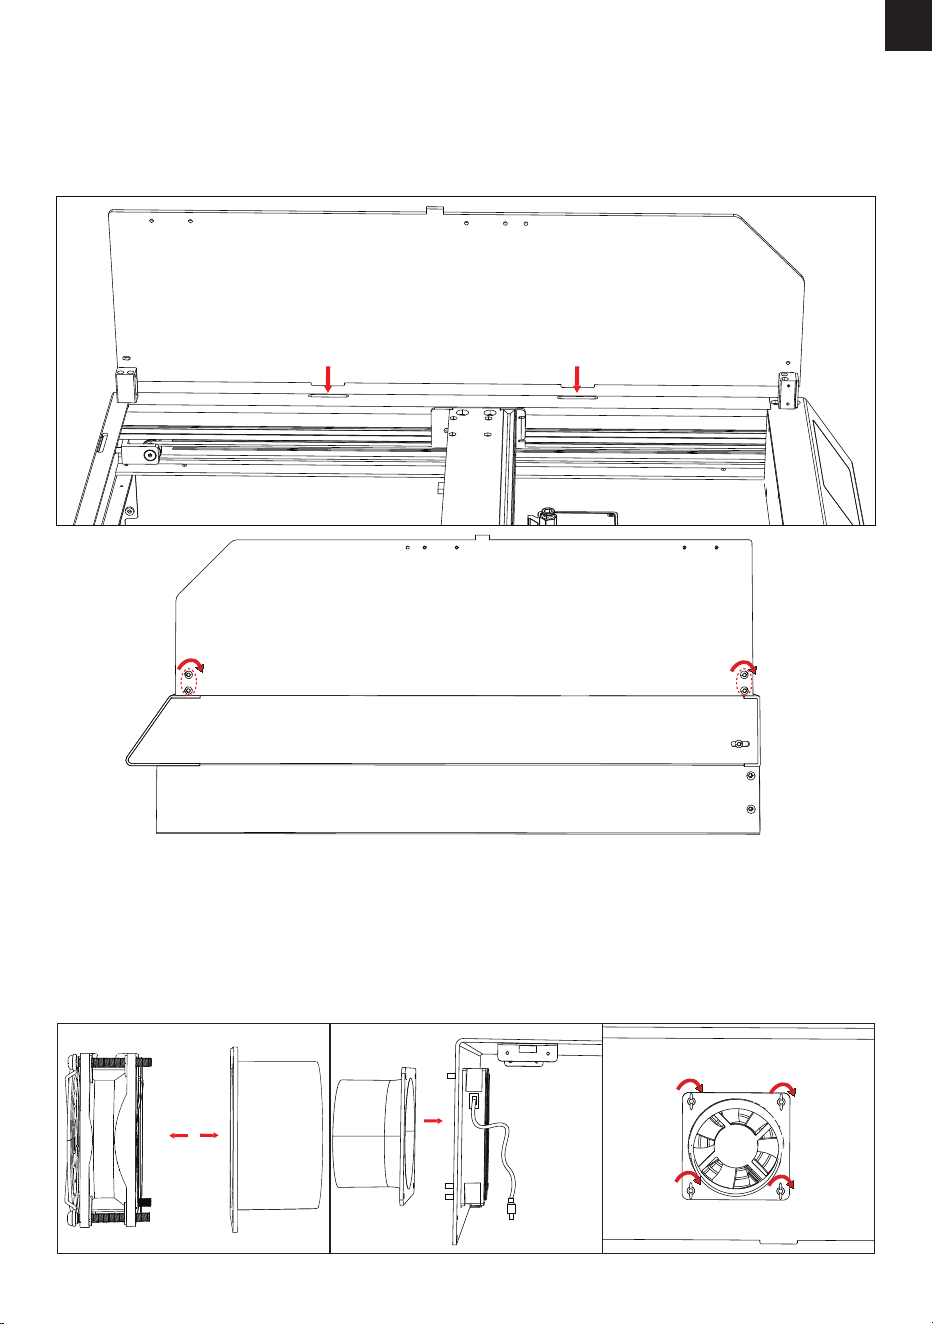
Fase 3: Installazione del ventilatore di scarico
(1) Separare la guida dell'aria dalla ventola di scarico.
(2) Installare la ventola di scarico dall'interno del coperchio protettivo posteriore e far scorrere le quattro viti
della ventola di scarico attraverso i fori. Assicurarsi che il cavo della ventola sia a sinistra.
(3) Installare la guida dell'aria dall'esterno del coperchio protettivo posteriore e ssarla con quattro bulloni
ad alette.
Fase 2: Installazione delle coperture protettive destra e sinistra
(1) Inserire le sporgenze inferiori delle coperture protettive nelle fessure dei telai degli assi Y destro e
sinistro.
(2) Serrare le viti per ssare le coperture protettive.
Nota: I disegni seguenti mostrano l'installazione del coperchio di protezione destro. Installare il
coperchio di protezione sinistro nello stesso modo.
-106-
IT
R
R
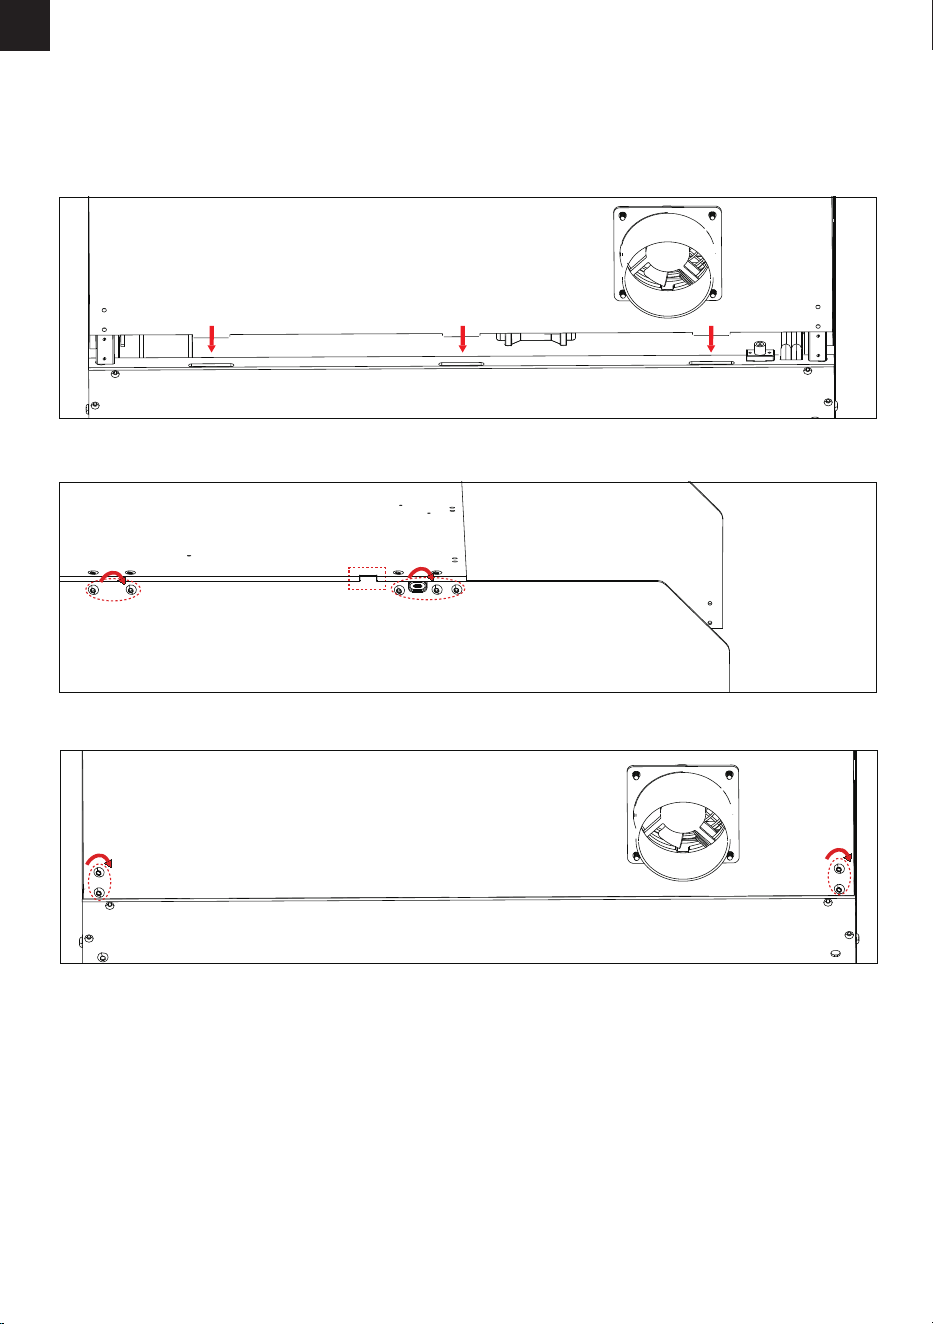
Fase 4: Installazione del coperchio protettivo posteriore
(1) Inserire le sporgenze inferiori del coperchio protettivo posteriore nelle fessure del telaio dell'asse X
posteriore.
(2) Allineare le scanalature laterali del coperchio di protezione posteriore con le sporgenze sulla parte
superiore dei coperchi di protezione destro e sinistro.
(3) Serrare le viti per ssare il coperchio di protezione posteriore.
Fase 5: Collegamento della ventola di scarico e della luce LED
(1) Collegare la ventola di scarico e la luce LED nelle posizioni indicate nel disegno e ssare i cavi con i
fermacavi in dotazione.
-107-
IT
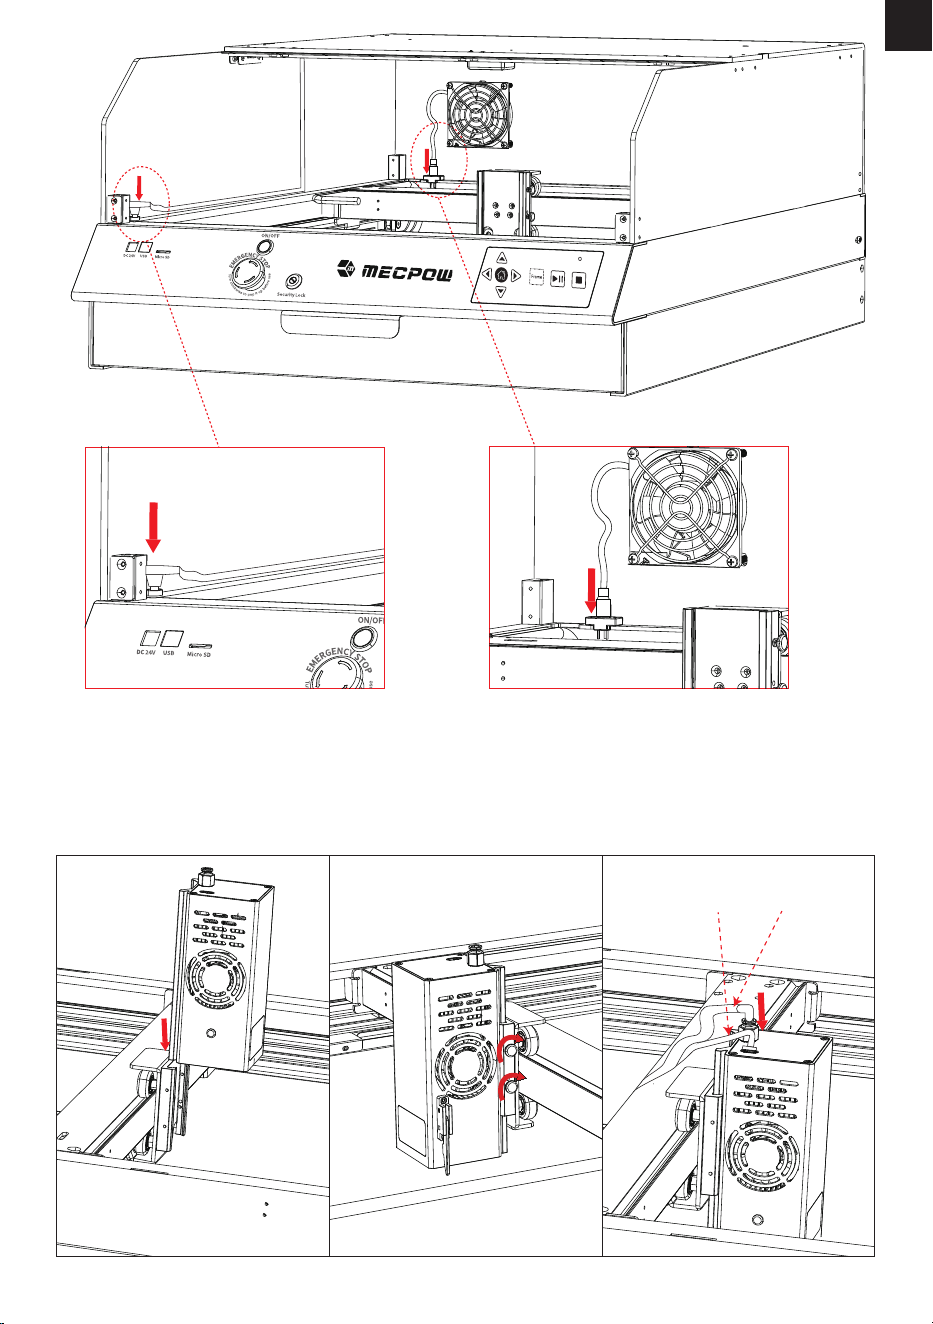
Fase 6: Installazione del modulo laser
(1) Far scorrere il modulo laser sulla piastra scorrevole. Regolare il modulo laser all'altezza corretta e serrare a
mano le viti.
(2) Collegare il cavo di alimentazione e il cavo del tubo di scarico al modulo laser in base ai fori corrispondenti.
Nota: il cavo A è il cavo di alimentazione del modulo laser e il cavo B è il cavo del tubo di scarico.
-108-
IT
A B
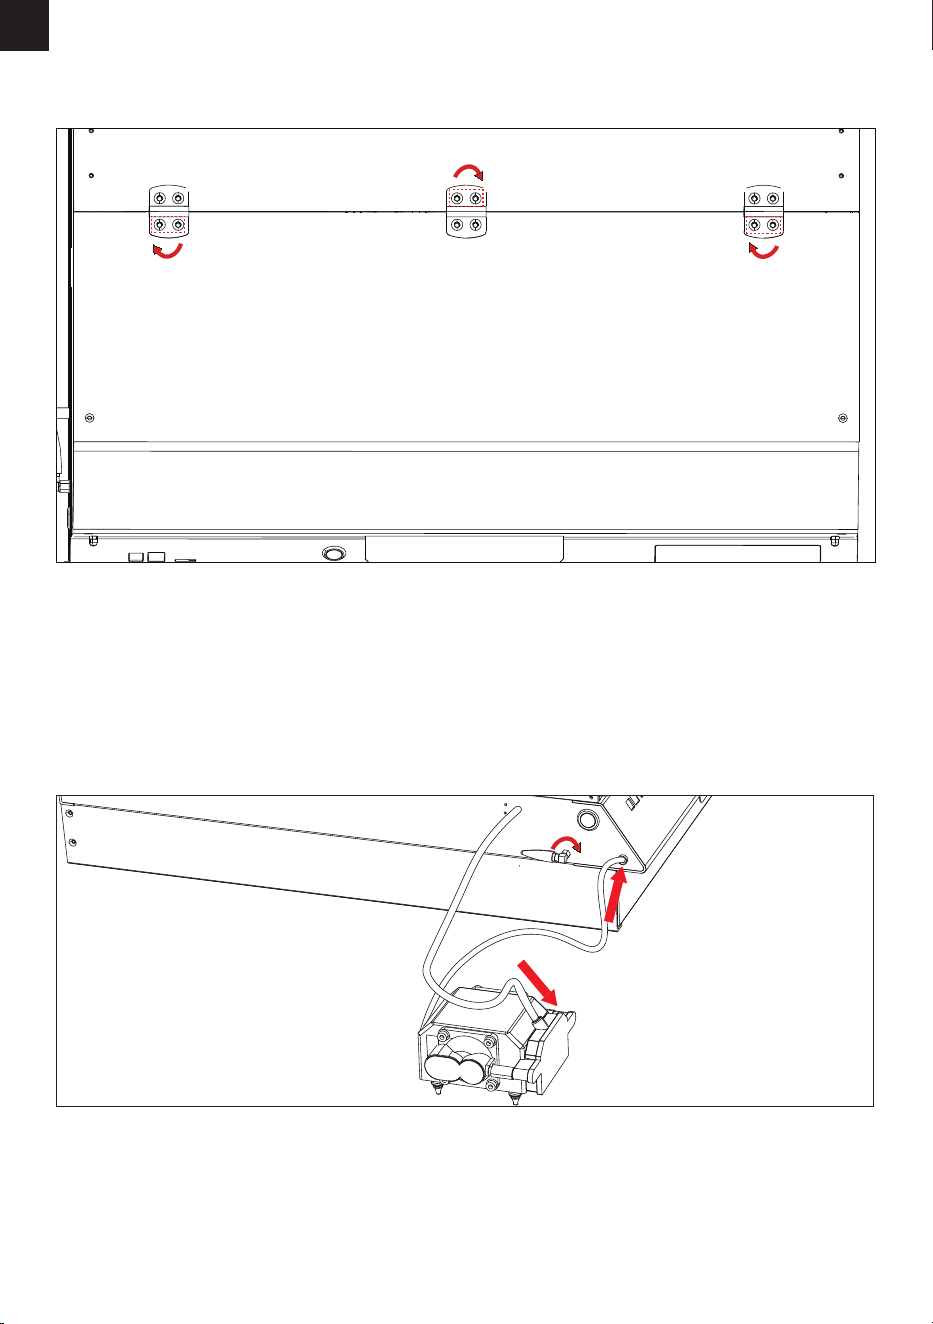
Fase 7: Installazione del coperchio protettivo anteriore
(1) Posizionare il coperchio di protezione anteriore sulla parte superiore e allineare le cerniere con i fori delle viti.
(2) Serrare le viti e i bulloni per ssare il coperchio protettivo anteriore.
(1) Collegare la pompa dell'aria al tubo della macchina e collegare il cavo della pompa dell'aria all'interfaccia
della pompa dell'aria.
(2) Collegare l'antenna WiFi alla macchina e ruotarla in senso orario per stringerla.
Fase 8: Installazione della pompa dell'aria e dell'antenna WiFi
-109-
IT
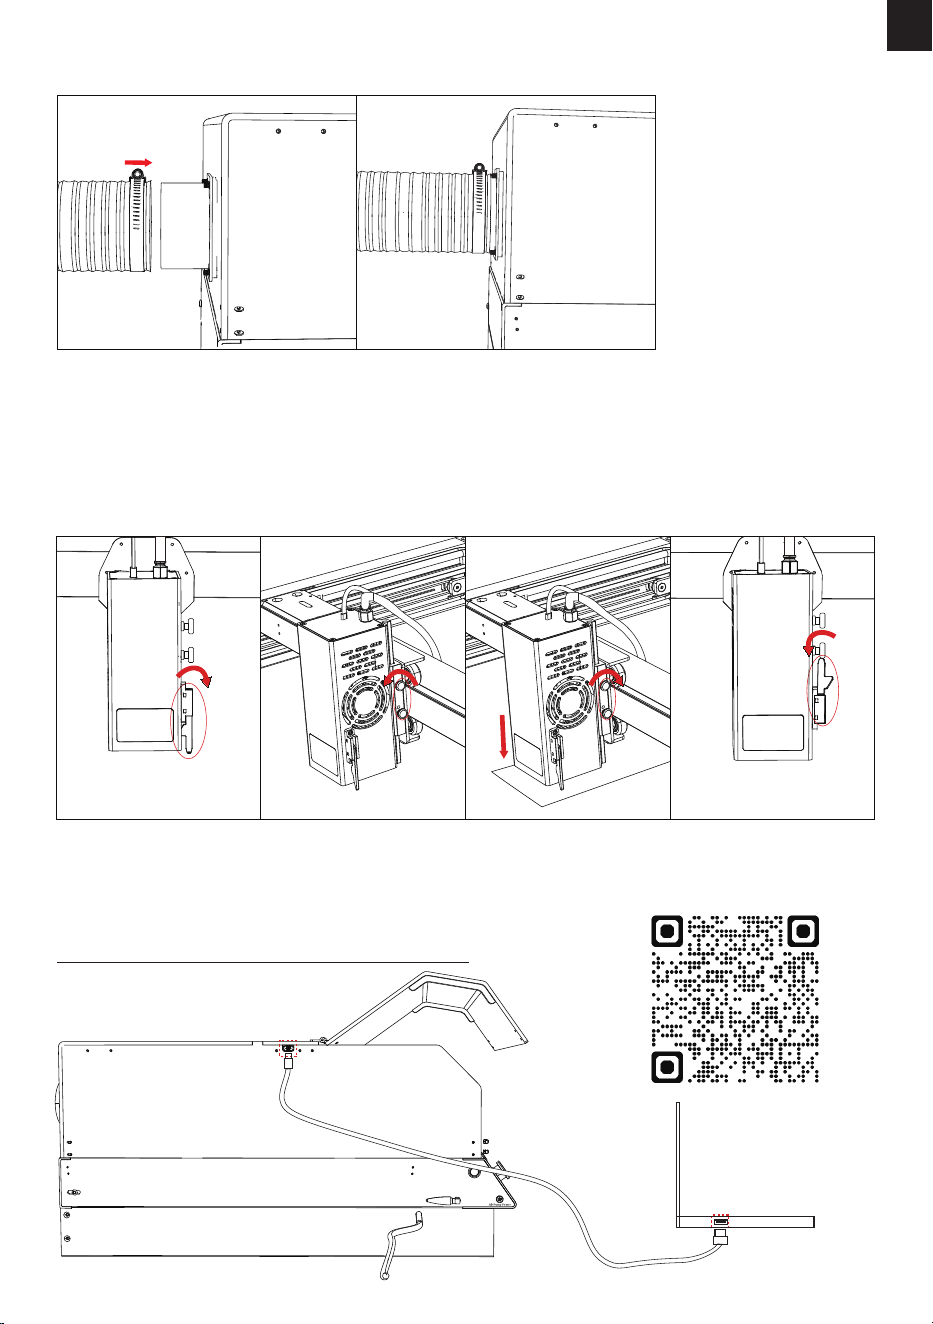
(1) Abbassare la barra di messa a fuoco sul modulo laser.
(2) Tenere il modulo laser con una mano e allentare le 2 viti per spostare il modulo laser.
(3) Far scorrere il modulo laser leggermente verso il basso nché la barra di messa a fuoco non tocca l'oggetto da
incidere.
(4) Serrare le viti per ssare il modulo laser, quindi spingere la barra di messa a fuoco in posizione.
(1) Installare il tubo di scarico e serrarlo con il cerchio della gola.
Fase 10: Messa a fuoco
Fase 9: Installazione del tubo di scarico
Nota: per informazioni dettagliate sull'uso della fotocamera, visitare il link sottostante o scansionare il
codice QR.
https://docs.lightburnsoftware.com/Camera/index.html
Fase 11: Collegamento del cavo USB della fotocamera
-110-
IT
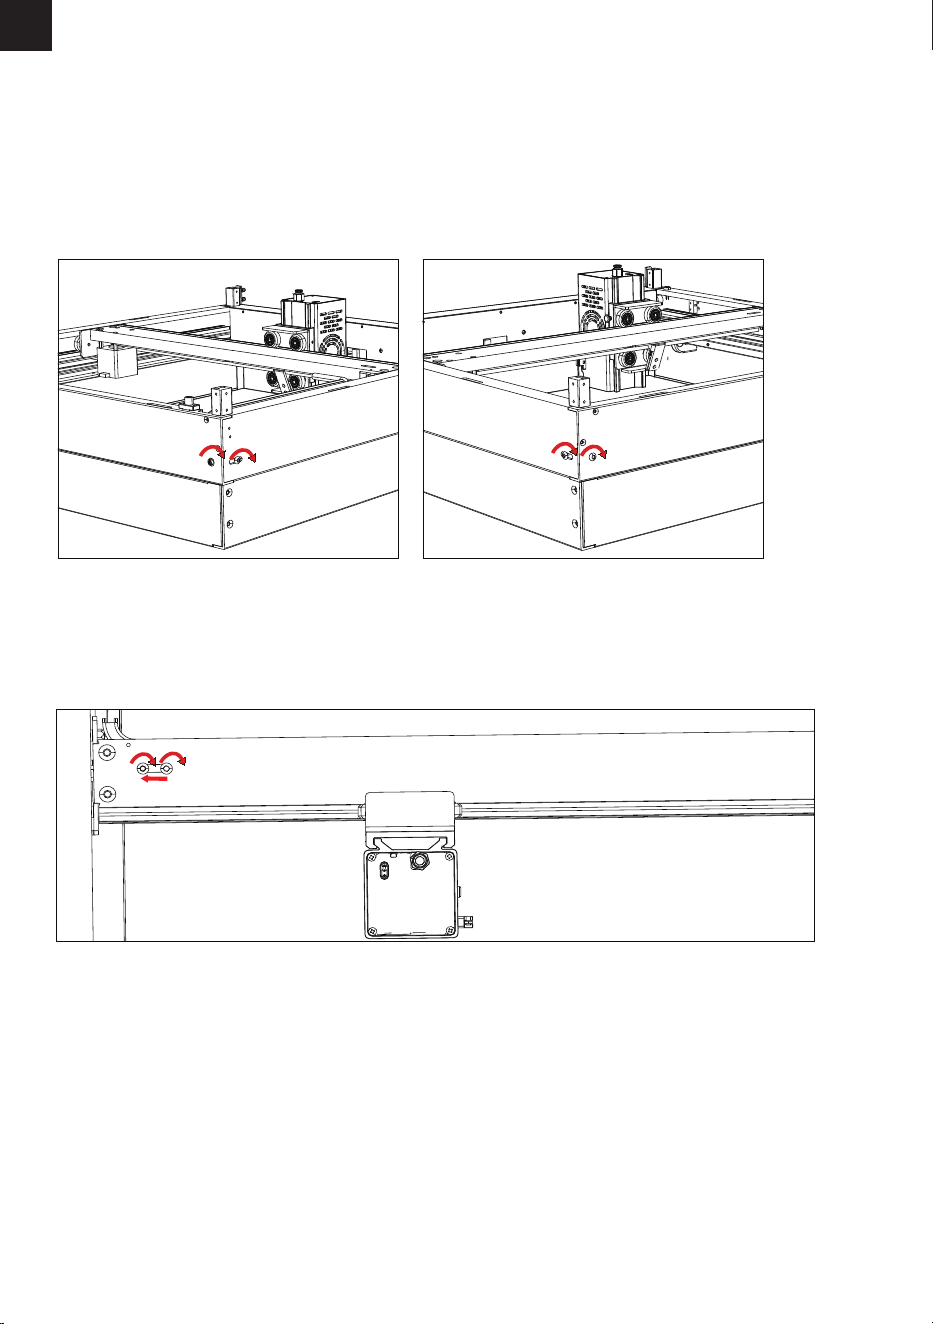
Stringere le cinghie dell'asse Y
Stringere la cinghia dell'asse X
(1) Allentare leggermente la vite 1 mostrata nel disegno a tratteggio.
(2) Girare la vite 2 per tendere le cinghie come mostra il disegno a tratteggio.
(3) Stringere la vite 1 per ssare le cinghie.
Le cinghie vengono regolate in fabbrica. Se le cinture si allentano dopo un periodo di utilizzo, è possibile
regolarle per stringerle correttamente come segue.
Come regolare la tensione della cintura
(1) Allentare leggermente le due viti del regolatore di tensione della cinghia dell'asse X e spostare il regolatore
per tendere la cinghia dell'asse X.
(2) Stringere le viti per ssare il regolatore.
-111-
IT
Vite 1Vite 2
Vite 1 Vite 2

-112-
IT
L'allarme suona quando si verica
un'anomalia.
7. Funzioni e operazioni
Part Funzioni/anomalie
Operazioni
Allarme
1. Scopri la causa dell'allarme.
2. Elimina questo fattore.
3. Premere il pulsante di arresto di
emergenza per 3 secondi per
resettare la macchina. Ruotare il
pulsante nella sua posizione
originale dopo averlo premuto.
4. Seguire le istruzioni operative del
software per riprendere il lavoro.
Modulo laser
Incide oggetti e materiali.
Anomalia: il modulo laser non
funziona o presenta anomalie
operative.
1. Controllare se il cavo di collegamento
del modulo laser è collegato corretta-
mente.
2. Controllare se la scatola di controllo
principale funziona normalmente.
3. Confermare se il software è installato o
congurato correttamente.
4. Contatta il servizio clienti se il problema
non può essere risolto.
Arresto di
emergenza
Arresta immediatamente il funziona-
mento della macchina.
Premere il tasto per arrestare il funziona-
mento della macchina e ruotare il tasto in
senso orario per rimetterla in funzione.
Sensore di
amma
Rileva se c'è un incendio all'interno o
intorno alla macchina e attiva l'allarme
arrestando anche il funzionamento
della macchina in caso di incendio. Si
attiva/disattiva tramite un interruttore
meccanico.
1. Controllare l'ambiente ed evitare di
esporre la macchina alla luce solare
diretta.
2. Contattare il servizio clienti per
regolare la sensibilità del sensore amma.
Pompa d'aria
Assiste la macchina durante il
funzionamento.
Anomalia: cessa di funzionare o
riscontra anomalie operative.
anomalie operative.
1. Controlla se l'alimentatore è collegato a una
fonte di alimentazione.
2. Controllare se il connettore CC della pompa
dell'aria è collegato correttamente.
3. Contatta il servizio clienti se il problema non
può essere risolto.
Motore
passo-passo
Garantisce il normale funzionamen-
to del modulo laser.
1. Controllare se i cavi corrispondono
alle speciche richieste.
2. Vericare che i cavi siano collegati
correttamente.
3. Controllare se la scatola di controllo
funziona correttamente.
4. Controlla se il software è installato o
congurato correttamente.
5. Contatta il servizio clienti se il
problema non può essere risolto.

-113-
IT
Interruttore del
sensore di amma
Viene utilizzato per controllare
l'attivazione e la disattivazione del
sensore ame in base alla situazione
reale.
Stato ON: il sensore di amma è in
funzione, la macchina smette di funzionare
automaticamente dopo aver controllato la
amma.
Stato OFF: il sensore di amma non
funziona, è necessario prestare attenzione
al fenomeno dell'incendio in tempo reale.
Sensore di
inclinazione
Se l'angolo di inclinazione della
macchina è superiore a 50±5 gradi, la
macchina si allarma e smette di
funzionare.
Mantenere la macchina a un angolo
inferiore a 45 gradi.
Blocco di
sicurezza
Interruttori di
necorsa
Controlla l'interruttore di alimentazi-
one per evitare false accensioni.
Arrestano il movimento del modulo
laser quando si sposta verso il punto
di partenza dell'asse X o dell'asse Y.
1. Controllare se il cavo dell'interruttore di
ne corsa è scollegato.
2. Controllare se la spina dell'interruttore di
ne corsa è installata in posizione.
3. Vericare che l'interruttore di ne corsa
sia in contatto con il componente
corrispondente.
4. Se il problema non può essere risolto,
contattare il servizio clienti.
Coperchio
protettivo
anteriore
La macchina smette di funzionare
quando il coperchio di protezione
anteriore è aperto.
Chiudere il coperchio di protezione
anteriore e premere il tasto "Avvio/Pausa"
per consentire alla macchina di continuare
il lavoro.
Conservare la chiave.
Metodi di
controllo
1. Controllo tramite software del
computer
2. Controllo tramite pannello di
controllo e scheda TF
3. Controllo tramite app mobile e
scheda TF
1. Collegare il computer tramite il cavo USB
e controllarlo tramite LightBurn o
LaserGRBL.
2. Lavorare oine utilizzando il pannello di
controllo e la scheda TF.
3. Lavorare oine utilizzando MKSlaser e la
scheda TF.
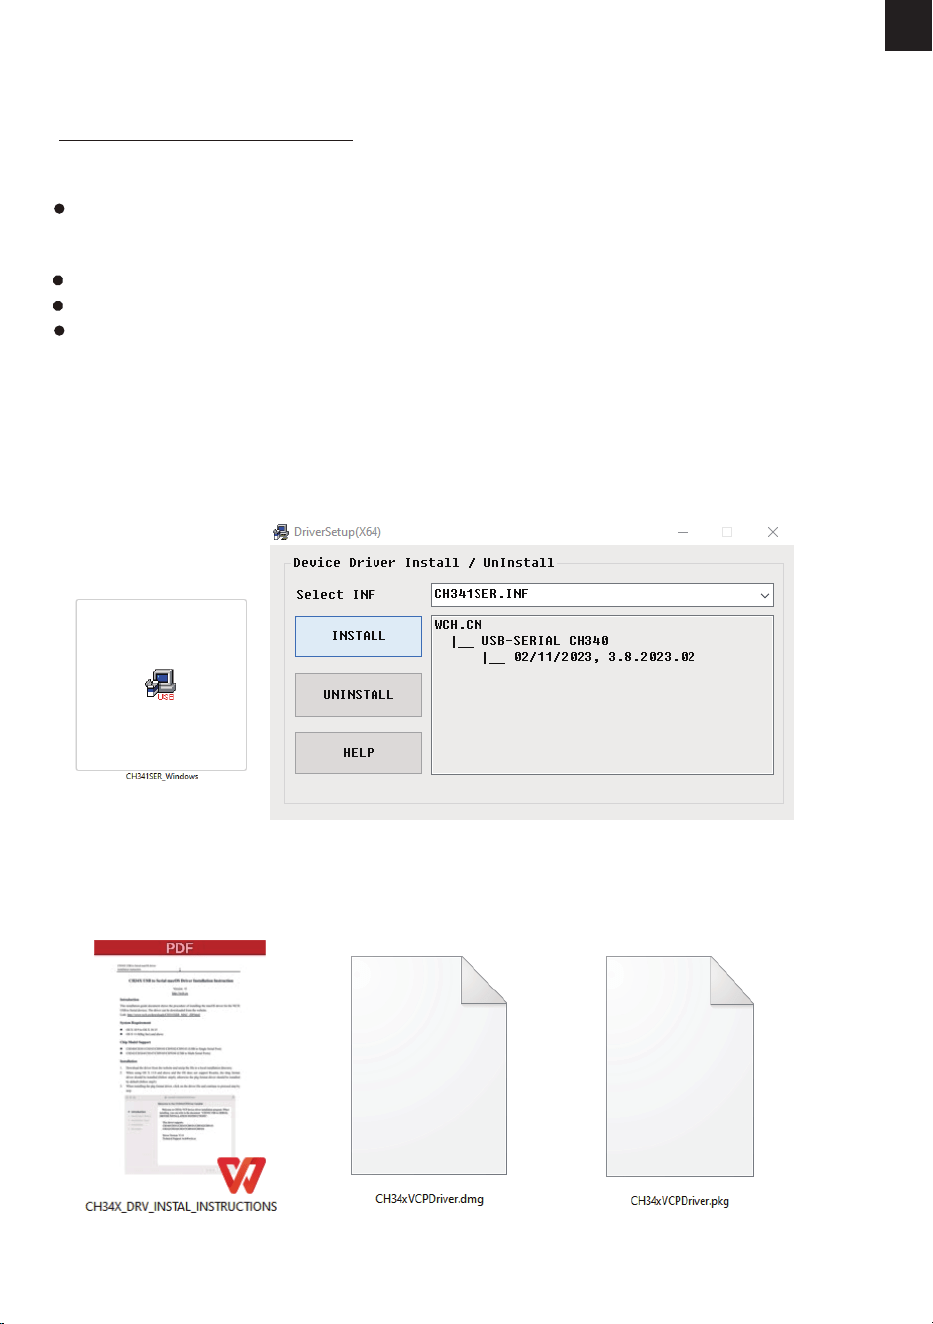
-114-
IT
1. Scaricare il driver dal collegamento sottostante.
https://mecpow.com/pages/driver-les
2. Contatta il servizio clienti per ottenere il le del driver.
Nota:
Per gli utenti Windows, se si utilizza un sistema inferiore a Win10, è necessario installare il
driver manualmente. Se si utilizza un sistema Win10 o superiore, non è necessario installare il
driver.
Il driver per gli utenti Mac supporta da OS X 10.9 a OS X 10.15 e OS X 11.0 (Big Sur) e oltre.
Il driver per gli utenti Linux supporta sistemi a 32 e 64 bit.
Si prega di accendere la macchina e collegarla al computer tramite il cavo USB prima di
avviare il driver!
8. Autista
Scarica Metodi
Installazione
Per gli utenti Windows:
1. Aprire il driver scaricato.
2. Fare clic su "INSTALL".
3. Fare clic su "OK" quando il driver è stato installato correttamente.
Per gli utenti Mac:
1. Aprire le istruzioni.
2. Aprire il driver scaricato e seguire le istruzioni per installarlo.
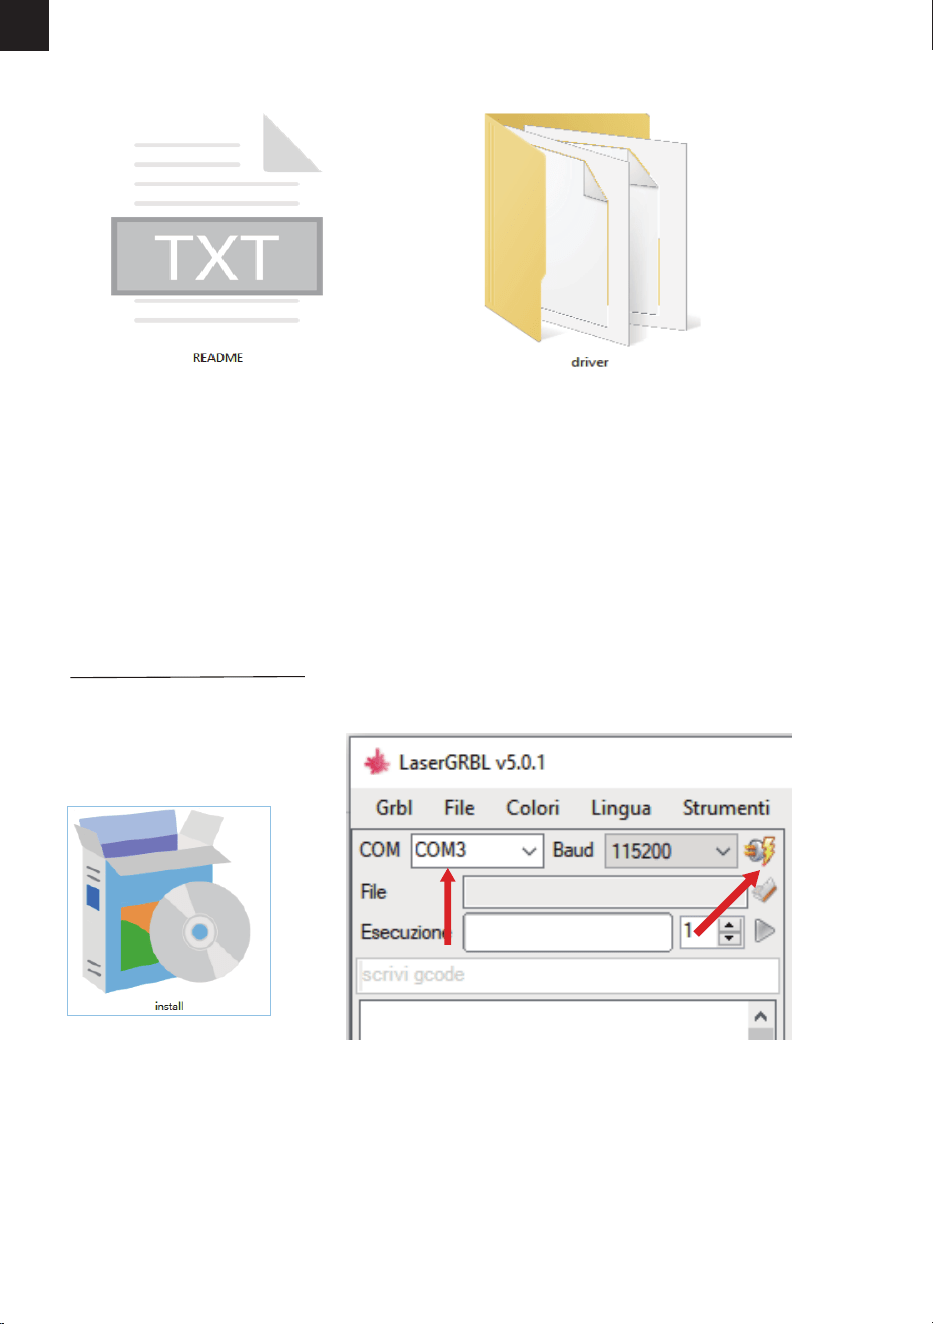
-115-
IT
Per gli utenti Linux:
1. Aprire il le README.
2. Aprire il le - driver e seguire le istruzioni "README" per installarlo.
9. Controllo tramite software del computer
LaserGRBL
È un software open source gratuito che supporta i computer Windows. Scaricalo da:
http://lasergrbl.com/download/
1. Installalo. 2. Aprire il software. Fare clic su "Connetti" e selezionare "COM3".
Collegare la macchina per incisione al software in tempo reale tramite il cavo USB. Durante il
funzionamento, è possibile avviare o arrestare la macchina per incisione attraverso il pannello di
controllo.
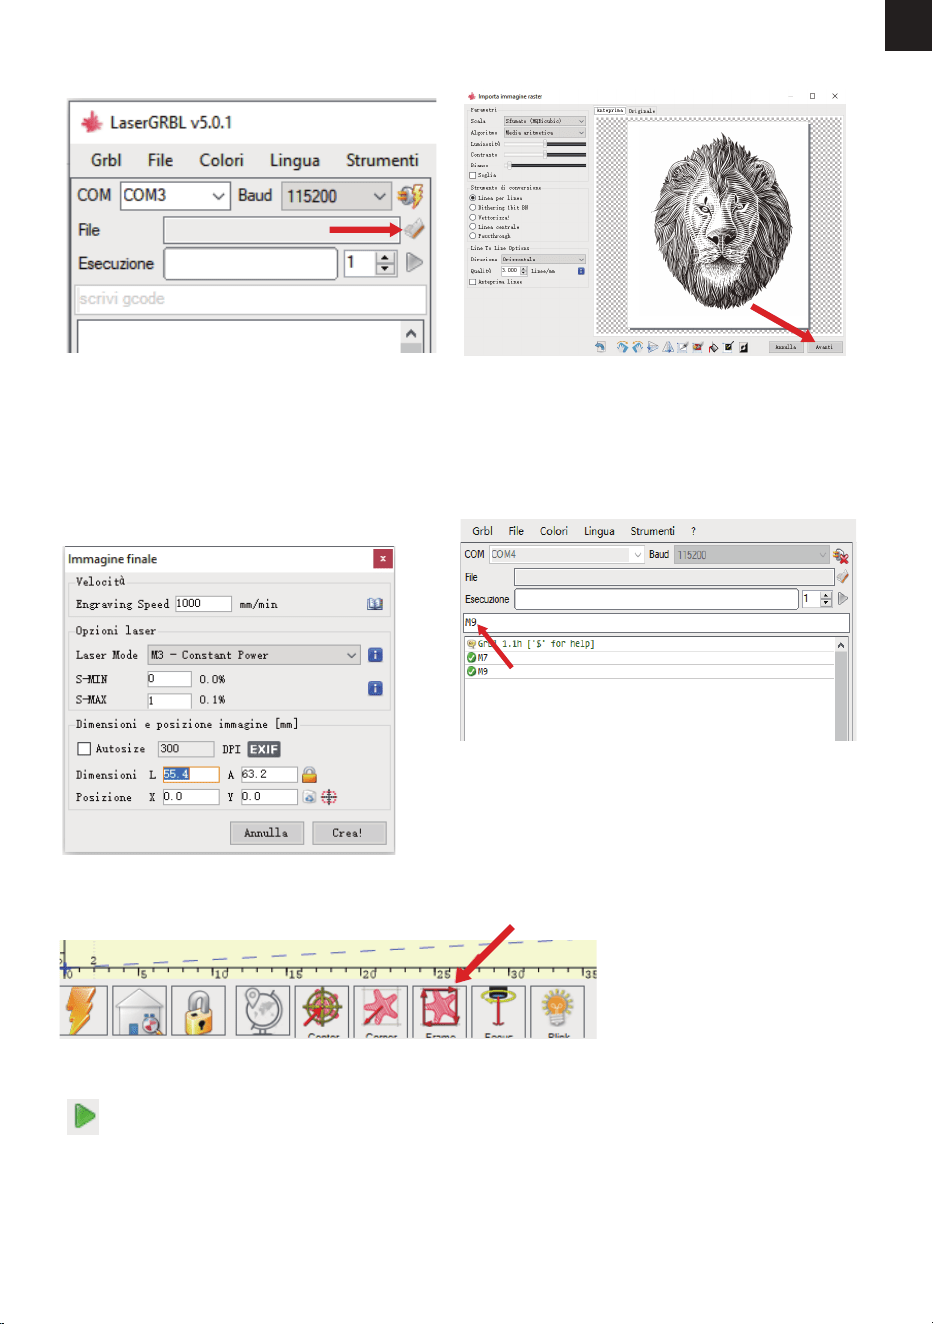
-116-
IT
3. Fare clic su "Apri le" per selezionare il le
di incisione.
4. Selezionare la modalità di incisione e fare clic
su "Avanti".
5. Selezionare i parametri operativi per
l'incisione o il taglio laser. (M3 è per intaglio
a potenza costante e M4 è per potenza
variabile. Consultare la sezione 10 per i
parametri operativi consigliati per
l'incisione o il taglio di materiali diversi.)
6. Immettere "M7" nella casella di comando e
premere Invio per avviare la pompa dell'aria. Per
arrestare la pompa dell'aria, immettere "M9" nella
stessa casella e premere Invio
7. Fare clic su "Framing" per visualizzare in anteprima l'intervallo di incisione e regolare la posizione
dell'incisione.
8. Fare clic su "Esegui il programma" per avviare l'incisione.
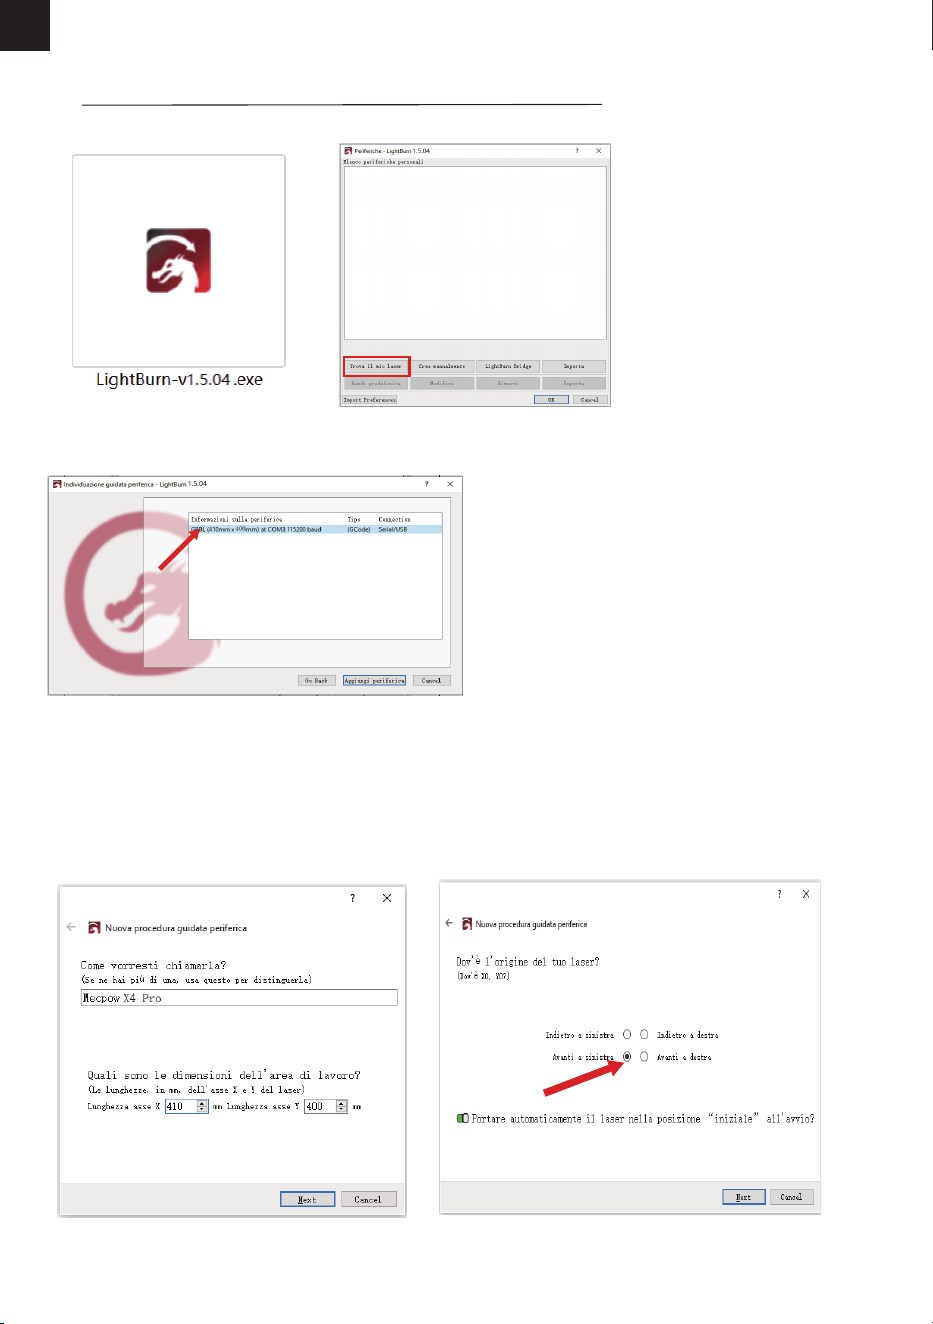
-117-
IT
LightBurn
IÈ un software professionale a pagamento che supporta computer MAC, Linux e Windows. Scaricalo
da: https://lightburnsoftware.com/pages/trial-version-try-before-you-buy
1. Installalo. 2. Aprire il software e fare clic su "Trova il mio laser".
3. Selezionare il dispositivo e fare clic su "Aggiungi periferica".
4. Assegna un nome al dispositivo e inserisci le
lunghezze dell'asse X e dell'asse Y, quindi fai clic su
"Next".
Nome: Mecpow X4 Pro
Lunghezza asse X: 410 mm
Lunghezza asse Y: 400 mm
5. Selezionare "Avanti a sinistra" come
origine del laser e fare clic su "Next".
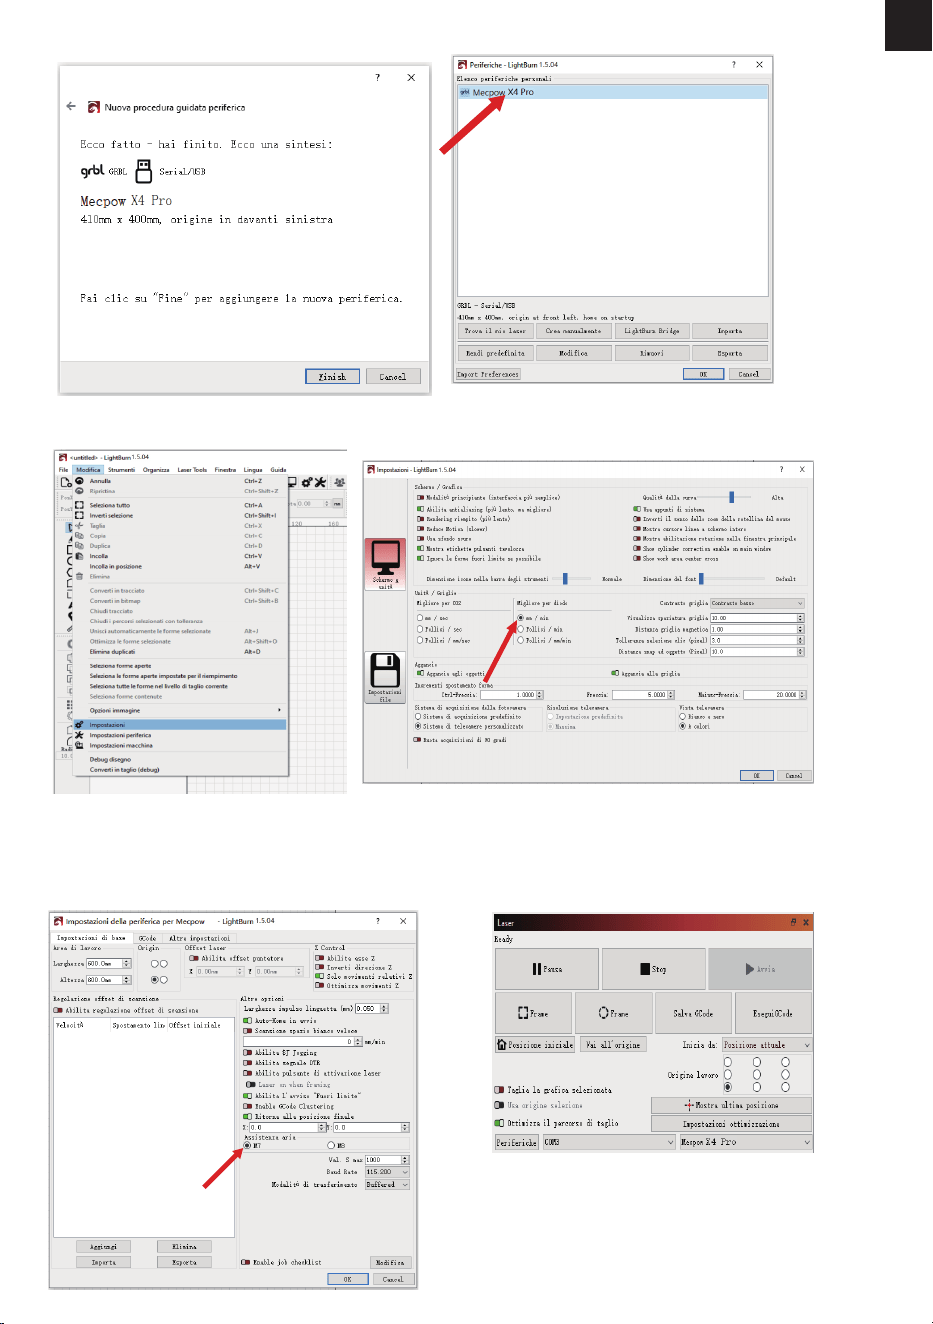
-118-
IT
6. Fare clic su "Finish". 7. Seleziona Mecpow X4 Pro e fai clic su "OK".
8. Fare clic su "Modica" - "Impostazioni" e impostare l'unità su "mm/min", quindi fare clic su "OK".
10. Selezionare "Posizione attuale" nella
sezione "Inizia da", quindi selezionare il
cerchio nell'angolo in basso a sinistra
nella sezione "Origine lavoro".
9. Fare clic su "Modica" - "Impostazioni
periferica" e selezionare "M7" sotto "Assisten-
za aria" per consentire alla pompa dell'aria di
funzionare in sincronia con la macchina.
5
X4
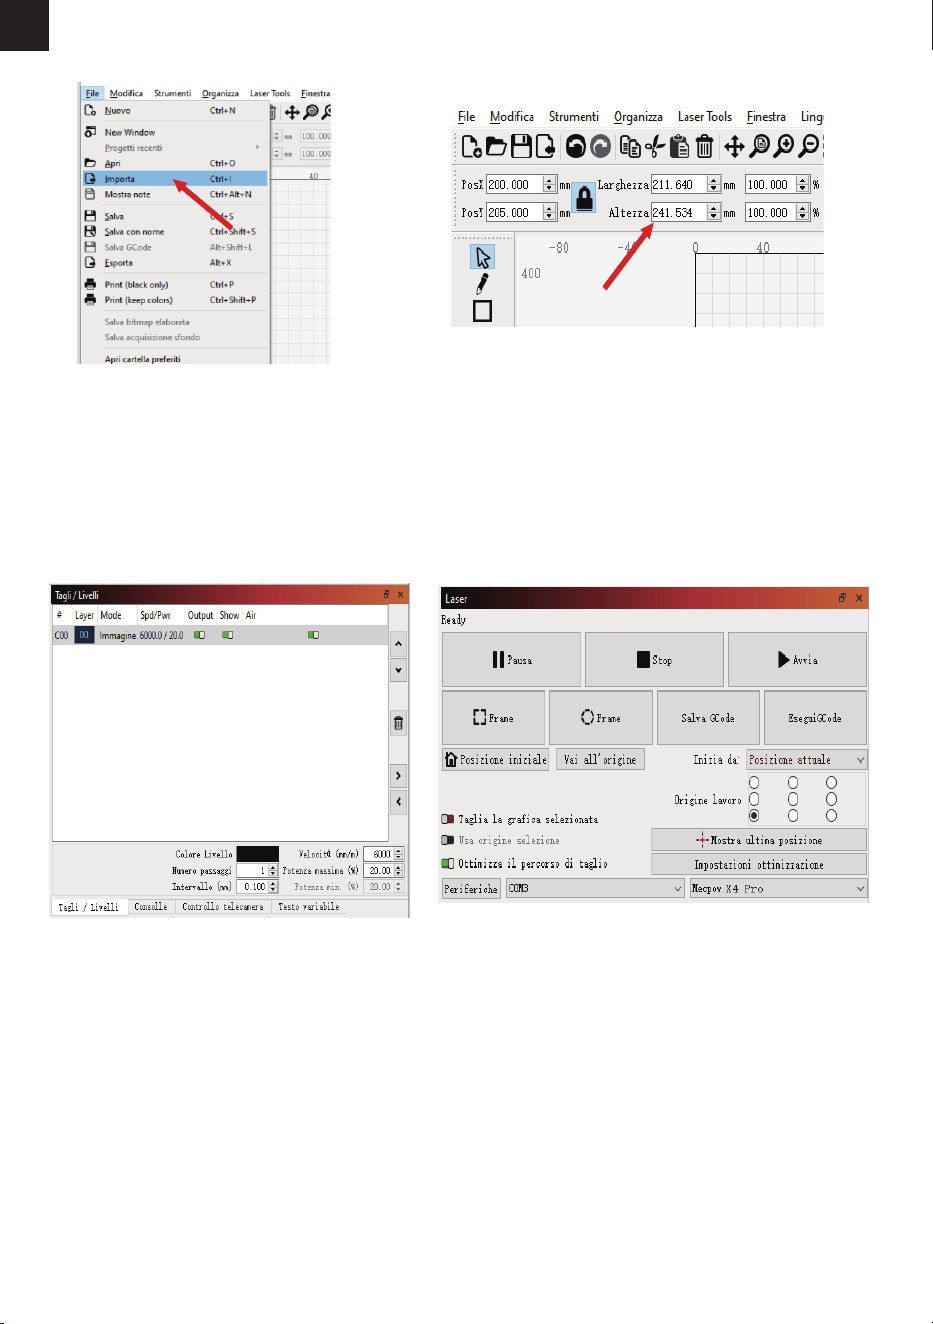
-119-
IT
11. Fare clic su "File" - "Importa" per
importare il le di incisione.
12. È possibile modicare la dimensione
dell'incisione nella parte superiore dell'interfaccia
dopo aver importato il le.
13. Selezionare la modalità di incisione e
impostare i parametri operativi per l'incisione o
il taglio laser. (I parametri operativi consigliati
per l'incisione o il taglio di materiali diversi sono
elencati nella sezione successiva.)
14. Fare clic su "Frame" per visualizzare in
anteprima l'intervallo di incisione e regolare la
posizione dell'incisione, quindi fare clic su "Avvia"
per avviare l'incisione.
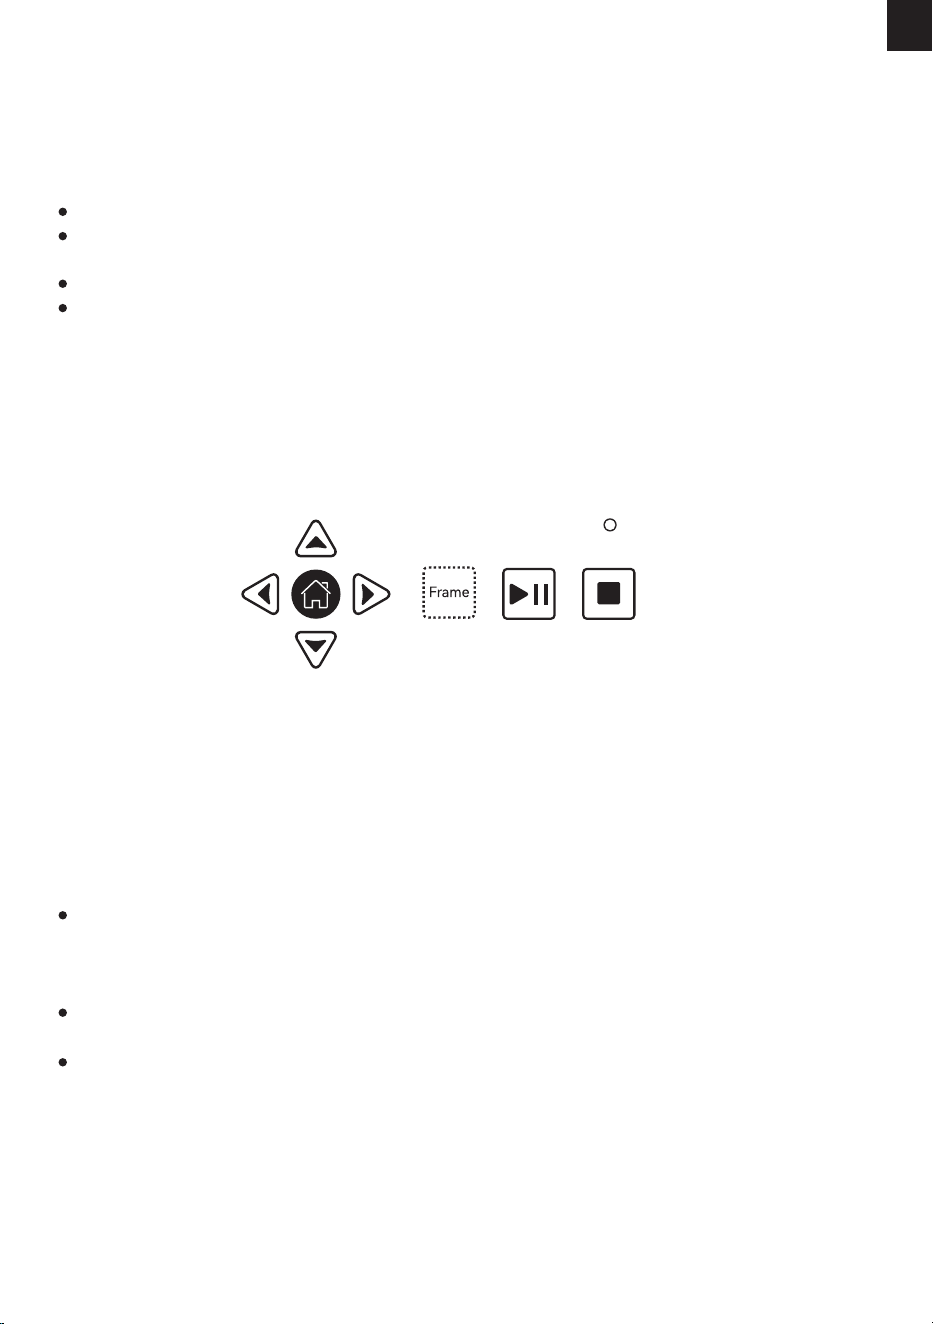
-120-
IT
1. Preparare un le G-code LightBurn per l'incisione o il taglio e salvarlo nella directory principale della scheda
TF. Inserire la scheda TF nella macchina per incidere. L'indicatore sul pannello di controllo si accende per
indicare che il le è stato caricato correttamente.
2. Premere il tasto "Frame" e la macchina entrerà in modalità anteprima. Il modulo laser si sposta lungo l'asse
X/Y per inquadrare l'area di lavoro target. È quindi possibile regolare manualmente l'oggetto inciso nella
posizione corretta o utilizzare i tasti freccia sul pannello di controllo per regolare il modulo laser nella
posizione corretta.
3. Premere il tasto "Avvio/Pausa" per avviare l'incisione/taglio. Se è necessario fare una pausa mentre l'incisore
sta lavorando, premere il tasto "Avvio/Pausa" e poi premerlo di nuovo per continuare l'incisione/il taglio. Se si
desidera terminare l'attività, premere il tasto "Stop". Al termine dell'incisione/taglio, il modulo laser torna alla
posizione iniziale. Quando non è in funzione, premere il tasto "Avvio/Pausa" e l'incisore ripeterà l'ultima
operazione di incisione/taglio, adatta alla produzione di massa.
La scheda TF supporta solo il formato FAT32.
Per impostazione predenita, la macchina per incidere legge l'ultimo le modicato nella directory
principale della scheda TF quando vi sono più le.
L'incisore può riconoscere solo i le NC e GC con nomi in inglese.
L'incisore può riconoscere i le NC e GC salvati con LightBurn. Tuttavia, i le NC e GC salvati con LaserGRBL
possono essere riconosciuti dall'incisore solo dopo essere stati convertiti con MKSLaser. MKSLaser può essere
ottenuto dalla scheda TF allegata o da Mecpow.com.
Nota:
10. Controllo tramite pannello di controllo e scheda TF
I tasti "Avvio/Pausa" e "Stop" hanno un accesso di controllo all'incisore superiore a quello del software del
computer e dell'applicazione mobile, il che signica che le attività di incisione/taglio emesse dal computer o
dal telefono cellulare possono essere avviate, messe in pausa e terminate direttamente attraverso il pannello
di controllo.
Se un'attività di incisione/taglio emessa dal computer o dal cellulare viene terminata, può essere riavviata
solo dal computer o dal cellulare.
I tasti "Cornice" e freccia non funzionano durante il processo di incisione/taglio.
Nota:
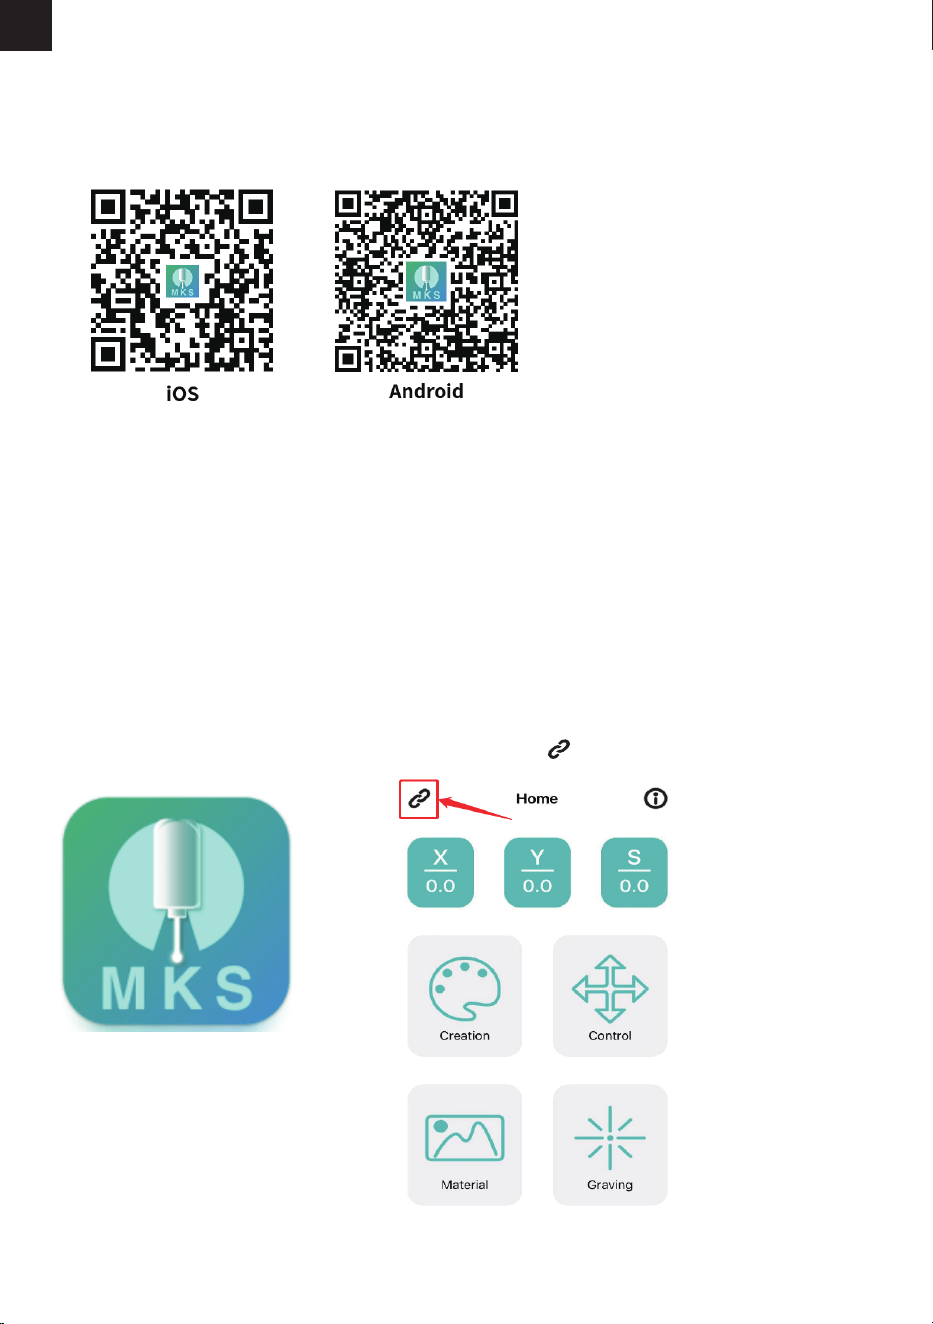
-121-
IT
Il "*****" nel nome Wi-Fi è una combinazione casuale di numeri. Varia in base alla macchina.
Per garantire la stabilità del segnale Wi-Fi, si consiglia di connettere il telefono al Wi-Fi della macchina per
incidere prima di inserire la scheda TF.
L'app deve essere utilizzata con la scheda TF. Il caricamento del le dell'incisione fallirà se la scheda TF non è
stata inserita.
MKSLaser è un'applicazione mobile gratuita che supporta i dispositivi Android e iOS.
1. Attivare la funzione Wi-Fi del telefono e collegare il Wi-Fi "Mecpow_*****".
Nome Wi-Fi: Mecpow_*****
Password Wi-Fi: 12345678
2. Apri l'app MKSLaser.
3. Fare clic sull'icona .
Scansionare il codice QR e scaricarla.
Scaricare l'applicazione
Connessione Wi-Fi
11. Controllo tramite App mobile e scheda TF
Nota:
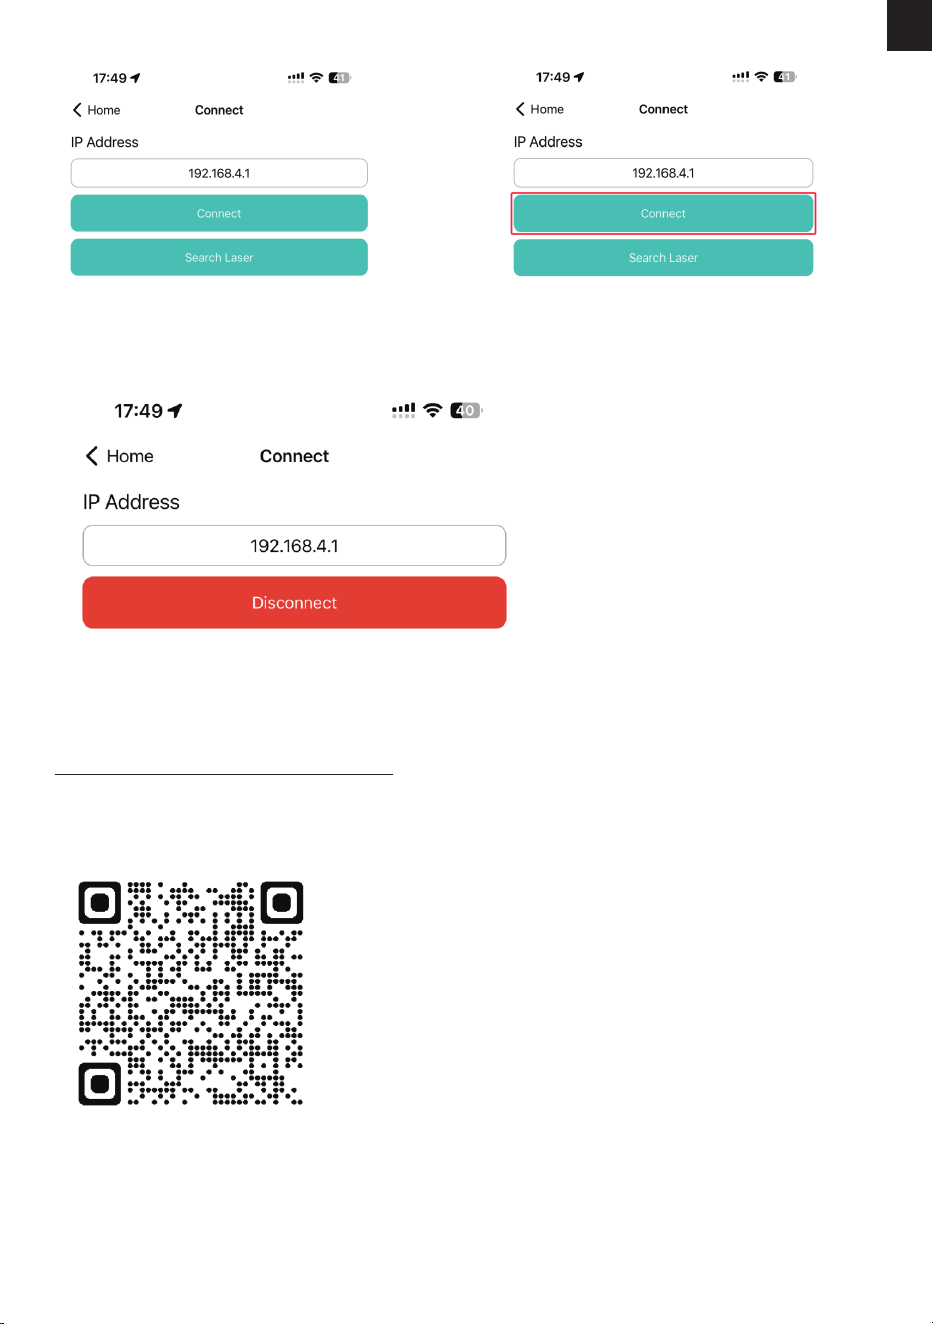
-122-
IT
Per un utilizzo dettagliato dell'applicazione MKSLaser, consultare le informazioni contenute nella scheda TF o
scaricare il manuale d'uso visitando il link sottostante o scansionando il codice QR.
https://mecpow.com/pages/download-center
4. Immettere l'indirizzo IP: 192.168.4.1 5. Fare clic su "Connetti".
6. Quando "Connetti" diventa "Disconnetti", signica che la connessione Wi-Fi è riuscita.
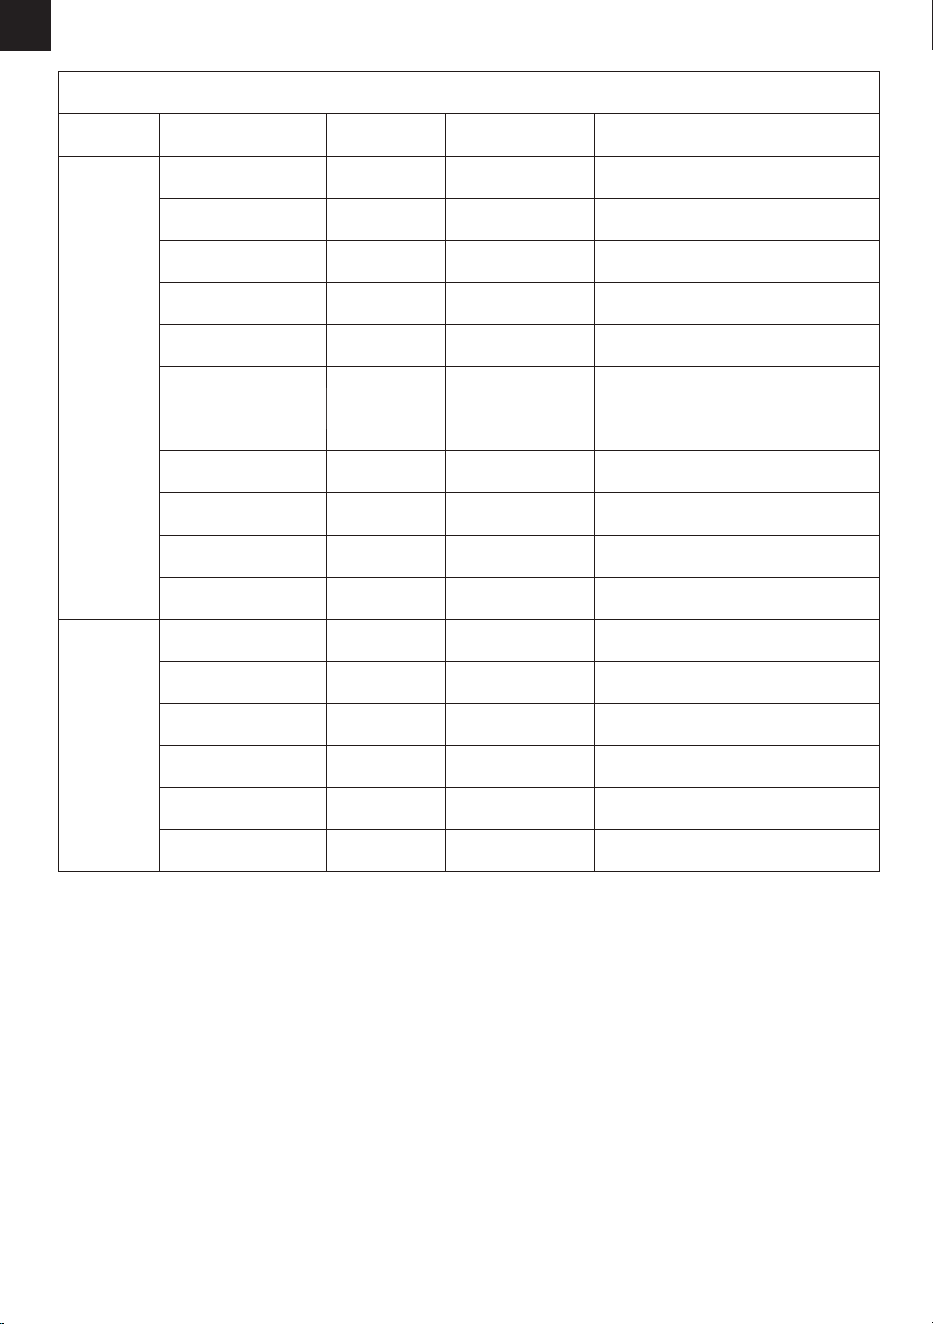
-123-
IT
13. Risoluzione dei problemi
1.La macchina non risponde quando viene accesa.
A.Controllare se la macchina sia correttamente inserita nella presa e accesa.
2.La macchina non riesce a connettersi al computer.
A.Controllare se il cavo USB sia collegato correttamente sia al computer che alla macchina. B.Installare il driver come
indicato e assicurarsi che il computer riconosca il dispositivo come a porta seriale.
C.Scollegare il cavo USB e l'alimentatore, attendere 5 secondi, quindi ricollegare .
3. L'incisione è troppo chiara o inesistente .
A. Assicurarsi che la macchina sia accuratamente messa a fuoco secondo il manuale.
B.Adjust la velocità di incisione. Se incide troppo velocemente, potrebbe non avere abbastanza tempo per masterizzare l'oggetto.
C.L'immagine è troppo superciale. Le immagini importate devono essere chiare , con linee sottili e non troppo di colore chiaro, in quanto ciò
inuirà direttamente sull'eetto dell'incisione.
D. Assicurarsi che l'oggetto da incidere sia posizionato in piano e parallelo alla macchina per evitare problemi di messa a fuoco
20 3000
3000
1000
3000
1000
1000
3000
50
13
20
50
80
50
50
80
3000
600
3000
200
130
75
3000
100
15
100
100
100
80
80 300
100
12.Parametri operativi consigliati
Mecpow X4 Pro (22W)
Modalità
Incisione
Materiali
Tavola di legno
Bambù
Resina
Pelle
La supercie deve essere verniciata.
La supercie deve essere verniciata.
Non incidere sull'acciaio
inossidabile lucidato a specchio.
La supercie deve essere applicata
con carta a trasferimento termico.
Vetro
Ceramica
Acrilico
Potenza
(%)
Velocità (mm/min)
Nota
Gomma
Acciaio inossidabile
Cartone
Cartone spesso 8 mm
Pannello di 9 mm
di spessore
Taglio
Pannello di 10 mm
di spessore
Carta da 0,2 mm
Pelle da 2 mm
Acrilico da 5 mm
-124-
IT
Per ulteriori domande e risposte, consultare il link sottostante o scansionare il codice QR qui sotto.
https://mecpow.com/pages/faq
4.Il processo di incisione offline si interrompe in modo imprevisto.
A. Vericare se il pulsante di arresto di emergenza è stato premuto accidentalmente. Se premuto,
ruotarlo verso destra per rilasciarlo.
B. Controllare se l'interruttore è stato disattivato accidentalmente. Se è così, riaccendilo.
C. Se tutto quanto sopra sembra essere normale, contattare il servizio clienti.
5.Il software smette di funzionare improvvisamente durante l'incisione.
A. Controllare se il cavo USB è allentato.
B. Confermare che il software sia installato correttamente e che i le di congurazione siano accurati.
C. Assicurarsi che il le di incisione funzioni correttamente.
D. Se tutto quanto sopra sembra essere normale, contattare il servizio clienti.
6.La macchina si muove correttamente, ma il laser rimane inattivo.
A. Vericare che il cavo del modulo laser sia collegato correttamente.
B. Controlla se c'è qualche leggero rumore proveniente dalla ventola del modulo laser.
C. Se tutto quanto sopra sembra essere normale, contattare il servizio clienti.
14. Dichiarazione di conformità
Questo prodotto è conforme agli standard di IL Comunità Europea.
Questo prodotto è conforme alla Restriction of Hazardous
Sostanze nelle apparecchiature elettriche ed elettroniche (RoHS) Norme dell'UE che limitano
l'uso di sostanze pericolose nelle apparecchiature elettriche e apparecchiature elettroniche per la
protezione dell'ambiente esalute pubblica.
Questo dispositivo è conforme alla Parte 15 di il funzionamento delle regole FCC È soggetto
alle seguenti due condizioni: (1) questo dispositivo non può causare interferenze dannose e
(2) questo dispositivo deve accettare qualsiasi interferenza ricevuta, incluse le interferenze
che potrebbero causare un funzionamento indesiderato.
Il segnale di avvertimento laser viene utilizzato per avvisare gli utenti e i visitatori se c'è il
rischio di essere esposti a un raggio laser nudo. L'esposizione a determinati laser può
causare danni agli occhi o all'ottica e ustioni della pelle.
Questo simbolo indica che il prodotto è in grado di essere riciclato.

-125-
PL
1. Przedmowa..................................................................................
2. Oświadczenie o bezpieczeństwie..............................................
3. Schemat.......................................................................................
4. Specyfikacje................................................................................
5. Lista elementów.........................................................................
6. Instrukcja montażu ...................................................................
7. Funkcje i działania......................................................................
8. Sterownik.....................................................................................
9. Sterowanie za pomocą oprogramowania komputerowego...
10. Sterowanie za pomocą panelu sterowania i karty TF...........
11. Kontrola przez aplikację mobilną i kartę TF.........................
12. Zalecane parametry pracy....................................................
13. Rozwiązywanie problemów...................................................
14. Oświadczenie o zgodności......................................................
ZAWARTOŚĆ
126
126
127
129
129
130
137
139
140
145
146
148
148
148

-126-
PL
1. Przedmowa
Ostrzeżenie
2. Oświadczenie o bezpieczeństwie
Szanowny Kliencie,
Dziękujemy za zakup naszej maszyny do grawerowania laserowego. To urządzenie to zaawansowany
technologicznie produkt, który integruje światło, mechanizm i elektryczność. Aby lepiej użytkować i
konserwować sprzęt, przeczytaj uważnie instrukcję obsługi i postępuj zgodnie z zawartymi w niej krokami.
Zastrzeżenie
Wszelkie straty spowodowane niewłaściwym użytkowaniem lub nieprzestrzeganiem instrukcji obsługi
ponosi użytkownik. Ostateczna interpretacja instrukcji obsługi należy do naszej rmy i zastrzegamy sobie
prawo do zmiany wszelkich informacji, danych, szczegółów technicznych itp. zawartych w instrukcji.
* Obróbka laserowa może być ryzykowna, a użytkownicy powinni dokładnie rozważyć, czy obrabiany
przedmiot nadaje się do obróbki laserowej.
* Przetwarzany obiekt i emisje muszą być zgodne z lokalnymi przepisami i regulacjami.
* To urządzenie wykorzystuje laser klasy IV (promieniowanie laserowe o dużej mocy), co może powodować
następujące sytuacje:
(1) Zapłon otaczających materiałów łatwopalnych;
(2) Podczas obróbki laserowej mogą powstawać inne rodzaje promieniowania oraz toksyczne i szkodliwe gazy,
w zależności od obrabianego przedmiotu;
(3) Bezpośrednia ekspozycja na promieniowanie laserowe może spowodować uszkodzenie ciała ludzkiego. W
miejscu pracy musi znajdować się sprzęt przeciwpożarowy, a wokół stołu roboczego lub maszyny nie wolno
układać materiałów łatwopalnych i wybuchowych. Należy również zadbać o dobrą wentylację.
* Otoczenie, w którym znajduje się maszyna powinno być suche, wolne od zanieczyszczeń,
wibracji, silnej elektryczności, silnego magnetyzmu i innych zakłóceń. Temperatura otoczenia podczas pracy
powinna wynosić 5-30°C, a wilgotność otoczenia podczas pracy powinna wynosić 35-65% RH.
* Napięcie robocze maszyny wynosi AC100-240V.
* Podczas pracy maszyny należy ją cały czas monitorować. Przed wyjazdem należy odciąć zasilanie, aby
zapobiec nieprzewidzianym problemom. Jeśli nienormalna sytuacja
wystąpi, należy natychmiast odciąć zasilanie i zająć się tym!
* Surowo zabrania się umieszczania w urządzeniu jakichkolwiek odblaskowych lub rozpraszających przedmi-
otów, które nie są związane z jego działaniem, aby zapobiec odbiciu lasera od ludzkiego ciała lub materiałów
łatwopalnych.
* Maszynę należy trzymać z dala od urządzeń elektrycznych wrażliwych na zakłócenia elektromagnetyczne,
które mogą powodować zakłócenia elektromagnetyczne.
* Surowo zabrania się osobom nieprofesjonalnym demontować grawerki laserowej, ponieważ wewnątrz
urządzenia może wystąpić niebezpieczeństwo w postaci wysokiego napięcia.
Środki bezpieczeństwa
1. Maszyna do grawerowania laserowego może wytwarzać światło laserowe. Zabrania się umieszczania
jakichkolwiek organizmów żywych pod emisją lasera (port jest oznaczony żółtym znakiem ostrzegawczym).
2. Pacjenci z nadwrażliwością na światło nie mogą używać ani zbliżać się do grawera laserowego.
3. Podczas korzystania z maszyny do grawerowania laserowego operator i osoby przebywające w pobliżu
maszyny muszą nosić okulary ochronne chroniące przed laserem. Nie obsługuj urządzenia laserowego bez
okularów laserowych. Nasza maszyna jest dostarczana z parą laserowych okularów ochronnych. Jeśli chcesz
kupić dodatkowe gogle, gogle powinny zapewniać ochronę przed długością fali w zakresie 400-445nm
(+-5nm), mieć średnicę zewnętrzną +5 i spełniać wymagania co najmniej na poziomie L5.
4. Gdy grawerka laserowa pracuje, użytkownik musi zachować szczególną ostrożność i nie pozostawiać jej bez
nadzoru, aby uniknąć zapłonu grawerowanego materiału. Umieść maszynę w miejscu ognioodpornym i
zapewnij dobrą wentylację. Zaleca się palić
gaśnica w pobliżu na wypadek sytuacji awaryjnych.
5. Upewnij się, że w pobliżu urządzenia do grawerowania laserowego nie ma materiałów łatwopalnych.
Zalecamy umieszczenie pod maszyną stołu roboczego o strukturze plastra miodu.
6. Podczas obsługi grawerki laserowej upewnij się, że wokół niej jest wystarczająco dużo miejsca. Grawerowan-
ie niektórych materiałów może powodować wydzielanie się dymu, który należy odprowadzić za pomocą
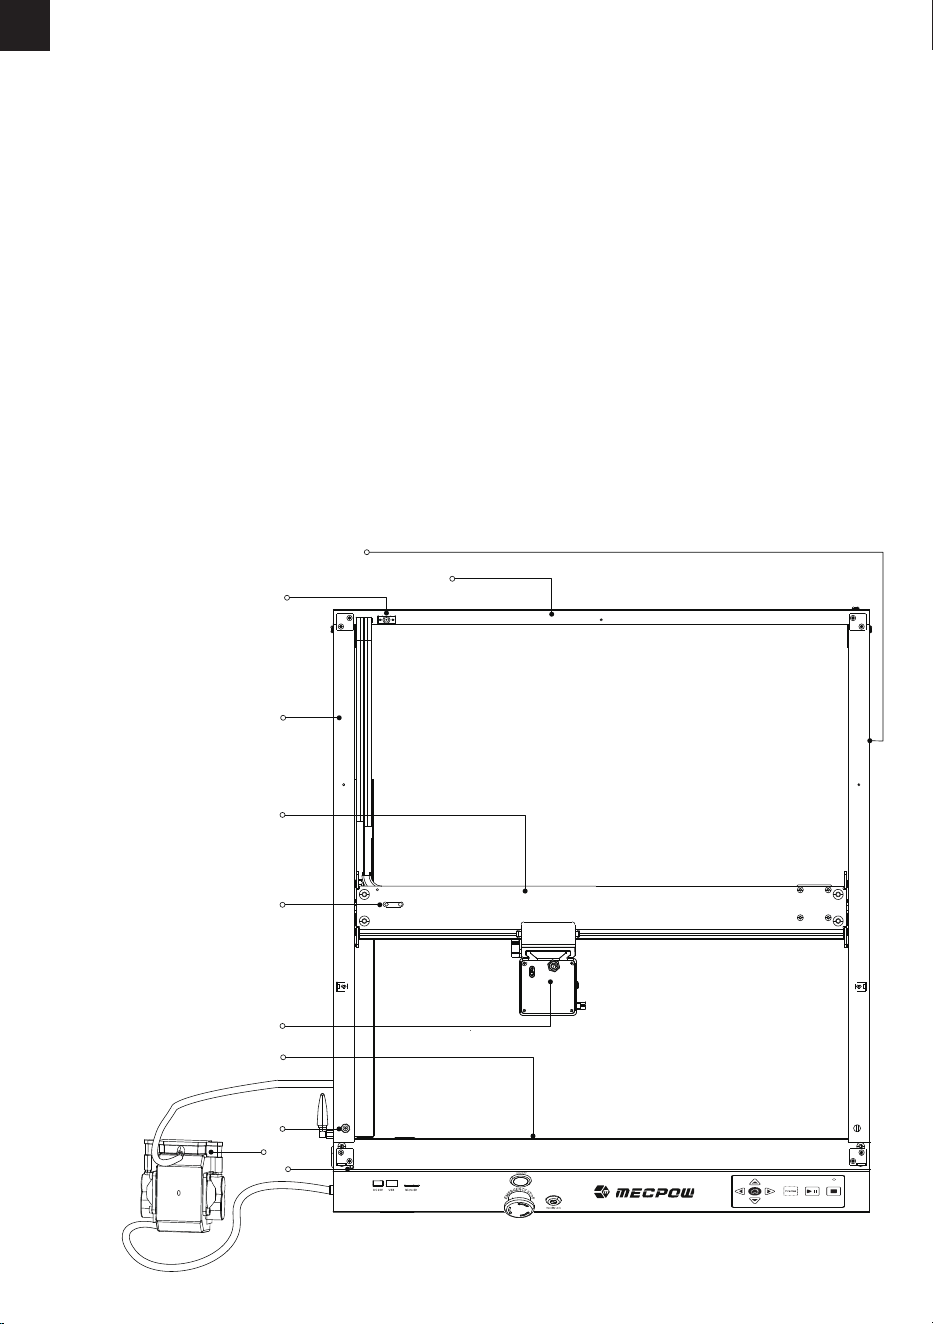
-127-
PL
Konserwacja
Zalecenia:
Wyłączyć urządzenie na 10 minut po 4 godzinach grawerowania i 10 minut po 1 godzinie cięcia.
Moduł lasera jest materiałem eksploatacyjnym.
specjalistycznego układu wydechowego.
7. Nie dotykaj wiązki laserowej ani obrabianego przedmiotu, gdy maszyna jest włączona
działania, ponieważ może to spowodować poważne obrażenia lub odbicie wiązki. Dodatkowo unikaj dotykania
chłodnicy, ponieważ może być gorąca ze względu na pracę lub niedawno zatrzymaną grawerkę laserową.
8. Dzieci i młodzież (zwłaszcza poniżej 14 roku życia) nie mogą samodzielnie korzystać z laserowej maszyny
grawerującej i powinny być przez cały czas nadzorowane przez osobę dorosłą.
9. Temperatura pracy maszyny wynosi od 41°F do 86°F (5°C do 30°C).
10. Wyłącz urządzenie, gdy nie jest używane, aby uniknąć niewłaściwego użycia przez osoby trzecie.
11. Podczas grawerowania laserowego istnieje ryzyko pożaru. Kiedy maszyna do grawerowania laserowego jest
w użyciu, musi być nadzorowana przez wykwalikowanego operatora, który może użyć gaśnicy, aby poradzić
sobie z ewentualnymi wypadkami.
12. Nasza grawerka laserowa jest wyposażona we wbudowany czujnik płomienia, aby zmaksymalizować
bezpieczeństwo naszego sprzętu. Należy jednak pamiętać, że nie udziela się żadnej pisemnej ani dorozumianej
gwarancji dotyczącej dostępności lub funkcjonalności czujnika płomienia.
3. Schemat
1. Prawa oś Y
2. Tylna oś X
3. Port DC wentylatora
wyciągowego
4. Lewa oś Y
5. Zespół osi X
6. Regulator naprężenia
paska osi X
7. Moduł lasera
8. Przednia oś X
9. Port DC światła LED
10. Pompa powietrza
11. Przełącznik Halla
2
4
5
8
10
1
9
6
11
3
7
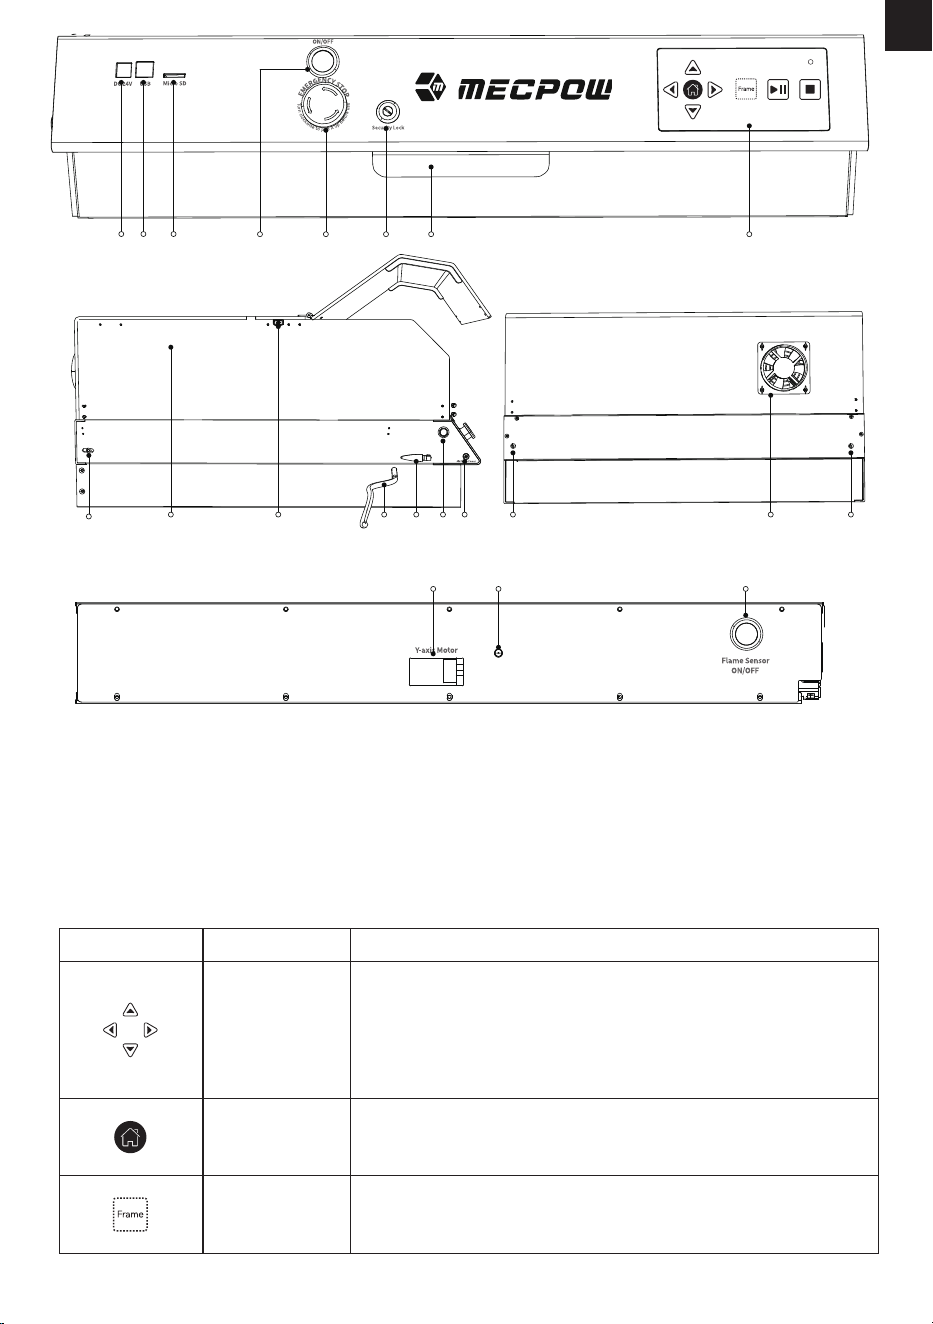
1. Port wejściowy DC
2. Port USB
3. Port Micro SD
4. Przełącznik zasilania
5. Przycisk zatrzymania awaryjnego
6. Blokada bezpieczeństwa
7. Szuada dolnej tacy
8. Panel sterowania
9. Śruba mocująca pasek osi Y
10. Pokrywa ochronna
11. Interfejs kamery zewnętrznej
12. Wąż do pompy powietrza
13. Antena WiFi
1
2 3
1110 1716 1614 15 1312
4 5 6
7 8
14. Przełącznik światła LED
15. Port zasilania pompy powietrza
16. Śruby do regulacji paska osi Y
17. Rura wydechowa
18. Silnik osi Y
19. Czujnik płomienia
20. Przełącznik czujnika płomienia
9
18 2019
-128-
PL
Ikony kluczy Nazwa klawisza
Klawisze strzałek
Strona główna
Klawisz patrolu
Funkcja klawisza
Wprowadzenie do panelu sterowania
Krótkie naciśnięcie jednego z przycisków spowoduje przesunięcie
modułu laserowego o 1 mm w odpowiednim kierunku. Długie
naciśnięcie przycisku przez 3 sekundy lub dłużej spowoduje, że
moduł laserowy będzie się poruszał do momentu zwolnienia
przycisku lub uderzenia modułu laserowego w wyłącznik krańcowy.
Naciśnij ten przycisk, aby przywrócić moduł laserowy do pierwot-
nego położenia.
Naciśnięcie tego przycisku spowoduje patrolowanie przez moduł
laserowy obszaru roboczego pierwszego pliku G-code na karcie TF.
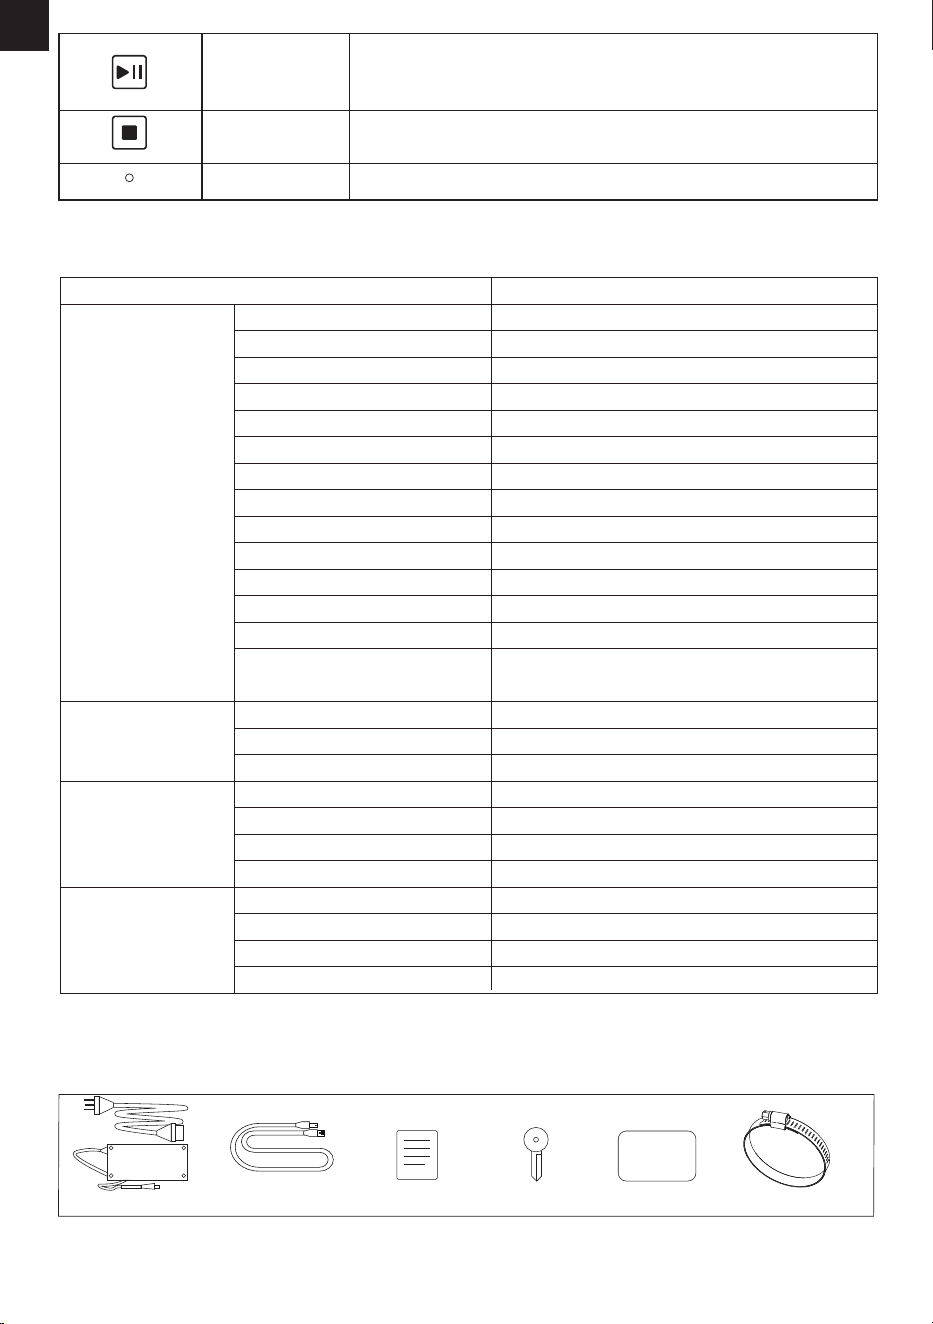
X4 Pro
790x655x235mm
21kg
685x620x310mm
Zasilacz *1
Kabel USB *2 Płyta drewniana *2
Klucz *2Instrukcja obsługi *1
-129-
PL
Przycisk Start/
Pauza
Klawisz Stop
Wskaźnik karty TF
Naciśnij ten przycisk, aby rozpocząć/wstrzymać grawerowanie.
Naciśnij ten przycisk, aby zakończyć grawerowanie.
Zapala się po wykryciu i odczytaniu karty TF.
4. Specifiche
5. Liste des éléments de la boite
Model
Parametry
podstawowe
Modulo laser
Pompa d'aria
Caricabatterie
DC 24V
410x400mm
22000mm/min
50°±5
Windows, Mac, Linux
JPEG, BMP, GIF, PLT, PNG, DXF
Aluminium
Drewno, akryl, porcelana, tkanina, bambus,
płyta z tworzywa sztucznego, skóra, owoce, chleb itp.
Rozmiar produktu
Rozmiar opakowania
Waga
Napięcie wejściowe
Moc znamionowa
Maks. Pole grawerowania
Maks. Prędkość grawerowania
Rozmiar plamki wiązki laserowej
Alarm przechyłu
Oprogramowanie
System
Obsługiwane formaty plików
Materiał ramy
Moc znamionowa
Wejście
Moc lasera
Napięcie wejściowe
Prąd wejściowy
Moc wejściowa
Prędkość powietrza
Napięcie wejściowe
Prąd wejściowy
Napięcie wyjściowe
Prąd wyjściowy
Materiały do
grawerowania laserowego
144W
77W
22W
24V 6A
24V
1.5A
36W
30L/min
AC 100-240V
2.5A
24V
6A
0.08x0.1mm
MKSLaser APP, LaserGRBL, LightBurn
Obręcz gardłowa *1
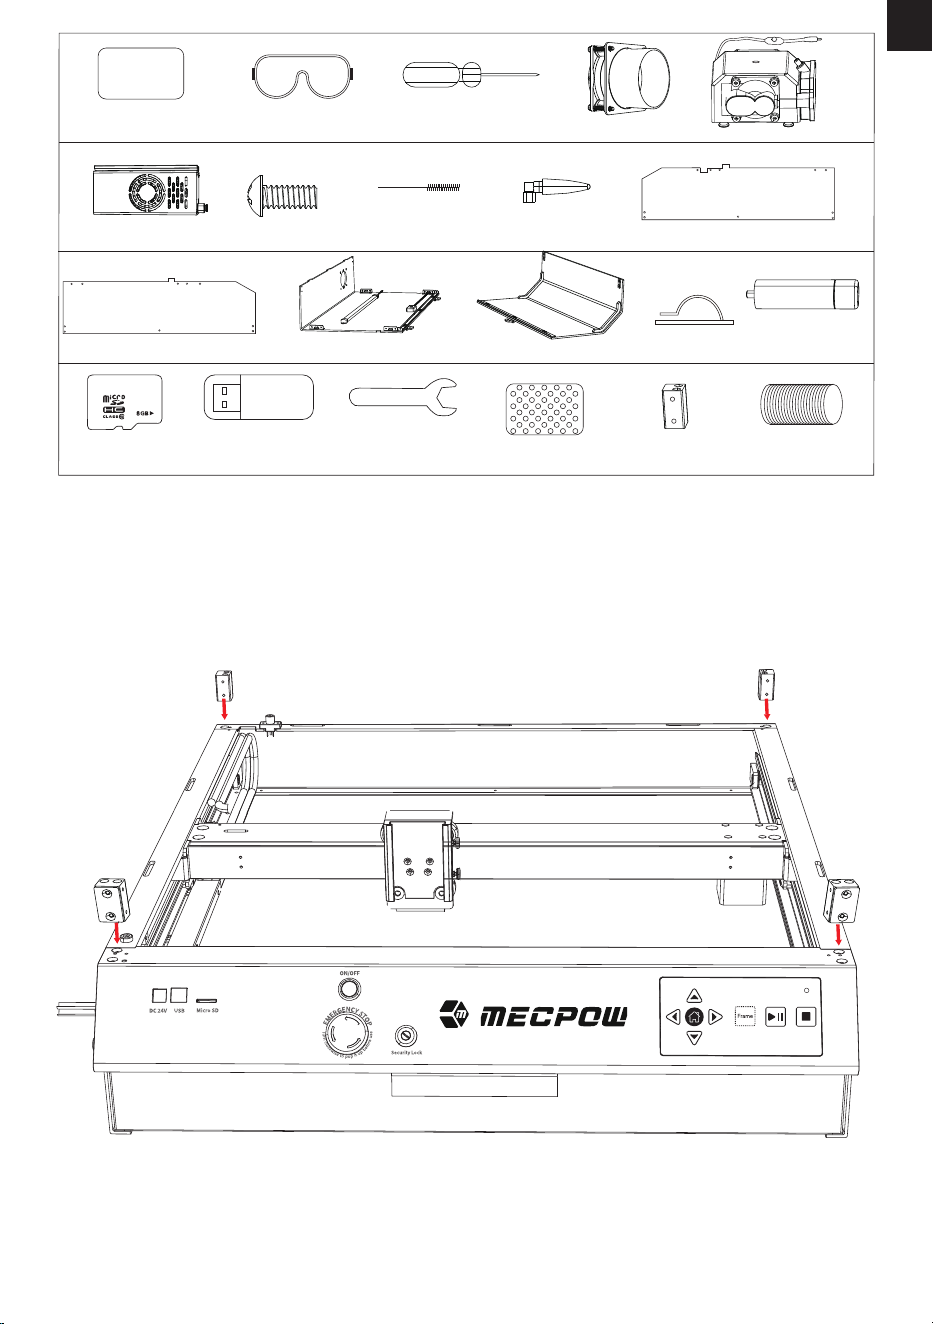
Metalowa płytka *1
Śrubokręt *1
Zestaw śrub *1
Gogle *1
Szczoteczka
do czyszczenia *1
Przednia osłona ochronna *1
Wentylator wyciągowy *1
Klips do kabla *5
Prawa pokrywa ochronna *1
Tylna pokrywa ochronna *1
Moduł lasera *1
Pompa powietrza *1
Lewa osłona ochronna *1
Rura wydechowa *1
Wspornik pokrywy
ochronnej *4
Karta TF *1 Klucz płaski *1 Karta kalibracyjna *1Czytnik kart TF *1
-130-
PL
Krok 1: Montaż 4 wsporników osłony ochronnej
Zainstaluj 4 wsporniki w odpowiednich otworach, jak pokazano poniżej. Dwa wsporniki z magnesem należy
zamontować z przodu grawerki i upewnić się, że magnesy są skierowane do przodu.
6. Instrukcja montażu
Antena WiFi *1
L
R
Podnośnik *4
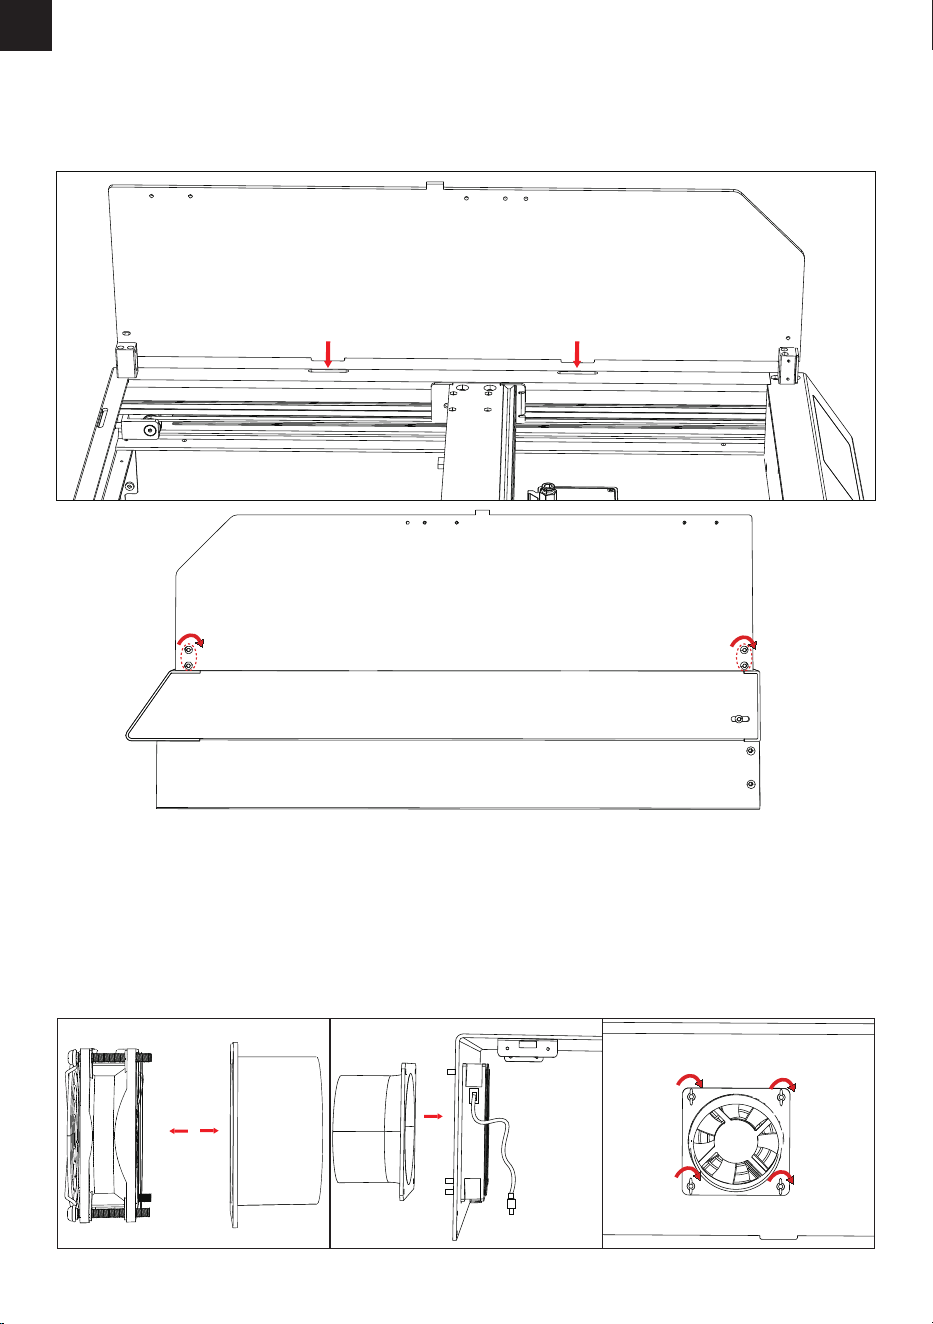
Krok 3: Montaż wentylatora wyciągowego
(1) Oddziel prowadnicę powietrza od wentylatora wyciągowego.
(2) Zainstaluj wentylator wyciągowy od wewnątrz tylnej pokrywy ochronnej i wsuń cztery śruby wentylatora
wyciągowego przez otwory. Upewnij się, że kabel wentylatora znajduje się po lewej stronie.
(3) Zamontuj prowadnicę powietrza od zewnątrz tylnej pokrywy ochronnej i zabezpiecz ją czterema
śrubami motylkowymi.
Krok 2: Montaż lewej i prawej osłony ochronnej
(1) Włóż dolne występy osłon ochronnych w szczeliny na lewej i prawej ramie osi Y.
(2) Dokręć śruby, aby zabezpieczyć osłony ochronne.
Uwaga: Poniższe rysunki przedstawiają montaż prawej osłony ochronnej. Lewą osłonę ochronną
należy zamontować w ten sam sposób.
-131-
PL
R
R
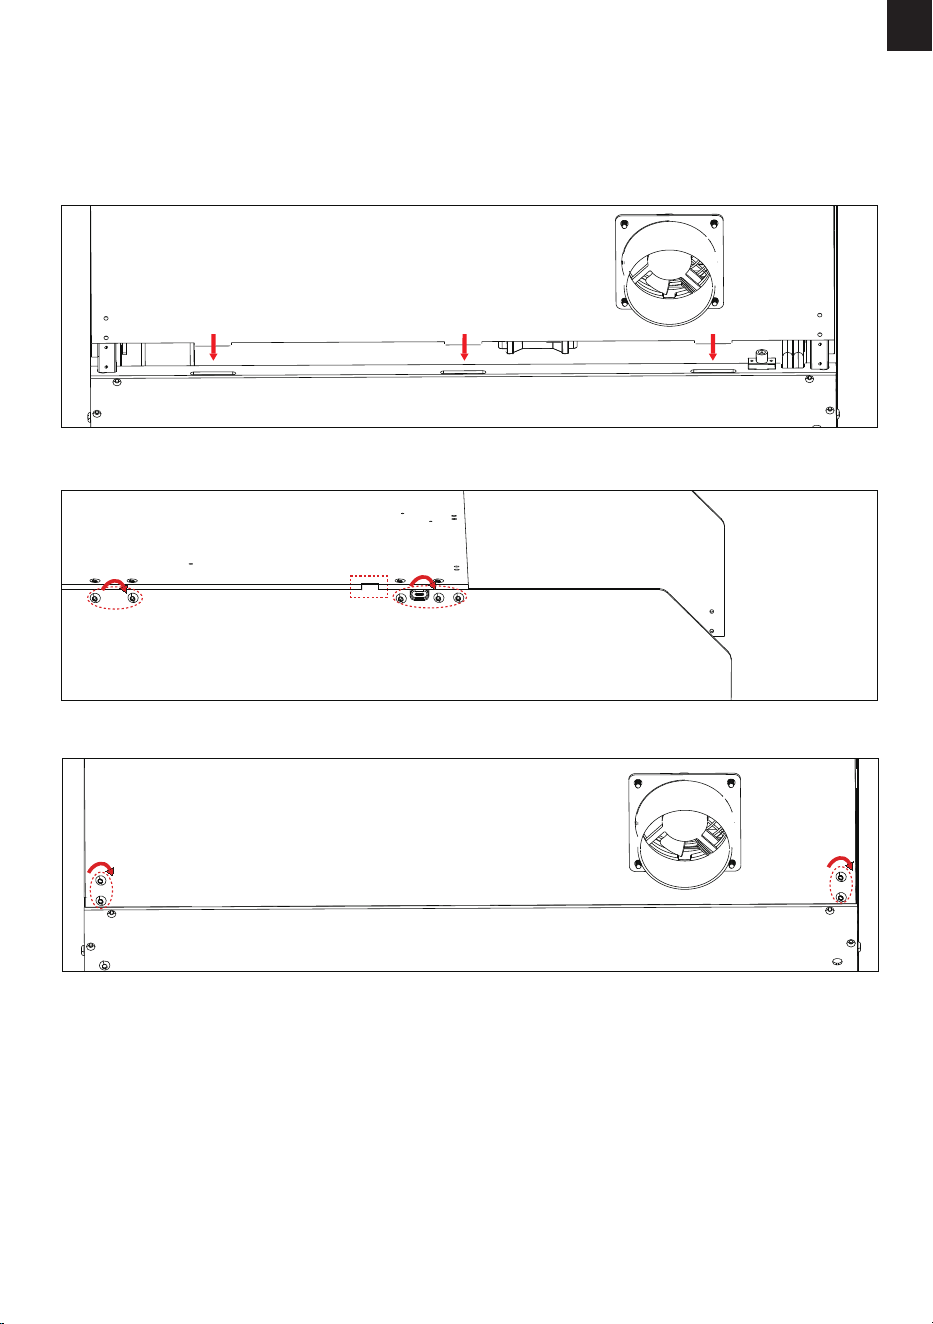
Krok 4: Montaż tylnej osłony ochronnej
(1) Włóż dolne występy tylnej osłony ochronnej w szczeliny na tylnej ramie osi X.
(2) Wyrównaj boczne rowki tylnej osłony ochronnej z występami na górze lewej i prawej osłony ochronnej.
(3) Dokręć śruby, aby zamocować tylną pokrywę ochronną.
Krok 5: Podłączanie wentylatora wyciągowego i lampki LED
(1) Podłącz wentylator wyciągowy i lampę LED w miejscach pokazanych na rysunku liniowym i
zabezpiecz kable za pomocą dostarczonych zacisków kablowych.
-132-
PL
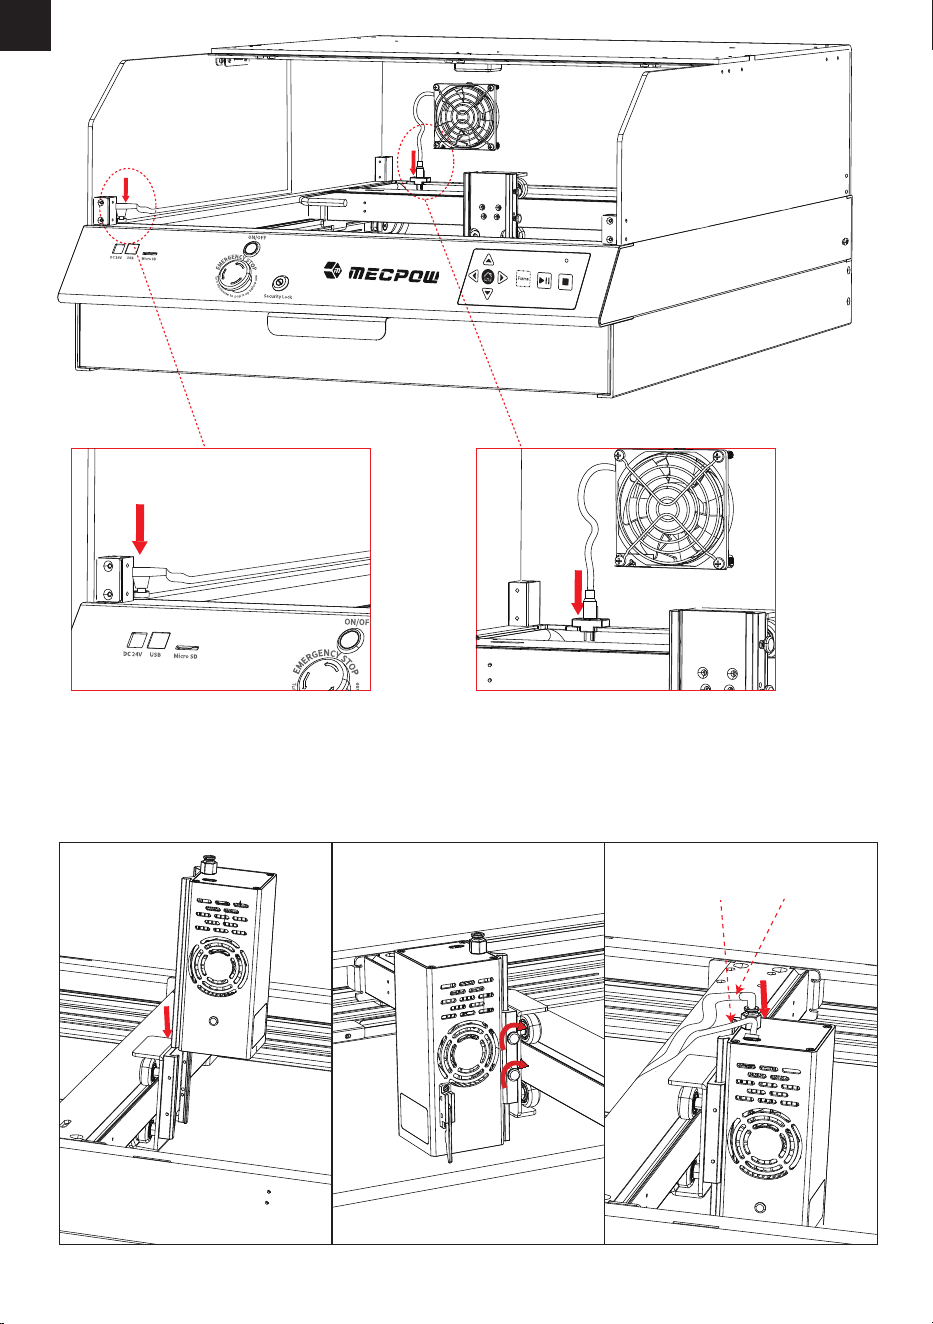
Krok 6: Instalacja modułu lasera
(1) Nasuń moduł lasera na płytę przesuwną. Wyreguluj moduł lasera do odpowiedniej wysokości, a następnie
ręcznie dokręć śruby.
(2) Podłącz kabel zasilający i kabel rury wydechowej do modułu lasera zgodnie z odpowiednimi otworami.
Uwaga: Kabel A jest kablem zasilania modułu lasera, a kabel B jest kablem rury wydechowej.
-133-
PL
A B
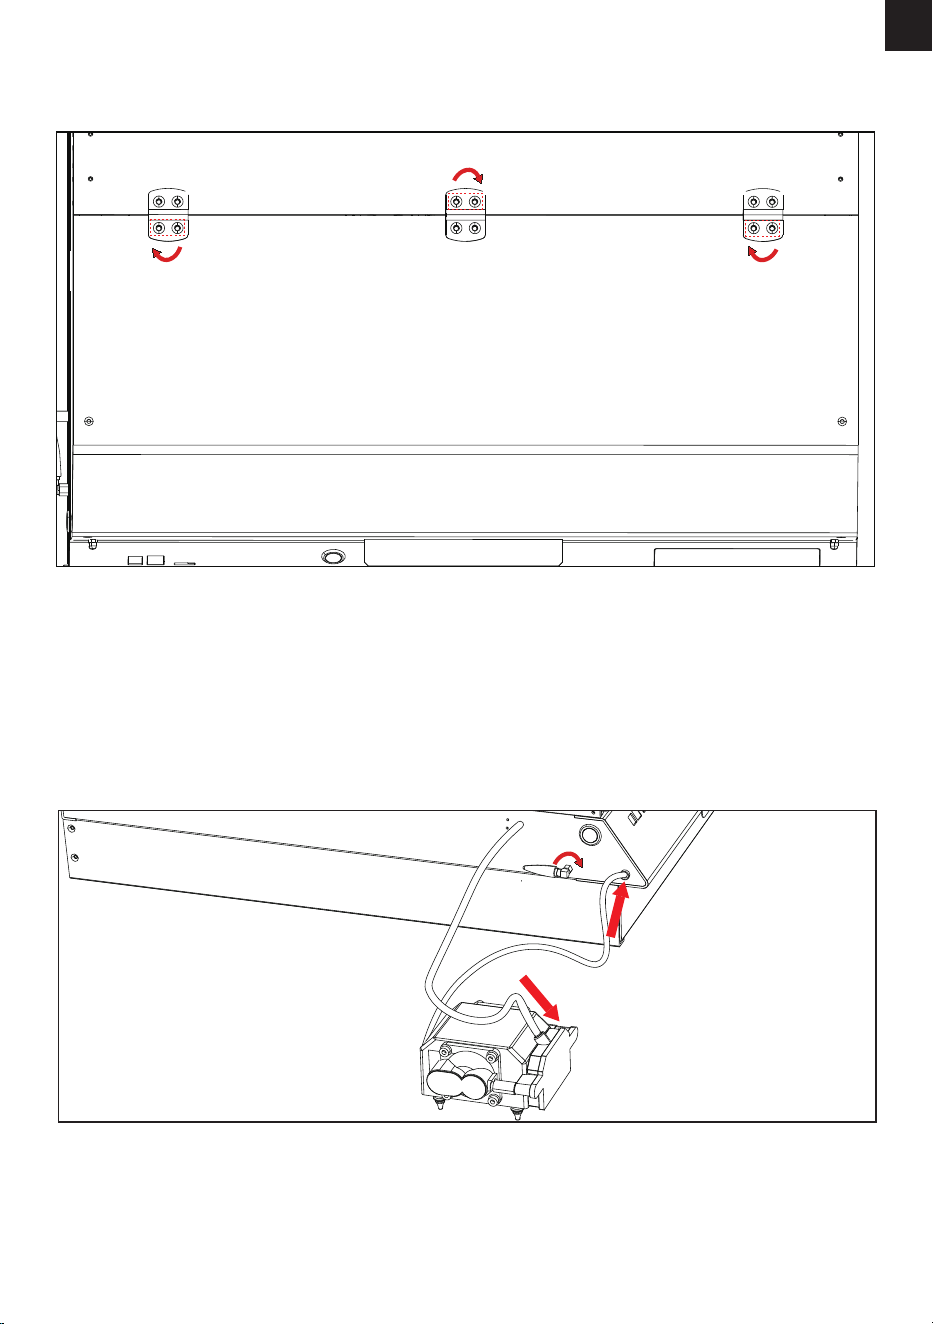
-134-
PL
Krok 7: Montaż przedniej osłony ochronnej
(1) Umieść przednią osłonę ochronną na górze i wyrównaj zawiasy z otworami na śruby.
(2) Dokręć śruby i wkręty, aby zabezpieczyć przednią pokrywę ochronną.
(1) Podłącz pompę powietrza do rurki urządzenia i podłącz kabel pompy powietrza do interfejsu pompy
powietrza.
(2) Podłącz antenę WiFi do urządzenia i obróć ją zgodnie z ruchem wskazówek zegara, aby ją dokręcić.
Krok 8: Instalacja pompy powietrza i anteny WiFi
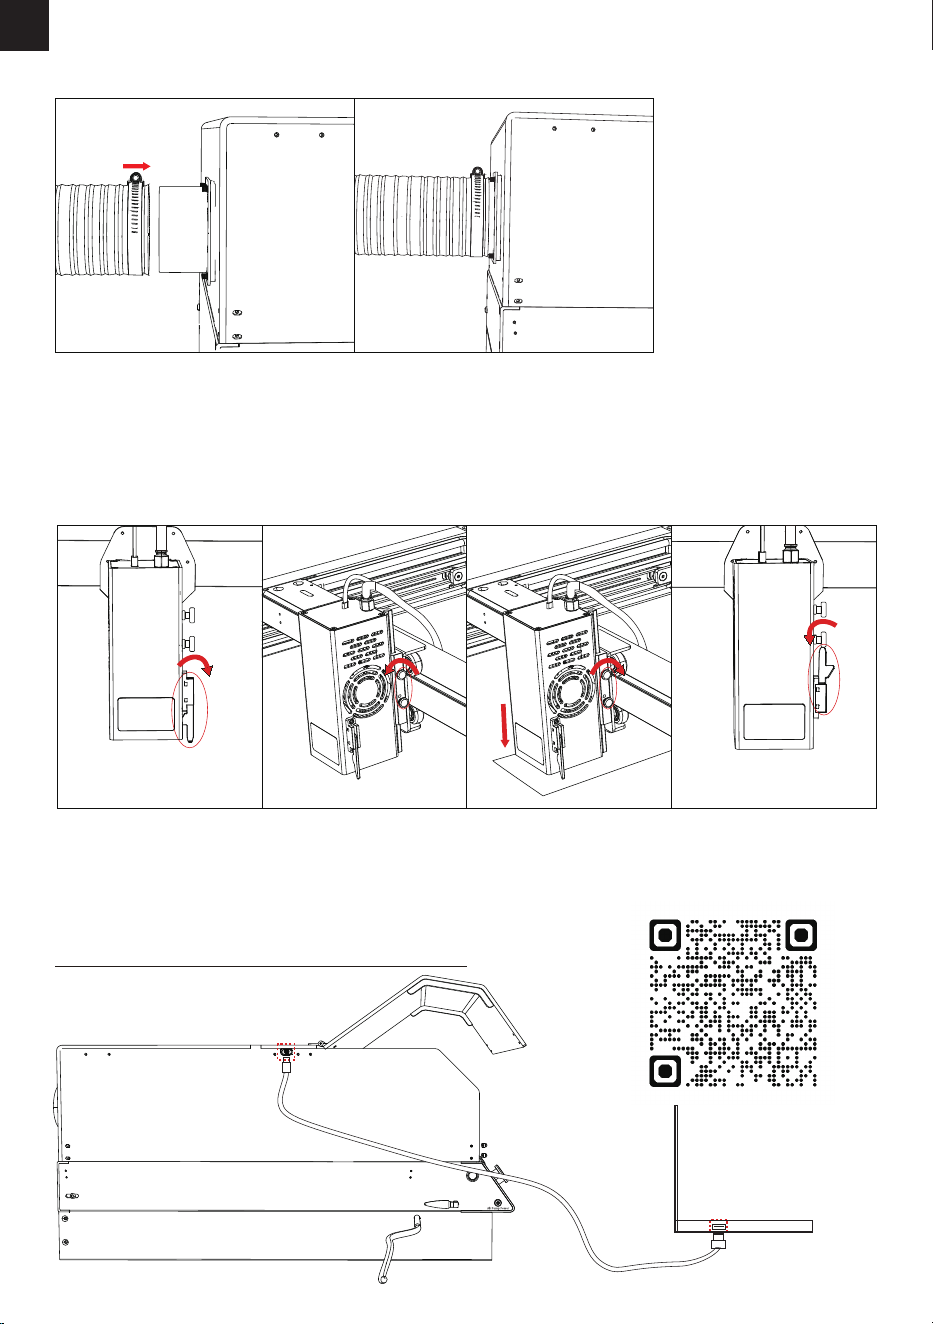
-135-
PL
(1) Pociągnij w dół pasek ogniskowania na module lasera.
(2) Przytrzymaj moduł lasera jedną ręką i poluzuj 2 śruby, aby przesunąć moduł lasera.
(3) Przesuń moduł lasera lekko w dół, aż pasek ogniskowania dotknie grawerowanego obiektu.
(4) Dokręć śruby, aby zabezpieczyć moduł lasera, a następnie wepchnij listwę ogniskującą na miejsce
(1) Zamontuj rurę wydechową i dokręć ją za pomocą obręczy.
Krok 10: Ustawianie ostrości
Krok 9: Montaż rury wydechowej
Uwaga: Aby uzyskać szczegółowe informacje na temat korzystania z kamery, odwiedź poniższy link lub
zeskanuj poniższy kod QR.
https://docs.lightburnsoftware.com/Camera/index.html
Krok 11: Podłączanie kabla USB kamery
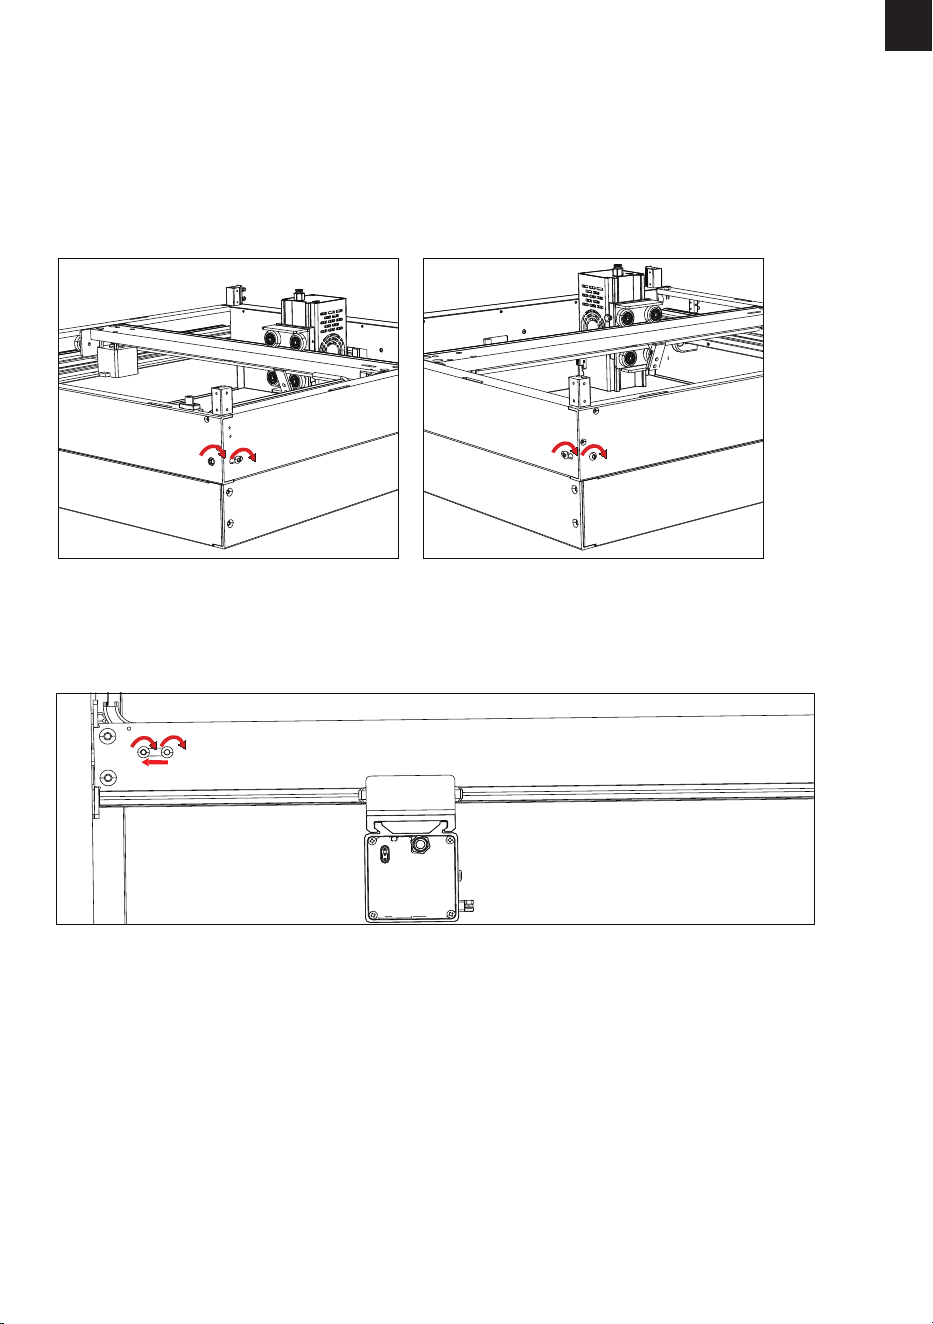
Napinanie pasków osi Y
Napinanie paska osi X
(1) Lekko poluzuj śrubę 1 pokazaną na rysunku.
(2) Obróć śrubę 2, aby napiąć paski, jak pokazano na rysunku.
(3) Dokręć śrubę 1, aby zabezpieczyć pasy.
Paski są wyregulowane fabrycznie. Jeżeli po pewnym czasie użytkowania paski poluzują się, można je
wyregulować w następujący sposób, aby uzyskać odpowiednie napięcie.
Jak wyregulować napięcie paska
(1) Lekko poluzuj dwie śruby regulatora napięcia paska osi X i przesuń regulator, aby napiąć pasek osi X.
(2) Dokręcić śruby mocujące regulator
-136-
PL
Śruba 1Śruba 2
Śruba 1 Śruba 2

-137-
PL
7. Funkcje i działanie
Części
Funkcje / nieprawidłowości
Działanie
Alarm
Alarm włączy się w przypadku
wystąpienia nieprawidłowości.
1. Ustal przyczynę alarmu.
2. Wyeliminuj ten czynnik.
3. Naciśnij przycisk zatrzymania awaryjnego
na 3 sekundy, aby zresetować urządzenie.
Po naciśnięciu przycisku obróć go z
powrotem do pierwotnej pozycji.
4. Postępuj zgodnie z instrukcjami obsługi
oprogramowania, aby wznowić pracę.
Moduł lasera Graweruje przedmioty i
materiały.
Nieprawidłowość: Moduł lasera
nie działa lub występują
nieprawidłowości w działaniu.
1. Sprawdź, czy kabel łączący modułu lasera jest
prawidłowo podłączony.
2. Sprawdź, czy główny panel sterowania działa
prawidłowo.
3. Sprawdź, czy oprogramowanie jest
prawidłowo zainstalowane lub skongurowane.
4. Jeśli nie można rozwiązać problemu, należy
skontaktować się z działem obsługi klienta.
Silnik krokowy Zapewnia normalne
funkcjonowanie modułu lasera.
1. Sprawdź, czy kable są zgodne z wymaganymi
specykacjami.
2. Sprawdź, czy kable są prawidłowo podłąc-
zone.
3. Sprawdź, czy panel sterowania działa
prawidłowo.
4. Sprawdź, czy oprogramowanie jest
prawidłowo zainstalowane lub skongurowane.
5. Jeśli nie można rozwiązać problemu, należy
skontaktować się z działem obsługi klienta.
Wyłącznik
awaryjny
Powoduje natychmiastowe
zatrzymanie pracy urządzenia.
Naciśnij przycisk, aby zatrzymać pracę
urządzenia i obróć przycisk zgodnie z
ruchem wskazówek zegara, aby
przywrócić urządzenie do pracy.
Czujnik
płomienia
Wykrywa pożar w urządzeniu lub w
jego pobliżu i aktywuje alarm,
jednocześnie zatrzymując jego
działanie w przypadku pożaru. Jest on
włączany/wyłączany za pomocą
przełącznika mechanicznego.
1. Sprawdź otoczenie i nie wystawiaj
urządzenia na bezpośrednie działanie
promieni słonecznych.
2. Skontaktuj się z działem obsługi
klienta w celu dostosowania czułości
czujnika płomienia.
Pompa
powietrza
Wspomaga urządzenie podczas pracy.
Nieprawidłowość: Urządzenie
przestaje działać lub występują
nieprawidłowości w jego działaniu.
anomalie operative.
1. Sprawdź, czy zasilacz jest podłączony do
źródła zasilania.
2. Sprawdź, czy złącze DC pompy powietrza jest
prawidłowo podłączone.
3. Jeśli nie można rozwiązać problemu, należy
skontaktować się z działem obsługi klienta.

-138-
PL
Przełącznik
czujnika
płomienia
Służy do sterowania aktywacją i
dezaktywacją czujnika ame w
zależności od aktualnej sytuacji.
Stan WŁĄCZONY: czujnik płomienia działa,
urządzenie zatrzymuje pracę automaty-
cznie po sprawdzeniu płomienia.
Stan WYŁĄCZONY: czujnik płomienia nie
działa, należy zwracać uwagę na zjawisko
pożaru w czasie rzeczywistym.
Czujnik
nachylenia
Jeśli kąt nachylenia urządzenia
przekracza 50±5 stopni, urządzenie
uruchomi alarm i przestanie działać.
Utrzymuj urządzenie pod kątem
mniejszym niż 45 stopni.
Blokada
bezpieczeństwa
Kontroluje przełącznik zasilania, aby
zapobiec fałszywemu włączeniu
zasilania.
Zachowaj klucz.
Wyłączniki
krańcowe
Zatrzymują one ruch modułu lasera,
gdy przesunie się on do punktu
początkowego osi X lub Y.
1. Sprawdź, czy kabel wyłącznika
krańcowego jest odłączony.
2. Sprawdź, czy wtyczka wyłącznika
krańcowego jest zainstalowana na swoim
miejscu.
3. Sprawdź, czy wyłącznik krańcowy styka
się z odpowiednim komponentem.
4. Jeśli nie można rozwiązać problemu,
należy skontaktować się z serwisem.
Przednia pokrywa
ochronna
Urządzenie przestaje działać, gdy
przednia pokrywa ochronna jest
otwarta.
Zamknij przednią pokrywę ochronną i
naciśnij przycisk "Start/Pauza", aby
urządzenie mogło kontynuować pracę.
Metody
sterowania
1. Sterowanie za pomocą
oprogramowania komputerowego
2. Sterowanie za pomocą panelu
sterowania i karty TF
3. Sterowanie za pomocą aplikacji
mobilnej i karty TF
1. Podłącz do komputera za pomocą kabla
USB i steruj za pomocą LightBurn lub
LaserGRBL.
2. Praca w trybie oine przy użyciu panelu
sterowania i karty TF.
3. Praca w trybie oine przy użyciu aplikacji
MKSlaser i karty TF.
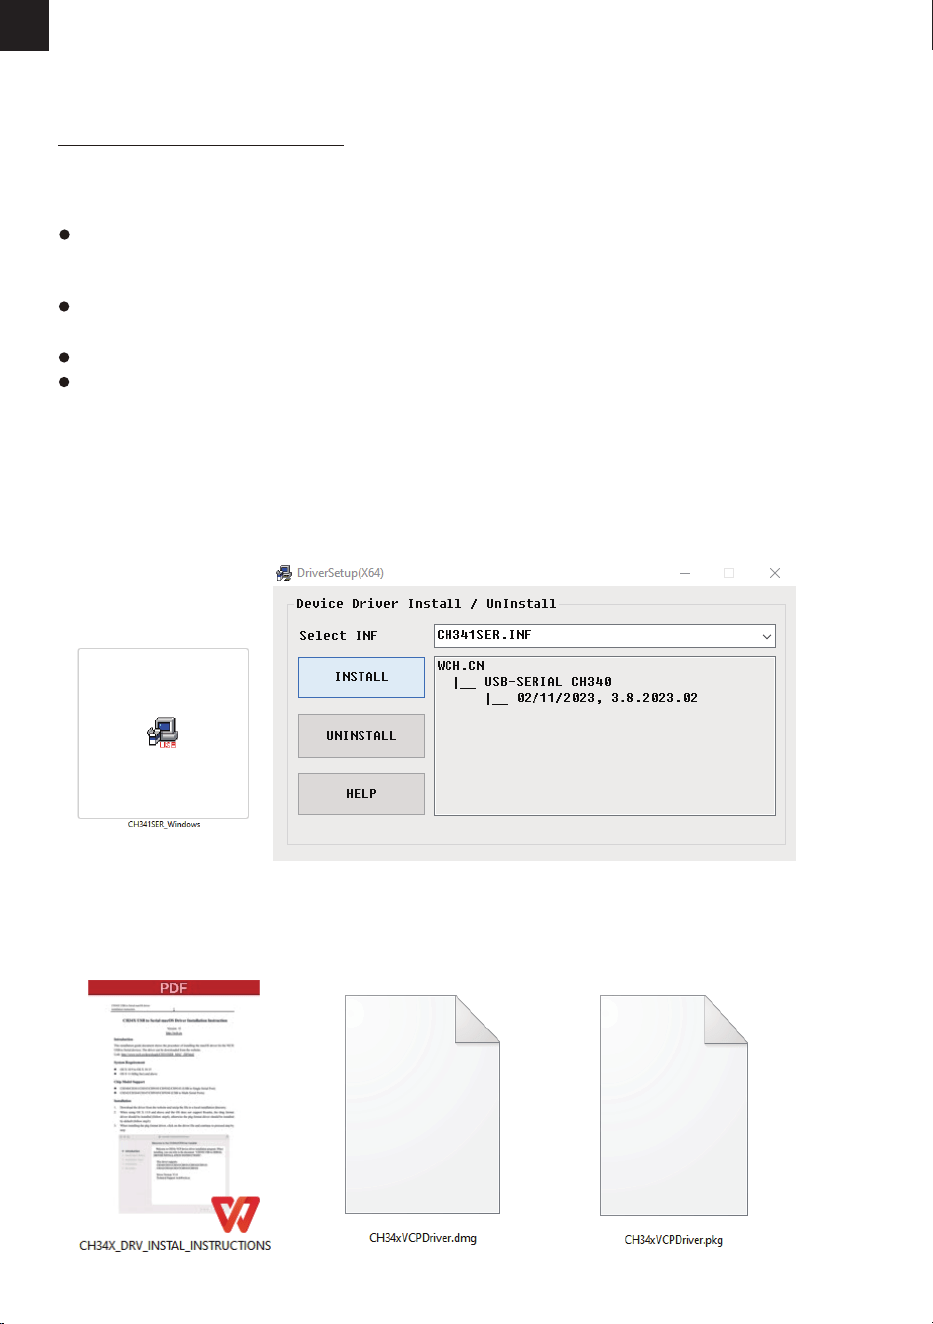
-139-
PL
1. Pobierz sterownik z poniższego łącza.
https://mecpow.com/pages/driver-les
2. Skontaktuj się z obsługą klienta, aby uzyskać plik sterownika..
Notatka:
W przypadku użytkowników systemu Windows, jeśli korzystasz z systemu poniżej Win10, musisz
ręcznie zainstalować sterownik. W przypadku korzystania z systemu Win10 lub nowszego nie ma
potrzeby instalowania sterownika.
Sterownik dla użytkowników komputerów Mac obsługuje systemy od OS X 10.9 do OS X 10.15 oraz
OS X 11.0 (Big Sur) i nowsze.
Sterownik dla użytkowników systemu Linux obsługuje systemy 32-bitowe i 64-bitowe.
Włącz urządzenie i podłącz je do komputera kablem USB przed uruchomieniem sterownika!
Dla użytkowników komputerów Mac:
1. Otwórz instrukcję.
2. Otwórz pobrany sterownik i postępuj zgodnie z instrukcjami, aby go zainstalować.
8. Sterownik
Metody ściągania sterownika
Instalacja
Dla użytkowników systemu Windows:
1. Otwórz pobrany sterownik.
2. Kliknij "INSTALL".
3. Kliknij "OK", gdy sterownik zostanie pomyślnie zainstalowany.
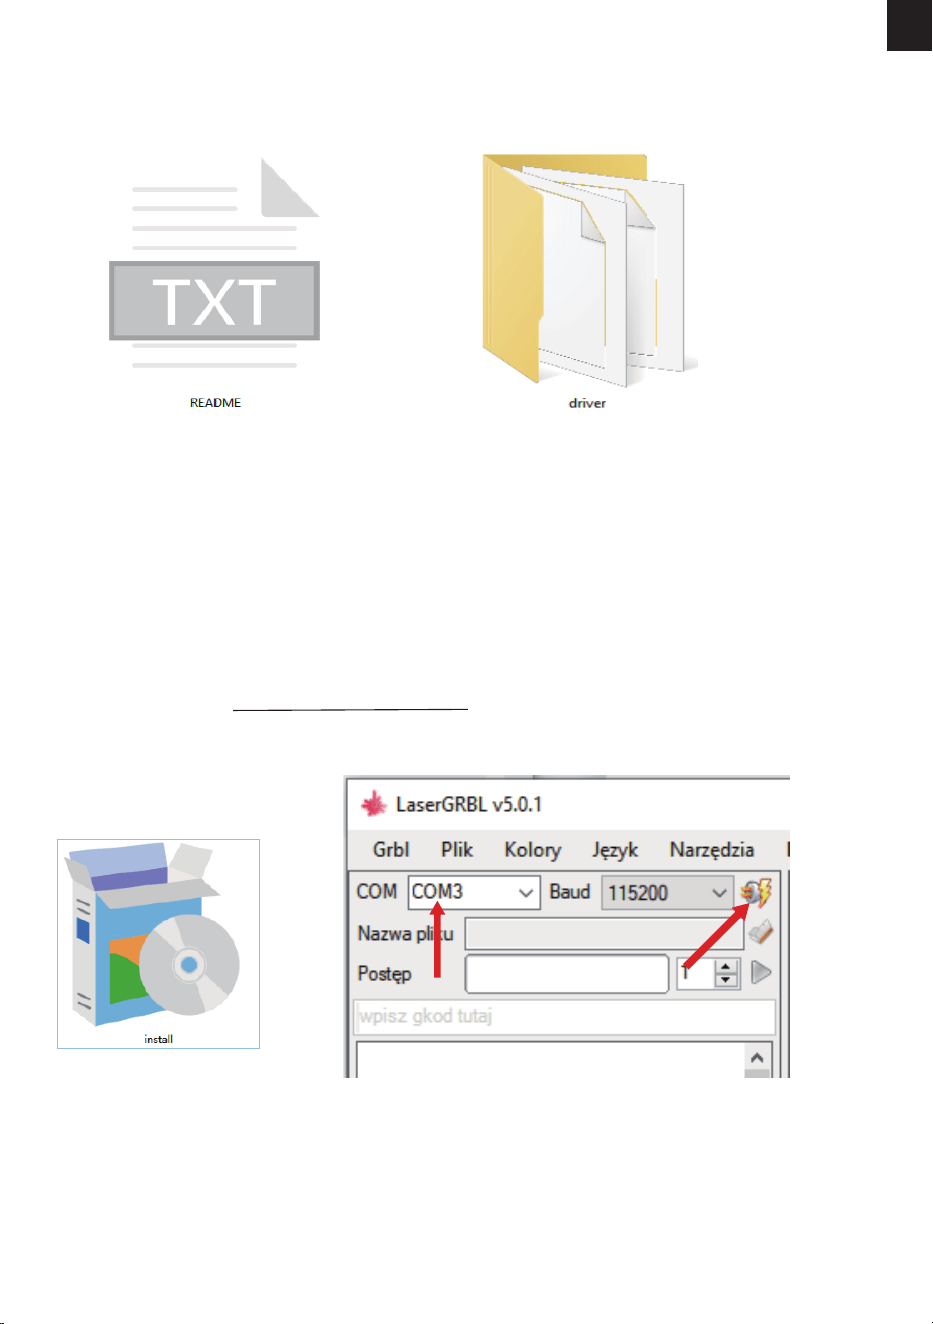
-140-
PL
Dla użytkowników systemu Linux:
1. Otwórz plik - README.
2. Otwórz plik - sterownik i postępuj zgodnie z "README", aby go zainstalować.
9. Sterowanie za pomocą oprogramowania
komputerowego
LaserGRBL
Jest to bezpłatne oprogramowanie typu open source, które obsługuje komputery z systemem
Windows. Pobierz go z: http://lasergrbl.com/download/
1. Zainstaluj go. 2. Otwórz oprogramowanie. Kliknij „Połącz” i wybierz „COM3”.
Podłącz maszynę do grawerowania do oprogramowania w czasie rzeczywistym za pomocą kabla USB.
Podczas pracy można uruchomić lub zatrzymać maszynę grawerującą za pomocą panelu sterowania.
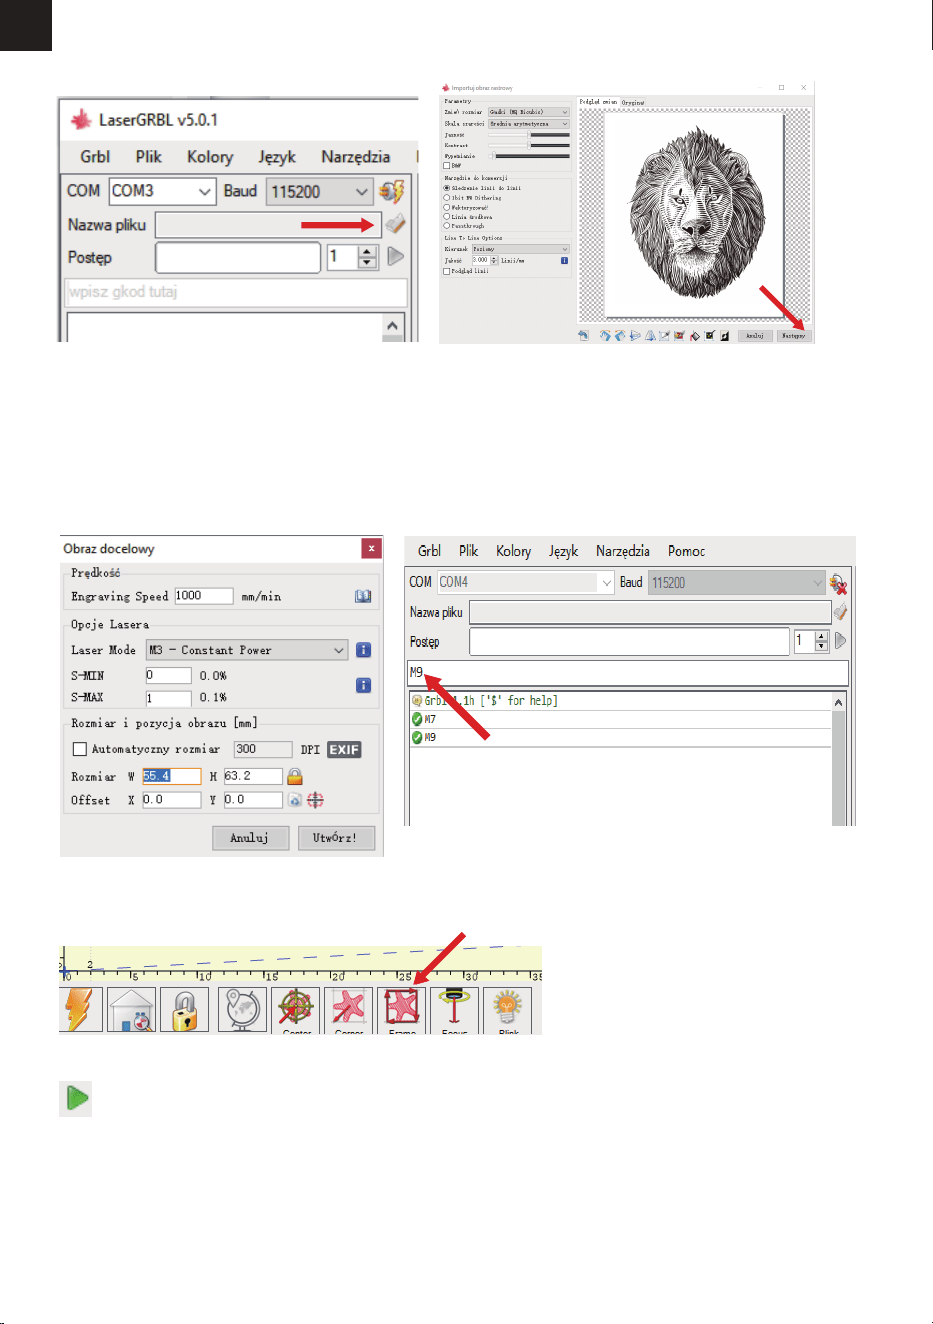
-141-
PL
3. Kliknij „Otwórz plik”, aby wybrać plik
do grawerowania.
4. Wybierz tryb grawerowania i kliknij „Następny”.
5. Wybierz parametry operacyjne do
grawerowania lub cięcia laserowego. (M3
służy do rzeźbienia ze stałą mocą, a M4 do
zmiennej mocy. Sprawdź w rozdziale 10
zalecane parametry operacyjne do
grawerowania lub cięcia różnych materiałów.)
6. Wprowadź "M7" w polu poleceń i naciśnij
Enter, aby uruchomić pompę powietrza. Aby
zatrzymać pompę powietrza, wprowadź "M9"
w tym samym polu i naciśnij Enter.
7. Kliknij „Framing”, aby wyświetlić podgląd zakresu grawerowania i dostosować pozycję grawerowania.
8. Kliknij „Uruchom program”, aby rozpocząć grawerowanie.
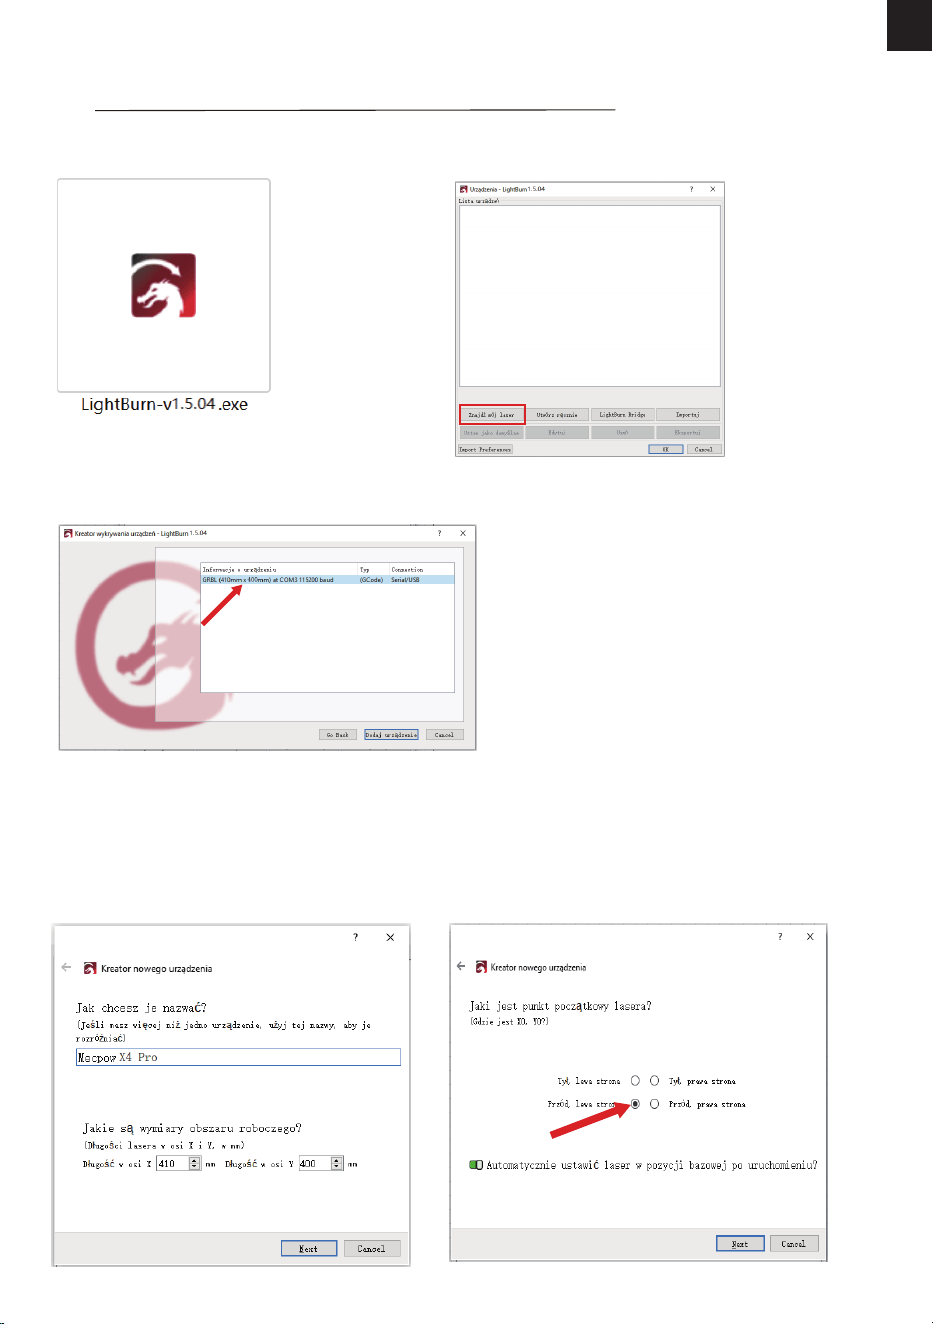
-142-
PL
LightBurn
Jest to płatne profesjonalne oprogramowanie obsługujące komputery MAC, Linux i Windows. Pobierz
go z: https://lightburnsoftware.com/pages/trial-version-try-before-you-buy
1. Zainstaluj go.
2. Otwórz oprogramowanie i kliknij „Znajdź mój laser”.
3. Wybierz swoje urządzenie i kliknij „Dodaj urządzenie”.
4. Nazwij swoje urządzenie i wprowadź
długości osi X i Y, a następnie kliknij „Next”.
Nazwa: Mecpow X4 Pro
Długość w osi X: 410 mm
Długość w osi Y: 400 mm
5. Wybierz „Przód, lewa strona” jako
źródło lasera i kliknij „Next”.
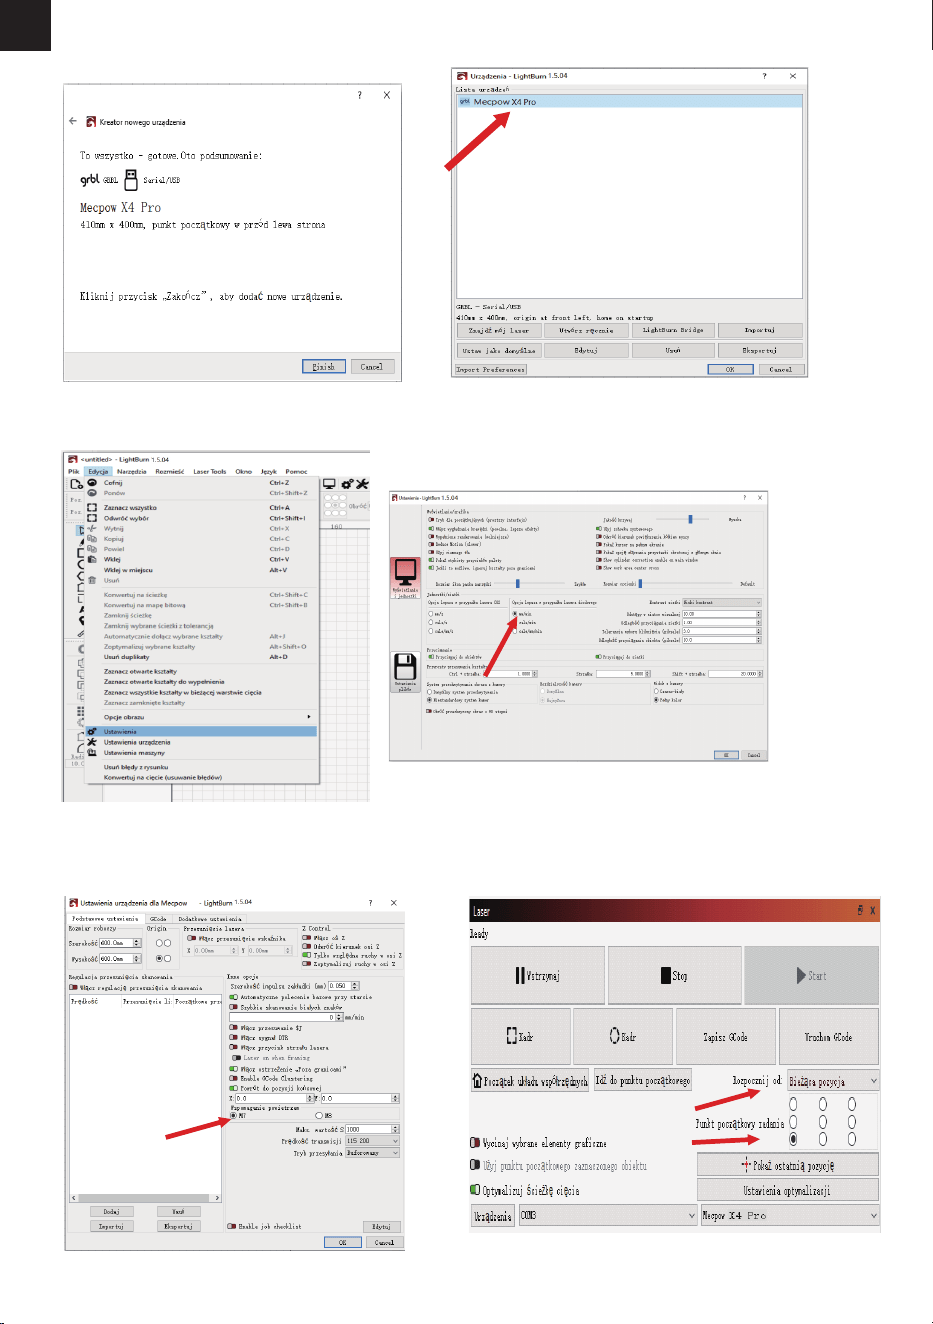
-143-
PL
8. Kliknij „Edycja” - „Ustawienia” i ustaw jednostkę „mm/min”, a następnie kliknij „OK”.
10. Wybierz opcję „Bieżąca pozycja” w sekcji
„Rozpocznij od”, a następnie wybierz kółko w lewym
dolnym rogu sekcji „Punkt początkowy zadania”.
9. Kliknij "Edytuj" - "Ustawienia urządzenia" i wybierz
"M7" w sekcji "Wspomaganie powietrzem", aby pompa
powietrza działała w synchronizacji z urządzeniem.
6. Kliknij „Finish”. 7. Wybierz Mecpow X4 Pro i kliknij „OK”.
4
X4
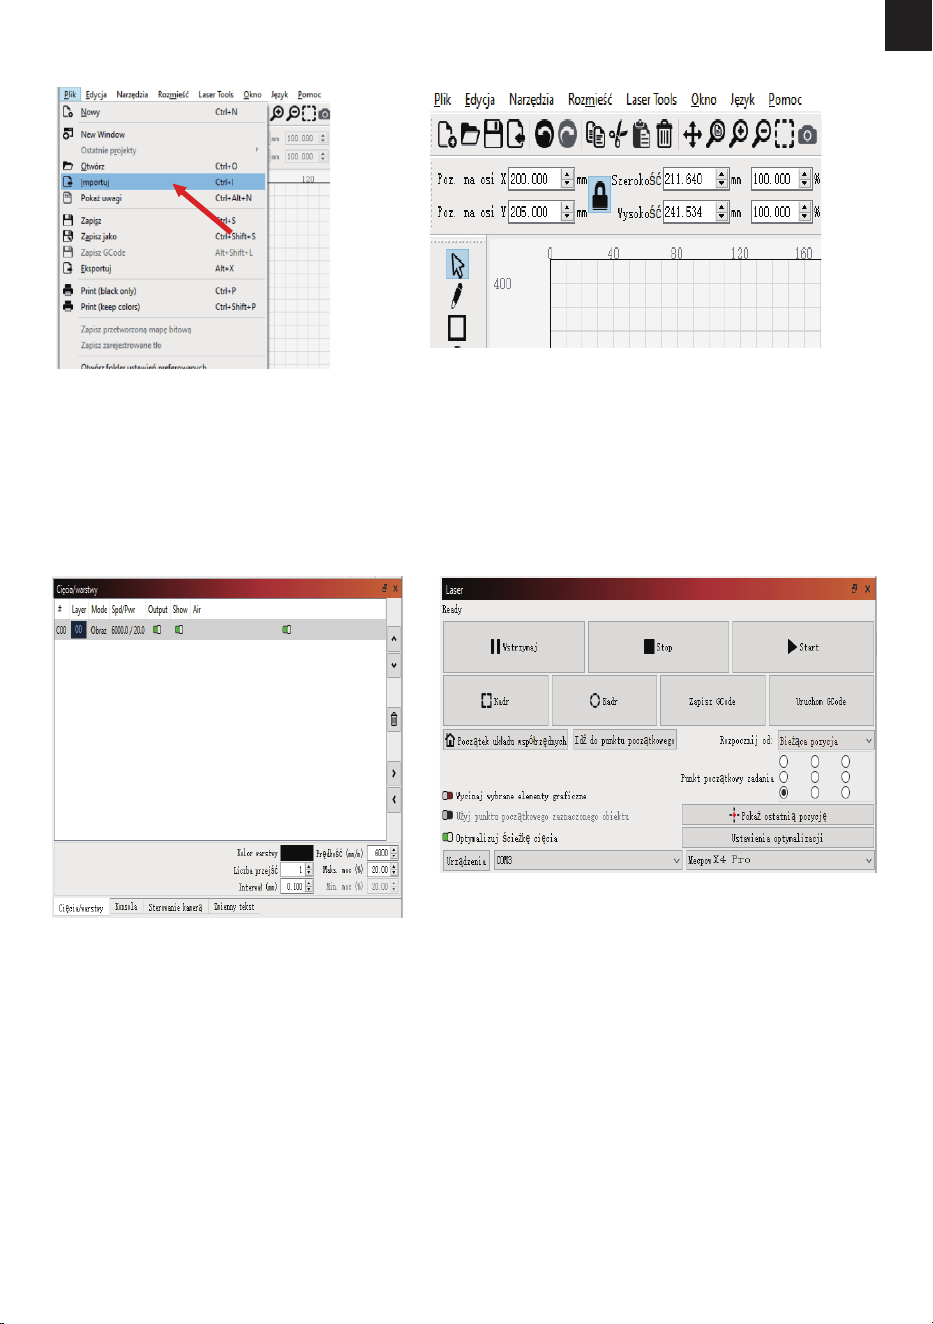
-144-
PL
11. Kliknij „Plik” - „Importuj”, aby
zaimportować plik grawerowania.
12. Możesz zmodykować rozmiar grawerowania w
górnej części interfejsu po zaimportowaniu pliku.
13. Wybierz tryb grawerowania i ustaw
parametry pracy dla grawerowania lub cięcia
laserowego. (Zalecane parametry operacyjne do
grawerowania lub cięcia różnych materiałów są
wymienione w następnej sekcji.)
14. Kliknij „Kadr”, aby wyświetlić podgląd zakresu
grawerowania i dostosować pozycję grawerowan-
ia, a następnie kliknij „Start”, aby rozpocząć
grawerowanie.
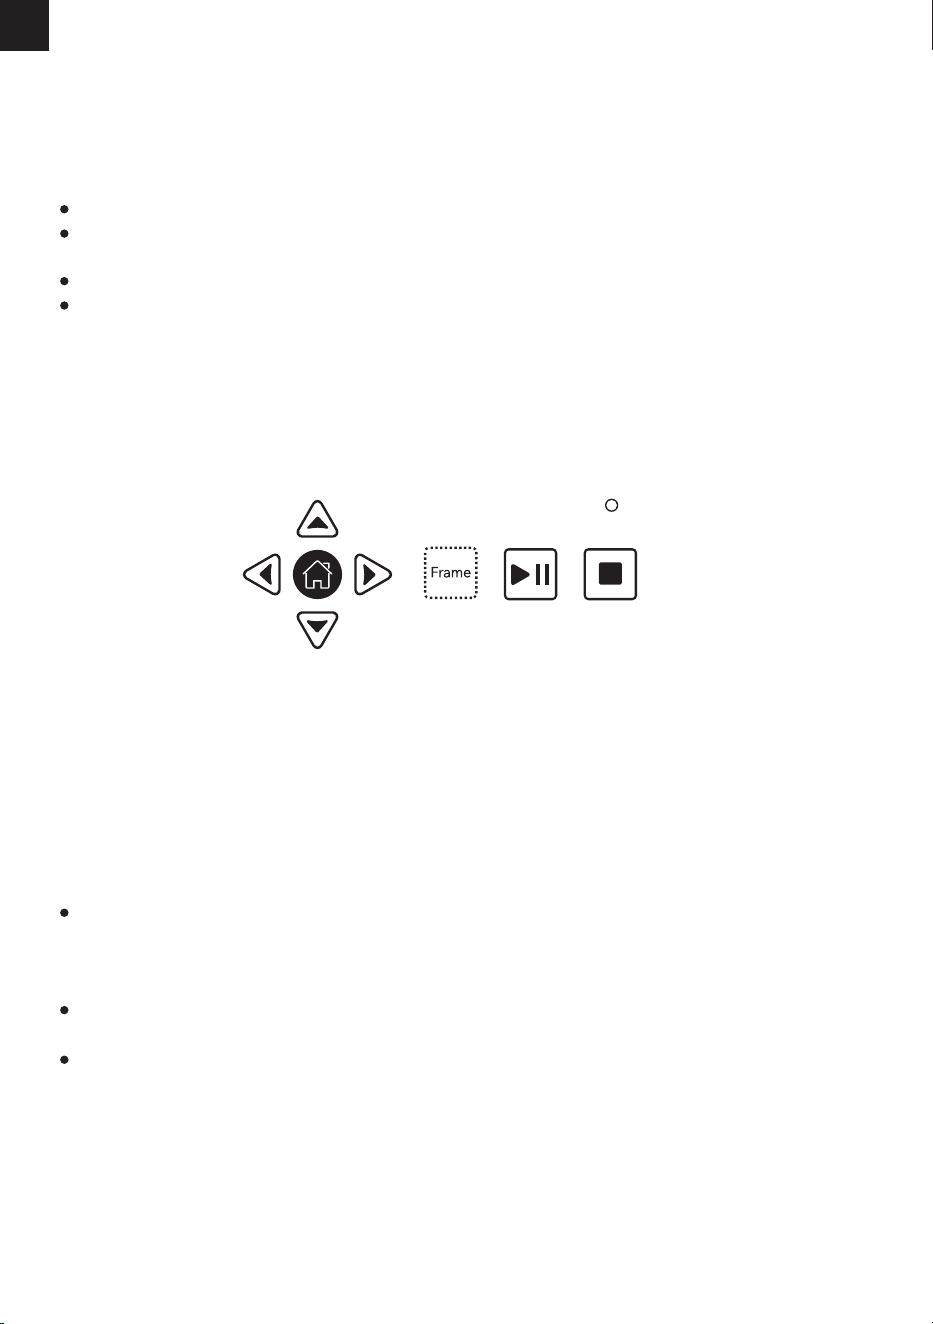
-145-
PL
1. Przygotuj plik LightBurn G-code do grawerowania lub cięcia i zapisz go w katalogu głównym karty TF. Włóż
kartę TF do urządzenia do grawerowania. Wskaźnik na panelu sterowania zaświeci się, wskazując, że plik został
pomyślnie załadowany.
2. Naciśnij przycisk "Frame", a urządzenie przejdzie do trybu podglądu. Moduł lasera przesunie się wzdłuż osi
X/Y, aby wykadrować docelowy obszar roboczy. Następnie można ręcznie ustawić grawerowany obiekt we
właściwej pozycji lub użyć przycisków strzałek na panelu sterowania, aby ustawić moduł lasera we właściwej
pozycji.
3. Naciśnij przycisk "Start/Pauza", aby rozpocząć grawerowanie/cięcie. W przypadku konieczności wstrzymania
pracy grawerki należy nacisnąć przycisk "Start/Pauza", a następnie nacisnąć go ponownie, aby kontynuować
grawerowanie/cięcie. Jeśli chcesz zakończyć zadanie, naciśnij przycisk "Stop". Po zakończeniu grawerowan-
ia/cięcia moduł laserowy powróci do pozycji wyjściowej. Jeśli urządzenie nie jest w stanie pracy, naciśnij
przycisk "Start/Pauza", a grawerka powtórzy ostatnie zadanie grawerowania/cięcia, co jest odpowiednie dla
produkcji masowej.
Karta TF obsługuje tylko format FAT32.
Grawerka domyślnie odczytuje ostatnio zmodykowany plik w katalogu głównym karty TF, jeśli znajduje się
na niej więcej niż jeden plik.
Grawer rozpoznaje tylko pliki NC i GC z nazwami w języku angielskim.
Grawer może rozpoznać pliki NC i GC zapisane za pomocą LightBurn. Jednak pliki NC i GC zapisane za
pomocą LaserGRBL mogą być rozpoznawane przez grawer tylko po konwersji za pomocą MKSLaser. Program
MKSLaser można pobrać z dołączonej karty TF lub ze strony Mecpow.com.
Uwaga:
10. Sterowanie za pomocą panelu sterowania i karty TF
Przyciski "Start/Pauza" i "Stop" mają większy dostęp do sterowania grawerką niż oprogramowanie
komputerowe i aplikacja mobilna, co oznacza, że zadania grawerowania/wycinania wykonywane przez
komputer lub telefon komórkowy można uruchamiać, wstrzymywać i kończyć bezpośrednio za pomocą
panelu sterowania.
Jeśli zadanie grawerowania/cięcia wykonane za pomocą komputera lub telefonu komórkowego zostanie
zakończone, można je ponownie uruchomić tylko za pomocą komputera lub telefonu komórkowego.
Klawisze "Frame" i strzałek nie działają podczas procesu grawerowania/cięcia.
Uwaga:
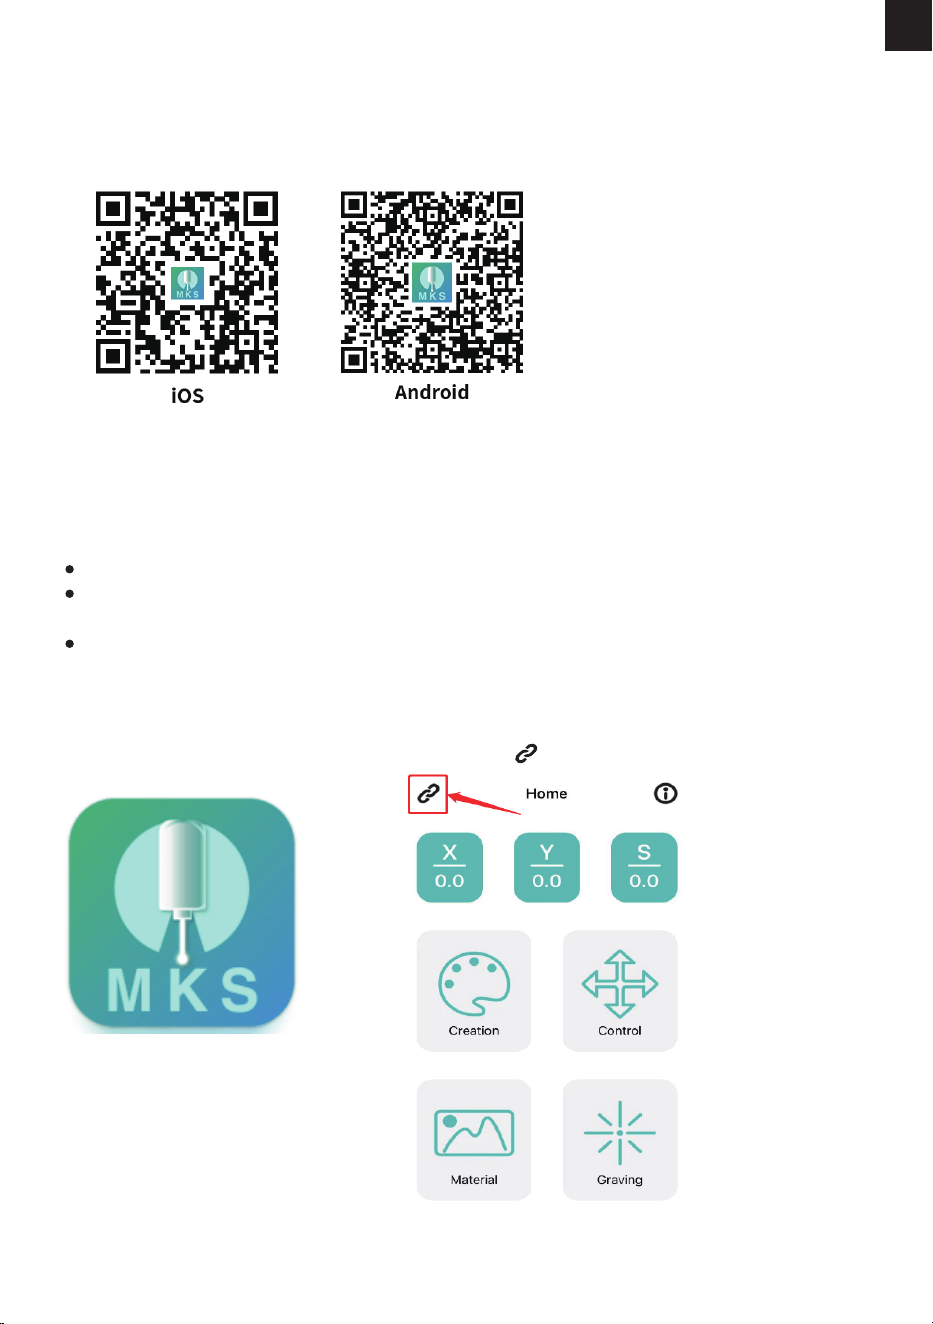
-146-
PL
„*****” w nazwie sieci Wi-Fi to losowa kombinacja cyfr. Zależy to od maszyny.
Aby zapewnić stabilność sygnału Wi-Fi, zaleca się podłączenie telefonu do Wi-Fi maszyny grawerującej
przed włożeniem karty TF.
Aplikacja musi być używana z kartą TF. Przesyłanie pliku grawerowania nie powiedzie się, jeśli karta TF nie
została włożona
MKSLaser to bezpłatna aplikacja mobilna, która obsługuje urządzenia z systemem Android i iOS.
1. Włącz funkcję Wi-Fi w telefonie i połącz Wi-Fi "Mecpow_*****".
Nazwa Wi-Fi: Mecpow_*****
Hasło Wi-Fi: 12345678
2. Otwórz aplikację MKSLaser.
3. Kliknij ikonę .
Zeskanuj kod QR i pobierz aplikację.
Pobieranie aplikacji
Połączenie Wi-Fi
11.Kontrola przez aplikacje mobilnq i karte TF
Uwaga:
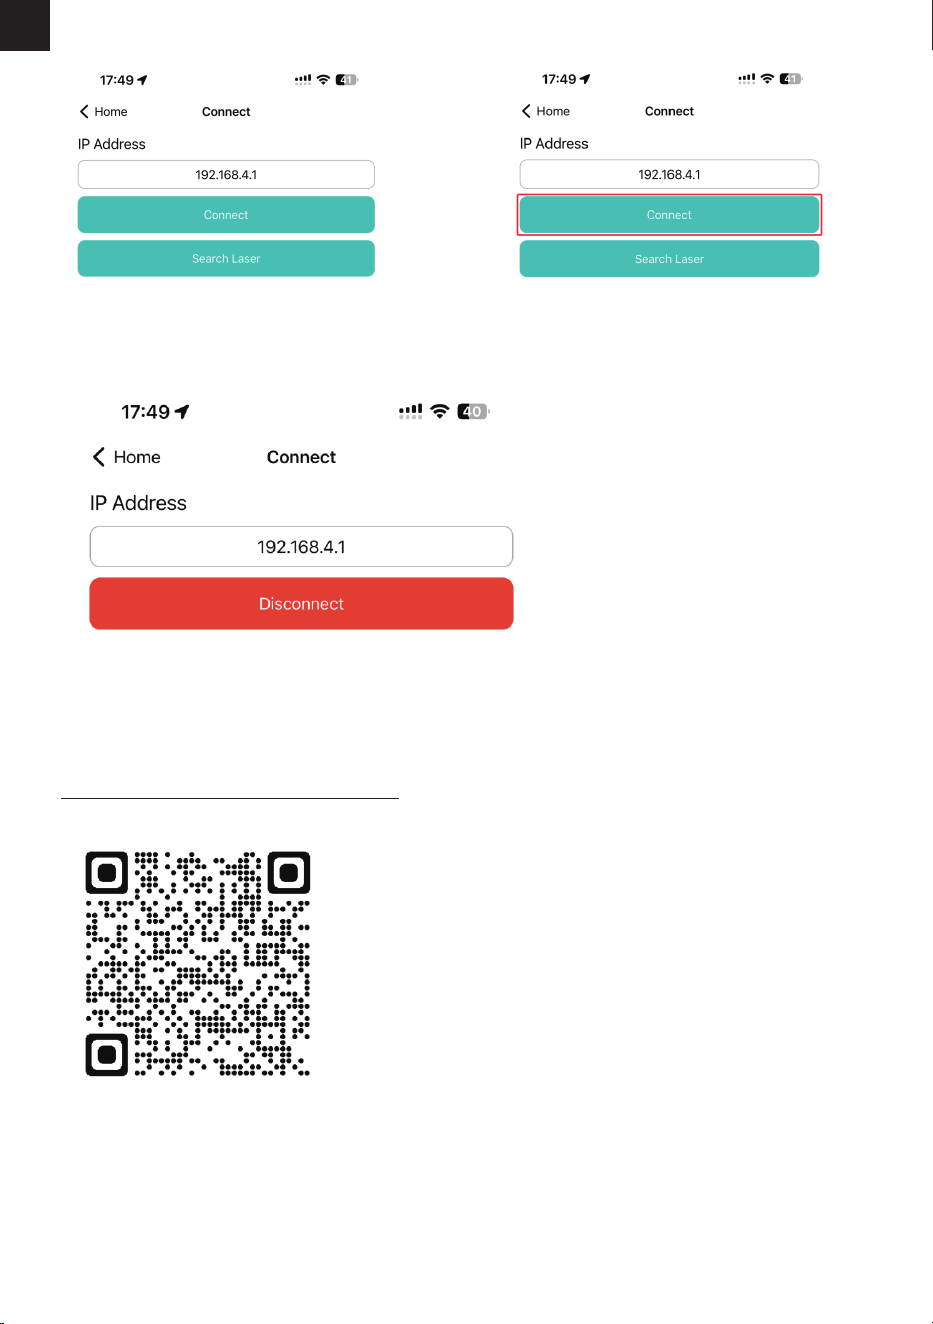
-147-
PL
Aby uzyskać szczegółowe informacje na temat korzystania z aplikacji MKSLaser, należy zapoznać się z
informacjami na karcie TF lub pobrać instrukcję obsługi, odwiedzając poniższe łącze lub skanując poniższy
kod QR.
https://mecpow.com/pages/download-center
4. Wpisz adres IP: 192.168.4.1 5. Kliknij „Connect”.
6. Kiedy „Connect” zmieni się na „Disconnect”, oznacza to, że połączenie Wi-Fi zostało pomyślnie nawiązane.
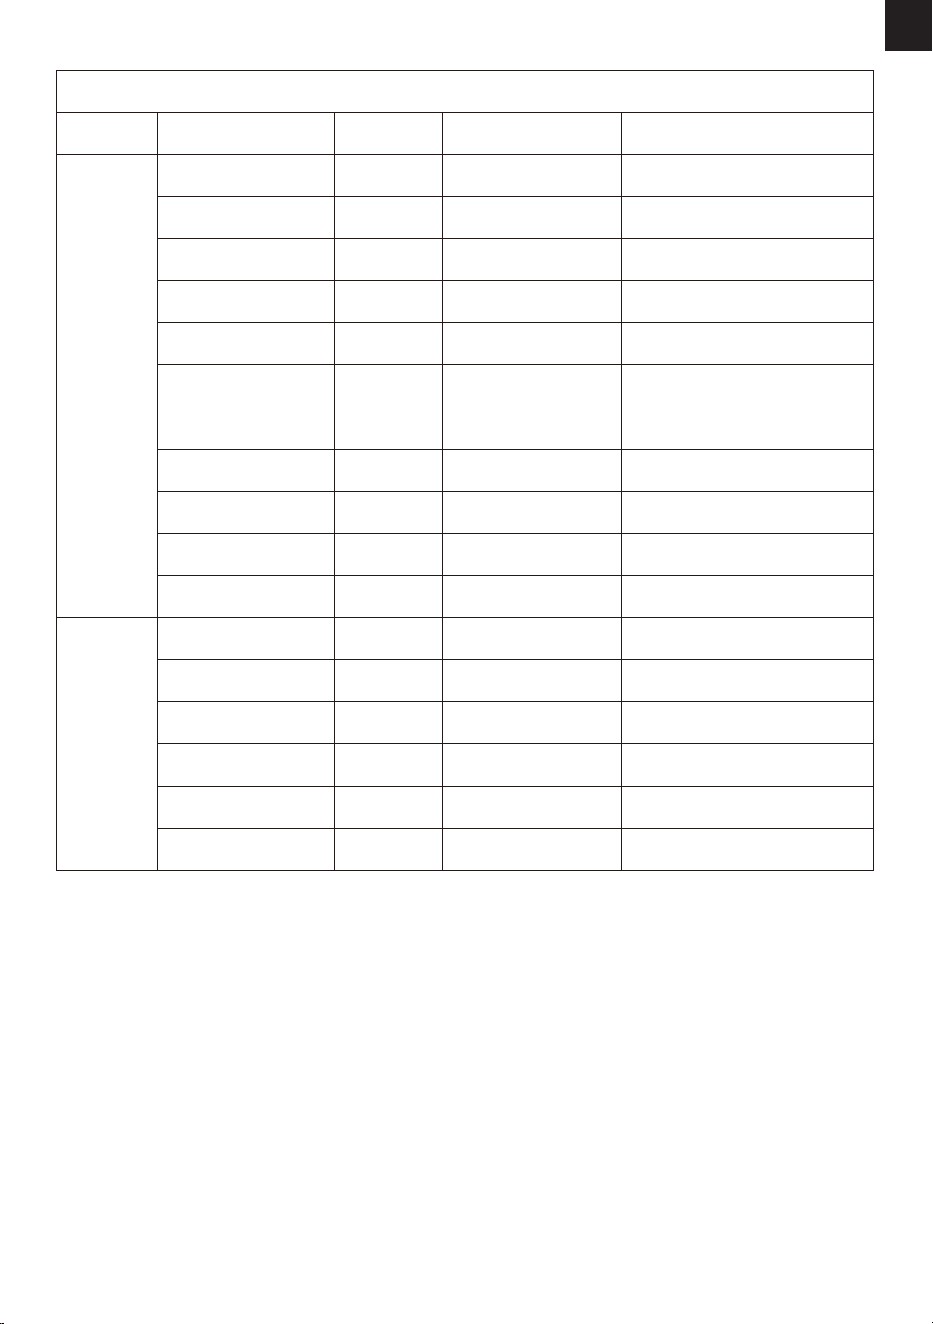
-148-
PL
13. Rozwiązywanie problemów
1. Maszyna nie reaguje po włączeniu.
A. Sprawdź, czy urządzenie jest prawidłowo podłączone do gniazdka i włączone.
2. Urządzenie nie łączy się z komputerem.
A. Sprawdź, czy kabel USB jest prawidłowo podłączony zarówno do komputera, jak i do urządzenia.
B. Zainstaluj sterownik zgodnie z instrukcją i upewnij się, że komputer rozpoznaje urządzenie jako port szeregowy.
C. Odłącz kabel USB i zasilacz, odczekaj 5 sekund, a następnie podłącz ponownie.
3. Grawer jest zbyt jasny lub nie istnieje.
A. Upewnij się, że urządzenie jest dokładnie ustawione zgodnie z instrukcją.
B. Dostosuj prędkość grawerowania. Jeśli graweruje zbyt szybko, może nie mieć wystarczająco dużo czasu, aby spalić
przedmiot.
C. Obraz jest zbyt płytki. Importowane obrazy muszą być wyraźne, z drobnymi liniami i niezbyt jasnymi kolorami,
ponieważ wpłynie to bezpośrednio na efekt grawerowania.
D. Upewnij się, że grawerowany przedmiot jest umieszczony płasko i równolegle do maszyny, aby uniknąć
problemów z ostrością.
20 3000
3000
1000
3000
1000
1000
3000
50
13
20
50
80
50
50
80
3000
600
3000
200
130
75
3000
100
15
100
100
100
80
80 300
100
12. Zalecane parametry pracy
Mecpow X4 Pro (22W)
Tryb
Rytownictwo
Materiały
Deska drewniana
Bambus
Żywica
Skóra
Powierzchnia wymaga
pomalowania.
Powierzchnia wymaga
pomalowania.
Nie grawerować na polerowanej
stali nierdzewnej.
Powierzchnię należy ałożyć
papierem termotransferowym.
Szkło
Ceramika
Akryl
Moc
(%)
UwagaPrędkość
(mm/min)
Guma
Stal nierdzewna
Karton
Płyta o grubości 8 mm
Płyta o grubości 9 mm
Ciąć
Płyta o grubości 10 mm
Papier 0,2 mm
Skóra 2 mm
Akryl 5 mm
-149-
PL
Więcej pytań i odpowiedzi można znaleźć pod poniższym linkiem lub skanując poniższy kod QR.
https://mecpow.com/pages/faq
4.Grawerowanie offline zostaje nieoczekiwanie zatrzymane.
A. Sprawdź, czy przycisk zatrzymania awaryjnego nie został przypadkowo naciśnięty. Jeśli został naciśnięty, obróć go
w prawo, aby go zwolnić.
B. Sprawdź, czy wyłącznik nie został przypadkowo przełączony. Jeśli tak, włącz go ponownie.
C. Jeśli wszystkie powyższe sposoby okazały się niewystarczające, skontaktuj się z działem obsługi klienta.
5.Oprogramowanie wyłącza się nagle podczas grawerowania.
A. Sprawdź, czy kabel USB nie jest poluzowany.
B. Upewnij się, że oprogramowanie zostało poprawnie zainstalowane, a pliki konguracyjne są prawidłowe.
C. Sprawdź, czy plik grawerowania jest prawidłowy.
D. Jeśli wszystkie powyższe sposoby okazały się niewystarczające, skontaktuj się z działem obsługi klienta.
6.Urządzenie porusza się prawidłowo, ale laser nie działa.
A. Sprawdź, czy kabel modułu lasera jest prawidłowo podłączony.
B. Sprawdź, czy z wentylatora modułu lasera nie wydobywa się niewielki hałas.
C. Jeśli wszystkie powyższe sposoby okazały się niewystarczające, skontaktuj się z działem obsługi klienta.
14. Oświadczenie o zgodności
Ten produkt jest zgodny z normami Wspólnoty Europejskiej.
Ten produkt jest zgodny z przepisami UE dotyczącymi ograniczenia stosowania niebezpiecznych
substancji w sprzęcie elektrycznym i elektronicznym (RoHS), które ograniczają stosowanie
niebezpiecznych substancji w sprzęcie elektrycznym i elektronicznym w celu ochrony środowiska i
zdrowia publicznego.
To urządzenie jest zgodne z częścią 15 przepisów FCC. Działanie podlega następującym dwóm
warunkom: (1) to urządzenie nie może powodować szkodliwych zakłóceń oraz (2) to urządzenie musi
akceptować wszelkie odbierane zakłócenia, w tym zakłócenia, które mogą powodować niepożądane
działanie.
Laserowy znak ostrzegawczy służy do ostrzegania użytkowników i gości, jeśli istnieje ryzyko
narażenia na nieosłonięty promień lasera. Ekspozycja na niektóre lasery może spowodować
uszkodzenie oczu lub układu optycznego oraz oparzenia skóry.
Ten symbol oznacza, że produkt nadaje się do recyklingu.

CHENGDU XINHONGJIN TECHNOLOGY CO., LTD.
No. 26, 1/F, Building 3, No. 68, Haichang Road, Huayang Street,
Tianfu New District, Chengdu City, Sichuan, China
www.mecpow.com [email protected]
EC REP
CET PRODUCT SERVICE LTD.
Osterho lzallee 144, 71636 Ludwigsburg Germany
E- mail::info@cetproduct.com Tel::+4971 416432236