EN User Manual A4/A3 Laminator with Trimmer
SLA 230/SLA 330
SLA 230, SLA 330
2 EN
EN
Copyright © 2025, Fast ČR, a. s.
Revision 01/2025
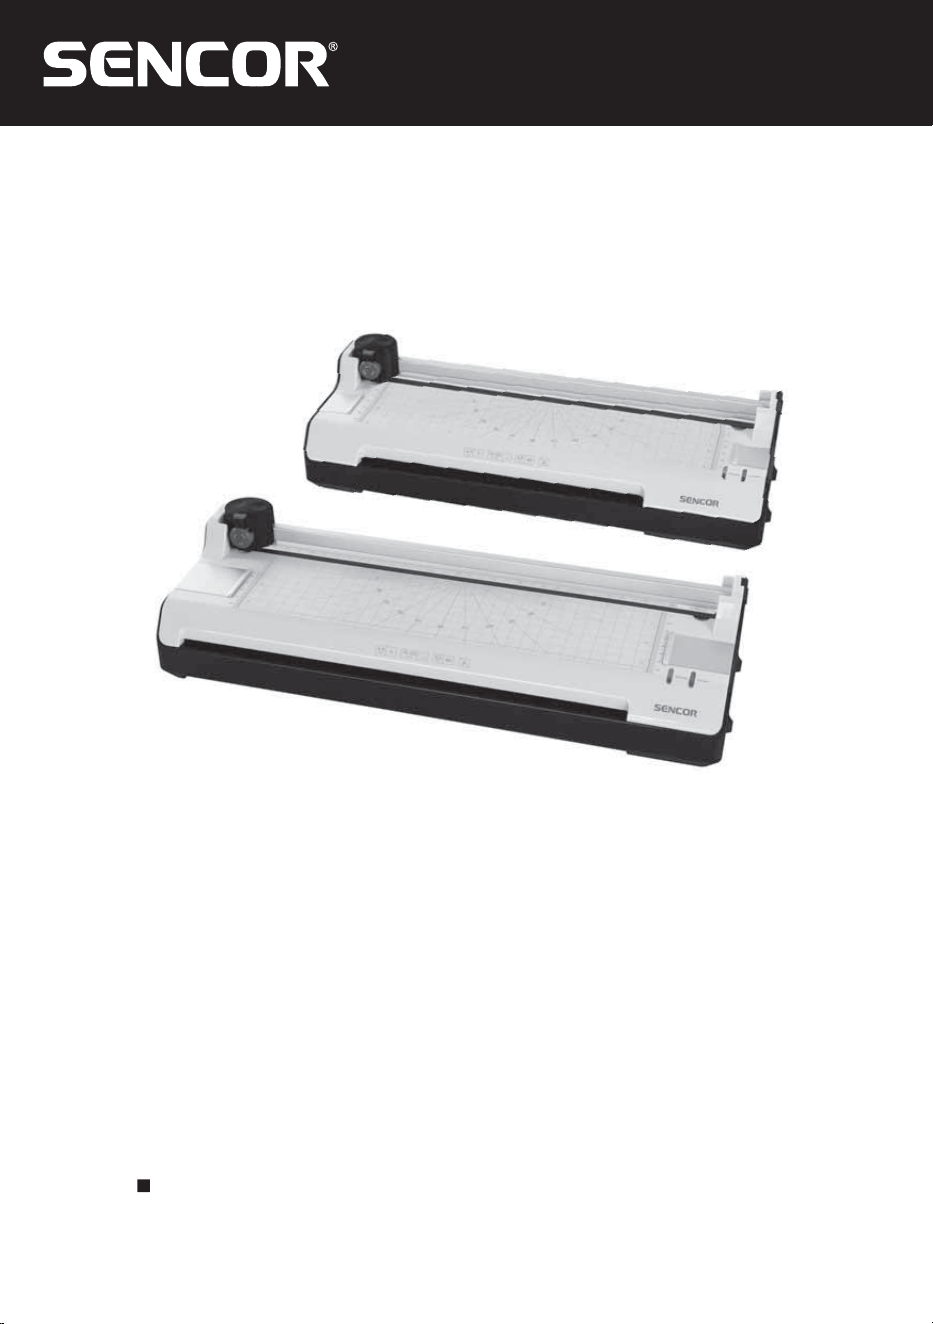
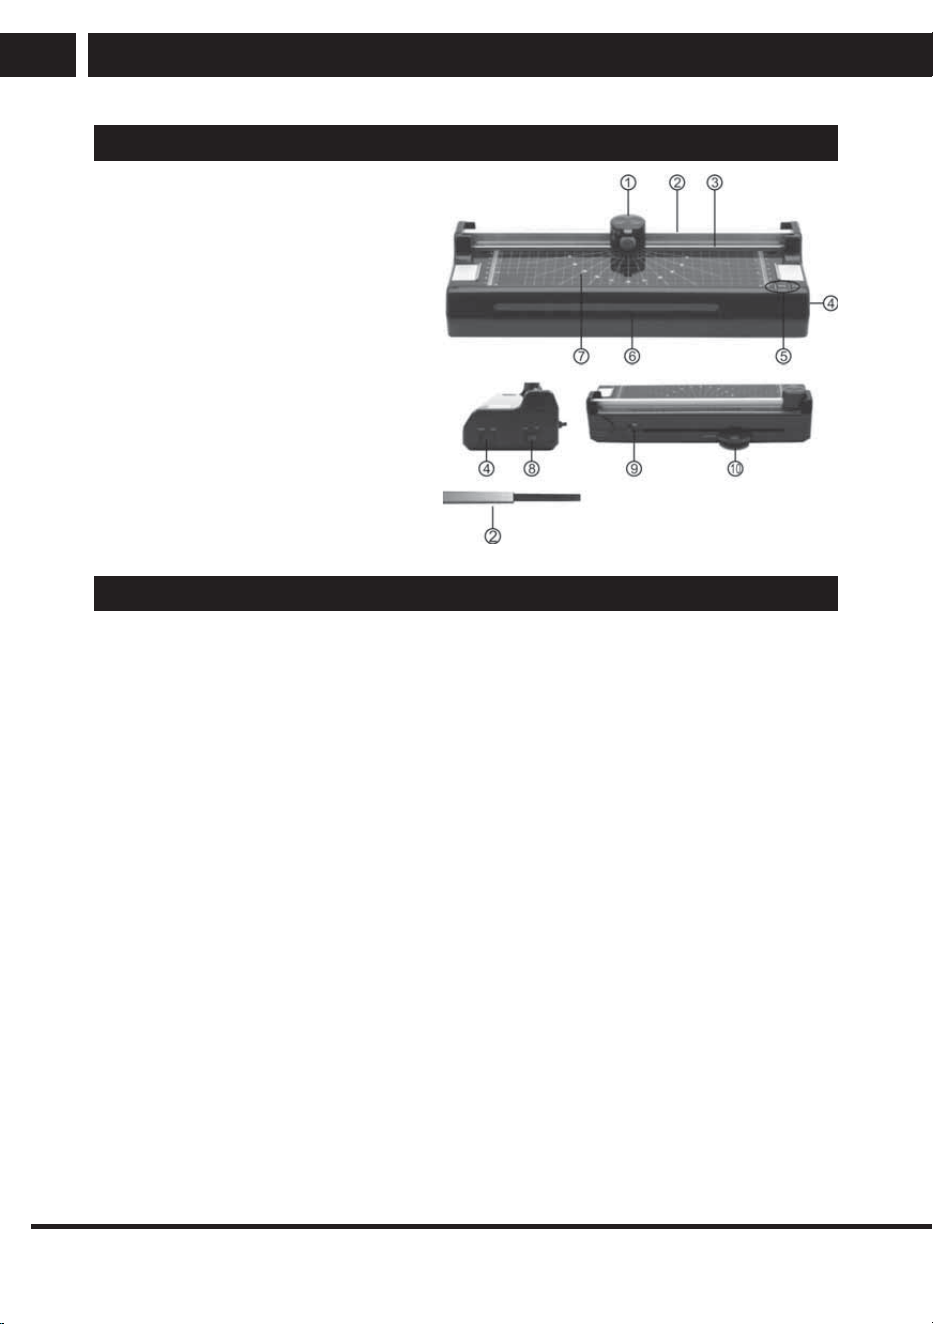
OPERATING ELEMENTS
1. Cutting head
2. Guide rail
3. Pressing rail with finger protection
4. Function switch (temperature control)
5. Indicator elements(LEDs)
6. Laminator in feed
7. Visual positioning aids in cm
(lines,angles,scale)
8. ON/OFF switch
9. Anti-blocking slider(for clearing jams)
10. Corner rounder (The function for round-
ing off the corners is located on the
reverse side of the devices.)
OPERATION
Laminator
The laminator can complete hot and cold lamination:
In the case of hot lamination, the lamination foil is adhered together. In the case of cold lam-
ination, the lamination foil is pressed together. Select the lamination method according to the
material to be laminated.
Note: Only cold lamination should be used for thermopaper and ultrasonic images!
1. Hot laminating
1.1 Connect the power cable to an easily accessible, standard electrical socket.
Caution: Check that the voltage specifications of the unit correspond to that of your
power supply network (220 - 240V, 50Hz).
1.2 Use the on/off switch on the right of the appliance to switch on:"HOT", the red display
lamp shows.
1.3 The drive motor for the transport rollers starts up. The correct operating temperature is
reached after about 3-5 minutes and the green display lamp shows.
1.4 Insert the document to be laminated in the pouches so that there is a margin of approx.
3 - 5 mm to the edge of the foil on all sides.
Caution: Only use foil intended for hot laminating.
1.5 Insert the foil containing the document in the laminator's insertion slot. Insert the ready
closed side of the pouch first.
Note: To prevent the laminating foil from creasing, never insert the open end of the foil
pocket in the insertion slot of the laminator first. When inserting the foil, observe the
instructions on the insertion slot. The laminating process occurs automatically.
There is a spare underlay pad
inside of the guide rail
EN 3
EN
Copyright © 2025, Fast ČR, a. s.
Revision 01/2025
Caution: The lamination foil is very hot and soft when ejected following lamination.
Therefore, handle the laminated document with due care!
Note: To flatten and smoothen the laminated product, place a book or similar heavy, flat
object on it.
1.6 When you have completed the laminating process, turn the function switch to the right
in COLD position and remove the power plug from the power socket. Let the device cool
down before packing it away, for example.
Caution: The device is very hot directly after laminating! Risk of injury!
2. Cold laminating
Attention: If you have just finished using the laminator for hot laminating, you must let the
laminator cool down. It takes about 30 minutes to cool down sufficiently.
2.1 Turn the function switch to the right in the COLD position. Note: Only use cold lamination
foil for cold laminating.
2.2 Remove the protective foil from the lamination foil.
2.3 Insert the document to be laminated in the lamination foil so that there is a margin of
approx.
3 - 5 mm to the edge of the foil on all sides.
2.4 Guide the laminating foil containing the document to be laminated in the laminator
infeed with the closed side first. The laminating process occurs automatically.
Note: To prevent the lamination foil from creasing, never feed the open side of the lam-
ination foil first in the laminator infeed. When inserting the lamination foil, observe the
instructions on the infeed slot.
3. Clearing jammed lamination foil
The device is equipped with an ABS switch (anti-blocking sliding switch) to clear foil jams
quickly. Proceed as follows if the lamination foil jams:
3.1 Switch the device off: Set the On/Off switch to OFF.
3.2 Slide the ABS switch fully to the left.
3.3 Hold the laminator firmly and pull the lamination foil together with the document to be
laminated out of the laminator's infeed.
3.4 Slide the ABS switch fully to the right.
3.5 Clean the transport rollers of any deposits and residual adhesive by inserting a folded
piece of paper in the laminator infeed, refer to Chapter "Cleaning the transport rollers".
Note: If foil jams occur repeatedly or jammed foil cannot be removed from the laminator,
please contact our hotline (refer to Guarantee).
Trimmer
The trimmer can be used to cut paper, card, photo paper and lamination
foil.
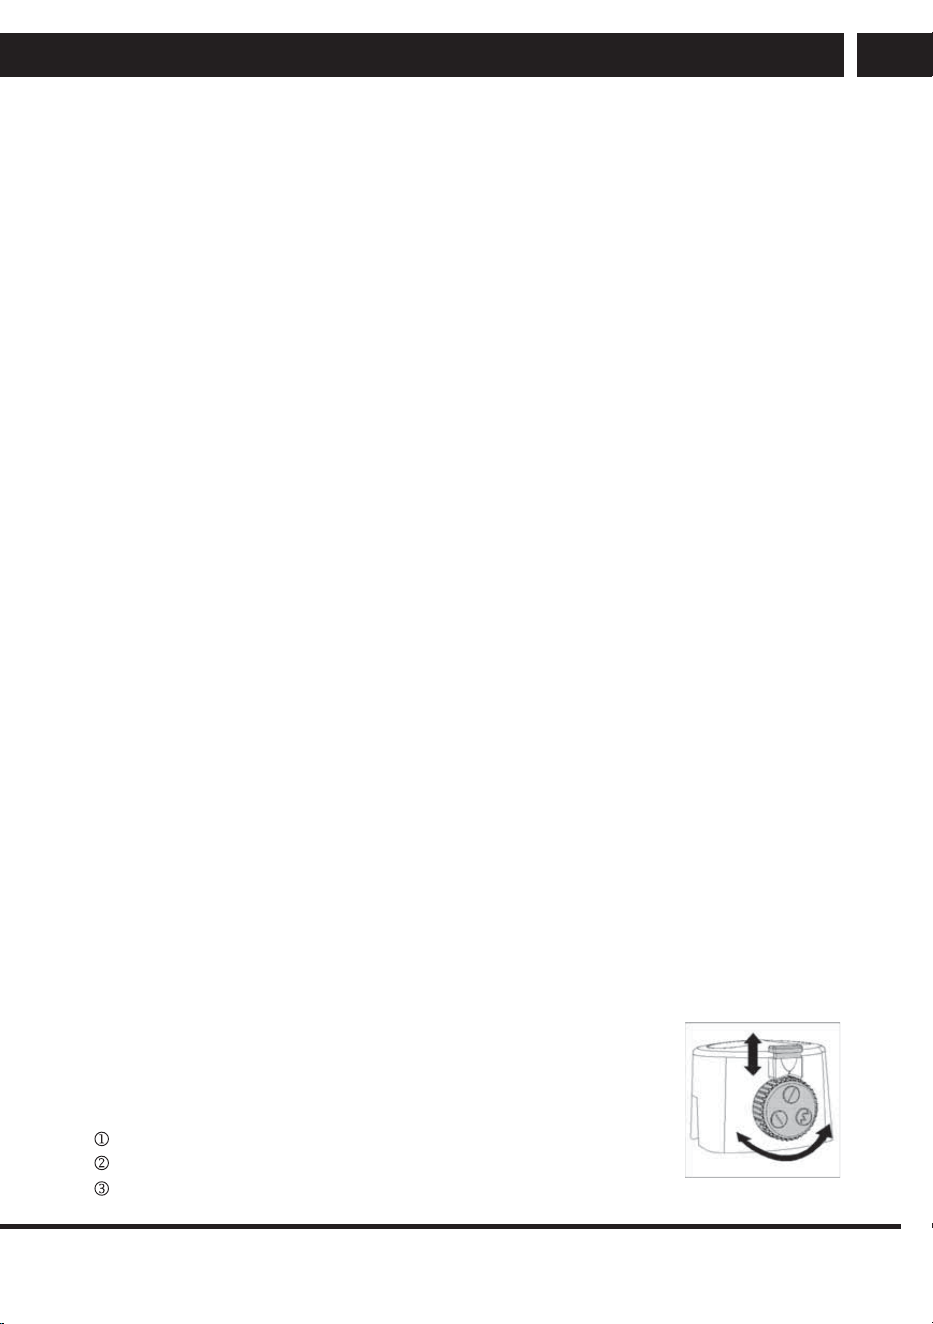
1. Selecting the type of cut
The trimmer is equipped to complete three types of cut:
straight cut,
wave cut,
perforation cut.
Fig. 1

4 EN
EN
Copyright © 2025, Fast ČR, a. s.
Revision 01/2025
Note: The blades are accommodated in protective housing. Select the type of cut you
require,see Fig.1:
1.1 Pull the setting lock on the cutting head upwards to the OPEN position.
1.2 Turn the rotating knob for the cut until the symbol related to the required cut is at the top.
1.3 Press the setting lock on the cutting head downwards to the LOCK position.
2. Cutting material
2.1 Place the device on a stable, level surface with the cutting head facing up.
2.2 Slide the cutting head to one side of the guide rail
2.3 Slide the material to be cut under the transparent pressing rail at the
required position.
Note: Observe the permissible quantity of material which may be
cut, refer to Chapter “Intended Use” or “Technical Data”.
Note: The visual positioning aids simplify correct alignment of the
material to be cut.
2.4 Hold the material to be cut firmly with one hand so that it cannot slip
when cut. Otherwise, the cut may be inaccurate.
2.5 To complete the cut, press the cutting head down and slide it along
the guide rail to the other side, refer to Fig. 2.
Note: To prevent a faulty cutting edge, do not run the cutting head back again but
remove the cut material directly after completing the cut.
3. Changing the cutting head
When the blades in the cutting head are damaged or worn, the cutting
head must be replaced.
Note: Only the entire cutting head can be replaced.
3.1 Remove the end cap of the guide rail from the base plate by pushing
it upwards at the lower end at the same time as pushing it inwards
gently.
3.2 Replace the old cutting head with a new one.
3.3 Slide the guide rail back in the device in the base plate and install the
new cutting head in the process
3.4 Place the end cap from above on to the opening at the end of the guide rail.
Fig. 2
EN 5
EN
Copyright © 2025, Fast ČR, a. s.
Revision 01/2025
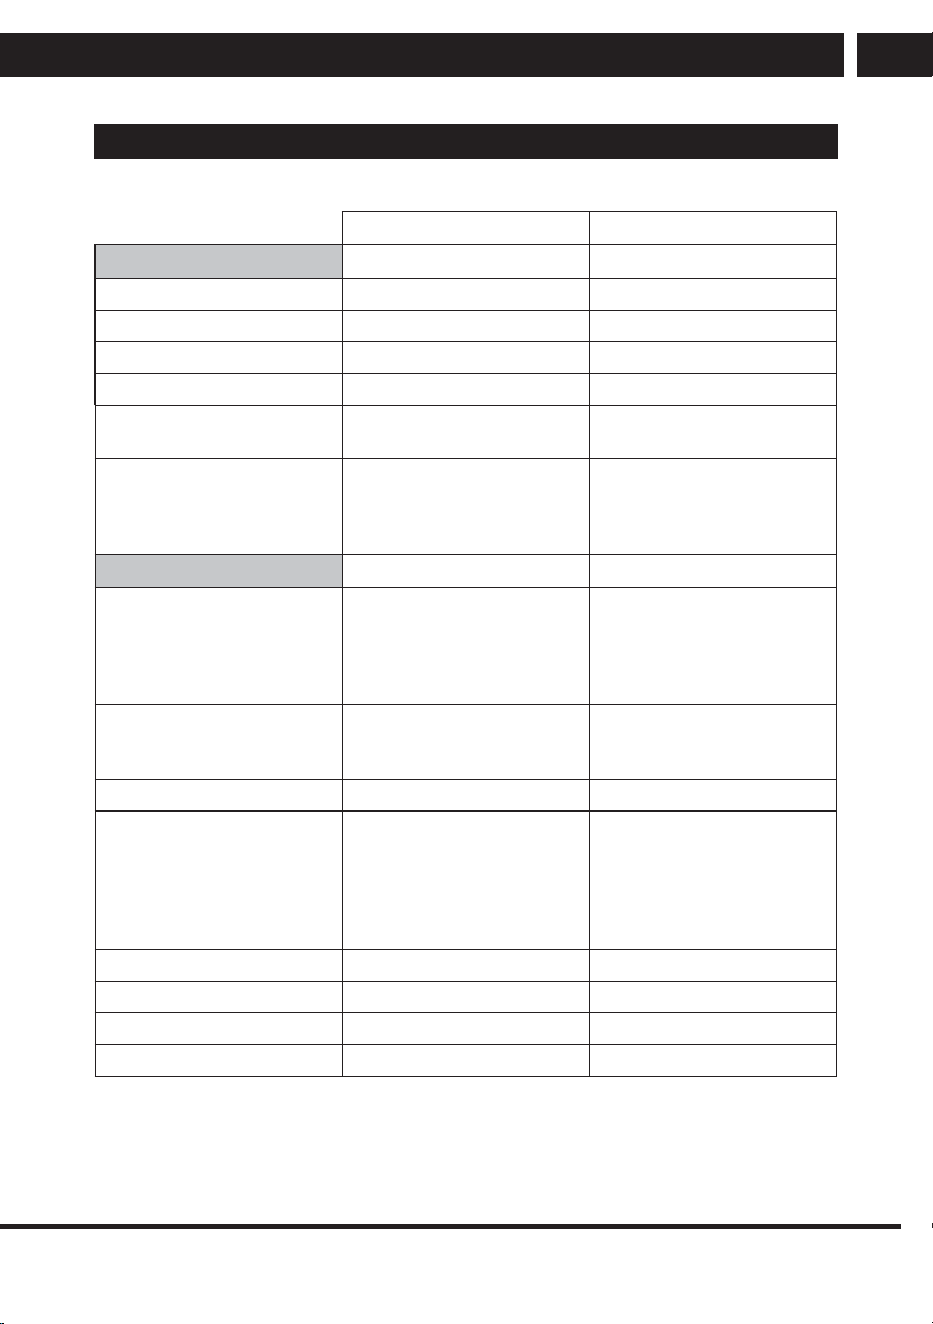
TECHNICAL DATA
SLA 230 SLA 330
Hot and cold laminator
A4 A3
Maximum laminating width: 230 mm 330 mm
For lamination foil thicknesses: 80 and 100 mic 80 and 100 mic
Laminating speed: 250 mm per minute 250 mm per minute
Warm-up phase: 3-5 minutes 3-5 minutes
Indicator elements:
LED POWER (red)
LED READY (green)
LED POWER (red)
LED READY (green)
Special features:
ABS switch (for clearing jams)
No blistering
Automatic shutdown on over-
heating
ABS switch (for clearing jams)
No blistering
Automatic shutdown on over-
heating
Trimmer
Special features:
Reel trimmers with 3 selectable
types of cut
and setting lock
Visual positioning aids in cm
(lines, angles, scale)
Reel trimmers with 3 selectable
types of cut
and setting lock
Visual positioning aids in cm
(lines, angles, scale)
Selectable types of cut:
Straight cut
Wave cut
Perforation cut
Straight cut
Wave cut
Perforation cut
Maximum size: A4 A3
Maximum cutting capacity:
Straight cut: 3 sheets of paper,
(80 g/m
2
)
Wave cut: 3 sheets of paper
(80 g/m
2
)
Perforation: 3 sheets of paper
(80 g/m
2
)
Straight cut: 3 sheets of paper,
(80 g/m
2
)
Wave cut: 3 sheets of paper
(80 g/m
2
)
Perforation: 3 sheets of paper
(80 g/m
2
)
Dimensions (W x D x H): 385 x 135 x 100 mm 420 x 145 x 100 mm
Weight: 1,3 kg 1,8 kg
Power supply: 220–240 VAC 50Hz 220–240 VAC 50Hz
Rated input power: Max. 265 W, 1.15 A Max. 365 W, 1.6 A
6 EN
EN
Copyright © 2025, Fast ČR, a. s.
Revision 01/2025
INSTRUCTIONS AND INFORMATION REGARDING THE DISPOSAL OF USED PACKAGING
MATERIALS
Dispose of packaging material at a public waste disposal site.
DISPOSAL OF USED ELECTRICAL AND ELECTRONIC APPLIANCES
The meaning of the symbol on the product, its accessory or packaging indicates
that this product shall not be treated as household waste. Please, dispose of
this product at your applicable collection point for the recycling of electrical &
electronic equipment waste. Alternatively in some states of the European Union
or other European states you may return your products to your local retailer when
buying an equivalent new product. The correct disposal of this product will help
save valuable natural resources and help in preventing the potential negative
impact on the environment and human health, which could be caused as a result
of improper liquidation of waste. Please ask your local authorities or the nearest
waste collection centre for further details. The improper disposal of this type of
waste may fall subject to national regulations for fines.
For business entities in the European Union
If you wish to dispose of an electrical or electronic device, request the necessary
information from your seller or supplier.
Disposal in other countries outside the European Union
If you wish to dispose of this product, request the necessary information about the
correct disposal method from local government departments or from your seller.
The product meets EU requirements.
Changes to the text, design and technical specifications may occur without prior notice and we
reserve the right to make these changes.
Manufacturer: Fast ČR, a.s., U Sanitasu 1621, CZ 251 01 Říčany

EN 7
EN
Copyright © 2025, Fast ČR, a. s.
Revision 01/2025
EN
Warranty conditions
Warranty card is not apart of the device packaging.
This product is warranted for the period of 24 months from the date of purchase to the end-user. Warranty
is limited to the following conditions. Warranty is referred only to the customer goods using for common
domestic use. The claim for service can be applied either at dealer’sshop where the product was bought, or
at below mentioned authorized service shops. The end-user is obligated to set up aclaim immediately when
the defects appeared but only till the end of warranty period. The end user is obligated to cooperate to certify
the claiming defects. Only completed and clean (according to hygienic standards) product will be accepted.
In case of eligible warranty claim the warranty period will be prolonged by the period from the date of claim
application till the date of taking over the product by end-user, or the date the end-user is obligated to take it
over. To obtain the service under this warranty, end-user is obligated to certify his claim with duly completed
following documents: receipt, certificate of warranty, certificate of installation.
This warranty is void especially if apply as follows:
Defects which were put on sale.
Wear-out or damage caused by common use.
The product was damaged by unprofessional or wrong installation, used in contrary to the applicable
instruction manual, used in contrary to legal enactment and common process of use or used for another
purpose which has been designed for.
The product was damaged by uncared-for or insufficient maintenance.
The product was damaged by dirt, accident of force majeure (natural disaster, fire, and flood).
Defects on functionality caused by low duality of signal, electromagnetic field interference etc.
The product was mechanically damaged (e.g. broken button, fall).
Damage caused by use of unsuitable media, fillings, expendable supplies (batteries) or by unsuitable
working conditions (e.g. high temperatures, high humidity, quakes).
Repair, modification or other failure action to the product by unauthorized person.
End-user did not prove enough his right to claim (time and place of purchase).
Data on presented documents differs from data on products.
Cases when the claiming product cannot be indentified according to the presented documents (e.g. the
serial number or the warranty seal has been damaged).
Manufacturer:
FAST ČR, a.s., U Sanitasu 1621, Říčany 251 01, Czech Republic
info@sencor.com
Authorized service centers:
Visit www.sencor.com for detailed information about authorized service centers.
The original version of the instructions is in the Czech language, other language versions are made by the
appropriate translation.