快速入门指南
D8 骑行记录仪
一,产品清单
二,按键与标识
扫描下载“录风者”APP
①
*安装前请确认配件齐全,如有缺失请联系客服。
②
记录仪 主机*1 底座支 架*1 L型六角 扳手(H2. 5)*1 L型六角 扳手(H3 )*1
车把支 架*1 内六角 螺丝(M3x 5)*2 六角螺 母*1 开口扳 手*1
后视镜 五金支架*1 安全帽 底座支架*1 安全帽底 座泡棉*1 内六角 螺丝(M3x 18)*1
硅胶垫* 2 内六角 螺丝(M4x 20)*1 说明 书*1
指示灯
内存卡
按键
铝盖
三,安装与使用
手机扫描封面二维码下载“录风者”APP。
开机:设备连接USB接口即开机,记录仪指示灯亮。
③
连接APP:点击“添加记录仪”>选择“行车记录仪”>记录
仪安装完成即可点击“下一步”>连接WiFi>跳转进入手机设
置界面>进入WiFi设置界面>点击"D8/D6...”开头的wifi名(如
下图所示)>输入密码"12345678">连接成功返回APP。
④
查看实时画面,连接成功即可查看。
⑤
查看回放,进入“实时画面” 点击“记录仪文件”。>
⑥
下载视频,进入“ ”
中视频下载。
记录仪文件 >点击右上角选择按钮>选
⑦
设置参数,点击“ 设置”记录仪 >点击所要设置的参数即可。
*因出厂配16G的内存卡已安装到设备中,所以无需在插卡。
(通电开机即亮灯,录制
中长亮)
(如需更换内存卡请按此
标识方向插卡)
(长按开/关机)
(如需更换内存卡需拆
开此盖)
⑧
安装底座:将底座支架孔和主机孔对齐,用
(M3x18)配合螺母固定。
内六角螺丝
⑨
安装车把支架:
1, 底座支架和车把支架用
2, 硅胶垫*2分别贴在车把支架的上下两个半圆弧中。
3, 车把支架套上车把用内六角螺丝(M4x20)固定即可。
两颗内六角螺丝(M3x5)固定。
⑩
安装后视镜支架:
1, 用开口扳手将车辆后视镜取下。
2, 底座支架和后视镜五金支架用两颗内六角螺丝(M3x5)固定。
3, 套在车辆后视镜镜杆上装回固定调好角度即可。
四,注意事项
①
②
③
连接WiFi时不能正常上网使用,仅限于查看记录仪视频。
WiFi使用期间ios可用流量,安卓暂不支持。
如自配内存卡,最大支持64G,请选择可兼容品牌:雷克沙
,金士顿,三星铠侠。使用不适配或读取写入速度不够的内
存卡,可能会导致设备出现卡机、视频花屏、掉帧、无法读
取播放等等问题。
首次连接记录仪,在APP功能设置里将存储卡操作格式化。
五,常见问题及解决对策
常见问题
解决对策
无法加入网络
长按记录仪按键强制关机,然后在手动
开机,等待设备灯闪时将手机靠近设
备,尝试重新连接WiFi。
指示灯红灯长亮
1,查看内存卡是否装上。
2,在APP里格式化内存卡。
3,内存卡已损坏或者未正确插入。
视频漏录
1,在紧急录像里面查看是否有视频。
2,紧急录像里面覆盖掉了。
视频跳录 内存卡有问题,在APP中格式化内存卡。
70 毫米
95 毫米
⑪
安装安全帽支架:
1,
2, 安全帽底座泡棉贴在支架上。
3, 在安全帽上找到合适的位置粘贴即可。
底座支架和安全帽底座支架用一颗内六角螺丝(M3x5)固定
*以上三种安装方式根据需求和条件任选一种使用。
六,频段参数
工作频段:
2412.0-2462.0 MHz最
大射频功率:16.53dbm
①
②
。
图示 名称WiFi
⚠
请及时保存重要视频,以防循环录制覆盖。
D8 Dashboard Camera
Quick Start Guide
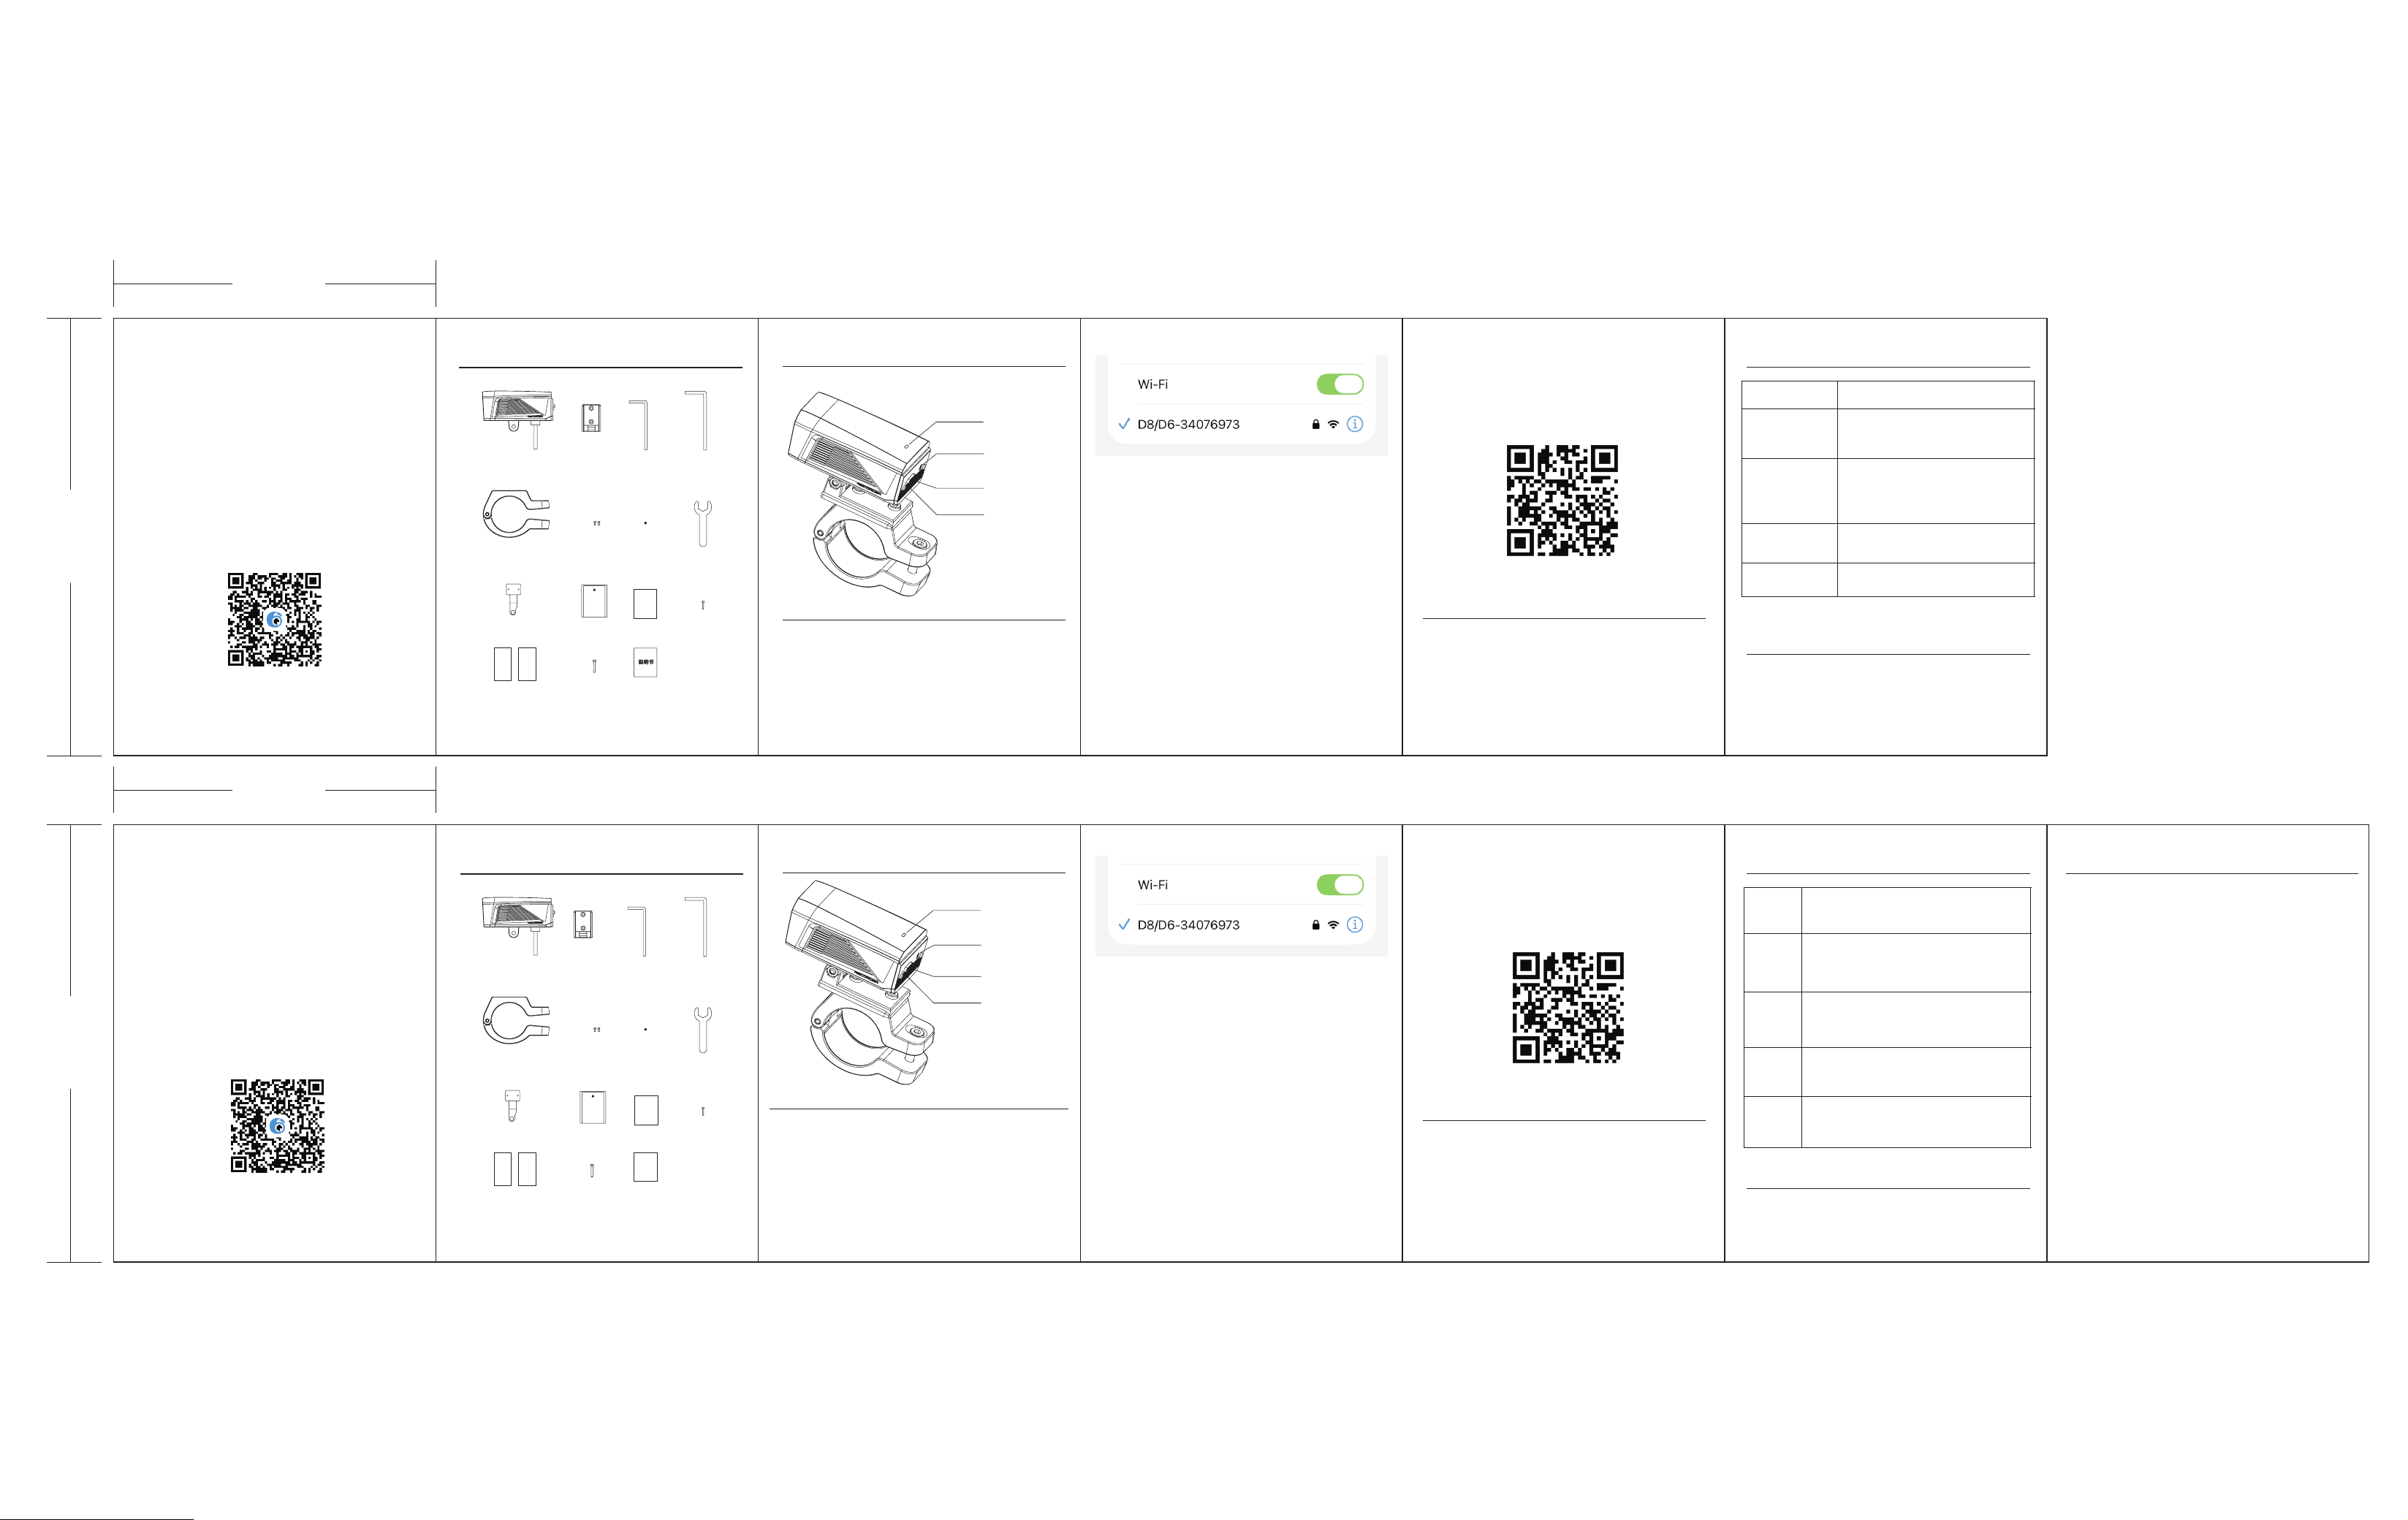
1.Product List
2.Buttons and Markings
Scan and download the “Viidure”app
①
*Please confirm that all accessories are complete before installation. If there
are any missing parts, please contact customer service.
②
Recorder host*1 Base bracket*1 L-shaped hexagonal wrench(H2.5)*1
L-shaped hexagonal wrench(H3)*1
Handlebar bracket*1 Hex socket screw(M3x5)*2 Hex nut*1 Open-end wrench*1
Rearview mirror hardware bracket*1 Safety helmet base bracket*1 Safety helmet base foam*1 Hex socket screw(M3x18)*1
Silicone pad*2 Hex socket screw(M4x20)*1 User Manual*1
Indicator light
MicroSD card
Buttons
Aluminum cap
3.Installation and Usage
Scan the QR code on the cover with your phone to download the
"Viidure" app.
Power on: The device is turned on when connected to the USB interface, and the
recorder indicator light is on.
③
Connect APP: Tap "Add ". > Once the dash cam is physically installed, tap
"Next".>"Connect Wi-Fi", the app will redirect you to your phone's Settings. > In
Settings, go to Wi-Fi,Find and tap the Wi-Fi network named "D8/D6…" (as shown
in the image below).Enter the password: "12345678". > After a successful
connection, return to the app to proceed.
Camera
④
View the real-time screen, connect successfully to view.
⑤
To view the playback, go to "Real time Screen">click on "Camera Files".
⑥
Download the video, go to "Camera Files">click the selection button in the
upper right corner>select the video download.
⑦
Set parameters, click on “ Settings">click on the parameters you
want to set.
Camera
*Since the 16GB memory card that comes with the factory has already been installed
in the device, there is no need to insert the card.
(The light will turn on when powered on,
and will remain on for a long time during
recording)
(If you need to replace the memory card,
please insert it in the direction indicated here)
(Long press to turn on/off)
(If you need to replace the memory card,
you need to remove this cover)
⑧
Installation base: Align the base bracket hole with the host hole, and fix it with
an internal hexagonal screw (M3x18) and nut.
⑨
Install handlebar bracket:
1. The base bracket and handlebar bracket are fixed with two internal hexagonal
screws (M3x5).
2. Two silicone pads are attached to the upper and lower semi-circular arcs of
the handlebar bracket.
3. Install the handlebar bracket onto the handlebar and fix it with an internal
hexagonal screw (M4x20).
⑩
Install the rearview mirror bracket:
1. Use an open-end wrench to remove the vehicle's rearview mirror.
2. The base bracket and rearview mirror hardware bracket are fixed with two
internal hexagonal screws (M3x5).
3. Install and fix the mirror rod on the vehicle's rearview mirror to adjust the angle.
4.Precautions
①
②
③
Unable to access the internet normally when connected to WiFi, limited to
viewing recorder videos. During WiFi usage, iOS has available data, but Android
does not currently support it.
If equipped with a memory card that supports up to 64GB, please choose
compatible brands: Rexroth, Kingston, Samsung Armor. Using memory cards
that are not compatible or have insufficient read and write speeds may cause
device issues such as lagging, video glitches, frame drops, and inability to read
and play.
Connect the recorder for the first time and format the memory card operation
in the APP function settings.
5.Common Problems and Solutions
Frequently
Asked
Questions
solution
Unable to
join the
network
Press and hold the recorder button to forcefully
shut down, then manually turn on the device, wait
for the device light to flash, and bring the phone
close to the device to try reconnecting to WiFi.
The red
indicator
stays on
continuously
1. Check if the memor y card is properly inserted.
2. Format the memor y card in the official app.
3. Replace the card if it is damaged.
Video
omission
1. Check if there is any video in the emergency
folder.
2. The emergency video was covered.
Video
missing
/skipping
Format the memory card in the official app.
Replace the card if it is damaged.
70 毫米
95 毫米
⑪
Install the safety helmet bracket:
1. The base bracket and safety helmet base bracket are fixed with an internal
hexagonal screw (M3x5)
2. The foam on the base of the safety helmet is attached to the bracket.
3. Find a suitable position on the safety helmet and stick it on.
*Choose one of the above three installation methods according to your needs and
conditions.
6.Frequency Band Parameters
Operating Frequency Band:2412.0-2462.0 MHz
Maximum Radio-Frequency Power: 16.53 dBm
①
②
。
Illustration WiFi Name
⚠
Please save important videos in a timely manner to prevent them from being
overwritten by repetitive recording.
7.Information to User
Note: This equipment has been tested and found to comply with thelimits for a
Class B digital device, pursuant to part 15 of the FCC Rules.These limits are designed
to provide reasonable protection againstharmful interference in a residential
installation.This equipmentgenerates, uses and can radiate radio frequency energy
and, if notinstalled and used in accordance with the instructions, may causeharmful
interference to radio communications. However, there is noguarantee that
interference will not occur in a particular installation. lfthis equipment does cause
harmful interference to radio or televisionreception, which can be determined by
turning the equipment off and on,the user is encouraged to try to correct the
interference by one or moreof the following measures:
-Reorient or relocate the receiving antenna.
-Increase the separation between the equipment and receiver.
-Connect the equipment into an outlet on a circuit different from that towhich the
receiver is connected.
-Consult the dealer or an experienced radio/TV technician for help.
Important: Change or modifcations not expressly approved by themanufacturer
responsible for compliance could void the user's authorityto operate the equipment.
This device complies with part 15 of the FCC Rules"Operation is subject to the
following two conditions:
(1)This device may not cause harmful interference, and
(2) this device must accept any interference received, includinginterference that
may cause undesired operation."
安装视频教程
Installation video tutorial
User Manual
This equipment complies with FCC radiation exposure limits set for an
uncontrolled environment. This equipment should be installed and
operated with a minimum distance of 20cm between the radiator and
any part of your body. This transmitter must not be co-located or
operating in conjunction with any other antenna or transmitter.