Dashcam User Manual
Product features
Front 4K. Left/Right/Back 1080
There is no gap or omission between the archives
2.78-inch screen
High-definition camera

Video file format: TS bitstream
Built-in microphone
Built-in microphone speaker
Supports high-capacity TF (micro SD) memory cards with
a maximum capacity of 512G
Built-in WIFI function
G-sensor impact sensing gear locking function
Built-in GPS (optional)
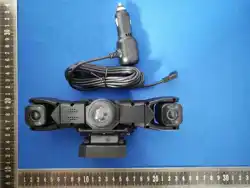
Support for voltage reduction lines (optional)
Supports rear-pull camera function (optional)
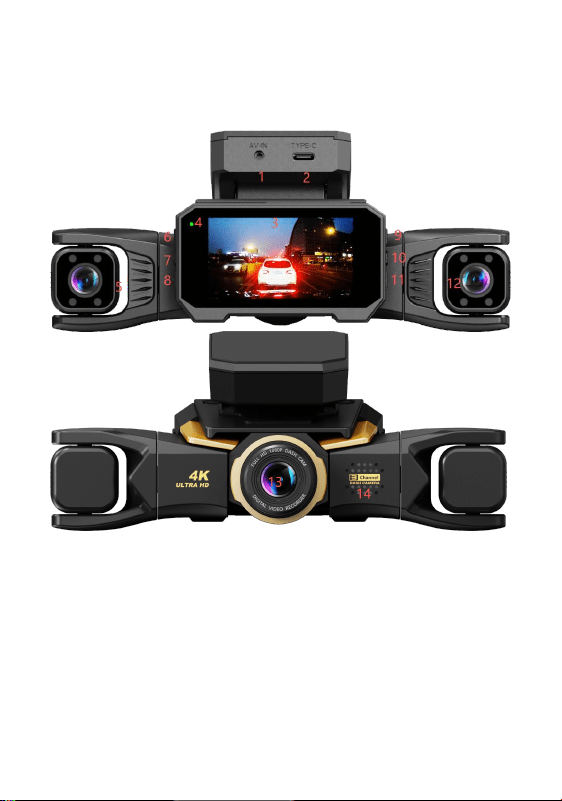
Product Description
Product structure
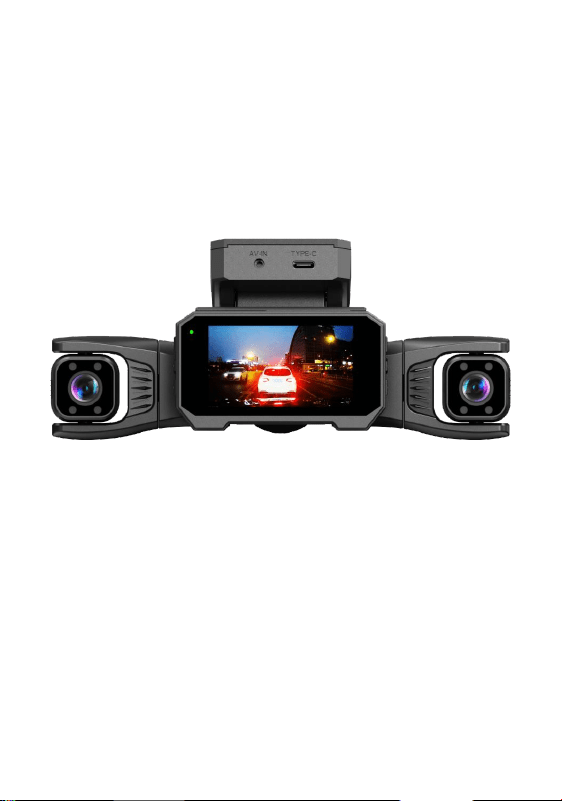
1)Rearview interface 2)Power interface
3)Display screen 4)Indicator light
5)Left camera 6)There are also buttons for
flipping up 7)Menu key 8)Click the page-turning
button
9)OK button 10)"Replay button" 11)Power button
12)Right camera

13)Front camera 14)"Horn"
一:Key description and function description
1. Rearview interface: Video input port for the
rearview mirror head
2. Power socket: It is used to connect an external
voltage reducing line or vehicle charging source to
provide working power for the machine
3. Display area of the screen
4. Work indicator light: After startup, the red
indicator light remains constantly on, while the blue
indicator light flashes slowly during video recording
5. Left camera
6. The page-flipping button: In the video recording
mode, briefly press to capture a photo. On the menu page,
briefly press to flip up the page
7. Menu key: Pause the video by briefly pressing to
enter the menu Settings page, and briefly return to the
menu Settings page
8. Down page-turning key: Short press to switch display
Windows while in video recording mode, and short press
to turn pages up on menu pages
9. OK button: Short press on the video recording page
to start or stop the recording. Short press on the menu
page to confirm
10. Playback button: A short press will enter the
playback page
11. Power button: Short press to turn on or off the screen,
long press to power off
12. Right side camera

13. Front camera
14. "Horn"
二:Special Function Description
1)G-sensor function
When gravity accelerates (1g=9.80 meters per second ^2),
the machine will automatically lock the video of the
accident and save it as an unerasable file.
The G-sensor gravity sensor can be selected in the menu.
This machine is set with four sensitivity options: off,
low, medium and high. The factory default is off.
2) One-click playback
Short press to enter the video playback page to view the
recorded video.
3) WIFI function
In standby mode, briefly press the menu key to enter the
WiFi switch option and set WiFi to on to enter WiFi mode.
If you need to exit the WiFi mode, re-enter the menu
option and turn off this function to exit.
You can connect to and operate this device through the
dedicated mobile phone APP.
4) Time-lapse video recording (This option requires a
voltage reduction cable to be functional; car chargers
do not support this feature)
Enter the time-lapse video recording Settings: You can
choose from: off /8 hours /12 hours /24 hours. After this
function is turned on, the system will continue to record
for the corresponding time even after the car is turned
off (the ACC power is off). System shutdown by default
Note: This function cannot be used when the car battery

is completely disconnected.
5) Parking monitoring function (This option requires a
voltage reduction cable to be functional; the car charger
does not support this function)
After the parking monitoring is activated, when the
vehicle is turned off and the dashcam enters the
automatic shutdown program, if the vehicle body is
subjected to vibration caused by external force, the
dashcam will start recording for about 20 seconds and
then automatically shut down. When the vehicle body
vibration is detected again, restart the camera function.
This function cannot be used when the car battery is
completely powered off.
7) GPS function (optional)
(1) When in standby mode, press the menu key to enter the
menu options. Select GPS Information to view the GPS
satellite search value
(2) The GPS icon on the display screen turns green after
a GPS satellite is detected.
三:Application installation and WiFi connection
instructions:
Open the "WiFi Switch" in the Settings. There are the QR
code for downloading the APP, the WiFi name and the
connection password in the Settings
Scan the QR code with your commonly used mobile phone or
search for the "Viidure" APP in the mobile application
store to download and install it
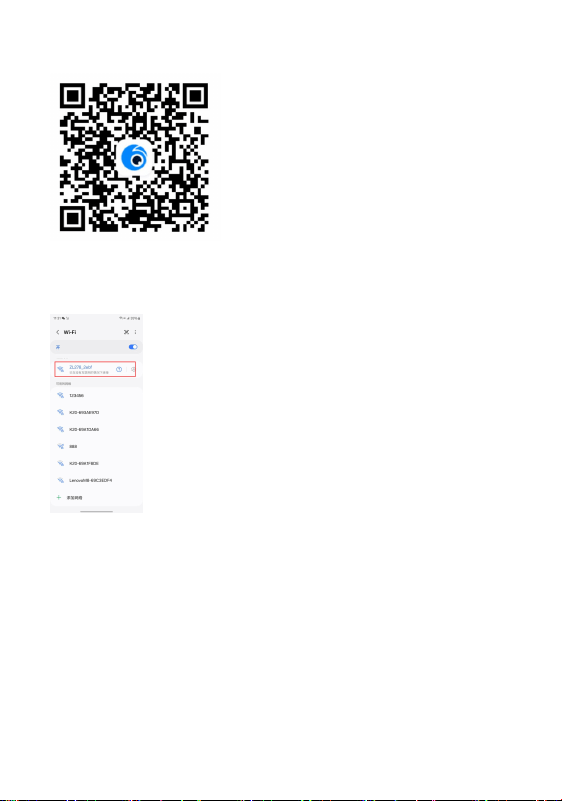
Search for WiFi on your mobile phone, find the WiFi name:
ZL278-******, enter the password: 12345678 to connect
注意:同一 时间内,一台记录仪 只能连接一台手机
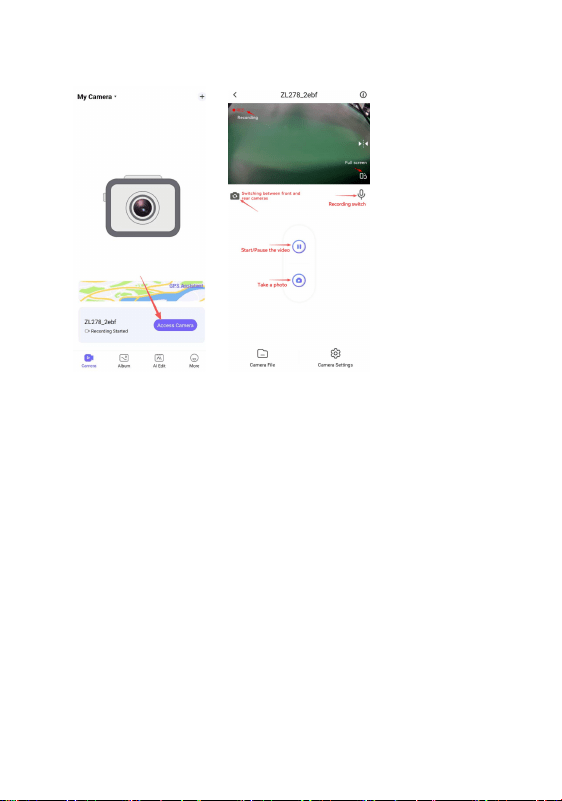
3.APP Operation: Open the APP, add the recorder, and after
successfully adding it following the steps, enter the preview
interface of the recorder
Six: Installation Guide
1. Turn off the car engine.
2. Insert the TF card into the card slot of the recorder.
Please use a high-speed TF card (C10 or above).
3. Fix the recorder to the front windshield of the car.
4. Insert the car charger or a car charger with GPS into
the car cigarette lighter.
Note: If using a lower
5. Connect the USB port of the recorder to the car charger
with a charging extension cable.
When wiring, the charging extension cable can be laid
along the edge of the car's windshield.
6. Install the rear camera at the rear of the vehicle and
pay attention to the direction when installing. Wiring
can be laid along the vehicle roof. After installation

is completed, plug the rear-pull plug into the rear-pull
interface of the recorder.
7. Adjust the lens position to ensure that the lens
remains level with the ground.
8. Start the engine and check if the machine has been
installed correctly.
When the machine is installed correctly, the system
working indicator light will be on. The machine starts
up and enters the recording state, with the video
recording indicator light flashing. Please pay attention
to checking whether the picture on the display screen is
normal.
Ten: Troubleshooting
Under normal operating conditions, if there is a
problem with the product, please refer to the following
methods to solve it
No photography or video recording is allowed
Check if the TF card has enough space and is locked.
It will automatically stop when recording
Due to the huge amount of high-definition video data,
please use a high-speed TF card compatible with SDHC. The
high-speed TF card will have the C10 logo.
When replaying pictures and videos, a "File Error"
prompt appears
An error occurred when storing data on the TF card,
resulting in an incomplete file. Please use the camera's
"Format" function to reformat the TF card.
The captured image was all foggy
Please check if there is any dirt or fingerprints on

the lens. Before shooting, wipe the lens with lens paper.
When shooting scenes such as the sky and water surface,
the images are very dark
In scenes with high contrast, it will affect the
exposure function of the camera. This can be corrected
by adjusting the "EV" value in the machine Settings menu.
There are horizontal stripes interfering in the image
This is caused by setting the incorrect "light source
frequency". Please set it to "50Hz" or "60Hz" according
to the local power supply frequency.
Crash
After the system freezes, please briefly press the
reset button to restore and restart.
四:FCC Warning
This device complies with Part 15 of the FCC Rules.
Operation is subject to the following two conditions:
(1) This device may not cause harmful interference, and
(2) this device must accept any interference received,
including interference that may cause undesired
operation.
NOTE 1: This equipment has been tested and found to
comply with the limits for a Class B digital device,
pursuant to part 15 of the FCC Rules. These limits are
designed to provide reasonable protection against
harmful interference in a residential installation. This
equipment generates, uses and can radiate radio

frequency energy and, if not installed and used in
accordance with the instructions, may cause harmful
interference to radio communications. However, there is
no guarantee that interference will not occur in a
particular installation. If this equipment does cause
harmful interference to radio or television reception,
which can be determined by turning the equipment off and
on, the user is encouraged to try to correct the
interference by one or more of the following measures:
- Reorient or relocate the receiving antenna.
- Increase the separation between the equipment and
receiver.
-Connect the equipment into an outlet on a circuit
different from that to which the receiver is connected.
-Consult the dealer or an experienced radio/TV
technician for help.
NOTE 2: Any changes or modifications to this unit not
expressly approved by the party responsible for
compliance could void the user's authority to operate the
equipment.
RF Exposure Statement
To maintain compliance with FCC'S RF Exposure
guidelines, This equipment should be installed and
operated with minimum 20cm between the radiator and your
body. This device and its antenna(s) must not be
co-located or operation in conjunction with any other
antenna or transmitter.