
Stereo Receiver
User Guide
EN

TABLE OF CONTENTS
ABOUT THIS PRODUCT AND MANUALS 6
Features of this product.............................................................................6
Supplied accessories and required commercially available items.....................7
About the manuals for this product.. ........................................................... 9
About the manuals for this product..........................................................................................................................................9
Notes about the safety information in the User Guide.. ........................................................................................................10
NAMES OF PARTS AND THEIR FUNCTIONS 11
Front panel.............................................................................................11
Rear panel..............................................................................................13
Front display..........................................................................................14
Remote control.......................................................................................15
LAYOUT 19
Placing the product.. ............................................................................... 19
Placing the speakers................................................................................20
CONNECTION 21
Connecting the speakers..........................................................................21
Preparing the speakers and speaker cables...........................................................................................................................21
How to connect the speakers..................................................................................................................................................22
Connecting the speakers.........................................................................................................................................................25
Bi-wiring connections (for high-quality audio).. ....................................................................................................................27
Connecting a subwoofer.......................................................................................................................................................... 28
Connecting external devices.....................................................................29
Connecting audio devices.. .....................................................................................................................................................29
Connecting radio antennas.......................................................................30
FM antenna ...........................................................................................................................................................................30
DAB/FM antenna.. ....................................................................................................................................................................31
AM antenna .. ........................................................................................................................................................................32
2
TABLE OF CONTENTS

Connecting to power................................................................................33
Connecting to power.. .............................................................................................................................................................33
Turning the power on.. ............................................................................................................................................................34
PLAYBACK 35
Basic operation.......................................................................................35
Switching the output speakers.. .............................................................................................................................................35
Selecting the input source.......................................................................................................................................................36
Adjusting the volume...............................................................................................................................................................37
Switching the front display.. ...................................................................................................................................................38
Playing radio..........................................................................................39
Selecting radio stations...........................................................................................................................................................39
Registering and deleting presets.. ..........................................................................................................................................41
Tuning to a Radio Data System (RDS) broadcaster................................................................................................................44
Tuning to a DAB radio station.. ...............................................................................................................................................45
Playing audio from a Bluetooth® device......................................................48
Pairing (initial setting).. ...........................................................................................................................................................48
Multi-point connection (connecting 2 devices simultaneously).. .........................................................................................51
Adjusting the sound.................................................................................53
Adjusting bass and treble (BASS/TREBLE).............................................................................................................................. 53
Adjusting volume balance (BALANCE).. .................................................................................................................................. 54
USEFUL FUNCTIONS 55
Adjusting the brightness of the front display...............................................55
Sleep timer.............................................................................................56
SETTINGS 57
Menu structure.. ..................................................................................... 57
Options menu......................................................................................... 58
Basic operations of the options menu....................................................................................................................................58
Setting items.. ..........................................................................................................................................................................59
Volume difference adjustment................................................................................................................................................60
Displaying audio signal information....................................................................................................................................... 61
Preset........................................................................................................................................................................................62
DAB initial setup.......................................................................................................................................................................63
Displaying the signal strength of the DAB channel.. ..............................................................................................................64
Pairing a Bluetooth device.. ....................................................................................................................................................65
Bluetooth input synchronization.. ..........................................................................................................................................66
3
TABLE OF CONTENTS

Settings menu.........................................................................................67
Basic operation of the settings menu.. ...................................................................................................................................67
Setting items.. ..........................................................................................................................................................................68
Balance control........................................................................................................................................................................69
Configuring the volume.. .........................................................................................................................................................70
Setting Bluetooth.....................................................................................................................................................................71
Auto standby.. ..........................................................................................................................................................................72
Firmware update......................................................................................................................................................................73
Initializing settings...................................................................................................................................................................74
FIRMWARE AND INITIALIZATION 75
Firmware update overview.......................................................................75
Checking the firmware version..................................................................76
How to update the firmware.....................................................................77
Updating the firmware via a USB flash drive..........................................................................................................................77
Initializing settings..................................................................................79
TROUBLESHOOTING 80
What to check first...................................................................................80
Problems with power, system, and/or remote control..................................81
Power fails to turn on...............................................................................................................................................................81
Power does not turn off...........................................................................................................................................................82
Power turns off right away.. ....................................................................................................................................................83
Power switches to standby automatically.. ...........................................................................................................................84
The product does not respond to operations.. ......................................................................................................................85
This product cannot be operated from the remote control.. ................................................................................................86
Problems with the audio.. ........................................................................ 87
No sound.. ................................................................................................................................................................................87
Volume cannot be increased...................................................................................................................................................88
No sound is output from a particular speaker.. .....................................................................................................................89
No sound is output from the subwoofer.................................................................................................................................90
Noise is being output...............................................................................................................................................................91
Sound is distorted....................................................................................................................................................................92
Problems with FM radio............................................................................93
Radio reception is poor or has noise.......................................................................................................................................93
Cannot automatically select FM radio stations......................................................................................................................94
Cannot select a radio station using the PRESET key..............................................................................................................95
4
TABLE OF CONTENTS

Problems with DAB radio..........................................................................96
Cannot receive DAB radio stations..........................................................................................................................................96
DAB radio cannot be received even after performing the initial scan.. ................................................................................97
DAB radio reception is poor or has noise................................................................................................................................ 98
DAB is unavailable or displayed as inaccurate....................................................................................................................... 99
No sound from DAB radio.. ....................................................................................................................................................100
Problems with AM radio..........................................................................101
AM radio reception is poor or has noise................................................................................................................................101
Cannot automatically select AM radio stations.................................................................................................................... 102
Cannot register (preset) AM radio stations...........................................................................................................................103
Cannot select a radio station with the PRESET key.. ...........................................................................................................104
Bluetooth connection.............................................................................105
Cannot connect with a Bluetooth device.. ...........................................................................................................................105
When connected via Bluetooth, there is no sound or audio dropouts occur.. ...................................................................106
Front display error messages.. ................................................................ 107
SPECIFICATIONS 108
Specifications.. ..................................................................................... 108
APPENDIX 112
Supported devices and formats............................................................... 112
Supported Bluetooth devices.. ............................................................................................................................................. 112
Support centers.....................................................................................113
Trademarks..........................................................................................114
About third-party software programs.......................................................115
5
TABLE OF CONTENTS

ABOUT THIS PRODUCT AND MANUALS
Features of this product
It is a stereo receiver that lets you enjoy a wide range of audio sources, including CDs, vinyl records, and
radio, with premium sound quality. It supports Bluetooth® playback and connects to various devices via
analog input jacks (LINE×2, CD×1, PHONO×1).
It also has a subwoofer pre-out, allowing you to connect your preferred speakers for true Hi-Fi audio.
6
ABOUT THIS PRODUCT AND MANUALS > Features of this product
Supplied accessories and required commercially
available items
n
Check the supplied accessories.
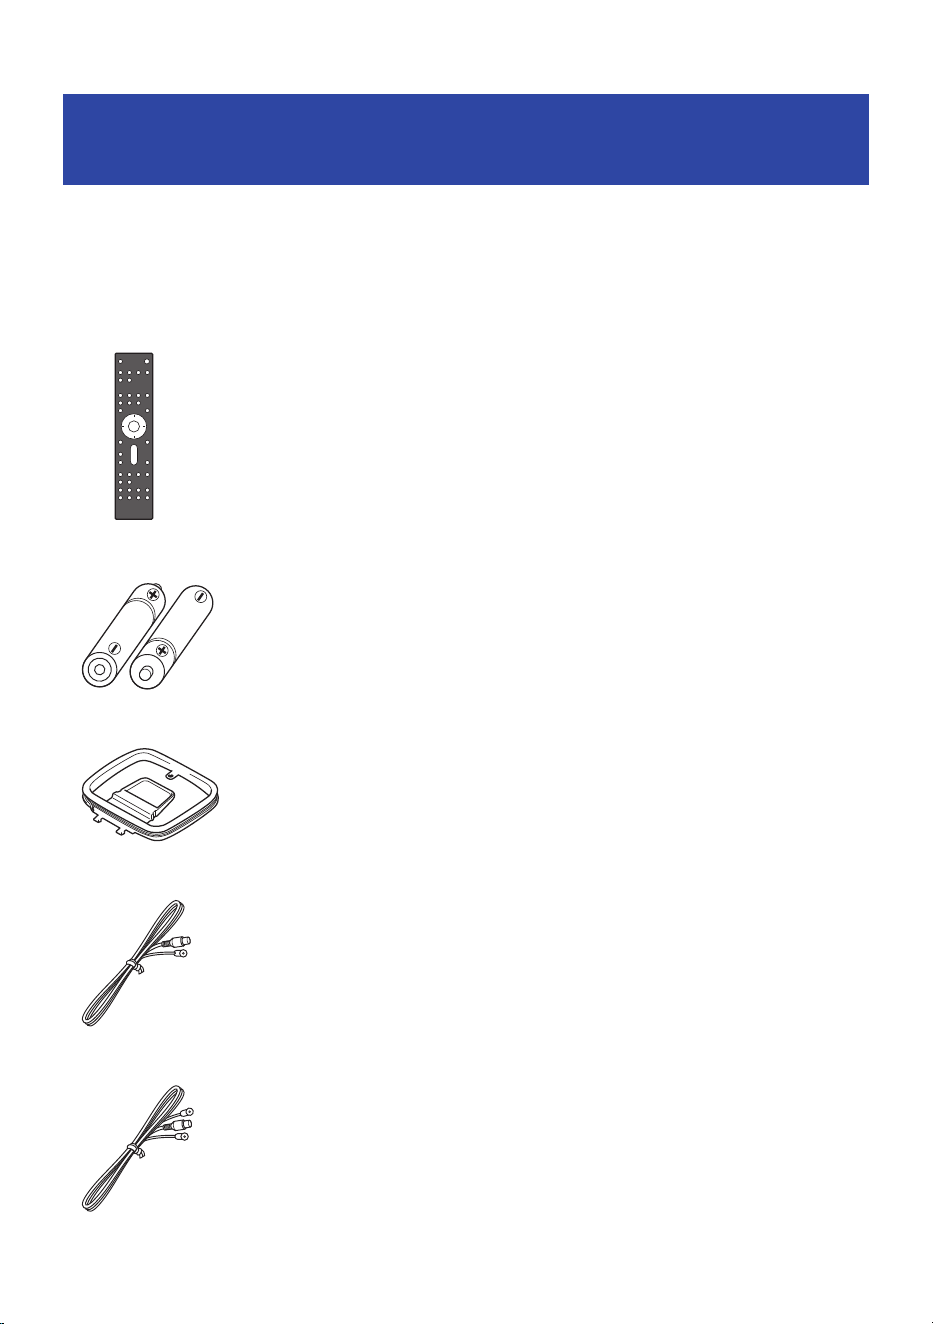
This product comes with the following accessories. Make sure you have received all of the following
accessories:
(
Remote control (×1)
(
AAA batteries (R03, UM-4) (×2)
(
AM antenna (×1)
(
FM antenna (U.S.A. and Canada models) (×1)
(
DAB/FM antenna (U.K., Europe, and Australia models) (×1)
7
ABOUT THIS PRODUCT AND MANUALS > Supplied accessories and required commercially available items

(
Safety Guide
(
Quick Guide
n
Obtain commercially available items
Obtaining the necessary items beforehand will help make the setup process smoother.
(
Speakers
(
Subwoofer* (with a built-in amp)
(
Speaker cables (qty required for the speakers)
(
Audio pin cable* (for connecting the subwoofer)
(
Banana plugs* (if used to connect speaker cables)
* Items marked with are optional. Have them ready if needed.
Prepare the necessary cables to connect the audio devices, such as analog stereo cables and RCA-type pin
cables, based on the audio devices’ audio jacks or terminals.
Next step
(
“Remote control”(p.15)
8
ABOUT THIS PRODUCT AND MANUALS > Supplied accessories and required commercially available items

About the manuals for this product
About the manuals for this product
The following guides are included with this product or are available on the Yamaha website.
Safety Guide
This contains important information for the safe use of the product. Be sure to read this guide before use.
Quick Guide
This explains the steps from opening the box after purchase to connecting speakers and playback devices
and enjoying audio.
User Guide (this guide)
This explains all functions and operating procedures, including those not covered in the Quick Guide.
9
ABOUT THIS PRODUCT AND MANUALS > About the manuals for this product

Notes about the safety information in the User Guide
(
The User Guide (this guide) uses the following signal words for important safety information.
(
WARNING
Content that indicates a risk of serious injury or death.
(
CAUTION
Content that indicates a risk of injury.
(
NOTICE
Content that must be followed to prevent product failure, damage, malfunction, data loss, and ensure
environmentally friendly use.
(
NOTE
Usage tips, functional limitations, and helpful supplementary information.
(
The illustrations and screenshots in the descriptions are for explanatory purposes only.
(
The company names and product names in this guide are the trademarks or registered trademarks of their
respective companies.
(
In this guide, various smartphones and tablets are collectively referred to as “smartphones”. When
necessary, the specific type of device is noted within the explanations.
(
This guide mainly explains operations using the remote control. If it is necessary to perform an operation
on the product itself, this is noted in the relevant section.
10
ABOUT THIS PRODUCT AND MANUALS > About the manuals for this product
NAMES OF PARTS AND THEIR FUNCTIONS
Front panel
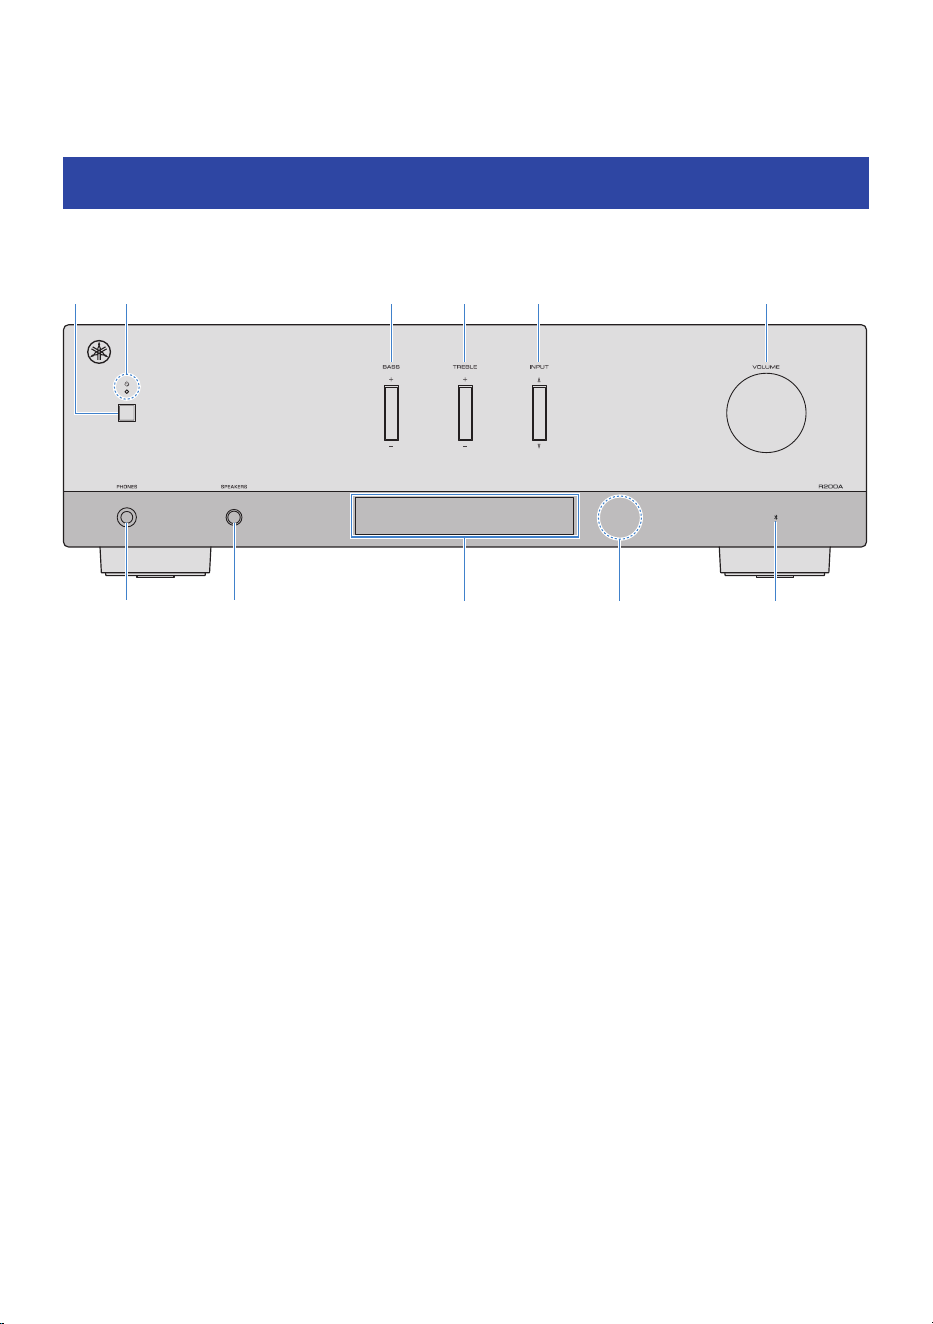
This section explains the names and functions of each part of the front panel.
ec da
f
g h ki j
b
a
z (Power) key
Turns the product on or off (in standby). (p.34)
b
Power indicator
Lights up as follows to indicate the power state.
(
Power on: Indicator lights up.
(
Power in standby and Bluetooth Standby enabled: Indicator is faintly lit.
(
Power off: Indicator is off.
c
BASS
Adjusts the volume of low frequencies (p.53).
d
TREBLE
Adjusts the volume of high frequencies (p.53).
e
INPUT
Selects the input source (p.36).
f
VOLUME
Adjusts the volume.
g
PHONES jack
For plugging in headphones.
11
NAMES OF PARTS AND THEIR FUNCTIONS > Front panel

h
SPEAKERS
For selecting the speakers to play through. Toggles Speakers A or B ON/OFF each time it is pressed (p.35).
i
Front display
Displays various information and menus (p.14).
j
Remote control sensor
Receives infrared signals from the remote control (p.15).
k
Bluetooth indicator
Turns on in the following condition.
(
Bluetooth connected: On
(
Bluetooth disconnected: Off
12
NAMES OF PARTS AND THEIR FUNCTIONS > Front panel
Rear panel
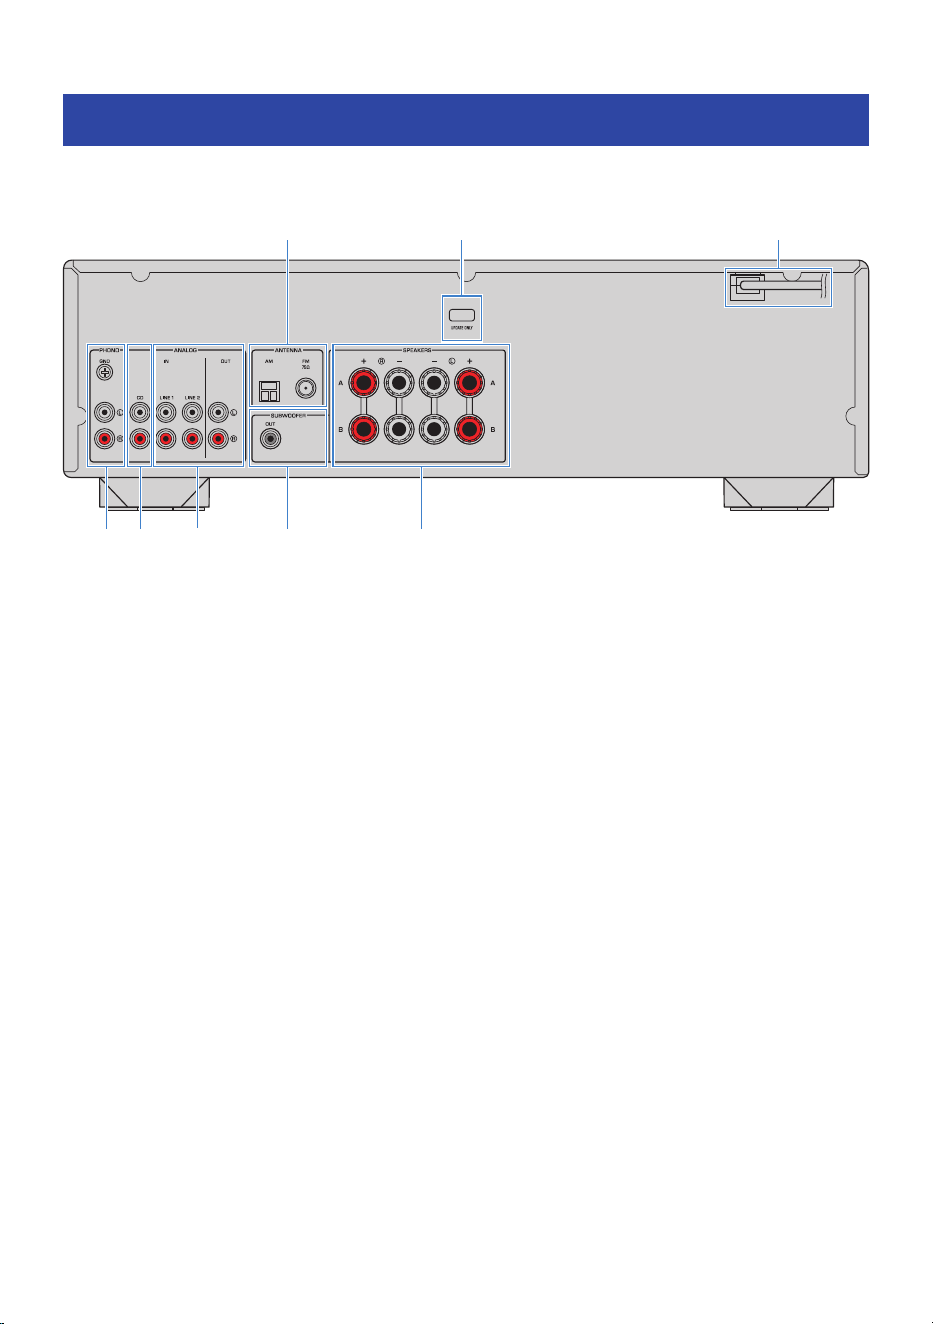
This section explains the names and functions of each part on the rear panel.
a b c
gd e f h
a
ANTENNA terminals
For connecting a radio antenna (p.30).
b
USB terminal
Dedicated to updating the firmware. Does not support playing music (p.77).
c
Power cord
Connects to an electrical outlet (p.33).
d
PHONO input jacks
For connecting to a turntable (record player) (p.29).
e
CD input jacks
For connecting to the analog audio output of devices such as a CD player (p.29).
f
LINE 1 and 2 jacks
For connecting external devices with analog audio input and output (p.29).
g
SUBWOOFER PRE OUT jack
For connecting to a subwoofer with a built-in amplifier (p.28).
h
SPEAKERS terminals
For connecting to speakers (p.25).
13
NAMES OF PARTS AND THEIR FUNCTIONS > Rear panel
Front display
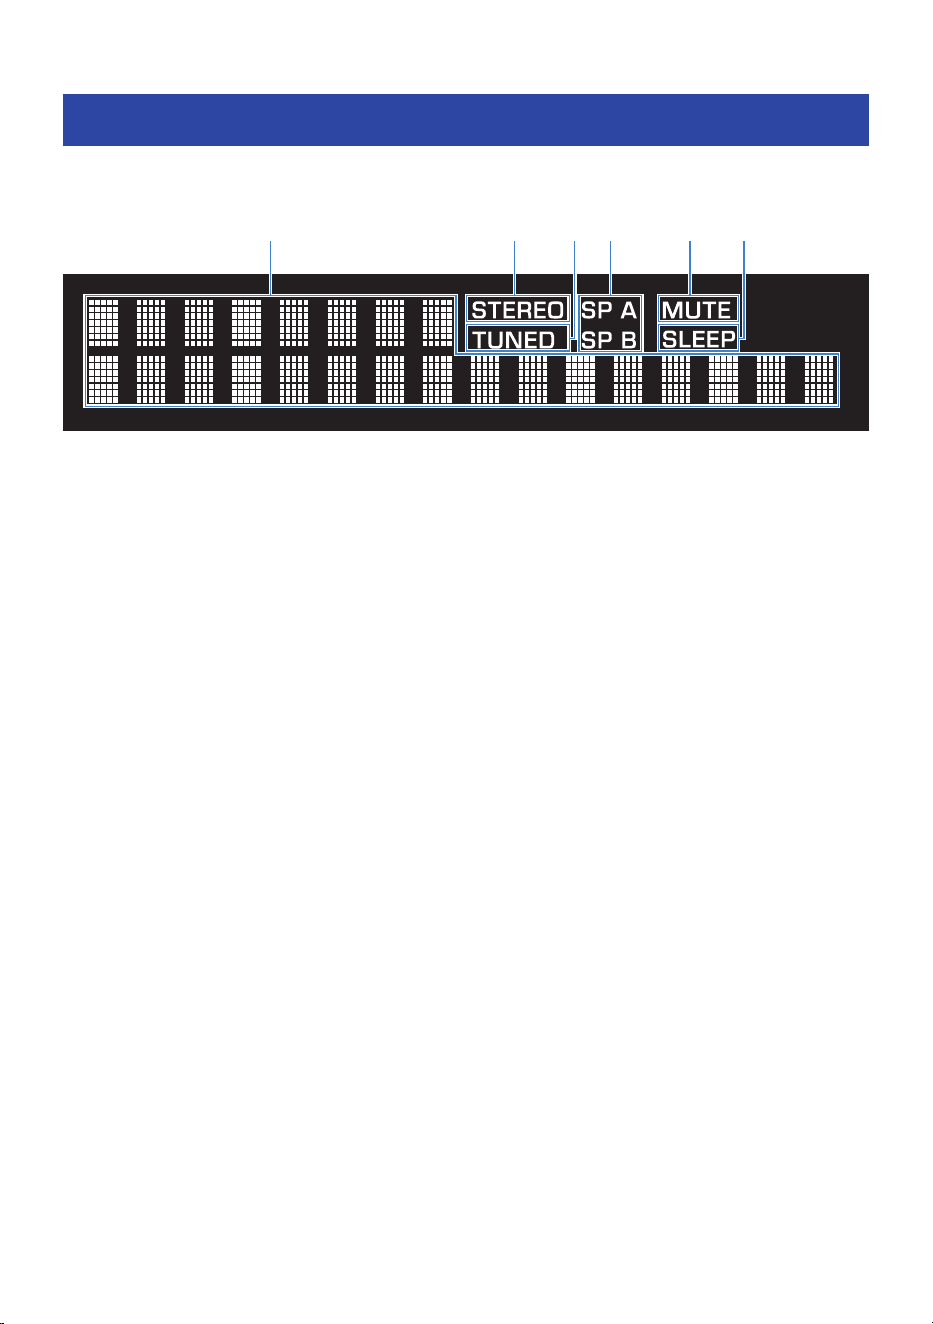
This section explains the names and functions of the parts of the front display.
a b d e fc
a
Information display
Displays various types of information, including the input source name. The displayed information can be changed by
pressing the DISPLAY key (p.38).
b
STEREO indicator
Lights up when FM radio is received in stereo.
c
TUNED indicator
Lights up when AM/FM radio is received.
d
Speaker indicators
The indicator(s) for the speakers (A/B) playing audio light up.
e
MUTE indicator
Flashes when the audio is muted.
f
SLEEP indicator
Lights up when the sleep timer has been set (p.56).
14
NAMES OF PARTS AND THEIR FUNCTIONS > Front display
Remote control
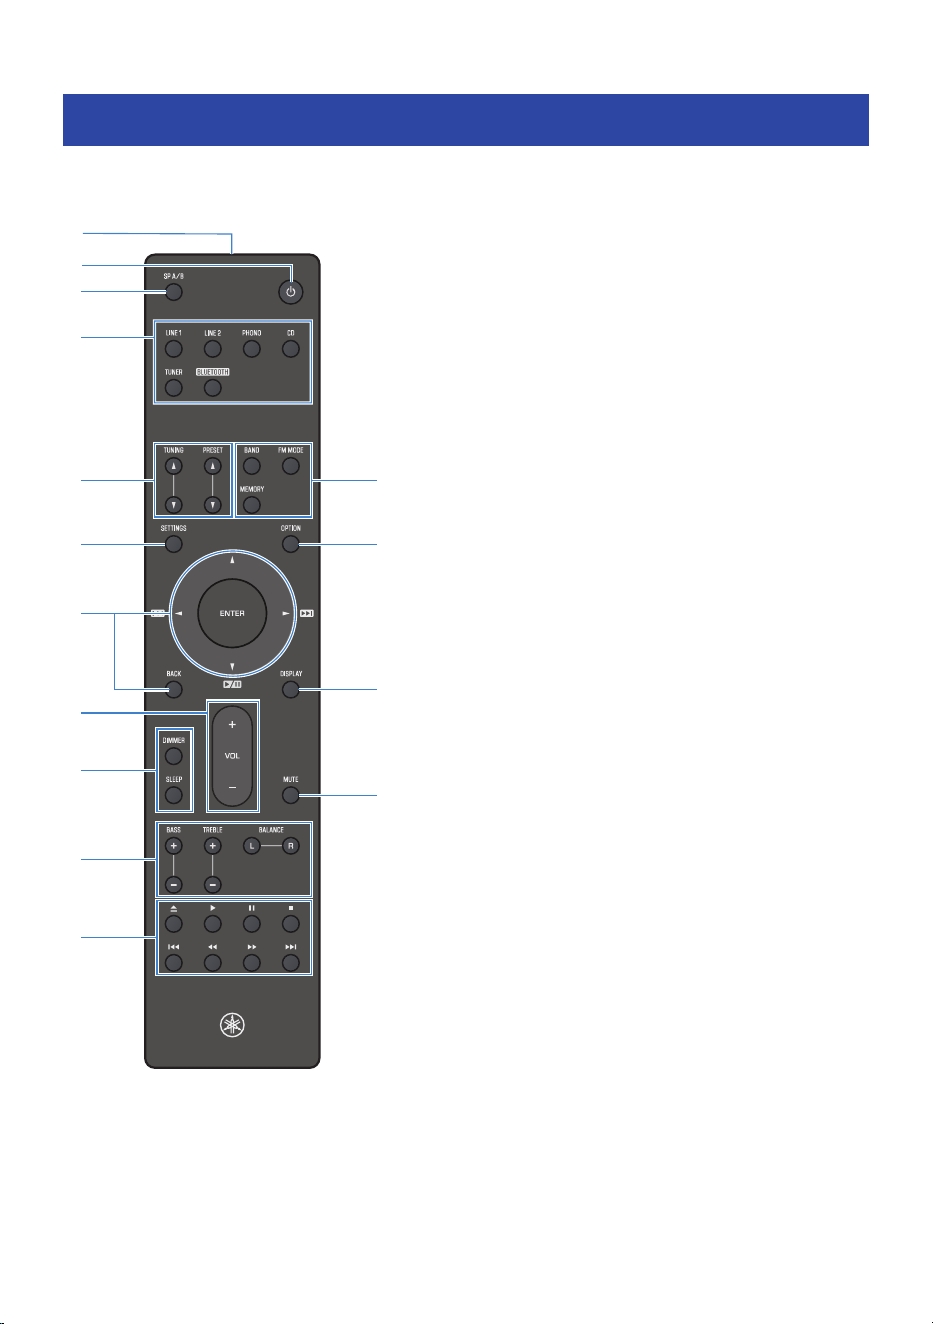
This section explains the names and functions of the remote control’s parts.
d
c
j
k
f
e
i
h
a
o
l
m
n
b
g
a
Remote control signal transmitter
Sends infrared signals from the remote control.
b
z (Power) key
Turns the product on or off (in standby) (p.34).
15
NAMES OF PARTS AND THEIR FUNCTIONS > Remote control

c
SP A/B key
For switching the output speakers. Toggles Speakers A or B ON/OFF each time it is pressed (p.35).
d
Input source selection keys
Selects the input source to play (p.36).
e
TUNING key
Switches the frequency of AM/FM radio (p.39).
PRESET key
Used to select a registered (preset) radio station (p.41).
f
SETTINGS key
Opens the settings menu (p.67).
g
ENTER and Cursor keys, and BACK key
Used to navigate the menus, including selecting menu options and changing settings.
h
VOLUME key
Adjusts the volume.
i
DIMMER key
Changes the brightness of the front display(p.55).
SLEEP key
Sets the sleep timer (p.56).
j
BASS keys, TREBLE keys, and BALANCE keys
Adjust the sound (p.53).
k
Yamaha CD player control keys
Used to control playback on a Yamaha CD player connected to the CD input.
Open/Close tray (=)
Opens or closes the tray while the CD player is on.
Play (r)
Starts playback.
Stop (■)
Stops playback.
Rewind (h)
Rewinds the currently playing track.
Skip (f)
Skips to the beginning of the current track.
Fast-Forward (j)
Fast-forwards the currently playing track.
Skip (g)
Skips to the beginning of the next track.
16
NAMES OF PARTS AND THEIR FUNCTIONS > Remote control
l
BAND key
Switches between AM/FM (p.39).
FM MODE key
Switches the FM radio reception mode (p.39).
MEMORY key
For registering radio stations (presets) (p.41).
m
OPTION key
Displays the options menu (p.58).
n
DISPLAY key
Used to switch the information shown on the front display (p.38).
o
MUTE key
Mutes the sound. Pressing it again restores the previous volume level.
n
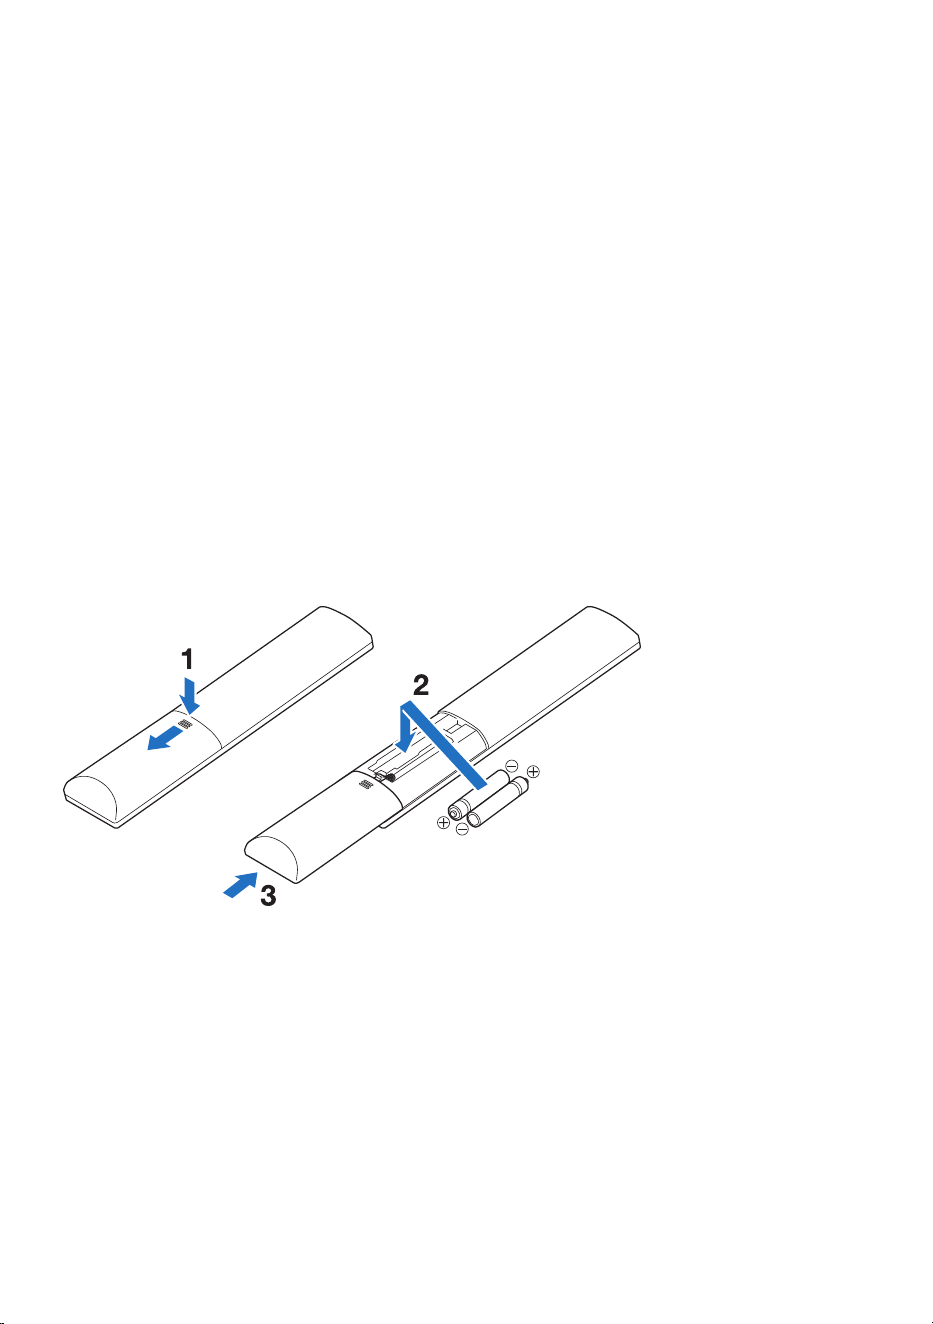
How to insert batteries
Insert the supplied batteries into the remote control, making sure the + and - ends are facing the correct
directions.
n
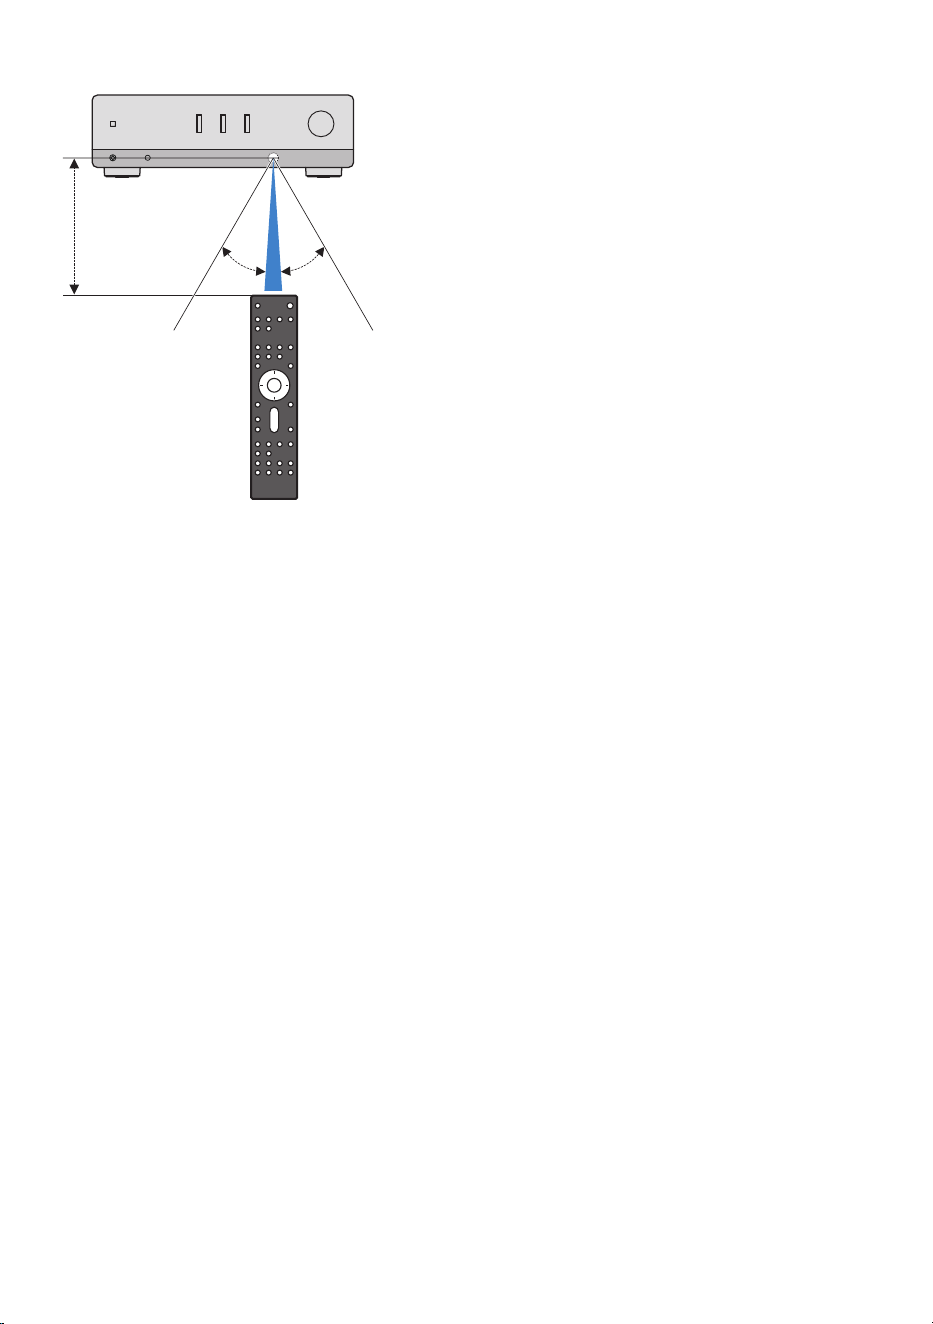
Remote control operating range
The operating range of the remote control is shown in the following illustration.
Use by pointing the remote control toward the product’s remote control sensor.
17
NAMES OF PARTS AND THEIR FUNCTIONS > Remote control
Within 6 m
30° 30°
18
NAMES OF PARTS AND THEIR FUNCTIONS > Remote control
LAYOUT
Placing the product
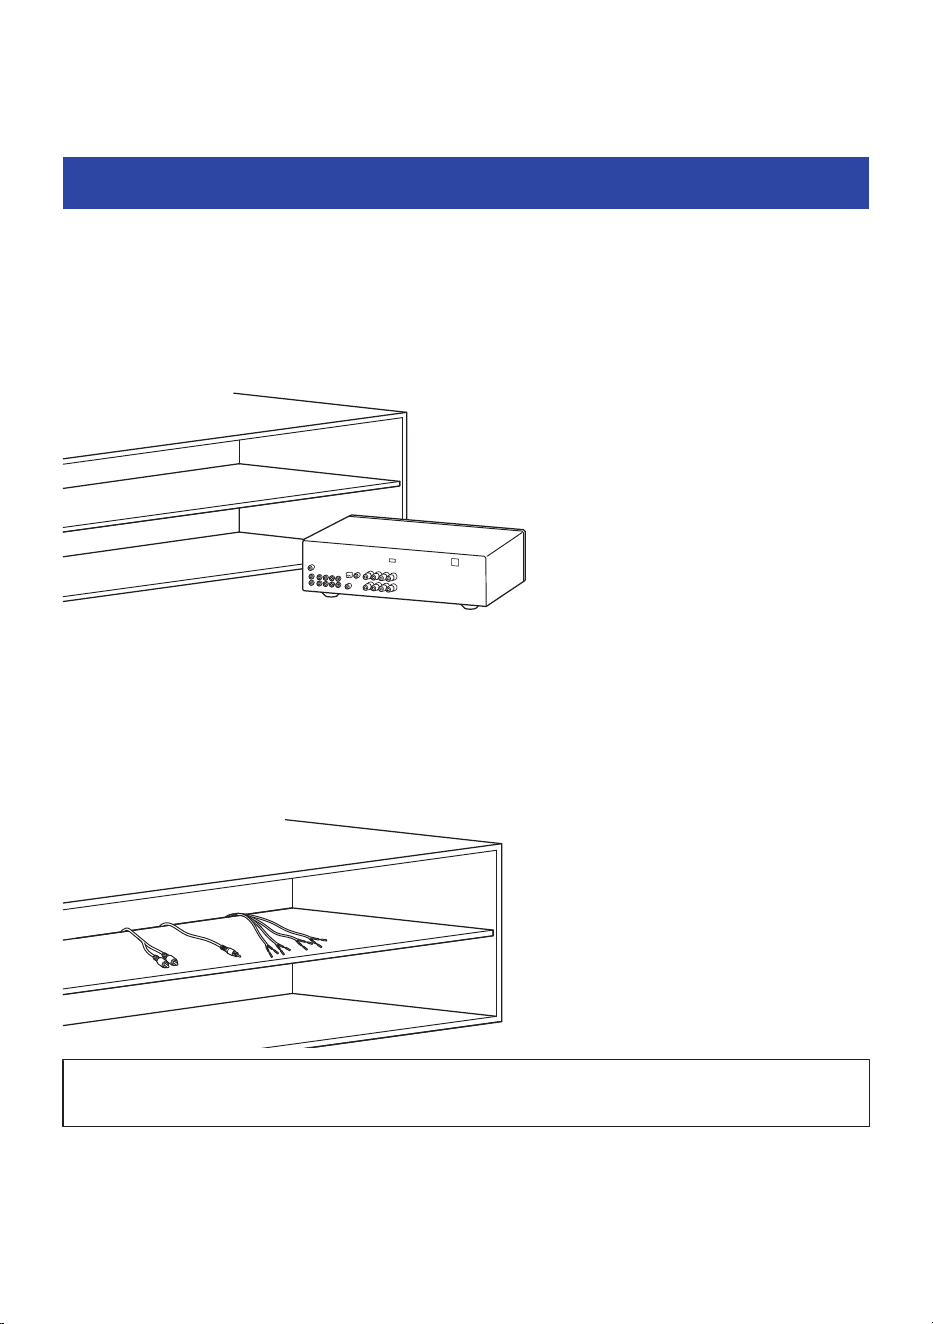
Temporarily place the product in a location where wiring and operation are convenient.
When the setup and operating procedures in this guide are complete, replace the unit in your preferred
location, such as a rack.
Example
NOTE
(
Ensure there is sufficient space around the product.
(
If you use the product on a rack, route the cables through the back of the rack beforehand to make it easier to connect to the
product.
Example
Next step
(
“Placing the speakers”(p.20)
19
LAYOUT > Placing the product
Placing the speakers
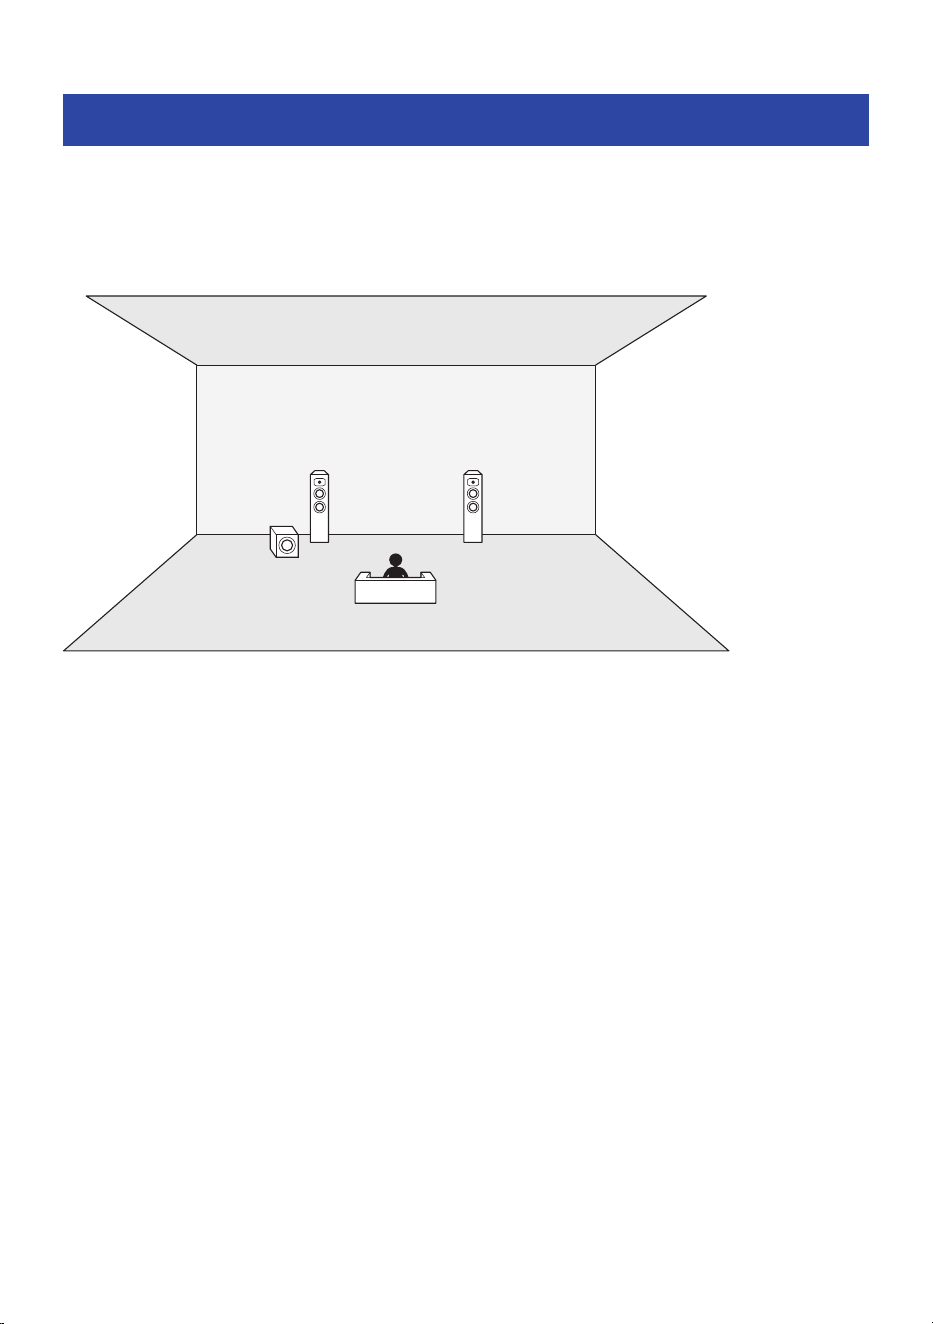
Place the speakers as shown in the illustration below for the best sound.
This product is a Stereo Receiver that supports 2-channel stereo playback.
Place the left (L) and right (R) speakers symmetrically.
By adding a subwoofer with a built-in amplifier, you can enhance the bass.
Speaker (L) Speaker (R)
Subwoofer
20
LAYOUT > Placing the speakers
CONNECTION
Connecting the speakers
Preparing the speakers and speaker cables
n
Preparing the speakers
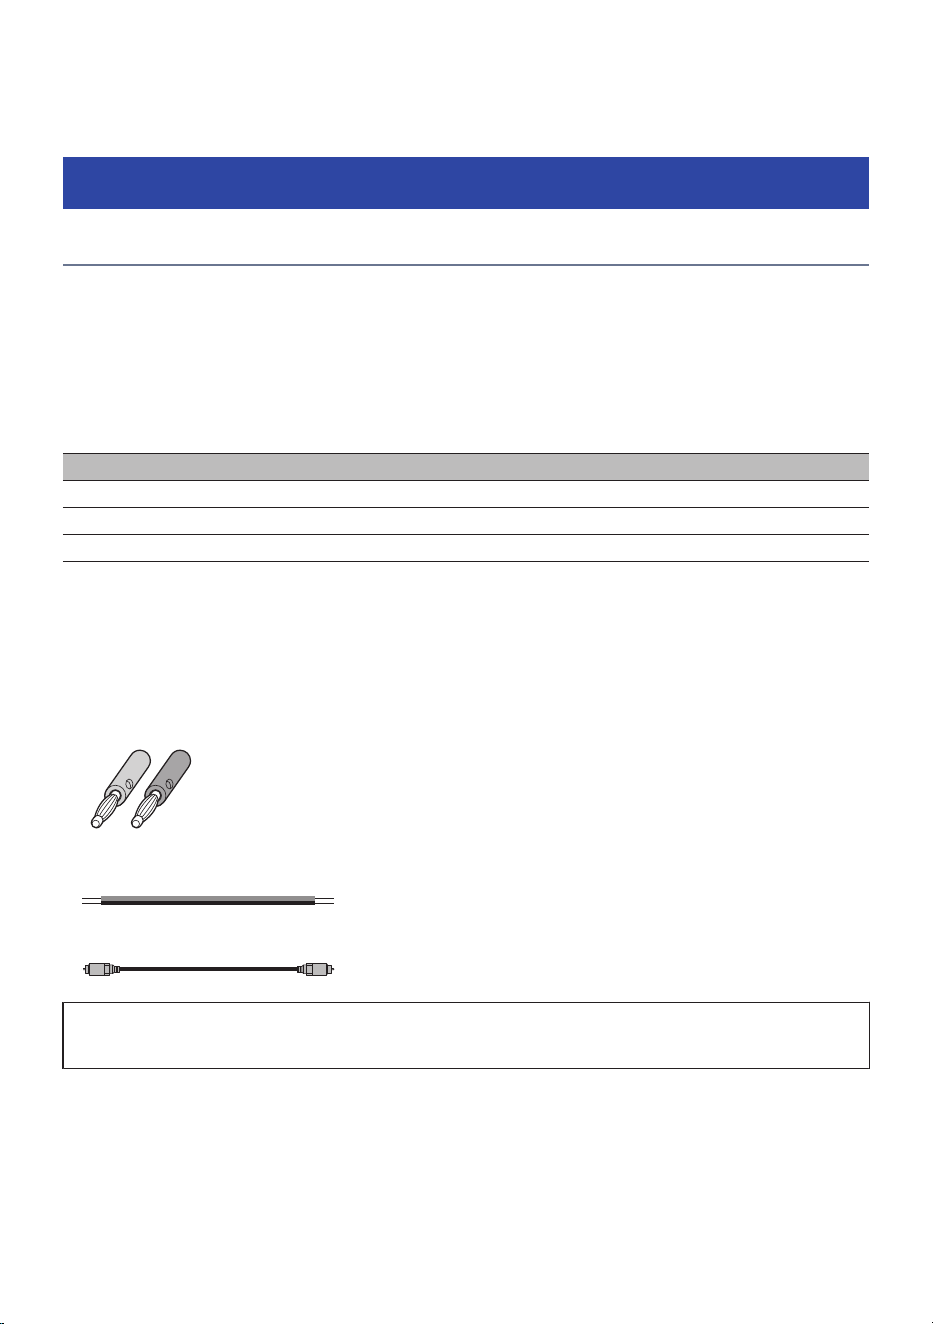
Prepare the speakers and subwoofer for connection to this product by keeping the following points in mind.
(
Use speakers with the impedances listed below. Connecting speakers with excessively low impedance
may cause this product to overheat.
(
Use a subwoofer with a built-in amplifier.
Speaker connection Speaker impedance
Using either speaker connection A or B 8 Ω or more
Using both speaker connections A and B* 16 Ω or more
Bi-wiring connections 8 Ω or more
* : When output simultaneously.
n
Preparing the speaker cables
To connect this product to your speakers, obtain the following commercially available cables.
(
U.S.A. and Canada models
Banana plugs (if used to connect speaker cables)
(
Speaker cables (for speaker connection)
–
+
–
+
(
Monaural pin cable (for subwoofer connection)
Next step
(
“How to connect the speakers”(p.22)
21
CONNECTION > Connecting the speakers
How to connect the speakers
Connect the speakers and subwoofer.
Before making any connections, disconnect this product and the speakers/subwoofer from the AC outlet.
n
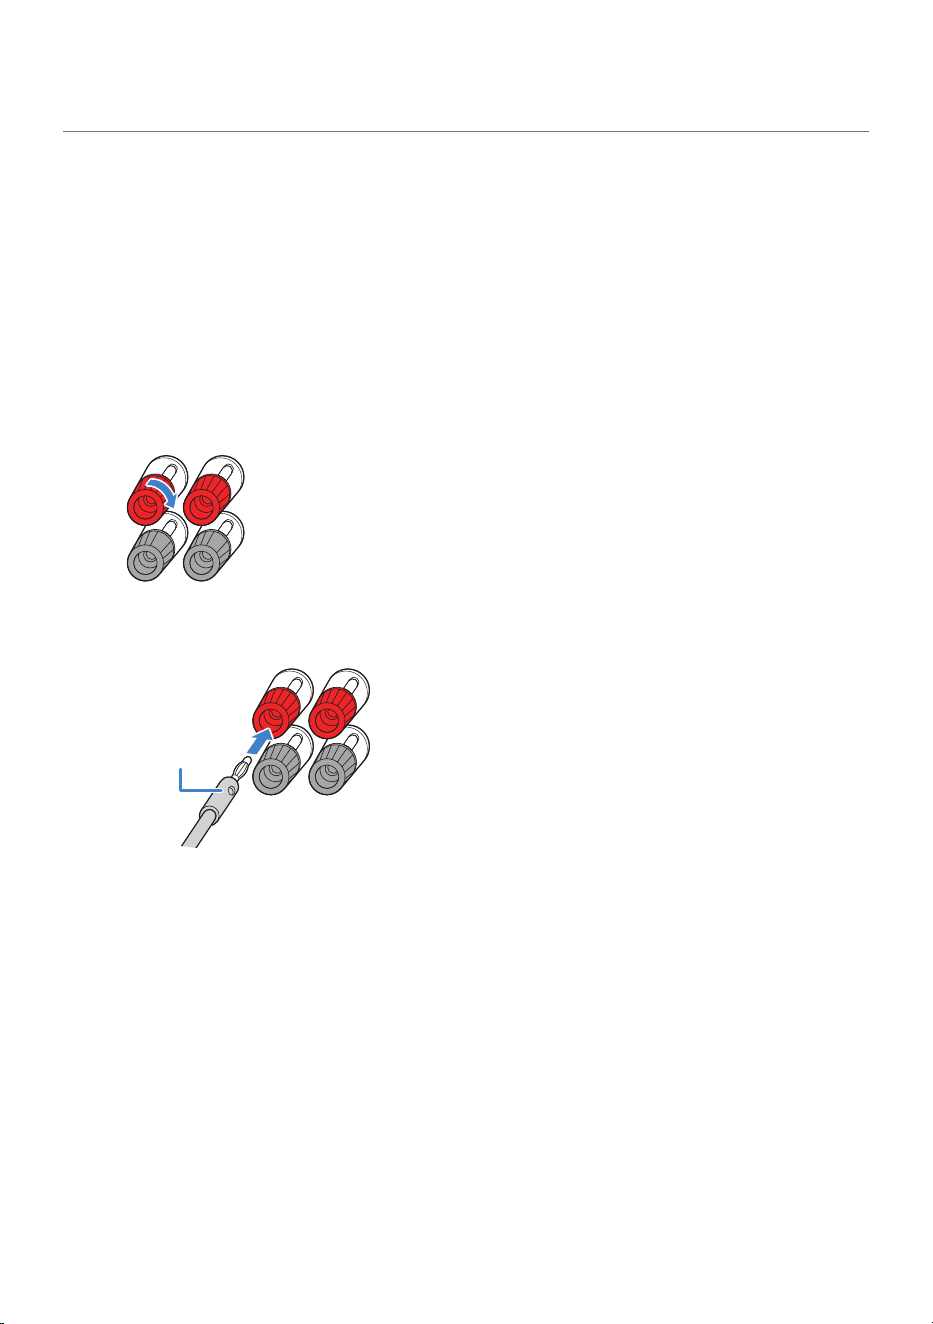
When using banana plugs
Model For
U.S.A. and Canada
Using banana plugs allows easier and safer connections than using bare speaker cables.
1 Tighten the speaker terminal.
2 Insert the banana plug into the speaker terminal.
Banana plug
n
When using speaker cables without banana plugs
If banana plugs are not used, the speakers can be connected using speaker cables only.
22
CONNECTION > Connecting the speakers
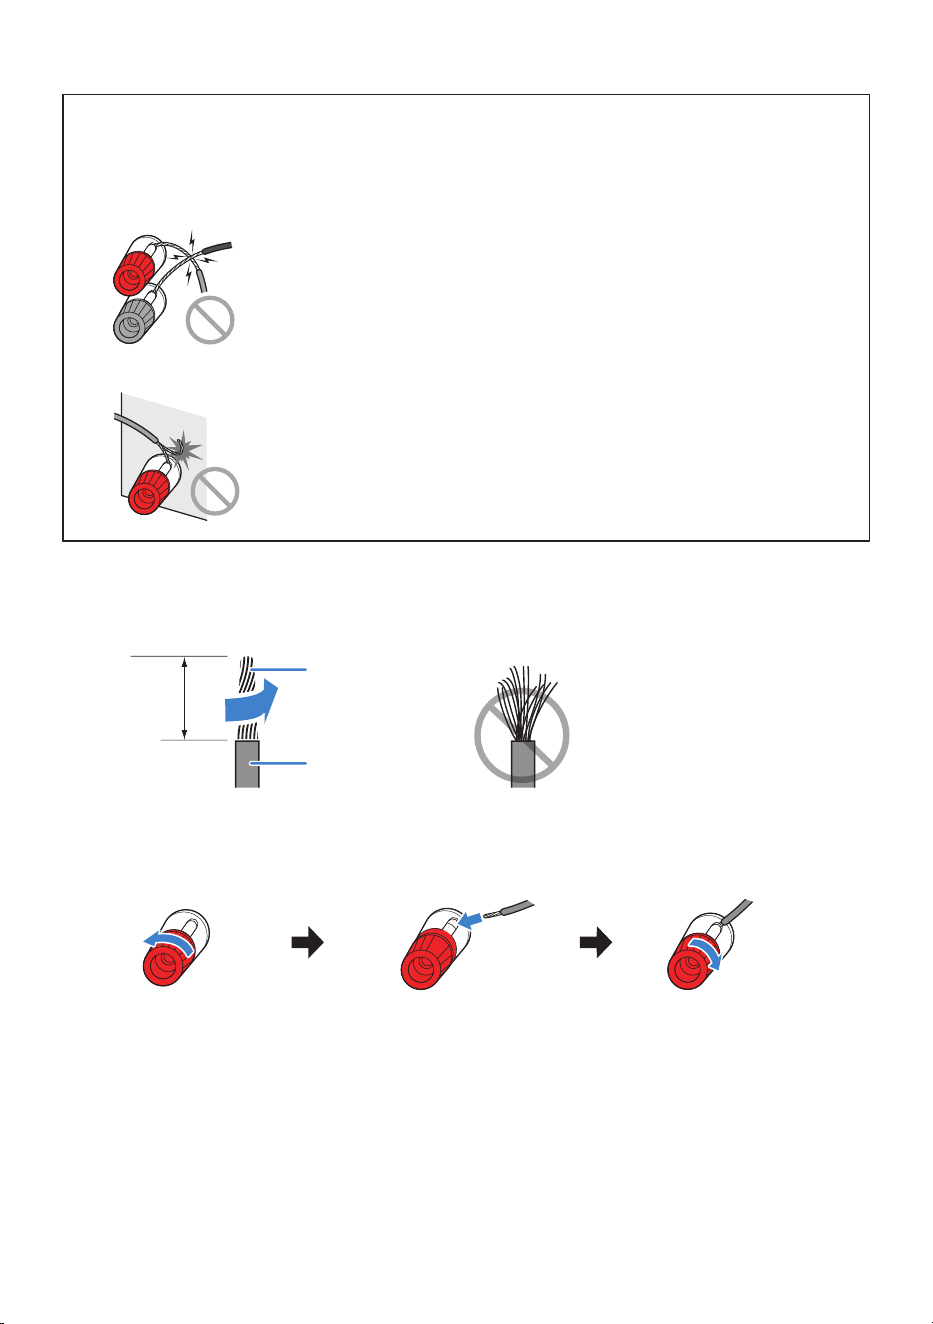
NOTICE
(
When preparing the speaker cables, work away from the product. Otherwise, pieces of the cable strands of the speaker cable
may fall inside the product and cause a short circuit, resulting in malfunction.
(
Incorrect speaker cable connection may cause a short circuit and damage this product or the speakers.
(
Do not allow cable strands to touch each other.
(
Do not allow cable strands to touch any metal parts of this product (rear panel, screws, etc.).
1 Strip about 10 mm of insulation from the end of the speaker cable, then twist the
strands tightly.
10 mm
Core wire
Insulation
2 Connect the speaker cable to the speaker terminal.
Loosen the speaker
terminal.
Insert the core wire of the speaker
cable into the gap on the side of the
terminal (upper right or lower left).
Tighten the terminal.
This completes the speaker connections.
23
CONNECTION > Connecting the speakers
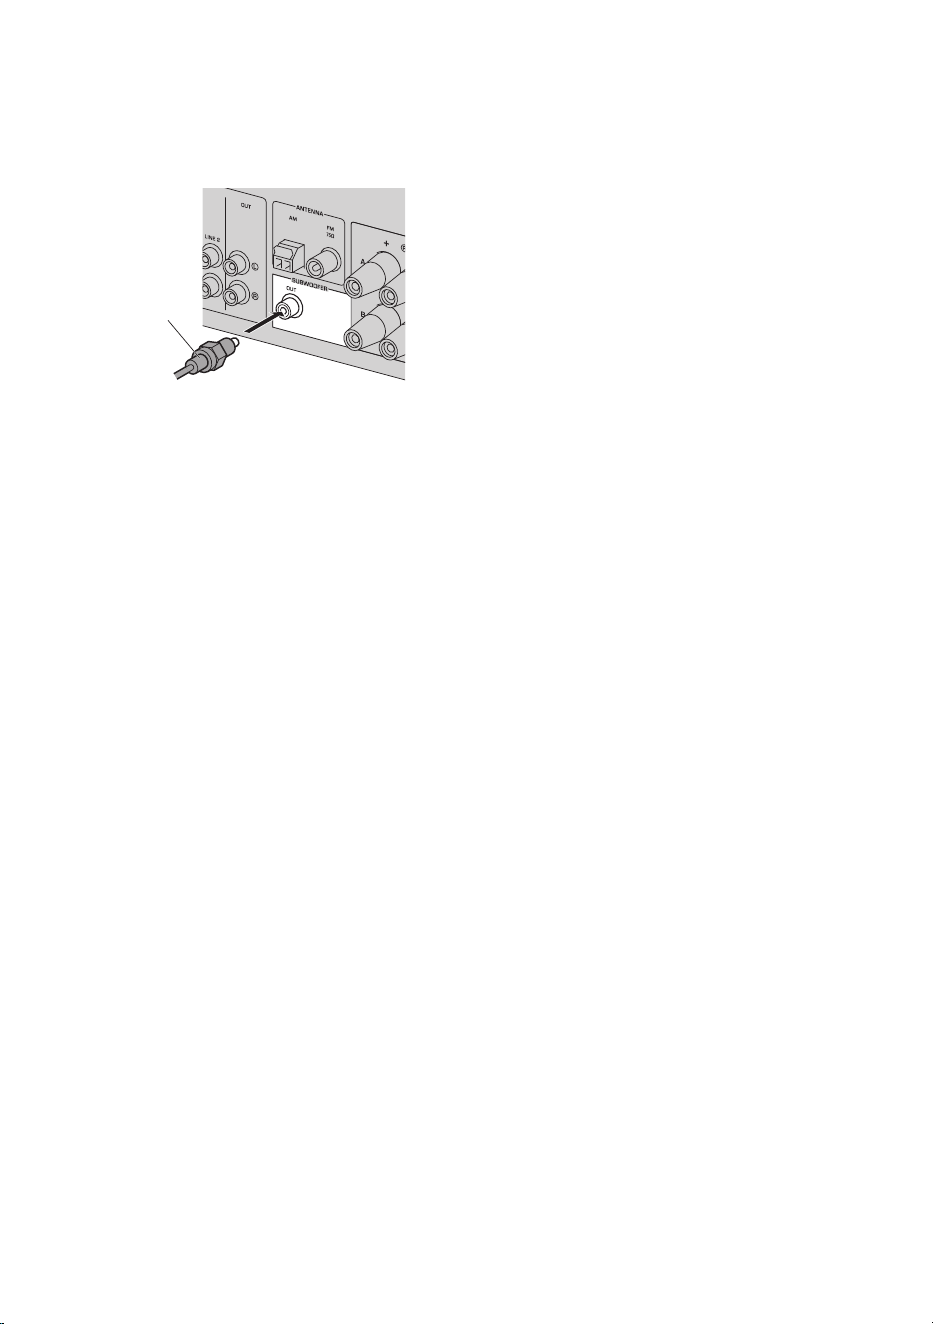
n
Connecting a subwoofer
Connect this product and the subwoofer using a monaural pin cable.
Monaural
pin cable
24
CONNECTION > Connecting the speakers
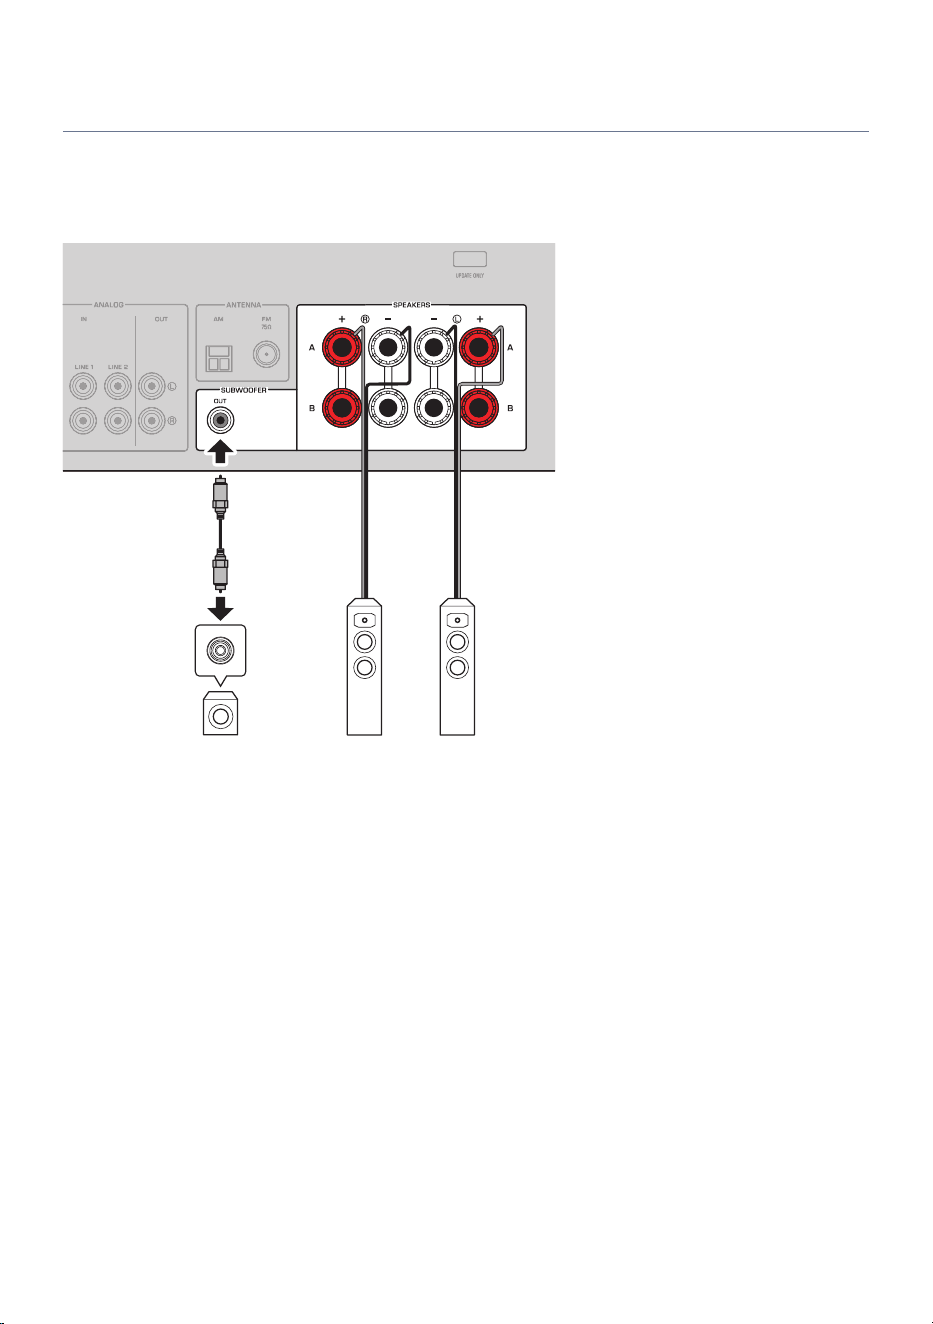
Connecting the speakers
Connect the speakers as shown in the illustration below, following their placement.
n
Speaker connections
Speaker
(R channel)
Speaker
(L channel)
Subwoofer
(with a built-in
amplifier)
Rear panel
25
CONNECTION > Connecting the speakers
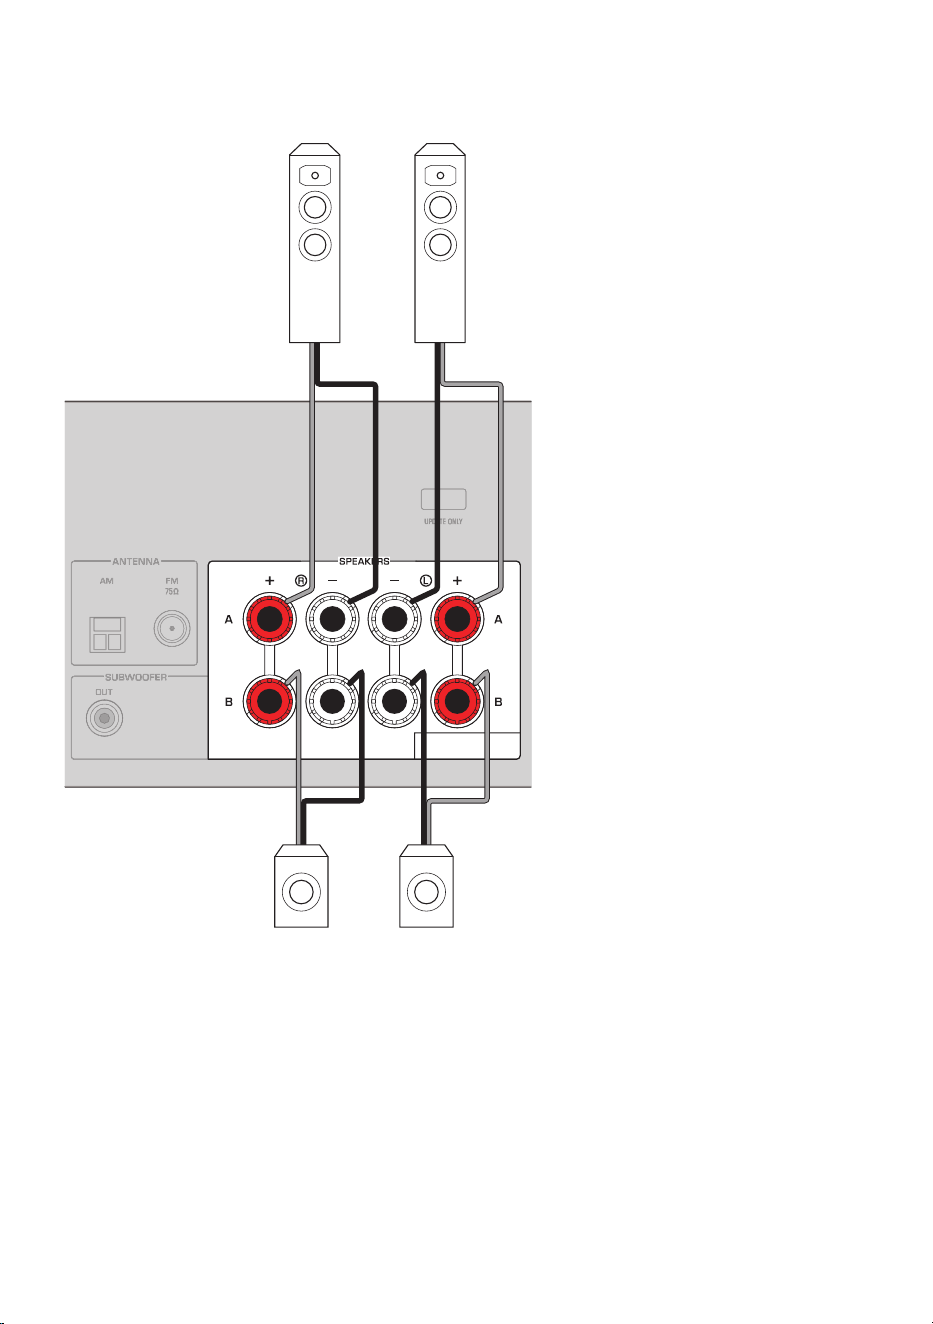
n
When connecting speakers A and B
Speaker A
(R channel)
Speaker B
(R channel)
Speaker B
(L channel)
Speaker A
(L channel)
Rear panel
26
CONNECTION > Connecting the speakers
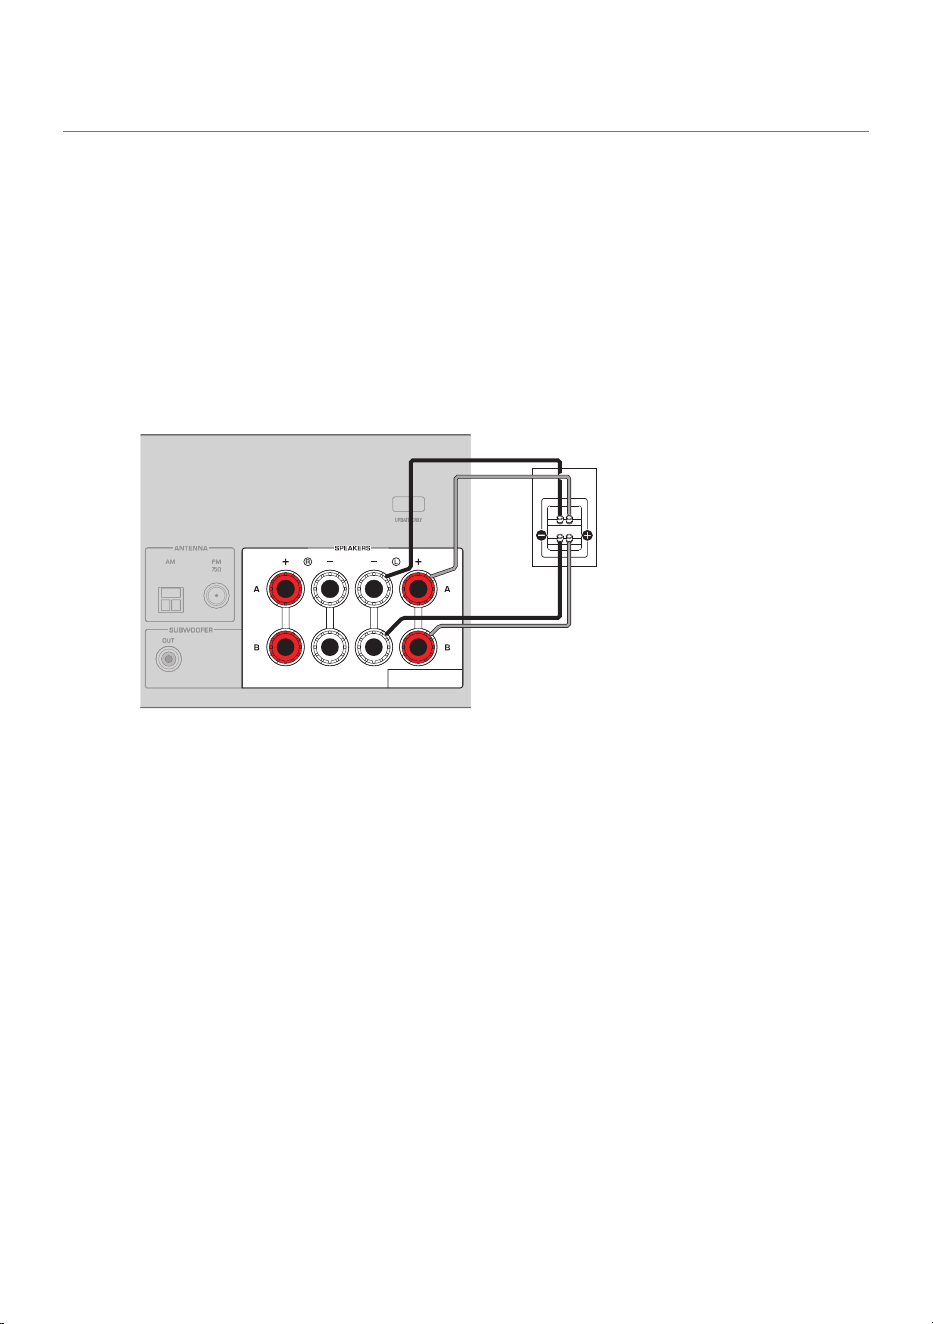
Bi-wiring connections (for high-quality audio)
Bi-wiring allows you to split the output between the speaker woofers (low-frequency) and the tweeter/
midrange (mid- to high-frequency) and drive them separately. You need speakers that support bi-wiring for
these connections.
1 Remove the jumper bars or bridges attached to the speaker terminals.
2 Connect the product and the speakers as illustrated.
The illustration shows connecting the left channel. Connect the right channel in the same way.
You can swap the speaker terminals A and B for the speaker connections.
Rear panel
Speakers
NOTE
(
If the system is bi-wired, turn on the product, then press the SP A/B key to enable speakers A and B.
(
Use bi-wiring-compatible speakers with an impedance of 8 Ω or higher.
Related links
“Switching the output speakers”(p.35)
27
CONNECTION > Connecting the speakers
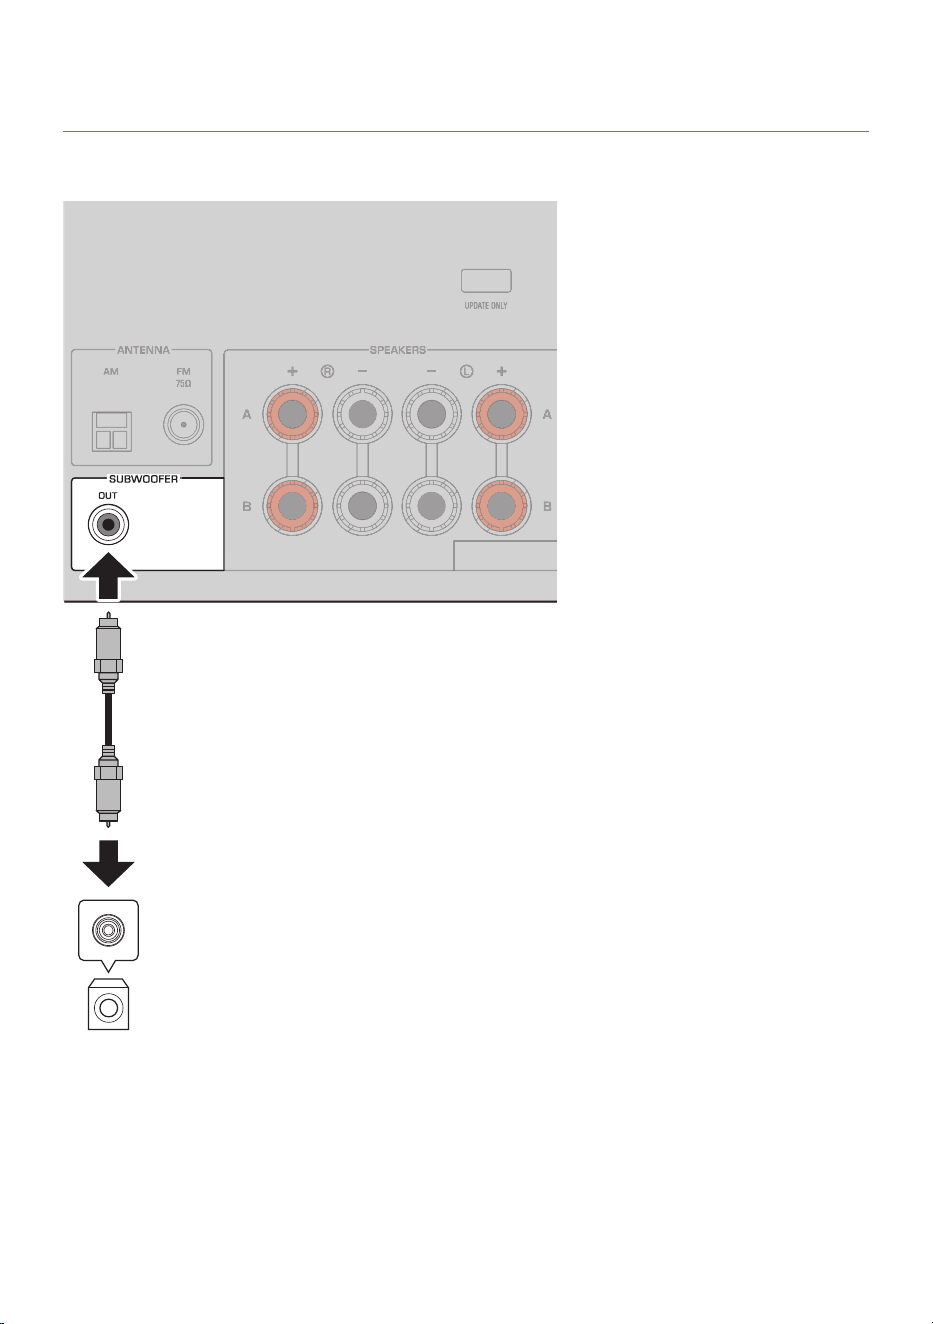
Connecting a subwoofer
To use a subwoofer, connect it to the product using a commercially available monaural pin cable (RCA).
Rear panel
Subwoofer
(with a built-in amplifier)
28
CONNECTION > Connecting the speakers
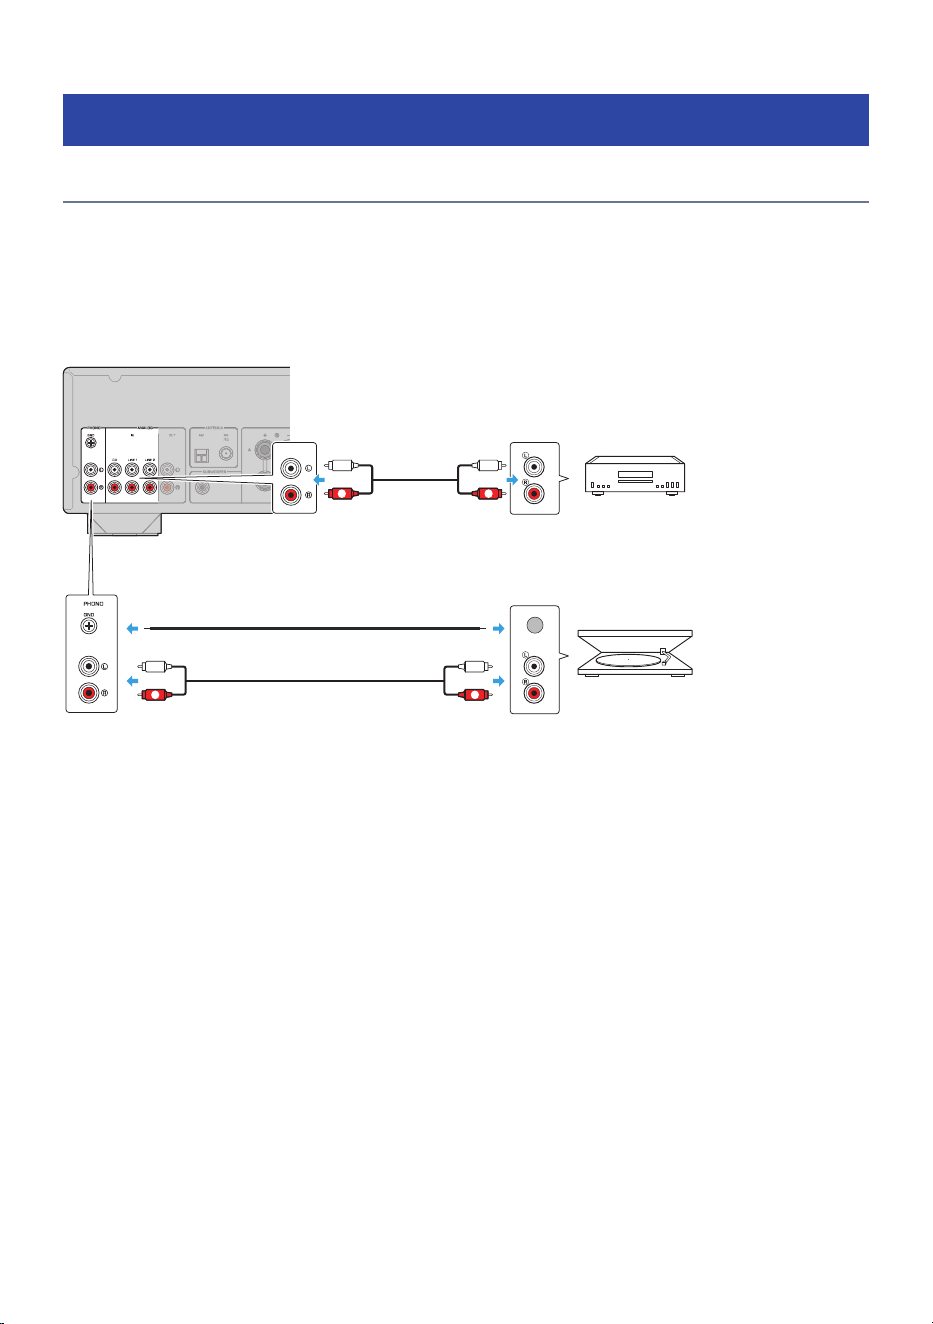
Connecting external devices
Connecting audio devices
This explains how to connect audio devices, such as a CD player, to the product.
Use suitable cables to connect the audio devices, such as RCA-type pin cables, based on the audio devices’
audio jacks or terminals.
GND
L
R
L
R
L
R
L
R
Rear panel
Ground wire
PHONO jacks
LINE 1 and LINE 2 jacks, CD Jacks
Audio device
(CD recorder, CD player, etc.)
Audio output (analog stereo)
Turntable
Audio output (PHONO)
NOTE
The PHONO jacks on this product are compatible with MM cartridges. Use a step-up transformer or similar if connecting a turntable
with an MC (low-output) cartridge.
Related links
“Rear panel”(p.13)
29
CONNECTION > Connecting external devices
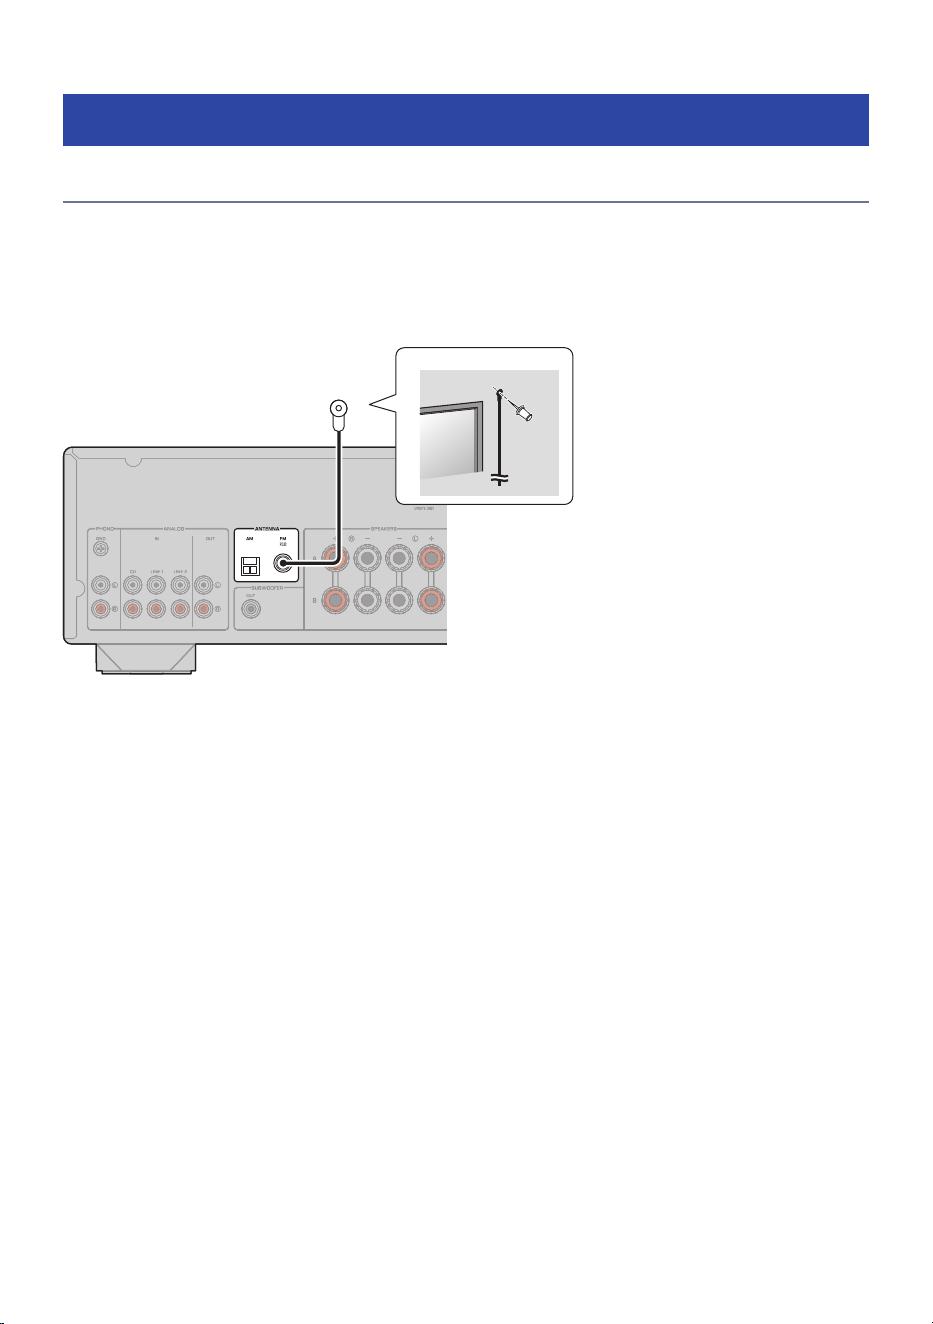
Connecting radio antennas
FM antenna
Model For
U.S.A. and Canada
Connect the supplied FM antenna to this product.
After connecting it, secure the FM antenna to a wall.
Rear panel
FM antenna
NOTE
Reception quality varies depending on where the antenna is positioned. If radio reception is poor, adjust the height, direction, or
placement of the FM antenna.
30
CONNECTION > Connecting radio antennas
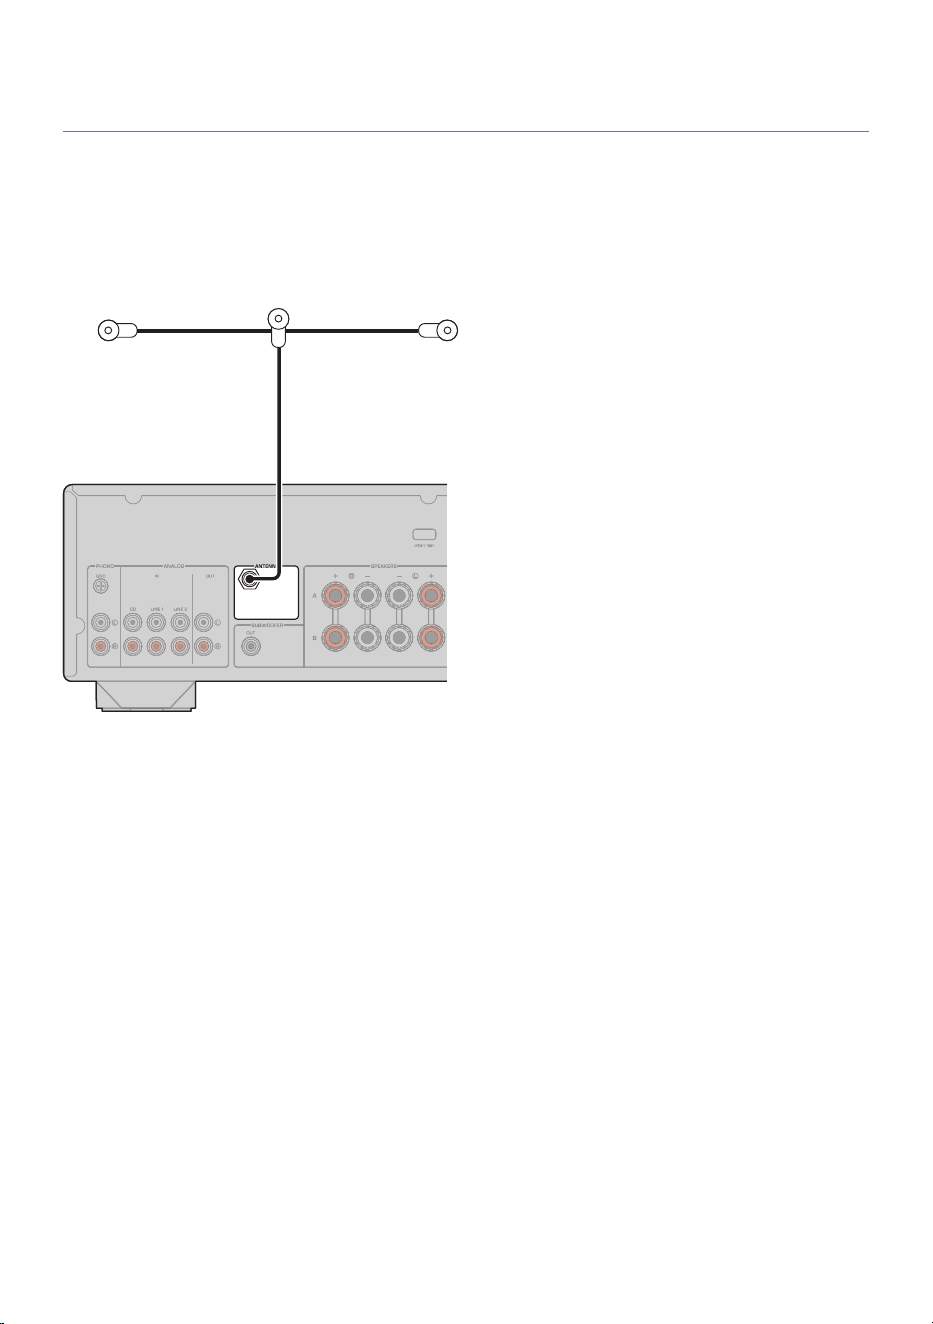
DAB/FM antenna
Model For
U.K., Europe, and Australia
Connect the supplied DAB/FM antenna to this product.
After connecting it, secure the DAB/FM antenna to a wall.
Rear panel
DAB/FM antenna
NOTE
(
Extend the antenna horizontally.
(
Reception quality varies depending on where the antenna is positioned. If radio reception is poor, adjust the height, direction, or
placement of the DAB/FM antenna.
31
CONNECTION > Connecting radio antennas
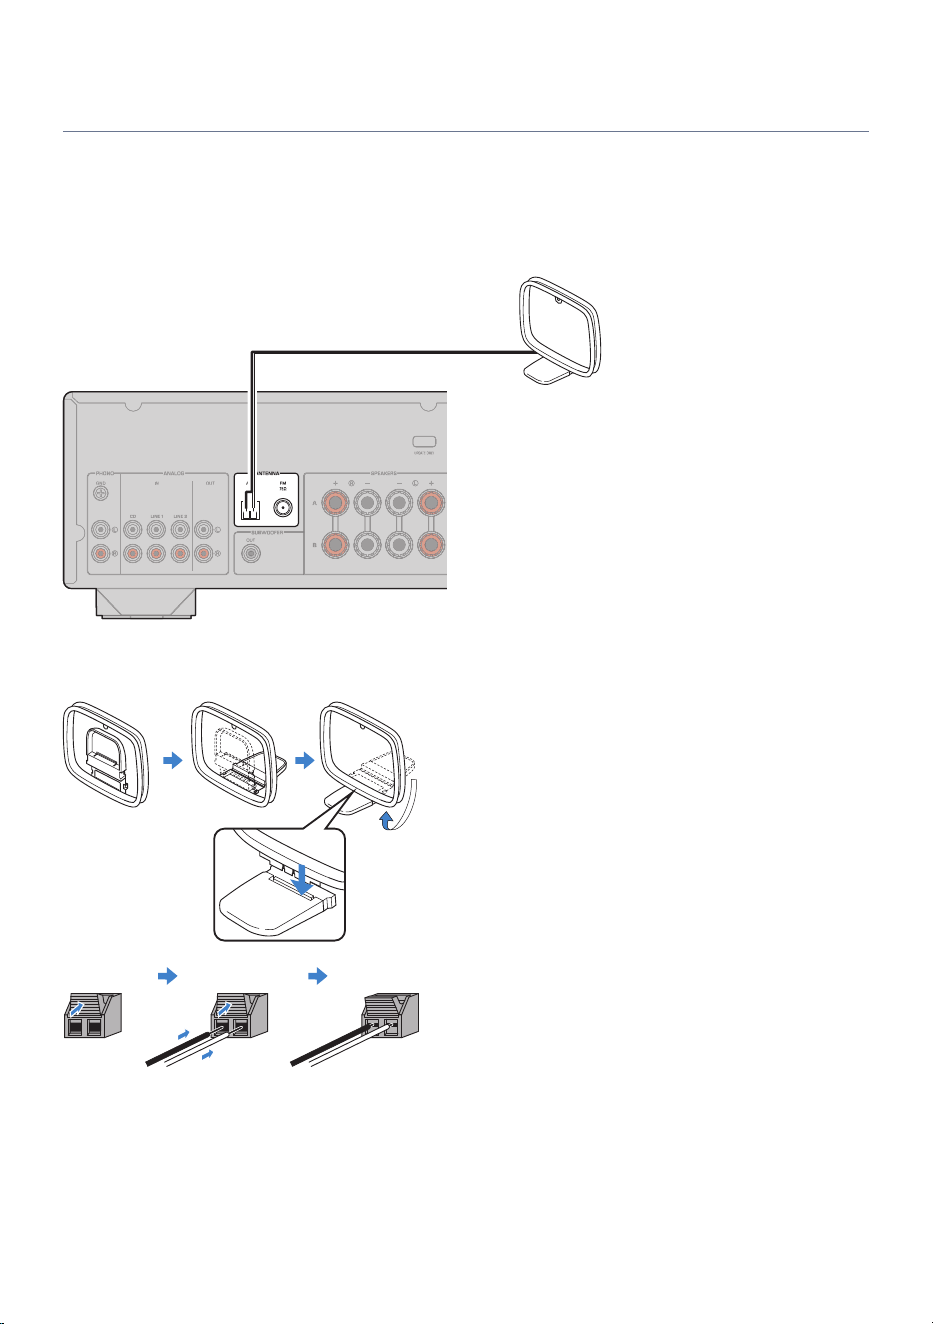
AM antenna
Model For
U.S.A. and Canada
Connect the supplied AM antenna to this product.
After connecting it, place the AM antenna on a flat surface.
Rear panel
AM antenna
WhiteBlack
Assembly and connection of the AM antenna
Release
Press and
hold Insert
NOTE
(
Unwind only as much wire from the antenna unit as needed for wiring.
(
The AM antenna cord does not have polarity.
32
CONNECTION > Connecting radio antennas
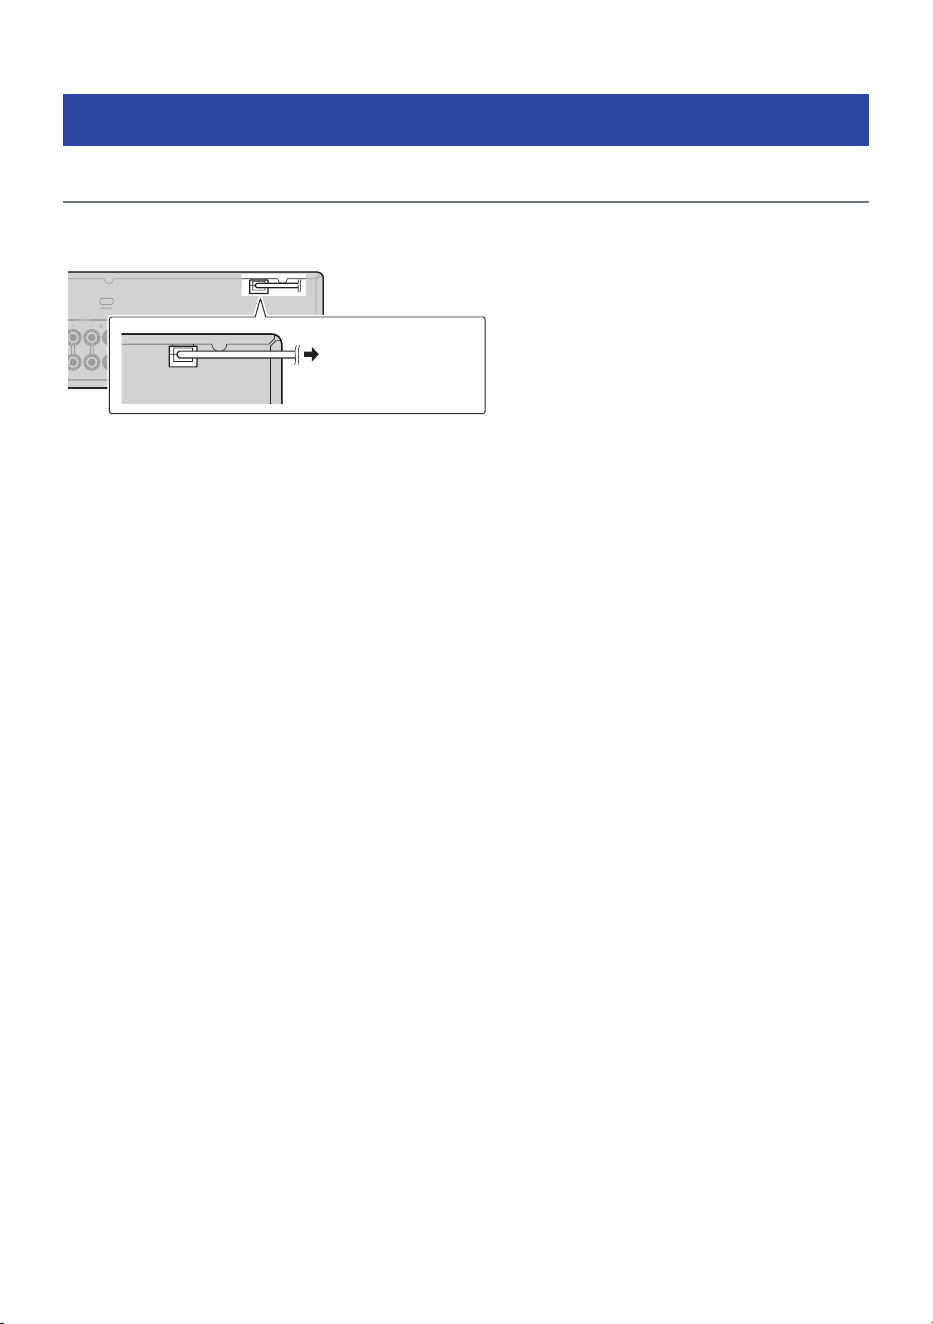
Connecting to power
Connecting to power
After making all the connections, plug the power cord into an outlet.
Rear panel
Connect to a power
outlet
NOTE
Be sure to unplug this product from the power outlet when it will not be used for an extended period. This product consumes a small
amount of electricity even when its power is in Standby.
33
CONNECTION > Connecting to power
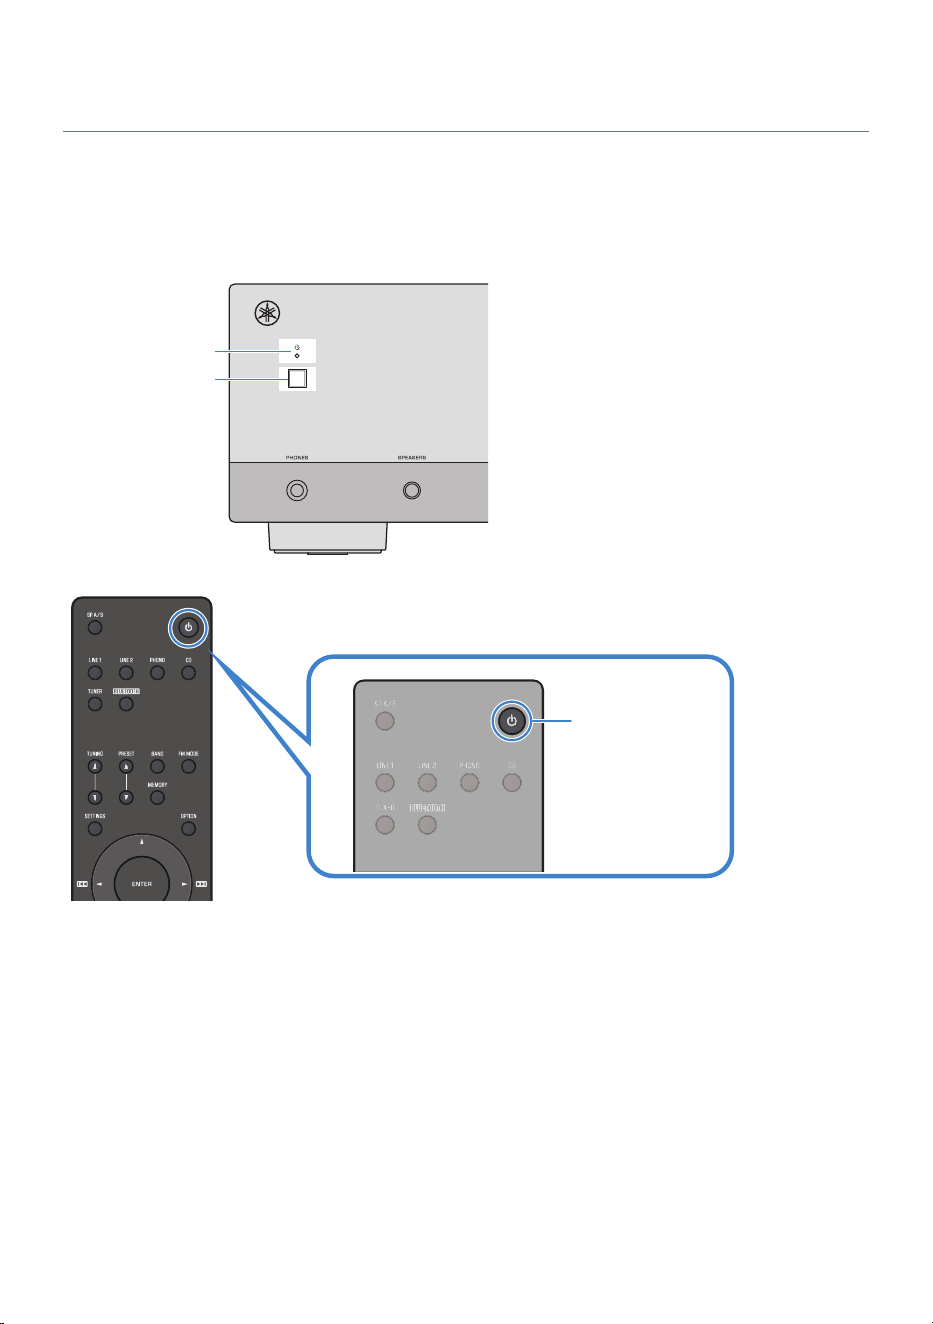
Turning the power on
Turn the product on.
Use the z (power) key on the remote control or on the front panel to turn the power on.
When the power comes on, the power indicator lights up.
Power indicator
Power key
Power key
z
NOTE
It takes several seconds from turning the power on to the audio playing.
34
CONNECTION > Connecting to power
PLAYBACK
Basic operation
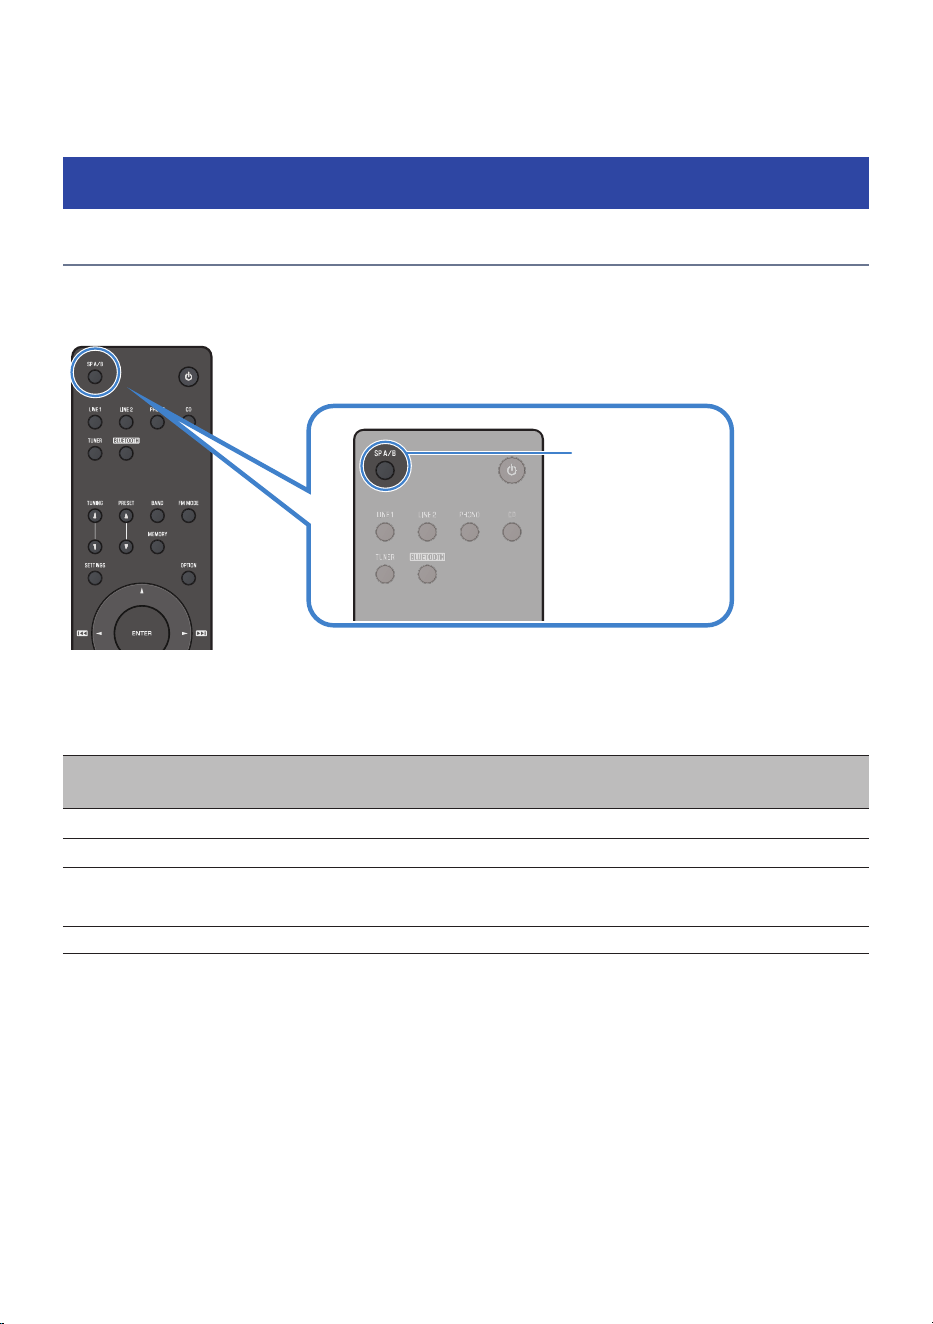
Switching the output speakers
Press the SP A/B key to select the output speakers.
You can see which speakers are selected by checking the speaker indicators on the front display.
SP A/B key
Each time you press the SP A/B key, it toggles Speakers A or B on/off.
Speaker indicator status
Speaker
indicator
Output speakers
SP A
Output from Speakers A.
SP B
Output from Speakers B.
SP A
SP B
Output from Speakers A and Speakers B.
No indicator No output from both Speakers A and Speakers B.
NOTE
(
You can also select the speakers by pressing SPEAKERS on the front panel.
(
If the speakers are bi-wired, turn on both Speakers A and Speakers B.
(
When headphones are connected, the speaker output is disabled.
35
PLAYBACK > Basic operation
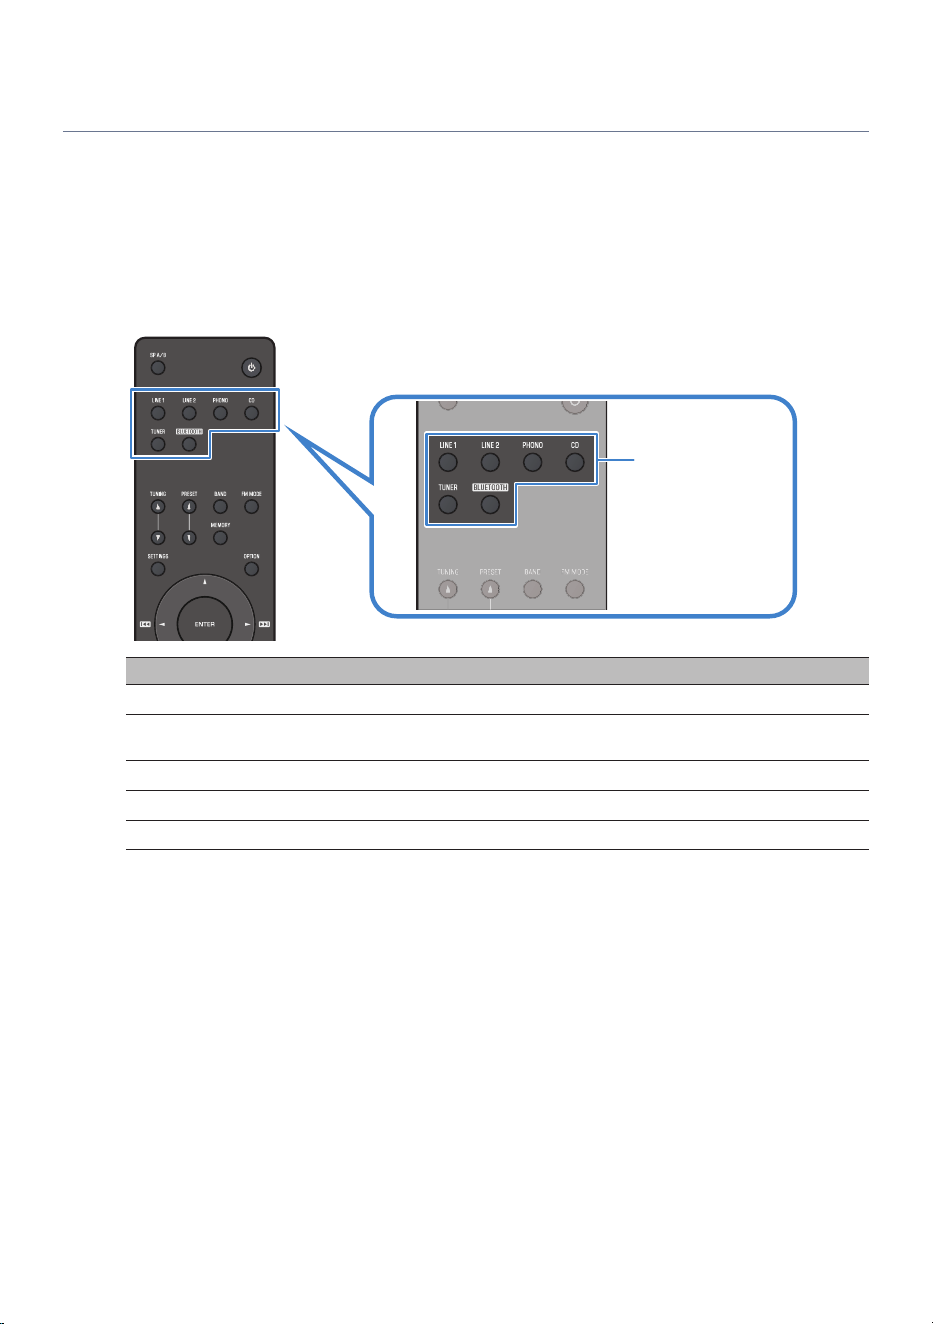
Selecting the input source
To play music, select the desired input source.
1 Turn on the external device to use.
2 Press the input source selection key for the input source you want to use.
The following input sources are available:
Input source selection
keys
Input source selection keys Input source
LINE 1 / LINE 2
Audio input via the LINE 1 or LINE 2 input jacks
PHONO
Audio input from a turntable (record player) connected to the PHONO input
jacks
CD
Audio input via the CD input jacks
TUNER
Radio audio
BLUETOOTH
Audio input from a Bluetooth-connected device, such as a smartphone
3 Start playback using an external device, or select a radio station on this product.
NOTE
(
You can also press INPUT on the front panel to select the input source.
(
How the playback keys behave and what information is displayed depend on the input source and the content being played.
(
For information on operating your external device, consult its owner’s manual.
36
PLAYBACK > Basic operation
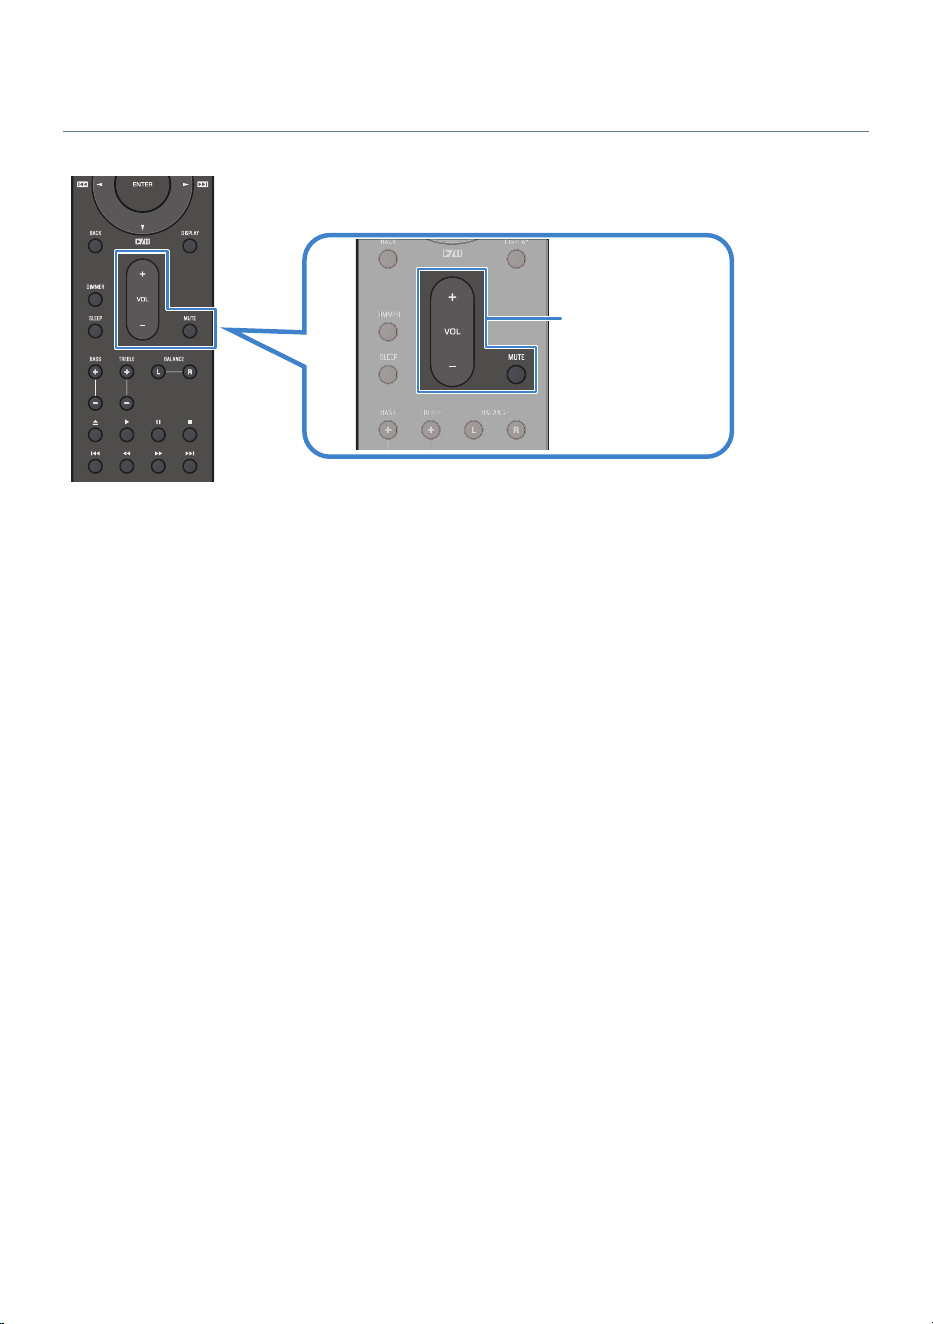
Adjusting the volume
Press the VOLUME +/− keys or the MUTE key to adjust the volume.
VOLUME +/− keys
MUTE key
NOTE
(
You can also turn VOLUME on the front panel to adjust it.
(
Pressing the MUTE key mutes the sound. Pressing it again returns the volume to its previous level.
(
You can adjust the sound to your preference using the BASS and TREBLE keys on the front panel.
Related links
(
“Adjusting bass and treble (BASS/TREBLE)”(p.53)
(
“Adjusting volume balance (BALANCE)”(p.54)
37
PLAYBACK > Basic operation

Switching the front display
The information shown on the front display can be changed depending on the current input source.
Press the DISPLAY key repeatedly to select the desired display item.
Input Displayed screen
LINE, CD, PHONO
Input
BLUETOOTH
Input, Audio Format
TUNER
Frequency
TUNER-RDS
Frequency, PS, PTY, RT, CT
TUNER-DAB
Station Name, PTY, DLS, Ensemble, Name, Channel No., Channel Frequency, Audio
Codec
NOTE
(
How the playback keys behave and what information is displayed depend on the input source and the content being played.
(
Some operations may not be available depending on the content being played and the connected device's specifications.
38
PLAYBACK > Basic operation
Playing radio
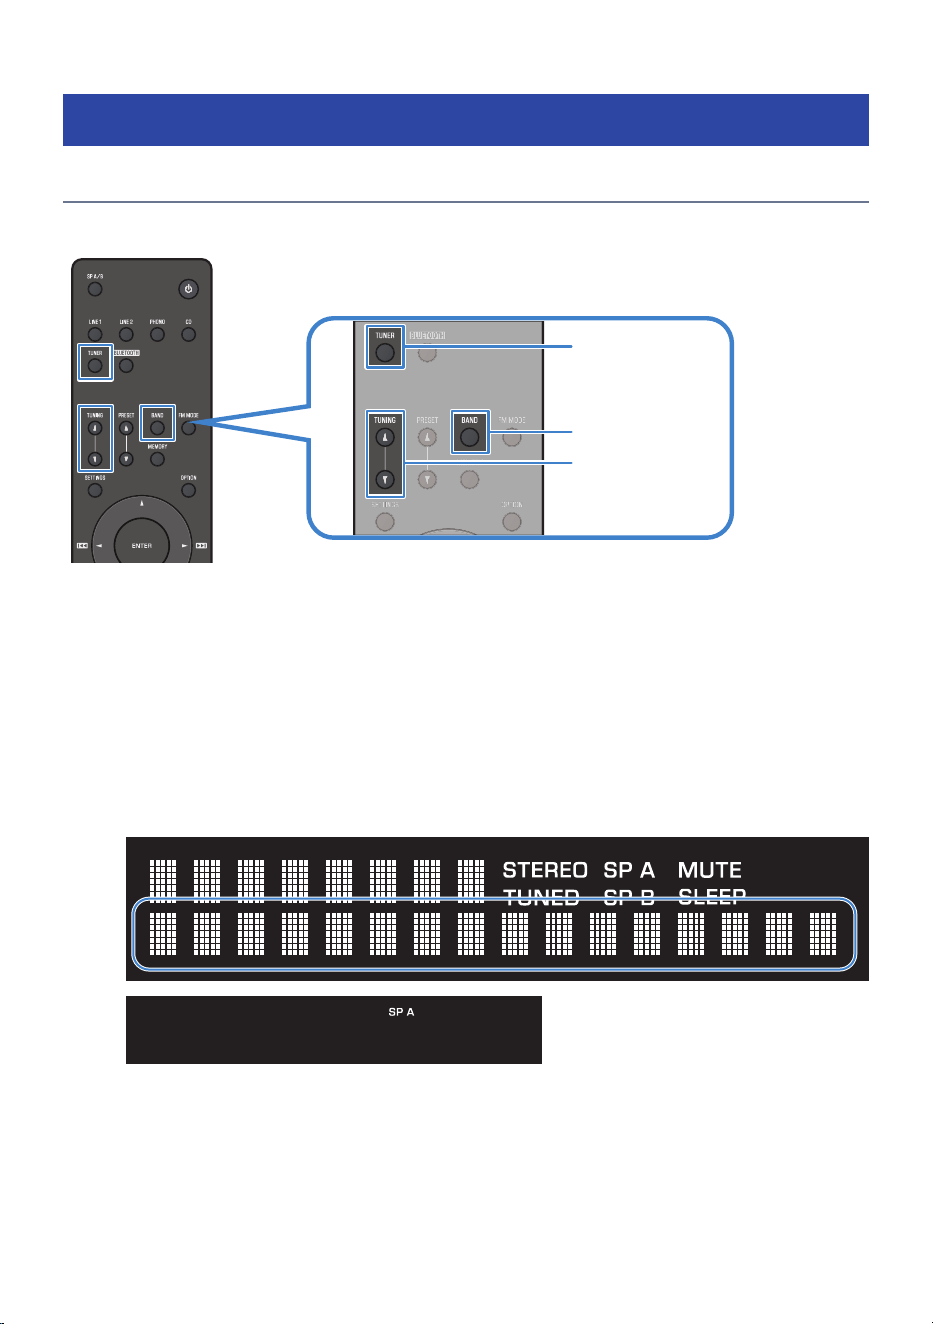
Selecting radio stations
You can use this product’s built-in tuner to listen to the radio.
TUNING key
TUNER key
BAND key
1 Press the TUNER key to switch the input source to “TUNER”.
2 Press the BAND key to switch to the next reception band.
FM/DAB
3 Press the TUNING key repeatedly to change the frequency.
Holding the key for approximately one second starts automatic tuning.
The currently selected frequency is shown on the front display.
FM 87.90MHz
NOTE
(
If FM radio reception is unstable, switching to mono may improve the signal. Use the FM MODE key to switch the FM radio reception
mode (Stereo/Mono).
(
To select a registered radio station, press the PRESET key. For details on registering radio stations, see the related links below.
39
PLAYBACK > Playing radio


Registering and deleting presets
n
Auto-registering radio stations (auto preset)
This function automatically registers the FM stations with the strongest signals to the preset numbers.
1 Press the TUNER key to switch the input source to “TUNER”.
2 Press the OPTION key.
The options menu opens on the display.
3 Select “Auto Preset” using the cursor keys (▲/▼), then press the ENTER key.
4 Specify a starting preset number (optional).
The selected preset number is used as the first preset number for automatic registration. To
specify a starting preset number, use the PRESET key or the cursor keys (▲/▼), then press the
ENTER key.
If you do not specify a starting preset number, registration begins with an automatically
selected preset number.
Radio station search and registration start automatically.
Once all registrations are complete, a completion message is displayed.
The options menu closes automatically, and the display reverts to the normal TUNER display.
NOTE
(
Up to 40 radio stations can be registered (40 stations total across FM and AM, or 40 each for FM and DAB).
(
To stop registration, press the BACK key during the auto-preset process.
(
(U.K. and Europe models only)
With the auto preset function, only radio stations that provide Radio Data System services will be automatically registered.
n
Registering radio stations (manual operation)
You can select a radio station and manually assign it to a preset number.
1 Tune to the radio station you want to register.
2 Press the MEMORY key.
01:Empty
89.1
3 Use the PRESET ▲/▼ keys to select the preset number (01–40) to register.
41
PLAYBACK > Playing radio

4 Press the MEMORY key again.
01:FM 89.1 MHz
PRESET
This completes the registration.
NOTE
(
Up to 40 radio stations can be registered (40 stations total across FM and AM, or 40 each for FM and DAB).
(
To register the tuned station to the next available preset number after the most recently assigned one, press and hold the MEMORY
key for 3 seconds or longer while the station you want to register is tuned in.
(
To go back to the original display without registering, press the BACK key.
(
After 30 seconds of inactivity, the display automatically returns to the previous display.
n
Recalling a registered radio station
This recalls a radio station (preset station) registered to a preset number.
1 Switch the input to “TUNER”.
2 Press the PRESET ▲/▼ key to select a preset number (01–40).
The radio station assigned to the preset number is recalled.
NOTE
(
Any preset number not assigned to a radio station is skipped.
(
If no radio stations are registered, “No Presets” is shown on the front display.
n
Deleting a registered radio station
You can remove a radio station registered to a preset number.
1 Switch the input source to “TUNER”.
2 Press the OPTION key to open the options menu on the front display.
3 Select “Clear Preset” and press the ENTER key.
4 Select the preset number to delete.
Press the PRESET ▲/▼ keys to select the preset number you want to delete (01–40).
5 Check the displayed number, then press the ENTER key to confirm deletion.
6 To delete other radio stations, repeat steps 2 to 5.
This completes the removal of the registration.
42
PLAYBACK > Playing radio


Tuning to a Radio Data System (RDS) broadcaster
Radio Data System (RDS) is a data transmission system used by FM broadcasters. When tuned to an RDS
broadcaster, this product displays RDS information, such as the broadcaster's name, on the front display.
An FM broadcaster that supports RDS can be tuned in the same way as an ordinary FM radio station.
Model For
U.K. and Europe
1 Select the desired FM broadcaster that supports RDS.
2 Press the DISPLAY key to change the display.
If the received broadcaster supports RDS, the front display shows information such as the
station name.
Frequency
Frequency
PS
Program Service
PTY
Program Type
RT
Radio Text
CT
Clock Time
NOTE
Use of the Auto Preset function is recommended for receiving Radio Data System (RDS) broadcasters. For details on “Auto Preset”, see
the related links below.
Related links
(
“Selecting radio stations”(p.39)
(
“Registering and deleting presets”(p.41)
44
PLAYBACK > Playing radio

Tuning to a DAB radio station
DAB radio scans for services in advance, then selects a registered service and tunes to it.
Model For
U.K., Europe, and Australia
NOTE
(
When using a DAB radio for the first time, make sure to perform a DAB scan.
(
When the product is moved to another location or the available broadcasters change, rescan.
(
Operations may be unavailable during the scan. Wait until the scan completes.
n
Scanning DAB broadcasters (initial setting)
1 Press the TUNER key to switch the input source to “TUNER”.
2 Press the BAND key to switch to the DAB band.
The initial scan starts.
When the initial scan finishes, the product automatically tunes to the first DAB radio station in frequency
order.
n
Registering radio stations (manual operation)
You can select a radio station and manually assign it to a preset number.
1 Tune to the radio station you want to register.
2 Press the MEMORY key.
3 Use the PRESET ▲/▼ keys to select the preset number (01–40) to register.
4 Press the MEMORY key again.
This completes the registration.
NOTE
(
Up to 40 radio stations can be registered.
(
DAB uses digital signals to provide clearer audio and more stable reception compared to analog signals. This product also supports
DAB+. DAB+ is an upgraded version of DAB and supports stations that use the MPEG-4 HE-AAC v2 audio codec, which provides a
more efficient transmission method.
(
Because not all regions are covered yet, be sure to check DAB coverage in your area. For nationwide DAB status and a list of DAB
frequencies worldwide, visit WorldDAB Online at http://www.worlddab.org/.
(
If the initial scan fails to find DAB radio stations, you can run it using the “Initial Scan” option in the options menu.
(
You can check the signal strength for each DAB channel label. In the options menu, select “Tune AID”. Then select the desired DAB
channel label. The signal strength of the displayed DAB channel label ranges from 0 (none) to 100 (maximum).
(
If you run the initial scan again after registering several DAB stations, the current DAB stations registered to the preset numbers will
be cleared.
45
PLAYBACK > Playing radio

n
DAB frequency information
This product supports only Band III (174–240 MHz).
Frequency Channel label
174.928 MHz 5A
176.640 MHz 5B
178.352 MHz 5C
180.064 MHz 5D
181.936 MHz 6A
183.648 MHz 6B
185.360 MHz 6C
187.072 MHz 6D
188.928 MHz 7A
190.640 MHz 7B
192.352 MHz 7C
194.064 MHz 7D
195.936 MHz 8A
197.648 MHz 8B
199.360 MHz 8C
201.072 MHz 8D
202.928 MHz 9A
204.640 MHz 9B
206.352 MHz 9C
208.064 MHz 9D
209.936 MHz 10A
211.648 MHz 10B
213.360 MHz 10C
215.072 MHz 10D
216.928 MHz 11A
218.640 MHz 11B
220.352 MHz 11C
222.064 MHz 11D
223.936 MHz 12A
225.648 MHz 12B
227.360 MHz 12C
229.072 MHz 12D
230.784 MHz 13A
232.496 MHz 13B
234.208 MHz 13C
235.776 MHz 13D
237.488 MHz 13E
239.200 MHz 13F
46
PLAYBACK > Playing radio

n
Displaying DAB information
When tuned to a DAB radio station, this product can receive various types of DAB information.
1 Tune to the desired DAB radio station.
2 Press the DISPLAY key to change the display.
The information will appear in the front display.
NOTE
Depending on the selected DAB radio station, some information may not be available.
TUNER-RDS
Frequency
Frequency
PS
Program Service
PTY
Program Type
RT
Radio Text
CT
Clock Time
TUNER-DAB
Station Name
Station Name
PTY
Program Type
DLS
Dynamic Label Segment
Ensemble Name
Ensemble Name
Channel No.
Channel No.
Channel Frequency
Channel Frequency
Audio Codec
Audio Codec
47
PLAYBACK > Playing radio
Playing audio from a Bluetooth® device
Pairing (initial setting)
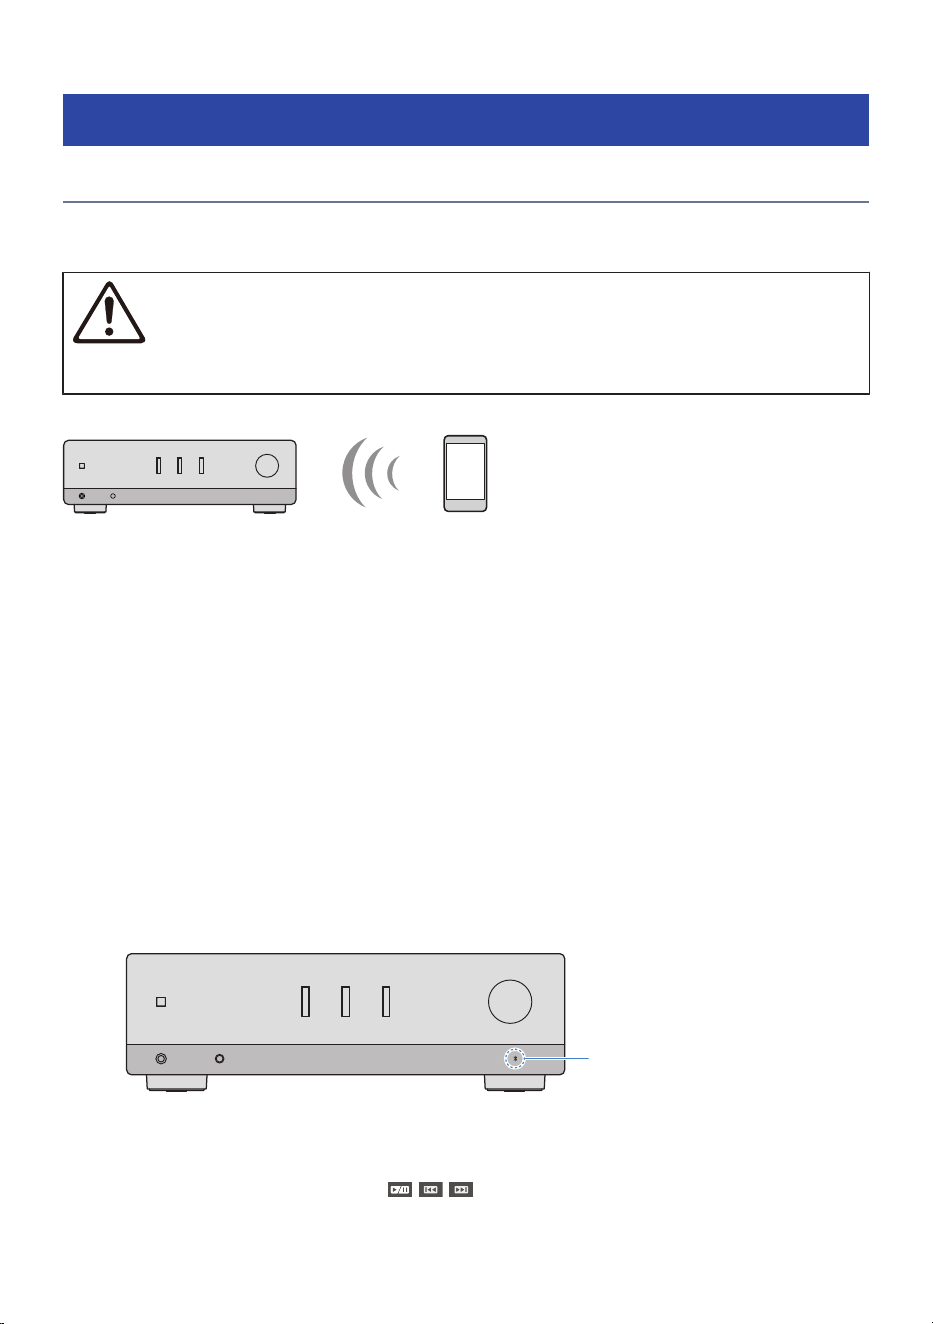
Wirelessly connect a Bluetooth device (such as a smartphone) to this product to play music files and other
audio.
CAUTION
(
Adjusting the volume on the Bluetooth device may cause the sound to become unexpectedly loud, which can result in hearing
impairment or damage to equipment. If the volume suddenly becomes too loud during playback, stop playback immediately.
This product Bluetooth device
(smartphone, etc.)
1 Press the BLUETOOTH key to switch the input source to “Bluetooth”.
2 Check that “Pairing” is displayed on the front display.
If it is not displayed, press and hold the BLUETOOTH key.
This product enters pairing mode. When pairing mode is enabled, the “$” icon on the front
panel flashes.
You can also access pairing from the “Pairing” option in the options menu.
3 Select this product (its network name) on the Bluetooth device.
The default name of this product is “Yamaha R200A”.
Once pairing is complete, “Connected” appears, and the Bluetooth indicator lights up.
Bluetooth indicator
4 Operate the Bluetooth device to play music.
You can also use the cursor keys (
/ / ) to control playback on the Bluetooth device.
48
PLAYBACK > Playing audio from a Bluetooth® device

NOTE
(
This product can register up to 8 Bluetooth devices (save them in the pairing history). When the 9th Bluetooth device is registered,
the oldest registered device is automatically deleted.
(
When the input is switched to Bluetooth, a paired Bluetooth device automatically connects if it is detected.
(
Depending on the Bluetooth device, you may be able to control this product’s volume directly from the device during playback.
You can also adjust the volume by pressing the VOLUME +/- key on the remote control or by rotating the front panel VOLUME
control.
n
How to disconnect a Bluetooth device
Perform one of the following.
(
Turn the product off manually.
(
Switch this product’s input source to something other than “Bluetooth”.
(
In the settings menu, set “Bluetooth” to “Off”.
(
Turn off Bluetooth on the device.
(
From the Bluetooth device’s connection list, disconnect this product.
(
From the Bluetooth device’s connection list, remove this product (reconnection will require pairing).
Related links
(
“Pairing a Bluetooth device”(p.65)
(
“Bluetooth input synchronization”(p.66)
49
PLAYBACK > Playing audio from a Bluetooth® device
Usage tips (when paired with multiple Bluetooth devices)
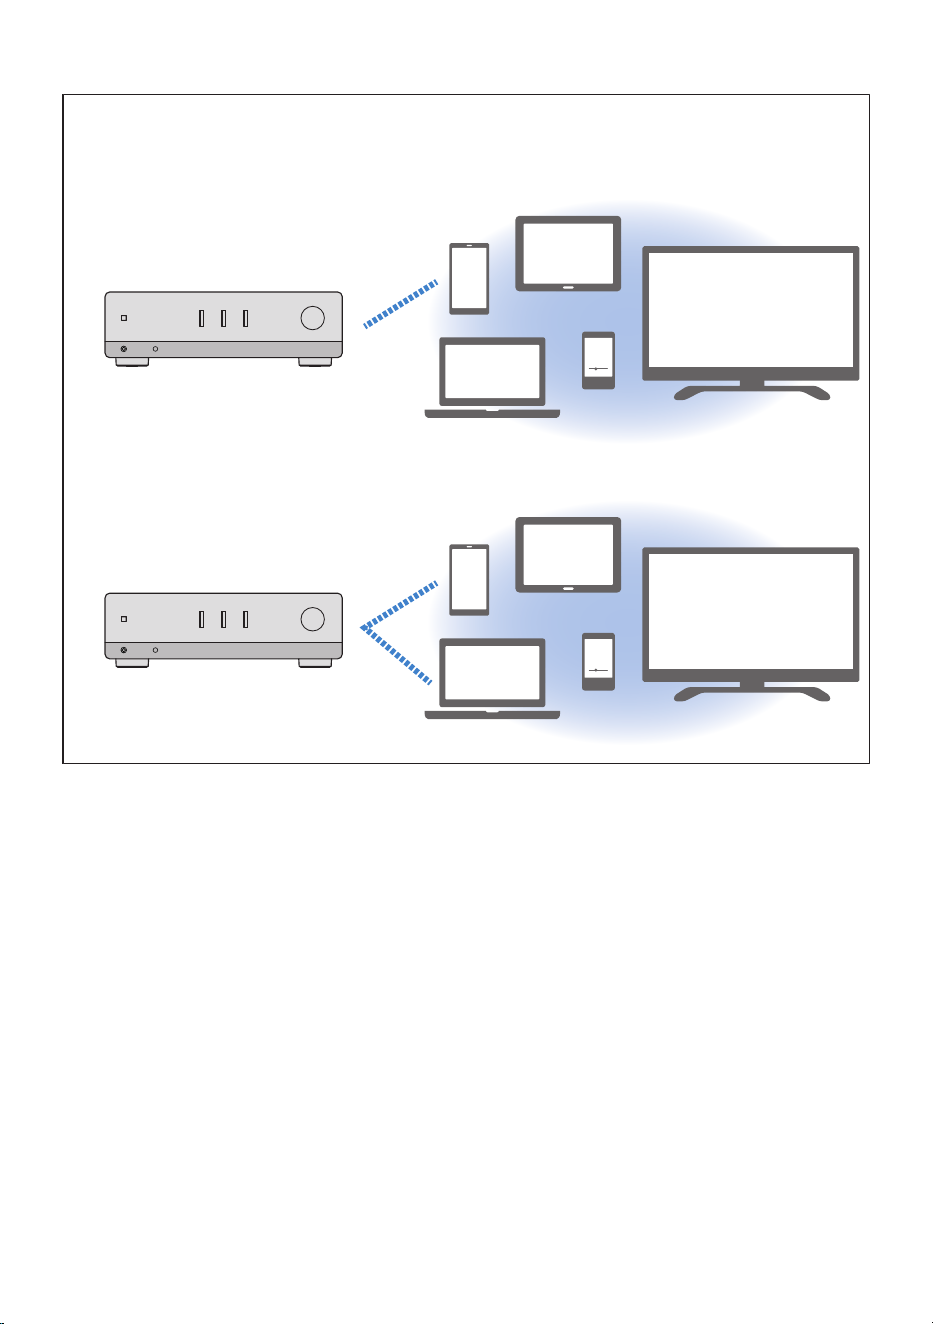
When you pair the product with multiple Bluetooth devices, you can use those devices as follows.
(
Connect this product to any paired Bluetooth device.
(
To do so, disconnect from all Bluetooth devices except the one you intend to connect to.
♫
(
Connect this product to any 2 paired Bluetooth devices (multi-point connection).
(
For more details, refer to “Multi-point connection (connecting 2 devices simultaneously)”(p.51).
♫
50
PLAYBACK > Playing audio from a Bluetooth® device

Multi-point connection (connecting 2 devices simultaneously)
This product supports multi-point connections, allowing up to 2 Bluetooth devices to connect
simultaneously. For example, after listening to music on your PC, you can switch to playing music on your
smartphone without disconnecting from the Bluetooth connection.
Preparation for multi-point connection
For a multi-point connection, pair (register) the 2 Bluetooth devices you want to connect to this product
beforehand.
n
How to use a multi-point connection
1 Press the BLUETOOTH key to switch the input source to “Bluetooth”.
2 Select this product on the first Bluetooth device, then connect to the device.
The Bluetooth indicator on this product lights up when the connection is complete.
3 Select this product on the second Bluetooth device, then connect to the device.
If the first device disconnects while the second device is connecting, reconnect the first
Bluetooth device after the second device's connection is complete.
When both Bluetooth devices are connected to this product, a multi-point connection is established.
n
How to play
1 Press the BLUETOOTH key to switch the input source to “Bluetooth”.
2 Start playback on the first Bluetooth device.
Music from the first Bluetooth device plays through this product.
3 Start playback on the second Bluetooth device.
Playback switches to the second Bluetooth device, and music plays through this product.
51
PLAYBACK > Playing audio from a Bluetooth® device

NOTE
(
Start and switch playback on the connected Bluetooth devices.
(
You can perform the following actions on this product:
(
Switch the input source to Bluetooth
(
Adjust the volume
(
Mute
(
You can play music from either device, but not from both devices simultaneously.
(
Music from the device you last played back is played through the product.
(
While playing music, if you start playback on another Bluetooth device, playback will switch to that device.
(
You can connect up to 2 Bluetooth devices via a multi-point connection. To connect to another Bluetooth device, disconnect one
of the currently connected devices.
(
After a multi-point connection is established, when this product is powered off and then back on, the device connected last is
automatically reconnected if both devices are powered on. To connect to the other device, select this product on the device, then
connect to it.
(
Multi-point connection performance varies by the Bluetooth device. The function does not guarantee performance on all
Bluetooth-supported devices. For more details, consult the user manual for the Bluetooth device.
(
Depending on the connected devices, the connection to the second device may be lost while the first device is in use.
(
Depending on the apps or software used, this function may not work properly. If it does not work correctly, operate the connected
device.
n
How to cancel the multi-point connection
Cancel the connection on the Bluetooth device.
52
PLAYBACK > Playing audio from a Bluetooth® device
Adjusting the sound
Adjusting bass and treble (BASS/TREBLE)
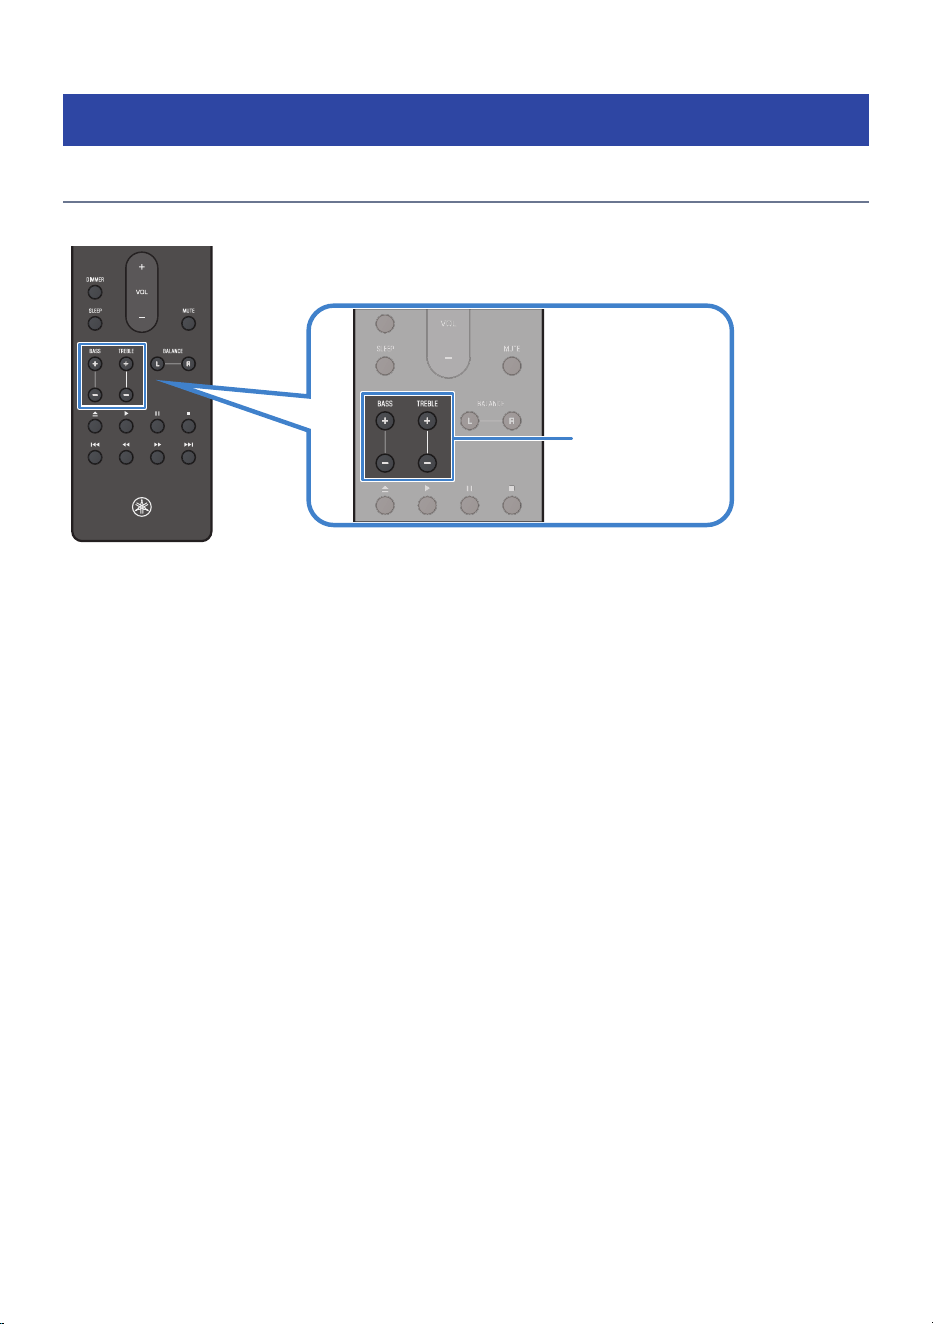
You can adjust the levels of the high-frequency range (Treble) and the low-frequency range (Bass) separately.
BASS key
TREBLE key
n
Adjusting the bass
Use the BASS keys (+/-) to adjust the bass level. If the bass sounds weak, press the + key to increase its level.
If it sounds too loud, press the - key to reduce its level.
Setting range: -10 dB to 0 to +10 dB (50 Hz)
n
Adjusting the treble
Use the TREBLE keys (+/-) to adjust the treble level. If the treble sounds weak, press the + key to increase its
level. If it sounds too loud, press the - key to reduce its level.
Setting range: -10 dB to 0 to +10 dB (20 kHz)
NOTE
You can also adjust the bass and treble levels using “BASS” and “TREBLE” on the front panel.
53
PLAYBACK > Adjusting the sound
Adjusting volume balance (BALANCE)
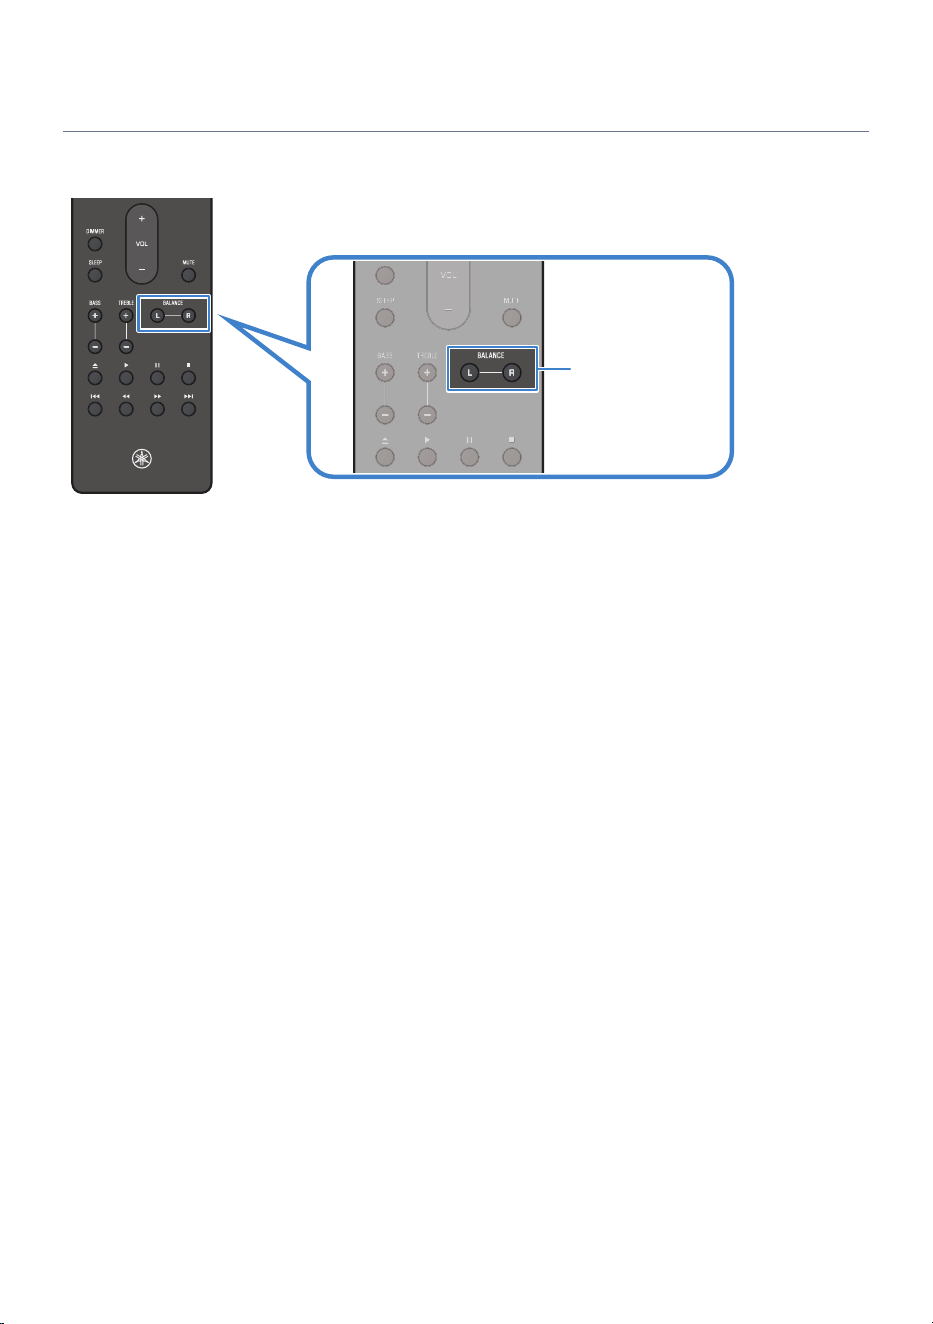
Any volume imbalance caused by speaker placement and/or room conditions can be corrected by adjusting
the balance between the left and right speakers.
BALANCE key
Use the BALANCE L (left channel) and R (right channel) keys to adjust the balance.
Pressing one key to its maximum level mutes the other channel.
NOTE
You can also adjust the balance in the “Settings Menu”.
54
PLAYBACK > Adjusting the sound
USEFUL FUNCTIONS
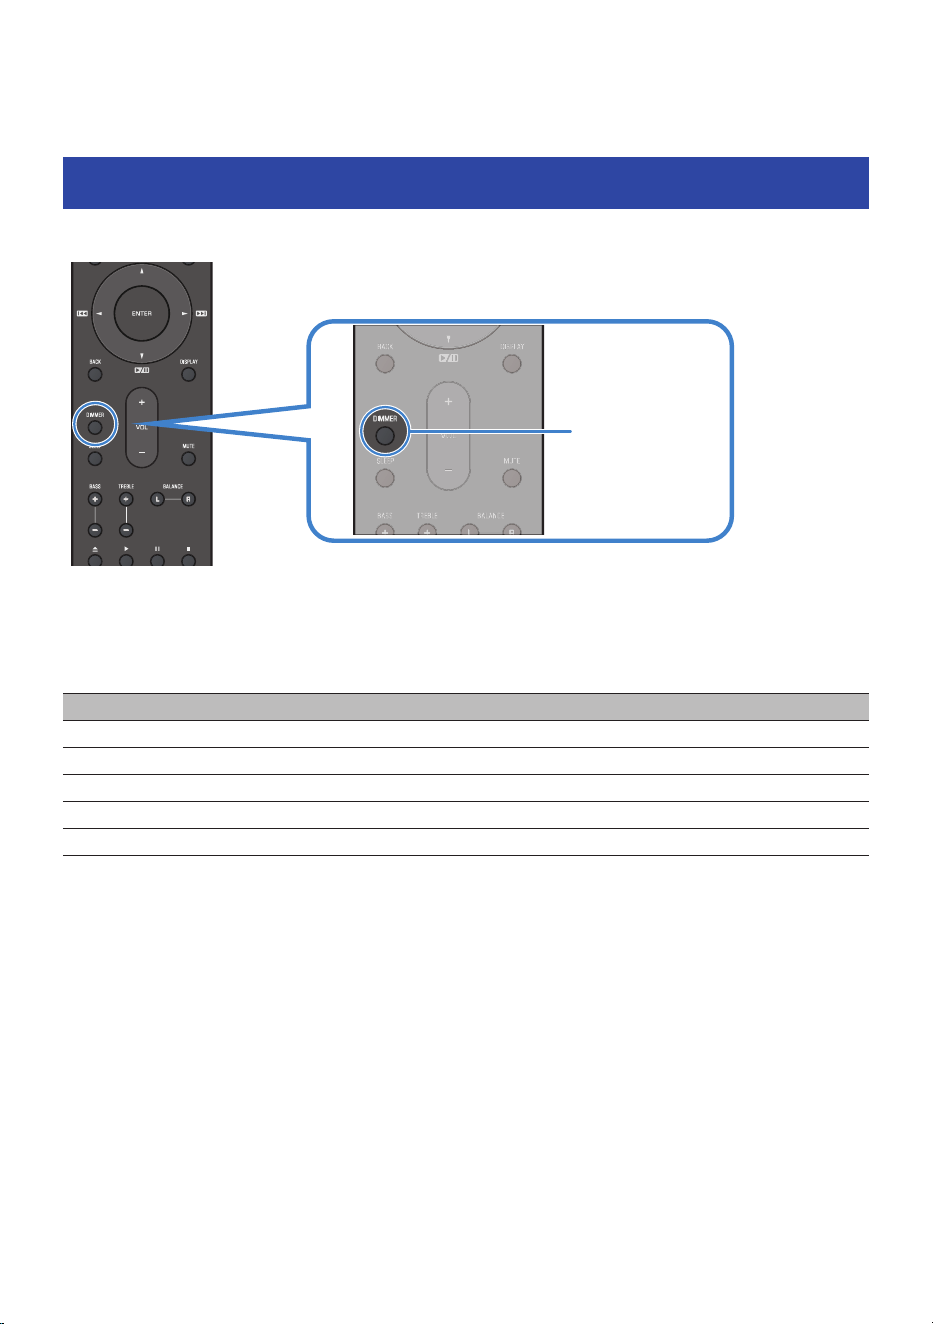
Adjusting the brightness of the front display
You can adjust the front display's brightness.
DIMMER key
Press the DIMMER key to adjust the front display's brightness.
Each time you press the DIMMER key, the brightness changes in 5 levels.
DIMMER (brightness) setting
Front display value Brightness
0 High (default setting)
-1 ↓
-2 ↓
-3 ↓
-4 Low
55
USEFUL FUNCTIONS > Adjusting the brightness of the front display
Sleep timer
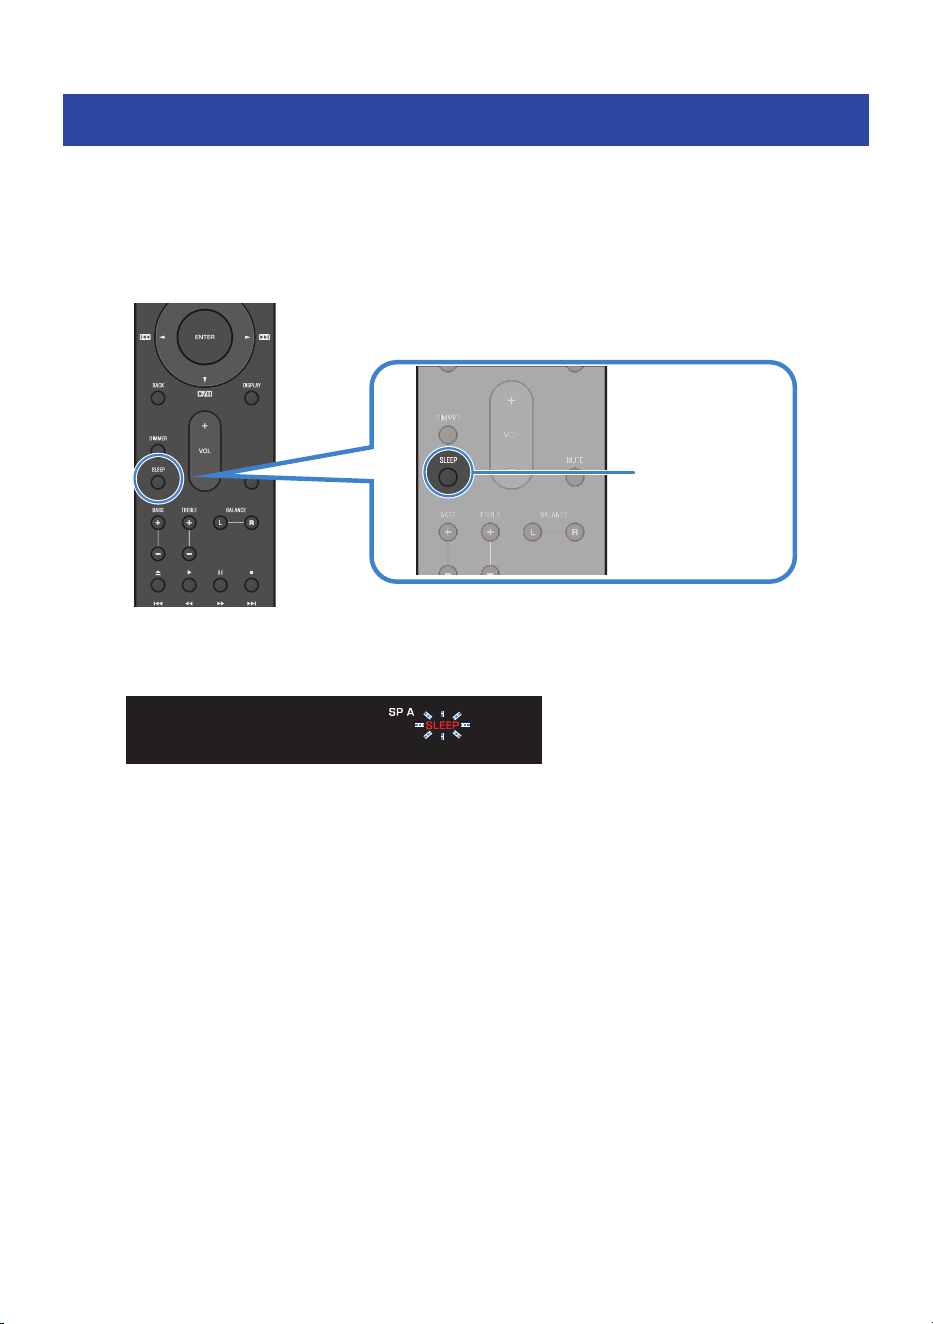
The sleep timer switches the product to standby once the specified time elapses.
1 Press the SLEEP key repeatedly to set the desired time for the sleep timer.
You can choose OFF, 120, 90, 60 or 30 minutes.
SLEEP key
2 When the desired time appears, stop pressing the keys.
Once the set time has elapsed, the product enters standby.
sleep 60min.
The SLEEP indicator on the front display flashes while a sleep timer setting is being made.
Once a setting is made, the SLEEP indicator lights up.
NOTE
(
To cancel the sleep timer, select OFF.
(
If you put this product into Standby, it cancels the sleep timer setting.
56
USEFUL FUNCTIONS > Sleep timer

SETTINGS
Menu structure
This product has the following menus, depending on the use case.
n
Option menu
You can set playback-related functions to match the source that is currently playing.
n
Settings menu
You can configure detailed settings for the functions of the product.
Related links
(
“Options menu”(p.58)
(
“Settings menu”(p.67)
57
SETTINGS > Menu structure
Options menu
Basic operations of the options menu
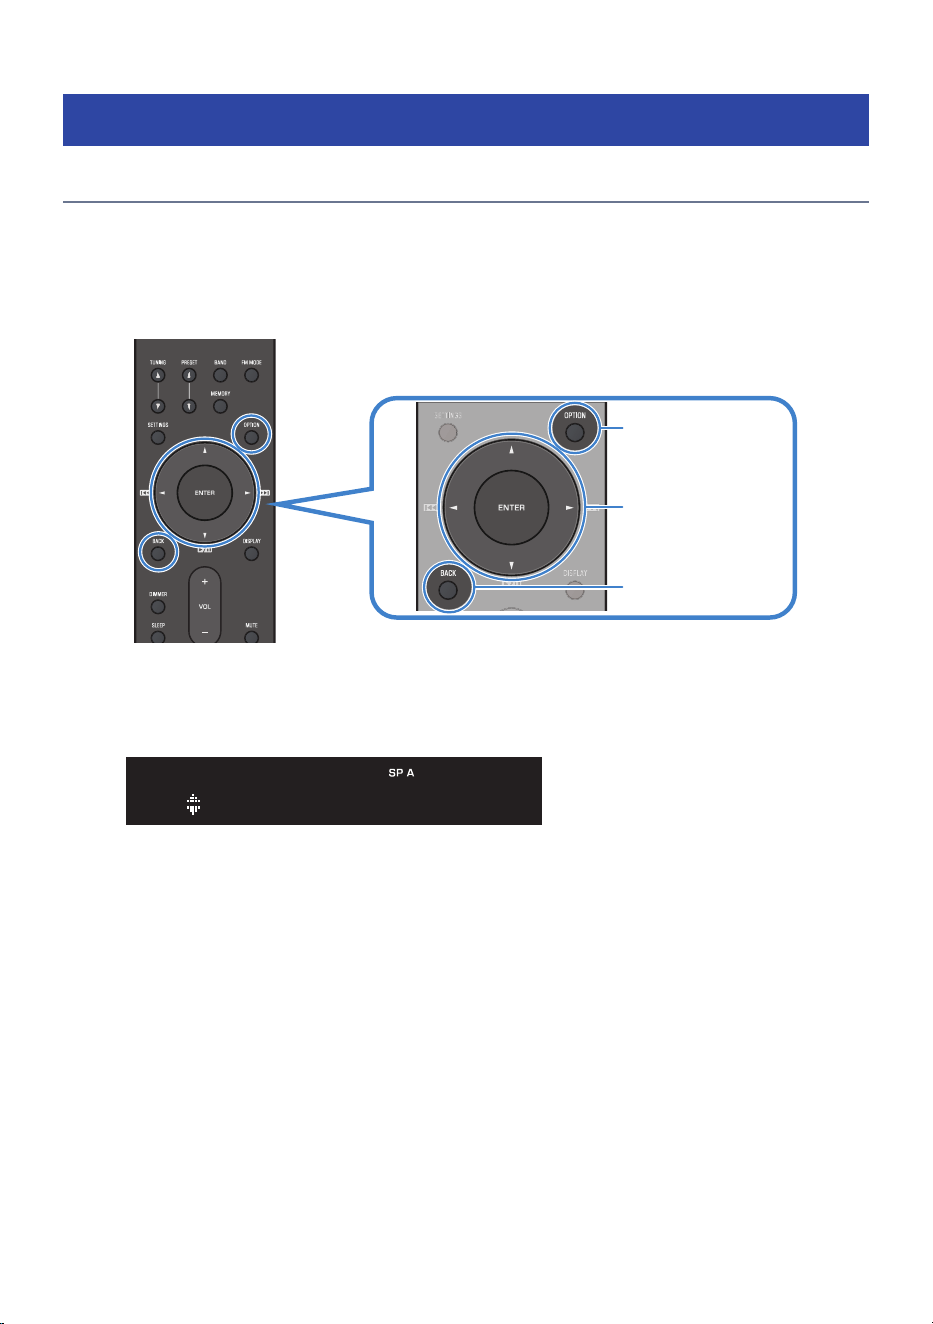
This section describes the basic control operations in the options menu. This menu is operated using the
remote control while viewing the front display.
1 Press the OPTION key.
OPTION key
Cursor keys
ENTER key
BACK key
2 When the options menu opens on the front display, use the cursor (▲/▼) keys to
select an item, then press the ENTER key.
To go back a level of the menu, press the BACK key.
Volume Trim
OPTION
3 Use the cursor (◀/▶) keys to select a value, then press the ENTER key to confirm
the setting.
4 Press the BACK key.
The options menu screen closes.
This completes the setting.
Related links
“Setting items”(p.59)
58
SETTINGS > Options menu

Setting items
This section shows the items available in the option menu. For more information, click the links under
“Page”.
Item Display name Page
Volume difference
adjustment
Volume Trim
60
Audio signal information Signal Info.
Format
61
Sampling
Preset (auto registration) Auto Preset
62
Preset (removal) Clear Preset
Broadcaster registration Initial Scan
63
Reception level checking Tune AID
64
Pairing Pairing
65
Bluetooth input
synchronization
Interlock
66
NOTE
(
The available settings vary depending on the selected input.
(
”Initial Scan” and ”Tune AID” are available on U.K., Europe, and Australia models.
59
SETTINGS > Options menu

Volume difference adjustment
This function corrects volume differences among input sources.
It reduces the volume difference that can occur when you switch input sources, so the audio plays at a
consistent volume.
Options menu
“Volume Trim”
Setting
Input level correction: -6.0 dB to 0.0 dB to +6.0 dB
Default setting
0.0 dB
Related links
“Basic operations of the options menu”(p.58)
60
SETTINGS > Options menu

Displaying audio signal information
When the input source is set to Bluetooth, you can display the format and sampling frequency of the
currently playing audio signal.
n
Displaying format information
You can display format information for the currently playing audio signal.
Options menu
“Signal Info.” > “Format”
Related links
“Basic operations of the options menu”(p.58)
n
Displaying the sampling frequency
You can display the sampling frequency of the audio signal that is playing.
Options menu
“Signal Info.” > “Sampling”
Related links
“Basic operations of the options menu”(p.58)
61
SETTINGS > Options menu

Preset
n
Automatically registering radio stations to preset numbers
You can automatically register radio stations to preset numbers.
Options menu
“Auto Preset”
Setting
01 to 40 (preset numbers)
Default setting
01
NOTE
(
Up to 40 radio stations can be registered.
(
Auto preset works only when FM is selected.
(
To abort the auto preset process before completion, press the BACK key.
n
Deleting a radio station registered to a preset number
You can delete a radio station registered to a preset number.
Options menu
“Clear Preset”
Setting
01 to 40 (preset numbers)
Default setting
Currently selected preset number
Related links
(
“Registering and deleting presets”(p.41)
(
“Basic operations of the options menu”(p.58)
62
SETTINGS > Options menu

DAB initial setup
Model For
U.K., Europe, and Australia
Before listening to DAB (Digital Audio Broadcasting) radio, perform an initial scan to automatically register
DAB radio stations.
When you select the menu item, the initial scan begins.
Options menu
“Initial Scan”
NOTE
Up to 40 radio stations can be registered.
Related links
(
“Tuning to a DAB radio station”(p.45)
(
“Basic operations of the options menu”(p.58)
63
SETTINGS > Options menu

Displaying the signal strength of the DAB channel
Model For
U.K., Europe, and Australia
You can check the signal strength of each DAB channel.
When you select the desired DAB channel label, the signal strength is displayed on a scale from 0 (none) to
100 (maximum).
Options menu
“Tune AID”
Related links
(
“Tuning to a DAB radio station”(p.45)
(
“Basic operations of the options menu”(p.58)
64
SETTINGS > Options menu

Pairing a Bluetooth device
You can register a Bluetooth device with this product.
Options menu
“Pairing”
1 Press the ENTER key.
You can also register a Bluetooth device with this product by pressing and holding the
BLUETOOTH key.
2 Select this product on the Bluetooth device (Yamaha R200A).
Related links
(
“Playing audio from a Bluetooth® device”(p.48)
(
“Basic operations of the options menu”(p.58)
65
SETTINGS > Options menu

Bluetooth input synchronization
When this setting is enabled, the input automatically switches to “Bluetooth” when a paired Bluetooth
device is powered on, even if another input is currently selected.
Options menu
“Interlock”
Setting
(
Off: Does not automatically switch the input to Bluetooth.
(
On: Automatically switches the input to Bluetooth.
Default setting
On
Related links
(
“Playing audio from a Bluetooth® device”(p.48)
(
“Basic operations of the options menu”(p.58)
66
SETTINGS > Options menu
Settings menu
Basic operation of the settings menu
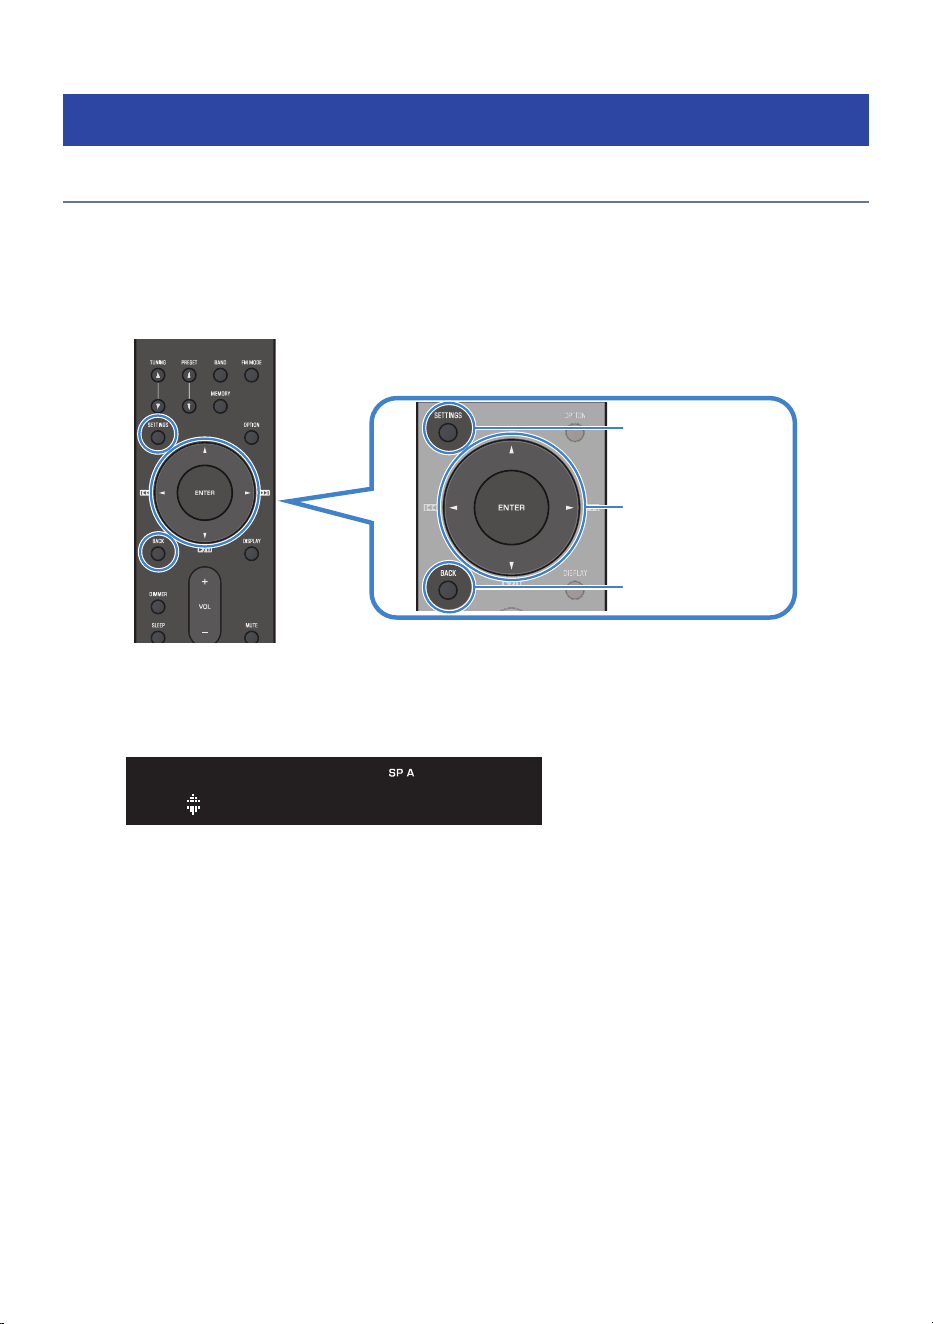
This section describes the basic control operations of the settings menu. This menu is operated using the
remote control while viewing the front display.
1 Press the SETTINGS key.
SETTINGS key
Cursor keys
ENTER key
BACK key
2 When the settings menu appears on the front display, use the cursor (▲/▼) keys to
select an item, then press the ENTER key.
To go back a level of the menu, press the BACK key.
Balance
SETTINGS
3 Use the cursor (◀/▶) keys to select a value, then press the ENTER key to confirm
the setting.
4 Press the BACK key.
The settings menu screen closes.
This completes the setting.
Related links
“Setting items”(p.68)
67
SETTINGS > Settings menu

Setting items
The following are the items in the settings menu. For more information, click the links under “Page”.
Item Front display value Page
Balance control Balance
69
Volume settings
Max Volume
70
Initial Volume
70
Bluetooth settings Bluetooth
Bluetooth
71
Bluetooth Standby
Auto standby Auto Standby Timer
72
Firmware update Firmware
Version
73
USB
Initializing settings Factory Reset All
74
68
SETTINGS > Settings menu

Balance control
Any volume imbalance caused by speaker placement and/or room conditions can be corrected by adjusting
the balance between the left and right speakers.
Settings menu “Balance”
Setting -10 to 0 to +10 (1 step)
Default setting 0
Related links
(
“Adjusting volume balance (BALANCE)”(p.54)
(
“Basic operation of the settings menu”(p.67)
69
SETTINGS > Settings menu

Configuring the volume
n
Setting the maximum volume
You can set the maximum volume that the VOLUME keys can adjust to.
Settings menu “Max Volume”
Setting 35–95
Default setting 95
n
Setting the power-on volume
This sets the volume when the power is turned on.
Settings menu “Initial Volume”
Setting
(
Off: Uses the volume from the last time the power entered standby.
(
Mute: Mutes the volume.
(
1 to 95: Uses the specified volume. Enabled only when the volume is set lower than
“Max Volume”.
Default setting Off
Related links
“Basic operation of the settings menu”(p.67)
70
SETTINGS > Settings menu

Setting Bluetooth
n
Setting Bluetooth
You can set whether to use the Bluetooth function.
Settings menu “Bluetooth” > “Bluetooth”
Setting
(
Off: Disables the Bluetooth function.
(
On: Enables the Bluetooth function.
Default setting On
n
Setting Bluetooth standby
Setting Bluetooth standby to “On” keeps Bluetooth active while the product is in standby and allows you to
power on the product by connecting a Bluetooth device.
Settings menu “Bluetooth” > “Bluetooth Standby”
Setting
(
Off: Disables the Bluetooth standby function.
(
On: Enables the Bluetooth standby function.
This setting consumes more power than when set to “Off”.
Default setting On
Related links
(
“Pairing a Bluetooth device”(p.65)
(
“Basic operation of the settings menu”(p.67)
71
SETTINGS > Settings menu

Auto standby
This setting automatically puts the product into standby power mode.
Settings menu “Auto Standby” > “Timer”
Options
(
Off: The product does not automatically enter standby mode.
Power does not turn off automatically, so standby power consumption increases.
(
5 min/20 min: The product enters standby mode when it has not been operated for
the specified period of time and no input signal has been detected during that
period.
(
2 hours/4 hours/8 hours/12 hours: The product switches to standby when it has not
been operated for the specified period of time.
Default setting 20 min
NOTE
(
Just before switching to standby, the front display shows “auto standby xxs” (where xx is the number of seconds) indicating the
number of seconds remaining until standby.
(
Even if Auto Standby is set to “5 min” or “20 min,” the product remains active when LINE 1, LINE 2, CD, PHONO, or TUNER input is
used, and Auto Standby does not activate.
Related links
“Basic operation of the settings menu”(p.67)
72
SETTINGS > Settings menu

Firmware update
n
Checking the firmware version
You can confirm the version of the current firmware.
Settings menu “Firmware” > “Version”
n
Updating the firmware
Settings menu “Firmware” > “USB” > “Update”
NOTE
(
For instructions on how to perform updates, see “How to update the firmware”(p.77).
(
Do not execute this unless updating the firmware. Before executing the update, review the information provided with the firmware
update.
Related links
(
“Basic operation of the settings menu”(p.67)
(
“How to update the firmware”(p.77)
73
SETTINGS > Settings menu

Initializing settings
You can initialize (reset) the product’s various settings.
Settings menu “Factory Reset”
Options “All”: Resets all settings to factory settings.
NOTE
(
If you perform Factory Reset, you cannot revert the initialized settings.
(
After the reset, you need to reconfigure the settings as needed.
(
For details on the specific operations, refer to “Initializing settings”(p.79).
Related links
(
“Basic operation of the settings menu”(p.67)
(
“Initializing settings”(p.79)
74
SETTINGS > Settings menu

FIRMWARE AND INITIALIZATION
Firmware update overview
Updated firmware is provided to add functionality to this product or to improve its performance. For more
information about firmware, visit the Yamaha website at https://www.yamaha.com/.
Firmware can be updated using a USB flash drive.
75
FIRMWARE AND INITIALIZATION > Firmware update overview

Checking the firmware version
You can check the version of this product’s firmware in the settings menu. Follow these steps.
1 Press the SETTINGS key.
The settings menu appears on the front display.
2 Use the cursor keys (q/w) to select “Firmware”, then press the ENTER key.
3 Select “Version”, then press the ENTER key.
The current firmware version is displayed.
76
FIRMWARE AND INITIALIZATION > Checking the firmware version
How to update the firmware
Updating the firmware via a USB flash drive
You can update the product’s firmware via a USB flash drive.
1 Download the latest version of the firmware for the product to your computer from
the Yamaha website.
For more information, visit the product information page on the Yamaha website at
“https://www.yamaha.com/”.
2 Extract the downloaded compressed file, and save the firmware data file to the
USB flash drive.
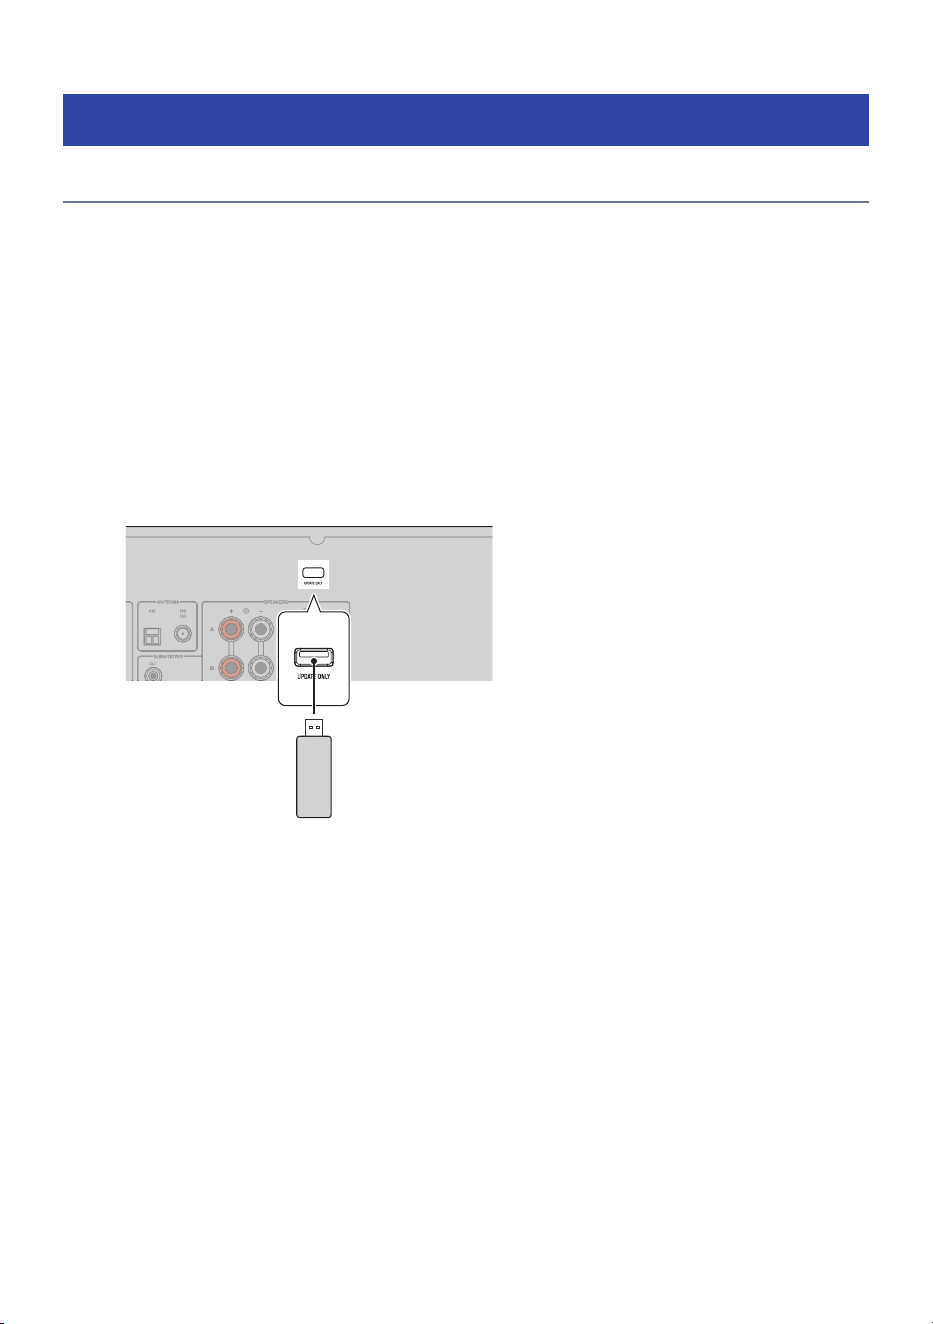
3 Connect the USB flash drive to the USB port on the rear panel.
USB Device (USB flash drive)
Rear panel
4 In the settings menu, select “Firmware” > “USB” > “Update”.
5 Press the ENTER key.
The firmware update starts.
During the update, progress is displayed on the front display.
Never turn off the power during the firmware update.
When the update process is complete, the power automatically turns off.
6 Remove the USB flash drive from the product.
This completes the firmware update.
Next time you turn on the product, it will display “UPDATE SUCCESS” to indicate the update is complete.
77
FIRMWARE AND INITIALIZATION > How to update the firmware

NOTICE
(
Do not unplug the power cord during a firmware update. If the process is interrupted, this product may become unusable. In
that case, the product will require servicing.
78
FIRMWARE AND INITIALIZATION > How to update the firmware

Initializing settings
You can reset (initialize) the product’s various settings.
Follow the procedure below to reset the settings.
1 Press the SETTINGS key.
The settings menu is displayed.
2 Select “Factory Reset”, then press the ENTER key.
3 When “All” appears, press the ENTER key.
4 Follow the instructions on the display to complete the reset.
When the reset is complete, the product automatically turns off.
This completes the initialization process.
NOTE
(
If you perform initialization, all settings, including volume and Bluetooth, are reset to factory settings.
(
After the reset, reconfigure the input settings as needed.
79
FIRMWARE AND INITIALIZATION > Initializing settings

TROUBLESHOOTING
What to check first
If the product stops working properly while you are using it, check the following conditions first.
(
The power plugs for the product and the audio device(s) (such as a CD player) are securely plugged into
the outlets.
(
The power for the product, the subwoofer, and audio devices (such as a CD player) is on.
(
The cables between devices are securely connected to the correct ports.
80
TROUBLESHOOTING > What to check first

Problems with power, system, and/or remote control
Power fails to turn on
(
The protection circuitry has been activated three times consecutively.
If the Standby indicator on the front panel flashes when you attempt to turn the power on, the power
will no longer turn on in order to protect the product. Please get in touch with an authorized service
center to have it repaired.
81
TROUBLESHOOTING > Problems with power, system, and/or remote control

Power does not turn off
(
The built-in microcontroller may have frozen due to an external electrical shock (such as from
lightning or excessive static electricity) or a sudden drop in electrical voltage.
Press and hold the z (Power) key on the front panel for 15 seconds or more to restart the product. If the
problem is not resolved, unplug the power cord from the wall outlet, then plug it back in.
82
TROUBLESHOOTING > Problems with power, system, and/or remote control

Power turns off right away
(
You may be trying to turn on the power while the speaker cables are shorted.
Firmly twist the strands of each speaker cable and then reconnect them to this product and the
speakers. For more details, refer to the following section.
(
“Connecting the speakers”(p.25)
83
TROUBLESHOOTING > Problems with power, system, and/or remote control

Power switches to standby automatically
(
The sleep timer has activated.
Turn the power back on and start playback.
(
The Auto Standby function was activated because no operations were performed for a certain
period of time.
To disable the Auto Standby function, set “Auto Standby” in the settings menu to “Off”. For more details,
refer to the following section.
(
“Auto standby”(p.72)
(
The protective circuit was activated due to a short in the speaker cables.
Firmly twist the strands of each speaker cable, then reconnect them to this product and the speakers.
For more details, refer to the following section.
(
“Preparing the speakers and speaker cables”(p.21)
(
The protective circuit was activated because the volume was set too high.
Lower the volume.
84
TROUBLESHOOTING > Problems with power, system, and/or remote control

The product does not respond to operations
(
The built-in microcontroller may have frozen due to an external electrical shock (such as from
lightning or excessive static electricity) or a sudden drop in electrical voltage.
Turn off the power using the z (Power) key on the front panel. Wait at least 15 seconds, then turn the
power back on. If the problem is not resolved, unplug the power cord from the wall outlet, then plug it
back in.
85
TROUBLESHOOTING > Problems with power, system, and/or remote control

This product cannot be operated from the remote control
(
It is outside the operating range.
Try using it within the operating range. For more details, refer to the following section.
(
“Remote control”(p.15)
(
The batteries are dead.
Replace with new batteries.
(
Strong light or sunlight is hitting the remote control signal receiver on the front panel.
Change the orientation of the lighting or the product.
86
TROUBLESHOOTING > Problems with power, system, and/or remote control

Problems with the audio
No sound
(
A different input is selected.
Use the input selection key to choose the correct input. For more details, refer to the following section.
(
“Selecting the input source”(p.36)
(
A cable connecting this product to an audio device is damaged.
Check the connections. If you find no issues, replace the cable with another one.
(
The output speakers are not set correctly.
Press the SP A/B key or the SPEAKERS key on the product to enable speaker output for the jacks where
the speakers are connected. For more details, refer to the following section.
(
“Switching the output speakers”(p.35)
(
The audio is muted.
Press the MUTE key to cancel muting.
(
Headphones are plugged into the PHONES jack.
Unplug the headphones.
(
The product entered standby mode via the Auto Standby function.
In the settings menu, set “Auto Standby” to “Off”. For more details, refer to the following section.
(
“Auto standby”(p.72)
87
TROUBLESHOOTING > Problems with the audio


No sound is output from a particular speaker
(
BALANCE is set to the maximum for either left or right.
Adjust BALANCE so sound comes out of the left and right speakers.
(
A cable connecting this product and the corresponding speaker is damaged.
Check the terminals on both the speaker side and the amplifier side. If the connection is normal, the
cable may be broken. Replace the cable with a different one.
(
The corresponding speaker may be damaged.
You can check this by swapping it with a different speaker that you know is functioning normally. If no
sound comes from the swapped-in speaker either, this product may be faulty.
(
The output speakers are not set correctly.
Press the SP A/B key or the SPEAKERS key on the product to enable speaker output for the jacks where
the speakers are connected. For more details, refer to the following section.
“Switching the output speakers”(p.35)
89
TROUBLESHOOTING > Problems with the audio

No sound is output from the subwoofer
(
The volume level of the subwoofer is extremely low.
Adjust the volume level of the subwoofer.
(
The auto standby function of the subwoofer (automatically turns off power) was activated.
Either disable the subwoofer auto standby function or adjust its activation sensitivity.
90
TROUBLESHOOTING > Problems with the audio

Noise is being output
(
A digital device or high-frequency device is located near this product.
Move such a device away from this product.
(
A cable connecting this product to an audio device is damaged.
Check the connections. If you find no issues, replace the cable with another one.
91
TROUBLESHOOTING > Problems with the audio

Sound is distorted
(
The volume is too loud.
Lower the volume.
92
TROUBLESHOOTING > Problems with the audio

Problems with FM radio
Radio reception is poor or has noise
(
The product is experiencing interference, such as multipath interference (reflected signals).
Change the height, orientation, or installation location of the FM antenna.
(
The radio station is being received from a distant region.
Press the FM MODE key to switch to mono reception.
93
TROUBLESHOOTING > Problems with FM radio

Cannot automatically select FM radio stations
(
The FM radio stations are being received from distant regions.
Manually select stations. For more details, refer to the following section.
(
“Selecting radio stations”(p.39)
Also consider using a commercially available outdoor antenna.
94
TROUBLESHOOTING > Problems with FM radio

Cannot select a radio station using the PRESET key
(
No radio stations are registered.
Register radio stations to the preset numbers. For more details, refer to the following section.
(
“Registering and deleting presets”(p.41)
FM radio stations can also be registered using the auto preset function. For more details, refer to the
following section.
(
“Registering and deleting presets”(p.41)
If FM radio station signals are weak, the auto preset function may not register any stations. In that case,
register stations manually.
(
The input is on something other than “TUNER”.
Press the TUNER key. “TUNER” presets can only be recalled when the input is on “TUNER”.
95
TROUBLESHOOTING > Problems with FM radio


DAB radio cannot be received even after performing the initial
scan
(
The DAB reception signal is weak.
Check the “Tune AID” signal strength displayed on the front display. Adjust the antenna’s height or
direction, or relocate it. For details, refer to the following section.
(
“DAB/FM antenna”(p.31)
(
“Tuning to a DAB radio station”(p.45)
(
DAB broadcasts may not be available in your region.
For coverage information in your region, contact your dealer or visit the WorldDAB website at
“http://www.worlddab.org”.
97
TROUBLESHOOTING > Problems with DAB radio

DAB radio reception is poor or has noise
(
Multipath interference may be occurring.
Check the “Tune AID” signal strength displayed on the front display. Adjust the antenna’s height or
direction, or relocate it. For details, refer to the following section.
(
“DAB/FM antenna”(p.31)
(
“Tuning to a DAB radio station”(p.45)
(
Your location may be too far from the DAB transmitter.
Use an outdoor antenna. A high-sensitivity multi-element antenna is recommended.
98
TROUBLESHOOTING > Problems with DAB radio

DAB is unavailable or displayed as inaccurate
(
The selected DAB station may be temporarily out of service or not providing information.
Contact the DAB broadcaster for details.
99
TROUBLESHOOTING > Problems with DAB radio

No sound from DAB radio
(
The selected DAB station may be temporarily off the air.
Try the station again later, or select a different station.
100
TROUBLESHOOTING > Problems with DAB radio

Problems with AM radio
AM radio reception is poor or has noise
(
It is picking up noise from sources like fluorescent lights, motors, etc.
It is difficult to completely eliminate noise from the environment. However, using a commercially-
available outdoor antenna may help reduce the noise.
101
TROUBLESHOOTING > Problems with AM radio


Cannot register (preset) AM radio stations
(
The auto registration function (auto preset) is enabled.
Auto preset only works with FM radio stations. Register AM radio stations manually. For more details,
refer to the following section.
(
“Registering and deleting presets”(p.41)
103
TROUBLESHOOTING > Problems with AM radio

Cannot select a radio station with the PRESET key
(
No radio stations are registered.
Register radio stations to the preset numbers. For more details, refer to the following section.
(
“Registering and deleting presets”(p.41)
(
The input is not “TUNER”.
Press the TUNER key. “TUNER” presets can only be recalled when the input is on “TUNER”.
104
TROUBLESHOOTING > Problems with AM radio

Bluetooth connection
Cannot connect with a Bluetooth device
(
The Bluetooth function of this product is disabled.
Enable the Bluetooth function. For more details, refer to the following section.
(
“Setting Bluetooth”(p.71)
(
The Bluetooth function on the Bluetooth device is off.
Turn on the Bluetooth function on the Bluetooth device.
(
This product is connected to a different Bluetooth device.
Terminate the current Bluetooth connection and connect to the desired Bluetooth device. For more
details, refer to the following section.
(
“Pairing (initial setting)”(p.48)
(
This product and the Bluetooth device are too far apart.
Move this product and the Bluetooth device closer together.
(
Wireless communication is being interfered with by other devices that use the 2.4GHz band (such
as microwave ovens or wireless LAN equipment).
Move this product and/or the Bluetooth device away from those devices. Also, if your wireless LAN router
supports the 5GHz frequency band, switch the connection to the 5GHz band.
(
The Bluetooth device you are using does not support the A2DP profile.
Use a Bluetooth device that supports the A2DP profile.
(
The connection information registered to the Bluetooth device is not functioning properly for
some reason.
Delete the connection information of the Bluetooth device and then reconnect this product to the
Bluetooth device. For more details, refer to the following section.
(
“Pairing (initial setting)”(p.48)
105
TROUBLESHOOTING > Bluetooth connection

When connected via Bluetooth, there is no sound or audio
dropouts occur
(
The volume of the Bluetooth device is too low.
Turn up the volume of the Bluetooth device.
(
The Bluetooth device is not set to output audio to this product.
Configure the Bluetooth device so that its audio output is set to this product.
(
The Bluetooth connection was cut off.
Reconnect via Bluetooth. For more details, refer to the following section.
(
“Pairing (initial setting)”(p.48)
(
They are too far apart.
Move the Bluetooth device closer to this product.
(
Wireless communication is being interfered with by other devices that use the 2.4GHz band (such
as microwave ovens or wireless LAN equipment).
Move this product and/or the Bluetooth device away from those devices. Also, if your wireless LAN router
supports the 5GHz frequency band, switch the connection to the 5GHz band.
106
TROUBLESHOOTING > Bluetooth connection

Front display error messages
When an error is shown on the front display, check it in the following table.
Message Contents Solution
CHECK SP WIRES
The speaker cable(s) are shorted.
Firmly twist the core wires of each of the
speaker cables and then reconnect
them to this product and the speakers.
For more details, refer to the following.
“How to connect the speakers”(p.22)
107
TROUBLESHOOTING > Front display error messages

SPECIFICATIONS
Specifications
The main specifications of this product are provided below.
Input jacks
Analog audio
(
Stereo × 4 (including PHONO)
Other
(
USB × 1 (USB 2.0, for firmware update)
Output jacks
Analog audio
(
Speaker output × 4 (A L/R, B L/R)
(
Subwoofer output (monaural) × 1
(
LINE output × 1
(
Headphones × 1
Audio formats (Bluetooth)
(
SBC
(
AAC
Tuner
Analog tuner
(
[U.K. and Europe models]
(
DAB/FM ×1 with Radio Data System (tuner)
(
[Australia model]
(
DAB/FM ×1 (tuner)
(
[U.S.A. and Canada models]
(
FM×1 (tuner)
(
AM×1 (tuner)
Bluetooth
Sink Function
(
Supports receiving audio from Bluetooth devices (smartphones, tablets, etc.)
(
Supported profiles
(
A2DP, AVRCP
(
Supported codecs
(
SBC, AAC
(
Supported content protection
(
SCMS-T
108
SPECIFICATIONS > Specifications

Bluetooth version
(
Ver.5.3
Wireless output
(
Bluetooth Class 2
Maximum communication distance
(
10 m (no obstructions)
Audio section
Rated power output (2-channel driven) (40 Hz to 20 kHz, 0.2% THD)
(
8 Ω 100 W+100 W
Dynamic power (IHF)
(
8 Ω 125 W
(
6 Ω 150 W
(
4 Ω 165 W
(
2 Ω 180 W
1-channel driven output (1 kHz, 0.7%THD)
(
4 Ω 115 W
Damping factor (1 kHz, 8 Ω) 120 or more
Input sensitivity / Input impedance
(
CD, etc. (1 kHz, 100 W/8 Ω) 500 mV/47 kΩ
(
PHONO (MM) (1 kHz, 100 W/ 8 Ω) 10 mV/47 kΩ
Maximum allowable input
(
CD, etc. (1 kHz, 0.5% THD) 2.2 V
(
PHONO (MM)(1 kHz, 0.06% THD) 35 mV
Rated output voltage / Output impedance
(
LINE OUT 500 mV/2.2 kΩ
(
SUBWOOFER OUT 6.0 Vrms/2.2 kΩ
(
PHONES (8 Ω) 470 mV/470 Ω
Maximum output level
(
SUBWOOFER OUT 6.0 V
Frequency Response
(
CD, etc. (10 Hz to 100 kHz) ±3.0 dB
(
CD, etc. (20 Hz to 20 kHz) ±0.5 dB
RIAA deviation
(
PHONO (MM) ±0.5 dB
109
SPECIFICATIONS > Specifications

Total harmonic distortion
(
CD, etc.→SP OUT (20 Hz to 20 kHz, 50 W, 8 Ω) 0.2% or less
(
PHONO (MM)→LINE OUT (20 Hz to 20 kHz) 0.025% or less
Signal to noise ratio (IHF-A Network)
(
CD, etc. (input shorted 500 mV) 100 dB or more
(
PHONO (MM) (input shorted 10 mV) 75 dB or more
Residual noise (IHF-A Network)
(
SP OUT 70 μV or less
Channel separation
(
CD, etc. (input 5.1 kΩ shorted, 1 kHz/10 kHz) 65 dB/50 dB or more
Tone control characteristics
(
Bass Boost/Cut ±10 dB / 2 dB steps, 50 Hz
(
Treble Boost/Cut ±10 dB / 2 dB steps, 20 kHz
FM tuner section
Tuning Range
(
[U.K., Europe, and Australia models]
(
[U.S.A. and Canada models]
87.50 MHz to 108.00 MHz
87.5 MHz to 107.9 MHz
50 dB Quiet Sensitivity (IHF, 1 kHz, 100% MOD.)
(
Mono 3 μV (20.8 dBf)
Signal to Noise Ratio (IHF)
(
Mono / Stereo 65 dB / 64 dB
Harmonic Distortion
(
Mono / Stereo 0.5% / 0.6%
Antenna Input 75 Ω, unbalanced
DAB tuner section (U.K., Europe, and Australia models)
Tuning Range 174 MHz to 240 MHz (BANDⅢ)
Supported formats MPEG 1 LayerⅡ / MPEG-4 HE-AAC v2 (aacPlus v2)
Antenna Input 75 Ω, unbalanced
AM tuner section (U.S.A. and Canada models)
Tuning Range 530 kHz to 1710 kHz
110
SPECIFICATIONS > Specifications

Antenna Input Loop antenna
General
Power supply
(
[U.S.A. and Canada models]
(
[Australia model]
(
[U.K. and Europe models]
AC 120 V, 60 Hz
AC 230 to 240 V, 50 Hz
AC 230 V, 50 Hz
Power consumption 200 W
Standby power consumption*
(
Bluetooth Standby off 0.3 W
(
Bluetooth Standby on 0.5 W
Dimensions (W × H × D)
* Include feet and protrusions
435 × 137 × 328 mm
(17-1/8” × 5-3/8” × 12-7/8")
Weight 7.3 kg (16.1 lbs)
* This content is based on the latest specifications available at the time of publication. For the most up-to-date information,
please download the latest version from the Yamaha website.
111
SPECIFICATIONS > Specifications

APPENDIX
Supported devices and formats
Supported Bluetooth devices
Refer to the following for Bluetooth devices supported by this product.
(
Bluetooth devices that support the A2DP and AVRCP profiles can be connected.
(
Connection to all Bluetooth devices is not guaranteed.
112
APPENDIX > Supported devices and formats

Support centers
If the problem cannot be resolved, please contact one of the following support centers.
Customers in Japan
Please contact the store where you purchased the product or the Product Support Center listed in the
“Safety Guide” included with this product.
Customers outside Japan
Please contact your nearest authorized Yamaha dealer or service center.
https://manual.yamaha.com/audio/address_list/
113
APPENDIX > Support centers

Trademarks
The following trademarks are used in this guide.
The Bluetooth® word mark and logos are registered trademarks owned by Bluetooth SIG, Inc. and any use of such marks by
Yamaha Corporation is under license. Other trademarks and trade names are those of their respective owners.
114
APPENDIX > Trademarks

About third-party software programs
This product uses the following third-party software programs:
(
CMSIS Core(M)
(
CMSIS Device (STM32G0xx)
(
STM32G0xx HAL/LL Driver
(
Tiny printf
(
STM32Cube USB Device Library
(
STM32Cube USB Host Library
(
FatFs
(
FreeRTOS
(
ARM (mbed TLS)
(
ARM ECC
(
USBware
(
Newlib
(
Red Hat Incorporated
(
University of California, Berkeley
(
David M. Gay (AT&T 1991, Lucent 1998)
(
Advanced Micro Devices
(
Sun Microsystems
(
Hewlett Packard
(
Hans-Peter Nilsson
(
Christopher G. Demetriou
(
SuperH, Inc.
(
Royal Institute of Technology
(
Alexey Zelkin
(
Andrey A. Chernov
(
FreeBSD
(
S. L. Moshier
(
Citrus Project
(
Todd C. Miller
(
DJ Delorie
(
Mike Barcroft
(
Konstantin Chuguev
(
Artem Bityuckiy
(
Alex Tatmanjants
(
M. Warner Losh
(
Andrey A. Chernov (targets using libc/posix)
(
Daniel Eischen
(
Ed Schouten
(
DMDecode
(
picojpeg
115
APPENDIX > About third-party software programs

(
DejaVu Fonts
(
Bitstream Vera Fonts
(
Arev Fonts
For information on copyrights and license conditions of each software program, refer to the following.
NOTE
(
At the request of the respective rights holders, the original (English) text is provided.
(
For other third-party software license information not contained in this manual, refer to the corresponding app for this product.
n
CMSIS Core(M)
Copyright © 2009-2019 Arm Limited. All rights reserved.
SPDX-License-Identifier: Apache-2.0
Licensed under the Apache License, Version 2.0 (the "License"); you may not use this file except in
compliance with the License. You may obtain a copy of the License at
http://www.apache.org/licenses/LICENSE-2.0
Unless required by applicable law or agreed to in writing, software distributed under the License is
distributed on an "AS IS" BASIS, WITHOUT WARRANTIES OR CONDITIONS OF ANY KIND, either express or
implied. See the License for the specific language governing permissions and limitations under the License.
n
CMSIS Device (STM32G0xx)
Copyright © 2018-2021 STMicroelectronics. All rights reserved.
SPDX-License-Identifier: Apache-2.0
Licensed under the Apache License, Version 2.0 (the "License"); you may not use this file except in
compliance with the License. You may obtain a copy of the License at
http://www.apache.org/licenses/LICENSE-2.0
Unless required by applicable law or agreed to in writing, software distributed under the License is
distributed on an "AS IS" BASIS, WITHOUT WARRANTIES OR CONDITIONS OF ANY KIND, either express or
implied. See the License for the specific language governing permissions and limitations under the License.
n
STM32G0xx HAL/LL Driver
Copyright © 2018 STMicroelectronics. All rights reserved.
116
APPENDIX > About third-party software programs

Redistribution and use in source and binary forms, with or without modification, are permitted provided that
the following conditions are met:
1. Redistributions of source code must retain the above copyright notice, this list of conditions and the
following disclaimer.
2. Redistributions in binary form must reproduce the above copyright notice, this list of conditions and the
following disclaimer in the documentation and/or other materials provided with the distribution.
3. Neither the name of the copyright holder nor the names of its contributors may be used to endorse or
promote products derived from this software without specific prior written permission.
THIS SOFTWARE IS PROVIDED BY THE COPYRIGHT HOLDERS AND CONTRIBUTORS "AS IS" AND ANY EXPRESS
OR IMPLIED WARRANTIES, INCLUDING, BUT NOT LIMITED TO, THE IMPLIED WARRANTIES OF
MERCHANTABILITY AND FITNESS FOR A PARTICULAR PURPOSE ARE DISCLAIMED. IN NO EVENT SHALL THE
COPYRIGHT HOLDER OR CONTRIBUTORS BE LIABLE FOR ANY DIRECT, INDIRECT, INCIDENTAL, SPECIAL,
EXEMPLARY, OR CONSEQUENTIAL DAMAGES (INCLUDING, BUT NOT LIMITED TO, PROCUREMENT OF
SUBSTITUTE GOODS OR SERVICES; LOSS OF USE, DATA, OR PROFITS; OR BUSINESS INTERRUPTION)
HOWEVER CAUSED AND ON ANY THEORY OF LIABILITY, WHETHER IN CONTRACT, STRICT LIABILITY, OR TORT
(INCLUDING NEGLIGENCE OR OTHERWISE) ARISING IN ANY WAY OUT OF THE USE OF THIS SOFTWARE, EVEN
IF ADVISED OF THE POSSIBILITY OF SUCH DAMAGE.
n
Tiny printf
The MIT License (MIT)
Copyright © 2014-2019 Marco Paland ([email protected]), PALANDesign Hannover, Germany
Permission is hereby granted, free of charge, to any person obtaining a copy of this software and associated
documentation files (the "Software"), to deal in the Software without restriction, including without
limitation the rights to use, copy, modify, merge, publish, distribute, sublicense, and/or sell copies of the
Software, and to permit persons to whom the Software is furnished to do so, subject to the following
conditions:
The above copyright notice and this permission notice shall be included in all copies or substantial portions
of the Software.
THE SOFTWARE IS PROVIDED "AS IS", WITHOUT WARRANTY OF ANY KIND, EXPRESS OR IMPLIED, INCLUDING
BUT NOT LIMITED TO THE WARRANTIES OF MERCHANTABILITY, FITNESS FOR A PARTICULAR PURPOSE AND
NONINFRINGEMENT. IN NO EVENT SHALL THE AUTHORS OR COPYRIGHT HOLDERS BE LIABLE FOR ANY
CLAIM, DAMAGES OR OTHER LIABILITY, WHETHER IN AN ACTION OF CONTRACT, TORT OR OTHERWISE,
ARISING FROM, OUT OF OR IN CONNECTION WITH THE SOFTWARE OR THE USE OR OTHER DEALINGS IN THE
SOFTWARE.
117
APPENDIX > About third-party software programs

n
STM32Cube USB Device Library
Copyright © 2015 STMicroelectronics. All rights reserved.
This software is licensed under terms that can be found in the LICENSE file in the root directory of this
software component. If no LICENSE file comes with this software, it is provided AS-IS.
LICENSE : SLA0044 Rev5 - ULTIMATE LIBERTY SOFTWARE LICENSE AGREEMENT
(https://www.st.com/SLA0044)
* SLA0044 2. Redistributions in binary form, except as embedded into microcontroller or microprocessor
device manufactured by or for STMicroelectronics or a software update for such device, must reproduce
any copyright notice provided with the binary code, this list of conditions, and the disclaimer set forth
below as items 10 and 11, in documentation and/or other materials provided with the distribution.
n
STM32Cube USB Host Library
Copyright © 2015 STMicroelectronics. All rights reserved.
This software is licensed under terms that can be found in the LICENSE file in the root directory of this
software component. If no LICENSE file comes with this software, it is provided AS-IS.
LICENSE : SLA0044 Rev5 - ULTIMATE LIBERTY SOFTWARE LICENSE AGREEMENT
(https://www.st.com/SLA0044)
* SLA0044 2. Redistributions in binary form, except as embedded into microcontroller or microprocessor
device manufactured by or for STMicroelectronics or a software update for such device, must reproduce
any copyright notice provided with the binary code, this list of conditions, and the disclaimer set forth
below as items 10 and 11, in documentation and/or other materials provided with the distribution.
n
FatFs
FatFs - Generic FAT file system module R0.12c
Copyright © 2017, ChaN, all right reserved.
FatFs module is an open source software. Redistribution and use of FatFs in source and binary forms, with or
without modification, are permitted provided that the following condition is met:
1. Redistributions of source code must retain the above copyright notice, this condition and the following
disclaimer.
This software is provided by the copyright holder and contributors "AS IS" and any warranties related to this
software are DISCLAIMED. The copyright owner or contributors be NOT LIABLE for any damages caused by
use of this software.
118
APPENDIX > About third-party software programs

n
FreeRTOS
FreeRTOS Kernel V10.4.3 Copyright © 2020 Amazon.com, Inc. or its affiliates. All Rights Reserved.
Permission is hereby granted, free of charge, to any person obtaining a copy of this software and associated
documentation files (the "Software"), to deal in the Software without restriction, including without
limitation the rights to use, copy, modify, merge, publish, distribute, sublicense, and/or sell copies of the
Software, and to permit persons to whom the Software is furnished to do so, subject to the following
conditions:
The above copyright notice and this permission notice shall be included in all copies or substantial portions
of the Software.
THE SOFTWARE IS PROVIDED "AS IS", WITHOUT WARRANTY OF ANY KIND, EXPRESS OR IMPLIED, INCLUDING
BUT NOT LIMITED TO THE WARRANTIES OF MERCHANTABILITY, FITNESS FOR A PARTICULAR PURPOSE AND
NONINFRINGEMENT. IN NO EVENT SHALL THE AUTHORS OR COPYRIGHT HOLDERS BE LIABLE FOR ANY
CLAIM, DAMAGES OR OTHER LIABILITY, WHETHER IN AN ACTION OF CONTRACT, TORT OR OTHERWISE,
ARISING FROM, OUT OF OR IN CONNECTION WITH THE SOFTWARE OR THE USE OR OTHER DEALINGS IN THE
SOFTWARE.
http://www.FreeRTOS.org
n
ARM (mbed TLS)
Apache-2.0
Copyright The Mbed TLS Contributors.
This component is licensed under the Apache License, Version 2.0.
You may use, modify and redistribute the software under the terms of the Apache License 2.0, provided that:
(
A copy of the Apache License 2.0 is included with the distribution;
(
Copyright and license notices are preserved;
https://github.com/Mbed-TLS/mbedtls
n
ARM ECC
Copyright © 2013, Kenneth MacKay All rights reserved.
Redistribution and use in source and binary forms, with or without modification, are permitted provided that
the following conditions are met:
119
APPENDIX > About third-party software programs

* Redistributions of source code must retain the above copyright notice, this list of conditions and the
following disclaimer.
* Redistributions in binary form must reproduce the above copyright notice, this list of conditions and the
following disclaimer in the documentation and/or other materials provided with the distribution.
THIS SOFTWARE IS PROVIDED BY THE COPYRIGHT HOLDERS AND CONTRIBUTORS "AS IS" AND ANY EXPRESS
OR IMPLIED WARRANTIES, INCLUDING, BUT NOT LIMITED TO, THE IMPLIED WARRANTIES OF
MERCHANTABILITY AND FITNESS FOR A PARTICULAR PURPOSE ARE DISCLAIMED. IN NO EVENT SHALL THE
COPYRIGHT HOLDER OR CONTRIBUTORS BE LIABLE FOR ANY DIRECT, INDIRECT, INCIDENTAL, SPECIAL,
EXEMPLARY, OR CONSEQUENTIAL DAMAGES (INCLUDING, BUT NOT LIMITED TO, PROCUREMENT OF
SUBSTITUTE GOODS OR SERVICES; LOSS OF USE, DATA, OR PROFITS; OR BUSINESS INTERRUPTION)
HOWEVER CAUSED AND ON ANY THEORY OF LIABILITY, WHETHER IN CONTRACT, STRICT LIABILITY, OR TORT
(INCLUDING NEGLIGENCE OR OTHERWISE) ARISING IN ANY WAY OUT OF THE USE OF THIS SOFTWARE, EVEN
IF ADVISED OF THE POSSIBILITY OF SUCH DAMAGE.
n
DAB Module (Siena FS2415) — Open Source Software
DAB7.x SDK Open Source Software (Frontier Silicon). Last updated: January 2023
In the table below there is a list of Third-Party Software. Details of the licence obligations associated with the
software are listed below.
Software Third-Party Software Provider
USBware
USBware from Jungo Ltd.
Newlib
Red Hat Incorporated
University of California, Berkeley
David M. Gay (AT&T 1991, Lucent 1998)
Advanced Micro Devices
Sun Microsystems
Hewlett Packard
Hans-Peter Nilsson
Christopher G. Demetriou
SuperH, Inc.
Royal Institute of Technology
Alexey Zelkin
Andrey A. Chernov
FreeBSD
S. L. Moshier
Citrus Project
Todd C. Miller
DJ Delorie (i386) Copyright © 1991 DJ Delorie All rights reserved.
Mike Barcroft
Konstantin Chuguev (--enable-newlib-iconv)
120
APPENDIX > About third-party software programs

Software Third-Party Software Provider
Artem Bityuckiy (--enable-newlib-iconv)
Alex Tatmanjants (targets using libc/posix)
M. Warner Losh (targets using libc/posix)
Andrey A. Chernov (targets using libc/posix)
Daniel Eischen (targets using libc/posix)
Ed Schouten - Free BSD
DMDecode (Used in
flash image
compression)
Simon Tatham
picojpeg
Rich Geldreich
DejaVu Fonts
Bitstream Vera Fonts Copyright
Arev Fonts Copyright
n
USBware
USBware from Jungo Ltd.
“This product includes software developed by the NetBSD Foundation, Inc. and its contributors.”
Neither the name of The NetBSD Foundation nor the names of its contributors may be used to endorse or
promote products derived from this software without specific prior written permission.
THIS SOFTWARE IS PROVIDED BY THE NETBSD FOUNDATION, INC. AND CONTRIBUTORS “AS IS” AND ANY
EXPRESS OR IMPLIED WARRANTIES, INCLUDING, BUT NOT LIMITED TO, THE IMPLIED WARRANTIES OF
MERCHANTABILITY AND FITNESS FOR A PARTICULAR PURPOSE ARE DISCLAIMED. IN NO EVENT SHALL THE
FOUNDATION OR CONTRIBUTORS BE LIABLE FOR ANY DIRECT, INDIRECT, INCIDENTAL, SPECIAL, EXEMPLARY,
OR CONSEQUENTIAL DAMAGES (INCLUDING, BUT NOT LIMITED TO, PROCUREMENT OF SUBSTITUTE GOODS
OR SERVICES; LOSS OF USE, DATA, OR PROFITS; OR BUSINESS INTERRUPTION) HOWEVER CAUSED AND ON
ANY THEORY OF LIABILITY, WHETHER IN CONTRACT, STRICT LIABILITY, OR TORT (INCLUDING NEGLIGENCE
OR OTHERWISE) ARISING IN ANY WAY OUT OF THE USE OF THIS SOFTWARE, EVEN IF ADVISED OF THE *
POSSIBILITY OF SUCH DAMAGE.
n
Newlib
The newlib subdirectory is a collection of software from several sources.
Each file may have its own copyright/license that is embedded in the source file.
Unless otherwise noted in the body of the source file(s), the following copyright notices will apply to the
contents of the newlib subdirectory:
1. Red Hat Incorporated
Copyright © 1994-2009 Red Hat, Inc. All rights reserved.
121
APPENDIX > About third-party software programs

This copyrighted material is made available to anyone wishing to use, modify, copy, or redistribute it subject
to the terms and conditions of the BSD License. This program is distributed in the hope that it will be useful,
but WITHOUT ANY WARRANTY expressed or implied, including the implied warranties of MERCHANTABILITY
or FITNESS FOR A PARTICULAR PURPOSE. A copy of this license is available at
http://www.opensource.org/licenses. Any Red Hat trademarks that are incorporated in the source code or
documentation are not subject to the BSD License and may only be used or replicated with the express
permission of Red Hat, Inc.
2. University of California, Berkeley
Copyright © 1981-2000 The Regents of the University of California. All rights reserved. Redistribution and use
in source and binary forms, with or without modification, are permitted provided that the following
conditions are met:
Redistributions of source code must retain the above copyright notice, this list of conditions and the
following disclaimer.
Redistributions in binary form must reproduce the above copyright notice, this list of conditions and the
following disclaimer in the documentation and/or other materials provided with the distribution.
Neither the name of the University nor the names of its contributors may be used to endorse or promote
products derived from this software without specific prior written permission.
THIS SOFTWARE IS PROVIDED BY THE COPYRIGHT HOLDERS AND CONTRIBUTORS "AS IS" AND ANY EXPRESS
OR IMPLIED WARRANTIES, INCLUDING, BUT NOT LIMITED TO, THE IMPLIED WARRANTIES OF
MERCHANTABILITY AND FITNESS FOR A PARTICULAR PURPOSE ARE DISCLAIMED. IN NO EVENT SHALL THE
COPYRIGHT OWNER OR CONTRIBUTORS BE LIABLE FOR ANY DIRECT, INDIRECT, INCIDENTAL, SPECIAL,
EXEMPLARY, OR CONSEQUENTIAL DAMAGES (INCLUDING, BUT NOT LIMITED TO, PROCUREMENT OF
SUBSTITUTE GOODS OR SERVICES; LOSS OF USE, DATA, OR PROFITS; OR BUSINESS INTERRUPTION)
HOWEVER CAUSED AND ON ANY THEORY OF LIABILITY, WHETHER IN CONTRACT, STRICT LIABILITY, OR TORT
(INCLUDING NEGLIGENCE OR OTHERWISE) ARISING IN ANY WAY OUT OF THE USE OF THIS SOFTWARE, EVEN
IF ADVISED OF THE POSSIBILITY OF SUCH DAMAGE.
3. David M. Gay (AT&T 1991, Lucent 1998)
The author of this software is David M. Gay.
Copyright © 1991 by AT&T.
Permission to use, copy, modify, and distribute this software for any purpose without fee is hereby granted,
provided that this entire notice is included in all copies of any software which is or includes a copy or
modification of this software and in all copies of the supporting documentation for such software.
THIS SOFTWARE IS BEING PROVIDED "AS IS", WITHOUT ANY EXPRESS OR IMPLIED WARRANTY. IN
PARTICULAR, NEITHER THE AUTHOR NOR AT&T MAKES ANY REPRESENTATION OR WARRANTY OF ANY KIND
CONCERNING THE MERCHANTABILITY OF THIS SOFTWARE OR ITS FITNESS FOR ANY PARTICULAR PURPOSE.
-------------------------------------------------------------------
The author of this software is David M. Gay.
Copyright © 1998-2001 by Lucent Technologies All Rights Reserved
Permission to use, copy, modify, and distribute this software and its documentation for any purpose and
without fee is hereby granted, provided that the above copyright notice appear in all copies and that both
that the copyright notice and this permission notice and warranty disclaimer appear in supporting
documentation, and that the name of Lucent or any of its entities not be used in advertising or publicity
pertaining to distribution of the software without specific, written prior permission.
122
APPENDIX > About third-party software programs

LUCENT DISCLAIMS ALL WARRANTIES WITH REGARD TO THIS SOFTWARE, INCLUDING ALL IMPLIED
WARRANTIES OF MERCHANTABILITY AND FITNESS. IN NO EVENT SHALL LUCENT OR ANY OF ITS ENTITIES BE
LIABLE FOR ANY SPECIAL, INDIRECT OR CONSEQUENTIAL DAMAGES OR ANY DAMAGES WHATSOEVER
RESULTING FROM LOSS OF USE, DATA OR PROFITS, WHETHER IN AN ACTION OF CONTRACT, NEGLIGENCE OR
OTHER TORTIOUS ACTION, ARISING OUT OF OR IN CONNECTION WITH THE USE OR PERFORMANCE OF THIS
SOFTWARE.
4. Advanced Micro Devices
Copyright 1989, 1990 Advanced Micro Devices, Inc.
This software is the property of Advanced Micro Devices, Inc (AMD) which specifically grants the user the right
to modify, use and distribute this software provided this notice is not removed or altered. All other rights are
reserved by AMD.
AMD MAKES NO WARRANTY OF ANY KIND, EXPRESS OR IMPLIED, WITH REGARD TO THIS SOFTWARE. IN NO
EVENT SHALL AMD BE LIABLE FOR INCIDENTAL OR CONSEQUENTIAL DAMAGES IN CONNECTION WITH OR
ARISING FROM THE FURNISHING, PERFORMANCE, OR USE OF THIS SOFTWARE.
So that all may benefit from your experience, please report any problems or suggestions about this software
to the 29K Technical Support Center at 800-29-29-AMD (800-292-9263) in the USA, or 0800-89-1131 in the UK,
or 0031-11-1129 in Japan, toll free. The direct dial number is 512-462-4118.
Advanced Micro Devices, Inc.
29K Support Products
Mail Stop 573
5900 E. Ben White Blvd.
Austin, TX 78741
800-292-9263
5. Sun Microsystems
Copyright © 1993 by Sun Microsystems, Inc. All rights reserved.
Developed at SunPro, a Sun Microsystems, Inc. business.
Permission to use, copy, modify, and distribute this software is freely granted, provided that this notice is
preserved.
6. Hewlett Packard
© Copyright 1986 HEWLETT-PACKARD COMPANY
To anyone who acknowledges that this file is provided "AS IS" without any express or implied warranty:
permission to use, copy, modify, and distribute this file for any purpose is hereby granted without fee,
provided that the above copyright notice and this notice appears in all copies, and that the name of Hewlett-
Packard Company not be used in advertising or publicity pertaining to distribution of the software without
specific, written prior permission. Hewlett-Packard Company makes no representations about the suitability
of this software for any purpose.
7. Hans-Peter Nilsson
Copyright © 2001 Hans-Peter Nilsson
Permission to use, copy, modify, and distribute this software is freely granted, provided that the above
copyright notice, this notice and the following disclaimer are preserved with no changes.
123
APPENDIX > About third-party software programs

THIS SOFTWARE IS PROVIDED “AS IS” AND WITHOUT ANY EXPRESS OR IMPLIED WARRANTIES, INCLUDING,
WITHOUT LIMITATION, THE IMPLIED WARRANTIES OF MERCHANTABILITY AND FITNESS FOR A PARTICULAR
PURPOSE.
8. Christopher G. Demetriou
Copyright © 2001 Christopher G. Demetriou
All rights reserved.
Redistribution and use in source and binary forms, with or without modification, are permitted provided that
the following conditions are met:
1. Redistributions of source code must retain the above copyright notice, this list of conditions and the
following disclaimer.
2. Redistributions in binary form must reproduce the above copyright notice, this list of conditions and the
following disclaimer in the documentation and/or other materials provided with the distribution.
3. The name of the author may not be used to endorse or promote products derived from this software
without specific prior written permission.
THIS SOFTWARE IS PROVIDED BY THE AUTHOR “AS IS” AND ANY EXPRESS OR IMPLIED WARRANTIES,
INCLUDING, BUT NOT LIMITED TO, THE IMPLIED WARRANTIES OF MERCHANTABILITY AND FITNESS FOR A
PARTICULAR PURPOSE ARE DISCLAIMED. IN NO EVENT SHALL THE AUTHOR BE LIABLE FOR ANY DIRECT,
INDIRECT, INCIDENTAL, SPECIAL, EXEMPLARY, OR CONSEQUENTIAL DAMAGES (INCLUDING, BUT NOT
LIMITED TO, PROCUREMENT OF SUBSTITUTE GOODS OR SERVICES; LOSS OF USE, DATA, OR PROFITS; OR
BUSINESS INTERRUPTION) HOWEVER CAUSED AND ON ANY THEORY OF LIABILITY, WHETHER IN CONTRACT,
STRICT LIABILITY, OR TORT (INCLUDING NEGLIGENCE OR OTHERWISE) ARISING IN ANY WAY OUT OF THE USE
OF THIS SOFTWARE, EVEN IF ADVISED OF THE POSSIBILITY OF SUCH DAMAGE.
9. SuperH, Inc.
Copyright 2002 SuperH, Inc. All rights reserved
This software is the property of SuperH, Inc (SuperH) which specifically grants the user the right to modify,
use and distribute this software provided this notice is not removed or altered. All other rights are reserved
by SuperH.
SUPERH MAKES NO WARRANTY OF ANY KIND, EXPRESS OR IMPLIED, WITH REGARD TO THIS SOFTWARE. IN
NO EVENT SHALL SUPERH BE LIABLE FOR INDIRECT, SPECIAL, INCIDENTAL OR CONSEQUENTIAL DAMAGES IN
CONNECTION WITH OR ARISING FROM THE FURNISHING, PERFORMANCE, OR USE OF THIS SOFTWARE.
So that all may benefit from your experience, please report any problems or suggestions about this software
to the SuperH Support Center via e-mail at [email protected] .
SuperH, Inc. 405 River Oaks Parkway San Jose CA 95134 USA
10. Royal Institute of Technology
Copyright © 1999 Kungliga Tekniska Högskolan (Royal Institute of Technology, Stockholm, Sweden).
All rights reserved.
Redistribution and use in source and binary forms, with or without modification, are permitted provided that
the following conditions are met:
1. Redistributions of source code must retain the above copyright notice, this list of conditions and the
following disclaimer.
124
APPENDIX > About third-party software programs

2. Redistributions in binary form must reproduce the above copyright notice, this list of conditions and the
following disclaimer in the documentation and/or other materials provided with the distribution.
3. Neither the name of KTH nor the names of its contributors may be used to endorse or promote products
derived from this software without specific prior written permission.
THIS SOFTWARE IS PROVIDED BY KTH AND ITS CONTRIBUTORS “AS IS” AND ANY EXPRESS OR IMPLIED
WARRANTIES, INCLUDING, BUT NOT LIMITED TO, THE IMPLIED WARRANTIES OF MERCHANTABILITY AND
FITNESS FOR A PARTICULAR PURPOSE ARE DISCLAIMED. IN NO EVENT SHALL KTH OR ITS CONTRIBUTORS BE
LIABLE FOR ANY DIRECT, INDIRECT, INCIDENTAL, SPECIAL, EXEMPLARY, OR CONSEQUENTIAL DAMAGES
(INCLUDING, BUT NOT LIMITED TO, PROCUREMENT OF SUBSTITUTE GOODS OR SERVICES; LOSS OF USE,
DATA, OR PROFITS; OR BUSINESS INTERRUPTION) HOWEVER CAUSED AND ON ANY THEORY OF LIABILITY,
WHETHER IN CONTRACT, STRICT LIABILITY, OR TORT (INCLUDING NEGLIGENCE OR OTHERWISE) ARISING IN
ANY WAY OUT OF THE USE OF THIS SOFTWARE, EVEN IF ADVISED OF THE POSSIBILITY OF SUCH DAMAGE.
11. Alexey Zelkin
Copyright © 2000, 2001 Alexey Zelkin <[email protected]> All rights reserved.
Redistribution and use in source and binary forms, with or without modification, are permitted provided that
the following conditions are met:
1. Redistributions of source code must retain the above copyright notice, this list of conditions and the
following disclaimer.
2. Redistributions in binary form must reproduce the above copyright notice, this list of conditions and the
following disclaimer in the documentation and/or other materials provided with the distribution.
THIS SOFTWARE IS PROVIDED BY THE AUTHOR AND CONTRIBUTORS “AS IS” AND ANY EXPRESS OR IMPLIED
WARRANTIES, INCLUDING, BUT NOT LIMITED TO, THE IMPLIED WARRANTIES OF MERCHANTABILITY AND
FITNESS FOR A PARTICULAR PURPOSE ARE DISCLAIMED. IN NO EVENT SHALL THE AUTHOR OR
CONTRIBUTORS BE LIABLE FOR ANY DIRECT, INDIRECT, INCIDENTAL, SPECIAL, EXEMPLARY, OR
CONSEQUENTIAL DAMAGES (INCLUDING, BUT NOT LIMITED TO, PROCUREMENT OF SUBSTITUTE GOODS OR
SERVICES; LOSS OF USE, DATA, OR PROFITS; OR BUSINESS INTERRUPTION) HOWEVER CAUSED AND ON ANY
THEORY OF LIABILITY, WHETHER IN CONTRACT, STRICT LIABILITY, OR TORT (INCLUDING NEGLIGENCE OR
OTHERWISE) ARISING IN ANY WAY OUT OF THE USE OF THIS SOFTWARE, EVEN IF ADVISED OF THE
POSSIBILITY OF SUCH DAMAGE.
12. Andrey A. Chernov
Copyright © 1997 by Andrey A. Chernov, Moscow, Russia.
All rights reserved.
Redistribution and use in source and binary forms, with or without modification, are permitted provided that
the following conditions are met:
1. Redistributions of source code must retain the above copyright notice, this list of conditions and the
following disclaimer.
2. Redistributions in binary form must reproduce the above copyright notice, this list of conditions and the
following disclaimer in the documentation and/or other materials provided with the distribution.
THIS SOFTWARE IS PROVIDED BY THE AUTHOR “AS IS” AND ANY EXPRESS OR IMPLIED WARRANTIES,
INCLUDING, BUT NOT LIMITED TO, THE IMPLIED WARRANTIES OF MERCHANTABILITY AND FITNESS FOR A
PARTICULAR PURPOSE ARE DISCLAIMED. IN NO EVENT SHALL THE REGENTS OR CONTRIBUTORS BE LIABLE
FOR ANY DIRECT, INDIRECT, INCIDENTAL, SPECIAL, EXEMPLARY, OR CONSEQUENTIAL DAMAGES (INCLUDING,
BUT NOT LIMITED TO, PROCUREMENT OF SUBSTITUTE GOODS OR SERVICES; LOSS OF USE, DATA, OR
125
APPENDIX > About third-party software programs

PROFITS; OR BUSINESS INTERRUPTION) HOWEVER CAUSED AND ON ANY THEORY OF LIABILITY, WHETHER IN
CONTRACT, STRICT LIABILITY, OR TORT (INCLUDING NEGLIGENCE OR OTHERWISE) ARISING IN ANY WAY OUT
OF THE USE OF THIS SOFTWARE, EVEN IF ADVISED OF THE POSSIBILITY OF SUCH DAMAGE.
13. FreeBSD
Copyright © 1997-2002 FreeBSD Project. All rights reserved.
Redistribution and use in source and binary forms, with or without modification, are permitted provided that
the following conditions are met:
1. Redistributions of source code must retain the above copyright notice, this list of conditions and the
following disclaimer.
2. Redistributions in binary form must reproduce the above copyright notice, this list of conditions and the
following disclaimer in the documentation and/or other materials provided with the distribution.
THIS SOFTWARE IS PROVIDED BY THE AUTHOR AND CONTRIBUTORS ``AS IS'' AND ANY EXPRESS OR IMPLIED
WARRANTIES, INCLUDING, BUT NOT LIMITED TO, THE IMPLIED WARRANTIES OF MERCHANTABILITY AND
FITNESS FOR A PARTICULAR PURPOSE ARE DISCLAIMED. IN NO EVENT SHALL THE AUTHOR OR
CONTRIBUTORS BE LIABLE FOR ANY DIRECT, INDIRECT, INCIDENTAL, SPECIAL, EXEMPLARY, OR
CONSEQUENTIAL DAMAGES (INCLUDING, BUT NOT LIMITED TO, PROCUREMENT OF SUBSTITUTE GOODS OR
SERVICES; LOSS OF USE, DATA, OR PROFITS; OR BUSINESS INTERRUPTION) HOWEVER CAUSED AND ON ANY
THEORY OF LIABILITY, WHETHER IN CONTRACT, STRICT LIABILITY, OR TORT (INCLUDING NEGLIGENCE OR
OTHERWISE) ARISING IN ANY WAY OUT OF THE USE OF THIS SOFTWARE, EVEN IF ADVISED OF THE
POSSIBILITY OF SUCH DAMAGE.
14. S. L. Moshier
Author: S. L. Moshier.
Copyright © 1984,2000 S.L. Moshier
Permission to use, copy, modify, and distribute this software for any purpose without fee is hereby granted,
provided that this entire notice is included in all copies of any software which is or includes a copy or
modification of this software and in all copies of the supporting documentation for such software.
THIS SOFTWARE IS BEING PROVIDED "AS IS", WITHOUT ANY EXPRESS OR IMPLIED WARRANTY. IN
PARTICULAR, THE AUTHOR MAKES NO REPRESENTATION OR WARRANTY OF ANY KIND CONCERNING THE
MERCHANTABILITY OF THIS SOFTWARE OR ITS FITNESS FOR ANY PARTICULAR PURPOSE.
15. Citrus Project
Copyright ©1999 Citrus Project, All rights reserved.
Redistribution and use in source and binary forms, with or without modification, are permitted provided that
the following conditions are met:
1. Redistributions of source code must retain the above copyright notice, this list of conditions and the
following disclaimer.
2. Redistributions in binary form must reproduce the above copyright notice, this list of conditions and the
following disclaimer in the documentation and/or other materials provided with the distribution.
THIS SOFTWARE IS PROVIDED BY THE AUTHOR AND CONTRIBUTORS “AS IS” AND ANY EXPRESS OR IMPLIED
WARRANTIES, INCLUDING, BUT NOT LIMITED TO, THE IMPLIED WARRANTIES OF MERCHANTABILITY AND
FITNESS FOR A PARTICULAR PURPOSE ARE DISCLAIMED. IN NO EVENT SHALL THE AUTHOR OR
CONTRIBUTORS BE LIABLE FOR ANY DIRECT, INDIRECT, INCIDENTAL, SPECIAL, EXEMPLARY, OR
CONSEQUENTIAL DAMAGES (INCLUDING, BUT NOT LIMITED TO, PROCUREMENT OF SUBSTITUTE GOODS OR
126
APPENDIX > About third-party software programs

SERVICES; LOSS OF USE, DATA, OR PROFITS; OR BUSINESS INTERRUPTION) HOWEVER CAUSED AND ON ANY
THEORY OF LIABILITY, WHETHER IN CONTRACT, STRICT LIABILITY, OR TORT (INCLUDING NEGLIGENCE OR
OTHERWISE) ARISING IN ANY WAY OUT OF THE USE OF THIS SOFTWARE, EVEN IF ADVISED OF THE
POSSIBILITY OF SUCH DAMAGE.
16. Todd C. Miller
Copyright © 1998 Todd C. Miller <[email protected]> All rights reserved.
Redistribution and use in source and binary forms, with or without modification, are permitted provided that
the following conditions are met:
1. Redistributions of source code must retain the above copyright notice, this list of conditions and the
following disclaimer.
2. Redistributions in binary form must reproduce the above copyright notice, this list of conditions and the
following disclaimer in the documentation and/or other materials provided with the distribution.
3. The name of the author may not be used to endorse or promote products derived from this software
without specific prior written permission.
THIS SOFTWARE IS PROVIDED “AS IS” AND ANY EXPRESS OR IMPLIED WARRANTIES, INCLUDING, BUT NOT
LIMITED TO, THE IMPLIED WARRANTIES OF MERCHANTABILITY AND FITNESS FOR A PARTICULAR PURPOSE
ARE DISCLAIMED. IN NO EVENT SHALL THE AUTHOR BE LIABLE FOR ANY DIRECT, INDIRECT, INCIDENTAL,
SPECIAL, EXEMPLARY, OR CONSEQUENTIAL DAMAGES (INCLUDING, BUT NOT LIMITED TO, PROCUREMENT OF
SUBSTITUTE GOODS OR SERVICES; LOSS OF USE, DATA, OR PROFITS; OR BUSINESS INTERRUPTION)
HOWEVER CAUSED AND ON ANY THEORY OF LIABILITY, WHETHER IN CONTRACT, STRICT LIABILITY, OR TORT
(INCLUDING NEGLIGENCE OR OTHERWISE) ARISING IN ANY WAY OUT OF THE USE OF THIS SOFTWARE, EVEN
IF ADVISED OF THE POSSIBILITY OF SUCH DAMAGE.
17. DJ Delorie (i386)
Copyright © 1991 DJ Delorie All rights reserved.
Redistribution, modification, and use in source and binary forms is permitted provided that the above
copyright notice and following paragraph are duplicated in all such forms.
This file is distributed WITHOUT ANY WARRANTY; without even the implied warranty of MERCHANTABILITY or
FITNESS FOR A PARTICULAR PURPOSE.
18. Mike Barcroft
Copyright © 2001 Mike Barcroft <[email protected]>
All rights reserved.
Redistribution and use in source and binary forms, with or without modification, are permitted provided that
the following conditions are met:
1. Redistributions of source code must retain the above copyright notice, this list of conditions and the
following disclaimer.
2. Redistributions in binary form must reproduce the above copyright notice, this list of conditions and the
following disclaimer in the documentation and/or other materials provided with the distribution.
THIS SOFTWARE IS PROVIDED BY THE AUTHOR AND CONTRIBUTORS “AS IS” AND ANY EXPRESS OR IMPLIED
WARRANTIES, INCLUDING, BUT NOT LIMITED TO, THE IMPLIED WARRANTIES OF MERCHANTABILITY AND
FITNESS FOR A PARTICULAR PURPOSE ARE DISCLAIMED. IN NO EVENT SHALL THE AUTHOR OR
CONTRIBUTORS BE LIABLE FOR ANY DIRECT, INDIRECT, INCIDENTAL, SPECIAL, EXEMPLARY, OR
CONSEQUENTIAL DAMAGES (INCLUDING, BUT NOT LIMITED TO, PROCUREMENT OF SUBSTITUTE GOODS OR
127
APPENDIX > About third-party software programs

SERVICES; LOSS OF USE, DATA, OR PROFITS; OR BUSINESS INTERRUPTION) HOWEVER CAUSED AND ON ANY
THEORY OF LIABILITY, WHETHER IN CONTRACT, STRICT LIABILITY, OR TORT (INCLUDING NEGLIGENCE OR
OTHERWISE) ARISING IN ANY WAY OUT OF THE USE OF THIS SOFTWARE, EVEN IF ADVISED OF THE
POSSIBILITY OF SUCH DAMAGE.
19. Konstantin Chuguev (--enable-newlib-iconv)
Copyright © 1999, 2000 Konstantin Chuguev. All rights reserved.
Redistribution and use in source and binary forms, with or without modification, are permitted provided that
the following conditions are met:
1. Redistributions of source code must retain the above copyright notice, this list of conditions and the
following disclaimer.
2. Redistributions in binary form must reproduce the above copyright notice, this list of conditions and the
following disclaimer in the documentation and/or other materials provided with the distribution.
THIS SOFTWARE IS PROVIDED BY THE AUTHOR AND CONTRIBUTORS “AS IS” AND ANY EXPRESS OR IMPLIED
WARRANTIES, INCLUDING, BUT NOT LIMITED TO, THE IMPLIED WARRANTIES OF MERCHANTABILITY AND
FITNESS FOR A PARTICULAR PURPOSE ARE DISCLAIMED. IN NO EVENT SHALL THE AUTHOR OR
CONTRIBUTORS BE LIABLE FOR ANY DIRECT, INDIRECT, INCIDENTAL, SPECIAL, EXEMPLARY, OR
CONSEQUENTIAL DAMAGES (INCLUDING, BUT NOT LIMITED TO, PROCUREMENT OF SUBSTITUTE GOODS OR
SERVICES; LOSS OF USE, DATA, OR PROFITS; OR BUSINESS INTERRUPTION) HOWEVER CAUSED AND ON ANY
THEORY OF LIABILITY, WHETHER IN CONTRACT, STRICT LIABILITY, OR TORT (INCLUDING NEGLIGENCE OR
OTHERWISE) ARISING IN ANY WAY OUT OF THE USE OF THIS SOFTWARE, EVEN IF ADVISED OF THE
POSSIBILITY OF SUCH DAMAGE.
iconv (Charset Conversion Library) v2.0
20. Artem Bityuckiy (--enable-newlib-iconv)
Copyright © 2003, Artem B. Bityuckiy, SoftMine Corporation. Rights transferred to Franklin Electronic
Publishers.
Redistribution and use in source and binary forms, with or without modification, are permitted provided that
the following conditions are met:
1. Redistributions of source code must retain the above copyright notice, this list of conditions and the
following disclaimer.
2. Redistributions in binary form must reproduce the above copyright notice, this list of conditions and the
following disclaimer in the documentation and/or other materials provided with the distribution.
THIS SOFTWARE IS PROVIDED BY THE AUTHOR AND CONTRIBUTORS “AS IS” AND ANY EXPRESS OR IMPLIED
WARRANTIES, INCLUDING, BUT NOT LIMITED TO, THE IMPLIED WARRANTIES OF MERCHANTABILITY AND
FITNESS FOR A PARTICULAR PURPOSE ARE DISCLAIMED. IN NO EVENT SHALL THE AUTHOR OR
CONTRIBUTORS BE LIABLE FOR ANY DIRECT, INDIRECT, INCIDENTAL, SPECIAL, EXEMPLARY, OR
CONSEQUENTIAL DAMAGES (INCLUDING, BUT NOT LIMITED TO, PROCUREMENT OF SUBSTITUTE GOODS OR
SERVICES; LOSS OF USE, DATA, OR PROFITS; OR BUSINESS INTERRUPTION) HOWEVER CAUSED AND ON ANY
THEORY OF LIABILITY, WHETHER IN CONTRACT, STRICT LIABILITY, OR TORT (INCLUDING NEGLIGENCE OR
OTHERWISE) ARISING IN ANY WAY OUT OF THE USE OF THIS SOFTWARE, EVEN IF ADVISED OF THE
POSSIBILITY OF SUCH DAMAGE.
21. Alex Tatmanjants (targets using libc/posix)
Copyright © 1995 Alex Tatmanjants <[email protected]> at Electronni Visti IA, Kiev, Ukraine
128
APPENDIX > About third-party software programs

All rights reserved.
Redistribution and use in source and binary forms, with or without modification, are permitted provided that
the following conditions are met:
1. Redistributions of source code must retain the above copyright notice, this list of conditions and the
following disclaimer.
2. Redistributions in binary form must reproduce the above copyright notice, this list of conditions and the
following disclaimer in the documentation and/or other materials provided with the distribution.
THIS SOFTWARE IS PROVIDED BY THE AUTHOR “AS IS” AND ANY EXPRESS OR IMPLIED WARRANTIES,
INCLUDING, BUT NOT LIMITED TO, THE IMPLIED WARRANTIES OF MERCHANTABILITY AND FITNESS FOR A
PARTICULAR PURPOSE ARE DISCLAIMED. IN NO EVENT SHALL THE AUTHOR BE LIABLE FOR ANY DIRECT,
INDIRECT, INCIDENTAL, SPECIAL, EXEMPLARY, OR CONSEQUENTIAL DAMAGES (INCLUDING, BUT NOT
LIMITED TO, PROCUREMENT OF SUBSTITUTE GOODS OR SERVICES; LOSS OF USE, DATA, OR PROFITS; OR
BUSINESS INTERRUPTION) HOWEVER CAUSED AND ON ANY THEORY OF LIABILITY, WHETHER IN CONTRACT,
STRICT LIABILITY, OR TORT (INCLUDING NEGLIGENCE OR OTHERWISE) ARISING IN ANY WAY OUT OF THE USE
OF THIS SOFTWARE, EVEN IF ADVISED OF THE POSSIBILITY OF SUCH DAMAGE.
22. M. Warner Losh (targets using libc/posix)
Copyright © 1998, M. Warner Losh [email protected]
All rights reserved.
Redistribution and use in source and binary forms, with or without modification, are permitted provided that
the following conditions are met:
1. Redistributions of source code must retain the above copyright notice, this list of conditions and the
following disclaimer.
2. Redistributions in binary form must reproduce the above copyright notice, this list of conditions and the
following disclaimer in the documentation and/or other materials provided with the distribution.
THIS SOFTWARE IS PROVIDED BY THE AUTHOR AND CONTRIBUTORS ``AS IS'' AND ANY EXPRESS OR IMPLIED
WARRANTIES, INCLUDING, BUT NOT LIMITED TO, THE IMPLIED WARRANTIES OF MERCHANTABILITY AND
FITNESS FOR A PARTICULAR PURPOSE ARE DISCLAIMED. IN NO EVENT SHALL THE AUTHOR OR
CONTRIBUTORS BE LIABLE FOR ANY DIRECT, INDIRECT, INCIDENTAL, SPECIAL, EXEMPLARY, OR
CONSEQUENTIAL DAMAGES (INCLUDING, BUT NOT LIMITED TO, PROCUREMENT OF SUBSTITUTE GOODS OR
SERVICES; LOSS OF USE, DATA, OR PROFITS; OR BUSINESS INTERRUPTION) HOWEVER CAUSED AND ON ANY
THEORY OF LIABILITY, WHETHER IN CONTRACT, STRICT LIABILITY, OR TORT (INCLUDING NEGLIGENCE OR
OTHERWISE) ARISING IN ANY WAY OUT OF THE USE OF THIS SOFTWARE, EVEN IF ADVISED OF THE
POSSIBILITY OF SUCH DAMAGE.
23. Andrey A. Chernov (targets using libc/posix)
Copyright © 1996 by Andrey A. Chernov, Moscow, Russia.
All rights reserved.
Redistribution and use in source and binary forms, with or without modification, are permitted provided that
the following conditions are met:
1. Redistributions of source code must retain the above copyright notice, this list of conditions and the
following disclaimer.
2. Redistributions in binary form must reproduce the above copyright notice, this list of conditions and the
following disclaimer in the documentation and/or other materials provided with the distribution.
129
APPENDIX > About third-party software programs

THIS SOFTWARE IS PROVIDED BY THE AUTHOR “AS IS” AND ANY EXPRESS OR IMPLIED WARRANTIES,
INCLUDING, BUT NOT LIMITED TO, THE IMPLIED WARRANTIES OF MERCHANTABILITY AND FITNESS FOR A
PARTICULAR PURPOSE ARE DISCLAIMED. IN NO EVENT SHALL THE REGENTS OR CONTRIBUTORS BE LIABLE
FOR ANY DIRECT, INDIRECT, INCIDENTAL, SPECIAL, EXEMPLARY, OR CONSEQUENTIAL DAMAGES (INCLUDING,
BUT NOT LIMITED TO, PROCUREMENT OF SUBSTITUTE GOODS OR SERVICES; LOSS OF USE, DATA, OR
PROFITS; OR BUSINESS INTERRUPTION) HOWEVER CAUSED AND ON ANY THEORY OF LIABILITY, WHETHER IN
CONTRACT, STRICT LIABILITY, OR TORT (INCLUDING NEGLIGENCE OR OTHERWISE) ARISING IN ANY WAY OUT
OF THE USE OF THIS SOFTWARE, EVEN IF ADVISED OF THE POSSIBILITY OF SUCH DAMAGE.
24. Daniel Eischen (targets using libc/posix)
Copyright © 2001 Daniel Eischen <[email protected]>.
All rights reserved.
Redistribution and use in source and binary forms, with or without modification, are permitted provided that
the following conditions are met:
1. Redistributions of source code must retain the above copyright notice, this list of conditions and the
following disclaimer.
2. Redistributions in binary form must reproduce the above copyright notice, this list of conditions and the
following disclaimer in the documentation and/or other materials provided with the distribution.
THIS SOFTWARE IS PROVIDED BY THE AUTHOR AND CONTRIBUTORS “AS IS” AND ANY EXPRESS OR IMPLIED
WARRANTIES, INCLUDING, BUT NOT LIMITED TO, THE IMPLIED WARRANTIES OF MERCHANTABILITY AND
FITNESS FOR A PARTICULAR PURPOSE ARE DISCLAIMED. IN NO EVENT SHALL THE REGENTS OR
CONTRIBUTORS BE LIABLE FOR ANY DIRECT, INDIRECT, INCIDENTAL, SPECIAL, EXEMPLARY, OR
CONSEQUENTIAL DAMAGES (INCLUDING, BUT NOT LIMITED TO, PROCUREMENT OF SUBSTITUTE GOODS OR
SERVICES; LOSS OF USE, DATA, OR PROFITS; OR BUSINESS INTERRUPTION) HOWEVER CAUSED AND ON ANY
THEORY OF LIABILITY, WHETHER IN CONTRACT, STRICT LIABILITY, OR TORT (INCLUDING NEGLIGENCE OR
OTHERWISE) ARISING IN ANY WAY OUT OF THE USE OF THIS SOFTWARE, EVEN IF ADVISED OF THE
POSSIBILITY OF SUCH DAMAGE.
25. Ed Schouten - Free BSD
Copyright © 2008 Ed Schouten <[email protected]> All rights reserved.
Redistribution and use in source and binary forms, with or without modification, are permitted provided that
the following conditions are met:
1. Redistributions of source code must retain the above copyright notice, this list of conditions and the
following disclaimer.
2. Redistributions in binary form must reproduce the above copyright notice, this list of conditions and the
following disclaimer in the documentation and/or other materials provided with the distribution.
THIS SOFTWARE IS PROVIDED BY THE AUTHOR AND CONTRIBUTORS ``AS IS'' AND ANY EXPRESS OR IMPLIED
WARRANTIES, INCLUDING, BUT NOT LIMITED TO, THE IMPLIED WARRANTIES OF MERCHANTABILITY AND
FITNESS FOR A PARTICULAR PURPOSE ARE DISCLAIMED. IN NO EVENT SHALL THE AUTHOR OR
CONTRIBUTORS BE LIABLE FOR ANY DIRECT, INDIRECT, INCIDENTAL, SPECIAL, EXEMPLARY, OR
CONSEQUENTIAL DAMAGES (INCLUDING, BUT NOT LIMITED TO, PROCUREMENT OF SUBSTITUTE GOODS OR
SERVICES; LOSS OF USE, DATA, OR PROFITS; OR BUSINESS INTERRUPTION) HOWEVER CAUSED AND ON ANY
THEORY OF LIABILITY, WHETHER IN CONTRACT, STRICT LIABILITY, OR TORT (INCLUDING NEGLIGENCE OR
OTHERWISE) ARISING IN ANY WAY OUT OF THE USE OF THIS SOFTWARE, EVEN IF ADVISED OF THE
POSSIBILITY OF SUCH DAMAGE.
130
APPENDIX > About third-party software programs

n
DMDecode
Simon Tatham
This software is copyright 2008 Simon Tatham.
Permission is hereby granted, free of charge, to any person obtaining a copy of this software and associated
documentation files (the "Software"), to deal in the Software without restriction, including without
limitation the rights to use, copy, modify, merge, publish, distribute, sublicense, and/or sell copies of the
Software, and to permit persons to whom the Software is furnished to do so, subject to the following
conditions:
The above copyright notice and this permission notice shall be included in all copies or substantial portions
of the Software.
THE SOFTWARE IS PROVIDED "AS IS", WITHOUT WARRANTY OF ANY KIND, EXPRESS OR IMPLIED, INCLUDING
BUT NOT LIMITED TO THE WARRANTIES OF MERCHANTABILITY, FITNESS FOR A PARTICULAR PURPOSE AND
NONINFRINGEMENT. IN NO EVENT SHALL THE COPYRIGHT HOLDERS BE LIABLE FOR ANY CLAIM, DAMAGES
OR OTHER LIABILITY, WHETHER IN AN ACTION OF CONTRACT, TORT OR OTHERWISE, ARISING FROM, OUT OF
OR IN CONNECTION WITH THE SOFTWARE OR THE USE OR OTHER DEALINGS IN THE SOFTWARE.
n
picojpeg
Rich Geldreich
Picojpeg is a public domain JPEG decompressor (Used in DAB slideshow) picojpeg - Public domain, Rich
Geldreich <[email protected]>
THE FOLLOWING FILE IS PROVIDED "AS IS", WITHOUT WARRANTY OF ANY KIND, EXPRESS OR IMPLIED,
INCLUDING BUT NOT LIMITED TO THE WARRANTIESOF MERCHANTABILITY, FITNESS FOR A PARTICULAR
PURPOSE AND NONINFRINGEMENT.
n
DejaVu Fonts
DejaVu Fonts are used in the colour variant.
Fonts are © Bitstream (see below). DejaVu changes are in public domain. Explanation of copyright is on
Gnome page on Bitstream Vera fonts (http://gnome.org/fonts/). Glyphs imported from Arev
(https://dejavu-fonts.github.io/Bitstream_Vera_Derivatives.html) fonts are © Tavmjung Bah (see below)
Bitstream Vera Fonts Copyright
Copyright © 2003 by Bitstream, Inc. All Rights Reserved. Bitstream Vera is a trademark of Bitstream, Inc.
Permission is hereby granted, free of charge, to any person obtaining a copy of the fonts accompanying this
license ("Fonts") and associated documentation files (the "Font Software"), to reproduce and distribute the
Font Software, including without limitation the rights to use, copy, merge, publish, distribute, and/or sell
copies of the Font Software, and to permit persons to whom the Font Software is furnished to do so, subject
to the following conditions:
The above copyright and trademark notices and this permission notice shall be included in all copies of one
or more of the Font Software typefaces.
The Font Software may be modified, altered, or added to, and in particular the designs of glyphs or
characters in the Fonts may be modified and additional glyphs or characters may be added to the Fonts, only
if the fonts are renamed to names not containing either the words "Bitstream" or the word "Vera".
131
APPENDIX > About third-party software programs

This License becomes null and void to the extent applicable to Fonts or Font Software that has been
modified and is distributed under the "Bitstream Vera" names.
The Font Software may be sold as part of a larger software package but no copy of one or more of the Font
Software typefaces may be sold by itself.
THE FONT SOFTWARE IS PROVIDED "AS IS", WITHOUT WARRANTY OF ANY KIND, EXPRESS OR IMPLIED,
INCLUDING BUT NOT LIMITED TO ANY WARRANTIES OF MERCHANTABILITY, FITNESS FOR A PARTICULAR
PURPOSE AND NONINFRINGEMENT OF COPYRIGHT, PATENT, TRADEMARK, OR OTHER RIGHT. IN NO EVENT
SHALL BITSTREAM OR THE GNOME FOUNDATION BE LIABLE FOR ANY CLAIM, DAMAGES OR OTHER LIABILITY,
INCLUDING ANY GENERAL, SPECIAL, INDIRECT, INCIDENTAL, OR CONSEQUENTIAL DAMAGES, WHETHER IN AN
ACTION OF CONTRACT, TORT OR OTHERWISE, ARISING FROM, OUT OF THE USE OR INABILITY TO USE THE
FONT SOFTWARE OR FROM OTHER DEALINGS IN THE FONT SOFTWARE.
Except as contained in this notice, the names of Gnome, the Gnome Foundation, and Bitstream Inc., shall not
be used in advertising or otherwise to promote the sale, use or other dealings in this Font Software without
prior written authorization from the Gnome Foundation or Bitstream Inc., respectively. For further
information, contact: fonts at gnome dot org.
Arev Fonts Copyright
Copyright © 2006 by Tavmjong Bah. All Rights Reserved.
Permission is hereby granted, free of charge, to any person obtaining a copy of the fonts accompanying this
license ("Fonts") and associated documentation files (the "Font Software"), to reproduce and distribute the
modifications to the Bitstream Vera Font Software, including without limitation the rights to use, copy,
merge, publish, distribute, and/or sell copies of the Font Software, and to permit persons to whom the Font
Software is furnished to do so, subject to the following conditions:
The above copyright and trademark notices and this permission notice shall be included in all copies of one
or more of the Font Software typefaces.
The Font Software may be modified, altered, or added to, and in particular the designs of glyphs or
characters in the Fonts may be modified and additional glyphs or characters may be added to the Fonts, only
if the fonts are renamed to names not containing either the words "Tavmjong Bah" or the word "Arev".
This License becomes null and void to the extent applicable to Fonts or Font Software that has been
modified and is distributed under the "Tavmjong Bah Arev" names.
The Font Software may be sold as part of a larger software package but no copy of one or more of the Font
Software typefaces may be sold by itself.
THE FONT SOFTWARE IS PROVIDED "AS IS", WITHOUT WARRANTY OF ANY KIND, EXPRESS OR IMPLIED,
INCLUDING BUT NOT LIMITED TO ANY WARRANTIES OF MERCHANTABILITY, FITNESS FOR A PARTICULAR
PURPOSE AND NONINFRINGEMENT OF COPYRIGHT, PATENT, TRADEMARK, OR OTHER RIGHT. IN NO EVENT
SHALL TAVMJONG BAH BE LIABLE FOR ANY CLAIM, DAMAGES OR OTHER LIABILITY, INCLUDING ANY GENERAL,
SPECIAL, INDIRECT, INCIDENTAL, OR CONSEQUENTIAL DAMAGES, WHETHER IN AN ACTION OF CONTRACT,
TORT OR OTHERWISE, ARISING FROM, OUT OF THE USE OR INABILITY TO USE THE FONT SOFTWARE OR
FROM OTHER DEALINGS IN THE FONT SOFTWARE.
Except as contained in this notice, the name of Tavmjong Bah shall not be used in advertising or otherwise to
promote the sale, use or other dealings in this Font Software without prior written authorization from
Tavmjong Bah. For further information, contact: [email protected].
132
APPENDIX > About third-party software programs

Yamaha Global Site
https://www.yamaha.com/
Yamaha Downloads
https://download.yamaha.com/
© 2026 Yamaha Corporation
Published 10/2026 KW-A0
AV25-0082
Layout Folder: YMH_PDF_Manual_A5_AV
Stylesheet Name: 01_YMH_PDF_Manual_A5_AV_En-Multi
Stylesheet Version: 2026.4.8