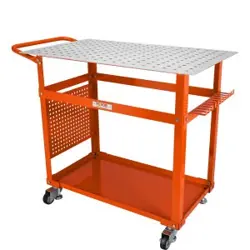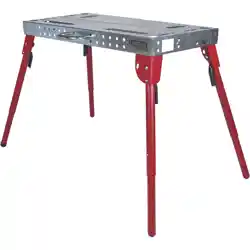
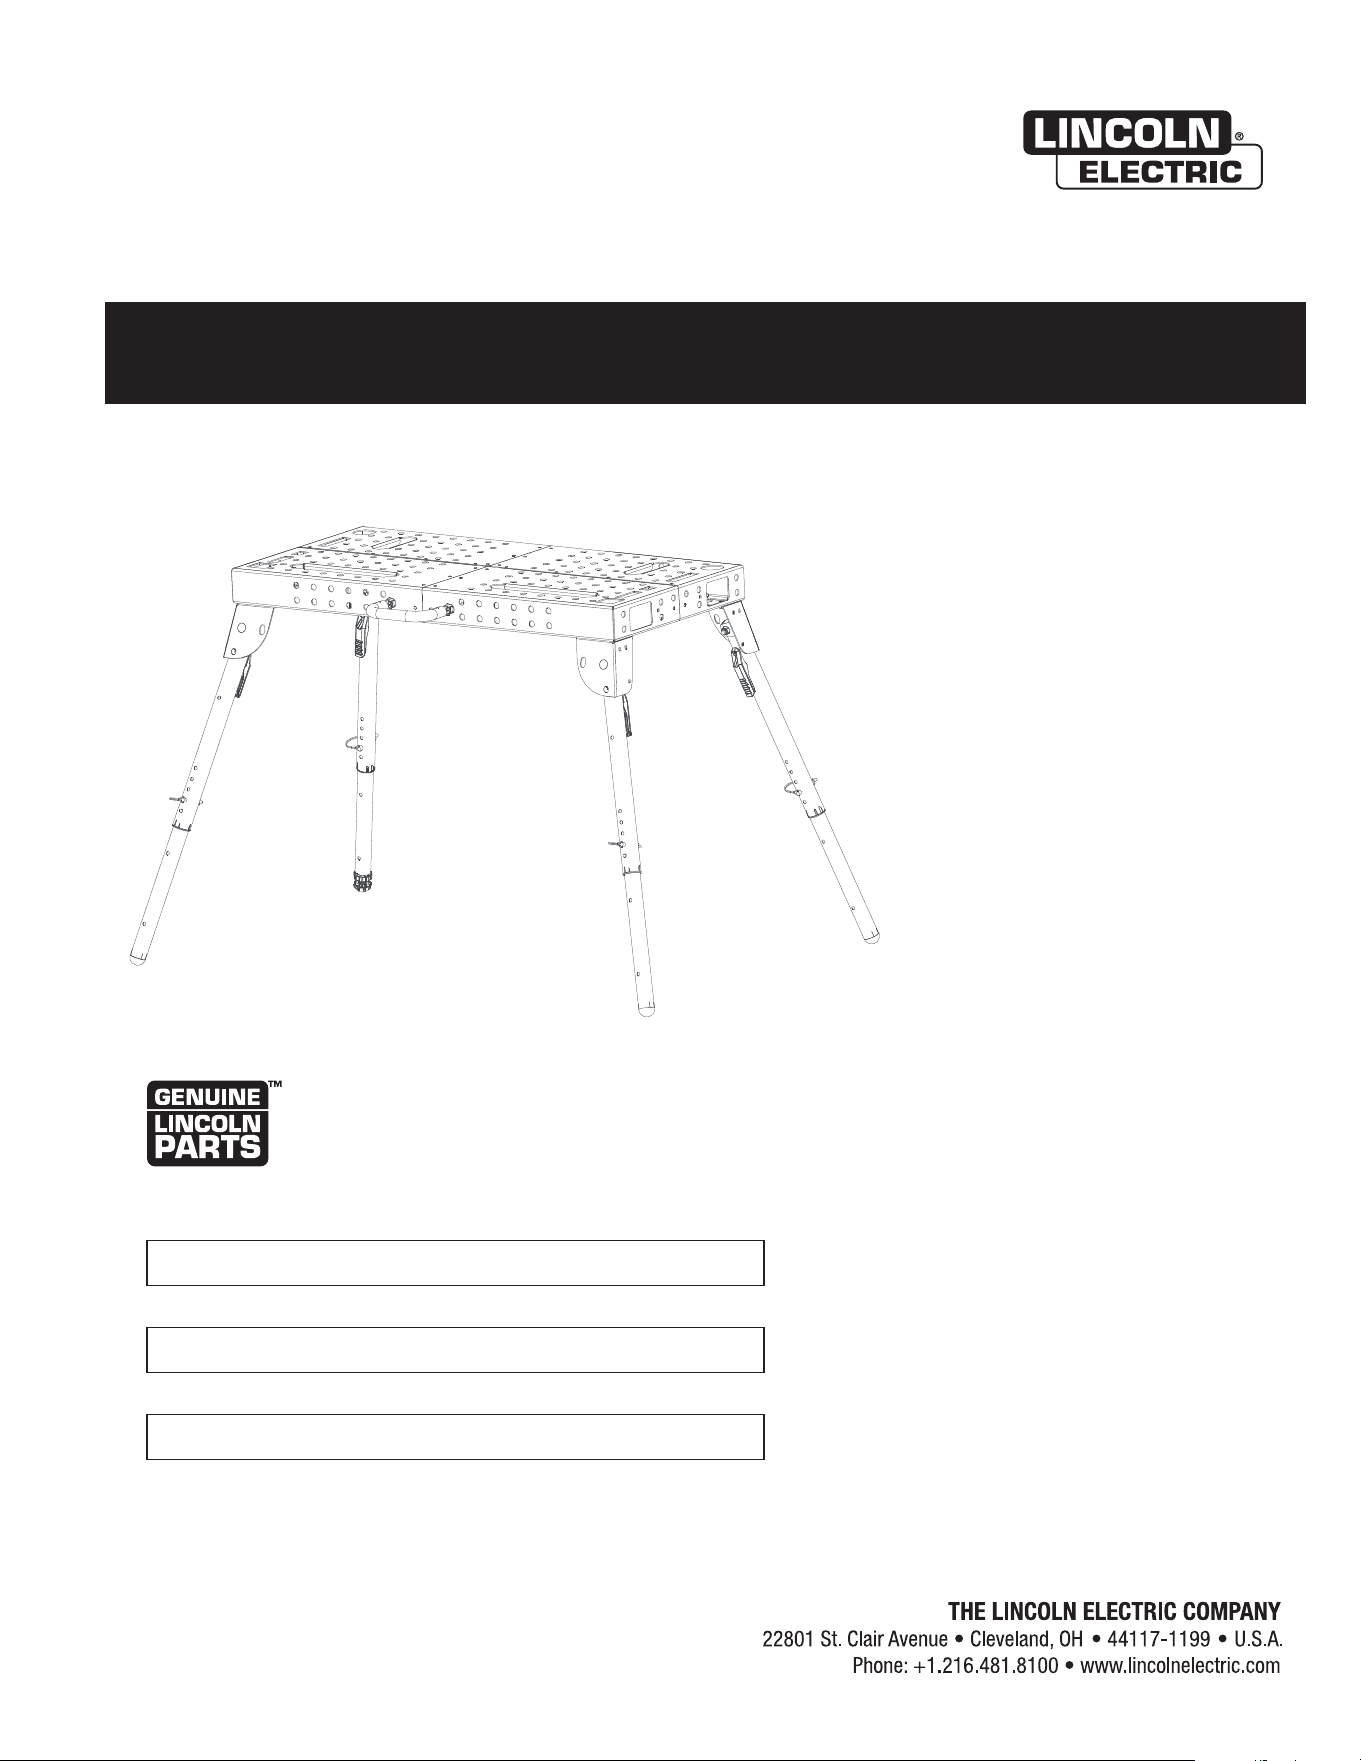
PORTABLE WELDING TABLE
Register your product:
www.lincolnelectric.com/register
Authorized Service and Distributor Locator:
www.lincolnelectric.com/locator
IM10655 | Issue Date Sep - 22
© Lincoln Global, Inc. All Rights Reserved.
For use with products having the following numbers:
K5334-1
Save for future reference
Date Purchased
Code: (ex: 10859)
Serial: (ex: U1060512345)
Instruction Manual
Need Help? Call 1.888.935.3877
to talk to a Service Representative
Hours of Operation:
8:00 AM to 6:00 PM (ET) Mon. thru Fri.
After hours?
Use “Ask the Experts” at lincolnelectric.com
A Lincoln Service Representative will contact you
no later than the following business day.
For Service outside the USA:
Email: [email protected]
THANK YOU FOR SELECTING
A QUALITY PRODUCT BY
LINCOLN ELEC TRIC.
PLEASE EXAMINE CARTON AND EQUIPMENT FOR
DAMAGE IMMEDIATELY
When this equipment is shipped, title passes to the purchaser
upon receipt by the carrier. Consequently, claims for material
damaged in shipment must be made by the purchaser against the
transportation company at the time the shipment is received.
SAFETY DEPENDS ON YOU
Lincoln arc welding and cutting equipment is designed and built
with safety in mind. However, your overall safety can be increased
by proper installation ... and thoughtful operation on your part.
DO NOT INSTALL, OPERATE OR REPAIR THIS EQUIPMENT
WITHOUT READING THIS MANUAL AND THE SAFETY
PRECAUTIONS CONTAINED THROUGHOUT. And, most importantly,
think before you act and be careful.
This statement appears where the information must be followed
exactly to avoid serious personal injury or loss of life.
This statement appears where the information must be followed
to avoid minor personal injury or damage to this equipment.
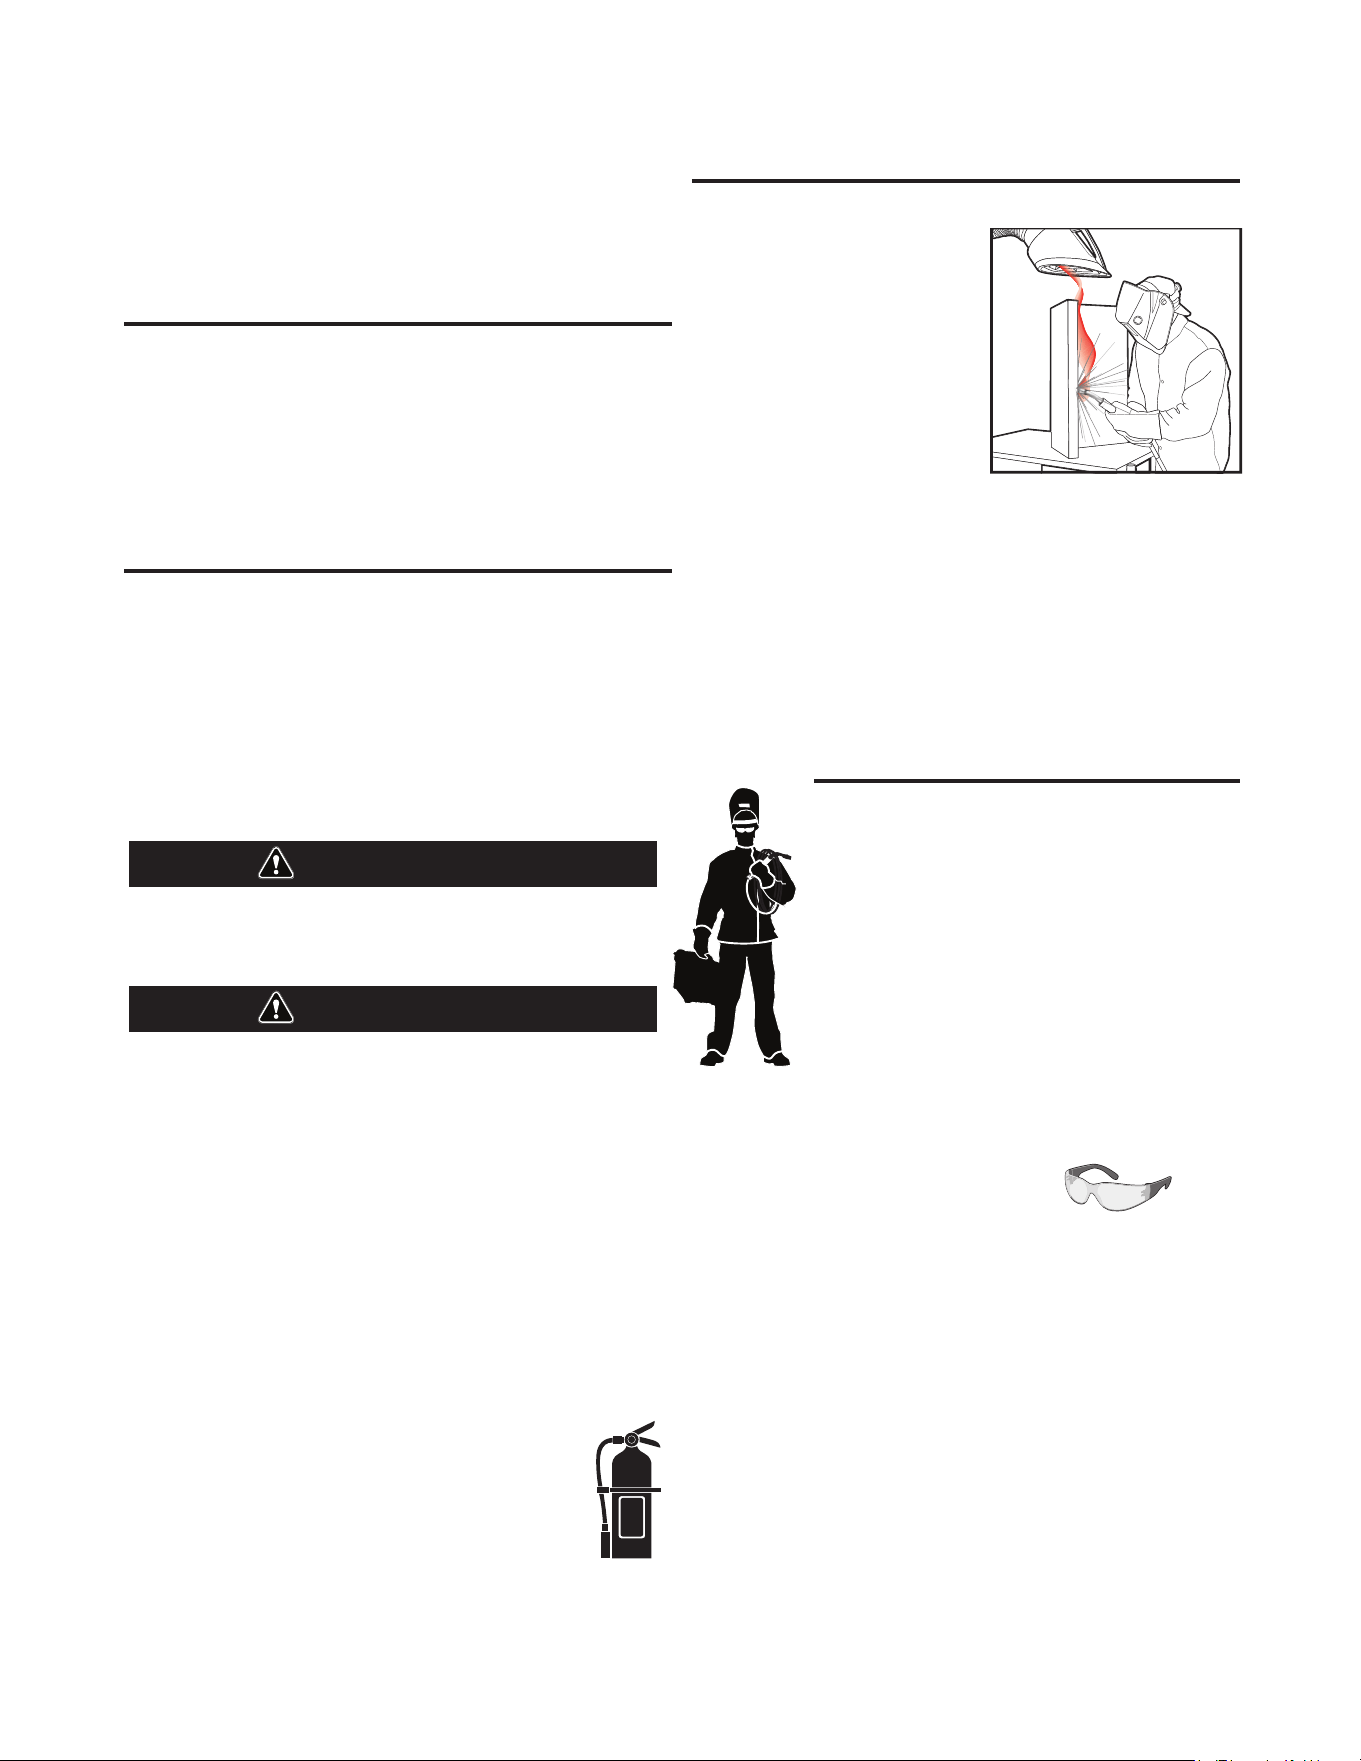
KEEP YOUR HEAD OUT OF THE FUMES.
DON’T get too close to the arc.
Use corrective lenses if necessary
to stay a reasonable distance
away from the arc.
READ and obey the Safety Data
Sheet (SDS) and the warning label
that appears on all containers of
welding materials.
USE ENOUGH VENTILATION or
exhaust at the arc, or both, to
keep the fumes and gases from
your breathing zone and the general area.
IN A LARGE ROOM OR OUTDOORS, natural ventilation may be
adequate if you keep your head out of the fumes (See below).
USE NATURAL DRAFTS or fans to keep the fumes away
from your face.
If you de velop unusual symptoms, see your supervisor.
Perhaps the welding atmosphere and ventilation system
should be checked.
WEAR CORRECT EYE, EAR &
BODY PROTECTION
PROTECT your eyes and face with welding helmet
properly fitted and with proper grade of filter plate
(See ANSI Z49.1).
PROTECT your body from welding spatter and arc
flash with protective clothing including woolen
clothing, flame-proof apron and gloves, leather
leggings, and high boots.
PROTECT others from splatter, flash, and glare
with protective screens or barriers.
IN SOME AREAS, protection from noise may be appropriate.
BE SURE protective equipment is in good condition.
Also, wear safety glasses in work area
AT ALL TIMES.
SPECIAL SITUATIONS
DO NOT WELD OR CUT containers or materials which previously
had been in contact with hazardous substances unless they are
properly cleaned. This is extremely dangerous.
DO NOT WELD OR CUT painted or plated parts unless special
precautions with ventilation have been taken. They can release
highly toxic fumes or gases.
Additional precautionary measures
PROTECT compressed gas cylinders from excessive heat,
mechanical shocks, and arcs; fasten cylinders so they cannot fall.
BE SURE cylinders are never grounded or part of an
electrical circuit.
REMOVE all potential fire hazards from welding area.
ALWAYS HAVE FIRE FIGHTING EQUIPMENT READY FOR
IMMEDIATE USE AND KNOW HOW TO USE IT.
WARNING
CAUTION
6DIHW\RI
SECTION A:
WARNINGS
CALIFORNIA PROPOSITION 65 WARNINGS
WARNING: Breathing diesel engine exhaust
exposes you to chemicals known to the State
of California to cause cancer and birth defects,
or other reproductive harm.
• Always start and operate the engine in a
well-ventilated area.
• If in an exposed area, vent the exhaust to the outside.
• Do not modify or tamper with the exhaust system.
• Do not idle the engine except as necessary.
For more information go to
www.P65 warnings.ca.gov/diesel
WARNING: This product, when used for welding or
cutting, produces fumes or gases which contain
chemicals known to the State of California to cause
birth defects and, in some cases, cancer. (California
Health & Safety Code § 25249.5 et seq.)
WARNING: Cancer and Reproductive Harm
www.P65warnings.ca.gov
ARC WELDING CAN BE HAZARDOUS. PROTECT
YOURSELF AND OTHERS FROM POSSIBLE SERIOUS
INJURY OR DEATH. KEEP CHILDREN AWAY.
PACEMAKER WEARERS SHOULD CONSULT WITH
THEIR DOCTOR BEFORE OPERATING.
Read and understand the following safety highlights. For
additional safety information, it is strongly recommended
that you purchase a copy of “Safety in Welding & Cutting -
ANSI Standard Z49.1” from the American Welding Society,
P.O. Box 351040, Miami, Florida 33135 or CSA Standard
W117.2. A Free copy of “Arc Welding Safety” booklet E205
is available from the Lincoln Electric Company, 22801
St. Clair Avenue, Cleveland, Ohio 44117-1199.
BE SURE THAT ALL INSTALLATION, OPERATION,
MAINTENANCE AND REPAIR PROCEDURES ARE
PERFORMED ONLY BY QUALIFIED INDIVIDUALS.
FOR ENGINE POWERED
EQUIPMENT.
1.a. Turn the engine off before troubleshooting
and maintenance work unless the
maintenance work requires it to be running.
1.b. Operate engines in open, well-ventilated areas or vent the engine
exhaust fumes outdoors.
arc or when the engine is running. Stop the
engine and allow it to cool before refueling to
prevent spilled fuel from vaporizing on contact
tank. If fuel is spilled, wipe it up and do not start engine until
fumes have been eliminated.
1.d. Keep all equipment safety guards, covers
and devices in position and in good repair.
Keep hands, hair, clothing and tools away
from V-belts, gears, fans and all other
moving parts when starting, operating or
repairing equipment.
1.e. In some cases it may be necessary to remove safety guards to
perform required maintenance. Remove guards only when
necessary and replace them when the maintenance requiring
their removal is complete. Always use the greatest care when
working near moving parts.
1.f. Do not put your hands near the engine fan. Do not attempt to
override the governor or idler by pushing on the throttle control
rods while the engine is running.
1.g. To prevent accidentally starting gasoline engines while turning
the engine or welding generator during maintenance work,
disconnect the spark plug wires, distributor cap or magneto wire
as appropriate.
1.h. To avoid scalding, do not remove the radiator
pressure cap when the engine is
hot.
ELECTRIC AND
MAGNETIC FIELDS MAY
BE DANGEROUS
causes localized Electric and Magnetic Fields (EMF).
and welding machines
welders having a pacemaker should consult their physician
before welding.
which are now not known.
2.d. All welders should use the following procedures in order to
2.d.1. Route the electrode and work cables together - Secure
them with tape when possible.
2.d.2. Never coil the electrode lead around your body.
2.d.3. Do not place your body between the electrode and work
cables. If the electrode cable is on your right side, the
work cable should also be on your right side.
2.d.4. Connect the work cable to the workpiece as close as pos-
sible to the area being welded.
2.d.5. Do not work next to welding power source.
SAFETY
Safety 02 of 04 - 10/08/2021
1.c. Do not add the fuel near an open ame welding
with hot engine parts and igniting. Do not spill fuel when lling
2.a. Electric current owing through any conductor
Welding current creates EMF elds around welding cables
2.b. EMF elds may interfere with some pacemakers, and
2.c. Exposure to EMF elds in welding may have other health effects
minimize exposure to EMF elds from the welding circuit:
1.i. Using a generator indoors CAN KILL YOU IN
MINUTES.
1.j. Generator exhaust contains carbon monoxide. This is a poison
you cannot see or smell.
1.k. NEVER use inside a home or garage,
EVEN IF doors and windows are open.
1.l. Only use OUTSIDE and far away from
windows, doors and vents.
1.m. Avoid other generator hazards. READ
MANUAL BEFORE USE.
ELECTRIC SHOCK
CAN KILL.
3.a. The electrode and work (or ground) circuits are
electrically “hot” when the welder is on. Do
not touch these “hot” parts with your bare skin or wet clothing.
Wear dry, hole-free gloves to insulate hands.
3.b. Insulate yourself from work and ground using dry insulation.
Make certain the insulation is large enough to cover your full area
of physical contact with work and ground.
In addition to the normal safety precautions, if
welding must be performed under electrically
hazardous conditions (in damp locations or while
wearing wet clothing; on metal structures such as
floors, gratings or scaffolds; when in cramped
positions such as sitting, kneeling or lying, if there
is a high risk of unavoidable or accidental contact
with the workpiece or ground) use the following
equipment:
• Semiautomatic DC Constant Voltage (Wire) Welder.
• DC Manual (Stick) Welder.
• AC Welder with Reduced Voltage Control.
3.c. In semiautomatic or automatic wire welding, the electrode,
electrode reel, welding head, nozzle or semiautomatic welding
gun are also electrically “hot”.
3.d. Always be sure the work cable makes a good electrical
connection with the metal being welded. The connection should
be as close as possible to the area being welded.
3.e. Ground the work or metal to be welded to a good electrical (earth)
ground.
3.f. Maintain the electrode holder, work clamp, welding cable and
welding machine in good, safe operating condition. Replace
damaged insulation.
3.g. Never dip the electrode in water for cooling.
3.h. Never simultaneously touch electrically “hot” parts of electrode
holders connected to two welders because voltage
between the
two can be the total of the open circuit voltage of both
welders.
3.i. When working above floor level, use a safety belt to protect
yourself from a fall should you get a shock.
3.j. Also see It ems 6.c. and 8.
ARC RAYS CAN BURN.
4.a. Use a shield with the proper filter and cover plates to protect your
eyes from sparks and the rays of the arc when welding or
observing open arc welding. Headshield and filter lens should
conform to ANSI Z87. I standards.
4.b. Use suitable clothing made from durable flame-resistant material
to protect your skin and that of your helpers from the arc rays.
4.c. Protect other nearby personnel with suitable, non-flammable
screening and/or warn them not to watch the arc nor expose
themselves to the arc rays or to hot spatter or metal.
FUMES AND GASES
CAN BE DANGEROUS.
5.a. Welding may produce fumes and gases
hazardous to health. Avoid breathing these
fumes and gases. When welding, keep your head out of the fume.
Use enough ventilation and/or exhaust at the arc to keep fumes
and gases away from the breathing zone. When welding
hardfacing (see instructions on container or SDS)
or on lead or cadmium plated steel and other
metals or coatings which produce highly toxic
fumes, keep exposure as low as possible and
within applicable OSHA PEL and ACGIH TLV limits
using local exhaust or mechanical ventilation
unless exposure assessments indicate otherwise.
In confined spaces or in some circumstances,
outdoors, a respirator may also be required.
Additional precautions are also required when
welding
on galvanized steel.
5. b. The operation of welding fume control equipment is affected by
various factors including proper use and positioning of the
equipment, maintenance of the equipment and the specific
welding procedure and application involved. Worker exposure
level should be checked upon installation and periodically
thereafter to be certain it is within applicable OSHA PEL and
ACGIH TLV limits.
5.c. Do not weld in locations near chlorinated hydrocarbon vapors
coming from degreasing, cleaning or spraying operations. The
heat and rays of the arc can react with solvent vapors to form
phosgene, a highly toxic gas, and other irritating products.
5.d. Shielding gases used for arc welding can displace air and
cause
injury or death. Always use enough ventilation, especially in
confined areas, to insure breathing air is safe.
5.e. Read and understand the manufacturer’s instructions for this
equipment and the consumables to be used, including the
Safety Data Sheet (SDS) and follow your employer’s safety
practices. SDS forms are available from your welding
distributor or from the manufacturer.
5.f. Also see item 1.b.
SAFETY
6DIHW\RI
WELDING AND CUTTING
SPARKS CAN CAUSE
FIRE OR EXPLOSION.
6.a. Remove fire hazards from the welding area. If
this is not possible, cover them to prevent the welding sparks
from starting a fire. Remember that welding sparks and hot
materials from welding can easily go through small cracks and
openings to adjacent areas. Avoid welding near hydraulic lines.
Have a fire extinguisher readily available.
6.b. Where compressed gases are to be used at the job site, special
precautions should be used to prevent hazardous situations.
Refer to “Safety in Welding and Cutting” (ANSI Standard Z49.1)
and the operating information for the equipment being used.
6.c. When not welding, make certain no part of the electrode circuit is
touching the work or ground. Accidental contact can cause
overheating and create a fire hazard.
6.d. Do not heat, cut or weld tanks, drums or containers until the
proper steps have been taken to insure that such procedures
will not cause flammable or toxic vapors from substances inside.
They can cause an explosion even though they have been
“cleaned”. For information, purchase “Recommended Safe
Practices for the Preparation for Welding and Cutting of
Containers and Piping That Have Held Hazardous Substances”,
AWS F4.1 from the American Welding Society
(see address above).
6.e. Vent hollow castings or containers before heating, cutting or
welding. They may explode.
6.f. Sparks and spatter are thrown from the welding arc. Wear oil free
protective garments such as leather gloves, heavy shirt, cuffless
trousers, high shoes and a cap over your hair. Wear ear plugs
when welding out of position or in confined places. Always wear
safety glasses with side shields when in a welding area.
6.g. Connect the work cable to the work as close to the welding area
as practical. Work cables connected to the building framework or
other locations away from the welding area increase the
possibility of the welding current passing through lifting chains,
crane cables or other alternate circuits. This can create fire
hazards or overheat lifting chains or cables until they fail.
6.h. Also see item 1.c.
6.I. Read and follow NFPA 51B “Standard for Fire Prevention During
Welding, Cutting and Other Hot Work”, available from NFPA, 1
Batterymarch Park, PO box 9101, Quincy, MA 022690-9101.
6.j. Do not use a welding power source for pipe thawing.
CYLINDER MAY EXPLODE IF
DAMAGED.
7.a. Use only compressed gas cylinders containing
the correct shielding gas for the process used
and properly operating regulators designed for
the gas and pressure used. All hoses, fittings,
etc. should be suitable for the application and
maintained in good condition.
7.b. Always keep cylinders in an upright position securely chained to
an undercarriage or fixed support.
7.c. Cylinders should be located:
• Away from areas where they may be struck or subjected
to physical damage.
• A safe distance from arc welding or cutting operations
and any other source of heat, sparks, or flame.
7.d. Never allow the electrode, electrode holder or any other
electrically “hot” parts to touch a cylinder.
7.e. Keep your head and face away from the cylinder valve outlet
when opening the cylinder valve.
7.f. Valve protection caps should always be in place and hand tight
except when the cylinder is in use or connected for use.
7.g. Read and follow the instructions on compressed gas cylinders,
associated equipment, and CGA publication P-l, “Precautions for
Safe Handling of Compressed Gases in Cylinders,” available from
the Compressed Gas Association, 14501 George Carter Way
Chantilly, VA 20151.
FOR ELECTRICALLY
POWERED EQUIPMENT.
8.a. Turn off input power using the disconnect
switch at the fuse box before working on
the equipment.
8.b. Install equipment in accordance with the U.S. National Electrical
Code, all local codes and the manufacturer’s recommendations.
8.c. Ground the equipment in accordance with the U.S. National
Electrical Code and the manufacturer’s recommendations.
Refer to
http://www.lincolnelectric.com/safety
for additional safety information.
SAFETY
6DIHW\RI
2
SAFETY
PORTABLE WELDING TABLE
Lifting And Transporting Table
SAFETY
SAFETY PRECAUTIONS
Do not attempt to use this equipment until you have
thoroughly read all operating and maintenance manuals
supplied with your machine. They include important safety
precautions, operating and maintenance instructions and
parts lists.
FIRE OR EXPLOSION hazard
FALLING EQUIPMENT can injure.
• i. Do not exceed maximum weight of
table. Evenly distribute load on surface.
MOVING PARTS can injure.
• Keep away from moving parts.
• Keep away from pinch points such as
drive rolls.
------------------------------------------------------------------
service this equipment.
WARNING
SETTING UP TABLE
To ensure proper setup of the portable welding table:
• Only use table for recommended
applications.
• ii. Do not stand, sit, or climb on table.
• iii. Do no use table on uneven surface
where it can be tipped over.
• iv. If table is to be used on an incline,
adjust leg height so table top is even.
• v. Keep equipment and parts away from
edges of the table to prevent falling objects.
ELECTRIC SHOCK can kill.
• Do not touch electrically live parts such as
output terminals or internal wiring.
• Insulate yourself from the work and
ground.
• Always wear dry insulating gloves.
WARNING
•
•
Insert locking pins in each leg (shipped loose).
•
Ensure table is level with all leg locking pins engaged prior to
using.
PORTABLE WELDING TABLE BEST PRACTICES
The following guidelines will ensure proper usage of the portable
welding table:
•
Do not exceed maximum weight of table. Evenly distribute
load on surface.
•
Do no use table on uneven surface where it can be tipped
over.
•
If table is to be used on an incline, adjust leg height so table
top is even.
•
Keep equipment and parts away from edges of the table to
prevent falling objects.
•
Inspect table before every use to ensure it has no loose
parts and is in good working condition. Check for loose
bolts, partially engaged legs pins, or any damage.
•
Tighten nuts to proper torque.
•
Use the supplied earth grounding bolt to connect the
welding table to a good electrical ground according to
national, state, and local codes.
NOTE: Portable welding table REQUIRES TWO PERSON LIFT.
•
properly secured prior to carrying.
•
Remove all items off table surface prior to folding/moving.
•
Ensure there is a clear pathway before moving transporting
table.
•
DO NOT drop table.
HOT PARTS can burn.
• Do not touch hot parts bare handed.
• Allow cooling period before working on
equipment.
• To handle hot parts, use proper tools
and/or wear heavy, insulated welding gloves
and clothing to prevent burns.
WARNING

TABLE OF CONTENTS
INSTALLATION .............................................................................................................................................SECTION A
TECHNICAL SPECIFICATIONS .....................................................................................................................................A-1
PORTABLE WELDING TABLE ASSEMBLY.....................................................................................................................A-2
OPTIONAL WHEEL KIT ASSEMBLY...............................................................................................................................A-6
PARTS LIST ...............................................................................................................PARTS.LINCOLNELECTRIC.COM
CONTENT/DETAILS MAY BE CHANGED OR UPDATED WITHOUT NOTICE. FOR MOST CURRENT INSTRUCTION MANUALS, GO
TO PARTS.LINCOLNELECTRIC.COM.
PORTABLE WELDING TABLE
PORTABLE WELDING TABLE PARTS KEY...................................................................................... ..............................A-1
SAFETY.........................................................................................................................................................................2
OPERATION...................................................................................................................................................SECTION B
SAFETY PRECAUTIONS...............................................................................................................................................B-1
MODIFICATIONS....................................................................................................................................
.....................B-2
OPERATION.................................................................................................................................................................B-2
USERS......................................................................................................................................... ..............................B-2
INSTALLATION
TECHNICAL SPECIFICATIONS
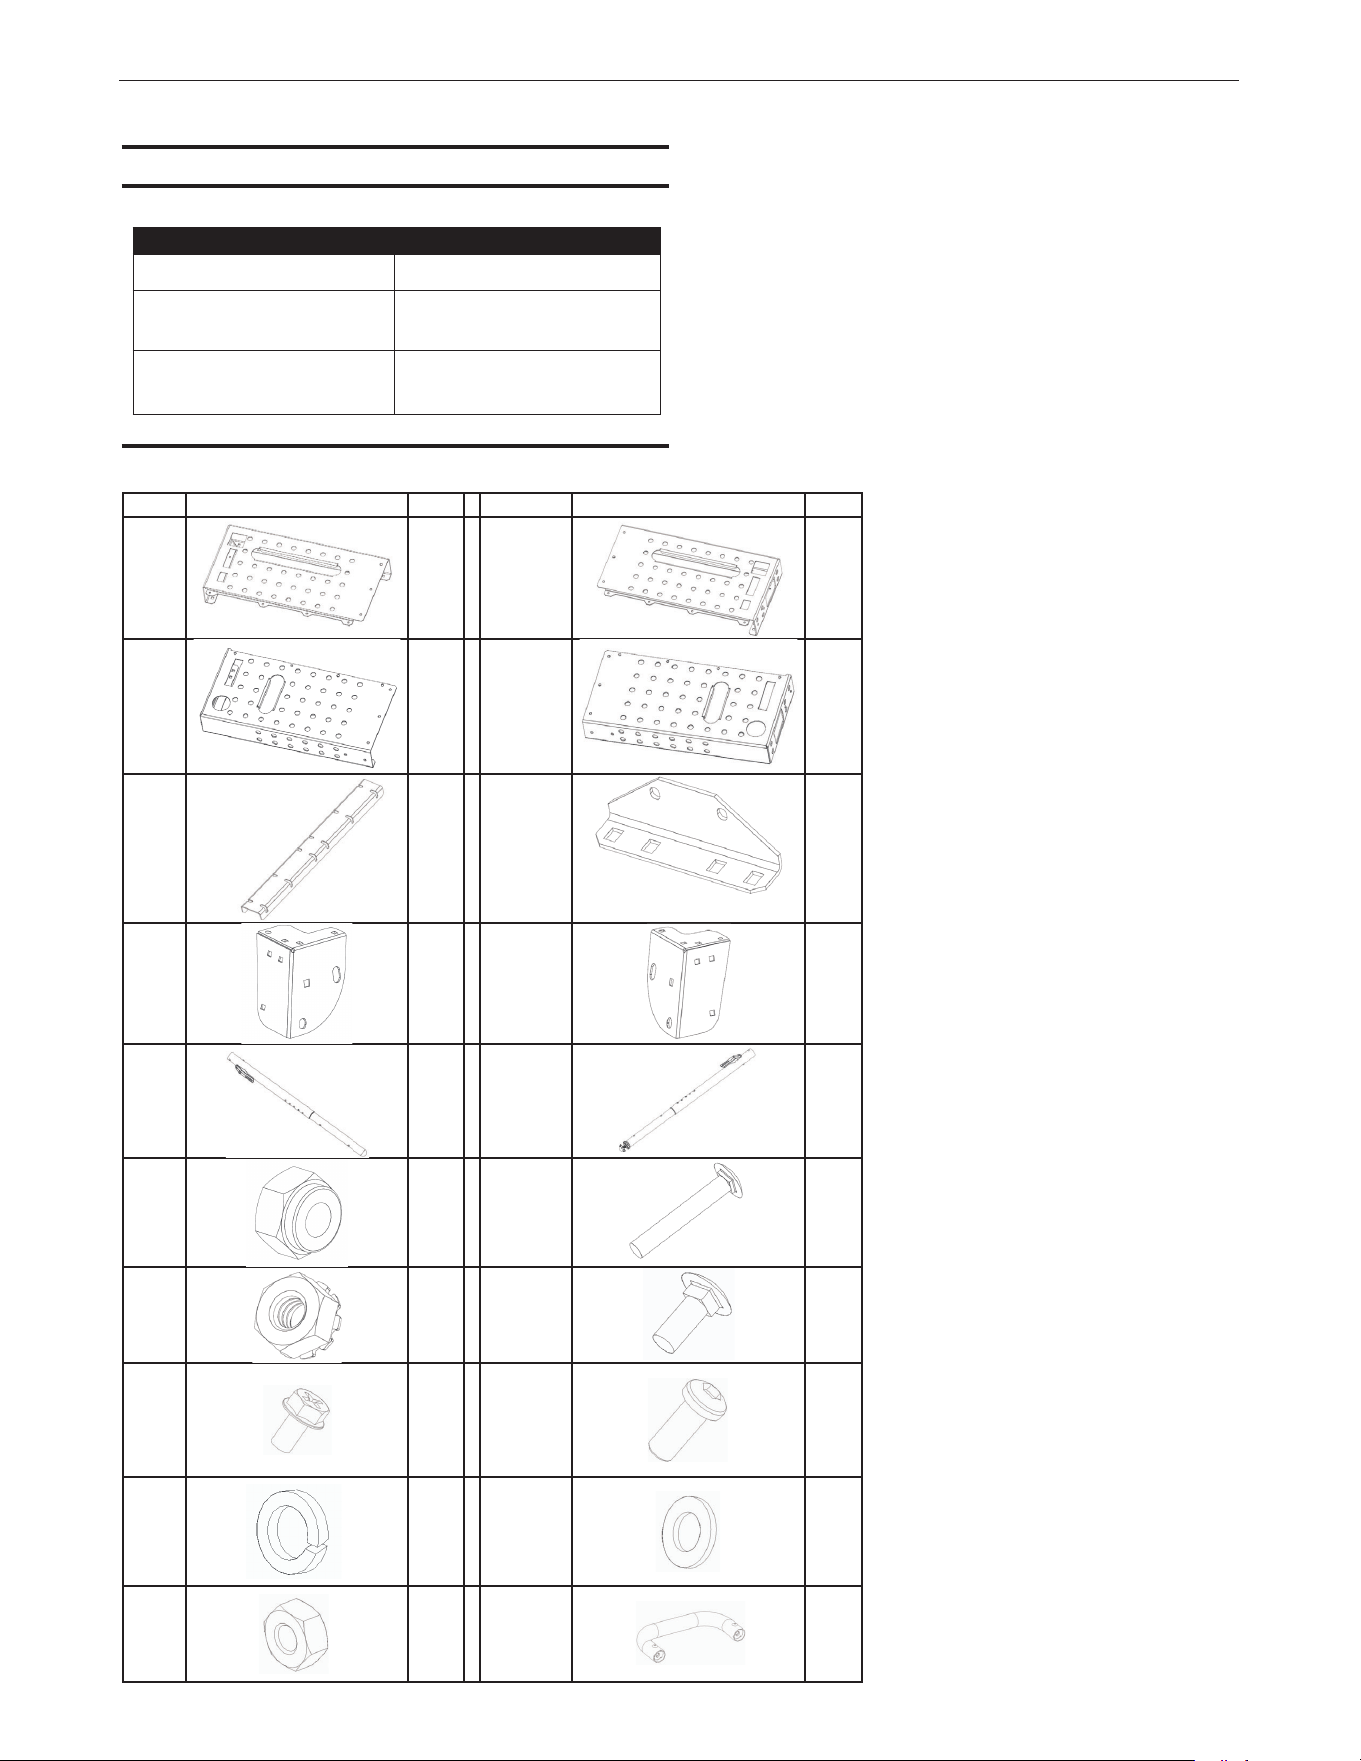
PORTABLE WELDING TABLE PARTS KEY
A-1
INSTALLATION
PORTABLE WELDING TABLE
GENERAL
TABLE TOP DIMENSION 44 in. L x 21 in. W
TABLE HEIGHT (ADJUSTABLE)
26.5 in. - 37.0 in. open legs,
8.5 in. closed legs.
MAXIMUM WEIGHT CAPACITY
500 lbs when weight is evenly
distributed, 350 lbs point load.
NAME PART QTY NAME PART QTY
A 1 B 1
C 1 D 1
E1F 4
G2H 2
J3K 1
L4M 4
N60O
(M16x16)
34
P4Q 3
R3S 3
T2U
(M8-20
Bolt)
1
(M6 Self
Thread-
ing)
A-2
INSTALLATION
PORTABLE WELDING TABLE ASSEMBLY
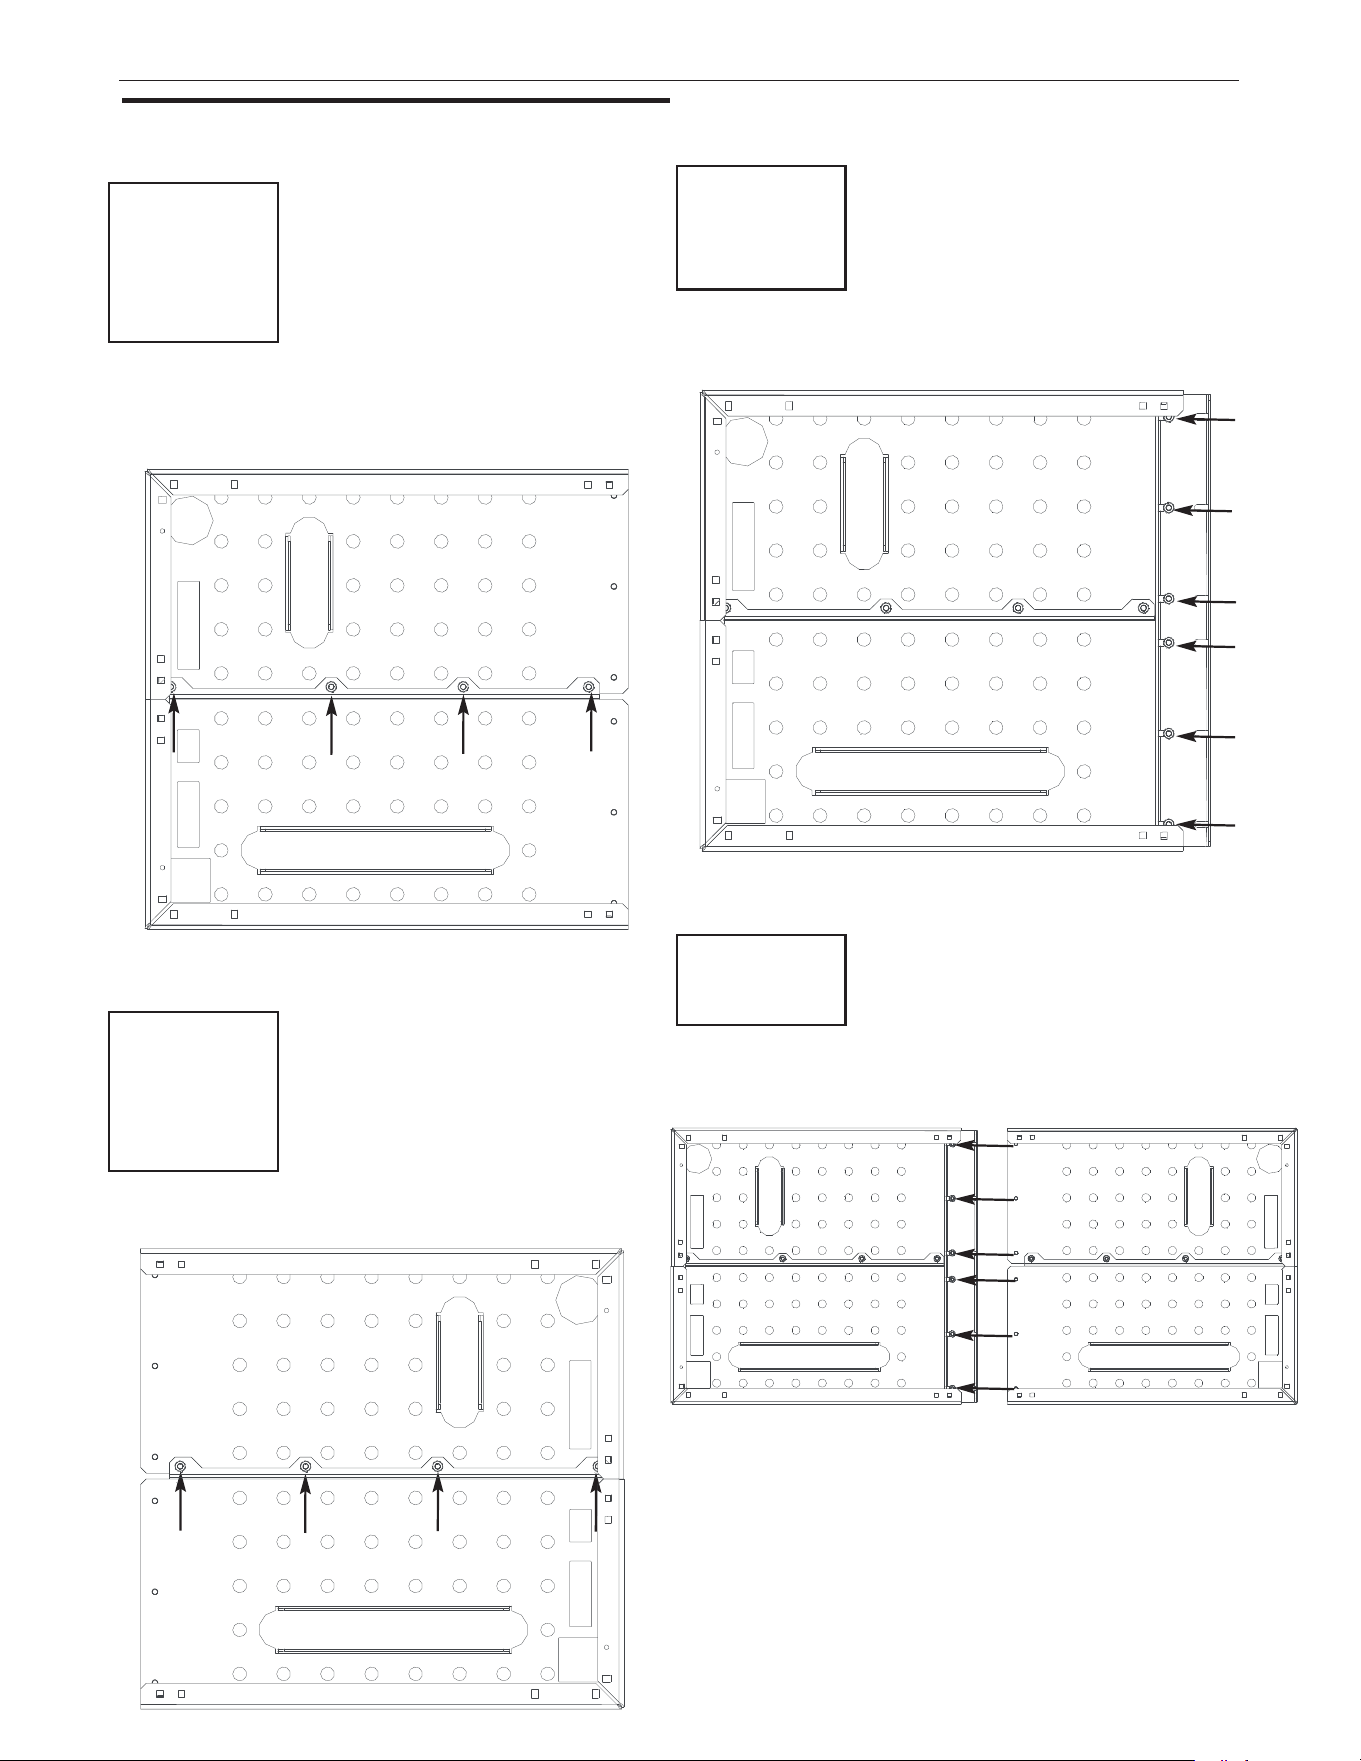
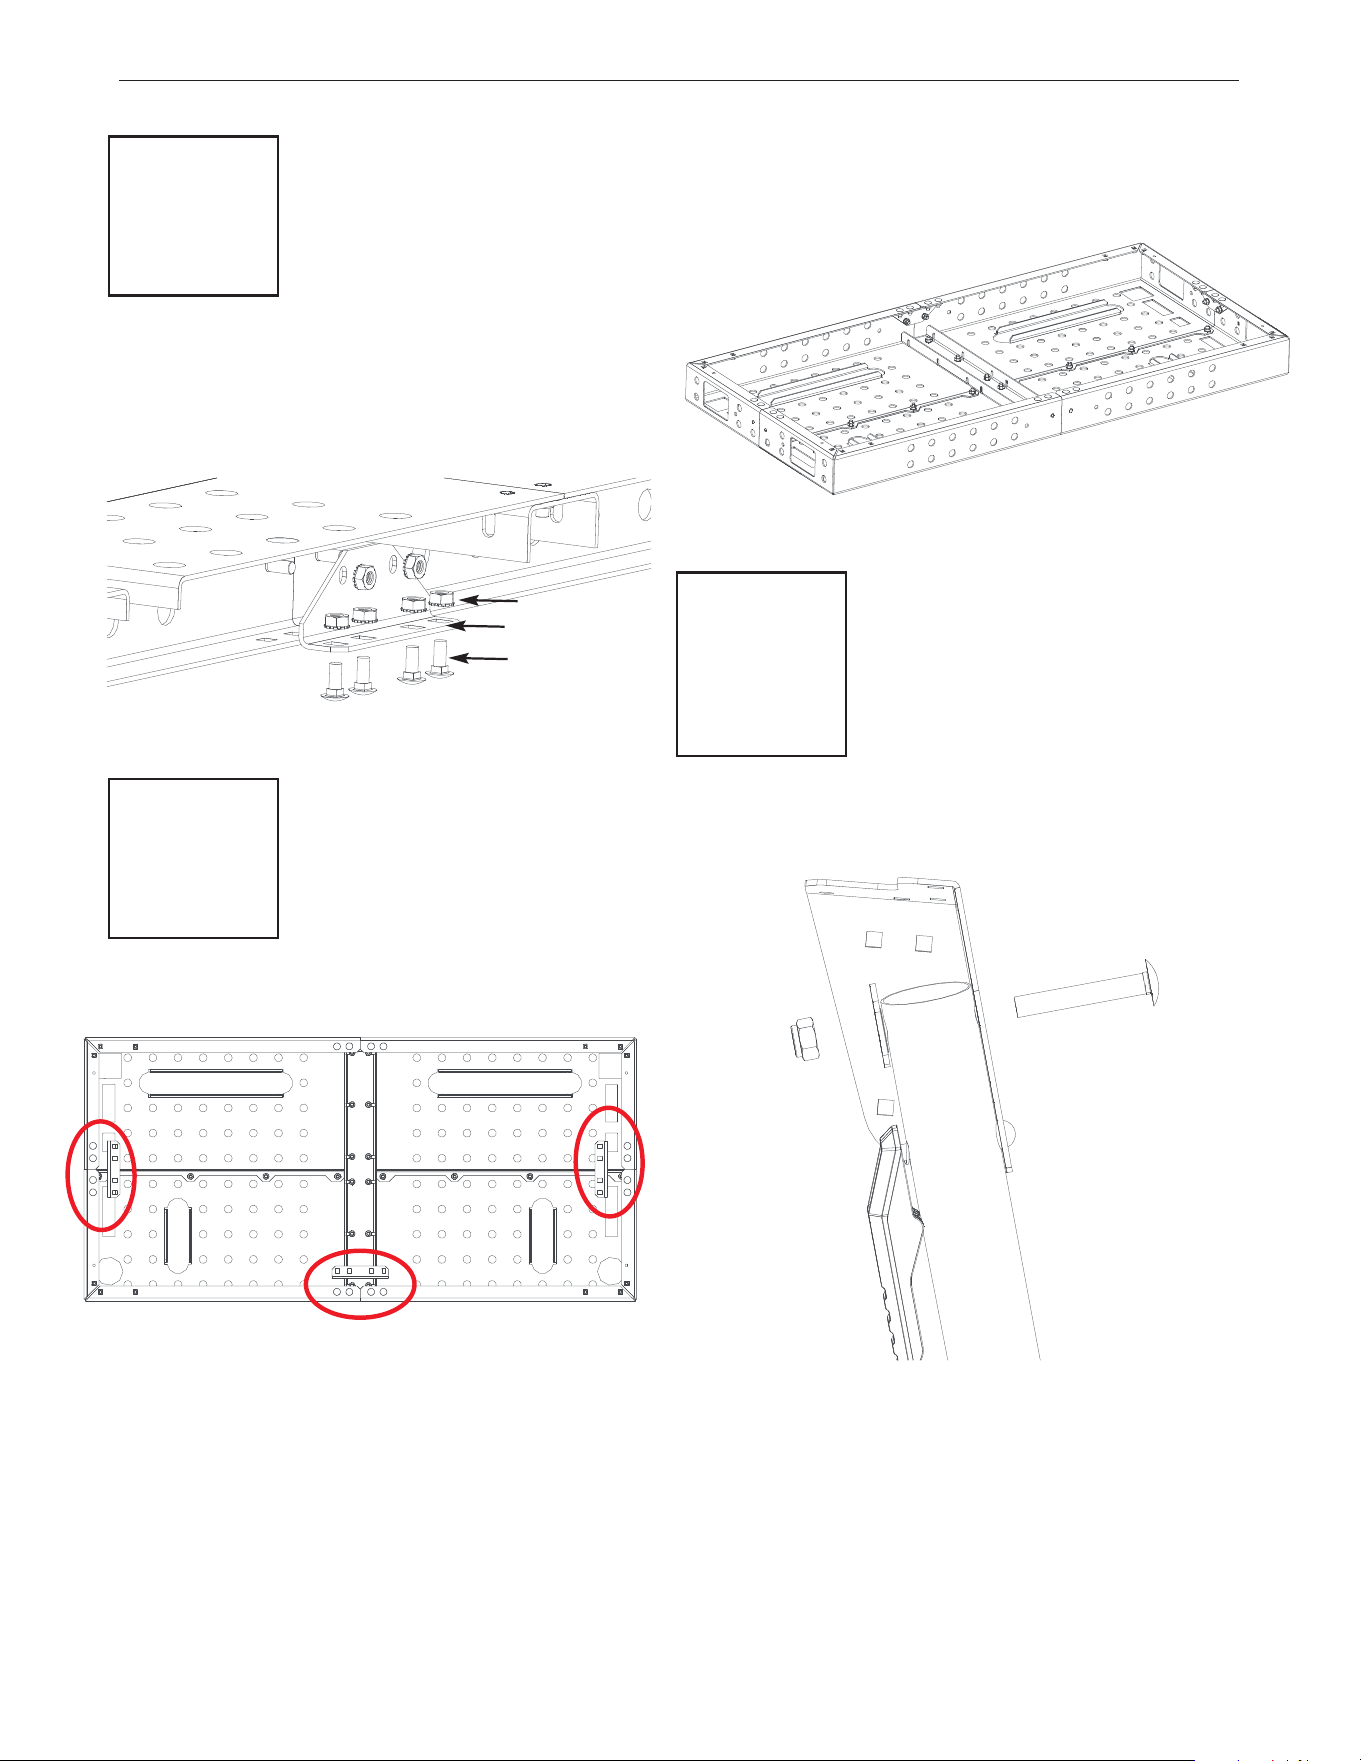
Parts needed
• A (x 1)
• C (x 1)
• N (x 4)
Step 1
On FLAT surface, place table top Part C’s threaded studs through
Part A’s tabbed slot hole. Lightly fasten with nuts (N). Do not
tighten.
FIGURE A.1
PORTABLE WELDING TABLE
Parts needed
• B (x 1)
• D (x 1)
• N (x 4)
Step 2
Repeat step (1) with top part B and D.
FIGURE A.2
Parts needed
• E (x 1)
• N (x 6)
Step 3
Slide bracket (E) onto assembly from Step 1. Lightly fasten nuts.
FIGURE A.3
Parts needed
• N (x 6)
Step 4
Slide assembly from Step 2 into bracket (E). Lightly fasten nuts.
FIGURE A.4
A-3
INSTALLATION
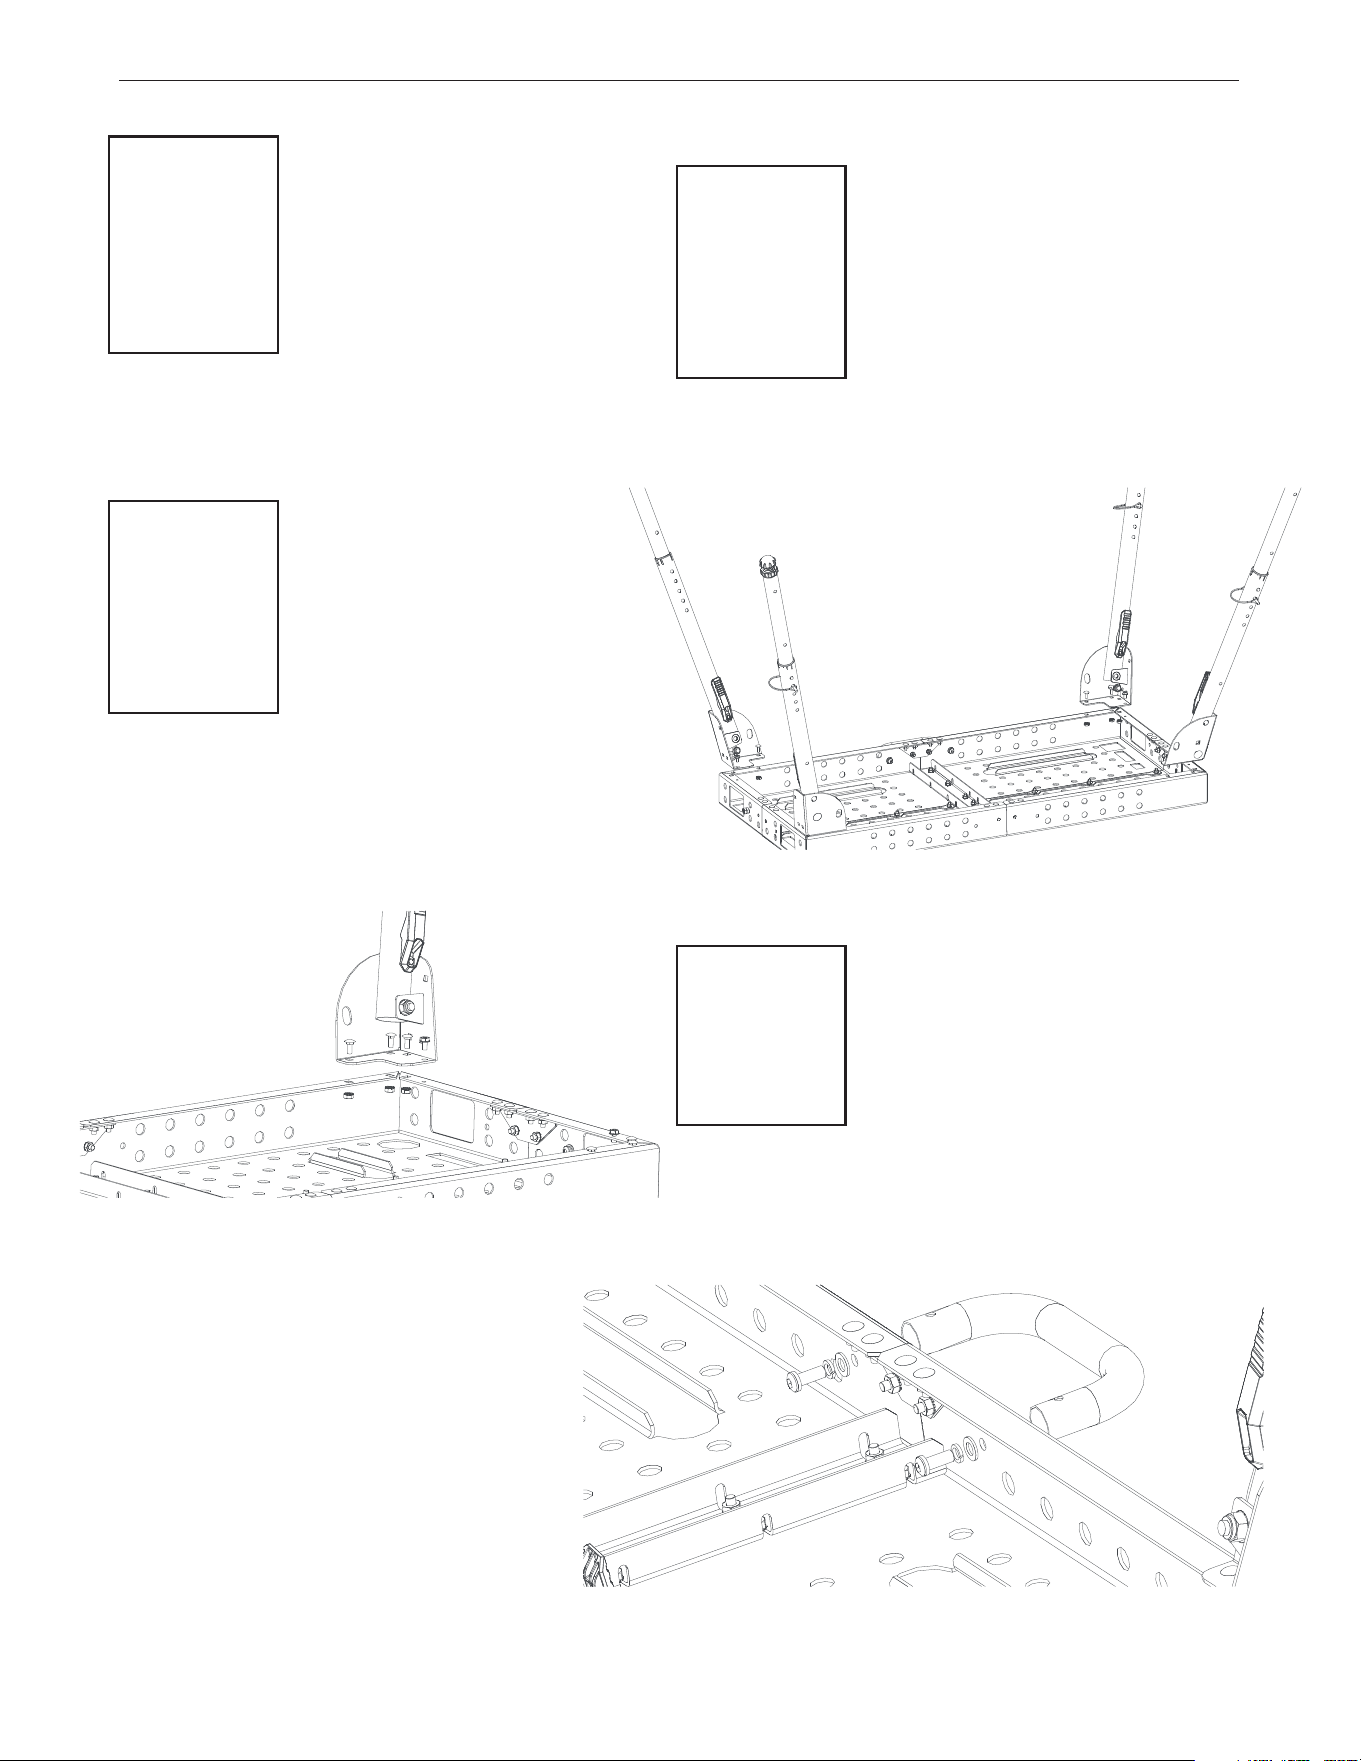
Parts needed
• F (x 1)
• N (x 6)
• O (x 4)
Step 5
On inner side of table, slide in side bracket (F) into threaded
studs. Lightly fasten with lock nuts (N). Insert carriage bolts
(O) through bracket and bottom lip of table top. Lightly fasten
with nuts (N).
FIGURE A.5
PORTABLE WELDING TABLE
Parts needed
• F (x 3)
• N (x 18)
• O (x 12)
Step 6
Repeat Step 5 with remaining three sides of table top.
FIGURE A.6
Step 7
Gradually tighten all nuts to 50-56 in-lbs. Table top now complete.
FIGURE A.7
Parts needed
• K (x 1)
• G (x 1)
• L (x 1)
Step 8
FIGURE A.8
• M (x 1)
NOTE: DO NOT OVERTIGHTEN DEFORMING THE LEG
TUBE.
Assemble leg component. Fasten with bolt (M) and nut (L).
A-4
INSTALLATION
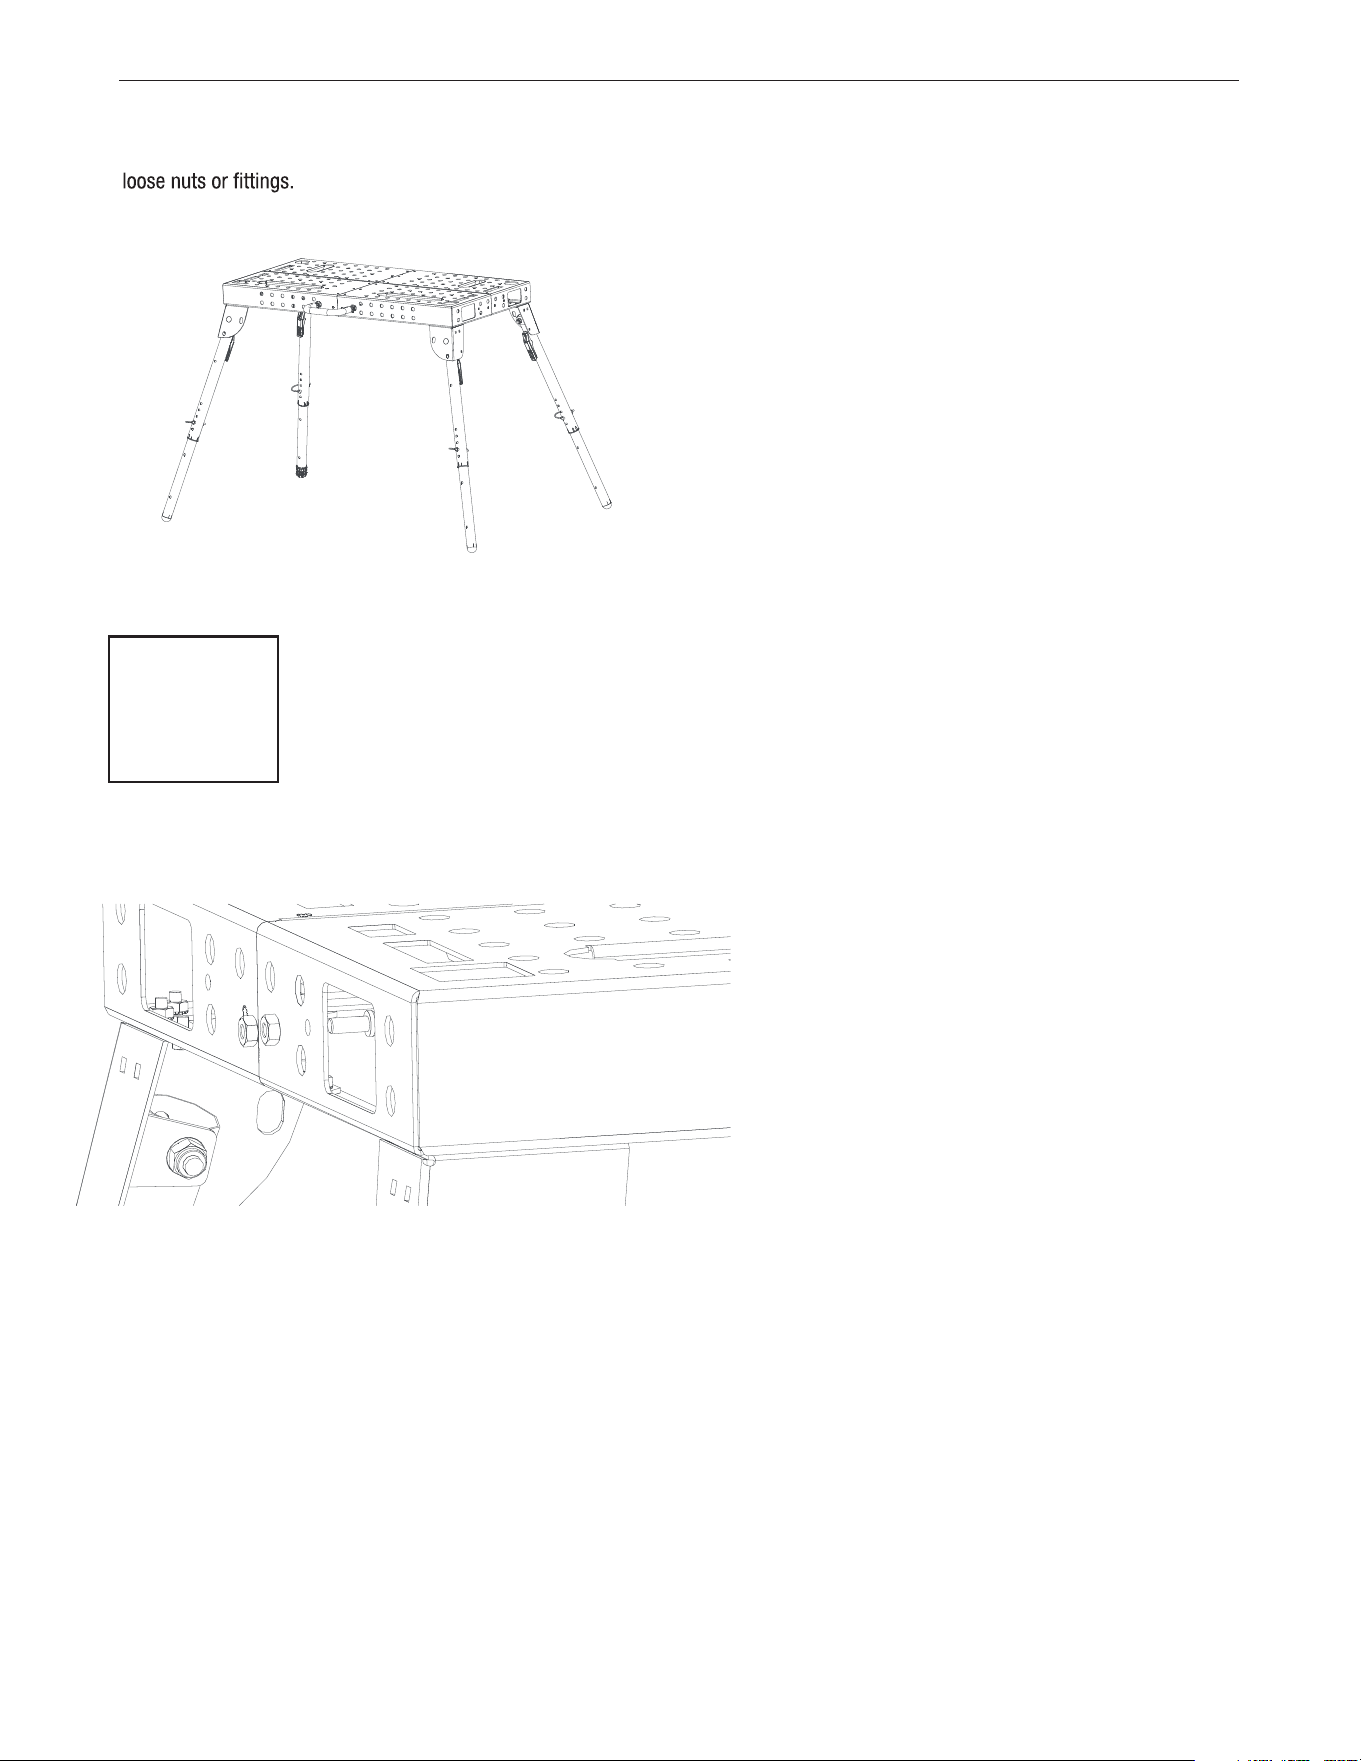
Parts needed
• J (x 1)
• G (x 6)
• H (x 4)
Step 9
Repeat step 8 with remaining three leg components.
PORTABLE WELDING TABLE
Parts needed
• Leg Assembly
(x 1)
• N (x 3)
Step 10
Align leg bracket bolt holes so legs pivot along long sides
of table. Mount table leg assembly onto table with carriage
bolts (O) and lock nuts (N). In the remaining circular hole,
fasten with self-tapping bolt (P). Tighten nuts to 50-56
in-lbs.
FIGURE A.9
• L (x 4)
• M (x 4)
• O (x 3)
• P (x 1)
Parts needed
• Leg Assembly
(x 3)
• N (x 9)
Step 11
Repeat step 10 with remaining three legs of table.
FIGURE A.10
• O (x 9)
• P (x 3)
Parts needed
• U (x 1)
• R (x 2)
Step 12
Fasten carrying handle onto long side of the table, or to short
side for use with optional wheel kit. Tighten bolts until handle
is secure.
FIGURE A.11
• S (x 2)
• Q (x 2)
A-5
INSTALLATION
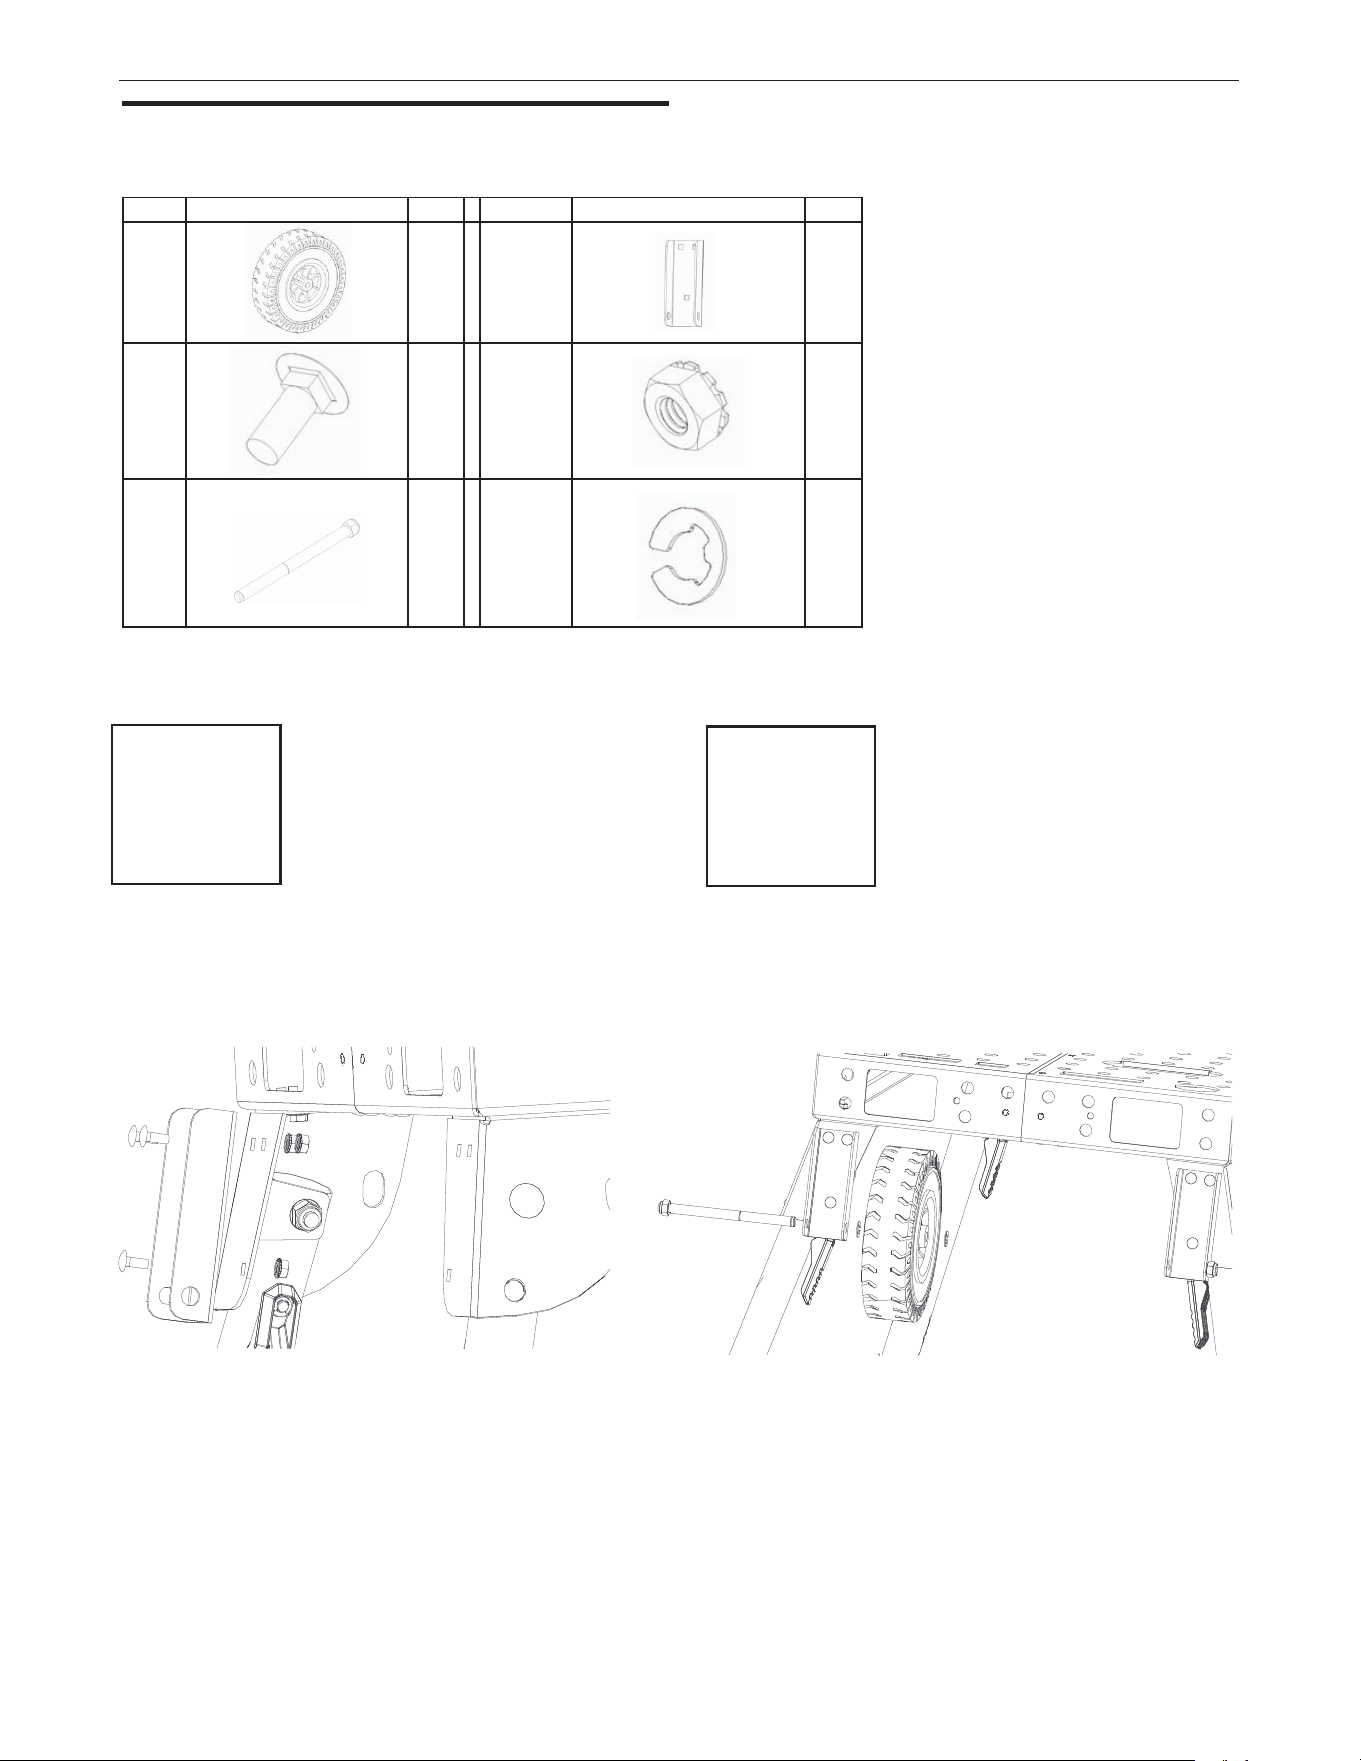
Step 13
Carefully turn table upright to stand onto legs. Check for
PORTABLE WELDING TABLE
Parts needed
• Q (x 1)
Step 14
Fasten earth ground stud assembly.
FIGURE A.13
• R (x 1)
• T (x 2)
FIGURE A.12
OPTIONAL WHEEL KIT ASSEMBLY
Wheel Kit Parts Key
A-6
INSTALLATION
PORTABLE WELDING TABLE
NAME PART QTY NAME PART QTY
A 2 B 2
C 6 D 6
2E F 4
Parts needed
• B (x 2)
• C (x 6)
• D (x 6)
Step 1
Attach bracket (B) with bolts (C) and nuts (D) onto leg bracket.
Repeat on adjacent side.
FIGURE A.14
Parts needed
• A (x 2)
• E (x 2)
• G (x 4)
Step 2
Insert axle (E) into mounting bracket and clip (G) in wheels (A).
Repeat on adjacent side.
FIGURE A.15
NOTE: Bracket holes with at sides to face out.
B-1
OPERATION
OPERATION
Safety Precautions
The manufacturer does not accept any liability for
damage to the product caused by a failure to follow the
cations made to equipment or by negligence during
installation, use, maintenance and repair of the product
mentioned in the safety pages of this document and any
corresponding accessories.
require additional safety instructions. Immediately
contact your supplier if you detect a potential hazard
when using the product.
The operation of portable welding table
equipment is affected by various factors
including proper use and positioning of the
equipment, maintenance of the equipment
involved. Worker exposure level should be checked upon
installation and periodically thereafter to be certain it is
within applicable federal, state and/or local regulations
and guidelines (i.e. OSHA PEL and ACGIH TLV limits in
the U.S.).
If the product is used in combination with products or machines
mentioned in the safety section of this manual, the safety
instructions in the documentation of these products also apply.
• Routinely inspect the product and check it for damage.
• Use common sense. Stay alert and keep your attention
to your
work. Do not use the product when you are under the
•
•
Never install the product in front of entrances and exits which
must be used by emergency services.
•
Make sure that the facility where the equipment is installed
•
accordance with applicable local, state and federal
regulations and guidelines, such as OSHA PEL.
FUMES and GASES can
be dangerous.
Welding may produce fumes and gases
hazardous to health. Avoid breathing these
fumes and gases.
When welding, keep your head out of the fume. Use
enough ventilation and/or exhaust at the arc to keep
fumes and gases away from the breathing zone. When
welding with electrodes which require special ventilation
such as stainless or hard facing (see instructions on
container or MSDS) or on lead or cadmium plated steel
and other metals or coatings which produce highly toxic
fumes, keep exposure as low as possible and within
applicable OSHA PEL and ACgIH TLv limits using local
in some circumstances, outdoors, a respirator may be
required. Additional precautions are also required when
welding on galvanized steel.
Fire hazard!
solids or liquids. Never use the product for
hydrochloric acid) or sharp particles.
WARNING
WARNING
WARNING
PORTABLE WELDING TABLE
hazardous chemicals, if recirculated, should be tested in
B-2
OPERATION
USERS
This product should only be used by authorized, trained and
MODIFICATIONS
manual, are not allowed. Modications will void the product
warranty.
PORTABLE WELDING TABLE
Modications of this product, other than those specied in this
OPERATION
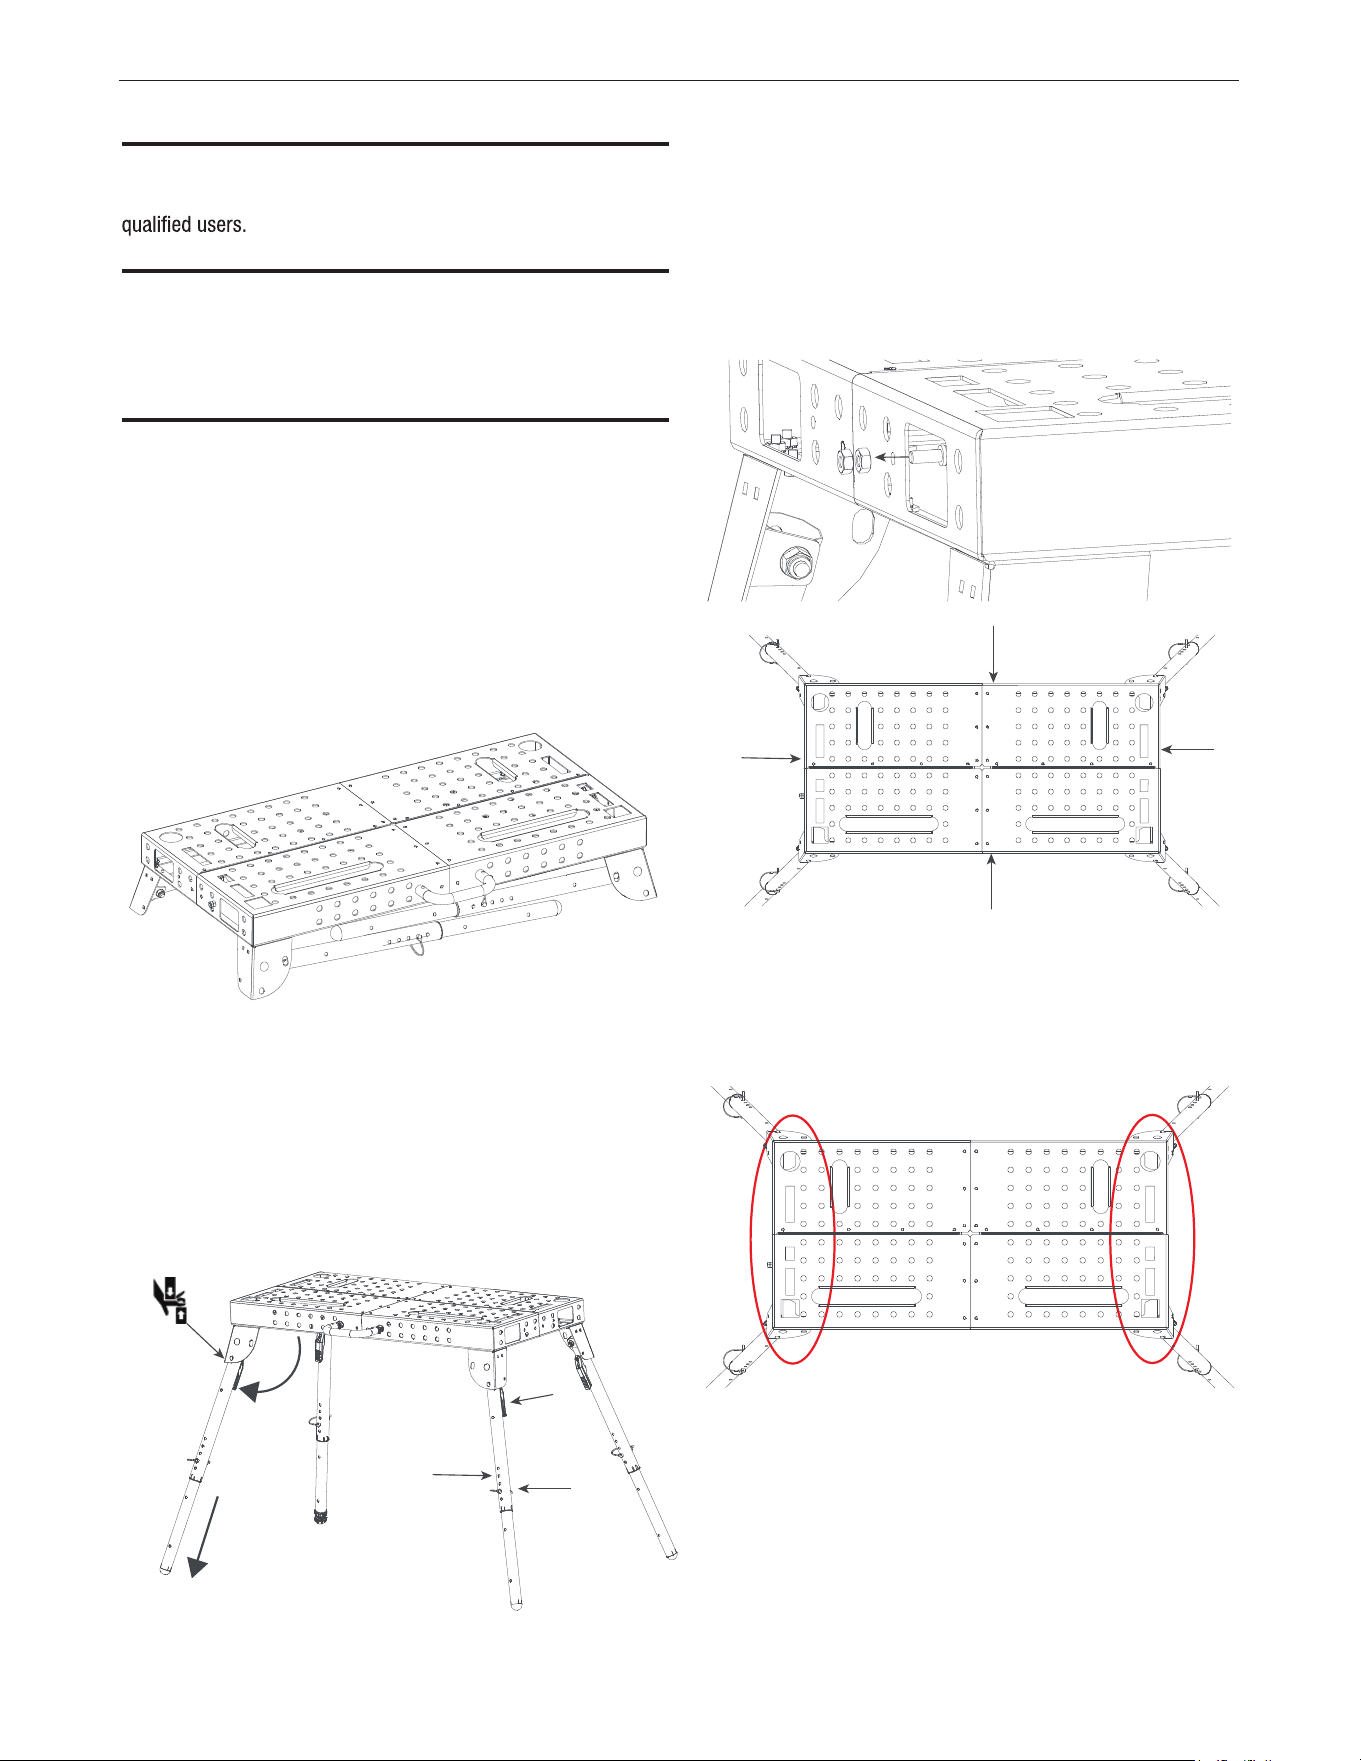
To set up the Portable Welding Table, swing the legs open by
pressing the levers located on the inside of each leg and pulling
loaded locking buttons engage. Ensure that buttons fully extend
through the leg bracket hole, locking the legs into the open
position.
SETUP
the leg toward the back side of the leg bracket until the spring-
CAUTION: Keep hands and ngers away from pinch points.
FIGURE B.1
The height of the table can be adjusted by pressing the spring-
loaded push buttons on the legs in while sliding the lower section
with the positioning holes xing the leg length. Ensure that the
push-buttons are fully extended through the upper leg tube.
Attach the safety pins that are included with the table as an
additional precaution.
of the leg up or down. The spring-loaded push buttons will engage
FIGURE B.2
The Portable Welding Table has an earth ground bolt with two
nuts that is to be used to connect the table to electrical earth
sides of the table. Attach a copper lead from the earth ground
stud to earth or building frame per local and national electrical
codes.
ground. The stud can be mounted in the middle of any of the four
FIGURE B.3
The Portable Welding Table has tool holder features along the
edges of both sides of the table. Typical welding tools can be
stored for easy access.
FIGURE B.4
B-3
OPERATION
PORTABLE WELDING TABLE
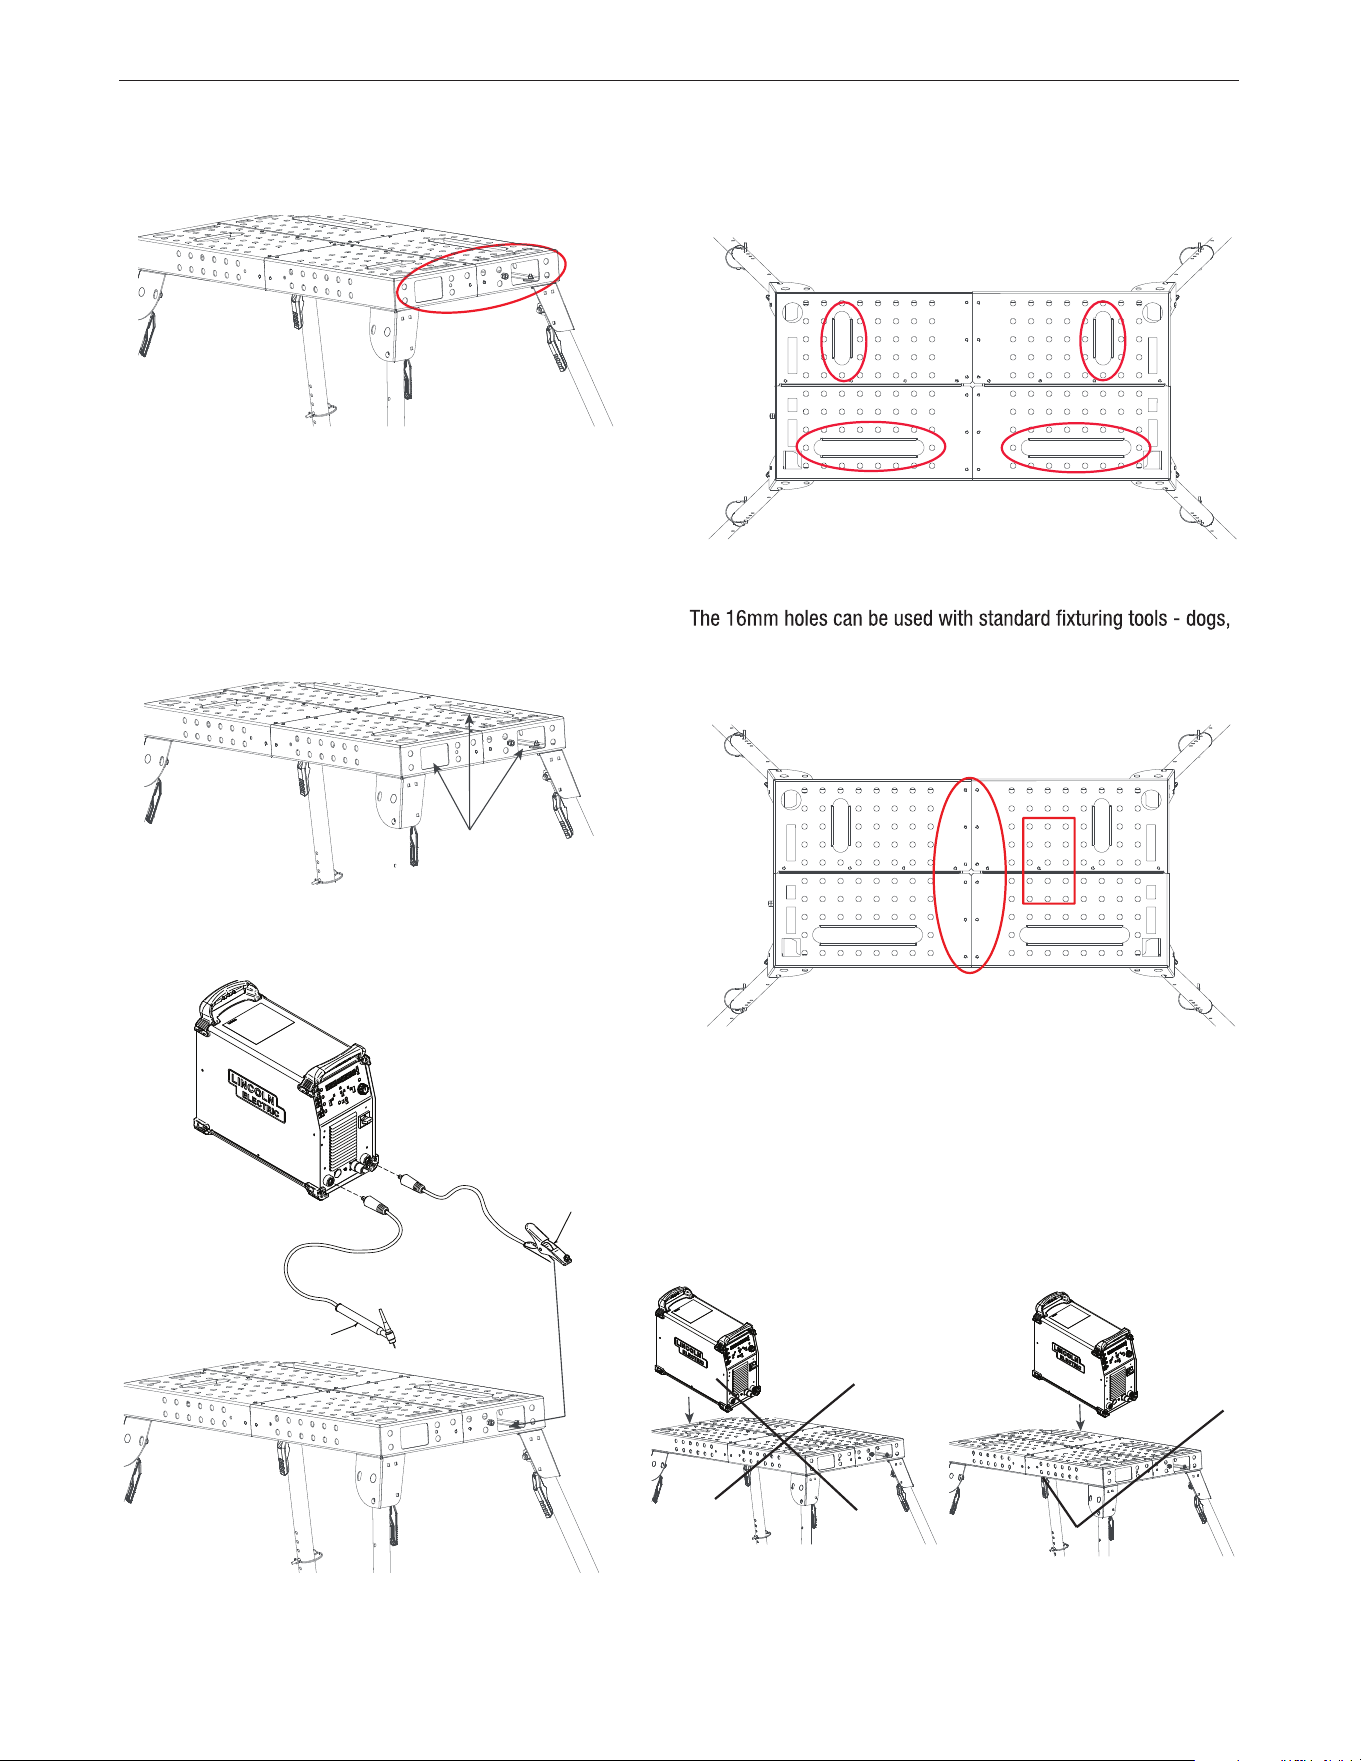
Attach the WORK cable clamp from a welder or plasma cutter to
the table close to where the welding or cutting is to occur. The
clamp.
USING THE TABLE
side windows or slots are to be used for connecting the WORK
FIGURE B.6
The slots on the tabletop can be used for clamping or for cutting
on the table surface without cutting the table itself.
FIGURE B.7
pins, clamps, etc. The solid area in the middle of the table can be
used for welding smaller pieces.
FIGURE B.8
Use the windows on the sides of the table to store clamps.
FIGURE B.5
WORK CLAMP
Gun Cable
CAUTION: Keep equipment or work away from the edges of the
table during use to prevent anything from falling off the table.
FIGURE B.9
B-4
OPERATION
PORTABLE WELDING TABLE
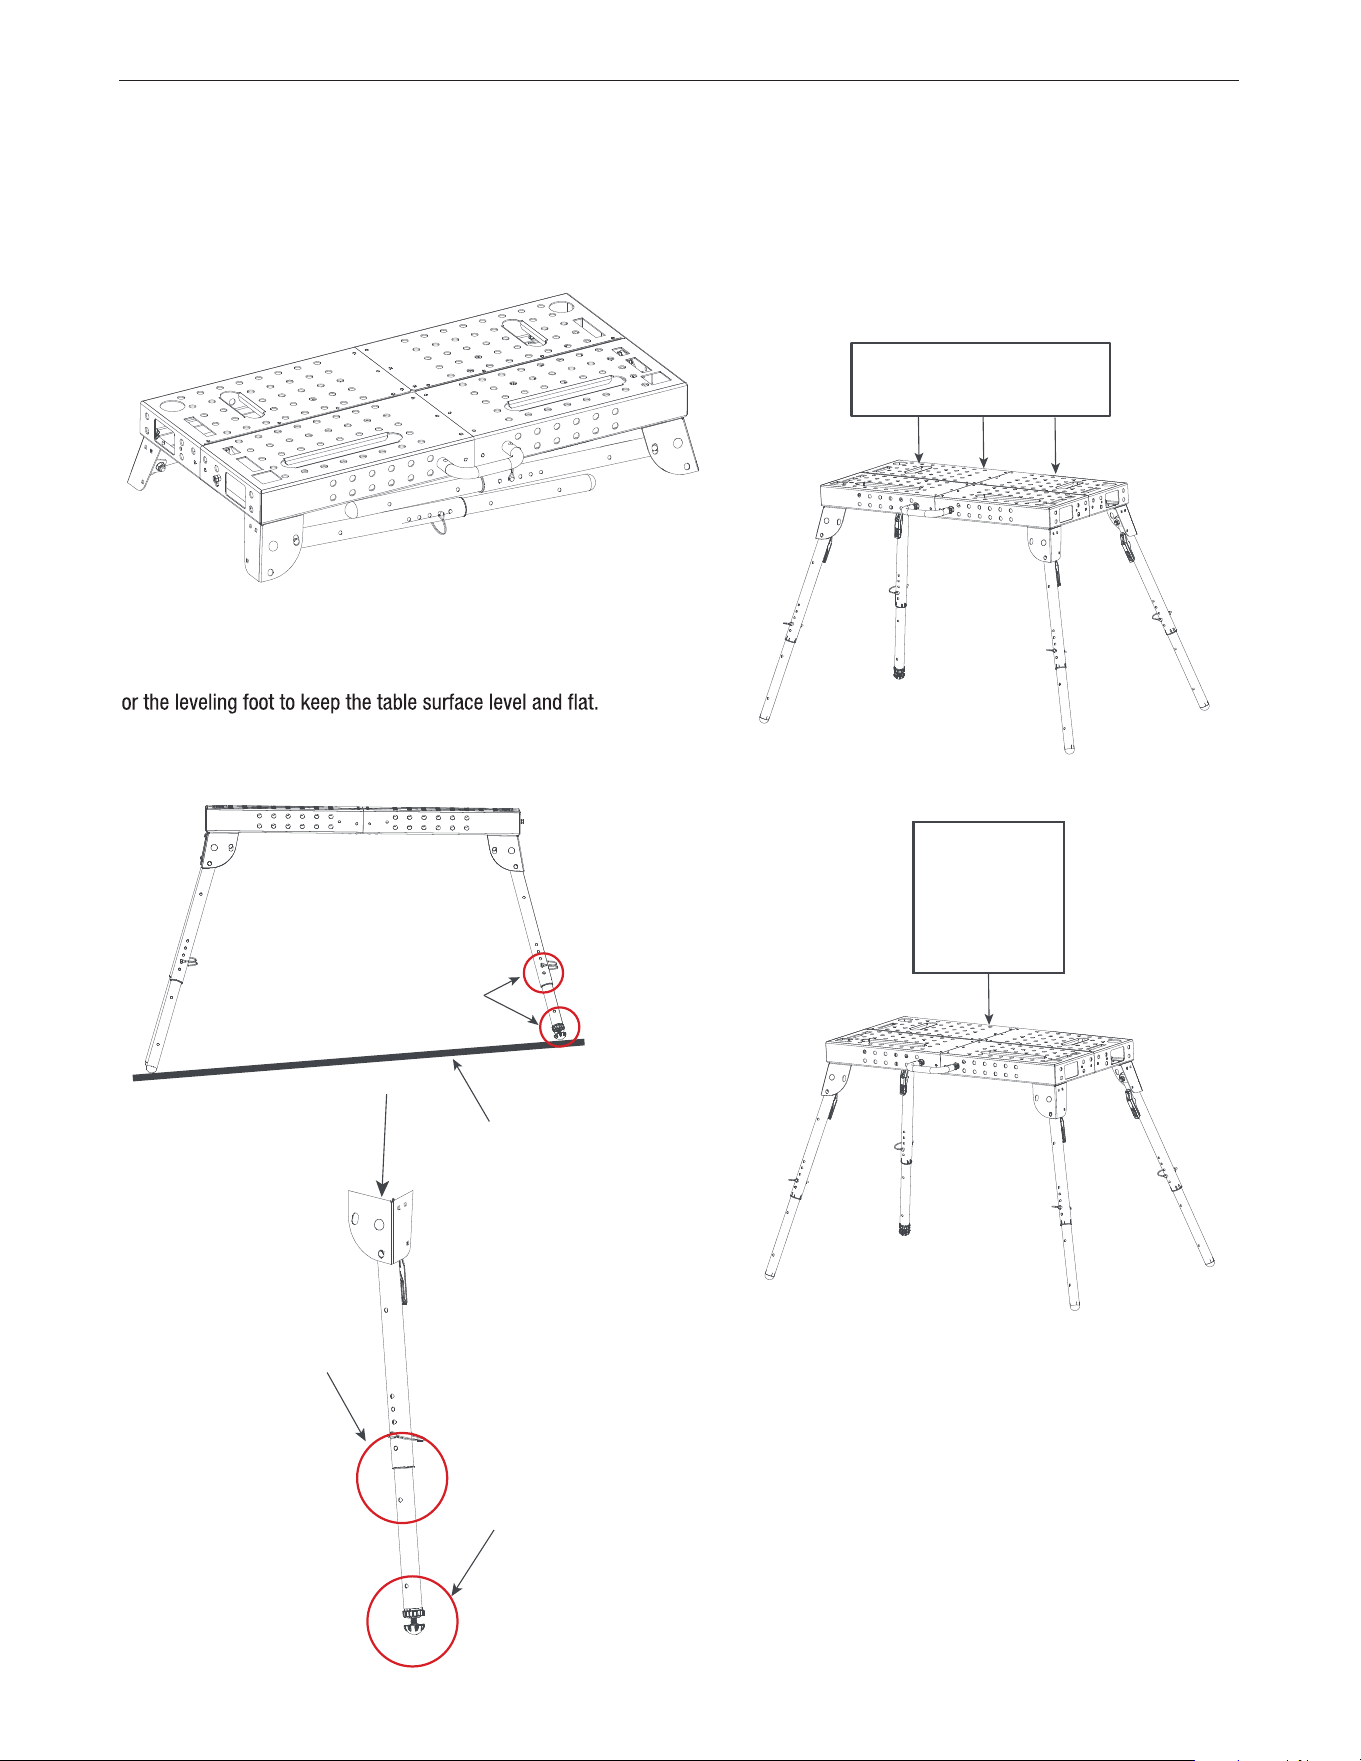
Always ensure that the Portable Welding Table is level during
use. If using on an inclined surface, adjust the leg length and/
FIGURE B.11
NOTE: DO NOT EXCEED THE MAXIMUM WEIGHT LIMITS OF THE
TABLE. For heavy weldments or loads, support the weight of
object or load located on the table with hoists or tethers.
FIGURE B.12
The Portable Welding Table can be folded down for storage
or transporting.
FIGURE B.10
The included handle can be mounted on any of the four
sides of the table.
Incline
• 500 LBS MAX, evenly dispersed.
• 350 LBS MAX, at any point on the table surface.
500 LBS MAX
350 LBS
MAX
See detail below
Leveling Foot
Adjustable Leg
Length Point
:$51,1*
$9,62'(
35(&$X&,21
$77(17,21
:$51X1*
$7(1d2
6SDQLVK
)UHQFK
*HUPDQ
3RUWXJXHVH
-DSDQHVH
&KLQHVH
.RUHDQ
$UDELF
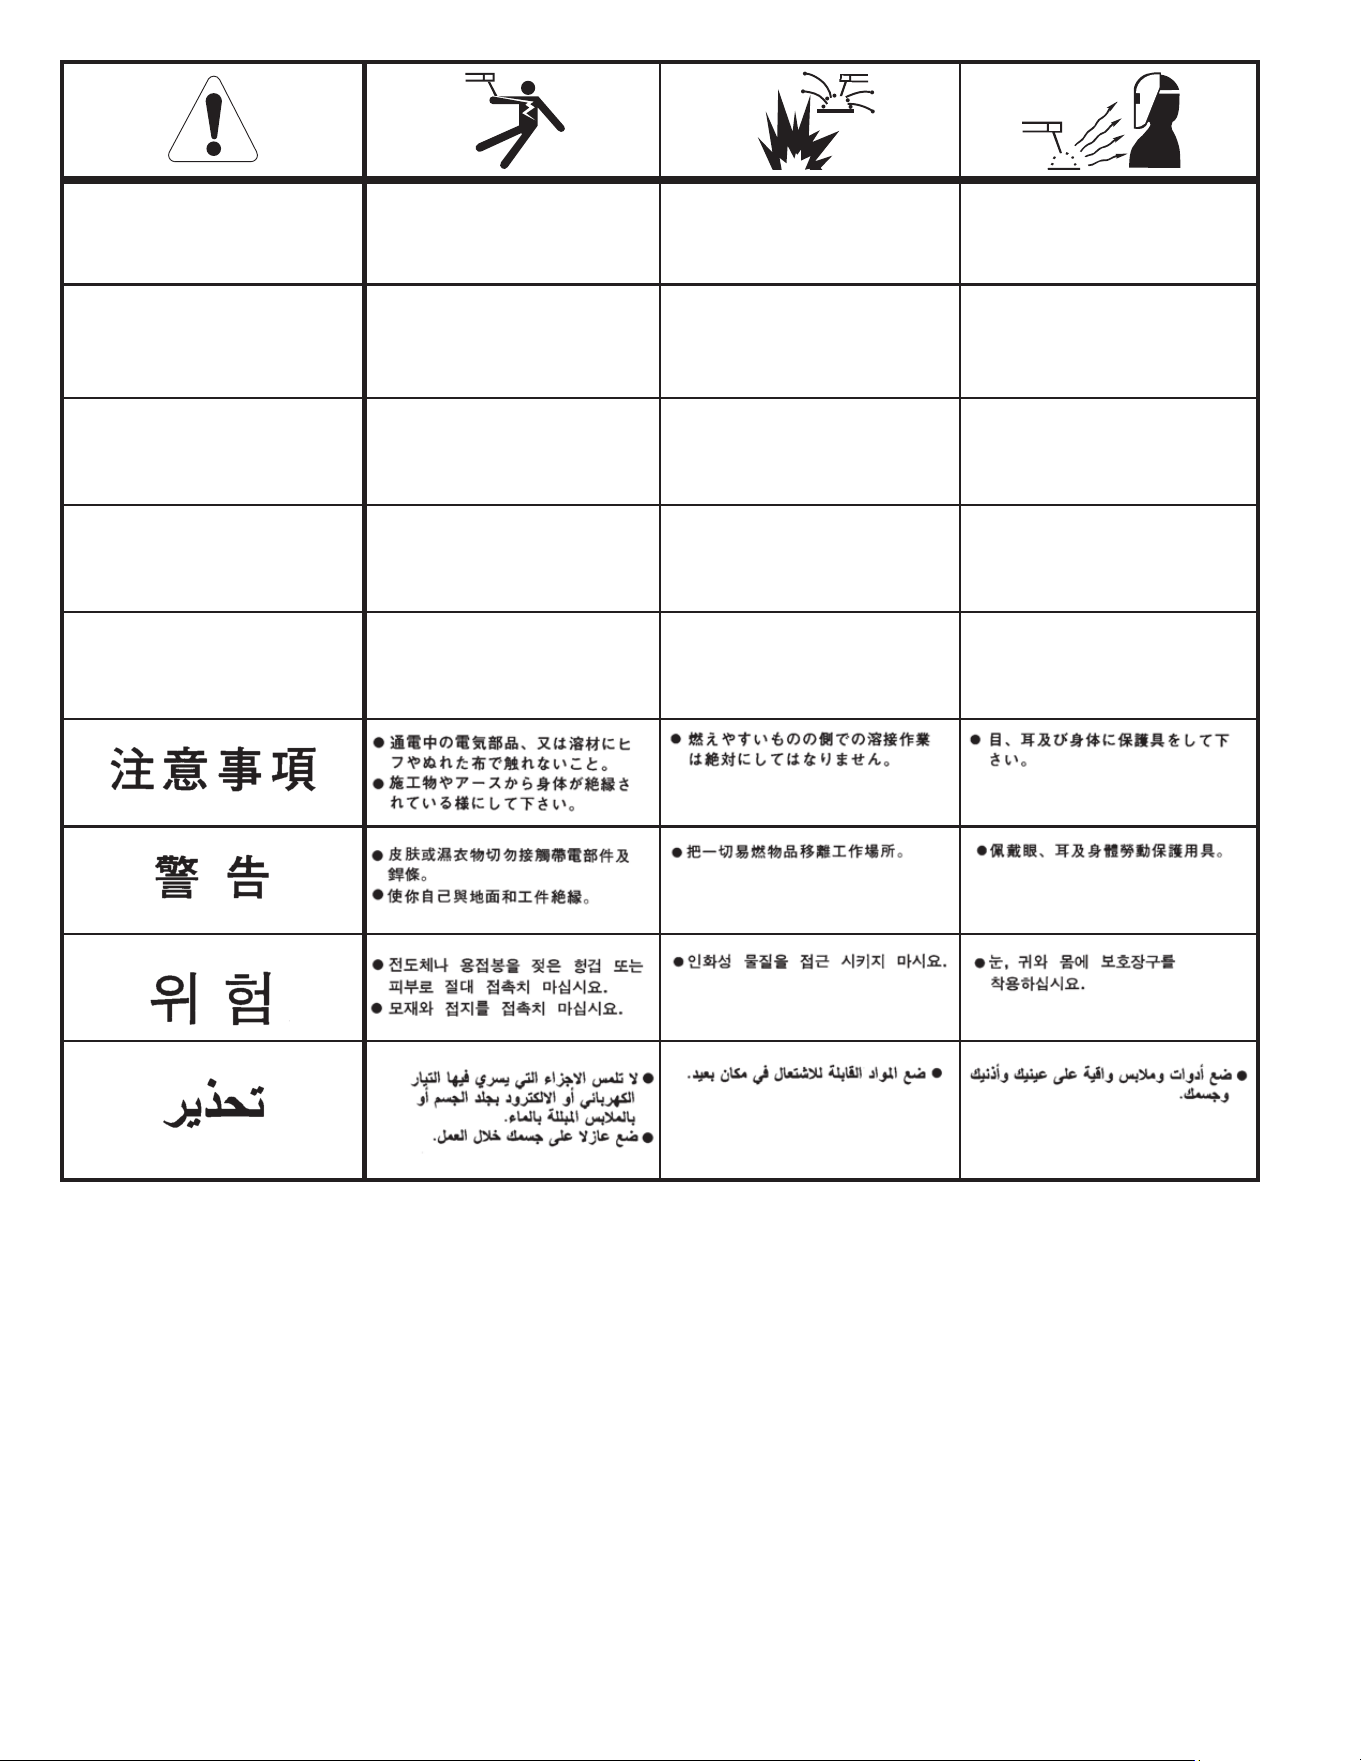
READ AND UNDERSTAND THE MANUFACTURER’S INSTRUCTION FOR THIS EQUIPMENT AND THE CONSUMABLES TO BE
USED AND FOLLOW YOUR EMPLOYER’S SAFETY PRACTICES.
SE RECOMIENDA LEER Y ENTENDER LAS INSTRUCCIONES DEL FABRICANTE PARA EL USO DE ESTE EQUIPO Y LOS
CONSUMIBLES QUE VA A UTILIZAR, SIGA LAS MEDIDAS DE SEGURIDAD DE SU SUPERVISOR.
LISEZ ET COMPRENEZ LES INSTRUCTIONS DU FABRICANT EN CE QUI REGARDE CET EQUIPMENT ET LES PRODUITS A
ETRE EMPLOYES ET SUIVEZ LES PROCEDURES DE SECURITE DE VOTRE EMPLOYEUR.
LESEN SIE UND BEFOLGEN SIE DIE BETRIEBSANLEITUNG DER ANLAGE UND DEN ELEKTRODENEINSATZ DES HER-
STELLERS. DIE UNFALLVERHÜTUNGSVORSCHRIFTEN DES ARBEITGEBERS SIND EBENFALLS ZU BEACHTEN.
Do not touch electrically live parts or
electrode with skin or wet clothing.
Insulate yourself from work and
ground.
No toque las partes o los electrodos
bajo carga con la piel o ropa moja-
da.
Aislese del trabajo y de la tierra.
Ne laissez ni la peau ni des vête-
ments mouillés entrer en contact
avec des pièces sous tension.
Isolez-vous du travail et de la terre.
Berühren Sie keine stromführenden
Teile oder Elektroden mit Ihrem
Körper oder feuchter Kleidung!
Isolieren Sie sich von den
Elektroden und dem Erdboden!
Não toque partes elétricas e elec-
trodos com a pele ou roupa molha-
da.
Isole-se da peça e terra.
Keep flammable materials away.
Mantenga el material combustible
fuera del área de trabajo.
Gardez à l’écart de tout matériel
inflammable.
Entfernen Sie brennbarres Material!
Mantenha inflamáveis bem guarda-
dos.
Wear eye, ear and body protection.
Protéjase los ojos, los oídos y el
cuerpo.
Protégez vos yeux, vos oreilles et
votre corps.
Tragen Sie Augen-, Ohren- und Kör-
perschutz!
Use proteção para a vista, ouvido e
corpo.
:$51,1*
$9,62'(
35(&$X&,21
$77(17,21
:$51X1*
$7(1d2
6SDQLVK
)UHQFK
*HUPDQ
3RUWXJXHVH
-DSDQHVH
&KLQHVH
.RUHDQ
$UDELF
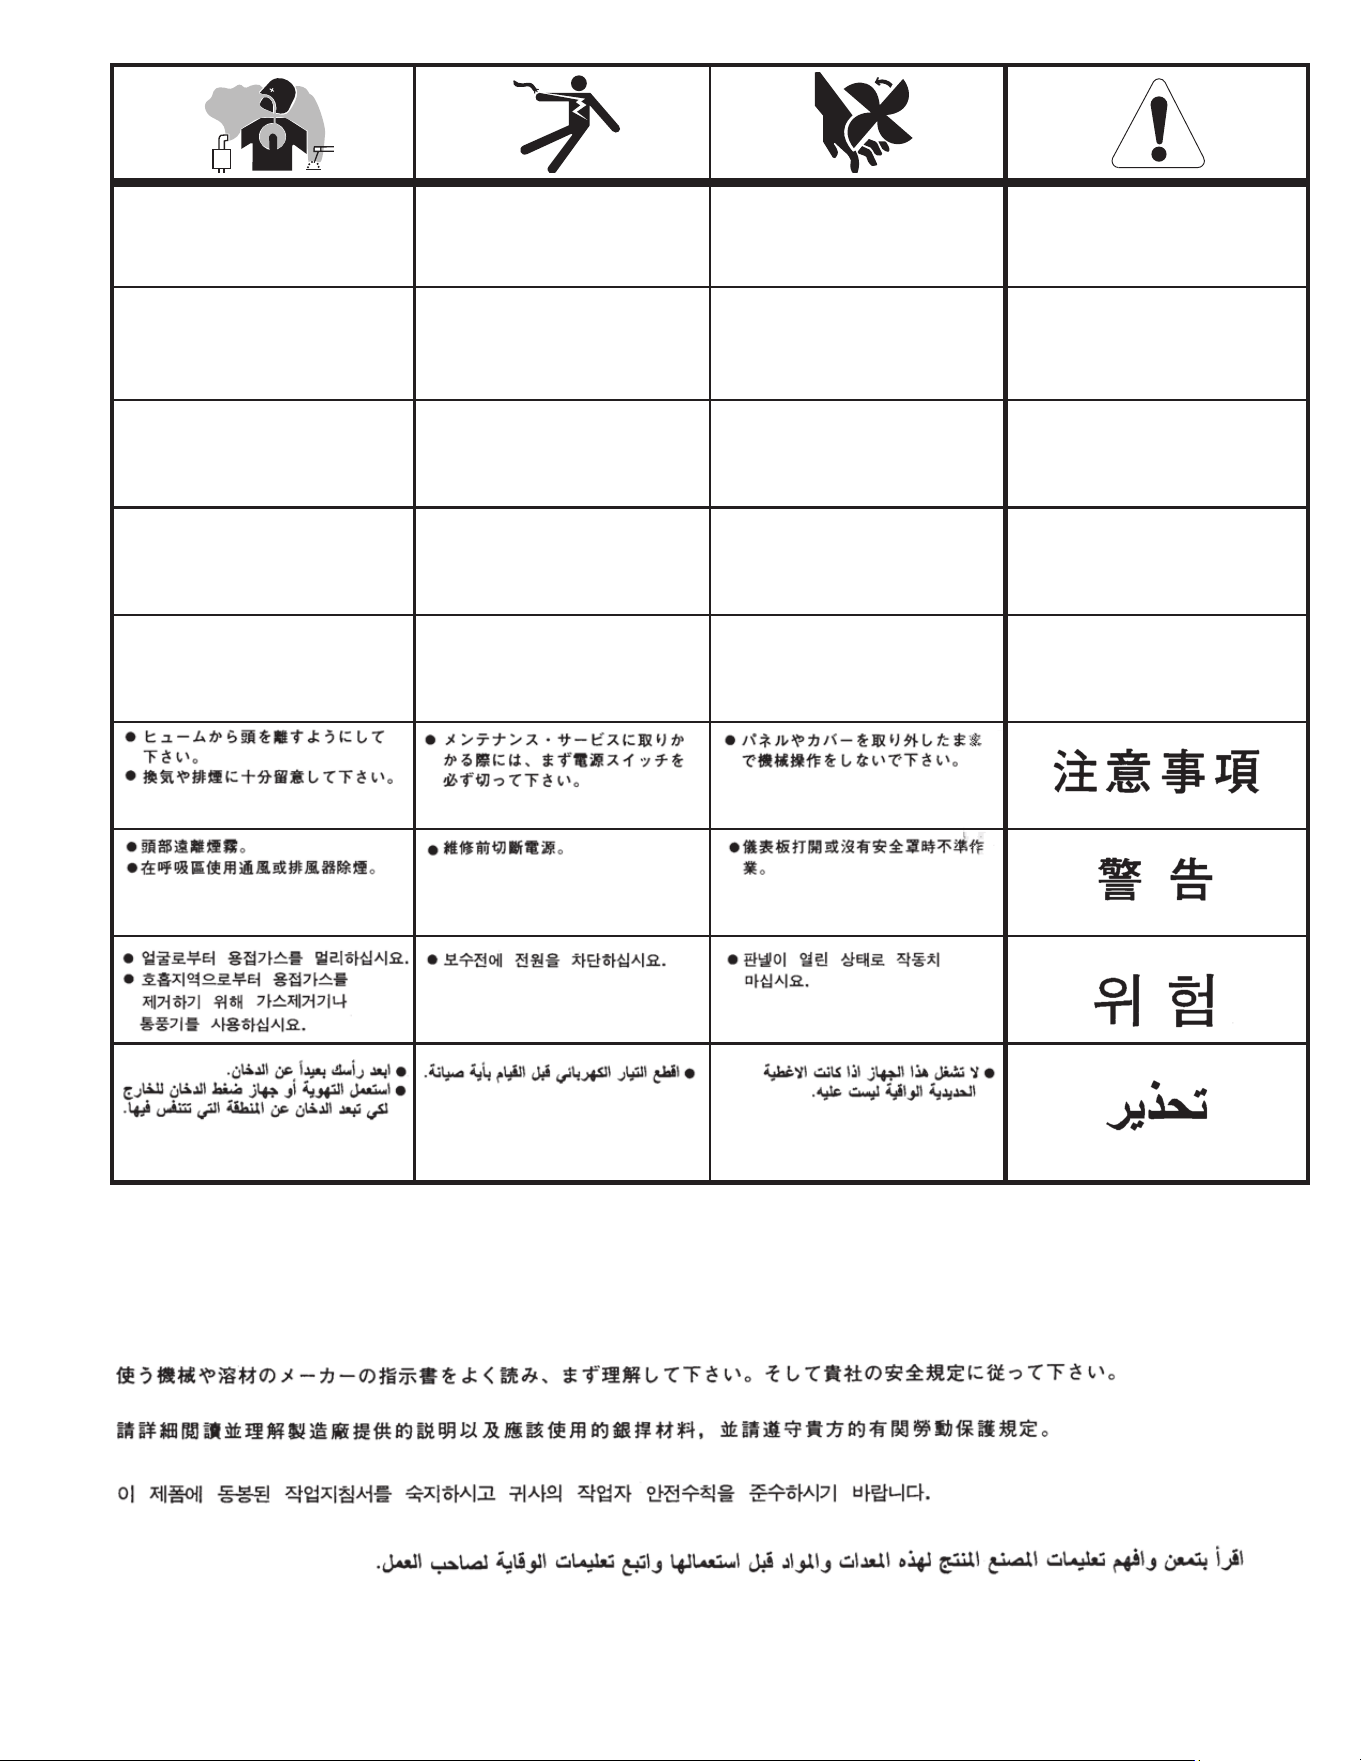
LEIA E COMPREENDA AS INSTRUÇÕES DO FABRICANTE PARA ESTE EQUIPAMENTO E AS PARTES DE USO, E SIGA AS
PRÁTICAS DE SEGURANÇA DO EMPREGADOR.
Keep your head out of fumes.
Use ventilation or exhaust to
remove fumes from breathing zone.
Los humos fuera de la zona de res-
piración.
Mantenga la cabeza fuera de los
humos. Utilice ventilación o
aspiración para gases.
Gardez la tête à l’écart des fumées.
Utilisez un ventilateur ou un aspira-
teur pour ôter les fumées des zones
de travail.
Vermeiden Sie das Einatmen von
Schweibrauch!
Sorgen Sie für gute Be- und
Entlüftung des Arbeitsplatzes!
Mantenha seu rosto da fumaça.
Use ventilação e exhaustão para
remover fumo da zona respiratória.
Turn power off before servicing.
Desconectar el cable de ali-
mentación de poder de la máquina
antes de iniciar cualquier servicio.
Débranchez le courant avant l’entre-
tien.
Strom vor Wartungsarbeiten
abschalten! (Netzstrom völlig öff-
nen; Maschine anhalten!)
Não opere com as tampas removidas.
Desligue a corrente antes de fazer
serviço.
Não toque as partes elétricas nuas.
Do not operate with panel open or
guards off.
No operar con panel abierto o
guardas quitadas.
N’opérez pas avec les panneaux
ouverts ou avec les dispositifs de
protection enlevés.
Anlage nie ohne Schutzgehäuse
oder Innenschutzverkleidung in
Betrieb setzen!
Mantenha-se afastado das partes
moventes.
Não opere com os paineis abertos
ou guardas removidas.

CUSTOMER ASSISTANCE POLICY
The business of The Lincoln Electric Company is manufacturing
and selling high quality welding equipment, consumables, and
cutting equipment. Our challenge is to meet the needs of our
customers and to exceed their expectations. On occasion,
purchasers may ask Lincoln Electric for advice or information
about their use of our products. We respond to our customers
based on the best information in our possession at that time.
Lincoln Electric is not in a position to warrant or guarantee such
advice, and assumes no liability, with respect to such information
or advice. We expressly disclaim any warranty of any kind,
including any warranty of fitness for any customer’s particular
purpose, with respect to such information or advice. As a matter
of practical consideration, we also cannot assume any respon-
sibility for updating or correcting any such information or advice
once it has been given, nor does the provision of information or
advice create, expand or alter any warranty with respect to the
sale of our products.
Lincoln Electric is a responsive manufacturer, but the selection
and use of specific products sold by Lincoln Electric is solely
within the control of, and remains the sole responsibility of the
customer. Many variables beyond the control of Lincoln Electric
affect the results obtained in applying these types of fabrication
methods and service requirements.
Subject to Change – This information is accurate to the best of our
knowledge at the time of printing. Please refer to
www.lincolnelectric.com for any updated information.
WELD FUME CONTROL EQUIPMENT
The operation of welding fume control equipment is affected by
various factors including proper use and positioning of the
equipment, maintenance of the equipment and the specific
welding procedure and application involved. Worker exposure
level should be checked upon installation and periodically
thereafter to be certain it is within applicable OSHA PEL and ACGIH
TLV limits.