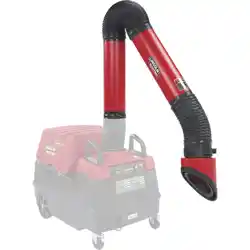
Operator’s Manual
Authorized Service and Distributor Locator:
www.lincolnelectric.com/locator
IM10344 | Issue D ate Feb - 20
© Lincoln Global, Inc. All Rights Reserved.
For use with extraction arms having Product Numbers:
For Wall Mount:
K1655-8 - LFA 3.1
(10FT) with Flange
K1655-9 - LFA 4.1
(13FT) with Flange
K1655-10 - LTA 2.0
Telescopic
K1655-14 - LTA 2.0-CW
Telescopic
K1655-12 - LFA 2.0
(6.5FT)
K1655-13 - LFA 4.1-LC
(13FT)
For Mobiex
®
:
K2633-5 - LFA 3.1
(10FT)
K2633-6 - LFA 3.1
(10FT) with Lamp Arc Sensor
K2633-7 - LFA 4.1
(13FT)
K2633-8 - LFA 4.1
(13FT) with Lamp Arc Sensor
Save for future reference
Date Purchased
Code: (ex: 10859)
Serial: (ex: U1060512345)
Fume Extraction Arms
THANK YOU FOR SELECTING
A QUALITY PRODUCT BY
LINCOLN ELEC TRIC.
PLEASE EXAMINE CARTON AND EQUIPMENT FOR
DAMAGE IMMEDIATELY
When this equipment is shipped, title passes to the purchaser
upon receipt by the carrier. Consequently, claims for material
damaged in shipment must be made by the purchaser against the
transportation company at the time the shipment is received.
SAFETY DEPENDS ON YOU
Lincoln arc welding and cutting equipment is designed and built
with safety in mind. However, your overall safety can be increased
by proper installation ... and thoughtful operation on your part.
DO NOT INSTALL, OPERATE OR REPAIR THIS EQUIPMENT
WITHOUT READING THIS MANUAL AND THE SAFETY
PRECAUTIONS CONTAINED THROUGHOUT. And, most importantly,
think before you act and be careful.
This statement appears where the information must be followed
exactly to avoid serious personal injury or loss of life.
This statement appears where the information must be followed
to avoid minor personal injury or damage to this equipment.
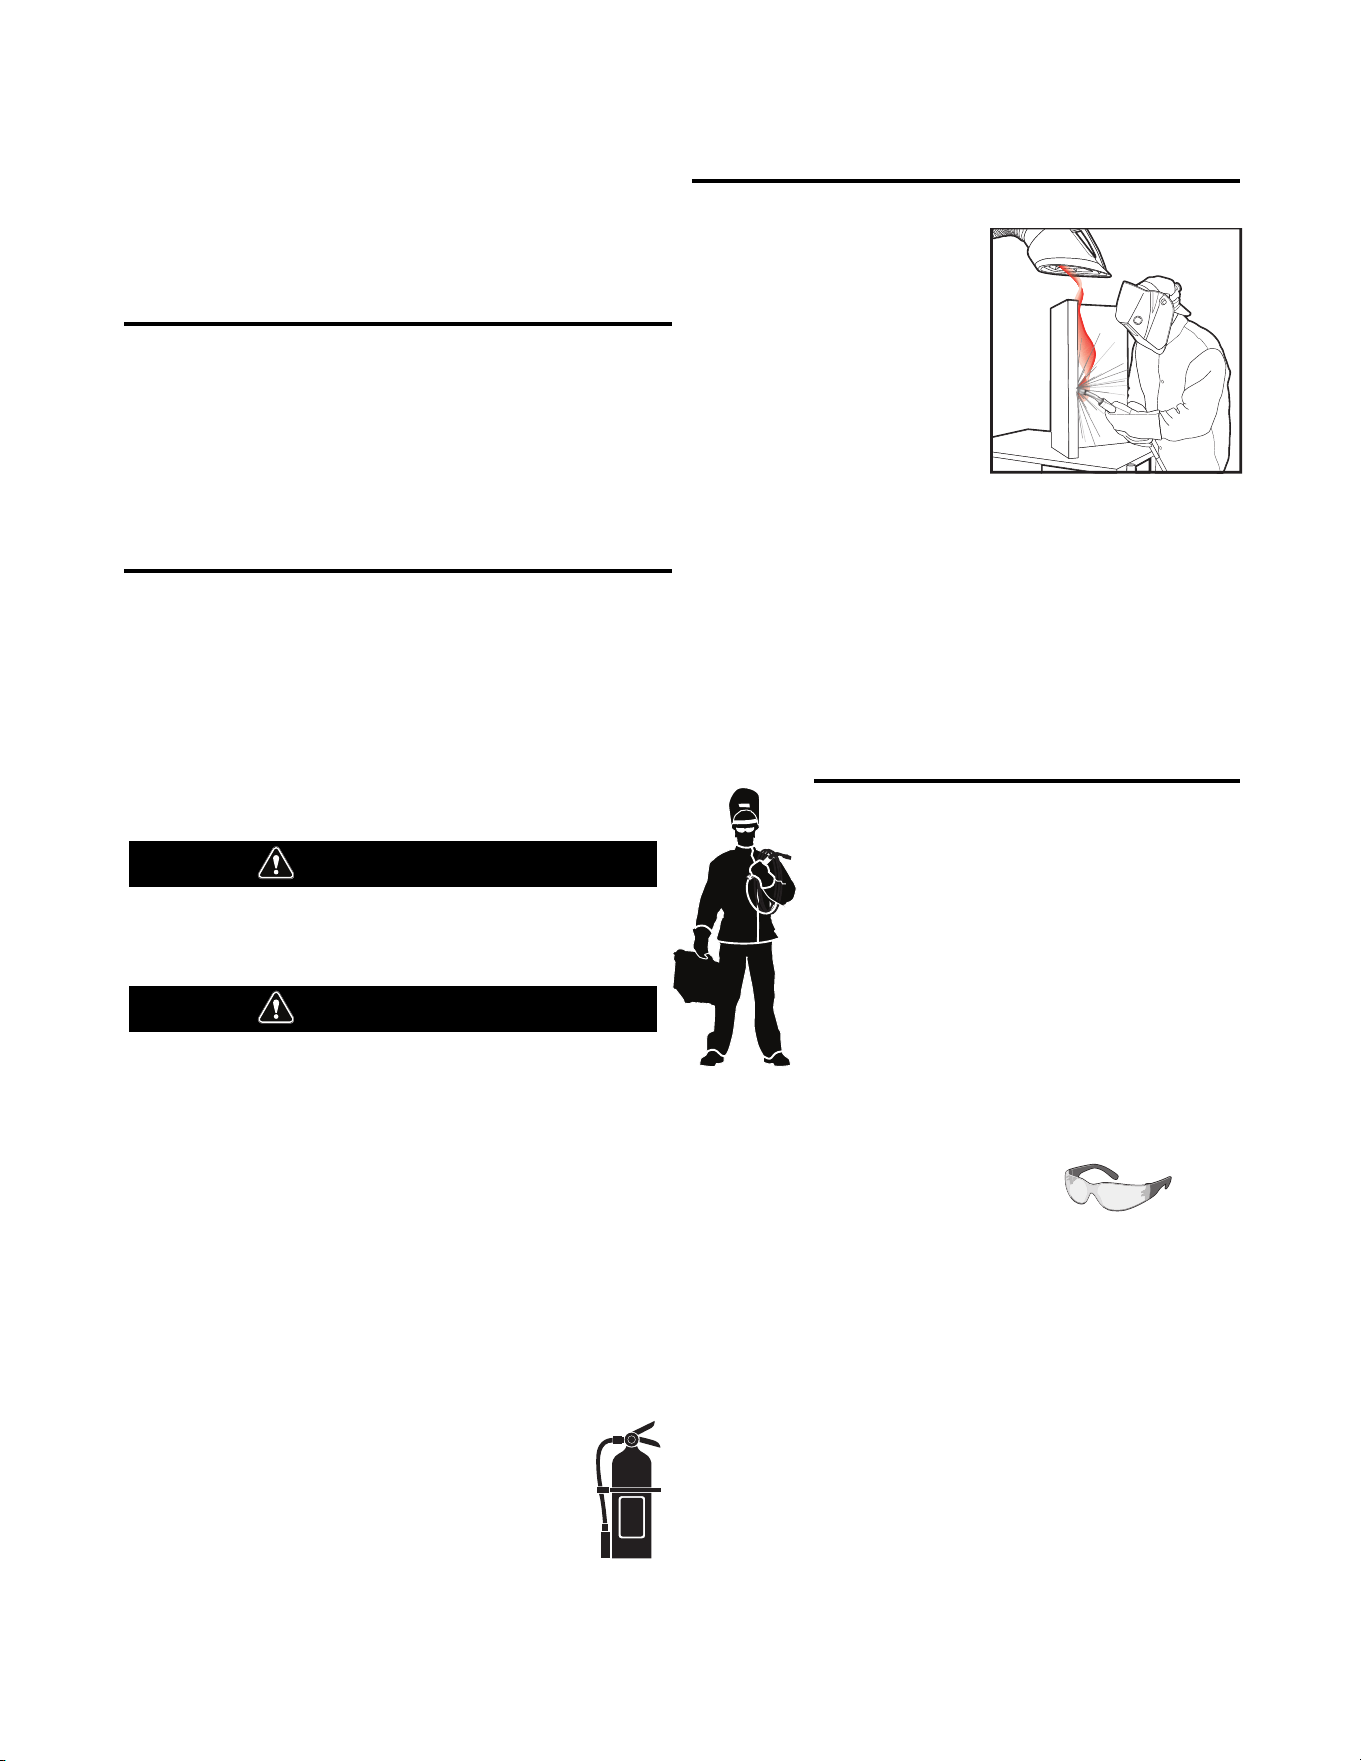
KEEP YOUR HEAD OUT OF THE FUMES.
DON’T get too close to the arc.
Use corrective lenses if necessary
to stay a reasonable distance
away from the arc.
READ and obey the Safety Data
Sheet (SDS) and the warning label
that appears on all containers of
welding materials.
USE ENOUGH VENTILATION or
exhaust at the arc, or both, to
keep the fumes and gases from
your breathing zone and the general area.
IN A LARGE ROOM OR OUTDOORS, natural ventilation may be
adequate if you keep your head out of the fumes (See below).
USE NATURAL DRAFTS or fans to keep the fumes away
from your face.
If you de velop unusual symptoms, see your supervisor.
Perhaps the welding atmosphere and ventilation system
should be checked.
WEAR CORRECT EYE, EAR &
BODY PROTECTION
PROTECT your eyes and face with welding helmet
properly fitted and with proper grade of filter plate
(See ANSI Z49.1).
PROTECT your body from welding spatter and arc
flash with protective clothing including woolen
clothing, flame-proof apron and gloves, leather
leggings, and high boots.
PROTECT others from splatter, flash, and glare
with protective screens or barriers.
IN SOME AREAS, protection from noise may be appropriate.
BE SURE protective equipment is in good condition.
Also, wear safety glasses in work area
AT ALL TIMES.
SPECIAL SITUATIONS
DO NOT WELD OR CUT containers or materials which previously
had been in contact with hazardous substances unless they are
properly cleaned. This is extremely dangerous.
DO NOT WELD OR CUT painted or plated parts unless special
precautions with ventilation have been taken. They can release
highly toxic fumes or gases.
Additional precautionary measures
PROTECT compressed gas cylinders from excessive heat,
mechanical shocks, and arcs; fasten cylinders so they cannot fall.
BE SURE cylinders are never grounded or part of an
electrical circuit.
REMOVE all potential fire hazards from welding area.
ALWAYS HAVE FIRE FIGHTING EQUIPMENT READY FOR
IMMEDIATE USE AND KNOW HOW TO USE IT.
WARNING
CAUTION
Safety 01 of 04 - 5/16/2018
SECTION A:
WARNINGS
CALIFORNIA PROPOSITION 65 WARNINGS
WARNING: Breathing diesel engine exhaust
exposes you to chemicals known to the State
of California to cause cancer and birth defects,
or other reproductive harm.
• Always start and operate the engine in a
well-ventilated area.
• If in an exposed area, vent the exhaust to the outside.
• Do not modify or tamper with the exhaust system.
• Do not idle the engine except as necessary.
For more information go to
www.P65 warnings.ca.gov/diesel
WARNING: This product, when used for welding or
cutting, produces fumes or gases which contain
chemicals known to the State of California to cause
birth defects and, in some cases, cancer. (California
Health & Safety Code § 25249.5 et seq.)
WARNING: Cancer and Reproductive Harm
www.P65warnings.ca.gov
ARC WELDING CAN BE HAZARDOUS. PROTECT
YOURSELF AND OTHERS FROM POSSIBLE SERIOUS
INJURY OR DEATH. KEEP CHILDREN AWAY.
PACEMAKER WEARERS SHOULD CONSULT WITH
THEIR DOCTOR BEFORE OPERATING.
Read and understand the following safety highlights. For
additional safety information, it is strongly recommended
that you purchase a copy of “Safety in Welding & Cutting -
ANSI Standard Z49.1” from the American Welding Society,
P.O. Box 351040, Miami, Florida 33135 or CSA Standard
W117.2. A Free copy of “Arc Welding Safety” booklet E205
is available from the Lincoln Electric Company, 22801
St. Clair Avenue, Cleveland, Ohio 44117-1199.
BE SURE THAT ALL INSTALLATION, OPERATION,
MAINTENANCE AND REPAIR PROCEDURES ARE
PERFORMED ONLY BY QUALIFIED INDIVIDUALS.
FOR ENGINE POWERED
EQUIPMENT.
1.a. Turn the engine off before troubleshooting
and maintenance work unless the
maintenance work requires it to be running.
1.b. Operate engines in open, well-ventilated areas or vent the engine
exhaust fumes outdoors.
1.c. Do not add the fuel near an open ame welding
arc or when the engine is running. Stop the
engine and allow it to cool before refueling to
prevent spilled fuel from vaporizing on contact
with hot engine parts and igniting. Do not spill fuel when lling
tank. If fuel is spilled, wipe it up and do not start engine until
fumes have been eliminated.
1.d. Keep all equipment safety guards, covers
and devices in position and in good repair.
Keep hands, hair, clothing and tools away
from V-belts, gears, fans and all other
moving parts when starting, operating or
repairing equipment.
1.e. In some cases it may be necessary to remove safety guards to
perform required maintenance. Remove guards only when
necessary and replace them when the maintenance requiring
their removal is complete. Always use the greatest care when
working near moving parts.
1.f. Do not put your hands near the engine fan. Do not attempt to
override the governor or idler by pushing on the throttle control
rods while the engine is running.
1.g. To prevent accidentally starting gasoline engines while turning
the engine or welding generator during maintenance work,
disconnect the spark plug wires, distributor cap or magneto wire
as appropriate.
1.h. To avoid scalding, do not remove the radiator
pressure cap when the engine is
hot.
ELECTRIC AND
MAGNETIC FIELDS MAY
BE DANGEROUS
2.a. Electric current owing through any conductor
causes localized Electric and Magnetic Fields (EMF).
Welding current creates EMF elds around welding cables
and welding machines
2.b. EMF elds may interfere with some pacemakers, and
welders having a pacemaker should consult their physician
before welding.
2.c. Exposure to EMF elds in welding may have other health effects
which are now not known.
2.d. All welders should use the following procedures in order to
minimize exposure to EMF elds from the welding circuit:
2.d.1. Route the electrode and work cables together - Secure
them with tape when possible.
2.d.2. Never coil the electrode lead around your body.
2.d.3. Do not place your body between the electrode and work
cables. If the electrode cable is on your right side, the
work cable should also be on your right side.
2.d.4. Connect the work cable to the workpiece as close as pos-
sible to the area being welded.
2.d.5. Do not work next to welding power source.
SAFETY
Safety 02 of 04 - 5/16/2018
ELECTRIC SHOCK
CAN KILL.
3.a. The electrode and work (or ground) circuits are
electrically “hot” when the welder is on. Do
not touch these “hot” parts with your bare skin or wet clothing.
Wear dry, hole-free gloves to insulate hands.
3.b. Insulate yourself from work and ground using dry insulation.
Make certain the insulation is large enough to cover your full area
of physical contact with work and ground.
In addition to the normal safety precautions, if
welding must be performed under electrically
hazardous conditions (in damp locations or while
wearing wet clothing; on metal structures such as
floors, gratings or scaffolds; when in cramped
positions such as sitting, kneeling or lying, if there
is a high risk of unavoidable or accidental contact
with the workpiece or ground) use the following
equipment:
• Semiautomatic DC Constant Voltage (Wire) Welder.
• DC Manual (Stick) Welder.
• AC Welder with Reduced Voltage Control.
3.c. In semiautomatic or automatic wire welding, the electrode,
electrode reel, welding head, nozzle or semiautomatic welding
gun are also electrically “hot”.
3.d. Always be sure the work cable makes a good electrical
connection with the metal being welded. The connection should
be as close as possible to the area being welded.
3.e. Ground the work or metal to be welded to a good electrical (earth)
ground.
3.f. Maintain the electrode holder, work clamp, welding cable and
welding machine in good, safe operating condition. Replace
damaged insulation.
3.g. Never dip the electrode in water for cooling.
3.h. Never simultaneously touch electrically “hot” parts of electrode
holders connected to two welders because voltage
between the
two can be the total of the open circuit voltage of both
welders.
3.i. When working above floor level, use a safety belt to protect
yourself from a fall should you get a shock.
3.j. Also see It ems 6.c. and 8.
ARC RAYS CAN BURN.
4.a. Use a shield with the proper filter and cover plates to protect your
eyes from sparks and the rays of the arc when welding or
observing open arc welding. Headshield and filter lens should
conform to ANSI Z87. I standards.
4.b. Use suitable clothing made from durable flame-resistant material
to protect your skin and that of your helpers from the arc rays.
4.c. Protect other nearby personnel with suitable, non-flammable
screening and/or warn them not to watch the arc nor expose
themselves to the arc rays or to hot spatter or metal.
FUMES AND GASES
CAN BE DANGEROUS.
5.a. Welding may produce fumes and gases
hazardous to health. Avoid breathing these
fumes and gases. When welding, keep your head out of the fume.
Use enough ventilation and/or exhaust at the arc to keep fumes
and gases away from the breathing zone. When welding
hardfacing (see instructions on container or SDS)
or on lead or cadmium plated steel and other
metals or coatings which produce highly toxic
fumes, keep exposure as low as possible and
within applicable OSHA PEL and ACGIH TLV limits
using local exhaust or mechanical ventilation
unless exposure assessments indicate otherwise.
In confined spaces or in some circumstances,
outdoors, a respirator may also be required.
Additional precautions are also required when
welding
on galvanized steel.
5. b. The operation of welding fume control equipment is affected by
various factors including proper use and positioning of the
equipment, maintenance of the equipment and the specific
welding procedure and application involved. Worker exposure
level should be checked upon installation and periodically
thereafter to be certain it is within applicable OSHA PEL and
ACGIH TLV limits.
5.c. Do not weld in locations near chlorinated hydrocarbon vapors
coming from degreasing, cleaning or spraying operations. The
heat and rays of the arc can react with solvent vapors to form
phosgene, a highly toxic gas, and other irritating products.
5.d. Shielding gases used for arc welding can displace air and
cause
injury or death. Always use enough ventilation, especially in
confined areas, to insure breathing air is safe.
5.e. Read and understand the manufacturer’s instructions for this
equipment and the consumables to be used, including the
Safety Data Sheet (SDS) and follow your employer’s safety
practices. SDS forms are available from your welding
distributor or from the manufacturer.
5.f. Also see item 1.b.
SAFETY
Safety 03 of 04 - 5/16/2018
WELDING AND CUTTING
SPARKS CAN CAUSE
FIRE OR EXPLOSION.
6.a. Remove fire hazards from the welding area. If
this is not possible, cover them to prevent the welding sparks
from starting a fire. Remember that welding sparks and hot
materials from welding can easily go through small cracks and
openings to adjacent areas. Avoid welding near hydraulic lines.
Have a fire extinguisher readily available.
6.b. Where compressed gases are to be used at the job site, special
precautions should be used to prevent hazardous situations.
Refer to “Safety in Welding and Cutting” (ANSI Standard Z49.1)
and the operating information for the equipment being used.
6.c. When not welding, make certain no part of the electrode circuit is
touching the work or ground. Accidental contact can cause
overheating and create a fire hazard.
6.d. Do not heat, cut or weld tanks, drums or containers until the
proper steps have been taken to insure that such procedures
will not cause flammable or toxic vapors from substances inside.
They can cause an explosion even though they have been
“cleaned”. For information, purchase “Recommended Safe
Practices for the Preparation for Welding and Cutting of
Containers and Piping That Have Held Hazardous Substances”,
AWS F4.1 from the American Welding Society
(see address above).
6.e. Vent hollow castings or containers before heating, cutting or
welding. They may explode.
6.f. Sparks and spatter are thrown from the welding arc. Wear oil free
protective garments such as leather gloves, heavy shirt, cuffless
trousers, high shoes and a cap over your hair. Wear ear plugs
when welding out of position or in confined places. Always wear
safety glasses with side shields when in a welding area.
6.g. Connect the work cable to the work as close to the welding area
as practical. Work cables connected to the building framework or
other locations away from the welding area increase the
possibility of the welding current passing through lifting chains,
crane cables or other alternate circuits. This can create fire
hazards or overheat lifting chains or cables until they fail.
6.h. Also see item 1.c.
6.I. Read and follow NFPA 51B “Standard for Fire Prevention During
Welding, Cutting and Other Hot Work”, available from NFPA, 1
Batterymarch Park, PO box 9101, Quincy, MA 022690-9101.
6.j. Do not use a welding power source for pipe thawing.
CYLINDER MAY EXPLODE IF
DAMAGED.
7.a. Use only compressed gas cylinders containing
the correct shielding gas for the process used
and properly operating regulators designed for
the gas and pressure used. All hoses, fittings,
etc. should be suitable for the application and
maintained in good condition.
7.b. Always keep cylinders in an upright position securely chained to
an undercarriage or fixed support.
7.c. Cylinders should be located:
• Away from areas where they may be struck or subjected
to physical damage.
• A safe distance from arc welding or cutting operations
and any other source of heat, sparks, or flame.
7.d. Never allow the electrode, electrode holder or any other
electrically “hot” parts to touch a cylinder.
7.e. Keep your head and face away from the cylinder valve outlet
when opening the cylinder valve.
7.f. Valve protection caps should always be in place and hand tight
except when the cylinder is in use or connected for use.
7.g. Read and follow the instructions on compressed gas cylinders,
associated equipment, and CGA publication P-l, “Precautions for
Safe Handling of Compressed Gases in Cylinders,” available from
the Compressed Gas Association, 14501 George Carter Way
Chantilly, VA 20151.
FOR ELECTRICALLY
POWERED EQUIPMENT.
8.a. Turn off input power using the disconnect
switch at the fuse box before working on
the equipment.
8.b. Install equipment in accordance with the U.S. National Electrical
Code, all local codes and the manufacturer’s recommendations.
8.c. Ground the equipment in accordance with the U.S. National
Electrical Code and the manufacturer’s recommendations.
Refer to
http://www.lincolnelectric.com/safety
for additional safety information.
SAFETY
Safety 04 of 04 - 5/16/2018

2
SAFETY
FUME EXTRACTION ARMS
As a rule of thumb, for many mild steel electrode, if the air is visibly
clear and you are comfortable, then the ventilation is generally
adequate for your work. The most accurate way to determine if the
worker exposure does not exceed the applicable exposure limit for
compounds in the fumes and gases is to have an industrial hygienist
take and analyze a sample of the air you are breathing. This is
particularly important if you are welding with stainless, hardfacing or
Special Ventilation products. All Lincoln MSDS have a maximum fume
guideline number. If exposure to total fume is kept below that
number, exposure to all fume from the electrode (not coatings or
plating on the work) will be below the TLV.
There are steps that you can take to identify hazardous substances in
your welding environment. Read the product label and material safety
data sheet for the electrode posted in the work place or in the
electrode or flux container to see what fumes can be reasonably
expected from use of the product and to determine if special
ventilation is needed. Secondly, know what the base metal is and
determine if there is any paint, plating, or coating that could expose
you to toxic fumes and/or gases. Remove it from the metal being
welded, if possible. If you start to feel uncomfortable, dizzy or
nauseous, there is a possibility that you are being overexposed to
fumes and gases, or suffering from oxygen deficiency. Stop welding
and get some fresh air immediately. Notify your supervisor and co-
workers so the situation can be corrected and other workers can
avoid the hazard. Be sure you are following these safe practices, the
consumable labeling and MSDS to improve the ventilation in your
area. Do not continue welding until the situation has been corrected.
NOTE: The MSDS for all Lincoln consumables is available on Lincoln’s web-
site: www.lincolnelectric.com
Before we turn to the methods available to control welding fume
exposure, you should understand a few basic terms:
Natural Ventilation is the movement of air through the
workplace caused by natural forces. Outside, this is usually
the wind. Inside, this may be the flow of air through open
windows and doors.
Mechanical Ventilation is the movement of air through the
workplace caused by an electrical device such as a portable
fan or permanently mounted fan in the ceiling or wall.
Source Extraction (Local Exhaust) is a mechanical device
used to capture welding fume at or near the arc and filter
contaminants out of the air.
The ventilation or exhaust needed for your application depends upon
many factors such as:
• Workspace volume
• Workspace configuration
• Number of welders
• Welding process and current
• Consumables used (mild steel, hardfacing, stainless, etc.)
• Allowable levels (TLV, PEL, etc.)
• Material welded (including paint or plating)
• Natural airflow
Your work area has adequate ventilation when there is enough
ventilation and/or exhaust to control worker exposure to hazardous
materials in the welding fumes and gases so the applicable limits for
those materials is not exceeded. See chart of TLV and PEL for Typical
Electrode Ingredients, the OSHA PEL (Permissible Exposure Limit), and
the recommended guideline, the ACGIH TLV (Threshold Limit Value),
for many compounds found in welding fume.
Ventilation
There are many methods which can be selected by the user to
provide adequate ventilation for the specific application. The following
section provides general information which may be helpful in
evaluating what type of ventilation equipment may be suitable for
your application. When ventilation equipment is installed, you should
confirm worker exposure is controlled within applicable OSHA PEL
and/or ACGIH TLV. According to OSHA regulations, when welding and
cutting (mild steels), natural ventilation is usually considered
sufficient to meet requirements, provided that:
1. The room or welding area contains at least 10,000 cubic feet
(about 22' x 22' x 22') for each welder.
2. The ceiling height is not less than 16 feet.
3. Cross ventilation is not blocked by partitions, equipment, or
other structural barriers.
4. Welding is not done in a confined space.
Spaces that do not meet these requirements should be equipped with
mechanical ventilating equipment that exhausts at least 2000 CFM of
air for each welder, except where local exhaust hoods or booths, or
air-line respirators are used.
Important Safety Note:
When welding with electrodes which require special
ventilation such as stainless or hardfacing (see
instructions on container or MSDS) or on lead or
cadmium plated steel and other metals or coatings which
produce hazardous fumes, keep exposure as low as
possible and below exposure limit values (PEL and TLV)
for materials in the fume using local exhaust or
mechanical ventilation. In con ned spaces or in some
circumstances, for example outdoors, a respirator may
be required if exposure cannot be controlled to the PEL
or TLV. (See MSDS and chart of TLV and PEL for Typical
Electrode Ingredients.) Additional precautions are also
required when welding on galvanized steel.
3
SAFETY
FUME EXTRACTION ARMS
BIBLIOGRAPHY AND SUGGESTED READING
ANSI Z87.1, Practice for Occupational and Educational Eye and Face
Protection, American National Standards Institute, 11 West 42nd
Street, New York, NY 10036.
Arc Welding and Your Health: A Handbook of Health Information for
Welding. Published by The American Industrial Hygiene Association,
2700 Prosperity Avenue, Suite 250, Fairfax, VA 22031-4319.
NFPA Standard 51B, Cutting and Welding Processes, National Fire
Protection Association, 1 Batterymarch Park, P.O. Box 9146, Quincy,
MA 02269-9959.
OSHA General Industry Standard 29 CFR 1910 Subpart Q. OSHA
Hazard Communication Standard 29 CFR 1910.1200. Available from
the Occupational Safety and Health Administration at
http://www.osha.org or contact your local OSHA office.
The following publications are published by The American Welding
Society, P.O. Box 351040, Miami, Florida 33135. AWS publications
may be purchased from the American Welding society at
http://www.aws.org or by contacting the AWS at 800-443-9353.
ANSI, Standard Z49.1, Safety in Welding, Cutting and Allied
Processes. Z49.1 is now available for download at no charge at
http://www.lincolnelectric.com/community/safety/ or at the AWS
website http://www.aws.org.
AWS F1.1, Method for Sampling Airborne Particulates Generated by
Welding and Allied Processes.
AWS F1.2, Laboratory Method for Measuring Fume Generation Rates
and Total Fume Emission of Welding and Allied Processes.
AWS F1.3, Evaluating Contaminants in the Welding Environment: A
Strategic Sampling Guide.
AWS F1.5, Methods for Sampling and Analyzing Gases from Welding
and Allied Processes.
AWS F3.2, Ventilation Guide for Welding Fume Control
AWS F4.1, Recommended Safe Practices for the Preparation for
Welding and Cutting of Containers and Piping That Have Held
Hazardous Substances.
AWS SHF, Safety and Health Facts Sheets. Available free of charge
from the AWS website at http://www.aws.org.
Supplemental Information:
(*) Not listed. Nuisance value maximum is 10 milligrams per cubic
meter. PEL value for iron oxide is 10 milligrams per cubic meter.
TLV value for iron oxide is 5 milligrams per cubic meter.
(**) As respirable dust.
(*****) Subject to the reporting requirements of Sections 311, 312,
and 313 of the Emergency Planning and Community Right-
to-Know Act of 1986 and of 40CFR 370 and 372.
(b) The PEL for chromium (VI) is .005 milligrams per cubic meter as
an 8 hour time weighted average. The TLV for water-soluble
chromium (VI) is 0.05 milligrams per cubic meter. The TLV for
insoluble chromium (VI) is 0.01 milligrams per cubic meter.
(c) Values are for manganese fume. STEL (Short Term Exposure
Limit) is 3.0 milligrams per cubic meter. OSHA PEL is a ceiling
value.
(****) The TLV for soluble barium compounds is 0.5 mg/m
3
.
TLV and PEL values are as of October 2013. Always check Safety
Data Sheet (SDS) with product or on the Lincoln Electric website at
http://www.lincolnelectric.com
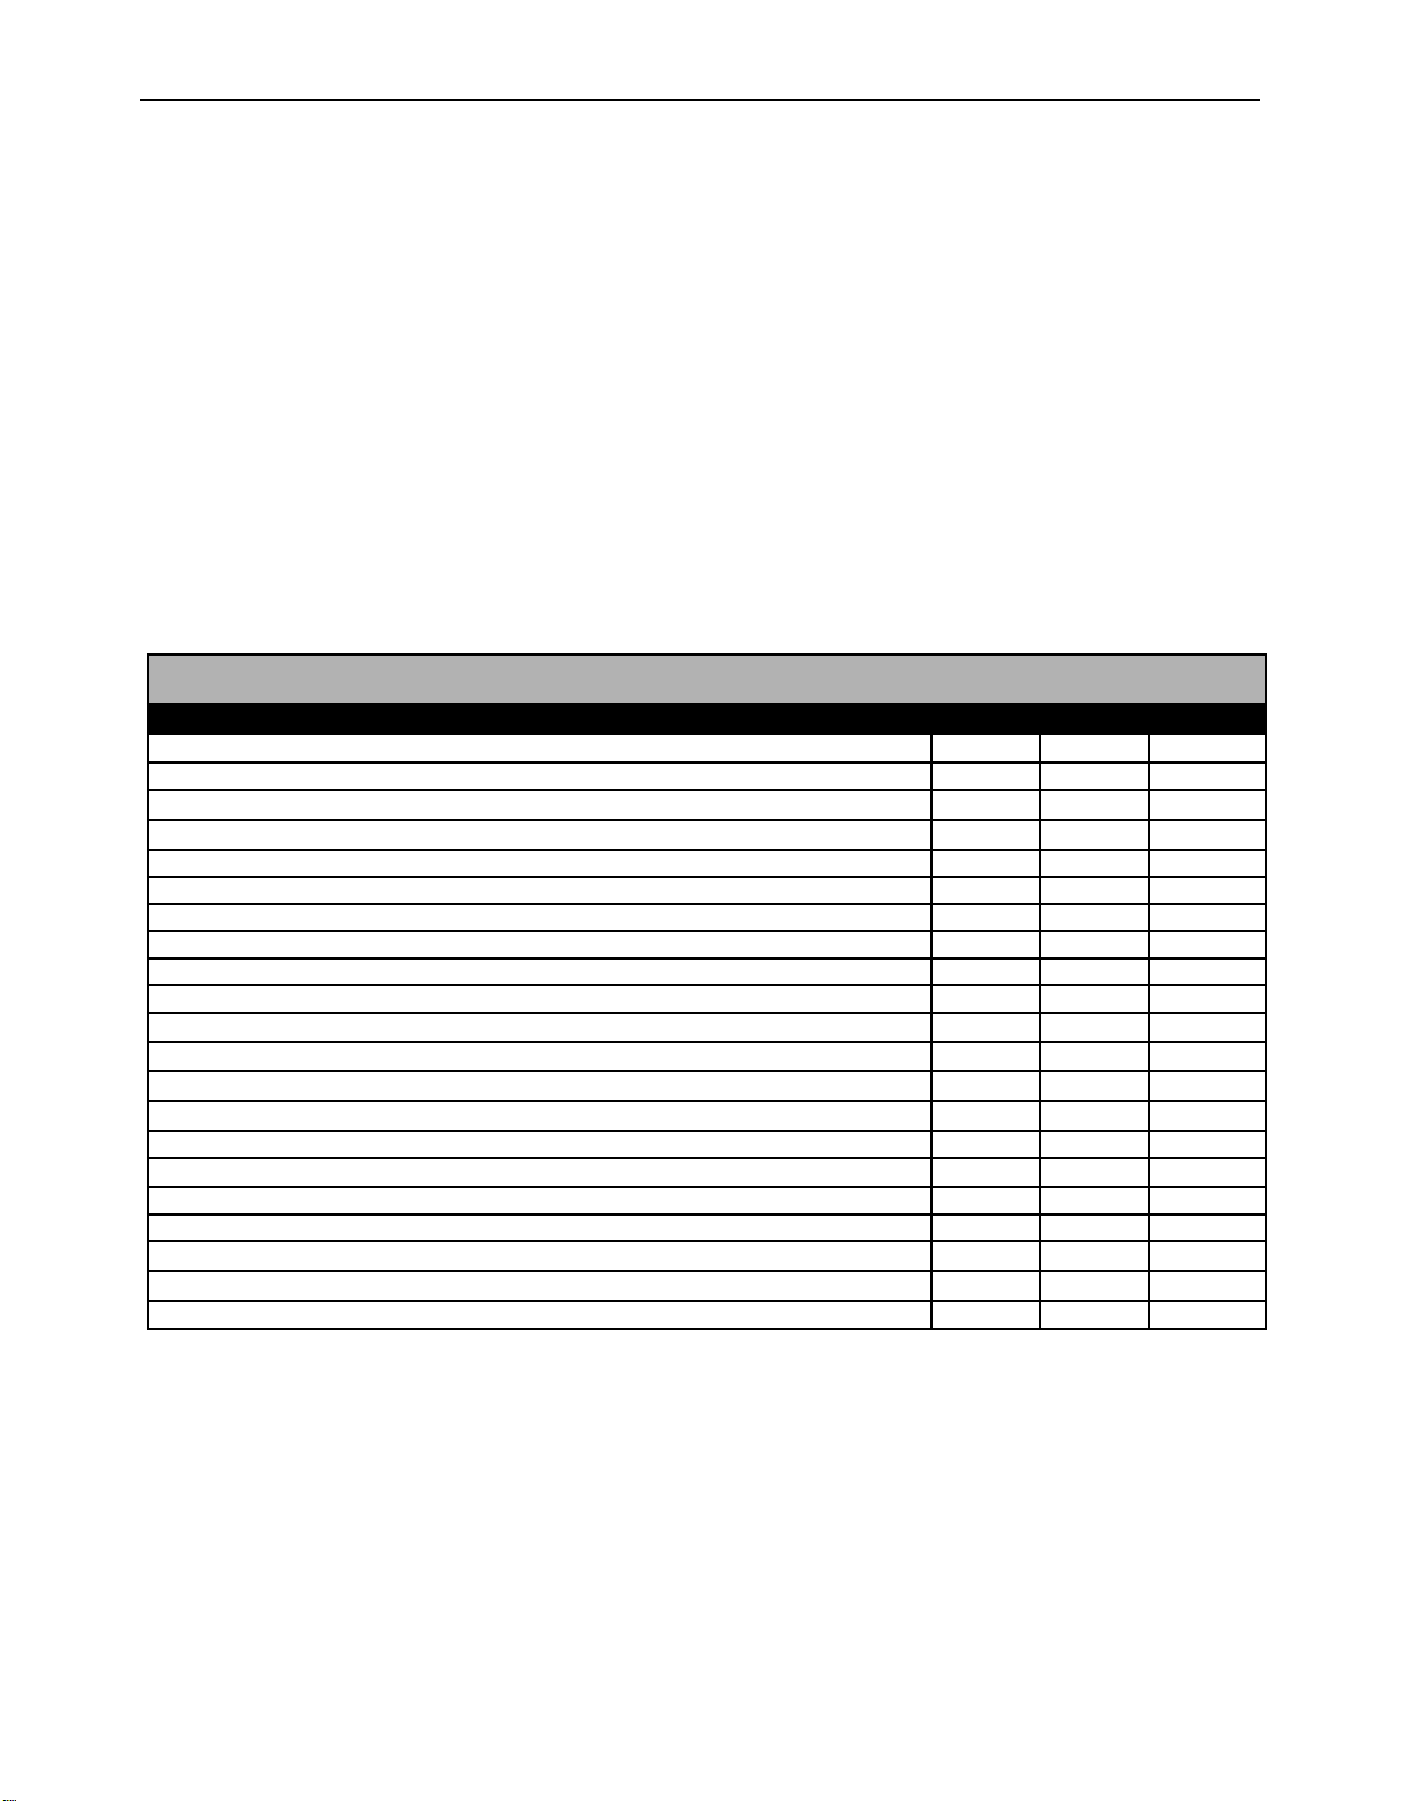
LISTED BELOW ARE SOME TYPICAL INGREDIENTS IN WELDING ELECTRODES AND
THEIR TLV (ACGIH) GUIDELINES AND PEL (OSHA) EXPOSURE LIMITS
INGREDIENTS CAS No. TLV mg/m
3
PEL mg/m
3
Aluminum and/or aluminum alloys (as AI)***** 7429-90-5 1.0 15
Aluminum oxide and/or Bauxite***** 1344-28-1 1. 0 5**
Barium compounds (as Ba)***** 513-77-9 0.5 0.5
Chromium and chromium alloys or compounds (as Cr)***** 7440-47-3 0.5(b) 0.5(b)
Hexavalent Chromium (Cr VI) 18540-29-9 0.05(b) .005(b)
Copper Fume 7440-50-8 0.2 0.1
Cobalt Compounds 7440-48-4 0.02 0.1
Fluorides (as F) 7789-75-5 2.5 2.5
Iron 7439-89-6 10* 10*
Limestone and/or calcium carbonate 1317-65-3 10* 15
Lithium compounds (as Li) 554-13-2 15 10*
Magnesite 1309-48-4 10 15
Magnesium and/or magnesium alloys and compounds (as Mg) 7439-95-4 10* 10*
Manganese and/or manganese alloys and compounds (as Mn)***** 7439-96-5 0.02 5.0(c)
Mineral silicates 1332-58-7 5** 5**
Molybdenum alloys (as Mo) 7439-98-7 10 10
Nickel***** 7440-02-0 0.1 1
Silicates and other binders 1344-09-8 10* 10*
Silicon and/or silicon alloys and compounds (as Si) 7440-21-3 10* 10*
Strontium compounds (as Sr) 1633-05-2 10* 10*
Zirconium alloys and compounds (as Zr) 12004-83-0 5 5

4
FUME EXTRACTION ARMS
TABLE OF CONTENTS
PAGE
GENERAL DESCRIPTION ..............................................................................................................................................5
RECOMMENDED PROCESSES........................................................................................................................................5
PROCESS LIMITATIONS .................................................................................................................................................5
EQUIPMENT LIMITATIONS .............................................................................................................................................5
RECOMMENDED FILTER UNITS......................................................................................................................................5
DESIGN FEATURES........................................................................................................................................................5
TECHNICAL SPECIFICATIONS .................................................................................................................................A-1
REACH ............................................................................................................................................................A-2
PRESSURE DROP.......................................................................................................................................................A-3
INSTALLATION...........................................................................................................................................................A-4
SELECT SUITABLE LOCATION.....................................................................................................................................A-4
WALL MOUNTING LFA 3.1/4.1 ...................................................................................................................................A-5
MOBIFLEX MOUNTING LFA 3.1/4.1 ...........................................................................................................................A-8
WALL MOUNTING LTA 2.0-CW.................................................................................................................................A-11
WALL MOUNTING LTA 2.0 TELESCOPIC ...................................................................................................................A-14
WALL MOUNTING LFA 2.0........................................................................................................................................A-16
WALL MOUNTING LFA 4.1-LC ..................................................................................................................................A-18
EXTENSION CRAMNES.............................................................................................................................................A-20
OPERATION ............................................................................................................................................................B-1
GRAPHIC SYMBOLS THAT APPEAR ON THIS MACHINE OR IN THIS MANUAL ...............................................................B-1
GENERAL DESCRIPTION.............................................................................................................................................B-1
MANUAL OPERATION.................................................................................................................................................B-1
USERS ............................................................................................................................................................B-1
INTENDED USE ..........................................................................................................................................................B-1
PRODUCT COMBINATIONS.........................................................................................................................................B-2
CONTROLS ............................................................................................................................................................B-2
OPTIONS/ACCESSORIES ..........................................................................................................................................C-1
MAINTENANCE.........................................................................................................................................................D-1
ROUTINE MAINTENANCE............................................................................................................................................D-1
PERIODIC MAINTENANCE...........................................................................................................................................D-2
SERVICE, MAINTENANCE AND REPAIRS .....................................................................................................................D-3
TROUBLESHOOTING .................................................................................................................................................E-1
PARTS LIST ...............................................................................................................PARTS.LINCOLNELECTRIC.COM
CONTENT/DETAILS MAY BE CHANGED OR UPDATED WITHOUT NOTICE. FOR MOST CURRENT INSTRUCTION MANUALS, GO
TO PARTS.LINCOLNELECTRIC.COM.
________________________________________________________________________

FUME EXTRACTION ARMS
GENERAL DESCRIPTION
The extraction arms have been specially designed for extracting
harmful fumes and gasses which are released during the most
common welding processes. Thanks to the patented construction
and the unique principle of the rotating of the hood the extraction
arm is easily maneuverable which enables constant adaptation of
the working reach to the specific requirements of the user.
LFA
Lincoln’s LFA extraction arms are spring-balanced for easy
positioning. They are intended for use with a low-vacuum, high-
volume extraction fan. The LFA arms are commonly installed on a
Mobiflex
®
200-M or 400-MS mobile base unit with filter or with an
SF2400 Wall-Mounted Extraction Fan, with or without a Statiflex
®
200-M or 400-MS Wall-Mounted Filter Unit.
LTA
Lincoln’s LTA 2.0 fume extraction arms telescope 3-5 ft. long,
making them ideal for small workstation or booth applications.
They are intended for use with a low-vacuum, high-volume
extraction fan.
The telescopic arm is commonly installed with a SF2400 Wall-
mounted Fan. Extracted air can be vented outside through the Air
Exhaust Silencer, or filtered through a Statiflex 200-M or 400-MS
Wall-Mounted Filter Unit. The Starter/Overload Switch for the
SF2400 Extraction Fan protects the motor against overcurrent.
The optional Arc Sensor/LampKit for Wall-Mounted Systems
provides a work lamp and remote, hood-mounted switches for the
lamp and extraction fan, replacing the starter/overload switch.
RECOMMENDED PROCESSES
• GMAW
• FCAW
EQUIPMENT LIMITATIONS
• Never use the product for extracting inflammable, glowing or
burning particles or solid liquids.
• Never use the product for extracting aggressive fumes (such
as hydrochloric acid).
• Never use the product for extracting paint mists.
• Never use the product for extracting fumes containing alkaline
or acid.
NOTE: This list is not all inclusive.
RECOMMENDED FILTER UNITS
See Page A-1 for compatability
• Mobiflex 200, Mobiflex 200 HE
• Statiflex 200-M
DESIGN FEATURES
Standard:
• Ultra-easy positioning
• Minimal maintenance
• 360° rotatable hood
Optional:
• The Automatic Start/Stop Arc Sensor can be installed with the
Lamp Kit to turn the extraction fan on and off automatically
when it detects a welding arc flash.
• Extension Cranes are available in 7 ft. and 14 ft. lengths.
5
A-1
INSTALLATIONFUME EXTRACTION ARMS
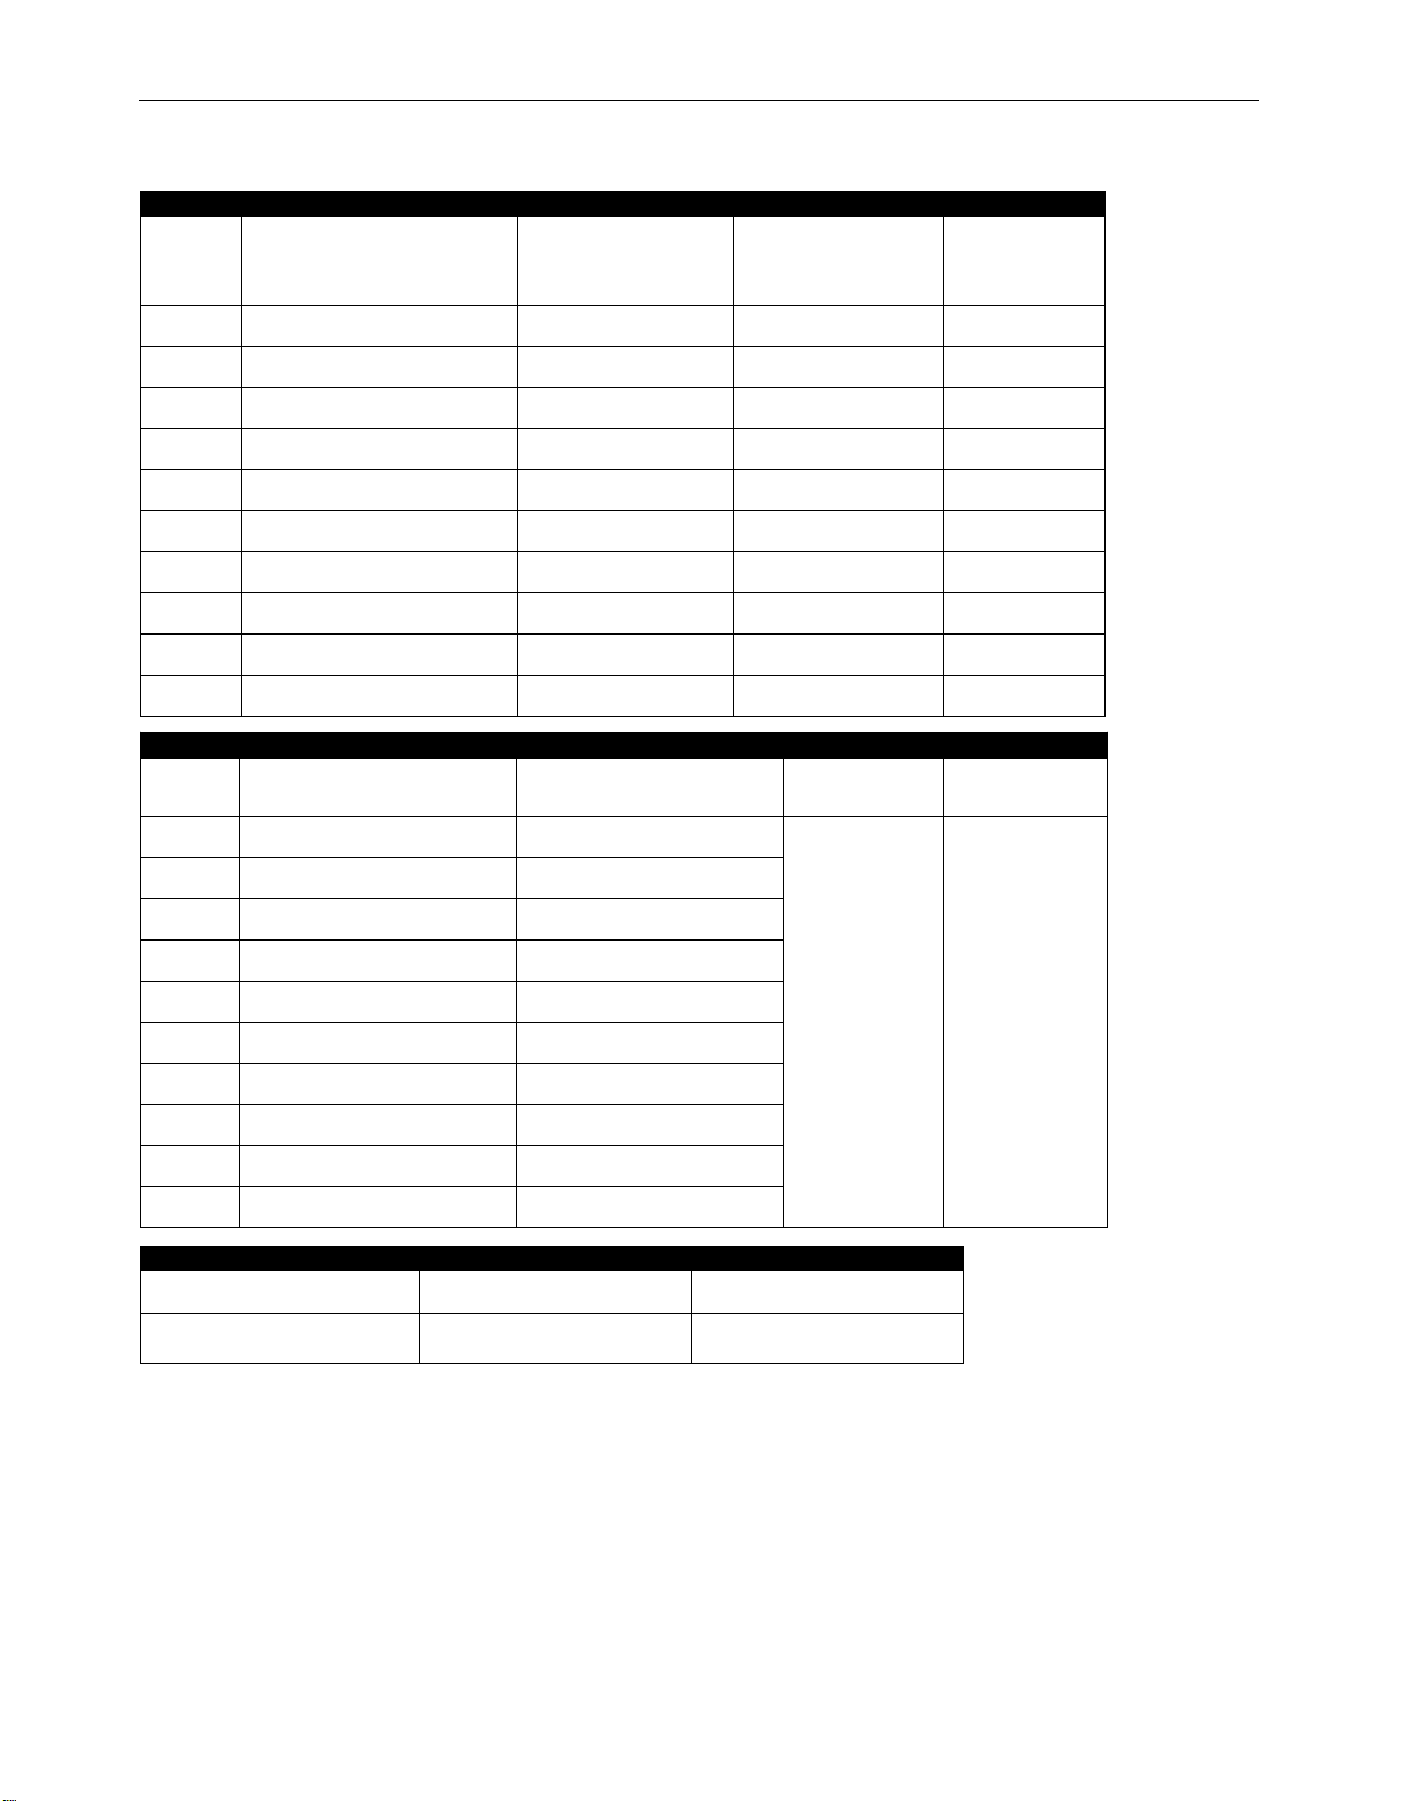
TECHNICAL SPECIFICATIONS -
EXTRACTION ARM MOUNTING COMPATIBILITY
Product
Number
Description
Mobiflex - 50 Hz, 230V
K2497-(2,4)
K2497-(12,14)
Mobiflex - 60 Hz, 115V
K1653-(2,3), K1741-(1,2)
K1653-(4,5), K1741-(3,4)
Wall Mount
Application
K1655-8 LFA 3.1 (10FT.) WITH FLANGE – – YES
K1655-9 LFA 4.1 (13FT.) WITH FLANGE – – YES
K1655-10 LTA 2.0 (6.5FT) TELESCOPIC – – YES
K1655-14 LTA 2.0-CW (6.5FT) TELESCOPIC – – YES
K1655-12 LFA 2.0 (6.5FT) – – YES
K1655-13 LFA 4.1-LC (13FT) – – YES
K2633-5 LFA 3.1 YES YES –
K2633-6 LFA 3.1 w/ LAS YES YES –
K2633-7 LFA 4.1 YES YES –
K2633-8 LFA 4.1 w/ LAS YES YES –
PHYSICAL DIMENSIONS
Product
Number
Net Weight Arm Length
Nominal Arm
Diameter
Extraction Capacity
Range
K1655-8 33 LBS. (15 KG) 10 FT. (3 M)
8 IN. (203 MM)
350-940 CFM
(600-1,600 M
3
/H)
K1655-9 37 LBS. (17 KG) 13 FT. (4 M)
K1655-10
15.4 LBS. (7 KG) 39.5 - 55 IN. (1000 - 1400 MM)
K1655-14
59.5 LBS (27KG) 60 - 98.4 IN. (1524 - 2500 MM)
K1655-12 33 LBS. (15 KG) 6.5 FT. (2 M)
K1655-13 33 LBS. (15 KG) 13 FT. (4 M)
K2633-5 32.8 LBS. (14.9 KG) 10 FT. (3 M)
K2633-6 37.3 LBS. (16.9 KG) 13 FT. (4 M)
K2633-7 33.5 LBS. (15.2 KG) 10 FT. (3 M)
K2633-8 38 LBS. (17.2 KG) 13 FT. (4 M)
AMBIENT CONDITIONS
Min. Temperature Max. Temperature Max. Rel. Humidity
41ºF (5ºC) 113ºF (45ºC) 80%
A-2
INSTALLATIONFUME EXTRACTION ARMS
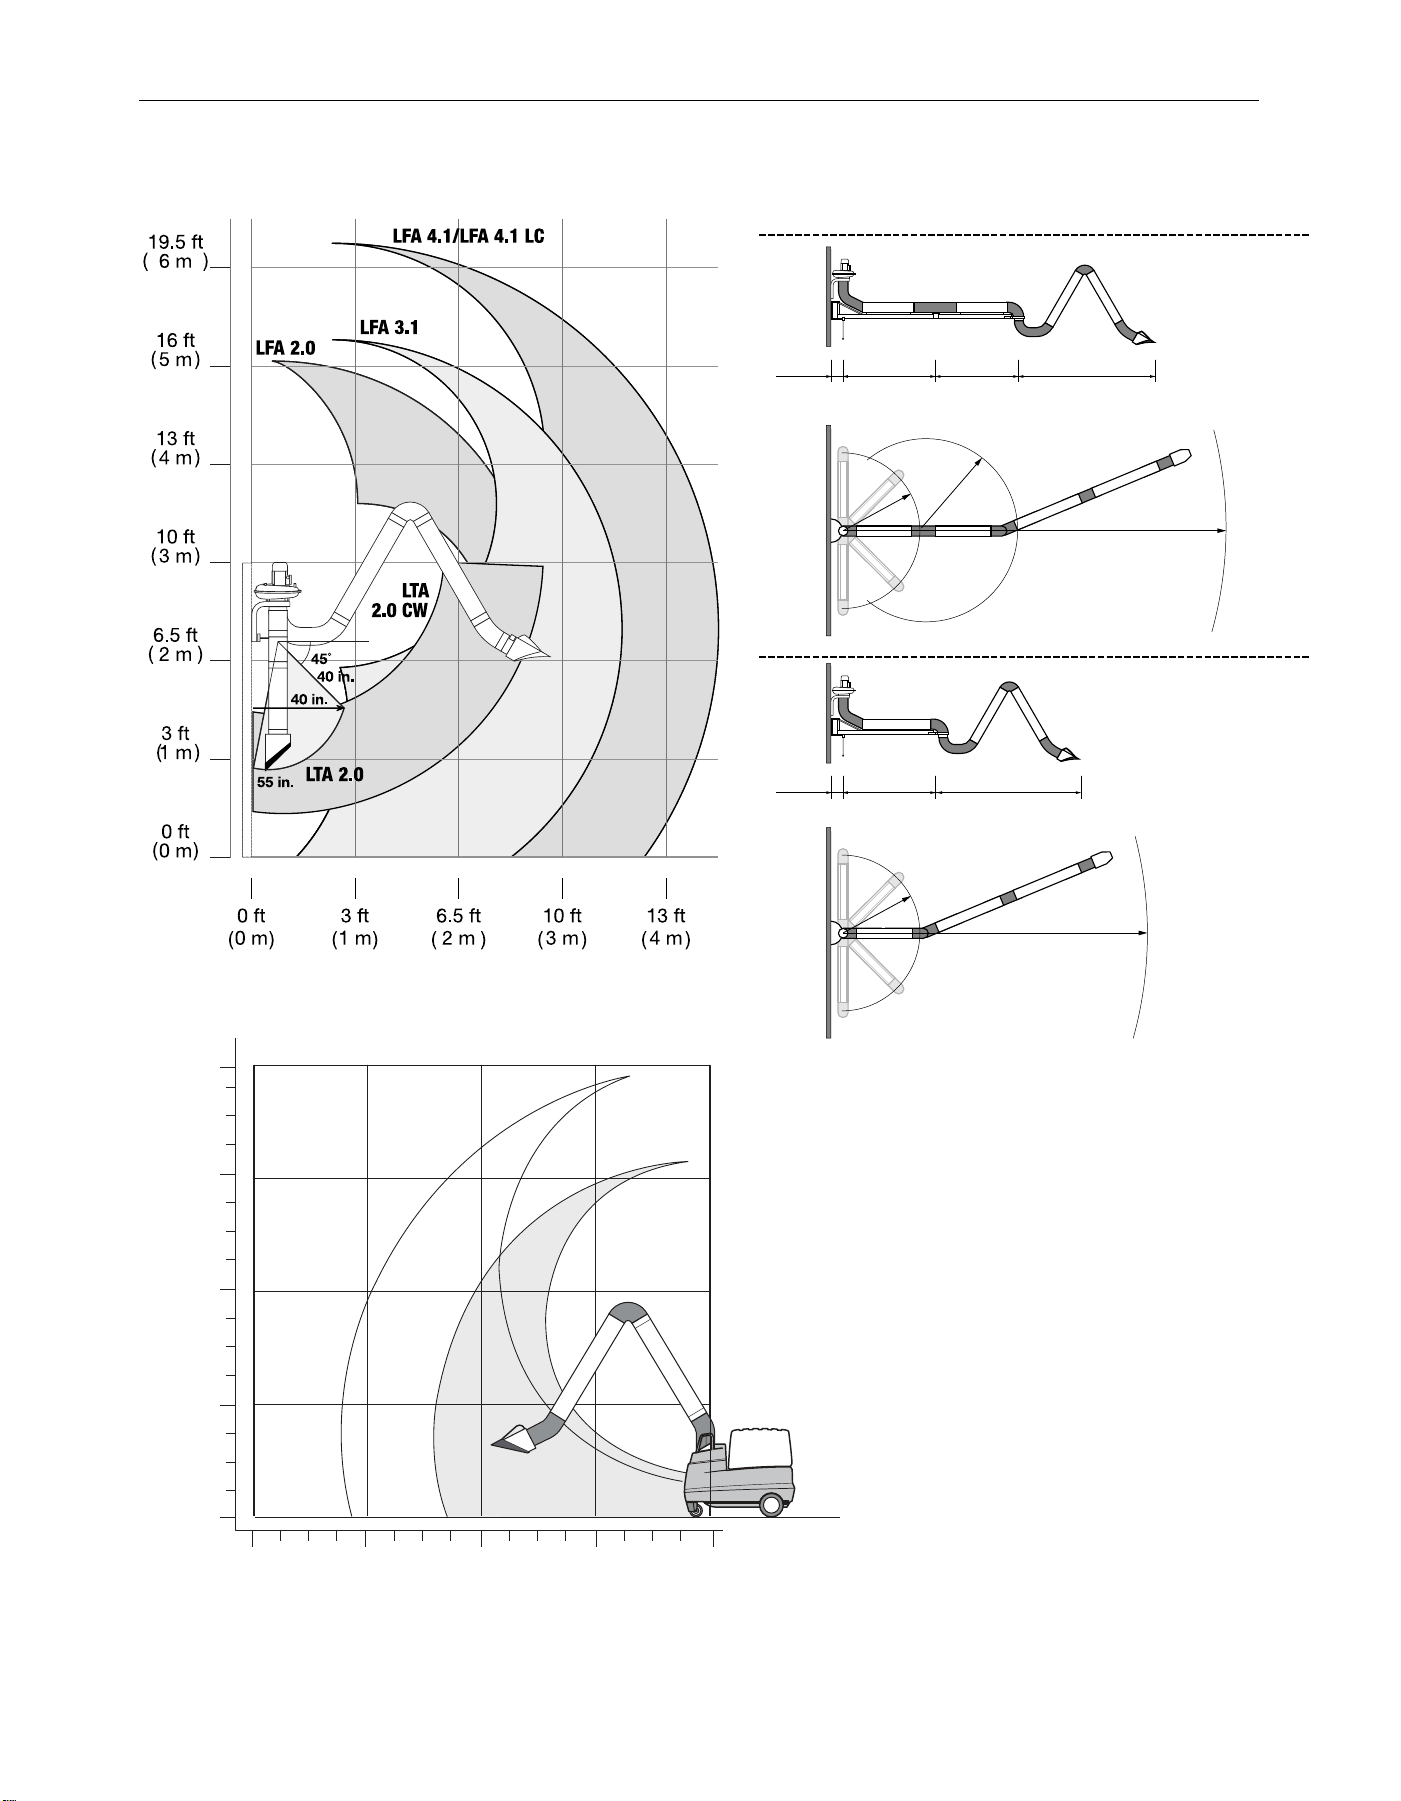
REACH
16 ft
(4.9 m)
LFA 4.1
LFA 3.1
12 ft
(3.7 m)
12 ft
(3.7 m)
8 ft
(2.4 m)
4 ft
(1.2 m)
0 ft
(0 m)
16 ft
(4.9 m)
8 ft
(2.4 m)
4 ft
(1.2 m)
0 ft
(0 m)
79"
(2000 mm)
8"
(200 mm)
79"
(2000 mm)
79"
(2000 mm)
LFA 3.1, 130 in.
LFA 4.1, 170 in.
With LFA 3.1, 287 in. (7300 mm)
With LFA 4.1, 327 in. (8300 mm)
79"
(2000 mm)
79"
(2000 mm)
8"
(200 mm)
79"
(2000 mm)
(3300/4300 mm)
LFA 3.1, 130 in.
LFA 4.1, 170 in.
(3300/4300 mm)
With LFA 3.1, 209 in. (5300 mm)
With LFA 4.1, 250 in. (6300 mm)
EC 4
EC 2
A-3
INSTALLATIONFUME EXTRACTION ARMS
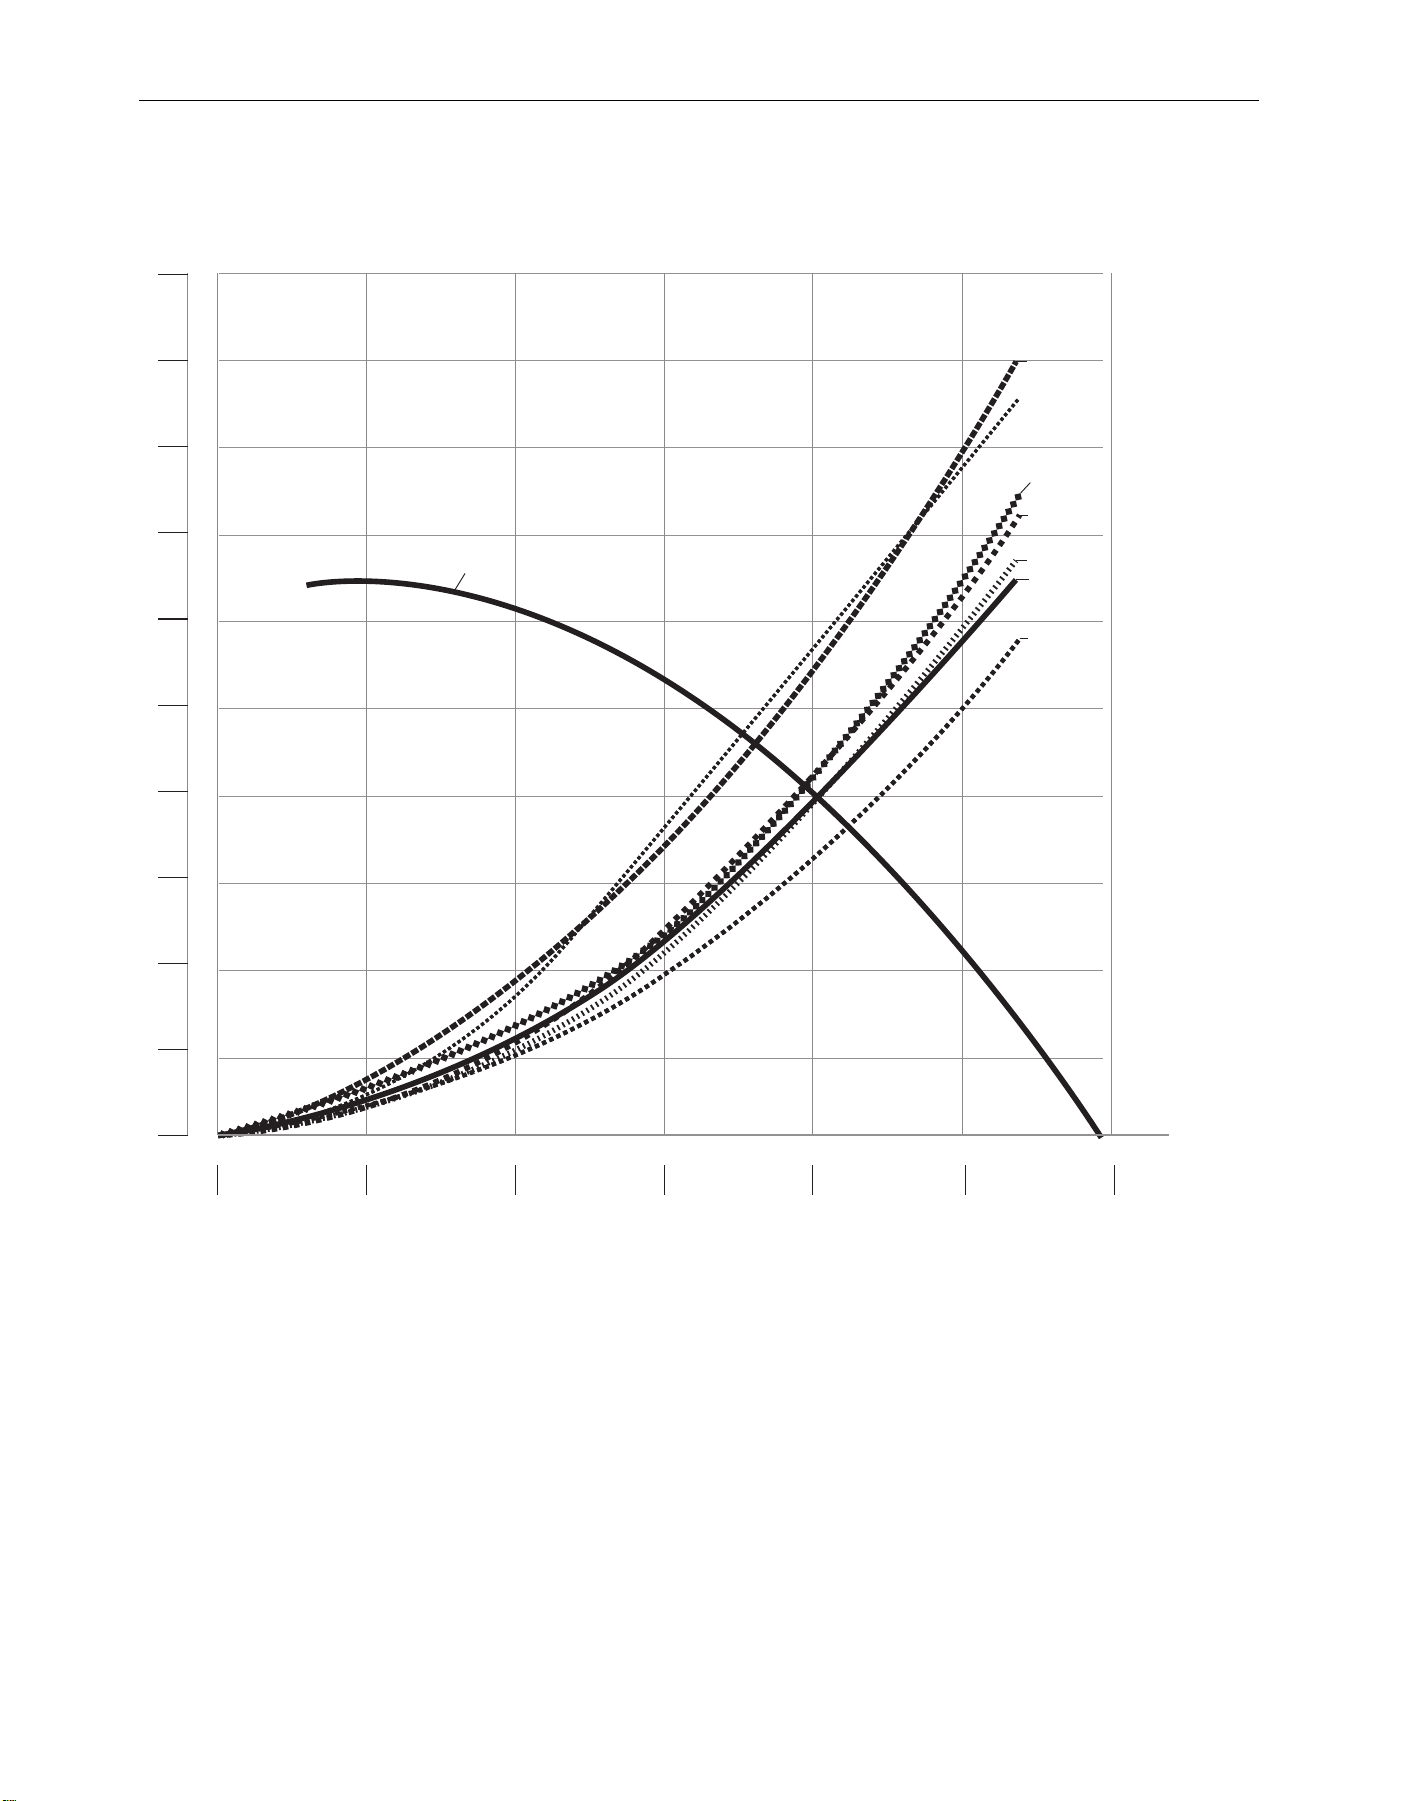
PRESSURE DROP
Vacuum (inches WG) vs. Air Flow (CFM)
200
1
2
3
4
5
6
7
8
9
10
400 600
SF2400 Fan
LTA 2.0 &
LTA 2.0-CW
LFA 4.1 & Mobiex
LFA 4.1 LC
LFA 3.1 & Mobiex
14ft Crane with LFA 4.1
7ft Crane with LFA 4.1
LFA 2.0
800 1000 1200
A-4
INSTALLATIONFUME EXTRACTION ARMS
Read this entire installation section before you
start installation.
INSTALLATION
ELECTRIC SHOCK CAN KILL.
• Only qualified personnel should perform
this installation.
• Turn the input power OFF and unplug
the machine from the receptacle before
working on this equipment.
• Insulate yourself from the work and ground.
• Always connect the machine to a power supply
grounded according to the National Electrical Code and
local codes.
MOVING PARTS can injure.
• Do not operate with covers open or
filter removed.
• Keep away from moving parts.
TIPPING Hazard
Unit is to be used on flat surface only.
The extraction arm must be fastened in an upright and
folded position during transport of the unit.
Only qualified personnel should install, use or
service this equipment.
SELECT SUITABLE LOCATION
• Inspect the product and check it for damage. Verify the
functioning of the safety features.
• During use, always use Personal Protective Equipment (PPE)
to avoid injury. This also applies for persons who enter the
work area.
• Check the working environment. Do not allow unauthorized
persons to enter the working environment.
• Protect the product against water and humidity.
• Make sure the room is always sufficiently ventilated; this
applies especially to confined spaces.
The installer is responsible for following local
safety codes and regulations.
Before drilling, verify locations of existing gas, water, or
electrical conduits.
For mounting compatibility see “EXTRACTION
ARM MOUNTING COMPATIBILITY” table
located on page A-1.
For wall mounting applications:
Install wall mounting brackets as detailed in the section titled
“INSTALLATION OF WALL MOUNTING BRACKETS” for Operator
Manual IM10320 SF2400 Stationary Fan.
• LTA 2.0-CW includes mount assembly. See wall
mounting instruction on page A-11.
• FOR LAMP KIT APPLICATIONS:
Install the wiring for the lamp kit as detailed in the
section titled “Installing the Lamp Kit” for operator
manual IM10366 Lamp Kit for Wall Mounted Systems
For Mobiflex mounting applications:
Install the base swivel mount on top of the machine as detailed in
the section titled “INSTALLATION” for Operator Manual IM10335
Mobiflex 200 & 200 HE.
Tools and requirements
The following tools are needed to mount and maintain extraction
arms.
• 9/16” wrench and socket
• 1/2” wrench and socket
• 7/16” wrench and socket
• Oil lubricant
• Grease lubricant
• Utility knife
• PPE - safety glasses and gloves
• 1/8” hex bit
WARNING
WARNING
CAUTION
A-5
INSTALLATIONFUME EXTRACTION ARMS
WALL MOUNTING THE
LFA 3.1 (10FT.) OR
LFA 4.1 (13FT.) ARM
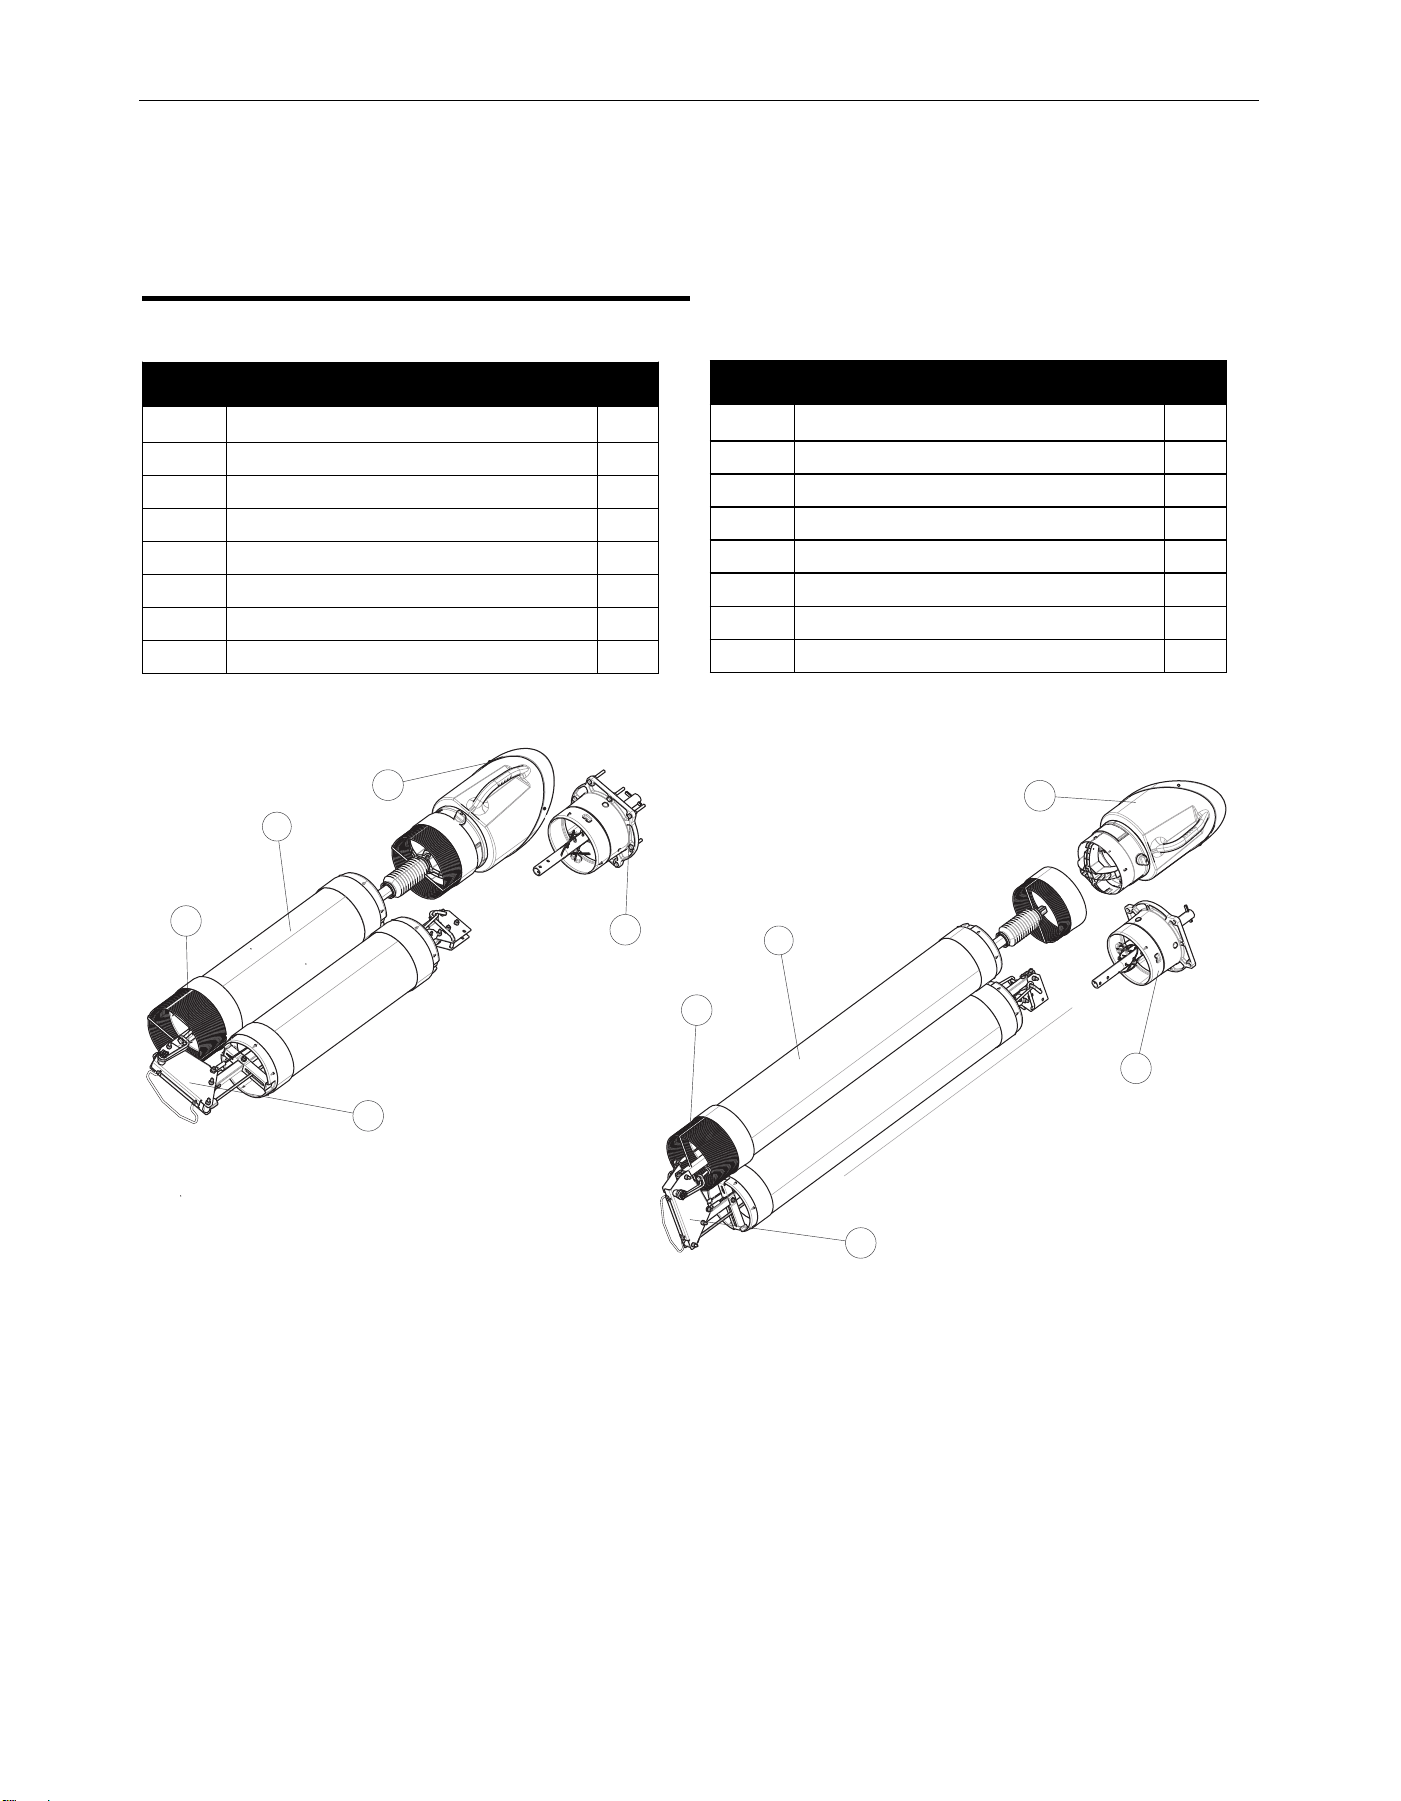
Components
*NOT SHOWN
See Parts Page for Hardware Bag Contents
For wall mounting applications:
Install wall mounting brackets as detailed in the section titled
“INSTALLATION OF WALL MOUNTING BRACKETS” for Operator
Manual IM10320 SF2400 Stationary Fan.
*NOT SHOWN
See Parts Page for Hardware Bag Contents
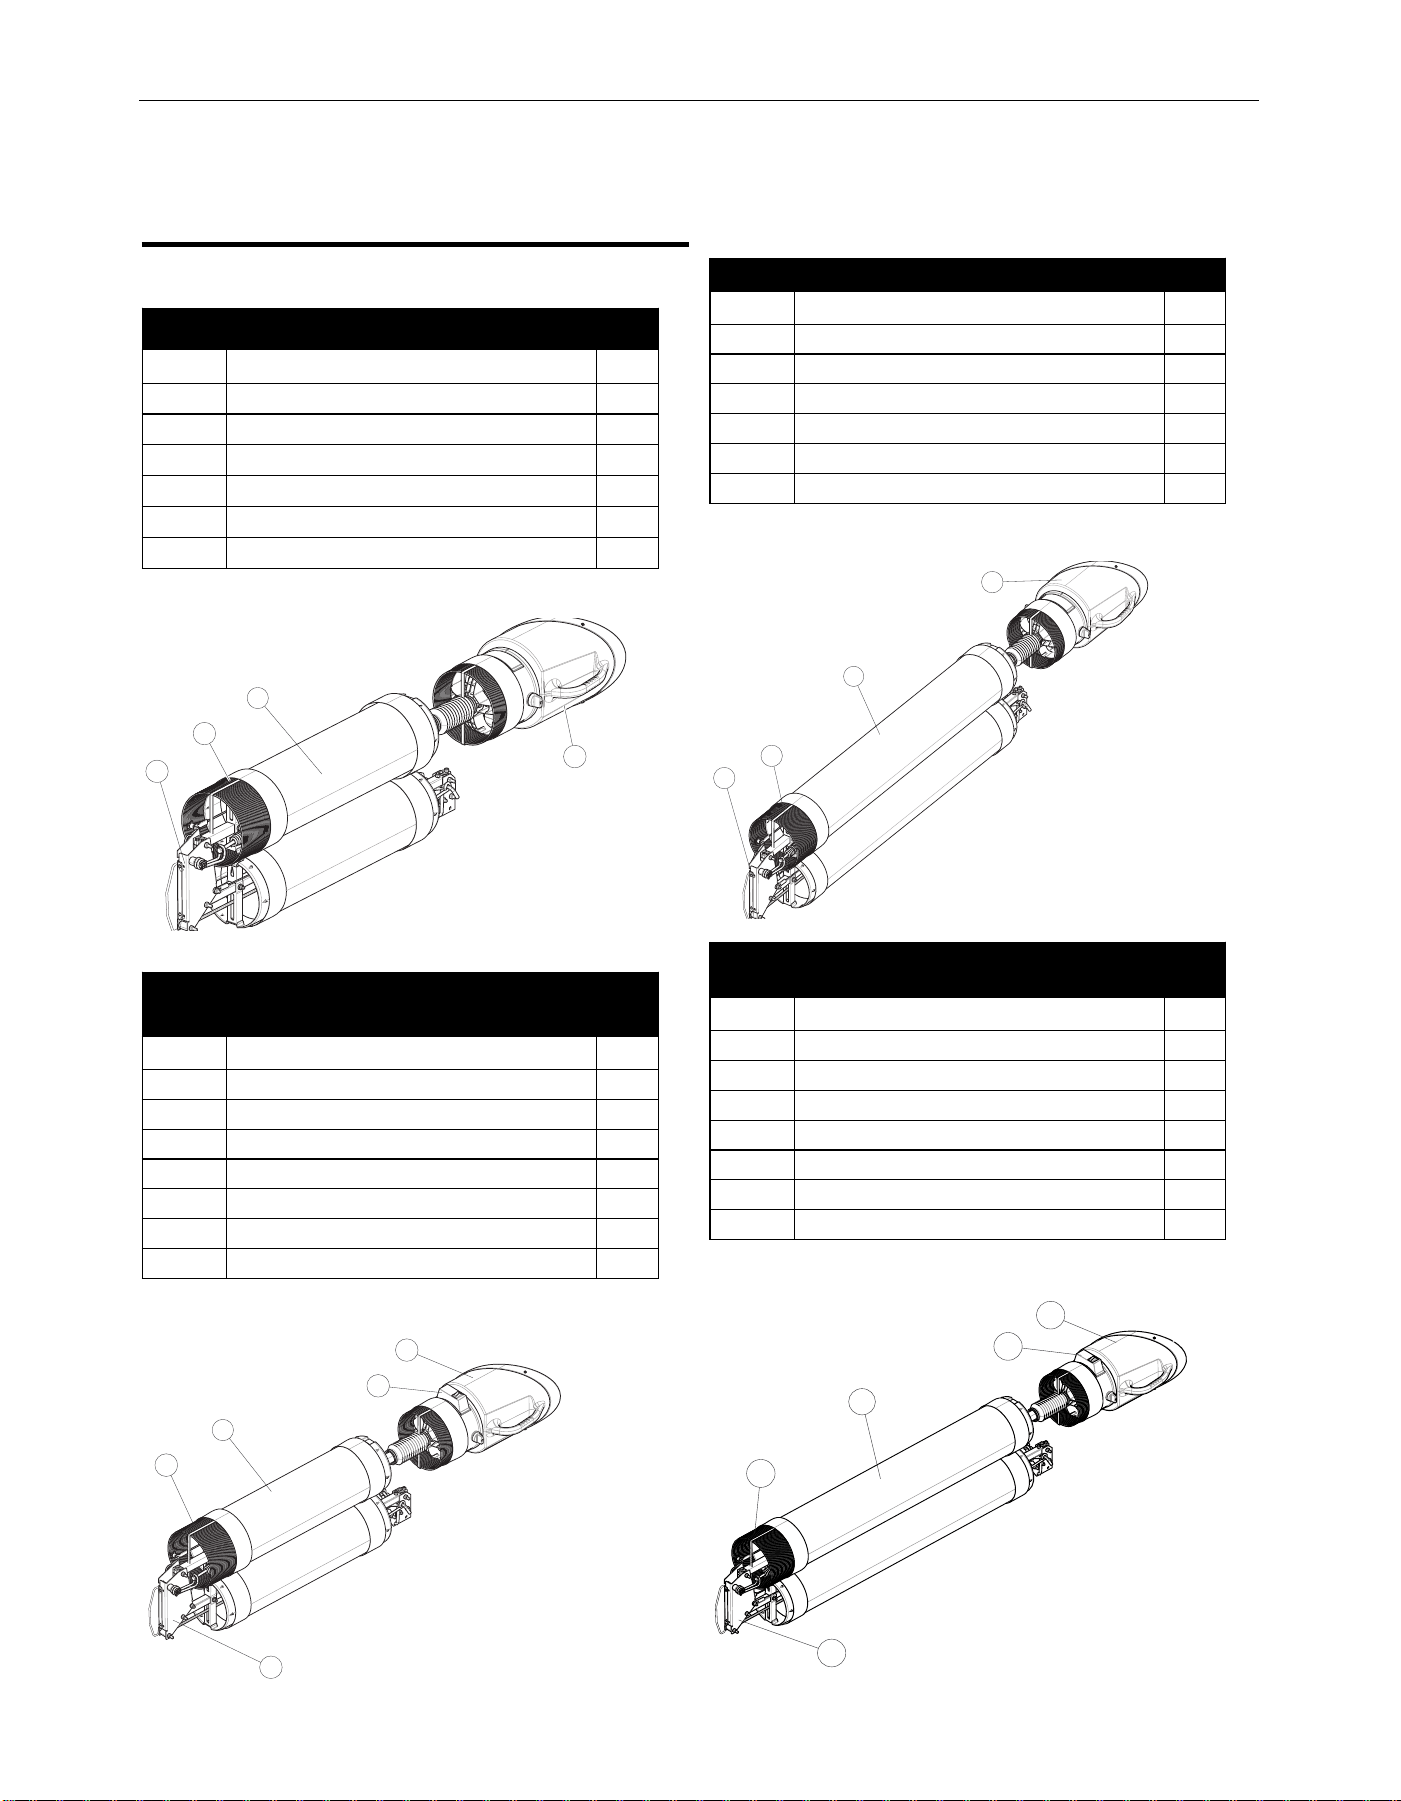
K1655-8 – LFA 3.1, 10FT EXTRACTION ARM
ITEM DESCRIPTION QTY
1 ARM BODY 1
2 HOSE SUPPORT 1
3 HOOD ASSEMBLY 1
4 FLEXIBLE HOSES 2
5 MOUNTING ASSEMBLY 1
6* INSTRUCTION MANUAL 1
7* LOOSE HARDWARE BAG 1
K1655-9 – LFA 4.1, 13FT EXTRACTION ARM
ITEM DESCRIPTION QTY
1 ARM BODY 1
2 HOSE SUPPORT 1
3 HOOD ASSEMBLY 1
4 FLEXIBLE HOSES 2
5 MOUNTING ASSEMBLY 1
6* INSTRUCTION MANUAL 1
7* LOOSE HARDWARE BAG 1
A-6
INSTALLATIONFUME EXTRACTION ARMS
MOUNTING THE LFA 3.1 OR 4.1 ARM TO THE WALL-
MOUNTING BRACKET
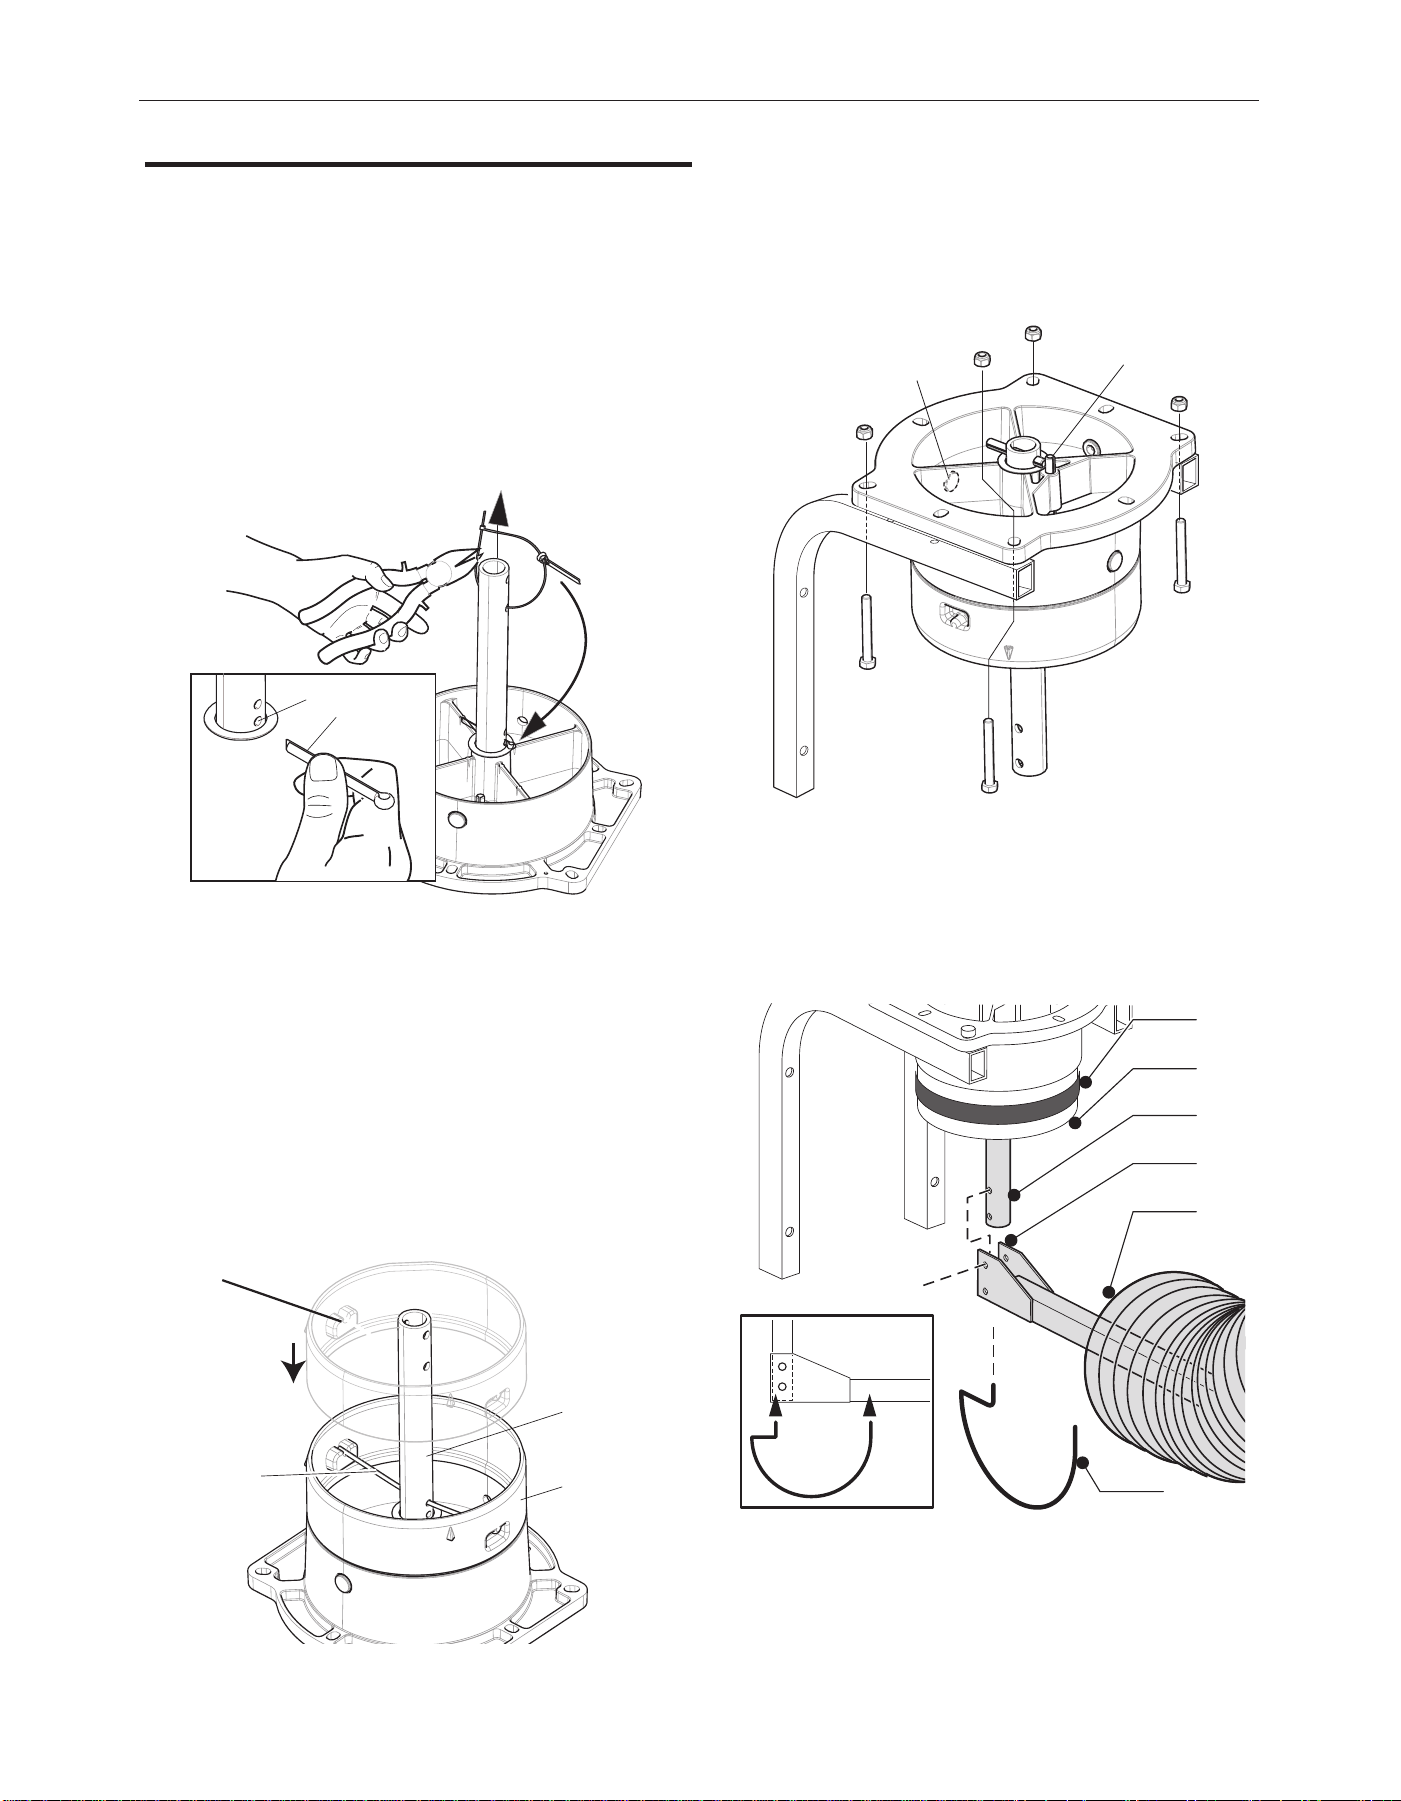
See Figure A.1 for steps 1-4
1. Cut through the upper cable tie to release the cotter pin
(Item A).
2. Lift the post of the base swivel mount by the lower cable tie.
3. Put the cotter pin through the lowest hole in the post (Item B)
and bend it around.
4. Cut the lower cable tie and let down the post.
FIGURE A.1
2. The mounting assembly of the arm comes in three pieces:
(See to Figure A.2)
• Metal rotating rod (Item A),
• red plastic ring (Item B),
• and metal spring collar pivot rod (Item C).
Mount the red plastic ring to the metal mounting assembly by
tting the metal spring collarpivot rod through the hole in the
rotating rod, and snapping it into place on the U-shaped
indents on the red plastic ring. The lip of the ring should t
securely against the top edge of the mounting assembly yet
rotate with the rod.
FIGURE A.2
3. Position the mounting assembly on a wall mounting bracket
(See Figure A.3) so that the cable hole (Figure A.3, Item A) is
on the wall side. Use the four 2.5” bolts and nuts to secure
the mounting assembly to the wall mounting bracket. Rotate
the hinge rod (Fig. 3, Item D) so the stop pin (Figure A.3, Item
B) is in the front.
FIGURE A.3
4. Mount the hanging adapter (Fig. A.4, Item D) to the hinge rod
using (2) 1.75” bolts with washers and nuts. Mount the spring
bracket (Fig. 5, Item F) into the two holes as shown. Position
one 8” rubber band (Fig. 5, Item A) and the exible hose
supplied with the mounting bracket (Fig. 5, Item E) on the red
plastic ring of the rotating hinge.
FIGURE A.4
B
C
A
A
B
A
B
D
E
F
C
A
B
U-shaped
indent
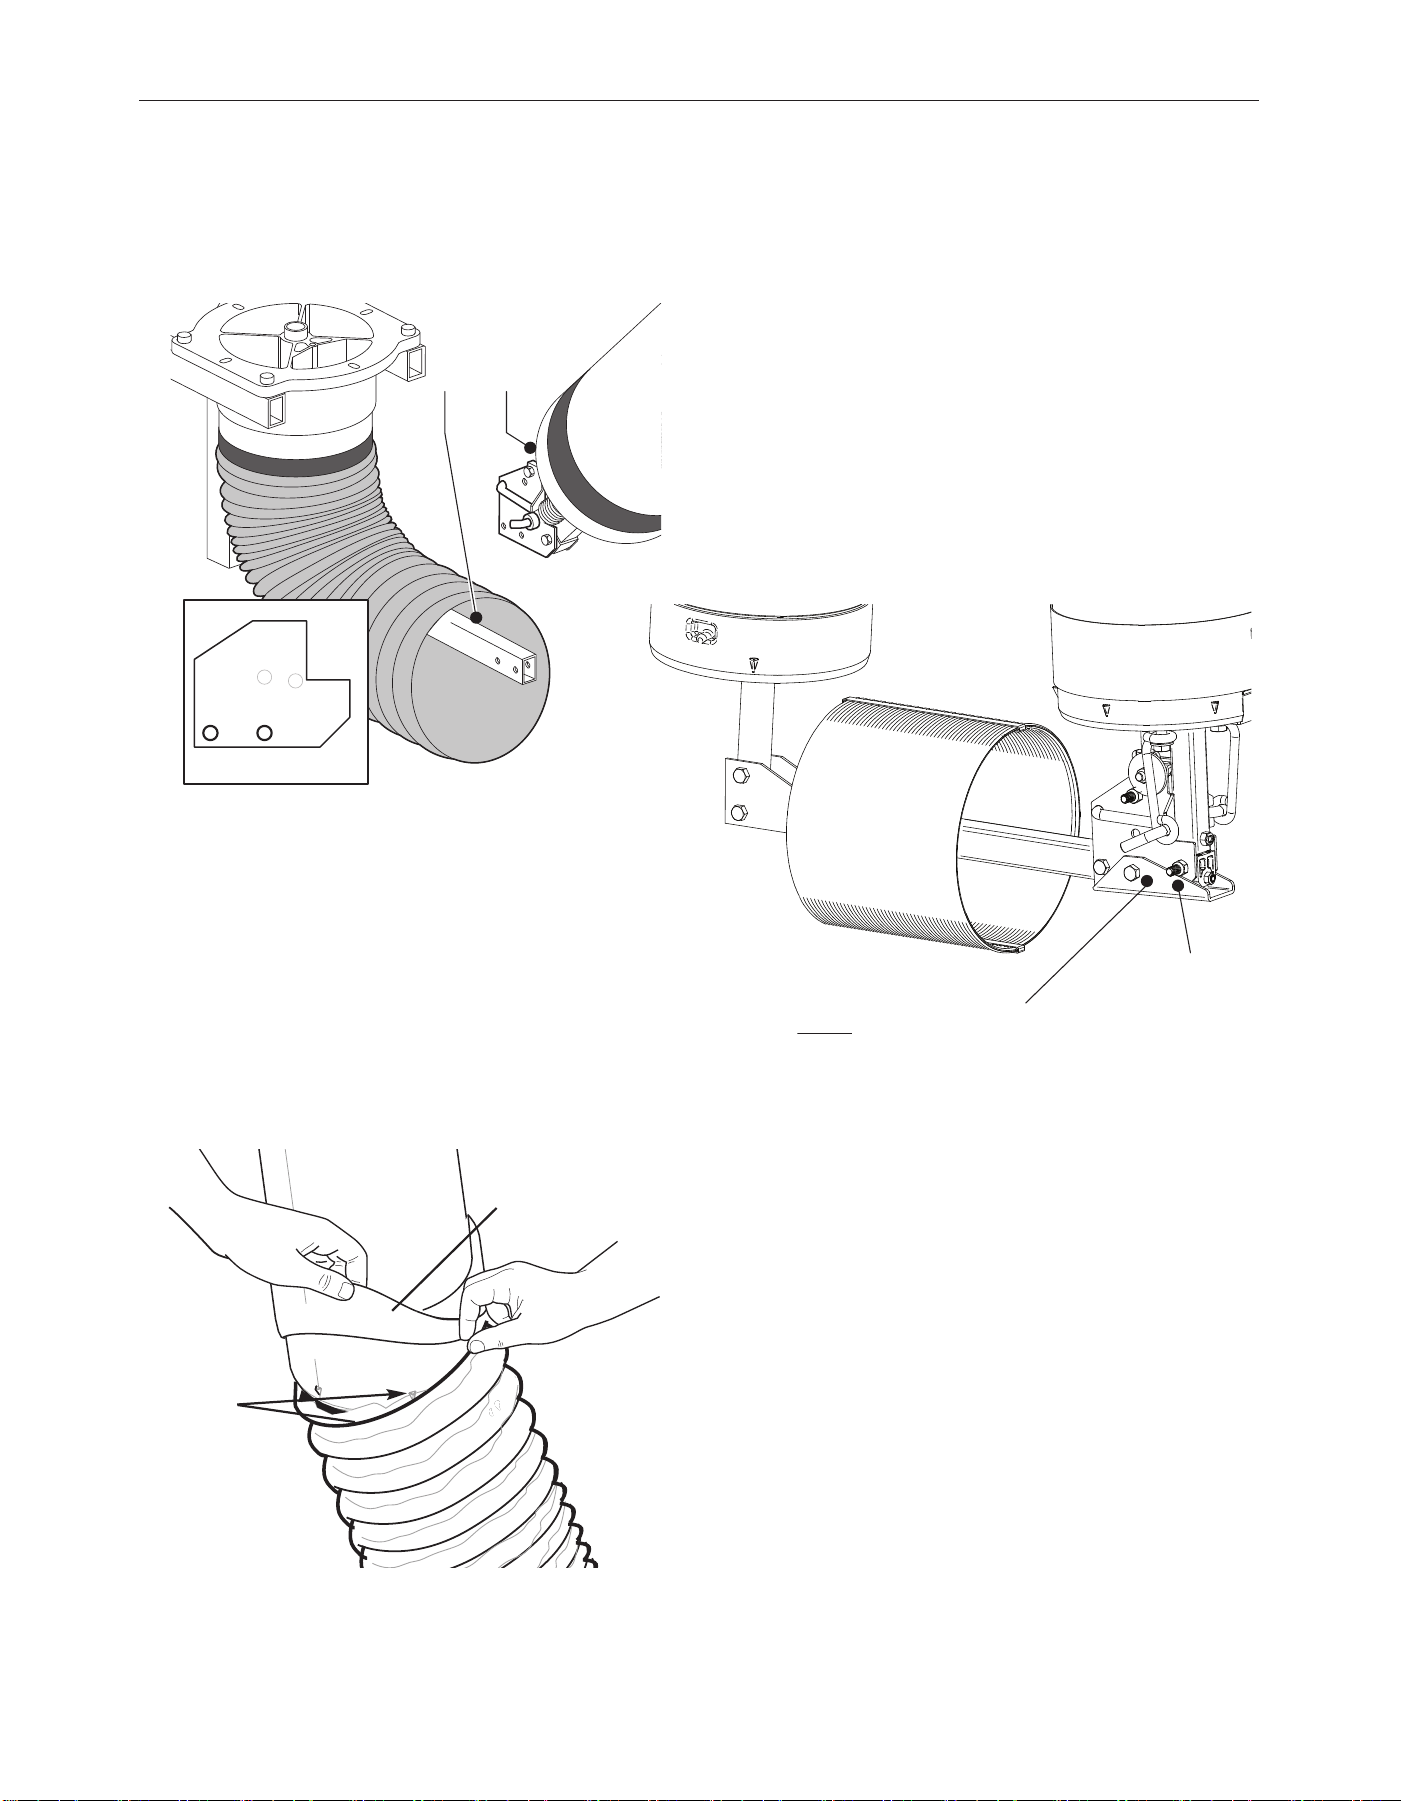
5. Put another rubber band on the top of the arm. Use (2) 2”
long bolts with nuts to mount the arm (Figure A.5, Item B) to
the hanging adapter (Figure A.5, Item A), using both holes as
indicated. Install stopper (Figure A.6, Item C) as shown to
ensure proper arm operation.
FIGURE A.5
6. Remove the plastic and tape packaging from the arm
sections. Adjust the friction of the arm and hood movement
as described in the maintenance section of this manual.
When set, seal all hose connections with the arm seal bands.
7. Fold back 2/3 of both arm seal bands. Remove the wrap of
the exible hose. Place the exible hose over both arm
sections. To secure the hose, at least one metal rings of the
hose should be applied over the ridges at each arm section.
Fold back the arm seal bands and place them over the hose.
The arm seal band should cover the arm section 0.5-1 in. See
Figure A.7
FIGURE A.7
A B
A-7
INSTALLATIONFUME EXTRACTION ARMS
Place at least
one metal band
of exible hose
over ridge
Stretch arm band seal
over exible tube
FIGURE A.6
C
NOTE: CRITICAL COMPONENT INSTALLATION
INSTALL STOPPER AS SHOWN TO ENSURE
PROPER ARM OPERATION
A-8
INSTALLATIONFUME EXTRACTION ARMS
MOBIFLEX MOUNTING
LFA 3.1 / 4.1 ARM
Components
*NOT SHOWN
See Parts Page for Hardware Bag Contents
*NOT SHOWN
See Parts Page for Hardware Bag Contents
For Mobiflex mounting applications:
Install the base swivel mount on top of the machine as detailed in
the section titled “INSTALLATION” for Operator Manual IM10335
Mobiflex 200 & 200 HE.
*NOT SHOWN
See Parts Page for Hardware Bag Contents
*NOT SHOWN
See Parts Page for Hardware Bag Contents
K2633-5 – LFA 3.1, 10FT EXTRACTION ARM
ITEM DESCRIPTION QTY
1 ARM BODY 1
2 HOSE SUPPORT 1
3 HOOD ASSEMBLY 1
4 FLEXIBLE HOSES 2
5* INSTRUCTION MANUAL 1
6* LOOSE HARDWARE BAG 1
K2633-6 – LFA 3.1, 10FT EXTRACTION ARM WITH
LAMP AND ARC SENSOR
ITEM DESCRIPTION QTY
1 ARM BODY 1
2 HOSE SUPPORT 1
3 HOOD ASSEMBLY 1
4 FLEXIBLE HOSES 2
5 LIGHT/POWER CONTROL SWITCH PANEL 1
6* INSTRUCTION MANUAL 1
7* LOOSE HARDWARE BAG 1
K2633-7 – LFA 4.1, 13FT EXTRACTION ARM
ITEM DESCRIPTION QTY
1 ARM BODY 1
2 HOSE SUPPORT 1
3 HOOD ASSEMBLY 1
4 FLEXIBLE HOSES 2
5* INSTRUCTION MANUAL 1
6* LOOSE HARDWARE BAG 1
K2633-8 – LFA 4.1, 13FT EXTRACTION ARM WITH
LAMP AND ARC SENSOR
ITEM DESCRIPTION QTY
1 ARM BODY 1
2 HOSE SUPPORT 1
3 HOOD ASSEMBLY 1
4 FLEXIBLE HOSES 2
5 LIGHT/POWER CONTROL SWITCH PANEL 1
6* INSTRUCTION MANUAL 1
7* LOOSE HARDWARE BAG 1
1
2
3
4
5
A-9
INSTALLATIONFUME EXTRACTION ARMS
MOUNTING THE LFA 3.1 OR 4.1 ARM
TO THE MOBIFLEX
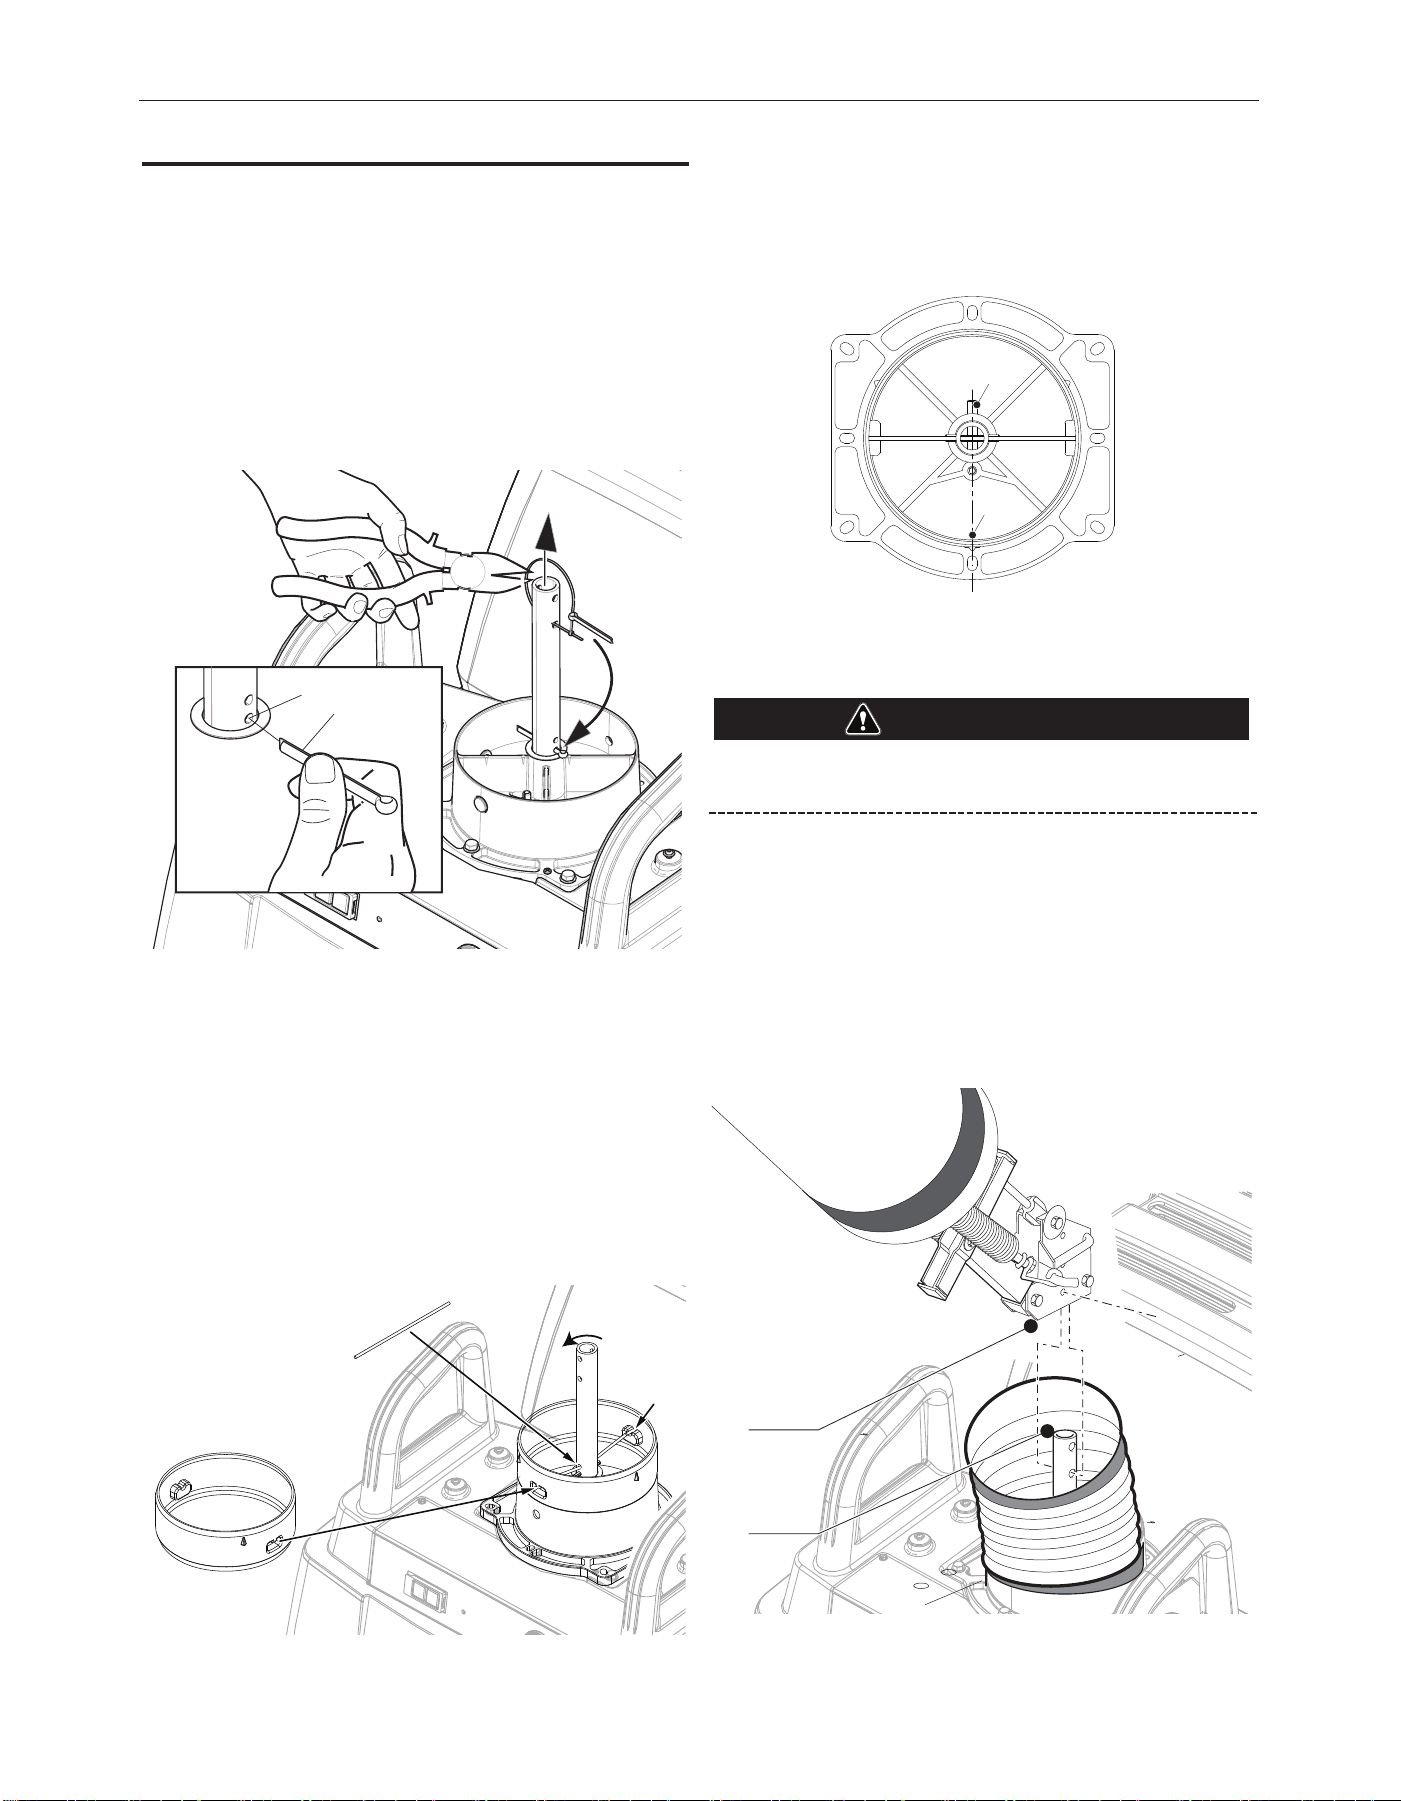
See Figure A.8 for steps 1-4
1. Cut through the upper cable tie to release the cotter pin
(Item A).
2. Lift the post of the base swivel mount by the lower cable tie.
3. Put the cotter pin through the lowest hole in the post (Item B)
and bend it around.
4. Cut the lower cable tie and let down the post.
FIGURE A.8
5. Remove clamping pin from under arm seal band of the base
swivel mount.
6. Fold down the arm seal band and take off the red plastic ring.
See Figure A.9 for steps 7-8
7. Insert the clamping pin (Item A) through the hole in the post
located above the split pin.
8. Position the red plastic ring (Item B) and place the clamping
pin into the ridges (Item C). Rotating the red plastic ring may
be necessary.
FIGURE A.9
See Figure A.10 for steps 9-12
9. Turn the base swivel mount so, that the stop pin (A) is in line
with the cable lead-through hole (B).
FIGURE A.10
Note: The supply cable inside the base swivel mount of the
Mobiex 200 OR 200 HE Base Unit is not used when mounting a
K2633-5 or K2633-7 LFA 3.1/4.1 Mobile Manual arm.
Do not remove the yellow tape attaching both arm sections.
See Figure A.11 for steps 1-3
1. Mount the extraction arm LFA 3.1/4.1 Mobile Manual (A) on
the post (B) using the two 5/16-18 bolts and two self-locking
5/16-18 nuts with washers.
2. Remove the yellow tape from both arm sections.
3. Proceed to Balance Check and adjust the friction of the arm
and hood movement as described in the maintenance section
of this manual.
FIGURE A.11
A
B
A
B
C
A
B
WARNING
B
A
A-10
INSTALLATIONFUME EXTRACTION ARMS
Electrical Connection for Lamp and Arc Sensor
The K2633-6 or K2633-8 LFA 3.1/4.1 Mobile Automatic extraction
arm contains an integrated Lamp & Arc Sensor Kit.
The supply cable inside the base swivel mount
should hang down vertically. Do not remove the
wire bridge.
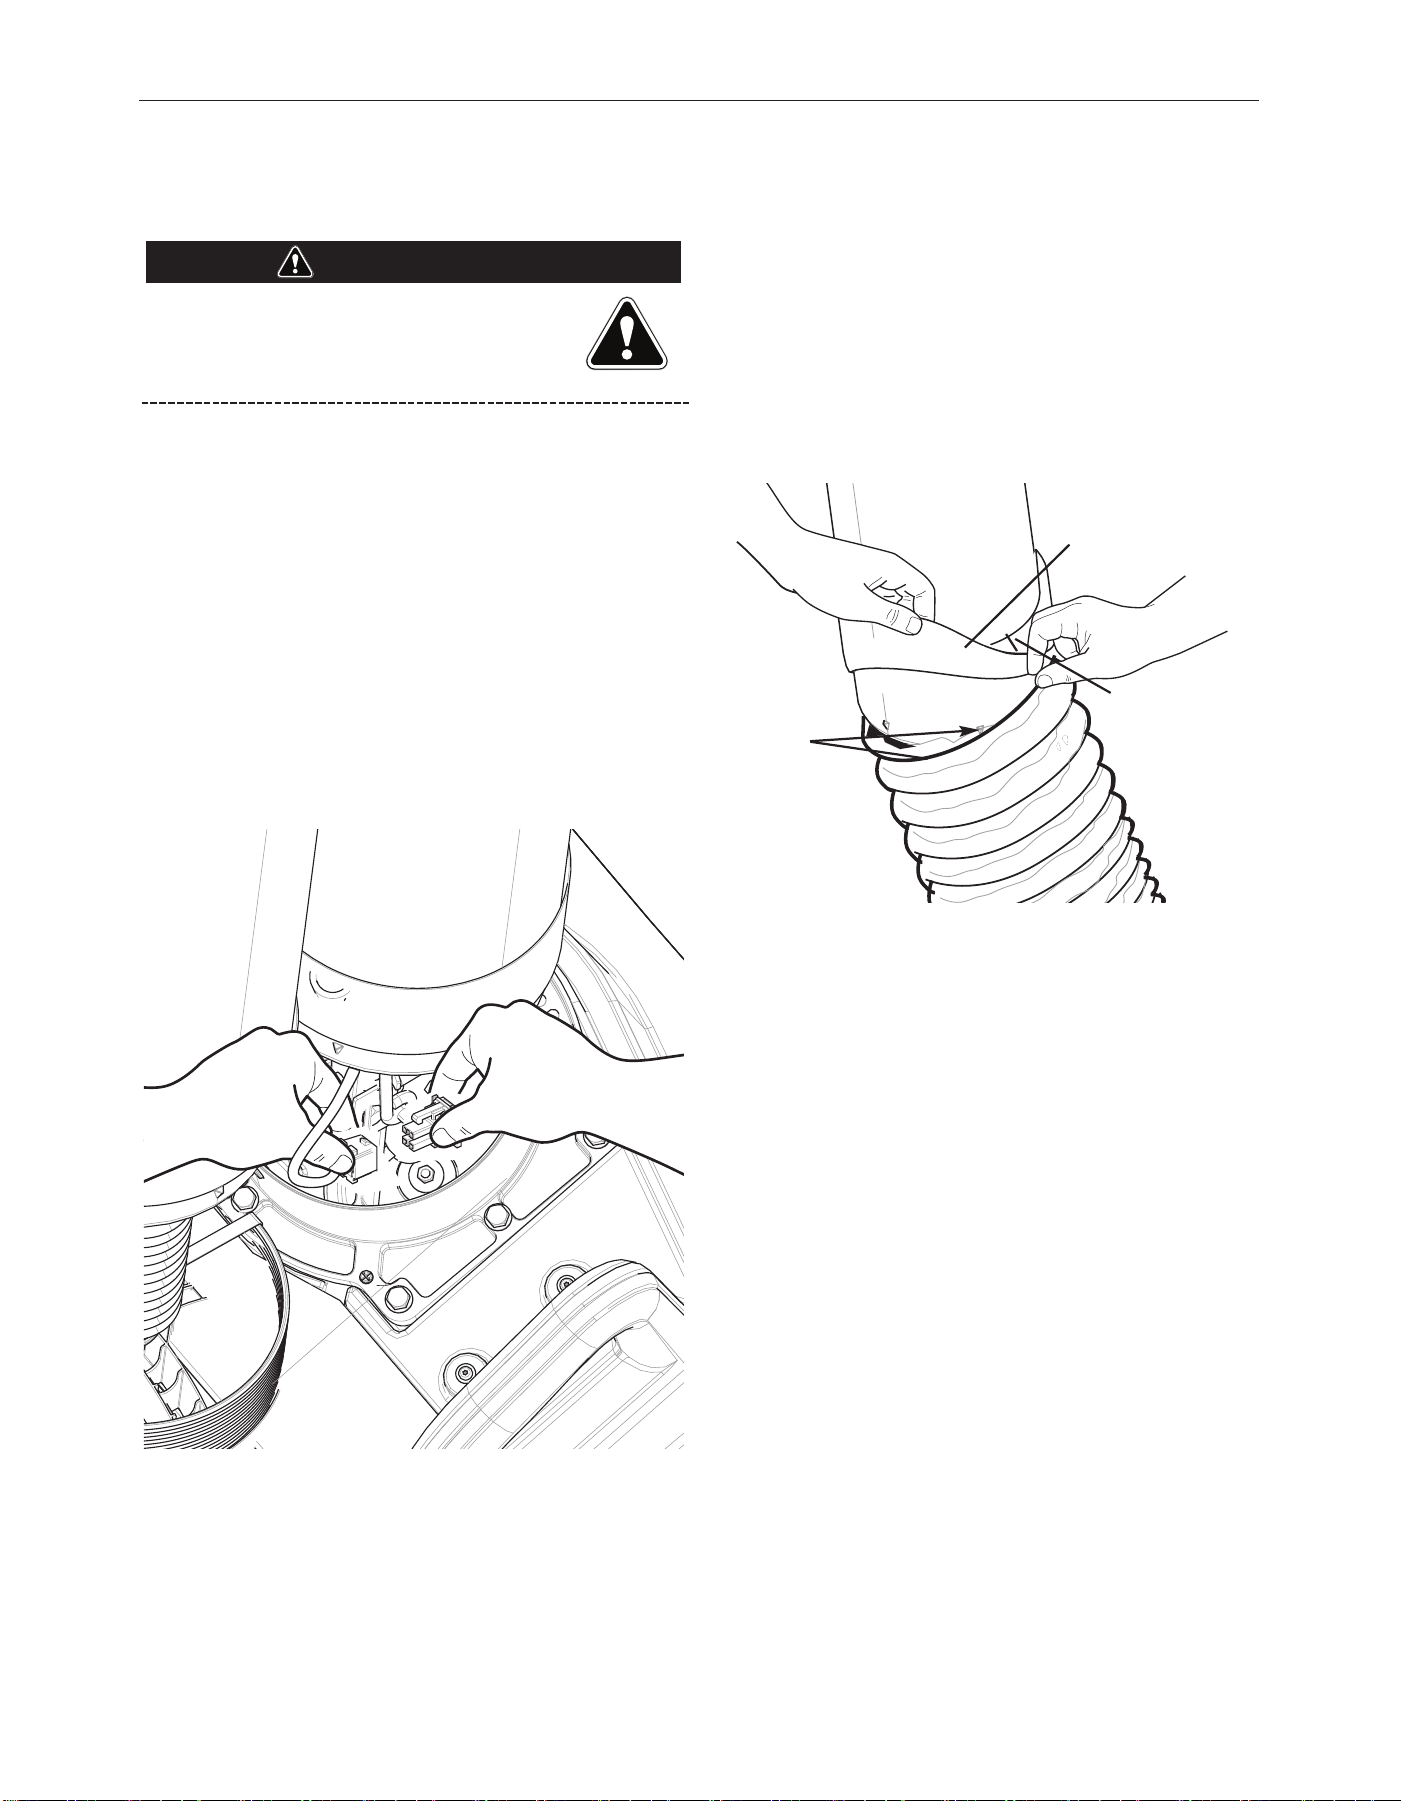
See Figure A.12 for steps 4-7
4. Remove the wire bridge from the supply cable inside the base
swivel mount.
5. Connect the supply cables of the Mobiex 200 or 200 HE Base
Unit and the extraction arm.
NOTE: If you are using an older Mobiex 200-M with an older
connection on the supply side, use the supplied adapter cable
S31224-62 in the loose hardware kit.
6. Remove the yellow tape from both arm sections.
7. Turn the extraction arm 359° and check whether the supply
cable is long enough. If necessary, pull the supply cable of the
Mobiex 200 or 200 HE Base Unit to a sufcient length.
FIGURE A.12
8. Remove the plastic and tape packaging from the arm
sections. Adjust the friction of the arm and hood movement
as described in the maintenance section of this manual.
When set, seal all hose connections with the arm seal bands.
9. Fold back 2/3 of both arm seal bands. Remove the wrap of
the exible hose. Place the exible hose over both arm
sections. To secure the hose, at least one metal rings of the
hose should be applied over the ridges at each arm section.
Fold back the arm seal bands and place them over the hose.
The arm seal band should cover the arm section 0.5-1 in. See
Figure A.13
FIGURE A.13
ATTENTION
0.5 - 1in. overlap
of arm band seal
on the arm
Place at least
one metal band
of exible hose
over ridge
Stretch arm band seal
over exible tube
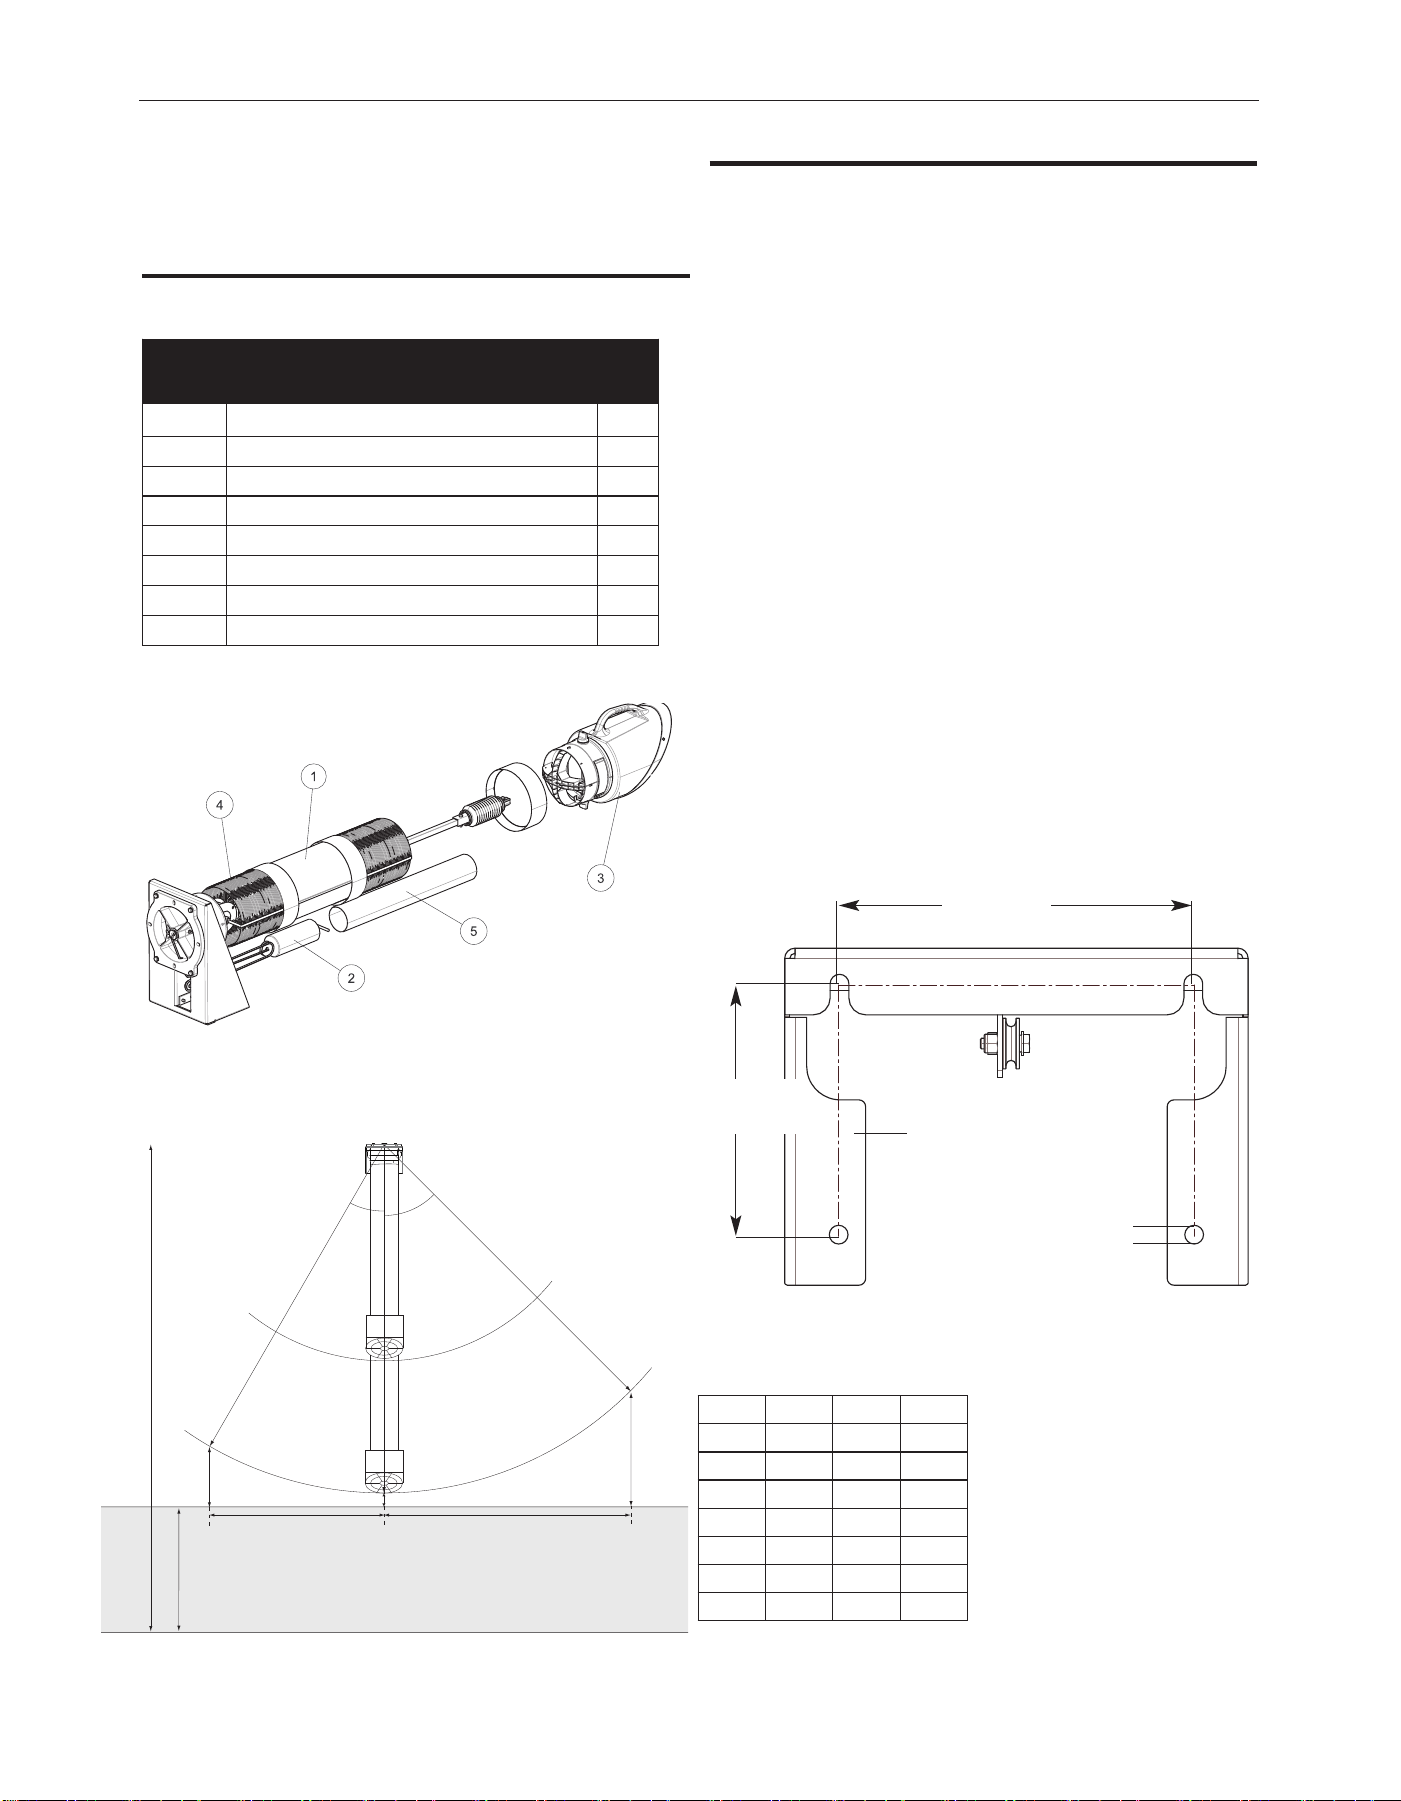
WALL MOUNTING
LTA 2.0-CW ARM
Components
*NOT SHOWN
See Parts Page for Hardware Bag Contents
MOUNTING THE LTA 2.0-CW EXTRACTION ARM ON
THE MOUNT ASSEMBLY
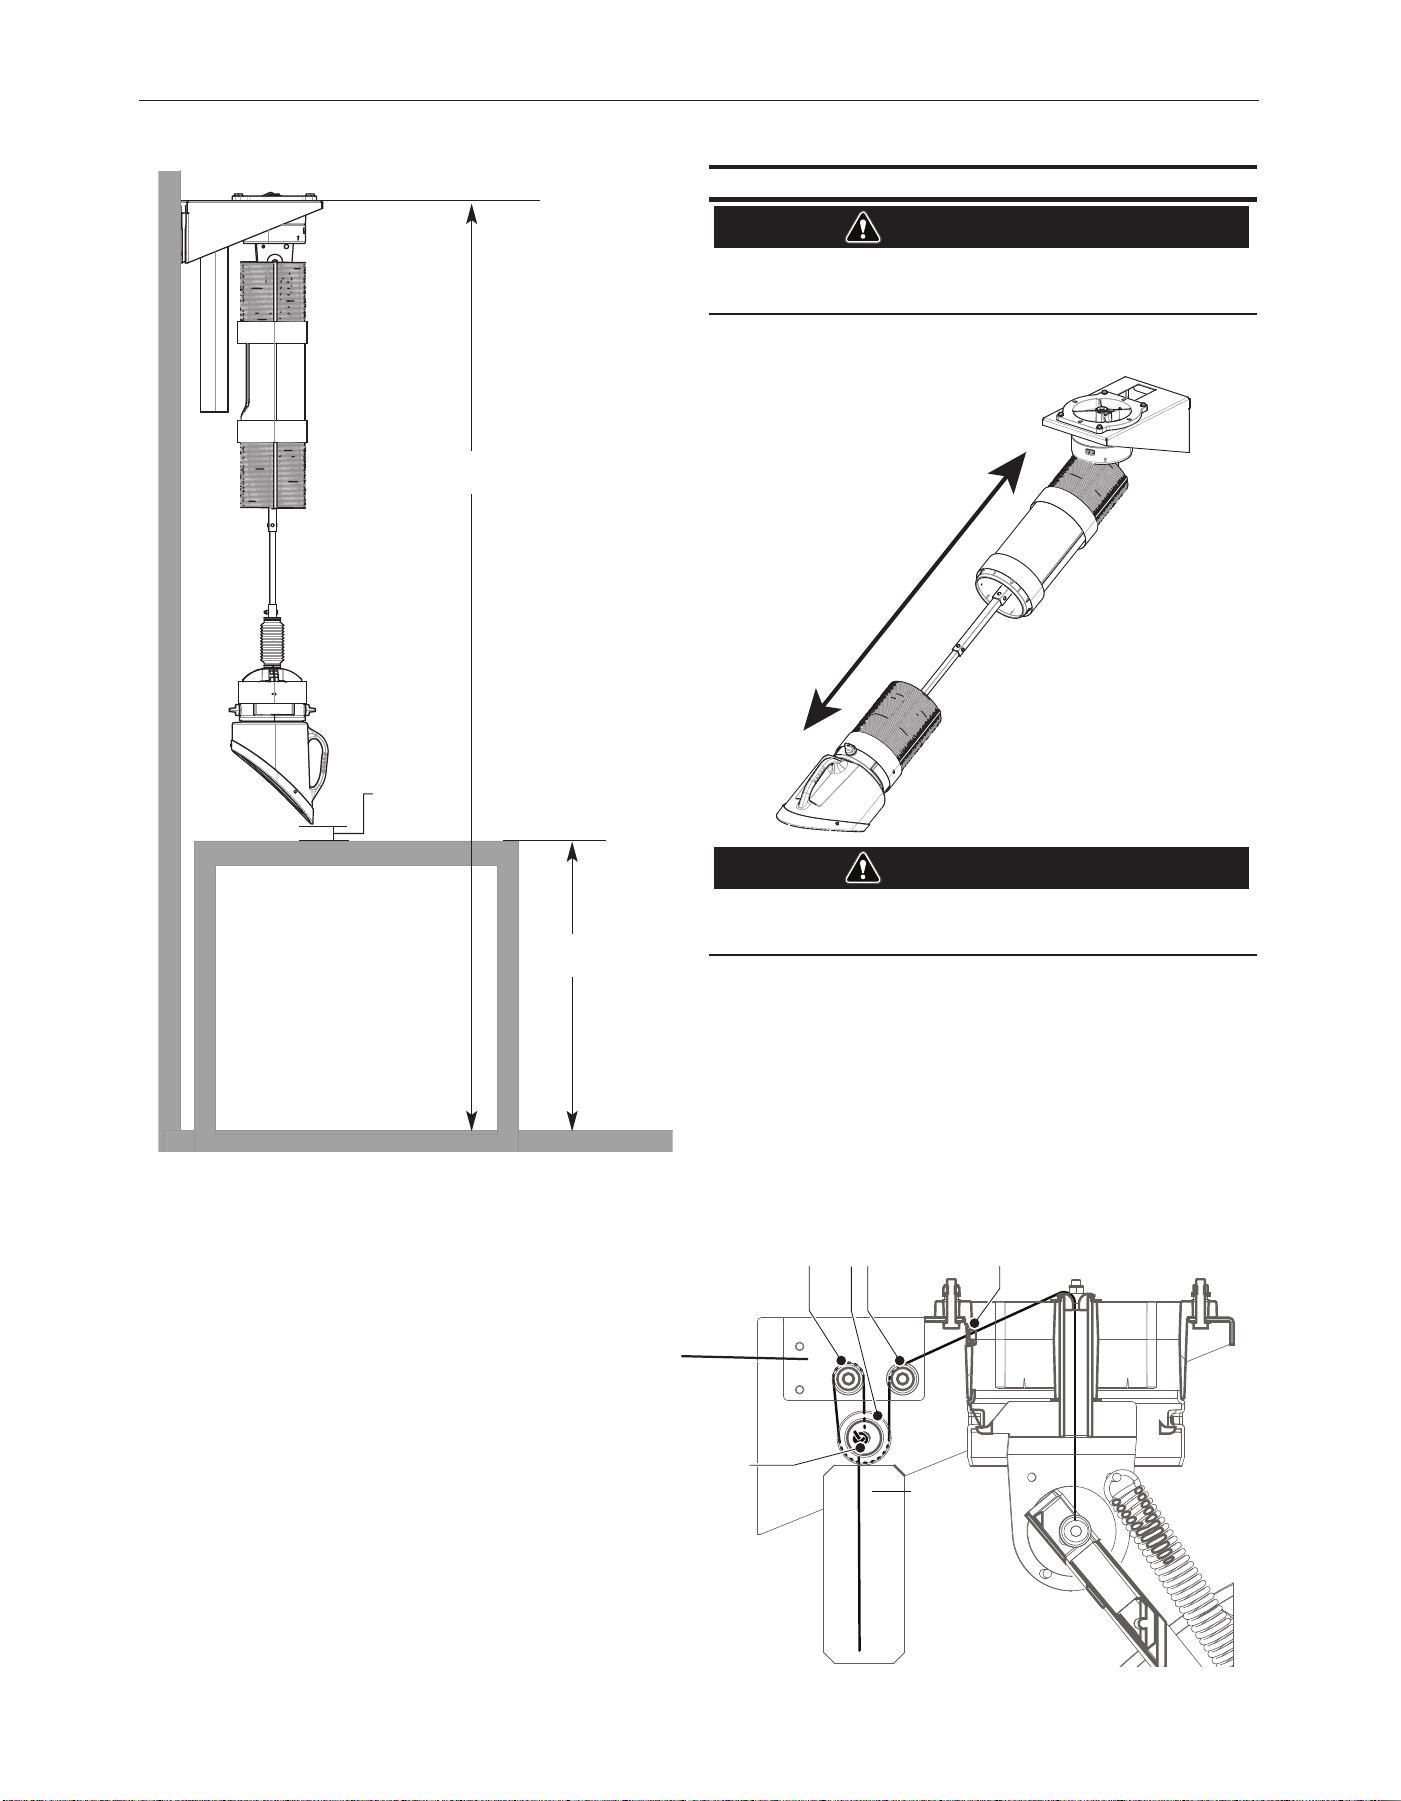
The recommended installation height of the wall mounting bracket
is 11.5 ft. (3500 mm). If the subject work bench is lower than the
standard height of 3.0 ft. (900 mm), it is advisable to install the
wall mounting bracket at a height of 9.8-10.6 ft. (3000-3250
mm). See Figures A.14 and A.15.
The package contains no mounting hardware for the Mount
Assembly since the required mounting hardware depends on the
wall type. The Mount Assembly can be mounted on:
• A thin brick or concrete wall (min. thickness of 4 inches/100
mm), using four threaded rods M10.
• A thick brick or concrete wall, using four cotter bolts
M10x120x60.
• Steel prole (e.g. H-prole), using four threaded rods M10.
NOTE: For central extraction systems, connec-
tion of the LTA 2.0-CW to an 8 inch duct
drop is made easier with K1657-5
Connector. See options/Accessories on
page C-1.
Mount the wall mounting bracket to the wall.
See Figure A.17 and A.18
FIGURE A.14
K1655-14 – LTA 2.0 – CW TELESCOPIC EXTRACTION
ARM
ITEM DESCRIPTION QTY
1 ARM BODY AND MOUNTING BRACKET 1
2 COUNTER WEIGHT 1
3 HOOD ASSEMBLY 1
4 FLEXIBLE HOSES 2
5 COUNTER WEIGHT GUIDE TUBE 1
6* INSTRUCTION MANUAL 1
7* LOOSE HARDWARE BAG 1
8.3 in
(210mm)
WALL FACING VIEW OF
MOUNT ASSEMBLY
0.5 in
(12mm)
4X
5.9 in
(150mm)
A-11
INSTALLATIONFUME EXTRACTION ARMS
30°
45°
G
E
C
B
A
D F
TOTAL HEIGHT
WORK BENCH
HEIGHT
MM INCH FEET
A 3500 138.8 11.5
B 900 35.4 3
C 450 17.7 1.5
D 1250 49.2 4.1
E 100 4.0 0.3
F 1800 70.9 5.9
G 800 31.5 2.6
A-12
INSTALLATIONFUME EXTRACTION ARMS
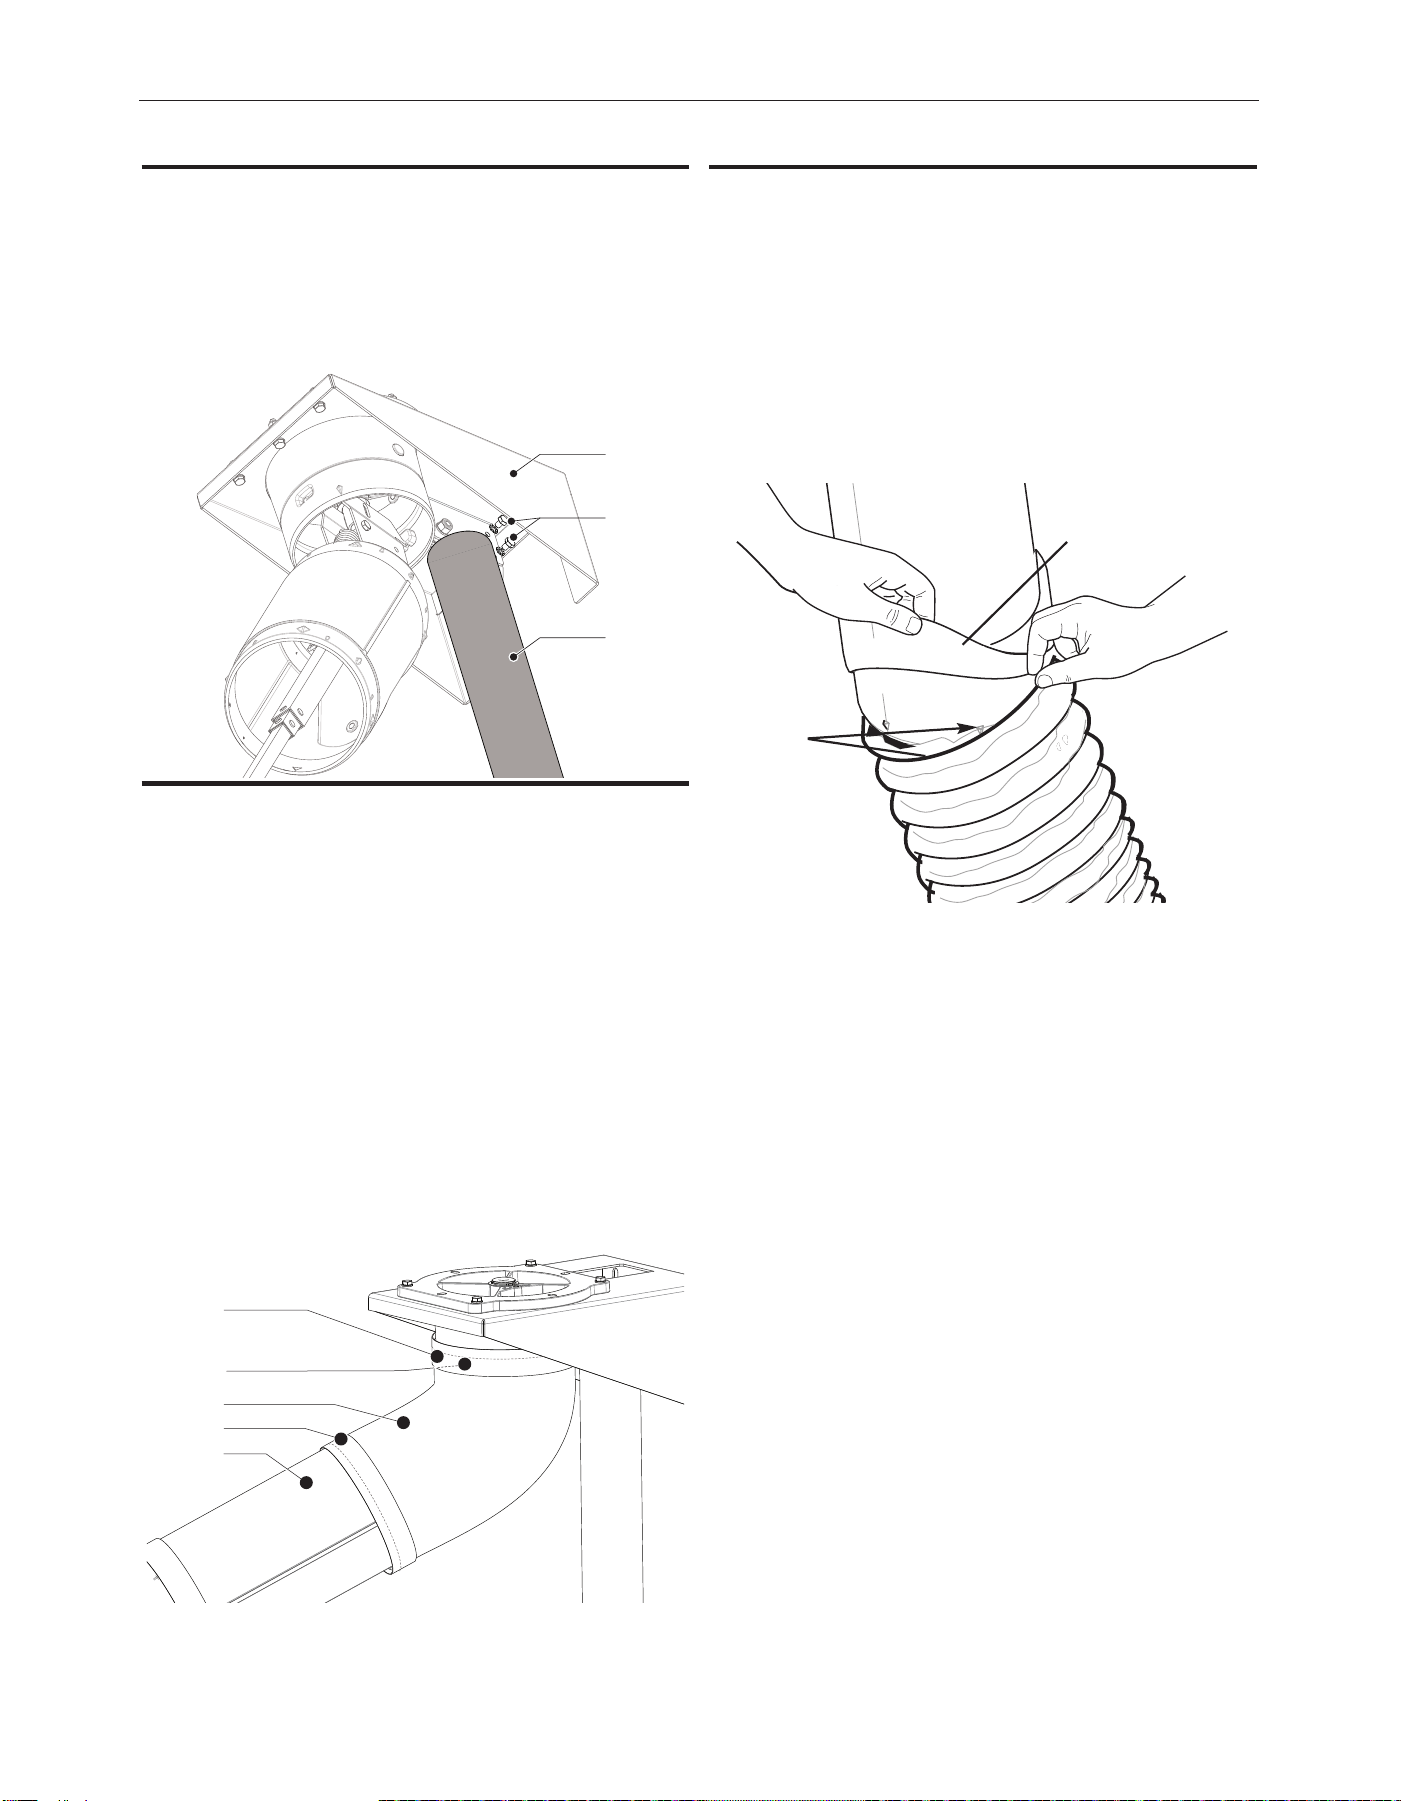
FIGURE A.15
ATTACHING THE ROPE
Tying the counterweight too low will affect the
reach of the extraction arm.
1. Pull the arm to the longest position (See Figure A.16).
FIGURE A.16
Failure to securely knot rope could
cause injury.
2. Guide the rope through the mounting assembly (D) and over
the pulley (C), the counterweight pulley (B) and the other
small pulley (A). (See Figure A.17)
3. Keep the counterweight in the highest position, which means
just below the small pulleys. Securely fasten the rope to the
counterweight by tying a knot (E) . The rope should be
threaded through the hole in the counterweight pulley. The
knot must be large enough so the rope cannot slip back
through the hole - take measures to make sure knot does
NOT untie itself. (See Figure A.17)
FIGURE A.17
11.5 ft. (3500mm)
0.3 ft.
(100mm)
3 ft. (900mm)
CAUTION
WARNING
A B C D
E
When tied
off properly,
there should
be about 18”
of extra rope
after the
knot, tie off
extra.
Bracket over pulleys
not shown for clarity in
routing of rope.
A-13
INSTALLATIONFUME EXTRACTION ARMS
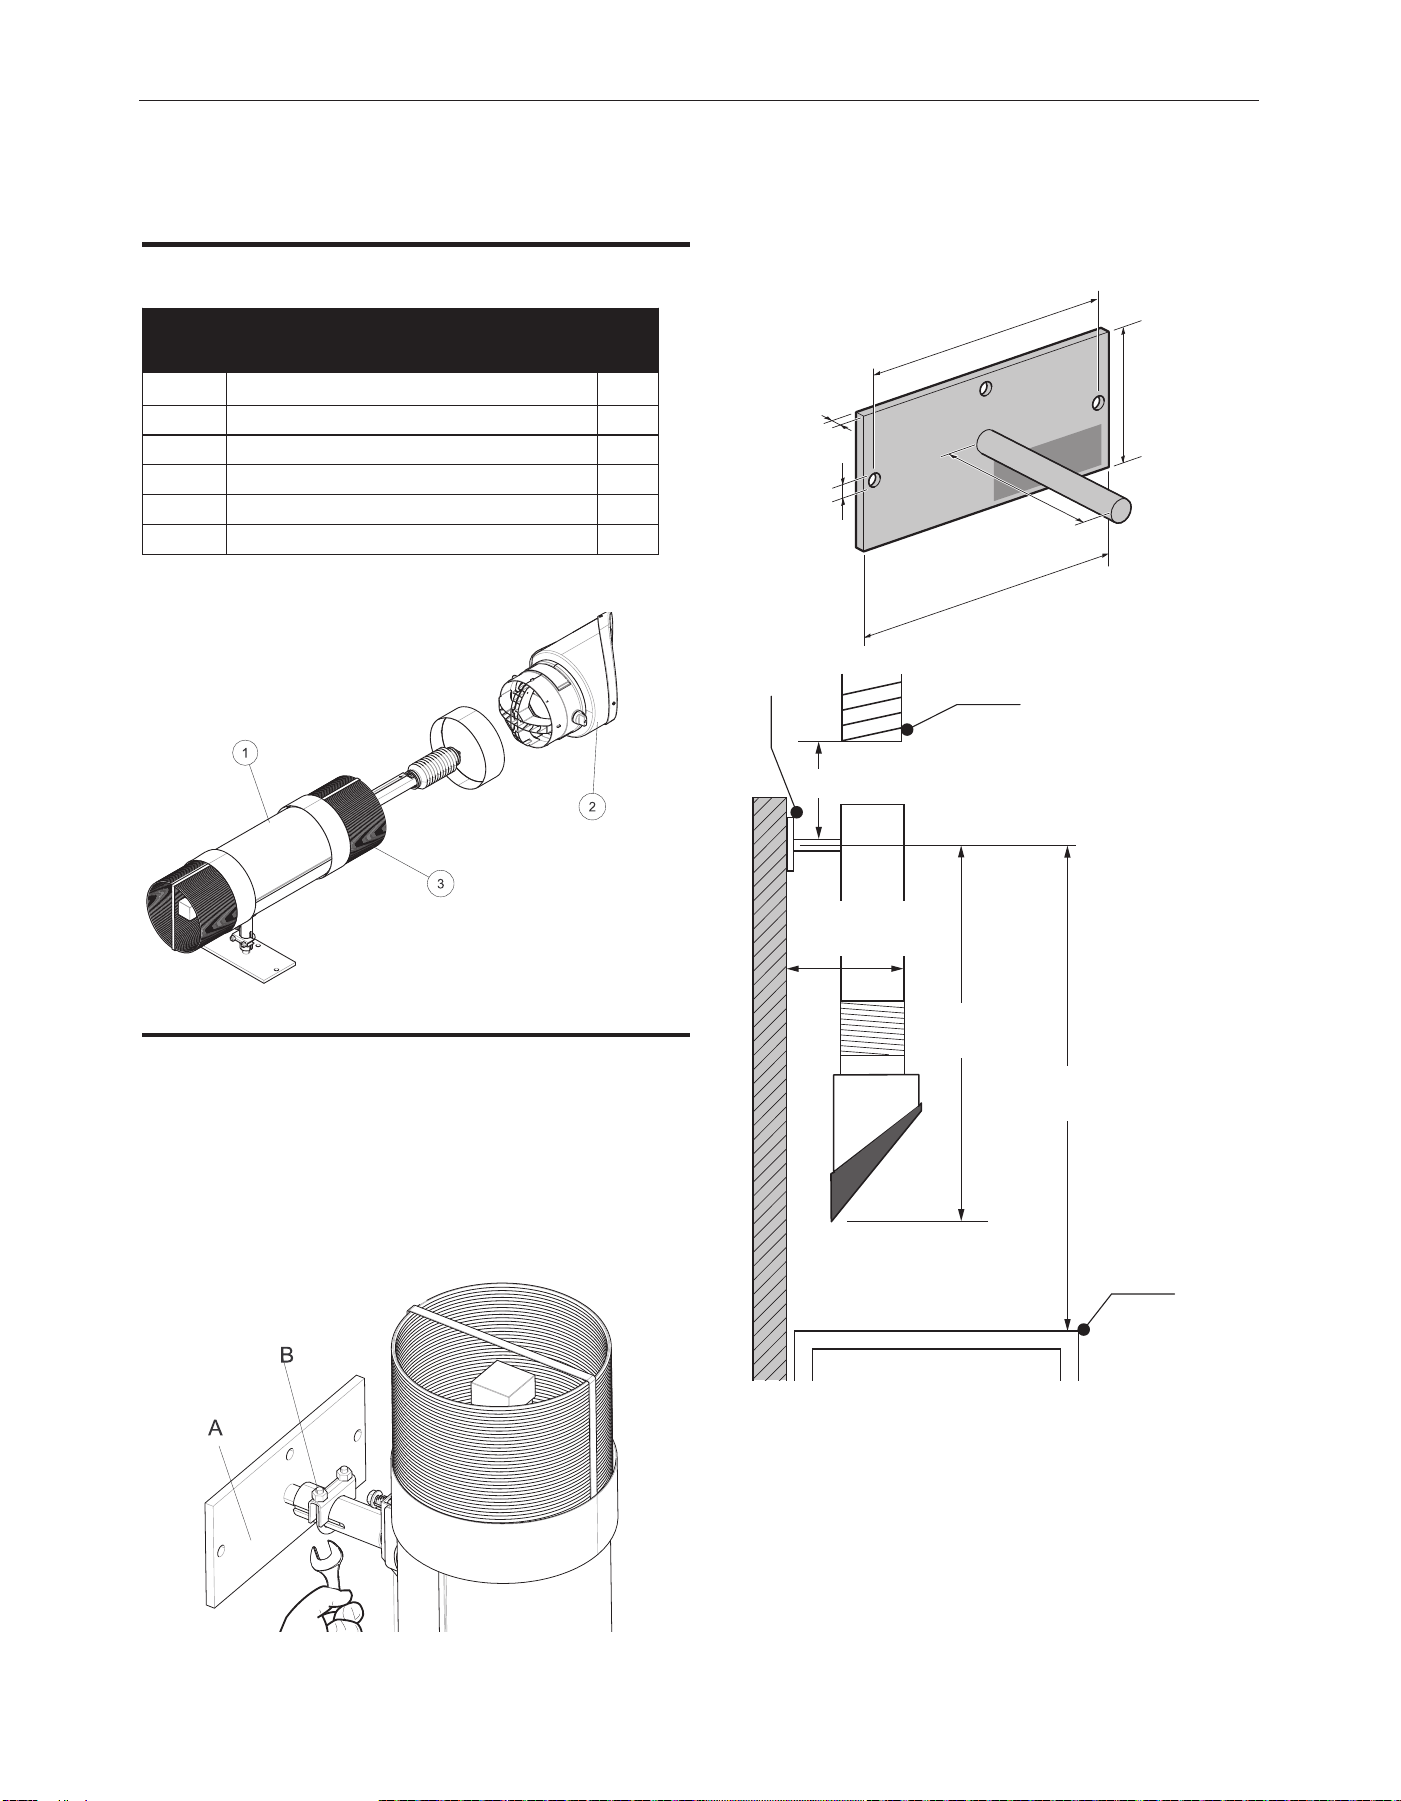
ATTACHING THE COUNTERWEIGHT CASING
4. Slide the counterweight casing (C) over the counterweight.
(See Figure A.18)
5. Using a 1/2” wrench, fasten the casing to the wall mounting
bracket (A) using (2) 5/16-18 x .75 bolts and (2) 5/16-18
locknuts.
6. Securely tighten bolts.
FIGURE A.18
ATTACHING THE HOSE TO THE
MOUNTING ASSEMBLY
The mounting assembly and the tube are both provided with a
rubber gaskets. To attach the shorter exible hose proceed as
follows:
7. Remove the banding straps from the exible hose.
8. Fold back 2/3 of both rubber gaskets. (A+D). (See Figure
A.19)
9. Place the exible hose (C) over the collar (B) and the tube (E).
To secure the hose, at least one metal ring of the hose should
be applied over the ridges of the collar. The same goes for the
tube.
10. Fold back the gaskets and place them over the hose. Make
sure the upper gasket overlaps the aluminum mounting
assembly approximately 0.4 in. (10 mm).
FIGURE A.19
MOUNTING OF THE EXTRACTION HOOD
11. Remove the plastic and tape packaging from the arm
sections. Adjust the friction of the arm and hood movement
as described in the maintenance section of this manual.
When set, seal all hose connections with the arm seal bands.
12 Fold back 2/3 of both arm seal bands. Remove the wrap of
the exible hose. Place the exible hose over both arm
sections. To secure the hose, at least one metal rings of the
hose should be applied over the ridges at each arm section.
Fold back the arm seal bands and place them over the hose.
The arm seal band should cover the arm section 0.5-1 in. See
Figure A.20.
FIGURE A.20
* Supplied hose clamp to be used in combination with mounting
kit K1657-2.
A
B
C
D
E
B
C
A
Place at least
one metal band
of exible hose
over ridge
Stretch arm band seal
over exible tube
A-14
INSTALLATIONFUME EXTRACTION ARMS
WALL MOUNTING THE
LTA 2.0 TELESCOPIC ARM
Components
*NOT SHOWN
See Parts Page for Hardware Bag Contents
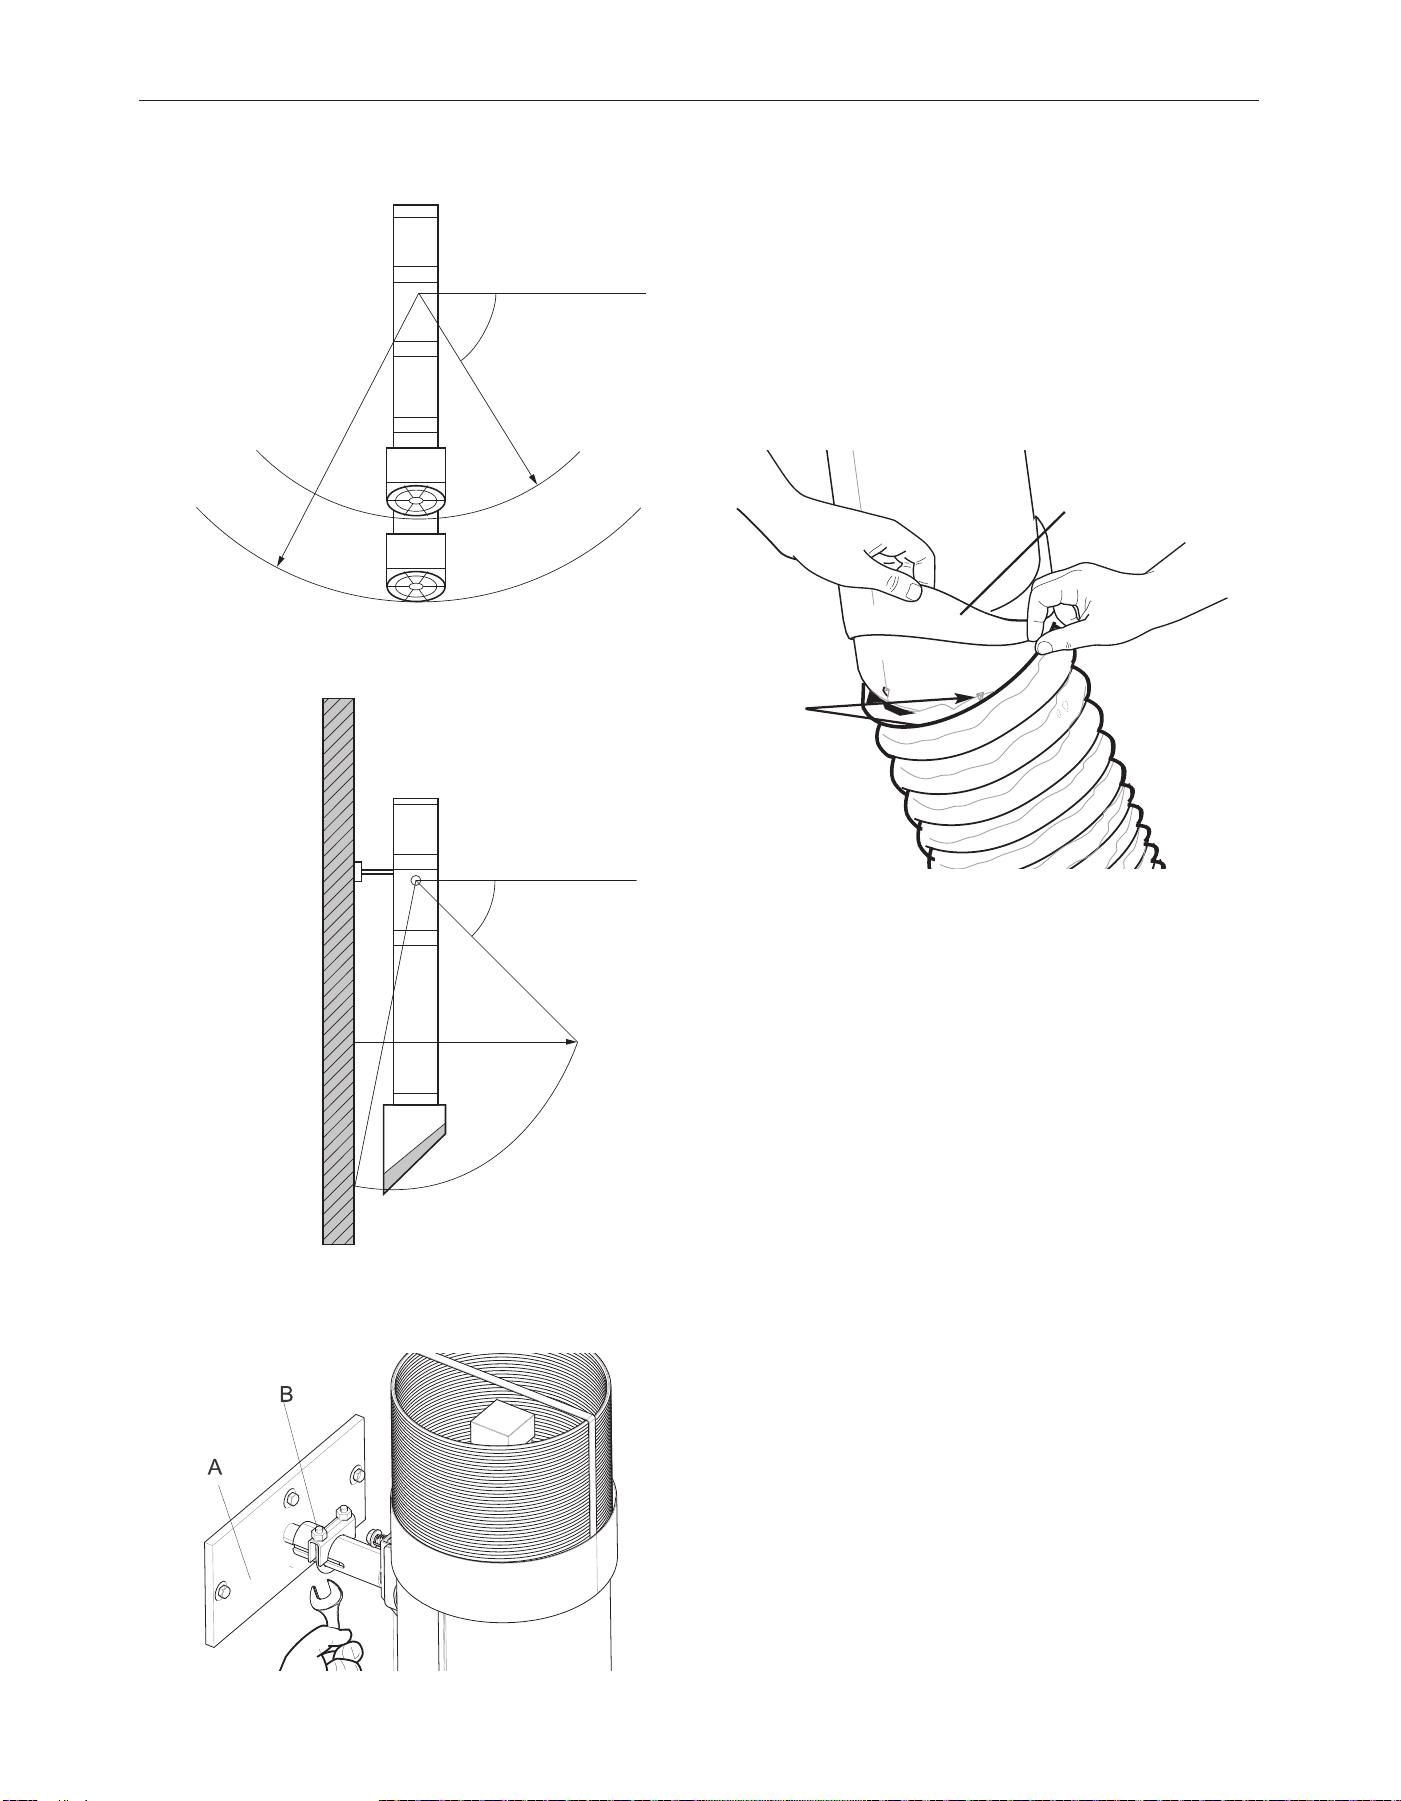
MOUNTING THE LTA 2.0 TELESCOPIC EXTRACTION
ARM ON THE WALL MOUNTING BRACKET
1. Disconnect the mounting bracket from the arm before
mounting by using a ½” wrench and loosening the U-clamp
(B) and sliding the post out of the friction tube (See Figure
A.21).
FIGURE A.21
2. Mount the telescoping arm mounting bracket (A) to the wall.
Standard mounting height is 63” (1600mm) from the work
table to the center of the bracket. Refer to Figure A.22 for
drilling dimensions.
FIGURE A.22
K1655-10 – LTA 2.0 TELESCOPIC EXTRACTION ARM
ITEM DESCRIPTION QTY
1 ARM BODY 1
2 HOOD ASSEMBLY 1
3 FLEXIBLE HOSES 2
4* INSTRUCTION MANUAL 1
5* LOOSE HARDWARE BAG 1
11.8"
(300 mm)
38.6-54.3"
(980-1380 mm)
B
C
A
11.8-15.7"
(300-400 mm)
63"
(1600 mm)
4.7"
(120 mm)
10"
(255 mm)
9"
(230 mm)
0.4"
(10 mm)
8.3"
(210 mm)
ø0.5"
(ø13 mm)
A-15
INSTALLATIONFUME EXTRACTION ARMS
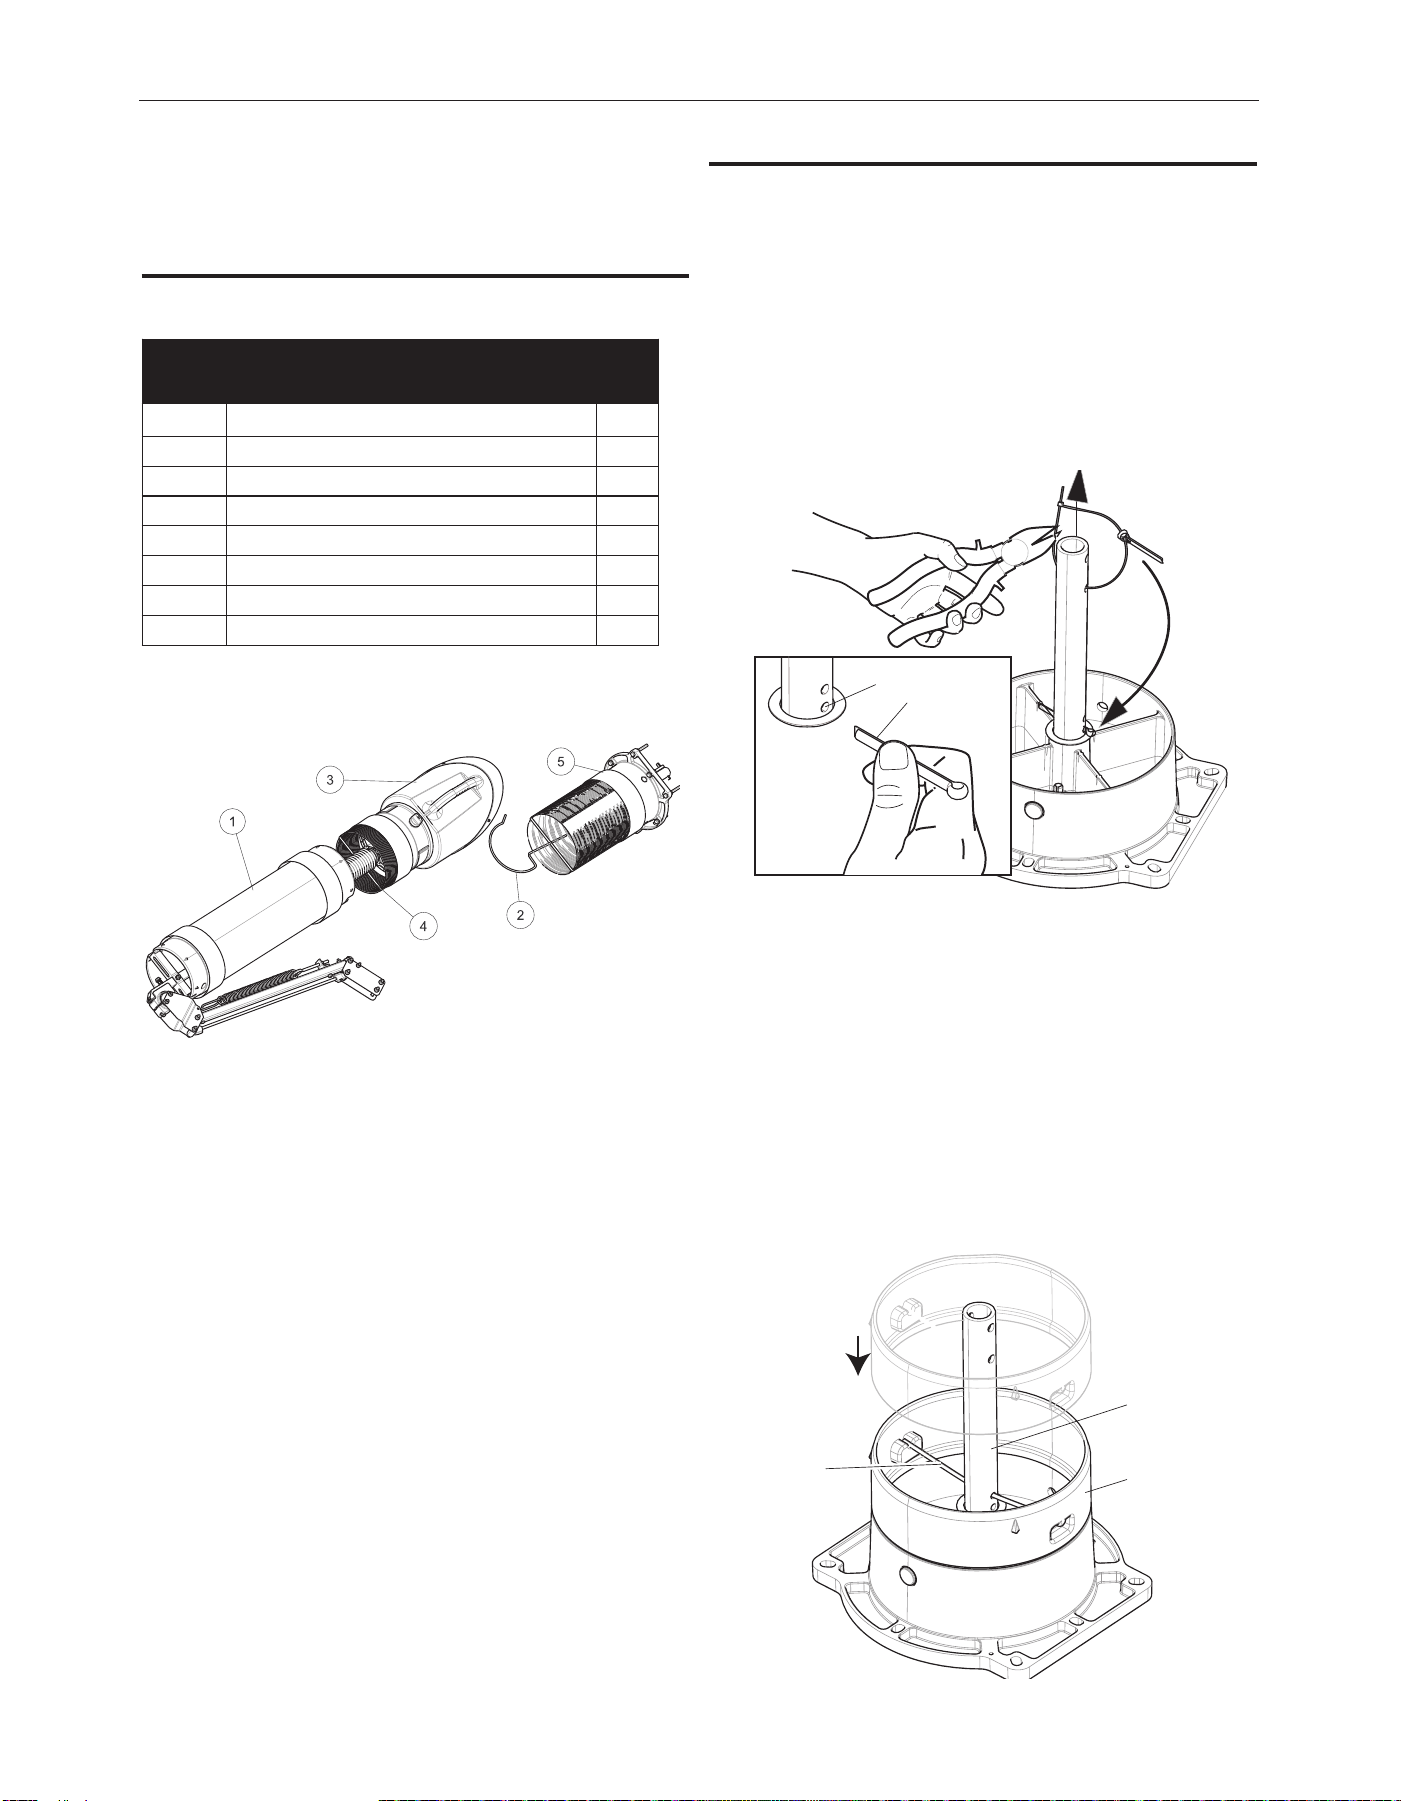
FIGURE A.23
3. Slide the arm friction tube onto mounting bracket. Using a ½”
wrench, tighten the U-clamp (B)
FIGURE A.24
4. Remove the plastic and tape packaging from the arm
sections. Adjust the friction of the arm and hood movement
as described in the maintenance section of this manual.
When set, seal all hose connections with the arm seal bands.
5. Fold back 2/3 of both arm seal bands. Remove the wrap of
the exible hose. Place the exible hose over both arm
sections. To secure the hose, at least one metal rings of the
hose should be applied over the ridges at each arm section.
Fold back the arm seal bands and place them over the hose.
The arm seal band should cover the arm section 0.5-1 in. See
Figure A.25
FIGURE A.25
45°
45°
40"
(1000 mm)
40"
(1000 mm)
40"
(1000 mm)
55"
(1400 mm)
55"
(1400 mm)
Place at least
one metal band
of exible hose
over ridge
Stretch arm band seal
over exible tube
A-16
INSTALLATIONFUME EXTRACTION ARMS
WALL MOUNTING
LFA 2.0 ARM
Components
*NOT SHOWN
See Parts Page for Hardware Bag Contents
For wall mounting applications:
Install wall mounting brackets as detailed in the section titled
“INSTALLATION OF WALL MOUNTING BRACKETS” for Operator
Manual IM10320 SF2400 Stationary Fan.
MOUNTING THE LFA 2.0 EXTRACTION ARM ON THE
WALL MOUNTING BRACKET
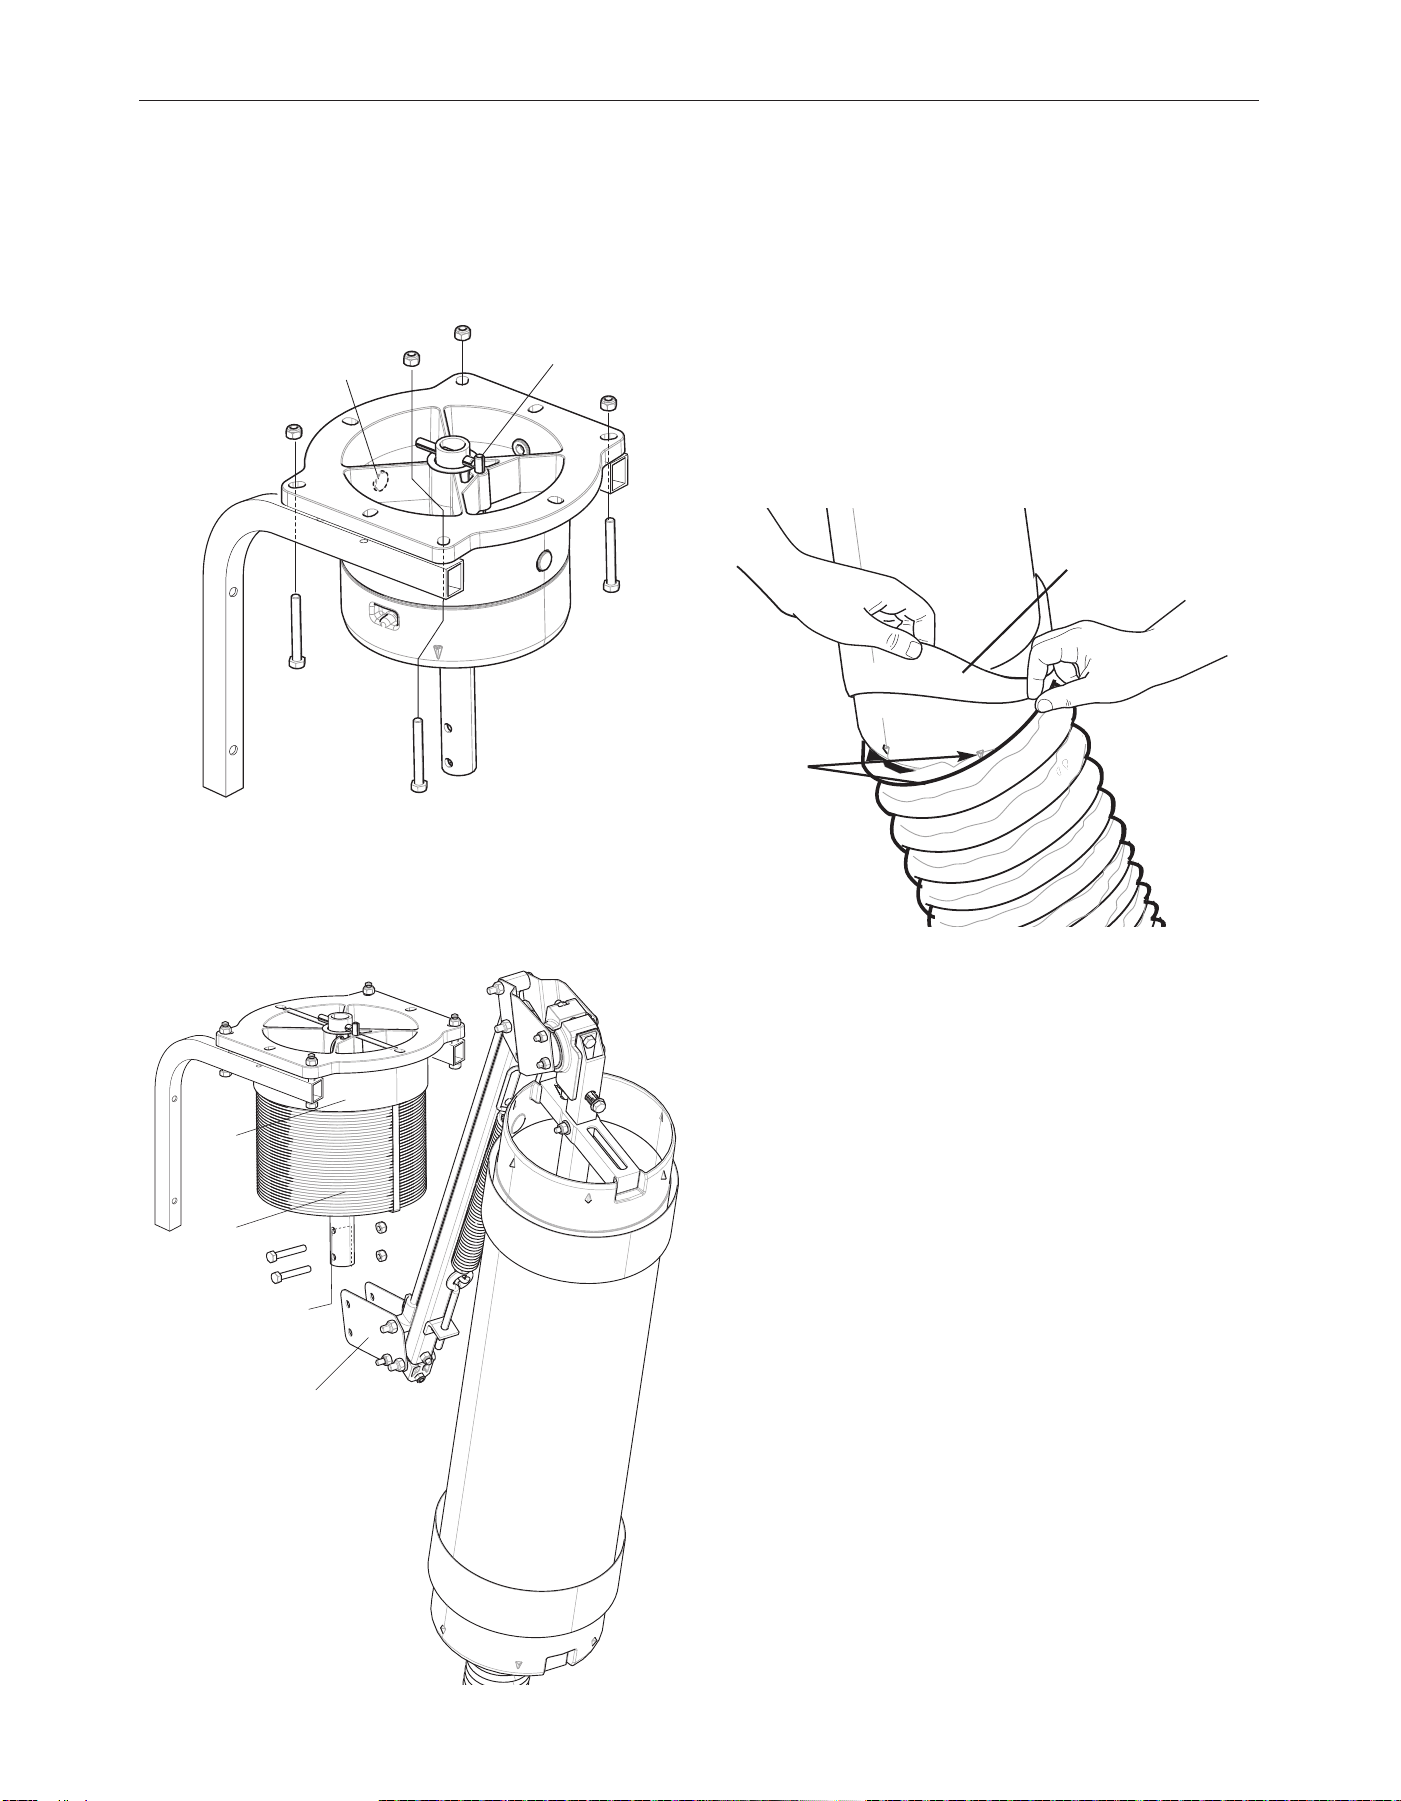
See Figure A.26 for steps 1-4
1. Cut through the upper cable tie to release the cotter pin
(Item A).
2. Lift the post of the base swivel mount by the lower cable tie.
3. Put the cotter pin through the lowest hole in the post (Item B)
and bend it around.
4. Cut the lower cable tie and let down the post.
FIGURE A.26
2. The mounting assembly of the arm comes in three pieces:
(See to Figure A.27)
• Metal rotating rod (Item A),
• red plastic ring (Item B),
• and metal spring collar pivot rod (Item C).
Mount the red plastic ring to the metal mounting assembly by
tting the metal spring collarpivot rod through the hole in the
rotating rod, and snapping it into place on the U-shaped
indents on the red plastic ring. The lip of the ring should t
securely against the top edge of the mounting assembly yet
rotate with the rod.
FIGURE A.27
K1655-12 – LFA 2.0 WALLMOUNT EXTRACTION
ARM
ITEM DESCRIPTION QTY
1 ARM BODY 1
2 HOSE SUPPORT 1
3 HOOD ASSEMBLY 1
4 FLEXIBLE HOSES 2
5 MOUNTING ASSEMBLY 1
6* INSTRUCTION MANUAL 1
7* LOOSE HARDWARE BAG 1
A
B
B
C
A
A-17
INSTALLATIONFUME EXTRACTION ARMS
3. Position the mounting assembly on a wall mounting bracket
(See Figure A.28) so that the cable hole (Figure A.28, Item A)
is on the wall side. Use the four 3” bolts and nuts to secure
the mounting assembly to the wall mounting bracket. Rotate
the hinge rod (Fig. A.28, Item D) so the stop pin (Figure A.28,
Item B) is in the front.
FIGURE A.28
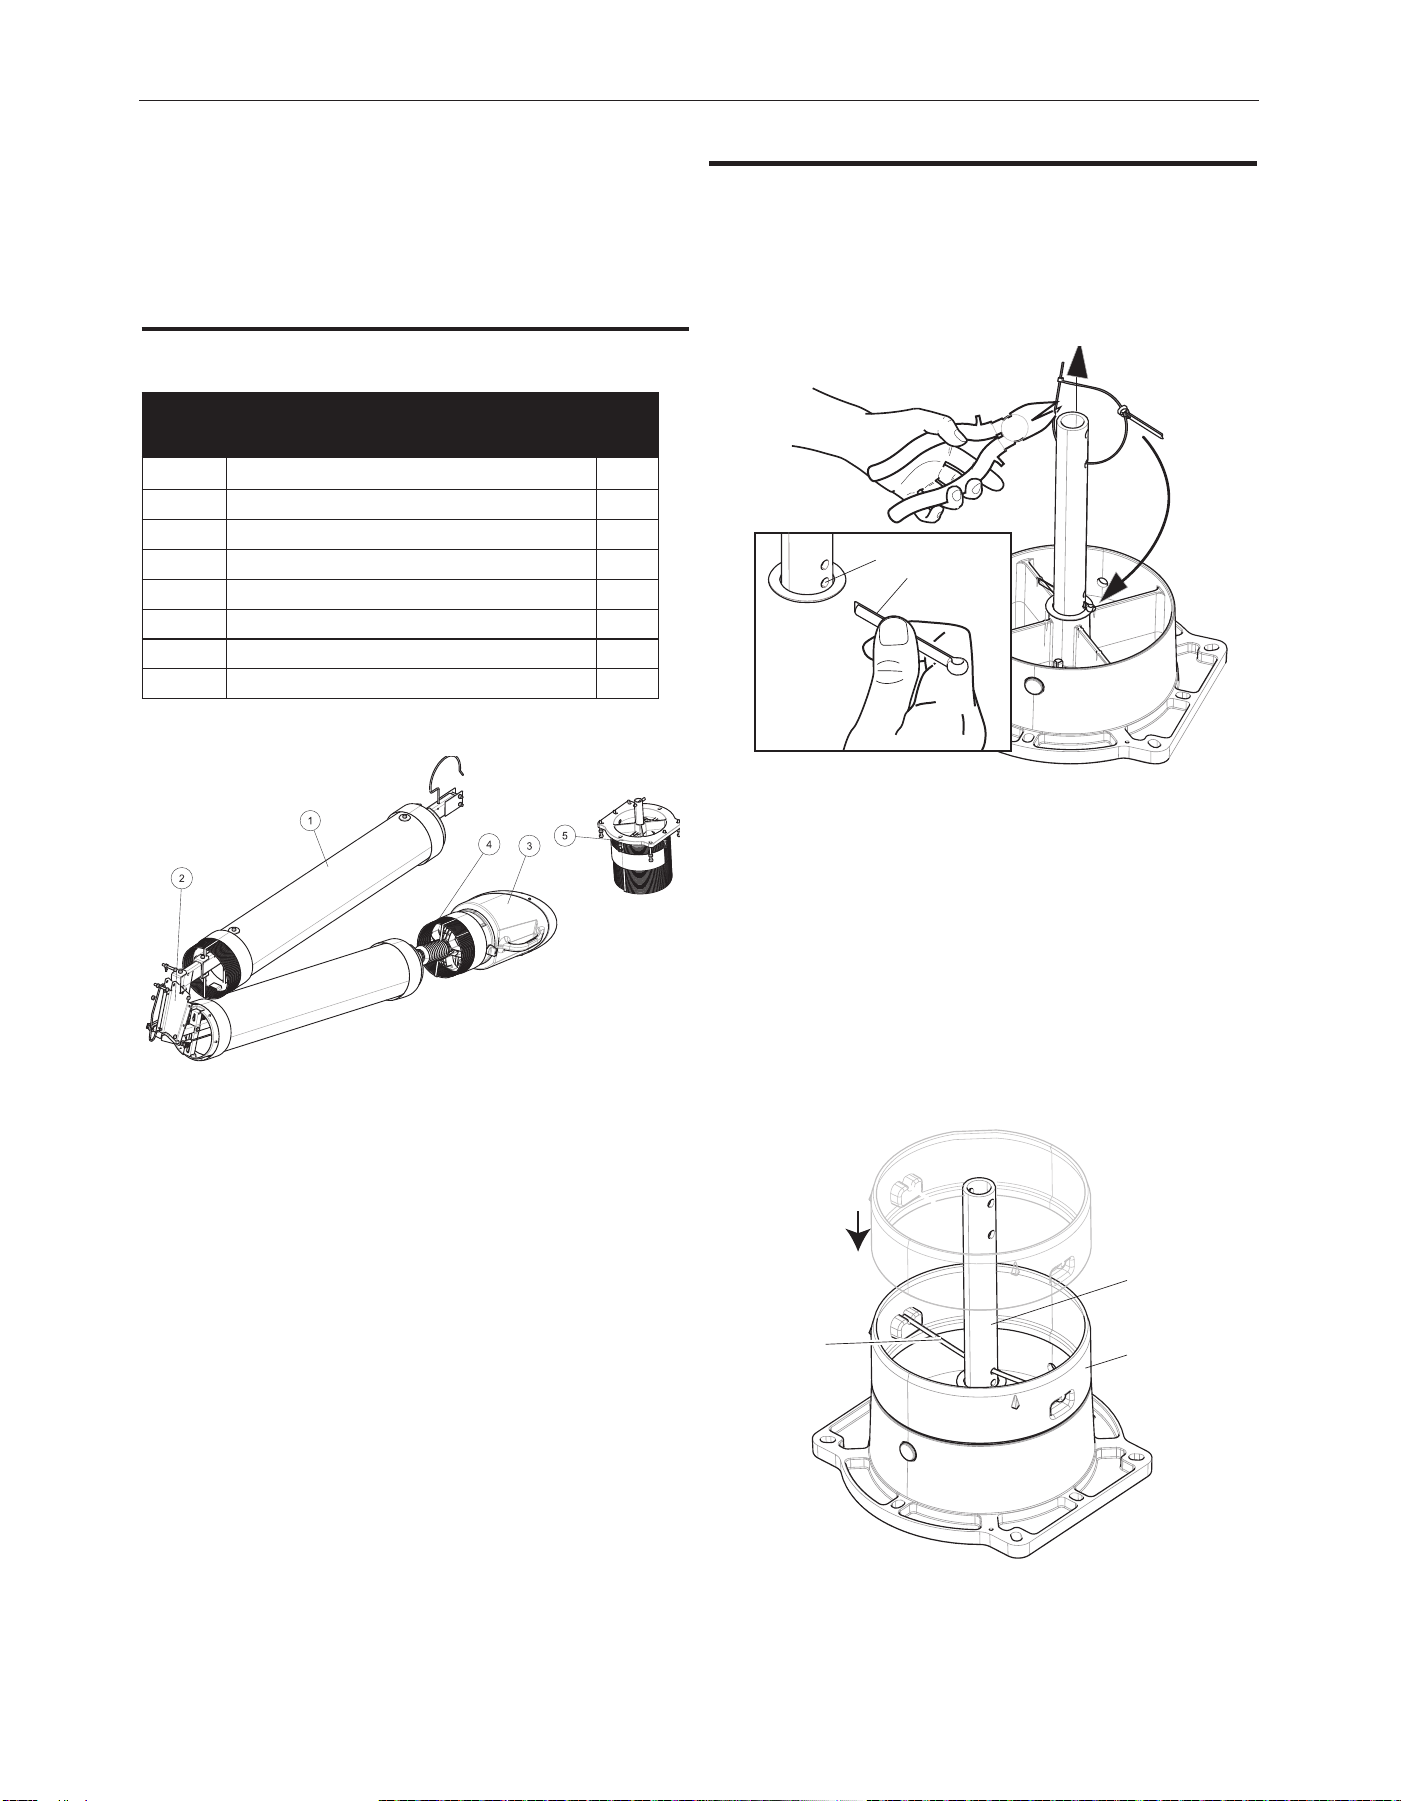
4. Position one 8” arm seal band and a exible hose on the red
plastic ring of the mounting assembly (Figure A.29 Item A &
B). Put another arm seal band on the top of the arm Body
(Figure A.29 Item C). Mount the arm body (Figure A.29, Item
D) to the mounting assembly using (2) 1.75” bolts and nuts.
FIGURE A.29
5. Mount the spring bracket and position the arm seal band and
the exible hose around the connection ange.
6. Remove the plastic and tape packaging from the arm
sections. Adjust the friction of the arm and hood movement
as described in the maintenance section of this manual.
When set, seal all hose connections with the arm seal bands.
7. Fold back 2/3 of both arm seal bands. Remove the wrap of
the exible hose. Place the exible hose over both arm
sections. To secure the hose, at least one metal rings of the
hose should be applied over the ridges at each arm section.
Fold back the arm seal bands and place them over the hose.
The arm seal band should cover the arm section 0.5-1 in. See
Figure A.30
FIGURE A.30
A
B
A
B
D
C
Place at least
one metal band
of exible hose
over ridge
Stretch arm band seal
over exible tube
A-18
INSTALLATIONFUME EXTRACTION ARMS
MOUNTING
LFA 4.1-LC LOW CEILING
ARM
Components
*NOT SHOWN
See Parts Page for Hardware Bag Contents
For wall mounting applications:
Install wall mounting brackets as detailed in the section titled
“INSTALLATION OF WALL MOUNTING BRACKETS” for Operator
Manual IM10320 SF2400 Stationary Fan.
MOUNTING THE LFA 4.1-LC EXTRACTION ARM ON
THE WALL BRACKET
See Figure A.31 for steps 1-4
1. Cut through the upper and lower cable ties (Item A). The
cotter pin is not used for wall mount applications.
FIGURE A.31
2. The mounting assembly of the arm comes in three pieces:
(See to Figure A.32)
• Metal rotating rod (Item A),
• red plastic ring (Item B),
• and metal spring collar pivot rod (Item C).
Mount the red plastic ring to the metal mounting assembly by
tting the metal spring collarpivot rod through the hole in the
rotating rod, and snapping it into place on the U-shaped
indents on the red plastic ring. The lip of the ring should t
securely against the top edge of the mounting assembly yet
rotate with the rod.
FIGURE A.32
K1655-13 – LFA 4.1-LC, 13FT EXTRACTION ARM
ITEM DESCRIPTION QTY
1 ARM BODY (2 SEPARATE PIECES) 1
2 HOSE SUPPORT 1
3 HOOD ASSEMBLY 1
4 FLEXIBLE HOSES 3
5 MOUNTING ASSEMBLY 1
6* INSTRUCTION MANUAL 1
7* LOOSE HARDWARE BAG 1
A
B
B
C
A
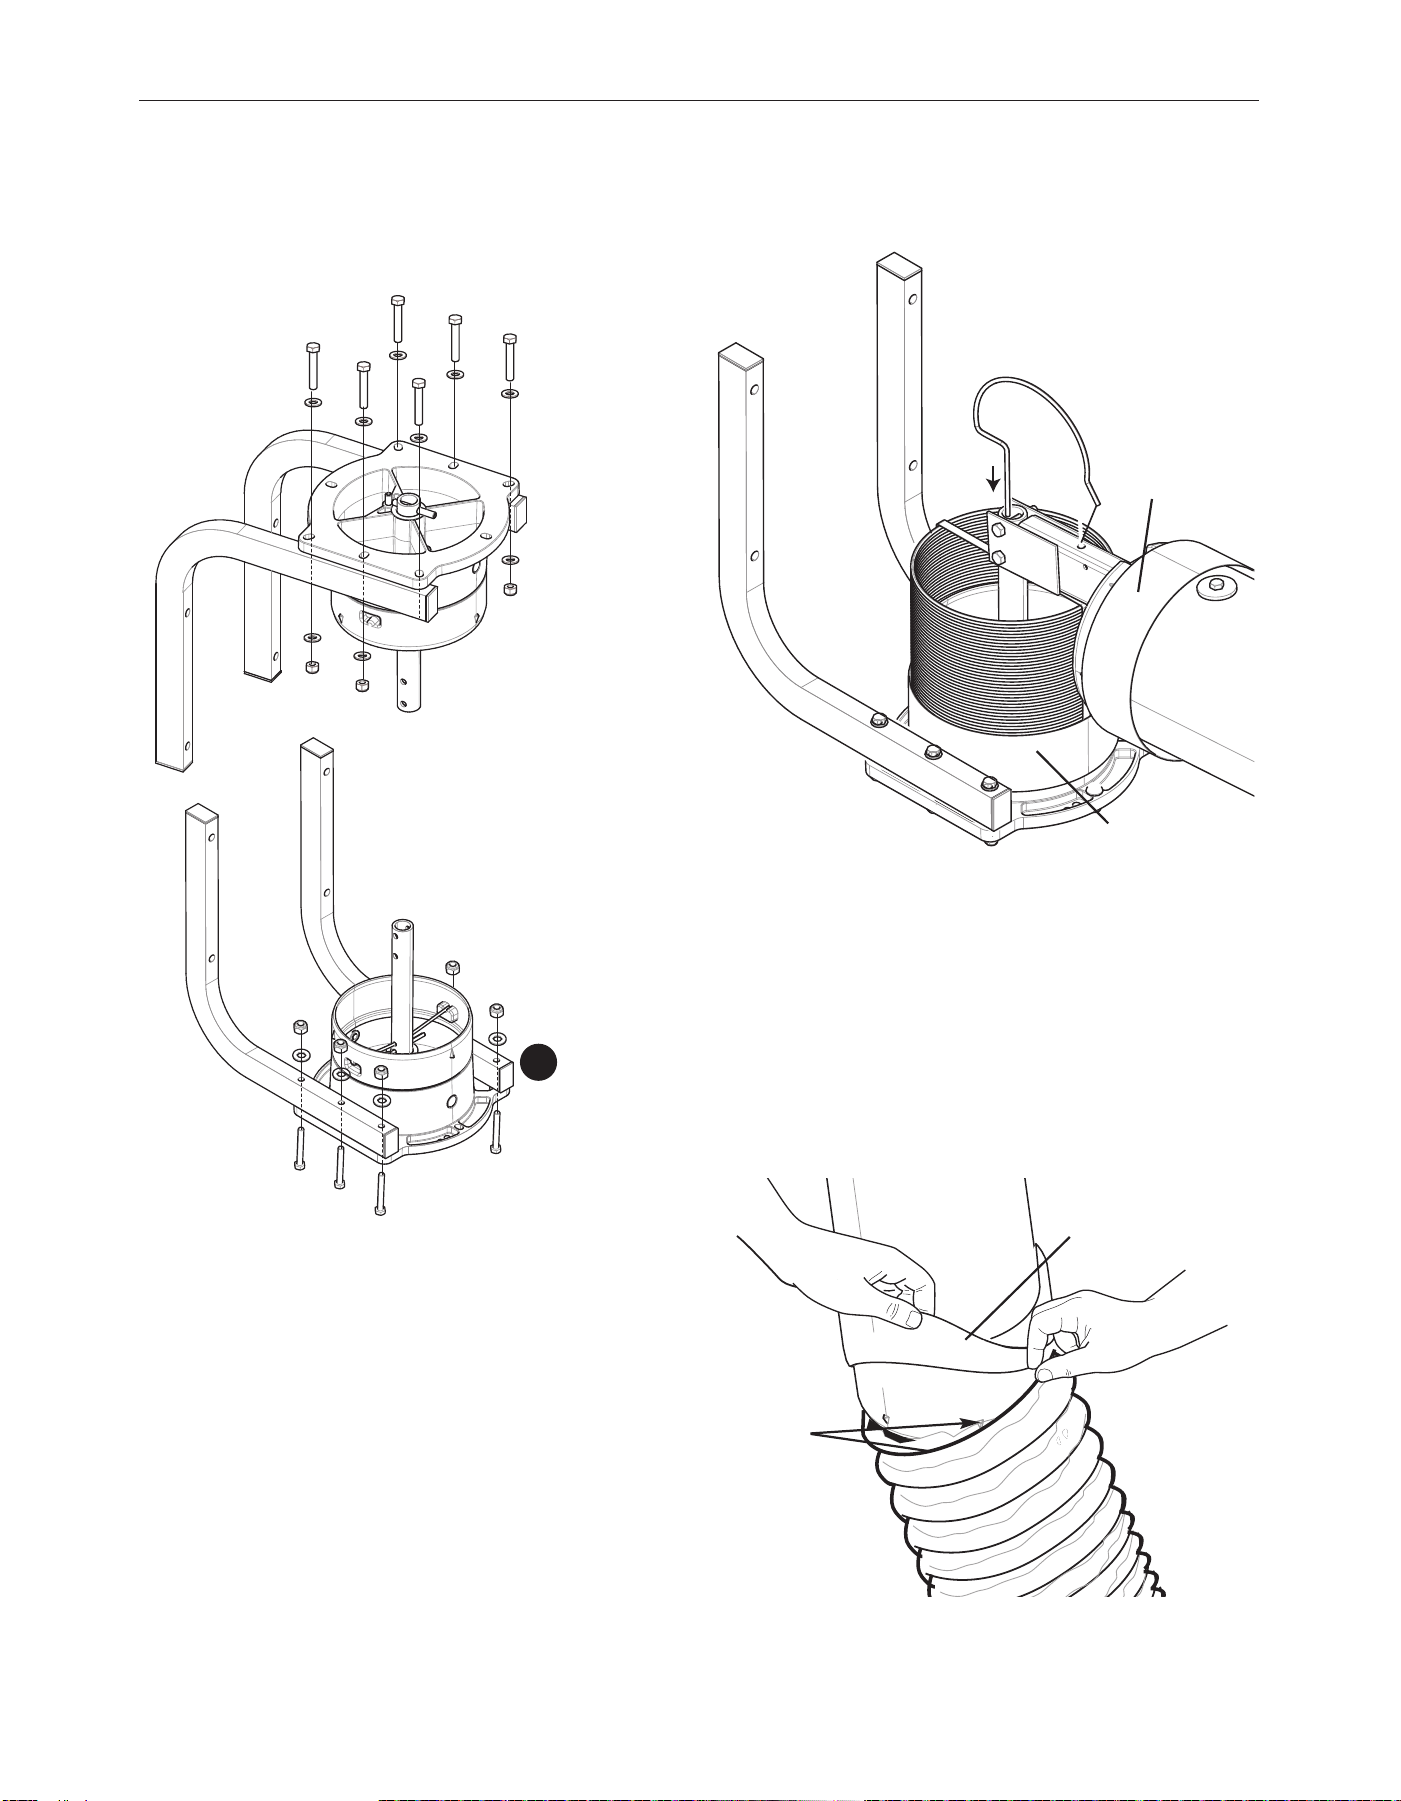
A-19
INSTALLATIONFUME EXTRACTION ARMS
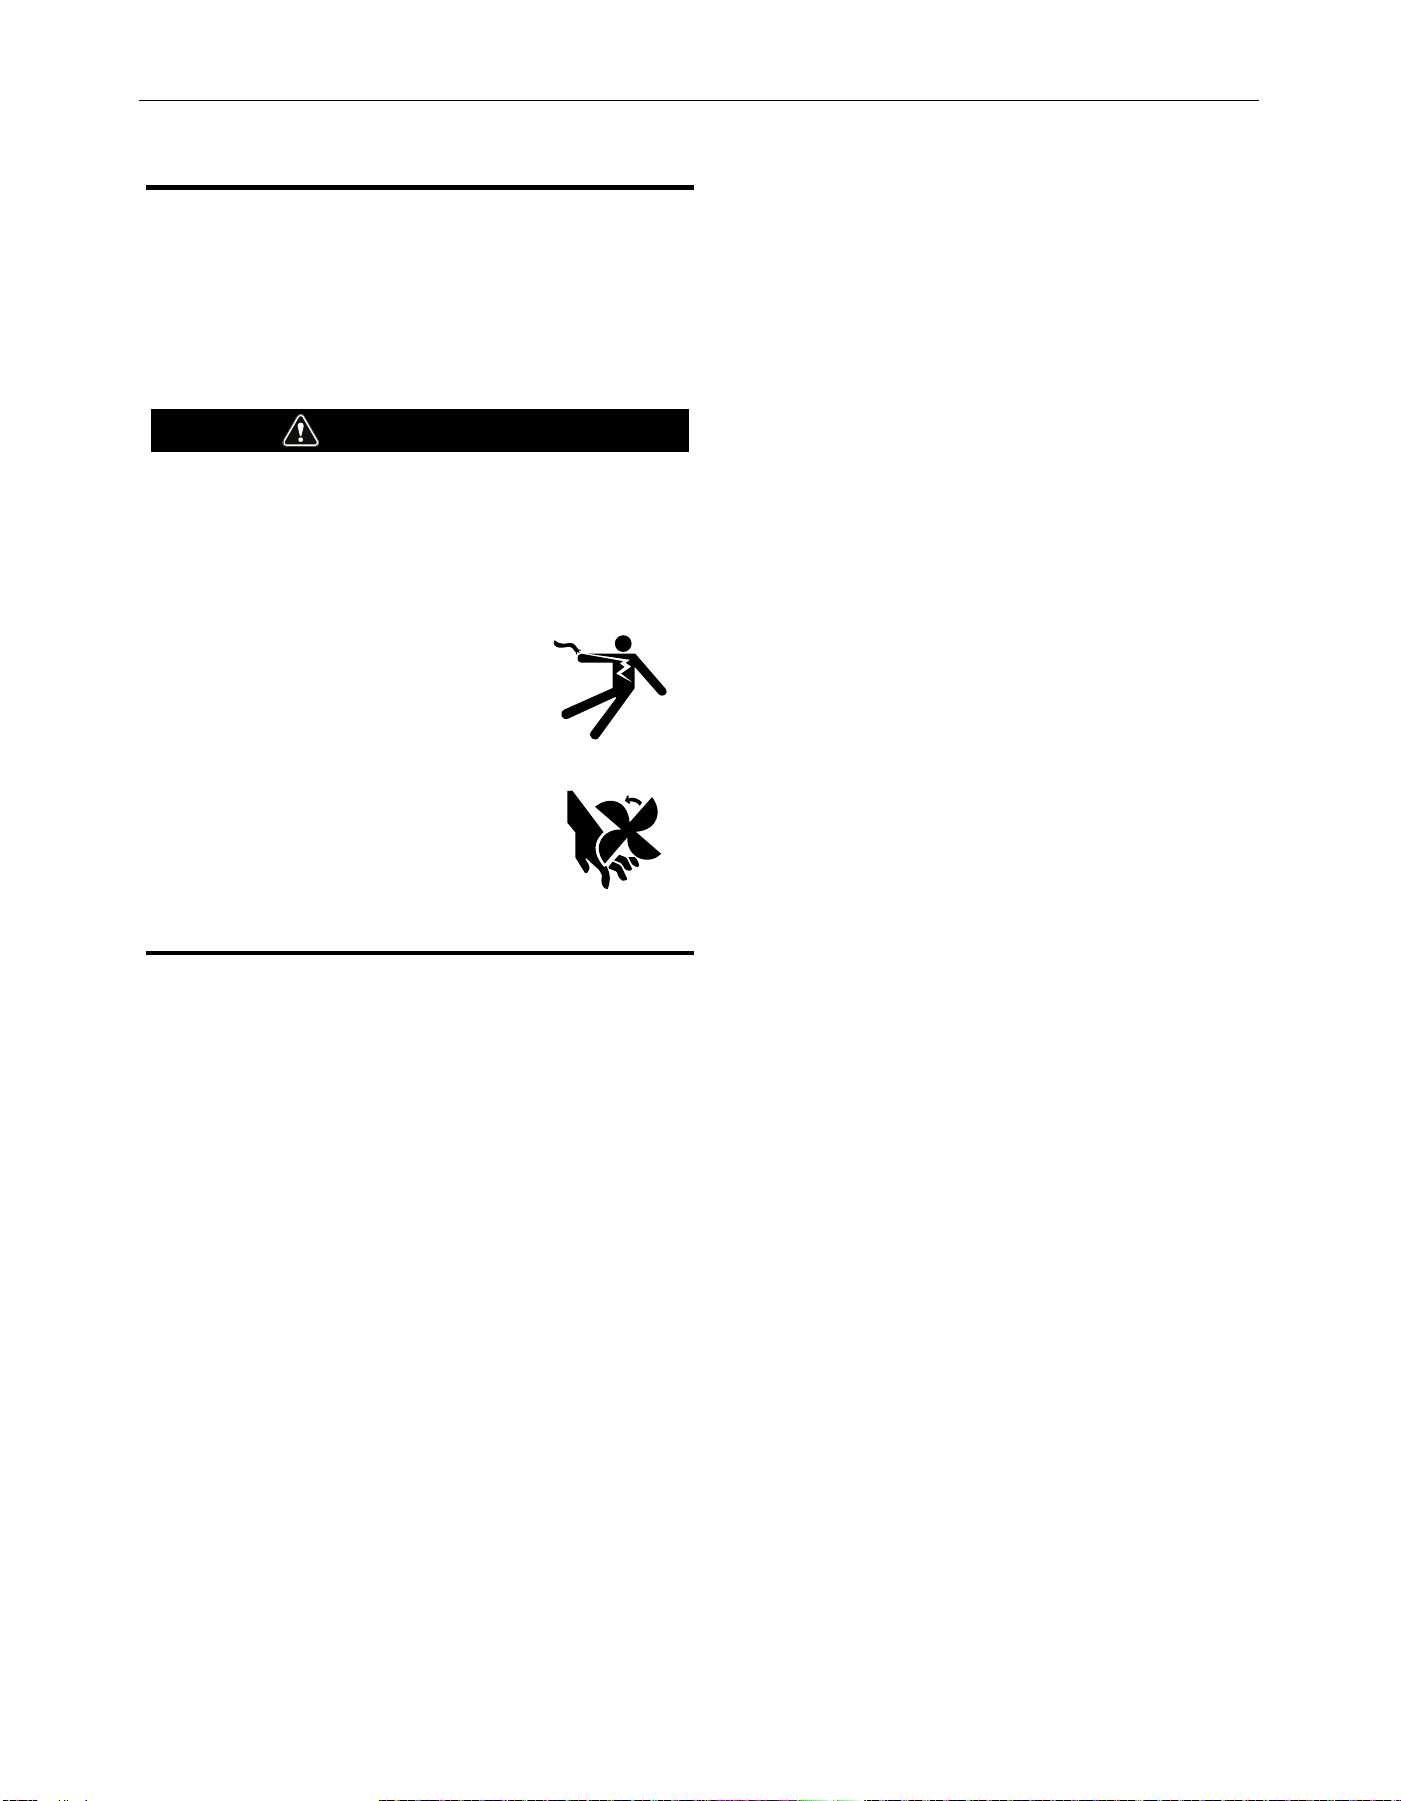
3. Position the mounting assembly on a wall mounting bracket
(See Figure A.33) so that the cable hole is on the wall side.
Use the six 3” bolts and nuts to secure the mounting
assembly to the wall mounting bracket. Rotate the hinge rod
so the stop pin is in the front.
FIGURE A.33
4. Position one 8” arm seal band and a exible hose on the red
plastic ring of the mounting assembly. Put another arm seal
band on the top of the arm. Mount the arm body (Figure A.34)
to the mounting assembly using (2) 1.75” bolts and nuts.
5. Mount the spring bracket and position the arm seal band and
the exible hose around the connection ange. (See Figure
A.34).
FIGURE A.34
6. Remove the plastic and tape packaging from the arm
sections. Adjust the friction of the arm and hood movement
as described in the maintenance section of this manual.
When set, seal all hose connections with the arm seal bands.
7. Fold back 2/3 of both arm seal bands. Remove the wrap of
the exible hose. Place the exible hose over both arm
sections. To secure the hose, at least one metal rings of the
hose should be applied over the ridges at each arm section.
Fold back the arm seal bands and place them over the hose.
The arm seal band should cover the arm section 0.5-1 in. See
Figure A.35
FIGURE A.35
This option puts fan
below brackets (arm
tight to ceiling)
This option puts fan
on top
OR
Place at least
one metal band
of exible hose
over ridge
arm band seal
arm band seal
Stretch arm band seal
over exible tube
!
Flange hangs from
underside of brackets
with shaft pointing up.
A-20
INSTALLATIONFUME EXTRACTION ARMS
EXTENSION CRANES
Do not attempt to use this equipment until you have thoroughly read
all installation, operating and maintenance information supplied with
your equipment. They include important safety precautions and
detailed operating and maintenance instructions.
READ THIS ENTIRE INSTALLATION SECTION BEFORE
YOU START INSTALLATION.
The installer is responsible for following Federal, State and
Local safety codes and regulations.
Before drilling, verify locations of existing gas, water, or
electrical conduits.
ELECTRIC SHOCK can kill.
• Do not touch electrically live parts such
as internal wiring.
• Turn the input power off at the fuse box
before working on this equipment.
• Have a qualified person install and
service this equipment.
MOVING PARTS can injure.
• Do not operate with covers open or
filter removed.
• Keep away from moving parts.
ONLY QUALIFIED PERSONNEL SHOULD INSTALL,
USE OR SERVICE THIS EQUIPMENT.
This installation section describes installation of a:
• K1671-1, 7 ft. Extension Crane (EC 2) OR
K1671-2, 14 ft. Extension Crane (EC 4)
with a K1655-8 LFA 3.1, 10 ft. Extraction Arm OR
K1655-9 LFA 4.1, 13 ft. Extraction Arm
K1671-1 Extension Crane (EC 2), 7 ft. Includes:
• 7 ft. Base Section, complete with wall bracket
• HandyStop handle
• (2) Arm Mounting Brackets
• Hanging Adapter
• Spring Bracket
• (2) 5/16-18 UNC, 2.50” long
• (2) 5/16-18 UNC, 1.75” long
• (2) 5/16-18 UNC, 5.00” long
• (13) Nuts, 5/16”, self-locking
• (14) Washers, 5/16”
• Total (2) Rubber Arm Band Seals, 8”
• (1) Flexible Connection Hose, 41.3” long
• (2) Flexible Connection Hose, 45.3” long
• (2) Max. 110/50kg Decal
• (2) Hose Clamps
• Self-adhesive Foam Seal
• Distance Spring
K1671-2 Extension Crane (EC 4), 14 ft. Includes:
all equipment listed above, as well as:
• 7 ft. Extension Section
• 3/4-10 UNC, 7.00 long
• Additional Flexible Connection Hose, 41.3” long, and (2) Rubber
Arm Band Seals, 8”
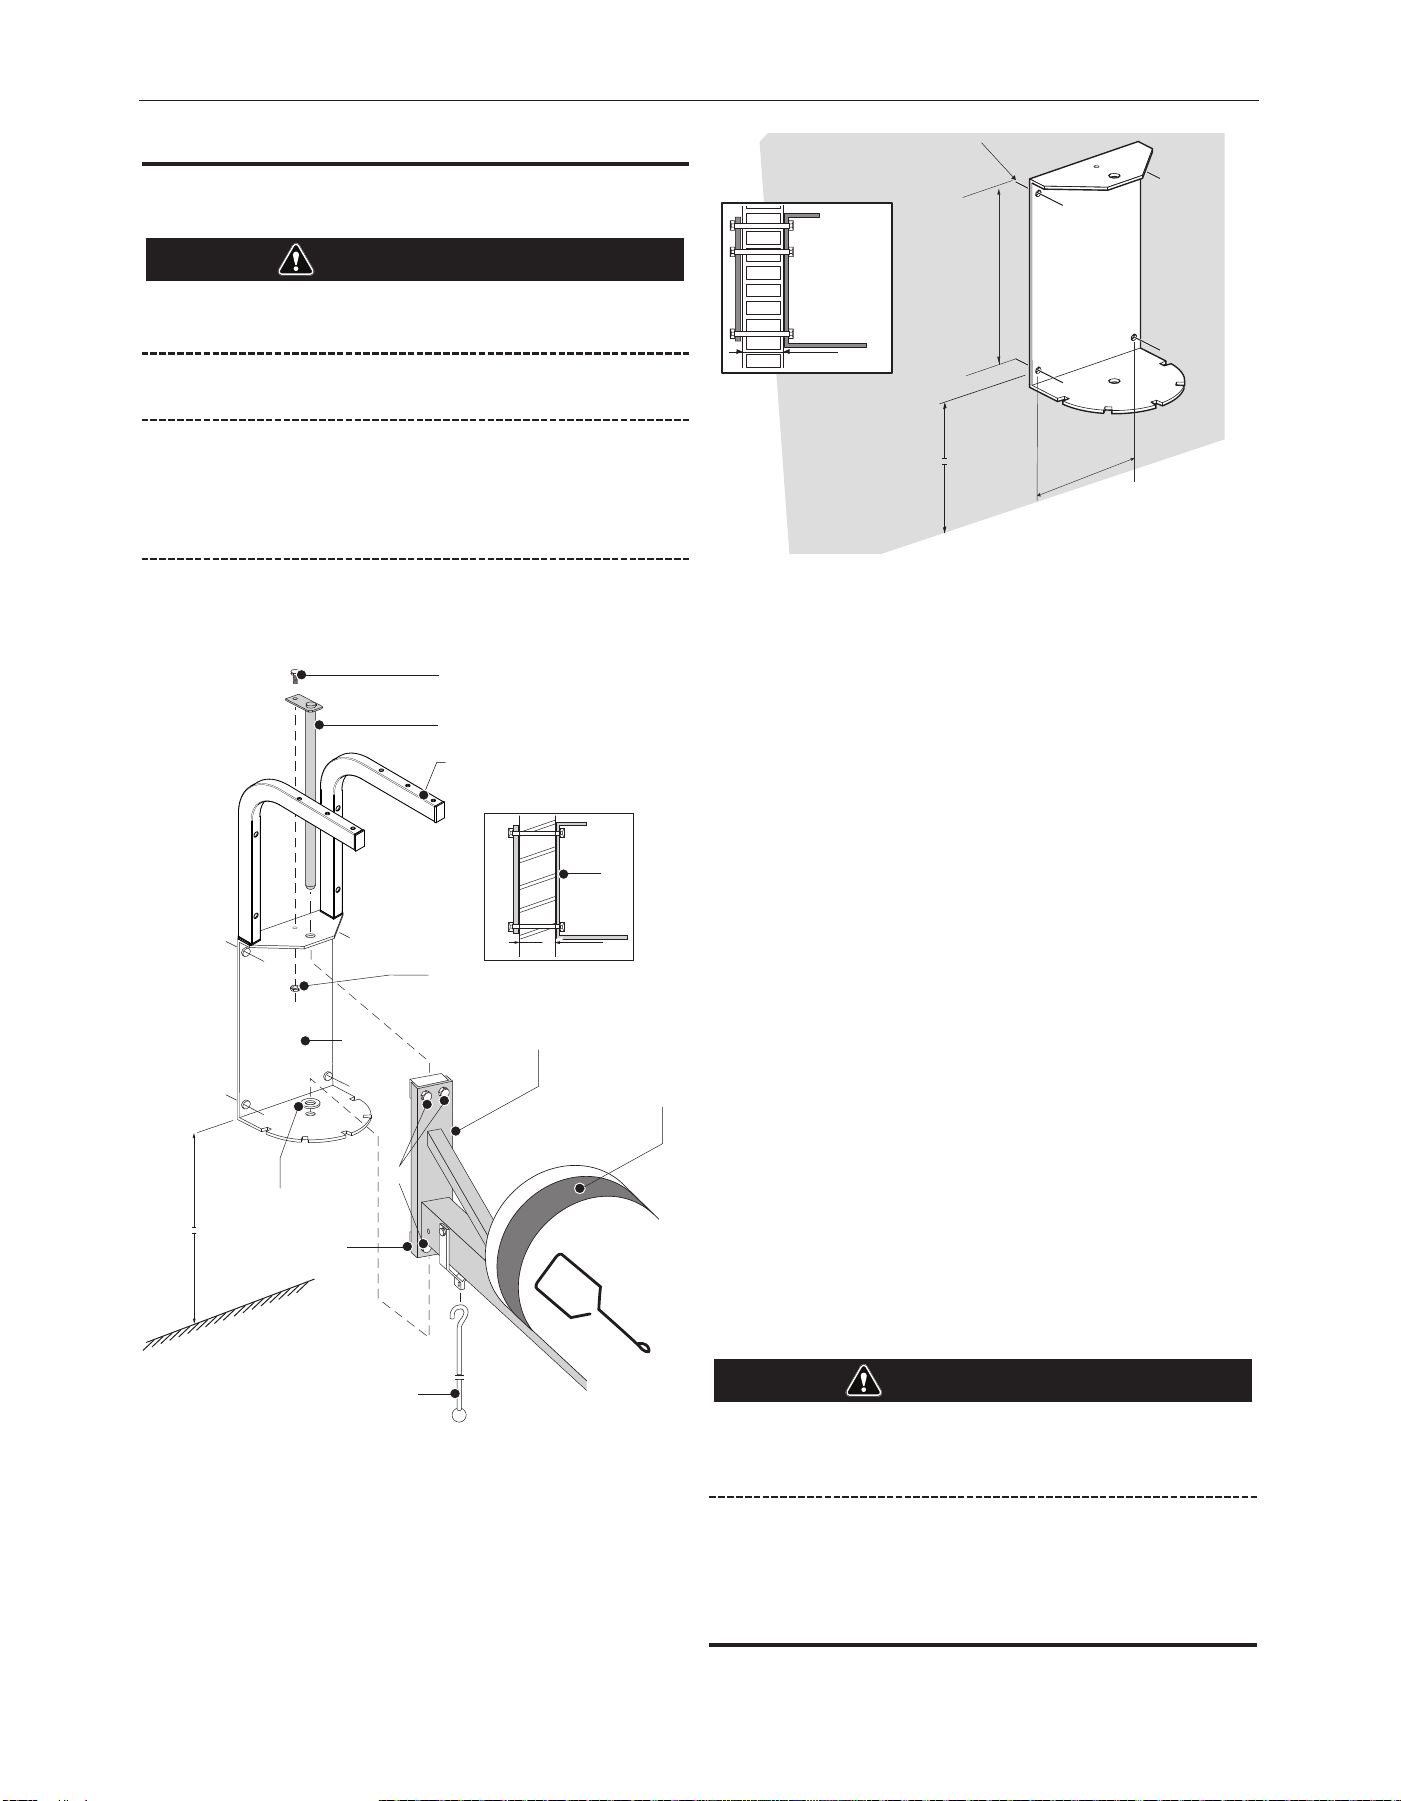
WARNING
A-21
INSTALLATIONFUME EXTRACTION ARMS
MOUNTING THE WALL BRACKET
Before you install the wall bracket, make sure that the wall
is strong enough [minimum wall thickness: 8 in. (200 mm)].
Locate any gas and water pipes and electric cables before
drilling any holes.
Leave the tape and plastic packaging on the extraction arm
sections until the arm is completely installed (including
mounting the hood). The arm is spring-balanced to
compensate for the weight of the hood and will spring out
quickly if it is not mounted securely, with the hood in place.
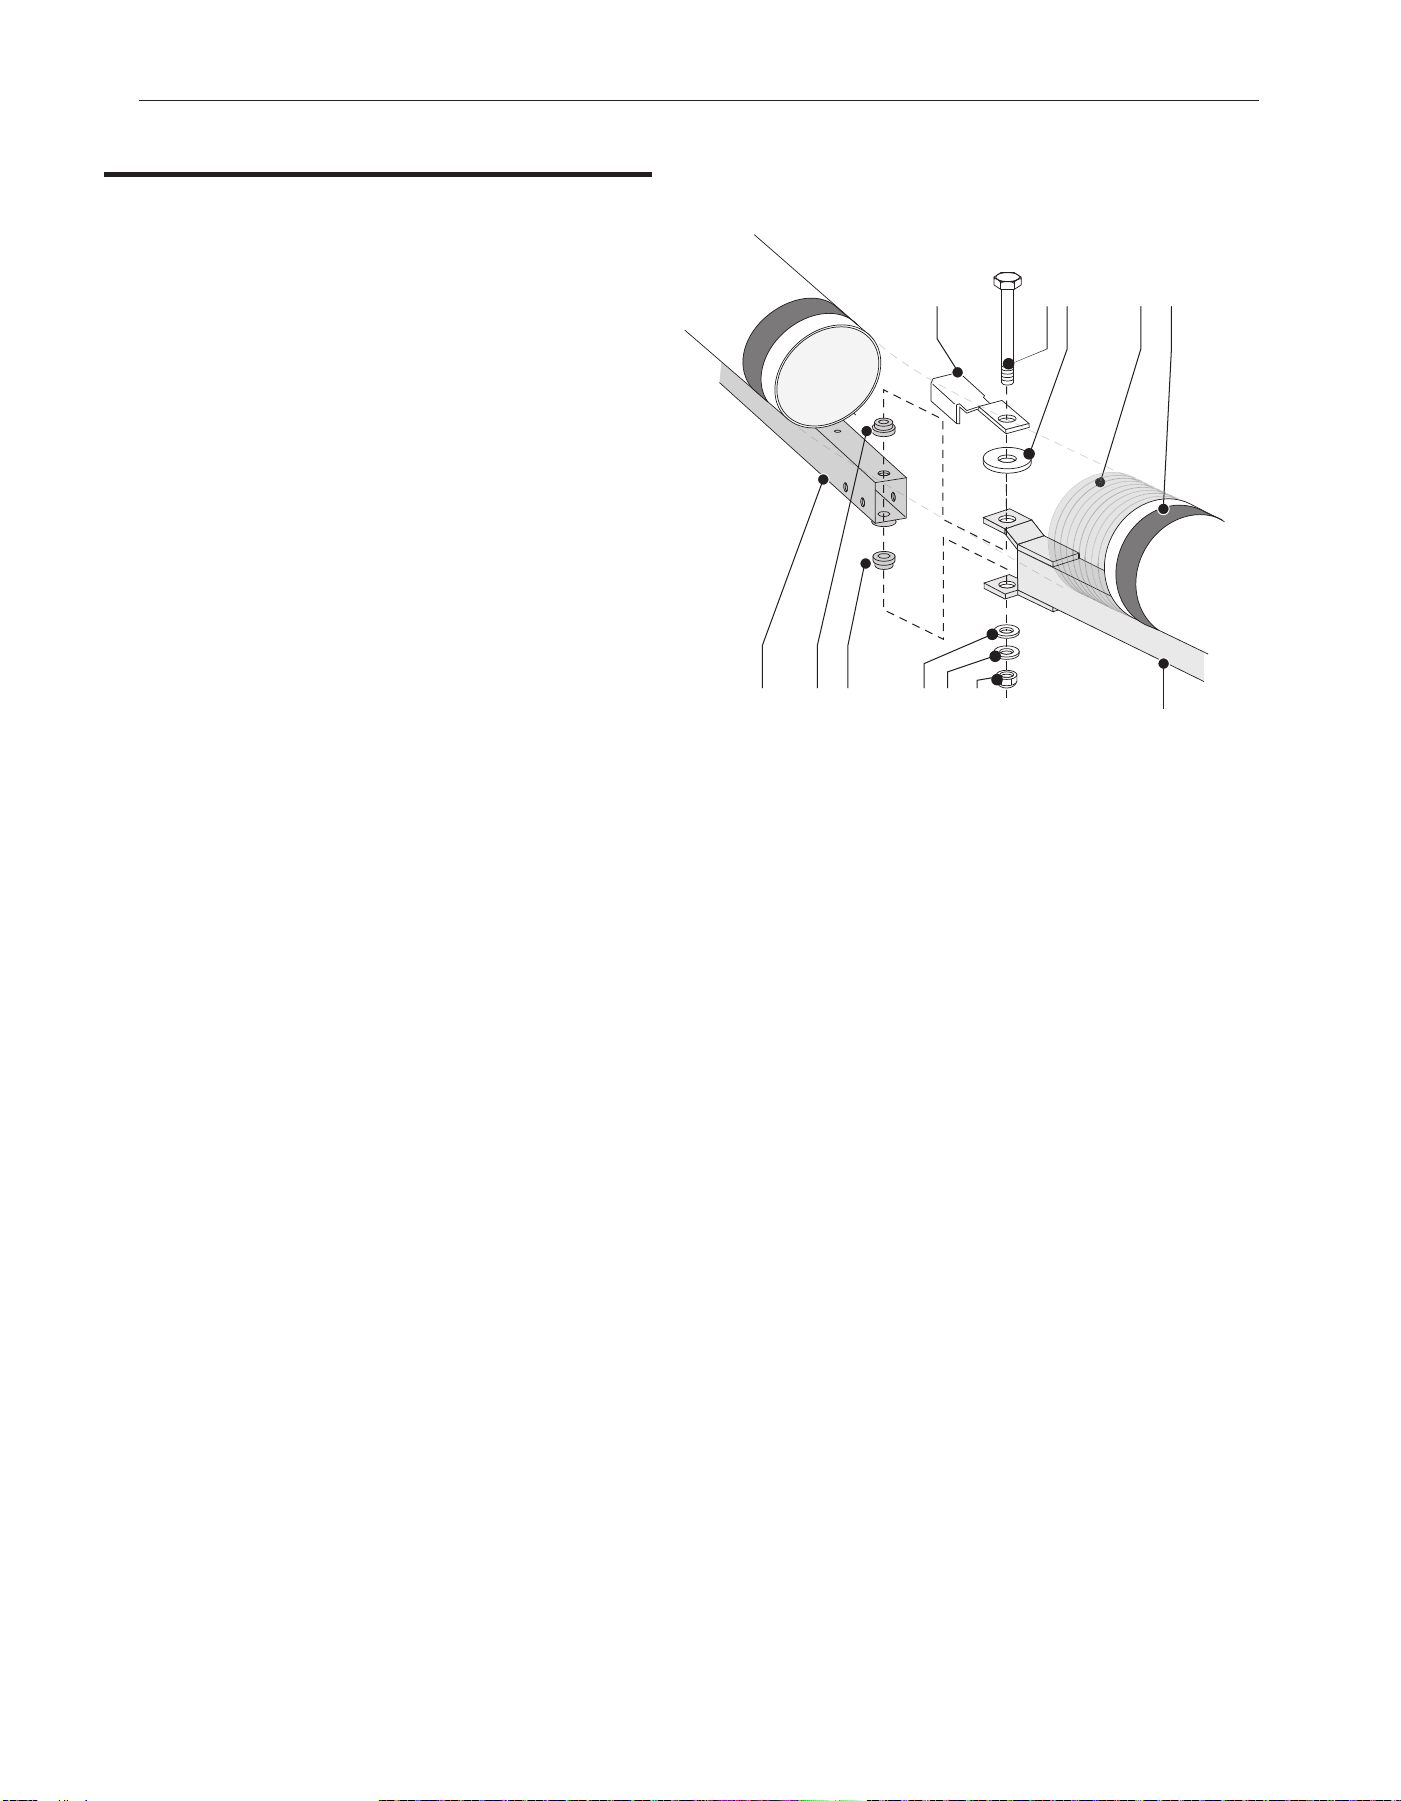
1.) Disassemble the Wall Bracket (Fig. A.36, Item E) from
the crane rail (Fig. A.36, Item F) by removing the bolt
(Fig. A.36 Item A) and nut (Fig. A.36, Item D).
2.) Support the far end of the crane rail, and pull out the
pivot pin (Figure A.36, Item B). Save all hardware for
later use.
3.) Mount the Wall Bracket of the extension crane to the
wall at 8 ft., 8 in. as shown in Figure A.37 Make sure the
wall bracket is level.
Recommended method is (4) min. 3/8” bolts through the
wall, with 0.2 in. (5mm) thick steel plate on the back
side of the wall for support (see Figure A.37 Inset).
4.) Remount the Crane Rail to the Wall Bracket
(See Figure A.36) per the following steps:
a) Put the crane rail base (F) between the upper and
lower part of the wall bracket (E) and hold it in
place.
b) Insert the locking pin (B) through the upper part of
the wall bracket and subsequently through both
plastic hinge joints of the crane rail base (I).
c) Lift the crane rail base to touch the upper part of
the wall bracket.
d) Put a washer (H) over the hole in the lower part of
the wall bracket (between lower plastic hinge joint
and wall bracket).
e) Push the locking pin further through the washer
and the hole.
f) Secure the locking pin using the bolt (A) and the
nut 5/16” (D).
g) Hang the HandyStop handle (G) through the loop in
the locking mechanism.
h) Fold back 2/3 of the rubber seal.
i) Cut the wrap of the exible hose.
j) Place one end of the exible hose over the tube.
To secure the hose, at least one metal ring of the
hose should be applied over the ridges at the tube.
k) Fold back the rubber seal and place it over the
hose. The rubber seal should cover 0.5 to 1 inch
(13 to 25 mm) of the tube.
To prevent damage to the exible hose, position the
extension crane in the middle of its turning circle when
mounting the hose to a fan or central duct.
l) Connect the other end of the exible hose to one
of the following:
SF4200 Fan – see SF4200 instruction manual for
details.
Central Fan – connect exible hose to central duct.
CAUTION
CAUTION
8.8 ft.
E
C
F
B
A
D
I
H
E
J
K
G
Figure A.36
104"
(2650 mm)
3/8"
3/8"
8" (200 mm)
13
9
/
16
”
9
1
/
8
”
3
/
8
” Hole (TYP-4)
Figure A.37
A-22
MAINTENANCE
FUME EXTRACTION ARMS
MOUNTING THE CRANE RAIL EXTENSION (EC 4)
K1671-2, 14 ft. Extension Crane
(See Figure A.38)
5) Lift the extension part (I) and align it with the base (O).
6) Insert a bolt 3/4-10 UNC, 7.00” long (C) subsequently
through:
- steel plate (B)
- composite washer (D)
- upper synthetic bearing, applied to extension piece (N)
- base (O)
- lower synthetic bearing, applied to extension piece (M)
- nylon washer (J)
- steel washer (K)
7) Secure bolt with selocking nut 3/4” (L).
8) Both tubes contain a supply wire, each attached with a
tie wrap. Cut both tie wraps.
9) Fold back 2/3 of both rubber seals (F).
10) Cut the wrap of the exible hose (E).
11) Place the exible hose over the tubes. To secure the
hose, at least one metal ring of the hose should be
applied over the ridges at the tubes.
12) Fold back both rubber seals and place them over the
hose. The rubber seals should cover the red plastic ring
0.5-1 in.
EB C D F
M
LKJNO
I
Figure A.38
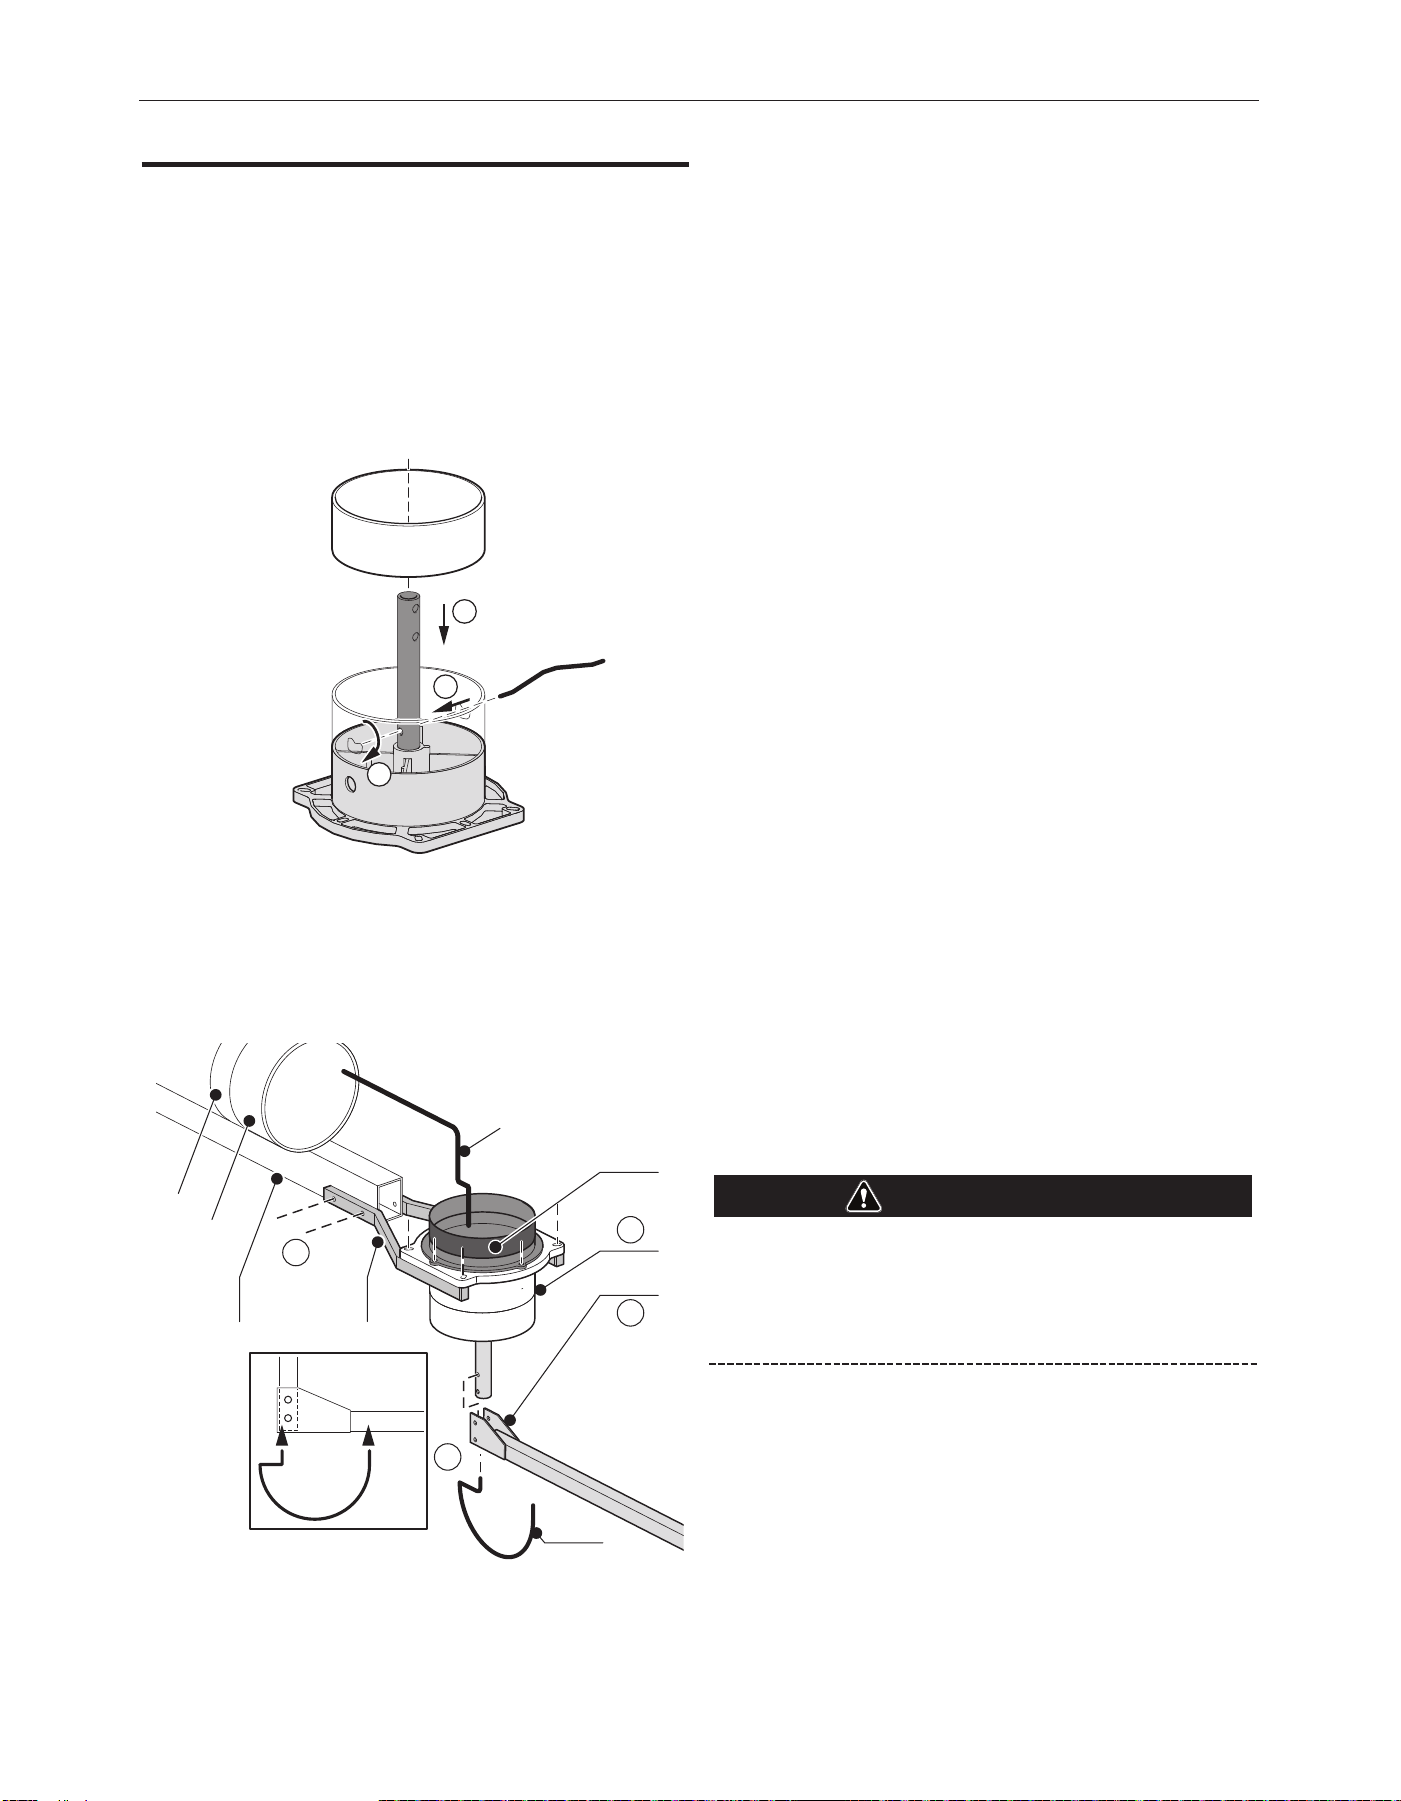
A-23
INSTALLATIONFUME EXTRACTION ARMS
MOUNTING THE EXTENSION ARM
13.) Mount the (2) Arm Mounting Brackets
(Figure A.43, Item B) using the (2) 5/16-18 UNC, 5.00”
long bolts with nuts.
14). The Extraction Arm’s Rotating Hinge consists of three
pieces: The metal base swivel mount, red plastic ring
and clamping pin. Note: these items are packaged with
the LFA 3.1 and LFA 4.1 extraction arms.
See Figure A.39.
Mount the red plastic ring to the metal base swivel
mount by tting the clamping pin through the hole in
the rotating rod, and snapping it into place on the
U-shaped indents on the red plastic ring. The lip of the
ring should t securely against the top edge of the base
swivel mount, yet rotate with the rod.
The assembly should look like Item D in Figure A.40.
15.) Mount the Rotating Hinge (D) on the Arm Mounting
Brackets using the (4) 5/16-18UNC, 2.25” long, (4)
washers and (4) nuts. Make sure the cable hole is
positioned in the back, pointing toward the crane rail.
16.) Remove protective paper from the self-adhesive foam
seal and attach the foam seal onto the base swivel
mount. The foam which is sandwiched between the
base swivel mount and the tapered connection ange
will help to make the system airtight.
Mount the tapered connection ange (C) onto the base
swivel mount using (2) 5/16-18x1.75 HHCS, (2) 5/16-
18x2.50 HHCS, (6) washers and (4) nuts.
17.) Fold back 2/3 of the rubber seal.
18.) Cut the wrap of the exible hose and place one end of
the exible hose over the tube. To secure the hose, at
least one metal ring of the hose should be applied over
the ridges at the tube.
19.) Fold back the rubber seal and place it over the hose.
The rubber seal should cover 0.5 to 1 inch of the tube.
20.) Place the Distance Spring (K) in the clamping bush in
the middle section of the base swivel mount. Feed the
other end of the Distance Spring into the open end of
the exible hose.
21.) Secure end of hose to inlet ring with hose clamp.
22.) Place a rubber seal over the lower part of the tapered
connection ange (D) and fold back 2/3 of the rubber
seal.
23.) Place the lose end of the exible hose over the lower
part of the tapered connection ange and secure the
hose with rubber seal.
24.) Turn the hinge rod so the long side of the stop pin at its
base points away from the wall, and mount the hanging
adapter (Fig. A.40, Item E) to the hinge rod using the (2)
1.75” bolts with nuts.
25.) Mount the spring bracket (Figure A.40, Item F) into the
two holes as shown.
Leave the tape and plastic packaging on the extraction arm
sections until the arm is completely installed (including
mounting the hood). The arm is spring-balanced and will
spring out quickly if not mounted securely with the hood in
place.
26.) Adjust the friction resistance of the swinging motion of
the extension crane according to maintenance section.
27.) Use the rubber seals and connecting hoses to close all
gaps between arm sections on the Extension Crane and
the Extraction Arm.
At this stage, the LFA 3.1 or LFA 4.1 extraction arm can be
mounted onto the extension crane. Please refer to the
extraction arm instruction manual for the next steps.
CAUTION
2
1
3
Figure A.39
C
D
E
BA
F
1
4
2
3
I
J
K
Figure A.40
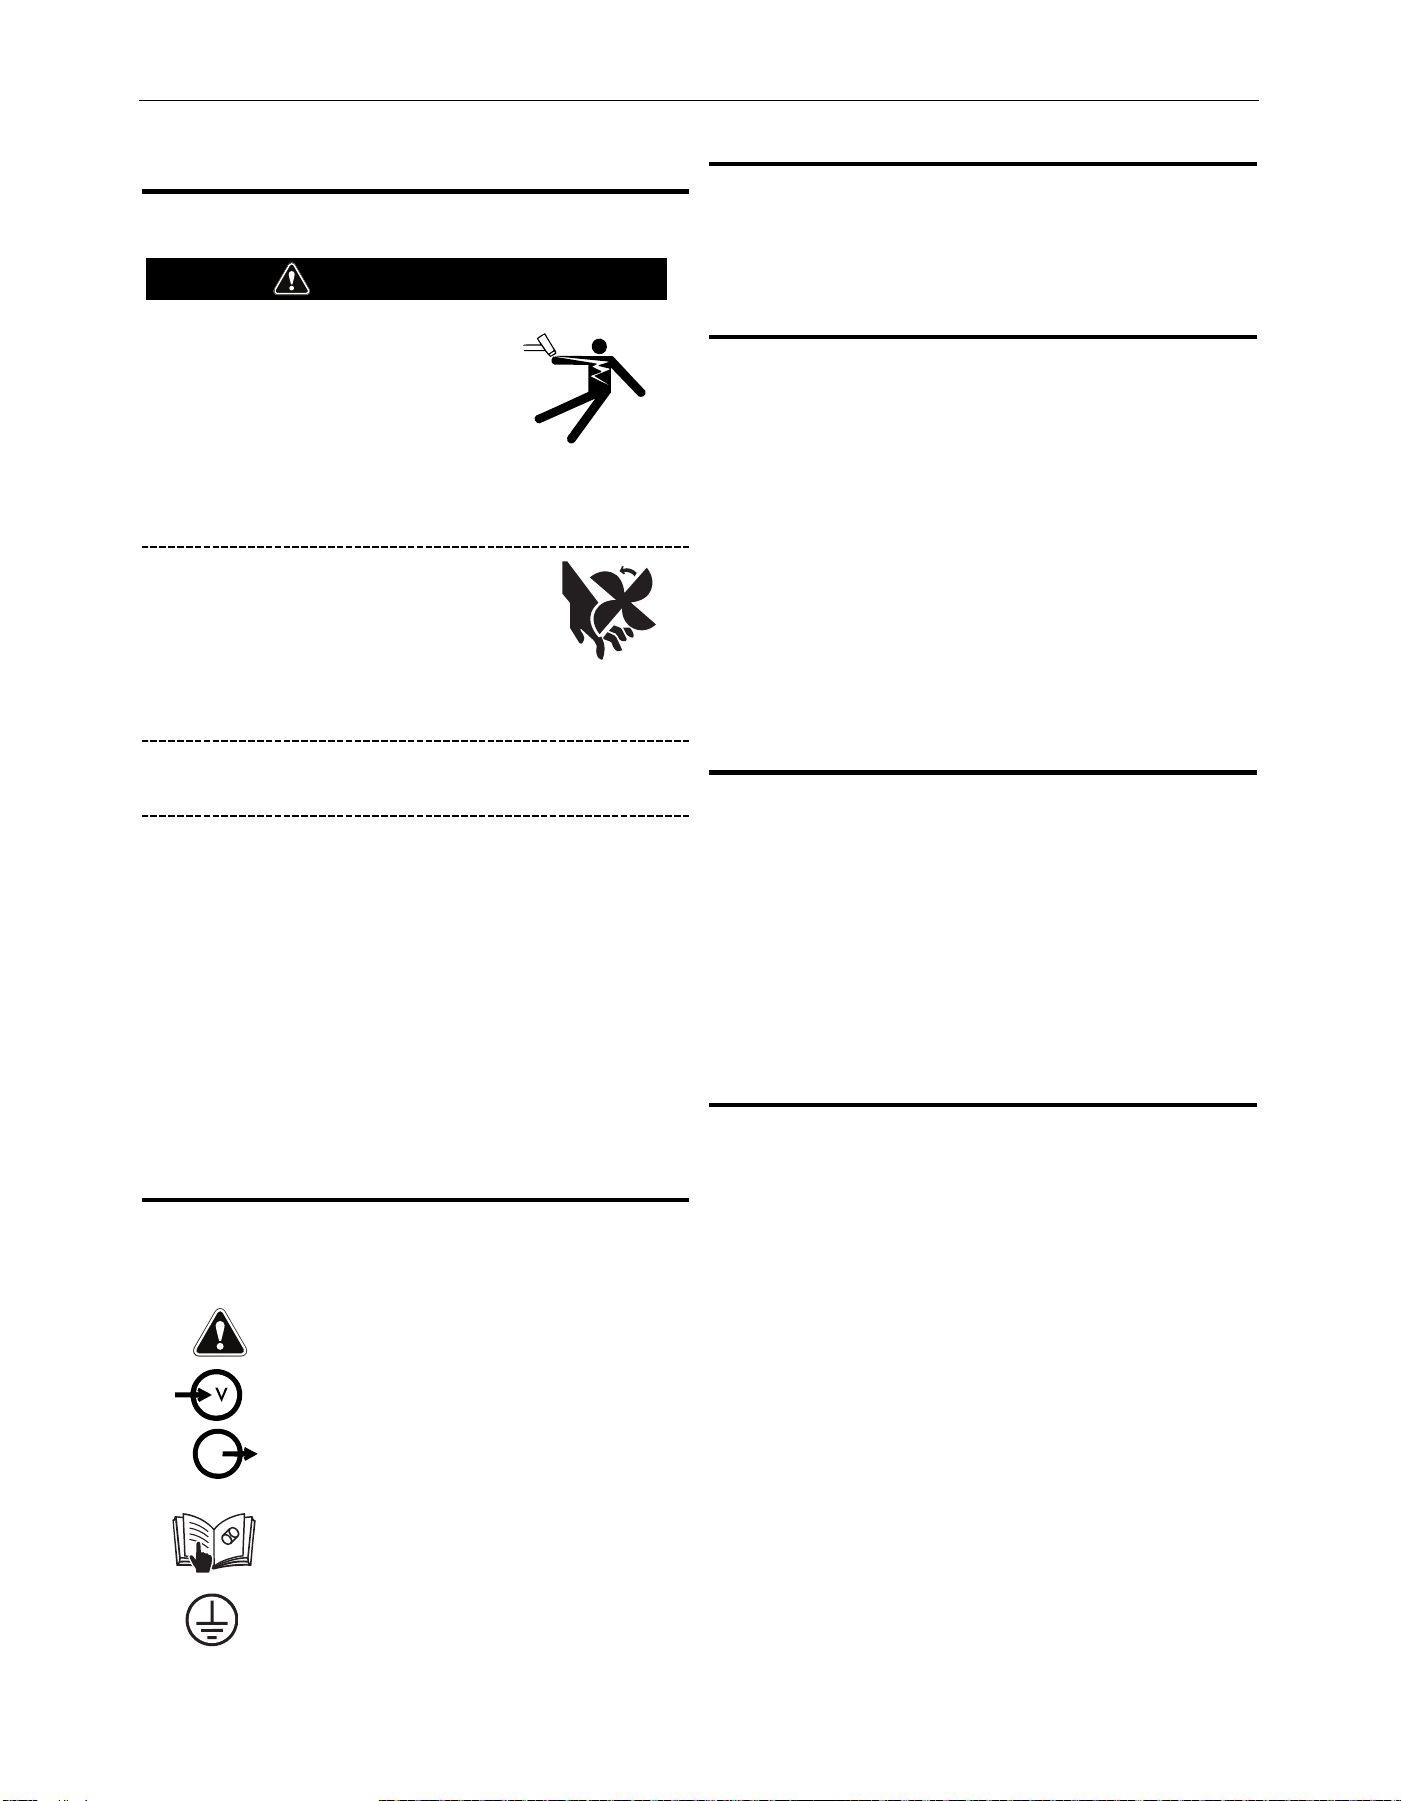
B-1
OPERATION
OPERATION
SAFETY PRECAUTIONS
ELECTRIC SHOCK can kill.
• Do not touch electrically live parts
or electrode with skin or wet
clothing.
• Insulate yourself from work and
ground.
• Always wear dry insulating gloves.
MOVING PARTS can injure.
• Do not operate with doors open or guards
off.
• Stop engine before servicing.
• Keep away from moving parts.
Observe additional Safety Guidelines detailed
in the beginning of this manual.
The serviceability of a product or structure utilizing the Fume
Extraction Arms is and must be the sole responsibility of the
builder/user. Many variables beyond the control of The Lincoln
Electric Company affect the results obtained in using the Fume
Extraction Arms wirefeeder. These variables include, but are not
limited to, welding procedure, plate chemistry and temperature,
weldment design, fabrication methods and service requirements.
The available range of the Fume Extraction Arms may not be
suitable for all applications, and the builder/user is and must be
solely responsible for welding settings.
GRAPHIC SYMBOLS THAT APPEAR ON THIS
MACHINE OR IN THIS MANUAL
GENERAL DESCRIPTION
Located in the hood is a throttle valve that can be fully opened,
partially opened or completely closed to control airflow. The arm
features a focus extraction spoiler which directs the air into the
hood.
MANUAL OPERATION
The extracted welding fume enters the extraction arm via the
rotatable hood. The arm discharges the polluted air to a filter unit
or directly to the atmosphere. The hood of the arm is fitted with a
throttle valve, which can be controlled using the rotary knob(s).
The throttle valve is mostly used when several extraction arms are
integrated in a line installation; in such configurations closing the
throttle valve prevents the loss of costly heated air.
NOTE: If an automatic damper system is part of the assembly,
keep the manual damper open at all times.
• Everyone working on or with the product, must be familiar
with the contents of this manual and must strictly observe the
instructions therein. The management should instruct the
personnel in accordance with the manual and observe all
instructions and directions given.
USERS
• The use of this product is exclusively reserved to well
authorized, trained and qualified users. Temporary personnel
and personnel in training can only use the product under
supervision and responsibility of skilled engineers.
• Use common sense. Stay alert and keep your attention on
your work. Do not use the product when you are under the
influence of drugs, alcohol or medicine.
• The product is not to be used by children or persons with
reduced physical, sensory or mental capabilities, or lack of
experience and knowledge.
INTENDED USE
This product has been designed exclusively for extracting gases
and particles which are released during the most common
welding processes. Using this product for other purposes is
considered contrary to its intended use. The manufacturer accepts
no liability for any damage or injury resulting from such use. The
product has been built in accordance with state-of-the art
standards and recognized safety regulations. Only use this product
when in technically perfect condition in accordance with its
intended use and the instructions explained in the user manual.
WARNING
FUME EXTRACTION ARMS
INPUT VOLTAGE
WARNING OR CAUTION
READ INSTRUCTION
MANUAL
PROTECTIVE
GROUND
OUTPUT ON
A
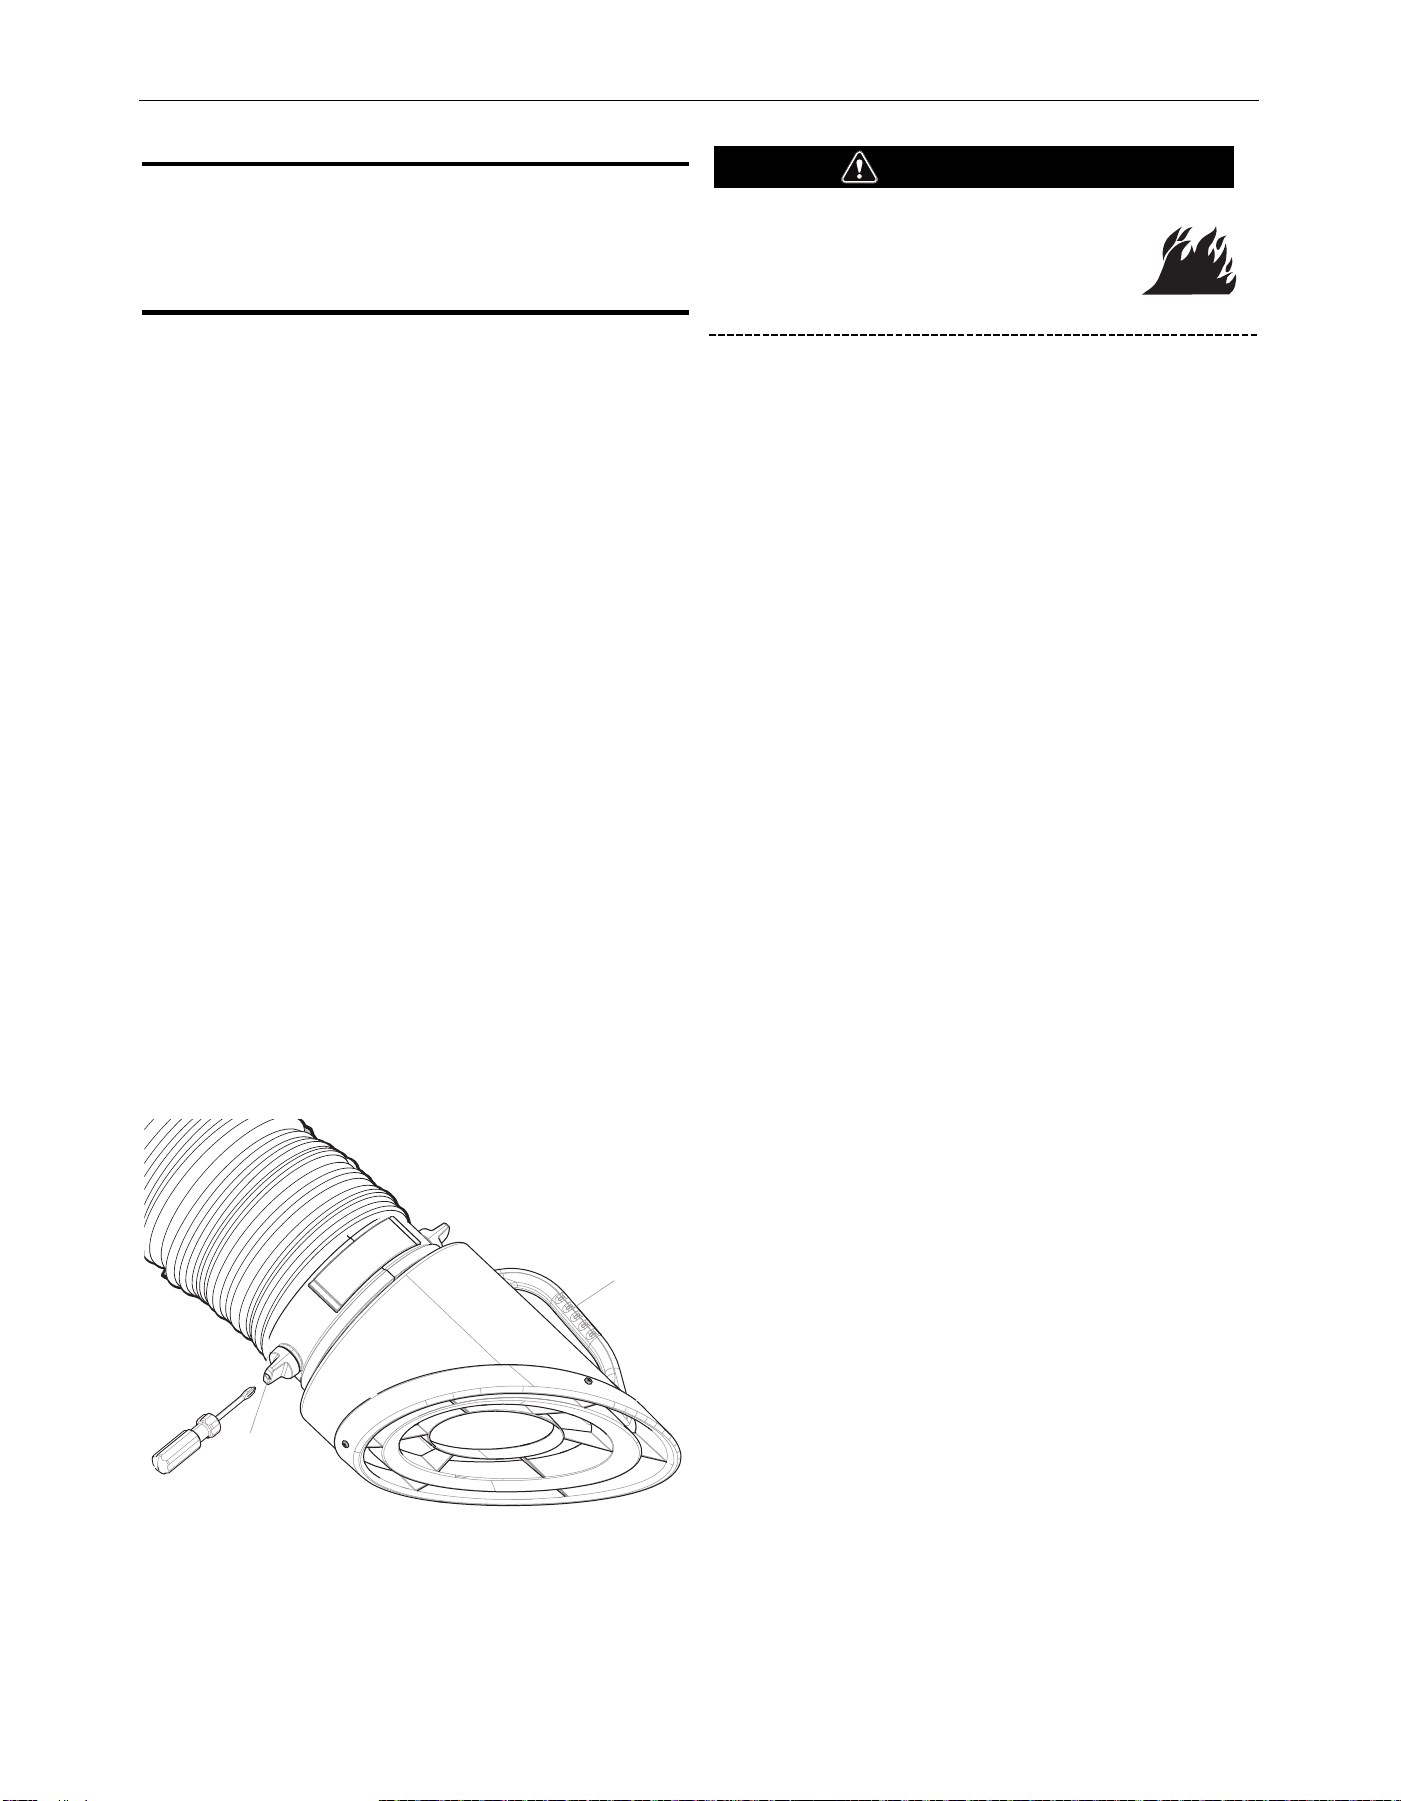
B-2
OPERATION
PRODUCT COMBINATIONS
If the product is used in combination with other products or
machines, the safety instructions in the documentation of these
products also apply.
CONTROLS
The Extraction Arms are provided with a handle for easy
positioning and a throttle valve for adjustment of the airflow. All
movement of the arm is controlled from the hood.
A. Rotary knobs for adjustment of throttle valve.
NOTE: Throttle valve rotational resistance can be adjusted using a
phillips screw driver. Find the knob (A) with a center
opening then insert phillips screw driver into knob to adjust
rotational resistance. Clockwise increases resistance,
counterclockwise decreases resistance. Adjust in minor
increments only.
B. Handle for positioning of the extraction arm and hood.
• Using the handle (B), position the hood of the extraction arm
in the desired position at approximately 6-20 inches (15-50
cm) from the source of fume.
NOTE: Retraction movement must happen slowly to allow
counterweight to descend.
• Open the throttle valve (A).
• Turn on the connected extraction fan; refer to the corre-
sponding manual.
• Start welding.
• If desired, adjust the airflow by turning the rotary knob of the
throttle valve (A).
NOTE: If an automatic damper system is part of the assembly,
keep the manual damper open at all times.
• Turn off the connected extraction fan approx. 50 seconds
after finishing welding; refer to the corresponding manual.
FIGURE B.1 - CONTROLS
Fire hazard!
Never use the product for extracting
inflammable, glowing or burning particles or
solid liquids. Never use the product for
extracting aggressive fumes (such as hydrochloric acid).
• Inspect the product and check it for damage.
• Protect the product against water and humidity.
• Never install the product in front of entrances and exits
which must be used by emergency services.
• Make sure the workshop contains sufficient approved
fire extinguishers.
• Air containing particles such as chromium, nickel,
beryllium, cadmium, lead etc., which is a health hazard,
should never be recycled. This air must always be put
outside the workshop.
• Never use the product for extracting paint mists.
• Never use the product for extracting fumes containing
alkaline or acid.
Observe the maintenance intervals given in this manual.
Overdue maintenance can lead to high costs for repairs and
revisions and can render the guarantee null and void.
Always use tools, parts, materials, lubricants and service
techniques which have been approved by the manufacturer.
Never use worn tools and do not leave tools behind in or on
the product.
WARNING
A
B
Knob with center
opening for adjustment
of rotational resistance
FUME EXTRACTION ARMS
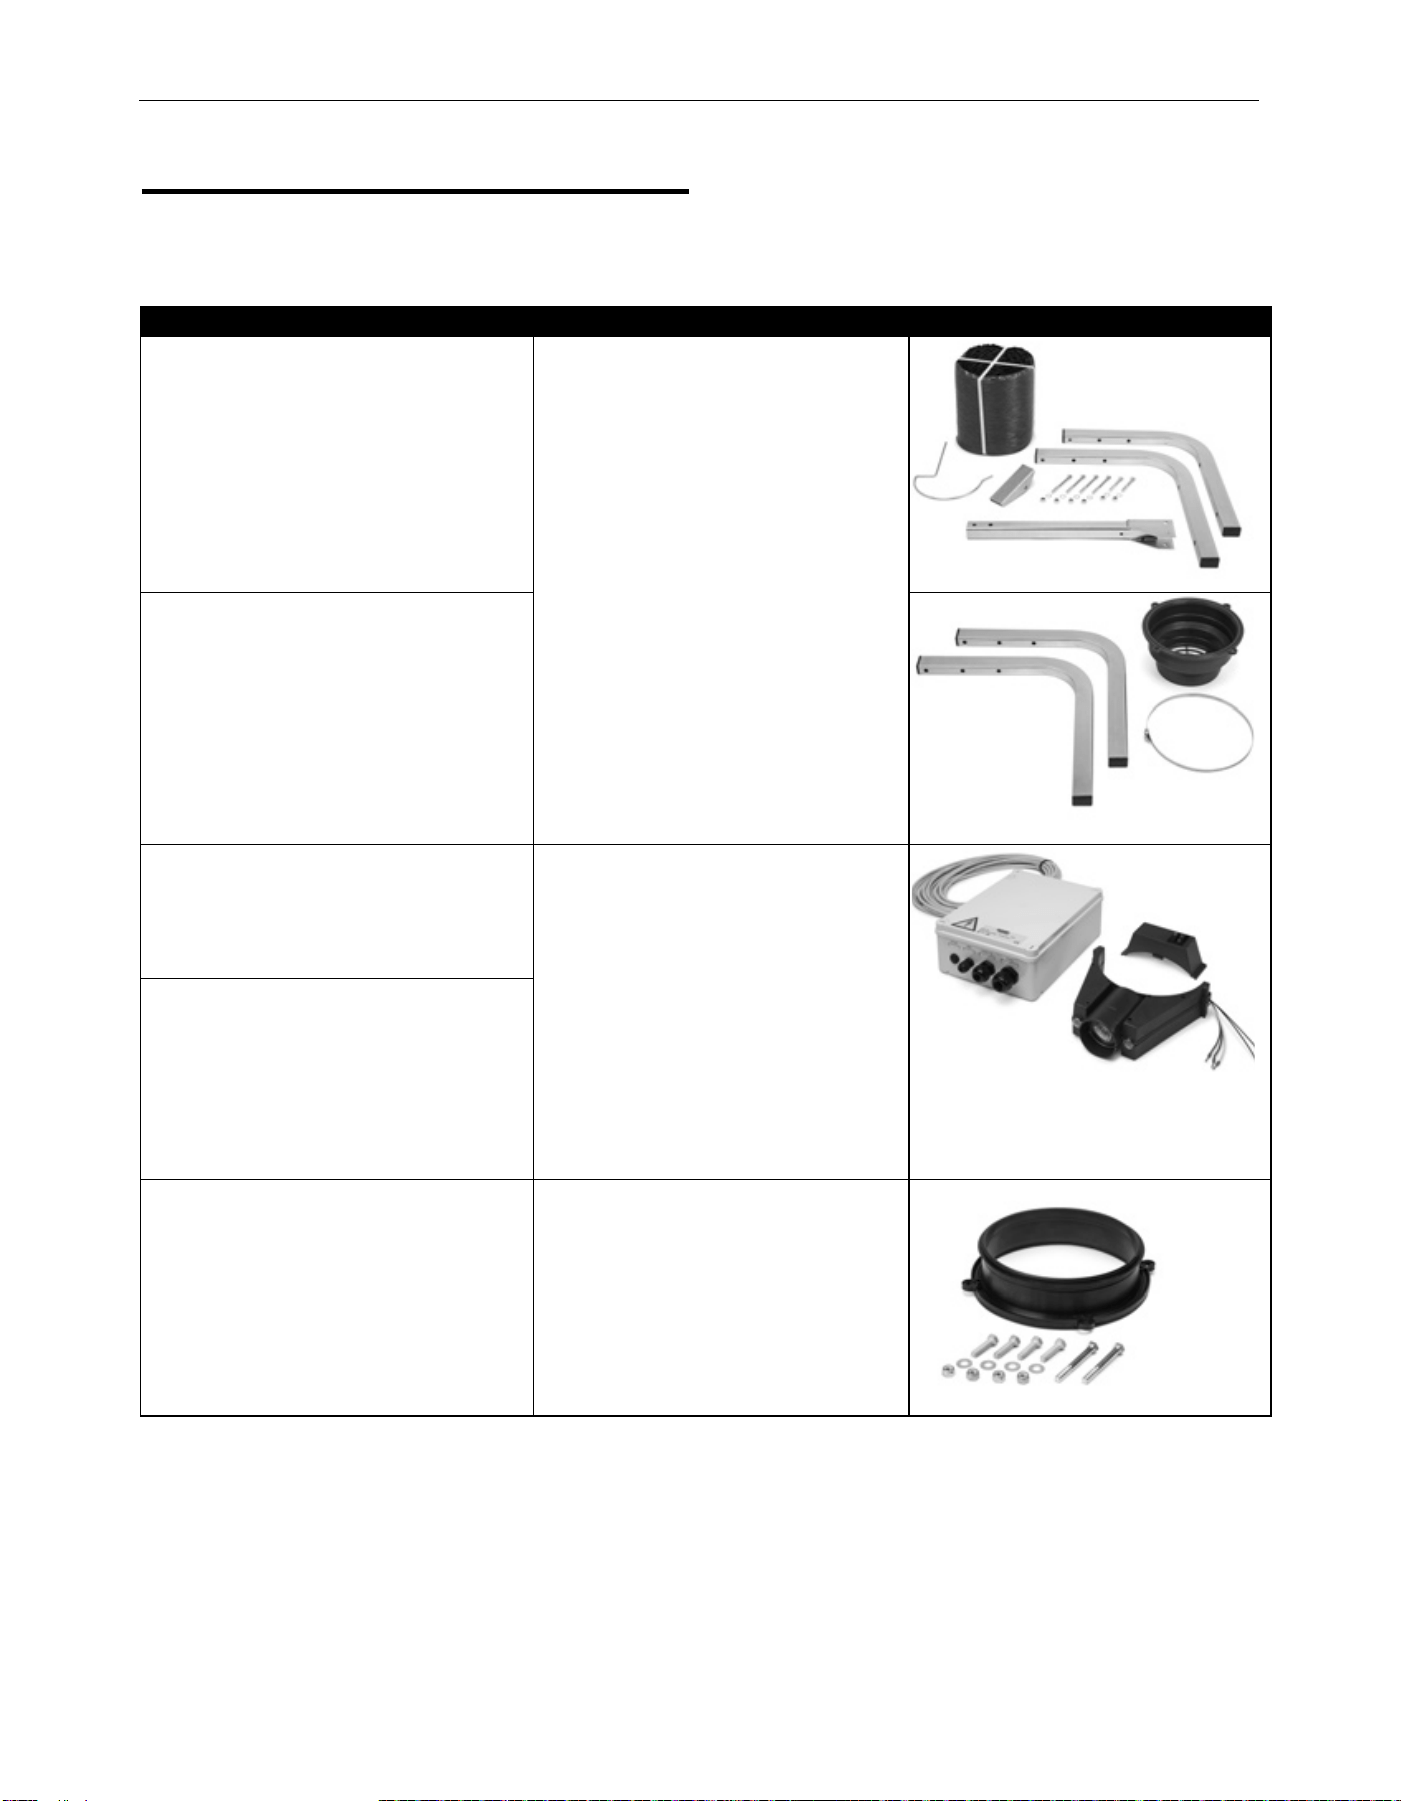
C-1
OPTIONS/ACCESSORIES
The following options/accessories are available for your
Fume Extraction Arms from your local Lincoln Electric Distributor.
FUME EXTRACTION ARMS
ACCESSORIES
K1657-1 SF2400 WALL MOUNTING BRACKET
FOR LFA 3.1 & 4.1
Kit allows mounting of SF2400 fan and
extraction arm to wall. Use K1657-1 for LFA
3.1 and 4.1 extraction arms. Use K1657-2 for
LFA 2.0, LTA 2.0 and LFA 4.1-LC extraction
arms.
K1657-2 SF2400 WALL MOUNTING BRACKET
FOR LTA 2.0, LFA 2.0 & LFA 4.1-LC
K1669-4
LAMP KIT WITH ARC SENSOR (SF2400 FAN)
Mounted in the lamp housing, the arc sensor
turns the fan on when sensing the arc flash,
and turns off 50 seconds after the arc extin-
guishes. Hood mounted switches turn the unit
on and off independently of the arc sensor. Kit
includes lamp housing with arc sensor,
control box, interconnect wire, hood mounted
lamp/ fan switch and instruction manual.
Required for Statiflex® 400-MS. For SF2400
Fan, use K1669-4. For SF4200 Fan, use
K1669-10.
K1669-10
LAMP KIT WITH ARC SENSOR (SF4200 FAN)
K1657-5 CONNECTOR, 8 IN. DUCT TO
EXTRACTION ARM.
Allows 8” duct work to be attached to all
arms except K1655-10 and Mobiflex
®
arms
K2633-5, K2633-6, K2633-7 and K2633-8
D-1
MAINTENANCE
ELECTRIC SHOCK CAN KILL.
• Turn the input power OFF at the
welding power source before
installation or changing drive rolls
and/or guides.
• Do not touch electrically live parts.
• When inching with the gun trigger, electrode and drive
mechanism are "hot" to work and ground and could
remain energized several seconds after the gun trigger
is released.
MOVING PARTS can injure.
• Do not operate with covers, panels or
guards removed or open.
• Only qualified personnel should perform
maintenance work.
DISPOSAL
After life of the product, dispose of product in accordance with
federal, state or local regulations.
When cleaning equipment or replacing filter
use personal protection equipment (PPE)
such as gloves, respirators and protective
clothing to protect against overexposure to
particulate. It is recommended that a
vacuum cleaner or wet methods be used to
clean up any loose particulate that is present in the
extraction arm. It is necessary to use a vacuum cleaner with
HEPA rated filtration.
SERVICE, MAINTENANCE AND REPAIRS
• Observe the maintenance intervals given in this manual.
Overdue maintenance can lead to high costs for repair and
can render the guarantee null and void.
• During service, maintenance and repair jobs, always use
Personal Protective Equipment (PPE) to avoid injury. This also
applies for persons who enter the work area.
• Always use tools, materials, lubricants and service techniques
which have been approved by the manufacturer. Never use
worn tools and do not leave any tools in or on the product.
• Safety features which have been removed for service,
maintenance or repairs, must be put back immediately after
finishing these jobs and it must be checked that they will still
function properly.
• Use sufficient climbing gear and safety guards when working
higher than 2 meters (local restrictions may apply).
• Ensure the workspace is well illuminated.
The product has been designed to function without problems for a
long time with a minimum amount of maintenance. In order to
guarantee this, some simple regular maintenance and cleaning
activities are required which are described in this chapter. If you
observe the necessary caution and carry out the maintenance at
regular intervals, any problems occurring will be detected and
corrected before they lead to a total breakdown. The indicated
maintenance intervals can vary depending on the specific working
and ambient conditions. Therefore it is recommended to
thoroughly inspect the complete product once every year beside
the indicated periodic maintenance. For this purpose contact your
supplier. See Table D.1.
Risk of Fire
PAST due maintenance can cause fire.
WARNING
WARNING
WARNING
FUME EXTRACTION ARMS
MAINTENANCE
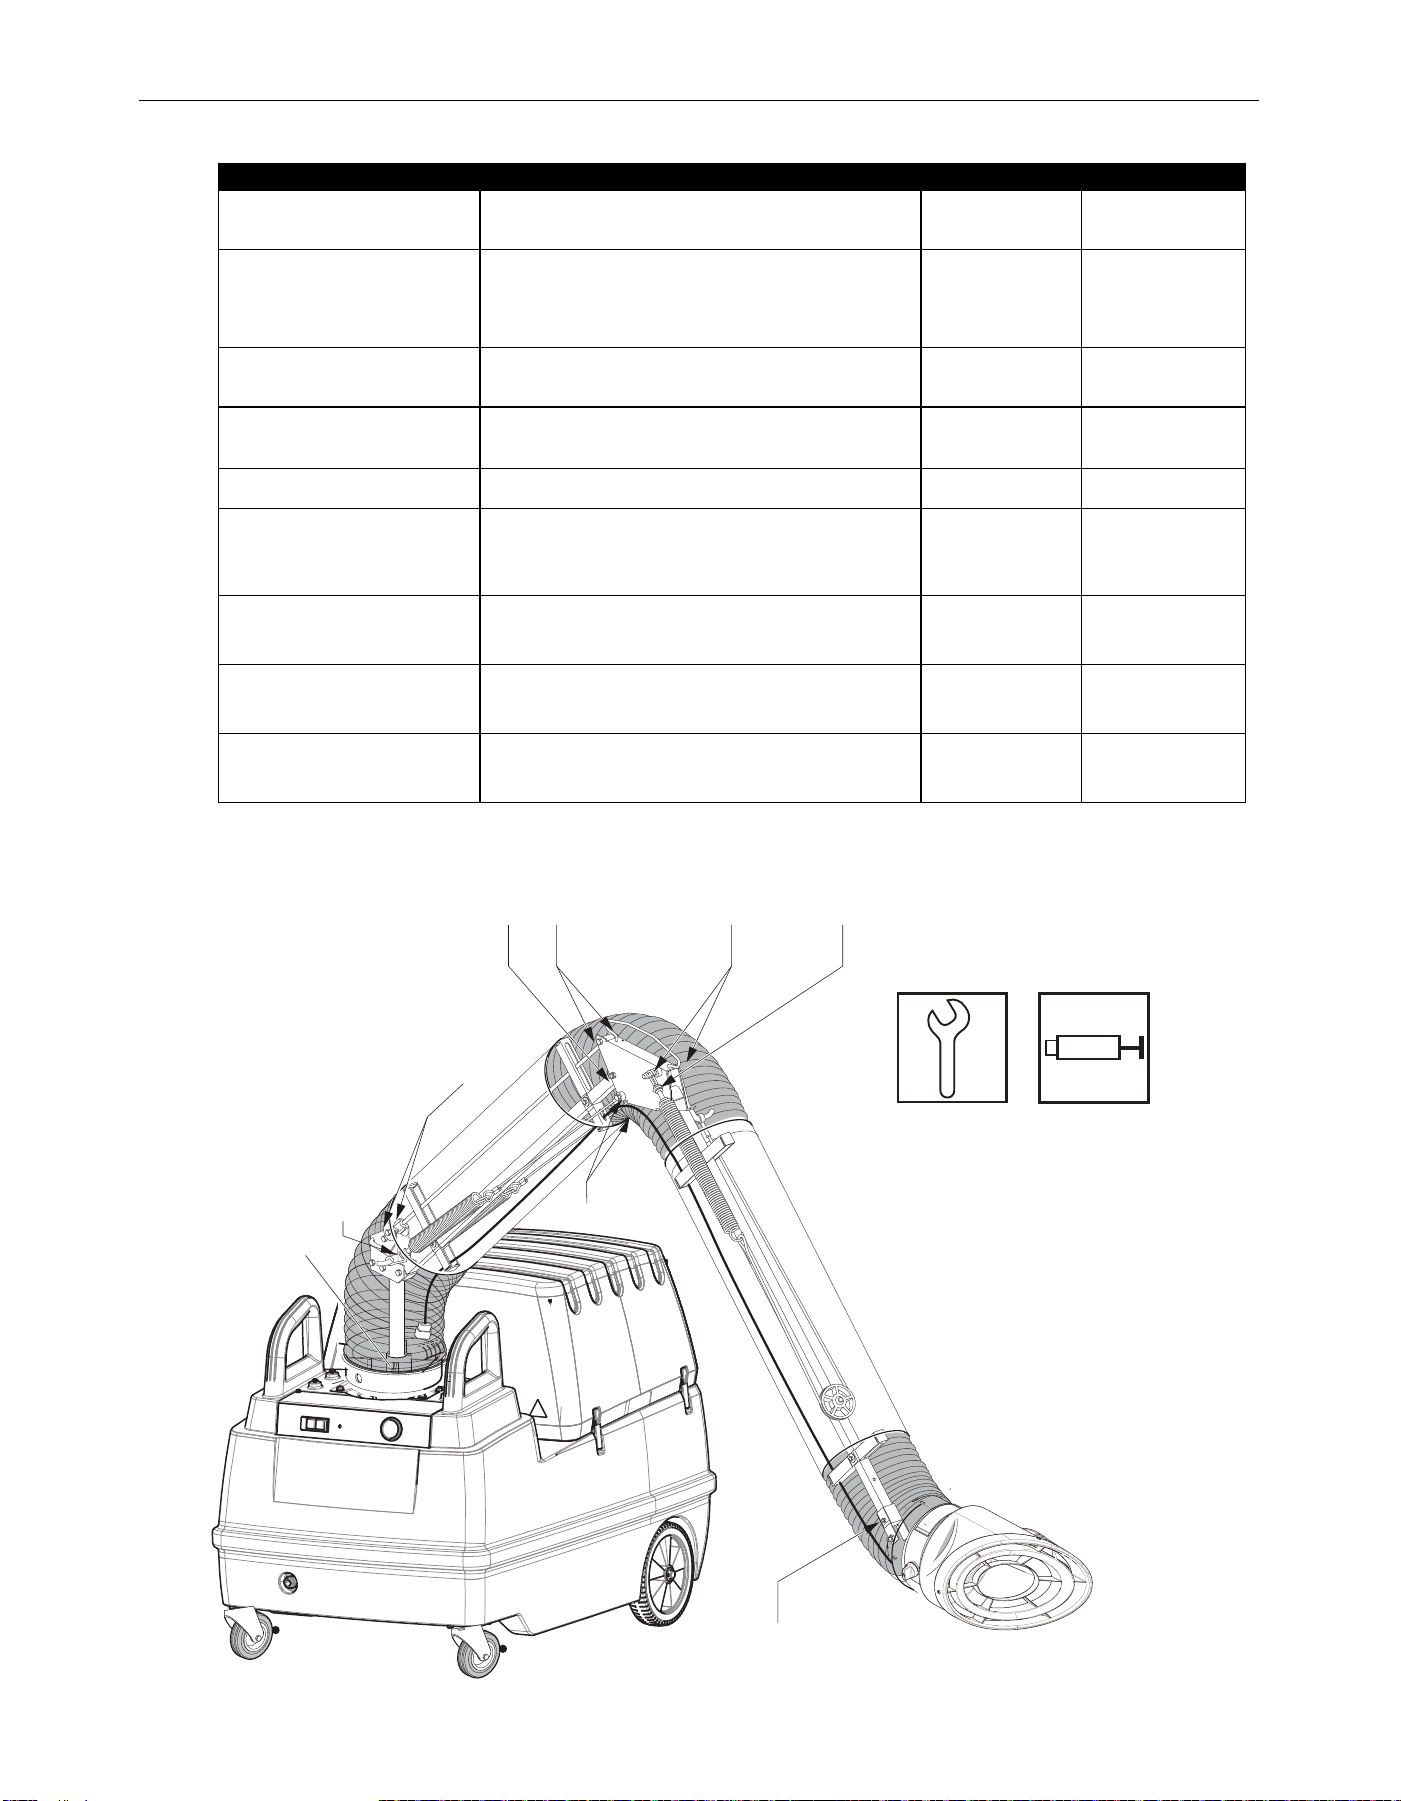
D-2
MAINTENANCE
FUME EXTRACTION ARMS
A
A AB B
B
C
B
A
TABLE D.1 - PERIODIC MAINTENANCE
Component Action
FREQUENCY
Every 3 mo.
FREQUENCY
Every 6 mo.
BALANCE SYSTEM (ITEM A)
CHECK THE BALANCE CONSTRUCTION OF THE
EXTRACTION ARM. ADJUST MECHANISM IF
NECESSARY.
X
OUTSIDE ARM
CHECK AND CLEAN WITH A NON-AGGRESSIVE
DETERGENT.
X
FLEXIBLE HOSES
CHECK FOR CRACKS OR DAMAGES. REPLACE IF
NECESSARY.
X
INSIDE ARM CHECK AND CLEAN THOROUGHLY. X
ARM MOVEMENT
CHECK HORIZONTAL, VERTICAL AND DIAGONAL ARM
MOVEMENT. IF NECESSARY, ADJUST THE SPRING
AND FRICTION.
X
ROTATABLE ARM
CHECK THE FUNCTION OF THE HOOD HINGE. IF
NECESSARY, ADJUST THE FRICTION. .
X
THROTTLE VALVE
CHECK 90º ROTATION OF THE THROTTLE VALVE
USING THE ROTARY KNOB
X
HINGES (ITEM B)
CHECK AND LUBRICATE THE HINGE POINTS WITH
BEARING GREASE.
X
C
AB
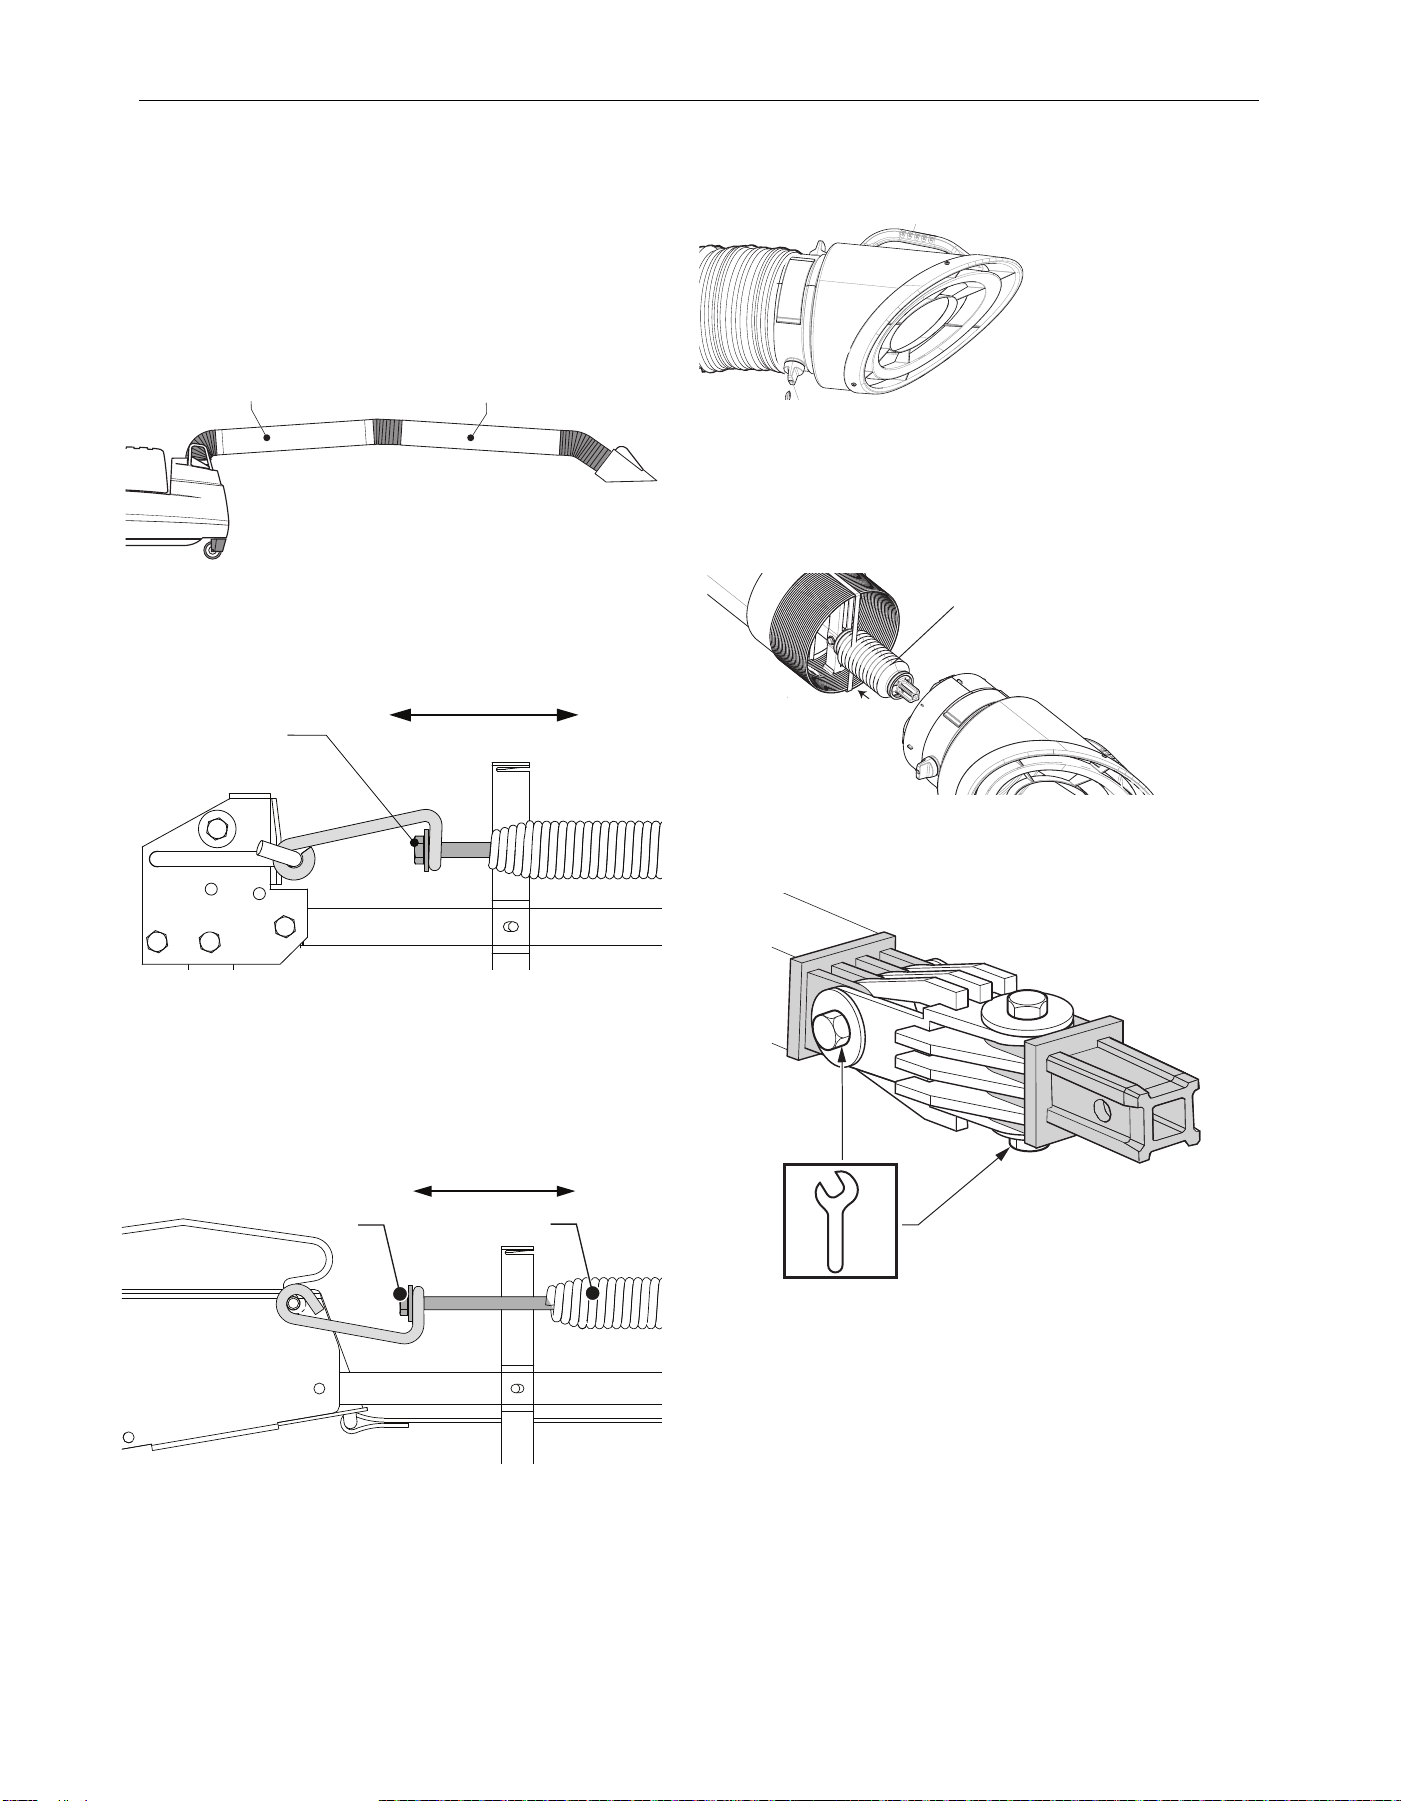
D-3
MAINTENANCE
The extraction arms have been pre-balanced in the factory for
optimal balance and positioning. However, they sometimes need
adjustment. To check and adjust the balance system, proceed as
follows.
If the entire arm falls on its own:
(See Figure F.1, items A and B)
• Tighten bolt (A) on the hinge fan side to increase spring tension.
Ensure spring does not turn as you tighten. Turn bolt on each
spring equal amounts. See Figure F.2.
If the hood section of the arm falls on its own:
(See Figure F.3, item B)
• Tighten bolt (A) in middle hinge to increase spring (B) tension.
Ensure spring does not turn as you tighten. See Figure F.3.
Bring the extraction hood to a horizontal position. The hood should
stay in this position. See Figure F.4.
If the extraction hood falls on its own:
• Pull back the arm band seal and flexible hose.
• Push the corrugated cover (Item A Figure F.5) back to expose
the wrist joint.
• Use a ½” wrench and ½” socket and ratchet to adjust the
bolt/nut pairs as shown Turn bolt (See Figure F.6 Item A) in
the hood hinge clockwise to tighten extraction hood.
• Replace the flexible hose and secure it with the arm band
seal.
If the extraction hood does not maintain a horizontal position
(left/right)
• Pull back the arm band seal and flexible hose.
• Turn bolt (See Figure F.6 Item B): in the hood hinge clockwise
to tighten horizontal movement.
• Replace the flexible hose and secure it with the arm band
seal.
1. Bring the arm (including extraction hood) to a horizontal
position. The arm should maintain this position. See Figure
F.4.
FUME EXTRACTION ARMS
13
A
B
A
FIGURE F.6 - HOOD ADJUSTMENT
FIGURE F.1
A B
FIGURE F.2
A
FIGURE F.3
A
B
FIGURE F.4 - HOOD ADJUSTMENT
FIGURE F.5 - HOOD ADJUSTMENT
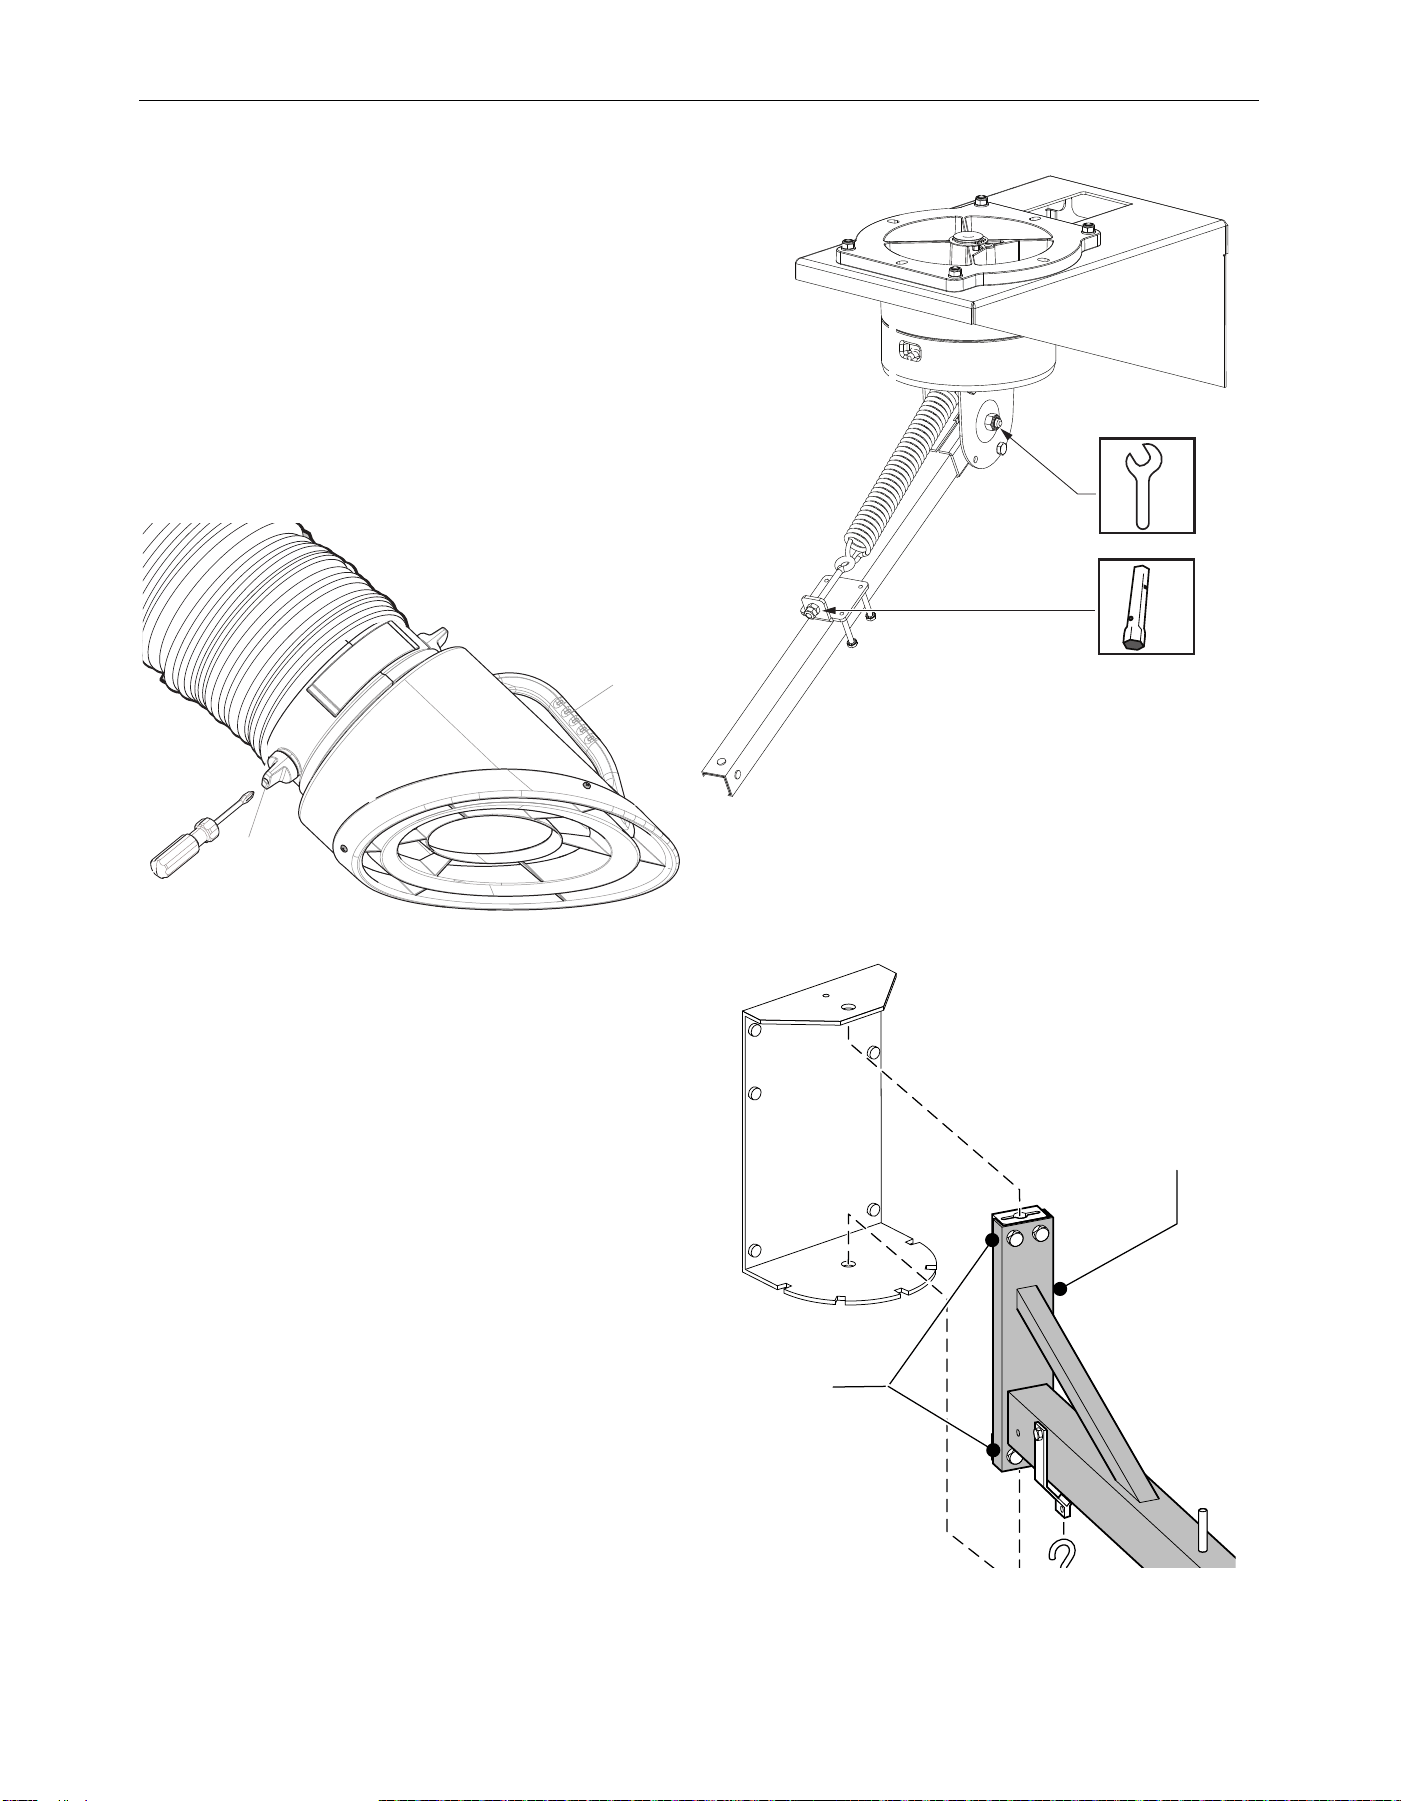
D-4
MAINTENANCE
A. Rotary knobs for adjustment of throttle valve.
NOTE: Throttle valve rotational resistance can be adjusted using a
phillips screw driver. Find the knob (A) with a center
opening then insert phillips screw driver into knob to adjust
rotational resistance. Clockwise increases resistance,
counterclockwise decreases resistance. Adjust in minor
increments only.
B. Handle for positioning of the extraction arm and hood.
• Using the handle (B), position the hood of the extraction arm
in the desired position at approximately 6-20 inches (15-50
cm) from the source of fume.
NOTE: Retraction movement must happen slowly to allow
counterweight to descend.
FIGURE F.7- CONTROLS
EXTENSION ARM ADJUSTMENT
Adjust the (4) bolts (Fig. F.8, Item B) at the base (Fig. F.8, Item A)
to squeeze the friction blocks around the pivot pin (see Figure F.8).
FIGURE F.9
A
B
Knob with center
opening for adjustment
of rotational resistance
FUME EXTRACTION ARMS
17
13
A
B
FIGURE F.8 - ARM ADJUSTMENT
A
B
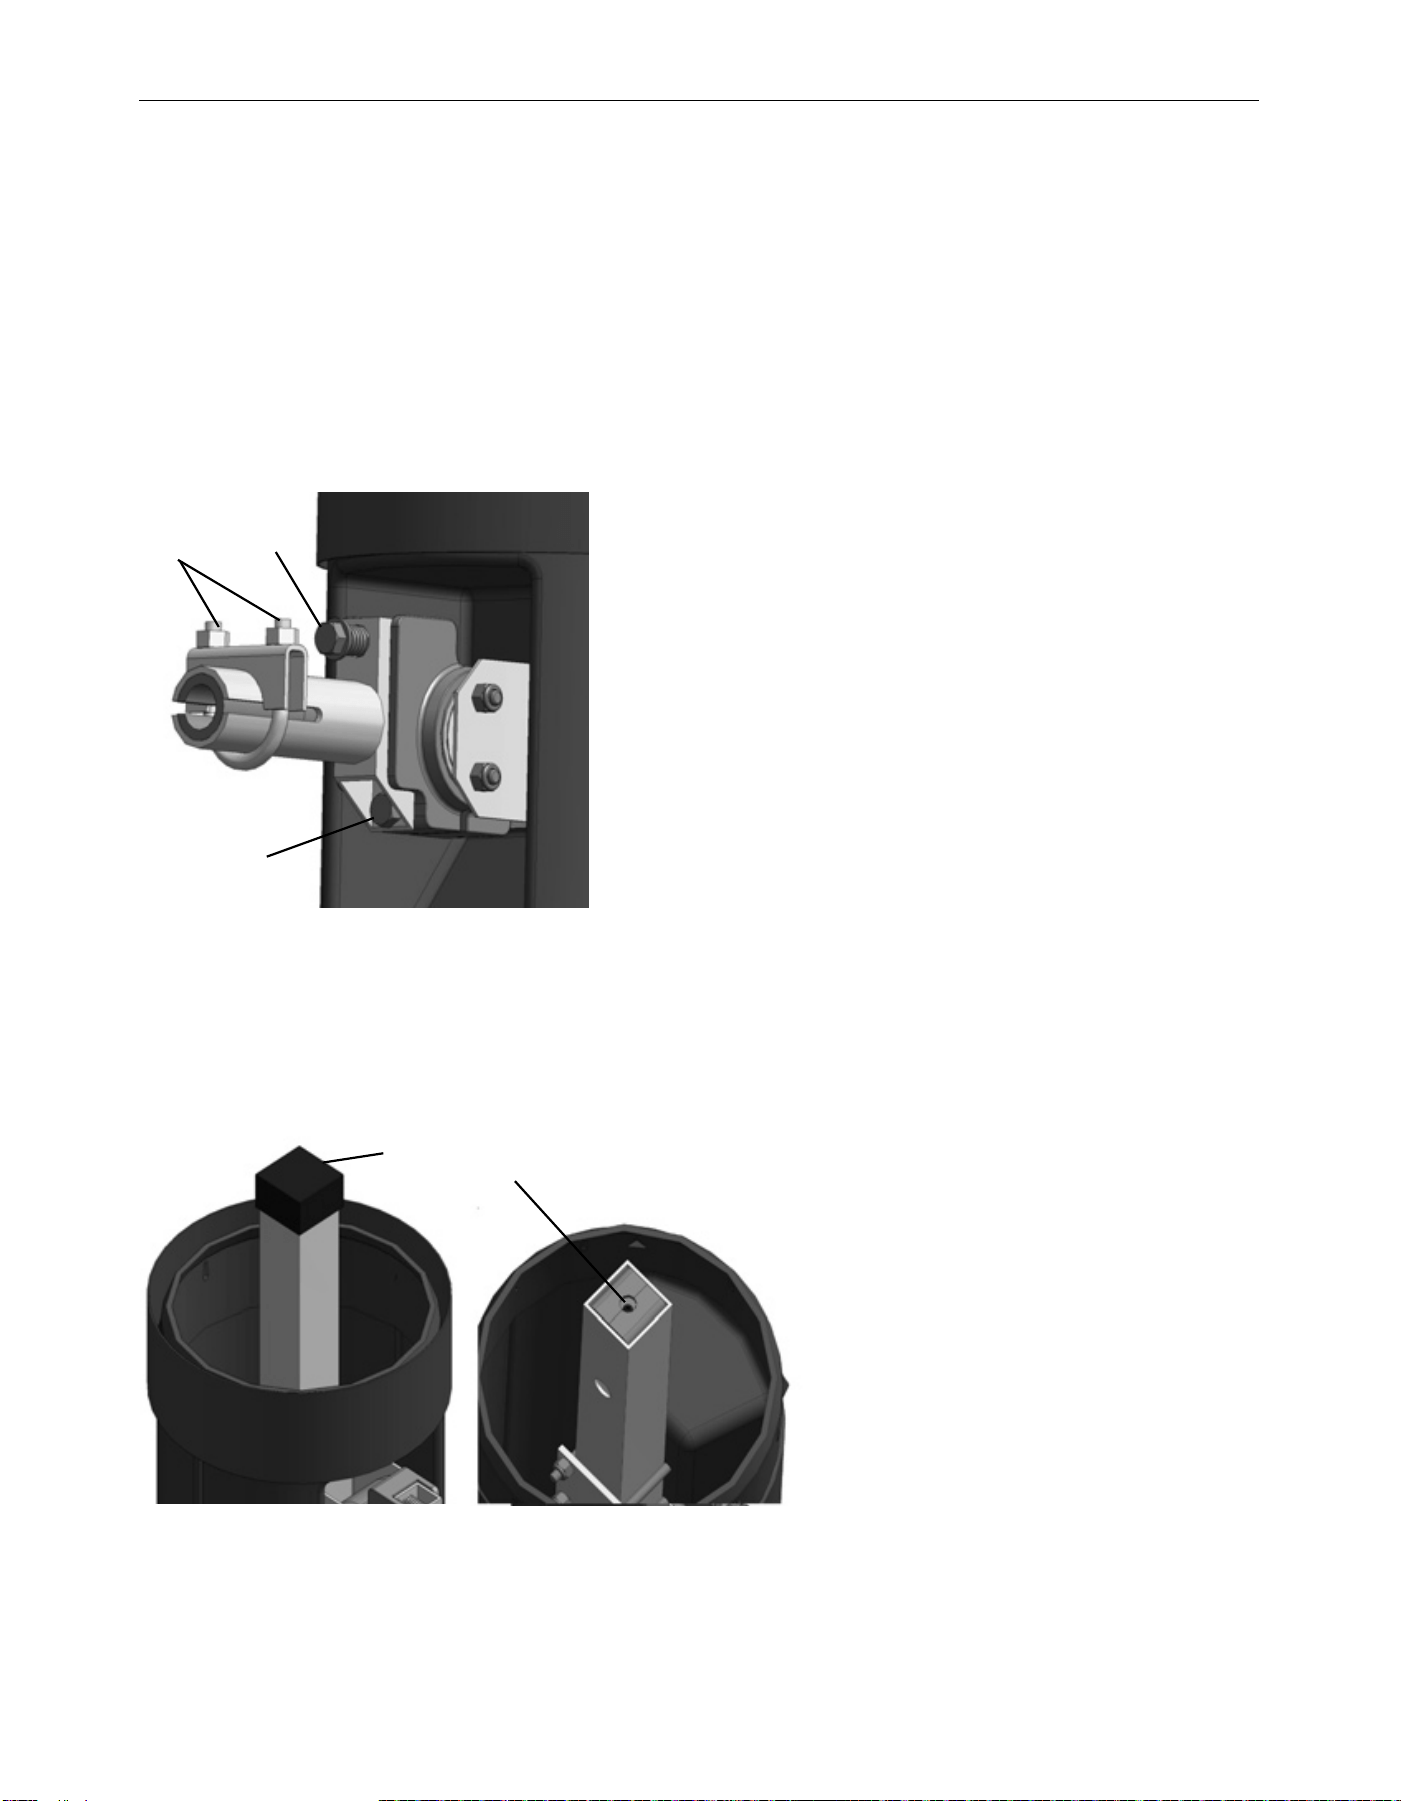
D-5
MAINTENANCE
LTA 2.0 TELESCOPIC ARM ADJUSTMENT
The amount of friction resistance should be set such that the arm
is comfortable to move (always test both up and down
movements), yet hold its position against gravity once positioned.
To adjust the friction setting for side to side movement of the arm,
tighten or loosen the nuts on the u-clamp (Feigner F.9 Item A) with
a ½” socket and ratchet.
To adjust the friction setting for front to back movement, adjust
the friction clamp bolts (Figure F.9 Item B) on the rotating hinge
with a ½” socket and ratchet.
To adjust the friction setting for the telescoping motion of the arm,
remove the black cap (Figure F.10 Item A) and turn the set screw
(Figure F.10 Item B) COUNTERCLOCKWISE TO INCREASE
FRICTION AND CLOCKWISE TO DECREASE IT using a 1/8”
T-handle hex bit.
FUME EXTRACTION ARMS
FIGURE F.9
FIGURE F.10
A
B
A
B
B

E-1
TROUBLESHOOTING
FUME EXTRACTION ARMS
TROUBLESHOOTING
Service and Repair should only be performed by
Lincoln Electric Factory Trained Personnel.
Unauthorized repairs performed on this equipment
may result in danger to the technician and machine
operator and will invalidate your factory warranty.
For your safety and to avoid Electrical Shock, please
observe all safety notes and precautions detailed
throughout this manual.
This Troubleshooting Guide is provided to help you locate
and repair possible machine malfunctions. Simply follow the
three-step procedure listed below.
Step 1. LOCATE PROBLEM (SYMPTOM).
Look under the column labeled “PROBLEM (SYMPTOMS).”
This column describes possible symptoms that the machine
may exhibit. Find the listing that best describes the symp-
tom that the machine is exhibiting.
Step 2. POSSIBLE CAUSE.
The second column labeled “POSSIBLE CAUSE” lists the
obvious external possibilities that may contribute to the
machine symptom.
Step 3. RECOMMENDED COURSE OF ACTION
This column provides a course of action for the Possible
Cause, generally it states to contact you local Lincoln
Authorized Field Service Facility.
If you do not understand or are unable to perform the
Recommended Course of Action safely, contact your local
Lincoln Authorized Field Service Facility.
WARNING
If for any reason you do not understand the procedures or are unable to perform the maintenance or repairs safely, contact your
Lincoln Authorized Service Facility for technical troubleshooting assistance before you proceed.
WWW.LINCOLNELECTRIC.COM/LOCATOR
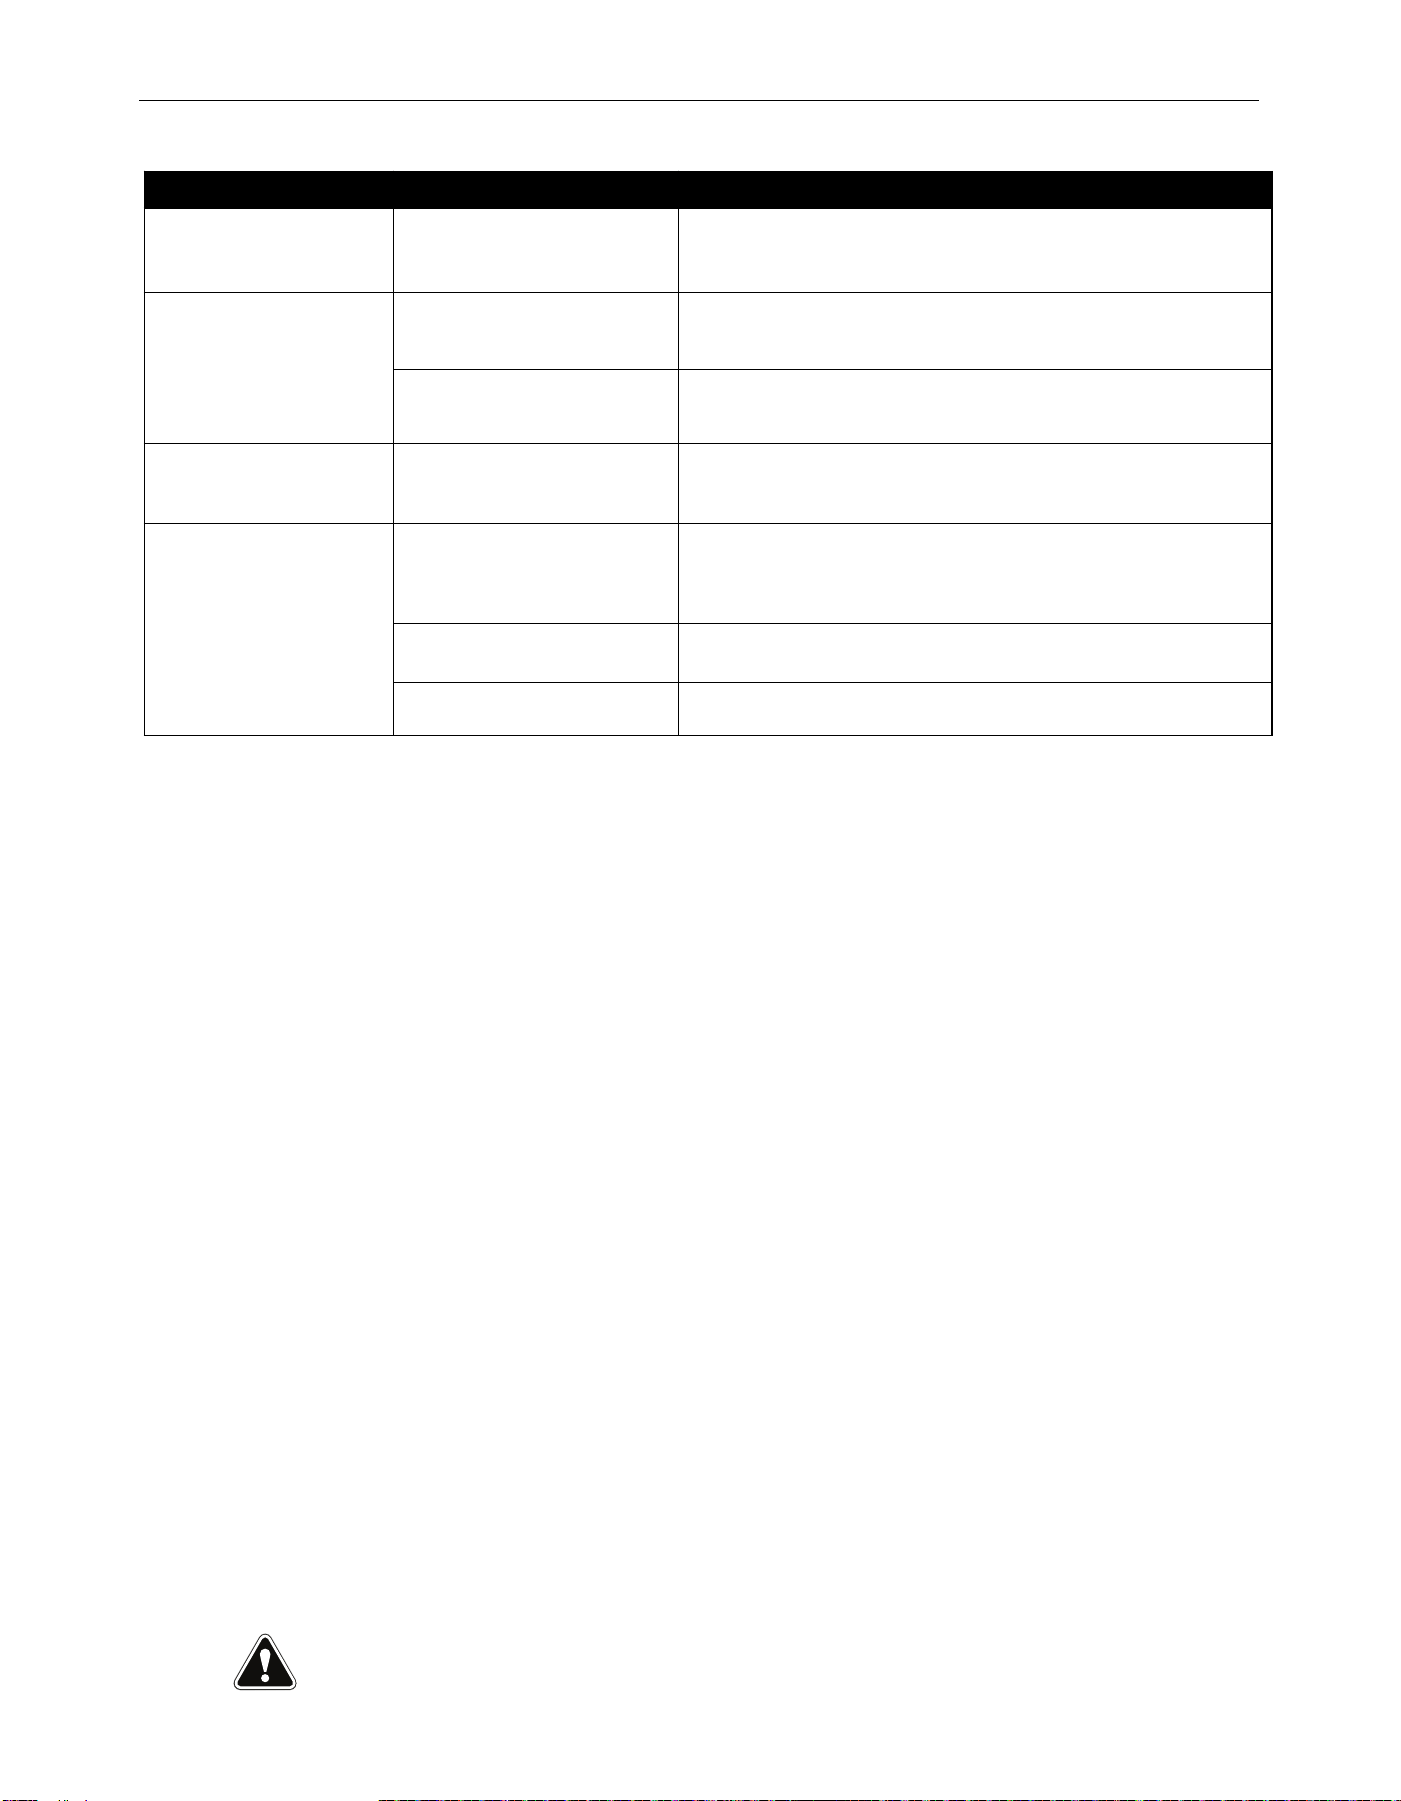
Observe all Safety Guidelines detailed throughout this manual
E-2
TROUBLESHOOTING
FUME EXTRACTION ARMS
PROBLEM
POSSIBLE CAUSE RECOMMENDED COURSE OF ACTION
EXTRACTION ARM CREAKS
OR SQUEAKS.
INSUFFICIENT LUBRICATION. LUBRICATE USING OIL OR GREASE.
EXTRACTION ARM NOT IN
BALANCE.
TOO MUCH OR NOT ENOUGH
FRICTION (AGEING).
ADJUST THE FRICTION USING THE UPPER BOLT ON THE MIDDLE HINGE
ADJUSTING MECHANISM NOT
STRONG ENOUGH.
ADJUST ADJUSTING MECHANISM.
EXTRACTION HOOD NOT IN
BALANCE.
TOO MUCH OR NOT ENOUGH
FRICTION (AGEING).
ADJUST THE FRICTION USING THE BOLT AND NUT ON THE PLASTIC PLUG.
EXTRACTION CAPACITY
INSUFFICIENT.
THROTTLE VALVE CLOSED. OPEN THE THROTTLE VALVE.
FLEXIBLE HOSE(S) TORN OR
LOOSE.
REPAIR OR REPLACE THE FLEXIBLE HOSE(S).
RUBBER ARM BAND SEAL TORN. REPAIR OR REPLACE THE RUBBER BAND SEAL(S).
If for any reason you do not understand the procedures or are unable to perform the maintenance or repairs safely, contact your
Lincoln Authorized Service Facility for technical troubleshooting assistance before you proceed.
WWW.LINCOLNELECTRIC.COM/LOCATOR

ii
THIS PAGE INTENTIONALLY LEFT BLANK
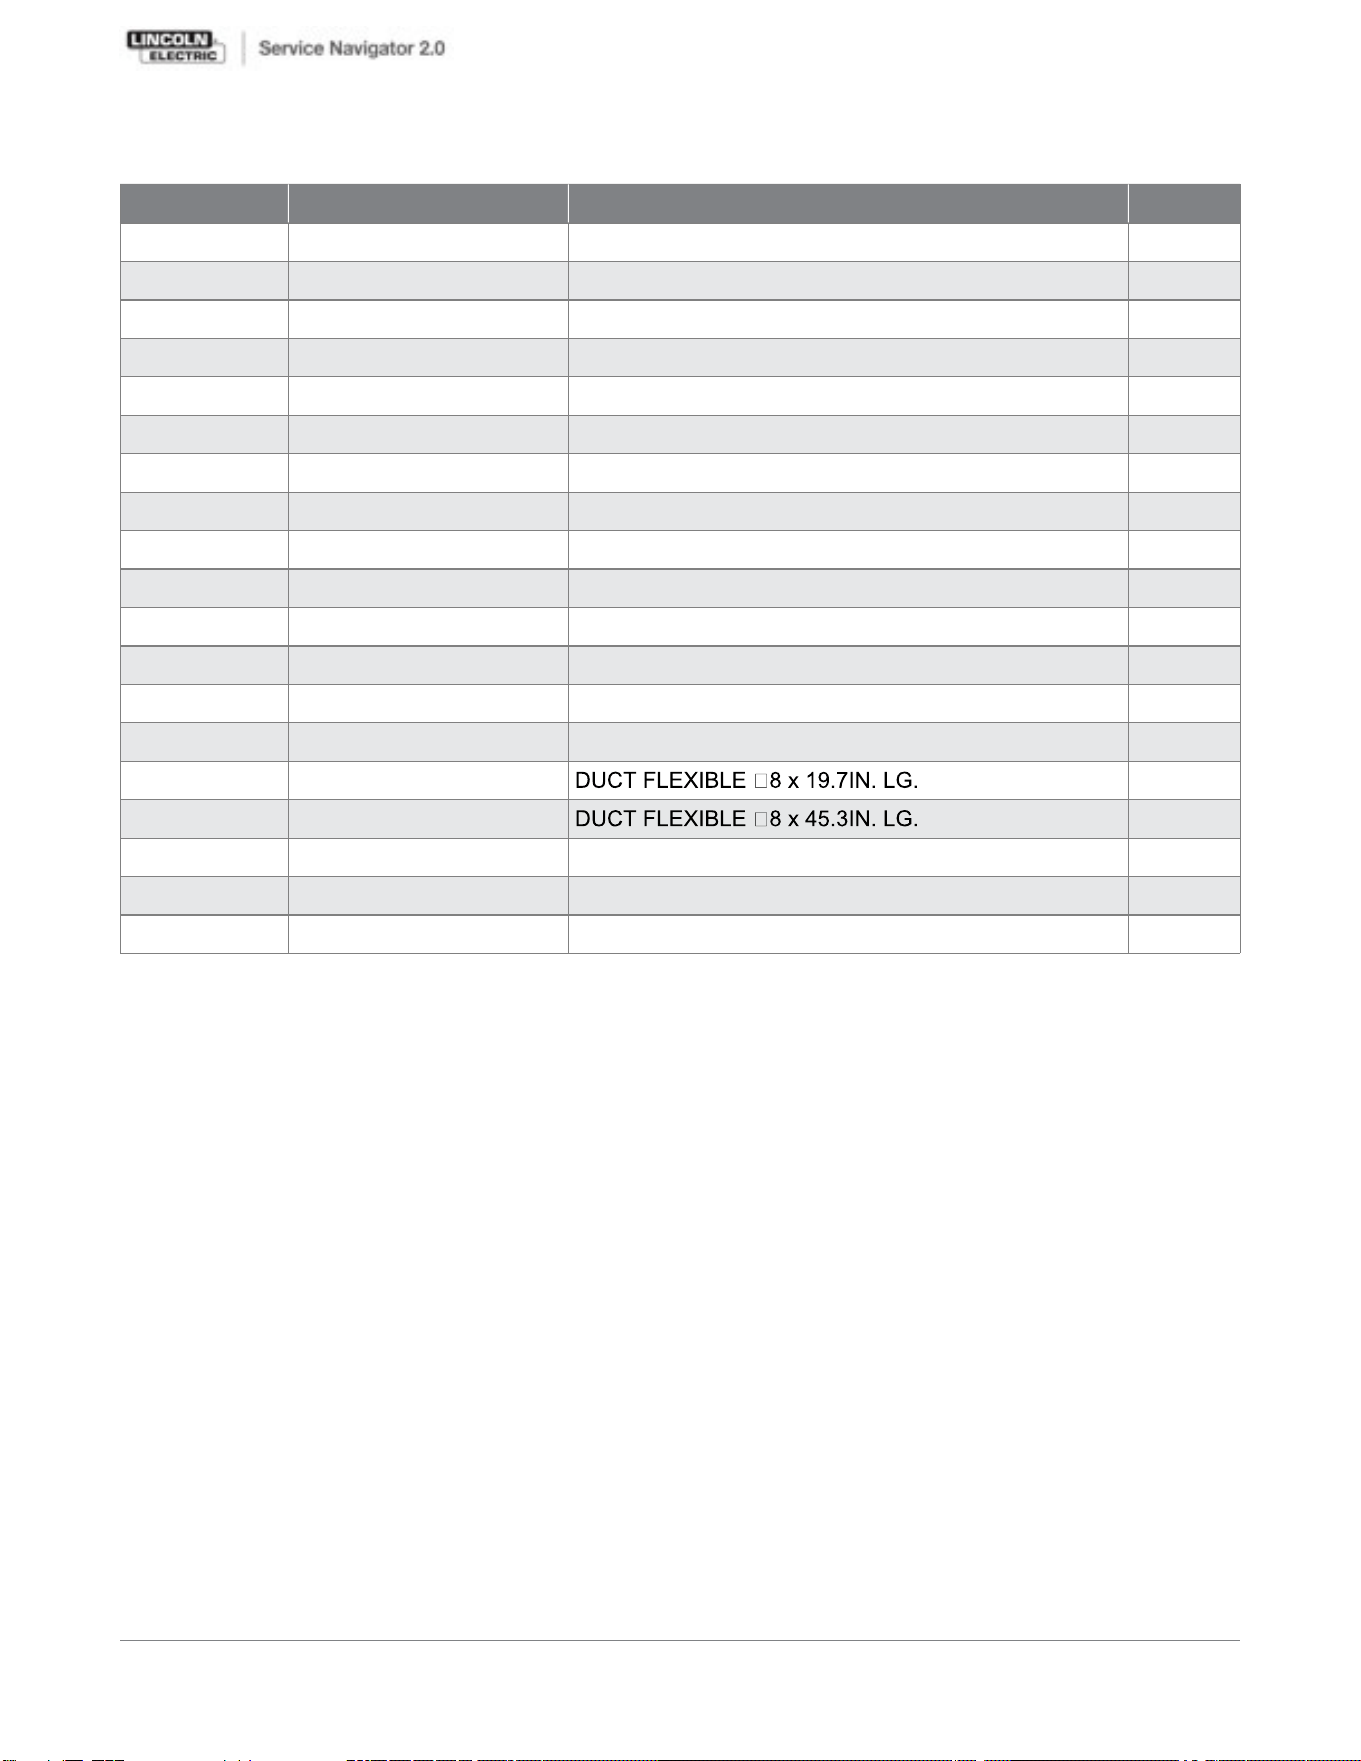
KEY PART NUMBER DESCRIPTION QTY
1 9SS31226-310 LFA 3.1 10FT SUPP. STRUCT. ASSEM. 1
2 9SS31226-320 ROTAHOOD RND RED ASSEM. 1
3 9SS31226-342 BASE SWIVEL MOUNT +TUBE ASSEM. 1
4 9SS31226-35 TUBE RND EXTERNAL PLASTIC FA3 2
5 9SS31226-24 COVER FLEX WRIST HINGE 1
6 9SFC0840101030 ARM SEAL BAND 6
7 9SCF000063 5/16-18X2.00HHCS 2
8 9SCF000016 1/4-20X1.75HHCS 1
9 9SS9262-98 PLAIN WASHER 2
10 9ST9187-16 1/4-20 HLN 1
11 9ST9187-15 5/16-18HLN-SS 10
12 9SCF000075 5/16-18X1.75HHCS 2
13 9SCF000187 5/16-18X2.50HHCS 6
14 9SS9262-121 PLAIN WASHER 4
15 9SS31256-9 1
16 9SS31256-5 1
17 9SM22196 1
18 9SM22196-1 DECAL WARNING FRENCH 1
DECAL WARNING ENGLISH
9SS27368-2 DECAL - 7IN LINCOLN LOGO 2
LFA 3.1 WITH FLANGE - K1655-8 General Assembly
LFA 3.1 WITH FLANGE - K1655-8
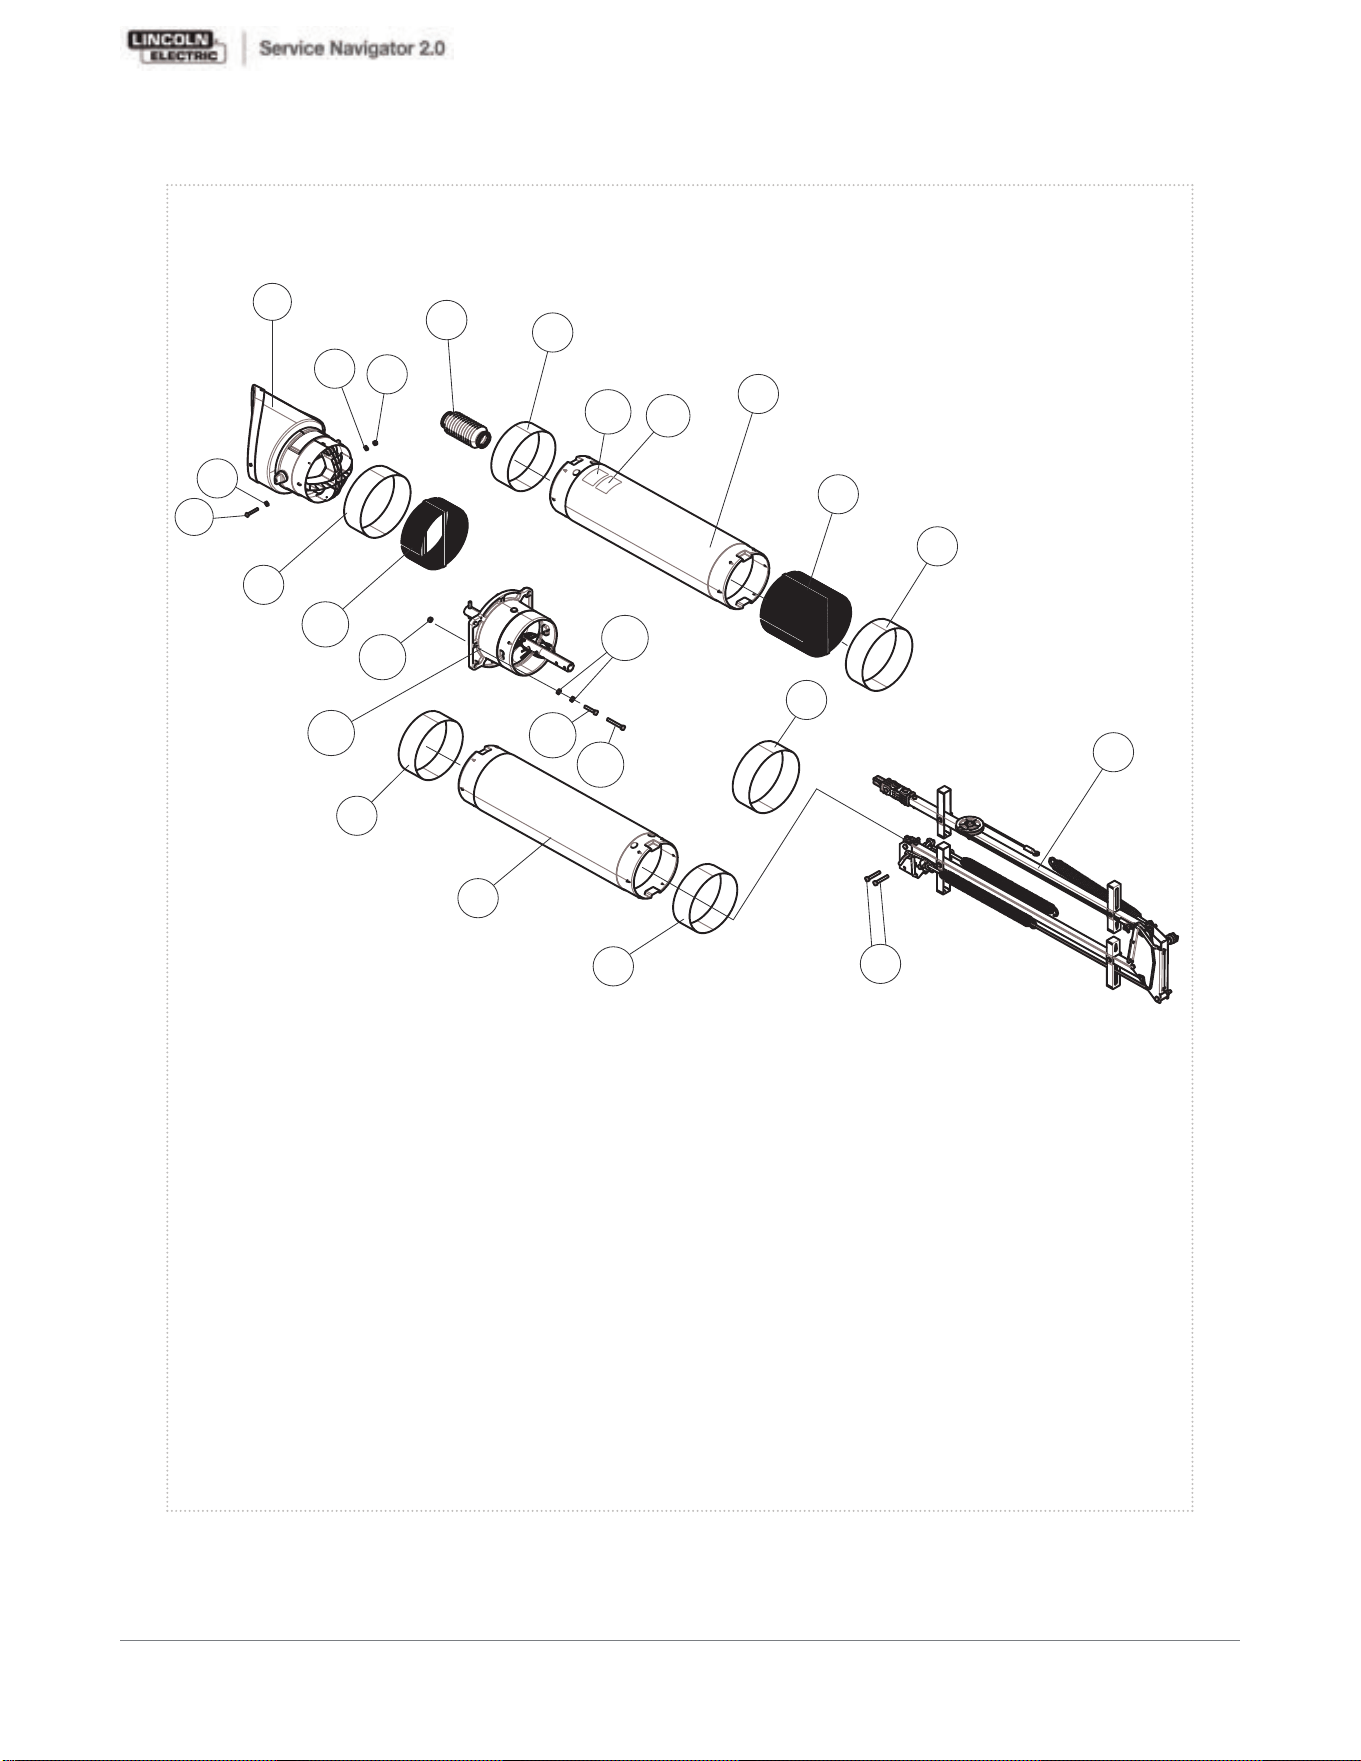
P-960-C.jpg
LFA 3.1 WITH FLANGE - K1655-8 General Assembly
LFA 3.1 WITH FLANGE - K1655-8
2
9
10
5
6
4
16
6
1
7
18
6
15
11
6
4
3
14
12
13
6
17
6
9
8
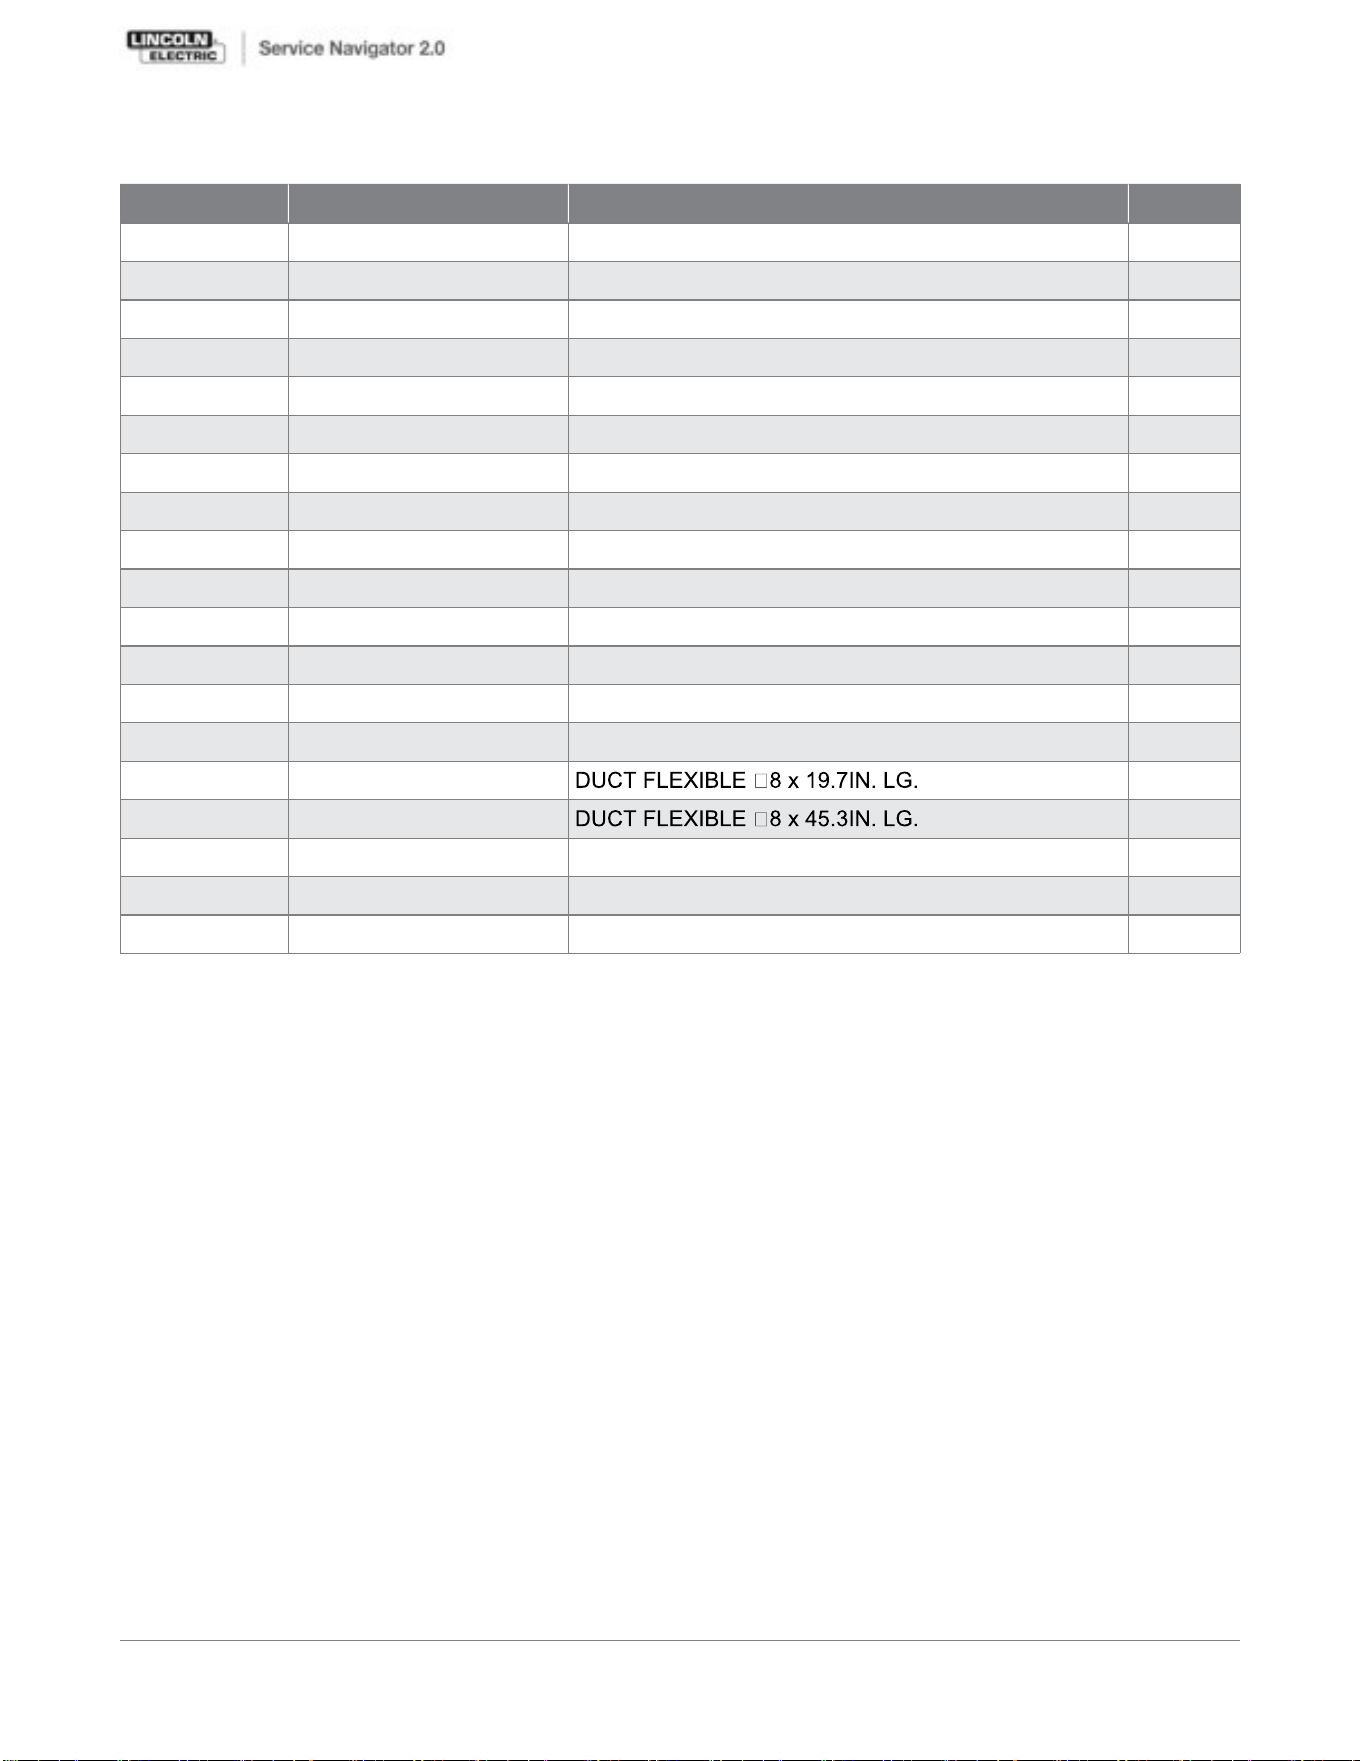
KEY PART NUMBER DESCRIPTION QTY
1 9SS31226-311 LFA 4.1 13FT SUPP. STRUCT. ASSEM. 1
2 9SS31226-320 ROTAHOOD RND RED ASSEM. 1
3 9SS31226-342 BASE SWIVEL MOUNT +TUBE ASSEM. 1
4 9SS31226-95 TUBE RND EXTERNAL PLASTIC FA4 2
5 9SS31226-24 COVER FLEX WRIST HINGE 1
6 9SFC0840101030 ARM SEAL BAND 6
7 9SCF000063 5/16-18X2.00HHCS 2
8 9SCF000016 1/4-20X1.75HHCS 1
9 9SS9262-98 PLAIN WASHER 2
10 9ST9187-16 1/4-20 HLN 1
11 9ST9187-15 5/16-18HLN-SS 10
12 9SCF000075 5/16-18X1.75HHCS 2
13 9SCF000187 5/16-18X2.50HHCS 6
14 9SS9262-121 PLAIN WASHER 4
15 9SS31256-9 1
16 9SS31256-5 1
17
18
9SM22196 DECAL WARNING ENGLISH 1
9SM22196-1 DECAL WARNING ENGLISH 1
9SS27368-2 DECAL - 7IN LINCOLN LOGO 2
LFA 4.1 WITH FLANGE - K1655-9 General Assembly
LFA 4.1 WITH FLANGE - K1655-9
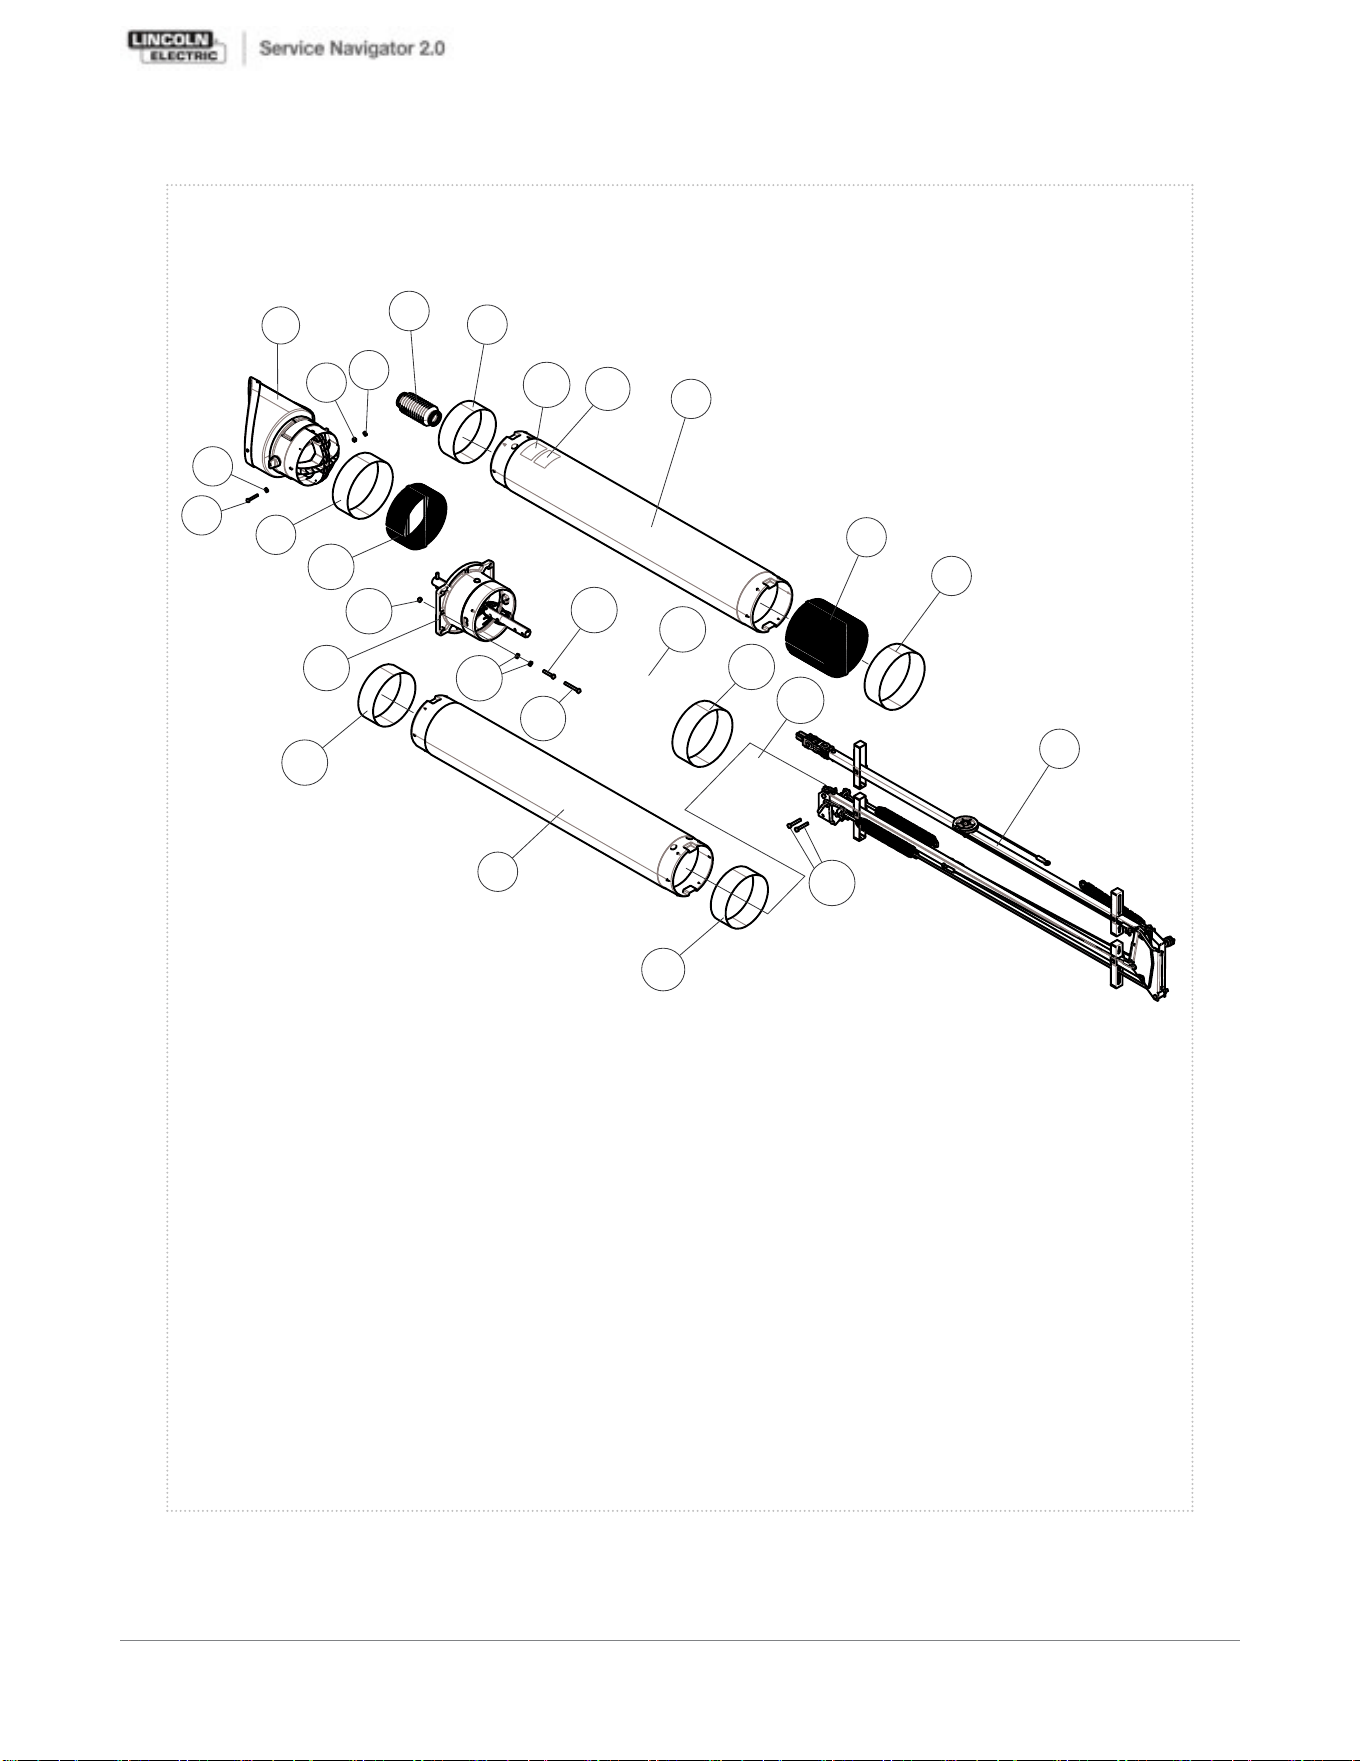
P-961-C.jpg
LFA 4.1 WITH FLANGE - K1655-9 General Assembly
LFA 4.1 WITH FLANGE - K1655-9
2
9
10
5
6
4
16
6
1
7
6
4
6
17
6
12
14
3
11
15
6
13
18
9
8
18
17
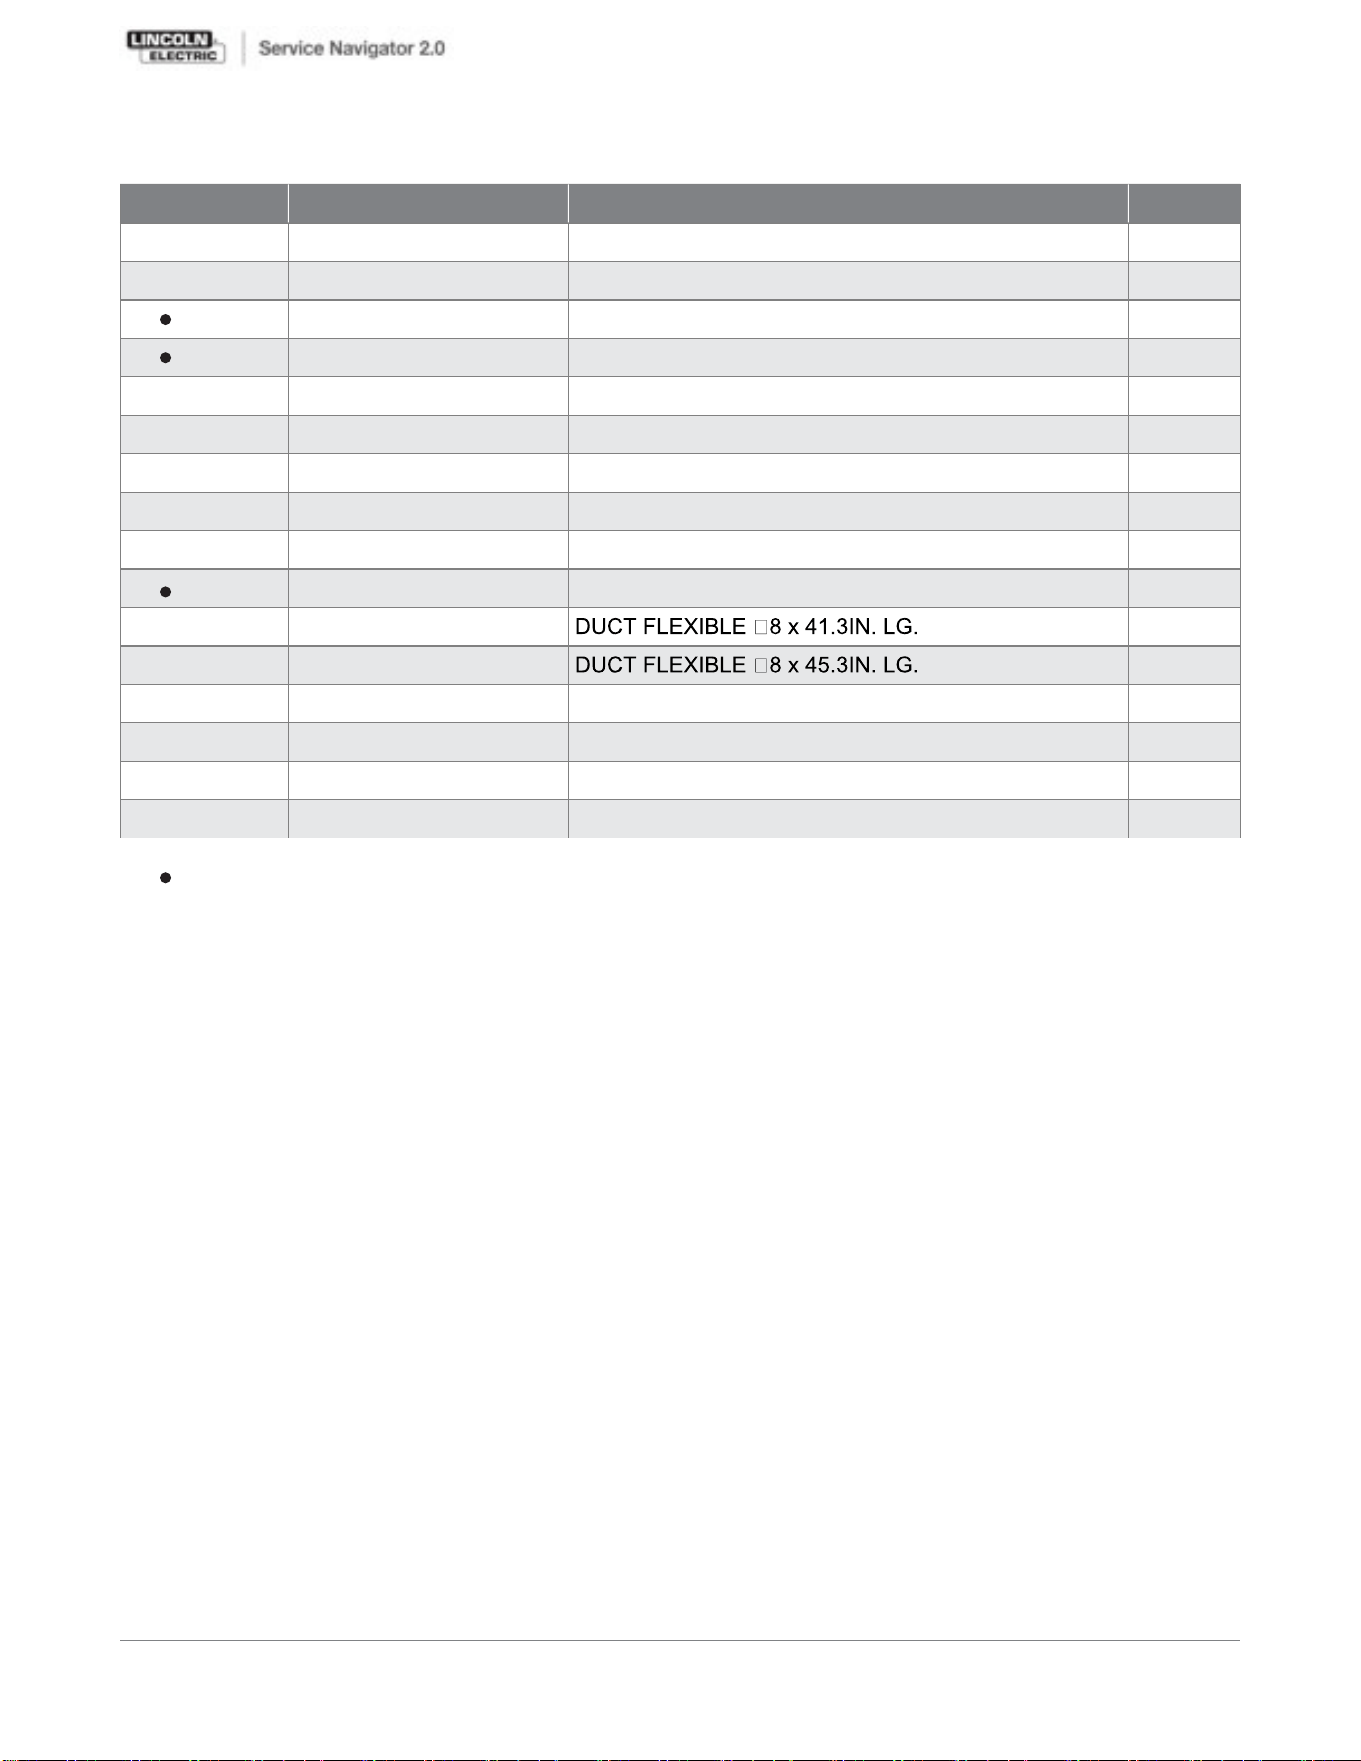
KEY PART NUMBER DESCRIPTION QTY
1 9SS31226-337 BASE LTA 2.0 ASSEM. 1
2 9SCF000055 1/4-20X2.75HHCS 2
3 9SS10888-47 HOSE CLAMP 8” 2
4 9SFC0840101030 ARM SEAL BAND 3
5 9SS31226-314 LTA 2.0 SUPP.STRUCT.ASSEM. 1
6 9SS31226-332 WRIST HINGE ASSEM. 1
7 9SCF000016 1/4-20X1.75HHCS 1
8 9SS31226-24 COVER FLEX WRIST HINGE 1
9 9SS31226-320 ROTAHOOD RND RED ASSEM. 1
10 9ST9187-16 1/4-20 HLN 3
11 9SS31256-4 1
12 9SS31256-5 1
13 9SS9262-98 PLAIN WASHER 2
9SM22196 DECAL WARNING ENGLISH 1
9SM22196-1 DECALWARNINGENVIRONMENTAL EQUIP 1
9SS27368-2 DECAL - 7IN LINCOLN LOGO 1
LTA 2.0 T FLEX - K1655-10 General Assembly
LTA 2.0 T FLEX - K1655-10
14
15
IN HARDWARE PACKAGE
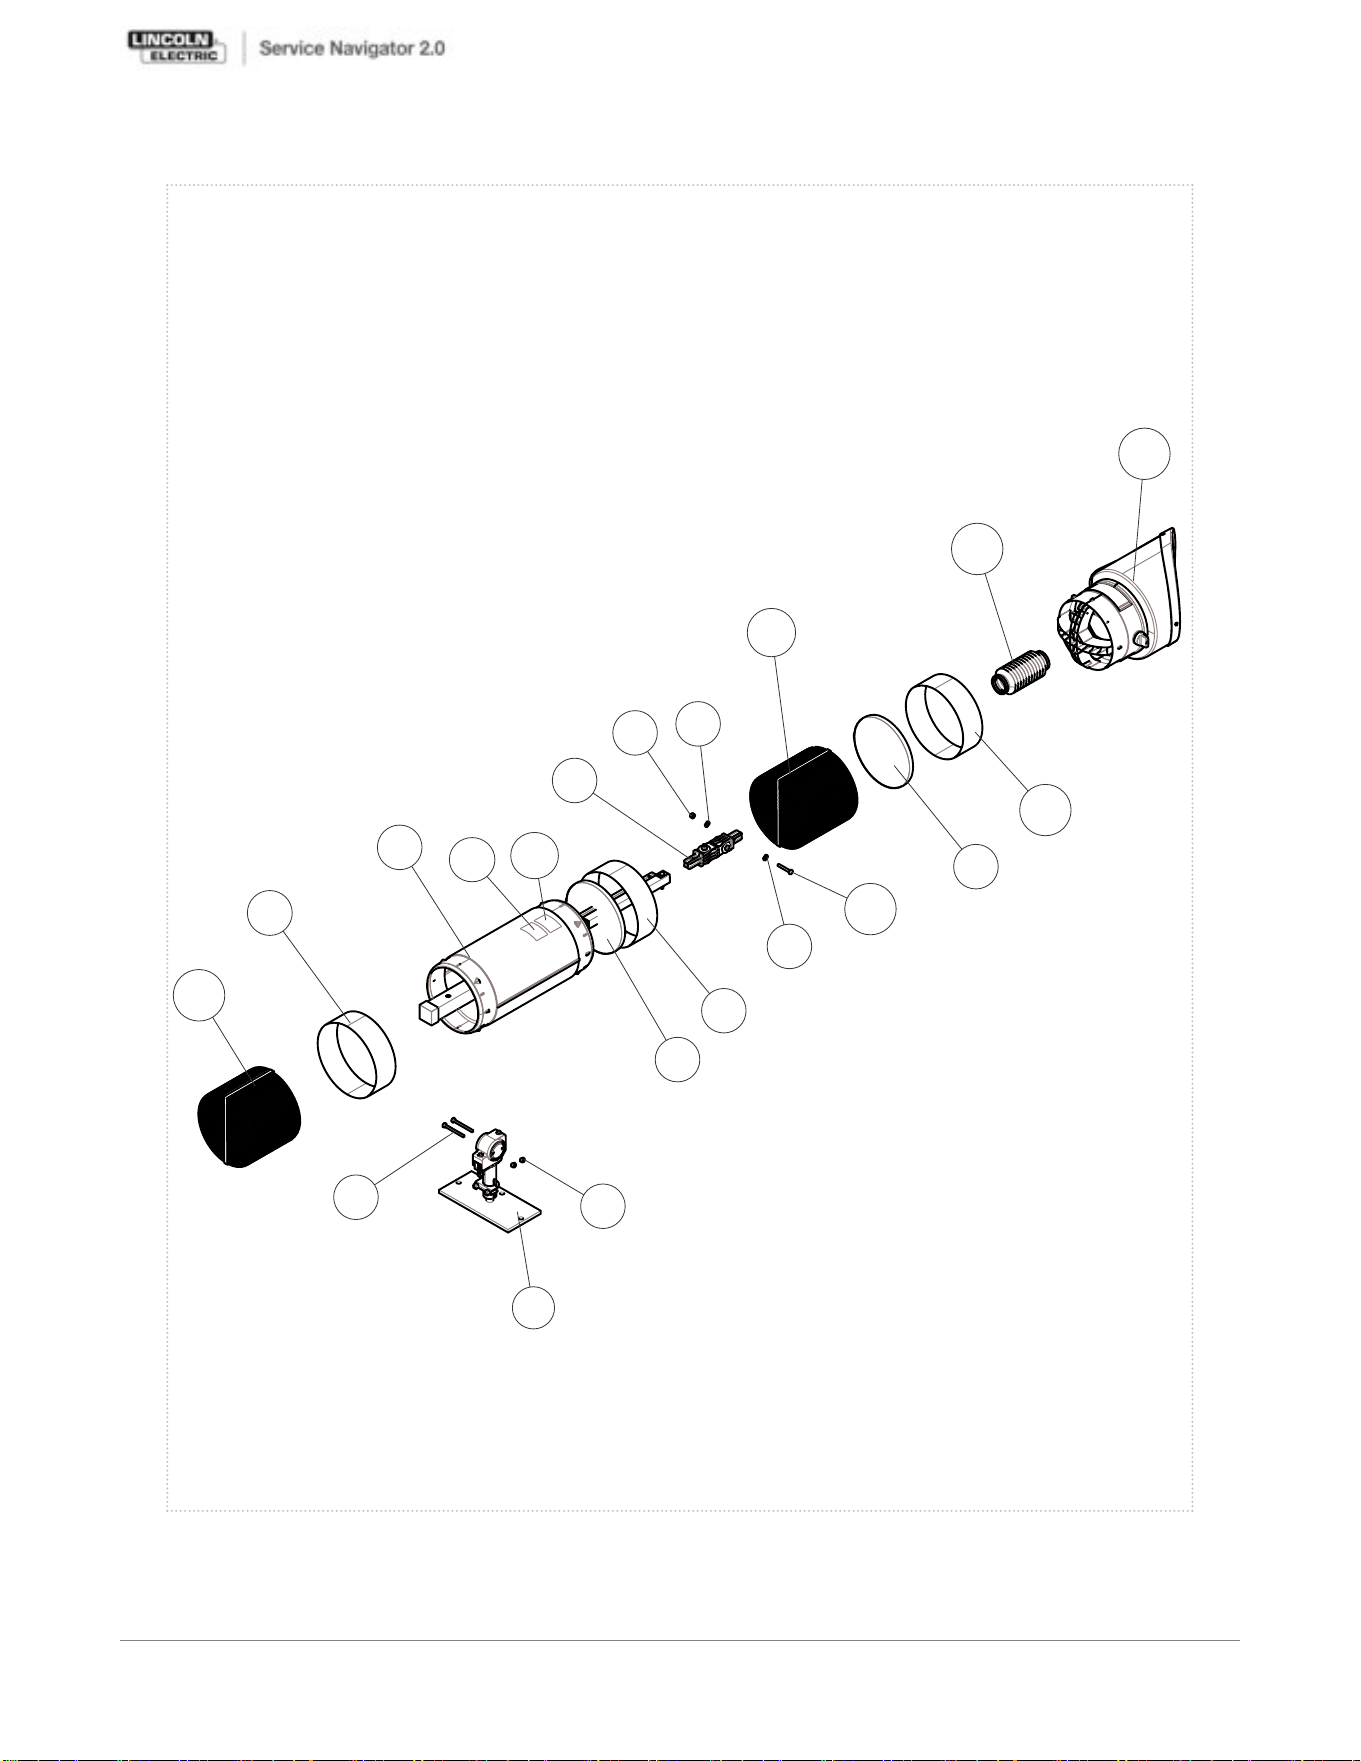
P-962-C.jpg
LTA 2.0 T FLEX - K1655-10 General Assembly
LTA 2.0 T FLEX - K1655-10
1
2
10
4
5
3
4
6
10
9
7
13
12
3
4
8
9
11
14
15
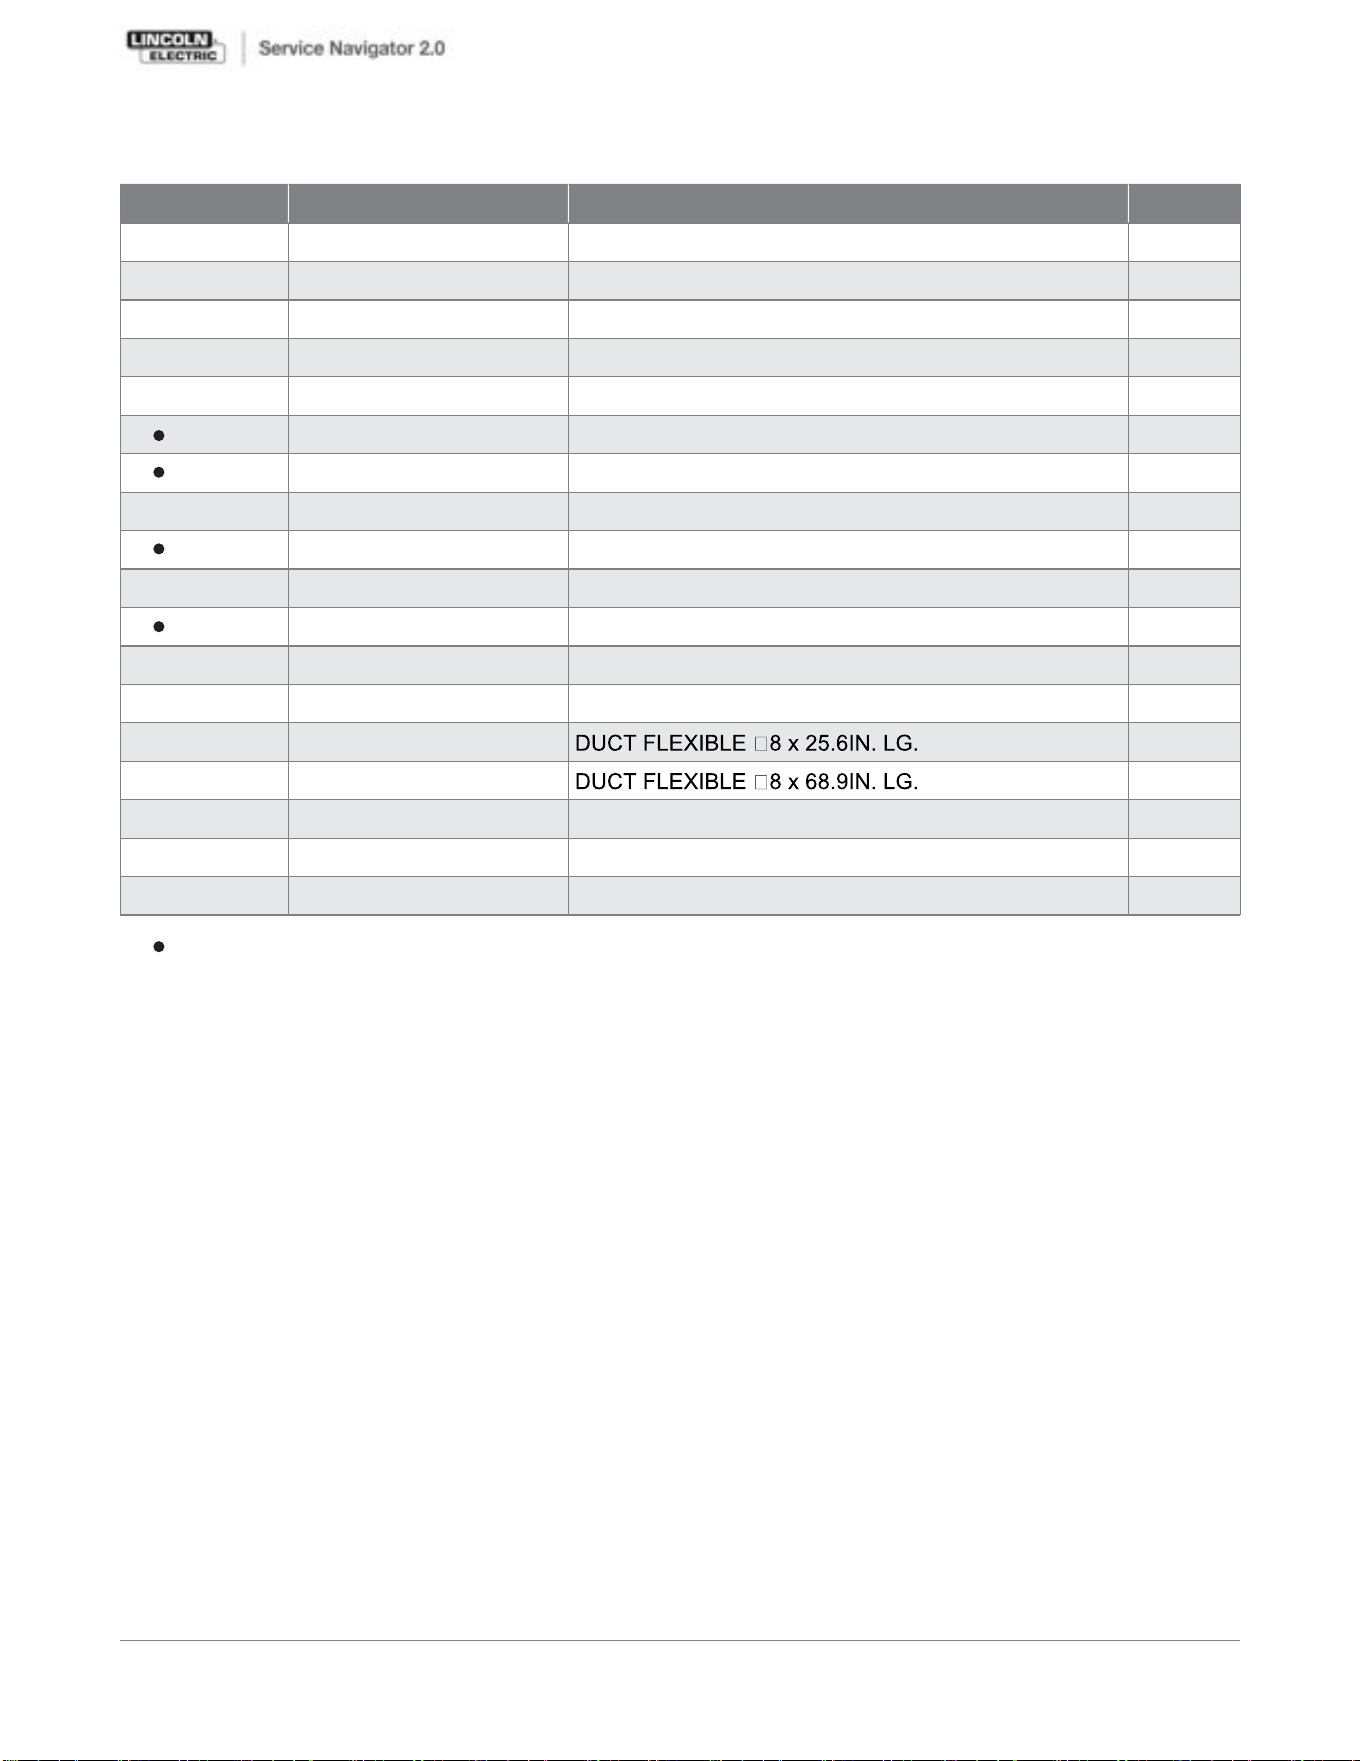
KEY PART NUMBER DESCRIPTION QTY
1 9SS31226-313 LFA 2.0 6.5FT SUPP. STRUCT. ASSY. 1
2 9SS31226-320 ROTAHOOD RND RED ASSEM. 1
3 9SS31226-342 BASE SWIVEL MOUNT +TUBE ASSEM. 1
4 9SS31226-35 TUBE RND EXTERNAL PLASTIC FA3 1
5 9SS31226-24 COVER FLEX WRIST HINGE 1
6 9SFC0703030260 SPACER SPRING HOSE HANG. 1
7 9SFC0840101030 ARM SEAL BAND 4
8 9SCF000063 5/16-18X2.00HHCS 2
9 9SCF000187 5/16-18X2.50HHCS 6
10 9SCF000016 1/4-20X1.75HHCS 1
11 9ST9187-15 5/16-18HLN-SS 10
12 9ST9187-16 1/4-20 HLN 1
13 9SS9262-98 PLAIN WASHER 2
14 9SS31256-9 1
15
16
9SS31256-8 1
9SM22196 DECALWARNING ENGLISH 1
17
9SM22196-1 DECALWARNING FRENCH 1
9SS27368-2 DECAL - 7IN LINCOLN LOGO 2
LFA 2.0 FLEXIBLE ARM - K1655-12 General Assembly
LFA 2.0 FLEXIBLE ARM - K1655-12 3
IN HARDWARE PACKAGE
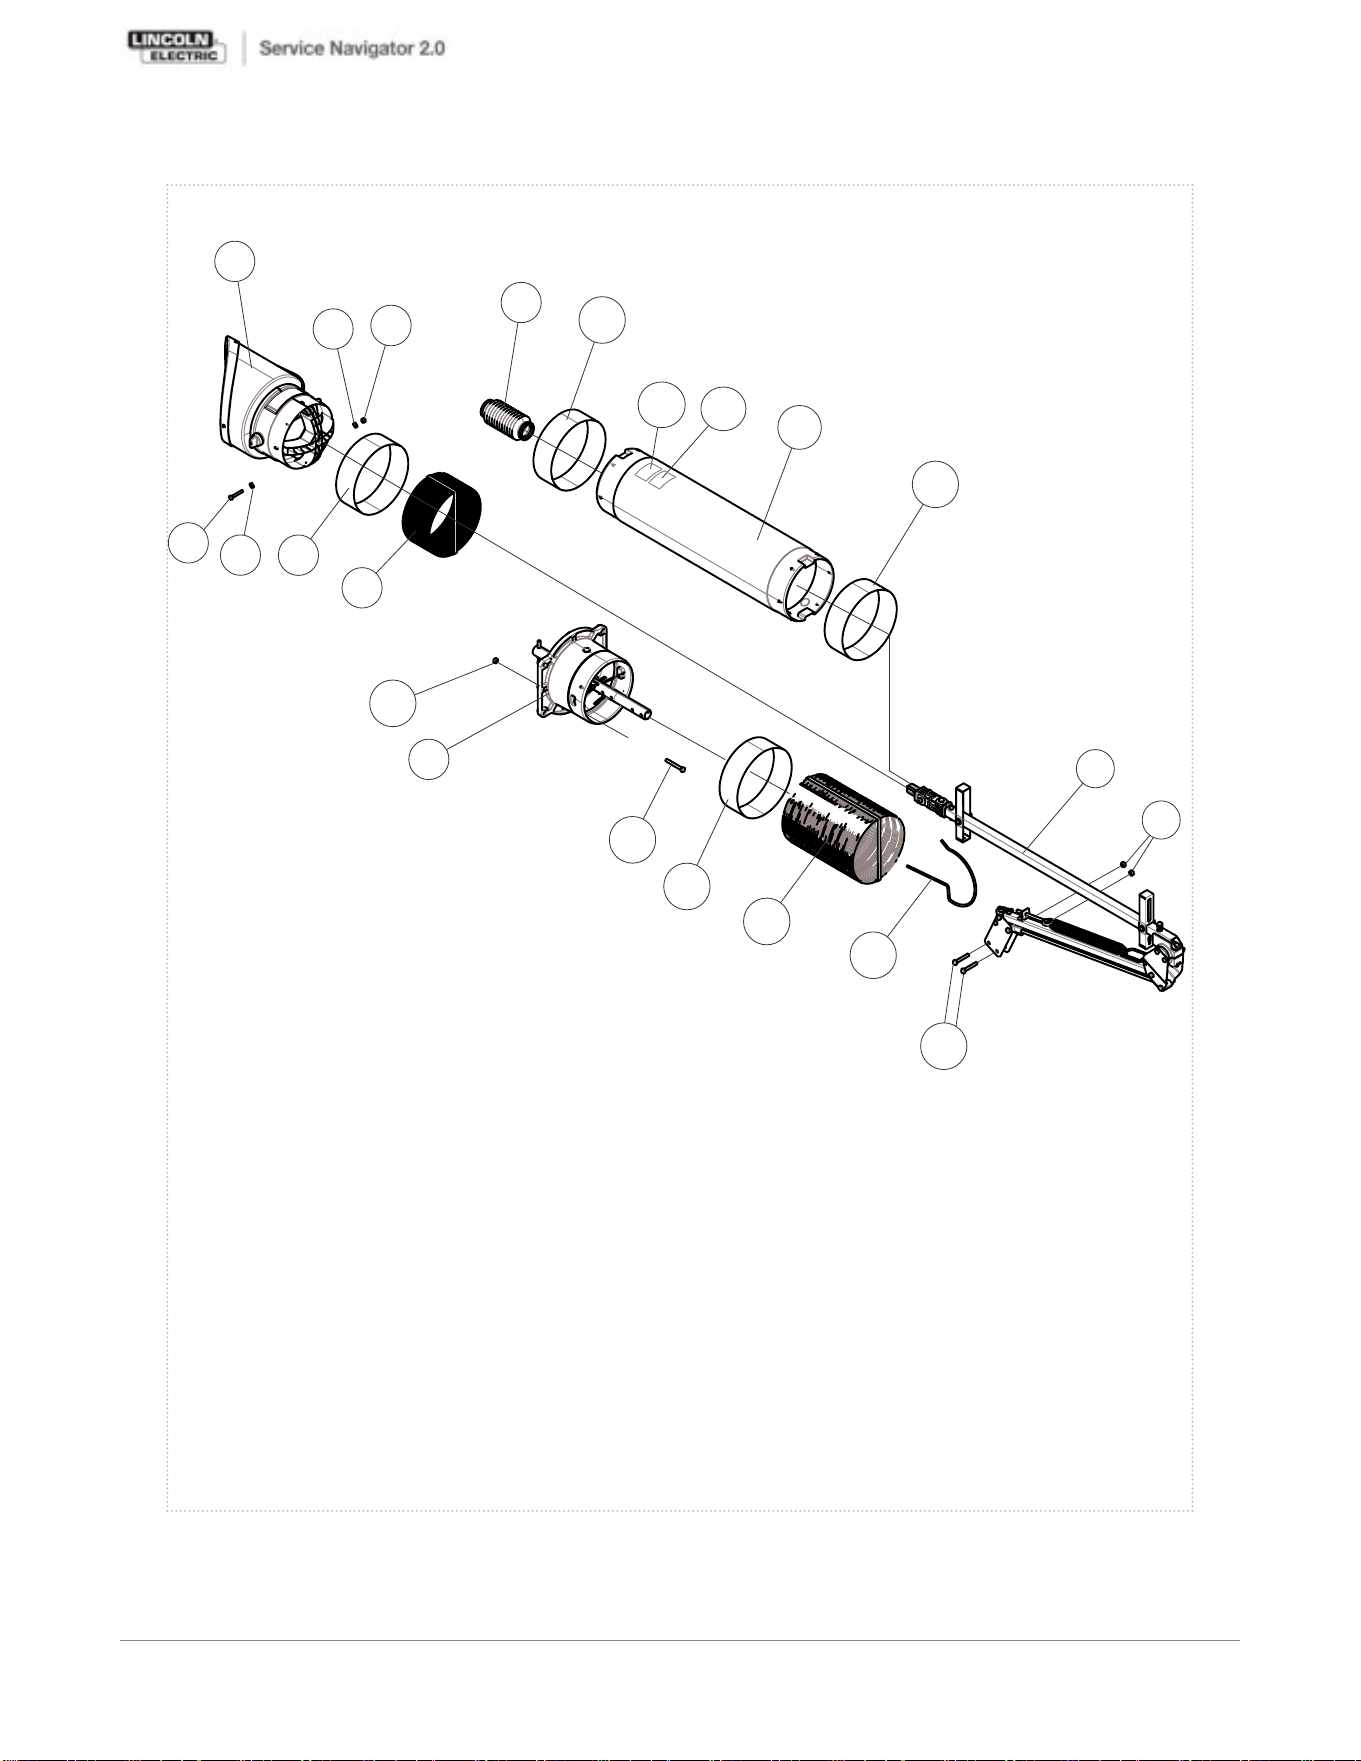
P-963-C.jpg
LFA 2.0 FLEXIBLE ARM - K1655-12 General Assembly
LFA 2.0 FLEXIBLE ARM - K1655-12
1
2
13
13
12
7
14
3
5
7
4
7
8
6
15
7
9
10
11
11
16
17
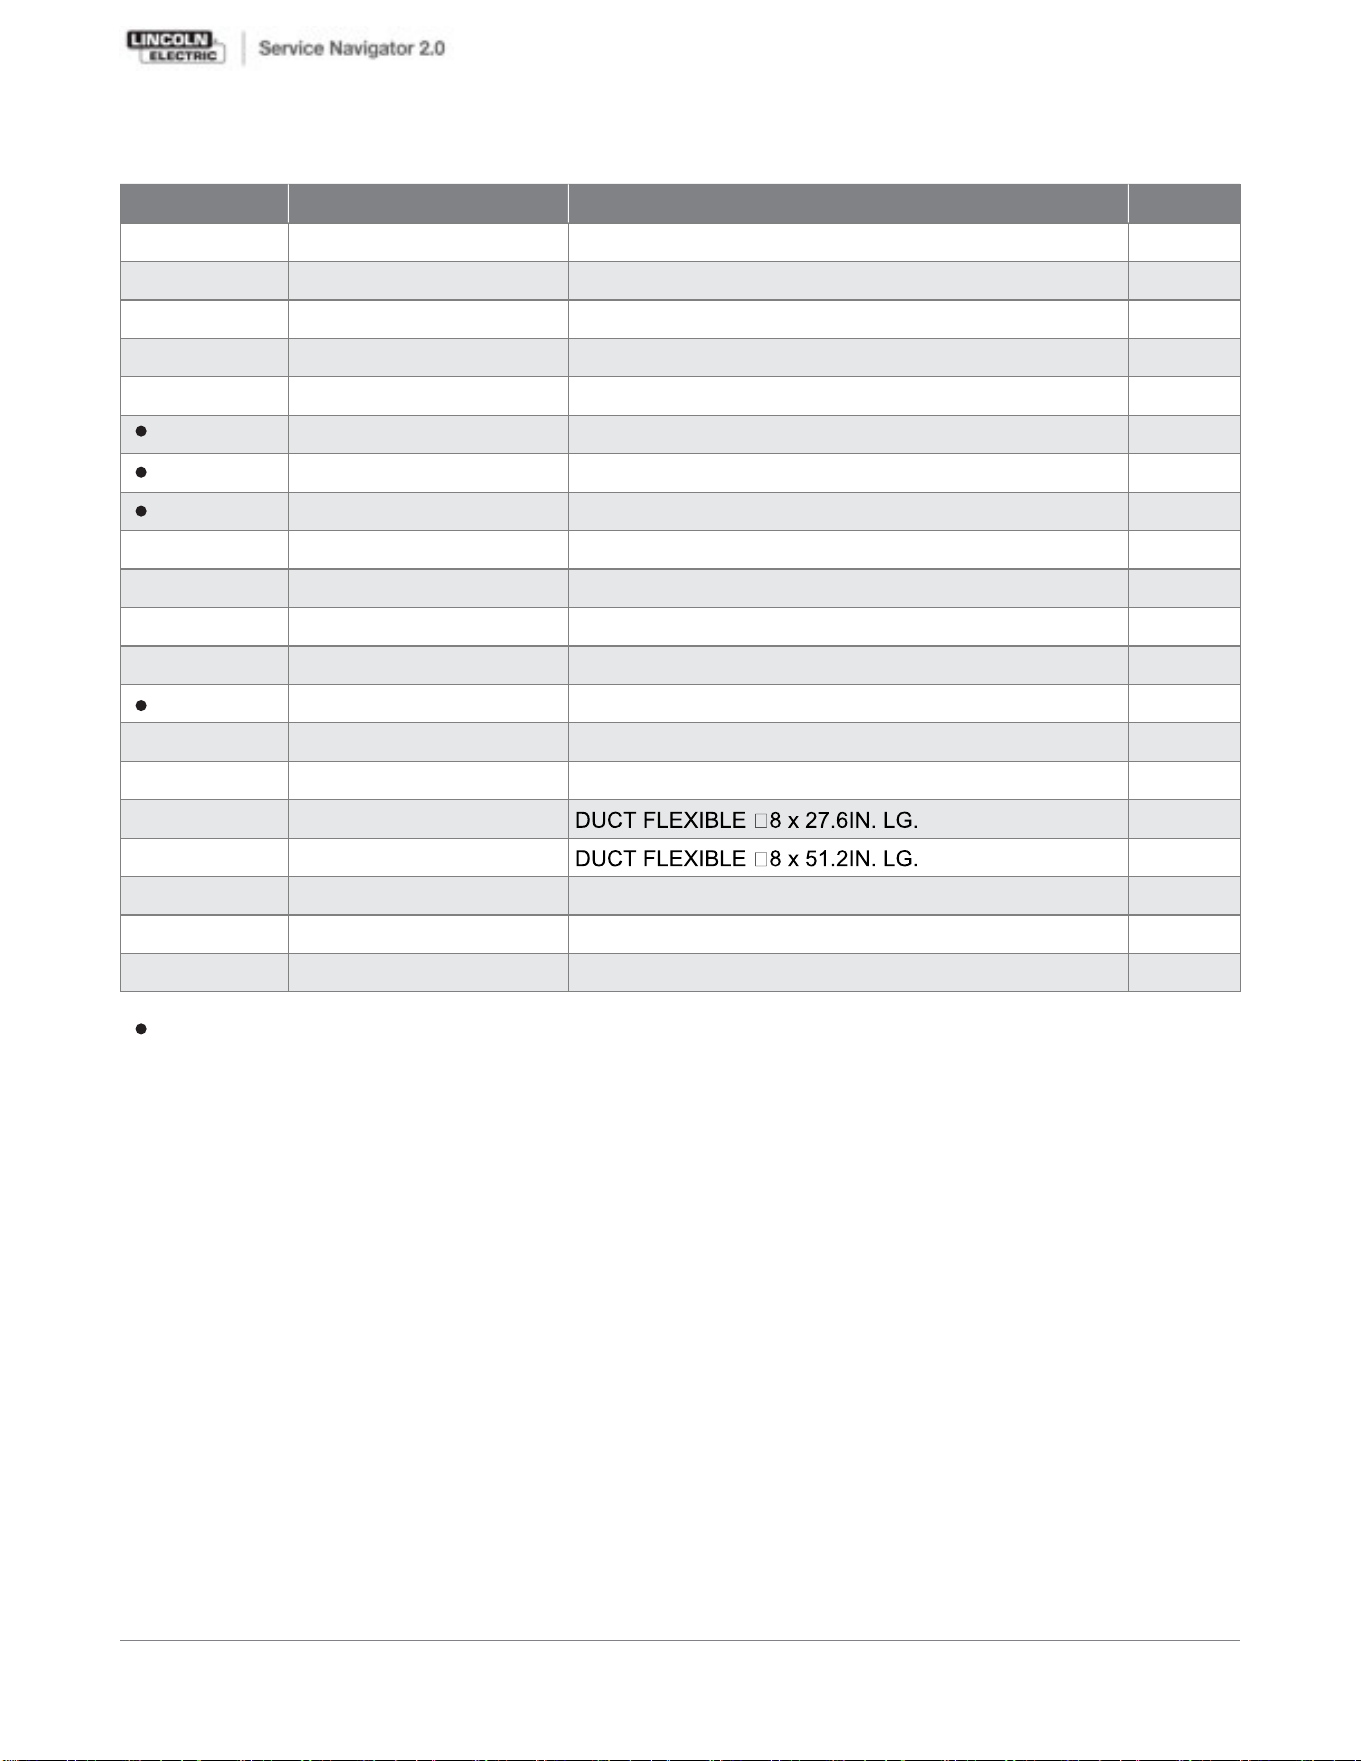
KEY PART NUMBER DESCRIPTION QTY
1 9SS31226-312 LFA 4.1 13FT LC CAB-SIDE ARM ASSEM. 1
2 9SS31226-309 LFA 4.1 13FT LC CAP-SIDE ASSEM. 1
3 9SS31226-320 ROTAHOOD RND RED ASSEM. 1
4 9SS31226-342 BASE SWIVEL MOUNT +TUBE ASSEM. 1
5 9SS31226-24 COVER FLEX WRIST HINGE 1
6 9SFC0703030260 SPACER SPRING HOSE HANG. 1
7 9SFC0840101030 ARM SEAL BAND 6
8 9SCF000187 5/16-18X2.50HHCS 4
9 9ST8833-4 HEX HD CAP SCREW 3
10 9SCF000063 5/16-18X2.00HHCS 2
11 9SCF000016 1/4-20X1.75HHCS 1
12 9ST9187-16 1/4-20 HLN 1
13 9ST9187-15 5/16-18HLN-SS 13
14 9SS9262-98 PLAIN WASHER 2
15 9SS31256-9 DUCT FLEXIBLE 8 X 19.7IN. LG. 1
16 9SS31256-3 1
17
18
19
9SS31256-6 1
9SM22196 DECAL WARNING ENGLISH 1
9SM22196-1 DECAL WARNING FRENCH 1
9SS27368-2 DECAL - 7IN LINCOLN LOGO 2
General Assembly
LFA 4.1 FLEXIBLE ARM - K1655-13
IN HARDWARE PACKAGE
KEY PART NUMBER DESCRIPTION QTY
1 9SS31226-320 ROTAHOOD RND RED ASSEM. 1
2 9SS31226-332 WRIST HINGE ASSEM. 1
3 9SS31226-315 INTERNAL LTA 2.0 CW ASSEMBLY 1
4 9SS31226-339 MOUNT + PIVOT LTA 2.0 CW ASSEM. 1
5 9SS31226-61 WEIGHT GUIDE LTA2 CW ASSEMBLY 1
6 9SFC0850101080 COUNTER WEIGHT LTA 2.0 ASSEM. 1
7 9SS31226-62 ROPE GUIDE 1
8 9SFC0711011130 BREAK/WEAR RING 2
9 9SFC0692000000 ROPE LTA 2.0 CW 1
10 9SFC0609260140 DISC SPRING 2
11 9SFC0801860180 OUTER TUBE T-FLEX/LTA 1
12 9SS31226-135 EYE BOLT 1
13 9SS31226-66 EXTENSION SPRING SNG 1
14 9SS31226-24 COVER FLEX WRIST HINGE 1
15 9SFC0840101030 ARM SEAL BAND 3
16 9SS31256-7 FLEXIBLE DUCT 8” x 59.1IN. LG. 2
17 9SS31226-65 ROPE WHEEL 1
18 9SFC0711010150 SIDE PLATE LTA2 CW 2
19 9SS31226-96 COLLAR HINGE PIVOT 1
20 9SFC0703090160 LTA 2.0 CW WIRE SPRING 1
21 9SFC0711010360 LOCKING PLATE 1
22 9SFC0342000070 GROMMET CLOSED 1
23 9SCF000141 1/4-20X1.50HHCS 2
24 9ST9187-16 1/4-20 HLN 3
25 9SCF000016 1/4-20X1.75HHCS 1
26 9SS9262-98 PLAIN WASHER 2
27 9SCF000040 5/16-18X.75HHCS 2
28 9ST8833-22 HEX HD CAP SCREW 4
29 9ST8833-91 5/16-18X2.75HHCS 2
30 9ST9187-15 5/16-18HLN-SS 5
31 9SS31256-9 FLEXIBLE DUCT 8” x 19.7IN. LG. 1
32 9SM22196 DECAL WARNING ENGLISH 1
33 9SM22196-1 DECAL WARNING FRENCH 1
31 9SS31256-9 FLEXIBLE DUCT 8” x 19.7IN. LG. 1
LTA 2.0 TELESCOPIC ARM - K1655-14 General Assembly
LTA 2.0 TELESCOPIC ARM - K1655-14
9SS27368-2 DECAL - 7IN LINCOLN LOGO 2
34 9SFC0711010010 CONNECTOR LTA/LM2 1
31 9SS31256-9 FLEXIBLE DUCT 8” x 19.7IN. LG. 1
9SFC0711011110 L PROFILE FILLING 1
35
IN HARDWARE PACKAGE
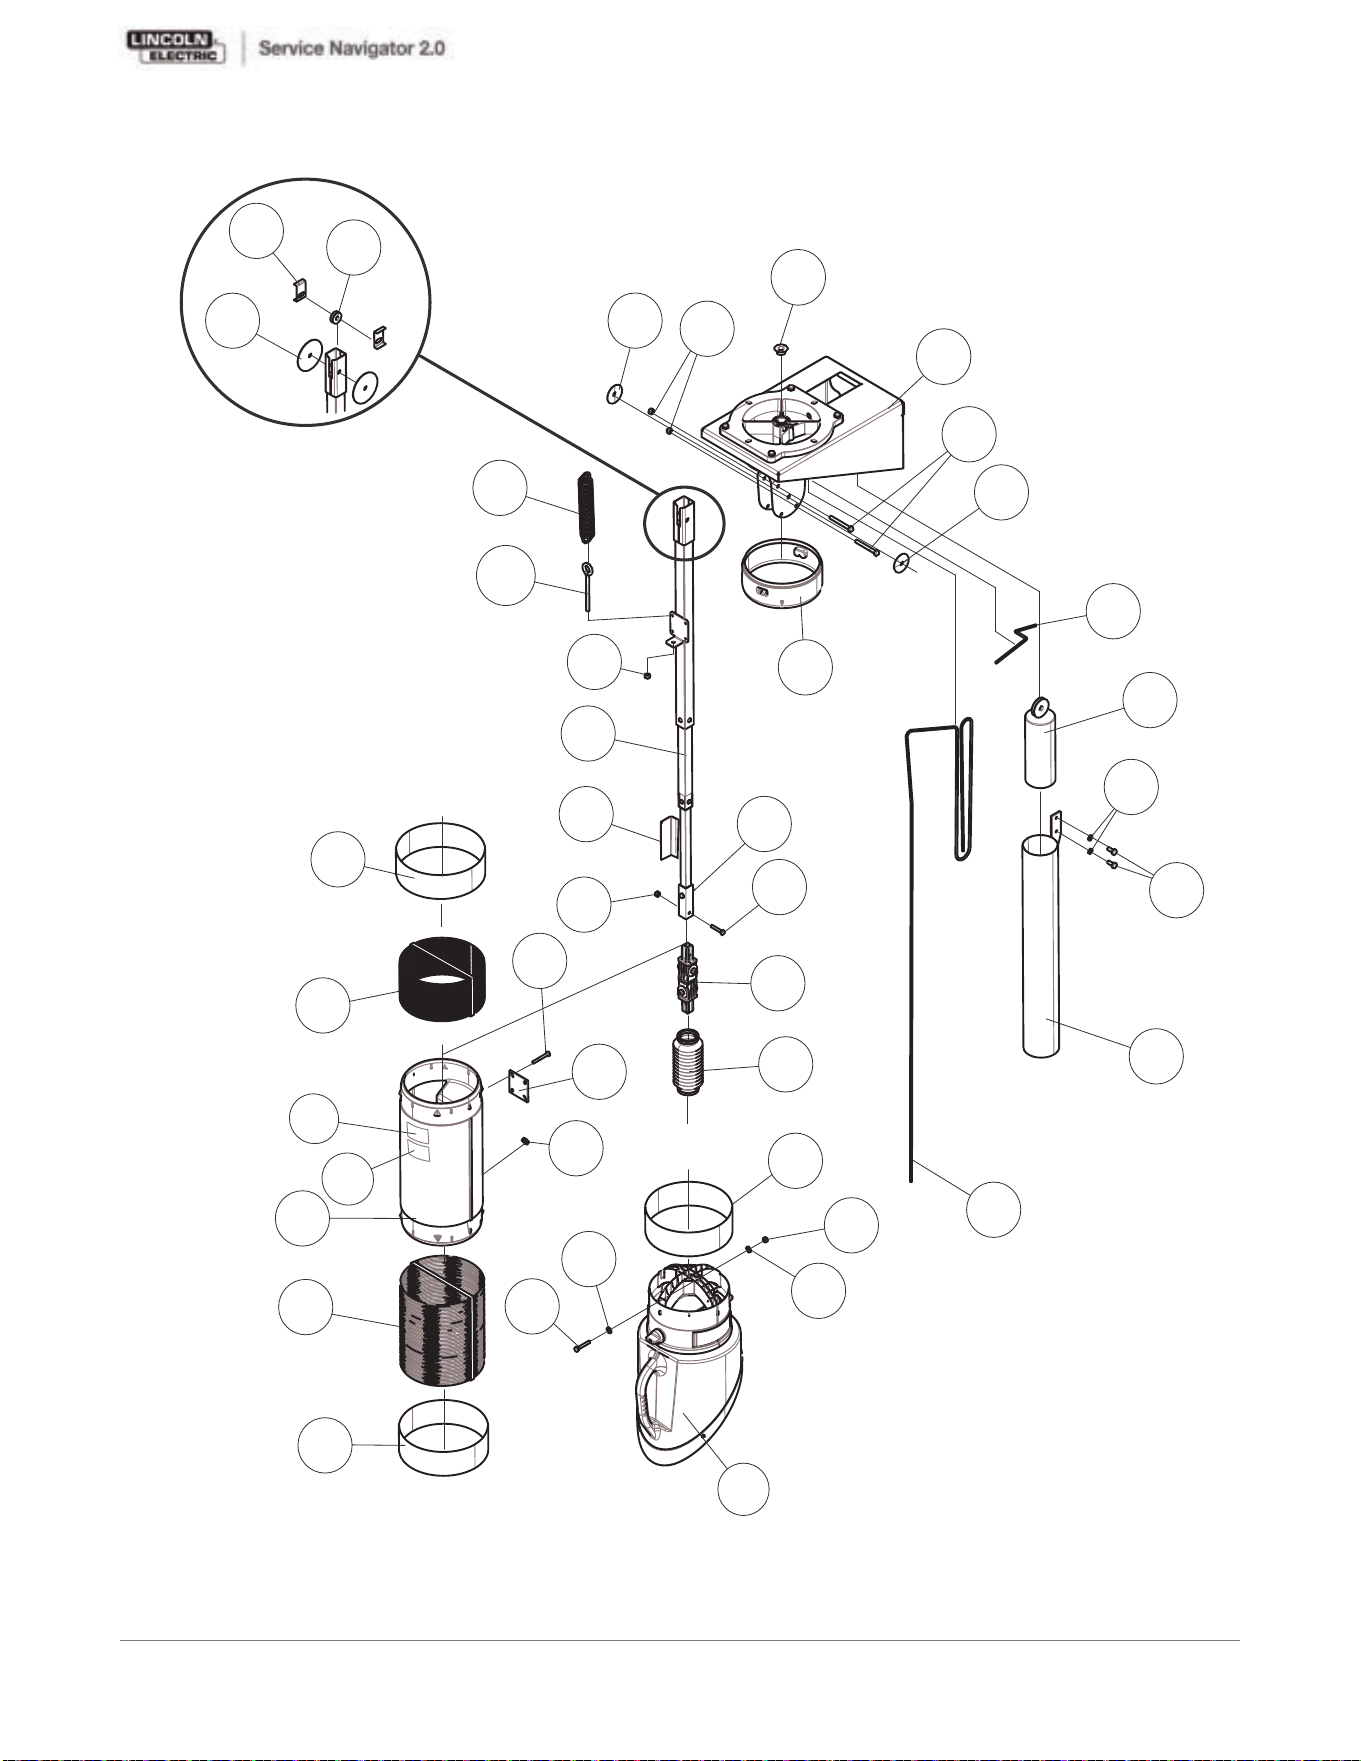
P-965-C.jpg
LTA 2.0 TELESCOPIC ARM - K1655-14 General Assembly
LTA 2.0 TELESCOPIC ARM - K1655-14
1
14
3
4
5
6
8
9
10
11
12
13
2
15
15
16
31
15
28
21
22
18
17
29
20
27
30
23
34
35
24
19
10
24
26
25
26
7
30
30
32
33
KEY PART NUMBER DESCRIPTION QTY
1 9SS31226-310 LFA 3.1 10FT SUPP. STRUCT. ASSEM. 1
2 9SS31226-320 ROTAHOOD RND RED ASSEM. 1
3 9SS31226-35 TUBE RND EXTERNAL PLASTIC FA3 2
4 9SS31226-24 COVER FLEX WRIST HINGE 1
5 9SFC0840101030 ARM SEAL BAND 5
6 9SCF000063 5/16-18X2.00HHCS 2
7 9SCF000016 1/4-20X1.75HHCS 1
8 9SS9262-98 PLAIN WASHER 2
9 9ST9187-16 1/4-20 HLN 1
10 9ST9187-15 5/16-18HLN-SS 2
11 9SS31256-9 1
12
13
9SS31256-5 1
9SM22196 DECAL WARNING ENGLISH 1
9SM22196-1 DECAL WARNING FRENCH 1
9SS27368-2 DECAL - 7IN LINCOLN LOGO 2
LFA 3.1 - K2633-5 General Assembly
LFA 3.1 - K2633-5
14
IN HARDWARE PACKAGE
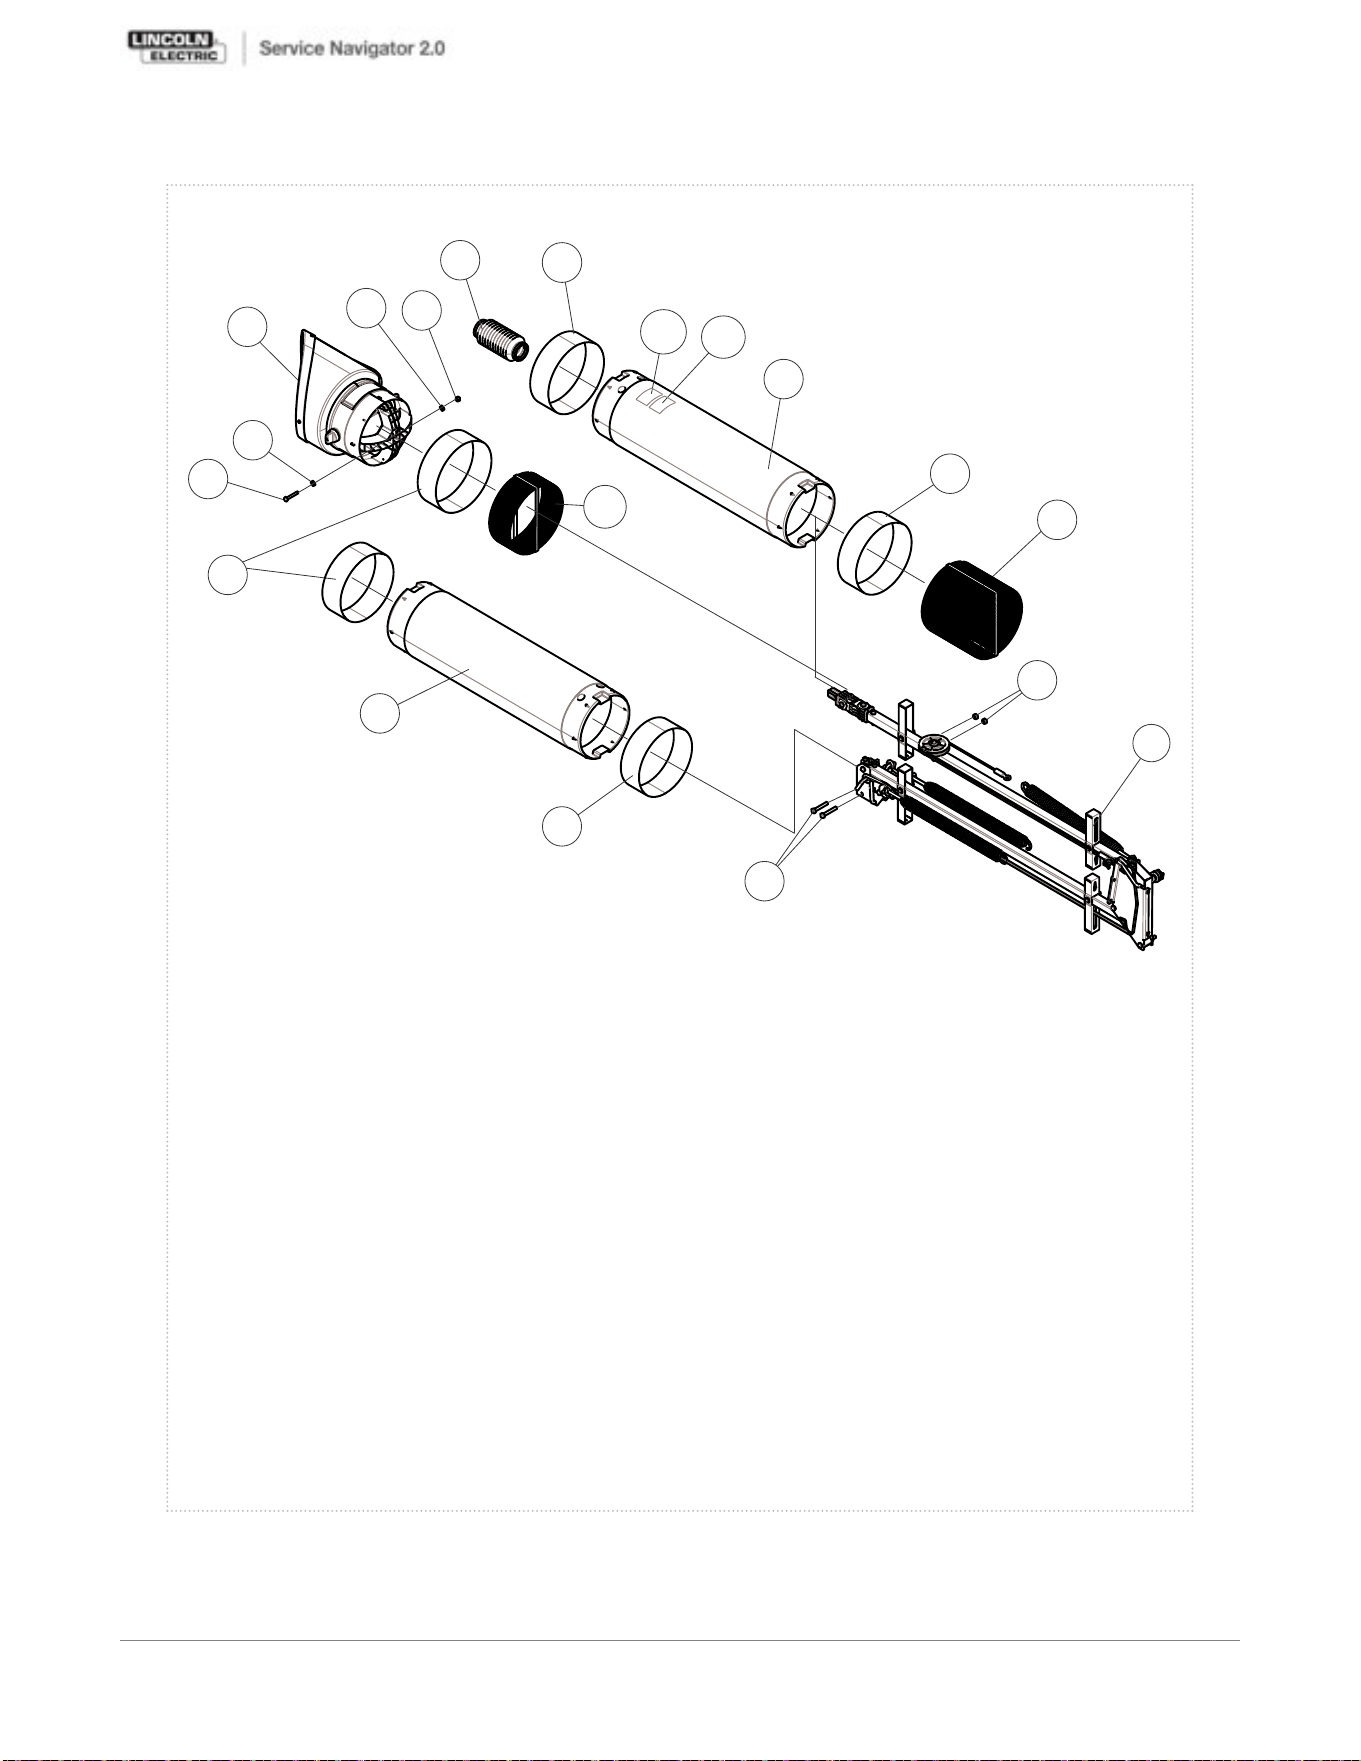
P-966-C.jpg
LFA 3.1 - K2633-5 General Assembly
LFA 3.1 - K2633-5
1
3
3
4
5
5
5
5
6
10
12
11
9
8
2
7
8
14
13
KEY PART NUMBER DESCRIPTION QTY
1 9SS31226-310 LFA 3.1 10FT SUPP. STRUCT. ASSEM. 1
2 9SS31226-322 ROTAHOOD RND RED WL-AST ASSEM. 1
3 9SS31226-35 TUBE RND EXTERNAL PLASTIC FA3 2
4 9SS31226-24 COVER FLEX WRIST HINGE 1
5 9SFC0840101030 ARM SEAL BAND 5
6 9SCF000063 5/16-18X2.00HHCS 2
7 9SCF000016 1/4-20X1.75HHCS 1
8 9SS9262-98 PLAIN WASHER 2
9 9ST9187-16 1/4-20 HLN 1
10 9ST9187-15 5/16-18HLN-SS 2
11 9SS31256-9 1
12 9SS31256-5 1
9SM22196 DECALWARNINGENVIRONMENTAL EQUIP 1
9SS31224-62 CONNECTOR ADAPTER 1
9SS27368-2 DECAL - 7IN LINCOLN LOGO 2
LFA 3.1 - K2633-6 General Assembly
LFA 3.1 - K2633-6
IN HARDWARE PACKAGE

P-967-C.jpg
General Assembly
4 LFA 3.1 - K2633-6
Printed 02/11/2016 at 10:26:47. Produced by Enigma.
KEY PART NUMBER DESCRIPTION QTY
1 9SS31226-311 LFA 4.1 13FT SUPP. STRUCT. ASSEM. 1
2 9SS31226-320 ROTAHOOD RND RED ASSEM. 1
3 9SS31226-95 TUBE RND EXTERNAL PLASTIC FA4 2
4 9SS31226-24 COVER FLEX WRIST HINGE 1
5 9SFC0840101030 ARM SEAL BAND 5
6 9SCF000063 5/16-18X2.00HHCS 2
7 9SCF000016 1/4-20X1.75HHCS 1
8 9SS9262-98 PLAIN WASHER 2
9 9ST9187-16 1/4-20 HLN 1
10 9ST9187-15 5/16-18HLN-SS 2
11 9SS31256-9 1
12
13
9SS31256-5 1
9SM22196 DECAL WARNING ENGLISH 1
9SS27368-2 DECAL - 7IN LINCOLN LOGO 2
LFA 4.1 - K2633-7 General Assembly
LFA 4.1 - K2633-7
9SM22196-1 DECAL WARNING FRENCH 1
14
IN HARDWARE PACKAGE

P-968-C.jpg
LFA 4.1 - K2633-7 General Assembly
LFA 4.1 - K2633-7
14
13
KEY PART NUMBER DESCRIPTION QTY
1 9SS31226-311 LFA 4.1 13FT SUPP. STRUCT. ASSEM. 1
2 9SS31226-321 ROTAHOOD RND RED WL-AST ASSEM. 1
3 9SS31226-95 TUBE RND EXTERNAL PLASTIC FA4 2
9SS31224-62 CONNECTOR ADAPTER 1
4 9SS31226-24 COVER FLEX WRIST HINGE 1
5 9SFC0840101030 ARM SEAL BAND 5
6 9SCF000063 5/16-18X2.00HHCS 2
7 9SCF000016 1/4-20X1.75HHCS 1
8 9SS9262-98 PLAIN WASHER 2
9 9ST9187-16 1/4-20 HLN 1
10 9ST9187-15 5/16-18HLN-SS 2
11 9SS31256-9 1
12
13
9SS31256-5 1
9SM22196 DECAL WARNING ENGLISH 1
9SM22196-1 DECAL WARNING FRENCH 1
FC0308420220 WIRE CONN. LFA 4.1(13FT) 1
9SS27368-2 DECAL - 7IN LINCOLN LOGO 2
LFA 4.1 - K2633-8 General Assembly
LFA 4.1 - K2633-8
14
IN HARDWARE PACKAGE

P-969-C.jpg
LFA 4.1 - K2633-8 General Assembly
LFA 4.1 - K2633-8
14
13

ii
THIS PAGE INTENTIONALLY LEFT BLANK

ii
THIS PAGE INTENTIONALLY LEFT BLANK
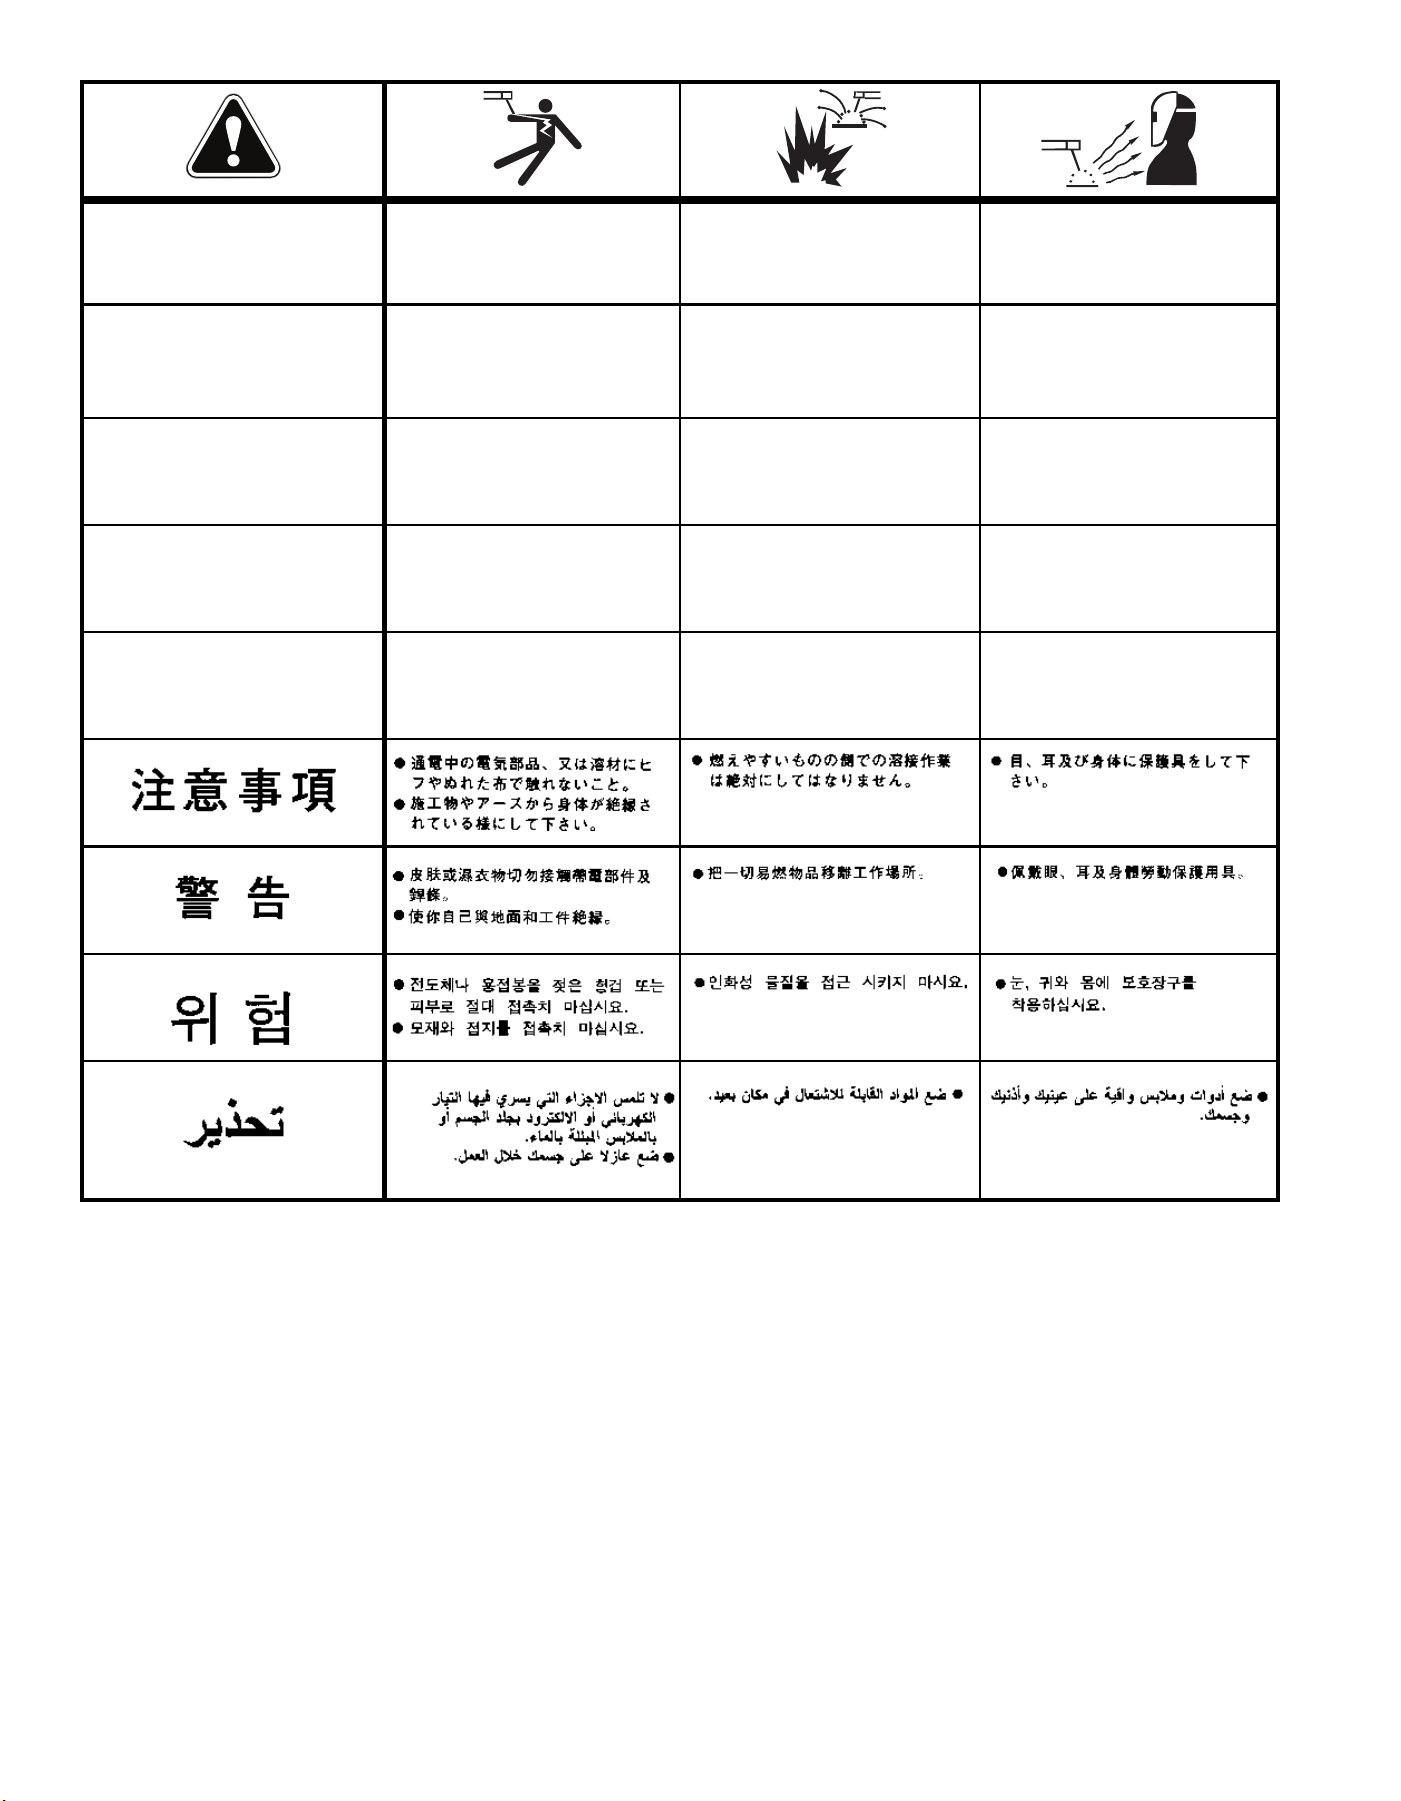
WARNING
AVISO DE
PRECAUCION
ATTENTION
WARNUNG
ATENÇÃO
Spanish
French
German
Portuguese
Japanese
Chinese
Korean
Arabic
READ AND UNDERSTAND THE MANUFACTURER’S INSTRUCTION FOR THIS EQUIPMENT AND THE CONSUMABLES TO BE
USED AND FOLLOW YOUR EMPLOYER’S SAFETY PRACTICES.
SE RECOMIENDA LEER Y ENTENDER LAS INSTRUCCIONES DEL FABRICANTE PARA EL USO DE ESTE EQUIPO Y LOS
CONSUMIBLES QUE VA A UTILIZAR, SIGA LAS MEDIDAS DE SEGURIDAD DE SU SUPERVISOR.
LISEZ ET COMPRENEZ LES INSTRUCTIONS DU FABRICANT EN CE QUI REGARDE CET EQUIPMENT ET LES PRODUITS A
ETRE EMPLOYES ET SUIVEZ LES PROCEDURES DE SECURITE DE VOTRE EMPLOYEUR.
LESEN SIE UND BEFOLGEN SIE DIE BETRIEBSANLEITUNG DER ANLAGE UND DEN ELEKTRODENEINSATZ DES HER-
STELLERS. DIE UNFALLVERHÜTUNGSVORSCHRIFTEN DES ARBEITGEBERS SIND EBENFALLS ZU BEACHTEN.
l Do not touch electrically live parts or
electrode with skin or wet clothing.
l Insulate yourself from work and
ground.
l No toque las partes o los electrodos
bajo carga con la piel o ropa moja-
da.
l Aislese del trabajo y de la tierra.
l Ne laissez ni la peau ni des vête-
ments mouillés entrer en contact
avec des pièces sous tension.
l Isolez-vous du travail et de la terre.
l Berühren Sie keine stromführenden
Teile oder Elektroden mit Ihrem
Körper oder feuchter Kleidung!
l Isolieren Sie sich von den
Elektroden und dem Erdboden!
l Não toque partes elétricas e elec-
trodos com a pele ou roupa molha-
da.
l Isole-se da peça e terra.
l Keep flammable materials away.
l Mantenga el material combustible
fuera del área de trabajo.
l Gardez à l’écart de tout matériel
inflammable.
l Entfernen Sie brennbarres Material!
l Mantenha inflamáveis bem guarda-
dos.
l Wear eye, ear and body protection.
l Protéjase los ojos, los oídos y el
cuerpo.
l Protégez vos yeux, vos oreilles et
votre corps.
l Tragen Sie Augen-, Ohren- und Kör-
perschutz!
l Use proteção para a vista, ouvido e
corpo.
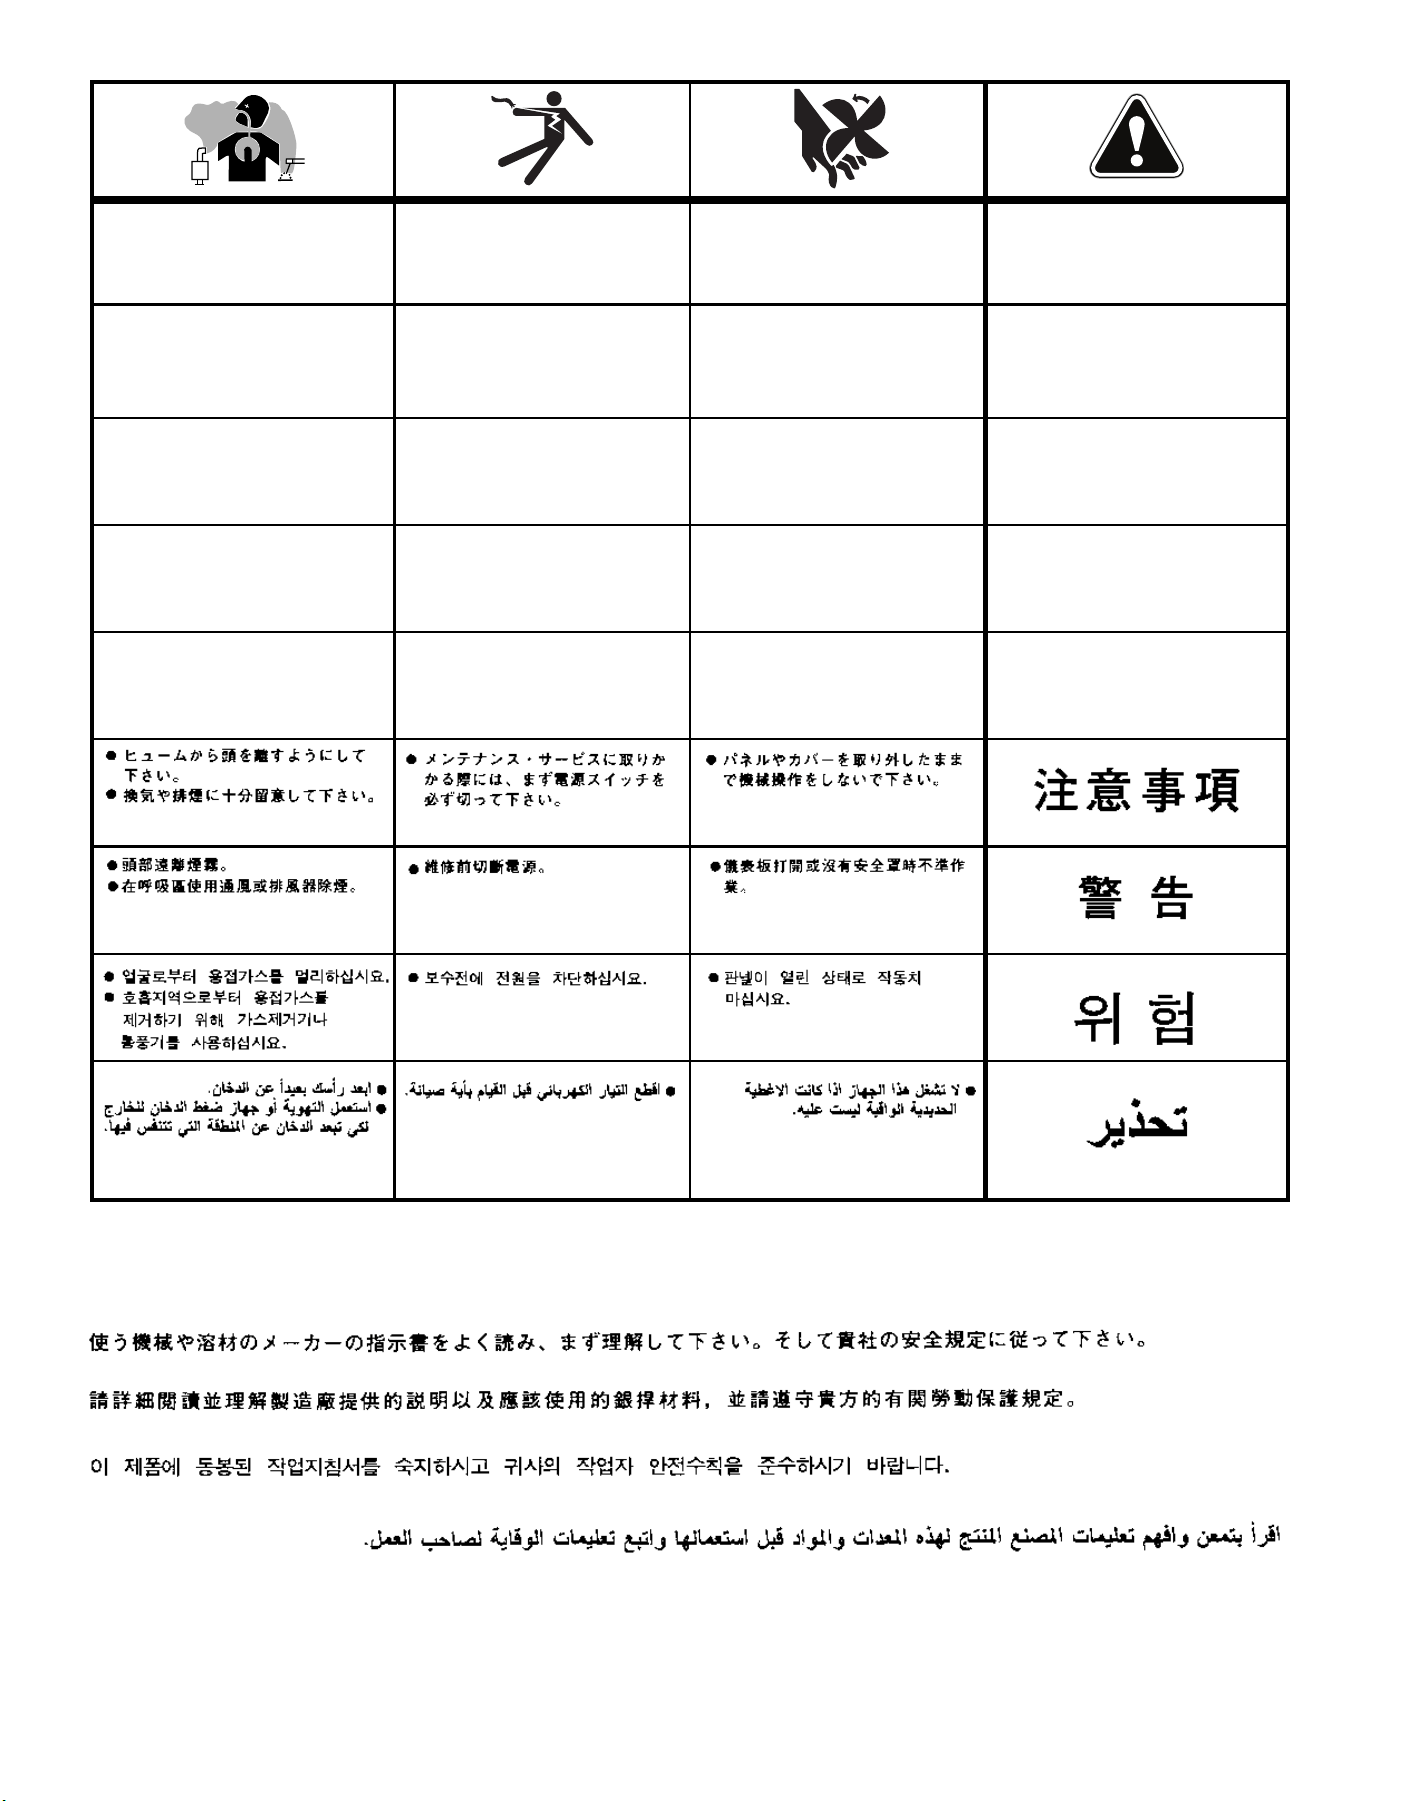
WARNING
AVISO DE
PRECAUCION
ATTENTION
WARNUNG
ATENÇÃO
Spanish
French
German
Portuguese
Japanese
Chinese
Korean
Arabic
LEIA E COMPREENDA AS INSTRUÇÕES DO FABRICANTE PARA ESTE EQUIPAMENTO E AS PARTES DE USO, E SIGA AS
PRÁTICAS DE SEGURANÇA DO EMPREGADOR.
l Keep your head out of fumes.
l Use ventilation or exhaust to
remove fumes from breathing zone.
l Los humos fuera de la zona de res-
piración.
l Mantenga la cabeza fuera de los
humos. Utilice ventilación o
aspiración para gases.
l Gardez la tête à l’écart des fumées.
l Utilisez un ventilateur ou un aspira-
teur pour ôter les fumées des zones
de travail.
l Vermeiden Sie das Einatmen von
Schweibrauch!
l Sorgen Sie für gute Be- und
Entlüftung des Arbeitsplatzes!
l Mantenha seu rosto da fumaça.
l Use ventilação e exhaustão para
remover fumo da zona respiratória.
l Turn power off before servicing.
l Desconectar el cable de ali-
mentación de poder de la máquina
antes de iniciar cualquier servicio.
l Débranchez le courant avant l’entre-
tien.
l Strom vor Wartungsarbeiten
abschalten! (Netzstrom völlig öff-
nen; Maschine anhalten!)
l Não opere com as tampas removidas.
l Desligue a corrente antes de fazer
serviço.
l Não toque as partes elétricas nuas.
l Do not operate with panel open or
guards off.
l No operar con panel abierto o
guardas quitadas.
l N’opérez pas avec les panneaux
ouverts ou avec les dispositifs de
protection enlevés.
l Anlage nie ohne Schutzgehäuse
oder Innenschutzverkleidung in
Betrieb setzen!
l Mantenha-se afastado das partes
moventes.
l Não opere com os paineis abertos
ou guardas removidas.

CUSTOMER ASSISTANCE POLICY
The business of The Lincoln Electric Company is manufacturing and
selling high quality welding equipment, consumables, and cutting
equipment. Our challenge is to meet the needs of our customers and
to exceed their expectations. On occasion, purchasers may ask
Lincoln Electric for advice or information about their use of our
products. We respond to our customers based on the best information
in our possession at that time. Lincoln Electric is not in a position to
warrant or guarantee such advice, and assumes no liability, with
respect to such information or advice. We expressly disclaim any
warranty of any kind, including any warranty of fitness for any
customer’s particular purpose, with respect to such information or
advice. As a matter of practical consideration, we also cannot assume
any responsibility for updating or correcting any such information or
advice once it has been given, nor does the provision of information
or advice create, expand or alter any warranty with respect to the sale
of our products.
Lincoln Electric is a responsive manufacturer, but the selection and
use of specific products sold by Lincoln Electric is solely within the
control of, and remains the sole responsibility of the customer. Many
variables beyond the control of Lincoln Electric affect the results
obtained in applying these types of fabrication methods and service
requirements.
Subject to Change – This information is accurate to the best of our
knowledge at the time of printing. Please refer to
www.lincolnelectric.com for any updated information.
WELD FUME CONTROL EQUIPMENT
The operation of welding fume control equipment is affected by
various factors including proper use and positioning of the equipment,
maintenance of the equipment and the specific welding procedure
and application involved. Worker exposure level should be checked
upon installation and periodically thereafter to be certain it is within
applicable OSHA PEL and ACGIH TLV limits.