,[TIZOUT5VKXGZOUT
3GT[GR
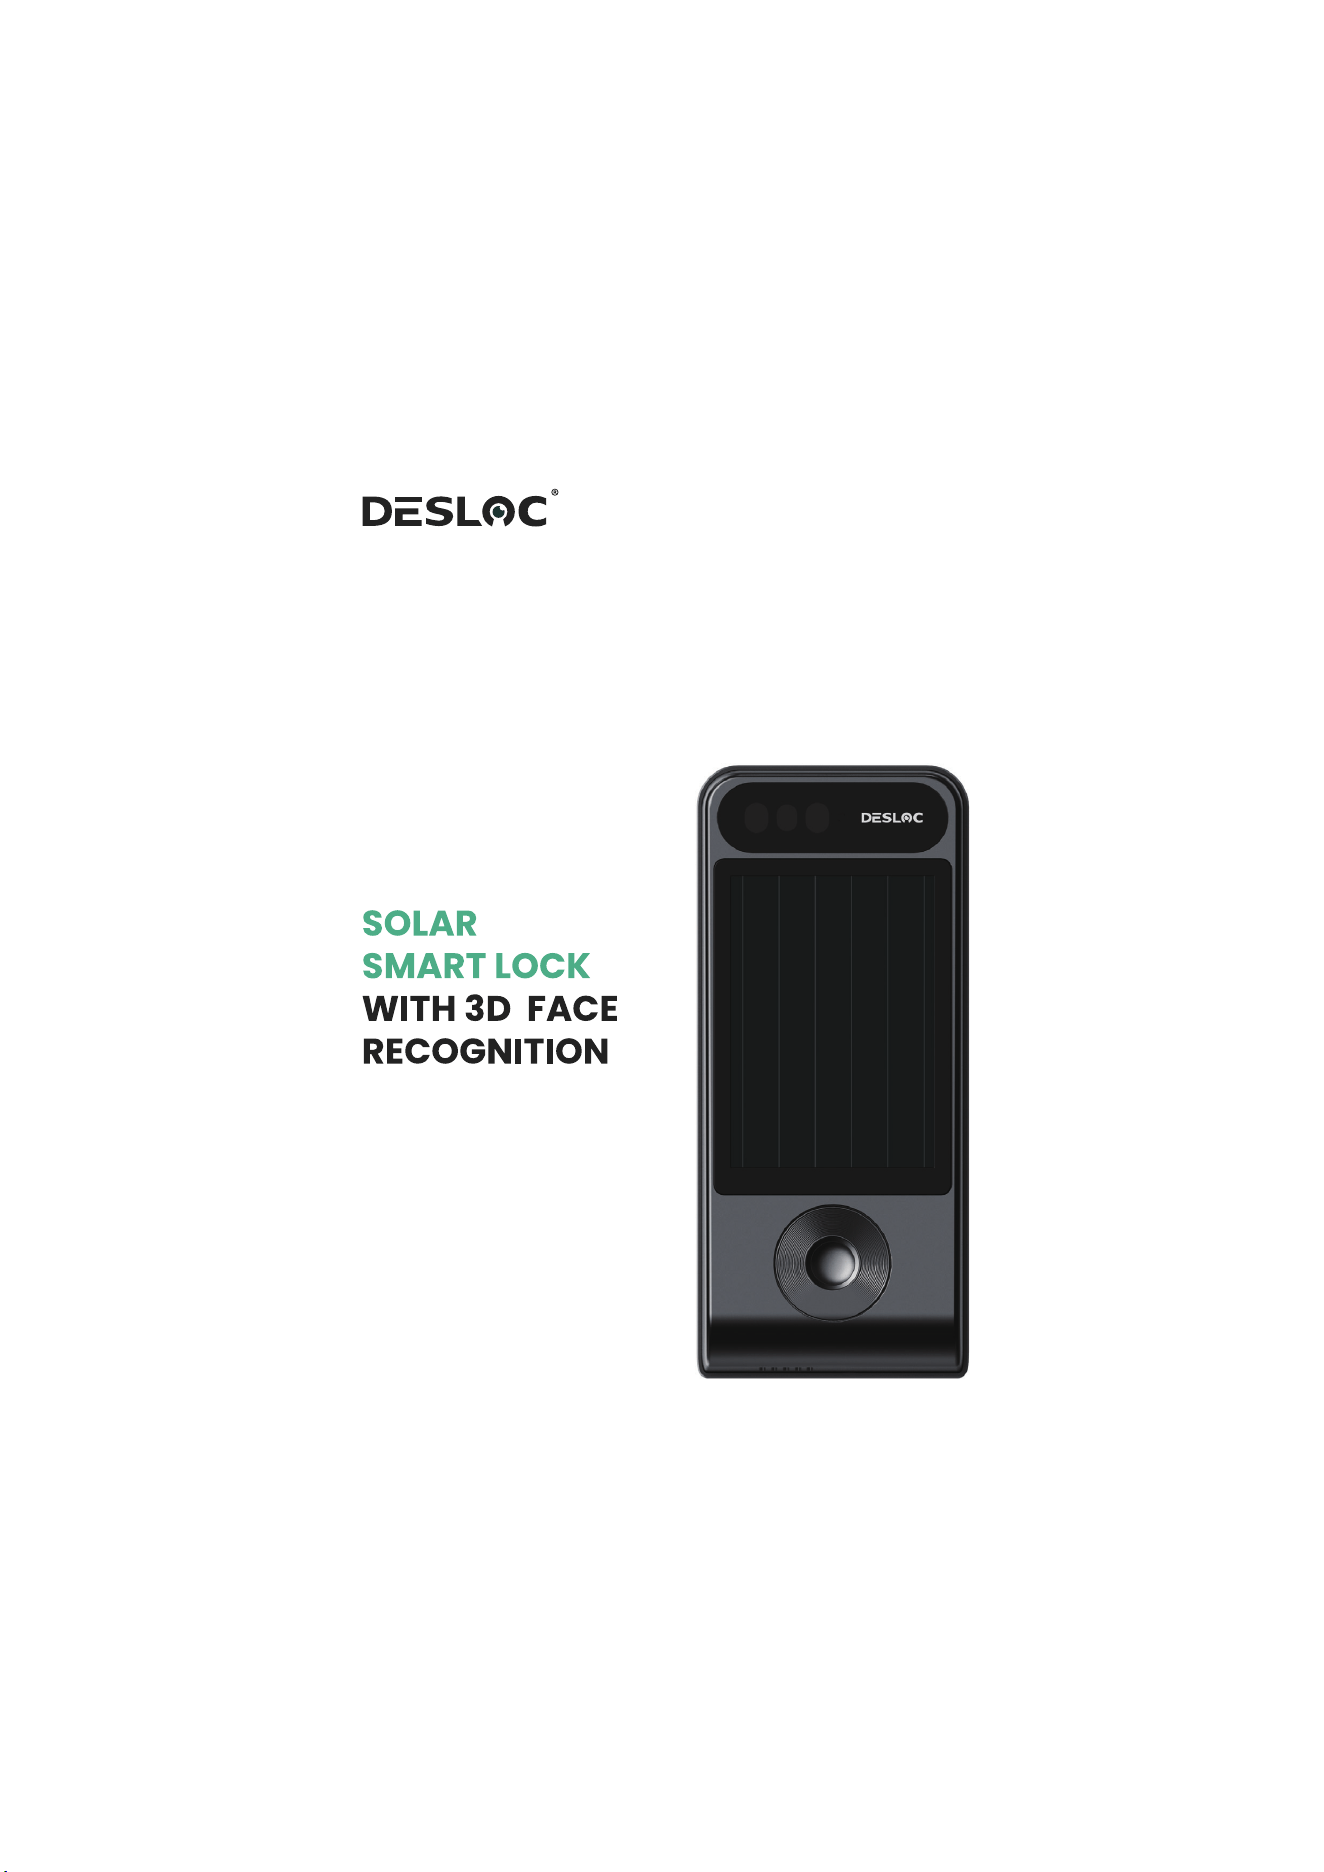
V150 Plus

<01>
1. Product Parameters
10,000mAh lithium battery
(Actual capacity may vary from 9,600-10,000 mAh due to
lithium battery characteristics.)
3D facial recognition, fingerprint recognition, app,
mechanical key
5V pulsed input for charging or power supply
supported under specific conditions
50 entries
Battery
Specifications
Solar
Charging
Unlocking
Methods
Fingerprint
Entries
50 entries
Face Entries

<02>
2
1
3
2.1 Owner Account Registration
2. App Network Configuration
Tips:
8-16 characters, include uppercase and lowercase letters, digits, and special symbols.
Example: Asdf120!
Please download the DESLOC app before use
<03>
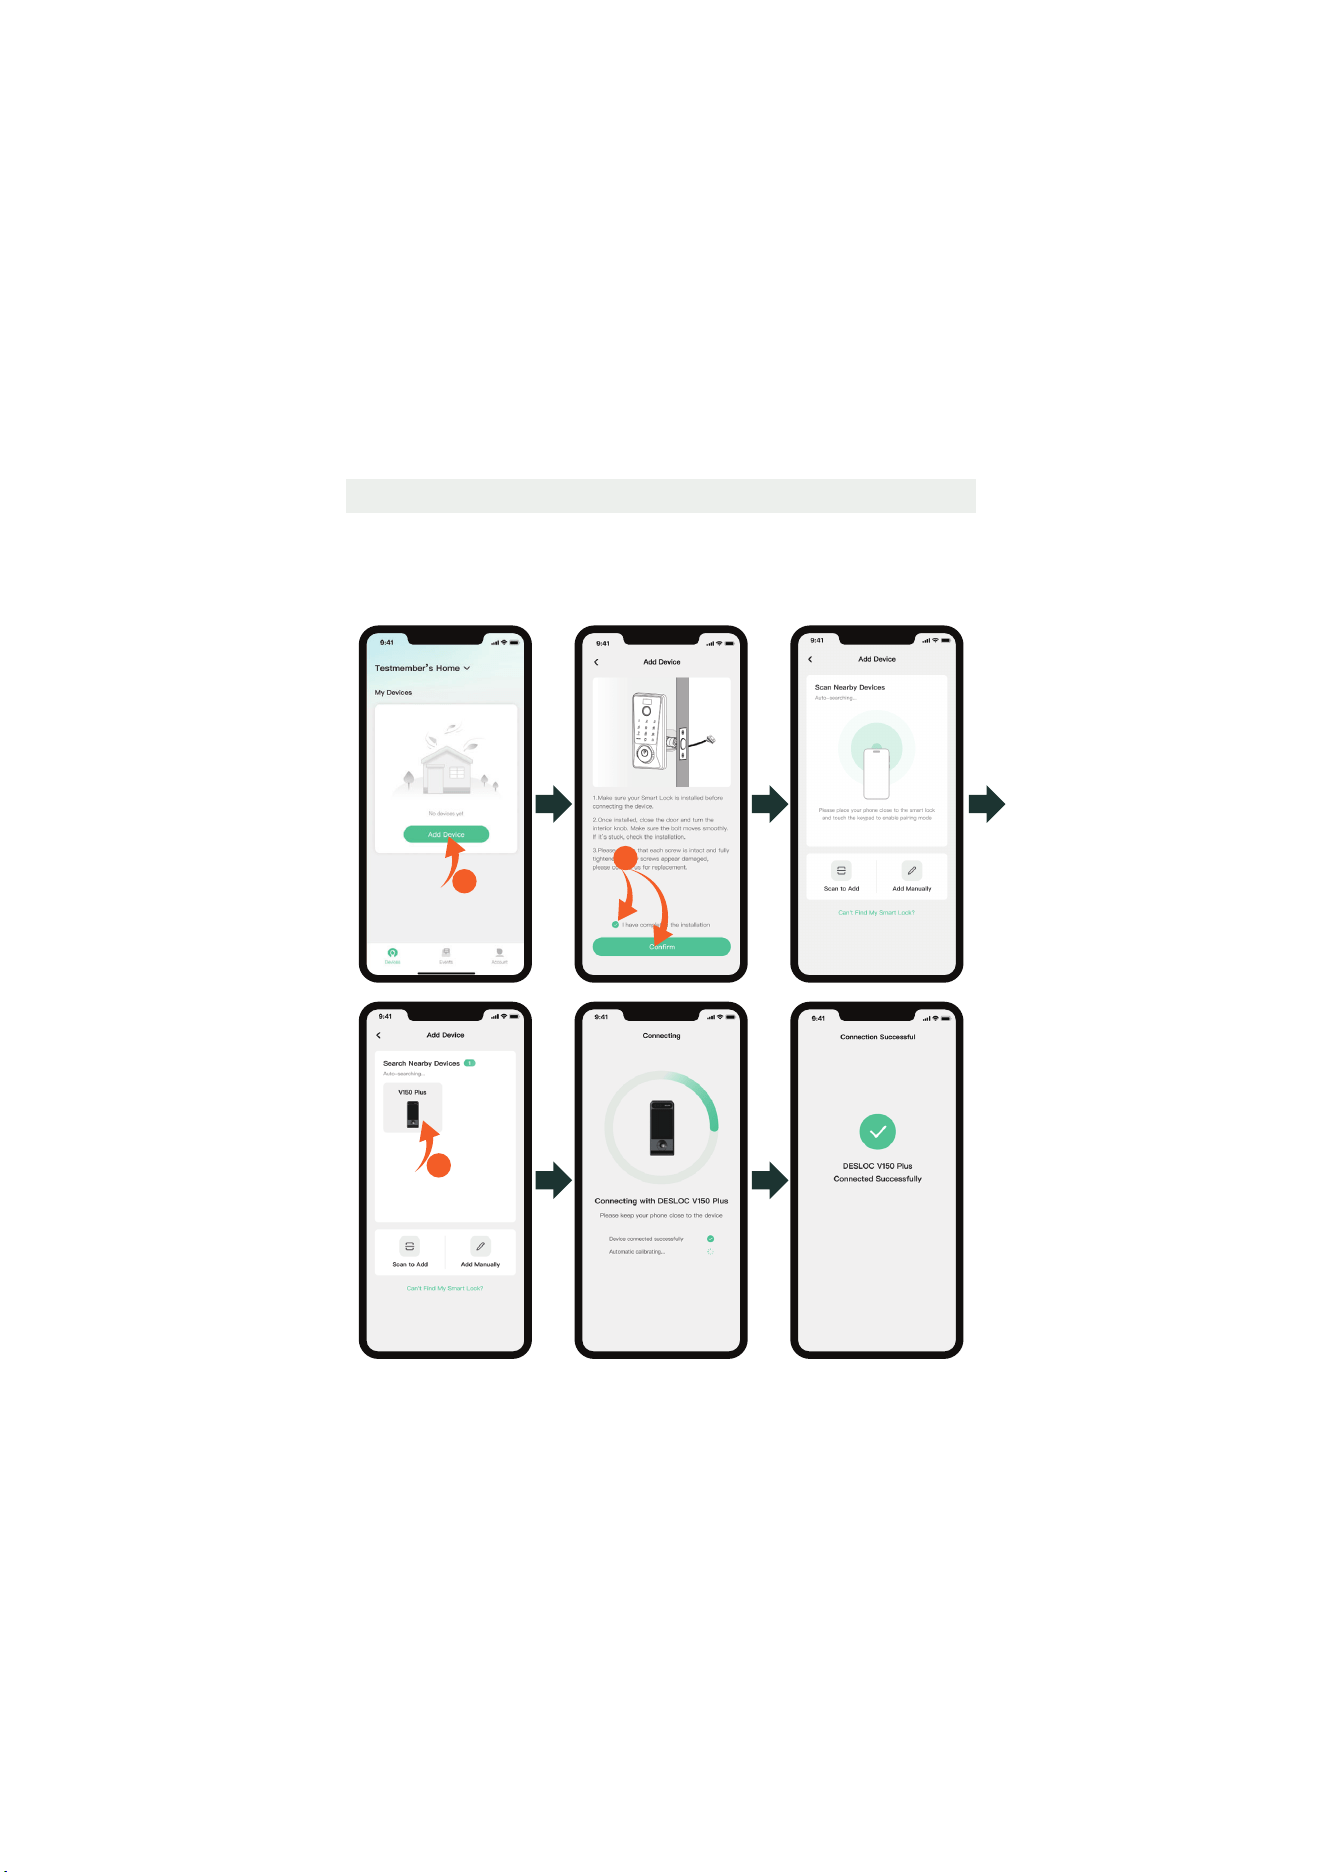
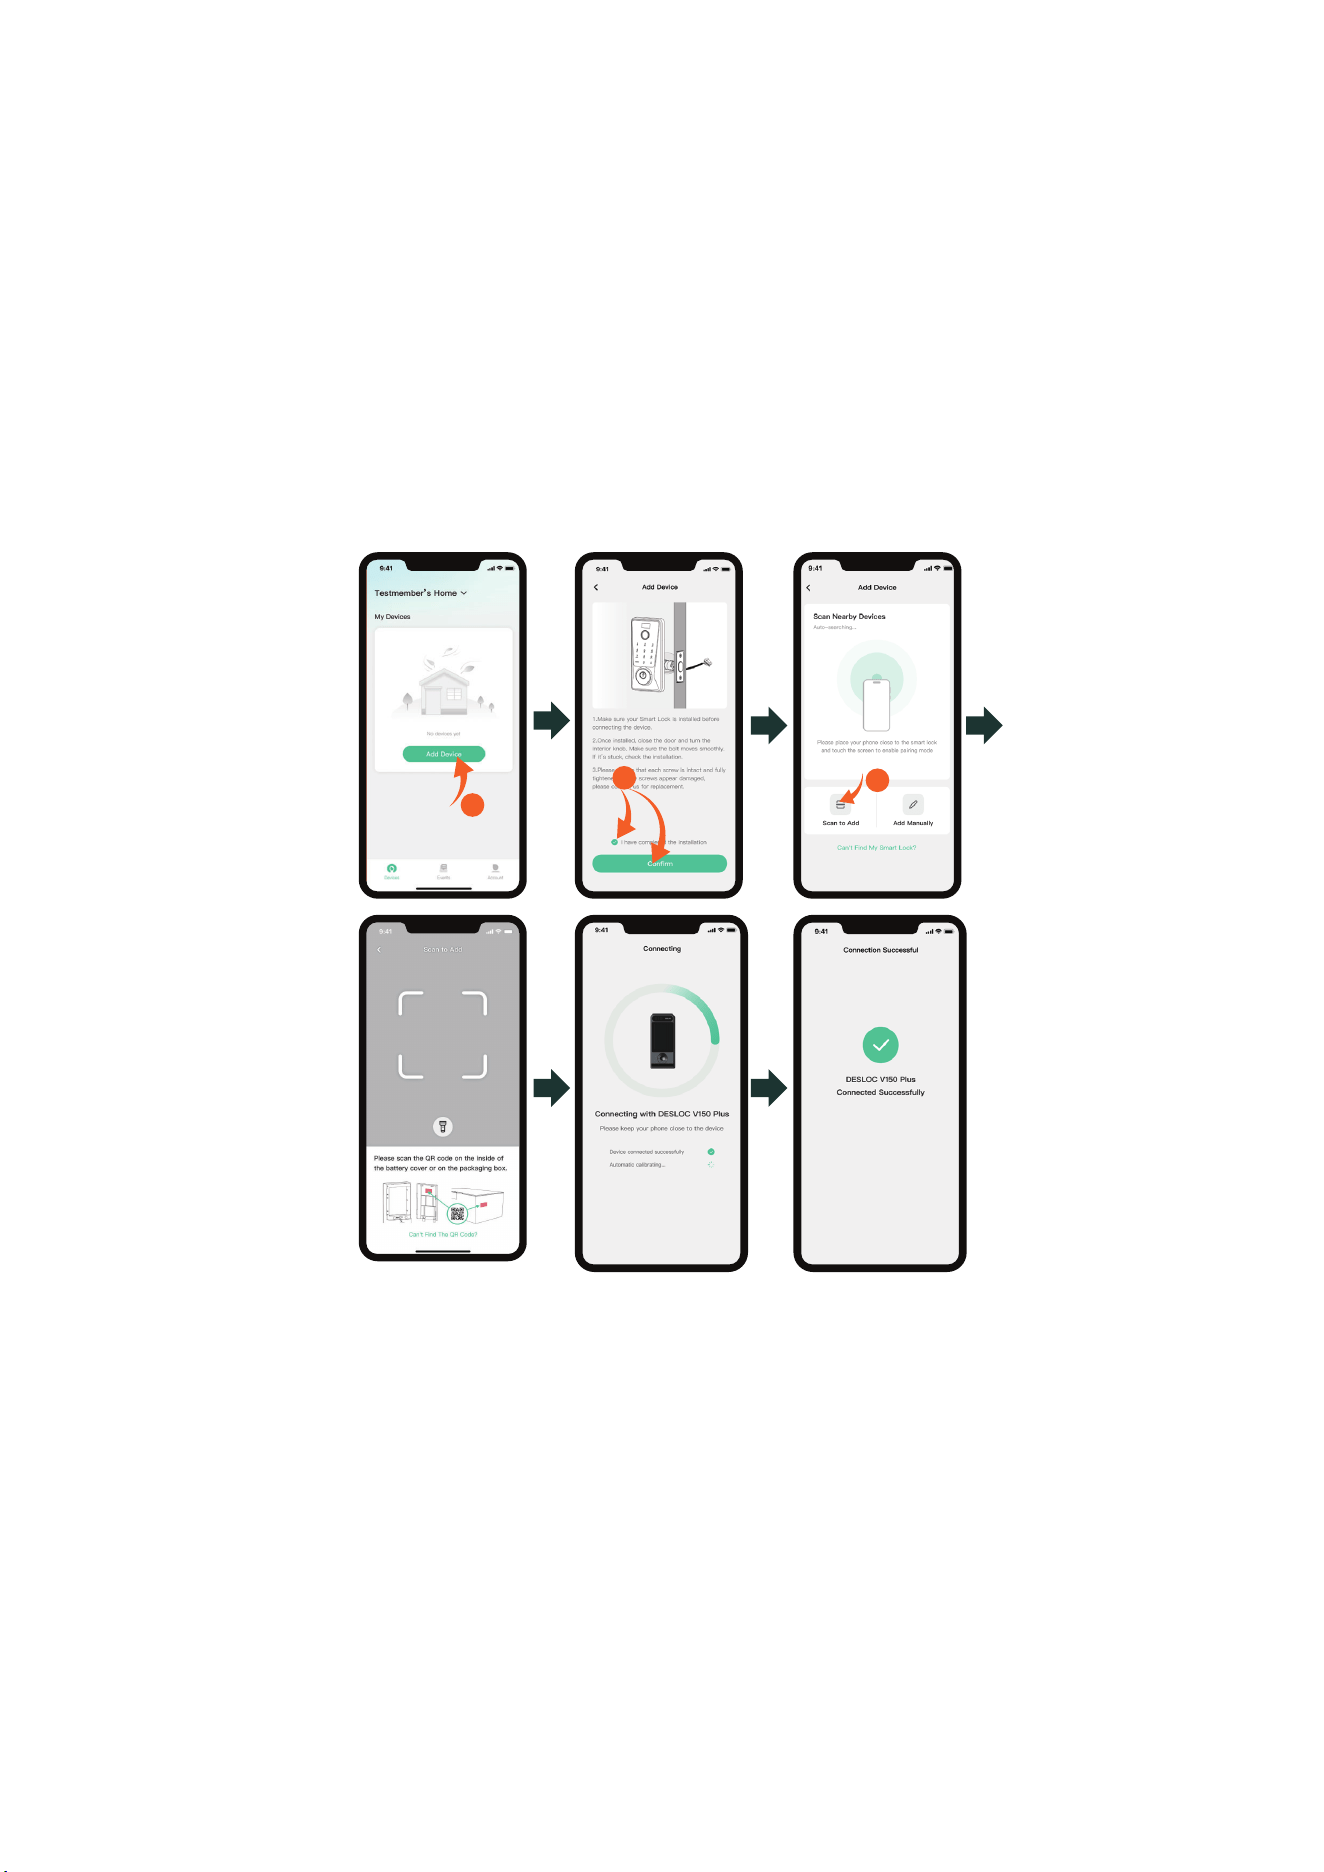
2.2 Add Device
There are three ways to add the device. Before connecting, activate the touch
keypad.
Method 1: Bluetooth Connection
Make sure Bluetooth is enabled and is close to the device.
1
3
2
<04>
1
3
2
Method 3: Add Manually
Tap "Add Manually", then manually enter the SN code (located on the inside
of the battery cover or on the packaging box) until "Connected Successfully"
is prompted.
Method 2: Scan to Add
Please scan the QR code on the inside of the battery cover or on the
packaging box to add.
<05>
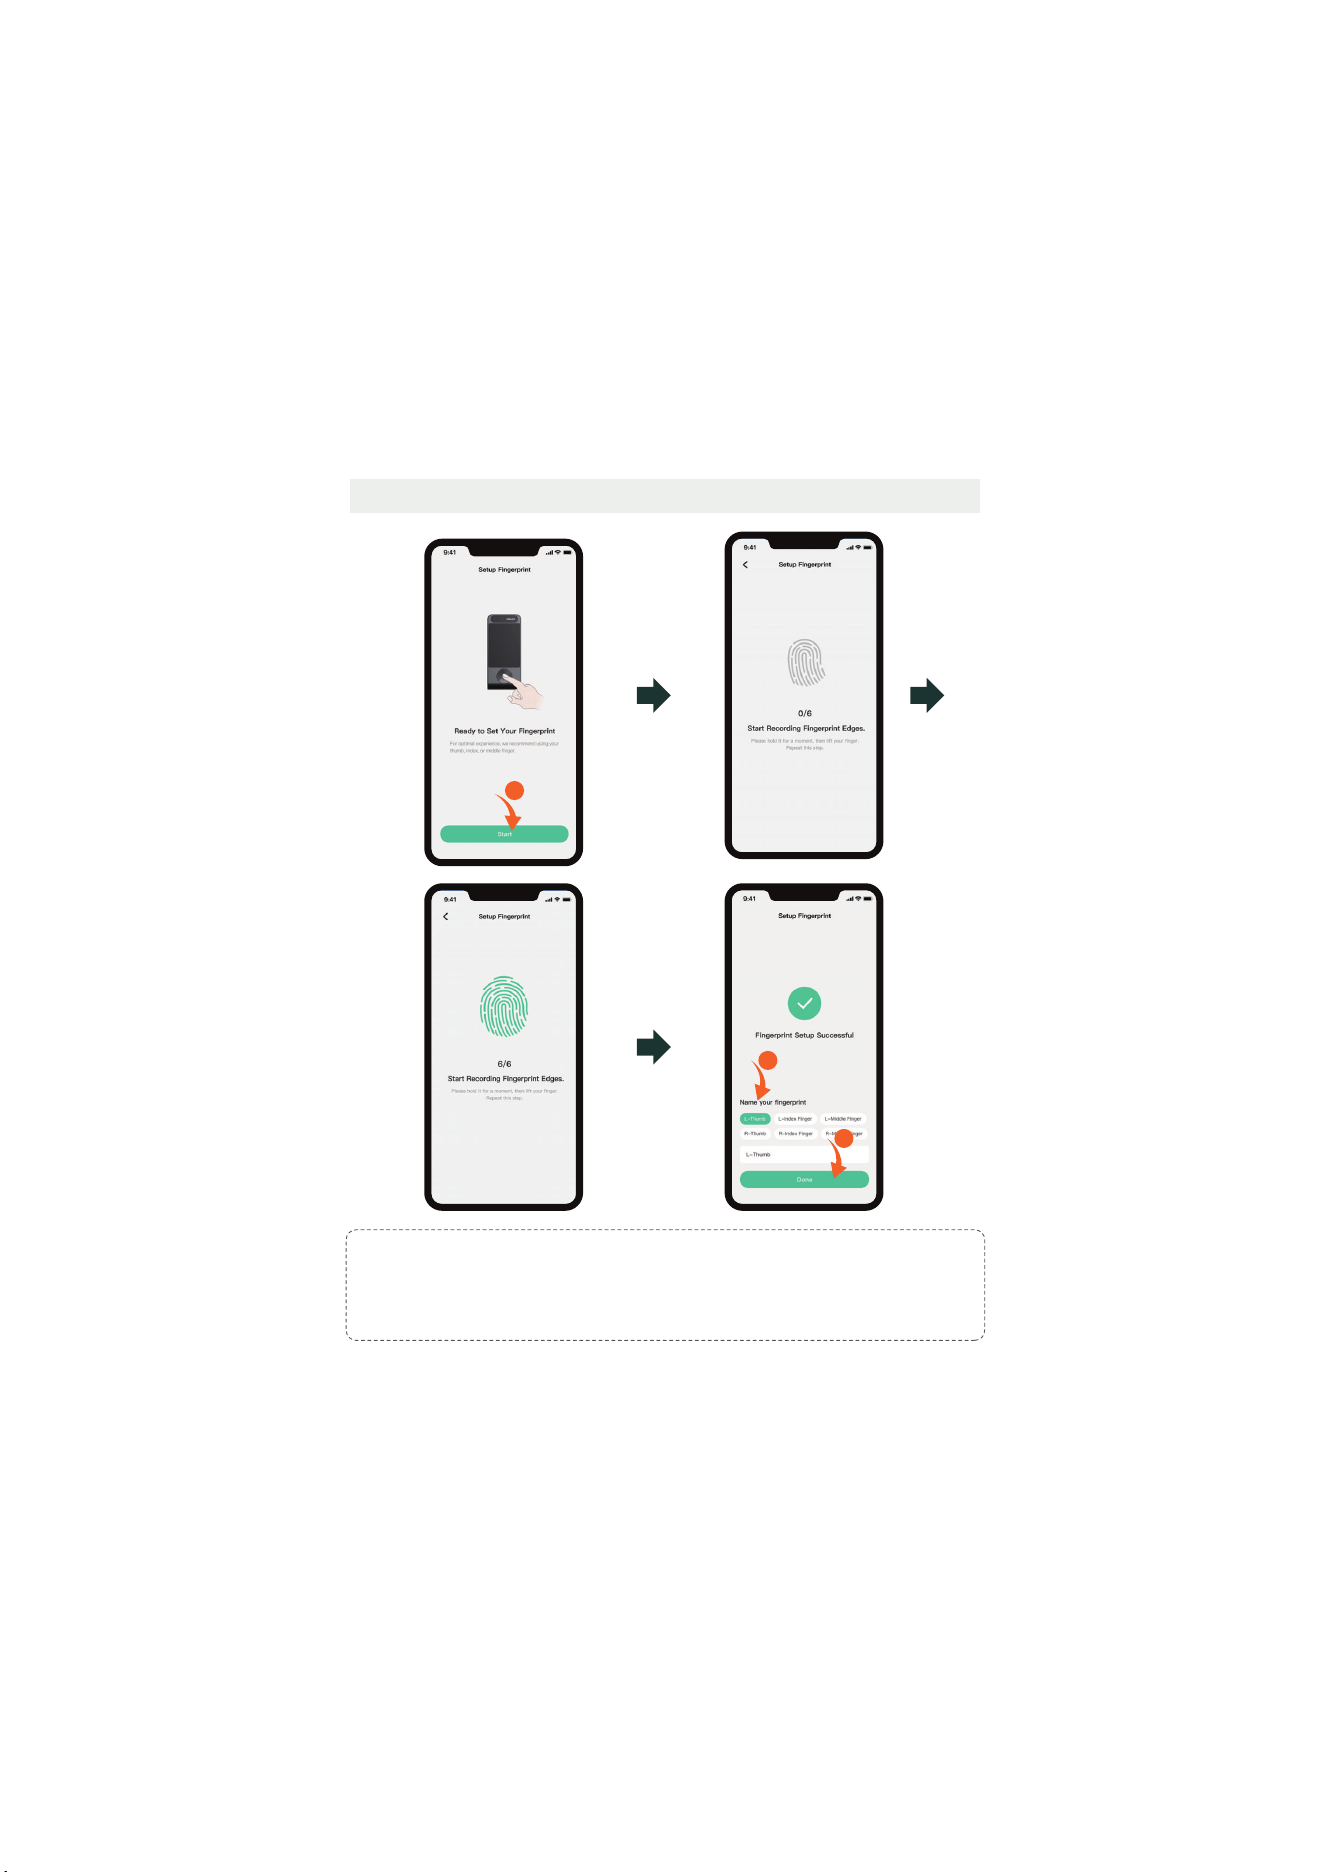
2.3 Owner Fingerprint Setting
1
4
3
Tips
:
1. Wipe off the water stains and dust on the finger before entering the fingerprint, and it is
recommended to give priority to the thumb, index finger, or middle finger.
2. You can also tap "Skip" and set up the fingerprint later via Devices > Enter the Device
Window > Assign Access > Owner > Add Fingerprint.
<06>
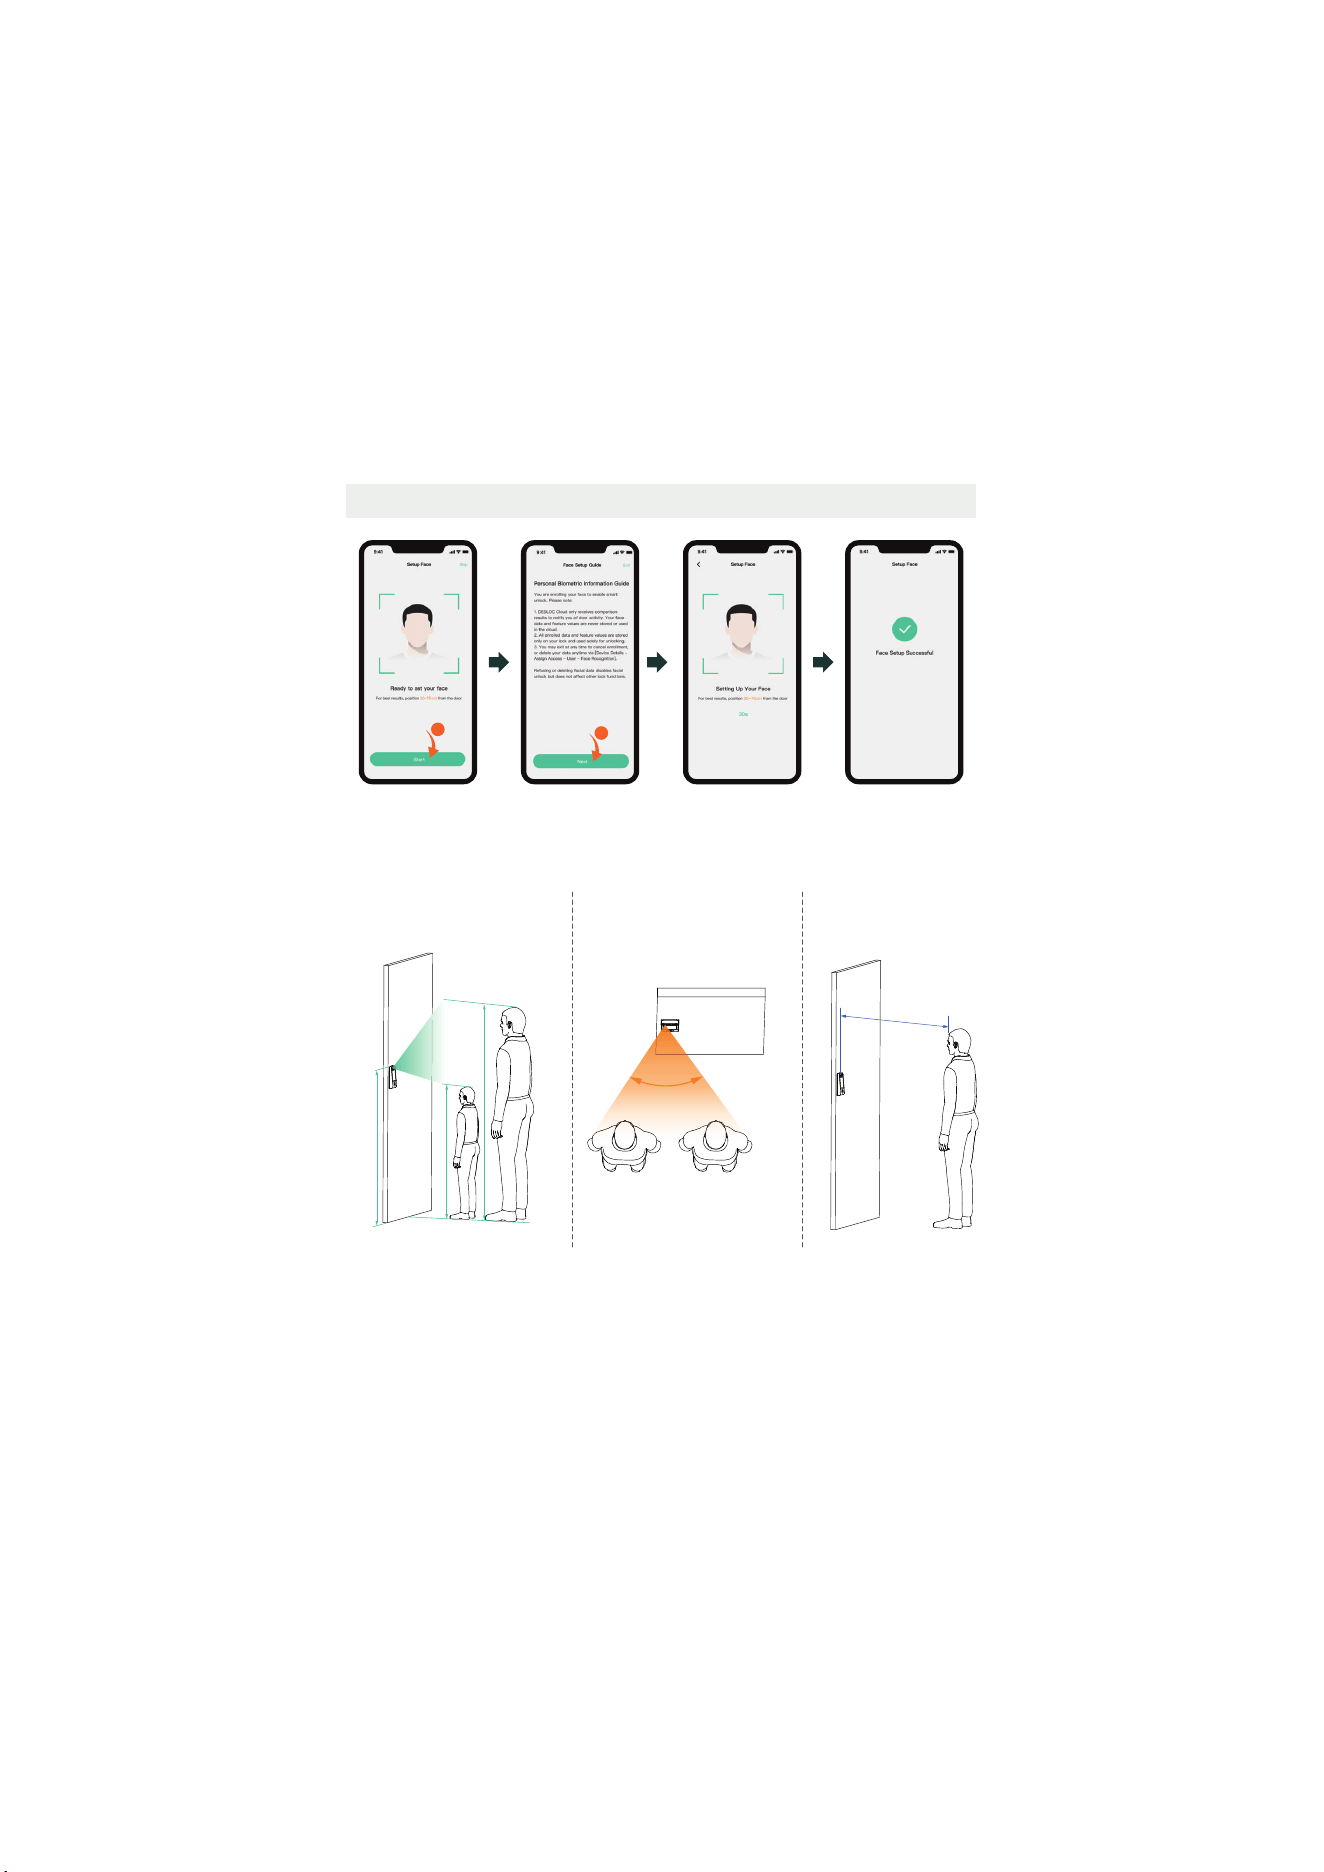
2.4 Owner Face Setting
2
1
0.4~1 m
2.3 m
1.1 m
1.2 m
Recommended installation height: 1.2 m
Face enrollment and unlocking require the following three conditions to be met
simultaneously:
1. Vertical effective recognition
range: 1.1–2.3 m.
3. Effective recognition
distance range: 0.4–1.0 m.
2. Horizontal effective
˥˘˖ˢ˚ˡ˜˧˜ˢˡ˔ˡ˚˟˘ʭЀʩʣʡ
60°

<07>
2.3 Wi-Fi Configuration2.4 Wi-Fi Configuration2.5 Wi-Fi Configuration
1
2
For iOS: The Wi-Fi name will be detected automatically (location authorization
required).
For Android: Choose the Wi-Fi name from the drop-down list (location
authorization required).
For both systems: Manual Wi-Fi name entry is also supported (no location
authorization required).
Tips:
1. Please connect to a 2.4 GHz Wi-Fi network.
2. Enable Location Services in Settings > Privacy > Location Services and allow DESLOC to
access.
3. You can also tap "Skip" and configure Wi-Fi later via Devices > Enter the Device Window >
Settings > General > Wi-Fi > Choose Wi-Fi.
<08>
3. Instructions for Use
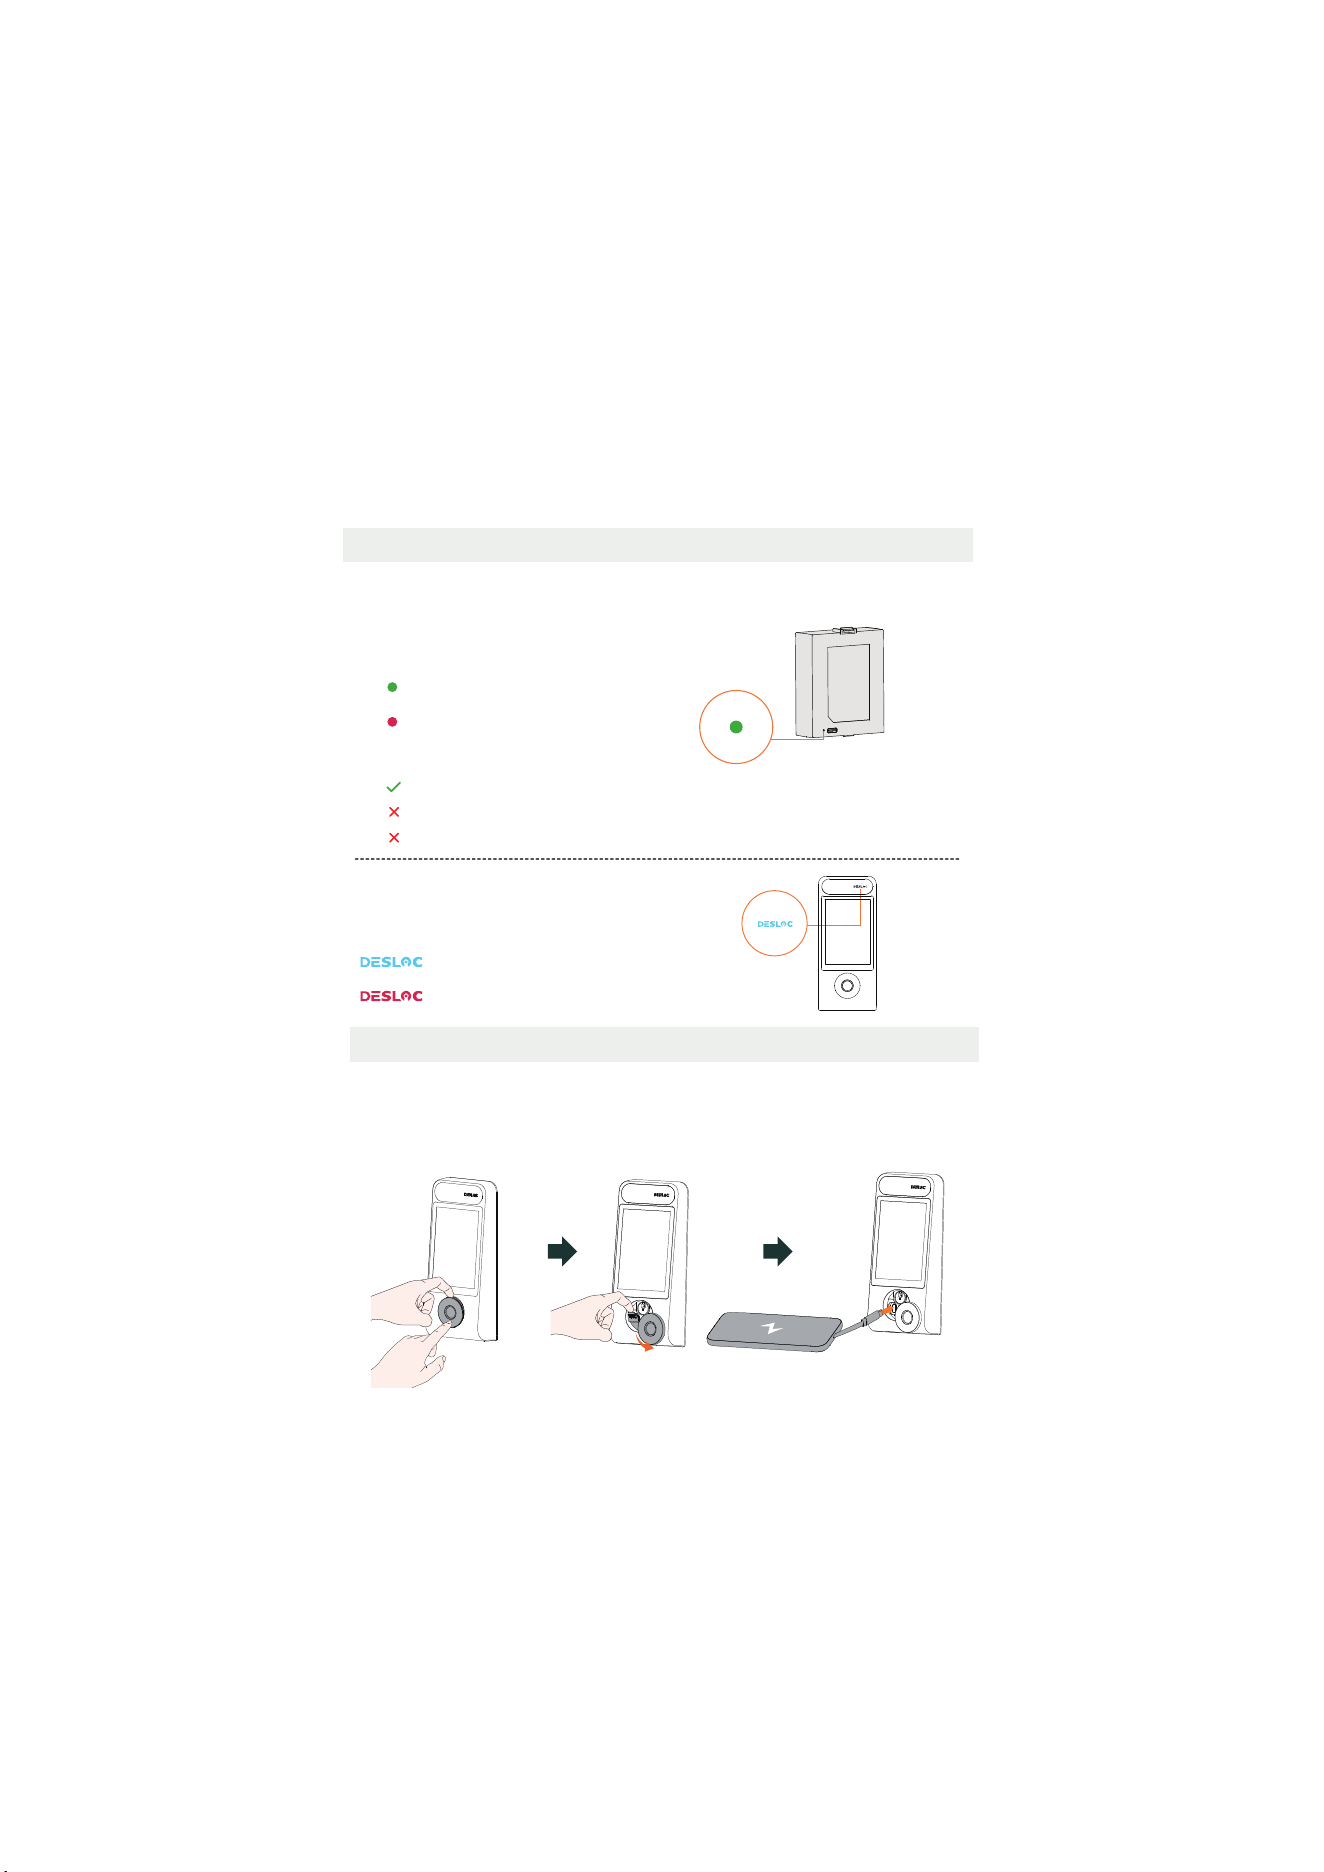
3.2 Emergency Charging Method
1. Press the lower side of the lock cylinder cover of the exterior lock, then pry the cover out from
above.
2. Rotate the cover to one side and pry out the silicone plug from the charging port.
3. Insert a Type-C charging cable.
3.1 Battery Charging Reminder
The exterior lock’s battery level indicator
will show the following colors:
Blue: Battery level > 10%
˅˘˗ʭʵ˔˧˧˘˥ˬ˟˘˩˘˟Ѐʤʣʘ
The lithium battery is not fully charged; please fully charge it before use (Use Type-C
chargers only).
The battery itself has an indicator that shows the
following colors (indicated only during charging):
Green light: Fully charged
Red light: Charging in progress
Optimal Charger:
RECOMMENDED 5V/2A(5-7 hours)
NOT RECOMMENDED 5V/1A(> 10 hours)
Fast Charge: Not Supported
<09>
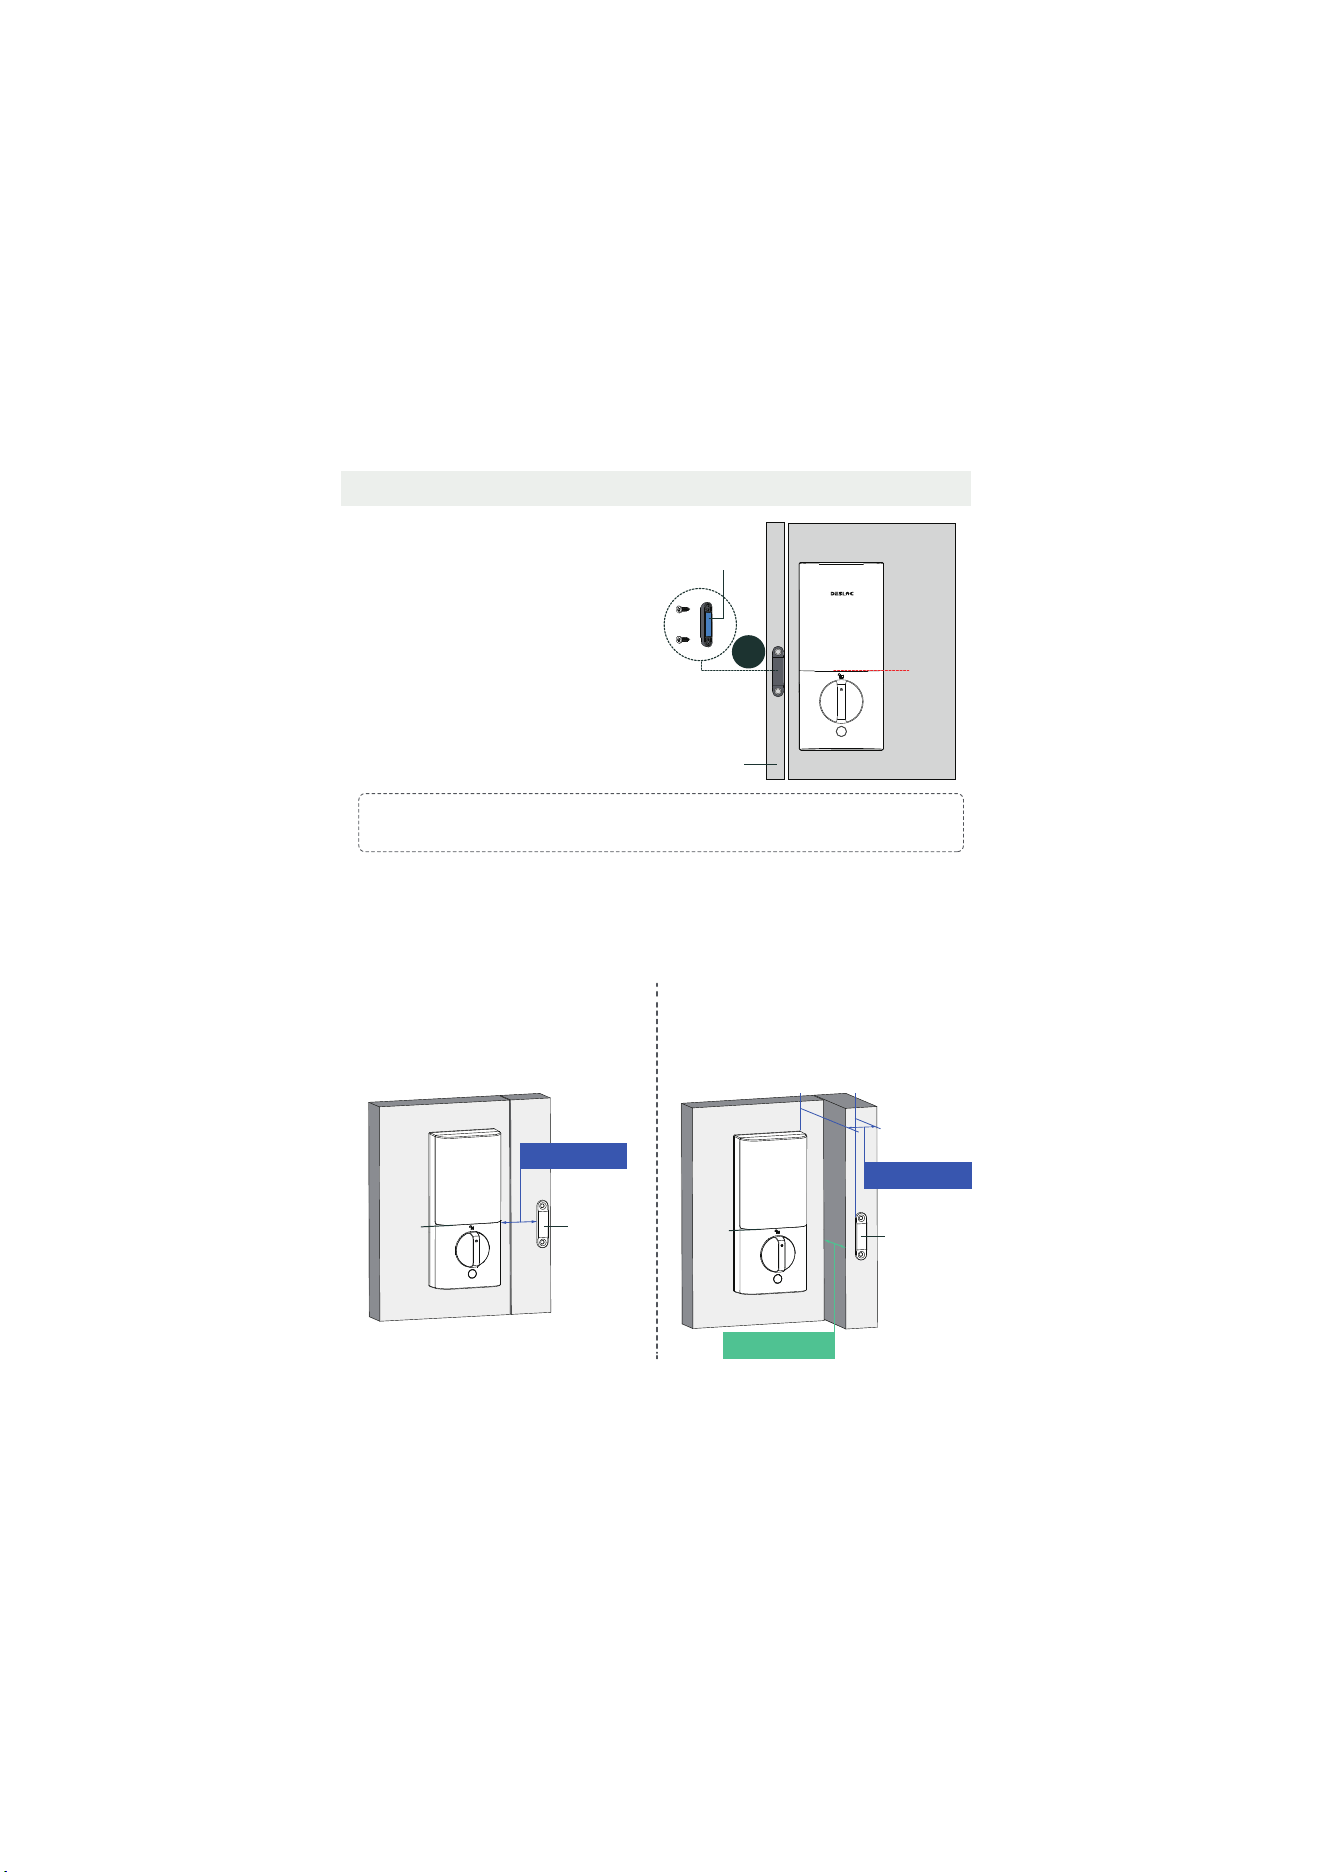
Illustration A Illustration B
If the above illustrations do not match your door type, you can try adjusting according to the
following two scenarios:
In all scenarios, during installation, ensure the center of the door sensor is approximately
aligned vertically with the lower seam line of the battery cover.
Scenario A: The horizontal gap between the
˗ˢˢ˥˦˘ˡ˦ˢ˥˔ˡ˗˧˛˘˜ˡ˧˘˥˜ˢ˥˟ˢ˖˞˜˦Ѐʦʨˠˠ
(1.38"), as shown in Illustration A.
Scenario B: The horizontal gap between the
˗ˢˢ˥˦˘ˡ˦ˢ˥˔ˡ˗˧˛˘˜ˡ˧˘˥˜ˢ˥˟ˢ˖˞˜˦Ѐʦʨˠˠ
(1.38"), and the interior/exterior depth offset
˜˦Ѐʥʣˠˠʛʣʡʪʬʕʜʟ˔˦˦˛ˢ˪ˡ˜ˡʼ˟˟˨˦˧˥˔˧˜ˢˡʵʡ
Ѐʥʣˠˠʛʣʡʪʬϣʜ
Door sensor
Seam
line
Ѐʦʨˠˠʛʤʡʦʫϣʜ
Door sensor
Seam
line
Ѐʦʨˠˠʛʤʡʦʫϣʜ
3.3 Installing the Door Sensor
Step 1: Determine the horizontal
installation position. The door sensor
should be flush with the edge of the door
frame.
Step 2:
Determine the vertical installation
position. The door sensor should be
vertically centered with the seam line
between the battery cover and the interior
lock (as shown by the red dashed line in
the right figure).
Step 3:
Once the position is determined,
peel off the adhesive backing of the door
sensor and stick it. If it does not adhere,
you may choose to secure it with screws.
Inside
Door sensor
Door frame
J
Adhesive backing
Seam
line
Tips:
The door sensor does not need to be installed if the auto-lock function is not used.
<10>
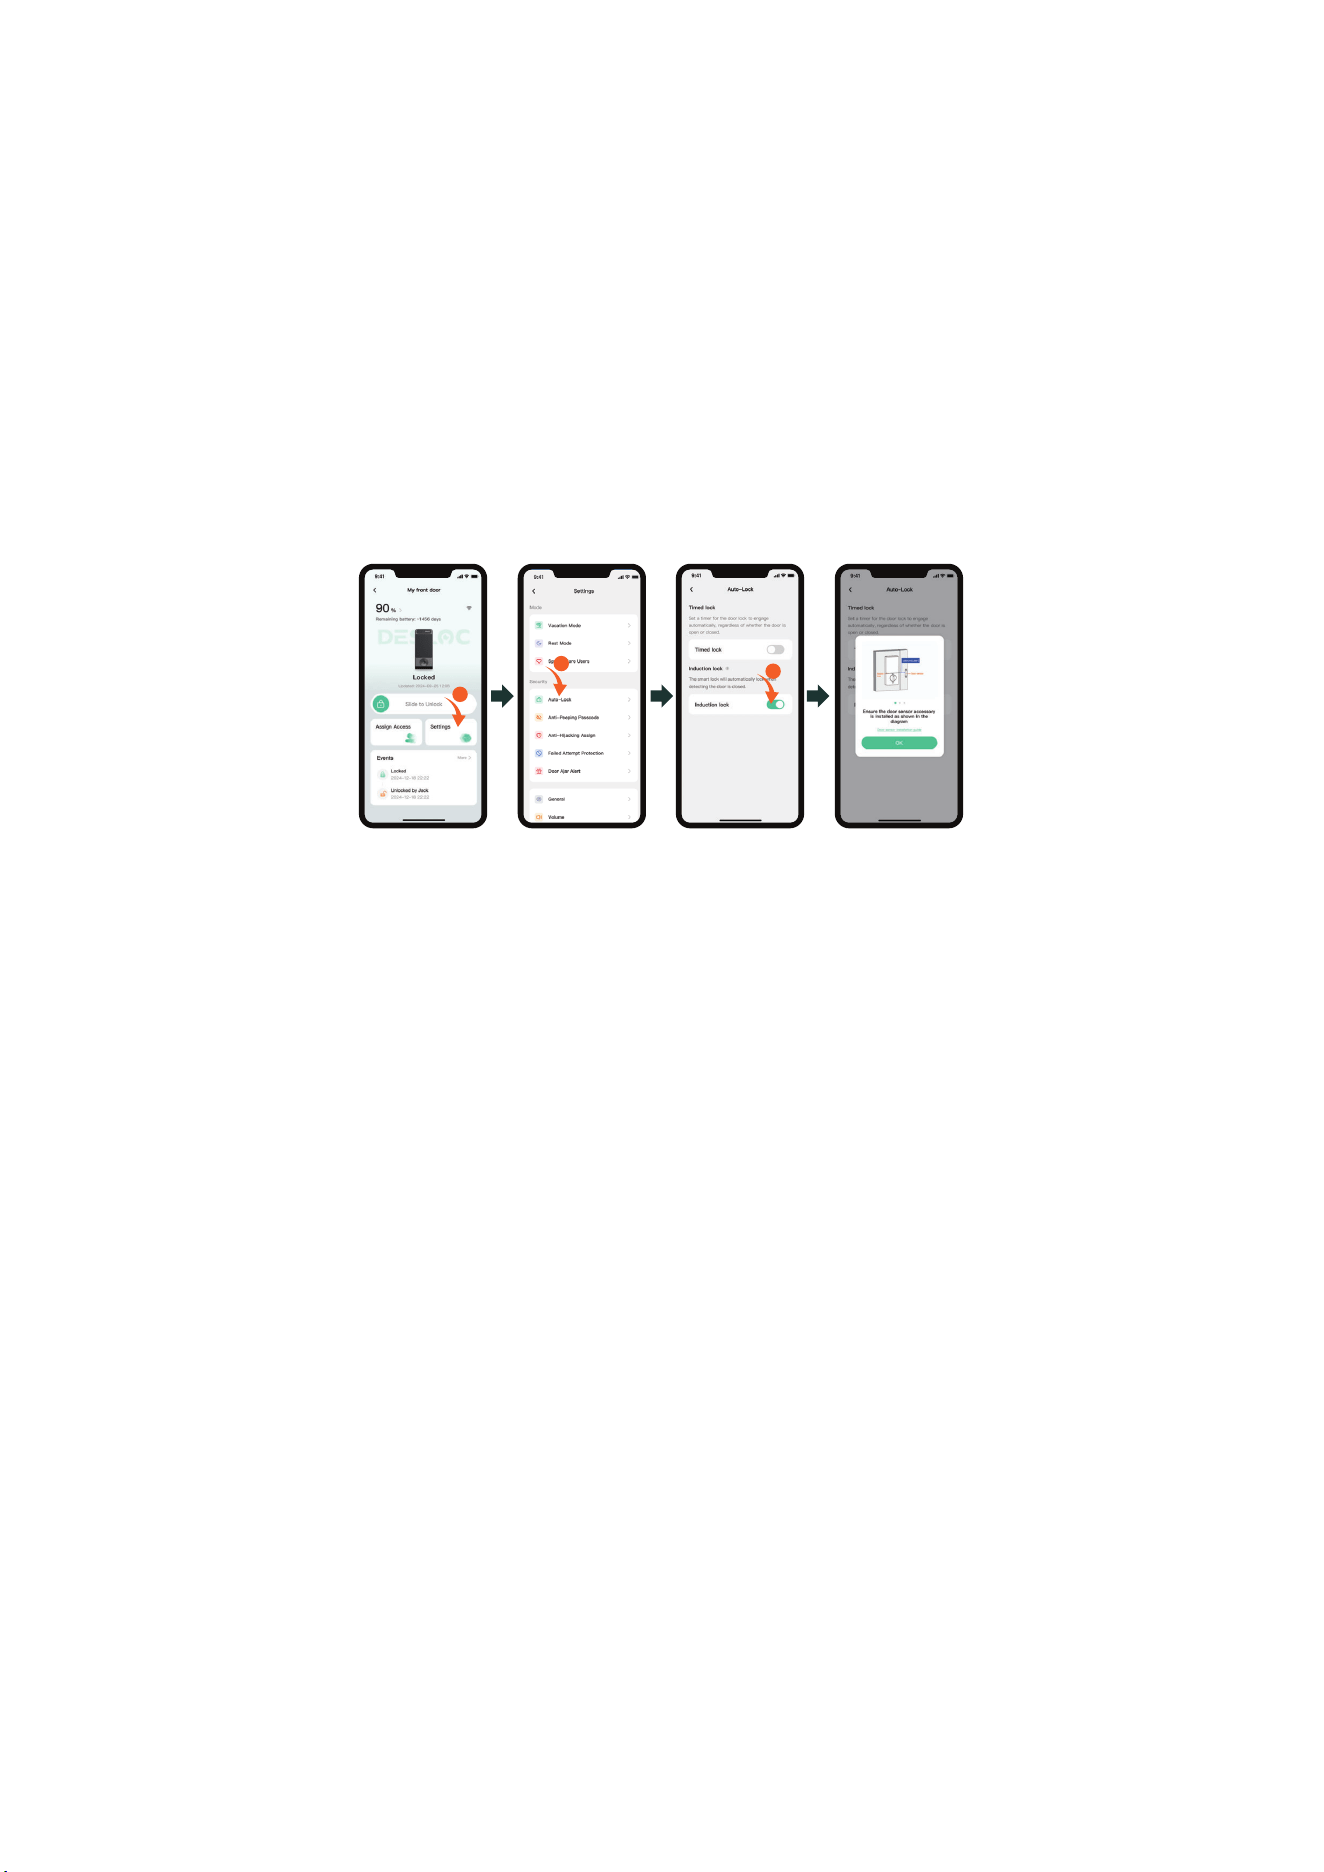
1
2
3
After installation, navigate to the Auto-Lock settings in the app and enable the
"Induction lock" option. Next, perform a test by unlocking, opening, and closing the
door to observe whether the smart lock engages automatically and confirm the
setup is operational.

<11>
3.4 Unlocking Methods
or
Press and
hold to unlock
Swipe right
to unlock
Outside
Outside
Method 4: App Unlocking
Press and hold or swipe right to unlock.
ˀ˘˧˛ˢ˗ʤʭʹ˜ˡ˚˘˥ˣ˥˜ˡ˧˲ˈˡ˟ˢ˖˞˜ˡ˚
Place the enrolled finger on the fingerprint
recognition area to unlock.
Method 2: 3D Face Unlocking
Face unlocking require the following three
conditions to be met simultaneously:
1. Vertical effective recognition range: 1.1–2.3 m.
ʥʡʻˢ˥˜˭ˢˡ˧˔˟˘˙˙˘˖˧˜˩˘˥˘˖ˢ˚ˡ˜˧˜ˢˡ˔ˡ˚˟˘ʭЀʩʣʡ
3. Effective recognition distance range: 0.4–1.0
m.
Method 3: Mechanical Key Unlocking
1. Press the lower side of the exterior lock's
lock cylinder cover, then pry the cover out
from above.
2. Rotate the cover to one side, insert the
key, and turn it left or right to unlock.
2.3 m
1.1 m
1
1.1
1.1 m
1
60°
0.4~1 m
1.2 m
Recommended installation height: 1.2 m
<12>
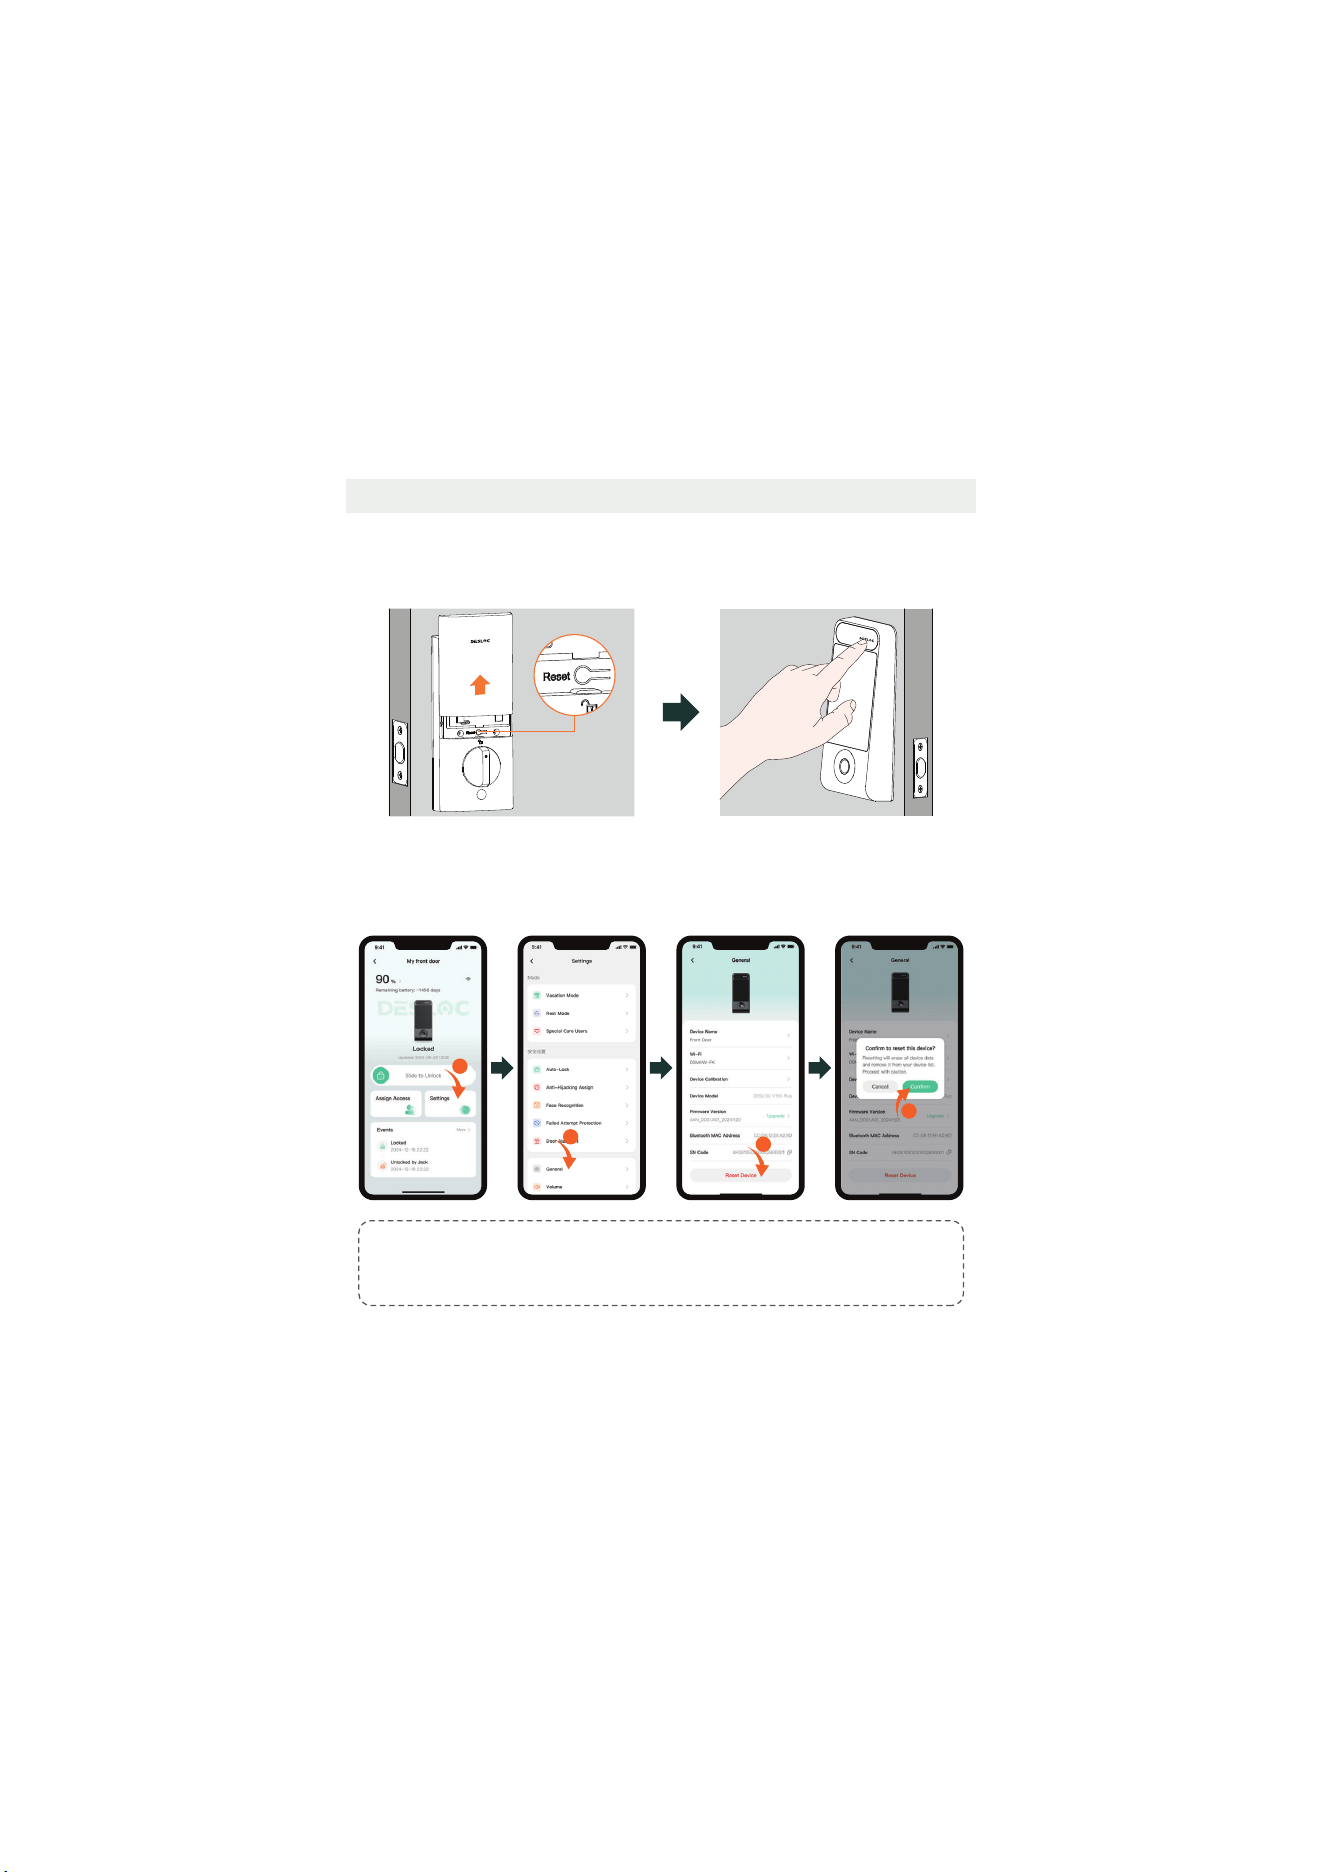
3.5 Factory Reset
Method 2:
Tap Settings > General > Reset Device > Confirm.
Inside
Reset button
1
2
3
4
Outside
Method 1:
Remove the battery cover, press and hold the interior lock "Reset" key for more
than 3 seconds, and press the exterior lock's "DESLOC Touch Button" to confirm.
Tips:
When restoring factory settings via the app, you need to be near the lock and maintain a
Bluetooth connection. Otherwise, the lock may still be usable.
<13>
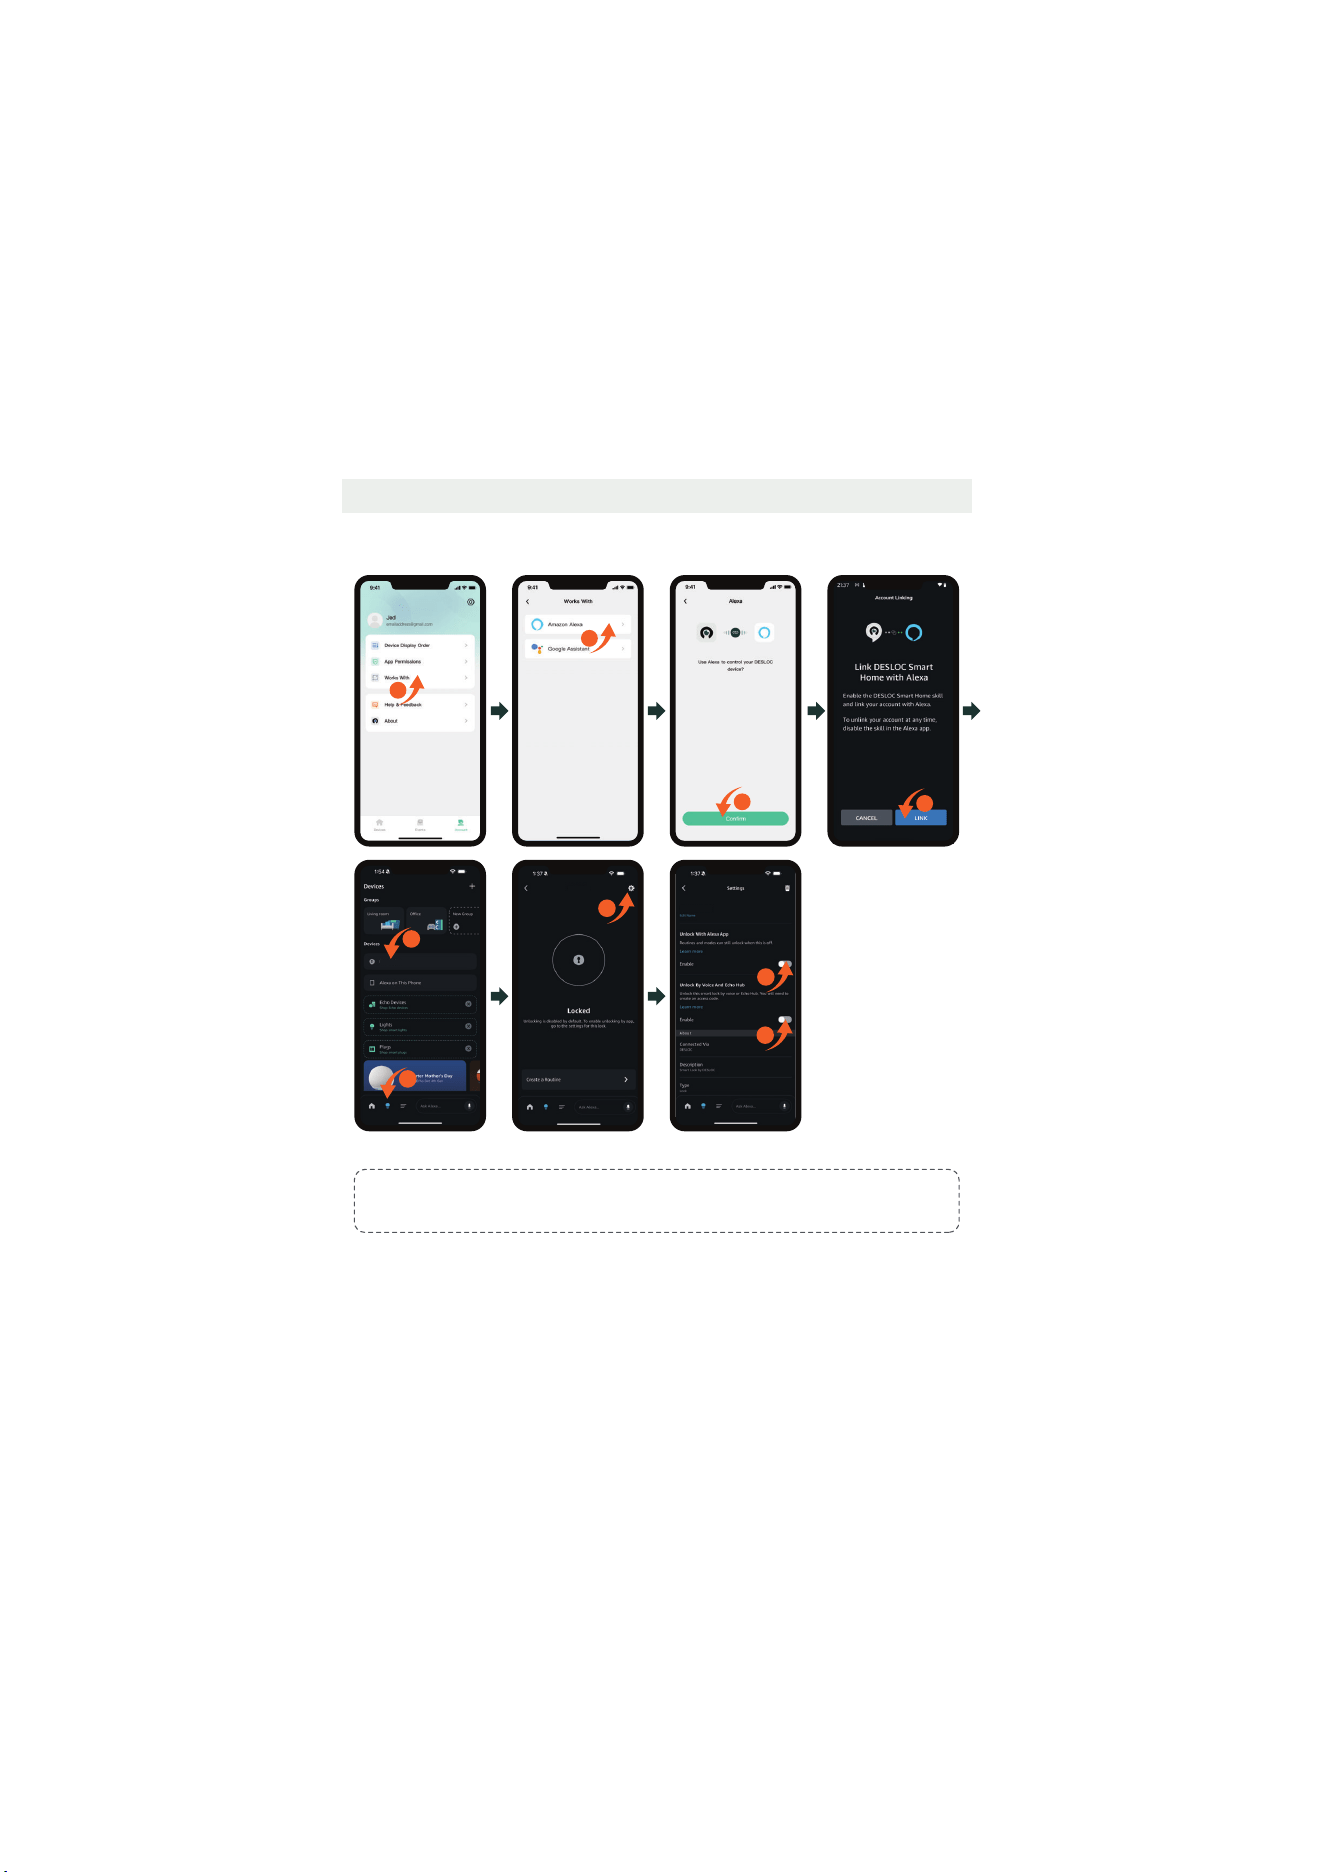
3.6 Third-party App Binding
a. How to connect the lock with Alexa
Tips:
Ensure the Wi-Fi feature is enabled in this app (if not, the device will not support Alexa).
1
5
6
V150 Plus
8
9
V150 Plus
2
3
4
7
V150 Plus
<14>
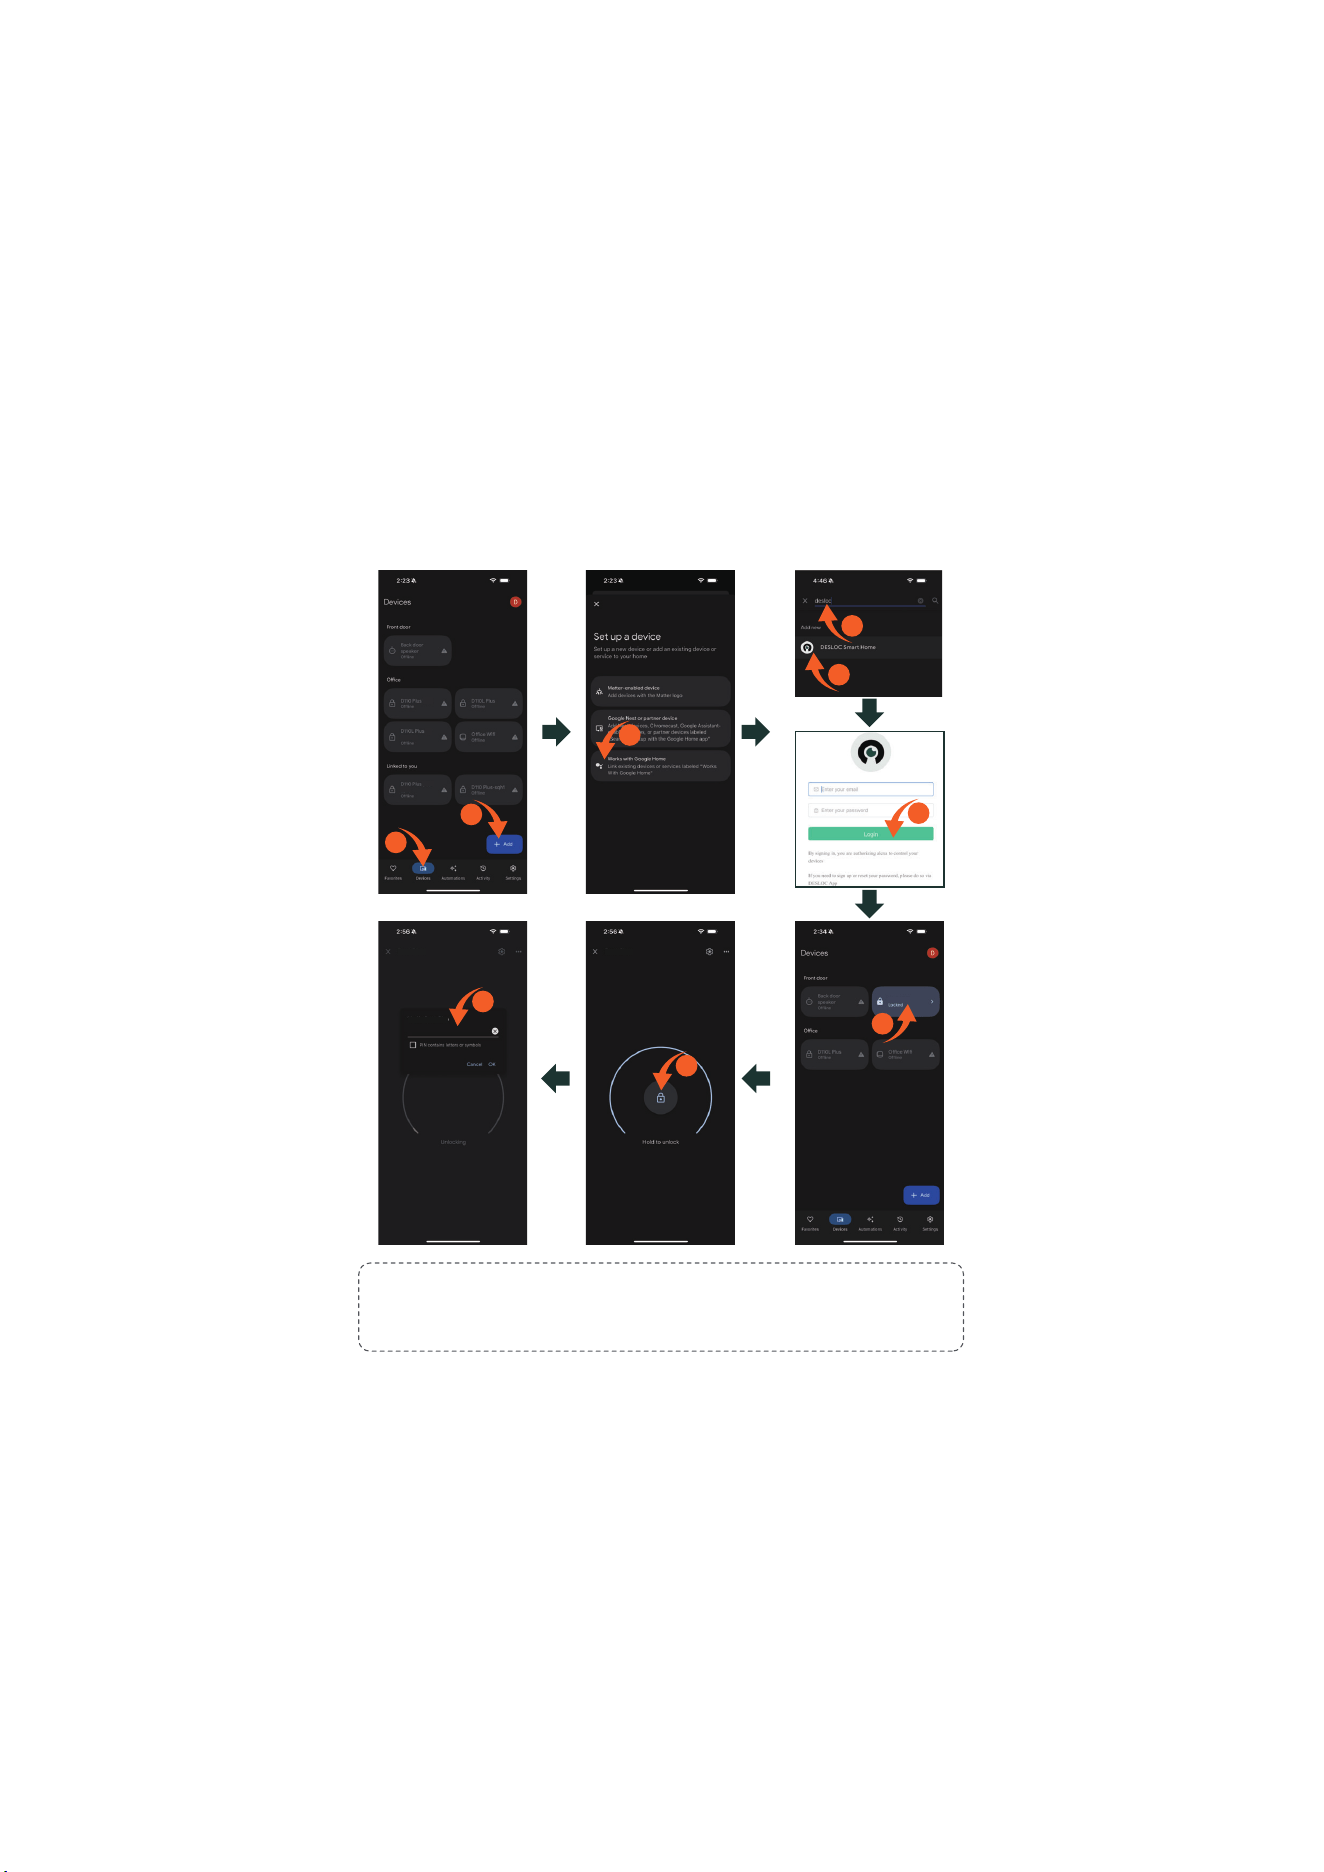
b. How to connect the lock with Google Assistant
Step 1: Install the Google Home app and tap "+".
Step 2: Search for DESLOC and authorize using your app account and password.
Step 3: Set a security code in this app to use it for unlocking via Google Home.
Tips:
1. Ensure the Wi-Fi feature is enabled in this app (if not, the device will not support Google
Assistant).
2. Initial passcode is 123456.
3
2
1
4
5
7
9
8
6
......
V150 Plus
V150 Plus
V150 Plus
Verify V150 Plus

<15>
4. Cautions and Statements
1. Do not subject the solar panel to physical damage or impact; if damaged, dispose of it properly to prevent environmental and water contamination.
ʥʡʾ˘˘ˣ˔˪˔ˬ˙˥ˢˠ˛˜˚˛ʠ˧˘ˠˣ˘˥˔˧˨˥˘˛˘˔˧˦ˢ˨˥˖˘˦ʮ˗ˢˡˢ˧˜ˡ˖˜ˡ˘˥˔˧˘ʡ˂ˣ˘˥˔˧˜ˡ˚˔ˡ˗˦˧ˢ˥˔˚˘˧˘ˠˣ˘˥˔˧˨˥˘˦ˠ˨˦˧ˡˢ˧˘˫˖˘˘˗ʤʣʣʶʡ
ʧʡʪˆˢ˟˔˥˃˔ˡ˘˟˃˥˘˖˔˨˧˜ˢˡ˦
4.4 Trademark Notice
and are trademarks or registered trademarks of Zhejiang Desman Intelligent Technology Co., LTD. and Hangzhou Key to the Future Technology Co., LTD.
All other trademarks and company names mentioned in this document are the property of their respective owners.
4.5 About This Document
2025 Zhejiang Desman Intelligent Technology Co., LTD. All rights reserved.
No part of this document may be reproduced, transmitted, distributed, or stored in any form or by any means without the prior written consent of Zhejiang Desman Intelligent Technology
Co., LTD. (hereinafter referred to as ‘Desman’). The products described herein may include software copyrighted by Desman and/or third parties. Unless explicitly authorized by the relevant
rights holders, no individual or entity may reproduce, distribute, modify, extract, decompile, disassemble, decrypt, reverse engineer, rent, transfer, sublicense, or otherwise infringe upon
the copyrights of any such software.
%
This device complies with part 15 of the FCC Rules. Operation is subject to the following two conditions: (1) this device should not create harmful interference; (2) this device must be
able to handle any interference it receives, even if it disrupts its operation.
Any changes or modifications not expressly approved by the party responsible for compliance could void the user's authority to operate the equipment.
NOTE:
This device has been tested and found to comply with the limits for a Class B digital device, pursuant to part 15 of the FCC Rules. These limits are designed to provide reasonable
protection against harmful interference in a residential installation. This device produces and emits radio frequency energy, and if not installed and operated as instructed, it could
disrupt radio communications. However, there is no guarantee that interference will not occur in a particular installation. If this device result in interference to radio or television
reception, which can be identified by power cycling the equipment, the user is advised to attempt to resolve the interference using the following steps:
-Reorient or relocate the receiving antenna.
-Increase the distance between the equipment and receiver.
-Connect the device to a circuit that is different from the one the receiver is using.
-Contact the dealer or an experienced radio/TV technician for help.
This device complies with FCC radiation exposure limits set forth for an uncontrolled environment. This device should be installed and operated with a minimum distance of 20 cm
between the radiator and your body.
4.1 FCC Caution
4.2 ISED Statement
The device contains licence-exempt transmitter(s)/receiver(s) that comply with Innovation, Science and Economic Development Canada’s licence-exempt RSS(s).
Operation is subject to the following two conditions: (1) this device may not cause interference; (2) this device must accept any interference, including interference that may cause
undesired operation of the device.
This equipment complies with IC RSS-102 radiation exposure limits set forth for an uncontrolled environment.
The equipment complies with IC Radiation exposure limit set forth for uncontrolled environment. This equipment should be installed and operated with minimum distance 20 cm
between the radiator and your body.
/¶DSSDU
HLOFRQWLHQWGHVpPHWWHXUVUpFHSWHXUVH[HPSWpVGHOLFHQFHTXLVRQWFRQIRUPHVDX[IOX[566H[HPSWpVGHOLFHQFHG¶LQQRYDWLRQVFLHQFHVHWGpYHORSSHPHQWpFRQRPLTXH&DQDGD/HIRQFWLRQQHPHQW
HVWVRXPLVDX[GHX[FRQGLWLRQVVXLYDQWHVFHGLVSRVLWLIQHSHXWSDVFDXVHUG¶LQWHUIpUHQFHFHGLVSRVLWLIGRLWDFFHSWHUWRXWHLQWHUIpUHQFH\FRPSULVO¶LQWHUIpUHQFHTXLSHXWFDXVHUXQIRQFWLRQQHPHQW
LQGpVLUDEOHGXGLVSRVLWLI
&HWpTXLSHPHQWHVWFRQIRUPHDX[OLPLWHVG¶H[SRVLWLRQDXUD\RQQHPHQW,&566pWDEOLHVSRXUXQHQYLURQQHPHQWQRQFRQWU{Op
-ÏRVJQFNFOUFTUDPOGPSNFËMBMJNJUFEFYQPTJUJPOBVSBZPOOFNFOU*$ÏUBCMJFQPVSMFOWJSPOOFNFOUOPODPOUSÙMÏ$FUÏRVJQFNFOUEPJUÐUSFJOTUBMMÏFUVUJMJTÏBWFDVOFEJTUBODFNJOJNBMFEFDNFOUSFMFSBEJBUFVSFUWPUSFDPSQT
4.3 Copyright Notice
This document applies to multiple product models. Please refer to the actual item for the appearance and functionality.
The user shall bear any loss resulting from failure to follow the instructions in this document.
This document will be updated as needed in accordance with the laws and regulations of the relevant regions. For details, please refer to the product's printed materials, digital copy,
QR code, or official website. In case of any discrepancy between the printed and electronic versions, the electronic version shall prevail.
Our company reserves the right to modify any information in this document at any time. All changes will be incorporated into the latest version without prior notice.
This document may contain technical inaccuracies, inconsistencies with product features or operation, or printing errors. The company's final interpretation shall apply.
If the downloaded PDF file cannot be opened, please use the latest version of a commonly used PDF reader.
We (DESLOC) will not be liable for any of the following actions or circumstances.
The touch screen of this product is made of glass. If this product is dropped on a hard surface or subjected to a serious collision, the glass may break. To reduce the risk of being cut
by glass fragments or cracks, do not touch or attempt to remove broken glass.
This product contains small parts that may pose a choking hazard to children under the age of 3. Please keep children away from these small parts.
The product may not work normally due to your own behavior or the malicious act of a third party or a low probability of quality problems. Do not attempt to gain access to the house
through the window or break the door violently, which may lead to property damage or even personal damage. If you find this kind of situation, please put safety first and contact
DESLOC after-sales team at [email protected] or its designated staff through other channels in time. DESLOC will offer technical support for you as soon as possible and provide
you with a replacement if the lock cannot be repaired in time.
4.6 Product Disclaimer