User Operation Manual
MBZ-255
Thank you for using our product.
Please read this manual carefully before
turning on the device.
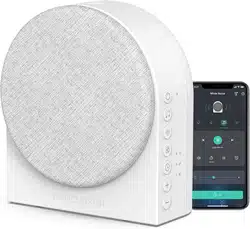
Smart White Noise Sound Machine
1
APP connection and usage method
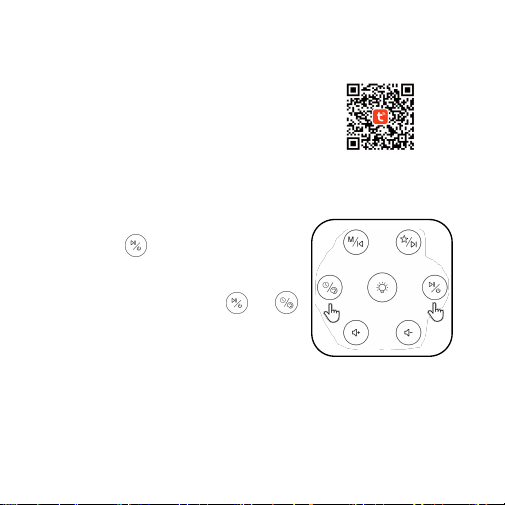
Step1:Download the app
Search for “TuYa” in the app store or scan the QR code on
the right to download and register. Ensure your phone has
Bluetooth and location enabled before proceeding.
Step2:Power on the device and enter network
configuration mode
(1) After receiving the device, long-press and hold
the power button
for 3 seconds to power it on.
Once powered on, the device will emit a notification
sound and the power indicator light will turn blue.
(2)After startup, long-press the buttons
and,
simultaneously to activate network configuration.
Once in network configuration mode, the device's
blue light will flash continuously.
2
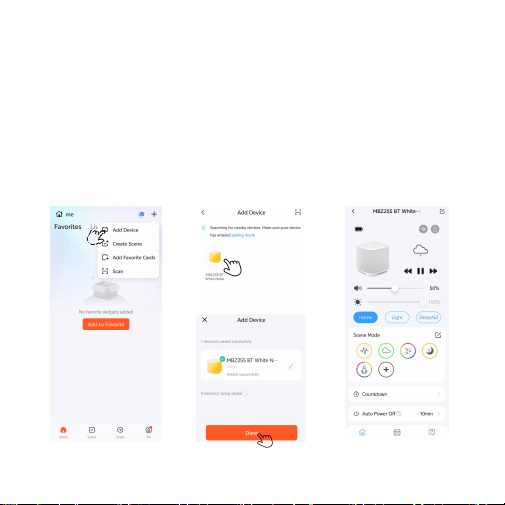
Step3:Operate APP
After opening the “TuYa” APP, click the “+” icon in the top-right corner to add a
device. Ensure the device is connected to the network and within Bluetooth range.
Step4:Add device
Click to add the device. After the connection is successful, the device will light up
with a green light and emit a notification sound, and the APP will jump to the
device's home page.
3
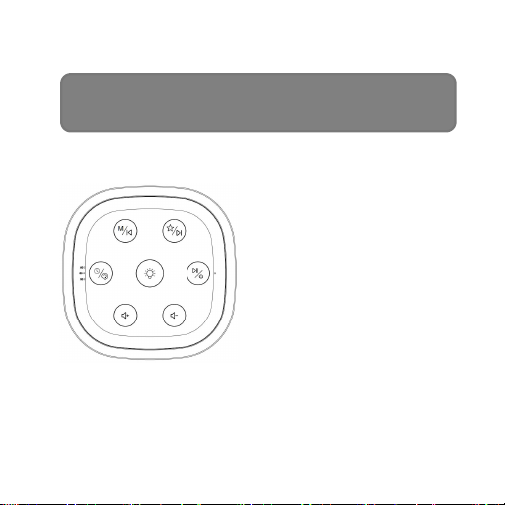
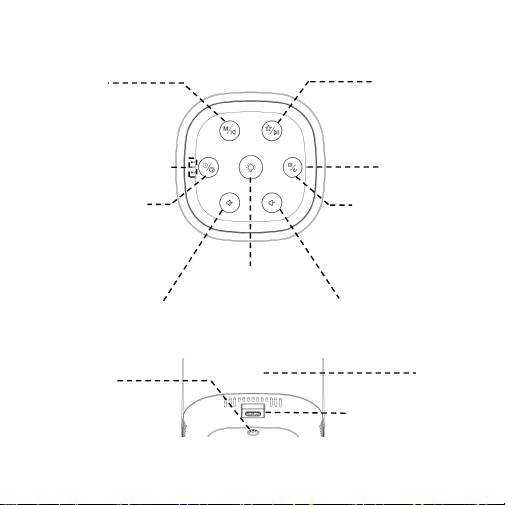
Product illustration description:
Scene Button
Short press: Next song
Long press: Switch
scene mode
Mode Button
Short press: Previous track
Long press: Switch Bluetooth
music/White noise mode
Light on/off button
Short press: Turn light on/off
Long press: Increase or decrease the light brightness
Volume Up Button
Volume Down Button
Power On/Off Button
Short press: Play/Pause
Long press: Power on/off
Power Light
Timing Indicator Light
Light Mode Button
Short press: Turn on/switch
light modes
Long press: Set timer to
30/60/90 Min
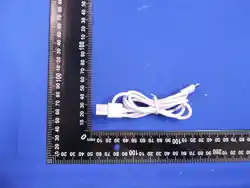
Type-C Charging Port
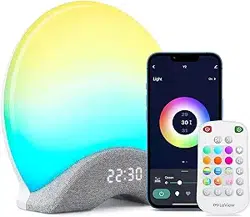
Lamp
Reset Hole
Use a mobile phone SIM
card ejector to gently poke
the hole to force shutdown
4
Product parameter:
Operating voltage: 3.7V
Dynamic current: less than 200 mA when off, less than 600 mA when on
Speaker: 4Ω3W
Adapter specifications: Input AC: 100-240V, 50/60Hz; Output DC: 5V,1A
Product dimensions: 84mm×84mm×81mm
Included accessories: Type-C charging cable*1, User manual*1
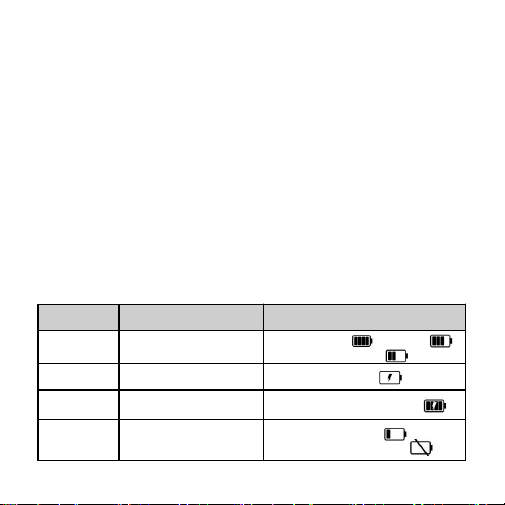
Battery and power indicator lights:
The power indicator and the app display allow you to easily check the device's
battery level.
Battery
status
Power light
APP battery status
Normal
power
Turn on: blue light
Fully charged Nearly full
Less power
Charging
Off: red light
On: blue light + red light
Charging
Full of
electricity
Green light
Fully charged and charging
Low power
Turn on: red light
flashing
Low power
Low power shutdown
5
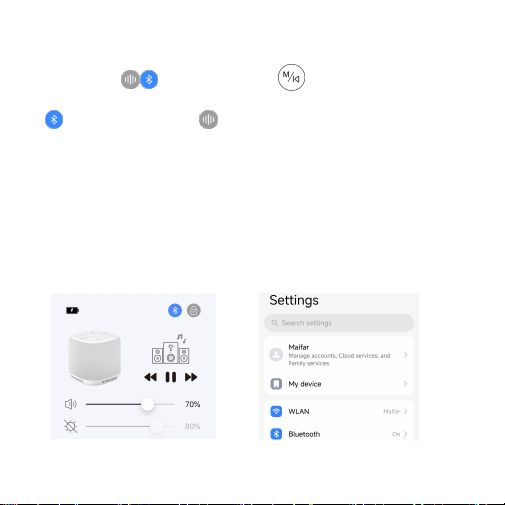
Mode switch:
Tap the app icon
or long-press the device
button to switch between
white noise and Bluetooth music mode.
(“ ” is Bluetooth Music mode,“ ” is White Noise mode):
(1) The white noise mode allows playback of 36 pre-installed sleep-inducing tracks.
(2) Bluetooth Music Mode supports mobile audio playback (scenario and itinerary
previews are not available).
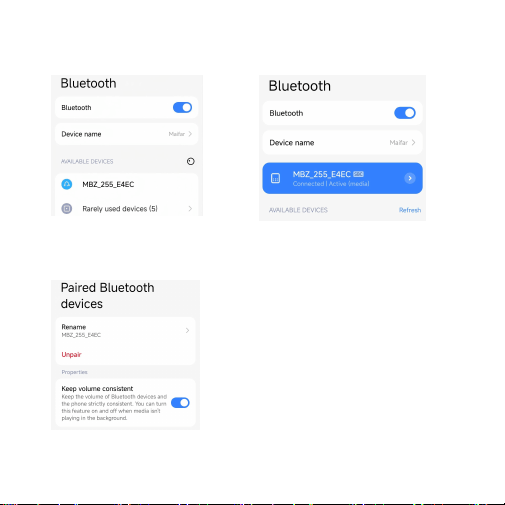
Bluetooth instructions for connecting your phone to the device (the device must be in
Bluetooth Music mode!):
Step1: Switch the device to Bluetooth Step 2: Open Settings on your phone
Music mode
6
Step3: Turn on Bluetooth and search Step4: Click the Bluetooth name
for the device “MBZ_255_****” to pair
Step5: Enter paired Bluetooth and Step6: Open the music app on your
confirm volume sync phone and play music (The above
image are for reference only)
7
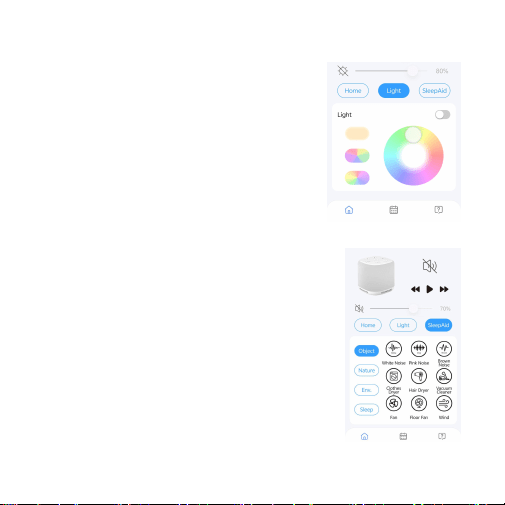
Light settings:
(1) You can customize colored lighting by selecting
your preferred colors from the color wheel. The left
panel features three options: Night Light, Breathing
Light, and Transforming Light.
(2) When playing local music via Bluetooth, the
breathing and changing lights will synchronize with the
music's rhythm. After the music stops, the lights will
revert to their normal breathing and changing patterns.
Sleep-Aid sound settings:
Playable sounds include object sounds, natural sounds,
ambient sounds, and sleep sounds. There are 36
sleep-inducing music tracks in total. Click the music icon
below to switch tracks, or swipe to adjust the volume.
Pairing these sleep-inducing music tracks helps you fall
asleep faster.
8
Function description:
1. Volume: To adjust volume during music playback, press and hold the volume
+/-buttons. When set to maximum or minimum volume, the power indicator light will
flash blue for 3 seconds.
2. Brightness adjustment: The device should be set to adjustable brightness when the
lights are on. When adjusted to the brightest or darkest level, the blue power indicator
light will flash for 3 seconds.
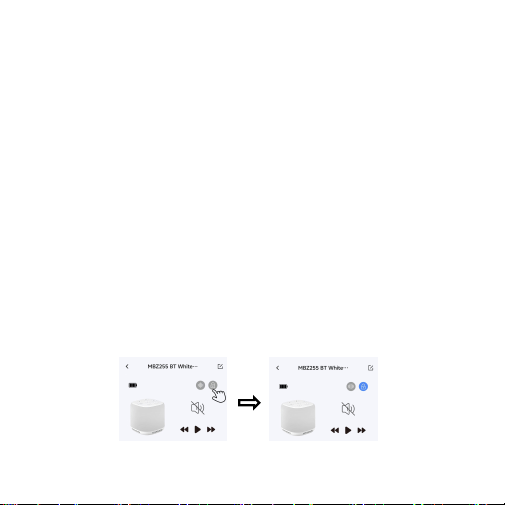
3. Child Lock: This feature locks device buttons to prevent accidental operation by
children.
(1) Activation: The Child Lock feature requires activation through the app. When
enabled, pressing any button on the device will trigger the timer indicator to flash three
times, confirming the lock is active. All other button functions will be disabled.
(2) Shutdown: You can either close the child lock directly through the app or press and
hold the power button or any other button on the device for 3 seconds to turn it off. After
shutdown, the device's timer indicator will light up from bottom to top, confirming the
child lock is disabled, and the device will resume normal operation.
The child lock is off The child lock is on
9
4. Memory function: Supports battery-free memory, saving the last settings of
scene mode, music, and lighting upon power-on.
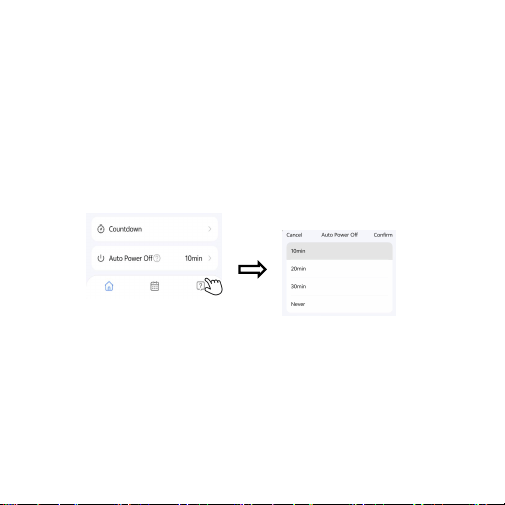
5. Smart Power Saving: To prevent power waste from forgotten shutdown, the device
supports smart power saving mode.
(1) The device will automatically shut down if no operation is performed within the set
time.The device defaults to a 10-minute idle time. The app allows you to set the
shutdown time, which can be 10,20, or 30 minutes, or set to never auto-shutdown.
(2) When the device is playing music, turning on lights, or starting a countdown, it is
considered in use and will not auto-shutdown.
10
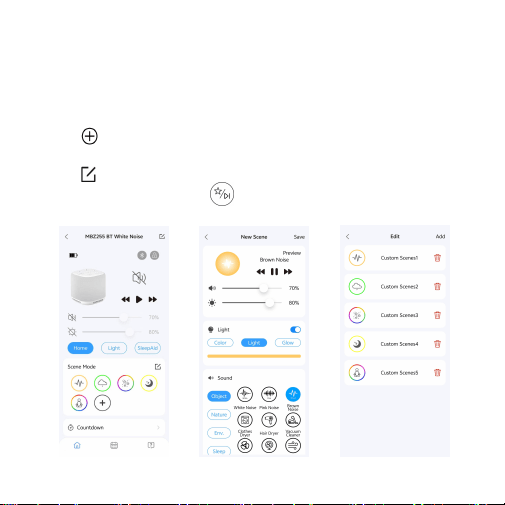
Custom scenario mode:
Save your favorite lighting and music as a scene for instant access with one click,
eliminating manual setup.
(1) The device features 5 preset scenarios with up to 8 customizable scenarios.
(2) Click
to quickly add or edit scenarios. You can set lighting and brightness,
sleep-inducing music, and volume (you can preview the lighting and music effects).
(3) Click
to enter the editing interface to add, modify, or delete scenarios.
(4) Long press and hold the button
on the device to switch to saved scenarios.
After each operation, the device will play the scenarios in the order specified by the APP.
11
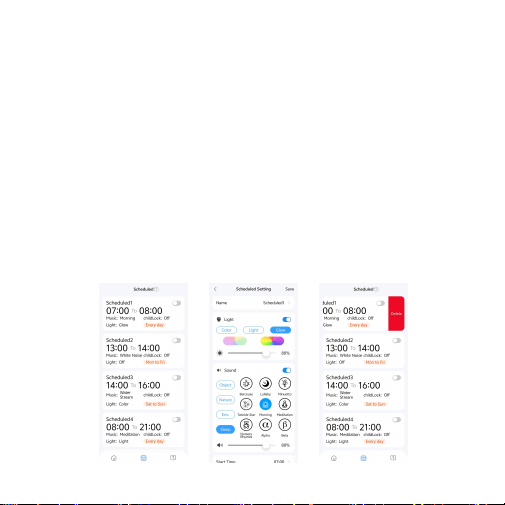
Schedule:
A schedule is an automation function. With pre-set lights and music, the device will
automatically turn on and run at the specified time, and automatically turn off when the
end time is reached.
(1)In a schedule, you can set the light and its brightness, sleep-aiding music, volume
level, time range of the schedule, repeat cycle, and child lock switch (supports
previewing the matching effect of the set light and music).
(2)In the schedule interface, you can add up to 6 schedules. The button on the right is
on when lit and off when dimmed gray. You can delete a schedule by sliding the screen
to the left.
(3)If a schedule has been activated, modifying or deleting the activated schedule will
automatically turn off the schedule.
12
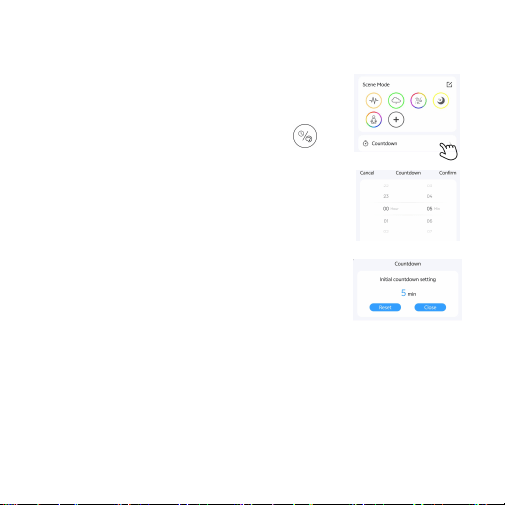
Countdown:
The device provides two countdown setting methods to meet
different needs of quick timing and precise timing. After the
countdown ends, the device will automatically shut down.
(1)Quick Timing: Long-press the timer mode button
on the device to set a timer for 30/60/90 minutes.
(2)Free Timing: On the APP's countdown module, you can
freely set any duration within 23 hours and 59 minutes.
(3)The device indicates the current timing status through the
timer indicator:
①From bottom to top, the timer indicators represent
30-minute, 60-minute, and 90-minute timers respectively.
②When the timing is not 30/60/90 minutes, all three
indicators will light up simultaneously.
③When all timer indicators are off, the device is in the infinite loop playback mode.
(4)Modify/Close Timing: After setting the time, you can click to modify or close the
countdown in the APP's countdown interface. After closing, the device's timer indicator
will turn off.

13
Notes:
Do not disassemble or repair the product to avoid damage.
Keep the product away from water to prevent damage caused by
flooding.
Keep the product away from high temperatures and fire sources.
Do not use corrosive detergents to wipe or clean the product.
Wipe the surface with a soft damp towel.
After-Sales Service:
If you have any problems with the product, please contact the seller.
One-year warranty period, starting from the invoice date.
The following situations are not covered by the warranty:
(1)Damage caused by improper operation, storage, or maintenance.
(2)The invoice model does not match the product model or the invoice
has been altered.
(3)Product damage caused by force majeure.
Our customer service center will serve you wholeheartedly.

NOTE: This equipment has been tested and found to comply with the limits for a Class B digital device,
pursuant to part 15 of the FCC Rules. These limits are designed to provide reasonable protection against
harmful interference in a residential installation. This equipment generates, uses and can radiate radio
frequency energy and, if not installed and used in accordance with the instructions, may cause harmful
interference to radio communications. However, there is no guarantee that interference will not occur in a
particular installation. If this equipment does cause harmful interference to radio or television reception,
which can be determined by turning the equipment off and on, the user is encouraged to try to correct the
interference by one or more of the following measures:
- Reorient or relocate the receiving antenna.
- Increase the separation between the equipment and receiver.
-Connect the equipment into an outlet on a circuit different from that to which the receiver is connected.
-Consult the dealer or an experienced radio/TV technician for help.
Changes or modifications not expressly approved by the party responsible for compliance could void the
user's authority to operate the equipment.
This device complies with Part 15 of the FCC Rules. Operation is subject to the following two conditions:
(1) this device may not cause harmful interference, and (2) this device must accept any interference
received, including interference that may cause undesired operation.
FCC RF Exposure Warning Statement:
This equipment complies with FCC radiation exposure limits set forth for an uncontrolled environment. T
his equipment can be used in portable exposure conditions.