1
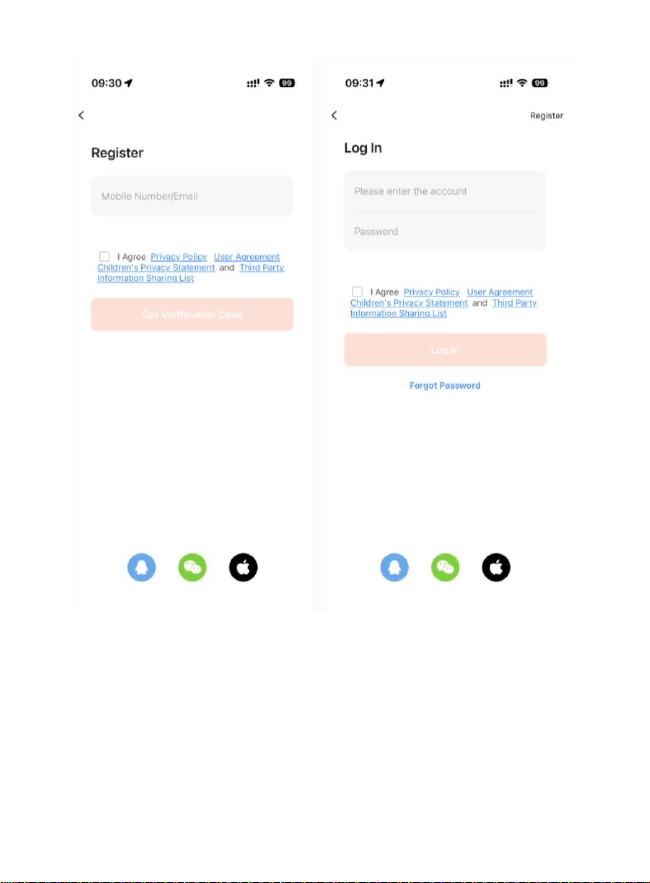
1、Registration and Login
(1)
No account yet: Select Register or log in via SMS verification code.
(2)
Tap [Create New Account] to enter the account registration page, then follow the
prompts to obtain the SMS verification code and set your password.
(3)
Existing account: Tap [Use Existing Account] to log in to the App. Password, verification
code, social media account, and other login methods are supported.
2
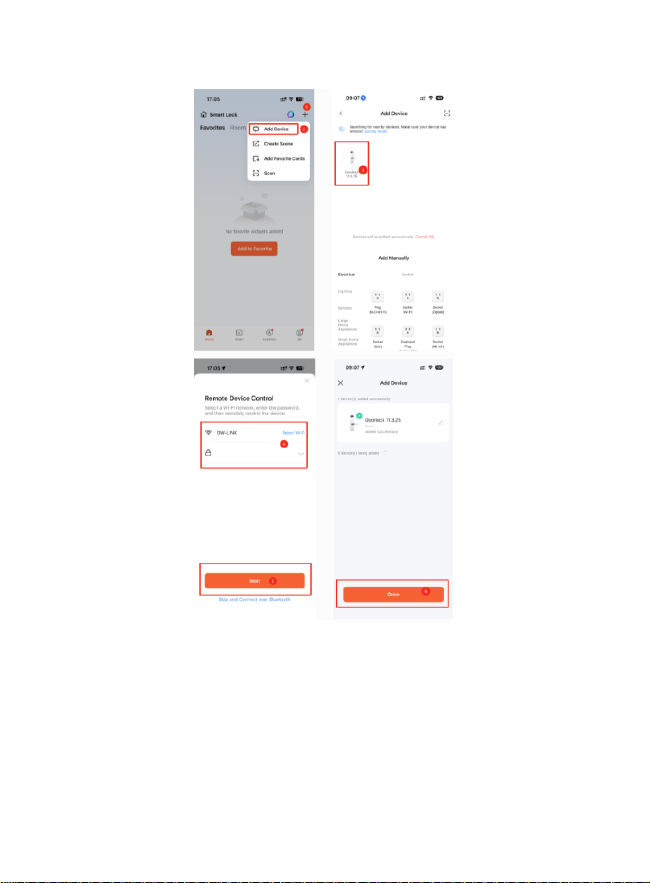
2、Add Wi-Fi Door Lock (Be sure to select a 2.4G network)
(1)
Tap the [Add Device] icon on the App's home page.
(2)
Touch the numeric keypad to wake up the door lock. Wait for your phone to scan the
device, select [Add], then tap the [+] icon to add the device.
(3)
Wait for the device to be added. The appearance of the smart lock interface
indicates a successful addition.
3
3、Door Lock Home Page
(1)
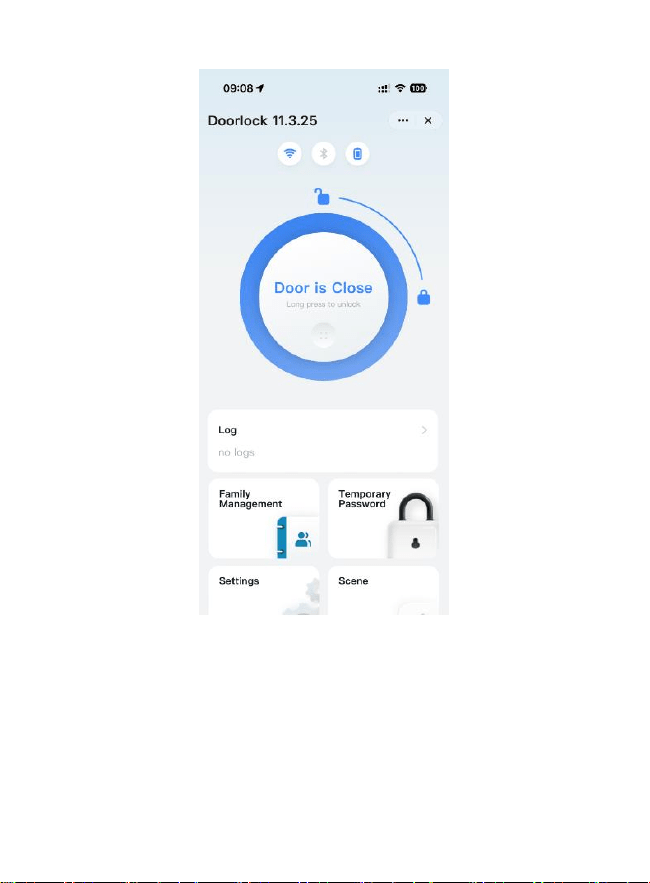
The top of the home page displays the device name, lock/unlock button and current
battery level, while the lower part includes [Logs], [Member Management],
[Temporary Password], [Smart Linkage], [Settings] and more.
(2)
After connecting to the Wi-Fi door lock, you can long-press the [🔒] icon to
unlock the door directly, and long-press the [🔒] icon again to lock it. (After
the door lock is successfully added, there may be a slight delay when
controlling the door lock due to network environment factors.)
4
4、Member Management — Admin Addition
(1)
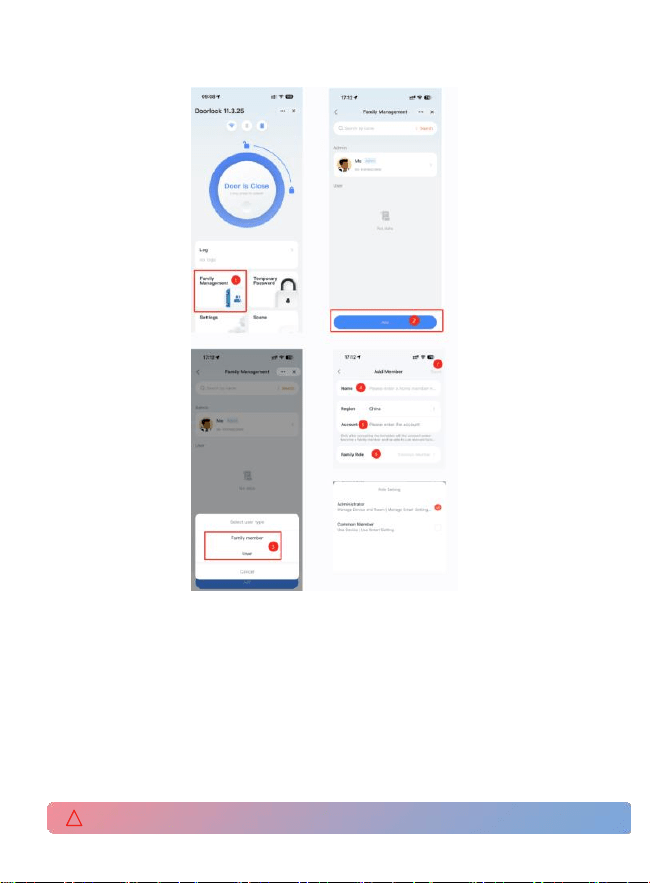
Go to the [Family Management] entry, tap the [ADD] icon below, enter the
member's name and Tuya account, select the permission, and then tap [Save]
to add an administrator. (The account used to add an administrator must be
a registered Tuya account; otherwise, the addition will fail.)。
(2)
(2) After the added account opens the Tuya Smart App, it will receive an invitation
message. Upon accepting the invitation, the account will gain management
permissions for the device.
!
All key information added through this account entry will be granted administrator permissions by default.
5
5、Member Management
—Adding Regular Members
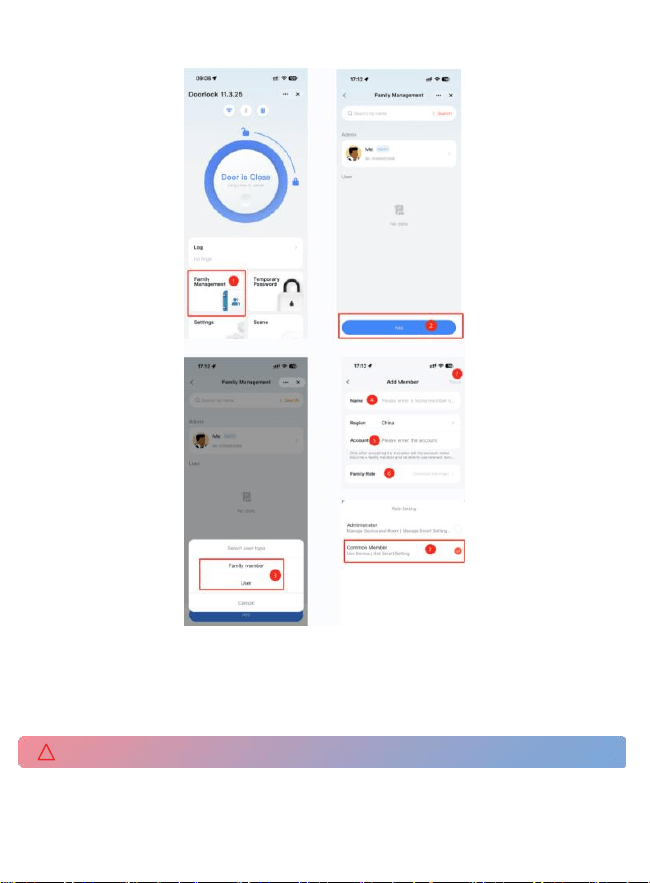
Go to the [Family Management] entry, tap the [ADD]icon below, enter the
member's name, and then tap [Save] to add a regular member.
!
All key information added through this account entry will be granted regular user permissions by default.
6
6、Password Management
(1)
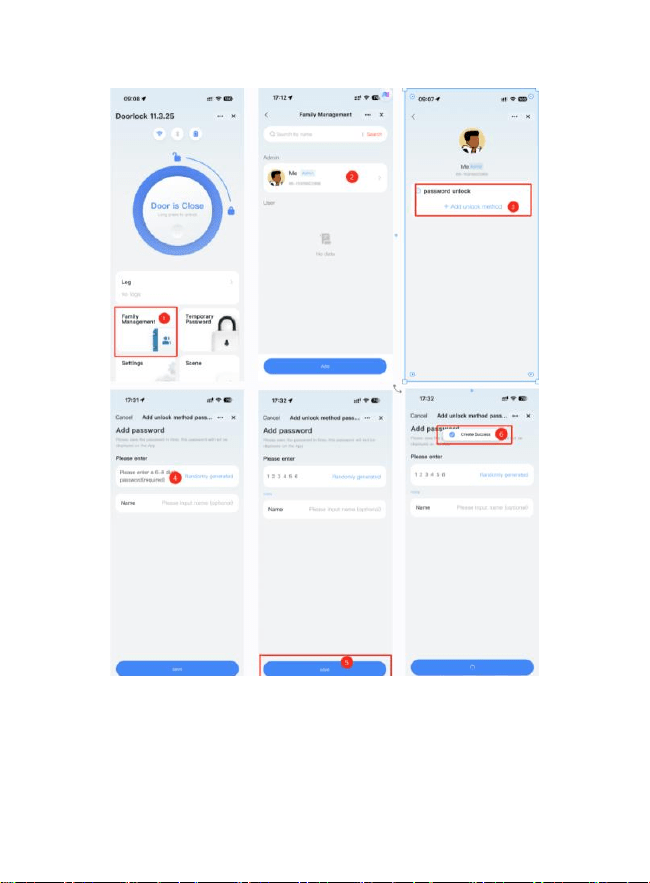
Go to the [Family Management] entry on the home page and select the
[Family Member] account with the corresponding permission (the
associated admin will have administrator privileges, while the associated
regular member will only have regular user privileges).
(2)
Tap [Add Password] and enter a 6–8 digit password.
7
7、Temporary Password Management
—Create
(1)
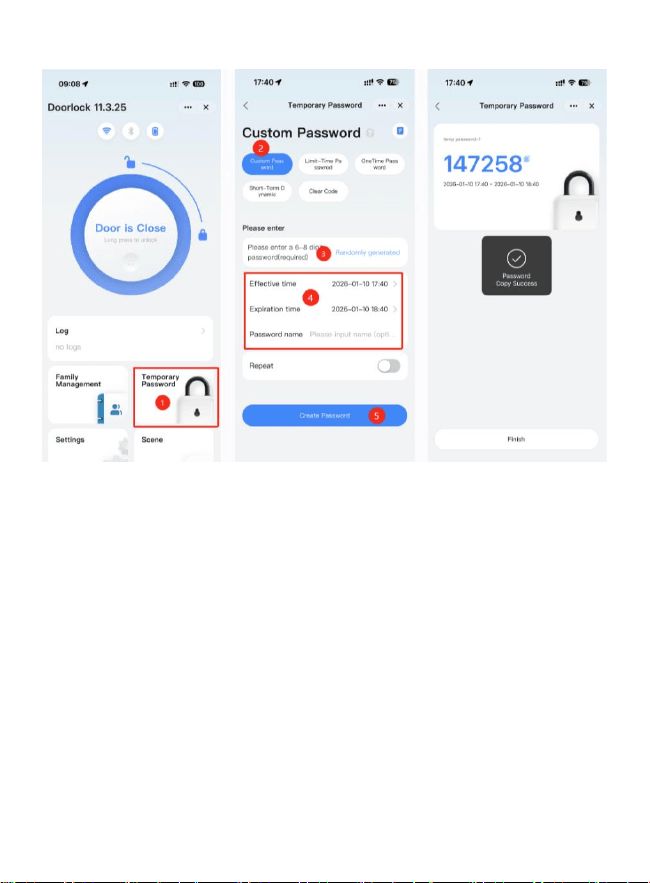
On the App homepage, tap to enter [Temporary Password].
(2)
Enter the temporary password creation interface, select the
password type and enter a 6–8 digit password.
(3)
Select the effective time and expiration time, and enter the password name.
8
8、Temporary Password Management
—Delete
(1)
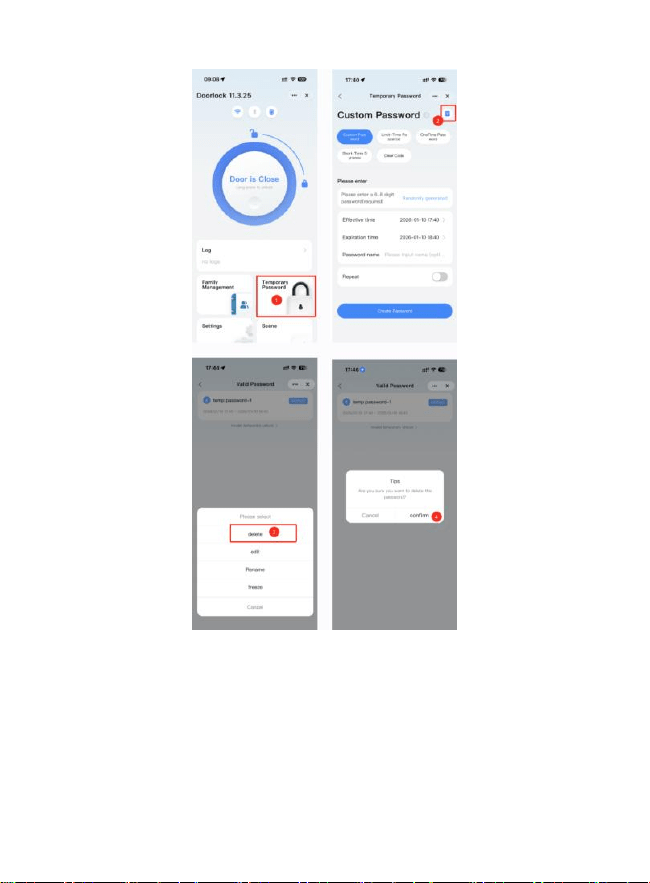
On the App homepage, tap the [Temporary Password] icon
(2)
Enter the [Temporary Unlocking] interface, select [Records] in the upper right
corner to access the [Temporary Password] records created in history..
(3)
Select the [Delete] option below, then tap [Confirm] to delete the [Temporary Password].
9
9、Delete Family Members
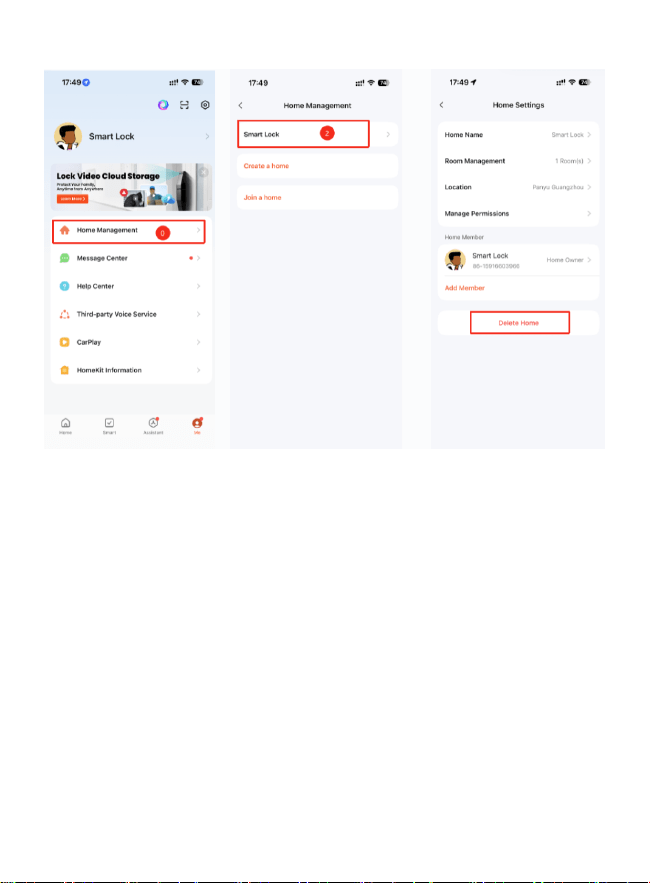
Tap [My] in the bottom right corner of the App → [Family Management], select the
family to delete added family members or modify their access permissions.
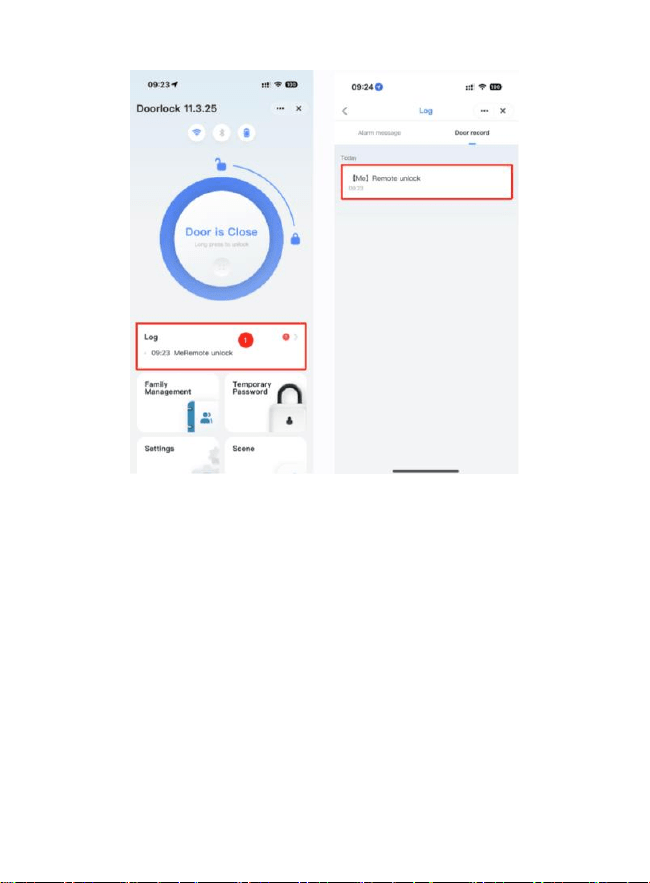
10
10、Door Opening Records and Device Alerts
Tap the [LOG] icon to view information such as door opening records and
access attempt error alerts.
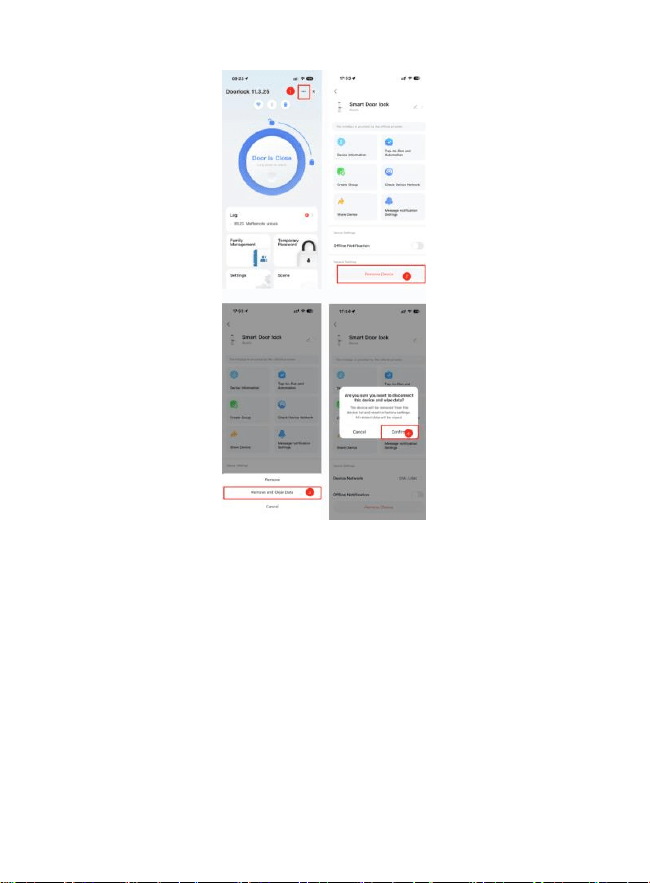
11
11、Restore Factory Settings
Tap the […] icon in the upper right corner of the home page, find [Remove Device]
after entering the interface, and select [Unbind and Clear Data]
(1)
When the door lock is in the networked state, performing the factory reset
operation will clear all local door opening methods of the door lock, restore
the door lock to its factory default state, and allow other users to re-pair
with the door lock via the App.
(2)
When the door lock is in the offline state, performing the factory reset
operation on the door lock via the mobile App will not take effect immediately.
All local door opening methods of the door lock will be cleared, the door lock
will be restored to its factory default state, and other users can re-pair with
the door lock via the App only after the door lock reconnects to the network.
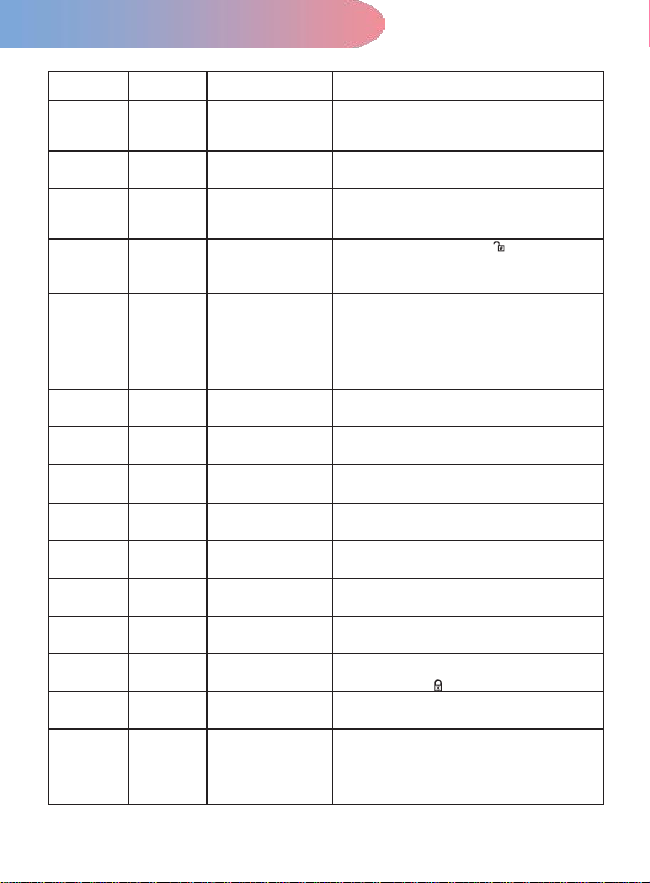
12
Product Parameters
Number
Function
Substance
Remark
1
Unlocking
Methods
Password + Tuya App +
Physical Key
2
Total Number
of Users
100 Groups
Supports both administrators and regular users
3
Password
100 Groups
Supports 6–8 digit passwords
4
Dummy
Password
Length
26 digit
5
Low Voltage
Alarm
4.8±0.2V
When the voltage drops below 4.8V, the indicator
light flashes red rapidly 5 times continuously and
prompts "Low battery. Please replace the battery".
The lock can still be unlocked about 100 times. When
the voltage drops below 4.5V, the door lock will stop
unlocking.
6
Quiescent
Current
≤200uA
7
Dynamic
Current
≤250mA
8
Supply
Voltage
6.0±0.3V
Voltage of a new battery when fully charged
9
Emergency
Power Supply
5V (DC)
USB Type-C Power Supply Port
10
Operating
Temperature
-25℃~+65℃
11
Operating
Humidity
20%~90%RH
12
Voice
Navigation
Buzzer
13
False Alarm
Support
After 5 consecutive failed attempts, the system
will be locked for 1 minute.
14
Quick Locking
Quick Lock Outside
the Door
The [*] key on the panel can be used as a
lock/return key.
15
Wired Door
Contact
(Only available
for optional
products)
After installing the door contact, plug in the power
cord and enable the door contact function in
the system. The door contact sensor will
trigger an automatic lock immediately when
the door is closed.

13
FCC Warning:
This equipment has been tested and found to comply with the limits for a
Class B digital device, pursuant to part 15 of the FCC Rules. These limits are
designed to provide reasonable protection against harmful interference in a
residential installation. This equipment generates, uses and can radiate radio
frequency energy and, if not installed and used in accordance with the
instructions, may cause harmful interference to radio communications.
However, there is no guarantee that interference will not occur in a particular
installation. If this equipment does cause harmful interference to radio or
television reception, which can be determined by turning the equipment off
and on, the user is encouraged to try to correct the interference by one or
more of the following measures:
• Reorient or relocate the receiving antenna.
• Increase the separation between the equipment and receiver.
• Connect the equipment into an outlet on a circuit different from that to
which the receiver is connected.
• Consult the dealer or an experienced radio/TV technician for help.
Caution: Any changes or modifications to this device not explicitly approved
by manufacturer could void your authority to operate this equipment.
This device complies with part 15 of the FCC Rules. Operation is subject to
the following two conditions: (1) This device may not cause harmful
interference, and (2) this device must accept any interference received,
including interference that may cause undesired operation.
The device has been evaluated to meet general RF exposure requirement.
This equipment complies with FCC radiation exposure limits set forth for an
uncontrolled environment.
This equipment should be installed and operated with minimum distance 20cm
between the radiator & your body.

型
号:DS05(涂鸦 WiFi 款)
版 本 号:1.0
修订日期:2025.02.24
原 产 地:中国 · 中山
2025 年 2 月发行
中国印刷 © 版权所有