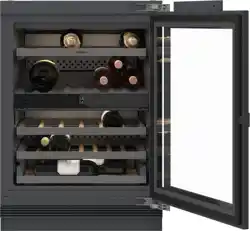

en Table of contents
You can find additional information and explanations online.
Scan the QR code on the title page.
Table of contentsTable of contents
1 Safety ............................................ 3
1.1 Definition of the signal
words ............................................. 3
1.2 General information .................... 3
1.3 Intended use ................................ 3
1.4 Restriction on user group .......... 4
1.5 Safe transport .............................. 4
1.6 Safe installation ........................... 4
1.7 Safe use ........................................ 5
1.8 Damaged appliance ................... 6
2 Preventing material damage ...... 7
3 Environmental protection and
saving energy .............................. 7
3.1 Disposing of packaging ............. 7
3.2 Saving energy .............................. 7
4 Installation and connection ........ 8
4.1 Scope of delivery ........................ 8
4.2 Criteria for the installation loc-
ation ............................................... 8
4.3 Installing the appliance .............. 8
4.4 Preparing the appliance for
the first time ................................. 8
4.5 Connecting the appliance to
the electricity supply ................... 8
5 Familiarising yourself with
your appliance ............................. 9
5.1 Appliance ...................................... 9
5.2 Control panel ............................. 10
6 Features ..................................... 10
6.1 Extendable bottle shelf ............ 10
6.2 Odour filter ................................. 11
7 Basic operation ......................... 11
7.1 Switching on the appliance ..... 11
7.2 Operating tips ............................ 11
7.3 Switching off the appliance ..... 11
7.4 Setting the temperature of the
wine storage compartment ..... 11
7.5 Temperature display bright-
ness ............................................. 12
7.6 Keylock ....................................... 12
7.7 Air humidity ................................ 12
8 Basic settings ............................ 12
8.1 Changing the basic settings ... 12
8.2 Overview of the basic set-
tings ............................................. 13
9 Additional functions ................. 14
9.1 Door opening aid ...................... 14
9.2 Interior lighting ........................... 14
9.3 Presentation mode ................... 14
9.4 Rest mode .................................. 15
10 Alarm ........................................ 15
10.1 Door alarm ............................... 15
10.2 Temperature alarm ................. 15
11 Wine storage compartment ... 15
11.1 Arranging the maximum num-
ber of standard bottles .......... 15
11.2 Tips for storing wine ............... 16
11.3 Drinking temperatures ........... 16
12 Defrosting ................................ 16
12.1 Defrosting in the wine stor-
age compartment ................... 16
13 Cleaning and servicing ........... 17
13.1 Care instructions for stainless
steel surfaces .......................... 17
13.2 Preparing the appliance for
cleaning .................................... 17
13.3 Cleaning the appliance .......... 17
13.4 Cleaning the condensation
channel and drainage hole ... 18
13.5 Removing the fittings ............. 18
13.6 Replacing the odour filter ...... 18
14 Troubleshooting ...................... 19
15 Storage and disposal .............. 21
2
Safety en
15.1 Taking the appliance out of
operation .................................. 21
15.2 Disposing of old appliance ... 21
16 Customer Service .................... 21
16.1 Product number (E-Nr.) and
production number (FD) ........ 22
17 Technical data ......................... 22
Safety 1 Safety
Observe the following safety instructions.
1.1 Definition of the signal words
This is where you can find explanations for the safety signal words
used in this manual.
WARNING
This indicates that death or serious injuries may occur as a result
of non-observance of this warning.
CAUTION
This indicates that minor or moderate injuries may occur as a res-
ult of non-observance of this warning.
ATTENTION
This indicates that damage to the appliance or other material
damage may occur as a result of non-compliance with this warn-
ing.
Note: This alerts you to important information.
1.2 General information
¡ Read this instruction manual carefully.
¡ Keep the instruction manual and the product information safe
for future reference or for the next owner.
¡ Do not connect the appliance if it has been damaged in transit.
1.3 Intended use
This appliance is only intended to be fitted under a counter.
Only use this appliance:
¡ For storing wine.
¡ in private households and in enclosed spaces in a domestic en-
vironment.
3
en Safety
¡ Up to an altitude of 1500m above sea level.
1.4 Restriction on user group
This appliance may be used by children aged 8 or over and by
people who have reduced physical, sensory or mental abilities or
inadequate experience and/or knowledge, provided that they are
supervised or have been instructed on how to use the appliance
safely and have understood the resulting dangers.
Do not let children play with the appliance.
Cleaning and user maintenance must not be performed by chil-
dren unless they are being supervised.
Children above the age of three years old and younger than eight
years old may load and unload the refrigerating appliance.
1.5 Safe transport
WARNING‒Risk of injury!
The heavy weight of the appliance may result in injury when lifted.
Do not lift the appliance on your own.
1.6 Safe installation
WARNING‒Risk of electric shock!
Incorrect installation is dangerous.
Connect and operate the appliance only in accordance with the
specifications on the rating plate.
Connect the appliance to a power supply with alternating cur-
rent only via a properly installed socket with earthing.
The protective conductor system of the domestic electrical in-
stallation must be properly installed.
Never equip the appliance with an external switching device,
e.g. a timer or remote control.
When the appliance is installed, the mains plug of the power
cord must be freely accessible. If free access is not possible, an
isolating switch must be integrated into the permanent electrical
installation according to the installation regulations.
When installing the appliance, check that the power cable is not
trapped or damaged.
If the insulation of the power cord is damaged, this is dangerous.
Never let the power cord come into contact with heat sources.
4

Safety en
WARNING‒Risk of explosion!
If the appliance's ventilation openings are closed off, a leak in the
refrigeration circuit may result in a flammable mixture of gas and
air.
Keep ventilation openings in the appliance casing or in the in-
tegrated casing clear of obstruction.
WARNING‒Risk of fire!
It is dangerous to use an extended power cord and non-approved
adapters.
Do not use extension cables or multiple socket strips.
Only use adapters and power cords approved by the manufac-
turer.
If the power cord is too short and a longer one is not available,
please contact an electrician to have the domestic installation
adapted.
Portable multiple socket strips or portable power supply units may
overheat and cause a fire.
Do not place portable multiple socket strips or power supply
units on the back of the appliance.
1.7 Safe use
WARNING‒Risk of electric shock!
An ingress of moisture can cause an electric shock.
Only use the appliance in enclosed spaces.
Never expose the appliance to intense heat or humidity.
Do not use steam- or high-pressure cleaners to clean the appli-
ance.
WARNING‒Risk of suffocation!
Children may put packaging material over their heads or wrap
themselves up in it and suffocate.
Keep packaging material away from children.
Do not let children play with packaging material.
Children may breathe in or swallow small parts, causing them to
suffocate.
Keep small parts away from children.
Do not let children play with small parts.
5
en Safety
WARNING‒Risk of explosion!
If the cooling circuit is damaged, flammable refrigerant may es-
cape and explode.
To accelerate the defrosting process, do not use any other
mechanical devices or means other than those recommended
by the manufacturer.
Products which contain flammable propellants and explosive sub-
stances may explode, e.g. spray cans.
Do not store products which contain flammable propellants (e.g.
spray cans) or explosive substances in the appliance.
WARNING‒Risk of fire!
Electrical devices within the appliance may cause a fire, e.g. heat-
ers or electric ice makers.
Do not operate electrical devices within the appliance.
WARNING‒Risk of injury!
Injury to the eyes caused by escaping flammable refrigerant and
hazardous gases.
Do not damage the tubes of the refrigerant circuit or the insula-
tion.
1.8 Damaged appliance
WARNING‒Risk of electric shock!
If the appliance or the power cord is damaged, this is dangerous.
Never operate a damaged appliance.
Never pull on the power cord to unplug the appliance. Always
unplug the appliance at the mains.
If the appliance or the power cord is damaged, immediately un-
plug the power cord or switch off the fuse in the fuse box.
Call customer service.
Page21
Improper repairs are dangerous.
Repairs to the appliance should only be carried out by trained
specialist staff.
Only use genuine spare parts when repairing the appliance.
If the power cord or the appliance power cable of this appliance
is damaged, it must be replaced with a special power cord or
special appliance power cable, which is available from the man-
ufacturer or its Customer Service.
6
Preventing material damage en
WARNING‒Risk of fire!
If the tubes are damaged, flammable refrigerant and harmful
gases may escape and ignite.
Keep naked flames and ignition sources away from the appli-
ance.
Ventilate the room.
Switch off the appliance.
Unplug the mains plug from the mains or switch off the circuit
breaker in the fuse box.
Call customer service.
Page21
Preventing material damage2 Preventing material
damage
ATTENTION
Using the base, runners or appliance
doors as a seat surface or climbing
surface may damage the appliance.
Do not stand or support yourself
on the base, runners or doors.
Contamination with oil or fat may
cause plastic parts and door seals to
become porous.
Keep plastic parts and door seals
free of oil and grease.
If you clean fittings and accessories
in the dishwasher, this may cause
them to become deformed or discol-
our.
Never clean fittings and accessory
in the dishwasher.
Environmental protection and saving energy3 Environmental protec-
tion and saving energy
3.1 Disposing of packaging
The packaging materials are environ-
mentally compatible and can be re-
cycled.
Sort the individual components by
type and dispose of them separ-
ately.
3.2 Saving energy
If you follow these instructions, your
appliance will use less power.
Selecting the installation location
Keep the appliance out of direct
sunlight.
Install the appliance as far away as
possible from heating elements,
cookers and other heat sources:
– Maintain a 30mm clearance to
electric or gas cookers.
– Maintain a 300mm clearance to
oil or solid-fuel cookers.
Never cover or block the exterior
ventilation grilles.
Saving energy during use
Note: The arrangement of the fittings
does not affect the energy consump-
tion of the appliance.
Open the appliance only briefly
and then close it carefully.
Never cover or block the interior
ventilation openings or the exterior
ventilation grilles.
7
en Installation and connection
Installation and connection4 Installation and con-
nection
4.1 Scope of delivery
After unpacking all parts, check for
any transport damage and for com-
pleteness of delivery.
If you have any complaints, contact
your dealer or our after-sales service
Page21
.
The delivery consists of the following:
Built-under appliance
Equipment and accessories
1
Installation material
Installation instructions
User manual
Customer service directory
Warranty enclosure
2
Energy label
Information on energy consump-
tion and noises
4.2 Criteria for the installation
location
WARNING
Risk of explosion!
If the appliance is in a space that is
too small, a leak in the refrigeration
circuit may result in a flammable mix-
ture of gas and air.
Only install the appliance in a
space with a volume of at least
1m
3
per 8g refrigerant. The
volume of refrigerant is indicated
on the rating plate.
"Appliance", Fig.
1
/
Page9
The weight of the appliance ex works
may be up to 50kg depending on
the model.
The subfloor must be sufficiently
stable to bear the weight of the appli-
ance.
This refrigerator is intended for use at
ambient temperatures of 10°C to
38°C.
The appliance is fully functional within
the permitted room temperature.
If the appliance is operated at colder
room temperatures, the appliance will
not be damaged up to a room tem-
perature of 5°C.
4.3 Installing the appliance
Install the appliance in accordance
with the enclosed installation in-
structions.
4.4 Preparing the appliance for
the first time
1.
Remove the informative material.
2.
Remove the protective foil and
transit bolts, e.g. remove the ad-
hesive strips and carton.
3.
Clean the appliance for the first
time.
Page17
4.5 Connecting the appliance
to the electricity supply
1.
Insert the appliance plug of the
power cord into the appliance.
2.
Insert the mains plug of the appli-
ance's power cable in a socket
nearby.
The connection data of the appli-
ance can be found on the rating
plate.
"Appliance", Fig.
1
/
Page9
1
Depending on the appliance specifications
2
Not in all countries
8
Familiarising yourself with your appliance en
3.
Check the mains plug is inserted
properly.
The appliance is now ready for
use.
Familiarising yourself with your appliance5 Familiarising yourself with your appliance
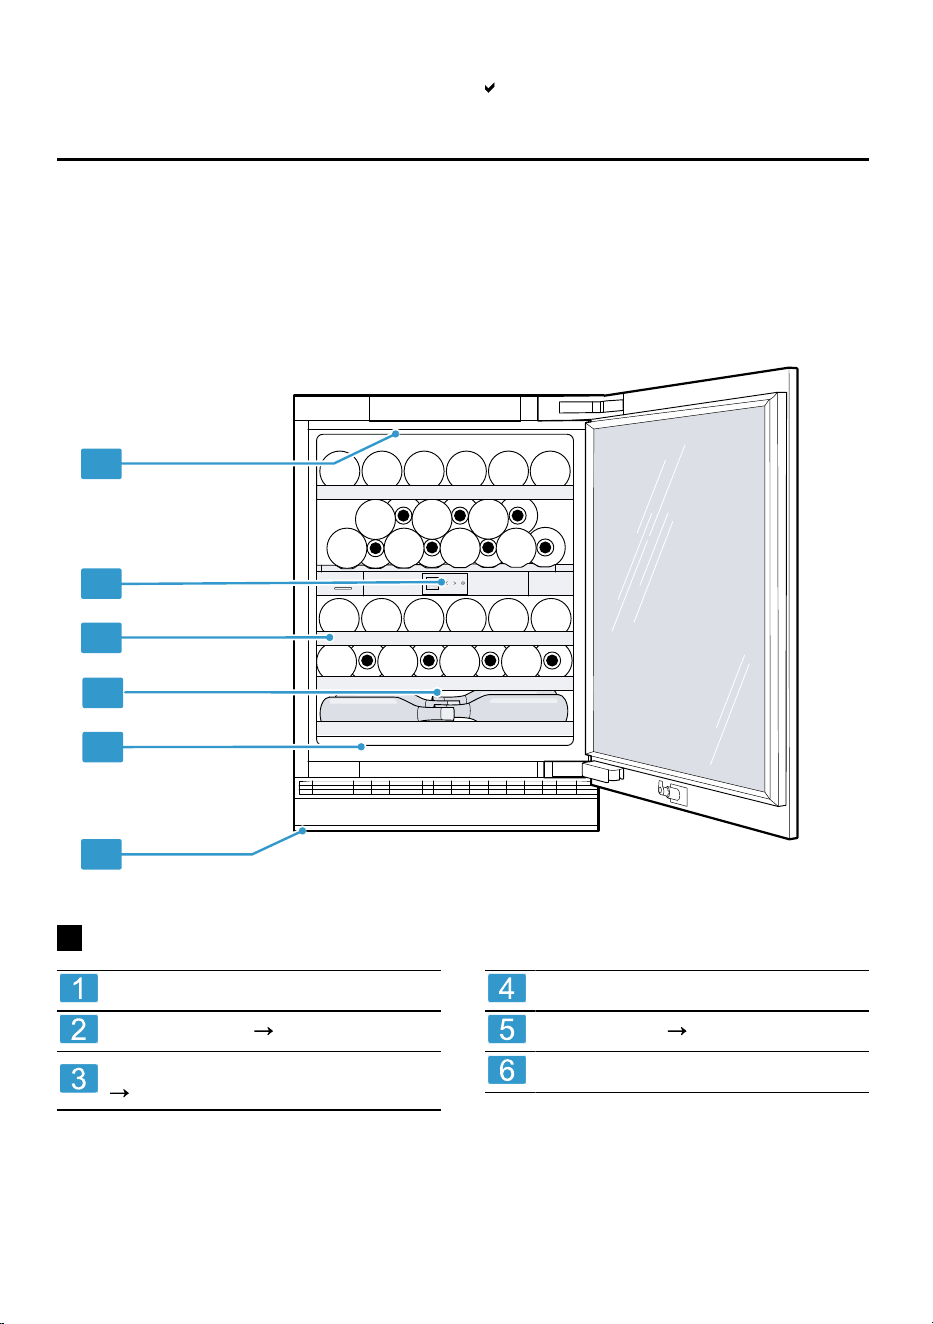
5.1 Appliance
You can find an overview of the parts of your appliance here.
1
2
3
6
5
4
1
Interior lighting
Control panel
Page10
Extendable bottle shelf
Page10
Condensation outlet
Rating plate
Page22
Screw foot
Note: Deviations between your appli-
ance and the diagrams may differ
with regard to their features and size.
9
en Features
5.2 Control panel
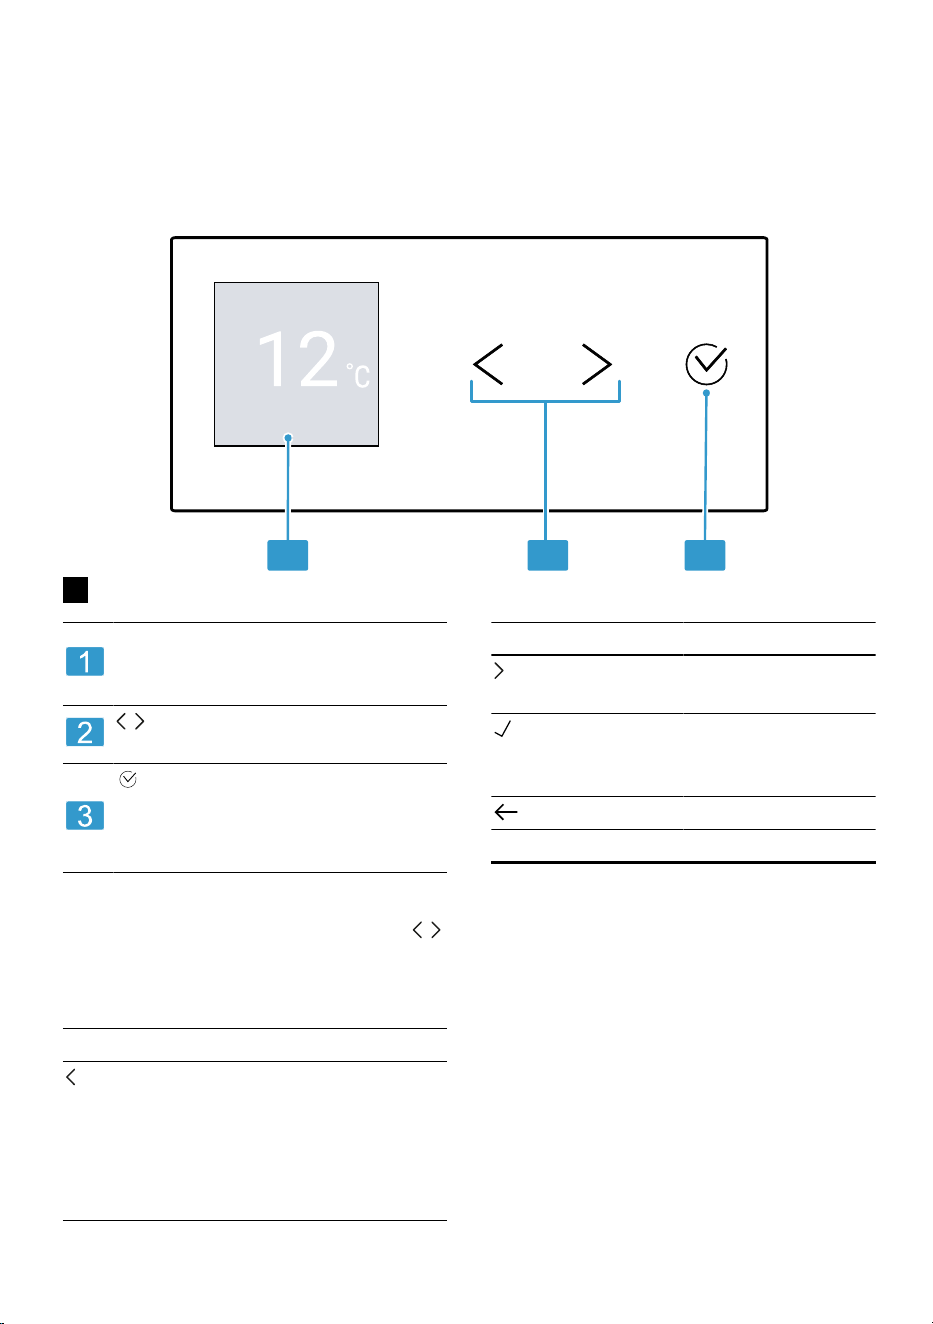
You can use the control panel to configure all functions of your appliance and
to obtain information about the operating status.
1 2 3
2
Displays the set temperature for
the refrigerator compartment
in°C.
/ is used to navigate through
the menu.
is used to select a compart-
ment in order to change the
temperature or switch on certain
additional functions.
Operating logic
You activate settings by using the /
buttons to navigate. The activated
settings are highlighted in white on
the display.
Symbol Description
Navigate to the
left.
Press and hold for
3seconds to
jump to the parent
menu.
Symbol Description
Navigate to the
right
Confirm, activate
or deactivate the
function
Navigate back
Features6 Features
The features of your appliance de-
pend on the model.
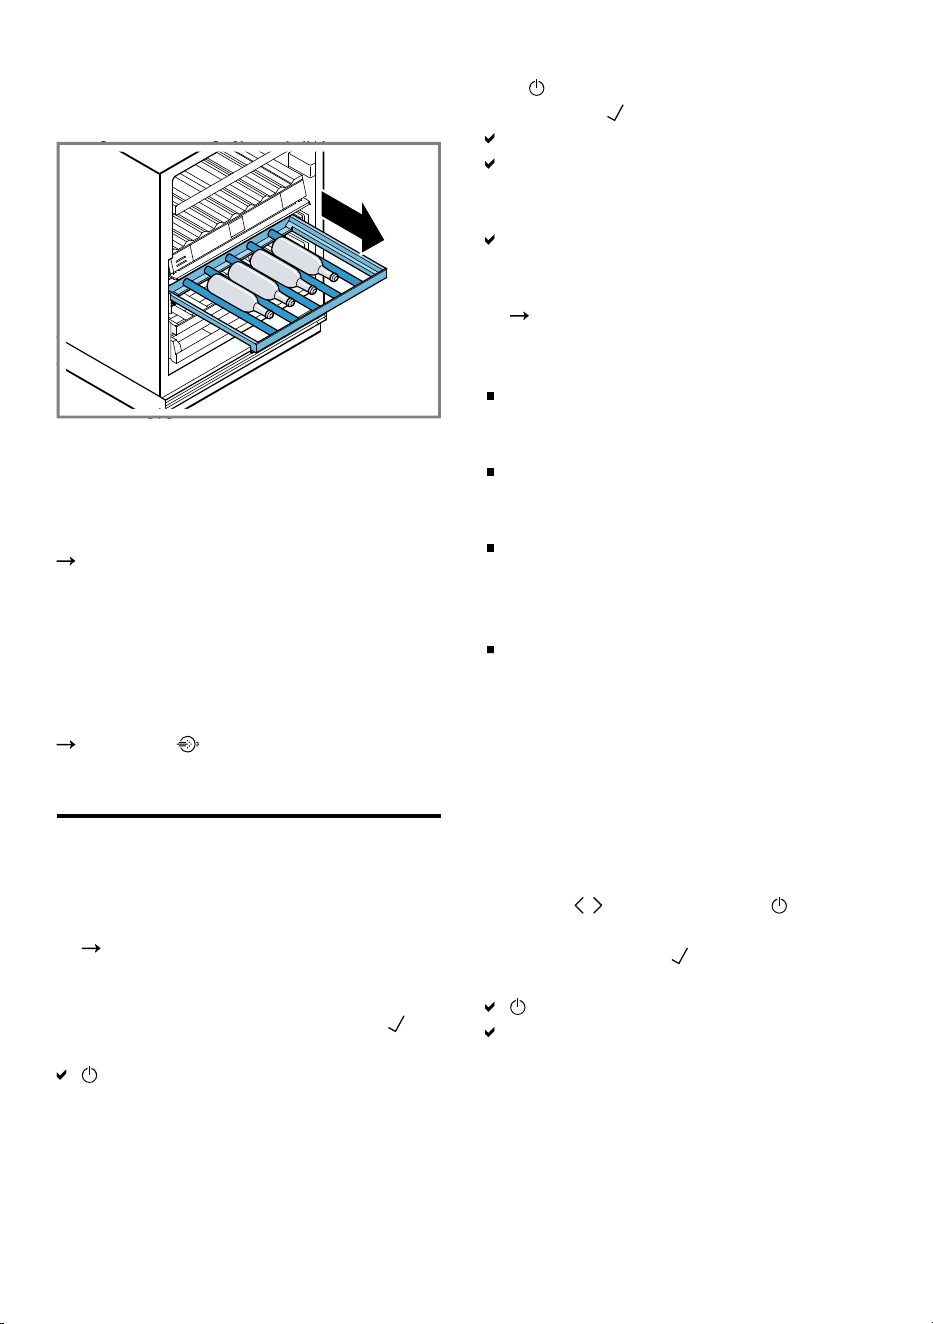
6.1 Extendable bottle shelf
In order to achieve an improved over-
view and to remove bottles more
10
Basic operation en
quickly, pull out the extendable bottle
shelf.
6.2 Odour filter
The odour filter filters odours in the
refrigerator compartment and can be
replaced if required.
"Replacing the odour filter",
Page18
Change the odour filter every six
months. This keeps the filter quality
permanently high.
Note: The filter alarm can be activ-
ated in the basic settings
Page13
. appears on the dis-
play every six months.
Basic operation7 Basic operation
7.1 Switching on the appliance
1.
Electrically connect the appliance.
Page8
Note: If the appliance has been
previously switched off using the
control panel, press and hold for
threeseconds.
flashes.
2.
If lights up permanently, press
and hold for 3seconds.
The appliance begins to cool.
The temperature display flashes
until the appliance has reached the
set temperature.
The appliance is now ready for
use.
3.
Set the required temperature.
Page11
7.2 Operating tips
Once you have switched on the
appliance, the set temperature is
only reached after several hours.
When closing the door, make sure
that the door is not blocked by
stored items.
When you close the door, a va-
cuum may be created. The door is
then difficult to open again. Wait a
moment until the vacuum is offset.
The temperature in the appliance
varies due to the following condi-
tions:
– How often the appliance is
opened
– Load capacity
– Ambient temperature
– Direct sunlight
7.3 Switching off the appliance
1.
Press / repeatedly until is se-
lected.
2.
Press and hold for
threeseconds.
flashes.
The display is switched off after
10minutes.
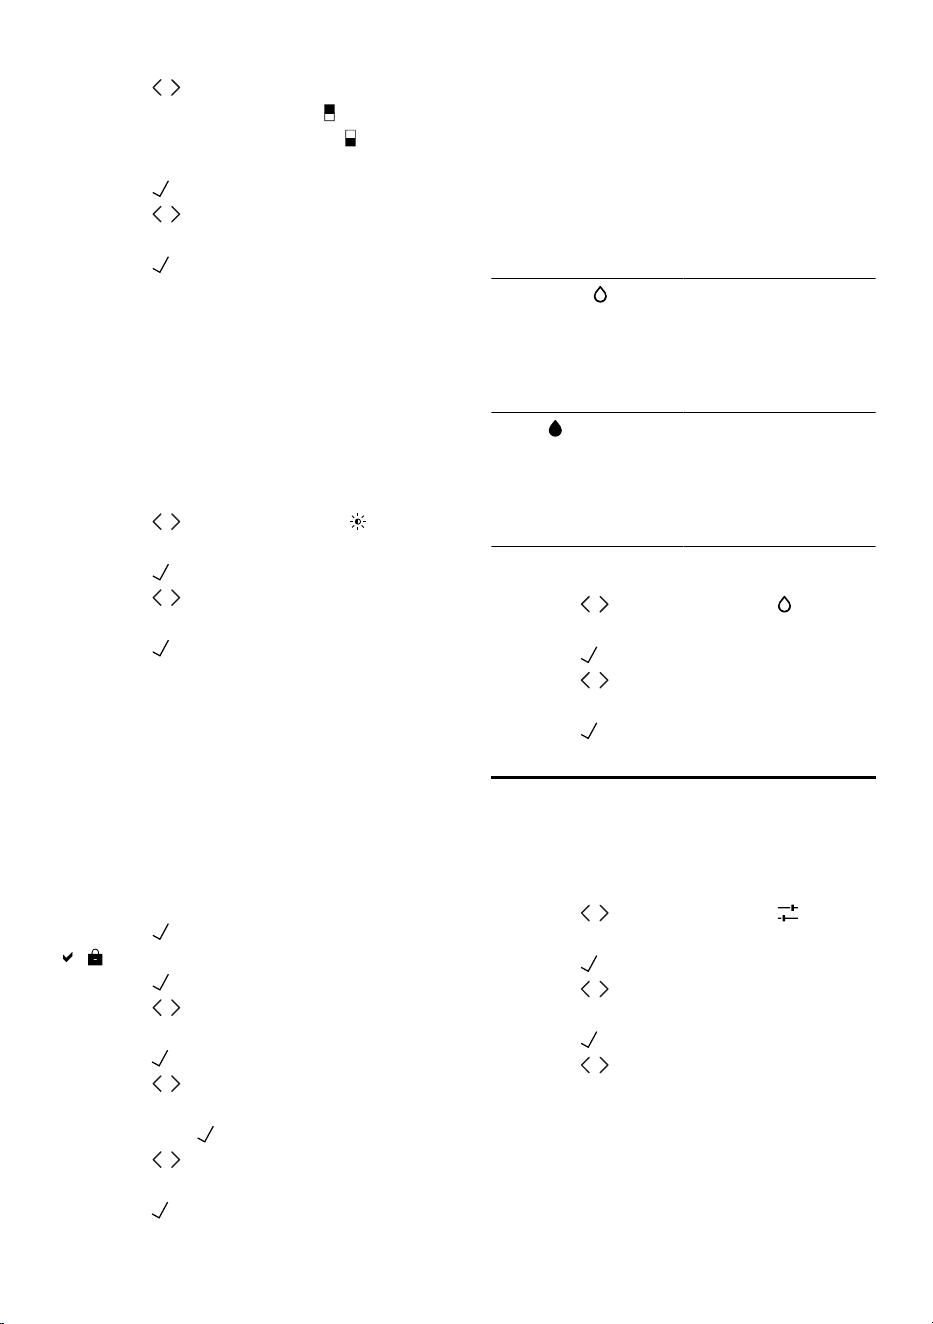
7.4 Setting the temperature of
the wine storage compart-
ment
Your appliance has two temperature
ranges.
11
en Basic settings
1.
Press / repeatedly until the up-
per temperature range or the
lower temperature range is selec-
ted.
2.
Press to confirm.
3.
Press / repeatedly until the re-
quired temperature is selected.
4.
Press to confirm.
7.5 Temperature display
brightness
You can set the brightness of the
temperature display in stages from
20–100%.
Setting the temperature display
brightness
1.
Press / repeatedly until is se-
lected.
2.
Press to confirm.
3.
Press / repeatedly until the re-
quired setting is selected.
4.
Press to confirm.
7.6 Keylock
The keylock prevents the appliance
from being operated accidentally or
incorrectly while running.
Note: You can find out how to activ-
ate the keylock and change the key-
lock PIN in the basic settings.
Switching off the keylock
1.
Press .
appears on the display.
2.
Press to confirm.
3.
Press / repeatedly until the first
digit of the PIN is selected and
press to confirm.
4.
Press / repeatedly until the
second digit of the PIN is selected
and press to confirm.
5.
Press / repeatedly until the third
digit of the PIN is selected and
press to confirm.
7.7 Air humidity
To prevent the corks from drying out
or shrinking, set the appropriate hu-
midity level.
Tip: To maintain a constant level of
humidity, avoid opening the door fre-
quently or for long periods of time.
Standard Average ambient
humidity between
50–80%
More energy effi-
cient
High Average ambient
humidity below
50%
Higher energy
consumption
Setting the humidity
1.
Press / repeatedly until is se-
lected.
2.
Press to confirm.
3.
Press / repeatedly until the re-
quired setting is selected.
4.
Press to confirm.
Basic settings8 Basic settings
8.1 Changing the basic set-
tings
1.
Press / repeatedly until is se-
lected.
2.
Press to confirm.
3.
Press / repeatedly until the re-
quired setting is selected.
4.
Press to confirm.
5.
Press / repeatedly until the de-
sired sub-setting is selected for the
respective setting.
12
Basic settings en
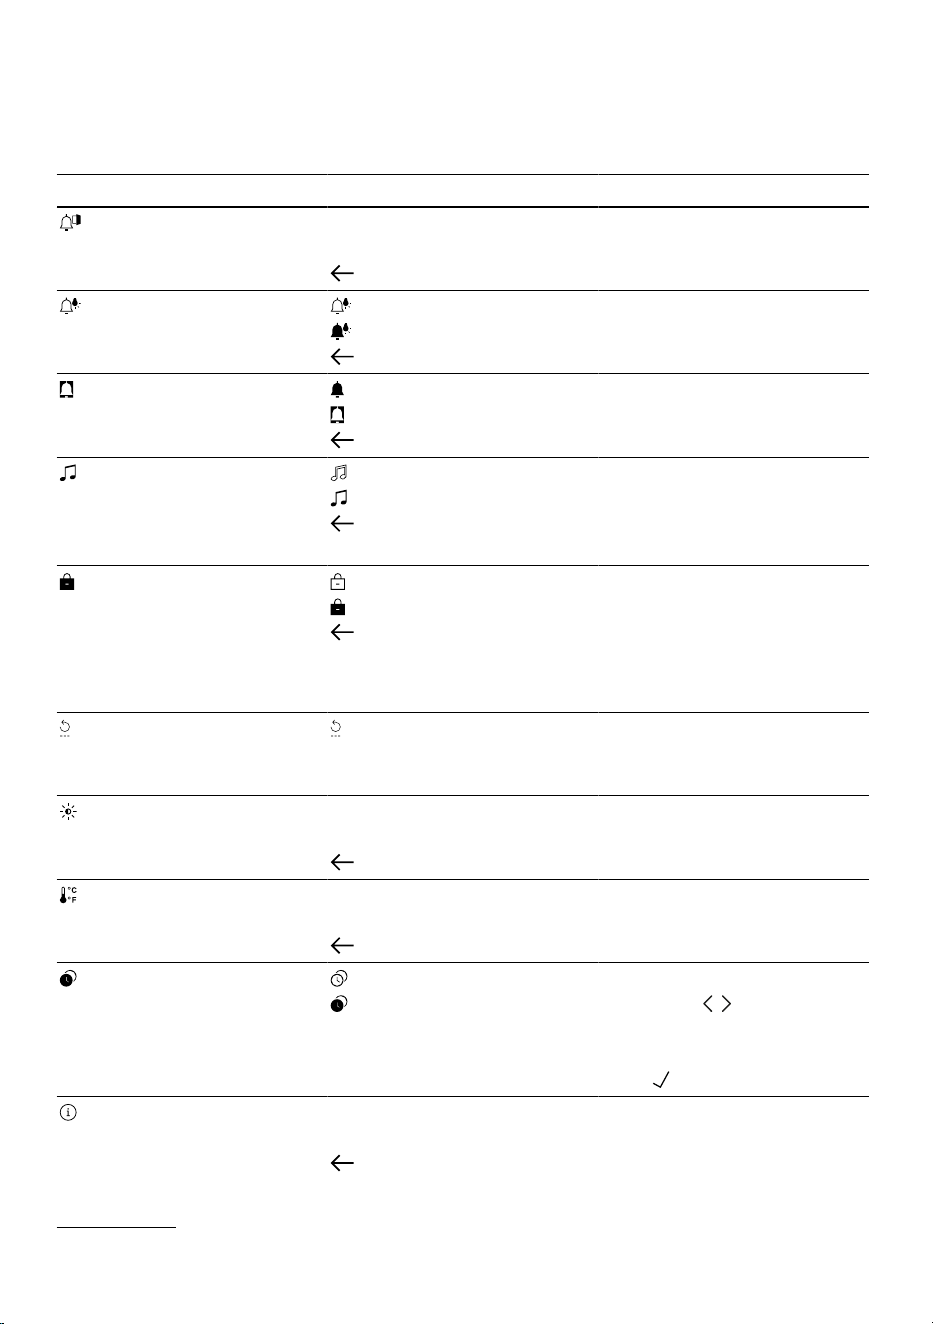
8.2 Overview of the basic settings
Here you can find an overview of the basic settings and factory settings. The
basic settings depend on the features of your appliance.
Setting Selection Description
Door alarm duration "1min"/"2min"/"3min"
"0min" (off)
(back)
Set the door alarm dura-
tion or deactivate the
door alarm.
Light alarm (on)
(off)
(back)
Switch the flashing appli-
ance lighting on or off
during alarm messages.
Alarm tone (on)
(off)
(back)
Switch all alarm tones on
or off.
Confirmation tones (on)
(off)
(back)
Switch the touch-key
tones, confirmation tones
and the start tone on or
off.
Keylock (on)
(off)
(back)
Note: On delivery, the
keylock PIN is set to
111.
Enter the PIN to activate
or deactivate the keylock.
Keylock PIN Enter the old keylock PIN
and then the new PIN and
repeat once more.
Display brightness "20%"/"40%"/"60%"/"8
0%"/"100%"
1
(back)
The display brightness
can be adjusted in
stages.
Temperature unit °C
°F
(back)
Set the temperature unit.
Idle mode (on)
(off)
1
To turn idle mode on or
off, press / repeatedly
until the desired setting is
selected, and press and
hold for 3seconds.
Appliance and soft-
ware information
Display for appliance
and software information
(back)
Display the appliance's
model name, index, serial
1
Factory setting (may vary according to model)
13
en Additional functions
Setting Selection Description
number and service num-
ber.
Tip: You need the appli-
ance information when
you contact Customer
Service.
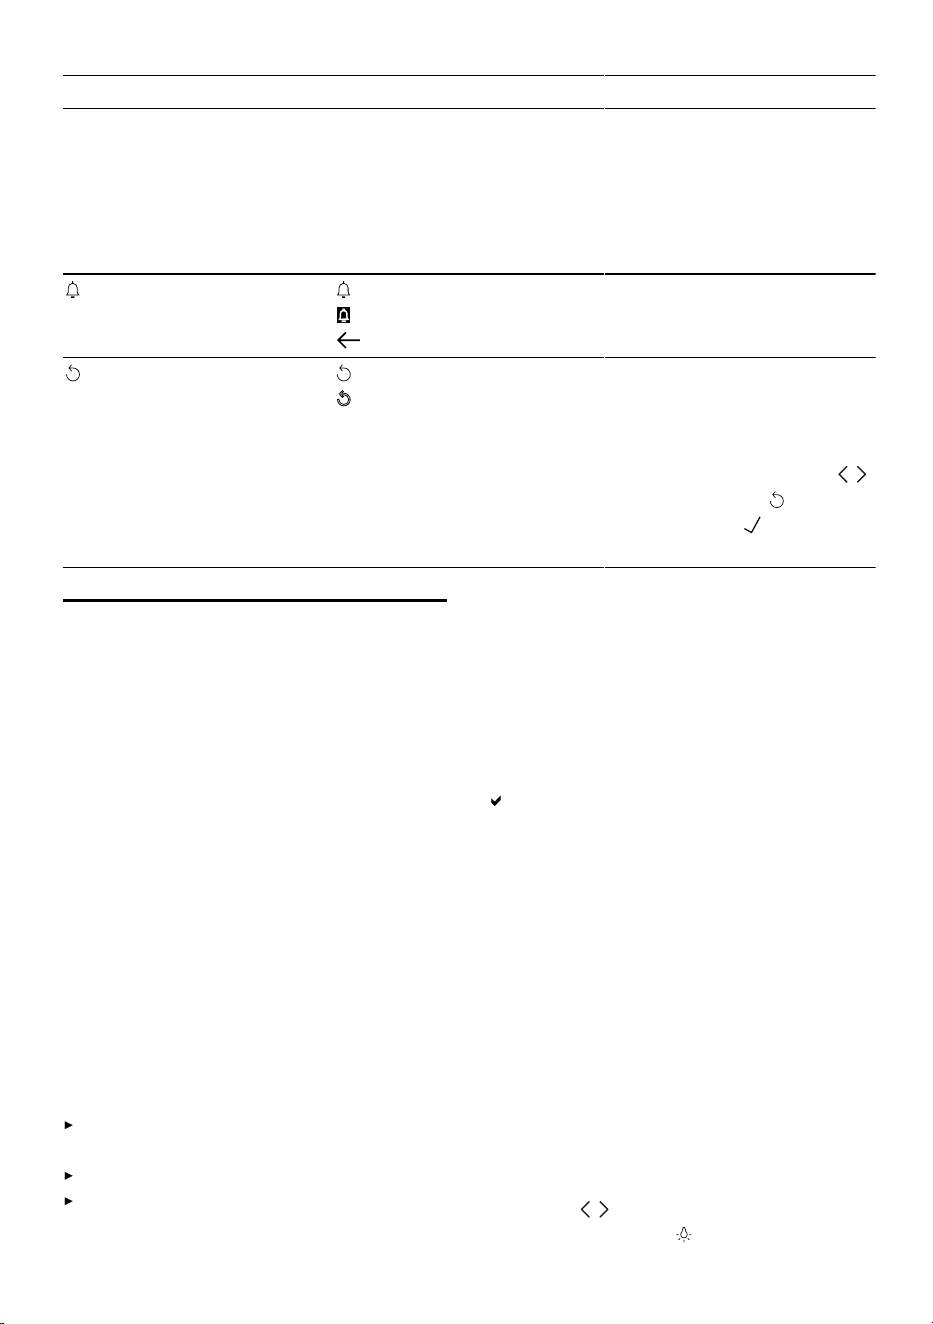
Filter alarm (on)
(off)
(back)
Activate or deactivate the
filter alarm for replacing
the odour filter.
Factory settings (on)
(off)
All settings are reset to
the original factory set-
tings.
To reset the appliance to
factory settings, press /
repeatedly until is selec-
ted and hold down for
3seconds.
Additional functions9 Additional functions
Find out which additional functions
can be used for your appliance.
9.1 Door opening aid
The door-opening aid supports you in
opening the door.
Opening the door using the door-
opening aid
ATTENTION
Blocking the door opening aid may
result in damage or failure of the
door opening aid. Loud clattering
noises can be heard.
Do not block the door-opening aid. If
the door opening aid has been
blocked, it must be reset to its initial
position.
Pull out the appliance plug from
the power outlet.
Wait for five seconds.
Plug in the mains plug. The door
opening aid returns to its starting
position flush with the front of the
appliance.
Requirement: The door-opening aid
only works when the appliance is op-
erating.
1.
Press the door at the top on the
side to be opened.
The door-opening aid extends and
opens the door slightly.
2.
Manually open the door within
three seconds.
Note: Do not close the door again
until the push rod has been fully re-
tracted.
9.2 Interior lighting
9.3 Presentation mode
In presentation mode, the interior
lighting is permanently switched on.
Switching on the presentation
mode
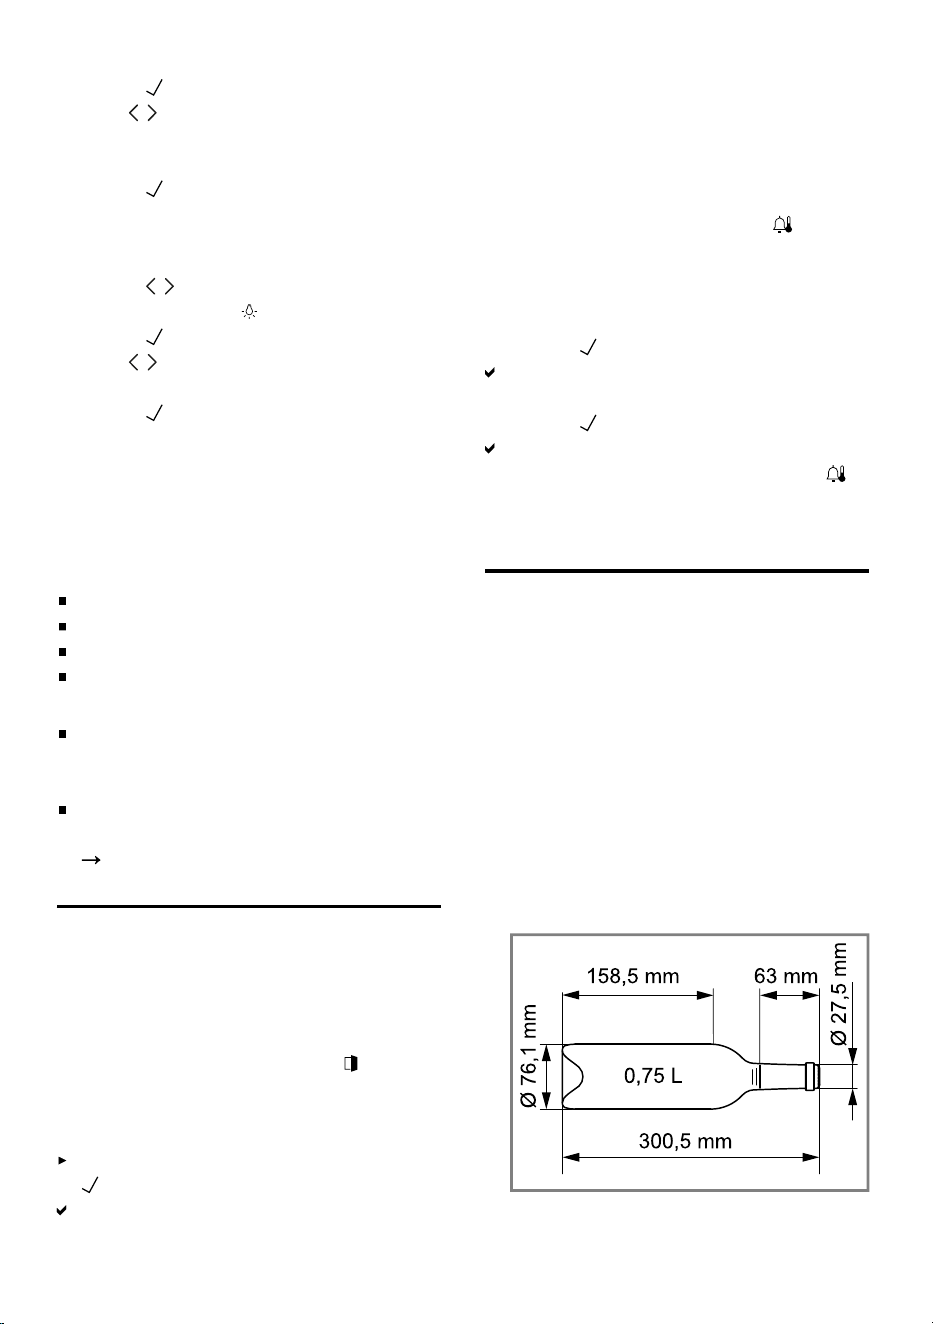
1.
Press / repeatedly until presenta-
tion light mode is selected.
14
Alarm en
2.
Press to confirm.
3.
Use / to set the required bright-
ness level to
"20%"/"40%"/"60%"/"80%"/"100%".
4.
Press to confirm.
Switching off the presentation
mode
1.
Press / repeatedly until presenta-
tion light mode is selected.
2.
Press to confirm.
3.
Use / to set the presentation
light brightness "0%".
4.
Press to confirm.
9.4 Rest mode
The rest mode switches off all non-
essential functions.
During rest mode, the following func-
tions are switched off:
Alarm
Interior lighting
Signal tones
Messages on the control panel
Notes
The brightness of the control panel
lighting is reduced during the rest
mode.
You can find out how to switch on
rest mode in the basic settings.
Page13
Alarm10 Alarm
10.1 Door alarm
If the appliance door is open for a
while, the door alarm switches on.
A warning tone sounds and ap-
pears.
Switching off the door alarm
Close the appliance door or touch
.
The warning tone is switched off.
10.2 Temperature alarm
If the wine storage compartment is
too warm or too cold for an extended
period, the temperature alarm
switches on.
A warning tone sounds and ap-
pears.
Switching off the temperature
alarm
1.
Touch .
The temperature display indicates
the warmest temperature.
2.
Touch .
The current temperature flashes
and the display alternates with
until the set temperature is
reached.
Wine storage compartment11 Wine storage com-
partment
In the wine storage compartment,
you store wine at a constant temper-
ature.
You can set the temperature in the
wine storage compartment from 5°C
to 20°C.
11.1 Arranging the maximum
number of standard
bottles
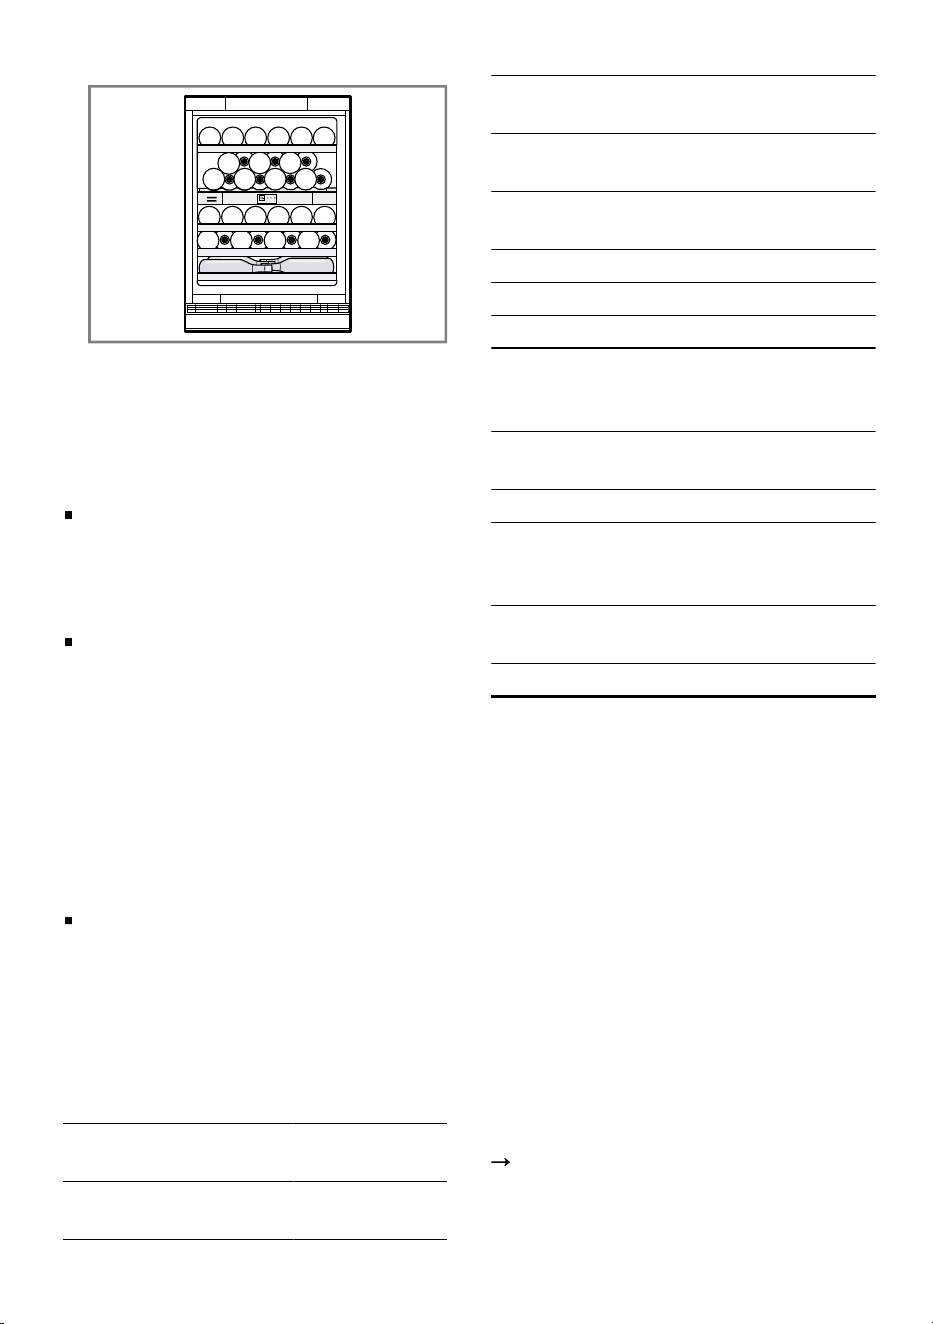
Standard bottle
15
en Defrosting
Storage example with 38standard
bottles
11.2 Tips for storing wine
Note the following tips for storing
wine.
Store the wine bottles directly on
the bottle shelves. The open bottle
shelves allow for continuous air cir-
culation, which quickly removes
excess moisture.
Temper the wine before serving it.
Remove red wine from the appli-
ance 4 to 5hours before serving
and rosé wine 2 to 3hours before
serving to allow it to slowly warm
to the ideal drinking temperature
(chambrieren). Serve white wine
immediately after taking it out of
the appliance. Cool Sekt and
Champagne in the refrigerating ap-
pliance shortly before serving.
Always store wine a little cooler
than its ideal drinking temperature,
as the wine warms up as soon as
it is poured into the glass.
11.3 Drinking temperatures
The correct serving temperature is
crucial for the taste of the wine.
Type of wine Drinking tem-
perature
Full-bodied red Bor-
deaux
18°C
Type of wine Drinking tem-
perature
Côtes du Rhône red,
Barolo
17°C
Full-bodied red Bur-
gundy, red Bordeaux
16°C
Port 15°C
Young red Burgundy 14°C
Young red wines 12°C
Young Beaujolais, all
white wines with little
residual sugar
11°C
Old white wines, full-
bodied Chardonnay
10°C
Sherry 9°C
Young white wines,
from late vintage on-
ward
8°C
Loire, Entre-deux-
Mers white wines
7°C
Defrosting12 Defrosting
12.1 Defrosting in the wine
storage compartment
When the appliance is operating,
condensation droplets or frost form
on the rear panel of the wine storage
compartment due to functional reas-
ons. The back panel in the wine stor-
age compartment defrosts automatic-
ally.
The condensation drains into the
drainage hole via the condensation
channel.
To ensure that the condensation can
drain and odours do not form, ob-
serve the following information: .
"Cleaning the condensation chan-
nel and drainage hole", Page18
16

Cleaning and servicing en
Cleaning and servicing13 Cleaning and servi-
cing
Customer Service must clean inac-
cessible points. Cleaning by cus-
tomer service can give rise to costs.
13.1 Care instructions for
stainless steel surfaces
When taking care of and cleaning
stainless steel surfaces, use only
cleaning cloths and cleaning agents
suitable for stainless steel.
Tips
To prevent visible scratches, wipe
the stainless steel surface in the
direction of the grain.
Suitable cleaning agents and
cleaning cloths are available from
our customer service, your dealer
or on our website.
13.2 Preparing the appliance
for cleaning
1.
Disconnect the appliance from the
power supply.
Unplug the appliance from the
mains or switch off the circuit
breaker in the fuse box.
2.
Take out all bottles and store them
in a cool place.
3.
Remove all fittings and accessor-
ies from the appliance.
Page18
13.3 Cleaning the appliance
WARNING
Risk of electric shock!
An ingress of moisture can cause an
electric shock.
Do not use steam- or high-pres-
sure cleaners to clean the appli-
ance.
Liquid in the lighting or in the con-
trols can be dangerous.
The rinsing water must not drip
into the lighting or controls.
ATTENTION
Unsuitable cleaning products may
damage the surfaces of the appli-
ance.
Do not use hard scouring pads or
cleaning sponges.
Do not use harsh or abrasive de-
tergents.
Do not use cleaning products with
a high alcohol content.
Do not use stainless-steel cleaning
agents on the outside of the appli-
ance.
If liquid gets into the drainage hole,
the evaporation pan may overflow.
The rinsing water must not get into
the drainage hole.
If you clean fittings and accessories
in the dishwasher, this may cause
them to become deformed or discol-
our.
Never clean fittings and accessory
in the dishwasher.
1.
Prepare the appliance for cleaning.
Page17
2.
Clean the appliance, the fittings,
the accessories and the door seals
with a dish cloth, lukewarm water
and a little pH-neutral washing-up
liquid.
3.
Dry thoroughly with a soft, dry
cloth.
4.
Insert the fittings.
5.
Electrically connect the appliance.
Page8
17
en Cleaning and servicing
13.4 Cleaning the condensa-
tion channel and drainage
hole
Regularly clean the condensation
channel and drainage hole to ensure
that the condensation can drain.
Carefully clean the condensation
channel and the drainage hole,
e.g. using a cotton bud.
13.5 Removing the fittings
If you want to clean the fittings thor-
oughly, remove these from your ap-
pliance.
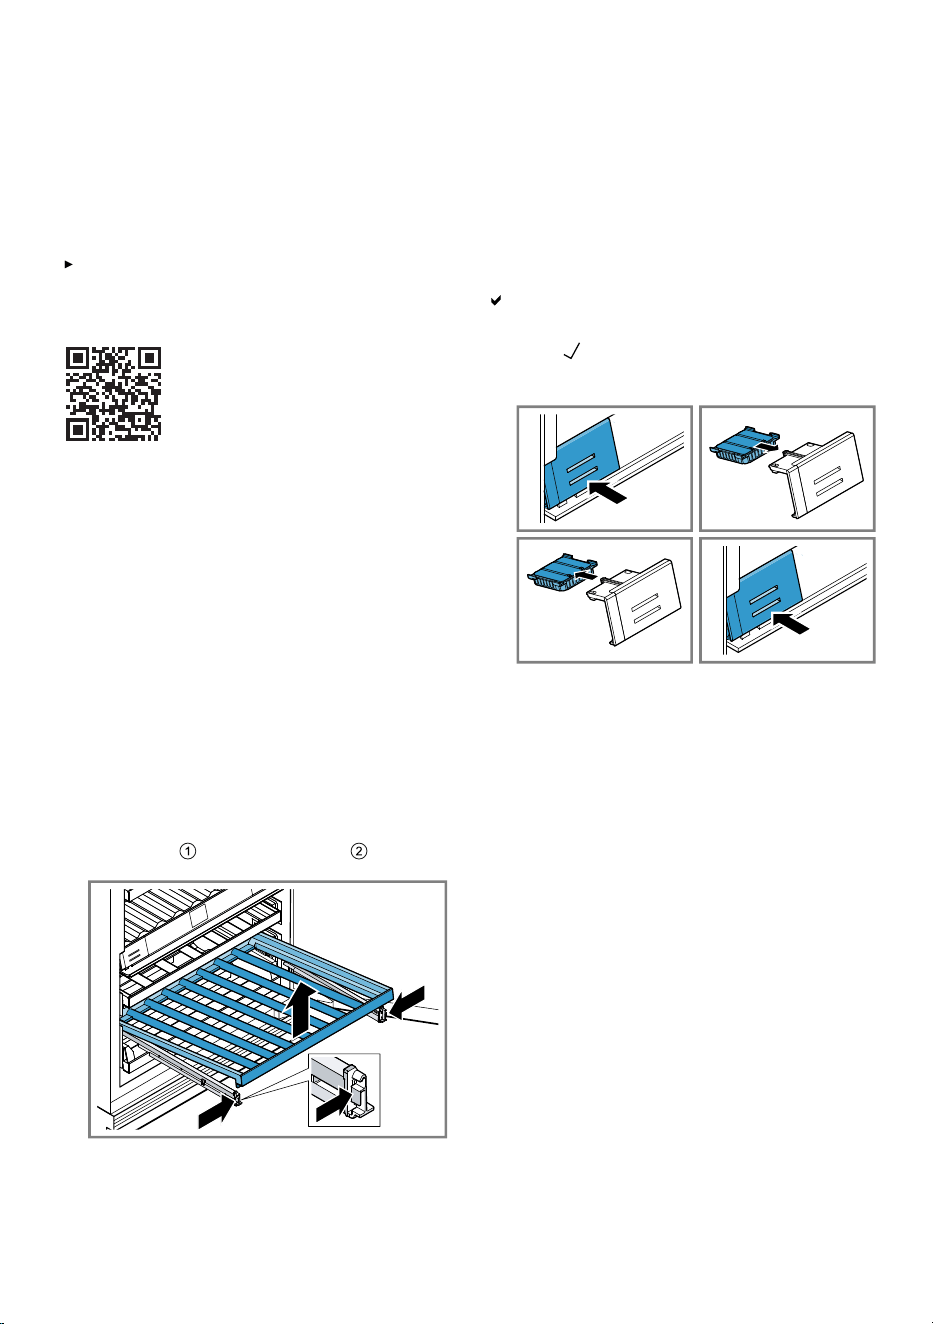
Extendable bottle shelf
Removing the extendable bottle
shelf
1.
Pull out the extendable bottle shelf
as far as it will go.
2.
Press the brackets on the rails
slightly inwards at the front on both
sides.
3.
Lift the extendable bottle shelf at
the front and remove it .
13.6 Replacing the odour filter
1.
Push the odour filter cover, release
it and remove it.
2.
Take the used odour filter out of
the odour filter holder and replace
it with the new odour filter.
3.
Insert the cover, push it in as far
as it will go and release it.
A clicking sound is heard. The
cover is automatically locked.
4.
Use to confirm and exit the filter
alarm.
Note: A new odour filter can be pur-
chased from our customer service or
our website.
18
Troubleshooting en
Troubleshooting14 Troubleshooting
You can rectify minor faults on your appliance yourself. Read the troubleshoot-
ing information before contacting after-sales service. This will avoid unneces-
sary costs.
WARNING
Risk of electric shock!
Improper repairs are dangerous.
Repairs to the appliance should only be carried out by trained specialist
staff.
Only use genuine spare parts when repairing the appliance.
If the power cord or the appliance power cable of this appliance is damaged,
it must be replaced with a special power cord or special appliance power
cable, which is available from the manufacturer or its Customer Service.
Fault Cause and troubleshooting
The appliance is not
cooling, the displays
and lighting are lit.
Showroom mode is switched on.
1.
Press / repeatedly until is selected.
2.
Press to confirm.
3.
Use to confirm the appliance and software inform-
ation.
4.
Press / repeatedly until "2""5""4" is selected and
press to confirm.
5.
Press / repeatedly until is selected and press
to confirm.
The LED lighting does
not work.
Different causes are possible.
Call customer service.
The customer service number can be found in the en-
closed customer service directory.
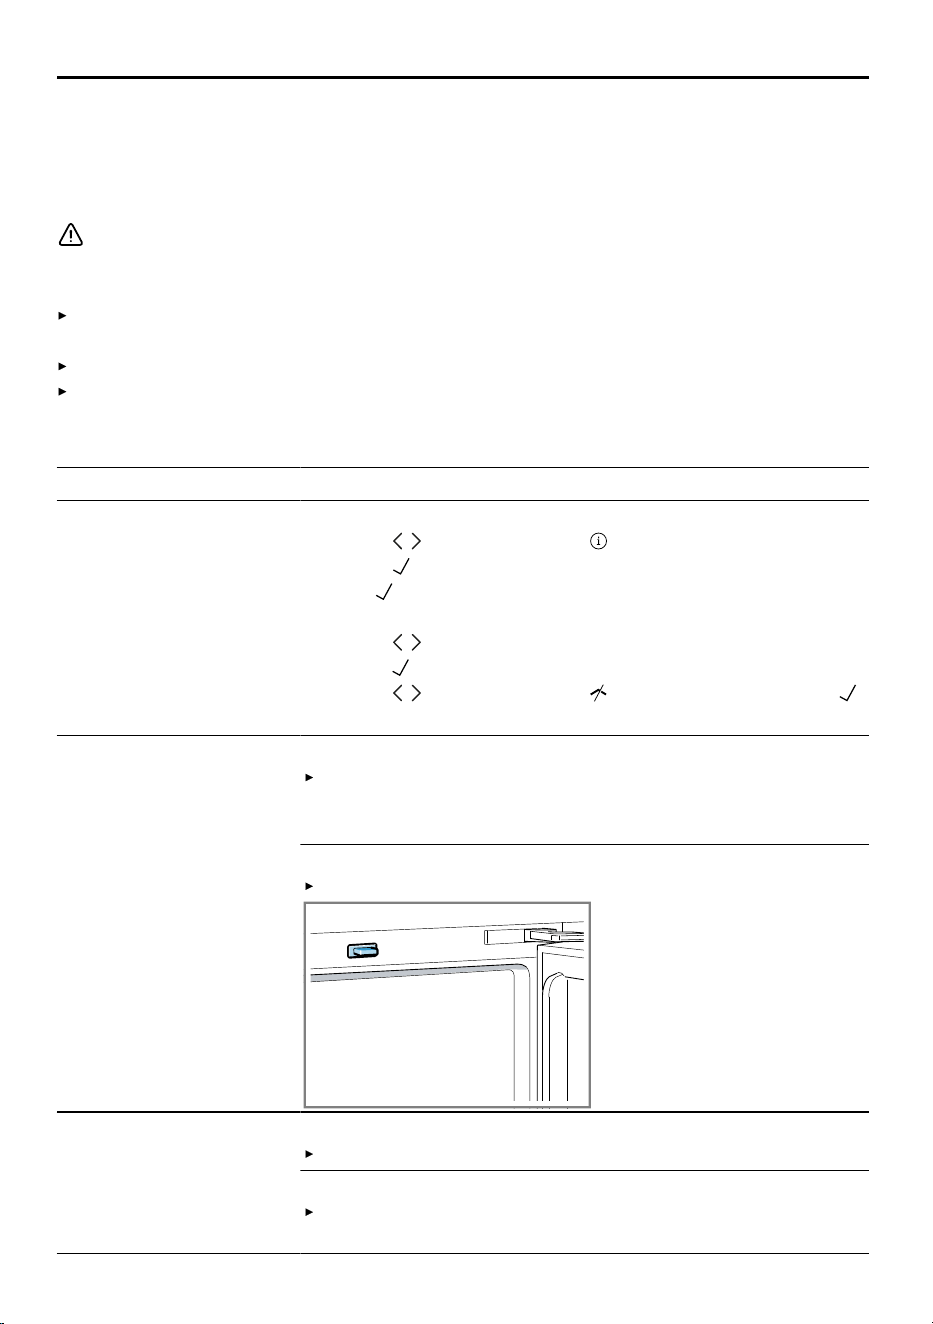
The light switch is jammed.
Check whether the light switch can be moved.
The refrigeration unit
is switching on more
frequently and for
longer.
The appliance has been opened frequently.
Do not open appliance door unnecessarily.
The exterior ventilation grilles are blocked.
Remove any obstructions from in front of the exterior
ventilation grilles.
19
en Troubleshooting
Fault Cause and troubleshooting
Message showing "D"
or "E" appears in the
display.
The electronics have detected a fault.
1.
Switch off the appliance.
2.
Disconnect the appliance from the mains.
Unplug the appliance from the mains or switch off the
circuit breaker in the fuse box.
3.
Reconnect the appliance after five minutes.
4.
If the message still appears on the display, call Cus-
tomer Service.
The customer service number can be found in the en-
closed customer service directory.
A warning tone
sounds and ap-
pears.
The door alarm is
switched on.
The appliance door is open.
Close the appliance door.
A warning tone
sounds and ap-
pears.
The temperature
alarm is switched on.
Different causes are possible.
1.
Touch .
The temperature display indicates the warmest tem-
perature.
2.
Touch .
The exterior ventilation grilles are blocked.
Remove any obstructions from in front of the exterior
ventilation grilles.
The temperature dif-
fers greatly from the
setting.
Different causes are possible.
1.
Switch off the appliance.
2.
Switch the appliance back on after fiveminutes.
If the temperature is too warm, check the temperat-
ure again after a couple of hours.
If the temperature is too cold, check the temperature
again on the following day.
The base of the wine
storage compartment
is wet.
The condensation channel or drainage hole are
blocked.
Clean the condensation channel and the drainage
hole.
Page18
The appliance hums,
bubbles, buzzes,
gargles or clicks.
Not a fault. A motor is running, e.g. refrigerating unit,
fan. Refrigerant flows through the pipes. The motor,
switches or solenoid valves are switching on or off.
No action required.
20
Storage and disposal en
Fault Cause and troubleshooting
The appliance makes
noises.
Fittings wobble or stick.
Check the removable fittings and, if required, re-
place these.
Storage and disposal15 Storage and disposal
15.1 Taking the appliance out
of operation
1.
Disconnect the appliance from the
power supply.
Unplug the appliance from the
mains or switch off the circuit
breaker in the fuse box.
2.
Clean the appliance.
Page17
3.
To guarantee the ventilation inside
the appliance, leave the appliance
open.
15.2 Disposing of old appli-
ance
Valuable raw materials can be re-
used by recycling.
WARNING
Risk of harm to health!
Children can lock themselves in the
appliance, thereby putting their lives
at risk.
Leave shelves and containers in-
side the appliance to prevent chil-
dren from climbing in.
Keep children away from the re-
dundant appliance.
WARNING
Risk of fire!
If the tubes are damaged, flammable
refrigerant and harmful gases may
escape and ignite.
Do not damage the tubes of the re-
frigerant circuit or the insulation.
1.
Unplug the appliance from the
mains.
2.
Cut through the power cord.
3.
Dispose of the appliance in an en-
vironmentally friendly manner.
Information about current disposal
methods are available from your
specialist dealer or local authority.
This appliance is labelled
in accordance with
European Directive
2012/19/EU concerning
used electrical and elec-
tronic appliances (waste
electrical and electronic
equipment - WEEE).
The guideline determines
the framework for the re-
turn and recycling of
used appliances as ap-
plicable throughout the
EU.
Customer Service16 Customer Service
Function-relevant genuine spare parts
according to the corresponding Eco-
design Directive can be obtained
from Customer Service for a period
of at least 10years from the date on
which your appliance was placed on
the market within the European Eco-
nomic Area.
Furthermore, our Customer Service
will continue to provide you with
other function-relevant and storable
21
en Technical data
genuine spare parts for up to
15years from the date on which your
appliance was placed on the market.
For more information, please contact
our Customer Service team.
Note: Under the terms of the manu-
facturer's warranty applicable to the
location, the use of Customer Service
is free of charge. The minimum dura-
tion of the warranty (manufacturer's
warranty for private consumers) in
the European Economic Area is 2
years according to the terms of war-
ranty applicable to the location. The
terms of warranty do not affect other
rights or claims held by yourself un-
der local legislation.
Detailed information about the war-
ranty period and the warranty condi-
tions in your country is available via
the QR code on the enclosed docu-
ment on service contacts and war-
ranty conditions, from our customer
service or on our website.
You can find the contact details for
our customer service via the QR
code on the enclosed document on
service contacts and warranty condi-
tions or on our website.
16.1 Product number (E-Nr.)
and production number
(FD)
If you contact Customer Service, you
will require the product number (E-
Nr.) and the production number (FD),
which you can find on the appliance's
rating plate.
"Appliance", Fig.
1
/ Page9
Make a note of your appliance's de-
tails and the Customer Service tele-
phone number to find them again
quickly.
Technical data17 Technical data
Refrigerant, cubic capacity and fur-
ther technical specifications can be
found on the rating plate.
"Appliance", Fig.
1
/ Page9
This product contains a light source
from energy efficiency class G. The
light source is available as a spare
part and should only be replaced by
trained specialist staff.
This product contains a second light
source from energy efficiency class
G. The light source is available as a
spare part and should only be re-
placed by trained specialist staff.
This product contains a third light
source from energy efficiency class
G. The light source is available as a
spare part and should only be re-
placed by trained specialist staff.
This product contains a fourth light
source from energy efficiency class
G. The light source is available as a
spare part and must only be re-
placed by trained specialist staff.
You can find more information about
your model online at
https://
eprel.ec.europa.eu/
1
. This web ad-
dress is linked to the official EU
EPREL product database. Please
then follow the instructions on
searching for the model. The model
identifier is made up of the charac-
ters before the slash in the product
number (E-Nr.) on the rating plate. Al-
ternatively, you can also find the
model identifier in the first line of the
EU energy label.
1
Only applies to countries in the European Economic Area
22

gaggenau.com
BSH Hausgeräte GmbH
Carl-Wery-Straße 34
81739 München, GERMANY
www.gaggenau.com
Valid within Great Britain:
Imported to Great Britain by
BSH Home Appliances Ltd.
Grand Union House
Old Wolverton Road
Wolverton, Milton Keynes
MK12 5PT
United Kingdom
*9002046912*
9002046912 (060121)
en
The difference is Gaggenau