
M2000 Series
Air Quality Monitor
User Manual

★
Do not place detector in heavily polluted environments for a long time; or it may cause
damages to the sensor.
★ Do not use the detector in a humid environment to maintain detection accuracy.
★ Do not use the detector for a long time in a strong irritating odor environment to
ensure measurement accuracy.
★ Do not cover the vents of the detector, and do not let flu enter the detector,
otherwise the particle sensor may not work properly.
★ Do not disassemble the device. In the event of a defect, please contact your dealer.
The dealer will contact the Service Centre and can send the device in to be repaired, if
necessary.
★ Children should only use the device under adult supervision. Keep packaging
material,like plastic bags and plastic film, out of the reach of children,as they pose a
choking hazard.
★ It is normal for the detector to show higher values when it is first switched on or when
it is not used for a long period of time. Place it in a ventilated environment and run it
on for at least 0.5 hours before testing. (only for M2000/M2000 2nd).
★
Repeat the test at multiple points in the target area to get a more complete picture of
your air quality.
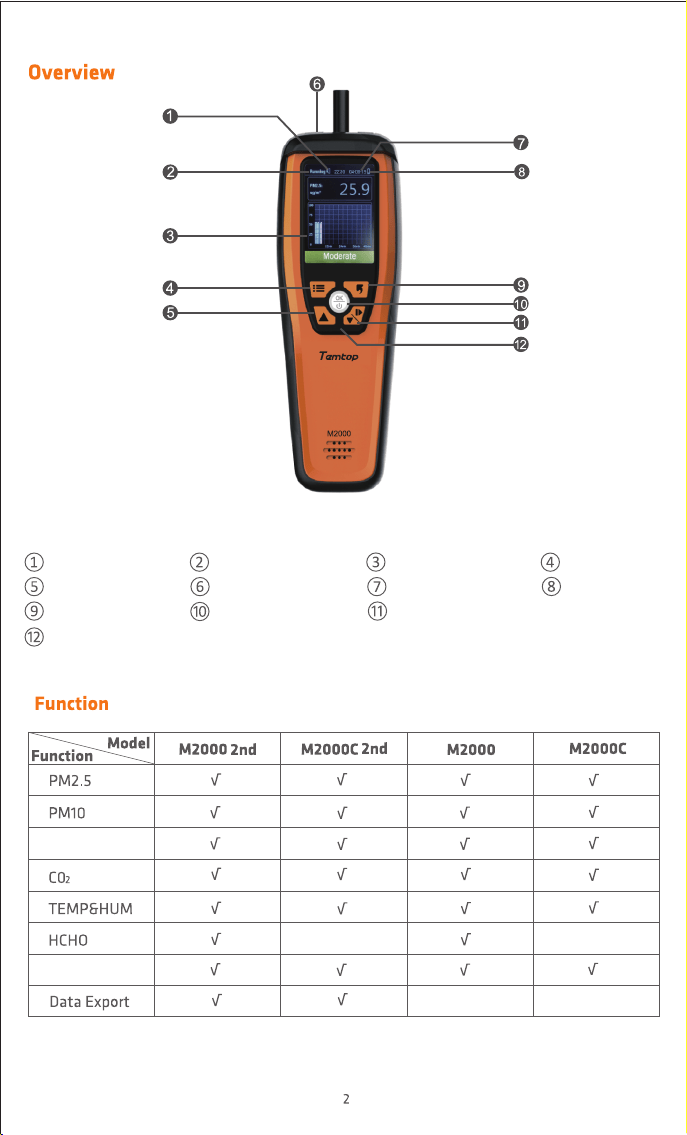
fig.1
Buzzer Status
Increase/Up Button
Back Button
Indicator Light
Measuring Status
USB Port
Power/OK Button
Display
Date & Time
Decrease/Down/Switch(Start/Pause) Button
Menu Button
Power Level
Particle Count
Histogram
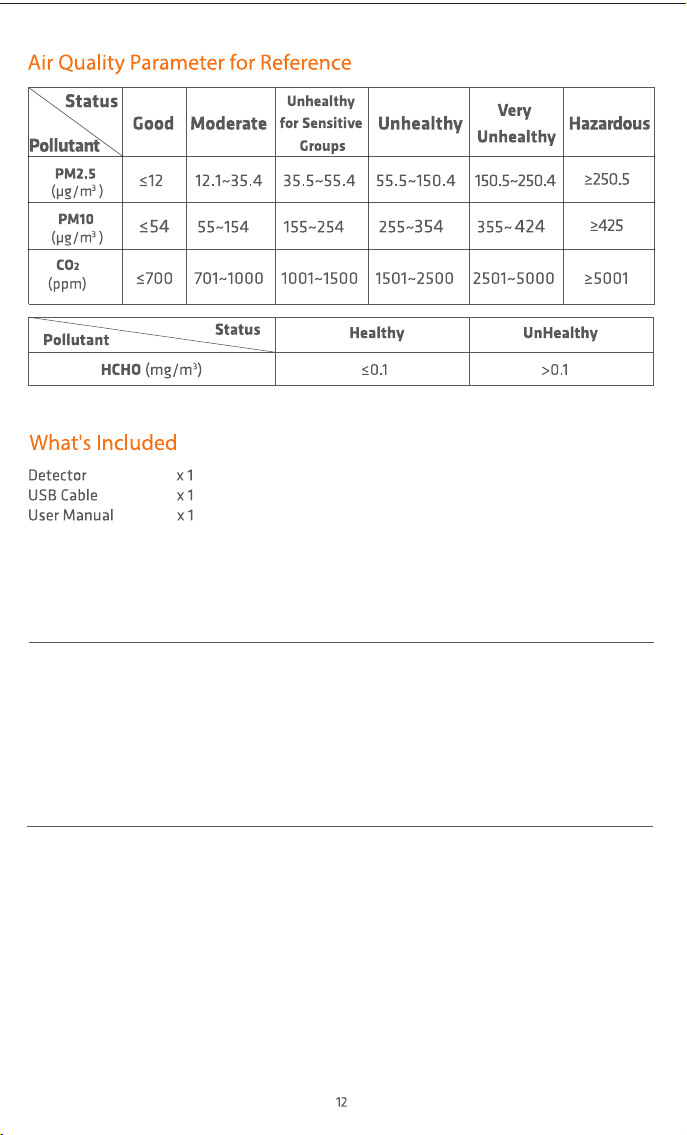
For M2000/M2000 2nd
Note: The above data are from Temtop Laboratory.
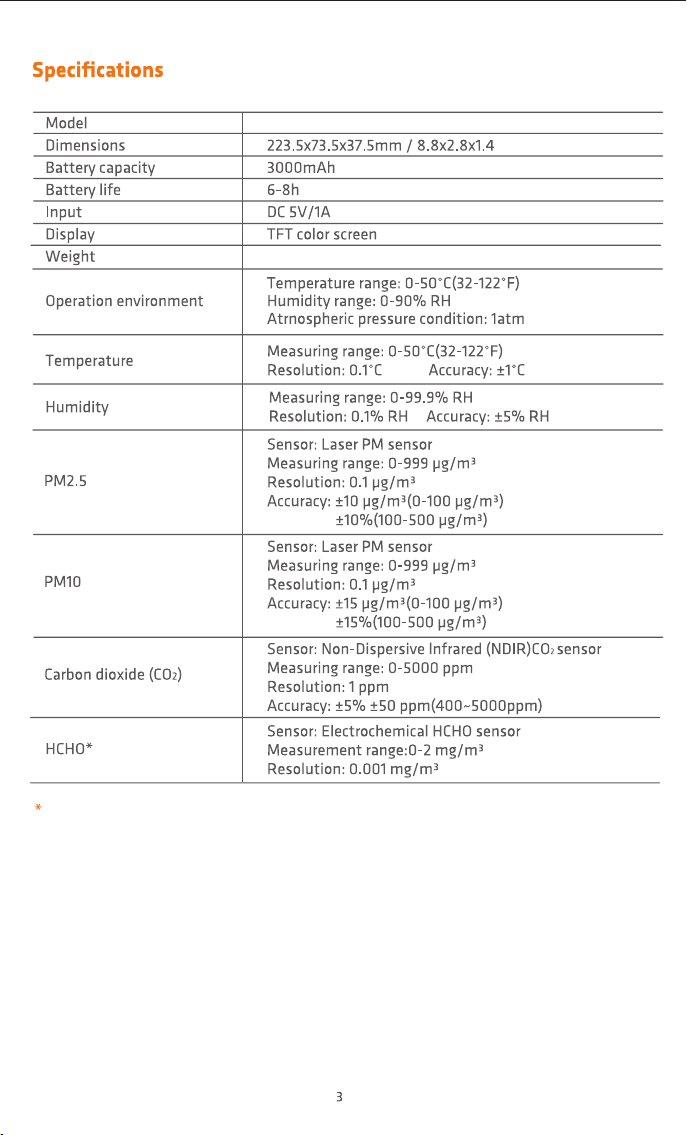
M2000 Series
228g @M2000/M2000 2nd 221g @M2000C/M2000C 2nd
Display CO2 curve
fig.2
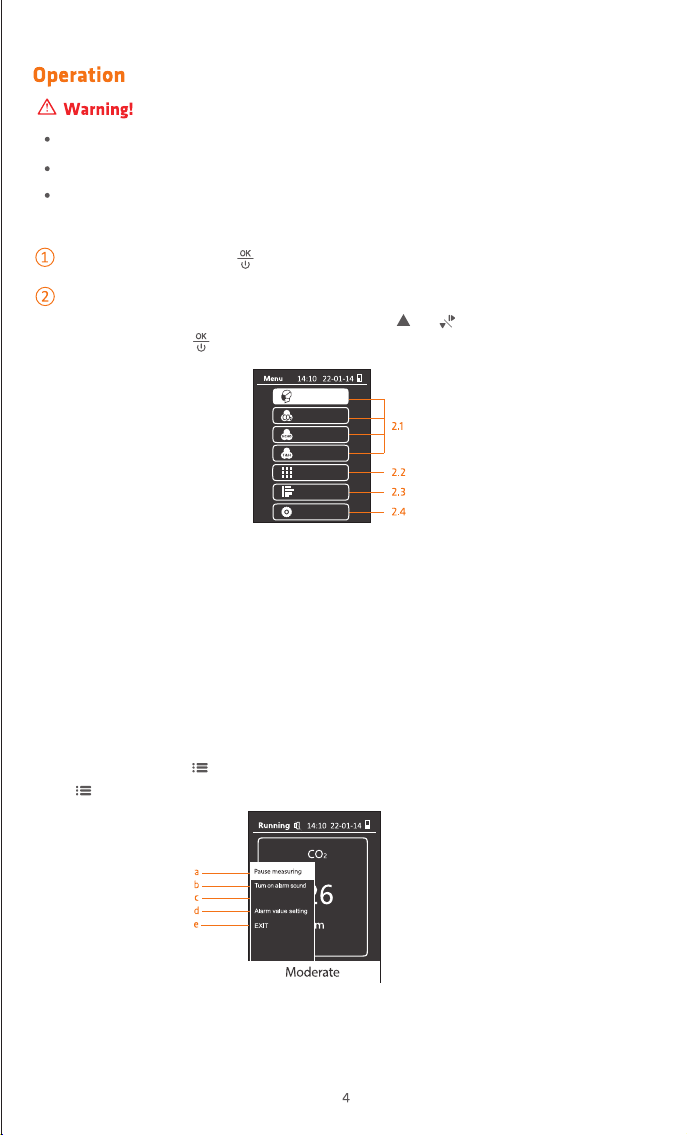
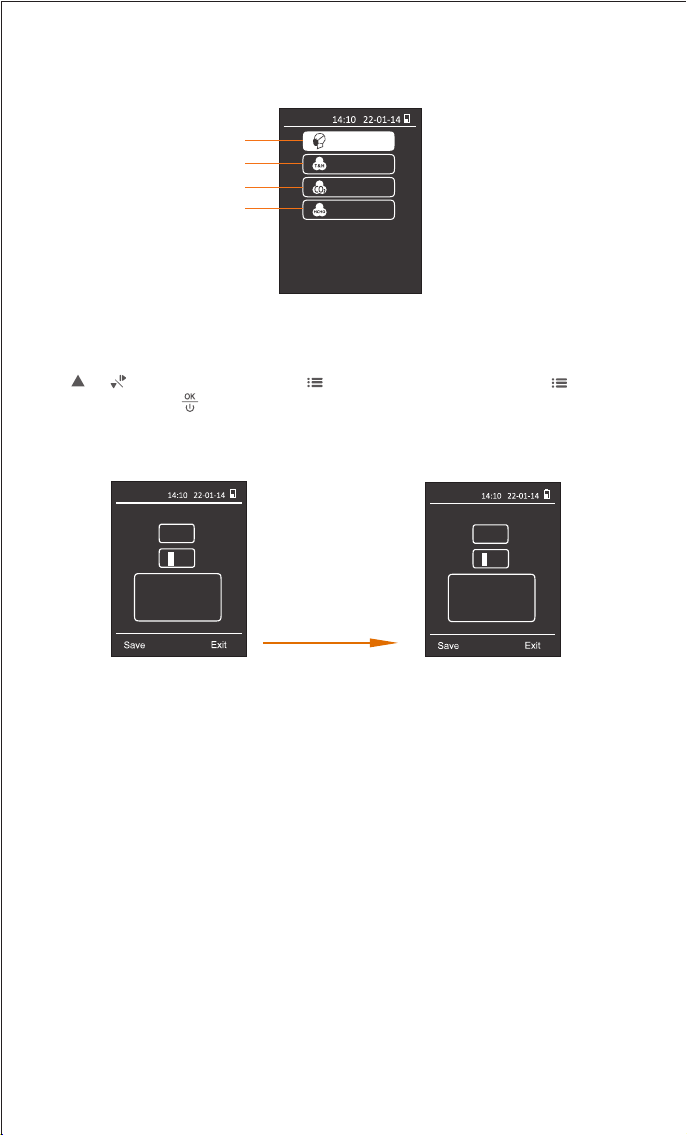
When the detector is turned on (fig.2), then press or to locate the option to
view or set and press to confirm.
fig.3
2.1 View or set PM2.5/CO2/HCHO/TEMP&HUM.
2.2 View all the information.
2.3 Check data records.
2.4 Set date, time,power saving,calibration,alarm value, language and help.
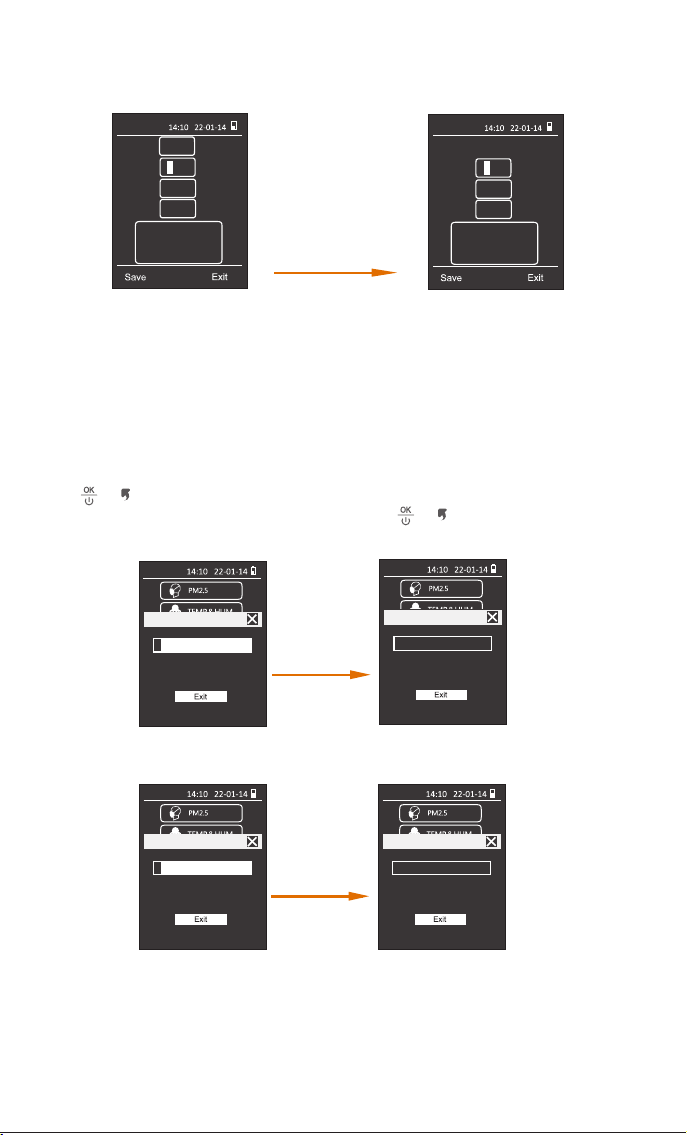
2.1 View or set PM2.5/CO2/HCHO/TEMP&HUM
In each interface, press to display more functions. Take CO2 interface for example,
press button, you may see the following function options (fig.3):
a. Pause measuring: Pause or restart deteating CO
2.
b. Turn on alarm sound: Mute / Unmute the buzzer.
PM2.5
CO2
HCHO
TEMP & HUM
View all info
History
Settings
ON/OFF Press and hold for 2 seconds to turn on/o the detector.
Detection
Indoor use:Keep the room/area airtight for 10 minutes to obtain more accurate results.
When charging, the indicator light is red and full of green.
If battery level shows, please charge the detector promptly to avoid eects during use
(also chargeable when turned o).
Note: If the start-up time is less than three minutes before entering the CO2 screen, a "Sensor
preheating" pop-up box will appear, please try again later (For M2000/M2000C).
Press the 'Up' or 'Down' button to
set the current value, press the
'menu' key to switch to the next
item.
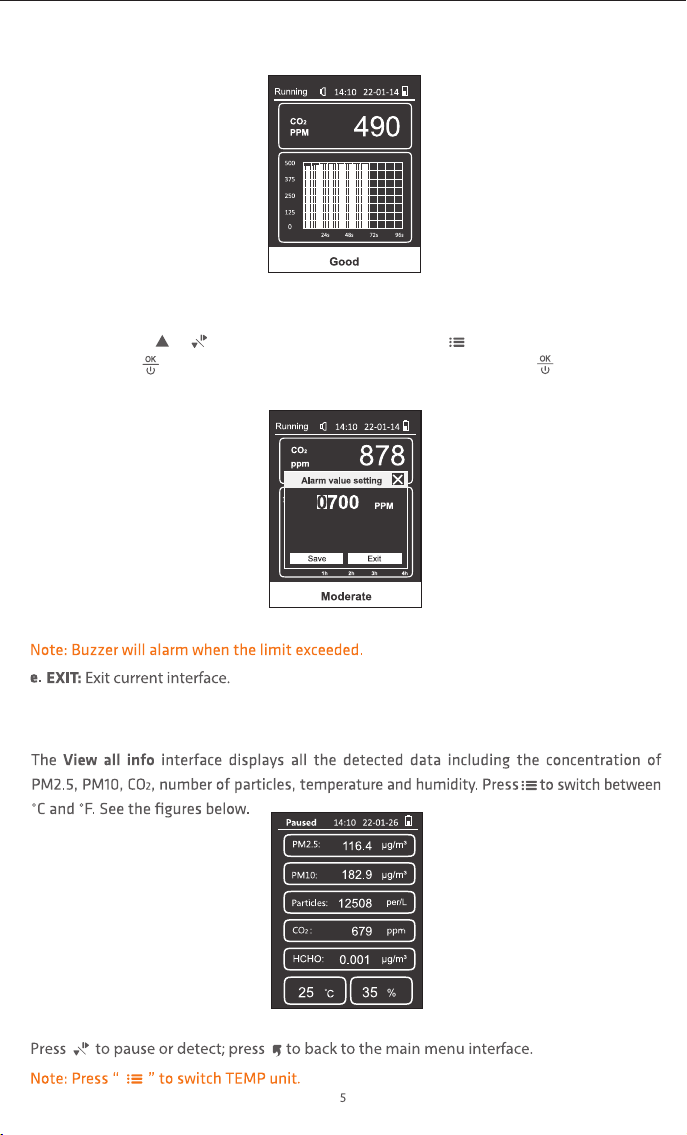
2.2 View all info
fig.4
fig.5
fig.6
c. Display CO2 curve
d. Alarm value setting: Set high alarm limit.
Operation: Press or button to adjust the value and press to switch digits. Then
press Save and to save the setting and exit the interface, or press Exit and to exit
without saving the setting (fig.5).
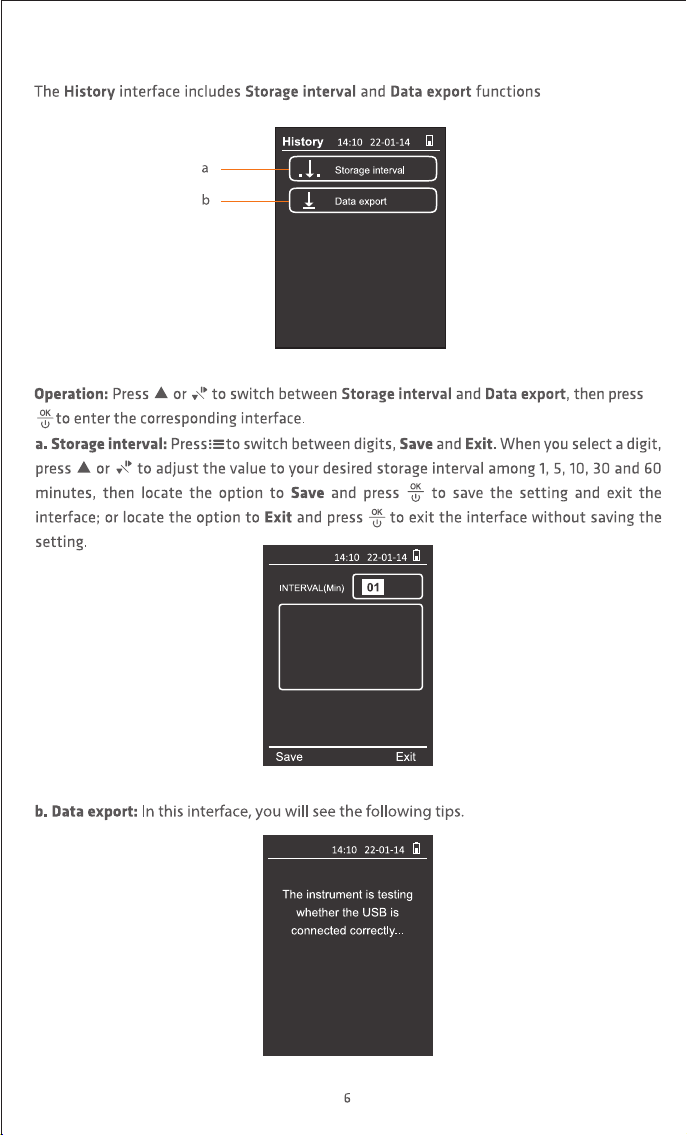
2.3 History (For M2000C 2nd/M2000 2nd)
fig.7
History
History
fig.8
fig.9
(fig.7).
Press the Up or Down button
to set the current value,
press the menu button to
switch to the next item.

BACK
History
History
wait!
History
fig.10 fig.11
fig.13
(fig.10);
(fig.11).
(fig.13).
fig.12
(fig.12)
*
*For M2000 2nd
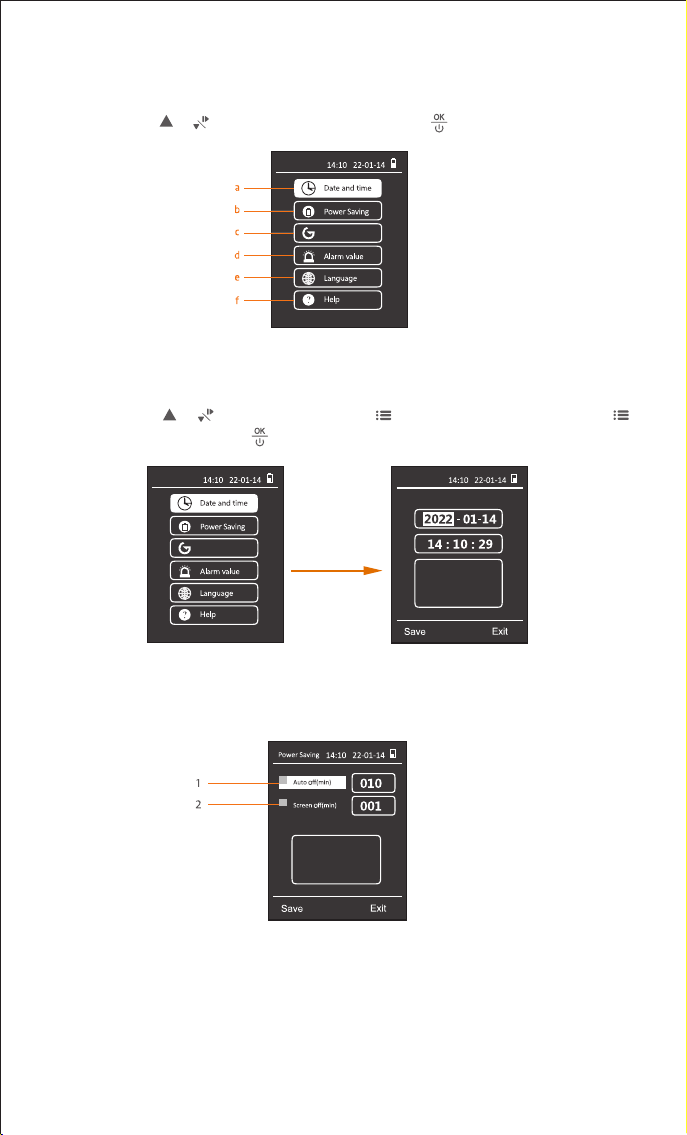
2.4 Settings
The
Settings
interface displays 6 options below (
fig.14
).
Operation:
Press or to select the desired option; press to enter the interface.
Settings
Calibration
fig.14
a. Date and time
(Example Of Button Operation)
:
Operation:
Press or to adjust time and press to switch to next digit. Then press
to switch to
Save
or
Exit
. Press to finish the settings and exit the interface.
Date and Time
Press the Up or Down button
to set the current value,
press the menu button to
switch to the next item.
fig.15
b. Power saving:
Set power saving mode.
fig.16
1. Auto-o(min): enable/disable auto-o power function, unit in min.
2. Screen-o(min): enable/disable screen-o function, unit in min.
Press the Up or Down button
to set the current value,
press the menu button to
switch to the next item.
Press the Up or Down button
to set the current value,
press the menu button to
switch to the next item.
8
Settings
Calibration
Press or to adjust number and press to switch to next digit. Then press to switch
to
Save
or
Exit
. Press to finish the calibration and exit the interface (fig.18 & fig.19).
Calibration
PM2.5
30.0 μg/m
3
K 0.61
fig.18
Press the Up or Down button
to set the current value,
press the menu button to
switch to the next item.
Calibration
PM2.5
49.2 μg/m
3
K 1.00
Press the Up or Down button
to set the current value,
press the menu button to
switch to the next item.
Decrease "K" to 0.61
Formula: K(target value) = PM2.5(target value) / PM2.5(current value) * K(current value).
Example (fig.18):
If PM2.5 target value is 30.0µg/m3, current value is 49.2µg/m3, current value of K is 1.00.
Then "K(target value) = 30.0/49.2 * 1.00 = 0.61"
For products calibrated according to ISO standard, K coecient is 1 by default. It is only
recommended that professional engineers perform this adjustment under standard conditions
with standard laboratory, or test bin facilities. At the same time, the calibration environment
required for P2.5 is relatively high, and the calibration results will be aected by factors such as
dust/particle size and dierent configurations of standard warehouse facilities, etc, so it is
strongly recommended that you use this function only under essential conditions or contact us
to better support your special needs.
c.
The
Calibration
interface displays 4 options below (fig.17).
Calibration
1
2
3
4
fig.17
9
1. PM2.5 Calibration: You can calibrate the temperature and humidity by modifying the "OFF" value.
PM2.5
TEMP & HUM
CO
2 Zero
HCHO Zero
Press or to stop the calibration and exit the interface(fig.20 & fig.21).If the calibration
progress is 100%, the calibration is completed and press or button to exit the interface.
Calibration
CO
2
Zero
HCHO Zero
CO2 Sensor under calibration
Calibration
CO
2
Zero
HCHO Zero
HCHO Sensor under calibration
Please put the sensor outdoors for
5 minutes until its calibration is
finished.
fig.20
Calibration
CO
2
Zero
HCHO Zero
HCHO Sensor under calibration
HCHO zero point calibration
successful.
HCHO Sensor under calibration
100%
6%
100%
Calibration
CO
2
Zero
HCHO Zero
CO2 Sensor under calibration
Please put the sensor outdoors for
5 minutes until its calibration is
finished.
6%
CO2 zero point calibration
successful.
Calibration
TEMP
23.0 ℃
OFF
- 0.2 ℃
HUM 33.0 %RH
OFF
+1.5 %RH
Press the Up or Down button
to set the current value,
press the menu button to
switch to the next item.
Calibration
TEMP
25.0 ℃
OFF
+1.8 ℃
HUM 36.0 %RH
OFF
+4.5 %RH
Press the Up or Down button
to set the current value,
press the menu button to
switch to the next item.
fig.19
Formula: OFF(TEMP target value) = TEMP(target value) - TEMP(current value) + OFF(TEMP current value).
OFF(HUM target value) = HUM(target value) - HUM(current value) + OFF(HUM current value).
Example (fig.19):
If TEMP target value is 25.0, current value is 23.0, current value of OFF(TEMP) is -0.2.
Then "OFF(TEMP target value)=25.0-23.0+(-0.2)=+1.8".
If HUM target value is 36.0, current value is 33.0, current value of OFF(HUM) is +1.5.
Then "OFF(HUM target value)=36.0-33.0+(+1.5)=+4.5".
Increase "OFF(TEMP)" to +1.8°C
Increase "OFF(HUM)" to +4.5%rh
10
4. HCHO Zero Calibration:
3. CO
2 Zero Calibration:
fig.21
Note: 1. Please ensure that you can calibrate under fresh air outdoors.
2. During the calibration process, please do not perform other operations until the
calibration is successful and you return to the previous level screen.
2. TEMP & HUM Calibration: You can calibrate the PM2.5 value by adjusting the "K" factor.
Alarm value
012.0
0
Recover
Alarm value
012.0
0
Press the ‘Up’ or ‘Down’
button to set the current
value, press the ‘menu’ key to
switch to the next item.
Recover
Restore factory settings as default
Switch on the menu button
and press OK button to
make a confirmation.
20%
Restore
Exit
fig.22
Press the Up or Down button
to set the current value,
press the menu button to
switch to the next item.
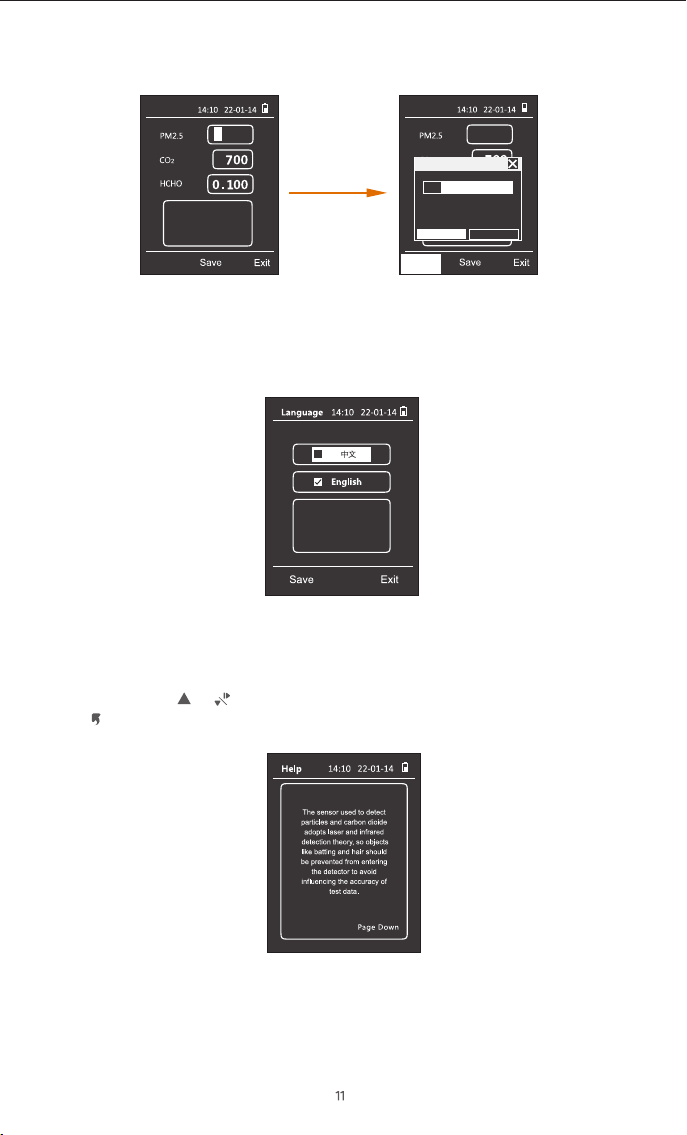
e. Language:
Set Chinese or English as displayed language (fig.23).
Switch on the menu button
and press OK button to make
a confirmation.
fig.23
f. Help:
View the help information for using the detector (fig.24).
Operation:
Press or to view the information that help you use the detector.
Press to back to set interface.
fig.24
d. Alarm value:
Set alarm limit for PM2.5, CO2 or HCHO concentration (fig.22).
Q: Why is the formaldehyde reading inaccurate?
A: The air is not circulated during storage and transportation. In order to ensure the best
performance of the equipment, it needs to be ventilated outdoors for 1-2 hours before the
first use.
Note that gases such as alcohol, carbon monoxide, and hydrogen sulfide may interfere with
the sensor test. Stay away from alcohol, cigarette (including carbon monoxide), soot
(including acrolein), and fruit (including ethanol). If the detector is exposed to high
concentrations of air pollution, it will damage the sensor and make it unable to work
properly.
FAQ:
Q: Why is the PM2.5 reading constantly changing?
A: As PM2.5 concentration in the environment is changing all the time not only due to
environmental factors like changes in airflow, humidity, wind direction and etc. but also due
to common pollutant sources like smoking, cooking; exhaust emissions from vehicles,
smoke from burning coal/chimneys/furnaces and etc. All these may influence the PM2.5
concentrations and give dierences in the readings.

Q: Why is the test result abnormal or below normal?
A: ① Please check whether the air inlet or outlet is covered or liquid has entered.
②
Gently shake the detector during detection to increase the interaction with surrounding air.
③ The sensor may be not recovered, Please place the detector outdoors for ventilation.
Q: Why data reading is unstable?
A: If the airflow in the current sampling space is in an unstable state, such as strong wind,
the concentration of particulate matter in the air will be unevenly distributed, and will vary
greatly with the surrounding airflow, resulting in large dierences in measured values.
Q: Why humidifiers can cause rising particulate matter readings?
A: Our sensors use the principle of light scattering. When using a humidifier, the humidifier
will spray many small droplets of water. Excessive humidity and moisture in the air will cause
dust particles to absorb water and swell, which will aect the scattering of light and cause
deviations in sensor readings.
Q: Why is the data reading very high/over-range after the detector is turned ON?
A: As being packed in ink printed package box over time may interfere with the sensor due to
the remaining organic volatile residue inside the package. Therefore, after unpacking, please
put the detector in a ventilated place to help accelerate its data recovery.
Q: Why is the data high after booting?
A: The reason why the data is high when you first turn on the sensor is that when the sensor
starts to work, the fan will run at full speed, and it will take a while (about 1-2 minutes) for
the fan to run stably. At this time, the airflow in the air duct will be stable, and the data will
gradually become stable.
Q: AQI/ PM2.5 and other values, why the measured value is inconsistent with the
ocial announcement?
A: The AQI/PM2.5 shown on the display is a measurement of the space where the device is
located. The measured value published on the Internet or ocial websites is the average
value of several monitoring points, and each measurement point will be dierent. At the
same time, according to the regulations of EPA and WHO, the AQI value is calculated based
on the highest value among the five pollutants in the atmosphere on that day. In the past
ten years, the local AQI in the United States has basically been calculated with the value of
PM2.5/10, and sometimes with the value of O
3.
13
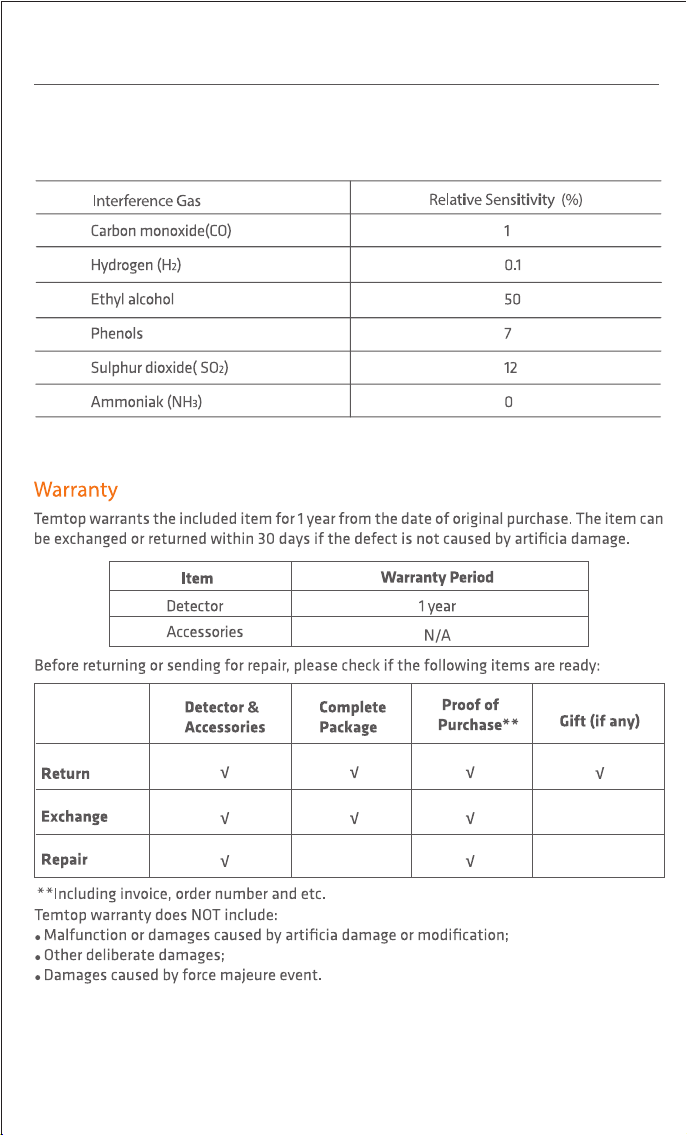
Q: Which the HCHO reading inaccurate or overestimated at some points?
A: As Temtop uses a high-precision electrochemical HCHO sensor, its electrochemical
reaction characteristics could also respond to other gases besides formaldehyde.This table
lists the most common gases that interfere with relative sensitivities of HCHO sensor.
14

V2.2