
Instruction Manual
PETROL WATER PUMP
HY50, HY80, HY100, HYC50, HYT80
WARNING: Read the instructions carefully before use.

2
CONTENTS
PAGE NO.S
1
SAFETY
3 - 7
2
MACHINE SPECIFIC SAFETY
7 - 8
3
PART LOCATIONS
9 - 10
4
PRE OPERATION INSPECTION
10 - 12
5
ASSEMBLY & OPERATION
13 - 15
6
STARTING PROCEDURE
16
7
STOPPING PROCEDURE
17
8
MAINTENANCE
17 - 20
9
STORAGE
21
10
TROUBLE SHOOTING
22
11
SPECIFICATION
24
12
DECLARATION OF CONFORMITY
25
13
RECYCLING & PRODUCT DISPOSAL
26
14
CONTACT DETAILS
27
15
WARRANTY & MANUAL UPDATES
27
INDEX

3
1.1 General Safety Notes.
1.2 The operator of the machine is responsible for, and has a duty of care in making sure
that the machine is operated safely and in accordance with the instructions in this user
manual. Keep the manual safe and pass it on if the machine is loaned or sold to another
user.
1.3 Please note the following safety points.
1.4 The machine should never be left it in a condition which would allow an untrained or
unauthorised person/s to operate this machine.
1.5 All due care and diligence should be taken by the operator for the safety of and with
regard to those around whilst using the machine.
1.6 Some or all of the following - warning signs, symbols and/or PPE pictograms may ap-
pear throughout this manual. You MUST adhere to their warnings. Failure to do so
may result in personal injury to yourself or those around you.
DANGER
Indicates a hazard, which, if not avoided, could result in serious injury or death.
WARNING
Indicates a hazard, which, if not avoided, could result in serious injury.
CAUTION
Indicates a hazard which, if not avoided, might result in minor or moderate injury.
NOTE
Indicates a situation that could easily result in equipment damage.
READ and keep the manual safe and pass it on if the machine is loaned or sold to another user.
You MUST fully understand all instructions to ensure you use and operate the machine safely.
Appropriate Personal Protective Equipment (PPE), MUST be worn at all times when operating or
repairing the machine.
1. SAFETY
4
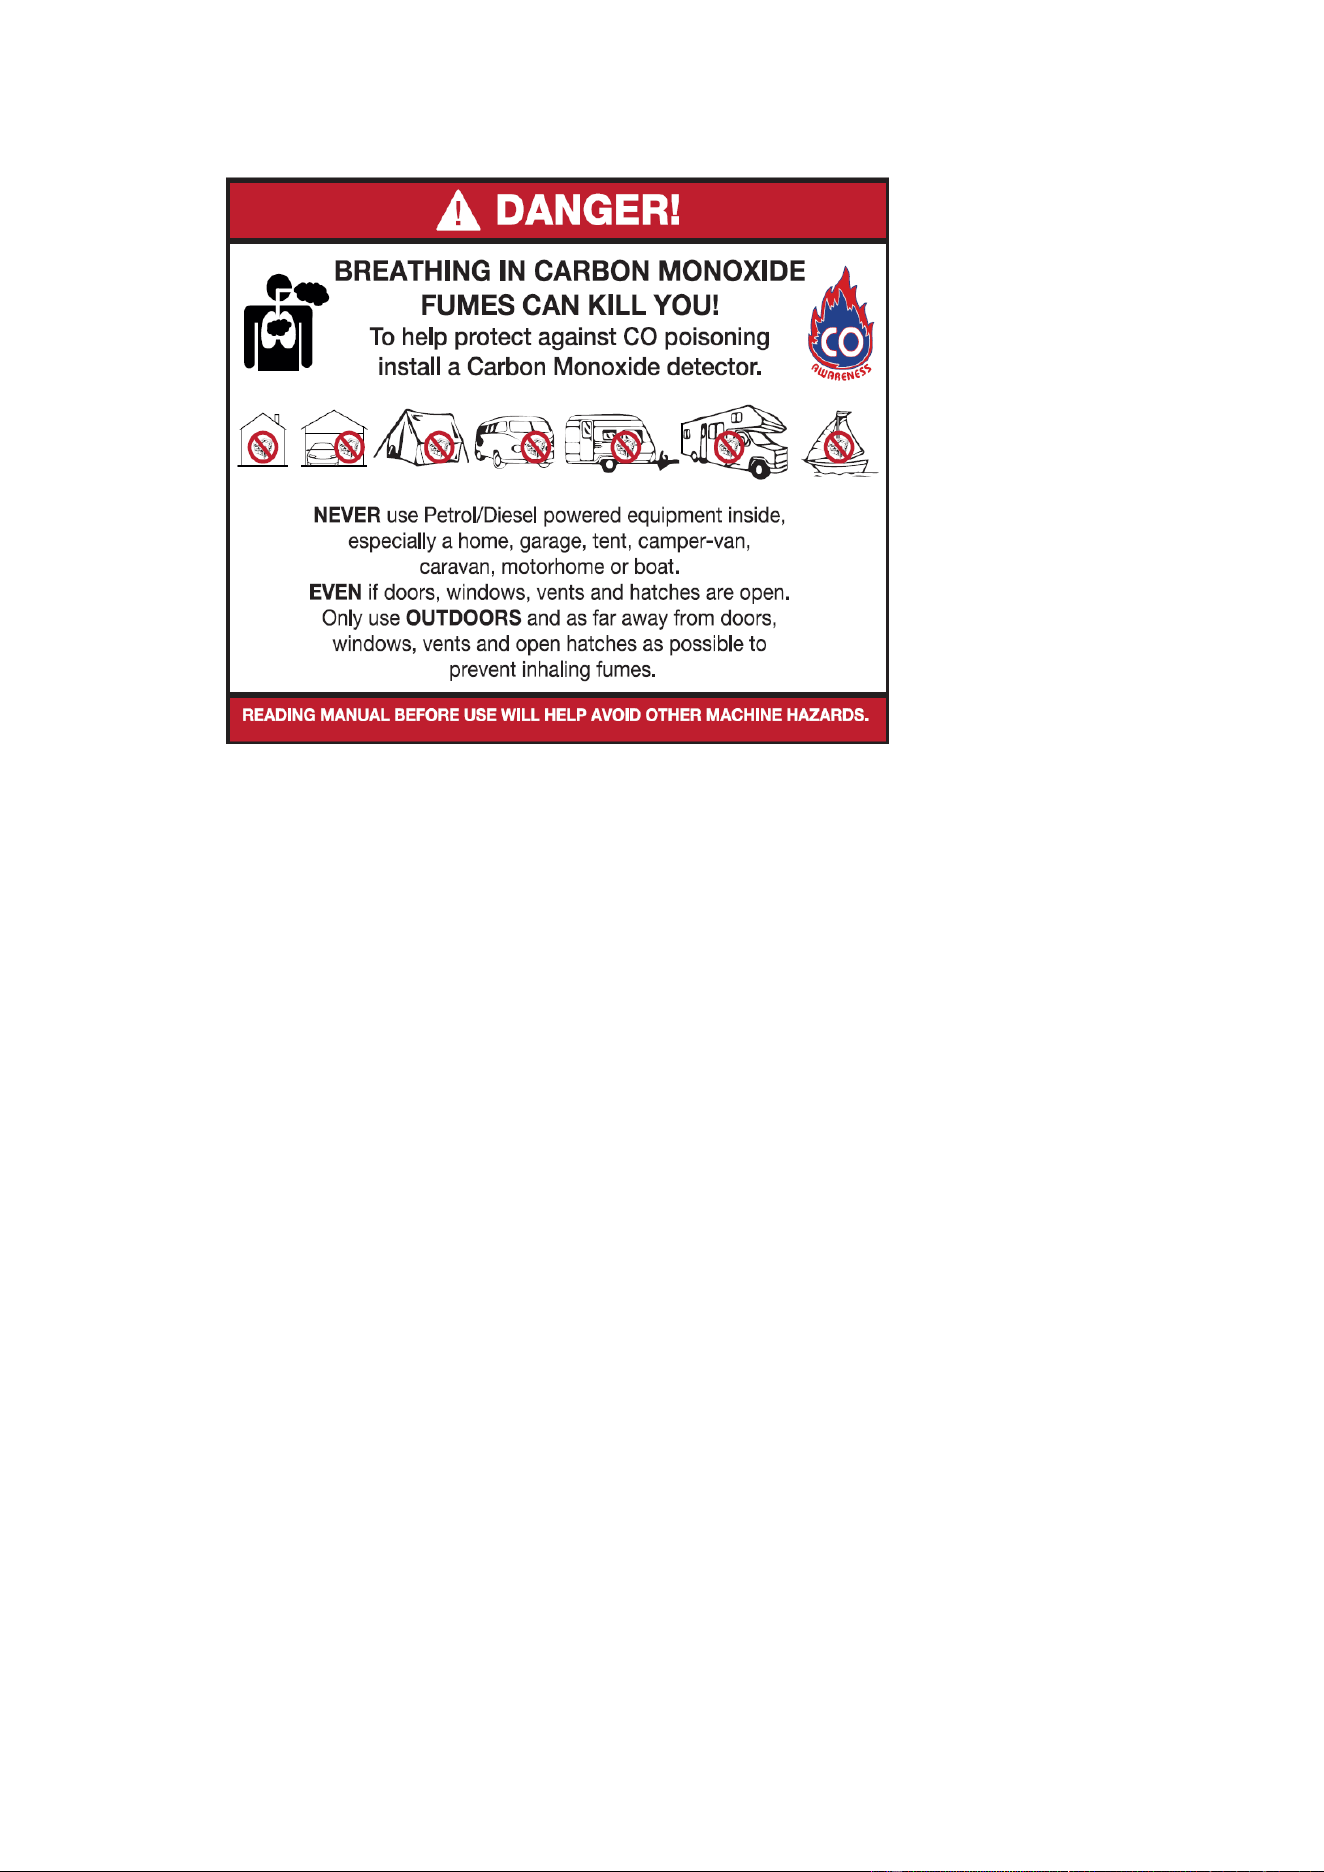
1.10 Carbon Monoxide (where applicable).
1.11 Carbon monoxide is a colourless and odourless gas. Inhaling this gas can cause
death as well as serious long term health problems such as brain damage.
1.12 The symptoms of carbon monoxide poisoning can include but are not limited to the
following;
Headaches, dizziness, nausea, breathlessness, collapsing or loss of consciousness.
1.13 Carbon monoxide poisoning symptoms are similar to flue, food poisoning, viral
infections and simply tiredness. It is quite common for people to mistake this very
dangerous poisoning for something else.
1.14 To avoid carbon monoxide poisoning DO NOT use Petrol/Diesel powered equipment
inside any of the following; Home, garage, tent, camper van, mobile home, caravan
or boat. This is not exhaustive and if you are in any doubt contact your dealer.
1.15 If you think you have or someone around you has been affected by carbon monoxide
poisoning;
1.16 Get them fresh air immediately, by leaving the affected area or by opening doors and
windows. If safe and practical to do so make sure that the machine is turned off.
DO NOT enter a room you suspect of having carbon monoxide present – instead call
the emergency services.
1.17 Contact a Doctor immediately or go to Hospital – let them know that you suspect
carbon monoxide poisoning.
1.18 DO NOT use in an enclosed area or moving vehicle.
5
1.20 General Fuel Safety (where applicable).
CAUTION
ALL FUELS ARE FLAMABLE
1.21 Fire Hazard – keep fuel away from all sources of ignition for example heaters.
Lamps, sparks from grinding or welding.
1.22
DO NOT carry out hot work on tanks that have contained fuel.
1.23 ALWAYS keep the work area tidy.
1.24 ALWAYS clean up spills promptly using absorbent granules and a lidded bin.
1.25 ALWAYS dispose of waste fuels correctly.
1.30 Fueling/De-fueling (where applicable).
CAUTION
ALL FUELS ARE FLAMABLE
1.31 ALWAYS fuel and defuel in a well ventilated area outside of buildings.
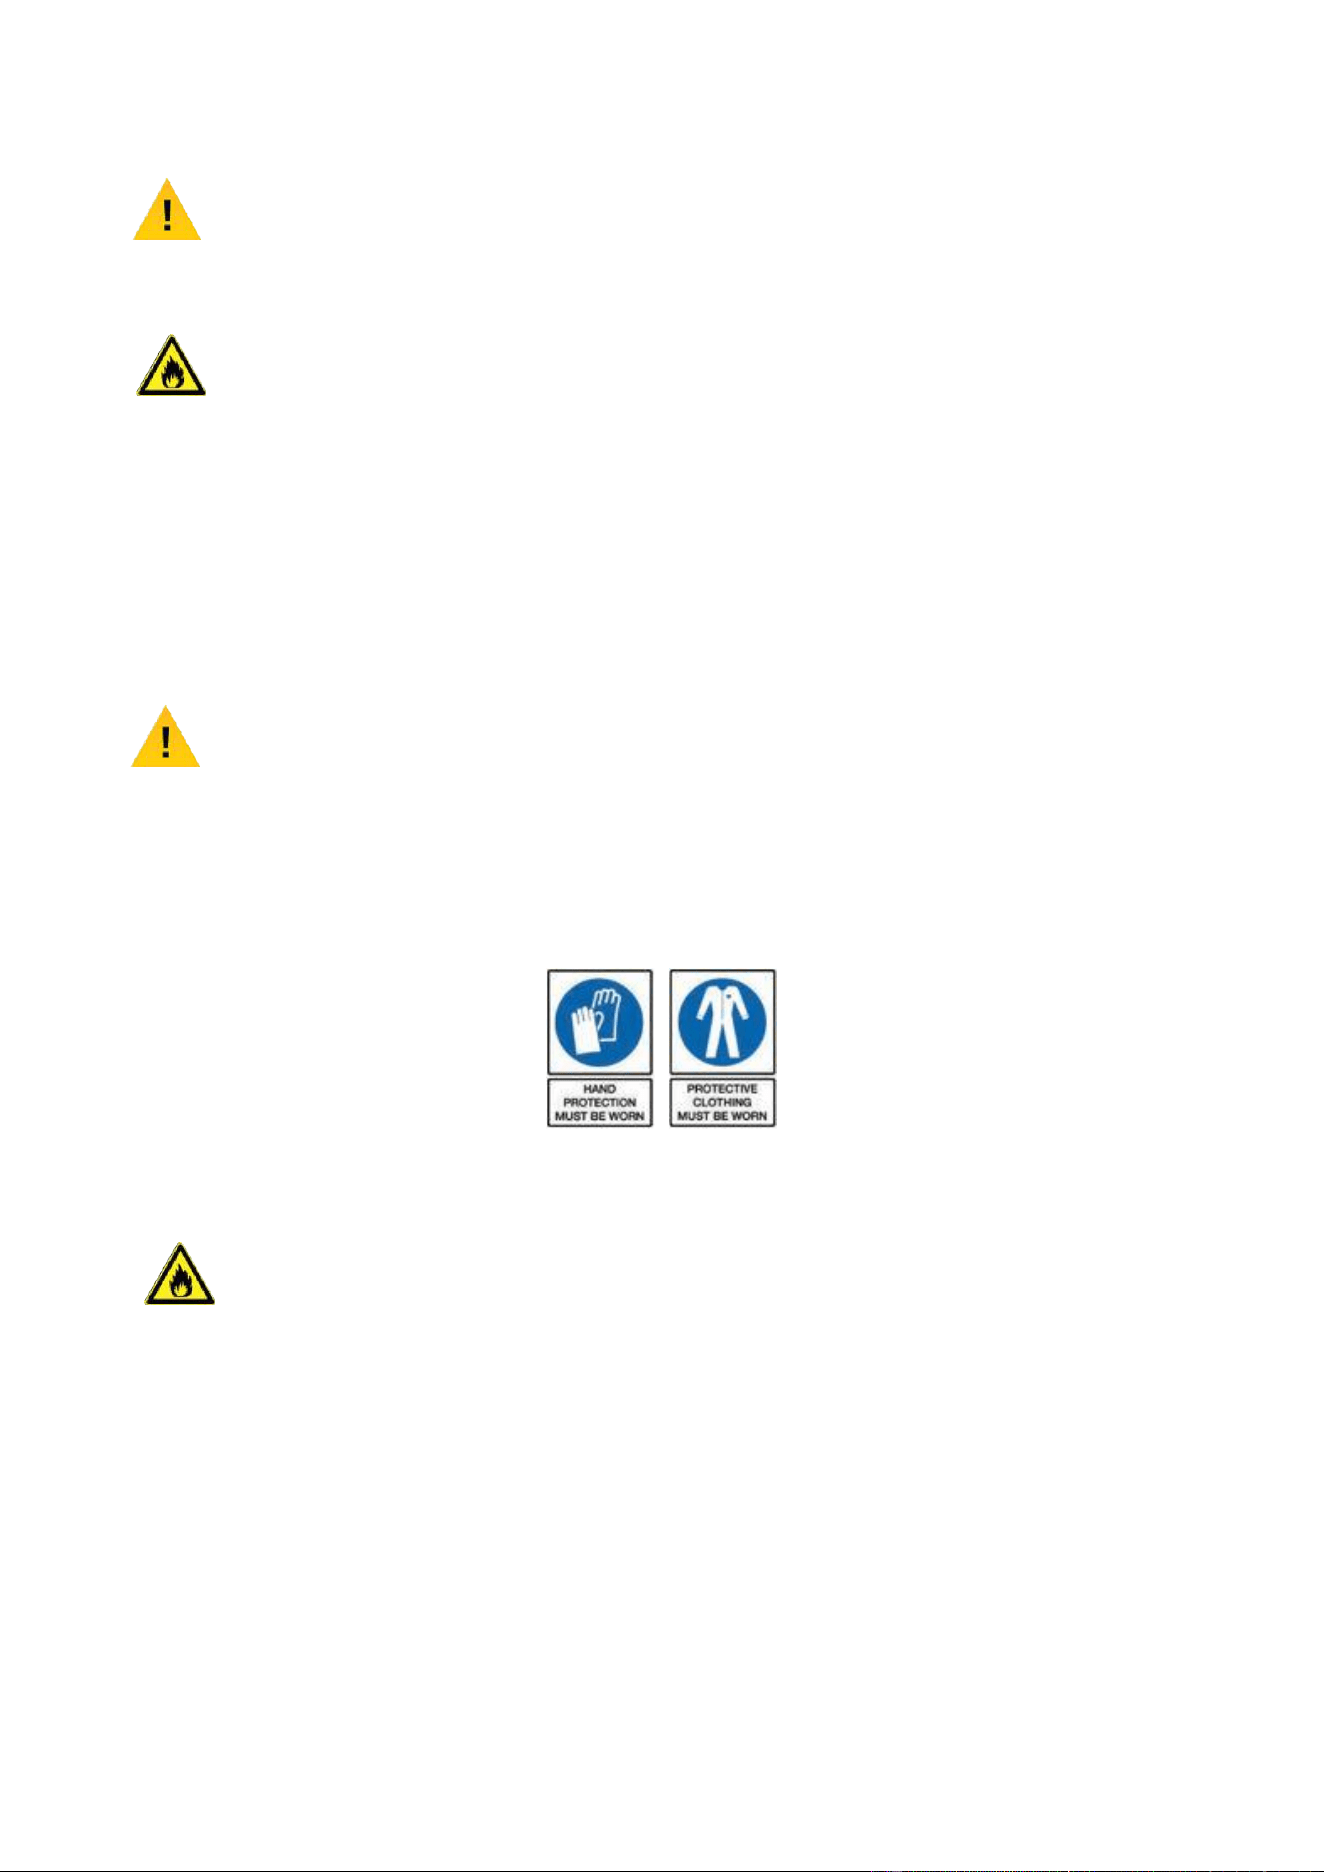
1.32 ALWAYS wear correct, suitable and fit for purpose Personal Protective Equipment
(PPE), suggested items are but not limited to safety gloves, overalls.
1.33 When fueling/de-fueling ALWAYS avoid inhaling fumes.
1.34 When de-fueling ALWAYS use a proper fuel retriever.
1.35 ALWAYS carry fuel in the correct and clearly marked container.
1.40 Electrical Safety (where applicable).
1.41 Electricity can kill – NEVER work on LIVE/ENERGISED equipment.
1.42 Prior to carrying out any maintenance work you MUST identify electrical isolation
methods and isolate all electrical supplies.
1.43 Prior to use and with all electrical supplies isolated, you MUST check all electrical
cables, plugs and connectors for the following;
1.44 Are intact and have no signs of damage, to include but not limited to bare wires,
chaffing, cuts and loose wiring.
1.45 If there are any signs of damage, the damaged item MUST be taken out of service
until the damage has been repaired by an electrically competent person.

6
1.46 All trailing cables should be routed so as not to cause any kind of trip hazard.
1.47 NEVER work on or near electricity with wet hands, wet clothing and wet gloves.
1.50 Batteries (where present).
1.51 Batteries present a risk if they become damaged by the possible leaking of
electrolyte. This electrolyte is an acid and can cause serious burn injuries. Care
should be taken when working on or near them. NOTE the electrolyte may be in
a liquid or gel form.
1.52 Should you come in to contact with electrolyte you should;
1.53 Remove all clothing contaminated with electrolyte. If you cannot remove then
saturate them in water.
1.54 Get medical assistance as soon as possible. You must advise the medical staff of
the type of acid.
1.55 Lead/acid battery = dilute sulphuric acid.
1.56 Nickel/cadmium = potassium hydroxide alkali electrolyte.
1.57 Use fresh running water to wash off excess electrolyte, continue this until medical
assistance arrives. Make sure that you do not was the electrolyte to another part of
your body or face.
1.58 If electrolyte comes in to contact with Eyes the electrolyte needs to be immediately
washed away with large amounts of water. Make sure that you do not wash the
electrolyte to another part of your face or body.
1.59 Gasses from charging batteries are highly flammable and great care should be taken
to charge in well ventilated areas.
1.59.1 There is an explosion risk if the battery terminals are short circuited, when
connecting/disconnecting ALWAYS exercise great care so that the terminals or
battery leads are NOT allowed to touch and cause a spark. ALWAYS use suitable
insulated tools.
1.60 Vibrations (where applicable).
1.61 Prolonged use of hand held (operated) machines will cause the user to feel the
effects of/from vibrations. These vibrations can lead to white finger (Raynaud’s
phenomenon) or carpal tunnel syndrome. This condition reduces the ability of the
hand to feel and regulate temperature, causing numbness and heat sensations and
may cause never damage and circulatory tissue death.
1.62 Not all factors that lead to white finger disease are known, but cold weather, smoking
and other diseases that affect blood vessels and blood circulation as well as large
and long-lasting impact of shocks are considered factors in the formation of white
finger. Note the following to reduce the risk of white finger and carpal tunnel
syndrome;
1.63 Wear gloves and keep your hands warm.
1.64 Take regular breaks.
1.65 All of the above precautions may help reduce the risk of white finger disease but not
rule out the carpal tunnel syndrome. Long-term and regular users are therefore

7
recommended to observe the condition of your hands and fingers. Seek medical
attention immediately if any of the above symptoms should occur.
1.70 Noise (where applicable).
1.71 The operating noise of the machine can damage your hearing. Wear hearing
protection such as earplugs or ear defenders to protect your hearing. Long-term
and regular users are advised to have hearing checked regularly. Be especially
vigilant and cautious when hearing ear protection because your ability to hear alarm
warnings will be reduced.
1.72 Noise emissions for this equipment is unavoidable. Carry out noisy work at approved
times and for certain periods. Limit the working time to a minimum. For your personal
protection and protection of people working nearby it is also advisable for them to
wear hearing protection.
1.73 See Certificate of Conformity section for Outdoor Noise declaration of
conformity.
2.1 CLEAN WATER PUMPS: Designed for pumping clean, fresh water only.
TRASH WATER PUMPS: Designed for pumping liquids with debris up to 25mm.
CHEMICAL WATER PUMPS: Designed for pumping liquids with weak acid and
bases (pH 4-11). Commonly seawater and liquid fertilizer.
2.2 To prevent fire, NEVER add fuel to the tank while the engine is running or warm.
2.3 Wipe away any spilt fuel or oil with a clean cloth before operating.
2.4 Keep sources of ignition away from the machine at all times.
2.5 To prevent fire and to provide adequate ventilation, keep the machine at least one
meter away from buildings and other equipment during operation.
2.6 Operate the machine on level ground – DO NOT place the machine indoors whilst
the engine is still hot.
2.7 NEVER use the machine indoors or in a closed area with poor ventilation.
This machine produces Carbon Monoxide which, if inhaled, can kill.
2.8 The exhaust and engine will get hot during operation and remain hot for some time
after operation. DO NOT touch these parts until the machine has had sufficient time
to cool completely.
2.9 Careless or improper use of any water pump may cause serious or fatal injury.
2.10 If you are unsure how to use your machine you must read and understand all of this
manual and get your dealer to demonstrate its use.
2.11 Observe all applicable local safety regulations and standards.
2. MACHINE SPECIFIC SAFETY

8
2.12 Children should never be allowed to use this machine.
2.13 Bystanders, especially children and animals should not be allowed in the area while
the machine is in use.
2.14 The operator is responsible for avoiding injury to third parties and damage to their
property.
2.15 Do not lend or rent your water pump without the owner’s manual.
Be sure that anyone who uses your water pump fully understands the information
contained in this manual.
2.16 You must be fit to operate this water pump.
2.17 You should not operate the water pump if you are unwell or physically unable.
If you get tired, stop the machine and take a break.
2.18 Do not operate the machine if you are under the influence of any substances, drugs,
alcohol, or medication that may impair vision, dexterity or judgement.
2.19 Only the attachments supplied are expressly approved for use with your specific model.
2.20 Other attachments must not be used because of the increased risk of accidents or
machine damage.
2.21 No liability will be accepted for personal injury or damage caused to the machine or
property while using unauthorised attachments.
2.22 Before starting, check the choke lever and stop switch can move freely.
2.23 Check the tightness of the spark plug cap, if loose sparks may occur and ignite the
escaping fuel vapours.
2.24 For safety reasons, this water pump must not be used in potentially explosive areas.
2.25 Start the engine at least 3m (10ft) from the fuelling area.
2.26 To reduce the risk of breathing toxic fumes, never start or run your unit in confined
spaces.
2.27 Make sure you have a firm footing before starting.
2.28 Avoid using the machine in slippery conditions, on slopes or uneven ground.
2.29 Correct Personal Protective Equipment (PPE) MUST be worn at all times when
operating or repairing this machine. This should include but is not limited to;
9
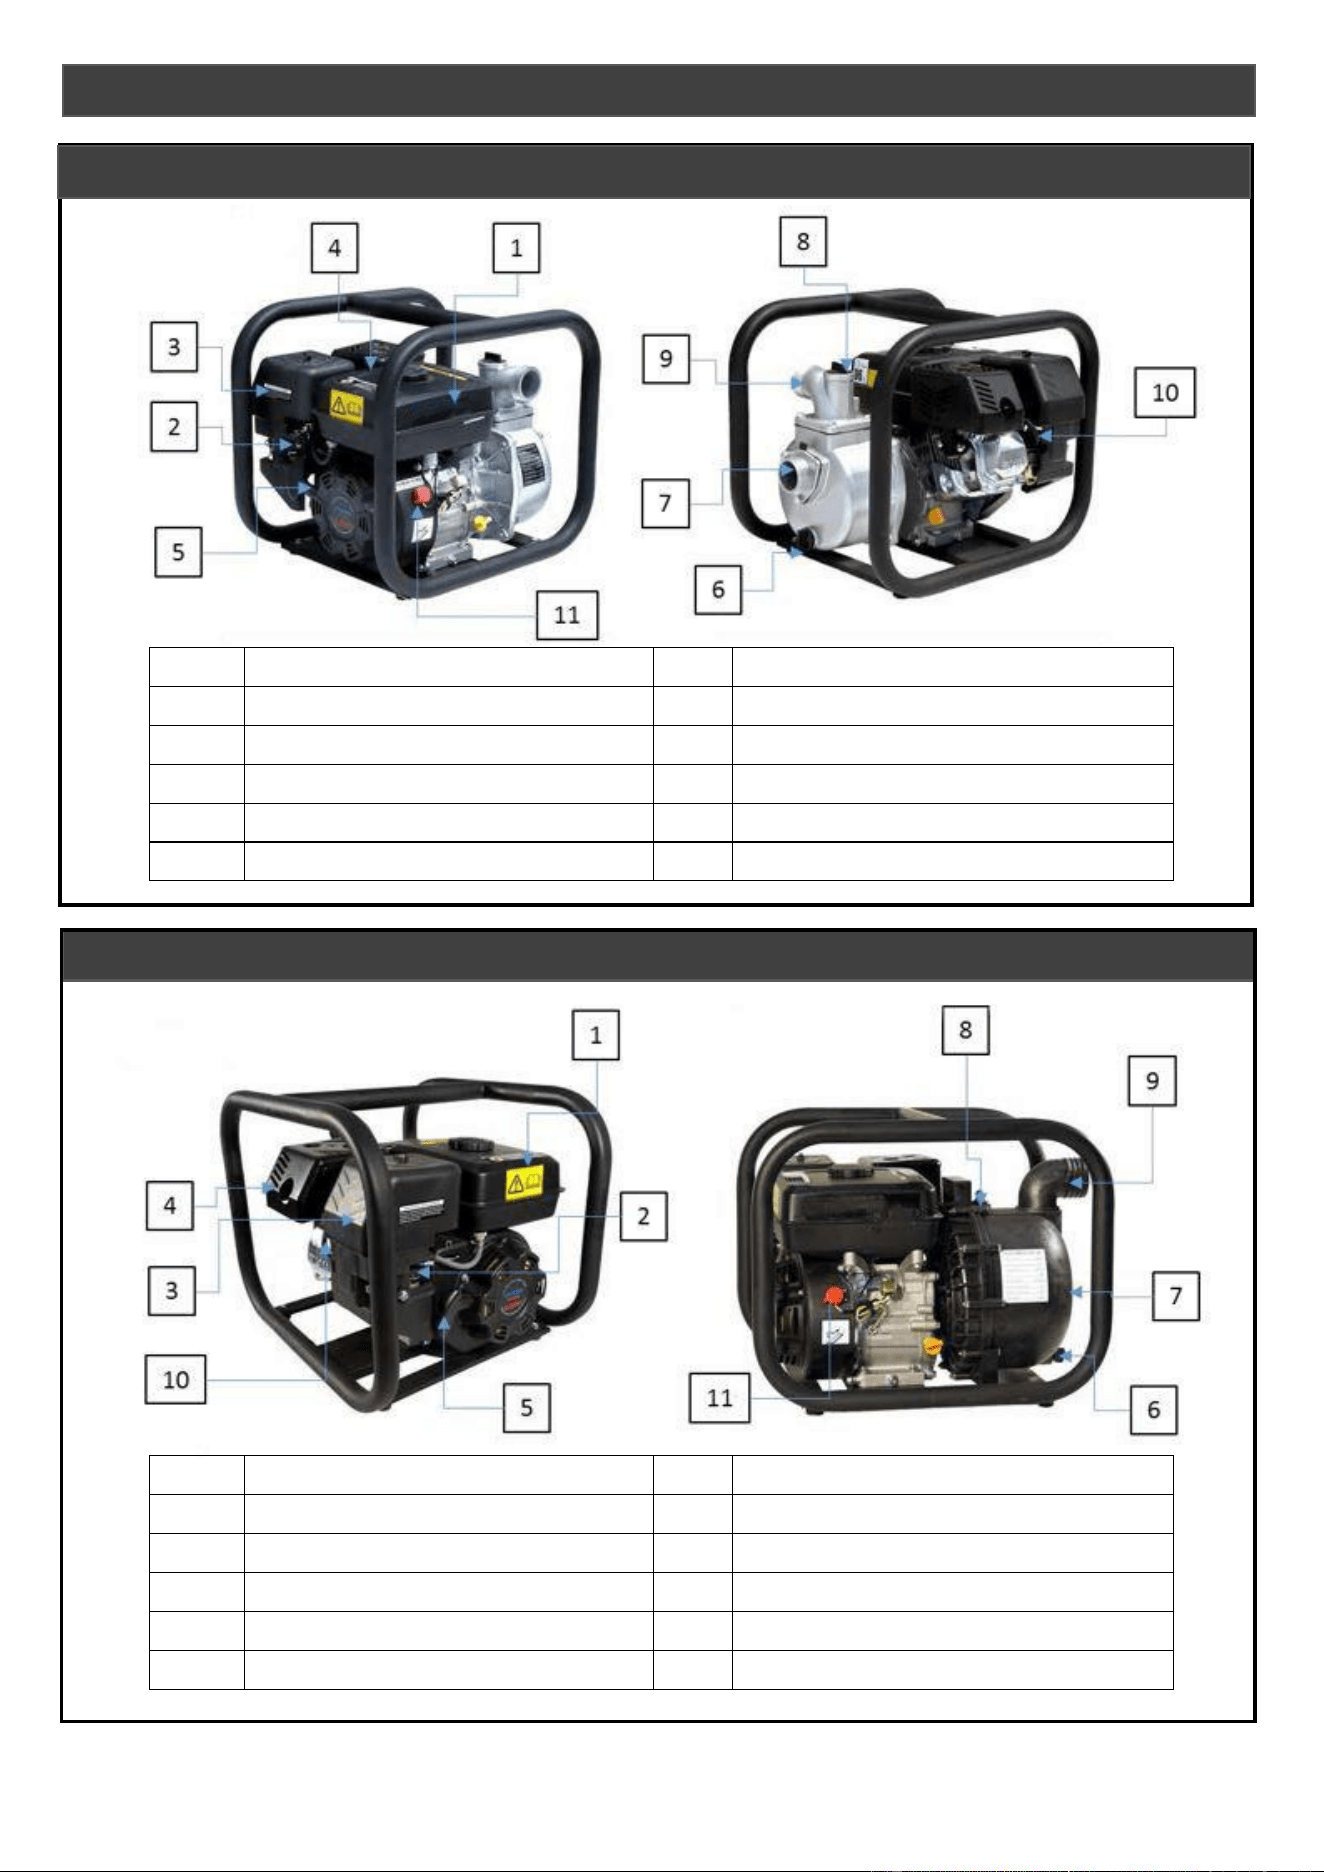
1
Fuel Tank
7
Pump Inlet
2
Throttle Lever
8
Pump Primer
3
Air Filter
9
Pump Outlet
4
Exhaust
10
Spark Plug
5
Recoil Starter
11
Engine Switch
6
Pump Drain Plug
1
Fuel Tank
7
Pump Inlet
2
Throttle Lever
8
Pump Primer
3
Air Filter
9
Pump Outlet
4
Exhaust
10
Spark Plug
5
Recoil Starter
11
Engine Switch
6
Pump Drain Plug
3. PART LOCATIONS
HY50, HY80, HY100
HYC50
10
WARNING
Failure to maintain this pump or deal with any problems that arise before operation
could cause a malfunction in which you could be seriously injured.
4.0 For your safety and to maximise the service life of the pump, it is important to check
the pump before use. If any problems are found, you MUST make sure that they are
dealt with by the appropriate person before you operate the pump.
4.1 The exhaust gasses contain poisonous carbon monoxide and so it is important to
avoid inhalation of these fumes.
Ensure that you are using the water pump outdoors, in a well-ventilated area and
never use the water pump in a closed garage or other closed area.
To prevent fire hazards, keep the water pump away from all walls and do not place
flammable objects close to the engine.
Before beginning your pre-inspection checks, ensure the pump is on a level surface
and the ignition switch is in the OFF position.
4.2 Check around and underneath the water pump for signs of oil or fuel leaks.
4.3 Remove any dirt and debris, especially from the exhaust and recoil starter.
4.4 Look for any signs of damage.
4.5 Check all nuts, bolts, screws, hose connections and clamps are tight.
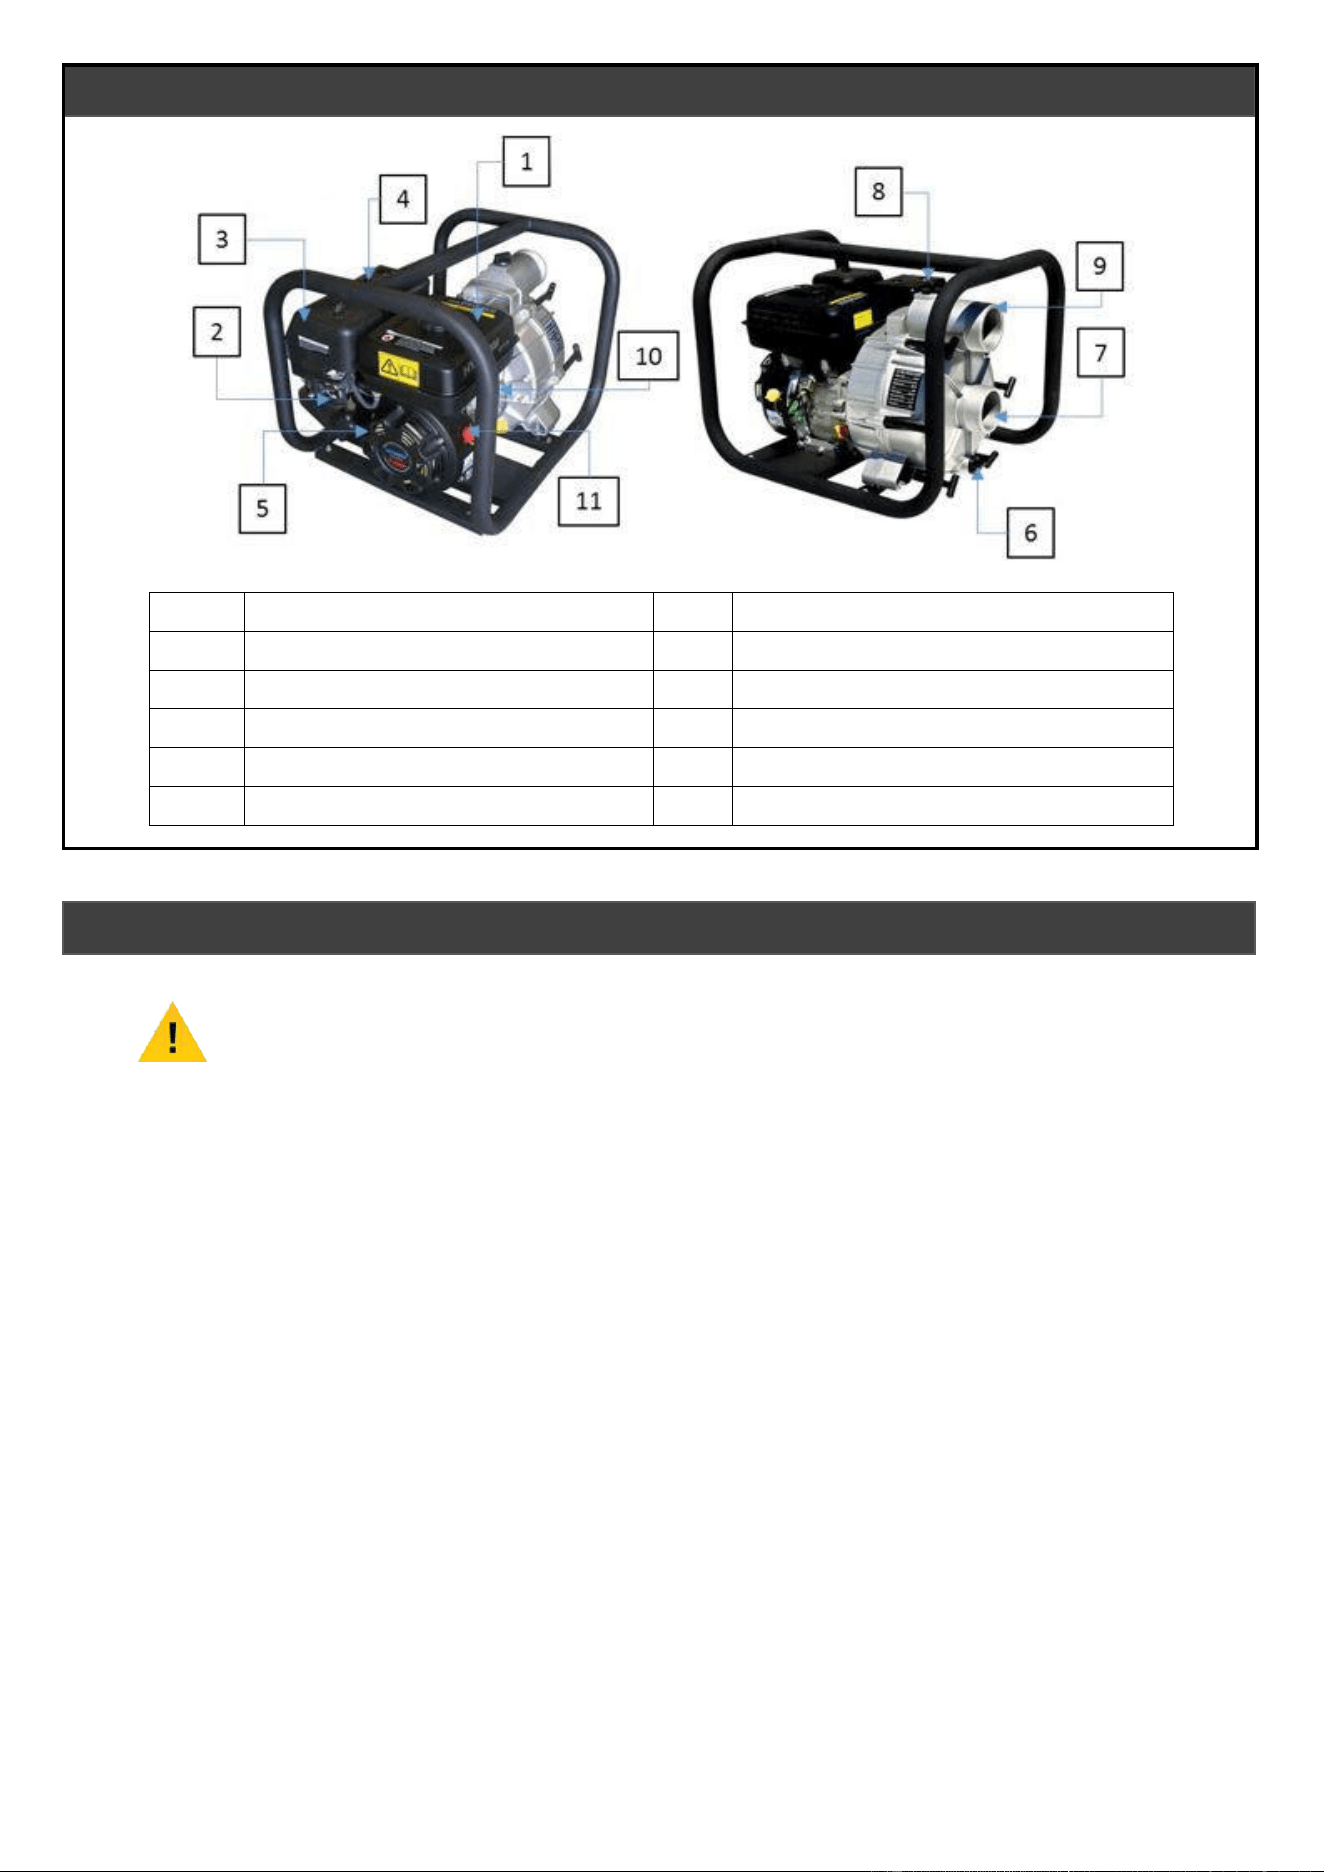
1
Fuel Tank
7
Pump Inlet
2
Throttle Lever
8
Pump Primer
3
Air Filter
9
Pump Outlet
4
Exhaust
10
Spark Plug
5
Recoil Starter
11
Engine Switch
6
Pump Drain Plug
HYT80
4. PRE-OPERATION INSPECTION

11
4.6 Check the internal condition of the hoses.
4.7 Before connecting the hoses to the water pump, make sure that they are in good
condition.
4.8 Ensure that the suction hose is of reinforced construction to prevent the hose from
collapsing.
4.9 Check that the sealing washer in the suction hose connector is in good condition.
If there are any leaks or a poor connection, the pump will draw in air and will not
function.
4.10 Check that the hose connectors and clamps are securely installed.
4.11 Check that the strainer is in good condition and is secured on the suction hose.
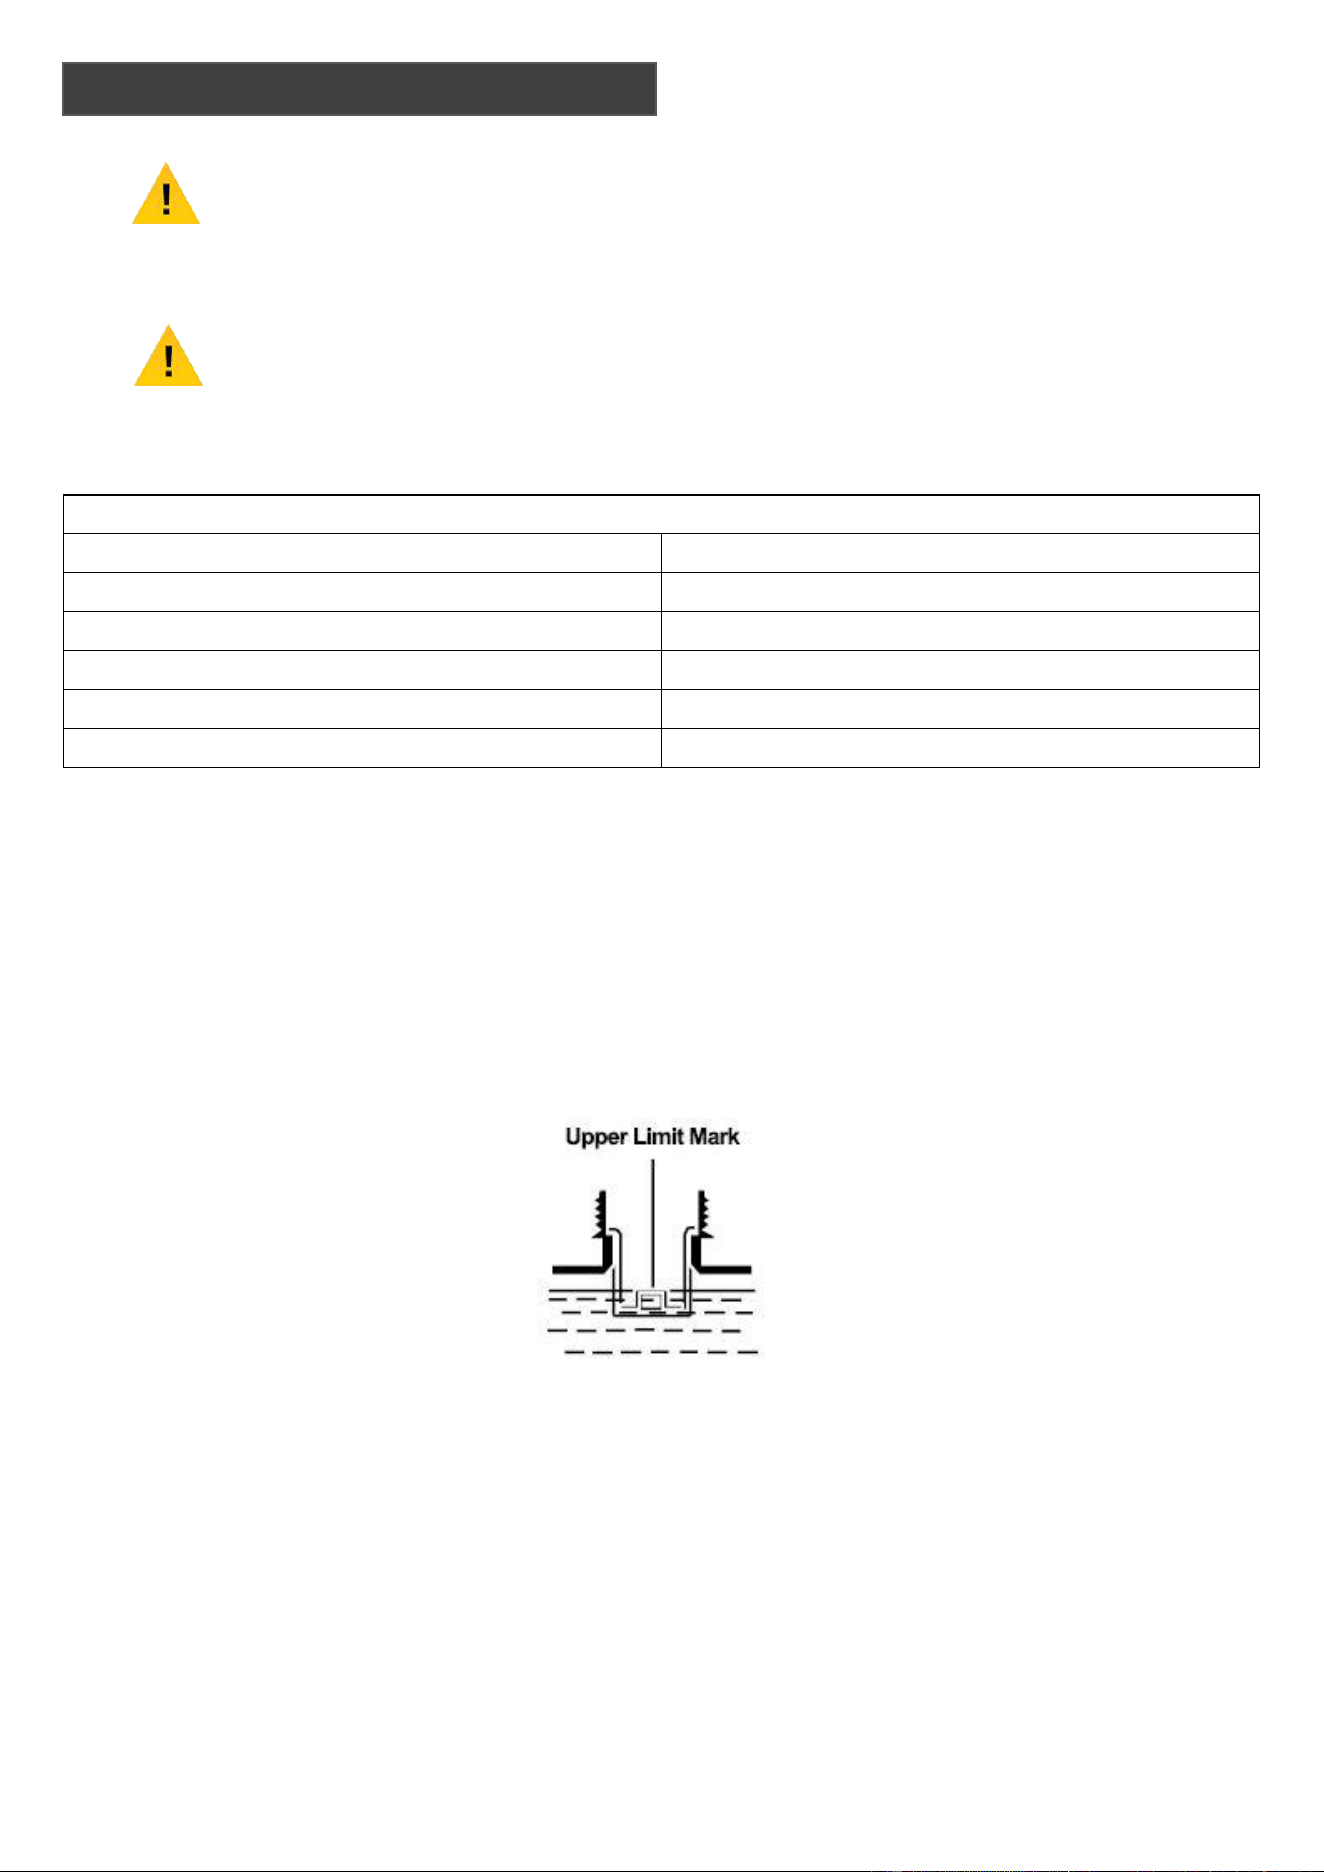
NOTE
This machine is shipped without engine oil and will require filling before use.
Failure to maintain the oil level will result in engine damage the will not be covered
by the Warranty.
NOTE
Before checking the engine oil level, place the water pump on a flat level surface.
Oil Type: Semi-Synthetic SAE 15W40 Engine Oil
Model Number
Oil Capacity - L
HY50
0.6
HY80
0.6
HY100
1.0
HYC50
0.6
HYT80
0.6
4.12 Remove the oil filler cap and wipe the dipstick clean with a lint free clean cloth.
4.13 Slowly fill with semi-synthetic SAE15w40 engine oil until it reaches the top of the oil
filler neck.
Stop occasionally to check the level.
4.14 Refit the oil filler cap securely.
ENGINE OIL
12
DANGER
ALL FUELS ARE FLAMMABLE
ALWAYS fuel and defuel in a well-ventilated area away from any sources of ignition.
ALWAYS allow the engine to cool completely before refuelling.
NOTE
Before checking the fuel level, place the water pump on a flat level surface.
Fuel Type: Straight Unleaded Petrol
Model Number
Fuel Capacity - L
HY50
3.6
HY80
3.6
HY100
6.0
HYC50
3.6
HYT80
3.6
4.15 Undo the fuel filler cap and slowly fill with fresh unleaded petrol to the upper limit mark
on the fuel strainer.
4.16 DO NOT overfill, allow a 25mm gap between the top of the fuel and the top of the fuel
tank to allow for expansion in hot weather.
4.17 Only use straight unleaded petrol.
4.18 Refit the fuel filler cap securely.
FUEL
13
5.0 To ensure safe usage of the water pump, you must make sure that you fully understand
how to operate it properly and how to use the controls.
5.1 Before starting the water pump for the first time, please make sure you have read the
Safety Instructions and Pre-Operation Inspection elements of this manual carefully.
5.2 Exhaust gasses contain poisonous carbon monoxide fumes that can build up to
dangerous levels in enclosed areas.
Breathing in carbon monoxide fumes can cause unconsciousness or death.
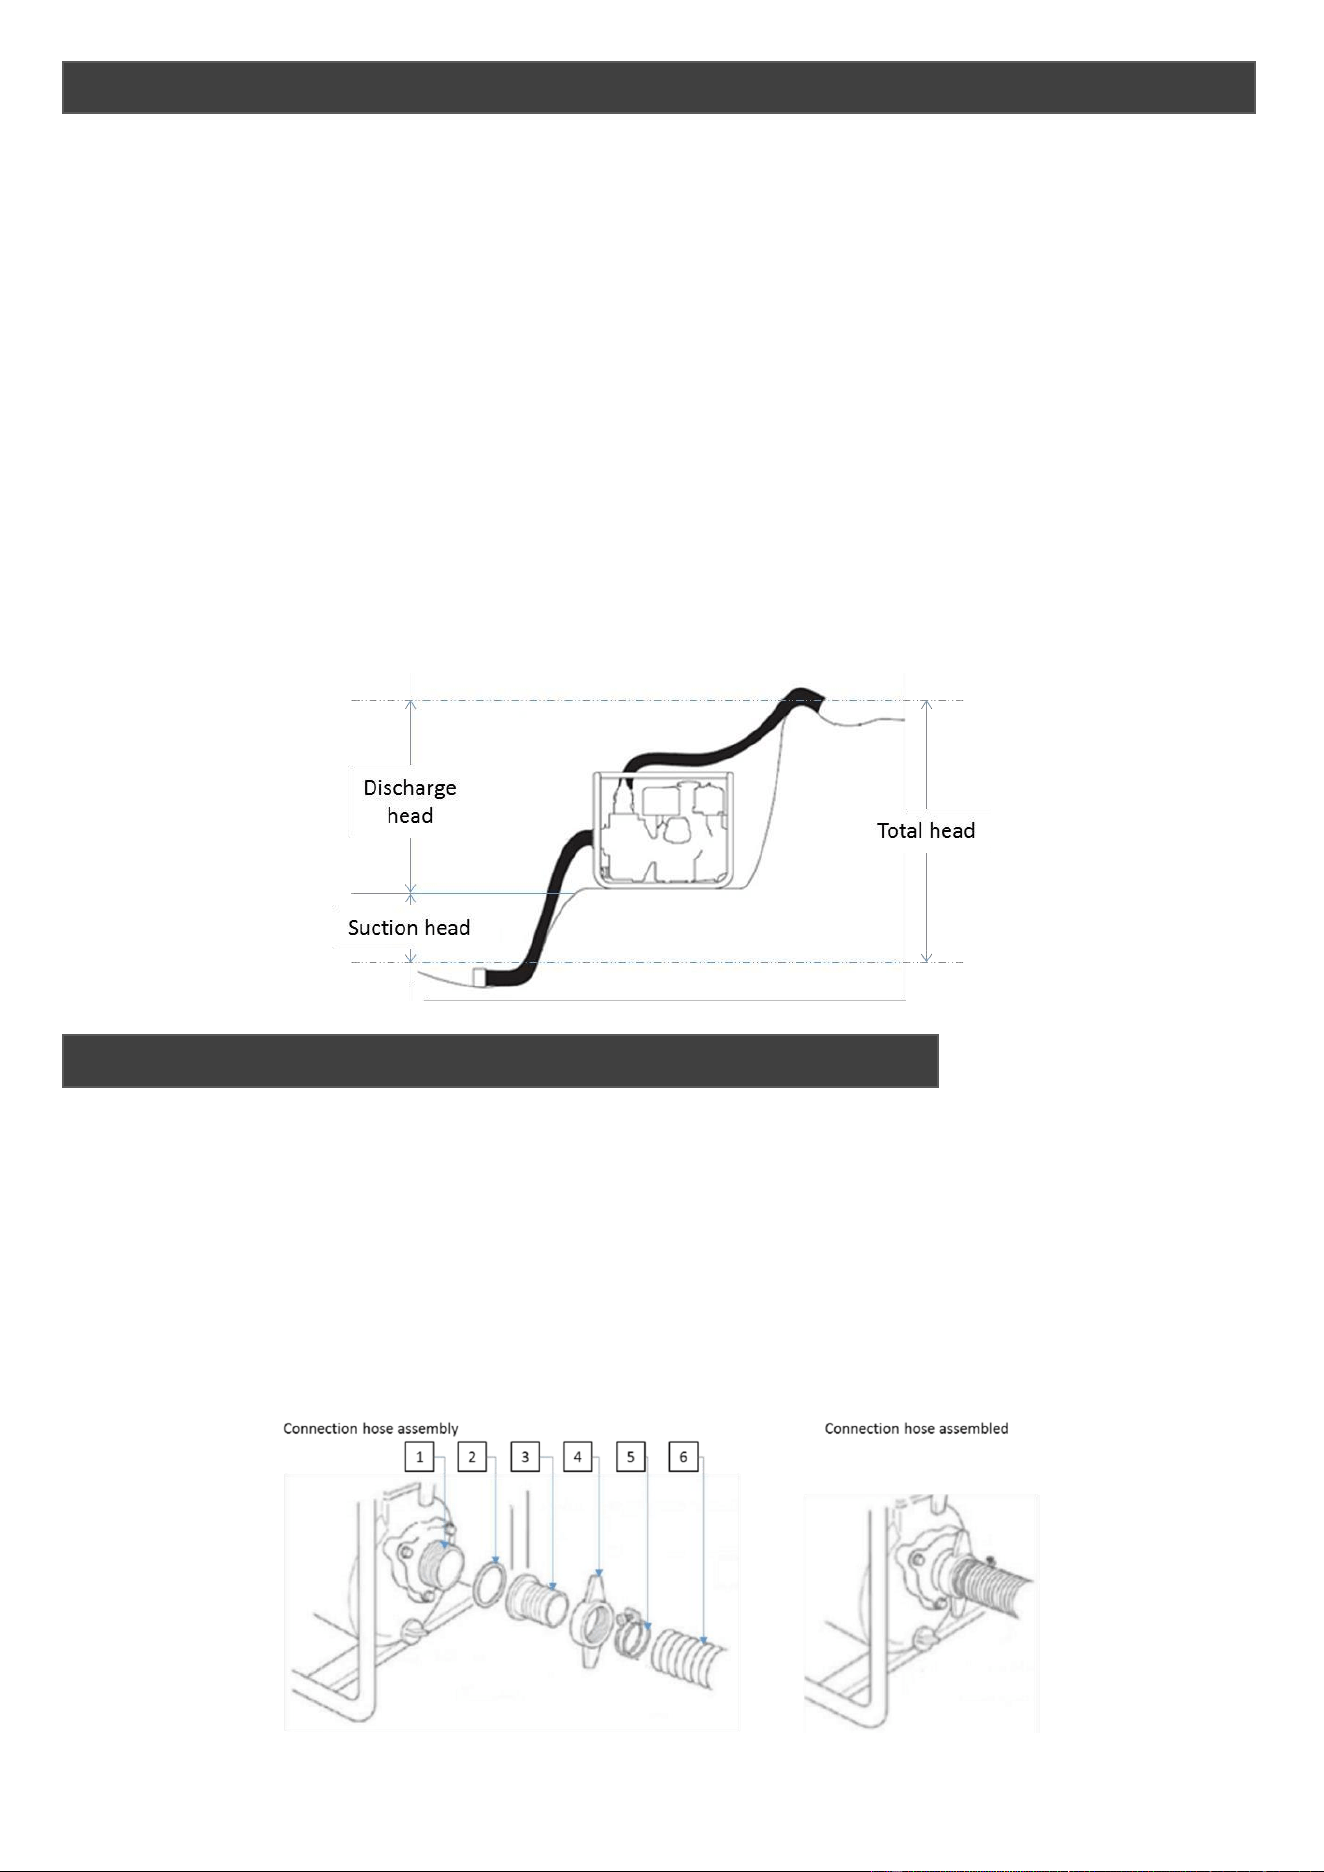
5.3 For best pump performance, place the water pump near the water level and use hoses
of the correct length and no longer than is necessary. This will allow the pump to
produce the greatest output.
5.4 As the head increases, the pump output decreases. The length, type and size of both
the suction and discharge hose can also significantly affect the pumps output.
By placing the pump near the water level, minimizes the suction head and reduces
priming time.
5.5 Place the sealing washer (2) over the supplied suction port (1).
Before using the connector sealing washer, make sure it is in good condition.
5.6 Offer the supplied hose connector (3) to the sealing washer (2) the put the supplied
clamp ring (4) over the hose connector and tighten in a clockwise direction.
5.7 Take the supplied hose clamp ring (5) over the end of the suction hose (6) the push
the suction hose over the end of the hose connector. Once in place, move the hose
clamp into position and tighten the screw in a clockwise direction until the hose is
secure.
5. ASSEMBLY & OPERATION
SUCTION HOSE CONNECTION (not supplied)

14
5.8 Install the supplied hose strainer on to the end of the suction hose (not supplied) and
secure it with the hose clamp.
The strainer will help prevent the pump from becoming clogged or damaged with debris.
5.9 The hose strainer is fitted at the opposite end of the suction hose.
5.10 Take the hose clamp ring and place over the end of the suction hose, then push
the suction hose over the end of the hose strainer.
Tighten the hose clamp ring screw in a clockwise direction until the hose is firmly
secured to prevent air entering the pump and to prevent water leakage.
NOTE
Hoses are not supplied.
5.11 The hose diameter should be no wider than the water suction port diameter.
Minimum hose diameters should be as follows:
HY50 - 50mm
HY80 - 80mm
HY100 - 100mm
HYC50 - 50mm
HYT80 - 80mm
5.12 Connect the discharge hose (3) to the hose connector (1) and hose clamp (2) provided
with the pump to install the discharge hose, then tighten the clamp.
5.13 Tighten the hose clamp ring screw in a clockwise direction until the hose is firmly
secure to prevent the hose becoming detached.
5.14 For best results, use a short, large-diameter hose as it will reduce fluid friction and
improve the pump output.
HOSE STRAINER CONNECTION
HOSE DIAMETERS
DISCHARGE HOSE CONNECTION (not supplied)
15
NOTE
Operating the pump in a dry, un-primed condition, will damage the seal.
If the pump has accidently been operated in a dry state, stop the engine immediately
and allow it to cool before priming.
5.15 Before starting the engine, place the water pump on a flat, level surface and fill the
pump with water.
5.16 Unscrew the priming plug (1) and fill the pump with clean water.
5.17 After priming, reinstall the priming plug and tighten.
5.18 DO NOT unscrew the priming plug during operation of the water pump.
5.19 At high altitude, the standard carburettor air-fuel mixture will be excessively rich.
5.20 As a result output power will decrease and fuel consumption will increase.
The Air-Fuel mixture will be likely to make the spark plug dirty and difficult to start.
5.21 The engine performance can be improved by installing a main fuel jet of a smaller
diameter in the carburettor. If you intend to use the water pump at altitudes greater
than 1000m above sea level, contact us regarding carburettor modification.
5.22 Even with a suitable carburettor, the engine horsepower will decrease by around 3.5%
for each 300m increase in altitude. The effect of this will be greater if a carburettor
modification is not made.
PRIMING THE PUMP
USING AT HIGH ALTITUDE
16
6.0 Before starting/operating the water pump, please ensure you are familiar with each
control function and know how to operate these functions in the event of an emergency.
6.1 Check the engine has been filled with fuel and oil.
6.2 Where fitted, move the fuel tap (1) to the ON position.
6.3 If the engine is cold, move the choke lever (2) to the CLOSED position.
6.4 Adjust the throttle lever (3) to change the speed of the engine, which will change the
flow rate of the water. For a higher flow rate set the throttle lever to the ‘HIGH’ position
and for a lower flow rate, set the throttle lever to the ‘LOW’ position.
6.5 Turn the engine switch to the ‘ON’
6.6 Gently pull the recoil starter handle until you feel resistance, then pull swiftly until the
engine starts.
Ensure you keep the recoil cord in line with the direction of travel to prevent excessive
cord wear.
DO NOT allow the cord to snap back, instead, gently return it to the start position.
6. STARTING PROCEDURE

17
7.0 Allow the engine to sit at idle for 30 seconds under no load.
7.1 Move the engine switch to the ‘OFF’ position and the engine will come to a stop.
7.2 Where fitted, move the fuel tap to the ‘OFF’ position.
7.3 After use, remove the pump drain plug and drain the pump chamber.
7.4 Remove the pump priming cap and flush the chamber with clean, fresh water.
7.5 Allow the water to drain from the pump chamber, then replace the filler cap and
drain plug.
8.0 Good maintenance is essential for safe, economical and trouble-free operation.
It will also help reduce air pollution. The maintenance schedule applies to normal
operating conditions.
If you operate your pump under severe conditions such as sustained high load or
high temperature then maintenance will need to be carried out more frequently.
Regular service period
Every use
1
st
month or
20 hours
Every 3
months or 50
hours
Every 6
months or
100 hours
Every year or
300 hours
Engine oil
Check level
O
Change
O
O
Air filter
Check
O
Clean
O (1)
Sediment
cup
Clean
O
Spark plug
Clean
O
Change
Valve
clearance
Readjust
O
O (2)
Cylinder
head
Wash
Every 300 hours (2)
Fuel tank
and strainer
Wash
Every 2 years (2)
Fuel pipe
Change
Every 2 years (2)
Impeller
Check
O (2)
Impeller
clearance
Check
O (2)
(1) Service more regularly when the pump is used in dusty environments.
(2) These items should be serviced by a company authorised to do so by and approved
Hyundai dealer.
7. STOPPING PROCEDURE
8. MAINTENANCE
18
WARNING
Improper maintenance and the fitting of aftermarket parts not specified by the
manufacturer, may lead to malfunction that could cause serious injury or damage to
the water pump that will not be covered by the warranty.
NOTE
This machine is shipped without engine oil and will require filling before use.
Failure to maintain the oil level will result in engine damage the will not be covered
by the Warranty.
NOTE
Before checking the engine oil level, place the water pump on a flat level surface.
Oil Type: Semi-Synthetic SAE 15W40 Engine Oil
Model Number
Oil Capacity - L
HY50
0.6
HY80
0.6
HY100
1.0
HYC50
0.6
HYT80
0.6
8.1 Drain the engine oil while the engine is warm not hot. Warm oil will drain more
effectively.
8.2 Place a suitable container (4) below the engine to catch the used oil, then remove
the oil filler cap/dipstick (1) and the drain plug (3) and washer (4).
8.3 Allow the oil to drain completely and then replace the drain plug and washer and
tighten securely.
8.4 DO NOT pour waste oil down any drains or grids and dispose of in the proper manner.
ENGINE OIL
19
8.5 Place the water pump on flat, level ground and slowly refill with oil to the top of the
oil filler neck.
Stop occasionally to check the level.
8.6 Refit the oil filler cap/dipstick securely.
NOTE
Never run the engine without an air filter or with a heavily used or damaged filter.
This will restrict air flow to the engine and cause poor starting, poor running or
possible damage to the engine.
8.7 Undo the air filter cover nut and remove the air filter cover.
8.8 Undo the air filter nut and remove the air filter.
8.9 Inspect the air filter and if it shows signs of wear or damage, replace immediately.
8.10 Foam Elements: wash the foam element in warm soapy water, rinse with fresh water
and allow to dry.
Once dry soak in fresh engine oil and squeeze out any excess.
Refit.
8.11 Paper Elements: Blow the dust from the paper element from the inside of the air
filter, out.
Do not use a brush as this will push the debris further into the filter.
Refit.
8.12 Carefully clean the air filter housing and seals ensuring no dirt or debris enters the
carburettor chamber.
8.13 Reassemble and refit the air filter.
AIR FILTER
20
NOTE
Using the wrong type of spark plug can result in engine damage.
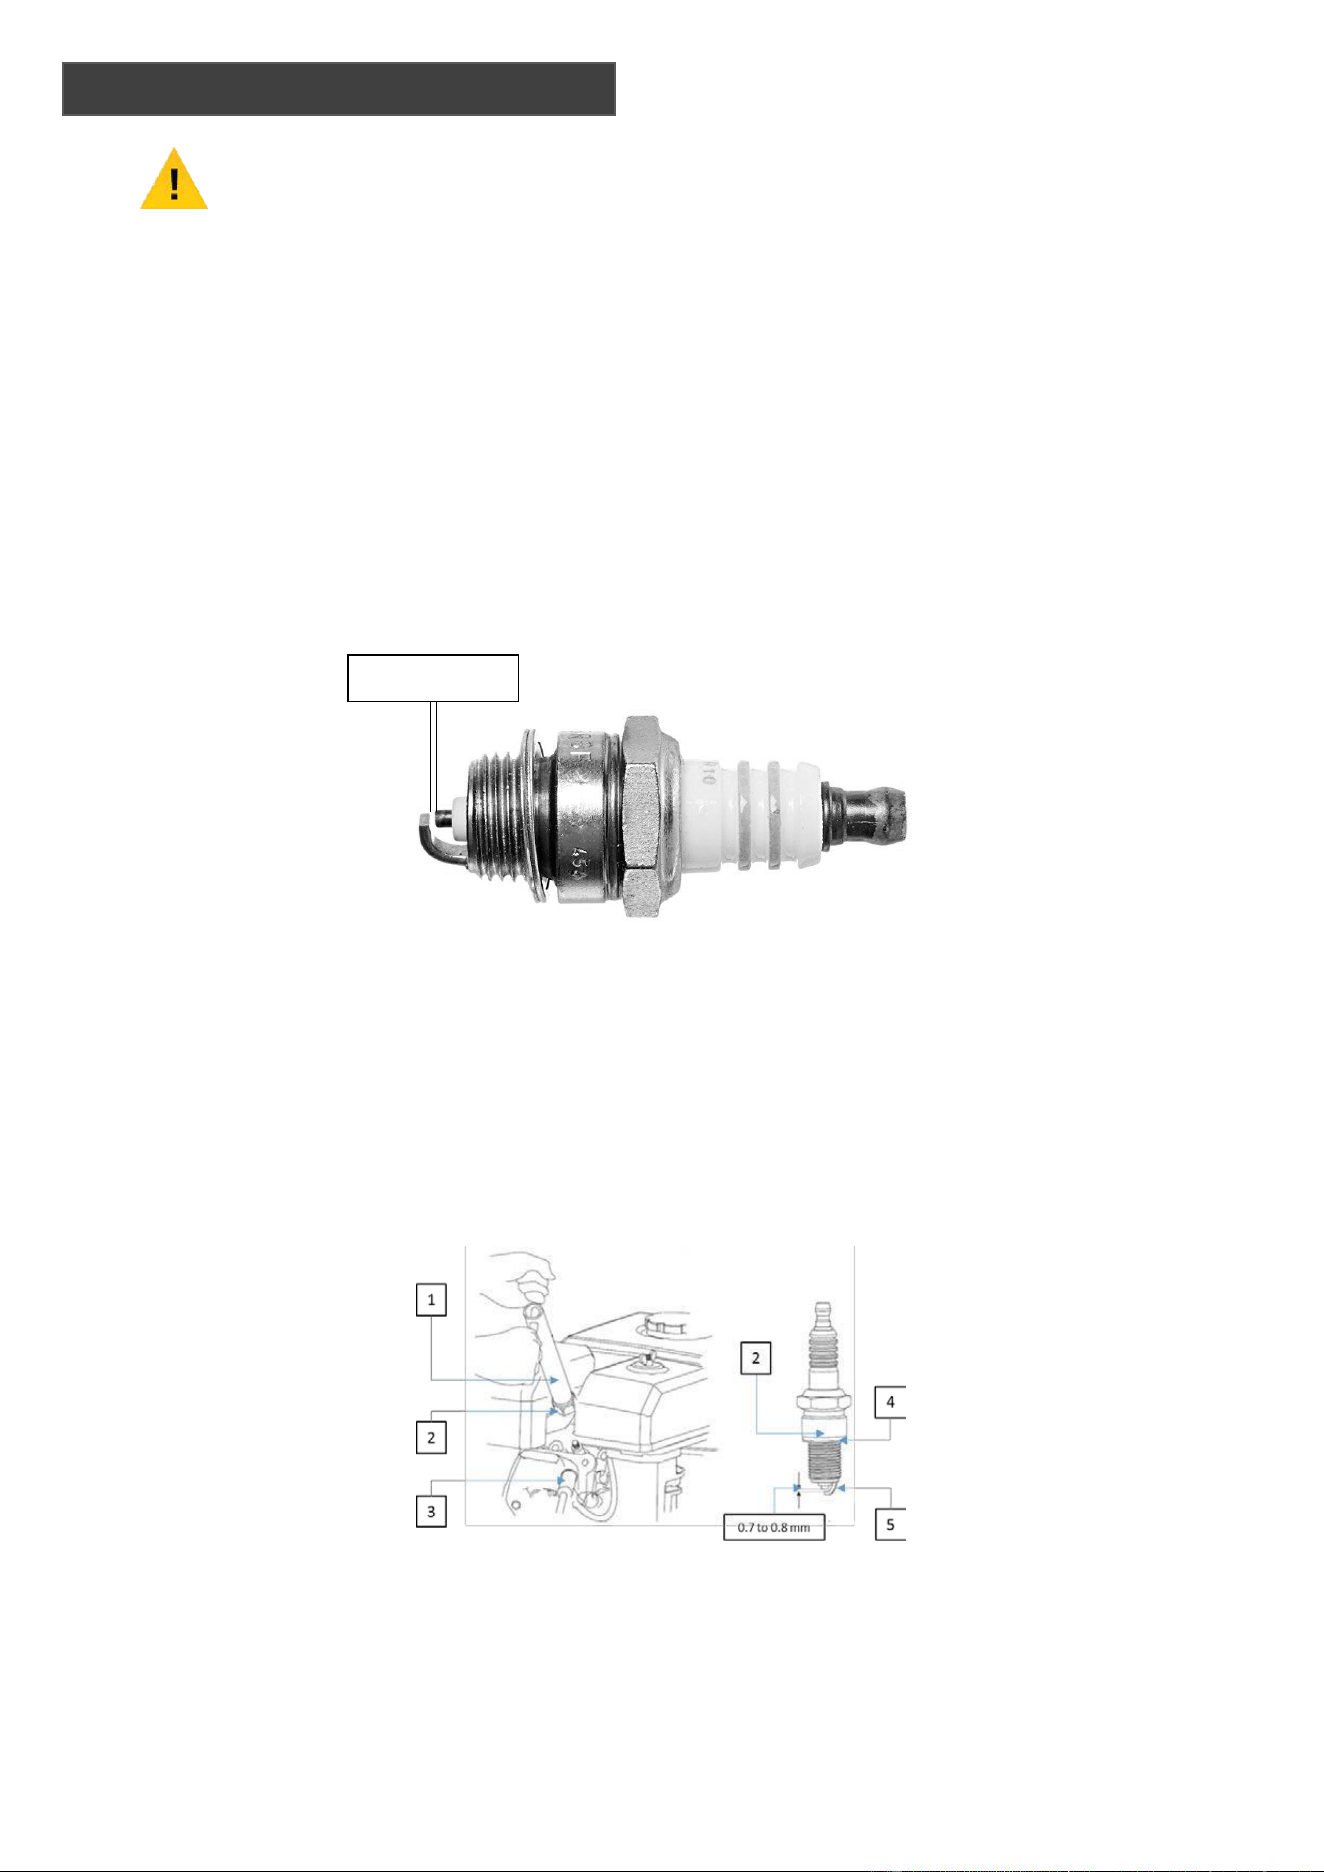
Recommended Spark Plug: NGK BP6ES or Equivalent.
8.14 Remove the spark plug HT lead cap (3) and remove any dirt from around the spark
plug base.
8.15 Using a plug wrench (1) undo and remove the spark plug.
8.16 Using a feeler gauge, measure the spark plug gap (5).
If the insulator or electrode is damaged or worn, then replace the spark plug.
Correct the spark plug gap by gently bending the electrode until it is at the correct
setting of 0.7 to 0.8mm.
8.17 Inspect the spark plug sealing washer (4) is in good condition.
8.18 Refit the spark plug by hand to avoid cross threading.
8.19 Once the spark plug washer has touched the top of the cylinder head, tighten with the
plug wrench.
DO NOT over tighten.
8.20 Refit the spark plug HT lead cap.
SPARK PLUG
0.7-0.8mm

21
NOTE
If you store the machine for periods of 30 days or more you must follow the correct
storage procedure.
Failure to do so may result in poor starting, poor running or damage to the machine.
9.0 Clean the water pump with a damp cloth.
DO NOT use a hose pipe or pressure washer.
9.1 Change the engine oil as specified in the Maintenance section.
9.2 Remove the spark plug and pour one teaspoon of fresh engine oil down the cylinder
bore.
Place a lint free cloth over the spark plug hole and gently pull the recoil start handle
4 to 5 times to coat the cylinder bore with oil.
Refit the spark plug.
9.3 Place a suitable container underneath the carburettor.
9.4 Remove the fuel from the fuel tank by using a syphon.
9.5 Remove the drain plug (3) and the washer (2) from the carburettor float bowl (1) and
sediment cup (6) and O ring, then open up the fuel lever (4).
9.6 Completely drain the fuel from the carburettor and fuel tank, then replace the sediment
cup and drain plug and re-tighten.
9.7 Lubricate all cables or moving parts with a light silicone grease.
9.8 Store in a cool, dry place away from sources of ignition.
9.9 Do not stack other items on top of the water pump.
9. STORAGE
22
Engine
Water Pump
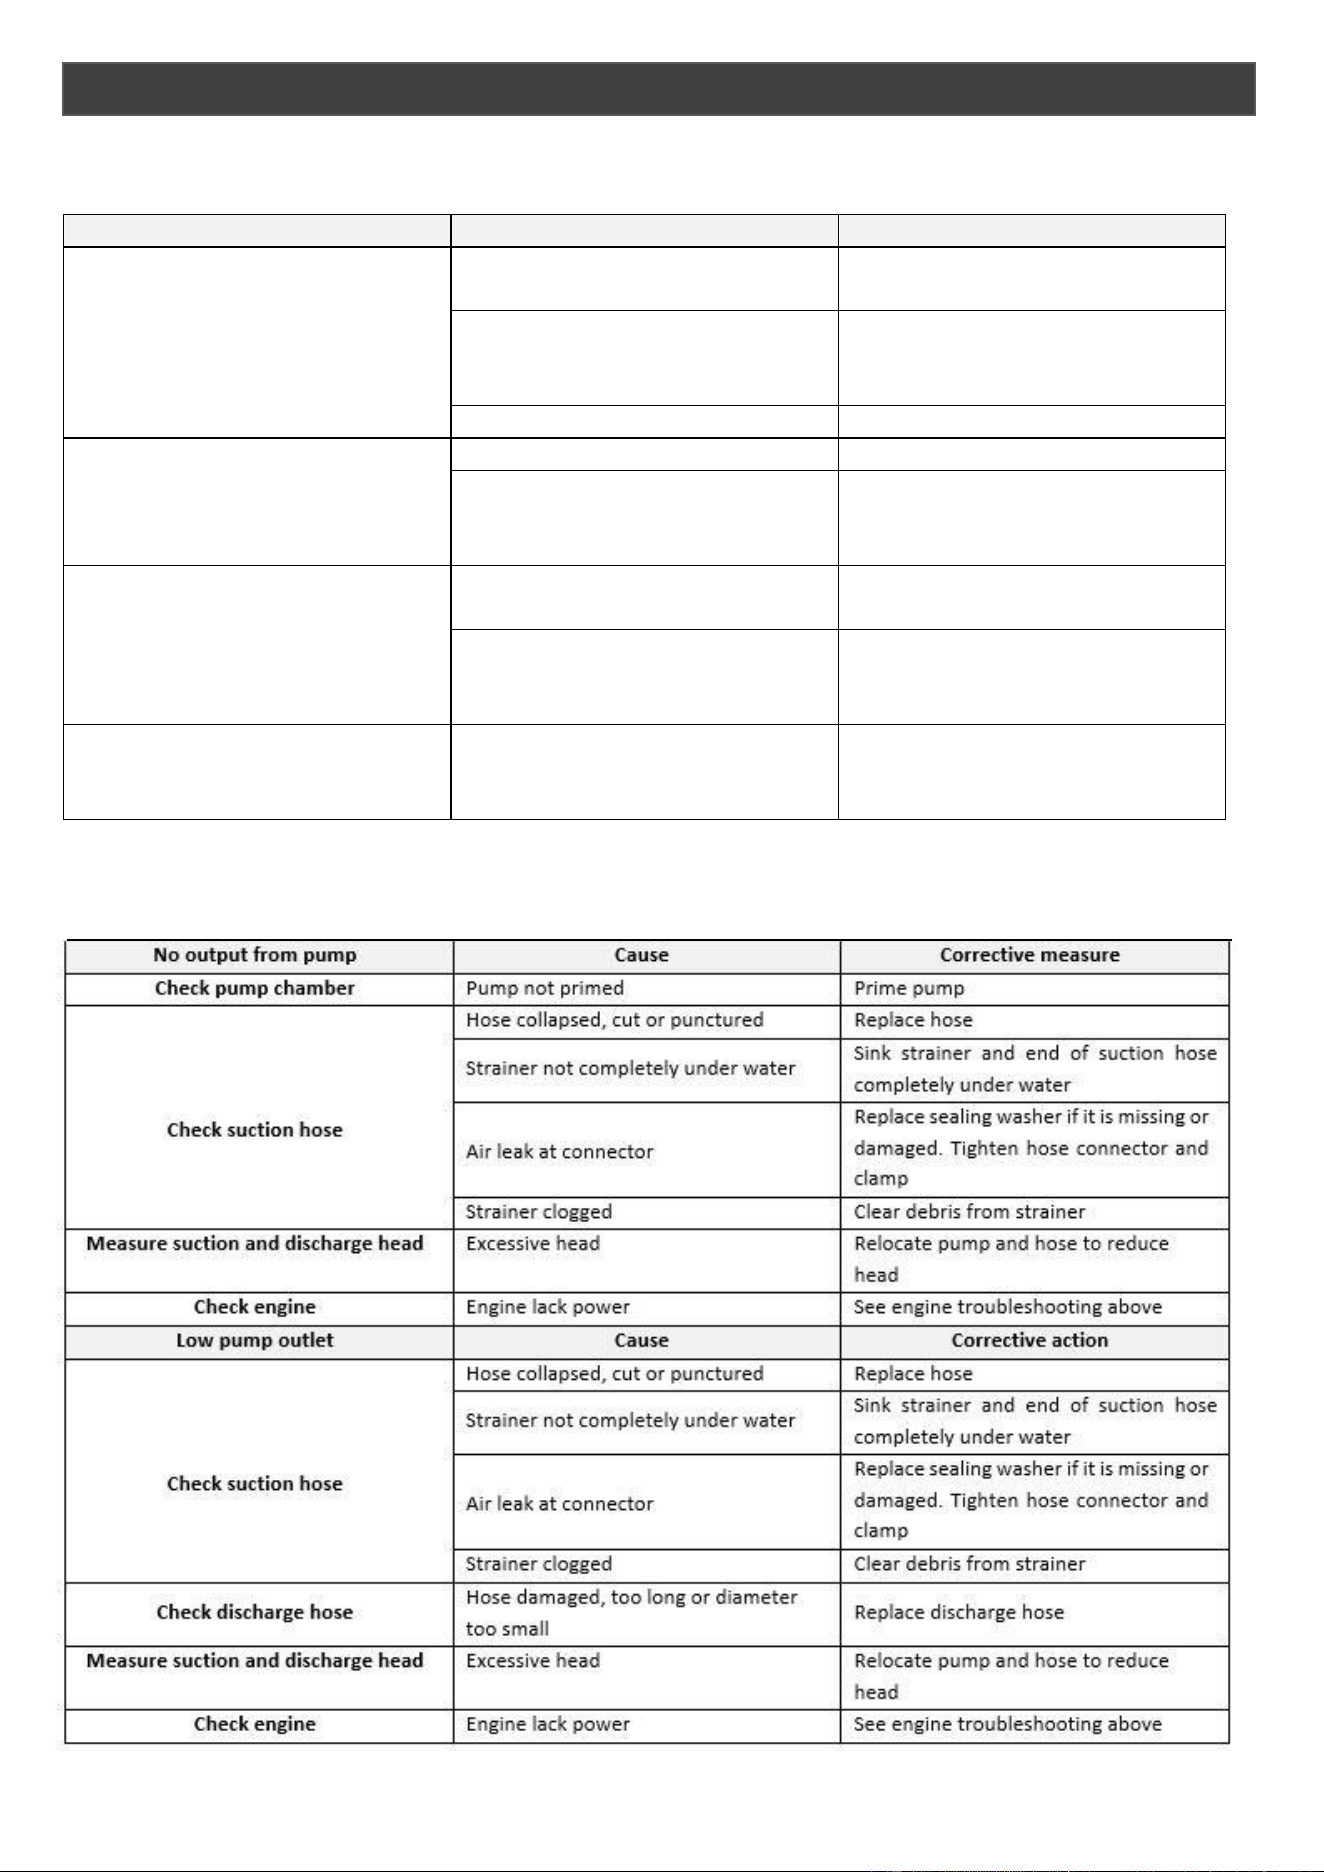
Engine will not start
Cause
Corrective measure
Check controls
Fuel Valve 'OFF'
Move fuel valve lever to 'ON'
position
Choke 'OPEN'
Move the choke lever to the
'CLOSED' position unless the
engine is warm
Engine Switch 'OFF'
Turn engine switch to 'ON'
Check Fuel
Out of Fuel
Refuel
Bad fuel, pump has been stored
without treating or draining fuel
or refueling with bad fuel
Drain the fuel tank and
carburetor and, refuel with fresh
fuel
Remove and inspect the spark
plug
Faulty spark plug or improperly
gapped
Adjust gap or replace with a new
spark plug
Spark plug wet with fuel, flooded
engine
Dry spark plug and reinstall. Start
engine with throttle lever in
'FAST'
Contact dealer
Fuel filter clogged, carburetor
malfunction, ignition malfunction,
valves stuck etc.
Return to dealer for repair
10. TROUBLESHOOTING
23
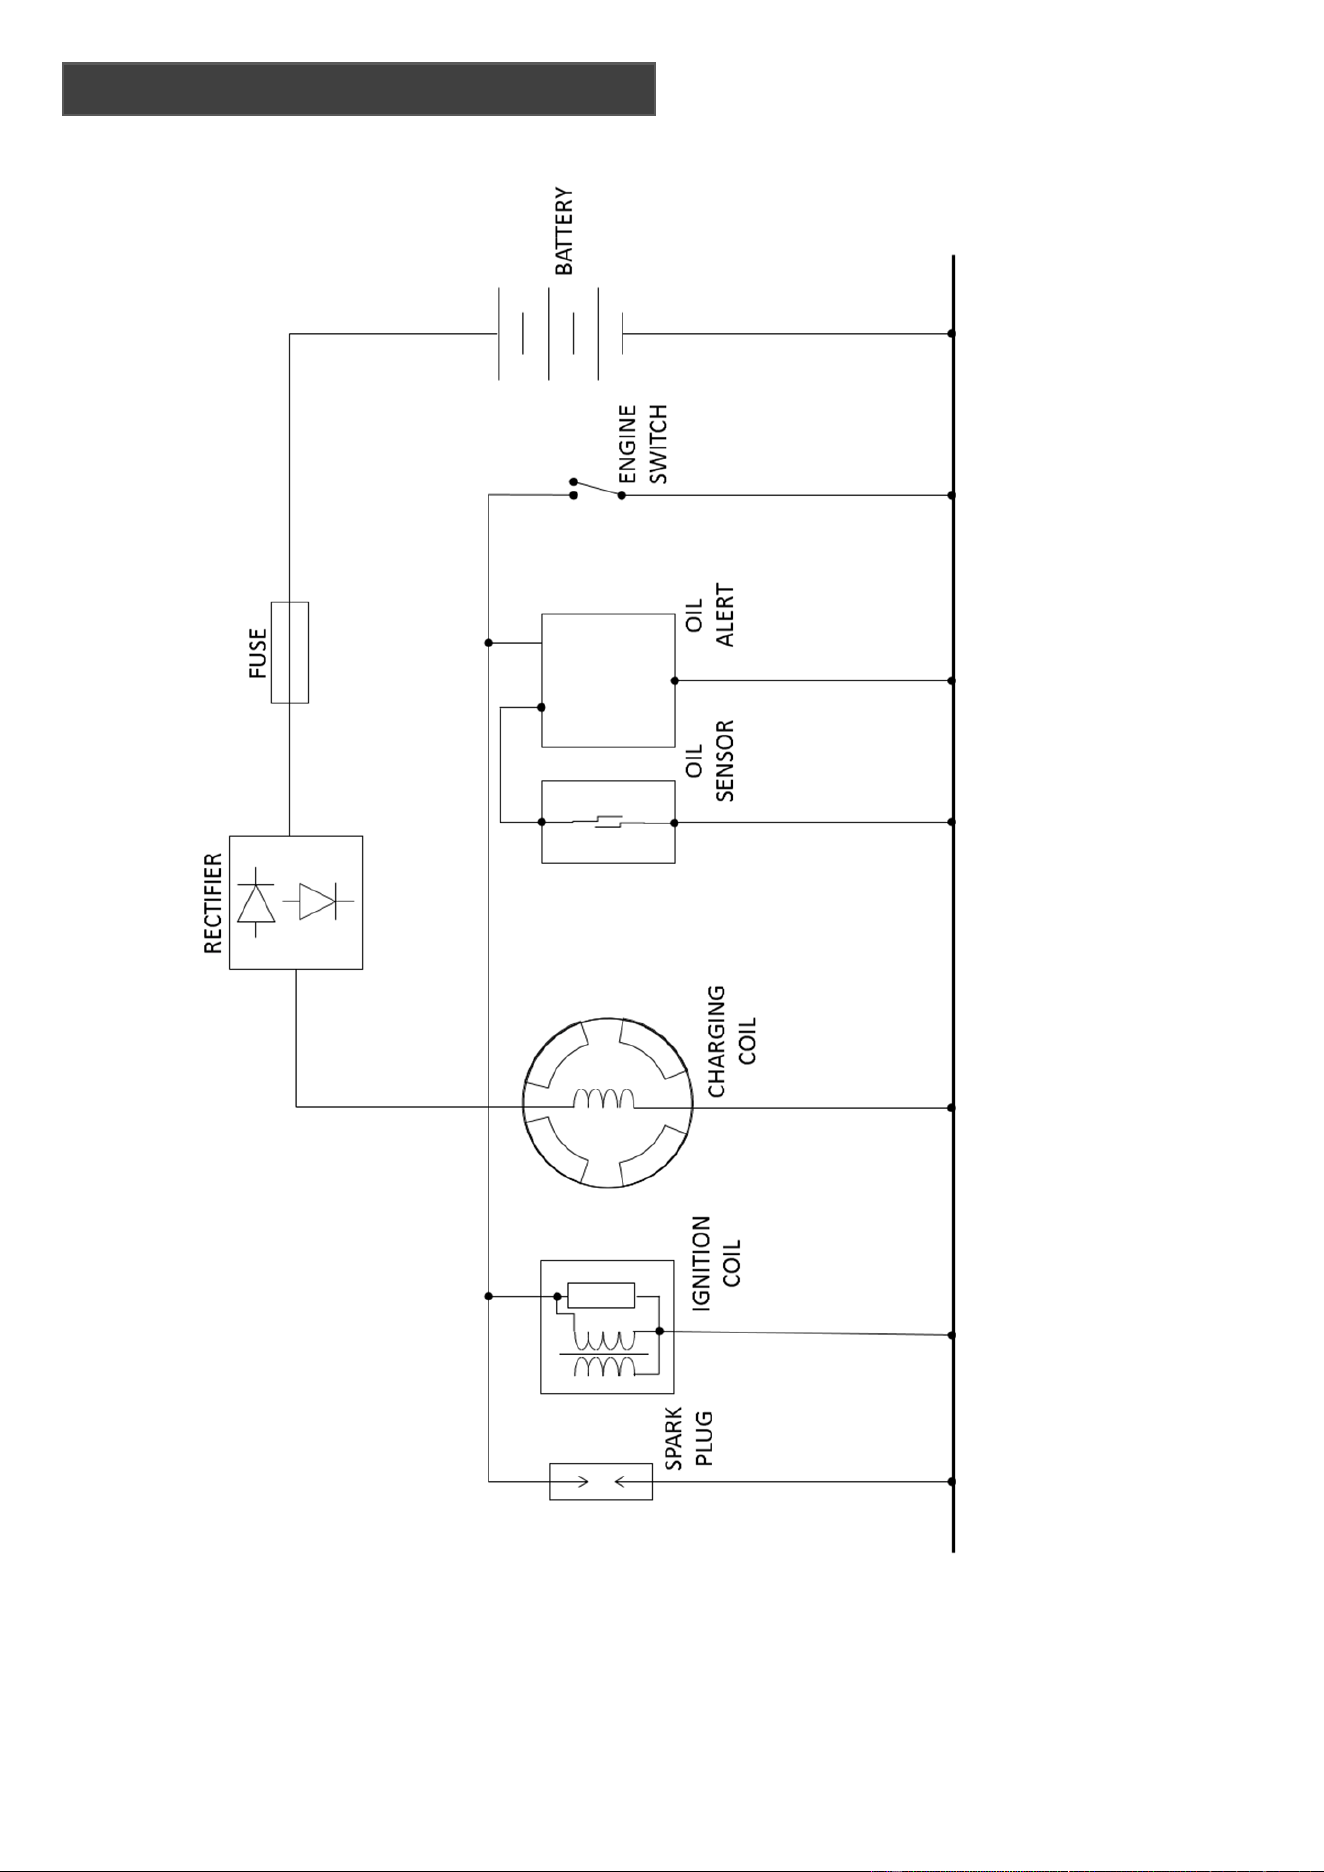
WIRING DIAGRAM

24
HY50
HY80
HY100
HYC50
HYT80
Inlet/Outlet
Diameter -
mm
50
80
100
50
80
Engine
Displacement
- cc
212 212
270
212 212
Max Head - m
32 28 30
30
25
Max Suction
Head - m
7
7
7
8
7
Max Capacity
– m
3
/h
28 58 90 25 60
Engine Speed
– rpm
3600
3600
3600
3600
3600
Oil Type
Semi-Synthetic SAE15W40 Engine Oil
Oil Capacity –
l
0.6
0.6
1.0
0.6
0.6
Fuel Type
Straight Unleaded Petrol
Fuel Capacity
– l
3.6
3.6
6.0
3.6
3.6
Net Weight –
kg
23 25
41
29
35
Product
Dimensions –
mm (LxWxH)
495x395x425 535x395x425 645x485x600
550x445x450
565x445x460
11. SPECIFICATION

25
12. DECLARATION OF CONFORMITY
12.0
Genpower Ltd confirms that the Hyundai water pumps conform to the following CE Directives;
2006/42/EC Machinery Directive
2004/108/EC EMC Directive
73/23/EC The Low Voltage Directive
97/68/EC NRMM Emissions Directive
2000/14/EC Noise Emissions Directive
EC DECLARATION OF CONFORMITY
The undersigned, as authorised by: Genpower Ltd
Declares that the following equipment manufactured under license by Hyundai Korea
Conforms to the Directive: 2006/42/EC Machinery Directive, 2004/108/EC EMC Directive , 73/23/EC The Low Voltage
Directive, 97/68/EC NRMM Emissions Directive, 2000/14/EC Noise Emissions Directive.
Of the European Parliament and of the council on the approximation of the laws of the Member States relating to the noise
emission in the environment by equipment for use outdoors.
Equipment Category:
Product Name/Model:
Type:
The technical documentation is kept by:
Water Pumps
HY50, HY80, HY100, HYT80,
HYC50
Water Pump
Roland Llewellin, Genpower Ltd,
Isaac Way, Pembroke Dock,
Pembrokeshire, SA72 4RW.
The conformity assessment procedure followed was in accordance with annex V or VI of the Directive.
Notified Body:
Certification No:
Measured Sound Power Level:
Guaranteed Sound Power Level:
Chongqing Maifeng Power Machinery Co.Ltd
55 Yinxiang Grand Ave, Yinxiang New Town, Tuchang, Hechuan
District, P.R. China
70403075161603
104dB (A)
104dB (A)
A copy of this certificate has been submitted to the European Commission and to EU Member State United Kingdom.
Place of Declaration:
Date:
Signed By:
Position in Company:
Pembroke Dock, SA72 4RW
Tuesday, 06 August 2019
Roland Llewellin
Managing Director
Name and address of manufacturer or authorised representative:
Genpower Ltd, Isaac Way, Pembroke Dock, Pembrokeshire, SA72 4RW.

26
14.0 We do not offer a take back scheme for the recovery of Waste Electrical Electronic
Equipment (WEEE) & Batteries.
Instead the responsibility to dispose of WEEE and or Batteries is passed onto you by
us.
So when it becomes necessary to dispose of your machine you must take it to your
local Civic Amenity Site.
For further information please contact your local Authority for disposal advice.
14.1 You MUST make sure that all unused oil and fuel is disposed of correctly either
beforehand or at your local Civic Amenity Site.
Under NO circumstances must any fuel or oil be put down any drains.
14.2 Certain products contain WEEE waste which should not be disposed
of in your domestic waste.
14.3 You MUST recycle WEEE in accordance with your local authority or
recycling centre.
14.4 Certain products contain batteries which should not be disposed of
in your domestic waste.
14.5 You MUST recycle batteries in accordance with your local authority or recycling
centre.
14.6 Unwanted packaging and materials should be stored and taken to a recycling centre
so it can be disposed of in a manner which is compatible with the environment.
14.7 The following symbol means that you should ‘Reduce – Reuse –
Recycle’.
14.8 We are a Member of the VALPAK National Compliance Scheme and our registration
number is RM08660
14.9 For further information about disposal please contact your Local Authority.
14.10 You can also get more advice and guidance about recycling at the following website
http://www.recycle-more.co.uk
14.11 Should you pass this product on to another user either sold or loaned, you MUST
pass on this user manual.
This will make sure that all other users can use and maintain this machine safely.
13. RECYCLING & PRODUCT DISPOSAL

27
15.0 Genpower LTD, Isaac Way,
London Road, Pembroke Dock,
Pembrokeshire.
SA72 4RW. UK.
15.1 +44 (0) 1646 687880
15.3
15.4
POSTAL ADDRESS
TELEPHONE
TECHNICAL EMAIL
WEBSITE
www.hyundaipowerproducts.co.uk
16.0
Proof of purchase will be required before you make a warranty claim.
Full warranty terms and conditions can be found on the HYUNDAI POWER
PRODUCTS website: www.hyundaipowerproducts.co.uk
17.0 Our manuals are constantly being reviewed and updated.
However if you find an error, omission or something you find unclear, please
contact your dealer for assistance.
17.1 Our latest manuals are also placed online.
17.2 We reserve the right to make any modifications without prior notice whenever
necessary.
14. CONTACT DETAILS
15. WARRANTY
16. MANUAL UPDATES

For Inquiries, Please Contact:
GENPOWER LTD
Isaac Way, London Road,
Pembroke Dock, UK, SA72 4RW.
T: +44 (0) 1646 687 880
E: info@hyundaipowerproducts.co.uk
www.hyundaipowerproducts.co.uk
Imported / Distributed by Genpower Ltd for
the United Kingdom & Ireland
Licensed by Hyundai Corporation Holdings, Korea