Help Guide
Wearable Thermo Device Sensing Kit
RNPK-6T
Use this manual if you encounter any problems or have any questions when using your REON POCKET.
Recommended pages in the Help Guide
Using REON POCKET TAG
Using the dedicated neckband
Explains how to attach and detach the neckband.
REON POCKET TAG Help Guide
For information on how to use REON POCKET TAG, RNPT-2 (included), refer to the Help Guide at this link.
Before use
Checking the package contents
Names of parts
Charging
Charging the unit
Battery duration
Checking the remaining battery level
Preparations
Using the unit with the neckband
Using the unit with the air vent cover
Using the unit by holding it in your hand
1
B-P42-100-11(2) Copyright 2026 Sony Thermo Technology Inc.
Operating from the unit
Installing the dedicated app “REON POCKET”
Installing the “REON POCKET” app
Overview of the “REON POCKET” app screen
Operating from the “REON POCKET” app
COOL mode
WARM mode
SMART COOL
⇔
WARM mode
Starting/stopping operation by attaching/detaching (AUTO START/STOP)
Registering and initializing
Unregistering the unit
Controlling the unit with another smartphone
Initializing the unit
Precautions and specifications
Precautions
To prevent burning or malfunction due to getting wet
Notes on cleaning
Specifications
Trademarks and copyrights
Notes on the License
Troubleshooting
When the unit cannot be operated or charged
When the mode LED flashes in purple
Checking the support site (FAQ and other)
Contact information
2
Help Guide
Wearable Thermo Device Sensing Kit
RNPK-6T
Before use
Notice on use
The REON POCKET is intended for use in daily outings, commuting, and light exercise (e.g. walking, golfing). Please
note that this product is not waterproof.
Please refrain from using the product in the following environments.
Strenuous work or exercise (e.g. running) at a level that causes intense sweating
Rain, snow, or other conditions where the unit is exposed to moisture
Prolonged use under hot sun
Since the product is a precision device, do not subject the product to strong impacts such as dropping or throwing it.
When the unit is operated with the setting [COOL], warm air may be ventilated from the air vent depending on the
temperature of the surrounding environment. If you are concerned about this, lower the temperature setting level of
[COOL], or refrain from using the unit.
When using in [COOL] mode
Wear breathable and loose-fitting clothing.
To divert exhaust from the air vent at the top of the unit, use an air vent cover. If you use the unit without the air vent
cover, make sure that your clothing does not block the air vent.
Be sure to create adequate room around your neck by taking off your tie, opening the top button of your shirt, etc.
This will improve air flow from the air vent.
Wear white or other light-colored clothing that absorbs less heat from the sun than dark clothing.
Do not intentionally block the air inlet or air vent.
Do not use the unit when sleeping.
When using in [WARM] mode
If the unit feels too hot, stop using it immediately.
Do not use the unit when sleeping.
Notice on heat stroke
The REON POCKET is not intended to be used as a heat stroke prevention device.
Please refer to the information website of Ministry of the Environment, Government of Japan for guidelines on daily living
to prevent heat stroke.
Air temperature
(typical value)
Guideline for life
activities that need
attention
Precautions
Danger
(above 35°C)
Risks in all life activities
The elderly are at high risk of developing heat stroke, even in a
resting state. Avoid going outside as much as possible and move
to a cool room.
Severe Warning
(31°C — 35°C)
Avoid hot sun when going out, and be careful of rising room
temperature when indoors.
Warning
(28°C — 31°C)
Risks in moderate or
increased life activities
Take regular and sufficient rest when exercising or doing
strenuous work.
3
From the website “Heat Illness Prevention Information,” Ministry of the Environment, Government of Japan
Notice about water
When your hands are wet, do not touch the unit or the supplied USB cable, and do not charge the unit.
B-P42-100-11(2) Copyright 2026 Sony Thermo Technology Inc.
Air temperature
(typical value)
Guideline for life
activities that need
attention
Precautions
Caution
(below 28°C)
Risks in strenuous life
activities
Generally, there is little danger, but there is a risk of occurrence
during strenuous exercise or heavy labor.
4
Help Guide
Wearable Thermo Device Sensing Kit
RNPK-6T
Checking the package contents
If anything is missing, consult Sony Authorised Service Centre.
The number in the parentheses indicates the number of pieces.
The unit and the air vent cover (short) are attached to the neckband at the time of purchase.
REON POCKET unit (RNP-6) (1)
NECKBAND (RNPB-N6) (1)
Air vent cover (short) (1)
Air vent cover (adjustable) (1)
REON POCKET TAG (Tag) (RNPT-2) (1)
Lithium coin cell battery (CR2032) (inserted in the tag) (1)
Carabiner (included with the tag) (1)
L-shaped USB Type-C® cable (USB-C® — USB-C) (1)
Startup Guide (RNPK-6) (1)
Startup Guide (RNPT-2) (1)
Warranty (RNP-6) (valid only in Japan)* (1)
Warranty (RNPT-2) (valid only in Japan)* (1)
USB AC adaptor is not included. Use a commercially available USB AC adaptor.
Using the air vent cover
For details on using the air vent cover, refer to “Using the unit with the air vent cover.”
B-P42-100-11(2) Copyright 2026 Sony Thermo Technology Inc.
For details on warranty in countries and regions other than Japan, refer to the page below.
https://reonpocket.sony.com/support/warranty/
*
5
Help Guide
Wearable Thermo Device Sensing Kit
RNPK-6T
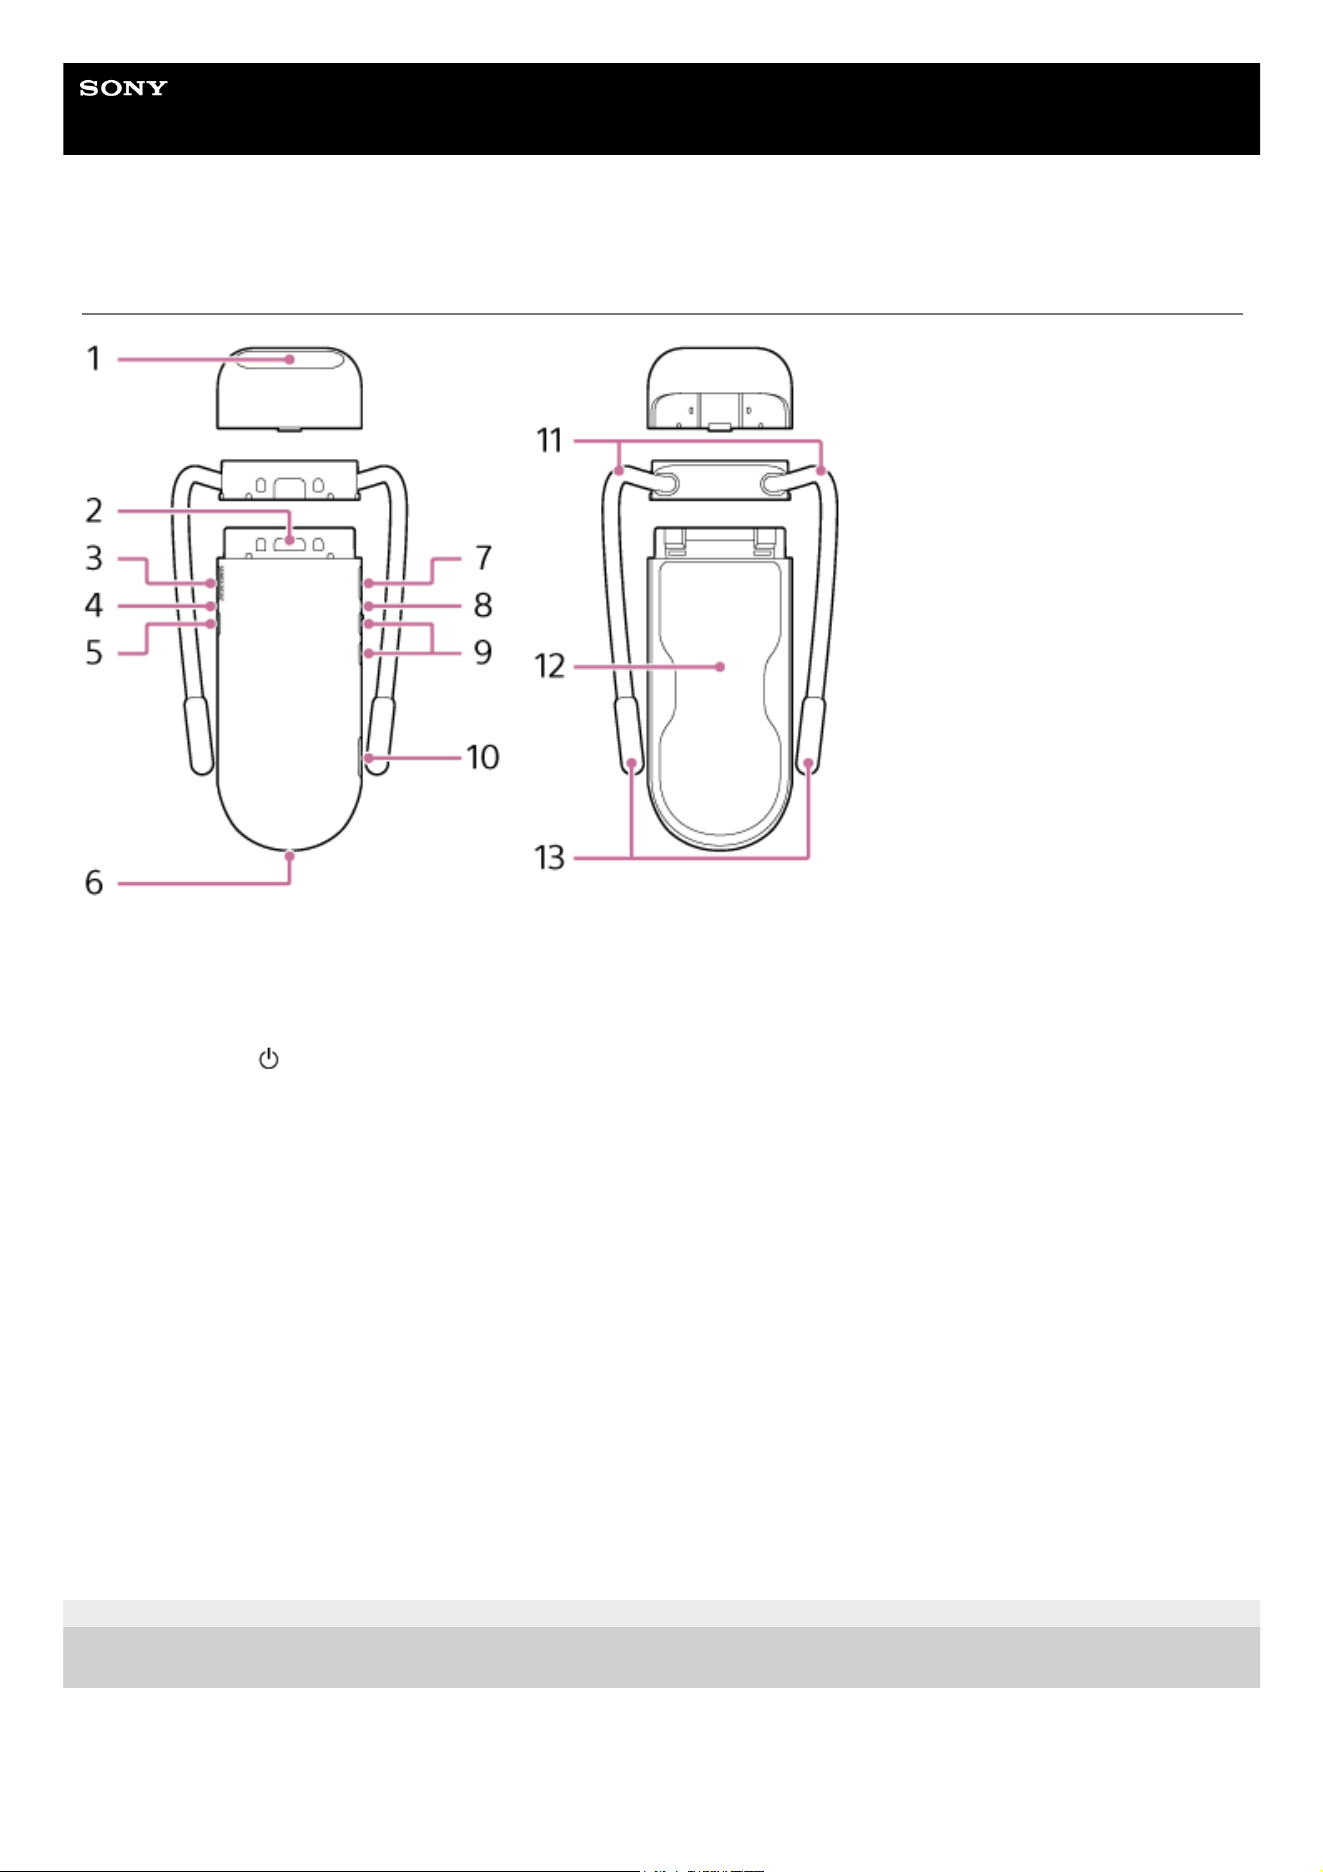
Names of parts
The unit and the air vent cover (short) are attached to the neckband at the time of purchase.
For details on “Names of parts” of REON POCKET TAG (included), refer to the following Help Guide.
https://rd1.sony.net/help/reonpocket/rnpt1/h_zz/
B-P42-100-11(2) Copyright 2026 Sony Thermo Technology Inc.
Air vent1.
Neckband release button2.
START/STOP/ (power) button3.
Mode LED4.
MODE button5.
Air inlet6.
SMART button7.
Status LED8.
+ (plus) button / − (minus) button9.
USB port10.
Band11.
Cooling/warming section
(Material: Stainless steel SUS316L)
12.
Band extensions13.
6
Help Guide
Wearable Thermo Device Sensing Kit
RNPK-6T
Charging the unit
The unit has a lithium-ion battery. When you use the unit for the first time or have not used it for a long time, charge the
unit for 30 minutes or more.
Cooling or warming is possible while the unit is being powered by a USB connection with a portable battery, computer or
a USB AC adaptor. (The built-in battery of the unit is not charged during cooling or warming.)
Note
Charge the battery in an ambient temperature of 5°C to 40°C.
Do not touch the unit, USB cable, or USB AC adaptor with wet hands.
Related Topic
Battery duration
Checking the remaining battery level
B-P42-100-11(2) Copyright 2026 Sony Thermo Technology Inc.
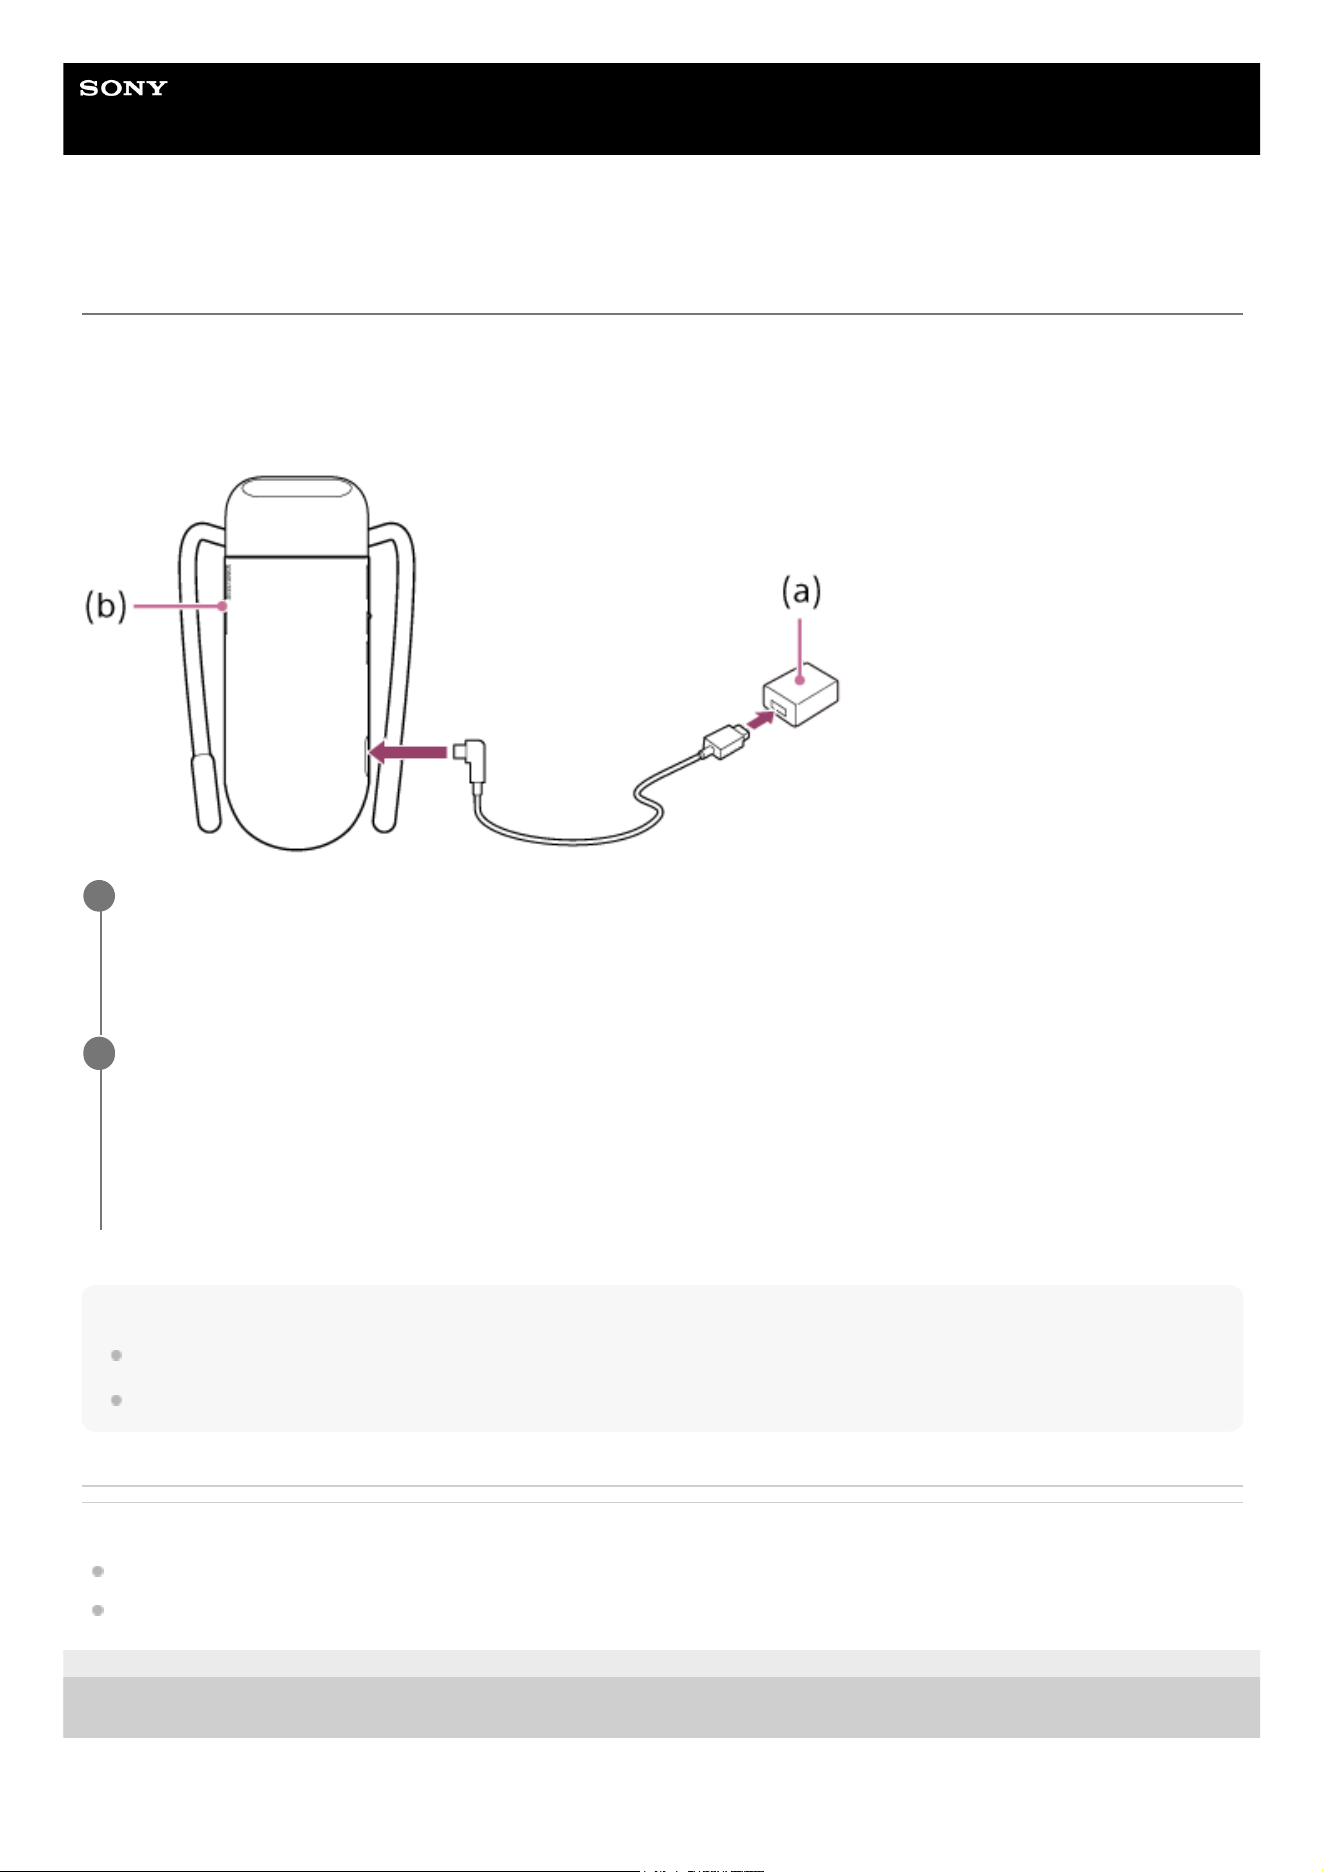
Open the USB port cover and connect the unit to a commercially available USB AC adaptor (a) using the
supplied USB cable.
The mode LED (b) will light up in red, and charging will start.
1
When the mode LED turns off, disconnect the USB cable from the unit and the USB AC adaptor.
The mode LED turns off when charging is complete.
When charging starts from the discharged state, the battery will be 80% charged in about 60 minutes, and fully
charged in about 120 minutes.
(The charging time may vary depending on the USB AC adaptor you are using.)
2
7
Help Guide
Wearable Thermo Device Sensing Kit
RNPK-6T
Battery duration
The amount of time that the unit can be used with one full charge
The following is the guideline for battery duration for each temperature level during cooling or warming operations.
The values for the [COOL] mode are guidelines for when you use the unit while staying still in an environment with a
room temperature of 30°C.
The battery duration varies depending on the usage and environment.
When using in [COOL] mode
Level 1: About 10 hours
Level 2: About 8 hours 30 minutes
Level 3: About 7 hours
Level 4: About 5 hours 30 minutes
Level 5: About 3 hours
When using in [WARM] mode
Level 1: About 7 hours
Level 2: About 5 hours
Level 3: About 4 hours
Level 4: About 3 hours
Hint
In the case of continuous use, operation will be paused at the following times.
When using in [COOL] mode: About 15 hours
When using in [WARM] mode: About 8 hours
Related Topic
Charging the unit
Checking the remaining battery level
B-P42-100-11(2) Copyright 2026 Sony Thermo Technology Inc.
8
Help Guide
Wearable Thermo Device Sensing Kit
RNPK-6T
Checking the remaining battery level
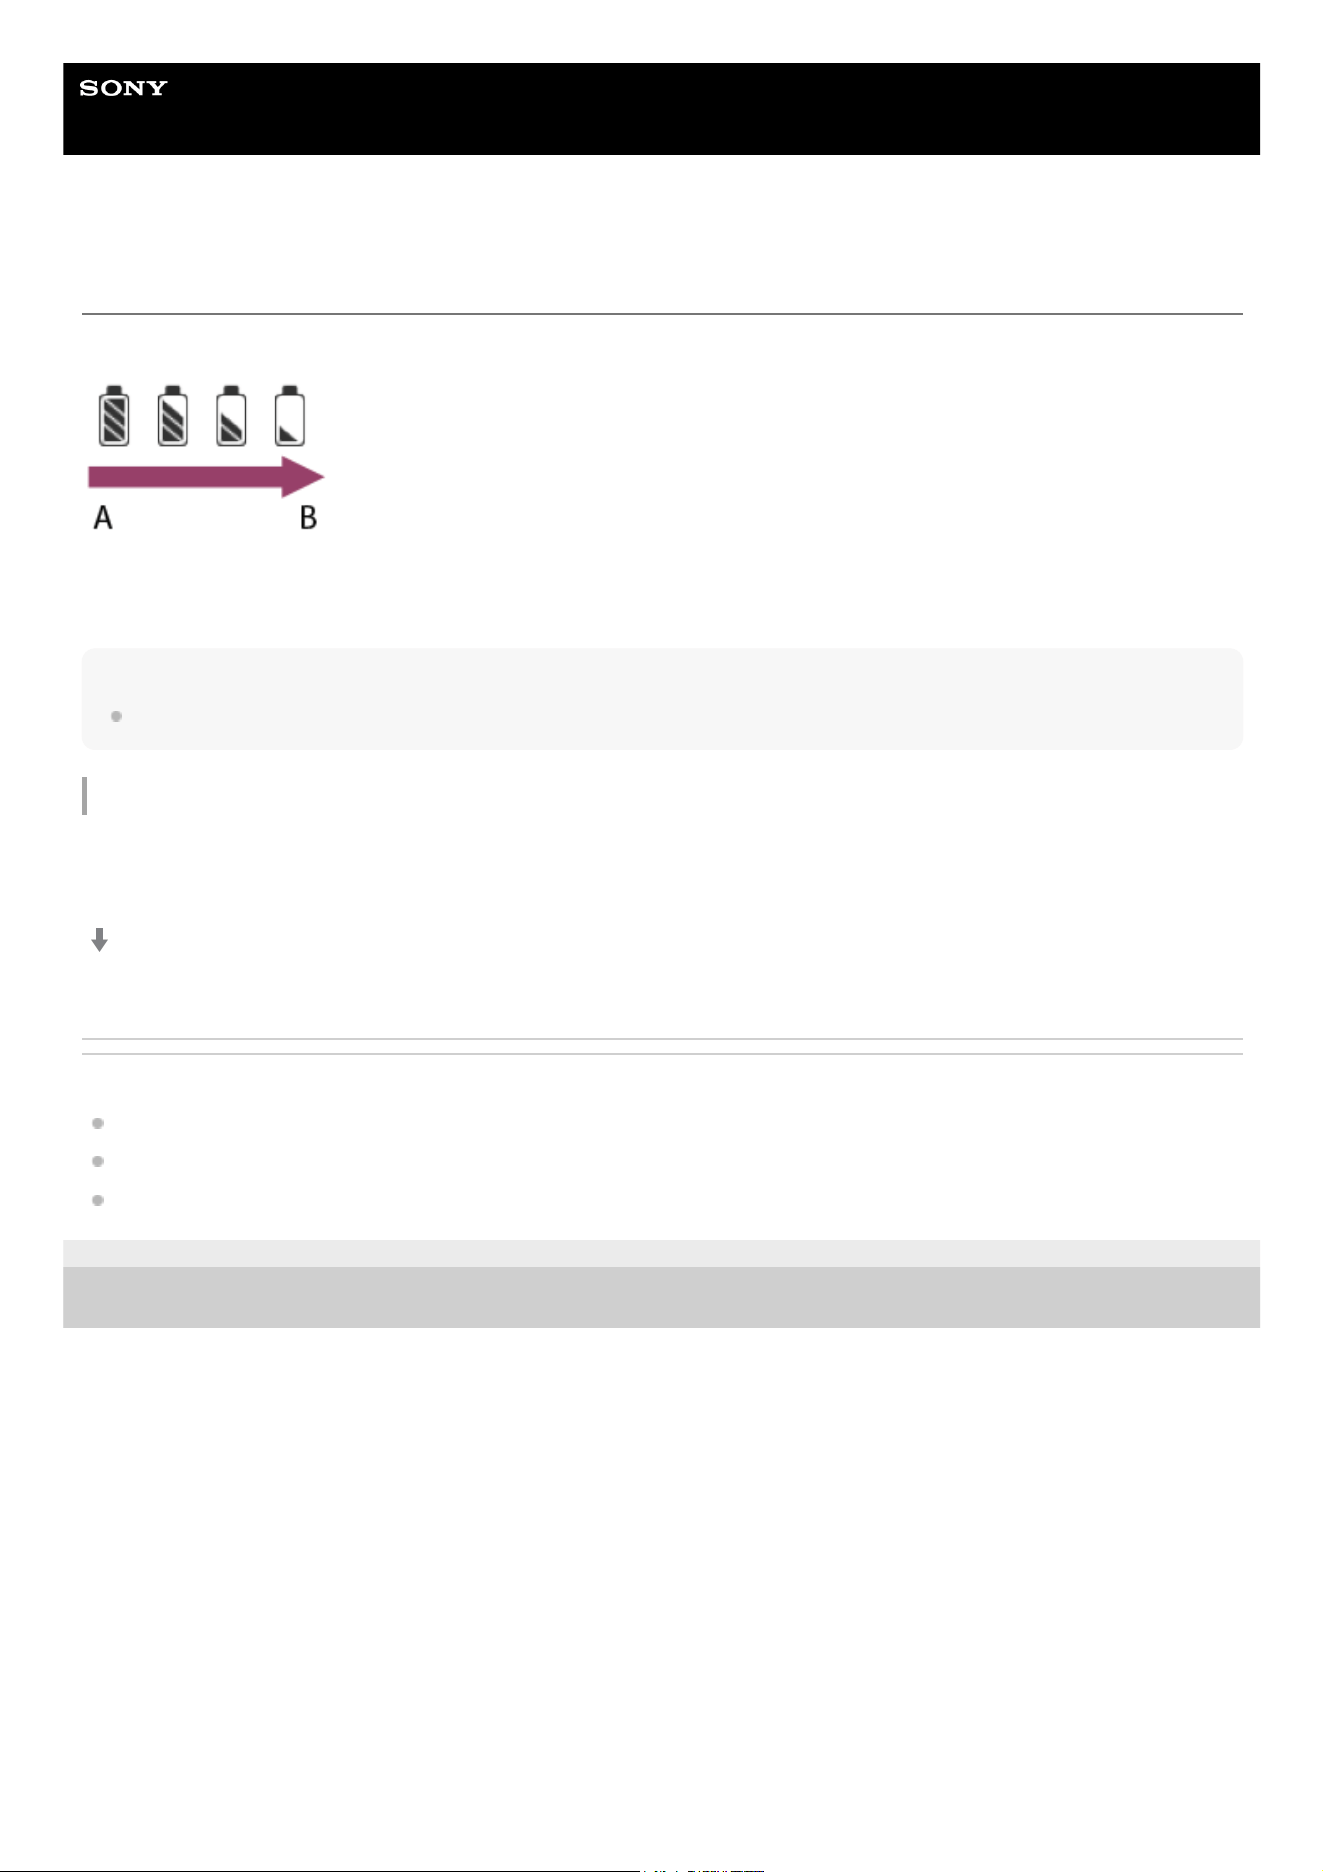
You can check the battery level of the unit by the battery icon on the “REON POCKET” app.
A: Full
B: Low
Note
The correct remaining battery level may not be displayed under some operating or environmental conditions.
To check the remaining battery level on the unit
Press and hold the MODE button on the unit for about 2 seconds, and the mode LED blinks in red for the number of
times according to the remaining battery level.
Blinks 4 times: Full
Blinks 1 time: Low
Related Topic
Charging the unit
Battery duration
Overview of the “REON POCKET” app screen
B-P42-100-11(2) Copyright 2026 Sony Thermo Technology Inc.
9
Help Guide
Wearable Thermo Device Sensing Kit
RNPK-6T
Using the unit with the neckband
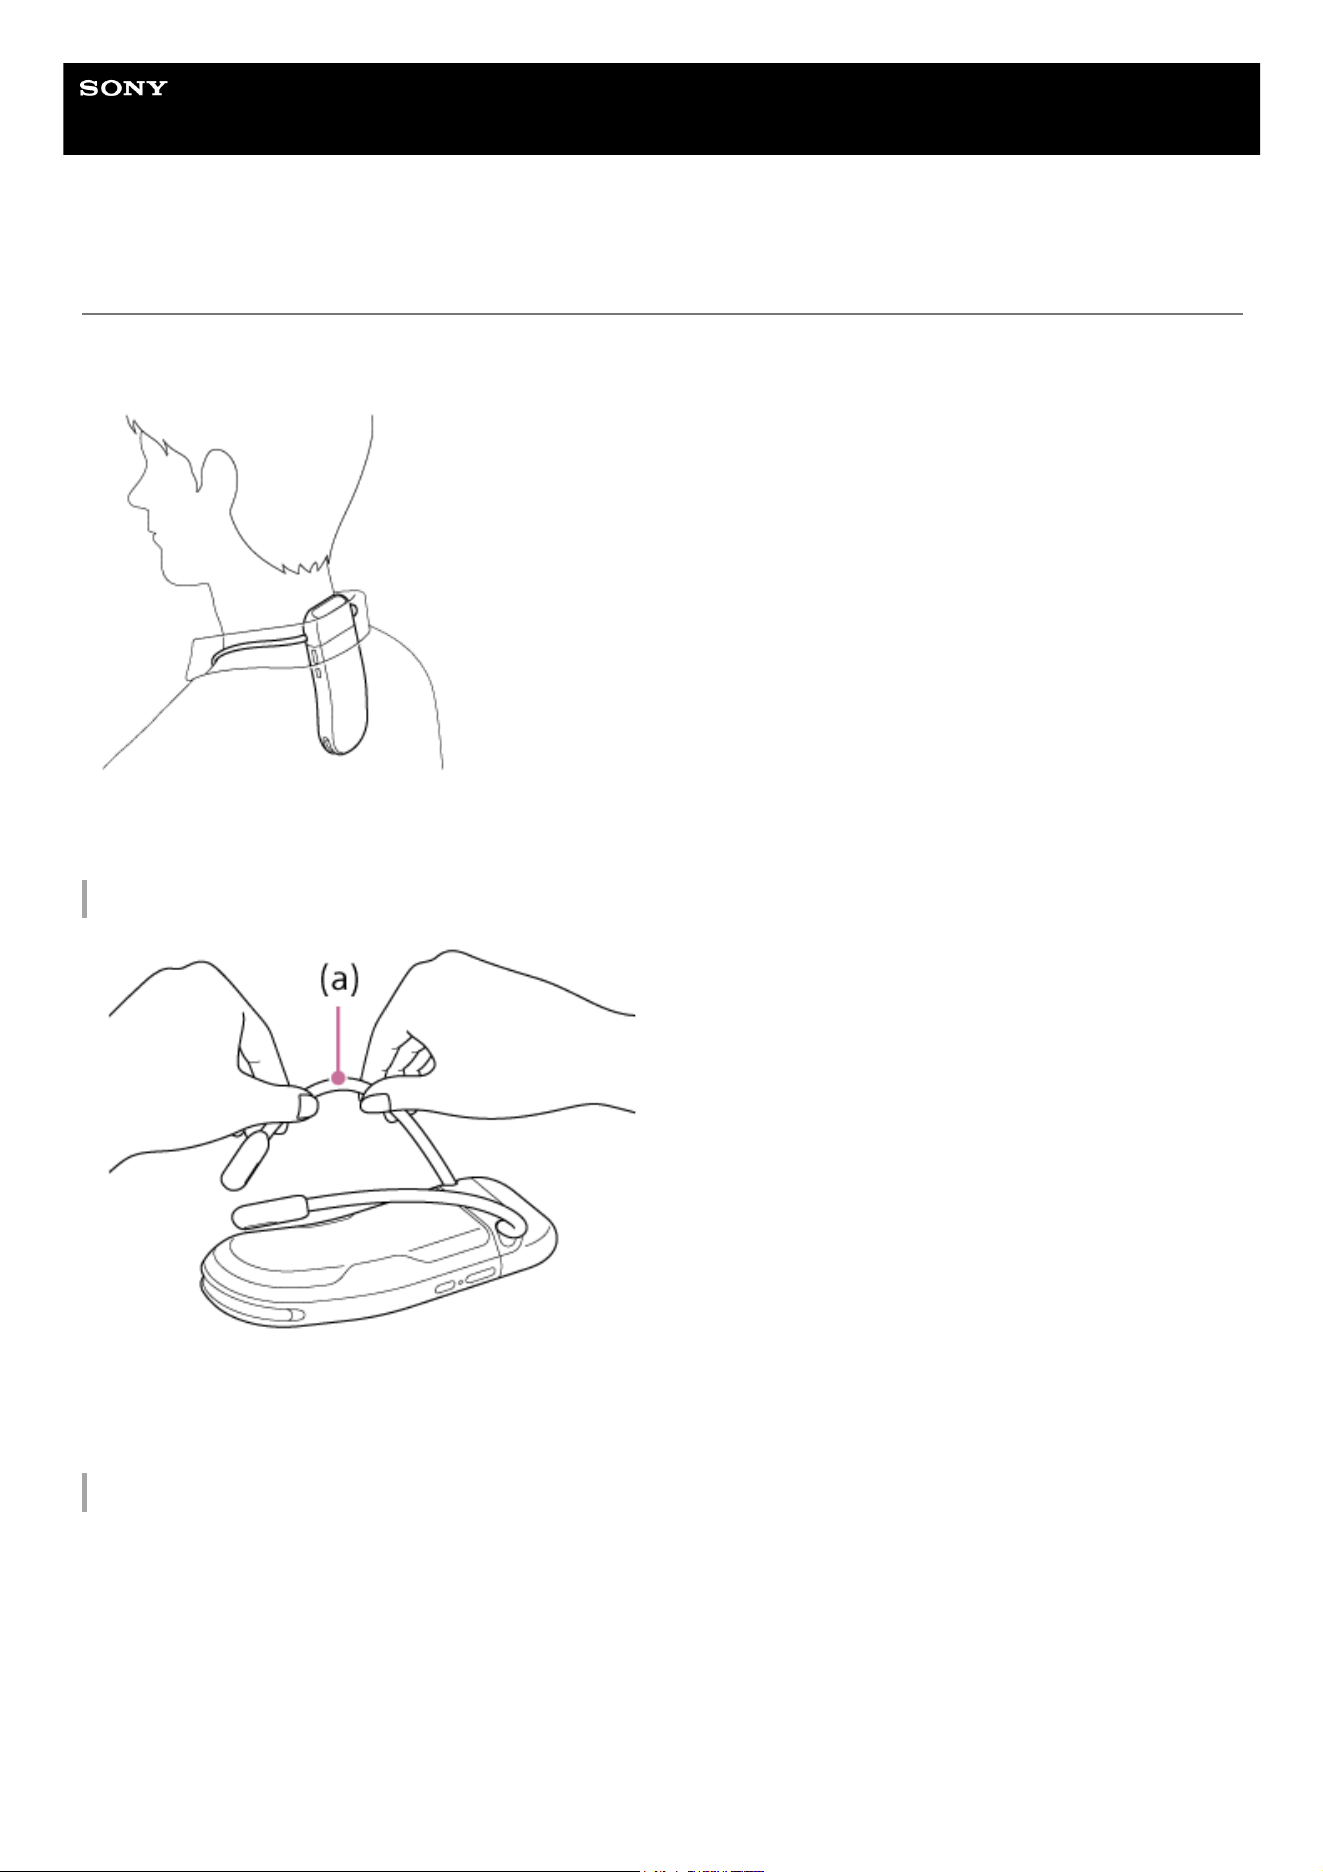
The unit is attached to the neckband at the time of purchase. Wear the neckband as is and place the band around the
bottom of your neck so that the cooling/warming section of the unit comes into direct contact with your skin.
For details on how to use the dedicated neckband, also refer to the support site.
https://reonpocket.sony.com/support/
Adjusting the band
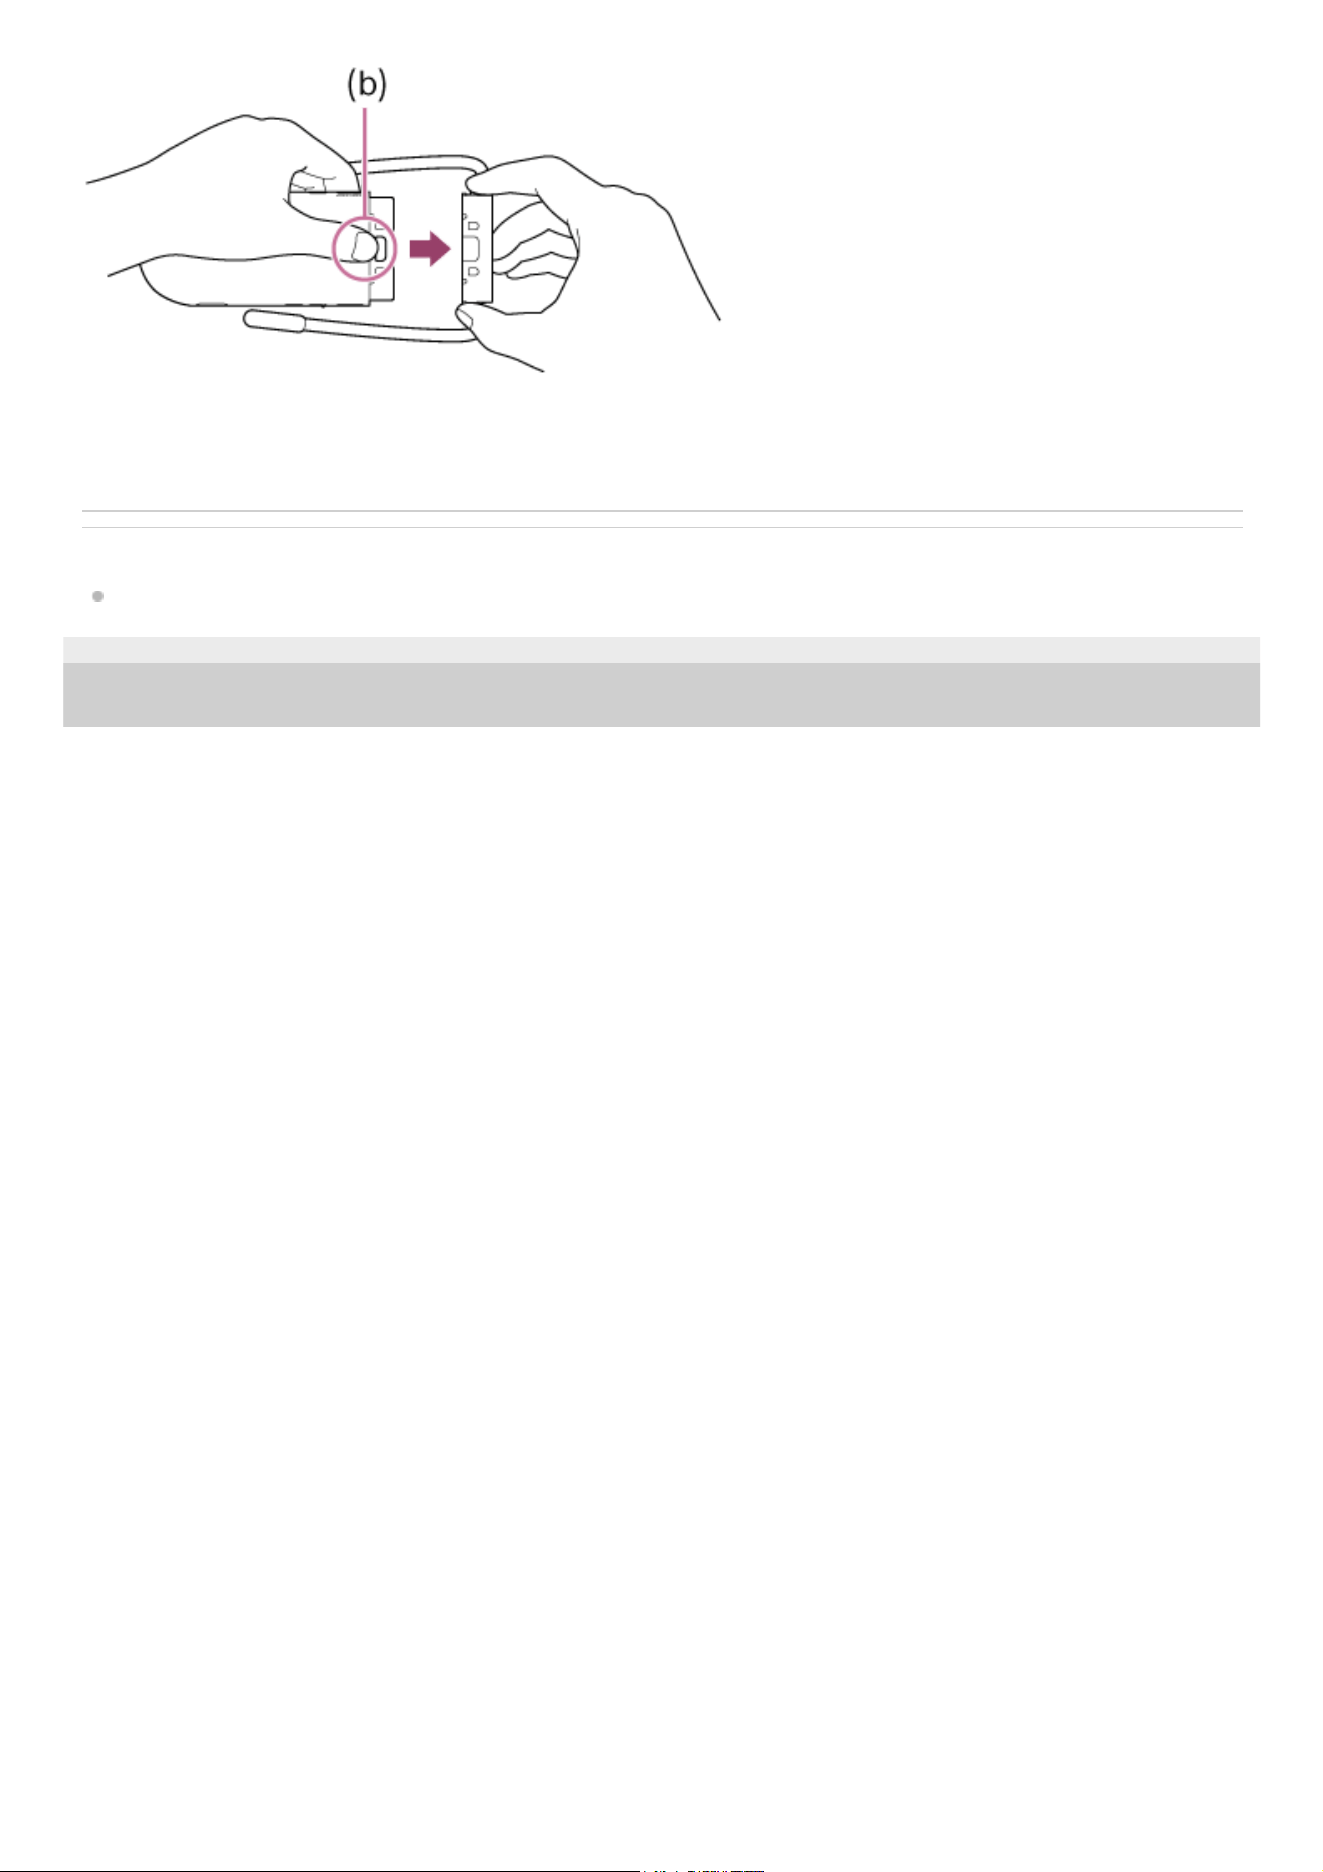
To adjust the band size around your neck, or to improve the contact of the cooling/warming section with your skin, take
the neckband off, then adjust the band (a).
The band can be bent freely. Hold the band and adjust the width and angle with a small amount of force.
Detaching the neckband from the unit / Attaching the neckband to the unit
Remove the air vent cover in advance.
10
Help Guide
Wearable Thermo Device Sensing Kit
RNPK-6T
Using the unit with the air vent cover
At the time of purchase, the air vent cover (short) is attached to the neckband. To divert exhaust from the air vent at the
top of the unit, use the short or adjustable type of air vent cover depending on your clothing. The adjustable air vent
cover allows you to adjust the length and angle.
If you use the unit without the air vent cover, make sure that your clothing does not block the air vent.
Detaching the air vent cover from the neckband / Attaching the air vent cover to the
neckband
Hold the top and bottom of the air vent cover with your fingers and remove it downwards.
To attach the air vent cover, align the tabs with the notches on the neckband and push it into the neckband until it fits
firmly.
B-P42-100-11(2) Copyright 2026 Sony Thermo Technology Inc.
12
Help Guide
Wearable Thermo Device Sensing Kit
RNPK-6T
Using the unit by holding it in your hand
You can use the unit by holding it and putting the cooling/warming section to your skin.
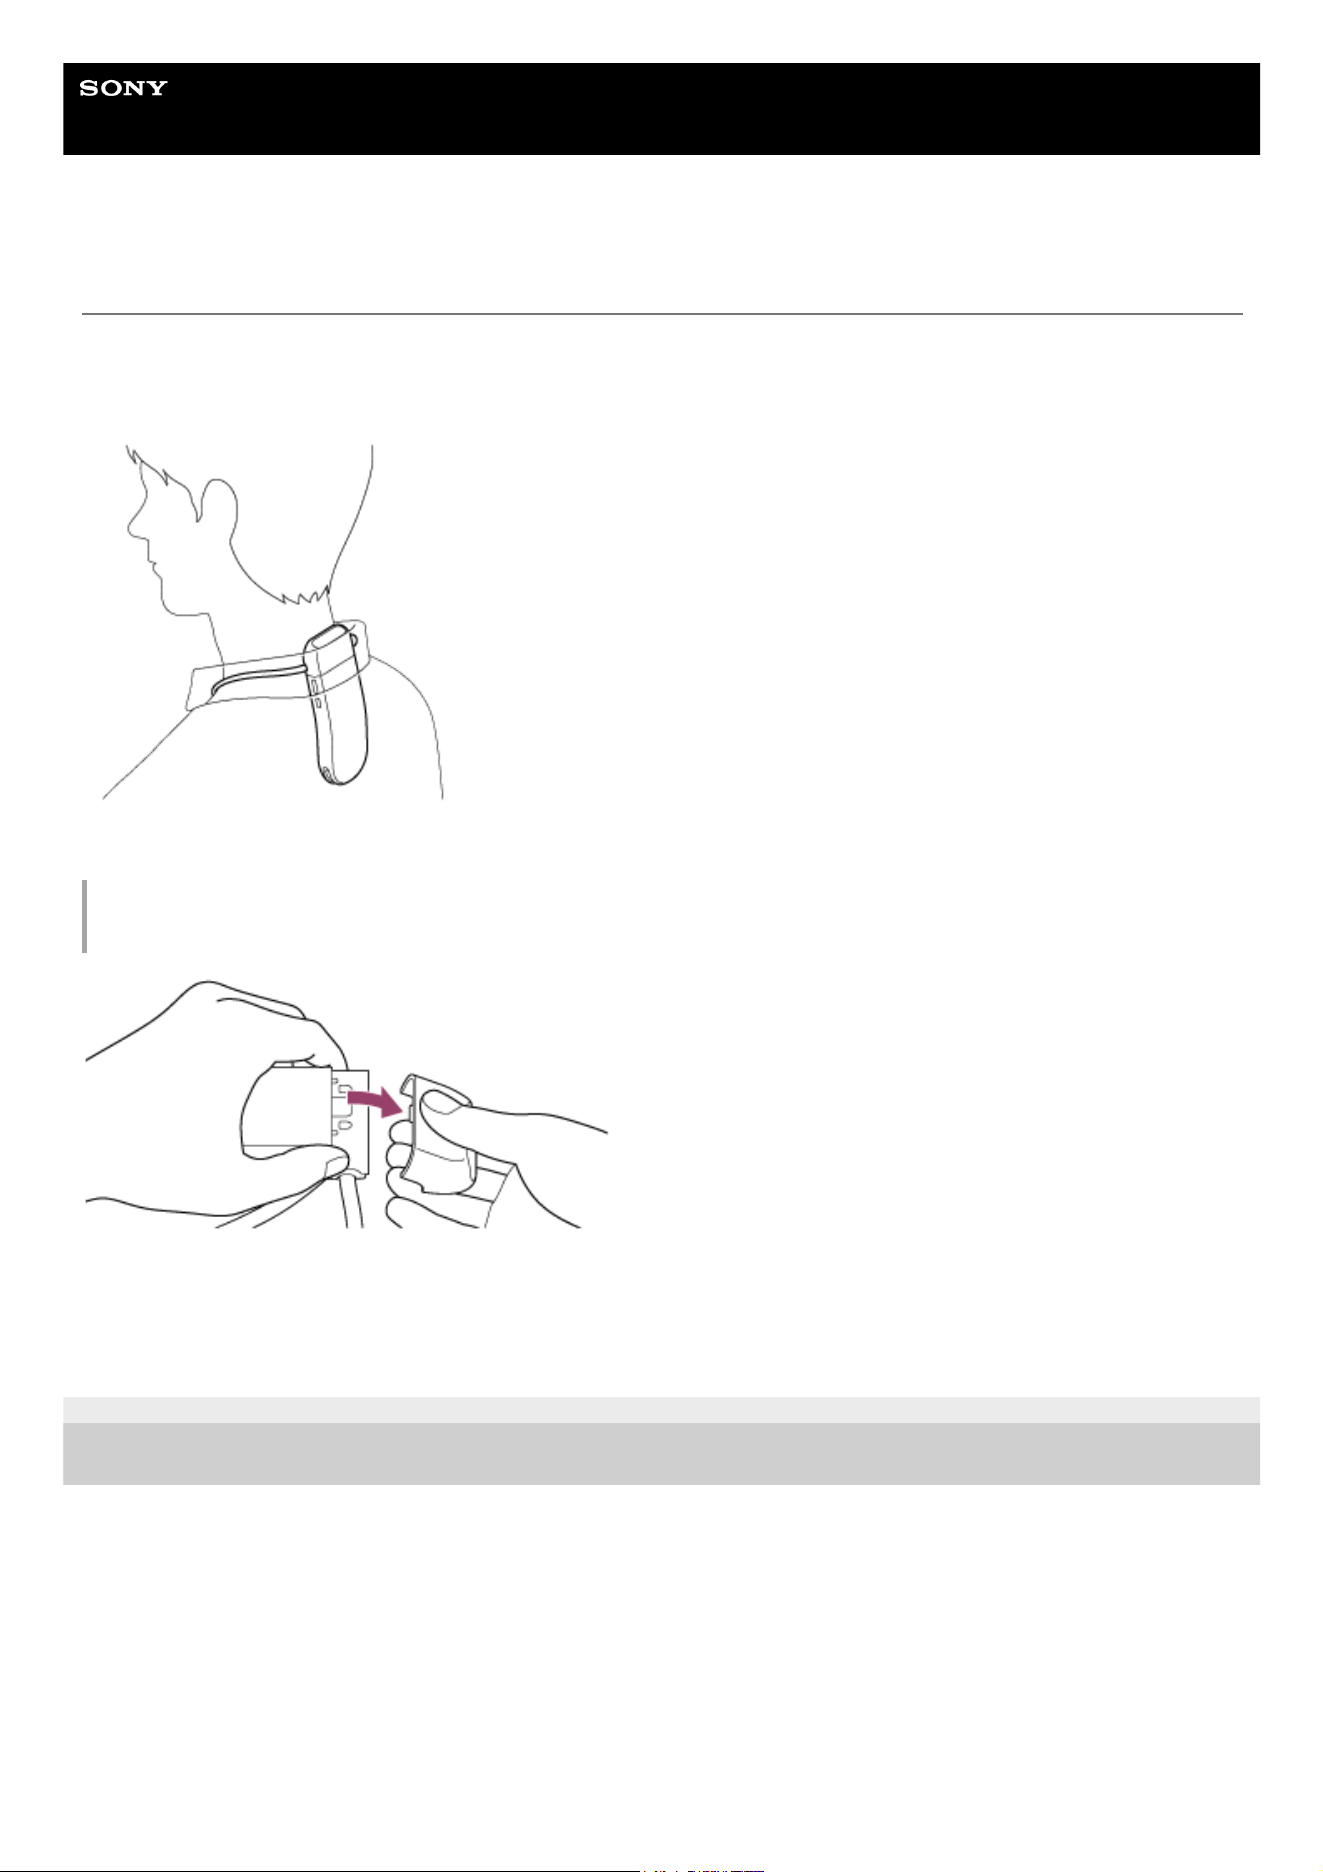
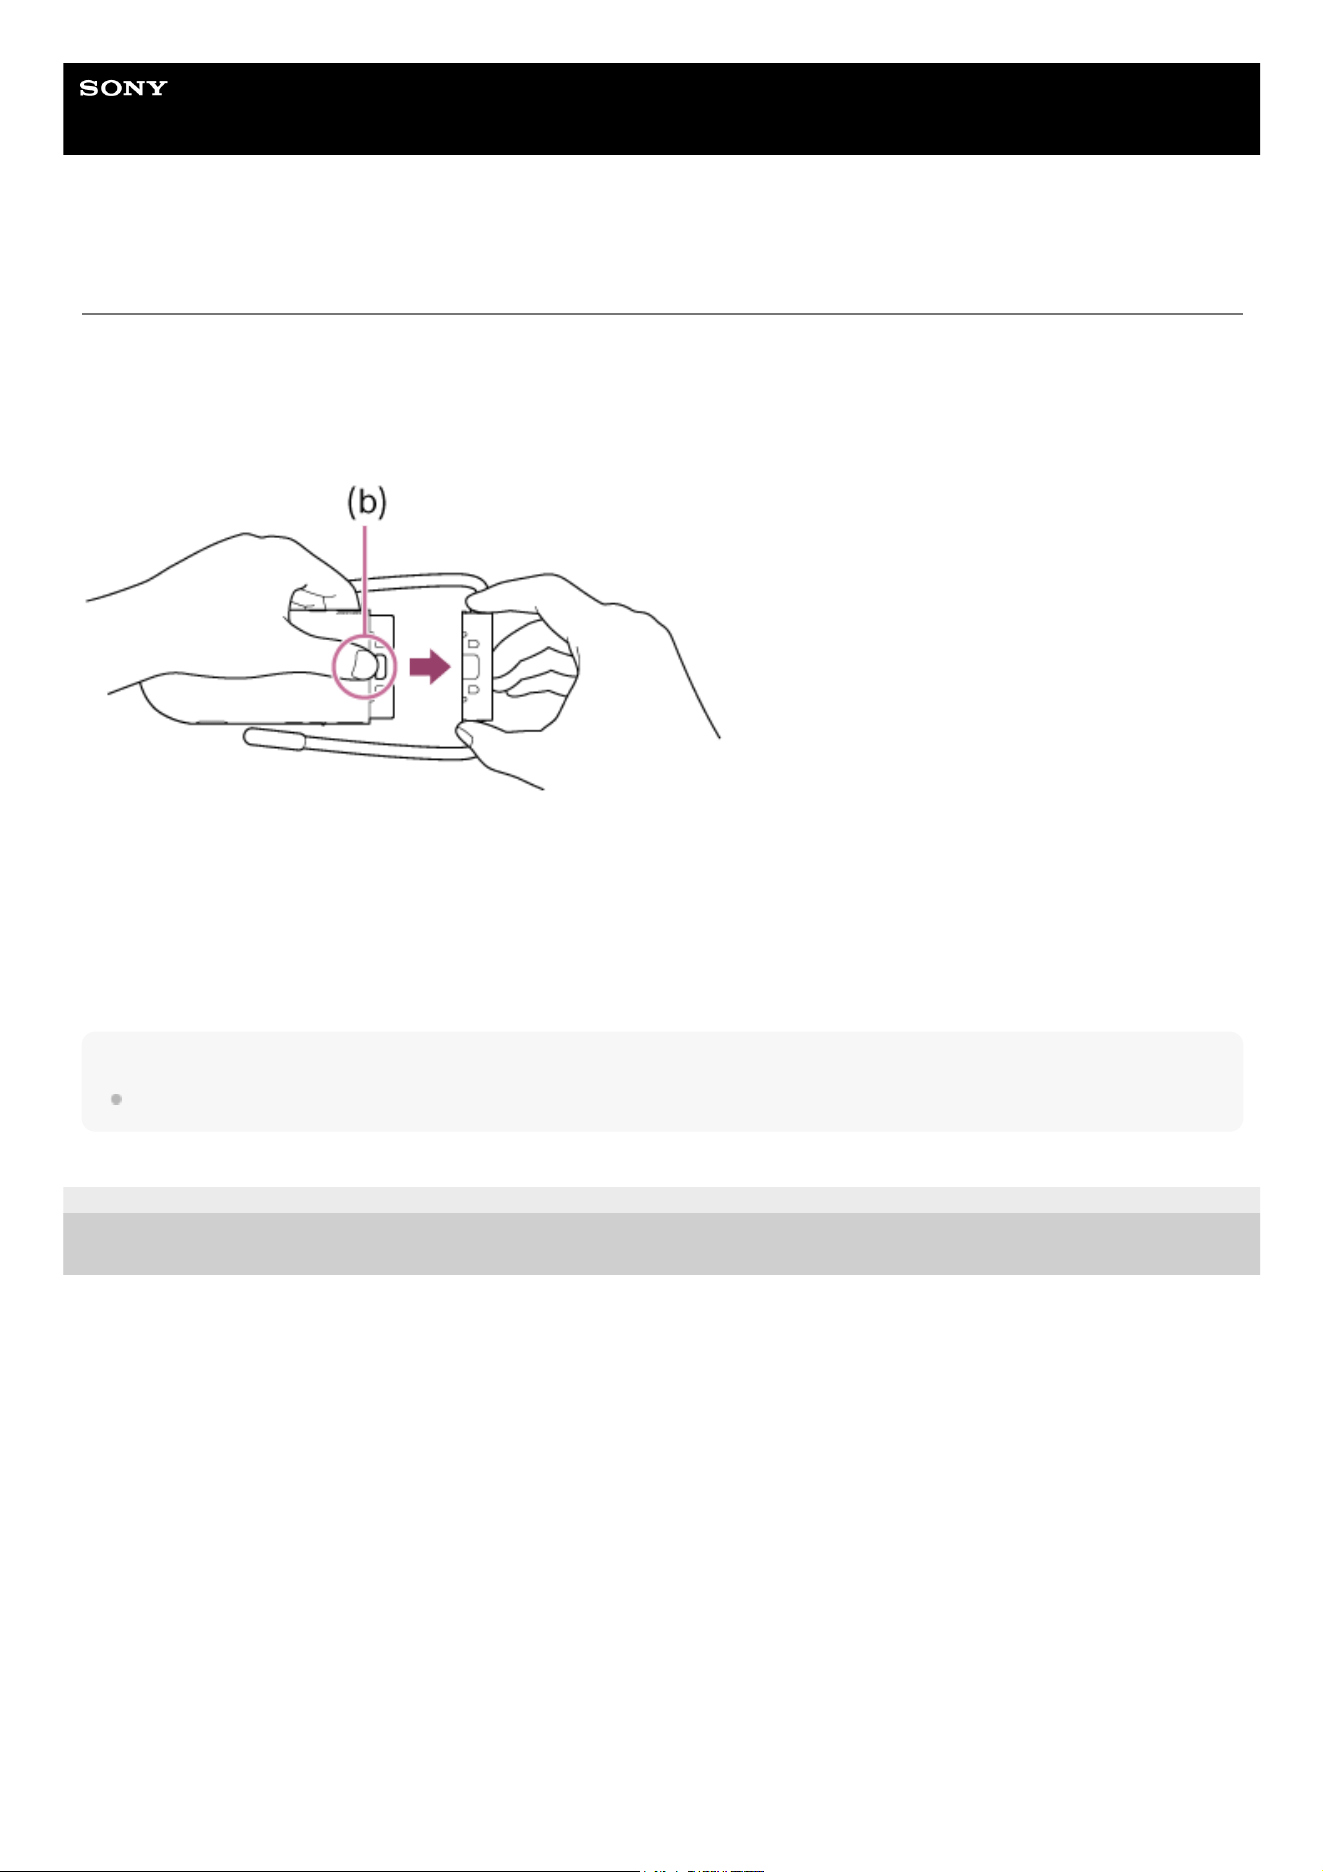
To detach the neckband from the unit
Remove the air vent cover in advance.
Remove the neckband straight out while pressing and holding down the release button (b).
To attach the neckband, push it into the unit until it fits firmly.
When carrying the unit
When carrying the unit in a bag, it is recommended to put the unit in a small pouch to prevent sharp objects such as a
key from scratching the cooling/warming section.
Note
Do not operate the button of the unit with wet hands.
B-P42-100-11(2) Copyright 2026 Sony Thermo Technology Inc.
13
Help Guide
Wearable Thermo Device Sensing Kit
RNPK-6T
Operating from the unit
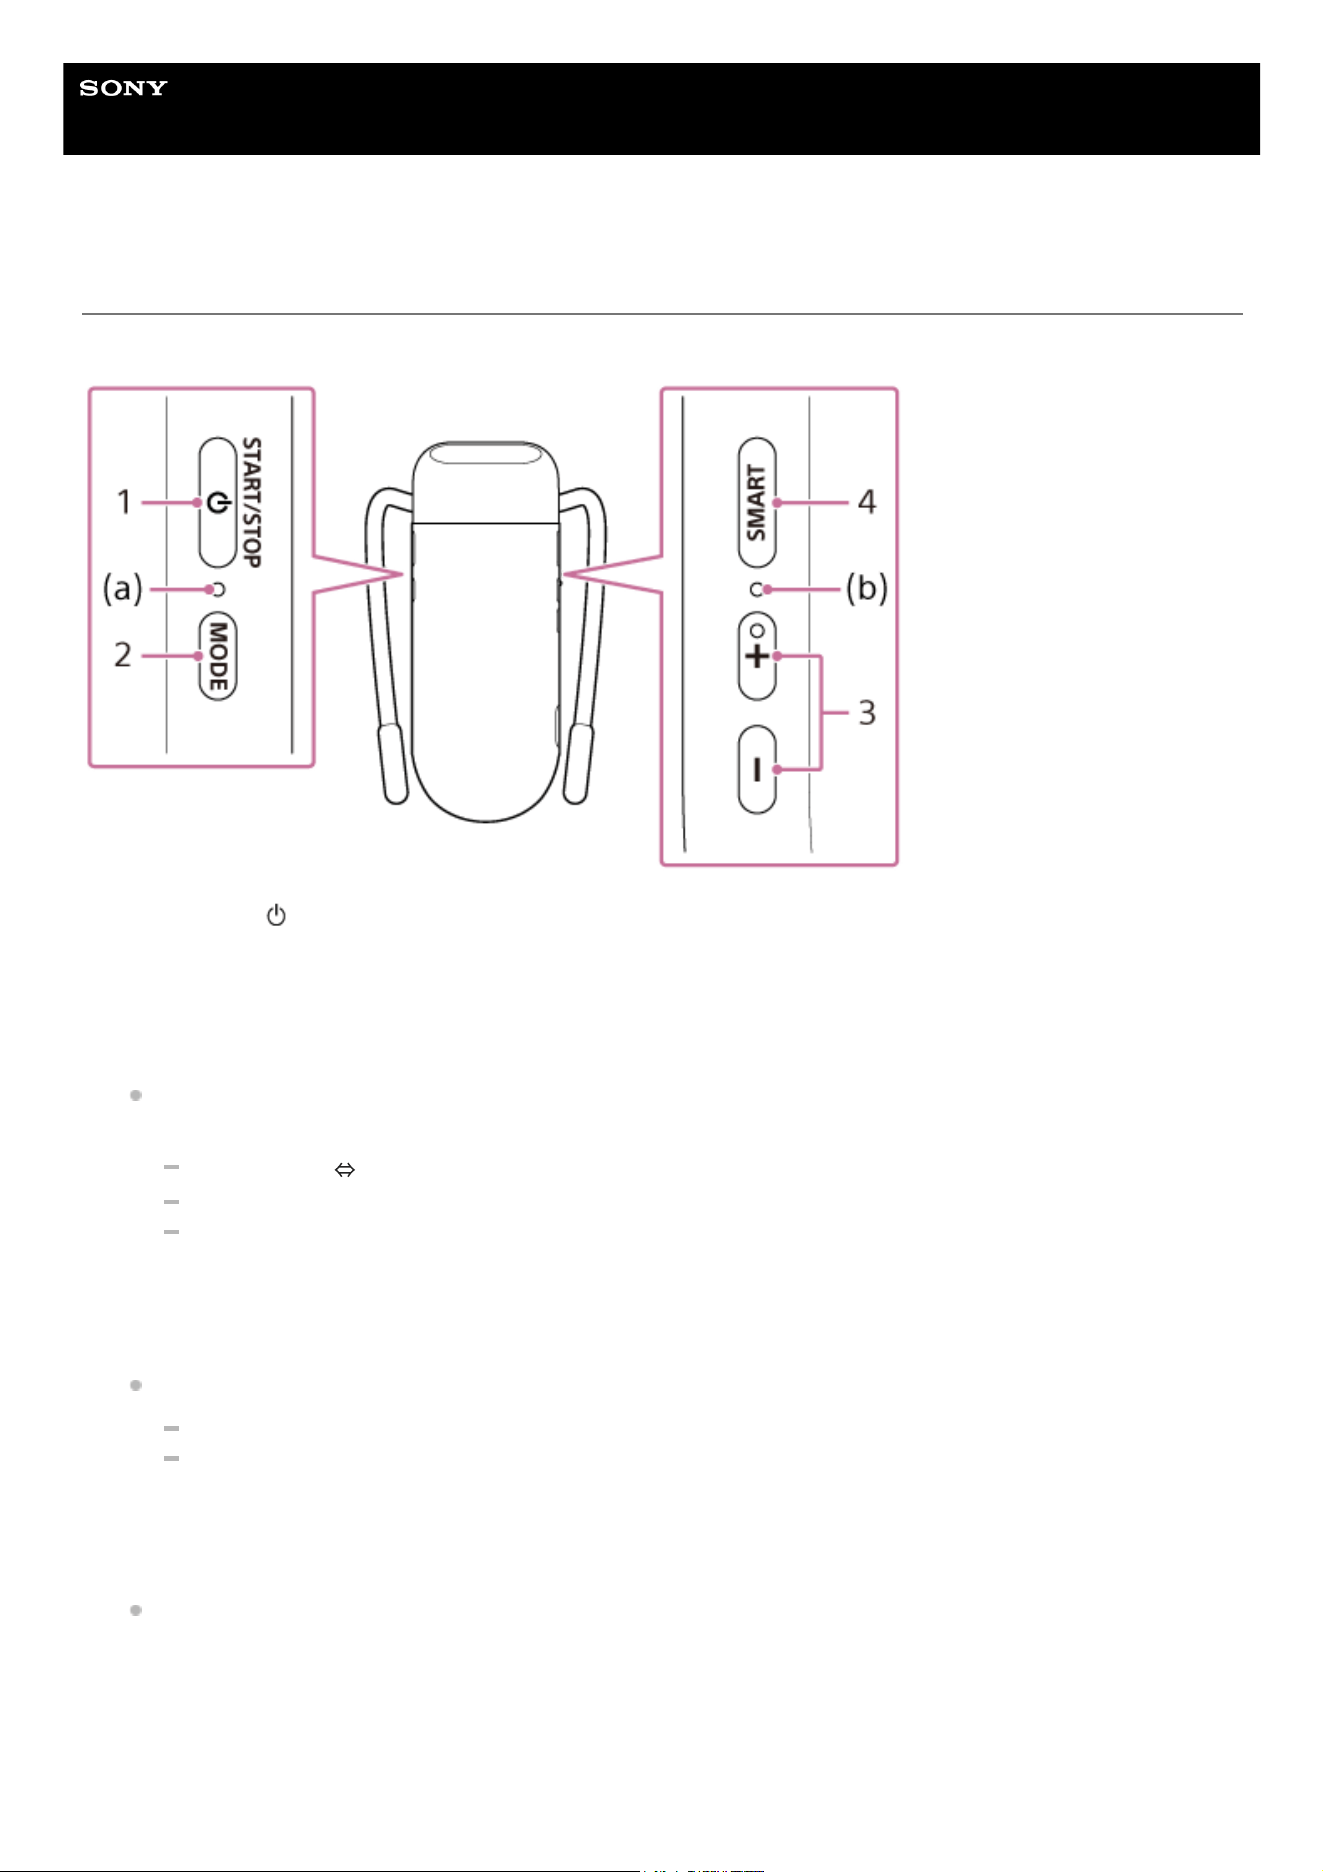
You can perform cooling/warming operations by using the following buttons on the unit.
START/STOP/ (power) button
Starts/stops operation. Pressing and holding the button for about 2 seconds turns the unit on/off.
1.
MODE button
Switches between COOL (cooling operation) and WARM (warming operation).
When the mode is changed, the mode LED (a) will light up for about 5 seconds in the color shown below
corresponding to the mode.
SMART COOL
⇔
WARM mode
*
: green
SMART COOL / MANUAL COOL mode: blue
SMART WARM / MANUAL WARM mode: orange
After switching modes, the mode LED (a) will be in the following state depending on the operating condition.
Operating: Remains lit in a color corresponding to the current mode.
Stopped: Flashes continuously in a color corresponding to the current mode.
2.
REON POCKET TAG (included) is required to use this function. For details on how to use REON POCKET TAG, refer to the following
Help Guide.
https://rd1.sony.net/help/reonpocket/rnpt1/h_zz/
*
+ (plus) button / − (minus) button
Changes the cooling/warming setting.
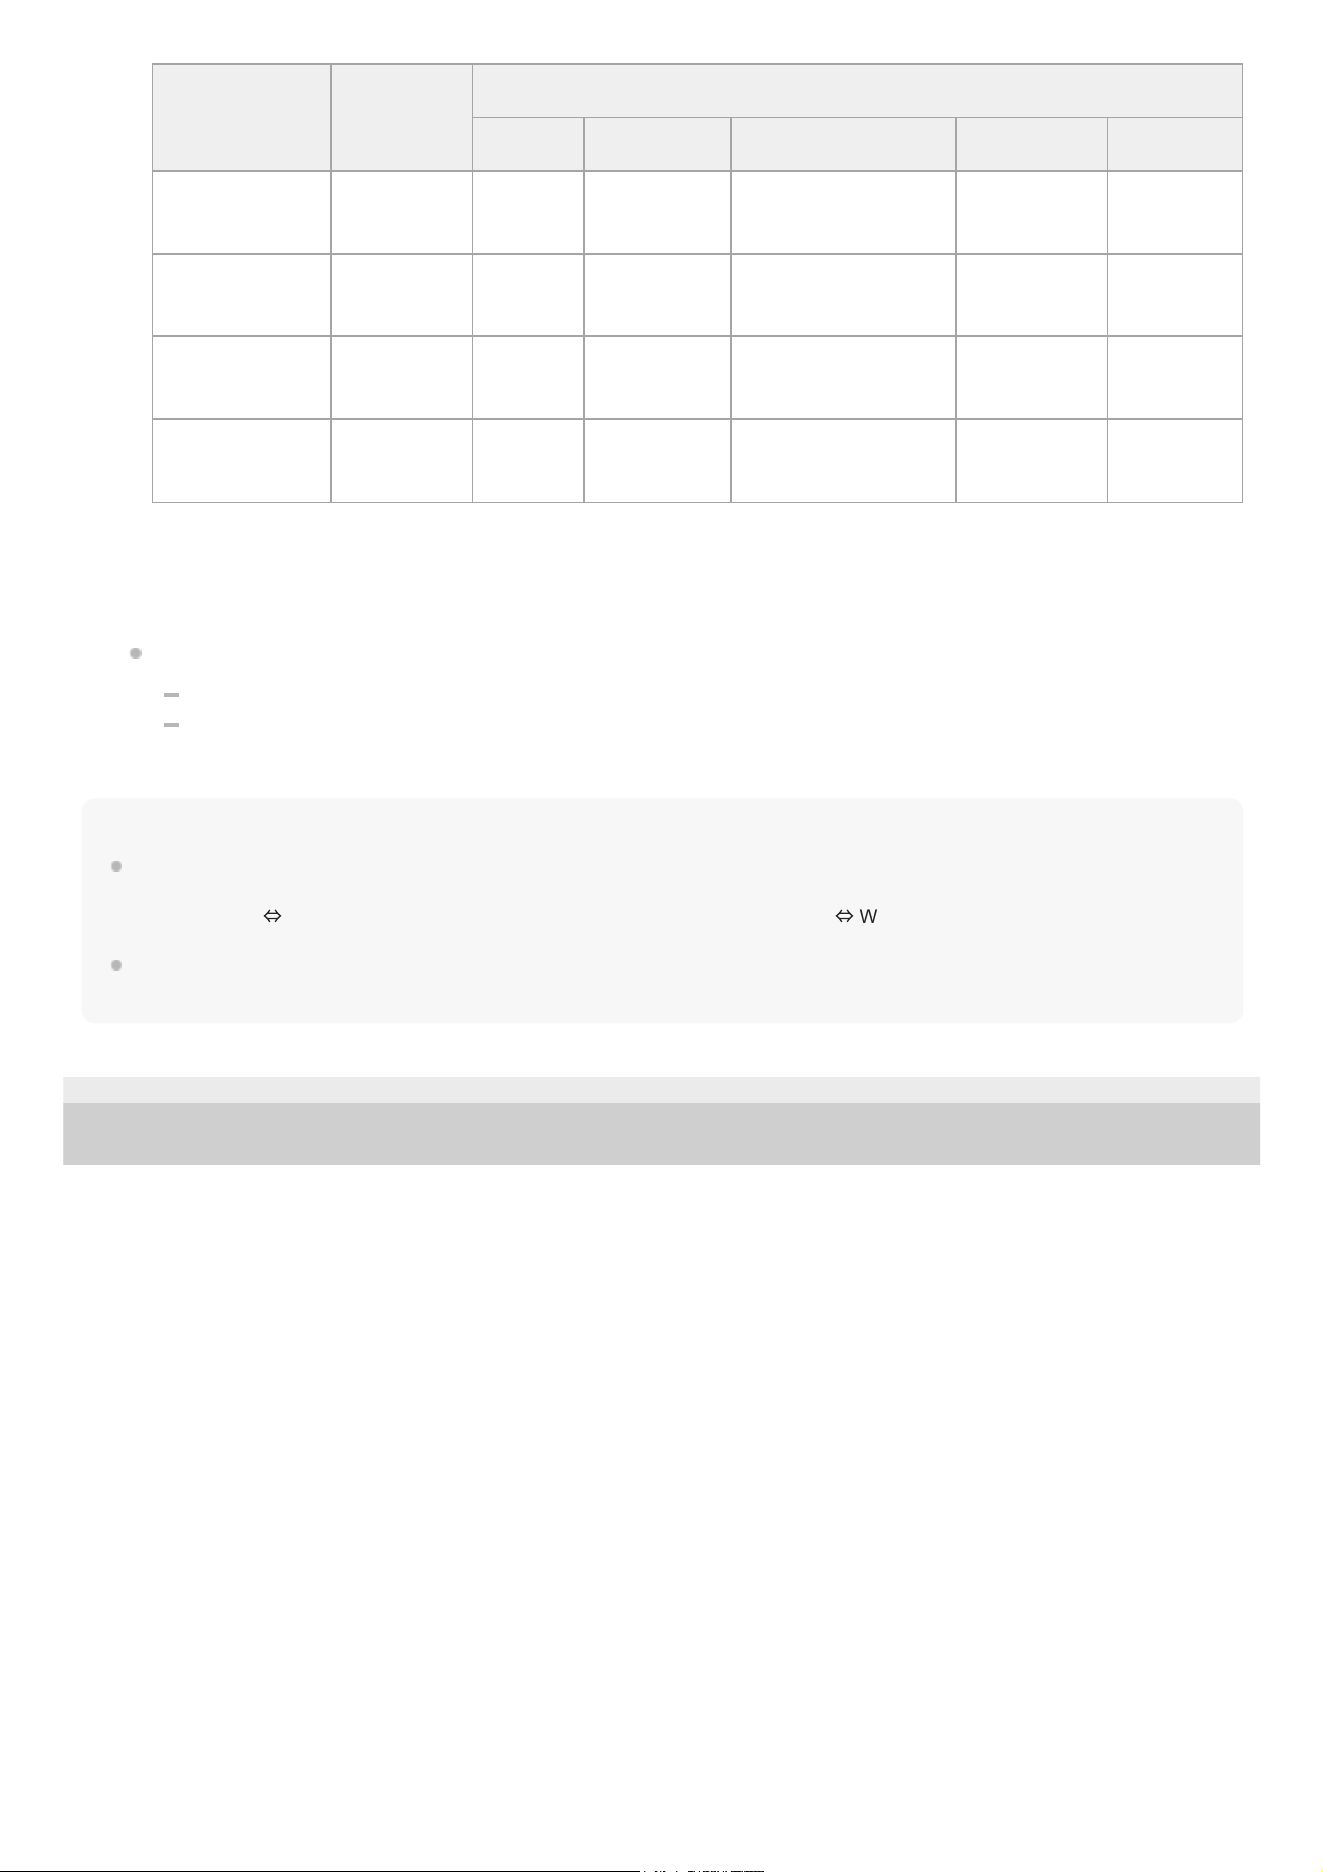
When the setting is changed, the status LED (b) will flash. The color of the LED indicates the current mode, and
the number of flashes indicates the current setting. The table below shows the flashing color and number of
flashes for each mode.
3.
14
Hint
If the unit is linked to REON POCKET TAG, the operating mode will change in the following order each time you press the MODE
button.
SMART COOL
⇔
WARM mode → COOL mode → WARM mode → SMART COOL
⇔
WARM mode...
While the unit is switching between modes, the mode LED (a) will flash for about 10 seconds in a color corresponding to the new
mode.
B-P42-100-11(2) Copyright 2026 Sony Thermo Technology Inc.
Mode
Flashing
color
Number of flashes
1 time 2 times 3 times 4 times 5 times
MANUAL
COOL mode
Blue
Level 1
(low)
Level 2 Level 3 Level 4
Level 5
(strong)
MANUAL
WARM mode
Orange
Level 1
(low)
Level 2 Level 3
Level 4
(strong)
―
SMART COOL
mode
Green
Low
Cool
Slightly Low
Cool
Medium
(Recommended)
Slightly High
Cool
High Cool
SMART WARM
mode
Green
Low
Warm
Slightly Low
Warm
Medium
(Recommended)
Slightly High
Warm
High Warm
SMART button
Switches between the SMART COOL / SMART WARM mode and the MANUAL COOL / MANUAL WARM mode.
While the unit is operating, the status LED (b) indicates the current mode.
SMART COOL / SMART WARM mode: lights up in green
MANUAL COOL / MANUAL WARM mode: off
4.
15
Help Guide
Wearable Thermo Device Sensing Kit
RNPK-6T
Installing the “REON POCKET” app
Install the “REON POCKET” app on your smartphone. After the installation, register the unit to your smartphone via
Bluetooth® connection on the initial setup screen.
Note
In advance, turn on the Bluetooth function on your smartphone.
If you are using an Android smartphone, allow the “REON POCKET” app to access the location information.
Hint
If the connection between your smartphone and the unit is not stable, bring them closer to stabilize the connection.
B-P42-100-11(2) Copyright 2026 Sony Thermo Technology Inc.
Download the “REON POCKET” app from Google Play or the App Store and install it.
https://reonpocket.sony.com/app/download/
1
Launch the “REON POCKET” app and follow the on-screen instructions to perform the initial setup.
Proceed with the initial setup by following the on-screen instructions. When the Bluetooth connection between the
unit and your smartphone is established, the unit is registered to your smartphone. The status LED on the unit lights
up in blue for about 1 minute and then goes off.
2
16
Help Guide
Wearable Thermo Device Sensing Kit
RNPK-6T
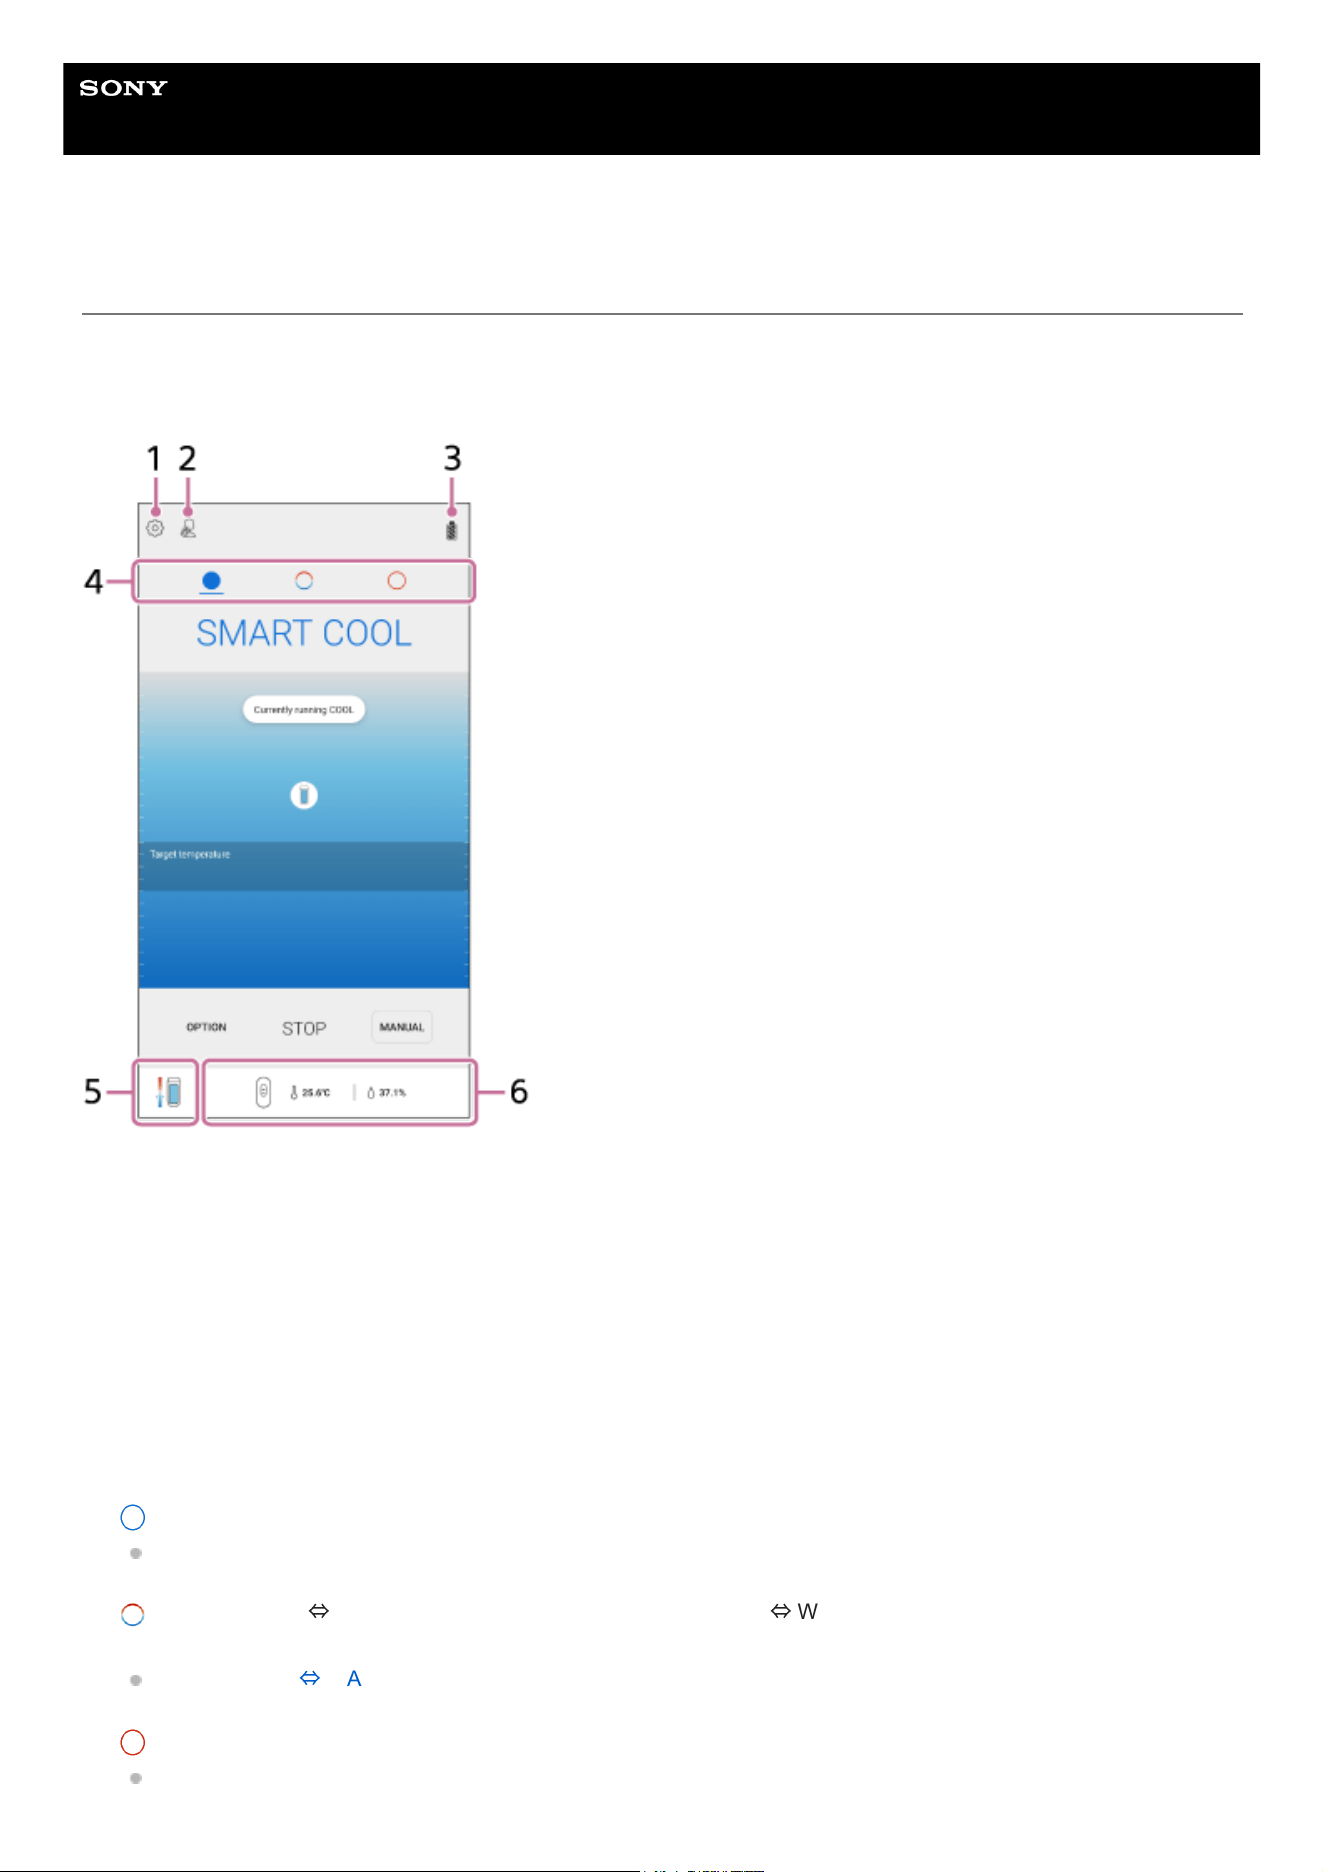
Overview of the “REON POCKET” app screen
This page introduces items common to each mode of the app.
The SMART COOL screen (RNP-6) is used as an example. For the specific items in each mode, refer to the respective
pages.
Settings icon
Tap to configure the various settings (such as [AUTO START/STOP]), to unregister or to initialize the unit, and to
check the versions of the unit and the app.
1.
[AUTO START/STOP] icon
Indicates that the [AUTO START/STOP] function is active.
2.
Battery icon
Indicates the remaining battery level of the unit.
3.
Mode icons
(COOL): Tap to switch to the SMART COOL screen for using in cooling operation.
COOL mode
(SMART COOL
⇔
WARM)*: Tap to switch to the SMART COOL
⇔
WARM screen, which automatically switches
between cooling operation and warming operation.
SMART COOL
⇔
WARM mode
(WARM): Tap to switch to the SMART WARM screen for using in warming operation.
WARM mode
4.
17
Related Topic
COOL mode
WARM mode
SMART COOL
⇔
WARM mode
Checking the remaining battery level
B-P42-100-11(2) Copyright 2026 Sony Thermo Technology Inc.
Temperature indication of the cooling/warming section
Indicates the guideline for the temperature of the contact surface of the unit. Tap to show the details of the
temperature of the contact surface, as well as tips and notes.
5.
Temperature/humidity*
Displays the temperature and humidity measured by REON POCKET TAG (included).
6.
REON POCKET TAG (included) is required to use this function. For details on how to use REON POCKET TAG, refer to the following Help
Guide.
https://rd1.sony.net/help/reonpocket/rnpt1/h_zz/
*
18
Help Guide
Wearable Thermo Device Sensing Kit
RNPK-6T
COOL mode
This page introduces recommended use to make the cooling/warming section cool (SMART COOL mode).
In the SMART COOL mode, the unit automatically adjusts the temperature of the cooling/warming section according to
the following conditions.
The temperature around the unit
Your movements such as walking or staying still
The temperature and humidity data sent from REON POCKET TAG
*
Your temperature preference
According to the temperature of the cooling/warming section and the conditions above, the unit may automatically
increase or reduce the cooling intensity or pause operation.
When the unit is linked to REON POCKET TAG (included)
*
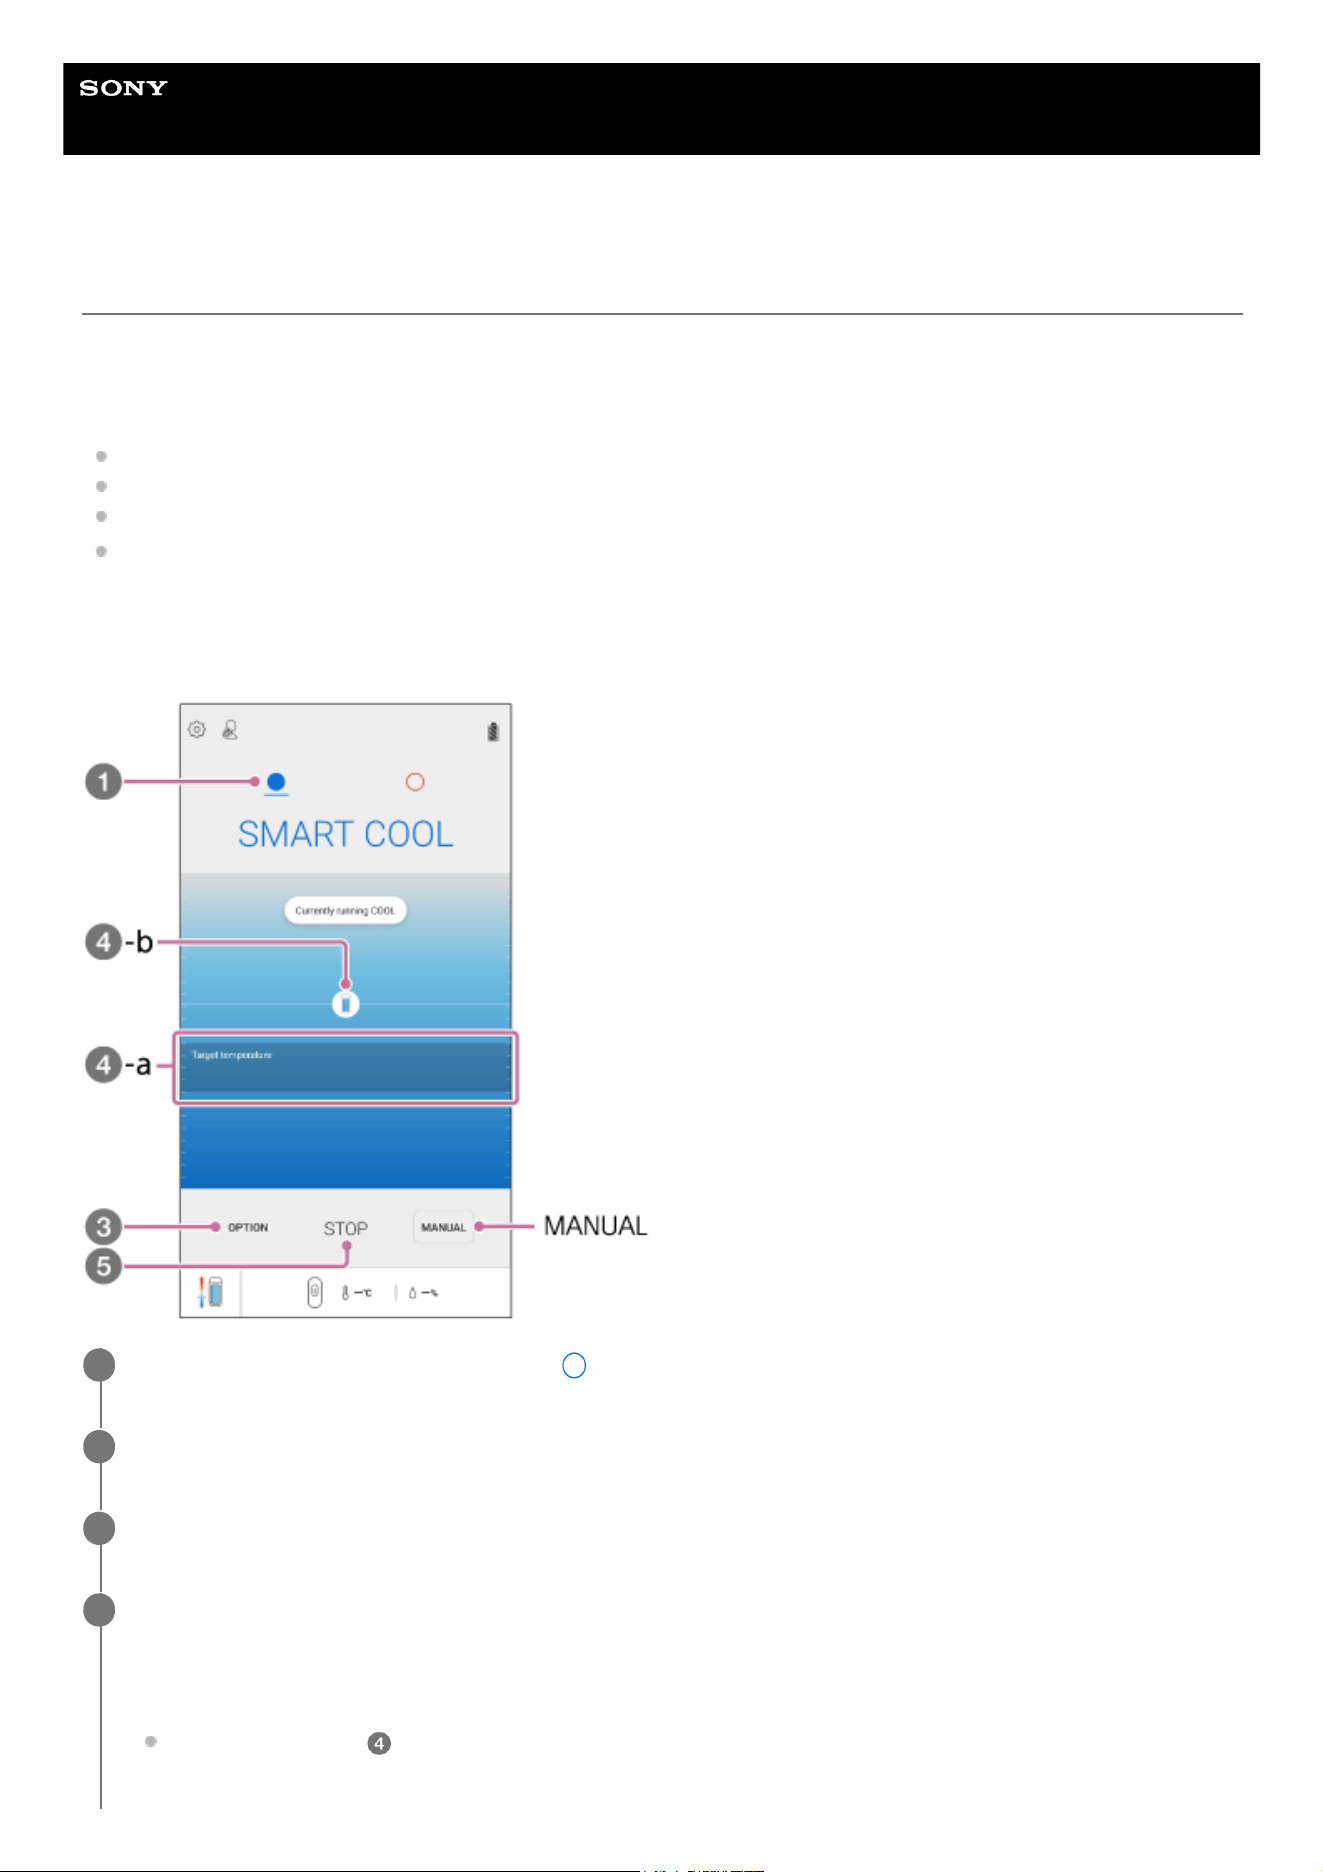
On the “REON POCKET” app screen, tap (COOL icon).
1
If the above screen is not displayed, tap [START].
2
Tap [OPTION].
3
Set the temperature preference.
Once the setting is made, cooling operation will start. The unit automatically adjusts the temperature of the
cooling/warming section.
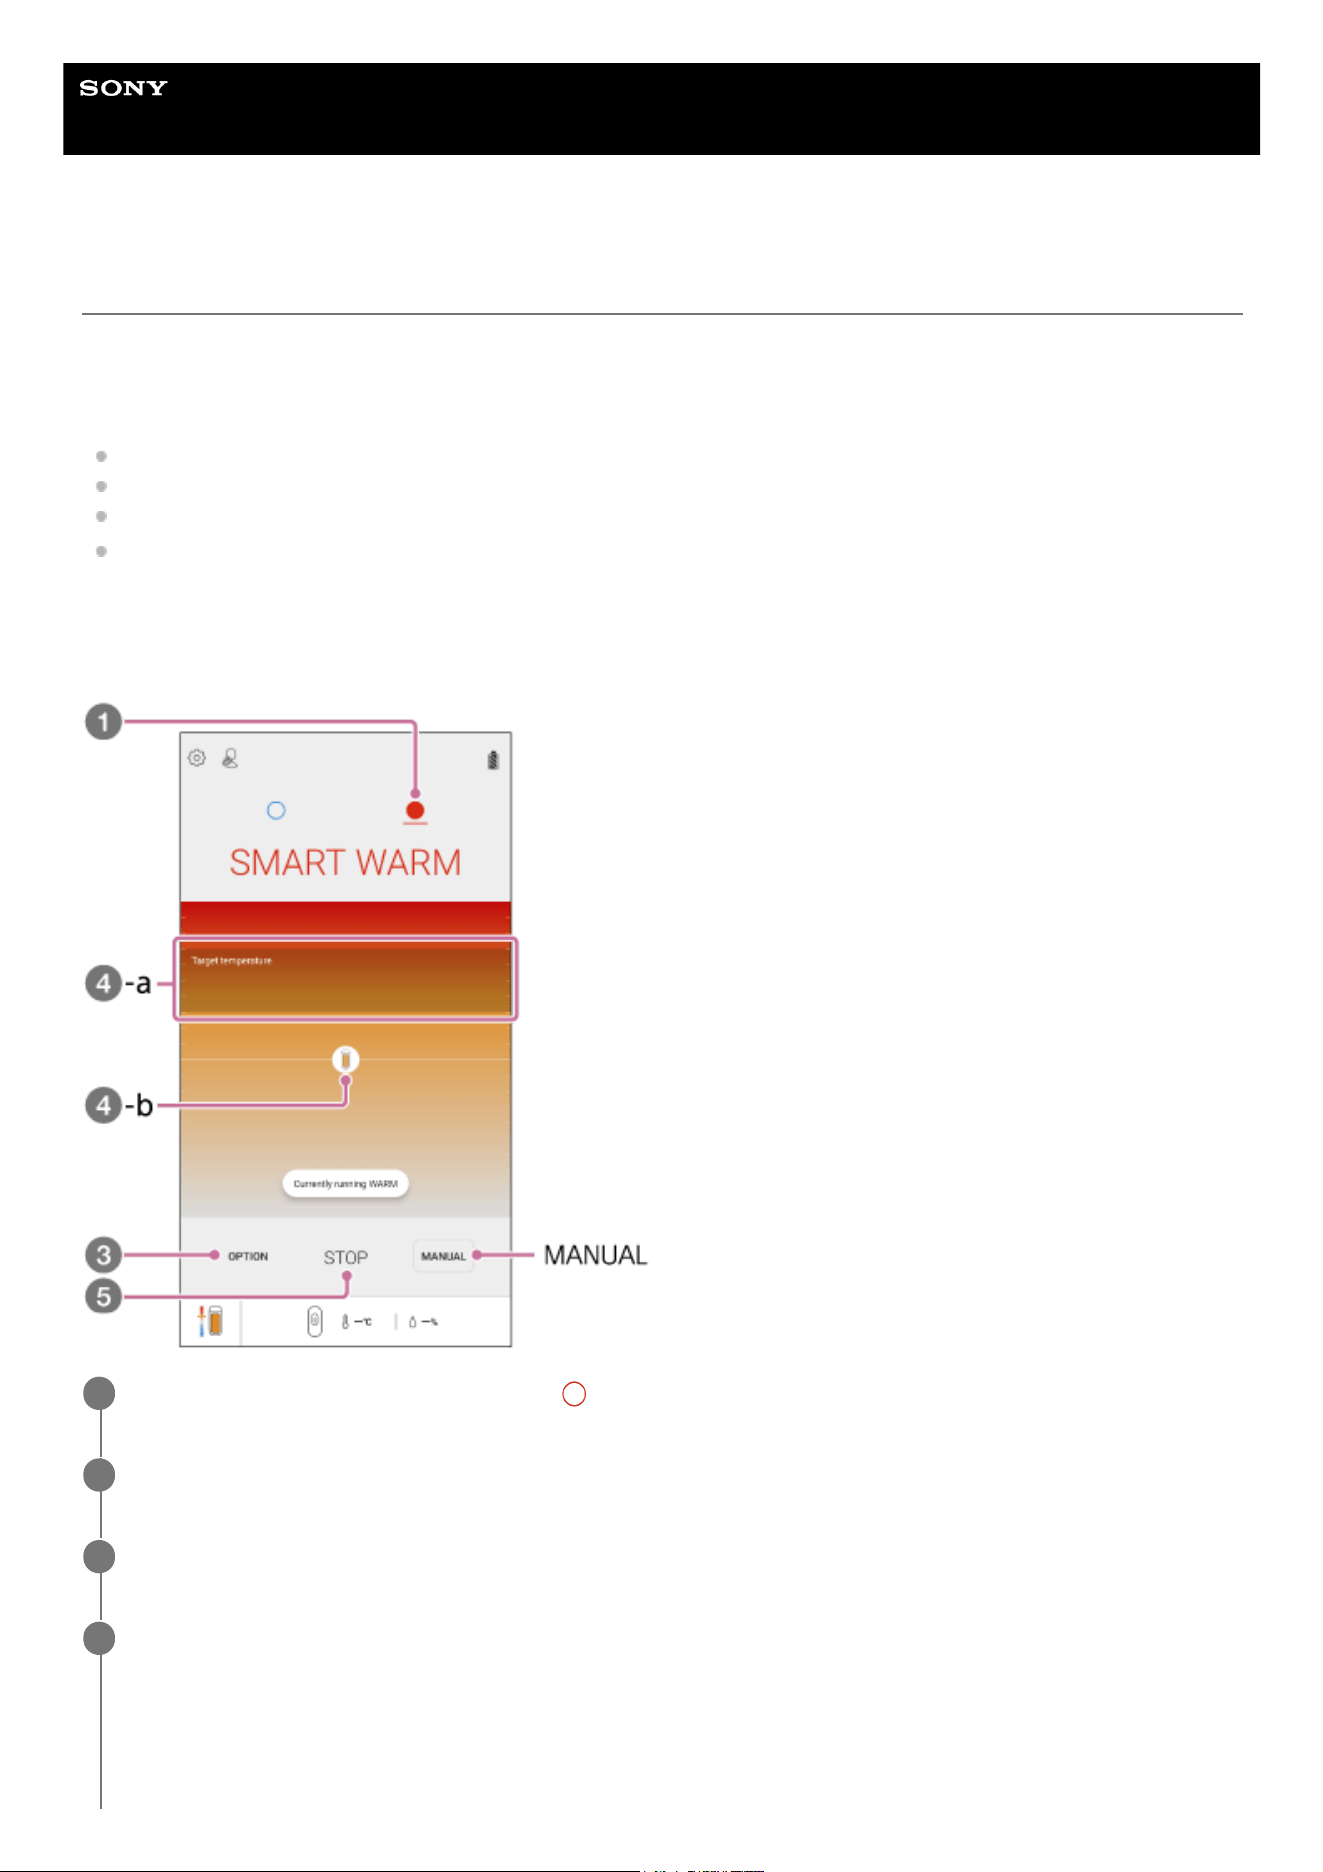
Target temperature ( -a): Indicates the target temperature range of the cooling/warming section (depending
on the temperature preference that you have set).
4
19
Using in the MANUAL COOL mode
In the MANUAL COOL mode, the cooling strength is kept at the selected temperature level.
Tap [MANUAL], and then tap the desired temperature level.
The temperature level changes as follows.
[1] (low) → [2] → [3] → [4] → [5] (strong)
Note
When the following abnormalities are detected, the cooling operation automatically stops (the mode LED flashes in purple for
about 8 seconds).
The temperature inside the unit has become extremely high.
The temperature of the cooling/warming section has become extremely low.
The fan inside the unit is not working properly.
For details, refer to “ When the mode LED flashes in purple .”
Hint
The exhaust volume of the fan is automatically controlled according to the temperature inside the unit.
Related Topic
WARM mode
B-P42-100-11(2) Copyright 2026 Sony Thermo Technology Inc.
Unit icon ( -b): Indicates the current temperature of the cooling/warming section. The circle around the unit
icon indicates the intensity of cooling. When the unit automatically pauses cooling operation, the icon becomes
translucent.
To stop cooling, tap [STOP].
5
20
Help Guide
Wearable Thermo Device Sensing Kit
RNPK-6T
WARM mode
This page introduces recommended use to make the cooling/warming section warm (SMART WARM mode).
In the SMART WARM mode, the unit automatically adjusts the temperature of the cooling/warming section according to
the following conditions.
The temperature around the unit
Your movements such as walking or staying still
The temperature and humidity data sent from REON POCKET TAG
*
Your temperature preference
According to the temperature of the cooling/warming section and the conditions above, the unit may automatically
increase or reduce the warming intensity.
When the unit is linked to REON POCKET TAG (included)
*
On the “REON POCKET” app screen, tap (WARM icon).
1
If the above screen is not displayed, tap [START].
2
Tap [OPTION].
3
Set the temperature preference.
Once the setting is made, warming operation will start. The unit automatically adjusts the temperature of the
cooling/warming section. When warming operation has continued for about 1 hour, operation is paused for about 1
minute, and then resumes automatically.
4
21
Using in the MANUAL WARM mode
In the MANUAL WARM mode, the warming strength is kept at the selected temperature level.
Tap [MANUAL], and then tap the desired temperature level.
The temperature level changes as follows.
[1] (low) → [2] (medium) → [3] (strong) → [4] (maximum)
When warming operation has continued for about 1 hour, operation is paused for about 1 minute, and then resumes
automatically.
The warming operation will automatically stop in about 8 hours.
Note
When the following abnormalities are detected, the warming operation automatically stops (the mode LED flashes in purple for
about 8 seconds).
The temperature inside the unit has become extremely high.
The temperature of the cooling/warming section has become extremely high.
For details, refer to “ When the mode LED flashes in purple .”
Related Topic
COOL mode
B-P42-100-11(2) Copyright 2026 Sony Thermo Technology Inc.
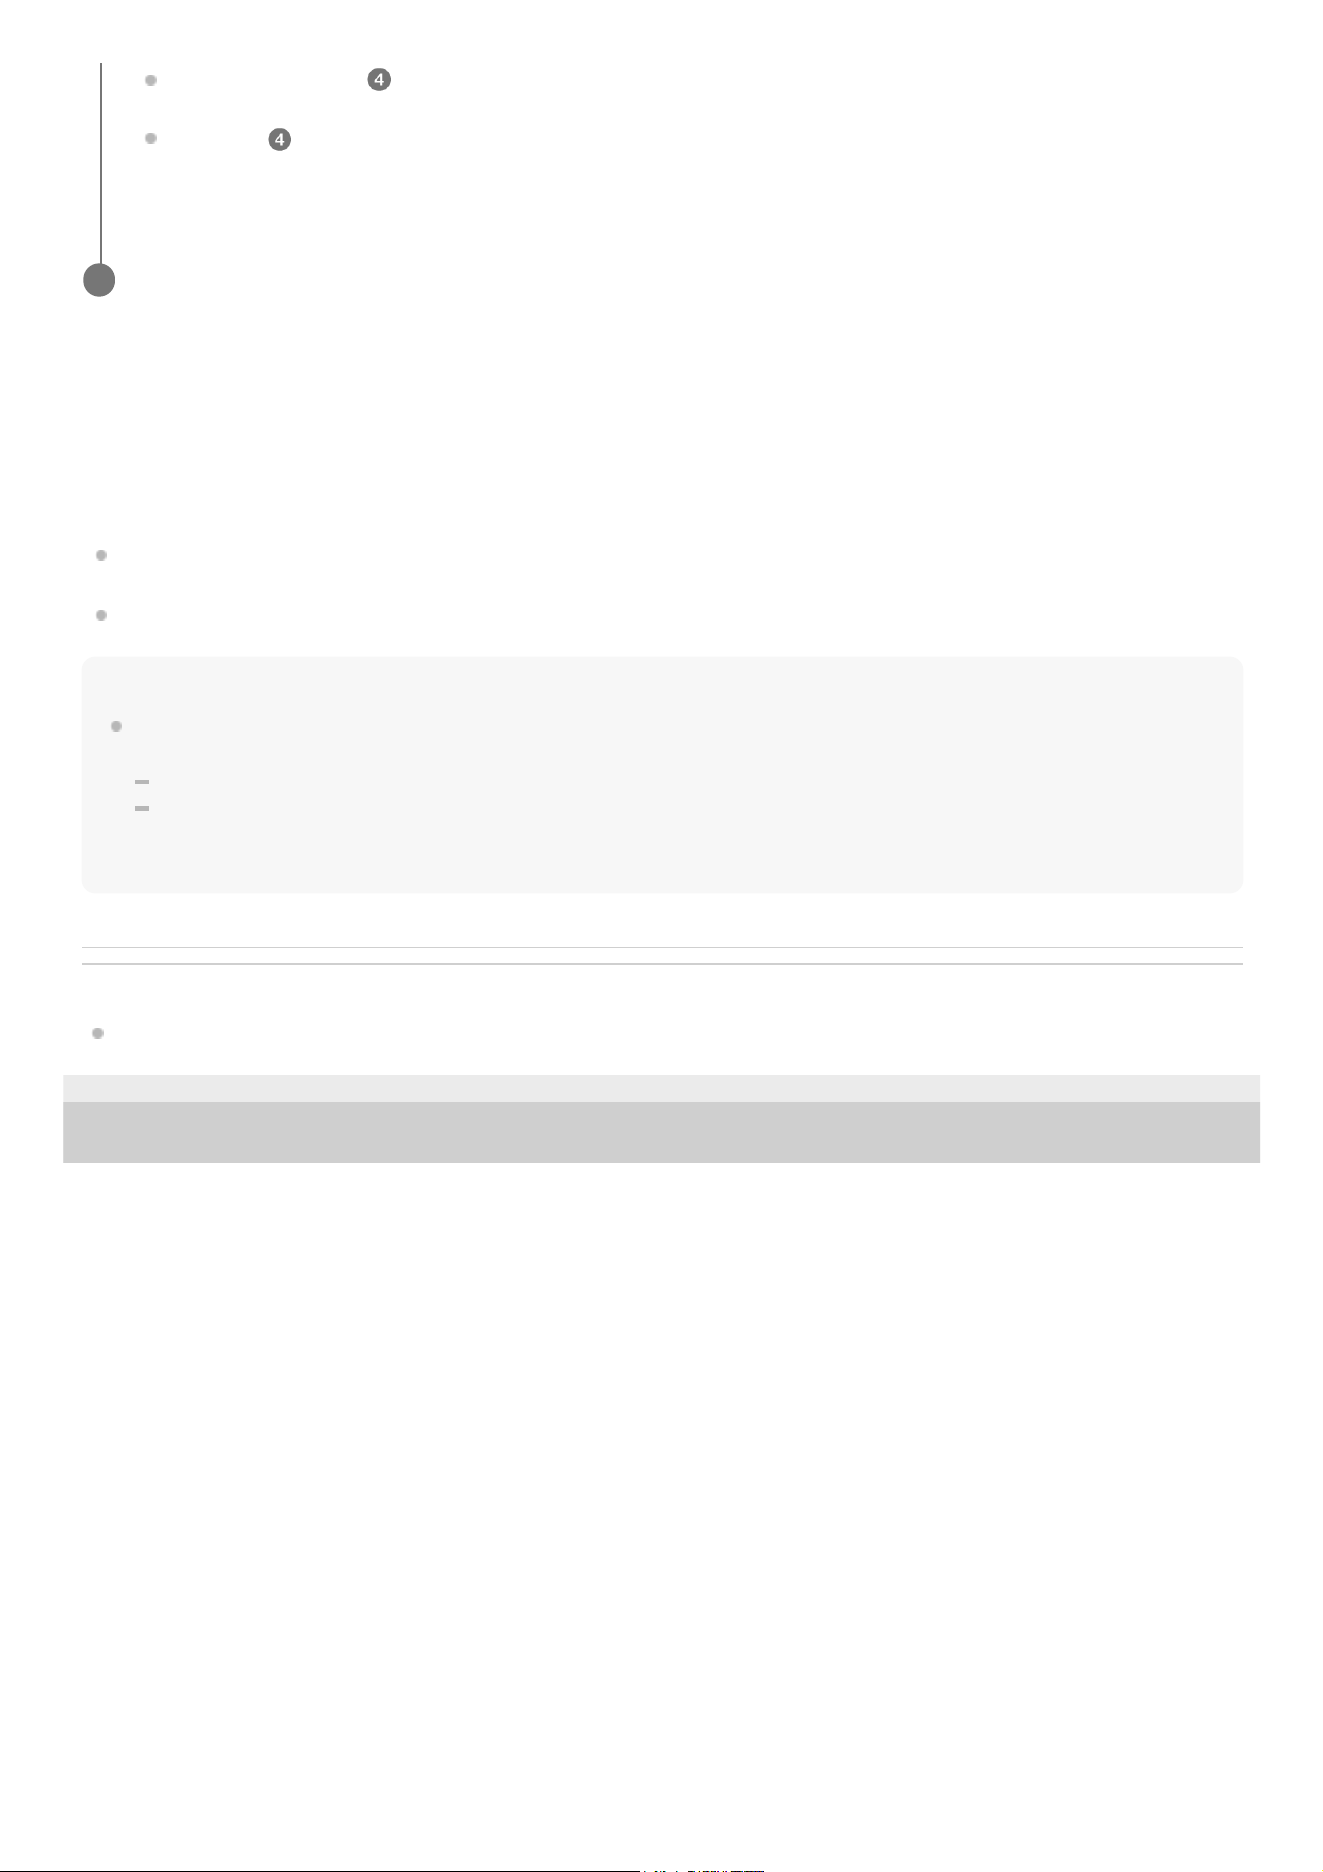
Target temperature ( -a): Indicates the target temperature range of the cooling/warming section (depending
on the temperature preference that you have set).
Unit icon ( -b): Indicates the current temperature of the cooling/warming section. The circle around the unit
icon indicates the intensity of warming. When the unit automatically pauses warming operation, the icon
becomes translucent.
To stop warming, tap [STOP].
5
22
Help Guide
Wearable Thermo Device Sensing Kit
RNPK-6T
SMART COOL
⇔
WARM mode
This page introduces use to switch between cooling operation and warming operation automatically (SMART COOL
⇔
WARM mode) by linking data between the unit and REON POCKET TAG (included).
Note
REON POCKET TAG (included) is required to use this function.
For details on how to use REON POCKET TAG, refer to the following Help Guide.
https://rd1.sony.net/help/reonpocket/rnpt1/h_zz/
In the SMART COOL
⇔
WARM mode, the unit automatically adjusts the temperature of the cooling/warming section
while switching between cooling operation and warming operation automatically according to the following conditions.
The temperature around the unit
Your movements such as walking or staying still
The temperature and humidity data sent from REON POCKET TAG
Your temperature preference
According to the temperature of the cooling/warming section and the conditions above, the unit may automatically
increase or reduce the cooling/warming intensity or pause operation.
On the “REON POCKET” app screen, tap (SMART COOL
⇔
WARM icon).
1
If the above screen is not displayed, tap [START].
2
Tap [OPTION]
-
[Preference of temperature].
3
23
To set the temperatures at which cooling/warming operation switches
In the SMART COOL
⇔
WARM mode, you can set the reference temperatures at which the operating mode switches
from cooling to warming and from warming to cooling.
Note
When the following abnormalities are detected, the cooling/warming operation automatically stops (the mode LED flashes in
purple for about 8 seconds).
The temperature inside the unit has become extremely high.
The temperature of the cooling/warming section has become extremely high or low.
The fan inside the unit is not working properly.
For details, refer to “ When the mode LED flashes in purple .”
Hint
The exhaust volume of the fan is automatically controlled according to the temperature inside the unit.
Related Topic
COOL mode
WARM mode
B-P42-100-11(2) Copyright 2026 Sony Thermo Technology Inc.
Set the temperature preference.
Set your temperature preferences for [COOL] and [WARM], respectively.
Once the setting is made, cooling/warming operation will start. The unit automatically adjusts the temperature of the
cooling/warming section while switching between cooling operation and warming operation automatically.
When warming operation has continued for about 1 hour, operation is paused for about 1 minute, and then resumes
automatically.
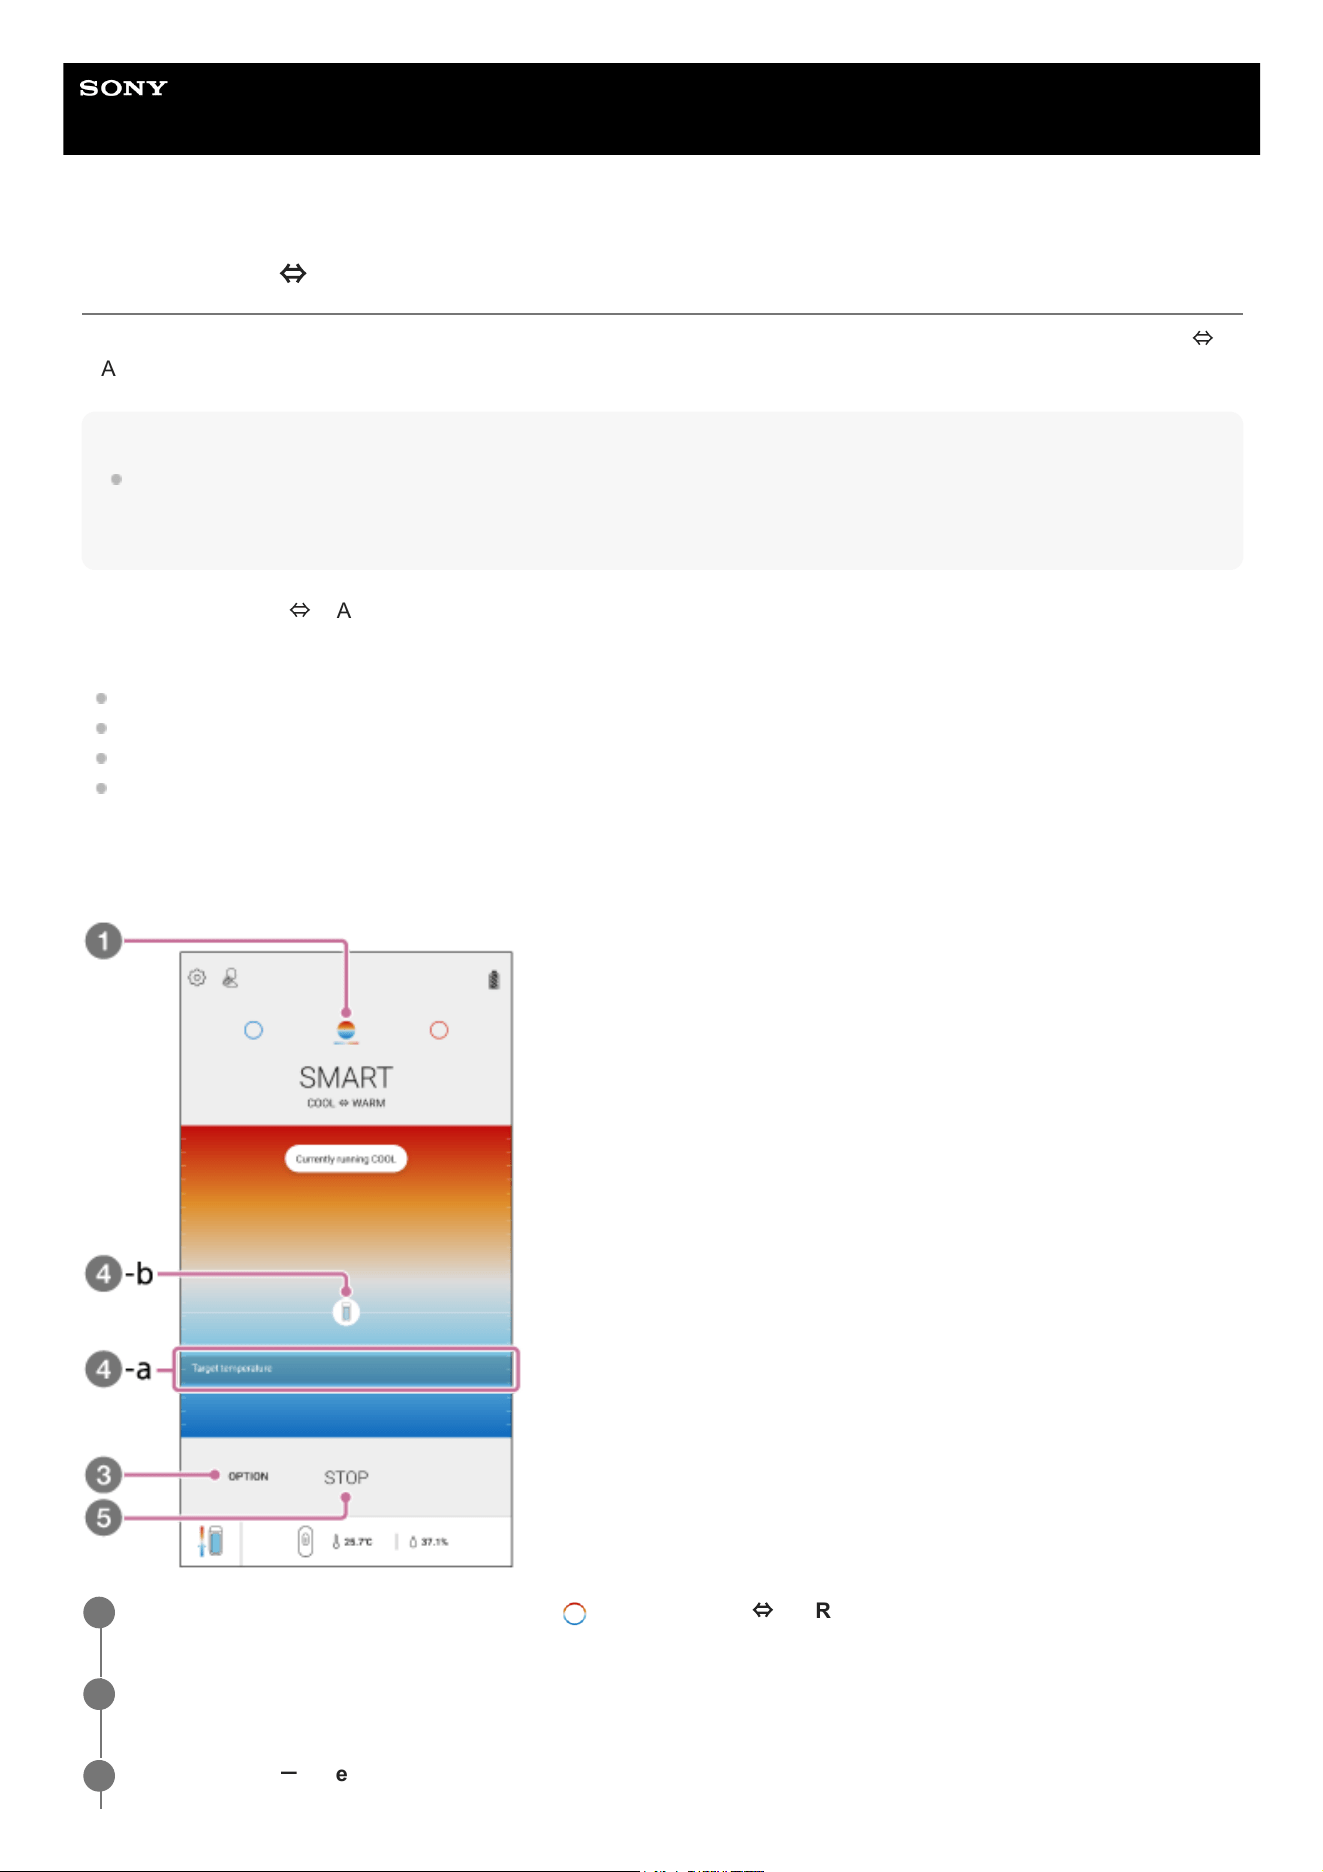
Target temperature ( -a): Indicates the target temperature range of the cooling/warming section (depending
on the temperature preference that you have set).
Unit icon ( -b): Indicates the current temperature of the cooling/warming section. The circle around the unit
icon indicates the intensity of cooling/warming. When the unit automatically pauses cooling/warming operation,
the icon becomes translucent.
4
To stop cooling/warming, tap [STOP].
5
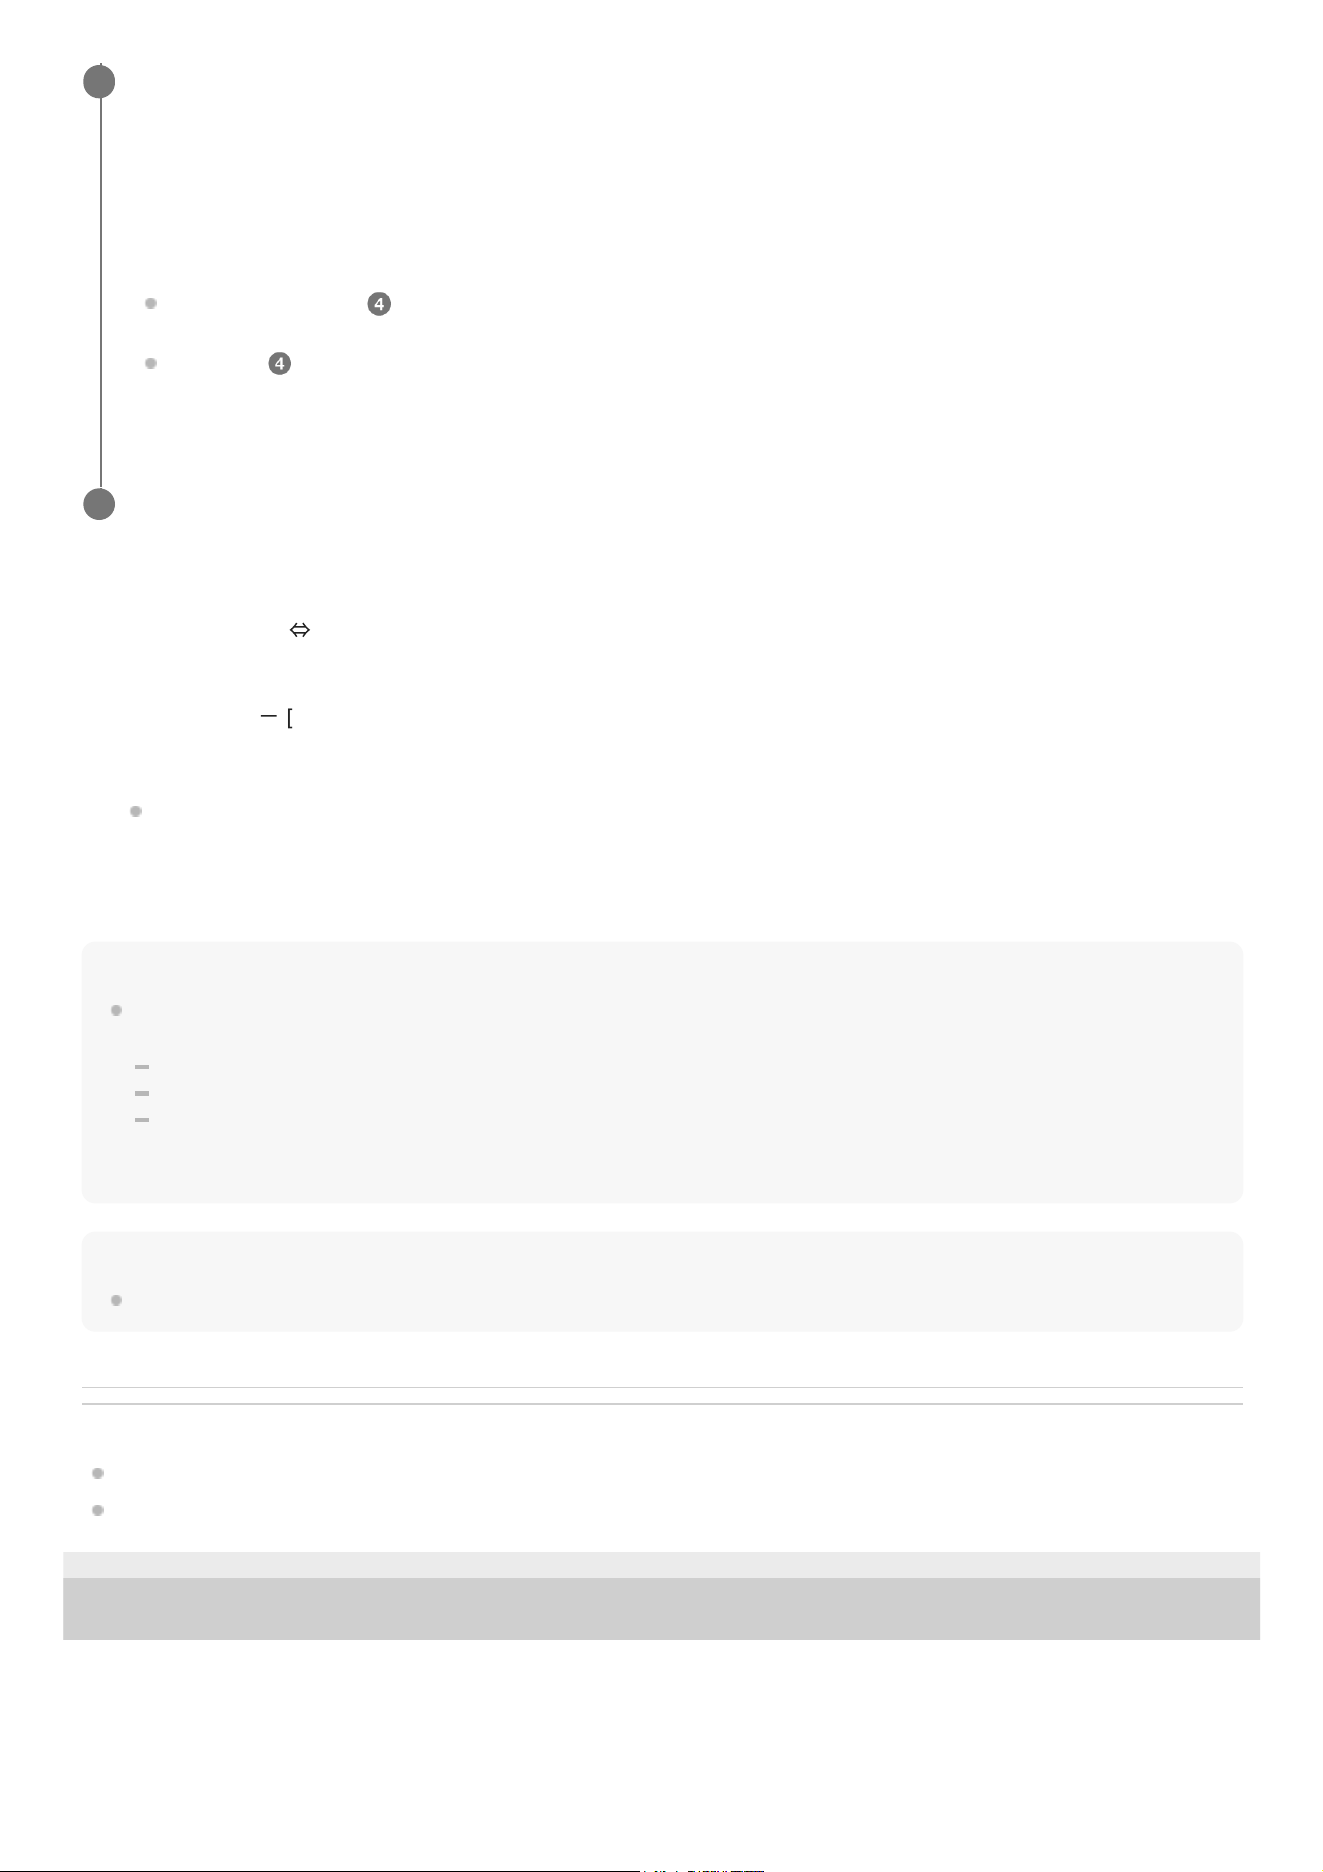
Tap [OPTION]
-
[Switching Temperatures].1.
Set the switching temperatures by sliding the boxes to the left and right of the temperature bar.
The temperature for switching to cooling operation cannot be set lower than the temperature for switching to
warming operation.
2.
Tap [Done].3.
24
Help Guide
Wearable Thermo Device Sensing Kit
RNPK-6T
Starting/stopping operation by attaching/detaching (AUTO START/STOP)
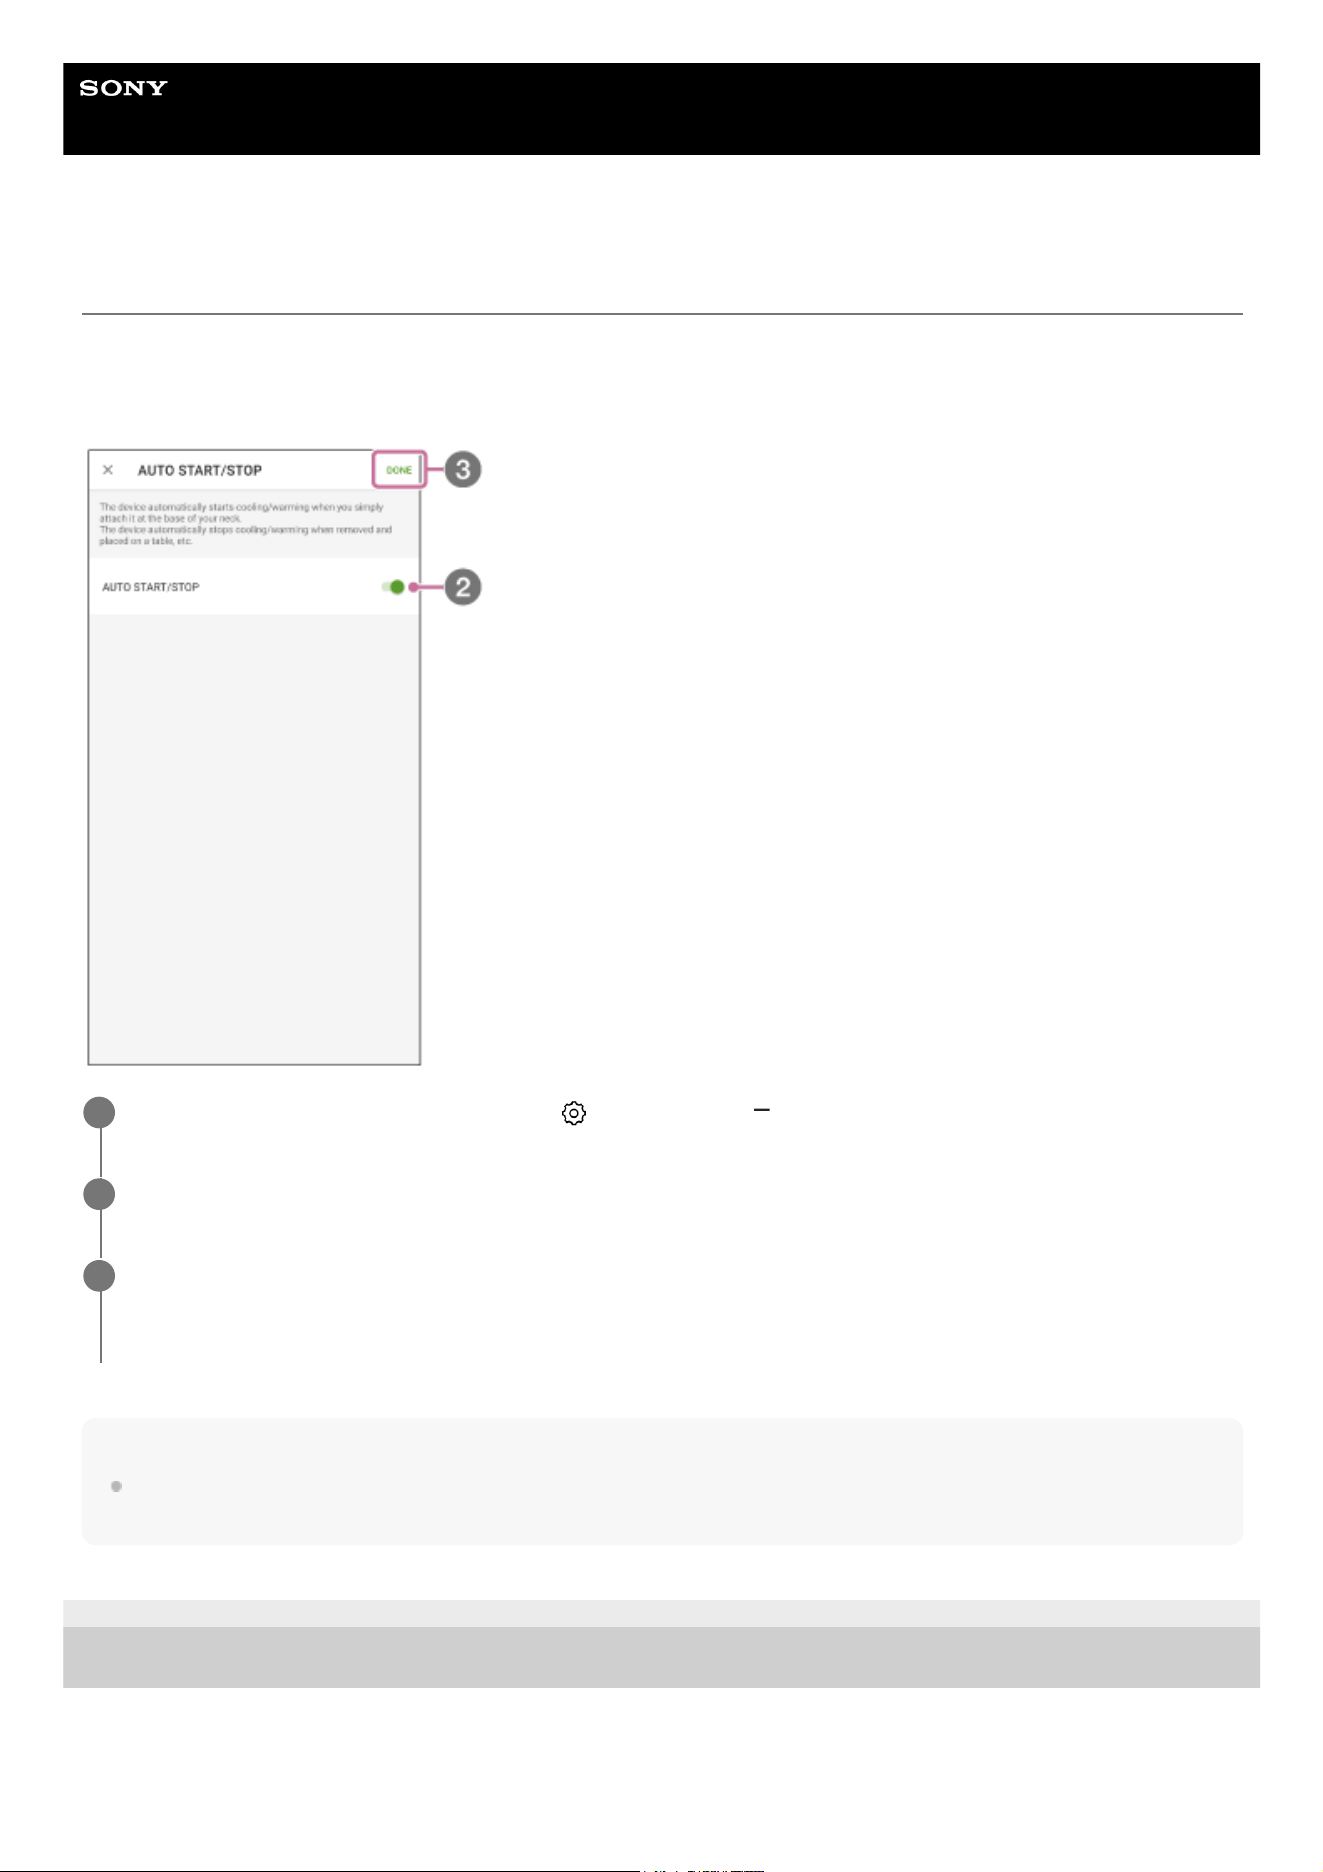
The “AUTO START/STOP” function allows the unit to start cooling/warming automatically when you attach the unit to
your neck, and allows it to stop cooling/warming automatically when you remove the unit and place it on a desk, etc.
When started with the [AUTO START/STOP] function, the unit operates in the same mode as last time.
Note
The [AUTO START/STOP] function may not work properly depending on the usage conditions, such as when you use the unit by
holding it in your hand or when you attach the unit to a place other than the bottom of your neck.
B-P42-100-11(2) Copyright 2026 Sony Thermo Technology Inc.
On the “REON POCKET” app screen, tap (Settings icon)
-
[AUTO START/STOP].
1
Tap [AUTO START/STOP] switch.
2
Tap [Done] on the upper right corner of the screen.
The [AUTO START/STOP] function is switched on or off.
3
25
Help Guide
Wearable Thermo Device Sensing Kit
RNPK-6T
Unregistering the unit
Only one unit can be connected to one smartphone at the same time.
If you have two or more REON POCKET units, take the following steps to unregister the connected unit from your
smartphone, and then connect another unit.
B-P42-100-11(2) Copyright 2026 Sony Thermo Technology Inc.
On the “REON POCKET” app screen, tap (Settings icon)
-
[Unregister Device].
1
Tap [Unregister].
The device registration of the unit is canceled. The “REON POCKET” app becomes the device registration screen.
2
26
Help Guide
Wearable Thermo Device Sensing Kit
RNPK-6T
Controlling the unit with another smartphone
Only one smartphone can be connected to one unit.
If you changed your smartphone model or if you wanted to use one REON POCKET unit with two or more smartphones,
take the following steps to delete the information of the connected smartphone from the unit so that another smartphone
can connect to the unit.
B-P42-100-11(2) Copyright 2026 Sony Thermo Technology Inc.
Press and hold the SMART button on the unit for about 5 seconds.
The information of the connected smartphone is deleted from the unit.
1
Launch the “REON POCKET” app on another smartphone to connect to the unit.
2
27
Help Guide
Wearable Thermo Device Sensing Kit
RNPK-6T
Initializing the unit
If you cannot control the unit properly with the “REON POCKET” app, try to initialize the unit.
Note
The initializing deletes the setting information from the unit as follows:
Device registration information of the connected smartphone
Cooling/warming settings
The saved [Preference of temperature] settings for the SMART COOL mode, the SMART WARM mode, and the SMART COOL
⇔
WARM mode
The saved [Switching Temperatures] settings for the SMART COOL
⇔
WARM mode
B-P42-100-11(2) Copyright 2026 Sony Thermo Technology Inc.
On the “REON POCKET” app screen, tap (Settings icon)
-
[Initialize Device].
1
Tap [OK].
The unit is initialized. After initialization, the “REON POCKET” app screen becomes the connection screen. After
turning the unit on, press and hold the SMART button on the unit for about 2 seconds to start the connection.
2
28
Help Guide
Wearable Thermo Device Sensing Kit
RNPK-6T
Precautions
On the waterproof property
Although this unit is designed to be splash-proof, it does not completely prevent dust and water droplets from entering
the unit.
Please do not use the unit in a humid place such as a bathroom, or expose it to rain or other liquids. Note that if
trouble is diagnosed as exposure to water or other liquid, repair of the unit may not be covered by warranty or repair
may not be possible. Repair, when possible, is not covered by warranty and is carried out at cost.
On handling the unit
Do not use the unit if it is damaged. Doing so may cause injury. If the unit is damaged, stop using the unit
immediately and contact the Sony Authorised Service Centre.
To prevent damage to the neckband when you are using a backpack or a baby carrier sling, be careful not to put the
load on the neckband. Also, be careful when you lean against the back of a chair.
Do not expose the unit to direct sunlight or ultraviolet rays for many hours. It may cause discoloration of the unit.
Do not subject the unit to strong impact such as dropping it on a floor. Do not drive a nail into the unit, hit it with a
hammer, or step on it. Also, do not deform the USB port. Doing so may cause a malfunction.
Avoid spraying the unit with insect repellent. It may cause deformation or discoloration.
If the unit is not to be used for a long time, disconnect the USB Type-C® cable, carefully wipe off any perspiration,
dirt, or moisture, and store in a proper location, avoiding locations subject to excessively high or low temperatures
and high humidity. If a battery with expired service life is left in the unit for a long time, battery leakage may damage
the mechanical parts.
On Bluetooth® communications
Microwaves emitting from a Bluetooth device may affect the operation of electronic medical devices. Turn off this unit and
other Bluetooth devices in the following locations, as it may cause an accident:
in hospitals
near priority seating in trains
locations where inflammable gas is present
near automatic doors
near fire alarms
Note on charging
Before charging, make sure that there is no moisture such as sweat on the USB port area or USB cable. If there is
moisture on them, wipe it off with a soft, dry cloth, and leave the unit at room temperature to dry before charging.
To prevent low-temperature burns
Although this product is designed to prevent low-temperature burns, please pay special attention to the following points
when using the product.
Check the condition of your skin about once an hour. If you notice any abnormalities, stop using the unit immediately.
If the unit feels too hot, stop using it immediately.
Do not use the unit when sleeping.
Do not use the unit in bedding or near heaters such as stoves.
Pay special attention when someone with poor circulation or impaired skin sensation uses the unit.
29

Services and software provided by other companies
Network services, content, and the [operating system and] software of this Product may be subject to individual terms
and conditions and changed, interrupted or discontinued at any time and may require fees, registration and credit card
information.
B-P42-100-11(2) Copyright 2026 Sony Thermo Technology Inc.
30
Help Guide
Wearable Thermo Device Sensing Kit
RNPK-6T
To prevent burning or malfunction due to getting wet
Be sure to clean after use
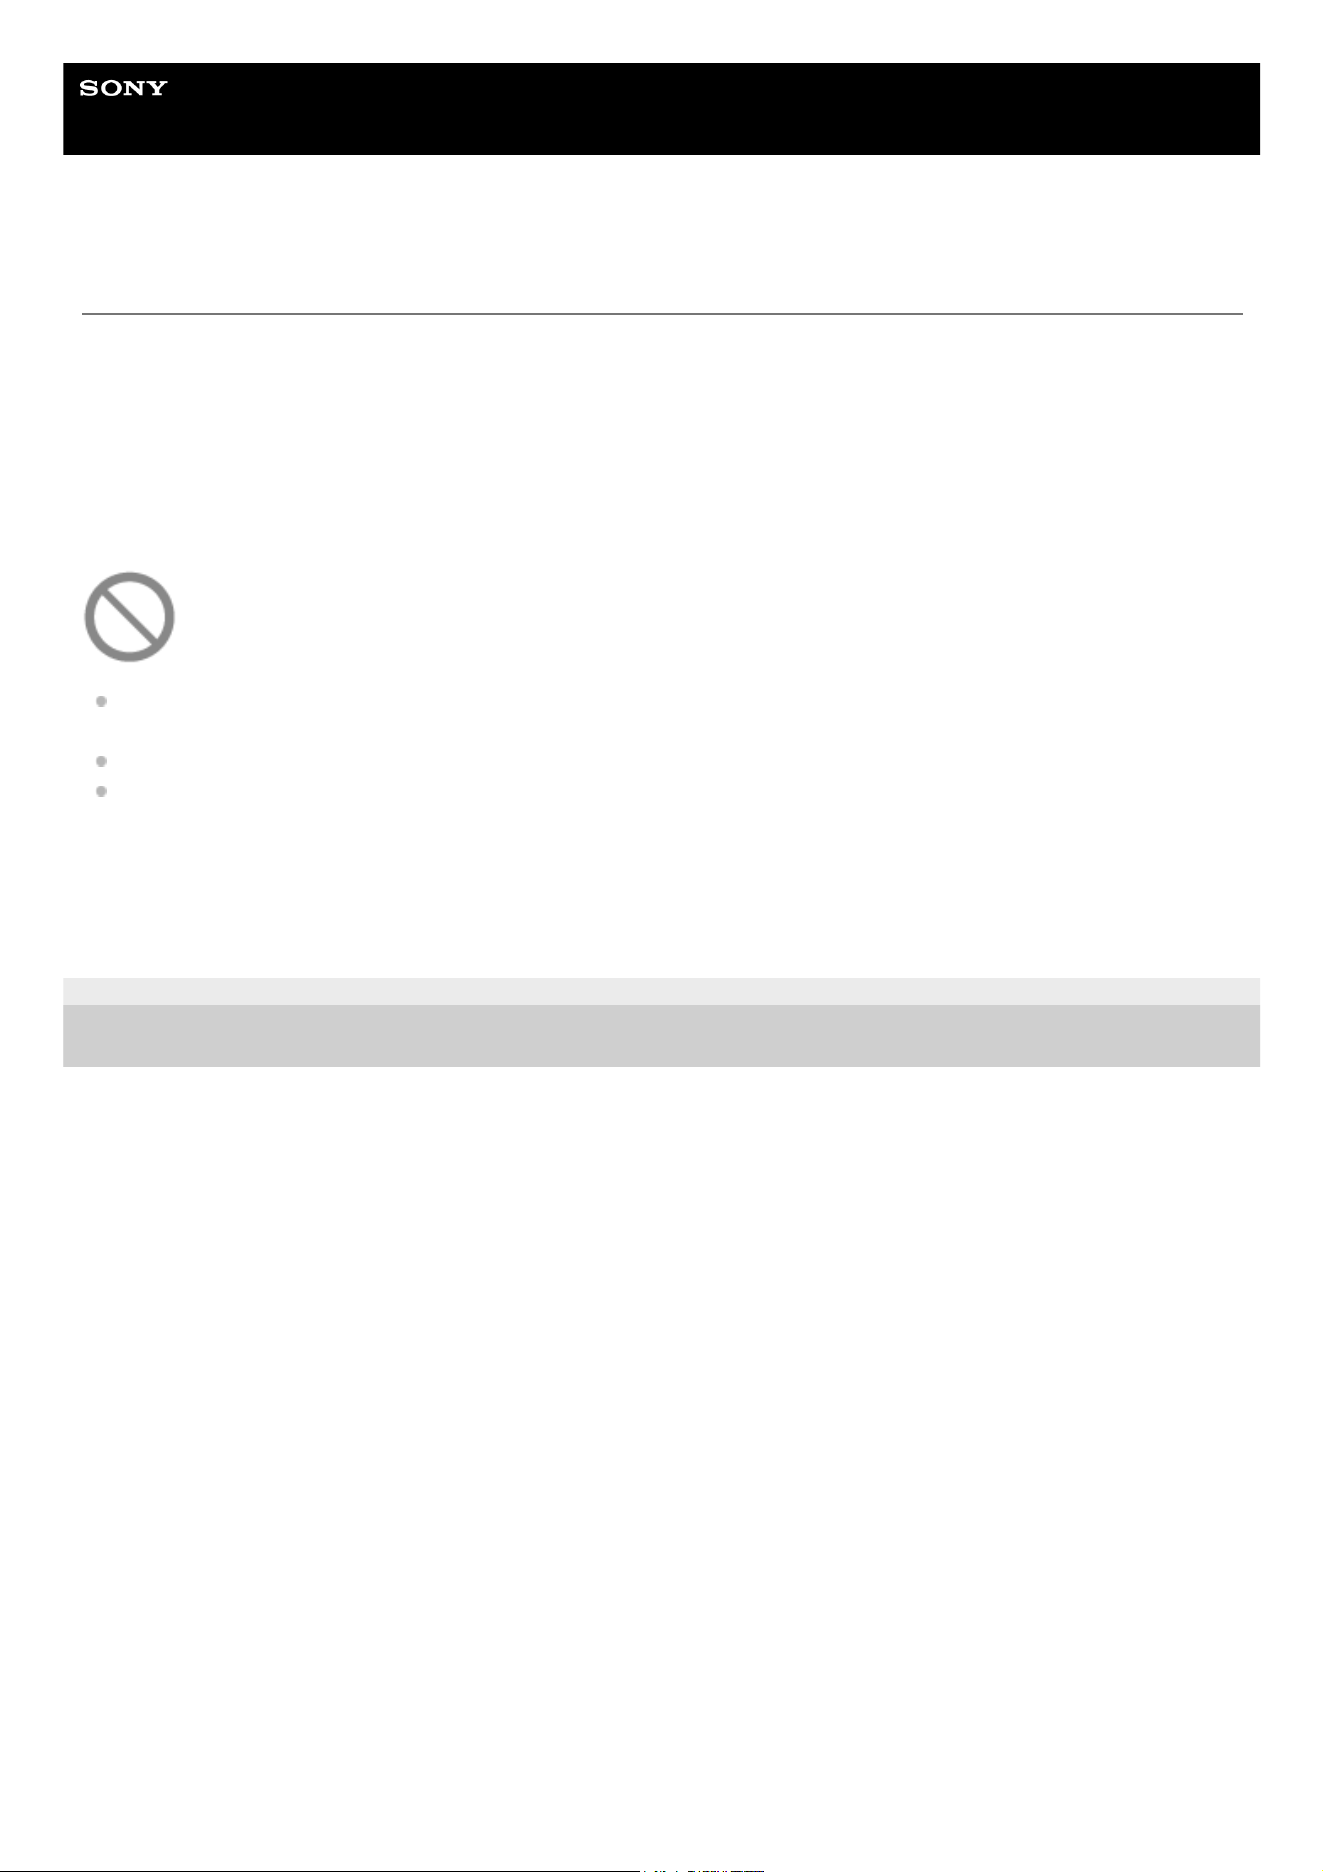
Charging with liquid such as water or sweat or foreign objects such as dust attached to the unit may cause an accident
such as burns or serious wounds due to fire, electrocution, heat generation, smoke, or ignition. It may also cause a
malfunction.
Avoid the following situations and be careful not to get moisture or dirt on the unit
Touching the unit without wiping your wet hands after doing housework in a kitchen or washing your hands in a
washroom.
Putting the unit in a bag with a cold PET bottle.
Spilling a drink on the unit while eating or drinking.
If the unit gets wet or dirty, wipe it off with a dry, soft cloth
B-P42-100-11(2) Copyright 2026 Sony Thermo Technology Inc.
31
Help Guide
Wearable Thermo Device Sensing Kit
RNPK-6T
Notes on cleaning
Wipe off any dirt gently with a soft cloth. If the unit is very dirty, soak a soft cloth in neutral detergent diluted with
water, wring it out hard, wipe off the stain, and then wipe dry with a dry cloth. Do not use alcohol, benzene, thinner,
etc.
Strongly wiping off the unit using a cloth with dust may scratch the surface of the unit.
B-P42-100-11(2) Copyright 2026 Sony Thermo Technology Inc.
32
Help Guide
Wearable Thermo Device Sensing Kit
RNPK-6T
Specifications
Power source
DC 3.7 V: Built-in lithium-ion rechargeable battery
DC 5 V: When charged using USB
Operating temperature range
5°C to 40°C
Dimensions (w/h/d)
Approx. 110 mm × 45 mm × 160 mm (when the unit and the air vent cover (short) are attached to the neckband, including
the band)
Approx. 53 mm × 24 mm × 119 mm (unit only)
Mass
Approx. 165 g (when the unit and the air vent cover (short) are attached to the neckband)
Approx. 125 g (unit only)
Communication specification
Communication system:
Bluetooth 5.0 Low Energy
Output:
Bluetooth Specification Power Class 2
Frequency band:
2.4 GHz band (2.4000 GHz to 2.4835 GHz)
External interface
USB Type-C®
System requirements for battery charge using USB
USB AC adaptor
A commercially available USB AC adaptor (USB-C®) capable of supplying an output current of 1 A (1 000 mA) or more
Supported operating systems
Check the following support page for supported operating systems.
https://reonpocket.sony.com/support/device.html
For details on “Specifications” of REON POCKET TAG (included), refer to the following Help Guide.
https://rd1.sony.net/help/reonpocket/rnpt1/h_zz/
Design and specifications are subject to change without notice.
B-P42-100-11(2) Copyright 2026 Sony Thermo Technology Inc.
33
Help Guide
Wearable Thermo Device Sensing Kit
RNPK-6T
Trademarks and copyrights
REON POCKET is a trademark or registered trademark of Sony Thermo Technology Inc.
The Bluetooth® word mark and logos are registered trademarks owned by Bluetooth SIG, Inc. and any use of such
marks by Sony Group Corporation and its subsidiaries is under license.
Google Play and Google Play logo are trademarks of Google LLC.
App Store is a service mark of Apple Inc.
USB Type-C® and USB-C® are registered trademarks of USB Implementers Forum.
System and/or product names mentioned in this document are, in general, registered trademarks or trademarks of
their respective developers and the “™” and “®” marks are omitted in the text. Furthermore, any copyrights not
explicitly mentioned in this document are the property of their respective owners.
B-P42-100-11(2) Copyright 2026 Sony Thermo Technology Inc.
34
Help Guide
Wearable Thermo Device Sensing Kit
RNPK-6T
Notes on the License
Important information on software
This section covers the software used by this product.
Software License Information
NOTICES AND LICENSES FOR SOFTWARE USED IN THIS PRODUCT
Required public statement & License for the software used in this product
----------------------------------------------------------------------------
nRF5 SDK
Copyright (c) 2010 - 2018, Nordic Semiconductor ASA
All rights reserved.
Redistribution and use in source and binary forms, with or without modification,
are permitted provided that the following conditions are met:
1. Redistributions of source code must retain the above copyright notice, this list of conditions and the following
disclaimer.
2. Redistributions in binary form, except as embedded into a Nordic
Semiconductor ASA integrated circuit in a product or a software update for such product, must reproduce the above
copyright notice, this list of conditions and the following disclaimer in the documentation and/or other materials provided
with the distribution.
3. Neither the name of Nordic Semiconductor ASA nor the names of its
contributors may be used to endorse or promote products derived from this software without specific prior written
permission.
4. This software, with or without modification, must only be used with a Nordic Semiconductor ASA integrated circuit.
5. Any software provided in binary form under this license must not be reverse engineered, decompiled, modified and/or
disassembled.
THIS SOFTWARE IS PROVIDED BY NORDIC SEMICONDUCTOR ASA "AS IS" AND ANY EXPRESS OR IMPLIED
WARRANTIES, INCLUDING, BUT NOT LIMITED TO, THE IMPLIED WARRANTIES OF MERCHANTABILITY,
NONINFRINGEMENT, AND FITNESS FOR A PARTICULAR PURPOSE ARE DISCLAIMED. IN NO EVENT SHALL
NORDIC SEMICONDUCTOR ASA OR CONTRIBUTORS BE LIABLE FOR ANY DIRECT, INDIRECT, INCIDENTAL,
SPECIAL, EXEMPLARY, OR CONSEQUENTIAL DAMAGES (INCLUDING, BUT NOT LIMITED TO, PROCUREMENT
OF SUBSTITUTE GOODS OR SERVICES; LOSS OF USE, DATA, OR PROFITS; OR BUSINESS INTERRUPTION)
HOWEVER CAUSED AND ON ANY THEORY OF LIABILITY, WHETHER IN CONTRACT, STRICT LIABILITY, OR TORT
(INCLUDING NEGLIGENCE OR OTHERWISE) ARISING IN ANY WAY OUT OF THE USE OF THIS SOFTWARE, EVEN
IF ADVISED OF THE POSSIBILITY OF SUCH DAMAGE.
SoftDevice
Copyright (c) 2007 - 2018, Nordic Semiconductor ASA
All rights reserved.
35

Redistribution and use in source and binary forms, with or without modification,
are permitted provided that the following conditions are met:
1. Redistributions of source code must retain the above copyright notice, this list of conditions and the following
disclaimer.
2. Redistributions in binary form, except as embedded into a Nordic Semiconductor ASA integrated circuit in a product or
a software update for such product, must reproduce the above copyright notice, this list of conditions and the following
disclaimer in the documentation and/or other materials provided with the distribution.
3. Neither the name of Nordic Semiconductor ASA nor the names of its contributors may be used to endorse or promote
products derived from this software without specific prior written permission.
4. This software, with or without modification, must only be used with a Nordic Semiconductor ASA integrated circuit.
5. Any software provided in binary form under this license must not be reverse engineered, decompiled, modified and/or
disassembled.
THIS SOFTWARE IS PROVIDED BY NORDIC SEMICONDUCTOR ASA "AS IS" AND ANY EXPRESS OR IMPLIED
WARRANTIES, INCLUDING, BUT NOT LIMITED TO, THE IMPLIED WARRANTIES OF MERCHANTABILITY,
NONINFRINGEMENT, AND FITNESS FOR A PARTICULAR PURPOSE ARE DISCLAIMED. IN NO EVENT SHALL
NORDIC SEMICONDUCTOR ASA OR CONTRIBUTORS BE LIABLE FOR ANY DIRECT, INDIRECT, INCIDENTAL,
SPECIAL, EXEMPLARY, OR CONSEQUENTIAL DAMAGES (INCLUDING, BUT NOT LIMITED TO, PROCUREMENT
OF SUBSTITUTE GOODS OR SERVICES; LOSS OF USE, DATA, OR PROFITS; OR BUSINESS INTERRUPTION)
HOWEVER CAUSED AND ON ANY THEORY OF LIABILITY, WHETHER IN CONTRACT, STRICT LIABILITY, OR TORT
(INCLUDING NEGLIGENCE OR OTHERWISE) ARISING IN ANY WAY OUT OF THE USE OF THIS SOFTWARE, EVEN
IF ADVISED OF THE POSSIBILITY OF SUCH DAMAGE.
CMSIS
All pre-build libraries contained in the folders "ARM" and "GCC" are guided by the following license:
Copyright (C) 2009-2014 ARM Limited.
All rights reserved.
Redistribution and use in source and binary forms, with or without modification, are permitted provided that the following
conditions are met:
- Redistributions of source code must retain the above copyright notice, this list of conditions and the following disclaimer.
- Redistributions in binary form must reproduce the above copyright notice, this list of conditions and the following
disclaimer in the documentation and/or other materials provided with the distribution.
- Neither the name of ARM nor the names of its contributors may be used to endorse or promote products derived from
this software without specific prior written permission.
THIS SOFTWARE IS PROVIDED BY THE COPYRIGHT HOLDERS AND CONTRIBUTORS "AS IS" AND ANY
EXPRESS OR IMPLIED WARRANTIES, INCLUDING, BUT NOT LIMITED TO, THE IMPLIED WARRANTIES OF
MERCHANTABILITY AND FITNESS FOR A PARTICULAR PURPOSE ARE DISCLAIMED. IN NO EVENT SHALL
COPYRIGHT HOLDERS AND CONTRIBUTORS BE LIABLE FOR ANY DIRECT, INDIRECT, INCIDENTAL, SPECIAL,
EXEMPLARY, OR
CONSEQUENTIAL DAMAGES (INCLUDING, BUT NOT LIMITED TO, PROCUREMENT OF SUBSTITUTE GOODS OR
SERVICES; LOSS OF USE, DATA, OR PROFITS; OR BUSINESS INTERRUPTION) HOWEVER CAUSED AND ON
ANY THEORY OF LIABILITY, WHETHER IN CONTRACT, STRICT LIABILITY, OR TORT (INCLUDING NEGLIGENCE
OR OTHERWISE) ARISING IN ANY WAY OUT OF THE USE OF THIS SOFTWARE, EVEN IF ADVISED OF THE
POSSIBILITY OF SUCH DAMAGE.
36

B-P42-100-11(2) Copyright 2026 Sony Thermo Technology Inc.
37
Help Guide
Wearable Thermo Device Sensing Kit
RNPK-6T
When the unit cannot be operated or charged
When you cannot operate or charge the unit, or if an abnormality occurs, reset the unit. It may solve the problem.
To reset the unit, press and hold the MODE button and the SMART button on the unit simultaneously for about 10
seconds.
When the reset is complete, the “REON POCKET” app becomes the connection screen.
Hint
Even if you reset the unit, the following information will remain.
Settings for the SMART COOL mode, the SMART WARM mode, and the SMART COOL
⇔
WARM mode
The smartphone registered to the unit
If the problem persists, contact Sony Authorised Service Centre.
Related Topic
Checking the support site (FAQ and other)
Contact information
B-P42-100-11(2) Copyright 2026 Sony Thermo Technology Inc.
38
Help Guide
Wearable Thermo Device Sensing Kit
RNPK-6T
When the mode LED flashes in purple
In the following situations, the mode LED on the unit flashes in purple for about 8
seconds and cooling/warming stops automatically.
The temperature inside the unit has become extremely high.
The temperature of the cooling/warming section has become extremely high or low.
In these cases, wait for a while and then try to control the unit again.
There is a temporary problem inside the unit.
The fan inside the unit does not work properly.
In these cases, try to control the unit again.
If the problem persists, contact Sony Authorised Service Centre.
In the following situations, the mode LED on the unit flashes in purple for about 8
seconds and charging stops automatically.
When charging the unit in extremely hot or cold environments
In this case, leave the unit at room temperature for 1 to 2 hours, and then try charging the unit again.
If the mode LED on the unit flashes in purple repeatedly, the battery may not be
charging properly, or there may be an abnormality in the charging function.
In this case, refer to the support site below.
https://reonpocket.sony.com/support/
Related Topic
Contact information
B-P42-100-11(2) Copyright 2026 Sony Thermo Technology Inc.
39
Help Guide
Wearable Thermo Device Sensing Kit
RNPK-6T
Checking the support site (FAQ and other)
You can check the FAQ, troubleshooting methods and the latest information such as update on the support site below.
https://reonpocket.sony.com/support/
Hint
You can also access the support site from the “REON POCKET” app screen. Tap (Settings icon)
-
[Support Page].
B-P42-100-11(2) Copyright 2026 Sony Thermo Technology Inc.
40
Help Guide
Wearable Thermo Device Sensing Kit
RNPK-6T
Contact information
For the latest information and the FAQ, refer to the support site. You can also check the contact information at the
support site below.
https://reonpocket.sony.com/support/
B-P42-100-11(2) Copyright 2026 Sony Thermo Technology Inc.
41